

Page 1

7” Capacitive
Multi-Touch Tablet
Instruction Manual
Page 2

Instruction Manual
2
HKC brings you the latest in Android™ technology,
giving you the performance you want at an affordable
price. The crystal clear 7” capacitive touch screen is
great for watching movies, reading books, surfing the
web, video conferencing online and more. With
Google Play you can take advantage of more than
600,000 apps and games, as well as the world's largest
collection of eBooks, millions of songs, thousands of
movies, TV shows and magazines. Designed to
enhance your entertainment experience at home or
on the go and with up to 9 colors to choose from, you
can enjoy your technology in style! Welcome to
HKC…
Page 3

Instruction Manual
3
Technical Specifications:
• Android 4.0 OS (Ice Cream Sandwich)
• 7” Capacitive multi-touch screen, 800 x 480
resolution, 16:9 aspect ratio
• 1GHZ processor with 1 GB system memory
• 8GB onboard storage memory, up to 32GB
additional memory via micro SD card slot
• Front facing webcam with microphone
• Built-in Wi-Fi
• Micro USB port
• Pre-loaded with Google™ applications including
Google Play™, Gmail™, Google Maps™, YouTube™
and more…
• Up to 5 hours of battery life
• Weights 0.5 lbs; 4.75" x 7.55" x 0.375" dimensions
What's in the Box:
• HKC tablet
• instruction manual
• in ear headphones
• AC charger
• micro USB cable
Page 4

Instruction Manual
4
Switch on/Unlock:
Switch On and unlock: when the device is in the OFF mode, press
and hold “Power” key for 3 seconds to enter the Android startup
progress bar, it need about 100seconds enter to the system
desktop, the LCD is under locked mode, please press and pull the
icon to no glee point, then the LCD will unlock automatically.
Power Save Modes/Lock screen/Switch OFF:
Press the “POWER” key shortly after starting up, system will enter
to SLEEP power save and lock screen mode. Press the “POWER” key
or tap the touch screen. For example: playing music, movie, etc.
Switch OFF: when the device is in the OFF mode, press and hold the
“POWER” key for 3 seconds, the screen will display the power off
interface, choose the power off option to confirm, the system will
shut down automatically.
Page 5

Instruction Manual
5
【Note】 When the device has low battery, it will alarm
continuously and shut down automatically if the device is not being
charged and the device cannot start up. Please check if the battery
is low, and try it again after the battery is charged.
Battery Management and Charging:
Charge the battery for about 4-5 hours to make sure the battery is
fully charged before the first time of use.
Insert the micro port of the battery adapter into DC slot on the
device, and connect the other side with the power socket. Then the
Power indicating lamp of the device will be in a high-lighted blue
color, the desktop icon of the battery will keep rolling, which
shows it is charging, please wait until the battery is fully charged,
and do not disconnect the power while charging. Once the
battery is fully charged, the indicating lamp will change into a dark
blue color, the icon on the desktop will stop rolling. When the
battery is exhausted completely, please charge at least one minute
before starting up.
【Note】In order to keep the battery working in best condition,
please pay attention as follows:
• Please do not charge the battery in high temperatures.
• Do not wait for the batter to be fully depleted before charging
again. Keep the battery charged as needed.
• In order to keep the battery in the best condition make sure to
charge once per two weeks if you do not use the device for a long
time.
Page 6

Instruction Manual
6
Icon
Function
Instruction
Icon
Function
Instruction
Back to Home
menu
Note when the
system finds new
devices
Show current
power status
Menu for function
block
back
Wifi /Ethernet
Connection status
menu
Remain your last
task
Operation of the Function Icons:
Function Icon Definitions:
Product Keys:
Page 7

Instruction Manual
7
Symbol
Name
Description
1
Volume Key
Press Left to Vol -
2
Volume Key
Press Right to Vol+
3
POWER Key
Press the button shortly to enter
sleeping/wake up mode, press for a few
seconds to switch ON/OFF
4
Earphone Slot
Stereo earpiece Jack
5
USB Slot
MINI 5Pin USB Port, connect to a pc
6
TF card Slot
TF card slot (Micro SD Card Slot)
7
HOST Slot
HOST Slot to make USB Connection
8
DC Socket
Connect with 5V DC charger
Wireless and Networks:
WIFI
Turn on the Wi-Fi setting: tap the module icon to enter into
the function menu list; press “setting” and enter into the setting
interface; press “wireless and network” to setup, just select the
Wi-Fi option as per below:
Page 8

Instruction Manual
8
Set the Wi-Fi and connect to a network: press the “Wi-Fi setting to
enter into the Wi-Fi options, the system will find the Wifi names
available automatically. Please refer to the picture below, WIF
networks available for use will be shown on the right:
You can see the network connection status when you press the
network name. There will be a Wi-Fi icon “ ”. Showing the
level of Signal
VPN Virtual Private Network:
You can create virtual private networks (VPN) and connect to your
private network securely through a public network, such as the
internet. You must set a lock screen PIN or password before you
can use credential storage.
Add VPN network and follow the instructions on the screen.
Page 9

Instruction Manual
9
USB Function:
Read USB-disk:
Insert the USB-disk into the Mini USB port and press the “explorer”
option in the desktop, maybe you will need an additional adapter
cable to connect between the USB and the device, press “USB” and
enter into USB-disk. You may see the image below:
Page 10

Instruction Manual
10
Camera Function:
You can use camera to take videos, pictures or for video
conferencing functionalities.
Select the Camera Icon to use the functionality:
Desktop System:
(Multimedia Music/ Video/ Pictures/Record /E-book)
In the main menu or desktop, click the icon to play audio.
When no music files are the audio play list, the system will
automatically load the music files from the card to the audio player
play list after turning on the audio player (the device supports the
following audio file format: MP3, WAV, MIDI & WMA).
Page 11

Instruction Manual
11
If two or more songs are in the music play list area, slide up/down
on the touch screen to go page up/down.
Double-click favorites in the list to play music as shown in the
following picture:
Page 12

Instruction Manual
12
In the music playing interface, tap the “ “ button and then enter
the audio playing list.
Drag the playback progress bar to adjust
audio playback progress.
Note: audio player can play WAV recorded files/
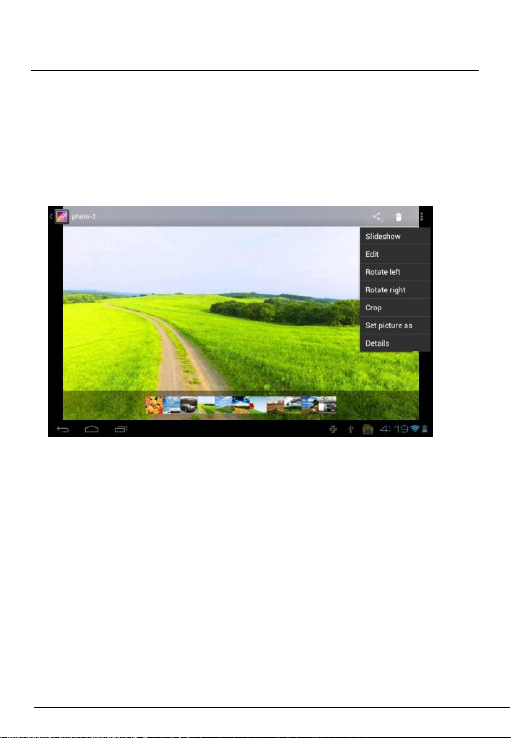
Photos:
In the main menu or desktop, tap the picture browsing icon:
Page 13
Instruction Manual
13
Photo Browser Button Descriptions:
Add Pictures (This device supports BMP, JPG, JPEG, PNG & GIF
formats). Open the corresponding folder, find the image file and
add the picture you want. Tap the photo setting button, and the
photo can be set as your wallpaper:
Explorer
In the main menu or desktop, tap the explorer icon to enter the
Management Interface, tap 【TF Card】then【Internal Memory】
and【USB】to open. Their root directory folders to copy, paste, add,
delete, remove and rename operation options, then tap previous /
next folder or A menu to finish then copy, delete, paste, remove
and rename to the correct directory.
To store additional files, you must insert a memory card. Your
device accepts micro SD™ or micro SDHC™ memory cards with
maximum capacities of 32 GB (depending on memory card
manufacturer and type).
Page 14

Instruction Manual
14
Desktop System (Network Applications)
Page 15

Instruction Manual
15
IE Browser
When the WiFi connection is in normal (for details refer to the
Wi-Fi Settings section), tap the main menu or desktop’s IE browser
icon to enter to the IE interface, click the address bar and input the
website and click “Go” to enter a corresponding website.
Note: the IE explorer uses the popular third-party IE explorer
software, please follow the IE explorer’s standard operating mode
to operate.
Email
When Wi-Fi connection is in normal (for details refer to the Wi-Fi
Settings section), tap the mail icon in main menu or desktop to
enter Email.
Page 16

Instruction Manual
16
Desktop System (Other Functions)
Calculator:
Click the icon on the desktop to open the calculator
Voice and Display Settings:
Tap【Sound】to enter the settings interface:
Page 17

Instruction Manual
17
Media Volume Settings:
Select 【media volume】to enter the settings interface, then to set
up music and video volume…
Set operating sound (screen choosing) and SD card notifications as
optional, tap and click till the display is highlighted.
Display Settings:
Page 18

Instruction Manual
18
【 Orientation 】The display screen will change the direction
automatically when rotating.
【Brightness】Drag to adjust the brightness, the tap “Ok” or
“cancel” to save the changes.
【Screen Timeout】Select after how many seconds will you like for
the screen to go into power saving mode.
Page 19

Instruction Manual
19
Location and Security Settings:
Tap “Location and Security” to enter the setting interface:
Apps
Tap “Apps” to enter apps setting interface:
Page 20

Instruction Manual
20
Running:
Tap “Running” to see and control the running service:
Language & input
Tap “language & input” to enter the settings interface:
Page 21

Instruction Manual
21
Language Setting:
The device support multi-languages, you can select the operation
interface of different languages according to your needs. Select
the matching language option, tap to confirm.
Time and Date Setting:
Select the Setting Menu “Date and Time” into setting interface,
select the behind the Automatic option, to modify the Date,
Time Zone and T ime.
Date Setting:
Tap to select Day, Month Year, and tap the icon to
confirm ok.
Page 22

Instruction Manual
22
Time Zone Settings:
Select the time zone you locate and tap the screen to confirm.
Page 23

Instruction Manual
23
Time Settings:
Tap to select hours, minutes, ex. 14:50, and tap the
icon to confirm ok.
PC Connectivity:
Learn to connect your device to a PC with a USB cable in various
USB connection modes. By connecting the device to a PC, you can
transfer files or transfer data to and from your device directly.
Page 24

Instruction Manual
24
About the device:
Check system information, legal information, device state software
version, etc.
Desktop Function Icon Settings:
Add, Move or Delete Desktop Icon
Tap the icon at the main interface, into function menu list,
display the entire application icon by pages. Press and drag the
application icon to copy to current desktop i.e. set the shortcut on
the desktop.
Page 25

Instruction Manual
25
Press the application icon on the desktop for a few seconds to enter
into the editing status mode and you can move the icon. When
you drag the icon and hold for a few seconds, it will turn to the
delete function, when you release the icon you can delete it.
How to update the software on your device:
Please visit www.HKCdigital.com and follow the
direction on the site.
Please contact HKC customer service at
888-999-1683 for further assistance.
Page 26

Instruction Manual
26
REGISTER YOUR TABLET
Keep your tablet up to date with the latest software updates,
and be updated on what is new and upcoming for HKC.
Please visit www.hkcdigital.com or mail the following info
to HKC to register your tablet;
• Name
• E-mail
• Address
• Product Purchased
• Model Purchased
• Where was it Purchased
• Date Purchased
• Serial #
• Proof of Purchase
Mail to:
HKC Digital USA, INC. (attn: registration)
20957 Currier Road - Walnut, CA 91789
Page 27

Instruction Manual
27
This HKC branded Product and delivered new in the original carton to the original purchaser is
warranted by HKC against manufacturing defects in materials and workmanship for a limited
warranty period of Ninety (90) Days for Labor and One (1) Year Hardware. However, there will
only be a 90 day hardware and labor limited warranty for commercial use. HKC is not
responsible for Software defects. Please refer to your Owner’s Manual for Software Provider
contact information.
This Limited Warranty does not apply to store display products and product sold as a “marked
down” special, in “as is” condition, “close outs”, “liquidation and clearance sales”, 'open box'
products missing accessories, no fault found or damaged at time of delivery to HKC’s authorized
service center listed below.
Proof of purchase in the form of a Bill of Sale, Receipt or Receipted Invoice is evidence the
Product is within the limited warranty period. The
Bill of Sale, Receipt or Receipted Invoice must be presented as a pre-condition to obtaining the
limited warranty service.
This limited warranty begins on the original date of purchase, and is valid only on Products
purchased through HKC authorized dealers and used in the United States, Canada, and Puerto
Rico by the original purchaser. To receive warranty service, the purchaser must contact HKC for
problem determination and service procedures. Warranty service may only be performed by
HKC’s authorized service center. The original dated bill of sale, receipt or receipted invoice must
be presented upon request as proof of purchase.
HKC’s service center listed below will repair your Product or if repairs cannot be made, HKC will
replace this Product at no charge with the same or similar Product. If the Product is defective as
specified in this limited warranty during the limited warranty period, HKC may use new or
remanufactured hardware or products to repair or replace the Product with a similar Product at
its sole discretion. All replaced hardware and Products become the property of HKC and must be
returned to HKC. Replacement hardware and Products assume the remaining original limited
warranty, or ninety (90) days, whichever is longer.
Product freight must be prepaid by original purchaser and shipped in either its original
packaging or packaging affording an equal degree of protection. HKC shall not be responsible for
or obligated to replace damaged goods.
If the product is received damaged by HKC’s service center, it is the responsibility of the
consumer to file a claim against the carrier. HKC’s service center will only store the damaged
product for 30 days and reserves the right, in its sole discretion, to dispose of the damaged
product or ship it back to the consumer at consumer’s expense after 30 days.
HKC Limited Warranty – Tablets
Page 28

Instruction Manual
28
This limited warranty covers manufacturing defects in materials and workmanship encountered
in normal, and except to the extent otherwise expressly provided for in this statement,
noncommercial use of this product, and shall not apply to the following, including, but not
limited to: Damage which occurs in shipment; delivery and installation; applications and uses for
which this product was not intended; altered product or serial numbers; cosmetic damage or
exterior finish; accidents, abuse, neglect, fire, water, lightning or other acts of nature; use of
products, equipment, systems, utilities, services, hardware, supplies, accessories, applications,
installations, repairs, external wiring or connectors not supplied or authorized by HKC which
damage this Product or result in service problems; incorrect electrical line voltage, fluctuations
and surges; customer adjustments and failure to follow operating instructions, cleaning,
maintenance and environmental instructions that are covered and prescribed in the instruction
book; reception problems and distortion related to noise, echo, interference or other signal
transmission and delivery problems; burned-in images. HKC does not warrant uninterrupted or
error-free operation of the product.
THERE ARE NO EXPRESS OR IMPLIED WARRANTIES OTHER THAN THOSE LISTED AND
DESCRIBED ABOVE, AND NO WARRANTIES WHETHER EXPRESS OR IMPLIED, INCLUDING, BUT
NOT LIMITED TO, ANY IMPLIED WARRANTIES OF MERCHANTABILITY OR FITNESS FOR A
PARTICULAR PURPOSE, SHALL APPLY AFTER THE EXPRESS WARRANTY PERIODS STATED
ABOVE, AND NO OTHER EXPRESS WARRANTY OR GUARANTY GIVEN BY ANY PERSON, FIRM OR
CORPORATION WITH RESPECT TO THIS PRODUCT SHALL BE BINDING ON HKC. REPAIR OR
REPLACEMENT AS PROVIDED UNDER THIS LIMITED WARRANTY IS THE EXCLUSIVE REMEDY OF
THE CONSUMER. HKC SHALL NOT BE LIABLE FOR ANY INCIDENTAL, OR CONSEQUENTIAL
DAMAGES FOR BREACH OF ANY EXPRESS OR IMPLIED WARRANTY ON THIS PRODUCT; EXCEPT
TO THE EXTENT PROHIBITED BY APPLICABLE LAW, ANY IMPLIED WARRANTY OF
MERCHANTIBILITY OR FITNESS FOR A PARTICULAR PURPOSE ON THIS PRODUCT IS LIMITED
FOR THE DURATION OF THIS LIMITED WARRANTY. THIS LIMITED WARRANTY SHALL NOT
EXTEND TO ANYONE OTHER THAN THE ORIGINAL PURCHASER OF THIS PRODUCT, IS
NONTRANSFERABLE AND STATES YOUR EXCLUSIVE REMEDY.
Some states do not allow limitations on how long an implied warranty lasts, or the exclusion or
limitation of incidental or consequential damages, so the above limitations or exclusions may
not apply to you. This warranty gives you specific legal rights, and you may also have other
rights which vary from state to state. Any provision contained herein which is found contrary to
state or local laws shall be deemed null and void and the remaining provisions shall continue in
full force and effect.
To obtain warranty service, please contact
LTI Computer, Inc. at: 888-999-1683
 Loading...