

Page 1

User Manual
HKC 50F1
Page 2

Index
Introduction
Installation .........................................................3
Safety .................................................................. 3
Warning/Caution ................................................... 4
Main unit description ........................................... 7
Remote Control ..................................................... 8
Main menu on TV ................................................ 10
Channel .......................................................... 10
Auto tuning .................................................... 11
Manual tuning .............................................. 12
Antenna type ................................................ 13
Country ........................................................... 14
Password ........................................................ 14
Signal Information ....................................... 15
Electronic program guide.......................... 15
Program Edit ................................................. 17
Picture ..................................................................... 18
Picture mode ................................................ 18
User mode .................................................... 19
Color temperature ....................................... 19
Image Noise Reduction ............................. 20
Sound .................................................................... 21
Sound mode ................................................ 21
Balans ............................................................. 22
AVC/Surround .............................................. 22
S/PDIF out ..................................................... 22
Record ................................................................... 25
Channelist ..................................................... 25
Personal Video Recorder (PVR) ............... 25
Recorder List ................................................ 27
PVR (Personal Video Recorder) .............. 27
Application Manager ........................................ 29
Media Center ....................................................... 31
Video in Media Center ............................... 31
Music in Media Center .............................. 32
Image in Media Center .............................. 33
Settings ................................................................. 34
Network settings ......................................... 35
Network status ............................................. 35
Wired connection ....................................... 35
Wireless connection Wi-Fi ........................ 36
Connection via PPPoE ................................ 36
Hotspot .......................................................... 37
Language setting ........................................ 38
Time and date .............................................. 38
System ............................................................ 39
Cache cleaner ............................................... 39
Connection with smartphone .................. 40
System upgrade .......................................... 40
Restoring the factory state ......................... 40
About .............................................................. 41
Styles ............................................................... 41
Specicaties .......................................................... 42
Troubleshooting .................................................. 43
Advance ................................................................ 23
Menu time ...................................................... 23
Sleeptimer ..................................................... 23
Blue screen ................................................... 23
Store mode ................................................... 24
Restore To Default........................................ 24
Input source Menu ...................................... 24
Useful Information and Licences ..................... 45
2
Page 3

Introduction
Thank you very much for purchasing your LED TV. It serves as a normal colour
TV and a PC monitor. To enjoy your set fully from the very beginning, read this
manual carefully and keep it handy for future reference.
INSTALLATION
1. Locate the TV in the room where direct light does not strike the screen. Total darkness
or a reection on the picture screen can cause eyestrain. Soft and indirect lighting is
recommended for comfortable viewing.
2. Allow enough space between the TV and the wall to permit ventilation.
3. Avoid excessively warm locations to prevent possible damage to the TV or premature
component failure.
4. This TV can be connected to AC 100-240V~ 50/60Hz.
5. Do not install the TV in a location near heat sources such as radiators, air ducts, direct
sunlight, or in closed compartments and closed areas. Do not cover the ventilation
openings when using the TV.
6. The indicator light will last for about 30 seconds after the power has been tumed off.
Wait until the indicator light goes out before repowering the TV.
SAFETY
1. DO NOT expose the television to extremely high temperatures (below 5 ° C and
above 35 ° C) or extreme humidity (less than 10% and more than 75%).
2. DO NOT expose the television to direct sunlight.
3. Prevent the television from coming into contact with liquids.
4. Make sure that no objects get into the television and do not place vases of water on
the television.
5. Unplug the power cord and remove the antenna cable during a lightning storm
(especially during lightning).
6. Do not walk on the cable and ensure that the cable is fully unrolled.
7. Do not overload outlets or extension cords, as this may result in the risk of re or
electric shock.
8. Use a soft, dry cloth (without volatile substances) to clean the television.
9. Do not attempt to repair the television yourself if it is defective. Contact us by sending
an email to service@hkc-europe.com.
3
Page 4

Warning
CAUTION
RISK OF ELECTRIC SHOCK
DO NOT OPEN
CAUTION: TO AVOID THE RISK OF ELECTRIC SHOCK. DO NOT
REMOVE COVER (OR BACK).
NO USER- SERVICEABLE PARTS INSIDE.
REFER SERVICING TO QUALIFIED SERVICE PERSONNEL.
This symbol is intended to alert the user to avoid the risk
of electric shock, do not disassemble this equipment by anyone
except a qualied service personnel.
This symbol is intended to alert the user to the presence of
important operating and maintenance instructions in
the literature accompanying the equipment.
4
Page 5

-
Caution
Caution
High voltages are used in the operation of this
product.
Do not open the product’s casing. Refer
servicing to qualied service personnel.
Caution
To prevent re or electrical shock hazard, do
not expose the main unit to moisture. Do not
place objects lled with liquids, such as vases,
on the TV.
Caution
Do not drop or push objects into the television
cabinet slots or openings. Never spill any kind
of liquid on the television receiver.
Caution
Avoid exposing the main unit to direct sunlight
and other sources of heat. Do not stand the
television receiver directly on other products
which give off heat: e. g. video cassette
players and audio ampliers. Do not block the
ventilation holes in the back cover. Ventilation
is essential to prevent failure of electrical
components. Do not squash power supply
cord under the main unit or other heavy
objects.
5
Page 6

Caution
Caution
Never stand on, lean on or suddenly push the
product or its stand. You should pay special
attention to children.
Caution
Do not place the main unit on an unstable
cart stand, shelf or table. Serious injury to an
individual, and damage to the television, may
result if it should fall.
Caution
When the product is not used for an extended
period of time, it is advisable to disconnect the
AC power cord from the AC outlet.
Caution
The LED panel used in this product is made of
glass and is therefore breakable. This product
must not be dropped or banged. If the LED
Panel breaks be careful ofbeing injured by
broken glass.
6
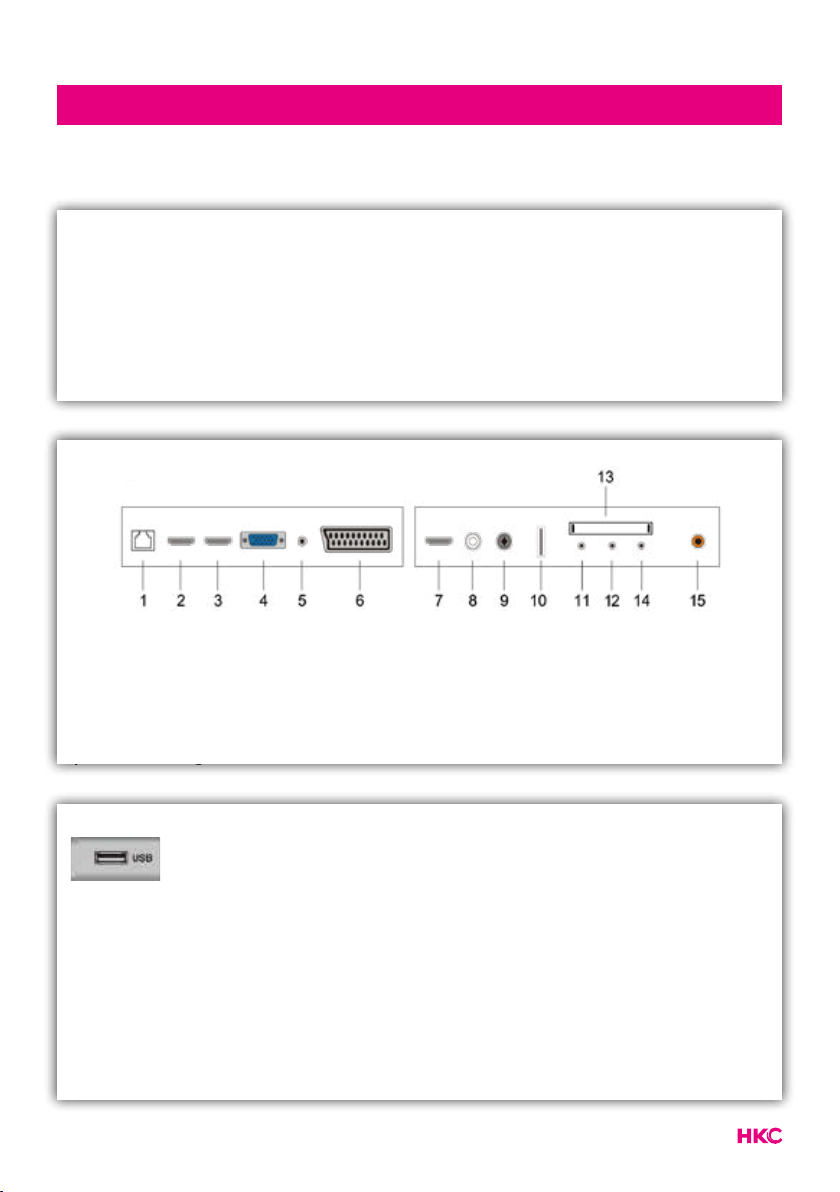
Page 7
Main unit description
Control Panel Button Function
VOL+ : Volume up.
VOL- : Volume down
CH+: TV channel up.
CH- : TV channel down.
MENU : Press to select the main menu.
SOURCE : Select the input signal.
POWER : Switch on when in standby mode or to enter the standby mode.
TV Connections
tekst
1. RJ45
2. HDMI-1
3. HDMI-2
4. VGA
5. PC audio
Optional Conguration as below:
Connect the USB to the USB jack on the set.
NOTE
• It is only 500 mA MAX of DC current output when you connect
with USB jack.
• To ensure the mobile HD works well, you should use other
power supply for the mobile HD and don’t use the USB jack in
the same time.
• It supports mobile HD by connecting with USB jack (must be
more than 2 Gb). The partitions of the mobile HD can’t be
more than 4 partitions. The max partition is 2 Tb. It supports
FAT/FAT32 les. The max FAT le is 4Gb and the max FAT32
le is 2Tb.
6. Scart
7. HDMI-3
8. LNB IN
9. RF antenne
10. USB-1
7
11. Mini YPBPR
12. Mini AV & AUDIO
13. CI-slot
14. Earphone
15. COAXIALE
Page 8

ASPECT
3
2
1
5
4 6
7
8 9
LIST
VOL
MENU
REPEAT
0
S
CH
AUDIO
INPUT
OK
TV.RD
CANCEL
REVEAL
MIX
GUIDETEXT
DVD SETUP
EXIT
S.PAGE
BACK
INDEX HOLD SIZE
FAV
tekstRemote Control
1 Indicator light.
The red indicator light ashes red to show that the remote is working and sending a signal.
2 Switch the TV between on and standby mode.
3 Watch the screen in various formats: Auto/4:3/16:9/
Zoom/Subtitels/Smart-zoom.
4 Mute and restore your TV sound.
5 0-9 numbers.
Press to select a programme.
Select numbered items in a menu (DVD mode).
6 List. Display the channel list (ATV/DTV mode).
7 Return. Return to the previous viewing channel (ATV/DTV
mode) or return to menu (DVD-modus).
Repeat. Select between different repeat modes (DVD
mode).
8 Display subtitles which are broadcast with the program-
me (DTV mode).
Display subtitles on the DVD (DVD mode).
9 Adjust the volume (+ higher, - lower).
10 Select a channel (up/down).
11 Audio
Turn on/off the Audio Description (AD) function (DTV
mode).
Select different Audio Mode on DVD mode.
Select sterio/dual sound reception (ATV mode)
12 Display the present channel information such as current
time and channel name (ATV/DTV mode).
Display the present disc information (DVD mode)
13 Displays the EPG (Electronic Programme Guide) (DTV
mode).
14 No function.
15 Displays the OSD menu (On Screen Display).
16 Select among the different input signal sources: DTV /
ATV / AV / SCART / YPbPr / HDMI1 / HDMI2 / HDMI3 / PC
/ USB.
17 Allows you to navigate trough the OSD menus and adjust
the system settings to your preference.
OK conrm the selection in the OSD menus.
18 Return to the previous menu in the OSD menus.
8
Page 9

ASPECT
3
2
1
5
4 6
7
8 9
LIST
VOL
MENU
REPEAT
0
S
CH
AUDIO
INPUT
OK
TV.RD
CANCEL
REVEAL
MIX
GUIDETEXT
DVD SETUP
EXIT
S.PAGE
BACK
INDEX HOLD SIZE
FAV
tekstRemote Control
19 • Exit the OSD menu.
• Display and exit the DVD setup menu (DVD mode).
20 • Access the Teletext items (ATV/DTV mode).
• Access menu options.
PROG (RED)
• Display th channel menu (ATV/DTV mode).
• Access menu options.
• Programme the DVD (DVD mode).
STEP (GREEN)
• Play the playback forward frame by frame (DVD mode).
GO TO (YELLOW)
• Skip to a specic location on a DVD (DVD mode).
A-B (BLUE)
• Repeat a segment between A and B (DVD mode).
21 • To select the page number of the index in teletext
(TV Teletex mode).
• Stop the playback or recording (USB/DTV/DVD mode).
22 • Freeze a multi-page passage on screen in Teletekst
(TV teletekst mode).
• To start the timeshift playback (DTV mode).
• To start playback or pause (DTV/USB/DVD mode).
23 • To show hidden information if existing (TV teletext
mode).
• Reverse playback rapidly (USB/DVD mode).
24 • To enlarge the picture on the TV in teletext
(TV teletex mode).
• Advance playback rapidly (USB/DVD mode).
25 • Display the favourite channel list (ATV/DTV mode).
• Display the DVD menu (DVD mode)
26 • A short cut to switch input source tot TV/Digital radio
channels.
• Select different angles for the video (DVD mode).
27 • TV and TXT pictures are mixed together
(TV teletext mode).
• To skip to the beginning of the previous chapter/track/
photo (USB/DVD mode).
28 • To open a subpage if existing in teletext
(TV teletext mode).
• Skip to the beginning of the next chapter/track/photo
(USB/DVD mode).
29 Display the DVD title content (DVD mode).
30 Play video slowly (DVD mode).
31 • Turn on and off the teletext function (TV mode).
• Zoom in on the displayed frame (DVD mode)
32 • Eject the disc (DVD mode)
• Cancel
9
Page 10

Main menu on TV
Channel
Main menu items (from right order Channel->Picture->Sound->Advance) at
DTV/ATV input source. The rst item is Channel page as default. Now, press
right key to enter the sub page, Auto Tuning is highlighted. In this page, we
have four subItems: Auto Tuning, Mannual Tuning, program guide (this item is
only showed in DTV channel) and program Edit .
tekst
Before introduce the specic menu func on, there are some basic key to know
rst.
Key Description
Navigation
OK
EXIT
MENU
Conrm your selection
Exit current page
Return to the last page
10
Page 11

tekstMain menu on TV
Auto tuning
Enter Auto Tuning ,there is a dialog to choose atv auto tuning ,dtv auto tuning
or ATV /DTV auto Tuning . Enter it and we can see a view of searching tv
program in ATV or DTV automatically.
11
EXIT
Press
to nish the
tuning process.
Page 12

Main menu on TV
Manual tuning
Manual tuning contains ATV- and DTV- manual tuning.
Item Adjust item Default Description
Channel 1-100 1 Current channel shows
Color System
Sound system I,L,M,N,BG,DK I Program sound system
Frequency 40-100mhz Channel frequency size
Program Search
PAL,NTSC,SECAM,A UTO
PAL Program color system
Start or stop channel
search
12
Page 13

Main menu on TV
Antenna Type
Item Description
Air Set Air format
Cable Set Cable format
Satellite Set Satellite format
Note:
Of course you are dependent on your own provider for the channel offer.
13
Page 14

tekstMain menu on TV
Country (only shows in DTV)
Here you can set which country you are in.
Password (only shows in DTV)
You can give broadcasters a pin code if you wish. For example, you can ensure
that children do not watch programs that are unsuitable for them.
14
Page 15

tekstMain menu on TV
Signal Information (only shows in DTV)
Here you will nd all information about a specic channel.
Electronic program guide (EPG)
Electronic Program Guide (EPG) contains program information that is now or in
the future is broadcast. The EPG is divided into 3 columns: Channel, the program
with day and time and the date.
You can choose from different programs and different dates.
15
Page 16

tekstMain menu on TV
Scroll through the list until you have the desired program. The electronic guide
also has the function to mark a program as a reminder. Scroll to the program,
press OK in the program menu and the program is selected to remind you at a
later time.
The reminder menu looks like this:
Select Remind and you will receive a reminder message on your TV at the
desired time. Schedule list is a list of programs for which you have set a
reminder.
16
Page 17

tekstMain menu on TV
Program Edit
The Program Edit menu shows the basic information of all TV programs. Press
on the
properties for the program such as favorite, delete or skip.
OK
button. A new menu then appears where you can set various
Key Range Description
Favorite ATV/DTV Set program as favorite
Delete ATV/DTV Delete the current channel
Skip ATV/DTV
Choose if skip the current channel when
CH+/- channel tuning
17
Page 18

tekstPicture
Picture mode
In this part of the user mode you can set the picture mode as desired.
Item Adjust Range Default Description
• Standard
Picture
mode
• User
• Lightness
• Soft
• Vivid
• Natural
• Sports
Standaard
Change the different
picture mode to change the
real picture effect in non
user mode
18
Page 19

tekstPicture
User mode
The page in user mode provide the user to adjust picture parameter to achieve
their prefer image quality.
Here you can adjust contrast, brightness, sharpness, saturation and backlight.
Color temperature
Like picture mode, color temperature is also the factor that inuence the nal
image quality. It provides 3 different color Temperature: standard, cool and
warm.
19
Page 20

tekstPicture
Image Noise Reduction
Image Noise Reduction is the function that reduce image noise and improve
picture quality.
Item Description
OFF Close Image Noise Reduction Function
Low Set Image Noise Reduction level low
Middle Set Image Noise Reduction level middle
Strong Set Image Noise Reduction level Strong
Zoom mode
Input source Panel resolution
ATV/DTV 16:9,4:3, Auto, Zoom1, Zoom2
HDMI 16:9,4:3,Just Scan, Zoom, Zoom2
VGA 16:9,4:3
20
Page 21

tekstSound
Sound mode
You can choose here which mode you set the sound for. You can choose
between standard, personal, music, feature lm or sport.
Sound user mode
Bass Adjust low sound Effect (0-600Hz)
Treble Adjust high sound Effect (more 1000Hz)
21
Page 22

tekstSound
Balance
Adjust sound balance: LEFT, RIGHT control data size
AVC/Surround
The switch of open or close AVC/Surround.
S/PDIF out
An S/PDIF connection makes it possible to transfer two audio channels (ie
stereo sound) in uncompressed digital form. Only intended for output. With
digital transmission, the audio signal does not have to be converted from digital
to analogue (and vice versa), so that you have no loss of audio quality.
PCM Output sound in uncompressed digital form
RAW Output sound in uncompressed RAW form
OFF Close the function of S/PDIF OUT
Alone
Alone means listen only, if you want to just listen the program, choose it and the
screen will be black.
Note : Press “menu” to cancel Alone state.
22
Page 23

tekstAdvance
Menu time
Here you can set how long you want to stay in a menu.
Sleeptimer
With the sleep timer you can set the TV to automatically switch to standby after
a set time.
Blue screen
You can turn it on so that you can see that there is nothing wrong with the TV
without a signal.
23
Page 24

tekstAdvance
Store mode
If this is on you can see all storage options.
Restore To Default
Reset all menu state to default, such as Menu time to default value.
Input source Menu
Here you can choose between the possible input sources.
24
Page 25

tekstRecord
Channelist
All available channels can be seen here.
Personal Video Recorder (PVR)
PVR funcition is only available for DTV, includes Record, Timeshift and Playback
function. Recording includes in time record and preserve record. In-time record
can be worked through short-cut key immediately, and preserve record need to
preserve before. Record and Playback can be done of the same time, that means
record DTV and playing USB equip at the same time. Timeshift is another function
for both record and playing together. The follows it would explain in details.
25
Page 26
tekstRecord
Item Description
Select Disk
Speed check* Check usb speed
Format** Storage format
Record list
(short cut index)
Video record
(short cut Record)
*Speedcheck: Check storage equipment PVR File System is well established.
Default as Start, OK/Enter and Right key to inspect the USB les systerm
and speed, the processiong shows Checking… When no inserting USB, or
inspection failed, it shows FAIL. When inserting USB but didn’t pass MStar
Format: enter Format menu. When inserting USB but inspecting unnormal no
partition, it shows No Partition.
** Format: At Format, press OK/Enter or Right key to start Checking PVR File
System, after conrmed USB equip information, it pop out Format Disk menu as
follows:
Choose the disc to store whatever content
need record
The list of record program
Start record
26
Page 27

tekstRecord
Recorder List
The menu is as follows:
The three functions mean the following:
Menu Omschrving
Ascend Select forward
Sort Change the order in list based on LAN or time
Delete Delete program in record list
PVR (Personal Video Recorder) - Opnemen
• Simple mode looks like this:
27
Simple mode just
shows the REC and
record time.
Page 28

tekstRecord
• All record modus looks like this:
Here you can adjust some things in the recording mode.
You can switch between simple mode and all record mode with the Exit button
on your remote control.
Key Function
||
- Pause Pause the recording
- Stop Stop the recording
- Rev Go back 30 seconds in the recording
- FF Go forward 30 seconds in the recording
- Timeplay
- Backward
- Forward
- A-B
- SlowMotion
Record and play simultaneously
Fast rewind
Fast forward
Marking specic place in the recording
Play in slow motion
28
Page 29

tekstApplication Manager
The four basic applications in our system are:
• Application Manager
• FileManager
• Media Center
• Settings
Application Manager
They are providing the most common function of manager the tv system in
launcer, such as le operater, music,application installer or uninstaller.
29
Page 30

tekstFile Manager
File Manager
The lemanager is used to show and operater all les in local store and USB.
You can perform le operations by menu key ,the le operation include delete,
copy, paste, etc.
30
Page 31

tekstMedia Center Video
Media Center
Here you will nd all options regarding video, music and image.
Video in Media Center
Key Function
Show the information like name, le formation
Adjust resolution
|
| |
Set breakpoint, subtitles and track number
Set playback on point A
Set video play in a specift time
Set sound in single cycle/all cycle/random
Show playlist
To previous video (play)
Rewind (various speeds)
Pause or start video
Fast forward (various speeds)
|
Go to next video (play)
31
Page 32

Music in Media Center
Key Function
Information about the music such as name, size etc.
Show / hear music at specic time
Adjusting sound
tekstMedia Center Muziek
|
| |
Show playlist
To previous music clip (play)
Rewind (various speeds)
Pause or start a music clip
Fast forward (various speeds)
|
Go to next music clip (play)
32
Page 33

Image in Media Center
Key Function
Information about the images such as name, size etc.
Zoom out on the images
Zoom in on the images
tekstMedia Center Images
|
| |
Show the list of images
Turn the image 90 ° counterclockwise
Go to previous image
Pause or start image
|
Go to next image
Turn the image 90 ° clockwise
33
Page 34

tekstSettings
Settings
With these settings you can adjust the TV to your wishes.
Key Function
Network setting
Set OSD language and input methods
Set time zone and current time
System information
Set wi display on
System Uupdate
Reset the settings in default mode
TV information
34
Page 35

tekstNetwork settings
Network status
Shows the current status of the network.
Wired connection
Select ‘Open Ethernet’ and choose to turn it on or off.
35
Page 36

tekstNetwork settings
Wireless connection Wi-Fi
Select ‘wireless connection’ and nd the name of the Wi-Fi point that you want
to use. Enter the password and connect.
Connection via PPPoE (Point-to-Point Protocol over Ethernet)
Select this, enter your username and password.
36
Page 37

tekstNetwork settings
Turn your TV into a hotspot for other devices
Connect an open network, enter your ssid and password and then save.
37
Page 38

tekstSettings: Language, input, time and date
Language setting
Press Column ‘Language Setting’ to change OSD language
Press Column ‘Modify the default input method’ to change input method
Time and date
Column Description
Get time and date over
network
TimeZone Select the time zone where you are located
Use 24-hour format
Select date format
ON: Date and time are set automatically via the
network
OFF: Set the time and date manually
ON: Use 24-hour format (00.00-23.59)
OF: Use 12-hour format (00.00-11.59 AM/PM)
1: Month-Day-Year
2: Day-Month-Year
3: Year-Month-Day
38
Page 39

tekstSettings: System
System
Item Description
Allow install of non
AppStore applications
Cache cleaner Clean cache
Google
Account Manager
Cache cleaner
Here you can delete the temporary internet les so that the system works better
again and you see the newest pages.
ON: Allow install of non appstore application
OFF: Not allow install of non appstore application
Show Google account information
39
Page 40

tekstSettings
Connection with smartphone
Make you phone image cast down on TV.
System upgrade
For updating the system.
Network upgrade Updating via the network
Local upgrade Updating via a local device such as a USB stick
Restoring the factory state
Resetting the TV’s factory settings.
40
Page 41

tekstSettings
About
Information about the TV.
Styles
In our new Ui system, we have a new advanced functions. The basic background
of TV can change with time.The tv will change its color when the time go day or
night to protect the user’s eyes. Following are the night tv and night home.
41
Page 42

tekstSpecications
RGB-input
Mode Resolution Horizontal Frequency (KHz) Vertical Frequency (KHz)
DOS 720 x 400 31.5 70
VGA 640 x 480 31.5 60
SVGA 800 x 600 37.9 60
XGA 1.024 x 768 48.4 60
WXGA 1.920 x 1.080 67.5 60
HDMI-input
Mode Resolution Horizontal Frequency (KHz) Vertical Frequency (KHz)
VGA 640 x 480 31.47 59.94
480i 720 x 480i 15.73 59.94/60
576i 720 x 576i 15.63 50
480p 720 x 480p 31.47 59.94/60
576p 720 x 576p 31.26 50
720p 1.280 x 720p
1.080i 1.920 x 1.080i
1.080p 1.920 x 1.080p
2.160p 3.840 x 2.160p
37.50
44.96
28.13
33.75
56.25
67.5
50
59.94/60
50
59.94/60
50
59.94/60
Component video (YPbPr) input
Mode Resolution Horizontal Frequency (KHz) Vertical Frequency (KHz)
480i 720 x 480i 15.73 59.94/60
576i 720 x 576i 15.63 50
480p 720 x 480p 31.47 59.94/60
576p 720 x 576p 31.26 50
720p 1.280 x 720p
1.080i 1.920 x 1.080i
1.080p 1.920 x 1.080p
Due to continuous product development, specications are subject to change without prior notice.
37.50
44.96
28.13
33.75
56.25
67.5
50
59.94/60
50
59.94/60
50
59.94/60
42
Page 43

Troubleshooting
Problem Solution
TV will not turn on • Make sure the power cord is
No picture, no sound • Check the cable between TV and
Poor picture, sound OK • Check the cable between TV and
Audio noise • Check if the cables are connected
No audio • Make sure the volume is not turned
Photos, videos and music from a USB
device are not displayed
tekst
plugged in.
• The batteries in the remote control
may be drained; replace the
batteries.
antenna/external AV device.
• Press the power button on the
remote.
• Press the SOURCE button the
remote, then press the button
repeatedly to select the TV source.
antenna/ external AV device.
• Try another channel, the station may
have broadcast difculties.
• Adjust the brightness/contrast in the
Video menu.
• Check that the unit is set to PAL
properly.
• Move any infrared equipment away
from the TV.
off or set to minimum.
• Check if the USB storage device
is capable of mass storage, as
described in the documentation that
came with the storage device.
• Check if the USB storage device is
compatible with the TV
• Check if the audio and image le
formats are supported by the TV.
43
Page 44

tekstTroubleshooting
USB les are played jerkily • The speed of the USB storage device
can affect the speed of data transfer
to the TV, preventing image and
/ or sound from being smoothly
displayed.
44
Page 45

Useful Information and Licences
Guarantee
We regret it when a HKC product doesn’t work as it should, despite our careful quality
control. That is why we offer a 2-year manufacturer’s warranty after the date of purchase
on all our models.
This guarantee is a pick-up and return guarantee. This means that we take care of the
return of the product to our repair and service center. We will thoroughly check the
product and solve the problem. We will send the product back to your home within 7
working days.
If the product can no longer be repaired, we will send you a new one.
Warranty conditions
1. Factory warranty is only given if you can present the purchase invoice.
2. This manufacturer’s warranty applies to all HKC-europe products.
3. Manufacturer’s warranty applies only to material and manufacturing defects.
Problems caused by improper use, incorrect installation, external factors and normal
wear and tear are not covered by this manufacturer’s warranty.
4. The factory warranty expires as soon as changes or repair work on the product are
carried out by yourself or third parties. The same applies if the serial number is
changed or removed.
5. The decision on repair or replacement of the product is exclusively reserved to HKC.
The warranty period is not extended due to repair or replacement.
tekst
Customer service contact form
To use the Manufacturer’s warranty or other questions, you can contact HKC Customer
Service via the customer service contact form at:
www.hkc-eu.com/en/service/klantenservice-contact/
Due to the continuous product development, the manual can change without prior
notice. Typing and printing errors reserved.
45
Page 46

tekstUseful Information and Licences
EC directives internet address:
https://eur-lex.europa.eu/browse/summaries.html?locale=en
The symbol on the product or its packaging indicates that this product
must not be disposed of with your other household waste. Instead, it
is your responsibility to dispose of your waste equipment by handing
it over to a designated collection point for the recycling of waste
electrical and electronic equipment. The separate collection and
recycling of your waste equipment at the time of disposal will help
conserve natural resources and ensure that it is recycled in a manner
that protects human health and the environment.
For more information about where you can drop off your waste for
recycling, please contact your local authority, or where you purchased
your product.
Notes for Battery Disposal
The batteries used with this product contain chemicals that are harmful
to the environment. To preserve our environment, dispose of used
batteries according to your local laws or regulations. Do not dispose of
batteries with normal household waste.
For more information, please contact the local authority or your retailer
where you purchased the product.
MPEG-2 NOTICE
Any use of this product in any matter other than personal use that
complies with the MPEG-2 standard for encoding video information
for packaged media is expressly prohibited without a license under
applicable patents in the MPEG-2 Patent Portfolio, which license is
available from MPEG LA, LLC, 6312 S. Fiddlers Green Circle, Suite
400E, Greenwood Village, Colorado, 80111 U.S.A.
46
Page 47

47
Page 48

About HKC
The HKC brand was established in 1997 as a manufacturer of PC monitors thanks to
the good quality and specic technical production process. HKC quickly grew into a
TOP 3 Producer of monitors on the Chinese market. In 2003 HKC started producing
LCD televisions, over the years, HKC has bought many suppliers which now makes all
parts of the TV in-house, so HKC has one of the only open-cell assembly lines where the
LCD of the TV is made. Since 2007, HKC has an ofce in the Netherlands and in 2016
HKC started the assembly of TV’s in the Netherlands, where HKC tries to offer as many
jobs as possible to people with a distance to the labor market in order to be socially
responsible.
Customer service
Send an email with your question:
service@hkc-europe.com
or phone +31 (0)24 - 34 34 230
(monday-friday 09.00 - 17.00 uur).
For product information:
www.hkc-eu.com
 Loading...