

Page 1
Manual 1.0
• English • Deutsch
PREMIUM PR:O
PR:O 10 XD • PR:O 12 D • PR:O 12 XD • PR:O 15 D • PR:O 15 XD
PR:O 18 SUB A • PR:O 210 SUB A
Page 2

Versio n 2. 4 07/20 15
Important Safety Instructions!
Read before connecting!
Thi s pro duct has b een built by t he ma nufact urer in a ccorda nce w ith
IEC 6006 5 and left the facto ry i n saf e wor king order. To main tain
thi s con ditio n and ensu re no n-ris k ope ratio n, th e use r mus t
fol low t he ad vice and w arnin g com ments foun d in the o perat ing
ins tructi ons. If t his p roduc t sha ll be used in vehic les, ships or
air craft or a t alt itude s exc eedin g 200 0 m above sea level , tak e car e
of the r eleva nt sa fety regul ation s whi ch ma y exc eed t he I EC 60 065
req uireme nts.
WARN ING: To preve nt th e ri sk of fire and shock haza rd, do no t
exp ose t his a pplia nce t o moi sture or rain. Do n ot op en ca se – no
use r ser vicea ble p arts insid e. R efer servi ce to qual ified ser vice
per sonnel .
Thi s sym bol, where ver i t app ears, aler ts yo u to the
pre sence of u ninsu lated dang erous volta ge i nside the enclo sure –
vol tage that may b e su fficie nt to con stitut e a risk of sh ock.
Thi s sym bol, where ver i t app ears, aler ts yo u to the
pre sence of e xtern ally access ible hazar dous volta ge. E xtern al wi ring
con nected to any t ermin al ma rked with this symbo l mu st be a
“re ady m ade c able” comp lying with the manu factur ers
rec ommend ation s, or must be a wir ing instal led b y in struct ed
per sons only.
Thi s sym bol, where ver i t app ears, aler ts yo u to impor tant
ope rating and main tenanc e ins truct ions in t he ac compan ying
lit eratur e. R ead t he ma nual.
Thi s sym bol, where ver i t app ears, tell s you : Take c are! Hot
sur face! To preve nt bu rns y ou mu st no t tou ch.
• Re ad th ese instru ction s.
• Ke ep th ese i nstru ction s.
• Fo llow all warnin gs an d in struct ions marke d on the produ ct an d
in this manua l.
• Do not use this produ ct ne ar wa ter. D o no t pla ce th e pro duct near
wat er, ba ths, wash basin s, ki tchen sink s, we t are as, s wimmi ng
poo ls or damp room s.
• Do not plac e obj ects conta ining liqu id on the produ ct – vases ,
gla sses, bottl es e tc.
• Cl ean only with dry cloth.
• Do not remo ve an y cov ers o r sec tions of the h ousin g.
• The set oper ating volta ge o f the prod uct m ust m atch the local
mai ns su pply volta ge. I f you are not sure of th e ty pe of powe r
ava ilable cons ult y our d ealer or local power com pany.
• Be fore conne cting the devic e, pl ease ensur e tha t the mai ns su pply
you are using is equip ped w ith a dequa te pr otecti on a gainst shor t
cir cuitin g an d gro unding faul ts wh en t he de vice is pl ugged in.
• To r educe the risk of e lectri cal shock, the grou nding of t his
pro duct must be ma intai ned. Use o nly the p ower suppl y cor d
pro vided with this prod uct, and m ainta in th e fun ction of the
cen ter ( ground ing) pin of th e ma ins c onnect ion at an y tim e. Ma ke
sur e the main s out let used provid es a prop er pr otect ive g round
con nectio n.
• Do not defea t th e saf ety p urpos e of the polari zed o r gr oundin g-
typ e plu g. A polar ized plug has two b lades with one wider tha n
the othe r. A g round ing t ype p lug has t wo bl ades and a thi rd
gro unding pro ng. The wid e bla de or the third pro ng ar e pro vided
for your safet y. If the provi ded p lug d oes not f it in to yo ur ou tlet,
con sult an el ectri cian for r eplac ement of t he ob olete outl et.
• Pr otect the power cor d fro m bei ng wa lked on or pin ched
par ticul arly at pl ugs, conve nience rece ptacl es, a nd th e po int w here
the y exi t fro m the dev ice! Power supp ly co rds s hould alwa ys be
han dled caref ully. Period icall y che ck co rds for c uts o r sig n of
str ess, especi ally at t he pl ug an d the poi nt wh ere t he co rd e xits
the devi ce.
• Ne ver use a dama ged p ower cord.
• Un plug this produ ct d uring light ning storm s or when unus ed fo r
lon g per iods of ti me.
• Thi s pro duct can be fu lly d iscon necte d fro m mai ns on ly by pull ing
the main s plu g at the unit or t he wa ll so cket. The p roduc t mus t be
pla ced i n suc h a way a t any time , th at di sconne cting from main s
is easil y pos sible .
• Fu ses: Repla ce wi th IE C127 (5x20 mm) type and r ated fuse for b est
per forman ce on ly! It is proh ibite d to use “patch ed fu ses” or t o
sho rt th e fus e-hol der. R eplac ing a ny ki nd of fuse s mu st on ly be
car ried out b y qua lifie d ser vice pers onal.
• Re fer a ll se rvic ing t o qua lifie d ser vice perso nnel. Ser vicin g is
req uired when the unit has been damag ed in any way, such as:
- Wh en th e pow er c ord o r plu g is damag ed o r fra yed.
- If liq uid h as be en sp illed or object s hav e fal len i nto t he p roduct .
- If the prod uct h as be en ex posed to rain or mo istur e.
- If the prod uct d oes n ot op erate norm ally when the operat ing
ins tructi ons are f ollowe d.
- If the prod uct h as be en dr opped or the c abine t has been dama ged.
• Do not conn ect e xtern al sp eaker s to this produ ct wi th an
imp edance low er th an th e rat ed im pedan ce gi ven o n the pro duct
or in t his m anual. Use only cabl es wi th su ffici ent c ross secti on
acc ording to the l ocal safet y reg ulati ons.
• Ke ep aw ay fr om d irect sunli ght.
• Do not inst all n ear h eat s ource s suc h as radia tors, heat regi sters ,
sto ves o r oth er de vices that prod uce h eat.
• Do not bloc k any vent ilati on op ening s. In stall in a ccord ance with
man ufactu rer’s ins tructi ons. T his produc t mus t no t be place d in
a b uilt- in in stalla tion such as a rack unle ss pr oper venti latio n is
pro vided.
• Al ways allow a co ld d evice to w arm u p to ambie nt t empera ture,
whe n bei ng mo ved i nto a roo m. Con densa tion can f orm i nside it
and dama ge th e pro duct, when bein g us ed wi thout warm ing u p.
• Do not plac e nak ed fl ame s ource s, su ch as lig hted candle s on the
pro duct.
• The dev ice m ust b e pos ition ed at leas t 20 cm/8“ away fro m wal ls.
• Us e on ly wi th th e car t, s tand, tripo d, b racket or table spec ified by
the manu factur er or sol d wit h the prod uct. When a car t is used ,
use caut ion w hen m oving the cart /produ ct co mbina tion to av oid
inj ury from tip-o ver.
• Us e on ly ac cessor ies r ecomm ended by t he m anufac turer, this
app lies for a ll ki nd of acce ssori es, f or ex ample prot ective cov ers,
tra nsport bag s, st ands, wall or c eilin g mou nting equi pment . In
cas e of attac hing any k ind of ac cessor ies t o the pro duct, alway s
fol low t he in struc tions for use, provi ded b y the manu factur er.
Nev er us e fix ing p oints on the p roduc t oth er th an sp ecifi ed by the
man ufactu rer.
• Thi s ap plianc e is NOT s uitab le to be used by an y pe rson or
per sons (incl uding child ren) with limi ted p hysica l, se nsori cal o r
men tal a bilit y, or by p ersons wit h ins uffic ient exper ience and/o r
kno wledge to opera te su ch an appl iance . Chi ldren unde r 4 y ears of
age must be kept away from this appli ance at a ll ti mes.
• Ne ver push object s of any kind into this produ ct t hrough cabi net
slo ts as they may touc h dan gerous vol tage points or short out
par ts th at co uld r esult in risk of fi re or ele ctric shock .
• Thi s pro duct is c apabl e of deliv ering soun d pre ssure level s in
exc ess o f 90 dB, which may cause perm anent hear ing d amage !
Exp osure to e xtrem ely h igh noise level s ma y cau se a perma nent
hea ring loss. Wear heari ng pr otecti on i f con tinous ly e xposed to
suc h hig h lev els.
• The man ufactu rer o nly g uaran tees the s afety, reli abili ty an d
eff icienc y of this prod uct i f:
- As sembly, ext ension , re -adjus tment , mod ifica tions or r epair s are
car ried out b y the man ufactu rer o r by perso ns a uthori zed t o do so.
- The ele ctrica l ins talla tion of th e re levant area comp lies with the
req uireme nts of IE C (AN SI) s pecif icatio ns.
- The uni t is used in a ccorda nce w ith the o perati ng in struc tions .
• Thi s pro duct is o ptimi zed fo r us e wit h mus ic an d spe ech signal s.
Usi ng th is pr oduct with sine wave , sq uare wave or ot her k ind o f
mea suring sig nals at hi gher level may lead to s evere dama ge of
the prod uct.
General Notes on Safety for Loudspeaker
Systems
Mou nting syst ems m ay on ly be used for thos e lou dspeak er
sys tems autho rized by t he ma nufact urer and only with the
mou nting acce ssorie s spe cifie d by the manufa cture r in the
ins tallat ion instru ction s. Re ad an d hee d the man ufactu rer’s
ins tallat ion instru ction s. The indi cated load -bear ing c apaci ty ca nnot
be guara nteed and the m anufa cturer will not be l iable for damag es
in the event of i mprope r in stalla tion or t he us e of unaut horiz ed
mou nting acce ssorie s.
The syst em’s load-b earin g cap acity cann ot b e gua rantee d and
the manu factur er wi ll n ot be liab le fo r dam ages in th e ev ent t hat
lou dspeak ers, mount ing a ccess ories, and conn ecting and atta ching
com ponent s ar e mod ified in a ny wa y.
Comp onent s aff ecting safe ty m ay on ly be repa ired by t he
man ufactu rer o r aut horiz ed ag ents, othe rwise the oper ating permi t
wil l be voide d.
Ins tallat ion may b e per forme d qua lified per sonnel only , and
the n onl y at pick- point s wit h suf ficie nt lo ad-ca rryin g cap acity and
in compl iance with loca l bui lding regu latio ns. U se on ly th e mou nting
har dware spec ified by t he ma nufact urer in t he in stalla tion
ins tructi ons (screw s, an chors , etc .). Take all the preca utions
nec essar y to ensur e bol ted connec tions and other thre aded locki ng
dev ices will not l oosen .
Fix ed an d por table inst allat ions (in t his c ase, speak ers a nd
mou nting acce ssorie s) mu st be sec ured by tw o ind epend ent s afeti es
to preve nt th em fr om fa lling. Safe ties must be a ble t o cat ch
acc essori es or par ts th at ar e loo se or may beco me lo ose. Ensur e
com plianc e wi th th e giv en na tiona l reg ulati ons w hen u sing
con nectin g, at tachi ng, a nd ri gging devi ces. Factor pote ntial dyna mic
for ces ( jerk) into the equa tion when deter minin g the prop er si ze
and load -bear ing c apacit y of safe ties.
Be sure to o bserv e spe aker stand s’ ma ximum load -bear ing
cap acity. Note that for reaso ns of des ign a nd co nstru ction, most
spe aker stand s are appr oved to be ar ce ntric load s onl y; th at i s, th e
spe akers’ mass has to b e pre cisel y cen tered and balan ced. Ensur e
spe aker stand s are set up s tably and secur ely. Take appr opria te
add ed me asure s to secur e spe aker stand s, fo r exa mple when:
- t he f loor or gr ound surfac e do es no t pro vide a sta ble, secur e bas e.
- t hey are e xtend ed to heig hts t hat i mpede stab ility.
- h igh wind pressu re ma y be expe cted.
- t here is t he ri sk th at th ey m ay be knoc ked o ver b y peo ple.
Spe cial measu res m ay be come neces sary as pr ecaut ions again st
uns afe a udienc e beh avior. Do not s et up spea ker s tands in
eva cuatio n rou tes and e mergen cy e xits. Ensu re co rridor s ar e wid e
eno ugh a nd pu t pro per barrie rs an d ma rkings in place when sett ing
spe aker stand s up in pa ssage ways. Moun ting and d ismou nting
are espe ciall y haz ardous tas ks. U se ai ds su itabl e for this purp ose.
Obs erve the given nati onal regula tions when doin g so.
Wear prop er pr otect ion ( in pa rticu lar, a helm et, gloves , and
safe ty s hoes) and use o nly suitab le me ans of as cent (ladd ers,
sca ffolds , etc .) d uring insta llati on. C omplia nce w ith this
req uireme nt i s the sole resp onsib ility of t he c ompany per formin g
the inst allat ion.
WARNING!
Afte r in stalla tion, insp ect t he s ystem compr ised of t he mo unting
fix tures and louds peaker s to ensu re it is proper ly s ecured .
The oper ator of lo udspe aker syste ms (f ixed or po rtabl e) mu st
reg ularly ins pect or ta sk a third par ty to regu larly insp ect a ll s ystem
com ponent s in acco rdance with the give n cou ntry ’s re gulat ions and
hav e pos sible defec ts r epaire d imm ediat ely.
We also strong ly r ecomme nd ma intai ning a log book or t he li ke to
doc ument all inspe ctions .
Whe n ins talli ng sp eakers for long er la sting or p erman ent o utdoo r
ope ration , be sure to t ake into accoun t th e sta bilit y and load bea ring capac ity o f pla tform s and surf aces; loads and force s ex erted
by wind, snow , and ice; as well as th ermal infl uence s. Als o be sure
to provi de su ffici ent s afety marg ins f or th e rig ging point s use d for
flo wn sy stems . Obs erve the given nati onal regula tions when doin g
so.
• As k the manu factur er i f your pro duct is al lowed for outdo or
usa ge !
Pro fessio nal l oudsp eaker syste ms c an pr oduce harm ful
vol ume l evels . Eve n pro longe d exp osure to s eemin gly h armle ss
lev els ( starti ng a t abo ut 95 dBA SPL) can cause perm anent hear ing
dam age! T herefo re w e rec ommend tha t eve ryone who is e xpose d to
hig h vol ume l evels prod uced by lo udspe aker syste ms we ars
pro fessio nal h earin g pro tectio n (ea rplug s or earmu ffs).
Man ufactu rer: Stame r Mus ikanl agen GmbH, Magd eburge r Str. 8,
666 06 St . Wend el, G erman y
Page 3
PREMIUM PR:O 1.0
3
Welcome to the HK Audio family!
Thank you for choosing a brand-name product made by our company. Rest
assured, we engineered and built it with the greatest care so it will serve
you well for many tomorrows to come.
Even if your experience with sound systems runs deep, some things about
this product are sure to be new to you. This is why we ask that you do not
set this manual aside without reading it first. Be sure to keep it in a safe
place for later reference.
Here‘s wishing you the best sound at every occasion!
Your HK Audio team
Warranty
Register each powered PREMIUM PR:O speaker separately to extend your
warranty to five years free of charge! Use the convenient online registration
option at www.hkaudio.com.
If you are unable to register online, please fill out the enclosed warranty
card, ensuring all information is legible and complete, and mail or fax it to
us.
The registration is only valid if the warranty registration card is filled out
and returned to HK AUDIO or the device is registered via Internet within
30 days of the date of purchase.
We are also interested in learning where and by whom our devices are used.
This information will help us design future products. Your data are of course
protected by German privacy laws.
Thank you!
HK AUDIO
Technischer Service
Postfach 1509
66959 St. Wendel, Germany
Fax: +49 6851 905 100
PREMIUM PR:O
• English • Deutsch
Page 4
PREMIUM PR:O 1.0
4
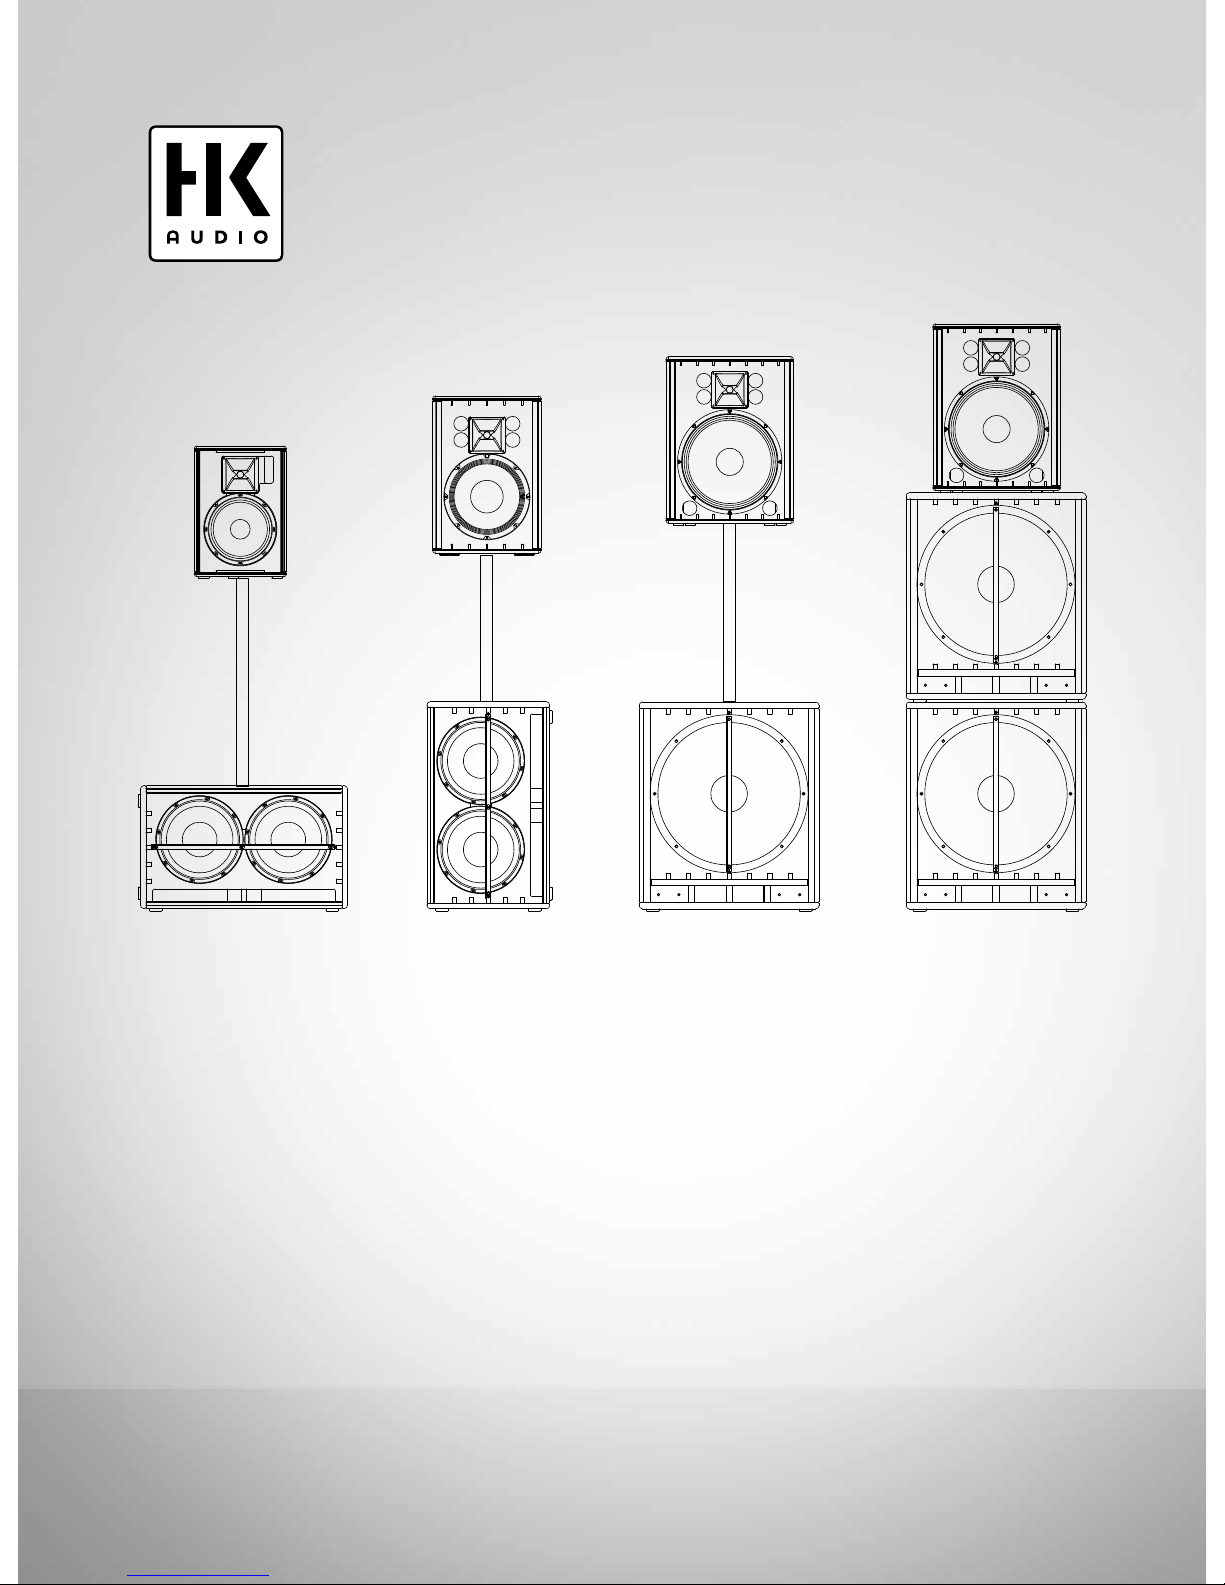
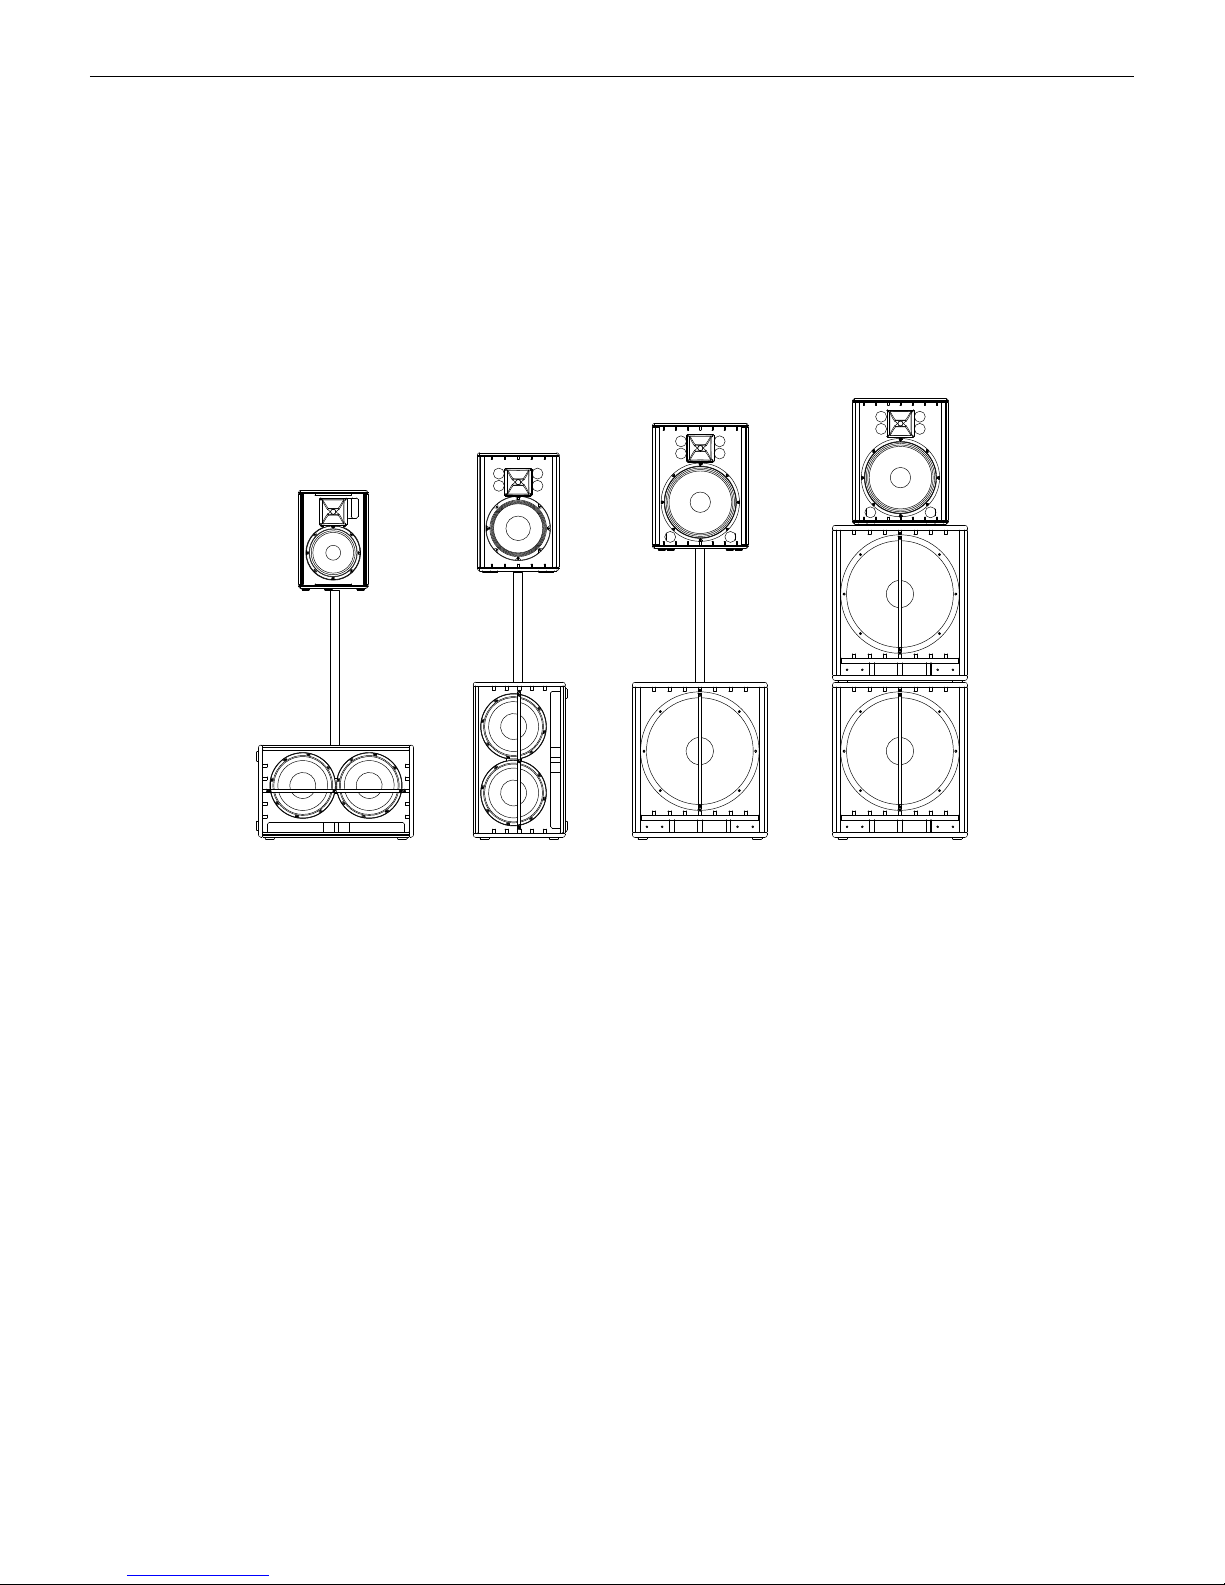
1 PREMIUM PR:O Self-powered Cabinets
PR:O 10 XD • PR:O 12 D • PR:O 12 XD • PR:O 15 D • PR:O 15 XD
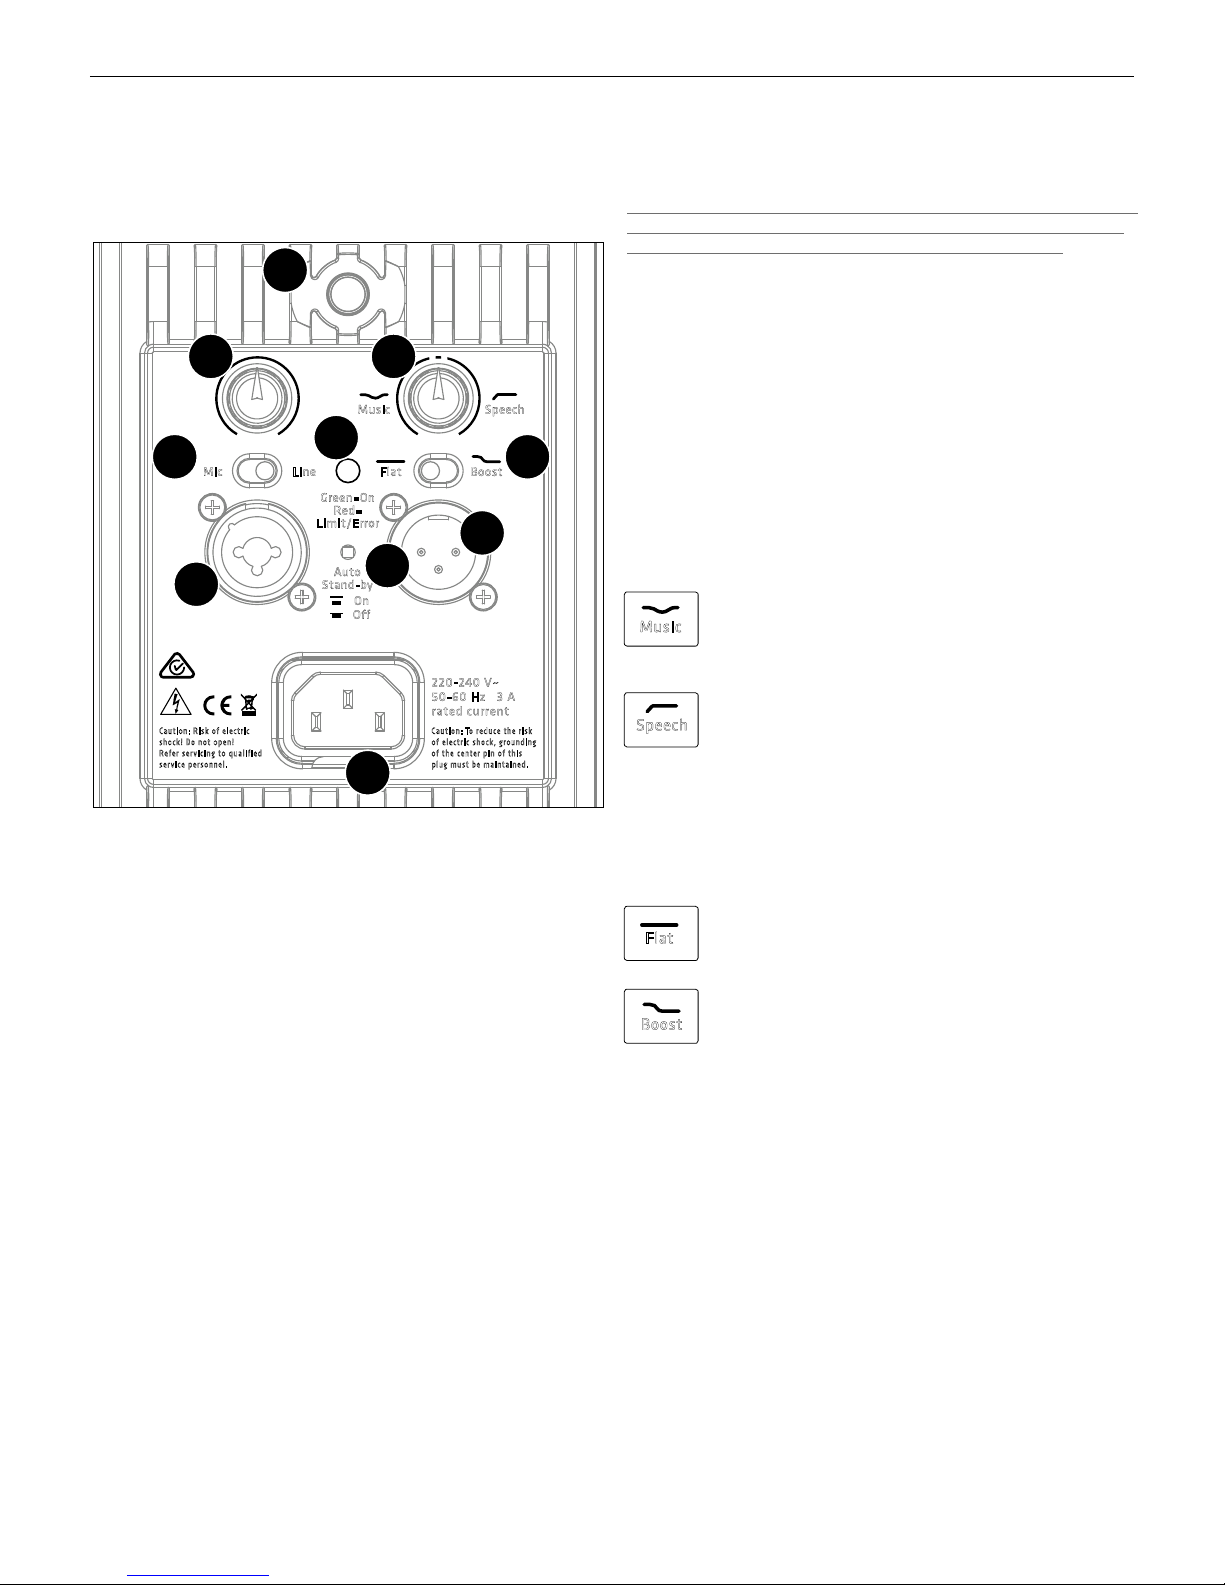
1.1 Control Features
Musi c Spee ch
Boos tFlat
Mic Line
Auto
Stan d-by
Gree n=On
Red=
Limi t/Error
On
O
ThruInput
Gain Tone
MADE IN GERMANY
Ca uti on : Ris k of el ec tr ic
sh ock ! Do no t op en!
Re fer s er vi cin g to qu al if ied
se rv ice p er son ne l.
Ca uti on : To r ed uce t he ri sk
of el ec tr ic sh oc k, gr ou ndi ng
of th e ce nte r pi n o f th is
pl ug mu st be m ai nta in ed .
22 0-240 V~
50 -60 Hz 3 A
ra ted curre nt
2
1
3 8
5
4
9
6
10
7
●
1
Power
This is the PREMIUM PR:O powered cabinet’s on/o button. The Limiter/
Status LED lights up green to indicate the cab is powered up.
●
2
Gain
Use this knob to adjust the input gain to match the incoming signal‘s level.
Adjusting volume levels with the Gain knob:
The +4 dBu (center-notched) position is the factory default setting. It is
tuned to achieve the right balance of levels between the mid/ high unit and
subwoofer. If necessary, turn the Gain knob to adjust the balance of levels
between the mid/ high unit and subwoofer(s) to suit the incoming line
signals.
●
3
Mic/Line Selector
When connecting a microphone, you can optimize the input‘s gain level by
setting this switch to Mic. This setting provides a 30 dB boost.
When connecting a line-level source such as a mixer, audio playback device,
or electronic musical instrument, set this switch to Line.
●
4
Input
Route the incoming audio signal into this electronically balanced,
combination XLR/ 6.3 mm (1/4”) input (pin 1 = ground, 2 = +, 3 = -).
●
5
Limiter/Status LED
This dual-color LED serves as a status indicator for the PREMIUM PR:O
powered cabinet (green = power on, red = limit/error). The LED briefly
flashes red to tell you the limiter is responding to signal peaks.
Caution! If the Status LED stays red during operation, the cabinet is being
overloaded. Turn down the signal level! If you are not routing a signal in
and the Status LED stays red, the system has detected a fault.
●
6
Auto Standby
PREMIUM PR:O mid/ high units have a power-saving function that can be
activated and deactivated. The power amp switches to standby mode when
the button is set to On and the unit does not receive a signal for about four
hours (consumption <0.5 watts). To power the PREMIUM PR:O cabinet
back up again, simply set its Power button to O for five seconds and then
back to On. Mid/ high units will remain up and running if you disable Auto
Standby by setting this button to O.
●
7
Tone
The Tone knob adjusts the frequency response to suit the given application.
Setting the knob to the center position defeats the filter.
Turning the Tone knob counterclockwise towards Music
attenuates by up to -6 dB a broad midrange band with a center
frequency of 2500 Hz, thereby taking the edge o the sound.
The overall volume is not aected.
Turning the Tone knob clockwise towards Speech activates a
80-to-200 Hz low-cut filter, which enhances clarity for speech
applications and reduces subsonic noise.
The X models (PR: O 10 XD, PR: O 12 XD, PR: O 15 XD) are also tuned to
minimize feedback and distortion at high volume levels.
●
8
Flat/Boost Selector
Setting this switch to Flat conjures the optimum linear
frequency response for live performances and for operation in
combination with subwoofers.
Setting this switch to Boost pumps up the bass. This boosts a
broad band of bass frequencies in the kick-drum range between
70 Hz and 80 Hz and extends the low-end response.
●
9
Thru
This passive parallel output routes the signal routed into the front-end
Input back out again (pin 1 = ground, 2 = +, 3 = -).
●
10
Mains
Use the factory-included power cord to connect this socket to a wall outlet.
Music
Speech
Flat
Boost
Page 5
PREMIUM PR:O 1.0
5
1.2 Connecting Cords
Music Speech
BoostFlat
Mic Line
Auto
Stand-b y
Green=O n
Red=
Limit/E rror
On
O
ThruInput
Gain Tone
MADE IN GERMANY
Caut io n: Ri sk of e le ctr ic
shoc k! D o n ot op en !
Refe r ser vi ci ng to q ua lif ie d
serv ic e per so nn el.
Caut io n: To red uc e the r is k
of e le ctr ic s hoc k, g rou nd in g
of t he ce nt er pi n of th is
plug m us t b e mai nt ai ned .
220- 240 V~
50-6 0 H z 3 A
rate d c urre nt
• When operating the PREMIUM PR:O speaker cabinet as a standalone unit
or monitor without an added subwoofer, use a balanced cord equipped
with XLR connectors or 6.3 mm (1/4”) jack plugs to route the signal from
the mixer (via a monitor out, line out, or a similar output) or microphone
to the Input.
• When operating the cabinet in combination with PREMIUM PR:O series
powered subwoofers, use a cord equipped with XLR connectors to connect
the subwoofer‘s Line Out Mid/High to the cabinet‘s Input.
• Plug a cord equipped with XLR connectors into the Thru port to route the
input signal out again.
Go to page 18-21 for illustrations of cable connections.
1.3 Operating the Cabinet
• Ensure the PREMIUM PR:O cabinet is switched o.
Caution! Always make sure the local mains voltage matches the voltage
specified on the PREMIUM PR:O unit. You may destroy powered
cabinet‘s electronic components if you connect it to the wrong mains
voltage.
• When patching in line signals, ensure all other connected components are
switched on before powering up. The connected mixer as well as all signal
sources connected to it—keyboards, instrument amps, eects and the
like—should be switched on first. Always switch on the PREMIUM PR:O
last, after you power up all connected devices, and switch it o first; that
is, before you switch o all connected devices.
• When you flip on the Power switch, the fan will start up briefly for a
system check and switch o after around five seconds. After that, the
cabinet‘s circuitry controls the fan. It kicks in only at very high volume
levels and is regulated according to the temperature. The Status LED
lights up red during the system check. It will turn green if there is no error
and the system is getting mains power.
• The Gain knob‘s default setting is the 12 o‘clock position (+4 dBu / centernotched). This is the preferred level if you have connected a mixer to the
PREMIUM PR:O cabinet. If you plug a CD player or keyboard straight into
the cabinet, you may have to turn this knob to adjust the gain to match it
to the device‘s signal level.
Caution! Turn the Gain knob counterclockwise all the way down to the far
left when switching the input sensitivity from Line to Mic.
• If you hear distortion or clipping occurs, first check the signal sources and,
if possible, reduce the output signal level there.
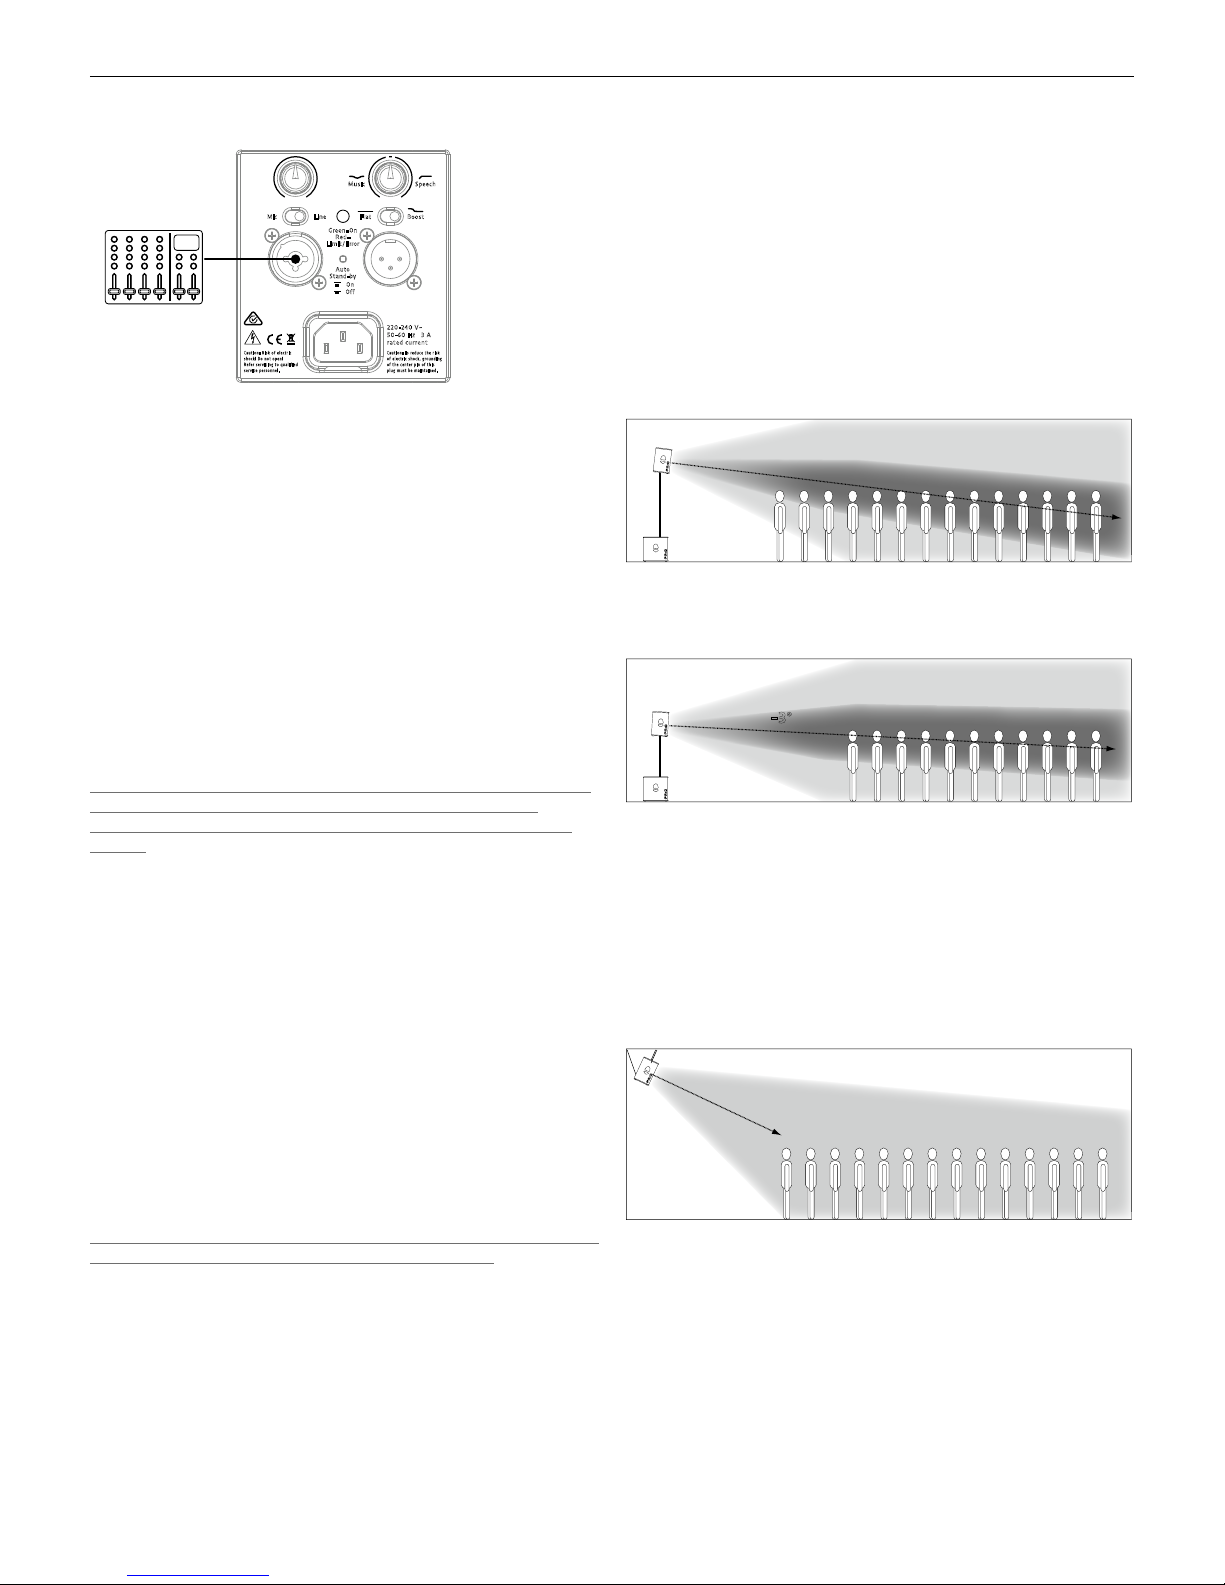
1.4 Aiming the Cabinet
DuoTilt™ 3/7
The HK Audio DuoTilt 3/7 pole mount lets you align PREMIUM PR:O
cabinets vertically on a speaker stand or mounting pole to prevent or reduce
troublesome ceiling reflections. The front aperture of the HK Audio DuoTilt
provides a 7° angle, the rear aperture a 3° angle of tilt.
Rule of thumb: We recommend that you opt for the 7° angle if the audience
close by and you place cabinets at an elevated position—for example, on
stands on the stage—or if the audience is seated. This way the sound and
particularly the high frequencies are distributed more uniformly right on up
to the front face of the speakers.
–3°
–7°
If you wish to address more listeners at a greater distance from the
speakers, opt for the 3° angle on the HK Audio DuoTilt 3/7.
–3°
In both situations, you can vary the speakers‘ reach by adjusting their
height. They throw sound over a greater distance as their elevation
increases.
Rigging Points
Every PREMIUM PR:O model comes with three countersunk M8 rigging
points. They lets you fly the speaker on steel cables or chains at inclinations
from 0° up to 45°. When flying the cabinet, for example, from a truss, use
the rear rigging point to determine the degree of inclination.
We recommend using our secure AP-8 suspension points to rig the speaker
to the mounting hardware.
• English • Deutsch
Page 6
PREMIUM PR:O 1.0
6
2 PREMIUM PR:O Self-powered
Subwoofer
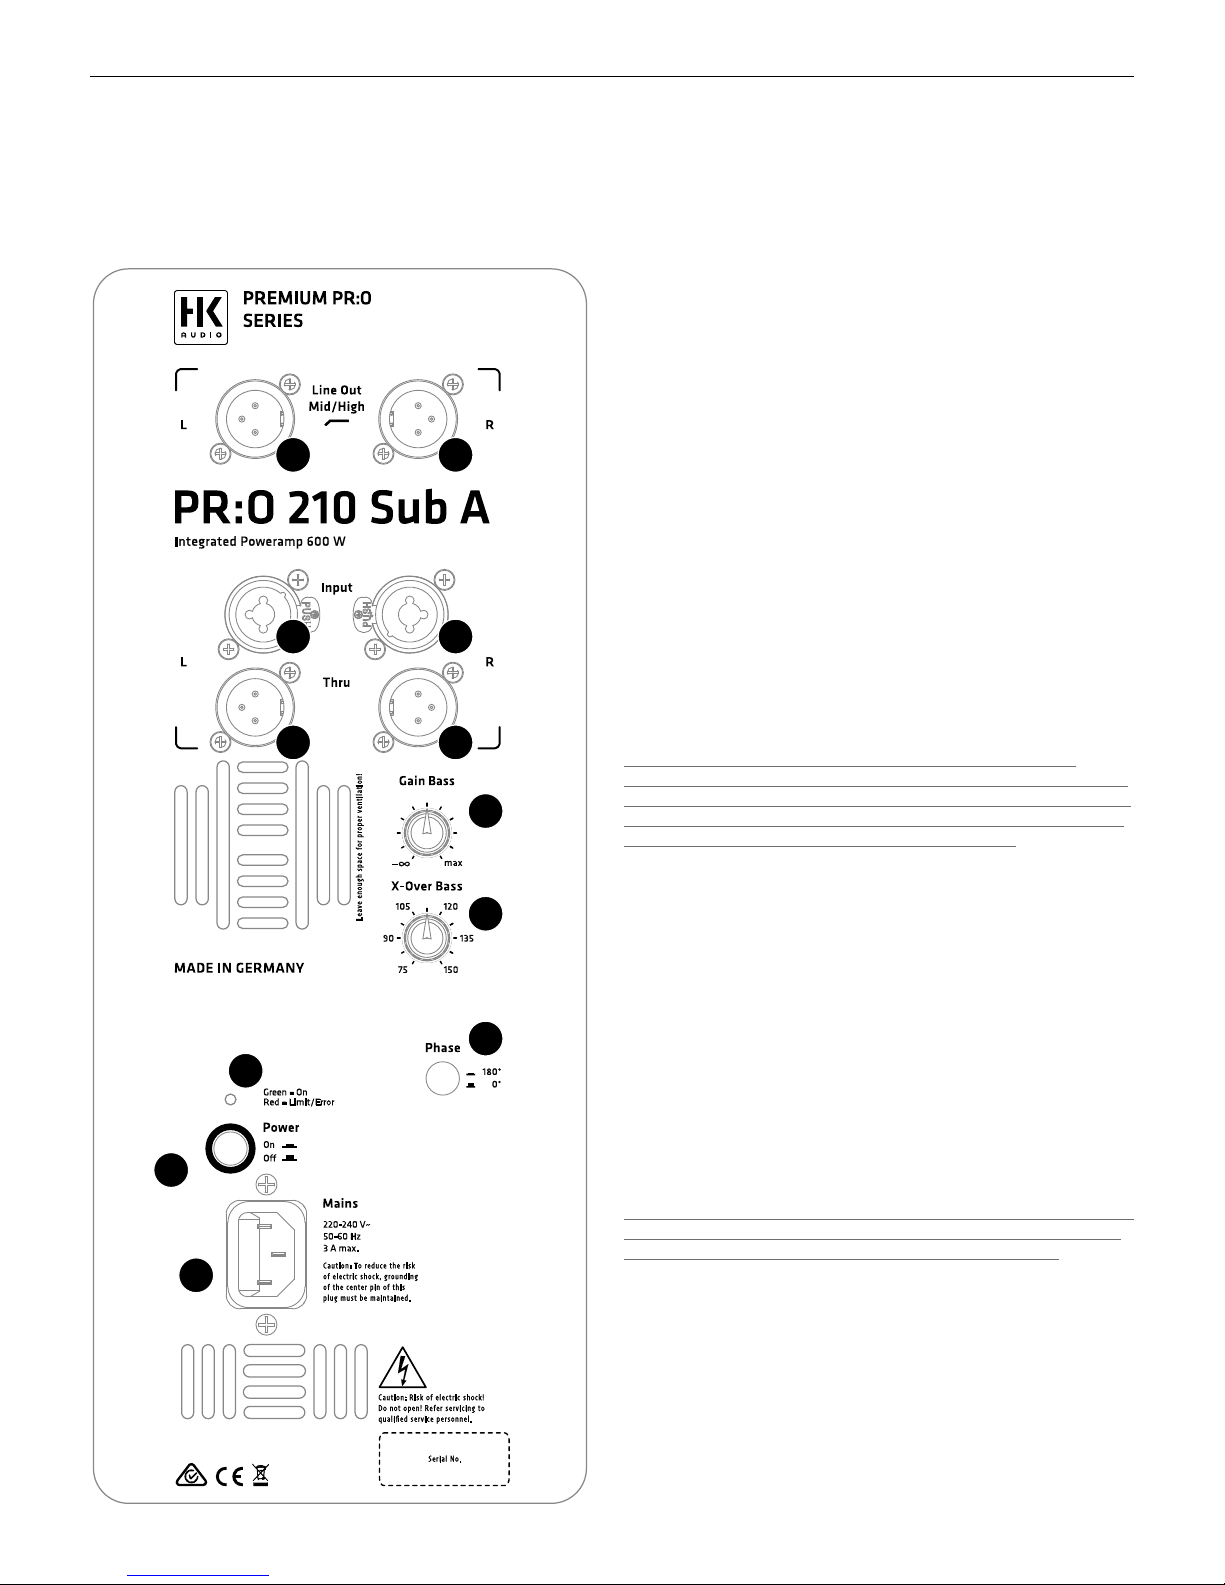
PR:O 18 Sub A • PR:O 210 Sub A
2.1 Control Features
2
1
3
2
1
3
4
5
6
7
8
9
●
1
Line Out Mid/High L/R
Two electronically balanced XLR outputs for connecting PREMIUM PR:O
mid/ high units (pin 1 = ground, 2 = +, 3 = -).
●
2
Input L/R
These two electronically balanced XLR / 1/4“ combi inputs accept signals
from mixing consoles (pin 1= ground, 2= +, 3= -).
●
3
Thru L/R
These two parallel outputs patch incoming line signals through, for
example, to other PREMIUM PR:O active speakers or monitors
(pin 1= ground, 2= +, 3= -).
●
4
Gain Bass
This knob adjusts the input level (center position = 0 dBV). The 12 o’clock
position is the ideal starting point when operating the subwoofer in
combination with a PREMIUM PR:O active cabinet. Then you can simply
twist the knob to the left or right to cut and boost bass frequencies. If you
connect a PREMIUM PR:O satellite, first set the Gain knob to the center
detent and then adjust the level to suit the given sound reinforcement
situation.
●
5
X-Over Bass
The active crossover can serve to vary the top cuto frequency of the
subwoofer with a range of 75 to 150Hz. The best cuto frequency for the
given application depends on the surroundings and satellite, so you will
have to experiment.
Note: If you set the cuto to a frequency higher than 100 Hz, the
subwoofer will render mostly the lower frequencies of signals generated
by bass guitars, kick drums, and low-end keyboard sounds. If you set the
cuto to a frequency higher than 100 Hz, the subwoofer will also render
the lower frequencies of voices and other sound sources.
●
6
Phase
The Phase switch changes the subwoofer’s phase position to match it to
the connected satellite’s phase position (0° – 180°). Set the switch to 0°
when operating the PR:O 18 SubA in combination with a PREMIUM PR:O
active cabinet. The PR:O 210 Sub A‘s phase has to be reversed 180° to
ensure it is in phase with PREMIUM PR:O mid-/high-range units.
You may have to invert the phase for combinations with other enclosures.
If you are unsure, simply try the 180° setting. If the bass response changes
and the signal sounds weak and washed out, the phase setting is incorrect.
●
7
Limiter/Status LED
This dual-color LED serves as a status indicator for the PREMIUM PR:O
powered cabinet (green = power on, red = limit/error). The LED briefly
flashes red to tell you the limiter is responding to signal peaks.
Caution! If the Status LED stays red during operation, the cabinet is being
overloaded. Turn down the signal level! If you are not routing a signal in
and the Status LED stays red, the system has detected a fault.
Page 7

PREMIUM PR:O 1.0
7
●
8
Power
This is the PREMIUM PR:O powered cabinet’s on/o button. The signal LED
lights up green to indicate the cab is powered up.
●
9
Mains Input
Use the factory-included power cord to connect this socket to a wall outlet.
Note: All PREMIUM PR:O self-powered subwoofers are equipped with
V-Lock mains sockets. If you use a VOLEX locking mains cord or another
optionally available brand with the same design, you can fix the mains
cord in place to prevent accidental disconnection..
2.2 Setting Up and Connecting the Cabinet
Use a balanced cord equipped with XLR connectors or 6.3 mm (1/4”) jack
plugs to route the signal from the mixer (via a monitor out, line out, or
a similar output) to the Input. Then connect the active satellites to the
XLR outputs labeled Line Out Mid/High. Use the two Thru ports to feed
the fullrange signal to other enclosures. Make sure the XLR connectors’
terminals are configured as follows: 1= ground, 2= +, 3= -.
2.3 Operating Speakers
• First make sure the powered cabinet is o.
Caution! Connect the cabinet to the mains supply only after you are
certain the local mains voltage matches the voltage specified on the rear
panel. If you connect the system to the wrong mains voltage, you may
destroy the electronic components of the PREMIUM PR:O active cabinet.
• Back the Gain knobs all the way o, turning them counterclockwise as far
as they will go.
Ensure you first switch on all other connected components, for example,
a connected mixing console as well as all signal sources patched into it,
such as keyboards, instrument amps, eects and so forth. Always connect
PREMIUM PR:O active cabinets to Line Out Mid/High, and always switch
them on last; that is, after you switch on all other connected components.
When you powering down, first turn the Gain knobs to the far left and
switch active cabinets o first, before switching o any connected devices.
After you power the system up by engaging the Power switch, a system
check prompts the fan to briefly kick on and back o again in about five
seconds. The fan is temperature-controlled, actuating only at very high
volumes and temperatures requiring cooling.
• The Limiter/Status LED lights up green when the cabinet receives mains
power.
Set the Gain knob to the center or 12 o’clock position (= 0 dBV). This is the
preferred level if you have connected a mixer to the PREMIUM PR:O active
cabinet. You can boost the input level 6 dB by turning up the Gain knob.
For the best audio results, ensure the Limiter/Status LED does not light up
continuously red.
2.4 Settings
Adjusting volume with the Gain knob
Twist this knob to adjust the line signal levels.
If you hear distortion or saturated signals, first check the signal sources
and, if possible, reduce the output signal level there. If you cannot adjust
the level of the signal routed to the PREMIUM PR:O active cabinet at the
source, match it to the power amps by backing o the Gain knob to lower
the input level.
3 Tips and Tricks
1 Do not expose electronic circuitry to moisture! Protect cabinets against
rain when you set them up outdoors. Keep soft drinks, beer, and any other
liquids away from the electronic components to prevent short circuits.
2 PREMIUM PR:O active enclosures provide optimum sound to you, so be
sure to provide optimum input signals to them! Noise such as humming
is generally caused by defective cables, the wrong type of cords, or
unbalanced signals routed into the mixing console. Check all signal and
mains cables.
3 Prevent distortion! Not only is it unpleasant to your audience’s ears, it also
endangers your equipment. Make sure all components that are connected
directly and indirectly to PREMIUM PR:O active cabinets have sucient
power ratings, and that they don’t distort because they‘re running at their
respective limits. Ensure all sources deliver clean audio signals.
4 Avoid ground loops! Annoying humming can arise even within audio
systems with balanced circuits, for example, when the mixing console’s
mains cord isn’t connected and grounded to the same mains circuit as
PREMIUM PR:O active enclosures. Using two dierent ground circuits can
create a ground loop. To prevent this problem, always connect PREMIUM
PR:O active enclosures and the mixing console to the same electrical
circuit; that is, the same phase!
CAUTION: Never tape over the plug’s ground terminal - this endangers
lives!
• English • Deutsch
Page 8

PREMIUM PR:O 1.0
8
4 Troubleshooting
The Limiter/Status LED does not light up when the power switched
on.
• Check if the power cord is plugged into the Mains input.
• Check if the mains power supply is providing current.
The Limiter/Status LED lights up red, flashing intermittently.
• The Limiter has actuated; lower the input level if necessary.
The Limiter/Status LED lights up red continuously, but no sound is
issuing from the cabinet.
• The enclosure’s protective circuit has tripped. Please contact your dealer.
The rendered music sounds distorted.
• Check your mixing console’s LED meters. They should not be constantly in
the red. If necessary, back o the volume at the mixer.
• If the LED displays on your mixer are in the green, back o the PREMIUM
PR:O active cabinet’s Gain knob.
• Observe the Limiter/Staus LED on the PREMIUM PR:O active enclosure’s
control panel. These may light up red, but only intermittently. The red
light may not illuminate continuously. If it does, turn down the Gain knob.
5 Applications
Go to page 18-21 for illustrations of cable connections.
6 Technical Specifications
Model PR:O 10 XD PR:O 12 D
Max SPL 122 dB half space* 124 dB half space*
Max SPL peak 131 dB half space* 132 dB half space*
Max SPL calculated 133 dB half space 133 dB half space
Frequency response
+/- 3 dB
81 Hz – 16 kHz 72 Hz – 16 kHz
Frequency response
-10 dB
69 Hz – 18 kHz 62 Hz – 18 kHz
Output power 1200 W 1200 W
Amp type Class D - biamped Class D - biamped
Active protective
circuits
Peak and RMS Sound
Limiter (separate for HF
and LMF)
Peak and RMS Sound
Limiter (separate for HF
and LMF)
Bass woofer
Low/Mid speaker 1x 10" 1x 12"
HF driver 1" 1"
Horn directivity 90° x 55° CD horn 90° x 55° CD horn
Active x-over frequency 2.5 kHz FIR X-Over with
48 dB/oct.
2.5 kHz FIR X-Over with
48 dB/oct.
Audio ports 1x XLR–1/4"-Combo In,
bal., 1x XLR-Through
1x XLR–1/4“-Combo In,
bal., 1x XLR-Through
Equalizer Tone knob (Music /
Speech) Bass Boost
Tone knob (Music /
Speech) Bass Boost
Angles up 35°
Pole mount DuoTilt 3/7 DuoTilt 3/7
Suspension points 3x M8 3x M8
Grips 1, integrated 2, integrated
Casters
Housing MDF MDF
Front grille 2 mm metal grille backed
with black acoustic foam
2 mm metal grille backed
with black acoustic foam
Finish Acrylic enamel, black Acrylic enamel, black
Optional accessories Protective cover, Satellite
Add-on
Protective cover, Satellite
Add-on
Dimensions (WxHxD) 38 x 49 x 29 cm 39 x 57 x 36 cm
Weight 13.2 kg / 29.1 lbs. 18.7 kg / 41.2 lbs.
*@10% THD
Page 9

PREMIUM PR:O 1.0
9
PR:O 12 XD PR:O 15 D PR:O 15 XD PR:O 18 SUB A PR:O 210 SUB A
124 dB half space* 125 dB half space* 125 dB half space* 125 dB half space* 123 dB half space*
132 dB half space* 130 dB half space* 130 dB half space* 127 dB half space* 126 dB half space*
133 dB half space 133 dB half space 133 dB half space 127 dB half space 126 dB half space
80 Hz – 16 kHz 60 Hz – 16 kHz 61 Hz – 16 kHz 48 Hz – X-over 60 Hz – 150 Hz
69 Hz – 18 kHz 54 Hz – 18 kHz 57 Hz – 18 kHz 38 Hz – X-over 40 Hz – 150 Hz
1200 W 1200 W 1200 W 600 W 600 W
Class D - biamped Class D - biamped Class D - biamped Class D Class D
Peak and RMS Sound
Limiter (separate for HF
and LMF)
Peak and RMS Sound
Limiter (separate for HF
and LMF)
Peak and RMS Sound
Limiter (separate for HF
and LMF)
Subsonic Filter, Peak
Limiter
Subsonic Filter, Peak
Limiter
1x 18" 2x 10"
1x 12" 1x 15" 1x 15"
1" 1" 1"
90° x 55° CD horn 90° x 55° CD horn 90° x 55° CD horn
2.5 kHz FIR X-Over with
48 dB/oct.
2.5 kHz FIR X-Over with
48 dB/oct.
2.5 kHz FIR X-Over with
48 dB/oct.
75 Hz – 150 Hz, switchable 75 Hz – 150 Hz, switchable
1x XLR–1/4“-Combo In,
bal., 1x XLR-Through
1x XLR–1/4“-Combo In,
bal., 1x XLR-Through
1x XLR–1/4“-Combo In,
bal., 1x XLR-Through
2x XLR–1/4“-Combo In,
2x XLR L/R Out Mid/
High,2x XLR Through
balanced
2x XLR–1/4“-Combo In,
2x XLR L/R Out Mid/
High,2x XLR Through
balanced
Tone knob (Music /
Speech) Bass Boost
Tone knob (Music /
Speech) Bass Boost
Tone knob (Music /
Speech) Bass Boost
33° 42°
DuoTilt 3/7 DuoTilt 3/7 DuoTilt 3/7 1x M20 2x M20
3x M8 3x M8 3x M8
2, integrated 2, integrated 2, integrated 2, integrated 2, integrated
optional 100 mm
MDF MDF MDF MDF MDF
2 mm metal grille backed
with black acoustic foam
2 mm metal grille backed
with black acoustic foam
2 mm metal grille backed
with black acoustic foam
2 mm metal grille backed
with black acoustic foam
2 mm metal grille backed
with black acoustic foam
Acrylic enamel, black Acrylic enamel, black Acrylic enamel, black Acrylic enamel, black Acrylic enamel, black
Protective cover, Satellite
Add-on
Protective cover, Satellite
Add-on
Protective cover, Satellite
Add-on
Protective cover, Satellite
Add-on
Protective cover, Satellite
Add-on
40 x 59 x 31 cm 47 x 62 x 42 cm 47 x 62 x 45 cm 53 x 61 x 64 cm 36 x 61 x 53 cm
16.3 kg / 35.9 lbs. 23.7 kg / 52.3 lbs. 22.6 kg / 49.8 lbs. 39.8 kg / 87.8 lbs. 27.2 kg / 60 lbs.
• English • Deutsch
Page 10

Versio n 2. 4 05/20 15
Wichtige Sicherheitshinweise! Bitte vor
Anschluss lesen!
Dies es Pro dukt wurde gemäß IEC 6 0065 h ergest ellt u nd ha t das Werk i n
eine m sich eren, betri ebsfähi gen Z ustand verla ssen. Um die sen Zu stand
zu erhalte n und um e inen g efahrl osen B etrieb zu g ewährle isten, ist es
notw endig, dass der B enutze r die Empfeh lungen und Warnhin weise
befo lgt, d ie in der Betrieb sanlei tung z u fin den si nd. B ei Ein satz
dies es Pro duktes in F ahrzeug en, S chiffen oder Flugz eugen, oder in
Höhe n ober halb 2000 m Meer eshöhe müsse n die entspr echend en
Sich erheit sstanda rds z usätzli ch zu r IEC 60065 beach tet we rden.
WARNU NG: Um das Risiko von Feuer oder Stromsc hlag zu ver hüten, darf
dies es Ger ät ni cht Fe uchtig keit o der Re gen a usgeset zt we rden. Öffnen Sie
das Gehäus e nic ht – im Inn eren gibt e s kei ne Bau teile, die vom Be nutzer
wart bar s ind. D ie Wart ung d arf nu r von einem quali fizier tem K undendi enst
durc hgefüh rt wer den.
Dies es Sym bol, wo imm er es ersch eint, warnt Sie v or
gefä hrlich er, nic ht iso lierte r Spa nnung im Geh äuse – Span nung, die
mögl icher weise genügt , eine Stro mschlag gefahr darzu stellen .
Dies es Sym bol, wo imm er es ersch eint, warnt Sie v or au ßen
zugä nglich er, gef ährlic her Sp annung . Eine Verbin dung z u jede r
Ansc hlussk lemme, die mit di esem S ymbol verse hen is t, dar f nur mit
konf ektion iertem Kabel herge stellt werde n, das s den Empfe hlungen des
Hers teller s genü gt, o der mi t Kabe l, da s von qualif iziert em Pe rsonal
inst allier t wurd e.
Dies es Sym bol, wo imm er es ersch eint, macht Sie a uf wi chtige
Bedi enungs - und Wartung sanwei sungen aufme rksam, die in bei liegen den
Unte rlagen zu f inden sind. Bitte lesen Sie das Ha ndbuch .
Dies es Sym bol, wo imm er es ersch eint, sagt Ihnen: Vorsich t!
Heiß e Ober fläche ! Um Verbrenn ungen zu ve rmeide n, nic ht an fassen.
• Bi tte le sen S ie die se Anw eisung en.
• Be wahren Sie diese Anweisu ngen auf.
• Be folgen Sie alle Wa rnhinwe ise u nd Anw eisunge n auf dem Gerät und i n
dies er Anl eitung .
• Be nutzen Sie dieses Gerät nicht in d er Nä he von Wasser. Stell en Sie
das Gerät nicht in d er Näh e von Wasser, Badewa nnen, Waschbe cken,
Küch enspül en, na ssen S tellen , Sch wimmbec ken o der in feuch ten R äumen
auf.
• St ellen Sie k eine G efäße, wie Va sen, Gläser, Flasch en us w., di e
Flüs sigkei ten en thalte n, auf das Gerät.
• Re inigen Sie das Ge rät nu r mit einem troc kenen Tuc h.
• En tfernen Sie keine Abdeck ungen oder Tei le des Gehäu ses.
• Di e auf dem G erät angege bene B etrieb sspannu ng mu ss mit der örtlic hen
Span nung d er Ne tzstro mversor gung ü berein stimme n. Wenn Sie sich
nich t sich er si nd, we lche Spannun g in Ihrem Netz zur Ver fügung steht ,
kons ultier en Sie bitt e Ihre n Händ ler o der de n ört lichen Strom versorg er.
• St ellen Sie v or Ans chluss des G erätes unbed ingt sicher, dass die Ne tz-
vers orgung sinstal lation über ausre ichend e Schu tz einri chtung en geg en
Kurz schluss und Erdung sfehle r ange schlos sener Geräte verfü gt.
• Um das Risiko eines Stro mschlag s zu verrin gern, muss die Er dung
des Geräte s bei behalt en wer den. Ve rwende n Sie nur das mi tgelie ferte
Stro mführu ngskab el und behal ten S ie die Funkt ion d er sei tliche n,
geer deten Schutz kontak te des Netz anschlu sses immer aufrec ht. St ellen
Sie sicher, dass das G erät nur an Steck dosen anges chlosse n wir d, die
über eine ordnu ngsgem äß fun ktioni erende Schut zerde verfüg en.
• Sc hützen Sie das St romfüh rungsk abel v or Bet reten und Q uetsch en,
beso nders in de r Nähe der Stecke r, Gerä testec kdosen – un d dort , wo
sie am Ge rät a ustrete n! St romführ ungska bel s ollten immer vorsi chtig
beha ndelt werden . Kont rollie ren Si e die Strom führun gskabel in
rege lmäßig en Abs tänden auf Einschn itte und An zeichen von Abnutz ung,
beso nders in de r Nähe des Stecke rs und an der Verb indung zum Gerät.
• Be nutzen Sie niemal s ein beschä digtes Strom führun gskabe l.
• Zi ehen S ie be i Gewi ttern den S tecker des Geräte s und wenn das Ge rät
über einen läng eren Z eitraum nich t benu tzt w ird.
• Di eses G erät wird n ur vo llständ ig vo n Stro mnetz getren nt, w enn de r
Stec ker vo m Ger ät ode r aus der Steckdo se ge zogen wird. Das G erät
soll te so aufge stellt werde n, das s das Tre nnen v om St romnetz leic ht
mögl ich is t.
• Si cherun gen: E rsetze n Sie Siche rungen nur m it de m Typ IEC 127
(5x2 0mm) und de m kor rekten Nennw ert, u m die optim ale Le istung
zu gewährl eisten ! Es ist u ntersag t, ku rzgesch lossen e Sich erunge n zu
ver wenden oder den S icheru ngshal ter zu überb rücken . Sich erunge n
dürf en nur von qualif iziert em Per sonal gewec hselt werden .
• Al le Wart ungsarb eiten sollt en nur von qualif iziert em Per sonal ausgef ührt
werd en. War tung ist no twendi g, wen n das Gerät auf irgend eine We ise
besc hädigt wurde , wie zum Beispi el:
- Wen n das Strom führung skabel oder der Stecker besc hädigt oder
abge nutzt ist.
- Wen n Flüs sigkei t oder Gege nstände in d as Ge rät ge langt sind.
- Wen n das Gerät Regen oder Feucht igkeit ausge setzt war.
- Wen n das Gerät nicht ordnu ngsgem äß fu nktioni ert, obwohl die
Bedi enungs anleit ung be achtet wurde .
- Wen n das Gerät hinge fallen ist o der d as Geh äuse b eschäd igt w urde.
• Be im Ans chluss von L autspr echern an d ieses Gerät darf die a uf dem
Gerä t oder in dieser Anleit ung a ngegebe ne Mi ndesti mpedanz nich t
unte rschri tten w erden. Die verwe ndeten Kabel müsse n ents preche nd den
loka len Re gelung en übe r ein en aus reiche nden Q uersch nitt verfüge n.
• Ha lten S ie da s Gerä t vom Sonne nlicht fern.
• In stalli eren S ie da s Gerä t nich t in der N ähe vo n Wärm equell en, wi e zum
Beis piel H eizkör per, He izregi ster, Ö fen od er an deren Geräte n, die Hitz e
erze ugen.
• Vers topfen Sie nicht die L üftungs öffnun gen. Install ieren Sie d as Ger ät
ents preche nd der Anlei tung des He rstell ers. D as Ger ät da rf nic ht
eing ebaut werden – wi e zum Beisp iel in eine n Gest ellrah men, e s sei
denn , dass für angeme ssene Belüft ung ge sorgt wird.
• Ei n kalt es Ge rät so llte immer auf di e Umg ebungs tempera tur e rwärmt
werd en, we nn es in e inen R aum t ranspor tiert wird. Es k önnte sich
Kond ensatio n im Innere n bild en, d ie das Gerä t besc hädigt , wenn es o hne
vorh erige Erwär mung b enutzt wird.
• St ellen Sie k eine o ffenen Flamm en, wi e bre nnende Kerzen , auf das
Gerä t.
• Da s Gerä t sol lte mi ndeste ns 20 cm vo n Wänd en au fgestel lt we rden.
• Da s Gerä t dar f nur mit R ollwag en, St ändern , Stat iven, T ischen oder
Halt erunge n benu tzt w erden, die v om He rstell er spe zifizi ert si nd od er
zusa mmen m it de m Gerä t ver kauft wurden . Wenn ein R ollwage n ben utzt
wird , seie n Sie vorsi chtig, wenn Sie d ie Rol lwagen /Gerät e-Kombi nation
tran sporti eren, um Verl etzung en dur ch Um kippen zu ve rmeide n.
• Ver wenden Sie nur Zu behör, das vo m Her stelle r empf ohlen ist. Das
gilt für alle A rten von Zu behör, wie zu m Bei spiel Schutz abdecku ngen,
Transp orttas chen, Stände r sowi e Wand- und Decken halter ungen. Wenn
Sie irgend ein Z ubehör am Ge rät a nbring en, be folgen Sie i mmer die
Anle itunge n des Herst ellers. Benu tzen S ie nu r die Befest igungs punkte
des Geräts , die vom Herste ller v orgese hen si nd.
• Di eses G erät ist NI CHT g eeignet für eine Person oder Person en
(ein schlie ßlich Kinder n) mit eing eschrän kten physisc hen, sensor ischen
und geisti gen F ähigke iten, oder f ür Pe rsonen mit unzulän gliche r
Erfa hrung und/ode r Fach kenntni s, um solch ein Gerät zu be dienen .
Kind er unt er 4 Jahren soll ten st ets vo n die sem Ge rät fe rn ge halten
werd en.
• Es sollt en ke inerlei Gege nständ e durc h die Gehäu seschl itze e ingefü hrt
werd en, da dadu rch ge fährli che, spannun gsführ ende Bauteil e ber ührt
oder kurzg eschlo ssen w erden können . Die s könn te zu einer Feuer - oder
Stro mschla ggefahr führe n.
• Di eses G erät ist im stande , Sch alldruc kpegel von mehr a ls 90 dB z u
prod uziere n. Die s kön nte zu einem daue rhafte n Hörs chaden führe n! Ei ne
Bela stung durch extre m hohe Gerä uschpeg el ka nn zu einem dauer haften
Gehö rverl ust fü hren. Bei e iner a nhalte nden B elastu ng dur ch so lch ho he
Pege l soll te ei n Gehö rschut z getr agen werden.
• De r Hers teller gewä hrleist et di e Sich erheit , Zuve rlässi gkeit und Le istung
des Geräte s nur unter folge nden Vo rausset zungen :
- Ei nbau, Erwei terung, Neue instel lung, Modifik atione n ode r Repa raturen
werd en vom Hers teller oder autori sierte m Per sonal ausgef ührt.
- Di e elek trisch e Ins tallati on de s betr effend en Ber eiches entsp richt den
Anfo rderun gen de r IEC (ANSI ) Maßg aben.
- Da s Gerä t wir d ents preche nd der Bedi enungsa nleitu ng ben utzt.
• Di eses P rodukt ist auf d ie Verw endung mit Musik- und S prach si gnalen
opti miert. Verwen dung mit Si nus-, Rechte ck- od er an deren MessSign alen b ei hö herem Pegel kann zu ern sten Beschä digunge n des Gerät s
führ en.
Allgemeine Sicherheitshinweise für Lautsprechersysteme
Befe stigun gssyste me dür fen a usschli eßlich für die vo m Her stelle r
frei gegebe nen La utspre chersy steme und mi t dem in d er Mon tagean leitun g
gena nnten Montag e-Zube hör ve rwende t wer den. D ie Mo ntagehi nweise des
Hers teller s sind dabe i unbe dingt zu be achten . Bei unsach gemäße r
Mont age bz w. Verw endung von nicht freige gebene m Mont age-Zu behör
kann die angege bene B elastu ng nic ht ga rantier t und keine rlei Haftung
seit ens de s Her stelle rs übe rnomme n werd en.
Soll ten Än derung en an Lautsp recher n, an Monta ge-Zube hör, Ver bindung sund Befest igungs elemen ten so wie An schlag mittel n vorg enomme n werd en,
kann die Tra gfähigk eit d es Sys tems n icht mehr g aranti ert we rden und
seit ens de s Her stelle r kein erlei Haftun g übe rnommen werd en.
Repa rature n an sicherh eitsre levant en Bau teilen dürfe n nur vom Herstel ler
oder Bevol lmächt igten durchg eführt werd en, an dernfal ls er lischt die
Betr iebser laubni s.
Die Instal lation darf aussc hließl ich du rch Sa chkund ige u nd nur an
Mont agepun kten m it au sreiche nder Trag fähigk eit, g gf. unt er de r
Berü cksich tigung von Bauaufl agen, erfolg en. D as vom Hers teller in de r
Mont ageanl eitung vorge schrie bene B efestig ungsma terial (Schr auben,
Dübe l, etc .) mu ss ver wendet werd en. Sc hraubv erbind ungen müssen durch
geei gnete Maßnah men g egen L ösen g esiche rt se in.
Orts feste oder mobile Insta llatio nen (h ier La utspre cher inkl.
Mont agezub ehör) müssen durc h zwei unabh ängig vonei nander wirke nde
Einr ichtun gen ge gen H erabfal len ge sicher t sein . Los e Zusa tzteile oder sich
löse nde Teile müsse n dur ch gee ignete Einri chtung en auf gefange n wer den
könn en. Be i Verw endung von Ve rbindu ngs- u nd Bef estigu ngsele menten
sowi e Ansc hlagmi tteln sind die na tional en Vorsc hrifte n zu beacht en.
Hins ichtli ch der Beme ssung der Si cherun gsmitt el sin d mög liche
dyna mische Belas tungen (Ruck kräfte ) mit zu b erücks ichtige n.
Bei Stativ en is t vor allem die maxima le Tragla st zu beacht en.
Auße rdem s ind d ie mei sten Stative aus konstr uktive n Grün den n ur für das
Tragen von genau zentri scher Belast ung z ugelass en. St ative müssen
stan dsiche r aufg estell t werd en. St ative sind durch geeign ete M aßnahme n
zusä tzlich zu s ichern , wenn zum Beispi el:
- i hre Au fstandf läche keinen sich eren S tand z ulässt ,
- i hre Hö hen d ie Sta ndsich erheit einsc hränke n,
- m it zu hohem Windd ruck z u rech nen i st,
- d amit z u rec hnen i st, da ss sie durc h Pers onen umgesto ßen w erden.
Beso ndere Maßnah men k önnen auch z ur Vors orge g egen gefähr dendes
Verha lten von Zu schaue rn erf orderl ich we rden. Stativ e dür fen ni cht
in Flucht- und Rettun gswege n aufg estellt werd en. Be i Aufs tellun g
in Ve rkehrs wegen ist a uf die erfor derlic he Bre ite d er Wege und auf
ordn ungsge mäße A bsperru ng so wie Ke nnzeich nung zu ach ten. Beim
Auf- und A bsetze n ist eine besond ere Ge fährdu ng ge geben. Hierz u
sind geeig nete Hilfsm ittel zu ver wende n. Es sind hierbe i die natio nalen
Vorsc hrifte n zu beacht en.
Währ end de r Mon tage i st ge eignete Schu tzausrü stung
(ins besond ere Ko pfschut z, Ha ndschuh e und Siche rheits schuhe ) zu tragen
und es si nd nu r geei gnete Aufstie gshilf en (Le itern, Gerüs te, e tc.) z u
ver wenden . Die Verantw ortung dafür lieg t alle ine be im au sführe nden
Inst allati onsbet rieb.
ACHTUNG!
Nach der Montag e ist die A ufhäng ung de s Syst em au s Halt erung und
Laut sprech er auf sich ere Be festigu ng zu überp rüfen.
Der Betrei ber v on Lau tsprec hersys temen (ortsfe st od er mob il) i st
verp flicht et, al le Sy stemkom ponent en unt er Be rücksi chtigun g der
jewe ils na tional en Reg elunge n reg elmäßig zu ü berprü fen bz w. prü fen
zu lassen und m öglich e Schä den u nverzüg lich beseit igen z u lass en.
Weite rhin raten wir dr ingend zu e iner a usführ lichen Dokum entati on al ler
Über prüfun gsmaßn ahmen in Prü fbüche rn o.ä .
Bei länger em od er dau erhaft em Ein satz von La utspre chern im
Frei en sin d für Stand sicher heit u nd Tragfä higkei t von Aufbau ten un d
Fläc hen in sbeson dere auch d ie Win dlaste n, Sch nee- und Ei slaste n
sowi e ther mische Einf lüsse zu ber ücksic htigen . Insb esonde re die
Last aufnah mepunkt e gef logene r Syst eme so llten hier mit a usreich enden
Sich erheit sreser ven d imensio niert werde n. Es sind hierbe i die natio nalen
Vorsc hrifte n zu beacht en.
• Fr agen S ie den Hers teller, ob Ih r Pro dukt f ür den Betr ieb im Freie n
geei gnet i st.
Prof essione lle La utspre chersy steme sind in der Lage ,
gesu ndheit sschädl iche Schall pegel zu erz eugen. Selb st die Einwi rkung
sche inbar harmlo ser S challpe gel ü ber ei nen l ängeren Zeitr aum k ann zu
blei benden Schäd en am Gehör führe n (ab ca. 95 dBA SPL)! Dahe r rate n wir
für alle Person en, di e dur ch den Betri eb vo n Laut sprech ersyste men d em
Einf luss h oher Schallp egel ausgese tzt s ind, z um Tragen von
prof essione llem Gehörsc hutz (Ohrstö psel oder K apselge hörsch utz).
Hers teller : Stam er Mu sikanla gen G mbH, M agdebu rger S tr. 8,
6660 6 St. Wendel , Deut schlan d
Page 11

PREMIUM PR:O 1.0
11
Willkommen in der HK Audio Familie!
Vielen Dank, dass Sie sich für ein Markenprodukt aus unserem Hause entschieden haben, das mit größter Sorgfalt für Sie entwickelt und gefertigt
wurde.
Auch wenn Sie bereits eingehende Erfahrungen mit Beschallungsanlagen
gesammelt haben – bei diesem Produkt wird es trotzdem einige Dinge
geben, die neu für Sie sind. Legen Sie deshalb diese Bedienungs anleitung
nicht ungelesen beiseite und bewahren Sie sie zur späteren Verwendung
auf.
Wir wünschen Ihnen allzeit besten Sound!
Ihr HK Audio Team
Garantie
Registrieren Sie jede einzelne PREMIUM PR:O – dann erhalten Sie eine
kostenlose Garantieverlängerung bis 5 Jahre! Nutzen Sie die komfortable
Online-Registrierung über www.hkaudio.com.
Falls Sie keine Möglichkeit haben, sich online zu registrieren, füllen Sie bitte
die beiliegende Garantiekarte vollständig und gut leserlich aus und senden
diese per Post oder Fax an uns.
Die Registrierung ist nur gültig, wenn die vollständig ausgefüllte Registrierungskarte innerhalb von 30 Tagen ab Kaufdatum an HK Audio
eingesendet wurde bzw. die fristgerechte Registrierung über das Internet
erfolgte.
Weiterhin möchten wir uns einen Eindruck verschaen, wo und von wem
unsere Geräte angewendet werden. Diese Informationen unterstützen
unsere zukünftige Produktentwicklung. Ihre Angaben unterliegen selbstverständlich den deutschen Datenschutzbestimmungen.
Vielen Dank!
HK AUDIO
Technischer Service
Postfach 1509
66959 St. Wendel, Deutschland
Fax: +49 6851 905 100
PREMIUM PR:O
• English • Deutsch
Page 12

PREMIUM PR:O 1.0
12
1 PREMIUM PR:O Aktiv-Tops
PR:O 10 XD • PR:O 12 D • PR:O 12 XD • PR:O 15 D • PR:O 15 XD
1.1 Bedienelemente
Musi c Spee ch
Boos tFlat
Mic Line
Auto
Stan d-by
Gree n=On
Red=
Limi t/Error
On
O
ThruInput
Gain Tone
MADE IN GERMANY
Ca uti on : Ris k of el ec tr ic
sh ock ! Do no t op en!
Re fer s er vi cin g to qu al if ied
se rv ice p er son ne l.
Ca uti on : To r ed uce t he ri sk
of el ec tr ic sh oc k, gr ou ndi ng
of th e ce nte r pi n o f th is
pl ug mu st be m ai nta in ed .
22 0-240 V~
50 -60 Hz 3 A
ra ted curre nt
2
1
3 8
5
4
9
6
10
7
●
1
Power
Power kennzeichnet den Ein-/Aus-Schalter für die PREMIUM PR:O Aktivmodelle. In eingeschaltetem Zustand leuchtet die Limiter/Status-LED grün.
●
2
Gain
Über den Gain-Regler wird die Empfindlichkeit des Inputs an den Eingangspegel angepasst.
Lautstärkeanpassung mit dem Gain-Regler:
Die Gain-Position +4 dBu (Centerclick) ist hierbei der Ausgangspunkt für
ein werkseitig ausgewogenes Top/Sub-Pegelverhältnis. Passen Sie bei
Bedarf mit dem Gain-Regler das Pegelverhältnis zwischen Topteil und
Subwoofer(n) für eingehende Line-Signale an.
●
3
Wahlschalter Mic/Line
Bei Anschluss eines Mikrofons, optimieren Sie mit der Schalterstellung
„Mic“ die Eingangsempfindlichkeit. Sie wird dabei um 30 dB erhöht.
Wählen Sie die Schalterstellung „Line“ für eine Line-Level-Quelle wie
Mischpult, Audio-Zuspieler oder elektronische Musikinstrumente.
●
4
Input
Elektronisch symmetrierte, kombinierte XLR-/Klinkenbuchse für das Eingangsssignal (Pin 1= Ground, 2= +, 3= -).
●
5
Limiter/Status-LED
Die zweifarbige LED zeigt den Status der PREMIUM PR:O Aktivbox an (Grün
= Power On, Rot = Limit/Fehler). Ein kurzzeitiges, rotes Aufleuchten der
LED zeigt das Arbeiten des Limiters bei Pegelspitzen an.
Achtung! Leuchtet die Status-LED während des Betriebs dauerhaft rot,
wird das System überlastet. Reduzieren Sie den Eingangspegel! Wenn
kein Eingangssignal anliegt und die Status-LED dauerhaft rot leuchtet,
liegt ein Fehler vor.
●
6
Auto Stand-by
Die Topteile der PREMIUM PR:O verfügen über eine Energiespar-Funktion,
die ein- und ausgeschaltet werden kann. Bei Stellung „On“ schaltet die
Endstufe – sofern etwa 4 Stunden kein Signal anliegt – in den Ruhezustand
(Verbrauch <0,5 Watt). Um die PREMIUM PR:O wieder in den Betriebszustand zu versetzen, schalten Sie die Lautsprecherbox über den PowerSchalter für fünf Sekunden aus und anschließend wieder ein. Auto Standby auf „o“ deaktiviert diese Funktion und die Topteile bleiben dauerhaft
in Betrieb.
●
7
Tone
Der Tone-Regler passt den Frequenzgang an den jeweiligen Anwendungsfall an. Auf Mittelstellung verhalten sich die Filter neutral.
Drehen nach links in Richtung „Music“ bewirkt eine breitbandige Absenkung des Mittenbereichs (Centerfrequenz bei 2,5
kHz, bis zu –6 dB) und nimmt damit dem Klang die Schärfe. Die
Gesamtlautstärke wird dadurch nicht beeinträchtigt.
Drehen nach rechts in Richtung „Speech“ aktiviert einen LowCut (von 80 – 200 Hz), das sorgt für Klarheit bei Sprachanwendungen und verringert die Übertragung von Trittschall.
Die „X“-Modelle (PR:O 10 XD, PR:O 12 XD, PR:O 15 XD) sind zusätzlich auf
eine rückkopplungs- und verzerrungsarme Wiedergabe bei hohen Lautstärken abgestimmt.
●
8
Wahlschalter Flat/Boost
Bei Schalterstellung „Flat“ wird der Frequenzgang auf eine
lineare Wiedergabe optimiert und ist damit ideal für LiveAnwendungen und den Betrieb mit Subwoofern.
Die „Boost“-Funktion verleiht dem Klang mehr Bass-Präsenz.
Sie unterstützt mit einer breitbandigen Anhebung den
Kickbass-Bereich zwischen 70 Hz – 80 Hz und erweitert die
Tiefton-Wiedergabe.
●
9
Thru
Passiver paralleler Ausgang zur Weiterleitung des in die Input-Buchse
eingespeisten Signals (Pin 1= Ground, 2= +, 3= -).
●
10
Mains
Verbinden Sie diese Anschlussbuchse mittels des mitgelieferten Netzkabels
mit der Netzsteckdose.
Music
Speech
Flat
Boost
Page 13

PREMIUM PR:O 1.0
13
1.2 Anschlüsse und Verkabelung
Music Speech
BoostFlat
Mic Line
Auto
Stand-b y
Green=O n
Red=
Limit/E rror
On
O
ThruInput
Gain Tone
MADE IN GERMANY
Caut io n: Ri sk of e le ctr ic
shoc k! D o n ot op en !
Refe r ser vi ci ng to q ua lif ie d
serv ic e per so nn el.
Caut io n: To red uc e the r is k
of e le ctr ic s hoc k, g rou nd in g
of t he ce nt er pi n of th is
plug m us t b e mai nt ai ned .
220- 240 V~
50-6 0 H z 3 A
rate d c urre nt
• Für eine Stand-Alone- oder Monitor-Anwendung der PREMIUM PR:O
Lautsprecherbox im Betrieb ohne Subwoofer schließen Sie das vom Mischpult (Monitor Out, Line Out o.ä.) oder Mikrofon kommende Signal über ein
symmetrisches XLR/Klinkenkabel an die Input-Buchse an.
• In Verbindung mit aktiven Subwoofern der PREMIUM PR:O Serie verbinden Sie den Line Out Mid/High des Subwoofers mittels XLR-Kabel mit der
Input-Buchse des Topteils.
• Zum Durchschleifen des am Input anliegenden Signals verwenden Sie ein
XLR-Kabel an der Thru-Buchse.
Anschussbeispiele zur Verkabelung finden Sie ab Seite 18.
1.3 Inbetriebnahme
• Achten Sie darauf, dass die PREMIUM PR:O ausgeschaltet ist.
Achtung! Achten Sie darauf, dass die Spannungsangabe auf der
PREMIUM PR:O der ortlichen Netzspannung entspricht. Der Anschluss an
eine falsche Netzspannung kann die Elektronik dieser Aktivbox zerstören.
• Achten Sie beim Anschluss eines Line-Signals darauf, dass alle übrigen angeschlossenen Komponenten schon vorher in Betrieb sind. Sowohl das angeschlossene Mischpult als auch alle mit ihm verbundenen Signalquellen
wie Keyboards, Instrumentalverstärker, Eekte usw. sollten eingeschaltet
sein. Die PREMIUM PR:O sollte immer zuletzt, d.h. nach allen anderen
Komponenten, eingeschaltet, und zuerst, d.h. vor allen angeschlossenen
Geräten, ausgeschaltet werden.
• Nach dem Einschalten mit dem Power-Schalter läuft der Lüfter kurz an
(Systemcheck) und stoppt nach ca. 5 Sekunden. Ab diesem Zeitpunkt
erfolgt die Lüftersteuerung durch die Elektronik der Box. Der Lüfter geht
nur bei sehr hohen Lautstärken in Betrieb und wird temperaturabhängig
geregelt. Während des Systemchecks leuchtet die Status-LED rot. Sie
wird grün, wenn kein Fehler vorliegt und Netzspannung anliegt.
• Die Default-Einstellung des Gain-Reglers ist auf Mittelposition (+4 dBu/
Centerclick). Grundsätzlich ist bei der Benutzung eines Mischpults zur
Ansteuerung der PREMIUM PR:O diese Pegelstellung zu bevorzugen.
Falls Sie direkt einen CD-Player oder z.B. ein Keyboard anschließen, kann
je nach Signalstärke die Eingangsempfindlichkeit über den Gain-Regler
angepasst werden.
Achtung! Drehen Sie ggf. den Gain-Regler zurück (Linksanschlag), wenn
die Eingangsempfindlichkeit des Inputs von „Line“ auf „Mic“ umgeschaltet werden soll.
• Falls Verzerrungen oder Übersteuerungen auftreten, überprüfen Sie die Signalquellen und reduzieren Sie nach Möglichkeit dort das Ausgangssignal.
1.4 Ausrichtung
DuoTilt™ 3/7
Mit dem HK Audio DuoTilt 3/7 können die PREMIUM PR:O Lautsprecherboxen auf einem Stativ, sowie einer Distanzstange vertikal ausgerichtet
werden. Dadurch können störende Reflexionen an der Decke vermieden
bzw. verringert werden. Beim Verwenden der vorderen Flanschönung im
DuoTilt beträgt der Neigungswinkel 7°, bei der hinteren 3°.
Als Faustformel gilt: Bei einer Platzierung der Lautsprecherboxen in der
Nähe der Zuhörer und z.B. mittels Stativen erhöht auf der Bühne oder bei
sitzendem Publikum ist ein Anwinkeln von 7° ratsam. Somit ist eine homogenere Schallverteilung, insbesondere im Hochtonbereich, bis unmittelbar
vor die Lautsprecherboxen gewährleistet.
–3°
–7°
Soll eine größere Anzahl an Zuhörern beschallt werden, die sich weiter
entfernt von den Lautsprecherboxen befinden, sollten Sie den 3°-Winkel
des DuoTilt nutzen.
–3°
In beiden Situationen kann über die Aufstellhöhe der Lautsprecherboxen
eine Reichweitenanpassung vorgenommen werden. Eine höhere Position,
bedeutet eine höhere Wurfweite.
Flugpunkte
Jedes PREMIUM PR:O-Modell bietet drei eingelassene M8-Flugpunkte. Dies
ermöglicht die „geflogene“ Installation der Lautsprecherbox an Stahlseilen
oder Ketten mit einer Neigung von 0° bis max. 45°. Bestimmen Sie den
Grad der Neigung bei Befestigungen z.B. an einer Truss über den hinteren
Anschlagpunkt.
Wir empfehlen als Übergangspunkt zwischen Lautsprecherbox und Montagematerial unsere sicheren AP-8 Anschlagpunkte.
• English • Deutsch
Page 14

PREMIUM PR:O 1.0
14
2 PREMIUM PR:O Aktiv-Subwoofer
PR:O 18 Sub A • PR:O 210 Sub A
2.1 Bedienelemente
2
1
3
2
1
3
4
5
6
7
8
9
●
1
Line Out Mid/High L/R
Zwei elektronisch symmetrierte XLR-Ausgangsbuchsen für den Anschluss
von PREMIUM PR:O-Topteilen (Pin 1= Ground, 2= +, 3= -).
●
2
Input L/R
Zwei elektronisch symmetrierte, kombinierte XLR-/Klinke-Eingangsbuchsen für das Mischpult-Signal (Pin 1= Ground, 2= +, 3= -).
●
3
Thru L/R
Parallele Line-Ausgänge zur Weiterleitung des Line-Signals, z.B. an weitere
PREMIUM PR:O-Aktivboxen oder Monitore (Pin 1= Ground, 2= +, 3= -).
●
4
Gain Bass
Mit diesem Regler wird der Eingangspegel angepasst (Mittelstellung =
0dBV). Im Betrieb mit aktiver PREMIUM PR:O-Aktivbox ist die Mittelstellung der ideale Ausgangspunkt. Je nach Bedarf kann der Bassanteil durch
Drehen des Reglers angehoben oder abgesenkt werden. In Verbindung mit
angeschlossenen PREMIUM PR:O-Topteilen wird der Gain-Regler in der
Mittelrasterung justiert. Von dort aus kann er je nach Beschallungssituation
reduziert oder erhöht werden.
●
5
X-Over-Bass
Mit der aktiven Frequenzweiche kann die obere Eckfrequenz des Subwoofers von 75 Hz bis 150 Hz variiert werden. Da sich die optimale Position
je nach räumlicher Umgebung und Benutzung der Topteile ändern kann,
empfehlen wir an dieser Stelle keinen festgesetzten Wert.
Hinweis: Unterhalb von 100 Hz überträgt der Subwoofer hauptsächlich
Signale von Bass, Bass-Drum und sehr tiefen Keyboardsounds. Das
Ändern der Trennfrequenz des Subwoofers bewirkt im Bereich oberhalb
100 Hz auch die Verstärkung tiefer Frequenzen von Stimmen und anderer
Klangerzeuger.
●
6
Phase
Mit dem Phasen-Schalter kann der Sub-Bass auf die Phasenlage der angeschlossenen Topteile angepasst werden (0°-180°). Im Betrieb mit PREMIUM
PR:O-Topteilen wird der Schalter beim PR:O 18 Sub A auf 0° eingestellt.
Beim PR:O 210 SUB A muss die Phase um 180° gedreht werden, damit
PREMIUM PR:O-Topteile und Subwoofer in Phase laufen.
Beim Betrieb mit anderen Lautsprechern ist unter Umständen ein Drehen
um 180° erforderlich. Falls Sie sich nicht sicher sind, probieren Sie es einfach
aus. Verändert sich der Bass-Sound und wirkt drucklos und undierenziert,
ist die Phase falsch eingestellt.
●
7
Limiter/Status-LED
Die zweifarbige LED zeigt den Status der PREMIUM PR:O Aktivbox an (Grün
= Power On, Rot = Limit/Fehler). Ein kurzzeitiges, rotes Aufleuchten der
LED zeigt das Arbeiten des Limiters bei Pegelspitzen an.
Achtung! Leuchtet die Status-LED während des Betriebs dauerhaft rot,
wird das System überlastet. Reduzieren Sie den Eingangspegel! Wenn
kein Eingangssignal anliegt und die Status-LED dauerhaft rot leuchtet,
liegt ein Fehler vor.
Page 15

PREMIUM PR:O 1.0
15
●
8
Power-Schalter
Power kennzeichnet den Ein-/Aus-Schalter für die PREMIUM PR:O Aktivmodelle. In eingeschaltetem Zustand leuchtet die Limiter/Status-LED grün.
●
9
Mains Input
Verbinden Sie diese Anschlussbuchse mittels des mitgelieferten Netzkabels
mit der Netzsteckdose.
Hinweis: Alle PREMIUM PR:O Aktiv-Subwoofer sind mit verriegelbaren
V-Lock Netzeingangsbuchsen ausgestattet. In Kombination mit einem
verriegelbaren Anschlusskabel („Volex“ oder baugleich, optional erhältlich) kann das Netzkabel arretiert werden und so gegen versehentliches
Herausrutschen gesichert werden.
2.2 Anschlüsse und Verkabelung
Schließen Sie die von Ihrem Mischpult kommenden Signale (Monitor Out,
Line Out o.ä.) über ein symmetrisches XLR/Klinkenkabel an die InputBuchse an. Verbinden sie die anzuschließenden Aktiv-Topteile über die XLRAusgänge „Line Out Mid/High“). Zum Weiterschleifen des Fullrange-Signals
auf andere Boxen nutzen Sie die beiden Thru-Buchsen. Die Belegung der
XLR-Stecker muss dabei wie folgt sein: 1= Ground, 2= +, 3= -.
2.3 Inbetriebnahme
• Achten Sie darauf, dass die Aktivbox ausgeschaltet ist.
Achtung! Achten Sie darauf, dass die Spannungsangabe auf der Rückseite der PREMIUM PR:O Aktivbox der Netzspannung entspricht. Der Anschluss an eine falsche Netzspannung kann die Elektronik der PREMIUM
PR:O Aktivbox zerstören.
• Drehen Sie die Gain-Regler auf Anschlag links.
Achten Sie darauf, dass alle übrigen angeschlossenen Komponenten
(z.B. Mischpult) schon vorher in Betrieb sind. Sowohl das angeschlossene
Mischpult als auch alle mit ihm verbundenen Signalquellen wie Keyboards,
Instrumentalverstärker, Eekte usw. sollten eingeschaltet sein. PREMIUM
PR:O-Aktivboxen sollten immer am „Line Out Mid/High“ angeschlossen und
nach allen anderen Komponenten eingeschaltet werden. Beim Ausschalten
bitte zuerst die Lautsprecher abdrehen (Gain nach links drehen) und vor
allen angeschlossenen Geräten ausschalten.
Nach dem Einschalten mit dem Power-Schalter läuft der Lüfter kurz an
(Systemcheck) und geht nach ca. 5 Sekunden aus. Der Lüfter ist temperaturgesteuert und geht nur bei sehr hohen Lautstärken in Betrieb und regelt
sich temperaturabhängig.
• Die Limiter/Status-LED leuchtet grün, wenn Spannung anliegt.
Drehen Sie den Gain-Regler in die Mitte (= 0 dBV). Wenn Sie ein Mischpult
zur Ansteuerung der PREMIUM PR:O-Aktivbox benutzen, ist diese Pegelstellung zu bevorzugen. Bei Bedarf können sie den Eingangspegel mit Hilfe
des Gain-Reglers um 6 dB erhöhen. Die Limiter/Staus-LED sollte hierbei
nicht permanent rot aufleuchten, um das bestmögliche Ergebnis zu erzielen
2.4 Einstellungen
Lautstärkeanpassung mit dem Gain-Regler
Passen Sie mit diesem Regler das Eingangssignal für Line-Signale an.
Falls Verzerrungen oder Übersteuerungen auftreten, überprüfen Sie die
Signalquellen und reduzieren Sie nach Möglichkeit dort das Ausgangssignal. Lässt sich das zur PREMIUM PR:O-Aktivbox führende Signal auf diese
Weise nicht verändern, passen Sie es mit dem Gain-Regler an (Reduzieren
des Eingangspegels).
3 Tipps und Tricks
1 Lassen Sie keine Feuchtigkeit an die Elektronik kommen! Achten Sie beim
Einsatz im Freien darauf, dass Ihr System vor Regen geschützt aufgestellt
wird. Softdrinks, Bier oder andere Flüssigkeiten dürfen nicht an die Elektronik gelangen, da dies zu Kurzschlüssen führen kann.
2 PREMIUM PR:O-Aktivboxen sorgen für optimalen Sound - sorgen Sie für
das optimale Eingangssignal! Brummen ist in den meisten Fällen das
Resultat defekter Kabel, falscher Kabel oder unsymmetrischer Eingangssignale am Mischpult. Überprüfen Sie alle Signal- und Netzkabel.
3 Vermeiden Sie Verzerrungen! Verzerrungen sind nicht nur unangenehm
für die Ohren der Zuhörer, sie sind auch gefährlich für Ihre Anlage. Achten
Sie darauf, dass alle direkt und indirekt an PREMIUM PR:O-Aktivboxen
angeschlossenen Komponenten über genügend Leistung verfügen und
niemals Verzerrungen produzieren, weil sie am maximalen Limit betrieben
werden. Sorgen Sie für ein sauberes Audiosignal.
4 Vermeiden Sie Brummschleifen! Auch trotz symmetrischer Signalfüh-
rung kann innerhalb eines Audio-Systems ein unangenehmer Brummton
entstehen, beispielsweise dann, wenn das Mischpult über das Netzkabel geerdet und nicht auf dem gleichen Stromkreis wie der PREMIUM
PR:O-Aktivboxen hängt. Durch die dann doppelt bestehende MasseErdverbindung kann es zu einer sogenannten „Brummschleife“ kommen.
Schließen Sie deshalb stets PREMIUM PR:O-Aktivboxen und Mischpult an
den gleichen Stromkreis (gleiche Phase!) an.
ACHTUNG! Nie die Masse am Stecker abkleben – (Lebensgefahr!)
• English • Deutsch
Page 16

PREMIUM PR:O 1.0
16
4 Fehlerbehebung
Die Limiter/Status-LED leuchtet beim Einschalten nicht auf.
• Überprüfen Sie, ob das Netzkabel am Mains-Input angeschlossen ist.
• Vergewissern Sie sich, dass das Netz Spannung führt.
Die Limiter/Status-LED leuchtet rot auf (Flackern).
• Der Limiter arbeitet, reduzieren Sie gegebenenfalls den Eingangspegel.
Die Limiter/Status-LED leuchtet dauerhaft rot auf, es kommt kein
Ton aus der Box.
• Die Schutzschaltung der Box wurde aktiviert. Bitte kontaktieren Sie Ihren
Fachhändler.
Die Musikwiedergabe scheint verzerrt zu sein.
• Überprüfen Sie die LED-Anzeigen an Ihrem Mischpult. Sie sollten sich
nicht ständig im roten Bereich befinden. Nehmen Sie gegebenenfalls die
Lautstärke am Mischpult zurück.
• Sind die LED-Anzeigen an Ihrem Mischpult im grünen Bereich, drehen Sie
den Gain-Regler am PREMIUM PR:O-Aktivlautsprecher zurück.
• Beobachten Sie die Limiter/Status-LED des PREMIUM PR:O-Aktivlautsprechers. Diese sollten nur kurz rot aufleuchten. Keinesfalls sollten
Sie ohne Unterbrechung rot aufleuchten. In diesem Fall drehen Sie die
entsprechenden Gain-Regler zurück.
5 Anwendungen
Anschussbeispiele zur Verkabelung finden Sie ab Seite 18.
6 Technische Daten
Modell PR:O 10 XD PR:O 12 D
Max SPL 122 dB Halfspace* 124 dB Halfspace*
Max SPL peak 131 dB Halfspace* 132 dB Halfspace*
Max SPL calculated 133 dB Halfspace 133 dB Halfspace
Frequenzgang +/- 3 dB 81 Hz – 16 kHz 72 Hz – 16 kHz
Frequenzgang -10 dB 69 Hz – 18 kHz 62 Hz – 18 kHz
Gesamtleistung 1200 W 1200 W
Endstufen Class D - Biamped Class D - Biamped
Aktive Schutzschaltungen
Peak- und RMS-SoundLimiter (jeweils für HF
und LMF getrennt)
Peak- und RMS-SoundLimiter (jeweils für HF
und LMF getrennt)
Basslautsprecher
Tief/ Mitteltonlautsprecher
1x 10“ 1x 12“
Hochtontreiber 1“ 1“
Horncharakteristik 90° x 55° CD-Horn 90° x 55° CD-Horn
Trennfrequenz aktiv 2,5 kHz FIR X-Over mit 48
dB/Okt.
2,5 kHz FIR X-Over mit
48 dB/Okt.
Anschlüsse 1x XLR/Klinke-Kombi In,
symm., 1x XLR-Through
1x XLR/Klinke-Kombi In,
symm., 1x XLR-Through
Klangregelung Tone-Regler (Music/
Speech), Bass-Boost
Tone-Regler (Music/
Speech), Bass-Boost
Aufstellwinkel 35°
Hochständerflansch DuoTilt 3/7 DuoTilt 3/7
Flugpunkte 3x M8 3x M8
Grie 1, integriert 2, integriert
Rollen
Gehäuse MDF MDF
Frontgitter 2 mm Metallgitter mit
schwarzem Akustikschaumsto
2 mm Metallgitter mit
schwarzem Akustikschaumsto
Oberfläche Acryllack, schwarz Acryllack, schwarz
Optionales Zubehör Schutzhüllen, Satellite
Add-on
Schutzhüllen, Satellite
Add-on
Abmessungen (BxHxT) 38 x 49 x 29 cm 39 x 57 x 36 cm
Gewicht 13,2 kg / 29,1 lbs. 18,7 kg / 41,2 lbs.
*@10% THD
Page 17

PREMIUM PR:O 1.0
17
PR:O 12 XD PR:O 15 D PR:O 15 XD PR:O 18 SUB A PR:O 210 SUB A
124 dB Halfspace* 125 dB Halfspace* 125 dB Halfspace* 125 dB Halfspace* 123 dB Halfspace*
132 dB Halfspace* 130 dB Halfspace* 130 dB Halfspace* 127 dB Halfspace* 126 dB Halfspace*
133 dB Halfspace 133 dB Halfspace 133 dB Halfspace 127 dB Halfspace 126 dB Halfspace
80 Hz – 16 kHz 60 Hz – 16 kHz 61 Hz – 16 kHz 48 Hz – X-Over 60 Hz – 150 Hz
69 Hz – 18 kHz 54 Hz – 18 kHz 57 Hz – 18 kHz 38 Hz – X-Over 40 Hz – 150 Hz
1200 W 1200 W 1200 W 600 W 600 W
Class D - Biamped Class D - Biamped Class D - Biamped Class D Class D
Peak- und RMS-SoundLimiter (jeweils für HF
und LMF getrennt)
Peak- und RMS-SoundLimiter (jeweils für HF
und LMF getrennt)
Peak- und RMS-SoundLimiter (jeweils für HF
und LMF getrennt)
Subsonic-Filter, PeakLimiter
Subsonic-Filter, PeakLimiter
1x 18“ 2x 10“
1x 12“ 1x 15“ 1x 15“
1“ 1“ 1“
90° x 55° CD-Horn 90° x 55° CD-Horn 90° x 55° CD-Horn
2,5 kHz FIR X-Over mit
48 dB/Okt.
2,5 kHz FIR X-Over mit
48 dB/Okt.
2,5 kHz FIR X-Over mit
48 dB/Okt.
75 Hz – 150 Hz, wählbar 75 Hz – 150 Hz, wählbar
1x XLR/Klinke-Kombi In,
symm., 1x XLR-Through
1x XLR/Klinke-Kombi In,
symm., 1x XLR-Through
1x XLR/Klinke-Kombi In,
symm., 1x XLR-Through
2x XLR/Klinke-Kombi In,
symm., 2x XLR L/R Out
Mid/High, 2x XLR Through
2x XLR/Klinke-Kombi
In, symm., 2x XLR L/R
Out Mid/High, 2x XLR
Through
Tone-Regler (Music/
Speech), Bass-Boost
Tone-Regler (Music/
Speech), Bass-Boost
Tone-Regler (Music/
Speech), Bass-Boost
33° 42°
DuoTilt 3/7 DuoTilt 3/7 DuoTilt 3/7 1x M20 2x M20
3x M8 3x M8 3x M8
2, integriert 2, integriert 2, integriert 2, integriert 2, integriert
optional 100 mm
MDF MDF MDF MDF MDF
2 mm Metallgitter mit
schwarzem Akustikschaumsto
2 mm Metallgitter mit
schwarzem Akustikschaumsto
2 mm Metallgitter mit
schwarzem Akustikschaumsto
2 mm Metallgitter mit
schwarzem Akustikschaumsto
2 mm Metallgitter mit
schwarzem Akustikschaumsto
Acryllack, schwarz Acryllack, schwarz Acryllack, schwarz Acryllack, schwarz Acryllack, schwarz
Schutzhüllen, Satellite
Add-on
Schutzhüllen, Satellite
Add-on
Schutzhüllen, Satellite
Add-on
Schutzhüllen, Satellite
Add-on
Schutzhüllen, Satellite
Add-on
40 x 59 x 31 cm 47 x 62 x 42 cm 47 x 62 x 45 cm 53 x 61 x 64 cm 36 x 61 x 53 cm
16,3 kg / 35,9 lbs. 23,7 kg / 52,3 lbs. 22,6 kg / 49,8 lbs. 39,8 kg / 87,8 lbs. 27,2 kg / 60,0 lbs.
• English • Deutsch
Page 18

PREMIUM PR:O 1.0
18
Music Speech
BoostFlat
Mic Line
Auto
Stand- by
Green= On
Red=
Limit /Error
On
O
ThruInput
Gain Tone
MADE I N GERMANY
Cau tio n: R isk o f ele ct ri c
sho ck! D o not o pe n!
Ref er se rv ic ing t o qua li fi ed
ser vi ce pe rs onn el .
Cau tio n: To re du ce th e ris k
of ele ct ri c s ho ck , g ro un din g
of the c en ter p in of t hi s
plu g m us t be ma in tai ne d.
220 -240 V~
50- 60 H z 3 A
rat ed c urr ent
Mic Flat
Left Right
Music Speech
BoostFlat
Mic Line
Auto
Stand- by
Green= On
Red=
Limit /Error
On
O
ThruInput
Gain Tone
MADE I N GERMANY
Cau tio n: R isk o f ele ct ri c
sho ck! D o not o pe n!
Ref er se rv ic ing t o qua li fi ed
ser vi ce pe rs onn el .
Cau tio n: To re du ce th e ris k
of ele ct ri c s ho ck , g ro un din g
of the c en ter p in of t hi s
plu g m us t be ma in tai ne d.
220 -240 V~
50- 60 H z 3 A
rat ed c urr ent
Line
Boost
Application Samples
Mono Fullrange/Monitor System
Stereo Fullrange System
Page 19

PREMIUM PR:O 1.0
19
• Application Samples
Left
Right
Left Right
Line Ou t
Mid/Hig h
Input
Thru
L R
L R
PREMIUM PR:O
SERIES
Music Speech
BoostFlat
Mic Line
Auto
Stand- by
Green= On
Red=
Limit /Error
On
O
ThruInput
Gain Tone
MADE I N GERMANY
Cau tio n: R isk o f ele ct ri c
sho ck! D o not o pe n!
Ref er se rv ic ing t o qua li fi ed
ser vi ce pe rs onn el .
Cau tio n: To re du ce th e ris k
of ele ct ri c s ho ck , g ro un din g
of the c en ter p in of t hi s
plu g m us t be ma in tai ne d.
220 -240 V~
50- 60 H z 3 A
rat ed c urr ent
Line Flat
2.1 System
Page 20

PREMIUM PR:O 1.0
20
Halfstack System + Monitoring
Left
Right
Left Right
Monitor
Out 2
Monitor
Out 1
Line Out
Mid/High
Input
Thru
L R
L R
PREMIUM PR:O
SERIES
Line Out
Mid/High
Input
Thru
L R
L R
PREMIUM PR:O
SERIES
Music Speech
BoostFlat
Mic Line
Auto
Stand-b y
Green=O n
Red=
Limit/E rror
On
O
ThruInput
Gain Tone
MADE IN GERMANY
Caut io n: Ri sk of e le ctr ic
shoc k! D o n ot op en !
Refe r ser vi ci ng to q ua lif ie d
serv ic e per so nn el.
Caut io n: To red uc e the r is k
of e le ctr ic s hoc k, g rou nd in g
of t he ce nt er pi n of th is
plug m us t b e mai nt ai ned .
220- 240 V~
50-6 0 H z 3 A
rate d c urre nt
Line Flat
Music Speech
BoostFlat
Mic Line
Auto
Stand-b y
Green=O n
Red=
Limit/E rror
On
O
ThruInput
Gain Tone
MADE IN GERMANY
Caut io n: Ri sk of e le ctr ic
shoc k! D o n ot op en !
Refe r ser vi ci ng to q ua lif ie d
serv ic e per so nn el.
Caut io n: To red uc e the r is k
of e le ctr ic s hoc k, g rou nd in g
of t he ce nt er pi n of th is
plug m us t b e mai nt ai ned .
220- 240 V~
50-6 0 H z 3 A
rate d c urre nt
Line Flat Line Flat
Page 21

PREMIUM PR:O 1.0
21
Left
Right
Line Out
Mid/High
Input
Thru
L R
L R
PREMIUM PR:O
SERIES
Line Out
Mid/High
Input
Thru
L R
L R
PREMIUM PR:O
SERIES
Left Right
Line Out
Mid/High
Input
Thru
L R
L R
PREMIUM PR:O
SERIES
Line Out
Mid/High
Input
Thru
L R
L R
PREMIUM PR:O
SERIES
Music Speech
BoostFlat
Mic Line
Auto
Stand-b y
Green=O n
Red=
Limit/E rror
On
O
ThruInput
Gain Tone
MADE IN GERMANY
Caut io n: Ri sk of e le ctr ic
shoc k! D o n ot op en !
Refe r ser vi ci ng to q ua lif ie d
serv ic e per so nn el.
Caut io n: To red uc e the r is k
of e le ctr ic s hoc k, g rou nd in g
of t he ce nt er pi n of th is
plug m us t b e mai nt ai ned .
220- 240 V~
50-6 0 H z 3 A
rate d c urre nt
Line Flat Line Flat
Fullstack System
• Application Samples
Page 22

PREMIUM PR:O 1.0
22
Page 23

PREMIUM PR:O 1.0
23
Page 24

HK Audio® • Postfach 1509 • 66595 St. Wendel • Germany • info@hkaudio.com • www.hkaudio.com
International Inquiries: fax +49-68 51-905 215 • international@hkaudio.com
984024 6 D-28 63
Subject to change without notice • Technische Änderungen vorbehalten
Copyright 2016 Music & Sales GmbH • 03/2016
PREMIUM PR:O
 Loading...