

Page 1
English
Deutsch
Français
Español
Manual 1.0
Page 2

Important Safety Instructions
Before connecting, read instructions
Important Advice on Safety!
Please read before use and keep for later use!
Wichtige Sicherheitshinweise!
Bitte vor Gebrauch lesen und für späteren Gebrauch
aufbewahren!
• Read all of the se instructions!
• Save these instruct ions for later use!
• Follow all warnings and instructions marked on the product!
• Do not use this product near water, i.e. bathtub, sink, swimming pool,
wet basement, e tc.
• Do not place th is product on an unstabl e cart, stand or table. The product may
fall, causing s erious damage to the pro duct or to persons!
• Slots and openings in the cabinet and t he back or bottom are provided for
ventilation; to ensure reliable operation o f the product and to protect it from
overheating, these openings must not be blocked or covered. This product
should not be placed in a built-in installation unless proper ventilation is provided.
• This product should not be placed near a source of heat such as a stove,
radiator, or another heat producing amplifier.
• Use only the su pplied power supply or p ower cord. If you are not sure of the
type of power available, consult your d ealer or local power com pany.
• Do not allow an ything to rest on the power cord. Do not loc ate this product
where persons w ill walk on the cord.
• Never break off the ground pin on the power supply cord.
• Power supply cords should always be handled carefully. Periodically check cords
for cuts or sign of stress, especially at the plug and the point where the cord
exits the unit.
• The power supply cord should be unplugged when the unit is to be unused for
long periods of time.
• If this product is to be mounted in an equipment rack, rear support should be
provided.
• This product should be used only with a cart or stand that is recommended by
HK AUDIO®.
• Never push objects of any kind into thi s product through cabinet slots as they
may touch dange rous voltage points or s hort out parts that coul d result in risk
of fire or electric shock. Never spill liquid of any kind o n the product.
• Do not attempt to service this product yourself, as opening or removing covers
may expose you to dangerous voltage poi nts or other risks. Refe r all servicing
to qualified se rvice personnel.
• Clean on ly with dry cloth.
• Do not defeat the safety purpose of the polarized or grounding-type plug.
A polarized plu g has two blades with one wider than the oth er. A grounding
type plug has two blades and a thir d grounding prong. The w ide blade or the
third prong are provided for the safety. If the provided plug does not fit into
your outlet, co nsult an electrician for replacement of the obsolete outlet.
• Unplug this product from the wall outlet and refer servicing to qualified service
personnel under the following conditions:
• When the power cord or plug is damaged or frayed.
• If liquid has b een spilled into the pro duct.
• If the product has been exposed to rain or water.
• If the product does not operate normally when the operating instruc tions are
followed.
• If the product has been dropped or the cabinet has been damaged .
• If the product exhibits a distinct change in performance, indicating a need of
service!
• Adjust only these controls that are covered by the operating instru ctions since
improper adjustment of other controls may result in damage and will often
require extensive work by a qualified t echnician to restore the product to
normal operation.
• Exposure to extreme ly high noise levels may cause a permanent heari ng loss.
• Individuals vary con siderably in susceptibility to noise induced hearing loss, but
nearly everyone will lose some hearing if exposed to sufficiently intense noise
for a sufficien t time. The U.S. Governm ent´s Occupational Safety an d Health
Administration (OSH A) has specified the fol lowing permissible noise lev el
exposures:
Duration Per Da y In Hours Sound LeveldBA, Slow Response
8 90
6 92
4 95
3 97
2 100
11/2 102
1 105
1/2 110
1/4 or less 115
• According to OSHA, any exposure in excess of the above permissible limits
could result in some hearing loss.
• Ear plug protectors in the ear canals or over the ears must be worn when operating
this amplification system in order to prevent a permanent hearing loss if exposure
is in excess of the limits as set forth above. To ensure against potent ially
dangerous exposure to high sound pressure levels, it is recommended that all
persons exposed to equipment capable of producing high sound pressu re levels such as this amplification system be protected by hearing protectors while
this unit is in operation.
• Fuses: Replace with IEC 127 (5x 20 mms) type and rated fuse for b est
performance only.
TO PREVENT THE RISK OF FIRE AND SHO CK HAZARD, DO NOT EXPOSE
THIS APPLIANCE TO MOISTURE OR RAIN. DO NOT OPEN CASE;
NO USER SERVICE -ABLE PARTS INSIDE.REFER SER VICING TO QUALIFIED
SERVICE PERSONNEL.
Version 1.0 10/2004
• The unit has been built by HK AUDIO® in accordance with IEC 60065 and l eft
the factory in safe working order. To maintain this condition and ensure nonrisk operation, the user must follow th e advice and warning com ments found in
the operating i nstructions. The unit conform s to Protection Class 1 (protectively
earthed).
• HK AUDIO® ONLY GUARANTEE THE SAFET Y, RELIABILITY AND EFFICIENCY
OF THE UNIT IF:
• Assembly, extension, re-adjustm ent, modifications or repair s are carried out by
HK AUDIO® or by pers ons authorized to do so.
• The electrical installation of the relevant area complies with the requirements
of IEC (ANSI) specifications.
• The unit is used in accordance with the operating instructions.
• The unit is regularly checked and teste d for electrical safety by a competent
technician.
WARNING:
• If covers are opened or sections of casing are removed, except where this can
be done manuall y, live parts can become exposed.
• If it is ne cessary to open the unit this must be insulated from all power sources.
Please take thi s into account before ca rrying out adjustments, main tenance,
repairs and bef ore replacing parts.
• The appliance c an only be insulated fro m all power sources if the mains
connection is u nplugged.
• Adjustment, maintenance and repairs carried out when the unit has been opened
and is still live may only be performed by specialist personnel who are authorized
by the manufact urer (in accordance with VBG 4) and who are aware of the
associated hazards.
• Loudspeaker outputs which have the IEC 417/5036 symbol (Diagram 1, below)
can carry volta ges which are hazardous if they are made contact with. Before
the unit is switched on, the loudspeake r should therefore only be connected
using the lead recommended by the manuf acturer.
• Where possible, all plugs on connection cables must be screwed or locked onto
the casing.
• Replace fuses o nly with IEC127 type and specified ratings.
• It is not p ermitted to use repaired fuses or to short-circuit the fuse holder.
• Never interrupt the protective conductor co nnection.
• Surfaces which are equipped with the "H OT" mark (Diagram 2, bel ow), rear
panels or cover s with cooling slits, co oling bodies and their c overs, as well as
tubes and their covers are purposely de signed to dissipate high temperatures
and should ther efore not be touched.
• High loudspeaker levels can cause permanent hearing damage. You should
therefore avoid the direct vicinity of loudspeakers operating at hi gh levels.
Wear hearing protection if continuously exposed to high levels.
MAINS CONNECTION:
• The unit is designed for continuous ope ration.
• The set operati ng voltage must match th e local mains supply vol tage.
• The unit is connected to the mains via the supplied power u nit or power cable.
• Power unit: Never use a damaged connection lead. Any damage must be rectified
by a competent technician.
• Avoid connection to the mains supply in distributor boxes together with several
other power con sumers.
• The plug socket for the power supply must be positioned near the unit and
must be easily accessible.
PLACE OF INSTALLATION:
• The unit should stand only on a cle an, horizontal working surfa ce.
• The unit must not be exposed to vib rations during operation.
• Keep away from moisture and dust where possible.
• Do not place the unit near water, baths, wash basins, kitchen sinks, we t areas,
swimming pools or damp rooms. Do not place objects containing l iquid on the
unit - vases, glasses, bottles etc.
• Ensure that the unit is well ventilated .
• Any ventilation openings must never be blocked or covered. The unit must be
positioned at l east 20 cm away from walls. The unit may onl y be fitted in a rac k
if adequate ven tilation is ensured and if the manufacturer's instal lation instructions are follo wed.
• Keep away from direct sunlight and the immediate vicinity of he ating elements
and radiant hea ters or similar devices.
• If the unit is suddenly moved from a cold to a warm loc ation, condensation can
form inside it. This must be taken into account particularly in the case of tube
units. Before s witching on, wait until the unit has reached roo m temperature.
• Accessories: Do not place the unit on an unsteady trolley, stand, tripod, base or
table. If the unit falls down, it can cause personal injury and itself become damaged.
Use the unit only with the trolley, rack stand, tripod or base recommen ded by
the manufacturer or purchased together with the unit. When setting the unit
up, all the manufacturer's instructions must be followed and the setup accessories
recommended by the manufacturer must be used. Any combination of unit and
stand must be moved carefully. A sudden stop, excessive use of force and uneven
floors can caus e the combination of uni t and stand to tip o ver.
• Additional equipmen t: Never use additional equipment which has not been
recommended by the manufacturer as this can cause accidents.
• To protect the unit during bad weather or when left unattended for prolonge d
periods, the ma ins plug should be disco nnected. This prevents the unit being
damaged by ligh tning and power surges i n the AC mains supply.
Diagram 1 Diagram 2
• Das Gerät wurde von HK AUDIO® gemäß IEC 60065 gebaut und hat das Werk
in sicherheitstechn isch einwandfreiem Zustand v erlassen. Um diesen Zustand
zu erhalten und einen gefahrlosen Betrieb sicherzustellen, muss der Anwender
die Hinweise un d die Warnvermerke beachten, die i n der Bedienungsanleitung
enthalten sind. Das Gerät entspricht der Schutzklasse I (schutzgeerdet) .
• DIE SICHERHEIT, ZUVERLÄSSIGKEIT U ND LEISTUNG DES GERÄTES WIRD
VON HK AUDIO® NUR DANN G EWÄHRLEISTET, WENN:
• Montage, Erweiterun g, Neueinstellung, Änderungen oder Reparaturen von
HK AUDIO® oder von d azu ermächtigten Personen au sgeführt werden.
• die elektrische Installation des betreffenden Raumes den Anforderungen von
IEC (ANSI)-Festlegungen entspricht.
• das Gerät in Übereinstimmung mit der Ge brauchsanweisung verwendet wird.
WARNUNG:
• Wenn Abdeckungen geöffnet oder Gehäuseteile entfernt werden, außer wenn
dies von Hand möglich ist, können Teile freigelegt werden, die Spannung führen.
• Wenn ein Öffnen des Gerätes erforderlich ist, m uss das Gerät von allen Spannungsquellen getren nt sein. Berücksichtigen Sie dies vor dem Abgleich, vor
einer Wartung, vor einer Instandsetzung und vor e inem Austausch von Teilen.
• Ein Abgleich, e ine Wartung oder eine Reparatur am geöffneten Gerät unter
Spannung darf n ur durch eine vom Herste ller autorisierte Fachkraft (nach VBG
4) geschehen, d ie mit den verbundenen G efahren vertraut ist.
• Lautsprecher-Ausgänge, die mit dem IEC 417/ 5036-Zeichen (Abb.1, s.unten)
versehen sind k önnen berührungsgefährliche Span nungen führen. Deshalb vor
dem Einschalten des Gerätes Verbindung nur mit dem vom Hersteller empfohlenen Anschlusskabe l zum Lautsprecher herstelle n.
• Alle Stecker an Verbindungskabeln mü ssen mit dem Gehäuse ver schraubt oder
verriegelt sein, sofern möglich.
• Es dürfen nur Sicherungen vom Typ IEC 127 und der angegebenen Nennstromstärke verwendet werden.
• Eine Verwendung von gef lickten Sicherungen oder Kur zschließen des Halters
ist unzulässig.
• Niemals die Sch utzleiterverbindung unterbrechen.
• Oberflächen, die mit dem "HOT"-Zeichen (Abb .2, s.unten) versehen sind,
Rückwände oder Abdeckungen mit Kühlschlitzen, Kühlkörper und deren Abdeckungen, sowie Röhren und deren Abdeckung en können im Betrieb erh öhte
Temperaturen annehmen und sollt en deshalb nicht berührt werden.
• Hohe Lautstärkepege l können dauernde Gehörschäd en verursachen.
Vermeiden Sie deshalb d ie direkte Nähe von Laut sprechern, die mit hohen
Pegeln betrieben werden. Verwenden Sie einen Gehörs chutz bei dauernder
Einwirkung hoher Pegel.
NETZANSCHLUSS:
• Das Gerät ist für Dauerbetrieb ausgelegt.
• Die eingestellte Betriebsspannung muss mit der örtlichen Netzspannung
übereinstimmen.
• Der Anschluss a n das Stromnetz erfolgt mit dem mitgelieferten Netzt eil oder
Netzkabel.
• Netzteil: Eine beschädigte Anschlussleitung kan n nicht ersetzt werden.
Das Netzteil da rf nicht mehr betrieben werden.
• Vermeiden Sie einen Ans chluss an das Stromnetz in Verteilerdosen zusammen
mit vielen ande ren Stromverbrauchern.
• Die Steckdose f ür die Stromversorgung muss nahe am Gerät angebracht und
leicht zugänglich sein.
AUFSTELLUNGSORT:
• Das Gerät sollt e nur auf einer sauberen , waagerechten Arbeitsfläche stehen.
• Das Gerät darf während des Betriebs kei nen Erschütterungen ausgesetzt sein.
• Feuchtigkeit und Staub sind nach Möglichkeit fe rnzuhalten.
• Das Gerät darf nicht in der Nähe vo n Wasser, Badewanne, Waschbecken,
Küchenspüle, Nassra um, Swimmingpool oder feucht en Räumen betrieben
werden. Keine m it Flüssigkeit gefüllten Geg enstände -Vase, Gläser, Flaschen
etc. auf das Gerät stellen.
• Sorgen Sie für ausreichende Belüftung der Geräte.
• Eventuelle Ventilationsöffnungen dürfen niemals blockiert o der abgedeckt
werden. Das Ger ät muß mindestens 20 cm von Wänden entfernt aufgestellt
werden. Das Ger ät darf nur dann in ein Rack eingebaut werden, wenn für
ausreichende Ventilation ge sorgt ist und die Einbau anweisungen des Herstellers eingehalte n werden.
• Vermeiden Sie direkte S onneneinstrahlung sowie die unmittelbare Nähe von
Heizkörpern und Heizstrahlern oder ähnlicher Geräte.
• Wenn das Gerät plötzlic h von einem kalten an einen warmen Ort gebracht
wird, kann sich im Geräteinnern Kondensfeuc htigkeit bilden. Dies ist insbesondere bei Röhren geräten zu beachten. Vor dem Ein schalten solange warten bis
das Gerät Raumt emperatur angenommen hat.
• Zubehör: Das Ge rät nicht auf einen inst abilen Wagen, Ständer, Dreifuß,
Untersatz oder Tisch stellen. Wenn das Gerät he runterfällt, kann es Persone nschäden verursachen und selbst beschädigt w erden. Verwenden Sie das Gerät
nur mit einem vom Hersteller empfohlenen oder zusammen mit dem Gerät
verkauften Wagen, Rack, S tänder, Dreifuß oder Untersatz. Bei der Aufstellu ng
des Gerätes müs sen die Anweisungen des Herstellers befolgt und muss das
vom Hersteller empfohlene Aufstellzubehör verwe ndet werden. Eine Kombination aus Ge rät und Gestell muss vor sichtigt bewegt werden. Plöt zliches
Anhalten, übermäßig e Kraftanwendung und ungleic hmäßige Böden können das
Umkippen der Ko mbination aus Gerät und Gestell bewirken.
• Zusatzvorrichtungen: Verwenden Sie niema ls Zusatzvorrichtungen, die nicht
vom Hersteller empfohlen wurden, weil dadur ch Unfälle verursacht werden
können
• Zum Schutz des Gerätes bei Gewitter ode r wenn es längere Zeit nicht beaufsichtigt oder b enutzt wird, sollte der Netzstecker gezogen werden.
Dies verhindert Schäden am Gerät aufgrund von Blitzschlag und Spann ungsstößen im Wechselstromnetz.
Abb.1 Abb.2
Page 3

Conseils de Securite Importants!
Priere de lire avant l'emploi et a conserver pour
utilisation ulterieure!
Importanti avvertimenti di sicurezza!
Leggere attentamente prima dell'uso e conservare
per un utilizzo successivo:
¡Indicaciones de seguridad importantes!
¡Léanse antes de utilizar el aparato y guardense para
so uso posterior!
• L'appareil a été conçu par HK AUDI O® selon la n orme IEC 60065 et a quitté
l'entreprise dans un état irréprochable. Af in de conserver cet état et d'assurer
un fonctionnement sans danger de l'appareil nous conseillons à l'ut ilisateur
la lecture des indications de sécurité contenues dans le mode d 'emploi.
L'appareil est conforme à la classification I (mise à terre de protection).
• SURETE, FIABIL ITE ET EFFICACITE DE L'A PPAREIL NE SONT GARANTIS PAR
HK AUDIO® QUE SI:
• Montage, exten sion, nouveau réglage, modif ication ou réparation sont
effectués par H K AUDIO® ou par tou te personne autorisée par HK AUDIO®.
• L'installation électrique de la pièce concernée correspond aux nor mes
IEC (ANSI).
• L'utilisation de l'appareil suit le mo de d'emploi.
AVERTISSEMENT:
• A moins qu e cela ne soit manuellem ent possible, tout enlèvemen t ou ouverture
du boîtier peut entrainer la mise au jour de pieces sous te nsion.
• Si l'ouverture de l'appareil est néces saire, celui-ci doit être coupé de chaque
source de coura nt. Ceci est à prendre en considération avant tout ajustement,
entretien, réparati on ou changement de piec es.
• Ajustement, en tretien ou réparation sur l'appareil ouvert et sous tension ne
peuvent être éf fectués que par un spéci aliste autorisé par le f abricant (selon
VBG4). Le spéci aliste étant conscient des dangers liés à ce gen re de réparation.
• Les sorties de baffles qui portent le signe IEC 417/5036 ( fig. 1, voir en bas)
peuvent être so us tension dangereuse. Avant de brancher l'appareil util iser
uniquement le c âble de raccordement conseil lé par le fabricant pour raccorder
les baffles.
• Toutes les prises des câbles de raccordement doive nt être, si possible, vi ssées
ou verrouillées sur le boîtier.
• L’utilisation de fusibles ra fistolés ou court-circuites est inadmissible
– seulement: IE C127.
• L'utilisation de fusibles rafistolés ou court-circuites est inadmissib le.
• Ne jamais interrompre la connexion du circuit protecteur.
• Il est con seillé de ne pas toucher aux surfaces pourvues d u signe "HOT" (fig.
2, voir en bas), aux parois arrières ou caches munis de fen tes d'aération,
éléments d'aération et leurs caches ansi qu'aux tubes et leurs caches.
Ces éléments pouvant atteindre des températures élévées pendant l'utilisatio n
de l'appareil.
• Les Niveaux de puissance élévés peuven t entrainer des lésions auditives
durables. Evitez do nc la proximité de haut- parleurs utilisés à haute puissance.
Lors de haute puissance continue utilisez une protection auditive.
BRANCHEMENT SUR LE SECTEUR:
• L'appareil est conçu pour une utilisat ion continue.
• La tension de fonctionnement doit conc order avec la tension se cteur locale.
• Le raccordemen t au réseau éléctrique s 'effectue avec l'adaptateur ou le cordon
d´alimentation livr é avec l'appareil.
• Adaptateur: Un câble de raccordement a bimé ne peut être rempla cé.
L'adaptateur est inutilisable.
• Evitez un racc ordement au réseau par d es boîtes de distribution surchargées.
• La prise de courant doit être placée à proximité de l'appareil et facile à atteindre.
LIEU D'INS TALLATION:
• L'appareil doi t être placé sur une surface de travail propre et horizontale.
• L'appareil en marche ne doit en au cun cas subir des vibrat ions.
• Evitez dans la mesure du possible pous sière et humidité.
• L'appareil ne doit pas être placé à proximité d'eau, de ba ignoire, lavabo, évier,
pièce d'eau, pi scine ou dans une pièce humide. Ne placez aucun vase, verre,
bouteille ou to ut objet rempli de liqui de sur l'appareil.
• L'appareil doi t être suffisamment aéré.
• Ne jamais recouvrir les ouvertures d'aération. L'appareil doit être placé à 20
cm du mur au minimum. L'appareil peut être monté dans un Rack si une
ventilation suffisa nte est possible et si les conseils de montage du fabricant
sont suivis.
• Evitez les ray ons de soleil et la proximité de radiateurs, cha uffages etc.
• Une condensati on d'eau peut se former dans l'appareil si celui -ci est transporté
brusquement d'un endroit froid à un end roit chaud. Ceci est particul ièrement
important pour des appareils à tubes. Avant de brancher l'appareil attendre
qu'il ait la température ambiante.
• Accessoires: L 'appareil ne doit être p lacé sur un chariot, sup port, trépied,
bâti ou table instable. Une chute de l'appareil peut entrainer aussi bien des
dommages corporels que techniques. Utilisez l'appareil uniquement avec un
chariot, Rack, support, trépied ou bâti conseillé par le fabricant ou vendu en
combinaison avec l'appareil. Les indications du fabricant pour l'instal lation
de l'appareil s ont à suivre, et les accessoires d'installation cons eillés par le
fabricant sont à utiliser. Un ensemble support et appareil doit être déplac é avec
précaution.
Des mouvements brusques et des revêtements de sol irreguliers peuve nt
entrainer la ch ute de l´ensemble.
• Equipements su pplémentaires: Ne jamais uti liser un équipement suppléme ntaire n'ayant p as été conseillé par le fabricant, ceci pouvant entrainer des
accidents.
• Afin de pr otéger l'appareil pendant un orage ou s'il ne do it pas être utilisé
pendant un cert ain temps, il est consei llé d'enlever la prise a u secteur.
Ceci évite des d ommages dûs à la foudre ou à des coups de tension dans le
réseau à couran t alternatif.
Fig. 1 Fig. 2
• L'apparecchio è stato costruito dalla HK AUDIO® secondo la normativa
europea IEC 600 65 ed ha lasciato il nostro stabilimento in stat o ineccepibile.
Per garantire i l mantenimento di tale s tato e un utilizzo assol utamente privo
di rischi l'ute nte è tenuto ad osservar e le indicazioni e gli avvertimenti di sicurezza contenuti nelle istruzioni per l'uso. L'apparecchio rispecchia il livello di
sicurezza I (co llegato a terra).
• Sicurezza, affidabi lità e prestazioni dell'appa recchio vengono garantiti da lla
HK AUDIO® solo ed es clusivamente se:
• Montaggio, ampliame nto, rimessa a punto, mo difiche e riparazioni vengon o
eseguite dalla HK AUDIO® stessa o d a personale da essa auto rizzato.
• Gli impianti el ettrici nei locali prescelti per l'uso dell'apparecchio rispondono
alle normative stabilite dall'ANSI.
• L'apparecchio viene utilizzato come indicato nel libretto delle istruzioni per l'uso.
Avvertimenti:
• In caso di apertura di parti di riv estimento o rimozione di parti dell'involucro,
a meno che non si tratti di pezzi rimovibili semplicemente a mano, possono
venire alla luc e parti dell'apparecchio con duttrici di tensione.
• Se l'apertura d ell'apparecchio dovesse risultar e necessaria è indispensabil e
staccare precedente mente quest'ultimo da tutte le fonti di tensione. Rispettare
tale misura di prevenzione anche prima di un allineamento, di o perazioni di
manutenzione, della messa in esercizio o della sostituzione di comp onenti
all'interno dell'ap parecchio.
• Allineamento, opera zioni di manutenzione o eventuali riparazioni
dell'apparecchio in presenza di tensione va nno eseguite esclusivamente da
personale specializ zato ed autorizzato, in grado di eseguire tali o perazioni
evitandone
i rischi connes si.
• Le uscite degli altoparlanti contrassegnate dai caratteri IEC 417/5036 (vedi
illustrazione 1 a fondo pag.) possono e ssere conduttrici di tension e pericolosa con cui evitare il contatto. Per questo motivo, prima di accendere
l'apparecchio, coll egare quest'ultimo agli alto parlanti servendosi esclusivamen te del cavetto d'allacciamento indicato dal produttore.
• Tutte le spine e i cavi di collegamento devono essere avvitati o fissati
all'involucro dell' apparecchio per quanto possi bile.
• Utilizzare esclusiv amente fusibili del tipo IEC 127 con la indicata corrente
nominale.
• L'utilizzo di f usibili di sicurezza non integri e la messa in corto circuito del
sostegno di met allo sono proibite.
• Non interrompere mai il collegamento con il circuito di protezione.
• Superfici contrasse gnate dalla parola "HOT" (vedi illustrazione 2 a fondo pag.),
cosi come grigl ie di aerazione, dispositivi di raffreddamento e i loro rivestimenti di protezion e, oppure valvole e i relativi rivestimenti protetti vi possono surriscaldarsi notevol mente durante l'uso e pe r questo motivo non vann o toccate.
• L'ascolto di su oni ad alto volume può provocare danni permanenti all'udito.
Evitate perciò la diretta vicinanza con alt oparlanti ad alta emissione di suono
e utilizzate cu ffie protettive in caso ciò non sia possibile.
Alimentazione:
• L'apparecchio è concepito per il funzioname nto continuo.
• La tensione di esercizio deve corrispondere alla tensione di rete a cui ci si allaccia.
• L'allacciamento all a rete elettrica avviene tramite alimentatore o cave tto
d'alimentazione con segnato insieme all'apparecchio.
• Alimentatore: un cavo di connessione danneg giato non può essere sos tituito.
L'alimentatore non può più essere utilizzat o.
• Evitate un allaccia mento alla rete di corre nte utilizzando cassette di distribuzione sovraccariche .
• La spina di corrente deve essere situat a nelle vicinanze dell'appar ecchio e
facilmente raggiung ibile in qualsiasi momento.
Locali di collo camento:
• Opportuno collocare l'apparecchio su una su perficie pulita e orizzontal e.
• Non sottoporre l'apparecchio in funzione a scosse e vibrazioni.
• Proteggere l'appare cchio per quanto possibile da umidità e polvere.
• Non collocare l 'apparecchio vicino ad acqua , vasche da bagno, lavan dini, lavelli
da cucina, loca li umidi o piscine. Non appoggiare recipienti conten enti liquidi
- vasi, bicchie ri, bottiglie, ecc. - su ll'apparecchio.
• Provvedere ad u na buone aerazione dell'appa recchio.
• Eventuali aperture previste per la ventilazione dell'apparecchio non vanno
ne bloccate, ne mai coperte. L'apparecchio va collocato ad almeno 20 cm di
distanza dalle pareti circostanti e può essere inserito tra altre componenti di
un impianto sol o in caso di sufficiente ventilazione e qualora le direttive di
montaggio del p roduttore vengano rispettate.
• Evitare di esporre l'apparecchio ai raggi d el sole e di collocarlo direttamente
nelle vicinanze di fonti di calore come caloriferi, stufette, ecc.
• Se l'apparecchio viene trasportato rapidamente da un locale freddo ad uno
riscaldato può succedere che al suo int erno si crei della conde nsa. Ciò va
tenuto in consi derazione soprattutto in cas o di apparecchi a valvol e. Attendere
che l'apparecchio abbia assunto la temperat ura ambiente prima di ac cenderlo.
• Accessori: non collocare l'apparecchio su c arrelli, supporti, treppiedi, superfici
o tavoli instab ili. Se l'apparecchio dovess e cadere a terra potrebb e causare
danni a terzi o danneggiarsi irreparabilmen te. Utilizzate per il co llocamento
dell'apparecchio su pporti, treppiedi e superfic i che siano consigliate dal
produttore o di rettamente comprese nell'offerta di vendita. Per il collocamento dell'apparecc hio attenetevi strettamente alle istruzioni del produtto re,
utilizzando esclusi vamente accessori da esso consigliati. L'apparecchio in
combinazione ad un supporto va spostato con molta attenzione. Movim enti
bruschi o il collocamento su pavimenti non piani possono provocare la caduta
dell'apparecchio e del suo supporto.
• Accessori supplemen tari: non utilizzate mai accessori supplementari che non
siano consigliati dal produttore, potendo e ssere ciò causa di incid enti.
• Per proteggere l'apparecchio in caso di temporali o nel caso ques to non venisse
utilizzato per diverso tempo si consiglia di staccarne la spina di corrente.
In questo modo si evitano danni all'app arecchio dovuti a colpi di fulmine o ad
improvvisi aumenti di tensione nel circuito di corrente alternata.
Illustrazione 1 Illustrazione 2
• El aparato ha sido producido por HK AUDIO® según el I EC 60065 y salió de
la fábrica en un estado técnicamente pe rfecto. Para conservar este estado y
asegurar un fun cionamiento sin peligros el usuario debe tener en cuenta las
indicaciones y advertencias contenidas en l as instrucciones de manejo.
El aparato corr esponde a la clase de protección l (toma de tierra protegida).
• LA SEGURIDAD, L A FIABILIDAD Y EL RENDIM IENTO DEL APARATO SOLO
ESTAN GARANTIZADOS POR HK AUDIO® CUANDO:
• el montaje, la ampliación, el reajuste, los cambios o las repar aciones se
realicen por HK AUDIO® o por pers onas autorizadas para HK AUDIO®;
• la instalación eléctrica del recinto en cuestión corresponda a los requisitos
de la determina ción del IEC (ANSI);
• el aparato se use de acuerdo con la s indicaciones de uso.
ADVERTENCIA:
• Si se destapan protecciones o se retira n piezas de la carcasa, exceptuando si
se puede hacer manualmente, se pueden d ejar piezas al descubierto que sean
conductoras de tensión.
• Si es necesario abrir el aparato, éste tiene que estar aislado de todas las
fuentes de alim entación. Esto se debe t ener en cuenta antes del ajuste, de un
entretenimiento, de una reparación y de una sustitución de las piezas.
• Un ajuste, un entretenimiento o una rep aración en el aparato ab ierto y bajo
tensión sólo pu ede ser llevado a cabo por un especialista autor izado por el
productor (según VBG 4) que conozca a fondo los peligros que ello conlleva.
• Las salidas de altavoces que estén prov istas de la característica IEC 417/5036
(figura 1, véas e abajo) pueden conducir tensiones peligrosas al con tacto. Por
ello es indispe nsable que antes de pone r en marcha el aparato; la conexión
se haya realiza do únicamente con el cab le de empalmes recomendado por el
productor.
• Las clavijas de contacto al final de los cables conectores tien en que estar
atornilladas o enclavadas a la carcasa, en tanto que sea posibl e.
• Sólo se pueden utilizar fusibles del ti po IEC 127 con la in tensidad de corriente
nominal indicada.
• El uso de f usibles reparados o la p uesta en cortocircuito del soporte es
inadmisible.
• El empalme del conductor de protección no se puede interrumpir en ningún
caso.
• Las superficies provistas de la característ ica "HOT" (figura 2, véa se abajo),
los paneles de fondo trasero o las protecciones con ranuras de ventilación, los
cuerpos de vent ilación y sus protecciones, así como las válvulas electrónicas y
sus protecciones pueden alcanzar temperaturas muy altas durante el funcionamiento y por ello no se deberían to car.
• Niveles elevados de la intensidad de so nido pueden causar continuos daños
auditivos; por ello debe evitar acercarse demasiado a altavoces que funcionen
a altos niveles . En tales casos utilice protecciones auditivas.
ACOMETIDA A LA RED:
• El aparato está proyectado para un func ionamiento continuo.
• La tensión de funcionamiento ajustada tiene que coincidir con la tensión de la
red del lugar.
• La conexión a la red eléctrica se e fectuará con la fuente d e alimentación o con
el cable de red que se entreguen co n el aparato.
• Fuente de alimentación: una linea de conexión dañada no se puede sust ituir.
La fuente de alimentación no puede volv er a ponerse en funciona miento.
• Evite una conexión de la red eléctrica a distribuidores con muchas tomas de
corriente.
• El enchufe para el suministro de corrie nte tiene que estar cerc a del aparato
y ser de fá cil acceso.
SITUACION:
• El aparato debería estar situado en una superficie limpia y totalmente horizontal.
• El aparato no puede estar expuesto a ningún tipo de sacudidas durante su
funcionamiento.
• Se deben evitar la humedad y el pol vo.
• El aparato no puede ponerse en funciona miento cerca del agua, l a bañera, el
lavamanos, la p ila de la cocina, un recinto con tuberías de agua, la piscina o
en habitaciones húmedas. Tampoco se pueden poner objeto s llenos de líquido
- jarrones, vas os, botellas, etc. - enc ima de él.
• Procure que el aparato tenga suficiente ventilación.
• Las aberturas d e ventilación existentes no se deben bloquear ni tapar nunca.
El aparato debe estar situado como míni mo a 20 cm de la pared. El aparato
sólo se puede montar en un rack, si se ha procurado la suficiente ventilación y
se han cumplido las indicaciones de mon taje del productor.
• Evite los rayos del sol directos así co mo la proximidad a radia dores, electroradiadores o ap aratos similares.
• Si el aparato pasa repentinamente de un lugar frío a otro c aliente, se puede
condensar humedad en su interior. Esto se debe tener en cuenta sobretodo en
los aparatos co n válvulas electrónicas. Ant es de poner en marcha el aparato se
debe esperar ha sta que éste haya adquir ido la temperatura ambiental .
• Accesorios: el aparato no se puede colocar encima de carros, estantes, trípodes,
soportes o mesa s inestables. Si el apar ato se cae puede causar daños personales y se puede estropear. Coloque el aparato sólo en un carro, rack, e stante,
trípode o sopor te recomendado por el pr oductor o que se le haya vendido
junto con el aparato. En la instalación se deben seguir las indicaciones del
productor así c omo utilizar los accesorios recomendados por el mism o para
colocarlo encima. El conjunto del aparato con el pedestal se de be mover con
mucho cuidado. Un paro brusco, la aplic ación de una fuerza desm esurada o un
suelo irregular puede ocasionar la caida de todo el conjunto.
• Piezas adicionales: no utilice nunca piezas adicionales que no esté n recomendadas por el productor, ya que se podrían provo car accidentes.
• Para protejer e l aparato de una torment a o si no se supervi sa ni utiliza durante
algún tiempo, s e debería desconectar la clavija de la red. Así se evitan daños
en el aparato a causa de un rayo y golpes de tensión en la red de corriente
alterna.
Figura 1 Figura 2
Page 4
L.U.C.A.S SMART Manual 1.0
Welcome to the HK AUDIO® family!
Thank you for choosing (another) HK AUDIO®
product.
L.U.C.A.S SMART consists of two satellites and a
compact subwoofer equipped with a power amp
and all the electronics required to drive the bass bin
and satellite. Painstakingly fine-tuned to match the
speakers for superior impulse response and the
best possible sound, the electronic circuitry makes the
system easy to handle and protects it from overloads.
You don't have to worry about tweaking frequencies
and finessing levels, all you have to
do is set up the system components, connect the
signal-carrying cords and power cable, and you're
ready for action.
Every HK AUDIO® active system is much more than
just a cabinet with an onboard power amp. Each
one is a full-fledged sound reinforcement solution
consisting of a subwoofer, satellite and meticulously
matched electronics. Our engineers brainstormed
new technologies specifically to satisfy stringent
performance requirements. Unique and sophisticated,
these features make an active HK AUDIO® sound
reinforcement system stand out from the crowd.
Warranty
Register your L.U.C.A.S SMART using the enclosed
warranty card to extend your warranty to five years
free of charge.
Use the convenient Online Registration option at
www.hkaudio.com
If you are unable to register online, please fill out the
enclosed warranty card completely and mail
or fax it to us. The registration is only valid if the warranty registration card is filled out and returned to HK
AUDIO® or the device is registered via the Internet
within 30 days after the date of purchase.
We are also interested in learning where and by whom
our devices are used. This information will help us design future products. Your data is of course protected
by privacy laws.
Thank you.
HK AUDIO
Technical Service
Postfach 1509
D-66595 St. Wendel, Germany
®
Table of Contents
1 L.U.C.A.S SMART’s Control Features . . . . . . . . . 6
2 Setting Up and Connecting L.U.C.A.S SMART . . 7
3 Mounting Satellites on Speaker Stands . . . . . . . 7
4 Operating the System . . . . . . . . . . . . . . . . . . . . . 8
5 Settings. . . . . . . . . . . . . . . . . . . . . . . . . . . . . . . . . 8
6 L.U.C.A.S SMART Accessories . . . . . . . . . . . . . . . 9
7 Tips and Tricks . . . . . . . . . . . . . . . . . . . . . . . . . . . 9
8 Troubleshooting . . . . . . . . . . . . . . . . . . . . . . . . . 10
9 Technical Specifications . . . . . . . . . . . . . . . . . . . 11
Page 5
5
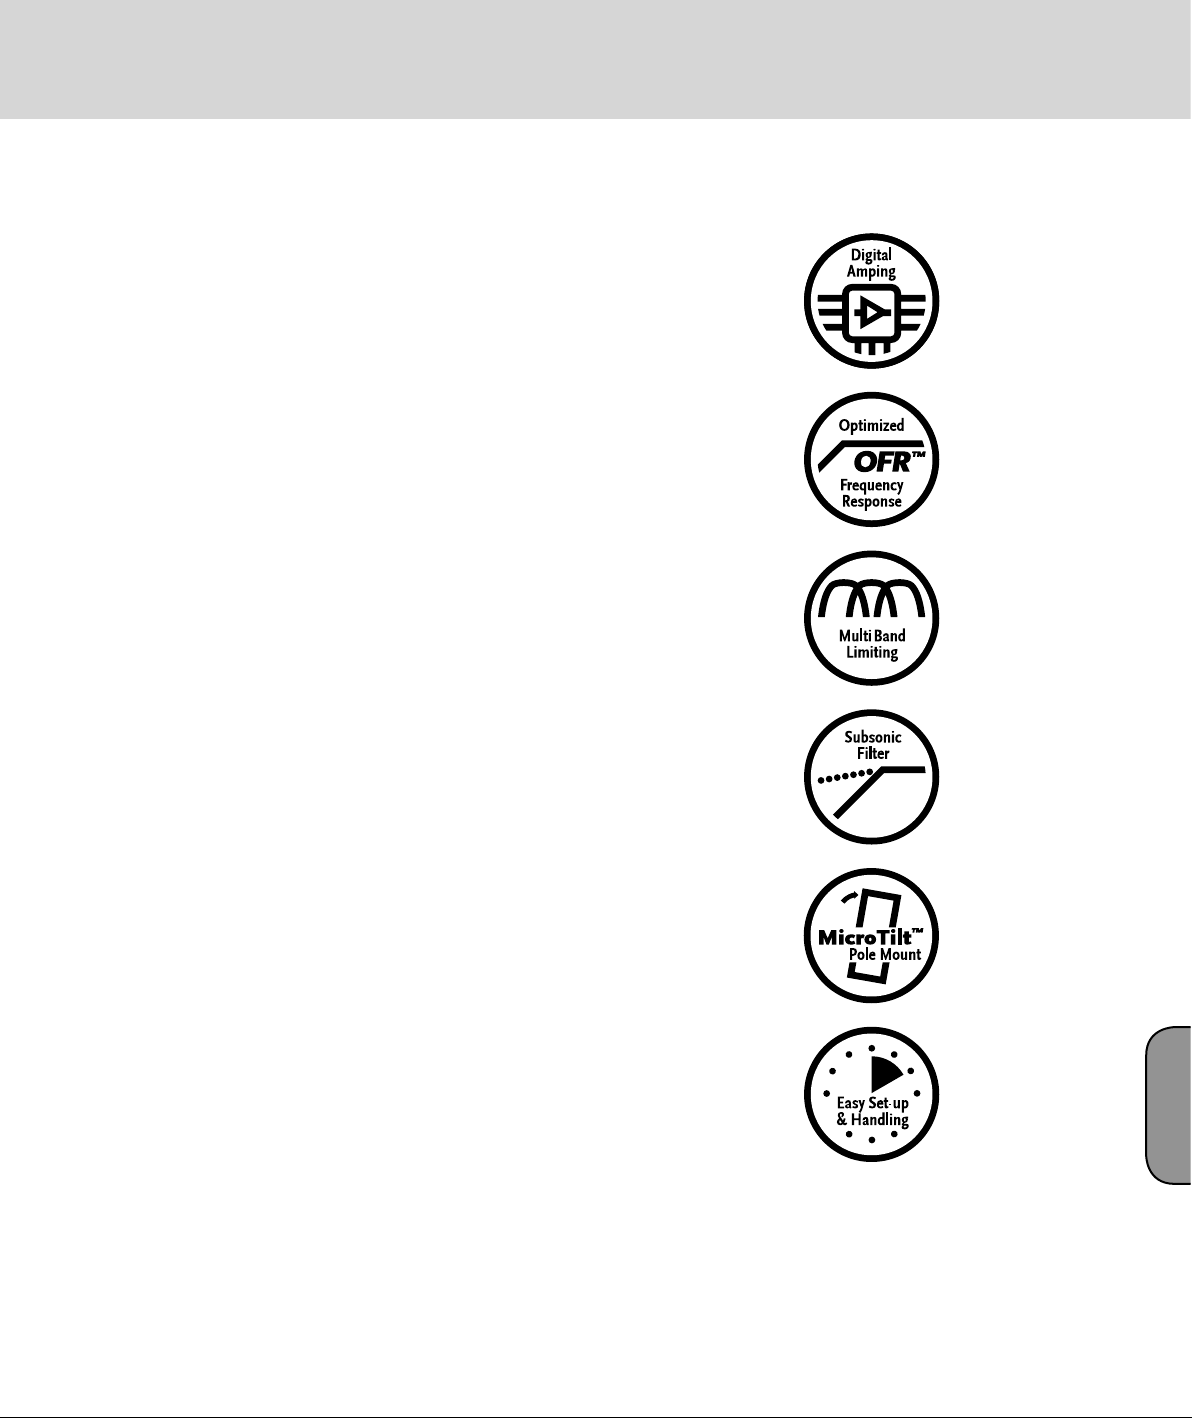
Digital Amping
Enhanced Efficiency and Dynamic Response
With an efficiency rating topping the 90% mark,
digital power amps are smaller, lighter, and more
compact than comparable conventional amps.
The reduced thermal load on components clearly
enhances reliability. The slew rate is far faster and
the damping factor is higher, resulting in audibly
more responsive and accurate performance.
• Outperforms analog power amps in efficiency for
greater reliability and lower current consumption
• Faster signal transmission for enhanced dynamic
response
OFR™
Optimized Frequency Response Technology
HK AUDIO®’s unique OFR™ technology deliver
commanding yet well-balanced sound at every level.
It corrects for non-linear frequency response in the
speaker components at the same time as it compensates for the way human hearing works at varying
levels.
• Fine-tuned to each system
• Rectifies non-linear frequency response
• Adapts the system to different volumes
• Powerful, balanced sound in every situation
MultiBand Limiting
Specialized limiting for each frequency range
Subsonic Filter
Preventing Low Frequency Interference
The integrated subsonic filter eliminates accidental
and unintentional signals such as footfalls, wind,
or the sound of a hand accidentally brushing a
microphone. It cuts these frequencies drastically,
freeing energy to render bass impulses better.
Goodbye squashed dynamics and artificial sound,
hello authenticity and natural sounding low/mid
frequencies.
• Increases power and volume in the useful
frequency range
• Protects power amps and speakers from harmful
ultra-low frequencies
DuoTilt™ and MicroTilt™
Making the Most of Sonic Energy
The new DuoTilt™ and MicroTilt™ speaker stand
mounting collars allow sound energy to be utilized
far more efficiently. The DuoTilt™ offers downward angles of 7.5° and 15°, and MicroTilt™ 10°, to
better aim the mid/high-range cabinets directly at
the audience. Troublesome ceiling reflections are
minimized; the soundscape is clearer, tighter, and
more focused.
• Tilts at angles designed for the best possible
alignment of the enclosure to the audience
• Minimizes ceiling reflections, maximizes energy
efficiency
Several limiters, each specializing in its own
frequency range, work side by side to keep the entire
system under control. This ensures even dynamic
response and punchy projection for a highly musical
sound across the entire frequency spectrum.
• Tighter low-end punch, snappier kick
• Clean, emphatic mids for smooth, rich vocals
• Transparent, glossy highs with extra headroom
• Speaker overload protection
Easy Setup and Handling
Less Pre-Gig Stress for a Better Show
All HK AUDIO® Active Systems were designed
as cohesive units consisting of perfectly matched
components. Painstaking effort was invested in
developing systems that are easily transported and
swiftly set up. Operation couldn’t be easier; endless
tweaking is a thing of the past.
• A true system design: All components were
perfectly matched for performance as a unit.
• Fast set-up and effortless handling saves time and
spells less pre-performance stress
English
Page 6
L.U.C.A.S SMART Manual 1.0
1
10 11 12 13
14
1516 17
2
3 4 5 6 7 8 9
14
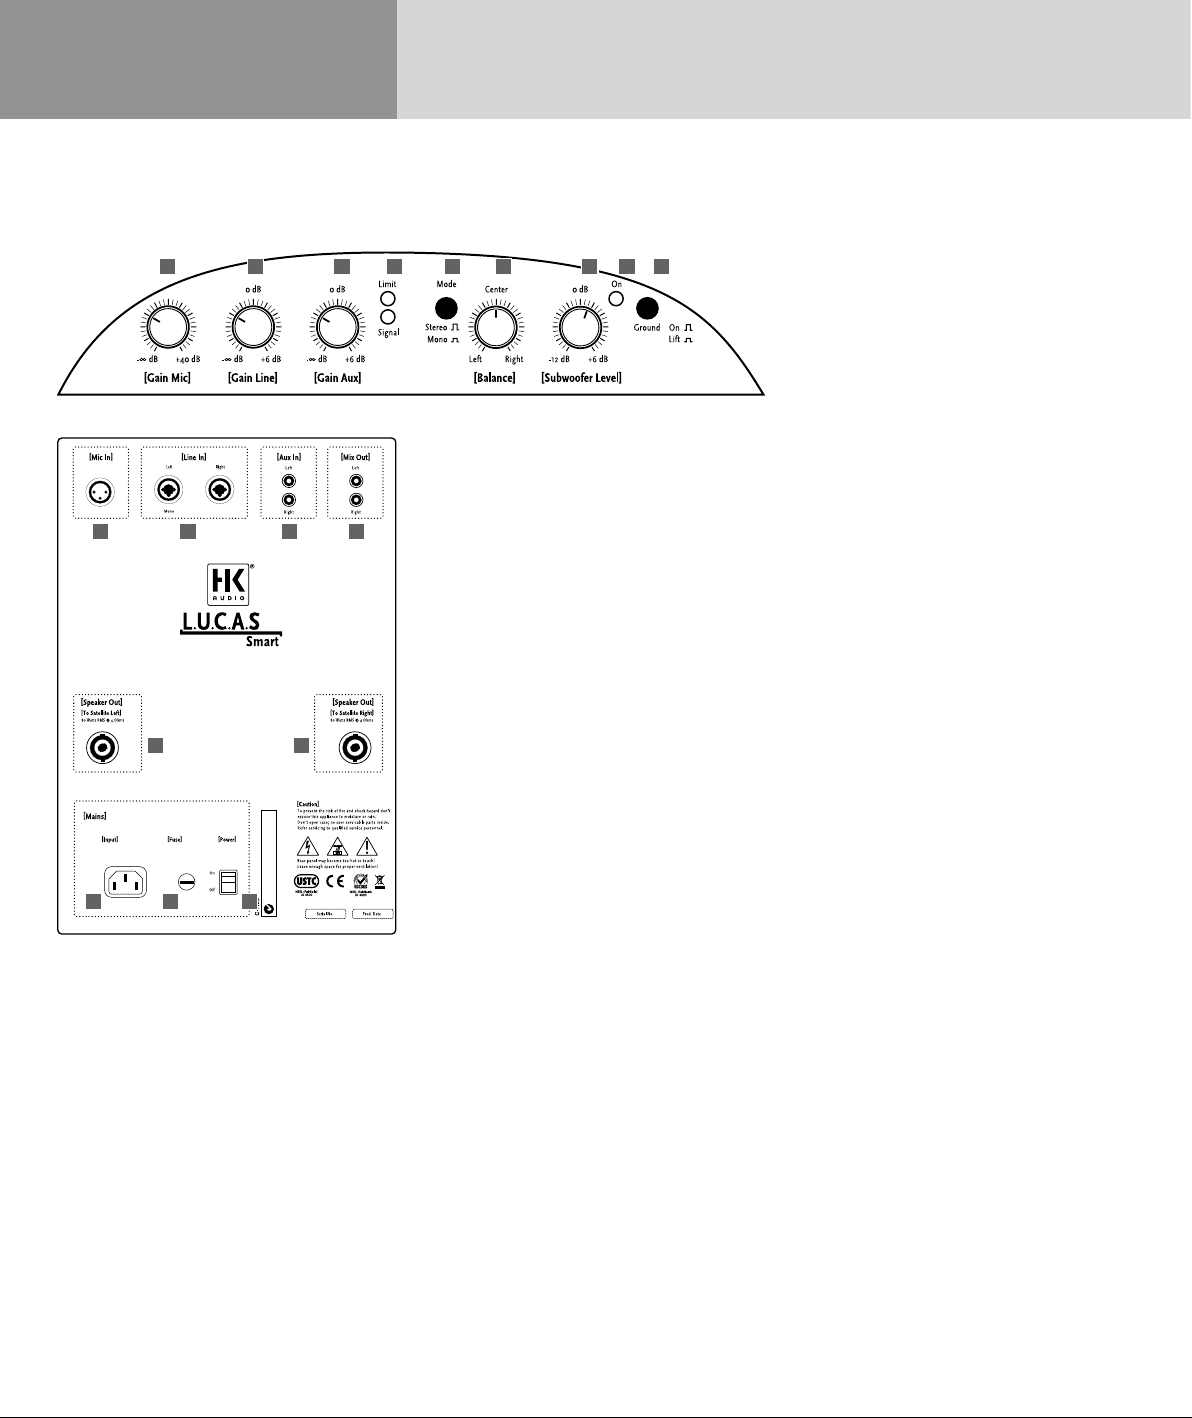
1 L.U.C.A.S SMART’s
Control Features
1 Gain Mic
Twist this knob to adjust the microphone level.
Note: You can adjust the microphone and line or
auxiliary inputs separately and mix them as desired.
2 Gain Line
This knob adjusts power amp gain to match input
signal levels. In the event that distortion becomes
audible, the incoming signal level is too high. Simply
back off this knob.
3 Gain Aux
This knob adjusts power amp gain to match input
signal levels. In the event that distortion becomes
audible, the incoming signal level is too high. Simply
back off this knob.
4 Limiter Status LEDs
These dual-color LEDs indicate the operating status
of the multi-band limiter. Green = incoming signal,
limiters inactive; yellow = limiter occasionally activated; red = limiters operating continuously.
5 Mode
If you have just a mono signal available, patch it to
the left input of the Line In or Aux In circuits. Set the
Mode switch to Mono. When you do this, the system
outputs the monaural input signal on both sides
(the left and right).
6 Balance
Use this knob to adjust the relative levels of the left
and right channels.
8 Power On LED
This LED lights up when the system is plugged into
a mains power supply and the Power switch (see
rear panel) is set to On.
9 Ground
Ground lift switch for separating the signal and
chassis ground when you encounter problems with
humming noises. The ground circuit is severed when
you press the button in.
Caution: Never tape over the plug’s ground terminal
– this endangers lives!
10 Mic In
You may plug a microphone directly into this electronically balanced XLR input. (pin 1= ground, 2= +,
3= -).
11 Line In Left/Right
This electronically balanced XLR input is designed
to take mixer signals (pin 1= ground, 2= +, 3= -).
You can also use cables equipped with 1/4" TRS (stereostyle) plugs (tip = +, ring = -, shield = ground).
12 Aux In
RCA connector designed to take external signal
sources such as (DJ) mixing consoles and CD players.
13 Mix Out
Master output for patching Line, Aux In and Mic In
signals through to other devices such as tape decks
and MD recorders or another L.U.C.A.S SMART
system.
14 To Satellite Left/Right
Connect these Speakon® outputs to L.U.C.A.S
SMART’s satellite speakers.
15 Fuse
Mains fuse. In the event of a malfunction, this fuse
will blow, severing the connection between
L.U.C.A.S SMART and the mains power supply in
order to protect the system from harm. Replace only
with another fuse of the same type and rating as
specified.
7 Subwoofer Level
Use this knob to adjust the relative volume of the
subwoofer.
16 Mains Input
Use the factory-included power cord to connect this
socket to a mains outlet.
Page 7
Caution! Make sure the local mains voltage matches
the voltage specified on the rear panel of L.U.C.A.S
SMART. If you connect the L.U.C.A.S SMART system
to the wrong mains voltage, you can damage its electronic components.
17 Power Switch
L.U.C.A.S SMART on/off switch. The light within the
switch will glow red to indicate that it is powered up.
ohms. Under no circumstances may the impedance
fall below this value, otherwise the power amp
may suffer serious damage! Use L.U.C.A.S SMART
satellite loudspeakers only!
Note: This system’s components were matched
and tuned for superior audio performance in the
configuration described herein. Do not set up or use
this system in any other configuration. If you use
satellites other than those that ship with the system,
this could degrade the system’s sound or even damage
the power amp.
7
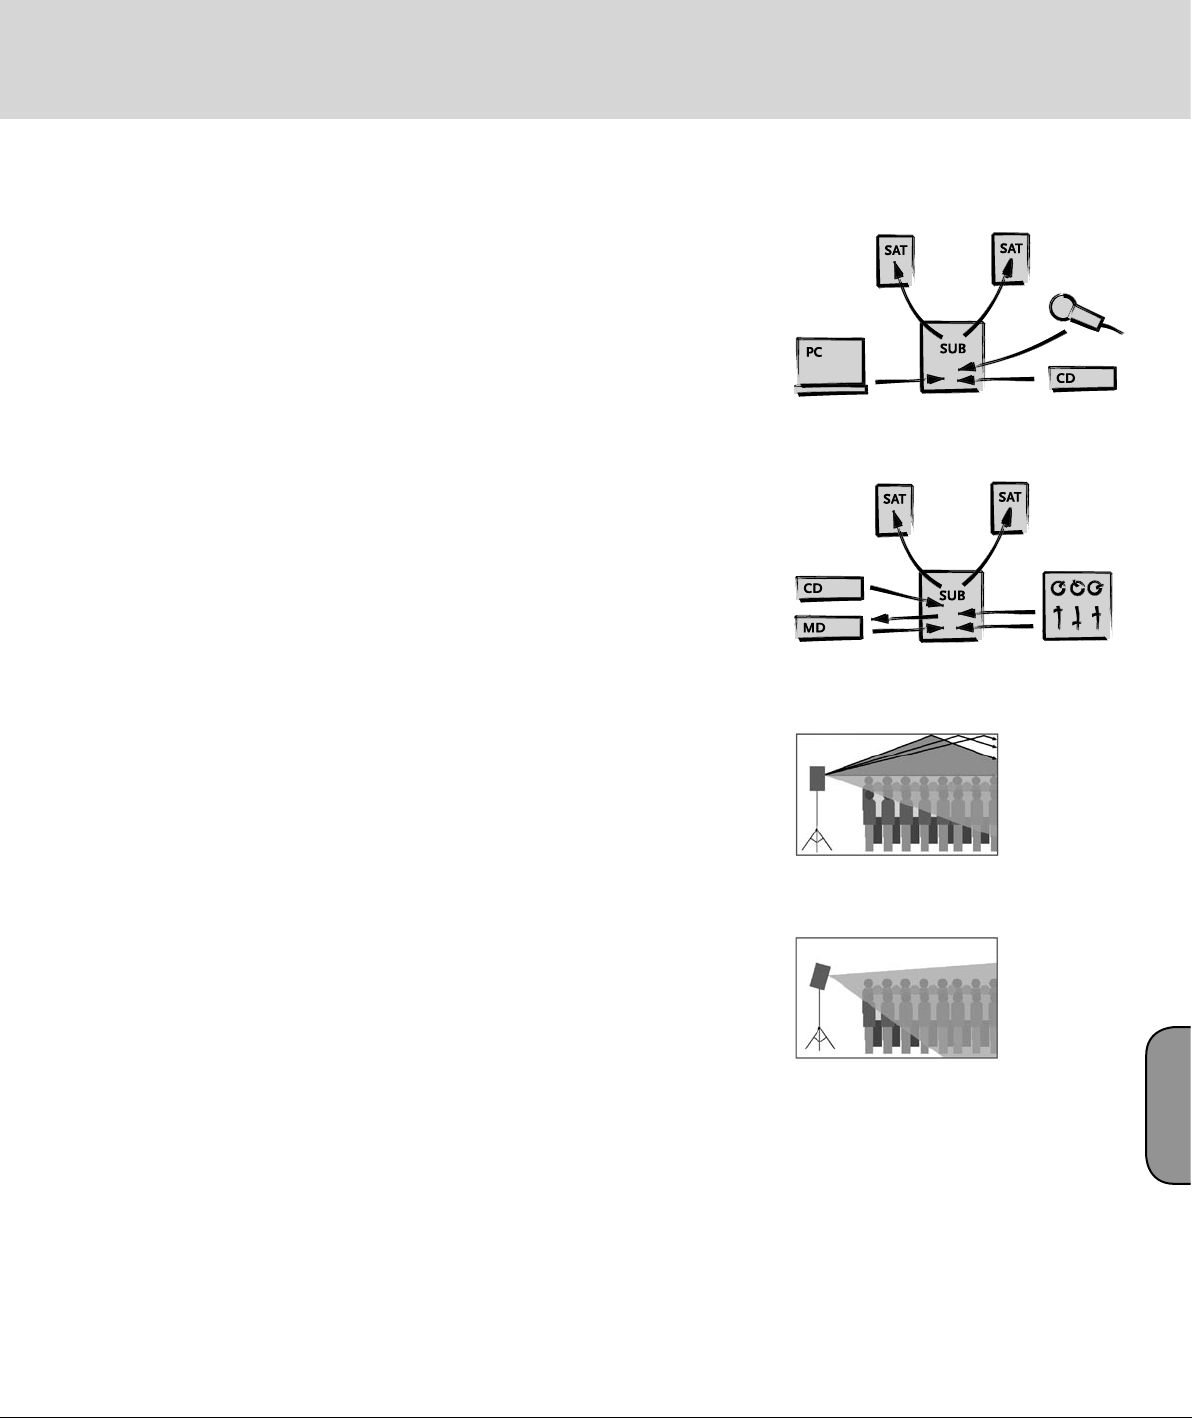
Presentation setup
2 Setting Up and Connecting
L.U.C.A.S SMART
Line In
Connect cables carrying signals from your mixer
(master left/right, line out, or a similar circuit) to
the balanced Input sockets using a cord equipped
with standard XLR microphone connectors or 1/4"
plugs. Make sure the XLR connectors have the following pin assignments: 1= ground, 2= +, 3= -. You
can also use cables equipped with 1/4" TRS (stereostyle) plugs
(tip = +, ring = -, shield = ground).
Aux In
Connect cables carrying signals from your DJ mixer,
CD player or tape deck (CD out, tape out, or similar
output) to Aux In using a cable equipped with RCA
connectors.
Mic In
If you want to connect a microphone directly to
L.U.C.A.S SMART without going into a mixer first,
plug it into the balanced Mic In socket. Use a
standard XLR microphone cable for this. Make sure
the XLR connectors are wired with pin 2 hot (pin
assignments: 1 = ground, 2 = +, 3 = -).
Satellite Left/ Right
Connect the L.U.C.A.S SMART system’s satellite
speakers to the Satellite Left and Satellite Right outputs. Use Speakon® loudspeaker cables with wire
cross-sections of at least 2 x 1.5 mm2 to do this.
Caution: The Satellite Left and Satellite Right outputs are designed for a nominal impedance of four
An electrical connection between the cord and input
jack is not established until the Speakon® connector locks into place. Turn the Speakon connector
clockwise until it engages.
3 Mounting the Satellites
on Speaker Stands
The newly developed, integrated MicroTilt™ pole
mount enables far more efficient use of sound energy. Offering a 10° angle of tilt, it lets you line up
cabinets so that they face the audience rather than
towards walls and ceilings. Troublesome ceiling
reflections are minimized, and you end up with a
focused sound that is clear and punchy. Cabinets are
stabilized
at their center of gravity - no wobbling, tilting,
or unintentional turning. What’s more, the HK
AUDIO® MicroTilt™ collar can accept microphone stands. The maximum attainable height with
microphone stands is 165 to 170 cm (about 5 1/2
feet), which is often sufficient for smaller events or
presentations
at which the audience is seated.
The HK AUDIO® L.U.C.A.S SMART Add-On Package
is highly recommended for musical performances
or presentations requiring coverage of greater areas
and distance (10 to 15-meters / 30 to 50 feet). This
kit consists of two stands (extendable to a height of
205 cm / 6’ 8"), a practical gig bag for easy transport and two loudspeaker cables for connecting the
satellites to the subwoofer.
Live performance setup
That was then: Up to 50% of the
sound energy was wasted
HK AUDIO® MicroTilt™: Full
utilization of sound energy
English
Page 8

L.U.C.A.S SMART Manual 1.0
4 Operating the System
First, make sure the Power On switch is set to the
Off position.
Caution! Connect the power cable only after you
have made absolutely sure that the local mains
voltage matches the voltage specified on the device.
If you connect the system to the wrong mains voltage,
you can easily damage the electronic components of
the L.U.C.A.S SMART system.
Gain Line In, Aux In, Mic In
Turn all Gain knobs (Gain Line, Gain Mic and Gain
Aux) all the way down (counterclockwise as far as
they will-go).
Before you power L.U.C.A.S SMART up, make sure
that all connected peripheral components are
switched on first. Your mixer, and all signal sources
connected to it such as keyboards, instrument amps,
effects and so forth, should be switched on-first.
The L.U.C.A.S SMART system should always be switched on last. Again, that means after you switch on
all connected devices. After you power the system up
by activating the On/Off switch (it will light up red
when it is set to On and getting mains power),
set the Gain Line knob to the center or 12 o’clock
position (= 0 dBV).
This is the preferred level if you have connected
a mixer to L.U.C.A.S SMART. If you connect a CD
player or a keyboard directly to the system, turn the
Gain Line knob clockwise all the way to the far right
to achieve maximum volume.
Note: Many DJ mixing desks are equipped with RCAformat outputs only. If you want to employ this type
of mixer, use either an RCA/XLR adapter (or RCA/1/4"
jack adapter) and plug it into the Line In port,
or connect the mixer to Aux In using a standard
RCA connector-equipped cord.
If you want to plug a CD player directly into the system, use Aux In to do this. Depending on signal
level, you can turn the Gain Aux knob all the way to
the right in order to achieve maximum volume.
5 Settings
Gain Mic Knob
Use this knob to adjust microphone level.
Note: You can adjust the microphone and line inputs
separately and mix them as desired. In the event of
audible distortion or saturated signals, back off the
Gain Mic knob.
Gain Line Knob
If you hear distortion or saturated signals, first check
the signal sources and, if possible, reduce the output
signal level there. If the signal that you are routing
to the L.U.C.A.S SMART system cannot be adjusted
at the source, adjust the power amp by backing off
the Gain Line knob.
Gain Aux Knob
Use this knob to adjust the level of the Aux In channel.
Note: You can adjust Aux In and Line In separately
and mix them as desired. In the event of audible
distortion or saturated signals, back off the
Gain Aux knob.
Mode
If you have just a mono signal available, patch it to
the left input of the Line In or Aux In circuits. Set
the Mode switch to Mono. This way the system can
output the monaural input signal on both left and
right sides.
Balance
Use the Balance knob to adjust the relative levels of
the left and right channels. The two sides’ volume
levels are equal when the knob is set to the center
position.
Subwoofer Level
When this knob is set to the center position, the
volume of the subwoofer is perfectly balanced with
the levels of the satellites so that the audience
is treated to a homogeneous sound with an even
distribution of bottom-end and top-end (satellite)
signals. If you want to boost or cut the bass frequencies, simply turn the Subwoofer Level knob to the
left (down to -12 dB) or right (up to +6 dB).
Page 9
9
Ground Lift Switch
If you encounter low frequency hum, try activating
the Ground Lift switch, which severs the chassis
earth circuit. If this doesn’t eliminate the problem,
check all cables connected to the L.U.C.A.S SMART
system and all signals routed to the mixer until you
pinpoint the problem.
Caution: Never tape over the plug’s ground terminal
– this endangers lives!
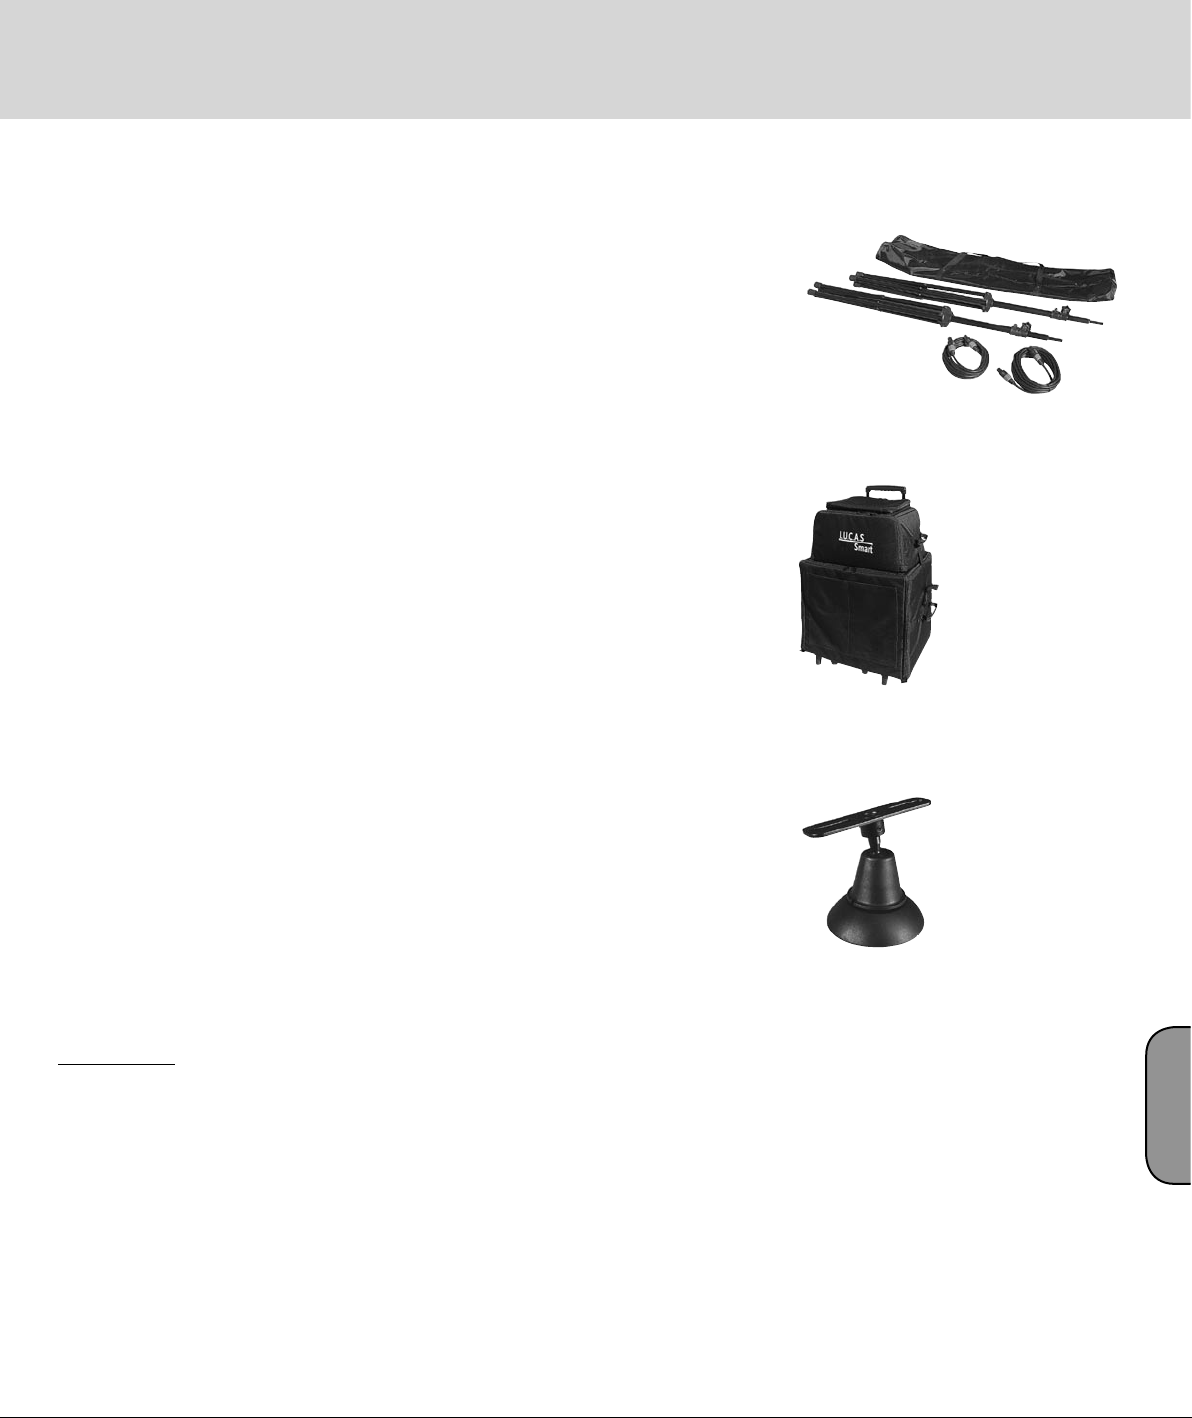
6 L.U.C.A.S SMART Accessories
L.U.C.A.S SMART Add-On Package
This complete accessory kit for L.U.C.A.S SMART
consists of two aluminum speaker stands, one gig
bag and two seven-meter speaker cables.
L.U.C.A.S SMART Roller Bag
A convenient and secure transportation solution for
the L.U.C.A.S SMART system, this roller bag offers
rugged upholstered bags designed to protect the
subwoofer and satellites. Simply strap the bag containing the satellites to the subwoofer and transport
the entire PA system easily on the built-in casters.
The roller bag also offers several practical compartments, perfect for storing cables, microphones and
even small mixers.
L.U.C.A.S SMART Wall Mount
Wall-mounting bracket for L.U.C.A.S SMART satellite
speakers.
To learn more about original HK AUDIO® accessories, talk to an HK AUDIO® dealer near you or visit
www.hkaudio.com
7 Tips and Tricks
1 Don’t expose electronic circuitry to moisture! When
you set the system up outdoors, be sure to protect
it against rain. Keep soft drinks, beer or any other
liquids well away from the cabinets to protect their
electronic components from short circuits.
2 L.U.C.A.S SMART delivers optimum sound when
you provide it with optimum input signals! Noise
such as hum is generally caused by defective
cables, the wrong type of cables, or unbalanced
signals routed into the mixing console. Check all
signal and mains cables.
3 Prevent distortion! Not only is it unpleasant to
the ears of your audience, it can also endanger
your equipment. Make sure all components
that are connected directly and indirectly to the
L.U.C.A.S SMART system have sufficient power
ratings, and that they don’t distort from running
at their respective limits. Provide an undistorted
signal to the system. If you send a distorted signal,
backing off the Gain knob won’t help clean it up.
Keep it clean!
4 Avoid ground loops! Even if the signal-carrying
circuit is balanced, redundant ground circuits in
a single audio system may generate undesirable
humming. For example, you may encounter a
ground loop when the mixer is grounded via a
mains cord that isn’t connected to the same mains
circuit as the L.U.C.A.S SMART system. To prevent
this problem, always be sure to connect L.U.C.A.S
SMART and the mixing console to the same electrical circuit. (Same phase!) If your equipment hums
despite this precaution, the Ground Lift switch can
be a great help.
L.U.C.A.S SMART Add On Package
L.U.C.A.S SMART Roller Bag
L.U.C.A.S SMART Wall Mount
Caution: Never tape over the plug’s ground terminal
– this endangers lives!
English
Page 10

L.U.C.A.S SMART Manual 1.0
8 Troubleshooting
The Power On LED and the mains switch do not
light up red after you switch the system on.
• Check if the power cord is plugged into the
Mains Input.
• Check if the mains power supply is actually
providing current.
• Check if L.U.C.A.S SMART’s fuse is defective.
Replace only with another fuse of the same type
and rating as specified.
The Power On LED and the Power switch light up
red, but no sound is coming from the cabinets.
• Check the cables that you connected to the Line In,
Mic In and Aux ports.
• Check if the signal sources (mixer, keyboard,
CD player) are-on.
• Are the Gain knobs turned up?
• Check the loudspeaker cables for damage.
• Check if the Speakon® connectors plugged into
the Satellite Left and Satellite Right sockets are engaged all the way (rotated fully to the right). Only
then will an electrical connection be established.
The subwoofer’s bass response sounds thin or weak.
• Check the setting of the Subwoofer Level knob.
Adjust the volume of the subwoofer using the
Subwoofer Level knob until you get the kind of
bottom end you want to hear.
The signal sounds distorted.
• Check the LED displays on your mixer. They should
not be constantly in the red. If necessary, back off
the volume at the mixer.
• If the LED displays on your mixer are in the green,
turn down the L.U.C.A.S SMART’s Gain knob (Line
In or Aux In).
• Observe the LEDs of the Limiter Status displays on
L.U.C.A.S SMART’s control panel. If the yellow LED
lights up continuously, the integrated protective
functions are working at full capacity. In this instance, do not turn the volume level up any higher.
Annoying hum
• Check the cables that you are using to connect the
signal source to L.U.C.A.S SMART. Replace damaged
cables.
• If you cannot pinpoint the cause of the hum, press
the Ground Lift switch. This should remedy the
problem in most cases.
Page 11

9 Technical Specifications
11
L.U.C.A.S SMART Subwoofer
Inputs/Outputs:
Line In: XLR female, 1/4" combination jack
(pin 1= ground; 2= +, 3= -) electronically balanced &
floating
Aux In: RCA connector unbalanced
Mic In: XLR female (pin 1 = ground; 2 = +, 3 = -)
electronically balanced & floating
Sum Out, Master Out: RCA connector unbalanced
Output level: +4 dBV peak
Satellite speaker outs: Speakon® (pin 1+ = +, 1- = -)
Amplifier and loudspeakers Subwoofer
Subwoofer power output: 250 W / 3 ohms @ 0.3 % THD
Satellite power output: 2x 80 W / 4 ohms @ 0,3 % THD
Protection circuits: HK AUDIO® Multi Band Limiter,
Subsonic Filter
Low-frequency loudspeaker: 1x 10" HK AUDIO® Custom
Impedance: 3 ohms
Active crossover: 90 Hz; 24 dB/octave,
Frequency response: 43 Hz to 92 Hz, +/-3dB
34 Hz to 140 Hz, -10dB
Sound pressure level 1W/1m, half-space: 97 dB
Max. sound pressure level/1m, half-space: 117 dB @
10% THD
Weight: 21 kg/ 46.2 lbs.
Dimensions (WxHxD): 32 cm x 41 cm x 46,5 cm
(12-5/8" x 16-1/8" x 18-3/8")
L.U.C.A.S SMART Satellite
Loudspeaker input: Speakon® NL 4 (pin 1+ = +, 1- =
-)
Mid-range loudspeaker: 1x 6.5" HK AUDIO® Custom
Tweeter: 1x 1" Dome Tweeter
Mounting collar: HK AUDIO® MicroTilt™, 15 mm
Impedance: 4 ohms
Nominal power handling capacity: 80 W RMS
Crossover frequency (passive, internal): 3 kHz;
12 dB/octave
Frequency response (via active crossover): 92 Hz to
21 kHz, +/-3dB; 85 Hz to 23 kHz, -10dB
Sound pressure level 1W/1m, half-space: 97 dB
Max. sound pressure level/1m, half-space: 115 dB
@ 10% THD
Weight: 4.5 kg/9.9 lbs.
Dimensions (WxHxD): 18.5 cm x 27.5 cm
x 21.5 cm
(7-1/4" x 10-7/8" x 8-1/2")
General electrical data:
Protection class 1 (protectively earthed)
Mains fuse:
Version 230 V: 250 V / T 1.6 A
Version 120 V: 250 V / T 3.15 A
Version 100 V: 250 V / T 3.15 A
Max. power consumption: 370 VA
Mains voltage range: ± 10%
Ambient operating temperature: -10° C to +35° C
during operation
English
Page 12

L.U.C.A.S SMART Manual 1.0
Willkommen in der HK Audio® Familie!
Vielen Dank, dass Sie sich für ein (weiteres)
HK AUDIO® Produkt entschieden haben!
L.U.C.A.S SMART besteht aus zwei Satelliten und
einem kompakten Subwoofer, in dem die komplette
Endstufenelektronik für Bass und Satelliten integriert
ist. Die gesamte Elektronik ist für ein optimales Klangund Impulsverhalten des Systems genau
auf die verwendeten Lautsprecher abgestimmt. Gleichzeitig gewährleistet sie Schutz vor Überlastungen und
ermöglicht eine einfache Bedienung des Systems.
Sie müssen sich um keinerlei Einstell- und Einpegelarbeiten mehr kümmern, sondern brauchen nur die
Systemkomponenten aufzustellen, Netzversorgung
und Signalkabel anzuschließen und schon kann es
losgehen.
Jedes HK AUDIO® Aktivsystem ist mehr als nur eine
Box mit eingebauter Endstufe, es ist eine komplette
Beschallungslösung, bestehend aus Subwoofer,
Satelliten und einer akribisch angepassten Elektronik.
Um die bestmöglichen Ergebnisse zu erzielen, haben
unsere Ingenieure speziell für diese Systeme neue
Technologien entwickelt. Diese einzigartigen Features
heben ein aktives HK AUDIO® Beschallungssystem
aus der Masse einfacher Aktivboxen heraus.
Garantie
Registrieren Sie Ihren L.U.C.A.S SMART mit der
beigelegten Registrierungskarte und erhalten Sie
eine kostenlose Garantieverlängerung bis 5 Jahre!
Nutzen Sie die komfortable Onlineregistrierung
über www.hkaudio.de
Falls Sie keine Möglichkeit haben, sich online zu
registrieren, füllen Sie bitte die beiliegende Garantiekarte vollständig aus und senden diese per Post oder
Fax an uns. Die Registrierung ist nur gültig, wenn die
vollständig ausgefüllte Registrierungskarte innerhalb
von 30 Tagen ab Kaufdatum an HK AUDIO® eingesendet wurde bzw. die fristgerechte Registrierung über das
Internet erfolgte. Weiterhin möchten wir uns einen
Eindruck verschaffen, wo und von wem unsere Geräte
angewendet werden.
Diese Informationen unterstützen unsere zukünftige
Produktentwicklung. Ihre Angaben unterliegen selbstverständlich dem Datenschutz.
Vielen Dank!
HK AUDIO
Technical Service
Postfach 1509
D-66959 St. Wendel
®
Inhaltsverzeichnis
1 Die Bedienelemente des L.U.C.A.S SMART . . . 14
2 Anschlüsse und Verkabelung . . . . . . . . . . . . . . . 15
3 Ausrichtung der Satelliten
auf einem Hochständer . . . . . . . . . . . . . . . . . . . 15
4 Inbetriebnahme . . . . . . . . . . . . . . . . . . . . . . . . . 16
5 Einstellungen . . . . . . . . . . . . . . . . . . . . . . . . . . . 16
6 L.U.C.A.S SMART Zubehör . . . . . . . . . . . . . . . . 17
7 Tipps und Tricks . . . . . . . . . . . . . . . . . . . . . . . . . 17
8 Fehlerbehebung . . . . . . . . . . . . . . . . . . . . . . . . . 18
9 Technische Daten . . . . . . . . . . . . . . . . . . . . . . . . 19
Page 13

13
Digital Amping
mehr Effizienz und Dynamik
Mit einer extrem hohen Effizienz von über 90 % sind
digitale Endstufen wesentlich kleiner, leichter und
kompakter als herkömmliche Endstufen. Die geringere
thermische Belastung der Bauteile erhöht die Zuverlässigkeit. Die wesentlich schnellere Anstiegszeit
(slew-rate) und der höhere Dämpfungsfaktor werden
in einer deutlich schnelleren dynamischen Ansprache der Systeme hörbar.
• höhere Effizienz als analoge Endstufen bedeutet
mehr Zuverlässigkeit und geringere Stromaufnahme
• schnellere Signalübertragung für eine höhere
dynamische Ansprache
OFR™
Optimized Frequency Response Technologie
Die einzigartige OFR™ Technologie sorgt für einen druckvollen, ausgewogenen Sound bei jeder
Lautstärke. Dabei werden die Nicht-Linearitäten
im Frequenzgang der Lautsprecherkomponenten
korrigiert und die Wiedergabe des Systems an das
Hörempfinden des menschlichen Ohres angepasst.
Subsonic-Filter
Schutz vor tieffrequenten Störungen
Der integrierte Subsonic-Filter eliminiert ungewollte,
tieffrequente Störungen. Signale wie Trittschall,
Wind oder Griffgeräusche am Mikro werden drastisch abgesenkt und die Energie steht zur Übertragung der relevanten Bassimpulse zur Verfügung.
Das Ergebnis ist eine dynamische und natürliche Tief/Mittenbereich-Wiedergabe.
• höhere Ausgangslautstärke im nutzbaren
Frequenzbereich
• Schutz von Endstufe und Lautsprecher vor
schädlichen, ultratiefen Frequenzen
DuoTilt™ und MicroTilt™
bessere Ausnutzung der Schallenergie
Die neu entwickelten Ständerflansche DuoTilt™ und
MicroTilt™ ermöglichen eine effizientere Ausnutzung der Schallenergie. Mit den Aufstellwinkeln 7,5°
und 15° beim DuoTilt™ sowie 10° beim MicroTilt™
können die Topteile optimal auf das Publikum ausgerichtet werden. Störende Deckenreflexionen werden
vermieden, der Sound wird druckvoller und klarer.
• individuelle Abstimmung auf jedes System
• Korrektur der Nicht-Linearitäten im Frequenzgang
• passt die Anlage an verschiedene Lautstärken an
• druckvoller, ausgewogener Klang in jeder Situation
MultiBand-Limiting
Optimiert für jeden Frequenzbereich
Mehrere aufeinander abgestimmte Limiter bearbeiten
alle akustisch relevanten Frequenzbereiche. Durch
diese Lautsprecher-unabhängige Limitierung wird
eine ausgewogene Dynamikprojektion und damit
ein druckvoller und ausgewogener Klang über das
gesamte Frequenzspektrum erreicht.
• mehr Punch und Kick im Bass
• saubere und druckvolle Mitten für eine gute Stimmwiedergabe
• transparente Höhen mit zusätzlichem Headroom
• Schutz der Lautsprecher vor Überlastung
• Geeignete Aufstellwinkel zur optimalen Ausrichtung der Box auf das Publikum
• Vermeidung von Deckenreflexionen und bessere
Energieausnutzung
Easy Setup and Handling
weniger Stress vor dem Auftritt
Alle HK AUDIO® Aktiv-Systeme wurden als System
konzipiert und bestehen aus perfekt aufeinander
abgestimmten Komponenten. Bei der Entwicklung
wurde darauf geachtet, dass die Systeme einfach
zu transportieren und schnell aufzubauen sind.
Die Bedienung ist unkompliziert und schwierige
Einstellarbeiten sind nicht erforderlich.
• Systemkonzept: alle Komponenten sind perfekt
aufeinander abgestimmt
• schneller Aufbau und leichte Bedienung bedeuten
Zeitersparnis und weniger Stress vor dem Auftritt
Deutsch
Page 14

L.U.C.A.S SMART Manual 1.0
1
2
3 4 5 6 7 8 9
1 Die Bedienelemente
des L.U.C.A.S SMART
6 Balance
Mit diesem Regler wird das Lautstärkeverhältnis
zwischen linkem und rechtem Kanal eingestellt.
7 Subwoofer Level
Mit diesem Regler wird die Lautstärke des Subwoofers angepasst.
8 Power On LED
Diese LED leuchtet, wenn der Power-Schalter (siehe
Rückseite) auf ON steht und entsprechende Netzverbindung besteht.
10 11 12 13
14
1516 17
14
1 Gain Mic
Mit diesem Regler wird der Mikrofonpegel angepasst.
Hinweis: Der Mikrofon sowie der Line- und Aux InEingang sind unabhängig voneinander regelbar und
können so gemischt werden.
2 Gain Line
Mit diesem Regler wird die Endstufe an den Pegel
des Eingangssignals angepasst – so lassen sich
Verzerrungen vermeiden, falls das Eingangssignal
zu hoch sein sollte.
3 Gain Aux
Mit diesem Regler wird die Endstufe an den Pegel
des Eingangssignals angepasst – so lassen sich
Verzerrungen vermeiden, falls das Eingangssignal
zu hoch sein sollte.
4 Limiter Status LEDs
Diese zweifarbigen LEDs zeigen den Status der
MultiBand Limiter an (Grün = Signal, die Limiter
arbeiten noch nicht / Gelb leuchtet ab und zu = die
Limiter arbeiten kurzzeitig / dauerhaft gelb = die
Limiter arbeiten ununterbrochen).
5 Mode
Falls nur ein Monosignal zur Verfügung steht, verbinden Sie dieses mit dem linken Eingang des Line
In bzw. Aux In. Drücken Sie den Mode-Schalter auf
Mono. Nun kann das (Mono-) Eingangssignal auf
beiden Signalwegen (links und rechts) wiedergegeben werden.
9 Ground
Ground-Lift-Schalter für die Trennung von Signal- und Gehäusemasse bei Brummproblemen. In
gedrücktem Zustand wird die Masse des NF-Signals
von der Gehäusemasse getrennt.
Achtung: Nie die Masse am Netzstecker abkleben
– Lebensgefahr!
10 Mic In
Elektronisch symmetrierte XLR-Eingangsbuchse zum
direkten Anschluss eines Mikrofons. (pin 1= Ground,
2= +, 3= -).
11 Line In Left/Right
Elektronisch symmetrierte Eingangsbuchse für das
Mischpult-Signal (pin 1= Ground, 2= +, 3= -).
Es kann ebenfalls ein Kabel mit Stereo Klinkenstecker
verwendet werden (Tip = +, Ring = -, Shield = Ground).
12 Aux In
Cinch-Eingangsbuchse für das (DJ-) Mischpult/
CD-Player-Signal .
13 Mix Out
Misch-Ausgang zur Weiterleitung der Line, Aux
In- und Mic In-Signale, z.B. an ein Tape Deck, MDRecorder oder auch an weitere L.U.C.A.S SMART
Systeme.
14 To Satellite Left/Right
Verbinden Sie die Speakon® Ausgangsbuchsen mit
den L.U.C.A.S SMART Satelliten.
Page 15

15
15 Fuse
Netzsicherung. Bei Betriebsstörungen trennt die
Schmelzsicherung den L.U.C.A.S SMART vom Netz
und schützt vor Beschädigung. Ersetzen Sie nur Sicherungen von gleichem Typ und gleichem Wert.
16 Mains Input
Verbinden Sie diese Anschlussbuchse mittels des
mitgelieferten Stromkabels mit der Netzsteckdose.
Achtung! Achten Sie darauf, dass die Spannungsangabe auf der Rückseite des L.U.C.A.S SMART der
Netzspannung entspricht. Der Anschluss an eine
falsche Netzspannung kann die elektronischen
Elemente des L.U.C.A.S SMART zerstören.
17 Power Switch
Der Ein/Aus-Schalter für den L.U.C.A.S SMART. In
eingeschaltetem Zustand leuchtet der Schalter rot.
2 Anschlüsse und Verkabelung
des L.U.C.A.S SMART
Line In
Schließen Sie die von Ihrem Mischpult kommenden
Signalkabel (Master left/right, Line out o.ä.) an die
symmetrierten Input-Buchsen mit einem XLR-Mikrofonkabel oder einem Klinkenkabel an.
Die Belegung der XLR-Stecker muss dabei wie folgt
sein: 1= Ground, 2= +, 3= -. Es kann ebenfalls ein
Kabel mit Stereo Klinkenstecker verwendet werden
(Tip = +, Ring = -, Shield = Ground).
Aux In
Schließen Sie die von Ihrem DJ-Mischpult, CD-Player
oder Tapedeck kommenden Signalkabel (CD out,
Tape out o.ä.) an die Aux In-Buchse mit einem
Cinch-Kabel an.
Mic In
Falls Sie ein Mikrofon direkt ohne Mischpult an
L.U.C.A.S SMART anschließen möchten, verwenden
Sie die symmetrierte Mic In-Buchse. Verwenden Sie
dazu ein XLR-Mikrofonkabel. Die Belegung der XLRStecker muss dabei wie folgt sein:
1= Ground, 2= +, 3= -
Satellite Left/ Right
Verbinden Sie die Satelliten des L.U.C.A.S SMART
Systems mit den Ausgängen Satellite Left und
Satellite Right. Verwenden Sie dazu Speakon®-Lautsprecherkabel mit mindestens 2x 1,5 mm2 Leiterquerschnitt.
Achtung: Die Systemkomponenten sind akustisch
optimal aufeinander abgestimmt und dürfen
ausschließlich in der angegebenen Konfiguration
betrieben werden. Bei Verwendung anderer Satelliten
kann der Klang negativ beeinflusst werden bzw. die
Endstufe Schaden nehmen.
Die elektrische Verbindung zwischen Kabel und
Eingangsbuchse ist nur dann hergestellt, wenn der
Speakon®-Stecker verriegelt ist. Drehen Sie dazu
den Speakon®-Stecker im Uhrzeigersinn bis er
einrastet.
3 Verwendung von Hochständern
Der neu entwickelte, integrierte MicroTilt™ Hochständerflansch ermöglicht eine effizientere Ausnutzung der Schallenergie. Mit dem Aufstellwinkel von
10° kann die Box optimal auf das Publikum ausgerichtet werden. Störende Deckenreflexionen werden
minimiert, der Sound ist klar und verständlich.
Die Box ist dabei genau im Schwerpunkt, kein Wackeln,
kein Kippen, kein unbeabsichtigtes Verdrehen. Der
HK AUDIO® MicroTilt™ ermöglicht darüber hinaus
auch die Verwendung von Mikrophonstativen. Die
maximal erreichbare Höhe beträgt dabei 165 - 170
cm. Für kleinere Veranstaltungen bzw. Präsentationen, bei denen die Zuhörer sitzen, ist dies oftmals
bereits ausreichend. Für Musikdarbietungen oder
Präsentationen, bei denen eine größere Fläche über
eine weitere Distanz (10 - 15 m) beschallt werden
soll, empfiehlt sich das HK AUDIO® L.U.C.A.S
SMART
Add On Package. Dies besteht aus 2-Stativen, die
bis auf 205 cm ausgefahren werden können, einem
praktischen Gig Bag für den einfachen Transport und
2-Lautsprecherkabeln zum Anschluss der Satelliten
an den Subwoofer.
Setup für Präsentationen
Setup für Live-Beschallung
Bisher: Bis zu 50% der Schallenergie
gehen verloren.
Deutsch
HK AUDIO® MicroTilt™:
Optimale Nutzung der Schallenergie.
Page 16

L.U.C.A.S SMART Manual 1.0
4 Inbetriebnahme
Achten Sie darauf, dass der Power On-Schalter auf
der Stellung Off steht.
Achtung: Schließen Sie das Netzkabel erst an, nachdem
Sie sich vergewissert haben, dass die zur Verfügung
stehende Netzspannung mit der auf dem Gerät
angegebenen übereinstimmt. Der Anschluss an
eine falsche Netzspannung kann die elektronischen
Bauteile des L.U.C.A.S SMART Systems zerstören.
Gain Line In, Aux In, Mic In
Drehen Sie alle Gain-Regler (Gain Line In, Gain Mic In
und Gain Aux) zu (Anschlag links).
Achten Sie darauf, dass alle übrigen angeschlossenen
Komponenten schon vorher in Betrieb sind. Sowohl
das angeschlossene Mischpult als auch alle mit ihm
verbundenen Signalquellen wie Keyboards, Instrumentalverstärker, Effekte usw. sollten eingeschaltet
sein.
L.U.C.A.S SMART sollte immer zuletzt, d.h. nach
allen anderen Komponenten, eingeschaltet, und
zuerst, d.h. vor allen angeschlossenen Geräten, ausgeschaltet werden. Nach dem Einschalten mit dem
Power On/Off-Schalter (leuchtet rot, wenn Spannung anliegt und er auf ”On” steht) drehen Sie den
Gain Line In Regler bis auf Mittelstellung (= 0 dBV).
Wenn Sie ein Mischpult zur Ansteuerung des
L.U.C.A.S SMART benutzen, ist diese Pegelstellung
zu bevorzugen. Falls Sie direkt ein Keyboard anschließen, kann je nach Signalstärke der Gain Line-Regler
ganz nach rechts gedreht werden, um die maximale
Lautstärke zu erzielen.
Hinweis: Viele DJ-Mischpulte verfügen lediglich
über Cinch-Ausgänge. Falls Sie solch ein Mischpult
benutzen, können Sie entweder einen Cinch-XLR
(oder Cinch-Klinke)-Adapter zum Anschluss an den
Eingang Line In verwenden, oder Sie schließen das
Mischpult
über ein gewöhnliches Cinch-Kabel an den Aux InEingang an.
Falls Sie direkt einen CD-Player anschließen möchten,
verwenden Sie den Aux In-Eingang. Je nach Signalstärke
kann der Gain Aux-Regler ganz nach rechts gedreht
werden, um die maximale Lautstärke zu erzielen.
5 Einstellungen
Gain Mic-Regler
Passen Sie mit diesem Regler die Lautstärke des
Mikrofons an.
Hinweis: Mikrofon- und Line- Eingang sind unabhängig voneinander regelbar und können gemischt
werden. Falls Verzerrungen oder Übersteuerungen
auftreten, drehen Sie den Gain Mic In zurück.
Gain Line-Regler
Falls Verzerrungen oder Übersteuerungen auftreten,
überprüfen Sie die Signalquellen und reduzieren Sie
nach Möglichkeit dort das Ausgangssignal. Lässt
sich das zu L.U.C.A.S SMART führende Signal auf
diese Weise nicht verändern, passen Sie es mit dem
Gain Line-Regler an die Endstufen an.
Gain Aux-Regler
Passen Sie mit diesem Regler die Lautstärke des
Aux-Kanals an.
Hinweis: Aux In und Line In sind unabhängig voneinander regelbar und können gemischt werden.
Falls Verzerrungen oder Übersteuerungen auftreten,
drehen Sie den Gain Aux zurück.
Mode
Falls nur ein Monosignal zur Verfügung steht, verbinden Sie dieses mit dem linken Eingang des Line
In bzw. Aux In. Drücken Sie den Mode-Schalter auf
Mono. Nun kann das (Mono-) Eingangssignal auf
beiden Signalwegen (links und rechts) wiedergegeben werden.
Balance
Stellen Sie mit dem Regler Balance das Lautstärkeverhältnis zwischen linkem und rechtem Kanal
ein. In der Mittelstellung werden beide gleich laut
wiedergegeben.
Subwoofer Level
In Mittelstellung ist die Lautstärke des Subwoofers
den Satelliten so angepasst, dass ein homogener
Klangeindruck mit ausgewogenem Bass- und Mittelhochtonanteil (Satellit) besteht. Durch Drehen des
Subwoofer Level-Reglers nach links oder rechts kann
die Lautstärke des Subwoofers bei Bedarf reduziert
(bis zu -12 dB) bzw. erhöht werden (bis zu +6-dB).
Page 17

17
Ground Lift-Schalter
Beim Auftreten von tieffrequentem Brummen betätigen
Sie den Ground Lift-Schalter. In gedrücktem Zustand
wird die Masse des NF-Signals von der Gehäusemasse getrennt. Führt dies nicht zum Erfolg, überprüfen Sie die Kabel, die zu L.U.C.A.S SMART führen,
und alle am Mischpult ankommenden Signale auf
Mängel.
Achtung: Nie die Masse am Netzstecker abkleben
– Lebensgefahr!
6 L.U.C.A.S SMART Zubehör
L.U.C.A.S SMART Add On Package
Das komplette Ergänzungsset für L.U.C.A.S SMART
bestehend aus 2x Alu-Boxenhochständer, 1x Gig Bag,
2x 7m Lautsprecherkabel.
L.U.C.A.S SMART Trolley
Die bequeme und sichere Transportlösung für das
L.U.C.A.S SMART System. Der Subwoofer und die Satelliten sind optimal in stabilen gepolsterten Taschen
geschützt. Einfach die Tasche mit den Satelliten auf
den Subwoofer schnallen und schon kann das komplette System ohne Mühe auf den integrierten Rollen
transportiert werden. Der Trolley bietet weitere praktische Staufächer, in denen Kabel, Mikrophone oder
auch kleine Mischpulte Platz finden.
L.U.C.A.S SMART Wandhalter
Zur Wandmontage der L.U.C.A.S SMART Satelliten.
Mehr Informationen zu Original HK AUDIO® Zubehör erhalten Sie bei Ihrem HK AUDIO® Händler
oder im Internet unter www.hkaudio.de
7 Tipps und Tricks
1 Lassen Sie keine Feuchtigkeit an die Elektronik
kommen! Achten Sie beim Einsatz im Freien darauf,
dass Ihr System vor Regen geschützt aufgestellt
wird. Cola, Bier oder andere Flüssigkeiten dürfen
nicht an die Elektronik gelangen, da dies zu Kurzschlüssen führen kann.
2 L.U.C.A.S SMART sorgt für optimalen Sound
– sorgen Sie für das optimale Eingangssignal!
Brummen ist in den meisten Fällen das Resultat
defekter Kabel, falscher Kabel oder unsymmetrischer Eingangssignale am Mischpult. Überprüfen
Sie alle Signal- und Netzkabel.
3 Verhindern Sie Verzerrungen! Verzerrungen sind
nicht nur unangenehm für die Ohren der Zuhörer,
sie sind auch gefährlich für Ihre Anlage. Achten
Sie darauf, dass alle direkt und indirekt an L.U.C.A.S
SMART angeschlossenen Komponenten über genügend Leistung verfügen und niemals Verzerrungen
produzieren, weil sie am Limit betrieben werden.
Sorgen Sie für ein sauberes Signal, das nicht durch
den Einsatz des Gain-Reglers beeinflusst werden
muss.
4 Vermeiden Sie Brummschleifen! Auch bei sym-
metrischer Signalführung kann innerhalb eines Audio
Systems ein unangenehmer Brummton entstehen.
Ist beispielsweise das Mischpult über das Netzkabel
geerdet und hängt nicht auf dem gleichen Stromkreis
wie L.U.C.A.S SMART, so kann es zu einer sogenannten "Brummschleife" kommen. Schließen Sie
deshalb stets den L.U.C.A.S SMART und Ihr Mischpult an den gleichen Stromkreis (gleiche Phase!)
an. Sollten Sie trotzdem einmal Brummprobleme
mit der Anlage haben, so kann der GroundliftSchalter eine große Hilfe sein.
L.U.C.A.S SMART Add On Package
L.U.C.A.S SMART Trolley
L.U.C.A.S SMART Wandhalter
Deutsch
Achtung: Nie die Masse am Netzstecker abkleben
– Lebensgefahr!
Page 18

L.U.C.A.S SMART Manual 1.0
8 Fehlerbehebung
Die Power On-LED und der Netzschalter leuchten
beim Einschalten nicht rot auf.
1 Überprüfen Sie, ob das Netzkabel am Mains Input
angeschlossen ist.
2 Vergewissern Sie sich, dass das Netz Spannung
führt.
3 Prüfen Sie, ob evtl. die Sicherung des L.U.C.A.S
SMART defekt ist. Ersetzen Sie nur Sicherungen
von gleichem Typ und Wert!
Die Power On-LED und der Power-Schalter leuchten
rot auf, aber es kommt kein Ton aus den Boxen.
1 Überprüfen Sie die Anschlusskabel, die Sie an
den Anschlüssen Line In, Mic In und Aux In angeschlossen haben.
2 Prüfen Sie, ob die Signalquellen (Mischpult, Key-
board, CD- Player...) eingeschaltet sind.
3 Sind die Gain-Regler aufgedreht?
4 Überprüfen Sie die Lautsprecherkabel auf
evtl. Beschädigungen.
5 Stellen Sie sicher, dass die Speakon®-Stecker
in den Buchsen Satellite Left und Satellite Right
eingerastet sind (Drehung nach rechts). Nur dann
besteht eine elektrische Verbindung.
Es kommen nur wenig Bässe aus dem Subwoofer.
1 Überprüfen Sie die Einstellung des Subwoofer Level-
Reglers. Stellen Sie mit dem Subwoofer Level-Regler
die Lautstärke des Subwoofers wie gewünscht ein.
Die Musikwiedergabe scheint verzerrt zu sein.
1 Überprüfen Sie die LED-Anzeigen an Ihrem Misch-
pult. Sie sollten sich nicht ständig im roten Bereich
befinden. Nehmen Sie gegebenenfalls die Lautstärke
am Mischpult zurück.
2 Sind die LED-Anzeigen an Ihrem Mischpult im
grünen Bereich, drehen Sie die entsprechenden
Gain-Regler (Line In bzw. Aux In) an L.U.C.A.S
SMART zurück.
3 Beobachten Sie die LEDs der Limiter-Status-An-
zeige im Bedienfeld von L.U.C.A.S SMART. Falls
die gelbe LED ununterbrochen leuchtet, bedeutet
dies, dass die integrierten Schutzfunktionen voll
arbeiten und die Lautstärke nicht weiter erhöht
werden kann.
Störende Brummtöne
1 Überprüfen Sie die Kabel, mit der die Signalquelle
und L.U.C.A.S SMART verbunden sind. Ersetzen
Sie beschädigte Kabel.
2 Falls die Ursache des Brummens nicht gefunden
werden kann, drücken Sie den Ground Lift-Schalter. In den meisten Fällen kann damit Abhilfe
geschaffen werden.
Page 19

9 Technische Daten
19
L.U.C.A.S SMART Subwoofer
Ein- /Ausgänge:
Line In: XLR female, Klinken-Kombibuchse
(pin1= Ground; 2= +, 3= -) Elektronisch symmetriert
& floating
Aux In: Cinch, unsymmetrisch
Mic In: XLR female (pin 1= Ground; 2= +, 3= -, Elektronisch symmetriert & floating
Mix Out: Cinch, unsymmetrsich
Ausgangspegel: +4 dBV maximal
Lautsprecherausgänge Satellite: Speakon®
(pin 1+= +, 1-= -)
Ausgangsleistung Subwoofer: 250 W/3 ohms @
0,3 % THD
Ausgangsleistung Satelliten: 2x 60 W/4 ohms @
0,3 % THD
Schutzschaltungen: HK AUDIO® Mulit Band Limiter,
Subsonic Filter
Lautsprecher: 1x 10" HK AUDIO® Custom
Impedanz: 3 Ohm
Aktive Frequenzweiche: 90 Hz; 24 dB/Oktave,
Frequenzgang: 43 Hz bis 92 Hz , +/- 3dB
34 Hz bis 140 Hz , - 10dB
Schalldruck 1W/1m, halfspace: 97 dB
Max. Schalldruck/1m, halfspace: 117 dB @ 10% THD
L.U.C.A.S SMART Satellit
Lautsprecher Eingang: Speakon NL 4 (pin 1+= +, 1-=
-)
Lautsprecher: 1x 6,5" HK AUDIO® Custom
Hochtöner: 1x 1" Dome Tweeter
Hochständerflansch: HK AUDIO® MicroTilt™, 15
mm
Impedanz: 4 Ohm
Nominale Belastbarkeit: 60 W RMS
Trennfrequenz (passiv): 3 kHz; 12 dB/Oktave
Frequenzgang: 92 Hz bis 21 kHz , +/- 3 dB
85 Hz bis 23 kHz , - 10dB
Schalldruck 1/1m, halfspace: 97 dB
Max. Schalldruck/1m, halfspace: 115 dB @ 10% THD
Gewicht: 4,5 kg / 9.9 lbs.
Maße (BxHxT): 18,5 cm x 27,5 cm x 21,5 cm
(7 1/4"x 10 7/8" x 8 1/2")
Allgemeine elektrische Daten:
Schutzklasse 1/protection class 1 (protectively earthed)
Netzsicherung:
Version 230 V: 250 V / T 1.6 A
Version 120 V: 250 V / T 3.15 A
Version 100 V: 250 V / T 3.15 A
Max. Leistungsaufnahme: 370 VA
Netzspannungsbereich: +/- 10%
Umgebungstemperaturbereich: -10° C bis +35° C
im Betrieb
Gewicht: 21 kg/ 46,2 lbs.
Maße (BxHxT): 32 cm x 41 cm x 46,5 cm
(12-5/8" x 16-1/8" x 18-3/8")
Deutsch
Page 20

L.U.C.A.S SMART Manual 1.0
Bienvenue dans la famille
HK AUDIO® !
Merci d'avoir opté pour un produit HK AUDIO®.
L.U.C.A.S SMART comprend deux satellites et un
caisson de basses (subwoofer) compact dans lequel est
intégré l'ensemble de l'électronique d'étage de puissance pour le haut-parleur du caisson de basses et les
satellites. L'ensemble de l'électronique est exactement
syntonisé sur les hautes-parleurs utilisés pour assurer
un excellent comportement acoustique
et impulsionnel. Simultanément, il assure une
protection contre les surcharges ainsi qu'un contrôle
simple du système.
Vous n'avez donc plus besoin de vous soucier de
tâches de réglage et d'ajustage du niveau. Il ne
vous reste plus qu'à mettre en place les composants
du système, à raccorder le cordon d'alimentation
secteur et le câble de signaux et le tout est déjà prêt à
fonctionner.
Chaque système actif HK AUDIO® est bien plus qu'une
simple enceinte avec étage de puissance intégré,
il s'agit là d'une solution de sonorisation complète
comprenant un caisson de basses, des satellites et
une électronique adaptée avec une extrême minutie.
Afin d'obtenir des résultats optimaux, nos ingénieurs
ont développé de nouvelles technologies spécialement
pour ces systèmes. Ces caractéristiques uniques en
leur genre distinguent le système de sonorisation
actif HK AUDIO d'une multitude d'enceintes actives
simples.
Garantie
Veuillez enregistrer votre L.U.C.A.S SMART avec
la carte d'enregistrement jointe pour profiter de la
prolongation de garantie à 5 ans gratuite !
Enregistrez-vous confortablement En Ligne sur
l'adresse Internet : www.hkaudio.com
Si vous n'avez pas la possibilité de vous enregistrer en
ligne, vous pouvez également remplir la carte
de garantie jointe et nous l'envoyer par fax ou par
courrier. L'enregistrement n'est valable que lorsque
vous envoyez la carte d'enregistrement dûment
remplie dans un délai de 30 jours à partir de la date
d'achat ou lorsque vous vous êtes enregistré en bonne
et due forme et dans les délais impartis sur Internet.
Ainsi, nous avons la possibilité de savoir où et par
qui nos appareils sont utilisés. Ces informations vont
permettre de planifier la fabrication
de nos produits pour le futur. Bien entendu, vos
informations sont soumises au droit de protection
contre les abus.
Merci !
HK AUDIO
Technical Service
Postfach 1509
D-66959 St. Wendel
®
Table des matières
1 Les éléments de commande . . . . . . . . . . . . . . . . 22
2 Raccordements et câblage . . . . . . . . . . . . . . . . . 23
3 Utilisation de pieds. . . . . . . . . . . . . . . . . . . . . . . 23
4 Mise en service . . . . . . . . . . . . . . . . . . . . . . . . . . 24
5 Réglages . . . . . . . . . . . . . . . . . . . . . . . . . . . . . . . 24
6 Accessoires L.U.C.A.S SMART . . . . . . . . . . . . . . 25
7 Astuces . . . . . . . . . . . . . . . . . . . . . . . . . . . . . . . . 25
8 Recherche d'anomalies . . . . . . . . . . . . . . . . . . . . 26
9 Caractéristiques techniques . . . . . . . . . . . . . . . . 27
Page 21

21
Digital Amping
Davantage d'efficience et de puissance sonore
Malgré une efficience extrêmement élevée de plus
de 90 %, les étages de puissance numériques sont
considérablement plus petits, légers et compacts
que les étages de puissance habituels. La sollicitation
thermique réduite des composants augmente la
fiabilité. Le temps de montée (slew-rate) considérablement plus rapide ainsi que le facteur d'atténuation
plus élevé se traduisent par une réaction dynamique
nettement plus rapide des systèmes.
• Efficience accrue par rapport aux étages de puissance
analogiques signifie gain de fiabilité et réduction de
la consommation de courant
• Transfert plus rapide des signaux pour une réaction
dynamique accrue
OFR™
Optimized Frequency Response Technologie
La technologie OFR™ unique en son genre est le
garant d'un son puissant et équilibré à tout niveau
sonore. Ce faisant, les défauts de linéarité sont corrigés
dans la réponse en fréquences des composants des
haut-parleurs et la restitution du système est adaptée
à la sensibilité auditive de l'oreille humaine.
• Adaptation individuelle à chaque système
• Corrections des défauts de linéarité dans la réponse
en fréquence
• Adaptation de l'installation à divers volumes sonores
• Son puissant et équilibré en toute situation
MultiBand-Limiting
optimisé pour chaque bande de fréquence
Plusieurs limiteurs adaptés les uns aux autres traitent
toutes les bandes de fréquence significatives du point
de vue de l'acoustique. Cette limitation indépendante
des enceintes permet d'obtenir une projection dynamique équilibrée et, par conséquent, un son plus
puissant et équilibré sur le spectre de fréquences tout
entier.
• Davantage de punch et de kick dans les basses
• Médiums non falsifiés et puissants pour une bonne
restitution vocale
• Aigus transparents avec brillance supplémentaire
• Protection des haut-parleurs contre les surcharges
Subsonic-Filter
Protection contre les perturbations basse fréquence
Le filtre Subsonic intégré élimine les perturbations
basse fréquence indésirables. Les signaux comme
bruit d'impact/de pas, le vent ou les bruits de préhension sur le micro sont considérablement réduits
et l'énergie est utilisée pour le transfert des impulsions
de basses significatives. Il en résulte une restitution
dynamique et naturelle des basses et des médians.
• Volume sonore de sortie plus élevé au sein de la
gamme de fréquence utile
• Protection de l'étage de puissance et des haut-parleurs contre les fréquences ultrabasses destructives
DuoTilt™ et MicroTilt™
Pour profiter au maximum de l'énergie acoustique
Les embases pour pied DuoTilt™ et MicroTilt™
nouvellement conçues permettent de tirer plus efficacement profit de l'énergie acoustique. Grâce aux
angles de montage de 7,5° et de 15° pour ce qui est
du DuoTilt™ et de 10° pour ce qui est du MicroTilt™,
les satellites peuvent être orientés de manière optimale
vers le public. Les réflexions perturbatrices au plafond
sont évitées, le son devient plus impressionnant et
plus clair.
• Angles de montage appropriés assurant une
orientation optimale de l'enceinte vers le public
• Les réflexions au plafond sont évitées et l'utilisation
de l'énergie est augmentée
Easy Setup and Handling
Moins de stress avant la prestation
Tous les systèmes actifs HK AUDIO® ont été conçus
sous forme de système et sont constitués de composants en parfaite harmonie conceptuelle. Lors de leur
développement, les créateurs ont veillé à ce que les
systèmes soient faciles à transporter et se montent
rapidement. Leur maniement est tout à fait aisé et
des travaux d'ajustage difficiles ne sont pas nécessaires.
• Concept du système : Tous les composants sont en
parfaite harmonie conceptuelle
• Montage rapide et maniement aisé signifient gain
de temps et moins de stress avant la prestation
Français
Page 22

L.U.C.A.S SMART Manual 1.0
1
2
3 4 5 6 7 8 9
7 Subwoofer Level
Ce potentiomètre permet d'adapter le volume sonore du caisson de basses.
8 LED Power On
Cette LED est allumée si l'interrupteur principal
Power (cf. au dos) est positionné sur On et si le
système est sous tension.
10 11 12 13
14
1516 17
14
1. Les éléments de commande
du L.U.C.A.S SMART
1 Gain Mic
Ce potentiomètre assure l'adaptation du niveau du
micro.
Nota : Le micro ainsi que l'entrée Line et Aux In sont
réglables indépendamment l'un de l'autre et peuvent
être par conséquent mélangés.
2 Gain Line
Ce potentiomètre assure l'adaptation de l'étage de
puissance au niveau du signal d'entrée – ceci permet
d'éviter les distorsions au cas où le signal d'entrée
serait trop élevé.
3 Gain Aux
Ce potentiomètre assure l'adaptation de l'étage de
puissance au niveau du signal d'entrée – ceci permet
d'éviter les distorsions au cas où le signal d'entrée
serait trop élevé.
4 LED d’etat du Limiteur
Ces LED à deux couleurs indiquent l'état des limiteurs multibande (MultiBand Limiter) (vert = signal, les limiteurs ne fonctionnent pas encore / jaune
s'allume de temps en temps = les limiteurs fonctionnent brièvement / continu jaune = les limiteurs
fonctionnent sans interruption).
9 Ground
Commutateur Ground-Lift pour la séparation du signal
et du boîtier en cas de problèmes de ronflements.
A l'état enfoncé, la masse du signal BF est séparée
de la masse du boîtier.
Attention : Ne collez jamais la terre de la fiche secteur
– Danger de mort !
10 Mic In
Connecteur femelle d'entrée XLR symétrisée électroniquement pour le raccordement direct d'un micro.
(pin 1 = Ground, 2 = +, 3 = -).
11 Line In Left/Right
Connecteur femelle d'entrée symétrisée électronique
pour le signal de la table de mixage (pin 1= Ground,
2= +, 3= -). Il est également possible d'utiliser un
câble avec jack stéréo (pointe = +, Ring = -,
Shield = Ground).
12 Aux In
Prise cinch d'entrée pour la table de mixage (DJ) /
signal de lecteur de CD.
13 Mix Out
Sortie de mixage pour transmission des signaux
Line, Aux In et Mic In, p. ex. à un magnétophone (Tape Deck), MD Recorder ou à un système
L.U.C.A.S SMART supplémentaire.
5 Mode
Si seulement un signal d'entrée est disponible,
reliez-le à l'entrée de gauche de la Line In ou Aux In.
Appuyez l'interrupteur Mode sur Mono. Dès à présent,
le signal d'entrée (mono) peut être restitué sur les
deux trajets de signal (à gauche et à droite).
6 Balance
Ce potentiomètre vous permet de régler le rapport de
volume sonore entre le canal de gauche et de droite.
14 To Satellite Left/ Right
Reliez les connecteurs femelles de sortie Speakon®
aux satellites L.U.C.A.S SMART.
15 FUSE
Fusible secteur. En cas de dérangements, le fusible
coupe le L.U.C.A.S SMART du secteur et le protège
contre les détériorations. Ne remplacez le fusible
que par des fusibles de même type et de même
valeur.
Page 23

23
16 Mains Input
Reliez ce connecteur femelle de raccordement au
moyen du cordon d'alimentation secteur fourni à la
fiche secteur.
Attention ! Veillez à ce que l'indication de tension
au dos du L.U.C.A.S SMART corresponde à la tension
secteur. Le raccordement à une tension secteur non
correcte est susceptible de détruire les éléments
électroniques du L.U.C.A.S SMART.
17 Interrupteur Principal Power
L'interrupteur principal Marche/Arrêt pour le
L.U.C.A.S SMART. Sur "Marche", l'interrupteur est
allumé (lumière rouge).
2 Raccordements et câblage du
L.U.C.A.S SMART
Line In
Raccordez le câble de signaux (Master left/right,
Line out ou semblable) venant de votre table de mixage
aux prises symétrisées Input à un câble pour micro
XLR ou d'un câble avec jack. Ce faisant, les broches
de la fiche XLR doivent être affectées comme suit
: 1= Ground, 2= +, 3= -. Un câble jack stéréo peut
également être utilisé (pointe= +, Ring = -,
Shield = Ground).
Aux In
Raccordez le câble de signaux venant de votre table
de mixage DJ, lecteur de CD ou magnétophone (Tape
Deck) (CD out, Tape out ou semblable) au connecteur
femelle Aux In au moyen d'un câble cinch.
Mic In
Si vous désirez raccorder un micro directement sans
table de mixage au L.U.C.A.S SMART, veuillez utiliser
la prise symétrisée MIC IN. Utilisez à cet effet un
câble pour micro XLR. Ce faisant, les broches de la
fiche XLR doivent être affectées comme suit :
1= Ground, 2= +, 3= -
Satellite Left/Right
Reliez les satellites du système L.U.C.A.S SMART
aux sorties Satellite Left et Satellite Right. Utilisez à
cet effet un câble pour haut-parleurs Speakon® d'au
moins 2x 1,5 mm2 de section.
Attention : Les sorties pour Satellite Left et Satellite
Right sont dimensionnées pour une impédance
nominale de 4 Ohms, cette valeur ne devant en aucun cas être dépassée par le bas. Sinon, l'étage de
puissance risque d'être sérieusement endommagé
! Utilisez exclusivement les haut-parleurs satellites
L.U.C.A.S SMART !
Nota : Les composants système sont en parfaite
harmonie acoustique et ont exclusivement le droit
d'être exploités dans la configuration stipulée.
En cas d'utilisation d'autres satellites, la qualité du
son risque d'être négativement influencée ou l'étage
de puissance risque d'être endommagé.
La liaison électrique entre le câble et le connecteur
femelle d'entrée n'est établie qu'une fois que le
connecteur Speakon® est verrouillé. A cet effet, tournez le connecteur Speakon® dans le sens des aiguilles d'une montre jusqu'à ce qu'il s'enclenche.
3 Utilisation de pieds
La nouvelle embase pour pied d’enceinte MicroTilt™
intégrée assure une utilisation plus efficiente de
l'énergie acoustique. L'équerre de mise en place de
10° permet de diriger l'enceinte de manière optimale
vers le public. De cette manière, les réflexions au
plafond perturbatrices sont minimisées, le son est
transparent et compréhensible. L'enceinte est toujours sur le centre de gravité : pas de vacillement,
pas de basculement, pas de déplacement accidentel. Le HK AUDIO® MicroTilt™ permet en outre
d'utiliser des pieds de micro. Ce faisant, la hauteur
maximale pouvant être atteinte est de 165 - 170 cm.
Ceci est souvent suffisant pour de petites manifestations
ou présentations où les auditeurs sont assis.
Pour les programmes musicaux ou les présentations
pour lesquels une surface plus importante doit être
sonorisée sur une grande distance (10 - 15 m), il est
recommandé d'utiliser le kit Add On HK AUDIO®
L.U.C.A.S SMART. Ce kit supplémentaire comprend 2
pieds qui peuvent atteindre une hauteur télescopée
de 205 cm, un Gig Bag pratique pour le transport
aisé et deux câbles pour haut-parleur pour le raccordement des satellites au caisson de basses.
Setup pour présentations
Setup pour sonorisation en direct
Français
Jusqu'à présent : Jusqu'à 50 % de
l'énergie acoustique sont perdus.
HK AUDIO® MicroTilt™: Utilisation
optimale de l'énergie acoustique.
Page 24

L.U.C.A.S SMART Manual 1.0
4 Mise en service
Veillez à ce que l'interrupteur principal Power On soit
sur la position Off.
Attention : Ne branchez le cordon d'alimentation secteur qu'après avoir la certitude que la tension secteur
disponible correspond à celle indiquée sur l'appareil.
En effet, le raccordement à une tension secteur non
correcte est susceptible de détruire les éléments électroniques du L.U.C.A.S SMART.
Gain Line In, Aux In, Mic In
Réglez tous les potentiomètres Gain (Gain Line, Gain
Mic et Gain Aux) sur leurs butées de gauche.
Veillez à ce que tous les autres composants raccordés
soient déjà préalablement en service. Aussi bien la
table de mixage raccordée que toutes les sources de
signal qui y sont reliées (comme keyboards, amplis
d'instruments, effets, etc.) devraient être activés
(= être sur Marche). Le système L.U.C.A.S SMART devrait être toujours mis en marche le dernier, c'est-à-dire
après tous les autres composants et devrait être mis
hors marche (= inactivé) en premier, c'est-à-dire avant
tous les appareils raccordés. Après mise en marche par
l'interrupteur principal Power On/Off (qui s'allume en
rouge si la tension est appliquée et s'il est positionné
sur "On"), tournez le potentiomètre Gain Line jusqu'à
la position médiane (= 0 dBV).
Si vous utilisez une table de mixage pour la commande
du L.U.C.A.S SMART, cette position de niveau doit être
privilégiée. Si vous raccordez directement un keyboard,
vous pouvez régler le potentiomètre Gaine Line In – en
fonction de la puissance du signal - entièrement vers la
droite afin d'obtenir le volume sonore maximal.
Nota : De nombreuses tables de mixage DJ disposent
uniquement de sorties cinch. Si vous utilisez une telle
table de mixage, vous pouvez alors utiliser soit un
adaptateur cinch XLR (ou cinch - jack) pour un raccordement à l'entrée Line In soit vous pouvez raccorder
la table de mixage à l'entrée Aux In par un câble cinch
normal.
Si vous désirez raccorder directement un lecteur de
CD, utilisez l'entrée Aux In. C'est en fonction de la
puissance du signal que le potentiomètre Gain Aux In
peut être tourné tout à fait à droite pour un volume
sonore maximal.
5 Réglages
Potentiomètre Gain Mic
Ce potentiomètre vous permet d'adapter le volume
sonore du micro.
Nota : L'entrée Micro et l'entrée Line sont réglables
séparément l'une de l'autre et sont mixables.
En cas d'apparition de distorsions ou de surcharges,
tournez le Gain Mic In vers moins.
Potentiomètre Gain Line
En cas d'apparition de distorsions ou de surcharges,
vérifiez les sources des signaux et réduisez-y, si
possible, le signal de sortie. Si le signal menant
au L.U.C.A.S SMART ne peut pas être modifié de
cette manière, adaptez-le aux étages de puissance au
moyen du potentiomètre Gain Line In.
Potentiomètre Gain Aux
Avec ce potentiomètre, vous adaptez le volume sonore
du canal Gain Aux In.
Nota : L'entrée Micro et l'entrée Line sont réglables
séparément l'une de l'autre et sont mixables.
En cas d'apparition de distorsions ou de surcharges,
tournez le Gain Aux In vers moins.
Mode
Si seulement un signal d'entrée est disponible,
reliez-le à l'entrée de gauche de la Line In ou Aux In.
Appuyez l'interrupteur Mode sur Mono. Dès à présent,
le signal d'entrée (mono) peut être restitué sur les
deux trajets de signal (à gauche et à droite).
Balance
Réglez avec ce potentiomètre Balance le rapport de
volume sonore entre le canal de gauche et de droite.
En position médiane, les deux sont restitués avec le
même volume sonore.
Subwoofer Level
En position médiane, le volume sonore du caisson
de basses est adapté aux satellites et assure une
impression sonore homogène à part de basse et
médium/aigu équilibrée (satellite). En tournant le
potentiomètre Subwoofer Level vers la gauche ou
vers la droite, vous pouvez, selon vos souhaits, réduire
(jusqu'à -12 dB) ou augmenter (jusqu'à +6 dB) le
volume sonore du caisson de basses.
Page 25

25
Interrupteur Ground Lift
En cas d'apparition de ronflements à basses
fréquences, actionnez l'interrupteur Ground Lift.
A l'état enfoncé, la masse du signal BF est séparée
de la masse du boîtier. Si cette opération n'est pas
couronnée de succès, vérifiez l'état des câbles qui
mènent au L.U.C.A.S SMART ainsi que de tous les signaux qui arrivent à la table de mixage.
Attention : Ne déconnectez jamais la terre de la fiche
secteur – Danger de mort !
6 Accessoires L.U.C.A.S SMART
Add On Package L.U.C.A.S SMART
Le kit supplément complet pour L.U.C.A.S SMART,
comprenant 2x pieds alu élevés pour enceinte,
1x Gig Bag, 2x 7 m de câble pour haut-parleur.
Numéro de référence : 191813
Trolley L.U.C.A.S SMART
La solution de transport confortable et fiable du système
L.U.C.A.S SMART. Le caisson de basses et les satellites sont protégés d'une manière optimale dans des
sacs stables rembourrés. Il suffit de fixer le sac avec
les satellites sur le caisson de basses et l'installation
de PA complète peut déjà être transportée sur les
roues intégrées. Le chariot (Trolley) offre des compartiments de rangement supplémentaires vraiment pratiques dans lesquels vous pouvez placer câbles, micros
ou même de petites tables de mixage.
Numéro de référence : 191823
Fixation murale L.U.C.A.S SMART
Pour la fixation murale des satellites L.U.C.A.S SMART.
Numéro de référence : 191803
Pour de plus amples informations concernant les
accessoires HK AUDIO® originaux, veuillez vous
adresser à votre revendeur HK AUDIO® ou visiter
le site Internet sous www.hkaudio.com
bière, ou d'autres liquides quelconques ne doivent
pas être au contact de l'électronique. Il y a sinon
risque de courts-circuits.
2 L.U.C.A.S SMART assure un son optimal - c'est à
vous d'assurer le signal d'entrée optimal ! Un ronflement est dans la plupart des cas le résultat de câbles
défectueux, de câbles inappropriés ou de signaux
d'entrée asymétriques sur la table de mixage. Vérifiez tous les câbles de signaux et secteur.
3 Evitez les distorsions ! En effet, les distorsions ne
sont pas seulement désagréables à l'oreille des
auditeurs mais sont également dangereuses pour
votre installation. Veillez à ce que tous les composants raccordés directement et indirectement au
système L.U.C.A.S SMART disposent d'une puissance suffisante et à ce qu'ils ne produisent jamais
de distorsions car exploités jusqu'à leur ultime
limite. Assurez la délivrance d'un signal net et clair
qui n'ait pas besoin d'être influencé par l'utilisation
du potentiomètre Gain.
4 Evitez les boucles de ronflements ! Même en pré-
sence d'un signal symétrique, un son de ronflement
désagréable risque de devenir audible au sein d'un
système audio. Si, par exemple, la table de mixage
est mise à la terre par le cordon d'alimentation
secteur et n'est pas alimentée sur le même circuit
de courant que le système L.U.C.A.S SMART, ce
que l'on appelle une "boucle de ronflement" est
susceptible d'apparaître. C'est pourquoi vous devez
toujours raccorder le L.U.C.A.S SMART et votre
table de mixage au même circuit de courant (même
phase !). Toutefois, si vous vous trouvez malgré
tout confronté(e) à des problèmes de ronflement de
l'installation, c'est l'interrupteur Groundlift qui peut
s'avérer extrêmement utile.
Attention :
Ne déconnectez jamais la terre de la fiche secteur
– Danger de mort !
Add On Package L.U.C.A.S SMART
Trolley L.U.C.A.S SMART
Français
Fixation murale L.U.C.A.S SMART
7 Astuces
1 Ne laissez jamais de liquide se trouver au contact
de l'électronique ! En cas d'utilisation à l'extérieur,
veillez à ce que votre système soit convenablement
protégé contre les précipitations; du Coca, de la
Page 26

L.U.C.A.S SMART Manual 1.0
8 Recherche d'anomalies
La LED Power On et l'interrupteur Power ne
s'allument pas (rouge) au moment de la mise en
marche.
1 Vérifiez si le cordon d'alimentation secteur est
raccordé à Mains Input.
2 Assurez-vous que le secteur est sous tension.
3 Vérifiez si le fusible du L.U.C.A.S SMART est éventu-
ellement défectueux. Ne remplacez le fusible que
par des fusibles de même type et de même valeur !
La LED Power On et l'interrupteur principal
s'allument (rouge) mais aucun son ne sort des enceintes de haut-parleurs.
1 Vérifiez les câbles de raccordement que vous avez
branchés aux prises Line In, Mic In et Aux In.
2 Vérifiez si les sources de signaux (table de mixage,
keyboard, lecteur de CD...) sont activées.
3 Les potentiomètres Gain sont-ils correctement
tournés ?
4 Vérifiez si les câbles pour haut-parleur sont bien
dans un état impeccable.
5 Assurez-vous que les connecteurs Speakon® sont
bien enclenchés dans les prises Satellite Left et
Satellite Right (rotation vers la droite). Ce n'est
qu'ainsi qu'il y a liaison électrique.
La restitution musicale semble ne pas être fidèle.
1 Vérifiez les indicateurs à LED sur votre table de
mixage. Ils ne devraient pas se trouver continuellement au sein de la zone rouge. Si nécessaire,
réduisez le volume sonore sur la table de mixage
2 Si les indicateurs à LED sur votre table de mixage
sont dans la zone verte, tournez correspondamment les potentiomètres Gain (Line ou Aux) sur le
L.U.C.A.S SMART.
3 Observez les LED de l'indicateur d'état des limiteurs
dans le pupitre de commande du LUCAS SMART.
Si la LED jaune est allumée continuellement, cela
signifie que les fonctionnalités de protection intégrées fonctionnent intégralement et que le volume
sonore ne peut plus être augmenté.
Bruits de ronflement gênants
1 Vérifiez les câbles avec lesquels la source de
signaux et le LUCAS SMART sont reliés. Remplacez
les câbles endommagés.
2 Si vous ne parvenez pas à localiser l'origine du
ronflement, appuyez sur l'interrupteur Ground Lift.
Dans la plupart des cas, il vous permettra
d'y remédier.
Peu de basses sortent du caisson de basses
1 Vérifiez le réglage du potentiomètre Subwoofer Level.
Réglez, avec le potentiomètre Subwoofer Level, le
volume sonore souhaité du caisson de basses.
Page 27

9 Caractéristiques techniques
27
L.U.C.A.S SMART Subwoofer
Entrées/sorties :
Type d'entrée : conn. fem. XLR, prise combo
(pin1= Ground; 2= +, 3= -) symétrisée électroniquement & flottante
Aux In : cinch, asymétrique
Mic In : conn. fem. XLR (pin 1= Ground; 2= +, 3= -)
symétrisée électroniquement & flottante
Sum Out, Master Out : cinch, asymétrique
Niveau de sortie : +4 dBV maximal
Sorties de haut-parleur satellite : Speakon®
(pin 1+= +, 1-= -)
Puissance de sortie du subwoofer : 250 W / 3 Ohms
@ à distorsion harmonique totale de 0,3 %
Puissance de sortie des satellites : 2x 80 W / 4
Ohms @ à distorsion harmonique totale de 0,3 %
Circuits de protection : HK AUDIO® Multi Band Limiter, Filtres Subsonic
Haut-parleur : 1x 10" HK AUDIO® Custom
Impédance : 3 Ohms
Circuit diviseur de fréquence actif : 90 Hz ; 24 dB /
octave,
Réponse en fréquence : 43 Hz à 92 Hz , +/- 3 dB
34 Hz à 140 Hz , - 10 dB
Pression acoustique 1 W/ 1 m, halfspace : 97 dB
Pression acoustique maximale / 1 m, halfspace :
117 dB @ à distorsion harmonique totale de 10 %
Poids : 21 kg/ 46,2 lbs.
Dimensions (l x h x p) : 32 cm x 41 cm x 46,5 cm
(12-5/8" x 16-1/8" x 18-3/8")
L.U.C.A.S SMART Satellite
Entrée haut-parleur : Speakon® NL 4
(pin 1+= +, 1-= -)
Haut-parleur : 1x 6,5" HK AUDIO® Custom
Aigu : 1x 1" Dome Tweeter
Bride pour pied pour enceinte : HK AUDIO® MicroTilt™, 15 mm
Directivité : 80°x 50°
Impédance : 4 Ohms
Capacité de charge nominale : 80 W RMS
Fréquence séparatrice (passive) : 3 kHz ; 12 dB /
octave
Réponse en fréquence (via circuit diviseur de
fréquence actif) : 92 Hz à 21 kHz , +/- 3 dB
85 Hz à 23 kHz , - 10 dB
Pression acoustique 1 W/ 1 m, halfspace : 97 dB
Pression acoustique maximale / 1 m, halfspace :
115 dB @ à distorsion harmonique totale de 10 %
Poids : 4,5 kg/ 9.9 lbs.
Dimensions (l x h x p) : 18,5 cm x 27,5 cm x 21,5 cm
(7 1/4" x 10 7/8" x 8 1/2")
Données électriques générales :
Classe de protection 1 / protection class 1 (protectively earthed)
Fusible secteur:
Version 230 V: 250 V / T 1.6 A
Version 120 V: 250 V / T 3.15 A
Version 100 V: 250 V / T 3.15 A
Consommation maxi : 370 VA
Plage de tension secteur : +/- 10 %
Plage de température ambiante : -10° C à +35° C
pendant opération
Français
Page 28

L.U.C.A.S SMART Manual 1.0
¡Bienvenido a la familia HK AUDIO®!
Muchas gracias por haber adquirido un producto
HK AUDIO®.
El sistema L.U.C.A.S SMART consta de dos satélites y
un subwoofer compacto con la electrónica de una etapa de potencia completa para subgraves y satélites.
Toda la electrónica va unida a una óptima respuesta
de sonido y de impulso con los altavoces utilizados. Simultáneamente protege contra sobrecargas,
posibilitando un manejo sencillo del sistema.
Ya no se tiene que preocupar de tareas de ajustes y
de sincronización, simplemente tiene que montar los
componentes del sistema, conectar la alimentación
de red y los cables de señal y ya puede arrancar.
Cada sistema activo HK AUDIO® es más que una
simple caja con etapa de potencia integrada, es
una solución de sonido completa, compuesta de
subwoofer, satélites y una electrónica adaptada
exactamente. Para lograr los mejores resultados,
nuestros ingenieros han desarrollado nuevas tecnologías especialmente para estos sistemas. Estas
innovaciones únicas hacen que un sistema de sonorización HK AUDIO® activo se distinga del resto de
cajas activas simples.
Garantía
¡Registre su L.U.C.A.S SMART con la tarjeta de
registro adjunta y obtendrá una prolongación gratuita
de la garantía de hasta 5 años!
Utilice el cómodo Registro Online en www.hkaudio.
com
Si no puede usar el registro online, rellene íntegramente la tarjeta de garantía adjunta y envíenosla por
correo o fax. El registro solamente será válido si se ha
enviado la tarjeta de registro totalmente cumplimentada dentro de los 30 días siguientes a la fecha de la
compra a HK AUDIO® o se ha efectuado el registro
en el plazo correcto a través de Internet. Además,
queremos saber quién usa nuestros equipos y dónde.
Estas informaciones apoyan nuestro desarrollo de
productos en el futuro. Por supuesto, sus datos están
Protegidos.
¡Muchas gracias!
HK AUDIO
Technical Service
Postfach 1509
D-66959 St. Wendel
®
Índice
1 Los elementos de contro . . . . . . . . . . . . . . . . . . 30
2 Conexión y cableado del L.U.C.A.S SMART. . . . 31
3 Utilización de soportes altos para altavoz . . . . 31
4 Puesta en marcha . . . . . . . . . . . . . . . . . . . . . . . . 32
5 Ajustes . . . . . . . . . . . . . . . . . . . . . . . . . . . . . . . . 32
6 Accesorios para el L.U.C.A.S SMART. . . . . . . . . 33
7 Consejos y trucos . . . . . . . . . . . . . . . . . . . . . . . 33
8 Solución de errores . . . . . . . . . . . . . . . . . . . . . . 34
9 Datos técnicos . . . . . . . . . . . . . . . . . . . . . . . . . . 34
Page 29

29
Digital Amping
Eficacia y rango dinámico mejorado
Con un valor de eficacia rozando la marca del 90-%,
las etapas de amplificación digitales son más pequeñas, ligeras y más compactas que los amplificadores convencionales comparables. La carga térmica
reducida en los componentes mejora claramente la
fiabilidad. La velocidad de inflexión es mucho más
rápida y el factor de atenuación es mayor, dando
lugar a un rendimiento con más respuesta y precisión
audibles.
• Supera a las etapas de amplificación analógicas en
eficacia por la mayor fiabilidad y el menor consumo de corriente
• Transmisión de señal más rápida para una
respuesta dinámica mejorada
OFR™
Tecnología de respuesta de frecuencia optimizada
La tecnología exclusiva de HK AUDIO® OFR™ le
ofrece un sonido dominante aunque bien balanceado
a cada nivel de volumen. Corrige la respuesta de
frecuencia no lineal de los componentes del altavoz
a la vez que compensa la variación que hay en la
percepción del oído humano a niveles distintos.
• Ajustado para cada sistema
• Rectifica la respuesta de frecuencia no lineal
• Adapta el sistema para distintos volúmenes
• Sonido potente, equilibrado para cada situación
MultiBand Limiting
Limitador especializado para cada rango de frecuen-
cia
Varios limitadores, cada uno especializado en su
propia banda de frecuencias, trabajan juntos para
mantener el sistema completo bajo control. Esto
le garantiza una respuesta dinámica equilibrada y
una proyección con impacto para tener un sonido
altamente musical a lo largo de todo el espectro
de frecuencias.
• Impacto en graves más compacto y bombo
más vigoroso
• Medios limpios y enfatizados para unas voces
suaves y ricas
• Agudos transparentes y brillantes con mayor
rango dinámico
• Protección contra sobrecarga de los componentes
Subsonic Filter
Evita interferencias de frecuencias graves
El filtro subsónico integrado elimina las señales
accidentales y no deseadas como el ruido de pasos,
viento o el sonido de una mano que accidentalmente
roza un micrófono. El sistema corta estas frecuencias
drásticamente, liberando energía para conseguir
mejores impulsos de graves. Adiós al dinamismo aplastado y al sonido artificial, hola a unas frecuencias
graves/medias con un sonido auténtico y natural.
• Aumenta la potencia y el volumen en el rango de
frecuencias útiles
• Protege las etapas de amplificación y los altavoces
contra las frecuencias ultra-graves dañinas
DuoTilt™ y MicroTilt™
Sacando el mejor partido de la energía sonora
Los nuevos anillos de montaje para soporte de altavoz
DuoTilt™ y MicroTilt™ permiten utilizar la energía
sonora de forma mucho más eficaz. El DuoTilt™
ofrece ángulos de inclinación hacia abajo de 7.5º y
15º, y el MicroTilt™ de 10º, para orientar mejor las
cajas de rango medio/agudo directamente al público.
Las molestas reflexiones en el techo quedan minimizadas; el panorama de sonido es más claro, preciso
y más orientado.
• Angulos de inclinación diseñados para la mejor
alineación posible de la caja con el público
• Minimiza las reflexiones en el techo, maximiza
la eficacia de la energía
Easy Setup and Handling
Fácil manejo e instalación, para un menor stress
previo a la actuación y un espectáculo mejor
Todos los sistemas activos HK AUDIO® han sido
diseñados como unidades lógicas y simples formadas
por componentes seleccionados para trabajar juntos. Se realizó un enorme esfuerzo en el desarrollo
de sistemas que se pudieran transportar fácilmente
e instalar rápidamente. Se trató de conseguir la máxima simpleza de montaje; los ajustes sin fin son cosa
del pasado.
• Un diseño auténtico de sistema: Todos los componentes fueron seleccionados perfectamente para
funcionar como una unidad.
• La instalación rápida y el manejo sin esfuerzos
ahorra tiempo, y conlleva un menor stress previo
a la actuación.
Español
Page 30

L.U.C.A.S SMART Manual 1.0
1
2
3 4 5 6 7 8 9
1 L.U.C.A.S SMART’s
Control Features
7. Nivel de Subwoofer
Regulador para adaptar el volumen del subwoofer.
8. Power On LED
Este LED se ilumina si el interruptor Power se
encuentra en On (parte posterior) y contamos con
la correspondiente conexión de red.
9 Ground
Ground lift switch for separating the signal and
chassis ground when you encounter problems with
humming noises. The ground circuit is severed when
you press the button in.
10 11 12 13
14
1516 17
14
1 Gain Mic
Con este regulador se ajusta el nivel del micrófono.
Nota: La entrada de micrófono y de Line y Aux In
son regulables de manera totalmente independiente,
aunque también pueden usarse al mismo tiempo.
2 Gain Line
Con este regulador se adapta la etapa de potencia
al nivel de la señal de entrada – de esta forma se
evitan distorsiones en caso de una señal de entrada
demasiado alta.
3 Gain Aux
Con este regulador se adapta la etapa de potencia
al nivel de la señal de entrada – de esta forma se
evitan distorsiones en caso de una señal de entrada
demasiado alta.
4. LEDs de Estado Limitador
Estos LEDs de dos colores indican el estado de limitación multibanda (verde = señal, los limitadores aún
no funcionan / amarillo = los limitadores funcionan
brevemente / amarillo permanente = los limitadores
funcionan de forma ininterrumpida).
5 Modo
Si sólo está disponible una señal de entrada, conéctela
a la entrada izquierda de Line In o bien de Aux In.
Presione el conmutador Modo y sitúelo en Mono.
Ahora se puede reproducir la señal de entrada (mono)
en ambas vías de señales (izquierda y derecha).
6 Balance
Con este regulador se ajusta la relación de volumen
entre los canales derecho e izquierdo.
Caution: Never tape over the plug’s ground terminal
– this endangers lives!
10 Mic In
Conector hembra de entrada simétrica electrónica
XLR para la conexión directa de un micrófono.
(pin 1= masa, 2= +, 3= -).
11 Line In Left/Right
Conector hembra de entrada simétrica electrónica
para la señal de la mesa de mezclas (pin 1= masa,
2= +, 3= -). Se puede utilizar también un cable con
conector de jack estéreo (Punta = +, Anilla = -,
Pantalla = Masa).
12 Aux In
Conector de entrada RCA hembra para la mesa de
mezclas (DJ)/ Señal de reproductor de CD.
13 Mix Out
Salida de mezcla para el paso de las señales de Line,
Aux In y Mic In, p. ej. de un cassette, grabador MD
u otros sistemas L.U.C.A.S SMART.
14 Satellite Left y Satellite Right
Conecte los conectores de salida Speakon® con los
satélites L.U.C.A.S SMART.
15. Fusible
Fusible de red. Cuando se producen anomalías en
el funcionamiento, el fusible separa el L.U.C.A.S
SMART de la red y lo protege de daños. Cambie
siempre los fusibles por otros del mismo tipo y
valor.
16. Mains Input
Una el conector a una base de enchufe mediante
Page 31

31
el cable de red suministrado.
¡Atención! Tenga en cuenta la indicación de tensión
en el lado posterior del L.U.C.A.S SMART, pues tiene
que coincidir con la tensión de red. La conexión a
una tensión de red errónea podría destruir los elementos electrónicos del sistema L.U.C.A.S SMART.
17. Interruptor de Potencia
Es el interruptor de On/Off para el L.U.C.A.S SMART.
Cuando está encendido, el interruptor es de
color rojo.
2 Conexión y cableado del
L.U.C.A.S SMART
Line In
Conecte el cable de señal procedente de su mesa de
mezclas (Master left/right, Line Out o similar) a los
conectores hembra balanceados Input mediante un
cable de micrófono XLR o cable jack. El conexionado
debe ser el siguiente: 1= Masa, 2= +, 3= -. También
se puede utilizar un cable con conector jack estéreo
(Punta = +, Anilla = -, Pantalla = Masa).
Aux In
Conecte el cable de señal procedente de su mesa
de mezcla DS, reproductor CD o cassette (CD out,
Tape out o similar) al conector hembra Aux In con
un cable RCA.
Mic In
Si desea conectar un micrófono directamente sin
mesa de mezclas al L.U.C.A.S SMART, deberá utilizar
el conector hembra balanceado Mic In. Utilice para
ello un cable de micrófono XLR. El conexionado
debe ser el siguiente: 1= Masa, 2= +, 3= -.
Satellite Left/Right
Conecte los satélites del sistema L.U.C.A.S SMART
con las salidas Satellite Left y Satellite Right. Utilice
para ello cable de altavoces Speakon® con una sección de cable mínima de 2x 1,5 mm2.
Atención: Las salidas de Satellite Left y Satellite
Right llevan una impedancia nominal de 4 ohmios
y, en ningún caso, ha de ser inferior a este valor.
En caso contrario, la etapa de potencia podría sufrir
daños considerables. ¡Utilice exclusivamente altavoces Satélite L.U.C.A.S SMART!
Nota: Los componentes del sistema han sido
ajustados acústicamente entre sí de forma óptima
y deberán utilizarse exclusivamente con la configuración indicada. Emplear otros satélites puede influir
negativamente el sonido o incluso dañar la etapa
de potencia.
La conexión eléctrica entre el cable y el conector
hembra de entrada queda establecida con el conector
Speakon®. Para ello deberá girar el conector Speakon® en el sentido de las agujas del reloj hasta que
quede fijado.
3. Utilización de soportes altos
para altavoz
El nuevo soporte alto MicroTilt™ integrado permite
un aprovechamiento más eficaz de la energía acústica. Con el ángulo de instalación de 10°, la caja puede
orientarse óptimamente hacia el público.
Las reflexiones perturbadoras en el techo se minimizan, el sonido es claro y comprensible. La caja
se encuentra exactamente en el centro de gravedad,
sin oscilaciones, inclinaciones o giros imprevistos.
El soporte HK AUDIO® MicroTilt™ permite,
además, utilizar pies para micrófono. La altura
máxima que alcanza es de 165 - 170 cm que, normalmente, suele ser suficiente altura para actos o
presentaciones en los que los oyentes están sentados. Para conciertos en los que tiene que sonorizarse
una superficie mayor con una distancia superior (10
- 15 m), se recomienda el HK AUDIO® L.U.C.A.S
SMART Add On Package. Este complemento está
formado por 2 pies que pueden extraerse hasta 205
cm, un práctico Gig Bag para facilitar el transporte
y 2 cables de altavoces para conectar los satélites al
subwoofer.
Configuración para presentaciones
Español
Configuración para actuación en vivo
Así era antes: Hasta el 50% de
la energía sonora se desperdiciaba
HK AUDIO® DuoTilt™: Utilización
completa de la energía son
Page 32

L.U.C.A.S SMART Manual 1.0
4 Puesta en marcha
Compruebe que el interruptor Power On esté en la
posición Off.
Atención: Conecte el cable de red tras cerciorarse
de que la tensión de red disponible concuerda con
la indicada en el aparato. Si lo conecta a una tensión
de red incorrecta, los elementos electrónicos del
sistema L.U.C.A.S SMART pueden dañarse gravemente.
Gain Line In, Aux In, Mic In
Cierre todos los reguladores Gain (Gain Line,
Gain Mic y Gain Aux) girando completamente a
la izquierda.
Compruebe que el resto de los componentes
conectados están previamente en funcionamiento.
Deben estar conectadas tanto la mesa de mezclas
como todas las fuentes de señal añadidas, como teclados, amplificadores instrumentales, efectos etc.
El sistema L.U.C.A.S SMART debe conectarse siempre en último lugar, es decir, después de que lo estén
todos los demás componentes y desconectarse
primero, es decir, antes que los demás aparatos
conectados. Después de conectar con el interruptor
Power On/Off (iluminado de color rojo, si hay presencia de tensión y está en ”On”), gire el regulador
Gain Line hasta la posición central (= 0 dBV).
Si utiliza una mesa de mezclas para el control del
L.U.C.A.S SMART, esta posición de nivelación debe
tener preferencia. Si conecta directamente un teclado, según la potencia de la señal del regulador Gain
Line, el regulador puede girarse completamente hacia la derecha para lograr el volumen máximo.
Nota: Muchas mesas de mezclas de DJ disponen
únicamente de salidas RCA. Si utiliza este tipo de
mesa de mezclas, puede usar un adaptador RCA-XLR
(o RCA-jack) para la conexión a la entrada Line In,
o puede conectar la mesa de mezclas a través de un
cable RCA convencional a la entrada de Aux In.
Si desea conectar directamente un reproductor de
CD, utilice la entrada Aux In. Según la potencia de
la señal del regulador Gain Aux, el regulador puede
girarse completamente hacia la derecha para lograr
el volumen máximo.
5 Ajustes
Regulador Gain Mic
Ajuste con este regulador el volumen del micrófono.
Nota: Las entradas de micrófono y line se regulan
de forma totalmente independiente, aunque también
pueden usarse al mismo tiempo. Si se producen
distorsiones o sobremodulaciones, reduzca el
regulador Gain Mic.
Regulador Gain Line
Si se producen distorsiones o sobremodulaciones,
compruebe las fuentes de señal y reduzca la señal
de salida. Si la señal que llega al L.U.C.A.S SMART
no puede modificarse de este modo, adáptela con el
regulador Gain Line a las etapas de potencia.
Regulador Gain Aux
Ajuste con este regulador el volumen del canal
Gain Aux In.
Nota: Aux In y Line In se regulan de manera totalmente independiente, aunque pueden usarse al
mismo tiempo. Si se producen distorsiones o sobremodulaciones, reduzca el regulador Gain Aux.
Modo
Si sólo está disponible una señal de entrada, conéctela a la entrada izquierda del Line In o de Aux In.
Presione el conmutador Modo y colóquelo en Mono.
Ahora se puede reproducir la señal de entrada (mono)
en ambas vías de señal (izquierda y derecha).
Balance
Ajuste con este regulador el volumen de los canales
izquierdo y derecho. En la posición central ambos
canales disponen de igual sonoridad.
Nivel de Subwoofer
En la posición central, el volumen del subwoofer
está adaptado a los satélites, de forma que existe
una impresión sonora homogénea con una proporción equilibrada de graves y medios/agudos (satélite).
Girando el regulador Subwoofer Level a izquierda o
derecha, el volumen del subwoofer, en caso necesario,
puede bajarse (hasta -12 dB) o subirse (hasta +6 dB).
Page 33

33
Interruptor Ground Lift
Si se produce algún zumbido de baja frecuencia,
pulse el interruptor Ground Lift. Mientras está accionado la señal NF se separa de la masa de la caja. Si
esto no da resultado, compruebe los cables que van
hacia el L.U.C.A.S SMART y todas las señales que
llegan a la mesa de mezclas para detectar posibles
deficiencias.
Atención: No desconecte nunca la masa (toma de
tierra) del conector de red – ¡peligro de muerte!
6 Accesorios para el
L.U.C.A.S SMART
L.U.C.A.S SMART Add On Package
El set de complementos completos para el L.U.C.A.S
SMART se compone de 2 soportes altos
para altavoz de aluminio, 1x Gig Bag, 2x 7m cable
de altavoz.
L.U.C.A.S SMART Trolley
Es la solución para un transporte seguro y cómodo
del sistema L.U.C.A.S SMART. El subwoofer y los satélites van protegidos óptimamente dentro de bolsas
acolchadas sólidas. Simplemente tiene que enganchar
la bolsa con el satélite sobre el subwoofer y ya puede
transportar el PA completo sin esfuerzos sobre las
ruedas integradas. El Trolley le ofrece, además,
espacios prácticos para guardar elementos como,
por ejemplo, cables o micrófonos. El espacio es
suficientemente grande para guardar pequeñas
mesas de mezclas.
Soporte de pared para el L.U.C.A.S SMART
Para el montaje en pared del satélite L.U.C.A.S
SMART.
Podrá obtener más información acerca del accesorio
original HK AUDIO® por medio del distribuidor de
HK AUDIO® o en Internet en www.hkaudio.com
7 Consejos y trucos
1 ¡No permita que entre humedad en los circuitos
electrónicos! Cuando se utilice el sistema al aire
libre, asegúrese de que esté protegido de la lluvia.
No debe verterse cola, cerveza ni otros líquidos
en los componentes electrónicos, ya que puede
producirse un cortocircuito.
2 El L.U.C.A.S SMART proporciona un sonido ópti-
mo – procure que exista una señal de entrada que
también lo sea. Los zumbidos suelen ser el resultado de cables defectuosos, incorrectos o señales
de entrada no balanceadas en la mesa de mezclas.
Compruebe todos los cables de señal y de red.
3 ¡Evite las distorsiones! No sólo son desagradables
para los oyentes, sino también peligrosas para
la instalación. Asegúrese de que todos los componentes conectados directa e indirectamente al
L.U.C.A.S SMART tengan potencia suficiente y no
produzcan nunca distorsiones por utilizarse
al límite. Procure una señal limpia en la que
no intervenga el regulador GAIN.
4 ¡Evite bucles de zumbido! Aunque la señal sea
balanceada puede crearse dentro de un sistema de
audio un zumbido desagradable. Por ejemplo, si
la mesa de mezclas es llevada a tierra a través del
cable de red y no está conectada al mismo circuito
de corriente que el L.U.C.A.S SMART, se puede generar un "bucle de zumbido". Por lo tanto, conecte
siempre el L.U.C.A.S SMART y la mesa de mezclas
al mismo circuito de corriente (¡misma fase!).
Si continuara teniendo problemas de zumbido
con la instalación, puede ser de gran ayuda el
conmutador Groundlift.
Atención: No desconecte nunca la masa (toma de
tierra) del conector de red – ¡peligro de muerte!
L.U.C.A.S SMART Add On Package
Español
L.U.C.A.S SMART Trolley
L.U.C.A.S SMART Soporte de pared
Page 34

L.U.C.A.S SMART Manual 1.0
8 Solución de errores
El LED Power On y el interruptor de red no aparecen
en rojo al encender el aparato.
1 Compruebe si el cable de red está conectado
a Mains Input.
2 Compruebe que existe tensión en la red.
3 Compruebe si eventualmente el fusible del
L.U.C.A.S SMART está defectuoso. ¡Reponga única-
mente fusibles del mismo tipo y valor!
El LED Power On y el interruptor Power aparecen en
rojo, pero no sale ninguna señal de los altavoces.
1 Compruebe los cables que ha conectado a las to-
mas de Line In, Mic In y Aux In.
2 Compruebe que las fuentes de señal están conectadas
(mesa de mezclas, keyboard, lector de CD...).
3 ¿Están abiertos los reguladores Gain?
4 Compruebe si los cables de altavoz presentan daños.
5 Asegúrese de que los conectores Speakon® han
encajado en las tomas Satellite Left y Satellite
Right (giro hacia la derecha). Sólo así existirá co-
nexión eléctrica.
Del subwoofer llegan sólo unos pocos graves.
1 Compruebe el ajuste del regulador Subwoofer Level.
Ajuste con el regulador Subwoofer Level el volumen
del subwoofer a su gusto.
La reproducción musical aparentemente está
distorsionada.
1 Compruebe las indicaciones del LED en la mesa de
mezclas. Éste no debe estar siempre en rojo. En
ese caso, baje el volumen en la mesa de mezclas.
2 Si las indicaciones del LED en su mesa de mezclas
se encuentran en verde, disminuya los correspondientes reguladores Gain (Line o bien Aux) en el
L.U.C.A.S SMART.
3 Observe los LEDs que indican el estado del limitador
en el panel del L.U.C.A.S SMART. Si el LED amarillo
brilla de forma ininterrumpida es indicio de que to-
das las funciones de protección funcionan correcta-
mente y que no se debe aumentar más el volumen.
Tonos molestos de zumbido
1 Compruebe los cables con los que se une la fuente
de señal y el L.U.C.A.S SMART. Reponga, en su
caso, los cables dañados.
2 Si no se localiza la causa del zumbido, accione el
interruptor Ground Lift. En la mayoría de los casos
se soluciona con ello el problema.
9 Datos técnicos
L.U.C.A.S SMART Subwoofer
Entradas /Salidas:
Line In: XLR conector hembra, Conector hembra jack
(pin1= masa; 2= +, 3= -), Electrónica balanceada &
floating
Aux In: RCA, No balanceada
Mic In: Conector hembra XLR (pin 1= masa; 2= +, 3=
-)
Electrónica balanceada & floating
Sum Out, Master Out: RCA, No balanceada
Nivel de salida: +4 dBV máximo
Salidas de altavoces satélite: Speakon®
(pin 1+= +, 1-= -)
Potencia de salida subwoofer: 250 W / 3 ohmios
@ 0,3 % THD
Potencia de salida satélites: 2x 80 W / 4 ohmios
@ 0,3 % THD
Circuitos de protección: Limitador multibanda
HK AUDIO®, Filtro subsónico
Altavoces: 1x 10" HK AUDIO® Custom
Impedancia: 3 Ohmios
Crossover activo: 90 Hz; 24 dB / octava,
Crossover: 43 Hz hasta 92 Hz , +/- 3dB
34 Hz hasta 140 Hz , - 10dB
Presión acústica 1W/ 1m, halfspace: 97 dB
Presión acústica máx. / 1m, halfspace: 117 dB
@ 10% THD
Peso: 21 kg/ 46,2 lbs.
Dimensiones (LxAxP): 32 cm x 41 cm x 46,5 cm
(12-5/8" x 16-1/8" x 18-3/8")
Page 35

L.U.C.A.S SMART Satélite
Entrada altavoz: Speakon® NL 4 (pin 1+= +, 1-= -)
Altavoz: 1x 6,5" HK AUDIO® Custom
Altavoces de agudos: 1x 1" Dome Tweeter
Brida para soportes elevados: HK AUDIO® MicroTilt™, 15 mm
Impedancia: 4 Ohmios
Carga nominal: 60 W RMS
Frecuencia de separación (pasiva): 3 kHz; 12 dB /
Octava
Crossover (a través de crossover activo): 92 Hz a
21 kHz , +/- 3dB
85 Hz a 23 kHz, - 10dB
Presión acústica 1W/ 1m, halfspace: 97 dB
Presión acústica máx. / 1m, halfspace: 115 dB
@ 10% THD
Peso: 4,5 kg / 9.9 lbs.
Dimensiones (LxAxP): 18,5 cm x 27,5 cm x 21,5 cm
(7-2/8"x 10-7/8"x 8-1/2")
Características eléctricas generales:
Clase de protección 1 / protection class 1 (protección
puesta a tierra)
Fusible:
Version 230 V: 250 V / T 1.6 A
Version 120 V: 250 V / T 3.15 A
Version 100 V: 250 V / T 3.15 A
Consumo de potencia máx: 370 VA
Rango de tensión de red: +/- 10%
Rango de temperatura ambiente: -10° C hasta +35°
durante la operatión.
Für das folgend bezeichnete Erzeugnis
HK AUDIO® L.U.C.A.S SMART
wird hiermit bestätigt, dass es den wesentlichen
Schutzanforderungen entspricht, die in der
Richtlinie des Rates zur Angleichung der Rechts-
vorschriften der Mitgliedsstaaten über die elek-
tromagnetische Verträglichkeit (89/336/EWG)
und der Niederspannungsrichtlinie (73/23/EWG)
festgelegt sind. Diese Erklärung gilt für alle
Exemplare, und bestätigt die Ergebnisse der Mes-
sungen, die durch die Qualitätssicherung der Fa.
Stamer Musikanlagen GmbH durchgeführt wur-
den. Zur Beurteilung des Erzeugnisses hinsicht-
lich elektromagnetischer Verträglichkeit wurden
folgende Normen herangezogen: EN 50081-1 •
EN 50082-1. Zur Beurteilung der Einhaltung der
Niederspannungsrichtlinie wurde folgende Norm
herangezogen: EN 60065
Diese Erklärung wird verantwortlich für den Her-
steller
Stamer Musikanlagen
GmbH*
Magdeburger Str. 8
66606 St.Wendel
abgegeben durch
35
This is to certify that
HK AUDIO® L.U.C.A.S SMART
complies with the provisions of the Directive of
the Council of the European Communities on the
approximation of the laws of the Member States
relating to electromagnetic compatibility
(EMC Directive 89/336/EEC) and the low voltage
Directive (73/23/EEC).
This declaration of conformity of the European
Communities is the result of an examination carried out by the Quality Assurance Department of
STAMER GmbH in accordance with European
Standards EN 50081-1, EN 50082-1and EN
60065 for low voltage, as laid down in Article 10
of the EMC Directive.
Español
Stamer Musikanlagen
GmbH*
Magdeburger Str. 8
66606 St.Wendel
Lothar Stamer Dipl.Ing.
Managing Director
St.Wendel, 02/13/06
* Stamer Musikanlagen manufactures exclusively
for HK AUDIO®.
Lothar Stamer Dipl.Ing.
Geschäftsführer
St.Wendel, den 13/02/06
* Stamer Musikanlagen stellt exklusiv für
HK AUDIO® her.
Page 36

Technische Änderungen vorbehalten
Copyright 2006 Music & Sales GmbH • 06/2006
MS D-1581 06/06
HK Audio® • Postfach 1509 • 66595 St. Wendel
Germany • info@hkaudio.com • www.hkaudio.com
International Inquiries: fax +49-68 51-905 215
international@hkaudio.com
 Loading...