

Page 1
DSP CONTROL
• Remote Operation Software for the LINEAR 7 Series
Manual 1.1
English:
> page 2
Deutsch:
> Seite 9
Page 2
Manual 1.1DSP CONTROL – LINEAR 7
Manual
• Remote Operation Software
for the LINEAR 7 Series
Content
1 Introduction ........................................................................... 2
2 Network Center ......................................................................3
3 Unit Control ............................................................................4
The DSP CONTROL Panels
Network Center
1 Introduction
The control features on LINEAR 7 series speakers’ rear connector
panel serve to operate these enclosures. However, DSP CONTROL
software gives you a convenient and fl exible remote-control that
accesses DSP functions such as level, equalizer, delay, limiters and
groups.
If you wish to control a LINEAR 7 speaker remotely, use an
Ethernet cable to connect it to the same network as the computer
running DSP CONTROL. Consult your LINEAR 7 speaker’s manual
to learn more about this.
Software and Firmware Versions
Please make sure you have installed the proper software and
fi rmware before you start using DSP CONTROL. This manual covers
the following versions:
• DSP CONTROL software version 3.8.24_123055
• LINEAR 7 fi rmware version 40378
Installing DSP CONTROL
Download the free DSP CONTROL software at www.hkaudio.com.
Be sure to stop by from time to time to check for more recent
versions.
DSP CONTROL runs on the following operating systems:
• Windows 10 or later
• MAC OS X 10.14 or later
Double-click the installation package to start installing DSP
CONTROL. An installation wizard will guide you through the
process.
If you run into any problems, please get in touch with your
dealership or mail us at support@hkaudio.com.
Launching DSP CONTROL
Double-click the program icon to launch DSP CONTROL.
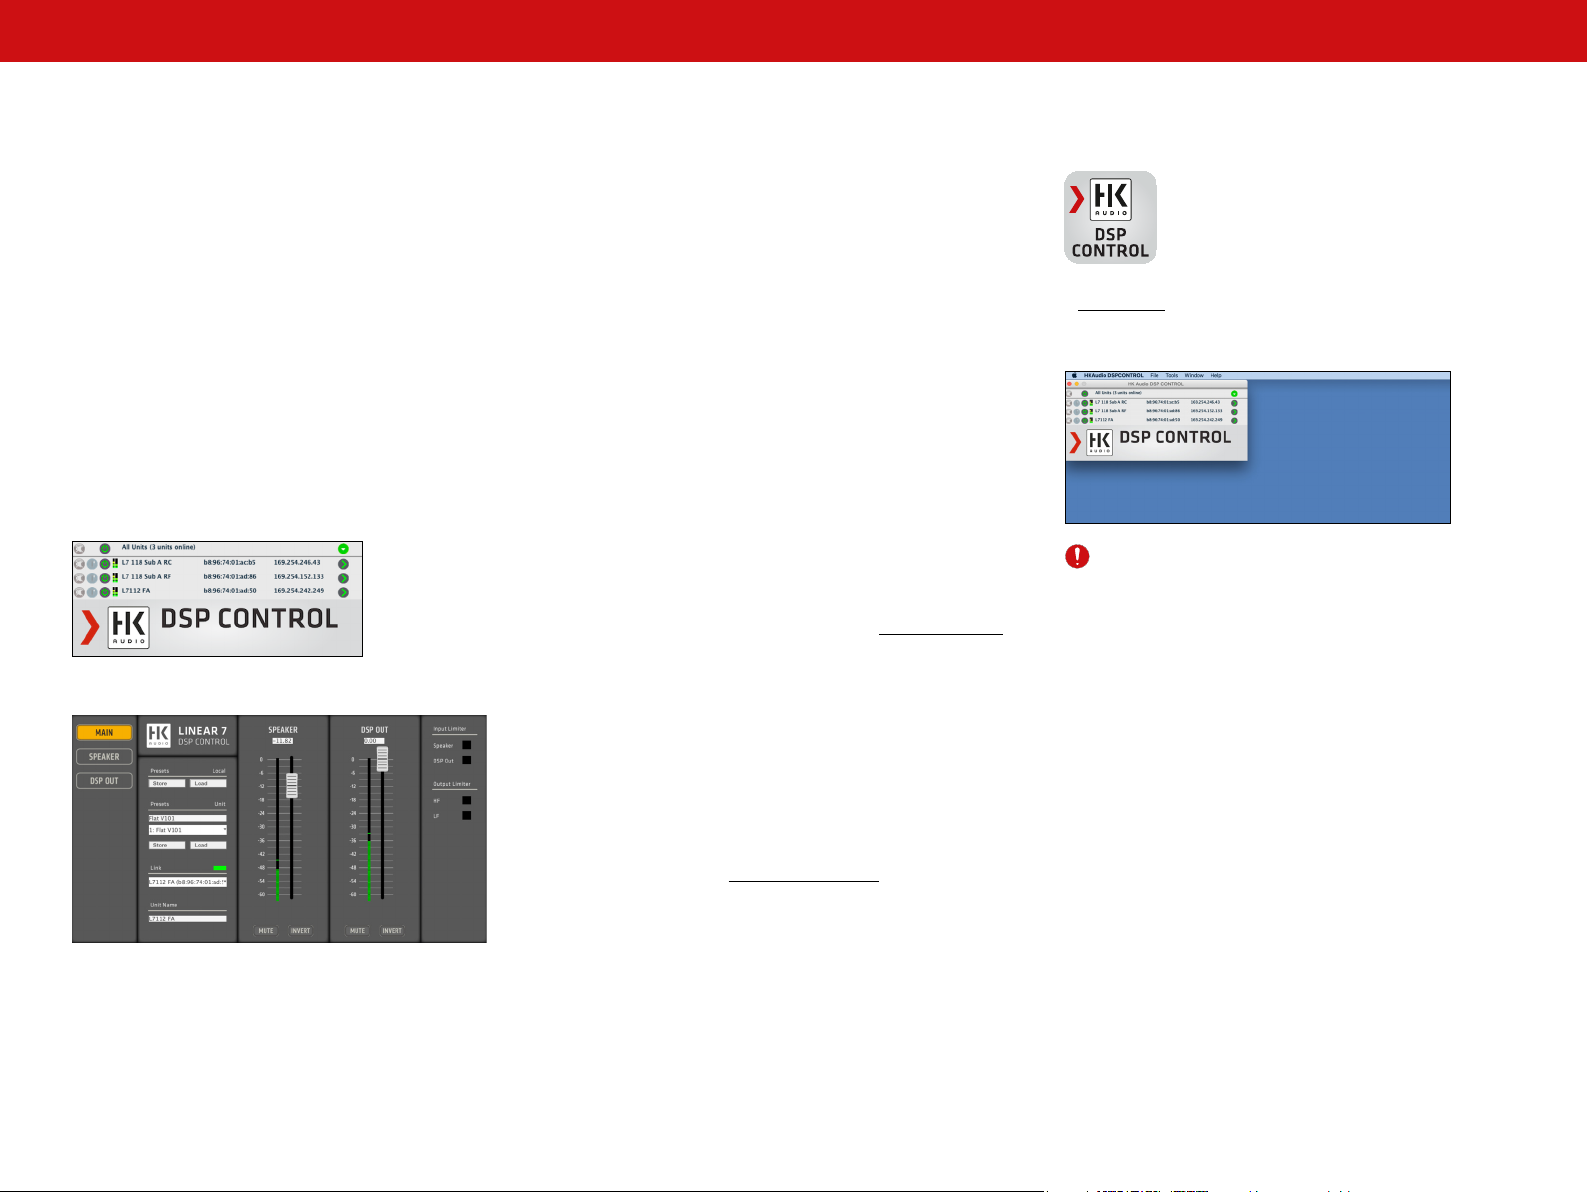
The Network Center opens:
Heads up: Demo mode lets you access DSP CONTROL functions
without having to connect LINEAR 7 speakers. See section 2.2,
Enter Demo Mode, for more on this..
Unit Control
• Deutsch • English
- 2 -
Page 3
Manual 1.1DSP CONTROL – LINEAR 7
2 Network Center
2.1 General Info
The Network Center lists all LINEAR 7 speakers found in the
network with their Mac and IP addresses.
If the green
an activated LINEAR 7 speaker in the network.
Click the green
for that speaker.
Wink Button
The Wink button on the left helps you identify the currently
selected LINEAR 7 speaker. Clicking the Wink button causes the
LED behind the front grille and all LEDs on the rear of the speaker
to fl ash so the given speaker is easy to spot.
status icon is illuminated, application has a found
arrow, to go to the Unit Control window
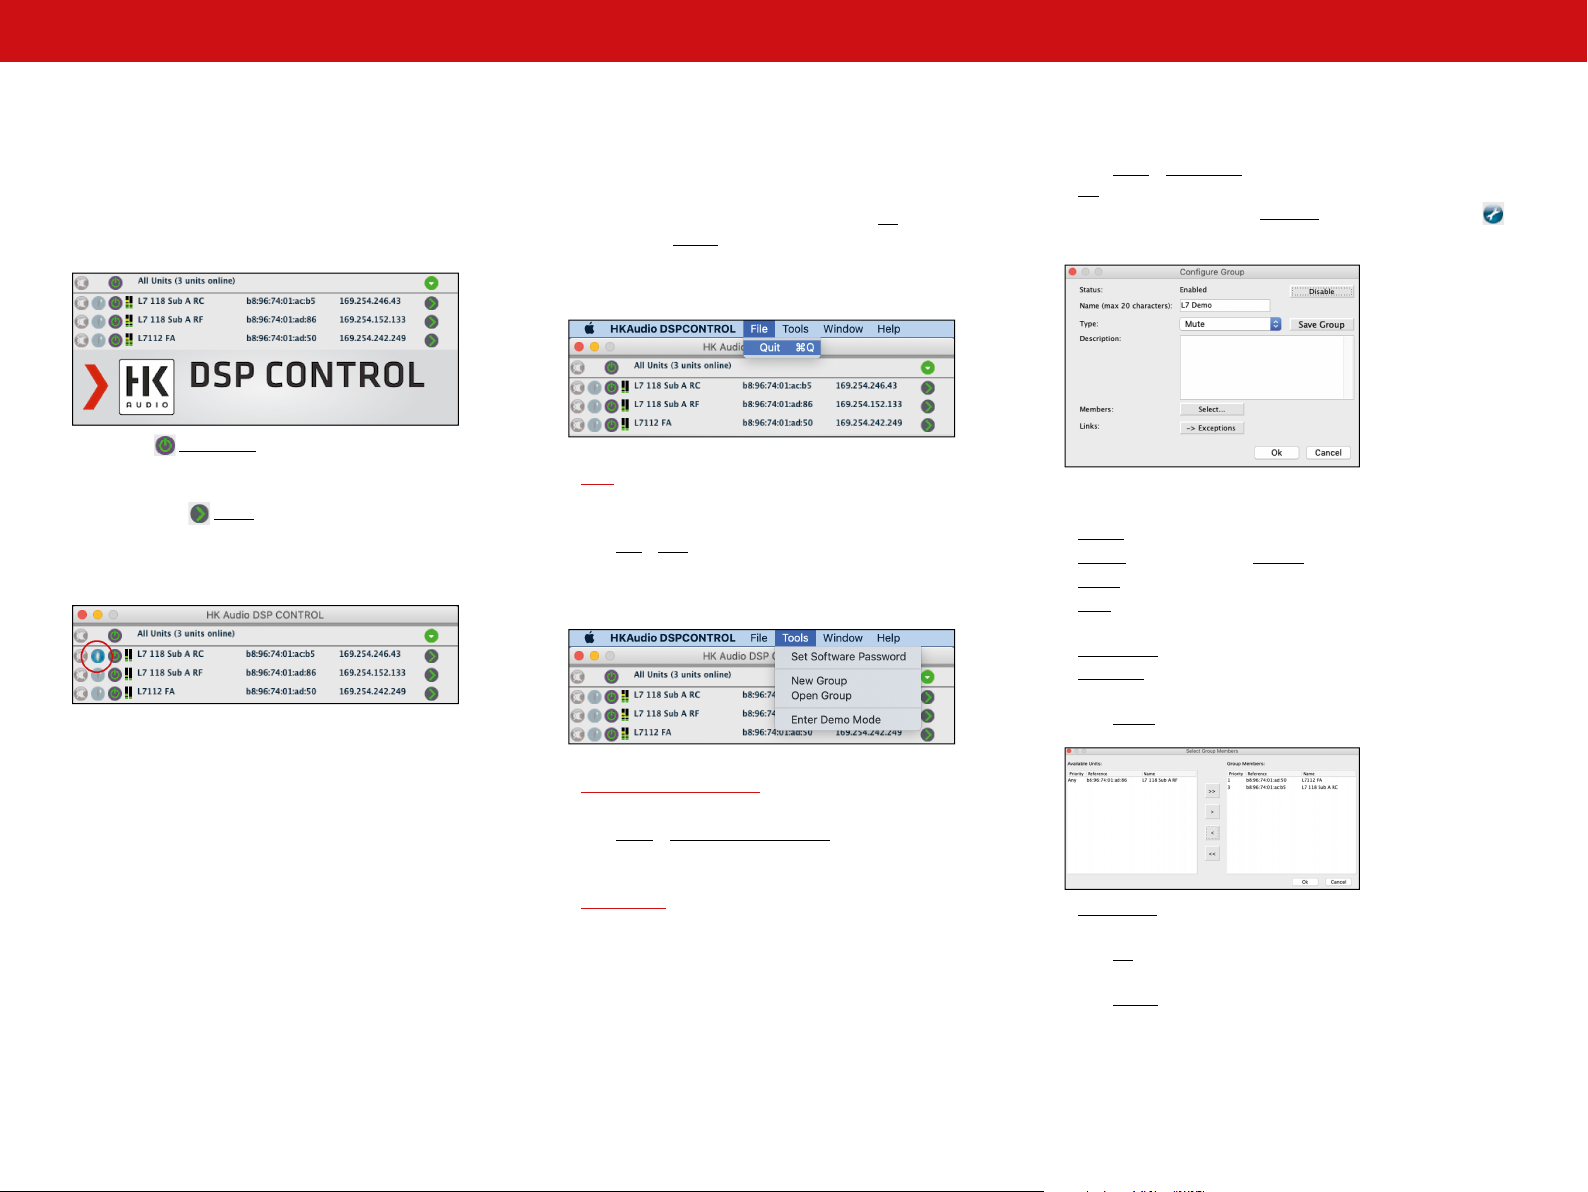
2.2 Network Center Menu Bar
The menu bar at the top works as you would expect. Clicking a
menu tab opens a submenu that drops down to show you the
available options. Confi rm your selection with OK or belay that
command with Cancel.
File
Quit
•
Exits DSP CONTROL.
Click File > Quit to exit DSP CONTROL.
Tools
Set Software Password
•
Grouping multiple speakers:
Click Tools New Group, enter a name for the group, and click
OK to confi rm.
To edit the group, click the tool icon at the top right corner:
The Confi gure Group popup window opens:
Confi guring a group in the Confi gure Group window:
Status indicates if the group is disabled or enabled.
Enable activates a group; Disable deactivates it.
Name serves to name the group.
Type selects the group function, which is currently limited
to Mute.
Description lets you describe the group in words.
Members serves to add speakers to or remove them
from the group.
Click Select… to add or remove speakers from the group:
Click Tools > Set Software Password to protect access
to the Network Center with a password.
New Group
•
Groups: You can combine LINEAR 7 speakers in groups. The
current version of DSP CONTROL lets you mute an entire group
of speakers. More group functions are in the works. To give
you a good picture of these assignments, the Network Center
panel displays all current groups at the top, above the individual
connected speakers.
- 3 -
Save Group stores a confi gured group on the computer’s
hard drive.
Click OK to close the Confi gure Group popup window
and confi rm your settings.
Click Cancel to close the Confi gure Group popup window
without confi rming your settings.
• Deutsch • English
Page 4
Manual 1.1DSP CONTROL – LINEAR 7
Enter Demo Mode (Leave Demo Mode)
•
This option enables and disables demo mode.
The demo mode allows you to use the software without a connected LINEAR 7 speaker. So you can test the software and create
presets which you can save on your local hard disk. These presets
can be used as a template for a connected speaker.
Click Tools > Enter Demo Mode
Click the green
The Unit Control panels opens where you can edit the individual
demo speaker models. See chapter 3 for more on this.
Select Tools > Leave Demo Mode in the menu bar to disable
Demo mode.
arrow on the right to enable Demo mode.
Help
Request Support
•
Click Help > Request Support to open a popup window that lets
you send a message to HK Audio Support’s team straight from
DSP CONTROL. Enter the name of the product that you have a
question about in the fi rst popup window. A larger box opens
when you confi rm this entry with OK. Type your question in here.
Please note that the support form will only be sent if you enter
at least 50 characters. Confi rm with OK and then enter your
name and e-mail address.
About
•
Click Help > About to view the system-related information for
the DSP CONTROL application.
3 Unit Control
3.1 Accessing Unit Control
In the Network Center window, click the green
to the name of the speaker you want to edit to access start this
speaker’s Unit Control panel.
The MAIN Unit Control panel appears:
3.2 The Unit Control Menu Bar
Click a menu option to see the available commands. Confi rm
your selection with OK or belay that command with Cancel.
File
arrow next
Open
•
Opens external presets or settings.
Click File > Open to upload a preset from a storage medium.
Save
•
Stores your settings.
Click File > Save to store the current settings as a preset on a
storage medium.
Backup Presets
•
Stores all of the selected speaker’s confi gured presets on your hard
disk or another storage medium.
Click File > Backup Presets to save the current presets to a
folder on a storage medium for you to upload later.
Quit
•
Click File > Quit to close the Unit Control panel.
Hardware
Enter Password
•
You cannot change a locked speaker’s presets on the speaker nor
edit its settings in the software, apart from enabling and disabling
Mute. More on this under "Lock Unit" below.
Once you enter the password, you can access all settings on the
speaker and in the software. If you haven't set any individual
password the factory password "Password" applies.
- 4 -
• Deutsch • English
Page 5
Manual 1.1DSP CONTROL – LINEAR 7
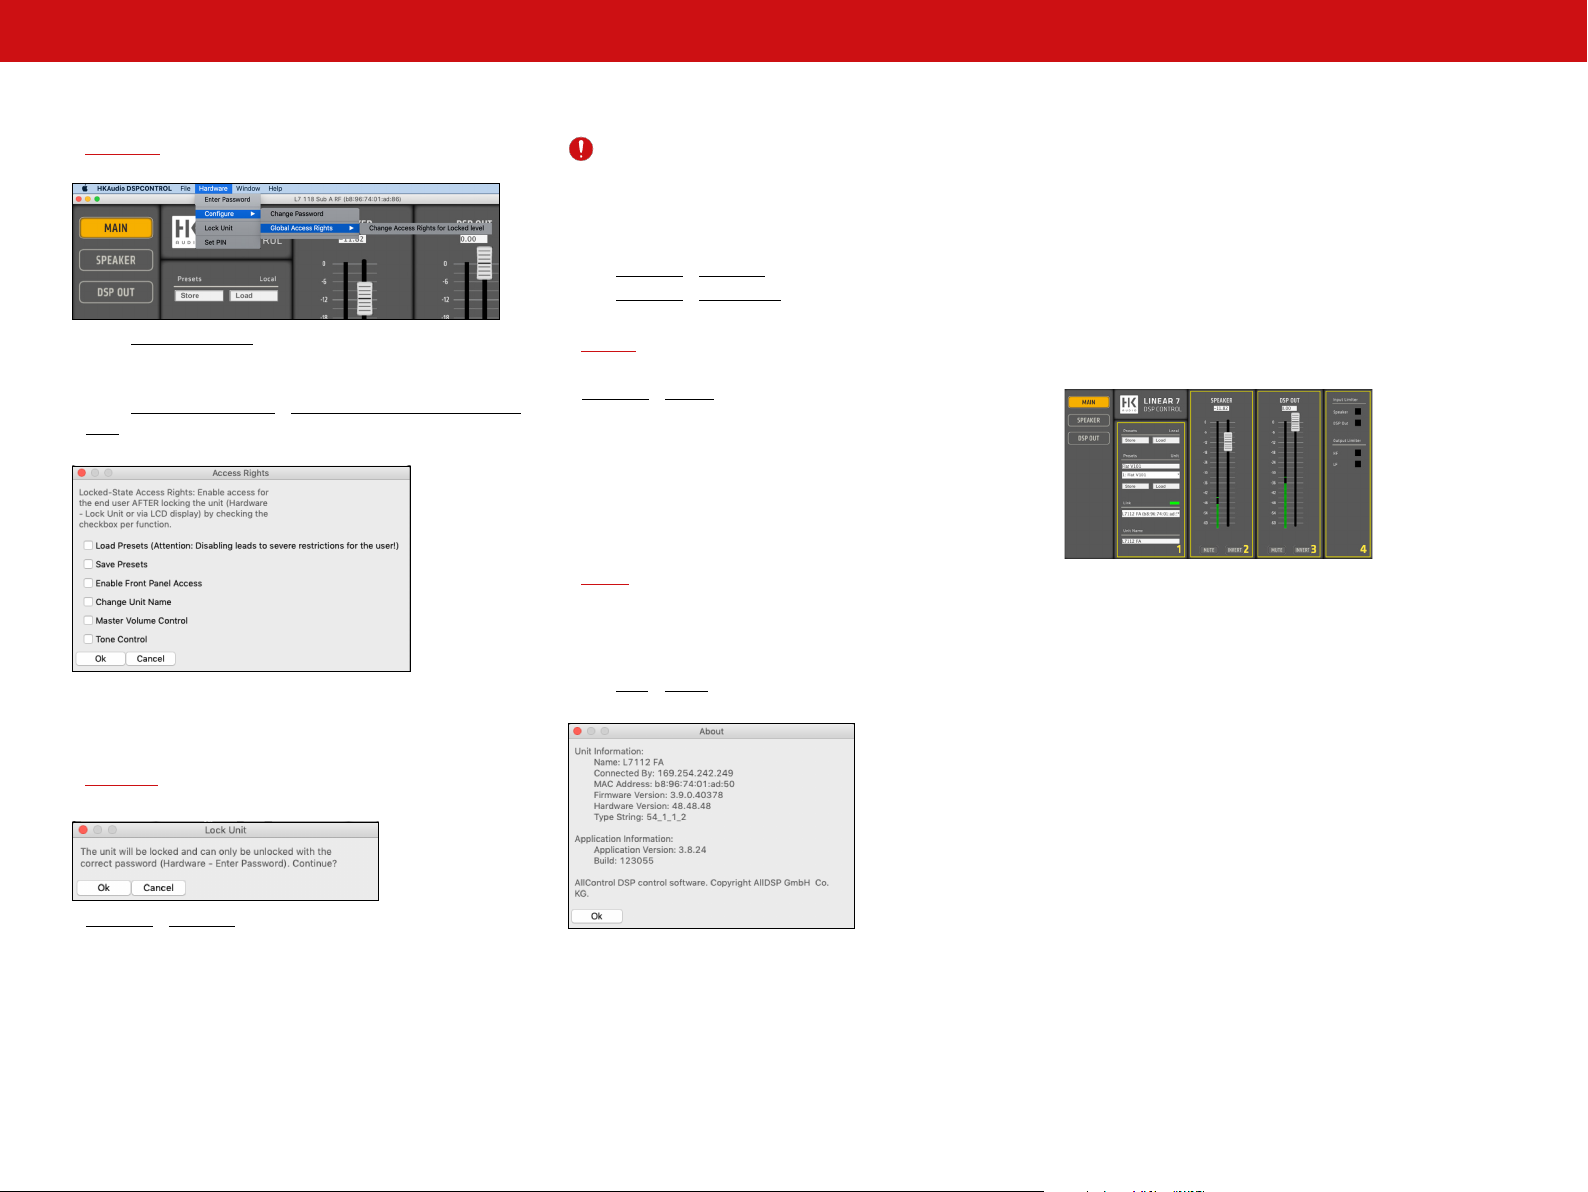
Confi gure
•
Select Change Password to change the current password that
unlocks the speaker.
Select Global Access Rights > Change Access Rights for Locked
level to defi ne the authorizations for Lock Unit mode.
Your options are Load Presets, Save Presets, Enable Front Panel
Access, Change Unit Name, Master Volume Control, and Tone
Control.
Heads up: You can disengage this lock by selecting the Unlock Unit
menu option in the software or by pressing and holding the Preset
button on the LINEAR 7 speaker for three seconds.
Click Hardware > Lock Unit to lock the controller.
Click Hardware > Unlock Unit to unlock the controller.
Set Pin
•
Hardware > Set Pin serves to protect the selected speaker with a
PIN code. The protection mechanism activates once you quit DSP
CONTROL. The next time DSP CONTROL launches and detects
the speaker in the network, you will have to enter the assigned
PIN code before you can edit the speaker’s settings.
Help
About
•
This option lets you view specifi cations such as the fi rmware version
and speaker type designation, and learn more about the connected
unit and software.
Click Help > About to view this information.
3.3 Unit Control Windows
The left panel with the three big buttons that select MAIN,
SPEAKER and DSP OUT never changes.
MAIN Window
The MAIN window tells you how the connected LINEAR 7
speakers are confi gured and lets you adjust various settings.
It has four panels:
• SYSTEM (1)
• SPEAKER (2)
• DSP OUT (3)
• LIMITER ACTIVITY (4)
Lock Unit
•
Protects the controller from unauthorized access.
Hardware > Lock Unit locks the speaker so the operating mode
cannot be changed on the LINEAR 7 speaker.
• Deutsch • English
- 5 -
Page 6

Manual 1.1DSP CONTROL – LINEAR 7
System Panel
•
This panel a ords you access to the following functions:
Presets Local
The Store button saves the current software settings to the
hard disk or another storage medium.
The Load button uploads settings from your hard disk or other
storage medium to the software.
Presets Unit
Use this text box to name your presets.
You can select one of up to ten available presets in the selection
box.
The Store button saves the current software settings on the
LINEAR 7 speaker.
The Load button uploads settings stored in the LINEAR 7
speaker’s memory to the software.
Link
If you wish to control more than one LINEAR 7 speaker with this
application, select the speaker you want to edit from the Link
selection list.
Unit Name
Displays the name of the LINEAR 7 speaker currently being
edited. You can also rename the selected speaker in this input
box.
Speaker Panel
•
Heads up: The level shown here is relative rather than absolute.
It depends on the level set on the LINEAR 7 speaker. In other
words, 0 dB corresponds to whatever the GAIN knob setting on the
LINEAR 7 speaker happens to be at the time.
Mute
MUTE
Clicking the Mute button silences the input. The button lights
up red.
Invert
INVERT
The Invert button reverses the channel’s polarity. The button
lights up yellow.
• DSP OUT Panel
Good-to-know info about managing presets: Every LINEAR 7
speaker comes with three fi xed factory presets and open memory
slots for custom settings. The three factory presets’ default
settings are read-only. However, you can load factory presets
and use them as templates for editing and then save the edited
version as a di erent preset.
The list shows ten presets, the fi rst three of which cannot be
overwritten. You can assign settings as you see fi t to memory
slots four to ten. They only way to load and switch user presets is
remotely via DSP CONTROL.
This panel affords you access to the input channel’s basic
settings. You can adjust all of the controls pictured here; all
changes are instantly applied to the SPEAKER window. We
recommend using the SPEAKER window to fine-tune settings.
See page 7, SPEAKER Window, for more on this.
Input Level
Adjust the input level with the fader or by entering a value in the
input box above it. It sweeps from –60 to 0 dB. Simply slide it to
"off" if you wish to switch the channel off.
- 6 -
This panel affords you access to the DSP OUT channel’s basic
settings. You can adjust all of the controls pictured here; all
changes are instantly applied to the DSP OUT window. We
recommend using the DSP OUT window to fine-tune settings.
See page 8, DSP OUT Window, for more on this.
• Deutsch • English
Page 7

Manual 1.1DSP CONTROL – LINEAR 7
• Limiter Activity Panel
This panel shows you what the system’s limiters are doing.
It serves visual monitoring purposes only, so you cannot adjust its
settings. Go to the SPEAKER or DSP OUT windows to set limiter
parameters.
SPEAKER Window
Equalizer
The equalizer features ten bands that you can confi gure
individually. Set the frequency (Freq), the quality factor that
determines the fi lter’s bandwidth (Q) and gain (Gain) by entering
the values in the respective input boxes. You can also adjust the
frequency and gain by moving the EQ points on the EQ display. All
EQ bands may be switched on and o individually.
The EQ 1 to EQ 10 buttons activate filters. The button lights up
in the color of the given frequency band.
High Pass and Low Pass Filters
You can also confi gure HPFs and LPFs individually. To do so, simply
enter the frequency to the respective input box.
• The HPF and LPF buttons activate the fi lters.
• The frequency (Freq) range sweeps from 20 to 20,000 Hz.
• Select the fi lter Type in the Type drop-down menu.
Your options are:
Butterworth, Linkwitz-Riley, Bessel
EQ Display
The SPEAKER window lets you confi gure the selected LINEAR 7
speaker. These settings only a ect the speaker’s response, and
not the DSP OUT port. See section 3.3 to learn more.
On the left is the same window selection panel found in the MAIN
window. The center panel provides signal-processing tools. On
the right is the same fader panel found in the MAIN window’s
SPEAKER panel.
Select the filter type in the Type drop-down menu:
Your options are:
• Bell, Notch, All Pass, Low Shelf, High Shelf, Band Pass, High Pass,
Low Pass
• The frequency (Freq) range sweeps from 20 to 20,000 Hz.
• The quality factor that determines the fi lter’s bandwidth (Q) can
be set in the range of 0.5 to 25.0.
• Gain adjusts from -12 to +12 dB.
- 7 -
The EQ display shows the frequency curve for the given equalizer
settings. Edit the EQ bands’ frequency and gain by moving the EQ
points graphically.
• Deutsch • English
Page 8

Manual 1.1DSP CONTROL – LINEAR 7
Screen Tools
There are fi ve icons on the left of the EQ display:
The magnifi cation arrow zooms the EQ display up to the
size of the SPEAKER window. Click it again to zoom the readout up
to the size of the full screen.
Click the gray X icon in the upper left corner of one of the
extended views to shrink the graphical panel back down to the
standard size..
The camera icon takes a screenshot that you can save in a
PNG image fi le.
The magnifying glass helps you make very fi ne
adjustments. It zooms in to blow the cursor’s movements up so
you can draw EQ curves with even greater precision.
The T(ext) icon superimposes the parameters of the active
EQ bands/fi lters on the EQ display. This comes in very handy when
you have zoomed up the screen.
Speaker Limiter
Adjust the limiter threshold with the fader or by entering a value
to the input box. The threshold can range from –30 to 0 dBu.
HK Audio engineers have fi ne-tuned all other limiter parameters to
the connected LINEAR 7 speaker, which is why you cannot adjust
these factory defaults.
DSP OUT Window
DSP OUT is an XLR port that serves to integrate an added powered
speaker lacking network connectivity. You can then control this
speaker’s volume, fi ltering, limiting and delay independently. For
example, this option lets you run LINEAR 7 mid/high units and
LINEAR SUB bass bins or LINEAR 5 LTS models and LINEAR 7
subwoofers together in the same network.
The DSP OUT window lets you confi gure the signal sent to the DSP
OUT port, for example, to adjust settings for a model of subwoofer
that is not a member of the LINEAR 7 family. This window provides
the same control features as the SPEAKER window. Its settings
only a ect the DSP OUT port, and not the speaker’s response.
Delay
Adjust the delay time with the fader or by entering a value to the
input box. You can choose to work with feet, inches, m, mil, mm,
ms and s as your units.
Speaker
The big fader and the input box above it serve to adjust the input
channel’s level. The LED display gives you visual feedback as to
the incoming signal’s level. The control range sweeps from –60 to
0 dB.
Mute
The Mute button silences the channel without changing the level
settings.
Invert
The Invert button reverses the channel’s polarity. The button lights
up yellow when the polarity is reversed 180°.
• Deutsch • English
- 8 -
Page 9

Manual 1.1DSP CONTROL – LINEAR 7
Bedienungsanleitung
• Remote Operation Software zur
Fernsteuerung der LINEAR 7-Serie
Inhalt
1 Einleitung ..............................................................................9
2 Network Center ....................................................................10
3 Unit Control ..........................................................................11
Die Arbeitsbereiche von DSP CONTROL
Network Center
1 Einleitung
Die Lautsprecher der LINEAR 7-Serie können über ihr rückwärtiges
Anschlussfeld bedient werden. Für eine maximale Flexibilität ist
jedoch auch die Fernbedienung der Lautsprecher mit der Software
DSP CONTROL möglich, welche Zugri auf DSP-Funktionen wie
Level, Equalizer, Delay, Limiter und auch Gruppenbildung ermöglicht.
Für die Remote-Funktionalität muss der LINEAR 7-Lautsprecher
über eine Ethernet-Verkabelung mit demselben Netzwerk verbunden sein, wie der Computer, auf dem DSP CONTROL installiert
wurde.
Weitere Informationen hierzu fi nden Sie in der Bedienungsanleitung Ihres LINEAR 7-Lautsprechers.
Software- und Firmware-Versionen
Bevor Sie mit der Nutzung von DSP CONTROL beginnen, stellen Sie
bitte sicher, dass Sie die aktuellste Version installiert haben.
Dieses Handbuch ist auf Grundlage folgender Versionen erstellt
worden:
• DSP CONTROL Software-Version: 3.8.24_123055
• LINEAR 7 Firmware-Version: 40378
Installation von DSP CONTROL
DSP CONTROL steht unter www.hkaudio.com zum kostenlosen
Download bereit. Vergewissern Sie sich regelmäßig, ob es eine
aktuellere Version der Software gibt.
DSP CONTROL starten
DSP CONTROL wird durch Doppelklick auf das Programmsym-
bol gestartet.
Anschließend ö net sich das Network Center:
Info: Die Funktionen von DSP CONTROL stehen auch ohne verbundenen LINEAR 7-Lautsprecher im Demo-Mode zur Verfügung
(siehe dazu in Kapitel 2.2 "Enter Demo Mode").
Unit Control
Folgende Betriebssysteme werden unterstützt:
• Windows 10 oder neuer
• MAC OS X 10.14 oder neuer
Starten Sie die Installation von DSP CONTROL durch Doppelklick
auf das Installationspaket. Der Assistent führt Sie im Weiteren
durch den Installationsvorgang.
Bei Problemen wenden Sie sich bitte an Ihren Fachhändler oder an
support@hkaudio.com.
• Deutsch • English
- 9 -
Page 10

Manual 1.1DSP CONTROL – LINEAR 7
2 Network Center
2.1 Allgemein
Im Network Center werden alle im Netzwerk gefundenen
LINEAR7-Lautsprecher aufgelistet, inklusive Mac- und
IP-Adressen.
Wenn ein eingeschalteter LINEAR 7-Lautsprecher im Netzwerk
erkannt wurde, leuchtet das
Ein Klick auf den grünen
betre enden Lautsprechers.
Wink-Button
Der Wink-Button links dient zur Identifi zierung des gerade angewählten LINEAR 7-Lautsprechers. Nach Klick auf den Wink-Button
blinken eine LED hinter dem Frontgitter und alle LEDs auf der
Rückseite des Lautsprechers, was bei der optischen Lokalisierung
der Lautsprecherposition hilfreich ist.
Status-Icon grün.
Pfeil ö net die Unit Control des
2.2 Die Network Center-Menüleiste
Die Bedienung der Menüleiste oben erfolgt nach bekanntem
Prinzip: Anklicken eines Menüpunktes ö net das gewählte Untermenü, anschließend erscheinen die verfügbaren Menübefehle.
Bestätigen Sie Ihre Eingaben in den Menübefehlen mit OK oder
brechen Sie mit Cancel ab.
File
Quit
•
DSP CONTROL beenden
Klicken Sie auf File > Quit, um DSP CONTROL zu beenden.
Tools
Set Software Password
•
Klicken Sie auf Tools > Set Software Password, um den Zugri
auf das Network Center mit einem Passwort zu sichern.
Mehrere Lautsprecher in einer Gruppe vereinen:
Klicken Sie auf Tools New Group, geben Sie dann einen Namen
für die Gruppe ein und bestätigen diesen mit einem Klick auf OK
Zum Bearbeiten der Gruppe klicken Sie auf das Symbol
Schraubenschlüssel oben rechts:
Es ö net sich das Dialogfenster "Confi gure Group":
Im Fenster "Confi gure Group" können Sie nun Ihre Gruppe
konfi gurieren:
Status gibt an, ob die Gruppe de- oder aktiviert ist
Enable aktiviert eine Gruppe, Disable deaktiviert sie
Name dient zum Benennen der Gruppe
Type dient zur Anwahl der gewünschten Group-Funktion (derzeit
"Mute")
Description erlaubt es, der Gruppe eine Beschreibung hinzuzu-
fügen
Unter Members können der Gruppe Lautsprecher hinzugefügt
oder entfernt werden
Klicken Sie auf Select…, um der Gruppe Lautsprecher hinzuzufü-
gen oder zu entfernen:
New Group
•
Gruppen: LINEAR 7-Lautsprecher können zu sogenannten
"Groups" zusammengeschlossen werden. In der aktuellen Version
von DSP CONTROL steht für Gruppen die Funktionalität "Mute"
zur Verfügung. Weitere Gruppen-Funktionen befi nden sich in Vorbereitung. Zur besseren Übersicht werden die erstellten Gruppen
im Network Center über den verbundenen Einzellautsprechern
angezeigt.
- 10 -
Save Group erlaubt das Speichern einer konfi gurierten Gruppe
auf der Festplatte des Rechners
Mit einem Klick auf OK beenden Sie das Dialogfenster „Confi gu-
re Group“ und übernehmen die getätigten Einstellungen
Mit einem Klick auf Cancel beenden Sie das Dialogfenster „Con-
fi gure Group“ ohne die getätigten Einstellungen zu übernehmen
• Deutsch • English
Page 11

Manual 1.1DSP CONTROL – LINEAR 7
Enter Demo Mode (Leave Demo Mode)
•
Demo-Mode starten (Demo-Mode beenden)
Der Demo Mode dient dazu, dass man die Software auch ohne
angeschlossenen LINEAR 7-Lautsprecher benutzen kann. So kann
man die Software testen und Presets erstellen, die man lokal auf
der Festplatte speichern kann. Diese Presets kann man später als
Vorlage für einen angeschlossenen Lautsprecher nutzen.
Klicken Sie auf Tools > Enter Demo Mode
Um den Demo-Mode zu starten, klicken Sie rechts auf den
grünen
Es ö net sich die Unit Control (siehe auch Kapitel 3), wo Sie die
einzelnen Demo-Lautsprechermodelle bearbeiten können
Um den Demo-Mode zu verlassen, wählen Sie in der Menüleiste
Tools > Leave Demo Mode
Pfeil
Help
Request Support
•
Ein Klick auf Help > Request Support ö net einen Dialog, in
dem Sie direkt aus DSP CONTROL heraus eine Anfrage an den
HK Audio Support senden können. Im ersten Dialogfenster geben Sie das Produkt ein, zudem Sie eine Frage haben. Nach einer
Bestätigung mit OK ö net sich ein größeres Eingabefeld, in dem
Sie Ihr Anliegen beschreiben können. Beachten Sie bitte, dass
der Versand der Support-Formulars nur dann erfolgt, wenn Sie
hier mindestens 50 Zeichen eingegeben haben. Nach erneuter
Bestätigung mit OK geben Sie nun noch Ihren Namen und Ihre
E-Mail-Adresse ein.
About
•
Klicken Sie auf Help > About, um System-Informationen über
DSP CONTROL anzeigen zu lassen.
3 Unit Control
3.1 Unit Control starten
Zum Starten der Unit Control eines Lautsprechers klicken Sie im
Network Center auf den grünen
Lautsprechers, den Sie editieren möchten.
Das Unit Control-Startfenster MAIN erscheint:
3.2 Die Unit Control-Menüleiste
Durch Anklicken des entsprechenden Menüpunktes werden die
verfügbaren Menübefehle angezeigt. Bestätigen Sie Ihre Eingaben in den Menübefehlen mit OK oder brechen Sie mit Cancel ab.
File
Pfeil neben dem Namen des
Open
•
Externe Presets oder Einstellungen ö nen
Klicken Sie File > Open, um ein Preset von einem Datenträger zu
laden.
Save
•
Einstellungen sichern
Klicken Sie File > Save, um die aktuellen Einstellungen als Preset
auf einem Datenträger zu speichern.
Backup Presets
•
Erlaubt das Speichern aller belegten Presets des ausgewählten Lautsprechers auf der Festplatte oder einem Datenträger.
Klicken Sie File > Backup Presets, um die aktuellen Presets in
einem Ordner auf einem Datenträger zu speichern, um diese
später mit einem Import wieder zu laden.
Quit
•
Klicken Sie File > Quit, um Unit Control zu schließen.
Hardware
Enter Password
•
Befi ndet sich der Lautsprecher in gesperrtem Zustand (siehe
Lock Unit), lassen sich weder am Lautsprecher selbst die Presets
umschalten, noch in der Software Einstellungen ändern. Ausgenommen davon ist "Mute".
Nach Eingabe des Passwortes hat man sowohl am Lautsprecher
als auch in der Software wieder Zugri auf alle Einstellungen.
Wurde noch kein eigenes Passwort vergeben, greift das FactoryPasswort "Password".
- 11 -
• Deutsch • English
Page 12

Manual 1.1DSP CONTROL – LINEAR 7
Confi gure
•
Mit Change Password können Sie das derzeit gesetzte Passwort
für den Lock-Modus ändern
Mit Global Access Rights > Change Access Rights for Locked
level können Sie die Berechtigungen für den Lock-Unit-Mode
festlegen.
Diese sind: Load Presets, Save Presets, Enable Front Panel Access,
Change Unit Name, Master Volume Control, Tone Control
Lock Unit
•
Controller vor unbefugter Nutzung schützen
Info: Der "Gesperrt"-Zustand lässt sich durch die Anwahl des
Menü-Punktes "Unlock Unit" in der Software beenden. Auch
durch ein Gedrückt-Halten des Preset-Tasters (3 Sekunden)
am LINEAR7-Lautsprecher lässt sich der "Gesperrt"-Zustand
aufheben.
Klicken Sie Hardware > Lock Unit, um den Controller zu sperren
Klicken Sie Hardware > Unlock Unit, um den Controller wieder
frei zu schalten
Set Pin
•
Mit Hardware > Set Pin können Sie den angewählten Laut-
sprecher mit einem PIN-Code schützen. Der Schutz wird erst
wirksam, wenn DSP CONTROL beendet wird. Wird DSP CONTROL
erneut gestartet und der Lautsprecher im Netzwerk erkannt,
muss der vorab vergebene PIN-Code eingeben werden, um Einstellungen am Lautsprecher zu ändern.
Help
About
•
Informationen, wie Firmware-Version, Lautsprecher-Typenbezeichnung und weitere über die angeschlossene Einheit und Software,
anzeigen lassen.
Klicken Sie Help > About, um die Informationen abzurufen
3.3 Die Unit Control-Arbeitsfenster
Der linke Bildschirmrand mit seinen drei großen Buttons bleibt
immer gleich. Hier kann zwischen MAIN, SPEAKER und DSP OUT
umgeschaltet werden.
Fenster MAIN
Im Startfenster MAIN erhalten Sie eine Übersicht über die
Konfi guration des angeschlossenen LINEAR 7-Lautsprechers und
können diverse Einstellungen vornehmen.
Das Fenster ist in vier Bereiche gegliedert:
• SYSTEM (1)
• SPEAKER (2)
• DSP OUT (3)
• LIMITER ACTIVITY (4)
Mit Hardware > Lock Unit kann der Lautsprecher in einen
„Gesperrt“-Zustand versetzt werden. Dann ist es nicht mehr
möglich, den Betriebsmodus direkt am LINEAR 7-Lautsprecher
umzuschalten.
• Deutsch • English
- 12 -
Page 13

Manual 1.1DSP CONTROL – LINEAR 7
System-Bereich
•
In diesem Bereich haben Sie Zugri auf folgende Funktionen:
Presets Local
Über den Button Store können Sie die aktuellen Einstellungen
der Software auf der Festplatte oder einem anderen Datenträger
speichern.
Über den Button Load können Sie Einstellungen, welche sich auf
der Festplatte oder einem anderen Datenträger befi nden, in den
Arbeitsbereich der Software laden.
Presets Unit
In dem Textfeld können Sie für Ihre selbst erstellen Presets
einen Namen vergeben.
In dem Auswahlfeld können Sie eines, der bis zu zehn verfügba-
ren Presets auswählen.
Über den Button Store können Sie die aktuellen Einstellungen
der Software direkt auf dem LINEAR 7-Lautsprecher speichern.
Über den Button Load können Sie Einstellungen, die sich im
Speicher des LINEAR 7-Lautsprechers befi nden, in den Arbeitsbereich der Software laden.
Weitere Informationen zum Preset-Management: Jeder
LINEAR7-Lautsprecher stellt neben den drei Factory-Presets freie
Speicherplätze für selbst erstellte Einstellungen zur Verfügungen.
Die drei Factory-Presets sind mit vorgegebenen Einstellungen
als Read-only angelegt. Diese können Sie als Vorlage in den
Arbeitsbereich laden, bearbeiten und unter einem anderen Preset
abspeichern.
Es sind insgesamt zehn Presets in der Liste sichtbar. Ein Überschreiben der ersten drei Presets ist nicht möglich. Die Speicherplätze vier bis zehn können mit eigenen Einstellungen belegt werden. Das Laden und/oder Wechseln unterschiedlicher User-Presets
ist ausschließlich per DSP CONTROL Remote-Zugri möglich.
Link
Falls Sie mehr als einen LINEAR 7-Lautsprecher mit der Software
steuern, können Sie in der Link-Auswahlliste den Lautsprecher
anwählen, den Sie bearbeiten möchten.
Unit Name
Hier wird der Name des LINEAR 7-Lautsprechers angezeigt, der
gerade bearbeitet wird. Weiterhin kann man in diesem Eingabefeld den Namen des gewählten Lautsprechers ändern.
Speaker-Bereich
•
Dieser Bereich gibt Ihnen Zugri auf die grundlegenden Ein-
stellungen des Eingangskanals. Alle dargestellten Funktionen
können bedient werden, alle Änderungen werden zeitgleich im
SPEAKER-Fenster übernommen. Für eine detaillierte Bearbeitung der Einstellungen empfi ehlt sich das Aufrufen des
SPEAKER-Fensters (siehe Seite 14 "Fenster SPEAKER").
Input Level
Der Eingangspegel kann mit dem Fader oder durch Eingabe eines
Wertes in das darüber liegende Eingabefeld eingestellt werden.
Der Wertebereich reicht von –60 bis 0 dB. Schalten Sie bei
Wunsch durch Schieben bis "o " den Kanal aus.
Info: Der Pegel bezieht sich auf das Signal in Abhängigkeit
vom am LINEAR 7-Lautsprecher eingestellten Wert. Das heißt,
bei 0dB entspricht der Wert genau dem am Gain-Regler des
LINEAR7-Lautsprechers eingestellten Wert.
Mute
MUTE
Ein Klick auf den Button Mute schaltet den Eingang stumm. Der
Button leuchtet rot.
Invert
INVERT
Der Button Invert kehrt die Polarität des Kanals um. Der Button
leuchtet gelb.
• DSP OUT-Bereich
Dieser Bereich gewährt Zugri auf die grundlegenden Einstel-
lungen des DSP OUT-Kanals. Alle dargestellten Funktionen
können bedient werden. Alle Änderungen werden zeitgleich im
DSP OUT-Fenster übernommen. Für eine detailliertere Bearbeitung aller verfügbaren Parameter empfi ehlt sich das Aufrufen
des DSP OUT-Fensters (siehe "Fenster DSP OUT", Seite 15).
- 13 -
• Deutsch • English
Page 14

Manual 1.1DSP CONTROL – LINEAR 7
• Limiter Activity-Bereich
In diesem Bereich sehen Sie die Aktivität der System-Limiter
Diese Sektion dient ausschließlich der optischen Überwachung –
eine Parametereingabe ist hier nicht möglich. Das Einstellen der
Limiter-Parameter wird in den Fenstern SPEAKER bzw. DSP OUT
vorgenommen.
Fenster SPEAKER
Equalizer
Der Equalizer verfügt über zehn Filter, die individuell konfi guriert
werden können. Frequenz (Freq), Flankensteilheit (Q) und Ver-
stärkung (Gain) können durch Eingabe der Werte in das jeweilige
Eingabefeld konfi guriert werden. Frequenz und Verstärkung
können darüber hinaus durch Verschieben der EQ-Punkte auf dem
EQ-Display bearbeitet werden. Alle EQ-Bänder sind einzeln an- und
abschaltbar.
Über die Buttons EQ 1 bis EQ 10 lässt sich ein Filter aktivieren.
Der Button leuchtet in der Farbe des zugehörigen Frequenzbandes.
Hoch- und Tiefpassfi lter
Die Hochpassfi lter HPF und Tiefpassfi lter LPF können ebenfalls
individuell konfi guriert werden. Die Frequenz kann in das jeweilige
Eingabefeld eingegeben werden.
• Die Buttons HPF bzw. LPF aktivieren die Filter
• Der Frequenzbereich (Freq) reicht von 20 bis 20.000 Hz
• Mit dem Ausklappmenü Type kann der Filtertyp ausgewählt
werden.
Zur Verfügung stehen:
Butterworth, Linkwitz-Riley, Bessel
EQ-Display
Das Fenster SPEAKER dient zur Konfi guration des angewählten
LINEAR 7-Lautsprechers. Die Einstellungen wirken sich nur auf die
Lautsprecherwiedergabe aus (nicht auf DSP OUT, siehe 3.3).
Am linken Rand befi ndet sich die vom Fenster MAIN her bekannte
Menüleiste zum Wechseln zwischen den Fenstern. Im mittleren
Bereich befi nden sich die Werkzeuge zur Signalbearbeitung, am
rechten Rand befi ndet sich die Fader-Sektion (auch bekannt aus
dem SPEAKER-Bereich des MAIN-Fensters).
Mit dem Ausklappmenü Type kann der Filtertyp ausgewählt
werden:
Zur Verfügung stehen:
• Bell, Notch, Allpass, Low Shelf, High Shelf, Band Pass, High Pass,
Low Pass
• Der Frequenzbereich (Freq) reicht von 20 bis 20.000 Hz
• Die Flankensteilheit (Q) kann im Bereich von 0,5 bis 25,0 eingestellt werden
• Die Verstärkung (Gain) kann von -12 bis +12 dB eingestellt werden
- 14 -
Im EQ-Display wird die Frequenzkurve der Equalizer-Einstellungen
angezeigt. Frequenz und Verstärkung der EQ-Bänder können durch
grafi sches Verschieben der EQ-Punkte bearbeitet werden.
• Deutsch • English
Page 15

Manual 1.1DSP CONTROL – LINEAR 7
Bildschirm-Werkzeuge
Auf der linken Seite des EQ-Displays befi nden sich fünf Symbole:
Der Vergrößerungspfeil vergrößert die EQ-Grafi k auf die Größe des kompletten SPEAKER-Fensters. Erneutes Klicken erweitert
sie auf die volle Bildschirmgröße.
Wenn Sie in einer der erweiterten Ansichten auf das graue
X-Symbol oben links klicken, wird der Grafi kbereich wieder auf die
Standardeinstellung reduziert.
Das Kamera-Symbol erzeugt einen Screenshot, den Sie in
einer PNG-Bilddatei speichern können.
Die Lupe eignet sich für sehr akkurate Einstellungen. Die
Cursor-Bewegungen werden feiner aufgelöst, so dass Sie EQKurven mit noch größerer Präzision zeichnen können.
Das T(ext)-Symbol blendet die Parameter der aktiven EQBänder/Filter permanent im EQ-Display ein. Dies ist besonders bei
vergrößerter Bildschirmdarstellung hilfreich.
Speaker Limiter
Der Threshold des Limiters kann mit dem Schieberegler oder durch
Eingabe eines Wertes in das Eingabefeld geändert werden. Der
Threshold-Wertebereich reicht von -30 bis 0 dBu.
Alle weiteren Limiter-Parameter wurden von den HK Audio Ingenieuren bereits optimal auf den angeschlossenen LINEAR 7-Lautsprecher voreingestellt und sind nicht änderbar.
Fenster DSP OUT
Der mit DSP OUT bezeichnete XLR-Signalausgang stellt ein
Netzwerk-Interface zur Integration einer zusätzlichen, von Hause
aus nicht netzwerkfähigen Aktivbox dar. Diese kann unabhängig
in ihrer Lautstärke, der Filterung, im Limiting und Delay gesteuert
werden. So können zum Beispiel LINEAR 7-Tops mit LINEAR SUBBässen, oder LINEAR 5 LTS mit LINEAR 7-Subwoofern im gleichen
Netzwerk betrieben werden.
Das DSP OUT-Fenster dient zur Konfi guration des an der DSP OUTBuchse anliegenden Signals, zum Beispiel zur Anpassung eines
systemfremden Subwoofers. Der Funktionsumfang ist identisch
zum SPEAKER-Fenster. Die Einstellungen wirken sich nur auf den
DSP OUT-Ausgang aus, nicht auf die Lautsprecherwiedergabe.
Delay
Die Verzögerungszeit (Delay) kann mit dem Schieberegler oder
durch Eingabe eines Wertes in das Eingabefeld geändert werden.
Als Einheit kann zwischen feet, inch, m, mil, mm, ms und s gewählt werden.
Speaker
Der große Fader und das darüber liegende Eingabefeld dienen
zur Pegeleinstellung des Eingangskanals. Die LED-Anzeige gibt
optische Rückmeldung über den anliegenden Signalpegel. Der
Einstellbereich reicht von –60 bis 0 dB.
Mute
Mit dem Button Mute kann der Kanal lautlos gestellt werden. Die
Level-Einstellungen bleiben unverändert.
Invert
Mit dem Button Invert kann die Polarität des Kanals umgekehrt
werden. Der Button leuchtet gelb, wenn die Polarität gedreht ist
(180°).
• Deutsch • English
- 15 -
Page 16

DSP CONTROL
LINEAR 7
D-3116
HK Audio® • Postfach 1509 • 66595 St. Wendel • Germany • info@hkaudio.com • www.hkaudio.com
International Inquiries: fax +49-68 51-905 215 • international@hkaudio.com
Subject to change without notice • Technische Änderungen vorbehalten
Copyrights 2019 Music & Sales GmbH • 10/2019
 Loading...