

Page 1

1
ConTour Array™
English
Deutsch
Français
Manual 1.3
Page 2

Important Safety Instructions
Before connecting, read instructions
Important Advice on Safety!
Please read before use and keep for later use!
Wichtige Sicherheitshinweise!
Bitte vor Gebrauch lesen und für späteren Gebrauch aufbewahren!
• Read all of these instructions!
• Save these instructions for later use!
• Follow all warnings and instructions marked on the product!
• Do not use this product near water, i.e. bathtub, sink, swimming pool,
wet basement, etc.
• Do not place this product on an unstable cart, stand or table. The product
may fall, causing serious damage to the product or to persons!
• Slots and openings in the cabinet and the back or bottom are provided for
ventilation; to ensure reliable operation of the product and to protect it from
overheating, these openings must not be blocked or covered. This product
should not be placed in a built-in installation unless proper ventilation is
provided.
• This product should not be placed near a source of heat such as a stove,
radiator, or another heat producing amplifier.
• Use only the supplied power supply or power cord. If you are not sure of the
type of power available, consult your dealer or local power company.
• Do not allow anything to rest on the power cord. Do not locate this product
where persons will walk on the cord.
• Never break off the ground pin on the power supply cord.
• Power supply cords should always be handled carefully. Periodically check
cords for cuts or sign of stress, especially at the plug and the point where the
cord exits the unit.
• The power supply cord should be unplugged when the unit is to be unused for
long periods of time.
• If this product is to be mounted in an equipment rack, rear support should be
provided.
• This product should be used only with a cart or stand that is recommended by
HK AUDIO®.
• Never push objects of any kind into this product through cabinet slots as they
may touch dangerous voltage points or short out parts that could result in
risk of fire or electric shock. Never spill liquid of any kind on the product.
• Do not attempt to service this product yourself, as opening or removing
covers may expose you to dangerous voltage points or other risks. Refer all
servicing to qualified service personnel.
• Clean only with dry cloth.
• Do not defeat the safety purpose of the polarized or grounding-type plug.
A polarized plug has two blades with one wider than the other. A grounding
type plug has two blades and a third grounding prong. The wide blade or the
third prong are provided for the safety. If the provided plug does not fit into
your outlet, consult an electrician for replacement of the obsolete outlet.
• Place the product always in a way that the mains switch is easily accessible.
• Unplug this product from the wall outlet and refer servicing to qualified service personnel under the following conditions:
• When the power cord or plug is damaged or frayed.
• If liquid has been spilled into the product.
• If the product has been exposed to rain or water.
• If the product does not operate normally when the operating instructions are
followed.
• If the product has been dropped or the cabinet has been damaged.
• If the product exhibits a distinct change in performance, indicating a need of
service!
• Adjust only these controls that are covered by the operating instructions since
improper adjustment of other controls may result in damage and will often
require extensive work by a qualified technician to restore the product to
normal operation.
• Exposure to extremely high noise levels may cause a permanent hearing loss.
• Individuals vary considerably in susceptibility to noise induced hearing loss,
but nearly everyone will lose some hearing if exposed to sufficiently intense
noise for a sufficient time. The U.S. Government´s Occupational Safety and
Health Administration (OSHA) has specified the following permissible noise
level exposures:
Duration Per Day In Hours Sound LeveldBA, Slow Response
8 90
6 92
4 95
3 97
2 100
11/2 102
1 105
1/2 110
1/4 or less 115
• According to OSHA, any exposure in excess of the above permissible limits
could result in some hearing loss.
• Ear plug protectors in the ear canals or over the ears must be worn when operating this amplification system in order to prevent a permanent hearing loss if
exposure is in excess of the limits as set forth above. To ensure against potentially dangerous exposure to high sound pressure levels, it is recommended
that all persons exposed to equipment capable of producing high sound
pressure levels such as this amplification system be protected by hearing
protectors while this unit is in operation.
• Fuses: Replace with IEC 127 (5x 20 mms) type and rated fuse for best
performance only.
TO PREVENT THE RISK OF FIRE AND SHOCK HAZARD, DO NOT EXPOSE
THIS APPLIANCE TO MOISTURE OR RAIN. DO NOT OPEN CASE; NO USER
SERVICE-ABLE PARTS INSIDE. REFER SERVICING TO QUALIFIED SERVICE
PERSONNEL.
Version 1.1 11/2006
• The unit has been built by HK AUDIO® in accordance with IEC 60065 and
left the factory in safe working order. To maintain this condition and ensure
non-risk operation, the user must follow the advice and warning comments
found in the operating instructions. The unit conforms to Protection Class 1
(protectively earthed).
• HK AUDIO® ONLY GUARANTEE THE SAFETY, RELIABILITY AND
EFFICIENCY OF THE UNIT IF:
• Assembly, extension, re-adjustment, modifications or repairs are carried out
by HK AUDIO® or by persons authorized to do so.
• The electrical installation of the relevant area complies with the requirements
of IEC (ANSI) specifications.
• The unit is used in accordance with the operating instructions.
• The unit is regularly checked and tested for electrical safety by a competent
technician.
WARNING:
• If covers are opened or sections of casing are removed, except where this can
be done manually, live parts can become exposed.
• If it is necessary to open the unit this must be insulated from all power
sources. Please take this into account before carrying out adjustments, maintenance, repairs and before replacing parts.
• The appliance can only be insulated from all power sources if the mains
connection is unplugged.
• Adjustment, maintenance and repairs carried out when the unit has been
opened and is still live may only be performed by specialist personnel who are
authorized by the manufacturer (in accordance with VBG 4) and who are aware of the associated hazards.
• Loudspeaker outputs which have the IEC 417/5036 symbol (Diagram 1, below)
can carry voltages which are hazardous if they are made contact with. Before
the unit is switched on, the loudspeaker should therefore only be connected
using the lead recommended by the manufacturer.
• Where possible, all plugs on connection cables must be screwed or locked
onto the casing.
• Replace fuses only with IEC127 type and specified ratings.
• It is not permitted to use repaired fuses or to short-circuit the fuse holder.
• Never interrupt the protective conductor connection.
• Surfaces which are equipped with the "HOT" mark (Diagram 2, below), rear
panels or covers with cooling slits, cooling bodies and their covers, as well as
tubes and their covers are purposely designed to dissipate high temperatures
and should therefore not be touched.
• High loudspeaker levels can cause permanent hearing damage. You should
therefore avoid the direct vicinity of loudspeakers operating at high levels.
Wear hearing protection if continuously exposed to high levels.
MAINS CONNECTION:
• The unit is designed for continuous operation.
• The set operating voltage must match the local mains supply voltage.
• The unit is connected to the mains via the supplied power unit or power
cable.
• Power unit: Never use a damaged connection lead. Any damage must be rectified by a competent technician.
• Avoid connection to the mains supply in distributor boxes together with several other power consumers.
• The plug socket for the power supply must be positioned near the unit and
must be easily accessible.
PLACE OF INSTALLATION:
• The unit should stand only on a clean, horizontal working surface.
• The unit must not be exposed to vibrations during operation.
• Place the product always in a way that the mains switch is easily accessible.
• Keep away from moisture and dust where possible.
• Do not place the unit near water, baths, wash basins, kitchen sinks, wet areas,
swimming pools or damp rooms. Do not place objects containing liquid on
the unit - vases, glasses, bottles etc.
• Ensure that the unit is well ventilated.
• Any ventilation openings must never be blocked or covered. The unit must
be positioned at least 20 cm away from walls. The unit may only be fitted in a
rack if adequate ventilation is ensured and if the manufacturer's installation
instructions are followed.
• Keep away from direct sunlight and the immediate vicinity of heating elements and radiant heaters or similar devices.
• If the unit is suddenly moved from a cold to a warm location, condensation
can form inside it. This must be taken into account particularly in the case of
tube units. Before switching on, wait until the unit has reached room temperature.
• Accessories: Do not place the unit on an unsteady trolley, stand, tripod, base
or table. If the unit falls down, it can cause personal injury and itself become
damaged. Use the unit only with the trolley, rack stand, tripod or base recommended by the manufacturer or purchased together with the unit. When
setting the unit up, all the manufacturer's instructions must be followed and the
setup accessories recommended by the manufacturer must be used. Any combination of unit and stand must be moved carefully. A sudden stop, excessive
use of force and uneven floors can cause the combination of unit and stand to
tip over.
• Additional equipment: Never use additional equipment which has not been
recommended by the manufacturer as this can cause accidents.
• To protect the unit during bad weather or when left unattended for prolonged
periods, the mains plug should be disconnected. This prevents the unit being
damaged by lightning and power surges in the AC mains supply.
Diagram 1 Diagram 2
• Das Gerät wurde von HK AUDIO® gemäß IEC 60065 gebaut und hat das
Werk in sicherheitstechnisch einwandfreiem Zustand verlassen. Um diesen
Zustand zu erhalten und einen gefahrlosen Betrieb sicherzustellen, muss
der Anwender die Hinweise und die Warnvermerke beachten, die in der
Bedienungsanleitung enthalten sind. Das Gerät entspricht der Schutzklasse I
(schutzgeerdet).
• DIE SICHERHEIT, ZUVERLÄSSIGKEIT UND LEISTUNG DES GERÄTES WIRD
VON HK AUDIO® NUR DANN GEWÄHRLEISTET, WENN:
• Montage, Erweiterung, Neueinstellung, Änderungen oder Reparaturen von
HK AUDIO® oder von dazu ermächtigten Personen ausgeführt werden.
• die elektrische Installation des betreffenden Raumes den Anforderungen von
IEC (ANSI)-Festlegungen entspricht.
• das Gerät in Übereinstimmung mit der Gebrauchsanweisung verwendet wird.
WARNUNG:
• Wenn Abdeckungen geöffnet oder Gehäuseteile entfernt werden, außer wenn
dies von Hand möglich ist, können Teile freigelegt werden, die Spannung
führen.
• Wenn ein Öffnen des Gerätes erforderlich ist, muss das Gerät von allen Spannungsquellen getrennt sein. Berücksichtigen Sie dies vor dem Abgleich, vor
einer Wartung, vor einer Instandsetzung und vor einem Austausch von Teilen.
• Ein Abgleich, eine Wartung oder eine Reparatur am geöffneten Gerät unter
Spannung darf nur durch eine vom Hersteller autorisierte Fachkraft (nach
VBG 4) geschehen, die mit den verbundenen Gefahren vertraut ist.
• Lautsprecher-Ausgänge, die mit dem IEC 417/5036-Zeichen (Abb.1, s.unten)
versehen sind können berührungsgefährliche Spannungen führen. Deshalb
vor dem Einschalten des Gerätes Verbindung nur mit dem vom Hersteller
empfohlenen Anschlusskabel zum Lautsprecher herstellen.
• Alle Stecker an Verbindungskabeln müssen mit dem Gehäuse verschraubt
oder verriegelt sein, sofern möglich.
• Es dürfen nur Sicherungen vom Typ IEC 127 und der angegebenen Nennstromstärke verwendet werden.
• Eine Verwendung von geflickten Sicherungen oder Kurzschließen des Halters
ist unzulässig.
• Niemals die Schutzleiterverbindung unterbrechen.
• Oberflächen, die mit dem "HOT"-Zeichen (Abb.2, s.unten) versehen sind,
Rückwände oder Abdeckungen mit Kühlschlitzen, Kühlkörper und deren Abdeckungen, sowie Röhren und deren Abdeckungen können im Betrieb erhöhte
Temperaturen annehmen und sollten deshalb nicht berührt werden.
• Hohe Lautstärkepegel können dauernde Gehörschäden verursachen.
Vermeiden Sie deshalb die direkte Nähe von Lautsprechern, die mit hohen
Pegeln betrieben werden. Verwenden Sie einen Gehörschutz bei dauernder
Einwirkung hoher Pegel.
NETZANSCHLUSS:
• Das Gerät ist für Dauerbetrieb ausgelegt.
• Die eingestellte Betriebsspannung muss mit der örtlichen Netzspannung
übereinstimmen.
• Der Anschluss an das Stromnetz erfolgt mit dem mitgelieferten Netzteil oder
Netzkabel.
• Netzteil: Eine beschädigte Anschlussleitung kann nicht ersetzt werden.
Das Netzteil darf nicht mehr betrieben werden.
• Vermeiden Sie einen Anschluss an das Stromnetz in Verteilerdosen zusammen mit vielen anderen Stromverbrauchern.
• Die Steckdose für die Stromversorgung muss nahe am Gerät angebracht und
leicht zugänglich sein.
AUFSTELLUNGSORT:
• Das Gerät sollte nur auf einer sauberen, waagerechten Arbeitsfläche stehen.
• Das Gerät darf während des Betriebs keinen Erschütterungen ausgesetzt sein.
• Feuchtigkeit und Staub sind nach Möglichkeit fernzuhalten.
• Das Gerät muss immer so aufgestellt werden, dass der Netzschalter frei zugänglich ist.
• Das Gerät darf nicht in der Nähe von Wasser, Badewanne, Waschbecken,
Küchenspüle, Nassraum, Swimmingpool oder feuchten Räumen betrieben
werden. Keine mit Flüssigkeit gefüllten Gegenstände -Vase, Gläser, Flaschen
etc. auf das Gerät stellen.
• Sorgen Sie für ausreichende Belüftung der Geräte.
• Eventuelle Ventilationsöffnungen dürfen niemals blockiert oder abgedeckt
werden. Das Gerät muss mindestens 20 cm von Wänden entfernt aufgestellt
werden. Das Gerät darf nur dann in ein Rack eingebaut werden, wenn für
ausreichende Ventilation gesorgt ist und die Einbauanweisungen des Herstellers eingehalten werden.
• Vermeiden Sie direkte Sonneneinstrahlung sowie die unmittelbare Nähe von
Heizkörpern und Heizstrahlern oder ähnlicher Geräte.
• Wenn das Gerät plötzlich von einem kalten an einen warmen Ort gebracht
wird, kann sich im Geräteinnern Kondensfeuchtigkeit bilden. Dies ist insbesondere bei Röhrengeräten zu beachten. Vor dem Einschalten solange warten
bis das Gerät Raumtemperatur angenommen hat.
• Zubehör: Das Gerät nicht auf einen instabilen Wagen, Ständer, Dreifuß,
Untersatz oder Tisch stellen. Wenn das Gerät herunterfällt, kann es Personenschäden verursachen und selbst beschädigt werden. Verwenden Sie das Gerät
nur mit einem vom Hersteller empfohlenen oder zusammen mit dem Gerät
verkauften Wagen, Rack, Ständer, Dreifuß oder Untersatz. Bei der Aufstellung
des Gerätes müssen die Anweisungen des Herstellers befolgt und muss das
vom Hersteller empfohlene Aufstellzubehör verwendet werden. Eine Kombination aus Gerät und Gestell muss vorsichtigt bewegt werden. Plötzliches
Anhalten, übermäßige Kraftanwendung und ungleichmäßige Böden können
das Umkippen der Kombination aus Gerät und Gestell bewirken.
• Zusatzvorrichtungen: Verwenden Sie niemals Zusatzvorrichtungen, die nicht
vom Hersteller empfohlen wurden, weil dadurch Unfälle verursacht werden
können
• Zum Schutz des Gerätes bei Gewitter oder wenn es längere Zeit nicht beaufsichtigt oder benutzt wird, sollte der Netzstecker gezogen werden.
Dies verhindert Schäden am Gerät aufgrund von Blitzschlag und Spannungsstößen im Wechselstromnetz.
Abb.1 Abb.2
Page 3

Conseils de Securite Importants!
Priere de lire avant l'emploi et a conserver pour
utilisation ulterieure!
Importanti avvertimenti di sicurezza!
Leggere attentamente prima dell'uso e conservare
per un utilizzo successivo:
¡Indicaciones de seguridad importantes!
¡Léanse antes de utilizar el aparato y guardense para so
uso posterior!
• L'appareil a été conçu par HK AUDIO® selon la norme IEC 60065 et a quitté
l'entreprise dans un état irréprochable. Afin de conserver cet état et d'assurer
un fonctionnement sans danger de l'appareil nous conseillons à l'utilisateur
la lecture des indications de sécurité contenues dans le mode d'emploi.
L'appareil est conforme à la classification I (mise à terre de protection).
• SURETE, FIABILITE ET EFFICACITE DE L'APPAREIL NE SONT GARANTIS
PAR HK AUDIO® QUE SI:
• Montage, extension, nouveau réglage, modification ou réparation sont
effectués par HK AUDIO® ou par toute personne autorisée par
HK AUDIO®.
• L'installation électrique de la pièce concernée correspond aux normes IEC
(ANSI).
• L'utilisation de l'appareil suit le mode d'emploi.
AVERTISSEMENT:
• A moins que cela ne soit manuellement possible, tout enlèvement ou ouverture du boîtier peut entrainer la mise au jour de pieces sous tension.
• Si l'ouverture de l'appareil est nécessaire, celui-ci doit être coupé de chaque
source de courant. Ceci est à prendre en considération avant tout ajustement,
entretien, réparation ou changement de pieces.
• Ajustement, entretien ou réparation sur l'appareil ouvert et sous tension
ne peuvent être éffectués que par un spécialiste autorisé par le fabricant
(selon VBG4). Le spécialiste étant conscient des dangers liés à ce genre de
réparation.
• Les sorties de baffles qui portent le signe IEC 417/5036 (fig. 1, voir en bas)
peuvent être sous tension dangereuse. Avant de brancher l'appareil utiliser
uniquement le câble de raccordement conseillé par le fabricant pour raccorder les baffles.
• Toutes les prises des câbles de raccordement doivent être, si possible, vissées
ou verrouillées sur le boîtier.
• L’utilisation de fusibles rafistolés ou court-circuites est inadmissible
– seulement: IEC127.
• L'utilisation de fusibles rafistolés ou court-circuites est inadmissible.
• Ne jamais interrompre la connexion du circuit protecteur.
• Il est conseillé de ne pas toucher aux surfaces pourvues du signe "HOT" (fig.
2, voir en bas), aux parois arrières ou caches munis de fentes d'aération,
éléments d'aération et leurs caches ansi qu'aux tubes et leurs caches.
Ces éléments pouvant atteindre des températures élévées pendant
l'utilisation de l'appareil.
• Les Niveaux de puissance élévés peuvent entrainer des lésions auditives
durables. Evitez donc la proximité de haut-parleurs utilisés à haute puissance.
Lors de haute puissance continue utilisez une protection auditive.
BRANCHEMENT SUR LE SECTEUR:
• L'appareil est conçu pour une utilisation continue.
• La tension de fonctionnement doit concorder avec la tension secteur locale.
• Le raccordement au réseau éléctrique s'effectue avec l'adaptateur ou le
cordon d´alimentation livré avec l'appareil.
• Adaptateur: Un câble de raccordement abimé ne peut être remplacé.
L'adaptateur est inutilisable.
• Evitez un raccordement au réseau par des boîtes de distribution surchargées.
• La prise de courant doit être placée à proximité de l'appareil et facile à
atteindre.
LIEU D'INSTALLATION:
• L'appareil doit être placé sur une surface de travail propre et horizontale.
• L'appareil en marche ne doit en aucun cas subir des vibrations.
• Posez l'appareil en place de sorte que l'interrupteur du réseau reste accessible facilement.
• Evitez dans la mesure du possible poussière et humidité.
• L'appareil ne doit pas être placé à proximité d'eau, de baignoire, lavabo, évier,
pièce d'eau, piscine ou dans une pièce humide. Ne placez aucun vase, verre,
bouteille ou tout objet rempli de liquide sur l'appareil.
• L'appareil doit être suffisamment aéré.
• Ne jamais recouvrir les ouvertures d'aération. L'appareil doit être placé à 20
cm du mur au minimum. L'appareil peut être monté dans un Rack si une
ventilation suffisante est possible et si les conseils de montage du fabricant
sont suivis.
• Evitez les rayons de soleil et la proximité de radiateurs, chauffages etc.
• Une condensation d'eau peut se former dans l'appareil si celui-ci est transporté brusquement d'un endroit froid à un endroit chaud. Ceci est particulièrement important pour des appareils à tubes. Avant de brancher l'appareil
attendre qu'il ait la température ambiante.
• Accessoires: L'appareil ne doit être placé sur un chariot, support, trépied,
bâti ou table instable. Une chute de l'appareil peut entrainer aussi bien des
dommages corporels que techniques. Utilisez l'appareil uniquement avec un
chariot, Rack, support, trépied ou bâti conseillé par le fabricant ou vendu en
combinaison avec l'appareil. Les indications du fabricant pour l'installation
de l'appareil sont à suivre, et les accessoires d'installation conseillés par le
fabricant sont à utiliser. Un ensemble support et appareil doit être déplacé
avec précaution.
Des mouvements brusques et des revêtements de sol irreguliers peuvent
entrainer la chute de l´ensemble.
• Equipements supplémentaires: Ne jamais utiliser un équipement supplémentaire n'ayant pas été conseillé par le fabricant, ceci pouvant entrainer des
accidents.
• Afin de protéger l'appareil pendant un orage ou s'il ne doit pas être utilisé
pendant un certain temps, il est conseillé d'enlever la prise au secteur.
Ceci évite des dommages dûs à la foudre ou à des coups de tension dans le
réseau à courant alternatif.
Fig. 1 Fig. 2
• L'apparecchio è stato costruito dalla HK AUDIO® secondo la normativa
europea IEC 60065 ed ha lasciato il nostro stabilimento in stato ineccepibile.
Per garantire il mantenimento di tale stato e un utilizzo assolutamente privo
di rischi l'utente è tenuto ad osservare le indicazioni e gli avvertimenti di sicurezza contenuti nelle istruzioni per l'uso. L'apparecchio rispecchia il livello di
sicurezza I (collegato a terra).
• Sicurezza, affidabilità e prestazioni dell'apparecchio vengono garantiti dalla
HK AUDIO® solo ed esclusivamente se:
• Montaggio, ampliamento, rimessa a punto, modifiche e riparazioni vengono
eseguite dalla HK AUDIO® stessa o da personale da essa autorizzato.
• Gli impianti elettrici nei locali prescelti per l'uso dell'apparecchio rispondono
alle normative stabilite dall'ANSI.
• L'apparecchio viene utilizzato come indicato nel libretto delle istruzioni per
l'uso.
AVVERTIMENTI:
• In caso di apertura di parti di rivestimento o rimozione di parti dell'involucro,
a meno che non si tratti di pezzi rimovibili semplicemente a mano, possono
venire alla luce parti dell'apparecchio conduttrici di tensione.
• Se l'apertura dell'apparecchio dovesse risultare necessaria è indispensabile
staccare precedentemente quest'ultimo da tutte le fonti di tensione. Rispettare tale misura di prevenzione anche prima di un allineamento, di operazioni
di manutenzione, della messa in esercizio o della sostituzione di componenti
all'interno dell'apparecchio.
• Allineamento, operazioni di manutenzione o eventuali riparazioni
dell'apparecchio in presenza di tensione vanno eseguite esclusivamente da
personale specializzato ed autorizzato, in grado di eseguire tali operazioni
evitandone i rischi connessi.
• Le uscite degli altoparlanti contrassegnate dai caratteri IEC 417/5036 (vedi
illustrazione 1 a fondo pag.) possono essere conduttrici di tensione pericolosa con cui evitare il contatto. Per questo motivo, prima di accendere
l'apparecchio, collegare quest'ultimo agli altoparlanti servendosi esclusivamente del cavetto d'allacciamento indicato dal produttore.
• Tutte le spine e i cavi di collegamento devono essere avvitati o fissati
all'involucro dell'apparecchio per quanto possibile.
• Utilizzare esclusivamente fusibili del tipo IEC 127 con la indicata corrente
nominale.
• L'utilizzo di fusibili di sicurezza non integri e la messa in corto circuito del
sostegno di metallo sono proibite.
• Non interrompere mai il collegamento con il circuito di protezione.
• Superfici contrassegnate dalla parola "HOT" (vedi illustrazione 2 a fondo
pag.), cosi come griglie di aerazione, dispositivi di raffreddamento e i loro
rivestimenti di protezione, oppure valvole e i relativi rivestimenti protettivi
possono surriscaldarsi notevolmente durante l'uso e per questo motivo non
vanno toccate.
• L'ascolto di suoni ad alto volume può provocare danni permanenti all'udito.
Evitate perciò la diretta vicinanza con altoparlanti ad alta emissione di suono
e utilizzate cuffie protettive in caso ciò non sia possibile.
ALIMENTAZIONE:
• L'apparecchio è concepito per il funzionamento continuo.
• La tensione di esercizio deve corrispondere alla tensione di rete a cui ci si
allaccia.
• L'allacciamento alla rete elettrica avviene tramite alimentatore o cavetto
d'alimentazione consegnato insieme all'apparecchio.
• Alimentatore: un cavo di connessione danneggiato non può essere sostituito.
L'alimentatore non può più essere utilizzato.
• Evitate un allacciamento alla rete di corrente utilizzando cassette di distribuzione sovraccariche.
• La spina di corrente deve essere situata nelle vicinanze dell'apparecchio e
facilmente raggiungibile in qualsiasi momento.
LOCALI DI COLLOCAMENTO:
• Opportuno collocare l'apparecchio su una superficie pulita e orizzontale.
• Non sottoporre l'apparecchio in funzione a scosse e vibrazioni.
• L’apparecchio deve essere posizionato sempre in modo da assicurare il libero
accesso all’interruttore di alimentazione.
• Proteggere l'apparecchio per quanto possibile da umidità e polvere.
• Non collocare l'apparecchio vicino ad acqua, vasche da bagno, lavandini,
lavelli da cucina, locali umidi o piscine. Non appoggiare recipienti contenenti
liquidi - vasi, bicchieri, bottiglie, ecc. - sull'apparecchio.
• Provvedere ad una buone aerazione dell'apparecchio.
• Eventuali aperture previste per la ventilazione dell'apparecchio non vanno
ne bloccate, ne mai coperte. L'apparecchio va collocato ad almeno 20 cm di
distanza dalle pareti circostanti e può essere inserito tra altre componenti di
un impianto solo in caso di sufficiente ventilazione e qualora le direttive di
montaggio del produttore vengano rispettate.
• Evitare di esporre l'apparecchio ai raggi del sole e di collocarlo direttamente
nelle vicinanze di fonti di calore come caloriferi, stufette, ecc.
• Se l'apparecchio viene trasportato rapidamente da un locale freddo ad
uno riscaldato può succedere che al suo interno si crei della condensa. Ciò
va tenuto in considerazione soprattutto in caso di apparecchi a valvole.
Attendere che l'apparecchio abbia assunto la temperatura ambiente prima di
accenderlo.
• Accessori: non collocare l'apparecchio su carrelli, supporti, treppiedi, superfici
o tavoli instabili. Se l'apparecchio dovesse cadere a terra potrebbe causare
danni a terzi o danneggiarsi irreparabilmente. Utilizzate per il collocamento
dell'apparecchio supporti, treppiedi e superfici che siano consigliate dal
produttore o direttamente comprese nell'offerta di vendita. Per il collocamento dell'apparecchio attenetevi strettamente alle istruzioni del produttore,
utilizzando esclusivamente accessori da esso consigliati. L'apparecchio in
combinazione ad un supporto va spostato con molta attenzione.
Movimenti bruschi o il collocamento su pavimenti non piani possono provocare la caduta dell'apparecchio e del suo supporto.
• Accessori supplementari: non utilizzate mai accessori supplementari che non
siano consigliati dal produttore, potendo essere ciò causa di incidenti.
• Per proteggere l'apparecchio in caso di temporali o nel caso questo non venisse utilizzato per diverso tempo si consiglia di staccarne la spina di corrente.
In questo modo si evitano danni all'apparecchio dovuti a colpi di fulmine o ad
improvvisi aumenti di tensione nel circuito di corrente alternata.
Illustrazione 1 Illustrazione 2
• El aparato ha sido producido por HK AUDIO® según el IEC 60065 y salió de
la fábrica en un estado técnicamente perfecto. Para conservar este estado y
asegurar un funcionamiento sin peligros el usuario debe tener en cuenta las
indicaciones y advertencias contenidas en las instrucciones de manejo.
El aparato corresponde a la clase de protección l (toma de tierra protegida).
• LA SEGURIDAD, LA FIABILIDAD Y EL RENDIMIENTO DEL APARATO SOLO
ESTAN GARANTIZADOS POR HK AUDIO® CUANDO:
• el montaje, la ampliación, el reajuste, los cambios o las reparaciones se
realicen por HK AUDIO® o por personas autorizadas para HK AUDIO®;
• la instalación eléctrica del recinto en cuestión corresponda a los requisitos
de la determinación del IEC (ANSI);
• el aparato se use de acuerdo con las indicaciones de uso.
ADVERTENCIA:
• Si se destapan protecciones o se retiran piezas de la carcasa, exceptuando si
se puede hacer manualmente, se pueden dejar piezas al descubierto que sean
conductoras de tensión.
• Si es necesario abrir el aparato, éste tiene que estar aislado de todas las
fuentes de alimentación. Esto se debe tener en cuenta antes del ajuste, de un
entretenimiento, de una reparación y de una sustitución de las piezas.
• Un ajuste, un entretenimiento o una reparación en el aparato abierto y bajo
tensión sólo puede ser llevado a cabo por un especialista autorizado por el
productor (según VBG 4) que conozca a fondo los peligros que ello conlleva.
• Las salidas de altavoces que estén provistas de la característica IEC 417/5036
(figura 1, véase abajo) pueden conducir tensiones peligrosas al contacto. Por
ello es indispensable que antes de poner en marcha el aparato; la conexión
se haya realizado únicamente con el cable de empalmes recomendado por el
productor.
• Las clavijas de contacto al final de los cables conectores tienen que estar
atornilladas o enclavadas a la carcasa, en tanto que sea posible.
• Sólo se pueden utilizar fusibles del tipo IEC 127 con la intensidad de corriente
nominal indicada.
• El uso de fusibles reparados o la puesta en cortocircuito del soporte es
inadmisible.
• El empalme del conductor de protección no se puede interrumpir en ningún
caso.
• Las superficies provistas de la característica "HOT" (figura 2, véase abajo),
los paneles de fondo trasero o las protecciones con ranuras de ventilación,
los cuerpos de ventilación y sus protecciones, así como las válvulas electrónicas y sus protecciones pueden alcanzar temperaturas muy altas durante el
funcionamiento y por ello no se deberían tocar.
• Niveles elevados de la intensidad de sonido pueden causar continuos daños
auditivos; por ello debe evitar acercarse demasiado a altavoces que funcionen
a altos niveles. En tales casos utilice protecciones auditivas.
ACOMETIDA A LA RED:
• El aparato está proyectado para un funcionamiento continuo.
• La tensión de funcionamiento ajustada tiene que coincidir con la tensión de
la red del lugar.
• La conexión a la red eléctrica se efectuará con la fuente de alimentación o con
el cable de red que se entreguen con el aparato.
• Fuente de alimentación: una linea de conexión dañada no se puede sustituir.
La fuente de alimentación no puede volver a ponerse en funcionamiento.
• Evite una conexión de la red eléctrica a distribuidores con muchas tomas de
corriente.
• El enchufe para el suministro de corriente tiene que estar cerca del aparato
y ser de fácil acceso.
SITUACION:
• El aparato debería estar situado en una superficie limpia y totalmente horizontal.
• El aparato no puede estar expuesto a ningún tipo de sacudidas durante su
funcionamiento.
• Coloque el dispositivo de forma que el interruptor de la red quede accessible
facilmente.
• Se deben evitar la humedad y el polvo.
• El aparato no puede ponerse en funcionamiento cerca del agua, la bañera, el
lavamanos, la pila de la cocina, un recinto con tuberías de agua, la piscina o
en habitaciones húmedas. Tampoco se pueden poner objetos llenos de líquido - jarrones, vasos, botellas, etc. - encima de él.
• Procure que el aparato tenga suficiente ventilación.
• Las aberturas de ventilación existentes no se deben bloquear ni tapar nunca.
El aparato debe estar situado como mínimo a 20 cm de la pared. El aparato
sólo se puede montar en un rack, si se ha procurado la suficiente ventilación
y se han cumplido las indicaciones de montaje del productor.
• Evite los rayos del sol directos así como la proximidad a radiadores, electro radiadores o aparatos similares.
• Si el aparato pasa repentinamente de un lugar frío a otro caliente, se puede
condensar humedad en su interior. Esto se debe tener en cuenta sobretodo
en los aparatos con válvulas electrónicas. Antes de poner en marcha el aparato se debe esperar hasta que éste haya adquirido la temperatura ambiental.
• Accesorios: el aparato no se puede colocar encima de carros, estantes,
trípodes, soportes o mesas inestables. Si el aparato se cae puede causar
daños perso nales y se puede estropear. Coloque el aparato sólo en un carro,
rack, estante, trípode o soporte recomendado por el productor o que se
le haya vendido junto con el aparato. En la instalación se deben seguir las
indicaciones del productor así como utilizar los accesorios recomendados
por el mismo para colocarlo encima. El conjunto del aparato con el pedestal
se debe mover con mucho cuidado. Un paro brusco, la aplicación de una
fuerza desmesurada o un suelo irregular puede ocasionar la caida de todo el
conjunto.
• Piezas adicionales: no utilice nunca piezas adicionales que no estén recomendadas por el productor, ya que se podrían provocar accidentes.
• Para protejer el aparato de una tormenta o si no se supervisa ni utiliza
durante algún tiempo, se debería desconectar la clavija de la red. Así se
evitan daños en el aparato a causa de un rayo y golpes de tensión en la red de
corriente alterna.
Figura 1 Figura 2
Page 4

ConTour Array™ 1.3
Table of Contents
A Notes on Rigging Safety. . . . . . . . . . . . . . . . . . . . . . . . . . . . . . . . . . . . . . . . . . . . . . . 5
1 Use . . . . . . . . . . . . . . . . . . . . . . . . . . . . . . . . . . . . . . . . . . . . . . . . . . . . . . . . . . . . . . . . . . . . . . . . . . . . . . 5
1.1 Intended Use . . . . . . . . . . . . . . . . . . . . . . . . . . . . . . . . . . . . . . . . . . . . . . . . . . . . . . . . . . . . . . . . . . . . . . 5
1.2 Unintended Use . . . . . . . . . . . . . . . . . . . . . . . . . . . . . . . . . . . . . . . . . . . . . . . . . . . . . . . . . . . . . . . . . . . . 5
2 Warranty and Liability. . . . . . . . . . . . . . . . . . . . . . . . . . . . . . . . . . . . . . . . . . . . . . . . . . . . . . . . . . . . . . . . 5
3 Notes on Safety for the HK AUDIO ConTour Array™ . . . . . . . . . . . . . . . . . . . . . . . . . . . . . . . . . . . . . . . 6
3.1 Responsibilities of the Operator . . . . . . . . . . . . . . . . . . . . . . . . . . . . . . . . . . . . . . . . . . . . . . . . . . . . . . . 6
3.2 Maintenance, Inspection and Repair of ConTour Array™ Rigging Hardware. . . . . . . . . . . . . . . . . . . . . 6
3.3 Technical Specifications of ConTour Array™ Rigging Hardware . . . . . . . . . . . . . . . . . . . . . . . . . . . . . . . 6
3.4 Maximum Number of Flown ConTour Array™ Enclosures . . . . . . . . . . . . . . . . . . . . . . . . . . . . . . . . . . . 6
3.5 Pick-points for Flying ConTour Array™ Enclosures . . . . . . . . . . . . . . . . . . . . . . . . . . . . . . . . . . . . . . . . . 6
3.6 Structural Modifications of ConTour Array™ Rigging Hardware . . . . . . . . . . . . . . . . . . . . . . . . . . . . . . 6
3.7 Original HK AUDIO Accessories . . . . . . . . . . . . . . . . . . . . . . . . . . . . . . . . . . . . . . . . . . . . . . . . . . . . . . . 6
3.8 Initiation and Operation . . . . . . . . . . . . . . . . . . . . . . . . . . . . . . . . . . . . . . . . . . . . . . . . . . . . . . . . . . . . . 6
B ConTour Array™ Speakers. . . . . . . . . . . . . . . . . . . . . . . . . . . . . . . . . . . . . . . . . . . . . . 8
1 The CTA 208 Mid/High Unit . . . . . . . . . . . . . . . . . . . . . . . . . . . . . . . . . . . . . . . . . . . . . . . . . . . . . . . . . . 8
1.1 Specifications, CTA 208. . . . . . . . . . . . . . . . . . . . . . . . . . . . . . . . . . . . . . . . . . . . . . . . . . . . . . . . . . . . . . 8
1.2 The CTA 208 Enclosures‘ Technical Data . . . . . . . . . . . . . . . . . . . . . . . . . . . . . . . . . . . . . . . . . . . . . . . . 9
2 CTA 118 Sub . . . . . . . . . . . . . . . . . . . . . . . . . . . . . . . . . . . . . . . . . . . . . . . . . . . . . . . . . . . . . . . . . . . . . . 10
2.1 Specifications, CTA 118 Sub. . . . . . . . . . . . . . . . . . . . . . . . . . . . . . . . . . . . . . . . . . . . . . . . . . . . . . . . . . 10
2.2 Technical Data, CTA 118 Sub . . . . . . . . . . . . . . . . . . . . . . . . . . . . . . . . . . . . . . . . . . . . . . . . . . . . . . . . . .11
C Rigging ConTour Array™ Enclosures . . . . . . . . . . . . . . . . . . . . . . . . . . . . . . . . . . 12
1 Components and Applications of ConTour Array™ Rigging Hardware . . . . . . . . . . . . . . . . . . . . . . . . 12
1.1 Mounting the Rigging Frame. . . . . . . . . . . . . . . . . . . . . . . . . . . . . . . . . . . . . . . . . . . . . . . . . . . . . . . . . 12
1.2 Setting the DualCurve™ Angle . . . . . . . . . . . . . . . . . . . . . . . . . . . . . . . . . . . . . . . . . . . . . . . . . . . . . . . 12
1.3 Rigging Additional CTA 208 Mid/High Enclosures . . . . . . . . . . . . . . . . . . . . . . . . . . . . . . . . . . . . . . . 12
2 Ground stacking. . . . . . . . . . . . . . . . . . . . . . . . . . . . . . . . . . . . . . . . . . . . . . . . . . . . . . . . . . . . . . . . . . . 14
3 Mains and Generator Power Supply . . . . . . . . . . . . . . . . . . . . . . . . . . . . . . . . . . . . . . . . . . . . . . . . . . . 14
D The ConTour Array™ DDO-Pro™ Controller . . . . . . . . . . . . . . . . . . . . . . . . . . . 15
1 The DDO-Pro™ Net Port . . . . . . . . . . . . . . . . . . . . . . . . . . . . . . . . . . . . . . . . . . . . . . . . . . . . . . . . . . . . .15
2 Audio Signal Routing. . . . . . . . . . . . . . . . . . . . . . . . . . . . . . . . . . . . . . . . . . . . . . . . . . . . . . . . . . . . . . . .15
3 Handling the DDO-Pro™ Controller. . . . . . . . . . . . . . . . . . . . . . . . . . . . . . . . . . . . . . . . . . . . . . . . . . . .15
3.1 Level . . . . . . . . . . . . . . . . . . . . . . . . . . . . . . . . . . . . . . . . . . . . . . . . . . . . . . . . . . . . . . . . . . . . . . . . . . . . .15
3.2 Key Lock . . . . . . . . . . . . . . . . . . . . . . . . . . . . . . . . . . . . . . . . . . . . . . . . . . . . . . . . . . . . . . . . . . . . . . . . . .15
3.3 Utilities. . . . . . . . . . . . . . . . . . . . . . . . . . . . . . . . . . . . . . . . . . . . . . . . . . . . . . . . . . . . . . . . . . . . . . . . . . .15
3.4 Sub Delay . . . . . . . . . . . . . . . . . . . . . . . . . . . . . . . . . . . . . . . . . . . . . . . . . . . . . . . . . . . . . . . . . . . . . . . . 16
3.5 Delay. . . . . . . . . . . . . . . . . . . . . . . . . . . . . . . . . . . . . . . . . . . . . . . . . . . . . . . . . . . . . . . . . . . . . . . . . . . . 16
3.6 Sub Level . . . . . . . . . . . . . . . . . . . . . . . . . . . . . . . . . . . . . . . . . . . . . . . . . . . . . . . . . . . . . . . . . . . . . . . . 16
3.7 System Setup . . . . . . . . . . . . . . . . . . . . . . . . . . . . . . . . . . . . . . . . . . . . . . . . . . . . . . . . . . . . . . . . . . . . . 16
3.8 Quick Guide to the V1.01 Controller‘s Menu Structure . . . . . . . . . . . . . . . . . . . . . . . . . . . . . . . . . . . . 17
4 Technical Specifications, DDO-Pro™ Controller: . . . . . . . . . . . . . . . . . . . . . . . . . . . . . . . . . . . . . . . . . 18
E Service . . . . . . . . . . . . . . . . . . . . . . . . . . . . . . . . . . . . . . . . . . . . . . . . . . . . . . . . . . . . . . 19
1 Maintenance . . . . . . . . . . . . . . . . . . . . . . . . . . . . . . . . . . . . . . . . . . . . . . . . . . . . . . . . . . . . . . . . . . . . . 19
2 ConTour Array™ Spare Parts . . . . . . . . . . . . . . . . . . . . . . . . . . . . . . . . . . . . . . . . . . . . . . . . . . . . . . . . . 19
3 Replacing Loudspeakers and Voice Coils . . . . . . . . . . . . . . . . . . . . . . . . . . . . . . . . . . . . . . . . . . . . . . . 19
3.1 1", 8" and 18" Speakers . . . . . . . . . . . . . . . . . . . . . . . . . . . . . . . . . . . . . . . . . . . . . . . . . . . . . . . . . . . . . 19
3.2 The Drivers‘ Voice Coils. . . . . . . . . . . . . . . . . . . . . . . . . . . . . . . . . . . . . . . . . . . . . . . . . . . . . . . . . . . . . 19
4 Checking Speakers‘ Phase. . . . . . . . . . . . . . . . . . . . . . . . . . . . . . . . . . . . . . . . . . . . . . . . . . . . . . . . . . . 19
Table of Figures
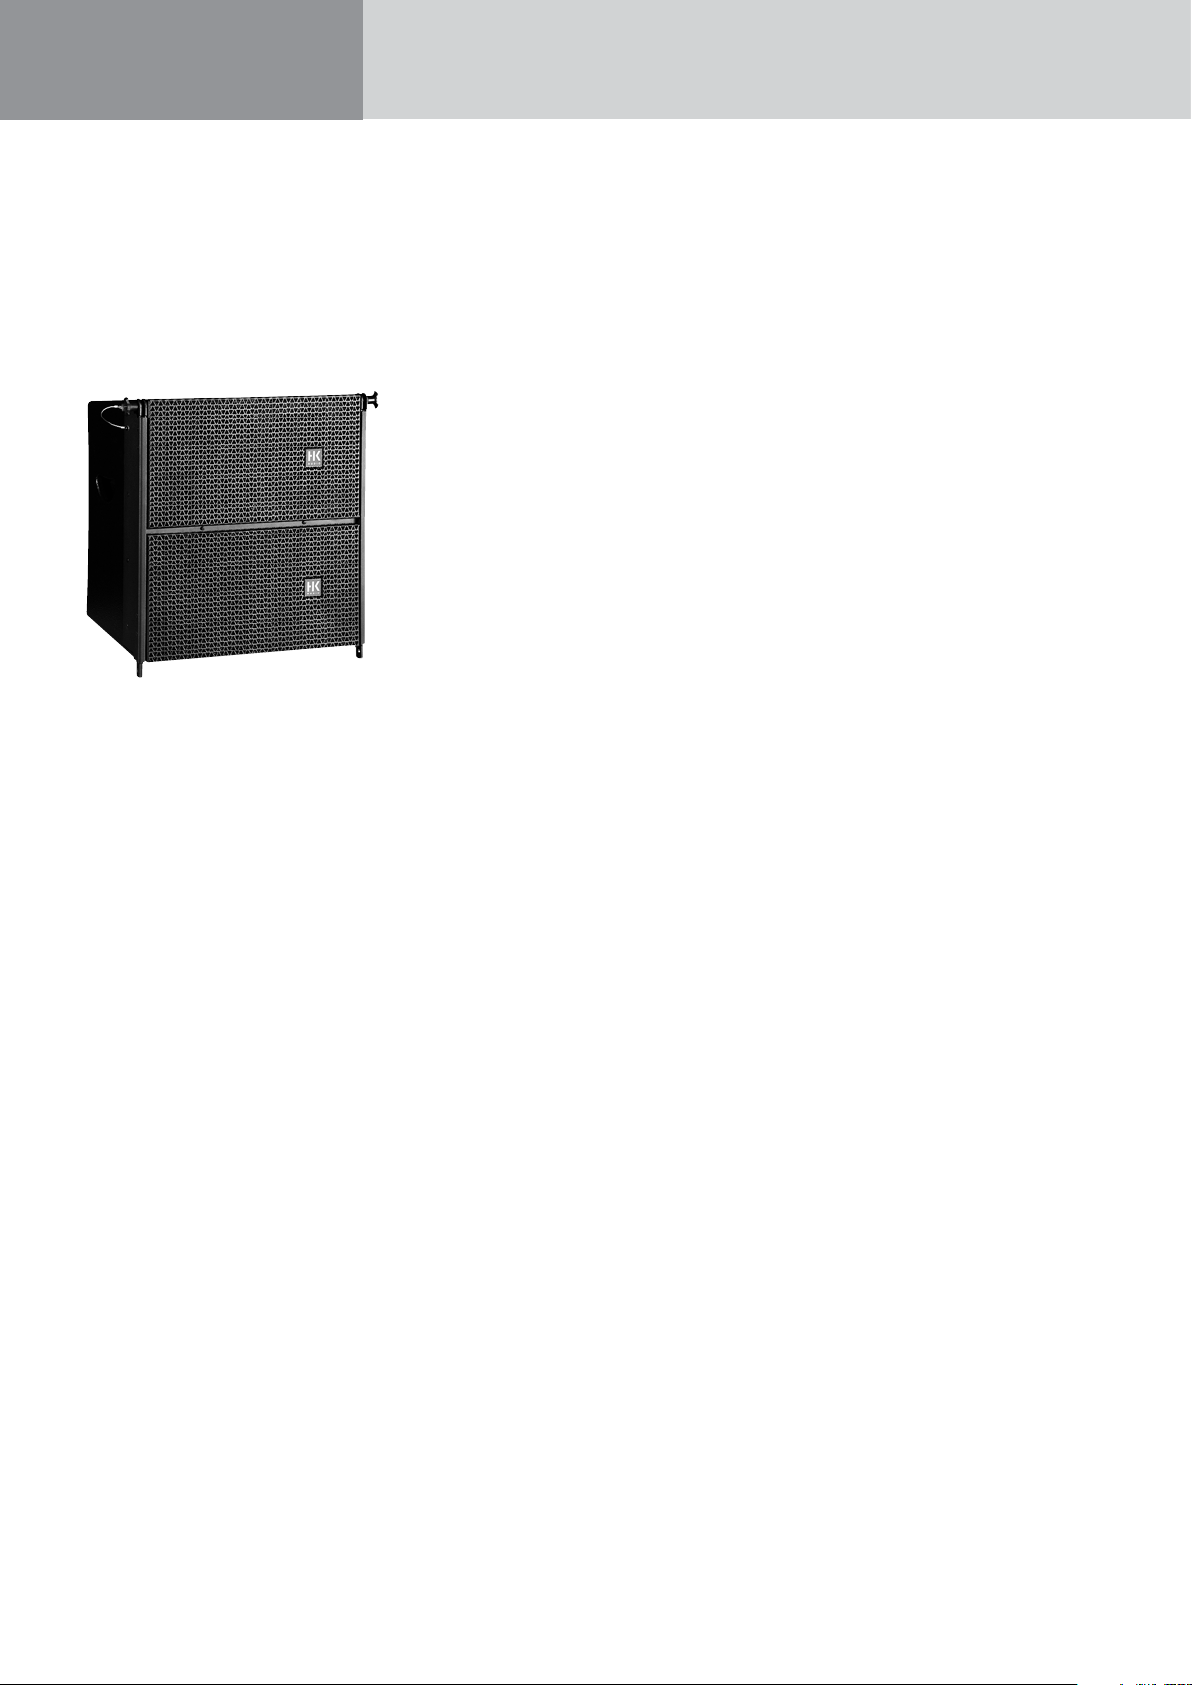
Figure 1: CTA 208 ........................................................................................................8
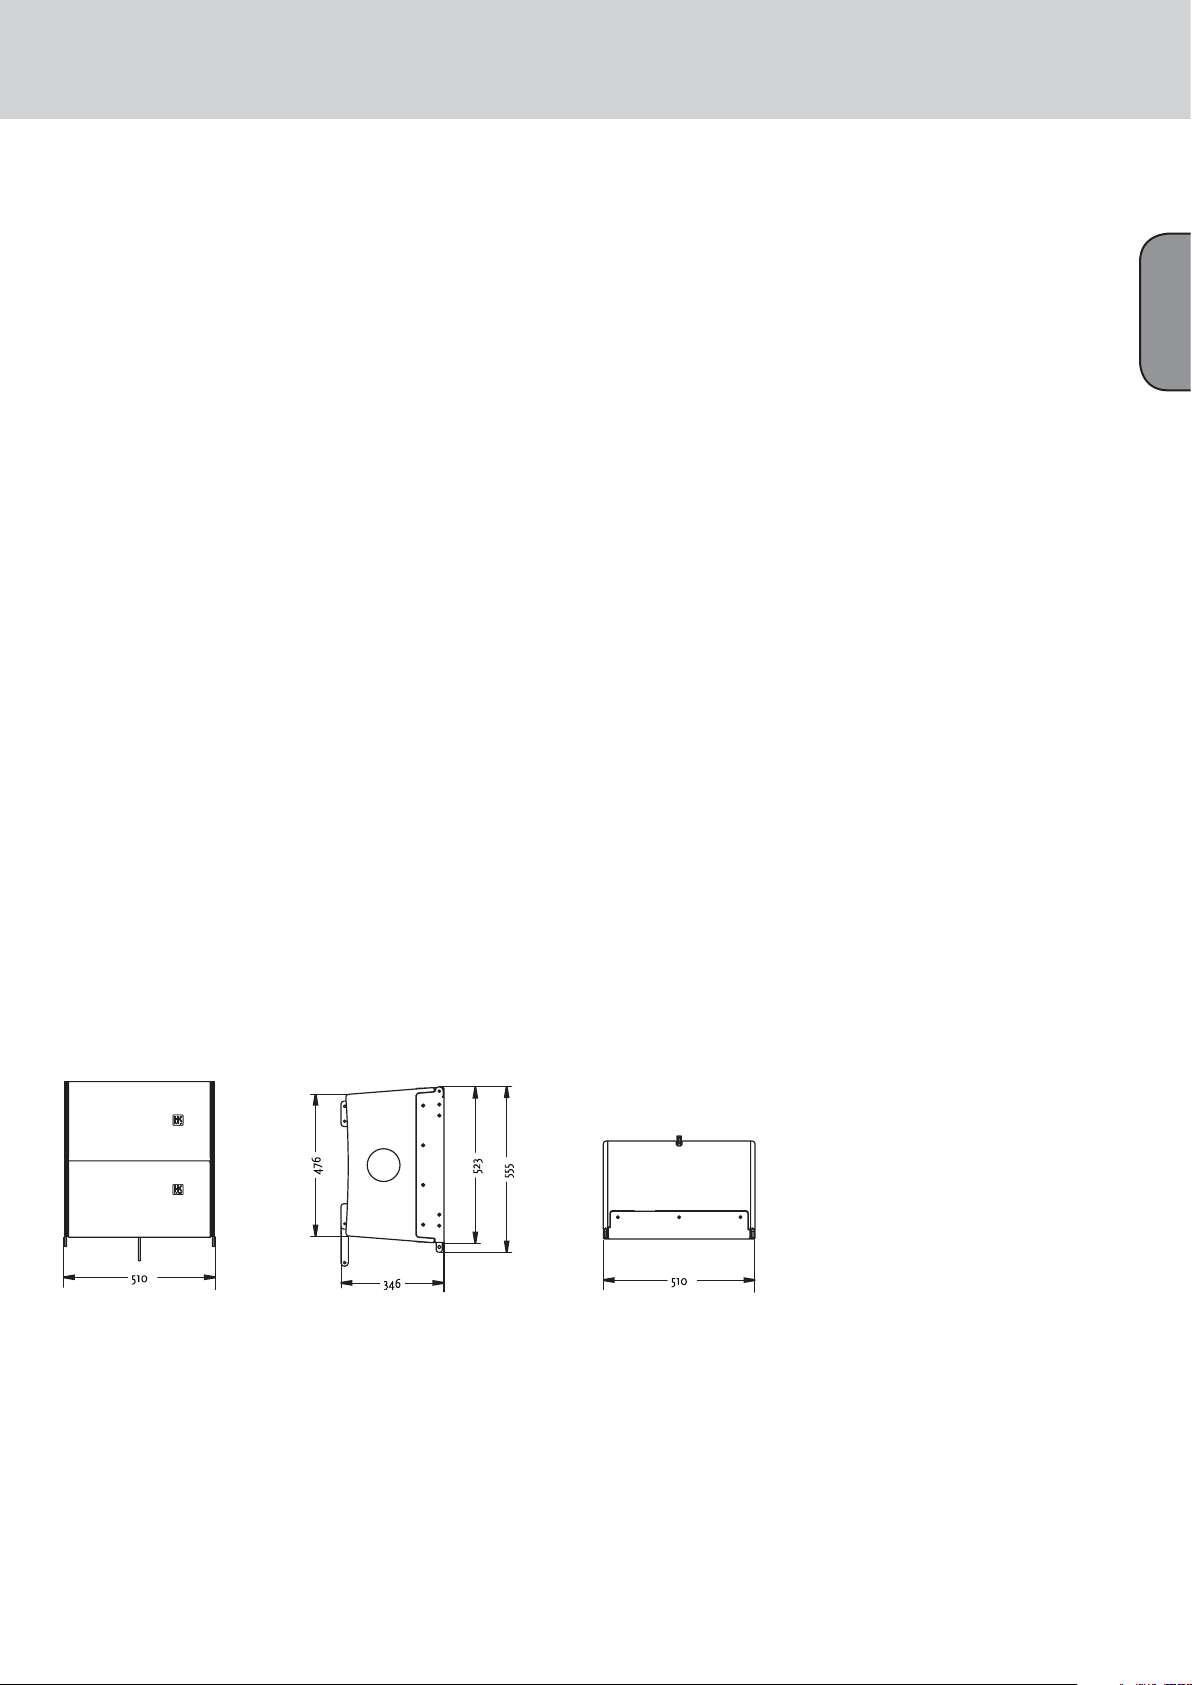
Figure 2: CTA 208 housing dimensions [in mm]........................................................ 9
Figure 3: CTA 118 Sub ..................................................................................................10
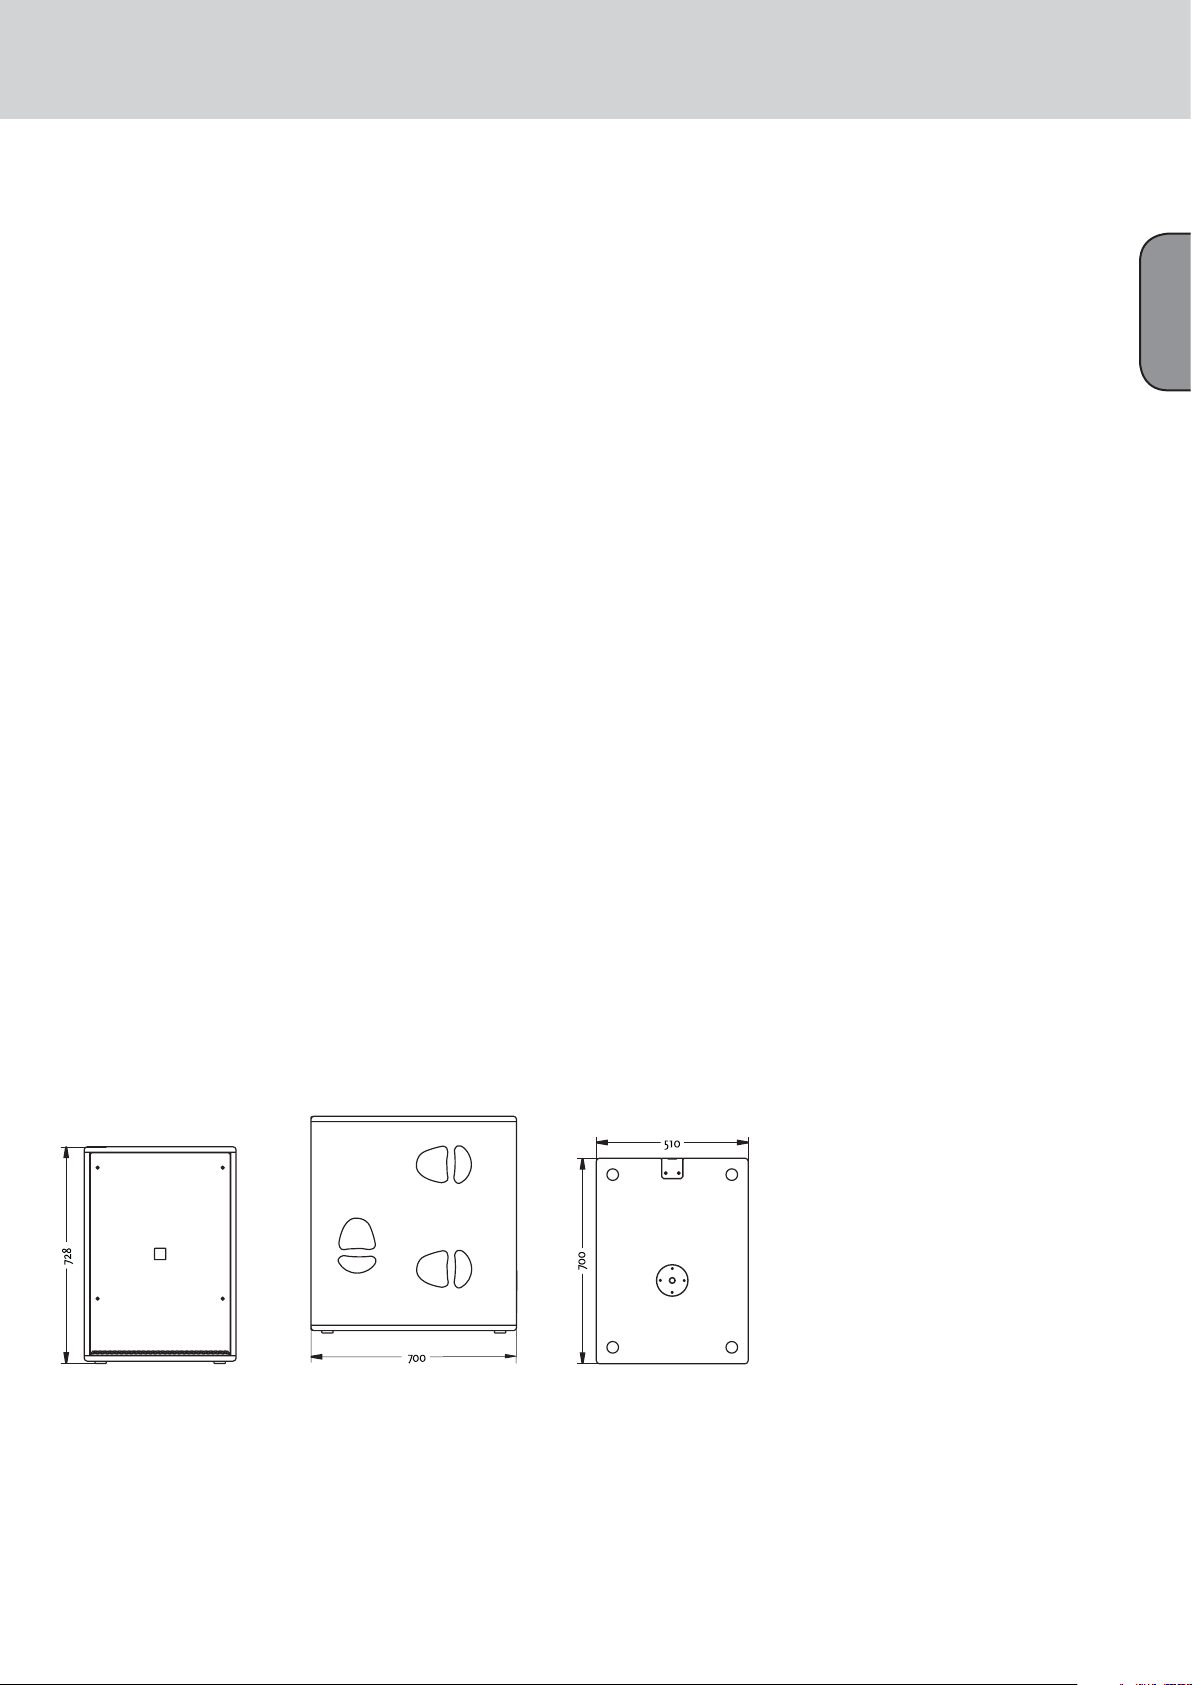
Figure 4: CTA 118 Sub housing dimensions [in mm] ................................................. 11
Figure 5: Integrated rigging attachments .................................................................12
Figure 6: ConTour Array™ rigging frame .................................................................. 12
Figure 7: Shackles for attaching motors, chain hoists ............................................. 12
Figure 8: Mounting the rigging frame ....................................................................... 13
Figure 9: Setting an intermediate angle ................................................................... 13
Figure 10: Hoisting the mounted CTA 208 enclosure............................................... 13
Figure 11 a,b,c,d,e: Rigging additional CTA 208 enclosures ....................................13
Figure 12 a, b: ConTour Array™ ground stack connectors ....................................... 14
Figure 13: ConTour Array™ stack plate .....................................................................14
Figure 14 a,b: Attaching the stack plate to the CTA 118 Sub................................... 14
Figure 15 a,b,c: CTA 208 Mid/High stack.................................................................. 14
Figure 16: DDO-Pro™ network .................................................................................. 15
Figure 17: DDO-Pro™ Controller panel ..................................................................... 15
Figure 18 a,b,c,d,e,f: System Setups .........................................................................16
Figure 19: Menu structure of the DDO-Pro™ Controller ........................................ 17
Page 5

A. Notes on Rigging Safety
Please read these instructions carefully before you begin setting up the system!
1 Use 2 Warranty and Liability
5
English
1.1 Intended Use
Specifications for intended use include the
following:
• When rigging enclosures, make sure that the load
is centered directly under the suspension point on
the rigging frame.
• The rigging frame may be tilted (not to be
confused with curved!) no more than 10% (6°).
Note that the specifications for intended use
require you to read and heed all of the operating
instructions and comply with inspection and
maintenance requirements.
Any use other than specified is unintended. The
manufacturer shall not be liable for damages
resulting from unintended use.
1.2 Unintended Use
Improper use of rigging frames and incorrect
handling of this load-carrying equipment can pose a
serious danger. Never
• use rigging frames to exert diagonal force or
tension on loads,
• use a crane to dislodge stuck or immovable loads,
• lift people,
• strike, knock or dent rigging frames,
• heat-treat or weld rigging frames,
• exceed the truss’s maximum load-carrying
capacity
HK AUDIO is not responsible for damages caused
by improper use or non-compliance with setup and
operating safety specifications. HK AUDIO excludes
all warranty and liability claims for personal injury
and property damages attributable to one or several
of the following:
• non-compliance with manual’s instructions,
invalidating all product liability and
warranty claims
• unintended use of rigging frames
• non-compliance with operating manual
instructions on transport, storage, first setup,
operation, maintenance and repair
• unauthorized structural modifications performed
on rigging hardware
• unauthorized changes made to parameters
indicated in the operating manual
• inadequate or improper repairs
Note that in addition to the above specifications,
the operational safety regulations of VBG 9
(accident prevention regulations of the German
employers’ liability insurance association) apply.
Page 6

ConTour Array™ 1.3
3. Notes on Safety for the HK AUDIO ConTour Array™
The HK AUDIO ConTour Array™ Rigging System’s
terms for use require you to install it according
to the following specifications. Before you begin
installation, ensure the pick-points (for example, a
chain hoist) on the stage roof or the venue’s ceiling
comply with BGV-C1 accident prevention rules and
the safety standards authority TÜV has certified
them for the full load. Before every installation,
inspect all parts to ensure they are in good working
order. Take particular care to confirm that all
Aeroquip tracks and connecting parts (cables,
fittings) are free of damage.
Use only parts named in these instructions! Be sure
to protect cabinets used outdoors against rain and
moisture. Mount these enclosures according to the
instructions in this installation manual. Keep all
documents on the system in a safe place.
A thorough understanding of fundamental
operating safety and safety rules is essential for
handling and operating this rigging system safely.
This operating manual contains key instructions on
handling enclosures safely.
3.1 Responsibilities of the Operator
As the operator, allow only people to work with
rigging frames who are
• 16 or older,
• physically and mentally able, familiar with
the basic rules of industrial safety and
accident prevention, and trained in handling
rigging systems.
Be sure to review and confirm regularly your
personnel’s working safety awareness. In addition,
task individuals with specific responsibilities
for setting up, putting into service, operating,
maintaining, and repairing equipment. Ensure
a skilful and experienced technician supervises
personnel training to handle the rigging system.
Also ensure defects, flaws and other damages that
could impede safety are repaired immediately.
3.2 Maintenance, Inspection and
Repair of HK AUDIO ConTour
Array™ Rigging Hardware
Inspections
§ 39, VBG 9a of the German employers’ liability
insurance association’s accident prevention rules
requires a qualified expert to inspect load-bearing
equipment and repair potential defects before you
first commission it.
§ 40, VBG 9a requires load-bearing equipment
to be inspected at least yearly for cracks. Inspect
equipment used in dynamic applications for cracks
every six months.
Maintenance
You may replace easily serviceable wearing or
standard parts according to the manufacturer’s
instructions. Use original replacement parts only.
Tighten screws and bolted connections
whenever necessary.
Repair
If parts of the load-bearing equipment become
deformed, it is up to the manufacturer to decide
if they are repairable. Only the manufacturer may
weld and repair load-bearing equipment.
3.3 Technical Specifications of
HK AUDIO ConTour Array™
Rigging Hardware
Load-carrying capacity: 150 kg/ 330 lbs.
Ambient temperature when in operation:
min –10° C, max + 60° C
3.4 Maximum Number of Flown
ConTour Array™ Enclosures
Fly no more than five (5) ConTour Array™ CTA 208
mid-/high-range units in stacked array from a
rigging frame.
Caution: Flying more than five CTA 208 cabinets in
stacked array voids the operating license!
3.5 Pick-points for Flying ConTour
Array™ Enclosures
Use only the rigging frame’s shackles in
combination with the holes in the center rail to
attach motors, chain hoists and straps!
• Clear the area immediately below arrays of people
before raising or lowering loads.
• Lift and lower flown mid/high enclosures
smoothly, avoiding abrupt stops or jerky motions.
• Secure the flown array with straps to prevent it
from moving, for example, in case of wind.
3.6 Structural Modifications of
ConTour Array™ Rigging Hardware
Do not modify the structure without the manufacturer’s consent. This also applies to welding
supporting parts. Structural changes require the
manufacturer’s written approval. Use original
replacement and wearing parts only.
3.7 Original HK AUDIO Accessories
Use original HK AUDIO parts only! The safety
standards authority TÜV has not certified any other
parts for use! Always install parts according to
these installation instructions! Store all documents
on the system in a safe place!
3.8 Initiation and Operation
§ 39, VBG 9a of the German employers’ liability
insurance association’s accident prevention rules
requires a qualified expert to inspect load-carrying
equipment and repair potential defects before you
first commission it.
§ 41 VBG 9a requires a non-routine inspection
on load-carrying equipment after damage, repair
work and other incidents that can affect
load-carrying capacity.
Page 7
This is to certify that
HK AUDIO® ConTour Array™
CTA 208 Mid/High Unit
HK AUDIO® ConTour Array™
CTA 118 SUB Active System Bass
7
English
complies with the provisions of the Directive of the Council of the
European Communities on the ap proximation of the laws of the Member
States relating to electromagnetic compatibility (EMC Directive 89/336/
EEC) and the low voltage Directive (73/23/EEC).
This declaration of conformity of the European Communities is the result
of an examination carried out by the Quality Assurance Department of
STAMER GmbH in accordance with European Standards EN 50081-1,
EN 50082-1 and EN 60065 for low voltage, as laid down in Article 10 of
the EMC Directive.
Magdeburger Str. 8
66606 St. Wendel
Lothar Stamer Dipl.Ing.
Managing Director
St. Wendel, 02/08/06
To the best of our knowledge, our products do not contain any
substances in concentrations or applications the placing on the market
of which is banned under the applicable requirements of the directive
202/95/EC (RoHS).
Page 8
ConTour Array™ 1.3
B. ConTour Array™ Speakers
1. The CTA 208 Mid/High Unit
Fig. 1: CTA 208
Design and Construction
The CTA 208 Mid/High unit‘s top and bottom
panels slope at an angle of 4.5°. Water-repellent,
black PU lacquer coats the enclosure made of
18 mm, 13-ply birch plywood. Your choices of array
curving angles (or splay) are 0° and 9°. The baffle
board cover consists of a metal grille; found behind
it are two CD horns equipped with acoustical lens
for the four 1" drivers.
The CTA 208 weighs 29 kg. It is 51 cm wide,
52.5 cm high and 34.6 cm deep (including rigging
attachments). Two grips on the side panels simplify
transport and set-up.
Fully integrated rigging attachments comprising
three quick-release pins and three rigging
connectors, two mounted on the sides and one in
the rear, serve to fly the mid/high units.
Electrical and Acoustical Data
The CTA 208 enclosure features two 8" cone chassis
speakers and four 1" B&C high frequency drivers
with a front-mounted acoustical lens in a CD horn
configuration. An internal passive crossover with a
crossover frequency of 2 kHz addresses the drivers
via a special acoustic lens. The CTA 208 enclosure‘s
nominal electrical power-handling is 500 watts
RMS at 8 ohms impedance. It produces 105 dB
(1W@1m) sound pressure, measured under halfspace conditions. Maximum SPL measured under
the same conditions at one meter is 134 dB at 10%
THD. The CTA 208 radiates at a horizontal angle of
100°. Frequency response ranges from 95 Hz to
19 kHz (±3 dB).
1.1 Specifications, CTA 208
A professional two-way system featuring cylindrical
wave technology, this cabinet serves to set up
vertical line arrays and project a coherent wavefront
across the entire frequency range. The precisiontuned enclosure sports two 8" midrange speakers.
Four 1" high-frequency drivers address two constant
directivity horns with 100° horizontal directivity via
a special acoustic lens. Vertical directivity depends
on the number of CTA 208s in use.
The housing is made of 15/18 mm birch plywood
coated with black PU varnish. Its fully integrated
rigging hardware adjusts to two 0° and 9° angles
for setting up line arrays. An integrated pole mount
offers two tilt angles of 3° and 11°. An impactresistant steel grille covers the front.
The active CTA 118 Sub system subwoofer with
an integrated DDO-Pro™ Controller drives the
enclosure. CTA 208‘s frequency response (+/- 3 dB)
ranges from 95 hertz to 19 kHz. Axial sensitivity is
105 dB, measured under half-space conditions at @
1W / 1m. Maximum SPL measured under the same
conditions with two CTA 208s is 134 dB at 10%
THD. Each unit‘s nominal power handling is
500 watts RMS at 8 ohms.
Connectors: 1 Neutrik NL 4 Speakon
Dimensions (W x H x D): 51 x 52.5 x 34.6 cm
Weight: 29 kg
Model: HK AUDIO CTA 208
®
.
Connections
The ports are out of harm‘s way on a recessed
connector panel on the CTA 208‘s back. It offers
two Speakon® NL 4 connectors. Pin assignments
are pin 1+ = mid/high +, 1– = mid/high-.
Caution: Please connect just one CT 208 to each
CTA 118 Sub enclosure. The second port serves to
connect a power amp in parallel (up to two CTA 208
at 4 ohms).
Page 9
1.2 The CTA 208 Enclosures‘ Technical Data
Nominal power handling/program/peak:................... 500 W RMS /1000 W/ 1500 W
Frequency response -10 dB 3): ................................... 80 Hz - 20 kHz
Frequency response +/-3 dB 3): ..................................95 Hz - 19 kHz
Directivity: ................................................................. 100° horizontal
Sensitivity 1W@1m 1): ............................................... 105 dB
Max. SPL calculated 1): ..............................................138 dB 2)
Max. SPL peak 1): .......................................................136 dB 3)
Max. SPL 1): ............................................................... 134 dB @ 10% THD (200 Hz- 5 kHz) 3)
Nominal impedance: .................................................8 ohms
Woofer/midrange speaker: ........................................ 2x 8"
High-frequency driver: ...............................................4x 1", 2" voice coil
Crossover frequency: ..................................................2 kHz, 12 dB/ octave
Connectors: ...............................................................2x Speakon® NL 4
Housing (birch): ........................................................15/18 mm (1/2"), 9/13-ply
Angles up: .................................................................. 2x 4.5°
Finish: ....................................................................... Black 2-component PU lacquer
Grille: ........................................................................ Metal grille with black acoustic foam
Handles: ....................................................................Two slot grips routed into the side panels
Rigging hardware: ......................................................DualCurve™, integrated with quick-release pins
Pole mount: ...............................................................HK AUDIO DuoTilt™
Weight: ...................................................................... 29 kg/ 63.8 lbs.
Dimensions (W x H x D): ........................................... 51 x 52.5 x 34.6 cm; 20" x 20 2/3" x 13 2/3"
Accessories: ...............................................................Touring flight case (2 CTA 208), rigging frame
9
English
1) Measured under half-space conditions 2) Based on peak power handling 3) Measured with 2 CTA 208s
Fig. 2: CTA 208 housing dimensions in mm
English
Page 10

ConTour Array™ 1.3
2. CTA 118 Sub
Fig. 3: CTA 118 Sub
Design and Construction
Made of 18 mm 13-ply birch plywood, waterrepellent, black PU lacquer coats the CTA 118 Sub
enclosure. A robust metal grille backed with
laminated acoustic foam rubber covers the baffle
board.
The CTA 118 Sub weighs 59 kg. It is 51 cm wide,
73 cm high and 71 cm deep. Three slot grips routed
into the side panels enable easy transport and
set-up; a recessed handle is on the lid. The active
circuitry resides in a separate chamber at the back
of the enclosure. A removable dolly protects the
electronic components and simplifies transport.
Electrical and Acoustical Data
The CTA 118 Sub enclosure features an 18" woofer.
The CTA 118 Sub enclosure‘s nominal electrical
power-handling is 700 W RMS at 8 ohms impedance.
It produces 101 dB (1W@1m) sound pressure,
measured under half-space conditions. Maximum
SPL measured under the same conditions at one
meter is 130 dB at 10% THD. The CTA 118 Sub‘s
frequency response ranges from 42 Hz to fx
(+/-3 dB). The two integrated PWM power amps
for the subwoofer and the mid/high output deliver
1000 W EIAJ @ 4 ohms each.
Connections
Ports are out of harm‘s way on a recessed connector
panel on the CTA 118 Sub‘s back. It offers two
Speakon® NL 4 connectors. Pin assignments are pin
1+ = mid/high +, 1- = mid/high. A Powercon mains
socket with another Powercon output connects to
the power supply. A female XLR and a male XLR port
serve to route signals. Two Neutrik Ethercon ports
serve to network several CTA 118 Subs.
2.1 Specifications, CTA 118 Sub
A professional active subwoofer equipped with a
DDO-Pro™ Controller and a 1000 W EIAJ PWM
power amp, the CTA 118 Sub delivers excellent
impulse response and exceedingly dynamic lowfrequency response. It features an 18" woofer
mounted in a precision-tuned bass reflex enclosure.
Another 1000 W PWM power amp drives
HK AUDIO CTA 208 or ConTour Series™ speakers.
The rectangular block housing is made of 18 mm
birch plywood coated with black PU lacquer. An
impact-resistant steel grille covers the front. A
removabledolly protects the electronic components
and simplifies transport
Its frequency response ranges from the crossover
frequency down to 42 Hz (-3 dB) and 36 Hz (-10 dB).
Maximum SPL under half-space conditions is 130 dB
at 10% THD.
Connectors: 1 Neutrik NL 4 Speakon® output, 1 XLR
female, 1 XLR male, 2 Powercon, 2 RJ45 Ethercon
Dimensions (W x H x D): 51 x 73 x 71 cm
Weight: 59 kg
Model: HK AUDIO CTA 118 Sub
Page 11
2.2 Technical Data, CTA 118 Sub
Integrated Power Amps:
Output power, Subwoofer: .......................................... 1000 W EIAJ, Class D @ 4 ohms
Output power, Mid/High: ............................................ 1000 W EIAJ, Class D @ 4 ohms
Protection circuits: ...................................................... DDO Pro™ Limiter, thermal protect, short-circuit
Line In/ Through:......................................................... Female XLR, electronically balanced & floating
Mid/High Out: ............................................................ 1 Speakon® NL 4
Mains In/ Out: ............................................................ 2 Powercon
Networking/ Communication: ..................................... DDO Pro™ Net/RS 485 Ethercon
Woofer: ........................................................................ 18"
Frequency response - 10 dB: ........................................ 36 Hz - fx
Frequency response+/- 3 dB: ....................................... 42 Hz - fx
Sensitivity 1W@1m 1): ................................................. 101 dB
Max. SPL calculated 1): ................................................ 134 dB 2)
Max. SPL peak 1): ........................................................ 133 dB
Max. SPL 1): ................................................................. 130 dB @ 10% THD (50 Hz- 200Hz)
Housing (birch): .......................................................... 18 mm (3/4"), 13-ply
Surface coating: ........................................................... Black 2-component PU lacquer
Grille: .......................................................................... Metal grille with black acoustic foam
Handles: ...................................................................... 6 slot grips routed into the side panels, 1 on the lid
Pole mount: ................................................................. M20
Weight: ........................................................................ 59 kg/ 129.8 lbs.
Dimensions (W x H x D): ............................................ 51 x 73 x 71 cm, 20" x 28 3/4" x 27 7/8"
Accessories: ................................................................. Protective cover, stack base plate
11
English
1) Measured under half-space conditions 2) Based on peak power handling
Fig. 4: CTA 118 Sub housing dimensions in mm
Page 12
ConTour Array™ 1.3
C. Rigging ConTour Array™ Enclosures
Please also read the Notes on Rigging Safety in Chapter A of this manual.
1. Components and Applications of
ConTour Array™ Rigging Hardware
Fig. 5: Integrated rigging attachments
Fig. 6: ConTour Array™ rigging frame
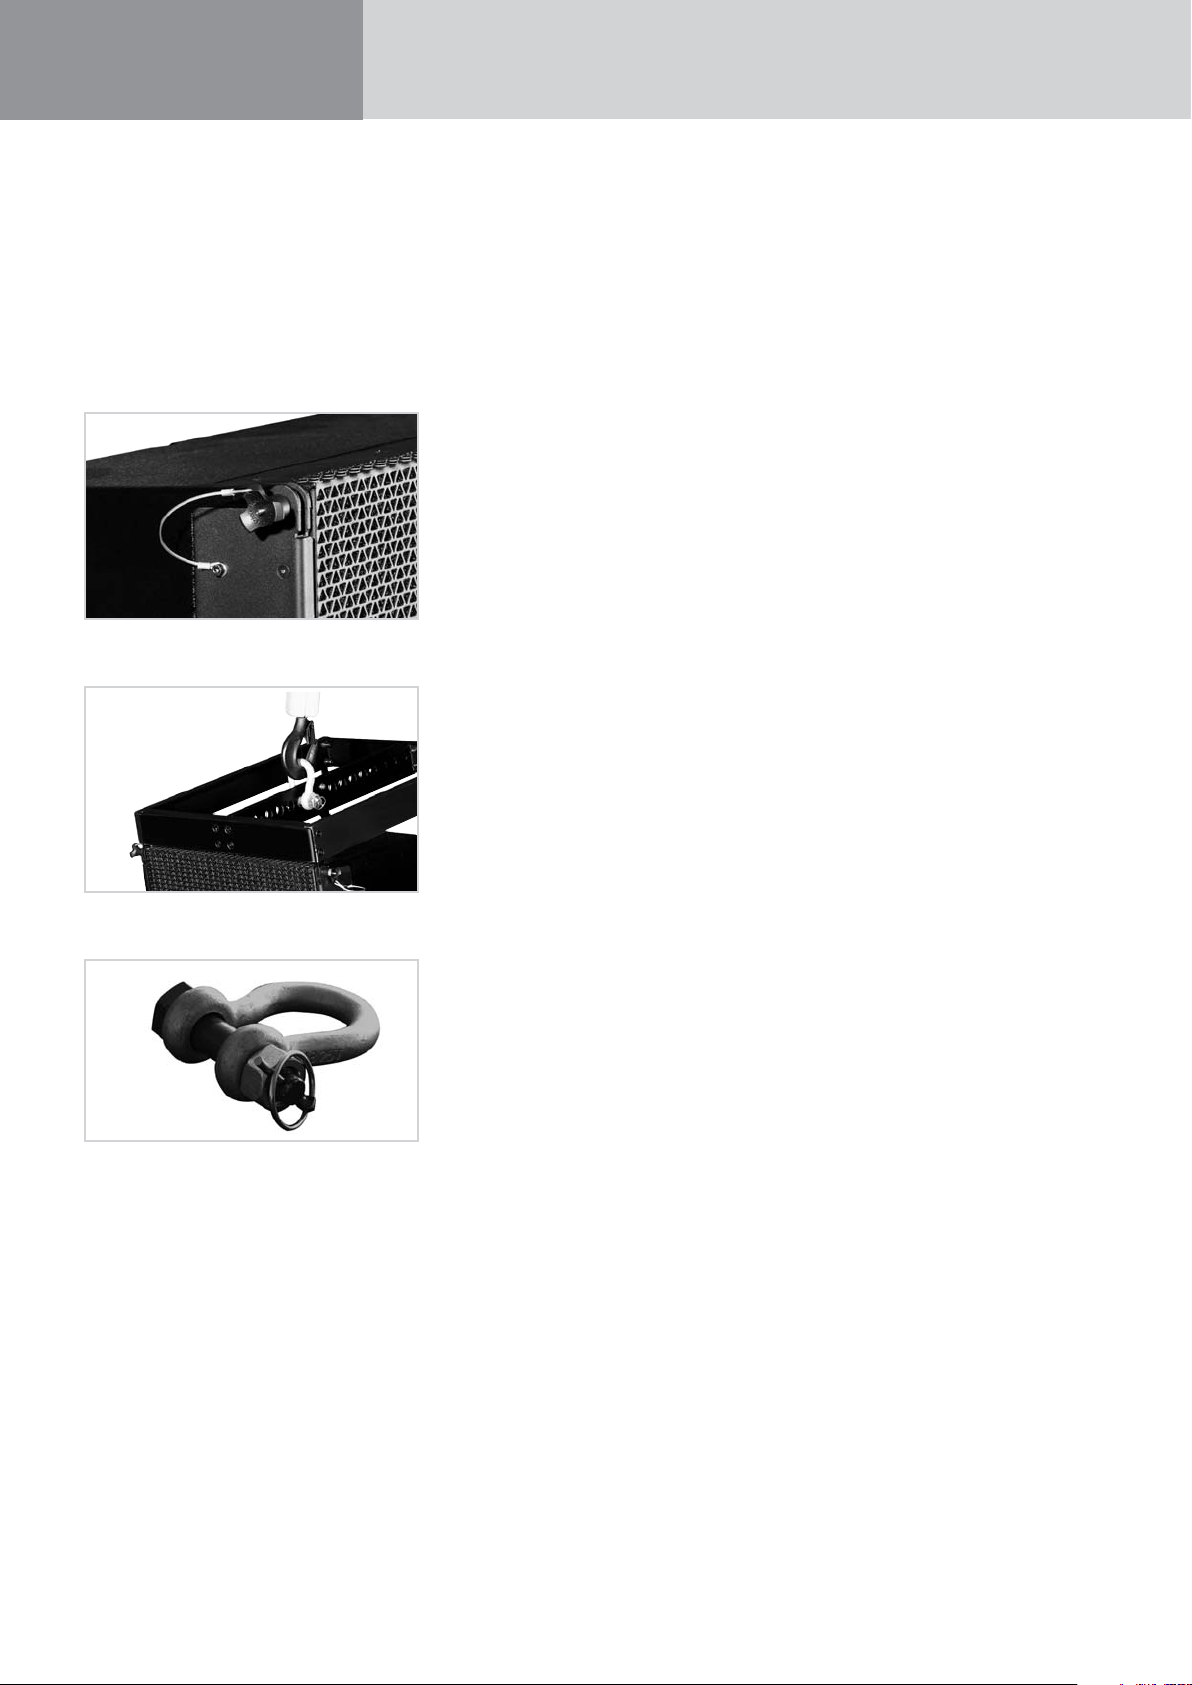
Fig. 7: Shackles for at taching motors, chain hoists
ConTour Array™ rigging hardware consists of the
following parts:
• a rigging frame with two shackles for attaching
motors or chain hoists.
• integrated rigging points on the side and back for
flying ConTour Array™ CTA 208 Mid/High units.
• three quick-release pins per CTA 208 for
connecting the enclosure to the rigging frame.
Important note on pins: Quick-release pins connect
rigging hardware and speaker enclosures, and their
proper function must be tested and verified. Pins
must always engage fully in the (fitted) hole. Under
no circumstances may these pins release on their
own when subjected to tractional forces. The nib in
the center of the pinhead must always be depressed
to insert pins; it releases the ball detents in front.
Once the pin engages in the hole, the nib must ease
back to its initial position.
1.1 Mounting the Rigging Frame
It takes two people to perform these tasks. Remove
the quick-release pins from the enclosure. Set the
rigging frame on the enclosure. First attach the two
front connectors. Turn the rigging frame‘s connector
component down and slide it into the rear
rigging connector.
Insert the rear pin through the hole labeled 0°.
Attach to the rigging frame the shackle that accepts
the motor hook. Your choice of pick point depends
on how sharply you aim to curve the array later.
Note: Depending on application, you may not be
able to select a pick point with a shackle. In this
case, use two shackles and a suitable O-ring as
shown in Figure 10.
Tip: If you intend to rig additional enclosures, we
recommend that you attach all the required speaker
cords to the rigging frame now because this task
becomes more difficult as the array grows higher.
Be sure to use cords of sufficient length!
1.2 Setting the DualCurve™ Angle
Curve the two CTA 208 cabinets using the rear
connector component. You have two angles to
choose from, 0° and 9°. Remove the pin on the
rear, insert lead the connector into the rigging track
and secure the connector component with the pin
as pictured.
1.3 Rigging Additional
CTA 208 Mid/High Enclosures
Hoist the mounted CTA 208 Mid/High cabinets to a
height that allows you to roll a second case holding
two enclosures under the array. Remove the two
front pins from the enclosure you wish to mount.
Move the second case with two additional CTA 208s
into position. Slowly lower the top two cabinets
until the two front connectors engage. Insert the
two front pins first, ensuring they engage fully and
securely (see Figure 11 a). You may have to shift
the two enclosures slightly to ease the pins into
position. To attach the rear connector component,
you must swivel it out of the track and ensure it
faces down (see Figure 11 b). Insert the pin through
the hole labeled 0° or 9° as required.
Hoist the array consisting of four CTA 208
enclosures high enough to remove it fully from the
case. Secure the hoisted array against blasts of wind
or unintentional twisting to prevent it from moving.
Check all pins on the top rigging frame to ensure
they seat firmly. Attach the motor to the shackle.
Important: Ensure the motor‘s chain bag hangs
freely and does not rest on the rigging frame!
Engage the motor to lift the cabinet from the case.
Roll the case off to the side. Remove the two front
pins from the enclosure you wish to mount and fold
down its connector component. Now you can rig
further cabinets.
Page 13

13
English
Fig. 8: Mounting the rigging frame
Fig. 9: Setting an intermediate angle
Fig. 10: Hoisting the mounted CTA 208 enclosure
Fig. 11 a, b, c, d, e: Rigging additional CTA 208 enclosures
Page 14
ConTour Array™ 1.3
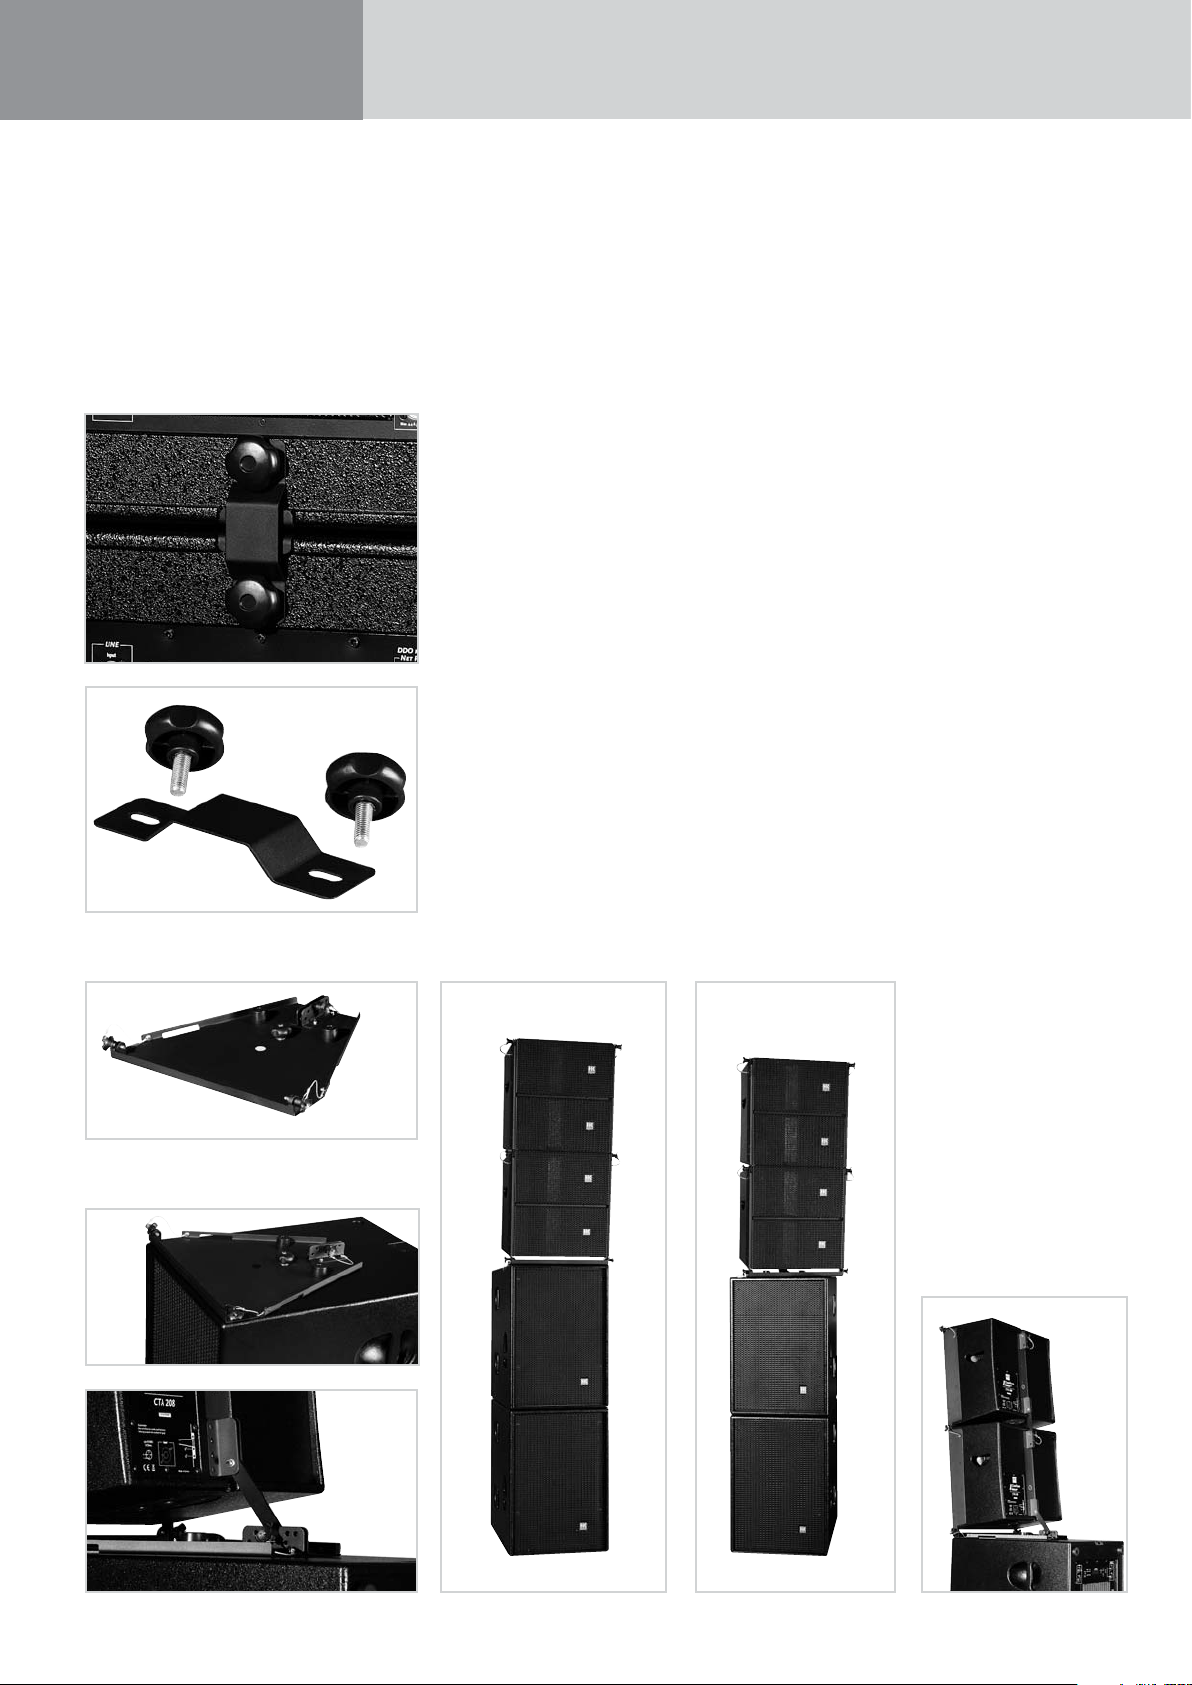
Fig. 12 a, b: ConTour Array™ ground stack connectors
2. Ground stacking
Depending on application, use two or three
ConTour Array™ subwoofers as the stack‘s base.
Set the desired number of subwoofers on top of
one another.
Caution:
Secure the ground stack to prevent it from tipping!
Use the M10 bushings on the back of the CTA 118
subwoofer and the ground-stack connectors to do
this.
Mount mid/high units individually, one after
another, on the top CTA 118 Sub. Use the ConTour
Array™ stack plate as the base and connector to
the subwoofer. Attach it to the CTA 118 Sub’s pole
mount using the M20 thumb screw. The stack plate
lets you easily adjust mid/high units without having
to move the subwoofer. On this stack plate, you can
freely select the desired down-tilt between 0° and 9°
in 1.5° increments.
3. Mains and Generator
Power Supply
Connect no more than two CTA 118 Subs to one
mains phase (16 A). If you use the Powercon
Link port, connect no more than one further CTA 118
Sub. The 13 A limit on maximum input current
(see label) applies to Great Britain because UK
power cables are approved to 13 A only. 16 A
current is permissible in other countries using EU
power cables.
Caution: If you must power the CTA 118 Sub with
a generator, ensure the generator is running before
you switch the system on. Never switch systems
off and on with the help of the generator! This
can damage the PWM power amps’ switching
power supply!
Note: The Powercon Link is not available for
100-120-volt units.
Fig. 13: ConTour Array™ stack plate
Fig. 14 a, b: Attaching the stackplate to the CTA 118 Sub
Fig. 15 a,b,c: CTA 208 Mid/High stack
Page 15
D. The ConTour Array™ DDO-Pro™ Controller
15
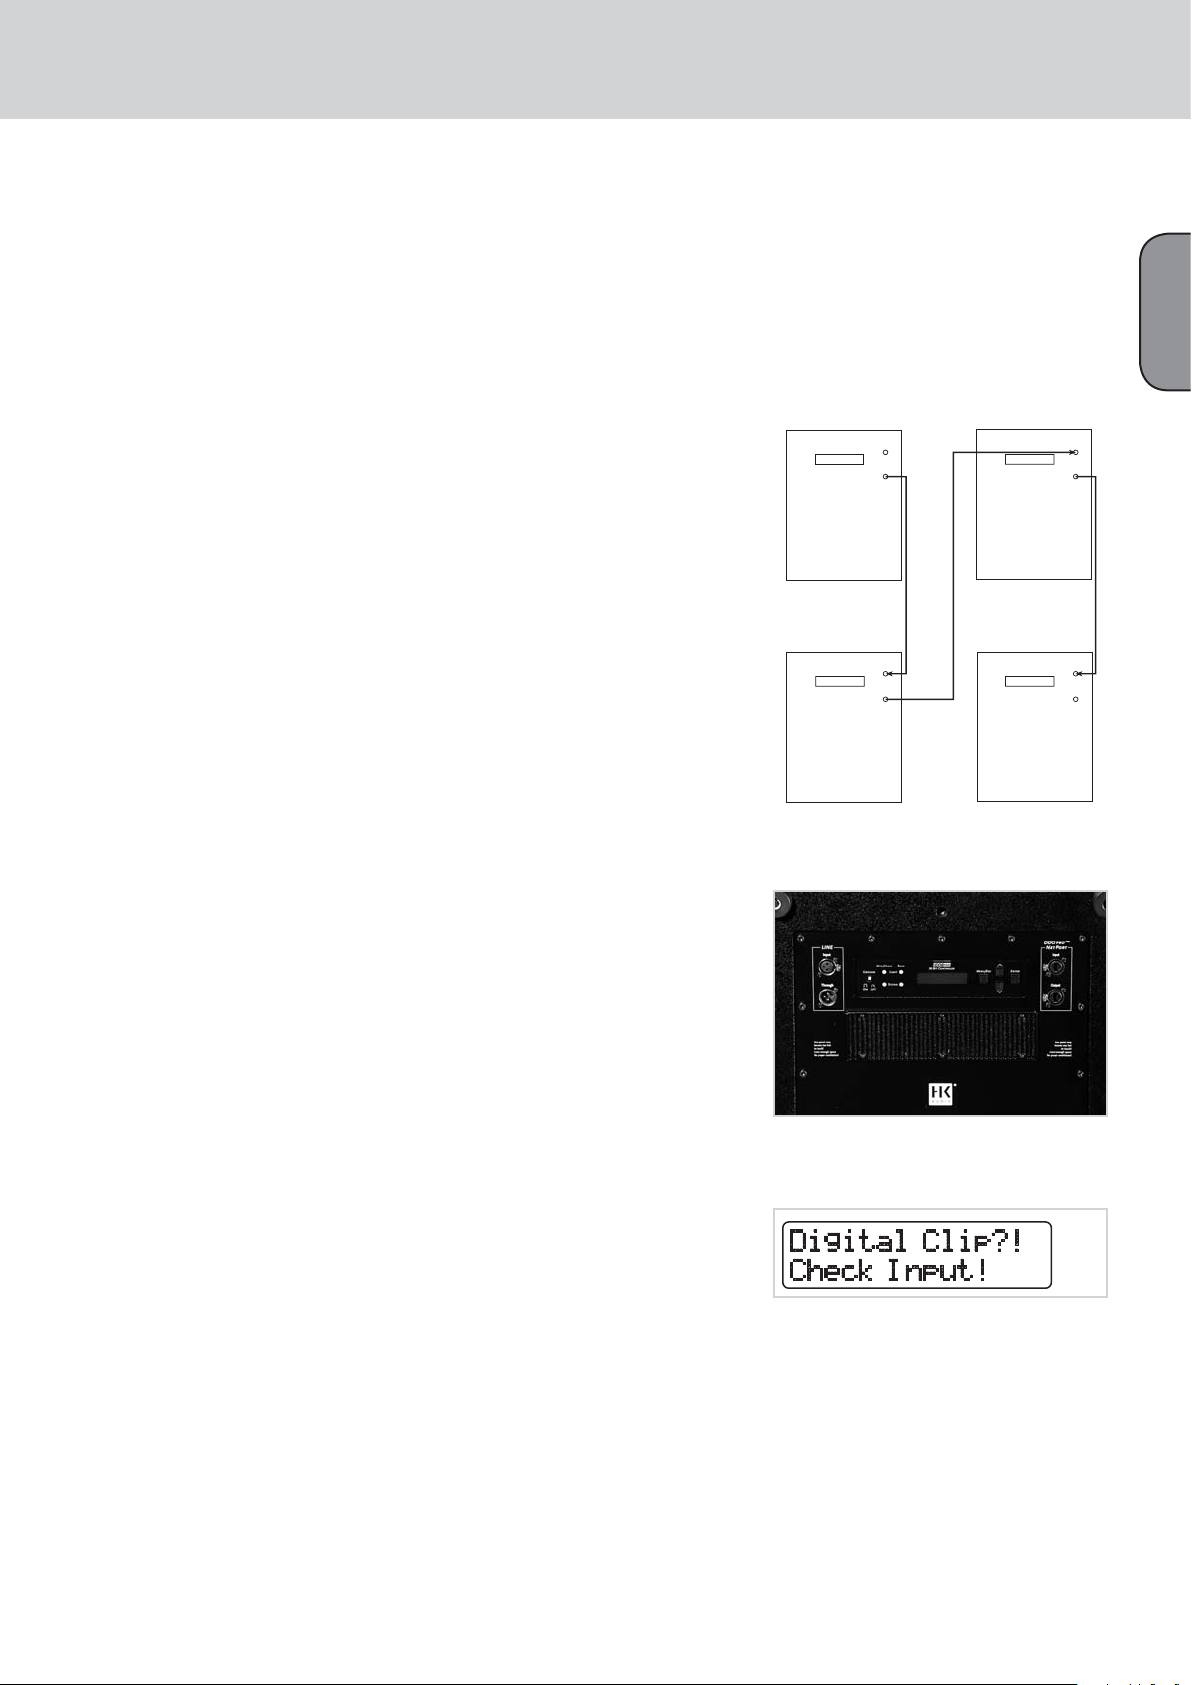
1. The DDO-Pro™
Net Port
Net Ports link several CTA 118 Subs in a
communication network. Use CAT 5 network cables
or professional Ethercon cables with a metal plug
to do this. Connect the first CTA 118 Sub’s output to
the next unit’s input, and so forth.
Note: This is purely a data interface. The DDO-Pro™
Net Port does not send audio signals.
If you wish to adjust controller settings (for example,
filter, gain or delay), you can do this on any CTA 118
Sub’s control panel. Automatically, the unit becomes
the master controller and sends parameter changes
to all networked CTA 118 Subs (up to 32 units).
Note: It does not send "Utilities" menu settings.
Caution: If you wish to use another CTA 118 Sub and
a ConTour Series™ cabinet (CT 108, CT 112, CT 115) for
near-fill or in-fill applications alongside CTA 208
speakers in a larger rig, DO NOT network it! Otherwise
the connected CT 108, CT 112 or CT 115 will adopt the
settings entered for the mid/high array.
2. Audio Signal Routing
Use an XLR cord to connect the signal source to
the first CTA 118 Sub’s signal input. If you wish to
connect further CTA 118 Subs to the source, do this
using the Signal Through ports. The XLR port’s pin
assignments are: pin 1 = ground, 2=+, 3=–.
Be sure to read section 3.1 covering maximum input
signal level and digital clip error and heed these
guidelines.
3. Handling the
DDO-Pro™ Controller
Four keys operate the device - Menu, Enter,
Up and Down.
Menu/ Esc:
This key accesses the controller’s menu structure
and exits a menu level.
Enter:
This key confirm changes and access menu levels.
Up and Down:
These keys navigate within a menu level and
increase and decrease displayed values. Please refer
to the menu structure quick guide at the end of the
chapter to learn more.
3.1 Level
You can adjust input levels from – 96 dB to +6 dB in
0.5 dB steps. Use the Up or Down keys to select the
gain setting and confirm your selection with Enter.
Note: The Level parameter adjusts the level after the
analog-to-digital converter to balance out varying
(system) levels. Level does not influence the input
signal’s volume in front of the analog-to-digital
converter. If the display reads “Digital Clip ?! Check
Input !” be sure to reduce the level at the mixing
console. In this case, the signal is saturating the
analog-to-digital converter, distorting the signal’s
rectangular waveform to create square waves. This
sounds extremely annoying and will eventually
destroy the power amp and speakers.
Tip: If you wish to reduce the volume of the lower
mid/high unit in the array – say, because it hangs
low and listeners are close to this unit – you can
use Level to do this. However, Level also affects the
subwoofer’s volume. Increase Sub Level by the same
value to compensate for the difference.
English
9J7''.IK8 9J7''.IK8
9J7''.IK8 9J7''.IK8
Fig. 16: DDO-Pro™ network
Fig. 17: DDO-Pro™ Controller panel
The AD converter’s Digital Clip indicator
Page 16
ConTour Array™ 1.3
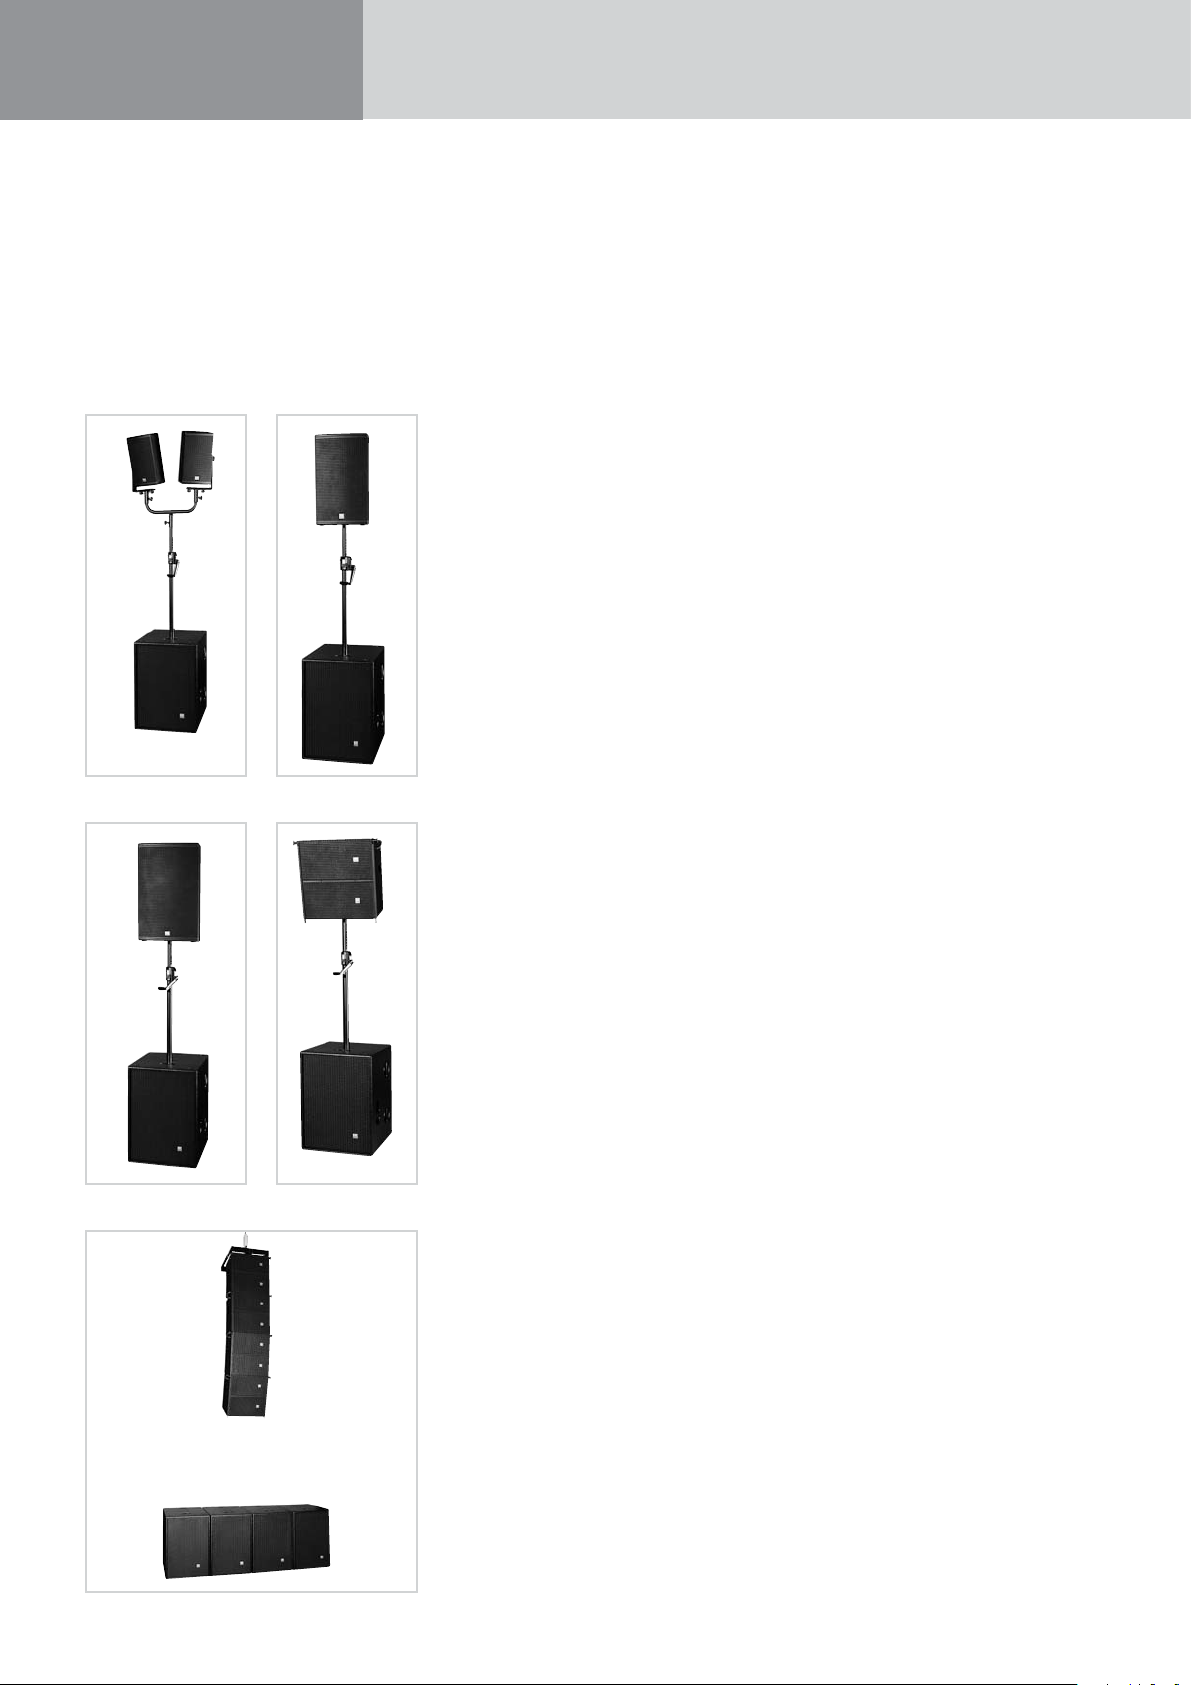
2 x CT 108 1 x CT 112
1 x CT 115 1 x CTA 208
4 x CTA 208
3.2 Key Lock – Preventing
Unauthorized Access
Locking Keys
You can lock the CTA 118 Sub’s keys to prevent
unauthorized or unintentional access. To lock keys,
press the MENU key, use the arrow up and down
keys to select the menu option Keylock (if not
already selected) and press the ENTER key. The LCD
now reads Are you sure? Press the ENTER key again
to lock keys.
Unlocking Keys
To unlock keys, press the MENU key, use the arrow
up and down keys to select the menu option Keylock
(if not already selected), and press the ENTER key.
The LCD now reads Are you sure? Press the ENTER
key again to unlock keys.
3.3 Utilities
Sync Remote
When you confirm the Sync Remote command, the
unit sends the current settings to all networked
controllers. The control panel currently in use is the
master. This feature comes in handy if the network
connection fails.
Noise Reduction
You can activate Noise Reduction on demand. It
mutes signal paths when the rig is off-line. The unit
ships with this feature deactivated.
LCD Contrast
Adjust the display’s contrast to taste using the Up
or Down keys. Confirm your selection with Enter.
Factory Reset
When you confirm this function, ALL settings reset
to their factory defaults. For example, you could use
it to set all delays to 0 ms and levels to 0 dB.
Delay Base
Select the preferred delay display reading - meters
(m), feet (ft) or milliseconds (ms). Select the
option with the Up or Down keys and confirm your
selection with Enter.
3.4 Sub Delay
Sub Delay is a time alignment tool, that is, it
compensates differences in mid/high units’ and
subwoofers’ response times. Like Sub Level, Sub
Delay controls subwoofers’ and mid/high units’
relative delay.
For example, if you place subwoofers well in front
of mid/high units, you must delay the subwoofers
accordingly. Do this by adjusting a positive
delay value in the Sub Delay menu. If you place
subwoofers well behind mid/high units, you must
enter negative values to compensate.
Caution: Negative Sub Delay values delay the signal
path from the subwoofer to the mid/high unit,
causing overall system latency! Experience has
shown that this method compensates differences of
15 ms or 5 m without latency problems. The control
range sweeps from -30 ms to 29.6 ms.
3.5 Delay
Delay controls the overall delay of a system
comprised of subwoofers and mid/high units. The
highest setting is 72.6 ms.
3.6 Sub Level
You can adjust the balance of volumes between the
subwoofer and mid/high unit from -12 dB to + 6 dB
in 0.5 dB steps. Use the Up or Down keys to select
the Sub Level and confirm your selection with Enter.
3.7 System Setup
A special filter preset is available for each
configuration (see fig. 19 a-f). Be sure to assign
the same preset to each DDO-PRO™ controller for
every configuration (1 to 4 CTA 208s). Use the Up
or Down keys to select the right preset and confirm
your selection with Enter.
Fig. 18 a, b, c, d, e, f: System Setups
Page 17

3.8 Quick Guide to the V1.01 Controller’s Menu Structure
17
English
Fig. 19: Menu structure of the DDO-PRO™ Controller
English
Page 18

ConTour Array™ 1.3
4. Technical Specifications
DDO-Pro™
Display: .......................................................................2x 16 text display
Inputs / outputs: .........................................................1 / 2
Sampling frequency: ....................................................48 kHz
Bandwidth: .................................................................. 56 bits
Frequency range: ......................................................... 20 Hz to 20 kHz, +/- 0.5 dB
Dynamic range: ...........................................................>112 (A-weighted, 22 kHz bandwidth)
Interface: ..................................................................... RS 485 Ethercon
Gain: ............................................................................ -96 dB to +6 dB in 0.5 dB steps
Sub Level: ....................................................................-12 dB to +6 dB in 0.5 dB steps
Delay: ..........................................................................Up to 72 ms
Limiter: ........................................................................HK AUDIO DDO™ Multi-Band Limiter
Controller:
Page 19

E. Service
1. Maintenance
19
English
4. Checking Speakers’ Phase
Regularly check the vents to ensure air flows freely
in and out. Clean the foam rubber filters whenever
necessary. Remove the vent grille on the back to do
this.
2. ConTour Array™
Spare Parts
Note:
• If your equipment needs service, please turn
to your HK AUDIO dealer or the HK AUDIO
distributor in your country. They stock the
required spare parts.
• In the event of a defect, always indicate the
defective device’s serial number. This way the
HK AUDIO service team can immediately find out
if an update is available for your product.
• Use only original HK AUDIO replacement speakers
and parts! Most were developed especially for HK
AUDIO products and are not available direct from
speaker manufacturers!
3. Replacing Loudspeakers
and Voice Coils
3.1 1", 8" and 18" Speakers
Proceed as follows to replace the given speaker:
• Unfasten and remove the Phillips screws holding
the grille in place. Remove the grille. These screws
are on the CT 118 Sub’s front panel and the
CTA 208’s side and bottom panels.
• Unfasten and remove the hex head bolts holding
the speaker in place.
• The speaker is now detached. Disconnect the
speaker wires.
3.2 The Drivers’ Voice Coils
Proceed as follows to replace the drivers’ voice coils:
• Remove the front grille as described above.
• Unfasten the four screws holding the horn yoke
and remove the horn and driver from the baffle.
Disconnect the wires connecting the driver. Ensure
correct polarity when installing and connecting
a replacement speaker! Red= positive, black =
negative
• Unfasten the voice coil housing’s hex head bolts
using a 3 mm wrench.
• Take the lid off the voice coil housing.
• Replace the voice coil.
Important note: Replace the voice coil in a clean
working environment only. Be sure to keep dust
and dirt out of the open driver. If despite your
precautions particles manage to get in, use a strip
of adhesive tape to remove them or carefully blow
compressed air into the back of the driver to whisk
the particles out. When installing the new voice
coil, ensure it is centered properly. Proceed as
follows to check this:
Close the cover of the voice coil housing and
reconnect the cords (red = positive, black =
negative). Feed a sine wave signal with a frequency
between 1000 Hz and 1500 Hz into the mid/high
enclosure’s input. Sweep through the frequency.
If you hear abrasive noises like crackling or
scratching, the voice coil is not centered properly.
Reopen the voice coil chassis and turn the voice coil
a bit until it renders the signal cleanly!
As a precaution, always check the components’
phase using a suitable phase-checker after replacing
speakers. To do this, connect the CTA 208 mid/high
unit to the CTA 118 Sub using a Speakon® cord.
Note: If you are checking the CTA 208 mid/high
unit in passive mode with an external power amp,
you will get a different phase reading! Therefore
always use the CTA 118 Sub for phase checks.
Connect the phase-checker to the CTA 118’s signal
input. It may be advisable to lower the input level on
the DDO-Pro™ Controller!
The speakers’ phases should read as follows:
With CTA 118 Sub:
18" woofer: In phase (+)
8" speaker: Out of phase (-)
1" driver: In phase (+)
CTA 208 passive:
8" speaker: In phase (+)
1" driver: Out of phase (-)
Caution: When installing and connecting a
replacement speaker, ensure the polarity is correct!
Red= positive, black = negative
Page 20

ConTour Array™ 1.3
Inhalt
A Sicherheitshinweise zum Flugbetrieb ....................................................................... 21
1 Verwendung ........................................................................................................................................ 21
1.1 Bestimmungsgemäße Verwendung .................................................................................................... 21
1.2 Sachwidrige Verwendung .................................................................................................................... 21
2 Gewährleistung und Haftung .............................................................................................................. 21
3 Wichtige Sicherheitshinweise HK AUDIO ConTour Array™................................................................. 22
3.1 Verpflichtung des Betreibers ............................................................................................................... 22
3.2 Wartung, Inspektion und Instandsetzung der ConTour Array™ Rigging-Hardware ............................. 22
3.3 Technische Beschreibung der ConTour Array™ Rigging-Hardware ...................................................... 22
3.4 Maximale Anzahl geflogener ConTour Array™ Boxen .......................................................................... 22
3.5 Pick-Punkte zum Fliegen der ConTour Array™ Boxen ......................................................................... 22
3.6 Bauliche Veränderung an der ConTour Array™ Rigging-Hardware ...................................................... 22
3.7 Original HK AUDIO Zubehör .............................................................................................................. 22
3.8 Inbetriebnahme und Betrieb ...............................................................................................................22
B ConTour Array™ Lautsprecher ...................................................................................24
1 CTA 208 Mid/High Unit .........................................................................................................................24
1.1 Ausschreibungstext CTA 208 .................................................................................................................24
1.2 Technische Daten CTA 208 ...................................................................................................................25
2 CTA 118 Sub ............................................................................................................................................26
2.1 Ausschreibungstext CTA 118 Sub ...........................................................................................................26
2.2 Technische Daten CTA 118 Sub ............................................................................................................... 27
C ConTour Array™–Rigging ............................................................................................ 28
1 Flugbetrieb und Komponenten der ConTour Array™ Rigging-Hardware ...............................................28
1.1 Montage des Flugrahmens .................................................................................................................... 28
1.2 Einstellen der DualCurve™ Winkel ........................................................................................................28
1.3 Montage weiterer CTA 208 Mid/High Boxen .........................................................................................28
2 Groundstacking ..................................................................................................................................... 30
3 Netzanschluss und Stromversorgung mittels Generatoren ...................................................................30
D ConTour Array™ DDO-Pro™ Controller.................................................................. 31
1 DDO-Pro™ Net Port ..............................................................................................................................31
2 Audio-Signal Anschlüsse ........................................................................................................................31
3 Bedienung des DDO-Pro™ Controllers ..................................................................................................31
3.1 Level .......................................................................................................................................................31
3.2 Keylock Tastensperre ............................................................................................................................. 32
3.3 Utilities ..................................................................................................................................................32
3.4 Sub Delay ...............................................................................................................................................32
3.5 Delay ...................................................................................................................................................... 32
3.6 Sublevel ..................................................................................................................................................32
3.7 System Setup .........................................................................................................................................32
3.8 Quick-Guide/Menüstruktur des Controllers V1.01 .................................................................................33
4 Technische Daten DDO-Pro™ Controller ............................................................................................... 34
E Service ...............................................................................................................................35
1 Wartungsarbeiten .................................................................................................................................. 35
2 ConTour Array™ Ersatzteile ...................................................................................................................35
3 Austausch der Lautsprecher und der Schwingspulen ............................................................................35
3.1 1", 8" und 18" Lautsprecher ....................................................................................................................35
3.2 Schwingspulen der Treiber .....................................................................................................................35
4 Überprüfung der Phasenlage der Lautsprecher .....................................................................................35
Verzeichnis der Abbildungen:
Abb. 1: CTA 208 ..........................................................................................................24
Abb. 2: Gehäuseabmessungen CTA 208 in [mm] ...................................................... 25
Abb. 3: CTA 118 Sub .................................................................................................... 26
Abb. 4: Gehäuseabmessungen CTA 118 Sub in [mm]................................................27
Abb. 5: Integrierte Flugmechanik...............................................................................28
Abb. 6: ConTour Array™ Flugrahmen ....................................................................... 28
Abb. 7: Schäkel zur Befestigung von Motoren, Kettenzügen ................................... 28
Abb. 8: Montage des Flugrahmens ............................................................................ 29
Abb. 9: Realisierung eines „Zwischenwinkels“ zum Gesamtcurving .......................29
Abb. 10: Hochfahren der montierten CTA 208 .........................................................29
Abb. 11 a, b, c, d, e: Montage weiterer CTA 208 ....................................................... 29
Abb. 12 a, b: ConTour Array™ Groundstack-Verbinder ............................................30
Abb. 13: ConTour Array™ Stackplatte .......................................................................30
Abb. 14 a, b: Befestigung der Stackplatte auf CTA 118 Sub ..................................... 30
Abb. 15 a, b, c: CTA 208 Mid/High-Stack ..................................................................30
Abb. 16: DDO-Pro™ Netzwerk .................................................................................. 31
Abb. 17: DDO-Pro™ Controller Bedienfeld ...............................................................31
Abb. 18 a, b, c, d, e, f: System Setups .......................................................................32
Abb. 19: Menüstruktur des DDO-Pro™ Controllers .................................................33
Page 21

A. Sicherheitshinweise zum Flugbetrieb
Lesen Sie diese Anleitung bitte sorgfältig durch, bevor Sie mit dem Aufbau beginnen!
2121
1. Verwendung
1.1 Bestimmungsgemäße Verwendung
Zur bestimmungsgemäßen Verwendung gehören
nachstehend aufgeführte Hinweise:
• Bei der Montage der Boxen ist darauf zu achten,
dass sich der Lastschwerpunkt unter dem Aufhängepunkt an den Flugrahmen befindet.
• Der Schiefhang (nicht mit dem Curving zu
verwechseln!) des Flugrahmens darf nicht größer
als 10 % (6°) sein. Zur bestimmungsgemäßen
Verwendung gehört auch das Beachten aller
Hinweise aus der Betriebsanleitung und die
Einhaltung der Inspektions- und Wartungsarbeiten.
Eine andere oder darüber hinausgehenden
Benutzung gilt als nicht bestimmungsgemäß.
Für hieraus entstehende Schäden haftet der
Hersteller nicht.
1.2 Sachwidrige Verwendung
Durch falschen Einsatz der Flugrahmen sowie
durch unsachgemäßen Umgang mit dieser
Lastaufnahmeeinrichtung können erhebliche
Gefahren entstehen. Es ist deshalb nicht zulässig
2. Gewährleistung
und Haftung
HK AUDIO ist nicht verantwortlich für Schäden,
welche aufgrund unsachgemäßen Gebrauchs
oder Zuwider handlungen gegen die gültigen
Sicherheitsvorschriften zum Aufbau und Betrieb
entstehen.
Gewährleistungs- und Haftungsansprüche bei
Personen- und Sachschäden sind ausgeschlossen,
wenn sie auf eine oder mehrere der folgenden
Ursachen zurückzuführen sind:
• die Nichtbeachtung der in der Betriebsanleitung
gegebenen Hinweise kann Ansprüche im Rahmen
der Pro dukthaftung und Garantieansprüche erlöschen lassen
• nicht bestimmungsgemäße Verwendung der
Lautsprecher
• nicht beachten der Hinweise in der Betriebs-
anleitung bezüglich Transport, Lagerung, Erstinbetriebnahme, Betrieb, Wartung und Instandsetzung
• eigenmächtige bauliche Veränderungen an der
Flughardware
• eigenmächtiges Verändern der in der Betriebs-
anleitung angegebener Parameter
• unsachgemäß durchgeführte Reparaturen
Deutsch
• mit Flugrahmen Schrägzug auf Lasten auszuüben
• festsitzende Lasten mit dem Kran loszureißen
• Personen zu heben
• Schläge oder Stöße in die Flugrahmen einzuleiten
• Wärmebehandlungen oder Schweißarbeiten an
Flugrahmen durchzuführen
• die zulässige Tragfähigkeit der Traverse darf nicht
überschritten werden
Zusätzlich zu diesen Hinweisen müssen
die Betriebssicherheitsverordnung VBG 9
beachtet werden.
Page 22

ConTour Array™ 1.3
3. Wichtige Sicherheitshinweise HK AUDIO ConTour Array™
Die Vorschriften zum HK AUDIO ConTour Array™
Rigging System beinhalten die Installation gemäß
nachfolgender Spezifikationen. Vergewissern Sie
sich vor der Montage, dass die Befestigungs punkte
im Bühnendach bzw. in der Hallendecke
(z.B. Kettenzug) der Unfallverhütungs vorschrift
BGV-C1 entsprechen und für die Gesamtlast
TÜV-abgenommen sind. Prüfen Sie vor jeder
Installa tion den einwandfreien Zustand der
Komponenten. Stellen Sie insbesondere sicher, dass
die Verbinderelemente keine
Beschädigungen aufweisen.
Verwenden Sie nur die in dieser Anleitung
spezifizierten Teile! Bei Verwendung im Freien
schützen Sie unbedingt die Lautsprecher vor Regenund Feuchtigkeitsein wir kungen! Die Montage muss
gemäß dieser Installations anleitung vorgenommen
werden! Bewahren Sie sämtliche zum System
gehörenden Papiere sorgfältig auf!
Grundvoraussetzung für den sicherheitsgerechten
Umgang und den störungsfreien Betrieb der
Flugvor richtung ist die Kenntnis der grundlegenden
Sicher heitshinweise und der Sicherheitsvorschriften.
Diese Betriebsanleitung enthält die wichtigsten
Hinweise, die Lautsprecher sicherheitsgerecht zu
betreiben.
3.1 Verpflichtung des Betreibers
Der Betreiber verpflichtet sich, nur Personen mit der
Flugvorrichtung arbeiten zu lassen, die
3.2 Wartung, Inspektion und
Instandsetzung der HK AUDIO
ConTour Array™ Rigging-Hardware
Inspektionen
Nach § 39 der VBG 9a müssen Lastaufnahmeeinrichtungen vor der ersten Inbetriebnahme beim
Empfänger durch einen Sachkundigen geprüft und
etwaige Mängel behoben werden.
Gemäß § 40 der VBG 9a sind Lastaufnahme einrichtungen mindestens einmal jährlich auf Rissfreiheit
zu prüfen. Eine zusätzliche Prüfung auf Rissfreiheit
ist bedingt durch den dynamischen Einsatz alle 6
Monate erforderlich.
Wartung
Verschleiß- oder Normteile, die leicht auszuwechseln sind, können nach den Anweisungen des
Herstellers vom Anwender ausgetauscht werden.
Dabei sind Originalteile zu verwenden.
Schrauben und Verschrau bungen sind falls
erforderlich nachzuziehen.
Instandsetzung
Die Entscheidung über die Instandsetzungsfähigkeit
deformierter Teile der Lastaufnahmeeinrichtung
trifft der Hersteller. Sämtliche Schweiß- und
Reparaturarbeiten an der Lastaufnahmeeinrichtung
führt der Hersteller durch.
3.3 Technische Beschreibung der
HK AUDIO ConTour Array™
Rigging-Hardware
3.5 Pick-Punkte zum Fliegen der
ConTour Array™-Boxen
Es dürfen ausschließlich die Schäkel des Flugrahmens mit den dafür vorgesehenen Bohrungen
der mittleren Stange zur Montage der Motoren/
Kettenzüge/ Gurte benutzt werden!
• Achten Sie darauf, dass sich keine Personen unter
bewegten Lasten aufhalten.
• Vermeiden Sie ruckartiges Hoch- und Runter fahren
der geflogenen Boxen.
• Sichern Sie das geflogene Array gegen
Bewegungen, wie z.B. bei Windböen, mit
entsprechenden Gurten.
3.6 Bauliche Veränderung an der
ConTour Array™ Rigging-Hardware
Ohne Genehmigung des Herstellers dürfen keine
konstruktiven Veränderungen vorgenommen werden.
Dies gilt auch für das Schweißen an tragenden Teilen.
Die Umbaumaßnahmen be dürfen einer schriftlichen
Zustimmung des Herstellers. Es sind nur
Originalersatz- und -verschleißteile zu verwenden.
3.7 Original HK AUDIO Zubehör:
Verwenden Sie ausschließlich die Original
HK AUDIO-Teile. Bei Einsatz von Fremdteilen
besteht keine TÜV-Genehmigung! Die Montage
muss gemäß dieser Installations- Anleitung
vorgenommen werden! Bewahren Sie sämtliche zum
System gehörenden Papiere sorgfältig auf!
• das 16. Lebensjahr vollendet haben,
• körperlich und geistig geeignet sind, mit den
grundlegenden Vorschriften über Arbeitssicherheit und Unfallverhütung vertraut und
über die Handhabung der Flugvorrichtung
eingewiesen sind.
Das sicherheitsbewusste Arbeiten des Personals ist
in regelmäßigen Abständen zu überprüfen.
Die Zuständig keiten des Personals sind für das
Rüsten, Inbetriebnehmen, Bedienen, Warten und
Instandsetzen klar festzulegen. Anzulernendes
Personal darf nur unter Aufsicht einer erfahrenen
Person mit der Flugrahmen arbeiten. Män gel
und andere Beschädigungen, welche die Sicherheit beeinträchtigen können, sind umgehend zu
beseitigen.
Tragfähigkeit: 150 kg
Umgebungstemperatur im Betrieb:
min –10° C, max +60° C
3.4 Maximale Anzahl geflogener
ConTour Array™-Boxen
Es dürfen maximal 5 ConTour Array™ CTA 208
Mittel-Hochtoneinheiten untereinander an einem
Flugrahmen geflogen werden.
Warnung: Werden mehr als 5 CTA 208 unter einander
betrieben, erlischt die Betriebserlaubnis!
3.8 Inbetriebnahme und Betrieb
Nach § 39 VBG 9a müssen Lastaufnahmeeinrichtungen vor der ersten Inbetriebnahme beim
Empfänger durch einen Sachkundigen geprüft und
etwaige Mängel behoben werden.
Nach § 41 VBG 9a müssen Lastaufnahmeeinrichtungen nach Schadensfällen oder anderen
Vorkommnissen, die die Tragfähigkeit beeinflussen
können, und nach Instandsetzungsarbeiten einer
außerordentlichen Prüfung unterzogen werden.
Page 23

Für die folgend bezeichneten Erzeugnisse
HK AUDIO® ConTour Array™
CTA 208 Mid/High Unit
HK AUDIO® ConTour Array™
CTA 118 SUB Active System Bass
2323
Deutsch
wird hiermit bestätigt, dass sie den wesentlichen Schutzanforderungen
entsprechen, die in der Richt linie des Rates zur Angleichung der Rechtsvorschriften der Mitgliedsstaaten über die elektromagnetische Verträglichkeit (89/336/EWG) und der Nieder spannungsrichtlinie (73/23/EWG)
festgelegt sind. Diese Erklärung gilt für alle Exemplare, und bestätigt
die Ergebnisse der Messungen, die durch die Qualitätssicherung der
Fa. Stamer Musikanlagen GmbH durchgeführt wurden. Zur Beurteilung
des Erzeugnisses hinsicht lich elektromagnetischer Verträglichkeit wurden
folgende Normen herange zogen: EN 50081-1 • EN 50082-1.
Zur Beurteilung der Einhaltung der Niederspannungsrichtlinie wurde
folgende Norm herangezogen: EN 60065
Diese Erklärung wird verantwortlich für den Hersteller
Magdeburger Str. 8
66606 St. Wendel
abgegeben durch
Lothar Stamer Dipl.Ing.
Geschäftsführer
St. Wendel, den 08.02.2006
Unsere Produkte enthalten nach unseren Kenntnissen keine Stoffe in
Konzentrationen oder Anwendungen, deren Inverkehrbringen nach den
geltenden Anforderungen der Richtlinie 202/95/EG (RoHS) verboten
sind.
Page 24

ConTour Array™ 1.3
B. ConTour Array™ Lautsprecher
1. CTA 208 Mid/High Unit
Abb. 1: CTA 208
Aufbau und Mechanik
Das CTA 208 Mid/High Gehäuse ist auf der Oberund Unterseite um je 4,5° abgeschrägt. Es ist aus
18 mm starkem, 13-schichtigem Birkensperrholz
aufgebaut und mit einem wasserabweisenden
schwarzen PU-Lack beschichtet. Zum Curven des
Array können Winkel von 0° und 9° eingestellt
werden. Die Schallwandabdeckung besteht aus
einem Metallgitter, hinter dem sich die beiden
CD-Hörner mit Akustiklinsen für die vier 1" Treiber
befinden. Die CTA 208 wiegt 29 kg, sie ist 51 cm
breit, 52,5 cm hoch und 34,6 cm tief (Angaben
inklusive Flugmechanik). Zur unkomplizierten
Handhabung bei Transport und Aufstellung dienen
zwei seitliche Griffe.
Zum Fliegen der Mid/High Boxen dient
die voll integrierte Flugmechanik, bestehend
aus drei Kugelsperrbolzen (Quick Release Pins),
zwei seitlichen und einer
rückwärtigen Verbindungsmechanik.
Elektrische und akustische Daten
Als Lautsprecher finden in der CTA 208 zwei
8"-Konuschassis und vier 1"-Hochtontreiber von
B&C mit vorgesetzter Akustiklinse und CD-Horn
Anwendung. Die Treiber werden über eine interne
passive Frequenzweiche angesteuert. Die Trennfrequenz liegt bei 2 kHz. Die nominelle elektrische
Belastbarkeit der CTA 208 beträgt 500 Watt RMS
bei einer Impedanz von 8 Ohm. Sie liefert einen
Schalldruck von 105 dB (1W/1m), gemessen unter
Halbraumbedingungen. Der maximal in 1 m
Entfernung unter gleichen Bedingungen erreichbare
Schalldruck beträgt 134 dB bei einem THD-Wert von
10 %. Die CDR 208 strahlt unter einem Winkel von
100° horizontal ab. Der Frequenzgang reicht von
95 Hz bis 19 kHz (+/-3 dB).
1.1 Ausschreibungstext CTA 208
Professionelles 2-Weg-Lautsprechersystem mit
Zylinderwellentechnologie für den Aufbau vertikaler
Linearrays zur Abstrahlung einer kohärenten
Wellenfront im gesamten Übertragungsbereich.
Zwei 8"-Mittentonlautsprecher in einem optimal
abgestimmten Gehäuse montiert und vier 1"Hochtontreiber über eine spezielle Akustiklinse
an zwei Constant Directivity Hörner mit 100°
horizontalem Abstrahlverhalten gekoppelt.
Der vertikale Abstrahlwinkel ist von der Anzahl der
CTA 208 abhängig.
Gehäuse aus 15/18 mm Birkensperrholz mit
schwarzem PU-Lack. Voll integrierte Flugmechanik
in zwei Schritten 0° und 9° verstellbar für
den Aufbau des Linearrays. Integrierter
Hochständerflansch mit zwei Aufstellwinkeln von
3° und 11°. Ballwurfsicheres Schutzgitter aus Stahl.
Ansteuerung über aktiven Systembass CTA 118 Sub
mit integrierten DDO-Pro™-Controller.
Übertragungsbereich (+/- 3 dB) von 95 Hz
bis 19 kHz. Empfindlichkeit von 105 dB in
Hauptabstrahlrichtung 1 W@1m im Halbraum,
maximaler Schalldruck 134 dB mit 2 CTA
208 Elementen im Halbraum bei 10% THD.
Belastbarkeit von 500 Watt RMS pro Einheit.
Impedanz von 8 Ohm.
Anschlüsse: 1x Neutrik NL 4 Speakon®.
Maße (B x H x T): 51 x 52,5 x 34,6 cm
Gewicht: 29 kg
Typ: HK AUDIO CTA 208
Anschlüsse
Die Anschlüsse befinden sich gegen
Beschädigungen geschützt versenkt angebracht auf
der Rückseite der CTA 208. Als Anschluss stehen
zwei Speakon® NL 4 Buchsen zur Verfügung. Die
Anschlussbelegung lautet: pin 1+ = Mid/ High +,
1– = Mid/ High.
Wichtiger Hinweis: Bitte an einen CTA 118 Sub nur
jeweils eine CT 208 anschließen, die 2. Buchse
dient zum parallelen Anschluss an eine Endstufe
(maximal. 2x CTA 208 an 4 Ohm).
Page 25

1.2 Technische Daten CTA 208
Belastbarkeit nominal/ program/ Peak: ...........................500 W RMS /1000 W/ 1500 W
Frequenzgang -10 dB 3): ..................................................80 Hz – 20 kHz
Frequenzgang +/- 3 dB 3): ................................................95 Hz – 19 kHz
Directivit y: ....................................................................... 10 0° horizont al
Schalldruck 1 W@1m 1): ................................................... 105 dB
Max. SPL calculated 1): .................................................... 138 dB 2)
Max. SPL peak 1): ............................................................. 136 dB 3)
Max. SPL 1): .....................................................................134 dB @ 10% THD (200 Hz- 5 kHz) 3)
Nominal - Impedanz: ....................................................... 8 Ohm
Tief-/ Mitteltonlautsprecher: ........................................... 2x 8"
Hochtontreiber: ...............................................................4x 1", 2" Schwingspule
Trennfrequenz passiv: .....................................................2 kHz, 12 dB/ Oktave
Anschlüsse: ...................................................................... 2 x Speakon® NL 4
Gehäuse (Birke): .............................................................. 15/18 mm (1/2"), 9/13-fach
Gehäusewinkel:................................................................ 2x 4,5°
Gehäuseoberfläche: ........................................................2- Komponenten PU Lack, schwarz
Schutzgitter: .................................................................... Metallgitter mit schwarzem Akustikschaumstoff
Griffe: .............................................................................. 2 seitlich eingefräste Griffe
Flughardware: ..................................................................Dual Curve™, integriert mit Quick-Release Pins
Hochständerflansch: ....................................................... HK AUDIO DuoTilt™
Gewicht: .......................................................................... 29 kg/ 63.8 lbs.
Abmessungen (B x H x T): ...............................................51 x 52,5 x 34,6 cm
20" x 20 2/3" x 13 2/3"
Zubehör: .......................................................................... Touring Flightcase (2x CTA 208), Flugrahmen
2525
Deutsch
1) Half Space Messung 2) Basierend auf Peak Belastbarkeit 3) Gemessen mit 2 CTA 208 Topteilen
Abb. 2: Gehäuseabmessungen CTA 208 in [mm]
Page 26

ConTour Array™ 1.3
2. CTA 118 Sub
Abb. 3: CTA 118 Sub
Aufbau und Mechanik
Das Gehäuse des CTA 118 Sub ist aus 19 mm
starkem, 13-schichtigem Birkensperrholz aufgebaut
und mit einem wasserabweisenden schwarzen PULack beschichtet. Die Schallwandabdeckung besteht
aus einem stabilen Metallgitter mit rückwärtig
verklebtem Akustikschaum.
Der CTA 118 Sub wiegt 59 kg. Er ist 51 cm breit,
73 cm hoch und 71 cm tief. Zur unkomplizierten
Handhabung bei Transport und Aufstellung dienen
drei seitlich eingefräste Griffe und eine Griffmulde
im Deckel des Gehäuses. Die aktive Elektronik
ist in einer eigenen Kammer auf der Rückseite
des Gehäuses untergebracht. Zum Schutz der
Elektronik und zum leichten Transport dient das
abnehmbare Rollbrett.
Elektrische und akustische Daten
Als Lautsprecher findet in dem CTA 118 Sub
ein 18" Basslautsprecher Anwendung. Die
nominelle elektrische Belastbarkeit des CTA
118 Sub Lautsprechers beträgt 700 Watt RMS
bei einer Impedanz von 8 Ohm. Er liefert einen
Schalldruck von 101 dB (1W/1m), gemessen unter
Halbraumbedingungen. Der maximal in 1 m
Entfernung unter gleichen Bedingungen erreichbare
Schalldruck beträgt 130 dB bei einem THD-Wert
von 10 %. Der Frequenzgang des CTA 118 Sub
reicht von 42 Hz bis fx (+/-3 dB). Die Leistung
der beiden integrierten PWM-Endstufen für den
Basslautsprecher und den Mid/High-Ausgang
beträgt jeweils 1000 W EIAJ @ 4 ohms.
2.1 Ausschreibungstext CTA 118 Sub
Professioneller aktiver Subwoofer mit DDO-Pro™
Controller und einer PWM Endstufe mit 1000 W
Leistung zur Ansteuerung des Basslautsprechers
mit hervorragendem Impulsverhalten und
sehr dynamischer Tieftonwiedergabe. Ein 18"
Basslautsprecher montiert in einem optimal
abgestimmten Bassreflexgehäuse. Zusätzliche
PWM-Endstufe mit 1000 W Leistung zur
Ansteuerung der HK Audio CTA 208 oder ConTourSeries™ Lautsprecher. Quaderförmiges Gehäuse
aus 19 mm Birkensperrholz mit schwarzem
PU-Lack. Trittfestes Schutzgitter aus Stahl.
Abnehmbares Rollbrett für den Transport und
Schutz der Elektronik.
Übertragungsbereich von der Trennfrequenz
bis hinab zu 42 Hz (-3 dB) bzw. 36 Hz (-10 dB).
Maximaler Schalldruck von 130 dB im Halbraum bei
10% THD.
Anschlüsse: 1x Neutrik NL 4 Speakon®-Ausgang,
1x XLR female, 1x XLR male, 2x Powercon, 2x RJ45
Ethercon.
Maße (B x H x T): 51 x 73 x 71 cm
Gewicht: 59 kg
Typ: HK AUDIO CTA 118 Sub
Anschlüsse
Die Anschlüsse befinden sich gegen
Beschädigungen geschützt versenkt angebracht
auf der Rückseite des CTA 118 Sub. Als Anschlüsse
für die CTA 208 steht eine Speakon
zur Verfügung. Die Anschlussbelegung lautet: pin
1+ = Mid/ High +, 1- = Mid/ High. Zum Anschluss
an das Stromnetz dient eine Powercon-Netzbuchse
mit einer weiteren Powercon-Ausgangsbuchse. Die
Signalverbindung wird über eine XLR female und
eine XLR male Buchse hergestellt. Zur Vernetzung
mehrer CTA 118 Sub erfolgt der Anschluss über zwei
Neutrik-Ethercon-Buchsen.
®
NL 4 Buchse
Page 27

2.2 Technische Daten CTA 118 Sub
Integrierte Endstufen:
Ausgangsleistung Subwoofer: .........................................1000 W EIAJ, Class D @ 4 ohms
Ausgangsleistung Mid/High: ........................................... 1000 W EIAJ, Class D @ 4 ohms
Schutzschaltungen: .........................................................DDO™ Pro- Limiter, Thermal Protect, Kurzschluss
Line In/ Through: .............................................................XLR female, elektronisch symmetriert & floating
Mid/High Out: .................................................................1x Speakon® NL 4
Netzbuchse In/ Out: ........................................................2x Powercon
Vernetzung/ Kommunikation: .........................................DDO™ Pro- Net/ RS 485 Ethercon
Basslautsprecher : ............................................................ 18"
Frequenzgang -10 dB: ......................................................36 Hz – fx
Frequenzgang +/-3 dB: .....................................................42 Hz – fx
Schalldruck 1 W@1m 1): ................................................... 101 dB
Max. SPL calculated 1): .................................................... 134 dB 2)
Max. SPL peak 1): ............................................................. 133 dB
Max. SPL 1): .....................................................................130 dB @ 10% THD (50 Hz- 200Hz)
Gehäuse (Birke): .............................................................. 18 mm (3/4"), 13-fach
Gehäuseoberfläche: ........................................................2- Komponenten PU Lack, schwarz
Schutzgitter: .................................................................... Metallgitter mit schwarzem Akustikschaumstoff
Griffe: .............................................................................. 6 seitlich eingefräste Griffe, 1x im Deckel
Hochstände rf lansch: ....................................................... M20
Gewicht: .......................................................................... 59 kg/ 129.8 lbs.
Abmessungen (B x H x T): ...............................................51 x 73 x 71 cm
20" x 28 3/4" x 27 7/8"
Zubehör: .......................................................................... Schutzhülle n, Stackingplat te
27
Deutsch
1) Half Space Messung 2) Basierend auf Peak Belastbarkeit
Abb. 4: Gehäuseabmessungen CTA 118 Sub in [mm]
Page 28

ConTour Array™ 1.3
C. ConTour Array™-Rigging
Beachten Sie auch die Sicherheitshinweise zum Flugbetrieb unter Kapitel A
1. Flugbetrieb und Komponenten der
ConTour Array™ Rigging- Hardware
Abb. 5: Integrierte Flugmechanik
Abb. 6: ConTour Array™ Flugrahmen
Abb. 7: Schäkel zur Befestigung von Motoren, Kettenzügen
Die ConTour Array™ Rigging- Hardware besteht aus
folgenden Teilen:
• ein Flugrahmen, an dem zwei Schäkel zur Montage
der Motoren bzw. Kettenzuges befestigt sind.
• seitlich und rückwärtig integrierte Flugmechanik
der ConTour Array™ CTA 208 Mid/High Units.
• drei Kugelsperrbolzen (Quick Release Pins) pro
CTA 208 zur Verbindung der Boxen bzw. des
Flugrahmens.
Wichtiger Hinweis zu den Pins: Die Kugelsperrbolzen (Quick Release Pins) dienen zur Verbindung
von Flughardware und Lautsprechergehäusen und
müssen auf ihre Funktion geprüft werden. Die Pins
müssen immer gänzlich in der dafür vorgesehenen
(Pass-) Bohrung einrasten. Sie dürfen sich unter
Einwirkung von Zugkräften nicht selbsttätig lösen.
Zum Einstecken der Pins muss immer der Stift in
der Mitte des Kopfes eingedrückt werden; dieser
löst die Kugeln im vorderen Bereich. Nach dem
Einrasten des Pins in der Bohrung muss der Stift
wieder zurück in die Ausgangsposition gleiten.
1.1 Montage des Flugrahmens
Diese Arbeiten sollten mit zwei Personen
durchgeführt werden. Lösen Sie die
Kugelsperrbolzen (Pins) der Lautsprecherbox.
Setzen Sie den Flugrahmen auf der Box ab.
Befestigen Sie zuerst die beiden vorderen
Verbindungen. Drehen Sie das Verbinderelement
des Flugrahmens nach unten und lassen sie es in
die hintere Flugverbindung eintauchen.
Stecken Sie den hinteren Pin durch die Bohrung
mit der Bezeichnung 0°. Befestigen Sie nun den
Schäkel am Flugrahmen, der zur Aufnahme des
Motorhakens dient. Die Wahl des Pick Punktes
hängt davon ab, wie stark das Gesamtcurving des
Arrays später sein soll.
Heben Sie nun die Boxen mit Hilfe des Motors aus
dem Case und rollen Sie dieses zur Seite. Lösen Sie
die beiden vorderen Pins der zu montierenden Box
und klappen sie das Verbinderelement nach unten.
Nun können weitere Boxen montiert werden.
Tipp: Sollen noch weitere Boxen montiert werden,
empfiehlt es sich alle benötigten Lautsprecherkabel
bereits jetzt am Flugrahmen zu befestigen, da mit
zunehmender Höhe dieser Vorgang erschwert wird.
Dabei auf ausreichende Kabellänge achten!
1.2 Einstellen der DualCurve™ Winkel
Das Curving zwischen zwei CTA 208 wird mit dem
rückseitigen Verbinderelement vorgenommen. Es
stehen zwei Winkel, 0° und 9° zur Verfügung. Lösen
Sie den Pin auf der Rückseite, führen Sie den
Verbinder in die Flugschiene und arretieren Sie dann
mit dem Pin das Verbinderelement wie abgebildet.
1.3 Montage weiterer CTA 208 Mid/High Boxen
Fahren Sie die bereits montierten CTA 208 Mid/
High Boxen so hoch, dass ein zweites Case mit
zwei Boxen untergerollt werden kann. Lösen Sie die
beiden vorderen Pins der zu montierenden Box.
Bringen Sie nun das zweite Case mit weiteren zwei
CTA 208 in Position. Fahren Sie die oberen 2
Boxen langsam ab, bis die beiden vorderen
Verbinder einrasten können. Montieren Sie zuerst
die beiden vorderen Pins. Diese müssen gänzlich
einrasten (vgl. Abbildung 11 a). Evtl. müssen die
beiden Boxen etwas gegeneinander verschoben
werden, damit die Pins passen. Zur Montage des
hinteren Verbindungselementes muss dieses aus
der Schiene gedreht werden und nach unten zeigen
(Vgl. Abbildung 11 b). Stecken Sie den Pin durch die
entsprechende Bohrung mit 0° oder 9° je
nach Anforderung.
Hinweis: Je nach Anwendungsfall kann es
vorkommen, dass ein Pick Punkt nicht mit einem
Schäkel gewählt werden kann. In diesem Fall
verwenden Sie zwei Schäkel und ein geeigneter
O-Ring wie in Abbildung 10 gezeigt.
Überprüfen Sie alle Pins des oberen Flugrahmens
auf festen Sitz und montieren Sie den Motor oder
Kettenzug am Schäkel.
Wichtig: Achten Sie darauf, dass der Kettensack des
Motors nicht auf dem Flugrahmen aufliegt und frei
hängt!
Montage weiterer CTA 208
Fahren Sie nun das Array bestehend aus vier CTA
208 so hoch, dass es vollständig aus dem Case
herausgefahren ist. Sichern Sie abschließend das
hochgefahrene Array gegen Bewegungen durch
Windstöße bzw. unbeabsichtigtes verdrehen.
Page 29

2929
Deutsch
Abb. 8: Montage des Flugrahmens
Abb. 9: Realisierung eines
„Zwischenwinkels“ zum Gesamtcurving
Abb. 11 a, b, c, d, e:Abb. 10: Hochfahren der montierten CTA 208
Page 30

ConTour Array™ 1.3
2. Groundstacking
Basis des Stacks bilden dabei je nach
Anwendungsfall 2-3 ConTour Array™ Subwoofer.
Stellen Sie die gewünschte Anzahl Subwoofer
übereinander.
Wichtig:
Sichern Sie den Groundstack gegen Kippen!
Benutzen Sie dazu die eingelassenen M10 Gewinde
auf der Rückseite der CTA 118 Subwoofer und die
Groundstack-Verbinder.
Die Montage der Topteile auf dem obersten CTA
118 Sub sollte nacheinander erfolgen. Als Basis
und Verbindung zum Subwoofer verwenden Sie
die ConTour Array™ Stackplatte. Diese wird mit
der M20 Knaufschraube im Hochständerflansch
des CTA 118 Sub befestigt. Die Topteile können
anschließend bequem vertikal mit der Stackplatte
gedreht werden, ohne das die Subwoofer bewegt
werden müssen. An der Stackplatte kann ein frei
wählbarer Down-Tilt zwischen 0° und 9° in 1,5°
Schritten eingestellt werden.
3. Netzanschluss und
Stromversorgung
mittels Generatoren
An einer Phase (16A) des Netzes sollten maximal
2 CTA 118 Sub angeschlossen werden. Sollten Sie
die Powercon Link- Buchse benutzen, darf maximal
ein weiterer CTA 118 Sub angeschlossen werden.
Die Begrenzung des maximalen Eingangsstromes
auf 13A (siehe Bedruckung) gilt für den Betrieb
in Großbrittanien, da die UK Netzkabel nur bis
13A zugelassen sind. In anderen Ländern mit
EU-Netzkabeln dürfen bis zu 16A Gesamtstrom
anliegen.
Wichtig: Müssen die CTA 118 Sub an einem
Stromgenerator betrieben werden, muss vor dem
Einschalten der Generator laufen. Schalten Sie
niemals mit Hilfe des Generators die Systeme an
oder aus! Die Schaltnezteile der PWM Endstufen
könnten beschädigt werden!
Hinweis: Bei Geräten für 100-120 Volt steht die
Powercon-Linkbuchse nicht zur Verfügung.
Abb. 12 a, b: ConTour Array™ Groundstack-Verbinder
Abb. 13: ConTour Array™ Stackplatte
Abb. 14 a, b: Befestigung der Stackplatte auf
CTA 118 Sub
Abb. 15 a, b, c: CTA 208 Mid/High-Stack
Page 31

D. ConTour Array™ DDO-Pro™ Controller
3131
1. DDO-Pro™ Net Port
Die Netzwerkbuchsen dienen zum Aufbau eines
Kommunikations-Netzes zwischen mehreren
CTA 118 Sub. Als Verbindungskabel können CAT 5
Netzwerk-Kabel oder professionelle Ethercon-Kabel
mit Metallstecker verwendet werden. Verbinden
Sie jeweils den Ausgang des ersten CTA 118 Sub mit
dem Eingang des nächsten usw.
Hinweis: Es handelt sich hierbei um eine reine
Datenschnittstelle. Audiosignale werden nicht über
den DDO-Pro™ Net Port übermittelt.
Sollen nun Einstellungsänderungen (z.B.
Systemfilter, Gain, Delay) am Controller erforderlich
sein, kann dies an jedem beliebigen Bedienfeld eine
CTA 118 Sub erfolgen. Das Gerät dient automatisch
als Master-Controller. Die Parameter-Änderungen
werden automatisch an die angeschlossenen CTA
118 Sub (maximal 32) im Netzwerk übertragen.
Hinweis: Einstellungen im Menü „Utilities“ werden
nicht übermittelt.
Wichtig: Wenn ein weiterer CTA 118 Sub eine
ConTour-Series™ Lautsprecherbox (CT 108, CT
112, CT 115) für Nearfill oder Infill-Anwendungen
gleichzeitig mit CTA 208 Lautsprechern in einem
größeren System betrieben werden soll, darf er
NICHT im Netzwerkverbund sein! Ansonsten
würden Einstellungen für das Mid/High Array auch
für die angeschlossene CT 108, CT 112 oder CT 115
übernommen.
2. Audio-Signal Anschlüsse
Verbinden Sie die Signalquelle mit XLR-Kabeln
am Signaleingang des ersten CTA 118 Sub. Sollen
weitere CTA 118 Sub an die Quelle angeschlossen
werden, erfolgt die Verbindung über die SignalThrough-Buchsen. Die Pinbelegung der XLRBuchsen lautet: Pin1=Ground, 2=+, 3=–.
Beachten Sie unbedingt die Hinweise unter Punkt
3.1 zum maximalen Eingangssignal und dem Fehler
Digital Clip.
3.
Bedienung des
DDO-Pro™
Die Bedienung erfolgt mittels der vier Tasten
Menue, Enter, UP und Down.
Menu/ Esc: Diese Taste öffnet die Menüstruktur des
Controllers bzw. verlässt eine Menüebene.
Enter: Mit dieser Taste werden Änderungen
bestätigt bzw. Menüebenen geöffnet.
Up, Down: Diese Tasten dienen zur Navigation
in einer Menüebene bzw. zur Erhöhung oder
Erniedrigung der angezeigten Parameter. Beachten
Sie den Quickguide/Menüstruktur am Ende des
Kapitels.
3.1 Level
Der Eingangspegel kann zwischen –96 dB bis + 6 dB
in 0,5 dB Schritten eingestellt werden. Wählen Sie
mit den Tasten Up oder Down den entsprechenden
Gain aus und bestätigen Sie die Auswahl mit Enter.
Hinweis: Der Parameter Level verändert den Pegel
nach dem AD-Wandler und dient zur Anpassung
unterschiedlicher (System-) Lautstärkepegel.
Level hat aber keinen Einfluss auf den Pegel des
Eingangssignales vor dem AD-Wandler. Wird im
Display folgender Text angezeigt: "Digital Clip ?!
Check Input !", müssen Sie den Pegel am Mischpult
unbedingt reduzieren. In diesem Fall wird der
AD-Wandler übersteuert und das Signal zum
Rechteck verzerrt. Das klingt äußerst unangenehm
und würde dauerhaft die Endstufen und
Lautsprecher zerstören.
Tipp: Wenn das untere Topteil im Mid/High Array
im Pegel abgesenkt werden soll, z.B. wenn es
seht tief hängt und sich die Zuhörer nahe diesem
Topteil befinden, kann dies mit der Reduktion des
Level-Pegels geschehen. Damit ändert sich aber
auch der Pegel für den Bassbereich, da er von Level
abhängig ist. Erhöhen Sie daher den Sub Level
um den gleichen Wert, damit die Differenz wieder
ausgeglichen ist.
3.2 Keylock – Tastensperre zum Schutz
vor Zugriff gegen unberechtigte
Personen
Controllers
9J7''.IK8 9J7''.IK8
Deutsch
9J7''.IK8 9J7''.IK8
Abb. 16: DDO- Pro™ Netzwerk
Abb. 17: DDO-Pro™ Controller Bedienfeld
Digital Clip - Anzeige des AD Wandlers
Aktivierung der Tastensperre
Die Tastensperre sichert den CTA 118 Sub vor der
(Fehl)Bedienung durch Unbefugte. Zur Aktivierung
der Tastensperre drücken Sie die Taste „Menü“ und
navigieren Sie mit den Tasten „Pfeil hoch“ oder
„Pfeil runter“ zu dem Punkt Keylock (sofern dieser
nicht bereits ausgewählt ist) und drücken Sie die
Taste „Enter“.
Page 32

ConTour Array™ 1.3
2 x CT 108 1 x CT 112
Danach erscheint auf dem LCD-Bildschirm die Frage
„Are you sure?“. Drücken Sie nun noch einmal die
Taste „Enter“ damit die Tastensperre aktiviert ist.
Deaktivierung der Tastensperre
Zur Deaktivierung der Tastensperre drücken Sie die
Taste „Menü“ und navigieren Sie mit den Tasten
„Pfeil hoch“ oder „Pfeil runter“ zu dem Punkt
Keylock (sofern dieser nicht bereits ausgewählt ist)
und drücken Sie die Taste „Enter“. Danach erscheint
auf dem LCD-Bildschirm die Frage „Are you sure?“.
Drücken Sie nun noch einmal die Taste „Enter“
damit die Tastensperre deaktiviert ist.
3.3 Utilities
Sync Remote
Mit der Bestätigung des Befehles Sync Remote
erfolgt eine Übertragung der aktuellen Parametereinstellungen an alle Controller im Netzwerk. Dabei
dient das verwendete Bedienpanel als Master.
Diese Funktion kann nützlich sein, wenn zuvor die
Netzwerkverbindung unterbrochen wurde.
Noise Reduction
Bei Bedarf kann eine Noise Reduction-Funktion
zugeschaltet werden. Im Leerlauf bzw. bei
Nichtbetrieb des Systems werden die Signalwege
stummgeschaltet. Im Auslieferungszustand ist
diese Funktion deaktiviert.
3.4 Sub Delay
Mit dem Parameter Sub Delay werden
Laufzeitunterschiede zwischen Topteilen und
Bässen ausgeglichen (Time-Alignment). Ähnlich
dem Sub Level regelt das Sub Delay das LaufzeitVerhältnis zwischen Bässen und Topteilen.
Stehen die Bässe z.B. weit vor den Topteilen,
werden die Bässe entsprechend verzögert. Dies
geschieht mittels eines positiven Delays im Menü
Sub Delay. Stehen die Bässe weit hinter den
Topteilen könnte dies mit der Eingabe negativer
Werte kompensiert werden.
Achtung: Negative Werte im Sub Delay verzögern
in diesem Fall der Bassaufstellung den Signalweg
für das Topteil und führt zu einer Latenz im
Gesamtsystem! Unterschiede bis 15 ms bzw.
5 m können aber erfahrungsgemäss noch
unproblematisch auf diese Art und Weise korrigiert
werden. Der Regelbereich beträgt zwischen –30 ms
bis 29,6 ms.
3.5 Delay
Der Parameter Delay regelt die Gesamtverzögerung
des Systems bestehend aus Bässen und Topteilen.
Es können maximal 72,6 ms eingestellt werden.
3.6 Sublevel
1 x CT 115 1 x CTA 208
4 x CTA 208
Abb. 18 a, b, c, d, e, f: System Setups
LCD Kontrast
Stellen Sie hier den gewünschten Kontrast des
Display mit den Tasten Up oder Down aus.
Bestätigen Sie die Auswahl mit Enter.
Factory Reset
Mit Bestätigung dieser Funktion werden ALLE
Einstellungen auf ihre Standardwerte im Auslieferungszustand zurückgesetzt. Verwenden Sie z.B.
diese Funktion, wenn sie sicher sein wollen, dass
alle Delays und Pegel wieder auf 0 dB bzw. 0 ms
gesetzt sind.
Delay Base
Wählen Sie hier die Anzeige-Optionen zwischen
Metern (m), Fuß (ft) oder Millisekunden (ms) zur
Anzeige der Delays aus. Wählen Sie mit den Tasten
Up oder Down die Option aus und bestätigen Sie
die Auswahl mit Enter.
Das Lautstärkeverhältnis zwischen Subwoofer und
Topteil kann zwischen –12 dB bis +6 dB in 0,5 dB
Schritten eingestellt werden. Wählen Sie mit den
Tasten Up oder Down den entsprechenden SubLevel aus und bestätigen Sie die Auswahl mit Enter.
3.7 System Setup
Für jede Systemkonfiguration steht ein eigenes
Filter-Preset zur Verfügung. Achten Sie darauf,
dass jeder Konfiguration (1 bis 4 CTA 208) in
jedem DDO-Pro™ Controller das gleiche Preset
zugeordnet wird. Wählen Sie mit den Tasten Up
oder Down das entsprechende System Preset aus
und bestätigen die Auswahl mit Enter.
Page 33

3.8 Quick-Guide/Menüstruktur des Controllers V1.01
3333
Deutsch
Abb. 19: Menüstruktur des DDO-Pro™ Controllers
Page 34

ConTour Array™ 1.3
4. Technische Daten DDO-Pro™ Controller:
Display: ............................................................................2x 16 Textdisplay
Eingänge / Ausgänge: ...................................................... 1 / 2
Samplingfrequenz: .......................................................... 48 kHz
Bandbreite: ......................................................................56 Bit
Frequenzbereich: .............................................................20 Hz bis 20 kHz, +/- 0.5 dB
Dynamikumfang: .............................................................>112 dB (A-gewichtet, 22 kHz Bandbreite)
Schnittstelle: ................................................................... RS 485 Ethercon
Gain: ................................................................................ -96 dB bis +6 dB in 0,5 dB-Schritten
Sub Level: ........................................................................-12 dB bis +6 dB in 0,5 dB-Schritten
Delay: ...............................................................................bis zu 72 ms
Limiter: ............................................................................ HK AUDIO DDO™ Mulitbandlimiter
Page 35

E. Service
3535
1. Wartungsarbeiten
Kontrollieren Sie regelmäßig die Lüftungsgitter
für Ein- und Auslass. Reinigen Sie bei Bedarf
die Schaumstoff-Filter. Schrauben Sie dazu die
Lüftungsgitter auf der Rückseite ab.
ConTour Array™
2.
Ersatzteile
Hinweise:
• Wenden Sie sich bitte im Service-Fall an Ihren
HK AUDIO Händler bzw. an den HK AUDIO
Vertriebspartner in Ihrem Land. Diese halten
Ersatzteile für Sie bereit.
• Geben Sie bei einem Defekt stets die
Seriennummer des betroffenen Gerätes an. So
kann das HK AUDIO Service Team sofort erkennen,
ob es ein Update zu ihrem Produkt gibt.
• Verwenden Sie ausschließlich original HK AUDIO
Ersatz-Lautsprecher bzw- Teile! Diese werden
zum großen Teil speziell für HK AUDIO-Produkte
entwickelt und können nicht beim LautsprecherHersteller direkt bezogen werden!
Austausch der
3.
Lautsprecher und der
Schwingspulen
3.1 1", 8" und 18" Lautsprecher
Um den entsprechenden Lautsprecher zu wechseln,
gehen Sie wie folgt vor:
• Lösen und entfernen Sie die Kreuzschlitz-
Schrauben des Gitters und nehmen Sie diese
heraus. Bei CT 118 Sub befinden sich die Schrauben
auf der Frontseite, bei CTA 208 auf der Ober-
und Unterseite.
• Lösen und entfernen Sie die Schrauben des
Speakers mit einem Innensechskant- Schlüssel
• Der Lautsprecher ist nun gelöst. Ziehen Sie die
Kabelzuleitungen ab.
3.2 Schwingspulen der Treiber
Um die Schwingspule des Treibers zu wechseln,
gehen Sie wie folgt vor:
• Entfernen Sie wie oben beschrieben das Frontgitter.
• Lösen Sie die sechs Schrauben des Hornf lansches
und nehmen Sie das Horn mit den Treibern aus der
Schallwand heraus. Lösen Sie die Anschlusskabel
zu dem Treiber. Achten sie beim Anschluss und
Einbau des Ersatzlautsprechers unbedingt auf die
richtige Polung! Rot = plus, schwarz = minus
• Lösen Sie nun die Innensechskant- Schrauben des
Schwingspulen- Gehäuses (3 mm Schlüssel).
• Entnehmen Sie den Deckel des SchwingspulenGehäuses
• Die Schwingspule kann nun ersetzt werden
Wichtig: Achten Sie auf eine saubere
Arbeitsumgebung beim wechseln der Schwingspule.
Es darf kein Staub oder Schmutz in den geöffneten
Treiber gelangen. Entfernen Sie Partikel
gegebenenfalls mit einem Streifen Klebeband oder
blasen Sie den Treiber von hinten vorsichtig mit
Druckluft aus um die Partikel zu entfernen. Achten
Sie beim Einbau der neuen Schwingspule darauf,
dass sie korrekt zentriert ist. Überprüfen Sie die
Zentrierung z.B. wie folgt:
Schließen Sie den Deckel des Spulengehäuses
und schließen Sie die Anschlusskabel wieder
an (rot = plus, schwarz = minus). Geben Sie ein
Sinussignal zwischen 1000 Hz und 1500 Hz auf
den Input der Mid/ High Box. Sweepen Sie die
Frequenz durch. Wenn Sie nun Schleifgeräusche
in Form von kratzen oder knistern hören sollten,
ist die Spule nicht ordnungsgemäß zentriert.
Öffnen Sie das Spulengehäuse erneut und drehen
Sie die Schwingspule etwas bis das Signal klar
wiedergegeben wird!
4. Überprüfung der
Phasenlage der
Lautsprecher
Überprüfen Sie nach einem Austausch der
Lautsprecher sicherheitshalber immer die
Phasenlage der Komponenten mit einem geeigneten
Phase-Checker. Schließen Sie dazu das CTA 208
Topteil an den CTA 118 Sub mit einem
Speakonkabel an.
Wichtig: Falls Sie das CTA 208 Topteil passiv über
eine externe Endstufe prüfen, werden sich andere
Phasenlagen ergeben! Benutzen Sie daher zur
Prüfung immer den CTA 118 Sub.
Schließen Sie dann den Phase-Checker an den
Signaleingang des CTA 118 an. Unter Umständen
sollten Sie den Eingangspegel am DDO-Pro™
Controller absenken!
Die Phasenlage der Lautsprecher ist wie folgt:
Aktiv über CTA 118 Sub:
18" Lautsprecher: In Phase (+)
8" Lautsprecher: Out of Phase (-)
1" Treiber: In Phase (+)
CTA 208 passiv:
8" Lautsprecher: In Phase (+)
1" Treiber: Out of Phase (-)
Deutsch
Wichtig: Achten sie beim Anschluss und Einbau
des Ersatzlautsprechers unbedingt auf die richtige
Polung! Rot = plus, schwarz = minus
Page 36

ConTour Array™ 1.3
Sommaire
A Consignes de sécurité concernant le mode suspendu .........................................37
1 Utilisation ............................................................................................................................................ 37
1.1 Utilisation conforme aux dispositions .................................................................................................. 37
1.2 Utilisation non conforme ..................................................................................................................... 38
2 Garantie et responsabilité.................................................................................................................... 37
3 Consignes de sécurité importantes concernant le ConTour Array™ HK AUDIO ................................... 38
3.1 Obligation de l’exploitant ....................................................................................................................38
3.2 Entretien, révision et remise en état du matériel d’accroche ConTour Array™ .....................................38
3.3 Description technique du matériel d’accroche ConTour Array™ ........................................................... 38
3.4 Nombre maximum d’enceintes ConTour Array™ suspendues .............................................................. 38
3.5 Points de fixation permettant de suspendre les enceintes ConTour Array™ ......................................... 38
3.6 Transformation du matériel d’accroche ConTour Array™ .....................................................................38
3.7 Accessoires HK AUDIO ........................................................................................................................ 38
3.8 Mise en service et fonctionnement ......................................................................................................38
B Enceintes ConTour Array™ ..........................................................................................40
1 Enceinte médiums/aigus CTA 208 .........................................................................................................40
1.1 Spécifications du CTA 208 .....................................................................................................................40
1.2 Caractéristiques techniques du CTA 208 ................................................................................................ 41
2 Caisson de basses CTA 118 Sub ...............................................................................................................42
2.1 Spécifications du CTA 118 Sub ................................................................................................................42
2.2 Caractéristiques techniques du CTA 118 Sub ..........................................................................................43
C Accroche du ConTour Array™ ....................................................................................44
1 Mode suspendu et composants du matériel d’accroche ConTour Array™ ............................................. 44
1.1 Montage du cadre d’accroche ................................................................................................................44
1.2 Réglage des angles DualCurve™ ............................................................................................................ 44
1.3 Montage d’enceintes CTA 208 médiums/aigus supplémentaires ..........................................................44
2 Empilement au sol .................................................................................................................................46
3 Raccordement au secteur et alimentation à l’aide de générateurs ........................................................ 46
D Contrôleur DDO-Pro™ ConTour Array™ .................................................................47
1 Port réseau DDO-Pro™ ..........................................................................................................................47
2 Connexions pour signaux audio .............................................................................................................47
3 Commande du contrôleur DDO-Pro™ ...................................................................................................47
3.1 Level .......................................................................................................................................................47
3.2 Verrouillage des touches Keylock ........................................................................................................... 48
3.3 Utilities .................................................................................................................................................. 48
3.4 Sub Delay ...............................................................................................................................................48
3.5 Delay ...................................................................................................................................................... 48
3.6 Sub Level ................................................................................................................................................ 48
3.7 Configuration du système ......................................................................................................................48
3.8 Guide rapide/structure du menu du contrôleur V1.01............................................................................49
4 Caractéristiques techniques du contrôleur DDO-Pro™ .........................................................................50
E Service après-vente ........................................................................................................51
1 Travaux de maintenance ..........................................................................................................................51
2 Pièces de rechange ConTour Array™ ....................................................................................................... 51
3 Remplacement des haut-parleurs et des bobines mobiles ...................................................................... 51
3.1 Haut-parleurs 1", 8" et 18" ...................................................................................................................... 51
3.2 Bobines mobiles des moteurs ................................................................................................................. 51
4 Vérification de la phase des haut-parleurs .............................................................................................. 51
Liste des illustrations :
Fig. 1 : CTA 208 ............................................................................................................ 40
Fig. 2 : dimensions du coffrage du CTA 208 en [mm] ...............................................41
Fig. 3 : CTA 118 Sub .....................................................................................................42
Fig. 4 : dimensions du coffrage du CTA 118 Sub en [mm] ......................................... 43
Fig. 5 : mécanisme d’accroche intégré ......................................................................44
Fig. 6 : cadre d’accroche ConTour Array™ ...............................................................44
Fig. 7 : manilles pour f ixation de moteur s, palans à chaîne ....................................44
Fig. 8 : montage du cadre d’accroche ........................................................................ 45
Fig. 9 : réalisation d’un « angle intermédiaire » de courbure générale .................. 45
Fig. 10 : levage des CTA 208 accrochés ...................................................................... 45
Fig. 11 a, b, c, d, e : montage de CTA 208 supplémentaires .................................... 45
Fig. 12 a, b : raccord pour empilement au sol du ConTour Array™ ......................... 46
Fig. 13 : plateau d’empilement ConTour Array™ ......................................................46
Fig. 14 a, b : fixation du plateau d’empilement sur un CTA 118 Sub .......................46
Fig. 15 a, b, c : stack CTA 208 médiums/aigus .......................................................... 46
Fig. 16 : réseau DDO-Pro™ ........................................................................................47
Fig. 17 : panneau de commande du contrôleur DDO -Pro™ .................................... 47
Fig. 18 a, b, c, d, e, f : conf igurations du système ...................................................48
Fig. 19 : structure du menu du contrôleur DDO-Pro™ ............................................49
Page 37

A. Consignes de sécurité concernant
le mode suspendu
Lisez attentivement ce manuel d’utilisation avant d’entamer le montage du système !
37
1. Utilisation
1.1 Utilisation conforme aux
dispositions
Afin de garantir une utilisation conforme aux
dispositions, respecter les consignes suivantes :
• Lors du montage des enceintes, veillez à ce que
le centre de gravité de la charge soit situé sous le
point d’ancrage du cadre d’accroche.
• L’accroche inclinée (à ne pas confondre avec
la courbure !) du cadre d’accroche ne doit pas
dépasser 10 % (6°). L’utilisation conforme aux
dispositions prévoit également le respect de toutes
les consignes figurant dans le manuel d’utilisation
ainsi que la réalisation des travaux de révision et
de maintenance.
Toute utilisation autre ou dépassant le cadre prévu
n’est pas considérée comme étant conforme.
Le fabricant n’est pas tenu responsable des
dommages résultant d’une telle utilisation.
1.2 Utilisation non conforme
L’utilisation non conforme des cadres d’accroche
ainsi que la manipulation incorrecte de ce dispositif
d’accroche peuvent être à l’origine de dangers
considérables. Il n’est par conséquent pas autorisé :
2. Garantie et
responsabilité
HK AUDIO n’est pas responsable des dommages
provoqués à la suite d’une utilisation incorrecte
ou par le non respect des consignes de sécurité en
vigueur relatives au montage et au fonctionnement.
Tout droit à garantie et demande de réparation de
préjudices corporels et matériels sont exclus s’ils
relèvent de l’un ou de plusieurs des cas suivants :
• le non respect des consignes figurant dans le
manuel d’utilisation peut entraîner l’annulation
de droits dans le cadre de la responsabilité du
fabricant et de la garantie
• l’utilisation non conforme des enceintes
• le non respect des consignes figurant dans le
manuel d’utilisation relatives au transport, au
stockage, à la première mise en service, au
fonctionnement, à l’entretien et à la remise
en état
• toute transformation non autorisée du matériel
d’accroche
• toute modification non autorisée des paramètres
mentionnés dans le manuel d’utilisation
• toute réparation effectuée de manière incorrecte
Français
• d’exercer une traction oblique sur les charges avec
les cadres d’accroche
• d’arracher avec la grue des charges
solidement fixées
• de soulever des personnes
• de frapper ou de percuter les cadres d’accroche
• d’effectuer des traitements thermiques ou des
travaux de soudure sur les cadres d’accroche
• de dépasser la force portante autorisée
des traverses
Outre ces consignes, le règlement allemand sur
la sécurité dans les entreprises VBG 9 doit
être respecté.
Page 38

ConTour Array™ 1.3
3. Consignes de sécurité importantes concernant le ConTour Array™ HK AUDIO
Les directives relatives au système d’accroche
ConTour Array™ de HK AUDIO incluent l’installation
conforme aux spécifications suivantes : assurez-vous
avant le montage que les points de fixation situés
dans le toit de la scène ou dans le plafond de la salle
(par ex. palans à chaîne) satisfont au règlement
allemand relatif à la prévention des accidents
BGV-C1 et répondent à la norme TÜV concernant la
charge totale. Vérifiez avant chaque installation que
les composants sont en parfait état. Assurez-vous
en particulier que les raccords ne présentent
aucun endommagement.
Utilisez uniquement les pièces spécifiées dans le
présent manuel ! En cas d’utilisation en plein air,
protégez impérativement les enceintes de la pluie
et de l’humidité ! Le montage doit être effectué
conformément au présent manuel d’installation !
Conservez en lieu sûr tous les papiers relatifs
au système !
La connaissance des consignes et des règles de
sécurité fondamentales constituent une condition
impérative à la manipulation en toute sécurité du
dispositif d’accroche et à son
parfait fonctionnement.
Ce manuel d’utilisation comporte les consignes les
plus importantes permettant de faire fonctionner les
enceintes en toute sécurité.
3.1 Obligation de l’exploitant
L’exploitant s’engage à ne laisser utiliser le dispositif
d’accroche que des personnes :
• âgées au moins de 16 ans,
• aptes physiquement et mentalement, connaissant
les règles fondamentales relatives à la sécurité du
travail et à la prévention des accidents et ayant été
initiées à la manipulation du dispositif d’accroche.
Le travail effectué par le personnel dans le respect
des consignes de sécurité doit être contrôlé à des
intervalles réguliers.
Les responsabilités du personnel concernant la
préparation, la mise en service, la maintenance et
la remise en état doivent être clairement définies.
Le personnel suivant une formation n’est autorisé à
utiliser le cadre d’accroche que sous la surveillance
d’une personne expérimentée. Les vices et autres
endommagements pouvant compromettre la
sécurité doivent immédiatement être supprimés.
3.2 Entretien, révision et remise en état
du matériel d’accroche HK
AUDIO ConTour Array™
Révisions
Conformément à l’article 39 du règlement allemand
sur la sécurité dans les entreprises VBG 9a, les
dispositifs d’accroche doivent être vérifiés chez le
destinataire par un expert avant la première mise en
service et les vices éventuels doivent
être supprimés.
Conformément à l’article 40 du règlement allemand
sur la sécurité dans les entreprises VBG 9a, les
dispositifs d’accroche doivent être contrôlés au
moins une fois par an afin de vérifier qu’ils ne
présentent pas de fissures. En raison de l’utilisation
dynamique du matériel, un contrôle supplémentaire
de l’absence de fissures est obligatoire tous les 6
mois.
Maintenance
Les pièces d’usure ou normalisées facilement
remplaçables peuvent être remplacées par
l’utilisateur conformément aux consignes du
fabricant. Dans ce cas, des pièces originales doivent
être utilisées. En cas de besoin, les vis et les
raccords filetés doivent être resserrés.
Remise en état
Le fabricant décide si les pièces déformées du
dispositif d’accroche peuvent être remises en état.
Tous les travaux de soudure et de réparation du
dispositif d’accroche sont effectués par le fabricant.
3.3 Description technique du matériel
d’accroche HK AUDIO ConTour
Array™
Force portante : 150 kg
Température ambiante lors du fonctionnement :
–10° C mini., +60° C maxi.
3.4 Nombre maximum d’enceintes
ConTour Array™ suspendues
Au maximum 5 enceintes CTA 208 médiums/aigus
ConTour Array™ peuvent être suspendues les unes
en dessous des autres à un cadre d’accroche.
Précaution : l’utilisation du système n’est pas
autorisée si plus de 5 CTA 208 sont suspendues les
unes en dessous des autres !
3.5 Points de fixation permettant de
suspendre les enceintes ConTour
Array™
Seules les manilles du cadre d’accroche peuvent
être utilisées avec les alésages de la tige centrale
prévue pour le montage des moteurs/ palans à
chaîne/ sangles !
• Assurez-vous qu’aucune personne ne se trouve
sous des charges en mouvement.
• Evitez tout levage/descente par à-coup des
enceintes suspendues.
• Sécurisez l’array suspendu à l’aide de sangles
contre tous mouvements, comme par ex. en cas de
rafale de vent.
3.6 Transformation du matériel
d’accroche ConTour Array™
Aucune transformation du matériel ne peut être
effectuée sans l’autorisation du fabricant. Ceci
vaut également pour les soudures au niveau des
pièces portantes. Toute transformation requiert
l’autorisation écrite du fabricant. Seules des pièces
de rechange et d’usure originales peuvent
être utilisées.
3.7 Accessoires HK AUDIO
Utilisez exclusivement les pièces originales
HK AUDIO. En cas d’utilisation de pièces d’autres
fabricants, le système n’est pas agréé TÜV ! Le
montage doit être effectué conformément au
présent manuel d’installation ! Conservez en lieu sûr
tous les papiers relatifs au système !
3.8 Mise en service et fonctionnement
Conformément à l’article 39 du règlement allemand
sur la sécurité dans les entreprises VBG 9a, les
dispositifs d’accroche doivent être vérifiés chez
le destinataire par un expert avant la première
mise en service et les vices éventuels doivent être
supprimés.
Conformément à l’article 41 du règlement allemand
sur la sécurité dans les entreprises VBG 9a, les
dispositifs d’accroche doivent être soumis à un
contrôle exceptionnel en cas de dommage ou
de tout autre incident pouvant compromettre la
portance ainsi qu’après des travaux de remise
en état.
Page 39

This is to certify that
HK AUDIO® ConTour Array™
CTA 208 Mid/High Unit
HK AUDIO® ConTour Array™
CTA 118 SUB Active System Bass
39
complies with the provisions of the Directive of the Council of the
European Communities on the ap proximation of the laws of the Member
States relating to electromagnetic compatibility (EMC Directive 89/336/
EEC) and the low voltage Directive (73/23/EEC).
This declaration of conformity of the European Communities is the result
of an examination carried out by the Quality Assurance Department of
STAMER GmbH in accordance with European Standards EN 50081-1,
EN 50082-1 and EN 60065 for low voltage, as laid down in Article 10 of
the EMC Directive.
Magdeburger Str. 8
66606 St. Wendel
Lothar Stamer Dipl.Ing.
Managing Director
St. Wendel, 02/08/06
Français
To the best of our knowledge, our products do not contain any
substances in concentrations or applications the placing on the market
of which is banned under the applicable requirements of the directive
202/95/EC (RoHS).
Page 40

ConTour Array™ 1.3
B. Enceintes ConTour Array™
1. Enceinte médiums/aigus CTA 208
Fig. 1 : CTA 208
Conception et mécanique
Les faces inférieure et supérieure du coffrage de
l’enceinte médiums/aigus CTA 208 sont biseautées
de 4,5°. Le coffrage est fabriqué en aggloméré de
bouleau 13 couches de 18 mm d’épaisseur et est
enduit d’un vernis PU noir et hydrofuge. L’array
peut être courbé selon des angles de 0° et 9°. Le
cache de la face avant est composé d’une grille
métallique derrière laquelle se trouvent les deux
pavillons CD dotés de lentilles acoustiques pour les
quatre moteurs 1". L’enceinte CTA 208 pèse 29 kg,
elle mesure 51 cm en largeur, 52,5 cm en hauteur
et 34,6 cm en profondeur (dimensions incluant le
mécanisme d’accroche). Ses deux poignées latérales
permettent de la manipuler facilement lors de son
transport et de son installation.
Le mécanisme d’accroche entièrement intégré,
composé de trois goupilles de blocage (Quick
Release Pins), de deux mécanismes d’assemblage
latéraux et d’un mécanisme d’assemblage à l’arrière,
permet de suspendre les enceintes médiums/aigus.
Caractéristiques électriques et acoustiques
Les enceintes CTA 208 sont composées de deux
châssis coniques 8" et de quatre moteurs d’aigus 1"
B&C et dotées d’une lentille acoustique montée à
l’avant et d’un pavillon CD. Les moteurs sont pilotés
via un diviseur de fréquence passif interne. La
fréquence de coupure s’élève à 2 kHz. La puissance
électrique nominale des enceintes CTA 208 s’élève à
500 Watt RMS pour une impédance de 8 Ohms. Elle
offre une pression acoustique de 105 dB (1W/1m),
mesurée en condition half-space. La pression
acoustique maximale pouvant être atteinte à une
distance de 1 m dans les mêmes conditions s’élève
à 134 dB pour une valeur THD de 10 %. Le CDR 208
diffuse sous un angle horizontal de 100°. La réponse
en fréquence est comprise entre 95 Hz et 19 kHz
(+/-3 dB).
1.1 Spécifications du CTA 208
Système d’enceintes professionnelles 2 voies
doté de la technologie d’ondes cylindriques pour
le montage de Line Arrays verticaux permettant
de diffuser un front d’onde cohérent sur toute la
zone de restitution. Deux enceintes médiums de
8" sont montées dans un coffrage parfaitement
conçu et quatre moteurs d’aigus 1" sont couplés, via
une lentille acoustique spéciale, à deux pavillons
à directivité constante et diffusion horizontale
de 100°. L’angle de diffusion vertical dépend du
nombre d’enceintes CTA 208.
Coffrage en aggloméré de bouleau de 15/18 mm et
enduit de vernis PU noir. Mécanisme d’accroche
entièrement intégré, réglable selon deux angles de
0° et 9° pour le montage du Line Array. Bride pour
pied intégrée permettant deux angles d’orientation
de 3° et 11°. Grille de protection en acier résistante
aux impacts.
Commande via un caisson de basse actif CTA 118
Sub doté d’un contrôleur DDO-Pro™ intégré.
Bande passante (+/- 3 dB) comprise entre 95 Hz et
19 kHz. Sensibilité de 105 dB dans la direction de
diffusion principale 1 W@1m (half-space), pression
acoustique maximum 134 dB avec 2 enceintes
CTA 208 (half-space) pour une valeur THD de
10%. Puissance de 500 Watt RMS par enceinte.
Impédance de 8 Ohms.
Connexions : 1x Neutrik NL 4 Speakon®.
Dimensions (l x h x p) : 51 x 52,5 x 34,6 cm
Poids : 29 kg
Type : HK AUDIO CTA 208
Raccordements
Pour être protégées contre tout endommagement,
les prises sont encastrées dans la face arrière des
enceintes CTA 208. La connexion s’effectue via deux
douilles Speakon® NL4. Le brochage est le suivant :
broche 1+ = Mid/High +, 1– = Mid/High.
Remarque importante : Veillez à ne raccorder qu’un
seul CT 208 à un CTA 118 Sub. La deuxième douille
sert au raccordement en parallèle à un étage de
sortie (maximum : 2x CTA 208 sous 4 ohms).
Page 41

1.2 Caractéristiques techniques du CTA 208
Puissance nominale/ programme/ peak : ........................500 W RMS /1000 W/ 1500 W
Réponse en fréquence -10 dB 3) : .....................................80 Hz – 20 kHz
Réponse en fréquence +/-3 dB 3) : ................................... 95 Hz – 19 kHz
Directivité : ......................................................................100° horizontal
Pression acoustique 1 W@1m 1) : .................................... 105 dB
Pression sonore Max calculée 1) : .................................... 138 dB 2)
Pression sonore Max peak 1) : .........................................136 dB 3)
Pression sonore Max 1) : ..................................................134 dB @ 10% THD (200 Hz- 5 kHz) 3)
Impédance nominale : .....................................................8 Ohms
Haut-parleurs graves/médiums : ..................................... 2x 8"
Moteurs d’aigus : ............................................................. 4x 1", bobine mobile 2"
Fréquence de coupure passive : ....................................... 2 kHz, 12 dB/ octave
Connexions : ....................................................................2x Speakon® NL 4
Coffrage (bouleau) : ........................................................15/18 mm (1/2"), 9/13 couches
Angle du coffrage : ...........................................................2x 4,5°
Surface du coffrage : ........................................................vernis PU 2 composants, noir
Grille de protection :........................................................ grille en métal garnie d’une mousse acoustique noire
Poignées : ........................................................................2 poignées fraisées latéralement
Matériel d’accroche : .......................................................DualCurve™, intégré avec système de
éverrouillage rapide
Bride pour pied : .............................................................. DuoTilt™ HK AUDIO
Poids : ..............................................................................29 kg / 63,8 lbs.
Dimensions (l x h x p) : .................................................... 51 x 52,5 x 34,6 cm
20" x 202/3" x 132/3"
Accessoires : ....................................................................flight case de tournées (2x CTA 208),
.........................................................................................cadre d’accroche
4141
Français
1) Mesurée en condition half-space 2) Basée sur une puissance peak 3) Mesurée avec 2 satellites CTA 208
Fig. 2 : dimensions du cof frage du CTA 208 en [mm]
Page 42

ConTour Array™ 1.3
2. CTA 118 Sub
Fig. 3 : CTA 118 Sub
Conception et mécanique
Le coffrage du CTA 118 Sub est fabriqué en
aggloméré de bouleau 13 couches de 19 mm
d’épaisseur et est enduit d’un vernis PU noir et
hydrofuge. Le cache de la face avant est composé
d’une grille en acier stable à l’arrière de laquelle
est collée une mousse acoustique. Le CTA 118 Sub
pèse 59 kg. Il mesure 51 cm en largeur, 73 cm en
hauteur et 71 cm en profondeur. Ses trois poignées
fraisées sur les côtés et sa poignée encastrée
dans le couvercle du coffrage permettent de le
manipuler facilement lors de son transport et de
son installation. La partie électronique active est
logée dans sa propre chambre sur la face arrière du
coffrage. Le plateau à roulettes amovible permet
de protéger la partie électronique et de transporter
facilement le système.
Caractéristiques électriques et acoustiques
Le CTA 118 Sub est équipé d’un haut-parleur de
basses 18". La puissance électrique nominale
du haut-parleur CTA 118 Sub s’élève à 700 Watt
RMS pour une impédance de 8 Ohms. Il offre une
pression acoustique de 101 dB (1W/1m), mesurée
en conditions half-space. La pression acoustique
maximale pouvant être atteinte à une distance de
1 m dans les mêmes conditions s’élève à 130 dB
pour une valeur THD de 10 %. La réponse en
fréquence du CTA 118 Sub est comprise entre 42 Hz
et fx (+/-3 dB). La puissance de chacun des deux
étages de puissance PWM intégrés pour le hautparleur de basses et la sortie Mid/High s’élève à
1000 W EIAJ, Class D @ 4 ohms.
2.1 Spécifications du CTA 118 Sub
Subwoofer actif professionnel doté d’un contrôleur
DDO-Pro™ et d’un étage de puissance PWM de
1000 W pour garantir au haut-parleur des basses un
comportement excellent en matière d’impulsions
ainsi qu’une restitution des graves très dynamique.
Le haut-parleur des basses 18" est monté dans un
coffrage Bassreflex parfaitement conçu. Il est doté
d’un étage de puissance PWM supplémentaire
de 1000 W permettant de piloter le CTA 208
HK AUDIO ou des enceintes ConTour-Series™.
Coffrage parallélépipède rectangle en aggloméré de
bouleau de 19 mm et enduit de vernis PU noir. Grille
de protection résistante en acier. Plateau à roulettes
amovible pour le transport et la protection des
composants électroniques.
Bande passante de la fréquence de coupure
jusqu’à 42 Hz (-3 dB) ou 36 Hz (-10 dB). Pression
acoustique maximum de 130 dB (half-space) pour
une valeur THD de 10%.
Connexions : 1x sortie Neutrik NL 4 Speakon®,
1x XLR femelle, 1x XLR mâle, 2x Powercon,
2x RJ45 Ethercon.
Dimensions (l x h x p) : 51 x 73 x 71 cm
Poids : 59 kg
Type : HK AUDIO CTA 118 Sub
Raccordements
Pour être protégées contre tout endommagement,
les prises sont encastrées dans la face arrière du
CTA 118 Sub. Une prise Speakon
disponible pour le branchement du CTA 208. Le
brochage est le suivant : broche 1+ = Mid/ High +,
1- = Mid/ High. L’enceinte est branchée au secteur
via une prise secteur Powercon dotée d’une sortie
Powercon supplémentaire. Les signaux sont
transmis via une prise XLR femelle et une prise XLR
mâle. Deux prises Neutrik Ethercon permettent de
relier plusieurs CTA 118 Sub.
®
NL 4 est également
Page 43

2.2 Caractéristiques techniques du CTA 118 Sub
Etages de puissance intégrés :
Puissance de sortie subwoofer : ......................................1000 W EIAJ, Classe D @ 4 ohms
Puissance de sortie médiums/aigus : .............................. 1000 W EIAJ, Classe D @ 4 ohms
Circuits de protection : .................................................... limiteur DDO™ Pro, protection thermique, court-circuit
Line In / Through : ........................................................... XLR femelle, symétrisée électroniquement & flottante
Sortie médiums/aigus : ...................................................1x Speakon® NL 4
Prise secteur In/ Out : .....................................................2x Powercon
Interconnexion/ communication : ...................................réseau DDO™ Pro/ RS 485 Ethercon
Haut-parleur de basses : .................................................. 18"
Réponse en fréquence -10 dB : .........................................36 Hz – fx
Réponse en fréquence +/-3 dB : ....................................... 42 Hz – fx
Pression acoustique 1 W@1m 1) : .................................... 101 dB
Pression sonore Max calculée 1) : .................................... 134 dB 2)
Pression sonore Max peak 1) : .........................................133 dB
Pression sonore Max 1) : ..................................................130 dB @ 10% THD (50 Hz- 200Hz)
Coffrage (bouleau) : ........................................................18 mm (3/4"), 13 couches
Surface du coffrage : ........................................................vernis PU 2 composants, noir
Grille de protection :........................................................ grille en métal garnie d’une mousse acoustique noire
Poignées : ........................................................................6 poignées fraisées latéralement, 1 poignée dans le
Couvercle
Bride pour pied : .............................................................. M20
Poids : ..............................................................................59 kg / 129,8 lbs.
Dimensions (l x h x p) : .................................................... 51 x 73 x 71 cm
20" x 283/4" x 277/8"
Accessoires : ....................................................................housse de protection, plateau d’empilement
43
Français
1) Mesurées en Half Space 2) Basée sur une puissance peak
Fig. 4 : dimensions du cof frage du CTA 118 Sub en [mm]
Page 44

ConTour Array™ 1.3
C. Accroche du ConTour Array™
Observez également les consignes de sécurité relatives au mode suspendu
figurant au chapitre A du présent manuel d’utilisation.
1. Mode suspendu et composants du
matériel d’accroche ConTour Array™
Fig. 5 : mécanisme d’accroche intégré
Fig. 6 : cadre d’accroche ConTour Array™
Le matériel d’accroche ConTour Array™ est
composé des éléments suivants :
• un cadre d’accroche sur lequel sont fixées deux
manilles permettant de monter des moteurs ou
des palans à chaîne.
• mécanisme d’accroche intégré sur les côtés et à
l’arrière des enceintes CTA 208 médiums/aigus
ConTour Array™.
• trois goupilles de blocage (Quick Release Pins) par
CTA 208 permettant de fixer les enceintes ou le
cadre d’accroche.
Remarque importante concernant les goupilles : les
goupilles de blocage (Quick Release Pins) servent
à fixer le matériel d’accroche et les coffrages
des enceintes. Leur parfait fonctionnement doit
impérativement être vérifié. Les goupilles doivent
toujours s’enclencher entièrement dans l’alésage
(calibré) prévu à cet effet. Elles ne doivent pas se
débloquer sous l’effet de tractions. Pour enclencher
les goupilles, la tige doit toujours être enfoncée
au milieu de la tête ; celle-ci débloque les billes à
l’avant. Une fois les goupilles enclenchées dans
l’alésage, la tige doit se replacer dans sa position
initiale.
1.1 Montage du cadre d’accroche
qu’il soit suspendu librement !
Soulevez les enceintes à l’aide du moteur pour
les sortir du flightcase et faîtes rouler celui-ci sur
le côté. Débloquez les deux goupilles avant de
l’enceinte à monter et rabattez la fixation vers le
bas. D’autres enceintes peuvent alors être montées.
Astuce : si vous souhaitez monter d’autres
enceintes, nous vous recommandons de fixer dès
maintenant au cadre d’accroche tous les câbles
haut-parleurs nécessaires dans la mesure où cette
procédure est rendue difficile avec la hauteur.
Veillez alors à ce que la longueur des câbles
soit suffisante !
1.2 Réglage des angles DualCurve™
La courbure entre deux CTA 208 est effectuée
à l’aide de la fixation arrière. Deux angles sont
disponibles : 0° et 9°. Débloquez la goupille sur
la face arrière, introduisez la fixation dans le rail
d’accroche et bloquez la fixation à l’aide de la
goupille comme indiqué sur la figure.
1.3 Montage d’enceintes CTA 208 médiums/
aigus supplémentaires
Fig. 7 : manilles pour f ixation de moteurs, palans à chaîne
Ces travaux doivent être effectués de préférence
par deux personnes. Détachez les goupilles de
blocage de l’enceinte. Posez le cadre d’accroche
sur l’enceinte. Fixez d’abord les deux fixations
avant. Tournez vers le bas la fixation du cadre
d’accroche et faites-la s’emboîter dans la fixation
d’accroche arrière.
Enfoncez la goupille arrière dans l’alésage repéré
par la désignation 0°. Fixez la manille sur le cadre
d’accroche servant à recevoir le crochet du moteur.
Le choix du point de fixation dépend du degré de
courbure générale de l’array.
Remarque : selon l’application, il se peut que vous
ne puissiez pas sélectionner un point de fixation
avec une manille. Dans ce cas, utilisez deux manilles
et un joint torique approprié, comme indiqué à la
figure 10.
Vérifiez que toutes les goupilles du cadre d’accroche
supérieur sont correctement fixées et montez le
moteur ou la chaîne à palan sur la manille.
Important : vérifiez que le sac de la chaîne du
moteur ne repose pas sur le cadre d’accroche et
Soulevez les enceintes CTA 208 médiums/aigus
déjà montées de sorte qu’un deuxième flightcase
comportant deux enceintes puisse être placé endessous. Débloquez les deux goupilles avant de
l’enceinte à monter.
Positionnez le deuxième flightcase comportant
deux autres CTA 208. Descendez lentement les
2 enceintes supérieures jusqu’à ce que les deux
fixations avant s’enclenchent. Montez d’abord les
deux goupilles avant. Celles-ci doivent s’enclencher
entièrement (cf. figure 11 a). Les deux enceintes
doivent éventuellement être légèrement déplacées
de sorte que les goupilles s’enclenchent. Pour
monter la fixation arrière, celle-ci doit être sortie du
rail en la faisant pivoter et être dirigée vers le bas
(cf. figure 11 b). Selon vos besoins, introduisez la
goupille dans l’alésage 0° ou 9°.
Montage de CTA 208 supplémentaires
Soulevez l’array composé de quatre CTA 208 de
sorte qu’il soit entièrement sorti du flightcase.
Sécurisez ensuite l’array contre tous mouvements
provoqués par des rafales de vent ou une rotation
involontaire.
Page 45

45
Fig. 8 : montage du cadre d’accroche
Fig. 9 : réalisation d’un
« angle intermédiaire » de courbure générale
Français
Fig. 10 : levage des CTA 208 accrochés
Fig. 11 a, b, c, d, e : montage de CTA 208
supplémentaires
Page 46

ConTour Array™ 1.3
Fig. 12 a, b : raccord pour empilement au sol du
ConTour Array™
2. Empilement au sol
Selon les applications, la base du stack est
constituée de 2 ou 3 subwoofers ConTour Array™.
Posez les subwoofers les uns sur les autres.
Important :
sécurisez l’empilement au sol de sorte qu’il ne
bascule pas ! Pour cela, utilisez les filetages M10
situés sur la face arrière des subwoofers CTA 118
ainsi que les raccords pour empilement au sol.
Les satellites sont montés les uns après les autres
sur le CTA 118 Sub supérieur. Utilisez le plateau
d’empilement ConTour Array™ comme base et
système de fixation sur le subwoofer. Celui-ci est
fixé à la bride pour pied du CTA 118 Sub à l’aide de
la vis à bouton M20. Les satellites peuvent ensuite
être inclinés verticalement en toute simplicité avec
le plateau d’empilement, sans avoir à déplacer les
subwoofers. L’angle d’inclinaison vers le bas peut
être sélectionné entre 0° et 9° par paliers de 1,5° au
niveau du plateau d’empilement.
3. Raccordement au
secteur et alimentation
à l’aide de générateurs
Raccordez au maximum 2 CTA 118 Sub à une phase
(16 A) du réseau. Si vous utilisez la prise Powercon,
au maximum un CTA 118 Sub supplémentaire peut
être raccordé. La limitation à 13 A (voir indications
imprimées) du courant d’entrée maximum est
prévue pour une mise en service en GrandeBretagne dans la mesure où les cordons secteur UK
ne sont autorisés que jusqu’à 13 A. Dans d’autres
pays utilisant des cordons secteur EU, l’intensité du
courant peut atteindre 16 A.
Important : si les CTA 118 Sub doivent fonctionner à
l’aide d’un générateur de courant, celui-ci doit être
en marche avant d’allumer le système. N’allumez
ou n’éteignez jamais les systèmes à l’aide du
générateur ! Les blocs d’alimentation de commande
des étages de puissance PWM pourraient être
endommagés !
Remarque : la prise Powercon n’est pas prévue
pour les appareils fonctionnant avec une tension de
100-120 Volts.
Fig. 13 : plateau d’empilement ConTour Array™
Fig. 14 a, b : : fixation du plateau d’empilement
sur un CTA 118 Sub
Fig. 15 a, b, c : stack CTA 208 médiums/aigus
Page 47

D. Contrôleur DDO-Pro™ ConTour Array™
47
1. Port réseau DDO-Pro™
Les prises réseau servent à établir un réseau de
communication entre plusieurs CTA 118 Sub.
Des câbles réseau CAT 5 ou des câbles Ethercon
professionnels dotés de connecteurs en métal
peuvent être utilisés comme câbles de connexion.
Reliez la sortie du premier CTA 118 Sub à l’entrée du
suivant, etc.
Remarque : il s’agit ici d’une interface de données à
part entière. Les signaux audio ne sont pas transmis
via le port réseau DDO-Pro™.
Si des réglages (par ex. System filter, Gain, Delay)
doivent être modifiés au niveau du contrôleur,
ceux-ci peuvent être effectués sur le panneau
de commandes de n’importe quel CTA 118 Sub.
L’appareil sert automatiquement de contrôleur
Master. Les modifications de paramètres sont
transmises automatiquement dans le réseau aux
CTA 118 Sub connectés (au maximum 32).
Remarque : les réglages effectués dans le menu «
Utilities » ne sont pas transférés.
Important : si vous souhaitez utiliser un CTA 118
Sub supplémentaire et une enceinte ConTourSeries™ (CT 108, CT 112, CT 115) comme retour
de proximité ou renfort simultanément avec des
enceintes CTA 208 dans un plus grand système,
NE LE BRANCHEZ PAS EN RÉSEAU ! Dans le cas
contraire, les réglages de l’array médiums/aigus
seraient également repris pour le CT 108, CT 112 ou
CT 115 connecté.
2. Connexions pour
signaux audio
Reliez à l’aide de câbles XLR l’émetteur de signaux
à l’entrée de signaux du premier CTA 118 Sub. Si des
CTA 118 Sub supplémentaires doivent être reliés
à cet émetteur, la connexion doit avoir lieu via les
prises de signaux Through. Le brochage des prises
XLR est le suivant : broche 1=Ground, 2=+, 3=–.
Observez impérativement les consignes figurant au
point 3.1 concernant le signal d’entrée maximum et
le défaut « Digital Clip ».
3. Commande du
contrôleur DDO-Pro™
La commande s’effectue à l’aide des quatre touches
Menu, Enter, UP et Down.
Menu/ Esc : cette touche permet d’ouvrir la
structure du menu du contrôleur ou de quitter un
niveau du menu.
Enter : cette touche permet de confirmer les
modifications ou d’ouvrir les différents niveaux du
menu.
Up, Down : ces touches servent à naviguer dans un
niveau du menu ou à augmenter ou à réduire les
paramètres affichés. Respectez les consignes du
Guide rapide/de la structure du menu à la fin du
chapitre.
3.1 Level
Le niveau d’entrée peut être réglé entre –96 dB
et +6 dB par paliers de 0,5 dB. Sélectionnez le
gain souhaité à l’aide des touches Up ou Down et
confirmez votre sélection à l’aide de la touche Enter.
Remarque : le paramètre « Level » modifie le
niveau sonore en aval du convertisseur AN et sert à
adapter différents niveaux sonores (du système). Le
paramètre « Level » n’a cependant pas d’influence
sur le niveau sonore du signal d’entrée en amont du
convertisseur AN. Si le message suivant s’affiche à
l’écran : « Digital Clip ?! Check Input ! », vous devez
impérativement réduire le niveau sonore sur la table
de mixage. Dans ce cas, le convertisseur AN est
saturé et le signal est carré et distordu. Le son est
extrêmement désagréable et finirait par détruire les
étages de puissance et les haut-parleurs.
Astuce : si le niveau sonore du satellite inférieur
de l’array médiums/aigus doit être réduit, par ex.
s’il est accroché très bas et que des auditeurs sont
proches de ce satellite, le niveau sonore « Level
» peut être réduit. Cependant, le niveau sonore
des basses est également abaissé car il dépend du
paramètre « Level ». Par conséquent, augmentez
autant le niveau « Sub Level » que vous avez abaissé
le niveau « Level » pour compenser la différence.
3.2 Keylock – Verrouillage des touches
pour protection contre accès par
des personnes non autorisées
Activation du verrouillage des touches
Le verrouillage des touches protège le Sub CTA
118 contre toute utilisation par des personnes non
autorisées. Pour activer le verrouillage des touches,
appuyez sur la touche « Menu » et naviguez au
moyen de la « flèche vers le haut » ou de la « flèche
vers le bas » jusqu’au point « Keylock » (pour
autant que celui-ci ne soit pas déjà sélectionné).
Appuyez ensuite sur la touche « Enter ». Apparaît
ensuite sur l’écran à cristaux liquides la question
« Are you sure? » (« Êtes-vous sûr ? »). Appuyez
à nouveau sur la touche « Enter » afin d’activer le
verrouillage des touches.
9J7''.IK8 9J7''.IK8
9J7''.IK8 9J7''.IK8
Fig. 16 : réseau DDO-Pro™
Fig. 17 : panneau de commande du contrôleur
DDO-Pro™
L´indication Digital Clip du convertisseur AN
Français
Page 48

ConTour Array™ 1.3
2 x CT 108 1 x CT 112
1 x CT 115 1 x CTA 208
4 x CTA 208
Désactivation du verrouillage des touches
Pour désactiver le verrouillage des touches, appuyez
sur la touche « Menu » et naviguez au moyen de la
« flèche vers le haut » ou de la « flèche vers le bas
» jusqu’au point Keylock (pour autant que celui-ci
ne soit pas déjà sélectionné). Appuyez ensuite sur
la touche « Enter ». Apparaît ensuite sur l’écran à
cristaux liquides la question « Are you sure? » («
Êtes-vous sûr ? »). Appuyez à nouveau sur la touche
« Enter » afin de désactiver le verrouillage des
touches.
3.3 Utilities
Sync Remote
Une fois la commande Sync Remote confirmée,
les réglages actuels des paramètres sont transmis
à tous les contrôleurs présents dans le réseau. Le
panneau de commande utilisé est alors considéré
comme panneau de commande Master. Cette
fonction peut s’avérer utile lorsque la connexion
réseau a auparavant été interrompue.
Noise Reduction
Si nécessaire, la fonction Noise Reduction peut être
utilisée. A l’arrêt ou en cas de non fonctionnement
du système, les trajets des signaux sont désactivés.
A la livraison, cette fonction est désactivée.
Contraste LCD
Permet de régler le contraste souhaité de l’écran à
l’aide des touches Up ou Down. Confirmez votre
sélection à l’aide de la touche Enter.
Factory Reset
Une fois cette fonction confirmée, TOUS les
réglages sont réinitialisés à leur valeur d’origine
paramétrés lors de la livraison. Utilisez cette
fonction par ex. si vous voulez être sûr que tous les
delays et niveaux ont été remis sur 0 dB ou 0 ms.
3.4 Sub Delay
Le paramètre Sub Delay permet d’égaliser les
différences de temps de propagation entre les
satellites et les caissons de basse (Time-Alignment).
Comme le Sub Level, le Sub Delay permet de régler
le rapport de temps de propagation entre les
caissons de basses et les satellites.
Si les caissons de basses sont placés loin devant les
satellites, les basses sont décalées dans le temps.
Ceci s’effectue à l’aide d’un delay positif dans le
menu Sub Delay. Si les caissons de basses sont
placés loin derrière les satellites, ce décalage peut
être compensé en saisissant des valeurs négatives.
Attention : lorsque les caissons de basses sont
disposés ainsi, des valeurs négatives dans le Sub
Delay décalent le trajet des signaux du satellite et
entraînent une latence dans le système tout entier !
Des différences atteignant 15 ms ou 5 m peuvent
cependant être corrigées sans problèmes de cette
manière. La plage de réglage est comprise entre
–30 ms et 29,6 ms.
3.5 Delay
Le paramètre Delay permet de régler l’ensemble
du décalage du système composé de caissons
de basses et de satellites. Au maximum 72,6 ms
peuvent être réglées.
3.6 Sub Level
Le rapport du volume sonore entre le subwoofer et
le satellite peut être réglé entre –12 dB et +6 dB par
paliers de 0,5 dB. Sélectionnez le Sub Level souhaité
à l’aide des touches Up ou Down et confirmez votre
sélection à l’aide de la touche Enter.
3.7 Configuration du système
Abb. 18 a, b, c, d, e, f : configurations du système
Delay Base
Sélectionnez ici les options d’affichage entre
Mètres (m), Pieds (ft) ou Millisecondes (ms) pour
afficher les delays. Sélectionnez l’option souhaitée
à l’aide des touches Up ou Down et confirmez votre
sélection à l’aide de la touche Enter.
Chaque configuration système dispose de son
propre preset de filtre. Veillez à ce que le même
preset soit attribué à chaque configuration (1 à
4 CTA 208) dans chaque contrôleur DDO-Pro™.
Sélectionnez le preset système souhaité à l’aide des
touches Up ou Down et confirmez votre sélection à
l’aide de la touche Enter.
Page 49

3.8 Guide rapide/structure du menu du contrôleur V1.01
49
Fig. 19 : structure du menu du contrôleur DDO-Pro™
Français
Page 50

ConTour Array™ 1.3
4. Caractéristiques techniques
du contrôleur DDO-Pro™
Ecran : ............................................................................. 2x 16 écran texte
Entrées / sorties : ............................................................1 / 2
Fréquence d’échantillonnage : ........................................48 kHz
Largeur de bande : ..........................................................56 bits
Bande de fréquence : .......................................................20 Hz à 20 kHz, +/-0,5 dB
Dynamique : ....................................................................>112 dB (pondéré A, largeur de bande 22 kHz)
Interface : ........................................................................ RS 485 Ethercon
Gain : ...............................................................................-96 dB à +6 dB par paliers de 0,5 dB
Sub Level : .......................................................................-12 dB à +6 dB par paliers de 0,5 dB
Delay : ............................................................................. jusqu’à 72 ms
Limiteur : .........................................................................limiteur multibande DDO™ HK AUDIO
Page 51

E. Service après-vente
5151
1. Travaux de maintenance
Contrôlez régulièrement les grilles d’aération
d’entrée et de sortie. Si nécessaire, nettoyez les
filtres en mousse. Pour cela, dévissez les grilles
d’aération situées sur la face arrière.
2. Pièces de rechange
ConTour Array™
Remarques :
• En cas de maintenance nécessaire, adressez-vous
à votre revendeur HK AUDIO ou au partenaire
commercial HK AUDIO de votre pays. Ceux-ci ont
à leur disposition les pièces de rechange qu’il vous
faut.
• En cas de panne, indiquez le numéro de série de
l’appareil défectueux. Le support HK AUDIO peut
ainsi vérifier immédiatement si une mise à jour
existe pour votre matériel.
• Utilisez exclusivement des haut-parleurs et des
pièces de rechange HK AUDIO ! La plupart d’entre
elles sont spécialement conçues pour les produits
HK AUDIO et ne peuvent pas être achetées
directement chez le fabricant de haut-parleurs !
3. Remplacement des hautparleurs et des bobines
mobiles
3.1 Haut-parleurs 1", 8" et 18"
Pour remplacer un haut-parleur, procédez de la
manière suivante :
• Déposez la grille en retirant les vis cruciformes.
Sur le CT 118 Sub, les vis se trouvent sur la face
avant, sur le CTA 208 sur les faces supérieure
et inférieure.
• Retirez les vis du haut-parleur à l’aide d’une clé
pour vis à six pans creux.
• Le haut-parleur est maintenant dévissé. Retirez
les câbles.
3.2 Bobines mobiles des moteurs
Pour remplacer la bobine mobile d’un driver,
procédez de la manière suivante :
• Retirez la grille avant comme indiqué ci-dessus.
• Retirez les six vis de la bride du pavillon et retirez
de l’enceinte le pavillon et les moteurs. Détachez
les câbles de raccordement au driver. Lors du
montage et du raccordement du haut-parleur de
rechange, respectez impérativement la bonne
polarité ! Rouge = plus, noir = moins
• Dévissez les vis à six pans creux du boîtier de la
bobine mobile (clé de 3 mm).
• Retirez le couvercle du boîtier de la bobine mobile
• La bobine mobile peut maintenant être retirée
Important : veillez à remplacer la bobine mobile
dans un environnement propre. Ne pas laisser
s’introduire de la poussière ou des salissures dans
le driver ouvert. Le cas échéant, retirez toutes les
particules à l’aide d’un ruban adhésif ou insufflez
avec précaution de l’air comprimé à l’arrière du
driver pour faire évacuer les particules. Lors du
montage de la bobine mobile neuve, veillez à ce
qu’elle soit parfaitement centrée. Vérifiez qu’elle est
correctement centrée par ex. de la manière suivante :
fermez le couvercle du boîtier de la bobine et
branchez les câbles de raccordement (rouge = plus,
noir = moins). Faites passer un signal sinusoïdal
compris entre 1000 Hz et 1500 Hz à l’entrée
de l’enceinte médiums/aigus. Balayez toute la
fréquence. Si vous entendez des bruits de frottement
sous forme de grattement ou de froissement, la
bobine n’est pas correctement centrée. Ouvrez à
nouveau le boîtier de la bobine et tournez la bobine
mobile jusqu’à ce que le signal soit correctement
retransmis !
4. Vérification de la phase
des haut-parleurs
Après avoir remplacé les haut-parleurs, vérifiez
toujours par mesure de sécurité la phase des
composants à l’aide d’un contrôleur de phase
approprié. Pour cela, raccordez le satellite CTA 208
au CTA 118 Sub à l’aide d’un câble Speakon®.
Important : si vous contrôlez le satellite CTA 208 de
manière passive via un étage de puissance externe,
d’autres positions de phase vont apparaître ! Par
conséquent, utilisez toujours le CTA 118 Sub pour
effectuer le contrôle.
Branchez le contrôleur de phase à l’entrée signaux
du CTA 118. Dans certaines circonstances, vous
devez réduire le niveau d’entrée au niveau du
contrôleur DDO-Pro™ !
La phase des haut-parleurs est la suivante :
Actif via CTA 118 Sub :
Haut-parleur 18" : In Phase (+)
Haut-parleur 8" : Out of Phase (-)
Driver 1" : In Phase (+)
CTA 208 passif :
Haut-parleur 8" : In Phase (+)
Driver 1" : Out of Phase (-)
Français
Important : lors du montage et du raccordement du
haut-parleur de rechange, respectez impérativement
la bonne polarité ! Rouge = plus, noir = moins
Page 52

ConTour Array™ 1.3
HK Audio® • Postfach 1509 • 66595 St. Wendel
Germany • info@hkaudio.com • www.hkaudio.com
International Inquiries: fax +49-68 51-905 215
international@hkaudio.com
Technische Änderungen vorbehalten
Copyright 2009 • Music & Sales GmbH • 04/2009
9840172 D-2207
 Loading...