

Page 1
Manual 1.0
English
Deutsch
Français
Español
Page 2

Wichtige Sicherheitshinweise!
Bitte vor Gebrauch lesen und für späteren Gebrauch
aufbewahren!
• Read all of these instructions!
• Save these instructions for later use!
•Follow all warnings and instructions marked on the product!
• Do not use this product near water, i.e. bathtub, sink, swimming pool,
wet basement, etc.
• Do not place this product on an unstable cart, stand or table. The product may
fall, causing serious damage to the product or to persons!
• Slots and openings in the cabinet and the back or bottom are provided for
ventilation; to ensure reliable operation of the product and to protect it from
overheating, these openings must not be blocked or covered. This product should
not be placed in a built-in installation unless proper ventilation is provided.
• This product should not be placed near a source of heat such as a stove,
radiator, or another heat producing amplifier.
• Use only the supplied power supply or power cord. If you are not sure of the
type of power available, consult your dealer or local power company.
• Do not allow anything to rest on the power cord. Do not locate this product
where persons will walk on the cord.
• Never break off the ground pin on the power supply cord.
• Power supply cords should always be handled carefully. Periodically check cords
for cuts or sign of stress, especially at the plug and the point where the cord
exits the unit.
• The power supply cord should be unplugged when the unit is to be unused for
long periods of time.
• If this product is to be mounted in an equipment rack, rear support should be
provided.
• This product should be used only with a cart or stand that is recommended by
HK AUDIO
®
.
• Never push objects of any kind into this product through cabinet slots as they
may touch dangerous voltage points or short out parts that could result in risk
of fire or electric shock. Never spill liquid of any kind on the product.
• Do not attempt to service this product yourself, as opening or removing covers
may expose you to dangerous voltage points or other risks. Refer all servicing
to qualified service personnel.
• Clean only with dry cloth.
• Do not defeat the safety purpose of the polarized or grounding-type plug.
A polarized plug has two blades with one wider than the other. A grounding
type plug has two blades and a third grounding prong. The wide blade or the
third prong are provided for the safety. If the provided plug does not fit into
your outlet, consult an electrician for replacement of the obsolete outlet.
• Unplug this product from the wall outlet and refer servicing to qualified service
personnel under the following conditions:
• When the power cord or plug is damaged or frayed.
• If liquid has been spilled into the product.
• If the product has been exposed to rain or water.
• If the product does not operate normally when the operating instructions are
followed.
• If the product has been dropped or the cabinet has been damaged.
• If the product exhibits a distinct change in performance, indicating a need of
service!
• Adjust only these controls that are covered by the operating instructions since
improper adjustment of other controls may result in damage and will often
require extensive work by a qualified technician to restore the product to
normal operation.
• Exposure to extremely high noise levels may cause a permanent hearing loss.
• Individuals vary considerably in susceptibility to noise induced hearing loss, but
nearly everyone will lose some hearing if exposed to sufficiently intense noise
for a sufficient time. The U.S. Government´s Occupational Safety and Health
Administration (OSHA) has specified the following permissible noise level
exposures:
Duration Per Day In Hours Sound LeveldBA, Slow Response
890
692
495
397
2 100
11/2 102
1 105
1/2 110
1/4 or less 115
• According to OSHA, any exposure in excess of the above permissible limits
could result in some hearing loss.
• Ear plug protectors in the ear canals or over the ears must be worn when operating
this amplification system in order to prevent a permanent hearing loss if exposure
is in excess of the limits as set forth above. To ensure against potentially
dangerous exposure to high sound pressure levels, it is recommended that all
persons exposed to equipment capable of producing high sound pressure levels
such as this amplification system be protected by hearing protectors while this
unit is in operation.
•Fuses: Replace with IEC 127 (5x 20 mms) type and rated fuse for best
performance only.
TO PREVENT THE RISK OF FIRE AND SHOCK HAZARD, DO NOT EXPOSE
THIS APPLIANCE TO MOISTURE OR RAIN. DO NOT OPEN CASE;
NO USER SERVICE-ABLE PARTS INSIDE.
REFER SERVICING TO QUALIFIED SERVICE PERSONNEL.
Version 1.0 10/2004
• The unit has been built by HK AUDIO
®
in accordance with IEC 60065 and left
the factory in safe working order. To maintain this condition and ensure nonrisk operation, the user must follow the advice and warning comments found in
the operating instructions. The unit conforms to Protection Class 1 (protectively
earthed).
•HK AUDIO®ONLY GUARANTEE THE SAFETY, RELIABILITY AND EFFICIENCY
OF THE UNIT IF:
• Assembly, extension, re-adjustment, modifications or repairs are carried out by
HK AUDIO®or by persons authorized to do so.
• The electrical installation of the relevant area complies with the requirements
of IEC (ANSI) specifications.
• The unit is used in accordance with the operating instructions.
• The unit is regularly checked and tested for electrical safety by a competent
technician.
WARNING:
• If covers are opened or sections of casing are removed, except where this can
be done manually, live parts can become exposed.
• If it is necessary to open the unit this must be insulated from all power sources.
Please take this into account before carrying out adjustments, maintenance,
repairs and before replacing parts.
• The appliance can only be insulated from all power sources if the mains
connection is unplugged.
• Adjustment, maintenance and repairs carried out when the unit has been opened
and is still live may only be performed by specialist personnel who are authorized
by the manufacturer (in accordance with VBG 4) and who are aware of the
associated hazards.
• Loudspeaker outputs which have the IEC 417/5036 symbol (Diagram 1, below)
can carry voltages which are hazardous if they are made contact with. Before
the unit is switched on, the loudspeaker should therefore only be connected
using the lead recommended by the manufacturer.
• Where possible, all plugs on connection cables must be screwed or locked onto
the casing.
• Replace fuses only with IEC127 type and specified ratings.
• It is not permitted to use repaired fuses or to short-circuit the fuse holder.
• Never interrupt the protective conductor connection.
• Surfaces which are equipped with the "HOT" mark (Diagram 2, below), rear
panels or covers with cooling slits, cooling bodies and their covers, as well as
tubes and their covers are purposely designed to dissipate high temperatures
and should therefore not be touched.
• High loudspeaker levels can cause permanent hearing damage. You should
therefore avoid the direct vicinity of loudspeakers operating at high levels.
Wear hearing protection if continuously exposed to high levels.
MAINS CONNECTION:
• The unit is designed for continuous operation.
• The set operating voltage must match the local mains supply voltage.
• The unit is connected to the mains via the supplied power unit or power cable.
• Power unit: Never use a damaged connection lead. Any damage must be rectified
by a competent technician.
•Avoid connection to the mains supply in distributor boxes together with several
other power consumers.
• The plug socket for the power supply must be positioned near the unit and
must be easily accessible.
PLACE OF INSTALLATION:
• The unit should stand only on a clean, horizontal working surface.
• The unit must not be exposed to vibrations during operation.
• Keep away from moisture and dust where possible.
• Do not place the unit near water, baths, wash basins, kitchen sinks, wet areas,
swimming pools or damp rooms. Do not place objects containing liquid on the
unit - vases, glasses, bottles etc.
• Ensure that the unit is well ventilated.
• Any ventilation openings must never be blocked or covered. The unit must be
positioned at least 20 cm away from walls. The unit may only be fitted in a rack
if adequate ventilation is ensured and if the manufacturer's installation instructions are followed.
• Keep away from direct sunlight and the immediate vicinity of heating elements
and radiant heaters or similar devices.
• If the unit is suddenly moved from a cold to a warm location, condensation can
form inside it. This must be taken into account particularly in the case of tube
units. Before switching on, wait until the unit has reached room temperature.
• Accessories: Do not place the unit on an unsteady trolley, stand, tripod, base or
table. If the unit falls down, it can cause personal injury and itself become damaged.
Use the unit only with the trolley, rack stand, tripod or base recommended by
the manufacturer or purchased together with the unit. When setting the unit
up, all the manufacturer's instructions must be followed and the setup accessories
recommended by the manufacturer must be used. Any combination of unit and
stand must be moved carefully. A sudden stop, excessive use of force and uneven
floors can cause the combination of unit and stand to tip over.
• Additional equipment: Never use additional equipment which has not been
recommended by the manufacturer as this can cause accidents.
•To protect the unit during bad weather or when left unattended for prolonged
periods, the mains plug should be disconnected. This prevents the unit being
damaged by lightning and power surges in the AC mains supply.
Diagram 1 Diagram 2
•Das Gerät wurde von HK AUDIO®gemäß IEC 60065 gebaut und hat das Werk
in sicherheitstechnisch einwandfreiem Zustand verlassen. Um diesen Zustand
zu erhalten und einen gefahrlosen Betrieb sicherzustellen, muss der Anwender
die Hinweise und die Warnvermerke beachten, die in der Bedienungsanleitung
enthalten sind. Das Gerät entspricht der Schutzklasse I (schutzgeerdet).
• DIE SICHERHEIT, ZUVERLÄSSIGKEIT UND LEISTUNG DES GERÄTES WIRD
VON HK AUDIO®NUR DANN GEWÄHRLEISTET, WENN:
• Montage, Erweiterung, Neueinstellung, Änderungen oder Reparaturen von
HK AUDIO®oder von dazu ermächtigten Personen ausgeführt werden.
• die elektrische Installation des betreffenden Raumes den Anforderungen von
IEC (ANSI)-Festlegungen entspricht.
• das Gerät in Übereinstimmung mit der Gebrauchsanweisung verwendet wird.
WARNUNG:
•Wenn Abdeckungen geöffnet oder Gehäuseteile entfernt werden, außer wenn
dies von Hand möglich ist, können Teile freigelegt werden, die Spannung führen.
•Wenn ein Öffnen des Gerätes erforderlich ist, muss das Gerät von allen Spannungsquellen getrennt sein. Berücksichtigen Sie dies vor dem Abgleich, vor
einer Wartung, vor einer Instandsetzung und vor einem Austausch von Teilen.
• Ein Abgleich, eine Wartung oder eine Reparatur am geöffneten Gerät unter
Spannung darf nur durch eine vom Hersteller autorisierte Fachkraft (nach VBG
4) geschehen, die mit den verbundenen Gefahren vertraut ist.
• Lautsprecher-Ausgänge, die mit dem IEC 417/5036-Zeichen (Abb.1, s.unten)
versehen sind können berührungsgefährliche Spannungen führen. Deshalb vor
dem Einschalten des Gerätes Verbindung nur mit dem vom Hersteller empfohlenen Anschlusskabel zum Lautsprecher herstellen.
• Alle Stecker an Verbindungskabeln müssen mit dem Gehäuse verschraubt oder
verriegelt sein, sofern möglich.
• Es dürfen nur Sicherungen vom Typ IEC 127 und der angegebenen Nennstromstärke verwendet werden.
• Eine Verwendung von geflickten Sicherungen oder Kurzschließen des Halters ist
unzulässig.
• Niemals die Schutzleiterverbindung unterbrechen.
• Oberflächen, die mit dem "HOT"-Zeichen (Abb.2, s.unten) versehen sind, Rückwände oder Abdeckungen mit Kühlschlitzen, Kühlkörper und deren Abdeckungen, sowie Röhren und deren Abdeckungen können im Betrieb erhöhte Temperaturen annehmen und sollten deshalb nicht berührt werden.
• Hohe Lautstärkepegel können dauernde Gehörschäden verursachen.
Vermeiden Sie deshalb die direkte Nähe von Lautsprechern, die mit hohen
Pegeln betrieben werden. Verwenden Sie einen Gehörschutz bei dauernder
Einwirkung hoher Pegel.
NETZANSCHLUSS:
• Das Gerät ist für Dauerbetrieb ausgelegt.
• Die eingestellte Betriebsspannung muss mit der örtlichen Netzspannung
übereinstimmen.
• Der Anschluss an das Stromnetz erfolgt mit dem mitgelieferten Netzteil oder
Netzkabel.
• Netzteil: Eine beschädigte Anschlussleitung kann nicht ersetzt werden.
Das Netzteil darf nicht mehr betrieben werden.
•Vermeiden Sie einen Anschluss an das Stromnetz in Verteilerdosen zusammen
mit vielen anderen Stromverbrauchern.
• Die Steckdose für die Stromversorgung muss nahe am Gerät angebracht und
leicht zugänglich sein.
AUFSTELLUNGSORT:
• Das Gerät sollte nur auf einer sauberen, waagerechten Arbeitsfläche stehen.
• Das Gerät darf während des Betriebs keinen Erschütterungen ausgesetzt sein.
•Feuchtigkeit und Staub sind nach Möglichkeit fernzuhalten.
• Das Gerät darf nicht in der Nähe von Wasser, Badewanne, Waschbecken,
Küchenspüle, Nassraum, Swimmingpool oder feuchten Räumen betrieben
werden. Keine mit Flüssigkeit gefüllten Gegenstände -Vase, Gläser, Flaschen
etc. auf das Gerät stellen.
• Sorgen Sie für ausreichende Belüftung der Geräte.
•Eventuelle Ventilationsöffnungen dürfen niemals blockiert oder abgedeckt
werden. Das Gerät muß mindestens 20 cm von Wänden entfernt aufgestellt
werden. Das Gerät darf nur dann in ein Rack eingebaut werden, wenn für
ausreichende Ventilation gesorgt ist und die Einbauanweisungen des Herstellers eingehalten werden.
•Vermeiden Sie direkte Sonneneinstrahlung sowie die unmittelbare Nähe von
Heizkörpern und Heizstrahlern oder ähnlicher Geräte.
•Wenn das Gerät plötzlich von einem kalten an einen warmen Ort gebracht wird,
kann sich im Geräteinnern Kondensfeuchtigkeit bilden. Dies ist insbesondere
bei Röhrengeräten zu beachten. Vor dem Einschalten solange warten bis das
Gerät Raumtemperatur angenommen hat.
• Zubehör: Das Gerät nicht auf einen instabilen Wagen, Ständer, Dreifuß, Untersatz oder Tisch stellen. Wenn das Gerät herunterfällt, kann es Personenschäden
verursachen und selbst beschädigt werden. Verwenden Sie das Gerät nur mit
einem vom Hersteller empfohlenen oder zusammen mit dem Gerät verkauften
Wagen, Rack, Ständer, Dreifuß oder Untersatz. Bei der Aufstellung des Gerätes
müssen die Anweisungen des Herstellers befolgt und muss das vom Hersteller
empfohlene Aufstellzubehör verwendet werden. Eine Kombination aus Gerät
und Gestell muss vorsichtigt bewegt werden. Plötzliches Anhalten, übermäßige
Kraftanwendung und ungleichmäßige Böden können das Umkippen der Kombination aus Gerät und Gestell bewirken.
• Zusatzvorrichtungen: Verwenden Sie niemals Zusatzvorrichtungen, die nicht
vom Hersteller empfohlen wurden, weil dadurch Unfälle verursacht werden
können
• Zum Schutz des Gerätes bei Gewitter oder wenn es längere Zeit nicht beaufsichtigt oder benutzt wird, sollte der Netzstecker gezogen werden.
Dies verhindert Schäden am Gerät aufgrund von Blitzschlag und Spannungsstößen im Wechselstromnetz.
Abb.1 Abb.2
Important Safety Instructions
Before connecting, read instructions
Important Advice on Safety!
Please read before use and keep for later use!
Page 3

• L'appareil a été conçu par HK AUDIO®selon la norme IEC 60065 et a quitté
l'entreprise dans un état irréprochable. Afin de conserver cet état et d'assurer
un fonctionnement sans danger de l'appareil nous conseillons à l'utilisateur la
lecture des indications de sécurité contenues dans le mode d'emploi. L'appareil
est conforme à la classification I (mise à terre de protection).
• SURETE, FIABILITE ET EFFICACITE DE L'APPAREIL NE SONT GARANTIS PAR
HK AUDIO®QUE SI:
• Montage, extension, nouveau réglage, modification ou réparation sont
effectués par HK AUDIO®ou par toute personne autorisée par HK AUDIO®.
• L'installation électrique de la pièce concernée correspond aux normes
IEC (ANSI).
• L'utilisation de l'appareil suit le mode d'emploi.
AVERTISSEMENT:
•A moins que cela ne soit manuellement possible, tout enlèvement ou ouverture
du boîtier peut entrainer la mise au jour de pieces sous tension.
• Si l'ouverture de l'appareil est nécessaire, celui-ci doit être coupé de chaque
source de courant. Ceci est à prendre en considération avant tout ajustement,
entretien, réparation ou changement de pieces.
• Ajustement, entretien ou réparation sur l'appareil ouvert et sous tension ne
peuvent être éffectués que par un spécialiste autorisé par le fabricant (selon
VBG4). Le spécialiste étant conscient des dangers liés à ce genre de réparation.
• Les sorties de baffles qui portent le signe IEC 417/5036 (fig. 1, voir en bas)
peuvent être sous tension dangereuse. Avant de brancher l'appareil utiliser
uniquement le câble de raccordement conseillé par le fabricant pour raccorder
les baffles.
•Toutes les prises des câbles de raccordement doivent être, si possible, vissées
ou verrouillées sur le boîtier.
•L’utilisation de fusibles rafistolés ou court-circuites est inadmissible –
seulement: IEC127.
• L'utilisation de fusibles rafistolés ou court-circuites est inadmissible.
• Ne jamais interrompre la connexion du circuit protecteur.
• Il est conseillé de ne pas toucher aux surfaces pourvues du signe "HOT" (fig. 2,
voir en bas), aux parois arrières ou caches munis de fentes d'aération,
éléments d'aération et leurs caches ansi qu'aux tubes et leurs caches.
Ces éléments pouvant atteindre des températures élévées pendant l'utilisation
de l'appareil.
• Les Niveaux de puissance élévés peuvent entrainer des lésions auditives
durables. Evitez donc la proximité de haut-parleurs utilisés à haute puissance.
Lors de haute puissance continue utilisez une protection auditive.
BRANCHEMENT SUR LE SECTEUR:
• L'appareil est conçu pour une utilisation continue.
• La tension de fonctionnement doit concorder avec la tension secteur locale.
• Le raccordement au réseau éléctrique s'effectue avec l'adaptateur ou le cordon
d´alimentation livré avec l'appareil.
• Adaptateur: Un câble de raccordement abimé ne peut être remplacé. L'adaptateur est inutilisable.
•Evitez un raccordement au réseau par des boîtes de distribution surchargées.
• La prise de courant doit être placée à proximité de l'appareil et facile à atteindre.
LIEU D'INSTALLATION:
• L'appareil doit être placé sur une surface de travail propre et horizontale.
• L'appareil en marche ne doit en aucun cas subir des vibrations.
•Evitez dans la mesure du possible poussière et humidité.
• L'appareil ne doit pas être placé à proximité d'eau, de baignoire, lavabo, évier,
pièce d'eau, piscine ou dans une pièce humide. Ne placez aucun vase, verre,
bouteille ou tout objet rempli de liquide sur l'appareil.
• L'appareil doit être suffisamment aéré.
• Ne jamais recouvrir les ouvertures d'aération. L'appareil doit être placé à 20 cm
du mur au minimum. L'appareil peut être monté dans un Rack si une
ventilation suffisante est possible et si les conseils de montage du fabricant
sont suivis.
•Evitez les rayons de soleil et la proximité de radiateurs, chauffages etc.
• Une condensation d'eau peut se former dans l'appareil si celui-ci est transporté
brusquement d'un endroit froid à un endroit chaud. Ceci est particulièrement
important pour des appareils à tubes. Avant de brancher l'appareil attendre
qu'il ait la température ambiante.
• Accessoires: L'appareil ne doit être placé sur un chariot, support, trépied, bâti
ou table instable. Une chute de l'appareil peut entrainer aussi bien des dommages corporels que techniques. Utilisez l'appareil uniquement avec un chariot,
Rack, support, trépied ou bâti conseillé par le fabricant ou vendu en combinaison avec l'appareil. Les indications du fabricant pour l'installation de l'appareil
sont à suivre, et les accessoires d'installation conseillés par le fabricant sont à
utiliser. Un ensemble support et appareil doit être déplacé avec précaution.
Des mouvements brusques et des revêtements de sol irreguliers peuvent
entrainer la chute de l´ensemble.
• Equipements supplémentaires: Ne jamais utiliser un équipement supplémentaire n'ayant pas été conseillé par le fabricant, ceci pouvant entrainer des
accidents.
•Afin de protéger l'appareil pendant un orage ou s'il ne doit pas être utilisé
pendant un certain temps, il est conseillé d'enlever la prise au secteur.
Ceci évite des dommages dûs à la foudre ou à des coups de tension dans le
réseau à courant alternatif.
Fig. 1 Fig. 2
• L'apparecchio è stato costruito dalla HK AUDIO®secondo la normativa europea IEC 60065 ed ha lasciato il nostro stabilimento in stato ineccepibile. Per
garantire il mantenimento di tale stato e un utilizzo assolutamente privo di rischi l'utente è tenuto ad osservare le indicazioni e gli avvertimenti di sicurezza
contenuti nelle istruzioni per l'uso. L'apparecchio rispecchia il livello di
sicurezza I (collegato a terra).
•Sicurezza, affidabilità e prestazioni dell'apparecchio vengono garantiti dalla
HK AUDIO®solo ed esclusivamente se:
•Montaggio, ampliamento, rimessa a punto, modifiche e riparazioni vengono
eseguite dalla HK AUDIO®stessa o da personale da essa autorizzato.
• Gli impianti elettrici nei locali prescelti per l'uso dell'apparecchio rispondono
alle normative stabilite dall'ANSI.
• L'apparecchio viene utilizzato come indicato nel libretto delle istruzioni per l'uso.
Avvertimenti:
• In caso di apertura di parti di rivestimento o rimozione di parti dell'involucro,
a meno che non si tratti di pezzi rimovibili semplicemente a mano, possono
venire alla luce parti dell'apparecchio conduttrici di tensione.
• Se l'apertura dell'apparecchio dovesse risultare necessaria è indispensabile
staccare precedentemente quest'ultimo da tutte le fonti di tensione. Rispettare
tale misura di prevenzione anche prima di un allineamento, di operazioni di
manutenzione, della messa in esercizio o della sostituzione di componenti
all'interno dell'apparecchio.
• Allineamento, operazioni di manutenzione o eventuali riparazioni dell'apparecchio in presenza di tensione vanno eseguite esclusivamente da personale
specializzato ed autorizzato, in grado di eseguire tali operazioni evitandone
i rischi connessi.
• Le uscite degli altoparlanti contrassegnate dai caratteri IEC 417/5036 (vedi
illustrazione 1 a fondo pag.) possono essere conduttrici di tensione pericolosa
con cui evitare il contatto. Per questo motivo, prima di accendere l'apparecchio, collegare quest'ultimo agli altoparlanti servendosi esclusivamente del
cavetto d'allacciamento indicato dal produttore.
•Tutte le spine e i cavi di collegamento devono essere avvitati o fissati all'involucro dell'apparecchio per quanto possibile.
• Utilizzare esclusivamente fusibili del tipo IEC 127 con la indicata corrente nominale.
• L'utilizzo di fusibili di sicurezza non integri e la messa in corto circuito del
sostegno di metallo sono proibite.
• Non interrompere mai il collegamento con il circuito di protezione.
• Superfici contrassegnate dalla parola "HOT" (vedi illustrazione 2 a fondo pag.),
cosi come griglie di aerazione, dispositivi di raffreddamento e i loro rivestimenti di protezione, oppure valvole e i relativi rivestimenti protettivi possono surriscaldarsi notevolmente durante l'uso e per questo motivo non vanno toccate.
• L'ascolto di suoni ad alto volume può provocare danni permanenti all'udito.
Evitate perciò la diretta vicinanza con altoparlanti ad alta emissione di suono
e utilizzate cuffie protettive in caso ciò non sia possibile.
Alimentazione:
• L'apparecchio è concepito per il funzionamento continuo.
• La tensione di esercizio deve corrispondere alla tensione di rete a cui ci si allaccia.
• L'allacciamento alla rete elettrica avviene tramite alimentatore o cavetto d'alimentazione consegnato insieme all'apparecchio.
• Alimentatore: un cavo di connessione danneggiato non può essere sostituito.
L'alimentatore non può più essere utilizzato.
•Evitate un allacciamento alla rete di corrente utilizzando cassette di distribuzione sovraccariche.
• La spina di corrente deve essere situata nelle vicinanze dell'apparecchio e
facilmente raggiungibile in qualsiasi momento.
Locali di collocamento:
• Opportuno collocare l'apparecchio su una superficie pulita e orizzontale.
• Non sottoporre l'apparecchio in funzione a scosse e vibrazioni.
• Proteggere l'apparecchio per quanto possibile da umidità e polvere.
• Non collocare l'apparecchio vicino ad acqua, vasche da bagno, lavandini, lavelli
da cucina, locali umidi o piscine. Non appoggiare recipienti contenenti liquidi vasi, bicchieri, bottiglie, ecc. - sull'apparecchio.
• Provvedere ad una buone aerazione dell'apparecchio.
•Eventuali aperture previste per la ventilazione dell'apparecchio non vanno ne
bloccate, ne mai coperte. L'apparecchio va collocato ad almeno 20 cm di distanza dalle pareti circostanti e può essere inserito tra altre componenti di un
impianto solo in caso di sufficiente ventilazione e qualora le direttive di
montaggio del produttore vengano rispettate.
•Evitare di esporre l'apparecchio ai raggi del sole e di collocarlo direttamente
nelle vicinanze di fonti di calore come caloriferi, stufette, ecc.
• Se l'apparecchio viene trasportato rapidamente da un locale freddo ad uno
riscaldato può succedere che al suo interno si crei della condensa. Ciò va
tenuto in considerazione soprattutto in caso di apparecchi a valvole. Attendere
che l'apparecchio abbia assunto la temperatura ambiente prima di accenderlo.
• Accessori: non collocare l'apparecchio su carrelli, supporti, treppiedi, superfici
o tavoli instabili. Se l'apparecchio dovesse cadere a terra potrebbe causare
danni a terzi o danneggiarsi irreparabilmente. Utilizzate per il collocamento
dell'apparecchio supporti, treppiedi e superfici che siano consigliate dal
produttore o direttamente comprese nell'offerta di vendita. Per il collocamento
dell'apparecchio attenetevi strettamente alle istruzioni del produttore, utilizzando esclusivamente accessori da esso consigliati. L'apparecchio in combinazione ad un supporto va spostato con molta attenzione. Movimenti bruschi o il
collocamento su pavimenti non piani possono provocare la caduta dell'apparecchio e del suo supporto.
• Accessori supplementari: non utilizzate mai accessori supplementari che non
siano consigliati dal produttore, potendo essere ciò causa di incidenti.
• Per proteggere l'apparecchio in caso di temporali o nel caso questo non venisse
utilizzato per diverso tempo si consiglia di staccarne la spina di corrente.
In questo modo si evitano danni all'apparecchio dovuti a colpi di fulmine o ad
improvvisi aumenti di tensione nel circuito di corrente alternata.
Illustrazione 1 Illustrazione 2
• El aparato ha sido producido por HK AUDIO®según el IEC 60065 y salió de la
fábrica en un estado técnicamente perfecto. Para conservar este estado y
asegurar un funcionamiento sin peligros el usuario debe tener en cuenta las
indicaciones y advertencias contenidas en las instrucciones de manejo.
El aparato corresponde a la clase de protección l (toma de tierra protegida).
• LA SEGURIDAD, LA FIABILIDAD Y EL RENDIMIENTO DEL APARATO SOLO
ESTAN GARANTIZADOS POR HK AUDIO®CUANDO:
• el montaje, la ampliación, el reajuste, los cambios o las reparaciones se
realicen por HK AUDIO®o por personas autorizadas para HK AUDIO®;
• la instalación eléctrica del recinto en cuestión corresponda a los requisitos
de la determinación del IEC (ANSI);
• el aparato se use de acuerdo con las indicaciones de uso.
ADVERTENCIA:
• Si se destapan protecciones o se retiran piezas de la carcasa, exceptuando si se
puede hacer manualmente, se pueden dejar piezas al descubierto que sean
conductoras de tensión.
• Si es necesario abrir el aparato, éste tiene que estar aislado de todas las
fuentes de alimentación. Esto se debe tener en cuenta antes del ajuste, de un
entretenimiento, de una reparación y de una sustitución de las piezas.
• Un ajuste, un entretenimiento o una reparación en el aparato abierto y bajo
tensión sólo puede ser llevado a cabo por un especialista autorizado por el
productor (según VBG 4) que conozca a fondo los peligros que ello conlleva.
• Las salidas de altavoces que estén provistas de la característica IEC 417/5036
(figura 1, véase abajo) pueden conducir tensiones peligrosas al contacto. Por
ello es indispensable que antes de poner en marcha el aparato; la conexión se
haya realizado únicamente con el cable de empalmes recomendado por el
productor.
• Las clavijas de contacto al final de los cables conectores tienen que estar
atornilladas o enclavadas a la carcasa, en tanto que sea posible.
• Sólo se pueden utilizar fusibles del tipo IEC 127 con la intensidad de corriente
nominal indicada.
• El uso de fusibles reparados o la puesta en cortocircuito del soporte es
inadmisible.
• El empalme del conductor de protección no se puede interrumpir en ningún
caso.
• Las superficies provistas de la característica "HOT" (figura 2, véase abajo),
los paneles de fondo trasero o las protecciones con ranuras de ventilación, los
cuerpos de ventilación y sus protecciones, así como las válvulas electrónicas y
sus protecciones pueden alcanzar temperaturas muy altas durante el funcionamiento y por ello no se deberían tocar.
• Niveles elevados de la intensidad de sonido pueden causar continuos daños
auditivos; por ello debe evitar acercarse demasiado a altavoces que funcionen
a altos niveles. En tales casos utilice protecciones auditivas.
ACOMETIDA A LA RED:
• El aparato está proyectado para un funcionamiento continuo.
• La tensión de funcionamiento ajustada tiene que coincidir con la tensión de la
red del lugar.
• La conexión a la red eléctrica se efectuará con la fuente de alimentación o con
el cable de red que se entreguen con el aparato.
•Fuente de alimentación: una linea de conexión dañada no se puede sustituir.
La fuente de alimentación no puede volver a ponerse en funcionamiento.
•Evite una conexión de la red eléctrica a distribuidores con muchas tomas de
corriente.
• El enchufe para el suministro de corriente tiene que estar cerca del aparato
y ser de fácil acceso.
SITUACION:
• El aparato debería estar situado en una superficie limpia y totalmente horizontal.
• El aparato no puede estar expuesto a ningún tipo de sacudidas durante su
funcionamiento.
• Se deben evitar la humedad y el polvo.
• El aparato no puede ponerse en funcionamiento cerca del agua, la bañera, el
lavamanos, la pila de la cocina, un recinto con tuberías de agua, la piscina o en
habitaciones húmedas. Tampoco se pueden poner objetos llenos de líquido jarrones, vasos, botellas, etc. - encima de él.
• Procure que el aparato tenga suficiente ventilación.
• Las aberturas de ventilación existentes no se deben bloquear ni tapar nunca.
El aparato debe estar situado como mínimo a 20 cm de la pared. El aparato
sólo se puede montar en un rack, si se ha procurado la suficiente ventilación y
se han cumplido las indicaciones de montaje del productor.
•Evite los rayos del sol directos así como la proximidad a radiadores, electroradiadores o aparatos similares.
• Si el aparato pasa repentinamente de un lugar frío a otro caliente, se puede
condensar humedad en su interior. Esto se debe tener en cuenta sobretodo en
los aparatos con válvulas electrónicas. Antes de poner en marcha el aparato se
debe esperar hasta que éste haya adquirido la temperatura ambiental.
• Accesorios: el aparato no se puede colocar encima de carros, estantes, trípodes,
soportes o mesas inestables. Si el aparato se cae puede causar daños personales y se puede estropear. Coloque el aparato sólo en un carro, rack, estante,
trípode o soporte recomendado por el productor o que se le haya vendido junto
con el aparato. En la instalación se deben seguir las indicaciones del productor
así como utilizar los accesorios recomendados por el mismo para colocarlo
encima. El conjunto del aparato con el pedestal se debe mover con mucho
cuidado. Un paro brusco, la aplicación de una fuerza desmesurada o un suelo
irregular puede ocasionar la caida de todo el conjunto.
• Piezas adicionales: no utilice nunca piezas adicionales que no estén recomendadas por el productor, ya que se podrían provocar accidentes.
• Para protejer el aparato de una tormenta o si no se supervisa ni utiliza durante
algún tiempo, se debería desconectar la clavija de la red. Así se evitan daños en
el aparato a causa de un rayo y golpes de tensión en la red de corriente alterna.
Figura 1 Figura 2
Conseils de Securite Importants!
Priere de lire avant l'emploi et a conserver pour utilisation ulterieure!
Importanti avvertimenti di sicurezza!
Leggere attentamente prima dell'uso e conservare per
un utilizzo successivo:
¡Indicaciones de seguridad importantes!
¡Léanse antes de utilizar el aparato y guardense para
so uso posterior!
Page 4

ACTOR DX Manual 1.0
Welcome to the HK AUDIO
family!
Thank you for choosing an HK AUDIO product.
ACTOR DX consists of two ADX 112 A mid/high units
loaded with a 12" woofer, 1. 4" driver and a DDO™
system controller, two ADX 115 A Sub subwoofers
with an onboard 1,000 W RMS Class D power amp,
and two ADX 115 Sub B subwoofers, the passive
complement to the Sub A bin.
You don't have to worry about tweaking frequencies
and finessing levels, all you have to do is set up the
system components, connect the signal-carrying
cables and the power cords, and you're ready to roll.
An HK AUDIO®active system is made up of more
than just two active cabinets; it is an end-to-end
sound reinforcement solution consisting of subwoofers, mid/high units and meticulously matched
electronic circuitry.
Our engineers developed new technologies to satisfy
the stringent requirements of such an advanced
system. With its unique and sophisticated features,
every active HK AUDIO®sound reinforcement
system stands out in the crowd of far more basic
active cabinets.
All the best from the HK AUDIO team; enjoy your
ACTOR DX system!
Warranty
Register your ACTOR DX using the enclosed
warranty card to extend your warranty to five years
free of charge!
Use the convenient online registration option at
www.hkaudio.com
.
If you are unable to register online, please fill out the
enclosed warranty card completely and mail or fax it
to us. The registration is only valid if the warranty
registration card is filled out and returned to
HK AUDIO
®
or the device is registered via the
Internet within 30 days of the date of purchase.
We are also interested in learning where our devices
are used and by whom. This information will help us
design future products. Your information is of course
protected by privacy laws.
Thank you!
HK AUDIO
®
Technical Service
Postfach 1509
D-66959 St. Wendel
Germany
Table of Contents
1 ACTOR DX System Components . . . . . . . . . . . .6
2Transport . . . . . . . . . . . . . . . . . . . . . . . . . . . . . . .6
3 Setup and Cable Connections . . . . . . . . . . . . . . .6
4Connections and Control Features . . . . . . . . . . .8
5 Tips and Tricks . . . . . . . . . . . . . . . . . . . . . . . . .10
6 ACTOR DX Accessories . . . . . . . . . . . . . . . . . . .11
7Troubleshooting . . . . . . . . . . . . . . . . . . . . . . . . .11
8Technical Specifications . . . . . . . . . . . . . . . . . . .12
Page 5
5
English
Unique features for premium performance
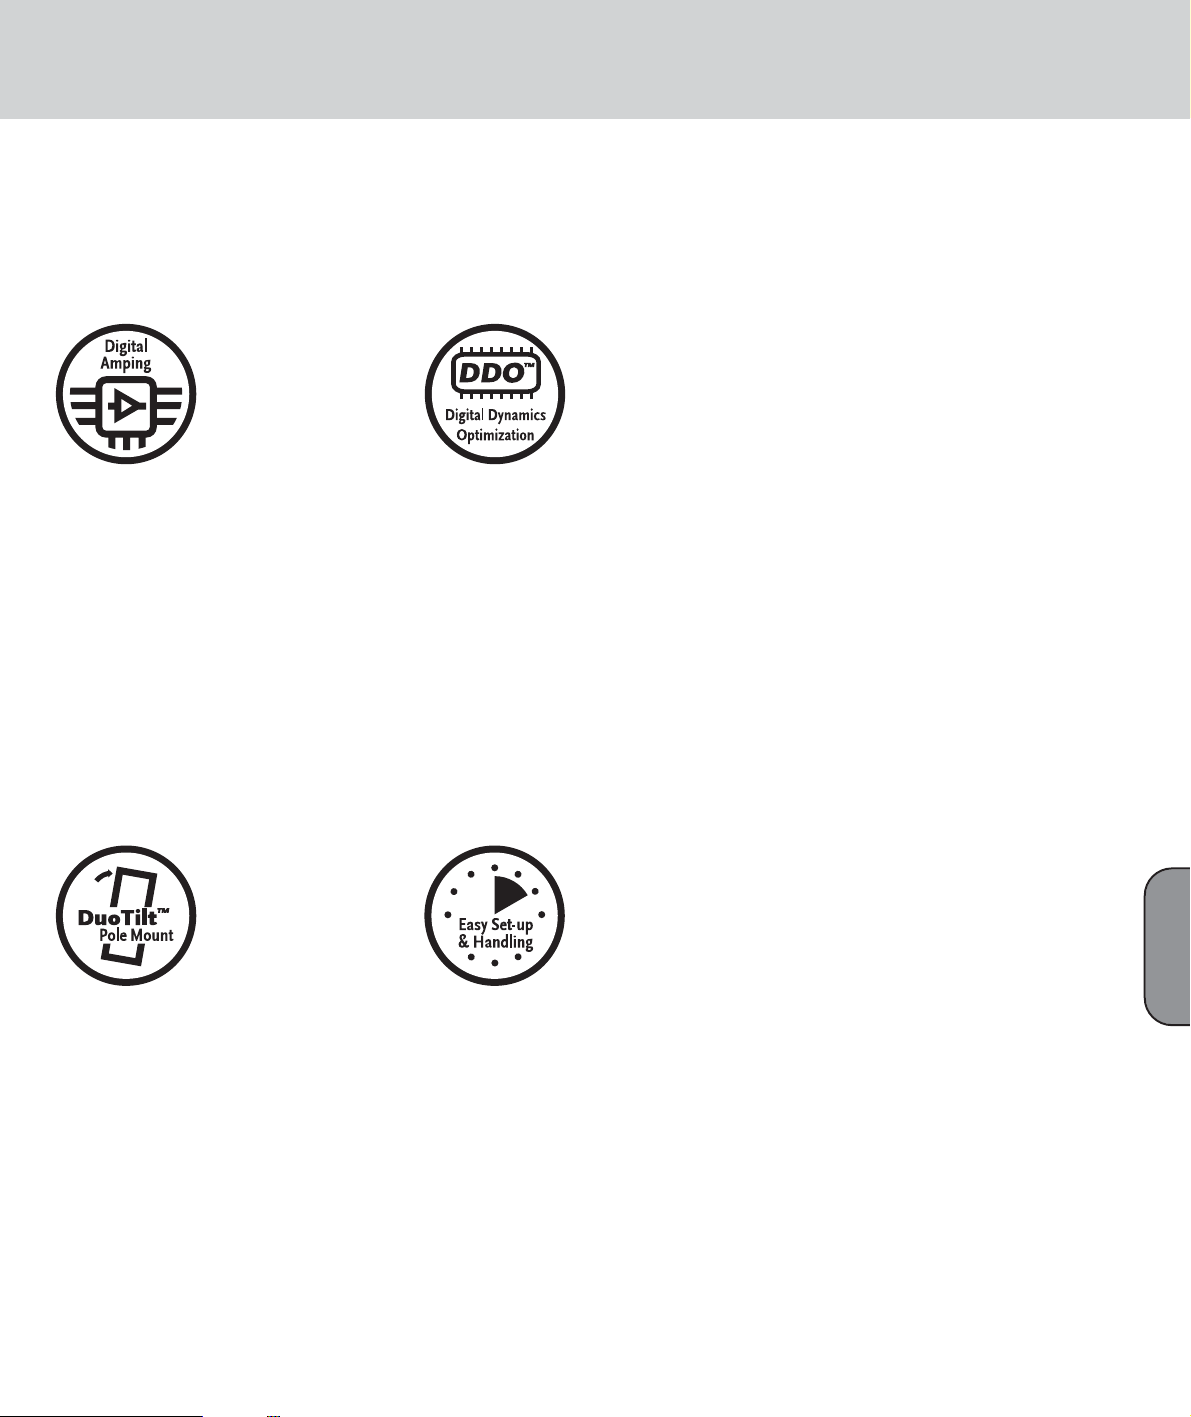
Digital amping
– for enhanced efficiency and dynamics
With an extremely high efficiency rating topping
the 90% mark, Class D digital power amps are
substantially smaller, lighter, and more compact than
comparable conventional amps. The reduced
thermal load on components enhances reliability,
while the far faster slew rate and higher attenuation
factor audibly enhance the speed and accuracy of the
system’s dynamic response.
DDO™ Controller technology
The DDO™ Controller compensates for varying
response of components such as low-frequency,
midrange and high-frequency speakers, power amps,
crossovers and so forth to forge a homogenous
system with uniform dynamics and a sonic image
with sharply defined contours.
DuoTilt™
– making the most of sonic energy
The novel DuoTilt™ pole mount allows sound energy
to be utilized far more efficiently. DuoTilt™ offers
7.5° and 15° angles of tilt, enabling perfect mid/high
unit-to-audience alignment. Troublesome ceiling
reflections are minimized, making the sound clearer,
tighter, and more focused.
Easy Setup and Handling
– for less pre-gig stress
Like all HK AUDIO Active Systems, ACTOR DX
was designed as a cohesive system consisting of
perfectly matched components. Painstaking effort
was invested in ensuring ACTOR DX can be transported easily and set up quickly. Handling and EQing
couldn’t be any easier, with no complicated and
time-consuming tweaking challenges to master.
Page 6
ACTOR DX Manual 1.0
1 ACTOR DX System
Components
ADX 112 A Mid/High Unit
These enclosures are loaded with one 12" HK AUDIO
Custom speaker and one 1. 4" compression driver
with a 60° x 40° CD horn. Delivering 600 W RMS,
the Class D power amp is housed in a separate
chamber along with the DDO™ Controller.
ADX 115 Sub A Subwoofer
The ACTOR DX A Sub’s housing is split up into two
chambers. The front chamber serves as the speaker
cabinet for the 15" front-loaded loudspeaker, which
has a power handling capacity of 500 W RMS and a
nominal impedance of 8 ohms. The power amp is
housed in a separate compartment at the rear of the
cabinet.
ADX 115 Sub B Subwoofer
The housings and speakers of the ADX 115 Sub Bs
and Sub A are identical. The Sub B is the passive
version of the Sub A.
2 Transport
To transport the system, simply set the subwoofers
on their casters and place the mid/high units onto
the subwoofers with the foam rubber grille side
facing down. Use original HK AUDIO‚ covers to get
your system ready to handle the rigors of the road.
Padded and protected against moisture, your
ACTOR DX system is sure to serve you well for a
long time to come.
3 Setup and Cable Connections
3.1 The Standard ACTOR DX System
The standard system comprises
two ACTOR ADX 112 A mid/high units,
two ADX 115 Sub A subwoofers and
two ADX 115 Sub B subwoofers.
Always connect ACTOR DX starting at the top and
working your way down (refer to the diagram on the
rear panel of ACTOR DX components)! This may
seem unusual if you are accustomed to working with
active systems where signals are routed via
paralleled pass-through jacks, which would allow
connections to be made in any sequence.
ACTOR DX, in contrast, features the DDO™ System
Controller housed in the ADX 112 A mid/high unit.
This controller lets you determine basic settings
such as the system configuration, the mid/high
unit’s level and the subwoofer’s level right on the
mid/high unit. DDO™ then routes signals from the
mid/high unit to Sub A.
Note: Always connect cords in the correct sequence.
Never connect a cord carrying a signal from a mixer
directly to Sub A because this bypasses the DDO™
system controller! Always connect signal sources to
the “master” system input located on ACTOR DX
mid/high units!
3.2 ACTOR DX Full-range Setup
The full-range setup comprises
two ACTOR ADX 112 A mid/high units.
Select the appropriate system configuration on the
system controller's control panel. In full-range mode,
the subwoofer output (DDO™ controlled) is disabled
to prevent handling errors.
3.3 ACTOR DX Club Set
The club set comprises
two ACTOR ADX 112 A mid/high units and
two ADX 115 Sub A bins.
ADX 112 A
ADX 115 Sub A
ADX 115 Sub B
Standard system connections
Connections for full-range setup
Page 7
7
English
3.4 Dual ACTOR DX System
The dual system comprises four
ACTOR ADX 112 A mid/high units, four ADX
115 Sub A bins and four ADX 115 B Sub bins.
Connect cables from top to bottom as described
above. Plug a microphone cord into the first
mid/high unit’s THROUGH port to route the mixer
signal to the second ACTOR DX stack.
Ensure XLR connectors are wired as follows:
1= ground, 2= +, 3= -
3.5 Flying ACTOR ADX 112 A Mid/High Units
Use the HK AUDIO rigging frame to fly ACTOR DX
mid/high units. To attach the frame, remove the
countersunk M10 hex head bolts from the side
panels. Bolt the rigging frame’s brackets to the
enclosure. Set the mid/high unit’s inclination to the
desired angle by loosening the knobs on the sides
and firmly hand-tightening them again. The serrated
plastic washers hold the mid/high unit in place.
Note: For reasons of safety, use tested and certified
load-securing devices only (for example, halfcouplers, TV spigots, brackets, and so forth)!
Ensure wall and pole mounts are designed to handle
the load (an ACTOR ADX 112 A weighs 30 kg).
3.6 Using the ACTOR DX Tilt Unit
Using the optional tilt unit couldn’t be easier:
Proceed as if mounting the enclosure on a pole.
Set the ACTOR DX tilt unit with the bottom plate
facing down on the upper subwoofer and then set
the ACTOR mid/high unit on it so the tilt unit’s rod
is inserted into one of the two holes (7.5° or 15°).
Question
Can I connect speakers other than an ACTOR DX
mid/high unit to an ACTOR DX Sub A or Sub B
subwoofer?
Answer
The system components are acoustically matched
for optimum audio performance and may be
operated in the indicated configuration only. Using
other mid/high units can degrade the sound and
damage the power amp (e.g. the Sub A’s).
Sub A’s nominal impedance is 4 ohms, and
impedance may not fall short of this value. Connect
no more than one Sub B to Sub A’s speaker out.
Club set connections
Dual system connections
ACTOR ADX 112 A with rigging bracket
The ACTOR DX tilt unit in action
Page 8

ACTOR DX Manual 1.0
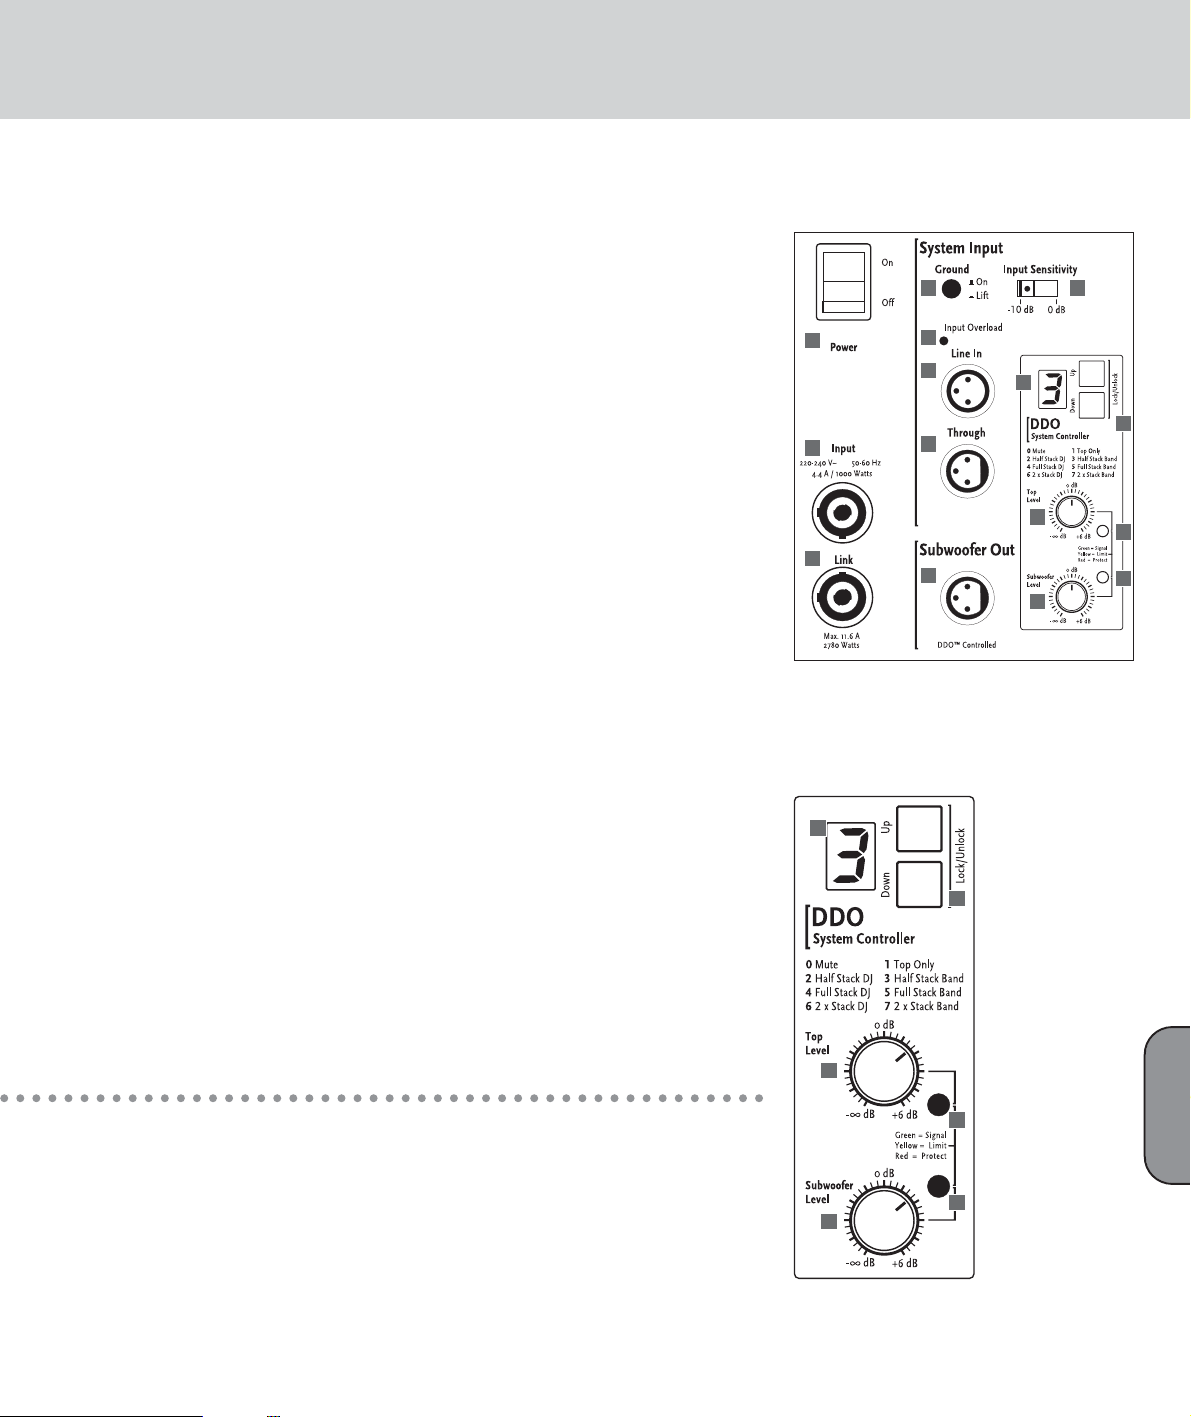
4 Connections and Control
Features
4.1 ACTOR ADX 112 A
1 Power Switch
Handling: This is the on/off switch for the active
system. When engaged, the system controller’s
display lights up orange.
Always switch the ACTOR DX active system on last,
that is, after powering up all other components, and
switch it off first before powering down all other
connected devices.
2 Mains Input
Connecting cords: Use the factory-included Powercon cable to connect this socket to a wall receptacle.
Caution! Make sure the local mains voltage matches
the voltage specified on the device. If you connect
the system to the wrong mains voltage, you may
destroy the ACTOR DX system’s electronic
components.
3 Mains Link
Connecting cords: The Powercon Link socket is wired
in parallel to the Mains Input. Connect other load
consumers (for example, another ACTOR DX
mid/high unit or an ACTOR DX Sub A bin) to it.
Heads up: The Powercon Link socket can handle
loads up to 11.6 A and 2780 W (at 230 volts). This
means you can use it to power up to but no more
than two additional ACTOR DX components.
Note: Always switch on ACTOR DX components one
after another to prevent a sudden spike in the
venue’s power supply. Otherwise the power surge
may cause the house circuit breaker to trip.
4 Ground
Ground lift button for separating the signal and
chassis ground in the event of humming noises.
In the event of low-frequency hum, engage the
Ground Lift switch. The ground circuit is severed
when this button is pressed. If this doesn’t solve the
problem, check all cords connected to ACTOR DX as
well as all signal cables routed to the mixing console
for damage (see also Tips and Tricks).
5 Input Sensitivity
This selector matches the preamp’s input sensitivity
to the mixer’s output signal level.
Engage this switch to select either -10 dB (for example, for unbalanced 1/4” jacks and consumer level
devices) or +0 dB (for example, for balanced XLR
ports and professional mixers).
Recommendation: Select +0 dB when using a
professional-grade mixer sporting balanced outputs.
This lets you take advantage of console faders’ full
control range and helps prevent overloads.
Opt for -10 dB A when using a console with a lower
output level (unbalanced 1/4" output).
6 Input Overload
This LED lights up when the input level is too high
and the entire system (preamp and controller) is
being overdriven. Not only does this result in
unpleasant distortion, it can also harm the system’s
components. If the red LED lights up, reduce the
level (volume) at the mixer!
7 Line In
Connecting cords: Connect cords carrying signals
from your mixer (master left/right, line out, or a
similar circuit) to the balanced inputs using a mic
cord equipped with XLR connectors.
Ensure XLR connectors are wired as follows:
1= ground, 2= +, 3= -.
8 Through
Connecting cords: Use this parallel output to route
the incoming line signal to other components (for
example, to additional ACTOR DX mid/high units)
via XLR cords.
9 Limiter LEDs
These are the active system’s "rev counters," serving
to indicate the limiter’s operating status.
10 Subwoofer Output
Connecting cords: Use this output to send the
subwoofer signal from the DDO™ controller to an
ACTOR ADX 115 Sub A via an XLR cord.
Ensure XLR connectors are wired as follows:
1= ground, 2= +, 3= -.
ACTOR ADX 112 A
1
4
6
7
8
10
9
9
5
11
12
13
14
2
3
Page 9
9
English
11 Display
Read-out: The numeric display indicates the
currently selected system configuration.
0 Mute
1Top only 1 mid/high unit Full-range mode
2 Half Stack DJ 1 mid/high unit, 1 Sub A
3 Half Stack Band 1 mid/high unit, 1 Sub A
4Full Stack DJ 1 mid/high unit, 1 Sub A+ Sub B
5Full Stack Band 1 mid/high unit, 1 Sub A+ Sub B
6 Dual Stack DJ 2 mid/high units, 2 Sub A+ Sub B
7 Dual Stack Band 2 mid/high units, 2 Sub A + Sub B
L Locked buttons are disabled
U Unlocked buttons are enabled
12 Up/Down Buttons
Use these buttons to select system configurations.
Operation: To enable the buttons, press Up and
Down simultaneously and hold for about one to two
seconds. The letter U (for unlocked) appears briefly
in the display. Now you can press Up and/or Down
to select the desired setup (see the table above). The
buttons are automatically disabled soon thereafter.
The letter L (locked) appears briefly in the display.
13 Top Level
Operation: Use this knob to determine the volume of
the mid/high unit. The standard setting is 0 dB at
the 12 o’clock position. This means the level is
neither boosted nor cut.
14 Subwoofer Level
Operation: When the knob is set to the 12 o’clock
position, the subwoofer’s and the mid/high unit’s
respective volumes are matched, ensuring bass and
mid/high ranges are rendered in balanced musical
proportion. If desired, twist the Subwoofer Level
knob to the left to decrease and to the right to
increase the subwoofer’s level by up to 6 dB.
Tip: If necessary or desired, use the Subwoofer Level
knob to boost or cut bass frequencies below 100 Hz
rather than resorting to the mixer’s master EQ.
15 Rigging Points
Attach the ACTOR DX rigging frame here to fly the
mid/high unit from a truss or similar suspension
device.
ACTOR ADX 112 A control features
Control features of the ACTOR DX system controller
1
2
3
4
6
7
8
10
5
9
9
11
11
12
9
9
12
13
14
13
14
More about limiter LEDs
A dedicated LED indicates the limiter status for the
mid/high-range signal path and the subwoofer
circuit, respectively.
What do the lights mean?
The green LED indicates that the given input is
receiving a signal. As long as the LED lights up
green, the system is operating at low-to-medium
levels, with plenty of headroom available for the
power amps. Yellow indicates that the system is
being pushed close to its threshold. The yellow LED
may flash at regular intervals, but it may not
illuminate continuously. If it does this, back off the
volume on your mixer.
If the LED constantly lights up red, there is a
problem in the power amp and the system will shut
down. In this case, have a qualified service
technician check the device.
Page 10
ACTOR DX Manual 1.0
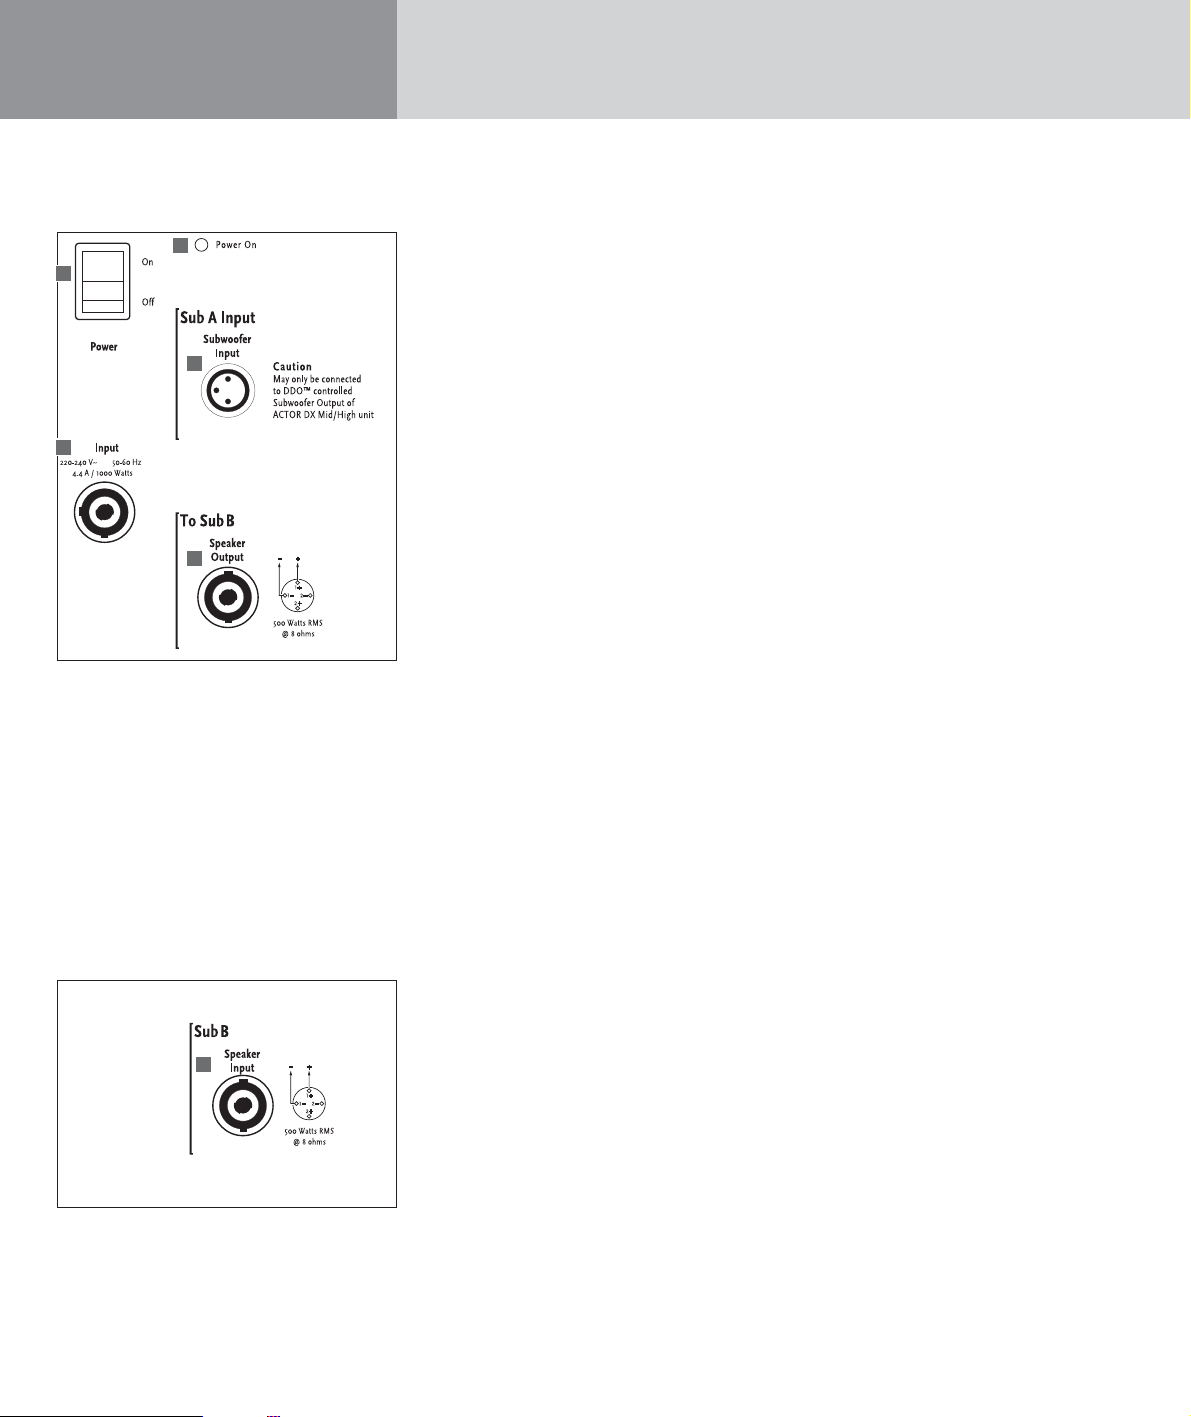
4.2 ACTOR ADX 115 Sub A
1 Power Switch
Operation: This is the on/off switch for the active
system. When engaged, the Power On LED lights up
red. Always switch the ACTOR DX active system on
last, that is, after powering up all other components,
and switch it off first before powering down all other
connected devices.
2 Mains Input
Connecting cords: Use the factory-included Powercon cord to connect this socket to a wall receptacle.
Caution! Make sure the local mains voltage matches
the voltage specified on the device. If you connect
the system to the wrong mains voltage, you may
destroy the ACTOR DX system’s electronic
components.
3 Power On LED
This LED lights up when the Power switch is set to
ON and the system is connected to a mains power
supply.
4 Subwoofer Input
Connecting cords: To patch the signal from the
DDO™ controller to a Sub A bin, plug one end of a
mic cord equipped with XLR connectors into the
mid/high unit’s Subwoofer output and the other into
the Subwoofer Input. Ensure XLR connectors are
wired as follows: 1= ground, 2= +, 3= -.
Note: Never patch the mixer's line and/or master
signal directly into Sub A’s Subwoofer Input. This
bypasses the system’s controller, crossover, equalization and protection circuitry, risking serious damage
to the subwoofer. Read chapter 3, Setup and Cable
Connections, for more on this.
5 To Sub B Speaker Output
Connecting cords: Use this parallel Speakon
®
output
to connect a passive ACTOR DX B Sub bin.
Note: Be sure to twist the Speakon“ connectors
clockwise until they lock in place! You must first disengage the safety catch before you can unplug the
connector. To do this, pull the bayonet catch towards
the cord. Pin assignments are pin 1+ = +, pin 1- = -.
Feel free to use a four-core cable if you wish, though
pin 2+ and 2- remain unused, of course.
4.3 ACTOR ADX 115 Sub B
6 Sub B In
Connecting cords: Connect the Speakon®input to
the ADX 115 Sub A bin’s Speaker Output using a
suitable loudspeaker cord.
5 Tips and Tricks
Do not expose electronic circuitry to moisture! When
you set the system up outdoors, be sure to protect it
against rain. Keep soft drinks, beer and all other
liquids well away from the cabinets to protect their
electronic components from short circuits.
Ensure that the ducts on the enclosures’ rear panels
are free of dirt and the devices are ventilated
properly. Otherwise, electronic components may
overheat and suffer damage.
ACTOR DX delivers optimum sound, so you should
provide it with optimum input signals! Noise such as
humming is generally caused by defective cables, the
wrong type of cords, or unbalanced signals routed
into the mixing console. Check all signal and mains
cables.
Prevent distortion! Not only is it unpleasant to your
audience’s ears, it also endangers your equipment.
Make sure all components that are connected
directly and indirectly to ACTOR DX have sufficient
power ratings, and that they don’t distort because
they‘re running at their respective limits. Provide an
undistorted signal to the system that doesn’t have to
be cleaned up by backing off the Gain knob.
Avoid ground loops! You may encounter a ground
loop when the mixer is grounded via a mains cord
which isn’t connected to the same mains circuit as
ACTOR DX. To prevent this problem, always connect
the ACTOR DX system and the mixing console to the
same electrical circuit (same phase!). If your equip-
Control features of the ACTOR ADX 115 Sub A
Control features of the ACTOR ADX 115 Sub B
1
2
3
4
5
6
Page 11

11
English
ment hums despite this precaution, the Ground Lift
switch can be a great help.
CAUTION: Never tape over the plug’s ground
terminalæthis endangers lives!
6 ACTOR DX Accessories
HK AUDIO ACTOR DX Tilt-Unit
Designed to hold the ACTOR DX mid/high unit, the
tilt unit is placed on the subwoofer, with the
DuoTilt™ fitting offering a choice of 7.5° or 15°
angles.
HK AUDIO Dust Covers for ACTOR DX
This set comprises subwoofer and satellite covers.
Extremely tear resistant, water repellant and thickly
padded, these covers afford lasting protection for the
ACTOR DX system during transport.
HK AUDIO ACTOR DX Rigging Frame
Easy-to-mount U bracket for attaching half-couplers,
TV spigots and clamps.
To learn more about original HK AUDIO accessories,
talk to your HK AUDIO dealer or visit
www.hkaudio.com.
7 Troubleshooting
The Power On LED or display does not light up red
when switched on.
1 Check if the power cord is plugged into the Mains
Input.
2 Check if the mains power supply is providing
current.
3 Check if the house circuit breaker has tripped.
The Power On LED lights up red, but the cabinets
produce no sound.
1 Check the cords connected to the inputs.
2 Check if the signal sources (mixer, keyboard, CD
player, etc.) are on.
3 Are the Gain knobs turned up?
4 Check the speaker cords for damage.
5 Check if the Speakon“ connectors are locked
(twisted to the right). An electrical connection is
established only if their locking mechanism
engages.
The subwoofer’s low frequency output is weak.
1 Check the setting of the Subwoofer Level knob. Set
Sub A’s volume to the desired level using the
Subwoofer Level.
2 Check if the system configuration "Top Only" is
selected on the system controller. This mutes the
subwoofers.
The signal sounds distorted.
1 Check the LED displays on your mixer. Ensure they
are not constantly in the red. If necessary, back off
the volume at the mixer.
2 If the LED displays on your mixer are in the green,
but the sound is still distorted, back off the Level
knobs on the ACTOR ADX 112 A enclosures.
3 Observe the Input Overload indicator and the
Limiter LEDs on the ACTOR DX mid/high units’
control panels. It is acceptable for these to flash
yellow from time to time, but under no
circumstances may the yellow LEDs illuminate
continuously. If they do, turn down the Level
knobs. Check also the Input Sensitivity setting.
If the signal is saturated, set it to +0 dB.
Annoying hum
1 Check the cords connecting the signal source to
ACTOR DX. Replace damaged cords.
2 If you cannot pinpoint the cause of the humming,
engage Ground Lift. This should remedy the
problem in most cases.
Page 12

ACTOR DX Manual 1.0
8 Technical Specifications
ACTOR ADX 112 A
Connections: 1x XLR Line In
1x XLR Line Through
1x XLR Subwoofer Output
Line In: XLR female (pin 1= Ground; 2= +, 3= -)
Input: Electronically balanced & floating
Input impedance: 20 k ohms
Sensitivity: Switchable from –10 dB to 0 dB (= +4 dBu)
Max. input level: +22 dBu
Frequency response +/- 3dB:1) 80 Hz – 19 kHz full-range mode
130 Hz – 19 kHz Stop-only mode
Axial sensitivity 1W@1m:2) 106 dB
Maximum SPL @1m: 2) 129 dB @ 10% THD
Mid/high-range amplifier: 1x 600 W RMS/ Class D
Active protective circuits: DDO™ Controller Multiband Limiter, Subsonic Filter
Midrange speaker: 12"
Tweeter/ driver: 1.4"
Directivity: 60° x 40° CD horn
Crossover frequency: 950 Hz, 12 dB/octave
Pole mount: HK AUDIO DuoTilt™, 36 mm, 7.5°, 15°
Rigging points: 4 M10 threaded bushings for attaching an optional
rigging bracket
Accessories: ACTOR DX Tilt-Unit, 7.5°, 15°
Dimensions (WxHxD): 39 cm x 65 cm x 42 cm
15 1/4" x 25 5/8" x 16 1/2"
Weight: 30 kg/ 66 lbs.
General electrical data:
Protection class 1 (protectively earthed)
Max. current consumption: 4.4 A (230 V)
8 A (117 V)
8 A (100 V)
Max. power consumption: 1000 VA
Mains voltage range: +/- 10%
Ambient temperature range: -10° C to +35° C
Internal fuses: T8A
1) Via active crossover
2) All measurements taken under half-space conditions
Page 13
13
English
ACTOR ADX 115 Sub A
Connections: 1x XLR Subwoofer Input
1x XLR Subwoofer Through
1x Speakon
®
Parallel Out
Subwoofer Input: XLR female (pin 1= Ground; 2= +, 3= -)
Input: Electronically balanced & floating
Input impedance: 20 k ohms
Sensitivity: +10 dBu (turned all the way up)
Max. input level: +22 dBu
Frequency response +/- 3dB: 1) 48 Hz – 130 Hz
Axial sensitivity 1W@1m: 2) 104 dB
Maximum SPL @1m: 2) 126 dB @ 10% THD
Subwoofer amplifier: 1x 1,000 W RMS / Class D
Active protective circuits: DDO™ Controller, Multiband Limiter, Subsonic Filter
Woofer: 15"
Pole mount: M20 thread base plate
Castors Four 100 mm castors on the rear panel
Dimensions (WxHxD): 48 cm x 65 cm x 66 cm incl. castors
18 7/8" x 25 5/8" x 26"
Weight: 35 kg/ 77 lbs.
General electrical data:
Protection class 1 (protectively earthed)
Max. current consumption: 4.4 A (230 V)
8 A (117 V)
8 A (100 V)
Max. power consumption: 1000 VA
Mains voltage range: +/- 10%
Ambient temperature range: -10° C to +35° C
Internal fuses: T8A
ACTOR ADX 115 Sub B
Connections: 1x Speakon®Input
Nominal power handling: 500 W RMS/ 8 ohms
Frequency response +/- 3dB: 1) 48 Hz – 130 Hz
Axial sensitivity t 1W@1m: *) 104 dB
Maximum SPL @1m: *) 126 dB @ 10% THD
Woofer: 15"
Pole mount: Castors Four 100 mm castors on the rear panel
Dimensions (WxHxD): 48 cm x 65 cm x 66 cm incl. castors
18 7/8" x 25 5/8" x 26"
Weight: 32 kg/ 70.4 lbs.
This is to certify that
HK AUDIO®ACTOR DX
complies with the provisions of the Directive of
the Council of the European Communities on the
approximation of the laws of the Member States
relating to electromagnetic compatibility
(EMC Directive 89/336/EEC) and the low voltage
Directive (73/23/EEC).
This declaration of conformity of the European
Communities is the result of an examination carried
out by the Quality Assurance Department of
STAMER GmbH in accordance with European
Standards EN 50081-1, EN 50082-1and EN 60065
for low voltage, as laid down in Article 10 of the
EMC Directive.
Stamer Musikanlagen
GmbH*
Magdeburger Str. 8
66606 St.Wendel
Lothar Stamer Dipl.Ing.
Managing Director
St.Wendel, 04/15/05
* Stamer Musikanlagen manufactures exclusively
for HK AUDIO®.
Page 14

ACTOR DX Manual 1.0
Willkommen in der HK AUDIO
Familie!
Vielen Dank, dass Sie sich für ein HK AUDIO
®
Produkt entschieden haben.
ACTOR DX besteht aus dem 12"/1,4" Topteil
ADX 112 A mit integriertem DDO™ SystemController, Subwoofer ADX 115 Sub A mit integrierter
1000 W RMS Class D Endstufe und dem Subwoofer
ADX 115 Sub B, die passive Ergänzung zu Sub A.
Sie müssen sich um keinerlei Einstell- und Einpegelarbeiten mehr kümmern, sondern brauchen nur die
Systemkomponenten aufzustellen, Netzversorgung
und Signalkabel anzuschließen und schon kann es
losgehen.
HK AUDIO
®
Aktiv-Systeme sind nicht einfach ein
paar Aktivboxen, sondern eine komplette
Beschallungslösung, bestehend aus Subwoofer,
Topteil und einer akribisch angepassten Elektronik.
Um diese Vorgaben verwirklichen zu können, haben
unsere Ingenieure speziell für diese Systeme neue
Technologien entwickelt. Einzigartige Features heben
ein aktives HK AUDIO®Beschallungssystem aus der
Masse einfacher Aktivboxen heraus.
Viel Spaß mit Ihrem ACTOR DX wünscht Ihnen Ihr
HK AUDIO Team!
Garantie
Registrieren Sie Ihren ACTOR DX mit der beigelegten Registrierungskarte und erhalten Sie eine
kostenlose Garantieverlängerung bis 5 Jahre!
Nutzen Sie die komfortable Online-Registrierung
über www.hkaudio.de
.
Falls Sie keine Möglichkeit haben, sich online zu
registrieren, füllen Sie bitte die beiliegende Garantiekarte vollständig aus und senden diese per Post oder
Fax an uns. Die Registrierung ist nur gültig, wenn die
vollständig ausgefüllte Registrierungskarte innerhalb
von 30 Tagen ab Kaufdatum an HK AUDIO®eingesendet wurde bzw. die fristgerechte Registrierung
über das Internet erfolgte. Weiterhin möchten wir
uns einen Eindruck verschaffen, wo und von wem
unsere Geräte angewendet werden.
Diese Informationen unterstützen unsere zukünftige
Produktentwicklung. Ihre Angaben unterliegen
selbstverständlich dem Datenschutz.
Vielen Dank!
HK AUDIO
®
Technischer Service
Postfach 1509
66959 St. Wendel
Inhalt
1 ACTOR DX Systemkomponenten . . . . . . . . . . .16
2Transport . . . . . . . . . . . . . . . . . . . . . . . . . . . . . .16
3 Aufstellung und Verkabelung . . . . . . . . . . . . . . .16
4 Anschlüsse und Bedienelemente . . . . . . . . . . . .18
5 Tipps und Tricks . . . . . . . . . . . . . . . . . . . . . . . .20
6 Zubehör für ACTOR DX . . . . . . . . . . . . . . . . . . .21
7Fehlerbehebung . . . . . . . . . . . . . . . . . . . . . . . . .21
8Technische Daten . . . . . . . . . . . . . . . . . . . . . . .22
Page 15
15
Deutsch
Einzigartige Features für beste Performance
Digital Amping
– mehr Effizienz und Dynamik
Mit einer extrem hohen Effizienz von über 90 %
sind Class-D Digital-Endstufen wesentlich kleiner,
leichter und kompakter als herkömmliche Endstufen.
Die geringere thermische Belastung der Bauteile
erhöht die Zuverlässigkeit. Die wesentlich schnellere
Anstiegszeit (slew-rate) und der höhere Dämpfungsfaktor werden in einer deutlich schnelleren,
präziseren Ansprache der Systeme hörbar.
DDO™ Controller-Technologie
Der DDO™-Controller kompensiert die lautsprecherabhängigen Dynamikunterschiede von
PA-Komponenten (Bass-, Mitten- und Hochtonlautsprecher, Endstufen, Frequenzweichen, etc.) und
schaffen so ein dynamisch homogenes System aus
einem Guss.
DuoTilt™
– bessere Ausnutzung der Schallenergie
Der neu entwickelte DuoTilt™ Hochständerflansch
ermöglicht eine effizientere Ausnutzung der Schallenergie. Mit zwei verschiedenen Aufstellwinkeln
(7,5°, 15°) können die Satelliten optimal auf das
Publikum ausgerichtet werden. Störende Deckenreflexionen werden vermieden, der Sound wird
druckvoller und klarer.
Easy Setup and Handling
– weniger Stress vor dem Auftritt
Wie alle HK AUDIO Aktiv-Systeme wurde ACTOR DX
als System konzipiert und besteht aus perfekt aufeinander abgestimmten Komponenten. Bei der Entwicklung wurde darauf geachtet, dass ACTOR DX
einfach zu transportieren und schnell aufzubauen
ist. Die Bedienung ist unkompliziert und schwierige
Einstellarbeiten sind nicht erforderlich.
Page 16

ACTOR DX Manual 1.0
1 ACTOR DX System-
komponenten
Topteil ADX 112 A (Mid/ High)
Bestückt sind sie mit einem 12" HK AUDIO Custom
Speaker und einem 1.4" Kompressionstreiber mit
60°x 40° CD Horn. Die Class D Endstufe liefert eine
Leistung vom 600 W RMS und ist mit dem DDO™Controller in einer eigenen Kammer untergebracht.
Subwoofer ADX 115 Sub A
Das Gehäuse des ACTOR DX Sub A ist in zwei
Kammern aufgeteilt. Das vordere Gehäuse dient als
eigentliches Lautsprechergehäuse für den direkt
geladenen 15" Lautsprecher. Er hat eine Belastbarkeit
von 500 W RMS und eine Nennimpedanz von
8 Ohm. Davon getrennt befindet sich dahinter das
Gehäuse für die Endstufe.
Subwoofer ADX 115 Sub B
Das Gehäuse und auch die Lautsprecherbestückung
des ADX 115 Sub B entsprechen Sub A. Er ist die
passive Variante des Sub A.
2 Transport
Zum Transport des Systems stellen Sie die Subwoofer auf die Räder und legen Sie die Mid/High
Topteile mit dem Schaumstoffgitter auf die Subwoofer. Verwenden Sie die original HK AUDIO
®
ACTOR DX Schutzhüllen, mit denen Sie Ihr
persönliches System für den harten On-The-Road
Einsatz rüsten. Gut gepolstert und gegen Nässe
geschützt werden Sie lange Freude an Ihrem
ACTOR DX System haben.
3 Aufstellung und Verkabelung
3.1 ACTOR DX Standard-System
Das Standard-System besteht aus
2x ACTOR ADX 112 A, 2x ADX 1145 Sub A,
2x ADX 115 Sub B.
ACTOR DX wird immer von oben nach unten verkabelt (Siehe Skizze bzw. Diagram auf der Rückseite
der ACTOR DX-Komponenten)! Dies mag zunächst
etwas verwirren, da bei Aktiv-Systemen die Reihenfolge der Verkabelungsschritte oftmals beliebig
wählbar ist, weil die Weiterleitung der Signale über
die Through- Buchsen erfolgt.
Im Gegensatz dazu besitzt ACTOR DX einen DDO™
Systemcontroller im ADX 112 A Topteil. Mit ihm
können am Topteil die Grund-Einstellungen wie
Systemkonfiguration, Top-Level und Subwoofer-Level
vorgenommen werden. Die DDO™ Subwoofer
Signalwege werden dann vom Topteil an den Subwoofer Sub A weitergeleitet.
Hinweis: Achten Sie auf die richtige Reihenfolge der
Verkabelung. Schließen Sie niemals das vom Mischpult kommende Signal an den Subwoofer Sub A
direkt an, Sie umgehen dann den DDO™ Systemcontroller! Schließen Sie Signalquellen stets am
System-Input des ACTOR DX Topteils an!
3.2 ACTOR DX Fullrange-Setup
Das Fullrange-Setup besteht aus
2x ACTOR ADX 112 A Topteilen.
Wählen Sie dazu die entsprechende Systemkonfiguration im Bedienfeld des ACTOR DX Systemcontrollers aus. Der Subwoofer Output (DDO™
controlled) wird in diesem Fall stummgeschaltet,
um Fehlbedienungen zu vermeiden.
3.3 ACTOR DX Club Set
Das Club Set besteht aus
2x ACTOR ADX 112 A, 2x ADX 115 Sub A.
ADX 112 A
ADX 115 Sub A
ADX 115 Sub B
Anschluss-Schema Standard System
Anschluss-Schema Fullrange Setup
Page 17

17
Deutsch
3.4 Doppeltes ACTOR DX System
Das doppelte System besteht aus
4x ACTOR ADX 112 A, 4x ADX 115 Sub A,
4x ADX 115 Sub B.
Die Verkabelung erfolgt auch hier wie oben beschrieben von „oben nach unten“. Um das Mischpultsignal auf den zweiten ACTOR DX-Stack zu
leiten, benutzen Sie die Through-Buchse des ersten
Topteils. Verwenden Sie dazu ein Mikrofonkabel.
Die Belegung der XLR Stecker muss dabei wie folgt
sein: 1= Ground, 2= +, 3= -
3.5 ACTOR ADX 112 A im Flugbetrieb
Zum Fliegen verwenden Sie den speziellen
HK AUDIO®-Flugrahmen für das ACTOR DX-Topteil.
Zur Montage lösen Sie die seitlich versenkten M10
Imbusschrauben. Schrauben Sie den Flugrahmen mit
dessen Flanschen fest an das Gehäuse. Die Neigung
des Topteils kann frei gewählt werden. Lösen Sie
dazu die seitlichen Knaufschrauben und drehen Sie
diese von Hand fest zu. Die verzahnten Kunststoffscheiben verhindern, dass sich das Topteil unbeabsichtigt verdreht.
Hinweis: Verwenden Sie ausschließlich geprüfte
Anschlagmittel (z.B. Half-Coupler, TV-Zapfen,
Schellen usw.) um die Sicherheit zu gewährleisten!
Die verwendeten Aufhängepunkte bzw. Stative
müssen für die entsprechende Belastung (Gewicht
ACTOR ADX 112 A = 30 kg) ausgelegt sein.
3.6 Verwendung der ACTOR DX Tilt-Unit
Die Montage des optional erhältlichen Schrägstellers
ist denkbar einfach:
Stellen Sie die ACTOR DX Tilt-Unit mit der
Bodenplatte auf den oberen Subwoofer und stellen
Sie anschließend das ACTOR-Topteil mit den
Flanschaufnahmen (7,5° oder 15°) auf den Flansch,
so als würden Sie die Lautsprecherbox auf ein
Stativ stellen.
Frage
Kann ich an ein ACTOR DX Topteil andere als die
ACTOR DX Subwoofer Sub A bzw Sub B anschließen?
Antwort
Die Systemkomponenten sind akustisch optimal aufeinander abgestimmt und dürfen nur in der angege-
benen Konfiguration betrieben werden. Bei Verwendung anderer Subwoofer kann der Klang negativ beeinflusst werden bzw. die Endstufe (z.B. Sub A)
Schaden nehmen. Der Lautsprecherausgang von Sub
A ist für eine (Gesamt)-Nennimpedanz von 4 Ohm
ausgelegt, die keinesfalls unterschritten werden darf.
Schließen Sie immer nur einen Sub B an den Lautsprecherausgang von Sub A an.
Anschluss-Schema Club Set
Anschluss-Schema doppeltes ACTOR DX System
ACTOR ADX 112 A mit Flugbügel
Verwendung der ACTOR DX Tilt-Unit
Page 18

ACTOR DX Manual 1.0
4 Anschlüsse und Bedien-
elemente
4.1 ACTOR ADX 112 A
1 Power-Schalter
Bedienung: Der Ein/Aus-Schalter für das AktivSystem. Im eingeschaltetem Zustand leuchtet das
Display des Systemcontrollers orange auf.
Das Aktiv-System ACTOR DX sollte immer zuletzt,
d.h. nach allen anderen Komponenten, eingeschaltet
und zuerst, d.h. vor allen angeschlossenen Geräten,
ausgeschaltet werden.
2 Mains Input
Anschluss: Verbinden Sie diese Anschlussbuchse
mittels des mitgelieferten Powercon-Stromkabels mit
der Netzsteckdose. Achtung! Achten Sie auf die jeweils gültigen Spannungen. Der Anschluss an eine
falsche Netzspannung kann die Elektronik des
ACTOR DX-Systems zerstören.
3 Mains Link
Anschluss: Die Powercon®Link- Buchse ist parallel
mit dem Mains Input verbunden. Schließen Sie hier
mit einem passenden Verbindungskabel weitere
Verbraucher (z.B. ein weiteres ACTOR DX Mid/HighTopteil oder ein ACTOR DX Sub A) an.
Wichtig: An der Powercon®Link-Buchse darf
maximal ein Strom von 11,6 A bzw. eine Leistung von
2780 W (bei 230 Volt) entnommen werden, d.h. Sie
können maximal zwei weitere ACTOR DX-Komponenten daran betreiben.
Hinweis: Schalten Sie immer die ACTOR DX-Kompo-
nenten nacheinander ein, um die Einschaltströme
möglichst gering zu halten. Andernfalls könnte durch
den hohen Gesamt-Einschaltstrom die Haussicherung auslösen.
4 Ground
Ground-Lift-Schalter für die Trennung von Signalund Gehäusemasse bei Brummproblemen.
Beim Auftreten von tieffrequentem Brummen
betätigen Sie den Ground-Lift-Schalter. In gedrücktem Zustand wird die Masse getrennt. Führt dies
nicht zum Erfolg, überprüfen Sie die Kabel, die zu
ACTOR DX führen, und alle am Mischpult ankommenden Signale auf Mängel (s. auch Tipps und
Tricks).
5 Input Sensitivity
Mit diesem Schalter können Sie die Empfindlichkeit
der Eingangsstufe an den Pegel des Mischpult-Ausgangssignal anpassen.
Wählen Sie mit diesem Schalter die Eingangsempfindlichkeit zwischen –10 dB (z.B. asymmetrische
Klinke, Consumer-Level) oder +0 dB (z.B. symmetrische XLR, professionelle Mischpulte) aus.
Empfehlung: Bei Verwendung eines professionellen
Mischpultes mit symmetrischen Ausgängen sollte
die Anpassung auf +0 dB gewählt werden. So nutzen
Sie optimal die Faderwege des Pultes und vermeiden
Übersteuerungen. Wird ein Pult mit geringerem Ausgangspegel verwendet (asymmetrischer Klinkenausgang), wählen Sie die Einstellung –10 dB aus.
6 Input Overload
Diese LED leuchtet auf, wenn der Eingangspegel zu
hoch ist und somit das gesamte System (Eingangsstufe und Controller) übersteuert wird. Übersteuerung sind als unangenehmes Verzerren zu hören und
könne darüber hinaus auch zu Beschädigungen der
Systemkomponenten führen. Reduzieren Sie beim
Aufleuchten der roten LED den Pegel (Lautstärke)
am Mischpult!
7 Line In
Anschluss: Schließen Sie die von Ihrem Mischpult
kommenden Signalkabel (Master left/ right, Line out
o.ä.) an die symmetrierten Eingangs-Buchsen mit
einem XLR-Mikrofonkabel an.
Die Belegung der XLR-Stecker muss dabei wie folgt
sein: 1= Ground, 2= +, 3= -.
8 Through
Anschluss: Paralleler Ausgang zur Weiterleitung des
Eingangs-Line-Signals (, z.B. an weitere ACTOR DX
To pteile mittels XLR Kabel.
9 Limiter LEDs
Der „Drehzahlmesser“ des Aktivsystems.
Anzeigen über den Betriebsstatus.
ACTOR ADX 112A
1
4
6
7
8
10
9
9
5
11
12
13
14
2
3
Page 19

19
Deutsch
10 Subwoofer Output
Anschluss: Ausgang des Subwoofer-Signals vom
DDO™-Controller an ACTOR ADX 115 Sub A mittels
XLR Kabel.
Die Belegung der XLR Stecker muss dabei wie folgt
sein: 1= Ground, 2= +, 3= -.
11 Display
Anzeige: Das numerische Display zeigt die aktuell
gewählte Systemkonfiguration an.
0 Mute Stummgeschaltet
1Top only 1x Topteil Fullrangebetrieb
2 Half Stack DJ 1x Topteil, 1x Sub A
3 Half Stack Band 1x Topteil, 1x Sub A
4Full Stack DJ 1x Topteil, 1x Sub A+ Sub B
5Full Stack Band 1x Topteil, 1x Sub A+ Sub B
6 2x Stack DJ 2x Topteil, 2x Sub A+ Sub B
7 2x Stack Band 2x Topteil, 2x Sub A+ Sub B
L Locked Tastensperre aktiv
U Unlocked Tastensperre gelöst
12 Up Down-Tasten
Tasten zum umschalten der Systemkonfigurationen
Bedienung: Zum Entsperren der Tasten drücken Sie
gleichzeitig die Tasten Up und Down für ca. 1-2 Sekunden. Im Display erscheint kurz der Buchstabe U
(Unlock). Danach können sie mit den Tasten Up bzw.
Down das gewünschte Setup (vgl. Tabelle) auswählen. Nach kurzer Zeit sind die Tasten wieder gesperrt. Das Symbol L (Lock) erscheint kurz im Display.
13 Top Level
Bedienung: Hier stellen Sie Lautstärke des Topteils
ein. Standardmäßig befindet sich der Level-Regler in
Mittenstellung auf 0 dB. Das heißt, es wird weder
der Pegel zusätzlich angehoben, noch abgesenkt.
14 Subwoofer Level
Bedienung: In Mittenstellung ist die Lautstärke des
Subwoofers an das Topteil so angepasst, dass ein
homogener Klangeindruck mit ausgewogenem Bassund Mittelhochton-Anteil besteht. Durch Drehen des
Subwoofer-Level-Reglers nach links oder rechts kann
die Lautstärke des Subwoofers bei Bedarf erniedrigt
bzw. erhöht werden(bis zu +6 dB).
Tipp: Nutzen sie den Subwoofer-Level-Regler, bevor
Sie z.B. in einem Master-EQ des Mixer-Setups Bassfrequenzen (< 100 Hz) anheben oder absenken
möchten bzw. müssen.
15 Flugpunkte
Zur Befestigung des ACTOR DX-Flugrahmens zum
Fliegen des Topteils in einer Truss oder ähnliches.
ACTOR ADX 112 A Bedienelemente
Bedienelemente des ACTOR DX Systemcontrollers
1
2
3
4
6
7
8
10
5
9
9
11
11
12
9
9
12
13
14
13
14
Info zu den Limiter LEDs
Der Limiterstatus des Mid/High- Signalweges sowie
des Subwoofers wird jeweils über eine eigene LED
angezeigt.
Wie ist nun die Anzeige zu verstehen?
Die grüne LED zeigt an, dass ein Signal am entsprechenden Eingang anliegt. So lange die LED grün
leuchtet, befindet sich das System im unteren bzw.
mittleren Arbeitsbereich und es steht noch genü-
gend Headroom für die Endstufen zur Verfügung.
Gelb zeigt an, dass das System sich im oberen Arbeitsbereich befindet. Die gelbe LED darf bedenkenlos rhythmisch aufblinken, sollte aber keinesfalls
dauerhaft aufleuchten. Nehmen Sie in diesem Fall
die Lautstärke an Ihrem Pult zurück.
Leuchtet die LED dauerhaft rot auf, liegt ein Fehler
der Endstufe vor und das System schaltet ab. In diesem Fall muss das Gerät von einem qualifizierten
Servicetechniker überprüft werden.
Page 20

ACTOR DX Manual 1.0
4.2 ACTOR ADX 115 Sub A
1 Power-Schalter
Bedienung: Der Ein/Aus-Schalter für das AktivSystem. In eingeschaltetem Zustand leuchtet die
Power-LED rot auf. Das Aktiv-System ACTOR DX
sollte immer zuletzt, d.h. nach allen anderen Komponenten, eingeschaltet und zuerst, d.h. vor allen angeschlossenen Geräten, ausgeschaltet werden.
2 Mains Input
Anschluss: Verbinden Sie diese Anschlussbuchse
mittels des mitgelieferten Powercon
®
-Stromkabels
mit der Netzsteckdose. Achtung! Achten Sie auf die
jeweils gültigen Spannungen. Der Anschluss an eine
falsche Netzspannung kann die Elektronik des
ACTOR DX-Systems zerstören.
3 Power On LED
Diese LED leuchtet, wenn der Power-Schalter auf On
steht und entsprechende Netzverbindung besteht.
4 Subwoofer Input
Anschluss: Schließen Sie das vom ACTOR DX
DDO™ Controller kommende Signal ( = SubwooferOutput des Topteils) an die Subwoofer-Input-Buchse
mit einem XLR-Mikrofonkabel an.
Die Belegung der XLR-Stecker muss dabei wie folgt
sein: 1= Ground, 2= +, 3= -.
Wichtig: Schließen Sie keinesfalls die Line- bzw.
Master-Signalwege des Mischpultes direkt an den
Subwoofer-Input von Sub A an, dieser würde dann
ohne Controller, sprich ohne Frequenzweiche, Entzerrung und Systemschutz angesteuert werden und
könnte ernsten Schaden nehmen. Lesen Sie hierzu
auch das Kapitel 3 Aufstellung und Verkabelung.
5 To Sub B Speaker Output
Anschluss: Paralleler Speakon®-Ausgang zum Anschluss des passiven ACTOR DX Sub B
Hinweis: Die Speakon®-Stecker müssen durch Drehen im Uhrzeigersinn einrasten! Vor dem Herausziehen muss zuerst die Verriegelung entsichert werden. Dazu wird der Bajonettverschluss bzw. die Verriegelung in Richtung des Kabels gezogen.
Die Pinbelegung lautet: pin 1+ = +, pin 1- = -.
Selbstverständlich kann auch ein vierpoliges Kabel
benutzt werden. Pin 2+ und 2- sind jedoch nicht
belegt.
4.3 ACTOR ADX 115 Sub B
6 Sub B In
Anschluss: Verbinden Sie die Speakon®-Eingangsbuchse mit dem Speaker-Output von ACTOR ADX
115 Sub A mit einem geeigneten Lautsprecherkabel.
5 Tipps und Tricks
Lassen Sie keine Feuchtigkeit an die Elektronik
kommen! Achten Sie beim Einsatz im Freien darauf,
dass Ihr System vor Regen geschützt aufgestellt
wird. Cola, Bier oder andere Flüssigkeiten dürfen
nicht an die Elektronik gelangen, da dies zu Kurzschlüssen führen kann.
Achten Sie darauf, dass die Lüftungsschlitze auf der
Rückseite der Geräte immer frei von Schmutz sind
und die Luftzirkulation gewährleistet ist. Ansonsten
kann die Elektronik überhitzen und Schaden
nehmen.
ACTOR DX sorgt für optimalen Sound - sorgen Sie
für das optimale Eingangssignal! Brummen ist in
den meisten Fällen das Resultat defekter Kabel,
falscher Kabel oder unsymmetrischer Eingangssignale am Mischpult. Überprüfen Sie alle Signalund Netzkabel.
Verhindern Sie Verzerrungen! Verzerrungen sind
nicht nur unangenehm für die Ohren der Zuhörer,
sie sind auch gefährlich für Ihre Anlage. Achten Sie
darauf, dass alle direkt und indirekt an ACTOR DX
angeschlossenen Komponenten über genügend
Leistung verfügen und niemals Verzerrungen produzieren, weil sie am Limit betrieben werden. Sorgen
Sie für ein sauberes Signal, das nicht durch den Einsatz des Gain-Reglers beeinflusst werden muss.
Vermeiden Sie Brummschleifen! Ist beispielsweise
das Mischpult über das Netzkabel geerdet und hängt
nicht auf dem gleichen Stromkreis wie ACTOR DX ,
so kann es zu einer sogenannten "Brummschleife"
ACTOR ADX 115 Sub A Bedienelemente
ACTOR ADX 115 Sub B Bedienelemente
1
2
3
4
5
6
Page 21

21
Deutsch
kommen. Schließen Sie deshalb stets das ACTOR DX
System und das Mischpult an den gleichen Stromkreis (gleiche Phase!) an. Sollten Sie trotzdem einmal Brummprobleme mit der Anlage haben, so kann
der Ground-Lift-Schalter eine große Hilfe sein.
ACHTUNG: Nie die Erdung am Netzstecker
abkleben - Lebensgefahr!
6 Zubehör für ACTOR DX
HK AUDIO ACTOR DX Tilt-Unit
Schrägsteller für das ACTOR DX-Mid/High-Topteil.
Die Tilt-Unit wird auf den Subwoofer gestellt, die
wählbaren Winkel betragen 7,5 und 15 ° und werden
durch den DuoTilt™ vorgegeben.
HK AUDIO ACTOR DX-Schutzhüllen
Bestehend aus Subwoofer- und Topteil-Schutzhüllen.
Äußerst reißfest, wasserabweisend und dick gepolstert für einen dauerhaften Schutz des ACTOR DX
Systems beim Transport.
HK AUDIO ACTOR DX-Flugrahmen
Leicht zu montierender U-Bügel zur Befestigung von
Half-Couplern, TV-Zapfen oder Klemmen.
Mehr Informationen zum HK AUDIO OriginalZubehör erhalten Sie bei Ihrem HK AUDIO-Händler
oder im Internet unter www
.hkaudio.de.
7 Fehlerbehebung
Die Power-On-LED bzw. das Display leuchtet beim
Einschalten nicht auf.
1 Überprüfen Sie, ob das Netzkabel am Mains-Input
angeschlossen ist.
2 Vergewissern Sie sich, dass das Netz Spannung
führt.
3 Prüfen Sie, ob eventuell die Haussicherung aus-
gelöst hat.
Die Power-On-LED leuchtet rot auf, aber es kommt
kein Ton aus den Boxen.
1 Überprüfen Sie die Anschlusskabel, die Sie an den
Anschlüssen Input angeschlossen haben.
2 Prüfen Sie, ob die Signalquellen (Mischpult, Key-
board, CD-Player usw. ) eingeschaltet sind.
3 Sind die Gain-Regler aufgedreht?
4 Überprüfen Sie die Lautsprecherkabel auf evtl.
Beschädigungen.
5 Stellen Sie sicher, dass die Speakon
®
-Stecker in den
Buchsen eingerastet sind (Drehung nach rechts).
Nur dann besteht eine elektrische Verbindung.
Es kommen nur wenig Bässe aus dem Subwoofer.
1 Überprüfen Sie die Einstellung des Subwoofer-
Level-Reglers. Stellen Sie mit dem Subwoofer-Level
Regler die Lautstärke des Subwoofers Sub A wie
gewünscht ein.
2 Überprüfen Sie, ob die Systemkonfiguration „Top
Only“ am Systemcontroller ausgewählt ist. Diese
schaltet nämlich die Subwoofer stumm.
Die Musikwiedergabe scheint verzerrt zu sein.
1 Überprüfen Sie die LED-Anzeigen an Ihrem Misch-
pult. Sie sollten sich nicht ständig im roten Bereich
befinden. Nehmen Sie gegebenenfalls die Lautstärke am Mischpult zurück
2 Sind die LED-Anzeigen an Ihrem Mischpult im
grünen Bereich, drehen Sie die Level Regler am
ACTOR ADX 112 A zurück.
3 Beobachten Sie die Input-Overload-Anzeige und
die LEDs der Limiter-Anzeigen im Bedienfeld von
ACTOR DX Mid/High. Diese sollten nur kurz gelb
aufleuchten. Keinesfalls dürfen sie ohne Unterbrechung gelb aufleuchten. In diesem Fall drehen Sie
die Level-Regler zurück. Überprüfen Sie auch die
Einstellung der Input-Sensitivity. Schalten Sie bei
Verzerrungen auf +0 dB.
Störende Brummtöne
1 Überprüfen Sie die Kabel, mit der die Signalquelle
und ACTOR DX verbunden sind. Ersetzen Sie beschädigte Kabel.
2 Falls die Ursache des Brummens nicht gefunden
werden kann, drücken Sie den Ground-Lift-Schalter.
In den meisten Fällen kann damit Abhilfe
geschaffen werden.
Page 22

ACTOR DX Manual 1.0
8 Technische Daten
ACTOR ADX 112 A
Anschlüsse: 1x XLR Line In
1x XLR Line Through
1x XLR Subwoofer Output
Line In: XLR female (pin 1= Ground; 2= +, 3= -)
Bauart Eingang: Elektronisch symmetriert & floating
Eingangsimpedanz: 20 k Ohm
Empfindlichkeit: Schaltbar zwischen –10 dB und 0 dB (entspricht +4 dBu)
Max. Eingangspegel: +22 dBu
Frequenzgang +/- 3dB:1) 80 Hz – 19 kHz Fullrange Mode
130 Hz – 19 kHz Satellite Mode
Empfindlichkeit 1W@1m:2) 106 dB
Maximaler Schalldruck @1m: 2) 129 dB @ 10% THD
Verstärker Mittelton/ Hochton: 1x 600 W RMS/ Class D
Aktive Schutzschaltungen: DDO™ Controller, Multiband Limiter, Subsonic Filter
Mitteltonlautsprecher: 12"
Hochtöner/ Treiber: 1,4"
Directivity: 60° x 40° CD Horn
Trennfrequenz: 950 Hz, 12 dB/ Oktave
Hochständerflansch: HK AUDIO DuoTilt™, 36 mm, 7.5°, 15°
Flugpunkte: 4x M10 Gewinde für optionalen Flugbügel
Zubehör: ACTOR DX Tilt-Unit, 7.5°, 15°
Abmessungen (BxHxT): 39 cm x 65 cm x 42 cm
15-1/4" x 25-5/8" x 16-1/2"
Gewicht: 30 kg/ 66 lbs.
Allgemeine elektrische Daten:
Schutzklasse 1 / protection class 1 (protectively earthed)
Max. Stromaufnahme: 4,4 A (230 V)
8 A (117 V)
8 A (100 V)
Max. Leistungsaufnahme: 1000 VA
Netzspannungsbereich: +/- 10%
Umgebungstemperaturbereich: -10° C bis +35° C
Interne Sicherungen: T8A
1) über aktive Systemweiche
2) Alle Messungen in Half-Space
Page 23

23
Deutsch
ACTOR ADX 115 Sub A
Anschlüsse: 1x XLR Subwoofer Input
1x XLR Subwoofer Through
1x Speakon
®
Parallel Out
Subwoofer Input: XLR female (pin 1= Ground; 2= +, 3= -)
Bauart Eingang: Elektronisch symmetriert & floating
Eingangsimpedanz: 20 k Ohm
Empfindlichkeit: +10 dBu (ganz aufgedreht)
Max. Eingangspegel: +22 dBu
Frequenzgang +/- 3dB: 1) 48 Hz – 130 Hz
Empfindlichkeit 1W@1m: 2) 104 dB
Maximaler Schalldruck @1m: 2) 126 dB @ 10% THD
Verstärker Subwoofer: 1x 1000 W RMS/ Class D
Aktive Schutzschaltungen: DDO™ Controller, Multiband Limiter, Subsonic Filter
Basslautsprecher: 15"
Hochständerflansch: M20 Gewindeplatte
Rollen: 4x 100 mm Rollen auf der Rückseite
Abmessungen (BxHxT): 48 cm x 65 cm x 66 cm inkl. Rollen
18-7/8" x 25-5/8" x 26"
Gewicht: 35 kg/ 77 lbs.
Allgemeine elektrische Daten:
Schutzklasse 1 / protection class 1 (protectively earthed)
Max. Stromaufnahme: 4,4 A (230 V)
8 A (117 V)
8 A (100 V)
Max. Leistungsaufnahme: 1000 VA
Netzspannungsbereich: +/- 10%
Umgebungstemperaturbereich: -10° C bis +35° C
Interne Sicherungen: T8A
ACTOR ADX 115 Sub B
Anschlüsse: 1x Speakon Input
Belastbarkeit nominal: 500 W RMS/ 8 Ohm
Frequenzgang +/- 3dB: 1) 48 Hz – 130 Hz
Empfindlichkeit 1W@1m: *) 104 dB
Maximaler Schalldruck @1m: *) 126 dB @ 10% THD
Basslautsprecher: 15"
Hochständerflansch: Rollen: 4x 100 mm Rollen auf der Rückseite
Abmessungen (BxHxT): 48 cm x 65 cm x 66 cm inkl. Rollen
18 7/8" x 25 5/8" x 26"
Gewicht: 32 kg/ 70.4 lbs.
Für das folgend bezeichnete Erzeugnis
HK AUDIO®ACTOR DX
wird hiermit bestätigt, dass es den wesentlichen
Schutzanforderungen entspricht, die in der Richtlinie
des Rates zur Angleichung der Rechtsvorschriften
der Mitgliedsstaaten über die elektromagnetische
Verträglichkeit (89/336/EWG) und der Niederspannungsrichtlinie (73/23/EWG) festgelegt sind.
Diese Erklärung gilt für alle Exemplare, und bestätigt
die Ergebnisse der Messungen, die durch die
Qualitätssicherung der Fa. Stamer Musikanlagen
GmbH durchgeführt wurden. Zur Beurteilung des
Erzeugnisses hinsichtlich elektromagnetischer
Verträglichkeit wurden folgende Normen herangezogen: EN 50081-1 • EN 50082-1. Zur Beurteilung
der Einhaltung der Niederspannungsrichtlinie wurde
folgende Norm herangezogen: EN 60065
Diese Erklärung wird verantwortlich für den Hersteller
Stamer Musikanlagen
GmbH*
Magdeburger Str. 8
66606 St.Wendel
abgegeben durch
Lothar Stamer Dipl.Ing.
Geschäftsführer
St.Wendel, den 15.04.2005
* Stamer Musikanlagen stellt exklusiv für
HK AUDIO
®
her.
Page 24

ACTOR DX Manual 1.0
Bienvenue dans la famille
HK Audio !
Nous vous remercions d'avoir opté pour
un produit HK AUDIO
®
.
L’ ACTOR DX est composé du satellite ADX 112 A
12"/1,4" avec contrôleur système DDO™ intégré, du
subwoofer ADX 115 Sub A à amplification intégrée de
1000 W RMS classé D et du subwoofer ADX 115
Sub B, le complément passif du Sub A.
Vous n'avez pas besoin de vous soucier des réglages
et des ajustages du niveau. Mettez simplement en
place les composants du système, raccordez le
cordon d'alimentation secteur et le câble de signaux
et le tout est prêt à fonctionner.
Un système actif HK AUDIO n'est pas simplement
un système composé de deux enceintes actives mais
une solution de sonorisation complète, comprenant
un subwoofer, un satellite et une électronique
minutieusement adaptée.
Pour pouvoir réaliser ce projet, nos ingénieurs ont
développé de nouvelles technologies spécialement
élaborées pour ce système. Le système de
sonorisation actif HK AUDIO se distingue des
enceintes actives traditionnelles par ses
caractéristiques uniques en leur genre.
L’équipe HK AUDIO vous souhaite une grande
satisfaction avec votre ACTOR DX !
Garantie
Veuillez enregistrer votre ACTOR DX à l’aide de la
carte d'enregistrement fournie et une prolongation
de garantie gratuite pouvant aller jusqu'à 5 ans vous
sera accordée !
Pour cela, utilisez notre service d’enregistrement en
ligne sur notre site Internet www
.hkaudio.com.
Si vous n'avez pas la possibilité de vous enregistrer
en ligne, vous pouvez également remplir la carte de
garantie ci-joint et nous la renvoyer par fax ou par
voie postale. L’enregistrement n’est valable que si la
carte d’enregistrement dûment remplie a été
retournée à HK AUDIO
®
dans les 30 jours suivant la
date d’achat ou si l’enregistrement a été effectué
dans les délais sur Internet. Ainsi, nous avons la
possibilité de savoir où et par qui nos appareils sont
utilisés. Ces informations nous permettent également d’améliorer la conception de nos produits.
Bien entendu, vos données sont soumises à la
réglementation sur la protection des données.
Merci !
HK AUDIO
®
Technical Service
Postfach 1509
66959 St. Wendel
Allemagne
Sommaire
1Composants système ACTOR DX . . . . . . . . . . .26
2Transport . . . . . . . . . . . . . . . . . . . . . . . . . . . . . .26
3 Mise en place et câblage . . . . . . . . . . . . . . . . . .26
4Connexions et éléments de commande . . . . . . .28
5Trucs et astuces . . . . . . . . . . . . . . . . . . . . . . . . .30
6 Accessoires ACTOR DX . . . . . . . . . . . . . . . . . . .31
7 Dépistage des pannes . . . . . . . . . . . . . . . . . . . .31
8Caractéristiques techniques . . . . . . . . . . . . . . . .32
Page 25

25
Français
Des caractéristiques uniques en leur genre pour une performance nec plus ultra
Digital Amping
– davantage de performances et de dynamisme
D’une efficacité extrêmement élevée de plus de
90 %, les étages de puissance numériques Class D
sont nettement plus petits, plus légers et plus compacts que les étages de puissance traditionnels. La
sollicitation thermique plus faible des composants
accroît leur fiabilité. Le temps de montée (slew rate)
considérablement plus rapide et le facteur d'atténuation plus élevé sont audibles sous forme de réponse
nettement plus rapide et précise des systèmes.
La technologie DDO™ Controller
Le contrôleur DDO™ compense les différences de
dynamique des composants en polyamide (caissons
de basses, haut-parleurs médiums et aigus, étages
de puissance, diviseurs de fréquence, etc.) et rend
ainsi homogène la dynamique générale du système.
DuoTilt™
– meilleure utilisation de l'énergie acoustique
L’embase pour pied d’enceinte DuoTilt™ nouvellement conçue assure une exploitation plus efficace de
l'énergie acoustique. Grâce à ses deux angles
d’orientation différents (7,5°, 15°), les satellites peuvent être orientés de manière optimale vers le public.
Les réflexions perturbatrices au plafond sont évitées,
le son est plus puissant et d’une plus grande clarté.
Easy Setup and Handling
– moins de stress avant l'entrée en scène
Comme tous les systèmes actifs HK AUDIO,
l’ACTOR DX a été conçu sous forme d’un système
dont les composants sont en parfaite harmonie
conceptuelle. Lors de sa conception, tout a été mis
en œuvre pour que l’ACTOR DX soit facile à transporter et rapide à monter. Résultat : son utilisation
est simple et les réglages difficiles sont éliminés.
Page 26

ACTOR DX Manual 1.0
1 Composants système
ACTOR DX
Satellite ADX 112 A (médiums/aigus)
Dotés d'un haut-parleur HK AUDIO Custom Speaker
12" et d'un moteur de compression de 1,4" à pavillon
CD 60°x 40°. L'étage de puissance class D délivre
une puissance de 600 W RMS et est logé avec le
contrôleur DDO™ dans sa propre chambre.
Subwoofer ADX 115 Sub A
La caisse de l’ACTOR DX Sub A est divisé en deux
chambres. La partie avant constitue le logement du
haut-parleur 15" à radiation directe. Celui-ci se
caractérise par une puissance de 500 W RMS et offre
une impédance nominale de 8 Ohms. Derrière ce
premier logement se trouve le logement de l'étage
de puissance.
Subwoofer ADX 115 Sub B
La caisse et les composants de l’enceinte ADX 115
Sub B sont identiques à ceux du Sub A. Le Sub B
constitue la variante passive du Sub A.
2 Transport
Pour pouvoir transporter le système, posez les
caissons de basses sur les roulettes puis les
satellites de médiums/aigus sur les caissons de
basses avec la grille en mousse. Utilisez les housses
HK AUDIO ACTOR DX d'origine pour transporter
votre système lors de vos déplacements. Bien
matelassé et protégé contre l'humidité, votre
système ACTOR DX vous procurera longtemps
entière satisfaction.
3 Mise en place et câblage
3.1 Système ACTOR DX standard
Le système standard est composé de
2 ACTOR ADX 112 A, 2 ADX 1145 Sub A
et 2 ADX 115 Sub B.
L’ ACTOR DX doit toujours être câblé du haut vers le
bas (cf. le schéma ou le diagramme au dos des
composants de l’ACTOR DX ) ! Il se peut que, dans
un premier temps, ceci vous paraisse inhabituel. En
effet, généralement, le câblage des systèmes actifs
peut être effectué dans n’importe quel ordre car les
signaux sont transmis via les prises Through.
Par contre, l’ACTOR DX possède un contrôleur
système DDO™ logé dans le satellite ADX 112 A.
Il permet de procéder directement sur le satellite aux
réglages de base tels que la configuration du
système, le réglage du niveau du satellite et le niveau
du subwoofer. Les étages de signaux du subwoofer
DDO™ sont ensuite transférés du satellite vers le
subwoofer Sub A.
Nota : il est absolument indispensable de respecter
l’ordre du câblage. Ne raccordez jamais le signal
venant de la table de mixage directement au subwoofer Sub A pour ne pas contourner le contrôleur
système DDO™ ! Raccordez toujours les émetteurs
de signaux à l'entrée système du satellite
ACTOR DX !
3.2 ACTOR DX Fullrange Setup
Le Fullrange Setup est composé de
2 satellites ACTOR ADX 112 A.
Pour pouvoir l’utiliser correctement, sélectionnez
la configuration système correspondante sur le
panneau de commandes du contrôleur système de
l’ACTOR DX. La sortie de caisson de basses (DDO™
controlled) est alors désactivée afin d'éviter des
erreurs de commande.
3.3 ACTOR DX Club Set
Le Club Set est composé de
2 ACTOR ADX 112 A et de 2 ADX 115 Sub A.
ADX 112 A
ADX 115 Sub A
ADX 115 Sub B
schéma de raccordement du système standard
schéma de raccordement du Fullrange Setup
Page 27

27
Français
3.4 Système ACTOR DX double
Le système double est composé de
4 ACTOR ADX 112 A, 4 ADX 115 Sub A et de
4 ADX 115 Sub B.
Le câblage doit être effectué comme décrit ci-dessus,
du « haut vers le bas » ! Pour transférer le signal de
la table de mixage vers le deuxième stack de
l’ACTOR DX, utilisez la prise Through du premier
satellite. Utilisez à cet effet un câble pour micro.
Les broches de la prise XLR doivent être affectées
comme suit : 1= Ground, 2= +, 3= -
3.5 Accroche du satellite ACTOR ADX 112 A
Pour accrocher le satellite, utilisez le cadre
HK AUDIO spécialement conçu pour le satellite
ACTOR DX. Pour le monter, desserrez les vis à six
pans creux M10 noyées latéralement. Vissez
fermement les brides du cadre sur la caisse. Il est
également possible de modifier l’angle d'inclinaison
du satellite. Pour cela, desserrez les vis à boutons
latérales puis serrez-les fermement à la main. Les
ronLEDles en plastique dentées empêchent que le
satellite tourne accidentellement.
Nota : utilisez exclusivement des dispositifs
d'accrochage homologués (p. ex. raccords mâle/
femelle, tourillons TV, colliers, etc.) de sorte que la
sécurité soit garantie !
Les points d'accrochage ou les pieds utilisés doivent
pouvoir supporter la charge déterminée (poids de
l’ACTOR ADX 112 A = 30 kg).
3.6 Utilisation de l’ACTOR DX Tilt Unit
Le montage de l'élément d'inclinaison disponible en
option est d'une grande simplicité :
Posez l’ACTOR DX Tilt Unit et la plaque de sol sur le
caisson de basses supérieur puis posez le satellite
ACTOR et les logements pour bride (7,5° ou 15°) sur
la bride comme si vous vouliez poser l’enceinte sur
un trépied.
Question
Est-il possible de raccorder un satellite ACTOR DX à
d'autres composants que le caisson de basses
ACTOR DX Sub A ou Sub B ?
Réponse
Les composants système sont en parfaite harmonie
acoustique et peuvent exclusivement être exploités
dans la configuration stipulée. En cas d'utilisation
d'autres caissons de basses, la qualité du son risque
d'être influencée négativement ou l'étage de
puissance (p. ex. Sub A) risque d'être endommagé.
La sortie haut-parleur du Sub A est dimensionnée
pour une impédance nominale (totale) de 4 Ohms.
Celle-ci ne doit en aucun cas être inférieure.
Ne raccordez qu'un seul Sub B à la sortie hautparleur du Sub A.
schéma de raccordement du Club Set
schéma de raccordement du système double
ACTOR ADX 112 A avec cadre d'accroche
utilisation de l’ACTOR DX Tilt Unit
Page 28

ACTOR DX Manual 1.0
4 Connexions et éléments de
commande
4.1 ACTOR ADX 112 A
1 Interrupteur principal Power
Commandes : L'interrupteur principal Marche/Arrêt
du système actif. Lorsque l’ACTOR ADX est en
marche, l’écran du contrôleur système est orange.
Le système actif ACTOR DX doit toujours être mis en
marche le dernier, c'est-à-dire après tous les autres
composants. De même, il doit être éteint en premier,
c'est-à-dire avant tous les autres appareils raccordés.
2 Mains Input
Connexion : Reliez à la fiche secteur ce connecteur
femelle à l’aide du cordon d’alimentation secteur
Powercon fourni. Attention ! Veillez aux tensions
admissibles. Le raccordement à une tension secteur
non correcte est susceptible de détruire
l'électronique du système ACTOR DX.
3 Mains Link
Connexion : Le connecteur femelle Powercon®Link
doit être relié parallèlement au connecteur Mains
Input. A l’aide d'un câble de raccordement
approprié, raccordez à cette prise d'autres enceintes
actives (p. ex. un autre satellite ACTOR DX
Mid/High ou un ACTOR DX Sub A).
Important : Sur le connecteur femelle Powercon
®
Link, seul un courant maximal de 11,6 A ou une
puissance de 2780 W (pour 230 Volts) peut être
prélevé(e). C'est-à-dire que vous pouvez y brancher
au maximum deux autres composants ACTOR DX.
Nota : Afin de maintenir le courant de démarrage à
un niveau minimum, allumez toujours les
composants ACTOR DX les uns après les autres.
Dans le cas contraire, vous risqueriez de faire
« sauter » le disjoncteur en raison du courant de
démarrage trop élevé.
4 Ground
Commutateur Ground-Lift pour la séparation de la
masse du signal et de la caisse en cas de ronflement.
En cas d'apparition de ronflements à basses fréquences, actionnez l'interrupteur Ground Lift. Une fois
enfoncé, la masse est coupée. Si cette opération a
échoué, vérifiez l'état des câbles qui mènent à
l’ACTOR DX et de tous les signaux qui arrivent à la
table de mixage (cf. également « Trucs et astuces »).
5 Input Sensitivity
Ce commutateur permet d’adapter la sensibilité de
l’étage d’entrée au niveau du signal de sortie de la
table de mixage.
Pour cela, choisissez à l’aide de ce commutateur la
sensibilité d’entrée entre –10 dB (par ex. jack non
symétrique, Consumer-Level) et +0 dB (par ex. XLR
symétrique, tables de mixage professionnelles).
Recommandation : En cas d’utilisation d’une table
de mixage professionnelle équipées de sorties
symétriques, l’adaptation doit être de +0 dB. Les
circuits du fader de la table de mixage sont ainsi
utilisés de manière optimale et les saturations sont
évitées. Si vous utilisez une table de mixage
possédant un plus faible niveau de sortie (sortie jack
asymétrique), choisissez – 10 dB.
6 Input Overload
Cette LED s’allume lorsque le niveau d’entrée est
trop élevé et par conséquent lorsque le système
entier (étage d’entrée et contrôleur) est saturé.
Les saturations se traduisent par des distorsions
désagréables à l’oreille et peuvent également
endommager les composants du système.
Lorsque la LED rouge s’allume, réduisez le niveau
(volume) sur la table de mixage !
7 Line In
Connexion : Raccordez les câbles de signaux (Master
left/right, Line out ou semblable) de votre table de
mixage aux prises symétrisées Input à l’aide d’un
câble pour micro XLR.
Les broches de la prise XLR doivent être affectées
comme suit : 1= Ground, 2= +, 3= -
8 Through
Connexion : Sortie parallèle pour le transfert du
signal d'entrée Line (par exemple vers d'autres
satellites ACTOR DX à l’aide d’un câble XLR).
9 LED du limiteur
Le « compte-tours » du système actif. Indications
sur l'état de fonctionnement.ACTOR ADX 112 A
1
4
6
7
8
10
9
9
5
11
12
13
14
2
3
Page 29

29
Français
10 Subwoofer Output
Connexion : Sortie du signal du caisson de basses du
contrôleur DDO™ à l’ACTOR ADX 115 Sub A à l’aide
du câble XLR. Les broches de la prise XLR doivent
être affectées comme suit : 1= Ground, 2= +, 3= -.
11 Display
Affichage : L’écran numérique indique la
configuration système sélectionnée.
0 Mute Désactivé
1Top only 1x satellite mode Fullrange
2 Half Stack DJ 1x satellite, 1x Sub A
3 Half Stack Band 1x satellite, 1x Sub A
4Full Stack DJ 1x satellite, 1x Sub A+ Sub B
5Full Stack Band 1x satellite, 1x Sub A+ Sub B
6 2x Stack DJ 2x satellite, 2x Sub A+ Sub B
7 2x Stack Band 2x satellite, 2x Sub A+ Sub B
L Locked Verrouillage des touches activé
U Unlocked Verrouillage des touches
désactivé
12 Touches Up Down
Touches permettant de changer de configuration
système
Commandes : pour déverrouiller les touches,
appuyez simultanément sur les touches « Up » et
« Down » pendant env. 1 à 2 secondes. La lettre U
(Unlock) s’affiche brièvement à l’écran. Vous pouvez
maintenant sélectionner la configuration souhaitée
(voir tableau) à l’aide des touches « Up » ou « Down
». Quelques instants plus tard, les touches sont à
nouveau verrouillées. Le symbole L (Lock) s’affiche
brièvement à l’écran.
13. Top Level
Commandes : Ce potentiomètre permet de régler le
volume du satellite. Le potentiomètre « Level » est
par défaut en position médiane, sur 0dB. C’est-à-dire
que le niveau n’est ni augmenté ni réduit.
14. Subwoofer Level
Commandes : En position médiane, le volume du
caisson de basses est adapté au satellite et procure
une impression d’homogénéité sonore grâce à
l’équilibre basses/médiums-aigus. En tournant le
potentiomètre Subwoofer Level vers la gauche ou
vers la droite, vous pouvez réduire ou augmenter
(jusqu'à +6 dB) le volume du caisson de basses.
Astuce : utilisez le potentiomètre de niveau du
caisson de basses « Subwoofer Level » avant d’élever ou d’abaisser les fréquences basses (< 100 Hz),
par ex. dans un Master EQ du Mixersetup.
15. Points d'accroche
Pour fixer par ex. à une poutre le cadre ACTOR DX
permettant d’accrocher le satellite.
éléments de commande ACTOR ADX 112 A
éléments de commande du contrôleur système
ACTOR DX
1
2
3
4
6
7
8
10
5
9
9
11
11
12
9
9
12
13
14
13
14
Informations relatives aux LED du limiteur
Le statut du limiteur de l'étage des signaux
médiums/aigus ainsi que de ceux du subwoofer est
signalé par une LED.
Comment faut-il interpréter l’affichage ?
La LED verte indique qu'un signal est appliqué à
l'entrée respective. Tant que la LED est verte, le
système fonctionne à bas ou à moyen régime et le
« headroom » (réserve de puissance) est encore
suffisant pour les étages de puissance. Une lumière
jaune indique que le système fonctionne à haut
régime. La LED jaune peut clignoter régulièrement
mais ne doit jamais être allumée en permanence.
Dans pareil cas, réduisez le volume sonore sur la
table de mixage.
Si la LED est rouge en permanence, l'étage de puissance présente un défaut et le système s'inactive.
Dans pareil cas, faites vérifier l'appareil par un
technicien qualifié.
Page 30

ACTOR DX Manual 1.0
4.2 ACTOR ADX 115 Sub A
1. Interrupteur principal Power
Commandes : L'interrupteur principal Marche/Arrêt
du système actif. Positionné sur marche, la LED
rouge de l’interrupteur principal Power est allumée.
Le système actif ACTOR DX doit toujours être mis en
marche le dernier, c'est-à-dire après tous les autres
composants. De même, il doit être éteint en premier,
c'est-à-dire avant tous les autres appareils raccordés.
2. Mains Input
Connexion : Reliez à la fiche secteur ce connecteur
femelle à l’aide du cordon d’alimentation secteur
Powercon fourni. Attention ! Veillez aux tensions
admissibles. Le raccordement à une tension secteur
non correcte est susceptible de détruire
l'électronique du système ACTOR DX.
3. LED Power On
Cette LED est allumée lorsque l'interrupteur
principal Power est positionné sur On et que le
système est sous tension.
4. Subwoofer Input
Connexion : Raccordez l'étage des signaux venant du
contrôleur DDO™ ACTOR DX ( = Subwoofer Output
du satellite) au connecteur femelle Subwoofer Input
à l’aide d’un câble XLR pour micro. Les broches de la
prise XLR doivent être affectées comme suit :
1= Ground, 2= +, 3= -
Important : ne raccordez jamais les étages des
signaux Line ou Master de la table de mixage
directement à la prise Subwoofer Input du Sub A car.
Dans pareil cas, il y aurait - sans le contrôleur, c'està-dire sans le diviseur de fréquence - formation de
distorsions et la protection du système serait mise à
l’épreuve, ce qui pourrait donner lieu à de graves
détériorations. Pour plus d’informations, reportezvous au chapitre 3 « Mise en place et câblage ».
5. To Sub B Speaker Output
Connexion : Sortie Speakon
®
parallèle pour le
raccordement de l’ACTOR DX Sub B passif
Nota : les connecteurs Speakon®doivent
s'enclencher lors de leur rotation dans le sens des
aiguilles d’une montre ! Avant de les retirer,
déverrouiller le système de protection.
Pour ce faire, tirez le dispositif de fermeture à baïonnette, ou le verrou, dans le sens du câble.
Le brochage est le suivant : broche 1+ = +, broche 1= -. Bien entendu, vous pouvez également utiliser un
câble quadripolaire. Toutefois, les broches 2+ et 2ne sont pas assignées.
4.3 ACTOR ADX 115 Sub B
6 Sub B In
Connexion : Raccordez le connecteur femelle
d'entrée Speakon“ à la sortie Speaker Output de
l’ACTOR ADX 115 Sub A en utilisant un câble pour
haut-parleurs approprié.
5 Trucs et astuces
Protégez les circuits électroniques contre l’humidité!
En cas d'utilisation extérieure, veillez à ce que votre
système soit convenablement protégé contre les intempéries. Ne jamais renverser de sodas, de bière,
de vin ou d'autres liquides sur les circuits électroniques, au risque de provoquer des courts-circuits.
Veillez à ce que les grilles d'aération situées au dos
des appareils soient toujours propres et à ce que la
circulation de l'air soit toujours assurée. Dans le cas
contraire, l’électronique peut subir une surchauffe et
des détériorations.
L’ ACTOR DX garantit un son optimal - à vous de
veiller à ce que le signal d'entrée soit lui aussi le
meilleur ! Un ronflement est dans la plupart des cas
le résultat de câbles défectueux, de câbles non
appropriés ou de signaux d'entrée asymétriques sur
la table de mixage. Vérifiez tous les câbles de
signaux et cordons secteur.
Evitez les distorsions ! En effet, les distorsions ne
sont pas seulement désagréables à l'oreille des
auditeurs mais sont également dangereuses pour
votre installation. Veillez à ce que tous les composants raccordés directement et indirectement au
système ACTOR DX disposent d'une puissance
suffisante et à ce qu'ils ne produisent jamais de
distorsions car exploités à leur limite maximum.
Veillez à ce que le signal soit de bonne qualité. Celuici ne doit pas être modifié par l’utilisation du
potentiomètre Gain.
éléments de commande de l’ACTOR ADX 115 Sub A
éléments de commande de l’ACTOR ADX 115 Sub B
1
2
3
4
5
6
Page 31

31
Français
Evitez les boucles de masse ! Si, par exemple, la
table de mixage est mise à la terre par le cordon
d'alimentation secteur et qu’elle n'est pas alimentée
sur le même circuit électrique que le système ACTOR
DX, une « boucle de masse » est susceptible
d'apparaître. Raccordez par conséquent le système
ACTOR DX et la table de mixage au même circuit
(même phase !). Toutefois, si l’installation produit
malgré tout des ronflements, l'interrupteur Ground
Lift peut s'avérer très utile.
ATTENTION : ne supprimez jamais la terre de la
fiche secteur - Danger de mort !
6 Accessoires ACTOR DX
HK AUDIO ACTOR DX Tilt-Unit
Elément d'inclinaison pour le satellite ACTOR DX
Mid/High. L’élément est posé sur le caisson de
basses, les angles possibles sont 7,5 et 15° et sont
conditionnés par le DuoTilt™.
Housses de protection HK AUDIO pour ACTOR DX
Composé de housses pour subwoofer et satellite.
Très résistantes aux déchirures, hydrofuges et
matelassées pour une protection durable du système
ACTOR DX lors de son transport.
Cadre d’accroche HK AUDIO ACTOR DX
Etrier en U facile à monter pour la fixation de
raccords mâle-femelle, de tourillons TV ou de pinces.
Pour de plus amples informations sur les accessoires
HK AUDIO d’origine, adressez-vous à votre
revendeur HK AUDIO ou visitez le site Internet
www.hkaudio.com
7 Dépistage des pannes
La LED Power On ou l’écran ne sont pas allumés
lorsque le système est en marche.
1 Vérifiez si le cordon d'alimentation secteur est
raccordé à la prise Mains Input.
2 Assurez-vous que la prise secteur est sous tension.
3 Vérifiez que le disjoncteur n’a pas « sauté ».
La LED Power On rouge est allumée mais les
enceintes restent silencieuses.
1 Vérifiez les câbles de raccordement aux
connecteurs Input.
2 Vérifiez si les sorties des signaux (table de mixage,
keyboard, lecteur CD, etc.) sont activées.
3 Les potentiomètres GAIN sont-ils correctement
tournés ?
4 Vérifiez si les câbles pour haut-parleur ne sont pas
endommagés.
5 Assurez-vous que les connecteurs mâles Speakon
®
se sont bien enclenchés dans les connecteurs
femelles (rotation vers la droite). Si ce n’est pas le
cas, il n’y a pas de contact électrique.
Peu de basses sortent du subwoofer.
1 Vérifiez le réglage du potentiomètre Subwoofer
Level. Réglez le volume du caisson de basses Sub A
à l’aide du potentiomètre Subwoofer Level.
2 Vérifiez que la configuration système « Top Only »
n’est pas sélectionnée sur le contrôleur système.
Si c’est le cas, cette configuration désactive les
caissons de basses.
La restitution musicale semble être saturée.
1 Vérifiez les LED de contrôle de votre table de
mixage. Elles ne doivent pas être en permanence
dans la zone rouge. Si nécessaire, réduisez le
volume sur la table de mixage.
2 Si les LED de contrôle de votre table de mixage
sont dans la zone verte, réduisez le niveau à l’aide
des potentiomètres Level de l’ACTOR ADX 112 A.
3 Observez la LED Input Overload et les LED du
limiteur situées sur le panneau de commandes de
l’ACTOR DX Mid/High. Celles-ci ne doivent s'allumer que brièvement en jaune. Elles ne doivent en
aucun cas s’allumer en permanence de couleur
jaune. Si c’est le cas, réduisez le niveau à l’aide des
potentiomètres Level. Vérifiez également le réglage
du commutateur Input Sensitivity. En cas de
distorsion, positionnez le commutateur sur +0 dB.
Bruits de ronflement gênants
1 Vérifiez les câbles avec lesquels les sorties des
signaux sont reliées à l’ACTOR DX. Remplacez les
câbles endommagés.
1 Si vous ne parvenez pas à localiser l'origine du
ronflement, appuyez sur l'interrupteur Ground Lift.
Dans la plupart des cas, cette fonction peut
s’avérer très utile.
Page 32

ACTOR DX Manual 1.0
8 Caractéristiques techniques
ACTOR ADX 112 A
Connexions : 1x XLR Line In
1x XLR Line Through
1x XLR Subwoofer Output
Line In : connecteur femelle XLR (broche 1= Ground; 2= +, 3= -)
Type d’entrée : symétrisée électroniquement & flottante
Impédance d’entrée : 20 k Ohms
Sensibilité : commutable entre –10 dB et 0 dB (= +4 dBu)
Niveau d’entrée maxi. : +22 dBu
Réponse en fréquence +/- 3dB:1) 80 Hz- 19 kHz mode Fullrange
130 Hz-19 kHz mode Satellite
Sensibilité 1W@1m : 2) 106 dB
Pression acoustique maximale @1m : 2) 129 dB @ 10% THD
Amplificateur médiums / aigus : 1x 600 W RMS/ classe D
Circuits de protection actifs : DDO™ Controller, Multiband Limiter, Subsonic Filter
Haut-parleur médiums : 12"
Aigus/ driver : 1,4"
Directivité : pavillon CD 60°x 40°
Fréquence de coupure : 950 Hz, 12 dB/ octave
Embase pour pied : HK AUDIO DuoTilt™, 36 mm, 7.5°, 15°
Points d'accroche : 4x filetage M10 pour étriers d’accrochage optionnels
Accessoires : ACTOR DX Tilt-Unit, 7.5°, 15°
Dimensions (l x h x p) : 39 cm x 65 cm x 42 cm
15-1/4" x 25-5/8" x 161/2"
Poids : 30 kg/ 66 lbs.
Données électriques générales :
Classe de protection 1 / protection class 1 (protectively earthed)
Consommation de courant maxi. : 4,4 A (230 V)
8 A (117 V)
8 A (100 V)
Puissance absorbée maxi. : 1000 VA
Plage de tension secteur : +/- 10%
Plage de température ambiante : -10° C à +35° C
Fusibles internes : T8A
1) via filtre système actif
2) Toutes les dimensions en half-space
Page 33

33
Français
ACTOR ADX 115 Sub A
Connexions : 1x XLR Subwoofer Input
1x XLR Subwoofer Through
1x Speakon®Parallel Out
Subwoofer Input : connecteur femelle XLR (broche 1= Ground; 2= +, 3= -)
Type d’entrée : symétrisée électroniquement & flottante
Impédance d’entrée : 20 k Ohms
Sensibilité : +10 dBu (maximum)
Niveau d’entrée maxi. : +22 dBu
Réponse en fréquence +/- 3dB : 1) 48 Hz -130 Hz
Sensibilité 1W@1m : 2) 104 dB
Pression acoustique maximale @1m : 2) 126 dB @ 10% THD
Amplificateur subwoofer : 1x 1000 W RMS/ classe D
Circuits de protection actifs : DDO™ Controller, Multiband Limiter, Subsonic Filter
Haut-parleurs de basses : 15"
Embase pour pied : plaque taraudée M20
Roulettes : 4x roulettes de 100 mm au dos
Dimensions (l x h x p) : 48 cm x 65 cm x 66 cm roulettes incluses
18-7/8" x 25-5/8" x 26"
Poids : 35 kg/ 77 lbs.
Données électriques générales :
Classe de protection 1 / protection class 1 (protectively earthed)
Consommation de courant maxi. : 4,4 A (230 V)
8 A (117 V)
8 A (100 V)
Puissance absorbée maxi. : 1000 VA
Plage de tension secteur : +/- 10%
Plage de température ambiante : -10° C à +35° C
Fusibles internes : T8A
ACTOR ADX 115 Sub B
Connexions : 1x Speakon®Input
Puissance nominale : 500 W RMS/ 8 Ohms
Réponse en fréquence +/- 3dB : 1) 48 Hz -130 Hz
Sensibilité 1W@1m : *) 104 dB
Pression acoustique maximale @1m : *) 126 dB @ 10% THD
Haut-parleurs de basses : 15"
Bride pour pied : Roulettes : 4x roulettes de 100 mm au dos
Dimensions (l x h x p) : 48 cm x 65 cm x 66 cm roulettes incluses
18-7/8" x 25-5/8" x 26"
Poids : 32 kg/ 70,4 lbs.
This is to certify that
HK AUDIO®ACTOR DX
complies with the provisions of the Directive of
the Council of the European Communities on the
approximation of the laws of the Member States
relating to electromagnetic compatibility
(EMC Directive 89/336/EEC) and the low voltage
Directive (73/23/EEC).
This declaration of conformity of the European
Communities is the result of an examination carried
out by the Quality Assurance Department of
STAMER GmbH in accordance with European
Standards EN 50081-1, EN 50082-1and EN 60065
for low voltage, as laid down in Article 10 of the
EMC Directive.
Stamer Musikanlagen
GmbH*
Magdeburger Str. 8
66606 St.Wendel
Lothar Stamer Dipl.Ing.
Managing Director
St.Wendel, 04/15/05
* Stamer Musikanlagen manufactures exclusively
for HK AUDIO®.
Page 34

ACTOR DX Manual 1.0
Bienvenido a la familia HK Audio
Muchas gracias por haber adquirido un producto
HK AUDIO.
ACTOR DX consta de una unidad de medios/agudos
de 12"/1,4" ADX 112 A con controlador de sistema
DDO™ integrado, subwoofer ADX 115 Sub A con
etapa de potencia 1000 W RMS Clase D integrada y
el subwoofer ADX 115 Sub B, el complemento pasivo
para Sub A.
Ya no tendrá que volver a preocuparse de ningún
tipo de trabajos de ajuste y regulación del nivel,
solamente necesitará instalar los componentes del
sistema, conectar la alimentación eléctrica y el cable
de señal y ya puede empezar.
Un sistema activo HK AUDIO no consta simplemente de dos cajas activas, sino que es una solución
de sonorización completa, compuesta por subwoofer, parte superior y una electrónica adaptada
con gran precisión.
Para poder hacer realidad estas premisas, nuestros
ingenieros han desarrollado nuevas tecnologías
especialmente para estos sistemas.
Sus características exclusivas destacan un sistema
de sonorización HK AUDIO activo de la masa de
cajas activas simples.
¡El equipo de HK AUDIO le desea que disfrute de su
ACTOR DX!
GARANTÍA
¡Registre su ACTOR DX con la tarjeta de registro
adjunta y recibirá una prolongación gratuita de la
garantía hasta 5 años!
Utilice el cómodo registro online a través de
www.hkaudio.com
.
Si no puede registrarse online, cumplimente
íntegramente la tarjeta de garantía adjunta y envíela
por correo o fax. El registro sólo será válido si la
tarjeta de registro totalmente cumplimentada se
envía dentro de un plazo de 30 días desde la fecha
de compra a HK AUDIO®o si el registro se ha
realizado dentro del plazo a través de Internet.
Además, queremos saber quién
usa nuestros equipos y dónde. Estas informaciones
son útiles para el desarrollo de nuestros productos
futuros. Por supuesto, sus datos están
Protegidos.
¡Muchas gracias!
HK AUDIO
®
Technical Service
Postfach 1509 (Apdo de correos )
66959 St. Wendel
Germany
Contenido
1 ACTOR DX Sistema de componentes . . . . . . . .36
2Transporte . . . . . . . . . . . . . . . . . . . . . . . . . . . . .36
3 Instalación y cableado . . . . . . . . . . . . . . . . . . . .36
4Conexiones y elementos de mando . . . . . . . . . .38
5Consejos y trucos . . . . . . . . . . . . . . . . . . . . . . .40
6Accesorios para ACTOR DX . . . . . . . . . . . . . . . .41
7 Solución de problemas . . . . . . . . . . . . . . . . . . .41
8 Datos técnicos . . . . . . . . . . . . . . . . . . . . . . . . .42
Page 35

35
Español
Características exclusivas para lograr el mejor rendimiento
Digital Amping
– más eficiencia y dinámica
Con una eficiencia extremadamente alta, superior al
90 %, las etapas de potencia digitales de Clase D
son considerablemente más pequeñas, más ligeras y
compactas que las normales. La carga térmica inferior de las piezas aumenta la fiabilidad. El tiempo
de subida considerablemente rápido (slew-rate) y el
factor de atenuación considerablemente superior
pueden apreciarse acústicamente por una respuesta
mucho más rápida y precisa de los sistemas.
Tecnología de controlador DDO™
El controlador DDO™ compensa las diferencias
dinámicas independientes de los altavoces de los
componentes PA (altavoces de graves, medios y
agudos, etapas de potencia, filtros, etc.) y
proporcionan de este modo un sistema homogéneo
dinámico de una pieza.
DuoTilt™
– mejor aprovechamiento de la energía acústica
El nuevo vaso de soporte DuoTilt™ permite un
aprovechamiento más eficiente de la energía acústica. Con dos ángulos de instalación diferentes (7,5°,
15°), los Satellites pueden orientarse óptimamente
hacia el público. Se evitan las reflexiones perturbadoras en el techo, el sonido es más potente y claro.
Easy Setup and Handling
– menos stress antes de la actuación
Como todos los sistemas activos de HK AUDIO, el
ACTOR DX ha sido concebido como un sistema y
está formado por componentes perfectamente
combinados entre sí. Durante el desarrollo se tuvo
en cuenta que ACTOR DX fuese fácil de transportar y
de montaje rápido. El manejo es muy simple y no
son necesarios trabajos de ajuste difíciles.
Page 36

ACTOR DX Manual 1.0
1 ACTOR DX Sistema de
componentes
Unidad de medios/agudos ADX 112 A
(Mid/High)
Estos van equipados con un 12" HK AUDIO Custom
Speaker y un motor de compresión 1.4" con difusor
CD de 60°x 40°. La etapa Clase D proporciona una
potencia de 600 W RMS y está alojada en una
cámara propia con el controlador DDO™.
Subwoofer ADX 115 Sub A
La carcasa del ACTOR DX Sub A está dividida en
dos cámaras. La caja delantera sirve como caja de
altavoz propiamente dicha para el altavoz de 15” de
radiación directa. Tiene una capacidad de carga de
500 W RMS y una impedancia nominal de 8 ohmios.
Detrás se encuentra separada la caja para la etapa
de potencia.
Subwoofer ADX 115 Sub B
La carcasa y también los altavoces del ADX 115 Sub B
corresponden a Sub A. Es la variante pasiva del
Sub A.
2 Transporte
Para transportar el sistema, coloque los subwoofer
sobre las ruedas y coloque las unidades de medios/
agudos con la rejilla de espuma sobre los subwoofer.
Utilice las fundas protectoras originales HK AUDIO
ACTOR DX para proteger su sistema personal
durante el uso intenso en la carretera. Bien acolchado y protegido de la humedad, podrá disfruitar
de su sistema ACTOR DX durante mucho tiempo.
3 Instalación y cableado
3.1 Sistema ACTOR DX estándar
El sistema estándar consta de 2x ACTOR ADX
112 A, 2x ADX 1145 Sub A, 2x ADX 115 Sub B.
ACTOR DX se cablea siempre de arriba a abajo
(véase el esquema o el diagrama de la parte trasera
de los componentes ACTOR DX). Esto puede ser
algo confuso, ya que en los sistemas activos el orden
de los pasos de cableado con frecuencia puede
seleccionarse libremente, ya que la transmisión de
las señales se realizapor medio de conectores
hembra Through.
Por el contrario, ACTOR DX posee un sistema de
controlador DDO™ en la parte superior ADX 112 A.
Con él pueden realizarse en la parte superior los
sjustes básicos como la configuración del sistema, el
Top Level y el Subwoofer Level. Las rutas de señal
DDO™ Subwoofer se transmiten desde la parte
superior a los subwoofer Sub A.
Nota: Compruebe el orden correcto del cableado.
¡No conecte nunca la señal procedente de la mesa
de mezclas directamente al subwoofer Sub A, se
desviarán entonces al controlador del sistema!
¡Conecte siempre las fuentes de señal a la entrada
del sistema de la parte superior ACTOR DX!
3.2 ACTOR DX Fullrange Setup
Fullrange Setup consta de 2 unidades de
medios / agudos ACTOR ADX 112 A.
Seleccione para ello la configuración del sistema
correspondiente en el campo de mando del controlador del sistema ACTOR DX. La salida de subwoofer
(controlada por DDO TM) se silencia en este caso
para evitar manejos incorrectos.
3.3 ACTOR DX Club Set
El Club Set consta de 2 ACTOR ADX 112 A,
2x ADX 115 Sub A.
ADX 112 A
ADX 115 Sub A
ADX 115 Sub B
Esquema de conexión del sistema estándar
Esquema de conexión de Fullrange Setup
Page 37

37
Español
3.4 Sistema ACTOR DX doble
El sistema doble consta de 4x ACTOR ADX
112 A, 4x ADX 115 Sub A, 4x ADX 115 Sub B.
El cableado se lleva a cabo aquí también como se ha
descrito anteriormente de "arriba a abajo“. Para
dirigir la señal de la mesa de mezcla en la segunda
pila ACTOR DX, utilice el conector hembra Through
de la primera parte superior. Para ello, utilice un
cable microfónico. El pinaje de los conectores XLR
debe ser la siguiente: 1= Ground, 2= +, 3= -
3.5 ACTOR ADX 112 A en funcionamiento volado
Para suspender la parte superior ACTOR DX utilice
el bastidor de rigging HK AUDIO especial. Para el
montaje afloje los tornillos de cabeza Allen M10
embutidos lateralmente. Sujete el bastidor suspendido con sus bridas en la caja. La inclinación de la
parte superior puede regularse libremente. Para ello,
afloje los tornillos de mariposa laterales y apriételos
manualmente. Los discos de plástico dentados evitan que la parte superior gire de forma imprevista.
Nota: Utilice exclusivamente medios de sujeción
comprobados (p. ej. semiacoplador, pivote TV,
abrazaderas, etc.) para garantizar la seguridad.
Los puntos de suspensión utilizados o pies deben
estar diseñados para la carga correspondiente (peso
ACTOR ADX 112 A = 30 kg).
3.6 Empleo de la Tilt-Unit ACTOR DX
El montaje del posicionador inclinado que puede
obtenerse opcionalmente es muy fácil:
Instale la Tilt-Unit ACTOR DX con la placa base
sobre el subwoofer superior e instale a continuación
la unidad de medios / agudos con los soportes
embridados (7,5° o 15°) sobre la brida, como lo haría
con la caja de altavoz sobre un pie.
Pregunta
¿Puedo conectar a una parte superior ACTOR DX
otros subwoofers Sub A o Sub B que no sean
ACTOR DX?
Respuesta
Los componentes del sistema están acústicamente
adaptados entre sí de forma óptima y sólo deben
utilizarse en la configuración indicada. Si se utiliza
otro subwoofer puede perjudicarse el sonido o
dañarse la etapa de potencia (por ejemplo, Sub A).
La salida de altavoz de Sub A está diseñada para
una impedancia nominal (total) de 4 ohmios, de la
que no debe bajarse en ningún caso. Conecte siempre sólo un Sub B a la salida de altavoz de Sub A.
Esquema de conexión de Club Set
Esquema de conexión del sistema doble
ACTOR ADX 112 A con arco de suspensión
Empleo de la ACTOR DX Tilt Unit
Page 38

ACTOR DX Manual 1.0
4 Conexiones y elementos de
mando
4.1 ACTOR ADX 112 A
1 Interruptor Power
Manejo: Es el interruptor de CON./DESC. para el
sistema activo. En estado activado, el display del
controlador del sistema se ilumina de color naranja.
El sistema activo ACTOR DX debe activarse siempre
el último, es decir, después de todos los demás
componentes y desactivarse el primero, es decir,
antes que todos los aparatos conectados.
2 Mains Input
Conexión: Una este conector hembra de conexión
por medio del cable de alimentación Powercon
®
suministrado con una caja tomacorriente.
¡ATENCIÓN! Preste atención a las tensiones
respectivas válidas. La conexión a una tensión de red
incorrecta puede destruir la electrónica del sistema
ACTOR DX.
3 Mains Link
Conexión: El conector hembra Powercon®Link debe
conectarse en paralelo con la entrada Mains Input.
Conecte por medio de un cable de conexión adecuado otros consumidores (por ejemplo, otra unidad
ACTOR DX Mid/High o un ACTOR DX Sub A).
Importante: En el conector hembra Powercon Link
debe extraerse, como máximo, una corriente de
11,6 A o una potencia de 2780 W (con 230 V).
Por lo tanto, como máximo puede utilizar otros dos
componentes ACTOR DX.
Nota: Active siempre los componentes ACTOR DX
sucesivamente, para mantener lo más bajas posibles
las corrientes de activación. De lo contrario, la
corriente de arranque total elevada puede disparar el
fusible principal.
4 Ground
Interruptor Ground-Lift para la separación de la
masa de señal y la de la carcasa si hay problemas de
zumbido. Al producirse zumbido de bajas frecuencias accione el interruptor Ground-Lift. Cuando está
presionado se separa la masa. Si esto no da
resultado, compruebe si hay deficiencias en los
cables que van al ACTOR DX y todas las señales que
entran en la mesa de mezclas (véase también
Consejos y trucos).
5. Sensibilidad de entrada
Con este interruptor puede adaptar la sensibilidad
de la etapa de entrada al nivel de la señal de salida
de la mesa de mezclas.
Seleccione con este interruptor la sensibilidad de
entrada entre –10 dBu (por ejemplo, jack asimétrico,
nivel de consumidor) o +0 dBu (por ejemplo, XLR
simétrico, mesas de mezcla profesionales).
Recomendación: Si se utiliza una mesa de mezclas
profesional con salidas simétricas, debe seleccionarse una adaptación de +0 dB. Por lo tanto, utilice
óptimamente las vías Fader de la mesa y evite las
sobremodulaciones. Si se utiliza una mesa con nivel
de salida bajo (salida de jack asimétrico), seleccione
el ajuste – 10 dB.
6 Sobrecarga de entrada
Este LED se ilumina cuando el nivel de entrada es
demasiado alto y con ello se sobremodula todo el
sistema (etapa de entrada y controlador). La sobremodulación se traduce en una distorsión desagradable y puede causar también daños en los componentes del sistema. ¡Cuando se ilumine el LED rojo
reduzca el nivel (volumen) en la mesa de mezclas!
7 Line In
Conexión: Conecte el cable de señal procedente de
su mesa de mezclas (Master left/ right, Line out u
otro) a los conectores hembra simétricos de entrada
con un cable microfónico XLR.
La ocupación de los conectores XLR debe ser la
siguiente: 1= Ground, 2= +, 3= -.
8 Through
Conexión: Salida paralela para la transmisión de la
señal de línea de entrada (por ejemplo, a otra parte
superior ACTOR DX por medio de cable XLR).
9 LEDs de limitador
El "cuentarrevoluciones“ del sistema activo.
Indicaciones sobre el estado de funcionamiento.
ACTOR ADX 112 A
1
4
6
7
8
10
9
9
5
11
12
13
14
2
3
Page 39

39
Español
10 Subwoofer Output
Conexión: Salida de la señal de subwoofer del
controlador DDO™ en el ACTOR ADX 115 Sub A por
medio del cable XLR.
La ocupación de los conectores XLR debe ser la
siguiente: 1= Ground, 2= +, 3= -.
11 Display
Indicación: El display numérico muestra la
configuración del sistema seleccionada actualmente.
0 Mute silencio
1Top only 1x unid. de medios/agudos modo Fullrange
2 Half Stack DJ 1x unid. de medios/agudos, 1x Sub A
3 Half Stack Band 1x unid. de medios/agudos, 1x Sub A
4Full Stack DJ 1x unid. de medios/agudos, 1x Sub A+ Sub B
5Full Stack Band 1x unid. de medios/agudos, 1x Sub A+ Sub B
6 2x Stack DJ 2x unid. de medios/agudos, 2x Sub A+ Sub B
7 2x Stack Band 2x unidades de medios/agudos, 2x Sub A+ Sub B
L Locked bloqueo de teclas activo
U Unlocked bloqueo de teclas liberado
12 Up Down-Tasten
Teclas para conmutar las configuraciones del sistema
Manejo: Para desbloquear las teclas pulse simultáneamente las teclas Up y Down durante 1-2 segundos.
En el display aparece brevemente la letra U (Unlock).
Después, con las teclas Up o Down puede
seleccionar el Setup deseado (véase la tabla).
Después de poco tiempo, las teclas se bloquean de
nuevo. El símbolo L (Lock) aparece brevemente en
el display.
13 Top Level
Manejo: Aquí puede ajustar el volumen de la unidad
de medios / agudos. De serie, el regulador Level se
encuentra en la posición central a 0 dB. Esto
significa que no se sube ni se baja adicionalmente
el nivel.
14 Subwoofer Level
Manejo: En la posición central, el volumen del
subwoofer se adapta a la parte superior, de forma
que existe una impresión acústica homogénea con
una parte de graves y agudos medios equilibrada.
Girando el regulador Subwoofer Level a la izquierda
o a la derecha puede subirse o bajarse el volumen
del subwoofer, si es necesario (hasta +6 dB).
Consejo: Utilice el regulador Subwoofer Level, por
ejemplo, antes de que quiera o deba subir o bajar las
frecuencias de graves (< 100 Hz) en un ecualizador
maestro de la configuración del mezclador.
15 Puntos de suspensión
Para fijar el bastidor de suspensión ACTOR DX para
suspender la unidad de medios / agudos en un
armazón o similar.
Elementos de mando de ACTOR ADX 112 A
Elementos de mando del controlador del sistema
ACTOR DX
1
2
3
4
6
7
8
10
5
9
9
11
11
12
9
9
12
13
14
13
14
Información sobre los LEDs de limitador
El estado de limitador de la vía de señal Mid/High,
así como del Subwoofer se indica del LED propio.
¿Cómo debe entenderse entonces la indicación?
El LED verde indica que una señal está aplicada en
la entrada correspondiente. Mientras está encendido
el LED verde, el sistema se encuentra en la zona de
trabajo inferior o media y existe todavía espacio libre
suficiente para las etapas de potencia. Amarillo
indica que el sistema se encuentra en la zona de
trabajo superior. El LED amarillo debe iluminarse
rítmicamente sin problemas, pero nunca debería
hacerlo fijo. En este caso baje el volumen de su
mesa. Si el LED se ilumina fijo en rojo, existe un
fallo en la etapa de potencia y el sistema se desconecta. En este caso, el aparato debe ser revisado
por un técnico de servicio cualificado.
Page 40

ACTOR DX Manual 1.0
4.2 ACTOR ADX 115 Sub A
1. Interruptor Power
Manejo: Es el interruptor de CON./DESC. para el
sistema activo. Cuando existe conexión, el LED
Power se enciende de color rojo.
El sistema activo ACTOR DX debe activarse siempre
el último, es decir, después de todos los demás
componentes y desactivarse el primero, es decir,
antes que todos los aparatos conectados.
2. Mains Input
Conexión: Una este conector hembra de conexión
por medio del cable de alimentación Powercon®suministrado con una caja tomacorriente. ¡ATENCIÓN!
Preste atención a las tensiones respectivas válidas.
La conexión a una tensión de red incorrecta puede
destruir la electrónica del sistema ACTOR DX.
3. LED Power On
Este LED se ilumina cuando el interruptor Power
está en ON y existe la conexión de red
correspondiente.
4. Subwoofer Input
Conexión: Conecte la vía de señal procedente del
controlador ACTOR DX DDO™ ( = salida de subwoofer de la parte superior) al conector hembra de
entrada del subwoofer con un cable microfónico
XLR. La ocupación de los conectores XLR debe ser la
siguiente: 1= Ground, 2= +, 3= -.
Importante: No conecte nunca las vías de señal Line
o Master de la mesa de mezclas directamente a la
Subwoofer Input de Sub A, ya que entonces se
excitaría sin controlador, es decir, sin diplexor,
compensación ni protección del sistema y podría
causar daños graves. Para ello, lea también el
capítulo 3 Instalación y cableado.
5. To Sub B Speaker Output
Conexión: Salida Speakon
®
paralela para conectar el
ACTOR DX Sub B pasivo
Nota: ¡Los conectores Speakon®deben enclavarse
girando en sentido horario! Antes de extraer debe
desasegurarse primero el bloqueo. Para ello, se tira
del cierre de bayoneta o el enclavamiento en la
dirección del cable. La asignación de pins es:
pin 1+ = +, pin 1- = -. Por supuesto, puede utilizarse
también un cable de cuatro polos. Sin embargo, el
pin 2+ y el 2- no están asignados.
4.3 ACTOR ADX 115 Sub B
6 Sub B In
Conexión: Conecte el conector hembra de entrada
Speakon“ a la Speaker Output de ACTOR ADX 115
Sub A con un cable de altavoz apropiado.
5 Consejos y trucos
¡No permita que entre humedad en la electrónica!
Al utilizar al aire libre, asegúrese de que su sistema
se instale protegido de la lluvia. No deben entrar en
el interior cola, cerveza ni otros líquidos, ya que
podrían causar un cortocircuito.
Asegúrese de que las ranuras de ventilación de la
parte posterior de los aparatos estén siempre libres
de suciedad y quede garantizada la circulación de
aire. De lo contrario puede calentarse la electrónica y
producirse daños.
ACTOR DX proporciona un sonido óptimo - ¡cuide
de una señal de entrada óptima! El resultado de un
cable defectuoso, incorrecto o señales de entrada
asimétricas en la mesa de mezclas será en la
mayoría de los casos un zumbido. Compruebe todos
los cables de señal y de red.
¡Evite las distorsiones! Las distorsiones no sólo son
desagradables para los oídos de los oyentes,
también son peligrosas para su instalación. Tenga en
cuenta que todos los componentes conectados a
ACTOR DX directa o indirectamente disponen de
potencia suficiente y no producen nunca
distorsiones, ya que se utilizan en el límite.
Procure que se reciba una señal limpia, no debe
verse afectada por el uso del regulador Gain.
¡Evite los bucles de masa! Por ejemplo, si la mesa de
mezclas está puesta a tierra a través del cable de red
y no está conectada en el mismo circuito eléctrico
que ACTOR DX , puede formarse el llamado "bucle
Elementos de mando de ACTOR ADX 115 Sub A
Elementos de mando de ACTOR ADX 115 Sub B
1
2
3
4
5
6
Page 41

41
Español
de masa". Por lo tanto, conecte siempre del sistema
ACTOR DX y la mesa de mezclas al mismo circuito
de corriente (¡la misma fase!). Si a pesar de ello
tuviese problemas de zumbido con la instalación,
puede ser de gran ayuda el interruptor Ground-Lift.
Atención: No conectar nunca la puesta a tierra al
conector de red - ¡Peligro de muerte!
6 Accesorios para ACTOR DX
HK AUDIO ACTOR DX Tilt-Unit
Vaso inclinado para la parte superior ACTOR DXMid/High. La Tilt Unit se coloca sobre el subwoofer,
los ángulos seleccionables son 7,5 y 15 ° y se predeterminan por medio del DuoTilt™.
Fundas protectoras HK AUDIO para ACTOR DX
Existen fundas protectoras para el subwoofer y la
unidad de medios / agudos. Extraordinariamente
resistentes a la rotura, repelen el agua y con
acolchado grueso para una protección permanente
del sistema ACTOR DX durante el transporte.
Bastidor de rigging HK AUDIO ACTOR DX
Soporte en forma de U fácil de montar para fijar
semiacopladores, pivotes para TV o bridas.
Encontrará más información sobre los accesorios
HK AUDIO originales en su distribuidor HK AUDIO
o en la dirección de Internet www.hkaudio.com.
7 Solución de problemas
El LED Power On o el display no se ilumina al
activar.
1 Compruebe si el cable de red está conectado en la
entrada Mains Input.
2 Compruebe que la red conduzca tensión.
3 Compruebe si se ha disparado el fusible principal.
El LED Power On se ilumina de color rojo, pero las
cajas no emiten ningún sonido.
1 Compruebe el cable de conexión que ha conectado
a las tomas de entrada.
2 Compruebe que estén conectadas las fuentes de
señal (mesa de mezclas, teclado, reproductor de
CD, etc. ).
3 ¿Están abiertos los reguladores Gain?
4 Compruebe si está dañado el cable del altavoz.
5 Compruebe que los conectores Speakon“ están
enclavados en los conectores hembra (girar a la
derecha). Sólo entonces existe conexión eléctrica.
Sólo salen pocos graves del subwoofer.
1 Compruebe el ajuste del regulador Subwoofer
Level. Ajuste con el regulador Subwoofer Level el
volumen del subwoofer Sub A según desee.
2 Compruebe si la configuración del sistema "Top
Only“ está seleccionada en el controlador del
sistema. Se encarga de silenciar el subwoofer.
La reproducción musical parece estar distorsionada.
1 Compruebe los LED indicadores de su mesa de
mezclas. No deberían estar siempre en la zona
roja. Si procede, baje el volumen en la mesa de
mezclas
2 Si las indicaciones de LED está en su mesa de
mezclas en la zona verde, gire hacia atrás el
regulador Level en ACTOR ADX 112 A.
3 Observe la indicación Input Overload y los LEDs de
las indicaciones de Limiter en el campo de mando
del ACTOR DX Mid/High. Deberían iluminarse en
amarillo sólo brevemente. En ningún caso deben
iluminarse en amarillo fijos. En este caso, gire
hacia atrás el regulador Level. Compruebe también
al ajuste de Input Sensitivity. Conmute las
distorsiones a +0 dB.
Zumbidos perturbadores
1 Compruebe el cable con el que están unidos la
fuente de señal y ACTOR DX. Sustituya los que
estén dañados.
2 Si no puede encontrarse la causa del zumbido,
presione el interruptor Ground-Lift. En la mayoría
de los casos puede solucionarse de este modo.
Page 42

ACTOR DX Manual 1.0
8 Datos técnicos
ACTOR ADX 112 A
Conexiones: 1x XLR Line In
1x XLR Line Through
1x XLR Subwoofer Output
Line In: XLR conector hembra (pin 1= Ground; 2= +, 3= -)
Tipo entrada: equilibrada electrónicamente y flotante
Impedancia de entrada: 20 kilohmios
Sensibilidad: Conmutable entre –10 dB y 0 dB (= +4 dBu)
Nivel de entrada máx.: +22 dBu
Respuesta de frecuencia +/- 3dB:1) 80 Hz – 19 kHz Fullrange Mode
130 Hz – 19 kHz Satellite Mode
Sensibilidad 1W@1m:2) 106 dB
Presión acústica máxima @1m: 2) 129 dB @ 10% THD
Amplificador medios/ agudos: 1x 600 W RMS/ Clase D
Circuitos protectores activos: DDO™ Controller Multiband Limiter, Subsonic Filter
Altavoz de medios: 12"
Altavoz de agudos/ excitador: 1,4"
Directivity: 60° x 40° CD bocina
Frecuencia de separación: 950 Hz, 12 dB/ octava
Brida para pie alto: HK AUDIO DuoTilt™, 36 mm, 7.5°, 15°
Puntos de suspensión: 4x M10 rosca para brida de suspensión opcional
Accesorios: ACTOR DX Tilt-Unit, 7.5°, 15°
Dimensiones (axAxP): 39 cm x 65 cm x 42 cm
15-1/4" x 25-5/8" x 16-1/2"
Peso: 30 kg/ 66 lbs.
Datos eléctricos generales:
Clase de protección 1 / protection class 1 (protectively earthed)
Consumo de corriente máx: 4,4 A (230 V)
8 A (117 V)
8 A (100 V)
Consumo máx de potencia: 1000 VA
Margen de tensión de red: +/- 10 %
Rango de temperatura ambiente: -10° C a +35° C
Fusibles internos: T8A
1) a través de desviación del sistema activa
2) Todas las dimensiones en semiespacio
Page 43

43
Español
ACTOR ADX 115 Sub A
Conexiones: 1x XLR Subwoofer Input
1x XLR Subwoofer Through
1x Speakon
®
Parallel Out
Subwoofer Input: XLR conector hembra (pin 1= Ground; 2= +, 3= -)
Tipo entrada: equilibrada electrónicamente y flotante
Impedancia de entrada: 20 kilohmios
Sensibilidad: +10 dBu (totalmente abierto)
Nivel de entrada máx.: +22 dBu
Respuesta de frecuencia +/- 3dB: 1) 48 Hz - 130 Hz
Sensibilidad 1W@1m: 2) 104 dB
Presión acústica máxima @1m: 2) 126 dB @ 10% THD
Amplificador Subwoofer: 1x 1000 W RMS/ Clase D
Circuitos protectores activos: DDO™ Controller, Multiband Limiter, Subsonic Filter
Altavoz de graves: 15"
Brida para pie alto: placa roscada M20
Ruedas: 4x 100 mm ruedas en la parte trasera
Dimensiones (axAxP): 48 cm x 65 cm x 66 cm incluidas ruedas
18-7/8" x 25-5/8" x 26"
Peso: 35 kg/ 77 lbs.
Datos eléctricos generales:
Clase de protección 1 / protection class 1 (protectively earthed)
Consumo de corriente máx: 4,4 A (230 V)
8 A (117 V)
8 A (100 V)
Consumo máx de potencia: 1000 VA
Margen de tensión de red: +/- 10 %
Rango de temperatura ambiente: -10° C a +35° C
Fusibles internos: T8A
ACTOR ADX 115 Sub B
Conexiones: 1x Speakon Input
Capacidad de carga nominal: 500 W RMS/ 8 Ohmios
Respuesta de frecuencia +/- 3dB: 1) 48 Hz- 130 Hz
Sensibilidad 1W@1m: *) 104 dB
Presión acústica máxima @1m: *) 126 dB@10% THD
Altavoz de graves: 15"
Brida para pie alto: Ruedas: 4x 100 mm ruedas en la parte trasera
Dimensiones (axAxP): 48 cm x 65 cm x 66 cm incluidas ruedas
18-7/8" x 25-5/8" x 26"
Peso: 32 kg/ 70.4 lbs.
This is to certify that
HK AUDIO®ACTOR DX
complies with the provisions of the Directive of
the Council of the European Communities on the
approximation of the laws of the Member States
relating to electromagnetic compatibility
(EMC Directive 89/336/EEC) and the low voltage
Directive (73/23/EEC).
This declaration of conformity of the European
Communities is the result of an examination carried
out by the Quality Assurance Department of
STAMER GmbH in accordance with European
Standards EN 50081-1, EN 50082-1and EN 60065
for low voltage, as laid down in Article 10 of the
EMC Directive.
Stamer Musikanlagen
GmbH*
Magdeburger Str. 8
66606 St.Wendel
Lothar Stamer Dipl.Ing.
Managing Director
St.Wendel, 04/15/05
* Stamer Musikanlagen manufactures exclusively
for HK AUDIO®.
Page 44

ACTOR DX Manual 1.0
Page 45

45
Page 46

ACTOR DX Manual 1.0
Page 47

47
Page 48

HK Audio®• Postfach 1509 • 66595 St. Wendel
Germany • info@hkaudio.com • www.hkaudio.com
International Inquiries: fax +49-68 51-905 215
international@hkaudio.com
Technische Änderungen vorbehalten
Copyright 2005 Music & Sales GmbH • 05/2005
MS D-1327 05/05
 Loading...