

RPHA 11
Warning!
Owner’s Manual
14 Rue de l'atome, CS30035
Europe
67801 Bischheim Cedex, France
TEL. +33 (0)3 90 22 74 00 FAX. +33 (0)3 90 20 09 12
If you have any questions, please email us at: info@hjc-europe.com
America
511 S.Harbor Blvd. #V, La Habra, California 90631
TEL. 562.407.2186 FAX. 562.802.7706
If you have any questions, please e-mail us at: info@hjchelmets.com
www.hjchelmets.com
HJC Corp.
REV.03.
Warning!
For your safety, it is important that you completely
read the owner’s manual and all warning labels.
Contents
OPEN
CLOSE
OPEN
CLOSE
OPEN
CLOSE
Pour ouvrir
Fermeture
OPEN
CLOSE
Pour ouvrir
Fermeture
Fermeture
Pour ouvrir
Fermeture
Pour ouvrir
English / Français
Deutsch / Español
Italian / Dutch
P. 2-8
P. 9-16
P.17-24
CLOSE
Fermeture
OPEN
Pour ouvrir
Pour ouvrir
OPEN
Pour ouvrir
Fermeture
CLOSE
Fermeture
OPEN
Pour ouvrir
Pour ouvrir
CLOSE
CLOSE
FermeturePour ouvrir
OPEN
Pour ouvrir
Pour ouvrir
10
Specications / Spécications
1
2
3
12
17
19
19
18
17
16
15
14
13
12
11
EJECT
10
4
5
6
7
8
9
English / Français
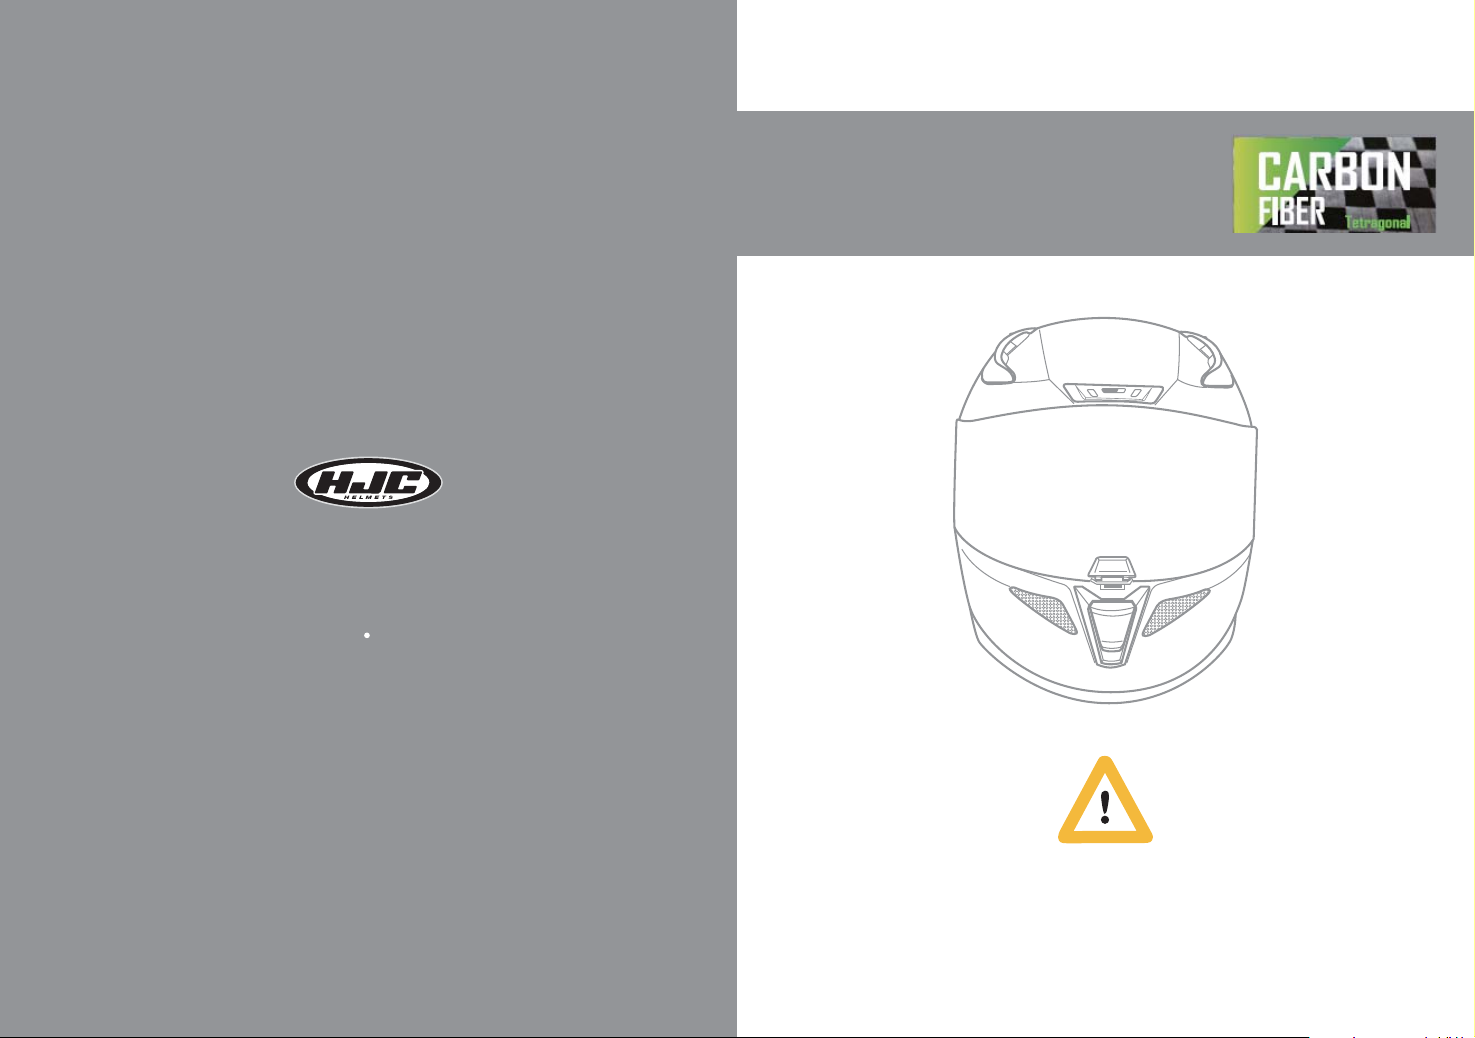
1. Outer Shell
2. Impact Absorbent Liner
3. Comfort Liner
4. Rear Exhaust Venturi Spoiler
Lower Rear Exhaust Venturi Vents
5.
6. Rubber Edge Trim
1. Coque extérieure
2. Calotin intérieur absorbant
les chocs
3. Ventilation latérale
poiler arrière avec ouvertures
4. S
pour extraction de l'air
5. Aération Arrière
inition du bord de caoutchouc
6. F
7. Chin Strap
8. Chin Strap Snap
9. Double "D" Ring
10. Inner Chin Vent
11. Side Chin Vents
12. Front Chin Vent
13. Shield Locking System
7. Jugulaire
8. Jugulaire de menton
9. Boucle Double "D"
entilation Mentonnière Intérieure
10. V
11. Ventilations mentonnières,
latérales
ération du menton de devant
12. A
13. S
ystème de blocage de l'écran
14. Tool-less Shield
15. Tear-O Button & Anti fog lens Pins
16. Eyeport Gasket
17. Forehead Vents
18. Shield Ratchet
19. Top Front Vents
14. Ecran
15. Bouton Tear-O & Anti fog lens Pins
16. Joint d’étanchéité d’écran
17. Ventilation frontale
18. Mécanisme de l’écran
entilation de devant du haut
19. V
21
Handle-locker
Shield Removal / Démontage de l’écran
Bouton de fermeture de l'écran
OPEN / Önen
OPEN / Önen
Attention!
<Anti fog lens & Tear o Film /
When putting on both tear o lm and anti fog lens, the tear o lm should be installed rst and then
anti fog lens. (The tear o lm cannot be installed after installing the anti fog lens.)
Si vous souhaitez utiliser le lm Tear o et Anti fog lens, il faudra d’abord installer le lm Tear o puis,
Anti fog lens. (Le lm Tear o ne peut être installé après Anti fog lens).
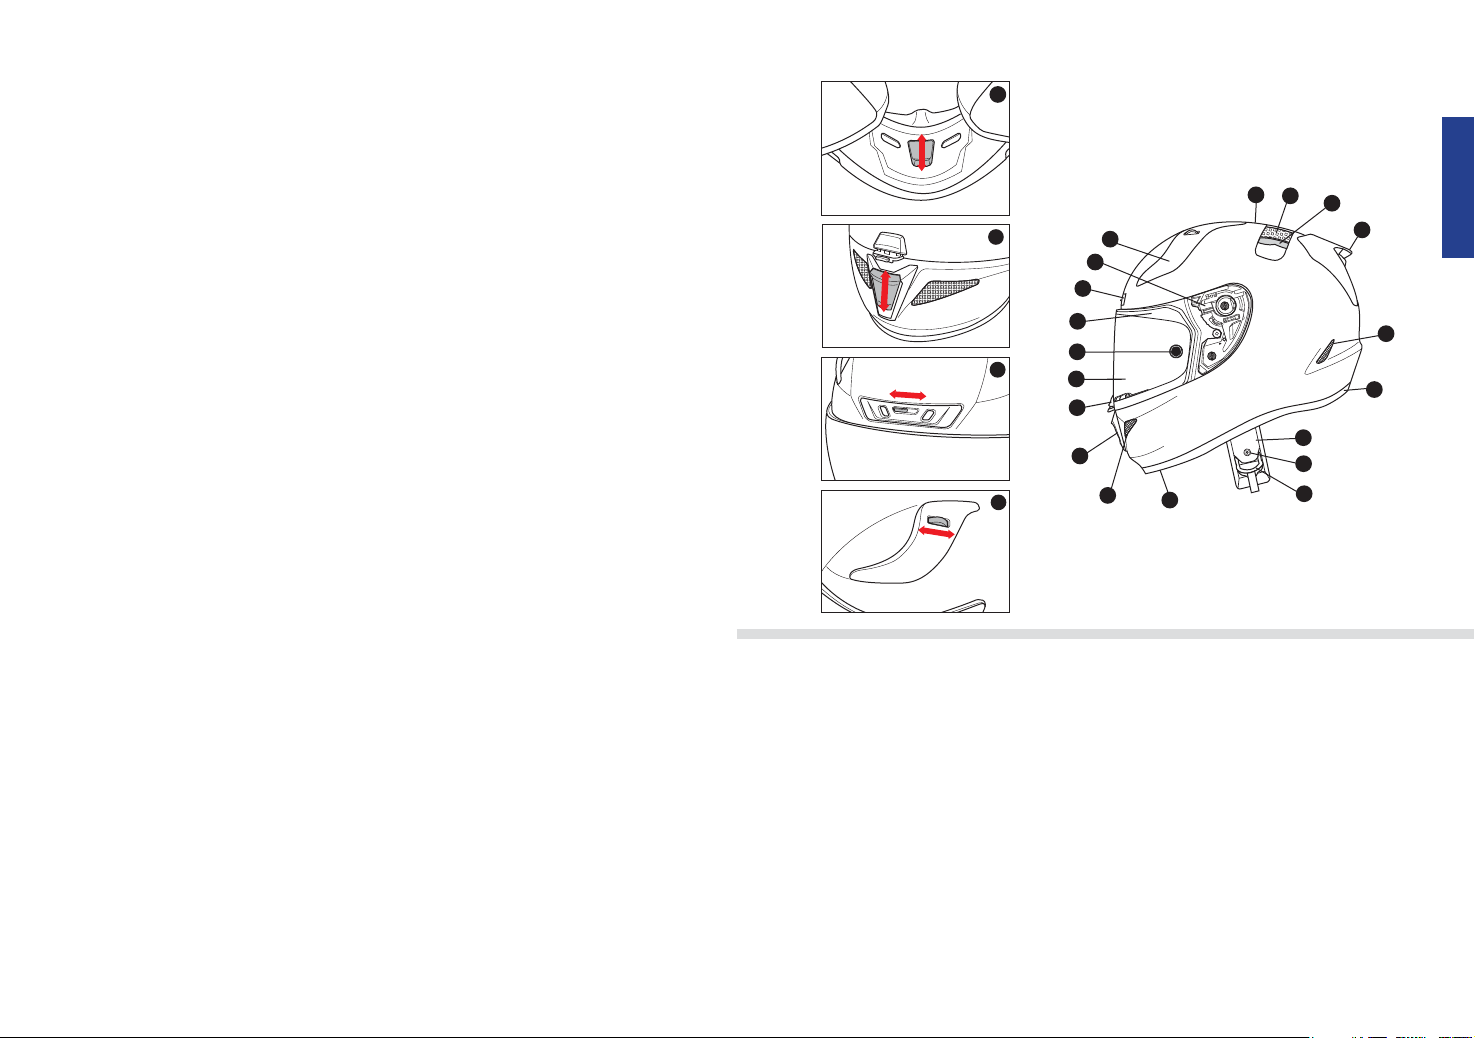
1. Move the slide lock to left to disengage. / Poussez le loquet vers la gauche an de le débloquer.
2. Squeeze the tab and lift up the center latch. / Pincez le loquet central et glissez-le vers le haut.
3. Open shield to the maximum open position. / Ouvrir l'écran au maximum de la position ouverture.
4. Push the handle-locker to the open position. The shield will be automatically released out
of base ratchet mechanism. / Placer le levier de fermeture en position ouverture. L'écran se retire
automatiquement du mécanisme de xation.
Slide lock
Verrou
Anti fog lens et lm Tear o
1 2
>
Center latch
Loquet central
EJECT
EJECT
OPEN / Önen
21
English / Français
3
EJECT
43
EJECT
EJECT
Handle-locker
Bouton de fermeture de l'écran
OPEN / Önen
Shield Installation / Installation de l’écran
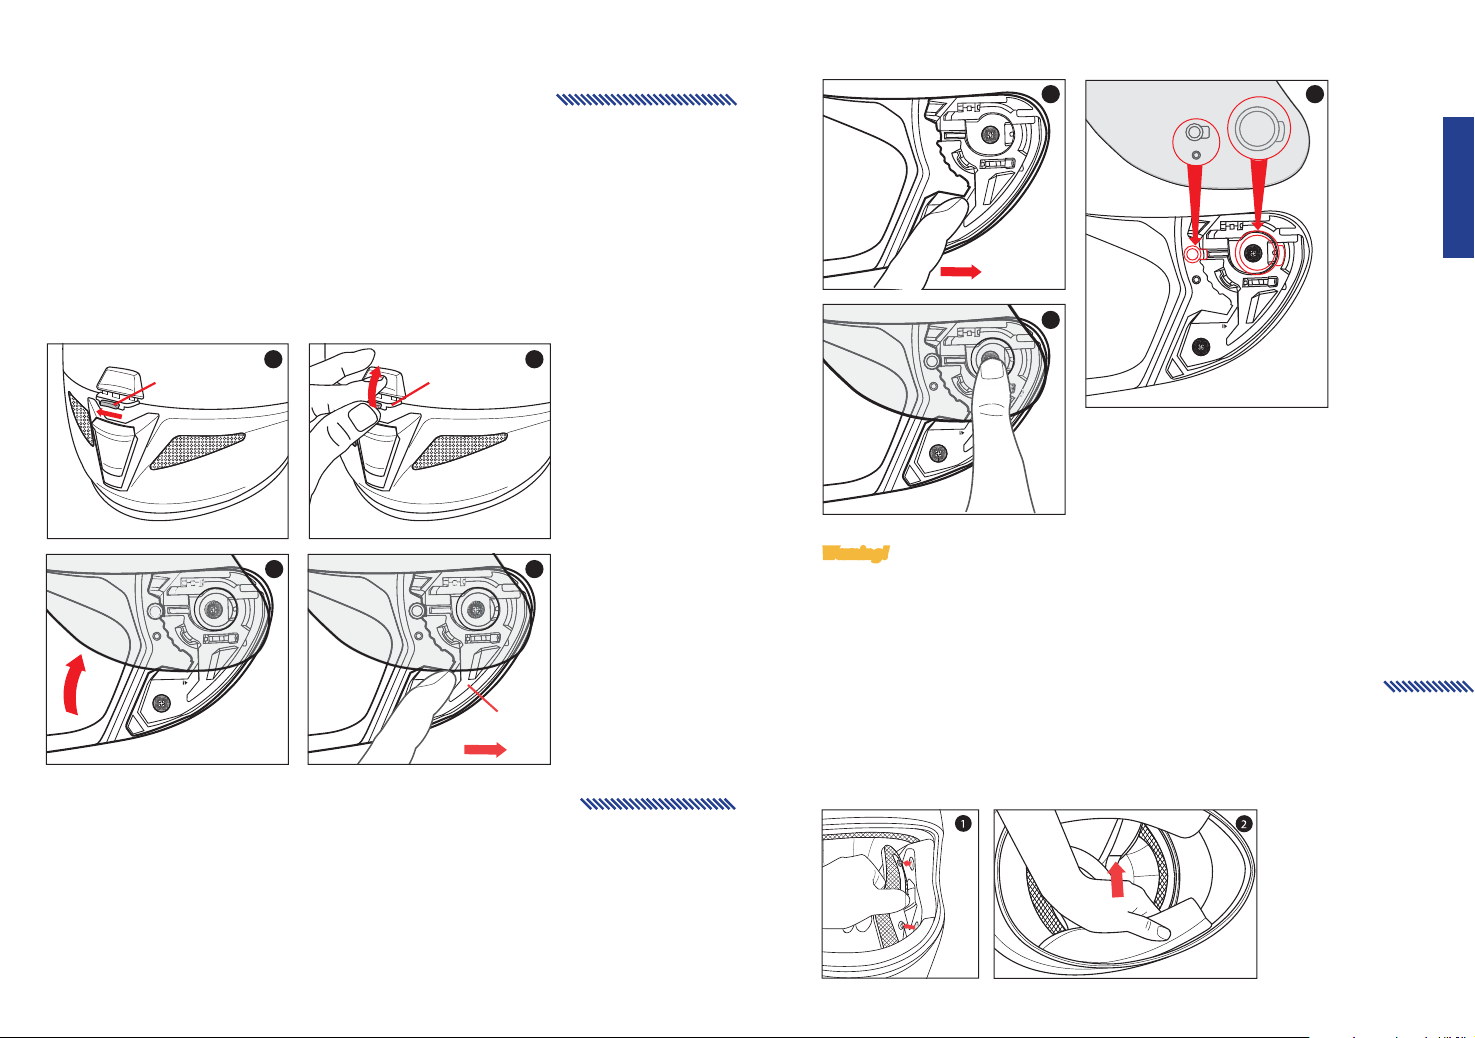
1. Ensure that the handle-locker is in the open position. / Assurez-vous que le levier de fermeture est en
position fermeture.
2. Align and insert the top of the shield guide into the plate-gear guide. / Alignez et insérez le haut des
points de xation de l'écran dans les points de xation du mécanisme de xation.
3. With the guides properly aligned, press the lower section of the shield into the plate-gear mechanism.
The locking tab should pop into position, locking the shield into place. / Les points de xation étant bien
alignés, appuyez la partie basse de l'écran dans le mécanisme de xation. Les pattes de xation doivent
s'encliqueter, xant ainsi l'écran.
3 4
Warning!
Always check to make sure helmet pads are installed before using the helmet. A helmet with
missing or improperly installed pads may increase your risk of serious injury or death in an accident.
Pour rendre sûr le casque, toujours vérier que les garnitures sont installées avant de l’utiliser.
Un casque où il manque, ou si les garnitures sont mal installées, peut augmenter le risque
de dommages sérieux ou de mort lors d’un accident.
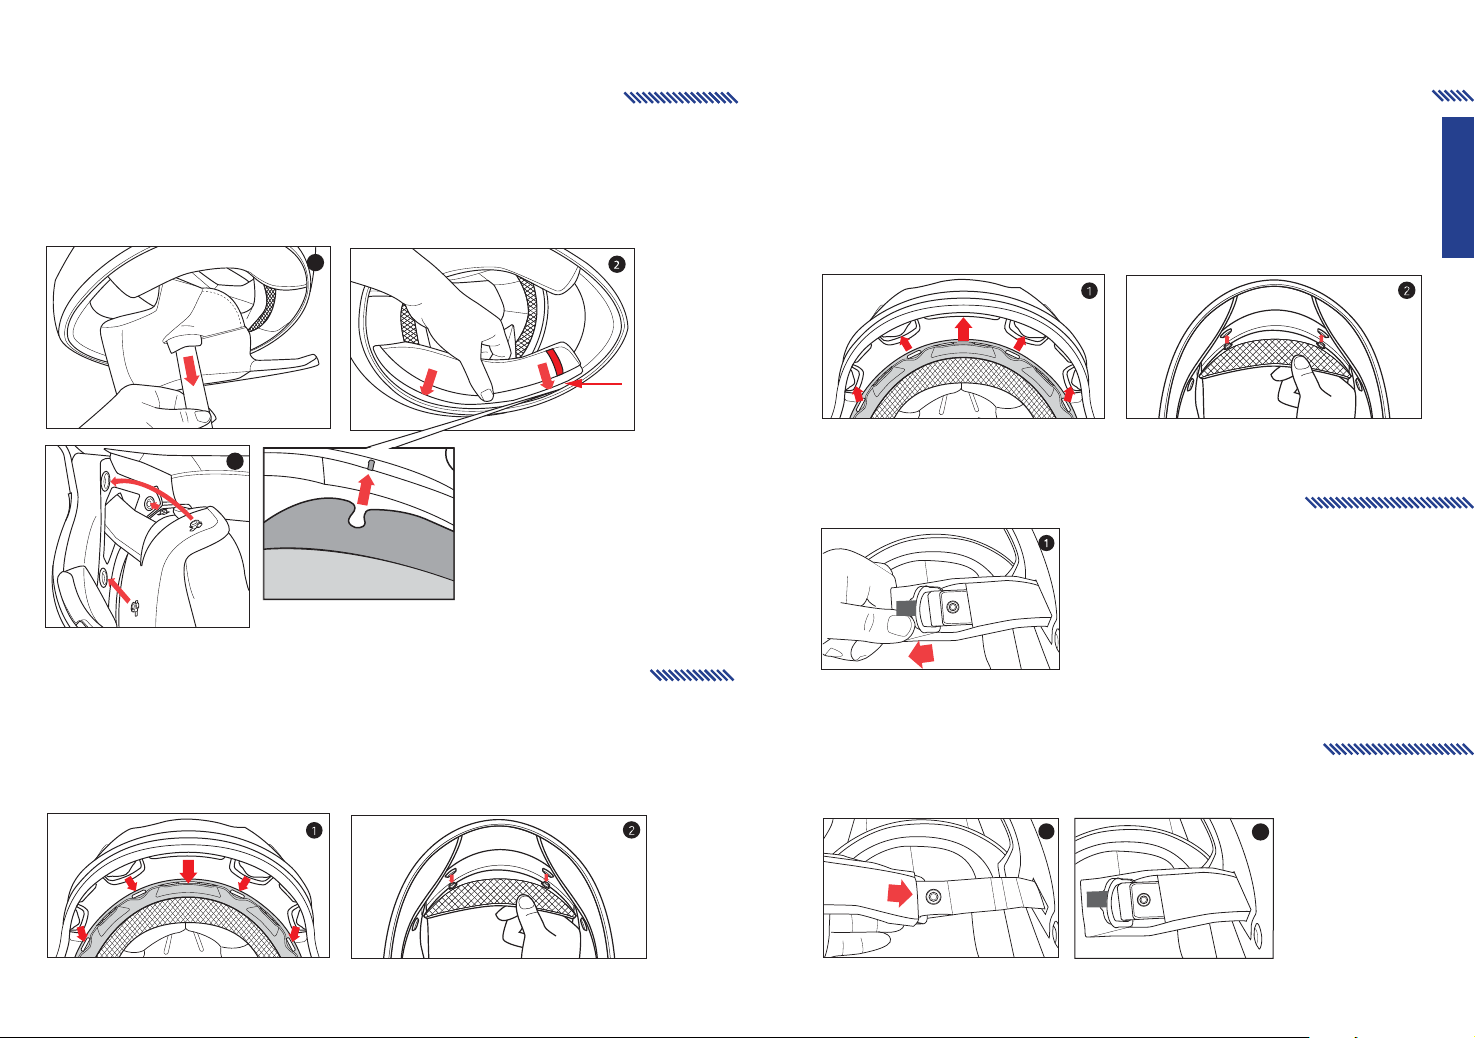
Cheek Pad Removal /
There are 3 snaps holding the cheek pad in place. / Il y a trois lanières tenant la garniture des joues en place.
1. Gently pry the cheek pad away from the interior, releasing the snaps. / Tirer doucement la garniture
des joues de l'intérieur, enlever les laniéres.
2. Grasp the cheek pad near its center and gently pull it free from the chin strap. / Prendre la garniture
des joues près de son centre et tirer doucement sur la sangle jugulaire.
Attention!
Démontage mousse de joue
B
A
Cheek Pad Installation /
Position du support
de languette
Position of
tap holder
1. Feed the chin strap through the opening in the cheek pad. / Insérer la sangle jugulaire á travers
l'ouverture de la garniture des joues.
2. Align and fully slide the cheek pad plastic plate between shell and EPS. / Alignez et glissez entièrement
la plaque plastiée de la mousse de joue entre la calotte et l’EPS.
3. Clip the cheek pad’s 3 small male snaps to the 3 female snaps xed on the shell interior. / Veuillez
assembler les 3 clips ensemble a l'intérieur de la calotte.
3
Installation mousse joue
1
※Slide tab 'A' from the cheek pad
into the holder 'B'.(Repeat same
on opposite side)
※Faire glisser l'encoche "A" des
mousses joues dans le support
"B" (répeter la même opération
du côté opposé)
A
B
Position of
tap holder
Position du support
de languette
Crown Pad Removal / Démontage garniture intérieure
1. Grasp the crown pad fabric as close as possible to its plastic base and pull/pry away from the helmet.
Notice how the crown pad plastic section aligns with the shell plastic sleeve. This will help orient you
with the reinstallation. / Saisir la garniture le plus près possible de la base en plastique, poussez/tirez vers
l’extérieur du casque. Notez que la garniture s’aligne avec la bande en plastique de la coque. Ceci vous aidera
lors de la réinstallation.
2. Repeat same at rear. / Refaite la même chose à l’arrière.
Crown Pad Installation / Installation de la garniture intérieure
1. Install the front section rst by aligning the plastic shell base and the crown pad plastic sleeve, ensuring
that the center and side holes are properly aligned. Press the crown pad plastic sleeve (center portion)
into the center of the channel which is built into the plasticshell base, working your way outward to each
side. / Installer en premier la partie frontale en alignant la coque plastique et la garniture frontale plastique
cliquetée en s’ assurant que les encoches du centre et des côtés soient correctement alignées. Appuyer la partie
frontale plastique (partie centrale) dans l’emplacement qui a été conçu à cet eet dans la coque en insérant
les encoches de chaque côté.
2. Align and snap the two rear snaps into place. / Alignez et pressez les 2 boutons pression arrière à leur place.
Chin Strap Cover Removal /
Démontage de la protection de jugulaire
1. Grasp the end of the chin strap cover and pull/pry away
from the helmet. / Maintenir le bout de la
protection de jugulaire et tirer/soulever vers
l’extérieur du casque.
Chin Strap Cover Installation /
Installation de la protection de jugulaire
1. Insert the chin strap into the chin strap cover and push the chin strap all the way in. / Insérer la jugulaire
dans la protection de jugulaire et poussez toute la jugulaire a l’intérieur.
1a
1b
English / Français
5 6

B
A
Emergency Kit /
Kit de secours
Breath Deector Installation /
In an emergency, you may remove the cheek pads as
indicated in the illustration. Pull the red line pocket with
your ngers. / En cas d'urgence, vous pouvez enlever les
mousses joues comme indiqué en illustration. Tirez sur la
languette rouge avec vos doigts.
Please use Emergency Kit only in emergency
situation. / Veuillez n'utiliser le kit de secours
qu'en cas d'urgence.
Breath Deector Removal /
Retrait du déecteur nasal
1. Push breath deector at and pull away from the helmet as arrows indicate. / Saisissez le centre du
cache-nez, tirez doucement dessus pour le sortir de sa fente.
Mise en place du déecteur nasal
1. Push breath deector into specied slot as arrows
indicate. / Faites glisser le cache-nez dans la fente
prévue à cet eet.
Chin Curtain Installation /
Mise ne place du cache menton
1. Align the center of the chin curtain with the center of the helmet. Push into place as arrows indicate.
(Please assemble in order from 1 to 3.) / Placez les languettes entre la calotte et les mousses joues.
Faites glisser un côté du cache-menton (côté découpé) sur le crochet. Répétez cette opération de l’autre côté.
(Veuillez installer dans l'ordre de 1 à 3.)
※ Slide tab 'A' from chin
curtain into holder 'B'.
(Repeat same on other
A
3
2
1
B
two sides) / Faire glisser
l'encoche "A" des mousses
joues dans le support "B"
(répeter la même opération
du côté opposé)
English / Français
Chin Curtain Removal / Retrait du cache menton
1. Pull the chin curtain away from the helmet as arrow indicates.
/ Faites glisser un côté du cache-menton (côté découpé) sur le
crochet
7 8

Arretierungsknopf
Önen
Schließen
Öffnen
Schließen
Öffnen
Schließen
Öffnen
Schließen
Öffnen
Apertura
Cerrado
Apertura
Cerrado
Cerrado
Apertura
Cerrado
Apertura
Botón de bloqueo
Apertura
Öffnen
Apertura
Schließen
Cerrado
Schließen
Cerrado
Öffnen
Apertura
Schließen
Cerrado
Öffnen
Apertura
Schließen
Cerrado
10
12
17
19
Öffnen
Apertura
Konstruktionsdetails / Especicaciones
1
2
3
19
18
17
16
15
14
13
12
11
EJECT
10
4
6
7
8
9
Visierdemontage /
La pantalla: como quitarla
<Anti fog lens und Abreissfolie>
Bei der Montage von Abreissfolien und Anti fog lens ist darauf zu achten, dass die Abreissfolien zuerst
befestigt werden und danach erst die Anti fog lens. (ist die Anti fog lens montiert, können keine
Abreissfolien mehr befestigt werden)
1. Zum Lösen des Druckknopfes ziehen Sie das Verschlussband nach links.
2. Zum Önen des Verschlusses halten Sie die rote Lasche fest und ziehen gleichzeitig das
Verschlussband heraus.
3. Visier bis zur maximal möglichen Oenstellung önen.
4. Den Arretierungshebel in Richtung 'OPEN' drücken. Das Visier wird automatisch entriegelt
und freigegeben.
5
Doppel-D-Verschluss
Cierre deslizable
1 2
Rote Lasche
Pestillo central
Deutsch / Español
43
1. Außenschale
2. Stoßdämpfende Innenschale
3. Komfort-Innenfutter
poiler mit Entlüftungsönungen
4. S
5. R
ückwärtige Helmentlüftungen
6. Gummi-Abschlusskante
1. Calota exterior
2. Línea de impacto absorbente
frontal y superior
3. Almohadilla confort
4. Espoiler con aberturas para
la extracción de aire
5. Ventilación trasera
6. Terminaciones en caucho
7. Correa barbillera
7. Kinnriemen
8. Druckknopf Kinnriemen
9. Doppel-D-Ring-Verschluß
ebel für seitliche Kinnbelüftung
10. H
11. Seitliche Kinnbelüftung
12. Frontlüftung (verstellbar)
13. Visierarretierung
roche de la correa de la barbilla
8. B
9. Anilla "D" doble
10. Ventilación interior de la
mentonera
11. Ventilación laterales
entilación frontal para la barbilla
12. V
13. Sistema de bloqueo de la
pantalla
ohne Werkzeug
14. Visier (
auswechselbar)
15. Befestigungsknopf für
Abreißscheiben & Anti fog lens Pins
16. Visierdichtung
17. Stirnbelüftung
18. Visierrasterung
19. Überkopfbelüftung (verstellbar)
14. Visor sin herramientas
otón de Tear-O & Anti fog lens Pins
15. B
16. Punto de visibilidad
17. Ventilación Frontal
18. Mecanismo de engranaje
de la pantalla
19. Ventilación frontal y superio
EJECT
EJECT
Arretierungsknopf
Botón de bloqueo
Önen
Apertura
<Anti fog lens y Film Tear O >
Si usted desea instalar el lm Tear O y la Anti fog lens, primero deberá instalar el lm Tear O y
luego la Anti fog lens. (El lm Tear O no podrá ser instalado una vez esté colocada la Anti fog lens)
1. Mover el cierre deslizante hacia la izquierda para desenganchar.
2. Apriete la pestaña y levante el pestillo central
3. Abra el protector completamente hasta la posición de abierto.
4. Mueva el cierre de la manija hacia la posición de abierto. El protector se liberará automáticamente
del mecanismo de trinquete de base.
109

Visiermontage /
Warnung!
B
A
Advertencia!
Apertura
Posición de la
lengüeta de sujeción
Position der Halterung
1. Sicherstellen, dass der Arretierungshebel in Position, 'OPEN' ist.
2. Die Visierführung an der Visieraufnahme der Visierrasterung ausrichten und einsetzen.
3. Ist die Visierführung sauber an der Visierrasterung ausgerichtet, den unteren Rand des Visieres
andrücken bis die Verriegelung aktiviert ist und das Visier in der Halterasterung hält.
EJECT
Como instalar la pantalla
ÖffnenÖffnen
Apertura
3
EJECT
21
Demontage der Wangenpolster /
Extracción de la almohadilla de la mejilla
Die Wangenpolster sind mit Druckknöpfen an der Styroporschale befestigt.
1. Ziehen Sie die Wangenpolster vorsichtig ins Helminnere ab und lösen Sie dabei die Druckknöpfe.
2. Die seitliche Befestigungslasche, die das Wangenpolster zwischen Helmschale und Styroporschale xiert,
vorsichtig nach unten herausziehen, und das Wangenpolster abnehmen und vom Kinnriemen abstreifen.
Hay 3 broches que mantienen la almohadilla de la mejilla en su lugar.
1. Levante con suavidad la almohadilla de la mejilla del interior, abriendo los broches.
2. Tome la almohadilla de la mejilla cerca del centro y con suavidad extráigala de la correa de la barbilla.
Montage der Wangenpolster /
Deutsch / Español
EJECT
1. Asegúrese de que el cierre de la manija esté en la posición de abierto.
2. Alinee e inserte la parte superior de la guía del protector en la guía del mecanismo de la placa.
3. Con las guías alineadas correctamente, inserte la sección inferior del protector en el mecanismo de
la placa. La pestaña de cierre debería encajar con un golpe seco, haciendo bloquear el protector.
Warnung!
Prüfen Sie vor der Benutzung des Helms, ob die Wangenpolster fest montiert sind. Ein Helm mit
fehlenden oder falsch montierten Wangenpolstern kann das Risiko schwerer oder tödlicher
Verletzungen bei einem Unfall erhöhen.
Advertencia!
Siempre asegúrese de que las almohadillas del casco estén instaladas antes de emplear el casco.
Un casco al que le faltan las almohadillas o que no las tiene instaladas adecuadamente puede
aumentar el riesgo de lesiones graves o muerte en un accidente.
11 12
Instalación de la almohadilla de la mejilla
1
3
A
B
※
Die Lasche "A" des Wangenpolsters
in die Halterung "B" schieben.
(dasselbe auf der anderen Seite
wiederholen)
※
Deslice la lengüeta 'A' de la carrillera
hasta en engarzarlo en 'B'. (Repita
lo mismo en el otro lado)
Position der Halterung
Posición de la
lengüeta de sujeción

1. Fädeln Sie die Kinnriemenenden durch die Önungen in den Wangenpolstern. Wangenpolster in die
richtige Position bringen.
2. Befestigungslasche zwischen Helmschale und Styroporschale einschieben. Auf richtige Positionierung
achten. Die Druckknöpfe müssen einander gegenüberliegen.
3. Druckknöpfe andrücken und deutlich hörbar einrasten lassen. Wangenpolster sind als Ersatzteil
lieferbar(immer paarweise).
1. Introduzca las correas de la barbilla a través de la abertura en la almohadilla de la mejilla.
2. Alinee y deslice totalmente la pieza de plástico de la espuma de mejilla entre la calota y el EPS.
3. Coger la parte delante y la parte atrás de la platina del acolchonado y separarla de la calota.
Demontage des Kopfpolsters /
1. Primero instalar la sección delantera, alineando la calota y el acolchado superior. Los agujeros laterales
y centrales han de estar bien alineados. El acolchado debe entrar en la ranura central, y después sigue
jando el acolchado hacia los dos lados.
2. Aliñe y cierre los dos broches posteriores.
Extracción de la almohadilla
1. Fassen Sie den textilen Teil des Futters möglichst nahe an der vorderen Plastiklasche und ziehen Sie
die Plastiklasche aus der Kunststohalterung heraus.
2. Lösen Sie die beiden Druckknöpfe am hinteren, unteren Helmrand und ziehen Sie dann das komplette
Kopfpolster nach unten aus dem Helm heraus.
1. Acerque la tela de la almohadilla de la cabeza tanto como sea posible a su base plástica y
quítela/levántela del casco. Observe cómo la sección plástica de la almohadilla de la cabeza
se aliña con la tira plástica del armazón. Esto lo ayudará a orientarse con la reinstalación.
2. Repita la misma operación en la parte trasera.
de la cabeza
Montage des Kopfpolsters/
Instalación de la almohadilla de la cabeza
1.
Befestigen Sie das Kopfpolster, indem Sie die vordere Plastiklasche mittig in die Kunststohalterung
(Stirnmitte) bis zum Einrasten einschieben. Anschließend die Plastiklasche links und rechts seitlich Komplett
einschieben.
2. Richten Sie die beiden hinteren Druckknöpfe aus und befestigen Sie sie mit den im Helm
angebrachten Unterdruckknöpfen.
Austausch der
Kinnriemenpolsterung /
Extracción Funda de la correa del cierre
1. Ziehen Sie die Polsterhülle einfach vom
Kinnriemen ab.
1. Estire del extremo de la funda de correa del
cierre.
Montage der Kinnriemenpolsterung /
Instalación de la funda de la correa del cierre
1. Das Kinnriemenende soweit wie möglich in die Polsterhülle einführen, und diese dann bis zum
Anschlag über den Kinnriemen streifen.
1a
1b
Deutsch / Español
1. Insertar la correa de cierre en la funda y empujar la correa hasta el nal.
13 14

B
A
Notfallvorrichtung /
Kit de emergencia
Einbau des Atemabweisers
Im Notfall können Sie die Wangenpolster, wie in der
Abbildung dargestellt, entfernen. Das Wangenpolster
an der Rescue Tasche anfassen und vorsichtig herausziehen.
Die Notfallvorrichtung bitte ausschließlich im
Notfall benutzen.
En caso de emergencia, remueva las carrilleras tal
como se indica en la ilustración.
Tire con los dedos del bolsillo de línea roja.
Use por favor el kit de emergencia sólo en caso
de emergencia.
Entfernen des Atemabweisers /
Extracción del deector de respiración
1. Fassen Sie den Atemabweiser mittig an und ziehen
ihn vorsichtig nach oben aus seiner Vorrichtung.
/ Instalación del deector
de respiración
1. Führen Sie den Atemabweiser in seine Vorrichtung.
1. Deslice la naricera dentro de la ranura.
Einbau der Kinnabdeckung /
Instalación de la cortina de barbilla
1. Fixieren Sie die Haken zwischen Außenschale und Wangenpolster. Verbinden Sie die gelochte Seite
des Kinnriemens mit dem Haken. Wiederholen Sie dies auf der anderen Seite.
(Bitte in der Reihenfolge 1 bis 3 zusammensetzen.)
A
3
2
1. Localice los enganches que hay entre la calota y la almohadilla de la mejilla. Deslice un costado de
la barbillera (recorte lengüeta) hasta engarzarlo en el enganche. Haga lo mismo en el otro costado.
(Móntelo por favor siguiendo el orden de 1 a 3.)
1
※
Die Lasche "A" des Windabweisers
in die Halterung "B" schieben.
(
dasselbe bei den beiden anderen
Halterungen wiederholen)
B
※ Deslice la lengüeta 'A' de
la barbillera hasta engarzarla
en 'B'. (Repita lo mismo en
ambos lados)
Deutsch / Español
Ausbau der Kinnabdeckung
/ Extracción de la cortina de
barbilla
1. Den Windabweiser vom Helm abziehen, siehe Pfeil.
1. Agarre el centro de la naricera y tire suavemente hacia
arriba hasta soltarla.
15 16
1. Tire de la barbillera hacia fuera tal como indican las echas.

Perno di bloccaggio
Chludere
Aprire
Aprire
Chludere
Aprire
Chludere
Aprire
Open
Sluiten
Open
Sluiten
Sluiten
Open
Chludere
Sluiten
Open
Bedieningsknop
fermo centrale
Centraal sluitingsmechanisme
Aprire
Open
Chludere
Sluiten
Chludere
Sluiten
Aprire
Open
Chludere
Sluiten
Aprire
Open
Chludere
Sluiten
Aprire
Open
10
12
17
19
1. Calotta esterna
2. Calotta interna in poliuretano
espanso
3. Rivestimento interno
4. Estrattore posteriore
5. Ventilazioni posteriori
1. Buitenschaal
2. Schokdemper
3. Zachte binnenbekleding
4. Achteruitlaten Venturi
5. Ventilatie in de achterzijde
van de helm
6. Rubberen randstrip
Caratteristiche / Specicaties
19
18
17
16
15
14
13
12
6. Rinitura di gomma
7. Cinturino sottogola
8. Cinghia per il mento con
chiusura a scatto
9. Doppio anello tipo D
entilazione interna mentoniera
10. V
11. Presa d'aria laterale
7. Kinriem
8. Drukknopjes helmbanden
9. Dubbele D-sluiting
10. Kinventilatie aan de
binnenzijde
11. Side kinventilatie
12. Voorste kin ventilatiesleuf
5
11
10
1
2
3
EJECT
7
8
9
12. Foro frontale per il mento
13. Sistema di chiusura visiera
14. Protezione senza attrezzi
ottone Tear-O & Anti fog lens Pins
15. B
16. Guarnizione della visiera
17. Ventilazioni fronte
18. Meccanismo visiera
19. Foro frontale superiore
13. Vizier lock systeem
cherm zonder gereedschap te openen
14. S
15. T
ear-o knop & Anti fog lens Pins
16. Oogpakking
17. Voorhoofd ventilatie
18. Raster van het vizier
ovenste ventilatiesleuf voorzijde
19. B
Rimozione della visiera /
Démontage de l’écran
<Anti fog lens e pellicola adesiva>
Durante l’applicazione della pellicola adesiva e della Anti fog lens, la pellicola adesiva deve essere
incollata prima della Anti fog lens. (La pellicola adesiva non può essere applicata dopo l'installazione
della Anti fog lens.)
4
1. Spostare il blocco scorrevole sulla sinistra per sganciare.
2. Premere la linguetta e sollevare il fermo centrale.
3. Aprire la visiera nella posizione di massima apertura.
4. Spostare la leva di bloccaggio in posizione "open". La visiera si sgancera, automaticamente dal
meccanismo.
5
blocco scorrevole
Sluitingsmechanisme
6
1 2
fermo centrale
Centraal sluitingsmechanisme
43
Italian / Dutch
EJECT
<Anti fog lens & Tear o Film>
Als u een tear o en een Anti fog lens wil plaatsen, dan behoort de tear o eerst gemonteerd te worden
en daarna het Anti fog lens. (De tear o kan niet geplaatst worden als het Anti fog lens al gemonteerd is.)
1. Schuif het sluitingsmechanisme naar links.
2. Druk het sluitingsmechanisme in en lift deze omhoog.
3. Zet het vizier volledig open.
4. Verschuif de handle naar open. Vizier zal automatisch uit het bevestigingsset los komen.
EJECT
Perno di bloccaggio
Bedieningsknop
Aprire
17
18

Installazione della visiera /
B
A
Attenzione!
Posizione della
sede del gancio
Waarschuwing!
Positie van
de houder
1. Spostare la leva di bloccaggio in posizione "Open".
2. Allineare la visiera con il meccanismo, come da illustrazione.
3. Premere la visiera nel meccanismo.
EJECT
Aprire
Monteren van het vizier
Rimozione dei guanciali / Wangkussentje losmaken
Ci sono 3 cinghie che tengono i guanciali al loro posto.
1. Levare gentilmente il guanciale dall'interno, rilasciando le cinghie.
2. Aerrare il guanciale vicino al baricentro e liberarlo gentilmente dalla chiusura a scatto per il mento.
21
3
EJECT
Er zijn 3 drukknopjes die het wangkussentje op zijn plaats houden.
1. Trek het wangkussentje langzaam van het interieur weg, hierbij zullen de drukknopjes loslaten.
2. Pak het wangkussentje in het midden vast en trek deze langzaam vrij van de kinbescherming.
Installazione del guanciale /
EJECT
1. Zorg ervoor dat het vergrendelingsmechanisme in de open positie staat.
2. Zorg dat het vizier precies schuift in de opening van de bevestigingsset.
3.
Als het vizier op zijn plaats zit, kan het onderste gedeelte van het vizier in de bevestigingsset gedrukt worden.
Attenzione!
Vericare sempre che le imbottiture del casco siano installate prima di usarlo. Un casco con
imbottiture installate male o addirittura assenti può incrementare il rischio di un serio
infortunio o la morte in un incidente.
Waarschuwing!
Controleer altijd alvorens u de helm in gebruik neemt of de helmkussentjes geïnstalleerd zijn.
Een helm met missende of op onjuiste wijze geïnstalleerde kussentjes kan de kans op ernstig letsel
of overlijden in het geval van een ongeluk verhogen.
19 20
Installatie wangkussentje
1
3
A
Posizione della
sede del gancio
Positie van
de houder
B
※Far scorrere l'aggancio A dai
guanciali all'interno della sede
'B' (ripetere su entrambi i lati)
※Druk 'A' van het wangkussen
in de houder 'B'.
(herhaal voor de andere kant)
Italian / Dutch

1. Inserire le cinghil per il mento attraverso l'apertura del guanciale.
2. Inserire la parte posteriore del guanciale nella calotta, facendo in modo di allineare
la parte inferiore del guanciale con il prolo in gomma del casco.
3. Chiudere i 3 bottoni.
1. Voer de helmbanden door de opening van het wangkussentje.
2. Plaats het plastic gedeelte van het wangkussen tussen de binnen - en buitenschaal.
3. Klik de drukkers vast in de helmschaal.
Rimozione dell’imbottitura a corona /
Losmaken van het middenkussentje
1. Aerrare il tessuto dell’imbottitura a corona il piú possibile verso la sua base di plastica e tirare fuori
dal casco. Notare come le sezioni di plastica dell’imbottitura a corona si allineino con i manicotti
della calotta. Questo vi sarà di aiuto quando dovrete reinstallarla.
2. Ripetere la stessa operazione per il retro.
1. Pak het weefsel van het middenkussentje zo dicht mogelijk bij zijn plastic basis vast en trek deze van
de helm weg. Zie hoe het plastic onderdeel van het middenkussen zich uitlijnt met de kunststofhoes
van de schaal. Zo kunt u het kussentje gemakkelijk herinstalleren.
2. Herhaal hetzelfde proces aan de achterkant.
Installazione dell’imbottitura a corona /
Installatie van het middenkussentje
1. Plaats het voorste gedeelte eerst, door de plastic basis
uit te lijnen. Zorg ervoor dat de gaten in het midden en aan de zijkant
mechanisme door de geleider in de helm, en klem de kunststof afdekplaat hierna over het geheel.
Zorg er hierbij voor dat u de plaat van het midden uit naar buiten toe vastklemt.
2. Plaats het middenkussen op zijn plaats en druk de twee achterste drukknopjes vast.
plaat en het schuifmechanisme in het midden
exact overeenkomen. Schuif het
Rimozione della protezione del cinturino /
Uitnemen cover kinsluiting
1. Aerrare la parte terminale della protezione
del cinturino e slarla come illustrato
nell'immagine.
1. Pak het uiteinde van de cover van de kinsluiting
vast en trek het voorzichtig los.
Installazione della protezione del cinturino /
Kinsluiting-cover installeren
1. Inserire il cinturino nella protezione del cinturino e spingere no in fondo, in modo da coprire
tutto il cinturino.
1a
1b
Italian / Dutch
1. Inserire la sezione frontale allineando la base in plastica e l’inserto dell’imbottitura, assicurandosi che I
fori centrali e laterali siano correttamente posizionati. Premere l’inser to dell’imbottitura (parte centrale)
verso il foro creato all’interno della calotta, ripetendo l’operazione su entrambi i lati.
2. Allineare e far scattare le chiusure a scatto al loro posto.
1. Stop de kinsluiting in de cover en duw de cover er volledig overheen.
21 22

Kit di emergenza / Kit voor noodgeval
B
A
Montaggio paranaso / Neuskap installatie
In caso di emergenza, è possibile rimuovere i guanciali,
come indicato nella gura. Tirare, le 2 linee laterali di
emergenza indicate con la linea rossa, con le dita.
Usare il kit di emergenza solo all'occorrenza.
Tijdens een noodgeval kun je de wangkussens
verwijderen zoals hiernaast weergegeven in de
afbeeldingen. Trek aan de rode draad met je vingers.
Gebruik de kit alleen in een noodsituatie.
Rimozione paranaso / Neuskap demonteren
1. Aerrare il centro del paranaso e tirarlo delicatamente
per rimuoverlo dalla sua sede.
1. Inlare il paranaso nell'apposita sede
1. Centreer en druk de neuskap op zijn plaats.
Montaggio protezione mento / Kinap installatie
1. Localizzare i ganci tra la calotta e i guanciali. Far scivolare un lato del sottogola (foro predisposto)
nel gancio. Ripetere dall'altro lato. (Procedere con l'assemblaggio partendo da 1 sino ad arrivare a 3.)
※ Far scorrere il gancio 'A' dal
sottogola alla sede 'B'.
(ripetere su entrambi i lati)
A
3
2
1. Kijk naar de ingang tussen de schaal en de wangkussens. Schuif een kant van de chin curtain
(uitgescneden gat) op het haakje. Hanteer dezelfde montage aan de andere kant.
(Monteer de chin curtain in een chronologische volgorde zoals hieronder weergegeven.)
1
B
※ Druk 'A' van het chin curtain
in de houder 'B'.
(herhaal voor de andere kant)
Italian / Dutch
Rimozione protezione mento / Kinap demonteren
1. Tirare il paranaso per toglierlo come indicato dalle frecce.
1. Pak het midden vast van de breath deector en trek
deze er voorzichtig uit.
1. Trek de chin curtain van de helm af zoals aangegeven.
23 24
 Loading...