

CS-15
www.hjchelmets.com
CS-15
Rev.01
Contents
CLOSE
OPEN
CLOSE
OPEN
English P . 1-6 Français
P . 7-12 Deutsch P . 13-18
Español P. 19-24 Italian P. 25-30 Dutch P. 31-36
Important Safety Information
The instructions in this manual are designed to help you select the right helmet, wear it properly, take care of it, and know when
to replace it. Failure to follow these instruction may increase your risk of serious injury or death in an accident.
In order to get the most protection possible from your helmet, you should always do the following:
• Wear your helmet when you ride;
• Handle your helmet carefully to avoid accidental damage; and
• Ride safely – do not take risks because you are wearing a helmet.
Although your HJC helmet is designed to reduce or prevent some injuries when worn, no helmet can protect you from all possible or
foreseeable impacts. For example, your helmet cannot protect you from spinal or neck injuries. In addition, there is no guarantee that your
helmet will PREVENT injuries to the area of your head that is covered. A low speed accident may even result in serious injury or death.
Selecting the Right Helmet
Never buy a used helmet or borrow someone else’s helmet. Over time the protective foam in helmets will adjust
to the contours of a user’s head. A used or borrowed helmet may not offer as much protection as a new helmet.
Wearing the wrong size helmet can increase your risk of serious injury or death in an accident. A helmet that is
too large for your head may be dislodged or knocked off in an accident. To select the right size helmet for your
1. Measure your head. Wrap a tape measure around your head about one inch (2.5cm) above your eyebrows.
2.
Use the sizing chart to select the helmet size that corresponds most closely to your head measurement. If your head
size falls between two helmet sizes, try on the larger helmet first and then the smaller size.
Size Chart
3.
Try on the helmet by grasping both chin straps to pull the helmet completely onto your head, ensuring that the top of your head
is in contact with the top of the helmet interior.
4.
Check for a proper fit. To make sure your helmet is the right size, check that :
• The helmet inner lining fits snugly around your head.
• The top pad presses firmly on your head.
• The cheek pads contact your cheeks.
• There is no space around your brow under the inner lining. Test this by trying to insert your fingers.
If the helmet does not fit snugly, try on a smaller size.
5.
Check your field of vision when trying on a helmet. Some helmets may obstruct or block your vision when looking left, right, up, or down.
Test the helmet fit by placing your hands on each side of the helmet. While holding your head as motionless
6.
as possible, try rotating your helmet from left to right then up and down. If you can feel the helmet padding
sliding on your head, it is too big, try a size smaller. You should feel the helmet move the skin on your
head and face as you try to move the helmet.
7. F
asten the retention system (chin strap) as tight as possible under your jaw without causing pain. There must be no slack
in the strap, and the strap must be tight up against your jaw. See page 2-3.
8.
Test the retention system (chin strap)
• Put your hands on the back of the helmet and try to push the helmet off by rotating it forward.
• Put your hands on the front of the helmet above your forehead (or on the chin guard) and try to push
the helmet off by rotating backward.
Repeat steps 3 throught 8 until you find a helmet that fits your head snugly and securely.
head, follow these instruction :
The size chart is only for reference. Always
try the helmet on and follow this manual's
instructions for a proper fit.
Always make sure you can see well enough to safely operate your motorcycle.
If helmet comes off or shifts over your eyes, try another size or another model or brand. You must be able
to see the edge in your upper field of vision.
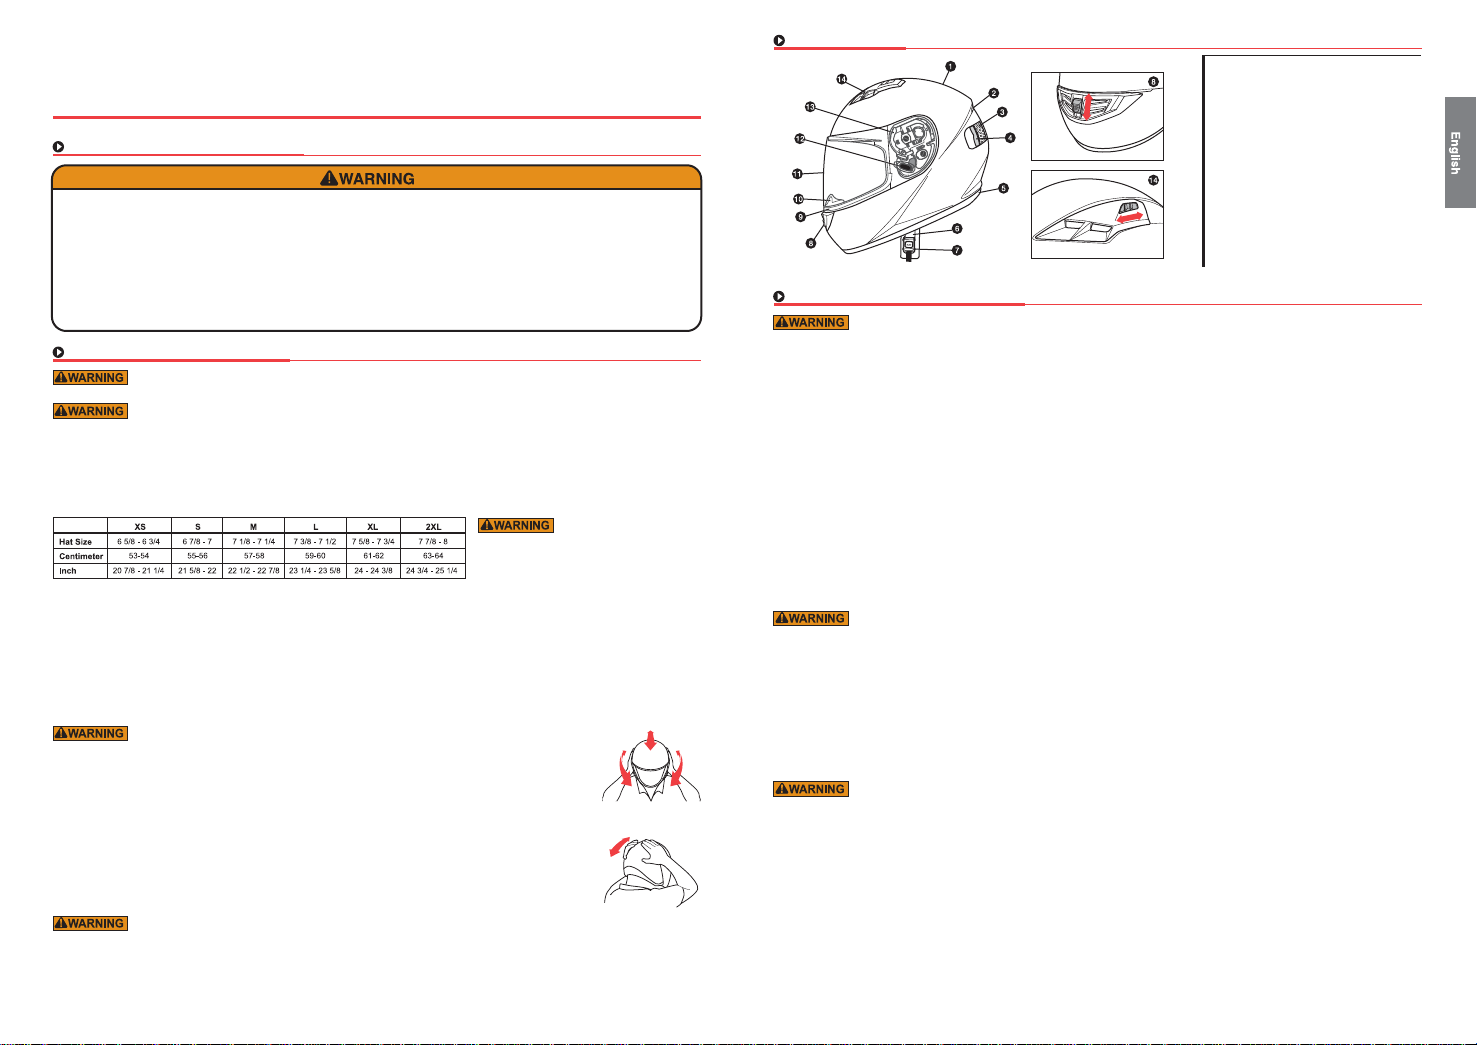
Specifications
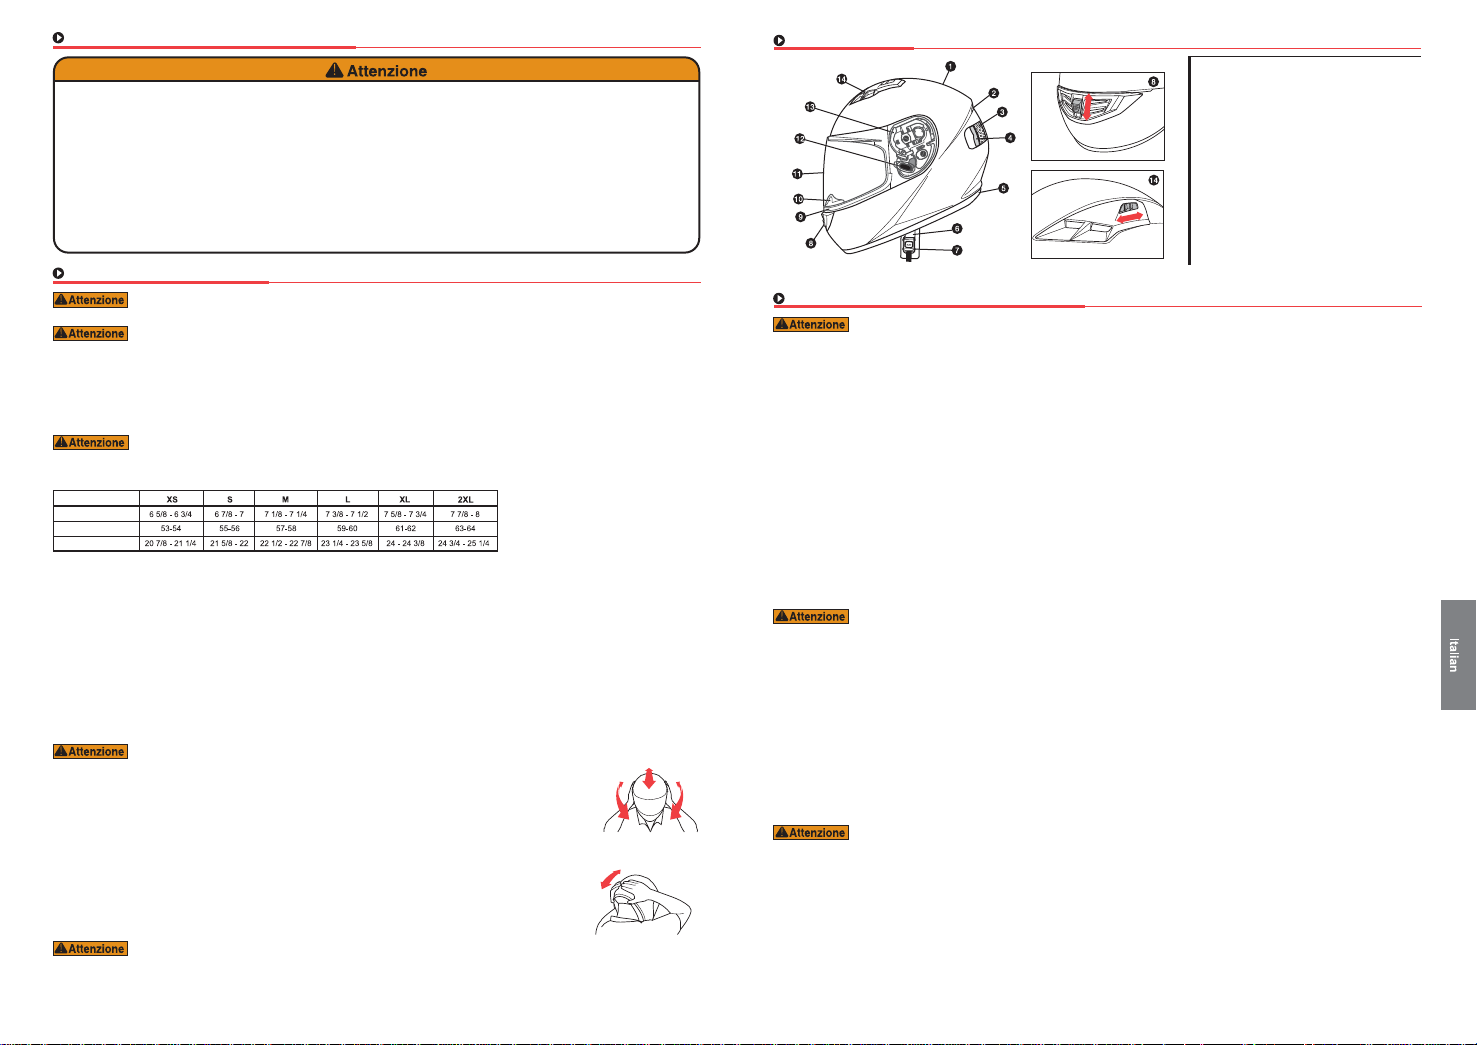
1. Outer Shell
CLOSE
OPEN
CLOSE
OPEN
2. Rear Venturi Exhausts
3. Impact Absorbent Liner
4. Comfort Liner
5. Rubber Edge Trim
6. Chin Strap
7. Micro Buckle
8. Front Chin Vent
9. Eyeport Gasket
10. Breath Deflector
11. Tool-less Shield
12. Shield Retention Button
13. Shield Ratchet
14. Top Front Vent
Using Your Helmet Correctly
To reduce the risk of serious injury or death and to help prevent damage to your helmet :
• Never adjust your helmet accessories while riding – Only make helmet adjustments when stopped.
• Never
drop your helmet – Dropping your helmet may crack the shell or damage the protective foam. The damage may
not be visible. Your helmet is only designed for ONE impact. Refer to “Helmet Replacement” (p. 6) for more information on
what
to do
• Never wear anything between your head and your helmet – this may reduce the effectiveness of your helmet.
• Never
to the helmet protective foam or liner.
• Never use
foam, or other components.
• Never
foam, or other components.
• Never use a dark or tinted face shield at night or in low visibility conditions.
- If you have any questions on what other substances may damage your helmet, please contact us.
• Always
Always lock your face shield in place when you are riding.
• Always
• Always store your helmet in its helmet bag when not in use to help reduce accidental surface damage.
Inspect your helmet
To ensure that your helmet is in the best condition to maximize your protection, always inspect your helmet for damage
before riding :
• Check
screws. Plastic base plate screws can break and plastic screws can strip the screw sleeves if over-tightened.
• C
section for further information. If your helmet has been dropped, you may not be able to see the damage.
• C
or purchase a new helmet. See “Replacement Parts” (p. 6) for information on parts replacement.
• Check the retention system (chin strap) for damage. If it is frayed or ripped, replace the helmet.
• Check that all pads are in place. Both of the cheek pads and the crown pads must be in place.
Check Your Face Shield
If your face shield is scratched or damaged it may reduce the visibility-replace if necessary.
Always make sure you can see well enough to safely operate your motorcycle.
Fasten the Retention System
Fasten the retention system (chin strap) as tight as possible under your jaw without causing pain. There must be no slack in the
strap, and the strap must be snug up against your jaw. If the retention system is not tight, your helmet may become dislodged or
knocked off in an accident.
after helmet has been dropped.
hang or hook your helmet on anything including mirror stalks or sissy bars - Doing so may cause damage
insect repellent on or around your helmet – insect repellant may damage your helmet’s shield, shell, protective
expose helmet to gasoline or gasoline fumes – Gasoline may damage your helmet’s shield, shell, protective
wear eye protection – If you are not using a helmet with a face shield, always wear eye protection when riding.
be alert for sounds – Your helmet may impair your hearing. However, your helmet is not a form of hearing protection.
To reduce the risk of serious injury or death, always use your helmet correctly.
the shield and shield ratchet – re-tighten shield ratchet screws if necessary. Be sure not to over-tighten any
heck
for helmet damage. If your helmet is damaged or cracked, stop using it immediately. See “Helmet Replacement” (p. 6)
heck for worn or damaged parts.
Plastic components may wear out over time. If you find worn or damaged parts, replace them
If parts fall off while riding, your vision may be blocked which could cause an accident.
1 2
Micro Buckle
Hold the Clip and pull
Chin strap
Clip
the Chin strap as directed
above to adjust the fit.
Micro buckle
Chin strap
Maintaining Your Helmet Correctly
Shell Cleaning
Only use approved methods to clean the helmet. Using other unapproved chemicals or methods may damage the helmet shell
or lining. A damaged helmet may increase your risk of serious injury or death in an accident.
Glossy Finish. HJC recommends cleaning your helmet with products designed for automotive cleaning and polishing. All HJC
helmets are finished with an automotive type base coat/clear coat finish. Rubbing compounds can be used for deep cleaning to
remove many scratches and scuffs. Follow the product’s instructions diligently. Over polishing with rubbing compounds can cause
light abrasions which may dull the finish of your helmet. Stickers and decals will leave adhesive residue when removed. To remove
the adhesive residue, use alcohol swabs. Be certain to immediately wipe away the excess liquid and clean the area with soap and
water once the adhesive residue is removed. Do not use excessive pressure while rubbing when attempting to remove the adhesive
residue, instead use multiple light treatments.
Non-Glossy Finish. For our flat finish (non-glossy) helmets, we recommend using warm water and mild soap. Use multiple
treatments for heavier dirt. Do not use excessive pressure or rubbing compounds while cleaning the surface as a “glossy” effect
could be created, running the flat finish appearance.
Interior Cleaning
Although we recommend changing a helmet every 3 to 5 years, the accumulation of sweat, humidity and dirt can deteriorate the
fabric and stitching and this may cause odor. To wash HJC removable pads, HJC recommends regular machine washing and air
drying. For non-removable interiors, HJC recommends using bacteria and mildew eliminating products such as “Helmet Fresh.”
Vent Cleaning
Dirt and debris can find its way into venting of your HJC helmet. Compressed air cans used for cleaning computer keyboards may
be used to blow the debris from the ventilation system. It is recommended that you remove any removable pads before doing this
process.
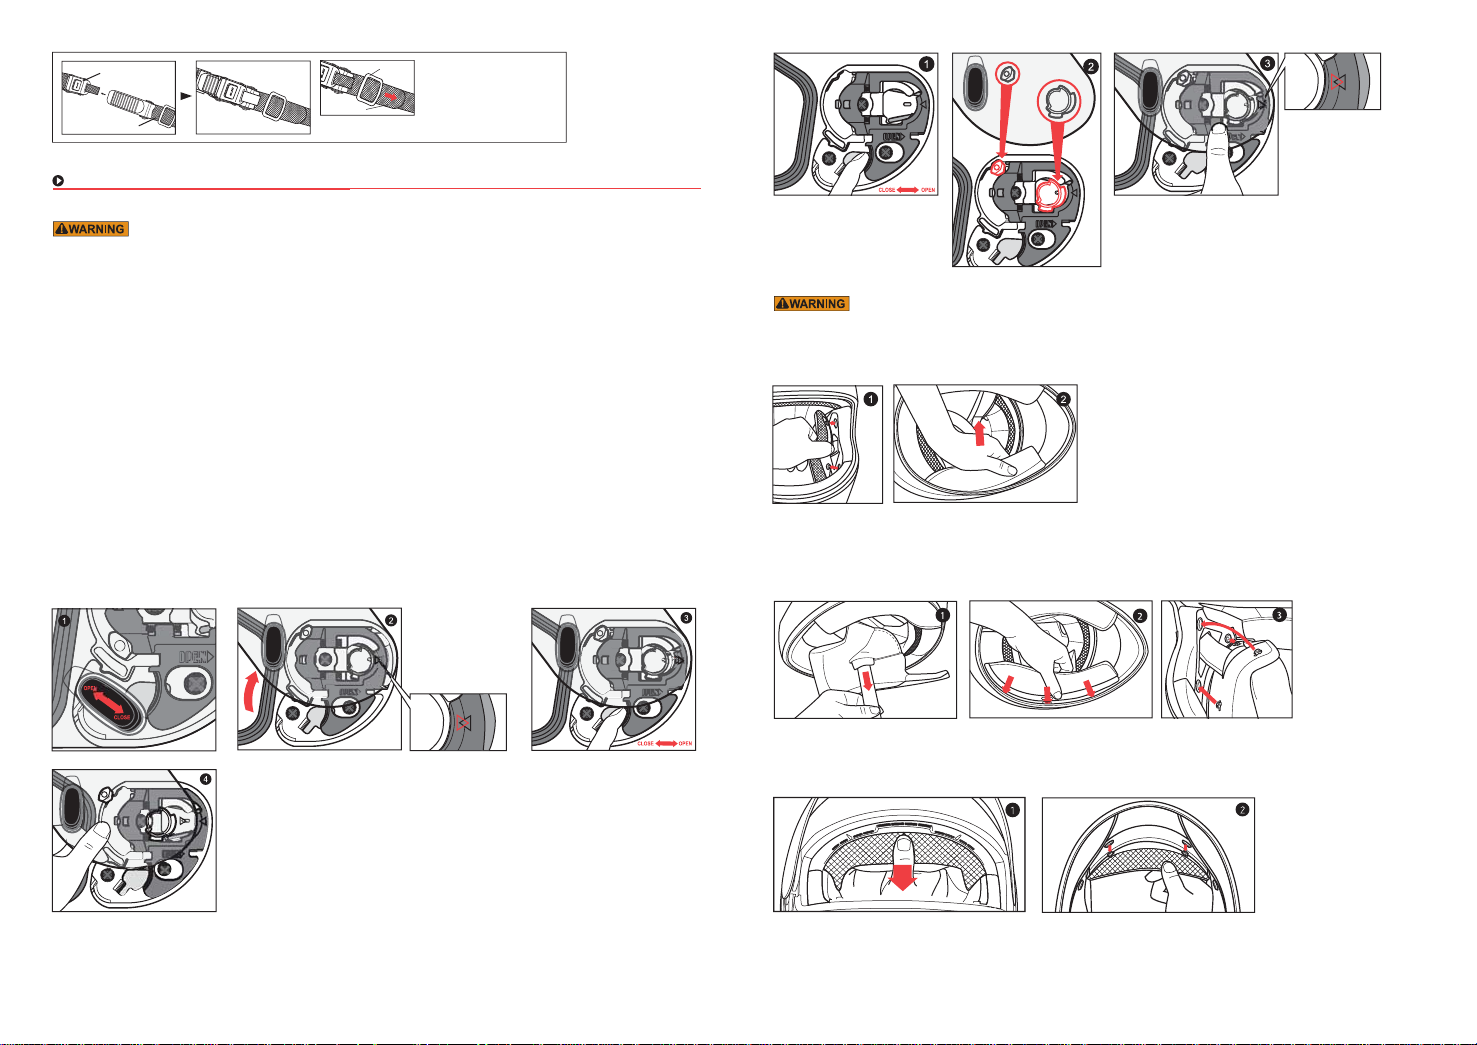
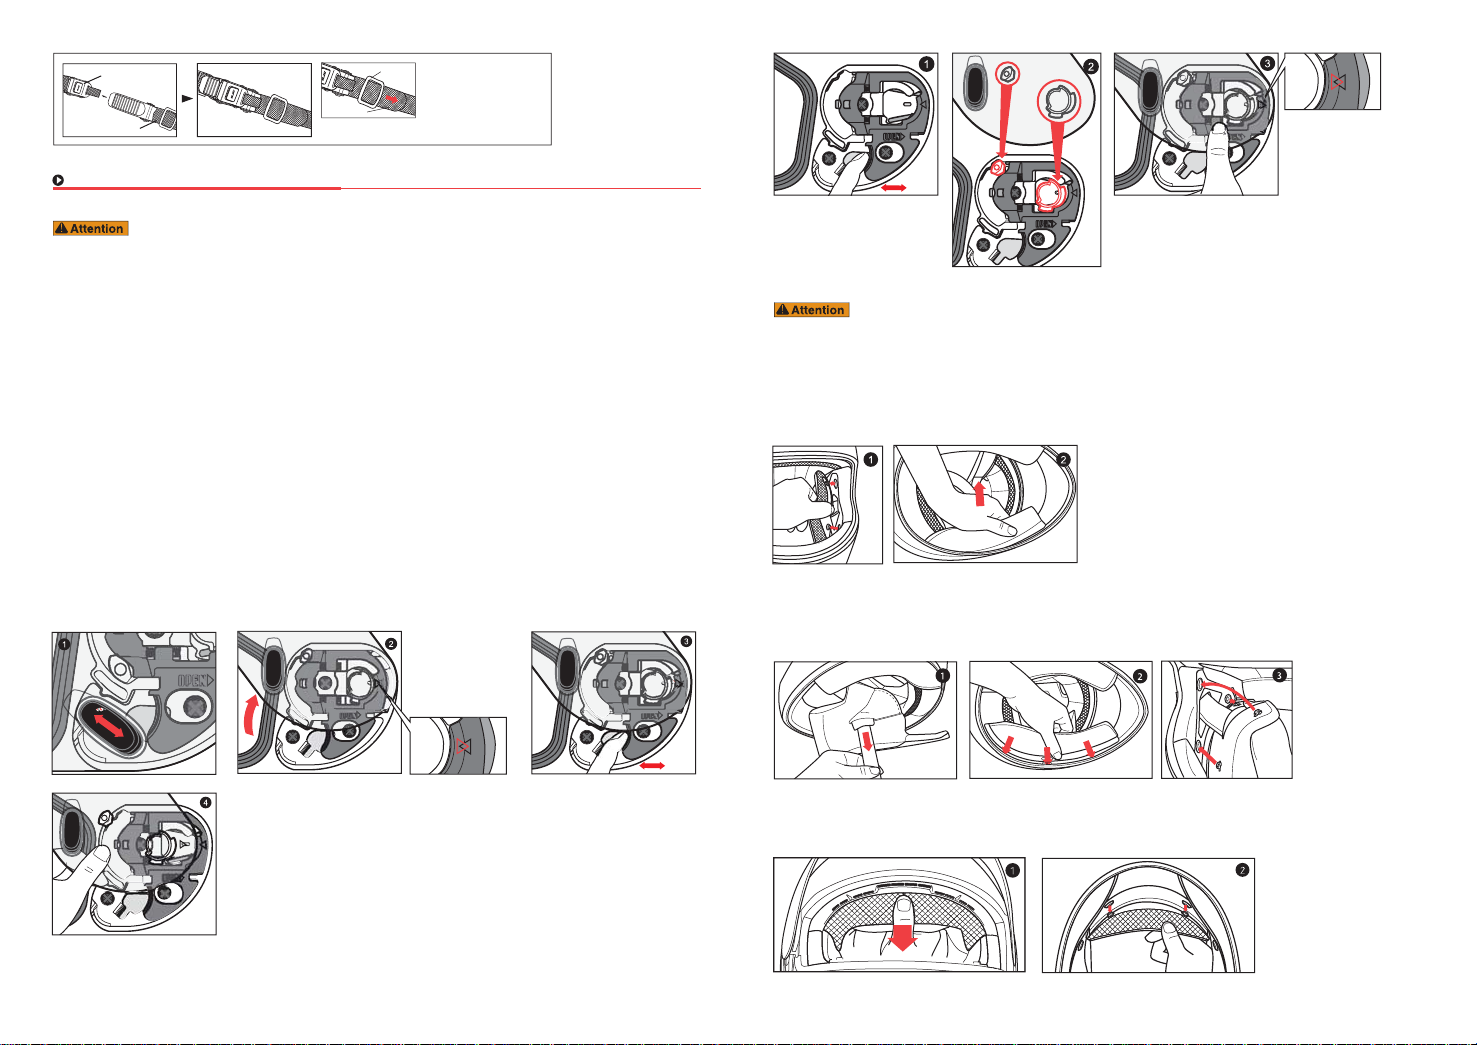
Shield Removal
When the shield is opened
to its maximum open
position, the arrow on the
shield should line up with
the arrow on the
handle-locker.
Shield Installation
1. Ensure that the handle-locker
is in the open position.
Always check to make sure helmet pads are installed before using the helmet. A helmet with missing or improperly installed
pads may increase your risk of serious injury or death in an accident.
2. Align and insert the top of the shield guide into
the plate-gear guide.
3.
With the guides properly aligned, press the lower section
of the shield into the plate-gear mechanism. The locking
tab should pop into position, locking the shield into place.
Cheek Pad Removal
There are 3 snaps holding the cheek pad in place.
1. Gently pry the check pad away from the interior, releasing
the snaps.
2. Grasp the cheek pad near its center and gently pull it free
from the chin strap.
Cheek Pad Installation
1. Feed the chin strap through the opening in the cheek pad.
2. Align and fully slide the cheek pad plastic plate between shell and EPS.
3. Clip the cheek pad’s 3 small male snaps to the 3 female snaps fixed on the shell interior.
Crown Pad Removal
1. Move the shield retention button to the open position.
2. Open shield to the maximum open position.
1. Grasp the crown pad fabric as close as possible and pull/pry away from the helmet.
2. Repeat same at rear.
3. Move the handle-locker to the open position.
4. Shield will be automatically released out of base ratchet mechanism.
3 4

Crown Pad Installation
1.
Align the center of the crown pad’s plastic sleeve with the shell. Force the crown pad’s plastic sleeve in between the shell
and EPS.
2.
Align the left or right end of the crown pad’s plastic sleeve with the shell. Force the crown pad’s plastic sleeve in between
the shell and EPS (one side at a time).
3. Align and snap the two rear snaps into place.
Breath Deflector Removal
1. Push breath deflector flat and pull away from the helmet as arrows indicate.
Breath Deflector Installation
1. Push breath deflector into specified slot as arrows indicate.
Chin Curtain Removal
1. Grasp the chin curtain fabric (one side at a time) at the bottom corners and
gently pull the sleeve down and away from the shell.
Replacement Parts
Always check to make sure helmet pads are installed before using the helmet. A helmet with missing or improperly installed
pads may increase your risk of serious injury or death in an accident.
Do Not Modify Your Helmet
Your HJC helmet is designed to meet ECE R 22-05 standard. Contact HJC Europe for more information about the ECE R 22-05
standard. Modifying your helmet may increase your risk of serious injury or death in an accident. Do not modify your HJC
helmet. Modifications include the following :
• drilling holes;
• cutting shell, liner, or strap;
• modifying the retention system, including adding a chin cup;
• removing parts;
• painting; and
• attaching accessories that are not manufactured by HJC for this helmet.
If you have questions about modifications, please contact HJC, See back cover for contact information.
Storing Your Helmet Correctly
An improperly stored helmet san become damaged and may increase your risk of serious injury or death in
an accident. You should:
•
Store helmet in a cool and dry place,
•
Keep helmet away from pets and other animals,
•
Keep helmet away from heat in excess of 50°C and do not set on or near hot surfaces.
•
When helmets left out in the sun for extended periods of time, it may fade overtime.
Helmet Replacement
Although your HJC helmet is constructed with the best materials available to offer a long-lasting product, it
will eventually need to be replaced. Immediately replace your helmet if:
• It has suffered an impact. Your helmet is only designed for ONE impact. An impact may fracture the outer
s
hell or compress the impact absorbing liner. You may not be able to detect this damage. Any impact in
a crash or a drop from as low as 4 feet is enough to damage your helmet.
• The shell, lining, or retention system is damaged. The helmet shell, the impact absorbing lining, and
Even if your helmet has not been damaged, it needs to be replaced every 3 to 5 years depending on how much you use it.
Over time, UV rays and adhesive and component aging will damage your helmet. Wearing a damaged helmet may increase
your risk of serious injury or death in an accident. If you are unsure if you need to replace your helmet, contact HJC Europe
before using your helmet again.
retention system must be in good condition to provide you with the most protection.
Helmet Disposal
If you buy a new helmet, destroy the old one to ensure it cannot be reused. Do not sell or give away your
old helmet, even if it has not been damaged. Over time the protective foam in the helmet will adjust to the
contours of your head. If someone else uses this helmet it will not provide them with as much protection.
the
Warranty
HJC hereby extends a limited warranty to the purchaser of a HJC helmet that the helmet is free of defects in materials and
workmanship.
Coverage
This warranty is applicable to manufacturer’s defects only and is good up to one year from the date of purchase, It does not
Chin Curtain Installation
1. Center the front plastic sleeve of the chin curtain with the shell.
Force the chin curtain’s plastic sleeve in between the shell and EPS.
5 6
apply to any problems arising out of wearer’s misuse, negligence, modifications, accidents, etc.
Disclaimer
Any warranty of merchantability and any implied warranty are hereby expressly disclaimed. In addition HJC shall not be liable
for any consequential damages.
Procedure
In order to receive warranty, please take your helmet, your receipt showing the date of purchase, and a brief memo that
includes a description of the problem, your name, and phone number tothe authorized HJC dealer from which you purchased
your helmet.

Informations importantes relatives à la sécurité
ouvert
ouvert
fermé
fermé
Les instructions fournies dans ce manuel sont destinées à vous aider à choisir le bon casque, à le porter correctement,
à l'entretenir ainsi qu'à savoir quand le changer. Si vous ne suivez pas ces instructions, vous risquez de vous blesser
gravement voire de perdre la vie en cas d'accident.
Afin que votre casque vous fournisse une protection optimale, il est impératif de tenir compte des points ci-dessous :
• Porter votre casque, lorsque vous roulez
• Prendre soin de votre casque afin de ne pas l'endommager
• Conduire prudemment ne prenez pas de risque du fait que vous portez un casque.
De plus, votre casque HJC est conçu pour réduire ou empêcher certaines blessures mais, aucun casque ne pourra vous protéger
de tous les chocs possibles et imaginables. Par exemple votre casque ne protégera pas votre colonne vertébrale ou votre nuque.
De plus, il n’y a aucune garantie que votre casque EMPECHERA des blessures dans la partie de votre tête qui est couverte.
Même un accident à faible vitesse peut provoquer une blessure grave ou un décès.
Choisir le bon casque
N'achetez jamais un casque d'occasion et n'empruntez pas le casque à quelqu'un. A force de le porter, l'intérieur
(en mousse) prend la forme de la tête de l'utilisateur. Un casque d'occasion ou emprunté risque de ne pas protéger
autant qu'un casque neuf.
Porter un casque de taille inadaptée peut accroître le risque de blessure ou de décès en cas d'accident. Un casque
trop grand peut bouger ou casser en cas de choc. Afin de choisir la taille la mieux adaptée, veuillez suivre les
1. Mesurez votre tête : utilisez un mètre à couturière pour mesurer le tour de tête. Placez celui-ci à environ 2,5 cm au-dessus des
sourcils.
2. Utilisez la grille de tailles pour trouver la taille de casque qui correspond le mieux à votre tour de tête. Si votre tour de taille est
entre deux tailles, essayez d'abord la taille au-dessus puis, la taille en-dessous de celle mesurée.
GRILLE DE TAILLES POUR LES CASQUES
Tour de tête
Centimètres
Pouces
3. Essayez votre casque en saisissant les deux parties de la jugulaire et, enfoncez complètement le casque sur votre tête,
tout en vous assurant que le haut de votre tête touche l'intérieur du casque.
4. Vérifiez le maintien du casque. Assurez-vous de la bonne taille de votre casque, en vérifiant que :
• La garniture intérieure du casque épouse votre tête,
• La garniture tête appuie fermement sur votre tête,
• Les mousses joues soient en contact avec votre joue,
• Aucun espace n'existe entre votre front et la garniture.
Vérifiez ceci en essayant de passer vos doigts.
Si le casque ne vous va pas parfaitement, essayez une autre taille.
5. Vérifiez votre champ de vision lorsque vous essayez un casque. Certains casques peuvent gêner ou réduire votre
champ de vision, lorsque vous regardez vers la droite, vers la gauche, vers le haut ou vers le bas.
6. Vérifiez le bon maintien de votre casque en posant les mains de chaque côté. Maintenez votre tête
le plus immobile possible et essayez de tourner le casque de gauche à droite puis, de bas en haut.
Si vous sentez que la garniture intérieure de votre casque glisse sur votre tête, c’est que le casque
est trop grand. Essayez une taille inférieure. Lorsque vous bougez le casque, vous devez sentir le
dessus de votre tête et la peau du visage bouger.
7. Attachez la jugulaire, le plus serré possible sous votre menton sans que cela ne vous fasse mal. Il ne
doit pas y avoir de jeu au niveau de la jugulaire et, celle-ci doit être bien resserrée sous votre menton.
8. Vérifiez la jugulaire
• Posez les mains à l’arrière du casque puis essayez de le retirer en le faisant pivoter vers l’avant.
• Posez les mains sur le devant du casque au niveau du front (ou au niveau du cache menton)
puis essayez de le retirer en poussant vers l’arrière.
Répétez les étapes 3 à 8 jusqu’à ce que vous trouviez le casque qui vous convienne parfaitement.
instructions ci-après.
La grille des tailles est donnée à titre indicatif.
Pour une tenue parfaite, essayez toujours le
casque et suivez les instructions du manuel
d’utilisation.
Assurez-vous toujours d’avoir une bonne visibilité pour piloter votre moto en toute sécurité.
Si le casque tombe ou arrive au niveau de vos yeux essayez une autre taille, un autre modèle ou marque.
Vous devez être en mesure de voir le bord dans votre champ de vision supérieur.
Spécifications
1. Coque extérieure
fermé
ouvert
fermé
ouvert
2. Spoiler arrière avec ouvertures
pour extraction de l'air
3. Calotin intérieur absorbant les chocs
4. Garniture intérieure
5. Joint
6. Jugulaire
7.
Boucle micrométrique
8. Aération mentonnière
9. Joint de l’écran
10. Cache nez
11. Ecran
12. Bouton de blocage de la visiére
13. Mécanisme de l’écran
14. Ventilation supérieure
Utillisation correcte du casque
Afin d'éviter le risque de blessure grave ou de décès et, d'éviter d'endommager votre casque:
• Ne pas régler votre casque pendant la conduite, Régler le casque une fois à l'arrêt.
• N
e pas faire tomber votre casque - une fois tombé, le casque peut être fissuré au niveau de la coque ou de la mousse de
protection. Le dommage peut être invisible. Votre casque peut supporter un seul impact. Veuillez consulter le chapitre
"Remplacement du casque" (p.12) pour plus d'informations.
• Ne rien placer entre votre tête et le casque - Autrement l'efficacité du casque est réduite.
• N
e pas accrocher le casque sur les rétroviseurs de la moto ou sur tout autre objet - ceci risque d'endommager la garniture
intérieure du casque.
• Ne pas répandre d'insecticide sur le casque - ce produit risque d'abimer l'écran, la coque, la garniture intérieure.
• Ne pas exposer le casque à de l'essence ou de la vapeur d'essence - l'essence détériore l'écran, la coque, la garniture
intérieure ou d'autres composants du casque.
• Ne pas utiliser le casque de nuit ou par visibilité réduite si l'écran est teinté.
- Si vous avez des questions sur d’autres substances qui peuvent endommager le casque, contactez-nous.
• Protéger les yeux lors de la conduite - si votre casque n'est pas équipé d'un écran, protégez vos yeux avec des lunettes
de protection. Toujours bloquer l'écran en position fermée lors de la conduite.
• Etre attentif au bruit - votre casque peut réduire votre audition. Pourtant votre casque ne vous protège pas des bruits.
• Si le casque n'est pas utilisé, protégez-le avec la housse de protection afin d'éviter tout dommage sur la coque.
Afin d’éviter tout risque de blessures graves ou de décès, utilisez correctement votre casque.
Vérifiez votre casque
Afin d'être sûr que votre casque est en bon état pour optimiser votre protection, vérifiez votre casque avant de l'utiliser.
• Vérifiez l'écran et le système de fixation - resserrer le système de fixation de l'écran si nécessaire. Ne pas serrer trop fort
les vis en plastique du système de fixation. Les vis en plastique peuvent casser au niveau de la tige filetée et les vis
plastiques peuvent endommager la douille.
• Inspectez le casque : si votre casque est endommagé ou fissuré, ne l'utilisez plus. Veuillez vous reporter au chapitre
"Remplacement du casque" (p.12) pour plus d'information. Si votre casque est tombé, le dégât peut ne pas être visible à
l'œil nu.
• V
érifiez les pièces d'usure ou endommagées. Les composants plastiques s'usent au fil du temps. Si des pièces sont usées
o
u endommagées, veuillez les remplacer ou acheter un nouveau casque. Cf "Remplacement des pièces" (p. 12) pour plus
d'information sur le remplacement des pièces.
Si des pièces tombent lors de la conduite, votre visibilité peut être réduite, ce qui peut provoquer un accident.
• Contrôler le système de fermeture (boucle jugulaire). S'il est usé ou détérioré, remplacez le casque.
• Vérifiez que la garniture intérieure est en place. Les mousses joues et la garniture intérieure doivent être en place.
Contrôler votre écran
Si votre écran est rayé ou endommagé cela risque de réduire la visibilité - Remplacez-le si nécessaire. Toujours s'assurer
d'une bonne visibilité pour conduire en pleine sécurité.
Boucler le système de fermeture
Le système de fermeture (boucle jugulaire) doit être bien resserré sous le menton, sans gêner. La boucle jugulaire ne doit
pas être lâche et, doit être bien ajustée au niveau du menton. Si le système de fermeture n'est pas bien resserré, le casque
pourrait bouger et se détacher en cas d'accident.
7 8
Boucle micrométrique
ouvert
fermé
ouvert
fermé
ouvert
fermé
Boucle
micrométrique
Jugulaire
Jugulaire
Passer la sangle par la
Boucle
boucle et régler à la
longueur désirée.
Installation de l'écran
Entretien correct de votre casque
Nettoyage de la coque
R
especter les instructions ci-dessous pour nettoyer le casque. L'utilisation de produits ou de procédés de nettoyage inappropriés
peut abîmer la coque du casque ou la garniture intérieure. Un caque endommagé augmente le risque de blessure ou de décès
en cas d'accident.
Finition brillante. HJC recommande de nettoyer votre casque avec des produits conçus pour le nettoyage et le polissage des
automobiles. Un vernis de base et un vernis de finition de type automobile sont utilisés pour tous les casques HJC. Les produits
nettoyants peuvent être utilisés pour un meilleur nettoyage et, pour enlever les rayures ou éraflures. Tenir compte des recommandations
du fabricant de ces produits. L'utilisation excessive de produits de polissage risque de causer une légère usure qui va ternir la finition
du casque. Des résidus collants restent après avoir retirés des autocollants ou décalcomanies. Pour enlever ces résidus, utiliser
un tampon imprégné d'alcool. Après avoir nettoyé ces résidus, essuyez immédiatement l'excès de liquide et nettoyer la zone avec
de l'eau et du savon. Ne pas frotter trop fort.
Finition mate.
Si nécessaire, répéter le traitement sans frotter trop fort. Un frottement trop fort risque de créer un effet brillant et de faire disparaître
la finition mate.
Nettoyage de l’intérieur
Même si nous recommandons de remplacer le casque tous les 3 à 5 ans, l'accumulation de la sueur, de l'humidité et de la saleté
pourrait détériorer le tissu et les coutures et engendrer une mauvaise odeur. Pour la garniture intérieure démontable HJC le lavage
régulier en machine et le séchage à l'air sont recommandés. Pour la garniture intérieure non démontable, HJC recommande l'utilisation
d'un produit éliminant les bactéries et les moisissures comme "Helmet Fresh".
Nettoyage des aérations
Des saletés et des débris peuvent pénétrer dans les aérations de votre casque HJC. Une bombe d'air comprimé telle que utilisée
pour le clavier d'ordinateur, peut être utilisée pour expulser les débris des aérations. Avant de débuter cette opération, il est
recommandé de retirer toutes les garnitures démontables.
Démontage de l'écran
Pour nos casques à finition mate, nous recommandons l'usage d'eau tiède et d'un savon doux pour le nettoyage.
L'écran est ouvert au
maximum de sa position
ouverture, lorsque la
flèche sur l'écran est
ouvert
fermé
alignée avec la flèche du
levier de fermeture.
1. Placer le bouton de blocage de l'écran en position ouverture.
2. Ouvrir l'écran au maximum de la position ouverture.
3. Placer le levier de fermeture en position ouverture.
4. L'écran se retire automatiquement du mécanisme de fixation.
fermé
ouvert
ouvert
fermé
2. A
1. Assurez-vous que le levier
de fermeture est en position
fermeture.
Pour rendre sûr le casque, toujours vérifier que les garnitures sont installées avant de l’utiliser. Un casque où il manque,
ou si les garnitures sont mal installées, peut augmenter le risque de dommages sérieux ou de mort lors d’un accident.
lignez et insérez le haut des points de fixation de l'écran
dans les points de fixation du mécanisme de fixation.
3. L
es points de fixation étant bien alignés, appuyez la partie
b
asse de l'écran dans le mécanisme de fixation. Les pattes
de fixation doivent s'encliqueter, fixant ainsi l'écran.
Démontage mousse de joue
Il y a trois lanières tenant la garniture des joues en place.
1. Tirer doucement la garniture des joues de l'intérieur, enlever les laniéres.
2. Prendre la garniture des joues près de son centre et tirer doucement sur la sangle jugulaire.
Installation mousse joue
1. Insérer la sangle jugulaire á travers l'ouverture de la garniture des joues.
2. Alignez et glissez entièrement la plaque plastifiée de la mousse de joue entre la calotte et l’EPS.
3. Veuillez assembler les 3 clips ensemble a l'intérieur de la calotte.
Démontage garniture intérieure
1. Saisir la garniture le plus près possible de la base en plastique, poussez/tirez vers l’extérieur du casque.
2. Refaite la même chose à l’arrière.
9 10

Installation de la garniture intérieure
1. Aligner l'embase de la lanière plastique centrale avec la coque et l'insérer à fond entre la coque et l'EPS.
ligner l'embase de la lanière plastique côté droit ou gauche avec la coque et insérer dans son emplacement. Insérer un
2. A
côté à la fois.
3. Aligner les deux boutons pression arrière et les mettre en place.
Retrait du déflecteur nasal
1. Saisissez le centre du cache-nez, tirez doucement dessus pour le sortir de
sa fente.
Mise en place du déflecteur nasal
1. Faites glisser le cache-nez dans la fente prévue à cet effet.
Retrait du cache menton
1. Saisir la partie textile du cache menton (un côté après l'autre), aux coins
inférieurs et, tirez doucement en le retirant de la calotte.
Remplacement de pièces
L'usage de pièces de rechange qui ne sont pas fabriquées par HJC, peut augmenter le risque de blessures graves ou de
décès en cas d'accident. Utilisez uniquement les pièces d'origine HJC conçues spécialement pour votre casque.
Ne pas modifier votre casque
Votre casque HJC a été conçu et réalisé selon la norme ECE R 22-05. Contactez HJC pour plus d’informations sur la norme
ECE R 22-05. En modifiant votre casque, vous augmentez le risque de blessure ou de décès en cas d'accident. Ne modifiez
pas votre casque HJC. Par modifications nous entendons :
•
percer des trous
•
couper la garniture ou la jugulaire
•
modifier le système de fermeture
•
enlever des pièces
•
peindre
•
utiliser des pièces de rechange qui ne sont pas d'origine HJC
Si vous avez des questions concernant la modification de votre casque, veuillez contacter HJC. Voir nos coordonnées au
dos de la notice.
Ranger votre casque
Un casque mal rangé peut être endommagé et augmente le risque de blessure ou de décès en cas d'accident.
Vous devez :
•
entreposer votre casque dans un endroit frais et sec,
•
maintenir les animaux domestiques ou autres loin de votre casque,
• éloigner votre casque de points chauds (+ de 50°C) et, ne pas le poser sur à côté de surfaces chaudes.
•
Une forte exposition au soleil durant de longues périodes peut endommager l'éclat des peintures.
Remplacer votre casque
Bien que votre casque HJC soit fabriqué avec les meilleurs matériaux pour une utilisation dans la durée, il
se peut qu'il soit nécessaire de le remplacer. Remplacez immédiatement votre casque lorsque :
• Le casque a subi un choc : votre casque est conçu pour résister à un seul choc Un choc peut provoquer
u
n impact sur la coque extérieure ou la calotte intérieure. Vous pouvez ne pas vous apercevoir du dommage.
Une chute d'une hauteur de 1 mètre est suffisante pour endommager votre casque.
• La coque, la garniture ou le système de fermeture sont endommagés : la coque, la garniture et le système
Même si votre casque n'est pas endommagé, il est recommandé de le remplacer tous les 3 ou 5 ans en fonction de l’utilisation.
Au fil du temps, les rayons UV et le vieillissement des autocollants et des différents composants, risquent de détériorer votre
casque. Le port d’un casque endommagé peut augmenter le risque de blessures graves ou de décès lors d’un accident.
Si vous n’êtes pas sûr s’il faut remplacer votre casque ou non, contactez HJC, avant d’utiliser le casque.
Mettre le casque au rebut
de fermeture doivent être en excellent état afin de garantir la meilleure protection.
En cas d’achat d’un nouveau casque, détruisez l’ancien afin de s’assurer qu’il ne sera plus utilisé. ll ne faut
pas vendre ou donner I’ancien casque, même s’il n’est pas endommagé. Avec le temps, la garniture intérieure
prend la forme de la tête. Si une autre personne l’utilise, la protection ne sera plus totalement assurée.
Garantie
HJC vous informe sur les limites de garantie. Le casque HJC est produit dans le respect des normes en vigueur. De sa
conception à la réalisation du produit fini, il bénéficie de l’expérience et du savoir faire HJC. Nos casques sortent de production
Mise en place du cache menton
1. Centrer la partie plastique à l'avant du cache menton avec la calotte.
11 12
après avoir subis divers tests et contrôles. Ils ne sont livrés que s’ils sont conformes.
Couverture
La garantie n’est applicable qu’aux défauts de fabrication et, est valable un an après l’achat du casque. Elle ne s’applique
pas aux mauvais usages, à la négligence, la modification apportée par l’utilisateur, ou les accidents, etc.
Limite de garantie
Sont exclues, toutes garanties commerciales et toutes garanties implicites à la vente.
Procédure
Afin de pouvoir bénéficier de la garantie, veuillez remettre à votre revendeur le plus proche, le casque, la facture d’achat et,
un document, mentionnant vos coordonnées et, relatant la description du problème rencontré.

Wichtige Sicherheitsinformation
Schließen
Schließen
Öffnen
Öffnen
Diese Bedienungsanleitung soll Ihnen zeigen, wie man den richtigen Helm auswählt, wie man ihn korrekt trägt, wie man
ihn pflegen sollte und wann es angebracht ist, ihn gegen einen Neuen auszutauschen. Das Nichteinhalten dieser Anleitung
kann das Risiko, bei einem Unfall tödliche oder ernsthafte Verletzungen zu erleiden, erhöhen.
Um den größtmöglichen Schutz des Helmes zu nutzen, beachten Sie daher immer folgendes:
• Tragen Sie immer einen Helm, wenn Sie mit dem Motorrad fahren
• Behandeln Sie den Helm mit größter Sorgfalt.
• Fahren Sie defensiv, ohne Risiken einzugehen, auch wenn Sie einen Helm tragen.
Obwohl Ihr HJC-Helm zur Vermeidung oder Verringerung von Verletzungen entwickelt wurde, kann er Sie nicht vor allen
vorhersehbaren Risiken bewahren. Dazu gehören u.a. Rückenmarks- und Halsverletzungen. Des Weiteren gibt es keine
Garantie, dass der Helm Verletzungen in dem abgedeckten Kopfbereich verhindert. Ein Unfall bei geringer Geschwindigkeit
kann bereits zu schweren oder tödlichen Verletzungen führen.
Auswahl des richtigen Helms
Die Innenpolsterung jedes neuen Helmes passt sich im Laufe der Zeit den Kopfkonturen seines Trägers an.
Deshalb bietet ein solcher Helm nur seinem Träger optimalen Schutz.
Tragen Sie nie einen Helm, der Ihnen nicht passt. Ein zu großer Helm kann sich bei einem Unfall vom Kopf lösen
und wegfliegen. Ein zu kleiner, enger Helm beeinträchtigt erheblich die Konzentration und das Wohlbefinden beim
1. Messen Sie Ihren Kopfumfang mit einem Maßband ca. 1 cm über den Augenbrauen und den Ohren.
2. W
Kopfgröße
Größentabelle
Helmgröße
Kopfumfang / cm
3. Fassen Sie bei der Anprobe beide Enden des Kinnriemens und ziehen Sie den Helm über den Kopf.
Achten Sie darauf, dass der Helm überall gleichmäßig an Ihrem Kopf anliegt, auch an der Kopfoberseite.
4. Prüfen Sie die richtige Passform. Überprüfen Sie, dass:
▪ Helminnenfutter und Polsterung überall komfortabel an Ihrem Kopf anliegen.
▪ die Überkopfpolsterung satt auf Ihrem Kopf aufliegt.
▪ die Wangenpolster ausreichend festen Halt bieten.
▪ es keinen Zwischenraum zwischen Augenbrauen und Innenpolsterung gibt.
Fingertest: versuchen Sie, einen Finger zwischen Augenbraue und Polsterung zu schieben.
Ist der Helm unbequem oder drückt er, probieren sie eine andere Größe.
5. Prüfen Sie unbedingt das Sichtfeld des Helmes nach oben, unten und nach beiden Seiten.
6. Testen Sie die Passform des Helmes indem Sie beide Hände links und rechts an den Helm anlegen.
Halten Sie den Kopf nun so unbeweglich wie möglich, und versuchen Sie mit beiden Händen den
Helm nach links und rechts sowie nach oben und unten zu drehen. Wenn Sie dabei fühlen, dass
die Helmpolsterung über Ihrem Kopf rutscht, dann ist der Helm zu groß. Probieren Sie die nächst
kleinere Größe. Versuchen Sie erneut, den Helm zu drehen. Wenn Kopf- und Gesichtshaut diese Drehbewegungen
mitmachen, haben Sie die richtige Größe gefunden. Der Helm darf jedoch an keiner Stelle zu sehr drücken und Schmerzen
verursachen. Sie sollten den Helm mindestens 10 Minuten anlassen.
7. Schließen Sie das Verschluss-System. Der Kinnriemen sollte so eng wie möglich an Ihrem Kinn anliegen, ohne dabei
Schmerzen zu verursachen. Er darf nicht durchhängen und sollte auf keinen Fall über das Kinn abzustreifen sein.
8. Testen Sie die Wirksamkeit des Verschluss-/Helmhaltesystems (Kinngurt)
▪ Halten Sie den Helm hinten mit beiden Händen fest und versuchen Sie ihn nach vorne über
den Kopf zu schieben.
▪ Versuchen Sie das Gleiche in umgekehrter Richtung.
Wiederholen Sie die Punkte 3-8 bis Sie einen Helm finden, der sicher und auch komfortabel sitzt.
13 14
Motorradfahren.
ählen Sie anhand des so festgestellten Kopfumfanges aus der unten stehenden Maßtabelle Ihre Helmgröße. Sollte Ihre
zwischen zwei Helmgrößen liegen, dann probieren Sie erst den größeren Helm und dann die kleinere Größe.
Die Größentabelle dient nur der Orientierung. Probieren Sie den Helm immer an und folgen Sie den
Anweisungen in der Anleitung für einen optimalen Sitz.
Achten Sie immer auf ausreichende Sicht für eine sichere Fahrt.
Wenn der Helm sich löst oder über Ihre Augen rutscht, probieren Sie eine andere Größe oder ein anderes
Modell oder eine andere Marke. Sie müssen in der Lage sein die obere Ecke in Ihrem Sichtfeld zu sehen.
Konstruktionsdetails
1. Außenschale
Schließen
Öffnen
Schließen
Öffnen
2. Hintere Entlüftung
3. Stoßdämpfende Innenschale
4. Komfort-Innenfutter
5. Gummi-Abschlusskante
6. Kinnriemen
7. Ratschenverschluss
8. Frontlüftung (verstellbar)
9. Visierdichtung
10. Atemabweisers
11. Visier
(ohne Werkzeug auswechselbar)
12. Visierverriegelungsknopf
13. Visierrasterung
14. Überkopfbelüftung (verstellbar)
Hinweise zum richtigen Umgang mit dem Helm
Wie man das Risiko ernsthafter Verletzungen minimieren und darüber hinaus Beschädigungen am Helm
▪ N
iemals Helmzubehör (z.B. Atemschutz) während der Fahrt montieren – Einstellungen am Helm (z.B. Kinngurtlänge) nicht
während der Fahrt verändern.
▪
Den Helm niemals fallen lassen, da sonst Außenschale oder Styropor-Innenschale beschädigt werden können. Diese
Beschädigung muss nicht sichtbar sein. Ihr Helm ist nur für die Aufnahme eines Aufschlages entwickelt. Weitere
Informationen dazu auf Seite 18, ‚Austausch des Helms’.
▪ W
enn Sie eine Sturmhaube tragen, sollte diese unbedingt auch bei der Anprobe des Helms getragen werden, um einen
sicheren Sitz zu gewährleisten.
▪ D
en Helm immer nur mittels des Befestigungsrings am Kinngurt mit dem Motorrad verbinden. Dabei sicherstellen, dass
Polsterungen und Schale nicht beschädigt werden.
▪ Niemals Insektenentferner im oder am Helm verwenden. Insektenentferner kann Visier, Schale, Polster und andere
Helmteile beschädigen.
▪ D
en Helm niemals Benzin oder Benzingasen aussetzen. Benzin kann Visier, Schale, Polster und andere Helmteile beschädigen.
▪ Niemals ein dunkles oder getöntes Visier bei Nacht oder bei eingeschränkter Sicht benutzen.
▪ T
ragen Sie immer einen Augenschutz, auch wenn Sie einen Helm ohne Visier fahren. Während der Fahrt sollte das Visier
geschlossen sein, solange freie Sicht gewährleistet ist.
▪ Den Helm immer im Helmbeutel aufbewahren, wenn er nicht in Gebrauch ist. Das verhindert unbeab-sichtigte Kratzer an
der Oberfläche.
- S
ollten Sie Fragen dazu haben, welche Einflüsse negative Folgen für Ihrem Helm haben könnten, dann setzen Sie sich bitte
mit uns in Verbindung.
Prüfung des Helms
Um sicherzustellen, dass der Helm maximalen Schutz bietet, sollte er vor jedem Gebrauch auf Beschädigungen untersucht werden:
▪ P
rüfung von Visier und Visierrasterung – Befestigung überprüfen und, falls erforderlich, Schrauben nachziehen. Dabei die
Schrauben nicht überdrehen. Die Plastikgewinde an Schrauben und Visier-halterungen könnten sonst beschädigt werden.
▪ D
en Helm auf Beschädigungen untersuchen – Zeigt der Helm Risse oder Beschädigungen, darf er nicht mehr benutzt werden.
Weitere Informationen dazu auf Seite 18 ‚Austausch des Helms’.
▪ K
ontrolle von verschlissenen und defekten Teilen – Plastik- und Gummiteile können mit der Zeit verschlissen oder beschädigt
sein. Diese Teile sind dann entweder gegen Originalteile auszutauschen oder ein neuer Helm ist anzuschaffen. Weitere
Informationen dazu auf S. 18 ‚Austauschen von Teilen’.
en Helmverschluss auf Beschädigungen untersuchen. Ist der Kinnriemen ausgefranst oder angerissen oder rastet das
▪ D
Helmschloss nicht mehr korrekt ein, sollten diese Teile von HJC ausgetauscht oder ein neuer Helm muss angeschafft werden.
▪ Al
le Polsterteile auf festen Sitz überprüfen. Sowohl Wangenpolster als auch Überkopf- und Nacken-Polster müssen richtig
positioniert sein und fest sitzen.
Überprüfung des Visiers
I
st das Visier zerkratzt oder beschädigt, kann es die Sicht beinträchtigen, und es ist zu ersetzen. Vergewissern Sie sich, dass
Sie jederzeit ausreichend genug sehen, um Ihr Fahrzeug sicher bewegen zu können.
Schließen des Helmverschlusses
Ist der Helm richtig verschlossen, sollte der Kinngurt so nah wie möglich am Kinn anliegen, ohne jedoch Schmerzen zu
verursachen. Er darf nicht durchhängen und sollte auf keinen Fall über das Kinn rutschen können. Ist der Kinngurt nicht
eng genug eingestellt, kann der Helm bei einem Sturz oder Unfall abgestreift und weggeschleudert werden.
vermeiden kann:
Den Helm immer richtig benutzen, um Verletzungen oder gar Todesfolgen zu reduzieren.
S
ollten sich Teile des Helms während der Fahrt lösen oder herausfallen, kann das die Sicht und den sicheren
Sitz beeinträchtigen und zu Unfällen führen.

Micro-Rastenverschluss
Schließen
Öffnen
Schließen
Öffnen
Schließen
Öffnen
Den Kinngurt durch die
Kinnriemen
Öse
Öse ziehen und passende
Kinngurtlänge einstellen.
MicroRastenverschluss
Kinnriemen
Dauerhafte und richtige Pflege Ihres HJC-Helms
Reinigen der Helmschale
Bitte den Helm nur so reinigen, wie nachfolgend beschrieben. Abweichungen davon oder die Anwendung nicht empfohlener
Chemikalien/Reinigungsmittel kann Helmschale, Visier, Polsterungen, Futter und andere Helmteile beschädigen. Damit wächst
das Verletzungsrisiko bei Sturz und Unfall.
Hochglanzpflege. HJC empfiehlt zur Pflege des Helms Reinigungs- und Poliermittel aus dem Automobilbereich. Alle HJC Helme
sind mit Autopflegemittel verträglichen Basis- und Klarlacken versehen. Dabei immer den Bedienungsanleitungen des jeweiligen
Pflegeprodukts folgen. Ein übermäßiges Polieren kann zu einem Lackabrieb führen und den Glanz der Oberfläche ermatten lassen.
Aufkleber und Dekore hinterlassen Kleberückstände, wenn man sie entfernt. Diese mit einem alkoholgetränkten Wattebausch
entfernen. Stellen Sie sicher, dass Sie diese hochaktive Flüssigkeit komplett abwischen und diese Stelle anschließend mit Seife
und Wasser noch mal reinigen. Beim Abreiben der Kleberückstände nicht zu fest reiben, sondern lieber mehrmals mit sanftem
Druck wiederholen.
Matte Oberfläche.
B
ei hartnäckigem Schmutz niemals zu fest reiben, sondern eine schonende Anwendung mehrmals wiederholen. Zu festes Reiben
kann Glanz erzeugen und den Matteffekt ruinieren.
Reinigung des Helminneren.
Obwohl wir empfehlen, den Helm alle 3-5 Jahre zu wechseln, kann die Ansammlung von Schweißrückständen, Feuchtigkeit und
Schmutz Nähte und Futterstoffe beeinträchtigen und Gerüche verursachen. Herausnehmbare Polsterteile können per Handwäsche
oder per Pflegewaschgang (30° Grad C.) in der Waschmaschine gewaschen werden. Anschließend an der Luft trocknen. Zum
Reinigen der festen Teile empfehlen wir eine milde Seifenlauge. Mit klarem Wasser nachwischen. Bei im Handel erhältlichen
Helmreinigungsmitteln immer den Gebrauchsanweisungen des Herstellers folgen und vorher an verdeckter Stelle ausprobieren.
Reinigung der Ventilation
Schmutz und Ablagerungen können in die Ventilation des Helms gelangen. Mit niedriger Druckluft die Ventilationsgänge ausblasen
und Schmutz entfernen. Vorher jedoch alle abnehmbaren Innenpolster entfernen.
Démontage de l'écran
Öffnen
Zur Reinigung eines Helms mit matter Oberfläche nehmen Sie bitte warmes Wasser und eine milde Seife.
Ist das Visier in der
maximal zu öffnenden
Position, sollte der Pfeil
auf dem Visier auf gleicher
Linie mit dem Pfeil auf der
Visier-Arretierungshalterung
sein.
Visiermontage
Schließen
1. Sicherstellen, dass der
Arretierungshebel in Position,
'OPEN' ist.
Prüfen Sie vor der Benutzung des Helms, ob die Wangenpolster fest montiert sind. Ein Helm mit fehlenden oder falsch
montierten Wangenpolstern kann das Risiko schwerer oder tödlicher Verletzungen bei einem Unfall erhöhen.
Öffnen
2. Die Visierführung an der Visieraufnahme der
Visierrasterung ausrichten und einsetzen.
3. I
st die Visierführung sauber an der Visierrasterung
a
usgerichtet, den unteren Rand des Visieres andrücken
bis die Verriegelung aktiviert ist und das Visier in der
Halterasterung hält.
Demontage der Wangenpolster
Die Wangenpolster sind mit Druckknöpfen an der Styroporschale
befestigt.
1. Z
iehen Sie die Wangenpolster vorsichtig ins Helminnere ab
und lösen Sie dabei die Druckknöpfe.
2. D
ie seitliche Befestigungslasche, die das Wangenpolster
z
wischen Helmschale und Styroporschale fixiert, vorsichtig
n
ach unten herausziehen, und das Wangenpolster abnehmen
und vom Kinnriemen abstreifen.
Montage der Wangenpolster
1. F
ädeln Sie die Kinnriemenenden durch die Öffnungen in den Wangenpolstern. Wangenpolster in die richtige Position bringen.
2. Befestigungslasche zwischen Helmschale und Styroporschale einschieben. Auf richtige Positionierung achten.
Die Druckknöpfe müssen einander gegenüberliegen.
ruckknöpfe andrücken und deutlich hörbar einrasten lassen. Wangenpolster sind als Ersatzteil lieferbar(immer paarweise).
3. D
Schließen
1. Den Visierverriegelungsknopf auf Position ‘OPEN’ stellen.
2. Visier bis zur maximal möglichen Offenstellung öffnen.
3. Den Arretierungshebel in Richtung ‘ONEN’ drücken.
Schließen
Öffnen
Demontage des Kopfpolsters
1. Fassen Sie den textilen Teil des Futters möglichst nahe an der vorderen Plastiklasche und ziehen Sie die Plastiklasche
aus der Kunststoffhalterung heraus.
2. Lösen Sie die beiden Druckknöpfe am hinteren, unteren Helmrand und ziehen Sie dann das komplette Kopfpolster nach
unten aus dem Helm heraus.
4. Das Visier wird automatisch entriegelt und freigegeben.
15 16

Montage des Kopfpolsters
1. A
nschließend den mittleren Teil der Lasche zwischen Außen- und EPS-Schale stecken und Lasche komplett einschieben.
2. D
ie vordere Plastiklasche an der Helmschale ausrichten und die beiden Enden nacheinander zwischen Außen- und EPS
-Schale stecken und einschieben.
3. Die beiden hinteren Druckknöpfe ausrichten und dann einrasten lassen.
Entfernen des Atemabweisers
1. F
assen Sie den Atemabweiser mittig an und ziehen ihn vorsichtig nach oben
aus seiner Vorrichtung.
Einbau des Atemabweisers
1. Führen Sie den Atemabweiser in seine Vorrichtung.
Demontage des Windabweisers
1. Den Stoff der Kinnabdeckung an einer äußeren Ecke greifen und den
Plastikrand der Kinnabdeckung vorsichtig zwischen Styroporpolsterung
und Helmschale herausziehen.
Ersatzteile
Die Verwendendung von Ersatzteilen, die nicht von HJC hergestellt oder freigegeben sind, können das Risiko,
bei einem Unfall tödliche oder ernsthafte Verletzungen zu erleiden, erhöhen.
Den Helm baulich nicht verändern
Ihr Helm ist nach den Vorschriften der ECE-Norm R 22-05 entwickelt worden. Kontaktieren Sie uns, falls Sie weitere Informationen
zu dieser Norm haben möchten. Veränderungen an Ihrem Helm können das Risiko, bei einem Unfall tödliche oder ernsthafte
Verletzungen zu erleiden, erhöhen. Daher sollten Sie Ihren Helm baulich nicht verändern. Diese Veränderungen schließen
folgendes mit ein:
▪ Bohren von Löchern
▪ Beschneiden von Helmschale, Kinngurt und Futter
▪ Veränderungen am Verschlusssystem/-Gurt einschließlich der Montage eines Kinnschutzes
▪ Das Entfernen von Helmteilen
▪ Lackierungen
▪ Befestigung von Zubehör, das nicht von HJC hergestellt oder freigegeben wurde.
Sollten Sie hierzu Fragen haben, setzen Sie sich bitte mit HJC Deutschland in Verbindung (www.hjc.germany.de).
Die richtige Aufbewahrung des Helms
E
in unsachgemäß aufbewahrter Helm kann beschädigt werden und kann das Risiko, bei einem Unfall tödliche
oder ernsthafte Verletzungen zu erleiden, erhöhen. Daher sollten Sie:
•
den Helm wohltemperiert und trocken lagern.
▪ den Helm getrennt von Tieren aufbewahren.
▪ den Helm
aufbewahren.
▪ Den Helm nicht zu lange in der Sonnen stehen/liegen lassen, da ansonsten die Farben bleichen können.
niemals einer Hitze von mehr als 50°C aussetzen und nicht auf oder neben heißen Oberflächen
Austausch des Helms
Obwohl wir Ihren HJC-Helm aus den besten verfügbaren Materialien hergestellt haben, könnte der Fall auftreten,
ihn ersetzen zu müssen. Ersetzen Sie ihn umgehend, wenn:
▪ er einen Aufschlag erlitten hat. Ihr Helm ist nur für die Aufnahme eines Aufschlages entwickelt worden.
Dieser Aufprall kann die äußere Schale beschädigen und/oder er kann die dämpfende Styropor-Innenschale
zusammendrücken. Diese Schäden sind nicht immer ersichtlich. Jeder Aufprall und Schlag oder ein Fall
a
us einer Höhe von 1.20 m kann ausreichen, die optimale Schutzwirkung des Helms zu zerstören.
▪ d
ie Außen- oder Innenschale oder das Verschluss-System beschädigt ist. Die Außenschale, die
s
toßdämpfende Innenschale und das Verschluss-System müssen ständig in bestem Zustand sein, um
Auch wenn Ihr Helm offensichtlich nicht beschädigt ist, sollte er nach 3-5 Jahren ausgetauscht werden, abhängig davon,
wie oft er benutzt wurde. Über die Zeit können UV-Strahlung sowie die Alterung von Klebstoffen und Teilen die Schutzwirkung
des Helms beeinträchtigen. Das Tragen eines solchen Helms können das Risiko, bei einem Unfall tödliche oder ernsthafte
Verletzungen zu erleiden, erhöhen.
Helmentsorgung
den besten Schutz gewährleisten zu können.
Wenn Sie einen neuen Helm kaufen, sollten Sie sicherstellen, dass der alte Helm nicht mehr benutzt werden
kann. Verkaufen Sie ihn nicht und geben Sie ihn auch nicht an andere weiter, auch wenn keine offensichtlichen
Schäden zu erkennen sind. Über die Zeit hat sich die weiche Styropor-Innenschale Ihren Kopfkonturen angepasst.
Benutzt ein anderer Träger nun diesen Helm, kann er diesem nicht den gleich guten Schutz mehr bieten.
Gewährleistung
Im Rahmen der gesetzlichen Gewährleistung haftet HJC für herstellungsbedingte Mängel an neuen Waren für die Dauer von
zwei Jahren, gerechnet ab Übergabe der Ware. Dieselbe Frist gilt auch für Ansprüche auf Ersatz von Mangelfolgeschäden,
soweit keine Ansprüche aus unerlaubter Handlung geltend gemacht werden. Als Mängel gelten Abweichungen an dem
Installation des Windabweisers
1. Die Kinnabdeckung mittig zur Kinnspitze ausrichten und den äußeren
Plastikrand zwischen der Styroporpolsterung und der Helmschale
einstecken.
17 18
Verkaufsgegenstand, von der Produktbeschreibung oder der darin beschriebenen Funktionsweise oder Abweichungen vom
herkömmlichen Gebrauch des Verkaufsgegenstandes, soweit diese Abweichungen die Tauglichkeit des Kaufgegenstandes
zum üblichen Gebrauch beeinträchtigen. Liegt ein Mangel bei Übergang des Verkaufsgegenstandes vor, ist der Käufer berechtigt,
Mängelbeseitigung oder Lieferung einer mängelfreien Sache zu verlangen. HJC kann die gewählte Art der Nacherfüllung
verweigern, wenn sie nur mit unverhältnismäßig hohem Aufwand möglich ist. Bereits getragene Helme werden nicht umgetauscht,
sondern mängelfrei nachgebessert.
Geltungsbereich
HJC haftet, im Rahmen der gesetzlichen Gewährleistung, nur für herstellungsbedingte Mängel. Ausdrücklich ausgenommen
vom Garantieschutz sind Mängel, die durch Transportfehler, Bedienungsfehler, Fahrlässigkeit oder Nachlässigkeit beim
Gebrauch oder der Pflege, durch Veränderungen oder Reparaturen durch nicht freigegebene Teile und nicht autorisierte
Personen oder durch Unfälle verursacht worden sind.
Reklamationsabwicklung
Um eine Garantieleistung in Anspruch nehmen zu können, gehen Sie bitte mit dem Helm und dem, mit Datum versehenen,
Einkaufsbeleg zu dem HJC-Fachhändler, bei dem Sie den Helm erworben haben. Fügen Sie bitte eine kurze Erklärung mit
Ihrem Namen, Telefon-Nr. und der Reklamationsbeschreibung bei.

Información de seguridad importante
Abrir
Abrir
Cerrar
Cerrar
Las instrucciones de este manual son para ayudarle a elegir correctamente un casco, a usarlo adecuadamente y para
saber cómo mantenerlo y cuándo repararlo. Si no sigue estas instrucciones, se incrementa el riesgo de sufrir una lesión
o accidente mortal.
Para lograr la mejor protección posible de su casco, debe seguir los siguientes pasos:
• Póngase su casco cuando monte en motocicleta.;
• Trate su casco cuidadosamente para prevenir daño accidental.;
• Conduzca con seguridad-no asuma riesgos porque conduzca con casco.
A pesar de que su casco HJC esté diseñado para reducir y prevenir posibles daños, ningún casco podrá protgerle de la
totalidad de previsibles impactos. Por ejemplo, su casco no podrá protegerle de lesiones en el cuello o las cerbicales.
Además, no hay garantía de que su casco EVITARÁ cualquier lesión en la parte de la cabeza cubierta por él. En accidentes
a baja velocidad se pueden producir lesiones graves o incluso letales.
Seleccionar correctamente un casco
Nunca compre un casco usado o lo tome prestado de otra persona. Con el tiempo, la espuma protectora del casco
se ajusta a la cabeza del usuario. El casco usado o prestado no podrá ofrecer la misma protección que uno nuevo.
Usar el casco de un tamaño que no sea el adecuado, puede aumentar el riego de lesión grave o muerte en caso
de accidente. Un casco demasiado grande podría soltarse y desprenderse en caso de accidente. Para elegir el
1. Mídase la cabeza. Coloque una cinta métrica en el contorno de su cabeza unos 2,5 cm encima de sus cejas.
se la tabla de medidas para seleccionar la talla de casco que se aproxime más a la medida de su cabeza. Si la medida de su
2. U
cabeza está entre dos tallas, pruebe primero el tamaño mayor y luego el menor.
Tabla de tallas
Tamaño de sombrero
Centímetro
Pulgada
3. Pruébese el casco sujetando las correas de la barbilla y tire de ellas para encajar el casco en su cabeza, asegurándose
de que la parte superior de su cabeza está en contacto con la parte interior del casco.
4. Verifique la adaptabilidad. Asegúrese de que su casco es del tamaño correcto y verifique los siguientes puntos:
• Los interiores del casco quedan bien ajustados a su cabeza,
• La almohadilla de la parte superior sujeta con firmeza su cabeza.
• Las almohadillas laterales están en contacto con sus mejillas.
• No queda espacio entre las cejas y la parte interior del casco. Compruébelo tratando de insertar los dedos dentro.
Si el casco no le queda bien ajustado, pruebe con un tamaño menor.
5. Verifique su area de visión cuando esté usando el casco. Algunos cascos podrían obstruir o bloquear su visión al mirar a
izquierda, derecha, arriba o abajo.
6. Pruebe si el casco es el adecuado colocando sus manos a cada lado del casco. Mientras mantiene
su cabeza lo mas inmóvil posible, trate de hacer girar su casco de izquierda a derecha y luego de
arriba a abajo. Si nota que el casco se desliza por su cabeza, significa que es demasiado grande;
pruebe entonces con uno de tamaño inferior. Ud. debe sentir que el casco mueve la piel de su
cabeza y cara a medida que ud. trata mover el casco.
7. Abroche el sistema de cierre (correa de la barbilla) ajustando al máximo la correa a su mandíbula pero sin causar dolor.
No debe quedar suelto, la correa debe estar junto a su mandíbula. Véase en la página 20-21.
8. Pruebe el sistema de cierre (correa de la barbilla)
• Ponga sus manos en la parte trasera del casco y trate de quitarse el casco a la fuerza,
girándolo hacia delante.
• Ponga sus manos en la parte delantera del casco encima de su frente o en la parte de
la barbilla, y trate de quitarlo a la fuerza girándolo hacia atrás.
Repita los pasos del punto 3 al 8, hasta encontrar el casco que mejor se le adecúe, bien ajustado a su cabeza.
19 20
casco del tamaño adecuado a su cabeza, siga las siguientes instrucciones.
sirve solo como referencia. Para un
ajuste perfecto, siempre hay que
probarse el casco siguiendo las
instrucciones de este manual.
Asegúrese siempre de que puede ver bien para poder conducir su moto con seguridad.
Si el casco se sale o se desliza sobre sus ojos, pruebe con otra talla o modelo o marca. El borde del casco
debe ser visible en su campo de visión superior.
Esta tabla de tallas
Especificaciones
1. Calota exterior
Cerrar
Abrir
Cerrar
2. Sistema de ventilación trasero
3. Línea de impacto absorbente frontal y
superior
4. Almohadilla confort
5. Terminaciones en caucho
6. Correa barbillera
7. Micro-hebilla
8. Ventilación frontal para la barbilla
9. Punto de visibilidad
Abrir
10. Protector de respiración
11. Visor sin herramientas
12. Botón de bloqueo de la pantalla
13. Mecanismo de engranaje de la pantalla
14. Ventilación frontal y superio
Uso correcto del casco
A efectos de reducir el riesgo de lesiones graves o letales, así como para prevenir daños en el casco:
• Nunca regule los accesorios del casco mientras está conduciendo. Hágalo cuando se detenga.
• Nunca deje caer el casco. Esto podría perjudicar la calota o las almohadillas interiores. El daño puede ser imperceptible
p
ero el casco puede estropearse con un solo impacto. Lea “Cambio de casco” (p.24) para obtener más información acerca
de lo que se debe hacer después de la caída de un casco.
• Nunca lleve nada entre la cabeza y el casco. Esto reduciría la efectividad del casco.
•
Nunca cuelgue o enganche el casco en lugares tales como marcos de espejos o soportes poco resistentes. Hacerlo podría
dañar las almohadillas interiores o el revestimiento.
• N
unca utilice repelente de insectos sobre o alrededor del casco. Éste podría deteriorar la pantalla, las almohadillas interiores
u otros componentes del casco.
• Nunca exponga el casco a la gasolina o el humo de la misma. La gasolina podría estropear la pantalla, la calota, las
almohadillas protectoras o el revestimiento.
• Nunca utilice las pantallas oscuras o de color durante la noche o en condiciones de visibilidad reducida.
- Si tiene alguna pregunta sobre qué otras sustancias pueden dañar el casco, póngase en contacto con nosotros.
•
Proteja siempre su vista. Si no utiliza un casco con pantalla, lleve siempre algún tipo de protección para la vista cuando
conduzca. Coloque, siempre, la pantalla en la posición correcta cuando conduzca
•
Manténgase siempre atento a los ruidos. El casco puede disminuir su capacidad auditiva. Ello no significa que el casco
actúe como protector contra ruidos.
• Cuando no lo use, guarde siempre su casco en la funda original para evitar daños accidentales en la superfície.
Para reducir el riesgo de lesiones graves o muerte, siempre emplee su casco correctamente.
Inspeccione el casco
Verifique que el casco se encuentra en las mejores condiciones, maximizando así la protección. Antes de conducir, compruebe
siempre que el casco se encuentra sin daños.
•
Compruebe la pantalla y su mecanismo. En caso de ser necesario, vuelva a ajustar los tornillos del mecanismo. Asegúrese
de no sobreajustar ningún tornillo. Si se fuerzan demasiado, los tornillos que sujetan la superfície plástica podrían romperse,
o bien dañar dicha superfície.
•
Asegúrese de que su casco no esté dañado. Si su casco está dañado o roto, deje inmediatamente de usarlo. Lea la sección
“Cambio de casco” (p.24) para obtener más información. Si su casco se ha caído, el daño puede no ser visible.
•
Asegúrese de que no haya partes desgastadas o dañadas. Los componentes plásticos pueden desgastarse con el paso
del tiempo. Si encuentra partes desgastadas o dañadas, reemplácelas o compre un casco nuevo. Lea “Repuestos” (p.24)
para obtener más información sobre el reemplazo de los repuestos.
Si alguna pieza se cayera mientras conduce, su visión resultaría impedida, lo que podría causar un accidente.
• C
ontrole que el sistema de cierre (correa de la barbilla) no está dañado. En caso de estar deshilachado o rasgado, reemplace
el caso.
•
Asegúrese de que todas las almohadillas estén en su lugar. Tanto las de las mejillas como las de la cabeza deben estar
en su lugar.
Revise la pantalla
Si la pantalla está rayada o dañada puede reducir la visibilidad. Cámbiela si es necesario. Asegúrese siempre de poder ver
lo suficientemente bien para conducir su motocicleta de forma segura.
Ajuste el sistema de cierre
Ajuste el sistema de cierre (correa de la barbilla) debajo de la mandíbula, sin que este cause dolor. La correa no debe quedar suelta
y debe estar bien ajustada a la mandíbula. Si el sistema de cierre no está ajustado, el casco puede soltarse o caerse en un accidente.

ouvert
fermé
Abrir
Cerrar
Abrir
Cerrar
Micro-hebilla
Para regular el ajuste,
Correa barillera
lazada
sujete la lazada y tire,
como se indica, de la
correa mentonera.
Micro-hebilla
Correa barillera
Mantenimiento correcto del casco
Limpieza de la calota
Para limpiar el casco utilice solamente los métodos aprobados que se enumeran a continuación. La aplicación de otros productos
químicos, así como el uso de métodos no aprobados, podría dañar la calota o los interiores del casco. Un casco dañado aumenta
el riesgo de que, en caso de accidente, se produzcan lesiones graves o incluso letales.
Acabado brillante. HJC recomienda limpiar su casco con productos diseñados para la limpieza y abrillantado de automóviles.
Todos los cascos HJC brillantes tienen una capa transparente de acabado base del tipo usado en automoción. Siga atentamente
las instrucciones del producto. Un lustrado excesivo puede causar raspaduras leves que podrian llegar a apagar el brillo del casco.
Las etiquetas adhesivas y las calcomanías dejarán residuos de pegamento cuando las quite. Para quitar el residuo de pegamento,
utilice algodones embebidos en alcohol. Asegúrese de secar el exceso de líquido inmediatamente y limpie el área con jabón y agua
una vez haya quitado el residuo de pegamento. Al frotar para intentar quitar el residuo, no ejerza una presión excesiva; hágalo más
bien a base de movimientos suaves.
Acabado mate. Para nuestros cascos con acabado mate (poco brillante), recomendamos emplear agua tibia y un jabón suave.
Recurra a una limpieza más completa para la suciedad más profunda. Al limpiar la superficie del casco, no ejerza una presión
excesiva ni utillice productos para pulido, ya que eso podría abrillantar la superfície, estropeando así el efecto mate de acabado.
Limpieza interna
Aunque recomendamos cambiar el casco cada 3 o 5 años, la acumulación de sudor, humedad y suciedad pueden deteriorar la
tela y la costura causando mal olor. Para lavar las almohadillas desmontables HJC, recomendamos lavarlas regularmente en la
lavadora y dejarlas secar al aire libre. Para las partes internas no desmontables, HJC recomienda un lavado regular en la lavadora
y secarlo al aire libre.
Limpieza de la ventilación
La suciedad y el polvo pueden entrar a través del sistema de ventilación del casco HJC. Las bombas de aire comprimido utilizado
para limpieza de los teclados de los ordenadores, pueden usarse para eliminar los residuos del sistema de ventilación. Se aconseja
quitar todas las almohadillas desmontables antes de realizar este proceso.
La pantalla: como quitarla
Una vez la pantalla
este completamente
abierta, la flecha de la
misma debería esta
Abrir
alineada con la flecha
de cierre de la palanca.
Como instalar la pantalla
ouvert
fermé
2.
1. Asegúrese de que el cierre
de la manija esté en la
posición de abierto.
Siempre asegúrese de que las almohadillas del casco estén instaladas antes de emplear el casco. Un casco al que le faltan
las almohadillas o que no las tiene instaladas adecuadamente puede aumentar el riesgo de lesiones graves o muerte en
un accidente.
Alinee e inserte la parte superior de la guía del protector
en la guía del mecanismo de la placa.
3.
Con las guías alineadas correctamente, inserte la sección
inferior del protector en el mecanismo de
la placa. La pestaña de cierre debería encajar con un
golpe seco, haciendo bloquear el protector.
Extracción de la almohadilla de la mejilla
Hay 3 broches que mantienen la almohadilla de la mejilla en su
lugar.
1. Levante con suavidad la almohadilla de la mejilla del interior,
abriendo los broches.
2. Tome la almohadilla de la mejilla cerca del centro y con
suavidad extráigala de la correa de la barbilla.
Instalación de la almohadilla de la mejilla
1. Introduzca las correas de la barbilla a través de la abertura en la almohadilla de la mejilla.
2. Alinee y deslice totalmente la pieza de plástico de la espuma de mejilla entre la calota y el EPS.
3. Coger la parte delante y la parte atrás de la platina del acolchonado y separarla de la calota.
Cerrar
Cerrar
1. Coloque el botón del sistema de bloqueo en posición de apertura “open”.
2. Abra la pantalla completamente.
Abrir
AbrirCerrar
Extracción de la almohadilla de la cabeza
1. Acerque la tela de la almohadilla de la cabeza tanto como sea posible a su base plástica y quítela/levántela del casco.
2. Repita la misma operación en la parte trasera.
3. Mueva la palanca de cierre hacia la posición de abrir.
4. La pantalla quedara automáticamente fuera del mecanismo que la sujetaba.
21 22

Montar la almohadilla de la cabeza
1. A
linee el centro de la solapa de plástico de la almohadilla respecto la calota, de forma que la solapa quede situada entre
la calota y el EPS, y presione con fuerza.
2. A
linee los extremos izquierdo y derecho de la solapa de plástico de la almohadilla respecto la calota, de forma que la solapa
quede situada entre la calota y el EPS. Presione, de uno en uno, con fuerza sobre dichos extremos.
3. Alinee y encaje en su sitio los dos broches posteriores.
Extracción del deflector de respiración
1. Agarre el centro de la naricera y tire suavemente hacia arriba hasta
soltarla.
Instalación del deflector de respiración
1. Deslice la naricera dentro de la ranura.
Desmontar la protección de la barbilla
1. Coja la protección de la barbilla por las esquinas inferiores y tire
suavemente hacia abajo y hacia fuera.
Repuestos
El uso de repuestos no fabricados por HJC puede aumentar el riesgo de lesiones graves o incluso letales
en caso de accidente. Sólo emplee partes de HJC que estén específicamente diseñadas para funcionar con
este casco.
No modifique su casco
El casco HJC está diseñado para ajustarse al estándar ECE R 22-05. Para obtener más información acerca del estándar
E
CE R 22-05, póngase en contacto con HJC Europa. Si modifica el casco, aumentará el riesgo de que se produzcan lesiones
graves o incluso letales. No modifique su casco HJC. Se entiende por modificación:
• realizar perforaciones;
• realizar cortes en el armazón, revestimiento o la correa;
• modificar el sistema de retención, incluyendo el agregar un protector de barbilla;
• extraer piezas;
• pintar o quitar pintura;
• agregar accesorios no fabricados por HJC para este casco.
Para cualquier pregunta acerca de las modificaciones, póngase en contacto con HJC Europa. Los datos de contacto se
encuentran en la contracubierta.
Guardar correctamente el casco
El guardar incorrectamente un casco puede ocasionar daños y aumentar el riesgo de que se produzcan
lesiones graves o incluso letales en caso de accidente. Es por ello que Ud. debe:
•
Conservar el casco en un lugar fresco y seco,
•
Mantenerlo fuera del alcance de mascotas u otros animales,
• No debe exponerlo a temperaturas que excedan los 50°C y no debe apoyarlo sobre o cerca de
superficies calientes.
• Una exposición a la irradiación solar por un largo periodo de tiempo puede llegar a empalidecer el casco.
Cambio de casco
Los cascos HJC están fabricados con los mejores materiales disponibles para ofecer un producto de larga
duración, pero con el tiempo deberá cambiar su casco. Reemplace su casco de inmediato si:
• Ha sufrido un impacto. El casco esta diseñado para UN solo impacto. Un impacto puede romper la calota
o
comprimir el revestimiento que amortigua el impacto. Puede que no advierta el daño. Cualquier impacto
en un choque o de una caída de tan solo 1,20m. es suficiente para romper el casco.
• La calota, el revestimiento o el sistema de cierre del casco resultan dañados. La calota del casco, el
r
evestimiento que amortigua los impactos y el sistema de cierre deben estar en buenas condiciones para
garantizar la máxima protección.
Incluso si su casco no se ha dañado, es necesario cambiarlo cada 3 o 5 años según el uso que le dé. Con el tiempo, los
rayos UV y el desgaste de los adhesivos y de los productos de limpieza dañarán el casco. Usar un casco dañado puede
aumentar el riesgo de lesiones graves o incluso letales en caso de accidente.
Si no está seguro de si debe reemplazar el casco, póngase en contacto con HJC Europa antes de usar nuevamente el casco.
Eliminar el casco
Si compra un nuevo casco, destruya el viejo para asegurarse de que no vuelva a ser utilizado. No venda ni
regale su antiguo casco, anque éste no presente daños. Con el tiempo la espuma protectora del casco se
adaptará a los contornos de su cabeza. Si alguien más llega a usarlo, el casco ya no ofrecerá la máxima
protección.
Garantía
Por la presente HJC extiende al comprador de un casco HJC una garantía limitada según la cual el casco no posee fallos
Montar el protector de barbilla
1. Centre el protector de la barbilla con la calota. Introduzca
el protector de plástico entre la calota y el EPS.
23 24
materiales ni de fabricación.
Cobertura
Esta garantía sólo se aplica a los fallos de confección y rige hasta el cumplimiento de un año desde la fecha de compra.
No se aplicará a ningún problema causado por un uso inapropiado, negligencia, modficaciones accidentales, etc., por parte
del usuario.
Limitación de responsabilidad
Toda garantía de comercialización y toda garantía implícita no se reconocen en la presente. Además, HJC no se hará
responsable de ningún daño resultante.
Procedimiento
Para recibir la garantía, debe llevar su casco, junto con el recibo en el que figura la fecha de compra, así como una breve
nota describiendo el problema, su nombre y su número de teléfono, al distribuidor HJC autorizado que le vendió el casco.
Importanti informazioni di sicurezza
Chludere
Chludere
Aprire
Aprire
Le istruzioni di questo manuale sono disegnate apposta per permetterti di scegliere il giusto casco, indossarlo correttamente,
prendertene cura, e sapere dove riporlo dopo l'utilizzo. Trascurare queste istruzioni potrebbe incrementare il rischio di un
grave infortunio o di morte in un incidente.
Per ottenere la miglior protezione possibile dal tuo casco, dovrestisempre attenerti alle seguenti istruzioni:
• Indossa il casco mentre guidi;
• Tieni il tuo casco in maniera corretta per evitare pericoli accidentali;
• Guida in maniera sicura - non rischiare solo perché usi un casco.
Sebbene il tuo casco HJC sia designato per ridurre o prevenire alcuni infortuni se indossato, nessun casco può proteggerti
da tutti i possibili o prevedibili impatti. Per esempio, il tuo casco non ti protegge da infortuni al collo o alla colonna vertebrale.
Inoltre, non vi è alcuna garanzia che il vostro casco prevenga lesioni alla zona della testa che è ricoperta. Anche un incidente
a bassa velocità può provocare gravi lesioni o la morte.
Scegliere il giusto casco
Non comprare mai caschi usati o prenderne in prestito da altri. Con il tempo la gomma protettiva dei caschi si adatta alla
forma della testa del proprietario. Un casco usato opreso in prestito può non offrire la stessa protezione di un casco nuovo.
Indossare un casco di dimensioni errate può aumentare il rischio di un serio infortunio oppure la morte in un incidente.
Un casco troppo largo per la tua testa si può dislocare o addirittura togliere in un incidente. Per scegliere il casco
di giuste dimensioni per la tua testa, segui queste istruzioni:
1.
Misura la tua testa. Posiziona un metro intorno alla tua testa circa un pollice(2.5cm) sopra le tue sopracciglia.
2. Usa la tabella delle misure per scegliere la misura del casco che corrisponde di più alle misure della tua testa. Se la misura della
testa è a metà tra due misure prova prima il casco più largo e poi quello più piccolo.
La tabella delle taglie è soltanto di riferimento. Provare sempre il Casco e seguire le istruzioni di questo manuale
per una misura giusta.
TABELLA TAGLIE
Misura del cappello
Centimetro
Pollice
3. P
rovati il casco afferrando il cinturino per infilare completamente il casco sulla tua testa, assicurandoti che la parte superiore
della tua testa sia in contatto con la parte interna superiore del casco.
4. Controlla che ci sia un’aderenza perfetta. Per assicurarsi che il casco sia della giusta misura, assicurati che:
• La fodera interna del casco aderisca perfettamente alla tua testa.
• L’imbottitura superiore prema con fermezza sulla tua testa.
• I guanciali devono toccare le tue guance.
• Non ci sia spazio attorno alla tua fronte sotto la fodera interna.
Puoi controllarlo provando ad inserire le tue dita.
Se il casco non aderisce perfettamente, provane uno più piccolo.
ontrolla il tuo campo visivo mentre provi un casco. Alcuni caschi possono ostruire o bloccare la tua visione quando guardi
5. C
a sinistra, destra, su o giù.
Accertati sempre che tu possa vedere bene a sufficienza per guidare in sicurezza il tuo motociclo.
6.
Prova l’aderenza del casco ponendo le tue mani su entrambi il lati del casco. Mantenendo la tua testa il più
possibile ferma, prova a ruotare il casco dasinistra verso destra, e poi su e giù. Se senti che l’imbottitura
interna non aderisce alla testa, il casco è troppo grande. Prova una taglia più piccola. Dovresti avvertire
che il casco sposta la superficie della testa e della faccia quando provi a muovere il casco.
7. Allaccia il sistema di chiusura (il cinturino) più stretto possibile sotto la tua mascella senza sentir dolore.
Non ci deve essere lasco nella cinturino, e la cinturino deve essere appoggiate alla mascella. Guarda la pagina 26-27.
8. Prova il sistema di chiusura (cinturino)
• Metti le tue mani sulla parte posteriore del casco e prova a togliere il casco ruotandolo in avanti.
• Metti le mani sul frontale del casco sopra la tua fronte (oppure alla sicura del mento) e prova a
toglierti il casco ruotandolo all’indietro.
Se il casco si stacca o si sposta sopra gli occhi, provare un’altra taglia o un altro modello o marca.
Dovete essere in grado di vedere il bordo nel vostro campo visivo superiore.
Ripeti le istruzioni da 3 a 8 fino a trovare un casco che di adatti perfettamente e con sicurezza alla tua testa.
25 26
Caratteristiche
1. Calotta esterna
Chludere
Aprire
Chludere
2. Rear Venturi Exhausts
3. Calotta interna in poliuretano espanso
4. Fori di aerazione posteriori
5. Rifinitura di gomma
6. Cinturino sottogola
7. Chiusura micrometrica
8. Foro frontale per il mento
9. Guarnizione della visiera
10. Paranaso
Aprire
11. Protezione senza attrezzi
12. Pulsante bloccaggio visiera
13. Meccanismo visiera
14. Foro frontale superiore
Usare il vostro casco correttamente
Per ridurre il rischio di seri danni o morte e per evitare danni al vostro casco :
• Non regolare mai gli accessori del vostro casco mentre guidate - Regolate il casco solo da fermi.
• Non
far mai cadere il casco - Far cadere il vostro casco può causare la rottura della calotta o danneggiare lo strato
protettivo. Il danno può non essere visibile. Il vostro casco è stato progettato per UN impatto. Fare riferimento
a “sostituzione del casco” (p. 30) per maggiori informazioni o per cosa fare dopo aver fatto cadere il casco.
• Non indossare mai niente tra la vostra testa ed il vostro casco - Questo potrebbe ridurre l’efficacia del vostro casco.
• Non
agganciare o tenere il vostro casco su nessun oggetto inclusi gli specchietti e lo schienale – Così facendo si può
danneggiare lo strato protettivo del casco oppure il rivestimento.
• Non
usare mai repellente per gli insetti sul casco o intorno ad esso – Il repellente per insetti può danneggiare la barriera,
la calotta, lo strato protettivo e altri componenti del vostro casco.
• Non
esporre mai il casco alla benzina o fumi di benzina – La benzina può danneggiare la protezione, la calotta, lo strato
protettivo e altri componenti del vostro casco.
• Non usare mai una visiera protettiva scura o colorata di notte o in condizioni di scarsa visibilità.
- Se avete domande su quali sostanze possano danneggiare il vostro casco vi preghiamo di contattarci.
•
Indossare sempre la protezione per gli occhi – Se non usate un casco con la visiera, usare sempre la protezione per gli
occhi durante la guida. Bloccare sempre la visiera al suo posto mentre guidate.
•
Fare sempre attenzione ai rumori – Il vostro casco può distorcere il vostro udito. In ogni caso il vostro casco non è una
forma di protezione dell’udito.
• Tenere sempre il vostro casco nell’apposito contenitore quando non lo usate per ridurre i danni accidentali alla superficie.
Per ridurre il rischio di incidenti seri o morte, usare sempre il vostro casco in maniera corretta.
Inspezionare il vostro casco
Per assicurarsi che il vostro casco sia sempre nelle migliori condizioni per la massima protezione, ispezionate sempre il
vostro
casco prima di partire :
• Controllare la visiera e il suo meccanismo - stringere le viti del meccanismo di fissaggio se necessario. Assicurarsi di non
stringere troppo le viti. Le viti con la testa di plastica si possono rompere e le viti di plastica possono spanare i manicotti
delle viti se strette troppo.
•
Controllare eventuali danni al casco. Se il vostro casco risulta danneggiato o rotto, smettere di usarlo immediatamente.
Leggere la sezione "Sostituzione del casco" (p. 30) per ulteriori informazioni. Se il casco vi è caduto, il danno potrebbe
anche non essere visibile.
•
Controllare eventuali parti danneggiate o consumate. I componenti di plastica si possono consumare con il tempo. Se trovate
p
arti danneggiate o consumate, sostituitele oppure comprate un nuovo casco. Vedere "Parti di ricambio" (p. 30) per
informazioni sulla sostituzione delle parti.
Se alcune parti cadono mentre guidate, la vostra visione potrebbe essere preclusa causando magari un incidente.
• Controllare il sistema di chiusura (cinturino) per eventuali danni. Se si è lacerata o spezzata, sostituire il casco.
• Controllare che tutte le imbottiture siano a posto. Devono essere a posto entrambi i guanciali e l'imbottitura superiore.
Controllare la vostra visiera
Se la visiera è strisciata o danneggiata può ridurre la visibilità - sostituire se necessario. Assicurarsi sempre di vederci
abbastanza bene per poter usare in sicurezza la vostra moto.
Allacciare il sistema di bloccaggio
Allacciare il sistema di bloccaggio (sottogola) il più stretto possibile sotto la vostra mandibola senza farvi male. Non ci devono
essere laschi nella cinghia, e il sottogola deve essere perfettamente aderente alla vostra mandibola. Se il sistema di bloccaggio
non è stretto, il vostro casco può spostarsi e addirittura togliersi durante un incidente.

Chiusura Micrometrica
Chludere
Aprire
Chludere
Aprire
Chludere
Aprire
Chiusura Micrometrica
Cinturino sottogola
Fibbia di regolazione
Cinturino
sottogola
Tenere la fibbia e tirare il
cinturino come indicato
prima per regolarlo.
Installazione della visiera
Manutenzione corretta del vostro casco
Pulizia della calotta
Per pulire il proprio casco si prega di utilizzare solo ed esclusivamente i seguenti metodi. L’uso di altri prodotti chimici o metodi
non approvati può danneggiare la calotta del casco o la protezione. Un casco danneggiato può incrementare il rischio di infortunio
serio o morte in un incidente.
Finiture lucide. HJC raccomanda di pulire il vostro casco con prodotti appositi per la pulizia e la lucidatura delle automobili. Tutti i
caschi HJC sono rifiniti con rivestimenti base per automobili e rivestimenti lucidi. Materiali di gomma possono essere usati per
una pulizia più profonda per rimuovere parecchi graffi e strisciate. Seguire le istruzioni del prodotto diligentemente. La lucidatura
eccessiva con materiali di gomma può causare delle leggere abrasioni che potrebbero rovinare la rifinitura del vostro casco. Gli
adesivi e decalcomanie lasceranno un residuo adesivo quando rimossi. Per rimuovere questo residuo adesivo, usare tamponi di
alcol. Accertarsi di togliere il liquido in eccesso e di pulire l’area con acqua e sapone una volta rimosso il residuo adesivo. Non
premere troppo mentre si strofina nel tentativo di rimuovere il residuo adesivo, preferire piuttosto ripetuti trattamenti leggeri.
Finiture opache. Per i nostri caschi con finiture opache (non lucide), raccomandiamo di usare acqua calda e sapone gentile.
Ripetere l’operazione per lo sporco più difficile. Non premere troppo con materiali di gomma mentre si pulisce la superficie altrimenti
si potrebbe avere un effetto "lucente" tale da rovinare la finitura opaca.
Pulizia dell’interno
Sebbene raccomandiamo di cambiare il casco ogni 3-5 anni, l’accumulo di sudore, umidità e sporco possono deteriorare il tessuto
e le cuciture e questo può causare odori sgradevoli. Per lavare le imbottiture rimovibili HJC, HJC raccomanda di usare una comune
lavatrice e asciugatrice. Per gli interni non rimovibili, HJC raccomanda di usare prodotti che eliminano la muffa e i batteri come
"Helmet Fresh"
Pulizia del foro di aerazione
Sporco e detriti si possono formare dentro il sistema di ventilazione del vostro casco HJC. Spray ad aria compressa come quelli
usati per pulire le tastiere dei computer possono essere usati per espellere i detriti dal sistema di ventilazione. Si raccomanda di
rimuovere tutte le imbottiture rimovibili prima di procedere.
Rimozione della visiera
Si prega di verificare che
la freccia riportata sulla
visiera sia allineata con la
Aprire
Chludere
freccia sul meccanismo,
come da illustrazione.
Chludere
Aprire
Chludere
1.
Spostare la leva di bloccaggio
in posizione "Open".
Aprire
2. Allineare la visiera con il meccanismo,
come da illustrazione.
3. Premere la visiera nel meccanismo.
Verificare sempre che le imbottiture del casco siano installate prima di usarlo. Un casco con imbottiture installate male o
addirittura assenti può incrementare il rischio di un serio infortunio o la morte in un incidente.
Rimozione dei guanciali
Ci sono 3 cinghie che tengono i guanciali al loro posto.
1. Levare gentilmente il guanciale dall'interno, rilasciando le cinghie.
2. Afferrare il guanciale vicino al baricentro e liberarlo gentilmente dalla chiusura a scatto per il mento.
Installazione del guanciale
1. Inserire le cinghil per il mento attraverso l'apertura del guanciale.
2. Inserire la parte posteriore del guanciale nella calotta, facendo in modo di allineare la parte inferiore del guanciale con il
profilo in gomma del casco.
3. Chiudere i 3 bottoni.
1. Sbloccare la visiera con l'apposito pulsante.
2. Aprire la visiera nella posizione di massima apertura.
3. Spostare la leva di bloccaggio in posizione "open".
4. La visiera si sgancera, automaticamente dal meccanismo.
Rimozione dell’imbottitura a corona
1. Afferrare il tessuto dell’imbottitura a corona il piú possibile verso la sua base di plastica e tirare fuori dal casco.
2. Ripetere la stessa operazione per il retro.
27 28

Installazione dell’imbottitura a corona
1. Allineare il centro della base in plastica dell'imbottitura con la calotta. Infilare la base in plastica tra la calotta e l'EPS.
2. Allineare
3. Allineare e agganciare i bottoni posteriori.
entrambi i lati della base in plastica dell'imbottitura con la calotta. Infilare la base in plastica tra la calotta e l'EPS.
Parti di ricambio
L’uso di parti di ricambio non fabbricate da HJC può incrementare il vostro rischio di serio infortunio o morte in un incidente.
Usare solo parti HJC che sono specificatamente progettate per questo casco.
Non modificare il vostro casco
Il vostro casco HJC è progettato per soddisfare gli standard ECE R 22-05. Contattare HJC Europe per maggiori informazioni
riguardo gli standard ECE R 22-05. Modificare il vostro casco può incrementare il rischio di infortunio serio o morte durante
un incidente. Non modificare il vostro casco HJC. Le modifiche includono l seguenti :
• scavare buchi;
• tagliare la calotte, la protezione o le cinghie;
• modificare il sistema di ritenzione, incluso aggiungere un para-mento;
Rimozione paranaso
1. Afferrare il centro del paranaso e tirarlo delicatamente per rimuoverlo dalla
sua sede.
• rimuovere parti;
• la pittura; e
• attaccare accessori che non sono fabbricati da HJC per questo casco.
Se avete domande riguardo le modifiche, contattate HJC. Vedere dietro per le informazioni sui contatti.
Alloggiare il vostro casco correttamente
Un casco non adeguatamente riposte può danneggiarsi e può aumentare il rischio di un infortunio serio o
morte in un incidente. Si dovrebbe:
•
Tenere il casco in un luogo secco e fresco,
•
Tenere il casco lontano da animali domestici e altri animali,
•
Montaggio paranaso
1. Infilare il paranaso nell'apposita sede.
Tenere il casco lontano da
bollenti.
•
Se il casco viene lasciato esposto al sole per lunghi periodi, c'è la possibilità
fonti di calore superiori a 50°C e non appoggiare o mettere vicino a superfici
Sostituzione del casco
Sebbene il vostro casco HJC sia costruito con l migliori materiali disponibili per offrirvi un prodotto duraturo
nel tempo, potrebbe anche aver bisogno di una sostituzione. Sostituire il vostro casco immediatamente se:
•
Ha subito un impatto. Il vostro casco è stato progettato per UN impatto. Un impatto può rompere la calotta
esterna o comprimere la protezione per l’assorbimento degli urti. Potreste anche non essere in grado
di vedere il danno. Un qualsiasi impatto in un incidente oppure la sola caduta del casco da un’altezza
di circa un metro è sufficiente per danneggiare il casco.
•
a calotta, la visiera o il cinturino sono danneggiati. La calotta del casco, la protezione per l’assorbimento
Rimozione protezione mento
1. Afferrare la protezione e sfilare la linguetta di plastica delicatamente.
Anche se il vostro casco non è stato danneggiato, necessita di una sostituzione ogni 3-5 anni, a seconda di quanto spesso
viene usato. Con il tempo, l raggi UV e l’usura degli adesivi e dei componenti danneggeranno il vostro casco. Indossare un
casco danneggiato può incrementare il rischio di infortunio serio o morte durante un incidente.
Se non siete sicuri sulla necessità o meno di dover sistituire il casco, contattate HJC prima di usare nuovamente il casco.
degli urti e il sistema di ritenzione devono essere in buone condizioni per assicurarvi la miglior protezione
possibile.
Smaltimento del casco
Se comprate un nuovo casco, distruggete il vecchio per assicurarsi che non possa essere riusato. Non vendere
o dare via il vecchio casco, anche se non è stato danneggiato. Con il tempo lo strato protettivo del casco si
adatterà al contorno della vostra testa. Se qualcun altro usasse il vostro casco non avrebbe la stessa protezione.
Garanzia
Montaggio protezione mento
1. Centrare la linguetta di plastica della protezione dd lnserirla tra la calotta
e la plastica.
29 30
HJC con il presente estende una garanzia limitata al compratore di un casco HJC che il casco in questione è senza difetti
di materiale e fabbricazione.
Copertura
Questa garanzia è applicabile solo ai difetti di fabbricazione e vale 1 anno dalla data dell'acquisto. Non è valida per altri
problemi dovuti a trascuratezza, negligenza, modifiche, incidenti, etc.
Limitazione della garanzia
Qualsiasi garanzia di commerciabilità e qualsiasi garanzia implicita con il presente vengono espressamente escluse.
In aggiunta, HJC non potrà essere ritenuta responsabile per nessun danno consequenziale.
Procedura
Per procedere con la richiesta di garnzia, prendere il casco e recarsi presso il rivenditore autorizzato HJC dov'è stato
acquistato il casco, presentando la ricevuta che attesta la data dell'acquisto del prodotto, ed una nota contente i vostri dati
anagrafici ed una descrizione del problema riscontrato.

Belangrijke Veiligheidsinformatie
Open
Open
Sluiten
Sluiten
De instructies in deze handleiding zijn samengesteld om u te helpen de juiste helm te kiezen, het op een correcte wijze te
dragen, het te onderhouden en om te weten wanneer het tijd is om een nieuwe helm aan te schaffen. Indien u deze instructies
niet opvolgt bestaat het risico dat u ernstig gewond raakt of kunt overlijden in het geval van een ongeluk. U zou de volgende
punten aluijd op moeten volgen zodat uw helm u zoveel mogelijk bescherming biedt:
• Draag de helm tijdens het rijden;
• Ga voorzichtig met uw helm om zodat onvoorziene schade voorkomen woedt;
• Rij voorzichtig - neem geen risico’s door het feit dat u een helm draagt.
Ofschoon uw HJC helm ontworpen is om enig letsel te voorkomen wanneer gedragen, bestaat er geen helm die u voor alle
mogelijke of bedenkbare impacten bescherm. Uw helm beschermt u bijvoorbeeld niet tegen ruggegraat of nek letsel. Er is
geen garantie dat de helm letsel kan voorkomen in het gebied rondom om uw hoofd dat afgedekt is. Een ongeluk op lage
snelheid kan leiden tot serieus letsel of overlijden.
De juiste helm selecteren
Koop nooit een gebruikte helm en leen nooit een helm van iemand anders. Na verloop van tijd zal het styropor
in de helm zich aanpassen aan de vorm van uw hoofd. Een gebruikte of geleende helm zal mogelijk niet zoveel
bescherming bieden als een nieuwe helm.
Het dragen van een niet-passende helm vergroot uw kans op letsel of overlijden in het geval van een ongeluk.
Een helm die te groot is voor uw hoofd kan losraken of afgeworpen worden tijdens een ongeluk. Volg deze
instructies op om de juiste maat helm te kiezen.
1.
Meet uw hoofd; wikkel een meetlint om uw hoofd ongeveer 2,5cm boven uw wenkbrauwen.
Gebruik de tabel hieronder om de juiste maat helm te kiezen die het dichst bij de omvang van uw hoofd in de buurt komt. Indien
2.
de gemeten maat tussen twee helm maten invalt, pas dan eerst de grotere helm en vervolgens de kleinere.
Maat tabel
Helm maat
Centimeter
Inch
3.
Pas de helm door de twee kinbanden vast te pakken en de helm volledig op uw hoofd te trekken, zorg ervoor dat de
bovenkant van uw hoofd contact maakt met de bovenkant van de helm.
4. Controleer of de maat correct is; controleer om er zeker van te zijn dat de helm de juiste maat heeft en of:
• De voering van de helm comfortabel om uw hoofd heen zit.
• De voering goed op uw hoofd drukt
• De wangkussens met uw wangen contact maken
• Er geen ruimte tussen uw voorhoofd en de voering bevindt,
controleer dit door te proberen hier twee vingers tussen te krijgen.
If the helmet does not fit snugly, try on a smaller size.
Controleer uw zichtveld wanneer u een helm uitprobeert; sommige helmen kunnen uw zichtveld belemmeren wanneer
5.
u naar links, rechts, boven of beneden kijkt.
Zorg er altijd voor dat uw zicht goed is zodat u veilig op uw motor kunt rijden.
6. Test of de helm geschikt is door beide handen op de zijkanten van de helm te plaatsen. Probeer de helm
van links naar rechts, en van boven naar beneden te draaien terwijl u uw hoofd zo stil mogelijk houdt.
Indien u de voering langs uw gezicht voelt glijden, is de helm te groot, probeer een kleinere maat.
Wanneer u de helm probeert te draaien zou de helm uw huid mee moeten draaien.
7.
Bevestig het retentie systeem (kinband)
veroorzaakt. De riempjes mogen niet los zitten en behoren stevig om uw kaak te zitten. Zie pagina 32-33.
8.
Test het retentie systeem (kinband)
• Plaats uw handen op de achterkant van de helm en probeer de helm van uw hoofd te duwen
door het naar voren te draaien.
• Plaats uw handen op de voorkant van de helm boven uw voorhoofd (of plaats uw handen op
de kin) en probeer de helm van uw hoofd te duwen door het naar achteren te draaien.
Als de helm van het hoofd af komt of over je ogen schuift, pas dan een andere maat, model of merk.
Je moet de rand aan de bovenkant van het gezichtsveld kunnen zien.
zo strak mogelijk onder uw kaak zonder dat dit pijn
Herhaal stap 3 t/m 8 totdat u een helm vindt die comfortabel en stevig op uw hoofd zit.
Het maattabel is een referentie. Pas te allen
tijde de helm en volg de instructies van deze
handleiding om na te gaan of de helm voor u
geschikt is.
Specificaties
1. Buitenschaal
Sluiten
Open
Sluiten
Open
2. Achteruitlaten Venturi
3. Schokdemper
4. Zachte binnenbekleding
5. Rubberen randstrip
6. Kinriem
7.
Kinbandsluiting
8. Voorste kin ventilatiesleuf
9. Oogpakking
10. Vizier vergrendelings-knop
11. Scherm zonder gereedschap
te openen
12. Vizier vergrendelings-knop
13. Raster van het vizier
14. Bovenste ventilatiesleuf voorzijde
Juist gebruik van uw helm
Lees de volgende punten goed door om risico op zwaar letsel te verminderen en schade aan uw helm te voorkomen:
• Pas tijdens het rijden nooit uw helm accessoires aan; doe dit slechts wanneer u niet aan het rijden bent.
• Laat uw helm nooit vallen; Door het vallen kan de schaal barsten of het styropor beschadigen. Het kan zijn dat de schade
niet zichtbaar is. Uw helm is slechts ontworpen voor één impact. Zie het onderdeel “vervangen van de helm” (p.36) voor
meer
informatie over hoe te handelen nadat de helm gevallen is.
• Draag nooit iets tussen uw hoofd en de helm; dit vermindert mogelijk de effectiviteit van uw helm.
•
Hang of haak uw helm nooit aan iets, inclusief sissybars en spiegels; u kunt zodoende schade berokkenen aan het styropor
van de helm of de voering.
• Gebruik nooit insectenwerende middelen op of in de nabijheid van uw helm; insectenwerende middelen kunnen zowel het
vizier, de schaal, het styropor of andere onderdelen van uw helm beschadigen.
•
Stel uw helm nooit bloot aan brandstof of brandstof uitstoten; brandstof kan zowel het vizier, de schaal, het styropor of
andere onderdelen van uw helm beschadigen.
• Gebruik’s nachts of gedurende andere omstandigheden met slecht zicht nooit een donker of getint vizier.
-
Indien u vragen heeft betreffende welke overige substanties uw helm kunnen beschadigen, neem dan gerust contact met ons op.
•
Draag te allen tijden oogbescherming; indien u geen helm draagt met een vizier dient u te allen tijden oogbescherming te
dragen. Zorg er altijd voor dat uw vizier goed op zijn plaats bevestigd zit wanneer u aan het rijden bent.
•
Wees op uw hoede voor geluiden; uw helm vermindert mogelijk uw hoorvermogen. Uw helm is echter geen vorm van
gehoorbescherming.
•
Bewaar uw helm altijd in zijn helmtas wanneer u hiervan geen gebruik maakt; zodoende verhindert u mogelijke onvoorziene
opvervlakte beschadigingen.
Gebruik uw helm altijd correct, zo vermindert u de kans op ernstig letsel of overlijden.
Inspecteer uw helm
Om ervoor te zorgen dat uw helm zich in een goede conditie bevindt en u maximaal kan beschermen dient u deze te inspecteren
alvorens u gaat rijden:
•
Kijk het vizier en de pallen waar deze aan draait na en draai de schroeven van de pallen, indien nodig, aan; zorg ervoor
dat u de schroeven niet te vast aandraait. Plastic basisplaten schroeven kunnen breken en plastic schroeven kunnen het
kunststof omhulsel beschadigen indien zij te vast aangedraaid worden.
• Kijk of uw helm beschadigd is; indien uw helm beschadigd of gebarsten is gebruik hem dan niet meer. Zie onderdeel
“het vervangen van de helm” (p. 36) voor meer informatie. Indien uw helm gevallen is, kunt u de schade mogelijk niet zien.
• Controleer op beschadigde onderdelen of slijtage. onderdelen van plastic kunnen na verloop van tijd onbruikbaar raken.
Indien u versleten of beschadigde onderdelen tegenkomt dient u deze te vervangen of een nieuwe helm aan te schaffen.
Zie onderdeel “Vervangingsonderdelen”
Indien er tijdens het rijden onderdelen van uw helm vallen kan dit uw zicht blokkeren en een ongeluk tot
• Kijk het retentiesysteem (kinbanden) na op schade; vervang de helm indien dit gerafeld of gescheurd is.
•
Zorg ervoor dat alle kussentjes op hun plaats zitten; beide wangkussens en de binnenvoering dienen zich op de juiste
plaats te bevinden.
Kijk uw vizier na
Indien uw vizier bekrast of beschadigd is kan dit mogelijk uw zicht verminderen, vervang deze indien nodig. Zorg er altijd
voor dat uw zicht goed is zodat u veilig op uw motor kunt rijden.
Bevestig het retentiesysteem
Bevestig het retentiesysteem (kinbanden) zo strak mogelijk onder uw kaak zonder dat dit pijn veroorzaakt. De banden mogen
geen speling hebben en moeten zich nauwsluitend om de kaak heen bevinden. Indien het retentiesysteem speling heeft kan
uw helm mogelijk losraken of afgeworpen worden tijdens een ongeluk.
gevolg hebben.
(p. 36)
voor meer informatie over het vervangen van onderdelen.
31 32
Dutch

Kinbandsluiting
Open
Sluiten
Open
Sluiten
Open
Sluiten
Kinbandsluiting
Kiriem
Kiriem
Houd de clip op zijn plaats
Clip
en trek aan de kinband,
zoals hierboven
beschreven staat, om de
ideale pasvorm te bereiken.
Monteren van het vizier
Uw helm op juiste wijze onderhouden
Bevestiging van schaal
Gebruik alleen de goedgekeurde methodes hier beschreven om de helm te reinigen. Het gebruik van overige niet-goedgekeurde
chemicaliën of methoden kan de schaal van de helm of de voering mogelijk beschadigen. Een beschadigde helm verhoogt mogelijk
het risico op ernstig letsel of overlijden in het geval van een ongeluk.
Glanzende laklaag; HJC raadt aan om uw helm schoon te maken met producten die specifiek zijn gemaakt voor het schoonmaken
en lakken van auto’s. Alle HJC helmen worden afgewerkt met een onderlaag/heldere laklaag ontworpen voor auto’s. Boenmiddelen
kunnen gebruikt worden als een diepgaande reiniging voor het verwijderen van vele krassen en slijtageplekken. Volg de productinstructies
nauwkeurig op. Overmatig boenen met boenmiddelen kan lichte schuurplekken tot gevolg hebben die de laklaag van uw helm dof
kunnen maken. Stickers en decalco’s laten na verwijdering kleverige resten achter. Maak gebruik van alcoholdoekjes voor het
verwijderen van deze kleverige resten. Zorg ervoor dat u onmiddellijk overmatige vloeistof wegveegt en reinig het gebied na het
verwijderen van de resten met water en zeep. Gebruik geen overmatige kracht tijdens het schoonboenen maar pas meerdere
lichte bewegingen toe.
Niet glanzende laklaag; voor onze matte helmen (niet glanzend) raden wij het gebruik van warm water en milde zeep aan. Pas
meerdere behandelingen toe in het geval van hardnekkig vuil. Zet geen overmatige kracht en gebruik geen boenmiddelen tijdens
het schoonmaken van de oppervlakte daar er een “glanzend” effect kan ontstaan, welke het matte uiterlijk teniet doet.
Schoonmaken van het interieur
Hoewel wij aanraden om een helm iedere 3 tot 5 jaar te vervangen, kan de ophoping van zweet, vochtigheid en vuil er voor zorgen
dat de kwaliteit van het weefsel en hechtingen verslechteren en geurtjes tot gevolg heeft. Voor het wassen van HJC uitneembare
wangkussens, raadt HJC een standaard wasmachine aan en het laten drogen in de open lucht (niet in een droogmachine). In het
geval uw helm geen uitneembaar interieur heeft, raadt HJC het gebruik van bacterie- en schimmelverwijderende producten aan,
zoals “Helmet Fresh”.
Schoonmaken van ventilatiesleuven
Vuil en rommel kan in de ventilatiesleuven van uw HJC helm terechtkomen. Gebruik voor het reinigen van de ventilatiesleuven
persluchtbusjes, deze worden tevens voor het schoonmaken van toetsenborden gebruikt. Het wordt aangeraden dat u alle
uitneembare delen verwijderd voordat u hiermee begint.
Démontage de l’écran
Als het vizier maximal
geopend is zal het pijltje
op het vizier gelijk staan
Open
met het pijltje op het
bevestigingsset.
Sluiten
1. Zorg ervoor dat het
vergrendelings mechanisme
in de open positie staat.
Controleer altijd alvorens u de helm in gebruik neemt of de helmkussentjes geïnstalleerd zijn. Een helm met missende of op
onjuiste wijze geïnstalleerde kussentjes kan de kans op ernstig letsel of overlijden in het geval van een ongeluk verhogen.
Open
2. Zorg dat het vizier precies schuift in de opening
van de bevestigingsset.
3. Als het vizier op zijn plaats zit, kan het onderste
gedeelte van het vizier in de bevestigingsset
gedrukt worden.
Wangkussentje losmaken
Er zijn 3 drukknopjes die het wangkussentje op zijn plaats houden.
1. Trek het wangkussentje langzaam van het interieur weg, hierbij zullen de drukknopjes loslaten.
2. Pak het wangkussentje in het midden vast en trek deze langzaam vrij van de kinbescherming.
Installatie wangkussentje
1. Voer de helmbanden door de opening van het wangkussentje.
2. Plaats het plastic gedeelte van het wangkussen tussen de binnen - en buitenschaal.
3. Klik de drukkers vast in de helmschaal.
Sluiten
1. Verzet de vizier vergrendelingknop op open.
2. Zet het visier volledig open.
3. Verschuif de handle naar open.
Sluiten
Open
Losmaken van het middenkussentje
1. Pak het weefsel van het middenkussentje zo dicht mogelijk bij zijn plastic basis vast en trek deze van de helm weg.
2. Herhaal hetzelfde proces aan de achterkant.
4. Vizier zal automatisch uit het bevestigingsset los komen.
33 34

Installatie van het middenkussentje
1. Zorg ervoor dat het midden van de plastic rand van de hoofd flap in de schaal valt. Duw hierna de
plastic rand volledig tussen de buitenschaal en de styropor binnenschaal.
2. Zorg ervoor dat de linker of rechterkant van de plastic rand van de hoofd flap in de schaal valt.
Forceer de plastic rand tussen de buitenschaal en de styropor binnenschaal.
3. Zorg ervoor dat de 2 drukkers recht boven elkaar zitten en druk deze aan.
Neuskap demonteren
1. Pak het midden vast van de breath deflector en trek deze er voorzichtig uit.
Vervangingsonderdelen
Het gebruik van niet door HJC gefabriceerde vervangingsonderdelen kan de kans op ernstig letsel of overlijden in het geval
van een ongeluk verhogen. Gebruik slechts HJC onderdelen speciaal gemaakt voor deze helm.
Breng geen aanpassingen aan uw helm aan
Uw helm is ontworpen om te voldoen aan de ECE R 22-05 standaarden. Contacteer HJC Europa voor meer informatie omtrent
de ECE R 22-05 standaard. Het aanbrengen van aanpassingen aan uw helm kan de kans op ernstig letsel of overlijden in het
geval van een ongeluk verhogen. Breng geen aanpassingen aan uw HJC helm aan. Aanpassingen omvatten het volgende:
• Boren van gaten;
• Snijden in de schaal, voering of banden;
• Het retentiesysteem aanpassen, inclusief het aanbrengen van een kinkapje;
• Verwijderen van onderdelen;
• Verven;
• Het aanbrengen van accessoires niet gefabriceerd door HJC voor deze helm.
Contacteer HJC indien u vragen heeft omtrent aanpassingen. Zie de achterzijde voor contactdetails.
Correcte opslag van de helm
Een op onjuiste wijze opgeslagen helm kan beschadigen en de kans op ernstig letsel of overlijden in het
geval van een ongeluk verhogen. U dient de volgende stappen uit te voeren:
• Bewaar uw helm op een koele droge plaats;
• Houdt de helm uit het bereik van huisdieren en overige dieren;
tel uw helm niet bloot aan temperaturen hoger dan 50°C (122°F) en zet deze niet in de nabijheid van
• S
of op hete oppervlakten.
•
Neuskap installatie
1. Centreer en druk de neuskap op zijn plaats.
Kinflap demonteren
1. Trek de kinflap weg vanuit de binnen en buitenschaal van de helm.
Vervangen van de helm
Zelfs indien uw helm niet beschadigd is dient u deze iedere 3 tot 5 jaar te vervangen, afhankelijk van de gebruiksfrequentie.
Na verloop van tijd kunnen UV-stralen, kleverige substanties en het verouderen van de componenten uw helm beschadigen.
Het dragen van een beschadigde helm kan de kans op ernstig letsel of overlijden in het geval van een ongeluk verhogen.
Indien u niet zeker weet of u uw helm dient te vervangen, neem dan contact op met HJC Europa voordat u de helm weer
gebruikt.
Berg de helm veilig op in een donkere, droge kamer wanneer u deze voor een langere tijd niet meer gebrui.
Hoewel uw HJC helm wordt vervaardigd uit materialen van de hoogst beschikbare kwaliteit om u een duurzaam
product aan te bieden, zal deze eventueel vervangen moeten worden. Vervang uw helm onmiddellijk:
• Indien deze een impact ondergaan heeft; uw helm is slechts ontworpen voor één impact. Een impact
kan de buitenschaal doen barsten of de impactabsorberende voering ineendrukken. Het is mogelijk dat
deze schade niet voor het oog zichtbaar is. Iedere impact in het geval van een ongeluk of het laten
vallen van de helm vanaf een afstand van slechts 120 cm is genoeg om uw helm te beschadigen.
Indien de schaal, de voering of het retentiesysteem is beschadigd; de Schaal van de helm, de impact
•
-absorberende voering en het retentiesysteem dienen zich in goede staat te bevinden zodat zij u de
meeste bescherming kunnen bieden.
Van uw helm ontdoen
Indien u een nieuwe helm koopt dient u uw oude helm te vernietigen om er zeker van te zijn dat deze niet
nogmaals gebruikt kan worden. Verkoop uw oude helm niet en geef deze niet weg, zelfs als deze niet
beschadigd is. Na verloop van tijd zal het styropor in de helm zich aanpassen aan de vorm van uw hoofd.
Indien iemand anders de helm in gebruik neemt zal de helm diegene geen optimale bescherming bieden.
Garantie
Kinflap plaatsen
1. Centreer het harde kunststof deel van de kinflap rondom de helmschaal.
Druk hem daarna tussen de binnen en buitenschaal.
35 36
HJC geeft hierbij een gelimiteerde garantie aan de aankoper van een HJC helm dat deze vrij van materiaal- en fabricagefouten is.
Dekking
Deze garantie is slechts van toepassing op defecten te wijten aan de fabrikant en gaat in op de datum van de aankoop en
zal gedurende één jaar geldig zijn. De dekking is niet van toepassing op defecten te wijten aan misbruik van de drager,
nalatigheid, aanpassingen, ongelukken enz.
Disclaimer
Iedere garantie van verhandelbaarheid en iedere geïmpliceerde garantie wordt hierbij uitdrukkelijk ontkent. Hiernaast zal
HJC niet aansprakelijk zijn voor de gevolgschaden van om het even welk soort.
Procedure
U kunt als volgt uw garantie claimen: verzamel uw helm, het aankoopbonnetje waarop de dag van uw aankoop vermeld
wordt en een kort briefje waarop u de aard van uw probleem omschrijft en uw naam en telefoonnummer vermeld en verzend
deze spullen naar de HJC dealer waar u de helm aangeschaft heeft.
 Loading...