

Page 1

Operation of New conception projector D8H/D8HD
D8H
D8HD
Model NO.:
D8H (AV,TV,S-video,Audio-out,VGA,Scart,YPbPr,HDMI)
D8HD D8H + DVB-T+ USB+ card reader
Page 2

Operation of New conception projector D8H/D8HD
Catalogue
1. Production brief
2. Safeguards
(1) Important information
(2) Other information
3. Appearance introduction
(1) Top view
(2) Bottom view
(3) Front view
(4) Back view
(5) Left side view
4. Operation introduction
(1) Operation steps
(2) Button introduction
(3) Signal cables connection diagram
(4) Operation of System function
5. User’s maintenance
(1) Cleaning notice
(2) Illustration of projector bulb replacement
(3) Simple repair of faulty
6. Parameter and function
(1) Technical specification
(2) Main functions
7. Accessories
1
Page 3
Operation of New conception projector D8H/D8HD
Product Brief
The new function projector of D8H/D8HD has the unique function of direct TV signal input. It
integrates TV playing, AV playing and VGA signal input, even with Scart,YPbPr,SD card, USB,HDMI,
DVB-T signal input ,with fine and novel appearance and shape. It is convenient and handy. With the
function of image keystone correction, it is suitable for multi-angle playing. With the screen rotation
function, it can place on the table or hang on the ceiling. The aspect ratio of 16:9 super wide screen makes
you feel watching films at home, so you can enjoy the real home theater. D8H/D8HD is the best AV
product designed for commercial, teaching, entertainment and household using.
For your own safety, and in order to use the projector more conveniently and in a correct way, please
read the user’s manual carefully before you use the D8 series(D8/D8H/D8HD), and keep them handy for
future reference.
Safeguards
Important safeguard
Warning
Intense light source. Do not look into the lens or view it directly. Be especially
careful that children do not look directly into the lens.
Warning
To reduce the risk of fire or electric shock, do not expose the appliance to
liquids.
Warning
Forbid to touch high temperature area on the bulb box. Ask the specialist to
replace the lamp when you need. Consult the “bulb replacement” in the user
manual if you replace it yourself. If you have any problem, please contact us or
Warning
Notice:
To reduce the risk of fire or electric shock, do not dismantle the cabinet. There is
no user-serviceable parts inside. Contact us or the dealer when needed.
2
Page 4

Operation of New conception projector D8H/D8HD
1. The D8 series(D8/D8H/D8HD) uses special light source of discharging gas. Please do not turn on or
off D8 series frequently. Every turn on/off interval should be more than 30 minutes. Otherwise, it may
damage the bulb easily and make it unworkable. When the bulb automatically turns on and off or its
brightness is obviously weak, please replace the bulb.
2. Wait for more than 7 minutes after you shut down D8 series with the remote control. Then disconnect
the D8 series from the main power supply after the fan stops. Please wait for more than 3 minutes to
turn on the D8 series after it is turned off by pressing “power” or shut down abnormally. Otherwise it
would directly shorten the life of the bulb or even damage the bulb.
3. In order to cool the D8 series adequately, please stop using the remote control for 2 minutes after D8
series is shut down. The remote control will not function within 2 minutes. 2 minutes later, the remote
control function will resume automatically.
4. Because the temperature is high inside the D8 series bulb box, exhaust vents are distributed in the side
and bottom of the D8 series. Make sure not block up, cover or fill in things into the vents, and also
avoid touching high voltage electricity or circuit in order not to damage D8 series or cause an
accident.
5. There are protective circuits and alarming device inside the D8 series. When the internal temperature
rises caused by improper environment or blocked vents, the projector will alarm automatically. At this
time, the projector should be shut down.
6. As the LCD has a particular characteristic of sequence reversal, when the contrast is not in
consistency with the brightness, there will appear a few bright frames in the screen, which is normal.
7. When there is some light spots or black dots in the image, please enjoy the D8 series at ease as it will
not affect the D8 series’s function at all. According to international inspection standard(less than 8
dots), it is normal.
8. The D8 series will work normally under normal surrounding temperature. When the surrounding
temperature is too high, round black spot will appear and become bigger and bigger in the image
during playing, please turn off the D8 series so as to avoid damaging the LCD chip.
9. Please don’t put the D8 series onto or near calorific and hot objects, or put it into airtight cabinet. Do
put it in the ventilated place!
10. Avoid using D8 series in condition of moisture, high-temperature, vibrancy, dust and radiation. When
it needs to be moved, please take or put it gently!
11. When the D8 series is installed hanging on the ceiling, it is advised to use outlet with a switch, which
can be used to turn off the main power supply after the D8 series is turned off.
12. When the D8 series needs to be installed hanging, please refer to picture(2)
3
Page 5

Operation of New conception projector D8H/D8HD
13. The lens of D8 series is high precision optical apparatus, please do not touch with a hand and avoid
other things touching it. When the D8 series leaves unused for a long time, please cover the lens with
its lid, so as to avoid hurting the lens(lens lid is equipped with the D8 series)
14. In order to minimize the unnecessary abrasion of the crust of the D8 SERIES, using remote control to
operate each function is advised.
15. In order to avoid damages of internal machine, when lighting storm occurs or voltage waves, please
turn off the D8 SERIES, and pull out the plug from the outlet 7 minutes later.
16. If the D8 SERIES has been used for years, after the D8 SERIES is turned off, the bulb is on, the
screen still appears light. This situation might happen. Then please turns off the main power supply
and send the D8 SERIES to our authorized repair station to change a new relay. (Then please do not
turn on the D8 SERIES again, so as to avoid any accident.)
17. Please use the D8 SERIES according to all warnings and instructions marked on the D8 SERIES.
18. D8 SERIES is composed of many precise electronic and optical components. There are no parts of an
apparatus that can be maintained or adjusted by yourself. Disassembling will damage it and please do
not open it. If abnormal problem occurs, please contact us or dealers immediately! If disassembling it
by yourself, free guarantee and repair service will be invalid.
3
Page 6
Operation of New conception projector D8H/D8HD
Appearance introduction
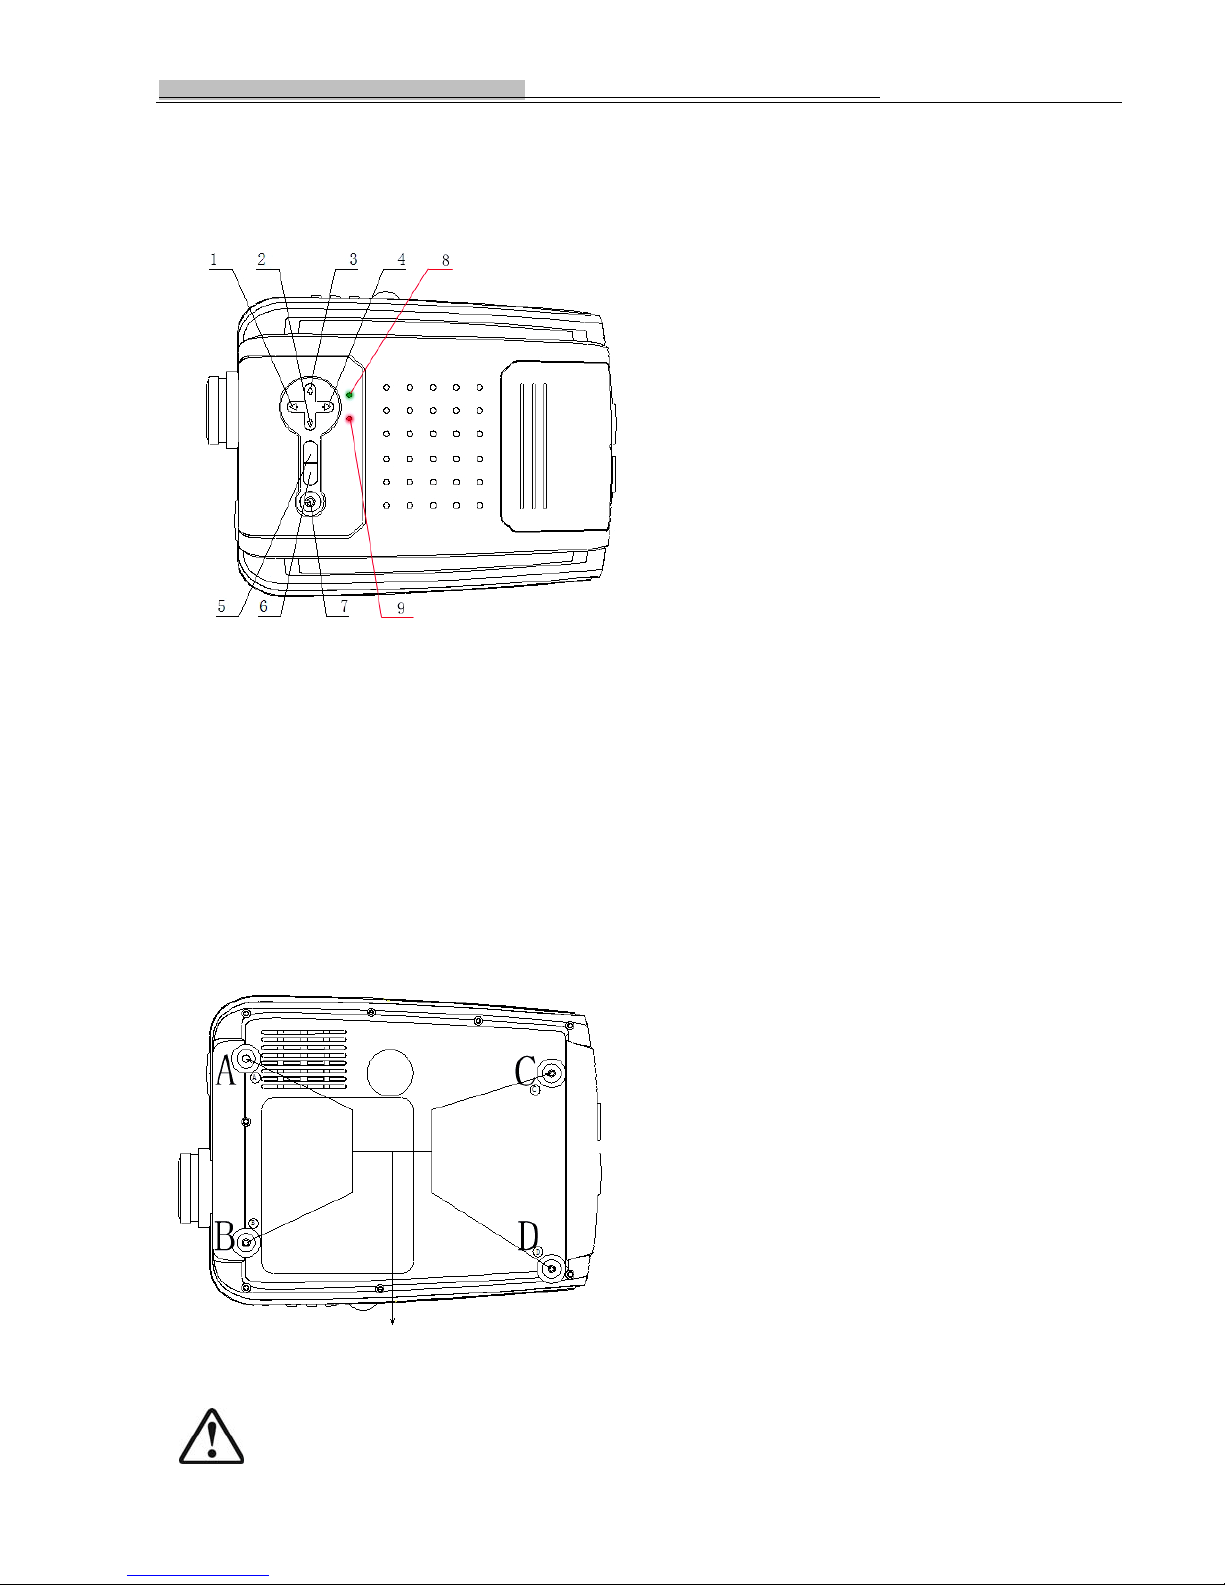
Top view
1. Channel + 6. input signal switch(AV/TV/VGA etc. input signal switch)
2. Vo l u m e — 7. ON/OFF button
3. Volume + 8. Lamp indicator
4. Channel — 9. Power indicator
5. System function menu
(Picture 1)
Bottom view
Hoisting Screw rod (Tell you how to hang the projector to ceiling)
Note: When hoisting the machine, the length of the screw rod in position A B C D used for
3
Page 7
Operation of New conception projector D8H/D8HD
hoisting hole should not exceed 10mm, to avoid an electric shock when the plastic enclosure is
broken and the rod touched the high-tension electricity inside the machine.
(Picture 2)
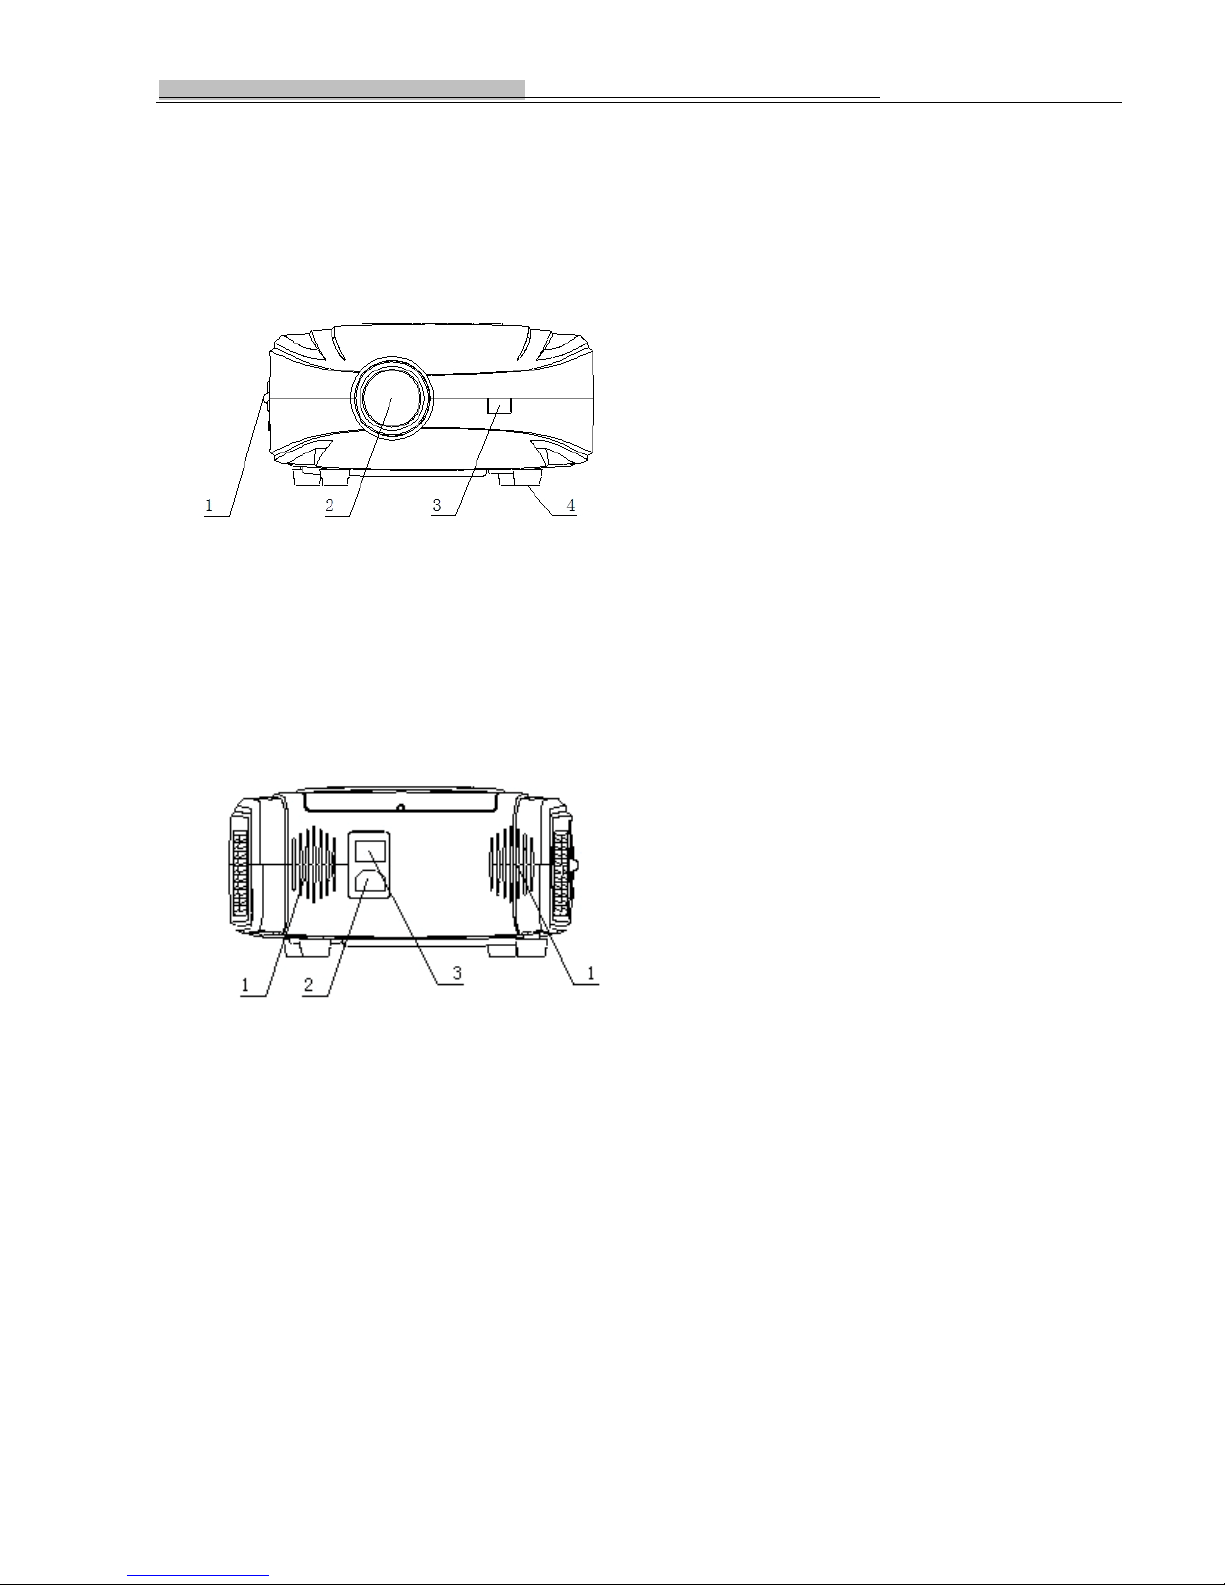
Front V iew
1. Keystone correction knob 2. Lens
3. Remote sensor 4. Tilt adjuster
(Picture 3)
Back View
1. Speaker vent 2. Power socket 3. Power switch
(Picture 4)
3
Page 8
Operation of New conception projector D8H/D8HD
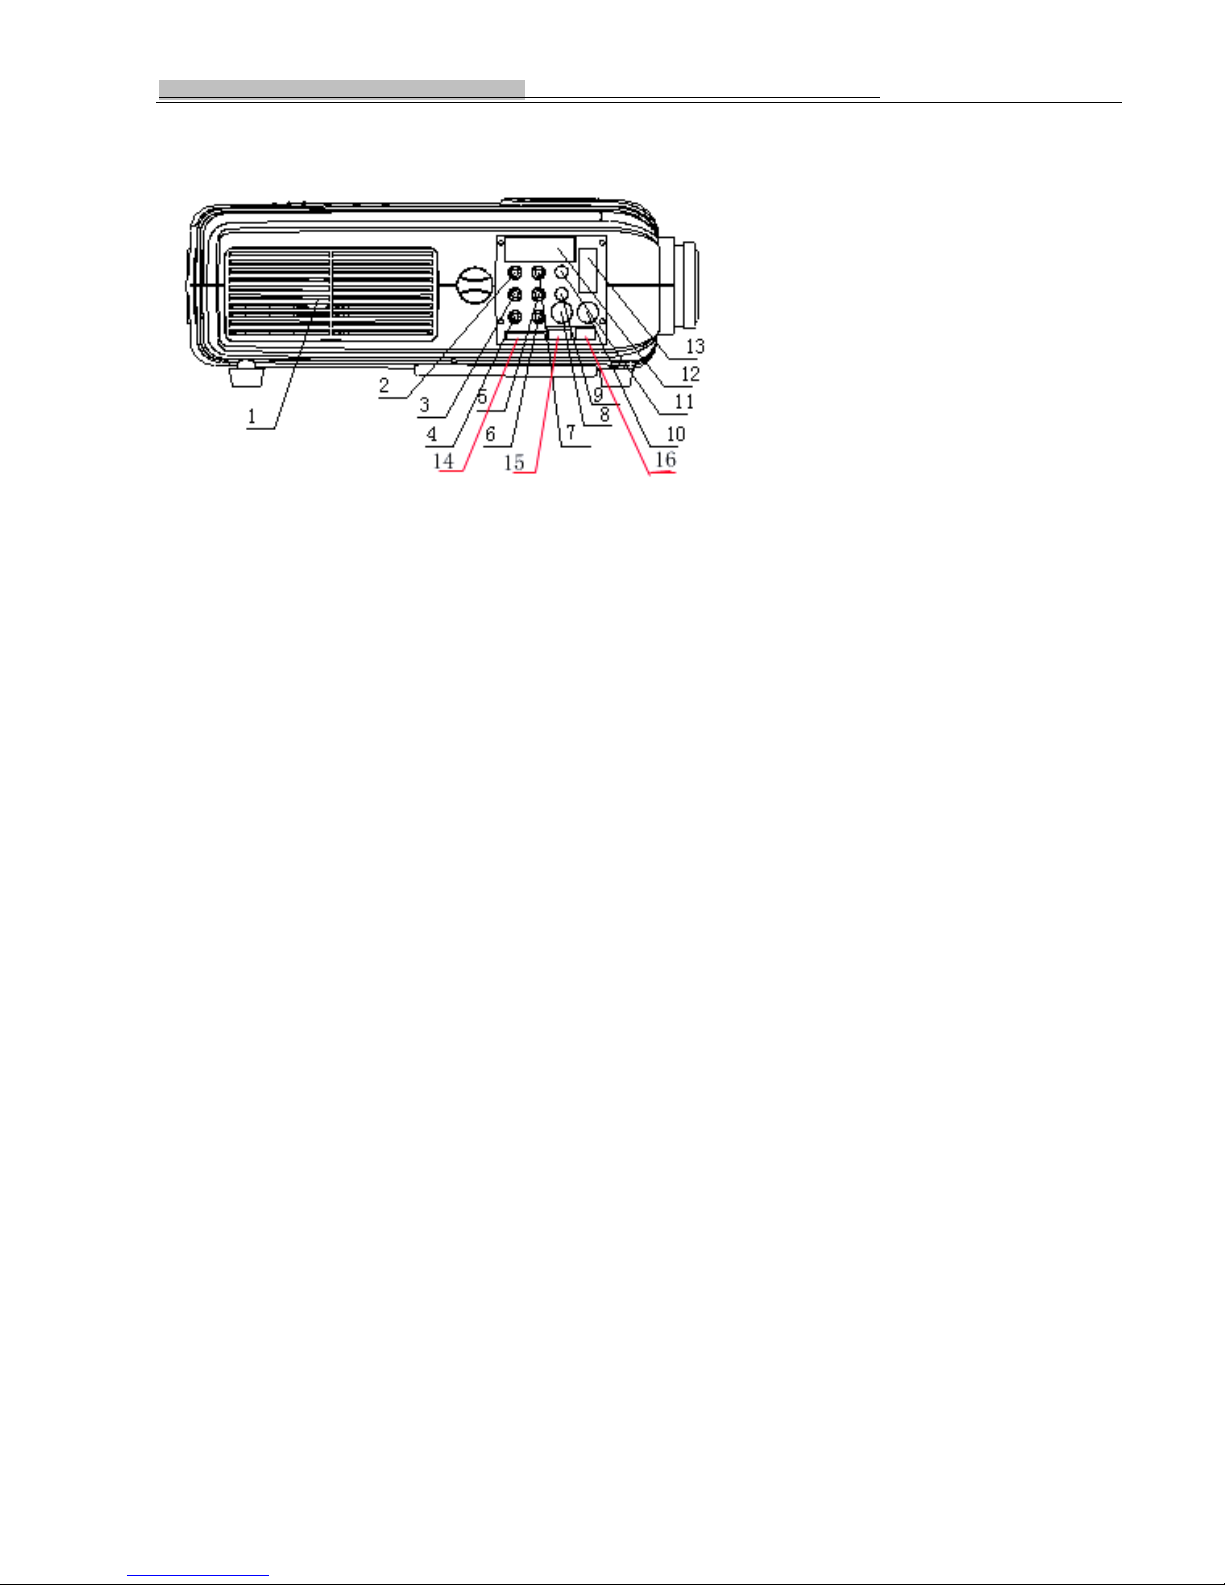
Left Side View
1. Exhaust vent 9. Right audio output (Red)
2. Right audio input (Red) 10. S-Video input
3. Left audio input (White) 11. Left audio output (White)
4. Video input (Yellow) 12. Scart input
5. Pb (Blue) 13. VGA input
6. Y (Green) 14. SD card input
7. Pr (Red) 15. HDMI input
8. TV/DVB-T 16. USB input
Note: AV output(only on TV) (Picture 5)
Operation Introduction
Operation procedure
(1) Power on & off
Place the D8 SERIES in a proper position, plug in the power cord, and turn on the mains switch.
Now the power indicator should be red; you can just press the POWER button. When the power is on, the
power indicator turns to green. (Note: When the power cord is plugged in, the mains switch should be
in the position of OFF, in order to avoid a direct shock to the internal circuit of the D8 SERIES by
the electric current.) When turning it off, use the remote control first. Now, the power indicator should
turn to red, and the radiator fan will still work for 7 minutes for elimination of heat. (Note: the mains
switch can be turned off only when the fan stops working, otherwise the internal components of the
machine is liable to damage, and consequently the service life of the machine will be shortened.)
(2)
Keystone correction
When the D8 SERIES is turned on, the projected images become brighter gradually. Owning to the
different angle of the positions of the D8 SERIES , image keystone distortion may occur. In case of
keystone distortion, the image can be projected regularly by adjusting the keystone correction knob. (±15
degree adjusting angel) (Note: When turning the keystone correction knob, please turn it gently, and
3
Page 9
Operation of New conception projector D8H/D8HD
never use too much effort, or else unwanted damage should occur.)
(3) Focusing
The focus length will change with the change of the distance between D8 SERIES and the screen, so
that the image will blur. Now you can turn the lens gently with your hand, to correct the focal length so as
to obtain distinct images.
Button operation
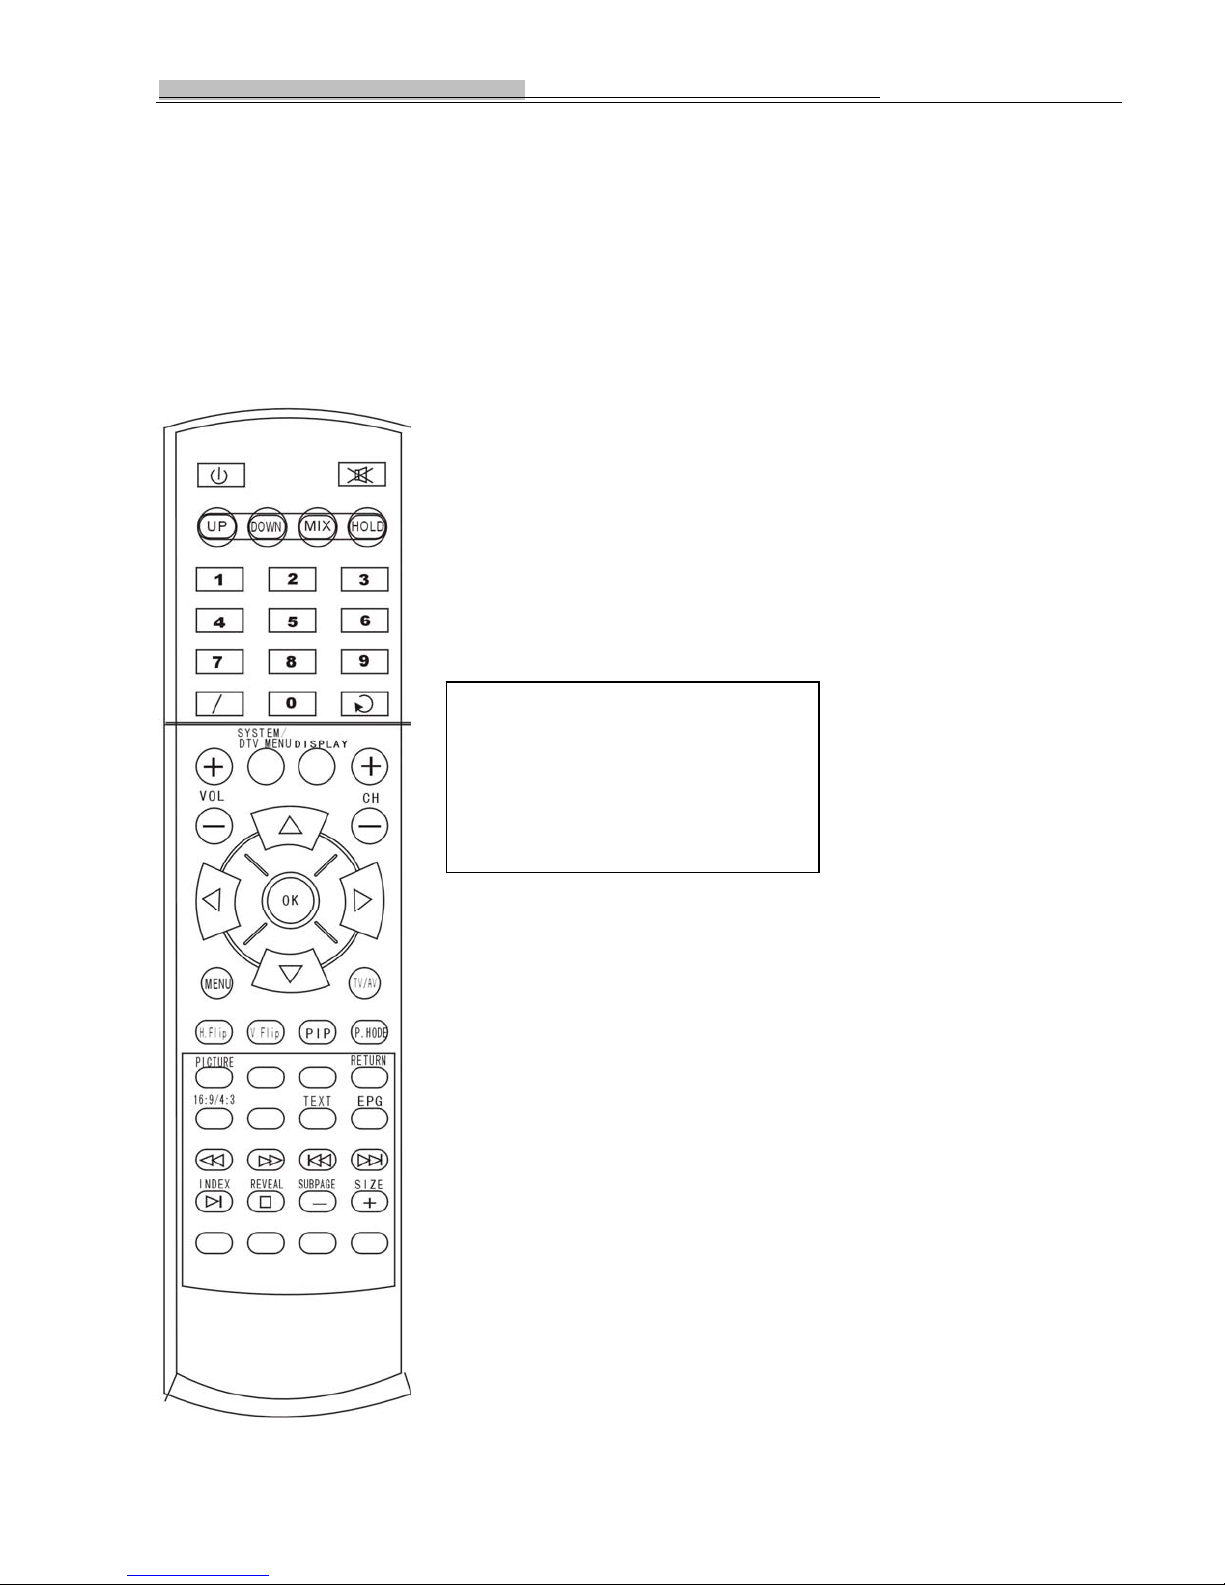
Illustration of remote control
Warn in g
Do not expose the remote control to
shocks, liquid or high humidity. Do
not expose it to direct sunlight or
other intense light source when you
operate.
(Picture 6)
3
Page 10

Operation of New conception projector D8H/D8HD
Power: ON/OFF
Menu: OSD menu/ switch menus
CH+-: Channel browse key; select functions in OSD
V+-: Volume adjusting button; it can also adjust the chosen function in OSD
0—9: Channel selection from 0-9
-/--: Channel bit setting
MUTE: Volume ON/OFF
AUTO: Celerity channel change
: Play back
P. Mode : Picture mode
Display: Display mode
OK: Confirm
UP / DOWN / LEFT / RIGHT: direction key & selection
SYSTEM/DTV MENU: System switch/ DVB-T menu
AV/TV: TV signal and AV signal switching button
H.Flip: Horizontal rotation
V.Flip: Vertical rotation
PIP: Picture in picture
Return:
(1).return to upper menu
(2). programs replaying under mode of full screen
16:9/4:3: 16:9 or 4:3 aspect ratio switch
PICTURE: From text to picture mode
TEXT: From picture to Text mode
EPG: Guide of Elect channel information
UP: Picture or text UP
DOWN: Picture or text Down
MIX: Picture and text mix mode
HOLD: Pause
INDEX: Index or login or stop for reading card
REVEAL: Picture or text flip or pause for reading card
SUBPAGE: Sub page
SIZE: Picture or text size
3
Page 11
Operation of New conception projector D8H/D8HD
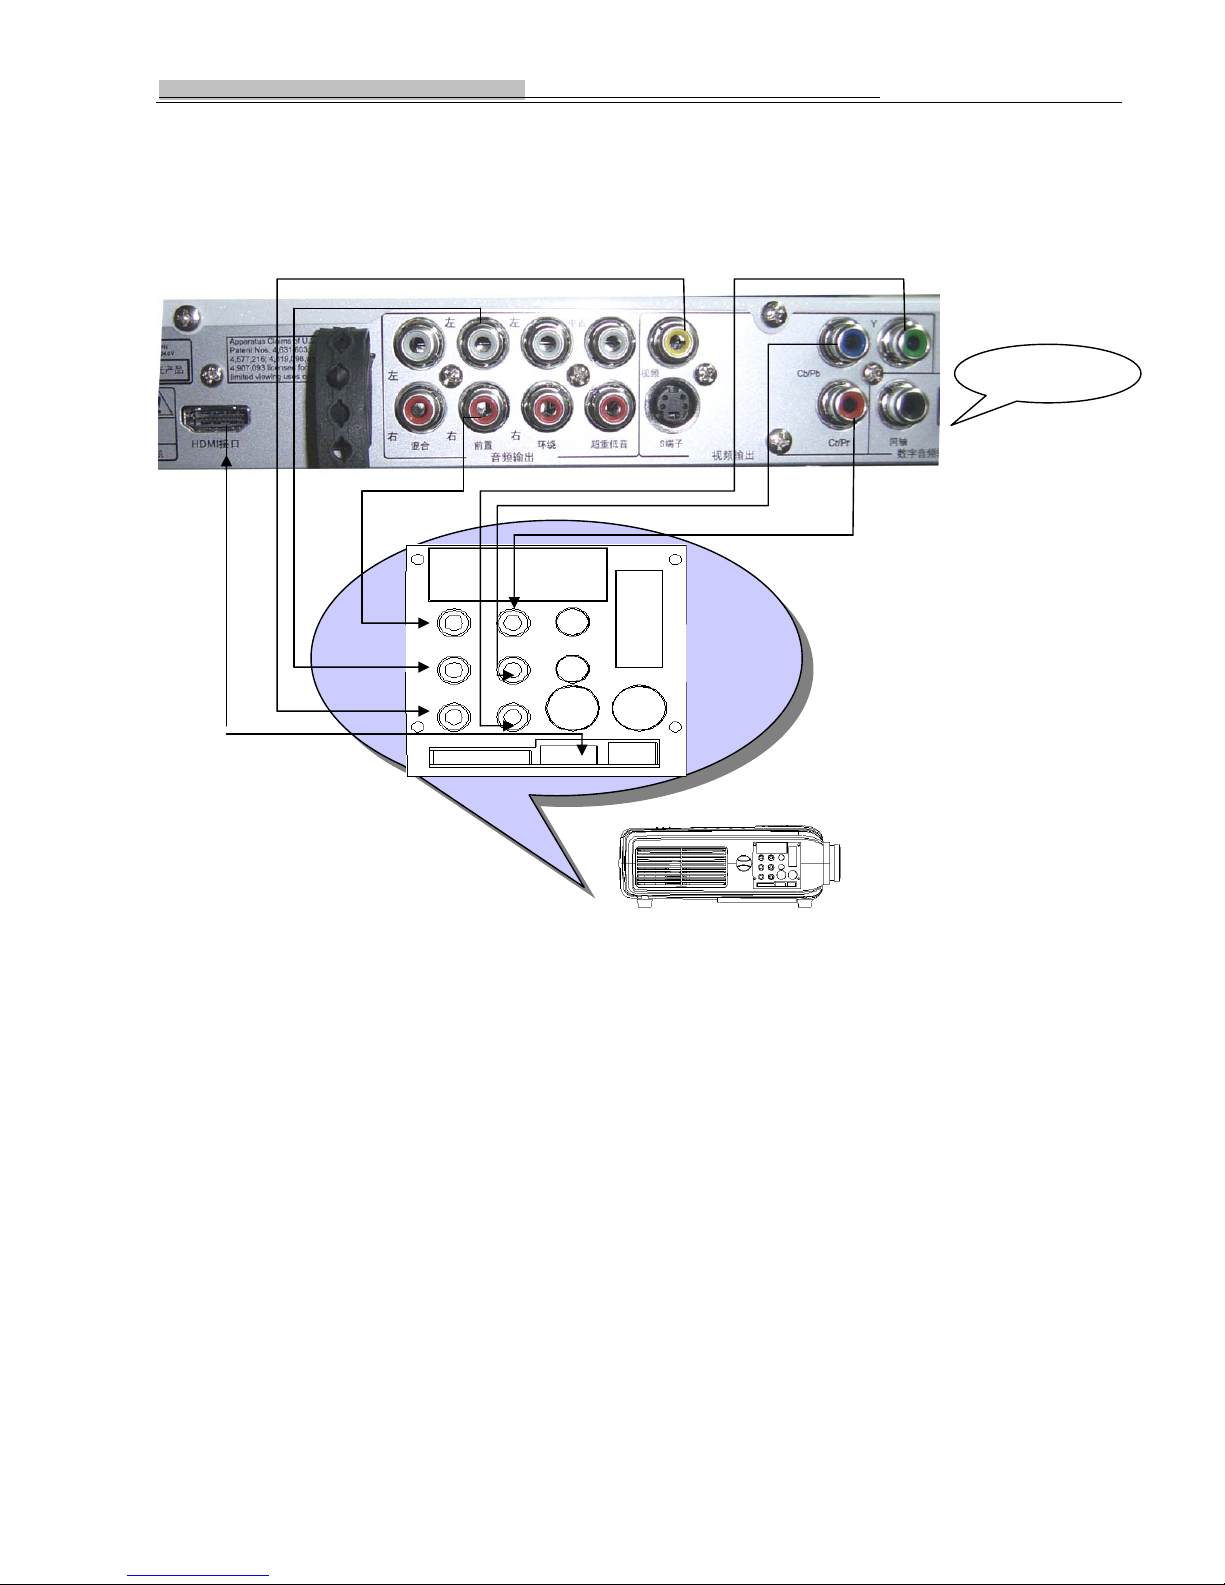
Signal Line connection diagram
HDMI DVD
(Picture 7)
System function operation
After the correct connection as above picture shows, enter OSD to make the setting. Press the button
“ Menu” , picture as follow will show. Use “ CH+/-” to select the sub-menu and use “V+/-” to adjust.
Menu and Operations
Press “MENU” Key to enter OSD menu
The OSD menu has 7 sub-menus
1. PICTURE sub-menu
2. SOUND sub-menu
3. ADVANCE sub-menu (Not for PC source)
4. SYSTEM sub-menu
5. GEOMETRY sub-menu (Only for PC source)
6. PIP sub-menu (Only for PC/HDMI/YPbPr source)
3
Page 12
Operation of New conception projector D8H/D8HD
7. TV-CHANNEL sub-menu (Only for TV source)
8. DVB-T,USB,card reader menu (D8H without this function)
9. Games (D8H without this function)
See below picture
“◄” / “►” key: to move the cursor left or right to select sub-menu
“▲”/”▼” key: enter sub-menu
“MENU” key: exit from main menu
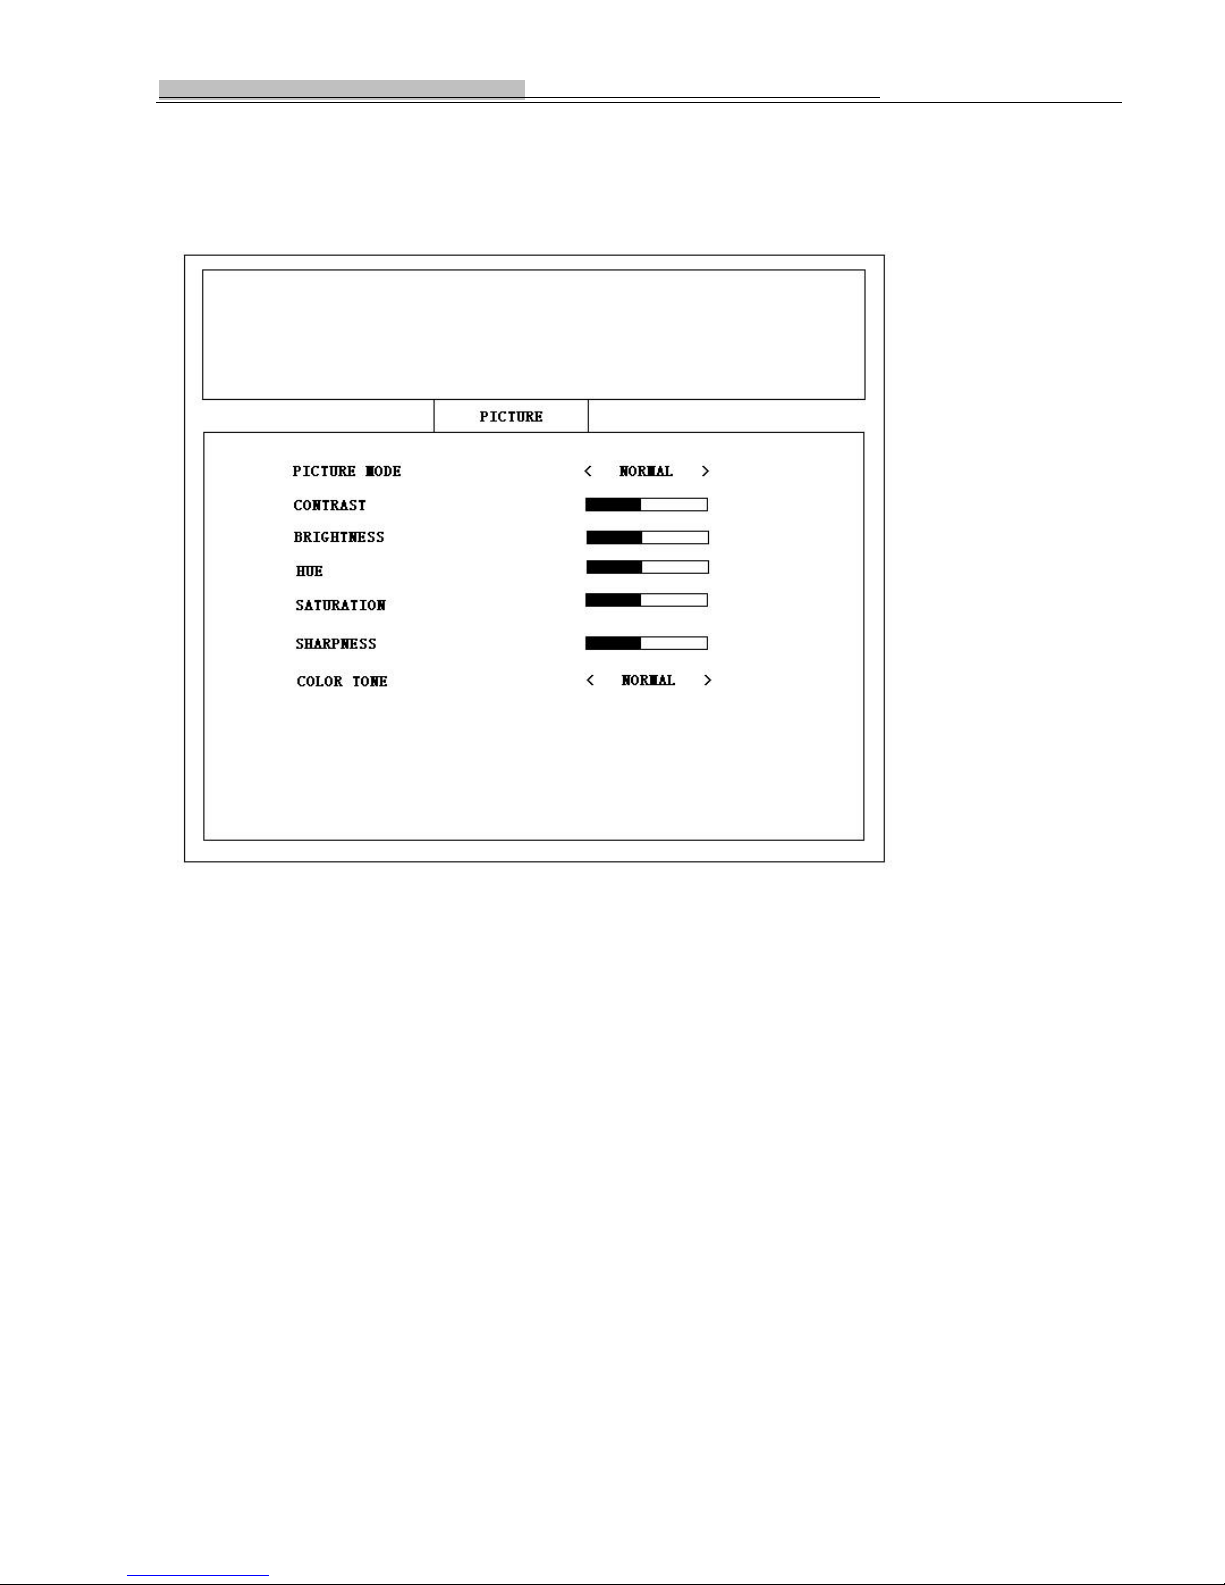
Operations for PICTURE sub menu:
PICTURE sub menu can adjust picture mode, brightness, contrast, hue, saturation, sharpness and color tone. As below:
3
Page 13
Operation of New conception projector D8H/D8HD
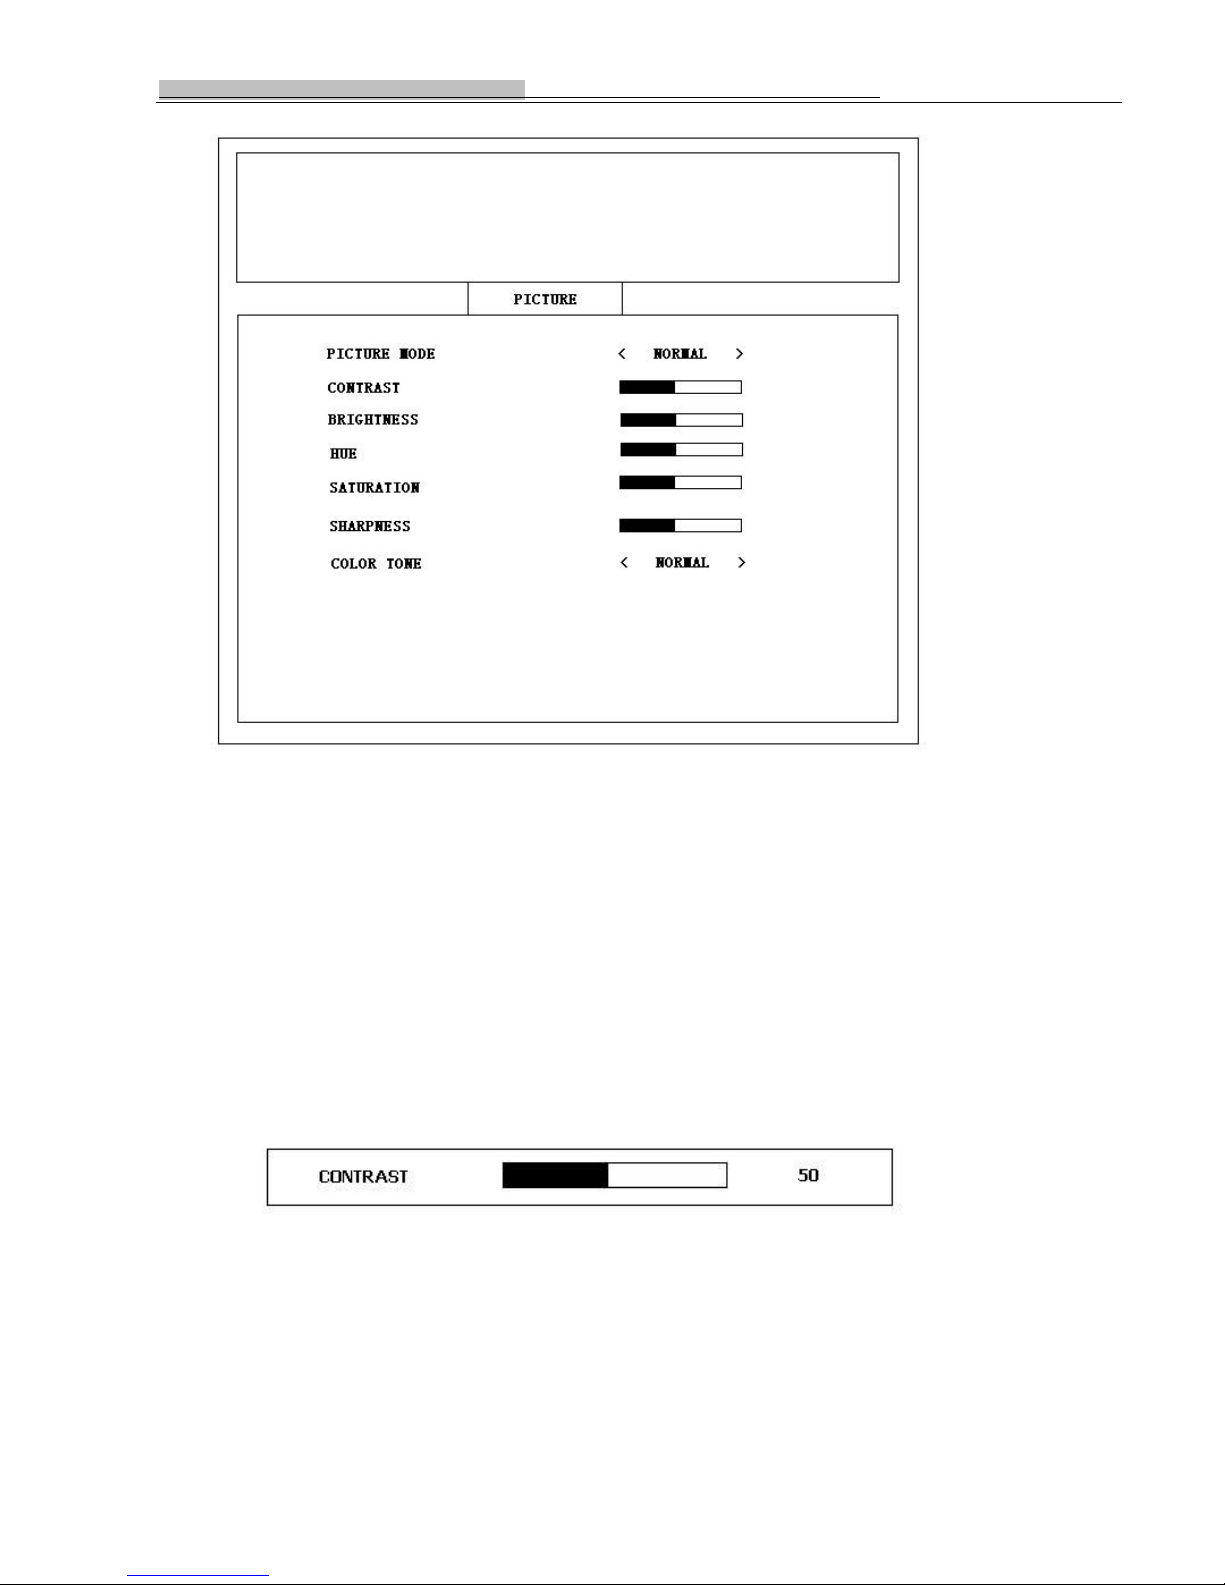
Press “▲”/”▼” to move cursor. Press “◄”/”►” to select item. Press”MENU” to return or exit menu.
1. PICTURE MODE:
There are 4 picture modes: STANDARD/DYNAMIC/SOFT/PERSONAL.
STANDARD: middle brightness and contrast;
DYNAMIC: high brightness and contrast;
SOFT: low brightness and contrast;
PERSONAL: user define the brightness and contrast.
Note: when user adjust brightness/contrast/hue/saturation/sharpness value, the picture mode will auto change to
PERSONAL mode.
2. CONTRAST:
As below:
Press “◄” to decrease value, Press “►” to increase value. Press “MENU” to return or exit menu.
3. BRIGHTNESS :
As below:
3
Page 14

Operation of New conception projector D8H/D8HD
Press “◄” to decrease value, Press “►” to increase value. Press “MENU” to return or exit menu.
4. HUE : (Only at NTSC mode)
As below:
Press “◄” to decrease value, Press “►” to increase value. Press “MENU” to return or exit menu.
5. SATURATION :
As below:
Press “◄” to decrease value, Press “►” to increase value. Press “MENU” to return or exit menu.
6. SHARPNESS :
As below:
Press “◄” to decrease value, Press “►” to increase value. Press “MENU” to return or exit menu.
7. COLOR TONE:
There are 3 color tone modes: NORMAL/WARM/COOL.
NORMAL: middle color tone;
WARD: high color tone, image show red;
COOL: low color tone, image show blue;
Operations for SOUND sub menu:
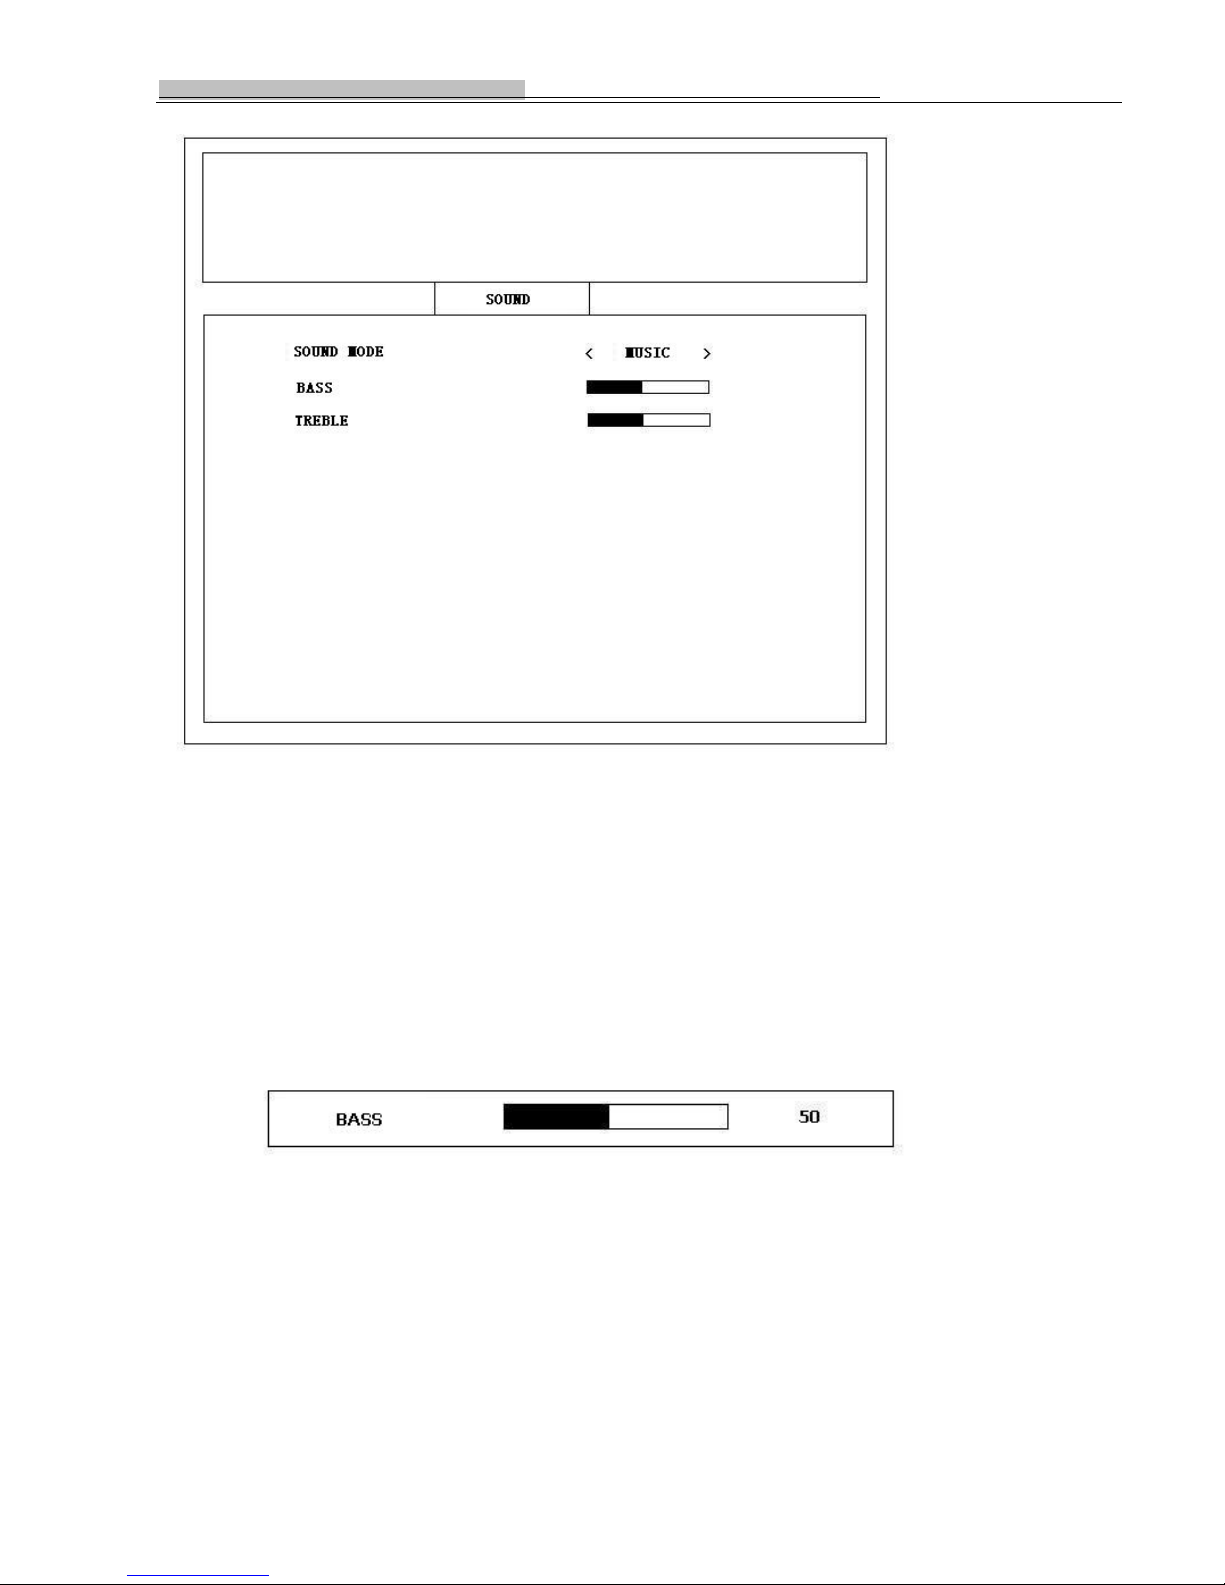
“SOUND” sub menu can adjust sound mode, bass and treble. As below:
3
Page 15
Operation of New conception projector D8H/D8HD
Press “▲”/”▼” to move cursor. Press “◄”/”►” to select item. Press”MENU” to return or exit menu.
1. SOUND MODE: can support STANDATD/NEWS/MUSIC/PERSONAL 4 sound modes.
STANDARD: suit for TV program;
NEWS: suit for language program;
MUSIC: suit for listening music;
PERSONAL: user define the bass and treble.
2. BASS:
As below:
Press “◄” to decrease value, Press “►” to increase value. Press “MENU” to return or exit menu.
NOTE: when user define the BASS value, the sound mode will auto change to PERSONAL.
3. TREBLE:
As below:
3
Page 16
Operation of New conception projector D8H/D8HD
Press “◄” to decrease value, Press “►” to increase value. Press “MENU” to return or exit menu.
NOTE: when user define the TREBLE value, the sound mode will auto change to PERSONAL.
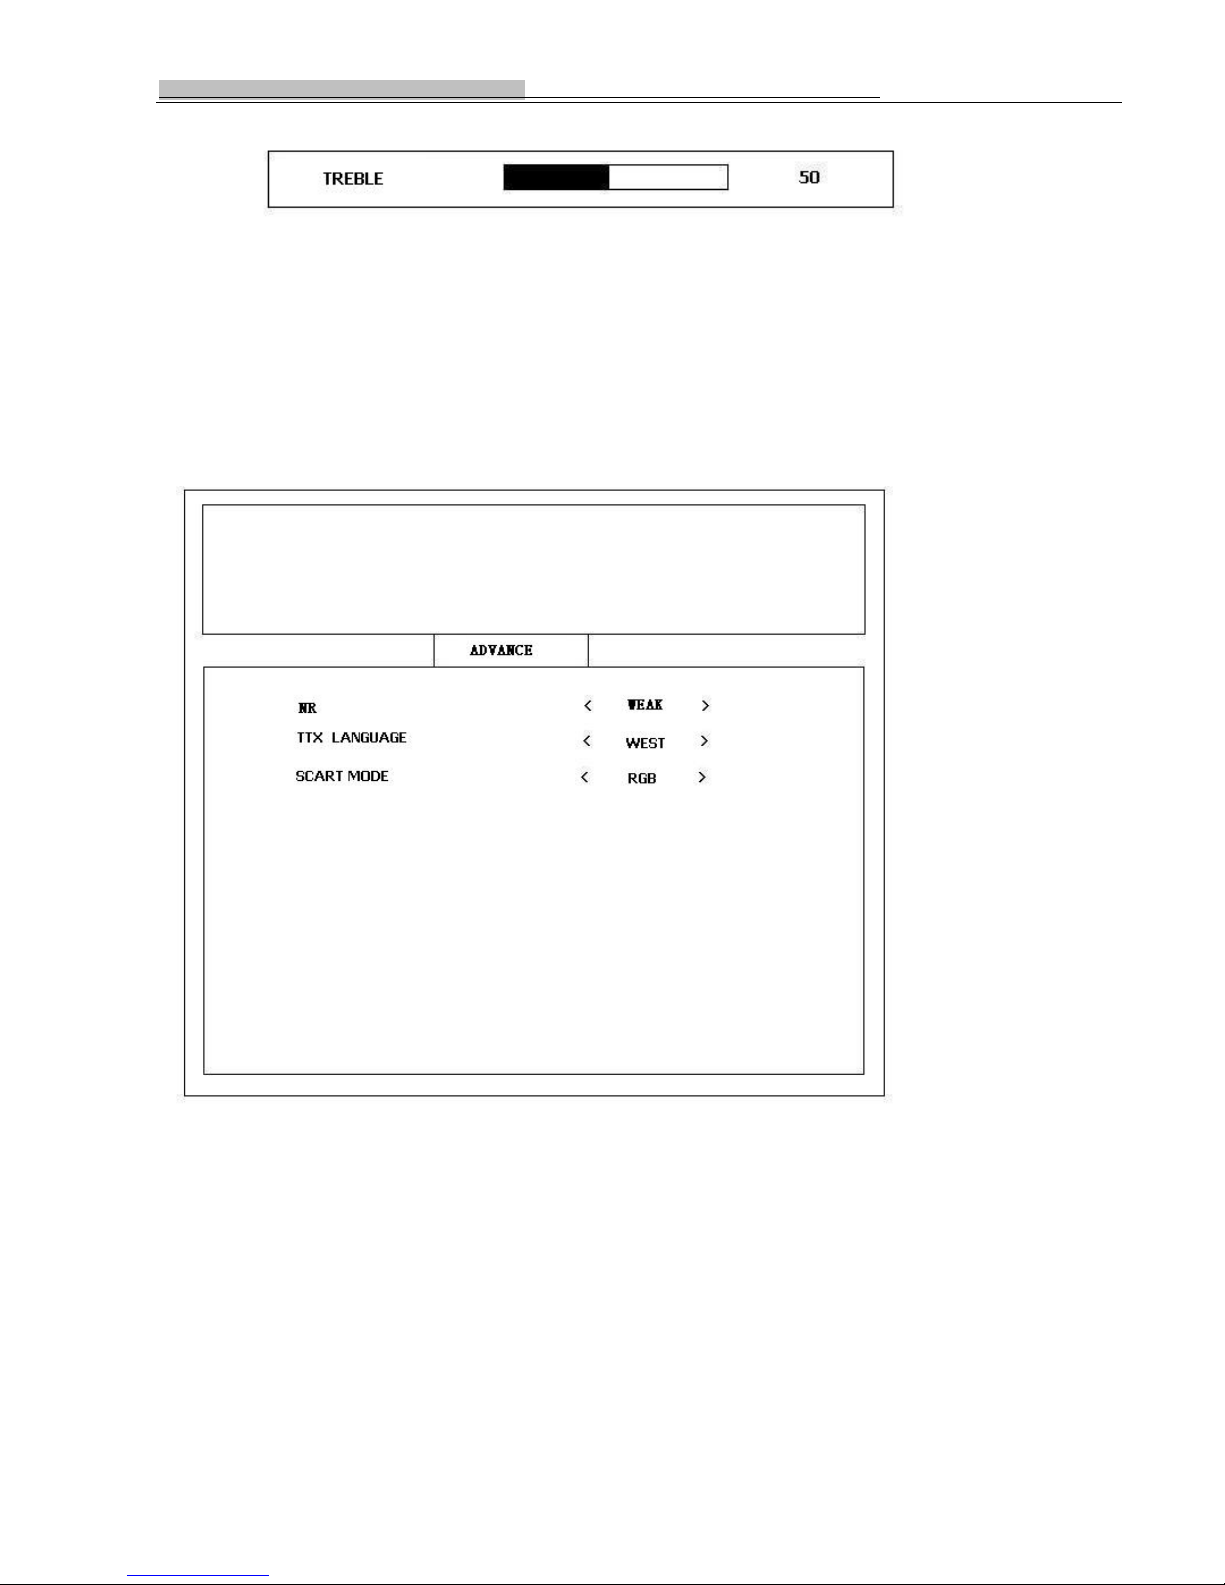
Operations for ADVANCE sub menu: (NOT for PC)
ADVANCE sub menu can adjust NR, TTX language and Scart mode. As below:
Press “▲”/”▼” to move cursor. Press “◄”/”►” to select item. Press”MENU” to return or exit menu.
1. NR: (Noise Reduce)
There are 4 modes for noise reduce: OFF/WEAK/MIDDLE/STRONG.
OFF: switch off NR;
WEAK: low level NR;
MIDDLE: middle level NR;
STRONG: high level NR;
2. TTX LANUGAE:
Select language for teletext.
3
Page 17
Operation of New conception projector D8H/D8HD
There are 5 language can be seleted : WEST/EAST/RUSSIAN/ARABIC/FARSI.
3. SCART MODE: (ONLY for SCART source)
There are 3 sources for SCART mode: AUTO/RGB/CVBS:
AUTO: can auto detect scart source;
RGB: switch to SCART RGB source manually;
CVBS: switch to SCART CVBS source manually.
Operations for SYSTEM sub menu:
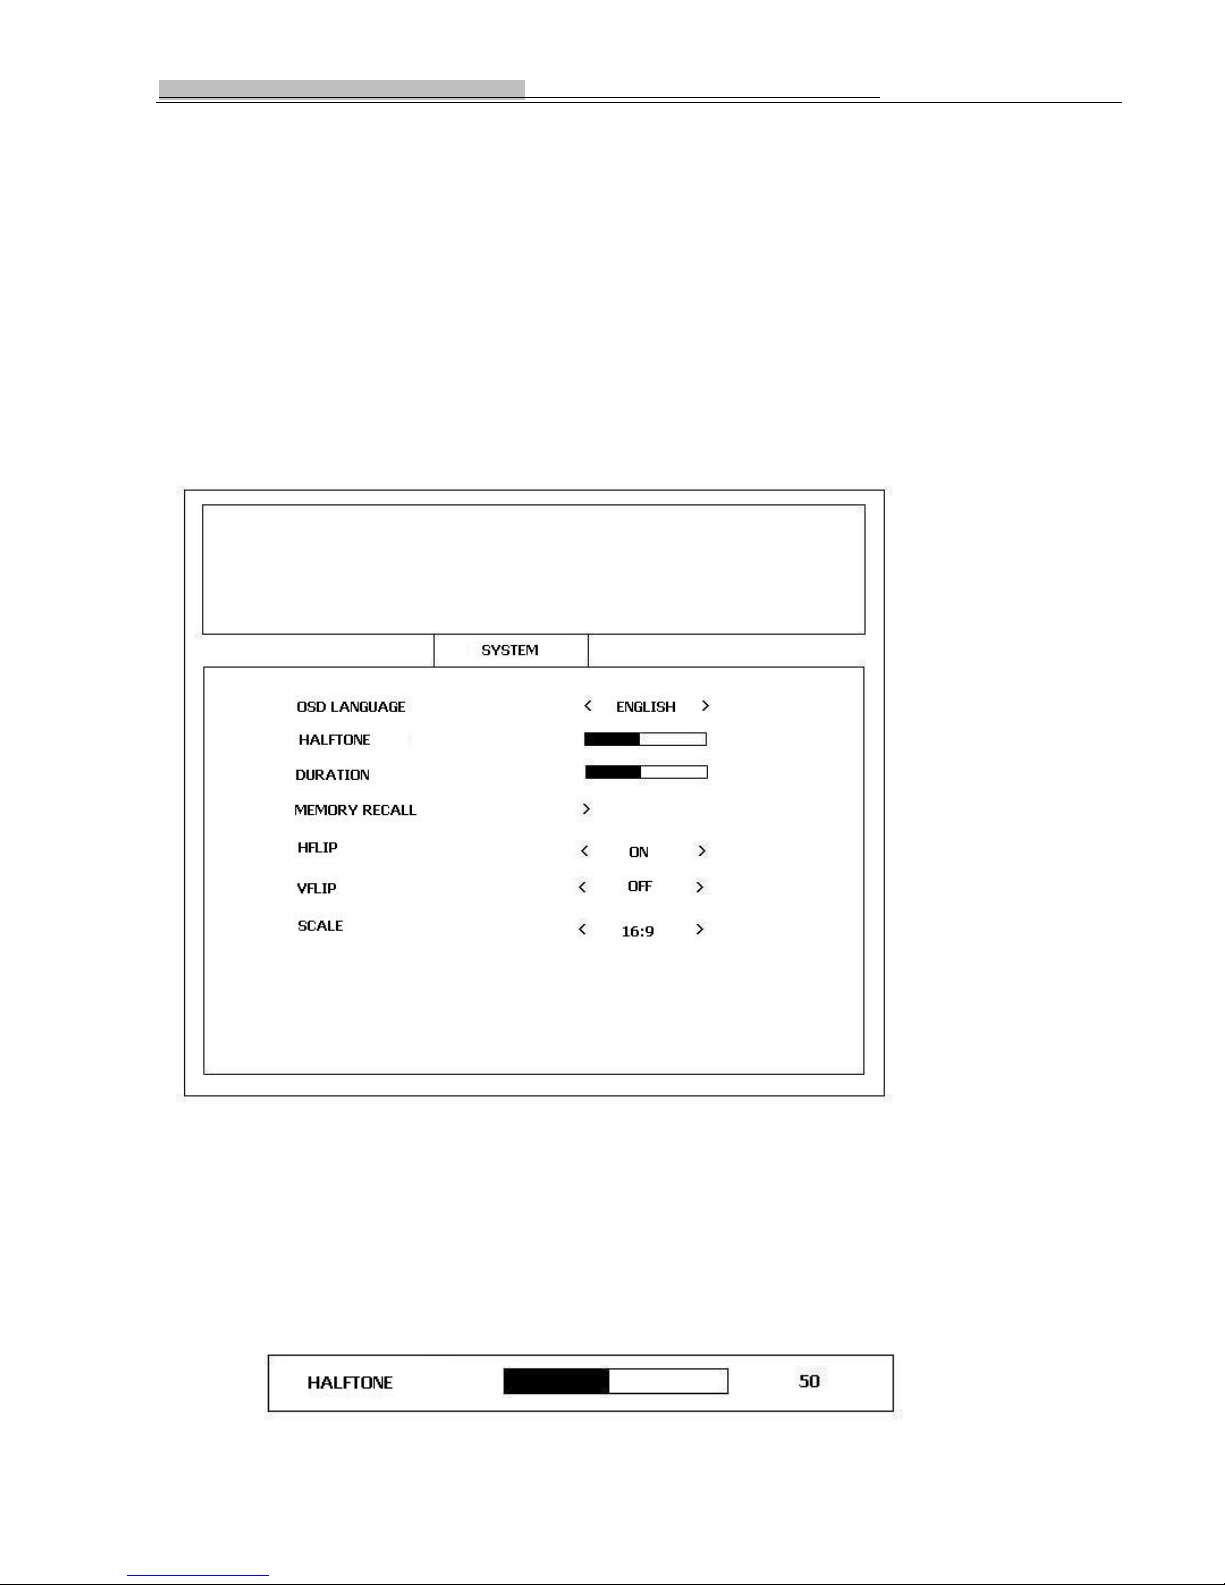
“SYSYTEM” sub menu can adjust OSD language, OSD halftone, OSD duration, Memory reset, H flip, V flip and scale.
As below:
Press “▲”/”▼” to move cursor. Press “◄”/”►” to select item. Press ”MENU” to return or exit menu.
1. OSD LAUGUAGE:
There are 5 OSD languages: ENGLISH/GERMAN/FRANCE/SPANSH/ITALIAN.
2. HALFTONE:
Adjust OSD halftone. As below:
3
Page 18
Operation of New conception projector D8H/D8HD
Press “◄” to decrease value, Press “►” to increase value. Press “MENU” to return or exit menu.
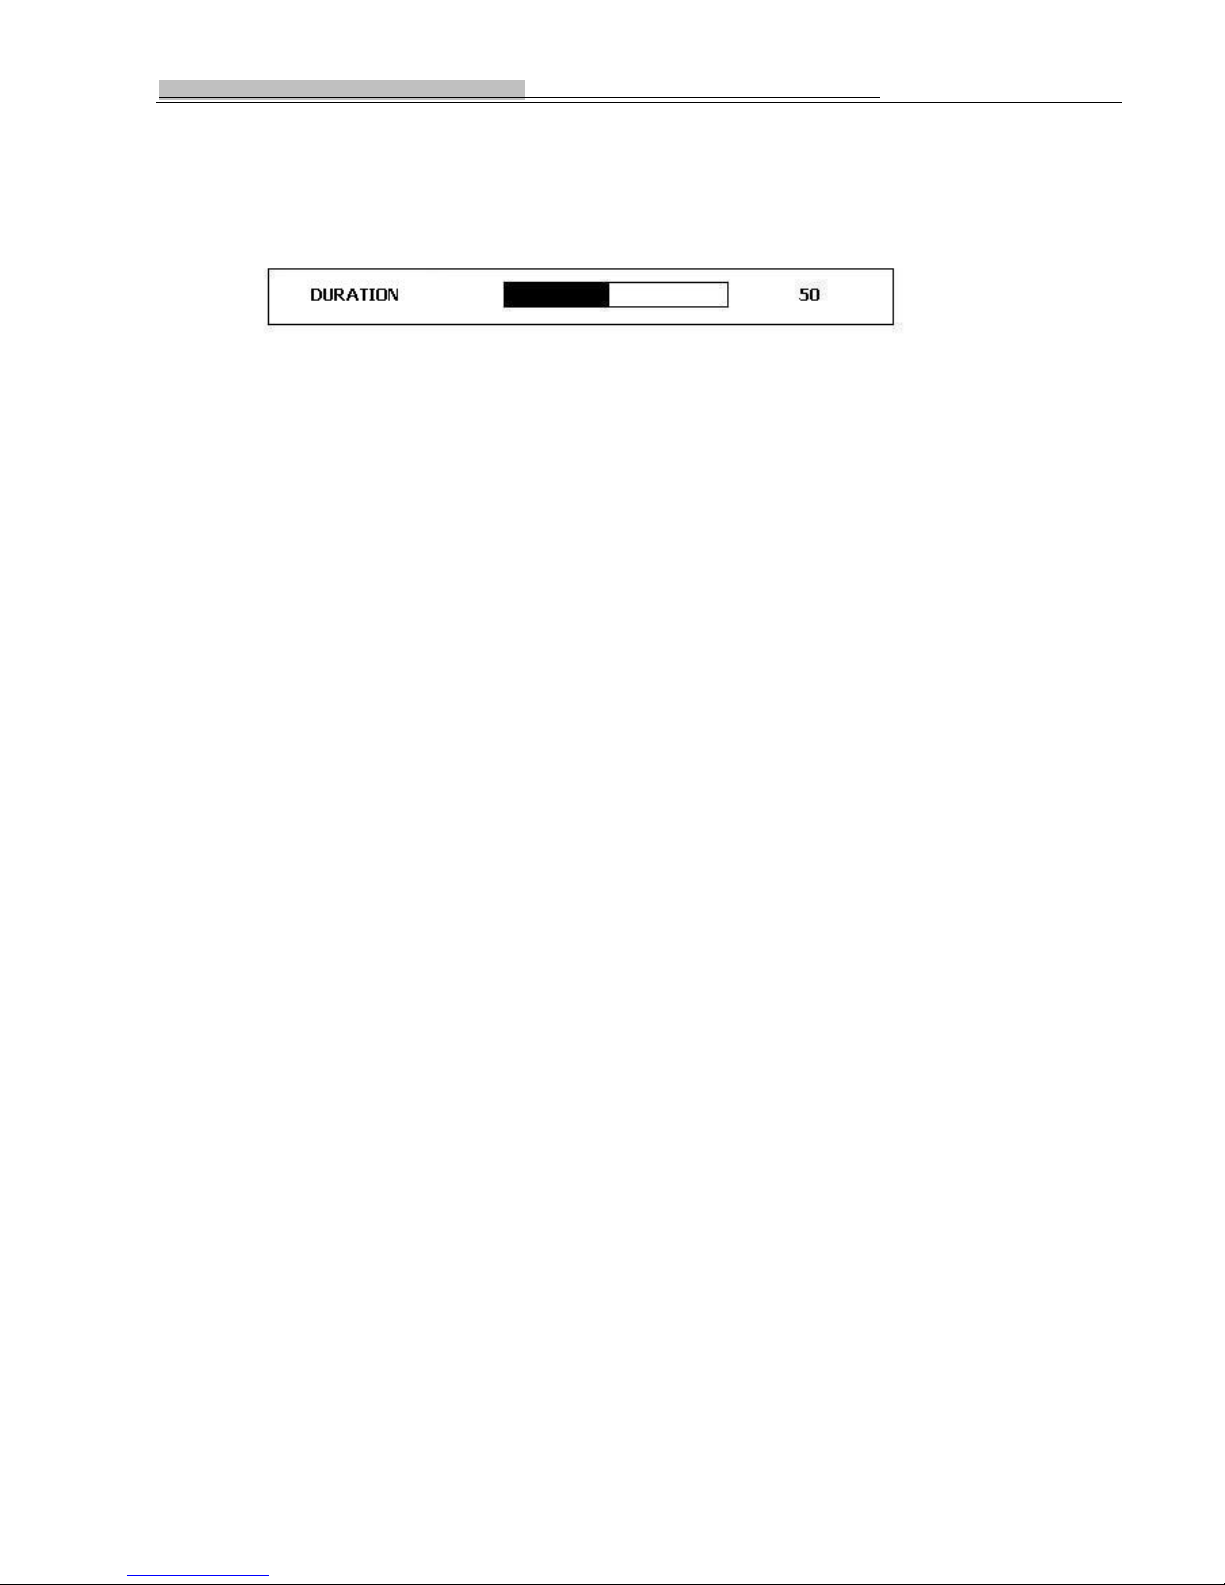
1. DURATION:
Adjust OSD duration. As below:
Press “◄” to decrease value, Press “►” to increase value. Press “MENU” to return or exit menu.
2. MEMORY RESET:
Doing factory reset function.
3. HFLIP:
Do image horizontal flip function.
ON: flip on;
OFF: flip off.
4. VFLIP:
Do image vertical flip function.
ON: flip on;
OFF: flip off.
5. SCALE:
Do image scaling function.
There are 3 mode for image scaling: 16:9/4:3/ZOOM.
16:9: working at 16:9 mode;
4:3: working at 4:3 mode;
ZOOM: working at V Zoom mode.
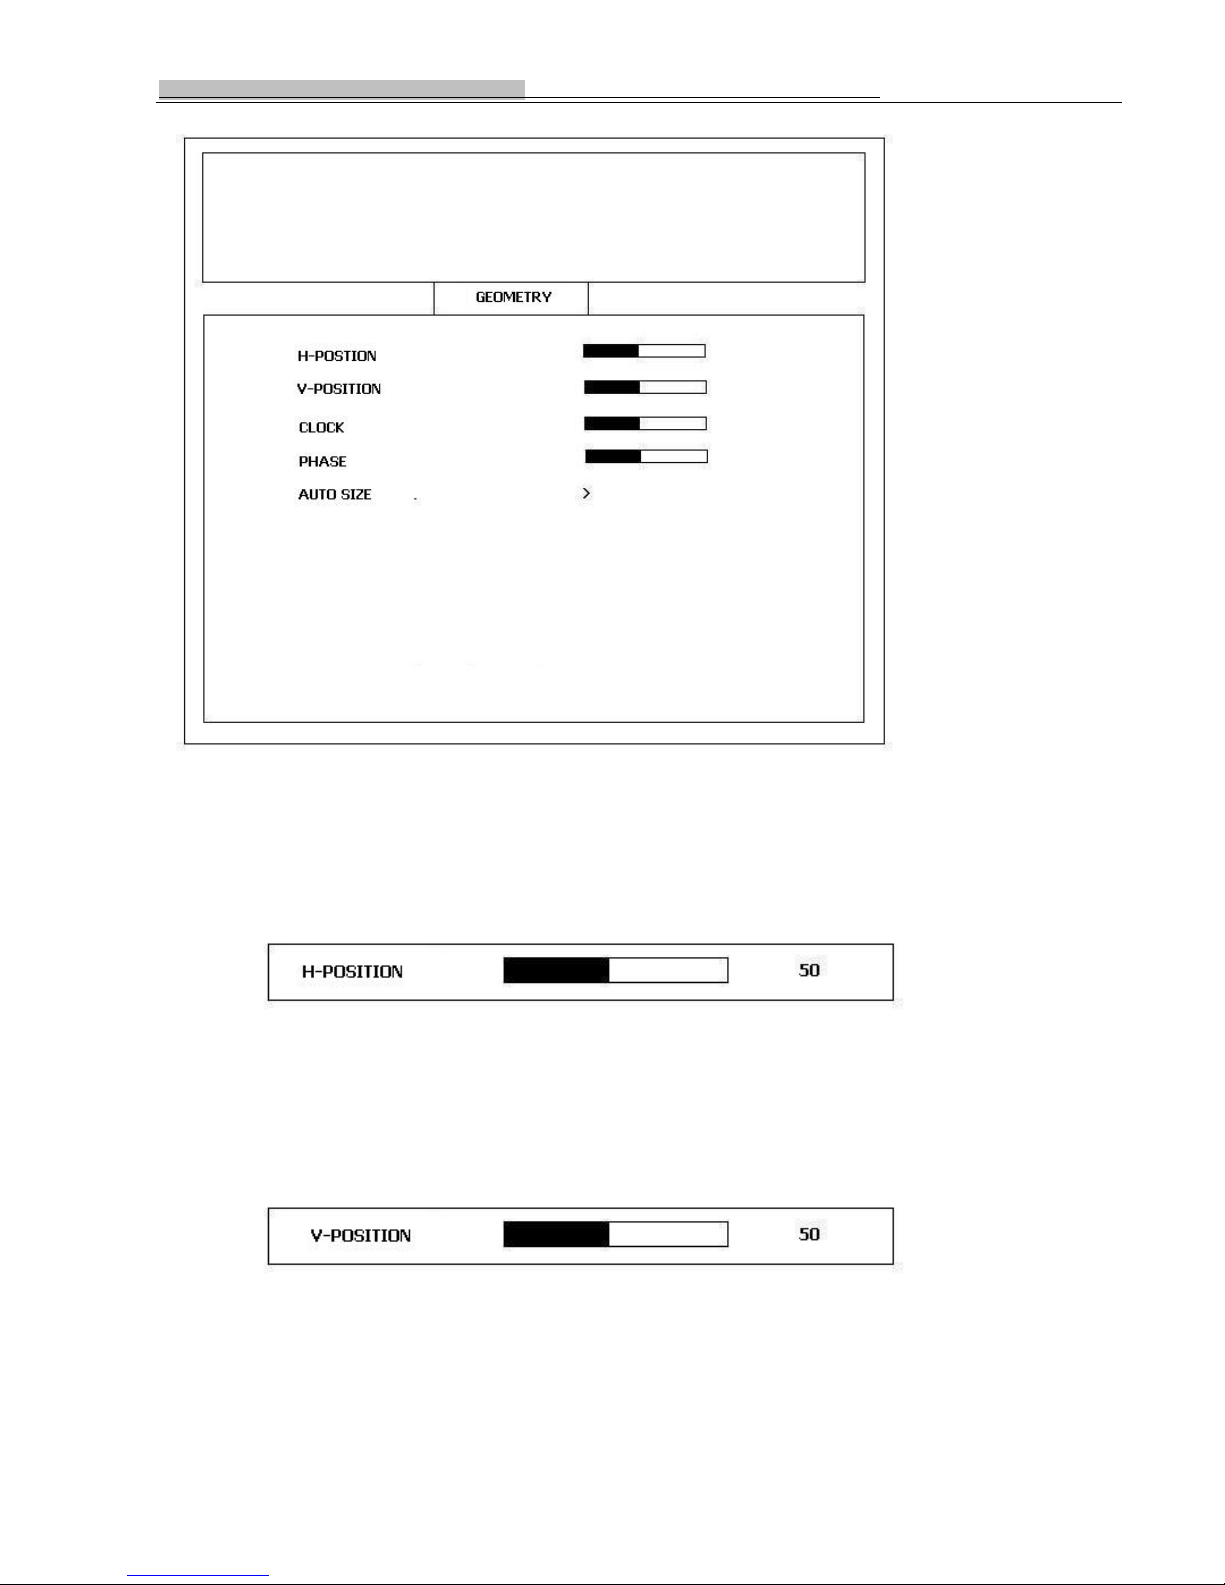
Operations for GEOMETRY sub menu: (ONLY for PC source)
GEOMETRY sub menu can adjust H-Position, V-Position, Clock, Phase and Auto Size. As below:
3
Page 19
Operation of New conception projector D8H/D8HD
Press “▲”/”▼” to move cursor. Press “◄”/”►” to select item. Press ”MENU” to return or exit menu.
1. H-POSITION:
Adjust image horizontal position. As below:
Press “◄” to decrease value, Press “►” to increase value. Press “MENU” to return or exit menu.
2. V-POSITION:
Adjust image Vertical position. As below:
Press “◄” to decrease value, Press “►” to increase value. Press “MENU” to return or exit menu.
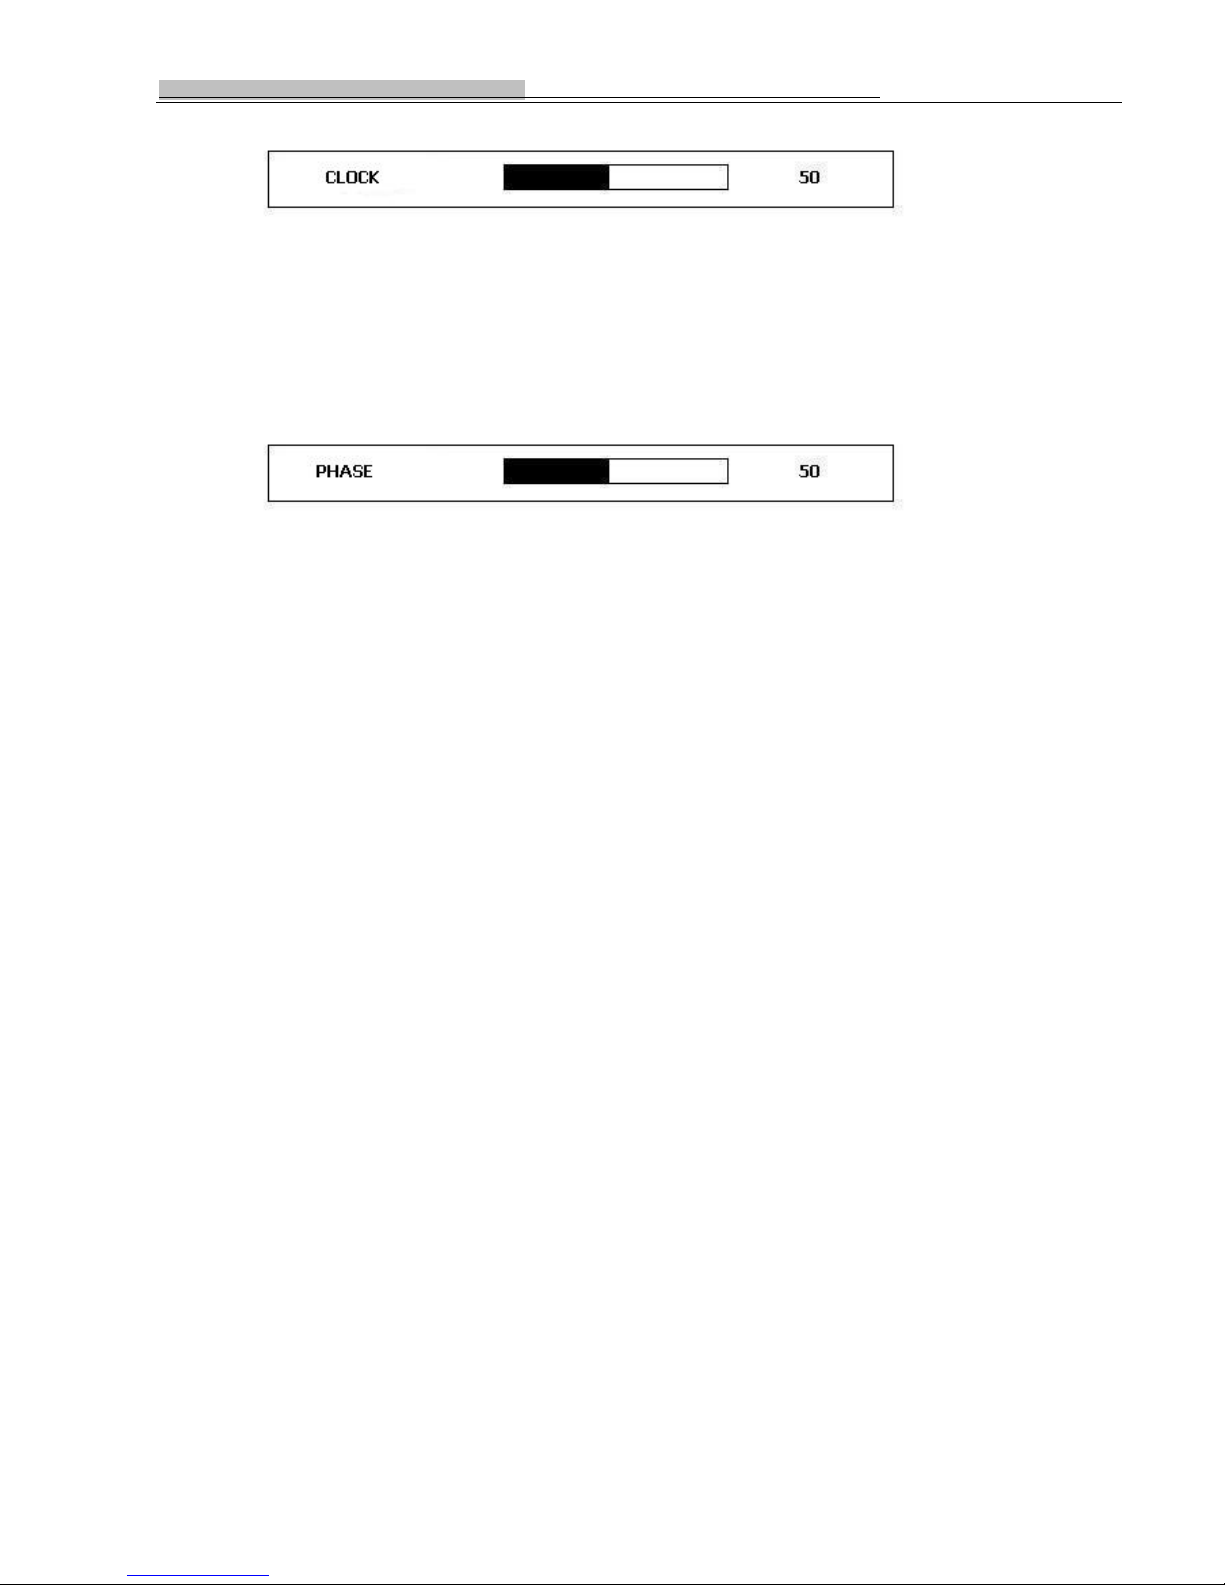
3. CLOCK:
Adjust image size. As below:
3
Page 20
Operation of New conception projector D8H/D8HD
Press “◄” to decrease value, Press “►” to increase value. Press “MENU” to return or exit menu.
4. PAHSE:
Adjust image phase. As below:
Press “◄” to decrease value, Press “►” to increase value. Press “MENU” to return or exit menu.
5. AUTO SIZE:
Do image auto size adjustment.
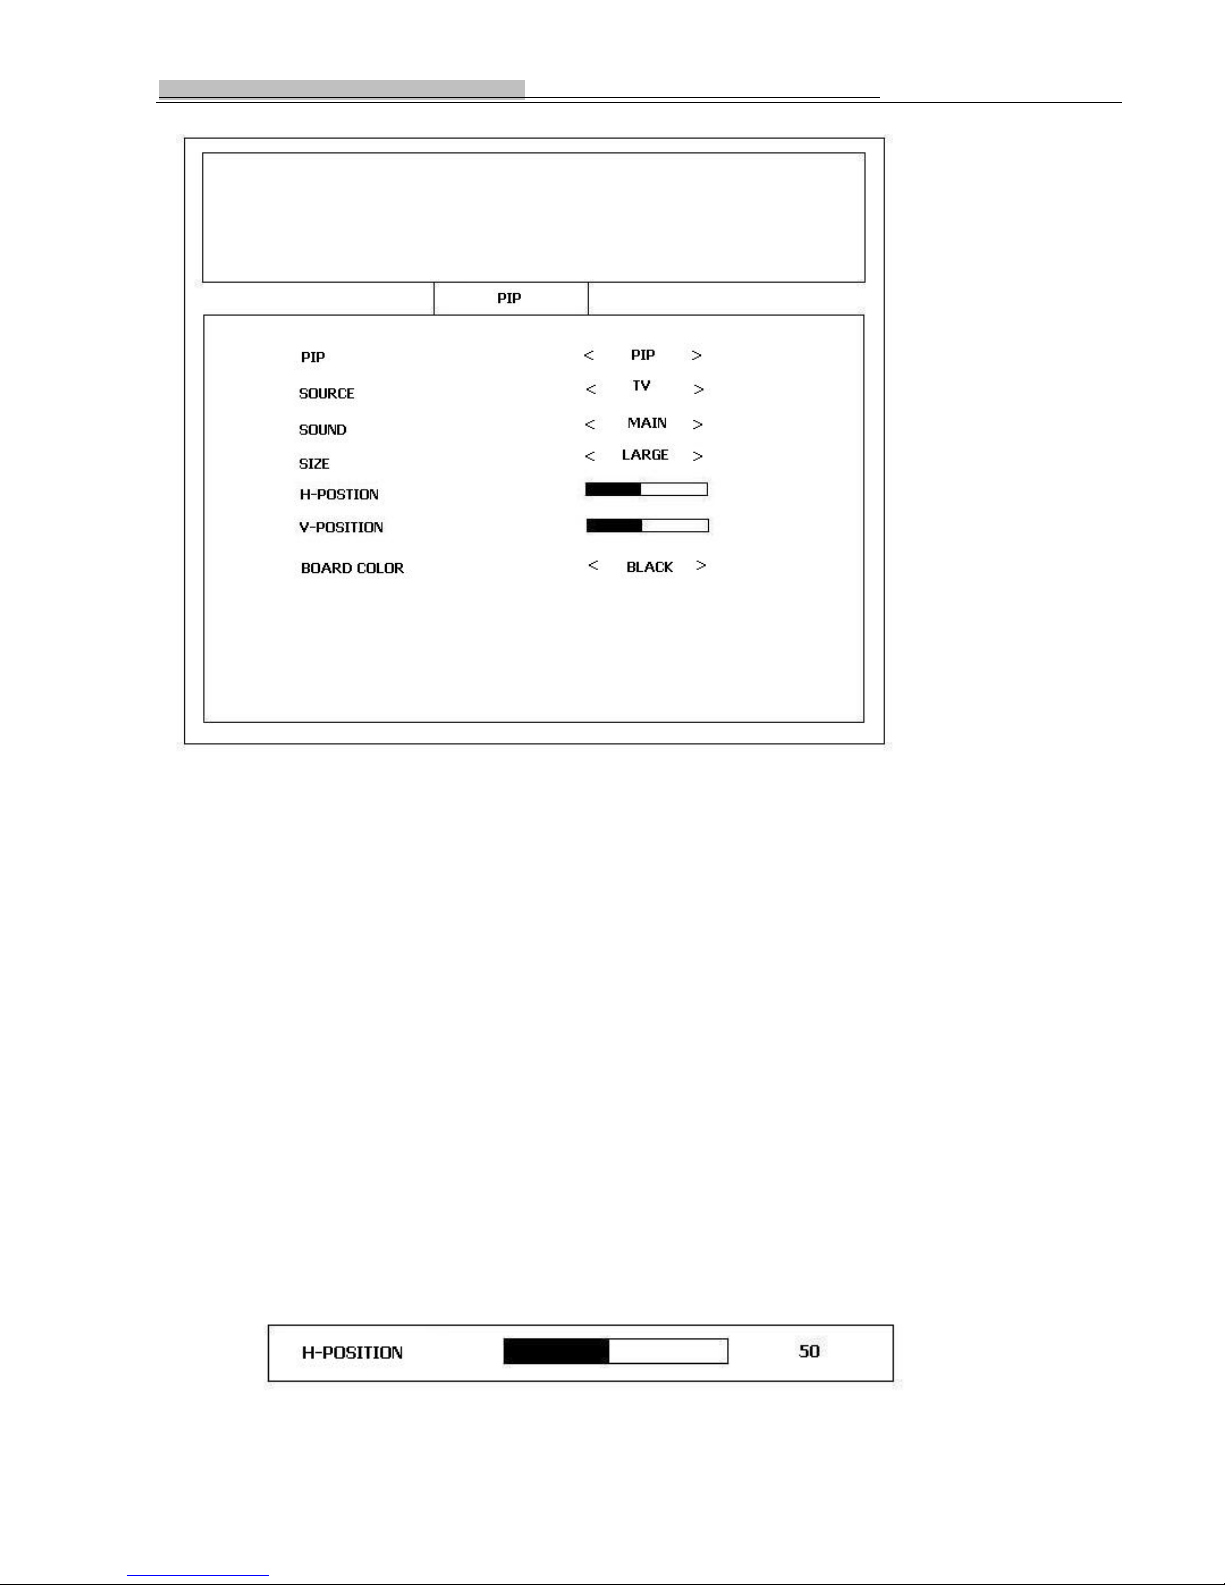
Operations for PIP sub menu: (ONLY for PC/HDMI/YPrPb source)
PIP sub menu can adjust PIP on/off, pip source, sound, size, h position, v position and board color. As below:
3
Page 21
Operation of New conception projector D8H/D8HD
Press “▲”/”▼” to move cursor. Press “◄”/”►” to select item. Press ”MENU” to return or exit menu.
1. PIP:
Switch PIP function on or off: OFF/PIP:
OFF: switch off PIP function;
PIP: switch on PIP function.
2. SOURCE:
Select PIP source.
NOTE: the PIP ONLY can be done between PC/HDMI/YPbPr and TV/AV/SVIDEO. Can not be done among
PC/HDMI/YPbPr or TV/AV/SVIDEO.
3. SOUND:
Select the sound source: MAIN/SUB
MAIN: select main channel sound;
SUB: select sub channel sound.
4. H-POSITION:
Adjust the PIP window horizontal position. As below:
Press “◄” to decrease value, Press “►” to increase value. Press “MENU” to return or exit menu.
3
Page 22
Operation of New conception projector D8H/D8HD
5. V-POSITION:
Adjust the PIP window vertical position. As below:
Press “◄” to decrease value, Press “►” to increase value. Press “MENU” to return or exit menu.
6. BOARD COLOR:
Select PIP window board color: BLACK/BLUE:
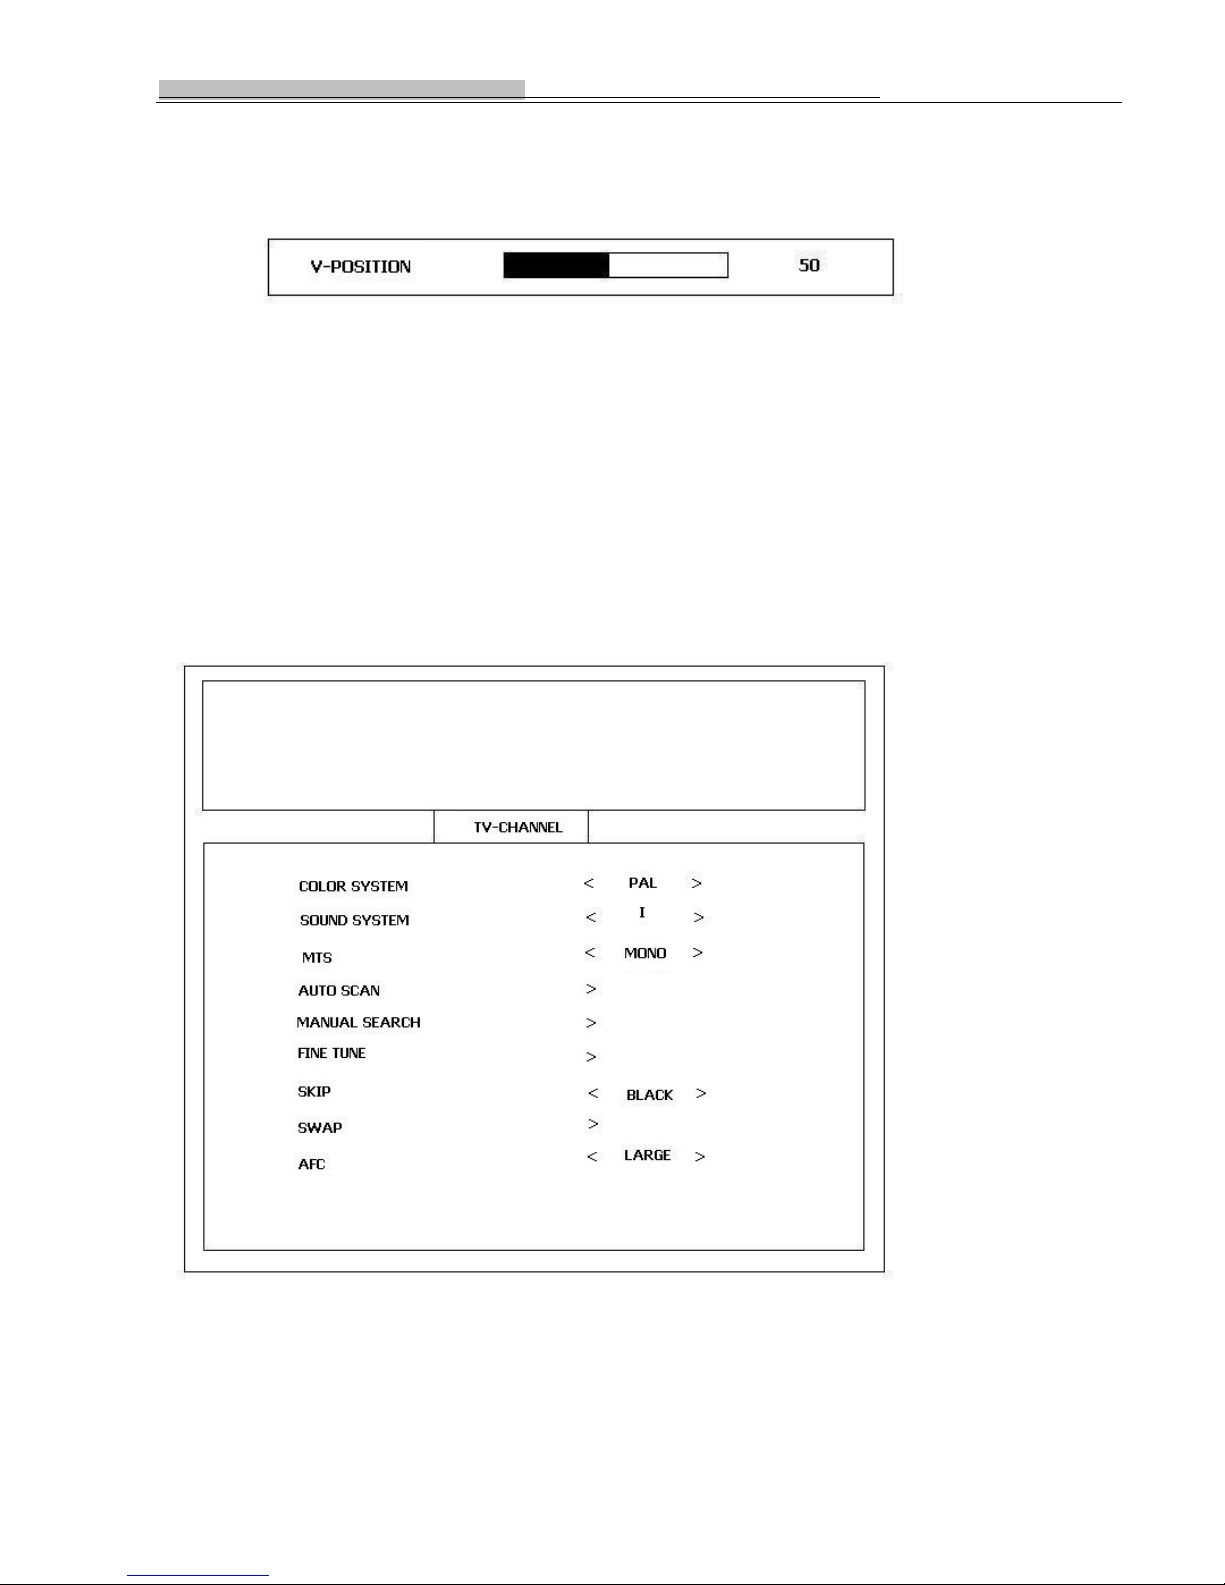
Operations for TV-CHANNEL sub menu: (ONLY for TV source)
TV-CHANNEL sub menu can adjust color system, sound system, MTS, Auto scan, manual search, fine tune, skip, swap
and AFC. As below:
Press “▲”/”▼” to move cursor. Press “◄”/”►” to select item. Press ”MENU” to return or exit menu.
1. COLOR SYSTEM:
Select TV color system. There are 3 color system can be selected: AUTO/PAL/SECAM.
2. SOUND SYSTEM:
3
Page 23
Operation of New conception projector D8H/D8HD
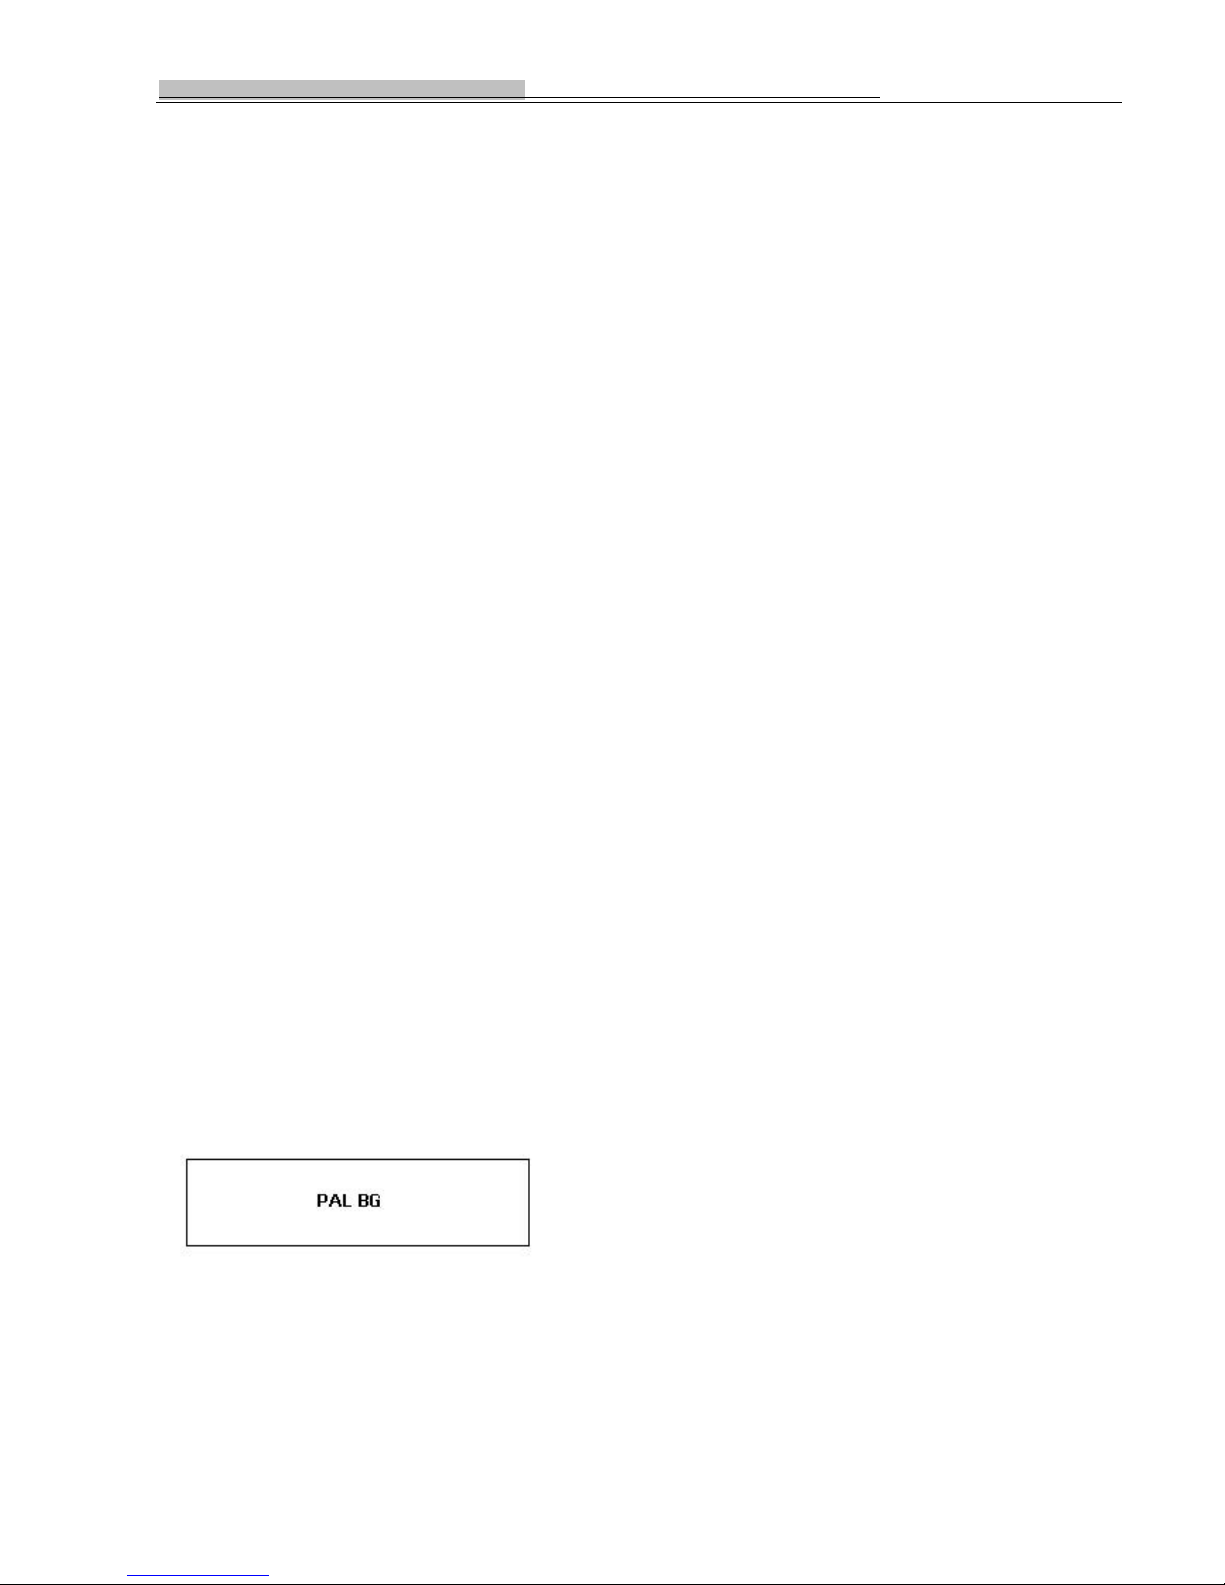
Select TV sound system. There are 6 sound system can be selected: AUTO/BG/DK/I/L/L’.
Such as:
PAL-I: China,UK
PAL-BG: Australia,Germany
SECAM-I: France
Attention:
You should switch to TV signal source first ,and then select TV sound system,and then select”Auto search”,if
you don’t select correct TV sound system,will appear noise or no picture no sound.
3. MTS:
Select TV MTS. This function need the TV signal support. Can support TV NICAM sound.
4. AUTO SCAN:
Do TV auto search channel function.
5. MANUAL SEARCH:
Do TV manual search channel function
6. FINE TUNE:
Do TV frequency fine tune function.
7. SKIP:
Do TV channel skip function.
8. SWAP:
Do TV channel swap function.
9. AFC:
Do TV frequency AFC (Auto Frequency Control) function.
Operations for Special sub menu:
SYSTEM Function
Press “SYSTEM” key to enter system function Menu. Press “SYSTEM” to toggle tv sound system value. Press
“MENU” to return or exit menu.
There are PAL BG/PAL DK/PAL I/SECM L/SECAM L’ 5 modes. As below:
16:9/4:3 Function:
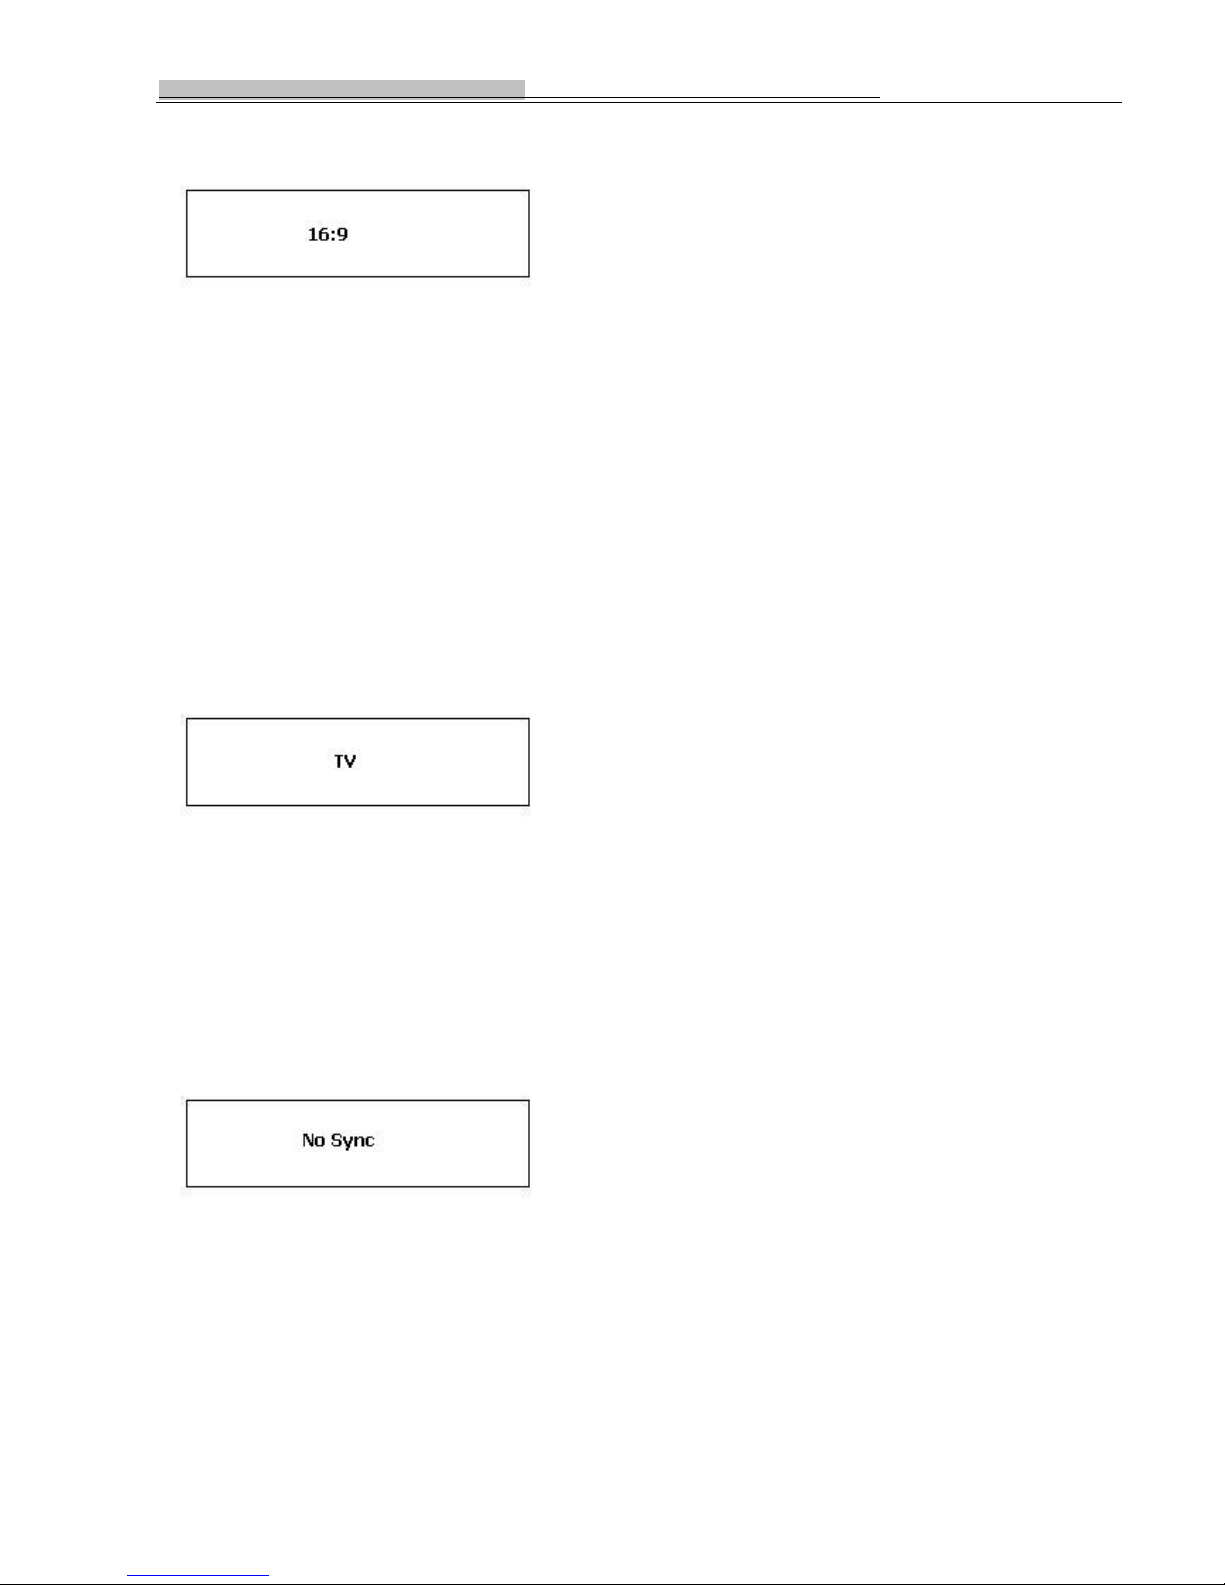
Press “16:9/4:3” to enter image flip menu as below:
Press “Up”/”Down” to move cursor, press “OK” to select item, press “MENU” to return or exit menu. Press “16:9/4:3”
direct to exit menu.
3
Page 24
Operation of New conception projector D8H/D8HD
DISPLAY Function
Press “DISPLAY” to enter image info menu as below:
Press “DISPLAY” or “MENU to exit menu.
Input source choice Menu:
Press “TV/AV” key to enter Input source choice Menu. It can change to different input source.
This unit has “HDMI/TV/SCART/AV/S-VIDEO/YpbPr(YcbCr)/PC” 7 input sources.
HDMI– HDMI or DVI signal.
TV–TV mode.
SCART—scart terminal mode, support CVBS and RGB signal.
AV – CVBS terminal mode
S-VIDEO – Y/C terminal mode
YpbPr(YcbCr) – HDTV terminal mode
PC – computer mode
As below:
“TV/AV” key: perform input source choice. Will enter to the mode after change to the selected mode for 2 seconds.
“MENU” key: exit menu
No Signal warning Menu
When no signal input, the machine will enter the “No Signal warning Menu”.
See below:
Power off confirmation Menu:
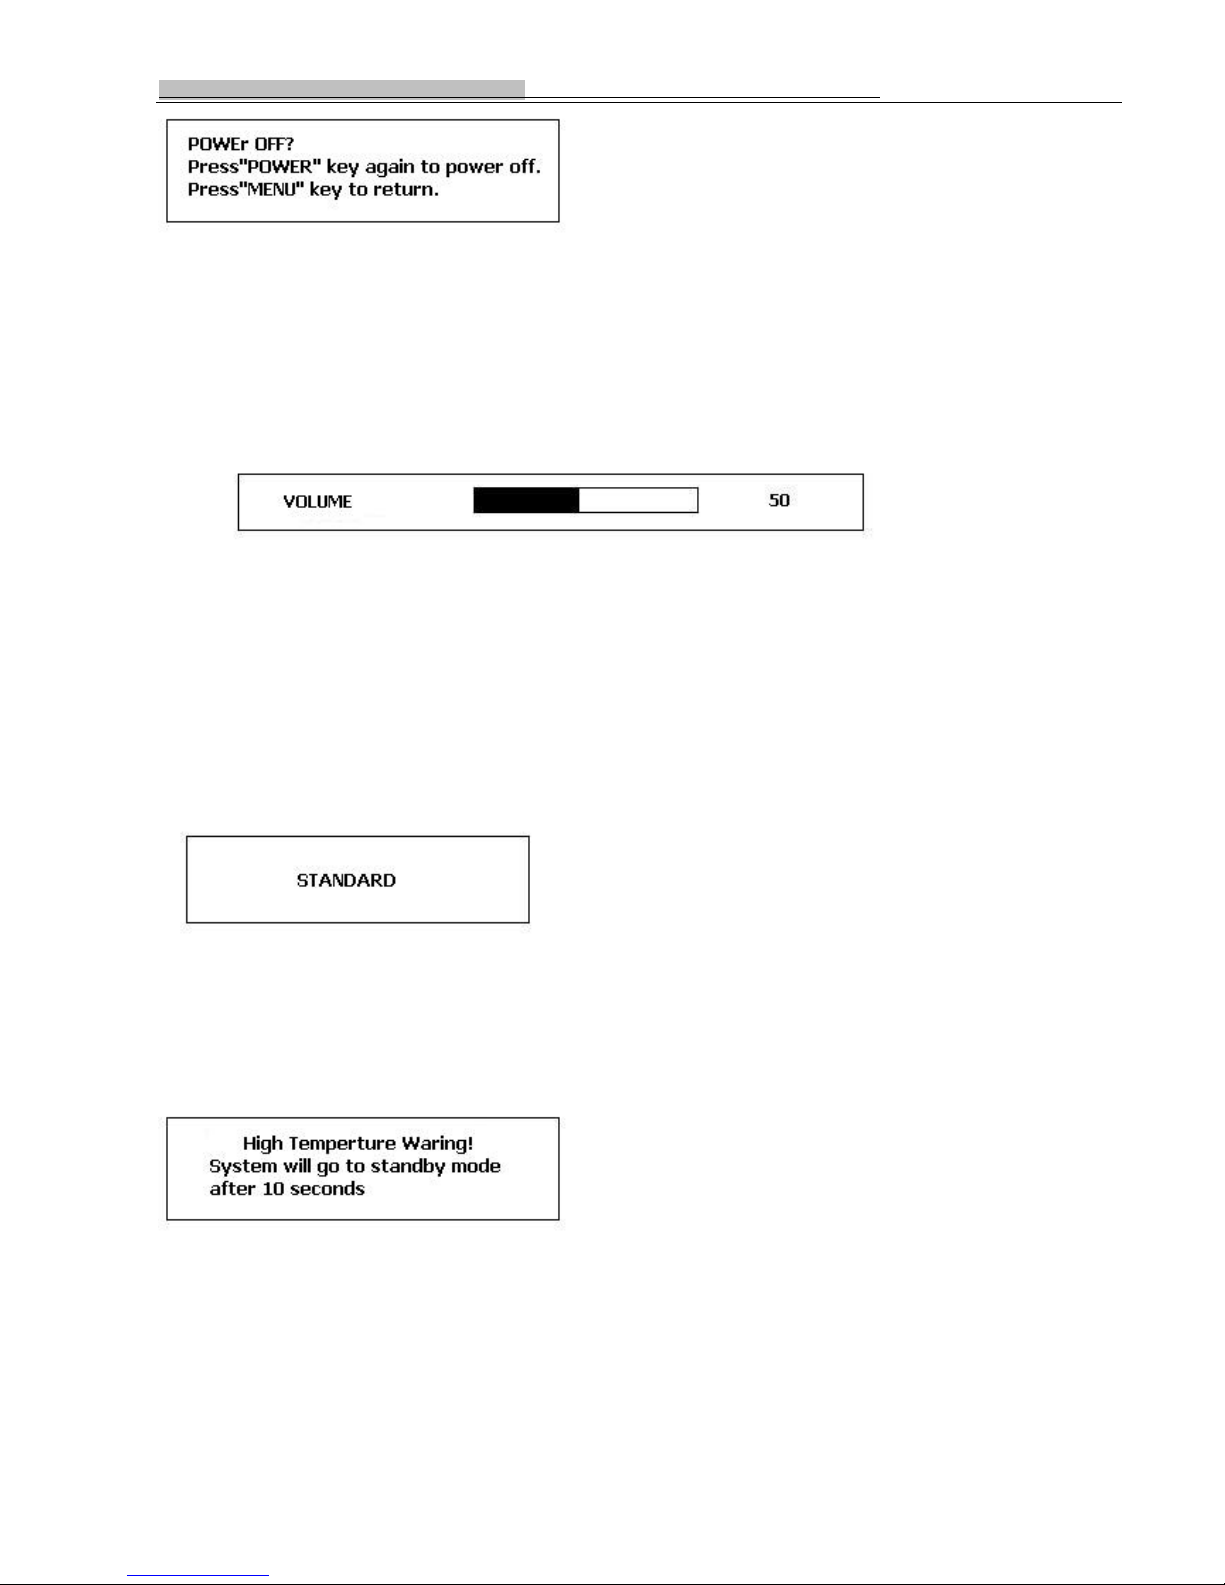
Press Power key to enter “Power off confirmation Menu”
This menu can avoid turn off the machine by mistake
as below:
3
Page 25
Operation of New conception projector D8H/D8HD
Press “POWER” to power off. Press “MENU” to return (still power on).
In this mode, if the machine will return to “working” mode after 10 seconds.
V olume Adjustment Menu:
Without enter to “Main Menu”, press the “Vol+” / “Vol-“ button directly to enter the “Volume Adjustment Menu”
See below
“Vol+” key: Increase volume
“Vol-“ key: Decrease volume
“MENU” key: Exit menu
Picture Mode Menu
Without enter “Main Menu”, “P. Mode” key directly to enter “Picture Mode Selection Menu”. Continue to press ”P.
Mode” to perform picture mode selection.
The selections are “STANDARD” –“DYNAMIC”—“SOFT”—“PERSONAL”.
High Temperature Warning Menu:
If the temperature goes exceedingly high during operations, the machine will show “High Temperature Warning” menu,
See picture below:
System has entered the Protect Mode. All the keys will not be function except the Power button. Please do not shut down
the power with the mains lead. The system will automatically enter protect mode for cooling down after 10 seconds.
When High Temperature Warning appears , it indicates that the ventilation system might have problems. Please refer to
“Abnormal Phenomenon and Solution” ‘s “High Temperature Warning Mode” for solution.
3
Page 26
Operation of New conception projector D8H/D8HD
8. DVB-T,USB,card reader menu
1 Digital TV
In the main menu of the system, under Digital TV, there are such as options as auto TV search or broadcast programs,
program management, system setup, software update and software version information view etc.
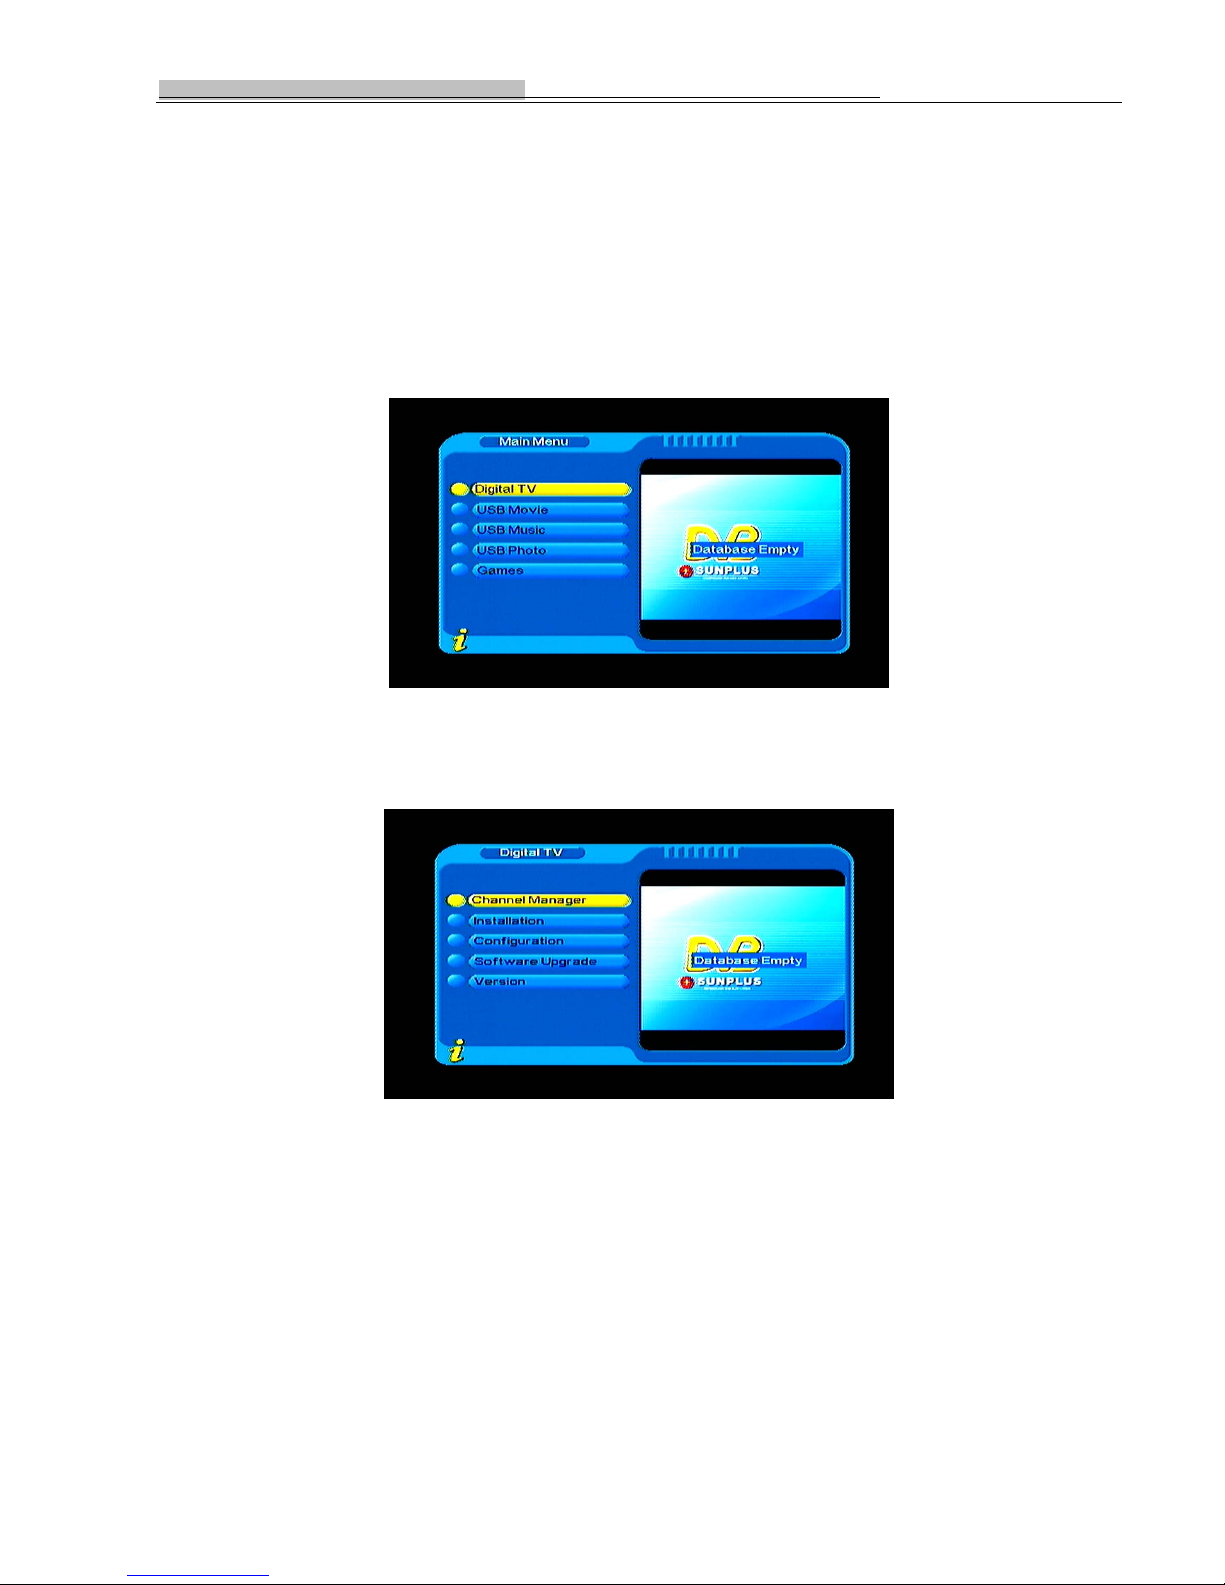
After the platoform is opened,, as shown in, to set some information about Digital TV, enter Digital TV menu of the
system; and press MENU key firstly to enter the main menu as shown in Figure 1.1:
Figure 1.1 System Main Menu
In Main Menu, press UP/DOWN key to choose Digital TV option and then Press ENTER key once to enter Digital
TV menu as shown in Figure 1.2:
Figure 1.2 Digital TV menu
1.1 Installation
There are three kinds of Installation mode as follow:
1. Area Search: searching programs by scan area;
2. Manual Search
3. Auto Search
You can enter into parameter “installation page” via input password digitals(default password is “0000”), As shown
in the figure below:
3
Page 27
Operation of New conception projector D8H/D8HD
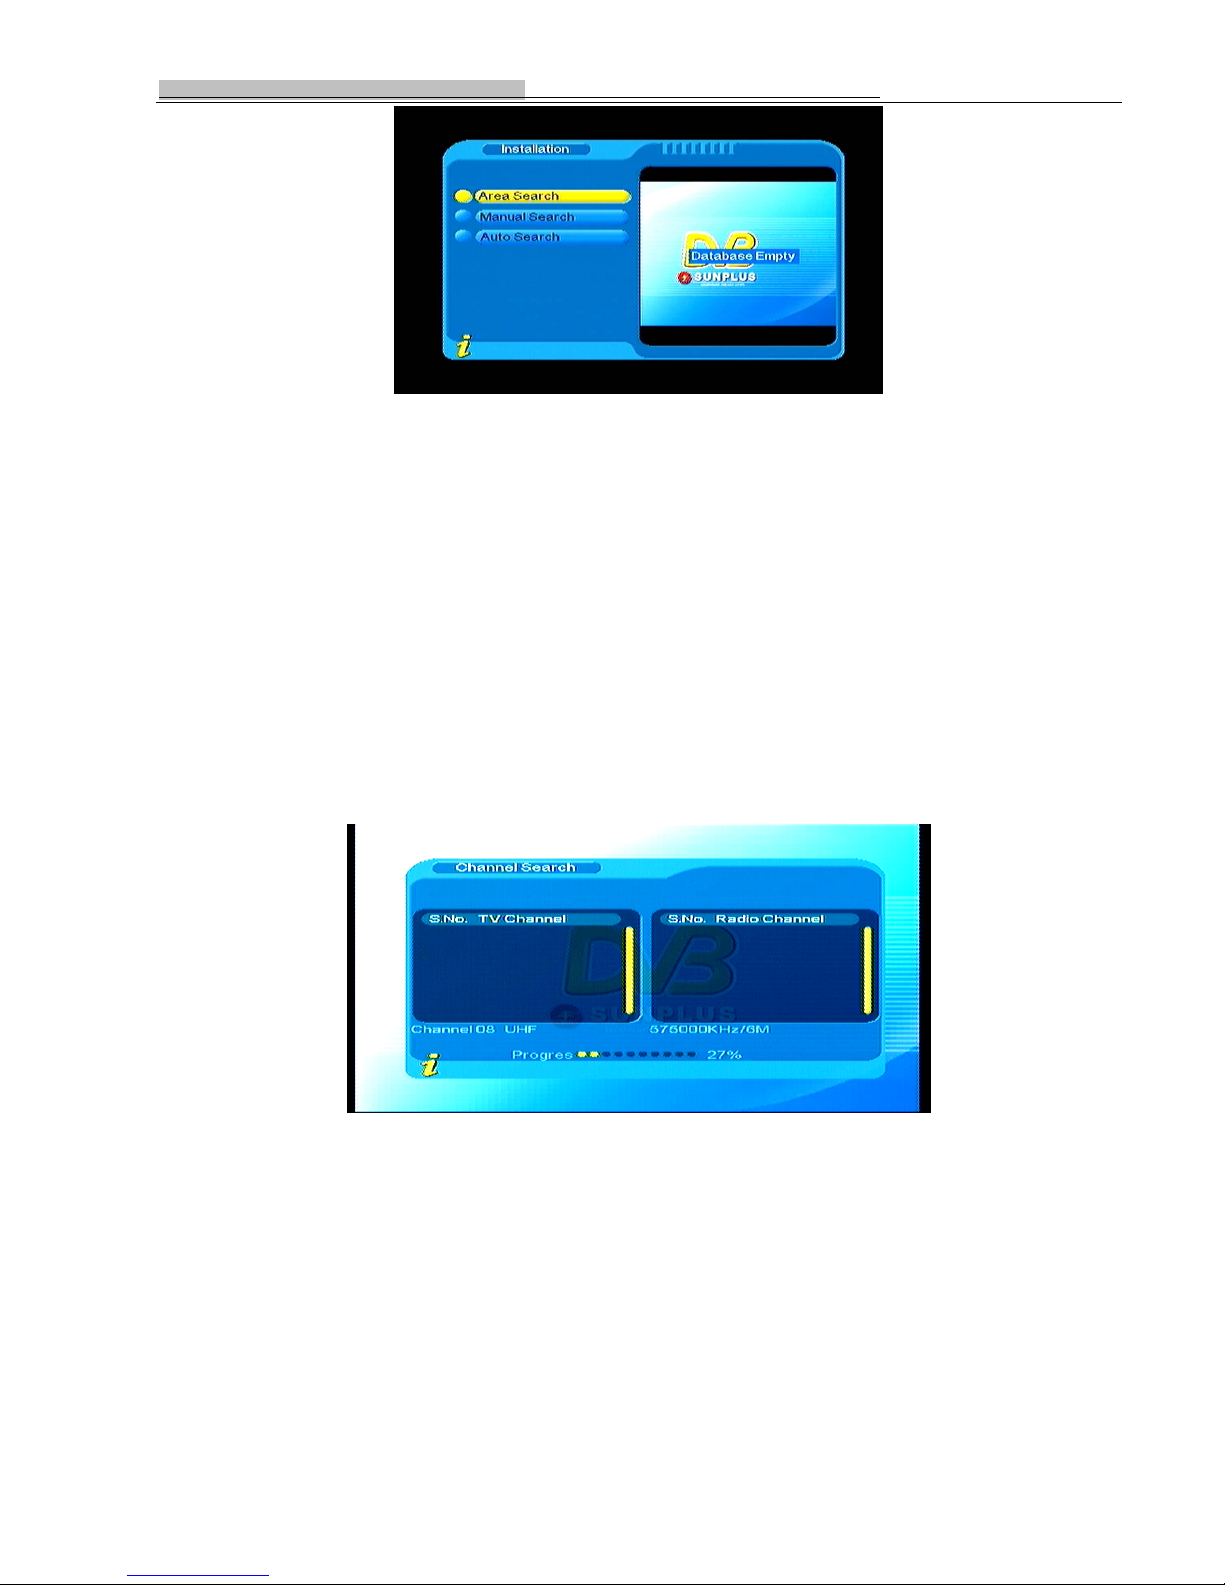
Figure 1.3 Installation menu
1.1.1 Area Search
Area search is a kind of intelligent and convenient mode of programs searching, which covers programs of all
frenquent points of target countries or regions.
At present, this system covers many targets countrier and regions including: Germany/ England/ Italy/ France/
Spain/ Holland/ Taiwan/ China/Norway/Swead/Finland;
The default country(region) of system is Taiwan( you can select target countries you want under system
settingÆscan Area).
1. You can move the cursor to “area search” via press “UP/DOWN” key under “installation menu”,then press “enter”
to enter into area searching page, As shown in the figure below:
Figure 1.4 Channel Search page
2. After entering into area search page,system will scan all programs one by one under frequency points of current
countries or regions selected automatically.
3. During scanning, press “RETURN” key to stop and exit scanning.
4. If any program is detected and the scanning process is finished, system will exit the scanning page and save the
program, at the same time return to the “installation menu” and to play them in vpp window automatically. As shown
in the figure below:
3
Page 28
Operation of New conception projector D8H/D8HD
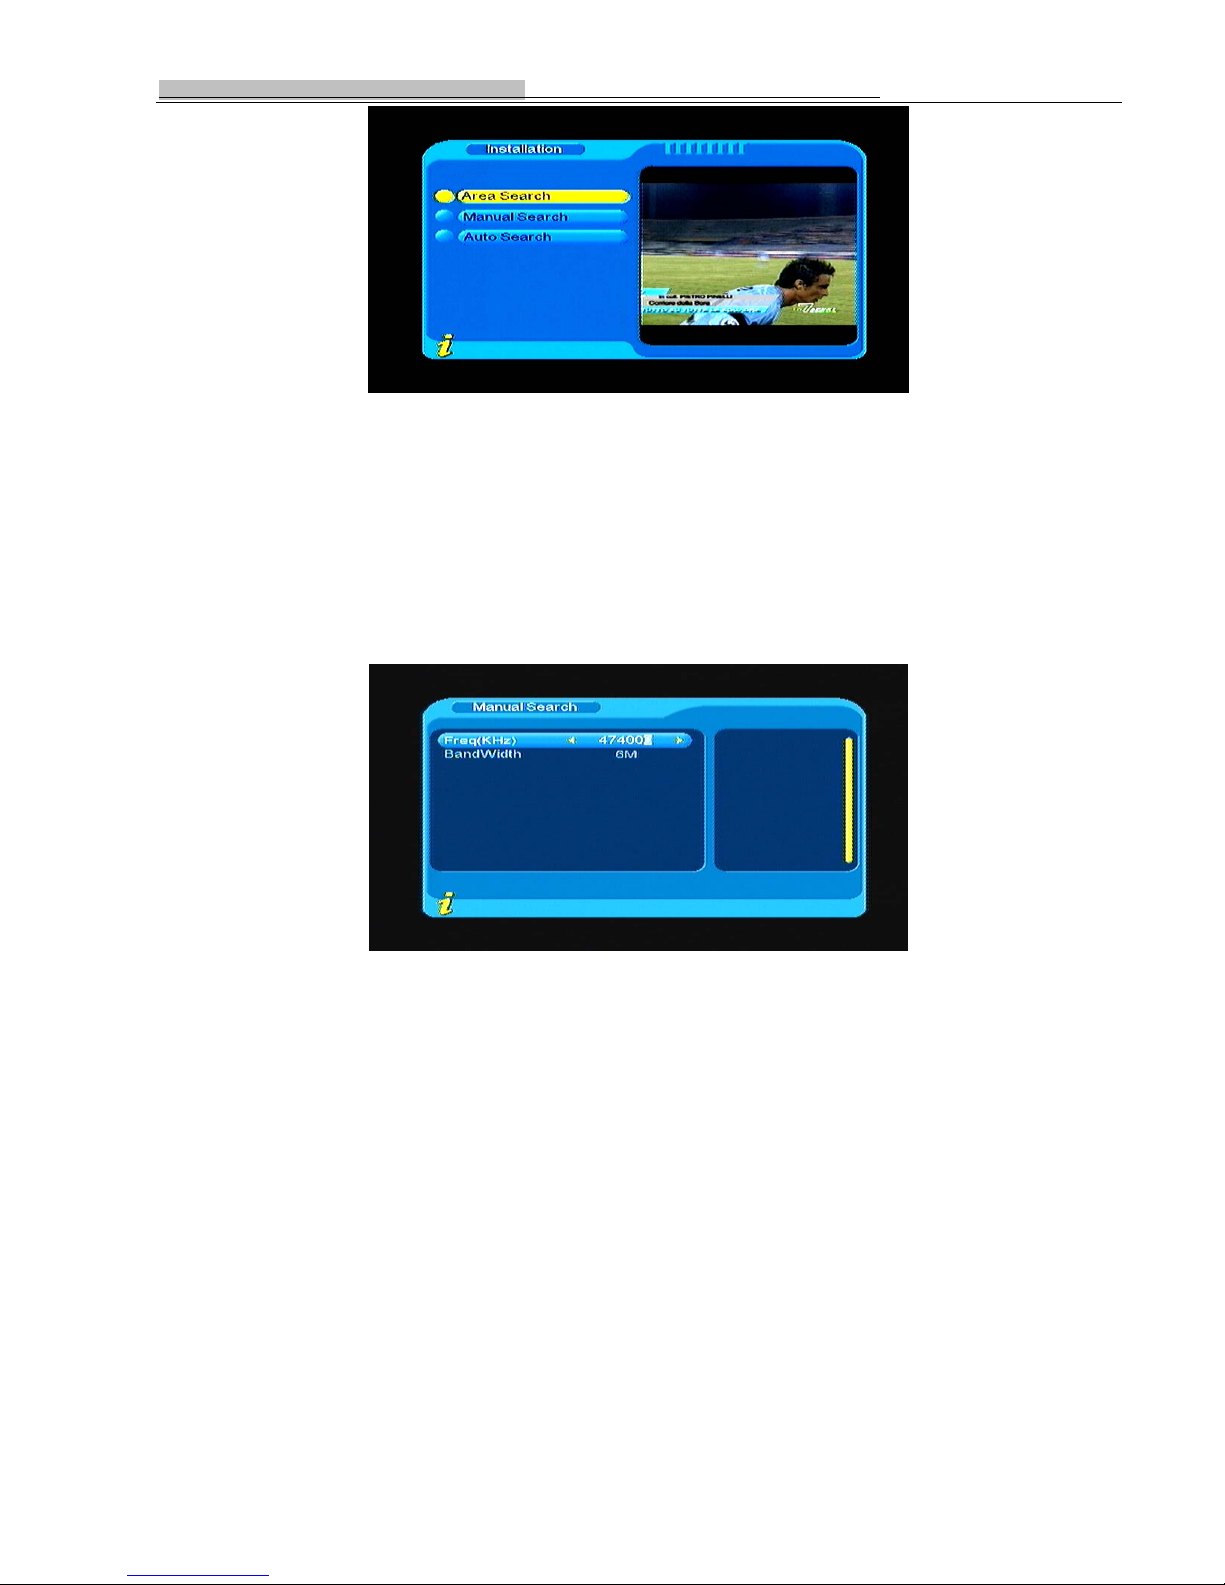
Figure 1.5
1.1.2 Manual Search
If you understand much about digital TV and know the frequency of the program or if you want to scan the program
at any frequency required, you can select manual scaning, which can save your much time.
1. You can move the cursor to “area search” via press “UP/DOWN” key under “installation menu”,then press “enter”
to enter into area searching page, As shown in the figure below:
Figure 1.6 manual search menu
2. Prior manual scaning, you need to configure relevant parameters including:
(1).Freq(KHz): the default frequency is 474000KHz,you can input relevant digitals to modify it.;
(2).BandWidth: the default value of bandwidth is 64MHz.while you can set it to 6MHz,7MHz,8MHz.;
3. Press “ENTER” key after configuration of parameters to start manual scan.
4. If any program is detected and the scanning process is finished, system will exit the scanning page and save the
program, at the same time return to the “installation menu” and to play them in vpp window automatically. As shown
in the figure below:
1.1.3 Auto Search
You can search the programs of any channel.
1. You can move the cursor to “area search” via press “UP/DOWN” key under “installation menu”,then press “enter” to
enter into area searching page, As shown in the figure below:
3
Page 29
Operation of New conception projector D8H/D8HD
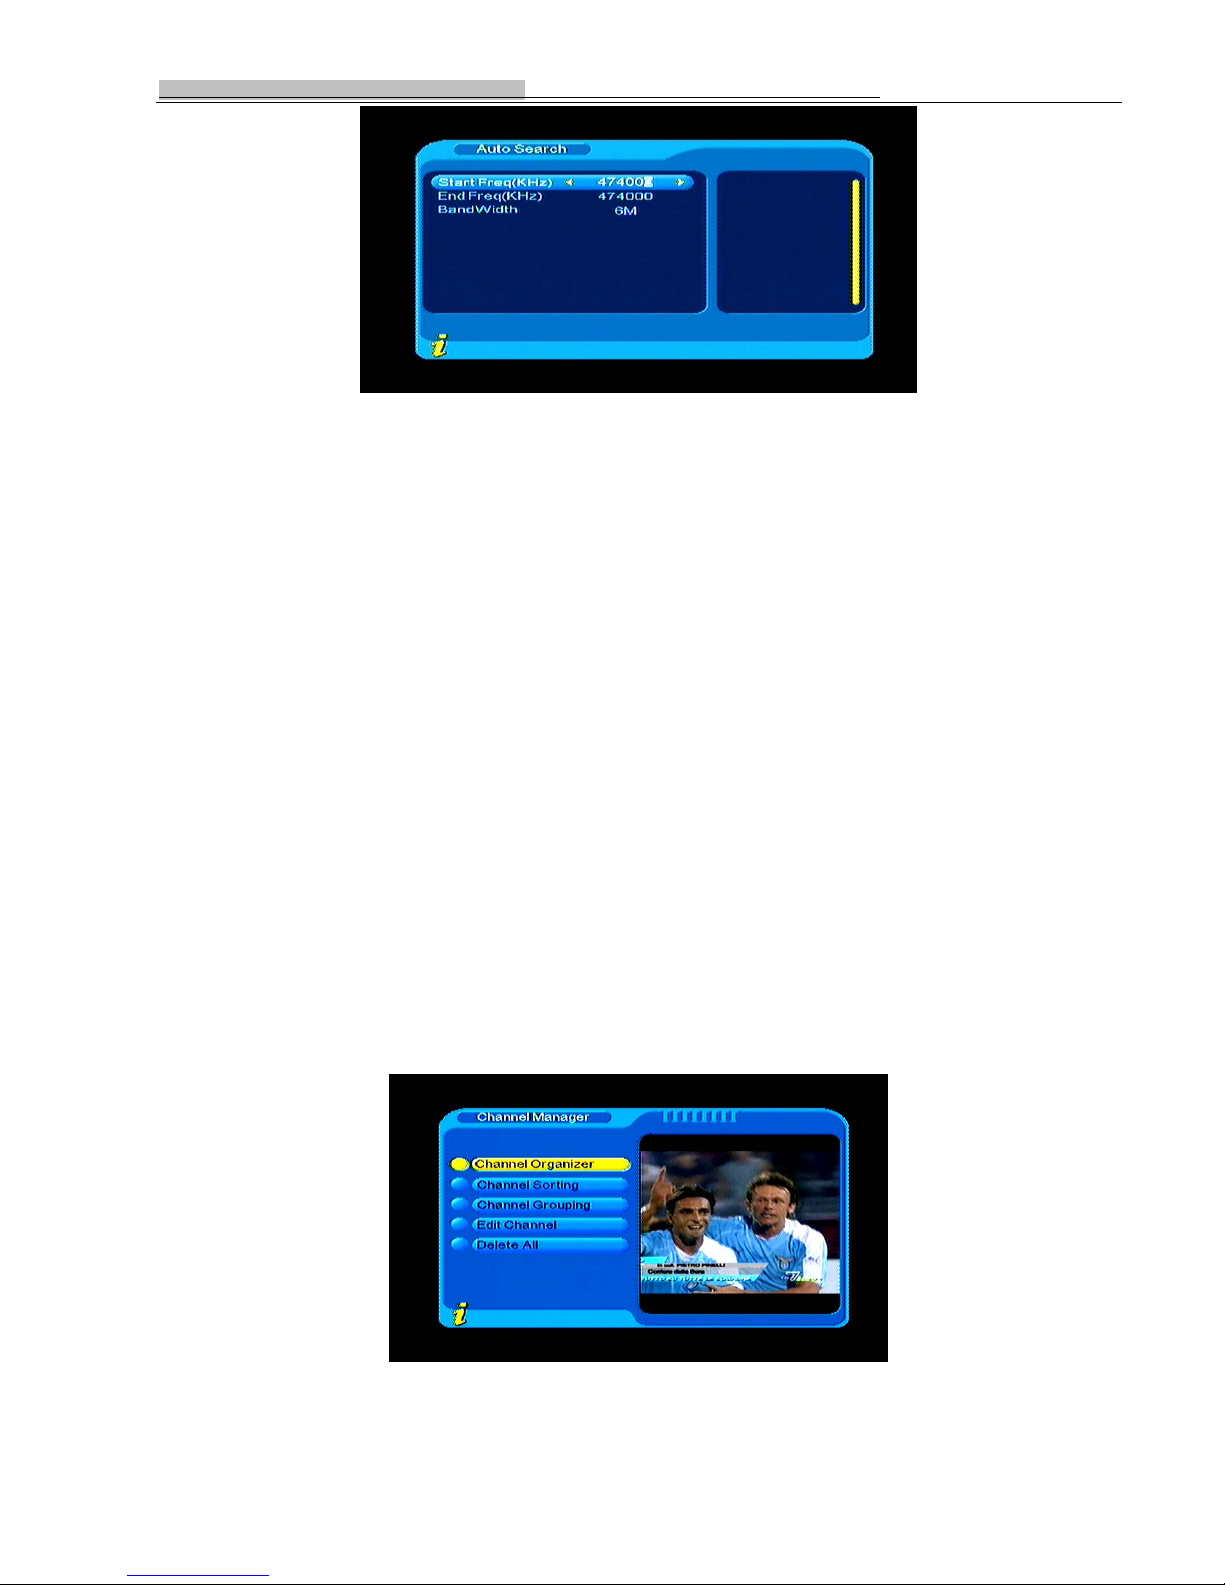
Figure1.7 auto search menu
2. Prior to auto searching, you need to configure relevant parameters including:
(1).Start Freq (KHz): the default frequency is 474000 KHz. You can input relevant digitals to modify it;
(2).End Freq (KHz): the default frequency is 474000 KHz. You can input relevant digitals to modify it;
(3).Band Width: the default value of bandwidth is 64MHz.while you can set it to 6MHz, 7MHz, and 8MHz.
3. Press “ENTER” key after configuration of parameters to start manual scan.
4. If any program is detected and the scanning process is finished, system will exit the scanning page and save the
program, at the same time return to the “installation menu” and to play them in vpp window automatically. As shown
in the figure below;
1.2 Channel Manager
System offer an efficient function of channel management such as channel deleting, marking, moving, locking,
sorting and grouping.,
There are two independent pages for channel management, TV and RADIO. You can enter the page via “digital
TVÆchannel manager”, as shown in the figure below
3
Figure 1.8 Channel Manager Menu
Page 30
Operation of New conception projector D8H/D8HD
1.2.1 Channel Organizer
Channel organizer page includes favorite channels, channel deleting, moving, locking and rename.
1. You can enter the page as shown in the figure below via “MENU->Digital TV->
Channel Manager -> Channel
Organizer”
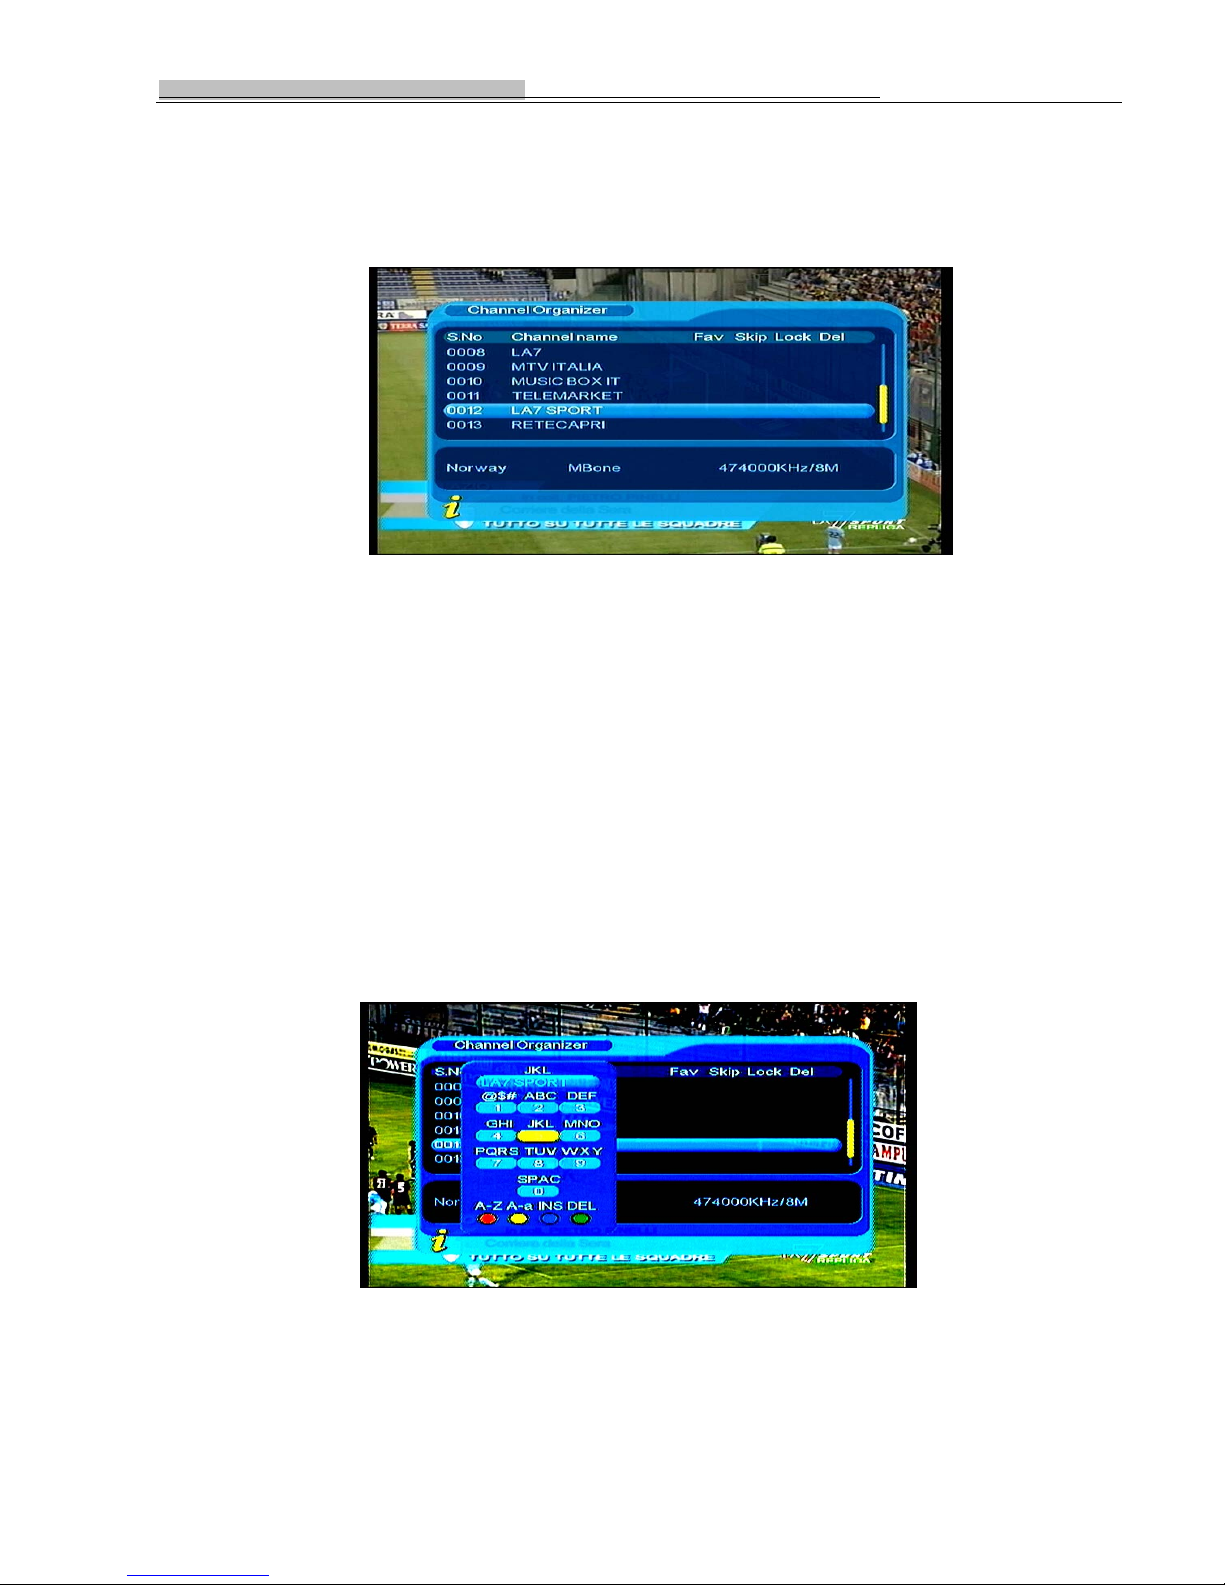
Figure 1.9 Channel Organizer page
2. it will pop up a dialogue box prompting that“Channel not available”when there are no channels in database to enter
into, and it will not enter into channel organizer page.
2. Channel Organizer menu includes: Favorite Channel, Delete Channel, Skip Channel, Lock Channel.Press
UP/DOWN key to choose the line where Favorite Channel is, then press the 4-color key on the remote controller:
press the red ZOOM key to set and cancel Favorite Channel, the green A-B key to set or cancel Delete Channel, the
yellow 3D key to set or cancel Skip Channel, the blue ANGLE key to set or cancel Lock Channel; After setting,
corresponding figure will appear;
3. To rename channel , press UP/DOWN key to choose the line where the channel to be renamed is, press
LEFT/RIGHT key to enter the page to rename the channel, as shown in Figure 1.10:
Figure 1.10 Edit Channel-Name Page
4. After program editing, to edit the program, press ENTER key; to set or cancel Lock Program, the system will hint to
input “0000”; to set Delete Program, the system will hint to choose dialogue box“Do you want to delete the
selected items?”, Press LEFT/RIGHT key to choose, choose ”Yes”to delete the programe chosen, “No”to cancel;
3
Page 31
Operation of New conception projector D8H/D8HD
5. Press RETURN key to exit Channel Organizer page.
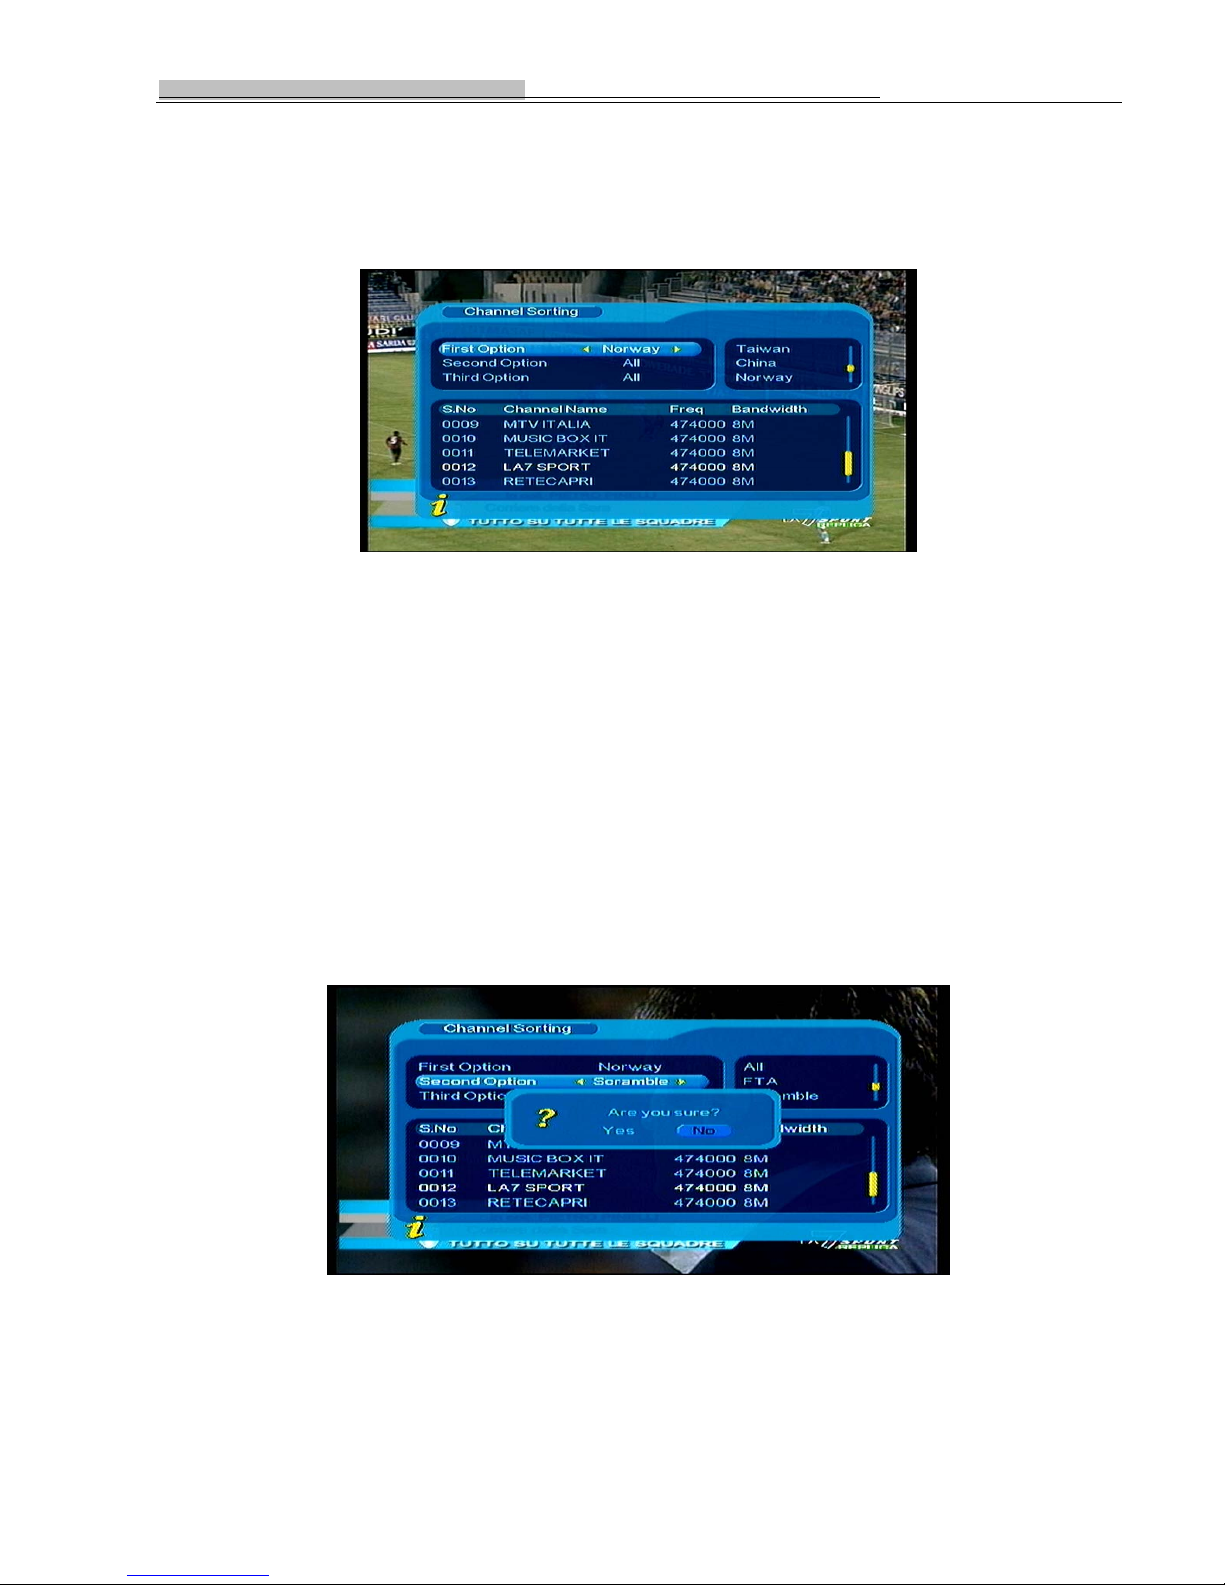
1.2.2 Channel Sorting
The channels shall be listed according to certain sequence so that the user can easily find them.
1. you can enter the page As shown in the figure below via “MENU->Digita TV->
Channel Manager -> Channel
Sorting”:
Figure1.11 Channel Sorting page
2. It will pop up and dialogue box prompting that“Channel not available”when there are no programs in database to enter
into, and it will not enter into channel sorting page.
3. Before sorting, the type of sorting shall be set, including the following items:
(1).First Option: choose the programs to be sorted via the selection area;
(2).Second Option: Press FTA(free of charge), Scramble(encrypted), ALL Freeand Encryted Channels;
(3).Third Option: According to alphabetic order A-Z, or Z-A;
4.Press UP/DOWN key choose Type , Press LEFT/RIGHT key to set Sorting Parameters;
5. After sorting is set, to realize channel sorting, press ENTER key, then the system will hint with the dialogue box“Are
you sure?”, as shown in Figure 1.12:
Figure 1.12
To choose “Yes”to confirm, you can see the programs in the program list; to choose “No”to cancel, you can return to
Channel Sorting page;
6. Press RETURN key to exit Channel Sorting page.
3
Page 32
Operation of New conception projector D8H/D8HD
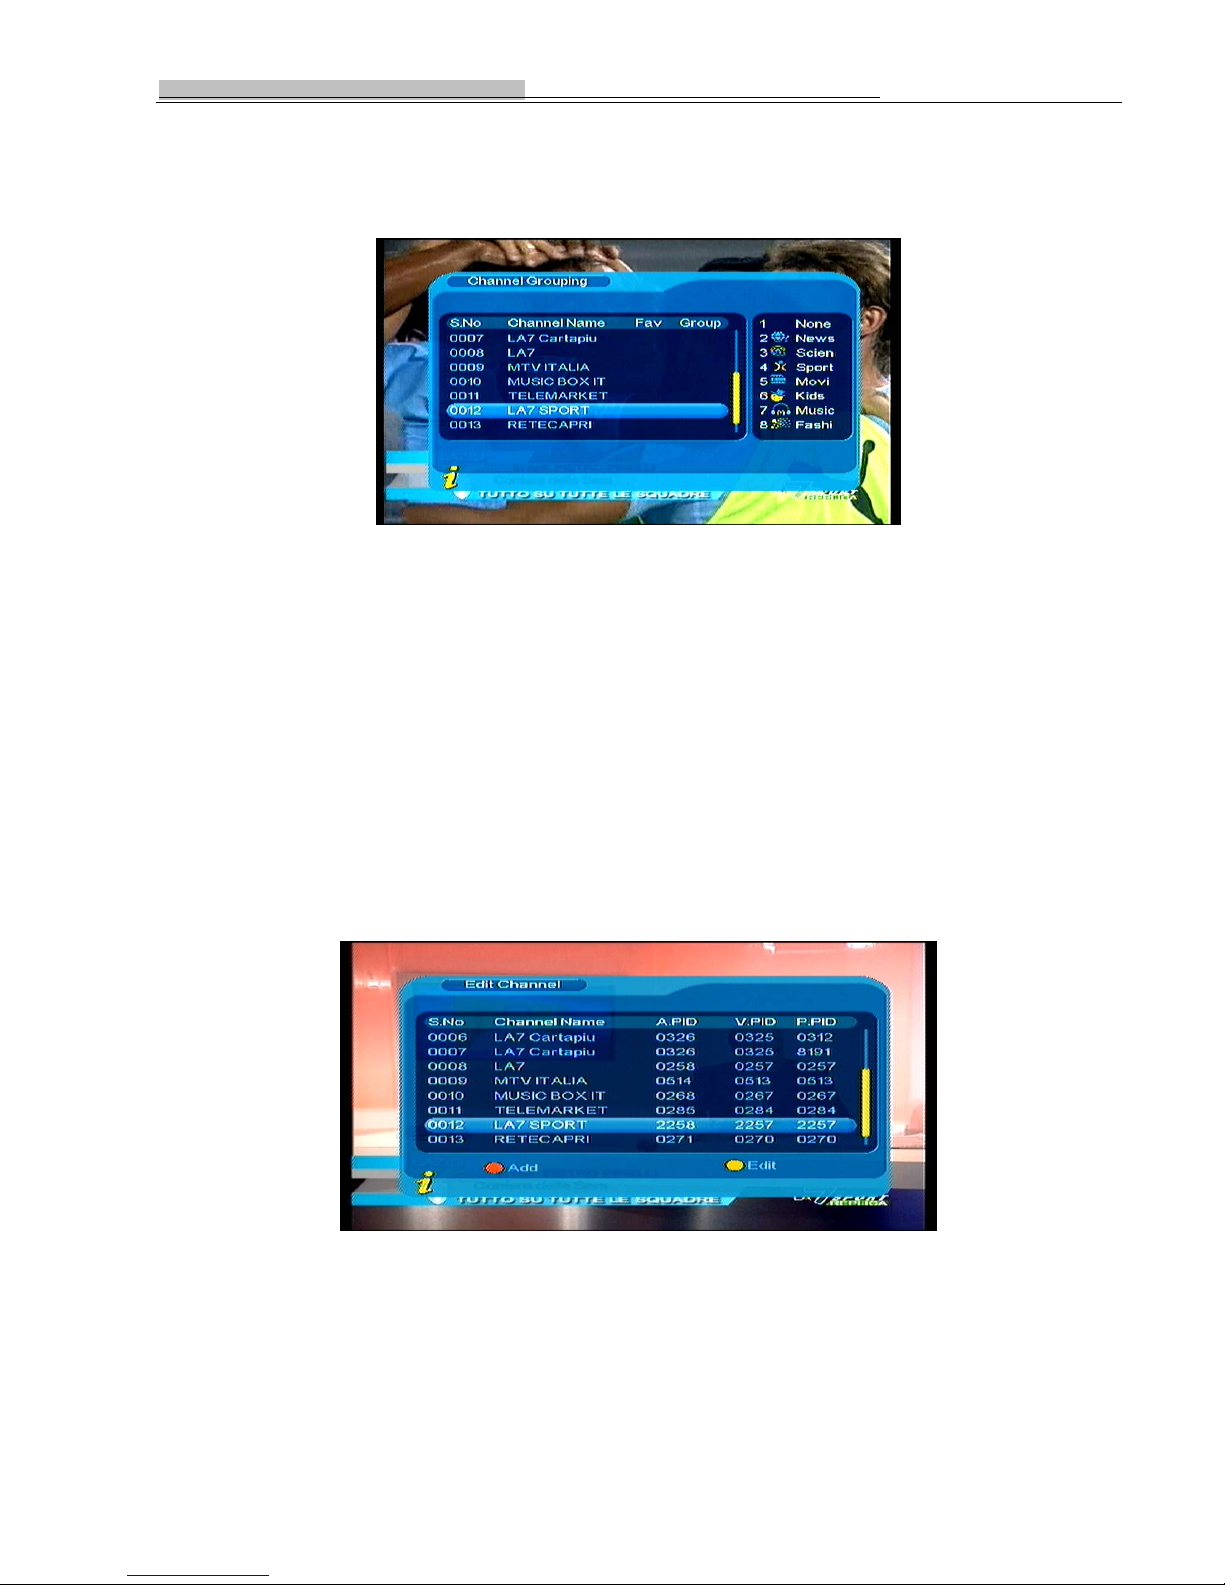
1.2.3 Channel Grouping
Group channels according to Movies, Sport,Music, Kids, Fashion etc.
1. You can enter the page As shown in the figure below via “MENU->Digita TV-> Channel Manager -> Channel
Grouping”:
Figure 1.13 Channel Grouping page
2. It will pop up and dialogue box prompting that“Channel not available”when there are no programs in database to enter
into, and it will not enter into channel grouping page.
3.Press UP/DOWN key to choose the line where the channel to be grouped is in, then press the number keys 1-8 on the
remote controller to set different channel grouping.
4. After channel is edited, when RETURN key is pressed to exit the menu, if actual channel editing action exists,
the system will carry out channel grouping renewal, with the hint of“Update succeeds”.
1.2.4 Edit Channel
Have such operations as Add, Delte and Rename to channels.
1. You can enter the page as shown in the figure below via “MENU->Digita TV-> Channel Manager -> Edit Channel”:
Figure 1.14 Add-Edit Channel Page
2. It will pop up and dialogue box prompting that “No Carriers” when there are no programs in database to enter into,
and it will not enter into ADD-Edit Channel page.
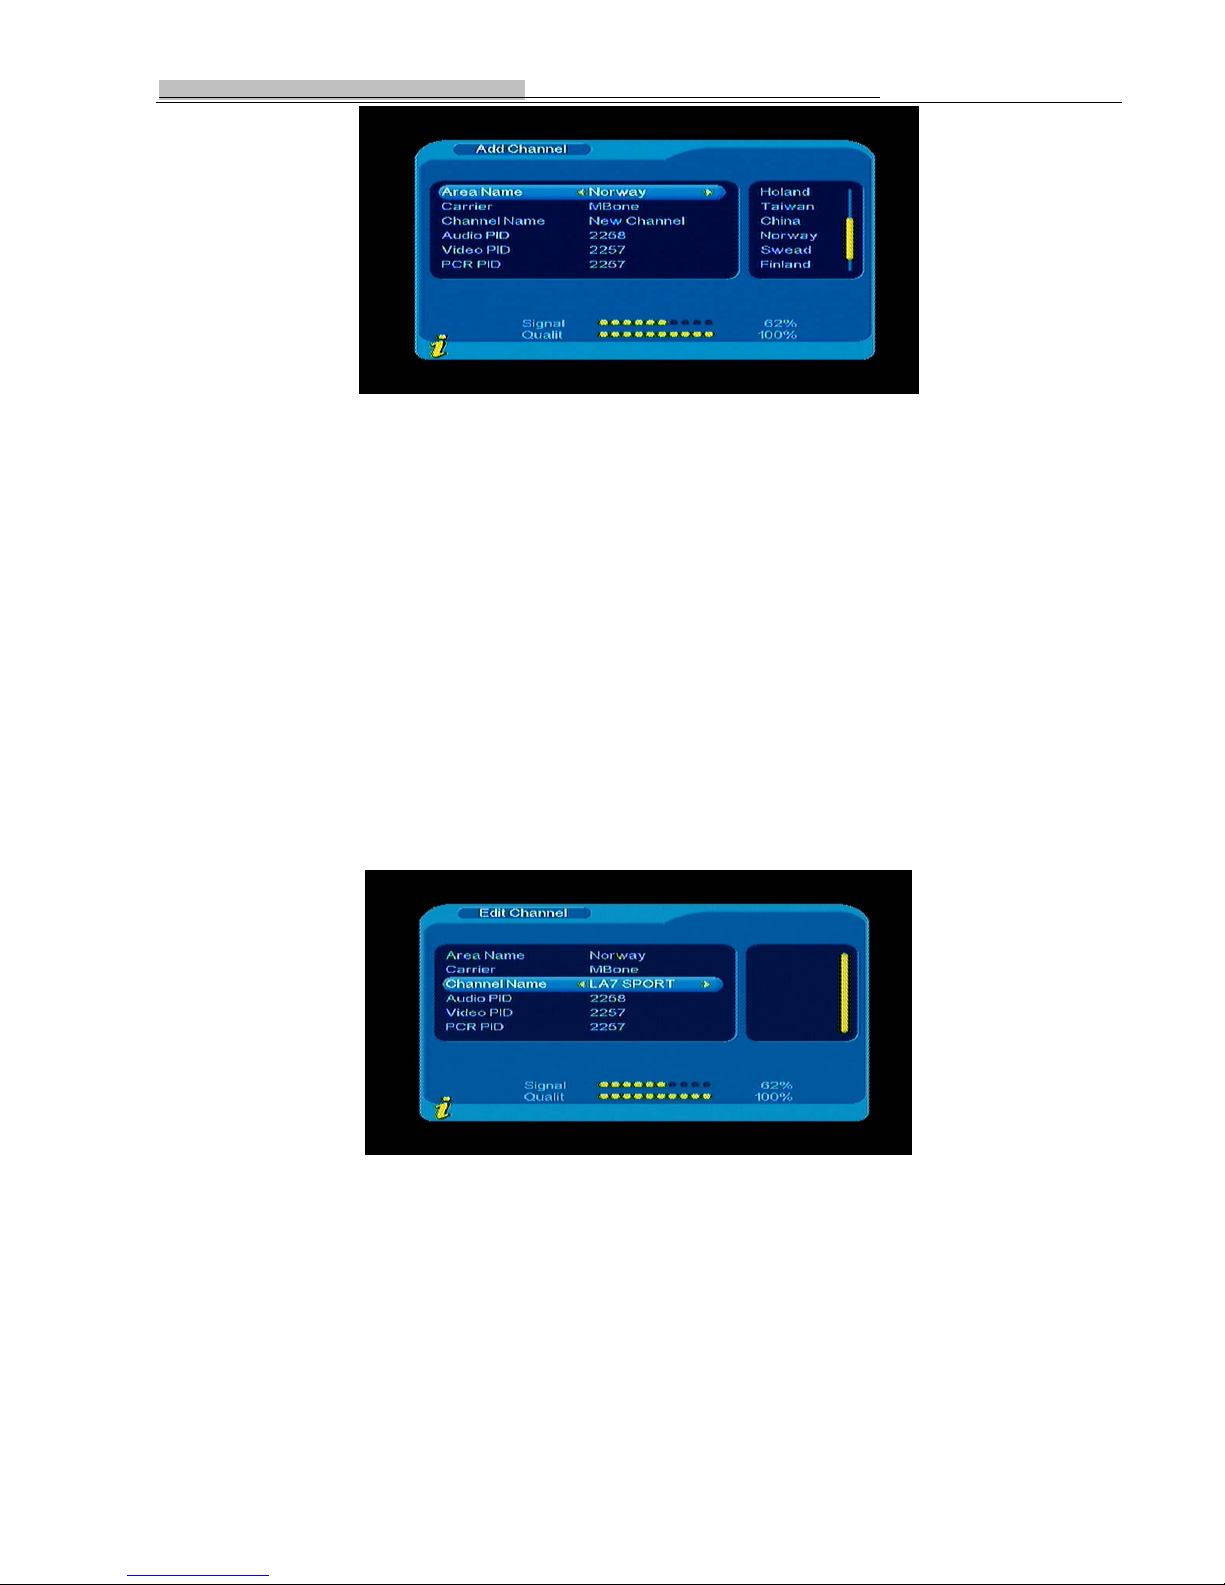
3.Press the red key ZOOM of the remote controller to enter Add Channel menu, as shown in Figure 1.15:
3
Page 33
Operation of New conception projector D8H/D8HD
Figure 1.15 Add Channel page
Under Add Channel menu, there are 6 parameters for adding one channel as follows:
(1).Area Name: For Area Name, press the RIGHT key of the remote controller to enter the Area Name list on the
right, then press UP/DOWN key to choose area name, press ENTER key to confirm;
(2).Carrier: Press LEFT/RIGHT key to choose;
(3).Channel Name: Press LEFT/RIGHT key to enter Rename Channel page as shown in Figure 1.10;
(4).Audio PID, Video PID, PCR PID, Press 0-9 number key to revise values;
(5).Press ENTER key to confirm the adding, the system will hint with “Update succeeds” and return to Edit
Channel menu;
(6).Press RETURN key to return to Edit Channel page.
4.Press the yellow 3D key of the remote controller to enter Rename Channel menu , as shown in Figure 1.16:
Figure 1.16 edit channel page
The operation for this menu is as that of for Add Channel page.
1.2.5 Delete All
If you do not like one or some channels, you can delte it/them in Channel Organizer menu (Chapter 1.2.1), but, if
you do not like all TV or Radio, you can enter Delete All menu to choose to delete all TV, RADIO, Carriers.
1. Under Channel Manager menu, press UP/DOWN key to choose Delete All option, press ENTER key again, then the
system will hint with the dialogue box of inputting password which is defaulted as “0000”, input the proper
3
Page 34
Operation of New conception projector D8H/D8HD
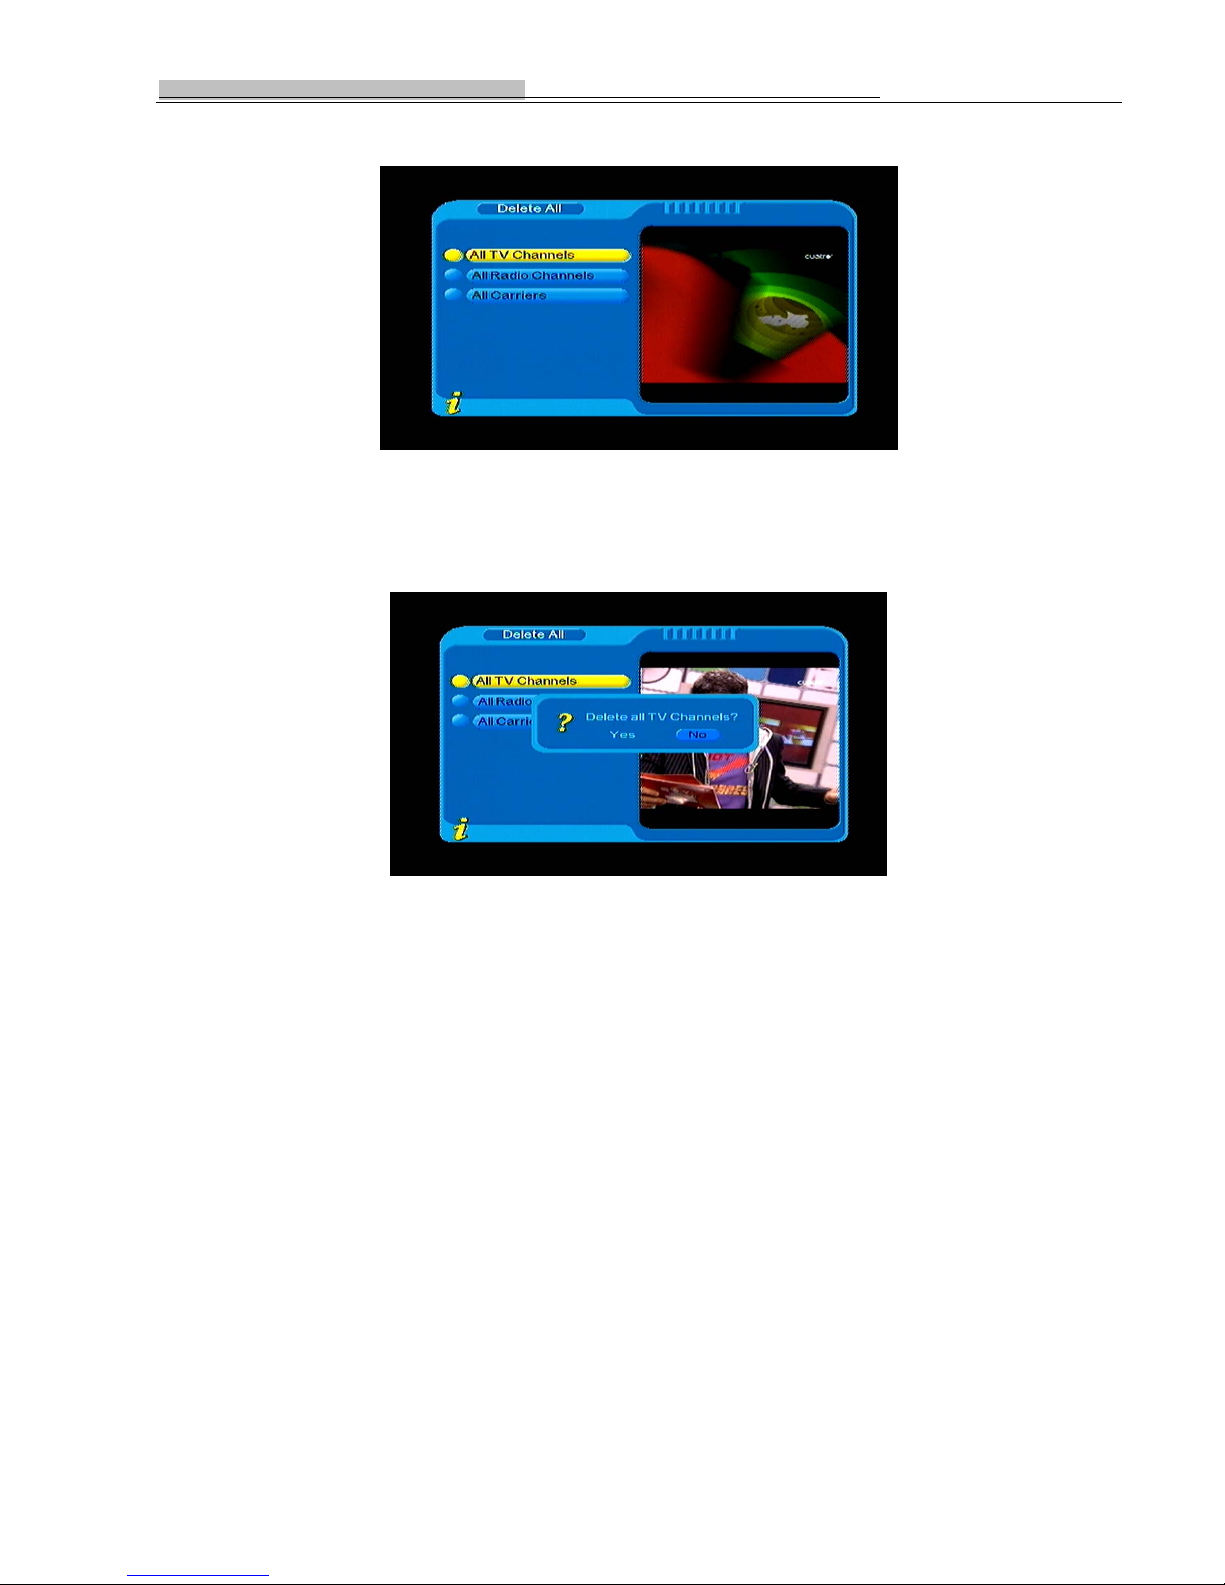
password via the 0-9number key of the remote controller, then enter Delete All menu as shown in Figure 1.17:
Figure 1.17 Delete All Page
2. To delete all TV channels, press UP/DOWN key to move the cursor to ALL TV Channels option, press ENTER key,
then the system will hint with ”Delete all TV Channels?”dialogue box as shown in Figure 1.18:
Figure 1.18 system register box
Press LEFT/RIGHT key to choose “Yes” or “No”, press ENTER key to confirm ,
3.To delete all RADIO channel, press UP/DOWN key move the cursor to ALL Radio Channels option,press ENTER key,
then the system will hint with ”Delete all Radio Channels?”dialogue box , press LEFT/RIGHT key to choose “Yes” or
“No”,press ENTER key to confirm;
4.To delete all Carriers and delete all TV and Radio channel, press UP/DOWN key to move the cursor to ALL Carriers
option, Press ENTER key, then the system will hint with “Delete all Carriers?”dialogue box, press LEFT/RIGHT key to
choose”Yes” or “No”, press ENTER key to confirm .
1.3 Configuration
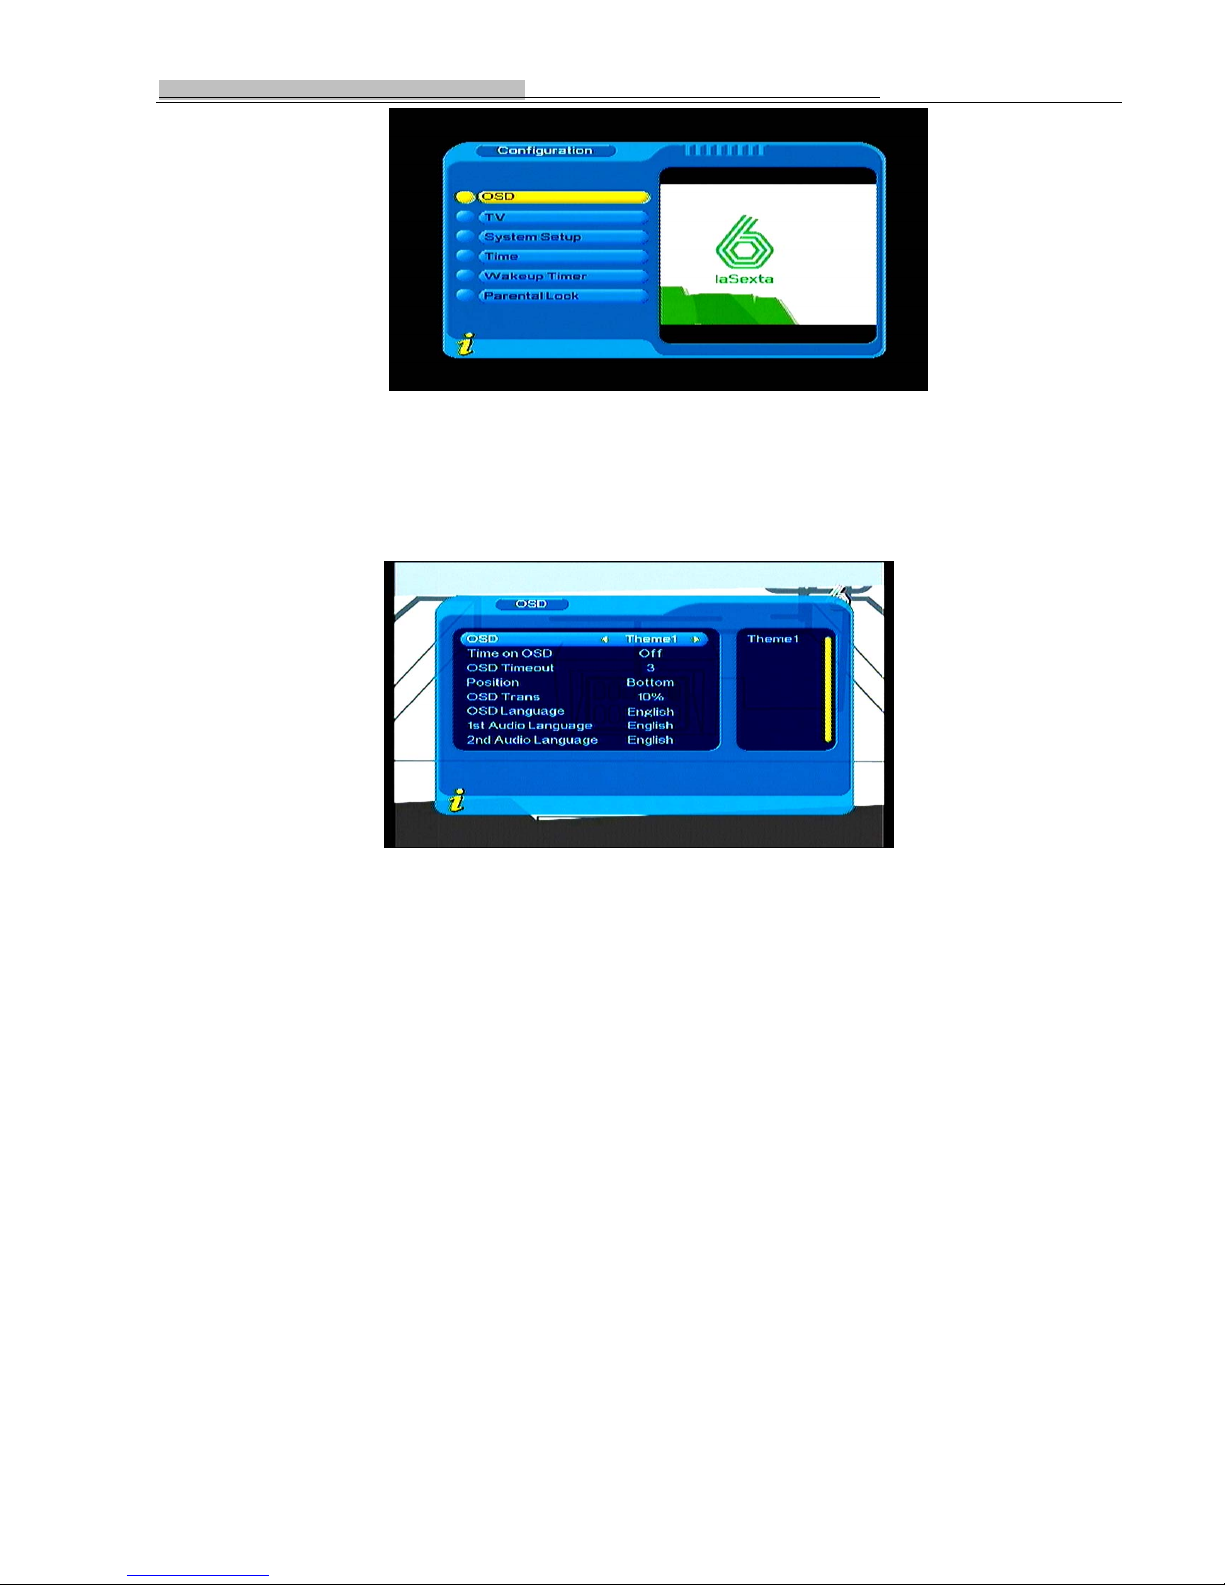
Configuration provides individualized system setup function, you can configure the system according to your own
hobby and demand.You can enter Configuration menu via the menu(MENU->Digita TV->Configuration), as shown in
Figure 1.19:
3
Page 35
Operation of New conception projector D8H/D8HD
Figure 1.19 Configuration page
1.3.1 OSD
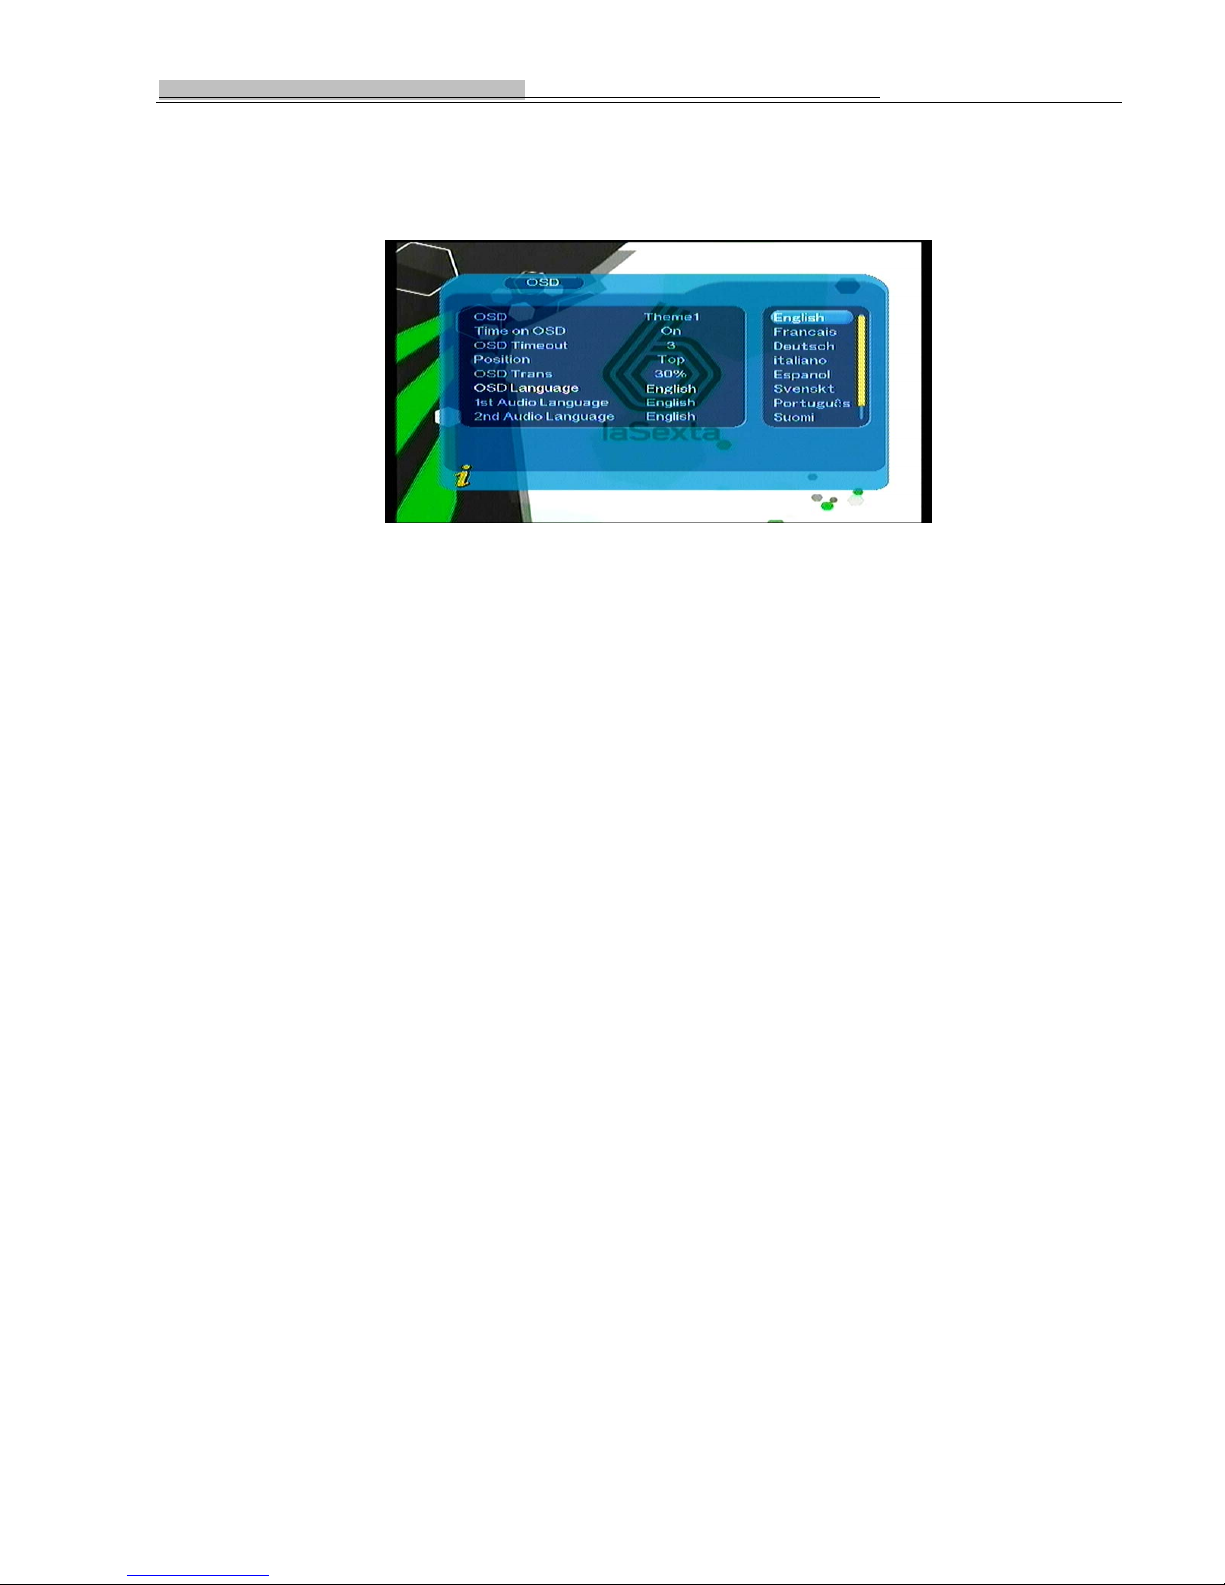
Via OSD option setup, you can set the user interface display mode according to your own demand.Via the menu
( MENU->Digita TV->Configuration ->
OSD), you can enter OSD menu, as shown in Figure 1.20:
Figure 1.20 OSD Setting Page
All options are listed on the left of the OSD menu, when the cursor moves on the option in OSD menu, the values
corresponding to this option on the right of the menu, press UP/DOWN key to move upward and downward to choose
the options in OSD menu.
There are following options in OSD menu:
(1).OSD Option sets system menu mode; currently, one mode is supported.
(2).Time on OSD Option sets whether to display system time in full-screen play channel.Move the cursor to Time on OSD
option, press LEFT/RIGHT key to choose between On and Off, the default is Off.
(3)OSD Timeout Option sets some information hint dialogue box and displays time length, move the cursor to OSD
Timeout Option, press LEFT/RIGHT key to choose among 1-16s, the default is 3s;
(4).Position Option sets channel information hints dialogue box display position in full-screen display channel.Move the
cursor to Position option, press LEFT/RIGHT key to choose circularly between Bottom and Top;
(5). Trans option sets menu transparency, press LEFT/RIGHT key to adjust between 0%-60%.
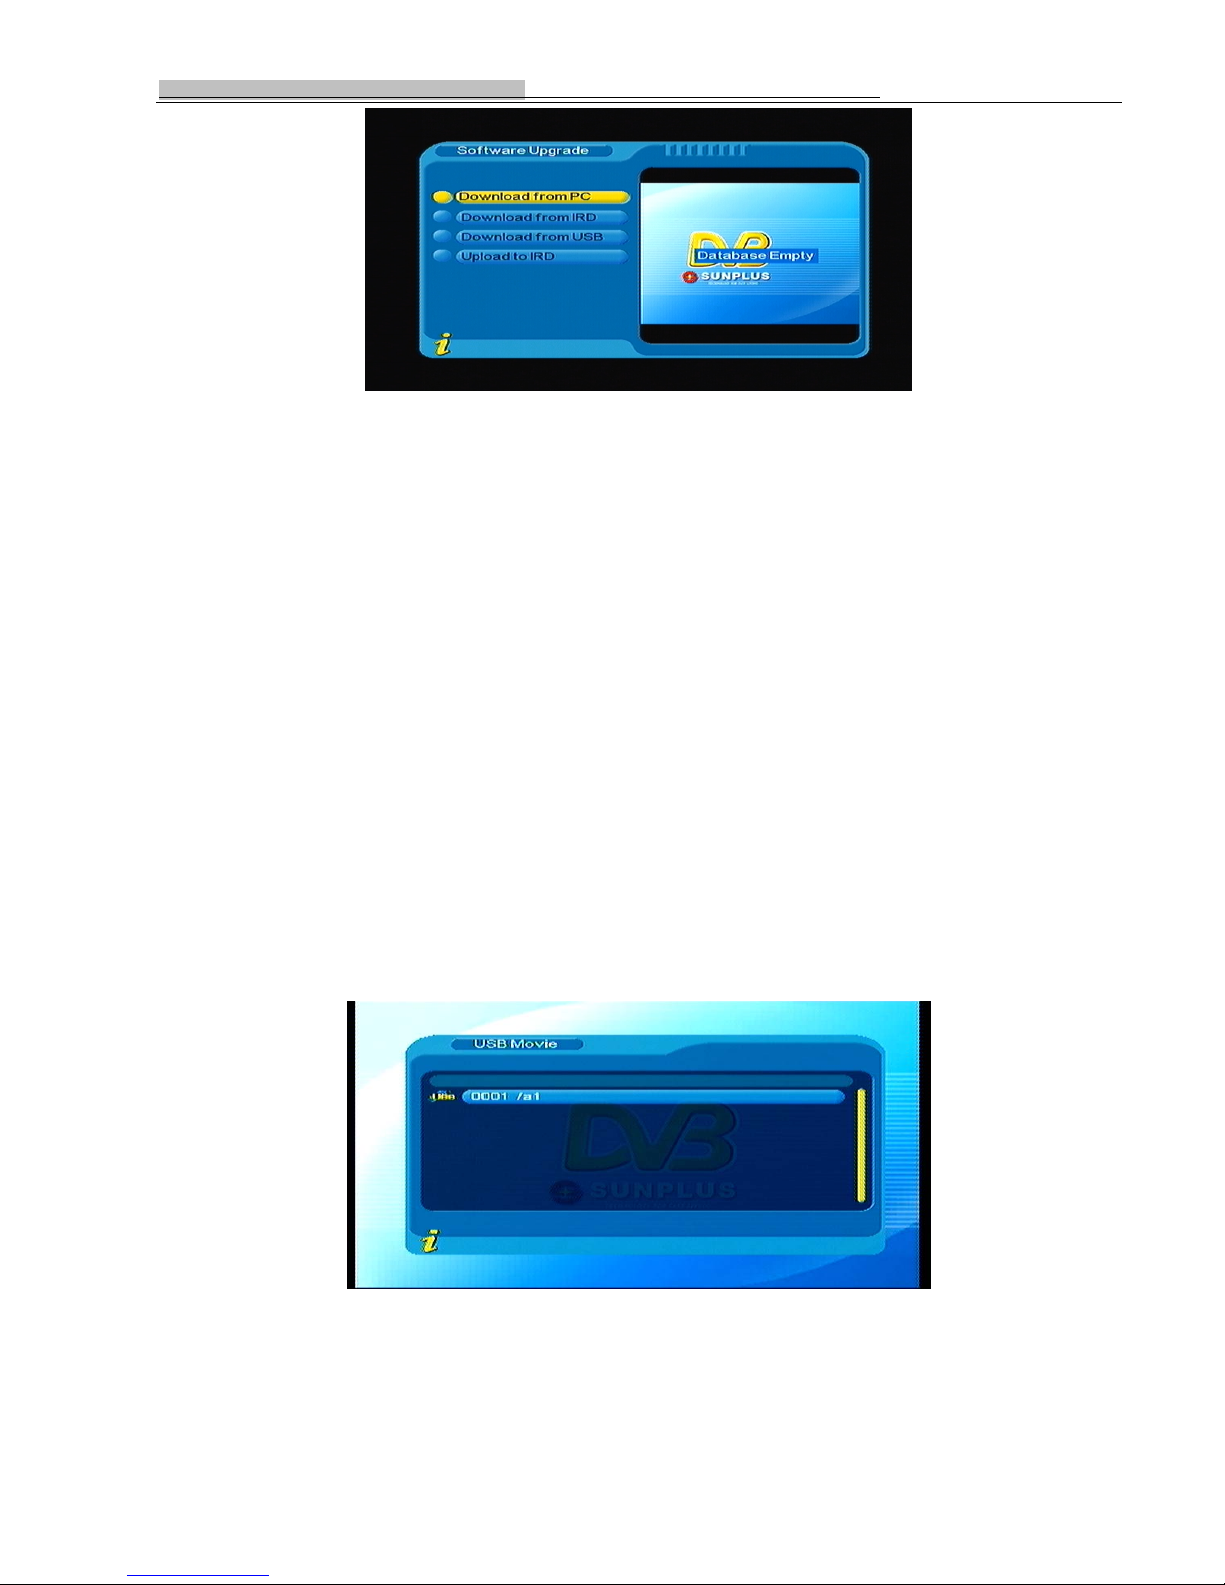
1. OSD Language option: The system has the user interface supporting a couple of languages, you can set language via
3
Page 36
Operation of New conception projector D8H/D8HD
OSD Language option:
(1)Move the cursor onto OSD Language option , Press RIGHT key to enter OSD Language List as shown in Figure
1.21:
Figure1.21
(2)Press LEFT/DOWN key choose language;
(3).Press ENTER key to confirm system interface language selection, then the setting is effective, and then the
interface language turns into the currently chosen language, the cursor can move onto OSD Language option on
the left;
2. 1st Audio Language option: Press RIGHT key to enter the currently supported Audio Language list, in the Audio
Languagelist, press UP/DOWN key to choose language, press ENTER key to confirm;
3. 2nd Audio Language option: Press RIGHT key to enter the currently supported Audio Language list, in the Audio
Languagelist, press UP/DOWN key to choose language, press ENTER key to confirm;
4. Press ENTER key to confirm the editing action in OSDmenu, the system will hint with “Update succeeds” and
then return to the previous menu .
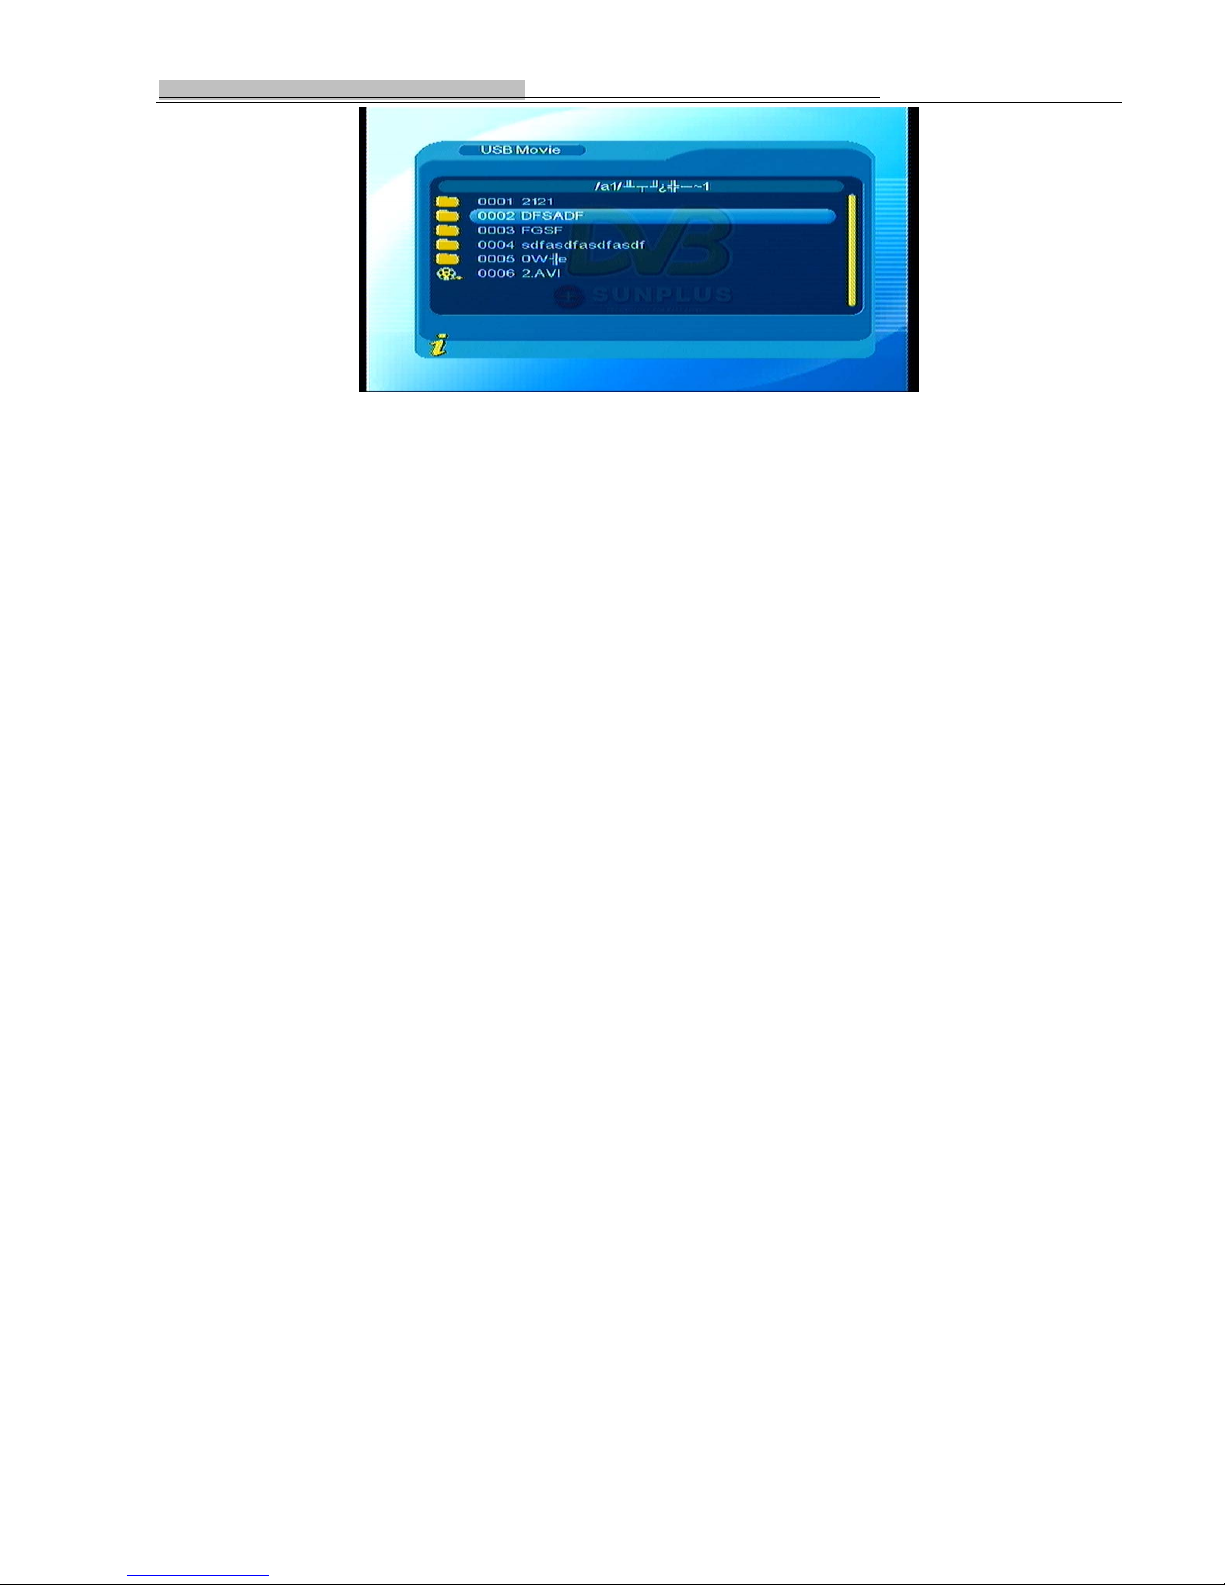
1.4 Software Upgrade
You can automatically update the software of the equipment.The software of the new version can support more
areas and more functions or solve more problems. Via menu ( MENU->Digita TV-> Software Upgrade) enter Software
Upgrade menu, as shown in Figure 1.36:
3
Page 37
Operation of New conception projector D8H/D8HD
Figure 1.36 Software Upgrade menu
2 USB Media Play
This mainboard of this projector integrates powerful function to support USB and you can connect
Ex-equipmentsvia the USB. At present, system can support usual USB media players and upgrade to system software.
This product supports the play of MP3, JPEG and MPEG-4( AVI).It can support only the files displaying in the list
and the file formate this product plays.
1.Copy media ducments to USB;
2.Plug in USB device;
3.Enter device in main menu.
2.1 USB Movie
1. In main menu as shown in Figure 1.1), press UP/DOWN to chooseUSB Movie option, Press ENTER key to
confirm, enter USB main directory as shown in Figure 2.1:
2. Press ENTER key to enter next directory , every directory displays only movie file and folder name, as shown in
Figure 2.2:
3
Figure 2.1
Page 38
Operation of New conception projector D8H/D8HD
Figure 2.2
Press RETURN key to return previous directory ;
3. Press UP/DOWN key to choose movie file name;
4. Press ENTER key to play movies;
5. Press FF key to play movie quickly( ×2, ×4, ×8, ×20, ×1);
6. Press REW key to rewind movie ( ×2, ×4, ×8, ×20, ×1);
7. Press SLOW+/- key to slow down movie( 1/2, 1/4, 1);
8. Press PREV key to play previous movie, NEXT key to play next movie;
9. Press LANGUAGE key to switch between the left and right channel and stereo;
10. Press PAUSE/STEP key to pause or play;
11. All movies can be replayed after paused during playing ;
12. Press RETURN key to exit movie play mode and return to the file directory .
2.2 USB Music
1. In main menu as shown in Figure 1.1), press UP/DOWN to chooseUSB Music option, to choose ENTER key to
confirm, enter USB main directory as shown in Figure 2.1:
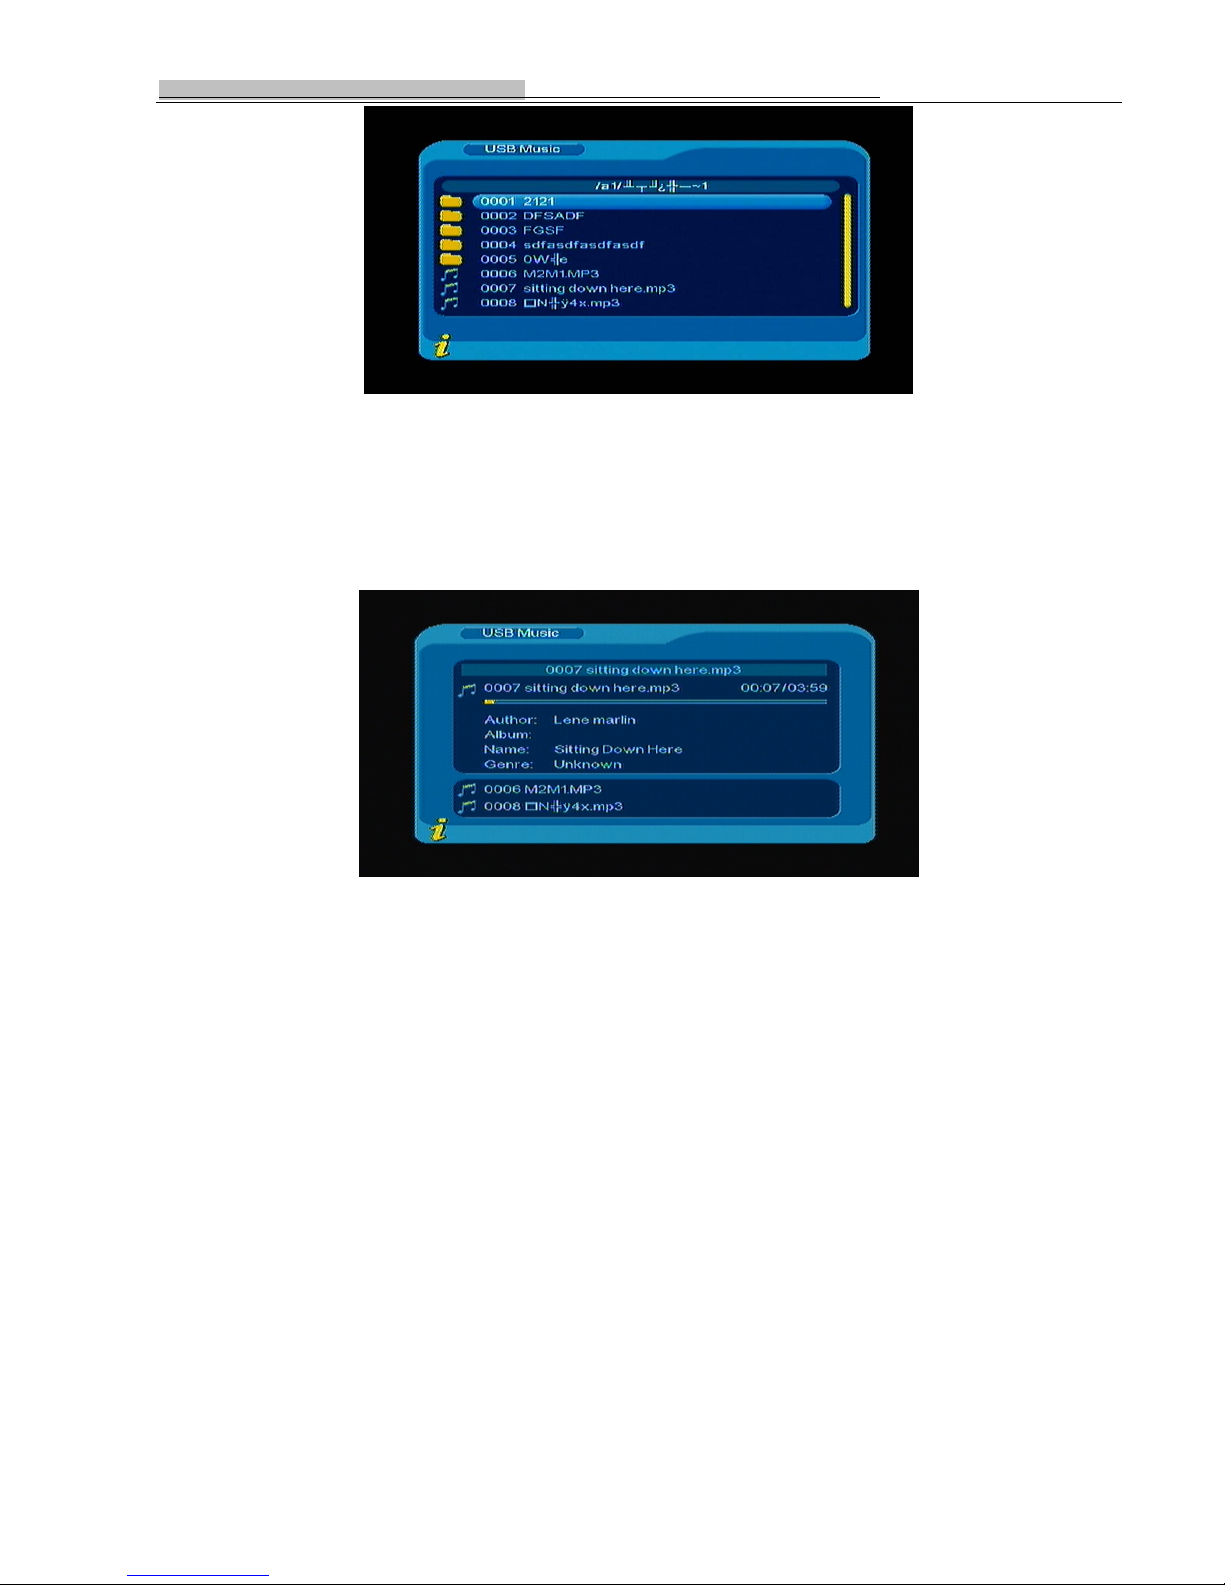
2. Press ENTER key to enter next directory, every directory can show music fileand folder name only, as shown in
Figure 2.3:
3
Page 39
Operation of New conception projector D8H/D8HD
Figure 2.3
Press RETURN key to return to the previous directory ;
3. UP/DOWN key to choose music file name;
1. Press ENTER key to play music file, its interface is as shown in Figure 2.4:
Figure 2.4 playing music
2. Press FF key to play quickly( ×2, ×4, ×8, ×20, ×1);
3. Press REW key to rewind music ( ×2, ×4, ×8, ×20, ×1);
4. Press PREV key to play previous music, press NEXT key to play next music ;
5. Press LANGUAGE key to switch between the left and right channel and stereo;
6. Press PAUSE/STEP key to pause or play music;
7. Press RETURN key to exit the music play mode and return to the file directory .
2.3 USB Photo
1. In main menu as shown in Figure 1.1), press UP/DOWN to chooseUSB Photo option, press ENTER key to confirm,
enter USB main directory as shown in Figure 2.1:
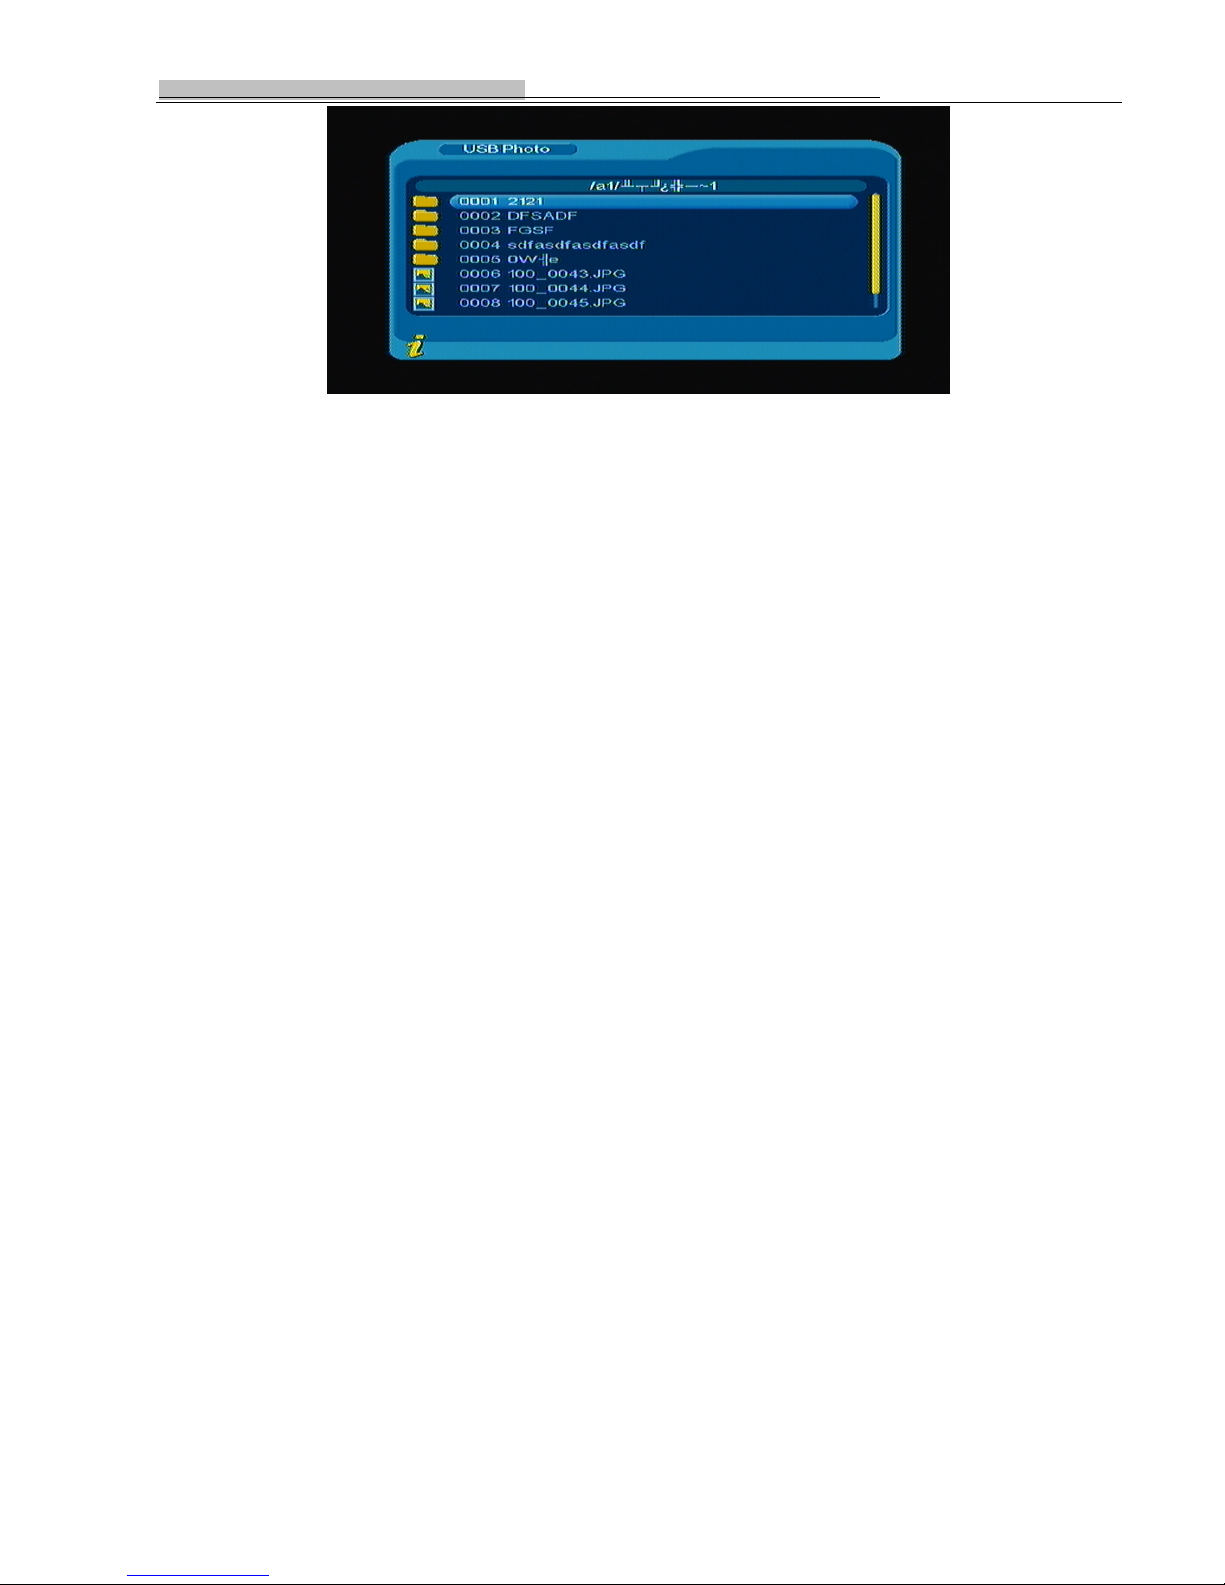
2. Press ENTER key to enter next directory, every directory can show photo file and folder name, as shown in Figure
2.5:
3
Page 40
Operation of New conception projector D8H/D8HD
Figure 2.5
Press RETURN key to return to the previous directory ;
3. UP/DOWN key to choose photo file name;
4. Press ENTER key to play Photo file ;
5.Press PREV key to play previous Photo, NEXT key to play next Photo;
6. In full-screen play state:
(1). Press Left,Right key to rotate the photo clockwise/counterclockwise by 90 degrees;
(2). Press UP key to view lens photo vertically;
(3). Press DOWN key to view lend photo horizontally.
7. Press RETURN key to exit play mode and return to file directory.
Games
If you want to have a rest or to relieve youself after hard working, you can play some games attached in the system.
3 card reader
It is similar with USB function,we will add the details later…..
User’s maintenance
Cleaning Notice
(1) Please turn off the D8 SERIES and pull out the plug from the outlet before cleaning.
(2) Do not use liquid cleanser or aerosol cleaner, please use a damp cloth or dry cloth for cleaning.
3
Page 41
Operation of New conception projector D8H/D8HD
(3) Clean the dust and spot on the external lens gently with dry cotton cloth.
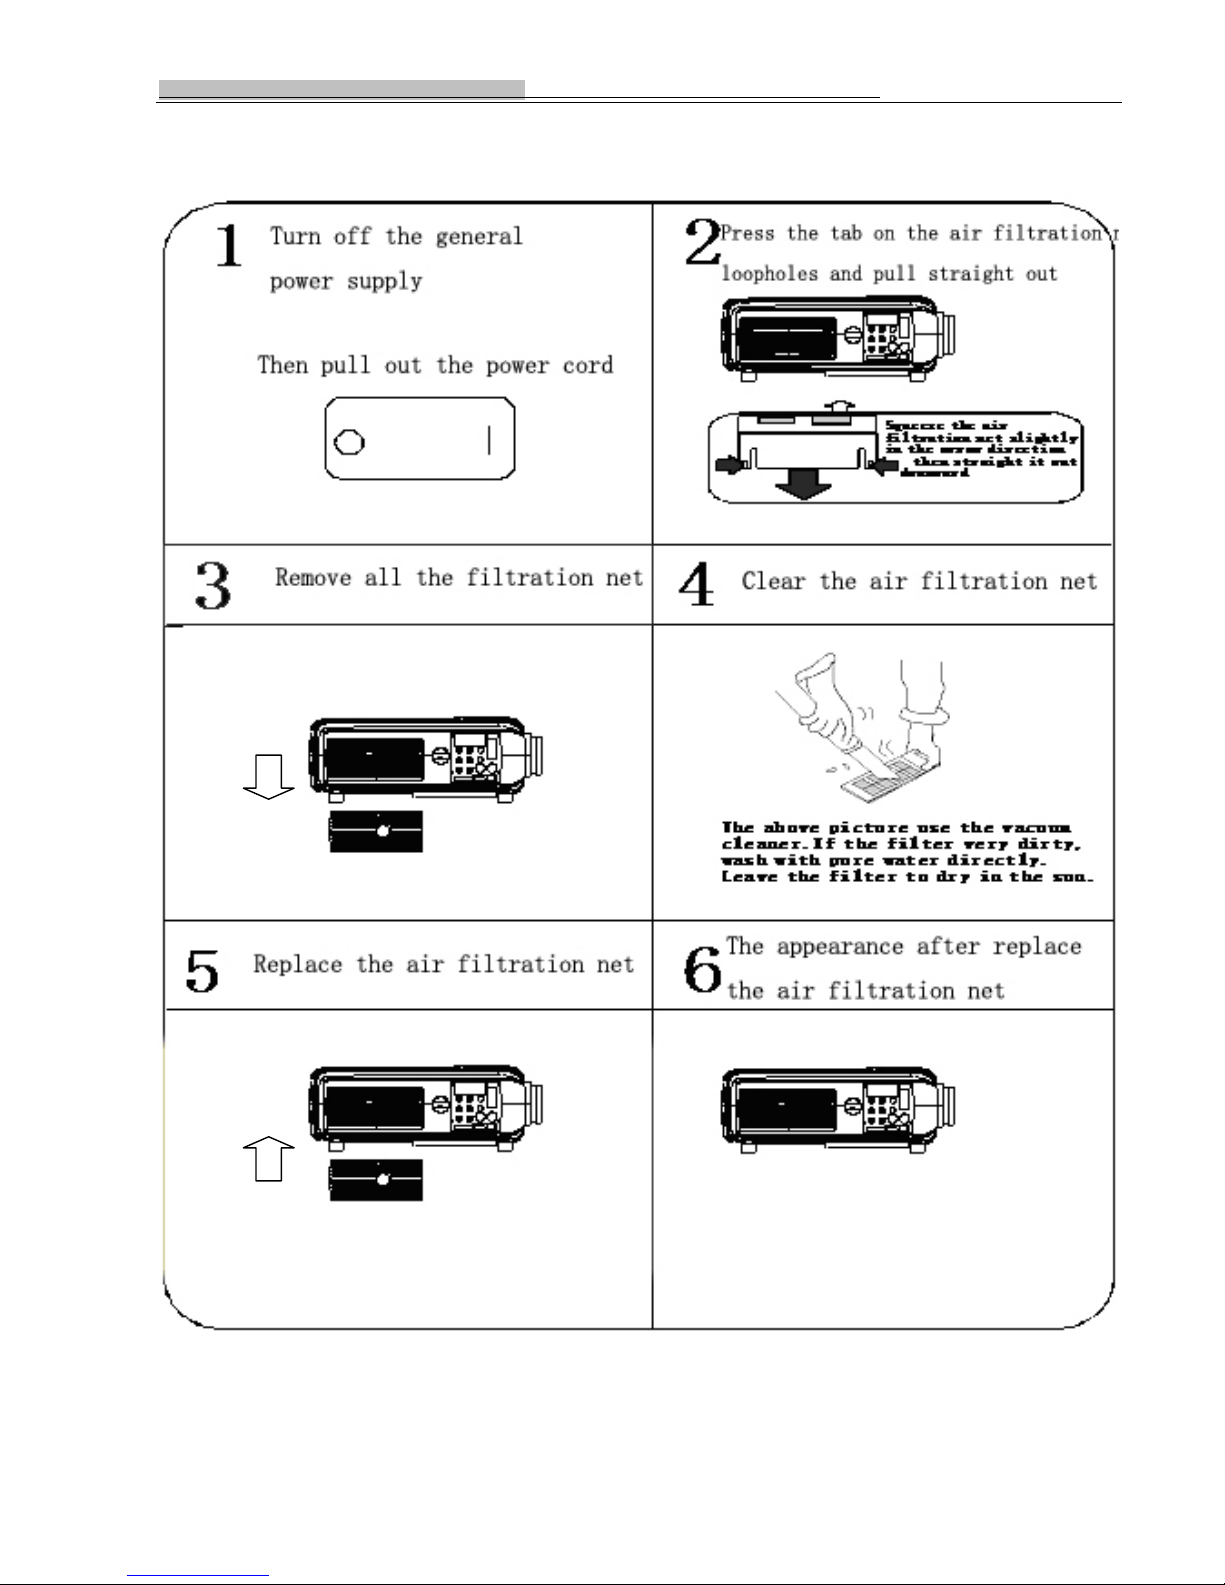
Conventional diagram for cleaning screen filter
3
(Picture65)
Page 42
Operation of New conception projector D8H/D8HD
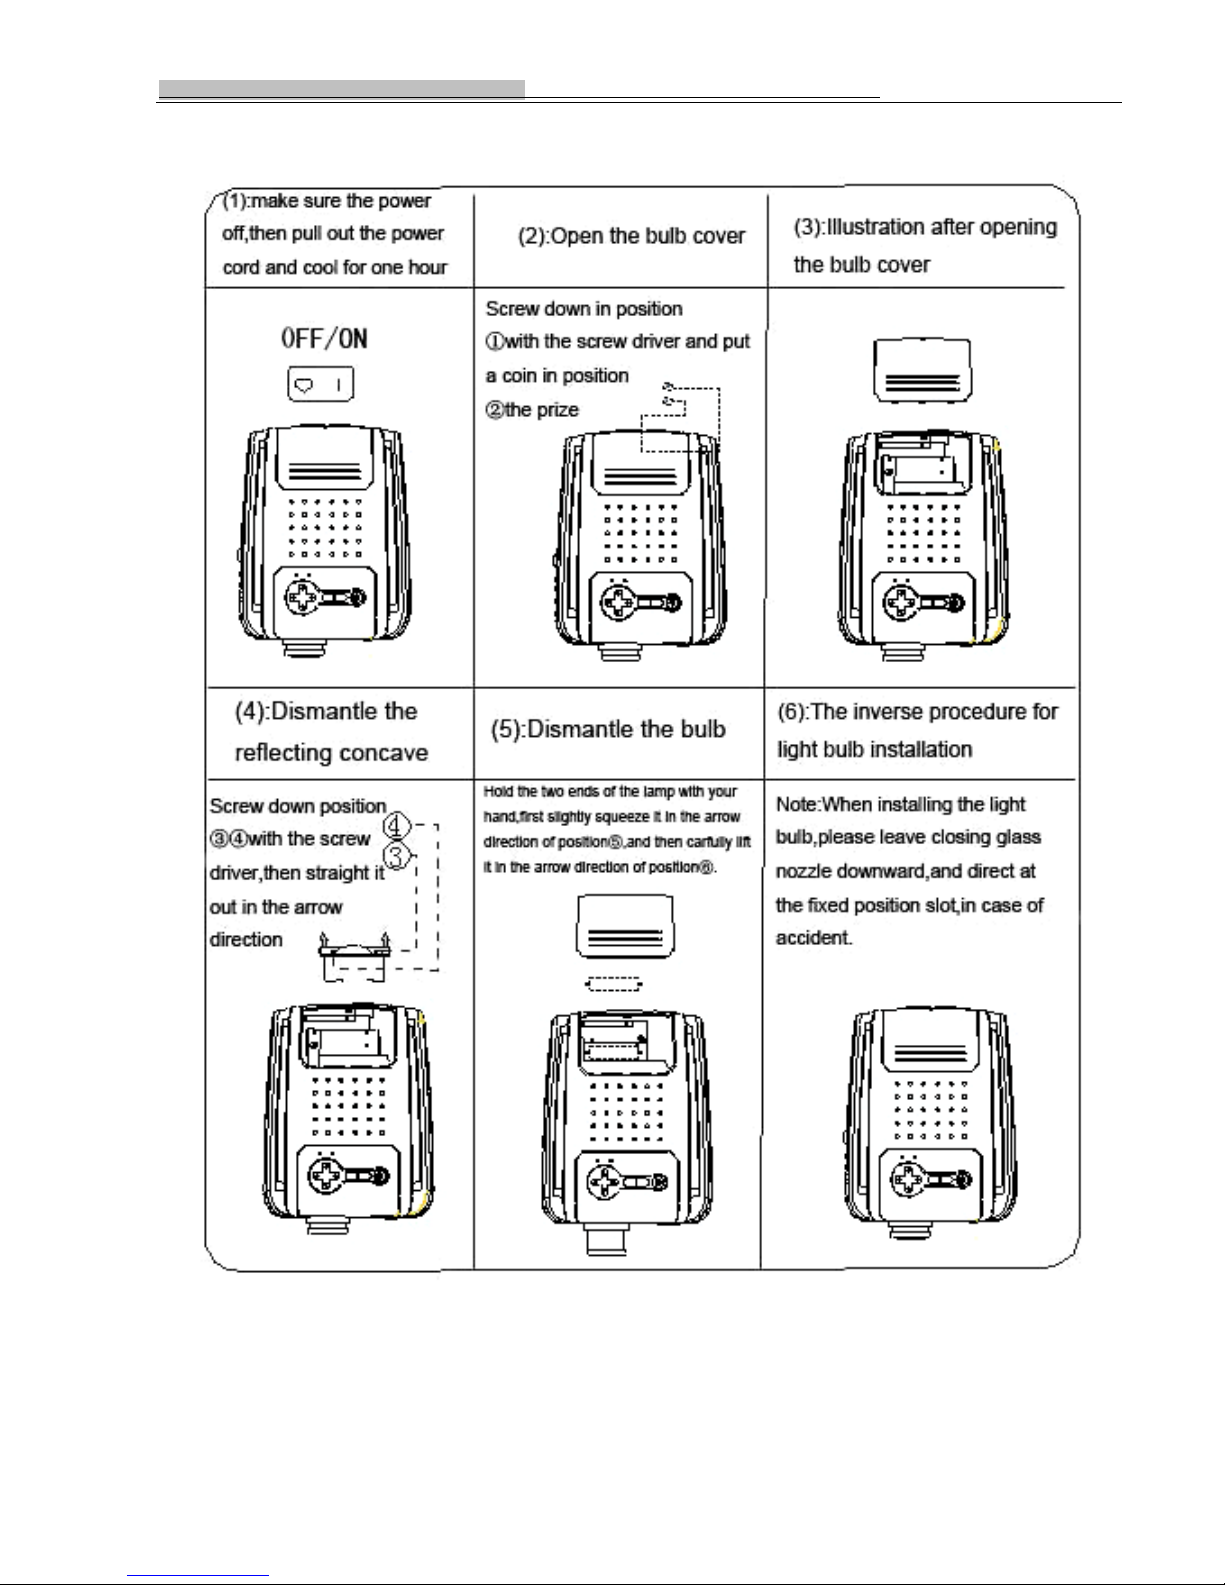
Illustration of light bulb replacement
3
(Picture 66)
Page 43
Operation of New conception projector D8H/D8HD
Simple repair and solution
The D8 SERIES is a high-tech product integrating optical, mechanical, and electronic components,
with CPU and several protection circuits installed. In case of violating the operation procedure or
improper setting, the protection circuit of the D8 SERIES will start to work. Then some abnormal
symptoms will occur to the D8 SERIES. However, as long as you make the correct setting or follow the
operation procedure, the failures may be resolved.
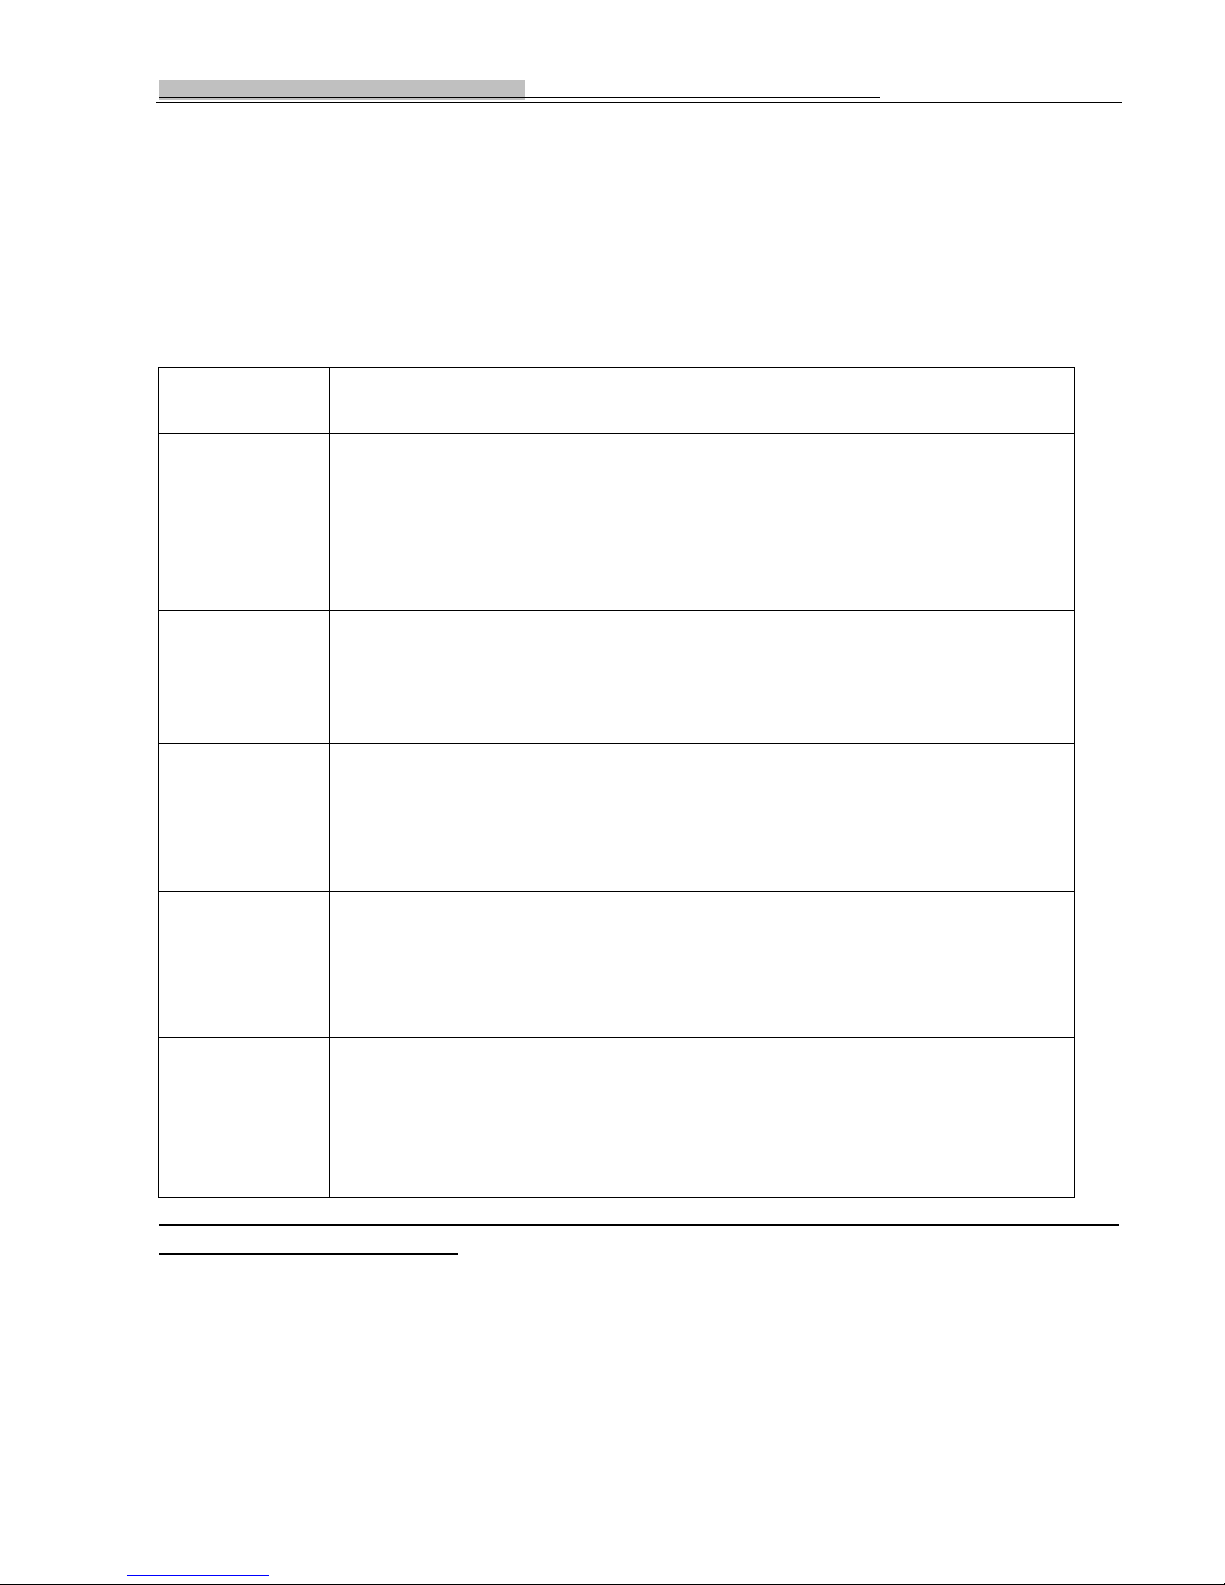
Symptom Solution
The lamp does
not light up
when turning
on the power
No picture
Remote
control does
not work
Picture is
blurred
1. Is the power cord properly connected?
Does the mains switch turn on? Is the plug plugged in?
2. Is the power turned on and off frequently? Reset it for 15 minutes.
3. Check how long the lamp has been used. Should the light bulb be
replaced?
1. Have you open the cover of the lens?
2. Is the connecting correct? Make sure all the signal cords are correctly
connected.
3. Are the contrast and brightness set to minimum?
1. Are the batteries in the remote control used up? Are the battery installed
correctly?
2. Is there obstacle between the remote control receiving part of the D8
SERIES and the remote control?
3. Is the remote control out of operating distance? (max distance: 7M)
1. Turn the lens gently and adjust focus to the right place.
2. Adjust the simulated analog variables of brightness, contrast, and color
3. Is the lens clean?
Unusual
sound
1. Is the audio signal connected correctly?
2. Is the audio input mode of the TV signal right?
4. Is the volume turned off or set to minimum?
If all above method can not solve the problem, please contact us or the dealers immediately. Do not
open the machine by yourself.
3
Page 44
Operation of New conception projector D8H/D8HD
Parameter and Function
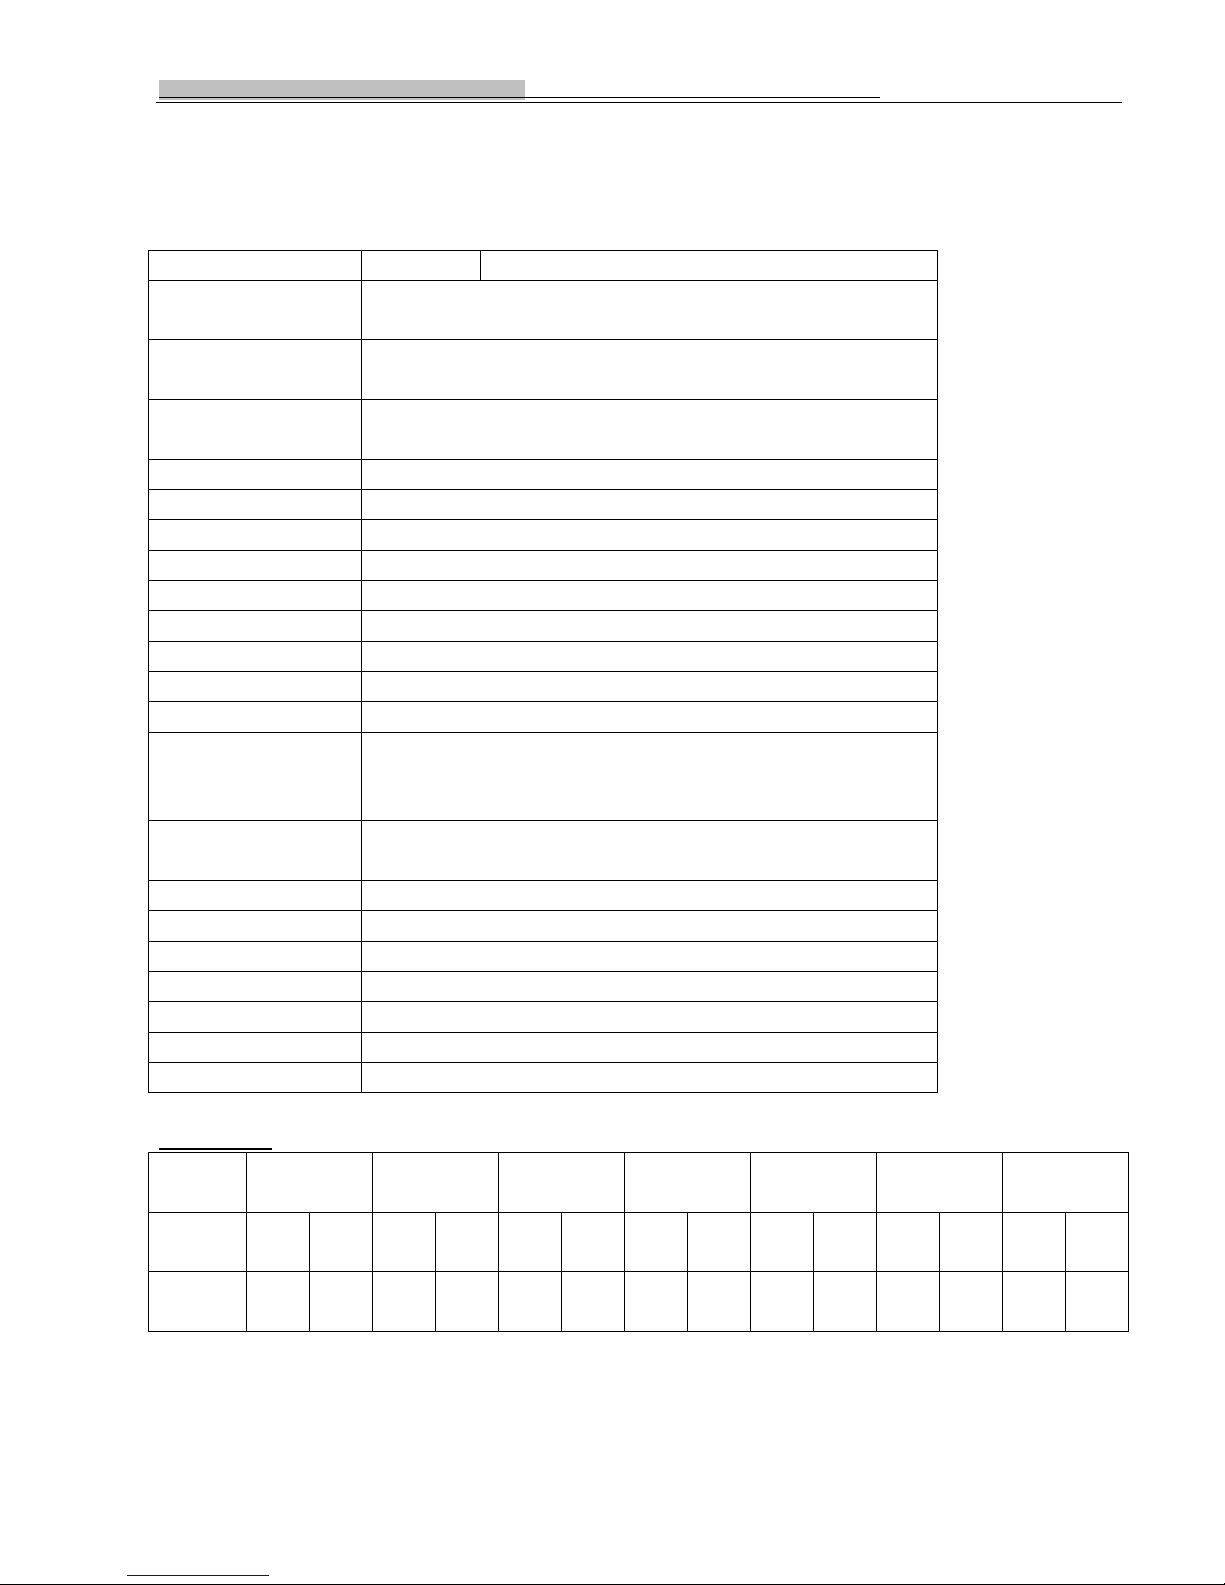
Technical specifications
Model No. D8H/D8HD
TV System
Display Technology 3.5 inch LCD
Brightness
Contrast ratio
Image enhance
Technology
Safety features Power off confirm/High temperature protect/ Error Warning.
Focus adjustments Manual Focusing,Support Vertical Zoom/Image Zoom/Image Shrink.
Picture Rotation function Horizontal/Vertical rotation
Compatibility HDTV: Support 1080i/720P/576P/480P/576i/480i
Security Mode Support ” Password for Power On” security mode.
Auto Power Off Support Auto Power Off when No Signal.
Aspect ratio Support 4:3/16:9 mode
Speaker 2W *2 Audio output.
OSD Languages
Input Socket
Advanced Feature
Lamp life 6000 hours around
Dimensions(LxWxH) 258x323x120mm
Weight NW:4.8kg,GW:6.5kg
Voltage AC210-240V 50/60Hz
Noise < 35dB.
Projection distance 1.2-5.2m
Projection size 23-120inch
D8 SERIES
Projection
distance
Aspect
ratio
Image
size(inch)
1.2m 2m 3m 3.1m 4m 4.1m 5m
4:3 16:9 4:3 16:9 4:3 16:9 4:3 16:9 4:3 16:9 4:3 16:9 4:3 16:9
25” 23” 44” 41” 68” 62” 72” 65” 93” 85” 100” 92” 114”
D8H/D8HD
support: 800*600,1024*768,1280*1024 (physical resolution 640*480)
2000ansi(MAX)
500:1
ACM(Adaptive Color Management) &ACC(Adaptive Contrast
& Color) & DCDI(Directional Correlational De-Interlace).
PA L/ NT SC / SE CA M
ENGLISH/GERMAN/FRANCE/SPANSH/ITALIAN.
AV,TV,S-video,Audio-out,VGA,Scart,YPbPr,SD
card,HDMI,USB,DVB-T
reader)
Support PIP(picture in picture), 3D,
Multi window
(D8H without DVB-T,USB,card
Teletext, NICAM, ZOOM,
107”
Main function
3
Page 45

Operation of New conception projector D8H/D8HD
(1) Signal compatibility:TV ( 75 Ω)AV,S-video,Audio-out,VGA,Scart,YPbPr,SD
card,HDMI,USB,DVB-T
(D8H without DVB-T,USB,card reader)
(2) Keystone correction and picture rotation, the picture aspect ratio can switch from 16:9 to 4:3.
(3) OSD screen display function
(4) The fans continue to work after the D8 SERIES is turned off (lasting for 10 minutes so as to
prolong the lamp life.)
(5) Alarm protection function in case of excessive heat
(6) Alarm function when sole heat-exhausting fan does not work
(7) Entire remote operation
(8) Manual focus adjustment, Support Vertical Zoom/Image Zoom/Image Shrink,support
PIP(Picture in picture),
3D, Teletext, NICAM, ZOOM, Multi window.
Supplied Accessories
Remote control, power cord, user manual, AV signal line, VGA signal line.
Thank you for reading the User Manual. If you have any question, please feel free to contact us or
the dealers. We will provide excellent service to you. We sincerely hope that you will enjoy your life with
our products.
Warranty
1.Oley projector can be changed in 1 week after selling. The projector is warranted for 1 year, and the
lamp is warranted for 6 months.
2.All accessories are out of warranty.
3.Products can change as following condition:
a). Must present the warranty card,and All package must be new
b).Products must be in warranty period and under the right operation;or the product have bad quality.
c).Customer should offer whole accessories.
If not in any of above condition,handle as the warranty products.
The Warranty projector appear as following case,you should pay for the maintenance and changing material.
A).Can’t present the warranty card or the card is not according to the register.
B).Product or some componets (such as lamp) is out of warranty period
C).The componet is damaged in the transport.
D).Misused after you purchase.
E).The faulty is caused by wrong operation and installation,not according to the user’s manual.
F).Fire,Flood or other natural disaster caused tge damage of projector.
G).The projector burnd out caused by you using wrong power supply. Pls note that our projector is 210-240V.
3
 Loading...