

Page 1
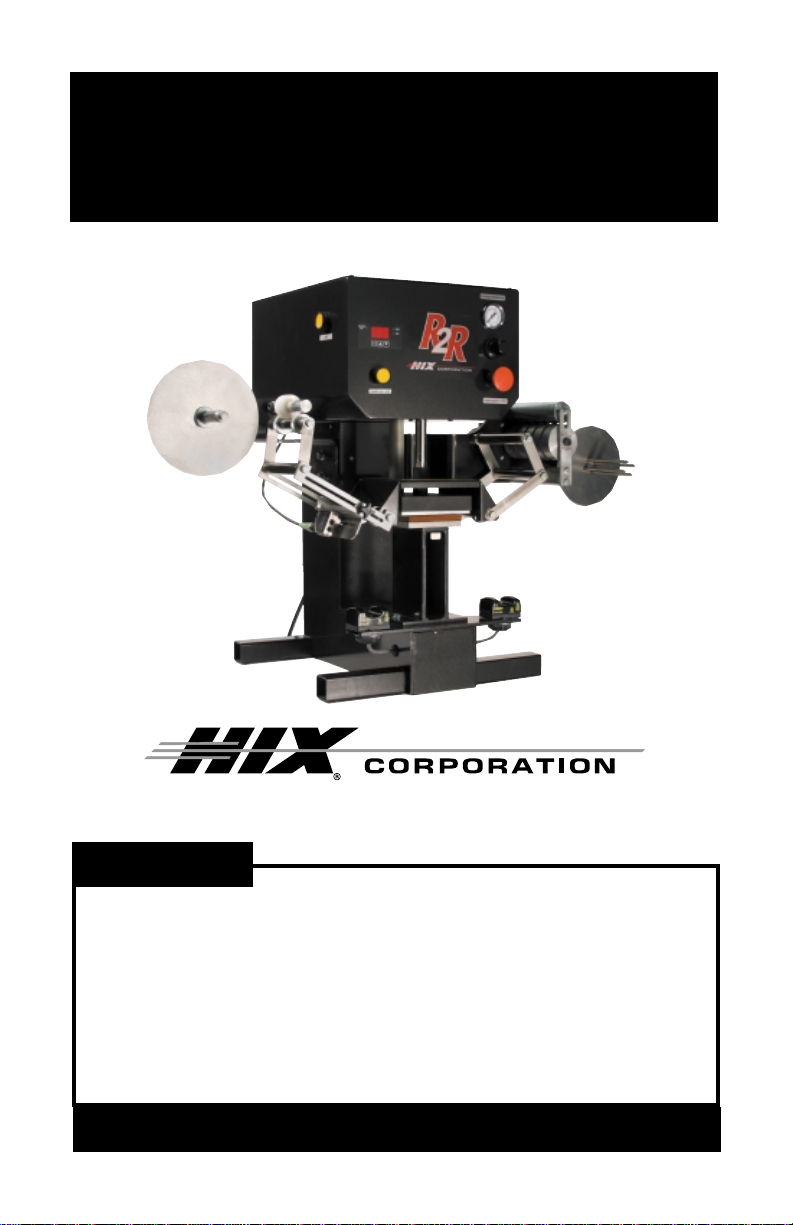
R2R
Reel to Reel Care Label Heat Press
OWNERS MANUAL
R2R shown
For Customer Service, Call 1-800-835-0606
or Visit www.hixcorp.com
CONTENTS
Receiving and Shipping 2
Set Up 3-6
Operation 7
Sensor Setting 8-9
Temperature and Time 10
Trouble Shooting/Maintance 11
Warranty 12
BEFORE warranty repair you MUST get Prior Authorization:
Call 1-800-835-0606
1
RV A_102609
Page 2

RECEIVING AND SHIPPING
UNPACKING
Remember to save all packing materials - including box,
liner and board. You may need these for shipping your
machine or if a repair is necessary in the future.
INSPECTION
Inspect your machine for hidden shipping damage. Contact
the delivery company immediately , should you find damage.
SHIPPING OR RETURNS
NOTE: Save all of your shipping/packing materials.
DO NOT RISK COSTLY SHIPPING DAMAGE!
SHIP ONLY IN ORIGINAL BOX. HIX will not be
responsible for freight damage repairs.
1. Place in original crate.
2. Fasten machine to shipping base with bolts provided.
3. Make sure crate top is securely fastened to base.
2
Page 3
SET UP
SET UP
1. Unpack - Remove nails located at base of crate and carefully remove
top portion of crate. Unfasten machine from shipping base and place
on secure, sturdy table. Reattach crate top to shipping base.
2. Keep crate for secure shipping in the event return shipment is required.
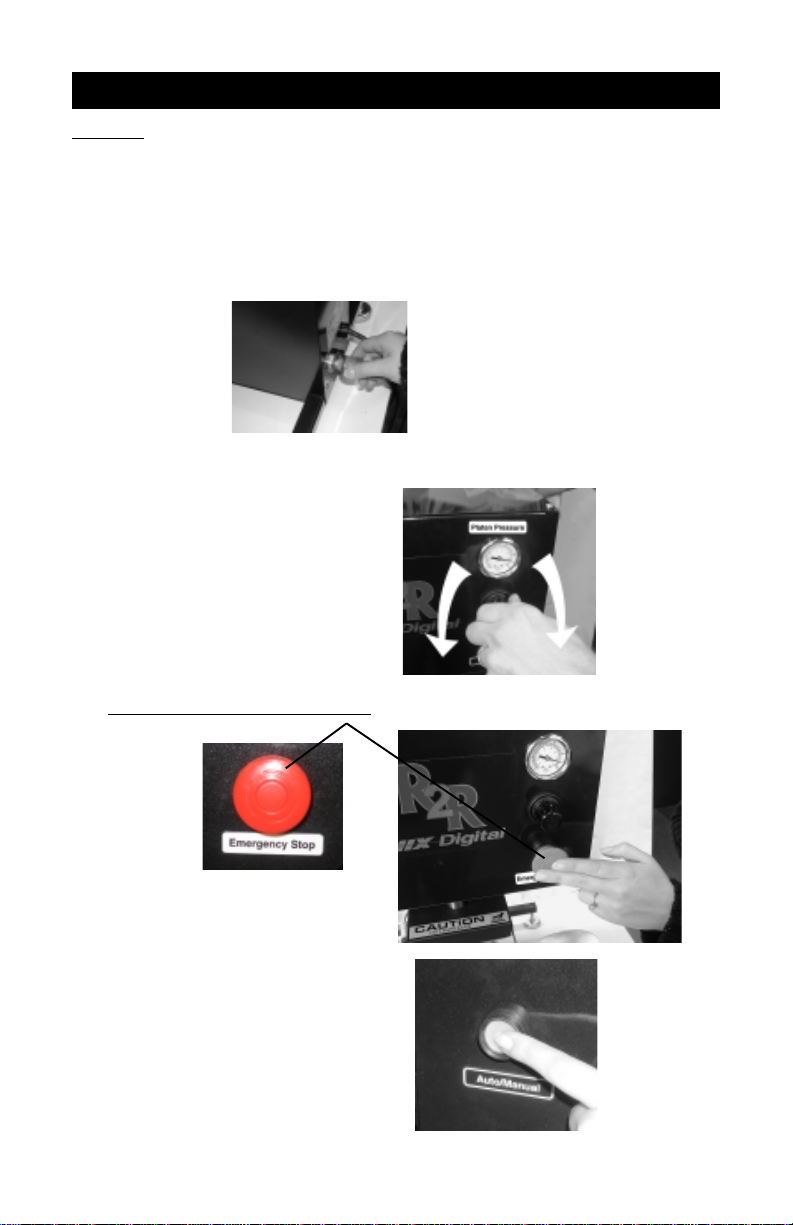
3. Connect air supply to brass air intake fitting 3/8”.
Note: pressure requires 4 CFM@ 70 PSI compressed air.
4. Set pressure Turn Knob below air
gauge right to increase pressure.
Left to decrease pressure.
Note: air pressure will not decrease
until machine cycles. Set starting
pressure to 40-50 PSI.
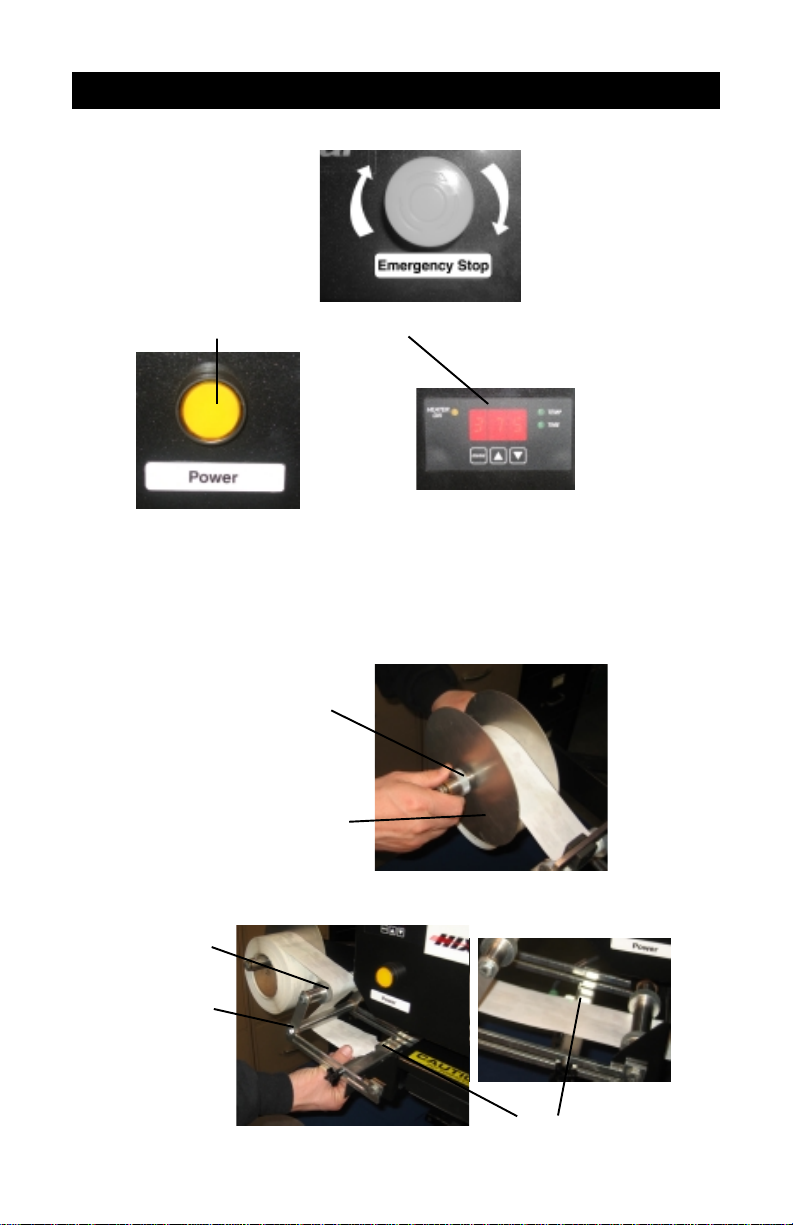
5. Push Emergency stop button.
6. Make sure auto/manual button is
in the “out” manual position.
(Press and release to change
button position)
3
Page 4
SET UP
7. Plug in machine.
8. Now rotate Emergency
stop button to the right
(clockwise) to release.
9. Push Yellow power button. Time/Temp display will light.
10. Set your desired time and temp. (See Page 10 )
11. Remove Reel Quick Knob and reel face flange
(non motor side).
Note: Quick Knobs can be slid off after rotating approximately one turn.
12. Load full reel on supply side (non motor side)
Reel Quick Knob
Reel Face Flange
13. Feed Label over top guide rod, under elbow rod and over the sensor.
T op Guide Rod
Elbow Rod
Sensor
4
Page 5

SET UP
Continue web underneath heat platen and underneath right elbow web
guide. Feed over top guide rod and through slot in drive roller mount.
Top Guide Rod
Right Elbow Web
Guide
Drive Roller Mount
For effective web tracking labels should be fed between drive roller
and pinch roller then back over top of pinch roller.
Pinch Roller
Pinch Roller
Drive Roller
5
Page 6

SET UP
Simply place lead
edge of label web
between four fingers
of take up real and let
hang free.
14. Take up slack by pressing
and releasing Jog button on
left side of control box.
15. Set sensor position and sensitivity . (See sensor section p age 8)
16. Position label on platen then move sensor to align its light beam on the
index mark.
Index Mark
17. Push manual/auto button to “In” position to set in auto mode.
6
Page 7

OPERATION/SENSOR SETTING
OPERATION
1. Visually check and confirm label is in centered position.
(Note: If it is NOT repeat sensor setting Page 8)
2. Position Garment into desired position
3. Place finger in each optical control switch, heat head will come down
and then rise after set time, take up roll will automatically index to next
label. Warning: Watch Hands!
SENSOR SETTING
1. Jog label by depressing and releasing the Jog button to move the label
index mark such that the light beam is aimed on the Index mark. (or
hand move)
Index Mark
7
Page 8

SENSOR SETTING Cont.
2. Reposition guides on guide rod to maintain front to rear centering of
label. Do not adjust left to right position at this time.
Guides on
guide rods
3. Depress manual/auto button to the “out” position or manual mode
4. Position sensor light on eye mark printed on label web.
5. Turn small phillips head adjusting screw, such that small faint arrow
points to “TM” - Sensor light will flash for 2-4 seconds, then turn back to
“S”. The sensor stops flashing and is now set to the index point.
TD
TM
S
TB
8
Page 9

SENSOR SETTING Cont.
6. Now reposition label such that the light beam is between index marks
and on a non-printed (or white area) of the label.
7. Now turn phillips head adjusting screw on sensor to “TB” for 2-4 seconds.
Sensor lights will flash, then turn back to “S” flashing stops. Sensor is
now set to recognize background fields.
8. Put machine in Auto Mode (button in ) and activate optical control switch,
the label will advance to next index mark and stop. Position label front
to rear if necessary (Step 2 of sensor setting) and right to left on lower
platen, using jog button.
Optical Control Switch
9. Now adjust position of sensor head such that the light beam is just
above the Index mark (approx. 3mm) and tighten.
Sensor Settings Abbreviations
(also printed on sensor)
S - Switching Mode
TM - Teach In Mark
TD - T each In Dynamic
(not required in this application)
TB - Teach In Background
9
Page 10

TEMP & TIME INSTRUCTIONS
TEMPERATURE & TIME INSTRUCTIONS
1. Turn on the machine by pushing the power button.
2. To change or set the temperature, press the menu button on
the digital control. The light next to “TEMP” will light. Press the
up ▲, or down ▼, button to your desired setting.
3. To change or set the time, press again, the menu button on
the digital control. The light next to “TIME” will light. Press the
up ▲, or down ▼, button to your desired setting.
4. When you have your desired settings press the menu button
a third time to lock in your settings otherwise the controller
will revert to the previous settings.
5. Wait for the machine to reach your preset temperature by
monitoring the display temperature until it matches the set
temperature. The heater On light will also cycle On and Off.
10
Page 11

TROUBLE SHOOTING/MAINTENCE
Symptom Cause Solution
1. Machine does not
index properly .
2. Labels do not
transfer properly.
3. Upper Platen does
not move.
4. Unit does not come
on
Press set to Manual
Sensor not set
properly
Not enough heat, time
or pressure.
No air pressure.
E-Stop button is on.
Breaker Tripped
Blown Fuse
De-Press Manual/
Auto button
First make sure label
is aligned properly .
Re-Teach sensor . See
“Sensor Section” pg 8.
Please refer to
transfer specifications
while most transfer
target times range
from 1-2 seconds.
Pressure and Temperature settings may
vary depending on
fabric limitations.
Check that air connection is secure.
Check that air supply
has not been interrupted.
Turn E-S top clockwise
and press Power
button.
Locate main breaker
panel and flip tripped
breaker to on position.
See Diagram on page
12 for location of fuse.
11
Page 12

WARRANTY
(Effective May 1, 2008)
HIX will automatically register the equipment on the date it was shipped to you or your distributor.
If the equipment was not purchased directly from HIX, but through a distributor (either domestic or
foreign), please keep a copy of their sales invoice showing the serial number and date it was sold/
shipped to you with this warranty. In this case, we will use the distributor’s invoice date as the
beginning warranty date. STAPLE A COPY OF YOUR RECEIPT TO THIS WARRANTY and keep
in a safe place to provide verification of your warranty should a problem occur. Thank you.
Please fill in the following information and attach a copy of your receipt for your records.
Date Purchased: ______________________ From:__________________________________
Model #: ____________________________ Serial #: ________________________________
This warranty applies to equipment manufactured by the HIX Corporation (HIX), Pittsburg, Kansas, U.S.A. HIX warrants to the original purchaser, its Ovens and Dryers, Heat Transfer Presses,
Mug Presses, Mug Glazer, Retensionable Screen Frames, Textile Printers, S pot Heaters, and Exposure Units against defects in workmanship and material, except for wear and tear for a period of “One
Year” from the date of purchase. HIX warrants its Accessories, Reten S plines/Hardware/Tool Kit, and
Shuttle for a period of 90 days from the date of purchase. DoughXpress and Thermatrol products are
covered under separate warranty.
In the event of a defect, HIX, at its option, will repair , replace or substitute the defective item at no
cost during this period subject to the limitations of insurance and shipping costs stated below.
In the case of heat transfer presses (except the Mug Press, Hobby Lite), HIX warrants the heat
casting for the “Life” of the machine for the original purchaser. If a part becomes obsolete at the time
for repair, and/or cannot be reasonably substituted for , HIX will credit, at half the then current list price
or last recorded price, only that part toward a new machine or any product HIX offers. This credit offer
shall be the sole responsibility of the HIX Corporation in the event of an obsolete part.
This warranty does not cover belts, pads, mug wraps, mug press liners, canvas, rubber blankets,
bulbs, glass, rod ends, turn buckles on printers, or mug press or damages due to accident, misuse/
abuse, alterations or damage due to neglect, shipping or lack of proper lubrication or maintenance.
HIX shall not be responsible for repairs or alterations made by any person without the prior written
authorization by HIX. This warranty is the sole and exclusive warranty of HIX and no person, agent,
distributor, or dealer of HIX is authorized to change, amend or modify the terms set forth herein, in
whole or in part.
In the case of a problem with the equipment identified herein, HIX Corporation should be contacted during regular business hours to discuss the problem and verify an existing warranty. HIX
personnel will assist the customer to correct any problems which can be corrected through operation
or maintenance instructions, simple mechanical adjustments, or replacement of parts. In the event
the problem cannot be corrected by phone, and upon the issuance of a return authorization by HIX,
the equipment shall be returned to HIX or an authorized service representative. All insurance and
shipment/freight costs are solely the responsibility of the customer, and not that of HIX, and HIX shall
not be responsible for improper handling or damage in transit. Contact HIX customer service for
complete return authorization information.
This expressed warranty is given in lieu of any and all other warranties, whether expressed or
implied, including but not limited to those of merchantability and fitness for a particular purpose, and
constitutes the only warranty made by HIX Corporation.
In no event shall HIX’s liability for breach of warranty extend beyond the obligation to repair or
replace the nonconforming goods. HIX shall not be liable for any other damages, either incidental or
consequential, or the action as brought in contract, negligence or otherwise.
This warranty gives you specific legal rights and you may also have other rights which vary from
state to state.
Manufacturers of the Finest Quality Textile and Graphics Screen Printing and Heat Transfer Equipment
1201 E. 27th Terrace • Pittsburg, KS 66762 • U.S.A.
Web site: www.hixcorp.com • Phone: (800) 835-0606
E-Mail: customerservice@hixcorp.com • Fax: (866) 561-0894
E-Mail: sales@hixcorp.com • Fax: (866) 563-4600
©2009 HIX Corp.
 Loading...