

Page 1
OWNER’S MANUAL
Call 1-800-835-0606
Visit www.hixcorp.com
ext. 209, ext. 211, ext. 220, ext.221 or
For Customer Service, Call 1-800-835-0606
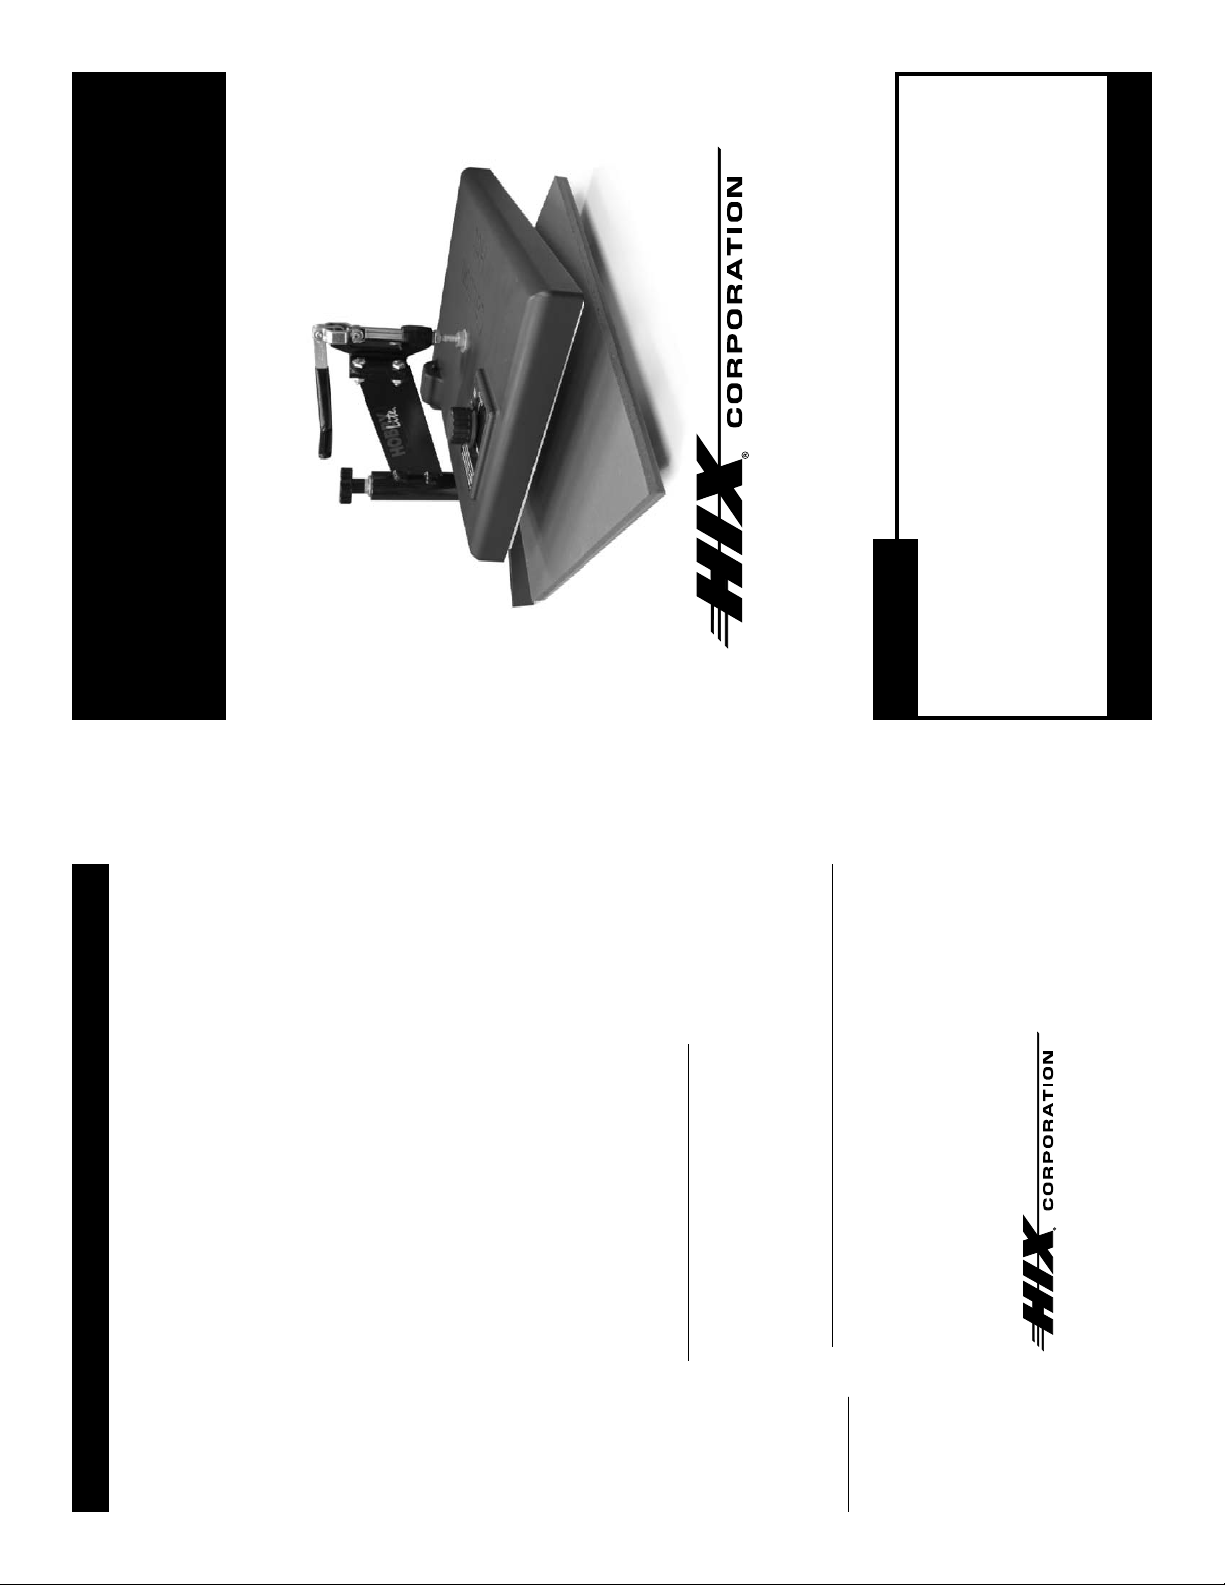
9”x12” Heat Transfer Machine
HOBBY LITE
Receiving and Shipping ............................................................................. 2
Installation and Preparation .......................................................................3
Pressure..................................................................................................... 3
Transfer Application ...................................................................................4
Maintenance & Repairs ............................................................................. 5
CONTENTS
BEFORE warranty repair you MUST get Prior Authorization:
Parts Identification (Exploded View / Parts List)..................................... 6-7
Warranty .................................................................................................... 8
(Effective January 1, 2007)
HIX will automatically register the equipment on the date it was shipped to you or your
WARRANTY
distributor. If the equipment was not purchased directly from HIX, but through a distributor
(either domestic or foreign), please keep a copy of their sales invoice showing the serial
number and date it was sold/shipped to you with this warranty. In this case, we will use the
distributor’s invoice date as the beginning warranty date. STAPLE A COPY OF YOUR RE-
CEIPT TO THIS WARRANTY and keep in a safe place to provide verification of your warranty
should a problem occur. Thank you.
Please fill in the following information and attach a copy of your receipt for your records.
Date Purchased: _____________________ From: _________________________________
This warranty applies to equipment manufactured by the HIX Corporation (HIX), Pittsburg,
Model #: ____________________________ Serial #: ________________________________
Kansas, U.S.A. HIX warrants to the original purchaser, its Conveyor Dryers, Heat Transfer
Presses, Mug Presses, Mug Glazer, Retensionable Screen Frames, Textile Printers, Spot
Heaters, and Exposure Units against defects in workmanship and material, except for wear
In the event of a defect, HIX, at its option, will repair, replace or substitute the defective item
and tear for a period of “One Year” from the date of purchase. HIX warrants its Accessories,
Reten Splines/Hardware/Tool Kit, and Shuttle for a period of 90 days from the date of pur-
chase. DoughXpress and Thermatrol products are covered under separate warranty.
In the case of heat transfer presses (except the Mug Press, Hobby Lite), HIX warrants the
at no cost during this period subject to the limitations of insurance and shipping costs stated
below.
heat casting for the “Life” of the machine for the original purchaser. If a part becomes obsolete
at the time for repair, and/or cannot be reasonably substituted for, HIX will credit, at half the
This warranty does not cover belts, pads, mug wraps, mug press liners, canvas, rubber
then current list price or last recorded price, only that part toward a new machine or any
product HIX offers. This credit offer shall be the sole responsibility of the HIX Corporation in the
event of an obsolete part.
blankets, bulbs, glass, PTFE or finish, rod ends, turn buckles on printers, or mug press or
damages due to accident, misuse/abuse, alterations or damage due to neglect, shipping or
lack of proper lubrication or maintenance. HIX shall not be responsible for repairs or alterations
made by any person without the prior written authorization by HIX. This warranty is the sole
E-Mail: sales@hixcorp.com • Fax: (866) 563-4600
1201 E. 27th Terrace • Pittsburg, KS 66762 • U.S.A.
Web site: www.hixcorp.com • Phone: (800) 835-0606
E-Mail: customerservice@hixcorp.com • Fax: (866) 561-0894
In the case of a problem with the equipment identified herein, HIX Corporation should be
and exclusive warranty of HIX and no person, agent, distributor, or dealer of HIX is authorized
to change, amend or modify the terms set forth herein, in whole or in part.
contacted during regular business hours to discuss the problem and verify an existing war-
ranty. HIX personnel will assist the customer to correct any problems which can be corrected
through operation or maintenance instructions, simple mechanical adjustments, or replace-
of the customer, and not that of HIX, and HIX shall not be responsible for improper handling or
ment of parts. In the event the problem cannot be corrected by phone, and upon the issuance
of a return authorization by HIX, the equipment shall be returned to HIX or an authorized
service representative. All insurance and shipment/freight costs are solely the responsibility
This expressed warranty is given in lieu of any and all other warranties, whether ex-
In no event shall HIX’s liability for breach of warranty extend beyond the obligation to repair
This warranty gives you specific legal rights and you may also have other rights which
damage in transit. HIX offers a reconditioning service and a core exchange/credit policy on
some models. HIX customer service personnel may be contacted for complete return authori-
zation and reconditioning information.
pressed or implied, including but not limited to those of merchantability and fitness for a
particular purpose, and constitutes the only warranty made by HIX Corporation.
or replace the nonconforming goods. HIX shall not be liable for any other damages, either
incidental or consequential, or the action as brought in contract, negligence or otherwise.
Manufacturers of the Finest Quality Textile and Graphics Screen Printing and Heat Transfer Equipment
vary from state to state.
©2007 HIX Corp. 8 HL080807
Page 2
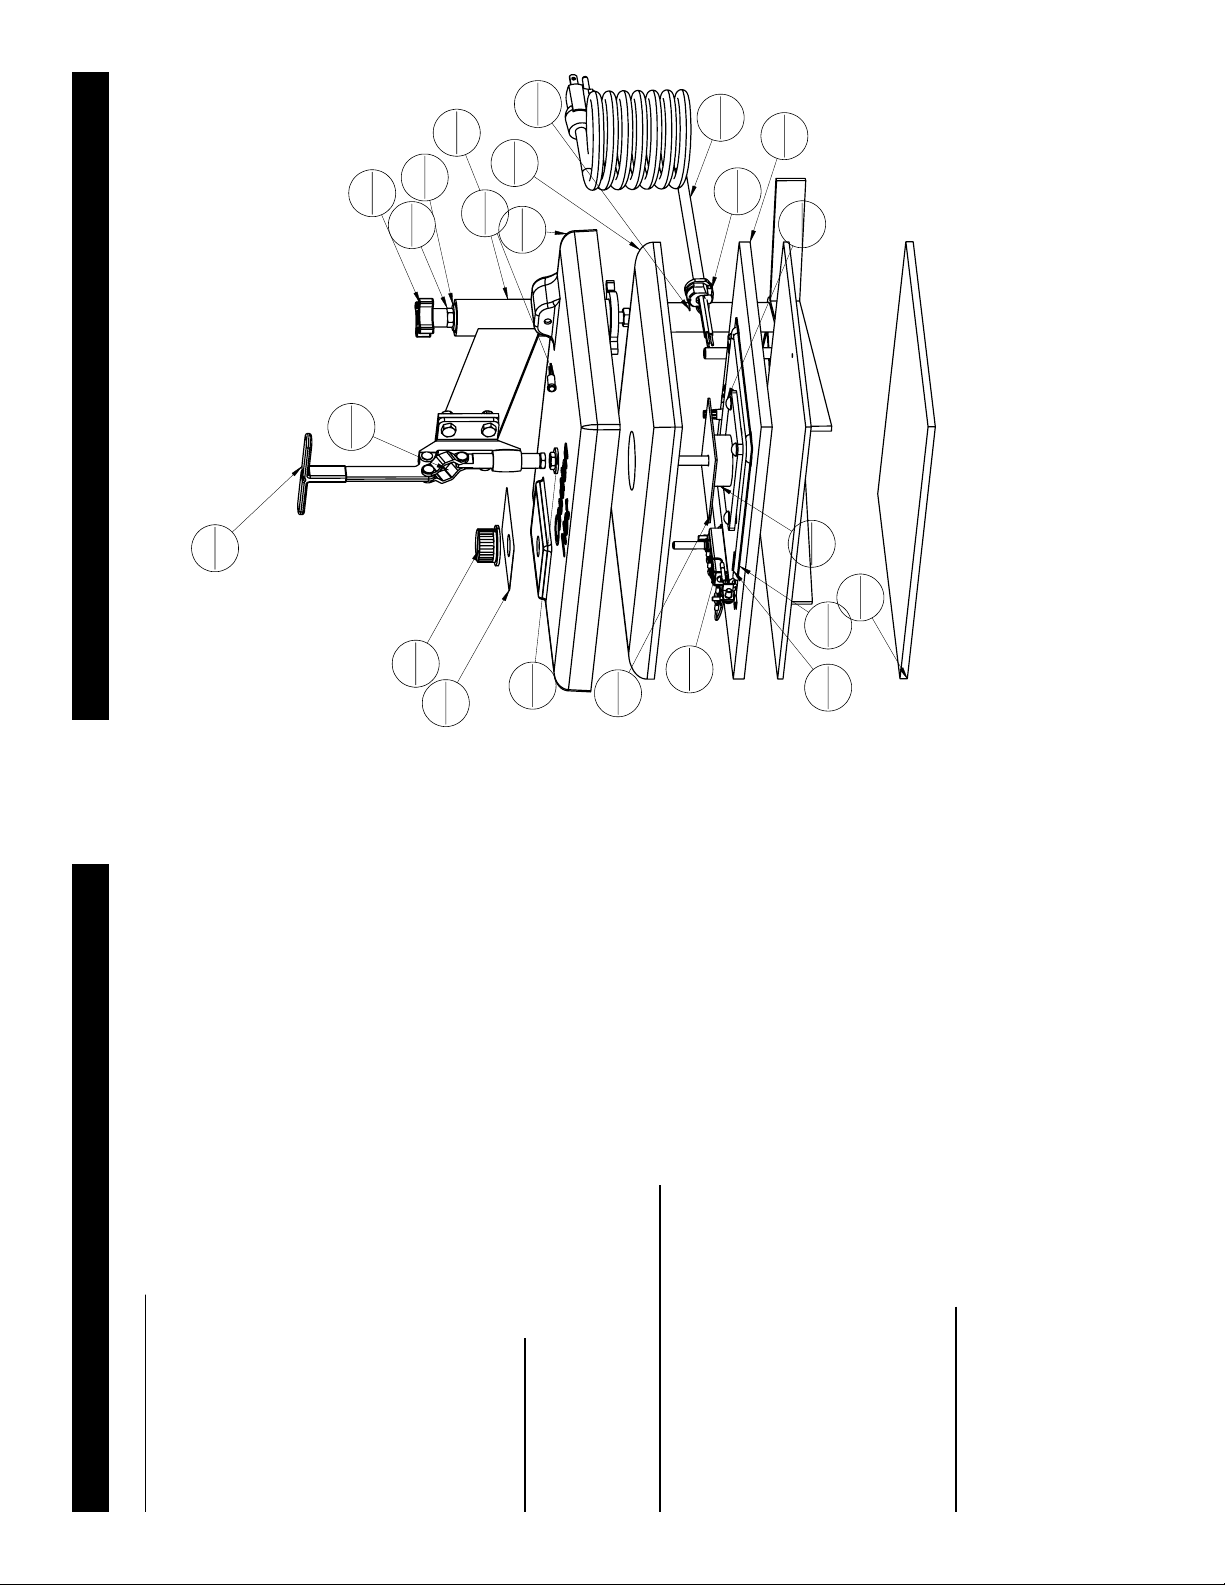
31
1
26
1
25
1
4
3
1
7
4
1
1
5
3
24
8
1
1
23
17
20
1
1
15
1
4
19
7
9125600 Hobby LIte RV B 1/18/07 RV C 8/08/07
PARTS IDENTIFICATION
1
29
DESCRIPTION
KNOB ( THERMOSTAT)9485411
PAD, SILICONE
Parts List
1
KNOB
WASHER 5/16 USS ZP1668314BOLT 1/4-20 x 3/4 ZP1067847ASSM, HOBBY LITE ARM
Hobby Lite base Weldment
(short)
HL UPPER PLATEN ASSY
1
27
1
HEAT SHIELD SPACER MED
1
11
2
1
1
12
1
1
13
HEAT REFLECTOR NO
FLANGE
WASHER 5/16 USS ZP
PLATEN, HL UPPER, grooved9125508115
HEATER, TUBULAR
CORDSET
22
PLATEN STUD ASSY.
21
1
SCREW, DRIVE #14x1/2 TYPE
U
CORD GRIP
THERMOSTAT HL912 1.75
1
16
HIGH 400 DEGREE
WASHER, SQUARE , HAYSITE
HL HEAT SHIELD
INSULATION9125406124
LIGHT, LED35173125
RESISTOR, 22K 1 WATT
DECAL TEMP 400 DEG
FUSE TERMINAL67660112.33
FUSE WIRE68497 HL fuse wire
CONNECTOR, BUTT 22-16GA
NUT HEX LOCK 1/4-20 NC ZP17111
CLAMP TOGGLE HL35211-3129
Decal, Pressure, PP35122131
SCREW ADJUSTMENT 3/8-16
x 4.5"
NUT HEX M8 X 1.25 ZP36242120
PLATEN, HOBBY LITE
PART NUMBER
912502212
4918213
QTY
ITEM
Congratulations on your purchase of the Hobby Lite heat
transfer machine. Three simple variables are involved in the
process of transferring an image: pressure, temperature,
and time. Pressure is easily controlled and adjustable.
RECEIVING AND SHIPPING
INTRODUCTION
T emperature is as simple as setting your temperature
912560418
912551319
9125505110
9125510111
9125509112
16683113
control to the setting of your transfer.
Y our Hobby Lite is designed for utility and fun in the
application of heat applied graphics. The Hobby Lite is not
designed nor intended for high volume or commercial heat
press applications. The press is designed to tilt forward on
closing, if too much pressure is set. If you experience tilting
forward upon closing simply reduce the pressure
adjustment setting.
INSPECTION
50159116
60590117
9125507118
59890
13250120
35150121
9125506122
9125501 black123
4
19
DO NOT RISK COSTLY SHIPPING DAMAGE!
SHIP ONLY IN ORIGINAL BOX. Another box may
be obtained by calling the number on the front of
After unpacking, inspect your machine for hidden shipping
damage. Contact the delivery company immediately , should
you find damage.
NOTE:Save all of your shipping/packing materials.
SHIPPING OR RETURNS
35165126
35157127
59756112.36
112.35
4
28
9125029119
50170121
2
this manual.
Fold in flaps and seal the box.
1. Fasten machine to shipping base.
2. Make sure heat platen is securely clamped down.
3. Place in original box. Secure all original packing materials.
INSTALLATION
In order to prevent electrical shock, make sure that the
electrical cord does not come in contact with the heat platen
at any time.
1. Plug the machine into the correct grounded electrical outlet.
WARNING: When using an extension cord, use 12 or 14
ga.-3 conductor . Maximum length, 25’ (7.62 m).
Page 3

OPERATION
1
26
1
25
1
4
3
1
1
5
3
24
8
1
1
23
17
20
1
1
15
1
4
19
31
1
29
Your new press does not require any “break in”. However,
you may notice your press will have an “unusual odor” when
you first begin to use it.
BREAK IN
1
7
4
This is normal and it is the “newness” baking off. You may
also see a faint vapor, especially if the press has set for a
long period of time or if you are in a humid area. It is simply
the humidity that has accumulated and is evaporating from
the insulation.
PREPARATION
1
1
1
27
indicating light should come on. While machine is heating
(approx. 15 minutes), the heat light will remain on, until it has
reached set temperature, after which it will go off. The heat
light will cycle on and off in order to maintain the desired
temperature.
1. Move on-off/thermostat switch to desired temperature. Heat
1
13
22
3
9125600 Hobby LIte RV B 1/18/07 RV C 8/08/07
1
11
machine, should be set so that the heat head will lock down
firmly. From time to time you should reset the pressure.
counterclockwise and increased by turning it clockwise.
WARNING: The heat platen can cause severe burns. Do
not leave the machine on and unattended. Make sure all
persons and items (not being transferred) are out of the
path of the heat platen.
PRESSURE
1. The pressure control knob, located on the top of the
12
1
21
1
16
2. Pressure is reduced by turning knob (with machine open)
2
1
1
1
NOTE: Adjustments may be required from one garment to
another and will vary to achieve the desired result.
CAUTION: Excessive pressure is unnecessary and can
cause structural damage, voiding the machine warranty!
DESCRIPTION
Parts List
PART NUMBER
QTY
ITEM
PARTS IDENTIFICATION
KNOB ( THERMOSTAT)9485411
PAD, SILICONE
KNOB
WASHER 5/16 USS ZP1668314BOLT 1/4-20 x 3/4 ZP1067847ASSM, HOBBY LITE ARM
912502212
4918213
912560418
Hobby Lite base Weldment
(short)
912551319
HL UPPER PLATEN ASSY
9125505110
HEAT SHIELD SPACER MED
9125510111
HEAT REFLECTOR NO
9125509112
FLANGE
WASHER 5/16 USS ZP
16683113
PLATEN, HL UPPER, grooved9125508115
HEATER, TUBULAR
CORDSET
50159116
60590117
PLATEN STUD ASSY.
SCREW, DRIVE #14x1/2 TYPE
U
9125507118
59890
4
19
CORD GRIP
THERMOSTAT HL912 1.75
HIGH 400 DEGREE
WASHER, SQUARE , HAYSITE
13250120
35150121
9125506122
HL HEAT SHIELD
9125501 black123
INSULATION9125406124
LIGHT, LED35173125
RESISTOR, 22K 1 WATT
35165126
DECAL TEMP 400 DEG
35157127
FUSE TERMINAL67660112.33
FUSE WIRE68497 HL fuse wire
CONNECTOR, BUTT 22-16GA
NUT HEX LOCK 1/4-20 NC ZP17111
CLAMP TOGGLE HL35211-3129
Decal, Pressure, PP35122131
SCREW ADJUSTMENT 3/8-16
x 4.5"
NUT HEX M8 X 1.25 ZP36242120
PLATEN, HOBBY LITE
6
59756112.36
112.35
4
28
9125029119
50170121
Page 4

MAINTENANCE & REPAIRSOPERATION
5
to remove any excess material from the heat platen.
CLEANING THE HEAT PLATEN
1. Unplug the machine and allow to cool.
2. Swing the heat platen away for easier access.
3. Use a soap or detergent and nonmetallic scrubbing sponge
LUBRICATION
household oil.
1. Every 3 months, lubricate moving parts with ordinary
thermostat may need replaced.
www.hixcorp.com for instructions. Part s ordering is available
on-line.
THERMOSTAT
1. If there is little/no heat or the machine overheats, your
2. Call HIX customer service at 620-231-8568 or visit
4
guidelines on temperature, pressure, pressing time, and
whether to peel the transfer hot or cold.
TRANSFER APPLICATION
1. Check your transfer paper instructions to get the proper
come in contact with the electrical cord or any other item.
2. Swing the heat platen all the way out making sure not to
heat platen back and clamp down to test your pressure
setting. NOTE: Wrinkles may also be removed by bringing
heated platen in contact with the garment before the transfer
is positioned.
3. Align garment (or other item) on the lower platen and swing
you want it to appear on the garment (or other item) with
printed side down. (Make sure that you have “mirrored” your
image before printing out the transfer).
4. Swing heat platen back out and position your transfer where
5. When doing double sided or sublimation transfers on
garments, always place a sheet of paper or cardboard
between the layers of garments so that bleeding through or
reheating of the transfer already applied does not occur.
the designated time has elapsed, open the machine.
6. Pull operating handle down locking the machine closed. After
prevent excessive wear on the silicone pad.
7. When not transferring, leave the heat platen up in order to
 Loading...