

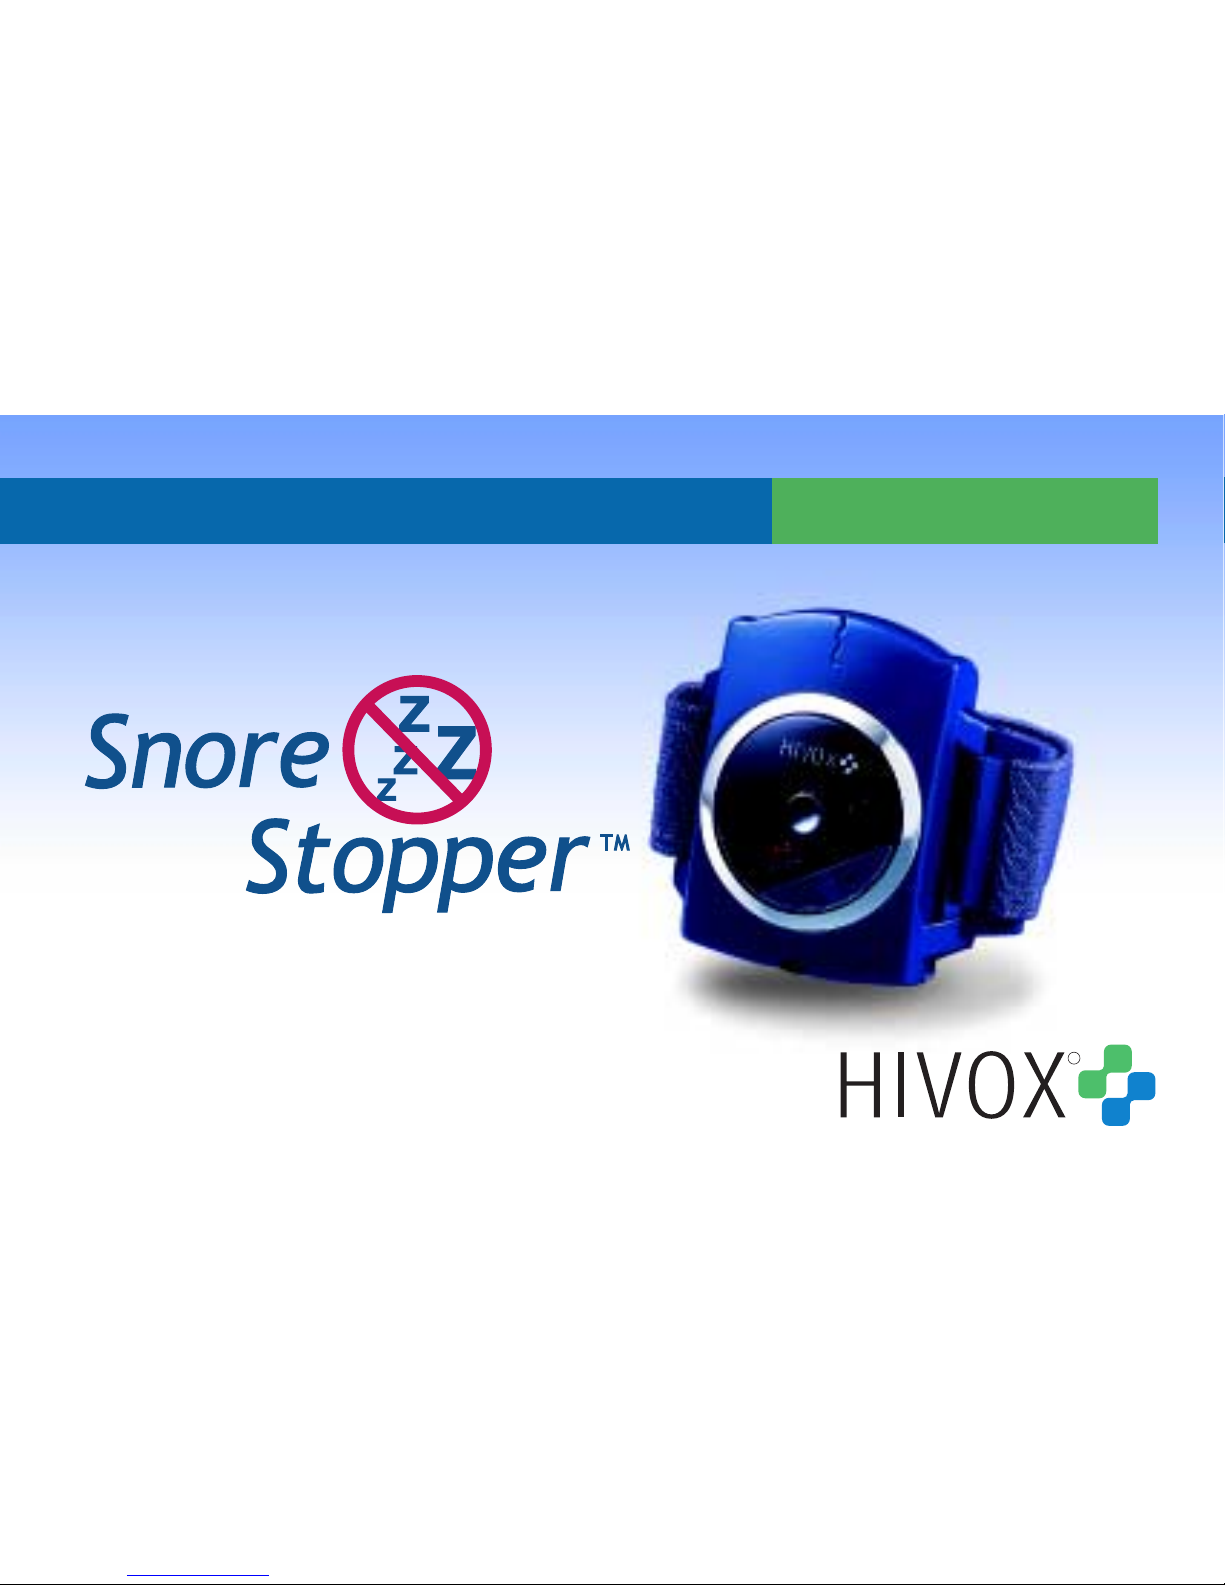
R
INSTRUCTION MANUAL
Model SS-650

R
How It Works
.................................................................................................... 1
1. Introduction ...............................................2
2. Names of the components .............................3
3. Operation the unit .....................................4
4. Maintenance and Trouble-shootin...................8
5. User FAQs .................................................10
6. Caution ....................................................13
7. Warning ...................................................14
8. Technical Specification ...............................15
i. The background noise should be
below 55 db while you use
Snore
Stopper.
ii. Normally, you might need a few
days to get used to this device,
after this period you will start
to enjoy it.
Contents
Attention!
What you get:
One set of Snore
Stopper includes:
* Main unit of Snore
Stopper(1)
* Wrist-belt with magic tape and
hook (1)
* 1.5 V AAA battery (1)
* Pack of self - adhesive electrode
pads, 3 pair (1)
* Manual (1)
* Warranty card (1)
* Storage case (1)
* Screwdriver (1)
P.S.

2 .................................................................................................... .................................................................................................... 3
The ComponentsIntroduction
At this point we thank you for buying Snore Stopper. It was a good choice. But firstly please
carefully read the manual to get used to the right operation and the possibilities of the
equipment. This way you will be able to enjoy the benefits of Snore
Stopper and you will have
pleasure with it for a long time.
Our modern life is tensed and stressful. Therefore one of the most important things is a silent
night and the possibility to recuperate during sleeping. In estimation, about 30% to 40% of the
middle aged of the current population snore, and more and more people are affected by snoring!
Many people think snoring is only a little problem and it will not influence your health. This is a
big mistake! It might cause high blood pressure, increase the risk of heart disease, stroke,
fatigue, depression, etc. But one thing is for sure: even in minor severe cases of snoring, we
annoy our beloved partners and keep them from recovering during the night!
But now all these can be stopped by using Snore
Stopper! Snore Stopper is a new device,
designed to reduce snoring by a biofeedback process: when the device detects snoring, a small
electronic gentle pulse will be sent automatically to stimulate the snorer' s skin through nerve
for around 5 seconds until the snorer reduce the snore by the laryngeal muscles get back into a
normal condition, or alter the sleeping position. This unique process results in a subconscious
reaction, without waking the snorer up and without disturbing the brain that controls his sleep.
You will see the great result when you go on using Snore
Stopper regularly for 6 to 8 weeks.
Snore
Stopper is a safe and intelligent choice to reduce your annoying snoring, and lets your
family expect a higher sleeping quality in the future!
Use only as directed. If any unusual symptoms appear, discontinue the treatment and see your
doctor.
Battery cover (AAA x 1)
Self-adhesive
electrode pads
ON/OFF switch / intensity
level volume
LED indicator
Detector
Test button
4 .................................................................................................... .................................................................................................... 5
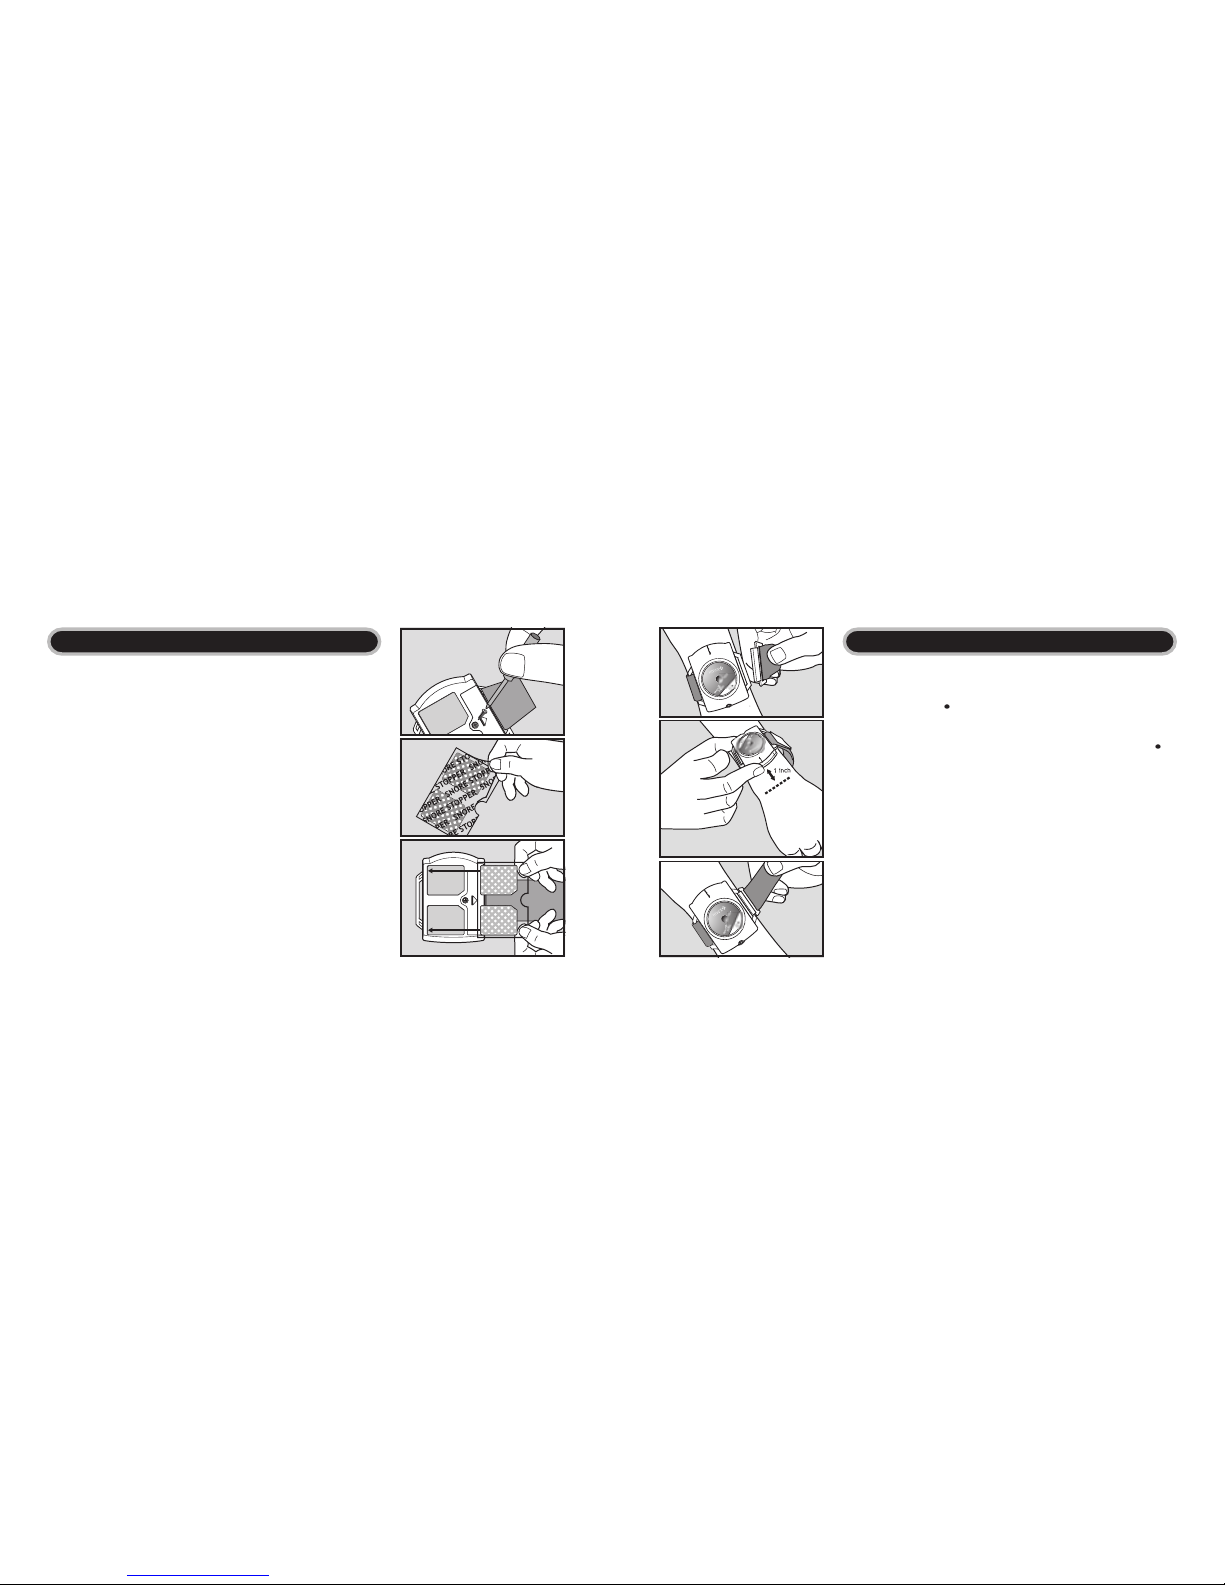
I. Assembly before use
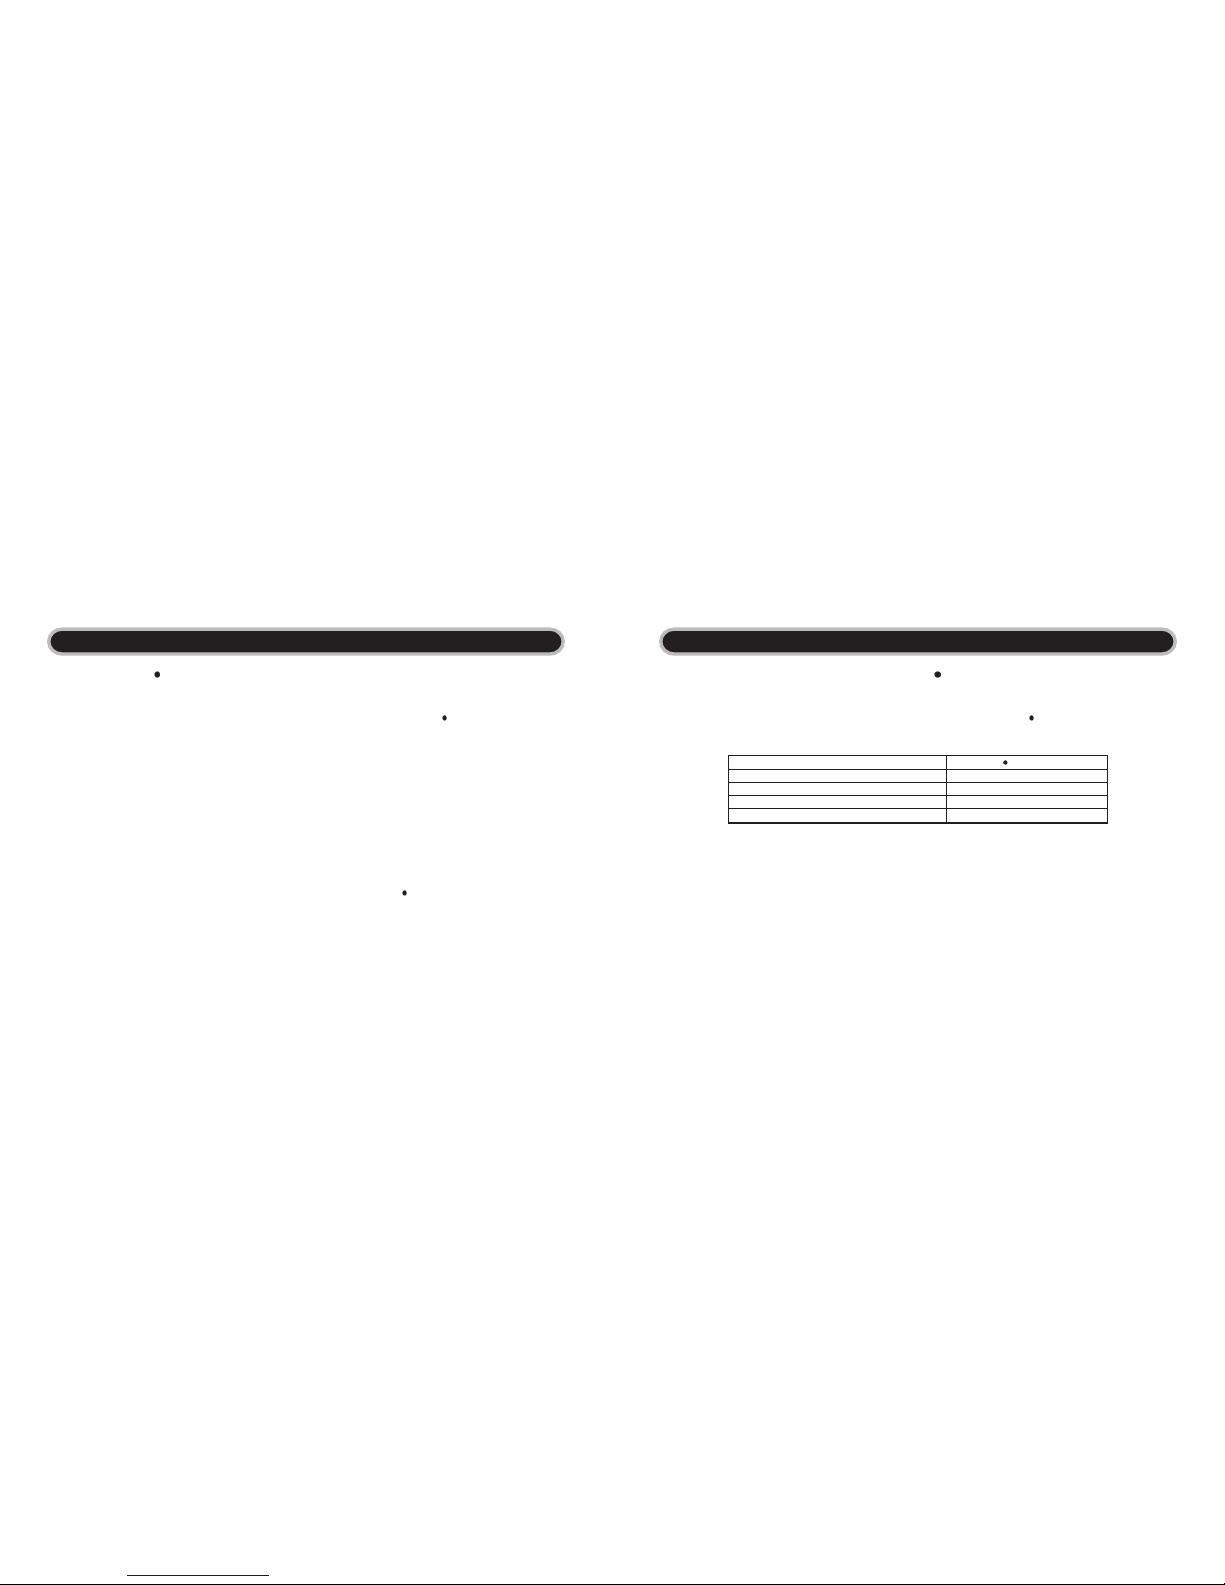
1. Battery loading:
Please open the battery box with a screwdriver to load AAA
battery. Make sure that the AAA + pole is placed towards "ON/
OFF switch / intensity level volume" as shown in picture I.
2. Then close the battery cover and fix it with the
screw.
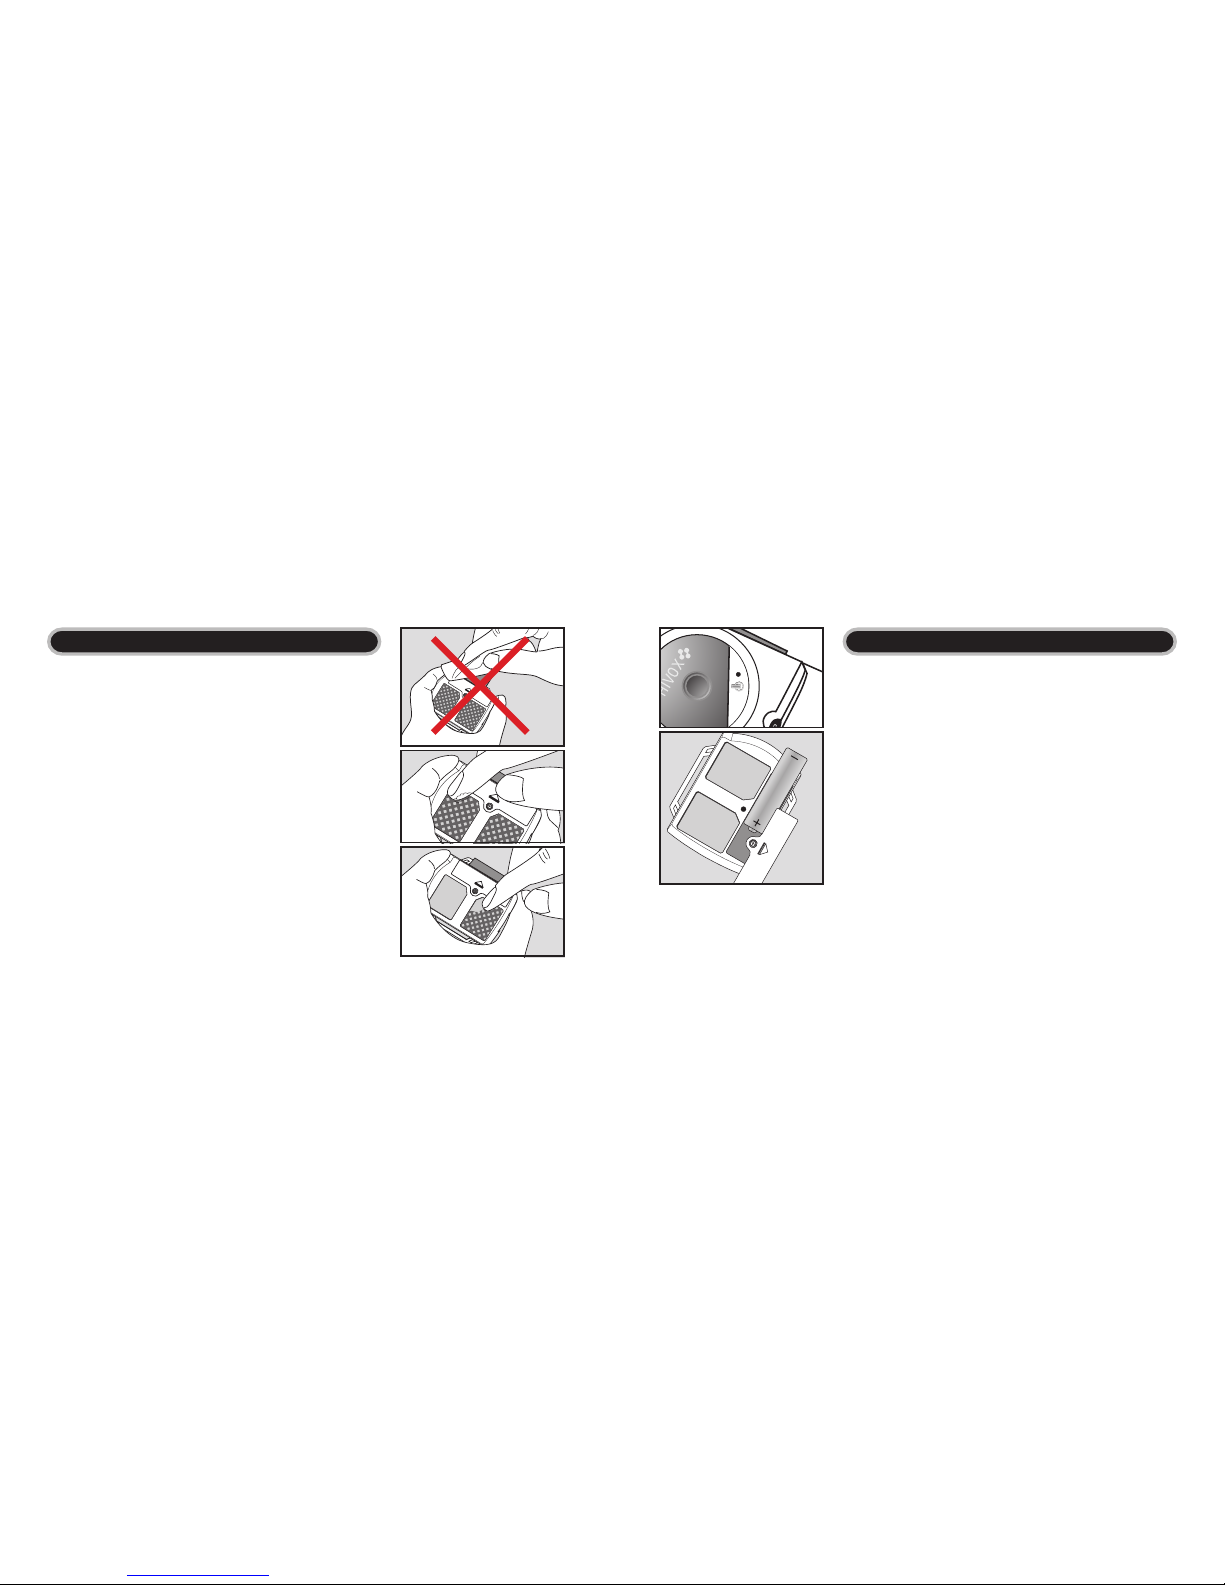
II. Stick the electrode pads
1. Open the vacuum pack and take out onepairof self-
adhesive electrode pads. Then carefully detach the big,
square plastic film on which the words SELF-ADHESIVE
ELECTRODE PADS are printed (At this time, do not remove
theother unprintedbig plastic film.) as shown in picture II.
2. Stick the electrode pads, on the backside of the device, onto
the black conductive rubbers. Gently press the pads with
your finger onto the device, then take away the big plastic
film as shown in Picture III.
III. Adjust the wrist-belt
1. After you have attached the electrode pads, you prepare to
wear the Snore
Stopper. As it is shown in picture IV the
wrist-belt has to be put into the left wing. Please fix the
magic tape on this side now.
2. Now please remove the big plastic film and place Snore
Stopper 1 inch above the wrist as shown in picture V and
hook the belt into the other " wing" of the device. Then
tighten it and fix this end of the belt as shown in picture
VI. (Do not pull the belt too tight; otherwise it will lead
to poor circulation. In fact, the device will function well,
when it touches the skin gently.)
Operate the unit Operate the unit
I
II
III
IV
V
VI
(Tip: Whenever you remove the old electrode pads and put on new ones, press
firmly with a thumb on the pads attaching them to the device, and move in a
circular motion to ensure better adhesion.)
6 .................................................................................................... .................................................................................................... 7
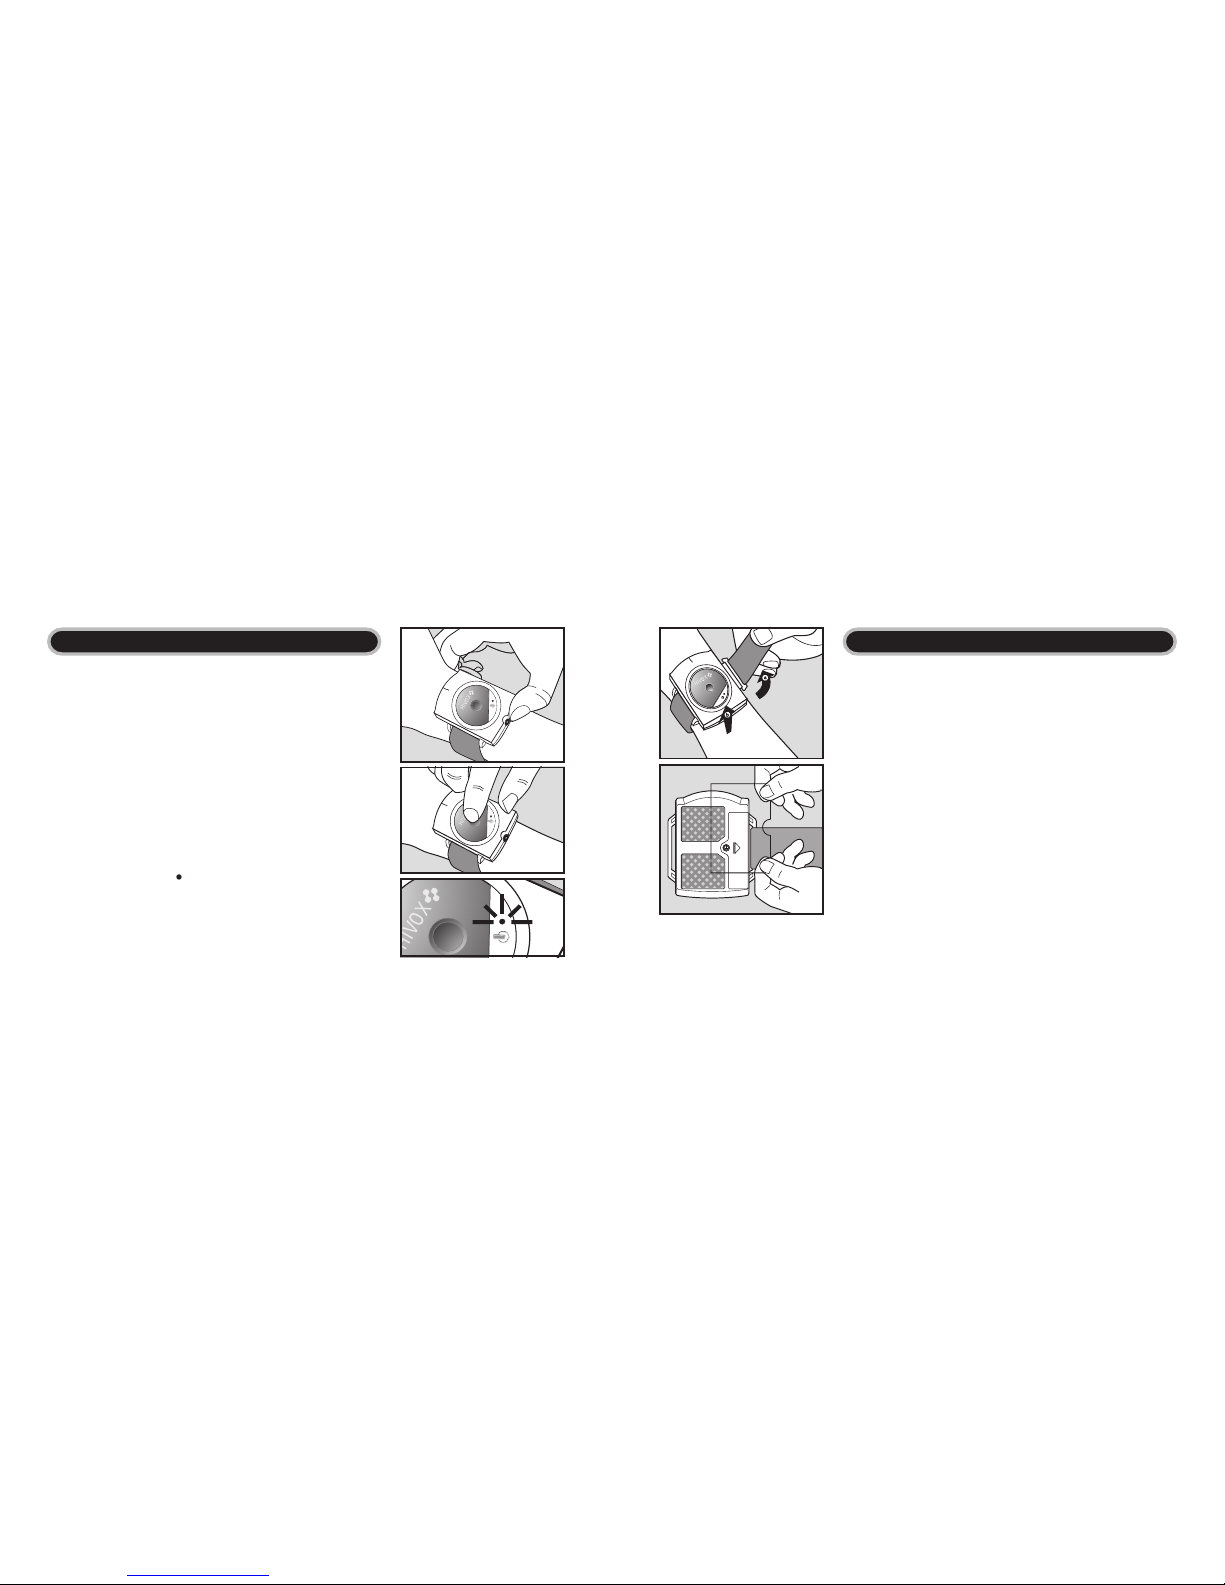
IV. How to use the device
1. Test the function of the device before use. Switch on the
power and then adjust the intensity to level 1. Check if the
LED indicator (green light) is blinking.
2. Press the test button three times in a row. The device will
release a weak electrical impulse that lasts for about 5
seconds. Now, you can adjust the intensity to the level you
like.
3. Due to the variations of the skin sensitivity, you might not
feel the electrical impulse. In that case, press the test
button 3 times in repetition, and adjust the intensity to the
level you like. By the way, the nerves are stimulated at
nighttime easier. Therefore we advise, that you reduce the
intensity for the night for 1~2 levels to have the best effect.
4. Meaning of the LED light:
When you wear Snore
Stopper on your arm the LED normally
changes from "red" to "green", which means, the device has
contact to your skin properly and you can start using it.
If the LED still shows red light, the device has no proper
contact to your skin. Therefore, you should adjust the wrist
belt into a position until you see that the LED indicator
Operate the unit Operate the unit
shows green light. If the device still does not work, please
look at the MAINTENANCE & TROUBLESHOOTING section on
page 8.
5. Our device 's patented intelligent design can detect snores
above 65 dB automatically, but without other background
noise. By now, you can stop the annoying snores and let you
and your family expects a better sleeping quality in the
future!
V. After Use
1. After use, please see the following instructions to prevent
damage of the self-adhesive electrode pads: Unhook the
wrist-belt and detach the device from your wrist gently.
After you put off the device, please stick the big plastic
film back onto the electrode pads. This can prevent the
pads of contamination with dusty particles and will
enhance their lifespan. This device will automatically
switch off after 8 hours. In order to enhance the battery's
life, please switch power off after you wake up.
8 .................................................................................................... .................................................................................................... 9
Maintenance and Trouble-Shooting
1. The self-adhesive electrode pads should be kept clean. In
order to maintain the device's performance, DO NOT rub
the electrode pads with your hands, facial tissue, or wool.
2. The electrode pads tend to lose their adhesion over time,
therefore weakening the intensity level. Moisten finger
with a few drops of water and rub it gently against the
electrode pads to improve contact. We recommend you
replace the electrode pads after 30 days of usage (varies
among individuals).
3. If you still do not feel the signal, please replace the old
pads by a pair of new ones. Please refer to section 2.
electrode pads sticking on page 4. (Note: Generally, the
electrode pads can be used for 30 nights continuously.)
Maintenance and Trouble-Shooting
4. If the LED indicator does not light during the testing
procedure, please check the following:
* Is the battery installed correctly? ("+" sign faces upward?)
* Is the battery's energy low? If so, please replace by a new
one.
5. If the points mentioned above are checked, and the device
still does not work correctly, please send it back to your
local dealer for repair. You are urgently reminded to
include the warranty card!
Note:
Always use the specified accessories in the manual. The use of other
parts that are not approved by the manufacturer may cause hazard. Do not
try to repair the device! There are no user serviceable parts inside.
10 .................................................................................................... .................................................................................................... 11
User FAQs User FAQs
1. Q : Does Snore Stopper really work ?
A : Yes, it works, but not for those with serious medical conditions as we indicate in our
introduction and warning sections. Use only as directed. If any unusual symptoms appear,
discontinue the treatment and see your doctor. The proper use of Snore
Stopper requires selfdiscipline, careful application and time to train reflexes.
We employ our special in-build electronic biosensor, which is designed to detect snoring,
based on the biophysical properties of snores. Besides, due to its broad detection capability,
no matter if your hands are under or outside the blankets, if the snores are above 65~70 dB
and occur 3 times in a row, they will be detected and trigger the device to response
automatically.
2. Does it really reduce my snoring?
A: Snoring is caused by a narrow airway. Firstly, when we sleep, our nerves are in a relaxed
state, and when the air moves into the narrow airway during breathing, it causes the soft
tissues of the throat (tonsils, soft palate & uvula) to vibrate. This vibration is the sound of
snoring. Generally, snoring can be reduced if the snorers change their sleeping positions or
are given a mild nerve stimulation. Based on this concept, Snore
Stopper is developed. When
the snores are detected, the device will output a 5 seconds' impulse onto superficial skin, then
snoring may be reduced in the following ways: i.) Snoring persons may change the sleeping
position ii.) increase the muscle tense of the throat muscles due to nerves stimulation.
Indoor background noise Snore Stopper Sensor
Above 65 dB (within 50 cm from TV) Seldom Activated
60 dB (within 1 m from TV ) Seldom Activa ted
55 dB (within 1m from air-conditioner) Seldom Activated
Below 55 dB No Activated
3. What is dB ? How do I know whether Snore Stopper can be used in my home?
A : dB (decibel) is an index of measuring the intensity of sound. If you are in an environment
that has a sound intensity of above 70 dB continuously, we talk about a noisy background,
normally, you will not live in this environment. The design of Snore
Stopper aims on the
source of indoor background noise. You may read the following table to see which is the
optimal sleeping condition for use.
Remarks : Under normal conditions, your home's indoor background noise will be 30~50 dB
4. Why do I feel the intensity so weak during the testing procedures ?
A: This may be due to three ways, i.) the difference in sex, age, weight and skin impedance will
cause the variations of your feeling. In fact, the intensity of the output impulse lies within the
safe range, so generally you should have the feeling. If your attention is called away, you may
also have the low-intensity feeling. ii.) the skin's nerves are more sensitive during the
nighttime. Since the device is designed to be used at night, you may have the low-intensity
feeling when you test the device in daytime. iii) check the conductive electrode pads to see if
you forget to attach them, or if they should be replaced due to extended use.
12 .................................................................................................... .................................................................................................... 13
User FAQs
5. When I 'simulate' the snores in a silent background, why does the device not work?
A: Since Snore Stopper's special biosensor is designed according to the biophysical properties of
snoring, so the device will react, and you may try to 'simulate' in such ways: say a long 1, 2, 3 or
produce 3 consecutive snores with the same frequency and at least above 65 dB. Please try it
again!
6. Why do I feel a special long time stimulation? Is something wrong with the device?
A: This is a special built-in design. As the microprocessor monitors your snoring frequency, if the
device detects 15 times of outputs, it emits a 25-seconds long stimulation is to train the heavy
snoring person to change the sleeping position.
7. Are the two sides of the electrode pad different? Does it matter if there is no proper
contact?
A: Yes, the two sides are different. To tell them apart, the one side of the electrode pad, which
must be attached to the device, has stronger adhesion (the side with printed words on the
waxed protective film).
The device will work as long as the electrode pads are properly attached to the black conductive
rubbers on the device, otherwise, electrode pads also can be use for last a while. Do not to
place the two electrode pads too closely to each other, as this will affect conductivity. In the
event the pads were stacked together, gently move them apart and resume proper attachment.
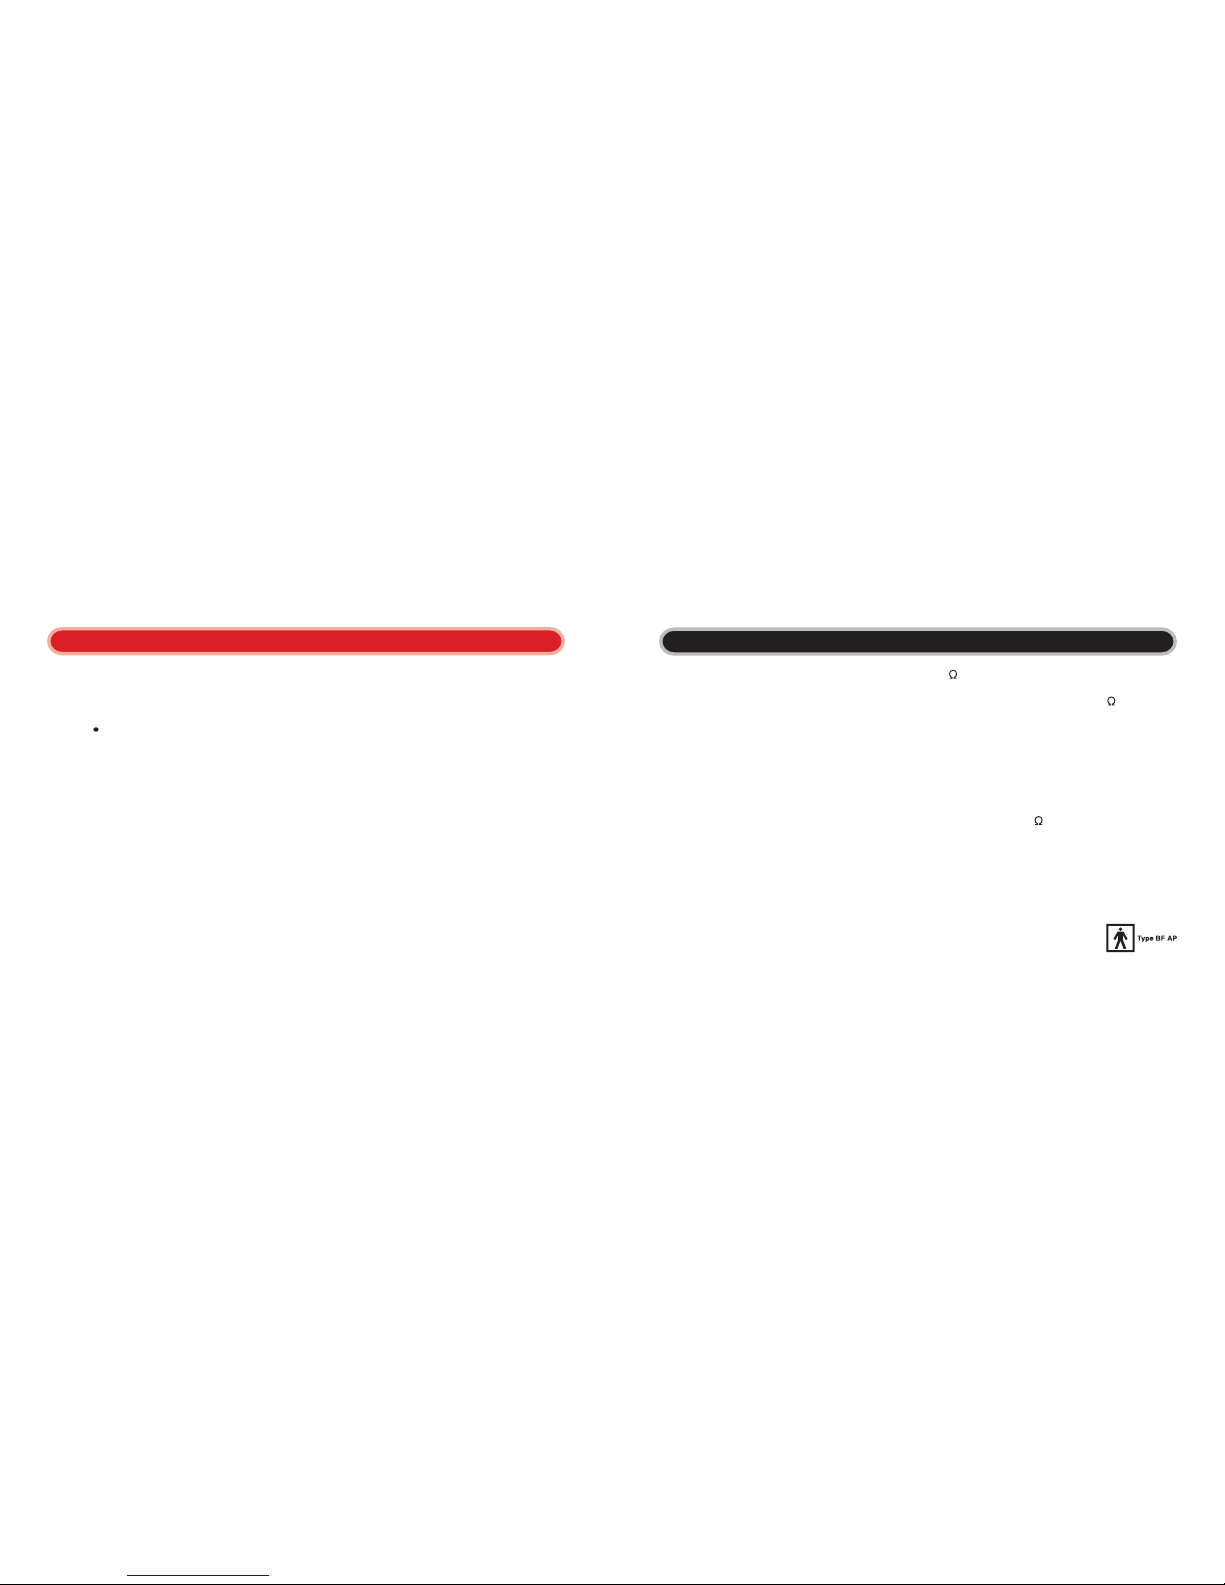
Caution
Caution
1. The intensity level volume should be adjusted to ZERO before
using.
2. DO NOT wear the device if the self-adhesive electrode pads
are not stuck to it.
Also, when you are pressing the test button, DO NOT touch
the conductive rubber or electrode pads with your fingers.
3. DO NOT wear the device on the underside of the wrist.
4. DO NOT wash your hands when you are wearing the device. It
is not waterproof.
5. When you are wearing the wrist-belt, DO NOT pull the belt
strongly, otherwise the lifespan of device will be shortened.
6. DO NOT use with other medical electronic devices AT THE SAME
TIME.
7. The device should be kept out of the reach of children.
8. Batteries must not be disposed in household waste. Return
them to public
collection points or
shops selling batteries
of the same kind.
14 .................................................................................................... .................................................................................................... 15
Technical Specification
Pulse amplitude: Fixed 180µA peak into 1,000 load
Pulse rate: Fixed 0.2 Hz
Pulse width: Fixed 800 µs, Voltage adjustment 2.5-14V, peak into 1,000
load
Wave form: Asymmetrical bi-phasic square pulse
Power source: 1.5V Volt AAA battery
Detective timer: 8 hours auto off
Operation environment: 10°C ~ +40°C, 30 ~ 85 % RH
Storage environment: -20°C ~ +50°C, 10 ~ 95 % RH
Transport environment: -10°C ~ +50°C, 35 ~ 85 % RH
Max wrist belt length: 22 cm, if you request a longer wrist belt, please contact your local
dealer for replacement.
( All electrical specifications are ±20% 1,000
load )
* Design and specifications are subject to change without notice.
WARNING !
1. This device is NOT suitable for persons with implanted cardiac pacemakers, and those
monitored by electronic equipments (e.g. ECG monitors and ECG alarms)
2. Heart disease patients SHOULD NOT use this device except under advice of a medical doctor.
3. Snore
Stopper is not suitable for Sleep Apnea patients.
4. Do not use this device during pregnancy except with a medical doctor's consent.
5. Patients with acute diseases and infectious diseases may use this device only under a medical
doctor's advice.
6. Patients with severe skin diseases or sensitive skin, or those in a state of bleeding SHOULD
NOT us this device.
7. DO NOT use this device on over swollen, infected, or inflamed areas or skin eruption, e.g.,
phlebitis, thrombophlebitis, varicose veins, etc.
8. DO NOT place the device in the mouth, neck and eyelid region.
9. Operation in close proximity (e.g. 1 meter) to a short wave or microwave therapy equipment
may produce instability in the device output.
Note :This device complies with the Electromagnetic Compatibility Requirement of EN 60601-1-2
as specified in EEC Directive 93/42/EEC.
16 .................................................................................................... .................................................................................................... 17
i. Die Hintergrundgeräusche sollten
unter 55dB liegen, während Sie
den Snore Stopper benutzen.
ii. Sie werden ein paar Tage
brauchen, bis Sie sich an den Snore
Stopper gewöhnt haben. Dann
werden Sie ihn aber nicht mehr
missen wollen!
Achtung!
Lieferumfang:
Ihr Snore Stopper Set hat folgenden
Inhalt:
*SnoreStopper (1)
* Flexibles Armband mit
Klettverschluss und Haken (1)
* AAA Batterie (1)
* 3 Paar Silikonpads (1)
* Handbuch (1)
* Garantie Karte (1)
* Praktisches Aufbewahrungsetui (1)
* Schraubendreher (1)
P.S.
i. Le bruit de fond doit être inférieur
à 55 db pour pouvoir utiliser
lappareil darrêt du ronflement.
ii. Normalement, vous aurez besoin
de quelques jours pour vous
habituer à cet appareil, après
cette période dessai vous
commencerez à lapprécier.
Attention!
Un exemplaire de lAppareil du Snore
Stopper comprend:
* LAppareil Principal du Snore
Stopper (1)
* Bracelet(1)
* Batterie (1)
* Electrodes auto-adhésives (1)
* Manuel (1)
* Carte de Garantie (1)
* Tournevis (1)
P.S.
i. Per utilizzare lo Snore Stopper, il
rumore di fondo deve essere
inferiore ai 55 decibel.
ii. Normalmente si impiegano un paio
di giorni per abituarsi al
dispositivo; passato questo periodo
si inizierà a godere dei risultati.
Attenzione!
La confezione dello Snore Stopper
include:
* Unità principale Snore Stopper (1)
* Cinturino da polso (1)
* Batteria (1)
* Confezione di elettrodi adesivi (1)
* Manuale (1)
* Carta garanzia (1)
* Cacciavite (1)
P.S.
i. Para utilizar el Snore Stopper, el
ruido de fondo no debe superar los
55db.
ii. Habitualmente, serán necesarios
algunos días para acostumbrarse a
este dispositivo, tras este periodo
comenzará a disfrutar del
dispositivo.
Atención
Un juego del Snore Stopper incluye:
* Unidad principal de Snore Stopper
(1)
* Muñequera (1)
* Batería (1)
* Paquete de contactos
autoadhesivos (1)
* Manual (1)
* Tarjeta de garantía (1)
* Destornillador (1)
P.S.
German Vision .............................................18
France Vision ...............................................32
Italy Vision ...................................................46
Spanish Vision ...............................................60
Contents

18 German version.................................................................................................... ....................................................................................................German version 19
KomponentenEinführung
BEDIENUNGSANLEITUNG Aversive Konditionierung
An dieser Stelle danken wir Ihnen recht herzlich dafür, dass Sie den Snore Stopper gekauft haben. Es war eine gute Wahl.
Lesen Sie nun bitte zuerst sorgfältig die Gebrauchsanleitung und machen Sie sich mit der Bedienung und den Möglichkeiten
des Gerätes vertraut.
Unser modernes Leben ist schnelllebig und anstrengend. Und wir brauchen unsere Nachtruhe dringend zur Erholung! Schon
deshalb ist das Schnarchen ein mehr als lästiges Übel. Schätzungen gehen überwiegend davon aus, dass etwa 30% 40% der
Bevölkerung schnarchen.
Die meisten Menschen denken, schnarchen wäre nur ein kleines Problem und auch die Gesundheit würde nicht darunter
leiden. In den weniger schweren Fällen stimmt das auch. Schnarchen kann aber auch sehr gefährlich für Ihre Gesundheit
sein! In schweren Fällen schnarchen die Schläfer 1.000 bis 5.000 mal pro Nacht! Vermeiden Sie das Risiko und verhelfen Sie
auch Ihren Lieben wieder zu einer ruhigen Nacht.
Mit Snore Stopper haben Sie jetzt ein neues Gerät in Händen, das durch einen biofeedback Prozess Ihr Schnarchen
reduziert und die Qualität Ihres nächtlichen Schlafes wesentlich verbessert. Wir verwenden dazu eine spezielle Technik, die
die Nerven stimuliert: wenn das Gerät merkt, dass Sie schnarchen sendet es einen kleinen Impuls für etwa 5 Sekunden auf
Ihre Haut, der dazu führt, dass Sie Ihre Position ändern und aufhören zu schnarchen. Dieser Prozess beruht auf einer
Reaktion Ihres Unterbewusstseins ohne Sie aufzuwecken oder Ihren Schlaf zu unterbrechen. Diese Wirkung wird nach etwa
6 bis 8 Wochen eintreten, wenn Sie Snore Stopper regelmäßig tragen.
Snore Stopper bietet eine sichere und intelligente Lösung um das störende Schnarchen zu beenden. Gönnen Sie sich und
Ihrer Familie wieder eine bessere Nachtruhe!
Benutzen Sie das Gerät nur, wie beschrieben. Wenn Sie ungewöhnliche Symptome feststellen, unterbrechen Sie bitte die
Anwendung und suchen Sie einen Arzt auf.
Batterie Fach
(der + Pol muss nach oben
zeigen)
Selbstklebende Silikon
Pad s
Ein / Aus Schalter und
Stärkeregler
LED Anzeige
Mikrofon
Test Knopf

20 German version.................................................................................................... ....................................................................................................German version 21
I. Vorbereitung
1. Machen Sie Ihr Gerät einsatzbereit, indem Sie die Batterie einsetzen. Öffnen
Sie dazu den Batteriedeckel mit dem Schraubendreher und legen Sie die
Batterie ein. Der + Pol muss auf der Seite des Ein- Ausschalters liegen wie in
Bild 1 zu sehen.
2. Danach schließen Sie das Batteriefach wieder und befestigen Sie es mit der
Schraube. Achten Sie bitte darauf, dass es vollständig geschlossen ist.
II. Aufkleben der Pads
1. Öffnen Sie die Vacuumverpackung und entnehmen Sie ein Paar der Pads.
Entfernen Sie dann vorsichtig die Plastikfolie mit dem Aufdruck SELF-
ADHESIVE ELECTRODE PADS , wie in Bild II gezeigt. (Lösen Sie noch nicht
die unbedruckte Folie von den Pads!)
2. Legen Sie nun die Pads auf die schwarzen Flächen und drücken Sie sie
vorsichtig mit den Fingern an. Dann nehmen Sie bitte die große Schutzfolie
ab, wie in Bild 3 gezeigt.
(TIP: Wenn Sie die alten Pads gegen Neue austauschen, pressen sie die Neuen mit
kleinen kreisenden Bewegungen an den Boden des Gerätes um eine optimal
Haftung zu erreichen.)
III. Anlegen des Armbandes
1. Befestigen Sie danach das Armband indem Sie das kürzere Ende in den
dafür vorgesehenen Bügel einführen, wie in Bild 5 gezeigt. Das Ende mit
dem kürzeren Teil muss dabei durch den linken Bügel geführt werden.
2. Nun sind Sie fertig und können Snore Stopper anziehen. Entfernen Sie
jetzt die große grüne Plastikfolie von den Silikonpads und legen Sie Snore
Stopper wie eine Uhr um Ihren Arm. Es sollte etwa 3 cm vom Handgelenk
entfernt getragen werden, wie in Bild 4 gezeigt. Hängen Sie jetzt den
Haken in den rechten Flügel ein, wie in Bild 8 gezeigt, ziehen Sie das
Armband fest und schließen Sie den Klettverschluß. (Ziehen Sie das
Armband dabei nicht zu fest an. Die Wirkung von SnoreStopper ist auch
dann schon gegeben, wenn er leicht auf der Haut aufliegt.)
Bedienung Bedienung
I
II
III
IV
V
VI

22 German version.................................................................................................... ....................................................................................................German version 23
IV.Wie man Snore Stopper benutzt
1. Jetzt können Sie das Gerät testen. Schalten Sie es ein, drehen Sie das
Stellrad auf Stärke 1 und prüfen Sie, ob das kleine grüne Licht auf der
Oberseite von Snore Stopper blinkt.
2. Jetzt drücken Sie den Testknopf dreimal hintereinander. Snore Stopper
wird ein leichtes Signal abgeben, das Sie wie ein sympathisches Kribbeln
au f der Haut spü ren . Die Stär ke d es Si gna ls ka nn j etzt so e inge ste llt
werden, wie sie es als angenehm empfinden.
3. Die Empfindlichkeit der Haut ist bei verschiedenen Menschen allerdings
höchst unterschiedlich. So kann es sein, dass Sie den Impuls auf Stufe 1
nicht spüren. Stellen Sie die Intensität dann auf einen höheren Wert und
drücken Sie den Testknopf erneut. Bedenken Sie auch, dass die Haut nachts
empfindlicher reagiert als am Tage. Wenn Sie also die ideale Einstellung
gefunden haben, dann sollten Sie den Wert für die Nacht um etwa eine Zahl
zurückd rehen.
4. Die Bedeutung des LED Lichtes:
Wenn Sie S nore Stopper am Arm tragen und der Kontakt zur Haut
opt imal is t, sol lte das LED von rot a uf grü n ums chalt en. Das zeigt an,
das s er eins atz bere it i st. We nn da s LE D nic ht g rün l euch tet , ist der
Hautkontakt nicht ausreichend und Sie sollten den Sitz des Gerätes und des
Armbandes überprüfen und eventuell besser einstellen. Wenn dann immer
noch kein grünes Licht erscheint, lesen Sie bitte unter Pflege und
Bedienung Bedienung
Fehlerbeseitigung auf Seite 24 nach.
5. Snore Stopper kann Schnarchen ab 65dB erkennen, dazu müssen die
Hintergrundgeräusche aber unter 55dB liegen. Sonst kann das Gerät den
Impuls nicht erzeugen. Von jetzt an können Sie das störende Schnarchen
reduzieren und Sie und Ihre Familie werden Ihre Schlafqualität signifikant
verbessern.
V.Aufbewahrung
1. Was Sie nach dem Gebrauch tun sollten: Öffnen Sie das Armband ganz und
ziehen Sie das Gerät vorsichtig vom Arm ab. Die Silikonpads können noch
ein wenig auf der Haut kleben. Lösen Sie sie indem Sie Snore Stopper
vorsichtig und senkecht nach oben vom Arm ziehen. Am Tage und bei
Nichtgebrauch ist es sinnvoll, wenn Sie die große grüne Schutzfolie wieder
auf die Silikonpads legen, damit sie nicht austrocknen oder verschmutzen.
Am Besten bewahren Sie Snore Stopper in der mitgelieferten praktischen
Aufbewahrungsbox auf

24 German version.................................................................................................... ....................................................................................................German version 25
Pflege und Fehlerbeseitigung
1. Die selbstklebenden Silikonpads sollten sauber gehalten
werden. Legen Sie nach dem Gebrauch die große
Schutzfolie wieder auf und bewahren Sie Snore
Stopper in
der praktischen Softbox auf, die wir mitliefern. So bleibt
er geschützt. Reinigen Sie die pads nicht mit einem (Woll-)
Tuch oder ähnlichem.
2. Nachdem Sie die Pads längere Zeit getragen haben werden
sie ihre Klebekraft verlieren. Damit wird auch die
Leitfähigkeit beeinflusst und es kann sein, dass Sie die
Impulse nicht mehr so stark empfinden. Befeuchten Sie die
Pads vorsichtig mit einem Tropfen Wasser. Streichen Sie
dazu mit dem Finger ein bis zwei Mal über die Oberfläche
der Pads.
3. Wenn die Pads nach etwa 15 Minuten noch nicht auf Ihrer
Haut kleben bleiben, sollten Sie sie gegen ein Paar neue
auswechseln. Unter normalen Bedingungen können Sie die
Pads etwa 30 Nächte lang benutzen.
Pflege und Fehlerbeseitigung
4. Wenn der LED Indikator nicht blinkt, überprüfen Sie bitte
Folgendes:
* ist die Batterie korrekt eingesetzt? Sie muss mit dem
Pluspol nach oben eingelegt werden.
* ist die Batterie zu schwach? Überprüfen Sie das durch den
Tausch gegen eine neue.
5. Hilft das auch nicht, so senden Sie die SnoreStopper bitte
zur Überprüfung ein. Benutzen Sie dazu bitte unbedingt
Ihre Garantiekarte.
* Benutzen Sie nur die im Handbuch beschriebenen Teile. Teile, die von uns
nicht freigegeben sind könnten Schaden am Gerät verursachen. Versuchen Sie
nicht das gerät zu reparieren. Es enthält keine Teile, die vom Benutzer
ersetzt werden können.

26 German version.................................................................................................... ....................................................................................................German version 27
Fragen, die oft gestellt werden Fragen, die oft gestellt werden
1. Arbeitet Snore Stopper sicher und zuverlässig?
A:Ja! Aber beachten Sie bitte unsere Warnhinweise zu Beginn dieses Handbuches. Auch wenn Sie sehr unregelmäßig
sc hna rc he n u nd d as mit ex pl osi on sar ti gem Sc hn ar che n v erb un de n is t ( fra ge n S ie i hr en Par tn er) , sol lt en S ie ärz tl ich en
Rat suchen! Der erfolgreiche Gebrauch des Snore Stopper verlangt Selbstdisziplin, dauerhafte Anwendung und etwas
Geduld.
Wi r ar be it en m it ein em sp ezi el l en tw ick el ten Bi os ens or, d er d as Sc hn arc he n bi op hy sik al isc h a us a nd er en G er äu sch en
herausfiltert und das funktioniert auch, wenn Sie Ihre Hände unter der Bettdecke haben. Wenn Snore Stopper dreimal
hi nter ein and er ei n Sch nar che n be merk t, d as l aute r al s 65 70 d B is t, reagiert er automatisch.
2.Reduziert Snore Stopper das Schnarchen wirklich?
A:Natürlich! Beim Schnarchen sind im Rachen die Atemwege eingeengt. Die Atemluft strömt somit durch diese Enge
schneller ein, und die weichen Wände des Rachens geraten in Schwingungen, wodurch das Schnarchgeräusch verursacht
wird. Das Schnarchen kann erfahrungsgemäß stark reduziert oder ganz abgestellt werden, wenn der Schläfer seine
Position verändert oder einen leichten Impuls erhält. Und genau mit diesem Konzept arbeitet Snore Stopper, der
Schnarchen erkennen kann und darauf einen kleinen, etwa 5 Sekunden langen Impuls erzeugt. Der führt dann wiederum
entweder zu einer Änderung der Schlafposition oder zu einer Anspannung der Halsmuskeln .
Hintergrundgeräusche Reaktion Snore Stopper
über 65 dB (50 cm vor dem TV Gerät) selten aktiviert
60 dB (1 m vor dem TV Gerät) selten aktiviert
55 dB (1m vor einer Klimaanlage) selten aktiviert
unter 55 dB nicht aktiviert
3.Was versteht man unter dB?
A: Die Lautstärke wird allgemein in dB oder Dezibel gemessen. Normalerweise liegen die Geräusche in einer Wohnung
bei etwa 30 50 dB. Ein Umgebungslärm von mehr als 70 dB wird bereits als unangenehm empfunden.
SnoreStopper wurde so entwickelt, dass er Hintergrundgeräusche entdecken kann. In der folgenden Übersicht sehen Sie
welche Geräuschkulisse ideal ist.
Remarks : Under normal conditions, your home's indoor background noise will be 30~50 dB
4. Warum spüre ich den Impuls beim Testen fast nicht?
A: Dafür kann es drei Gründe geben: einerseits ist die menschliche Haut am Tage wesentlich weniger sensibel als in der
Nacht, und andererseits haben die Menschen auch ein individuell sehr verschiedenes Empfinden, das vom Alter, dem
Geschlecht und zum Beispiel der momentanen Konzentration auf den Impuls abhängt. Snore Stopper ist so konzipiert,
dass er in der Nacht wirkt, daher kann es sein, dass Sie ihn am Tag nicht oder nur schwach spüren. Prüfen Sie auch, ob
sie die Pads überhaupt aufgeklebt haben bzw. ob sie nicht ersetzt werden sollten, weil sie schon zu alt sind.

28 German version.................................................................................................... ....................................................................................................German version 29
Fragen, die oft gestellt werden
5. Warum gibt Snore Stopper kein Signal ab, wenn ich in ruhiger Umgebung
probeschnarche?
A:er Biosensor ist so konzipiert, dass er erkennt, wenn Sie schnarchen. Das muss aber dreimal hintereinander und mit
gleicher Frequenz erfolgen. Außerdem sollte es lauter als 65 dB sein. Probieren Sie es bitte noch einmal.
6. Warum spüre ich das Signal länger als sonst?
A: s ist konstruktionsbedingt und ist für starke Schnarcher entwickelt. Der eingebaute Microprozessor erkennt die
Frequenz, mit der Sie schnarchen. Wenn man mehr als 50 mal in einem bestimmten Zeitraum schnarcht, gibt Snore
Stopper ein 15 Sekunden dauerndes Signal ab. Das bringt den Schläfer dazu, das Schnarchen stark einzuschränken.
7. Unterscheiden sich die beiden Seiten der Silikon Pads? Was passiert, wenn der
Kontakt nicht optimal ist?
A: Ja. D ie S eite , di e Sie auf das Gerä t kl eben müs sen ist, mit ein em Kl ebs tof f ver seh en. W enn Sie d ie Pa ds a us de r
Ver pa cku ng neh me n, sin d a uf d ie ser Se ite di e kl ein en be dru ck ten Fo lie n a nge br ac ht.
Da s G erä t f unk ti on ier t nu r e in wan df rei , w en n di e S ili ko n Pa ds k or re kt a ng ebr ac ht sin d. Sie dü rfe n n ic ht z u n ah e an ei nan de r
geklebt werden oder sich gar berühren. Wenn das einmal der Fall sein sollte, nehmen Sie sie vorsichtig ab und befestigen
sie neu wie beschrieben.
Caution
Vorsichtsmaßnahmen
1. Versichern Sie sich, dass der Intensitätsregler auf 0 steht, bevor Sie
SnoreStopper anziehen und wenn Sie ihn nicht benutzen.
2. Tragen Sie Snore Stopper nicht, wenn die Silikonpads nicht aufgeklebt sind
und berühren Sie die beiden Pole nicht mit den Fingern, wenn Sie den
Testknopf drücken.
3. Tragen Sie Snore Stopper nicht an der Unterseite Ihres Handgelenkes.
4. Ziehen Sie Snore Stopperaus, bevor Sie sich die Hände waschen. Es ist nicht
gegen das Eindringen von Feuchtigkeit geschützt!
5. Ziehen Sie das Armband nicht fest an. Sie verkürzen dadurch seine Lebenszeit
und SnoreStopper wird nicht besser funktionieren. Es muss nur leicht auf der
Haut anliegen um seine wohltuende Wirkung zu entfalten.
6. Benutzen Sie Snore Stopper nicht gleichzeitig mit anderen medizinischen
elektronischen Geräten.
7. Halten Sie das Gerät von Kindern fern.
8. Batterien gehören nicht in den Hausmüll! Bitte entsorgen Sie sie entsprechend
den örtlichen Vorschriften.
9. If irritation develops in
your skin, discoutinue use and
consult your physician.

30 German version.................................................................................................... ....................................................................................................German version 31
Technische Daten
Impulsamplitude: 180 uA fest, Spitze an 1.000 Ohm Last
Impulsfrequenz: 0.2 Hz fest
Impulsbreite: 800µs fest, Spannung 2,5 - 14 Volt Spitze an 1.000 Ohm Last
Signalform: Asymmetrisches Zweiphasen-Rechtecksignal
Leistungsquelle: AAA Battrie, 1,5 Volt
Zeitbegrenzung: schaltet nach 8 Stunden automatisch aus
Arbeitsumgebung: 10°C bis +40°C bei 30% bis 85% RLF
Lagerungsumgebung: -20°C bis +50°C bei 10% bis 95% RLF
Transportumgebung: -10°C ~ +50°C, 35 ~ 85 % RH
Länge des Armbandes: 22 cm sollte ein längeres Armband nötig sein, bestellen Sie es bitte
bei Ihrem Händler
Alle elektrischen Spezifikationen beziehen sich auf eine Last von 1.000
Ohm (+/- 20%).
Design und technische Daten können sich ohne Ankündigung ändern.
WARNUNG!
1. Snore Stopper darf nicht von Personen mit Herzschrittmachern getragen werden. Auch dann,
wenn Sie gerade an andere elektronische Geräte angeschlossen sind, zum Beispiel an ein EKG,
sollten Sie ihn nicht verwenden.
2. Herzkranke Personen müssen den Einsatz von Snore
Stopper mit Ihrem Arzt klären.
3. Snore Stopper ist für die Bekämpfung von Schlafapnö nicht geeignet.
4. Benutzen Sie Snore
Stopper nicht während einer Schwangerschaft oder dann nur in Absprache
mit Ihrem Arzt.
5. Patienten mit einer akuten Infektion oder Krankheit sollten das Gerät nur in Absprache mit
ihrem Arzt benutzen.
6. Patienten mit Hautkrankheiten, empfindlicher Haut oder offene Verletzungen sollten das Gerät
nicht einsetzen.
7. Verwenden Sie das Gerät nicht auf geschwollenen, infizierten, entzündeten oder geschädigten
Hautpartien.
8. Nehmen Sie Snore
Stopper nicht in den Mund und legen sie ihn nicht in die Region um Ihre
Augen oder in den Nacken.
9. Wenn Sie Snore
Stopper in der Nähe eines Mikrowellen Gerätes benutzen (Entfernung ca. 1 m
oder darunter) kann es sein, dass es nicht einwandfrei funktioniert.
Dieses Gerät entspricht den Anforderungen an Elektromagnetische Verträglichkeit gemäß EN 606011-2 wie in der EEC Direktive 93/42/EEC spezifiziert.

32 French version.................................................................................................... ....................................................................................................French version 33
Noms des composants
Introduction
Le Snore Stopper Appareil correcteur dhabitude
Merci pour votre achat de cet Appareil facilitant le Snore Stopper. Il sagit dun choix judicieux. Veuillez dabord lire
attentivement le manuel pour connaître le fonctionnement correct et les possibilités de cet équipement. De cette manière
vous pourrez profiter de tous les avantages de votre appareil du Snore Stopper et vous lapprécierez pendant longtemps.
Notre vie moderne est tendue et stressante. Cest pourquoi, lune des choses les plus importantes est une nuit silencieuse
et la possibilité de récupérer pendant le sommeil. Selon une estimation, environ 30 à 40% des personnes ayant lâge moyen
de la population actuelle ronflent, et de plus en plus de gens sont affectés par le ronflement! Beaucoup de gens pensent que
le ronflement nest quun petit problème et quil naura pas deffets sur la santé. Il sagit dune grande erreur! Car il
peut provoquer une hausse de tension, augmenter les risques de maladie cardiaque, dattaque, de fatigue et de dépression,
etc. Mais une chose est sûre: même dans les cas de ronflements moins sérieux, nous dérangeons nos partenaires et les
empêchons de se reposer pendant la nuit!
Heureusement tout ceci peut être maintenant résolu en utilisant lappareil du Snore Stopper! Le Snore Stopper est un
nouvel appareil conçu pour réduire le ronflement grâce à un processus biofeedback: lorsque lappareil détecte le
ronflement, une pulsation électronique légère est envoyée automatiquement pour stimuler la peau du ronfleur à travers un
nerf pendant environ 5 secondes jusquà ce que le ronflement soit réduit par les muscles laryngés reprenant une condition
normale ou par un changement de position du dormeur. Ce processus unique provoque une réaction subconsciente sans
réveiller le ronfleur ni déranger le cerveau contrôlant le sommeil. Vous vous rendrez compte de la grande qualité du
résultat si vous continuez à utiliser lappareil du Snore Stopper pendant un ou deux mois.
Le Snore Stopper est un choix sûr et intelligent permettant de réduire votre ronflement pénible et de permettre une
meilleure qualité de sommeil pour votre famille!
UTILISATION UNIQUEMENT EN RESPECTANT LES INDICATIONS ET SI LES SYMPTOMES PERSISTENT CONSULTEZ
VOTRE MEDECIN.
Compartiment de la pile
(AAA x 1 )
Electrodes auto-
adhésives
Interrupteur Marche/Arrêt
/ volume du niveau
dintensité
Témoin DEL
Détecteur
Bouton de test

34 French version.................................................................................................... ....................................................................................................French version 35
I ) Assemblage avant utilisation
1. Insérer la batterie
a.) Veuillez ouvrir le compartiment de la pile à laide dun tournevis pour
insérer la pile de taille AAA. Assurez-vous que la polarité + de la pile AAA
est positionnée vers Interrupteur Marche/Arrêt / volume du niveau
dintensité comme illustré dans la figure I.
b.) Ensuite fermez le couvercle de la pile et fixez avec la vis.
2. Coller les électrodes
a.) Ouvrez le paquet sous vide et sortez un ensemble délectrodes auto-
adhésives. Ensuite décollez attentivement le grand film plastique sur
lequel est indiqué Electrodes auto-adhésives (En même temps,
nenlevez pas un autre film plastique plus grand) comme indiqué sur la
figure II.
b.) Collez les électrodes, à larrière de lappareil, sur les caoutchoucs de
contact noirs. Pressez légèrement les électrodes à laide de votre doigt sur
lappareil, puis enlevez la grande pellicule plastique comme illustré dans la
Figure III.
3.Régler le bracelet
a.) Une fois les électrodes collées, vous pouvez vous préparer à installer
lAppareil du Snore Stopper. Comme illustré dans la figure V, le bracelet
doit être mis dans la partie gauche. Veuillez fixer la bande magique sur ce
côté maintenant.
b.) Placez lappareil un pouce au-dessus du poignet comme illustré dans la
figure IV et accrochez le bracelet sur lautre côté de lappareil comme
illustré dans la figure VIII. Puis serrez-le et fixez cette extrémité du
bracelet comme illustré dans la figure VI. (Ne serrez pas excessivement le
bracelet, sinon une mauvaise circulation sanguine se produira. En fait,
lappareil fonctionnera correctement lorsquil est en contact léger avec la
peau.)
Utilisation de lappareil Utilisation de lappareil
I
II
III
IV
V
VI
Astuces: Chaque fois que vous changez les électrodes, pressez fermement à
laide du pouce les électrodes qui se collent sur lappareil, et appliquez un
mouvement circulaire pour assurer une meilleure adhésion.

36 French version.................................................................................................... ....................................................................................................French version 37
II) Comment utiliser lappareil
1. Tester le fonctionnement de lappareil avant
lutilisation
a) Mettez lalimentation en marche puis réglez lintensité au niveau 1.
Vérifiez si le Témoin DEL (lumière verte) clignote.
b) Pressez le bouton test trois fois continuellement. Lappareil émettra une
faible impulsion électrique durant environ 4 secondes. Maintenant, vous
pouvez régler lintensité au niveau désiré.
c) En raison des différences de sensibilité de la peau, vous pouvez ne pas
sentir limpulsion électrique. Dans ce cas, pressez le bouton test 3 fois
répétitivement, puis réglez lintensité au niveau que vous désirez. De plus,
les nerfs sont stimulés plus facilement pendant la nuit. Donc nous vous
recommandons de commencer par les niveaux 1-2 les plus bas pour avoir le
meilleur effet.
2. Signification de la lumière du témoin DEL:
a) Normalement le témoin DEL change de couleur du rouge au vert, cela
signifie que lappareil est en bon contact avec votre peau et que vous
pouvez commencer à lutiliser.
b) Si la DEL reste toujours rouge, lappareil nest pas en bon contact avec
votre peau.
c) Donc, vous devrez régler le bracelet dans une position jusquà voir le
Utilisation de lappareil Utilisation de lappareil
témoin DEL sallumer en vert.
d) Si lappareil ne fonctionne toujours pas, veuillez vous référer à la section
Entretien & Dépannage en page 38.
3. Le concept intelligent breveté de notre appareil peut détecter
automatiquement les ronflements supérieurs à 65 dB, mais sans aucun bruit de
fond. A partir de maintenant, vous pouvez arrêter les ronflements ennuyants
et laisser votre famille avoir une meilleure qualité de sommeil!
* Utilisez toujours les accessoires spécifiés dans le manuel. Lutilisation
dautres pièces non approuvées par le constructeur peuvent provoquer un
danger.
III) Après lutilisation
1. Après lutilisation, veuillez suivre les instructions ci-dessous pour éviter
dendommager les électrodes auto-adhésives,
a)Décrochez le bracelet.
b)Séparez doucement lappareil de votre poignet.
2. Lorsque vous rangez lappareil après lutilisation, veuillez recoller la
grande pellicule plastique sur les électrodes. Cela peut protéger les
électrodes dune contamination avec les particules poussiéreuses et
prolonger la durée de vie des électrodes. Cet appareil séteindra
automatiquement au bout de 8 heures. Afin de prolonger la durée de vie de
la pile, veuillez éteindre lappareil une fois que vous vous réveillez.

38 French version.................................................................................................... ....................................................................................................French version 39
Entretien et Dépannage
1. Les électrodes auto-adhésives doivent rester propres. Afin de préserver les
performances de lappareil, NE PAS frotter les électrodes avec vos mains,
une serviette ou de la laine.
2. Les électrodes perdront leur adhésion une fois que lappareil aura été
utilisé pendant une certaine période. A ce moment-là, lintensité du signal
peut devenir faible et vous le sentirez moins fort quavant. Dans ce cas
vous pourrez prendre une goutte deau au bout de votre doigt et
humidifiez légèrement les électrodes. En un instant, le signal deviendra à
nouveau plus fort.
3. Si vous ne sentez toujours pas le signal, veuillez remplacer les anciennes
électrodes par une paire neuve. Veuillez vous référer à la section 2. Coller
les électrodes en page 34.(Remarque: Généralement, les électrodes
peuvent être utilisées pendant 30 nuits consécutivement.)
Entretien et Dépannage
4. Si le témoin DEL ne sallume pas lors de la
procédure de test, veuillez vérifier les points cidessous :
a.) Est-ce que la pile est installée correctement ? ( le symbole + fait face
vers le haut ? )
b.) Est-ce que la charge de la pile est faible? Si oui, veuillez la remplacer par
une neuve.
Si les points mentionnés ci-dessus sont vérifiés et que lappareil ne fonctionne
toujours pas, veuillez le renvoyer chez votre revendeur local pour une
réparation.
*Utilisez toujours les accessoires spécifiés dans le manuel. Lutilisation
dautres pièces non approuvées par le constructeur peut provoquer un danger.
Ne tentez pas de réparer lappareil! Il ny a pas de pièces utilisables par
lutilisateur à lintérieur.

40 French version.................................................................................................... ....................................................................................................French version 41
FAQUtilisateur FAQUtilisateur
1. Q : Est-ce que lappareil dArrêt du Ronflement fonctionne réellement ?
A : Oui, il fonctionne, mais pas sur des personnes ayant de sérieux problèmes de santé comme indiqué dans les sections
Introduction et Avertissement. Utilisez uniquement en respectant les indications données. En cas de symptôme
inhabituel, arrêtez le traitement et consultez votre médecin. Une utilisation correcte de lappareil dArrêt du
Ronflement nécessite une certaine auto-discipline, une application avec précaution et du temps pour entraîner les
réflexes.
Nous utilisons notre biocapteur électronique intégré spécial conçu pour détecter le ronflement, basé sur les propriétés
biophysiques du ronflement. Dautre part, grâce à sa capacité de détection étendue, peu importe si vos mains sont sous
ou au-dessus de la couverture, dès le ronflement est supérieur à 65~70 dB et quil se produit 3 fois continuellement, il
sera détecté et déclenchera automatiquement la réaction de lappareil.
2. Est-ce quil réduit vraiment mon ronflement?
A: Le ronflement est dû à un passage dair étroit. Dabord, quand nous dormons, nos nerfs sont dans un état de
décontraction, et lorsque lair passe dans ce passage dair étroit lors de la respiration, il provoque la vibration des tissus
mous de la gorge (tels les amygdales, le voile du palais, la luette). Cest cette vibration qui provoque le bruit du
ronflement. Généralement, les ronflements peuvent être réduits si le ronfleur change sa position de sommeil ou sil est
soumis à une légère stimulation nerveuse. Cest sur ce concept que lappareil dArrêt du Ronflement est développé.
Lorsque des ronflements sont détectés, lappareil produit une impulsion de 5 secondes à la superficie de la peau, ensuite
les ronflements peuvent être réduits des manières suivantes: i.) Le ronfleur peut changer la position de sommeil ii.) il
peut augmenter la tension musculaire des muscles de la gorge en raison de la stimulation nerveuse.
Bruit de fond intérieur Capteur de lappareil dArrêt du Ronflement
Supérieur à 65 dB (à moins de 50 cm de la TV) Rarement activé
60 dB (à moins de 1 m de la TV) Rarement activé
55 dB (à moins de 1 m du climatiseur) rarement Activé
Inférieur à 55 dB Non activé
3. Que sont les dB ? Comment je peux savoir si lappareil dArrêt du Ronflement peut
être utilisé chez moi ?
A : Les dB (décibels) permettent de mesurer lintensité du son. Si vous êtes dans un environnement qui a une intensité
sonore continuellement supérieure à 70 dB, il sagit dun fond bruyant; Normalement vous ne vivrez pas dans un tel
environnement. La conception de lappareil dArrêt du Ronflement est basée sur la source de bruit du fond intérieur.
Vous pouvez consulter le tableau ci-dessous pour connaître les conditions de sommeil optimales pour lutilisation.
Remarques : Dans des conditions normales, le bruit de fond intérieur de votre domicile est de 30~50 dB
4. Pourquoi est-ce que je sens très peu dintensité lors de la procédure de test ?
A: Il peut y avoir trois raisons, i.) La différence de sexe, dâge, de poids et dimpédance de peau peut faire varier vos
sensations. En fait, lintensité de limpulsion émise reste dans des limites sûres, donc vous devez généralement ressentir
la sensation. Si votre attention est attirée par autre chose, vous pourrez également avoir une sensation de faible
intensité. ii.) Les nerfs de la peau sont plus sensibles pendant la nuit. Comme lappareil est conçu pour être utilisé
pendant la nuit, vous aurez une sensation de faible intensité lorsque vous testez lappareil dans la journée. iii) Vérifiez
les électrodes, peut-être avez-vous oublié de les coller ou peut-être doivent-elles être remplacées en raison dune trop
longue utilisation.

42 French version.................................................................................................... ....................................................................................................French version 43
FAQUtilisateur
5. Lorsque je simule les ronflements dans le silence, pourquoi lappareil ne
fonctionne-t-il pas?
A: Comme le biocapteur de lappareil dArrêt du Ronflement est conçu en fonction des propriétés biophysiques du
ronflement, pour faire réagir lappareil vous devrez essayer de le «simuler» de la manière suivante: prononcez un long
1, 2, 3 ou émettez 3 ronflements consécutifs de la même fréquence à au moins 65 dB. Veuillez réessayer!
6. Pourquoi est-ce que je ressens une stimulation spécialement longue? Y-a-t-il un
problème avec lappareil?
A: Il sagit dune conception intégrée spécifique. Comme le microprocesseur détecte votre fréquence de ronflement, sil
détecte 15 ronflements, il émettra une stimulation plus longue de 25 secondes pour forcer le ronfleur à changer de
position de sommeil.
7. Est-ce que les deux faces dune électrode sont différentes? Cela a-t-il une importance si le contact nest pas très bon ?
A: Oui, les deux faces sont différentes. Pour les différencier, la face de lélectrode qui doit être fixée à lappareil dispose
dune adhésion plus forte (la face avec des mots imprimés sur le film de protection). Lappareil fonctionnera aussi
longtemps que les électrodes seront correctement fixées sur les caoutchoucs conducteurs noirs situés sur lappareil,
normalement les électrodes sont faites pour durer (dans le cas contraire les électrodes peuvent être également utilisées
pendant un petit moment).
Ne placez pas les deux électrodes trop proches lune de lautre car cela peut affecter la conductivité. Au cas où les
électrodes seraient collées ensembles, séparez-les doucement et reprenez un assemblage correct.
Caution
Précautions
1. Le volume du niveau dintensité doit être réglé à ZERO avant lutilisation.
2. NE PAS porter cet appareil si les électrodes auto-adhésives ne sont pas collées
dessus.
De plus, lorsque vous pressez le bouton test, NE PAS toucher le caoutchouc
conducteur ni les électrodes avec vos doigts.
3. NE PAS porter lappareil sur le dessous du poignet.
4. NE PAS laver vos mains lorsque vous portez lappareil.
5. Lorsque vous mettez le bracelet au poignet, NE serrez PAS fortement, dans le
cas contraire la durée de vie de lappareil sera diminuée.
6. NE PAS utiliser dautres appareils médicaux électroniques EN MEME TEMPS.
7. Cet appareil doit être gardé hors de portée des enfants.
8. Si une irritation se produit sur la peau, arrêtez lutilisation et consultez un
médecin.
9. Les piles usées ne doivent pas être jetées avec les déchets ménagers.
Déposez-les dans des lieux de
collecte publiques ou dans les
magasins vendant des piles de
même type.

44 French version.................................................................................................... ....................................................................................................French version 45
Spécifications Techniques
1.Amplitude de pulsation : Fixe 180 µA pic à 1,000 chargement
2.Taux de pulsation : 0.2 Hz fixe
3.Largeur de pulsation : Fixe 800 µs, Voltage reglable 2.5-14 V pic a 1,000 chargement
4.Forme dondes : Pulsation carree bi-phase asymetrique
5.Minuterie de detection : arret automatique au bout de 8 heures
6.Source dalimentation : Pile 1.5 Volt de taille AAA
7.Environnement de fonctionnement : 10°C ~ +40°C, 30 ~ 85 % RH
8.Environnement de stockage : -20°C ~ +50°C, 10 ~ 95 % RH
9.Environnement de transport : -10°C ~ +50°C, 35 ~ 85 % RH
10.Longueur maximum du bracelet: 22 cm, si vous avez besoin dun bracelet plus long, veuillez contacter votre
revendeur local pour un remplacement.
( Toutes les specifications electriques sont a ±20% 1,000 Chargement )
* Le concept et les specifications sont sujets a modifications sans preavis.
AVERTISSEMENT !
1. Cet appareil NE convient PAS aux personnes portant les stimulateurs cardiaques, ni à celles qui sont surveillées par les
appareils électroniques (ex. Moniteurs ECG et alarmes ECG)
2. Le Snore Stopper ne convient pas aux patients souffrant dapnée lors du sommeil ni aux personnes avec la peau
sensible.
3. NE PAS utiliser cet appareil lors de la grossesse sauf avec accord du médecin.
4. Les patients avec des maladies aiguës et des maladies infectieuses ne peuvent utiliser cet appareil que sous avis
médical.
5. Les patients qui ont les maladies de peau sévères ou une peau sensible, ou ceux qui saignent NE DOIVENT PAS utiliser cet
appareil.
6. NE PAS utiliser cet appareil sur des zones enflées, infectées ou enflammées ni sur des éruptions cutanées, ex., les
phlébites, les thrombophlébites, les varices,etc.
7. Les patients souffrant de maladie cardiaque NE DOIVENT PAS utiliser cet appareil sauf avec consentement du médecin.
8. NE PAS poser cet appareil dans la bouche, sur le cou ou les paupières.
9. Lutilisation à proximité (ex. 1 mètre ) dun équipement de soin à ondes courtes ou micro-ondes peut provoquer une
instabilité à la sortie de cet appareil.
Remarque :Cet appareil est conforme à la Norme de Compatibilité Electromagnétique de EN
60601-1-2 comme spécifié dans la Directive 93/42/EEC de lEEC.

46 Italy version.................................................................................................... ....................................................................................................Italy version 47
Nomenclatura delle partiIntroduzione
Snore Stopper Dispositivo a condizionamento avversante
Vi ringraziamo per avere acquistato lo Snore Stopper. Avete fatto una buona scelta. Vi preghiamo di leggere, innanzi
tutto, il manuale per apprendere ad operare lunità correttamente e scoprire le sue possibilità. In questo modo godrete dei
benefici dello Snore Stopper ed esserne appagati per un lungo periodo.
La vita odierna è intensa e stressante. La cosa più importante, quindi, è una notte tranquilla per recuperare le forze
durante il sonno. Una stima riporta che circa dal 30% al 40% della popolazione di mezza età russa, e sempre più persone ne
sono affette. In molti pensano che il russare sia un problema minore, che non influenza la salute. Questo è un grave errore!
Russare può causare lalta pressione sanguigna, aumentare il rischio di malattie del cuore, infarti, affaticamento,
depressione, ecc. Una cosa è certa: anche nei casi più lievi, russando disturbiamo i nostri amati partner ed impediamo loro
di riposarsi.
Ma ora possiamo porre termine a tutto ciò impiegando lo Snore Stopper! Snore Stopper è un nuovo dispositivo,
progettato per ridurre il russare grazie ad un processo di controreazione biologica: quando il dispositivo rileva il russare,
invia automaticamente un lieve e gentile impulso elettronico che stimola i nervi, tramite la pelle, per circa 5 secondi,
finché la persona riduce il russare portando in condizioni normali tramite i muscoli laringei, oppure cambiando la posizione
di riposo. Questo processo, unico nel suo genere, provoca una reazione subconscia che non sveglia la persona che russa e
senza disturbare la parte del cervello che controlla il sonno. Noterete i grandi risultati dopo avere utilizzato, in modo
continuato, lo Snore Stopper per uno o due mesi.
Lo Snore Stopper è una scelta intelligente e sicura per ridurre il disturbo provocato dal russare, e permette alla famiglia di
ottenere un sonno di qualità migliore nel futuro!
UTILIZZARE SOLAMENTE COME INDICATO. SE I SINTOMI PERSISTONO CONSULTARE IL PROPRIO MEDICO.
Scomparto batteria (1 x AAA)
Elettrodi adesivi
Interruttore acceso /
spento (ON/OFF)
controllo livello intensità
LED
Rilevatore
Tasto diagnostica

48 Italy version.................................................................................................... ....................................................................................................Italy version 49
I) Montaggio prima delluso
1. Inserire la batteria
a.) Aprire lo scomparto batteria con un cacciavite per inserire la batteria
AAA. Assicurarsi che il polo positivo + sia posto verso linterruttore
acceso / spento (ON/OFF) controllo livello intensità, come mostrato
nella figura I.
b.) Chiudere il coperchio dello scomparto batteria e fissarlo con la vite.
2. Attaccare gli elettrodi
a.) Aprire la confezione sottovuoto ed estrarre una serie di elettrodi adesivi.
Staccare con delicatezza la pellicola adesiva più grande che riporta la
dicitura Self-adhesive electrode pad (non rimuovere ancora laltra
pellicola adesiva grande) come mostrato nella figura II.
b.) Attaccare gli elettrodi, sulla parte posteriore del dispositivo, sui conduttori
neri in gomma. Premere con delicatezza gli elettrodi sul dispositivo, poi
rimuovere la pellicola di plastica più grande, come mostrato nella figura
III.
3. Regolazione del cinturino da polso
a.) Dopo avere attaccato gli elettrodi, prepararsi ad indossare lo Snore
Stopper. Il cinturino deve essere messo sullala sinistra, come mostrato
nella figura V. Ora fissare il nastro adesivo su questo lato.
b.) Porre il dispositivo ad 1 pollice (ca. 2,45 cm) sopra il polso, come mostrato
nella figura IV, ed agganciare il cinturino sullaltra ala del dispositivo,
come mostrato nella figura VIII. Poi stringere e fissare le estremità del
cinturino come mostrato nella figura VI. (Non stringere troppo il cinturino,
diversamente si impedirà una buona circolazione del sangue. Il dispositivo
funziona bene quando tocca delicatamente la pelle.)
Operare lunità Operare lunità
I
II
III
IV
V
VI
(Suggerimento: quando si sostituiscono gli elettrodi, premere con fermezza
con il pollice su di loro per attaccarli al dispositivo, ed eseguire un movimento
circolare per assicurare una migliore adesione.)

50 Italy version.................................................................................................... ....................................................................................................Italy version 51
II) Come utilizzare il dispositivo
1.Controllo delle funzioni del dispositivo prima
delluso
a) Accendere lalimentazione e regolare lintensità sul livello 1. Controllare
che la luce verde de l LED stia lampeggiando.
b) Premere il tasto Test tre volte consecutivamente. Il dispositivo rilascerà un
lieve impulso elettrico che durerà circa 4 secondi. Ora regolare lintensità
al livello desiderato.
c) A causa dei diversi livelli di sensibilità della pelle, è possibile non avvertire
limpulso elettrico. In questo caso, premere il tasto Test 3 volte
consecutivamente, e regolare lintensità al livello desiderato. Vogliamo
farvi notare che durante la notte la stimolazione dei nervi è più facile.
Consigliamo quindi, per un migliore effetto e risultato, di iniziare ad usare
il dispositivo con un livello dintensità 1-2.
2. Significati del LED:
a) Normalmente il LED cambia da rosso a verde, a significare che il
dispositivo ha un corretto contatto con la pelle ed è possibile iniziare ad
usarlo.
b) Se il LED rimane rosso, significa che il dispositivo non ha un corretto
contatto con la pelle.
c) E necessario quindi regolare il cinturino finché il LED diventa verde.
Operare lunità Operare lunità
d) Se il dispositivo non funziona ancora, si prega di fare riferimento alla
sezione Manutenzione e risoluzione dei problemi a pagina 52.
3.Il design intelligente brevettato del nostro dispositivo, può rilevare
automaticamente rumori provocati dal russare che siano superiori ai 65
decibel, ma non ci devono essere altri rumori di fondo. A questo punto potete
smettere di russare e permettere alla vostra famiglia ed a voi stessi di avere
un sonno di qualità migliore per il futuro.
* Utilizzare sempre gli accessori specificati nel manuale. Limpiego di
altre parti, che non siano approvate dal produttore, possono
provocare pericoli.
III) Dopo lutilizzo
1. Dopo lutilizzo del dispositivo, si prega di attenersi alle seguenti istruzioni
per prevenire danni agli elettrodi adesivi.
a) Sganciare il cinturino.
b) Staccare gentilmente il dispositivo dal polso.
2.Quando si ripone il dispositivo dopo luso, rimettere la pellicola di plastica
più grande sugli elettrodi. Ciò preverrà la contaminazione degli elettrodi con la
polvere e allungherà la durata di questi ultimi. Il dispositivo si spegna
automaticamente dopo 8 ore. Per allungare la durata della batteria, spegnere
il dispositivo quando ci si sveglia.

52 Italy version.................................................................................................... ....................................................................................................Italy version 53
Manutenzione e risoluzione dei problemi
1. Gli elettrodi adesivi devono essere mantenuti puliti. Per mantenere
loperatività del dispositivo, NON strofinare gli elettrodi con le mani,
salviette di carta, o lana.
2. Gli elettrodi perderanno il loro potere adesivo dopo un certo periodo
dutilizzo. A questo punto lintensità del segnale potrebbe diminuire,
oppure potreste avvertirlo con meno intensità di prima. In questo caso
bagnare leggermente le dita, ed inumidire leggermente gli elettrodi. Dopo
poco tempo il segnale sarà avvertito con lintensità originale.
3. Se non si avverte ancora il segnale, sostituire gli elettrodi con un nuovo
paio. Si prega di fare riferimento alla sezione 2 Attaccare gli elettrodi di
pagina 48. (Nota: in generale gli elettrodi possono essere utilizzati per 30
notti consecutive.)
Manutenzione e risoluzione dei problemi
4. Se il LED non si accende durante la procedura di diagnostica, controllare i
punti seguenti:
a.)La batteria è inserita correttamente? (il polo positivo + è posto verso
lalto? )
b.)La batteria è scarica? In caso affermativo sostituirla con una nuova.
Se i punti sopra descritti sono stati controllati ed il dispositivo non funziona
ancora correttamente, si prega di inviarlo al rivenditore locale per la
riparazione.
* Utilizzare sempre gli accessori specificati nel manuale. Limpiego di altre
parti, che non siano approvate dal produttore, possono provocare pericoli.
Non cercare di riparare da sé il dispositivo! Allinterno non ci sono parti che
possano essere riparate dallutente.

54 Italy version.................................................................................................... ....................................................................................................Italy version 55
Domande poste più di frequente dagli utenti Domande poste più di frequente dagli utenti
1. D: Snore Stopper funziona veramente?
R: Sì f unz iona , ma non per colo ro c he h ann o gra vi c ond izio ni m edi che c ome ind icat o ne ll intr odu zion e e n ell a sez ion e
de di cat a a gli av vis i. Im pie ga re i l d isp os it ivo es clu si va men te com e i nd ica to . Q ual or a ap pa ri sse ro sin to mi str an i,
interrom pere il trattam ento e consulta re il medico. Limpiego dello Snore Stoppe r richiede aut odisciplina, cura
ne ll ap pl ica zi one e t emp o p er abi tu ar e i r if les si .
La caratteristica principale del dispositivo è il nostro speciale sensore biologico incorporato, progettato per rilevare il
russare in base alle sue proprietà biofisiche. Inoltre, grazie alla sua ampia capacità di rilevamento, non ha importanza
se le mani sono sotto le coperte: se il russare è superiore ai 65 70 decibel, e si ripete per tre volte consecutivamente, è
ri lev at o d al d is pos it ivo ch e i nne sc a a uto ma tic am en te l a s ti mol az ion e.
2. Riduce davvero il russare?
R: Il russare è provocato da vie respiratorie insufficientemente ampie. Quando dormiamo il sistema nervoso è in uno
stato di rilassamento; inoltre quando laria si sposta in vie respiratorie insufficientemente ampie provoca la vibrazione
de i te ss ut i mo ll i de ll a go la (to ns ill e, p al at o, u go la) . Q ues ta vib ra zio ne è i l ru ss are . G ene ra lme nt e il ru ss are pu ò es se re
ri dot to se la p er son a c am bia la po siz io ne d i r ip oso op pur e s e è da ta u na leg ge ra sti mo la zio ne al s is tem a n er vos o.
Basandoci su questi concetti abbiamo sviluppato Snore Stopper. Quando il dispositivo rileva il russare, emette un
impulso della durata di 5 secondi sulla parte superficiale della pelle, ed il russare può essere ridotto in uno dei seguenti
modi:
1. la persona cambia la posizione di riposo;
2. la tensione dei muscoli della gola è aumentata grazie alla stimolazione del sistema nervoso.
Rumore di fondo dinterni Sensore Snore Stopper
Superiore ai 65 dB (distanza di 50 cm dalla TV) Attivazione sporadica
60 dB (distanza di 1 m dalla TV) Attivazione sporadica
55 dB (distanza di 1 m dal condizionatore) Attivazione sporadica
Inferiore ai 55 dB Nessuna attivazione
3. Che cosa sono i decibel (dB)? Come faccio a sapere se posso usare Snore Stopper
nella mia abitazione?
R: I decibel (dB) sono lunità di misura dellintensità del suono. In generale ci si riferisce ad ambienti rumorosi quando è
presente un rumore di fondo continuo con unintensità superiore ai 70 decibel. Normalmente non si vive in tali
am bien ti. Il se nso re de llo Snor e Stopper è progettato per rilevare la sorgente dei rumori interni dellabitazione. La
tabella seguente fornisce le indicazioni per i requisiti di riposo ottimali e di utilizzo del dispositivo.
Nota: in condizioni normali il rumore di fondo delle abitazioni è compreso tra i 30 ed i 50 dB.
4. Perché il livello dintensità è debole durante la procedura di prova?
R: Ciò può essere determinato da tre motivi:
1. La differenza di sesso, età, peso, sensibilità della pelle provoca variazioni nella sensazione. Lintensità dellimpulso è
compresa nei livelli di sicurezza ed in generale si dovrebbe provare la sensazione. Se tuttavia lattenzione è richiamata
dalla debolezza dellimpulso, è possibile che la pelle sia poco sensibile.
2. I nervi della pelle sono più sensibili durante la notte. Dato che il dispositivo è progettato per funzionare la notte, è
possibile rilevare la debolezza dellimpulso quando la procedura di prova è eseguita durante il giorno.
3. Controllare gli elettrodi conduttori: potrebbero non essere attaccati oppure potrebbe essere necessario sostituirli in
seguito ad utilizzo prolungato.

56 Italy version.................................................................................................... ....................................................................................................Italy version 57
Domande poste più di frequente dagli utenti
5. Perché il dispositivo non si attiva quando simulo il russare in un ambiente
silenzioso?
R: Lo speciale sensore biologico dello Snore Stopper è progettato in base alle proprietà biofisiche del russare, quindi
reagisce solamente a queste ultime. E possibile cercare di simulare il russare nel modo seguente: dire lentamente 1,
2, 3 oppure produrre 3 russate con la stessa frequenza ed almeno superiori ai 65 dB. Provare di nuovo.
6. Perché provo la sensazione di una speciale stimolazione prolungata? Cè qualcosa
che non funziona nel dispositivo?
R: Questa è una funzione speciale. Il microprocessore controlla la frequenza del russare; se il dispositivo rileva 15
emissioni, emette una stimolazione di 25 secondi per allenare la persona che russa in modo pesante a cambiare la
posizione di riposo.
7. I lati degli elettrodi sono diversi tra loro? Ha importanza se non cè un contatto
appropriato?
R: Sì, i lati degli elettrodi sono diversi tra loro. Per riconoscerli la parte dellelettrodo che deve essere attaccata al
dispositivo, è quella con il collante più potente (ovvero la parte con la pellicola protettiva stampata). Il dispositivo
funziona fintanto che gli elettrodi sono attaccati correttamente ai conduttori.
Non collocare gli elettrodi a distanza ravvicinata gli uni dagli altri, diversamente la conduttività sarà compromessa. Nel
caso in cui gli elettrodi siano attaccati gli uni agli altri, staccarli con gentilezza e ripristinare il contatto appropriato.
Caution
Cautela
1. Prima dellutilizzo il livello dintensità deve essere regolato su ZERO.
2. NON indossare il dispositivo se gli elettrodi adesivi non sono attaccati a
questultimo.
Ino ltre, quando si preme il tasto Test, NON toccare i conduttori di gomma o gli
elettrodi con le dita.
3. Non indossare il dispositivo allinterno del polso.
4. NON lavarsi le mani indossando il dispositivo.
5. Quando si indossa il cinturino, NON tirarlo con forza, diversamente si accorcia
la durata del dispositivo.
6. NON utilizzare il dispositivo CONTEMPORANEAMENTE con altri dispositivi
medici elettronici.
7. Il dispositivo deve essere tenuto lontano dalla portata dei bambini.
8. Se sulla pelle si sviluppa unirritazione, smettere di usare il dispositivo e
consultare un medico.
9.Le batterie non devono
essere gettate nel bidone della
spazzatura domestica. Riporle
nei punti di raccolta, oppure
portarle ai negozi che vendono
batterie dello stesso tipo.

58 Italy version.................................................................................................... ....................................................................................................Italy version 59
Specifiche tecniche
1.Ampiezza dellimpulso : Apice fisso 180 µA su carico 1,000
2.Portata impulso : Fissa 0.2 Hz
3.Profondità impulso : Fisso 800 µs, voltaggio regolabile 2,5 - 14 V apice su carico 1,000
4.Forma dellonda : Impulso asimmetrico bifasico quadrato
5.Timer : Spegnimento automatico dopo 8 ore
6.Sorgente dalimentazione : Batteria 1.5 V AAA
7.Ambiente operativo : dai 10° C ai + 40° C, dal 30 al 85 % RH
8.Ambiente dimmagazzinamento : dai - 20° C ai + 50° C, dal 10 al 95 % RH
9.Ambiente di trasporto: dai - 10° C ai + 50° C, dal 350 al 85 % RH
10.Lunghezza massima cinturino da polso: 22 cm, se si necessita un cinturino più lungo si prega di mettersi in
contatto con il rivenditore locale per la sostituzione.
(Tutte le specifiche elettriche sono ±20% carico 1,000
* Design e specifiche sono soggetti a cambiamenti senza preavviso.
ATTENZIONE !
1. Questo dispositivo NON è indicato per persone con pacemaker cardiaco e coloro che sono monitorizzati da attrezzature
elettroniche (e.g.: ECG).
2. Lo Snore Stopper non è indicato per pazienti che soffrono di apnee nel sonno e per coloro che hanno la pelle sensibile.
3. NON UTILIZZARE questo dispositivo durante la gravidanza, salvo consenso del medico curante.
4. I pazienti con malattie acute ed infezioni possono utilizzare questo dispositivo solamente dietro consiglio medico.
5. I pazienti con gravi malattie della pelle, o con pelle sensibile, o coloro in uno stato emorragico, NON DEVONO utilizzare
questo dispositivo.
6. NON utilizzare questo dispositivo su aree gonfie, infette, infiammate, oppure su eruzioni cutanee quali flebiti,
tromboflebiti, vene varicose, ecc.
7. I pazienti con malattie cardiache NON DEVONO utilizzare questo dispositivo, salvo dietro consiglio del medico curante.
8. NON porre il dispositivo in bocca, sul collo, o sulle palpebre.
9. Lutilizzo in prossimità (1 metro) di attrezzature per terapie ad onde corte o microonde, può provocare instabilità nelle
emissioni del dispositivo.
Nota: Questo dispositivo è conforme ai Requisiti di Compatibilità Elettromagnetica EN 60601-1-2
come specificato della Direttiva CEE 93/42/EEC.

60 Spanish version.................................................................................................... ....................................................................................................Spanish version 61
Nombres de los componentesIntroducción
Snore Stopper Dispositivo de condicionamiento adverso
En este punto, nos gustaría agradecerle la compra de Snore Stopper. Ha sido una buena elección. Pero lea con atención el
manual para acostumbrarse al funcionamiento correcto y las posibilidades del equipo. De esta manera podrá disfrutar de
las ventajas de SnoreStopper y se beneficiará de su utilización durante mucho tiempo.
El ritmo de vida moderno es tenso y estresante. Por lo tanto, un factor muy importante es disponer de una noche silenciosa
y la posibilidad de recuperarse durante el sueño. Aproximadamente, del 30% al 40% de la población de mediana edad actual
ronca y es un número en continuo crecimiento. Mucha gente piensa que roncar es sólo un pequeño problema que no afecta
a la salu d. E sta s upo sici ón e s un g ran erro r. Pu ede prov oca r que una alta pre sión san guín ea, i ncr emen tar el ri esg o de
ataques al corazón, infarto, fatiga, depresión, etc. Pero hay algo seguro: Incluso en los casos menos severos de ronquidos,
molestamos a nuestras amadas parejas y les evitamos que recuperen sus fuerzas durante la noche.
Pero todo esto puede detenerse utilizando Snore Stopper. Snore Stopper es un nuevo dispositivo, diseñado para reducir
los ronquidos mediante un proceso de retrobioalimentación: cuando el dispositivo detecta el inicio del ronquido, se enviará
au to mát ica me nt e un su av e im pu lso el ect ró nic o p ara es tim ul ar los ne rvi os de l a p iel de l us ua rio du ran te un os 5 se gun do s
ha st a qu e e l u sua ri o re du zca lo s r onq ui dos de vo lvi en do los mú scu lo s la rí ng eos a s u p osi ci ón n or ma l o a lt ere la pos ic ión de
sueño. Este proceso único, deriva en una reacción subconsciente sin despertar al usuario y sin molestar al cerebro, que es la
parte que controla el sueño. Verá qué fantásticos resultados obtiene cuando utilice Snore Stopper duran te uno o dos
me ses. Sno re Stopper es una elección segura e inteligente para reducir esos molestos ronquidos y permite a su familia
obtener un sueño de mejor calidad en el futuro.
UTILICE SOL AMENTE DE LA FORMA INDICADA Y, SI LOS SÍNTOMAS PERSISTEN, CONSULTE A UN MÉDICO
Caja de pilas (1 pila AAA)
Electrodos
autoadhesivos
Interruptor de encendido /
nivel de intensidad
Indicador LED
Detector
Botón de prueba

62 Spanish version.................................................................................................... ....................................................................................................Spanish version 63
I ) Montaje previo a la utilización
1. Instalación de la pila
a.) Abra el compartimento de la pila con un destornillador para instalar la pila
AAA. Asegúrese de que el polo + de la pila se coloca hacia el Interruptor
de encendido / Nivel de intensidad como se muestra en la figura I.
b.) A continuación cierre la tapa del compartimento y apriete el tornillo.
2. Pegado de las almohadillas de los electrodos
a.) Abra el envase al vacío y extraiga un juego de almohadillas autoadhesivas
para los electrodos. A continuación, despegue con cuidado dos
pequeños cuadrados de plástico con las palabras Self-adhesive
electrode pad impresas. (En este momento, no extraiga la película de
plástico mayor.) como se muestra en la figura II.
b.) Pegue los electrodos en la parte posterior del dispositivo, dentro de las
almohadillas conductoras. Pulse suavemente las almohadillas con los dedos
en el dispositivo y, a continuación, extraiga la película de plástico mayor
como se muestra en la figura III.
3. Ajuste de la muñequera
a.) Cuando haya adherido las almohadillas de los electrodos, prepárese para
utilizar el Snore Stopper. Como se muestra en la figura V la muñequera
debe colocarse en el enganche izquierdo. Coloque la cinta en este lado
ahora.
b.) Coloque el dispositivo 2,5 cm sobre la muñeca tal y como se muestra en la
figura IV y ajuste la cinta hasta el otro enganche del dispositivo como se
muestra en la figura VIII. A continuación apriétela y fije este extremo de la
cinta como se muestra en la figura VI. (No apriete demasiado la cinta,
podría dificultar la circulación. De hecho, este dispositivo funcionará
correctamente cuando toque ligeramente la piel.)
Funcionamiento de la unidad Funcionamiento de la unidad
I
II
III
IV
V
VI
(Sugerencia: Cuando cambie las almohadillas de los electrodos, apriete
firmemente con el pulgar en las almohadillas adheridas al dispositivo y
realice un movimiento circular para asegurar una mejor adherencia.)

64 Spanish version.................................................................................................... ....................................................................................................Spanish version 65
II) Utilización del dispositivo
1. Compruebe el funcionamiento del dispositivo antes
de utilizarlo
a) Enciéndalo y ajuste la intensidad al nivel 1. Compruebe si el indicador LED
(luz verde) está parpadeando.
b) Pulse el botón de prueba tres veces seguidas. El dispositivo emitirá un débil
impulso eléctrico que durará unos 4 segundos. A continuación puede ajustar
la intensidad al nivel que desee.
c) Debido al diferente nivel de sensibilidad dependiente del tipo de piel, puede
que no sienta el impulso eléctrico. En este caso, pulse el botón de prueba
tres veces consecutivas y ajuste el nivel de intensidad para ajustarlo a sus
preferencias. Durante la noche, los nervios se estimulan más fácilmente,
por lo que es recomendable que comience con 1~2 niveles menos para
obtener el mejor efecto.
2. Significado de la iluminación del LED:
a) Como norma general, el LED cambiará de rojo a verde, lo que significa
que el dispositivo dispone de un contacto apropiado con la piel y puede
comenzar a utilizarlo.
b) Si el LED sigue mostrando la luz roja, el dispositivo no está realizando un
contacto apropiado con la piel.
c) Por lo tanto, debe ajustar la muñequera en una posición en la que el LED se
Operate the unit Operate the unit
ilumine en verde.
d) Si el dispositivo sigue sin funcionar, consulte la sección Mantenimiento y
solución de problemas en la página 66.
3. El diseño inteligente patentado del dispositivo puede detectar
automáticamente ronquidos superiores a 65 dB, pero en un entorno sin ruido
de fondo. Desde este momento puede evitar los molestos ronquidos y permitir
que su familia disponga de un sueño de mejor calidad en el futuro.
* Utilice siempre los accesorios especificados en el manual. La utilización de
componentes no aprobados por el fabricante podría suponer un riesgo.
III) Tras la utilización
1. Después de utilizar el dispositivo, siga las instrucciones detalladas a
continuación para evitar dañar las almohadillas de los electrodos,
a) Desenganche la muñequera.
b) Desmonte suavemente el dispositivo de la muñeca.
2. Cuando se quite el dispositivo después de utilizarlo, vuelva a colocar la
película de plástico sobre las almohadillas. Esto ayudará a evitar que las
almohadillas se contaminen con partículas de polvo y mejorará la vida útil
de las almohadillas de los electrodos. Este dispositivo se desconectará,
automáticamente tras 8 horas. Para alargar la vida de la pila, apáguelo
cuando se despierte.

66 Spanish version.................................................................................................... ....................................................................................................Spanish version 67
Mantenimiento y solución de problemas
1. Las almohadillas autoadhesivas de los electrodos deben mantenerse
limpias. Para mantener el funcionamiento del dispositivo, NO frote las
almohadillas de los electrodos con las manos tejido facial o lana.
2. Las almohadillas de los electrodos perderán adherencia tras utilizar el
dispositivo durante un cierto periodo de tiempo. En este punto, la
intensidad de la señal puede debilitarse y sentirá que es más débil que
anteriormente. En este caso, ponga una gota de agua en la yema de los
dedos y humedezca ligeramente las almohadillas. Tras unos instantes, la
señal volverá a sentirse más fuerte.
3. Si no puede sentir la señal, cambie las almohadillas por unas nuevas.
Consulte la sección 2. Pegado de las almohadillas de los electrodos en la
página 62. (Nota: Por lo general, las almohadillas de los electrodos pueden
utilizarse continuamente durante 30 noches.)
Mantenimiento y solución de problemas
4. Si el indicador LED no se ilumina durante el procedimiento de prueba,
compruebe lo siguiente:
a.)¿Está la pila instalada correctamente? (El signo + mirando hacia
arriba )
b.)¿Está agotada la pila? Si es así, reemplácela por una nueva.
Si ha comprobado los puntos anteriores y el dispositivo sigue sin funcionar
correctamente, envíelo de vuelta a su distribuidor local para reparar.
*Utilice siempre los accesorios especificados en este manual. La utilización de
otros componentes, no aprobados por el fabricante podrían provocar riesgos.
No intente reparar el dispositivo En el interior no hay ningún componente que
necesite mantenimiento por parte del usuario.

68 Spanish version.................................................................................................... ....................................................................................................Spanish version 69
Preguntas frecuentes de usuarios
Preguntas frecuentes de usuarios
1. P: ¿Funciona de verdad Snore Stopper?
R : Si, funciona, pero no para aquellos individuos con problemas médicos serios tal como se indica en las secciones de
intro ducc ión y adv erte nc ias . Utilice sol amen te de la for ma ind icada . Si apar ece alg ún sín tom a inus ua l, inte rr um pa el
tra tam ien to y cont act e a s u méd ico . La u til iza ción del S nor e Stopper requiere autodisciplina, una utilización
cuidadosa y tiempo para formar los reflejos.
Nosotros utilizamos biosensores electrónicos integrados especiales, diseñados para detectar ronquidos, basados en las
propiedades biofísicas de los ronquidos. Además, gracias a las amplias posibilidades de detección no importa si la mano
se encu ent ra d ebaj o o e ncim a de la m ant a, s i el r onq uid o es s upe rior a 65 ~70 dB y ocu rre 3 vec es s egu idas , el Snor e
St opp er lo det ec tar á y ac tiv ar á e l di sp osi ti vo p ar a q ue r es po nda au tom át ic ame nt e.
2. ¿Reducirá realmente ni ronquido?
R: Los ronquidos están provocados por un estrechamiento de canal de paso del aire. Cuando dormimos, nuestros nervios
se enc ue nt ran re laj ad os y cu an do e l a ire pa sa p or un pas aj e es tr ech o a l r esp ir ar, pr ovo ca que lo s te ji dos bl an dos
(amígdalas, velo del paladar y úvula) vibren. Esta vibración es el sonido del ronquido. Por lo general, el ronquido puede
reducirse si la persona que ronca cambia la posición de sueño o reciben una estimulación nerviosa suave. Snore
Stopper se ha desarrollado basándose en este concepto. Cuando se detectan los ronquidos, el dispositivo emitirá un
im pul so de 5 se gu ndo s d e du ra ció n s obr e l a pi el sup er fic ia l, a con ti nu aci ón , el ro nqu id o se su av iza rá d e l as s ig uie nt es
ma ne ras : i .) Cam bi an do la p os tur a d e s ue ño i i. ) I ncr em ent an do la ten si ón mu scu la r de lo s m ús cul os de la g ar ga nta
gracias a la estimulación nerviosa.
Ruido de fondo doméstico Sensor de Snore Stopper
Superior 65 dB (a 50 cm de la TV) Se activará ocasionalmente
60 dB (a 1 m de la TV) Se activará ocasionalmente
55 dB (a 1m de un aparato de aire acondicionado) Se activará ocasionalmente
Inferior a 55 dB No se activará
3. ¿Qué significa dB? ¿Cómo puedo estar seguro de que Snore Stopper puede
utilizarse en mi casa?
R : dB (decibelio) es una unidad de medición de la intensidad del sonido. Si se encuentra en un entorno con una
intensidad de sonido continua superior a 70 dB, estamos hablando de un entorno ruidoso. Por lo general no solemos vivir
en este tipo de entornos. El diseño de Snore Stopper está basado en la fuente de un nivel de ruido de fondo doméstico.
Puede consultar la tabla siguiente para conocer cuáles son las condiciones de sueño óptimas para su utilización.
Observaciones :en condiciones normales, el ruido de fondo de su casa será de 30~50 dB
4. ¿Por qué parece tan débil la intensidad durante los procedimientos de prueba?
R: Puede deberse a tres motivos, i.) la diferencia de sexo, edad, peso e impedancia de la piel provocará diferencias en la
sensibilidad. De hecho, la intensidad del impulso de salida se encuentra dentro de los márgenes de seguridad, por lo que
generalmente debería sentirlo. Si se encuentra distraído, puede que su sensibilidad se reduzca. ii.) Los nervios de la piel
se encuentran al máximo de su sensibilidad durante la noche, puede que al probarlo durante el día la intensidad parezca
mucho más reducida. iii) Asegúrese de haber colocado las almohadillas de los electrodos en su sitio o si es necesario
reemplazarlas por estar gastadas del uso.

70 Spanish version.................................................................................................... ....................................................................................................Spanish version 71
Preguntas frecuentes de usuarios
5. Cuándo simulo los ronquidos en un entorno silencioso, ¿Por qué no funciona el
dispositivo?
R: El biosensor especial de Snore Stopper está diseñado para reaccionar a las propiedades biofísicas de los ronquidos.
Pruebe a simular los ronquidos de las siguientes maneras: diga un largo 1, 2, 3 o emita 3 ronquidos consecutivos con la
misma frecuencia y una intensidad de al menos 65 dB. ¡Inténtelo de nuevo!
6. ¿Por qué siento una estimulación prolongada especial? ¿Pasa algo extraño con el
dispositivo?
R: Este es un diseño integrado especial. Dado que el microprocesador recoge la frecuencia de su ronquido, si el dispositivo
detecta 15 consecutivos, emitirá una estimulación larga de 25 segundos para educar a las personas con ronquidos fuertes
para que cambien la postura de sueño.
7. ¿Hay dos partes diferentes en la almohadilla de los electrodos? ¿Importa si no hay
un contacto adecuado?
R: Si, las dos caras son diferentes. Para diferenciarlas, la cara de la almohadilla que debe colocarse hacia el dispositivo,
dispone de un adhesivo más fuerte (La cara en la que aparecen unas palabras impresas en la película de protección
encerada). El dispositivo funcionará mientras que las almohadillas de los electrodos estén conectadas correctamente a las
gomas negras de conducción del dispositivo. Las almohadillas pueden utilizarse durante bastante tiempo.
No coloque las almohadillas de los electrodos demasiado juntas una a la otra, esto afectaría a la conductividad. En caso de
que las almohadillas queden pegadas, sepárelas suavemente y vuelva a colocarlas correctamente.
Caution
Precaución
1. Ante de utilizar el dispositivo debe ajustar el nivel de intensidad a CERO.
2. NO utilice el dispositivo si no se han colocado las almohadillas de los
electrodos.
Además, cuando pulse el botón de prueba, NO toque las almohadillas de los
electrodos con los dedos.
3. No utilice el dispositivo por debajo de la muñeca.
4. NO se la ve las manos mientras lleve puesto el dispositivo.
5. Cuando ajuste la muñequera, NO tire de la cinta con fuerza. Acortaría la vida
del dispositivo.
6. NO utilice SIMULTÁNEAMENTE con otros dispositivos médicos electrónicos.
7. El dispositivo debe mantenerse fuera del alcance de los niños.
8. Si desarrolla irritaciones en la piel, interrumpa la utilización y consulte a un
médico.
9. Las pilas no deben tirarse
en la basura doméstica.
Devuélvalas a los puntos de
recogida públicos o a tiendas
que vendan pilas del mismo
tipo.

72 Spanish version....................................................................................................
AVISO!
1. Este dispositivo NO es adecuado para personas con marcapasos cardiacos y aquellos que estén siendo sometidos a un
seguimiento con equipo electrónico (como monitores y alarmas ECG)
2. Snore Stopper no debe ser utilizado por pacientes de apnea de sueño o aquellos con piel sensible.
3. NO utilice este dispositivo durante el embarazo excepto con el consentimiento del médico.
4. Los pacientes con enfermedades graves e infecciosas pueden utilizar este dispositivo solamente con consentimiento del
médico.
5. Los pacientes con enfermedades agudas de piel o piel sensible, o con hemorragias NO DBEN utilizar este dispositivo.
6. NNO utilice este dispositivo sobre zonas hinchadas, infectadas o inflamadas o con erupciones en la piel como por
ejemplo, flebitis, tromboflebitis, varices, etc.
7. Los pacientes con problemas cardiacos NO DEBEN utilizar este dispositivo excepto bajo consejo médico.
8. NO se coloque el dispositivo sobre la boca, el cuello o la región de los párpados.
9. Si se utiliza cerca (ej. 1 metro) de un aparato de onda corta o microondas, pueden aparecer irregularidades en la salida
del dispositivo.

Especificaciones técnicas
1.Amplitud de impulso: Fija 180 µA con picos de 1,000
2.Velocidad de impulso: Fijo a 0,2 Hz
3.Amplitud de impulso: Fija a 800 µs, con ajuste de voltaje de 2,5 a14 V de pico en 1,000
4.Forma de onda: impulso cuadrado bifásico asimétrico
5.Temporizador: Desconexión automática a las 8 horas
6.Fuente de alimentación: 1 pila AAA de 1,5 Voltios
7.Entorno de funcionamiento: 10°C ~ +40°C, 30 ~ 85 % RH
8.Entorno de almacenamiento: -20°C ~ +50°C, 10 ~ 95 % RH
9.Entorno de transporte: -10°C ~ +50°C, 35 ~ 85 % RH
10.Longitud máxima de muñequera: 22 cm, si necesita una muñequera mayor, póngase en contacto con su
distribuidor para obtener un recambio.
(Todas las especificaciones eléctricas son ±20% 1,000 )
*El diseño y las especificaciones están sujetos a cambio sin previo aviso.
Nota :Este dispositivo cumple con los Requisitos de compatibilidad electromagnética de EN 606011-2 como se especifica en la directiva EEC 93/42/EEC.
.................................................................................................... 73

Printed in Taiwan SS200-6610-02
©2002 by HIVOX BIOTEK INC.
R
HIVOX BIOTEK INC.
12/F, No.156, Sec.1, Chien Kuo North Road,
Taipei 104, Taiwan, ROC
www.hivox-biotek.com
 Loading...