

Hivision PWS700B Users manual
PWS700B
User’s Manual
1

Contents
1. Product Overview
The PWS700B is an affordable product with low power consumption, designed for communication and
digital multimedia entertainment by accessing Internet through a broadband terminal. It can be easily
operated by the user, without bothering about intrusion of viruses. In addition to a variety of multimedia
entertainment and high-speed broadband Internet access functions, the PWS700B can be used for
other purposes, such as the e-book reader, picture browser, Flash player, instant communication,
e-dictionary, MP3 player, game simulator and PDA. Also, it provides the user with personalized and
abundant Flash desktops.
Remarkable characteristics
— 7-INCH TFT-LCD
— True color image display
— Broadband Internet access
— Highly secure Linux OS, free of viruses
— All kinds of Xiptech application software packages
Enriched experience
— Internet surfing, information searching and news reading
— Instant online communication with family, friends or classmates
— Movie and music downloading and enjoying
— Flash movies and games
— All types of games simulation
— Picture and image sharing
2

— English searching and learning
Office assistant
— Office software package
— E-mail receiving and sending management
— Daily work plan and management
— PDF viewer
— E-book reader
2. System Overview
Provided with the embedded Linux OS, the PWS700B features perfect performance, adaptability and
robustness. It gives the user a stable work environment and software running environment.
3. Hardware Overview
◆ Processor: Intel xsales 416MHz 32-bit CPU
◆ Display terminal: 7-inch 800*480 true-color LCD
◆ RAM: 64M RAM
◆ Storage: 1G NAND Flash
◆ USB port: 2 extensible USB ports
◆ External storage: SD card slot
◆ Input device: standard keyboard and mouse
◆ Broadband interface: 10/100MB Ethernet interface
◆ Network access: ADSL, WiFi, CDMA, GPRS (optional)
◆ Appearance of the device
3
y
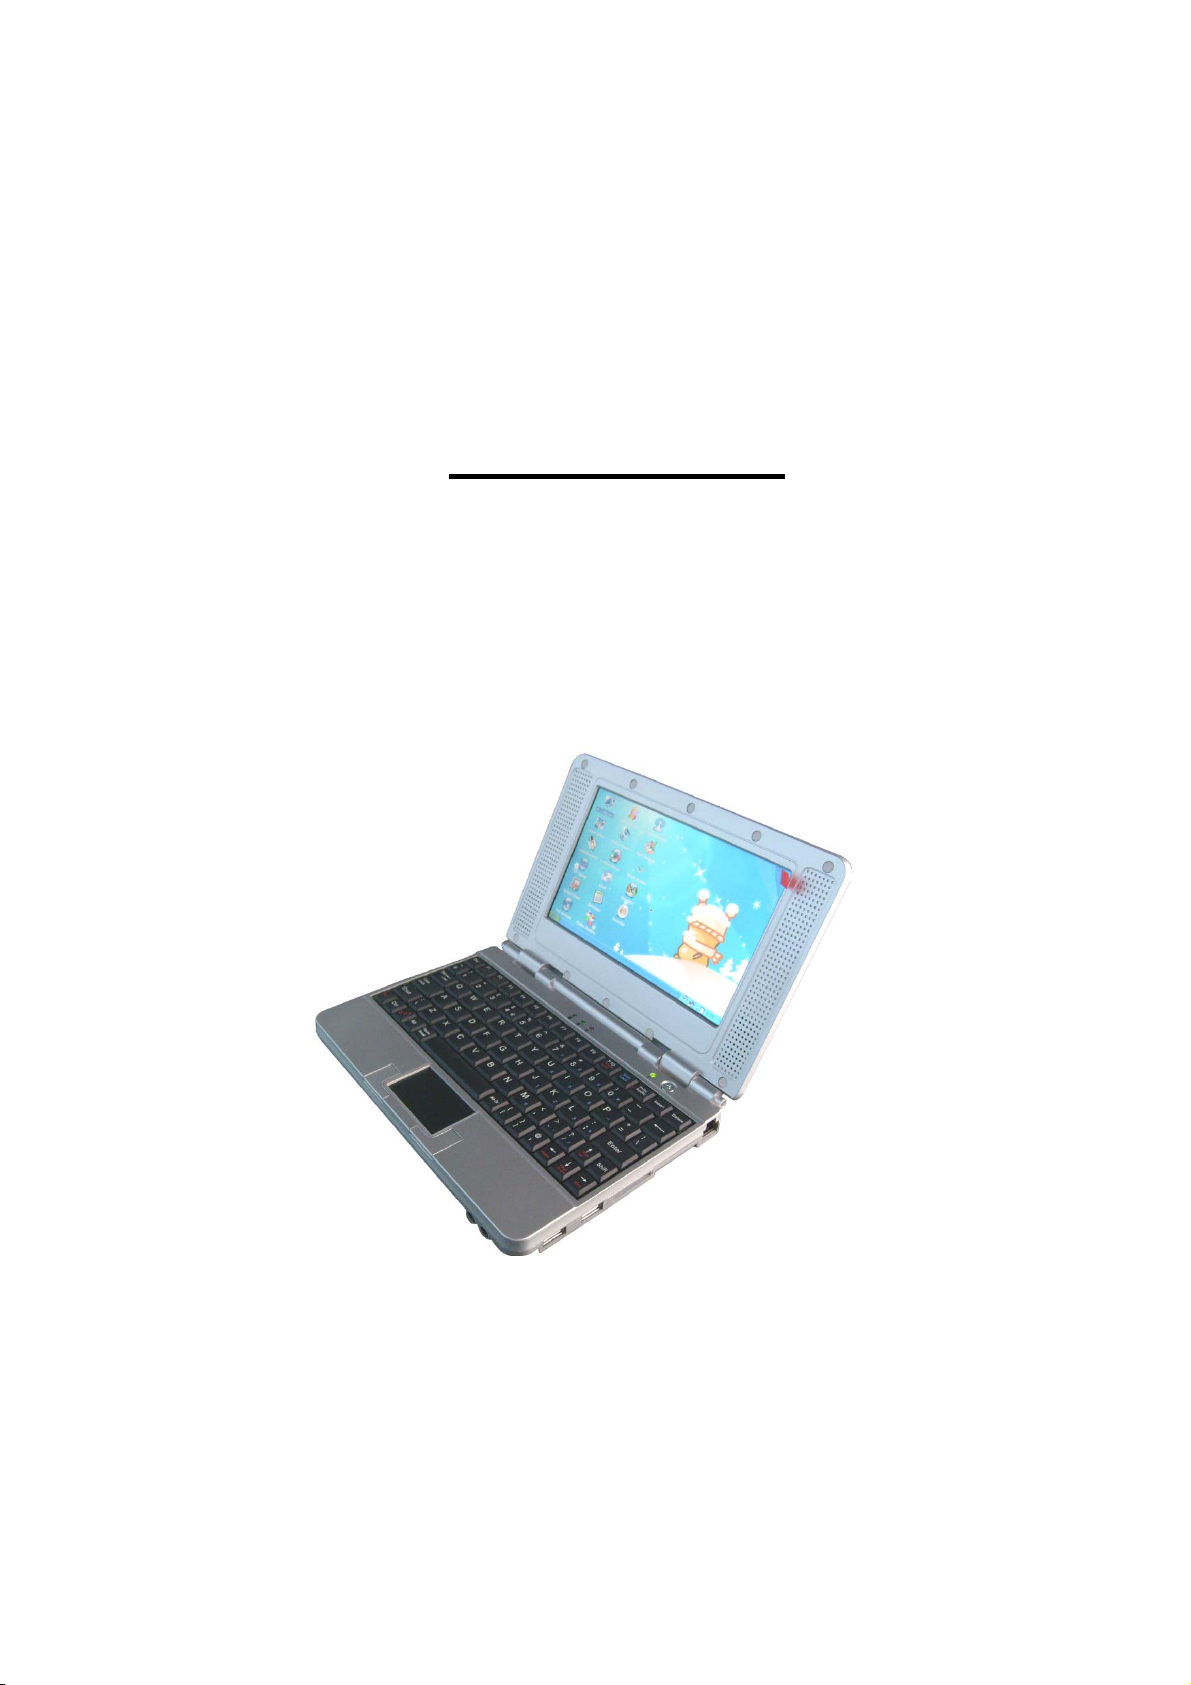
4. PWS700B Discription
.1) Outlook Discription
Front View
Speaker
Left key
Appearance
Display
Speaker
Keyboard
Right ke
Figure 1
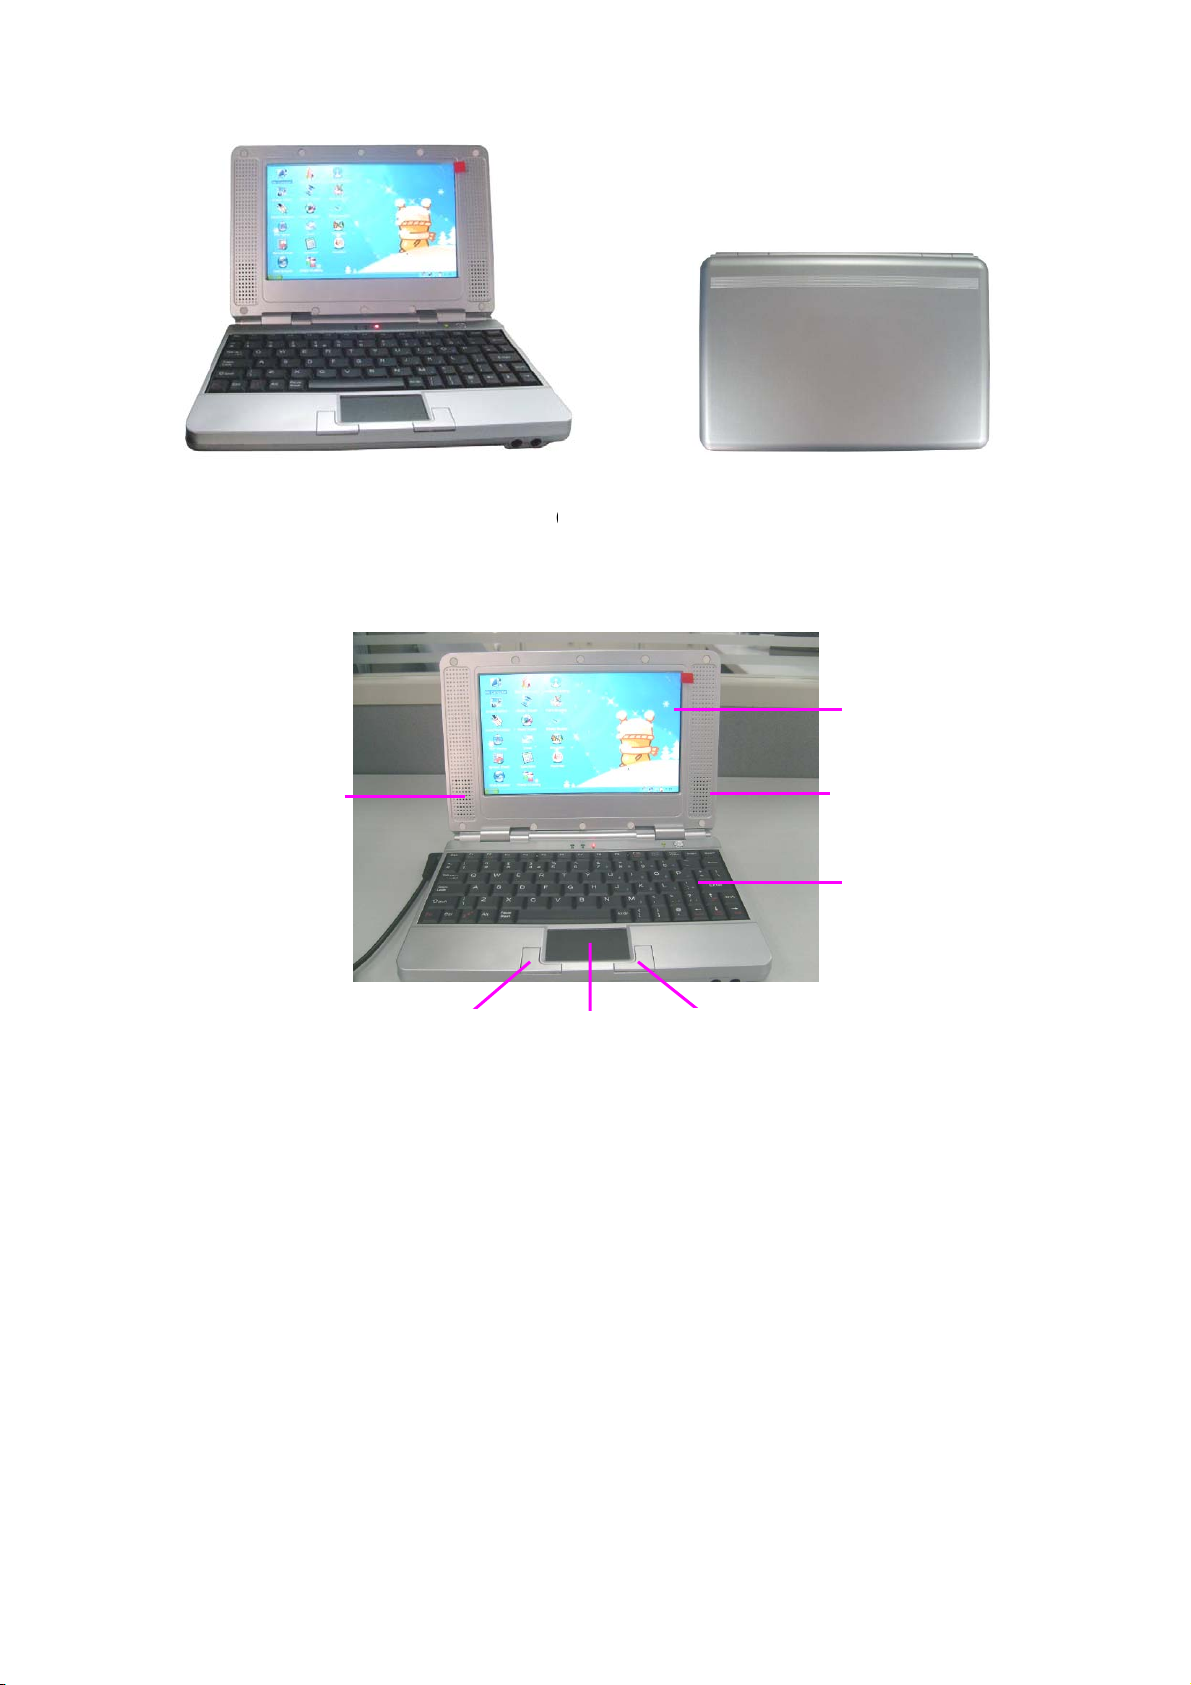
LED status indicator discribe as from left to right:① Capital letter status;② Num Lock status;③
Battery charge status;④ Power on/off
Side View
4
USB Port
Figure 2
Ethernet Port SD/MMC Slot
Microphone port Earphone
Power port
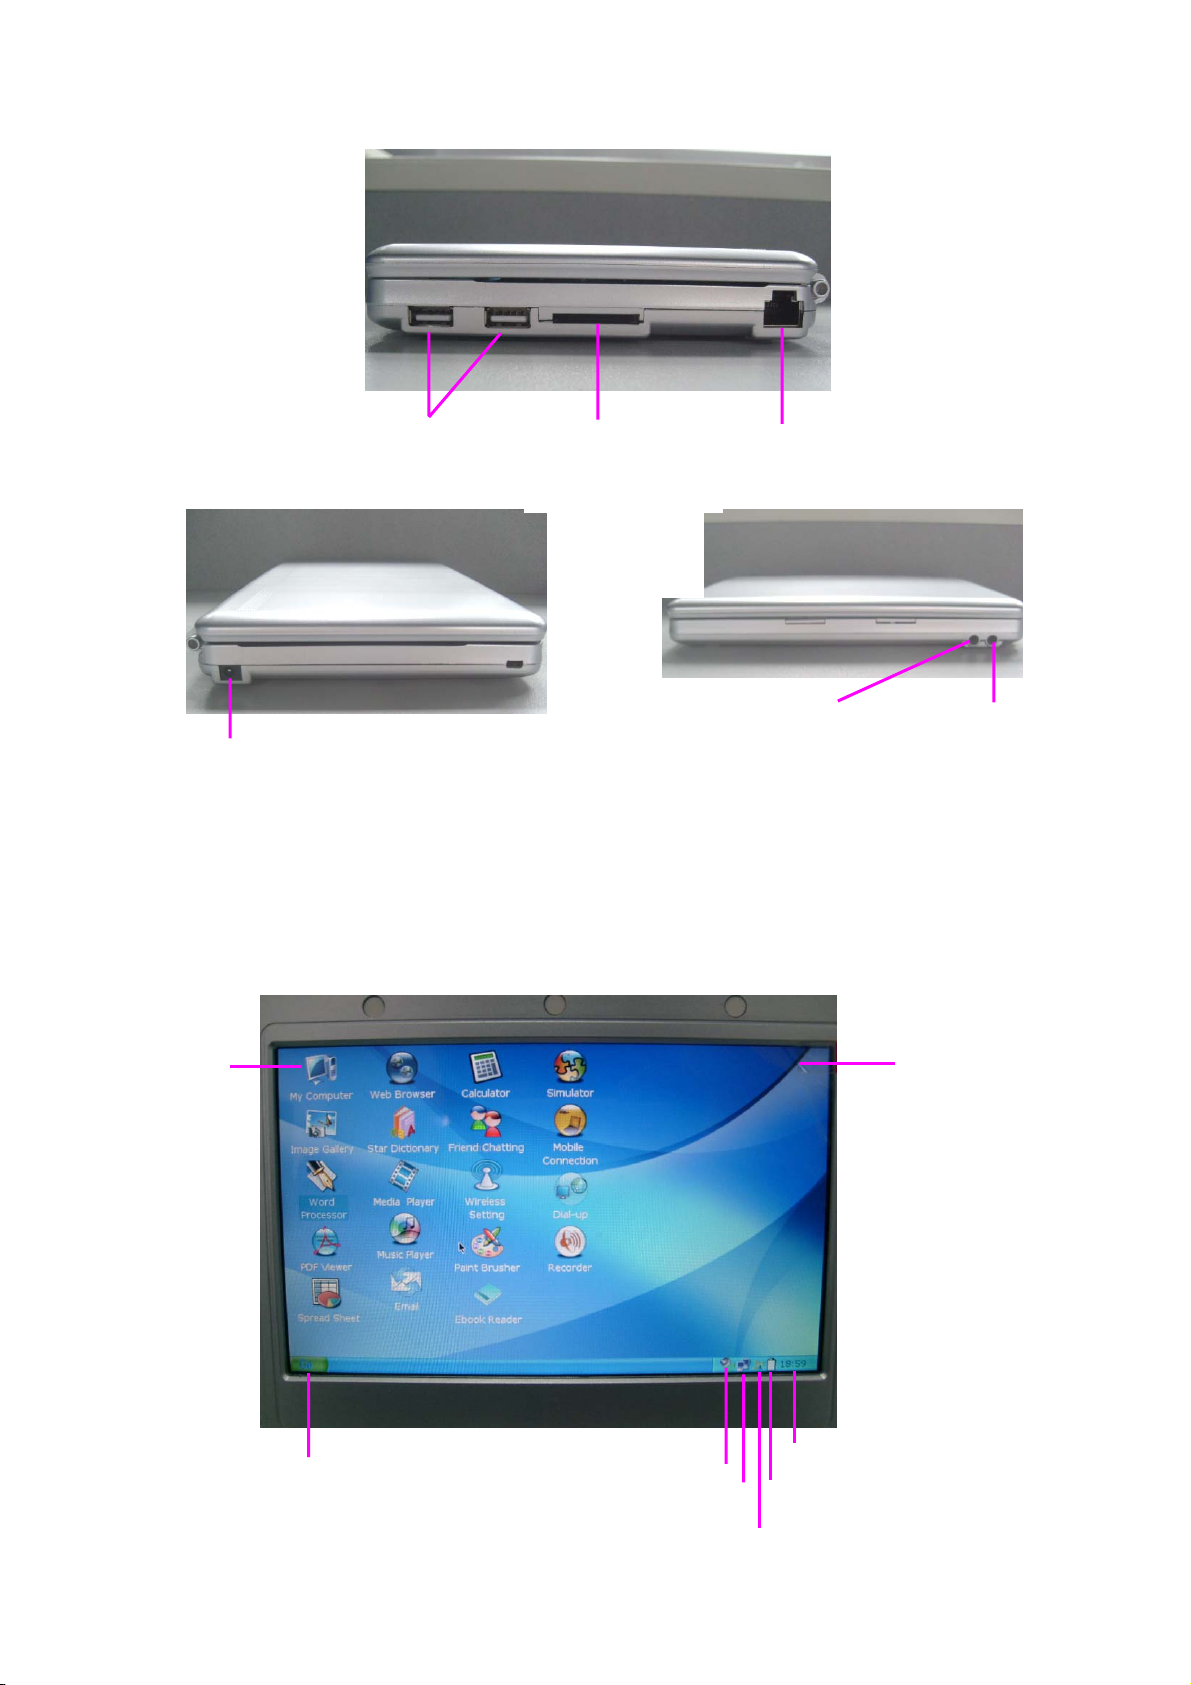
2) Desktop Discription
Application
icons
Figure 3
Figure 4
Desktop
Current Time
Start Menu
Volume Adjust
Battery Charges Status
5

LAN
WIFI Connetion Update Tool
Figure 5
5. Battery Charging
◆ Battery Charging for PWS700B
PWS700B is player with Internal Charging Battery,we suggest to charge up the battery when
the battery power is low.This can keep the best using for the battery,especially the first time of
charging.
◆ Way to Charging Battery
1) Plug in the power adapter to the power port of PWS700B,battery charges LED will light
up.Charging procedure will be completed once the LED turns off.
2) Plug in the power adapter to the power port of PWS700B,battery charges LED will light
up.Once power on PWS700B by pressing and hold Power on/off button,Charging status
will display on the sceen indicated as below.During battery charging,Charging indication
appears until Charging procedure is completed.Charging status LED should also turn
off,then user can unplug the power adapter.
Charging
3) During battery charging,user can operate PWS700B as usual.
4) Battery charging procedure normally need around 6 hours from low battery level to full
charging.During battery charging, the machine will become warm and this is a normal
condition.
Charging finish
6. Application discription
◆ Internet Access Express
The Internet access express is a kind of browser, also called the firefox browser. This browser allows
the user to open multiple pages in the same window and does not limit the page quantity. The system
resource occupation rate is relatively low. Its major functions include webpage browsing, webpage
6
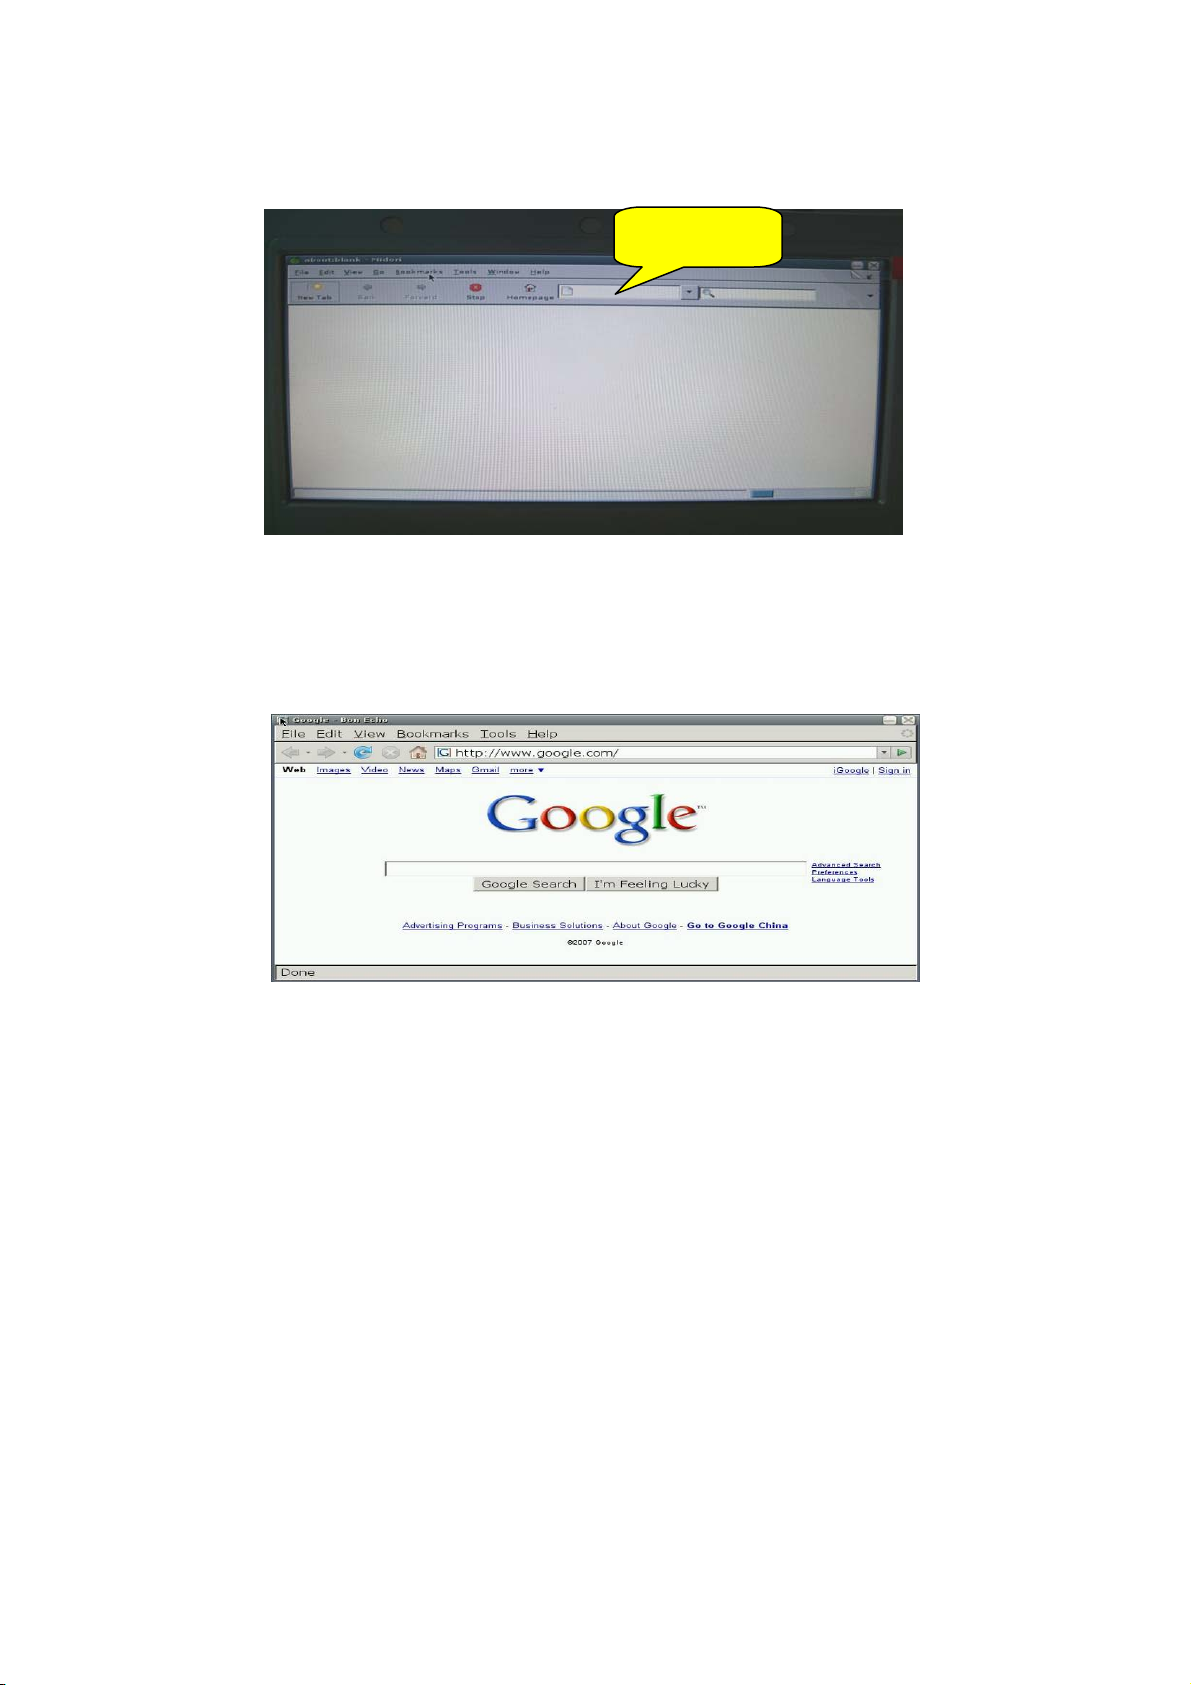
saving, online video, and opening pictures or files.
1) To open Web Browser, double click the Web Browser icon on the desktop, as shown in Figure 1:
2) Enter the web page address to be visited in the address bar on the interface in Figure 1. For
Figure 1
example, access http://www.google.com. The homepage of Google is opened in the window, as
shown in Figure 2:
Figure 2
3) You can open multiple web pages in the Web Browsing, but only currently browsed window is
displayed. To create a window, select File → New tab in the menu. To switch between different
tab pages, click the related tab. The tab browsing interface is shown in Figure 3:
7
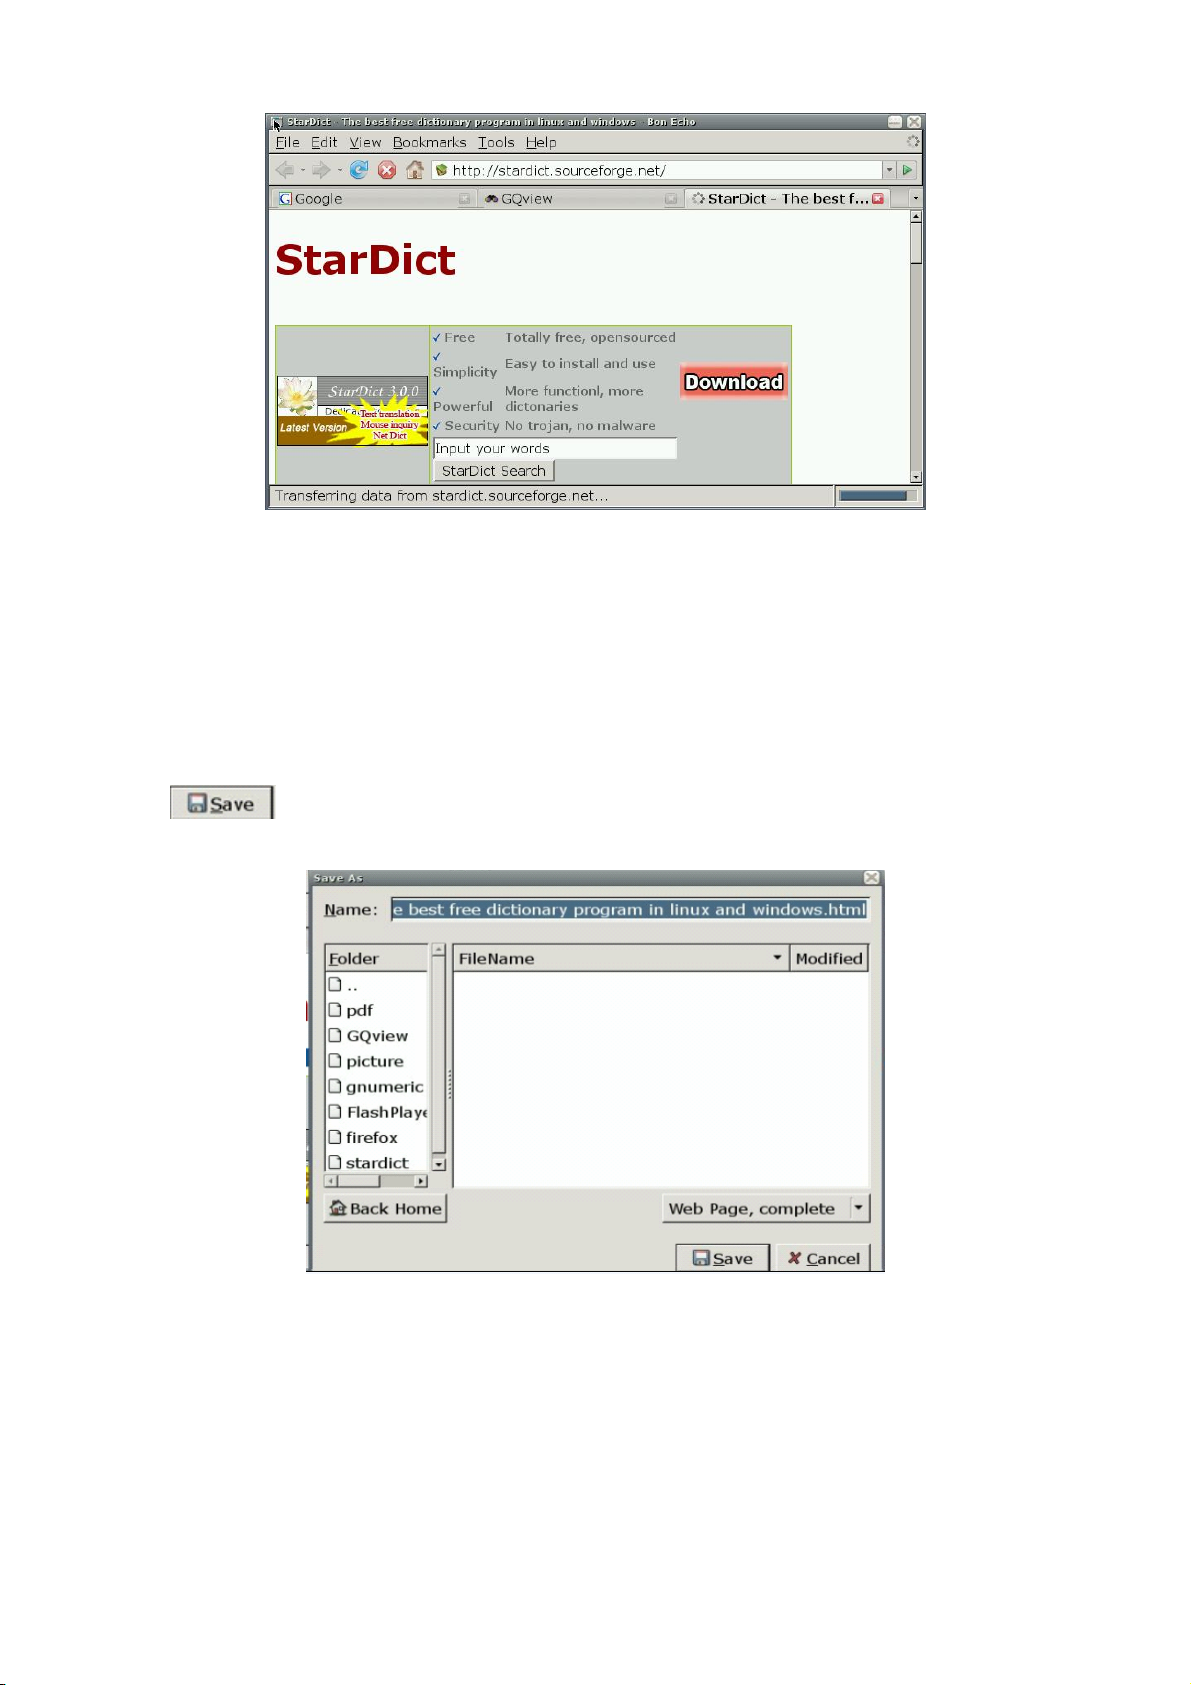
Figure 3
To close the current tab page, select File → Close tab in the menu.
To close the Web Browsing window, select File → Close window in the menu.
4) To save the favorite web page in the desired mode, select File → Save page as in the menu, as
shown in Figure 4. Enter the file name to be saved, select the saving directory, and click the
button to save the file.
Figure 4
5) For the personal private information stored in the browser, the Web Browsing provides the Clear
Private Data function through the Tools menu. Select Tools →Clear Private Data in the menu,
to display the window shown in Figure 5. Check the data to be cleared, and click the
8
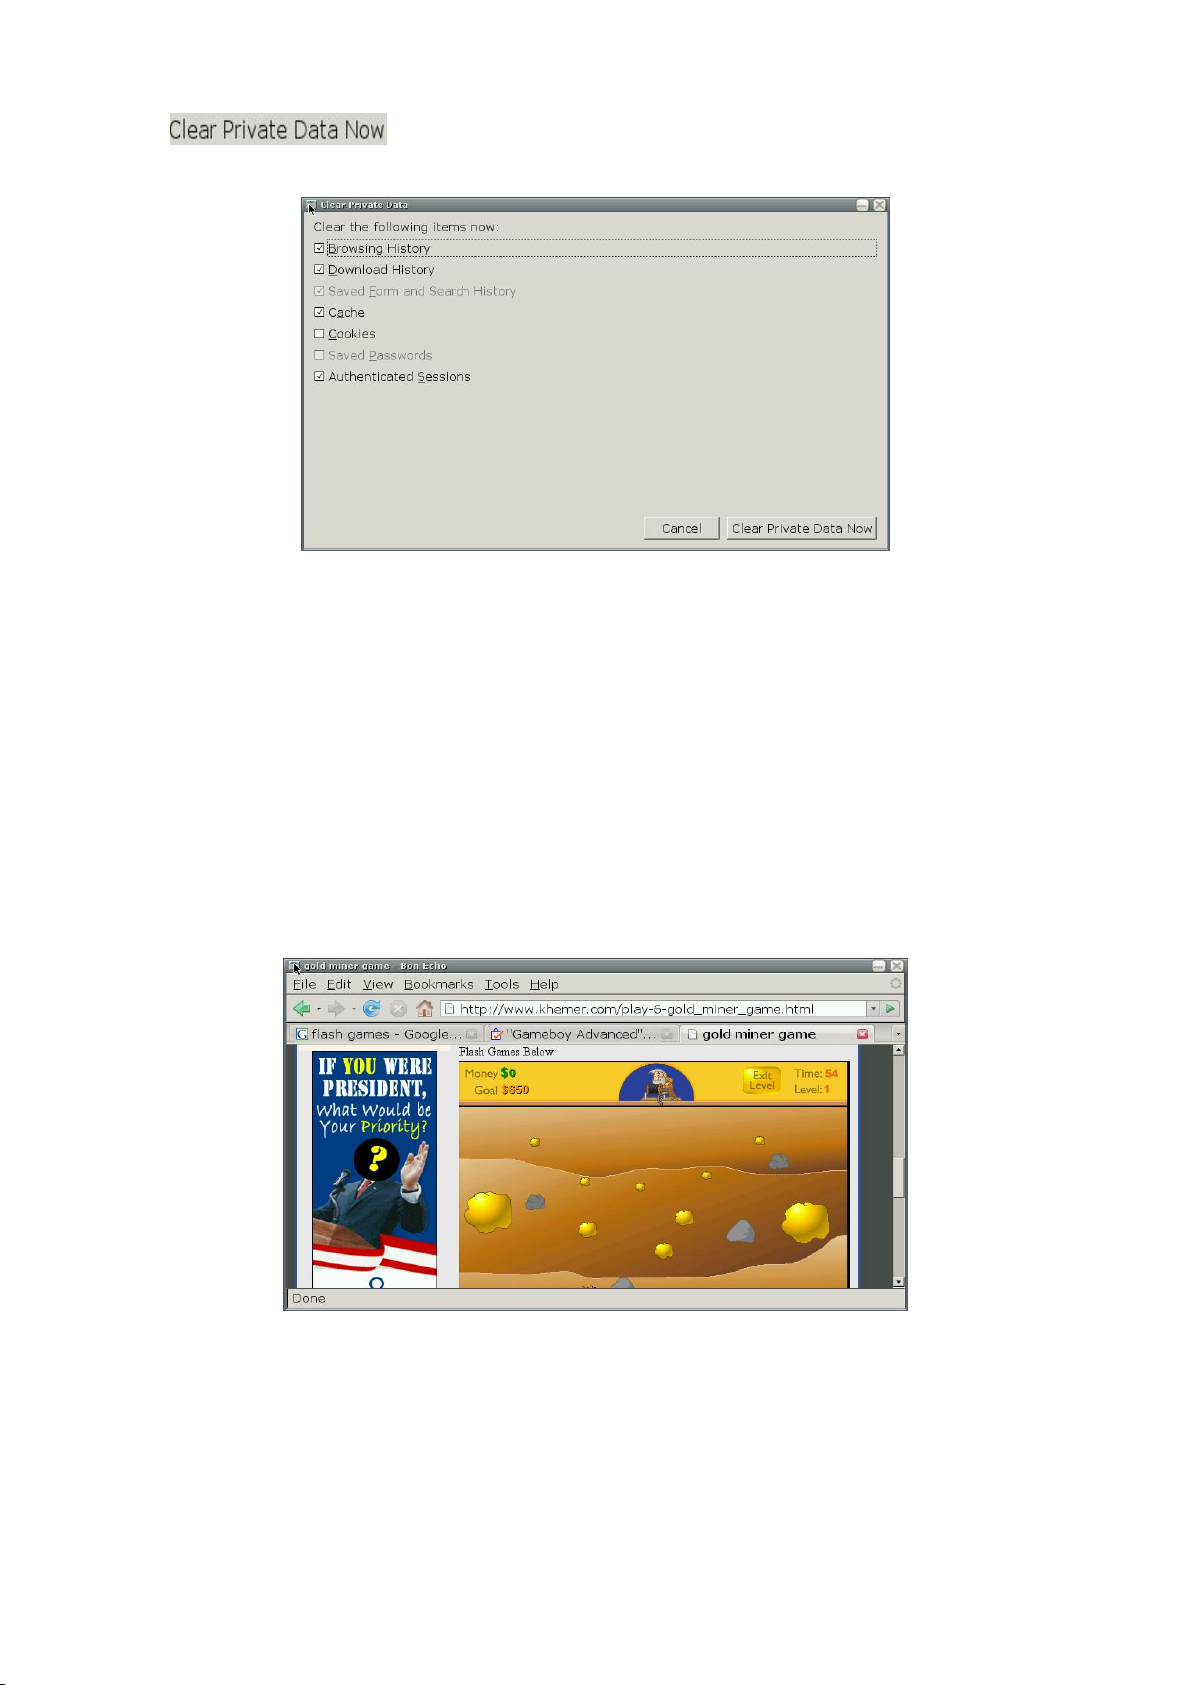
button to clear the personal private information.
Figure 5
6) The bookmark management function of Web Browsing is equal to the My Favorite function of
Windows IE, but it is more powerful. To open the powerful bookmark manager, select
Bookmarks → Organize Bookmarks in the menu. With this function, You can add a bookmark
to the current page or manage bookmarks. Just experience the specific operation by yourself!
7) You can watch flash programs online by using the Web Browsing browser. When you browse
web pages, Web Browsing can display animated pictures on the web page or play the online
flash program. You can click to play the flash program, as shown in Figure 6:
Figure 6
8) To obtain the help information of Web Browsing, select Help → Help Contents in the menu, as
shown in Figure 7.
9
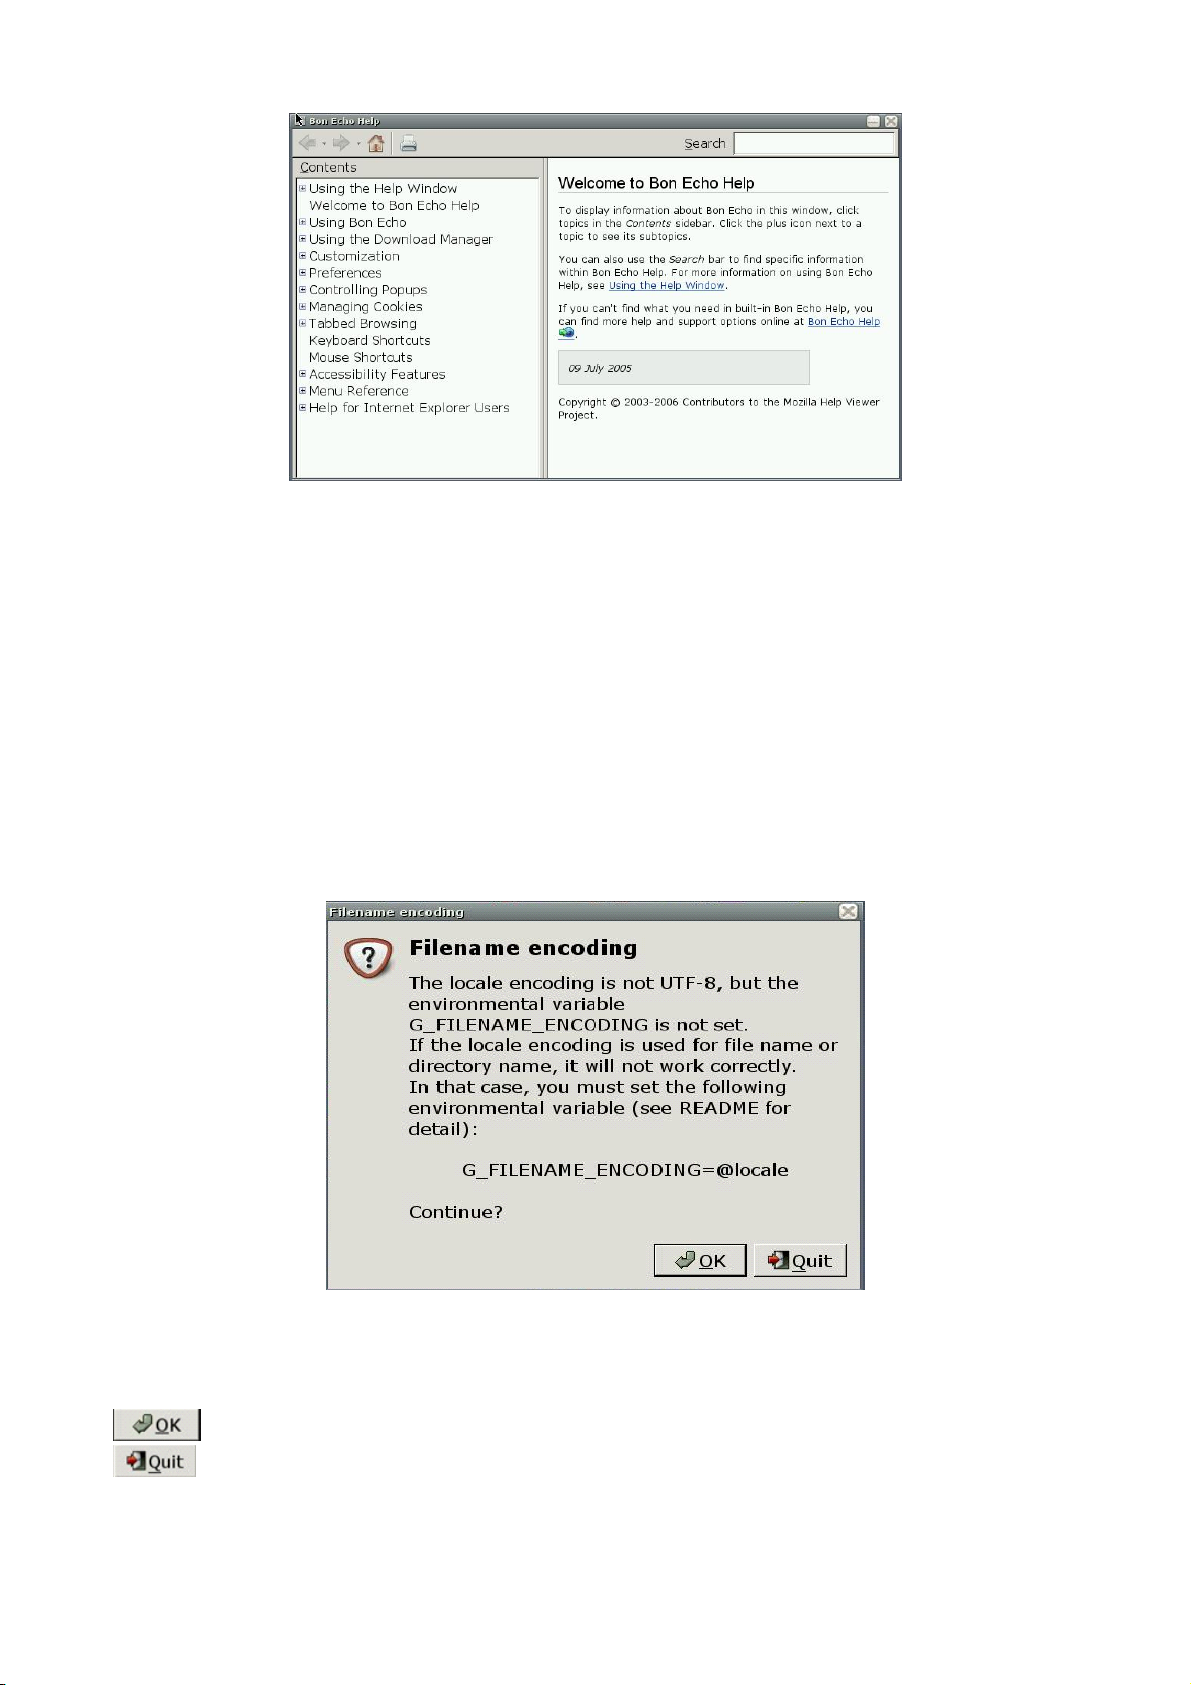
Figure 7
For more information about Web Browsing, visit http://www.mozilla.com/en-US/.
◆ Email Box
Email Box is a client email receiving and sending manager that can be operated easily just like
Outlook. If you have ever operated Outlook, you can use Email Box as easy as turning your hand
over.
1) Double click to open the Email Box application on the desktop, as shown in Figure 1:
Figure 1
The interface shown in Figure 1 will be displayed only when Email Box is opened for the first time. Click
on this interface to enter the Email Box, as shown in Figure 2. To exit the Email Box, click
.
10
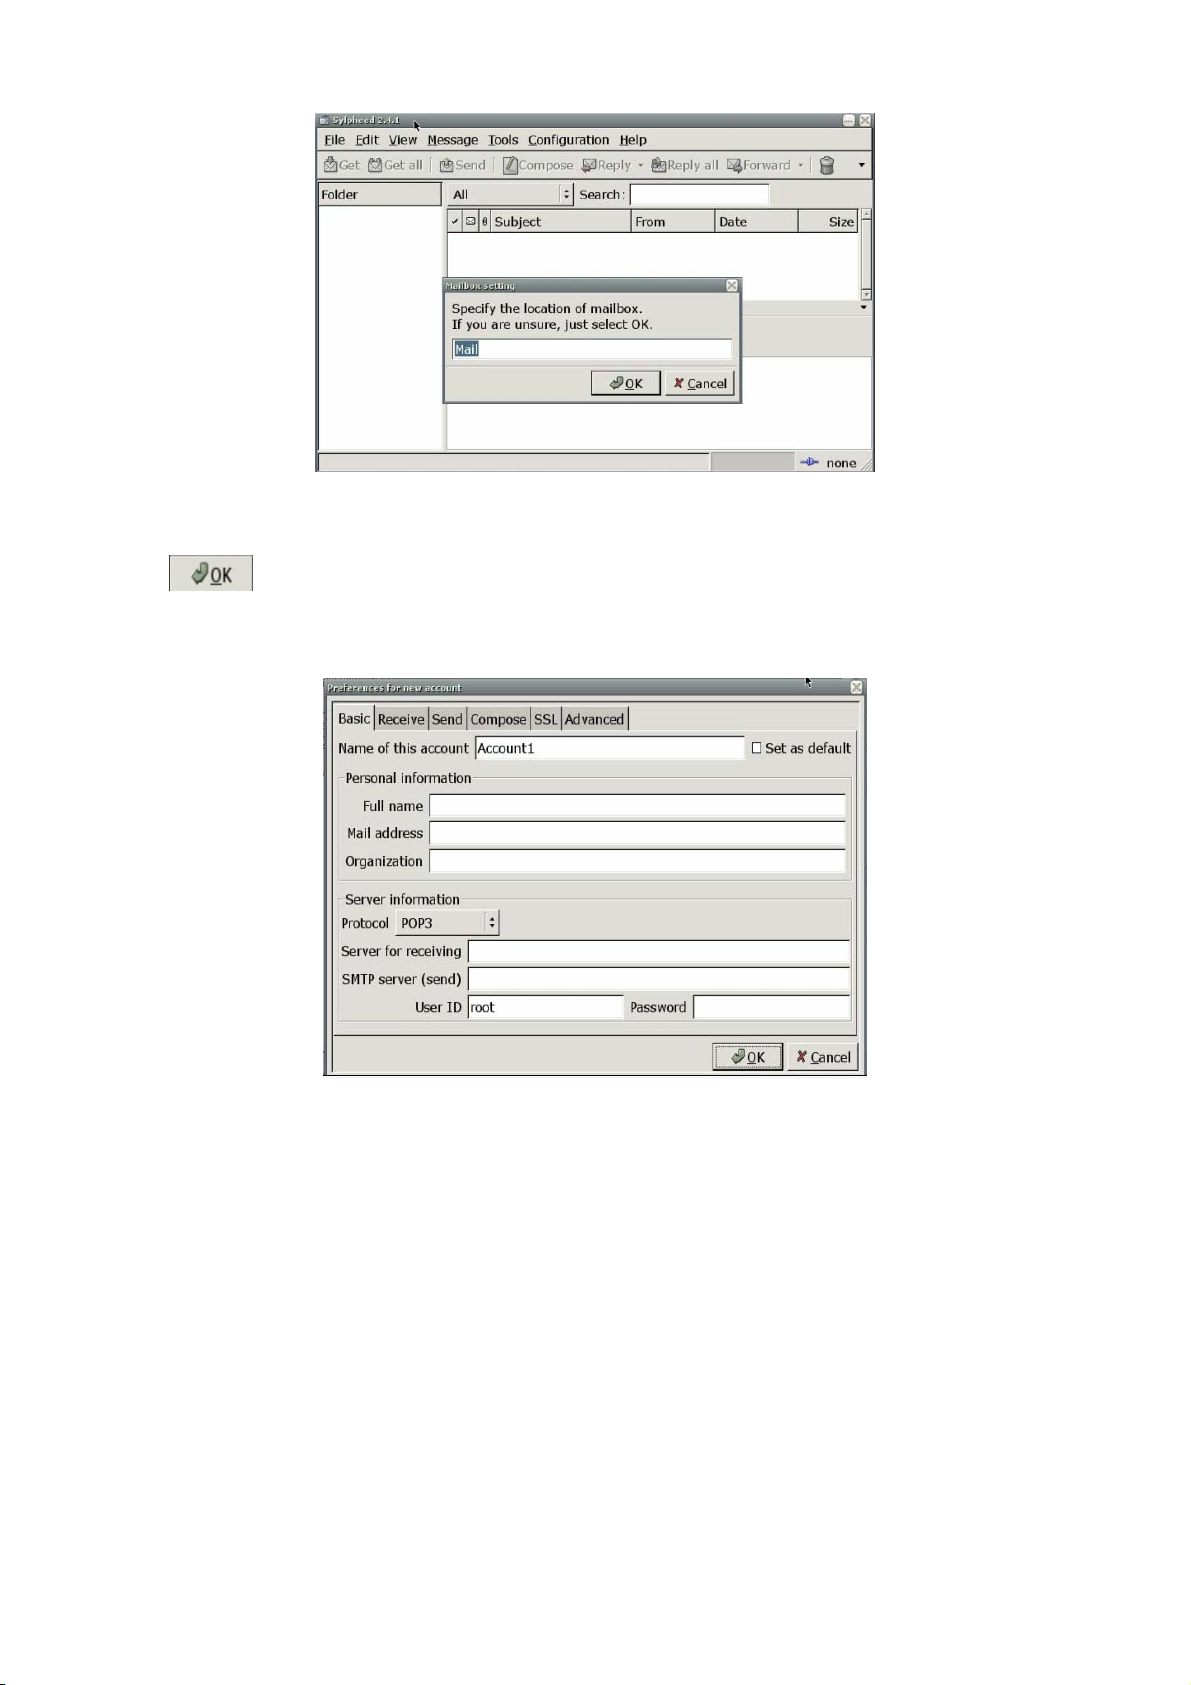
Figure 2
Click
on this interface, to enter the interface for setting the user account, as shown in Figure
3. Set the personal account as prompted by the options on the interface.
Figure 3
For example, set the account anywhere@126.com, as described below:
1) Fill in the following content on the Basic tab page of the interface in Figure 3, as shown in Figure 4:
Name of this account: anywhere (you can fill your desired name)
Full name: anywhere
Mail address: anywhere@126.com (the email box to be set, namely, the email box to be
managed by using Email Box)
11
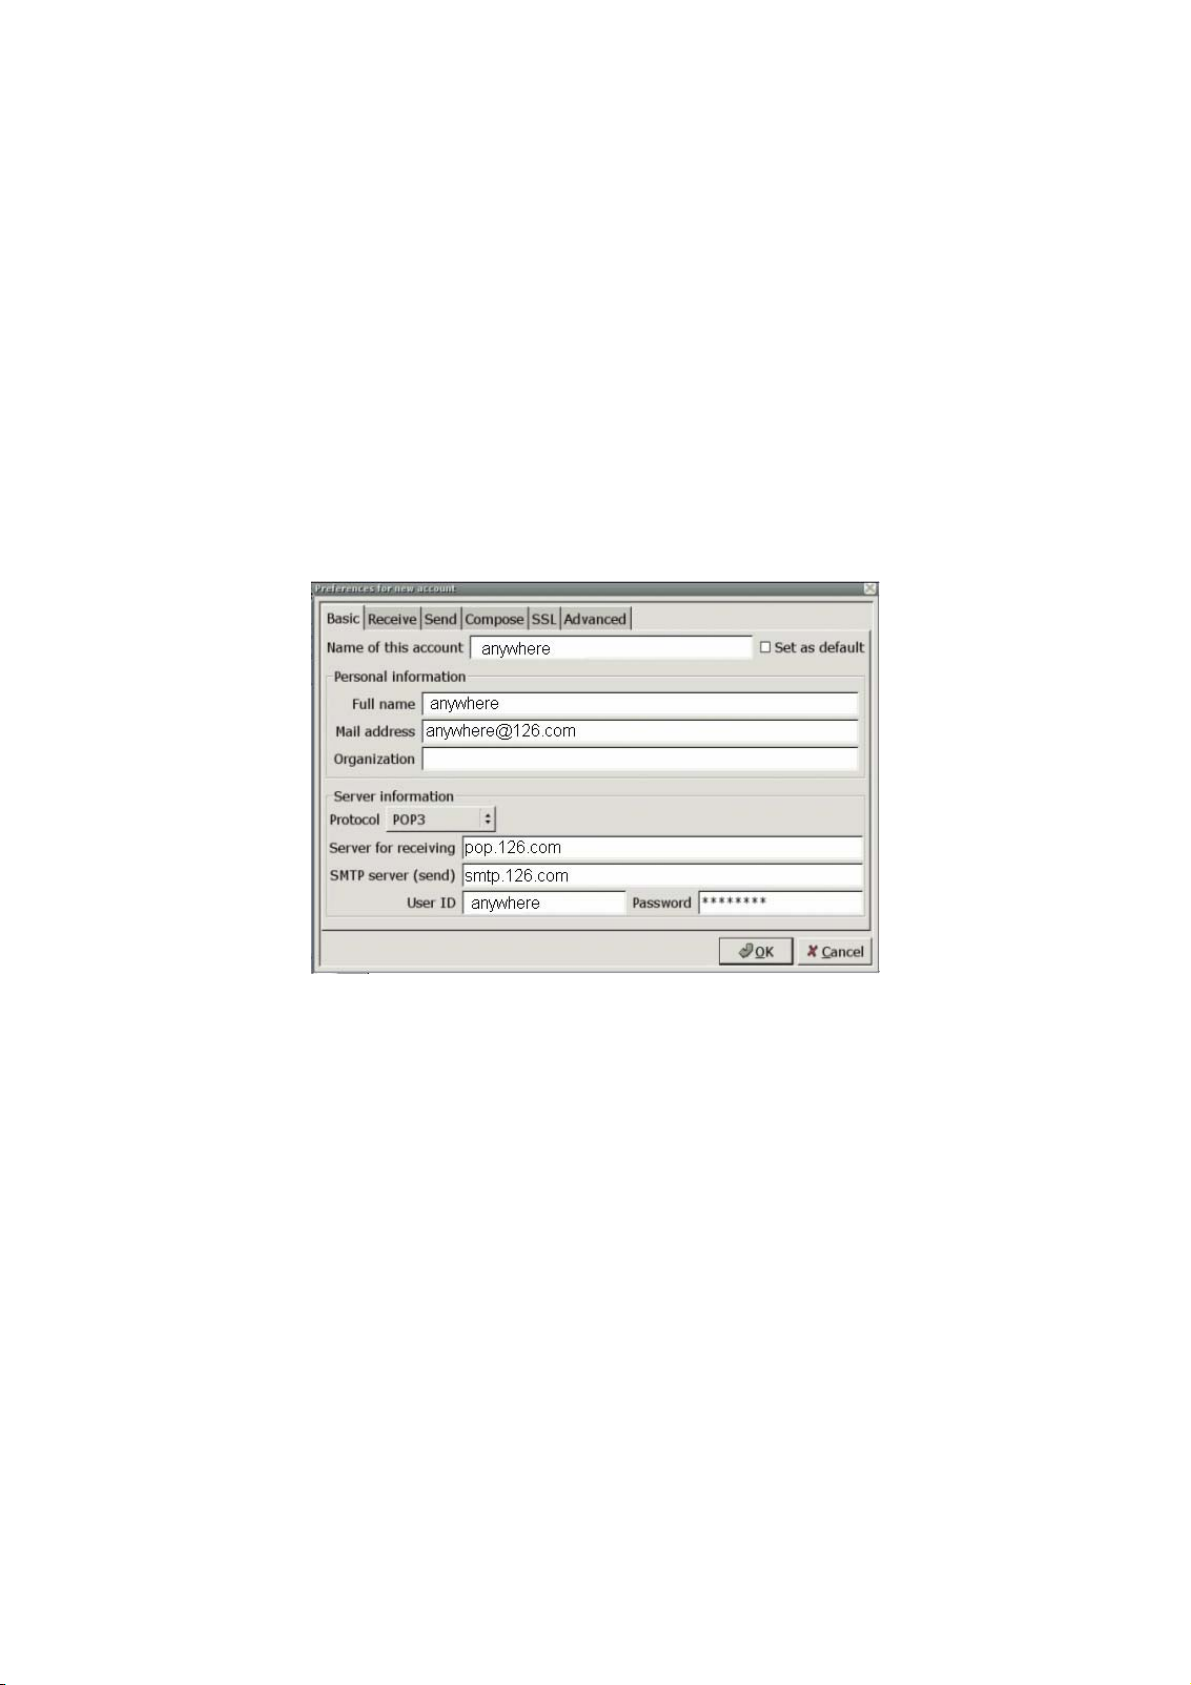
Protocol: POP3 (depending on the email box set by the user; here the POP3 for the 126 email
box is used)
Server for receiving: pop.126.com (depending on the email box set by the user; here pop of the
126 email box is used to receive emails)
SMTP server (send): smtp.126.com (depending on the email box set by the user; here smtp of
the 126 email box is used to send emails)
User ID: anywhere
Password: ****** (the email box password set by the user; here the password for
anywhere@126.com is used)
Figure 4
2) Fill in the following content on the Receive tab page of the interface in Figure 3, as shown in
Figure 5:
Check Filter messages on receiving (you can select it as needed. Here it is selected).
Default inbox: inbox (the default inbox; you can also select another one)
Check ‘Get all’ checks for new messages on this account.
12
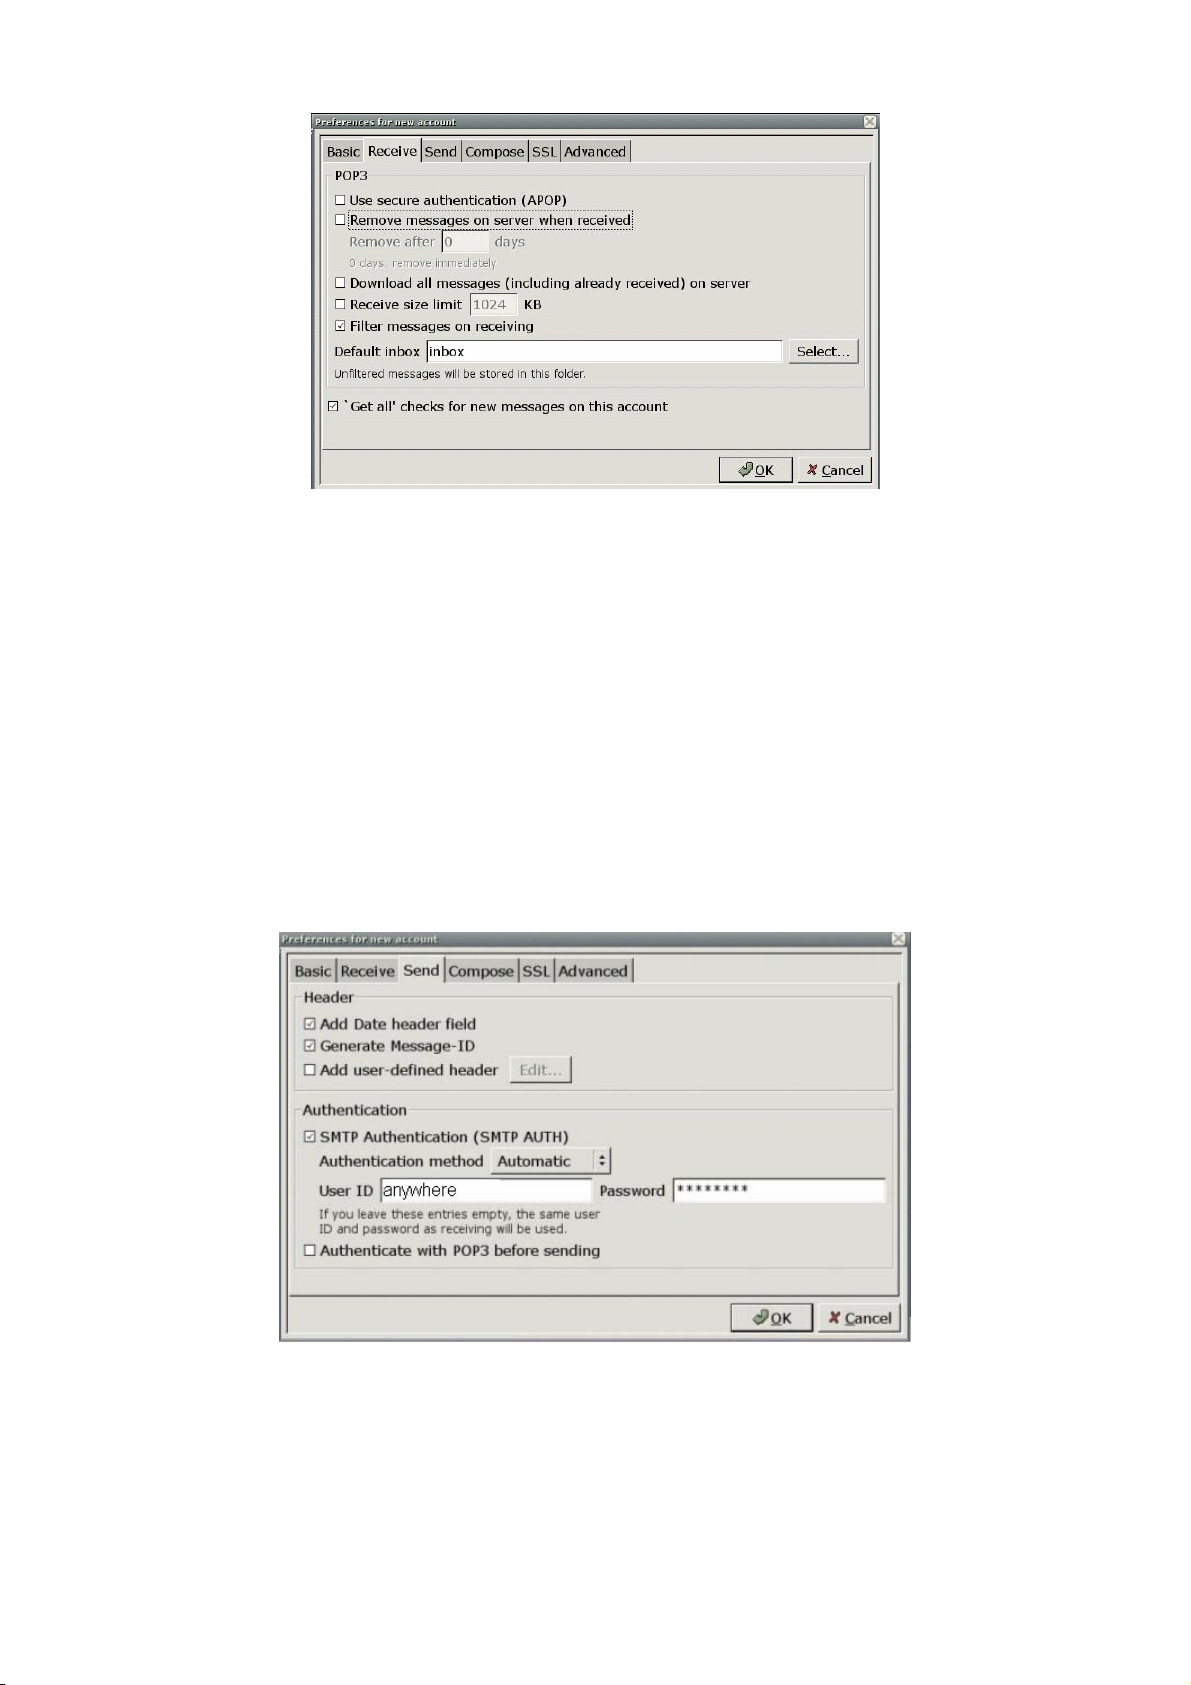
Figure 5
3) Fill in the following content on the Send tab page of the interface in Figure 3, as shown in Figure 6:
Check SMTP Authentication (SMTP AUTH) (this option must be selected, because SMTP is
used to send emails here).
Authentication method: Automatic
User ID: anywhere
Password: ****** (the email box password)
Figure 6
4) Fill in the following content on the Compose tab page of the interface in Figure 3, as shown in
13
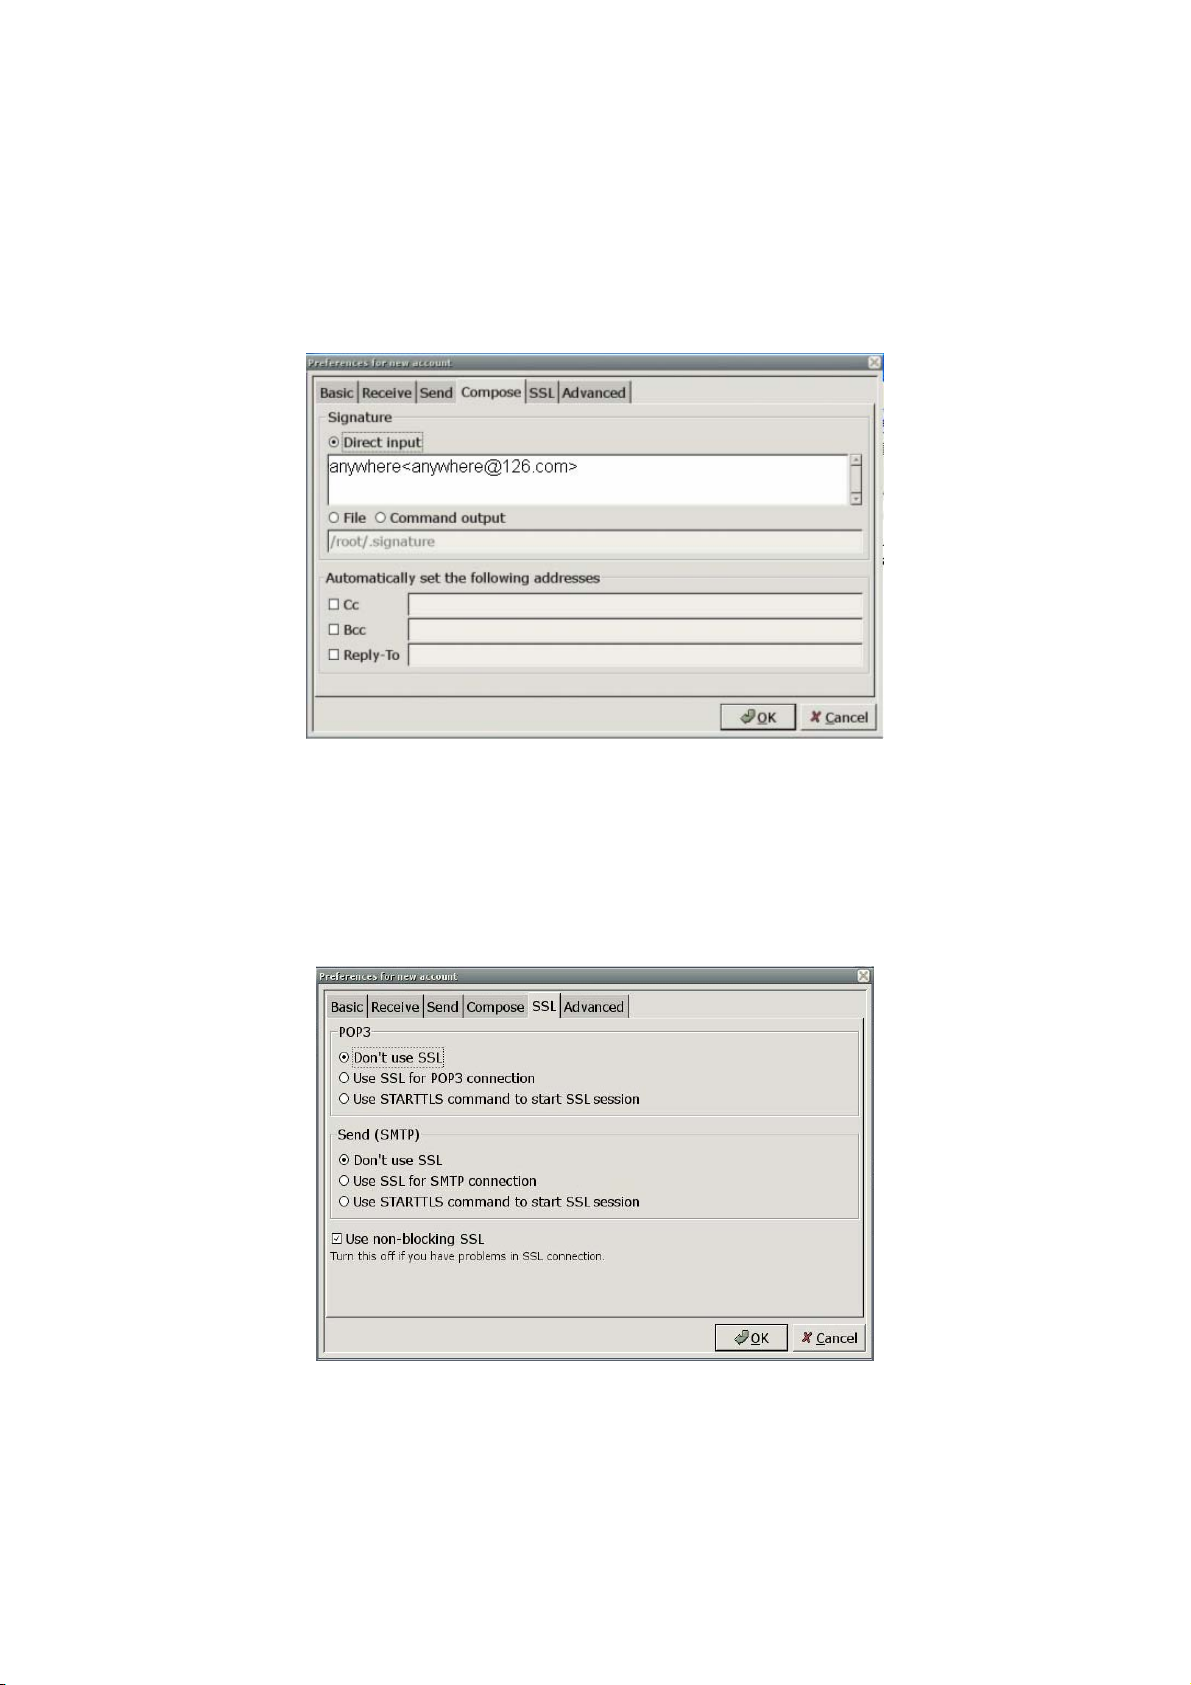
Figure 7:
Direct input: anywhere@126.com
Fill in the relevant email addresses in Cc, Bcc and Reply-To as needed. Here, no email address
is filled in.
5) Fill in the following content on the SSL tab page of the interface in Figure 3, as shown in Figure 8:
Figure 7
Check Don’t use SSL under POP3.
Check Don’t use SSL under SMTP.
Figure 8
6) Fill in the following content on the Advanced tab page of the interface in Figure 3, as shown in
14
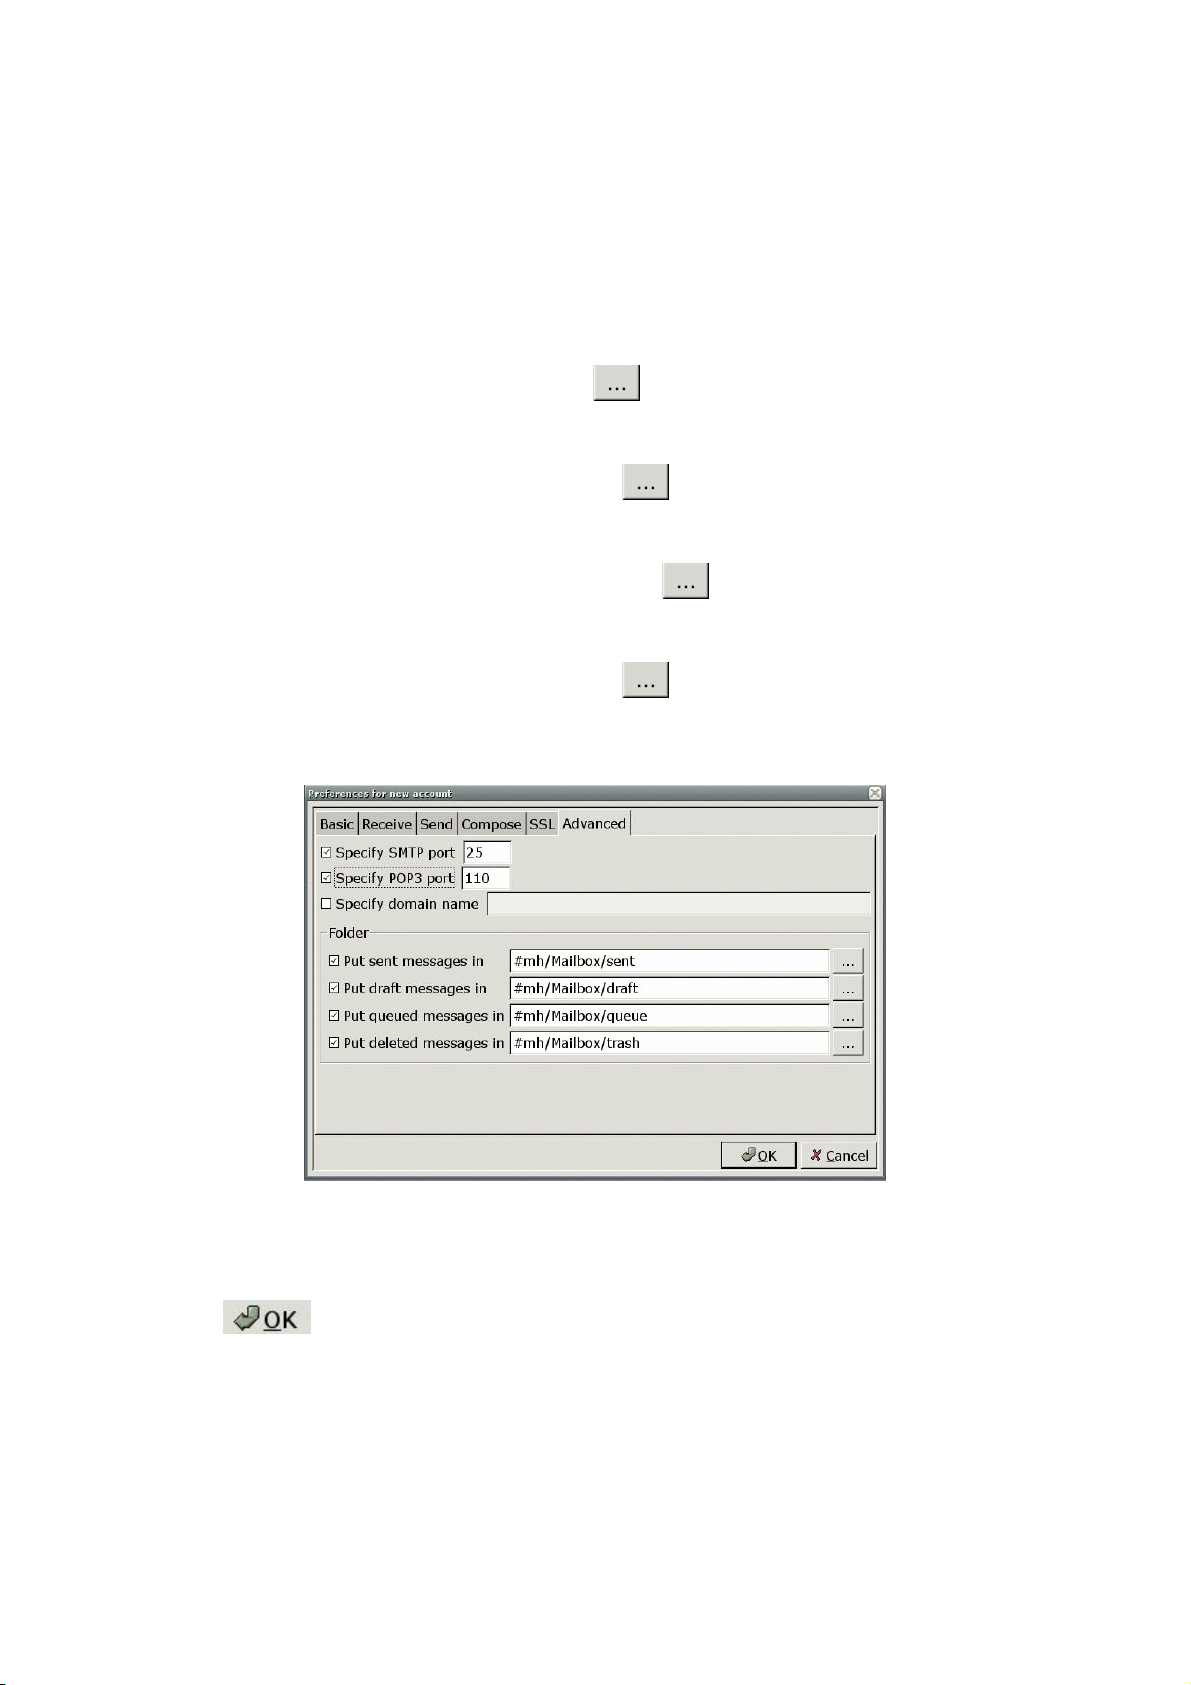
Figure 9:
Check Specify SMTP Port: 25 (SMTP port 25 is used for the 126 email box. You can fill in a
different port number according to the email box type).
Check Specify POP Port: 110 (POP port 110 is used for the 126 email box. You can fill in a
different port number according to the email box type).
Check Put sent message in, and then click
to select the location for saving the sent email.
Here the sent folder is selected.
Check Put draft message in, and then click to select the location for saving the draft
email. Here the draft folder is selected.
Check Put queued message in, and then click to select the location for saving the
queued email. Here the queue folder is selected.
Check Put deleted message in, and then click
to select the location for saving the deleted
email. Here the trash folder is selected.
Figure 9
By now, you have performed the relevant settings for the email box anywhere@126.com. Then,
click on the interface in Figure 9.
7) Edit the account information, as shown in Figure 10.
15
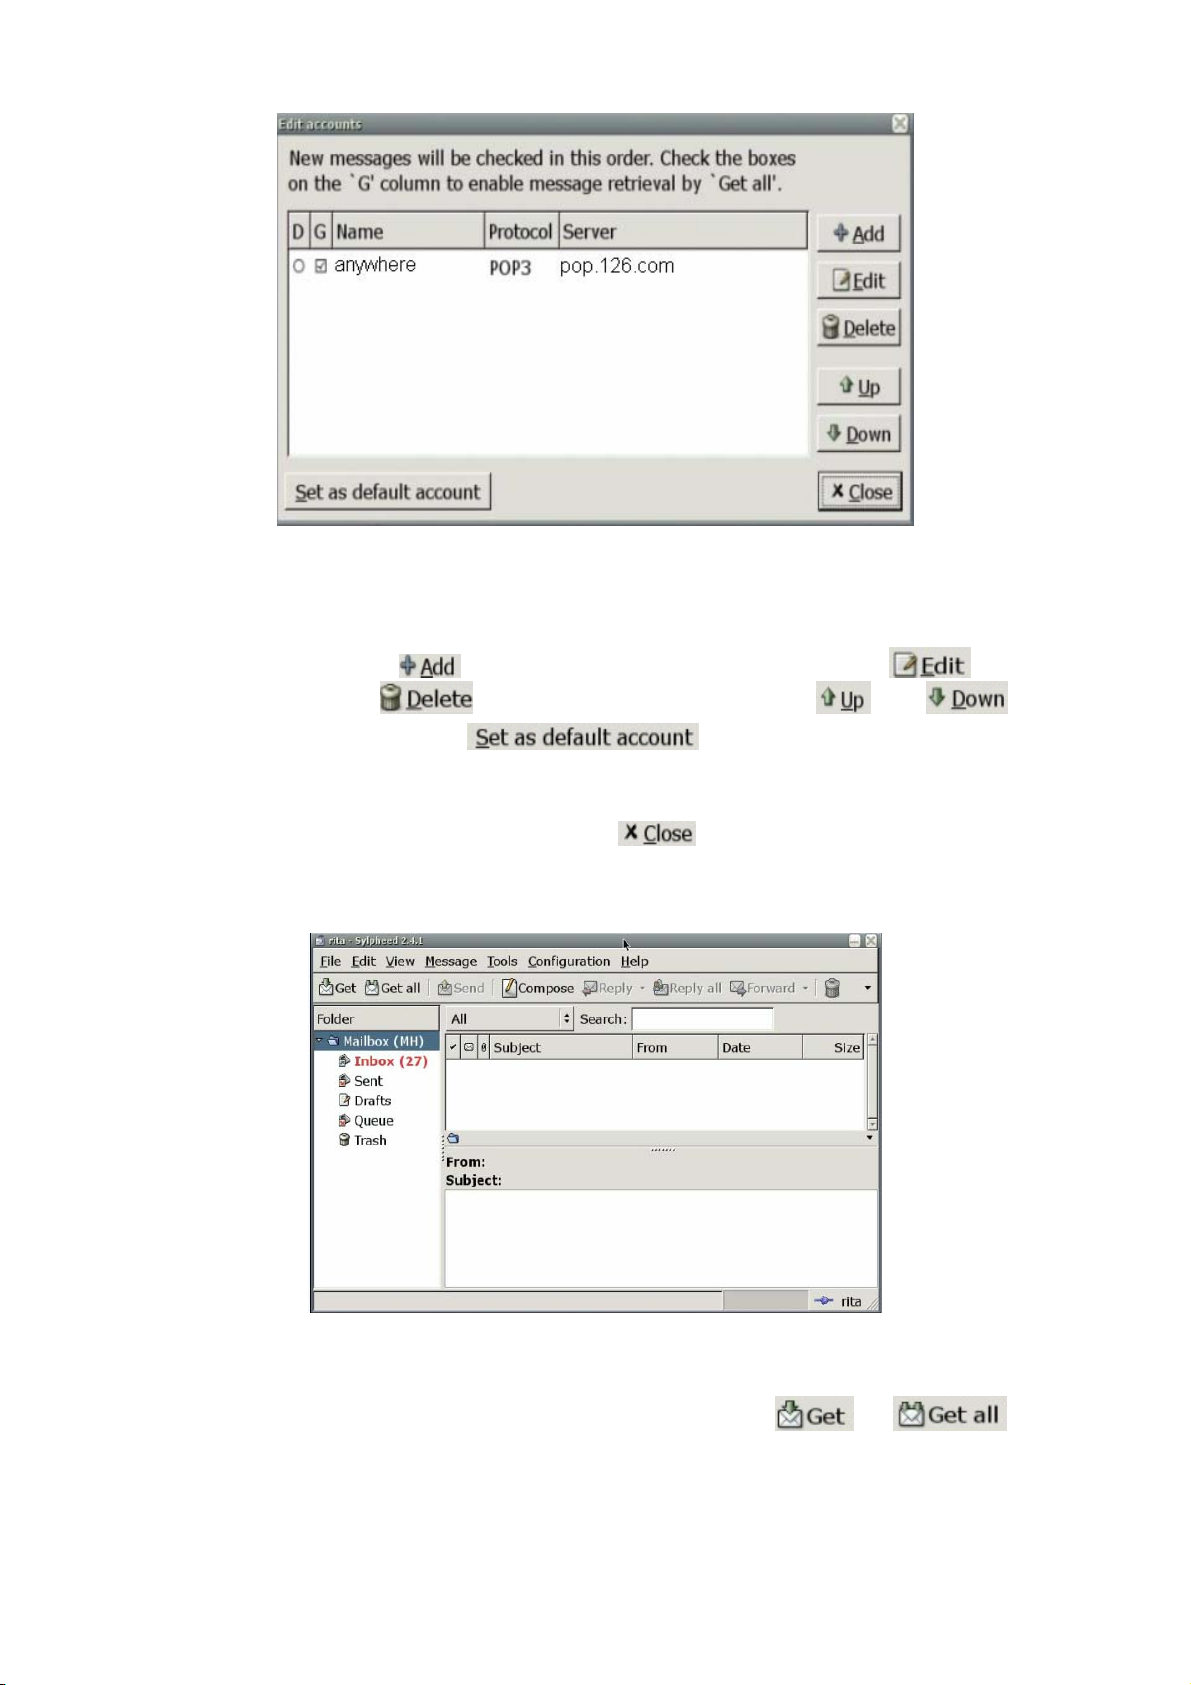
Figure 10
After the above settings in Steps 1 and 2, the Edit accounts interface will display the anywhere
account. You can click
existing account, click
on this interface to add an account, click to edit an
to delete an existing account, click and to sort
the existing accounts, and click
account.
8) To enter the main interface of Email Box, click
in Figure 11.
use the selected account as the default
on the interface in Figure 10, as shown
Figure 11
To get the email in the email box anywhere@126.com just set, click
or on the
interface in Figure 11, as shown in Figure 12.
16
 Loading...