

Page 1
HEV-1000 User
Manual
VER.1.0.0
HEV-1000 User Manual
Page 2
HOMEPAGE : http://www.hive21.com
TEL : +82-31-217-5474
FAX : +82-31-217-5471
ADDRESS : (16675) #3-702, YoungTong InnoPlex, Woncheon-Dong,
YoungTong-Gu, Suwon City, KyeongKi-Do, Korea.
Introduction
Thank you for purchasing our UV Camera (HEV-1000)..
It is a device to detect an area of ultraviolet rays and to display and record that detected area
after overlaying with an area of visible rays.
This user manual was made to help users to easily understand the functions of the device and its
maintenance method. Please fully read this manual prior to installation, operation, or use of the
device.
Every member of us is fully prepared for any of your questions or requests. Also for any of your
feedbacks or advices. You can reach us via phone, mail, fax or email specified below:
HEV-1000 User Manual
Page 3

Cautions
• Use an enclosed or designated power adaptor only.
• Do not connect a USB supplementary battery to the USB terminal.
If you want to use a USB supplementary battery, connect it to the power terminal on the rear of
the device by using the battery connecting cable enclosed with the device.
• Do not disassemble, remodel, or repair the device as you wish.
- Doing so may result in fire, electrical shock, or malfunction of the device. For repairing of the
device, please contact the store you purchased it.
• Be careful not to damage the camera by dropping it or letting it go through strong vibration or
impact.
• Do not place any container with liquid such as a cup or vase near the device.
- Contact with liquid may result in fire or electrical shock.
• Install the camera in a cool place, out of sun.
Sunlight may adversely impact the device.
• Do not place the device near any fire. Doing so may result in fire.
• The heat can be generated during the device’s operation.
• Do not let any water or particle get in through vents on the rear side of device.
• Do not forcibly take out the SD card while the device is on or it is recording. Doing so may
damage the SD card or data thereof.
• SD cards are consumables. Use of them for a too long period of time may result in data
recording failure or data loss. Periodic format and maintenance are required.
• We are not reliable for any data loss regardless of its cause.
• We are not reliable for any incidental damage or loss incurred by use of or unavailable time of
the device.
HEV-1000 User Manual
Page 4

• We are not reliable for any loss incurred by noncompliance with above.
Components
Quantity
Note
Camera
1 ea
HEV-1000
Power adaptor
1 ea
DC 5V 3A
Battery connecting cable
1 ea
HDMI cable
1 ea
SD card
1 ea
User manual
1 ea
Components
As you receive the product, open the package carefully and check if all the components are
enclosed in the box (refer to the table below). If there is any damaged or missing component, do
not use any component and device, and immediately contact your supplier. Also, keep the
package box for it can be an evidence for proving that such loss has been incurred during
shipment.
LCD board is not enclosed as components (sold separately).
USB supplementary battery is also not enclosed as components (sold separately).
HEV-1000 User Manual
Page 5
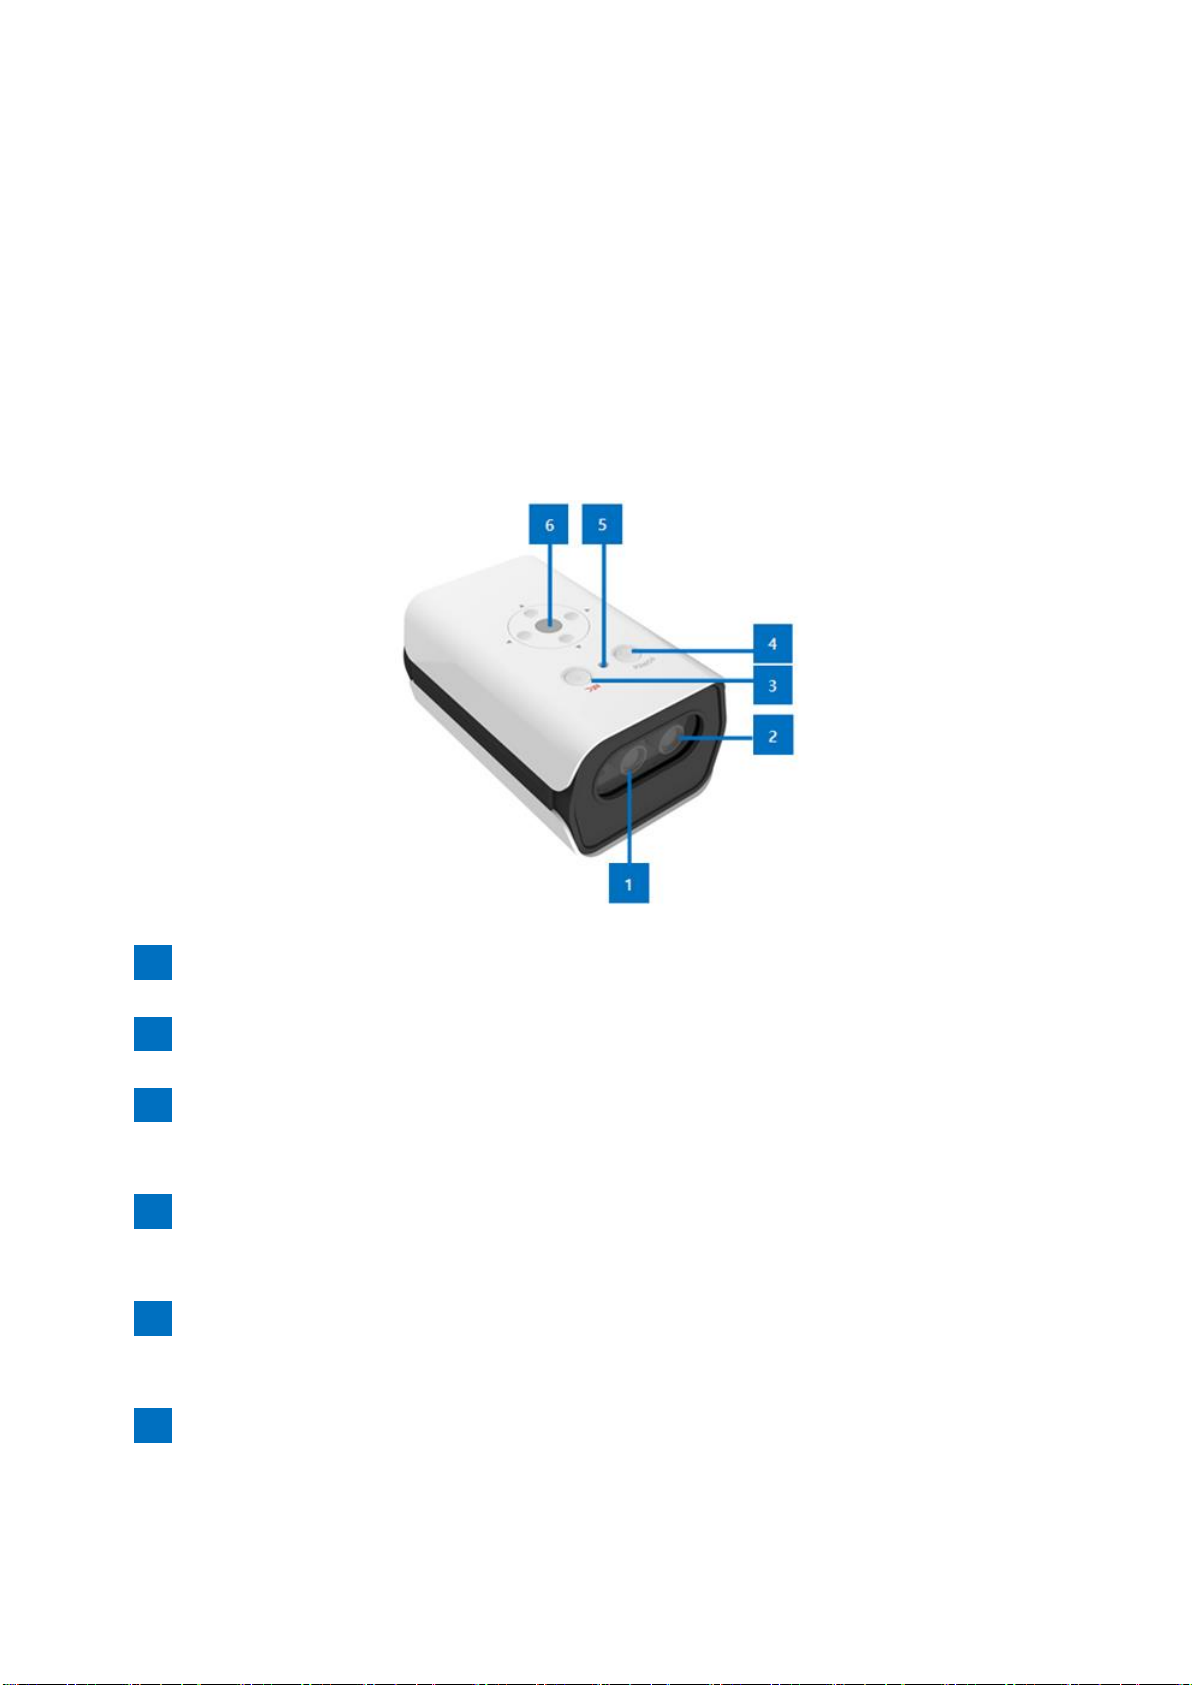
1
Visible Camera
2 UV Camera
3
Recording button
You can start/finish recording.
4 Power button
You can apply/stop applying the power to the device.
5
Power LED
This will be turned on blue when the device is powered.
6 5-direction buttons
You can set or operate the device.
Component Names and Functions
Front/Top
The front of HEV-1000 is configured by the visible camera and the UV camera. On its top, there is
an interface where users can use and set the device, which is composed by the button users can
apply/stop applying the power to HEV-1000, the button to start/finish recording, and 5-direction
buttons to use the device when the LCD touch screen is not linked.
HEV-1000 User Manual
Page 6
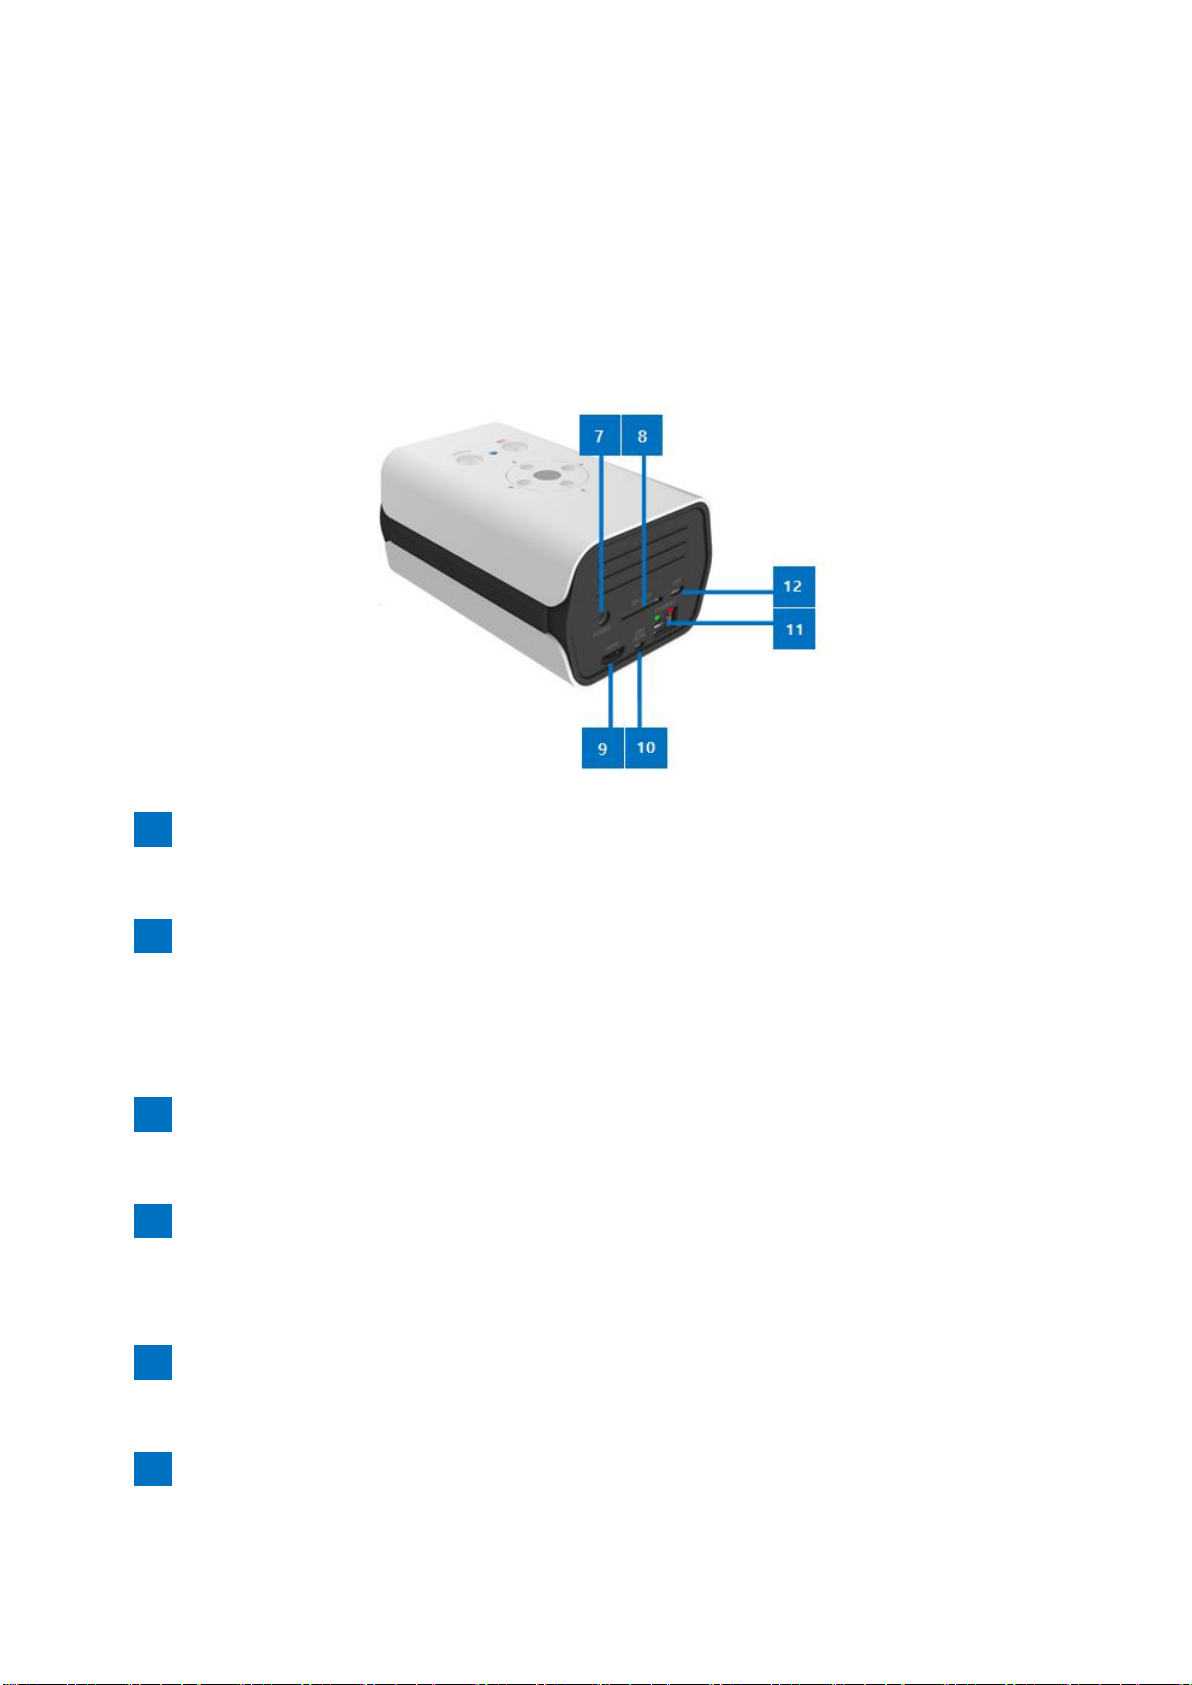
7
Power terminal
Connect the power adaptor enclosed. You can apply/stop applying the power to the device.
8 SD Card slot
Slot to connect the SD Card to save your recordings.
Taking out the SD card during the device’s operation may result in data loss.
Before taking out the SD card, make sure you turned off the device power first.
9 HDMI terminal
Connect the HDMI cable.
10
LCD Touch Screen Connecting Terminal
This terminal is to connect the LCD touch screen that is sold separately by using the Micro
HDMI cable enclosed with the LCD touch screen.
11
LAN terminal
This terminal is to be used when transmitting any video file (FTP) through the network.
12
USB terminal ( Micro C Type )
You can connect a USB device to save your recordings.
Rear
On the rear side of HEV-1000, there are the power terminal, the LCB connecting terminal, the
HDMI terminal, the LAN terminal, the USB slot and SD Card slot where users can save their
recordings.
HEV-1000 User Manual
Page 7
You can connect a USB Keyboard (SETTING > FTP Item is to be set for use of this keyboard).
• On LCD if the LCD touch screen is connected.
• On HDMI if there is no LCD touch screen connected.
Item
Details
Visible Camera
1/3" CMOS 1280 x 720 (HD)
UV Camera
1/3" CMOS 720 x 480 (SD)
Storage device
SD/SDHC Card & USB
Video
Compressed
H.264
Frame Rate
30 fps
Interface
SD Card
Maximum 32G
Ethernet
RJ-45 (Cable not provided)
Protocol
FTP, UDP, TCP/IP
RTC
Real Time Clock is supported
Buzzer
Alarm & Beep sound is supported
Others
Rated power
DC 5V 3A
Temp
0℃-50℃, 54H
When HEV-1000 is powered, you can see the blue light beaming around the buttons. Then, the
product logo will be displayed on the touch screen and HDMI.
After its booting is completed, you will see video is displayed either on LCD or HDMI (monitor).
Product Specifications
HEV-1000 User Manual
Page 8
Visible Image
UV Image
Visible + UV Image
Red
Blue
Green
Operation – How to operate the device
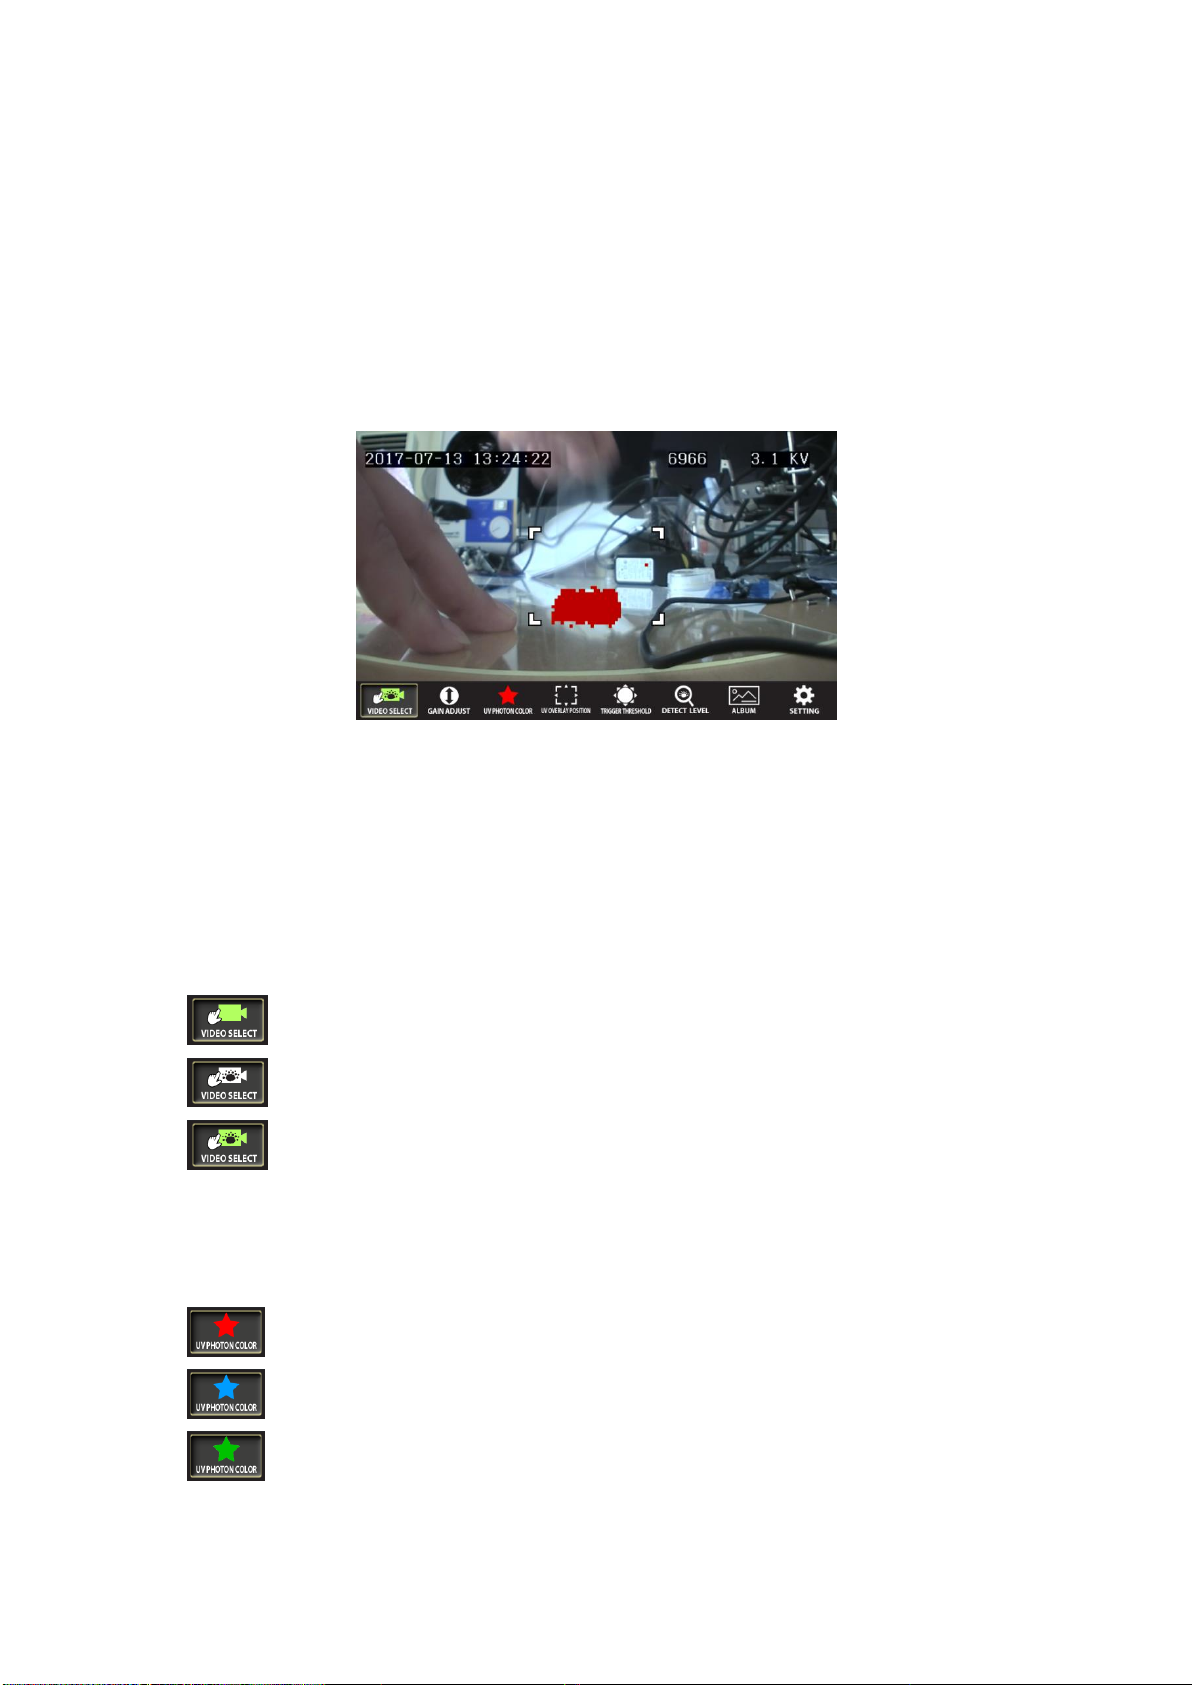
Main Screen
Here users can set menus that are frequently used by them. Users can adjust setting of the
device by using either an LCD touch screen or the button on the top of camera.
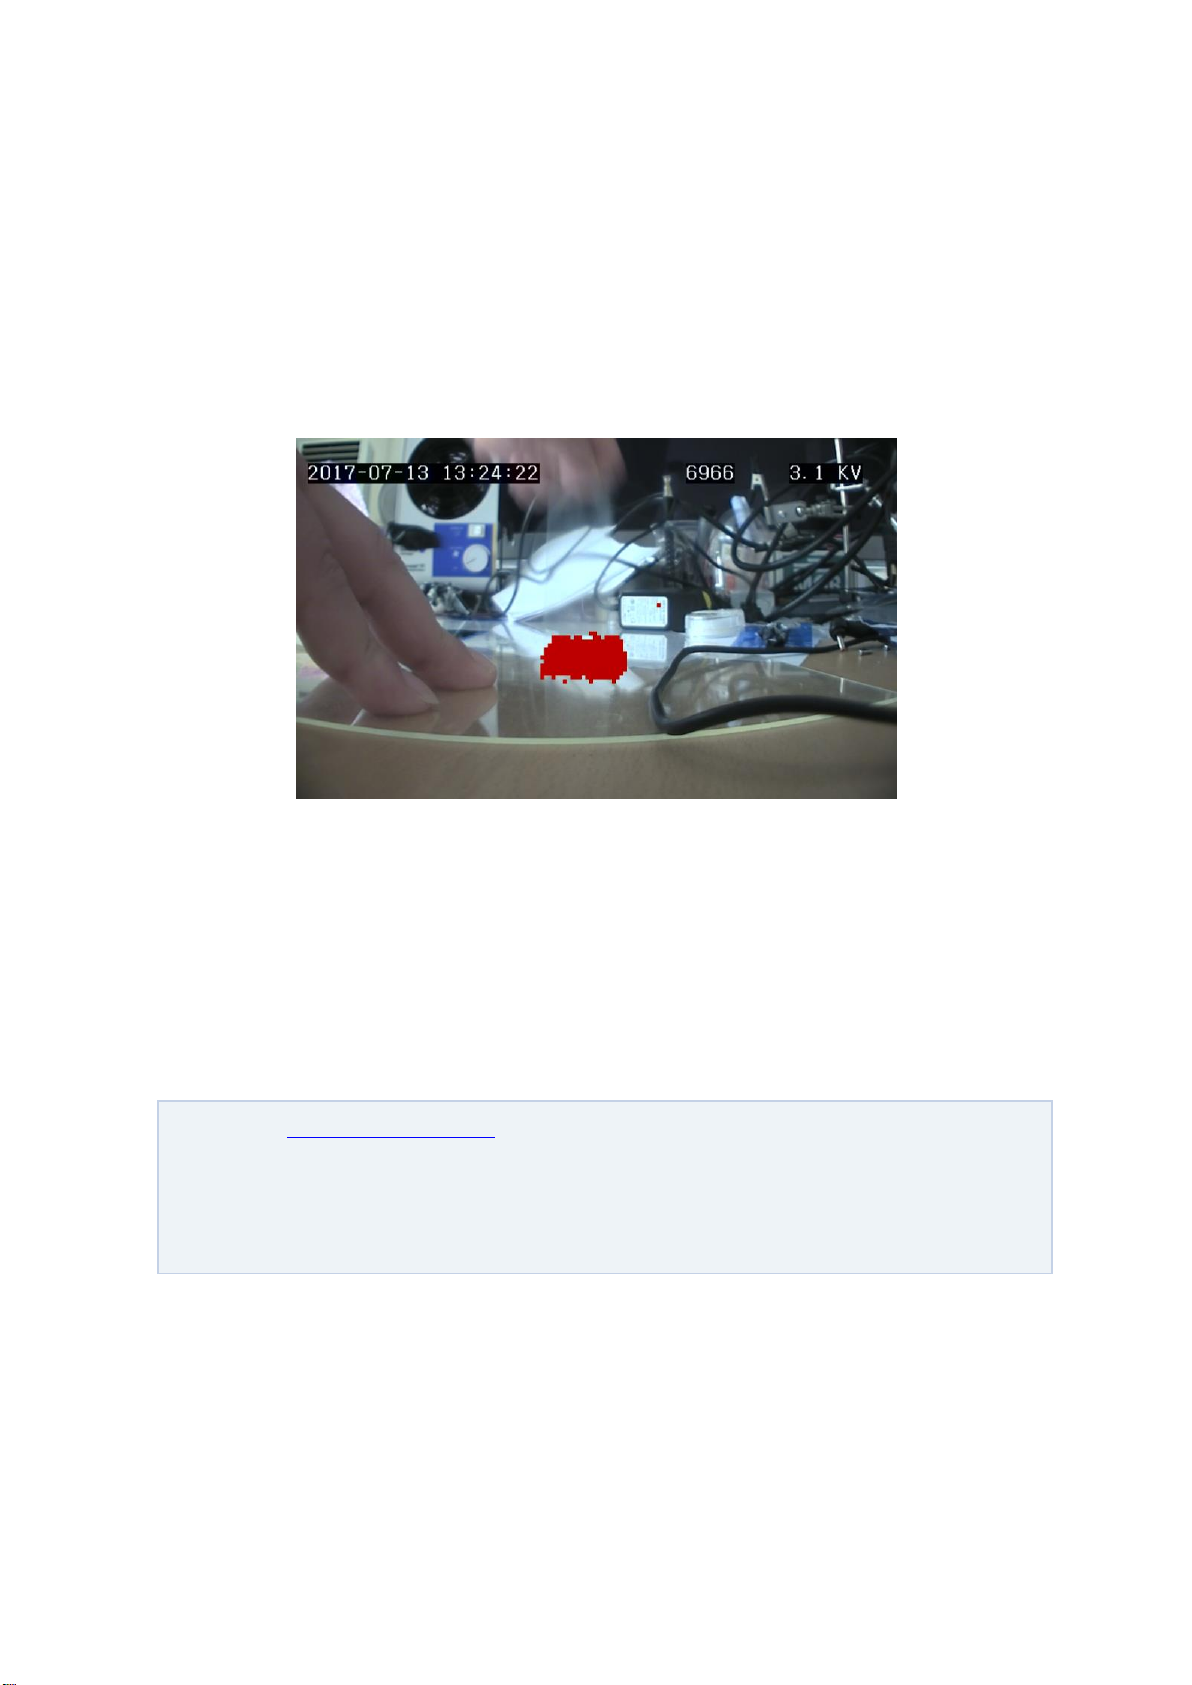
On the MAIN screen, users can view where exactly ESD has occurred and its situation at the
moment that are figured out by using the Video Overlay function of the device, which overlays
the UV image created by corona discharge onto the visible image.
1) VIDEO SELECT
Users can select which live video to display on the display.
2) UV PHOTON COLOR
Users can select the color of UV image that is to be overlaid on the Visible image.
HEV-1000 User Manual
Page 9
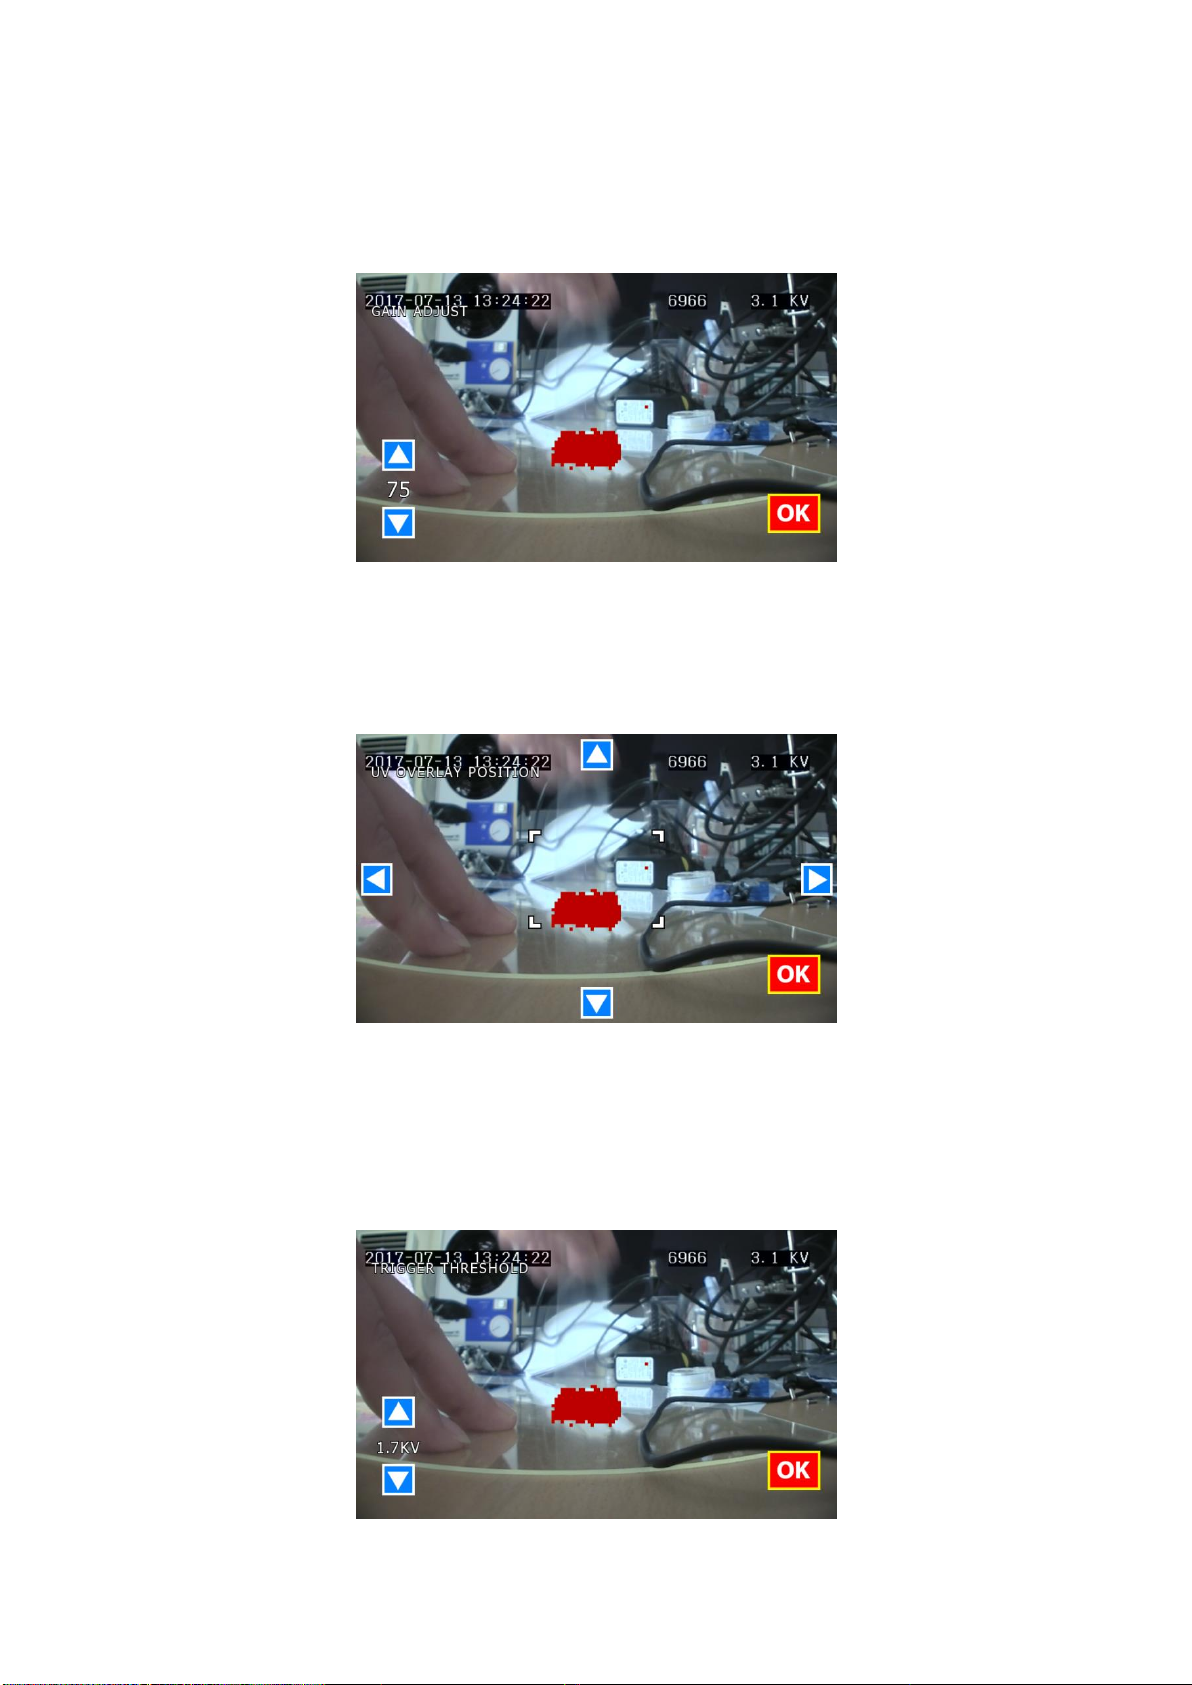
3) GAIN ADJUST
Users can adjust sensitivity of UV image from 0 to 100 by adjusting a Gain of Image Intensifier.
4) UV OVERLAY POSITION
Users can adjust the overlay location according to the size of and the distance to the subject.
.
5) TRIGGER THRESHOLD
Users can set the Threshold Level, where recording of ESD Event begins, from 0.7KV to 6.0KV.
This function works only after going through ESD CALIBRATION.
HEV-1000 User Manual
Page 10

6) DETECT LEVEL
Users can set the level of UV wavelength from 0 to 100. Only those UV whose wavelength is
above this detect level are overlaid.
Recording
1) Recording
Users can record and save an overlay image in a video file in the internal storage device of
camera.
• Use “Record” button on the top of device to start/pause recording.
• Current time and Photon Count are also recorded together after Imprinting.
• Recording format is AVI and its compression form is H.264.
• You can designate where to save recordings in SETTING -> STORAGE.
• Recordings will be organized by date in dated folders.
2) Recording method
Recordings can be made in two ways:
• Manual recording
- User manually starts and finishes the recording.
- Change the recording file name: SERIALNO_YYMMDD_HHMMSS_Manual.avi
• Event recording.
- Recording starts 3 seconds before the event and finishes 3 seconds after the event (ESD).
- When another ESD occurs during recording of event, your recording will be finished 3
seconds after the last event.
- Change the recording file name: SERIALNO_YYMMDD_HHMMSS_Event.avi
- Log file: Save the photon count and voltage value at the moment of the event in a file.
- Change the log file name: SERIALNO_YYMMDD_HHMMSS_Event.log
HEV-1000 User Manual
Page 11

- Log file storage format
[2017/10/12 14:49:48] 25.9KV 17023
[2017/10/12 14:49:49] 16.8KV 24305
[2017/10/12 14:49:50] 17.9KV 63230
[2017/10/12 14:49:51] 144.1KV 207878
(Caution) If any error occurs in HEV-100 due to separation of storage device without finishing
recording, your next recording may not be made normally as well. In such case, turn off the
power of HEV-1000 and turn it on again.
3) Cautions for recording
• Manual recording will be continued although ESD is occurred. Here, the event recording file
and its log file will not be created.
• Recording of video can be only made on the Main screen. However, it cannot be made in the
following circumstances:
- When any of the following setting is changed on the Main screen:
VIDEO SELECT, UV PHOTON COLOR, GAIN ADJUST, UV OVERLAY POSITION,
TRIGGER THRESHOLD, DETECT LEVEL
- In the Album Mode,
- In the Setting Mode,
- When linked with “HEV-1000 Intranet search and settings” program; and,
- When the storage device is problematic (no storage device or the file system that is not
supported, etc.).
• Error will occur when separating a storage device (USB or SD Card) from the device during
recording.
You may lose your recording if you separate the storage device without pressing “Stop”
button to finish your recording. This also can lead to fatal error or damage to your storage
device (USB or SD card). Must finish your recording or turn off the power of HEV-1000 before
you remove the storage device.
HEV-1000 User Manual
Page 12

(Caution) SD Cards are classified in class 1, 2, 4, 6, 8, and 10 according to their data
transmission speed, with higher number indicates faster speed. Lots of data are transmitted to
save a video so we highly recommend our users to use as high-classed SD Card as possible. At
least class 6 or higher is recommended.
4) Storage Device File System
HEV-1000 is using FAT32 file system. If any device not formatted in FAT32 is connected to the
device, the warning message will appear as the device recognizes the file system as unsupported
file system. Also, the window asking if you want to format the device will appear.
Single FAT32 file size cannot exceed 4 GB, meaning the maximum size of your recording will
be 4 GB.
• You will see the following message with warning sound when remaining storage of your SD
card reaches 12GB, 6GB, 3GB, and 1GB. Your recording will be continued.
When it reaches 100MB, your recording will be stopped with warning sound and no more
recording will be available. When you try to record at this point, you will see the following
message with warning sound.
HEV-1000 User Manual
Page 13

: You can move to the previous/next page.
Album Screen
- Users can play their recording right away at their work place.
- Including “PLAY”, it also has” PAUSE”, “FORWARD Search”, and “REVERSE
Search” functions.
- It also provides “Frame by Frame Search” that enables you to search the moment of ESD’s
occurrence (Available in the touch screen. By touching the screen on the left/right, you can search
the moment you want by frame)
1) List of dated folders
Recordings will be organized by date in dated folders.
2) List of saved recording files
When you select any dated folder, you will see recordings of that day organized by their
recording method, Manual and Event.
HEV-1000 User Manual
Page 14

When you select
, you can go back to the list of dated folders.
: Users can Play/Pause video.
: Go back to 30 seconds earlier
: Go to 30 seconds after.
: Fast forward.
: Rewind.
: Go back to the video file list.
3) Video Play mode
You can check video of ESD by playing your recording file.
HEV-1000 User Manual
Page 15

Setting Screen (environment setting)
Setting mode is to set subordinate functions of HEV-1000, including, ESD EVENT RECORDING
ON/OFF, UV FRAMES Setting, DATE & TIME Setting, Selection of Storage Devices, etc.
1) ESD EVENT RECORDING ON/OFF
Users can enable/disable the automatic recording function in the event of ESD.
2) PHOTON COUNT DISPLAY ON/OFF
Users can enable/disable display of photon count on the top of Main screen.
HEV-1000 User Manual
Page 16

3) UV FRAMES Setting
Users can set the frame rate of UV video to 1, 5, 10, 15, or 30 frames. Lower frame number
has longer exposure time, which makes it easier for the device to detect fine lights as well but its
reaction time becomes slower. With higher frame number, you will have faster reaction time but
its sensitivity will drop.
4) MAX LEVEL HOLD TIME
Users can set how long they want to display the max detect level. It can be set from 1 to 5
seconds.
5) ESD CALIBRATION
This function is to collect the photon count info by ESD level to assume ESD voltage. This
ESD calibration is performed in three different levels: 1KV, 3KV, and 6KV.
HEV-1000 User Manual
Page 17
rtsp://192.168.10.105:8557/videoCodec=H.264
• Here, the IP address (192.168.10.105) is the one set for the camera.
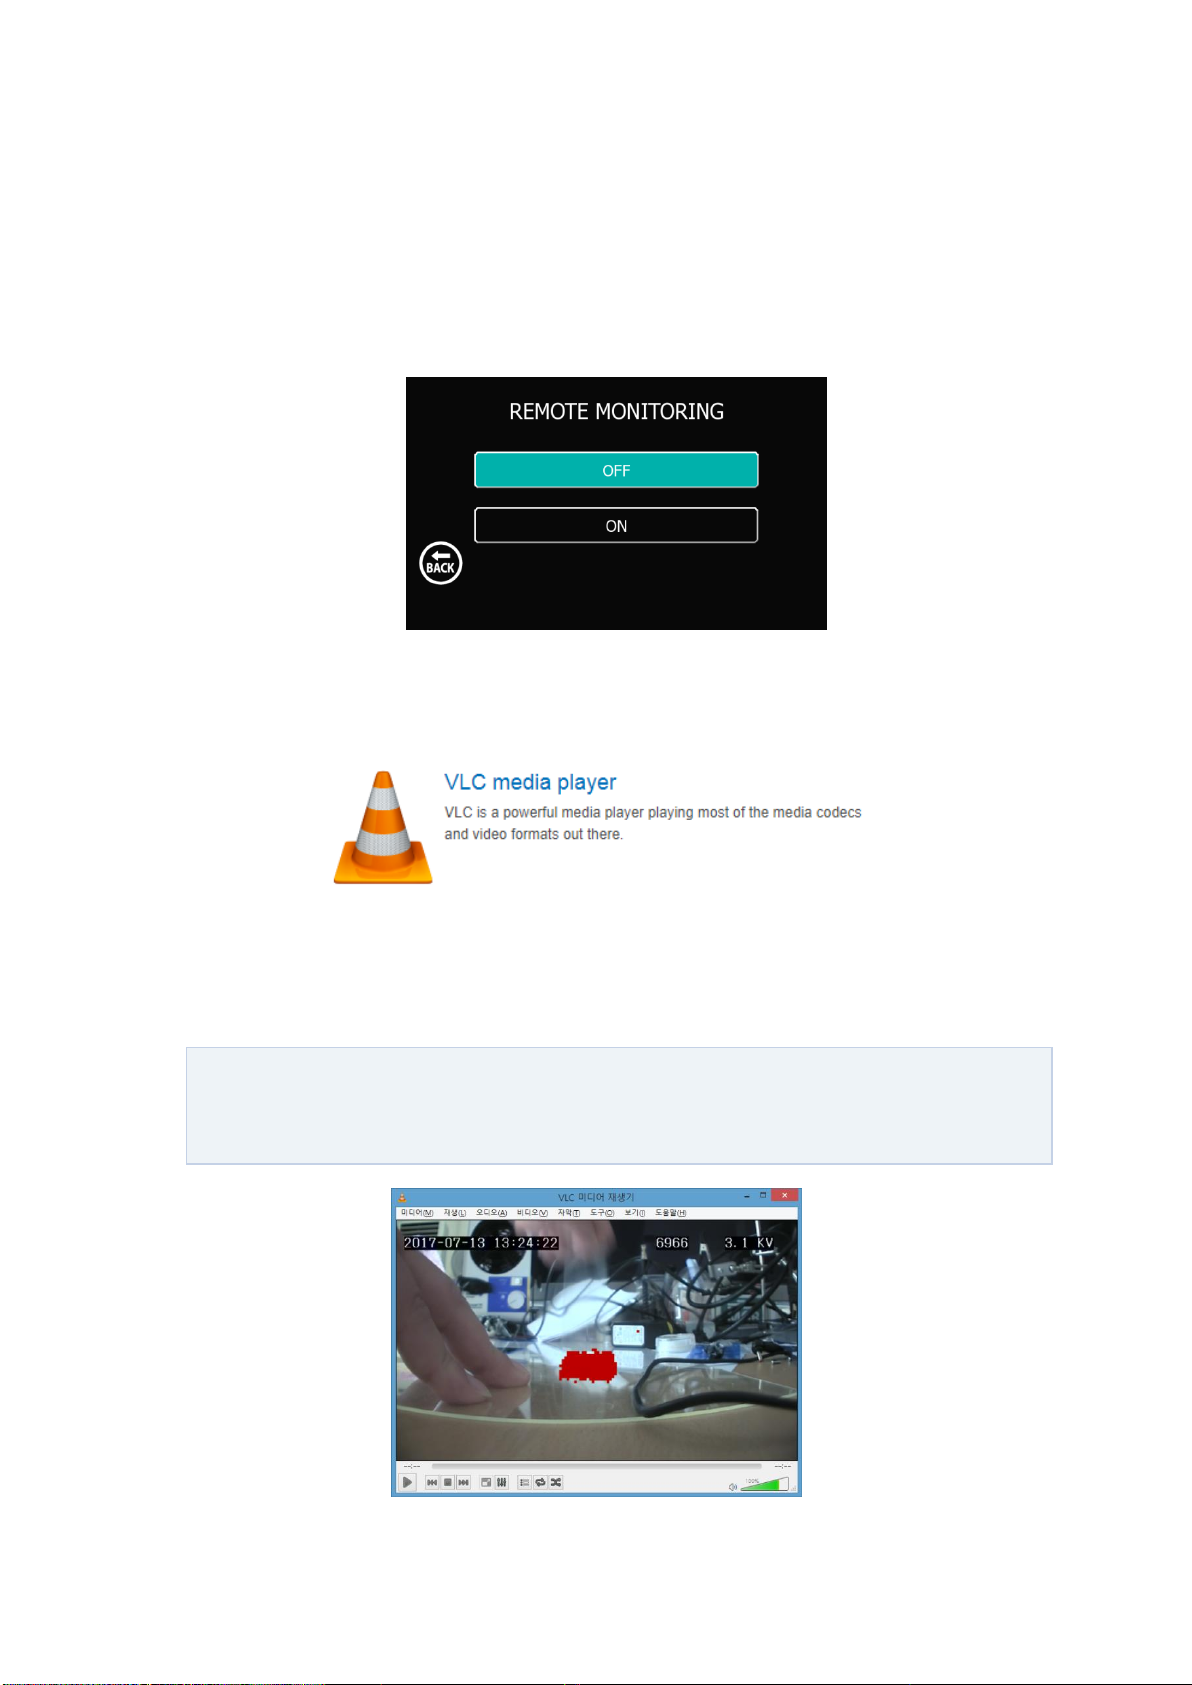
6) REMOTE MONITORING ON/OFF
Users can view a live video in a remote location where network is connected through this
REMOTE MONITORING function, which compresses the overlaid live video in H.264 and transmits
it via network. Users can enable/disable this function here in this menu.
For streaming from a remote location, use wide-use software that can be used in your PC
such as "VLC Media Player".
Execute “VLC Media Player” after installing it and select “Manu > Media(M) > Open Network
Stream(N)…”. Then, access to URL below so that you can receive video and stream it.
HEV-1000 User Manual
Page 18

(Caution) This REMOTE MONITORING will not work in the following situations:
- In a Setting Mode
- In an Album Mode
- When linked with “HEV-1000 Intranet search and settings” program
Also, a video to be streamed will vary depending on VIDEO SELECT setting. For example,
when your setting is “Visible only” Mode, non-overlaid video will be streamed.
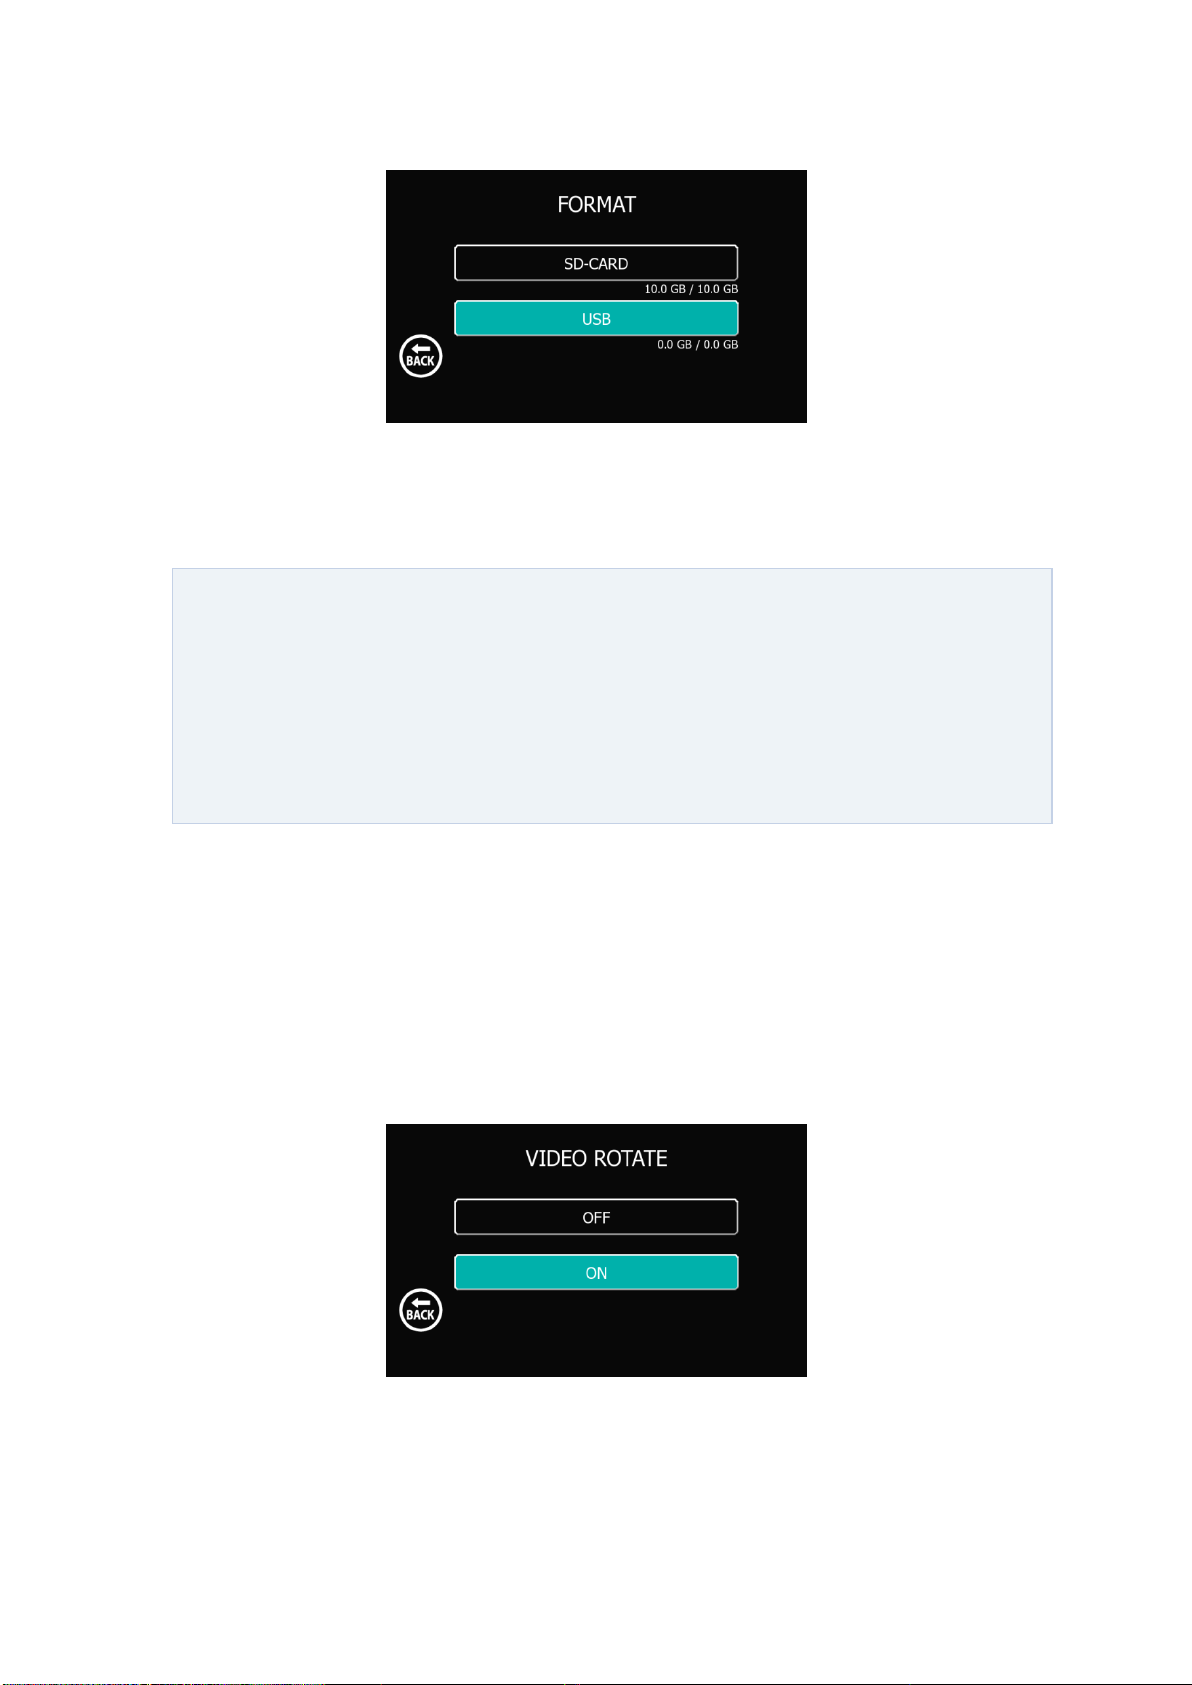
7) TARGET STORAGE
Users can select which storage device they want to save their recordings. You can choose
either USB or SD Card to save videos recorded by HEV-1000.
When storage device is connected, the whole capacity and the storable capacity will be
displayed.
8) FORMAT
Users can format their storage device that is connected to the USB slot or the SD card slot of
HEV-1000. To use this device’s save function, the file system of storage device to be used should
be formatted in FAT32. If your storage device is using another file system, format it in FAT32 by
using this FORMAT function.
HEV-1000 User Manual
Page 19
(Caution) When formatting the storage device, all the data therein will be deleted. Before
trying format, make sure you copy every data therein and save them in the other storage
device of yours.
(Caution) It takes more time to format a storage device with large capacity. Do not separate
the storage device during formatting. Doing so may result in the device’s or storage device’s
malfunction.
When storable capacity is exceeded, your previous recordings will not be
automatically deleted to save new recordings. To save your recordings, please
periodically backup and format your storage device.
• HEV-1000’s format function supports up to 2TB-sized storage device.
9) VIDEO ROTATE
Users can enable/disable left/right or up/down reversing function that reverses the image
shoot by camera. This function is useful when a camera is installed on the celling upside down.
10) VIDEO FREQUENCY
Users can set frequency of video. Different frequency values are used by country but mostly
HEV-1000 User Manual
Page 20

either 50.00Hz or 59.94Hz of frequency is used. Images will be displayed in PAL with 50.00Hz, and
Available date setting is from January 1, 2000 to December 31, 2037. When smaller than 2000
in NTSC with 59.95Hz.
11) BUZZER ON/OFF
Users can enable/disable BUZZER, which allows users to hear operation by LCD touch screen
and buttons by the sound.
12) DATE & TIME
Users can set the date and time of RTC (Real Time Clock). The date and time set here will be
used later to name the recording files.
HEV-1000 User Manual
Page 21

is typed for setting of year, it will be automatically changed to 2000, the smallest number
allowed. Also, bigger number than 2037 will also be changed to 2037.
IP ADDRESS Setting Range
- IP address system of HEV-1000 complies with IPv4.
- The first BYTE can be set to any number from 1 to 223, except for 127 which is reserved for
loopback.
- for other BYTES, you can select any numbers from 0 to 255.
13) IP ADDRESS
To enable network communication, there should be network devices physically connected to
each other, which have the same address that can be mutually recognized. Here, users can input
IP address, subnet mask, and gateway address required to distinguish mutually recognizable
address.
14) FTP SETTING
HEV-1000 provides a function to transmit event recordings and log files thereof to the remote
FTP server. To use this function, set the Host address, ID, and PW to access the remote FTP server
here in this menu.
Use a USB KEYBOARD here.
HEV-1000 User Manual
Page 22

When FTP SETTING is completed, log on to the FTP server asynchronously. Your log-on
(Caution) Such re-transmission of the files is not made if you turn off the HEV-1000 and turn
it on.
(Caution) Use of stylus pen is more accurate than your finger.
result will appear in a pop-up.
Connection with the FTP server will be displayed in SETTING screen as below.
When connection with the FTP server was lost due to network problem or other reasons,
event recording video and log file transmitted to the FTP server will be kept by HEV-1000 and it
will start transmitting again when connection is back (Save/Transmit maximum 100 recordings)
15) TOUCH CALIBRATION
If your touch screen is misaligned so that you are not able to touch where you want to, then
use this menu to calibrate touch motion. According to the instruction, touch the exact center of
the cross appeared on the screen for 3 times. When your touch-calibration is completed, your
touch compensation value will be saved within HEV-1000.
HEV-1000 User Manual
Page 23

Item
Value
UV PHOTON COLOR
Red
GAIN ADJUST
10
UV OVERLAY POSITION
center
TRIGGER THRESHOLD
1000
DETECT LEVEL
45
ESD EVENT RECORDING
OFF
PHOTON COUNT DISPLAY
OFF
UV FRAMES
15 Frames
16) FACTORY RESET
Users can initialize their setting to as-received status which is specified in the following table:
HEV-1000 User Manual
Page 24

MAX LEVEL HOLD TIME
1 Sec
Max TRIGGER THRESHOLD 1K
1000
Max TRIGGER THRESHOLD 3K
3000
Max TRIGGER THRESHOLD 6K
6000
REMOTE MONITORING
OFF
TARGET STORAGE
SD Card
VIDEO FREQUENCY
59.94Hz
BUZZER
ON
IP ADDRESS
192.168.0.2
SUBNET MASK
255.255.255.0
GATEWAY
192.168.0.1
FTP HOST ADDRESS
192.168.0.3
17) ABOUT DEVICE
Users can view S/N, Mac address, F/W version info of their HEV-1000.
HEV-1000 User Manual
Page 25

QUICK SETUP GUIDE
HEV-1000 supports Quick Setup Guide which allows its users to quickly change their settings
through network. It also allows faster and easier installation.
1) Connect the power adaptor to the power terminal on the rear of HEV-1000.
2) Directly connect the LAN cable to the LAN port of computer.
3) Execute “HEV-1000 Intranet search and settings” program.
4) Click “Search” button.
5) Every HEV-1000 that is connected to the same network will be displayed as below.
HEV-1000 User Manual
Page 26

In your HEV-1000, you will see the following message displayed.
5) Select the HEV-1000 you want, change its setting, and click “Save” button so that you can save
your recent setting to your selected HEV-1000.
6) When closing “HEV-1000 Intranet search and settings” program, your HEV-100 will go back to
the Main screen.
HEV-1000 User Manual
Page 27

File
Description
firm.bin
Image shown on LCD screen when firmware is
executed
font.bin
Font file image used in GUI
gui.bin
Image to be used in GUI
hdmi.bin
Image shown on HDMI screen while booting
kernel.bin
Linux Kernel file image
lcd.bin
Image shown on LCD screen while booting
rfs.bin
File system file image where processor runs
(Caution) Format your SD card when S/W upgrade fails.
S/W Upgrade
1) Turn off HEV-1000.
2) Put the following files required for S/W upgrade into your SD card.
3) Connect the SD card to the SD card slot on the rear of HEV-1000.
4) Apply the power by pressing the power button while the REC button on the top of HEV-1000 is
being pressed. You can also upgrade the software by using 5-direction buttons instead of the REC
button.
5)Confirm that “Upgrade…” message is shown on either LCD or HDMI’s booting scree and take
your finger off from REC button.
When upgrade is in progress, you will see the progress bar displayed under “Upgrade…”.
HEV-1000 User Manual
Page 28

Symptom
Possible Causes
Measures
Video is not
displayed
1. The power plug is not connected to
the device.
2. Wrong cable is connected.
1. Connect the supply power plug.
2. Check every cable’s connection.
6) When upgrading is completed, check if Main Screen is on.
7) Check the F/W Version of your device at Setting > About Device.
Servicing
IF your HEV-1000 has some problem, please check the following before you request for servicing.
Such check may save your time and money.
If the problem is not solved, turn off the device and unplug the plug. Then, please contact HEV1000 Service Center.
HEV-1000 User Manual
 Loading...