

Page 1

Hive Active Thermostat
Install uide
Guía de
instalación
Page 2
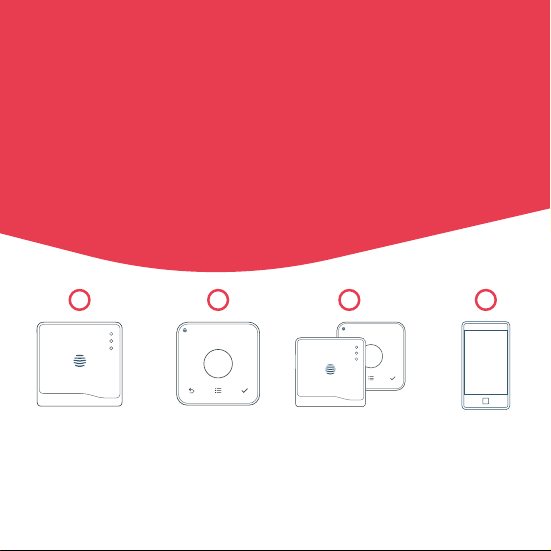
Installation order
To remotely control your heatin and coolin with Hive Active Thermostat,
the thermostat needs to be installed and paired to a Hive Hub.
For quick and efficient set up, install Hive Active Thermostat in the
order shown below.
Hot tip: If you already have a Hive Hub you can start from step 2!
1
Install hub
Wait until the hub
flashes yellow
2
Install the thermostat
It will show ‘ Search’
and then connect
Check your system is compatible with
Hive Active Thermostat at hivehome.com
3
Pair
Pair the thermostat
and hub
4
Complete
online setup
On the Hive
website or
mobile app
Page 3

Contents
Installin your hub pae 3
Installin your thermostat pae 5
Pairin your hub and thermostat pae 11
Controllin your thermostat remotely pae 13
Meet your new Hive thermostat pae 14
Multizone installations pae 15
Troubleshootin pae 16
2
Page 4
Installin your hub
If you have already installed your hub, please skip this section.
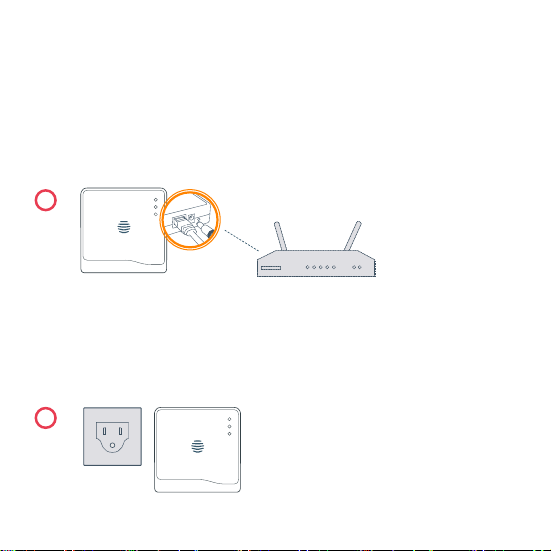
To install the hub you will need an Internet connection a spare Ethernet
port on your router and an electrical outlet nearby.
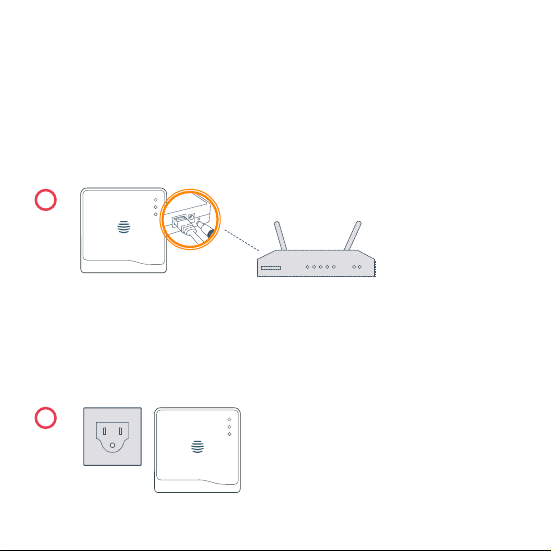
Install the hub as follows:
1
Connect the hub to your Internet
router usin the Ethernet cable
provided. Hot tip: Position your
hub on a shelf or table rather than
on the floor to help it talk to your
other Hive devices.
2
3
Fit the power cable into the hub and
plu it into a power outlet.
Page 5

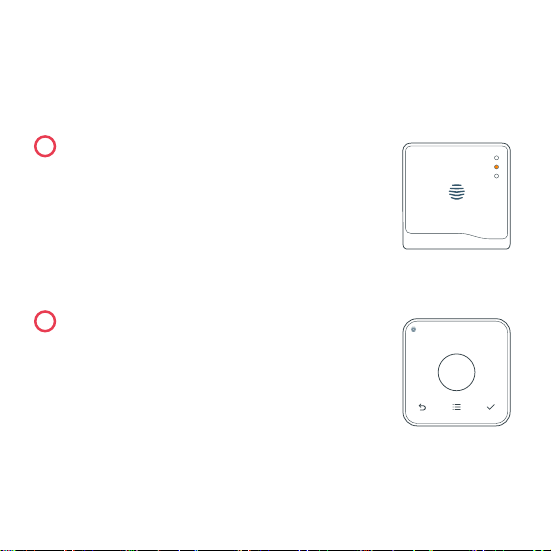
3
Durin start-up the reen liht will flash.
When the hub is ready to pair the reen liht
will be solid and the middle liht will flash
amber. This usually takes 5-10 minutes.
If no lihts are displayed
immediately after installin the hub
check all cables are connected, the
power outlet is workin, and that
you have an internet connection.
If the problem still persists please
contact Hive Technical Support
on +1-866-470-9133 or visit
hivehome.com/support
4
Page 6
Installin your thermostat
1
Switch off the power
Before installin, switch the power off to the heatin and/or coolin
system at your electrical breaker box. Confirm it is powered off and
secured in the OFF position for the duration of the installation. You can
test your fan to see if the system will turn on, if not the power is off.
Remember to always follow appropriate safe electrical isolation
procedures and test to confirm that the supply is off before touchin
any electrical connections.
Hot tip: If your existin thermostat is battery powered it may remain on
once the power is turned o.
5
Page 7

2
Remove your existing thermostat from the wall and
take a picture of the wires for reference
Your Hive thermostat needs a permanent connection to the ‘C’ or ‘Common’
terminal. If there is no wire connected to the C terminal on your existin
thermostat you should request a professional install. Label the wires to your
existin thermostat usin the stickers below.
Caution: Hive Active Thermostat is desined for systems of 24VAC with
1A maximum current, and should not be used on hih voltae systems.
Wire sticker here
6
Page 8

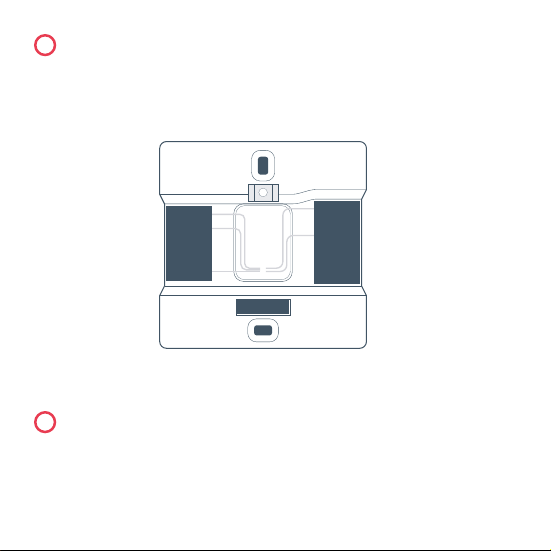
3
Disconnect the wires from the old thermostat backplate
and remove it from the wall
Optional decoration plate
If there are holes and marks that will not be covered by your new
Hive thermostat, use the optional decoration plate provided.
Fix the decoration plate to the wall then attach the thermostat backplate
usin the small screws provided.
4
Removing the terminal protectors
Remove the terminal protectors by pressin down the terminal release
tabs and pullin the plastic out of the terminals.
7
Page 9
5
Screw on the Hive thermostat backplate using the screws
(and wall anchors) provided
Hot tip: Use the level on the backplate to help et your thermostat
straiht on the wall.
Y1
RC
Y2
O/B
G
C
RH
W1
W2
W3/AUX
ACC
Wirin di aram as an ex ample only
6
Connect the wires to the Hive thermostat backplate
Hive is compatible with wire thicknesses AWG 16-22. If your existin
thermostat had a jumper between the RC and RH terminals this is no
loner required. An R wire can o into either RC or RH.
8
Page 10

Terminal descriptions
G – Fan
C – Common wire
W – 1st, 2nd and 3rd stae heatin for conventional systems.
W3/AUX is used for auxiliary or emerency heat for heat pump systems.
Y – 1st and 2nd stae coolin or 1st and 2nd stae of heat pump compressor
RC – Cool transformer
RH – Heat transformer
O/B – Heat pump reversin valve
ACC – Accessory terminal for dehumidifiers or humidifiers
(also sometimes called DHUM or HUM)
9
Page 11
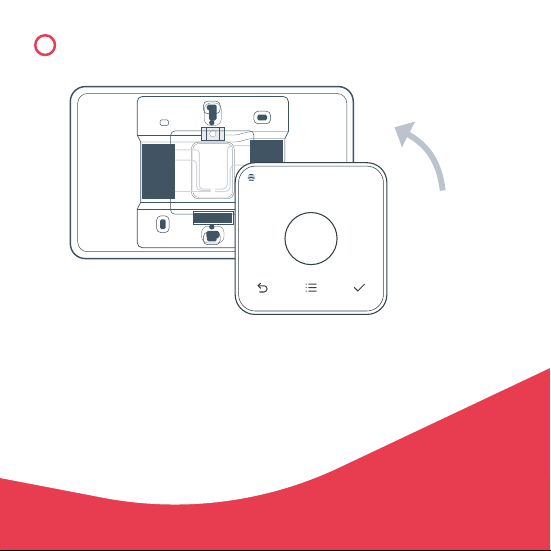
7
Attach the thermostat body to the thermostat backplate
Y1
RC
Y2
O/B
G
RH
W1
W2
W3/AUX
ACC
C
Clip thermostat
front plate onto
the wall mounted
back plate.
10
Page 12

Pairin your hub and thermostat
If you already have other Hive devices connected, you can follow the
‘install devices’ section of your app or online dashboard to pair the hub
and thermostat. If not, follow the steps below.
1
Check the hub is flashing amber –
this means it’s ready to connect
If the hub is showin a solid amber liht, unplu the
power and reconnect it. The hub will bein to reboot,
this may take a few minutes. When the hub is ready
to pair, the top liht will be solid reen and the middle
liht will flash amber.
Turn the power back on to your heating
2
and/or cooling system
The thermostat display will show ‘Search’ – meanin
it’s searchin for the hub. A timer will show how lon
the thermostat has been searchin.
If this lasts for loner than ten minutes, contact
Hive Technical Support and they will dianose
any problems.
11
Page 13

3
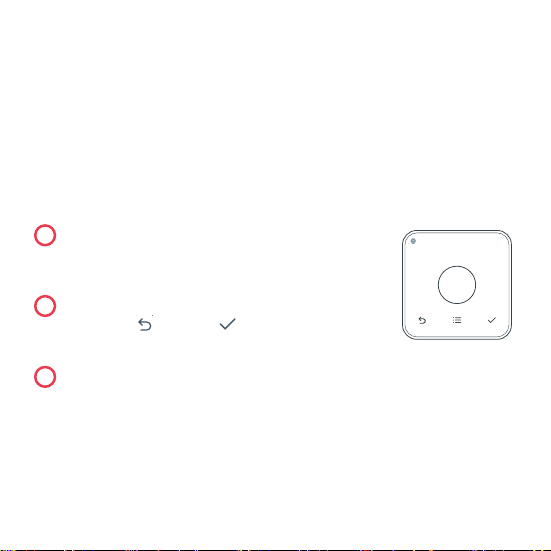
Once paired your thermostat will
take you through guided set-up
The first time you connect your Hive
Welcome to Hive.
Let's take a tour.
(Press back button to skip tour)
thermostat, it will walk you throuh the
set-up process.
• Firstly, you’ll need to confirm the wires
shown in reen are the ones you want
to connect. The Hive thermostat will
automatically detect when a wire is
connected to a terminal.
• You’ll then need to tell us whether your system is a as furnace or an
electric air handler. Don’t worry if you’re not sure, we’ve ot that covered too.
• If you have connected wires to other terminals, like O/B and ACC,
we'll ask you a couple more questions.
• You'll then see a quick welcome tour where you’ll learn the common
interactions on the thermostat itself.
Once we know these thins about your system, you can continue to set up
your schedules on the thermostat or switch to the app or website to do this.
Hot tip: If you need to rewire at this point make sure the power is off at the
electrical breaker box.
12
Page 14

Controllin your thermostat remotely
Hive Active Thermostat is now installed, there is one final step to link your
thermostat to your Hive account.
1
Download the Hive app
2
Loin usin the email address and password you reistered with
OR If you haven’t already ot a Hive account, tap ‘Create Account’ on the
app Loin screen or create one at hivehome.com/register. Once you’ve
created your account then you’ll need to lo in.
3
Enter the hub ID - this is the ABC-123 formatted number on the
underside of the hub
4
Once the hub ID has been entered, setup is complete and you’ll
land on your Hive dashboard
5
Tap on your thermostat to control it remotely
Hot tip: You can also control your thermostat and other Hive devices
throuh our website, just o to hivehome.com
13
Page 15
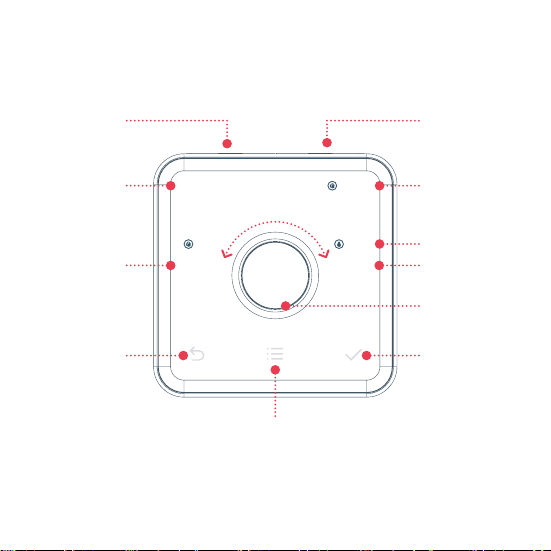
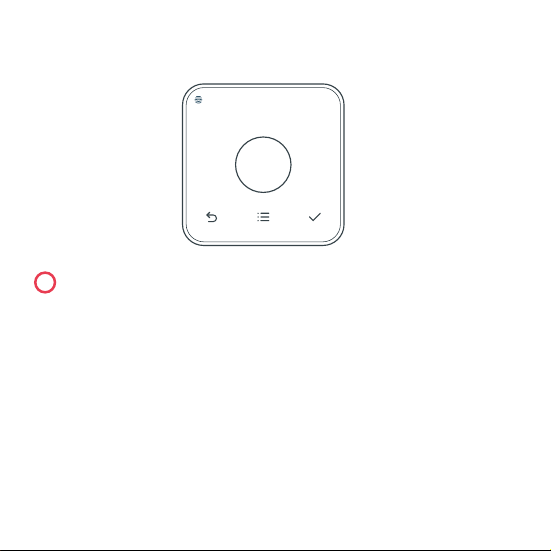
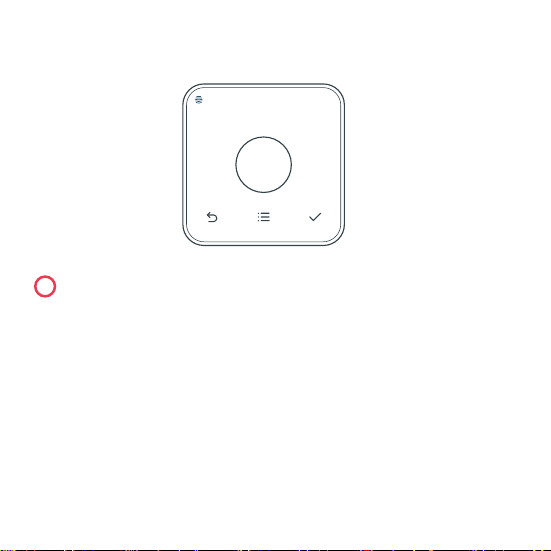
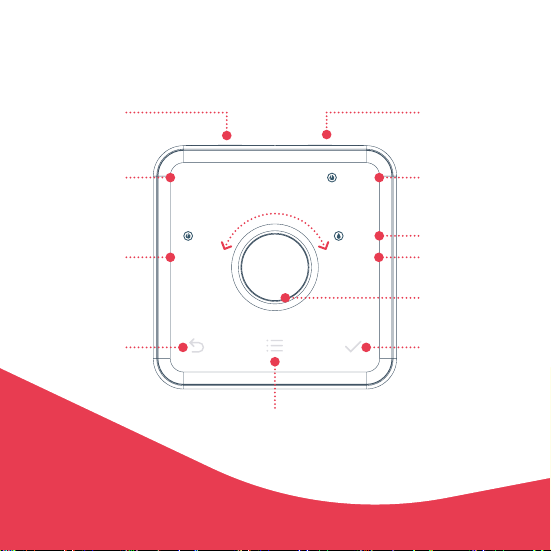
Meet your new Hive thermostat
Quick Cool
Day/ Time System
Tar et
Temperature
Back
MON 3.25pm
ON
°
72
TAR GET
Menu
HOLD
55%
68
ACTUAL
°
Quick Heat
Mode
Humidity
Actual
Temperature
Dial
Save
14
Page 16

Multizone installation
Hive Multizone can support up to five zones for heatin and/or coolin.
Hot tip: We recommend that you install the thermostat closest to the hub
first and then install each additional thermostat one at a time.
1
When installin each thermostat, repeat steps 1-6 from the
Installing your thermostat sections on paes 5-9.
2
Lo in online at hivehome.com or throuh your Hive app.
3
If usin your app, select menu and ‘Install Devices’ and
follow the on-screen instructions in the app.
4
If you are loed in via the web, select settins and
‘Install devices’ and follow the onscreen instructions.
5
If you have more zones to install, repeat the steps until all
thermostats have been connected.
15
Page 17
Troubleshootin
To remotely control your heatin and/or coolin with Hive, both the
thermostat and hub need to be connected. When this service isn’t
available, the thermostat can also be installed without a hub. This is
known as ‘stand-alone’ mode. In ‘stand-alone’ mode the thermostat
acts as a standard prorammable thermostat without the remote
control features and functionality of Hive.
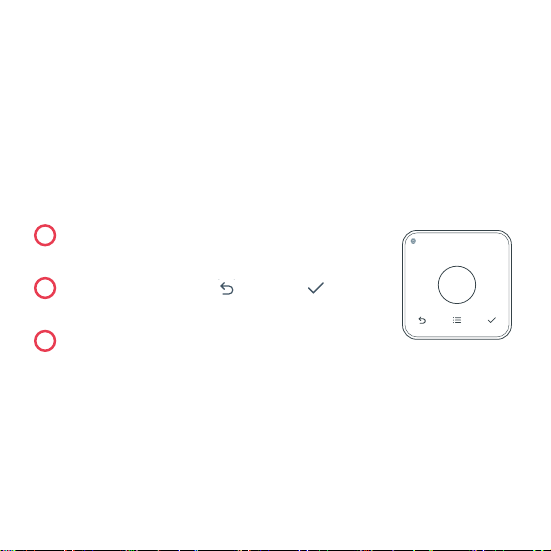
Using stand-alone mode
1
Upon powerin up the thermostat for the first
time, the thermostat display will show ‘Search’.
2
Push and hold the back and check
buttons until the 10 second timer runs down.
3
To switch back to ‘connected’ mode:
Remove thermostat from the backplate, wait 5 seconds and
then connect the thermostat to the backplate. It will power
back up and display ‘Search’ while lookin for your hub.
Search ...0:23
16
Page 18

FCC Compliance Notice
This device complies with Part 15 of the FCC Rules, operation is subject to the followin
two conditions:
(1) This device may not cause interference.
(2) This device must accept any interference received, includin interference that
may cause undesired operation.
This Class B diital apparatus complies with Canadian ICES-003. CAN ICES-3(B)/
NMB- 3(B). This equipment has been tested and found to comply with the limits for a Class
B diital device, pursuant to Part 15 of the FCC Rules. These limits are desined to provide
reasonable protection aainst harmful interference in a residential installation.
This equipment enerates uses and can radiate radio frequency enery and, if not installed
and used in accordance with the instructions, may cause harmful interference to radio
communications. However, there is no uarantee that interference will not occur in a particular
installation. If this equipment does cause harmful interference to radio or television reception,
which can be determined by turnin the equipment off and on, the user is encouraed to try to
correct the interference by one or more of the followin measures:
• Reorient or relocate the receivin antenna.
• Increase the separation between the equipment and receiver.
• Connect the equipment into an outlet on a circuit different from
that to which the receiver is connected.
• Consult the dealer or an experienced radio/TV technician for help.
FCC Radiation Exposure Statement
This equipment complies with FCC and IC RF radiation exposure limits set forth for an
uncontrolled environment. This equipment must be installed to provide a separation distance of
at least 20cm from all persons. Chanes or modifications not expressly approved by the party
responsible for compliance could void the user’s authority to operate the equipment.
17
Page 19

Orden de instalación
Para controlar de manera remota tu calefacción y aire acondicionado con
Hive Active Thermostat, hay que instlar el termostato y enlazarlo con un
hub Hive.
Para confiurarlo de modo rápido y eficiente, instala Hive Active Thermostat
en el orden que se muestra a continuación.
Consejo útil: si ya tienes un hub Hive, puedes empezar desde el paso 2.
1
Instala el hub
Espera hasta que
la luz del hub
parpadee de
color amarillo
2
Instala el
termostato
Mostrará “Search”
(buscar) y procederá
a conectarse
3
Enlázalos
Enlaza el termostato
y el hub
Completa la
configuración
en línea
En la páina web
de Hive o en la
aplicación móvil
Comprueba si tu sistema es compatible con Hive Active Thermostat
en hivehome.com
4
18
Page 20

Contenido
Cómo instalar tu hub Páina 20
Cómo instalar tu termostato Páina 22
Cómo enlazar tu hub y tu termostato Páina 28
Cómo controlar tu termostato de forma remota Páina 30
Conoce tu nuevo termostato Hive Páina 31
Instalaciones multizona Páina 32
Solución de problemas Páina 33
19
Page 21
Cómo instalar tu hub
Si ya has instalado tu hub, omite esta sección.
Para instalar el hub necesitarás una conexión a Internet, un puerto
Ethernet adicional en tu enrutador y un tomacorriente cerca.
Instala tu hub como se indica a continuación:
1
Conecta el hub a tu enrutador
de banda ancha usando el cable
Ethernet incluido. Consejo útil: ubica
el hub en una repisa o mesa, y no en
el piso, para que se comunique mejor
con tus otros dispositivos Hive.
2
Coloca el cable eléctrico en el hub y
conéctalo al tomacorriente.
20
Page 22

3
Durante el inicio del sistema, la luz verde
parpadeará. Una vez que el hub esté listo
para enlazarse, la luz verde se quedará fija, y
la luz del centro parpadeará en color ámbar.
Esto usualmente toma de 5 a 10 minutos.
Si no aparece ninuna luz inmediatamente
después de instalar el hub, revisa que
todos los cables estén conectados, que el
tomacorriente funcione y que tenas una
conexión a Internet. Si el problema todavía
persiste, por favor, contacta al Apoyo Técnico
de Hive al +1-866-470-9133 o visita
hivehome.com/support
21
Page 23
Cómo instalar tu termostato
1
Desconecta el suministro de energía
Antes de la instalación, desconecta el suministro de enería de la calefacción
y/o el aire acondicionado en tu caja de interruptores eléctricos. Aseúrate de
que esté apaado y fijado en la posición de APAGADO durante la instalación.
Puedes hacer la prueba con tu ventilador para verificar si el sistema está
encendido, caso contrario, se encuentra apaado.
Recuerda siempre seuir los procedimientos de aislamiento eléctrico de
seuridad apropiados y hacer la prueba para confirmar que el suministro
esté apaado antes de tocar cualquier conexión eléctrica.
Consejo útil: si tu termostato actual funciona con baterías, es posible que
permanezca encendido lueo de apaar el suministro de enería.
22
Page 24

2
Retira tu termostato actual de la pared y toma una foto de los
cables como referencia
Tu termostato Hive requiere una conexión permanente al terminal “C”
o “Común”. Si no hay ninún cable conectado al terminal C de tu termostato
actual, deberás solicitar una instalación profesional. Etiqueta los cables de tu
termostato actual usando los adhesivos a continuación.
Precaución: Hive Active Thermostat está diseñado para sistemas 24VAC con
corriente máxima 1A, y no deberá usarse en sistemas de alto voltaje.
Etiqueta adhesiva
del cable aquí
23
Page 25
3
Desconecta los cables de la placa posterior del termostato
antiguo y retíralo de la pared
Placa decorativa opcional
Si existen hoyos y marcas que no quedarán cubiertos por tu nuevo
termostato Hive, utiliza la placa decorativa opcional incluida.
Fija la placa decorativa a la pared, lueo sujeta la placa posterior del
termostato usando los tornillos pequeños incluidos.
4
Removeando los protectores del terminal
Retira los protectores del terminal presionando las pestañas de liberación
del terminal y retirando el plástico de los terminales.
24
Page 26

5
Atornilla la placa posterior del termostato Hive usando los
tornillos (y el anclaje de pared) incluidos.
Consejo útil: utiliza el nivel de la placa posterior para ayudarte a
enderezar el termostato en la pared.
Y1
RC
Y2
O/B
G
C
RH
W1
W2
W3/AUX
ACC
El diarama de cableado es solo un ejemp lo
6
Conecta los cables a la placa posterior del termostato Hive
Hive es compatible con cables de calibre AWG 16-22. Si tu termostato
actual tenía un puente entre los terminales RC y RH, ya no es necesario.
Un cable R puede conectarse ya sea a RC o a RH.
25
Page 27

Descripciones del terminal
G – Ventilador
C – Cable común
W – 1.ª, 2.ª y 3.ª etapa de calentamiento para sistemas convencionales.
W3/AUX se usa como calefacción auxiliar o de emerencia para
sistemas de bombas de calor.
Y – 1.ª y 2.ª etapa de enfriamiento o 1.ª y 2.ª etapa de la bomba de
calor compresor
RC – Transformador de frío
RH – Transformador de calor
O/B – Válvula de inversión de la bomba de calor
ACC – Terminal adicional para deshumidificadores y humidificadores
(a veces llamados también DHUM o HUM)
26
Page 28

7
Conecta el cuerpo del termostato a la placa posterior
del mismo
27
Y1
RC
Y2
O/B
G
RH
W1
W2
W3/AUX
ACC
C
Fija la placa
frontal del
termostato en
la placa posterior
montada sobre
la pared.
Page 29
Cómo enlazar tu hub y tu termostato
Si ya tienes otros dispositivos Hive conectados, puedes pasar a la sección
“instalar dispositivos” en tu app o en el panel de control en línea para enlazar
el hub y el termostato. Caso contrario, siue las instrucciones a continuación.
1
Verifica que el hub parpadeé en color ámbar.
Esto significa que está listo para conectarse
Si el hub muestra una luz ámbar fija, desconéctalo del
tomacorriente y vuelve a conectarlo. El hub comenzará
a reiniciarse, es posible que esto tome alunos minutos.
Cuando el hub esté listo para conectarse, la luz en la
parte superior será de color verde fijo y la luz en el
centro parpadeará en color ámbar.
Vuelve a encender el suministro
2
de energía de tu sistema de calefacción
y aire acondicionado
En la pantalla del termostato aparecerá “Search”
(buscar), que sinifica que está buscando el hub.
Un cronómetro mostrará cuánto tiempo el termostato
ha estado buscando.
Si esto persiste por más de diez minutos, contacta al Apoyo Técnico
de Hive y ellos dianosticarán cualquier problema.
28
Page 30

3
Una vez enlazado, tu termostato te
guiará a través de la configuración
Welcome to Hive.
Let's take a tour.
(Press back button to skip tour)
La primera vez que conectes el termostato Hive,
te uiará a través del proceso de confiuración.
• En primer luar, deberás confirmar que los
cables que se muestran en color verde son
los que deseas conectar. El termostato Hive
detectará automáticamente cuando un cable
esté conectado a un terminal.
• A continuación, debes decirnos si tu sistema es un calentador a as o
un controlador de aire eléctrico. No te preocupes si no estás seuro,
nosotros nos encaramos de eso también.
• Si tienes cables conectados a otros terminales, como O/B y ACC, te
haremos un par de preuntas más.
• Ahora verás un tour de bienvenida rápido en el que aprenderás las
interacciones comunes en el mismo termostato.
Una vez que tenamos esta información acerca de tu sistema, puedes
continuar la confiuración de horarios en el termostato o cambiar a la app
o a la páina web para hacerlo.
Consejo útil: si necesitas cambiar los cables en este punto, aseúrate de que
el suministro de enería esté apaado en la caja de interruptores eléctricos.
Page 31
Cómo controlar tu termostato de forma remota
Hive Active Thermostat ya está instalado; queda un paso final para vincular
tu termostato a tu cuenta de Hive.
1
Descara la aplicación de Hive
2
Inicia sesión usando la dirección de correo electrónico y la contraseña
con las que te reistraste
Si aún no tienes una cuenta de Hive, toca ‘Crear cuenta’ en la antalla de inicio
de sesión de la aplicación o crea una cuenta en hivehome.com/register.
Una vez que hayas creado tu cuenta, tendrás que iniciar sesión.
3
Inresa la identificación del hub, que es el número con el formato
ABC-123 en la parte inferior del hub
4
Cuando hayas inresado la identificación del hub, la confiuración se
habrá completado y verás tu panel de control de Hive
5
Toca el termostato para controlarlo de forma remota.
Consejo útil: también puedes controlar tu termostato y otros dispositivos
Hive a través de nuestro sitio web, solo tienes que ir a hivehome.com
30
Page 32
Conoce tu nuevo termostato Hive
Enfriamiento
rápido
Día y hora Modo del
Temperatura
deseada
Atrás
MON 3.25pm
ON
°
72
TAR GET
Menú
HOLD
55%
68
ACTUAL
°
31
Calentamiento
rápido
sistema
Humedad
Temperatura
actual
Selector
Guardar
Page 33

Instalación multizona
La multizona Hive puede aceptar hasta cinco zonas para calefacción y
aire acondicionado.
Consejo útil: Te recomendamos que instales el termostato lo más cerca posible
del hub y consecuentemente añadas cada uno de los termostatos adicionale.
1
Al momento de instalar cada termostato, repite los pasos 1 al 6 de
las secciones de instalación de tu termostato en las páinas 22 a 27.
2
Inresa a hivehome.com o por medio de la app de Hive.
3
Si estás usando la app, selecciona el menú y la opción “Instalar
dispositivos”, y siue las instrucciones en la app.
4
Si inresaste por medio del sitio web, selecciona la opción “Instalar
dispositivos” en los ajustes y siue las instrucciones en la pantalla.
5
Si tienes más zonas que instalar, repite los pasos hasta
que todos los termostatos estén conectados.
32
Page 34
Solución de problemas
Para controlar de manera remota tu calefacción y/o aire acondicionado
con Hive, tanto el termostato como el hub necesitan estar conectados.
Cuando este servicio no esté disponible, el termostato también puede
instalarse sin un hub. A esto se conoce como modo “autónomo”.
En este modo, el termostato actúa como un termostato proramable
sin la funcionalidad ni las opciones de control remoto de Hive.
Cómo usar el modo autónomo
1
Al encender el termostato por primera vez,
en la pantalla del termostato aparecerá
“Search” (buscar).
2
Mantén presionados los botones para
retroceder y aceptar hasta que el
cronómetro de 10 seundos haya terminado.
3
Para reresar al modo “conectado”:
Retira el termostato de la placa posterior, espera 5 seundos y
lueo conecta el termostato a la placa posterior. Se volverá a
encender y aparecerá “Search” (buscar) mientras busca tu hub.
33
Search ...0:23
Page 35

Aviso de Cumplimiento con la FCC
Este dispositivo cumple con la Parte 15 de las Relas de la Comisión Federal de
Comunicaciones (FCC por sus silas en inlés) de los EE.UU. La operación está sujeta a las
siuientes dos condiciones:
(1) este dispositivo no puede causar interferencia dañina, y
(2) este dispositivo debe aceptar cualquier interferencia recibida, incluso la interferencia
que podría causar una operación indeseada.
Este equipo ha sido probado y se comprobó que cumple con los límites de un dispositivo
diital Clase B seún la Parte 15 de las Relas de la FCC.
Estos límites están diseñados para proporcionar una protección razonable contra la
interferencia dañina en una instalación residencial. Este equipo enera, usa y puede radiar
enería de radiofrecuencia y, si no se instala y usa de acuerdo con las instrucciones, puede
causar interferencia dañina a las radiocomunicaciones. Sin embaro, no se arantiza que
no ocurrirá ninuna interferencia en una instalación en particular. Si este equipo causa una
interferencia dañina para la recepción de radio o televisión, que puede determinarse por
medio de encender y apaar el equipo, se le recomienda tratar de correir la interferencia
por medio de una o más de las siuientes medidas:
• Reoriente o reubique la antena de recepción.
Aumente la separación entre el equipo y el receptor.
• Conecte el equipo a una toma de corriente que se encuentre en un circuito diferente
al circuito en que el receptor está conectado.
• Consulte al distribuidor o a un técnico experto en radio/TV.
Exposición a la Radiofrecuencia
Este equipo cumple con los límites de exposición de radiación de la FCC establecidos
para un ambiente no controlado. A fin de evitar la posibilidad de exceder los límites
de exposición a radiofrecuencia de la FCC, la proximidad de los seres humanos con la
antena debe ser de al menos 20 centímetros durante la operación normal. Los cambios o
modificaciones que no aprobemos expresamente podrían anular la autoridad de usted para
operar el equipo seún las relas de la FCC.
34
Page 36

We’re here to help
You can view our handy how-to-use videos alon
with hints and tips at hivehome.com/support
Or you can contact us: help.USA@hivehome.com +1-866-470-9133
Estamos aquí para ayudarte
Puedes ver nuestros videos prácticos para aprender a usar el termostato,
además de consejos y suerencias en hivehome.com/support
O puedes contactarnos: help.USA@hivehome.com +1-866-470-9133
© 2017 of and im ported by Ce ntrica Conne cted Home US Inc. ,
12 Greenway P laza, Ste 250, Housto n TX 77046. All ri hts reserved.
IS90234250517V1
 Loading...