

Hitzer Energy master II 710 Owner's Manual
Hitzer Energy Master II Stoker Furnace
Model 710
Owner’s Manual
Installation and Operation
Save this Manual
Operating Instructions and Maintenance Enclosed.
Thoroughly Read and Understand Instructions.
Always Leave this Manual with Stove Owner.
Warning
FOLLOW THE INSTRUCTIONS WITHIN THIS MANUAL. IF
INSTRUCTIONS ARE NOT FOLLOWED, A FIRE MAY RESULT CAUSING
PROPERTY DAMAGE, PERSONAL INJURY, OR EVEN DEATH. REFER
TO MARKINGS ON THE FURNACE FOR ADDITIONAL INFORMATION.
CARBON MONOXIDE AND SMOKE DETECTORS/ALARMS MUST BE
INSTALLED IN THE HOME AND WORKING PROPERLY
DANGER – RISK OF FIRE OR EXPLOSION
DO NOT BURN GARBAGE, GASOLINE, DRAIN OIL, OR OTHER
FLAMMABLE LIQUIDS. DO NOT USE CHEMICALS OR FLUIDS TO
START FIRE
BURN RICE SIZE ANTHRACITE COAL ONLY
STOVE SURFACES MAY BE HOT WHILE IN OPERATION. KEEP
CHILDREN AWAY. DO NOT TOUCH DURING OPERATION.
DO NOT CONNECT THIS UNIT TO A CHIMNEY FLUE SERVING
ANOTHER APPLIANCE
DO NOT OPERATE WITH FLUE DRAFT EXCEEDING .06 WC (14.945 Pa)
Page 1

Table of Contents
I. Welcome to Hitzer Family
A. Safety Notice
II. Location of Stove & Installation
A. Pre Installation Information
B. Location
C. Clearances To Combustibles/Floor Protection
D. Requirements In Regards To Installation
E. Connecting Furnace To Chimney
III. Typical Installation
A. Illustrations
B. Supply Duct
C. Return Air
D. Combustion Air
E. Installation In A Confined Space
IV. Flue Systems
A. Masonry System
B. Factory Built Systems
C. Chimney Requirements
D. Flue Size
E. Chimney Height Requirements
F. Power Vent System
V. Basic Regulations for Safe Operations
A. Cautions
B. Local Codes
VI. Stove Start Up & Operation
A. Install Coal-Trol Thermostat
B. Start Up
C. Adjusting Chimney Draft
D. Measuring Furnace Compatibility
VII. MAINTENANCE
A. Daily
B. Weekly
C. Two Months
D. End Of The Season
E. Power Outages
VIII. TROUBLESHOOTING
IX. Further Information
Page 2
I. Welcome to Hitzer Family
Hitzer Inc. welcomes you to a proud and unified team of Hitzer stove owners. Thank You for your recent
purchase of a Hitzer Energy Master II Stoker Furnace. We can assure that your Hitzer furnace has the
finest Swiss Amish Craftsmanship. Your Hitzer Energy Master II Furnace is built with premium quality
materials to ensure safety, durability, and performance. These are all top priorities in the Hitzer line of
products.
We would like to personally thank you again and welcome you into our continually growing Hitzer Family.
We wish you and your family an extended amount of warmth and comfort, provided by your new Hitzer
Furnace. Thanks for choosing Hitzer where our motto is:
“Our Stoves Make Warm Friends.”
Safety Notice
Safety Notice: If this Hitzer Stove is not properly installed a house fire may result. For your safety and to
reduce the risk of fire, follow the installation instructions carefully. Failure to follow these instructions may
result in property damage, bodily injury, or even death. Contact your local building inspector or fire
officials about the need for a permit, restrictions, or installation inspection required in your area. Refer to
makings on your furnace for more information. Save these instructions for future reference.
Safety Notice: Always have working carbon monoxide and smoke detectors installed when using this
equipment. It is recommended to have one on each floor of the house and outside of sleeping rooms.
UL Tested/Label: Follow the information and clearance charts located on each Hitzer Stove Model. This
furnace has been tested to UL 391-2006 & CSA B366.1-M91, approved, and labeled on the rear of each
stove.
It is strongly recommended to have this Hitzer Furnace installed by an educated and certified professional
heating contractor. Please refer to a NFI (National Fireplace Institute) Certified Installer for your
installation needs and questions. Locate an NFI professional at www.nficertified.org.
Page 3

II. Location of Stove & Installation
Pre Installation Information:
Your Energy Master Furnace is intended for use in residential buildings. Do not install in a mobile home.
Do not install in a garage.
IMPORTANT: Always check with local authorities and obtain the necessary permits prior to
installing this furnace. This furnace must be installed in accordance with local, state, and national
codes and regulations.
Before installation some questions must be addressed.
1. Will your Energy Master Furnace be used as a primary (central) furnace, or will it be installed as an
add-on to your existing central heating system?
2. If your Energy Master Furnace is to be installed as an add-on, is it compatible with your existing
furnace? Your Energy Master Furnace is designed to be used with a listed gas-, oil-fired furnace
however not all furnaces will accept add-on applications. Some small furnaces, and especially counterflow or down-flow furnaces, can not be used in an add-on installation. The CFM (cubic feet per minute)
capability between the blower on the existing furnace and the add-on furnace must be compatible. If all
these conditions are met then the combined static pressure must not exceed the maximum static
pressure listed on the nameplate on either furnace. Before installing your Energy Master Furnace consult
your Hitzer dealer or heating contractor and your local, state and national building codes and regulations
to determine if your central heating system is compatible with your Hitzer Energy Master Furnace. Once it
is determined your existing furnace will accept an add-on installation a parallel installation with return air
(outlined later in this manual) is recommended.
3. Can the furnace be vented properly?
a. Is the chimney appropriate for this installation? This furnace requires installation in a masonry
chimney with a clay flue liner or a metal all-fuel chimney listed to UL103 (CAN/ULC-S629-M87) Type HT.
Do not connect this furnace to a chimney serving another appliance!
b. Has your chimney been inspected? It is important that your chimney is clean and structurally sound
(free from defect or damage) before installing your Energy Master Furnace.
c. If you are power venting your furnace is there a place to mount the power vent away from
obstacles? Refer to power vent placement chart with power vent instructions.
4. Is there easy access to outside combustion air should your furnace require it?
5. Can the furnace be installed safely?
a. This furnace must not be installed in a location where it could come in contact with walls, carpeting,
curtains/drapes, or other combustible surfaces.
b. The clearances listed in this manual and on the furnace are minimum clearances. Any reduction
must be approved by the regulatory authority and is not recommended by Hitzer Inc.
c. Will this location require floor protection?
d. Furnace must not be installed in a sleeping room.
6. How close is the electrical source and does it conform to requirements listed?
7. Are there any local, state, or national codes or regulations concerning the use and placement of your
furnace?
8. Are there any structural reasons why the furnace cannot be located where you want it?
9. Will the furnace be easily accessible for refueling, cleaning, maintenance, and repair?
Page 4
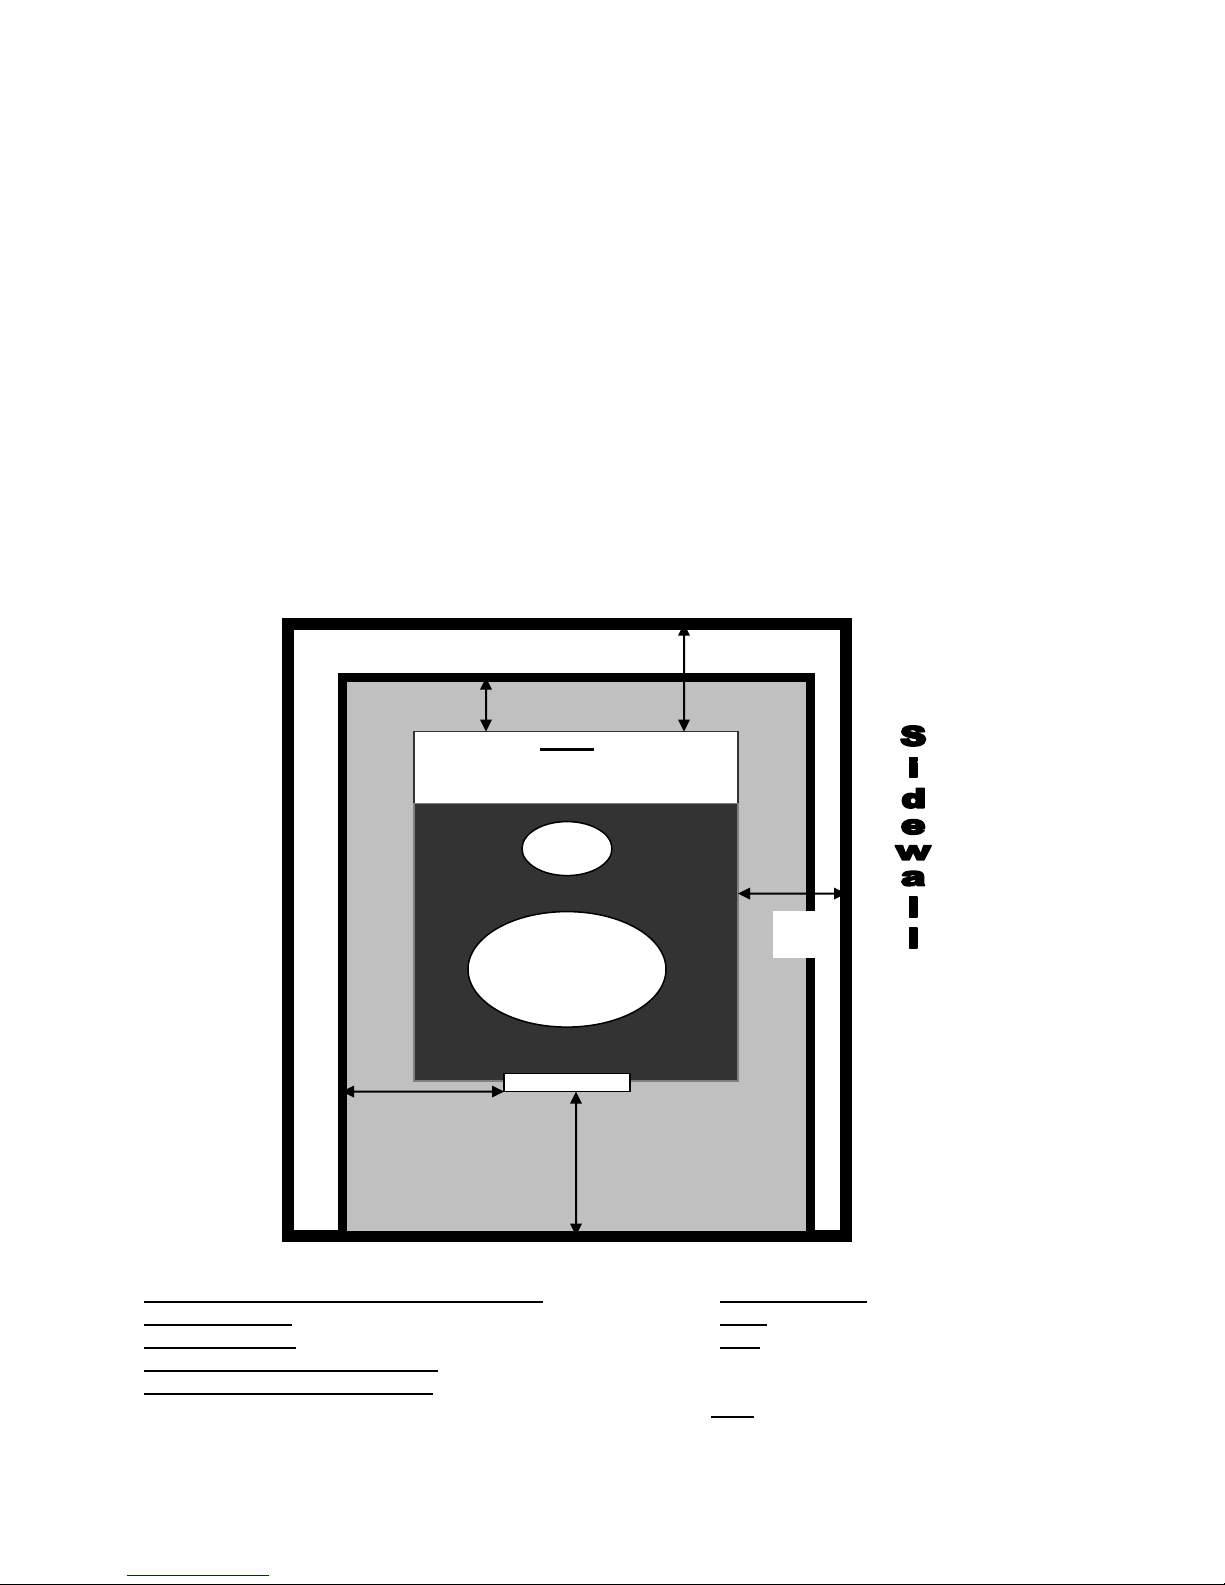
Location:
Furnace
Floor Protection
16 “
8”
2”
The location of the stove is very important for optimum stove performance as well as safety assurance.
When searching for the location of the stove be sure to strictly follow manufactures guidelines,
clearance to combustible material requirements, local building, and fire codes. Failure to follow
manufacture’s instruction and local jurisdiction codes may result in bodily injury, property
damage, fire, or death. Locate the stove where there is sufficient air supply for proper operation to
occur. It is vitally important to locate the stove next to existing forced air furnace as well as next to the
chimney, or exterior wall for power vent systems. The closer placement to these two items the better the
stove will perform, and achieve maximum heat flow. The longer the chimney connector pipe (stovepipe)
and farther away the furnace is from the chimney or power vent the less performance is achieved from
the furnace. Please consider the construction and layout of the home to be heated and make placement
of the Energy Master Furnace to achieve maximum heat benefit it can produce.
Clearances To Combustibles/Floor Protection:
This furnace must be placed on a non-combustible floor. If the floor is a combustible material floor
protection must be placed underneath it and extend at least 8 inches on each side of the fuel or ash door.
It must also extend 16 inches out from the front of the furnace. The floor protection must also be placed
underneath the chimney connector (stove pipe) and extend at least 2 inches on either side of the chimney
connector. This protection is for hot ash and sparks. It is not needed for heat protection. If your furnace is
installed on a concrete basement floor, it is recommended to install on a 2 inch thick nonflammable
material. This will reduce contact with the damp floor that can cause possible rust and corrosion.
Back wall
2”
Minimum Clearance to Combustible Material: Floor Protection:
Unit to Side Wall: 2 inches Front: 16 inches
Unit to Back Wall: 6 inches Side: 8 inches from
Chimney Connecter to Back Wall: 18 inches either side of the
Chimney Connecter to Side Wall: 18 inches fuel and ash door
Rear: 2 inches
Page 5

CAUTION: It is mandatory to abide by clearance to combustibles regulations provided on the
furnace label and in this instruction manual. Failure to abide by the clearance requirements may
result in a fire.
Requirements In Regards To Installation:
DO NOT connect to a chimney serving another appliance. Only one appliance is to be used per
chimney.
Flue must be the same size as stove flue collar or larger within requirements of flue size
maximums.
Chimney connector pipe (stove pipe) must be made of at least 24 gauge metal and be attached
with crimped ends facing the stove. A minimum of 3 screws is required at each connection point.
Masonry or manufactured thimble must be longer than the thickness of the wall and does not
intrude past the inner face of the chimney liner.
Thimble may be constructed of approved clay liner thimble tested and labeled. With a 12” non-
combustible clearance zone on each side of thimble. Please use NFPA 211 instructions and
requirements in regarding thimble information.
Thimble may be a manufactured thimble or class A chimney pipe. A manufactured component
must be installed with listed components accessories and meet manufacturer’s specifications.
It is required to have thimble clearances to combustible material as required by manufacturer and
NFPA 211.
NFPA 211 codes must be followed and an 18” clearance to combustible material is required for
chimney connectors.
This unit must be installed on a noncombustible floor according to the measurements above.
DO NOT install in a garage.
Connecting Furnace To Chimney:
Connection of your Energy Master Furnace to the chimney should be made as direct as possible. It is not
recommended to use more then 2 elbows for venting. The pipe connecting the furnace to the chimney
should be at least 24 gauge single wall pipe. Thicker gauges and double wall pipe may be used. A ½
inch slope, back toward the furnace, per foot of horizontal run is required. This allows any condensation
forming in the pipe to flow back toward the furnace. The connection pipe should be installed so the upper
pipe fits inside the lower pipe. Horizontal run pipe should have the seam turned up. Note the point at
which the flue passes through a wall to the chimney. This penetration must be made with an approved
through the wall thimble or class A chimney pipe and used with the listed proper accessories according to
manufacturer’s instructions. Chimney connector (stove pipe) CANNOT pass through a ceiling, wall, or any
concealed space. Three screws must be attached at each connection point of the chimney connector.
When the Class A chimney pipe connects to the masonry, it must be cemented to the chimney, or a
thimble must be connected to the chimney and the pipe should be tightly inserted into the thimble without
cementing.
III. Typical Installations
Illustrations:
Below are typical ways of installation formats. Note: these illustrations reflect typical installations and are
for design purposes only. Illustrations and diagrams are for informational purposes only. These diagrams
are not drawn to scale. Actual installation procedures may vary.
NOTE: It is always best to run the supply duct up. The supply duct must be constructed of material with
a minimum 250° temperature rating. With the supply duct up, this will allow gravity heat to still rise into
the system. The plenum on the furnace must be constructed of metal.
Page 6
 Loading...