

Page 1
www.hitvis.com
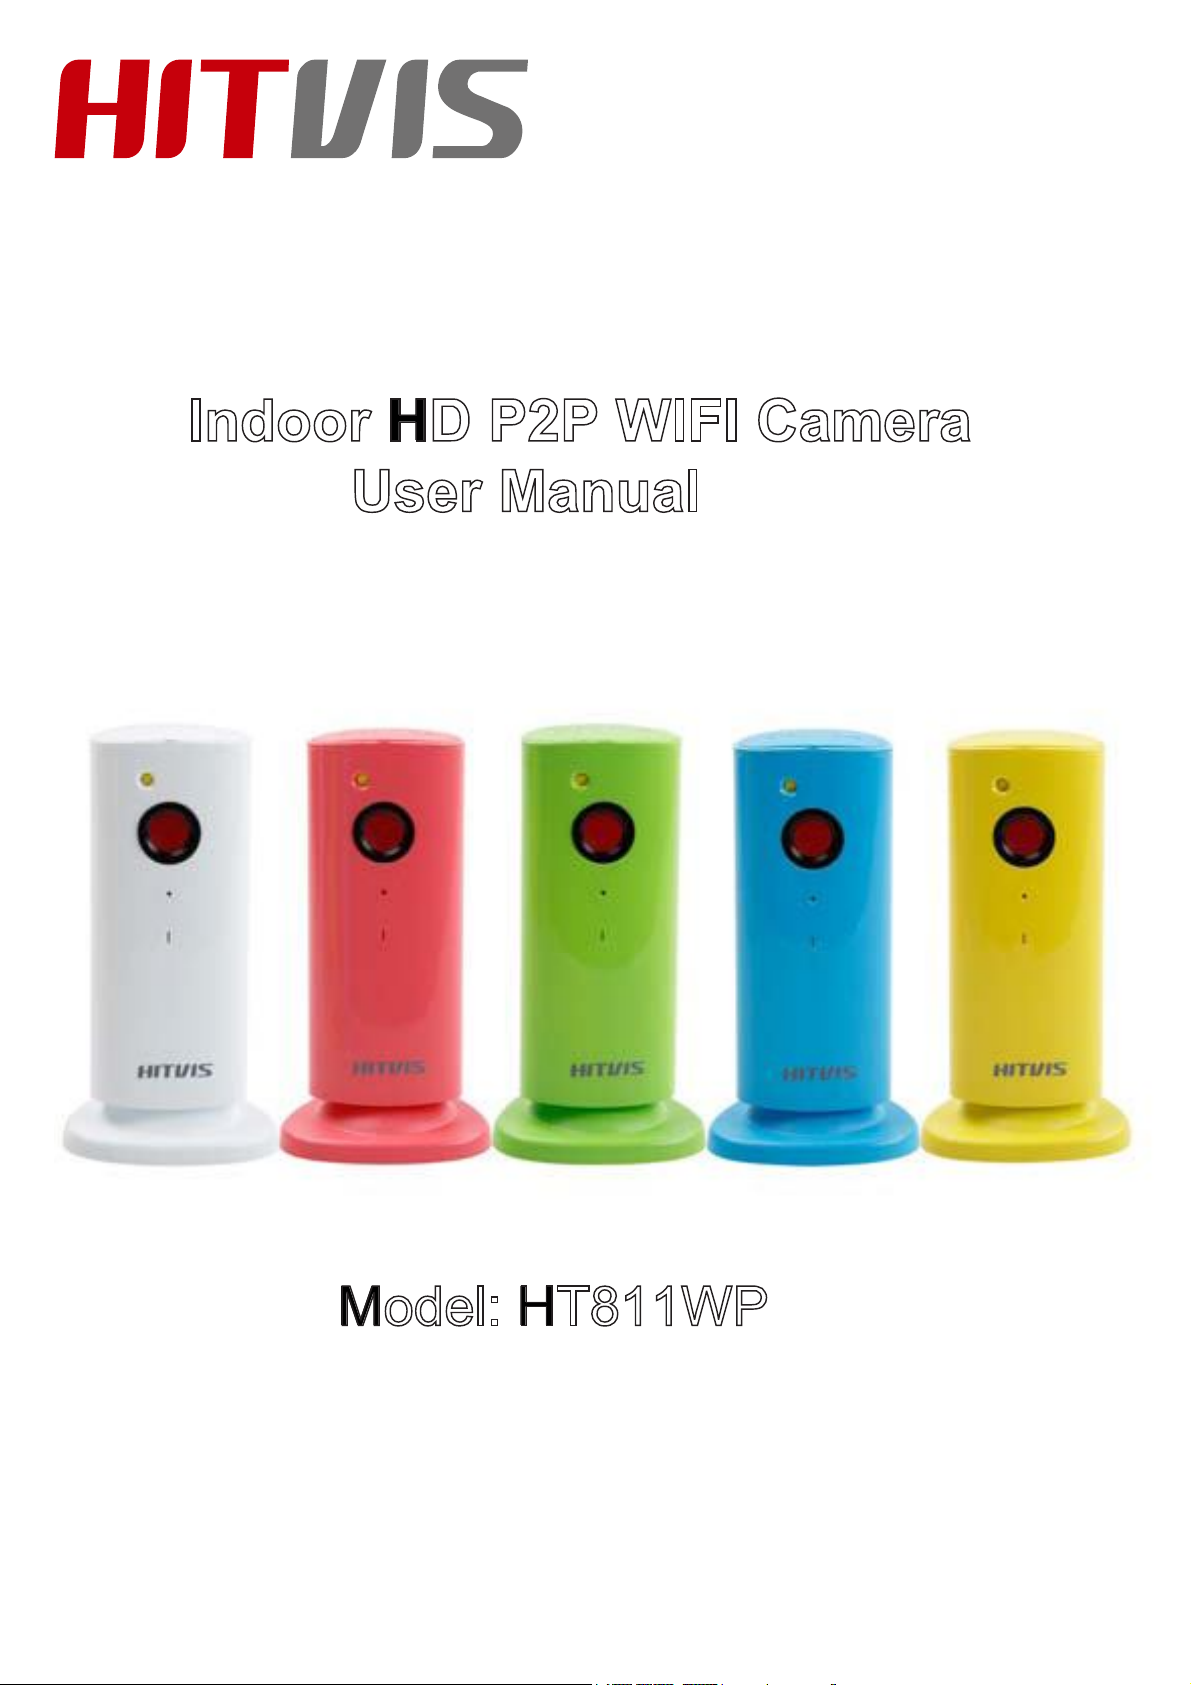
Indoor HD P2P WIFI Camera
User Manual
Model: HT811WP
V1.0
Page 2
1 Read Before Use
Please read and understand the following safety sheet before you use the
monitor.
This camera is designed for indoor usage only,between -10 °~55° C.
Keep this camera out of direct sunlight.
Only use the provided power adapter with this camera.
Keep the camera,power adapter,and accessories out of the reach of
children and pets.
2 Packing Contents
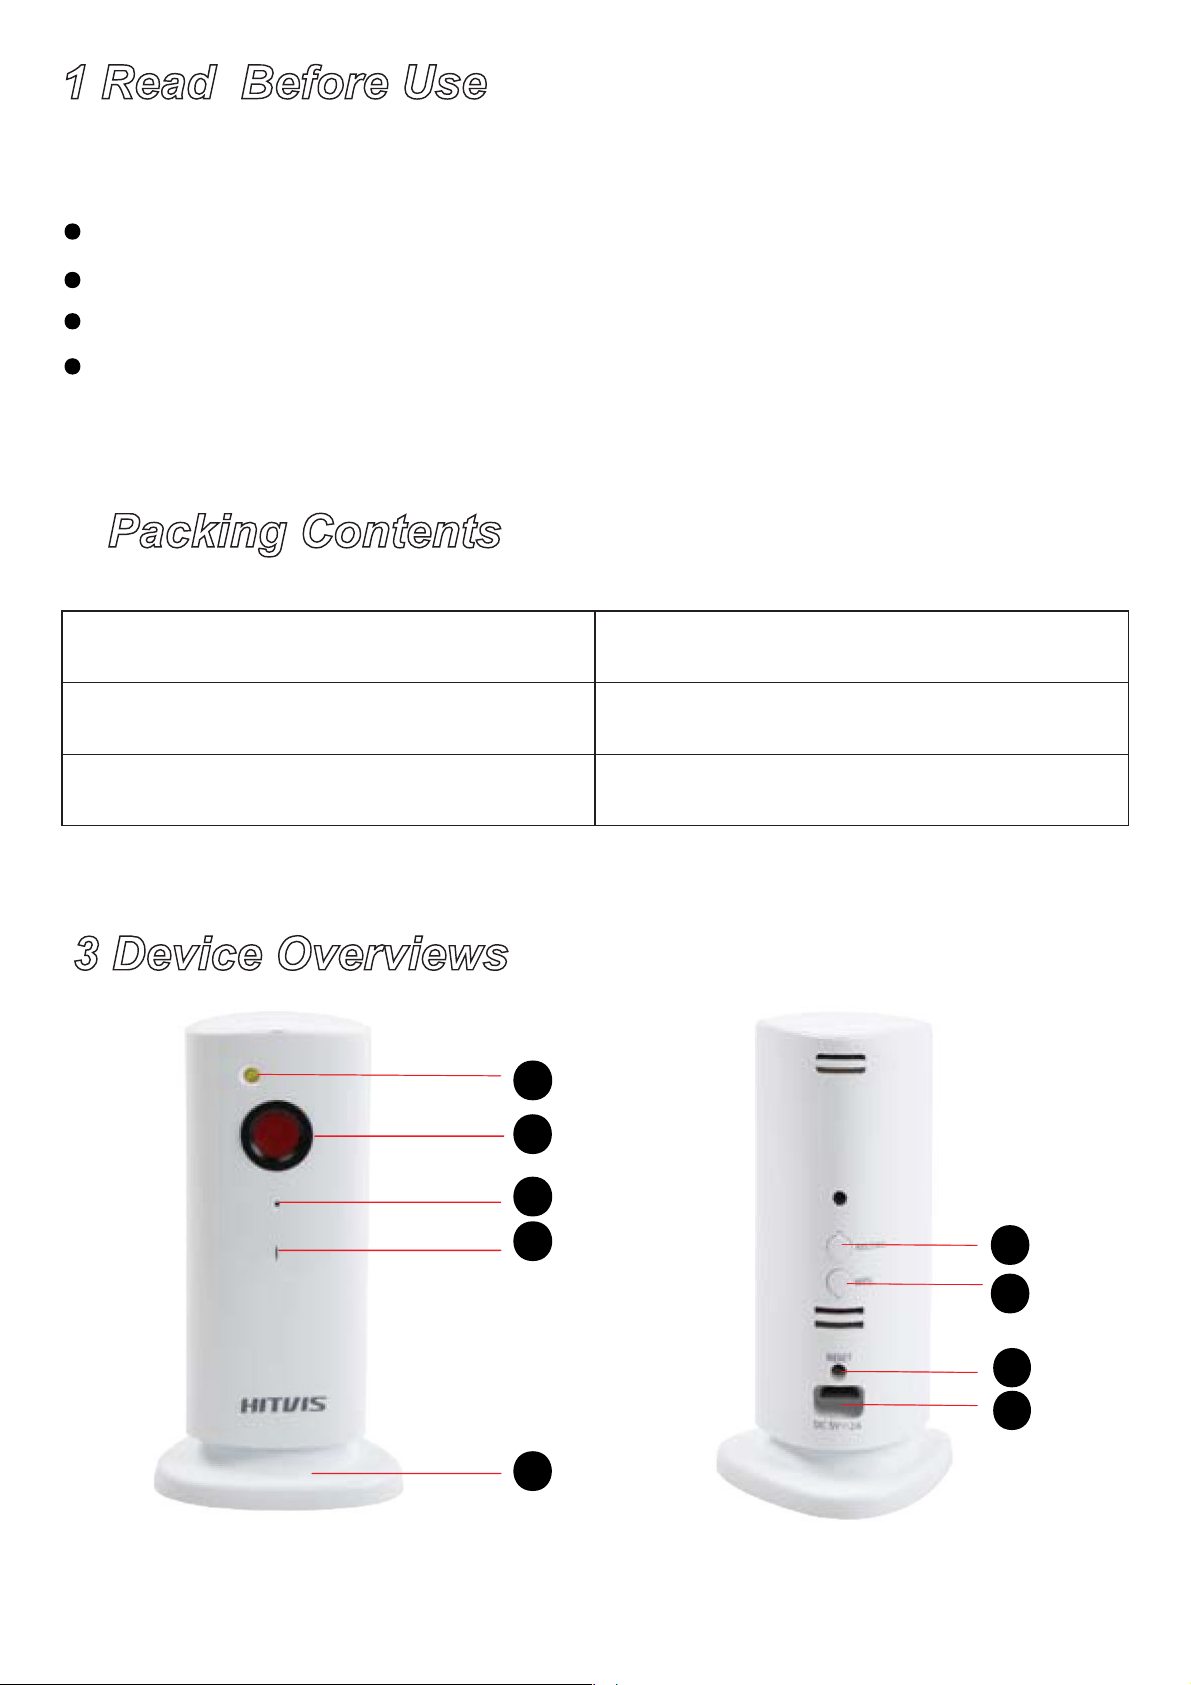
WIFI CAMX1
User Manual x1
Warranty Card x1
3 Device Overviews
Power Adapter x 1
Mounting Bracket x1
11
2
3
4
5
6
7
8
9
1
Page 3
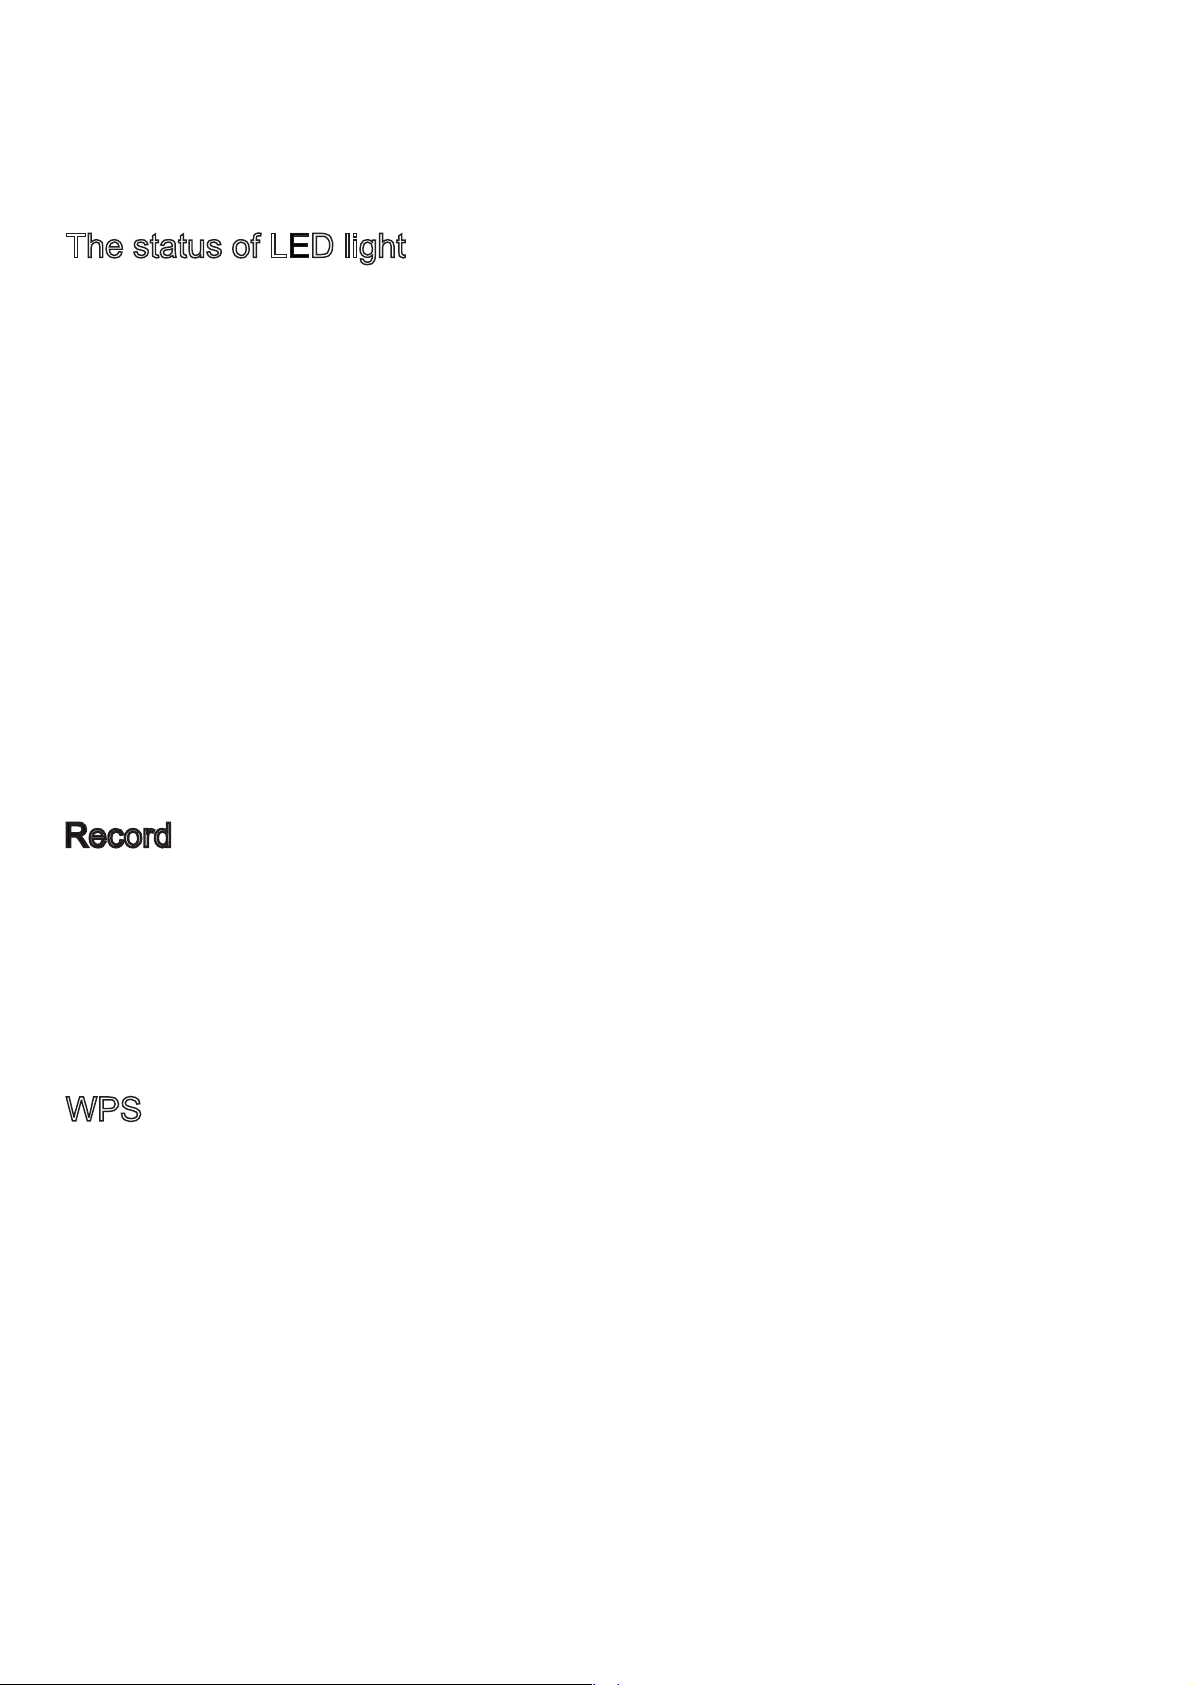
1---Flash lamp 2---Monitor Lens 3---LED light
4---Microphone
7--- WPS 8---Reset 9--- DC power
The status of LED light
No light: No power supplied to the monitor.
Keep green light: Camera is starting up.
Blinking red light about once every second: Camera is under AP mode.
Blinking green light about once every second: Camera has connected
to a wifi network and under STA mode.
Blinking green light about two times every second: Camera is recording
after you press the record button on the back of the camera.
Alternately flashes green and red light: Camera is connecting to a wifi
network after you pressed the WPS button.
Blinking red light quickly about two times every second: The network
5---Magnetic base 6---Record
has some problem and the camera cannot connect to the network.
Keep red light on: The camera has some problem and can’t start well.
Record
Press and hold this button for one second, the led light will turn to green
and blink quickly, the camera starts recording and stores the record file
to micro SD card. Press and hold this button for one second again, it
stops recording. Make sure the camera has inserted micro SD card.
WPS
Step1:
Press and hold the WPS button for one second , and you will see the led
light flashes green and red light alternately.
Step2:
Press the WPS button on your router within 60 seconds. The WPS button
is usually on the front side of your router. If you are not sure where the
WPS button is on your router, please refer to your router’s User Manual.
The HT811WP will automatically create a secure wireless connection to
your router. After connected successfully, the led in your camera will blink
green.
2
Page 4
Reset
Press and hold the Reset button for 3 seconds to reset the camera to
factory default settings.
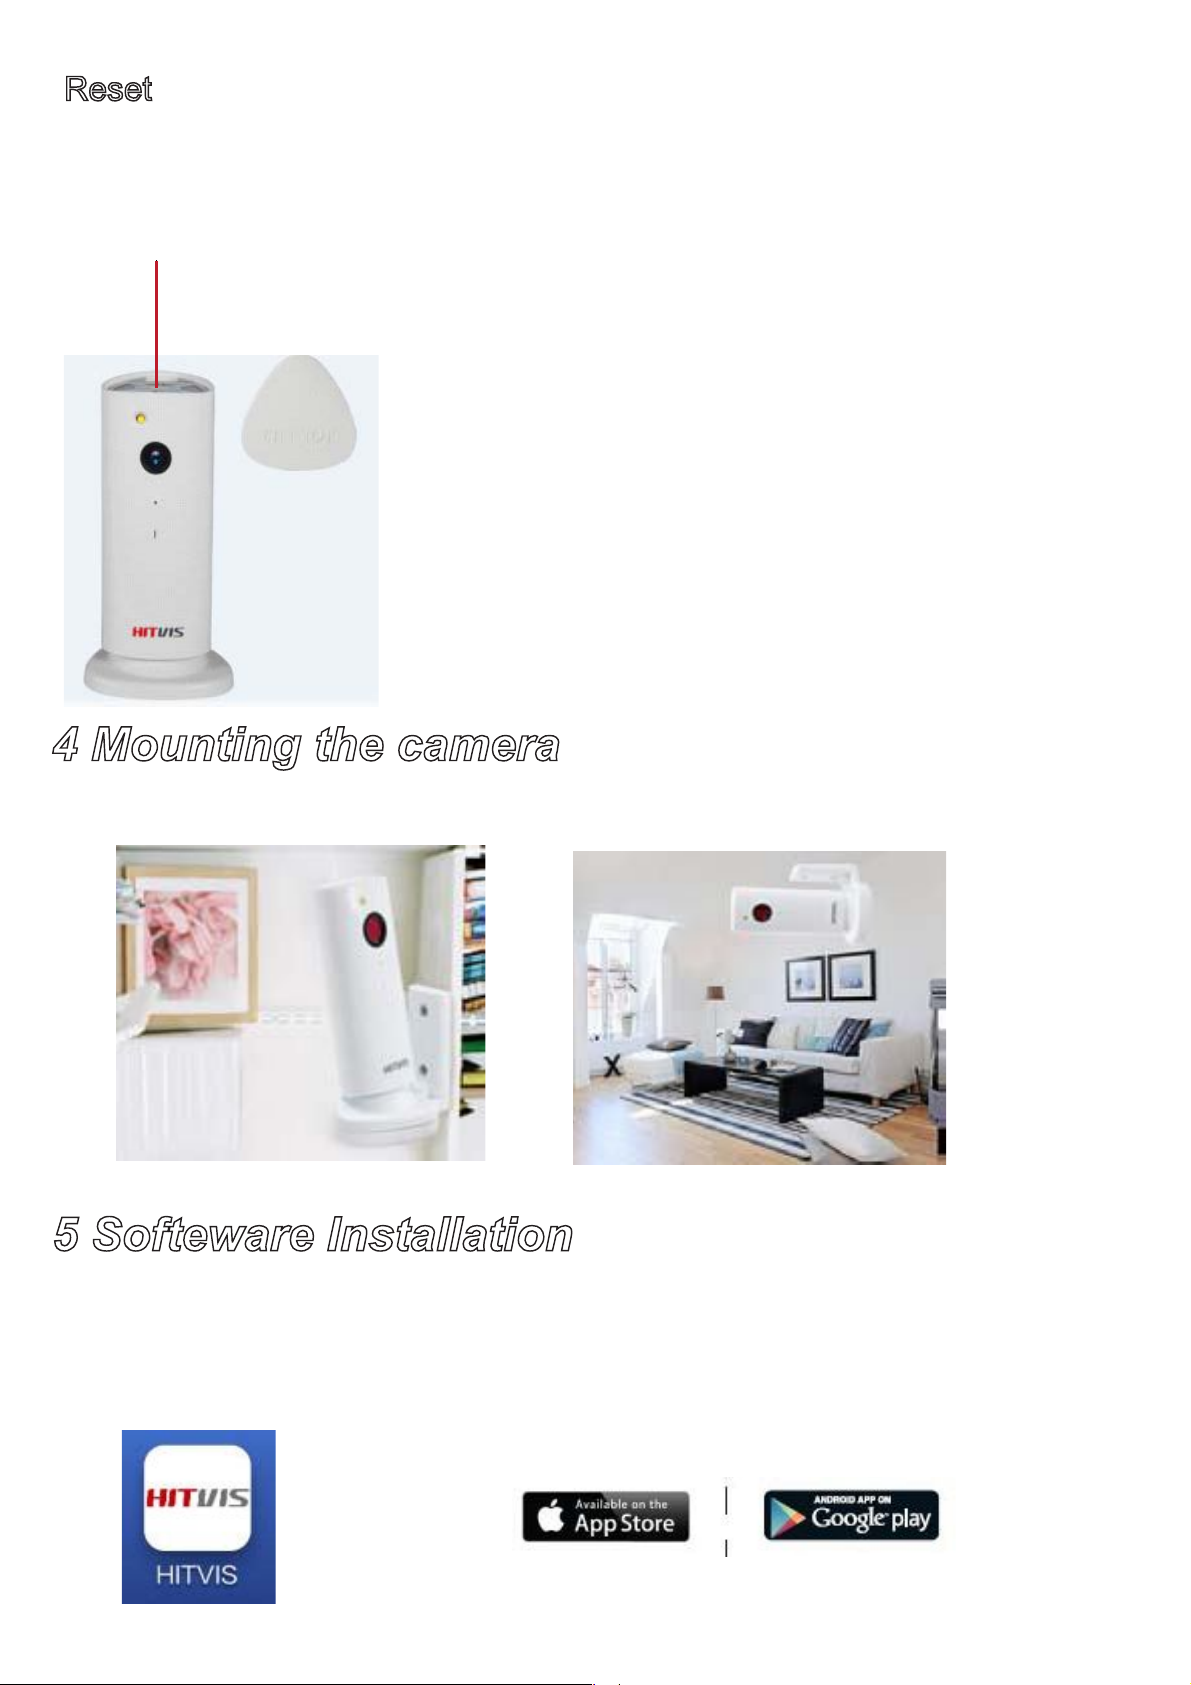
Micro SD card slot
Support up to 32G. You’d better insert or takeout
micro SD card when the camera without the power.
But if you inset the micro SD card while the camera
is running ,please reboot the camera (unplug the
power, then plug it again), or else the micro sd card
may be cannot work well.
The new file will recover the oldest file when there
is no space in the micro SD card.
4 Mounting the camera
Mount the camera on the wall or fix it at the celling.
5 Softeware Installation
Search for HITVIS app to download and install the app on your phone
when connected to the Internet.
You can also download the Android app from our website .
3
Page 5
6 AP and STA mode
The wifi camera supports AP and STA mode, what’s the difference?
AP mode: This is the default mode, your camera acts as an central
connection point, which wireless devices can connect to.
Under this mode, you can connect directly to your camera, which means
there is no need for an Internet connection or a router. You can view the
camera in LAN.
STA mode: Connect HT811WP to your home wifi network.
You can go to page 17 to read how to view the camera under AP or STA
mode.
Note
AP and STA modes cannot exist at the same time. One time only one
mode takes effect.
7 Live view
Step 1
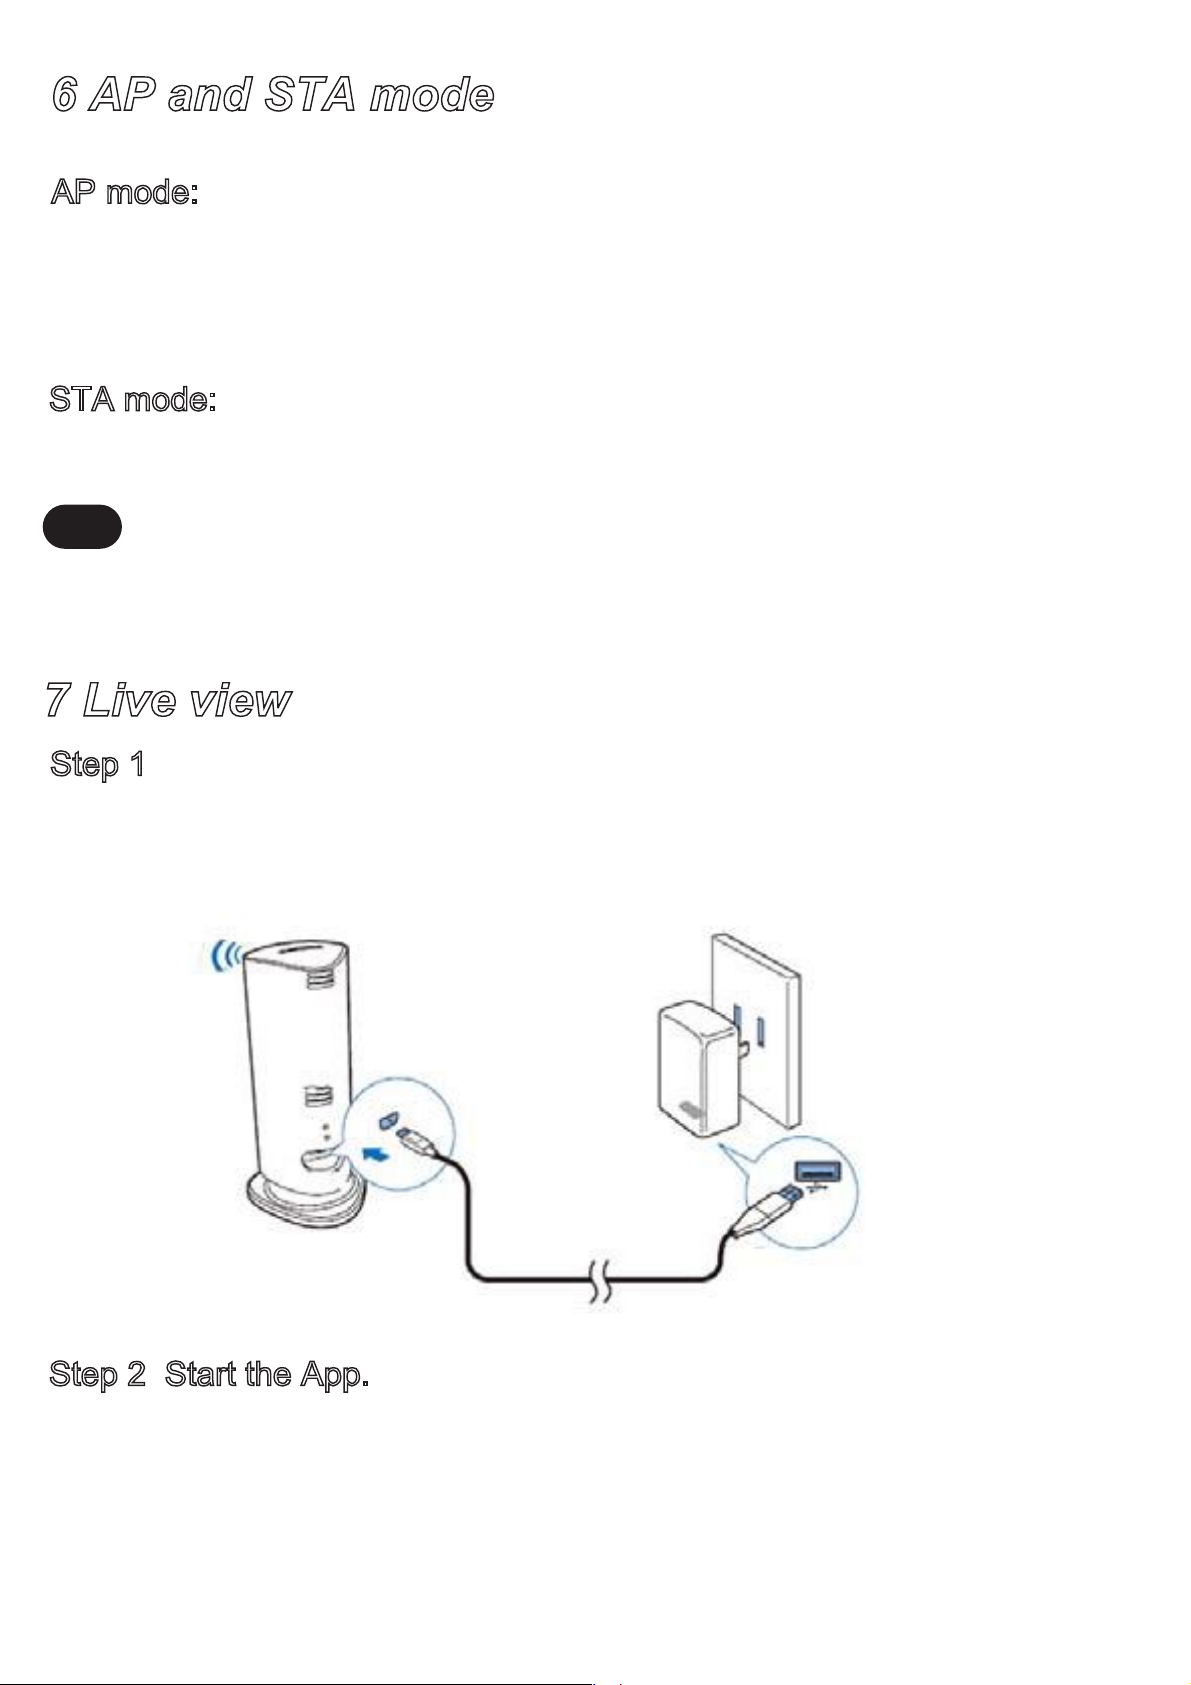
Power the camera, the LED light will turn to green . Wait for 5 seconds,
the light will turn to red and flash about once every second.
Step 2 Start the App.
Tap our phone app icon and start the program. First time using the app,
you will go to our guide interface as figure 1.
Click Next--Next , you can go to the following screen as figure 2 .
As a new user, please tap “New user” and do as our guide information.
4
Page 6
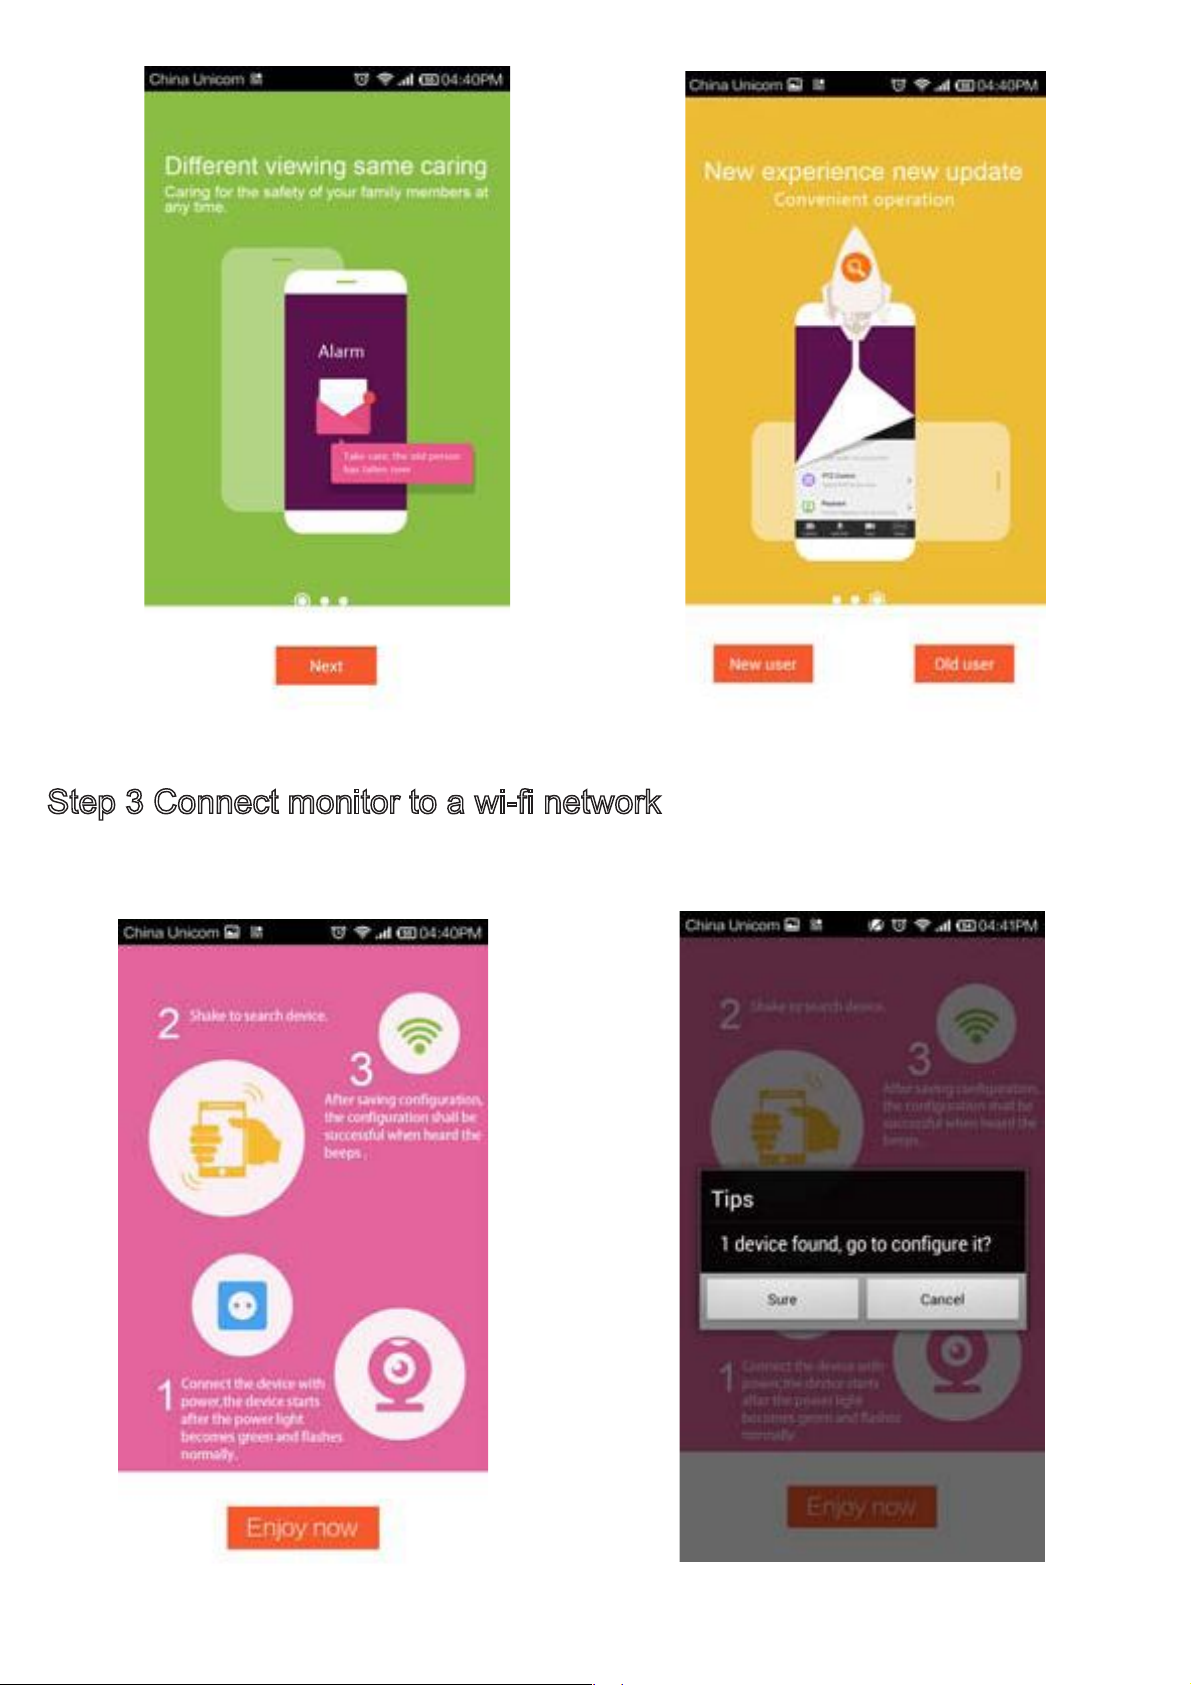
Figure 1 Figure 2
Step 3 Connect monitor to a wi-fi network
Tap “ Enjoy now ”(Figure 3) , App will search the device in LAN
automatically(Figure 4). Tap “Sure” , then select “Start” .(Figure 5)
Figure 3
Figure 4
5
Page 7
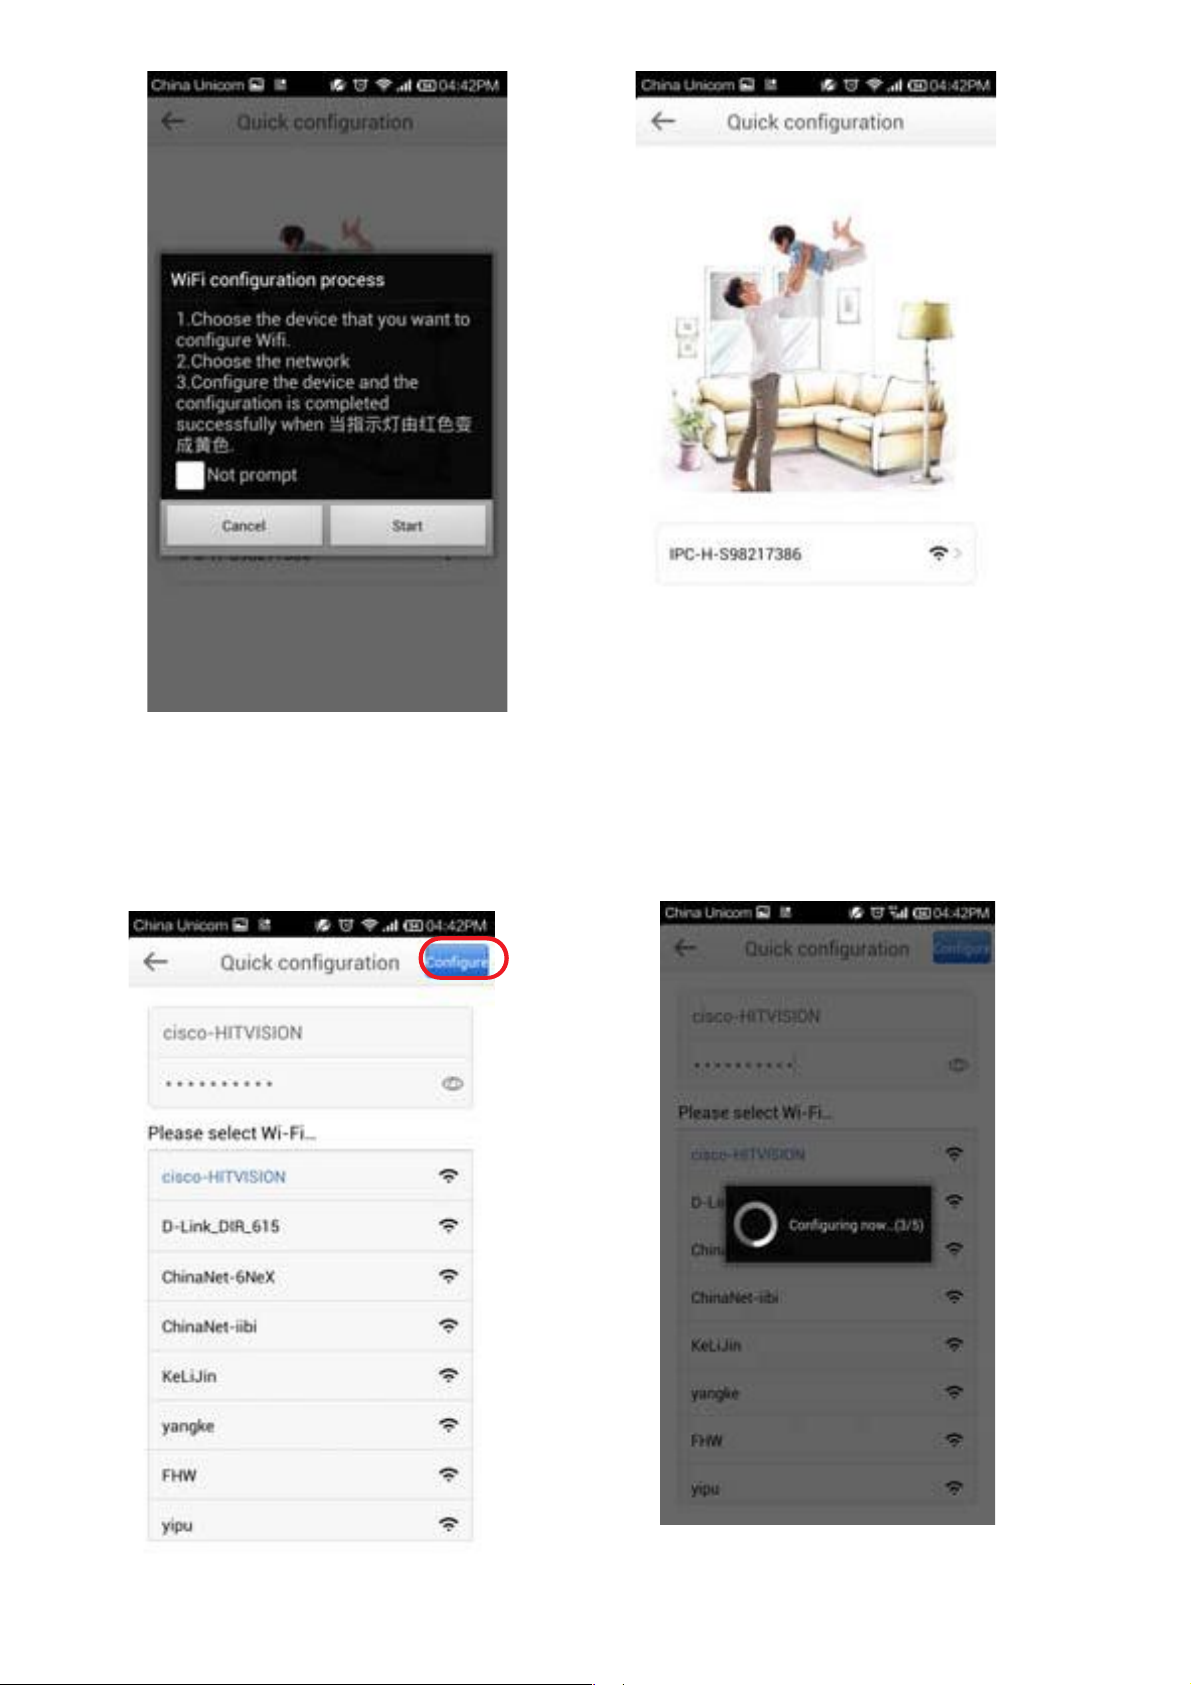
Figure 5
Figure 6
Tap the device ID you want to configure as figure 6, you can also see the
ID No. (for example: S98214258) in your color box.
Next you can connect your camera to a wifi network.
Figure 7 Figure 8
6
Page 8
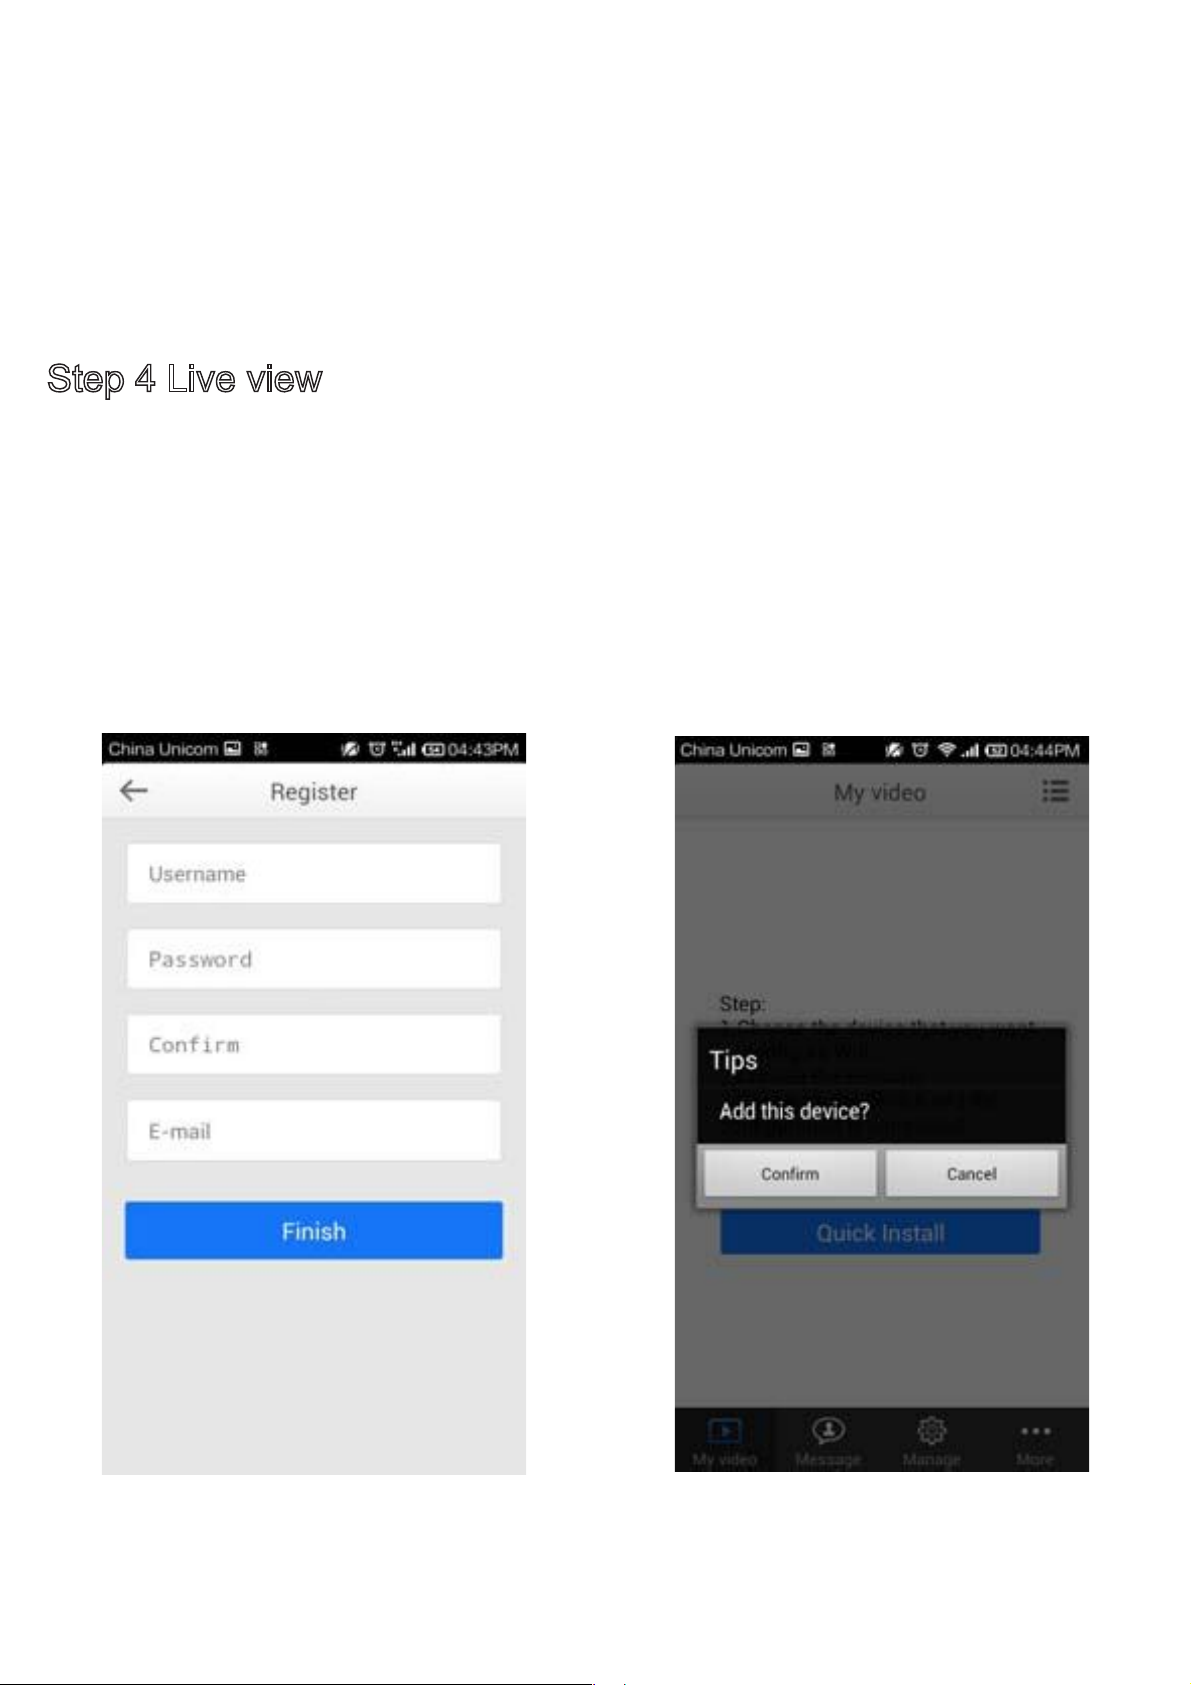
Click the SSID of your router in the list, the router SSID will be filled in the
top box automatically, you only need to fill in the sharekey. Make sure that
SSID and share key you filled in the camera exactly the same for your
router. Then tap “Configure” to finish configuration(Figure 7,8) .
Wait for 30 seconds, you can see the LED light of the camera turns to
green and flashes once every second which means the camera configured
successfully.
Step 4 Live view
Regist an App acount to manage your devices.(Figure 9)
Click “Confirm” and add you device to the app(Figure 10).
The device ID will filled automatically, you don’t need to change it, or else
you can not connect the device successfully. If you tap “Setting”, you can
see you need to fill the username and password. The default device
username is admin with no password. But for the first time using, you can
tap “Save” icon to add device without filling it. (Figure 11)
Figure 9
Figure 10
7
Page 9
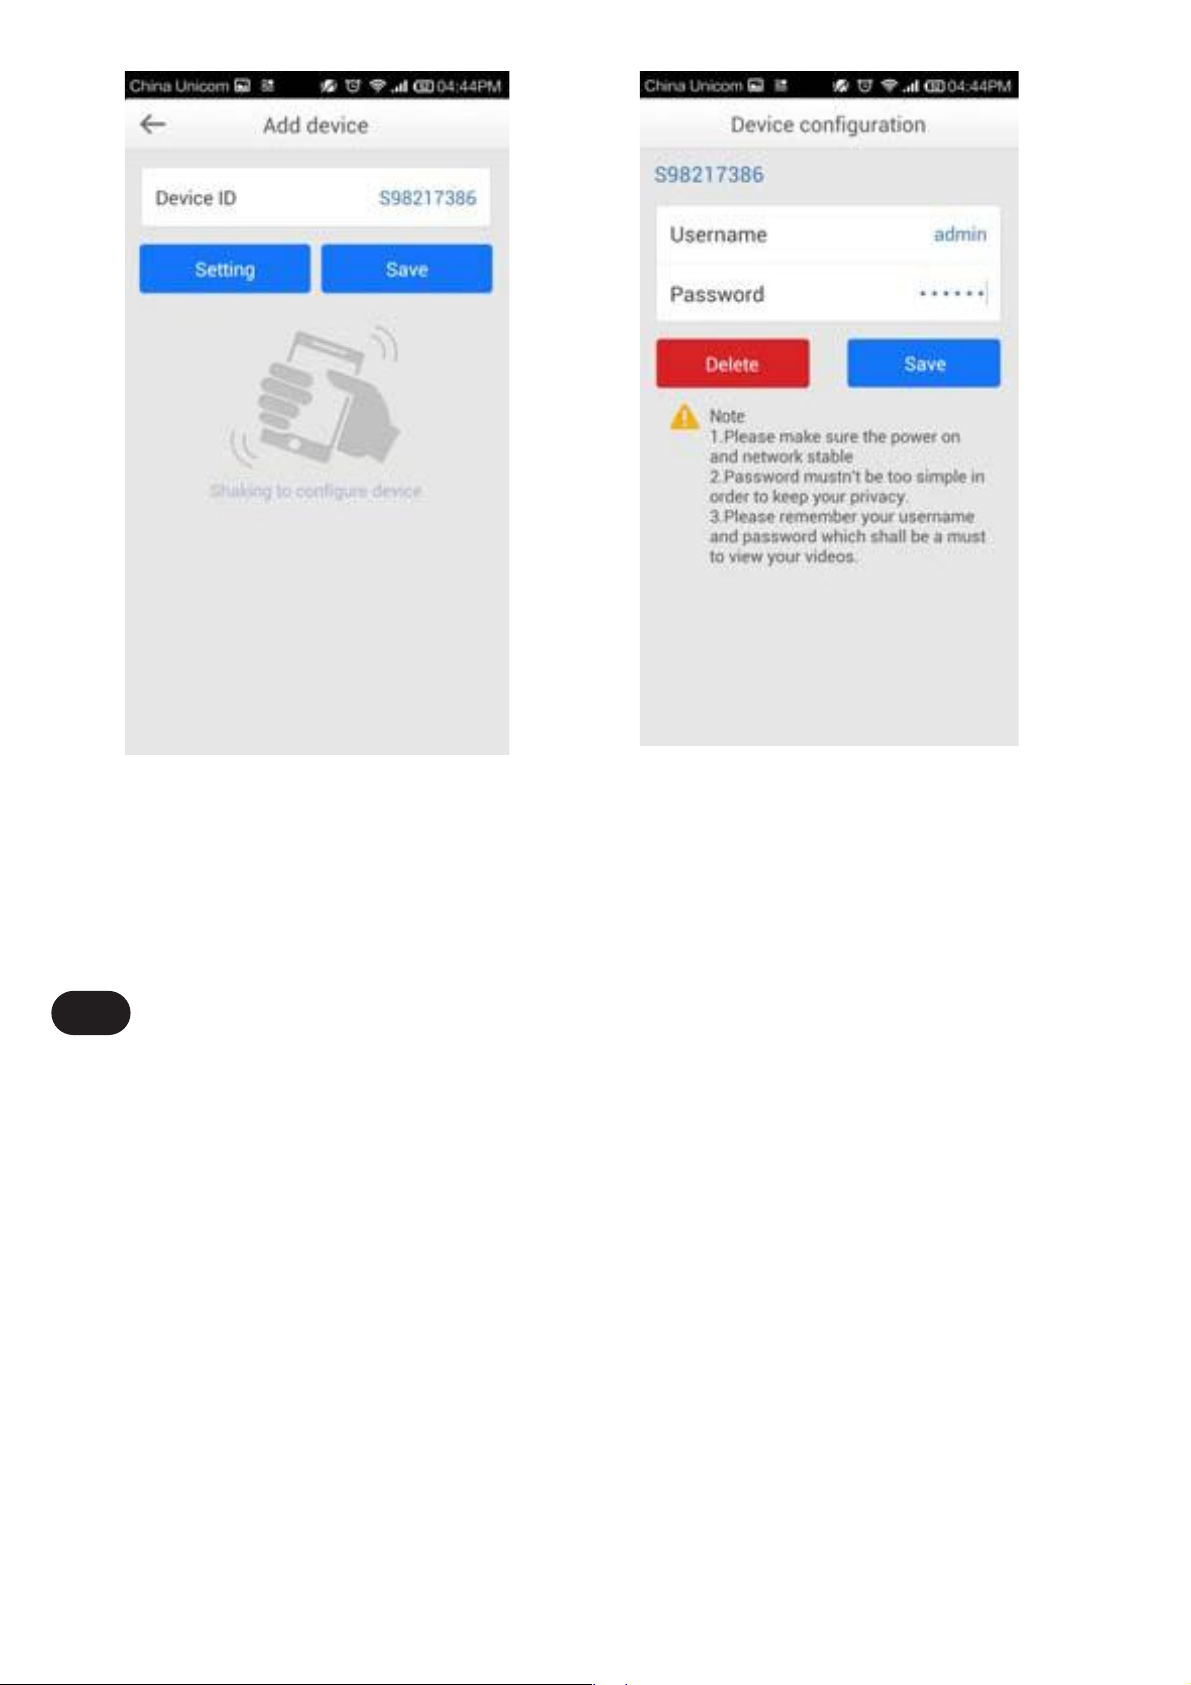
Figure 11
Figure 12
For the first time using, you must reset the username and password to
avoid unauthorized users. (Figure 12) Tap “Save” to save settings.
Note
Please remember the device username and password , you only have
this chance to change it. Next time you want to reset the username
or password, you must reset the camera.
After changing the device username and password, you will go to “ My
video ” page automatically, tap the device , and you can enjoy live video.
8
Page 10
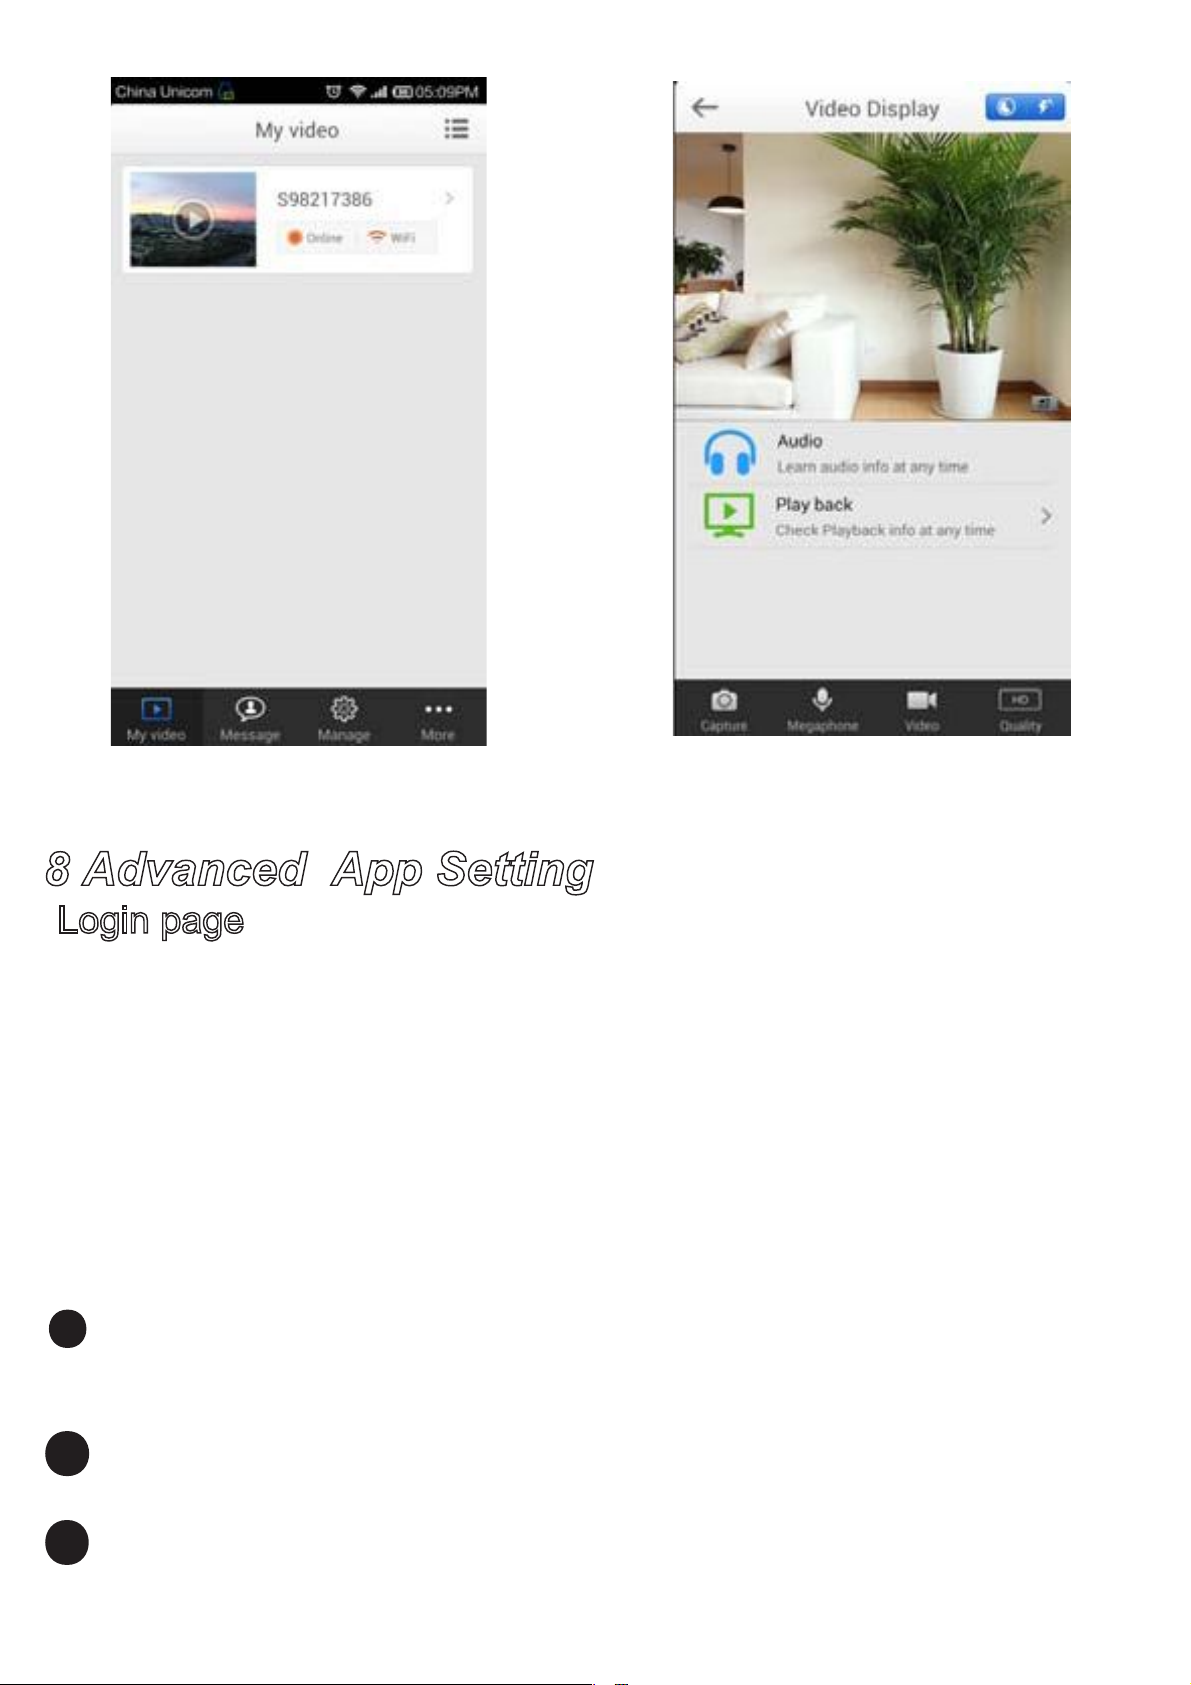
Figure 13
Figure 14
8 Advanced App Setting
Login page
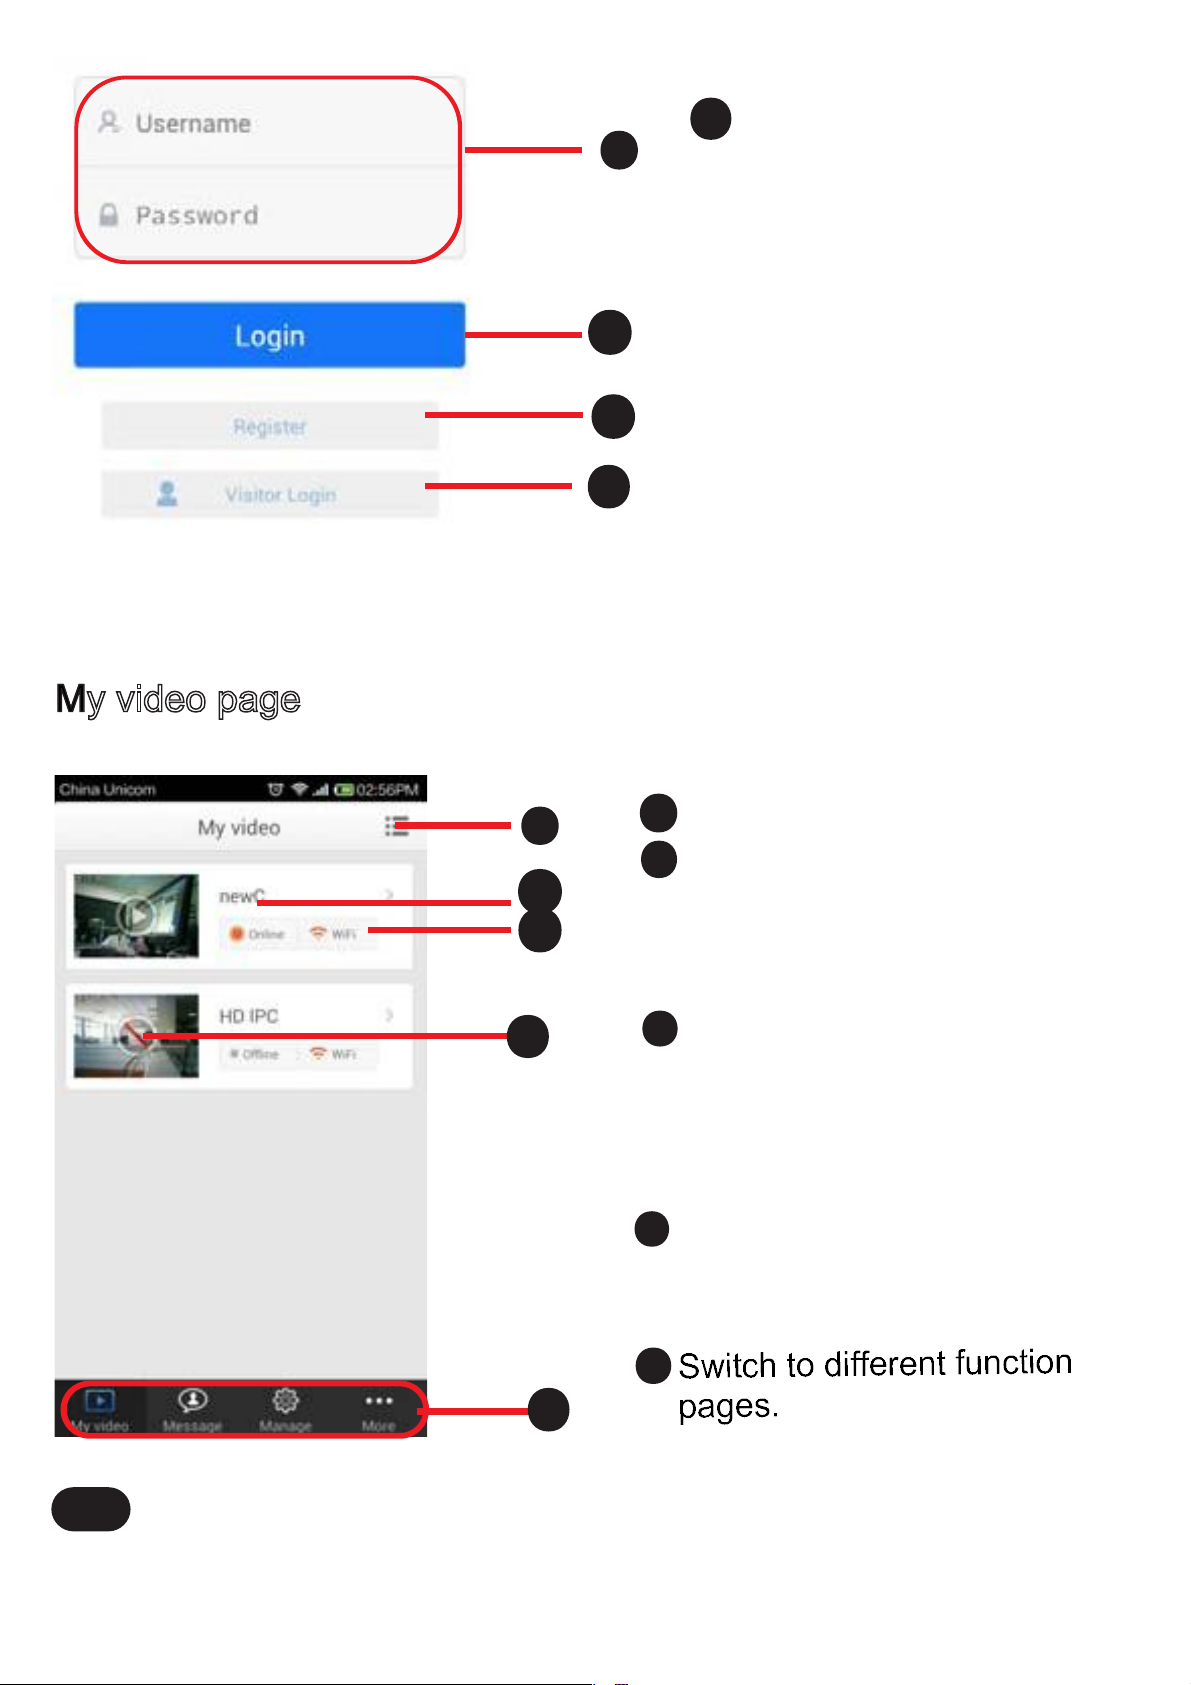
Phone app support two login modes: Visitor login and Account login.
For Visitor, you don’t need to register an app account, you can tap Visitor
login to login the app directly. For Account login mode, you must register
an app account, fill in the username and password before login, and your
phone must connect internet.
Some functions you can’t use under Visitor login mode, such as alarm
message receiver, advanced settings about the camera you added, scene
picture and so go. So here we suggest you using Account login mode.
1
1
Username / Password: The username and password you registered in
1
app.
2
Login: Fill in the app username and password, then tap login.
2
3
Register: Tap it and go to Register page, then you can register an app
3
account.
9
Page 11
4
flash lamp will open to increase the brightness at the same time.
2
3
1
4
Visitor login: Tap it and
login the app directly
without the app account.
My video page
4
3
1
2
1 Tap it and switch to view list.
2
The device alias. The default
alias is the device id No..
You can change it in Manage
page.(Figure 18)
3
The device status.
If it displays offline, you can’t
view the camera.
WiFi: That means the camera
has connected to a wifi network.
4
The device last frame picture.
You can turn on/off this function
in More page(Figure 22).
5
5
Tap one device ID, and you can
enjoy the live view.
Note
For visitors, My video screen has some difference with the up left one.
10
Page 12
Live view page
1
2
3
1
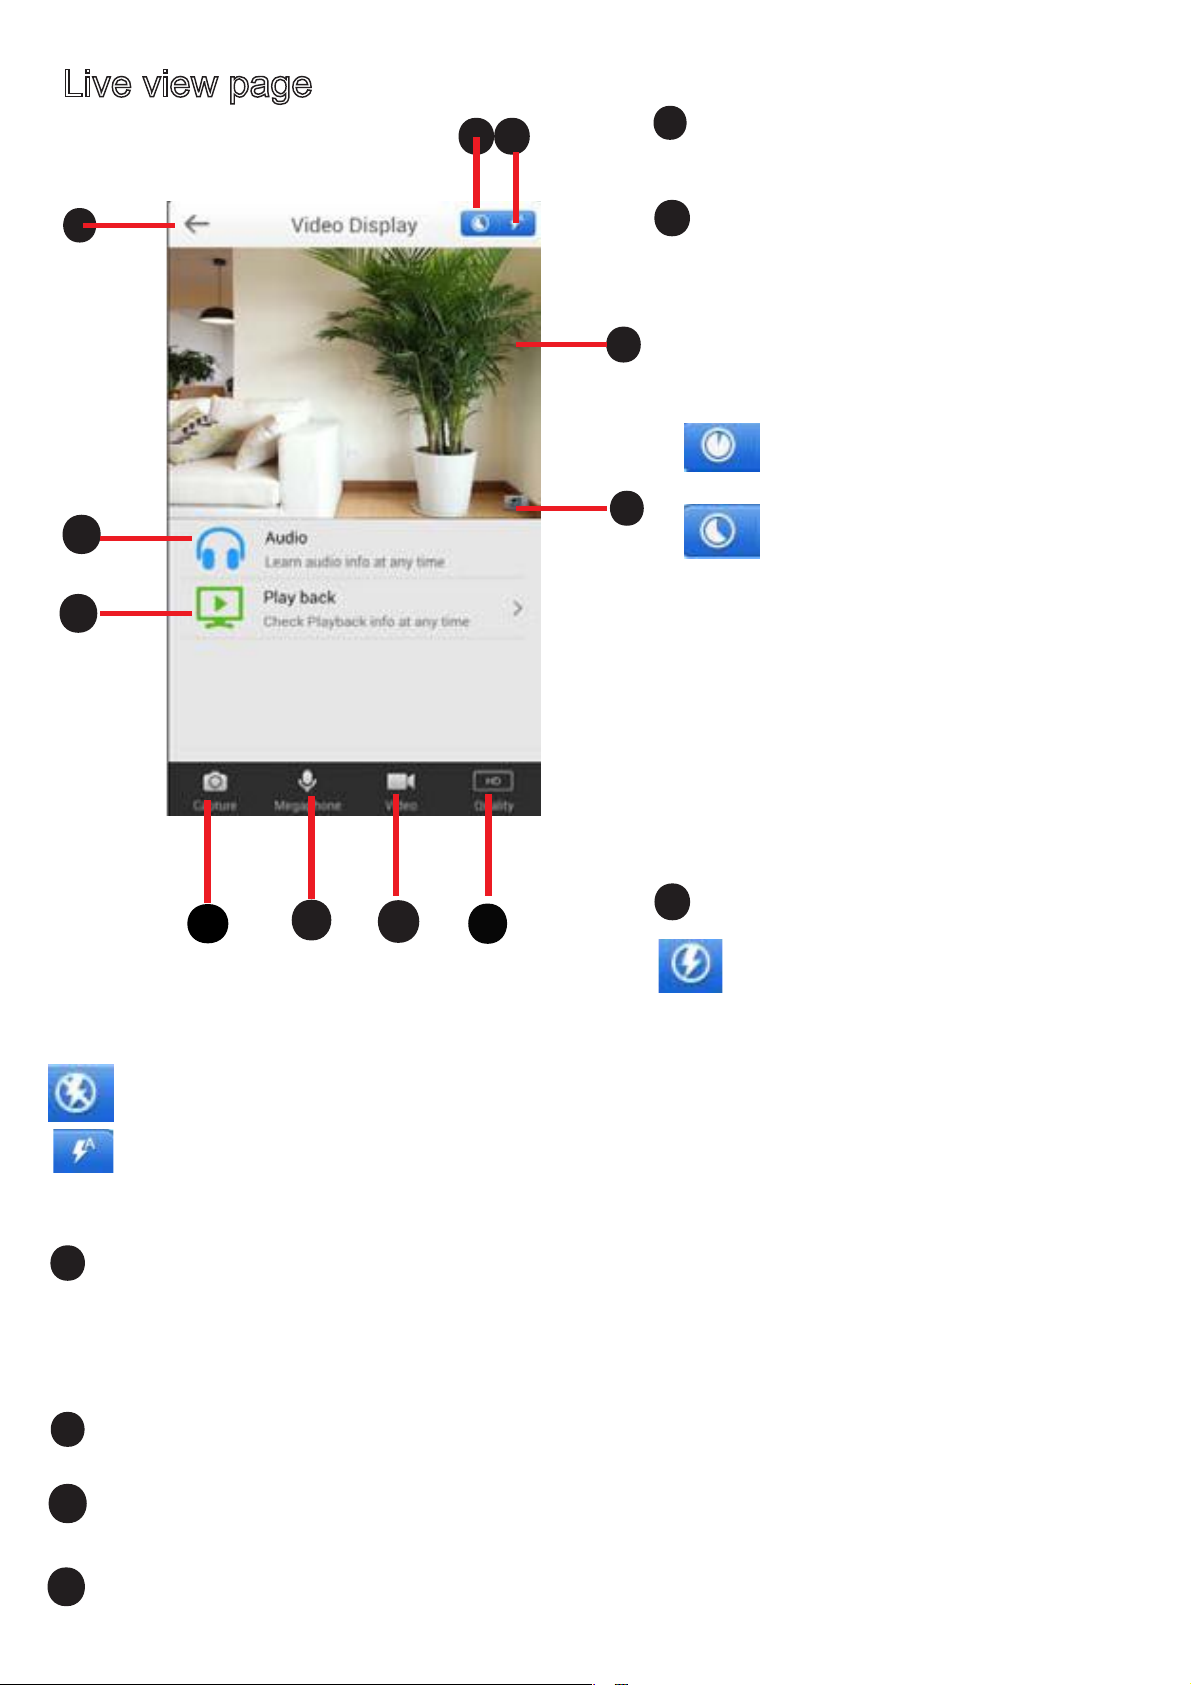
Back
Back to the My video page.
2
Alarm icon
Enabled the alarm,when the
motion has been detected, the
6
7
8
9
10
11
4
5
app will recording and send
alarm message to you.
Disabled the alarm.
Enabled the alarm.
You can set the alarm time
in Manage-->Advanced panel
(Figure 21).
If you open the alarm info
in More-->Setting panel, you
can receive the alarm info
when motion is detected
(Figure22).
3
Flash lamp status
The flash is on.
When you tap the Capture icon, the camera will take a snapshot and the
The flash lamp will always keep closing when you take the snapshot.
When you tap the Capture icon to take the snapshot picture, whether
the flash lamp open depends on the surrounding light conditions.
Don’t shoot the flash lamp at your eyes or children’s.
4
Live view window
If the camera has connected to a wifi nectwork, you can see the timestamp
in the left corner.If you have set the alias for the camera, you can see the
alias on the up left corner.
5
Flip
You can flip the image by tapping this icon.
6
Audio
Tap it and enable the audio.
Playback
7
11
Page 13
Tap it and play back the recording files that stored to micro sd card,
including alarm recording files and manually recoding files that gettings
from the record button on the back of the camera.
The name of the alarm recording files contain character ‘A’.
The name of the manually recording files contain character ‘N’.
8
8 Capture
Tap it and take a snapshot and stores it to your phone: Explorer---Hitvis
Capture lmg.. You can review the pictures in More---Media page.
9
Megaphone
The type camera can not support this function.
10
Video
Tap it to record a video and store it to your phone: Explorer---HITVISVideo.
You can review it in More---Media page.
11
Video resolution
Here supports three resolutions: HD,SD, Fluency.
Message Page
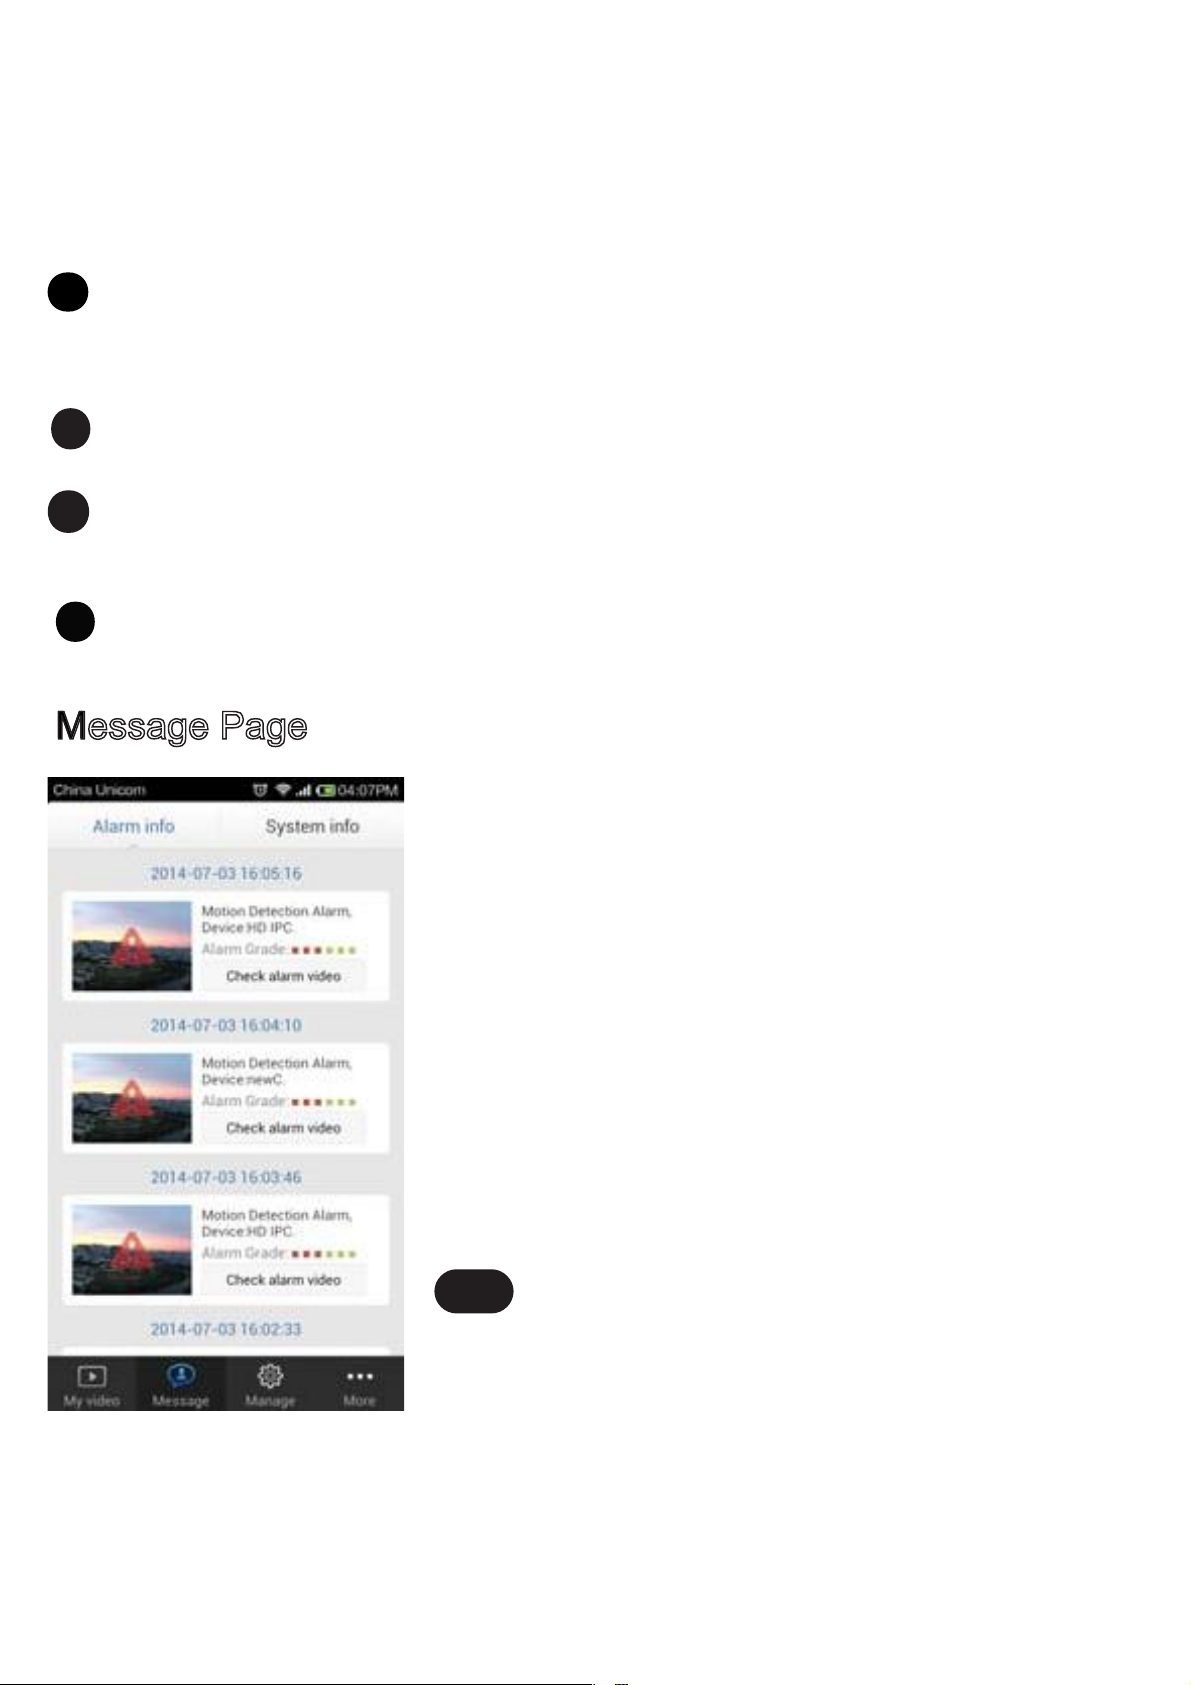
For account login mode, this page you can see
the alarm information and system infomation.
For alarm information, tap picture, you can
view the alarm picture, if you want to view the
alarm video, please tap “Check alarm video”.
The alarm videos have a copy in the micro SD
card. You can playback it from live view
window.
You can view the app information in the System
info page.
Slide your finger down the screen, the
information will update automatically.
Note
1 For the alarm information, make sure you have
open the alarm status firstly, then check whether
you open the alarm message switch in the More -Setting page.
2 Make sure you have plugged the micro SD card to you camera, or else
you can not get the alarm video.
3 For android users, you can’t get the alarm information anytime if you
exit app.
12
Page 14
Manage Page
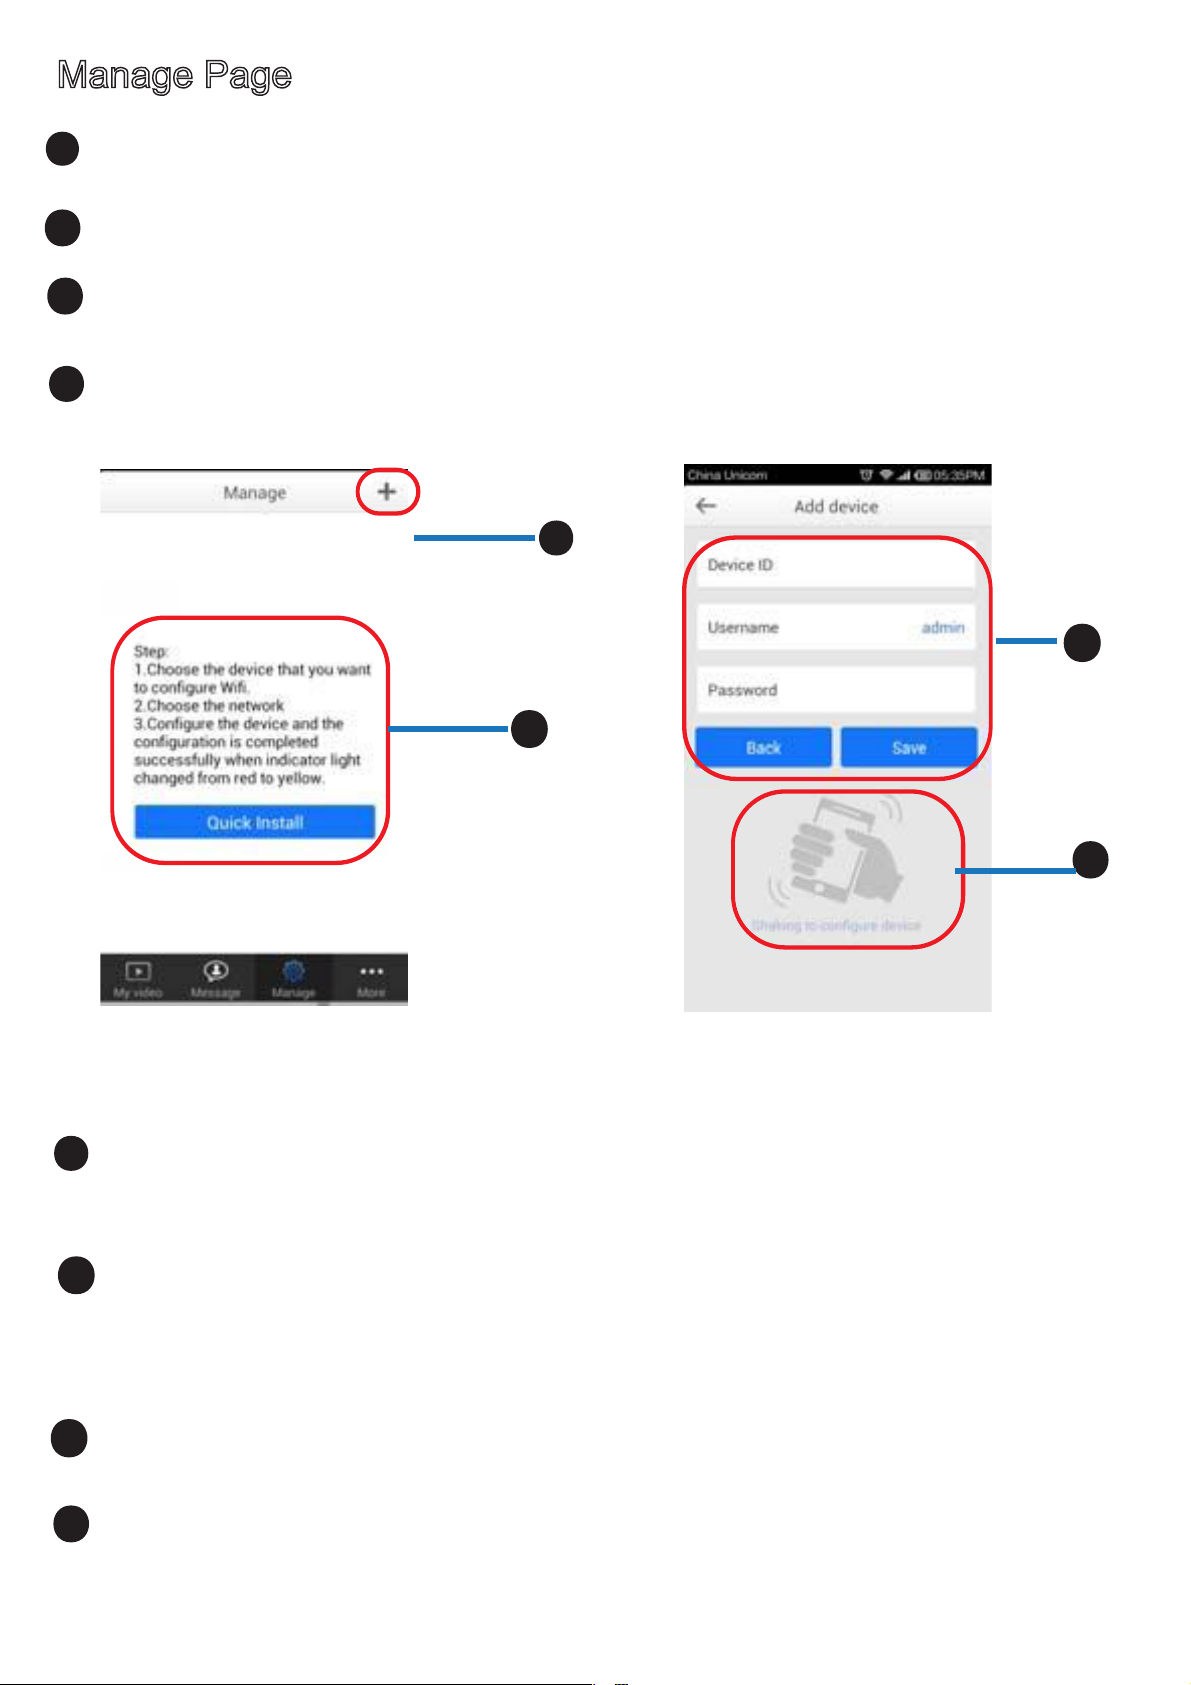
If you have not added cameras to the app, you will see figure 15.
1
Tap the plus sign in the up right corner, you will go to Add device page
.(Figure16)
2
Tap “Quick Install” and connect the camera to a wifi network. Make
sure the camera is under AP mode, or else you cannot search it.
3
If the camera has connected to internet, here you only need to fill in the
device ID, username and password. Then tap “Save” (Figure 16).
Shake your phone, you can also search the camera that under AP
4
mode, then you can connect the camera to your home router.
1
1
3
2
4
Figure 15 Figure 16
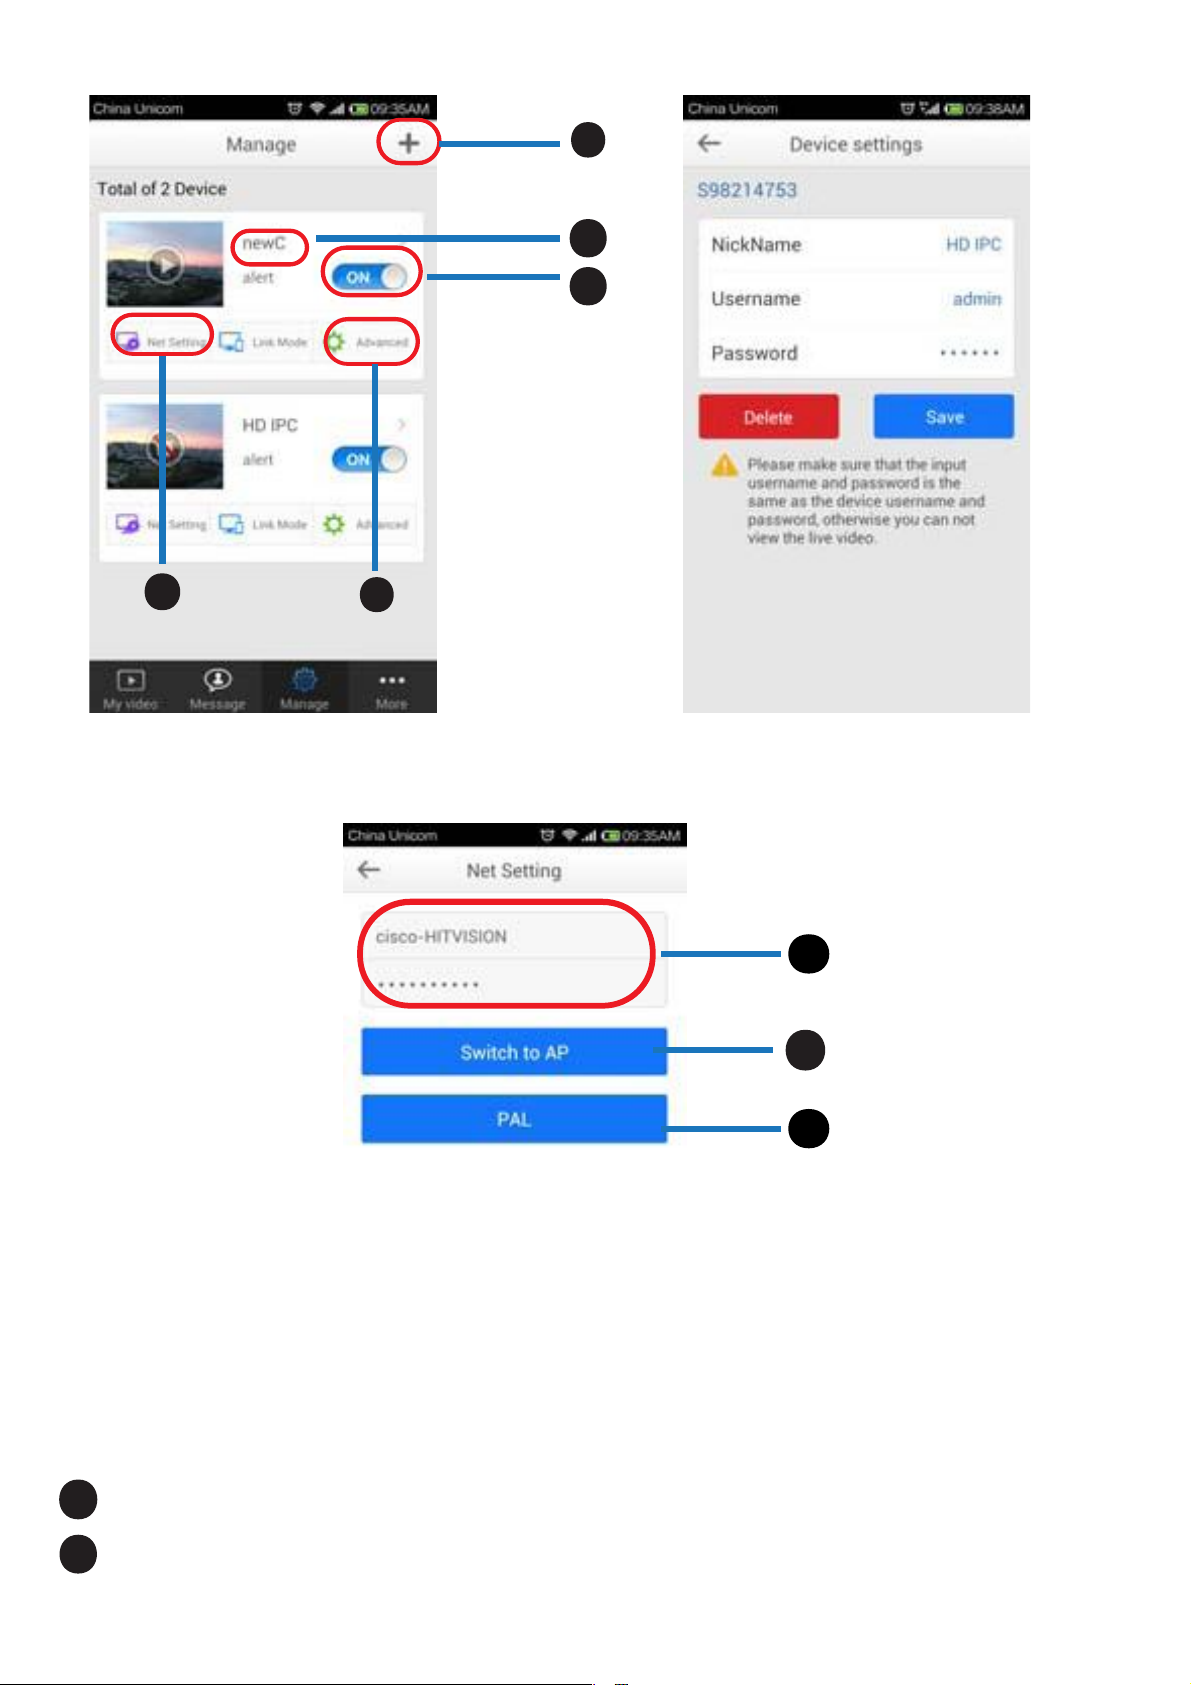
If you have added cameras,you will see the following screen.(Figure 17)
1
Tap the plus signal, you will go to Add device page(Figure16),this
page you can add cameras that under STA mode,or configure the
device to a wifi network.
2
The alias of the camera. Tap it and go to Device setting page ,you can
change the alias of the added camera.
If you have put the wrong username or password before, here you can
re-enter it (Figure 18).
3
Tap the switch, you can change the alter status. If here displays on,
you can go to Advanced to do the alarm time.
4
Net setting: Tap it and you can see the wifi network that device
connected(Figure19).
13
Page 15
4
1
2
3
4
Figure 17
5
Figure 18
6
7
8
Figure 19
5
Tap it and go to alarm time setting page(Figure 21).
6
The wifi network that camera conected, you need not to change it.
14
Page 16
9
10
11
12
13
14
Figure 21
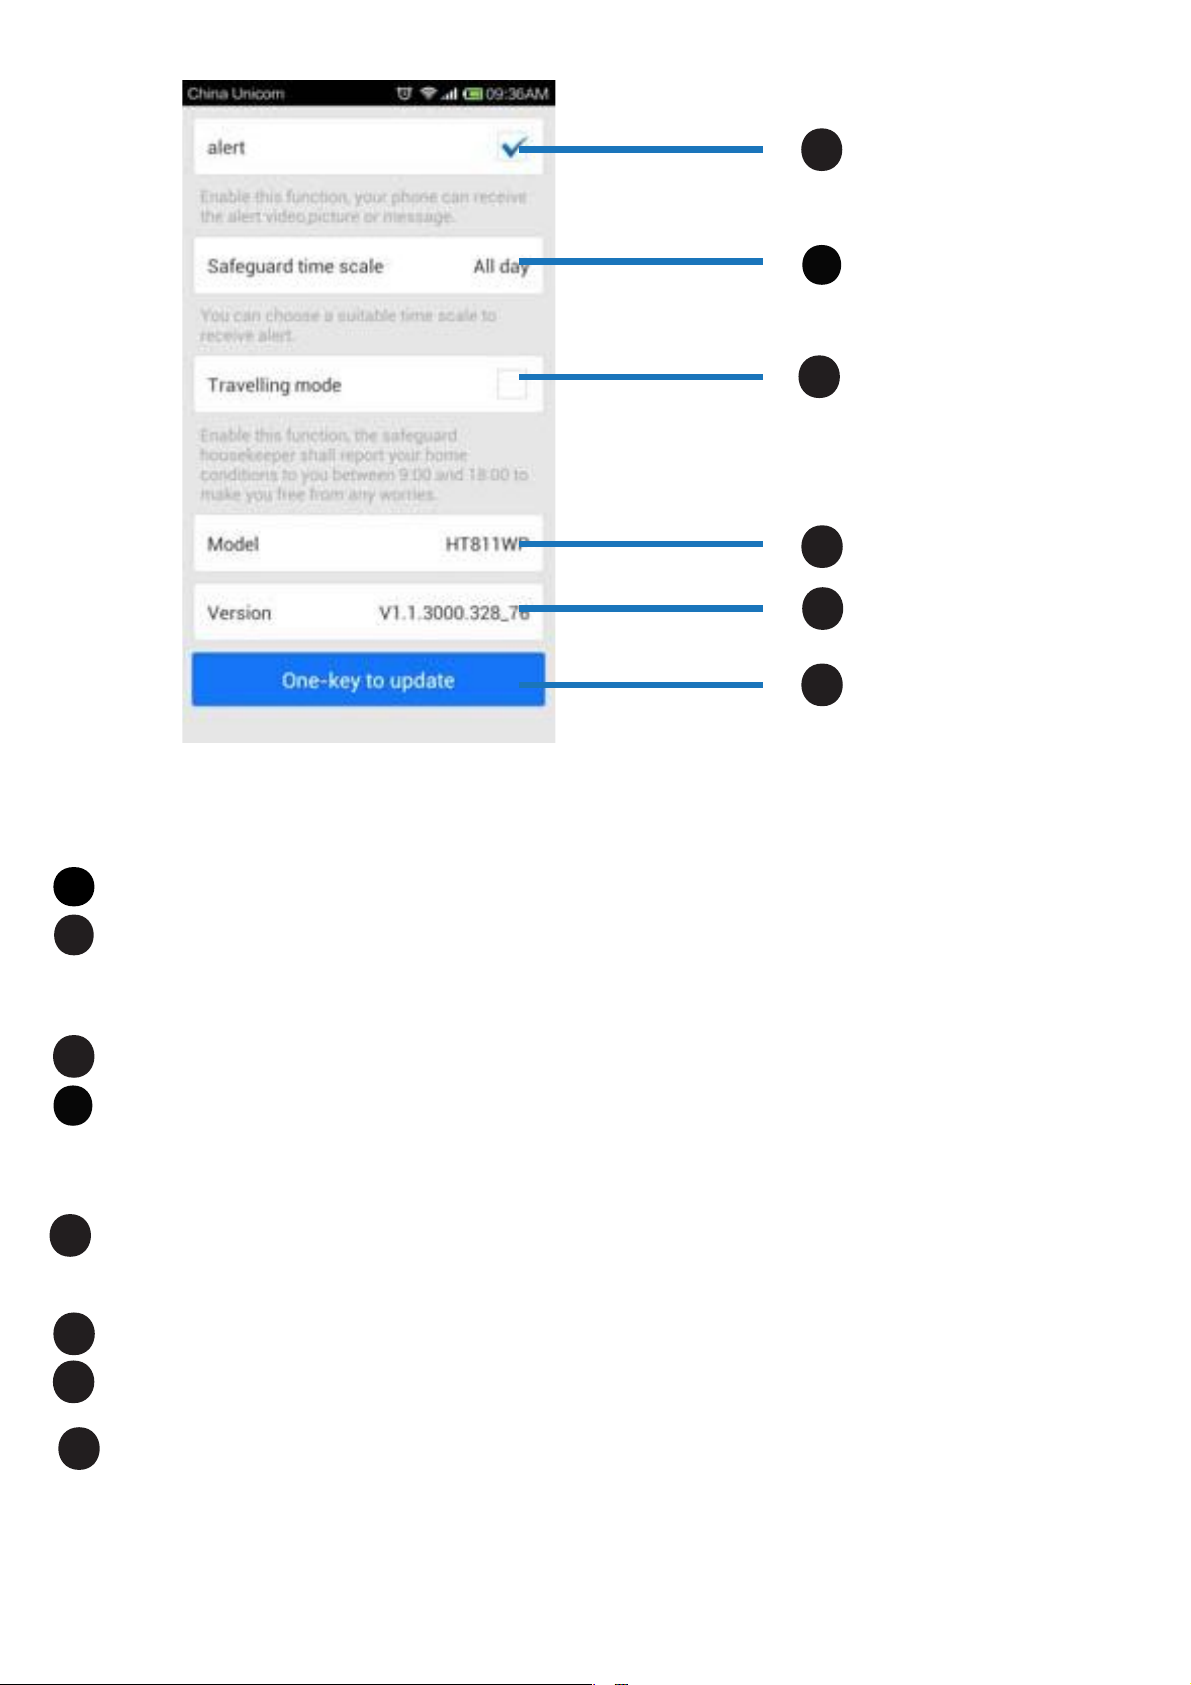
7
Tap it and the device will switch to AP mode.
Video format. If your country uses PAL, here you tap it and switch
8
your camera to PAL.
PAL (Region: China, Eurpoe) , NTSC: (Region: USA , Canada)
9
Enabled or disabled the alarm time settings.
10
Tap it and you can set the alarm time. During the alarm time , if you
haveopen the motion detection, and the motion is detected, the
14
camera will alarm.
11
Select the Travelling mode, the camera will alarm between 9 o’clock
and 18 o’clock when the motion is detected.
12
The camera model.
13
The software version of the camera.
14
Tap it and upgrade the camera’s software.
15
Page 17
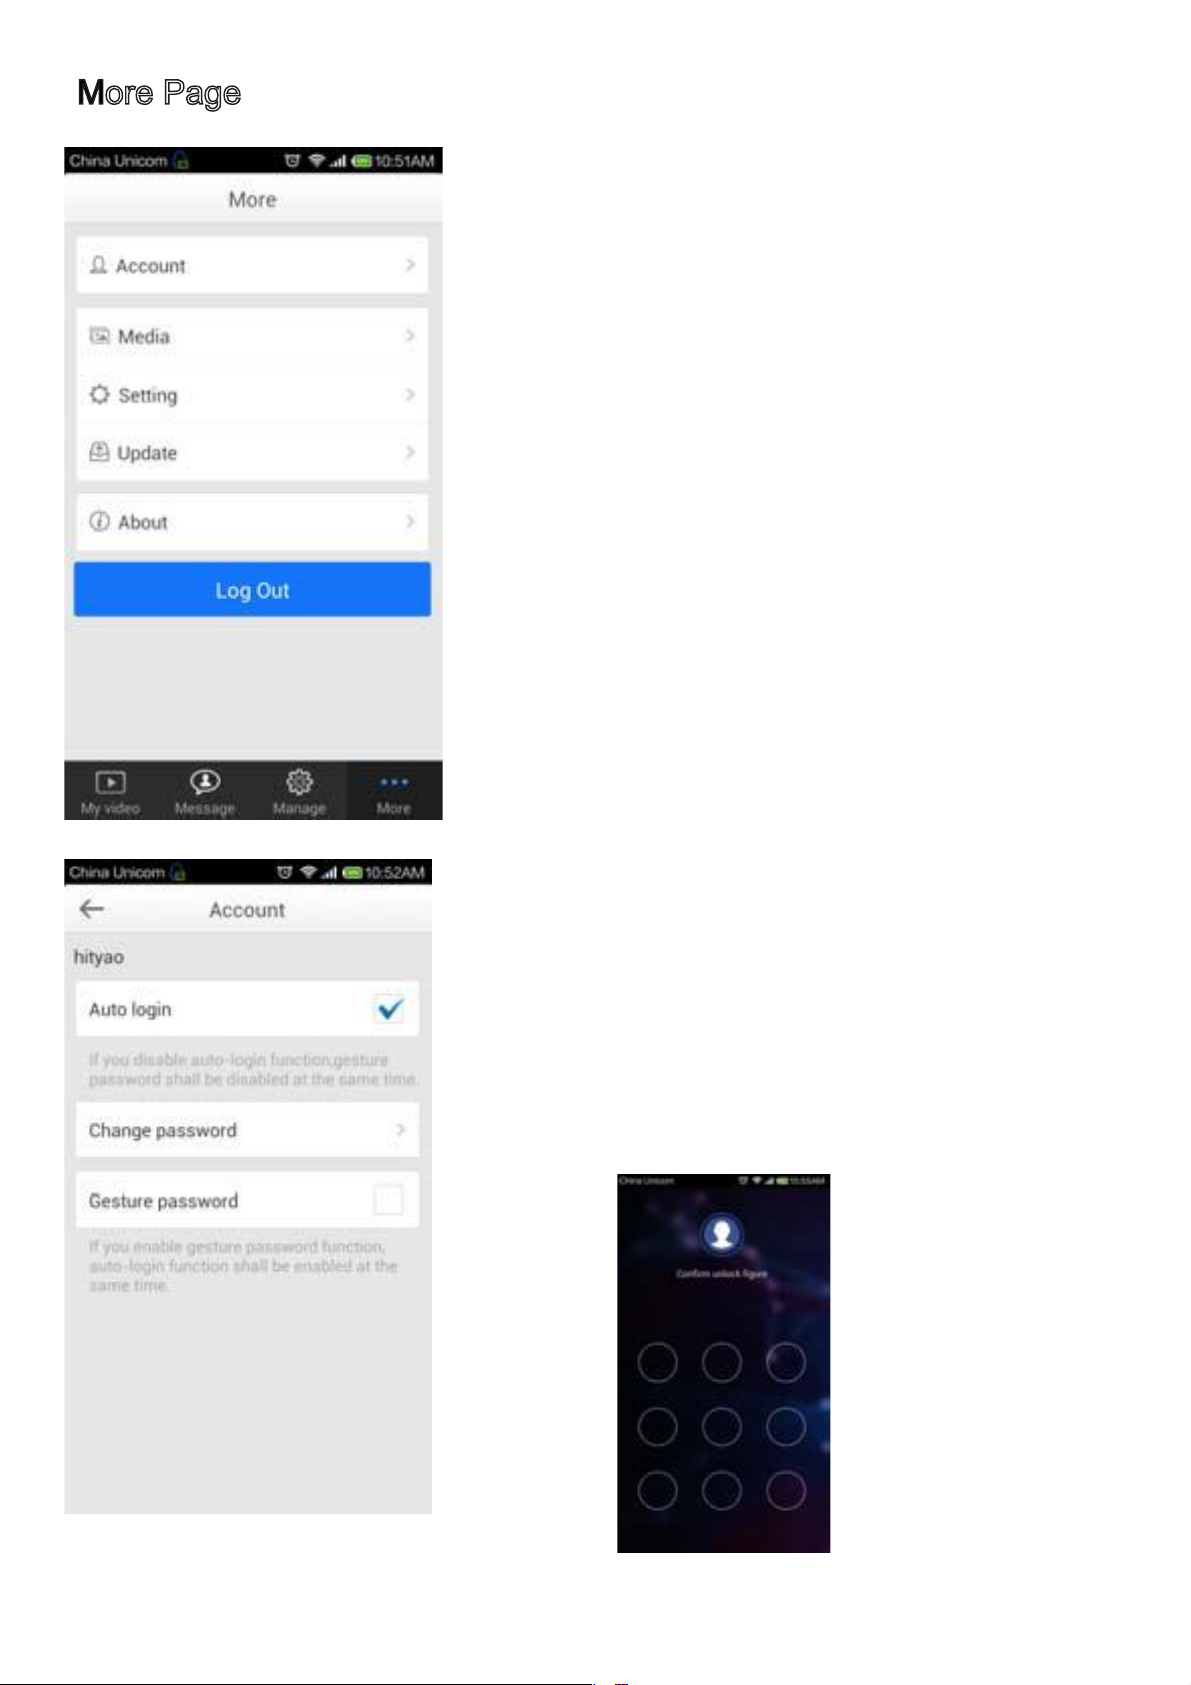
More Page
Account: Tap it and do more settings about
the login account.
Media: Tap it and review the captured images
and videos that stored in your phone.
Settings: Tap it and do more settings about
the app.
Update: Tap it and check whether there is
new phone app to update.
About: The app version.
Log Out: Log out the current login account.
For Visitor login, some function can’t be used.
Auto login: If you don’t logout the account when
you exit the app, next time you login, you need
not re-enter the username and password.
Change password: Change the account pwd.
Gesture password: Tap it and enter the pwd
to confirm, then you can set a gesture. Don’t
logout the account when exit the app, next
time you can enter the gesture to login.
16
Page 18
9 How to view the camera under AP or STA mode
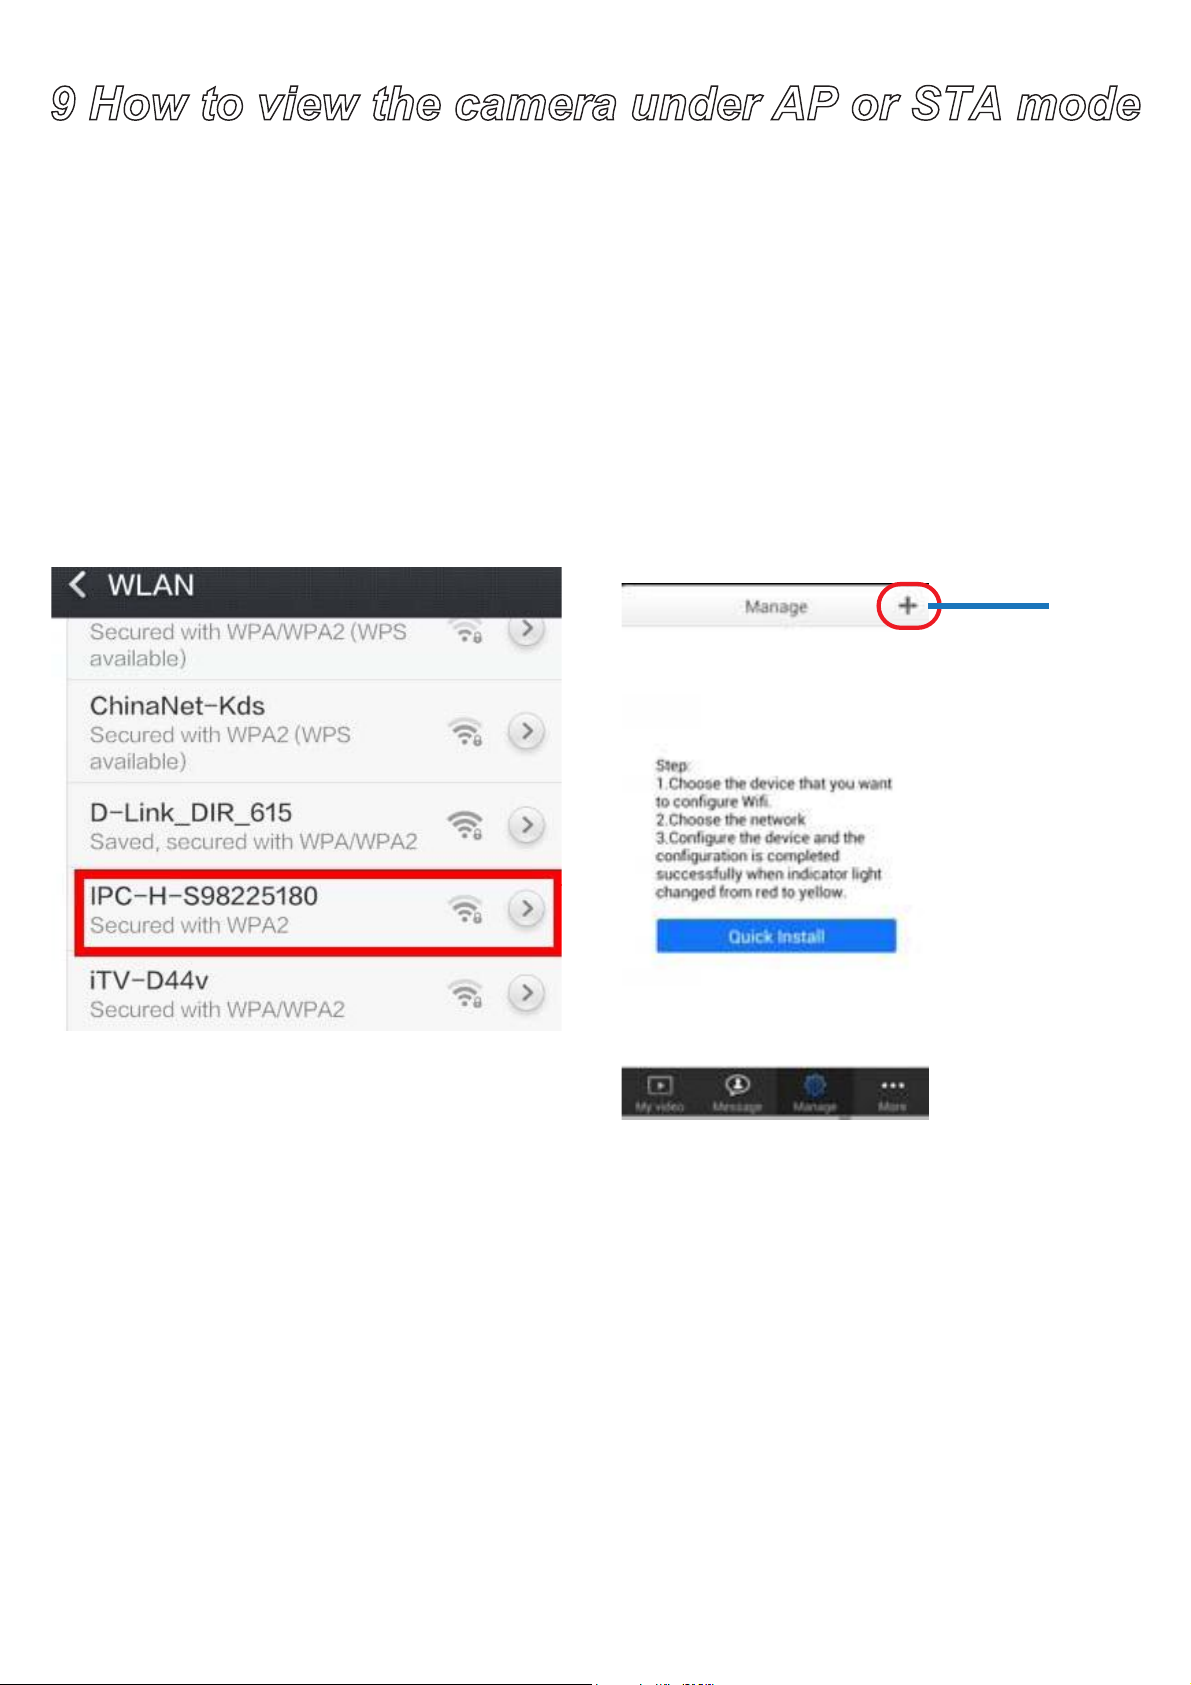
View the camera under AP Mode
When the camera is under AP mode, you can see the led is blinking red
about once every second.
(1)Connect your mobile device to the HT811WP network. The default
password is 12345678.
The SSID format of HT811WP is “IPC-H-S...”, the default AP password
is “12345678”.
Add
Figure 23
(2) Open the HITVIS app. Under AP mode , you can only login the app
as a visitor.Go to Manage page to add camera to app manually. The
device ID you can see in the color box. The default username is admin
with no password.(Figure 23)
(3)
Go to My video page, tap the device you added, you can view the live
view.
17
Page 19
View the camera under STA Mode
Firstly ,verify the status of the camera.
View the led status of the camera, if it displays green and blinking once
every second, that means the camera is under STA mode, you only need
to add the camera to app as figure 22, then you can view it directly.
If it displays red and blinking once every second,that means the camera is
under AP mode. You need to connect the camera to a wifi network.
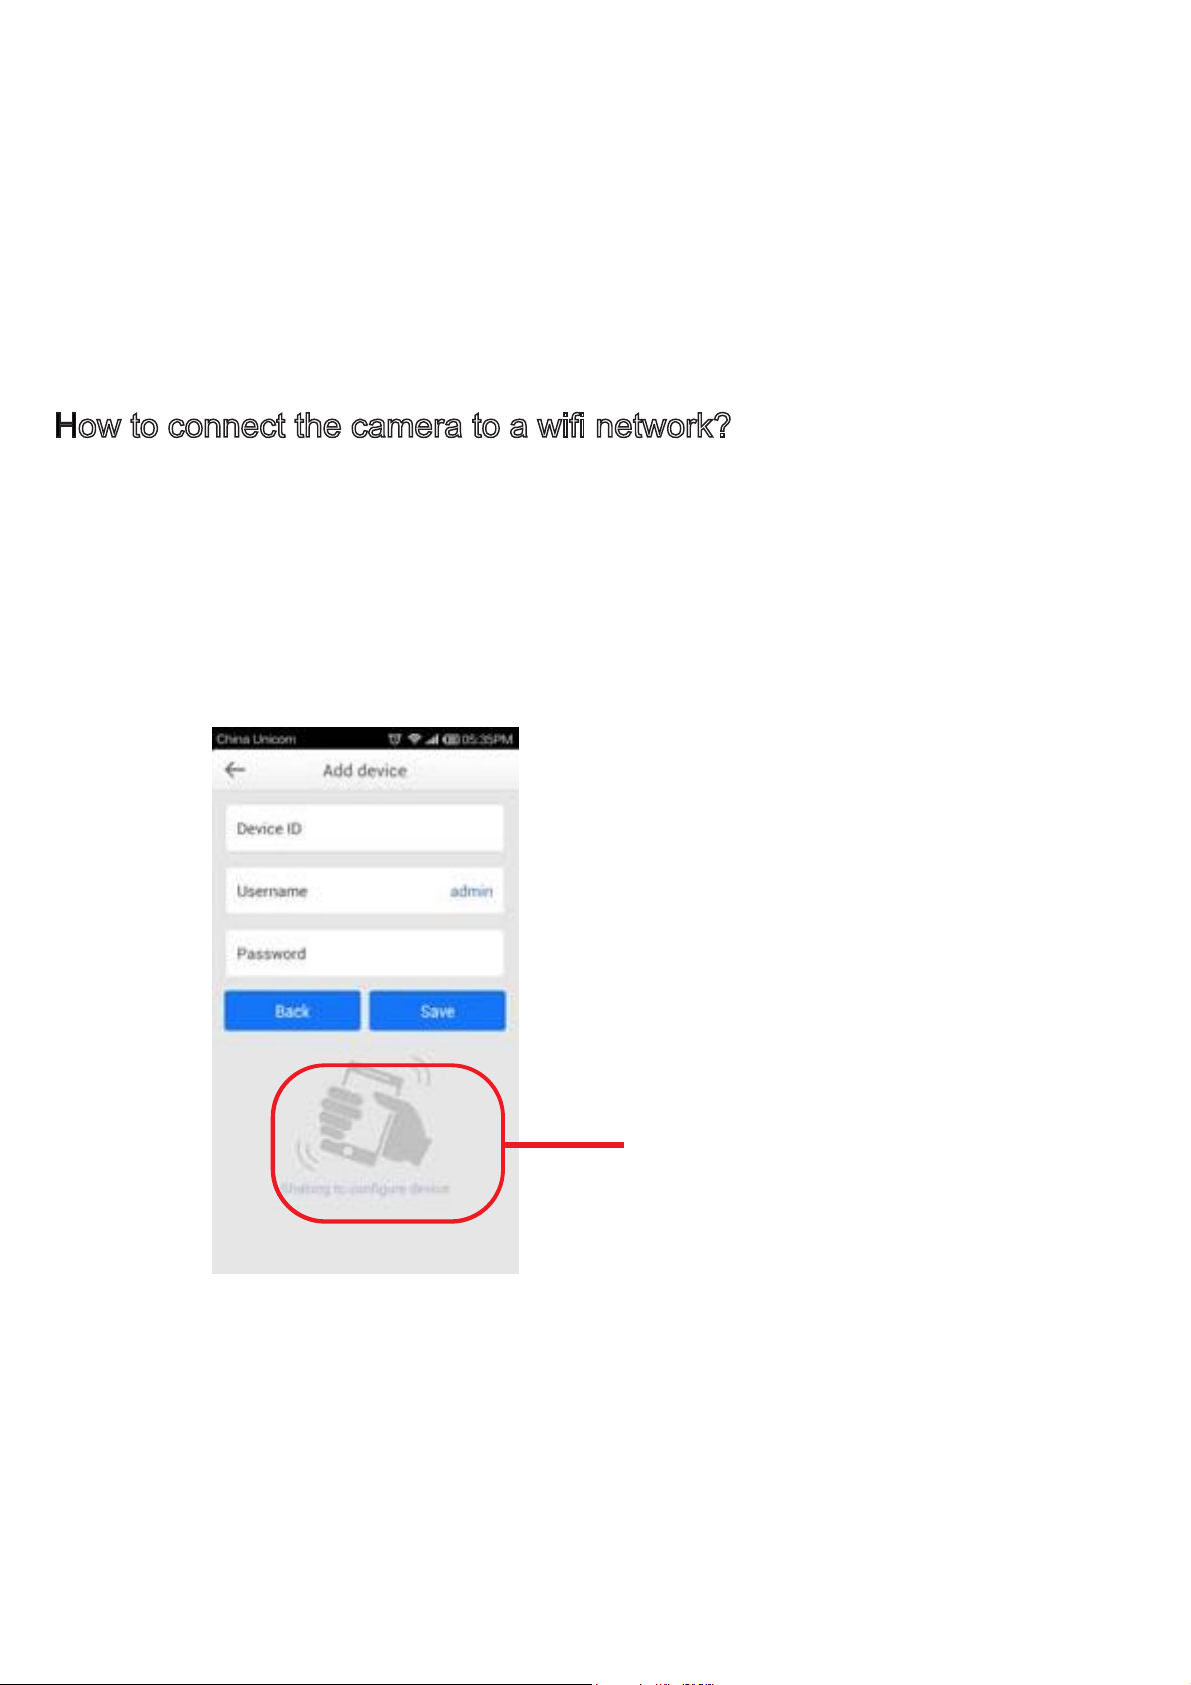
How to connect the camera to a wifi network?
Open the app, and go to Manage page, tap the plus sign (Figure 23) ,
then shaking your phone, app will search the device automaticall. Then
fill in the SSID and share key of your router. Wait for 30 seconds, you can
see the led turns to green and blinking once every second.
Add the camera to your phone, you can view the live view.
Shaking your phone or tap it
18
Page 20
10 Specificaition
Output resolution HD,D1,CIF
Image Sensor 1/3 Color CMOS sensor
Lens F: 2.4
Mini. illumination 3 Lux
Viewing Angle 68 degree
Frame rate 25fps(HD),30fps(D1),30fps(CIF)
Video Compression H.264
Connectivity Wi-Fi
Wireless Standard IEEE 802.11b/g/n
ONVIF Protocol Supports ONVIF
TF Card Up to 32G
Power supply 5V/2A
Dimension 36(L)X37(W)X97(H)mm
Net weight 70g
Gross Weight 285g
Operating Temperature -10°~55°C
Software supported Android, iOS
Certification CE,FCC, ROHS
19
Page 21
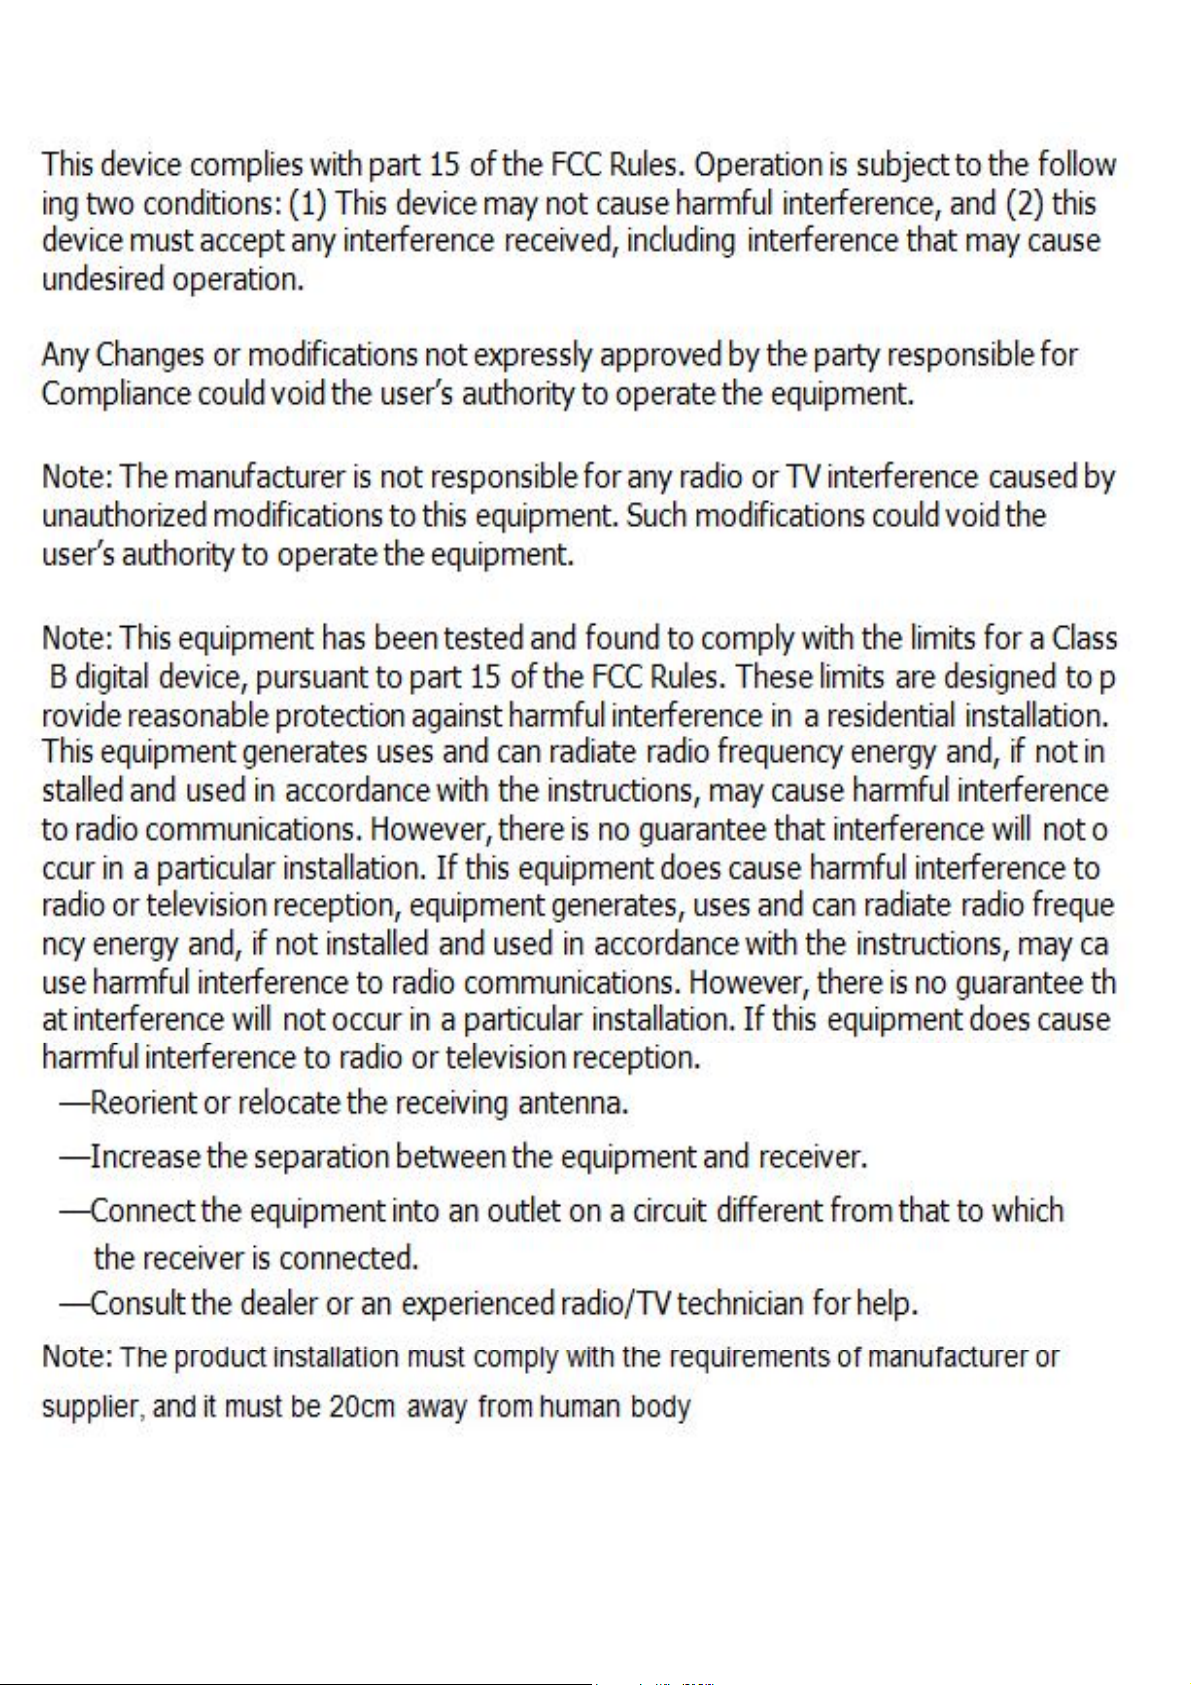
11 FCC Statement
20
Page 22
12 Others
While we hope your experience with this camera is enjoyable and easy to
use, you may experience some issues or have questions that this User’s
Guide has not answered.
If you have problem with this camera, please first contact HITVIS reseller
for solving the problems. If our reseller cannot provide service, pls contact
our service department: [email protected] .
FCC ID:2ACQIHT811WP
21
 Loading...