

Page 1
INSTRUCTION MANUAL
Please thoroughly familiarize yourself with the information in this manual prior to installation and operation
Rev.050520
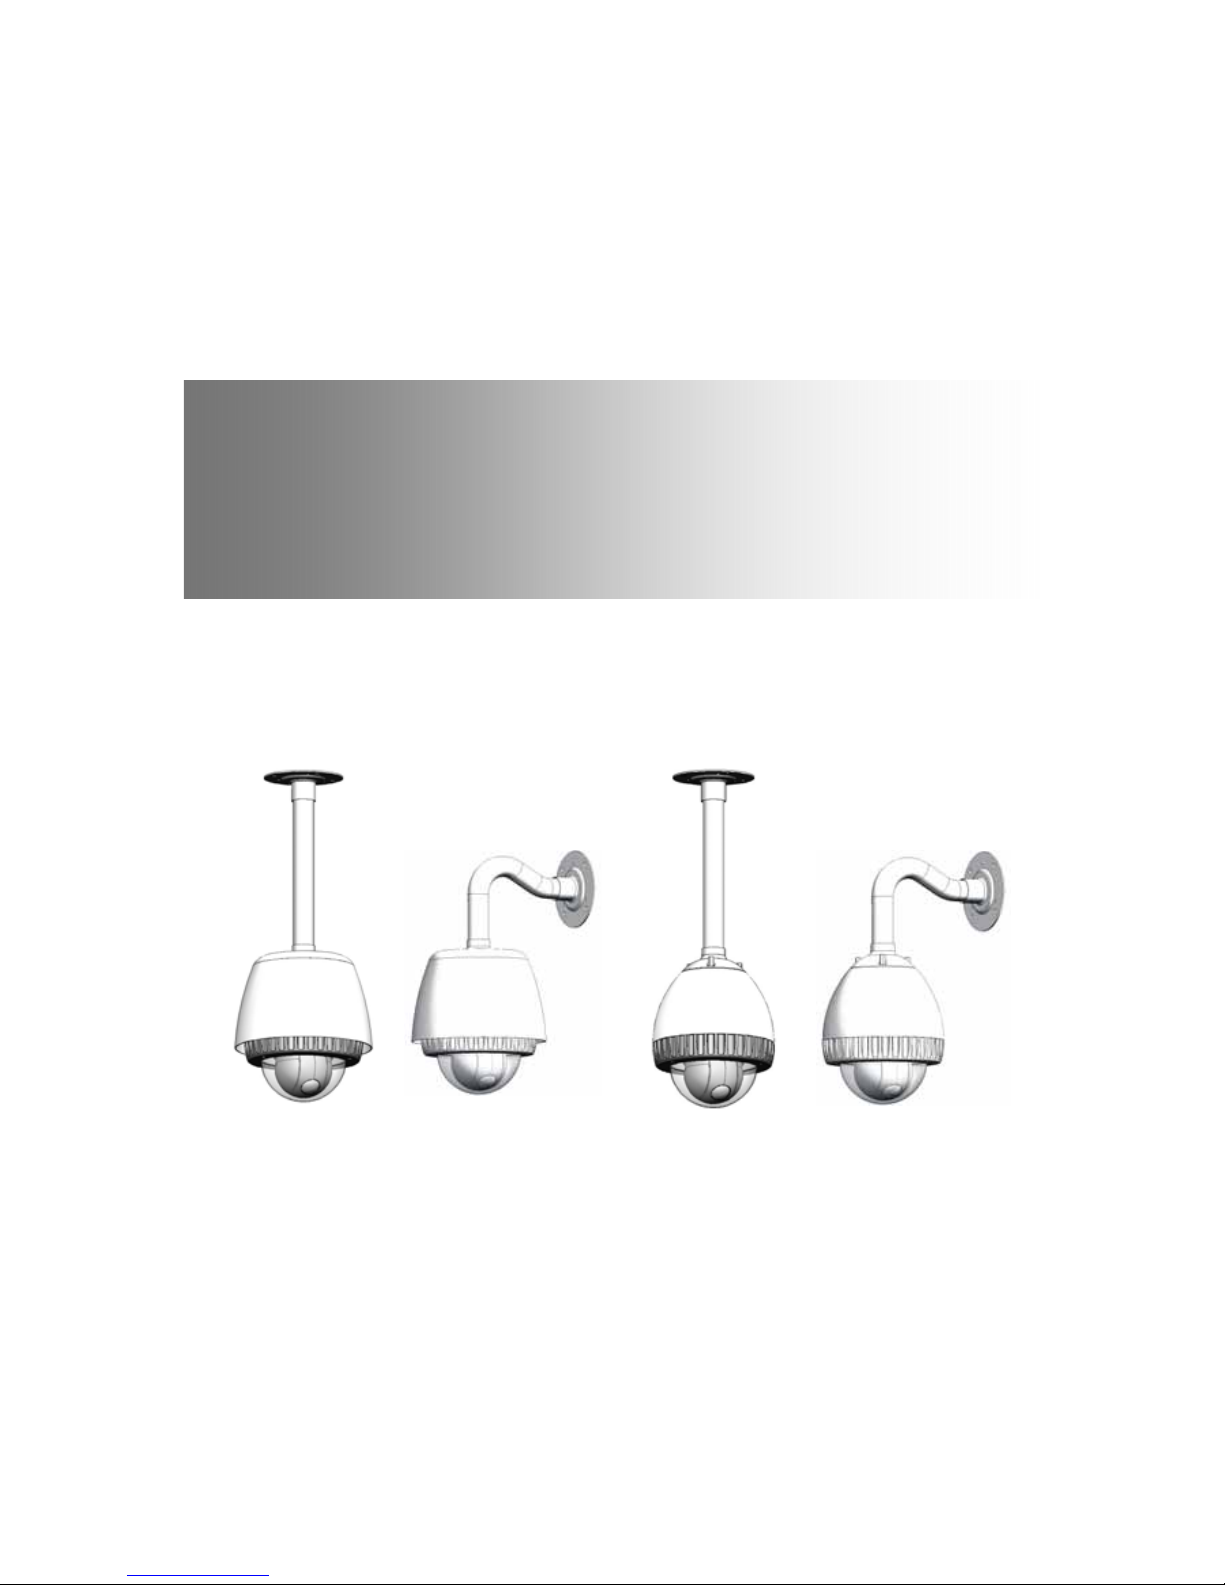
DOME HOUSING
(CEILING MOUNT/ WALL MOUNT)
Page 2
2
1. GENERAL
1.1 IMPORTANT SAFEGUARDS
Prior to install and use of this product, the following WARNINGS should be observed.
1. Installation and servicing should only be done by qualified service personnel and conform to
all local codes.
2. Unless the unit is specifically marked as a IPXX, it is designed for indoor use only and it must
not be installed where exposed to rain and moisture.
3. After replacement/repair of this unit’s electrical components, conduct a resistance
measurement between line and exposed parts to verify the exposed parts have not been
connected to line circuitry
4. The installation method and materials should be capable of supporting four times the weight of
the housing and dome camera combination.
1.2 WARNING AND CAUTION
TO REDUCE THE RISK OF FIRE OR ELECTRIC SHOCK, DO NOT EXPOSE THIS PRODUCT TO RAIN
OR MOISTURE. DO NOT INSERT ANY METALLIC OBJECTS THROUGH THE VENTILATION GRILLS OR
OTHER OPENINGS ON THE EQUIPMENT.
EXPLANATION OF GRAPHICAL SYMBOLS
The li gh tn ing f l ash w it h ar rowhead sym b ol , wi th in a n eq ui la te r al t ria ng l e, is intended to
alert the user t o the pre sence of u ninsulat ed "dange rous vo ltage" wi thin the product's
enclosure that may be of suffici en t m ag nit u de t o con st itut e a r isk of ele ct ric sh oc k t o
persons.
The exclamation point within an equilateral triangle is intended to alert the user to the
presence of important operating and maintenance (servicing) instruction in the literature
WARNIN
G
CAUTION
accompanying the product.
Page 3
3
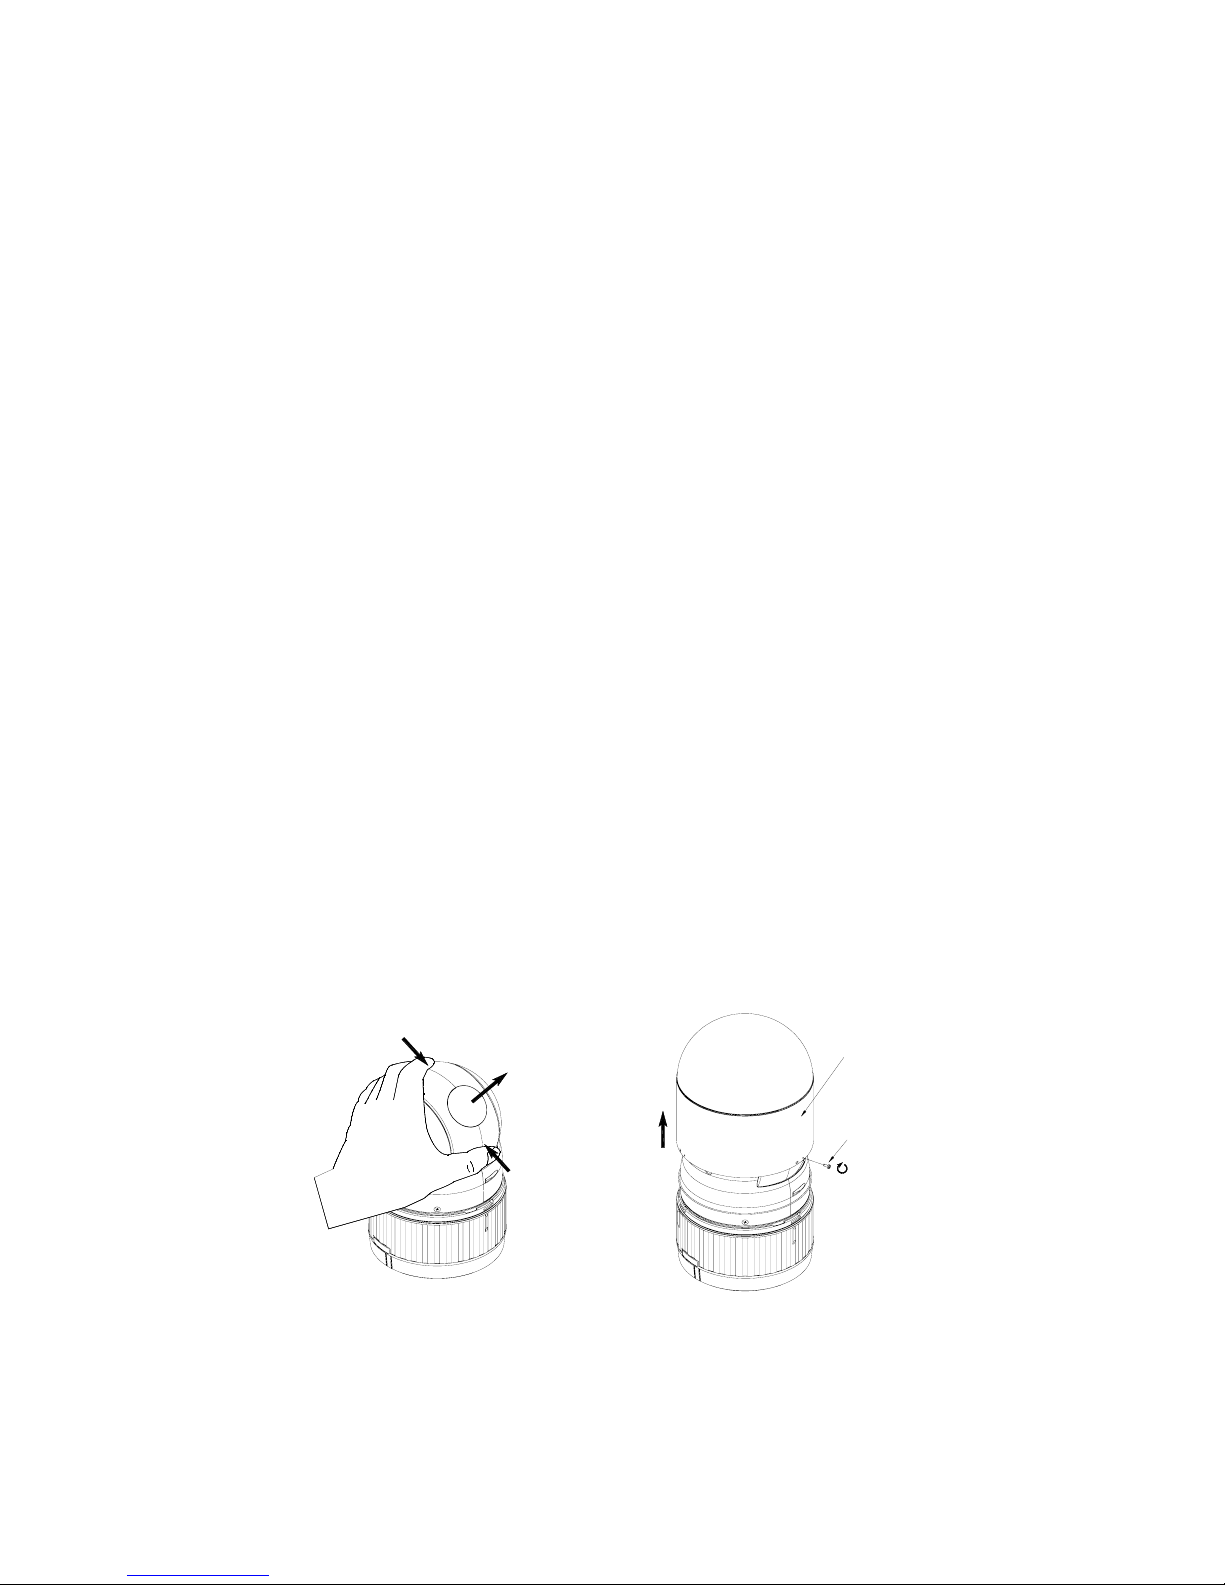
remove window
push
remove window
push
remove bubble ring ass'y
bubble ring ass'y
screw
2. DESCRIPTION
The Indoor/Outdoor dome housing is used with dome camera. The housing is constructed of
aluminum, steel and plastic. The housing is designed to be mounted both wall and ceiling. The
housing meets international IP65 standards for dust and moisture resistance. Sunshield model is
available for application to avoid the direct rays of the sun.
3. INSTALLATION
1. Attach the mounting base to ceiling or wall using the supplied M6 tapping screw and plastic
bushing.
2. Wind the both thread of the pipe end with Teflon tape about 20 times for sealing. Then use a
silicone rubber sealant to seal the area where the base bracket and the pipe meet.
CAUTION : A silicone rubber sealant must be applied to seal the housing to secure waterproofing.
3. Pull all the required cables through the base and pipe.
4. Fit the pipe whose thread is wound with Teflon tape to the base and turn until it is securely
fastened.
5. Loosen three screws(No.108) on the ring (No.203) and the base bracket(No.201) and connect
power of 24VAC to “AC IN” of fan & heater board(No.400). Again, Fasten three screws(No.108).
6. Connect power and communication lines to the dome base board. (Refer to Figure 2)
7. Fasten the dome base on the base bracket(No.201) using 3 screws(No.505).
8. Attach the dome body to the dome base. Align arrow mark of dome base with unlock mark of
dome body. Push dome body and turn to the lock mark direction.
Note : It is recommended to remove window and bubble ring ass’y for improving picture quality.
9. Fasten the housing ring(No.104) to external housing(No.102) using 3 screws(No.107).
Note : Screw until o-ring is depressed about 0.2~0.3mm. Locking torque should not exceed 4kgf⋅cm.
Figure 1. Remove window and bubble ring ass’y
Page 4

4
Figure 3. Input Wiring Diagram
Figure 2. Installation Drawing Figure 4. Sealing position
4. OPERATION
This housing has thermostatically controlled heater and fan. The thermostat of heater is set to
turn it on 4
o
(±5) and to turn it off on 15o(±5).
The thermostat of fan is set to turn it on 40
o
(±5) and to turn it off on 30o(±5).
5. MAINTENANCE
Perform the following maintenance at regularly scheduled intervals to prol ong the operational life
and appearance of the equipment.
Clean the bubble with a mild nonabrasive detergent in water and a soft cloth to maintain picture
clarity .
(TORQUE SHOULD NOT EXCEED 4kgfcm)
SCREW UNTIL O-RING IS DEPRESSED
DOME BODY
HOUSING RING
ABOUT 0.2~0.3 mm
LOOSEN 3 SCREWS
DOME CONNECTOR
DOME BASE BOARD
DOME BASE
FAN& HEATER BOARD
Seal using silicone rubber
around the circle
OUT
A
C24V
IN
A
C24V
HEATER
A
C24V
FAN
DC24V
Page 5

5
206
203
210
202
201
207
108
204
Figure 5. Exploded Assembly Diagram
107
110
104
103
105
108
300
102
200
106
109
112
101
113
111
304
303
305
400
304
302
301
Page 6

6
5.1 PARTS LIST
NO. PART NAME MA TERIAL QTY.
101 MOUNT BASE (51100510) AL 1
102 EXTERNAL HOUSING(50402797) AL 1
103 GASKET SEAL(50800449) SILICONE 1
104 HOUSING RING(50502842) ABS 1
105
HOUSING DOME CLEAR(DIA.=173) (50502318)
HOUSING DOME SMOKE(DIA.=173) (50502319)
HOUSING DOME CLEAR(DIA.=173) (50501543)
HOUSING DOME SMOKE(DIA.=173) (50501802)
ACRYL(2.5T)
ACRYL(2.5T)
ACRYL(1.6T)
ACRYL(1.6T)
1
106 STANDOFF SCREW SUNSHIELD (50700555) MSWR 3
107 SCREW PH M4X25 (50700556) MSWR 3
108 SCREW PH M4X8 (50700558) MSWR(BLACK) 10
109 O-RING(S125) (50800450) RUBBER 1
1 10 O-RING(SMALL) P-4 (50800452) RUBBER 3
111 O-RING(SMALL) P-5 (50800235) RUBBER 6
112 SUNSHIELD (50402798) AL 1
113 SCREW WRENCH M6X16 SUS (50700559) SUS 3
201 BASE BRACKET (50402791) STEEL(EGI) 1
202 GUIDE BRACKET (50402792) STEEL(EGI) 3
203 DOME RING (50402793) STEEL(EGI) 1
204 STANDOFF M6X15-H20 HEX(50700555) MSWR 3
205 SCREW PH M6X16 (50700560) MSWR 3
206 STANDOFF M4X15 HEX(50700557) MSWR 3
207 SCREW TC2 M4X8 (50700561) MSWR 6
301 BRACKET FAN&HEATER (50402794) AL 1
302 FAN 40X40X10 (55500200) DC 24V 2
303 HEATER 50W (55500201) AC 24V 1
304 SCREW PH M3X5 (50700288) 4
305 SCREW PH M3X10 (50700270) 4
400 ASS'Y PCB(05106519) 1
Page 7

7
5.2 ACCESSORIES
NO. PART NAME MA TERIAL QTY.
501 PLASTIC BUSHING 4
502 SCREW TAPPING M6X35 SUS 4
503 SET SCREW M4X4 SUS 2
504 SCREW MACHINE M4X25 MSWR 3
505 SCREW MACHINE M4X8 SUS 3
506 O-RING(SMALL) P-4 RUBBER 3
507 O-RING(SMALL) P-5 RUBBER 4
508 L-LENCH 5mm 1
509 L-LENCH 2mm 1
510 RTV SILICONE BOND 1
Page 8

8
6. SPECIFICATIONS
ELECTRICAL
Power source : 24VAC, 50/60Hz
Power consumption : Heater 50watts
Blower 6watts
Dome camera 20watts
MECHANICAL
Construction : Aluminum, Steel and Plastic (ABS)
Finish : Polyester powder coat
Dome Bubble : Plastic (Acrylic)
Dimensions : See Figure 6
Weight :
Approx. 4.3kg(sunshield included)
Approx. 3.5kg
GENERAL
Ambient Environment
Temperature :
-45°C to 50°C
Ratings : IP 65
- Weight and dimension are approximate
- Specifications are subject to change without notice.
(Unit : mm)
Figure 6. Dimension Drawing Figure 7. Mount base size.
PRINTED IN KOREA.
 Loading...