

Page 1
1
Cardio Coach
Cat. No. 42.7005
Operating instruction HiTRAX Cardio Coach Heart rate monitor
1. Introduction
Congratulations! You have got a HiTRAX Cardio Coach.
With this instrument you can monitor your heart rate, program a training zone with upper and lower limit according
to your personal fitness plan and you can calculate your calorie consumption.
Your HiTRAX Cardio Coach consists of a chest strap which registers the heart beat, and a watch which receives
these signals and monitors them on an LCD display.
Your HiTRAX Cardio Coach also provides time, stop watch and alarm function.
2. Features
- 4 operation modes: Time, pulse, stop watch and alarm.
- Time mode: indication of weekday, hours, minutes and seconds or month and day, 12 or 24-hour format, auto
calendar from 2000 to 2049, hourly chime signal, alarm
- Pulse mode: indication of actual heart rate, programmable training zone (upper and lower limit) with alarm,
average pulse, training time within the zone, calorie consumption
- Stop watch mode: 1/100-seconds, up to 24 hours, split time
- EL backlight
3. Buttons operation
S1: ST./SPL.
- HOURLY CHIME ON/OFF
S1
S2
S4
S3
S2
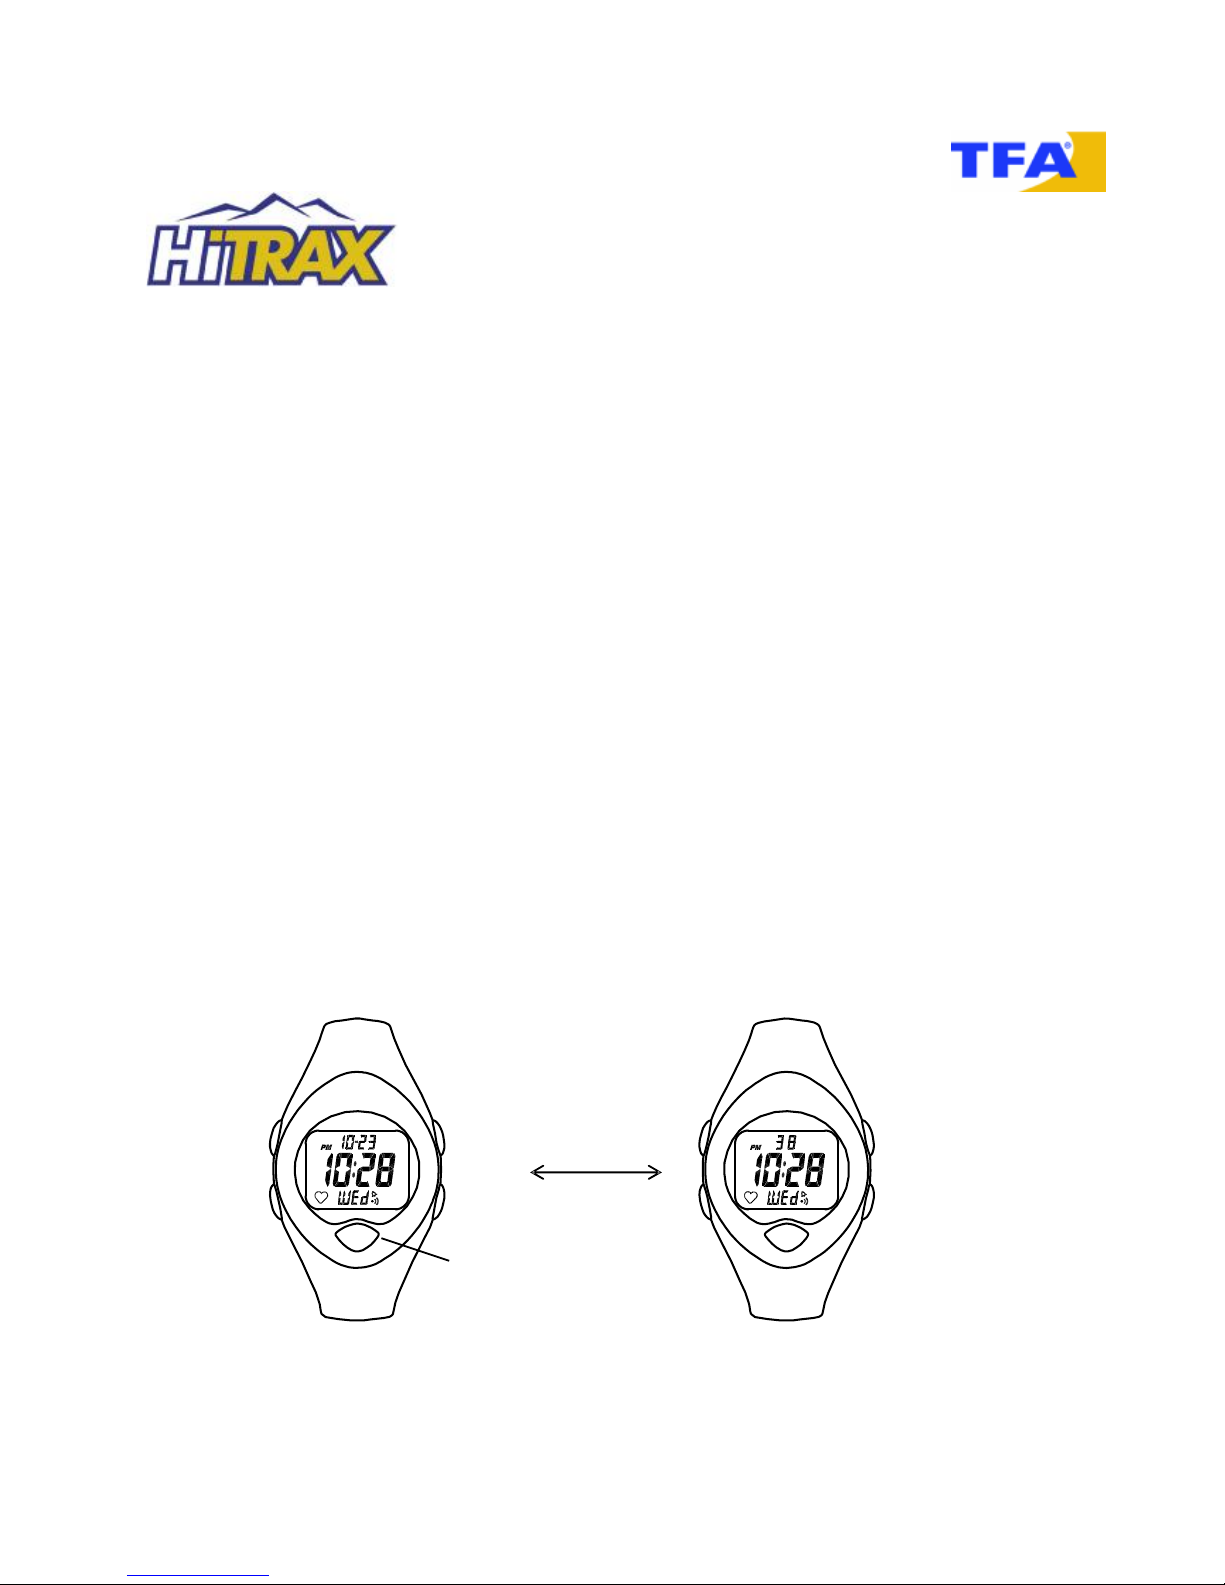
DISPLAY WITH MONTH-DAY DISPLAY WITH SECONDS
S5
Page 2
2
- START/SPLIT TIME (STOP WATCH MODE)
- ALARM ON/OFF
- FORWARD SETTING (SETTING MODE)
S2: STOP
- DISPLAY MONTH-DAY/SECONDS
- STOP (STOP WATCH MODE)
- SELECT DATA DISPLAY (STOP WATCH STOPPED)
- ALARM ON/OFF
- REVERSE SETTING (SETTING MODE)
S3: MODE
- MODE CHANGE
- SELECT SETTING (SETTING MODE)
S4: SET/RESET
- SET (PRESS AND HOLD)
- RE-LINK WATCH AND TRANSMITTER
- RESET STOP WATCH AND DATA (PRESS AND HOLD WHEN STOP WATCH STOPPED)
- EXIT (SETTING MODE)
S5: EL BACK LIGHT
4. Mode change
Press S3 for mode change operation. The sequence is as following:
Remark:
At any mode, press and hold S3 for 3 seconds to change directly to Time mode.
5. Heart rate measurement
To use the heart rate measuring function, follow these steps:
a) Enter data for heart rate monitor:
- Press S3 to enter Pulse mode. “PULS” will be displayed briefly.
- Press and hold S4 for 2 seconds to enter Setting mode. “ZONE HR” with flashing “on” will be displayed.
- Press S1 (forward) or S2 (reverse) to set the data (flashing). Press and hold S1 or S2 for fast setting.
- Press S3 to select the next data for setting. The sequence is shown as follows:
TIME
PULSE
STOP WATCH
ALARM
S3
S3
S3
S3
S1 S4
S2 S3
1 SECOND
AUTO
S5
Page 3
3
- After all data is entered, press S4 to exit setting mode.
Remarks:
1. If the heart rate zone and the zone alarm are set to “on”, one beep will sound every 5 seconds when the
heart rate is below “Zone Low Limit”, and two beeps will sound when the heart rate is above “Zone High Limit”.
2. If the heart rate zone is set to “off”, there will be no zone alarm and “Time in Zone” will not be shown in the
Stop watch mode.
3. The preset values for “Zone High Limit” and “Zone Low Limit” depend on sex and age according to the following
formula:
Male: High Limit = 220-Age Low Limit = (220-Age)x0.7
Female High Limit = 226-Age Low Limit = (226-Age)x0.7
The user can set his individual limits after entering sex and age.
4. If the unit or the weight is changed, the stop watch will be reset, and all data cleared automatically.
5. The weight can be set from 20 to 299 LB (or KG).
6. The age can be set from 1 to 99.
7. Both “Zone High Limit” and “Zone Low Limit” can be set from 40 to 240 BPM (Beat Per Minute).
8. If there is no button operation for about 3 minutes in setting mode, the watch will return back to Pulse mode
automatically.
b) Equipping the transmitter (chest strap)
- Attach the transmitter to the elastic strap provided. Put the round fastener at the elastic strap vertically from the
bottom up within the cut-out at the end of the transmitter part. Pull the elastic strap outwards and push the
round fastener firmly into the cut-out until it snaps in.
- Wet the grooved electrode areas of the transmitter with water.
- Secure the transmitter on your chest below the chest muscle. The sensor should be placed directly on your
- skin.
- Move the chest strap until there is an optimal contact. It can last some time to get a stable contact.
c) Heart rate measurement
HEART RATE
ZONE ON/OFF
MALE/FEMALE UNIT (LB/KG) WEIGHT
AGE ZONE HIGH LIMIT ZONE LOW LIMIT
ZONE ALARM
ON/OFF
S3 S3 S3
S3
S3 S3 S3
S3
1 SECOND
AUTO
S3
S4 S1
S2
ZONE ALARM ICON
Training tips:
There are 3 training zones:
1. The Health Zone (50 to 70% of maximum heart rate)
This zone is for beginners and people who haven’t been practising for a long time. When exercising in the
Health zone the intensity should be low and relaxed.
2. The Fitness Zone (70 to 80% of maximum heart rate)
Workout in this zone improves your fitness, when you already have been exercising for a while and feel fit.
If you have regular Zone Two intensity exercise, the heart is made stronger as well as it helps to convert
food into energy.
3. The High Performance Zone (80 to 100% of maximum heart rate)
Exercising in this zone is to get your maximum fitness. It is generally only to be recommended for those who
can exercise in the Fitness zone for 30-45 minutes without problems. The intensity should be increased step
by step.
Page 4
4
- Press S3 to enter Pulse mode. “PULS” will be displayed briefly.
- The Heart icon flashes when the heart rate signal is received from the transmitter and the heart rate is shown
on the display. It can last some time to get the correct value.
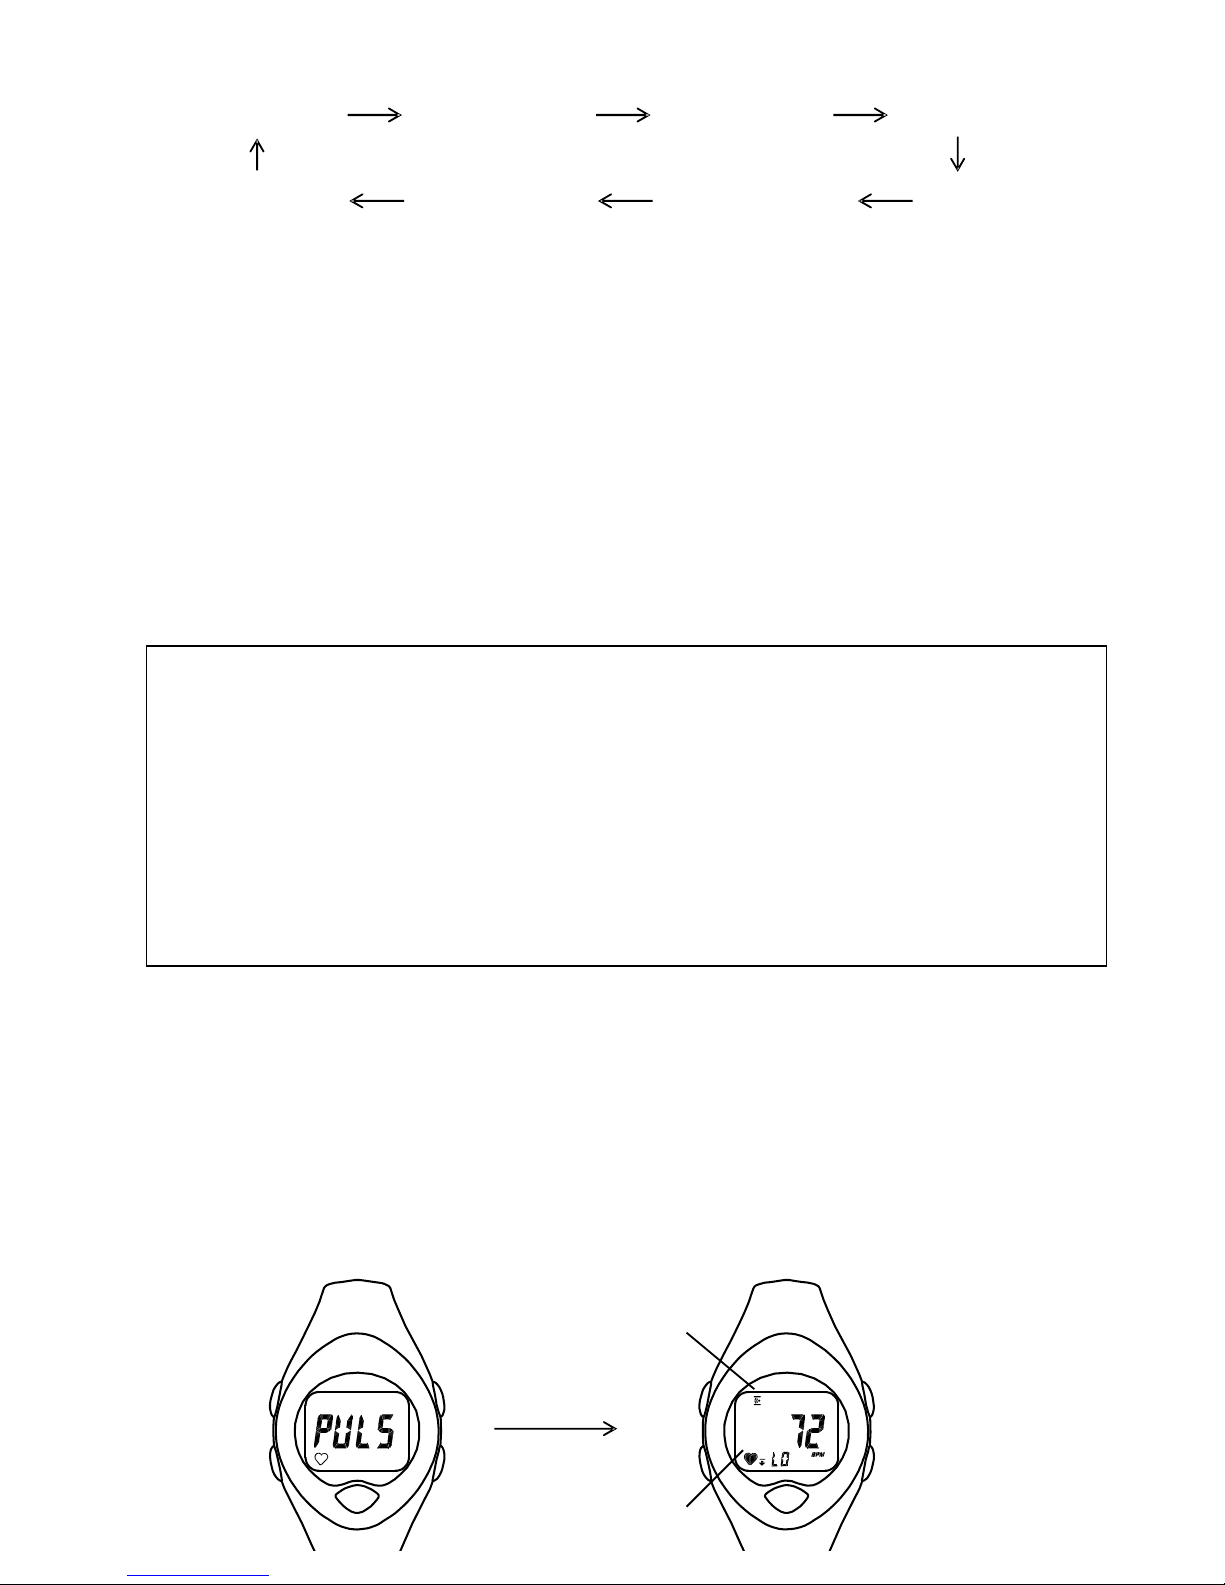
- If the heart rate zone and the zone alarm are set to “on”, one beep will sound every 5 seconds when the heart
rate is below “Zone Low Limit”, and two beeps will sound when the heart rate is above “Zone High Limit”. The
display will be as follows:
Remarks:
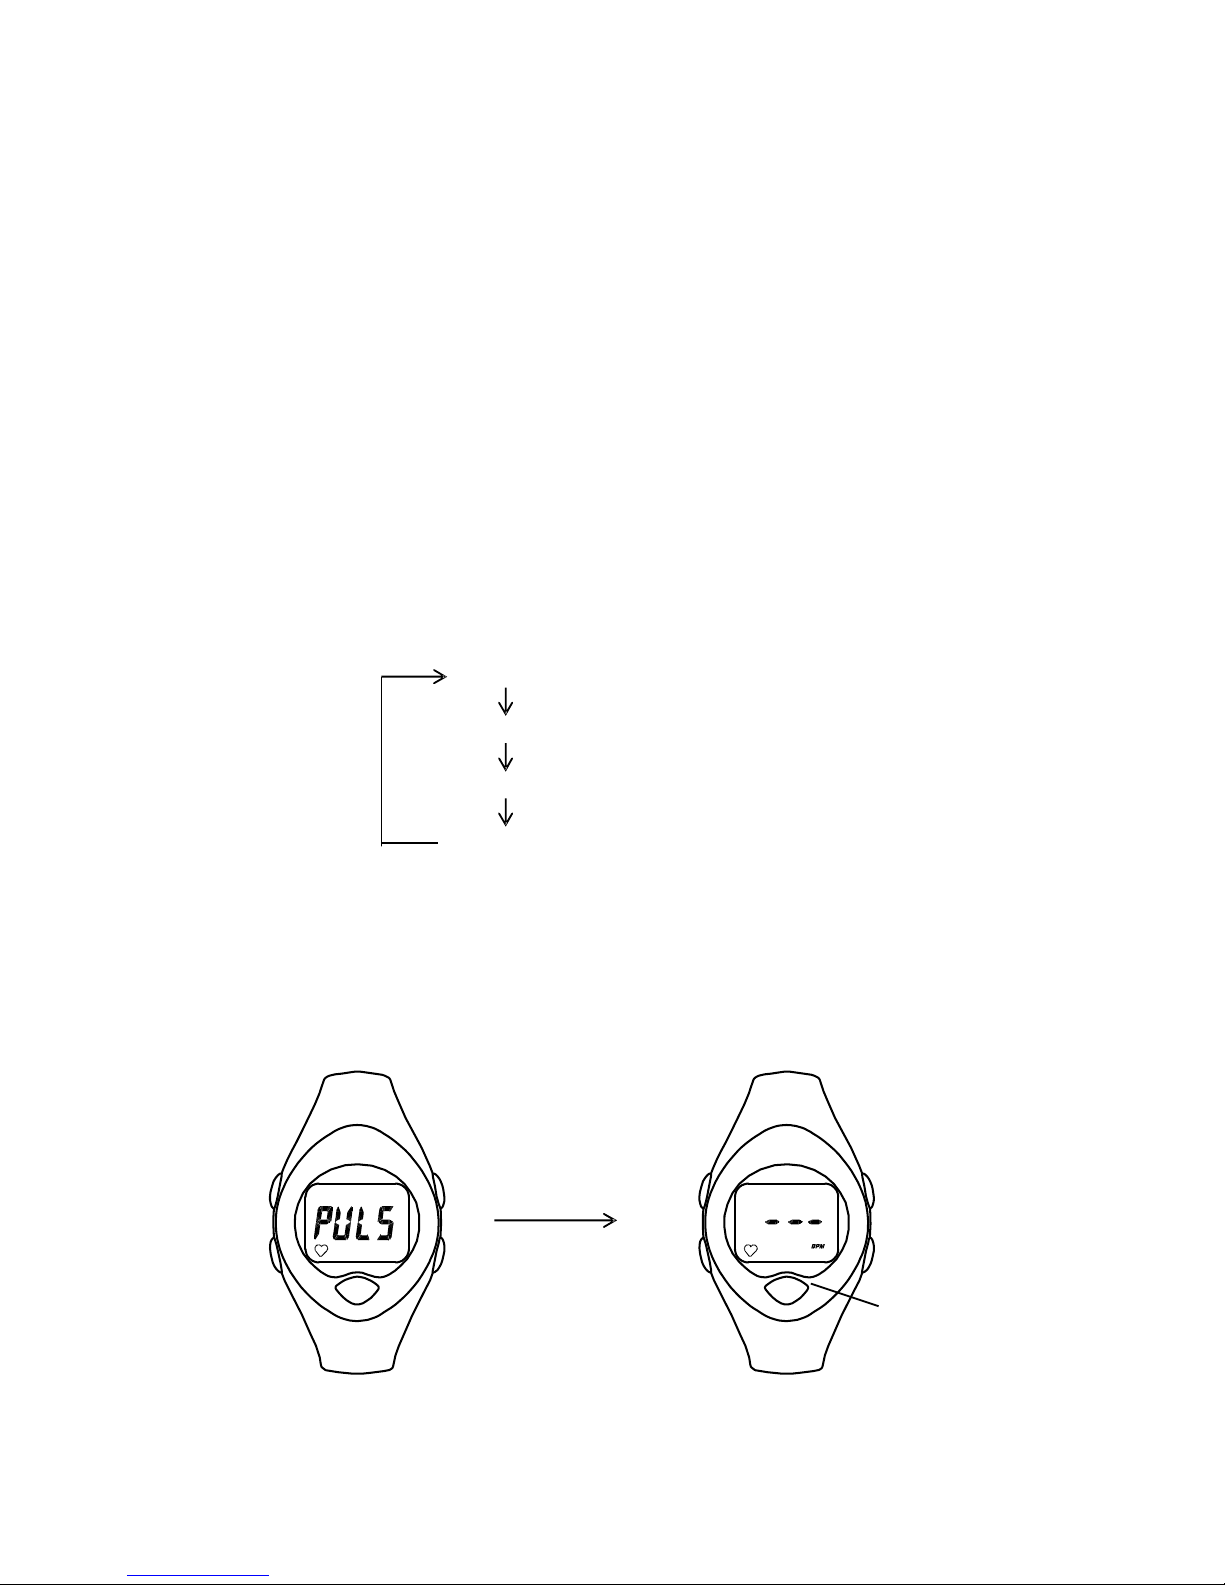
1. If no heart rate signal is received for 1 minute, the link between the watch and the transmitter will be cut off
automatically, and “- - -” will be shown on the display. To re-link, press S4, and “- - -” will start flashing or
the heart rate will be indicated.
2. The heart rate measurement will not be taken when EL back light is “on” or alarm is sounding.
3. If the heart rate zone is set to “off”, there will be no zone alarm or high/low limit indication.
4. If no heart rate signal is received and there is no button operation for about 3 minutes in Pulse mode, the
watch will change to Time mode automatically.
6. Stop watch operation (within Pulse mode)
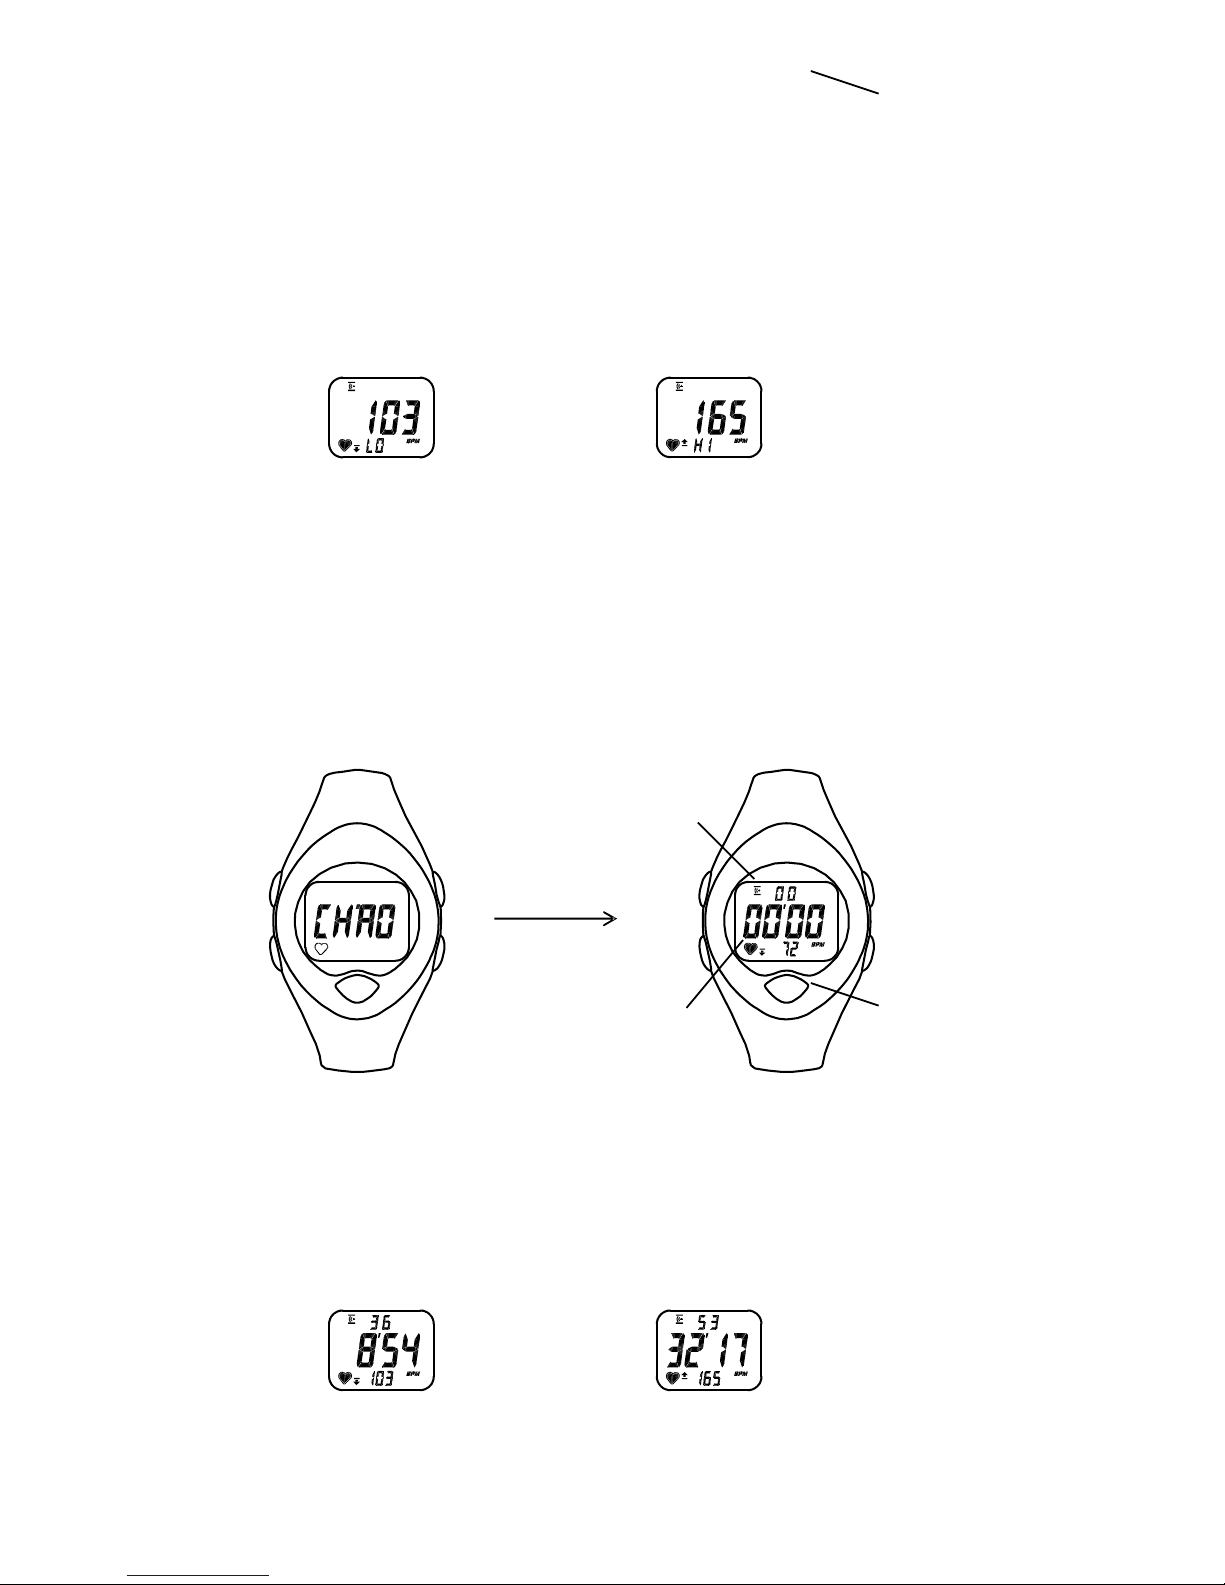
- Press S3 to enter Stop watch mode. “CHRO” will be displayed briefly.
- The heart icon flashes when heart rate signal is received from the transmitter and the heart rate is shown on
the display.
- Press S1 to start the stop watch.
- 1/100-seconds are shown at the top row while minutes and seconds are shown at the middle row of the display.
After one hour the seconds are shown at the top row while hours and minutes are shown at the middle row of
the display.
- If the heart rate zone and the zone alarm are set to “on”, one beep will sound every 5 seconds when the heart
rate is below “Zone Low Limit”, and two beeps will sound when the heart rate is above “Zone High Limit”. The
display will be as follows:
BELOW “ZONE LOW LIMIT” ABOVE “ZONE HIGH LIMIT”
HEART ICON
S1
S2 S3
S4
1 SECOND
AUTO
ZONE ALARM ICON
HEART ICON
BELOW “ZONE LOW LIMIT” ABOVE “ZONE HIGH LIMIT”
S5
S5
Page 5
5
- Press S1 again to take the split time, “SPL” is flashing and the split time will be shown for 10 seconds on the
display, then the display will return to the current running time of the stop watch.
- Press S2 to stop the stop watch.
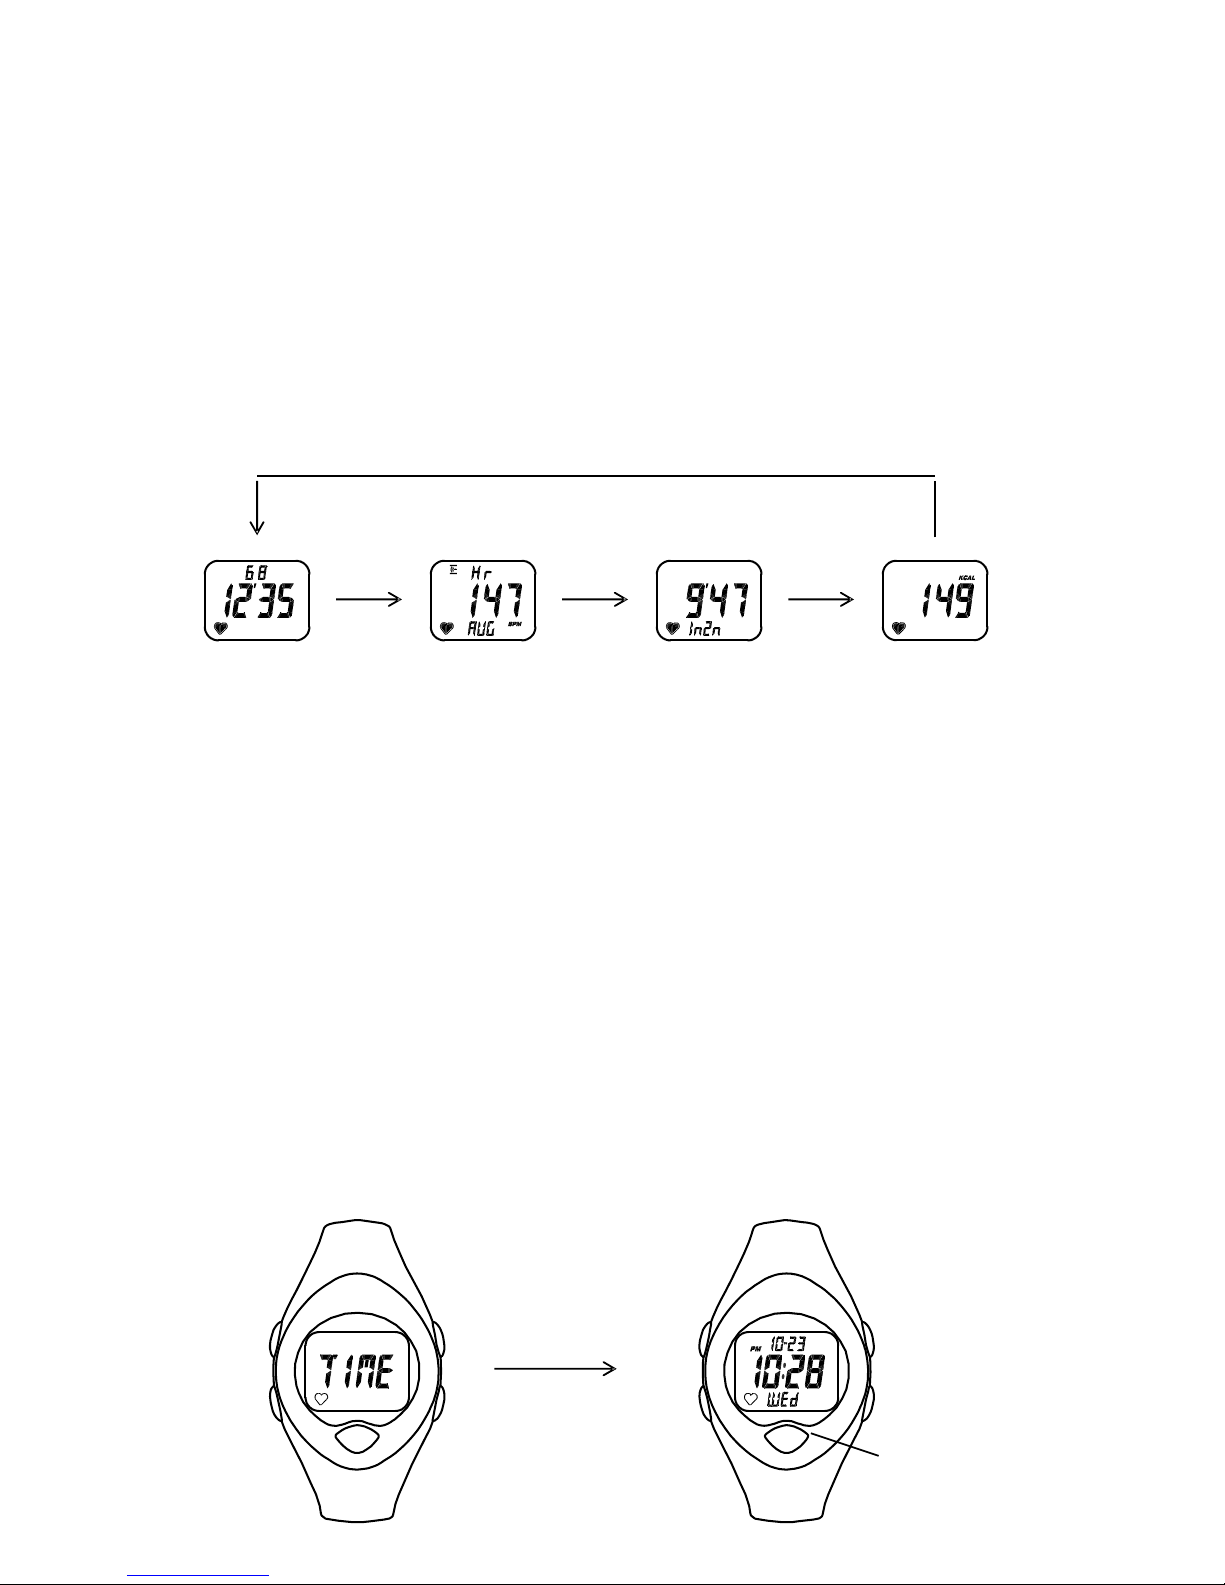
- If the heart rate zone is set to “on” after the stop watch is stopped, “Elapsed Time”, “Average Heart Rate”,
“Time in Zone” and “Calorie Consumption” will be displayed sequentially, each for 5 seconds. Press S2 to recall
the data one by one.
- Press S1 to re-start the stop watch or press and hold S4 for 2 seconds to reset the stop watch and all stored
data back to zeros (“CLr” displayed).
Remarks:
1. If no heart rate signal is received for 1 minute, the link between the watch and the transmitter will be cut off
automatically, and “- - -” will be shown on the display. To re-link, press S4, and “- - -” will start flashing or the
heart rate will be indicated.
2. The heart rate measurement will not be taken when EL back light is “on” or alarm is sounding.
3. The resolution for the stop watch is 1/100-second for the first hour and 1 second for the rest. After 24 hours the
stop watch will stop automatically.
4. If the heart rate zone is set to “off”, there will be no zone alarm, high/low limit indication or “Time in Zone”
display.
5. “Average Heart Rate” = Sum of heart rates ÷ Number of samples.
6. “Time in Zone” is the time (excluding 1/100-seconds) that the heart rate stays within the high/low limit set.
7. The “Calorie Consumption” (shown in KCAL) depends on the weight, the heart rate of the user and the exercise
time.
8. If there is no heart rate signal received since entering the stop watch mode, “- - -” will be shown on the display.
The “Average Heart Rate”, “Time in Zone” or “Calorie Consumption” cannot be displayed.
7. Setting of time and chime
S1 S4
S2 S3
1 SECOND
AUTO
S2 or
S2 or
5 SEC
AUTO
5 SEC
AUTO
5 SEC
AUTO
5 SEC
AUTO
S2 or S2 or
ELAPSED TIME AVERAGE
HEART RATE
TIME IN ZONE CALORIE
CONSUMPTION
S5
Page 6
6
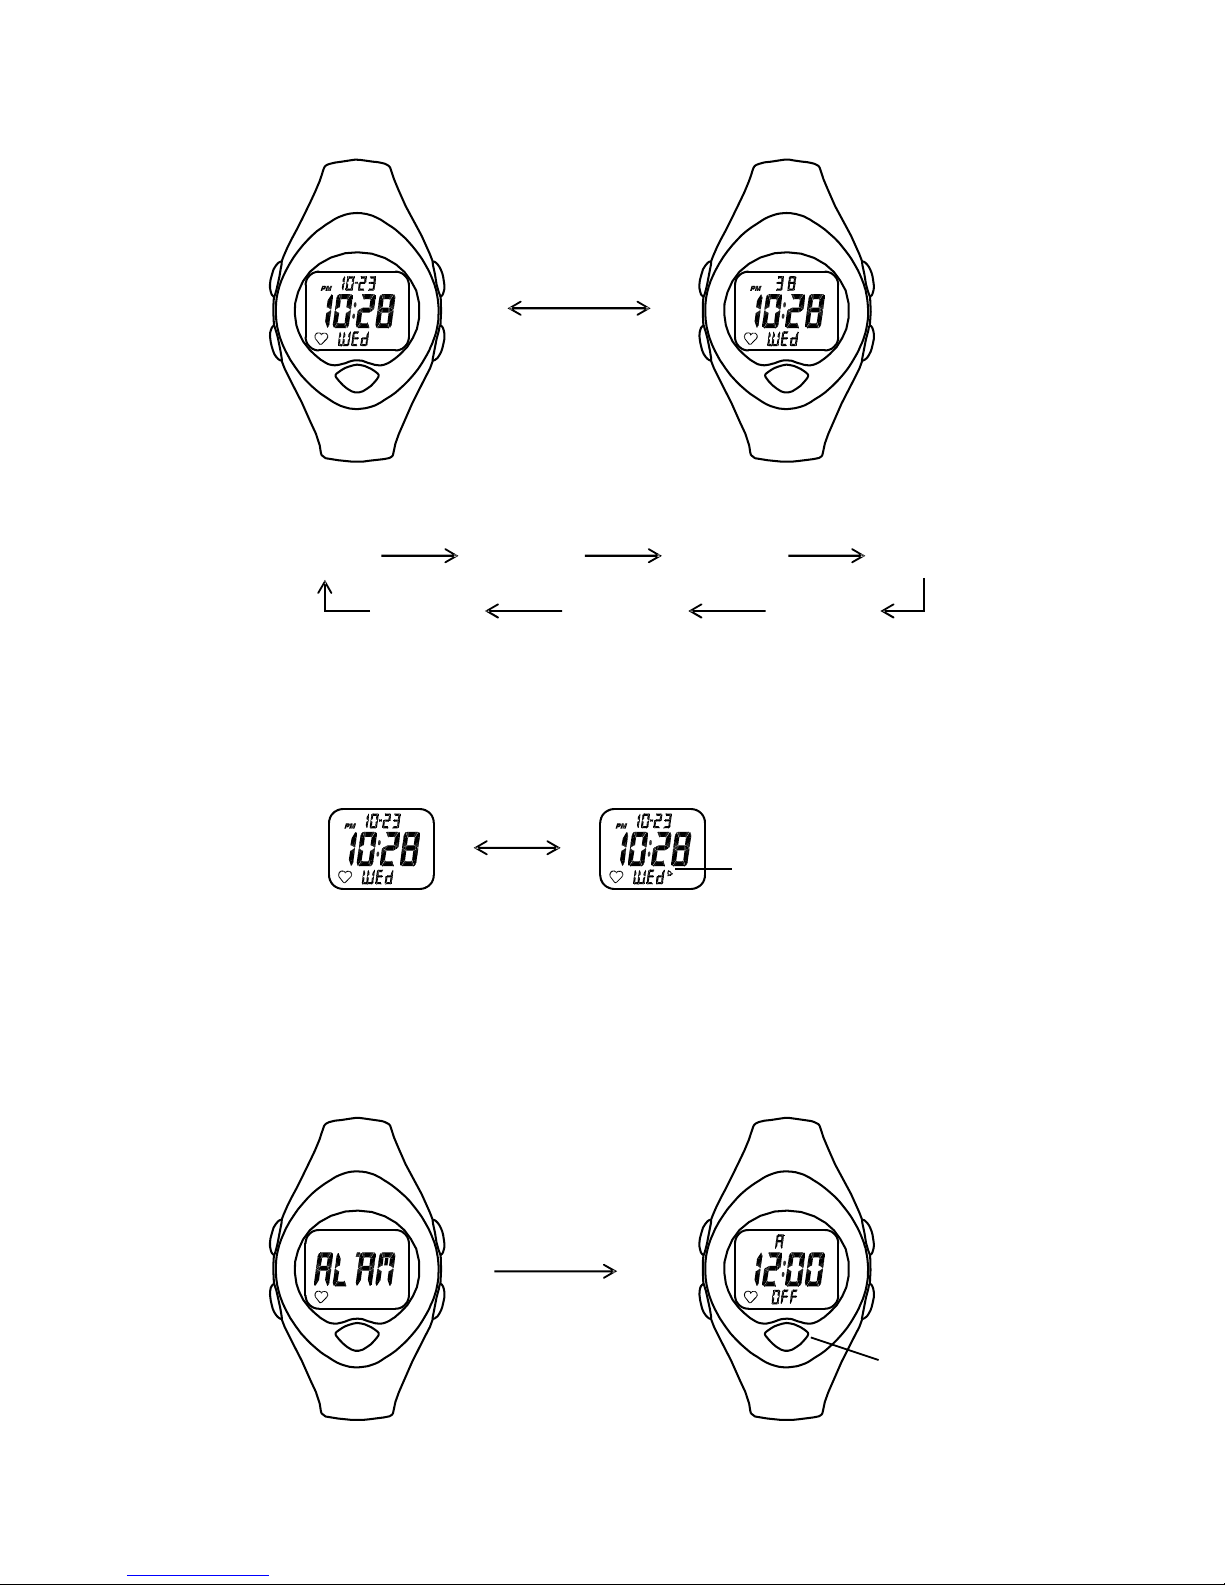
- Press S3 to enter Time mode. “TIME” will be displayed briefly.
- Press S2 to toggle between “Month and Day” or “Second” display.
- Press and hold S4 for 2 seconds to enter setting mode. The hour digits start flashing.
- Press S1 (forward) or S2 (reverse) to adjust the flashing digits. Press and hold S1 or S2 for fast setting.
- Press S3 to select the next digits or 12/24Hr for setting. The sequence is shown as follow:
- When setting seconds, pressing S1 or S2 while the second digits count between 30 to 59 will reset the second
digits to 00 and 1 minute will be added to the minute digits.
- The year can be set from 2000 to 2049.
- When setting 12/24Hr, press S1 or S2 to select 12-hour or 24-hour display format. If 12-hour display format is
selected, there will be a “PM” flag.
- After all adjustments are completed, press S4 to exit the setting mode. The weekday will be adjusted
automatically.
- Press S1 to toggle the chime function on or off. If the chime function is “on”, the chime icon will be shown.
Remarks:
- If the chime function is set to “on”, a signal will sound every full hour and there will be a button confirmation
sound.
- If there is no button operation for about 3 minutes in setting mode, the watch will return back to Time mode
automatically.
8. Setting of alarm
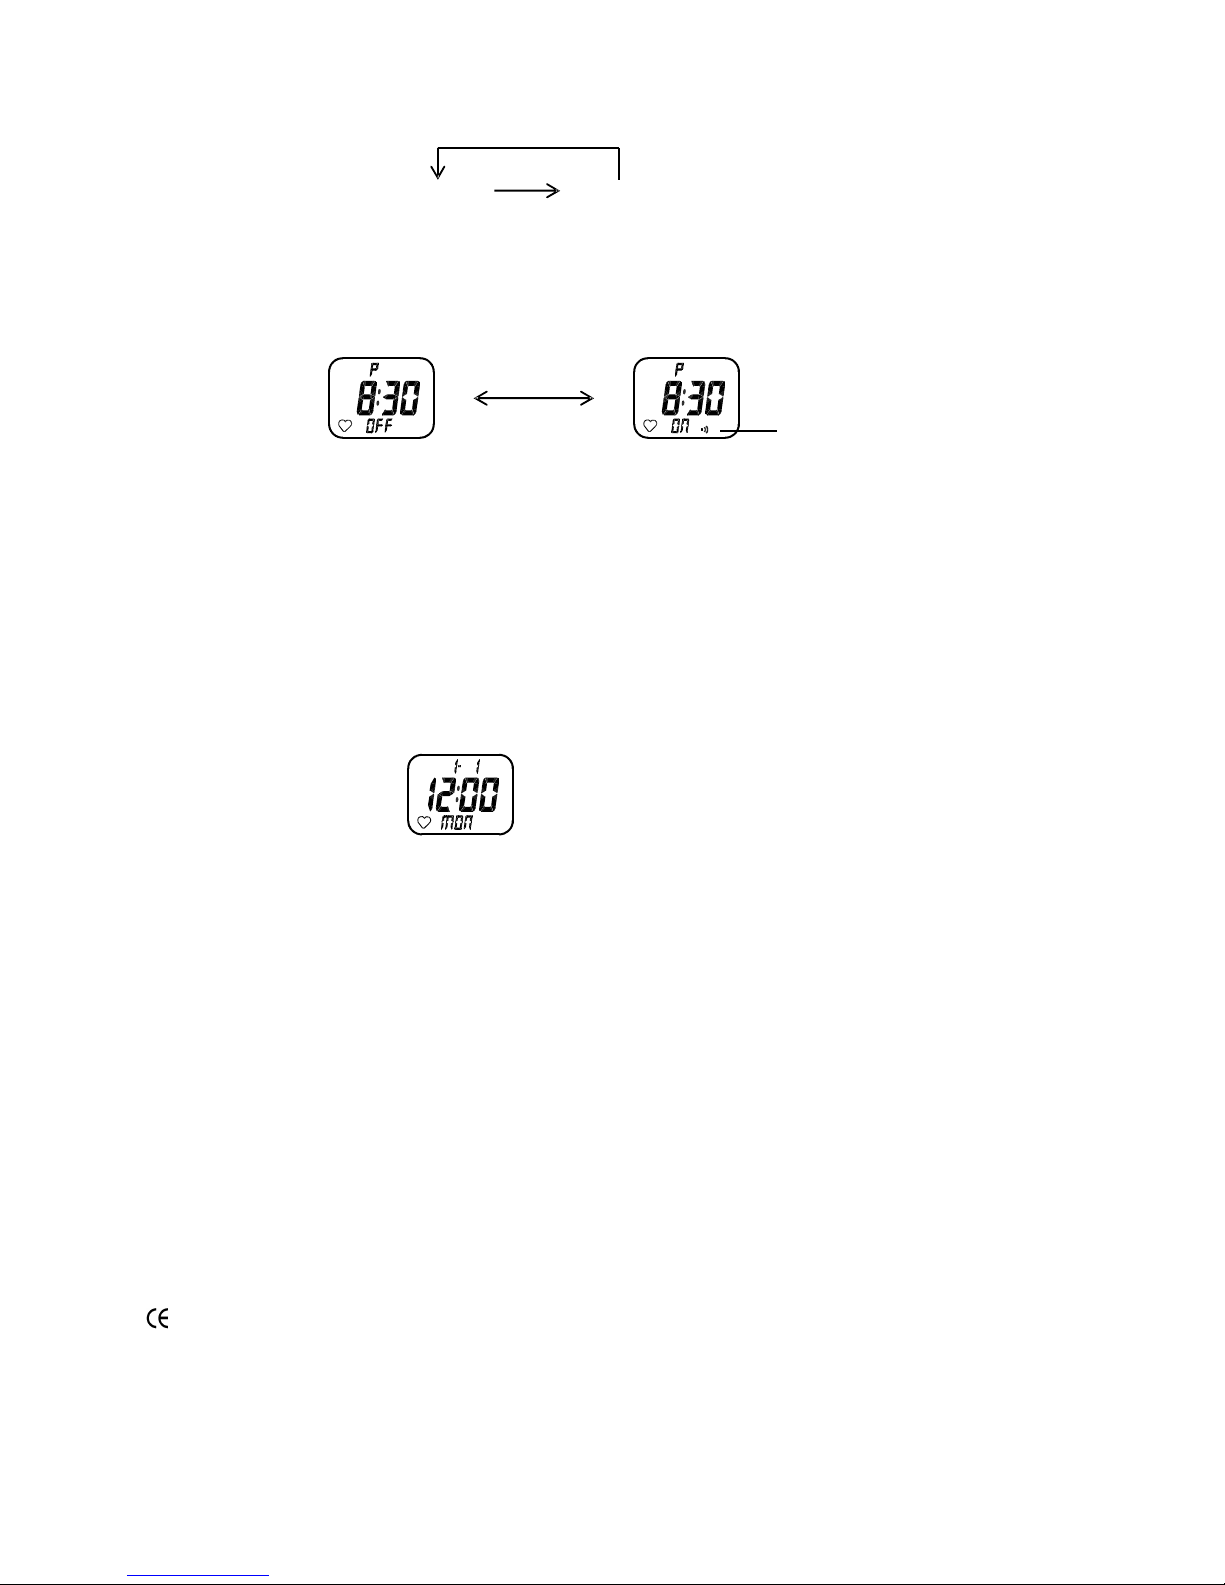
- Press S3 to enter Alarm mode. “ALRM” will be displayed briefly.
- Press and hold S4 for 2 seconds to enter setting mode. The hour digits start flashing.
S3
HOUR MINUTE SECOND YEAR
MONTH DAY 12/24Hr
S3
S3 S3
S3 S3 S3
S1 S4
S2 S3
S2
CHIME “OFF” CHIME “ON”
S1
CHIME ICON
1 SECOND
AUTO
S5
Page 7
7
- Press S1 (forward) or S2 (reverse) to adjust the flashing digits. Press and hold S1 or S2 for fast setting.
- Press S3 to select the next digits for setting. The sequence is as follows:
- After all adjustments are completed, press S4 to exit the setting mode.
- Press S1 or S2 to toggle the alarm function on or off. If the alarm function is “on”, the alarm icon will be shown.
Remarks:
1. The alarm sounds daily for 20 seconds at alarm time if the alarm function is “on”. Press any button to stop the
alarm sound.
2. The alarm function is automatically set to “on” when entering setting mode.
3. In the 12-hour display format there will an AM flag or PM flag for the alarm time.
4. If there is no button operation for about 3 minutes in setting mode, the watch will return back to Alarm mode
automatically.
9. Resetting of the watch
- Press and hold S1, S2, S3 and S4 simultaneously for 1 second. All segments of the display will be “off” and the
watch will be reset. After reset, test patterns will be displayed for a few seconds, and finally the display will be
as follows:
10. Battery change:
• Battery: Watch 1 x CR 2032, transmitter 1 x CR 2032
• Please contact a specialized dealer for battery change of the watch.
• The battery of the transmitter you can change by yourself. Open the battery compartment with a coin in the
direction indicated by the arrow.
• Do not dispose of empty batteries in household waste. Take them to special local collection sites.
11. Maintenance:
• Do not expose the instrument to extreme temperatures, vibration or shock
• Clean it with a soft damp cloth. Do not use solvents or scouring agents.
• Please do not try to repair the unit. Contact the original point of purchase. Please let change the battery before
complaining. No guarantee if the instrument is handled or opened improperly.
Transmitting frequency: 5,1 KHz
Equipment: chest strap, bike holder and box
S3
ALARM “ON”
HOUR MINUTE
S3
ALARM “OFF”
S1/S2
ALARM ICON
Page 8

8
25-10-2002 (File: M02-160D chop)
 Loading...