

Page 1

Photo Printer
L300/S300/S400
User Manual
E
ENGLISH
Page 2

Check the Package Content
Before using HiTi photo printer, please check the printer package content for the following items:
HiTi Photo Printer x 1
LCD Controller x 1 (only standard on S series photo printers)
Power Cord x 1
USB Cable x 1 (for the connection between the photo printer and the computer)
Paper Cassette x 1
Printer User Manual
PhotoDesiree Deluxe User Manual
HiTi Bag x 1 (including following items…)
Quick Guide x 1
Notice Sheet x 1
Warranty Card x 1
Master CD x1 (Includes the driver and PhotoDesiree Deluxe)
* The package content varies according to different areas.
Page 3

Table of Content
Get To Know HiTi Photo Printer
LCD controller
Front view
Rear view
Installing Your HiTi Photo Printer
Installing the LCD controller
Installing ribbon cartridge
Loading dedicated photo papers
Powering up the printer
Functional Instruction
Home Menu Introduction
PHOTO
COLLAGE
INDEX
STICKER
SETUP
IMAGE DEVICE
Printing Photos Without a PC
Distinguishing type of memory card
Insert memory card
Standalone printing
Special Function
I2O
Matte
Date print
Signature
Language
Print position
Color setting
LCD adjustment
Wallpaper and Color theme
Signature
Sepia and Border
ColorWizard
Image device
Advanced image editing
Cleaning mode
PC-Link Printing
Installing printer driver
Connecting to a computer
Troubleshooting
Indicator blinking
Others
Specification
Optional consumables and accessories
Page 4

Contact Us
Online support
Global sites
Page 5
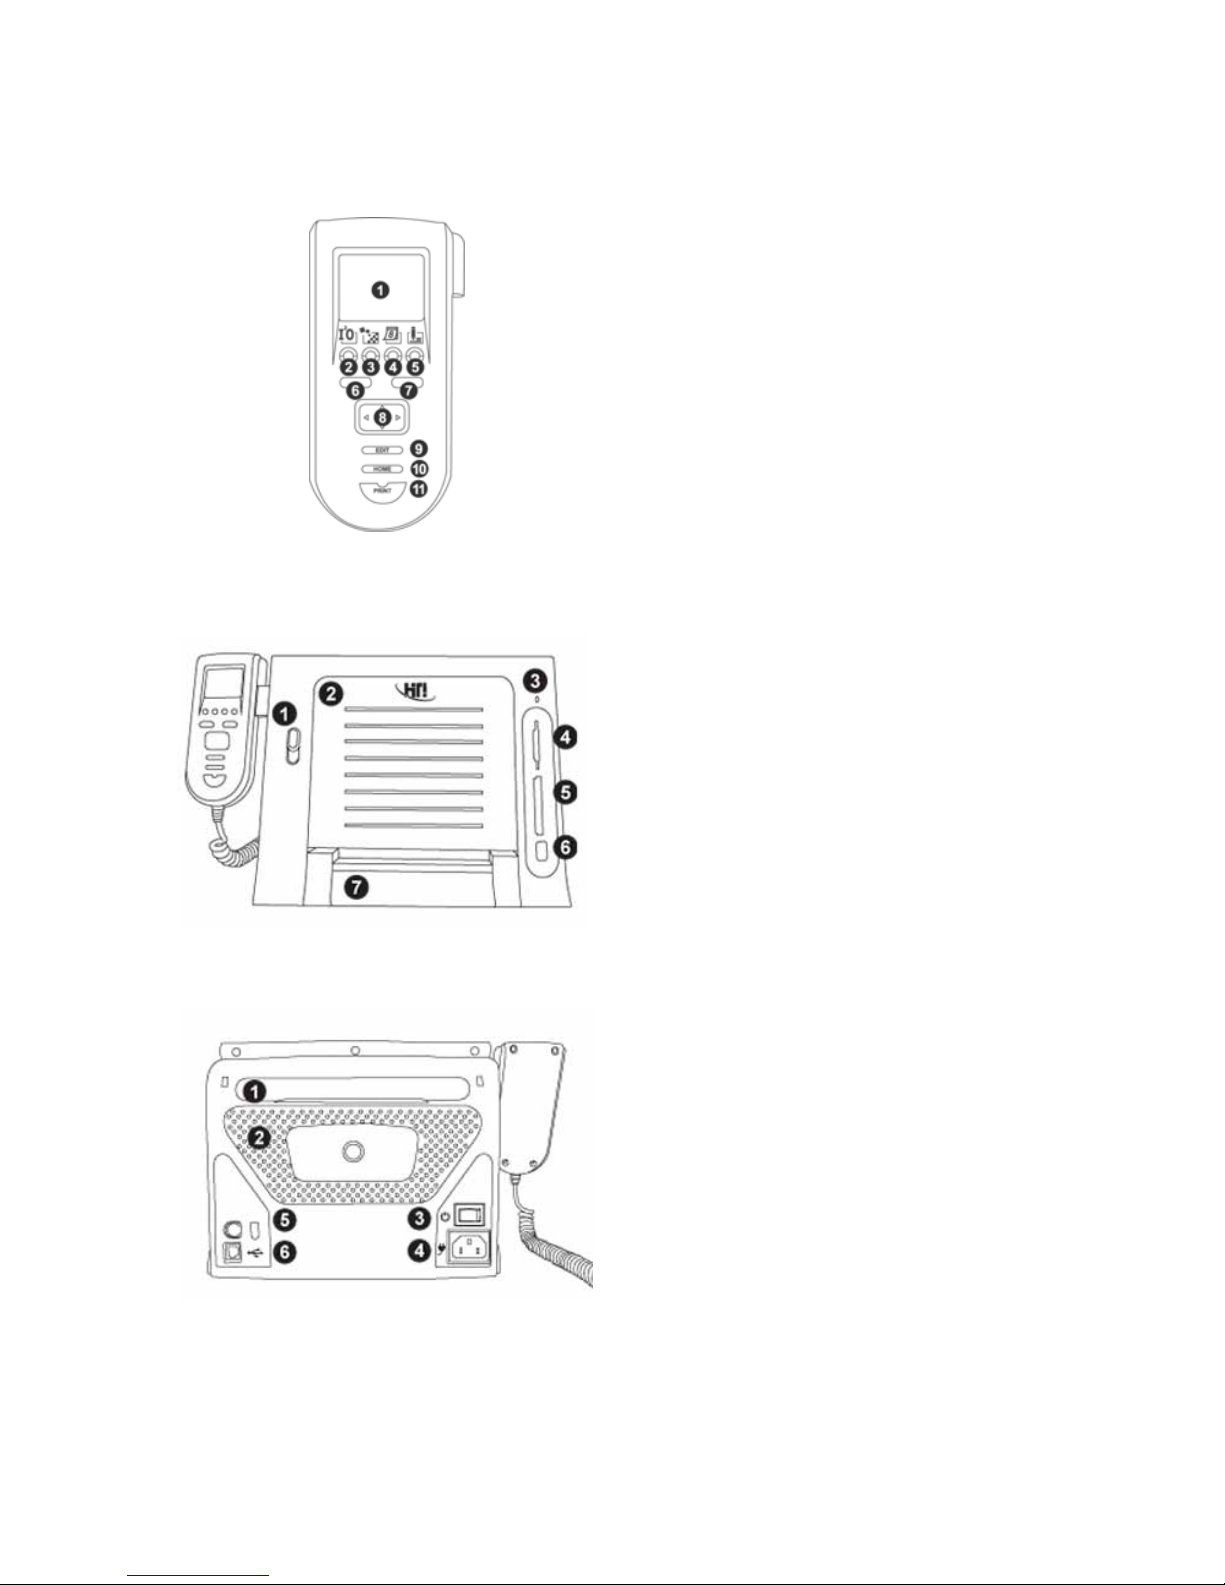
Get To Know HiTi Photo Printer
To ensure proper printer operation, please read the following instructions thoroughly before using the photo printer.
LCD controller
1. LCD panel
2. I2O ON/OFF
3. Matte ON/OFF
4. Date Print ON/OFF
5. Signature ON/OFF
6. [ESC]
7. [OK]
8. Directional button
9. [EDIT]
10. [HOME]
11. [PRINT]
Front
1. Ribbon Door Button
2. Ribbon Door
3. Indicator
4. MMC/SD/SM/MS Memory Card Slot
5. CF I/CF II Memory Card Slot
6. USB Host Slot
7. Paper Cassette Door
Rear
1. Hatchback
2. Heat Ventilation
3. Power Switch
4. Power Cord Socket
5. Controller Socket
6. USB Port
Page 6
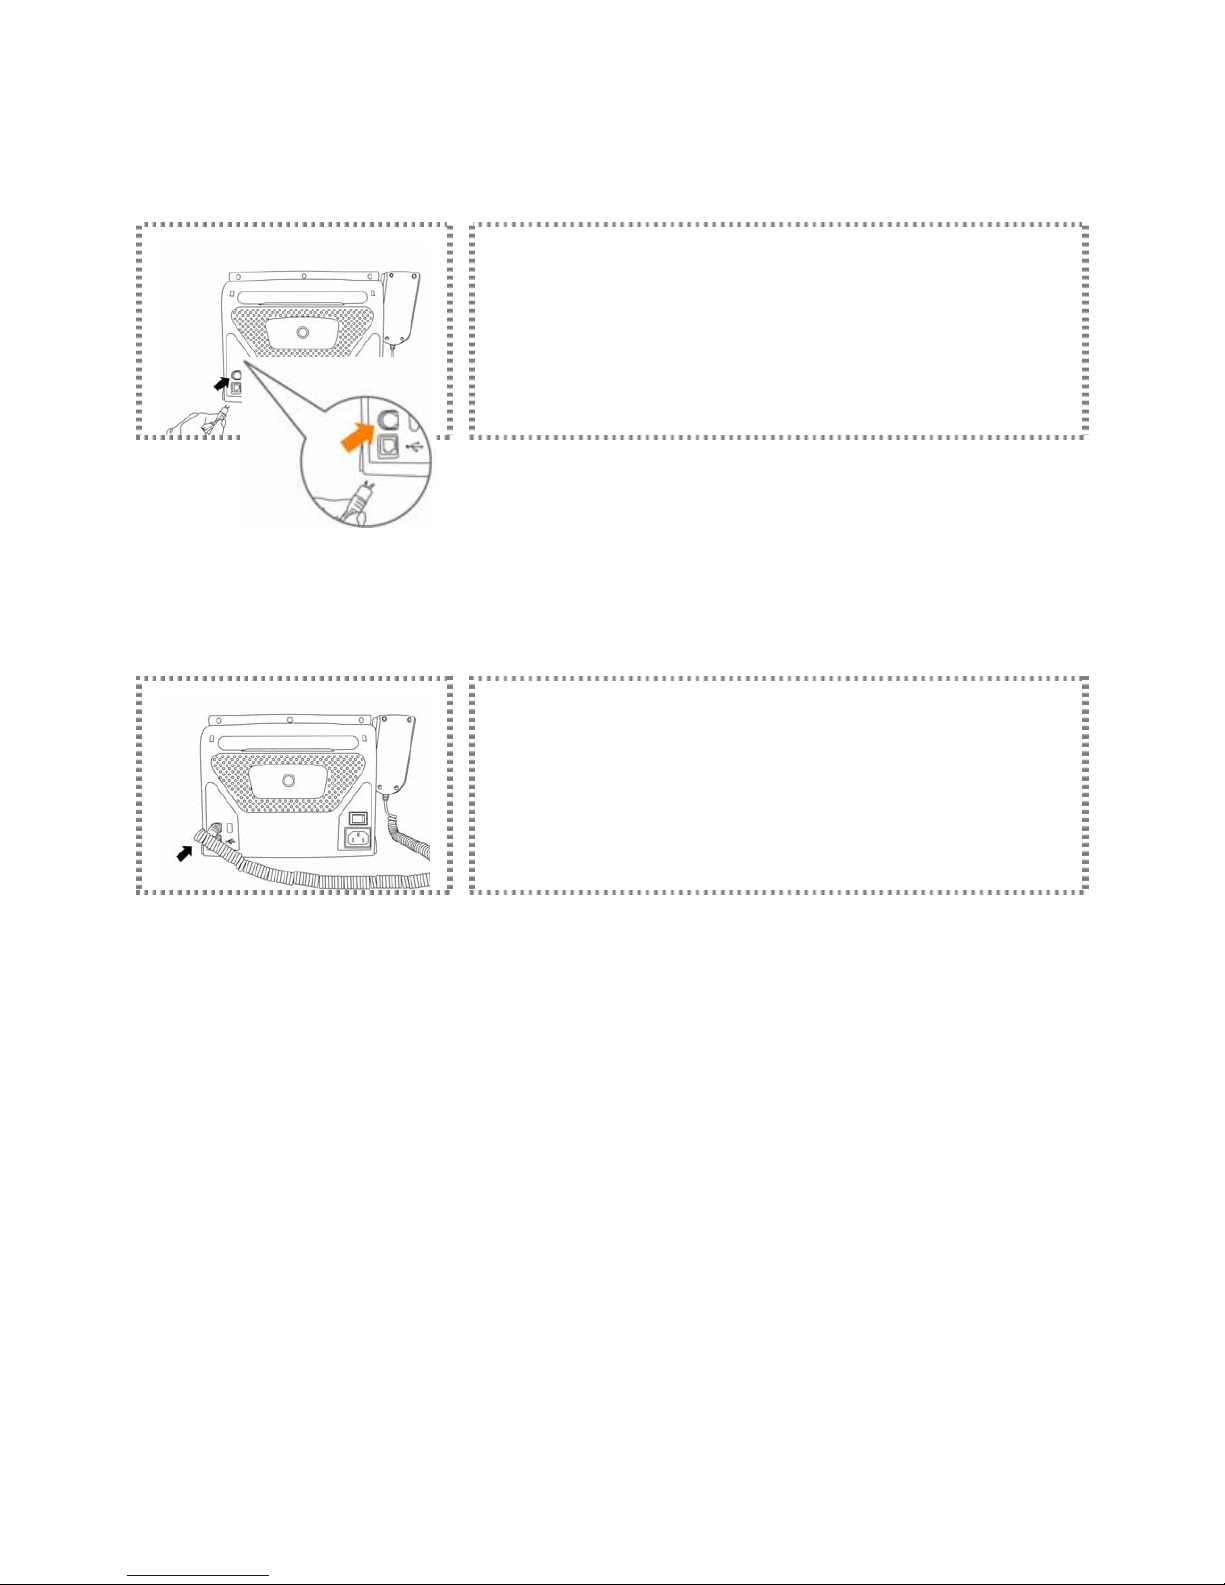
Installing Your HiTi Photo Printer
Please follow the instructions below to install your photo printer.
Installing the LCD controller
Connect the LCD controller to the photo printer
* Please connect the controller to the printer by matching the shapes of the connector to the socket
before insertion.
LCD controller installation is complete.
Page 7
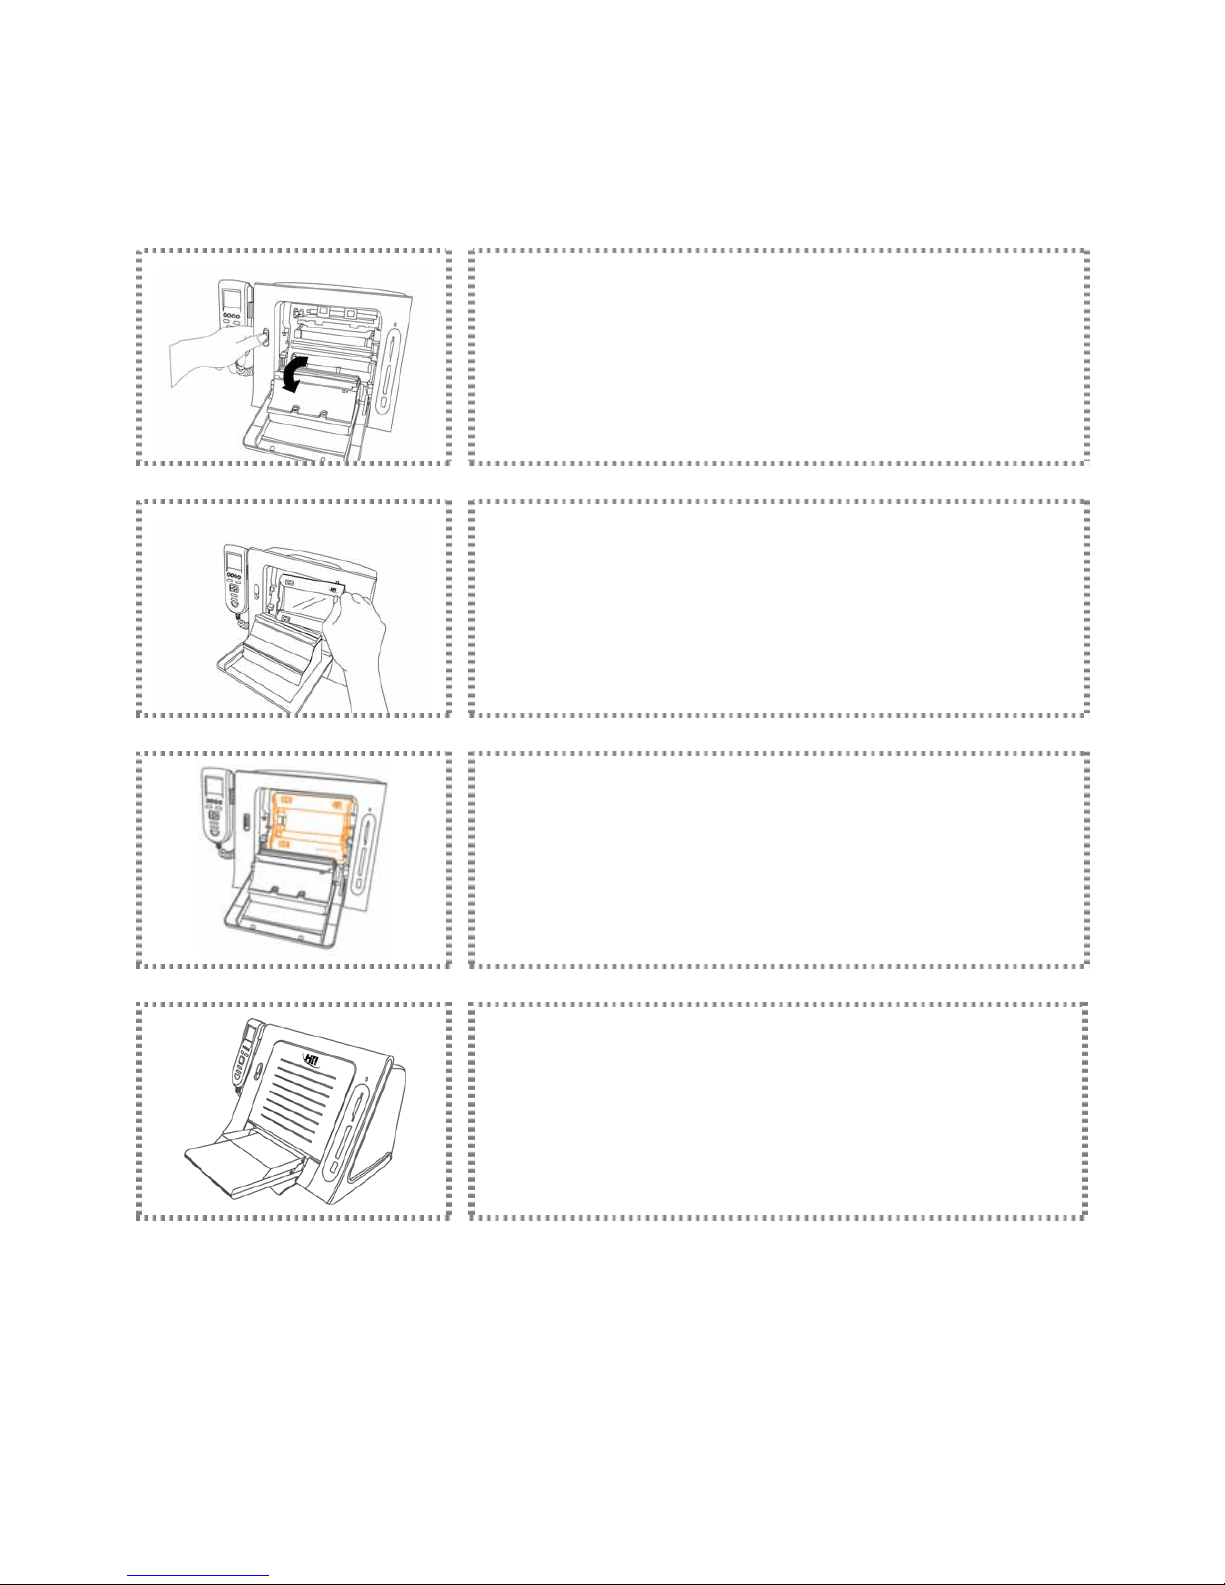
Installing Your HiTi Photo Printer
Please follow the instructions below to install your photo printer.
Installing ribbon cartridge: For more information about ribbon cartridge installation, please refer to the
instruction marked outside the packing for detail.
Push the ribbon door button to open the ribbon door.
Install the ribbon cartridge inserting the left (indicated by the arrow) side of the
ribbon first followed by the right side.
The ribbon has to be installed in the printer properly.
Close the ribbon door to complete the ribbon installation.
Page 8
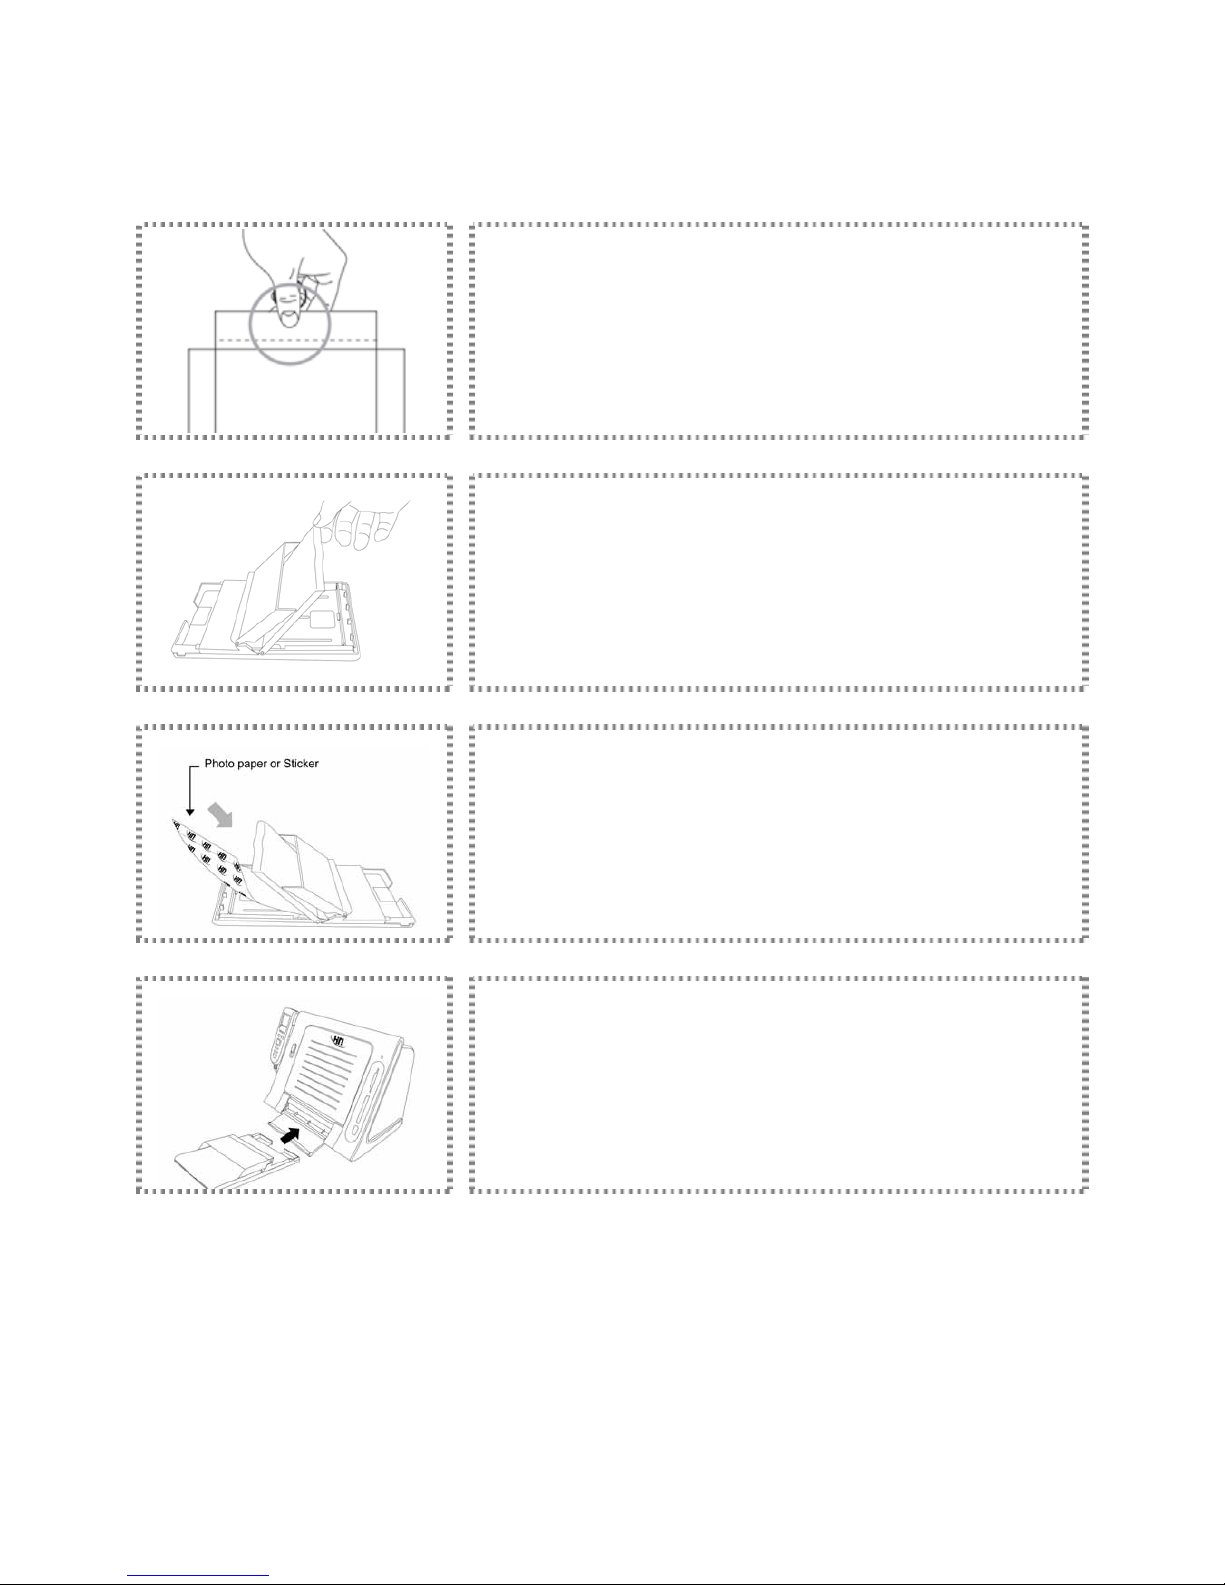
Installing Your HiTi Photo Printer
Please follow the instructions below to install your photo printer.
Loading dedicated photo papers
Follow the demonstration to correctly remove photo papers from the packaging.
Open the paper cassette cover.
Load photo papers into the paper cassette and then close the cover.
Open the paper cassette door on the printer and insert the paper cassette.
► For information on the other compatible consumable products, please refer to the Optional Consumables and
Accessories for detail.
► Please hold the side of photo paper and avoid touching the surface when taking them out from the packing.
Page 9
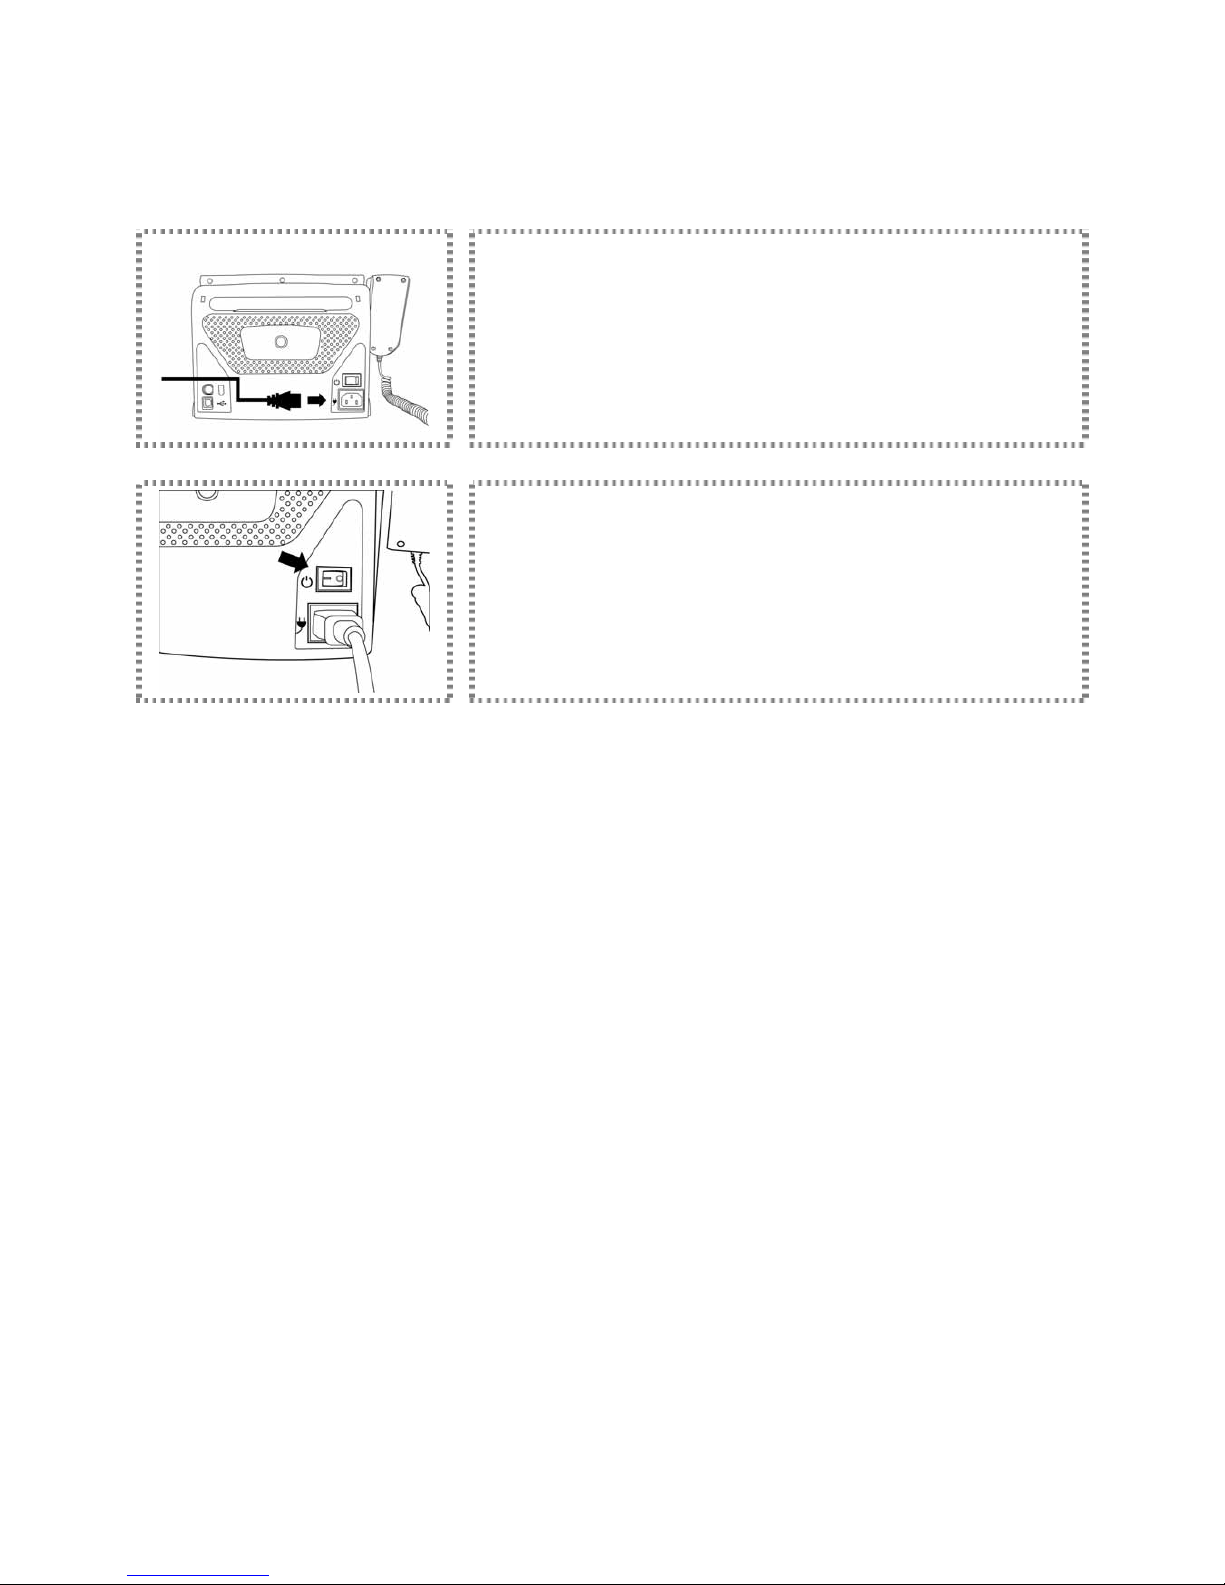
Installing Your HiTi Photo Printer
Please follow the instructions below to install your photo printer.
Powering up the printer
Plug the power cord into the power cord socket at the back of the printer.
Turn on the power.
Page 10
Functional Instruction
This instruction will help you to comprehend the photo printer.
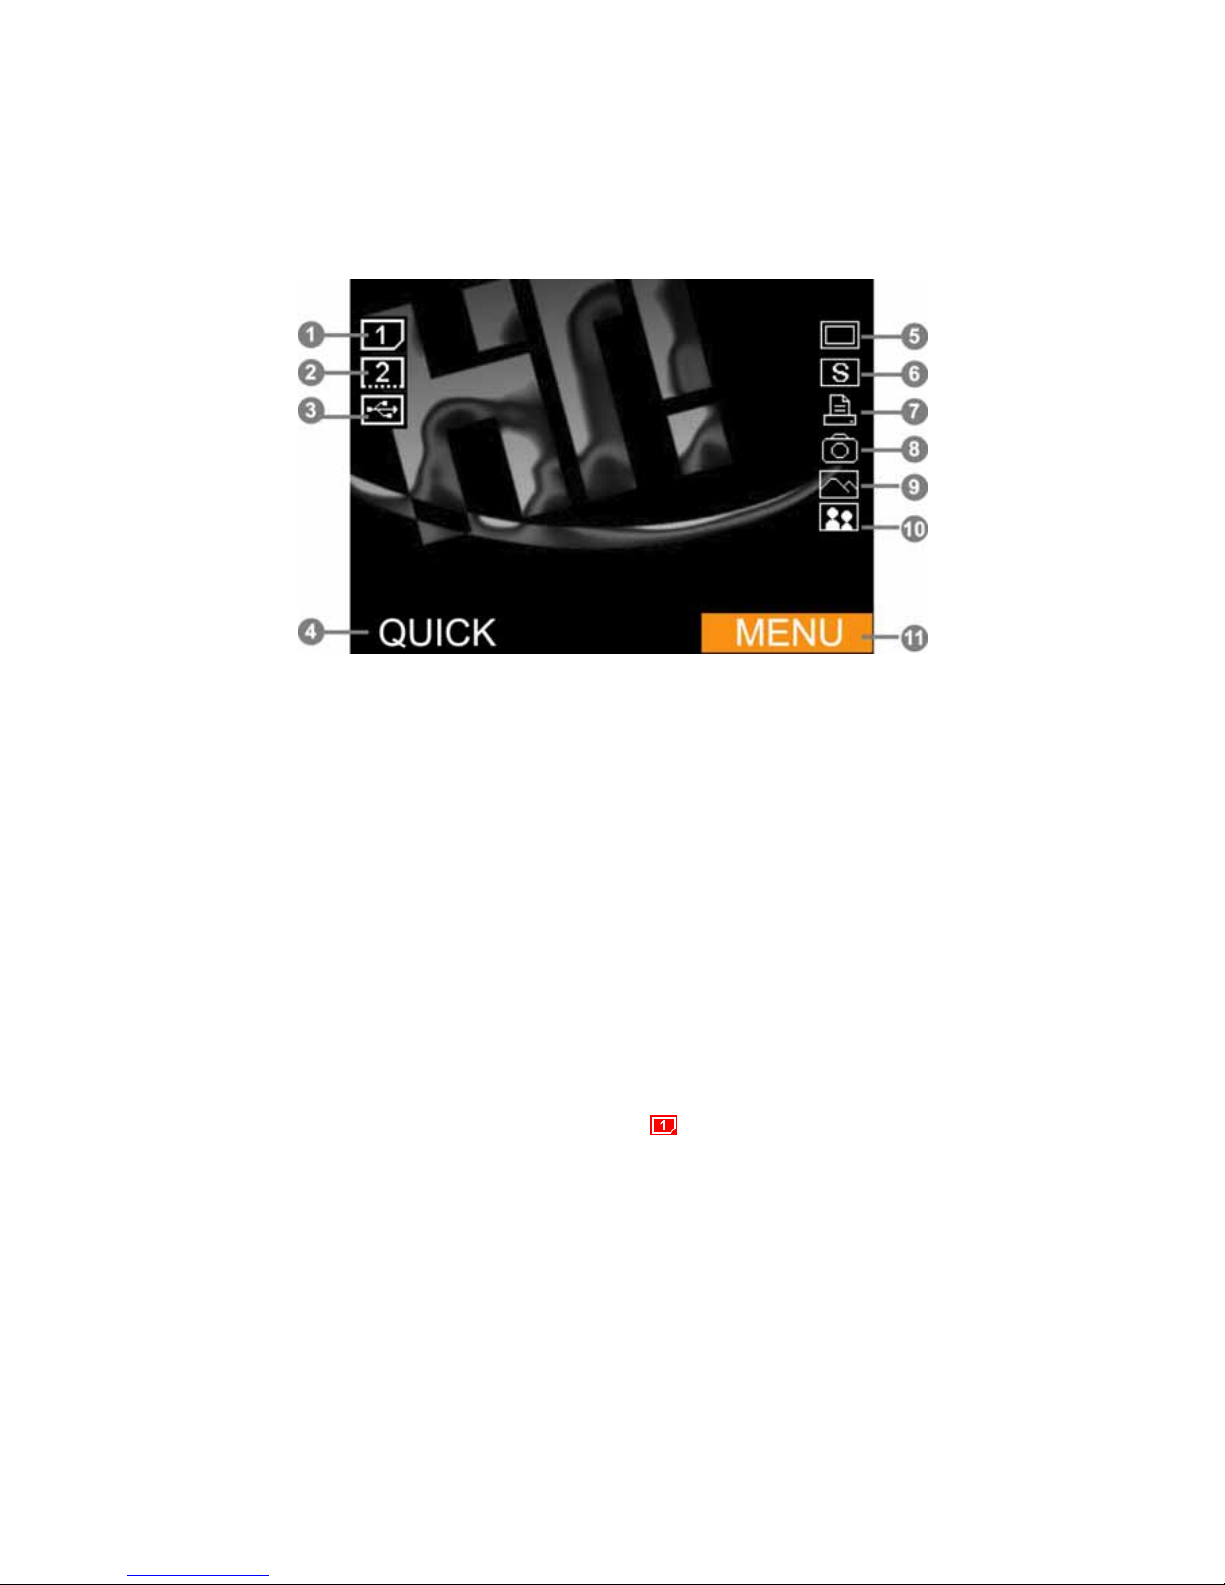
Home Menu Introduction
①
Image source from SD/SM/MMC/MS/MS Pro memory card
②
Image source from CF I/CF II/Microdrive memory card
③
Image source from USB host slot
④
Quick Print
⑤
Border ON/OFF
⑥
Sepia ON/OFF
⑦
Printing control by HiTi photo printer
⑧
Printing control by DSC
⑨
Mode: ‘Landscape’
⑩
Mode: ‘Portrait’
⑪
Functional Menu
► The selected image source will be shown in red color as in (
)
► QUICK: Applying this function will directly bring you to the image preview screen, prompting you to select an image
and print.
Page 11
Functional Instruction
This instruction will help you to comprehend the photo printer.
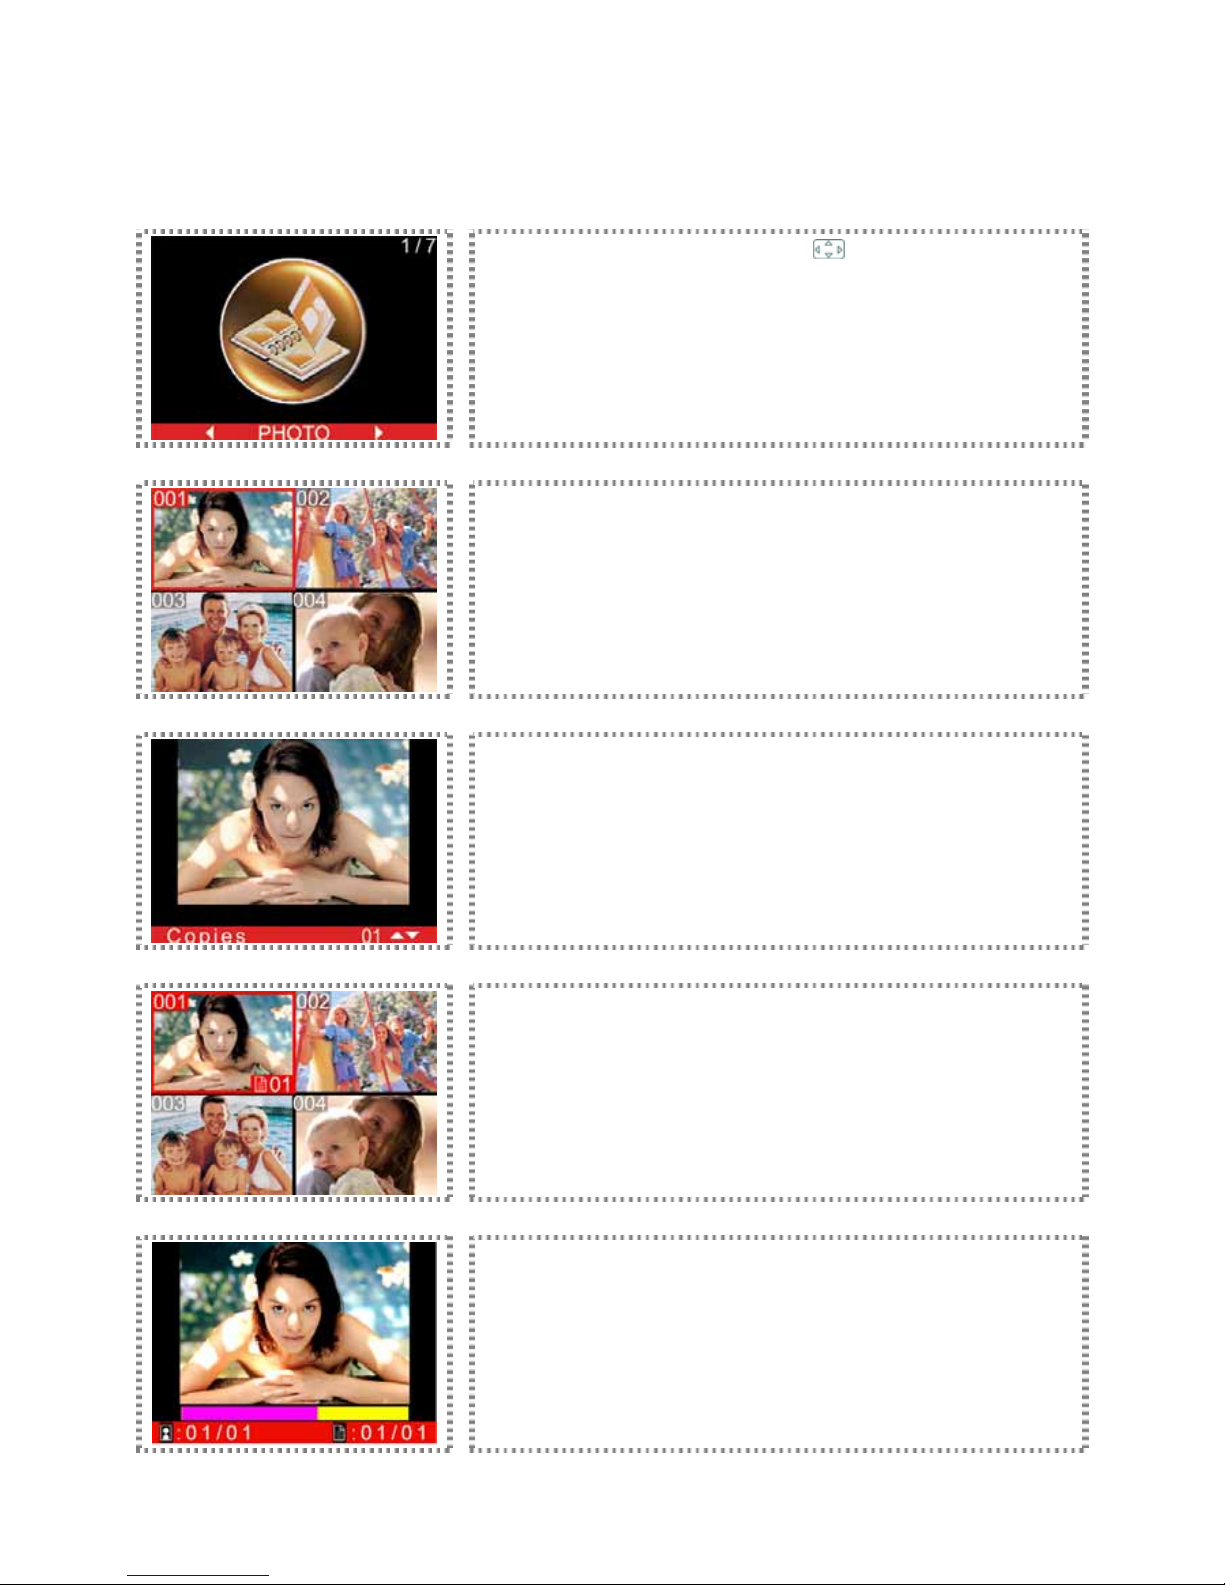
PHOTO
Enter MENU and use the directional button (
) to select PHOTO. Then,
press [OK] to continue.
Image preview screen: Select an image and press [OK] to continue or press
[EDIT] to use the advanced image editing functions.
After selecting the image, please press [OK] to process. Default value of
printing quantity is one copy. You can use the directional button to change the
quantity and then press [OK] to save the setting.
Press [PRINT] to begin the printing process.
The photo printer is processing your digital images.
► For more information regarding to the imaging processing, please refer to Advanced image editing.
Page 12
Functional Instruction
This instruction will help you to comprehend the photo printer.
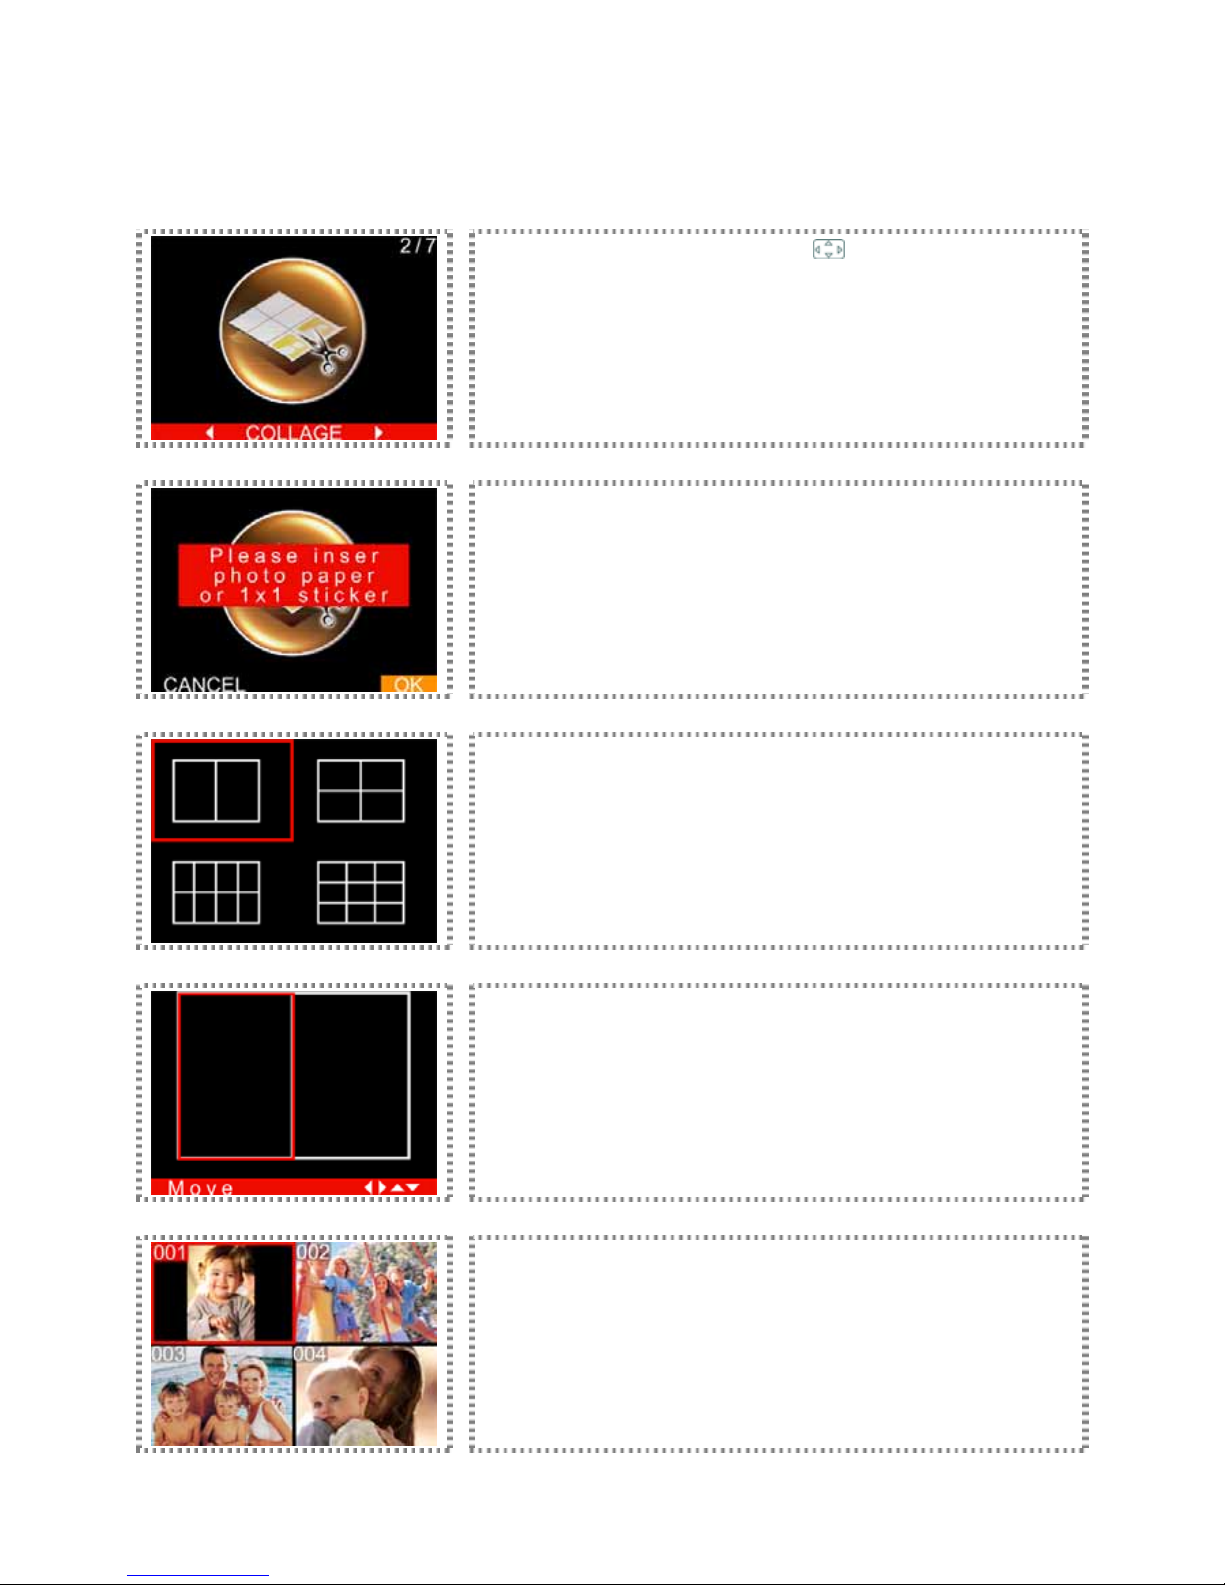
COLLAGE
Enter MENU and use the directional button (
) to select COLLAGE. Then,
press [OK] to continue.
The photo printer will remind you that the COLLAGE function is applicable on
photo paper or 1 x 1 sticker only. Please press [OK] to continue.
Select a collage format and press [OK] to continue.
Select a column for loading the image and press [OK] to continue.
Select an image and press [OK] to continue to the advanced image editing.
Page 13
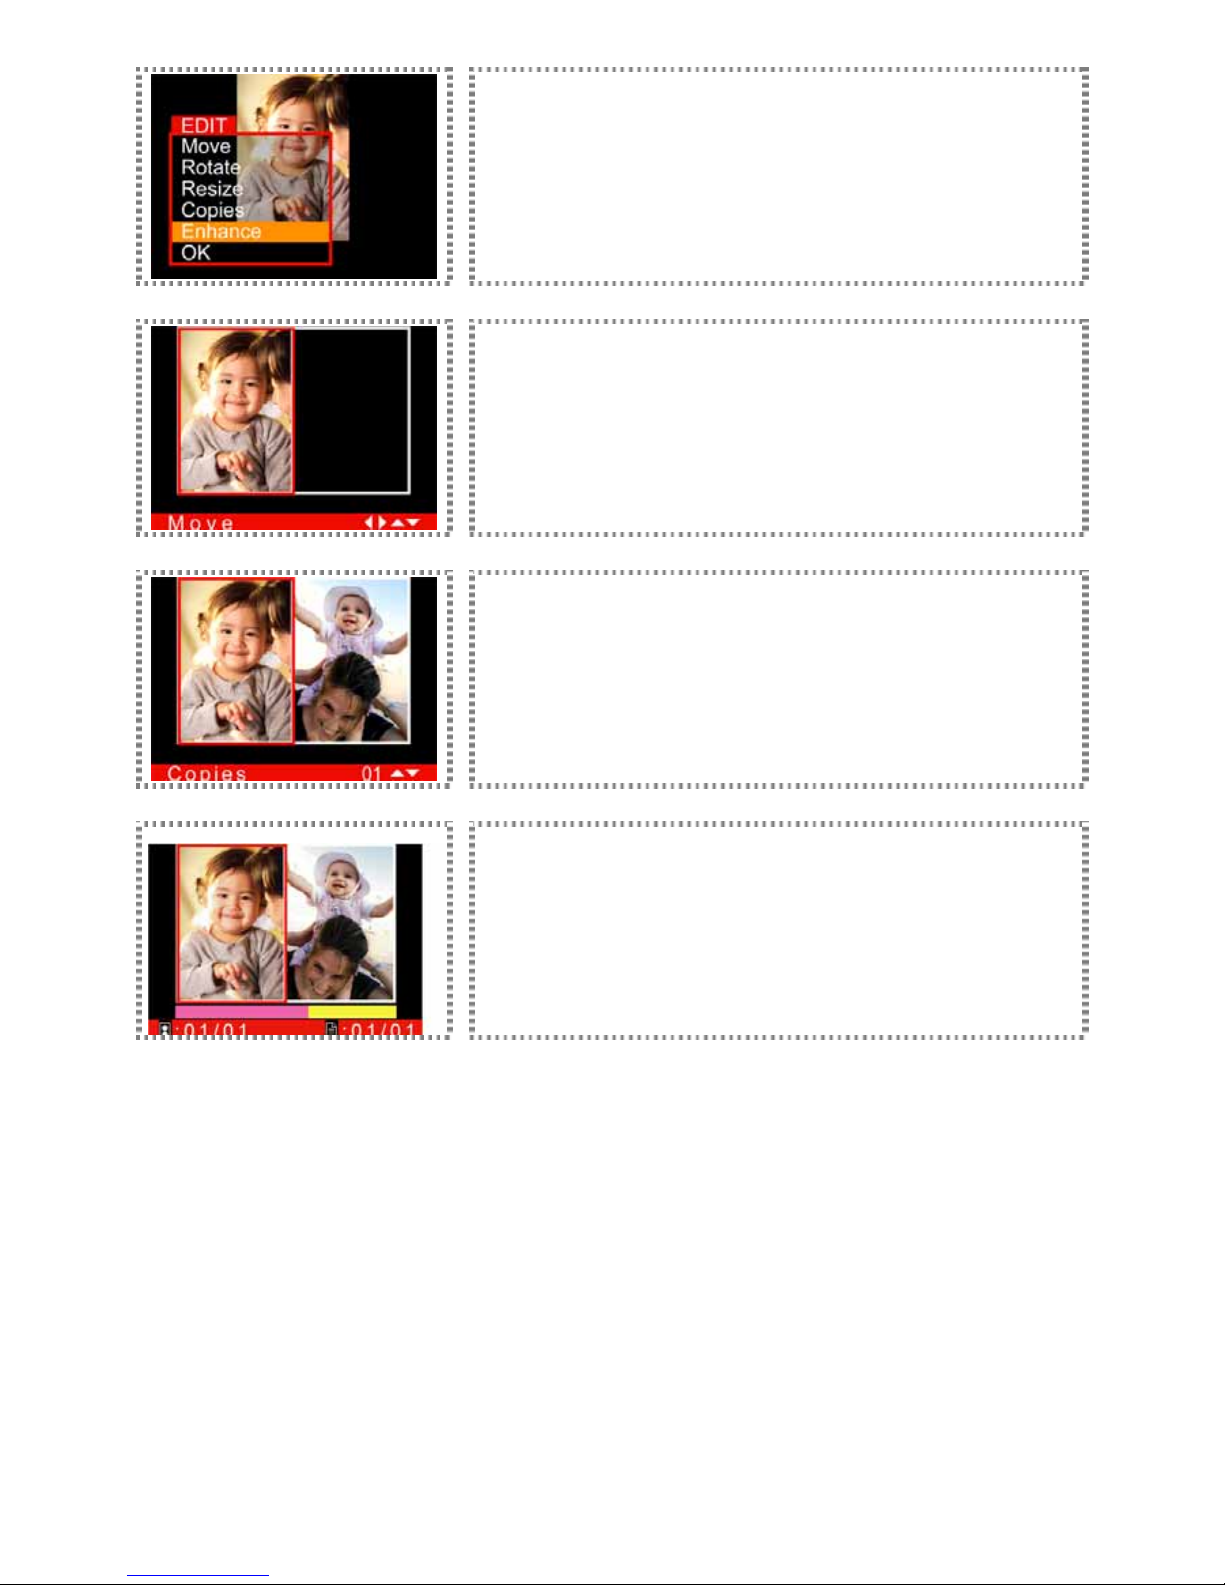
As to the image processing, please refer to Special Function for detail.
After image editing is complete, the image will be loaded into the column
previously selected.
Repeat the above steps until all columns are loaded with images. After all
columns are loaded with images, you can use the directional button to change
the quantity of the printout. Meanwhile, the printing indicator will regularly flash
blue, meaning the printer is ready to print.
The photo printer is processing your digital images.
► Collage printing can be applied only on the photo paper or 1 x 1 sticker exclusively provided by Hi-Touch Imaging
Technologies.
► If you would like to re-load the image, please use directional button to choose the replacement image and press [OK]
for re-loading.
► While loading images, you can use the directional button to decide the types of image loading: cell by cell, load to
column, or load to all.
Page 14
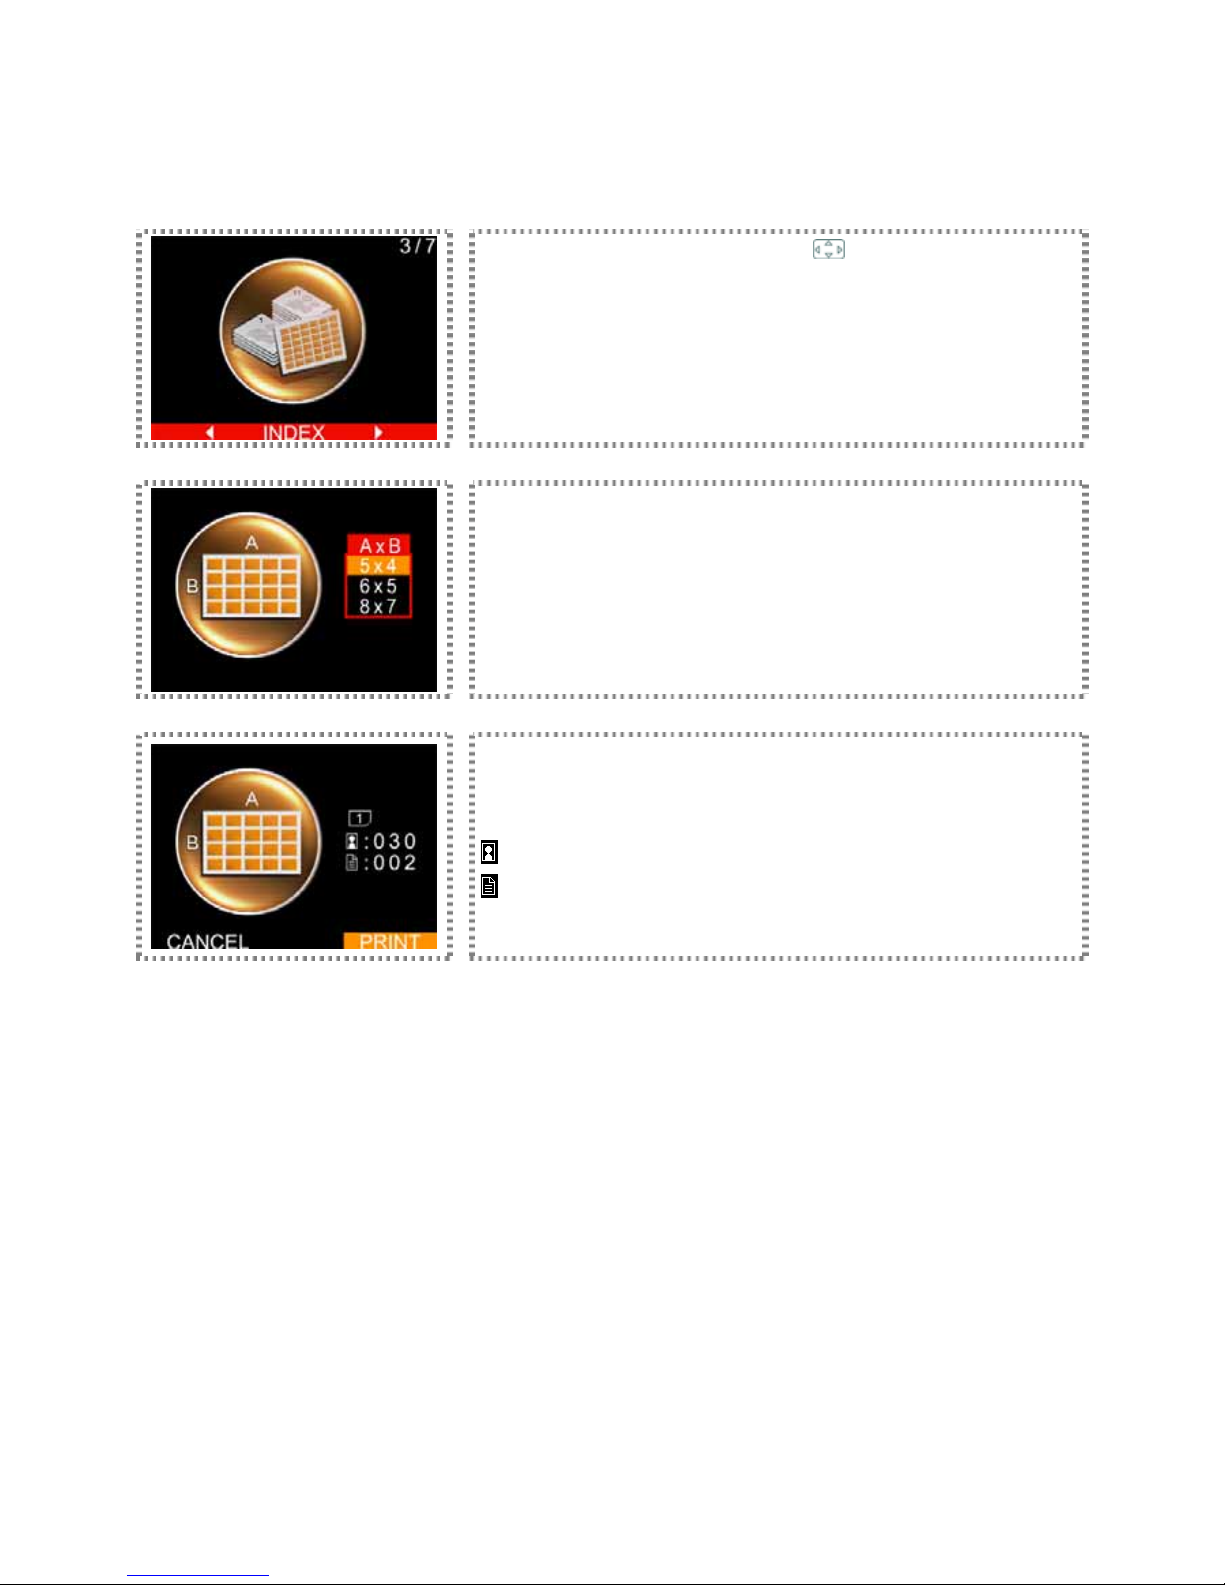
Functional Instruction
This instruction will help you to comprehend the photo printer.
INDEX
Enter MENU and use the directional button (
) to select INDEX. Then, press
[OK] to continue.
Select an index format and press [OK] to continue.
5 x 4: It means that 5 images will be placed in the column A, and 4 images will
be placed in the row B. A total of 20 images can be placed in this index.
The printer will capture all images from the selected image device and
automatically calculate the number of prints in light of the index format you
choose. Please press [PRINT] to start printing.
:Images
:Copies
► All digital images can be printed in sequence from the image device you set to be used.
► The index printing sequence on the photo printer may be different from it of your digital camera.
Page 15
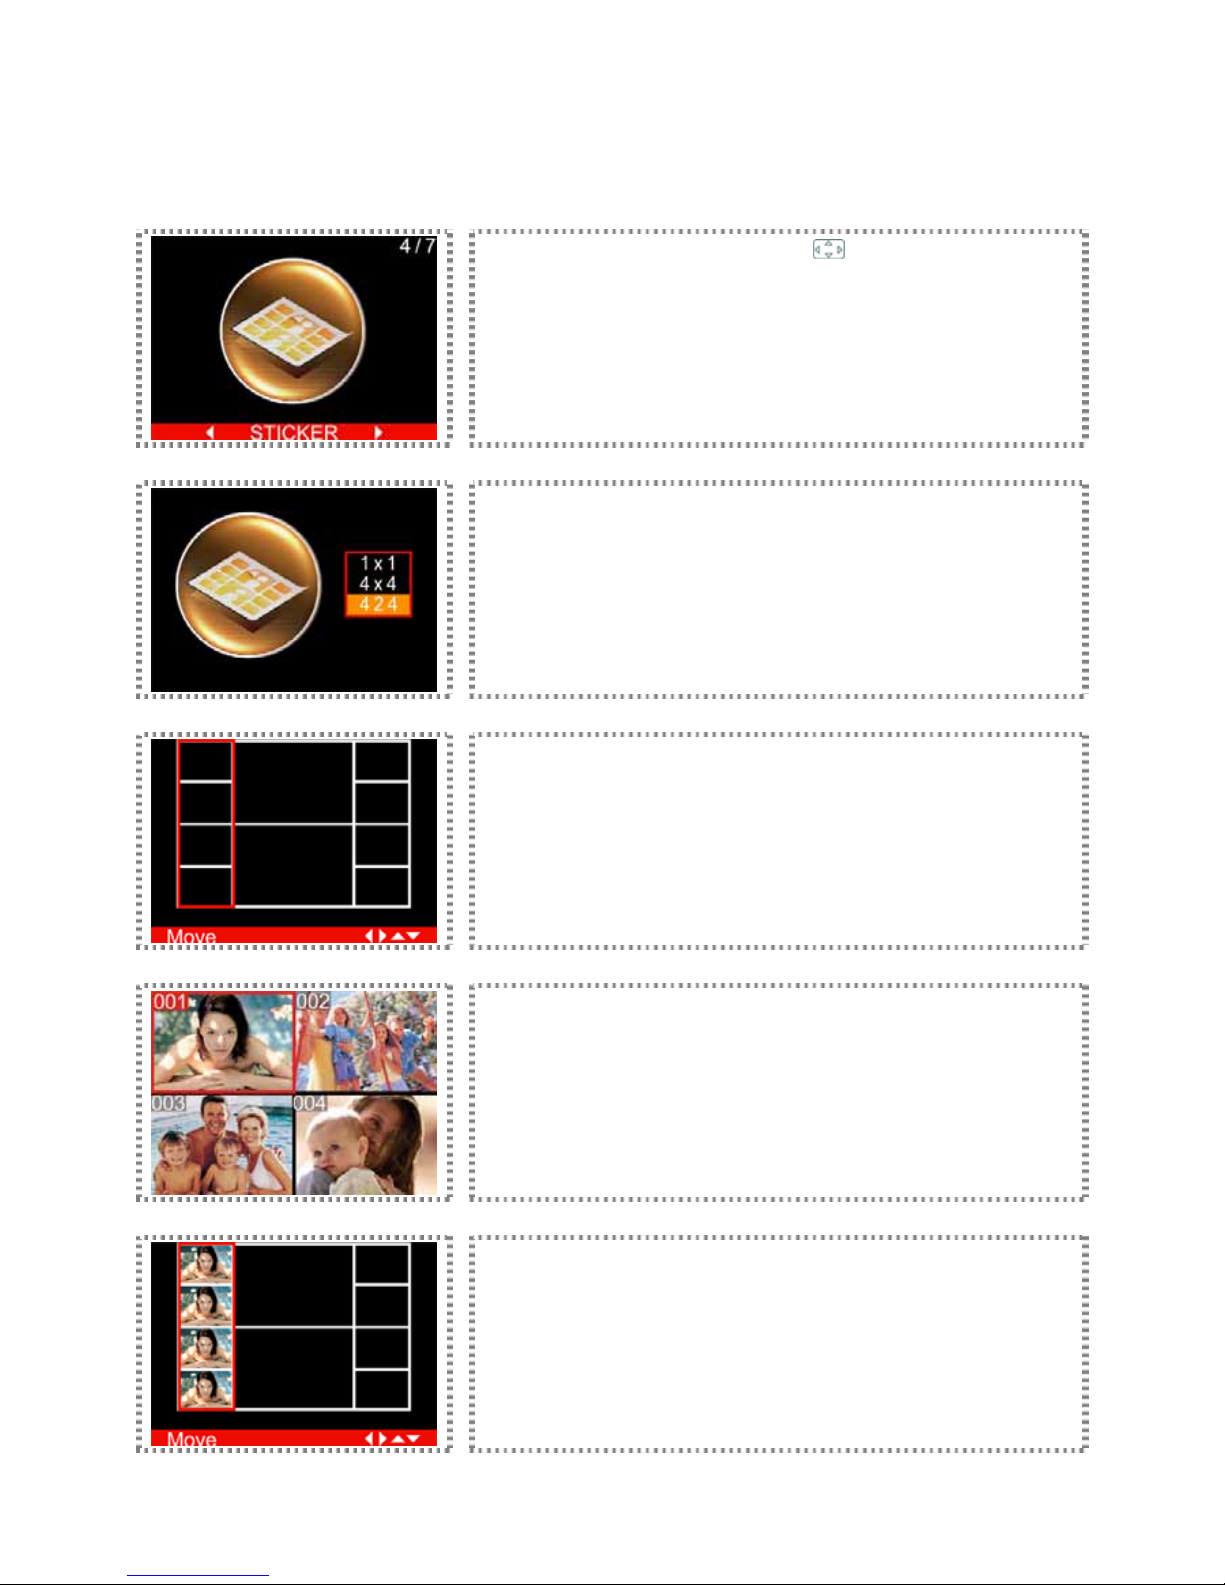
Functional Instruction
This instruction will help you to comprehend the photo printer.
STICKER
Enter MENU and use the directional button (
) to select STICKER. Then,
press [OK] to continue.
Select a sticker layout and press [OK] to continue.
Select a column for loading images and press [OK] to continue. You can use the
directional button to select different loading methods.
Select an image for loading and then press [OK] to continue to the advanced
image editing.
After all image editing activities are finished, previously selected images before
will be loaded into the column.
Page 16
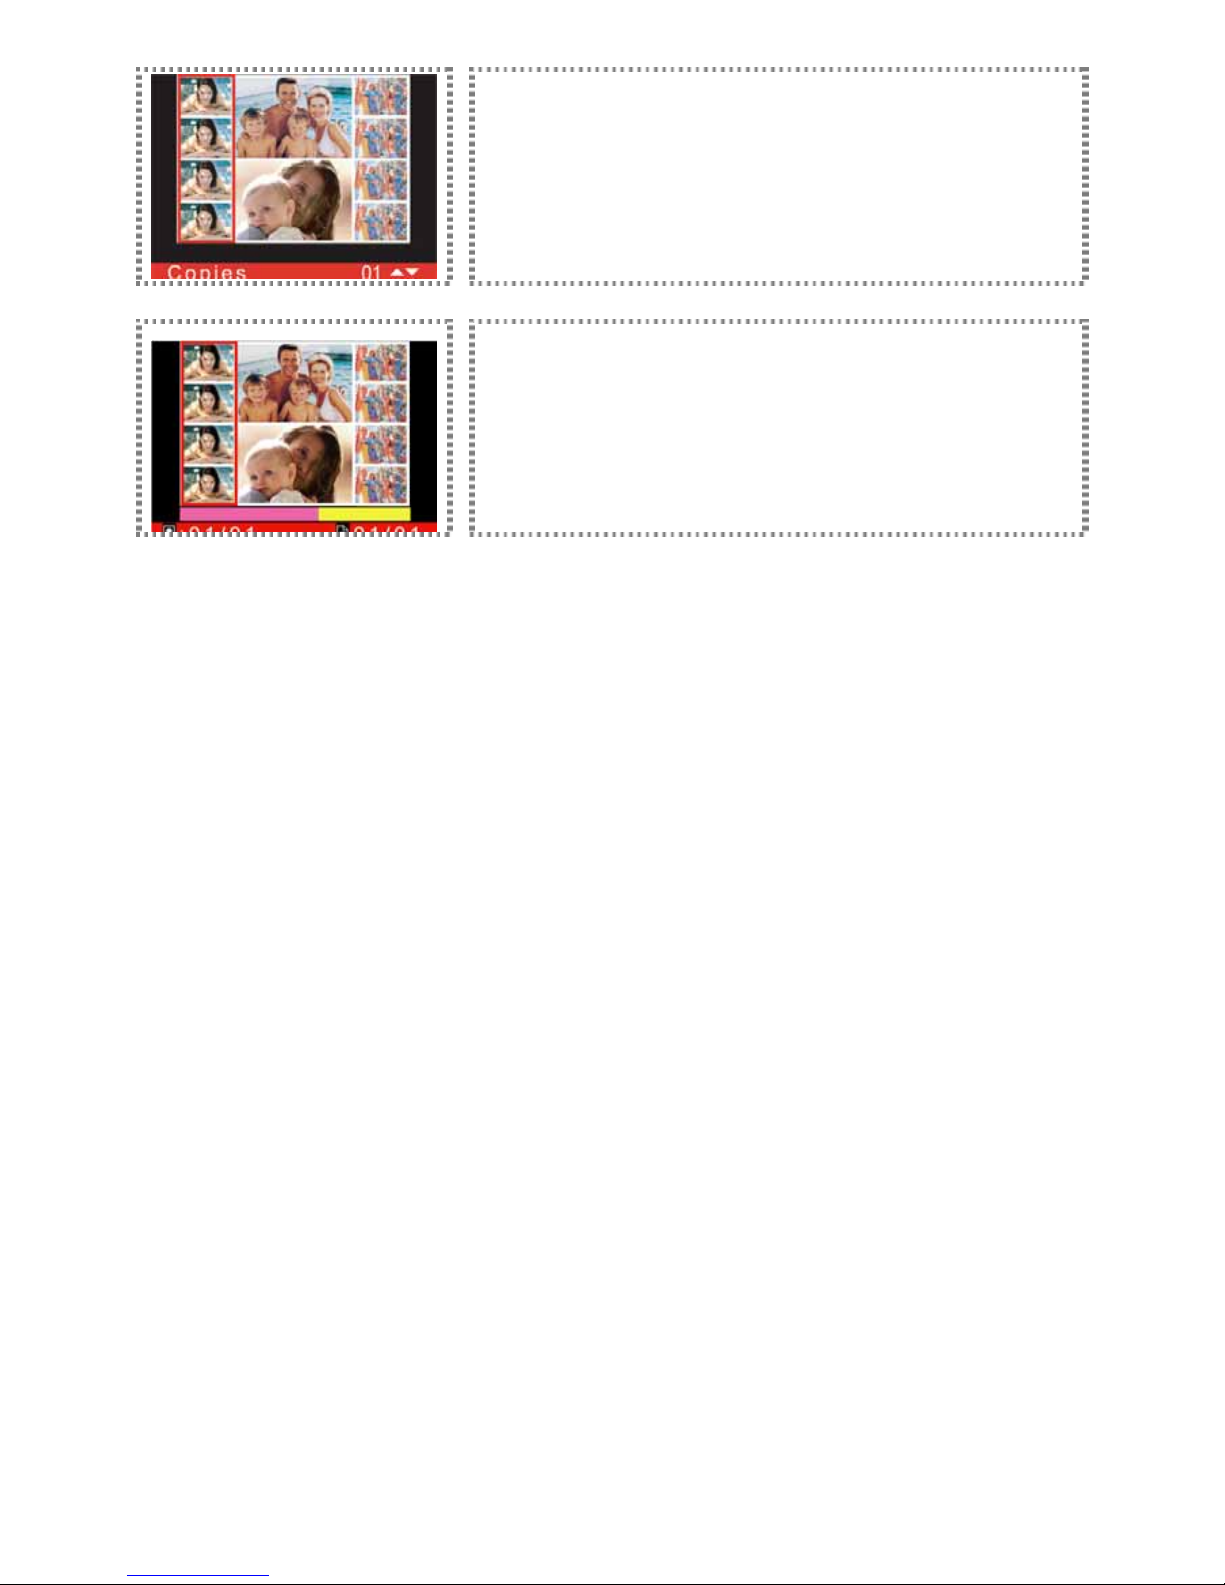
Repeat above steps until all columns are loaded with images. After all columns
are loaded with images, you can use the directional button to change the
quantity of the printout. Meanwhile, the printing indicator will regularly flash
blue, meaning the printer is ready to print.
The photo printer is processing your digital images.
► Three different types of stickers are provided by Hi-Touch Imaging Technologies: 1x1, 4/2/4, and 4x4 stickers.
► If you would like to re-load the image, please use directional button to choose the replacement image and press [OK]
for re-loading.
Page 17
Functional Instruction
This instruction will help you to comprehend the photo printer.
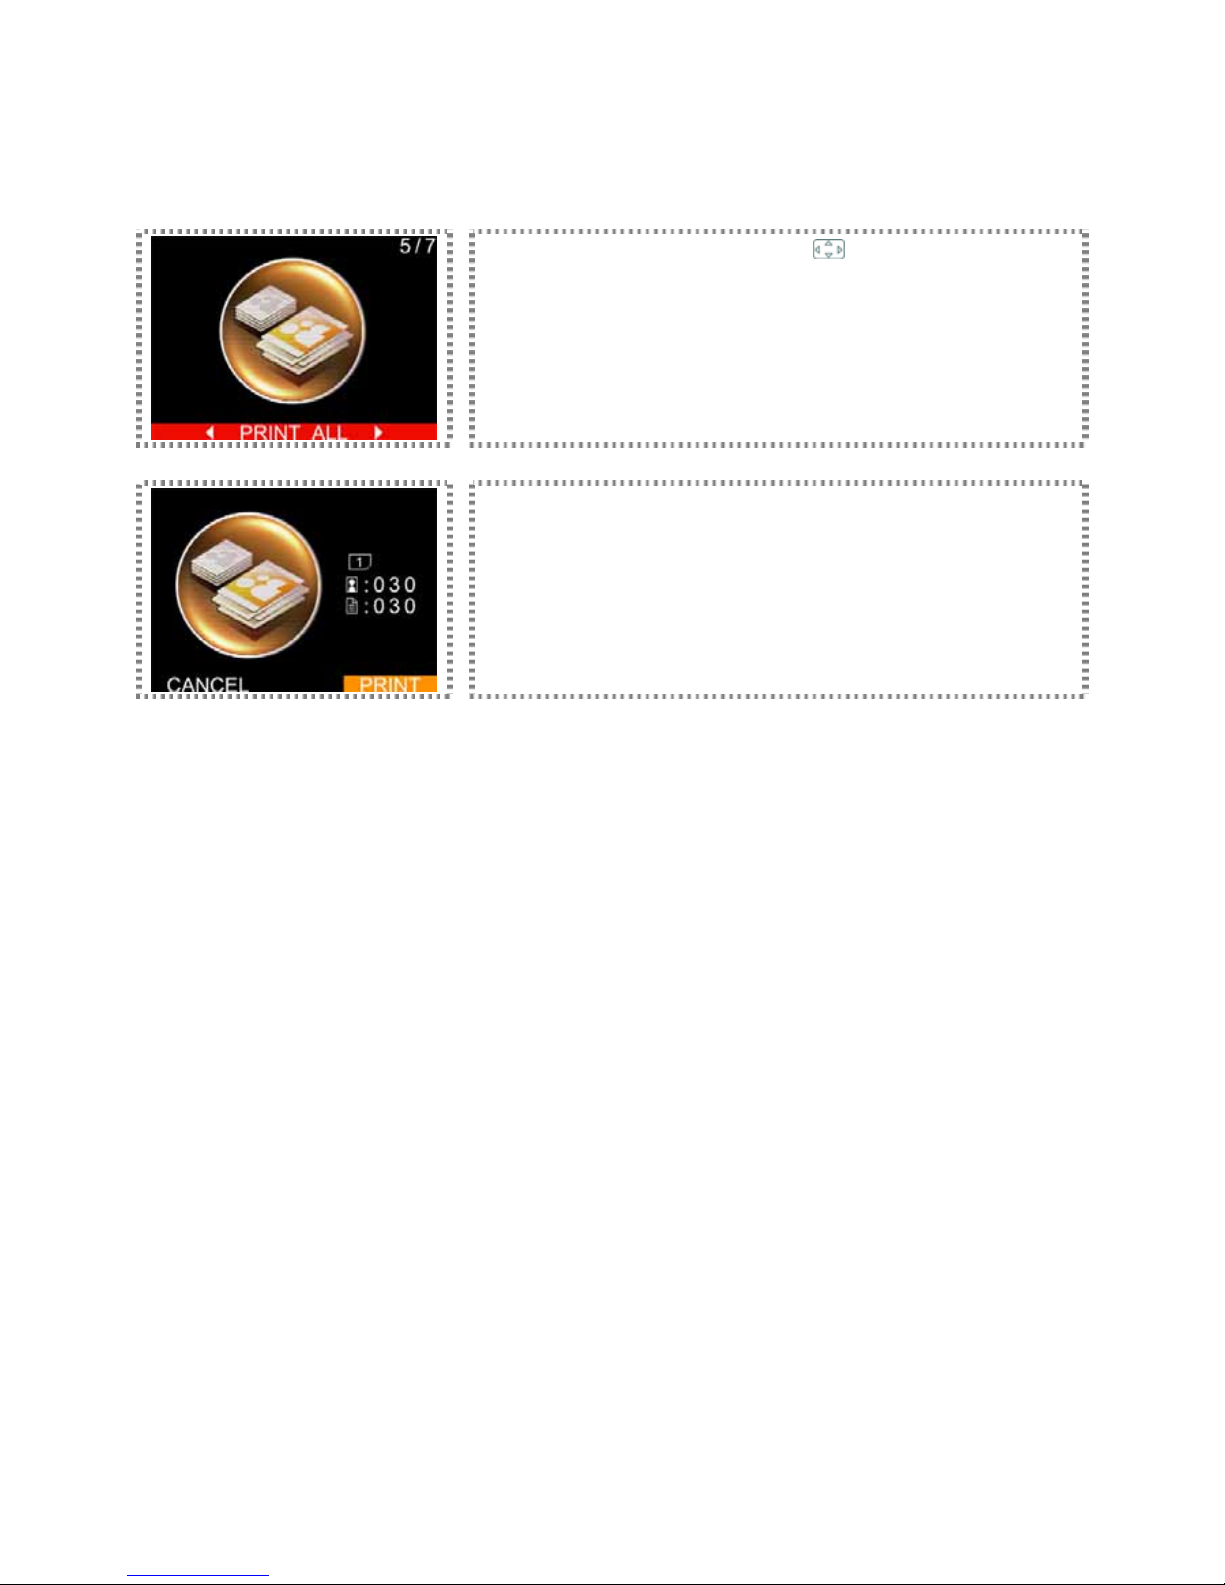
PRINT ALL
Enter MENU and use the directional button (
) to select PRINT ALL. Then,
press [OK] to continue.
The photo printer will read all images from the image device you choose. Now
you can press [PRINT] to start printing.
Page 18
Functional Instruction
This instruction will help you to comprehend the photo printer.
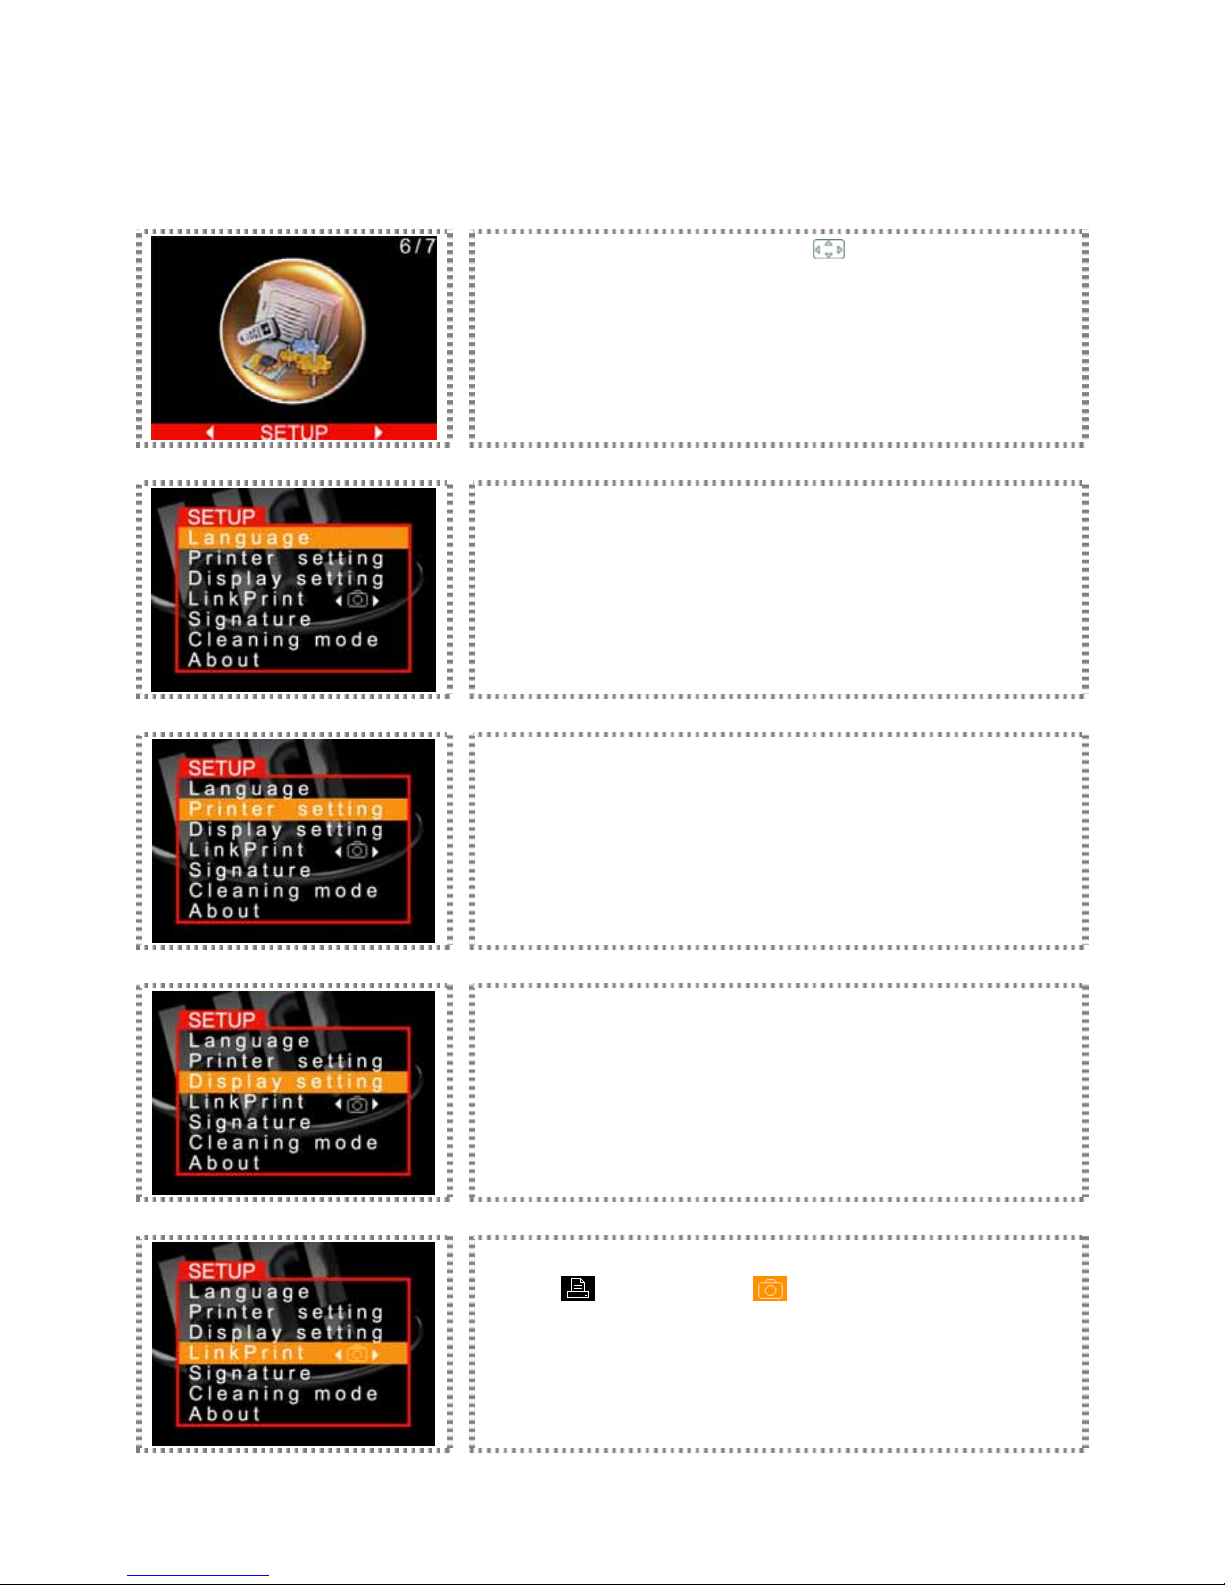
SETUP
Enter MENU and use the directional button (
) to select SETUP. Then, press
[OK] to continue.
Language: Please refer to Language from the Special Function.
Printer setting: Please refer to Print position, Color setting, Advanced image
editing, Border, and Sepia from the Special Function.
Display setting: Please refer to LCD adjustment and Wallpaper and Color
theme from the Special Function.
LinkPrint: HiTi S series photo printer supports printing from using the LCD
controller (
) or a digital camera ( ). Use the directional button to set
printing control by LCD controller or by digital camera.
Page 19
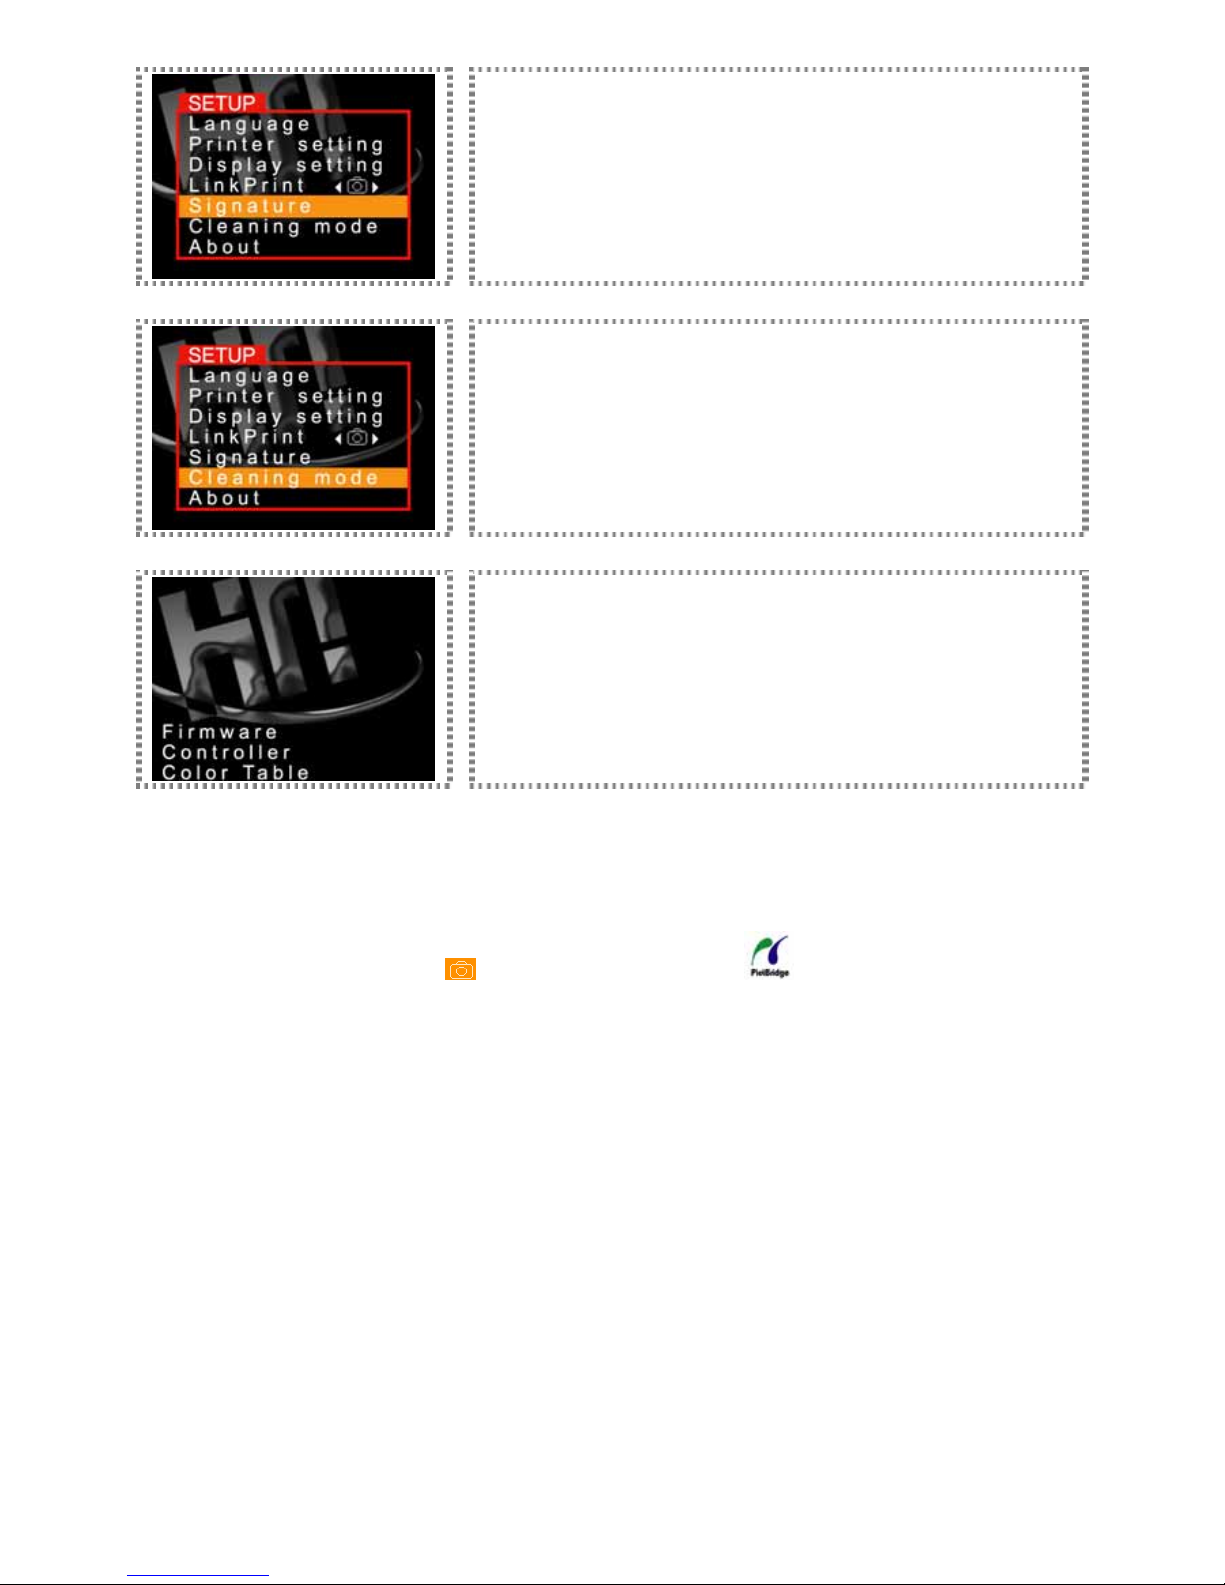
Signature: Please refer to Signature from the Special Function.
Cleaning mode: Please refer to Cleaning mode from the Special Function.
About: Firmware version, controller version, and version of the color table.
► If you would like to use a digital camera to print, be sure that your digital camera supports PictBridge. For more
information about PictBridge, please refer to your digital camera user manual.
► The meaning of printing control (
) by digital camera is the same as .
Page 20
Functional Instruction
This instruction will help you to comprehend the photo printer.
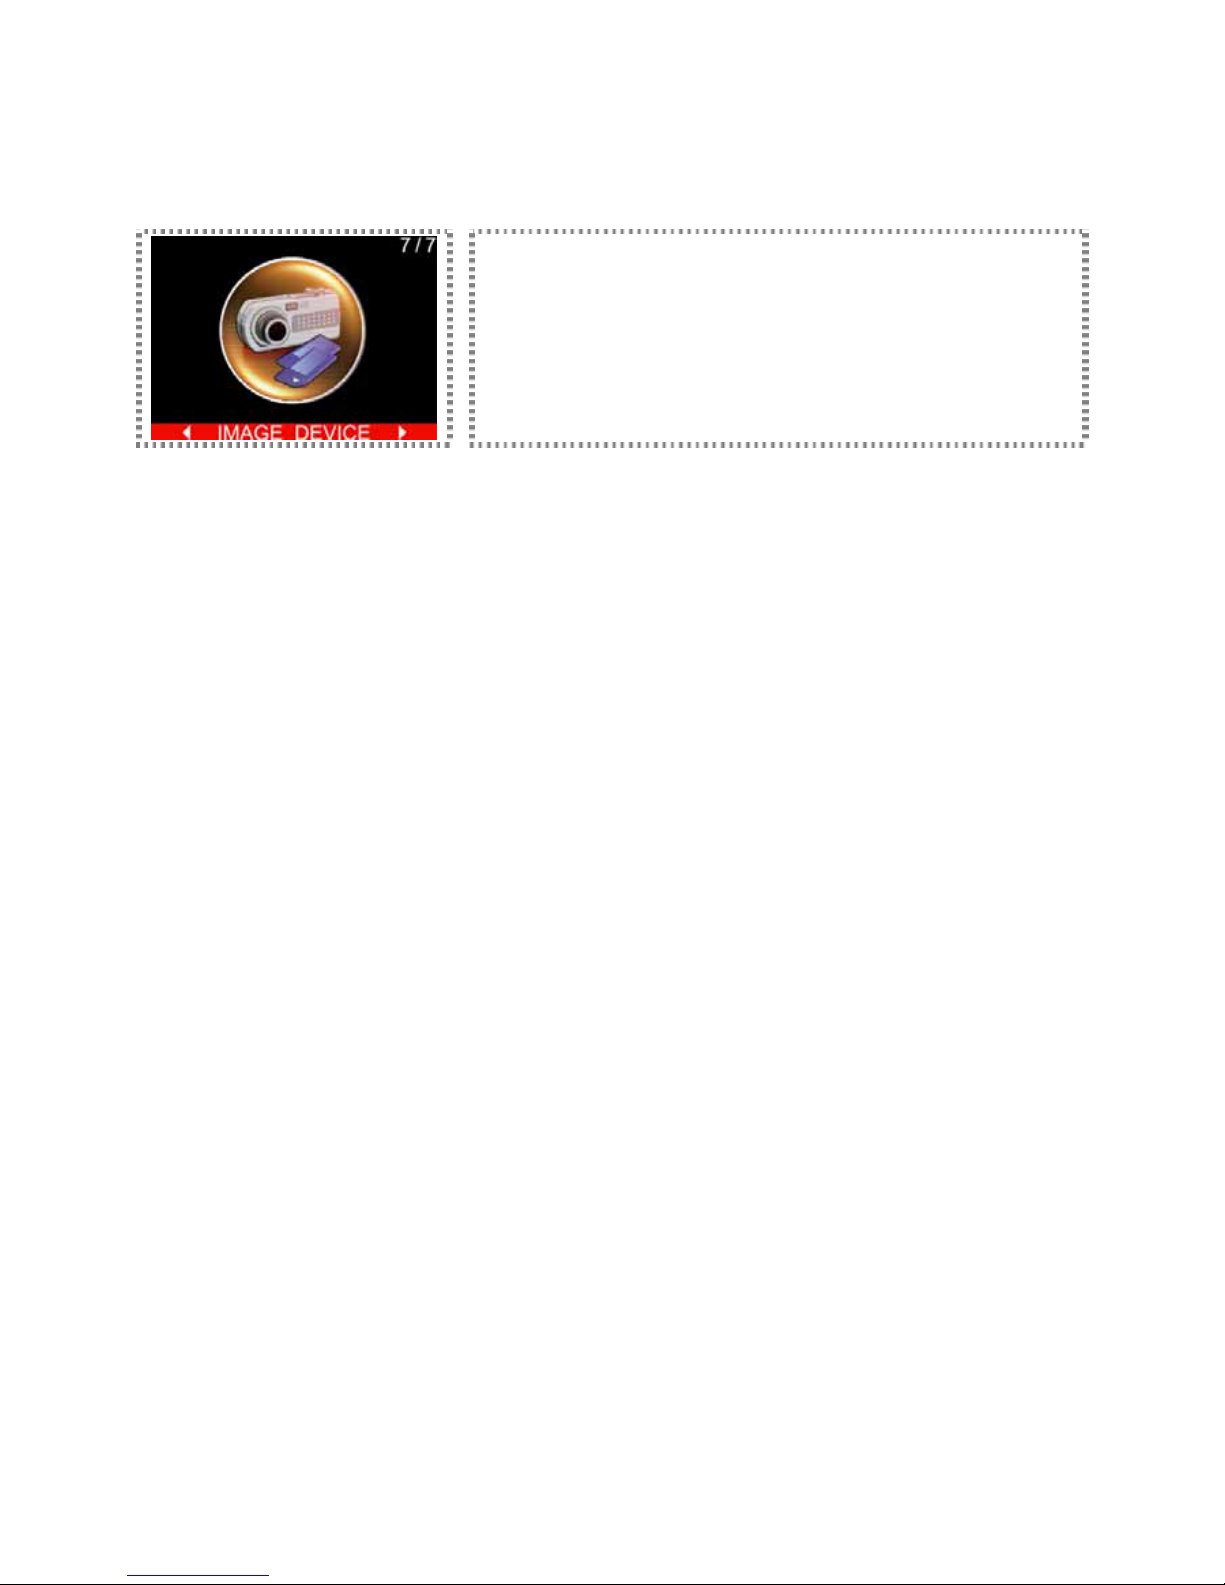
IMAGE DEVICE
Regarding the selection of image device, please refer to the IMAGE DEVICE
from the Special Function.
► When two memory cards are inserted to memory card slots at the same time, you can utilize this function to decide
which memory card slot will be used as the source of images.
Page 21
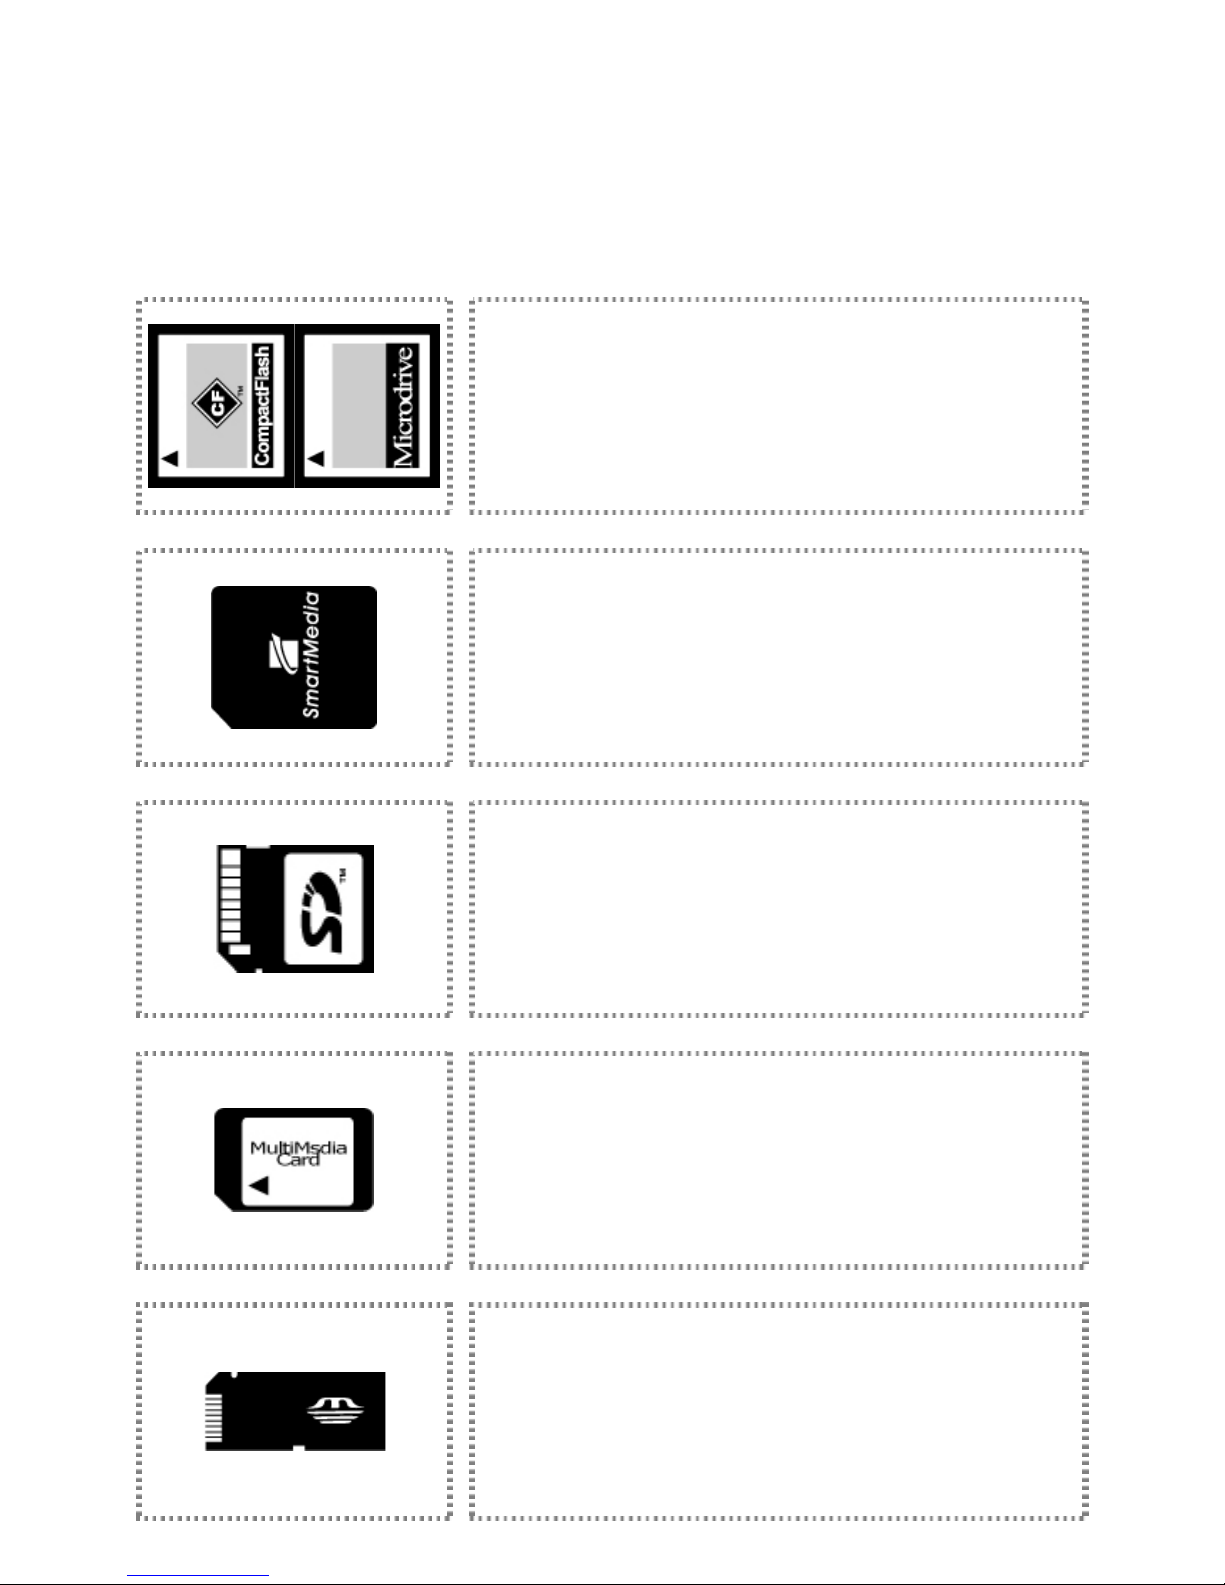
Printing Photos Without a PC
Standalone printing is only available on the HiTi S series photo printers. Before working on standalone printing, please know
the type of memory cards and the proper way to insert a memory card into the photo printer. The photo printer provides the
maximum flexibility and compatibility by supporting 8 different types of memory cards.
Distinguishing type of memory card
Compact Flash I / Compact Flash II / Microdrive memory card can be inserted
to the bottom memory card slot on the HiTi S series photo printer.
Smart Media memory card can be inserted to the top memory card slot on the
HiTi S series photo printer.
Secure Digital memory card can be inserted to the top memory card slot on
HiTi S series photo printer.
MMC memory card can be inserted to the top memory card slot on the HiTi S
series photo printer.
MS or MS Pro memory card can be inserted to the top memory card slot on
the HiTi S series photo printer.
Page 22
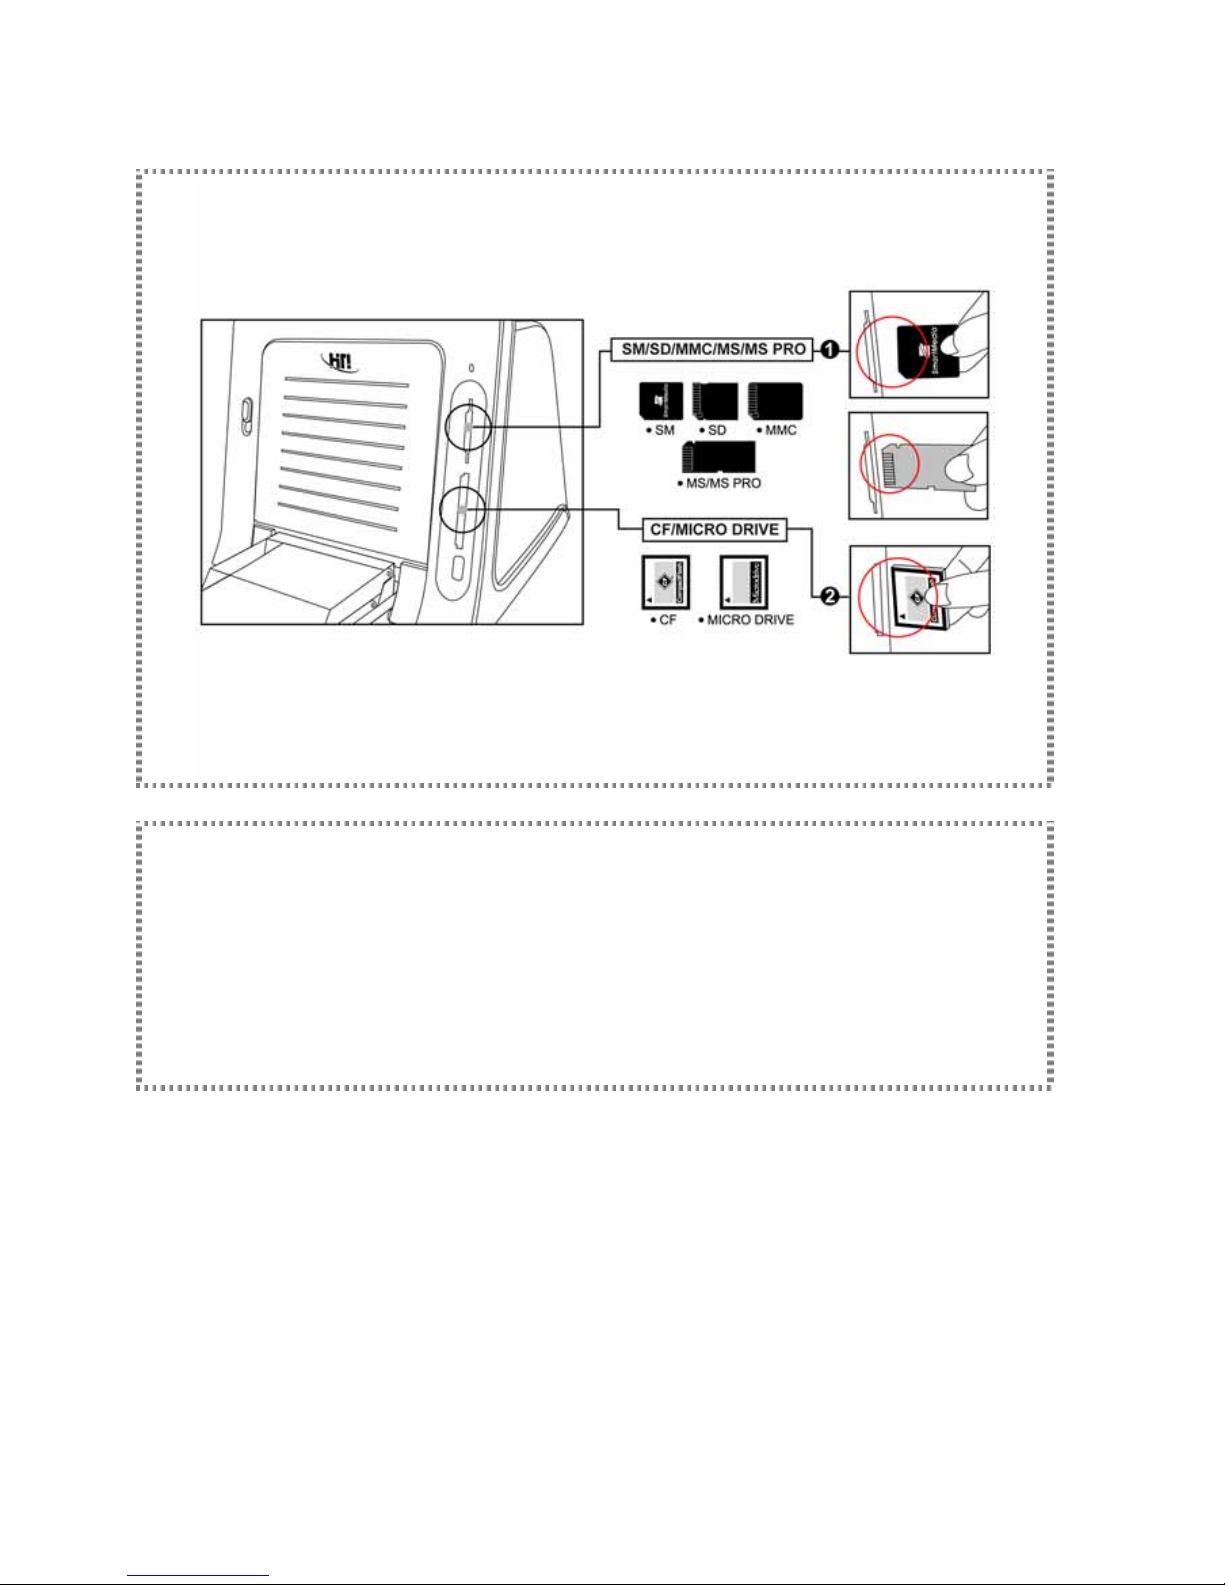
Insert memory card
Please know how to correctly insert your memory card:
If you use CF I, CF II, or Microdrive memory card, please insert it into the bottom memory card slot. See the
illustration above for detail.
If you use SM, SD, MMC, MS, or MS Pro memory card, please insert it into the top memory card slot. See the
illustration above for detail.
► The Memory Stick Duo and xD memory card can be used on HiTi S series photo printers only when a USB card reader
or adapter is applied.
Page 23

Printing Photos Without a PC
For standalone printing operations, please refer to the instructions listed above.
Standalone Printing
1. Installing LCD controller (Please refer to ‘Installing Your HiTi Photo Printer’)
2. Installing ribbon cartridge (Please refer to ‘Installing Your HiTi Photo Printer’)
3. Loading dedicated photo papers (Please refer to ‘Installing Your HiTi Photo Printer’)
4. Powering up the printer (Please refer to ‘Installing Your HiTi Photo Printer’)
5. Distinguishing memory card types (Please refer to ‘Standalone Printing’)
6. Inserting memory card (Please refer to ‘Standalone Printing’)
7. Printing photos (Please refer to ‘PHOTO’ from ‘Functional Instruction’)
Page 24
Special Function
Experience the special functions provided by the amazing HiTi photo printer.
I2O
Press (
) button on the controller to enable ‘Auto-color’ function. When this
function is activated, the indicator will light up. When this function is
deactivated, the indicator will dim out.
Matte
Press (
) button on the controller to activate ‘Matte’ function. When this
function is activated, the indicator will light up. When this function is
deactivated, the indicator will dim out.
Date print
Press (
) button on the controller to enable ‘Date Print’ function. When this
function is activated, the indicator will light up. When this function is
deactivated, the indicator will dim out.
Signature
Press (
) button on the controller to activate ‘Signature’ function. When this
function is activated, the indicator will light up. When this function is
deactivated, the indicator will dim out.
Page 25
Special Function
Experience the special functions provided by the amazing HiTi photo printer.
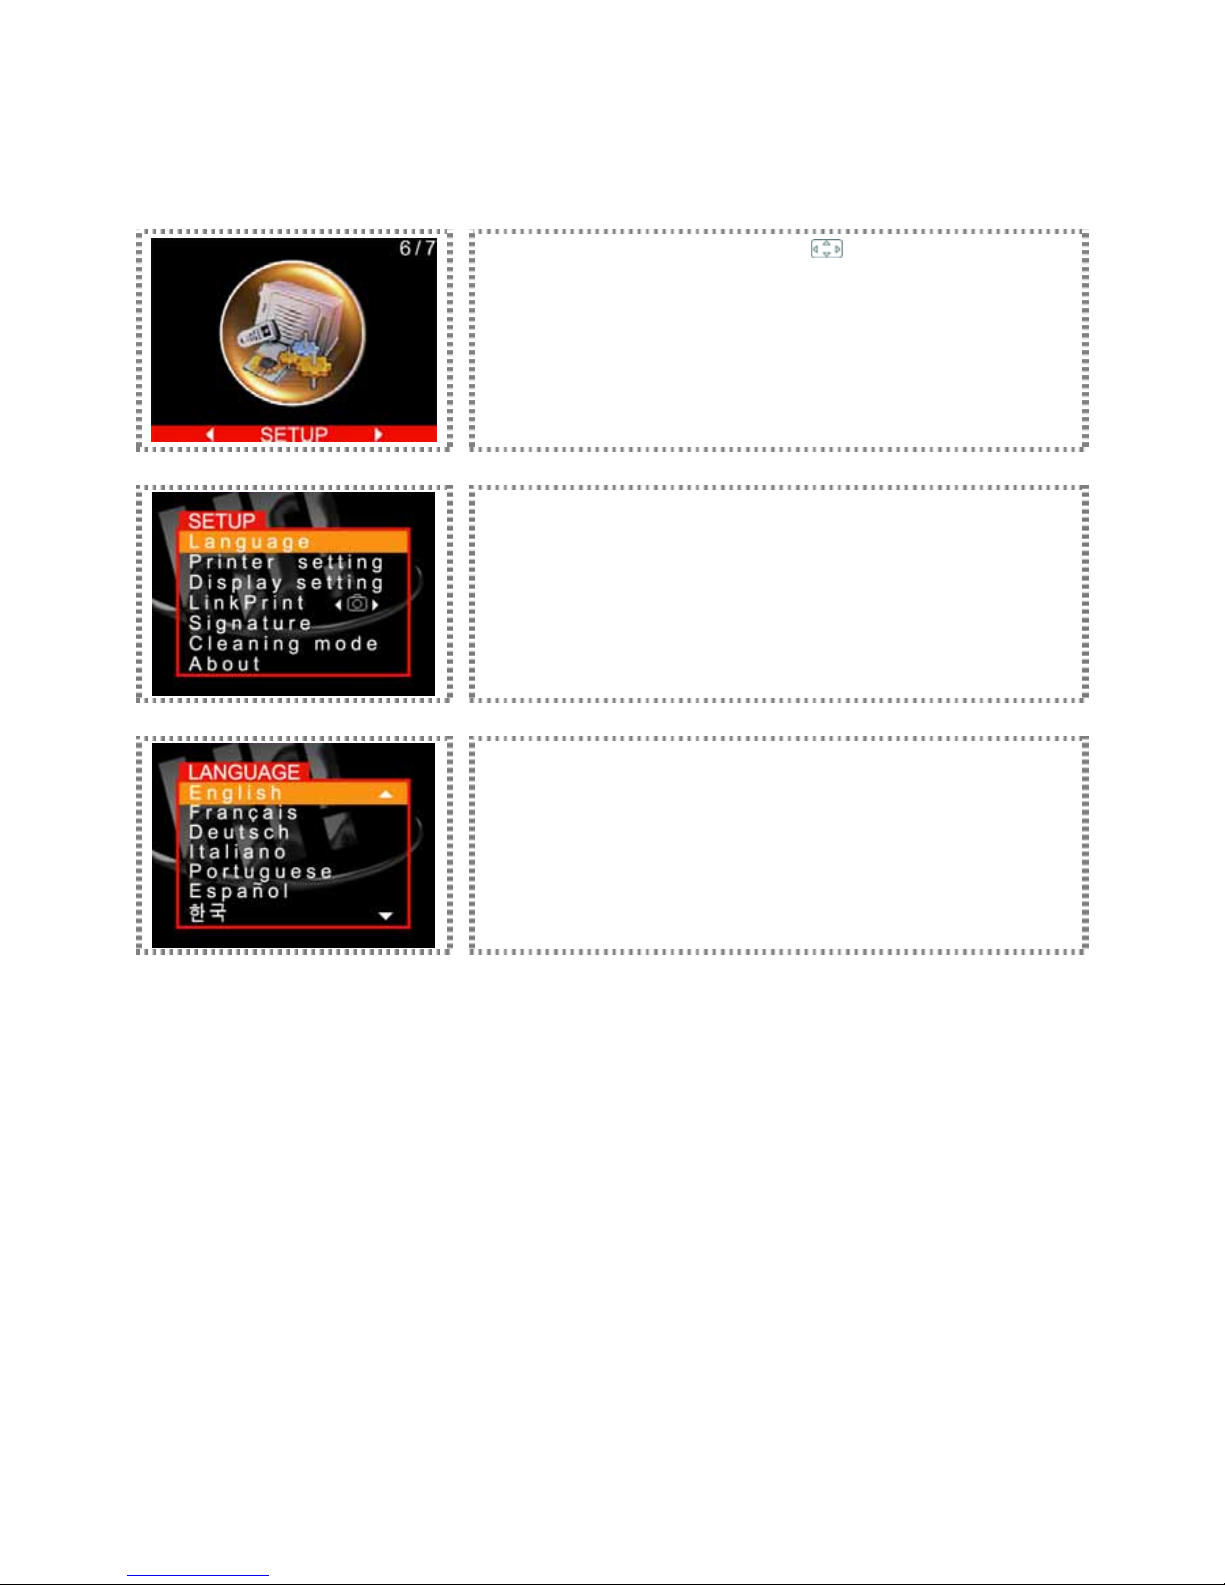
Language
Enter MENU and use the directional button (
) to select SETUP. Then, press
[OK] to continue.
Select Language and press [OK] to continue
Select a language and press [OK] to complete the language setup.
Page 26
Special Function
Experience the special functions provided by the amazing HiTi photo printer.
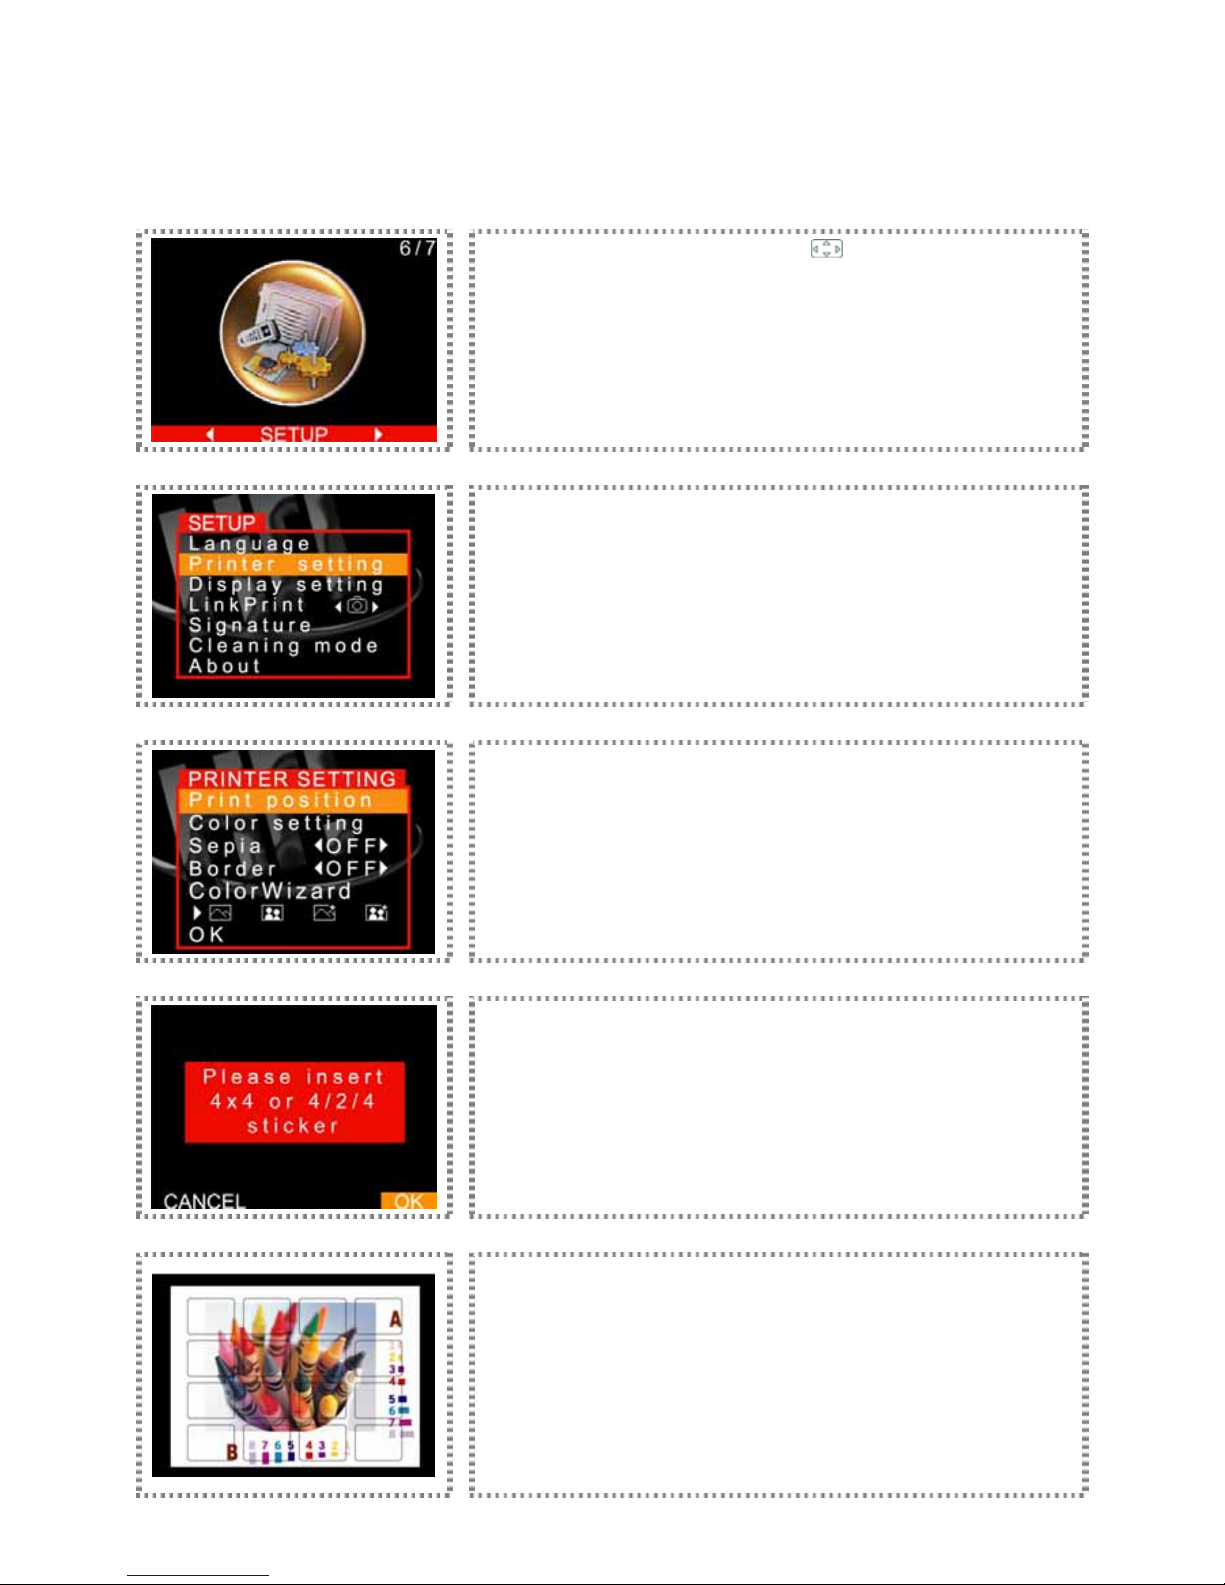
Print position: Before using this function, please insert memory card into the socket.
Enter MENU and use the directional button (
) to select SETUP. Then, press
[OK] to continue.
Select Printer setting and press [OK] to continue.
Select Print position and press [OK] to continue.
Place 4x4 or 4/2/4 sticker paper into to the paper cassette for calibration
reference. Print calibration is valid only when used with 4/2/4 or 4x4 sticker
paper exclusively provided by Hi-Touch Imaging Technologies.
Based on the printout of 4x4 or 4/2/4 stickers, choose the corresponding color
bar number in A and B column that best fit to the sticker paper borders.
Page 27

If need, adjust the printing parameters of A and B column and press [OK] to
save values.
Page 28
Special Function
Experience the special functions provided by the amazing HiTi photo printer.
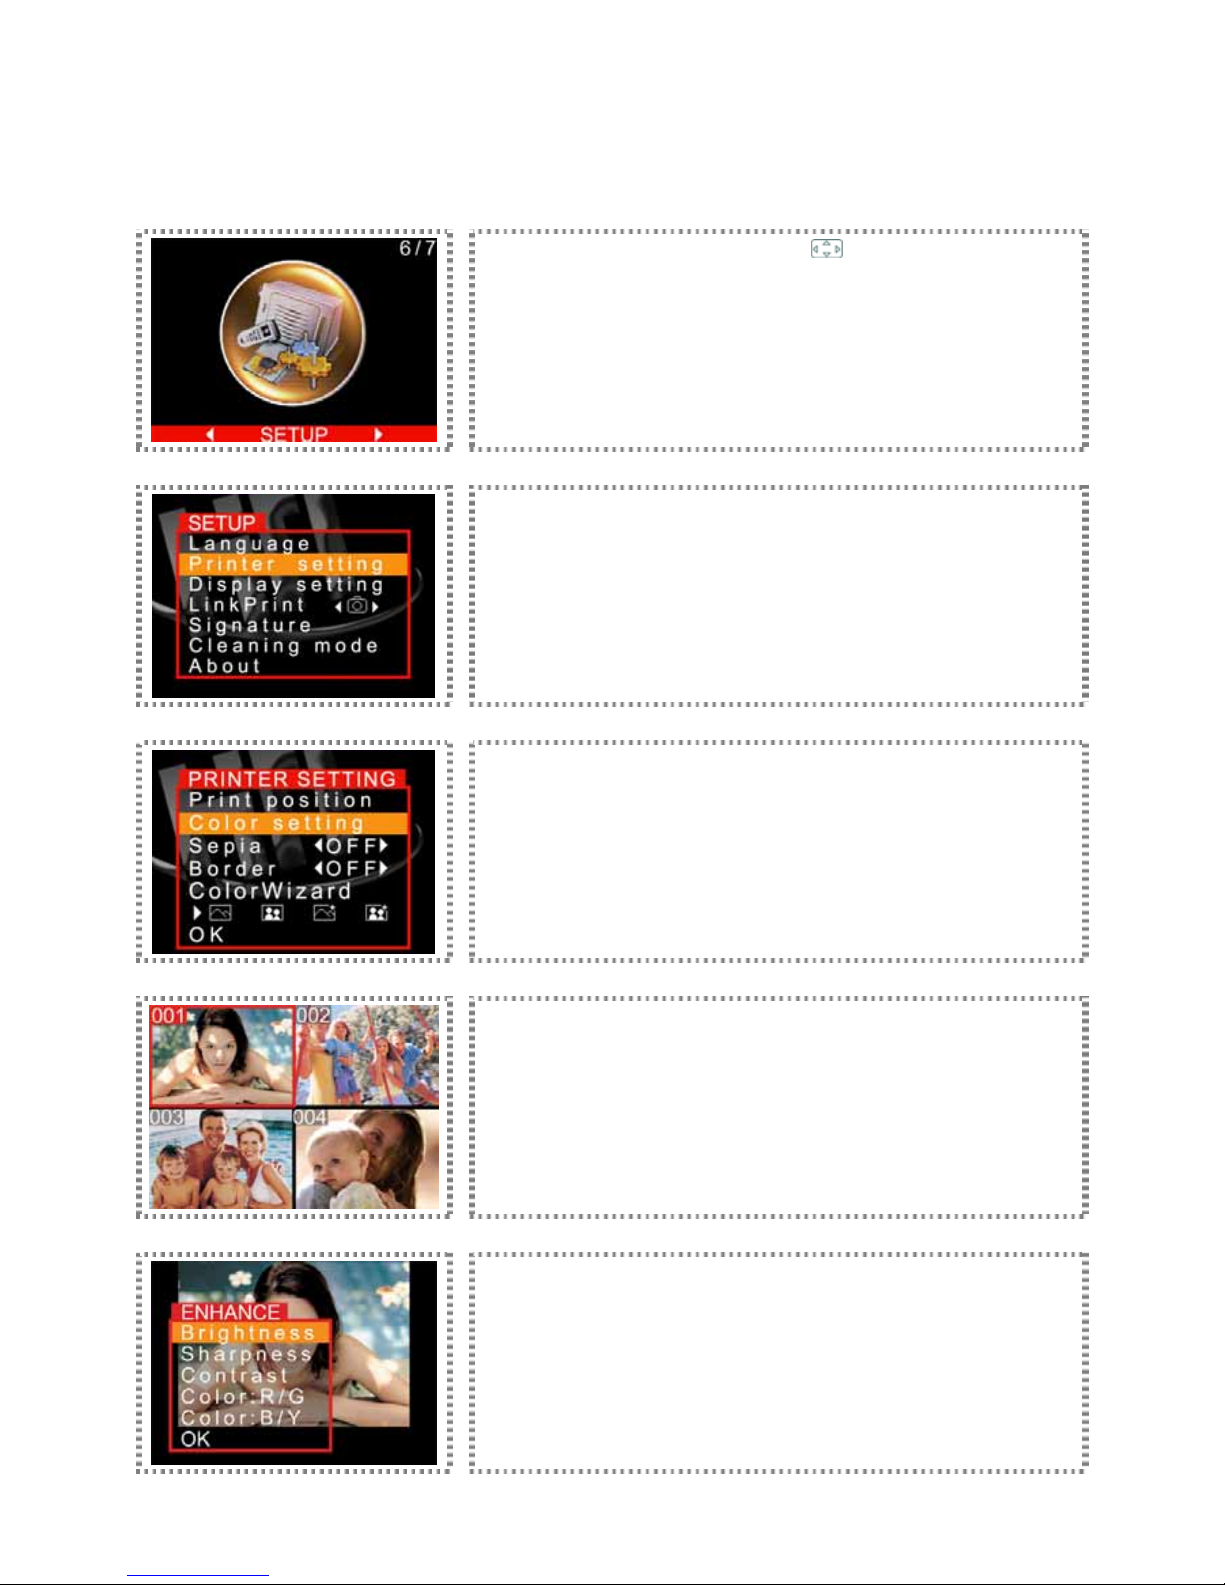
Color setting: Before using this function, please insert memory card into the socket.
Enter MENU and use the directional button (
) to select SETUP. Then, press
[OK] to continue.
Select Printer setting and press [OK] to continue.
Select Color setting and press [OK] to continue.
Select a reference image for color calibration and press [OK] to continue.
Enhance: Please refer to the instructions in Advanced image editing from
Special function.
► The value of color setting will be applied to all output images.
Page 29
Special Function
Experience the special functions provided by the amazing HiTi photo printer.
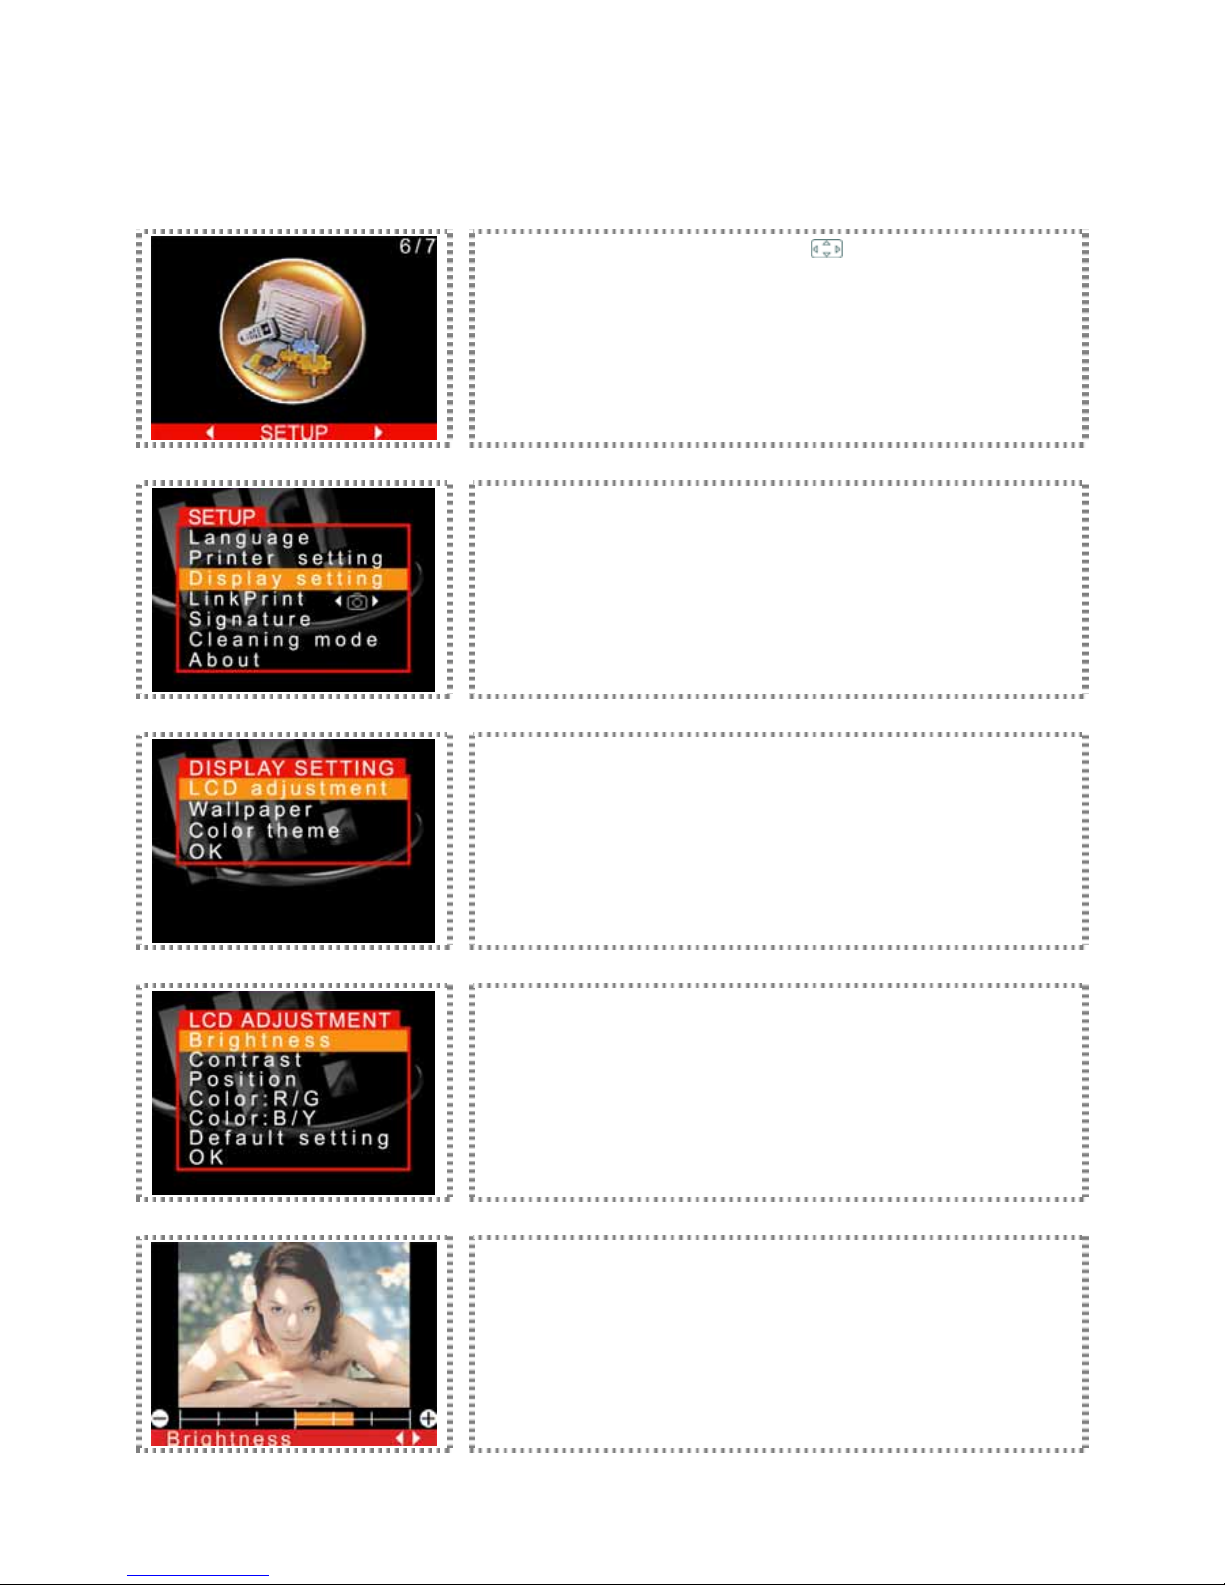
LCD adjustment
Enter MENU and use the directional button (
) to select SETUP. Then, press
[OK] to continue.
Select Display setting and press [OK] to continue
Select LCD adjustment and press [OK] to continue
Select an item needed to be adjusted and press [OK] button to continue.
Use the directional button to change the value and press [OK] to save the
setting. Repeat above steps when adjusting other settings.
Page 30
Special Function
Experience the special functions provided by the amazing HiTi photo printer.
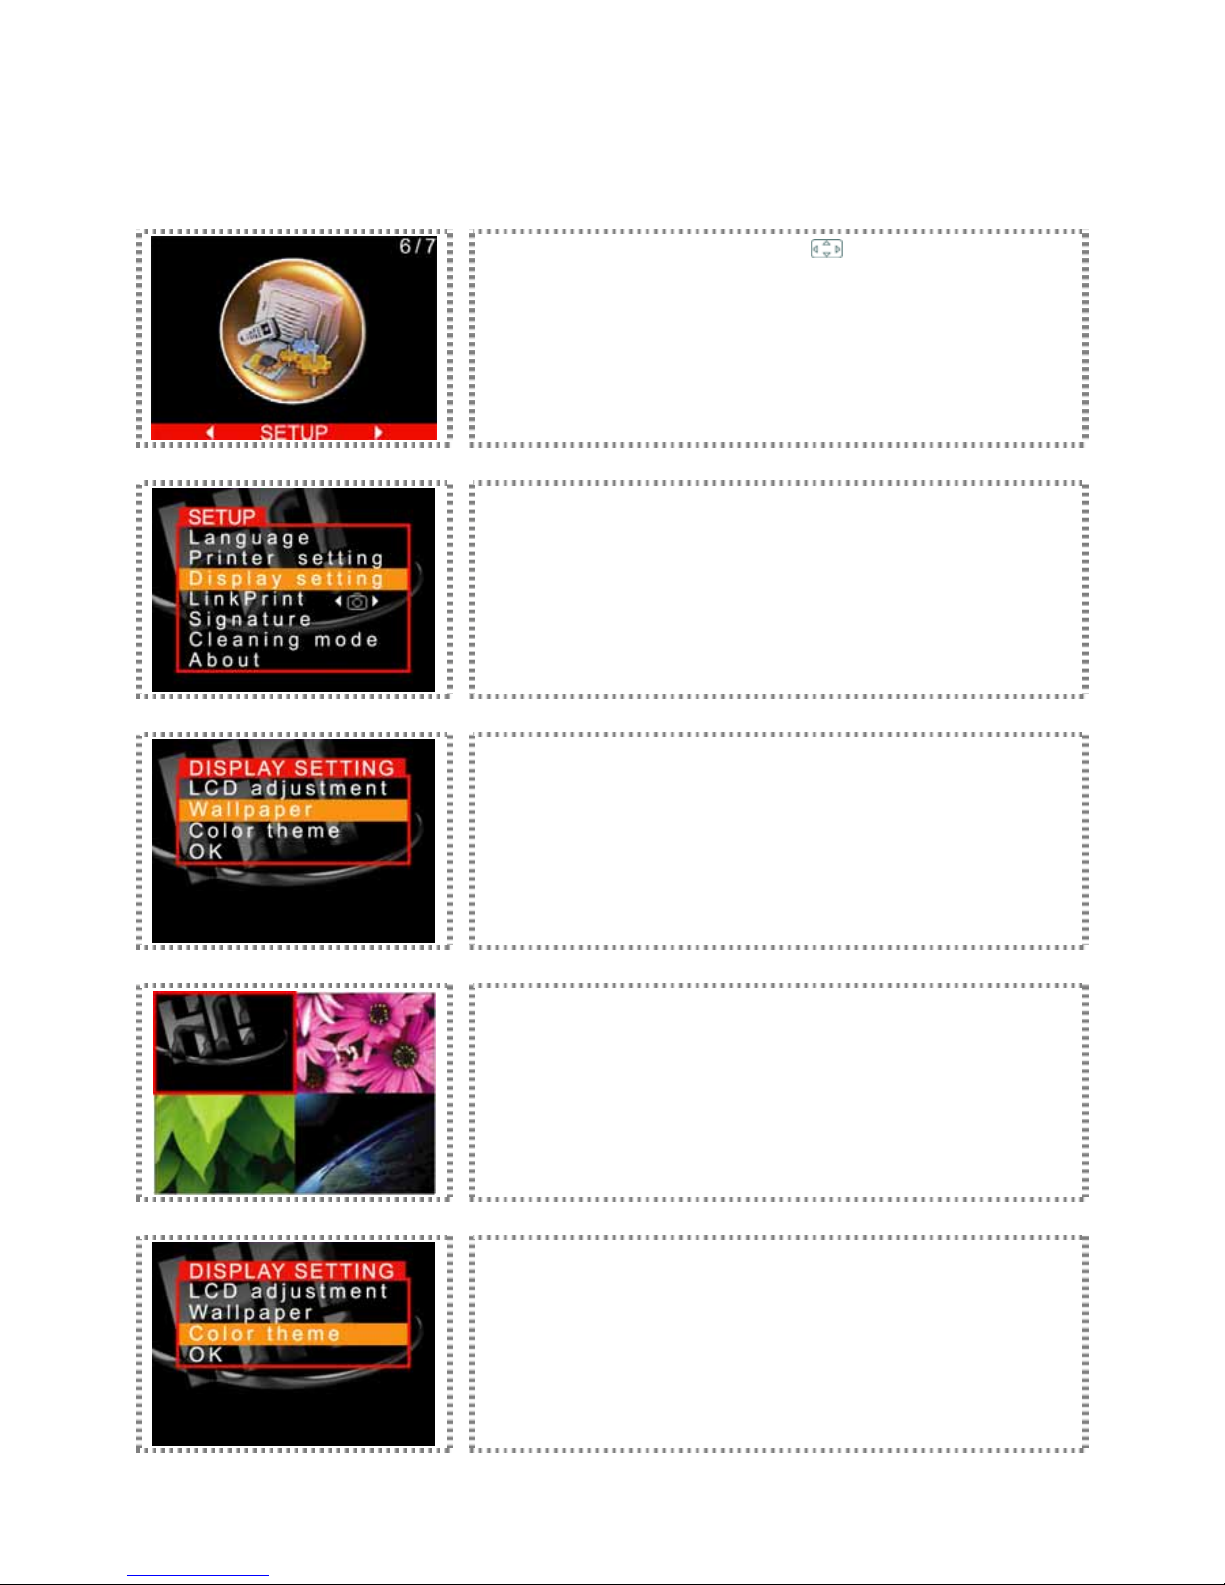
Wallpaper and Color theme
Enter MENU and the use directional button (
) to select SETUP. Then, press
[OK] to continue.
Select Display setting and press [OK] to continue.
Select Wallpaper and press [OK] to continue.
Select wallpaper and press [OK] to save the setting. Wallpaper setup is
complete.
Select Color theme and press [OK] to continue.
Page 31

Select a color theme and press [OK] to finalize. Color theme setup is complete.
► In the supplied CD, you can use HiTi ScreenMaker to edit and download unique wallpaper to the photo printer.
Page 32
Special Function
Experience the special functions provided by the amazing HiTi photo printer.
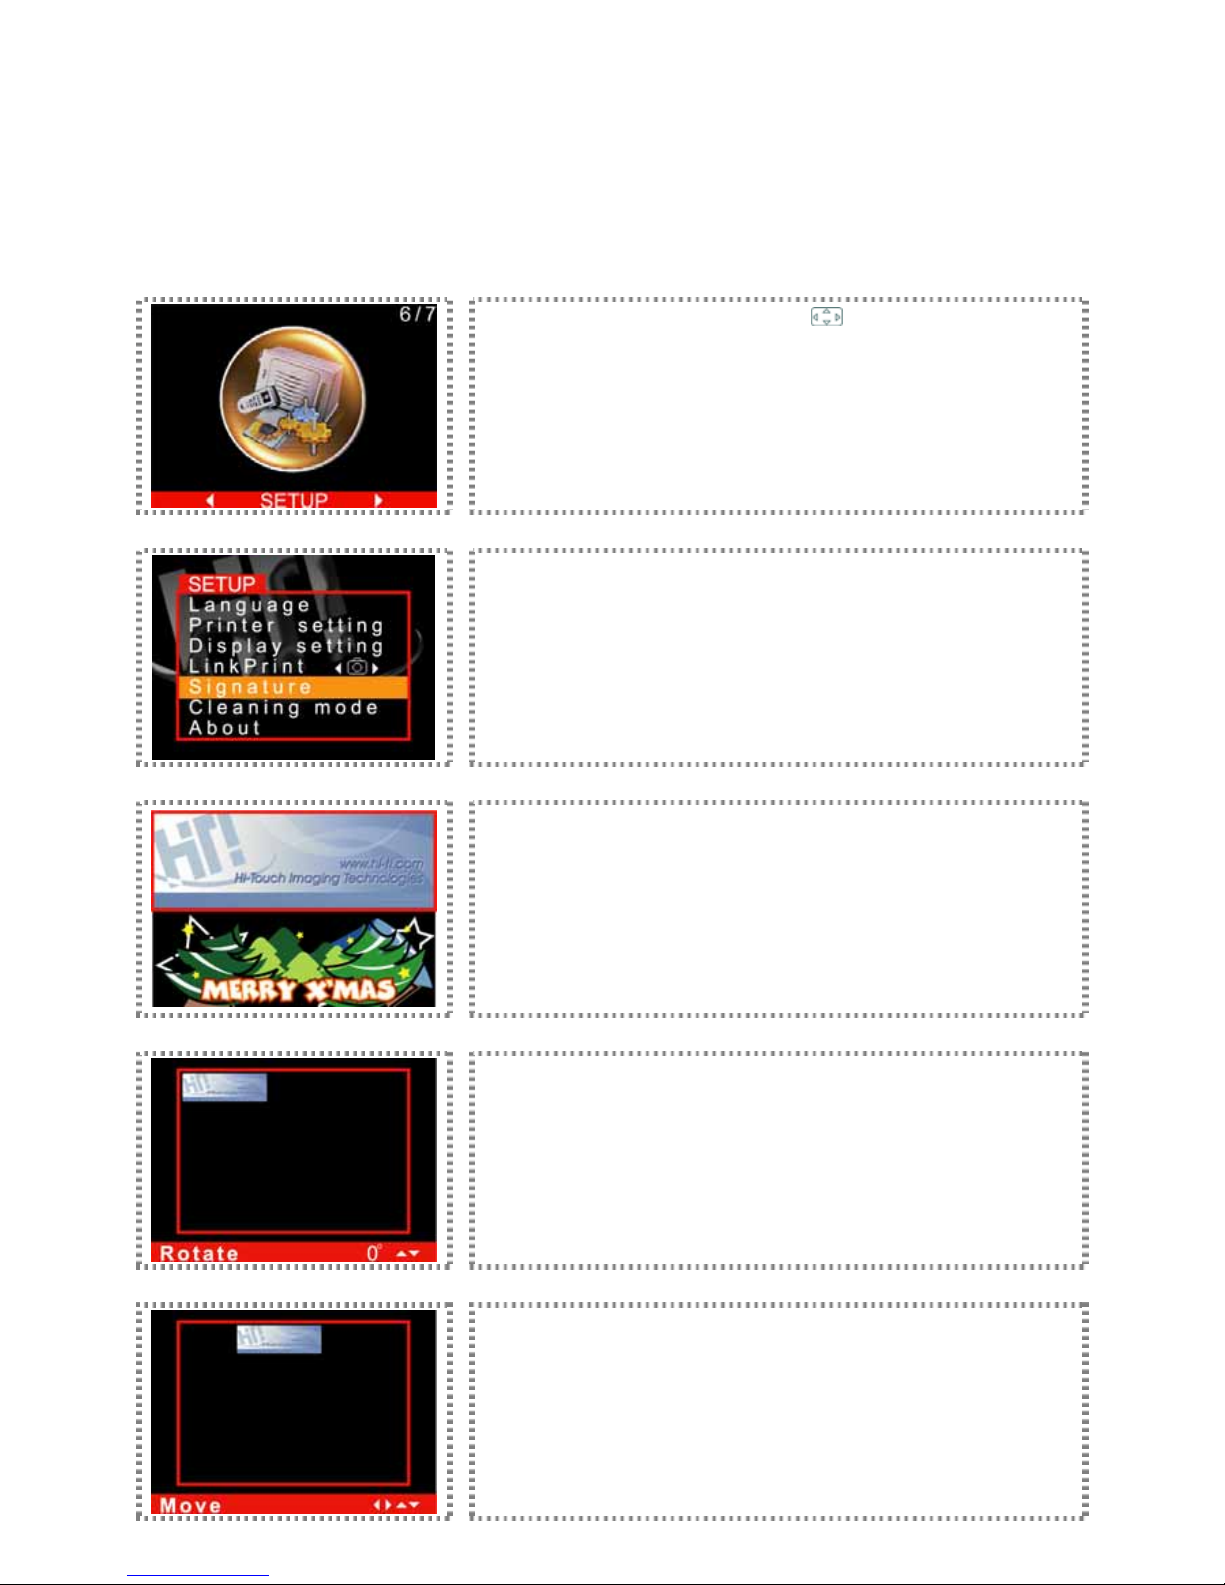
Signature: Before using this function, please verify that the signature files have already been saved in your
photo printer. Regarding on how to create or edit your signature file, please refer to SignMaker user manual
provided by Hi-Touch Imaging Technologies.
Enter MENU and use the directional button (
) to select SETUP. Then, press
[OK] to continue.
Select Signature and press [OK] to continue.
Select an image to become your signature and press [OK] to save the selection
or press [EDIT] to set up the output mode of the signature.
Change the printout format of signature: horizontal or vertical orientation. When
signature editing is complete, please press [OK] to continue.
Change the printout position of signature. When signature editing is complete,
please press [OK] to save all settings. Signature setup is complete.
Page 33
Special Function
Experience the special functions provided by the amazing HiTi photo printer.
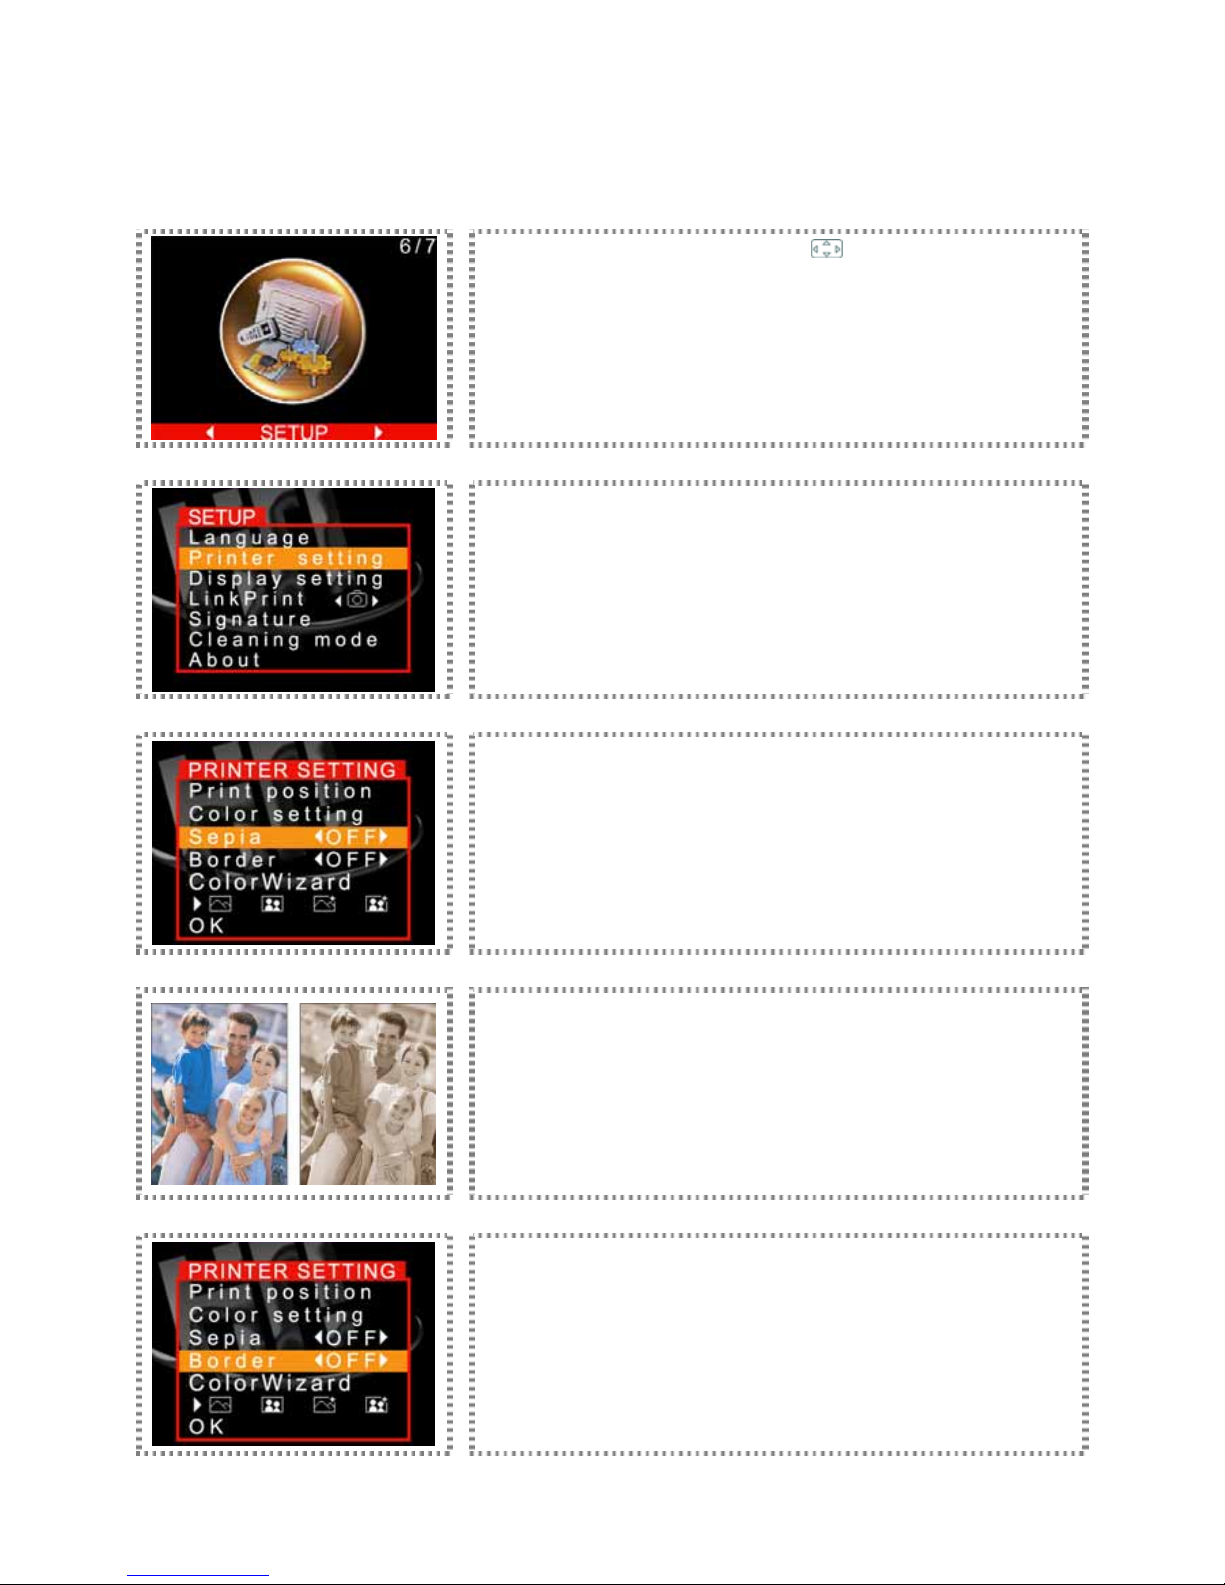
Sepia and Border
Enter MENU and use the directional button (
) to select SETUP. Then, press
[OK] to continue.
Select Printer setting and press [OK] to continue
Select Sepia and set it ON or OFF. After finalizing the setup, please press [OK]
to save the setting.
Samples on Sepia.
Select Border and set it ON or OFF, and then press [OK] to save the setting.
Page 34

Samples on Border
Page 35
Special Function
Experience the special functions provided by the amazing HiTi photo printer.
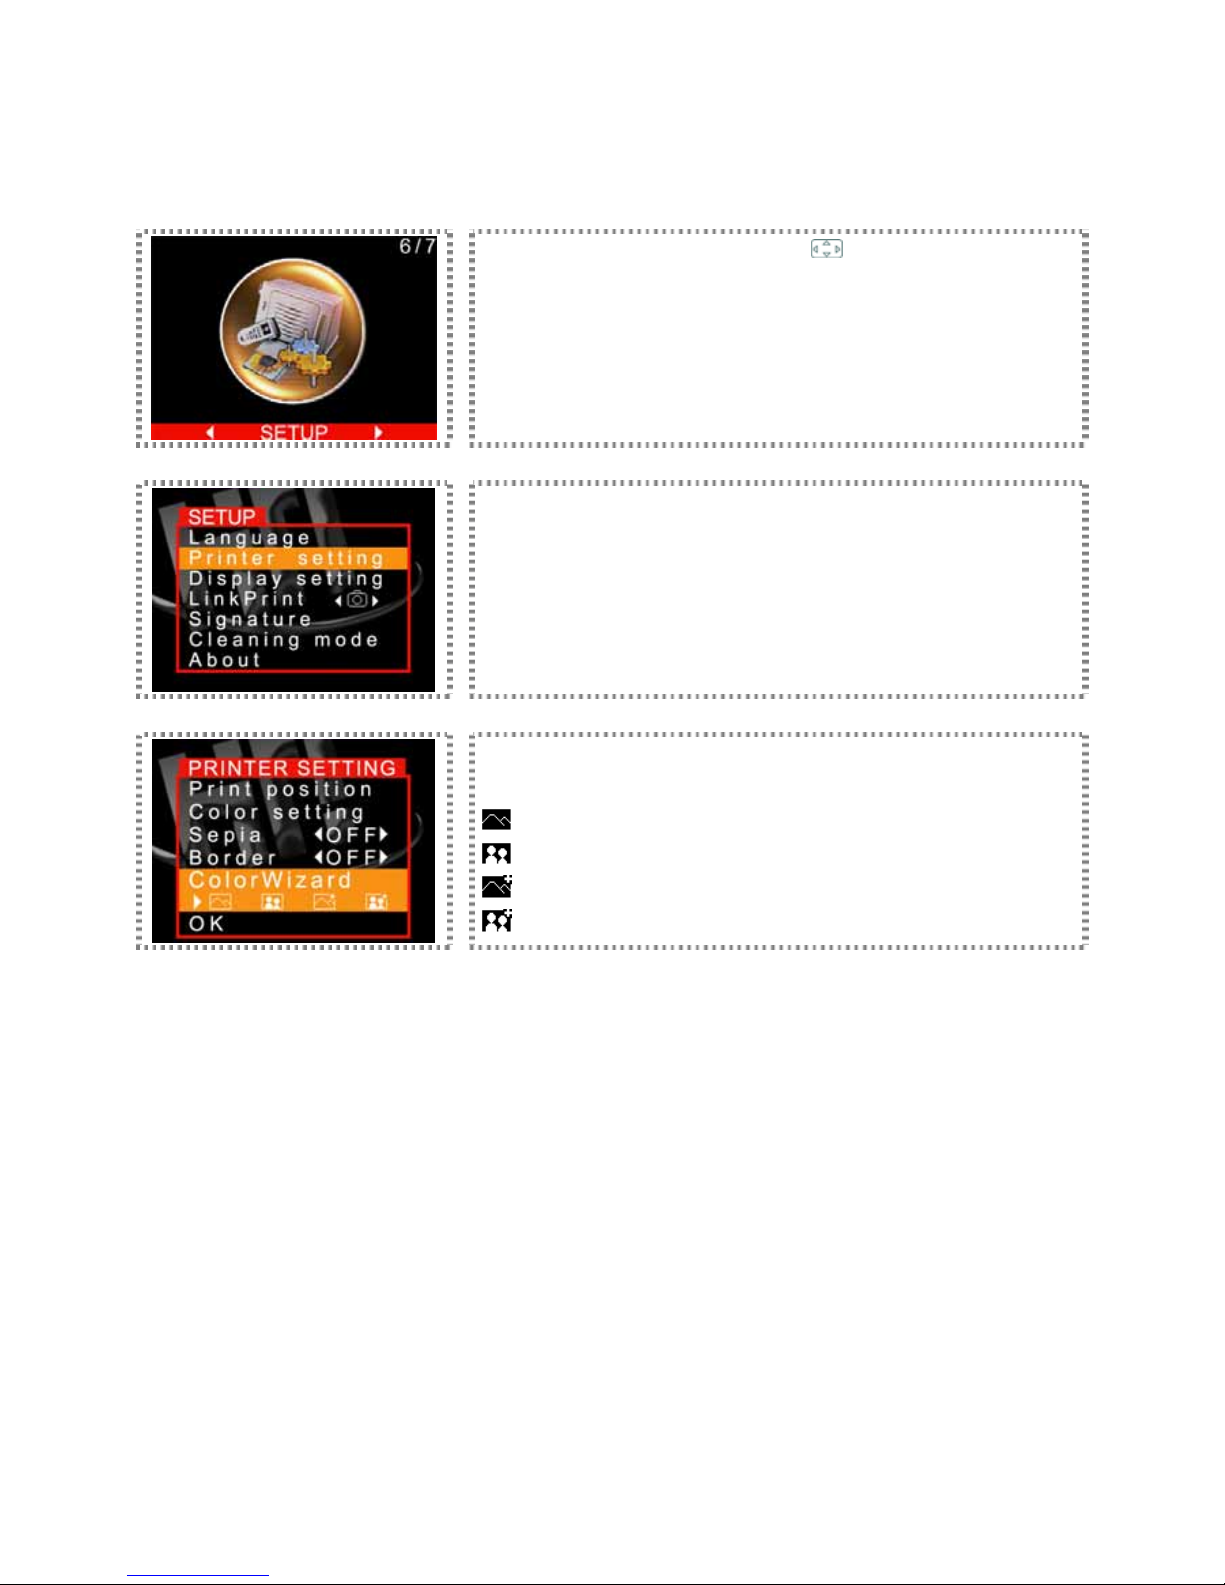
ColorWizard
Enter MENU and use the directional button (
) to select SETUP. Then, press
[OK] to continue.
Select Printer setting and press [OK] to continue.
Select ColorWizard and use directional button to choose to set landscape or
portrait. Then, choose [OK] to save settings.
: Landscape
: Portrait
: Landscape plus
: Portrait plus
Page 36
Special Function
Experience the special functions provided by the amazing HiTi photo printer.
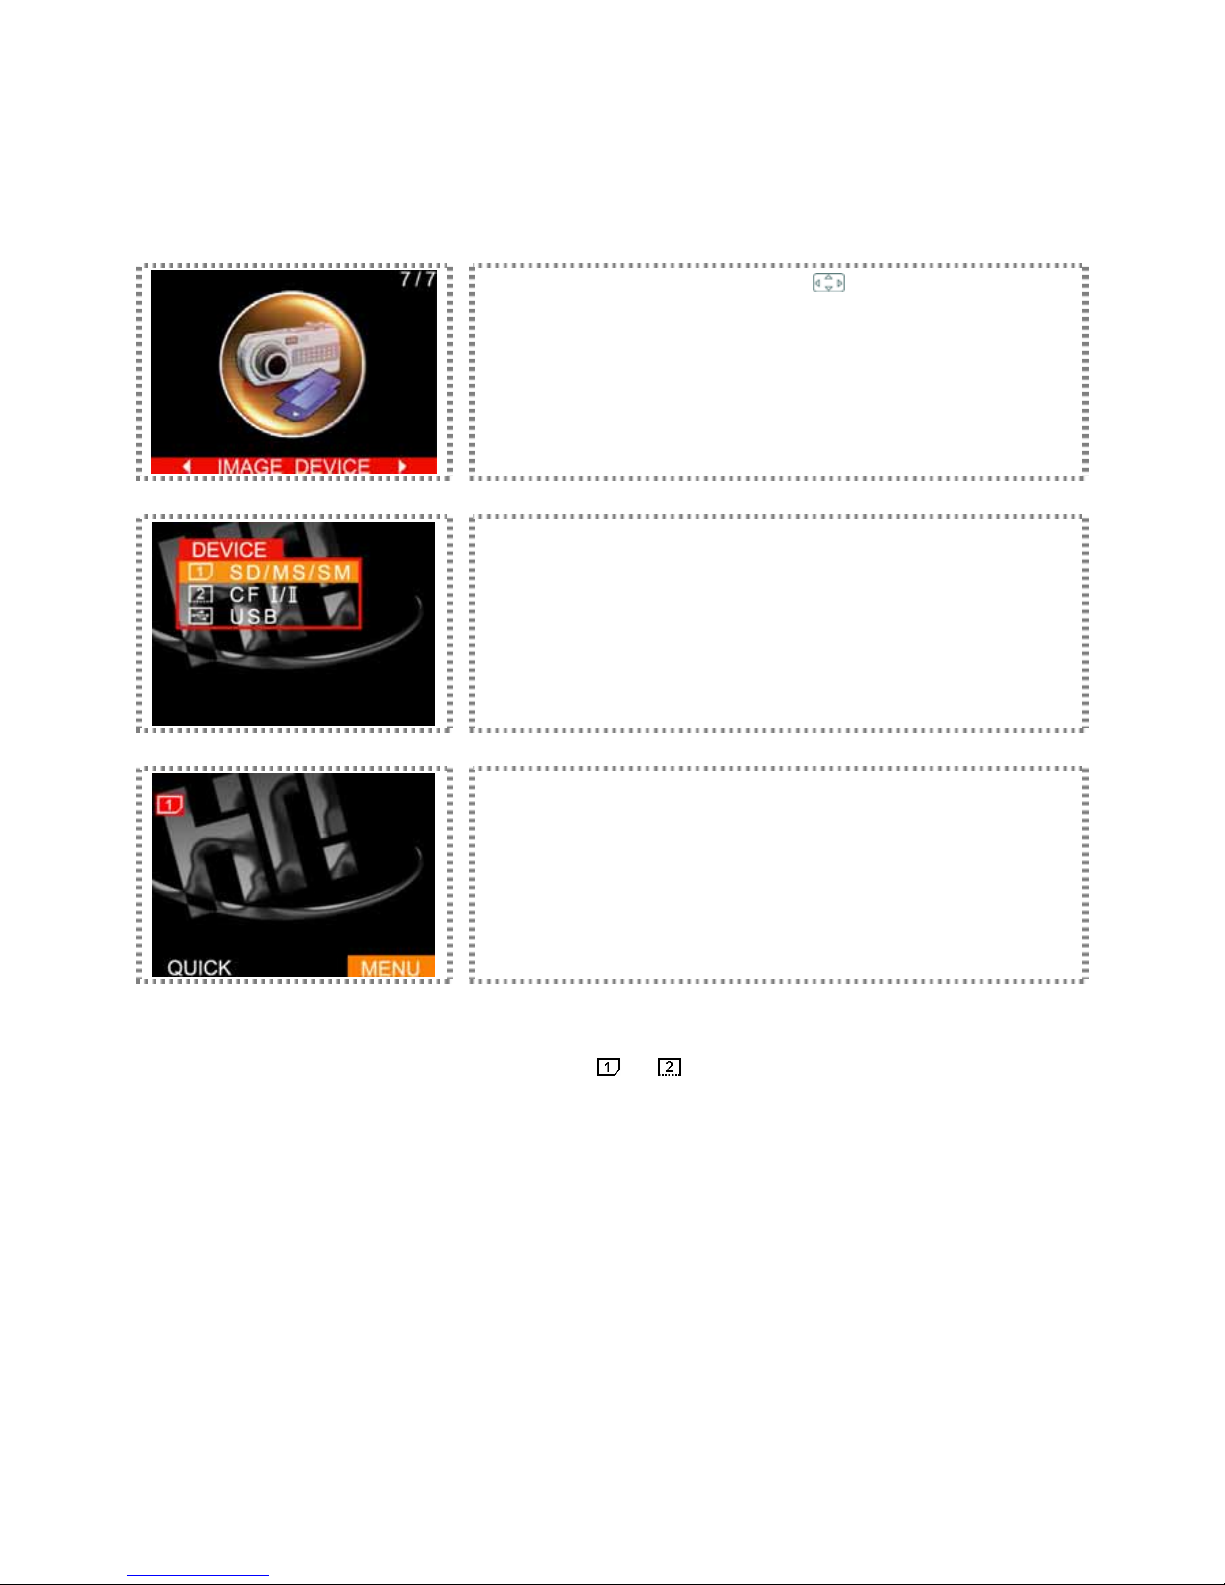
Image device: Three different image input devices are built into photo printer (top memory card slot, bottom
memory card slot and USB Host slot)
Enter MENU and use the directional button (
) to select IMAGE DEVICE.
Then, press [OK] to continue.
Select an image device and press [OK] to save the setting.
Press [ESC] or [HOME] to return to the main menu. The selected image device
will be displayed in red.
► For more information about the icon of image device (
) or ( ), please refer to the ‘Home Menu Instruction’ for
detail. HiTi photo printer can automatically detect image storage devices in all memory card slots. When only one
image device is being used, that image device will be the only one that can be selected.
Page 37
Special Function
Experience the special functions provided by the amazing HiTi photo printer.
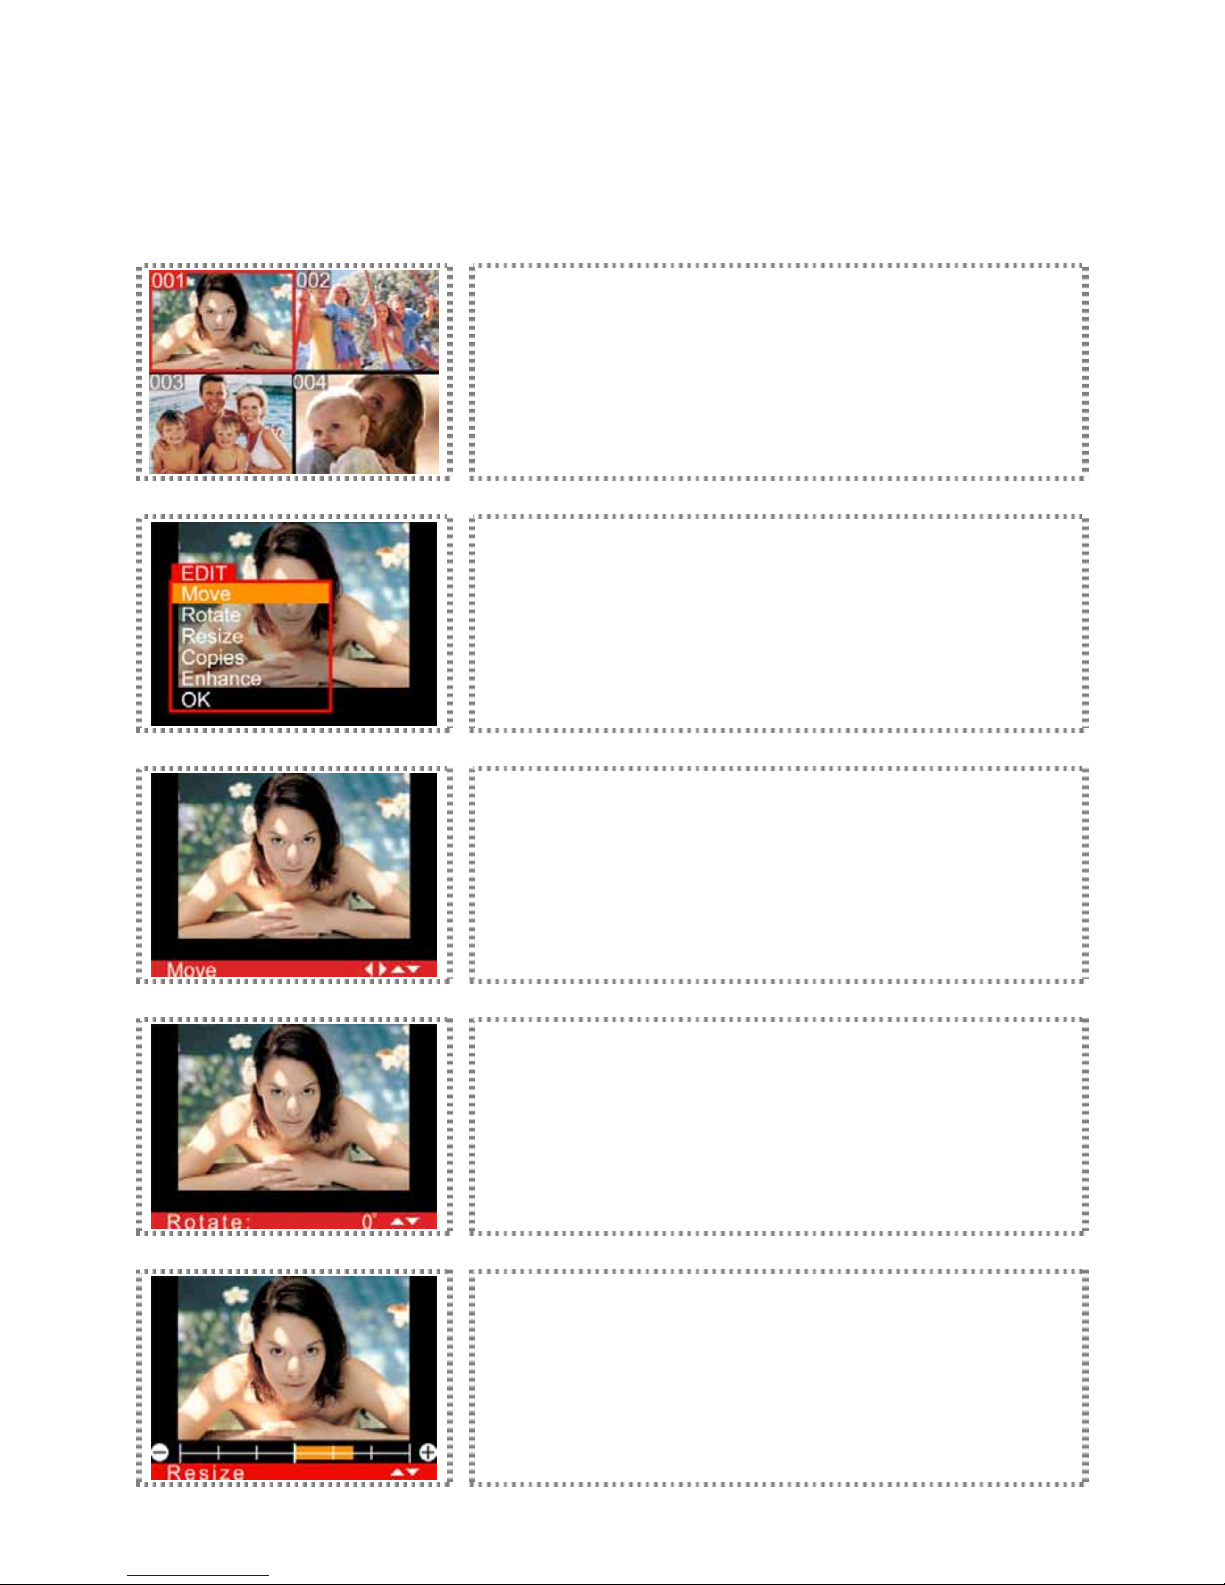
Advanced image editing: The intuitive advanced image editing function can enhance your digital images and
enrich the color representation.
On the preview screen, select an image and press [EDIT] to perform advanced
image editing function.
Select an option and press [OK] to start the image editing.
Move: This option is for adjusting the image position. Please press [OK] to
temporarily save the setting after editing.
Rotate: This option is for rotating the image. Please press [OK] to temporarily
save the setting after editing.
Resize: This option is for adjusting the image size. Please press [OK] to
temporarily save the setting after editing.
Page 38
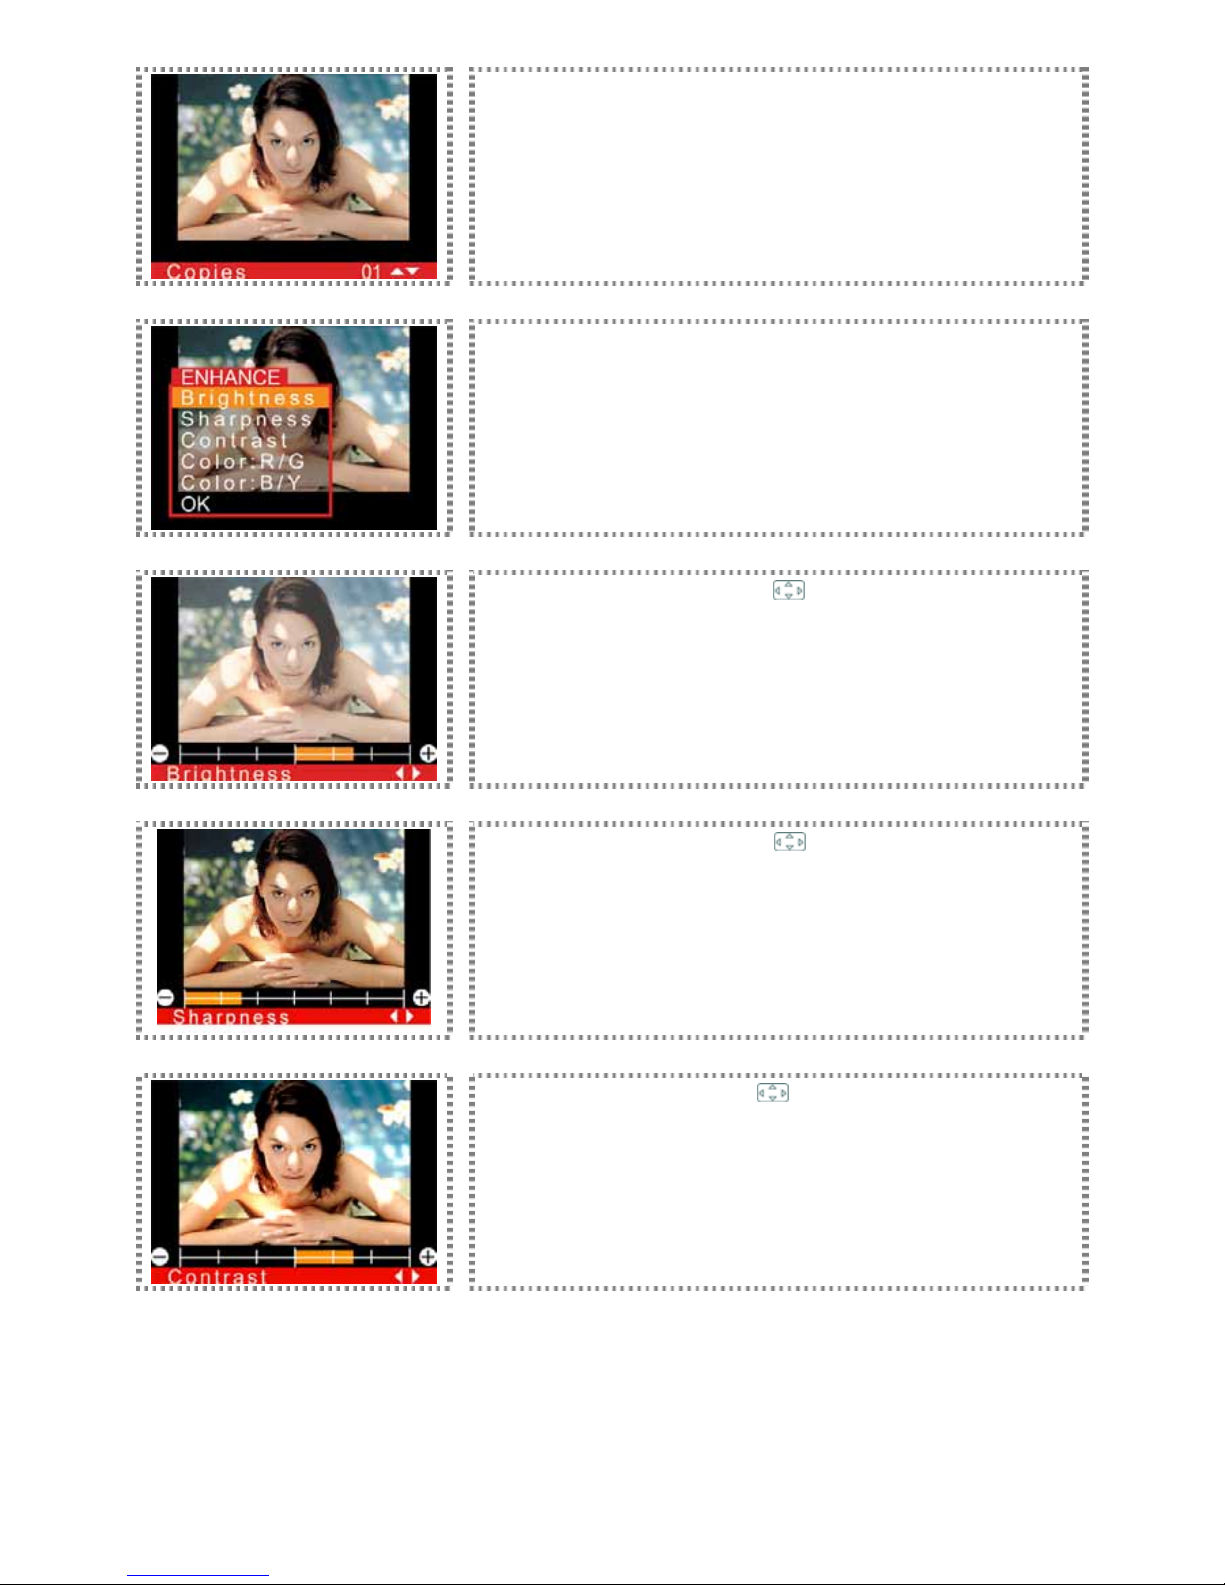
Copies: This option is for setting the quantity of the image output. Please press
[OK] to temporarily save the setting after editing.
Enhance (including Brightness, Sharpness, Contrast, and Color Tune): The
option is for adjusting the image parameter. Please press [OK] to start editing.
Brightness: Use the directional button (
) to adjust the image brightness.
Please press [OK] to temporarily save the setting after the adjustment.
Sharpness: Use the directional button (
) to adjust the image sharpness.
Please press [OK] to temporarily save the setting after the adjustment.
Contrast: Use the directional button (
) to adjust the image contrast. Please
press [OK] to temporarily save the setting after the adjustment.
Page 39
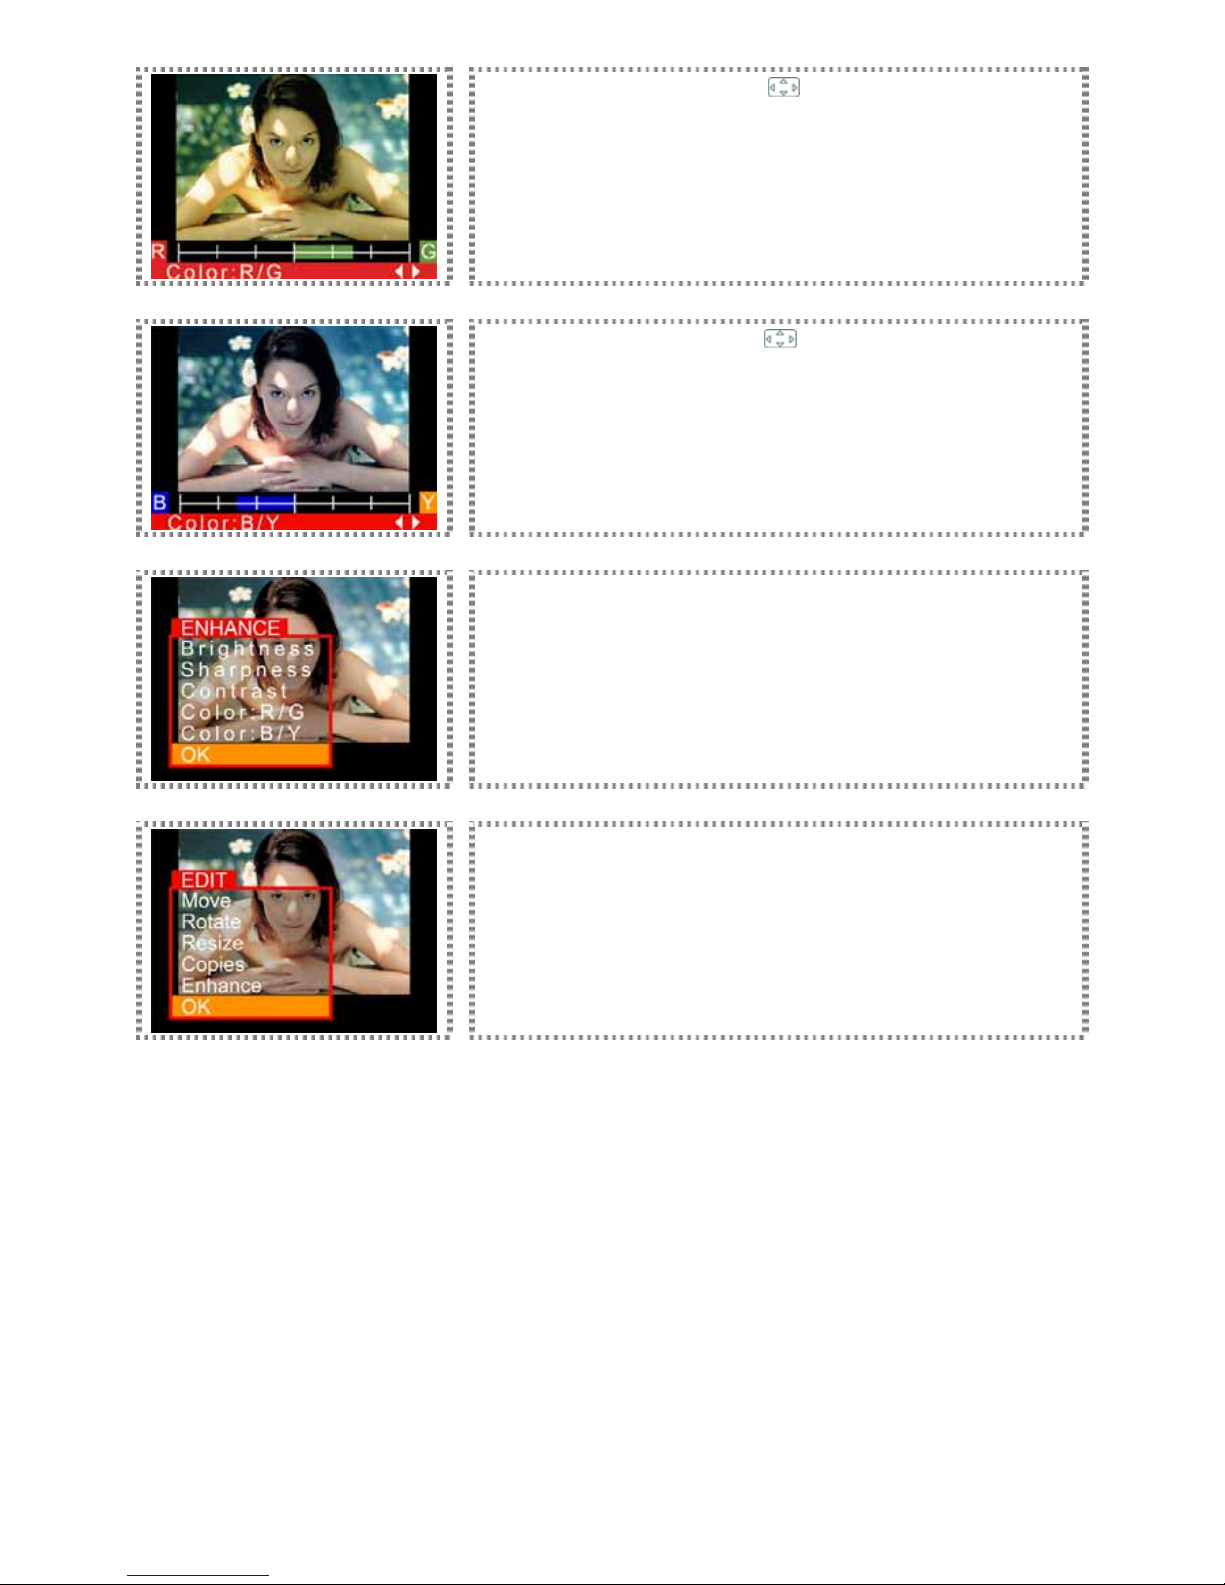
Color R/G: Use the directional button (
) to fine tune the image colors
between red and green. Please press [OK] to temporarily save the setting after
the adjustment.
Color B/Y: Use the directional button (
) to fine tune the image colors
between blue and yellow. Please press [OK] to temporarily save the setting
after the adjustment.
When all adjustments are complete, please press [OK] to save all temporary
settings.
After finishing the image editing, please press [OK] to save all temporary
settings.
Page 40
Special Function
Experience the special functions provided by the amazing HiTi photo printer.
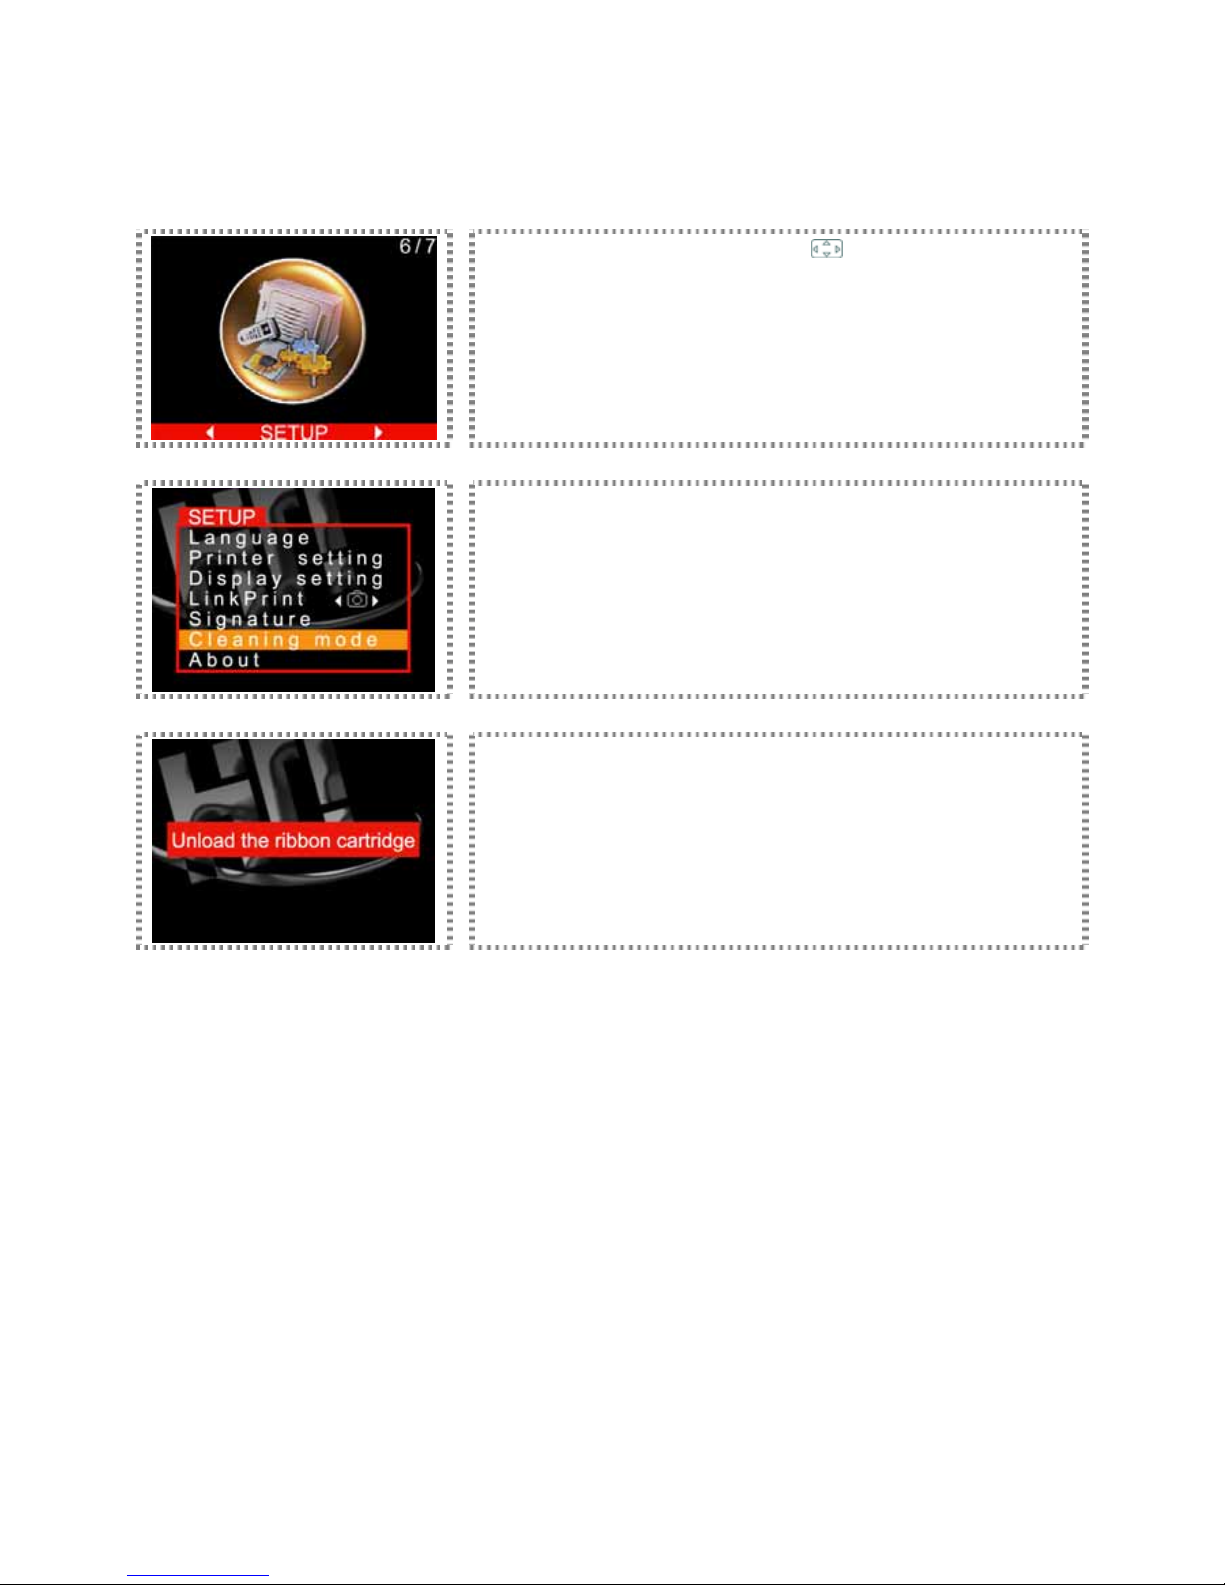
Cleaning mode
Enter MENU and use the directional button (
) to select SETUP. Then, press
[OK] to continue.
Select Cleaning mode and press [OK] to continue.
Unload the ribbon cartridge and close the ribbon door. Then, insert HiTi
cleaning paper and press [OK] to start the cleaning process.
► For more information about cleaning kit operation, please refer to Clean Kit User Instruction for detail.
Page 41
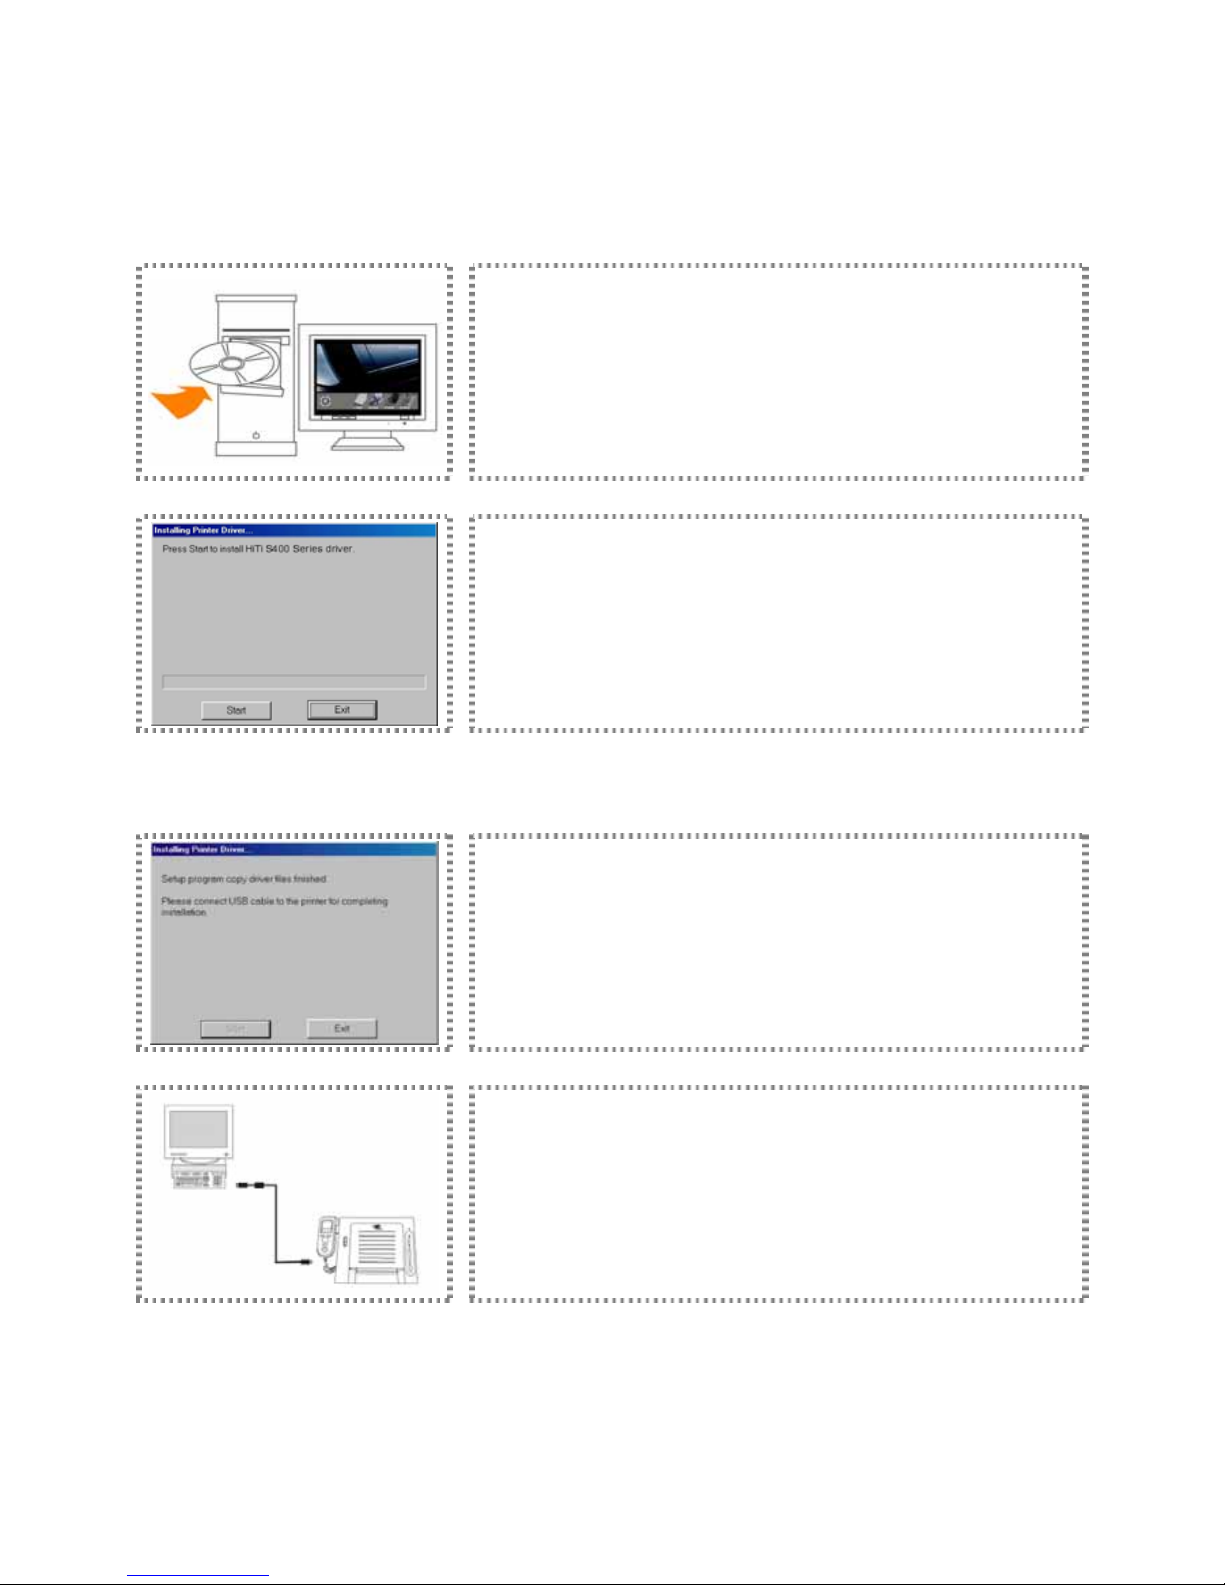
PC-Link Printing
This user manual provides instructions on how to connect the photo printer to a computer and install the printer driver. For
instructions on printing using a computer, please refer to the Hi-Ti PhotoDesiree Deluxe software user manual.
Installing printer driver
Place the master CD to your computer’s CD/DVD-ROM, and then the
installation wizard will guide you through the installation.
Select Start to continue.
Connecting to a computer
When the installation is complete, please use the USB cable to connect your
photo printer to your computer.
Connect to your computer.
Page 42

Turn on the printer after connecting the photo printer to a computer to finalize
printer installation.
► You may be prompted to sign a digital agreement when you install the driver in Windows 2000. Please press ‘Continue’
to proceed with the installation.
Page 43
Troubleshooting
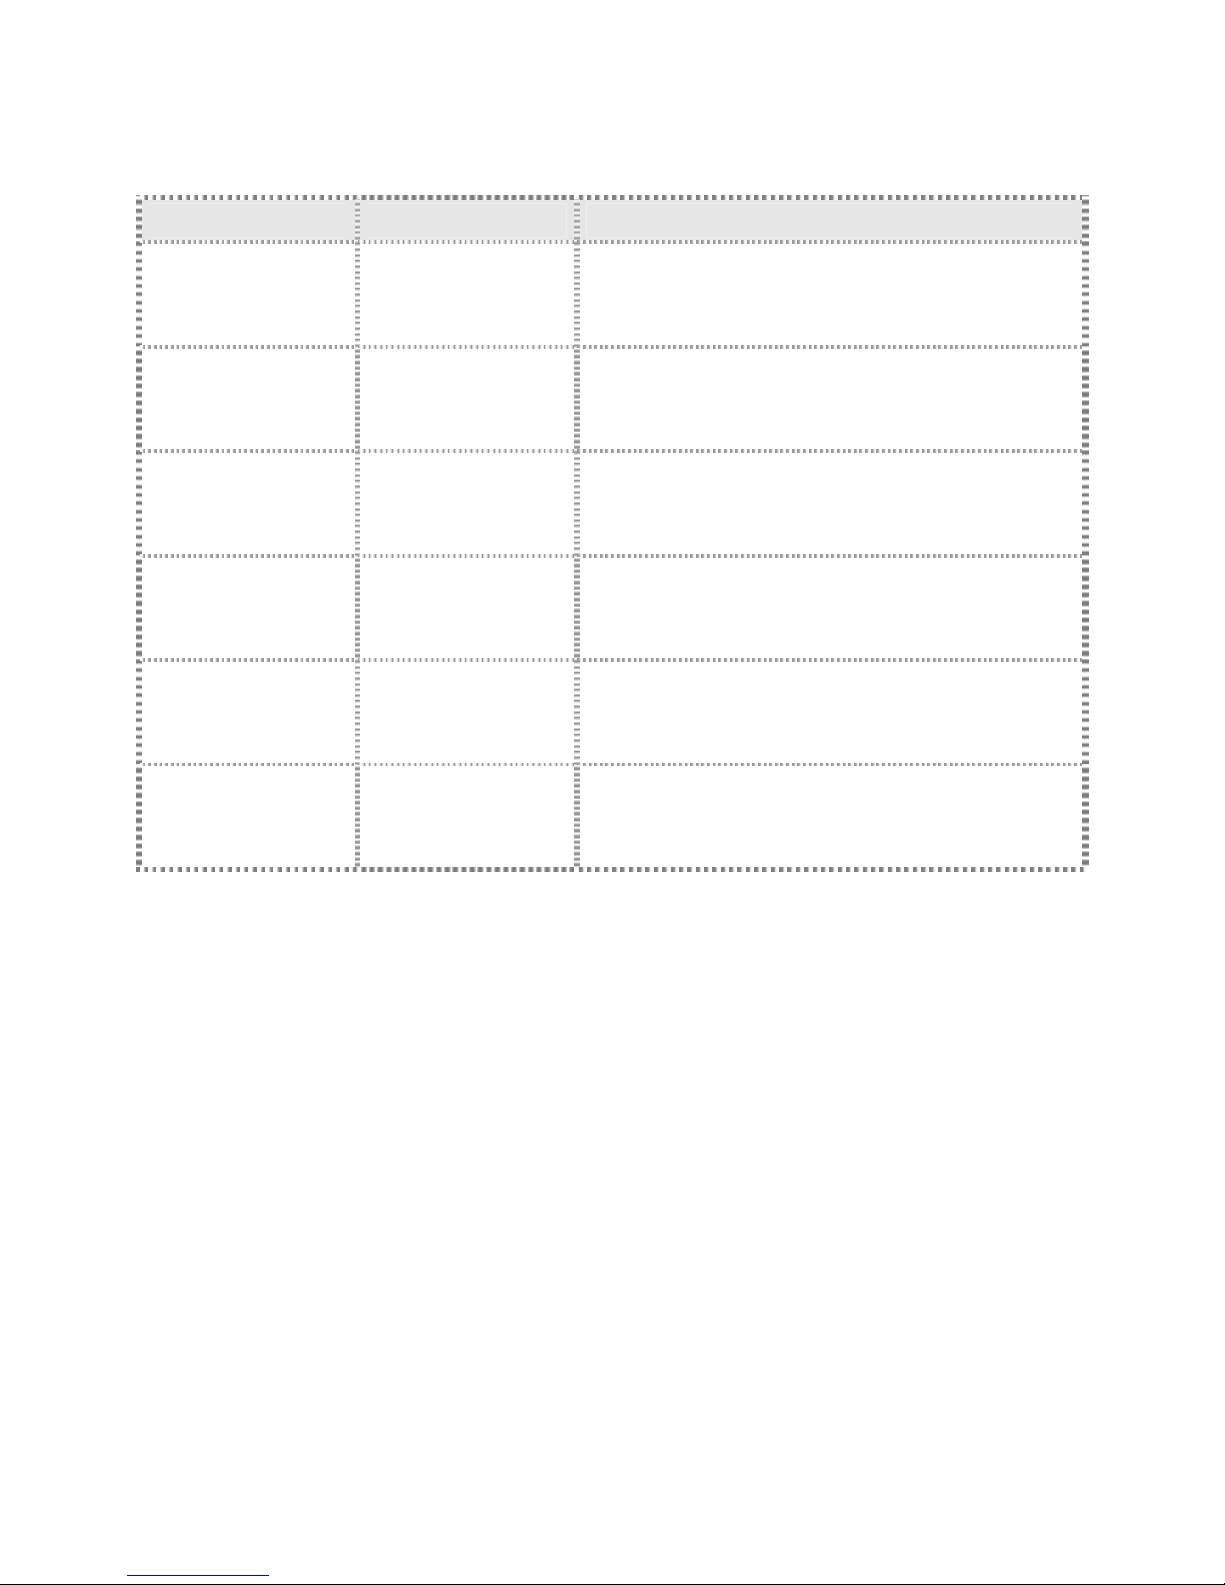
Indicator blinking
Status Problem Troubleshooting
Blinking once Cover open Re-open and re-close the ribbon door
Blinking twice Ribbon missing Re-install the ribbon cartridge
Blinking 3 times Ribbon out Replace the ribbon cartridge
Blinking 4 times Paper out Re-install photo papers and re-check consumable status
Blinking 5 times Paper jam Open the ribbon door cover and take out the paper jammed.
Blinking 6 times Paper mismatch
Please use HiTi compatible consumables and re-check if
consumables are correctly placed in the paper cassette.
► If your problem is not listed above, please contact the HiTi service center nearest to you.
Page 44
Others
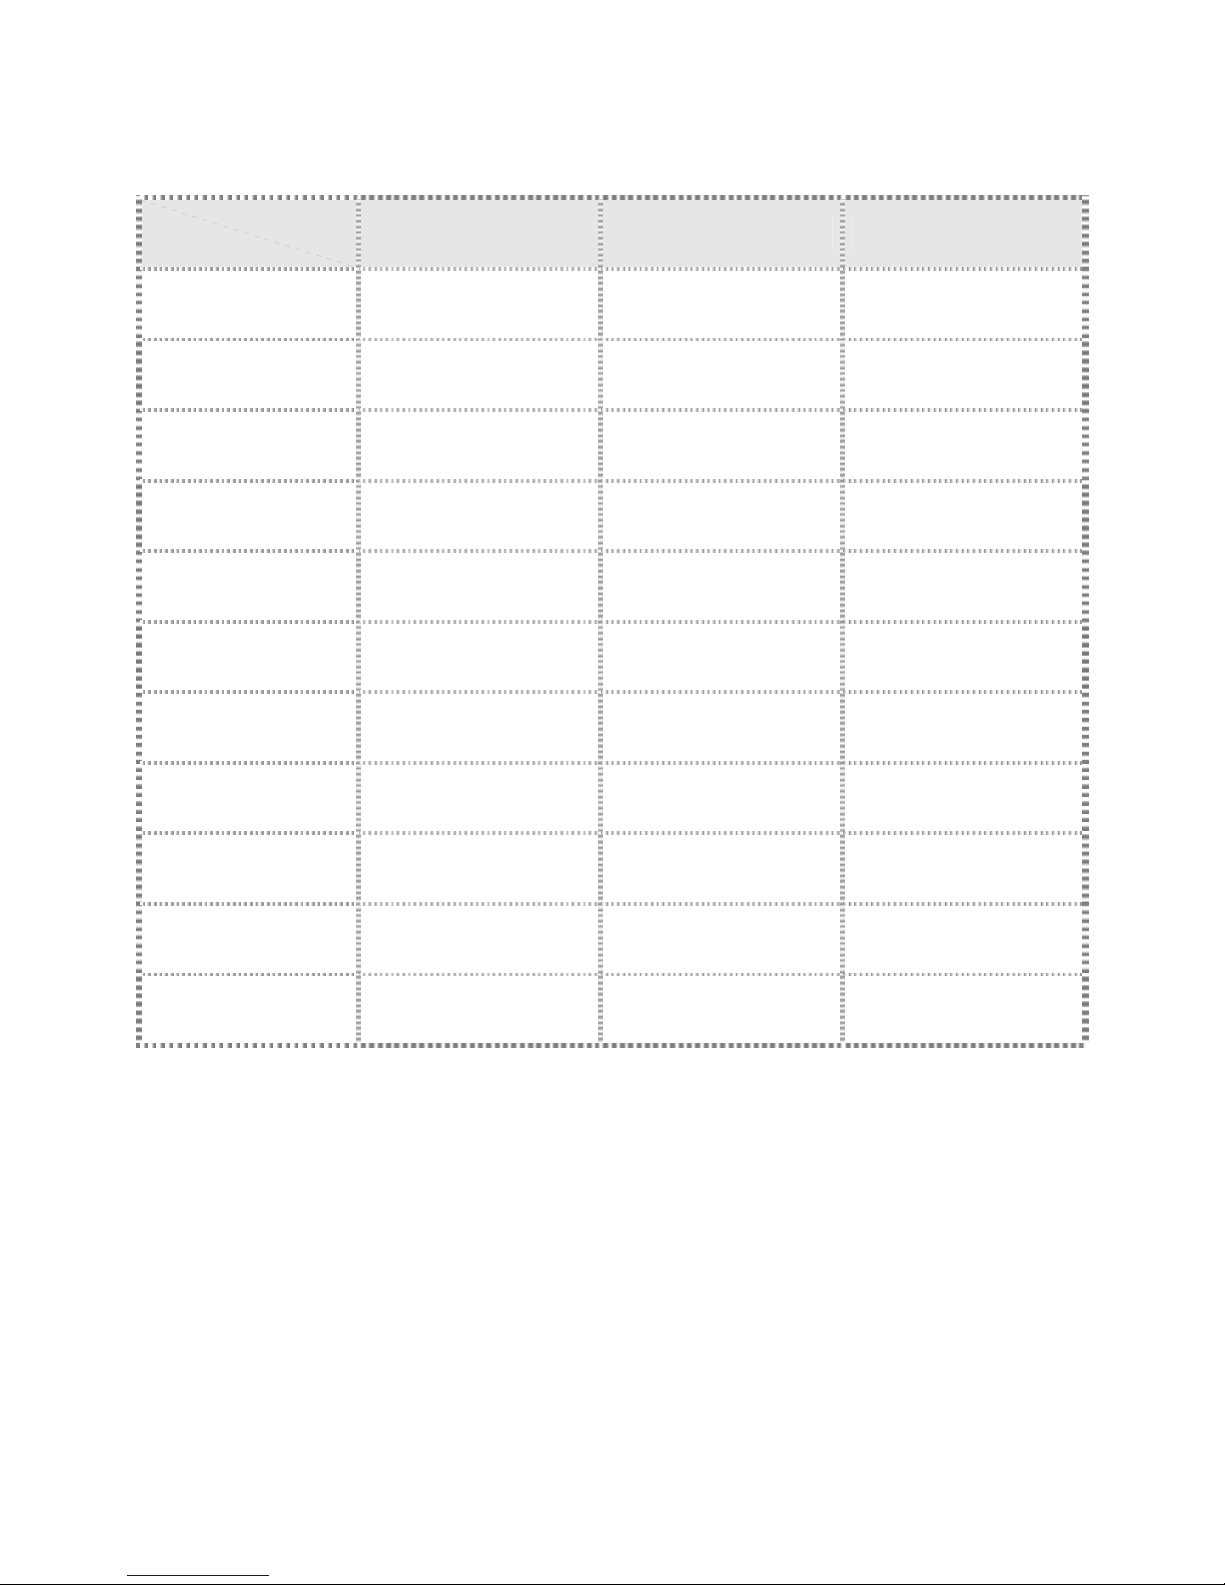
Specification
Model
Spec.
S400 S300 L300
Printing Method Dye Sublimation Dye Sublimation Dye Sublimation
Resolution 403 x 403 dpi 310 x 310 dpi 310 x 310 dpi
Print Paper Size 4” x 6” 4” x 6” 4” x 6”
Printing Speed approximate 70 seconds approximate 50 seconds approximate 50 seconds
Applicable Memory Card
CF I/CFII/Micro drive
SD/SM/MMC/MS/MS Pro
CF I/CFII/Micro drive
SD/SM/MMC/MS/MS Pro
N/A
USB Host
PTP / PictBridge
Mass Storage Devices
PTP / PictBridge
Mass Storage Devices
N/A
Compatible OS
Windows 98/Me/2000/XP
Mac OS X 10.2 or above
Windows 98/Me/2000/XP
Mac OS X 10.2 or above
Windows 98/Me/2000/XP
Mac OS X 10.2 or above
Ribbon Cartridge 50 prints 50 prints 50 prints
Paper Cassette 25 sheets 25 sheets 25 sheets
Power 100~240 V, 50/60 Hz 100~240 V, 50/60 Hz 100~240 V, 50/60 Hz
Weight 2.5 kg (6 lbs) 2.5 kg (6 lbs) 2.5 kg (6 lbs)
Page 45
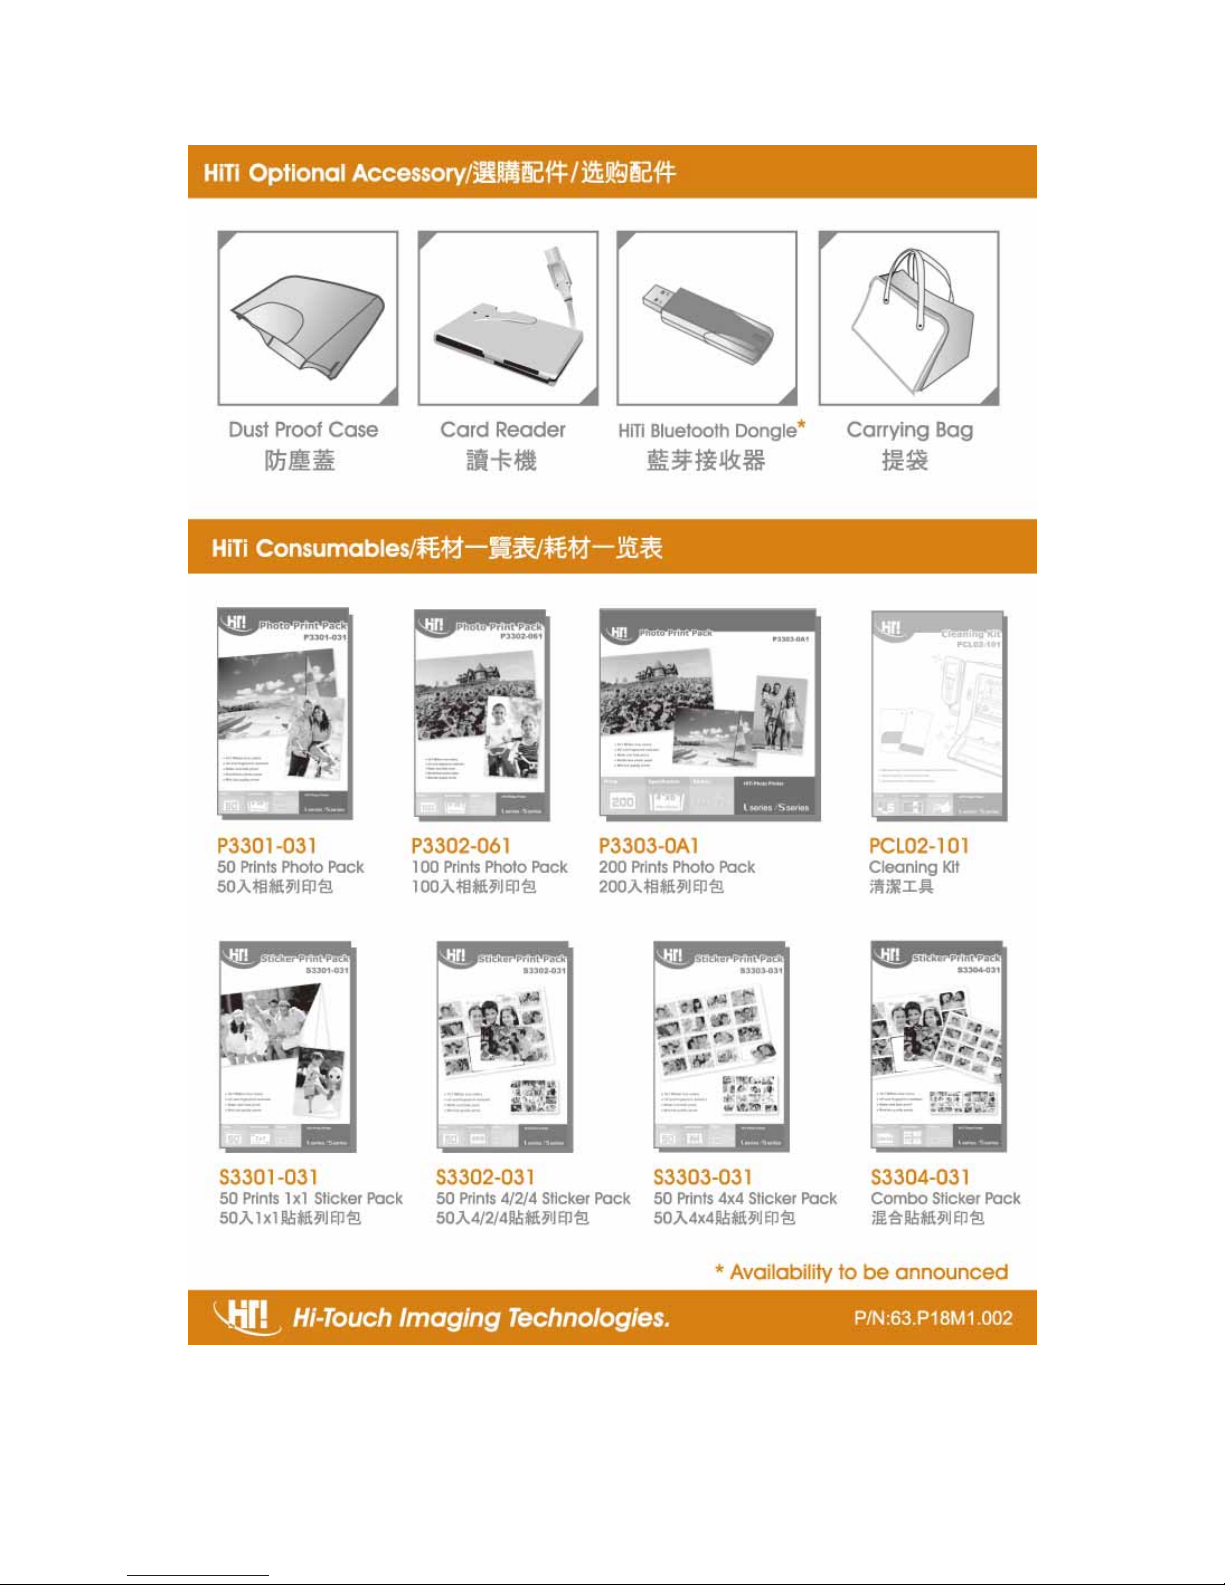
Optional Consumables and Accessories
Page 46
Contact Us
Online Support
For further inquires, please log on to Hi-Touch Imaging technologies website at www.hi-ti.com where you can
download free updated drivers, applications, and latest e-templates.
Global Sites
營運總部
誠研科技股份有限公司
台北縣板橋市雙十路三段 31 號 3 樓
電話:+886-2-82583060
傳真:+886-2-82583062
中国分公司
诚研科技苏州股份有限公司
中国苏州工业园区娄葑镇企鸿路 36 号 C 幢
电话:+86-512-87171688
传真:+86-512-67601186
Hi-Touch Imaging Technologies (America) Inc.
285 S. Dupont Ave, Sutie #104
Ontario, CA 91761
USA
Te l:+1-909-9740099
Fax:+1-909-9740011
Http://www.hitouchimaging.com
Hi-Touch Imaging Technologies Netherlands B.V.
ESP 206, 5633 AC, Eindhoven
The Netherland
Te l:+31-73-6450897
Fax:+31-73-6431366
Http://www.hi-ti.nl
Hi-Touch Imaging Technologies (UK) Limited
Unit 7, Centurion Court, Brick Close, Kiln Farm
Milton Keynes, MK 11 3JB
United Kingdom
Te l:+440-1908-266677
Fax:+440-1908-266678
Http://www.hi-ti.co.uk
Hi-Touch Imaging Technologies (Russia) Limited
10 Vostochnaya ul, Moscow 115280
Russia Federation
Te l:+7-95-5803208
Fax:+7-95-5803206
Http://www.hi-ti.ru
 Loading...