

Page 1

HiTi BS-iD400
User Manual
G
GLOBAL
Page 2

-2 -
General Information
Copyrights
All rights reserved. The information contained in this user guide is subject to change without notice. Hi-Touch
Imaging Technologies makes no warranty with regard to the material, incl uding, but not limited to, the implied
warranties of merchantability and fitness for a particular purpose. Hi-Touch Imaging Technologies will not be liable for
errors contained herein or for incidental or consequential damages in connection with the furnishing, performance, or
use of the material.
Safety Precautions
1 Never attempt to disassemble o r modify the printer. Doing so may lead to electric sho ck or printer malfunction.
2 Do not allow liquids near the printer, which may lead to electric shock or fire.
3 Do not use the printer if the printer body is damaged.
4 Avoid plugging the printer into a socket being used by couple appliances.
5 Do not place the printer on an unstable cart, stand, or table.
6 Make sure the printer is operated under the type of power indicated on the marking label. If you are not sure
the type of power, please consult your dealer or local power company for detail.
7 Do not block air vents protecting the printer from overheating.
8 Always unplug the printer for servicing.
FCC Notice
Do not make any changes or modifications to the equipment unless otherwise specified in the in struction.
This equipment has been tested and found to comply with the limits for a Class B digital device, pursuant to Part 15 of
the FCC Rules. These limits are designed to provide reasonable protection against harmful interference in a
residential installation. This equipment generates, uses, and can radiate radio frequency energy and, if not installed
and used in accordance with the instructions, may cause harmful interference to radio communicatio ns. However,
there is no guarantee that interference will not occur in a particular installation. If this equipment does cause harmful
interference to radio or television reception, which can be determined by turning the equipment off and on, the user is
encouraged to try to correct the interference by one or more of the following measures:
(1) Reorient or relocate the receiving antenna.
(2) Increase the separation between the equipment and receiver.
(3) Never push objects into this equipment through cabinet openings, which may touch da ngerous voltage points or
short out parts that could lead to a fire or electric shock.
(4) Never spill liquid on this equipment.
(5) Connect the equipment into an outlet on a c ircuit difference from that to which the receiver is connected.
Trademarks
Microsoft, MS-DOS, and Windows are registered trademarks of Microsoft Corporation. Adobe and Acrobat are
registered trademarks of Adobe Systems Incorporated. Mac, Macintosh, and Mac OS are trademarks of Apple
Computer, Inc., registered in the U.S. and other countries. Pentium is a U.S. trademark of Intel Corporation.
All other trademarks or registered trademarks are properties of their respective companies.
Page 3

-3 -
Table of Content
1 Check the Package Content
2 Get the Latest Application
3 Comprehend BS-iD400
z LCD Controller
z Front
z Back
z Optional Consumables
z Optional Accessories
4 Install BS-iD400
z Setting Up the Printer
z Installing the Ribbon Cartridge
z Loading the Dedicated Consumables
z Powering Up the Printer
5 Standalone Printing
z Print Photos Without a PC
z Home Menu Introduction
z Main Function Introduction
z Special Function Introduction
6 PC-Link Printing
z Connecting the PC and Printer
z Installing the Printer Driver
z Installing the iDesiree and PhotoDesiree Deluxe
7 Troubleshooting
z Indicator Status
8 Specification
9 Customer Service Information
z Online Support
z Global Sites
Page 4
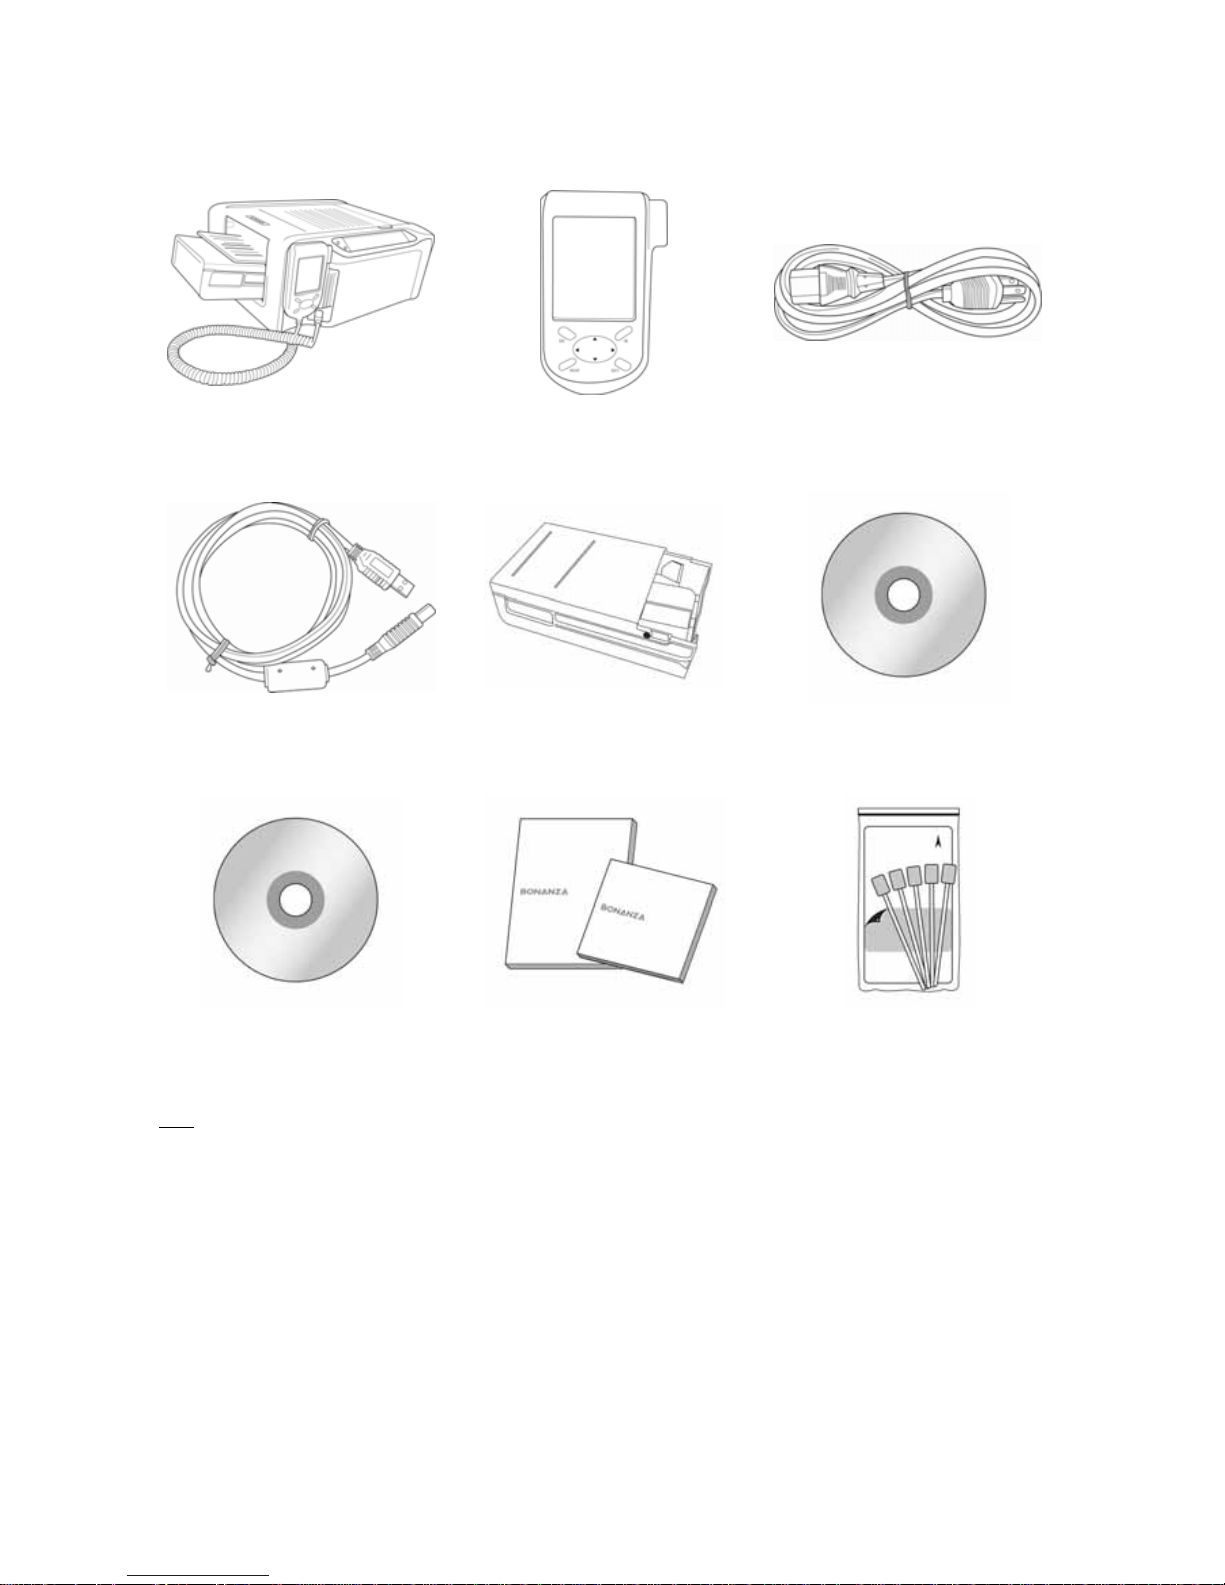
Check the Package Content
Before using BS-iD400, please check the package content for following items:
BS-iD400 LCD Controller Power Cord
USB Cable * Paper Cassette Master CD (iDesiree)
Master CD (iD400 & PDD)
User Manual
(iD400, PDD*, and iDesiree)
* Printer Cleaning Kit
Note
Paper Cassette: 2 types of paper cassettes are included. One type is used for loading photo paper or 1x1 stickers
and the other type is for loading 4/2/4 or 4x4 stickers.
PDD refers to PhotoDesiree Deluxe.
Printer Cleaning Kit includes cleaning kit user guide, cleaning paper, sponge, and micro fiber cleaning cloth.
-4 -
Page 5

-5 -
Acquiring the Latest Application
HiTi website provides the latest driver, application, user manual etc for users to download. Please log on to www.hiti.com for more information. If there is any question toward HiTi product, please contact your local service center for
detail.
Page 6
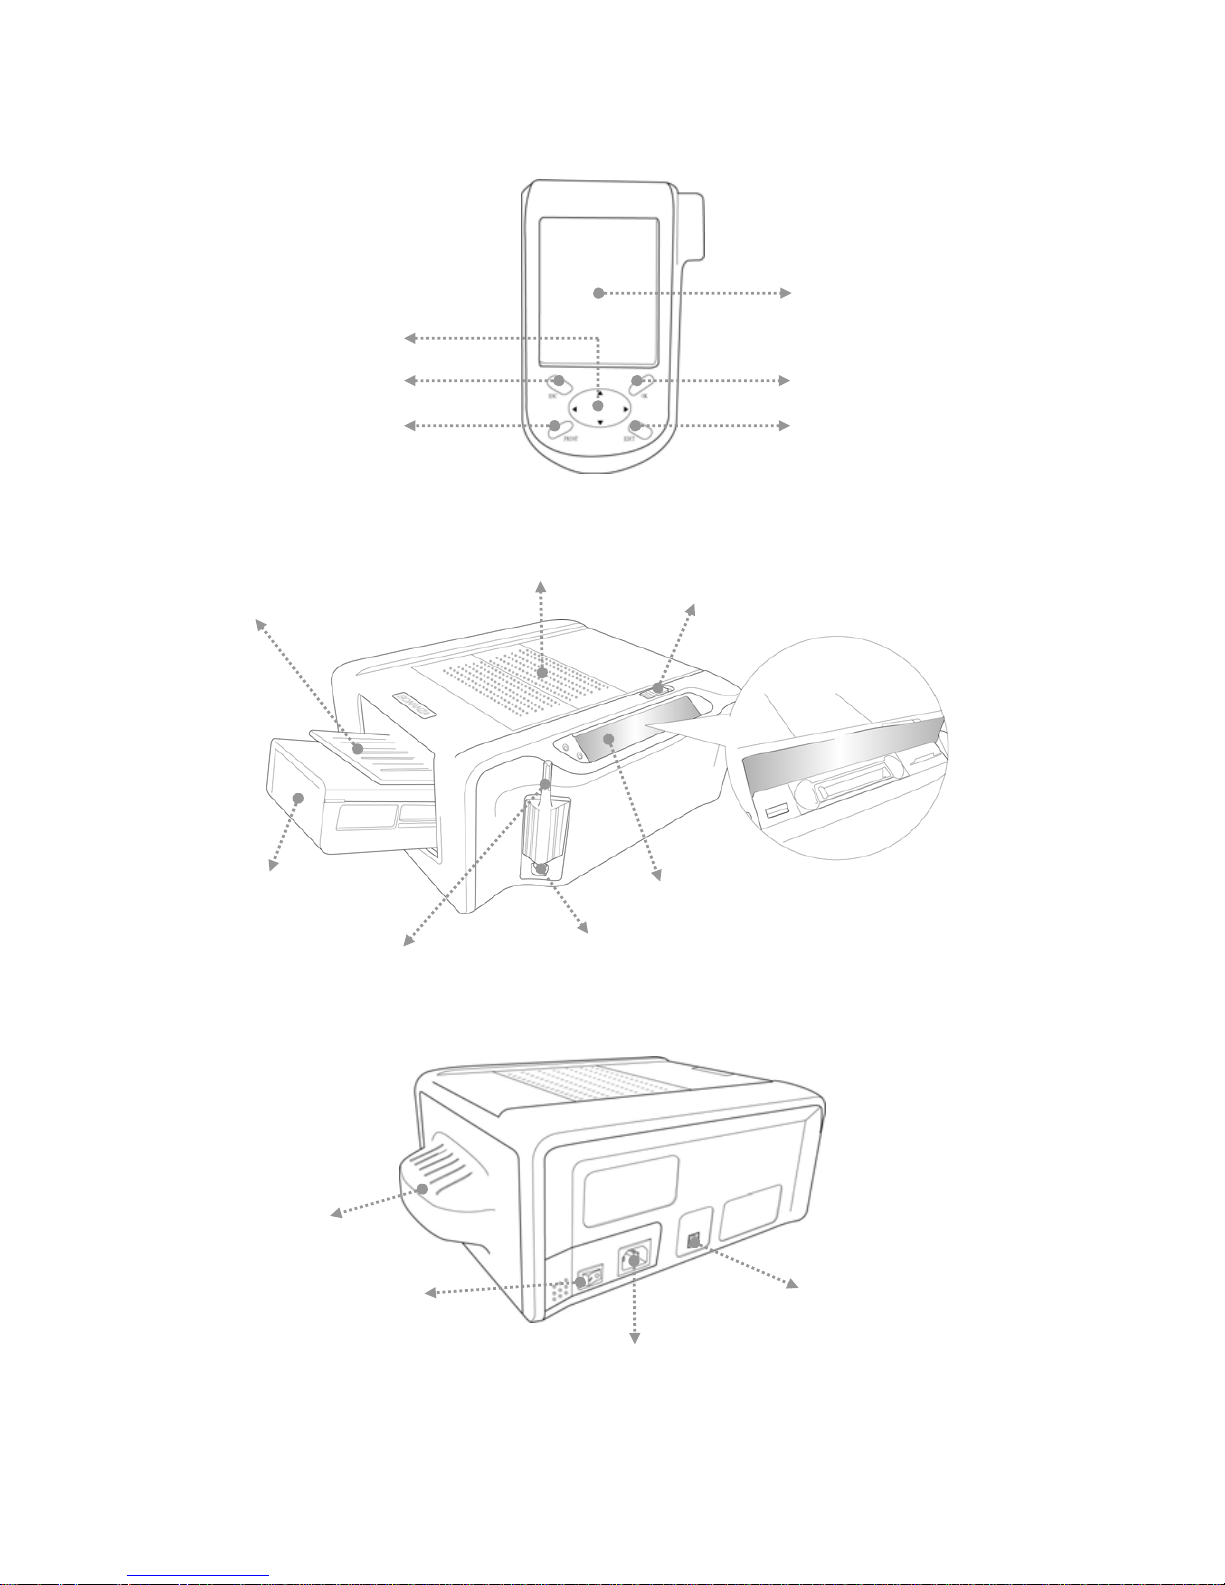
Comprehend the BS-iD400
z LCD Controller
TFT Color LCD
[Directional Button]
[ESC] [OK]
[PRINT] [EDIT]
z Front
Ribbon Door
-6 -
Paper Cassette
Memory Card Slot Cover
Controller Socket
Controller Holder
Ribbon Door Button
Paper Cassette Door
z Back
Dust Shield
USB Host Socket
Power Switch
Power Cord Socket
Page 7
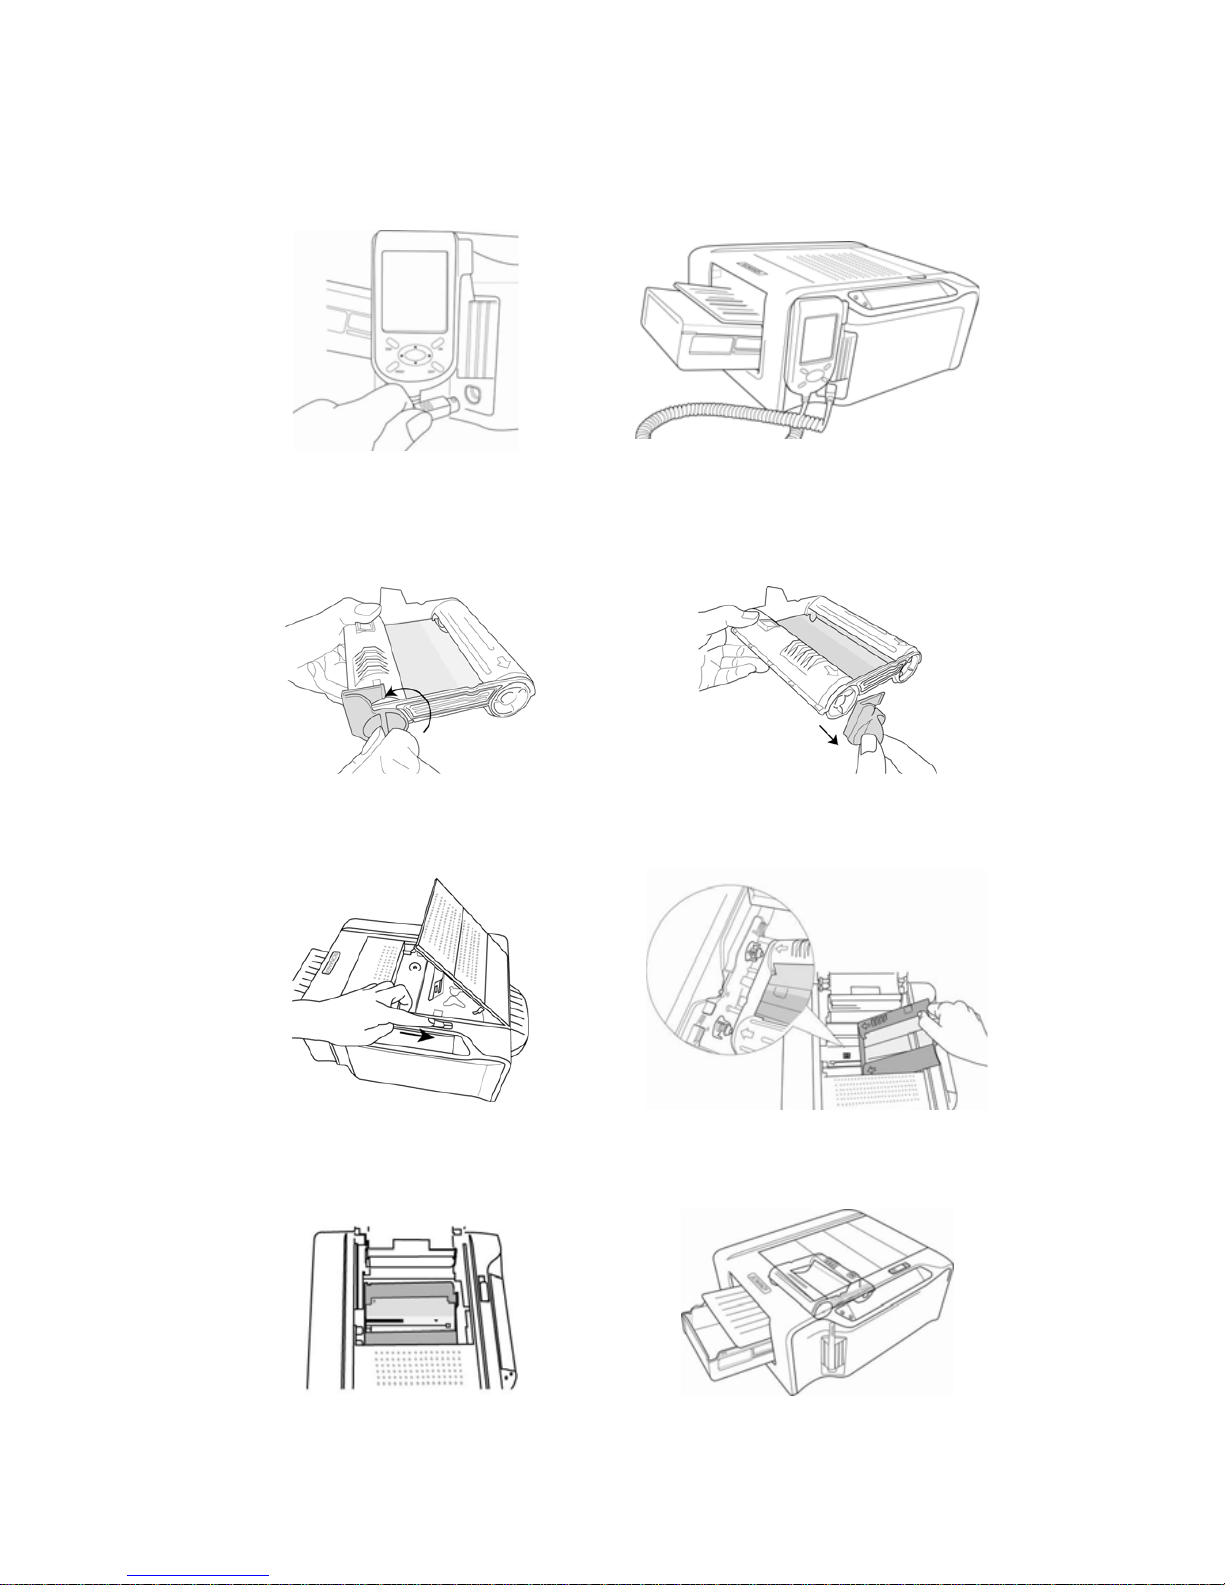
Install the BS-iD400
z Set Up the Printer
01 Connect the LCD controller to BS-iD400
z Install the Ribbon Cartridge
01 Twist the spool lock counter clockwise and remove it as il lustrated.
02 Open the ribbon door and install the ribbon cartridge
03 Close the ribbon door
-7 -
Page 8
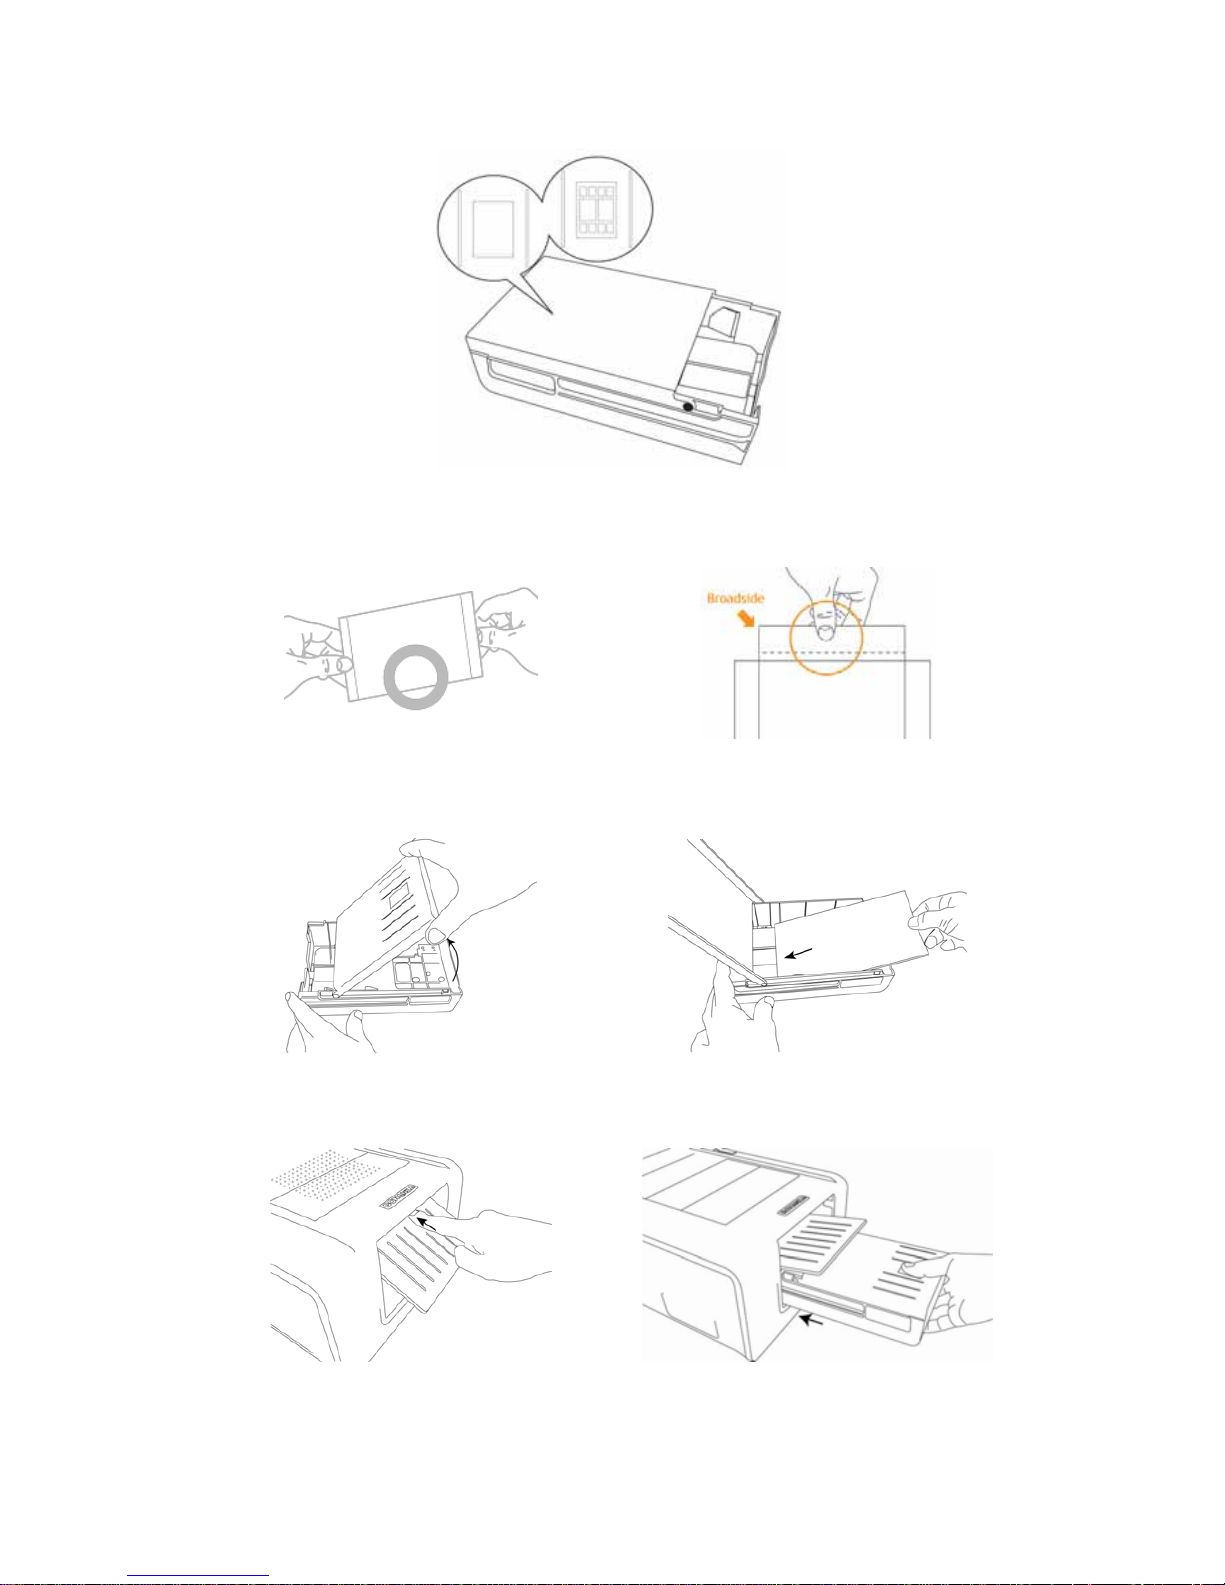
z Load the Dedicated Consumables
01 Identify the difference of 2-paper cassette and then choose the correct
02 Follow the instruction marked on the plastic bag to properly handling of consumables
03 Load photo papers into the paper cassette and then close the cover
04 Inwardly push the paper cassette door and insert paper cassette into the printer
-8 -
Page 9

z Power Up the Printer
01 Plug the power cord in the socket and then turn on the power
-9 -
Page 10
Standalone Printing
z Printing Photos Without a PC
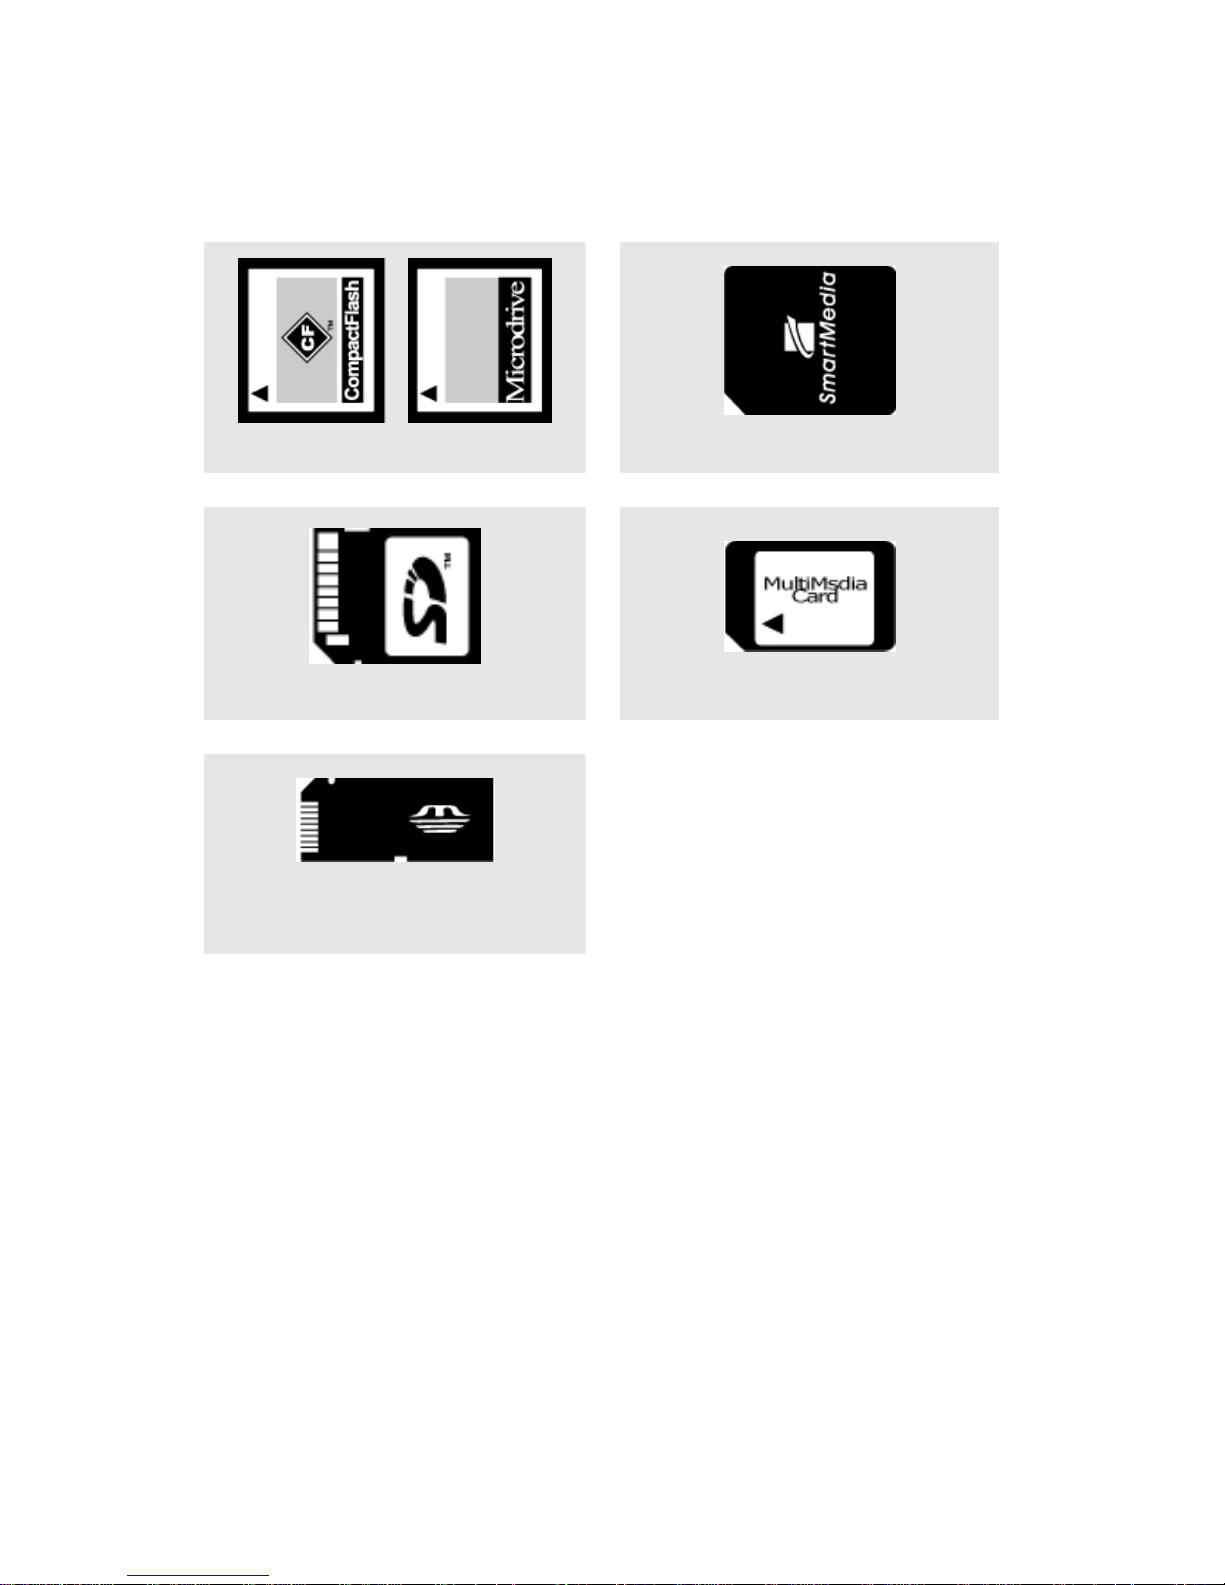
01 Distinguish the type of memory card
Compact Flash (CF) & Micro drive
Smart Media (SM)
Secure Digital (SD)
Multimedia Card (MMC)
Memory Stick (MS)
Memory Stick Pro (MS Pro)
- 10 -
Page 11
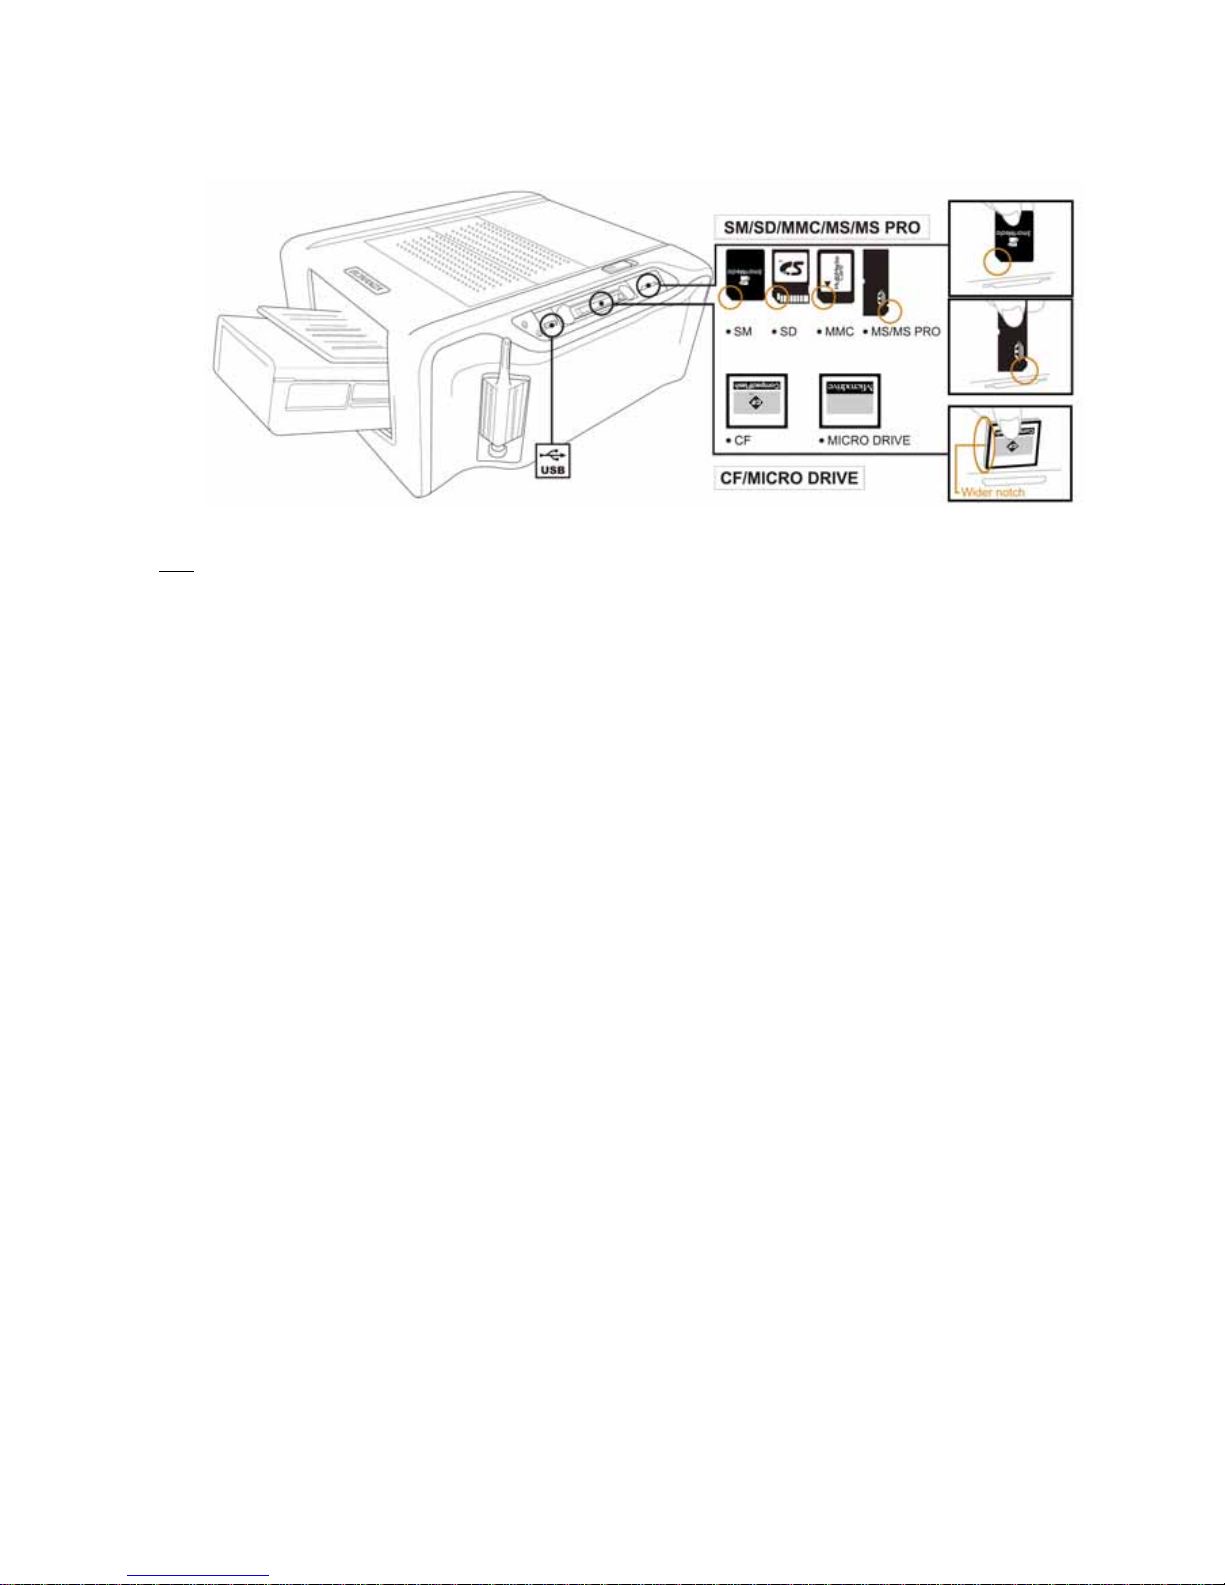
02 Insert memory card *
Note
The Memory Stick duo and xD memory card can be used on BS printer only when a USB card reader or
adapter is used.
03 Print photos withou t a PC
A Set up the printer
(Please see ‘Install BS-iD400’ for detail)
B Install ribbon cartridge
(Please see ‘Install BS-iD400’ for detail)
C Load dedicated photo papers
(Please see ‘Install BS-iD400’ for detail)
D Power up the printer
(Please see ‘Install BS-iD400’ for detail)
E Insert memory card
(Please see ‘Standalone Printing’ for detail)
F Print photos
(Please see ‘Standalone Printing’ for detail)
- 11 -
Page 12
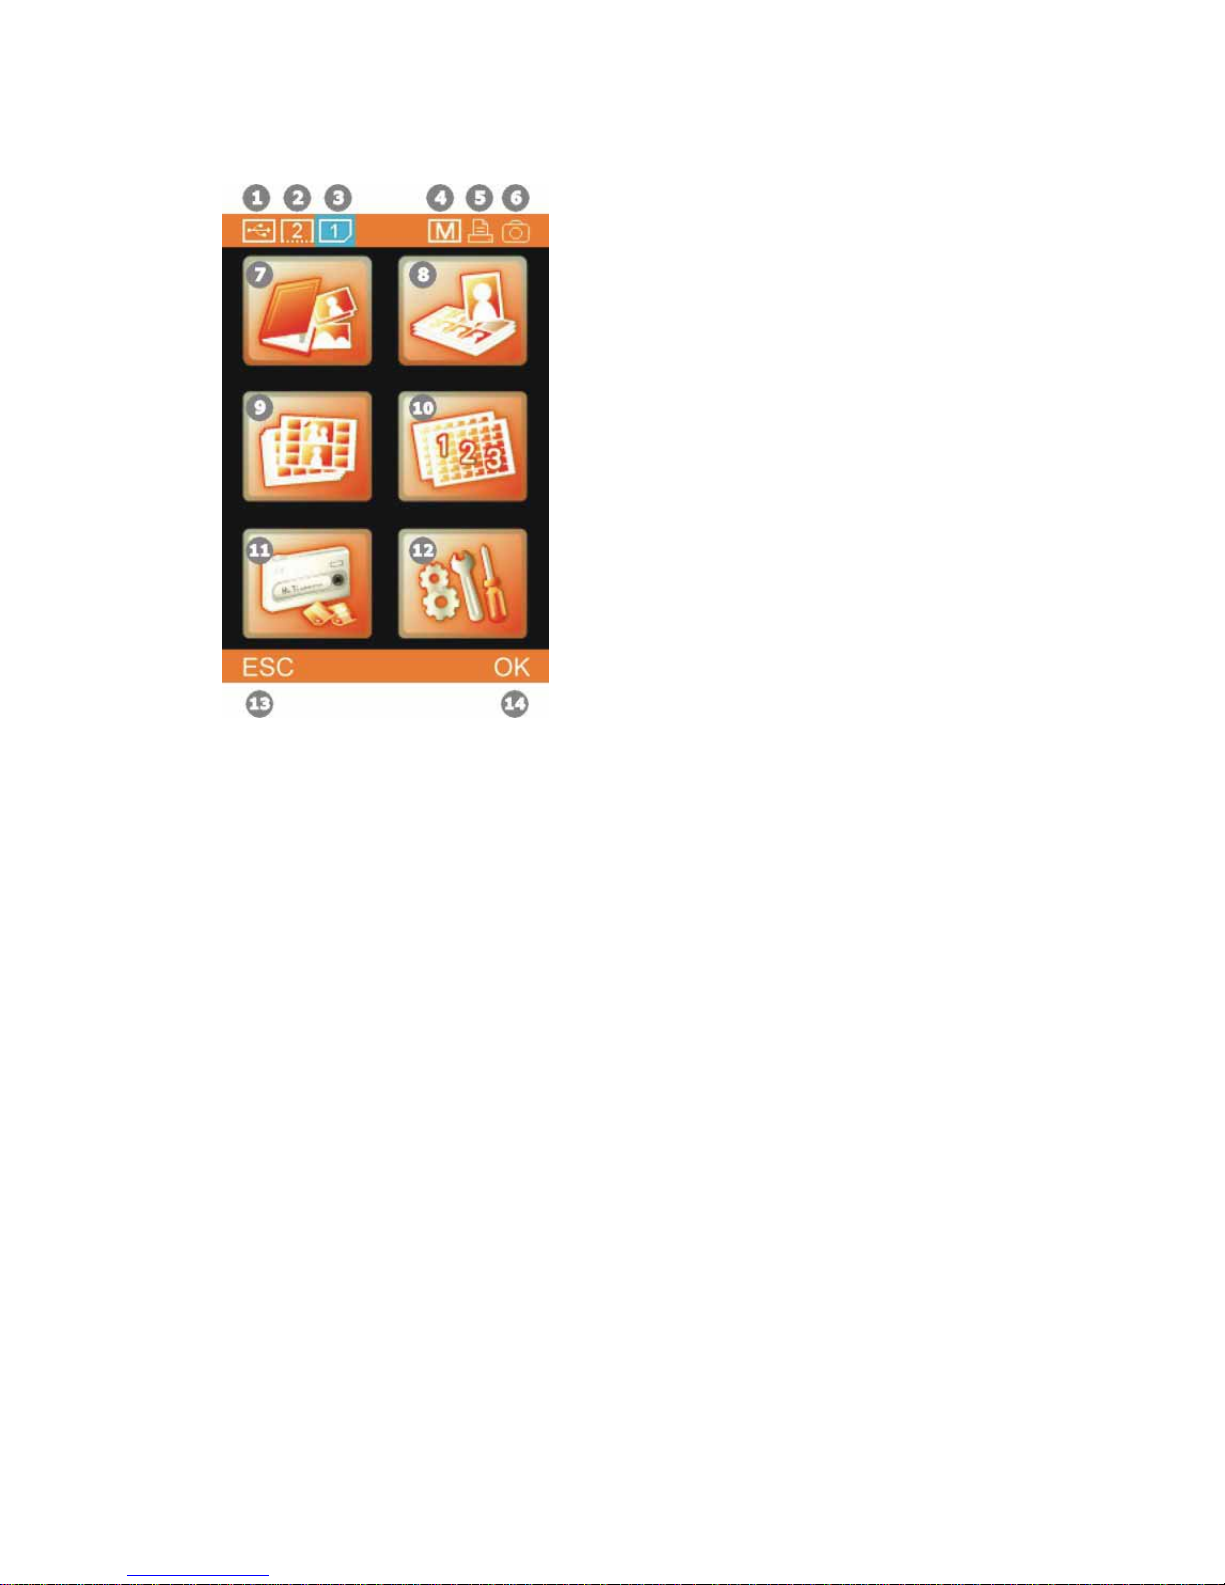
z Home Menu Introduction
①
Imge device from USB host
②
Imge device from CF / Micro Drive
③
Imge device from SD / SM / MMC / MS / MS
④
Matte effect ON
⑤
Printing control by BS iD400
⑥
Printing control by digital camera
⑦
PHOTO
⑧
ID PHOTO
⑨
STICKER
⑩
INDEX
⑪
IMAGE DEVICE
⑫
SETUP
⑬
Cancel or go back
⑭
Confirm or continue
- 12 -
Page 13
z Main Function Instruction
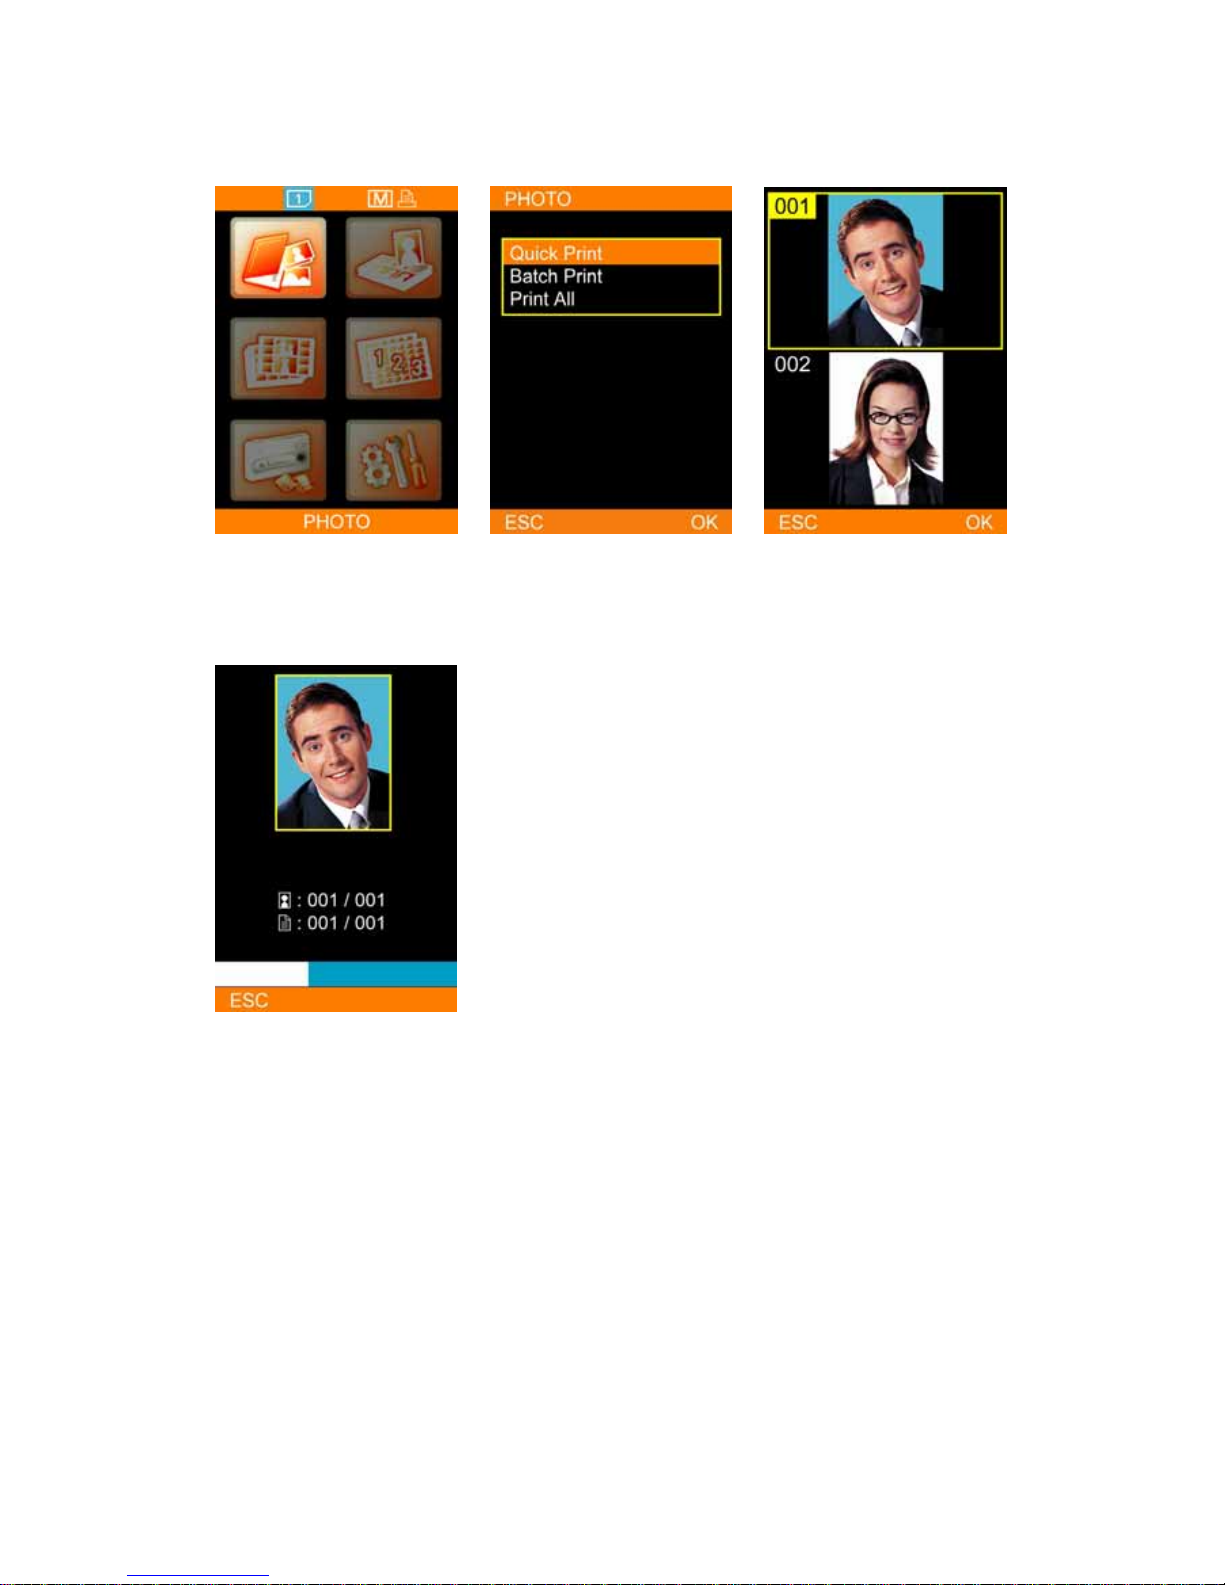
01 Photo
A Quick Print
Choose PHOTO, and press [OK]
to continue.
Select Quick Print. Note that
Quick Print item does not
allow users to edit photos
selected.
Select a photo, and then press
[OK] or [PRINT] to start
printing.
BS-iD400 is processing the job.
- 13 -
Page 14
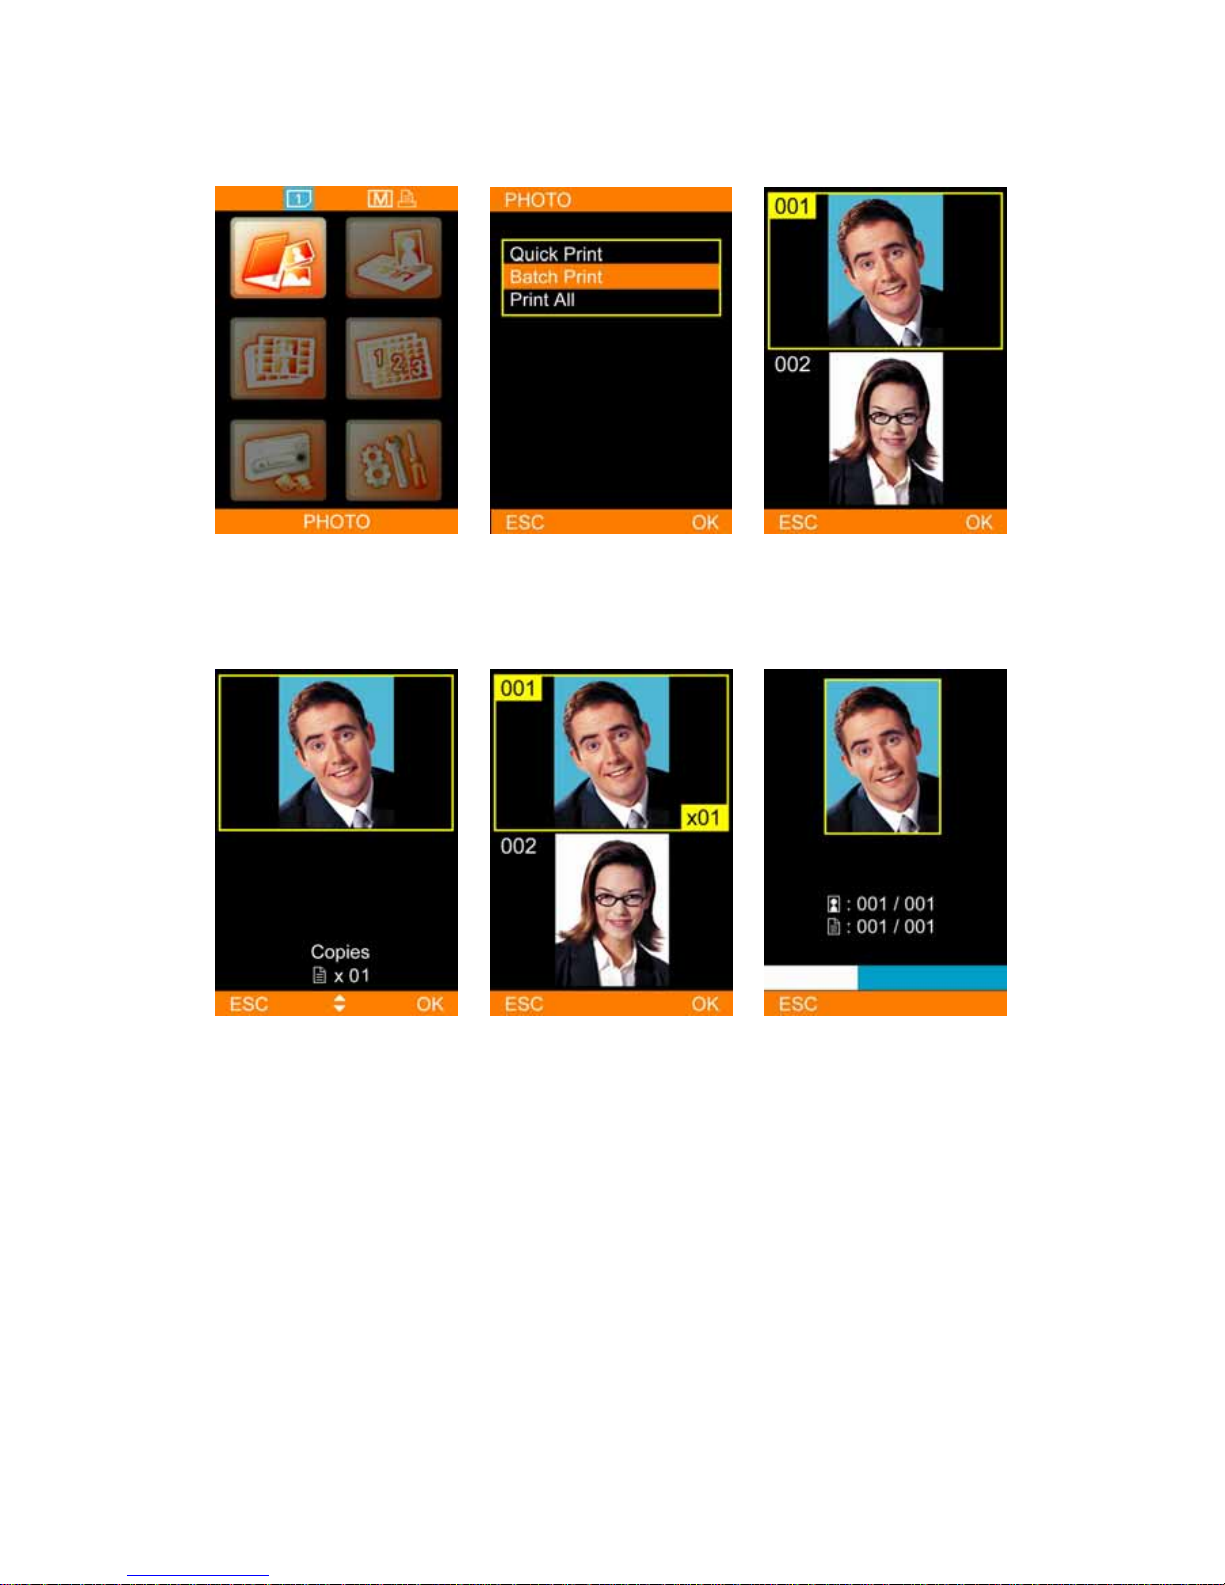
B Batch Print
Choose PHOTO, and press [OK]
to continue.
Select Batch Print, and then
press [OK] to continue.
Pick a photo for output, and then
press [OK] to continue or press
[EDIT] to start editing. As to
how to edit photos, please
see Special Function
Introduction for detail.
Use directional button to
determine the number of copies,
and then press [OK] to go back
image navigator.
The number of copies chosen is
displayed at lower right corner.
Repeat step 3 and step 4, when
everything is done, please press
[PRINT] to start printing.
BS-iD400 is processing the job.
- 14 -
Page 15
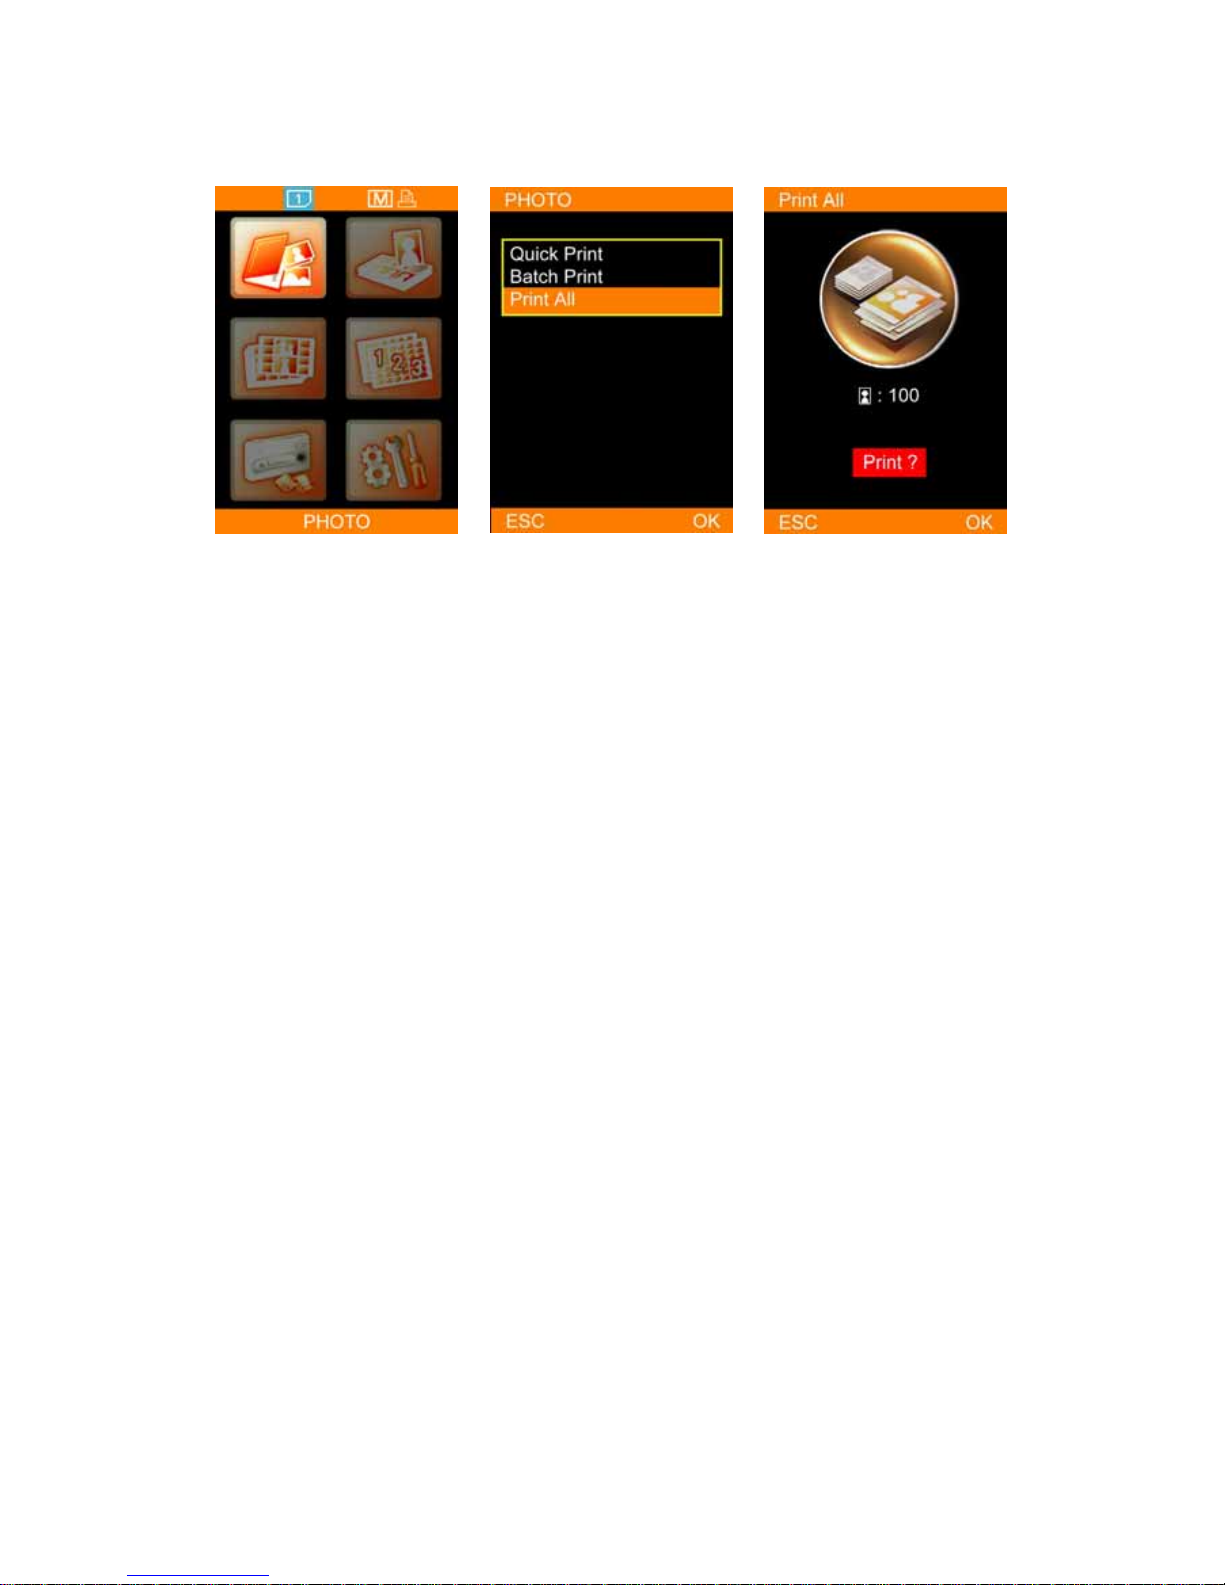
C Print All
Choose PHOTO, and press [OK]
to continue.
Select Print All, and then press
[OK] to continue.
Confirm the number of copies,
and press [OK] or [PRINT] to
start printing. Or press [ESC]
to go back.
- 15 -
Page 16
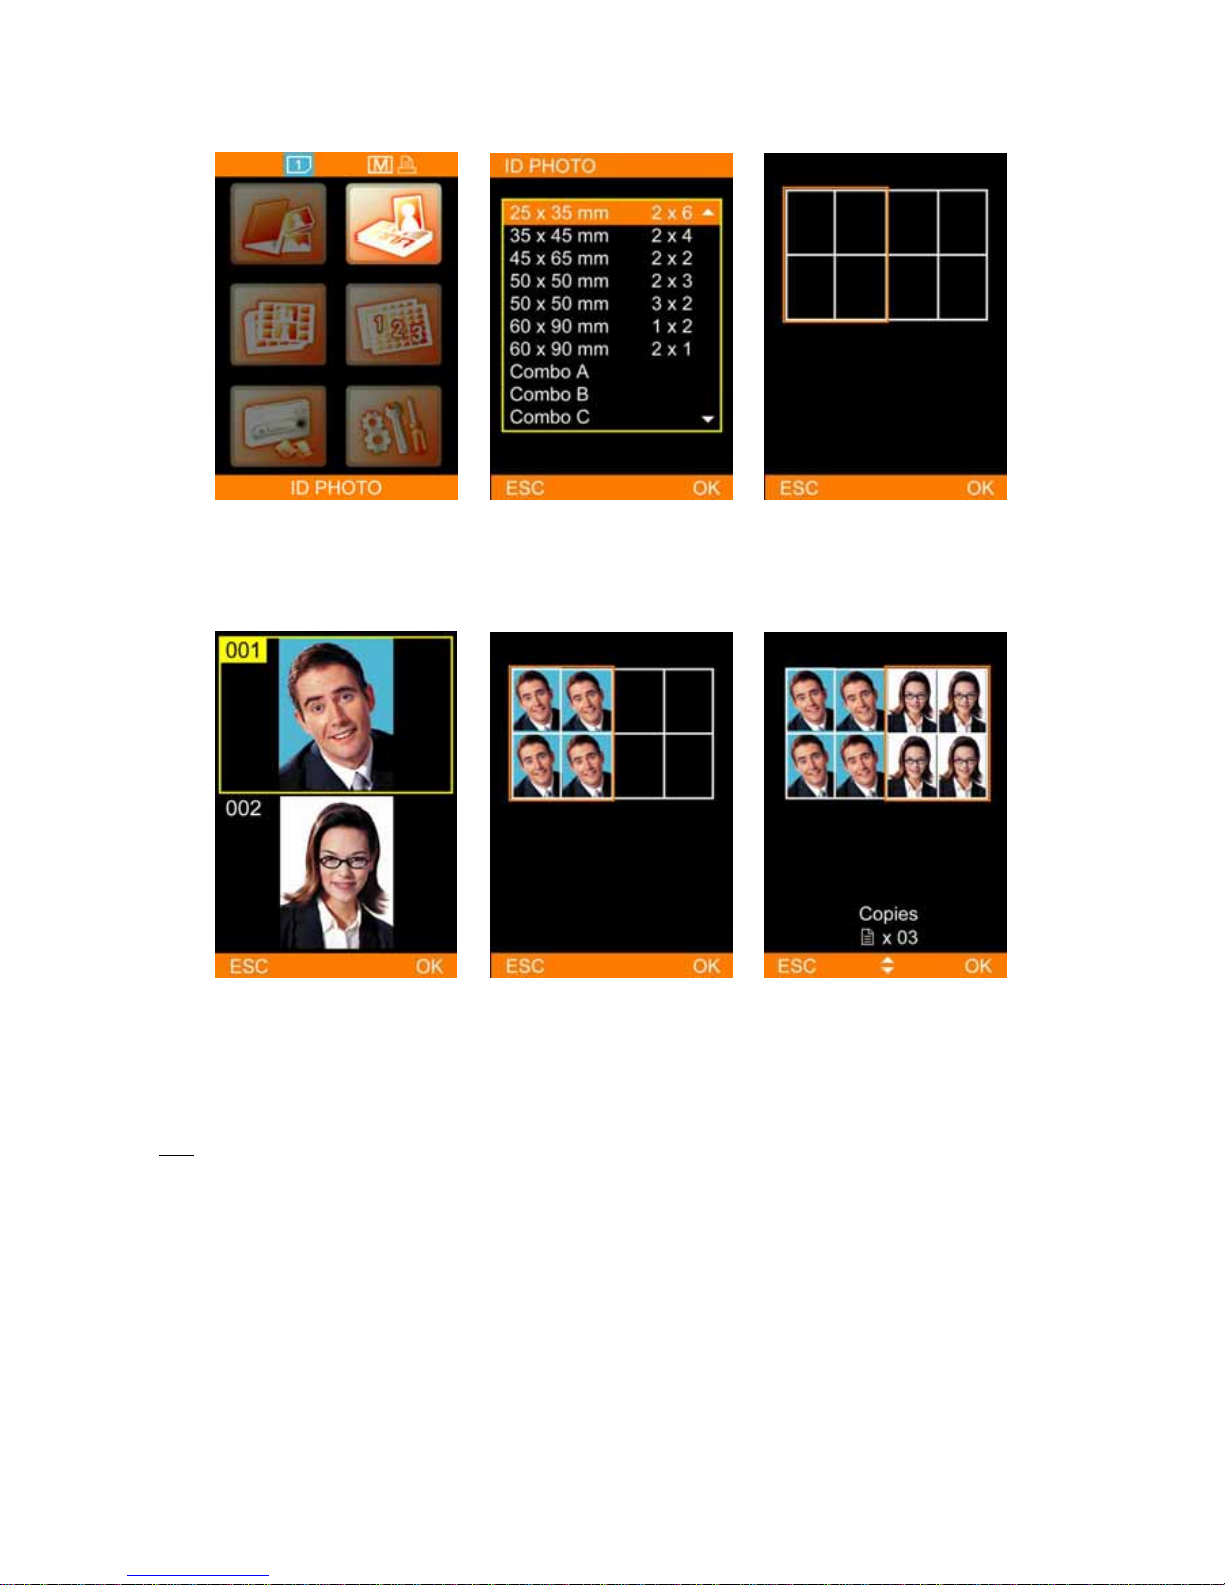
02 ID Photo
Choose ID PHOTO, and press
[OK] to continue.
Select an ID format, and then
press [OK] to continue.
Load images into column
highlighted.
Select an image, and then press
[OK] to continue.
Repeat step 3 and step 4 to
finish loading images into the
second column.
* When all columns are filled,
please determine the number of
copies and press [PRINT] to
start printing.
Note
It is allowed to change images loaded before by pressing [OK] when the selector aims at the image.
- 16 -
Page 17
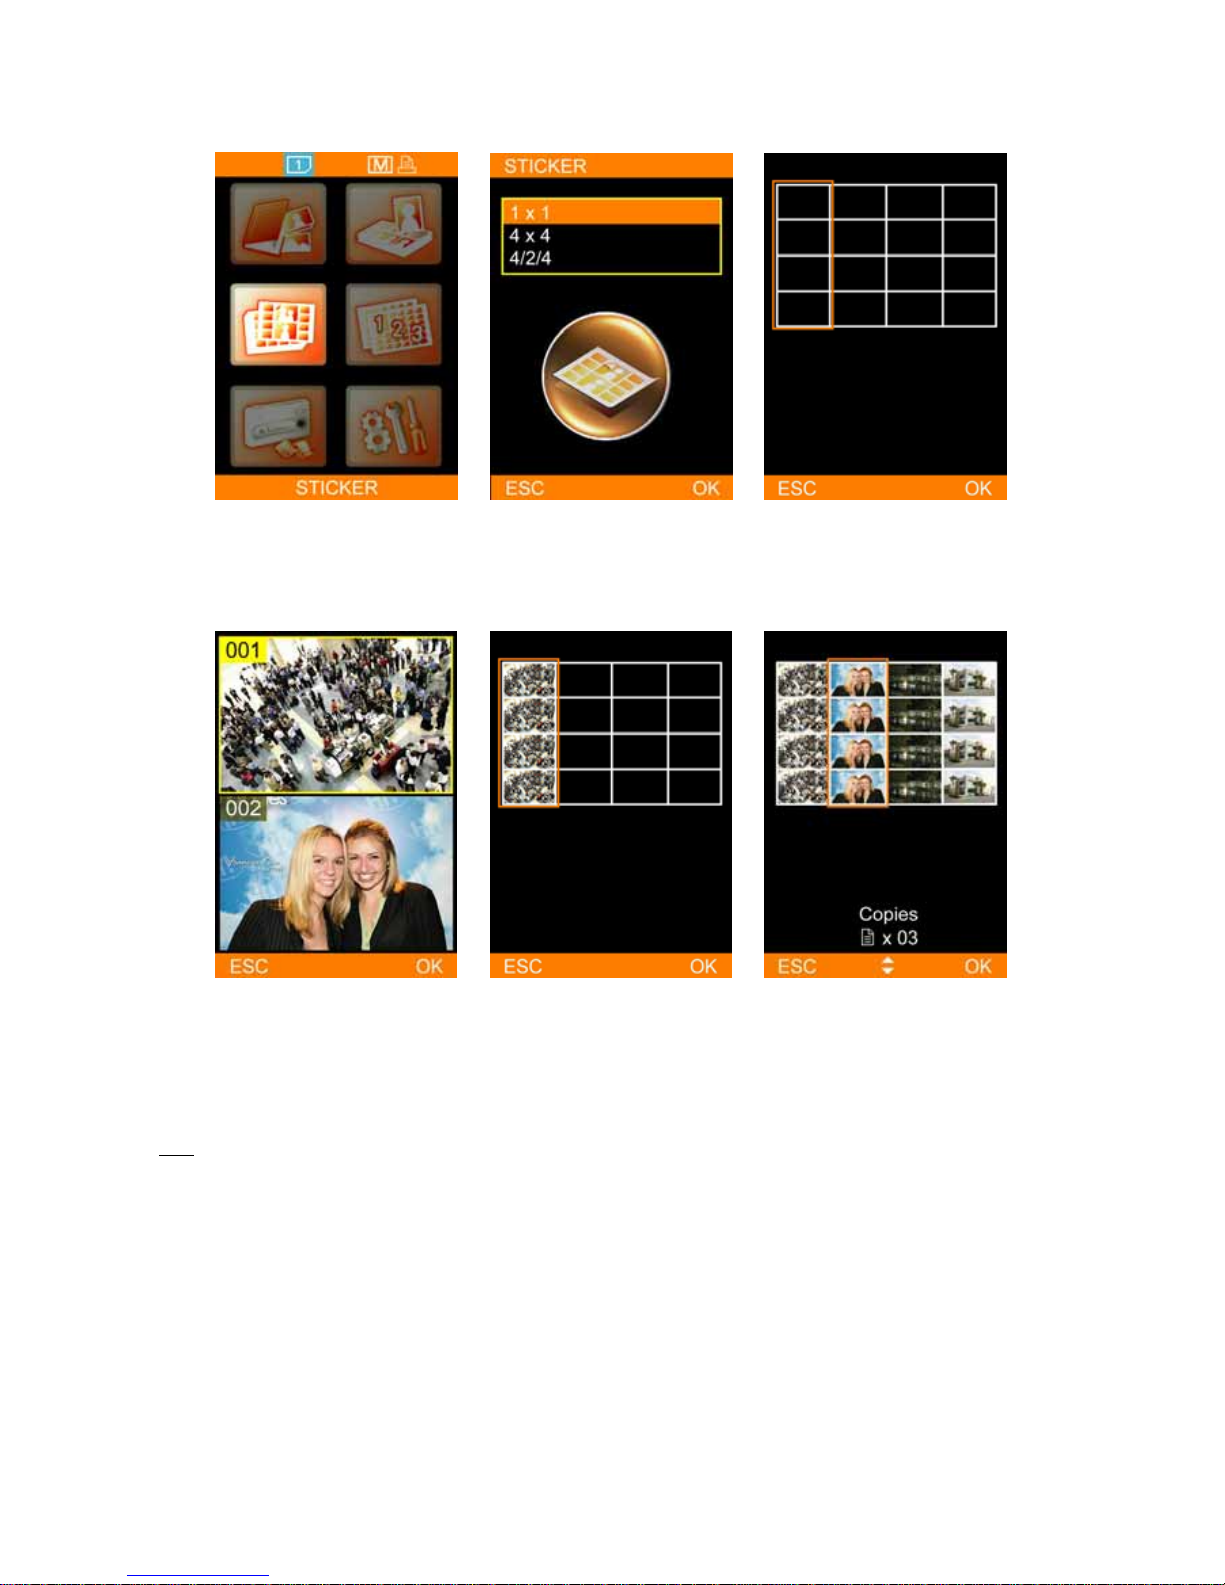
03 Sticker
Choose STICKER, and press [OK]
to continue.
Select a sticker format, and then
press [OK] to continue.
Load images into column
highlighted.
Pick an image, and then press
[OK] to continue.
Repeat step 3 and step 4 to
continue filling the rest of the
columns.
* When all columns are filled,
please choose the number of
copies and press [PRINT] to
start printing.
Note
It is allowed to change images loaded before by pressing [OK] when the selector aims at the image.
- 17 -
Page 18
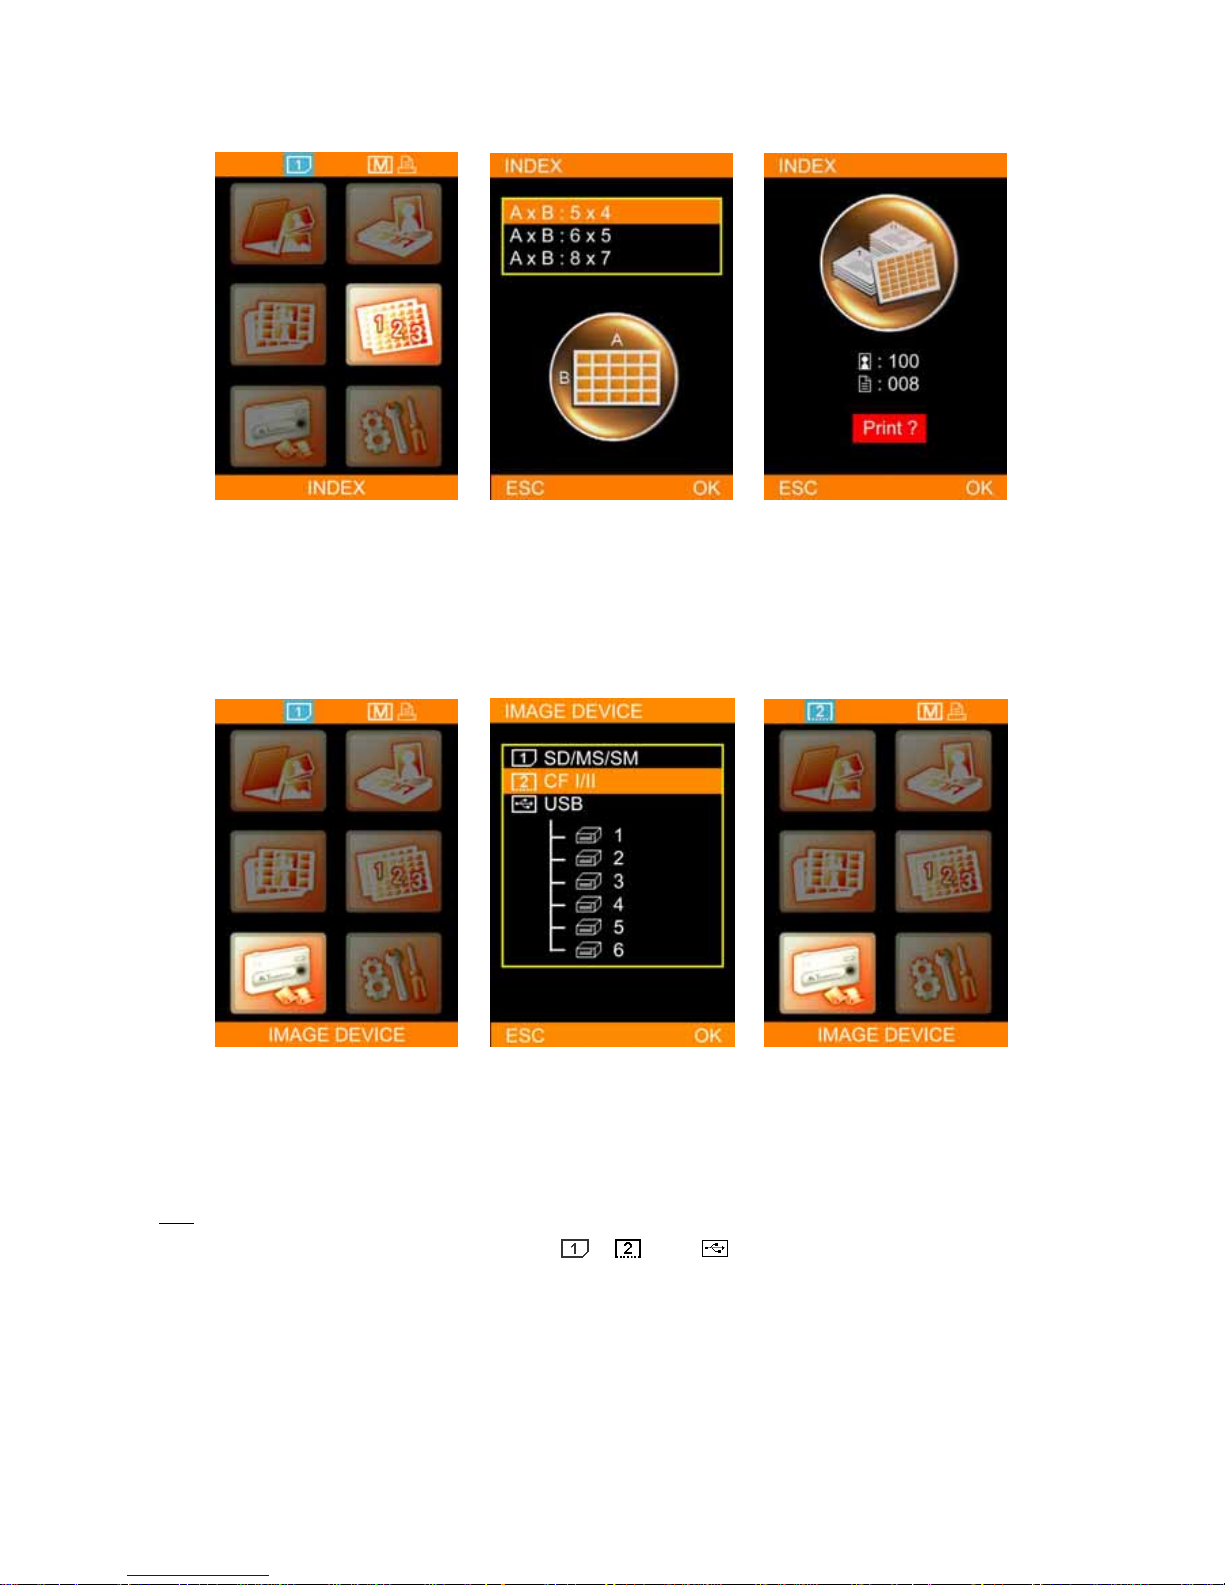
04 Index
Choose INDEX, and press [OK]
to continue.
Select an index format, and then
press [OK] to continue.
The printer automatically counts
the copy of prints based on the
index format. Please press [OK]
or [PRINT] to start printing or
press [ESC] to go back.
05 Image Device
Choose IMAGE DEVICE, and
press [OK] to continue.
Select an image device as the
image source, and then press
[OK] to save the setting.
The selected image device is
displayed in blue.
Note
For more information about the image device (
), ( ), and ( ), please refer to Home Menu Instruction.
- 18 -
Page 19
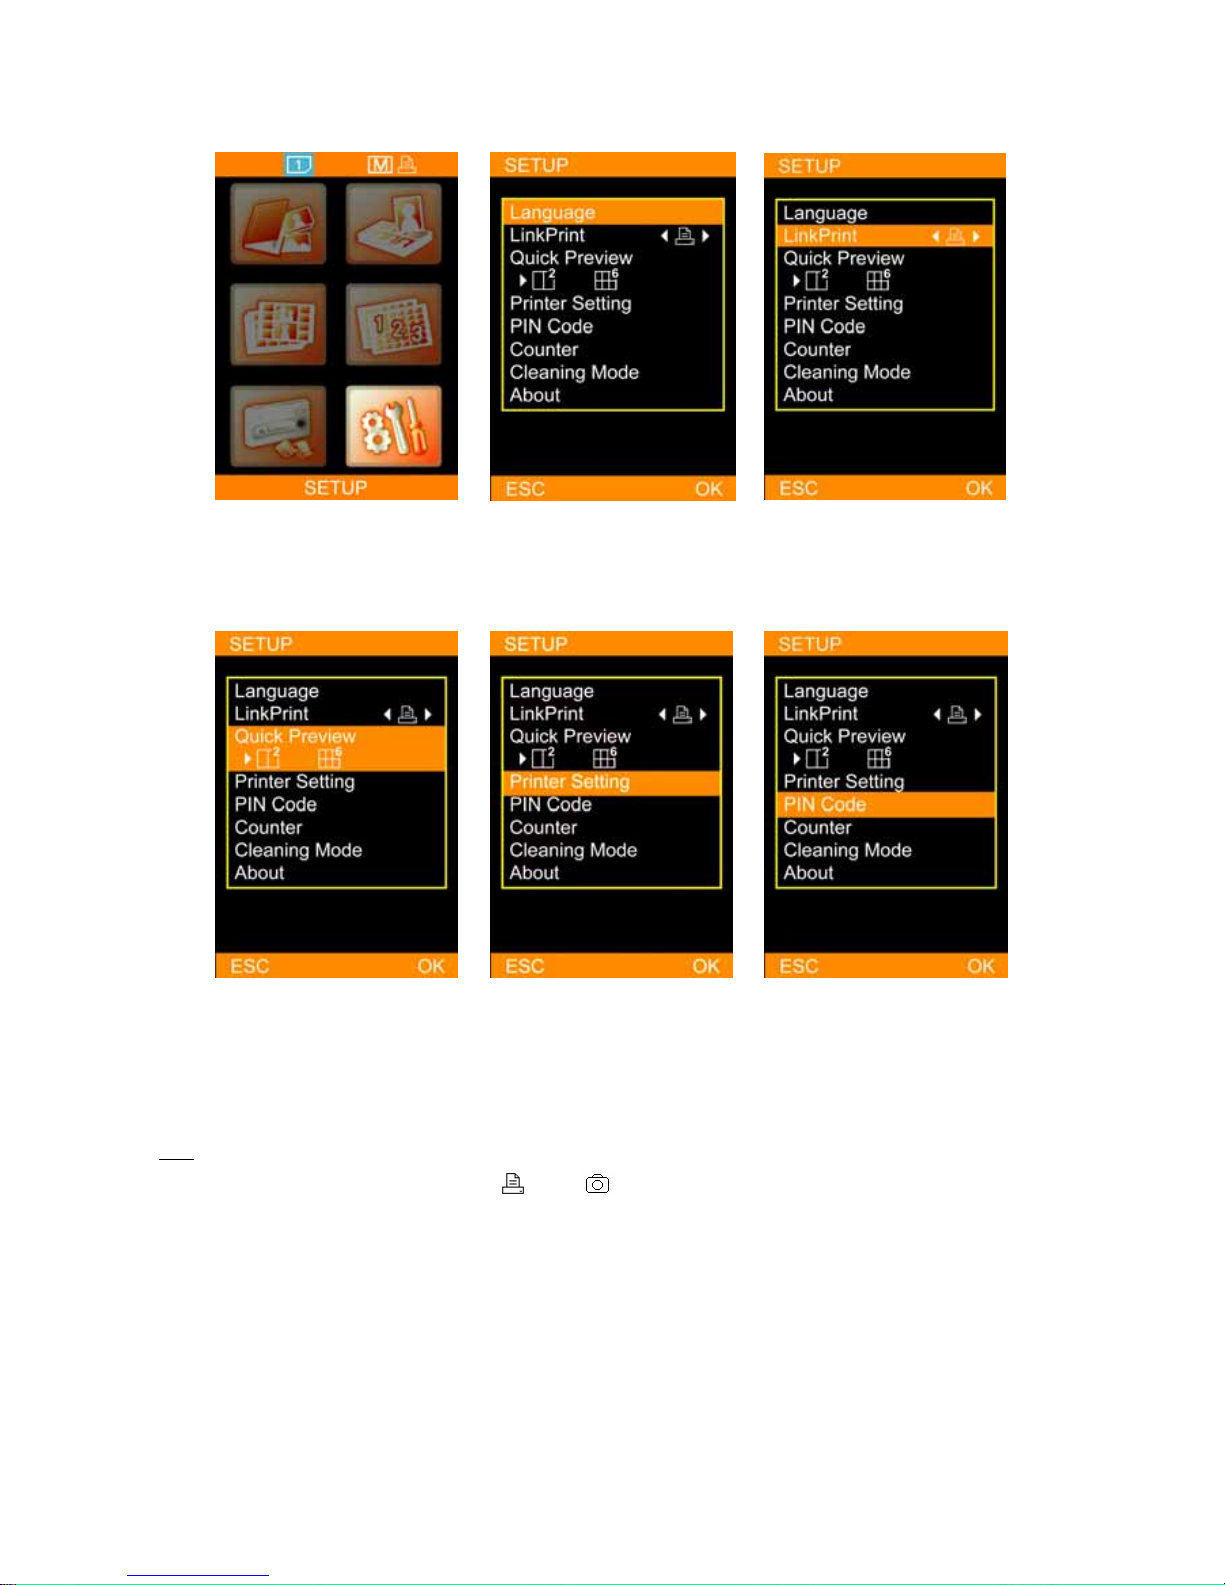
06 Setup
Choose SETUP, and press [OK] to
continue.
Language: Accessible languages
on BS-iD400 may vary from
region to region.
LinkPrint: Users are allowed to
control the BS-iD400 by using
the LCD controller or by using a
digital camera.*
Quick Preview: Choose between
2 or 6-image navigator. The
image navigator can display up
to 6-image per page.
Printer Setting: Allows users to
enable or disable Auto-Color and
Matte effect, adjust LCD screen,
color setting, and print position.
PIN Code: To assure printer
security, a PIN code can be set.
Once set, the PIN code would
have to be entered when the
printer reboots or the printing
list is being cleared.
Note
For more information about LinkPrint (
) and ( ), please refer to the Home Menu Instruction.
- 19 -
Page 20
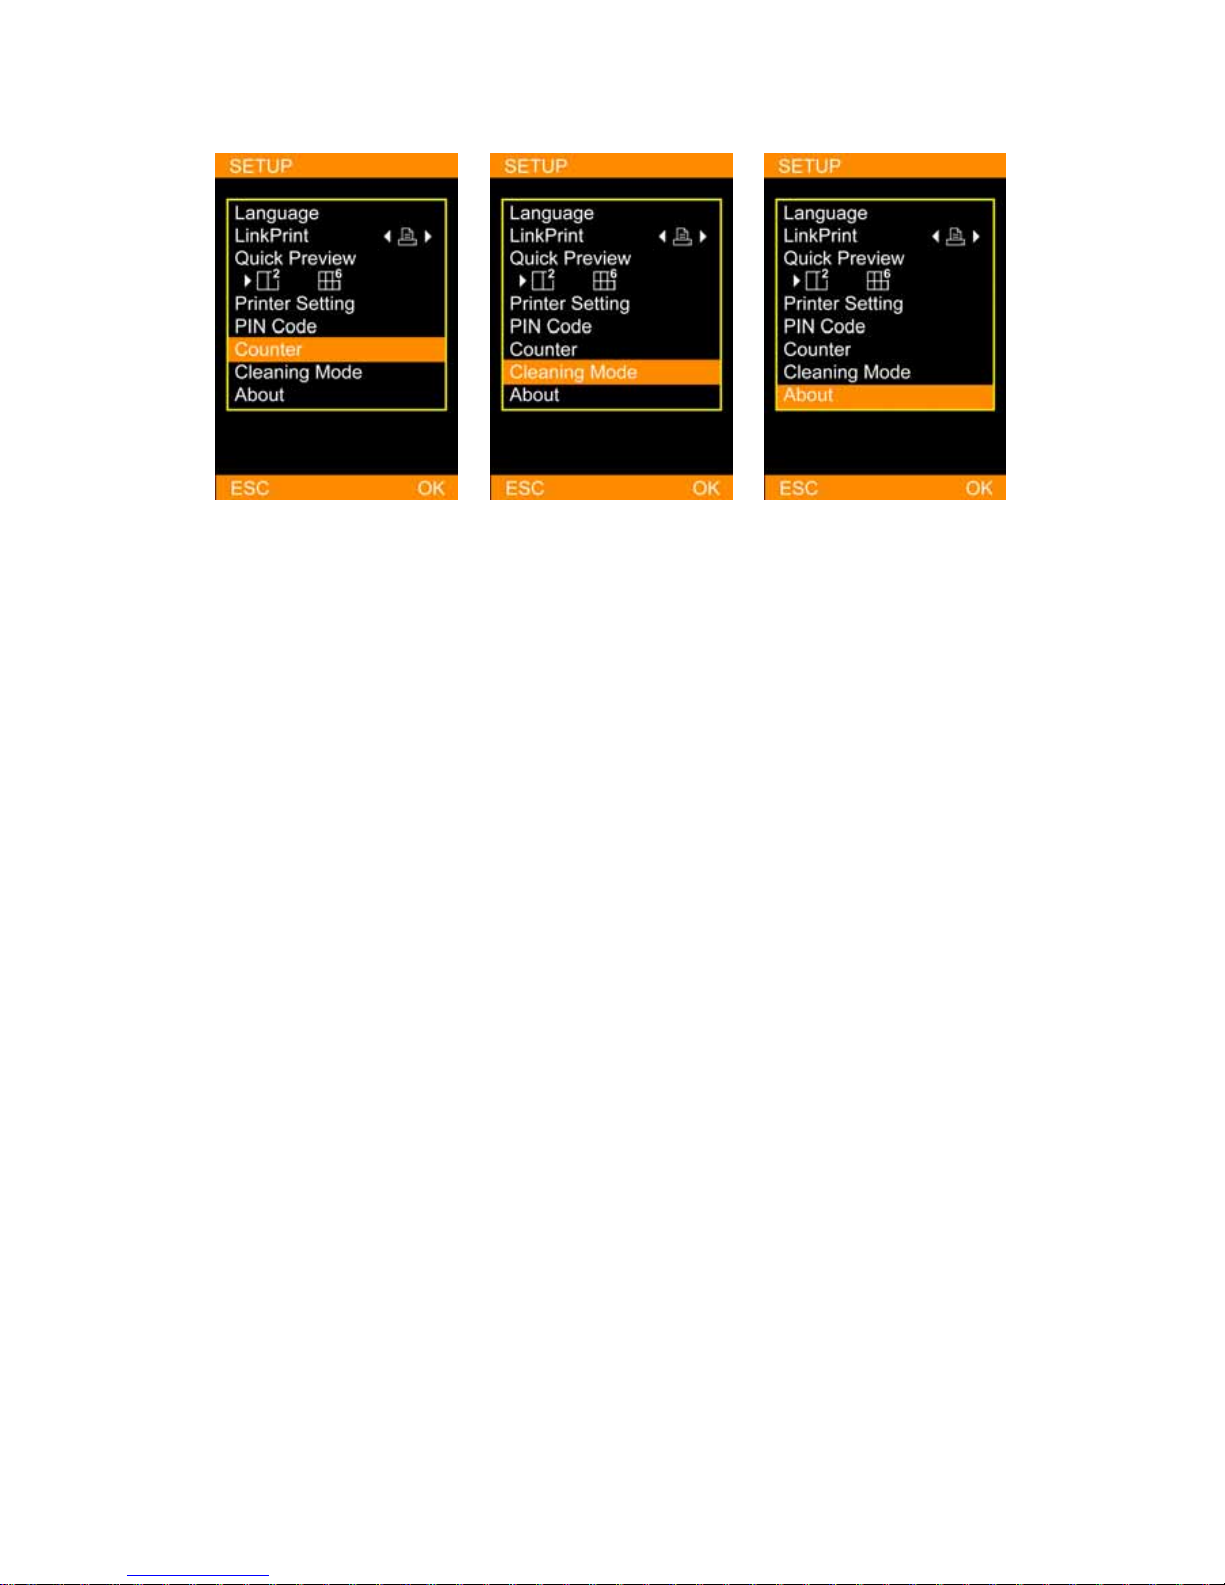
Counter: The printer can record
all printing activity. The user is
allowed to reset the counter if
the PIN code is correctly entered.
Cleaning Mode: HiTi strongly
suggest users to utilize this
function frequently to keep the
printer in optimal condition.
About: It displays information
about the current printer
firmware, color table version,
and controller firmware version.
- 20 -
Page 21
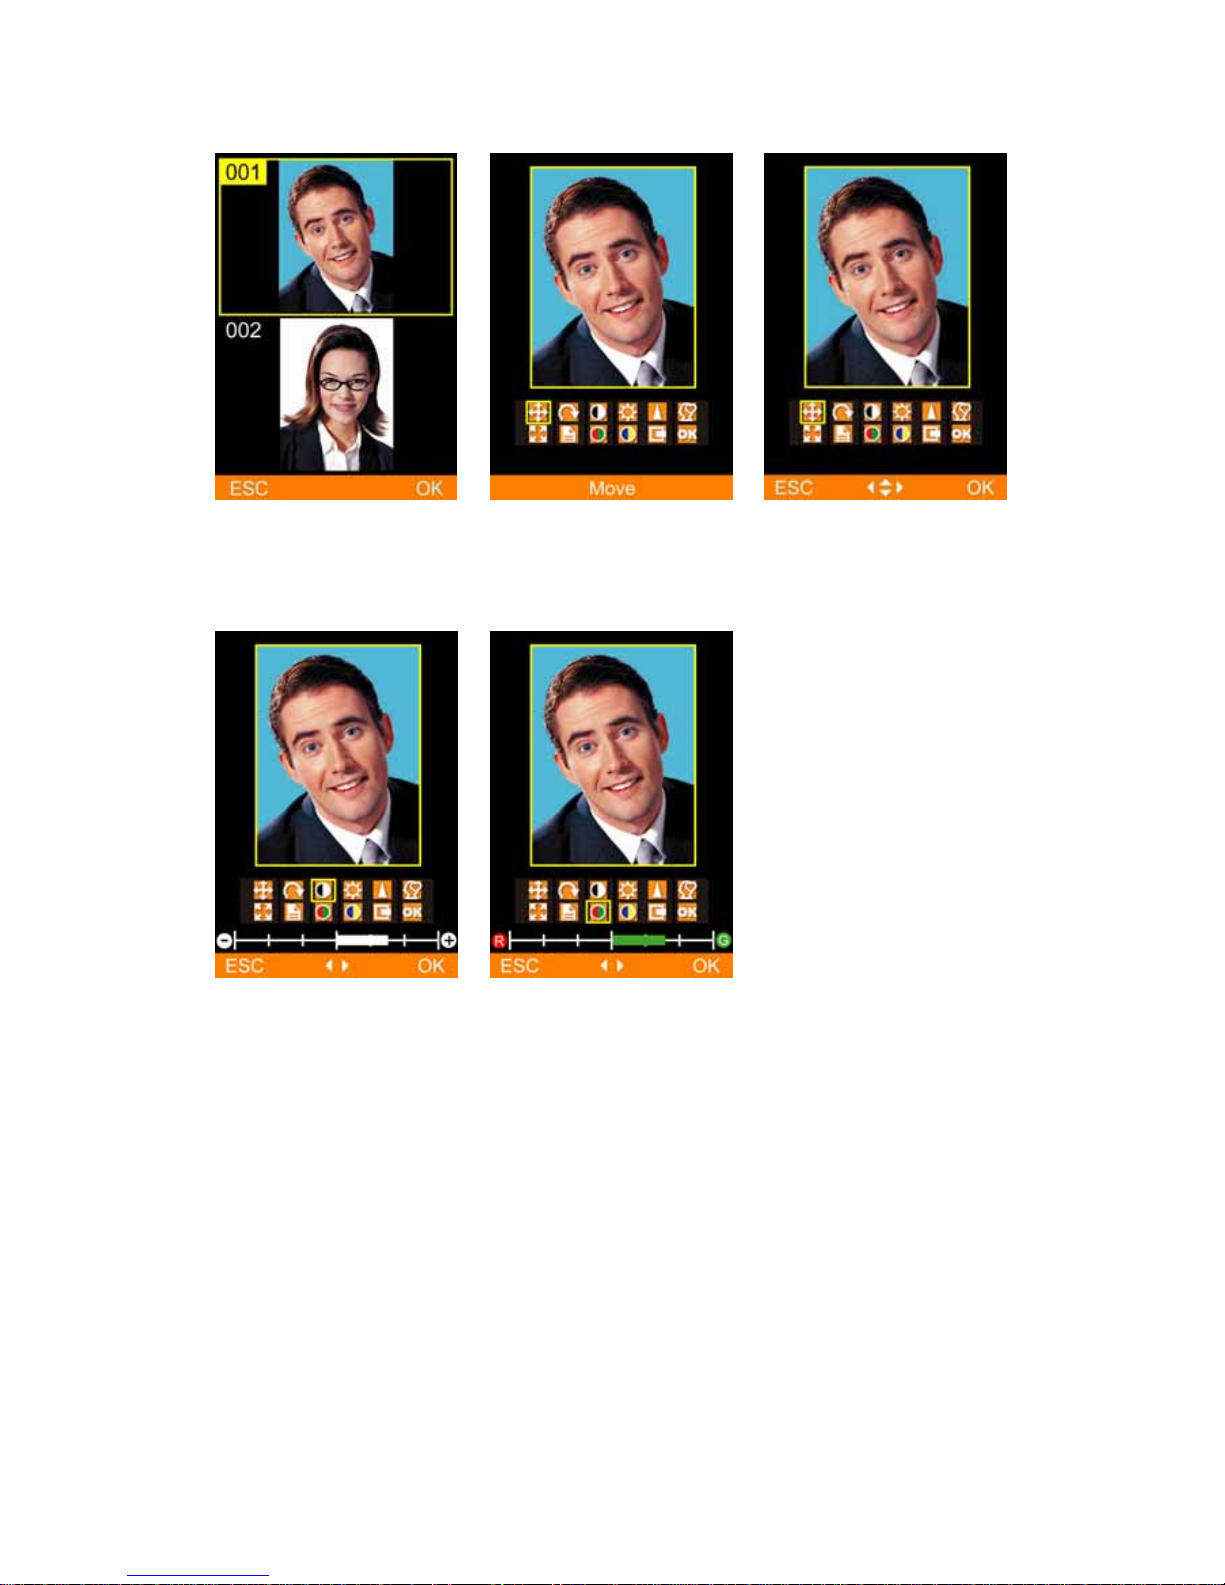
z Special Function Instruction
01 Image adjustor & enhancer
In the image navigator, select an
image and press [EDIT] to adjust
and enhance the selected image.
Select an image editing function
and press [OK] to start editing.
Example on ‘Move’: Use
directional button to adjust the
position of output image.
Example on ‘Contrast’: Use
directional button to adjust the
contrast of output image.
Example on ‘Color R/G’: Use
directional button to adjust the
level of red or green.
- 21 -
Page 22
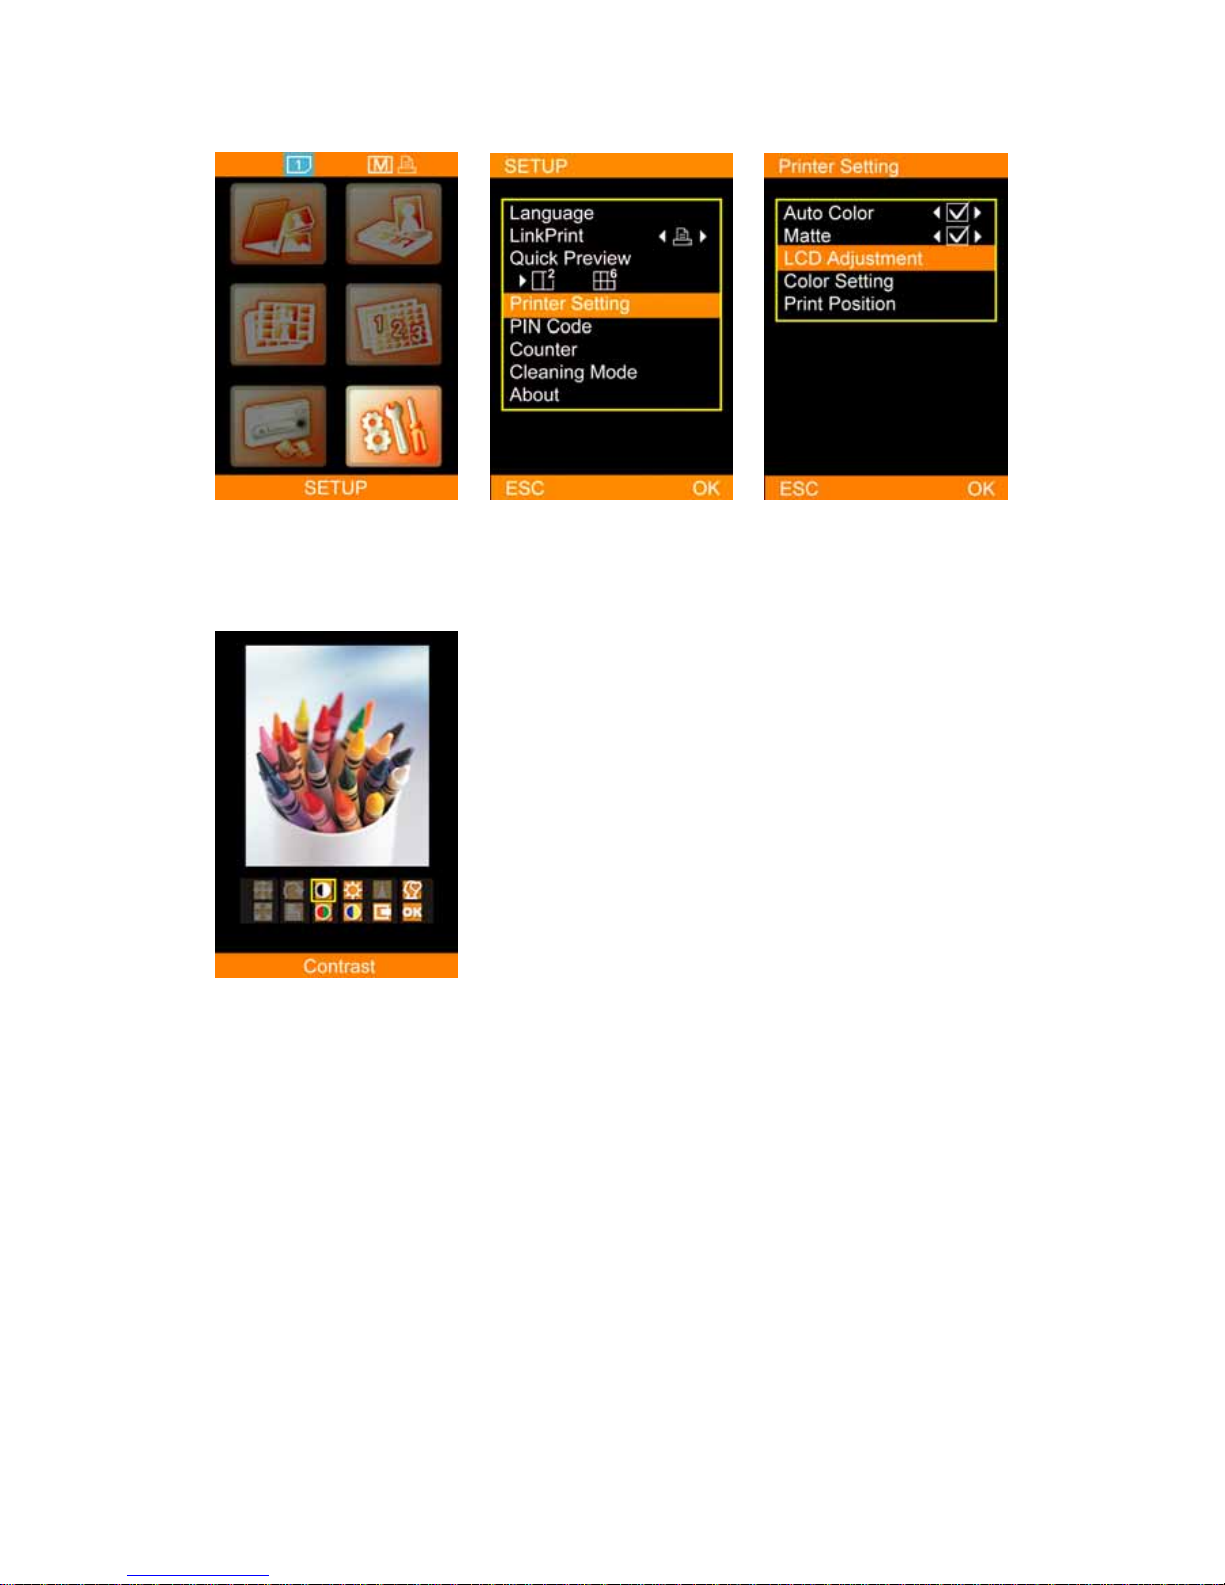
02 LCD Adjustment
Choose SETUP, and press [OK] to
continue.
Select Printer Setting and press
[OK] to continue.
Choose LCD Adjustment and
press [OK] to continue.
Choose an item for LCD
adjustment. Note that in LCD
adjustment, only the
properties of Contrast,
Brightness, Color R/G, Color
B/Y, Position, and Default
Setting can be adjusted.
- 22 -
Page 23
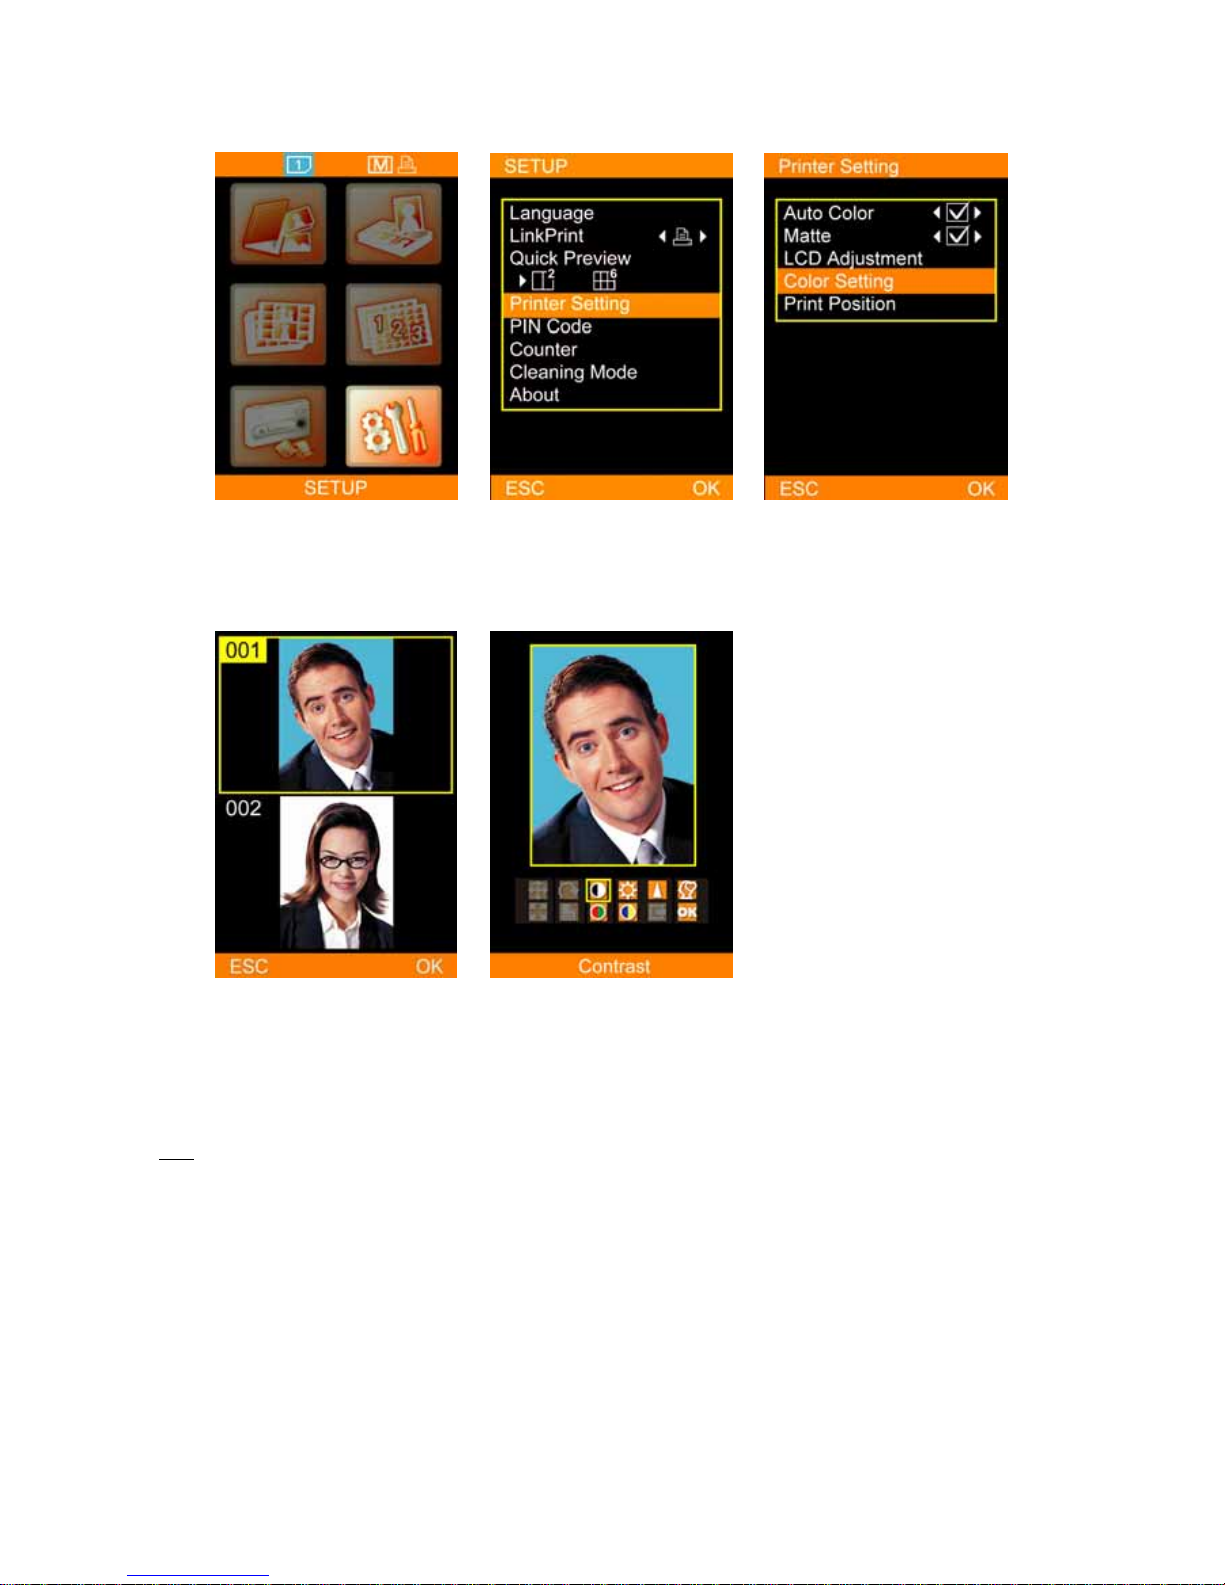
03 Color Setting *
Choose SETUP, and press [OK] to
continue.
Select Printer Setting and press
[OK] to continue.
Choose Color Setting and press
[OK] to continue.
Select a reference image saved
in the memory card for color
calibration, then press [OK] to
continue.
Note that in color setting,
only the properties of
Contrast, Brightness,
Sharpness, Color R/G, Color
B/Y, and Position can be
adjusted.
Note
Before accessing the function of color setting, please insert a memory card into the memory card slot.
- 23 -
Page 24
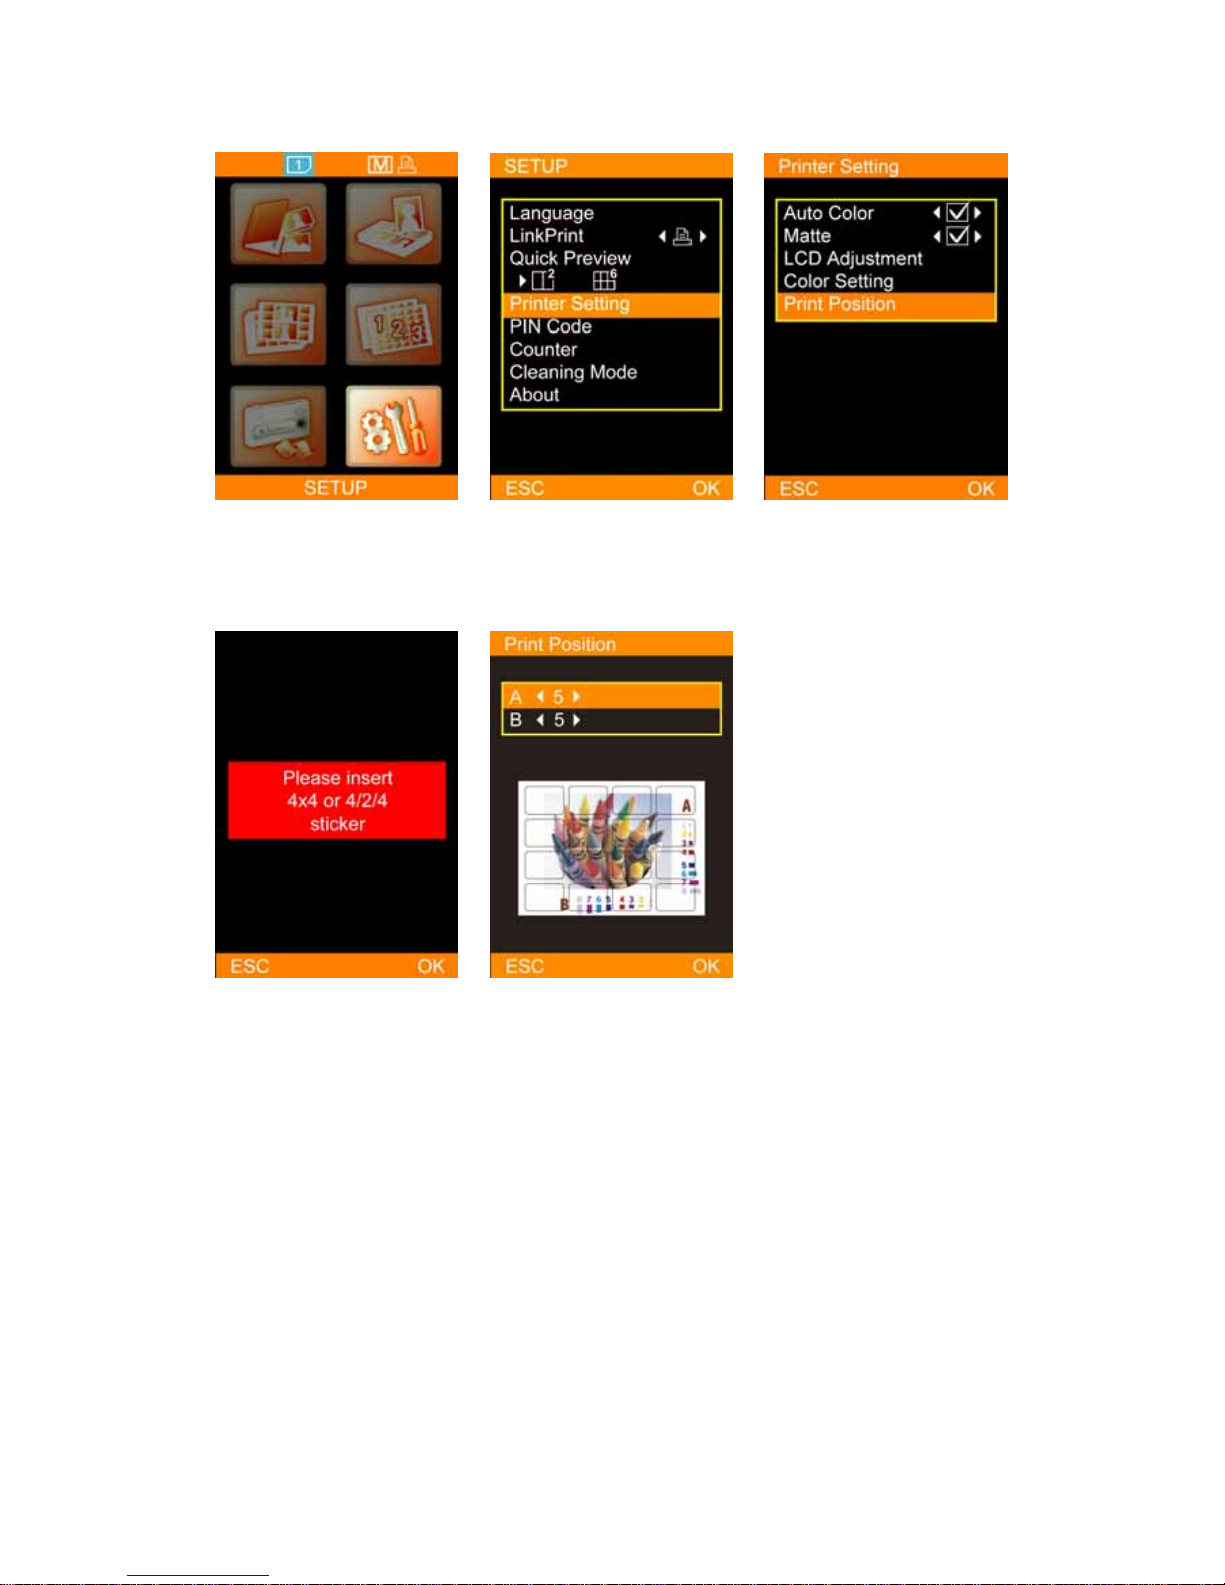
04 Print Position
Choose SETUP, and press [OK] to
continue.
Select Printer Setting and press
[OK] to continue.
Choose Print Position and press
[OK] to continue.
Place 4x4 or 4/2/4 sticker into
the paper cassette for calibration
reference.
Based on the printout of 4x4 or
4/2/4 sticker, adjust the
parameters in the A and B
column if needed, then press
[OK] to save values.
- 24 -
Page 25
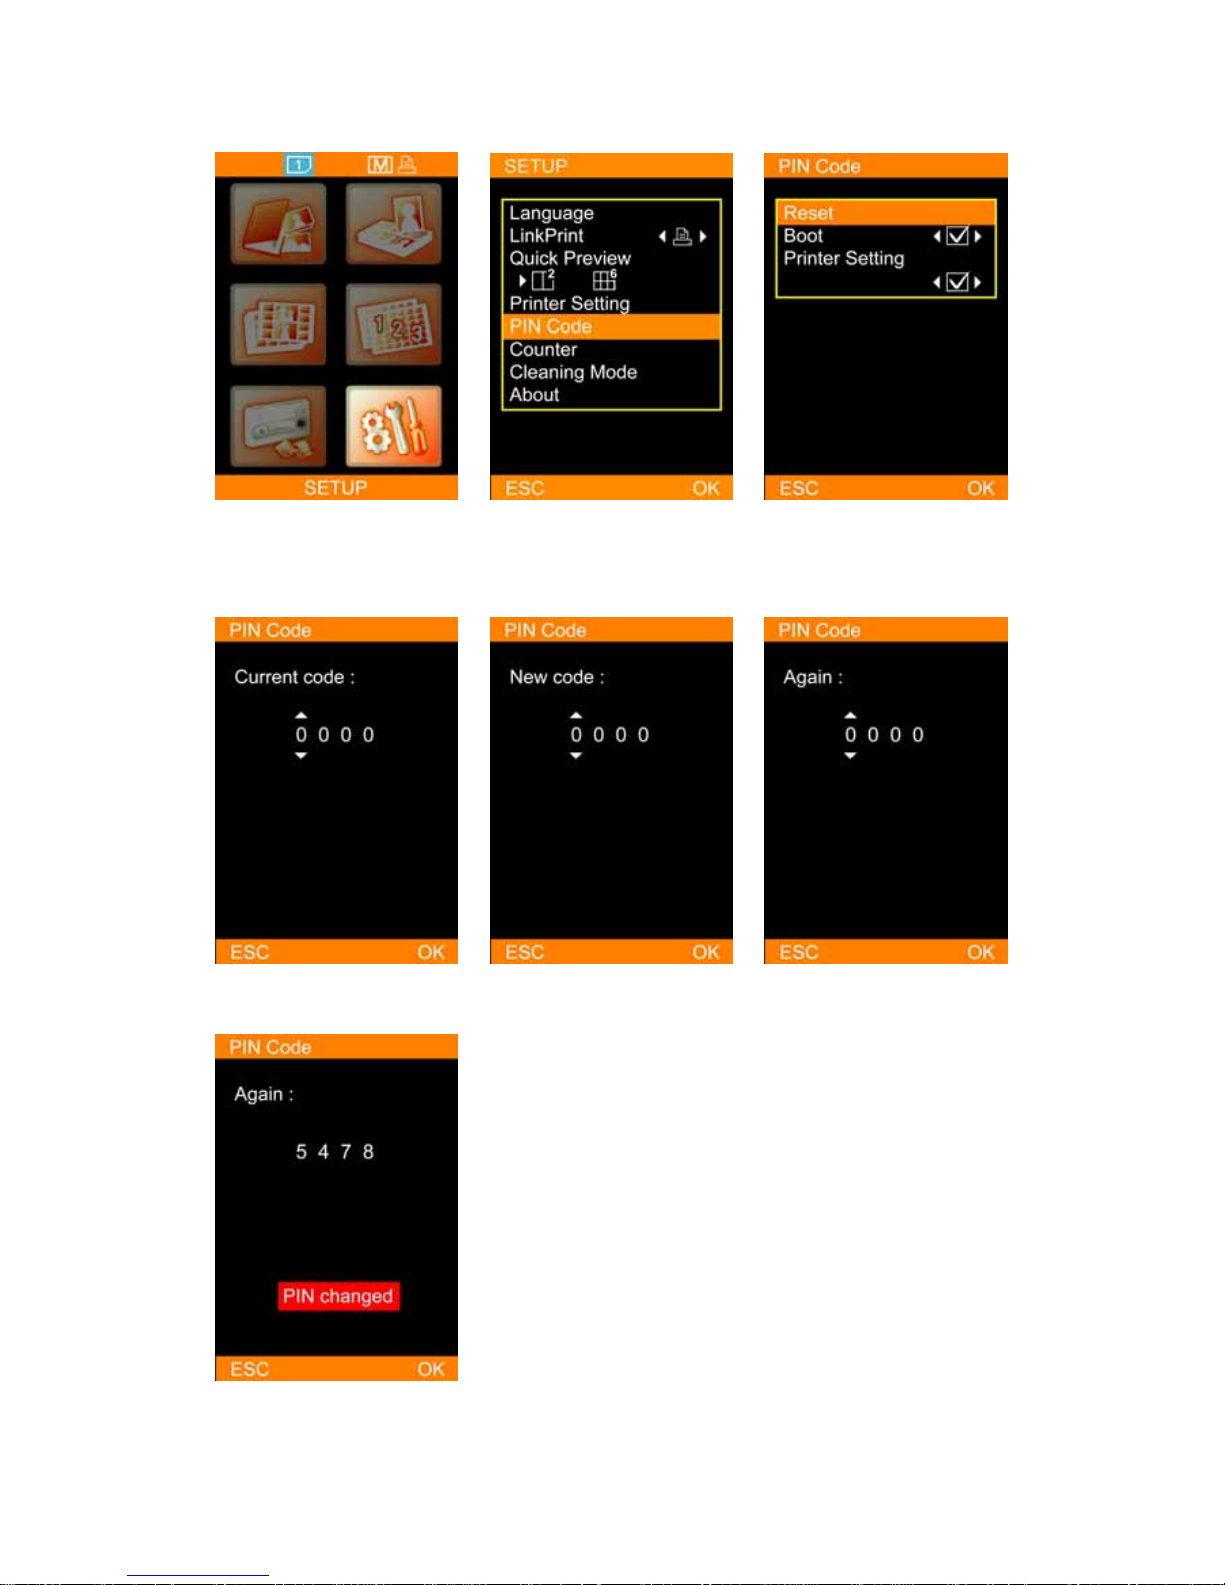
05 PIN Code
Choose SETUP, and press [OK] to
continue.
Select PIN Code and press [OK]
to continue.
Users may reset PIN code or
determine if PIN code is required
when the printer reboots or
when a user tries to apply printer
setting.
To reset PIN code, the current
code is required.
Enter the new PIN code Confirm the new PIN code
PIN code set notice: Confirms
the new PIN code when a new
PIN code is set.
- 25 -
Page 26
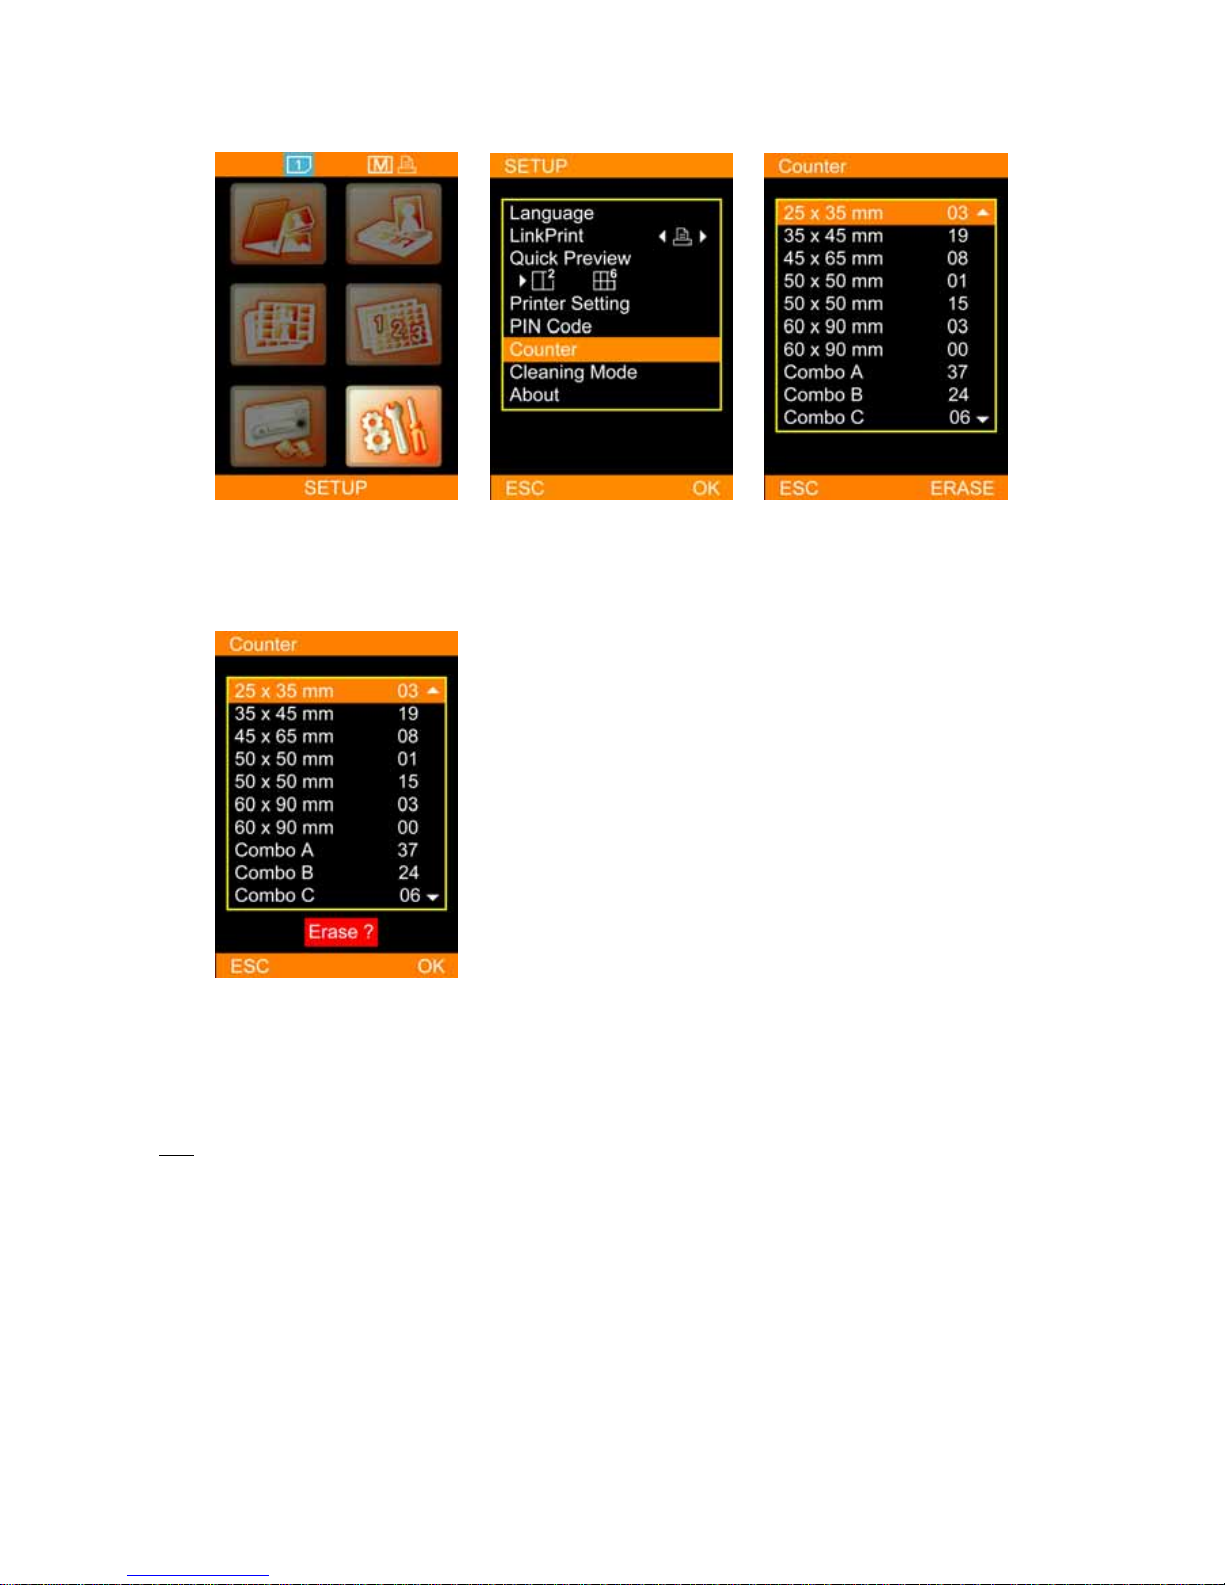
06 Printing Counter *
Choose SETUP, and press [OK] to
continue.
Select Counter and press [OK] to
continue.
Printing list: It allows users to
erase the printing list if needed.
Confirm the erase command:
After deleting, printing list will be
reset to 0 for all ID formats.
Note
The function of printing counter is exclusively designed for ID Photo applications.
- 26 -
Page 27
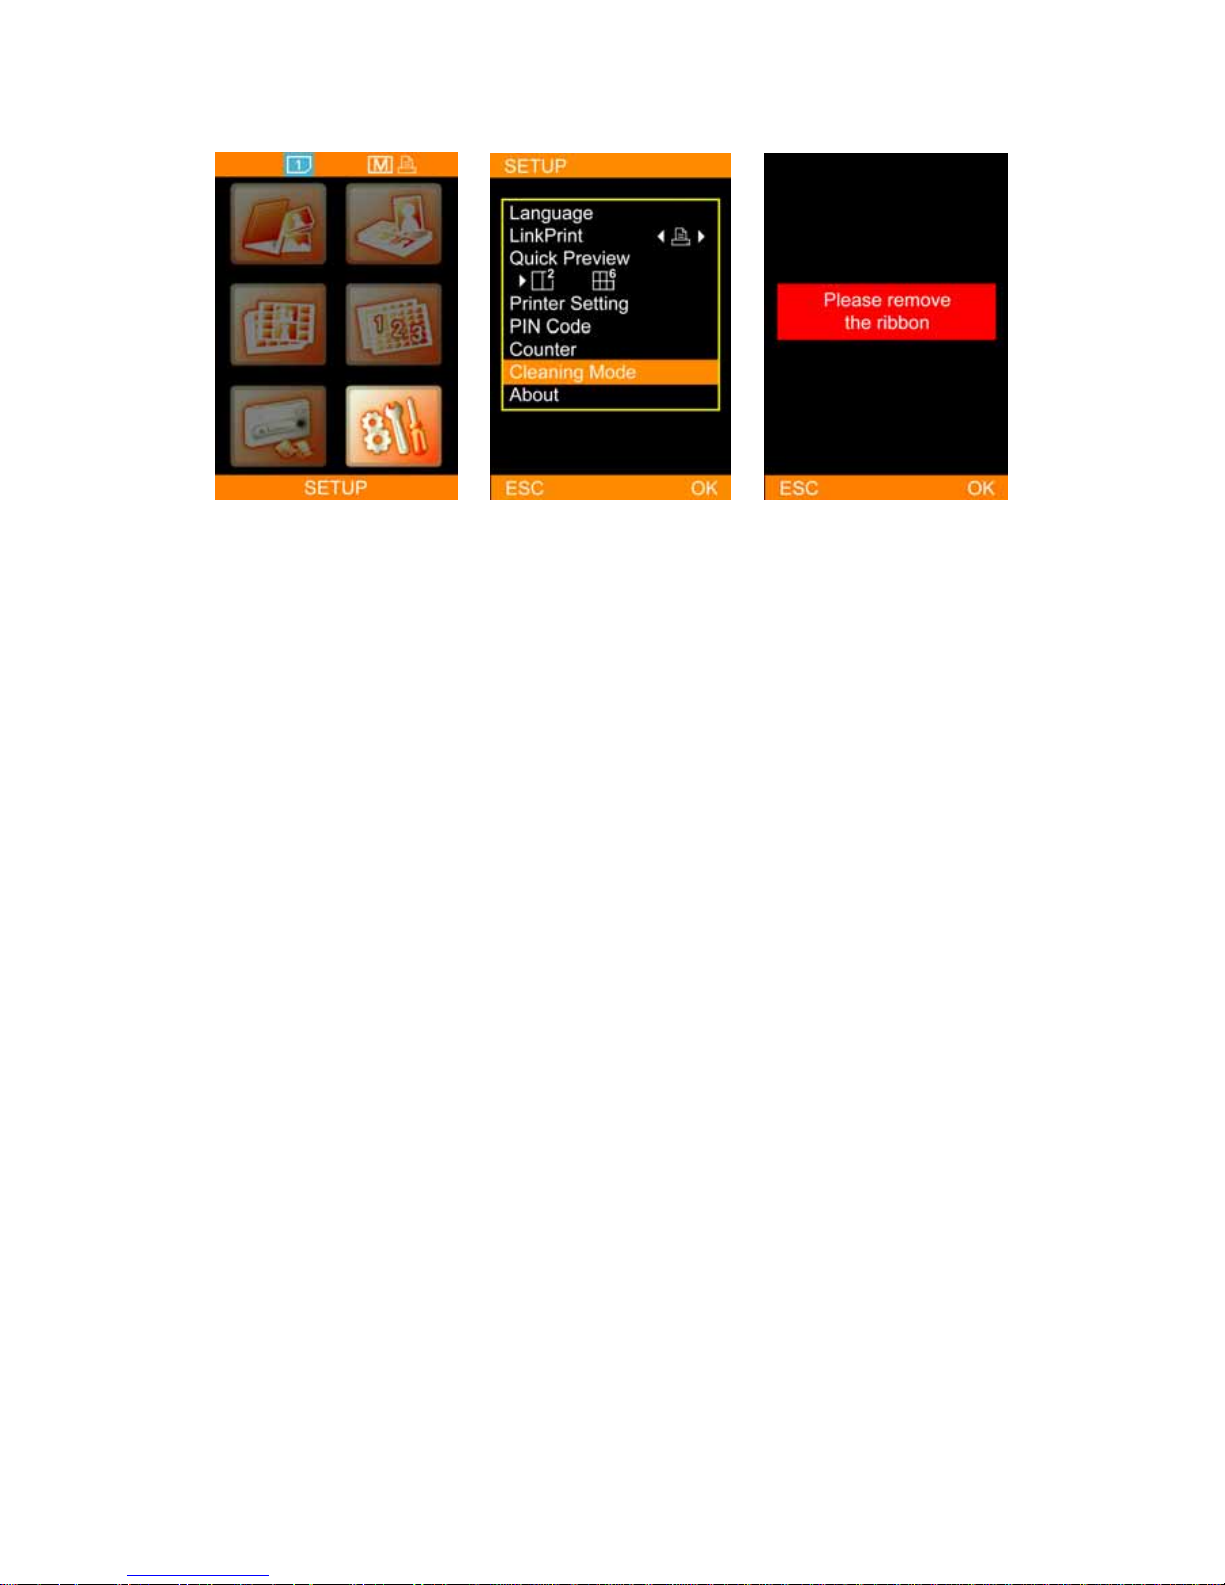
07 Cleaning Mode
Choose SETUP, and press [OK] to
continue.
Select Cleaning Mode and press
[OK] to continue.
Before the cleaning process
begins, please remove the ribbon
cartridge from the printer and
press [OK] to start the cleaning
job.
- 27 -
Page 28
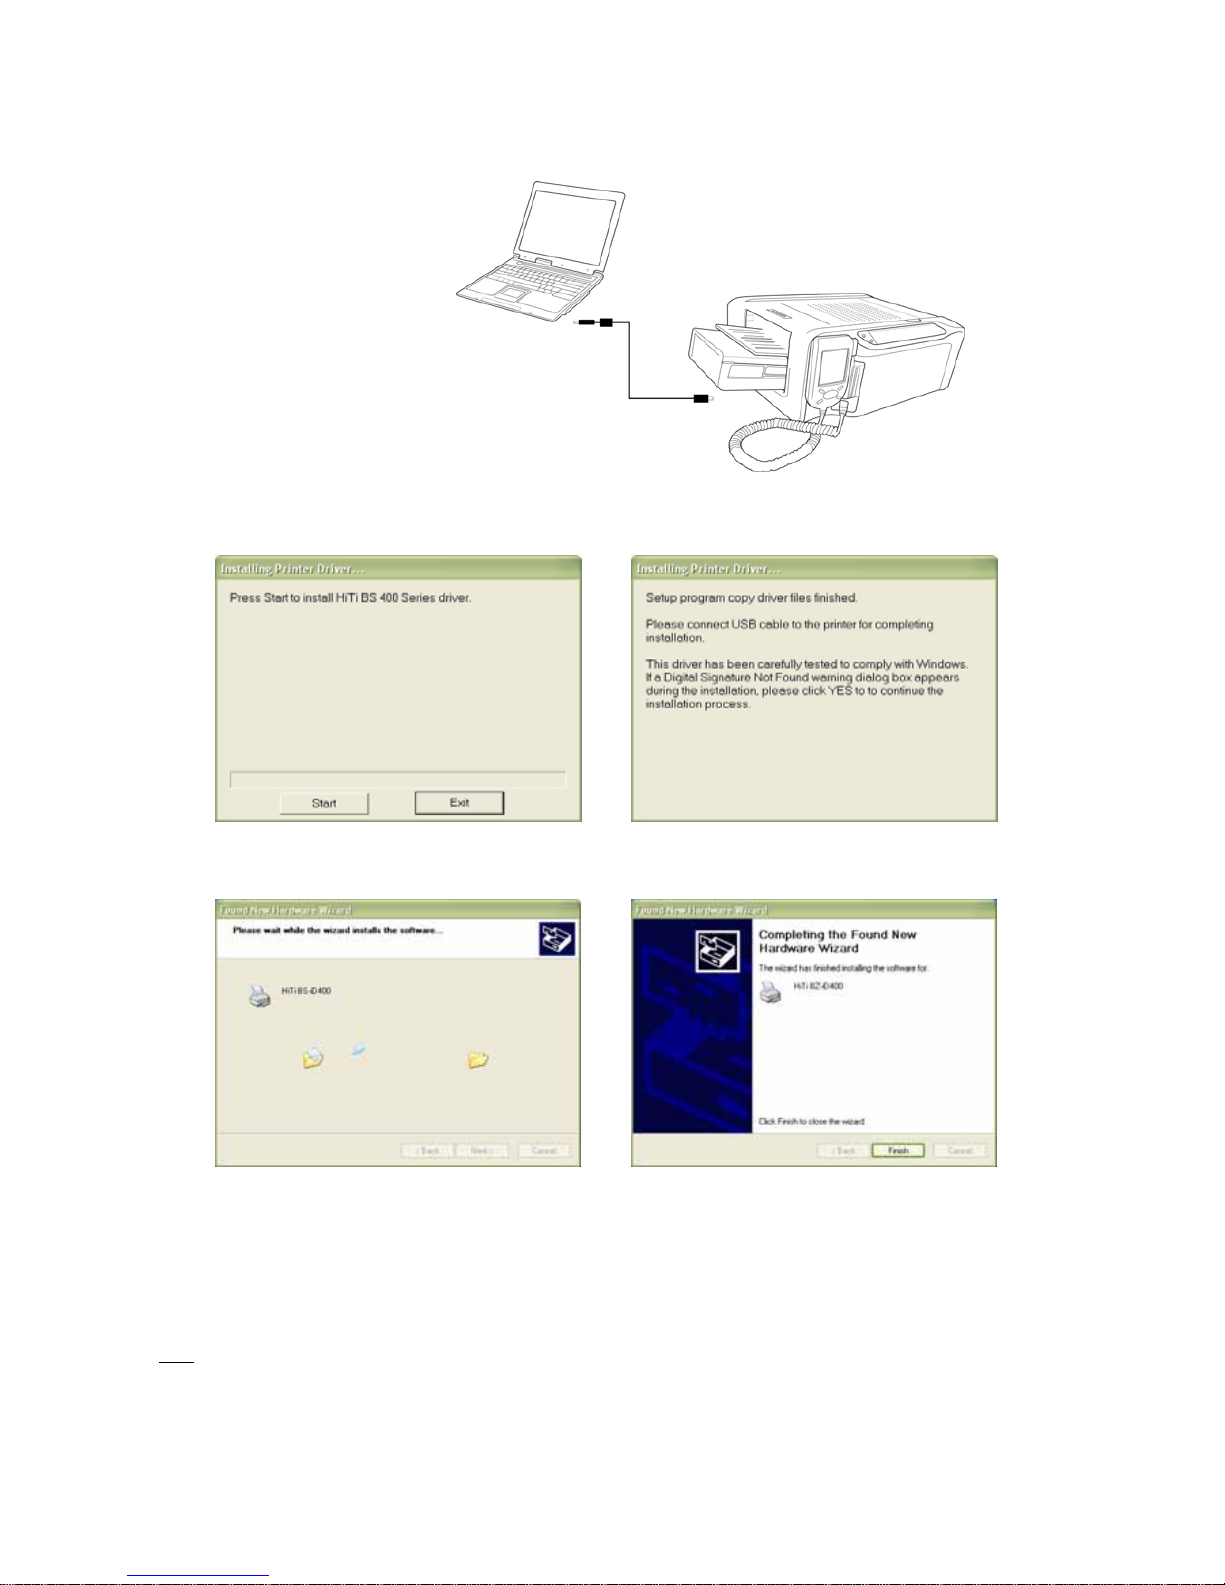
PC-Link Printing *
z Connect the PC and Printer
z Install the Printer Driver
Insert the Mater CD to run the installation. Power on the printer to continue.
The PC is installing the printer driver. Installation complete
z Install the iDesiree and PhotoDesiree Deluxe
(Please see the user guide of iDesiree and PhotoDesiree Deluxe for detail.)
Note
This user guide provides instructions o n how to successfully install the printer driver on a PC. For instructions on
printing by a PC, please refer to the user guide of iDesiree and PhotoDesiree Deluxe for detail .
- 28 -
Page 29

- 29 -
Troubleshooting *
z Indicator Status
Status Problem Troubleshooting
Blinking x 1 Cover Open z Open and close the ribbon door again.
Blinking x 2 Ribbon Missing z Reinstall the ribbon cartridge
Blinking x 3 Ribbon Out z Replace the ribbon cartridge
Blinking x 4 Paper Out z Reinstall photo papers and check consumables status.
Blinking x 5 Paper Jam z Open the ribbon door and remove the jammed paper.
Blinking x 6 Paper Mismatch
z Please use BZ-compatible consumables and check if
consumables are correctly placed in the paper cassette.
Note
If your problems are not listed above, please contact HiTi service center nearest to you.
Note that during printer operation, it is normal for the LCD controller to become warm to touch.
Page 30

- 30 -
Specification*
z HiTi BS-iD400
Model
Spec
BS-iD400
Print Method Dye Diffusion Thermal Transfer (D2T2)
Resolution 403 x 403 dpi (Equivalent to a inkjet 6400 dpi)
Display 2.5 inch TFT Color LCD
Print Size 4 x 6 inch (100 x 152 mm)
Paper Size 4 x 7 inch (100 x 178 mm)
Ribbon Cartridge 100 prints
Paper Cassette 100 sheets
Memory Card Slot CF I / CF II / Micro Drive / SD / SM / MMC / MS / MS Pro
USB Host PTP / LinkPrint / Mass Storage Devices
Compatible OS Windows 98 / Me / 2000 / XP / Mac OS X 10.2 or above
File Format Support JPEG / TIFF / DPOF
Computer Interface USB 1.1 / 2.0 Full speed
Power Supply 100 ~ 240V, 50/60Hz
Operation Environment Temperature: 15°C ~ 32°C / Humidity: 20 ~ 75% RH
Dimension (W x H x D) 10.6 x 6.1 x 14.3 inch (270 x 155 x 362 mm)
Weight 9.9 lbs (4.5kg)
Note
Specification is subject to change without notice.
Page 31

- 31 -
Customer Service Information
z Online Support
For further inquires, please log on to Hi-Touch Imaging Technologies website at www.hi-ti.com where users can
download free updated drivers, applications, and latest e-templates.
z Global Sites
Headquarters – Taiwan
Hi-Touch Imaging Tech nologies
3F, No.31, Shuang-Shih Rd. Sec.3
Pan-Chiao City, Taipei County 220,
Taiwan, ROC
Tel: +886-2-82583060
Fax: + 886-2-82583062
Http://www.hi-ti.com.tw
China
Hi-Touch Imaging Technologies (Suzhou)
Building C, 36# Qi-Hong Rd
Suzhou Industrial Park, Jiangsu Province
PRC
Tel: +86-512-87171688
Fax: +86-512-67601186
Http://www.hi-ti.com.cn
North America & Canada
Hi-Touch Imaging Technologies (America) Inc.
285 S. Dupont Ave, Suite #104
Ontario, CA 91761
USA
Tel: +1-909-9740099
Fax: +1-909-9740011
Http://www.hitouchimaging.com
Europe
Hi-Touch Imaging Technologies Netherlands B.V.
ESP 206, 5633 AC, Eindhoven
The Netherland
Tel: +31-(0)40-2565166
Fax: +31-(0)40-2903176 (or 2903287)
Http://www.hi-ti.nl
U.K. & Ireland
Hi-Touch Imaging Technologies (U.K.) Ltd.
Unit 7, Centurion Court, Brick Close, Kiln Farm
Milton Keynes, MK11 3JB
United Kingdom
Tel: +44-1908-266677
Fax: + 44-1908-266678
Http://www.hi-ti.co.uk
Russia
Hi-Touch Imaging Technologies (Russia) Ltd.
10 Vostochnaya ul, Moscow 115280 Office 3
Russia Federation
Tel: +7-095-5803208
Fax: +7-095-5803206
Http://www.hi-ti.ru
Page 32

- 32 -
© 2006 Hi-Touch Imaging Technologies. All Rights Reserved
WWW.Hi-Ti.COM P/N: 39.D050I.E01
 Loading...