

T-40 AND T-70 BLOWER HEATERS
EQUIPPED WITH OIL BURNER
Instruction and user manual
Page 1/14
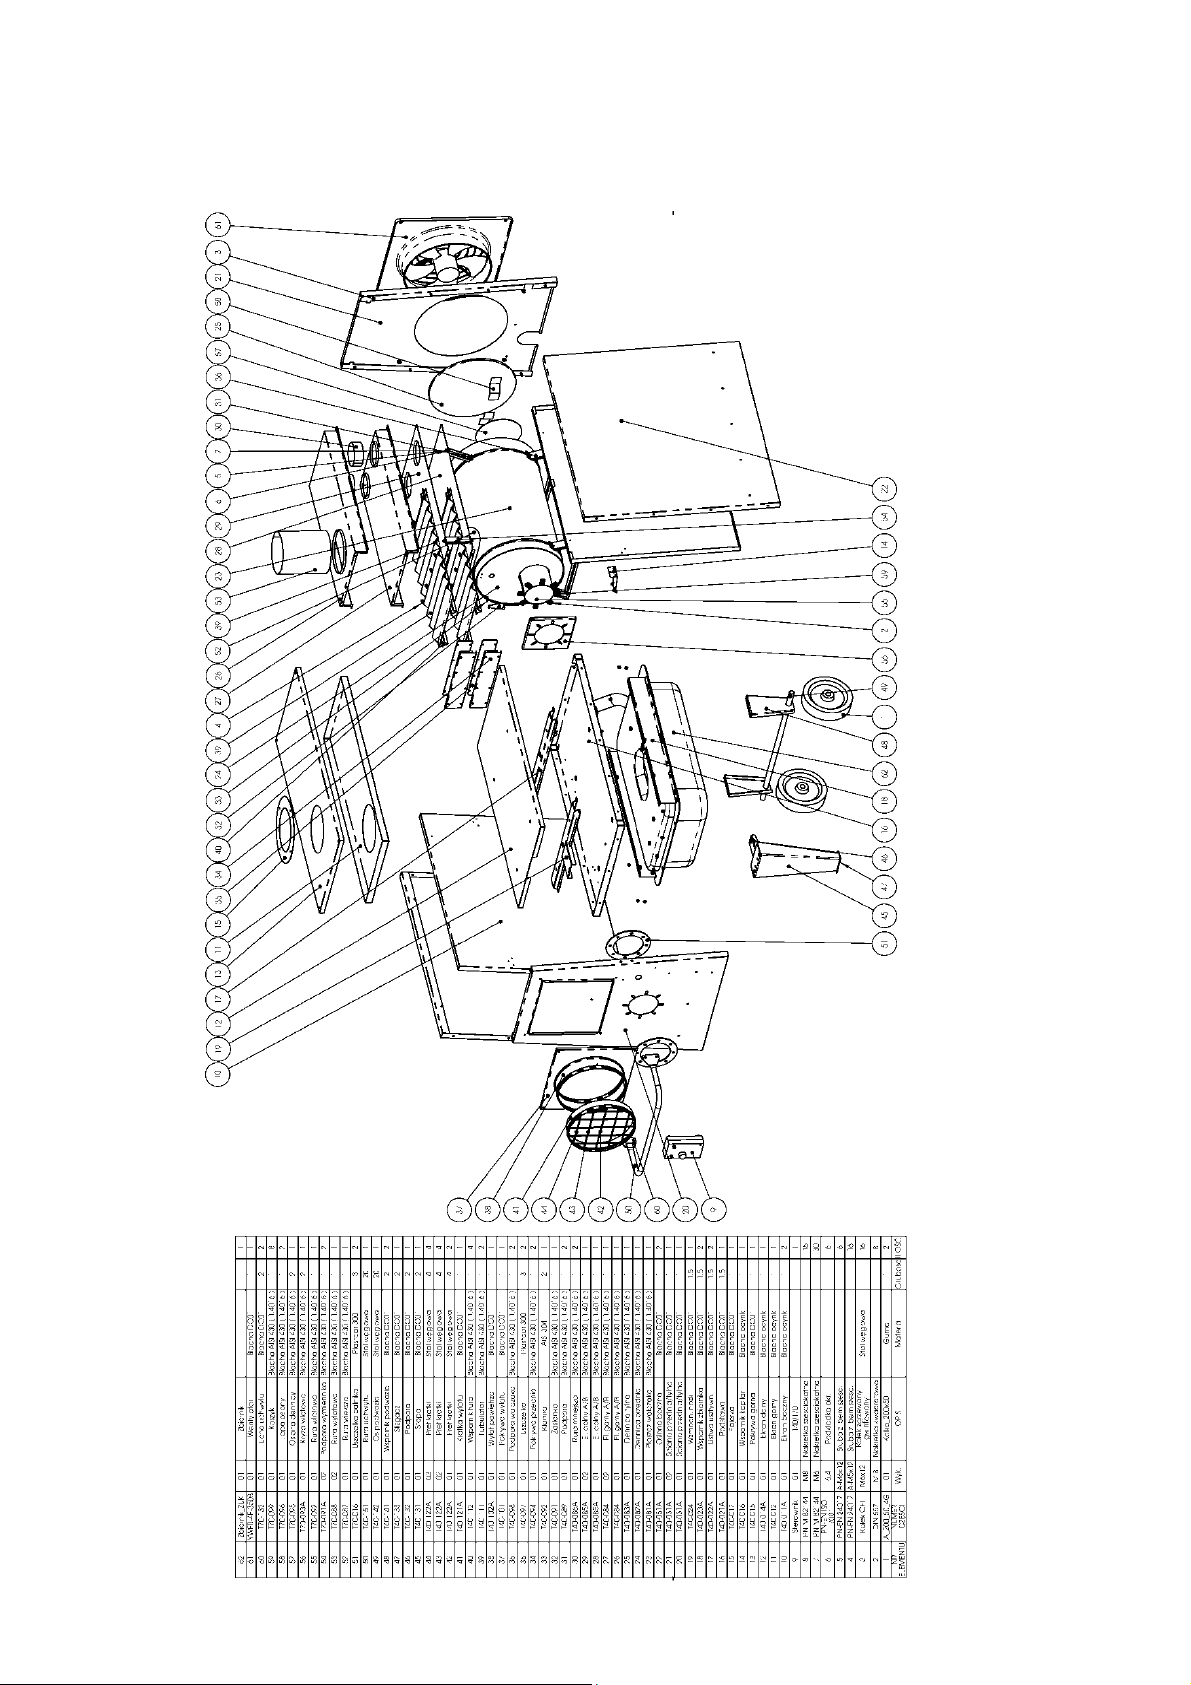
Fig.1 T40 construction
Page 2/14
PART
NO
DESCRIPTION
PART
NO
DESCRIPTION
1
Wheel_200x50
32
End cap
2
Screw cup
33
Clamp
3
Stud-bolt
34
Front cover
4
Hexagonal head screw
35
Insulating gasket
5
Hexagonal head screw
36
Combustion chamber support
6
Round washer
37
Air outlet cover
7
Hex cap screw
38
Air outlet point
8
Hex cap screw
39
Turbulator
9
T40/T70
40
Turbulator support
10
Side screen
41
Air outlet grille
11
Upper screen
42
Protective grille
12
Bottom screen
43
Protective grille
13
Upper cover
44
Protective grille
14
Support
45
Foot
15
Lid
46
Support
16
Footing
47
Slider
17
Cleat
48
Undercarriage support
18
Tank support
49
Undercarriage axis
19
Foot support
50
Handle pull
20
Front/rear panel
51
Insulating plate
21
Front/rear panel
52
Bigger flue
22
Side panel
53
Outlet pipe
23
Combustion chamber cover
54
Exchanger support
24
Front crown
55
Inlet pipe
25
Rear crown
56
Inlet flange
26
Upper part A/B
57
Crown cover
27
Upper part A/B
58
Cover flap
28
Bottom part A/B
59
Basket
29
Bottom part A/B
60
Handle end cap
30
Smaller flue
61
Fan
31
Support
62
Tank
Page 3/14
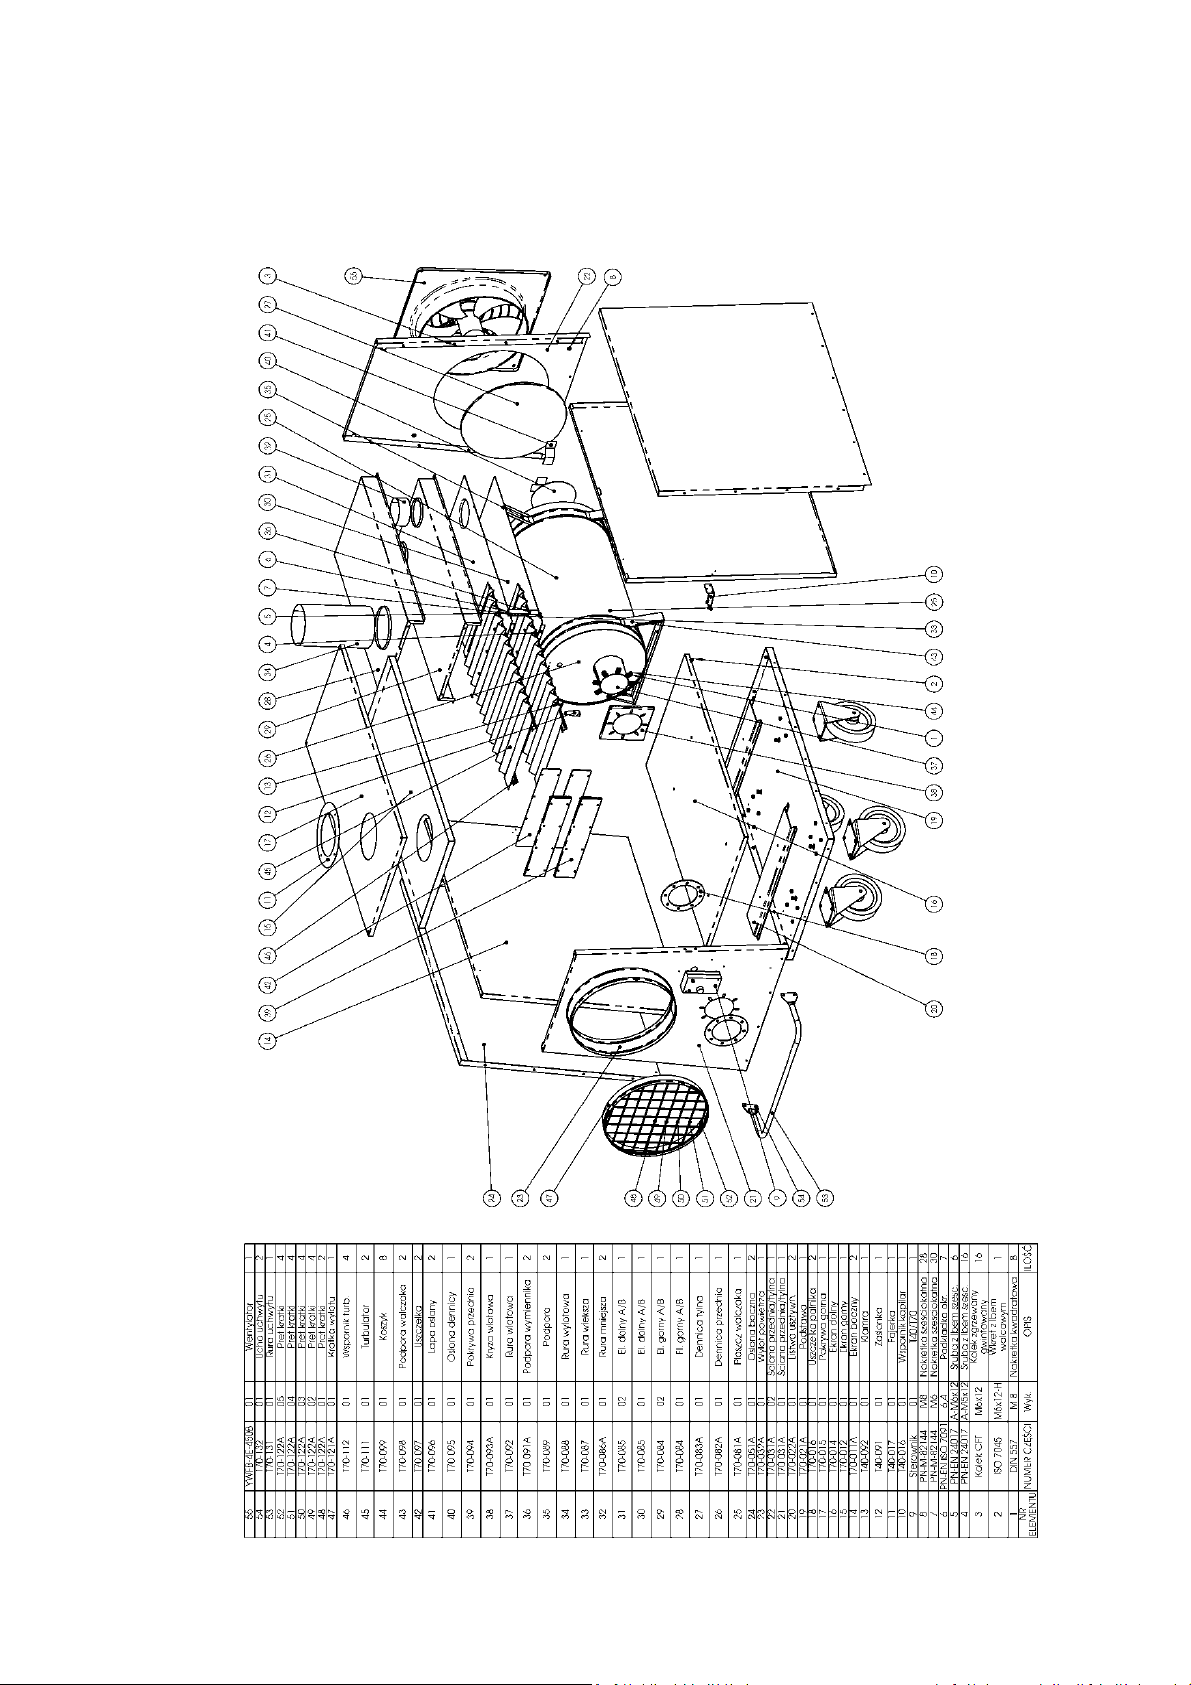
Fig.2 T70 construction
Page 4/14

PART
NO
DESCRIPTION
PART
NO
DESCRIPTION
1
Screw cup
29
Upper part A/B
2
Cheese head screw
30
Bottom part A/B
3
Stud-bolt
31
Bottom part A/B
4
Hexagonal head screw
32
Smaller flue
5
Hexagonal head screw
33
Bigger flue
6
Round washer
34
Outlet pipe
7
Hex cap screw
35
Support
8
Hex cap screw
36
Exchanger support
9
T40/T70
37
Inlet pipe
10
Support
38
Inlet flange
11
Lid
39
Front cover
12
End cap
40
Crown cover
13
Clamp
41
Cover flap
14
Side screen
42
Insulating gasket
15
Cover screen
43
Combustion chamber support
16
Bottom screen
44
Basket
17
Cover
45
Turbulator
18
Insulating plate
46
Turbulator support
19
Footing
47
Protective grille
20
Cleat
48
Protective grille
21
Front/rear panel
49
Protective grille
22
Front/rear panel
50
Protective grille
23
Air outlet point
51
Protective grille
24
Side panel
52
Protective grille
25
Combustion chamber
53
Handle pull
26
Front crown
54
Handle end cap
27
Rear crown
55
Fan
28
Upper part A/B
Page 5/14

Thank you for choosing Hiton blower heater which will provide heat almost
measurement
unit
T-40
T-70
Installed Power
kW
36
75
instantaneously. Low price of heating oil used for this device makes it even
more economical.
Our observations and experiences gained during production and sales of the
blower heaters show that if exploited according to this instruction manual, the
device causes no problems to their user and is almost failure-free.
We therefore strongly recommend strict adherence to this instruction
manual and we guarantee your satisfaction with this heater.
1. General information
Before installing the blower heater you should make sure there are no damages
caused during transportation and that the blower is complete with all parts.
2. Use
T range blower heaters should be used for heating all types of production
premises, warehouses, shops, residential buildings, chicken farms and others.
3. Fuel
The following fuel should be used: light EL heating oil (according to DIN
51603) or EKOTERM heating oil with the following parameters:
- density at 15oC < 0,86 kg/cm3
- kinematic viscosity at 20oC mm2/s < 6
- sulphur content < 0,3%
- ignition temperature 85oC
- calorific value > 42000 kJ/kg
This oil meets requirements of European quality and ecological norms.
In case of problems with purchasing fuel oil, diesel oil can also be used. If
diesel oil is used in place of the heating oil, the settings must be changed
accordingly (soot can start to deposit in combustion chamber and the heat
exchanger during burning).
Manufacturer's settings are set for the light heating oil.
4. Technical and exploitation parameters of the heater and burner
Blower heater range includes
Page 6/14

Burner's nozzle
0.85/60
o
1.75/60
o
Fuel pump pressure
bar
12
12
Burner power supply
V/Hz
220/50
220/50
Fan output
m3/h
2600
5000
Max. Air temperature
o
C
85
85
Fan power supply
V/Hz
220/50
220/50
Blower hole diameter
mm
280
440
Flue diameter
mm
180
180
Dimensions
Length
mm
1360
1550
Width
mm
590
720
Height
mm
1190
1305
Weight
kg
95
125
Tank
capacity
l
55
N/A
Average fuel consumption
l/h 2 4
T range heaters are portable devices. Each T-40 is equipped with a fuel tank
(external tanks of any capacity may be used). T-70 heaters are not equipped with
fuel tanks and can be fuelled from any plastic or metal tank meeting technical
requirements. Blower heater is used for producing air heated up to max
temperature of 850C. Basic component parts of the heater include cylindrical
combustion chamber made of acid-proof sheet and heat exchanger fitted with
turbulators. Heat of burned oil is absorbed by air which is ventilated by fan and
passes through heat exchanger and combustion chamber. Some of the heat is
transported outside through the flue in form of combustion fumes. Excellent
capacity of the heaters compensates for the heat losses and minimizes them.
Maximum air temperature at the outlet is 850 C. The temperature is controlled
by means of a thermostat with the range of 650C ÷ 850C. The device is
additionally equipped with safety thermostat set at 1100C. Both inlet and outlet
points are secured with protective screens. Outlet and inlet points should never
be obstructed. T range heaters require disposal of combustion fumes. Flue
connection should be made of insulated tin pipes and the flue should be in
vertical position 1m above the rooftop of the heated building. Chimney flue
diameter cannot be inferior to the diameter of the heaters' flue. Horizontal
connection between the heater and flue should be slightly inclined and not
longer than 2 meters. Flue can be fitted by means of elastic SPIRO pipes
provided that the above requirements are met.
T range heaters are powered by voltage rating 220 V (in case of heaters
Page 7/14

equipped with centrifugal fan the voltage is 380 V).
Chimney diameter cannot be inferior to the flue diameter.
Units are equipped with two-way fuel filers with shut off valves on the feed line
and return valve on fuel disposal (one-way filers are also in use).
For T range heaters connections between tank, filter and burner are made by the
manufacturer. T-70 heater does not have a tank and the feed line connection
between the filter and the tank should be installed by an authorized person
according to regulations regarding storage of light heating oil and depending on
the capacity of burner pump. All T range heaters are fitted with oil burners
with pumps.
Assembly
T-40 heaters are fitted with oil tanks and do not require assembly. Heaters
should be placed in appropriate location with respect to regulations regarding
flue and chimney connection. It also applies to T-70 units. When placing them,
regulations concerning connection of oil tank and storage of light heating oil
should be adhered to. Air outlet/inlet points should never be obstructed. If
heaters operate in conditions where contaminations occur or may occur (such as
dust, chemicals) or exhaust fans are in use (which may interfere by creating
negative pressure) air supply from a different source or from the outside should
be provided.
Fire regulations are also to be met.
Operation and maintenance manual
Prior to switching on the device, check the assembly and, if necessary, fill up
the oil tank. Heater cannot be switched on immediately after filling up the oil
tank. Allow the oil in the tank to settle for 15 minutes (if the device is switched
on too early, there is a risk of air getting into the oil feed line). Check if the
chimney is unobstructed and if there is sufficient air draught.
In 95 % of cases lack of air draught is the cause of failures of the device
(failure of flame sensor, electrodes, fuel nozzle, burner gasket, heat exchanger
gaskets).
Heater should be connected to the power outlet according to the following rule:
plug’s phase connects with the socket phase. Heater is fitted with two switches
(red switch activates heating and the blue switch triggers cooling) and a
thermostat.
Switching on
If you want to activate the heating mode, press the red button, the blue button
should be switched off.
If the blue button is switched on, the fan will work continuously without 3.5
Page 8/14

min cycles after the burner has been switched off.
The blue button should be switched on if you want to ventilate the device - the
red button should be switched off during this time.
Set the thermostat at a desired value.
Press the red button (the fan and burner will switch on simultaneously).
If the heater does not start, control diode on its casing will light up.
After one minute, control button should be pressed again, which will start the
burner.
If air gets into the oil feed line, for example when oil feed line is long, it is
necessary to repeat this operation 2-3 times (at 2 minute intervals).
If the burner still does not ignite, it is necessary to call an authorized service
to fix the failure.
Once the burner is activated, oil starts to burn automatically. Ignition spark
stops after a dozen or so seconds. Once the desired temperature has been
reached, the burner turns off and the fan continues to work (for about 3.5
minutes) cooling down the heat exchanger and combustion chamber and, at the
same time, absorbing their heat if the temperature of the heat exchanger located
near temperature sensors goes down to the value higher than or equal to the one
of the thermostat.
If during cooling down, the temperature goes down below the value set on the
thermostat the burner will start again with the fan still working.
It is possible to mount external thermostat, which will regulate the temperature
keeping it at a desired level.
Red button is used for turning the heater off. Safety feature of the control panel
does not allow turning the fan off while the burner is still working.
N O T E
The maintenance of the device should be carried out by an authorized
person.
Do not use the heater close to combustible materials their fumes or
explosives.
Do not use the heater if the air contaminations occur or may occur (dust,
chemicals) or if there are fans that can create negative pressure.
Do not allow the tank to be completely empty as this may cause the air to get
in.
Reset the burner if the supplier or type of fuel is changed. This should be
done by an authorized person.
Observe the fuel in filter (if the filter is clean and if there is no water in fuel).
Page 9/14

Fuel mixed with water looks like water with sugar on the filter; working
even for a few hours under such circumstances may cause damage to the
fuel pump.
Heater should operate in building/s with efficient air ventilation with the
inside temperature not lower than +50C.
Air inlet and outlet should never be obstructed.
Do not spill oil when filling up or cleaning the filer.
Supervise tightness of fuel installation and the quality of combustion fumes
(there should be no visible smoke coming out).
There should be no smell of oil.
Fire extinguisher should be placed close to the heater.
Maintenance
The device and the surrounding area should be kept clean.
Oil spill should be cleaned immediately.
Oil filter should be replaced regularly (transparent filter cover allows to see
contaminations).
Burner photocell should be cleaned regularly.
Oil tank should be cleaned every other season.
At least once a year, after the season and more often if necessary, clean the
combustion chamber and exchanger along with tulbulators and chimney flue.
Soot deposited in the flue isolates and decreases efficiency of the heater and
hinders its normal functioning.
In case of malfunctioning, i.e. visible dark fumes, it is necessary to turn the
heater off, clean it, set the burner and check fumes composition.
These are not covered by the warranty and are to be carried out by
authorized personnel.
Protect the heater against humidity.
Failures and their remedies
Turn the burner and power supply off.
Shut the fuel feed valves.
Use appropriate fire extinguisher.
Heating oil storage conditions
Oil should not be stored in temperature below -5C because this may cause
paraffin precipitation and block the filer.
Capacity of single tank without casing should not exceed 2000 l.
Tanks should not be placed closer than 1.5 m from the source of heat and
where oil is heated up to temperature higher by 150C than the room
Page 10/14

temperature where it is located.
Tanks should have minimum 32 mm diameter vent holes.
Mark the tank and place appropriate fire extinguisher next to it.
Possible remedies
Burner will not start
Damaged safety device of the network or the burner.
Faulty plug connection.
Loose connections (joints).
Thermostat damaged or set below room temperature.
Light from the outside reaches photocell.
Damaged control panel.
Blocked safety thermostat.
Damaged engine.
Blocked burner pump.
No fuel.
Burner starts but switches off after a while
No fuel supply - open fuel valves.
No ignition spark - too low fuel injection pressure.
Damaged pump or pump clutch.
Blocked fuel filter, pump filer or nozzle.
Damaged fuel line - not air-tight.
Damaged electro valve.
Damaged photocell.
No flame with proper fuel feeding
Worn-out nozzle.
Too big air valve opening - sparkle extinguishes.
Oiling up of the electrodes.
Damaged transformer.
Too big spaces between electrodes.
No flame with proper fuel feeding and proper ignition
Too low fuel injection pressure.
Wrong placement of the electrodes.
Spark bounces up to the casing.
Dirty nozzle.
Page 11/14

Water in fuel.
Air-locked fuel line.
No supply.
There is a flame but keeps on extinguishing
Leaking electromagnetic valve.
Damaged contacts of the control panel.
Improper angle of fuel nozzle injection.
Improper fitting of the disk.
Partly covered nozzle.
Dirty flame sensor.
Air-locked fuel line.
Disturbances during operation.
Improper ratio between air and fuel.
Too big fuel nozzle.
Unregulated fuel pressure.
Too high temperature of combustion fumes.
Too strong/weak chimney draught.
Combustion chamber and exchanger with soot.
Leaking fuel line.
Control panel
Bottom row of diodes signals the fuel level in the tank.
When the fuel tank is almost empty, intermittent sound is activated. This
means that the tank needs to be filled up.
When the fuel tank is empty, the red diode goes off (no fuel left) and
continuous sound is triggered. The device stops working. Once filled up, the
heater continues to work.
Each heater can be fitted with any temperature thermostat.
Fitting the thermostat:
In the bottom part of the control panel there is a short black wire next to two
white wires.
Remove wire sleeve at its end and cut the wire.
Join two wires obtained after cutting with wires of the external control panel.
Page 12/14

Set the heater knob at the maximum value.
Set the external thermostat to desired temperature.
NOTE: for thermostats powered by 220 V transmitters should be mounted.
NOTE
Failure to comply with the above instruction manual may cause damage to
the heater, which will result in the warranty to become void.
All repairs made under void warranty are subject to charges.
Page 13/14
 Loading...