


4-PROJECTOR BAR WITH 12X3W TRICOLOR LEDS
USER GUIDE
9955 - August 2012 Version 1.0
English
1 - Safety information
Important safety information
This unit is intended for indoor use only. Do not use it in a wet,
or extremely cold/hot locations. Failure to follow these safety instructions could result in fire, electric shock, injury, or damage to
this product or other property.
Any maintenance procedure must be performed by a CONTEST
authorised technical service. Basic cleaning operations must thoroughly follow our safety instructions.
This product contains non-isolated electrical components. Do not
undertake any maintenance operation when it is switched on as it
may result in electric shock.
Symbols used
This symbol signals an important safety precaution.
The WARNING symbol signals a risk to the user’s physical integrity.
The product may also be damaged.
The CAUTION symbol signals a risk of product deterioration.
TRI4U - 4-projector bar with 12x3W tricolor LEDs
WARNING : This unit contains no user-serviceable parts. Do not
open the housing or attempt any maintenance by yourself. In the
unlikely even your unit may require service, please contact your
nearest dealer.
In order to avoid any electrical malfunction, please do not use any
multi-socket, power cord extension or connecting system without
making sure they are perfectly isolated and present no defect.
Warning
This product is equipped with Class 2 LEDs.
Please avoid looking directly at the beam as it may cause
severe eye injuries.
Recycling your device
• As HITMUSIC is really involved in the environmental cause,
we only commercialise clean, ROHS compliant products.
• When this product reaches its end of life, take it to a
collection point designated by local authorities. The separate
collection and recycling of your product at the time of disposal
will help conserve natural resources and ensure that it is
recycled in a manner that protects human health and the
environment.
Instructions and recommendations
1 - Please read carefully :
We strongly recommend to read carefully and understand the safety instructions before
attempting to operate this unit.
2 - Please keep this manual :
We strongly recommend to keep this manual with the unit for future reference.
3 - Operate carefully this product :
We strongly recommend to take into consideration every safety instruction.
4 - Follow the instructions:
Please carefully follow each safety instruction to avoid any physical harm or property
damage.
5 - Avoid water and wet locations :
Do not use this product in rain, or near washbasins or other wet locations.
6 - Installation :
We strongly encourage you to only use a fixation system or support recommended
by the manufacturer or supplied with this product. Carefully follow the installation
instructions and use the adequate tools.
Always ensure this unit is firmly fixed to avoid vibration and slipping while operating
as it may result in physical injury.
7 - Ceiling or wall installation :
Please contact your local dealer before attempting any ceiling or wall installation.
8 - Ventilation :
The cooling vents ensure a safe use of this product, and avoid any overheating risk.
Do not obstruct or cover these vents as it may result in overheating and potential
physical injury or product damage. This product should never been operated in a
closed non-ventilated area such as a flight case or a rack, unless cooling vents are
provided for the purpose .
Page 2
9 - Heat exposure :
Sustained contact or proximity with warm surfaces may cause overheating and product
damages. Please keep this product away from any heat source such as a heaters,
amplifiers, hot plates, etc...
10 - Electric power supply :
This product can only be operated according to a very specific voltage. These
information are specified on the label located at the rear of the product.
11 - Power cords protection:
Power-supply cords should be routed so that they are not likely to be walked on or
pinched by items placed upon or against them, paying particular attention to cords at
lugs, convenience receptacles and the point where they exit from the fixture.
12 - Cleaning precautions :
Unplug the product before attempting any cleaning operation. This product should be
cleaned only with accessories recommended by the manufacturer. Use a damp cloth
to clean the surface. Do not wash this product.
13 - Long periods of non use :
Disconnect the unit’s main power during long periods of non use.
14 - Liquids or objects penetration :
Do not let any object penetrate this product as it may result in electric shock or fire.
Never spill any liquid on this product as it may infiltrate the electronic components
and result in electric shock or fire.
15 - This product should be serviced when :
Please contact the qualified service personnel if :
- The power cord or the plug has been damaged.
- Objects have fallen or liquid has been spilled into the appliance.
- The appliance has been exposed to rain or water.
- The product does not appear to operate normally.
- The product has been damaged.
16 - Inspection/maintenance :
Please do not attempt any inspection or maintenance by yourself. Refer all servicing
to qualified personnel.
17 - Operating environment :
Ambient temperature and humidity: +5 - +35°C, relative humidity must be less than
85% (when cooling vents are not obstructed).
Do not operate this product in a non-ventilated, very humid or warm place.
TRI4U - 4-projector bar with 12x3W tricolor LEDs
English
2 - Introduction
Thank you for purchasing the TRI4U.
You now have in your possession a high-quality, powerful and intelligent device.
Your TRI4U is composed of four projectors fixed to a power and control bar.
Its ease of use and installation, its vast colour palette and functions make it the best companion of nomadic installations.
This user guide will help you getting familiar with the many functions and possibilites offered by your TRI4U.
Please keep out within reach during the first uses.
3 - Description and installation
3.1 - Description
Here is a unique device, combining super-dynamic effects, 4 powerful projectors in a compact housing.
Automatic or music-sensitive mode: it offers many control possibilities via its DMX interface and allows you to control
(simultaneously or independently) several projectors..
Your TRI4U features .
• 12x3W LEDs spread across 4 projectors
• Beamwidth: 25° per projector.
• Independent adjustment for each projector
• Many modes:
- DMX (2 to 16 channels)
- Music-sensitive (master) via internal microphone
- Automatic (master)
- Slave
• Access to internal programs and music-sensitive mode
from the DMX
• Max. power consumption: 50W
• Alimentation : AC 90/250V - 50/60Hz
• DMX Input/output
• Display with drop-down menu
• Convection-cooled
• Black metal housing
• Exclusive built-in hanging bracket compatible with stands
• Dimensions: 375 x 160 x 60 mm
• Net weight: 2.5 Kg
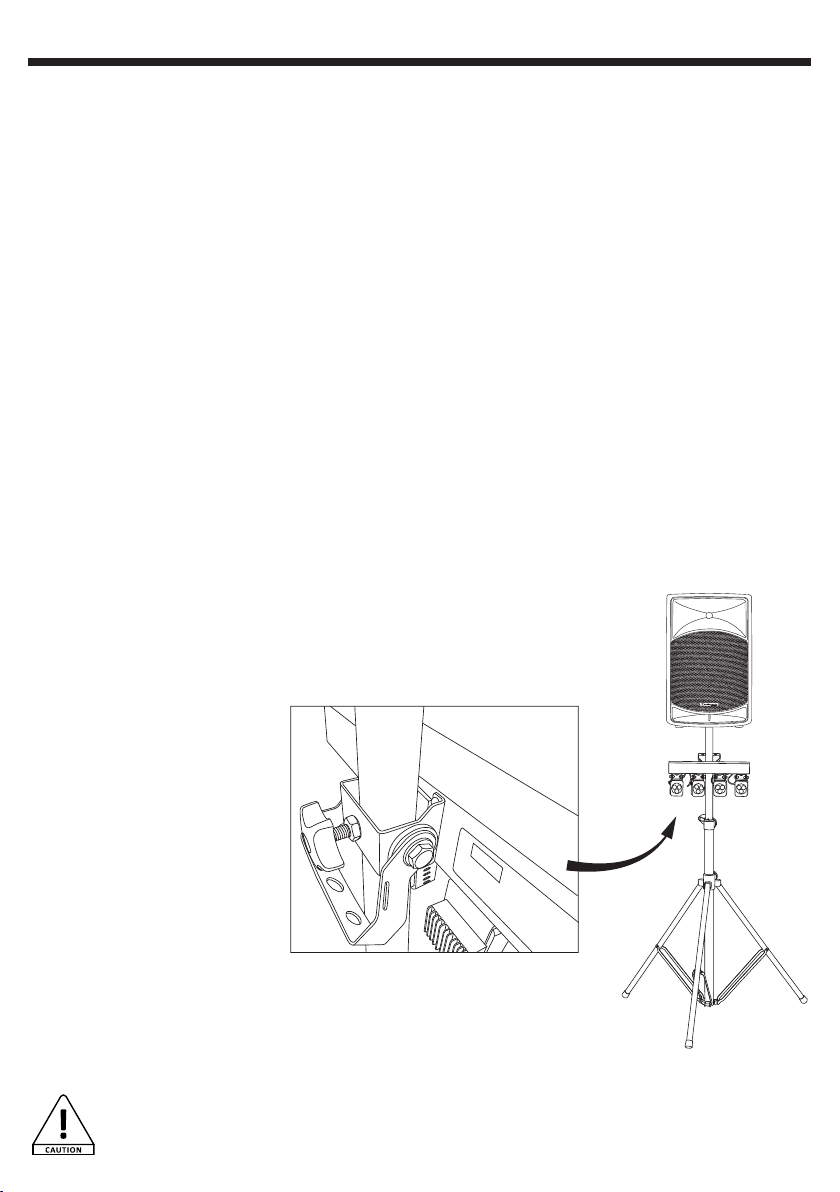
3.2 - Installation
Your TRI4U can be set up in two different ways:
1. It can typically be fixed to structure via its hanging bracket.
2. Mounted over a 35 mm speaker stand via the ring located behind the hanging bracket as
described on the figure below.
When using stands, please make sure
that:
- The stands is located far from the
audience in order to prevent any
accidental or intentional injury.
- The ceiling is high enough, and no
object is above the TRI4U in order to
prevent heat accumulation.
- The stand is resistant enough to
bear the weight of your TRI4U. Only
use certified and safe stands.
- The stand features a safety
system preventing unwanted pipe
movements.
- The stand is stable, with a solid base.
- No cable runs amongst the audience.
- The tripod base cannot be reached by the audience and protected by a barrier.
- The tripod must not be placed in front of an emergency exit.
-
Note: It is your sole responsibility to respect the local safety regulations when position your stands.
Note : The legislation requires that every device set up in a public space features a double fixation bracket.
This security system must hold 10 times the weight of the device.
Page 3
English
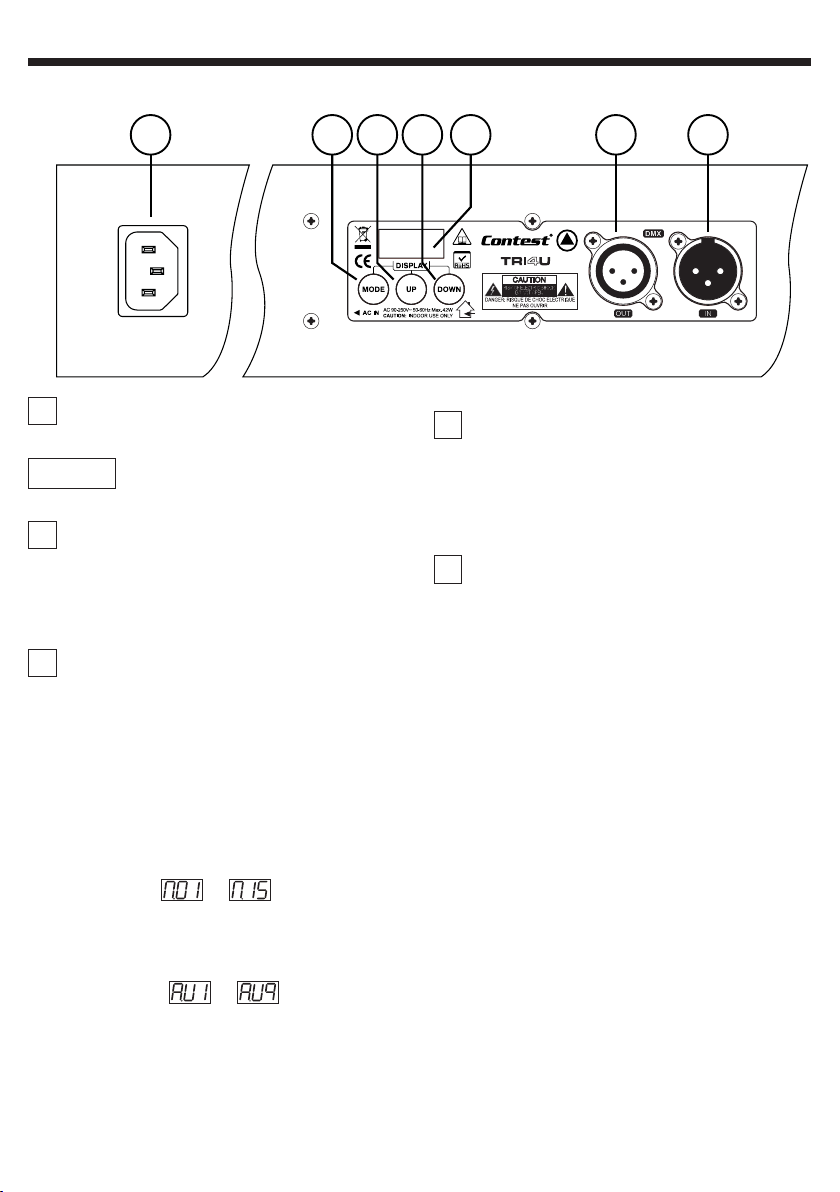
3.3 - The control panel
TRI4U - 4-projector bar with 12x3W tricolor LEDs
7
1
MODE Button
Allows you to access and browse the internal menu.
2 and 3
4
5
UP and DOWN Button
Allows you to modify the value of each function.
Display
Indicates the current status of your TRI4U.
Note about the display in DMX mode:
- Letter d flashes, alternating with the DMX address.
- The decimal dot will be lit if a DMX signal is detected
via the DMX input.
DMX Output
Can be used to daisy-chain several devices.
Same wiring as the DMX input.
1 2
3 4 5
6
DMX Input
3-pin male XLR plug wired as follows:
- Ground: 1
- Negative signal: 2
- Positive signal: 3
Can be used to carry the DMX signal (either coming from
another device or DMX controller) to the projector.
7
Power input socket
Can be used to connect the unit to an electrical outlet.
Please make sure the voltage of the electrical outlet will
not damage your TRI4U.
6
4 - Functions
4.1 - Macros and patterns configuration
4.1.1 - Macros:
Macros include 10 preset colours and 5 sequences of preset colours.
When using macros, all projectors will be used to display the same colour.
Sequences are either in step or cross-fade mode.
4.1.2 - Patterns: to
Patterns are visual effects created by turning on and off projectors to produce chasers, "ping-pong" effects, etc.
Patterns use preset colours and sequences are either in step or cross-fade mode.
Page 4
to

TRI4U - 4-projector bar with 12x3W tricolor LEDs
4.2 - Using the menu
4.2.1 - Menu structure
4.2.2 - More details about the Macro menu
English
Macro menu: preset colours and macro selection.
More details about M menu are available in the next chapter.
Auto menu: Auto mode allowing you to select 9 patterns.
The 4 projectors act independently.
More details about AU menu are available in chapter 4.2.3.
Channel Menu: DMX modes
and slave mode selection, from
2 to 16 channels.
The 4 projectors act
independently,
DMX Address selection.
Red: R255 - V000 - B000
Orange: R255 - V070 - B000
Yellow: R255 - V100 - B000
Green: R000 - V255 - B000
Cyan: R000 - V255 - B255
Blue: R000 - V000 - B255
Pink: R255 - V000 - B100
Magenta: R255 - V000 - B100
Cool white: R255 - V255 - B255
Warm white: R255 - V255 - B100
Colour macro 1 in step mode
Colour macro 2 in cross-fade mode
Colour macro 3 in cross-fade mode
Colour macro 4 in cross-fade mode
Colour macro 5 in cross-fade mode
Note : In Colour / Macro mode, your TRI4U will send information across 12 DMX channels towards connected slave units
Note : R, G and B values of this mode can be used to
recreate fixed colours by yourself.
Sequence including 8 fixed colours (Red,
Macro 1
Macro 2
Macro 3
Macro 4
Macro 5
Orange, Yellow, Green, Cyan, Blue, Magenta
and Pink).
Step transitions.
Same sequence with cross-fade transitions.
Red to Orange non-stop cross-fade
transitions.
Green to Blue non-stop cross-fade
transitions.
Warm White to Cool White non-stop crossfade transitions.
Page 5
.

English
TRI4U - 4-projector bar with 12x3W tricolor LEDs
4.2.3 - More details about the Auto mode
Sequencing of patterns 2, 3, 4, 5, 6.
Each pattern is repeated 10 times.
Step transitions.
Switching on and off each projector in a loop as follows : P1 > P2 > P3 > P4 > P3 > P2 > P1.
Includes 8 preset colours. 7 x 8 steps.
Step transitions.
Switching on each projector and replacing the current colour by the next preset colour for each
projector: P1 > P2 > P3 > P4 > P3 > P2 > P1 in a loop.
Includes 8 preset colours. 7 x 8 steps.
Step transitions.
Switching on / flashing / switching on each projector. Includes 8 preset colours.
12 x 8 steps.
Step transitions.
Colour sequencing by pair of projectors. Fork Effect.
4 x 2 steps.
Step transitions.
Switching on and off each projector one after another. Ping-pong effect.
Step transitions.
Symmetrical colour changes. Colour ping-pong effect.
All projectors on. 4x2 steps.
Step transitions.
Similar to AU7 with cross-fade transitions.
Sequence including several patterns with internal/external symmetry.
Cross-fade transitions.
Note : In auto mode, your TRI4U will send information across 12 DMX channels towards connected slave units.
4.2.4 - Macro and pattern speed settings
Once macros or patterns have been activated, you can adjust their
speed or activaite the music-sensitive mode by pressing the MENU
button for 2 seconds.
Then use the UP and DOWN buttons to select the desired speed.
The S2L value (Sound-to-Light) refers to the music-sensitive mode.
SP0 represents the slowest speed, whereas SP9 is the fastest.
Speeds available in step mode
S2L Music-sensitive mode
SP0 1 step every 10 seconds (6 BPM)
SP1 1 step every 5 seconds (12 BPM)
SP2 1 step every 2 seconds (30 BPM)
SP3 1 step per second (60 BPM)
SP4 1,33 step per second (80 BPM)
SP5 1,66 step per second (100 BPM)
SP6 2 steps per second (120 BPM)
SP7 3 steps per second (180 BPM)
SP8 4 steps per second (240 BPM)
SP9 8 steps per second (480 BPM)
Page 6
Speeds available in cross-fade mode
SP0 1 step every 20 seconds (3 BPM)
SP1 1 step every 10 seconds (6 BPM)
SP2 1 step every 4 seconds (15 BPM)
SP3 1 step every 2 seconds (30 BPM)
SP4 0,66 step per second (40 BPM)
SP5 0,833 étape par seconde (50 BPM)
SP6 1 step per second (60 BPM)
SP7 1,5 step per second (90 BPM)
SP8 2 steps per second (120 BPM)
SP9 4 steps per second (240 BPM)

TRI4U - 4-projector bar with 12x3W tricolor LEDs
4.2.5 - The various DMX modes
2-channel mode: the display indicates
CHANNEL 1 CHANNEL 2
000 - 010
011 - 020
021 - 030
031 - 040
041 - 051
052 - 061
062 - 071
072 - 081
082 - 092
093 - 102
103 - 112
113 - 122
123 - 133
134 - 143
144 - 153
154 - 163
164 - 174
175 - 184
185 - 194
195 - 204
205 - 215
216 - 225
226 - 235
236 - 245
246 - 255
Note :
- Macros and patterns are similar to those described in chapters 4.2.2 and 4.2.3.
- The music-sensitive mode triggered by channel 2 is only available for step transitions: macro 1 and patterns 1 to 7.
- Channel 2 only affects speed and does not activate the music-sensitive mode for macros 2 to 5 and patterns 8 to 9.
LEDs off No function
Red: R255 -V000 - B000
Orange: R255 - V070 - B000
Yellow: R255 - V155 - B000
Green: R000 - V255 - B000
Cyan: R000 - V255 - B255
Blue: R000 - V000 - B255
Pink: R255 - V000 - B255
Magenta: R255 - V000 - B100
Cool white: R255 - V255 - B255
Warm white: R255 - V255 - B200
Colour macro 1
Colour macro 2
Colour macro 3
Colour macro 4
Colour macro 5
Pattern 1
Pattern 2
Pattern 3
Pattern 4
Pattern 5
Pattern 6
Pattern 7
Pattern 8
Auto mode: Macros then Patterns 10 times each Music-sensitive mode ( Dimmer at 100%)
000 - 255 : Dimmer
000 - 255 : Speed
English
3-channel mode: the display indicates
DMX Channels DMX Values Functions
CHANNEL 1
CHANNEL 2
CHANNEL 3
000-255 Red levels for all projectors
000-255 Green levels for all projectors
000-255 Blue levels for all projectors
4-channel mode: the display indicates
DMX Channels DMX Values Functions
CHANNEL 1
CHANNEL 2
CHANNEL 3
CHANNEL 4
000-255 Red levels for all projectors
000-255 Green levels for all projectors
000-255 Blue levels for all projectors
000 Black-out
001-189 Dimmer
190-250 Strobe at increasing speed
251-255 Full On
Page 7

English
TRI4U - 4-projector bar with 12x3W tricolor LEDs
5-channel mode: the display indicates
DMX Channels DMX Values Functions
CHANNEL 1
CHANNEL 2
CHANNEL 3
CHANNEL 4
CHANNEL 5
000-255 Red levels for all projectors
000-255 Green levels for all projectors
000-255 Blue levels for all projectors
000-255 Dimmer from 0 - 100%
000-015 No strobe
016-250 Strobe at increasing speed
6-channel mode: the display indicates
CHAN. 1 CHAN. 2 CHAN. 3 CHANNEL 4 CHANNEL 5 CHANNEL 6
If channel 6 between
000 and 010
If chan. 6 between
000 and 010
If chan. 6 between
011 and 255
000 - 255 : Dimmer
000 - 024
No strobe
000 - 010
011 - 020
021 - 030
031 - 040
041 - 051
052 - 061
062 - 071
072 - 081
082 - 092
093 - 102
103 - 112
No function
Red
Orange
Yellow
Green
Cyan
Blue
Pink
Magenta
Cool white
Warm white
113 - 122
123 - 133
134 - 143
144 - 153
000 - 255 : Red dimmer
Note :
- The music-sensitive mode triggered by channel 4 is only available for step sequences: macro 1 and patterns 1 to 7.
- Channel 4 only affects speed and does not trigger the music-sensitive mode for macros 2 to 5 and patterns 8 to 9.
000 - 255 : Green dimmer
000 - 255 : Blue dimmer
000 - 255 : Main dimmer
000 - 255 : Speed
Music-sensitive
mode
(Dimmer at 100%)
154 - 163
164 - 174
175 - 184
185 - 194
025 - 255 : Strobe at increasing speed
195 - 204
205 - 215
216 - 225
226 - 235
236 - 245
246 - 255
Coiour macro 1
Colour macro 2
Colour macro 3
Colour macro 4
Colour macro 5
Pattern 1
Pattern 2
Pattern 3
Pattern 4
Pattern 5
Pattern 6
Pattern 7
Pattern 8
Auto mode: Macros
then Patterns 10 times
each
Page 8

TRI4U - 4-projector bar with 12x3W tricolor LEDs
English
12-channel mode: the display indicates
DMX Channels DMX Values Functions
CHANNEL 1
CHANNEL 2
CHANNEL 3
CHANNEL 4
CHANNEL 5
CHANNEL 6
CHANNEL 7
CHANNEL 8
CHANNEL 9
CHANNEL 10
CHANNEL 11
CHANNEL 12
000-255 Projector 1 Red level
000-255 Projector 1 Green level
000-255 Projector 1 Blue level
000-255 Projector 2 Red level
000-255 Projector 2 Green level
000-255 Projector 2 Blue level
000-255 Projector 3 Red level
000-255 Projector 3 Green level
000-255 Projector 3 Blue level
000-255 Projector 4 Red level
000-255 Projector 4 Green level
000-255 Projector 4 Blue level
Reversed 12-channel mode: the display indicates
This mode is similar to the previous one, but channels are reversed.
This mode is perfect to create symmetrical effects combining 2 TRI4U: one in regular 12-channel mode, the other one
in reversed 12-channel mode.
Channel 1 controls Red level of projector 4, channel 2 controls Green level of projector 4, channel 3 controls Blue level
of projector 4, ... etc.
15-channel mode: the display indicates
DMX
Channels
CHANNEL 1
CHANNEL 2
CHANNEL 3
CHANNEL 4
CHANNEL 5
CHANNEL 6
CHANNEL 7
CHANNEL 8
CHANNEL 9
CHANNEL 10
CHANNEL 11
CHANNEL 12
CHANNEL
13
CHANNEL
14
CHANNEL
15
DMX
Values
000-255
000-255 Projector 1 Green level
000-255
000-255
000-255 Projector 2 Green level
000-255
000-255
000-255 Projector 3 Green level
000-255
000-255
000-255 Projector 4 Green level
000-255
000-189 Main dimmer
190-250 Slow to fast strobe
251-255 Full On
000-255
000-200 Macros and patterns speed settings (increasing speed)
201-255 Music-sensitive mode for macro 1/patterns 1 to 5 (identical to channel 2 in 2-channel mode)
Projector 1 Red level
Projector 1 Blue level
Projector 2 Red level
Projector 2 Blue level
Projector 3 Red level
Projector 3 Blue level
Projector 4 Red level
Projector 4 Blue level
Fixed colours, macros and patterns selection
The DMX values are identical to channel 1 in 2-channel mode (page 7)
Functions
Page 9

English
TRI4U - 4-projector bar with 12x3W tricolor LEDs
Reversed 15-channel mode: the display indicates
This mode is similar to the previous one, but channels are reversed.
This mode is perfect to create symmetrical effects combining 2 TRI4U: one in regular 15-channel mode, the other one
in reversed 15-channel mode.
Channel 1 controls Red level of projector 4, channel 2 controls Green level of projector 4, channel 3 controls Blue level
of projector 4, ... etc.
16-channel mode: the display indicates
DMX Channels DMX Values Functions
CHANNEL 1
CHANNEL 2
CHANNEL 3
CHANNEL 4
CHANNEL 5
CHANNEL 6
CHANNEL 7
CHANNEL 8
CHANNEL 9
CHANNEL 10
CHANNEL 11
CHANNEL 12
CHANNEL 13
CHANNEL 14
CHANNEL 15
CHANNEL 16
000-255
000-255 Projector 1 Green level
000-255 Projector 1 Blue level
000
001-189 Projector 1 dimmer
190-250 Projector 1 slow to fast strobe
251-255 Projector 1 Full On
000-255
000-255 Projector 2 Green level
000-255 Projector 2 Blue level
000
001-189 Projector 2 dimmer
190-250 Projector 2 slow to fast strobe
251-255 Projector 2 Full On
000-255
000-255 Projector 3 Green level
000-255 Projector 3 Blue level
000
001-189 Projector 3 dimmer
190-250 Projector 3 slow to fast strobe
251-255 Projector 3 Full On
000-255
000-255 Projector 4 Green level
000-255 Projector 4 Blue level
000
001-189 Projector 4 dimmer
190-250 Projector 4 slow to fast strobe
251-255 Projector 4 Full On
Projector 1 Red level
Projector 1 black-out
Projector 2 Red level
Projector 2 black-out
Projector 3 Red level
Projector 3 black-out
Projector 4 Red level
Projector 4 black-out
Reversed 16-channel mode : the display indicates
This mode is similar to the previous one, but channels are reversed.
This mode is perfect to create symmetrical effects combining 2 TRI4U: one in regular 16-channel mode, the other one
in reversed 16-channel mode.
Channel 1 controls Red level of projector 4, channel 2 controls Green level of projector 4, channel 3 controls Blue level
of projector 4, ... etc.
Page 10

TRI4U - 4-projector bar with 12x3W tricolor LEDs
5 - Additional details
5-1 Master / Slave Mode
The Master / Slave mode allows you to synchronise several devices.
In Master / Slave mode, the first unit will control the others.
5.1.1 - Configuring a master unit
The master unit can be configured in two different ways:
1- Master unit in Color/Macro mode:
Press MENU then select Macro. Use the UP and DOWN buttons to select macros 1 to 5 (M11 to M15).
Press MODE for 2 seconds, then use the UP and DOWN buttons to adjust the speed (PS1 to PS9).
2 - Master unit in Auto mode:
Press MENU then select Auto. Use the UP and DOWN buttons to select patterns 1 to 9 (AU1 to AU9).
Press MODE for 2 seconds, then use the UP and DOWN buttons to adjust the speed (PS1 to PS9) or activate the
music-sensitive mode (SP0).
5.1.2 - Configuring one or several slave units
Press mode then select Channel. Use the UP and DOWN buttons to select SLA or SLr.
- SLA refers to the regular slave mode (replicates the master unit behaviours).
- SLr refers to the reversed slave mode, allowing you to create symmetry effects.
Note : In slave mode, each projector is automatically set on address 1, which cannot be modified.
5-2 The reversed DMX modes (r.XX)
When using reversed DMX modes, the projectors order is reversed. The table below describes these modes.
12 and 15-channel modes Termes utilisés
Projector 1 RGB
(channels 1,2,3)
Reversed 12 and 15-channel modes (channels 13, 14 and 15 of the 15-channel mode retain their
function)
Projector 4 RGB
(channels 1,2,3)
16-channel mode
Projector 1 RGB, D/S
(channels 1,2,3,4)
Reversed 16-channel mode
Projector 4 RGB, D/S
(channels 1,2,3,4)
Projector RGB 2
(channels 4,5,6)
Projector 3 RGB
(channels 4,5,6)
Projector 2 RGB, D/S
(channels 5,6,7,8)
Projector 3 RGB, D/S
(channels 5,6,7,8)
Projector 3 RGB
(channels 7,8,9)
Projector RGB 2
(channels 7,8,9)
Projector 3 RGB, D/S
(channels 9,10,11,12)
Projector 2 RGB, D/S
(channels 9,10,11,12)
Projector 4 RGB
(channels 10,11,12) RGB: Red, Green and Blue
D/S: Dimmer and strobe
Projector 1 RGB
(channels 10,11,12)
Projector 4 RGB, D/S
(channels 13,14,15,16)
Projector 1 RGB, D/S
(channels 13,14,15,16)
English
5-3 Turning off the display
The display automatically turns of after 25 seconds of inactivity.
Pressing one of the 3 buttons will reactivate the display without affecting the current settings, however, pressing twice
any button will modify the current settings.
5-4 DMX signal losses
In case of signal interruption, your TRI4U will keep the last settings used before the signal loss.
5-5 Maintenance
This device does not require particular maintenance procedures. The internal circuit is protected by a 5 x 20 mm,
250V/2A fuse. If need to replace the fuse, the problem might come from an internal defect requiring a qualified
technician.
Page 11

Because CONTEST® takes the utmost care in its products to make sure you only get the best possible quality, our products are
subjects to modifications without prior notice. That is why technical specifications and the products physical configuration might differ
from the illustrations.
Make sure you get the latest news and updates about the CONTEST® products on www.contest-lighting.com
CONTEST® is a trademark of HITMUSIC S.A. - Zone Cahors sud - 46230 FONTANES - FRANCE
 Loading...