

Hitman HD-5 User Manual

HD-5 ELECTRONIC DRUM SET
USER’S MANUAL
Virgin Musical Instruments


WELCOME
We would like to express our appreciation and congratulate you for purchasing this HITMAN Electronic
Drum Kit. You will nd the drum set’s features and functions listed within this owners manual. Please take
a few minutes to read the following pages of instruction, and retain this manual for future reference.
INCLUDED IN THE BOX
1 DRUM SOUND MODULE
1 BASS DRUM WITH STAND
1 BASS DRUM KICK PEDAL
1 HI-HAT PEDAL
1 EIGHT INCH SNARE DRUM HEAD DUAL-ZONE
3 EIGHT INCH TOM DRUM PADS
1 TWELVE INCH CRASH CYMBAL WITH CHOKE
1 TWELVE INCH RIDE CYMBAL
1 EIGHT INCH HIGH HAT CYMBAL WITH OPTICAL SENSOR FOOT PEDAL
1 DURABLE LIGHT WEIGHT DRUM FRAME COMPLETE WITH MOUNTING HARDWARE
1 KIT WIRING HARNESS CONNECTION CABLE
1 PAIR STEREO HEADPHONES
1 DRUM THRONE STOOL
(1) DRUM KEY
(2) DRUMSTICKS
(1) DRUMSTICK HOLDER BAG
(8) VELCRO STRIPS
(1) ASSEMBLY INSTRUCTIONS/INSTRUMENT GUIDE
FCC STATEMENTS
This equipment has been tested and found to comply with the limits for a Class B digital device, pur-
suant to Part 15 of the FCC Rules. Also, this equipment has been tested and found to comply with the
limits for the following standard:
EN55022-2006
EN55024:1998/+A1:2001:/+A2:2003
EN55013:2001/+A1:2001:/+A3:2006
EN6100-3-2:2006
EN6100-3-3:1995/+A1:2001/+A2:2003
These limits are designed to provide reasonable protection against harmful interference in a residential installation. This equipment generates uses, and can radiate radio frequency energy and, if not
installed and used in accordance with the instructions, may cause harmful interference to radio communications. However, there is no guarantee that interference will not occur in a particular installation.
If this equipment does cause harmful interference to radio or television reception, which can be determined by turning the equipment off and on, the user is encouraged to try to correct the interference by
one of more of the following measures:
Reorient or relocate the receiving antenna.
• Increase the separation between the equipment and receiver.
• Connect the equipment into an outlet or a circuit different from that to which the receiver is
connected.
• Consult the dealer or an experienced radio/TV technician for help.

TAKING CARE OF YOUR DRUM KIT
SERVICE AND MODIFICATION
Do NOT attempt to open the unit or make any
change in the circuits or parts of the unit. This
product should be serviced by a qualied service
personnel when:
• The power supply cord of the plug of
the adapter has been damaged.
• Liquid has been spattered into the unit
or it has been exposed to rain.
• The instrument does not appear to
operate normally or exhibits a marked
change in performance.
• The instrument has been dropped or
damaged.
.
POWER
This drum set contains digital circuitry and may
cause interference if placed too close to radio or
television receivers. If interference occurs, move
the drum set farther away from the affected
equipment
• Only use the attached power adapter.
• Turn the power switch to off when the
drum is not in use.
• To avoid damage to the drum and
other devise to which it is connected,
turn the power switches of all related
devices off prior to connection or disconnection of audio cables.
• Turn the power off if the main cable of
the power adapter is damaged or the
instrument is exposed to liquid.
• Do not switch the unit on and off in
quick succession, this places an unexpected load on the electronic components.
• Unplug the AC power cord during an
electrical storm.
• Avoid plugging the AC adapter into the
same AC outlet as appliances with high
power consumption, such as electric
heaters or ovens.
LOCATION
To avoid deformation discoloration or more serious
damage, do not expose the drum set to the following conditions;
• Direct sunlight (or near a window),
• High temperatures (near a heat
source, outside, or in a care during the
daytime)
• Rain or excessive humidity
• Excessive dust
• Strong vibration.
• Do not expose the unit to water or
other liquids.
•
HANDLING AND TRANSPORT
• Never apply excessive force to the
controls, connectors, pads or other
parts of the instrument.
• Always unplug cables by gripping
the plug rmly, NOT by pulling on the
cable.
• Physical shocks caused by dropping
bumping or placing heavy objects on
the instrument can result in scratches
and/or more serious damage.
• Carefully check the amplier volume
control before starting to play. Excessive volume can cause permanent
hearing loss.
CLEANING
• Only clean the unit with a dry of damp
soft cloth. Do not use chemicals or
polishes

TABLE OF CONTENTS
SOUND MODULE ........................................................................................................................... 6
CONTROL PANEL ......................................................................................................................... 6
BOTTOM PANEL ........................................................................................................................... 8
PLAYING THE PADS....................................................................................................................... 9
DRUM KIT ......................................................................................................................................11
KIT SELECT ................................................................................................................................11
KIT EDIT .................................................................................................................................... 12
CHANGE THE VOICE AND VOLUME OF THE PAD ........................................................................... 12
PATTERN ...................................................................................................................................... 13
PRACTICE THE PATTERN .......................................................................................................... 13
METRONOME ............................................................................................................................ 14
RECORDING ................................................................................................................................. 15
RECORDING .............................................................................................................................. 15
STOP AND SAVE ........................................................................................................................ 17
PLAYBACK ................................................................................................................................. 17
USB & MIDI ................................................................................................................................... 18
VOICE LIST ................................................................................................................................... 19
SPECIFICATIONS ......................................................................................................................... 20
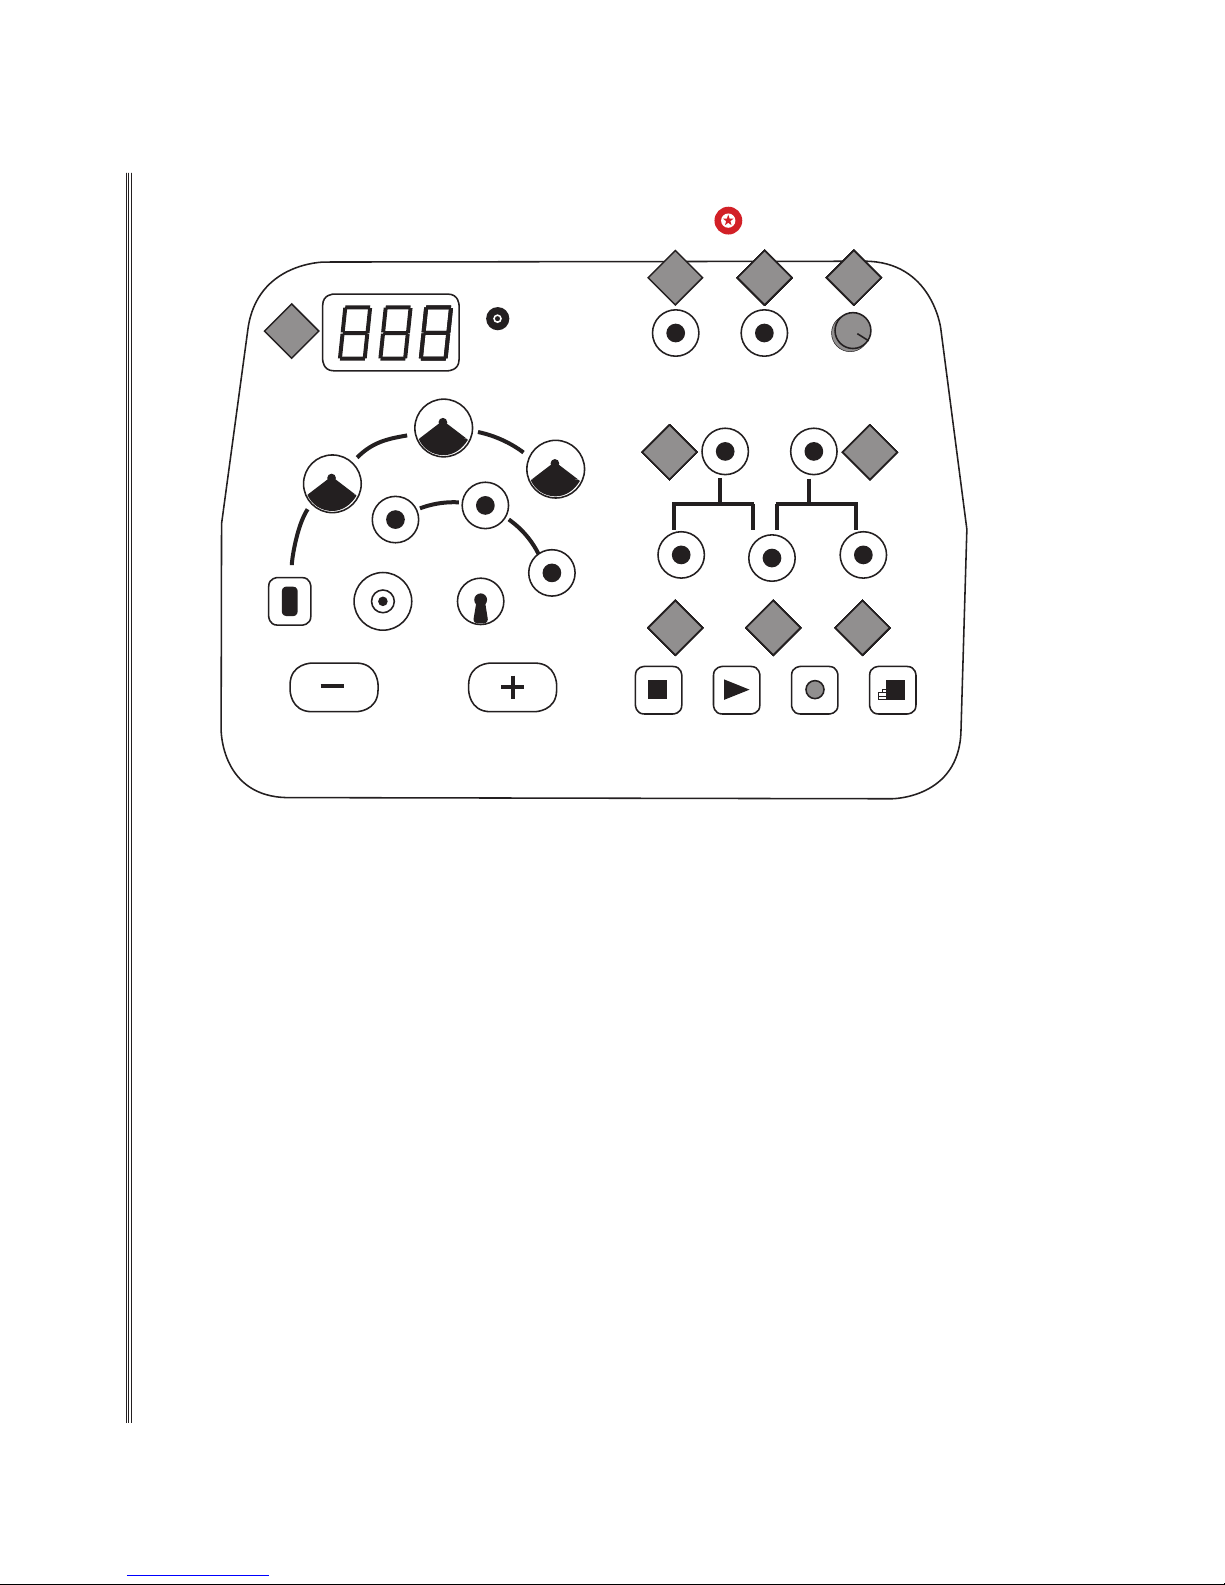
SOUND MODULE
CONTROL PANEL
Listed below please nd a list of the easy to use buttons on the HITMAN HD-5 Electronic Drums.
1
HI-HAT
TOM 1
CRASH
TOM 2
KICKSNAREHI-HAT PEDAL
HITMAN
HD-5
RIDE
TOM 3
111111111111132
CLICK TEMPO
KIT PATTERN
11111111111115
VOICE VOLUME DRUM OFF
11111111111117 11111111111118 11111111111119
STOP PLAY RECORD SAVE
11111111111114
MASTER
VOLUME
11111111111116
1 DISPLAY The display is a 3-digit 7-segment LED showing information such as kit number,
voice number and other parameters.
2 CLICK The CLICK button toggles the metronome on and off.
3 TEMPO The TEMPO button changes the tempo of the metronome, it is also used for
recording and pattern playing.
4 MASTER VOLUME Rotate this knob clockwise to increase the master volume and
counter-clockwise to decrease the master volume.
5 KIT Press the KIT button to enter the drum kit selection mode.
6 PATTERN Press the PATTERN button to enter the pattern play mode.
7 VOICE Press the VOICE button to enter the voice assignment mode.
8 VOLUME Use the VOLUME button to enter the volume adjustment mode.
9 DRUM OFF Pressing the DRUM OFF button will mute the drum sound in the pattern.
6
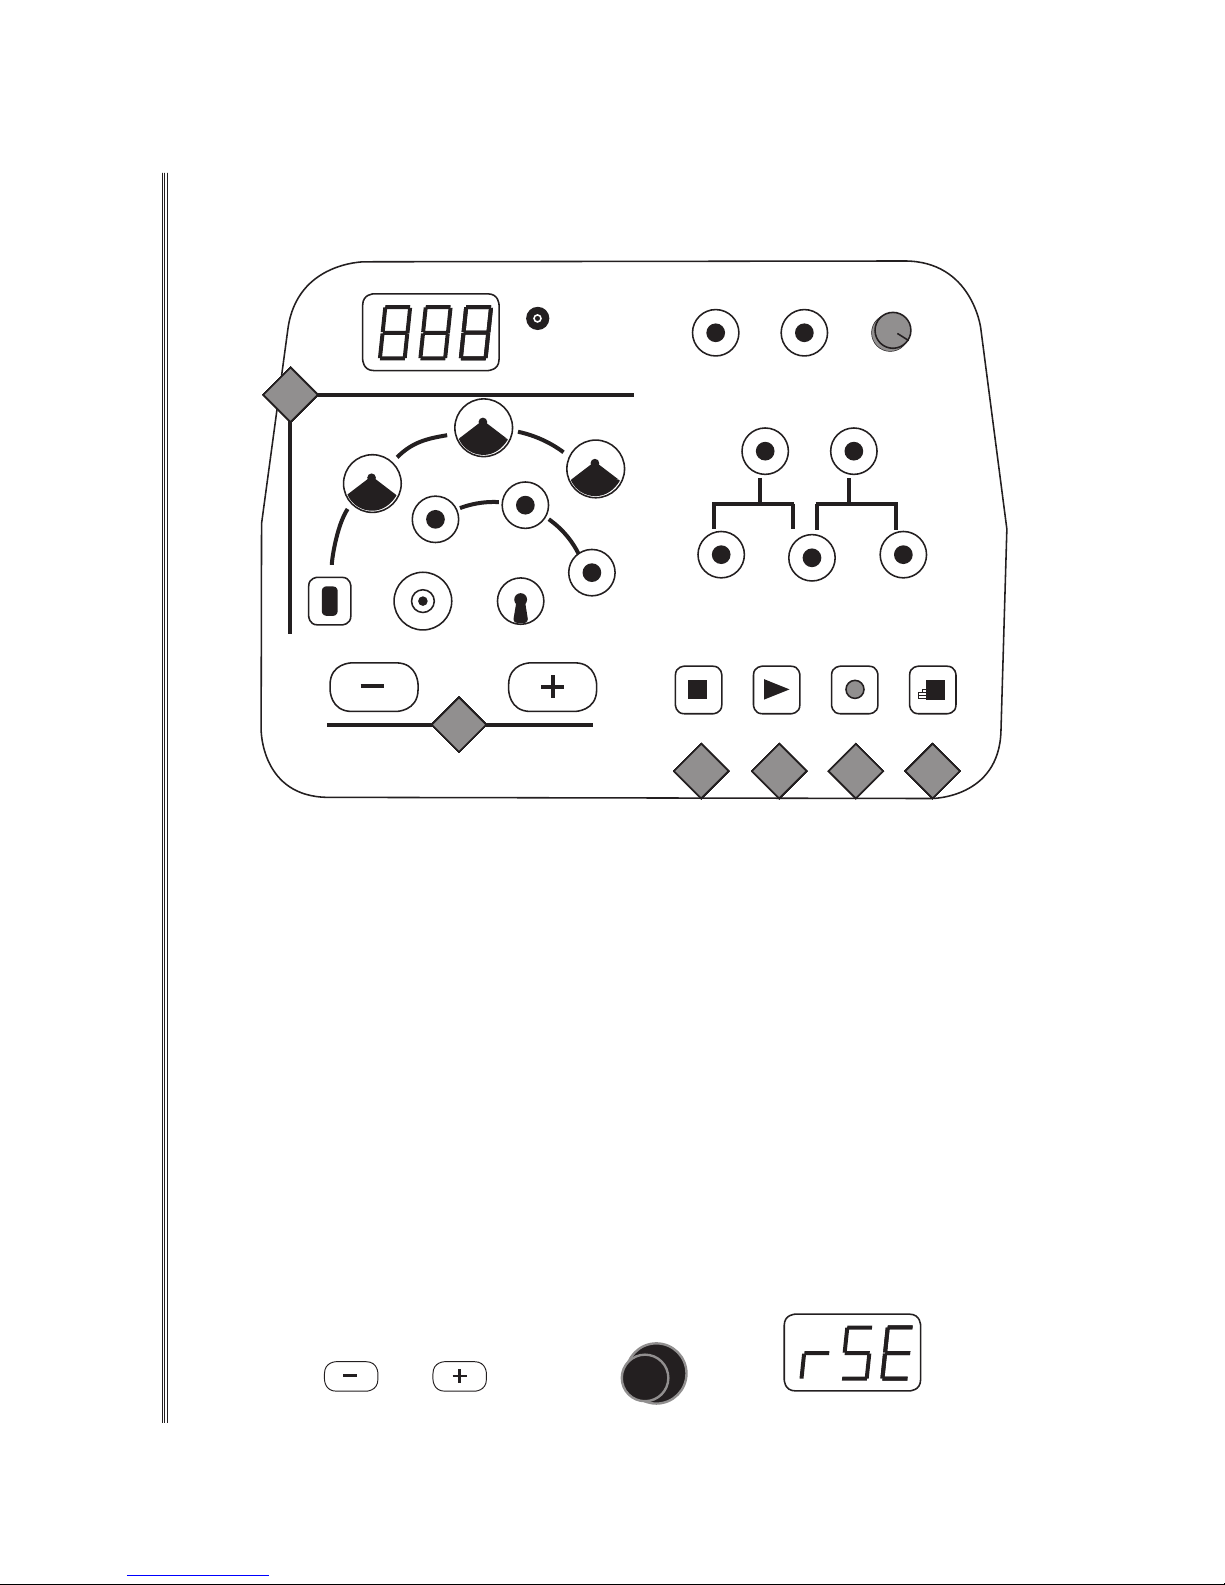
SOUND MODULE
CONTROL PANEL
Listed below please nd a list of the easy to use buttons on the Hitman HD-5 Electronic Drums.
HITMAN
HD-5
111111111111115
CLICK TEMPO
KIT PATTERN
CRASH
MASTER
VOLUME
HI-HAT
TOM 1
TOM 2
KICKSNAREHI-HAT PEDAL
111111111111114
RIDE
TOM 3
VOICE VOLUME DRUM OFF
STOP PLAY RECORD SAVE
111111111111110 111111111111111 111111111111112 111111111111113
1 STOP Use the STOP button to stop the pattern playing or to stop recording.
2 PLAY Use the PLAY button to play a pattern or a recorded performance.
3 RECORD Press the RECORD button to enter the record mode.
4 SAVE Press the SAVE button to save a recording or settings you have changed.
5 – BUTTONS + Use these – BUTTONS + to adjust and select options in the kit and pattern
modes, the volume settings and wherever needed.
6 PAD SELECT BUTTONS: These buttons have dual functions. When engaged in the kit
mode use these buttons to select or edit a pad.
When in the pattern play mode these buttons are used to display pad performance.
♫Please note, to reset the drum set, press and hold down both – buttons + while turning
on the power until “rSE” appears on the display. The factory settings will be restored and
any recorded contents erased.
POWER
OFF ON
7
 Loading...