

Hitman HD-10 Owner's Manual
Virgin Musical Instruments
Owner s Manual
HD-10
Precaution
Thank you for purchasing this electronic instrument.For perfect operation and
security, please read the manual carefully and keep it for future reference.
The lightning flash with arrowhead symbol within an equilateral triangle
is intended to alert the user to the presence of uninsulated “dangerous
voltage”within the product s enclosure that may be of sufficient
magnitude to constitute a risk of electric shock to persons.
The exclamation point within an equilateral triangle is intended to alert
the user to the presence of important operating and maintenance(servicing)
instructions in the literature accompanying the product.
Safety Precautions
CAUTION
RISK OF ELECTRIC SHOCK
DO NOT OPEN
Important Safety Instructions
1) Read these instructions.
2) Keep these instructions.
3) Heed all warnings.
4) Follow all instructions.
5) Do not use this apparatus near water.
6) Clean only with dry cloth.
7) Do not block any ventilation openings, install in
accordance with the manufacturer s instructions.
8) Do not install near the heat sources such as
radiators, heat registers, stoves, or other apparatus
(including amplifiers) that produce heat.
9) Do not defeat the safety purpose of the polarized
or grounding-type plug. A polarizedplug hase two
blades with one wider than the other. A grounding
type plug has two blades and a third grounding
prong. The wide blade or the third prong are
provided for your safety, if the provided plug does
not fit into your outlet. consult an electrician for
replacement of the obsolete outlet.
10) Protect the power cord from being walked on or
pinched particularly at plugs. convenience receptacles,
and the point where they exit from the apparatus.
11) Only use attachments/accessories specified by
the manufacturer.
12) Use only with the cart, stand, tripod, bracket, or
table specified by the manufacturer, or sold with the
apparatus. When a cart is used, use caution when
moving the cart/apparatus combination to avoid
injury from tip-over(Figure 1).
13) Unplug this apparatus during lightning storms
or when unused for a long periods fo time.
14) Refer all servicing to qualified service personnel.
Servicing is required when the apparatus has been
damaged in any way, such as power-supply cord or
plug is damaged, liquid has been spilled or objects
have fallen into the apparatus, the apparatus has
been exposed to rain or moisture, does not operate
normally, or has been dropped.
WARNING: To reduce the risk of fire or electric
shock, do not expose this apparatus to rain or moisture.
CAUTION: Apparatus shall not be exposed to
dripping or splashing and no objects filled with
liquids, such as vases, shall be placed on the
apparatus.
(Fi gure 1)

FCC STATEMENT
1. This device complies with Part 15 of the FCC Rules. Operation is subject to the
following two conditions:
(1) This device may not cause harmful interference.
(2) This device must accept any interference received, including interference that may
cause undesired operation.
2. Changes or modifications not expressly approved by the party responsible for compliance
could void the user's authority to operate the equipment.
NOTE: This equipment has been tested and found to comply with the limits for a Class B
digital device, pursuant to Part 15 of the FCC Rules. These limits are designed to provide
reasonable protection against harmful interference in a residential installation.
This equipment generates uses and can radiate radio frequency energy and, if not installed
and used in accordance with the instructions, may cause harmful interference to radio
communications.
However, there is no guarantee that interference will not occur in a particular installation.
If this equipment does cause harmful interference to radio or television reception, which
can be determined by turning the equipment off and on, the user is encouraged to try to
correct the interference by one or more of the following measures:
Reorient or relocate the receiving antenna.
Increase the separation between the equipment and receiver.
Connect the equipment into an outlet on a circuit different from that to which the
receiver is connected.
Consult the dealer or an experienced radio/TV technician for help.

Contents
Assembly Instruction............................................................................................
Panel Controls .....................................................................................................
Connect..................................................................................................................
Connecting the Power Supply...........................................................................
Connecting an Amplifier.....................................................................................
Connecting a CD Player, etc.(AUX In jack).......................................................
USB MIDI.........................................................................................................
Using Headphones...........................................................................................
Begin Playing the Drums .....................................................................................
Switch the Power On .......................................................................................
Selecting Drum Kits ........................................................................................
ENTER Button .................................................................................................
BACK Button ...................................................................................................
Selecting Kit Edit .............................................................................................
SETUP Button .................................................................................................
SONG Button ..................................................................................................
CLICK Button ..................................................................................................
TEMPO/TAP Button .........................................................................................
Recording Function .........................................................................................
COUNT Button..................................................................................................
Factory Reset .......................................................................................................
Drum Kits List .......................................................................................................
Voice List ..............................................................................................................
Style List ...............................................................................................................
MIDI Implementation Chart...................................................................................
Specifications .......................................................................................................
1
2
5
9
9
9
9
10
10
11
11
12
12
12
13
17
22
25
27
28
30
31
32
33
39
40
41
2
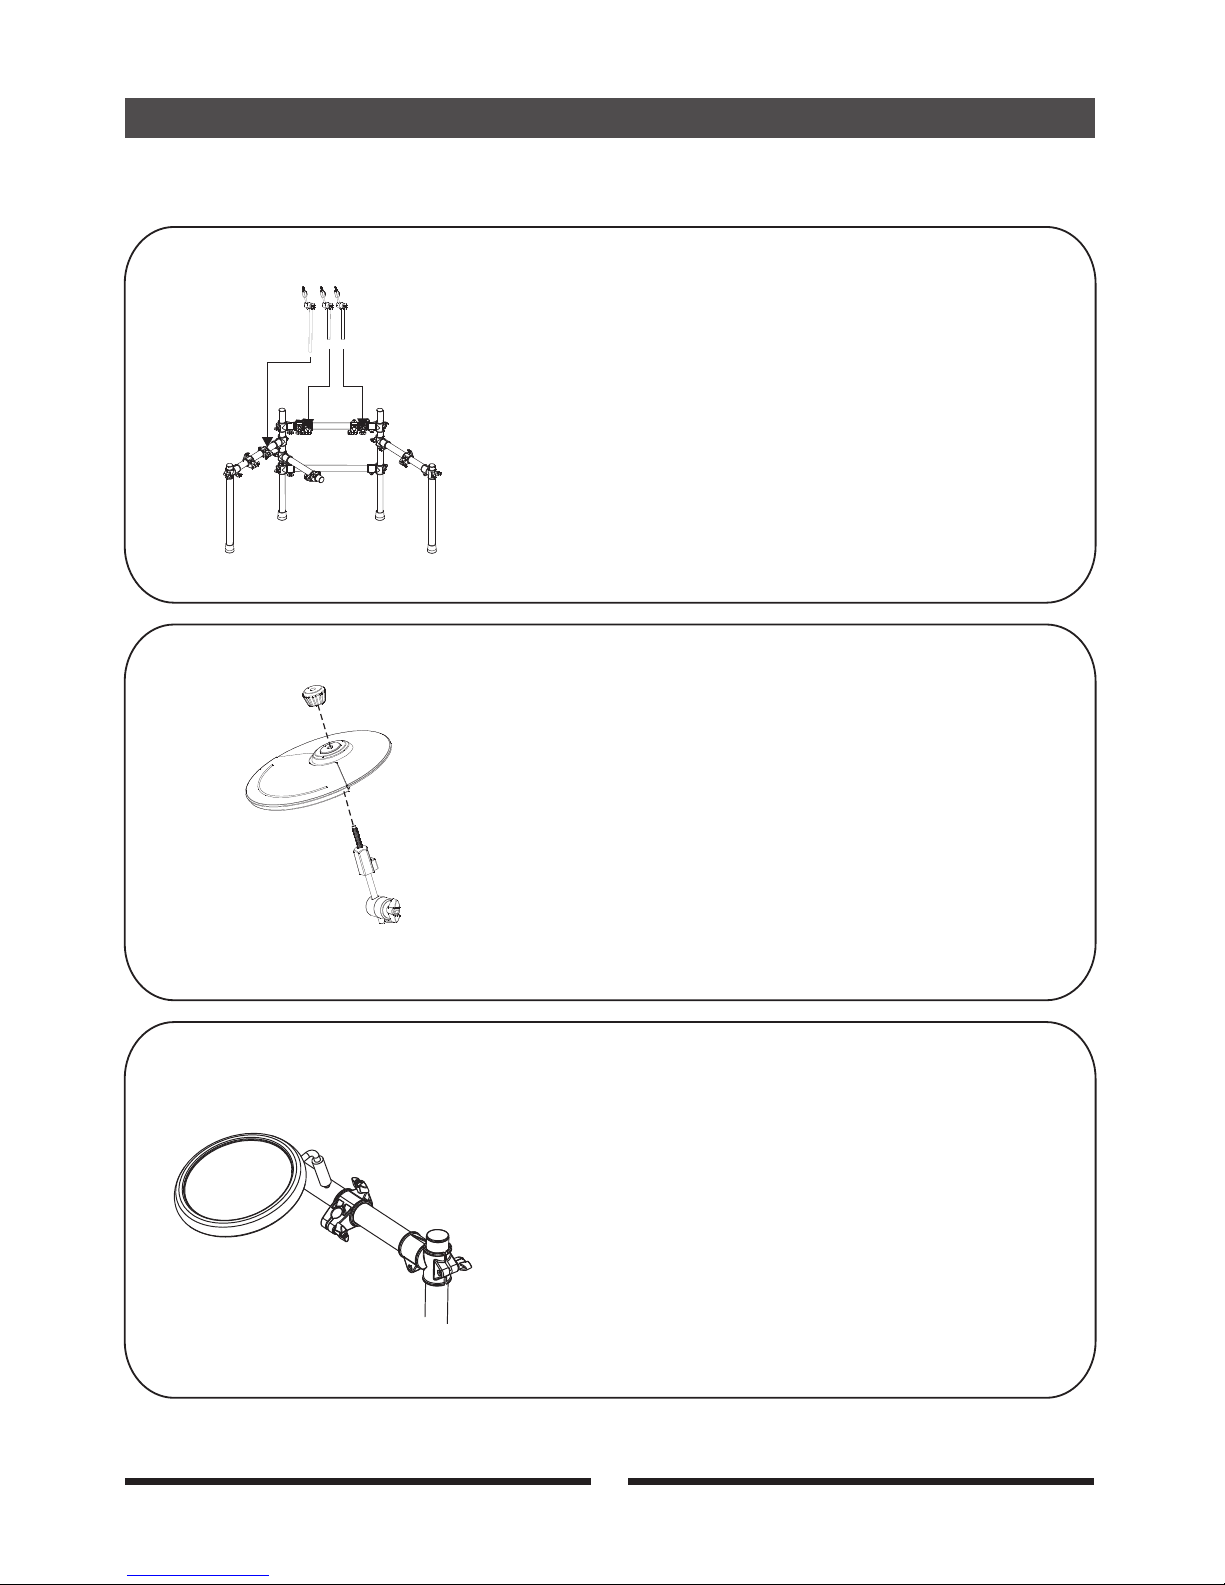
1
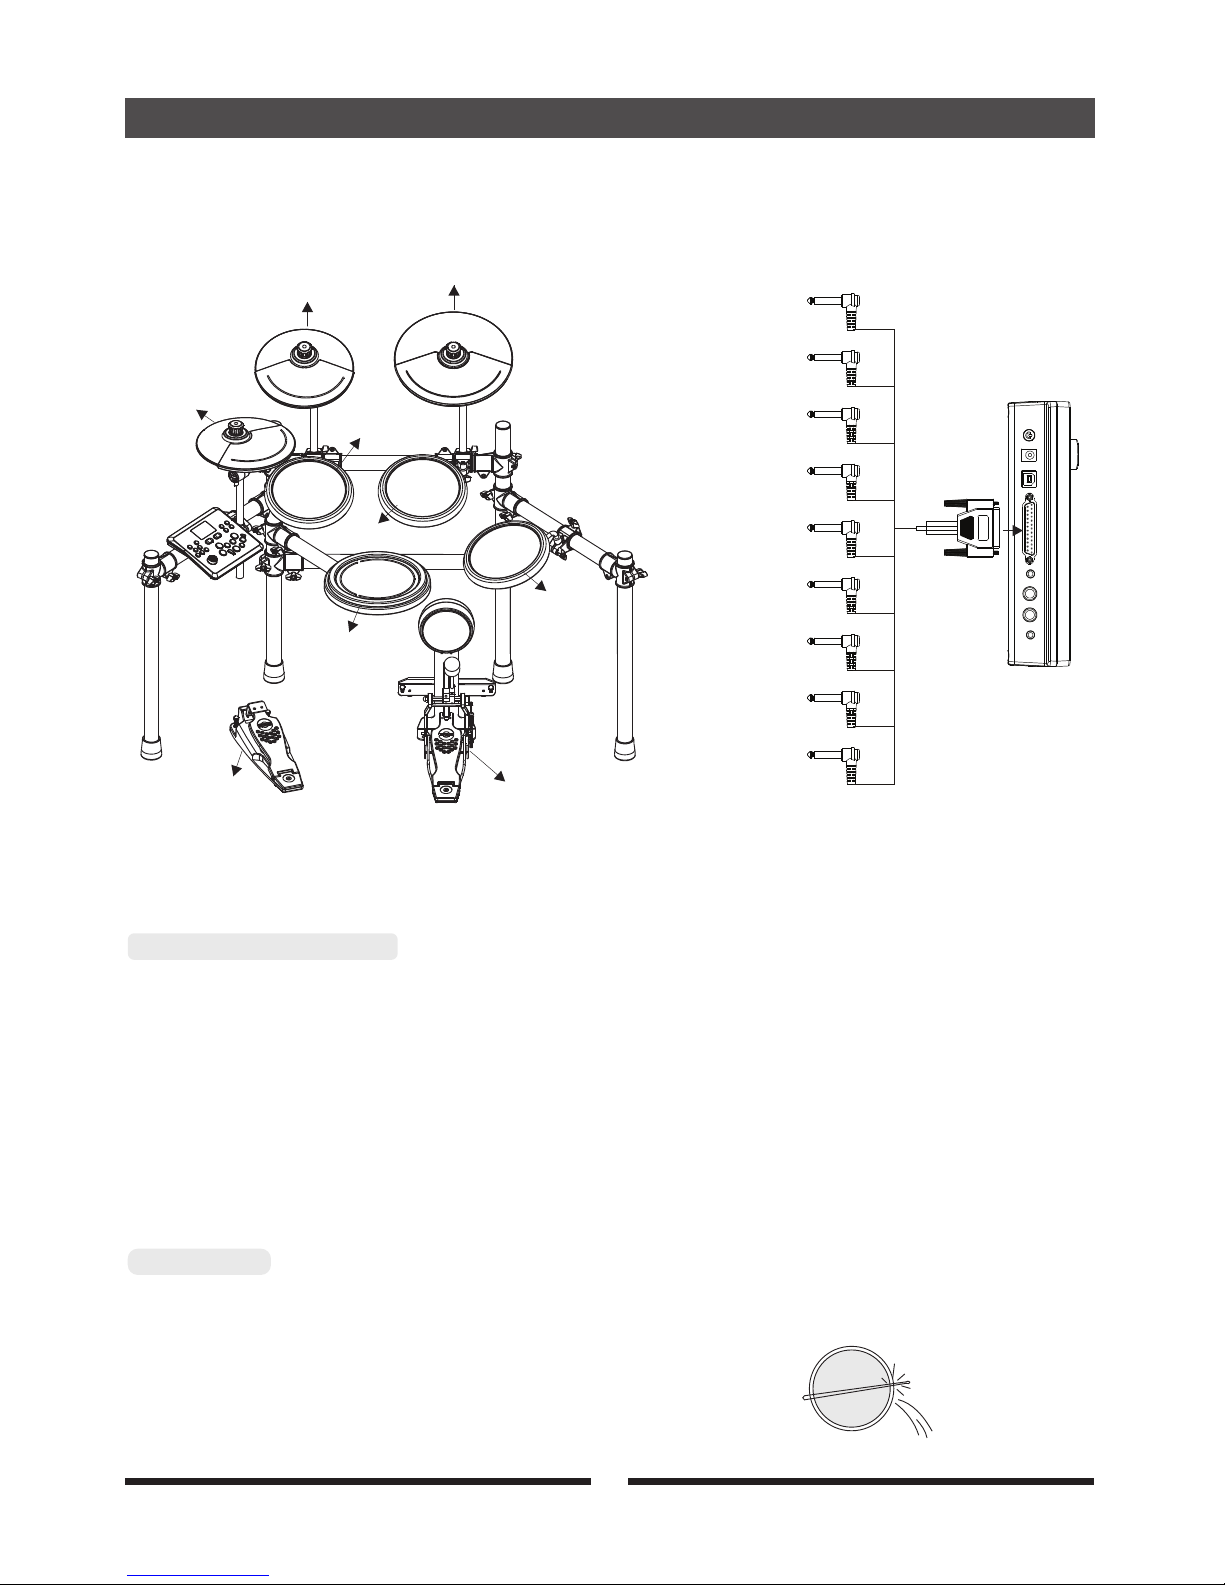
Attach the cymbal arms to the drum
frame indicated positionsinto the
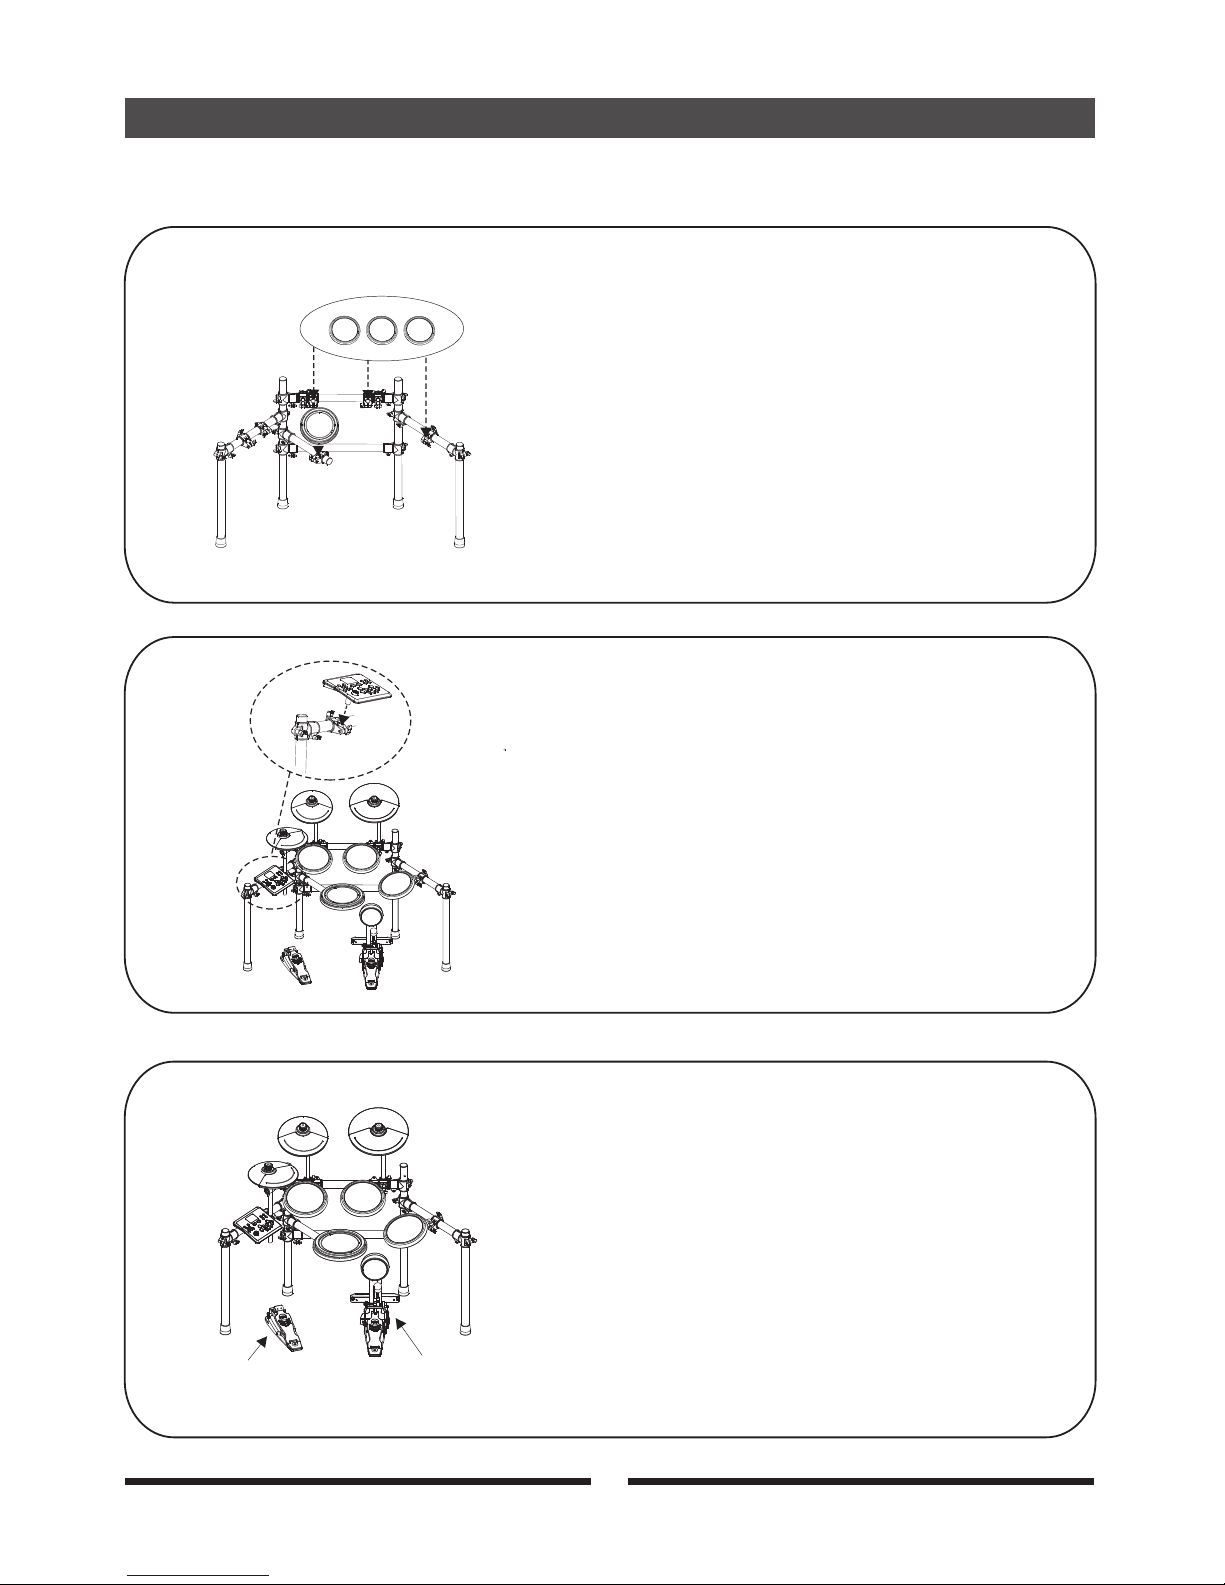
Align the holes in Snare Drum Pad and the three
Tom Drum Pads and insert into the pole on the
Drum Frame as shown.
2
3
Assembly Instruction
Attach the cymbals to the cymbal arms as shown.
3
Attach the Drum Pads in the positions shown below.
4
Assembly Instruction
5
Insert the rod of sound module stand into the
Drum Frame clamp as shown, then tighten.
6
Position Hi-hat control pedal on the left
and Kick pedal on the right.
Hi-hat control pedal
Kick pedal
Pressing the foot controller will produce a hi-hat closed sound.
A Hi-hat open sound will result if you hit the high hat without pressing foot controller.
Press foot controller directly to produce the hi-hat pedal sound.
The hi-hat tone changes smoothly from open to closed by pressing the pedal while hitting the hi-hat.
Press the forward part of the pedal quickly and release the pedal immediately to produce the
splash sound.
Strike the rim of the snare /crash/ride/tom 1/tom 2/tom 3 pads to produce stick sound.
Note: The crash pad also has a choke Function.
Hi-Hat Foot Controller
Cross Stick
Assembly Instruction
4
TO RIDE
TO CRASH
TO HH
TO TOM1
TO TOM2
TO TOM3
TO SNARE
TO HHC
TO KICK
Hi-hat
Crash
Ride
Tom1
Tom2
Tom3
Snare
Hi-hat
Control
Kick
5
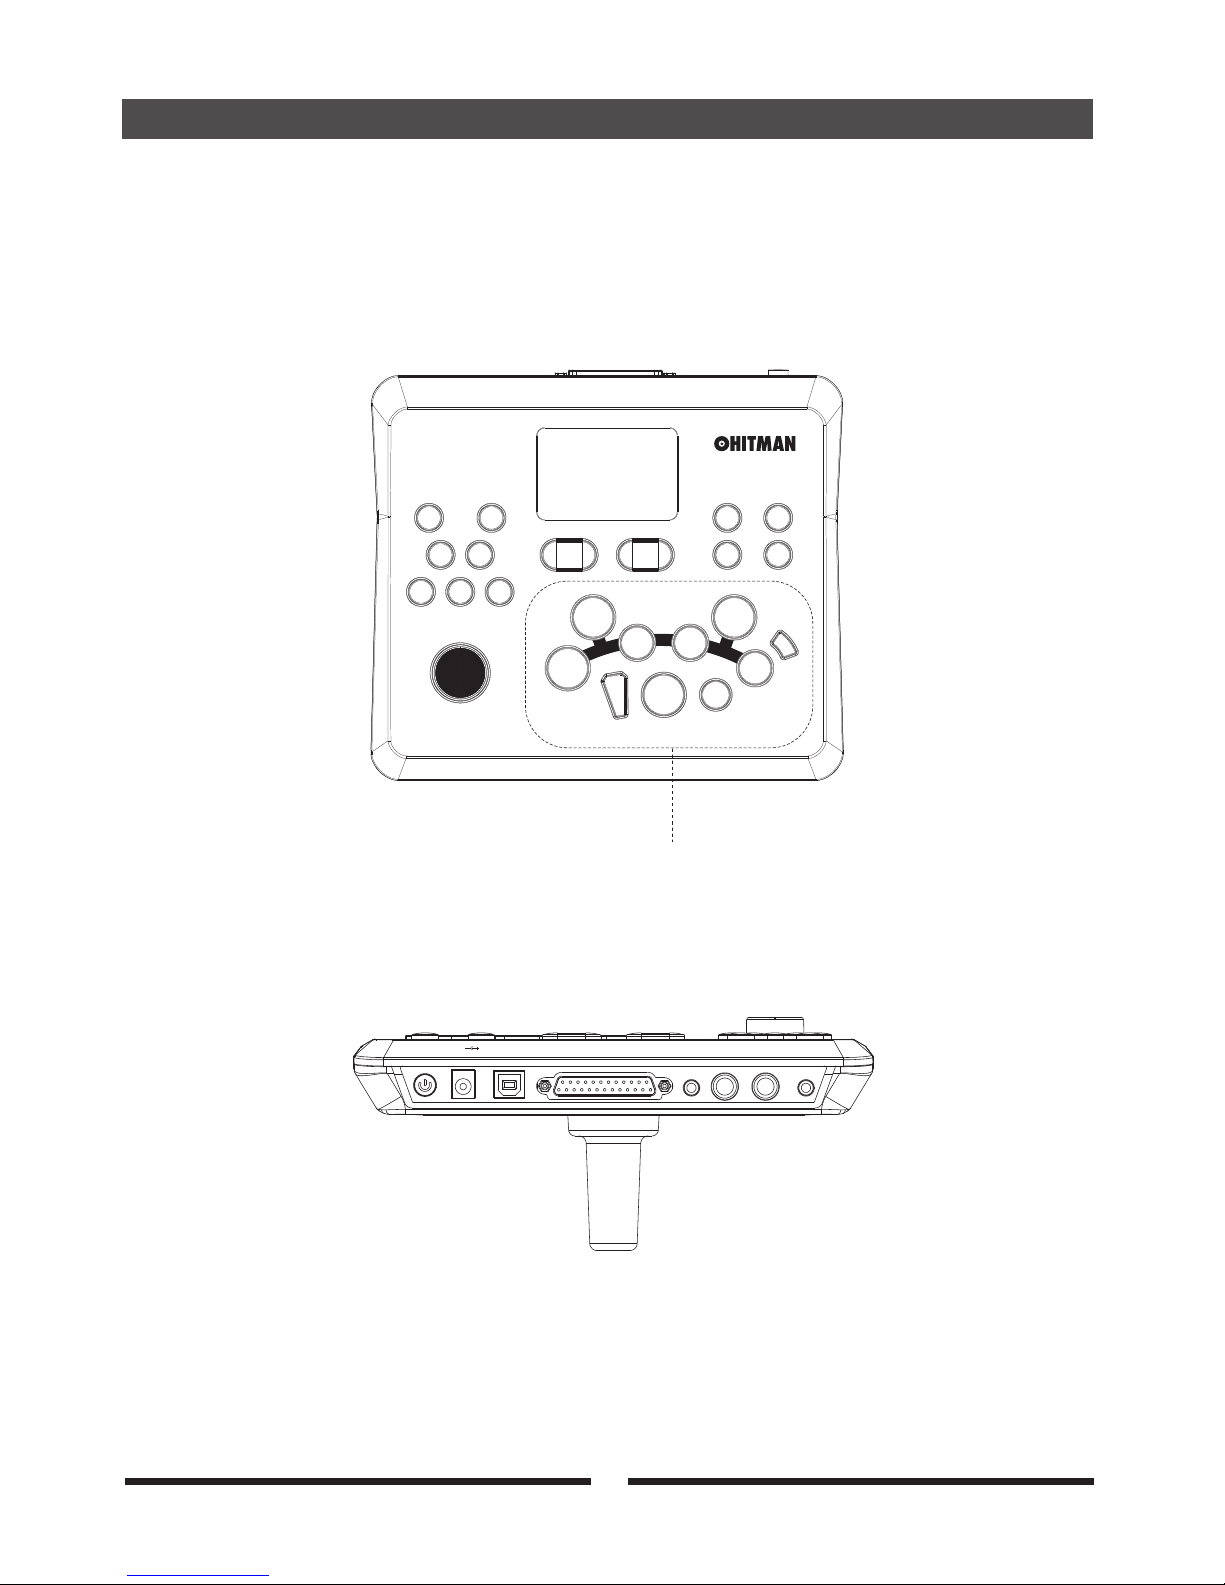
Panel Controls
Top Panel
Rear Panel
HD- 10
TEMP O/TAP
CLIC K
PLAY/S TOPRECO RD
KIT
SONG DRUM O FF
CRAS H
TOM1
TOM2
RIDE
RIM
COUN T
BACK
SETU P ENTE R
HI-H AT
HI-H AT
CONT ROL
SNAR E
KICK
TOM3
PHONES
DC 9V
USB TO HOST
AUX IN
POWER ON/OFF
LINE OUT
R
L/MONO
Drums selection
+
-
MAST ER VOLU ME
MIN MAX

6
Panel Controls
1. MASTER VOLUME Adjust the overall volume of the drum module with this pot. It controls the line
outputs and the headphone output.
2.[CLICK] BUTTON This button turns the metronome on and off at any time,
3.[TEMPO/TAP] BUTTON You can adjust the tempo of the built-in metronome, the practice songs, or the song
you are recording by pressing You can also set the tempo by hitting
the drum pads.
4.[RECORD] BUTTON
5.[PLAY/STOP] BUTTON
6.[KIT] BUTTON select which instrument (drum sound) is played by
each pad and adjust its volume or effects settings, etc.
7.[SONG] BUTTON Press this button to play the song and also lets you adjust the relative volumes of the
drum and accompaniment tracks.
8.[DRUM OFF] BUTTON Turn on or off the sound of the drum in a song.
9.[+/- ] BUTTONS
10.[SETUP] BUTTON parameters that affect all of the kit presets in the drum
module equally, such as the sensitivity, threshold, and velocity curve for each pad.
11.[ENTER] BUTTON This button will confirm and save the parameter changes you have made. It is also
used to access the sub-pages of each menu.
12.[COUNT] BUTTON Count the number of in the certain period.
13.[BACK] BUTTON Pressing this button takes the drum module to the previous menu. From the highest
Edit menu it will exit to the Kit Select menu, except in Song mode where it will exit
into the Song Select menu.
14.DRUMS SELECTION Corresponding button of the drum pads, include: HI-HAT, CRASH, TOM1, TOM2,
TOM3, RIDE, RIM, HI-HAT CONTROL, SNARE, KICK.
except from within the top
level of Click Edit mode.
[Tempo/Tap].
Kit Edit mode enables you to
Press [Setup] to access
Gives you the option to record your own song or practice session.
Start or stop playing a song, recording etc...
Use these buttons to navigate through the 50 drum kits, change menu selections and
parameter values. Pressing them both at once will reset the value of the current
parameter to its default setting.
drum hits

7
Panel Controls
Rear Panel
15. USB
16.
17. POWER ON/OFF
18. DC 9V This jack is intended for use with the included DC adapter only.
19. PHONES
20. LINE OUT (R and L)
21. AUX IN
Connect to a Tablet, Smartphone, laptop etc for two-way MIDI
communication. Allows for so many musical possibilities such as
triggering drum sounds from software, recording and sequencing,
millions of Apps etc..
WIRING HARNESS Where the pads and cymbals wiring harness connects to the Drum
CONNECTION Module.
Jack used to plug in a pair of stereo headphones.
Stereo audio outputs to connect to an amplifier or other external
powered speaker sources.
Connect the output of an external audio device such as a
Smartphone, Tablet, Laptop etc.. to play along with your favorite
songs.
After connecting the included DC adapter, use this switch to turn
the power on or off.
Panel Controls
8
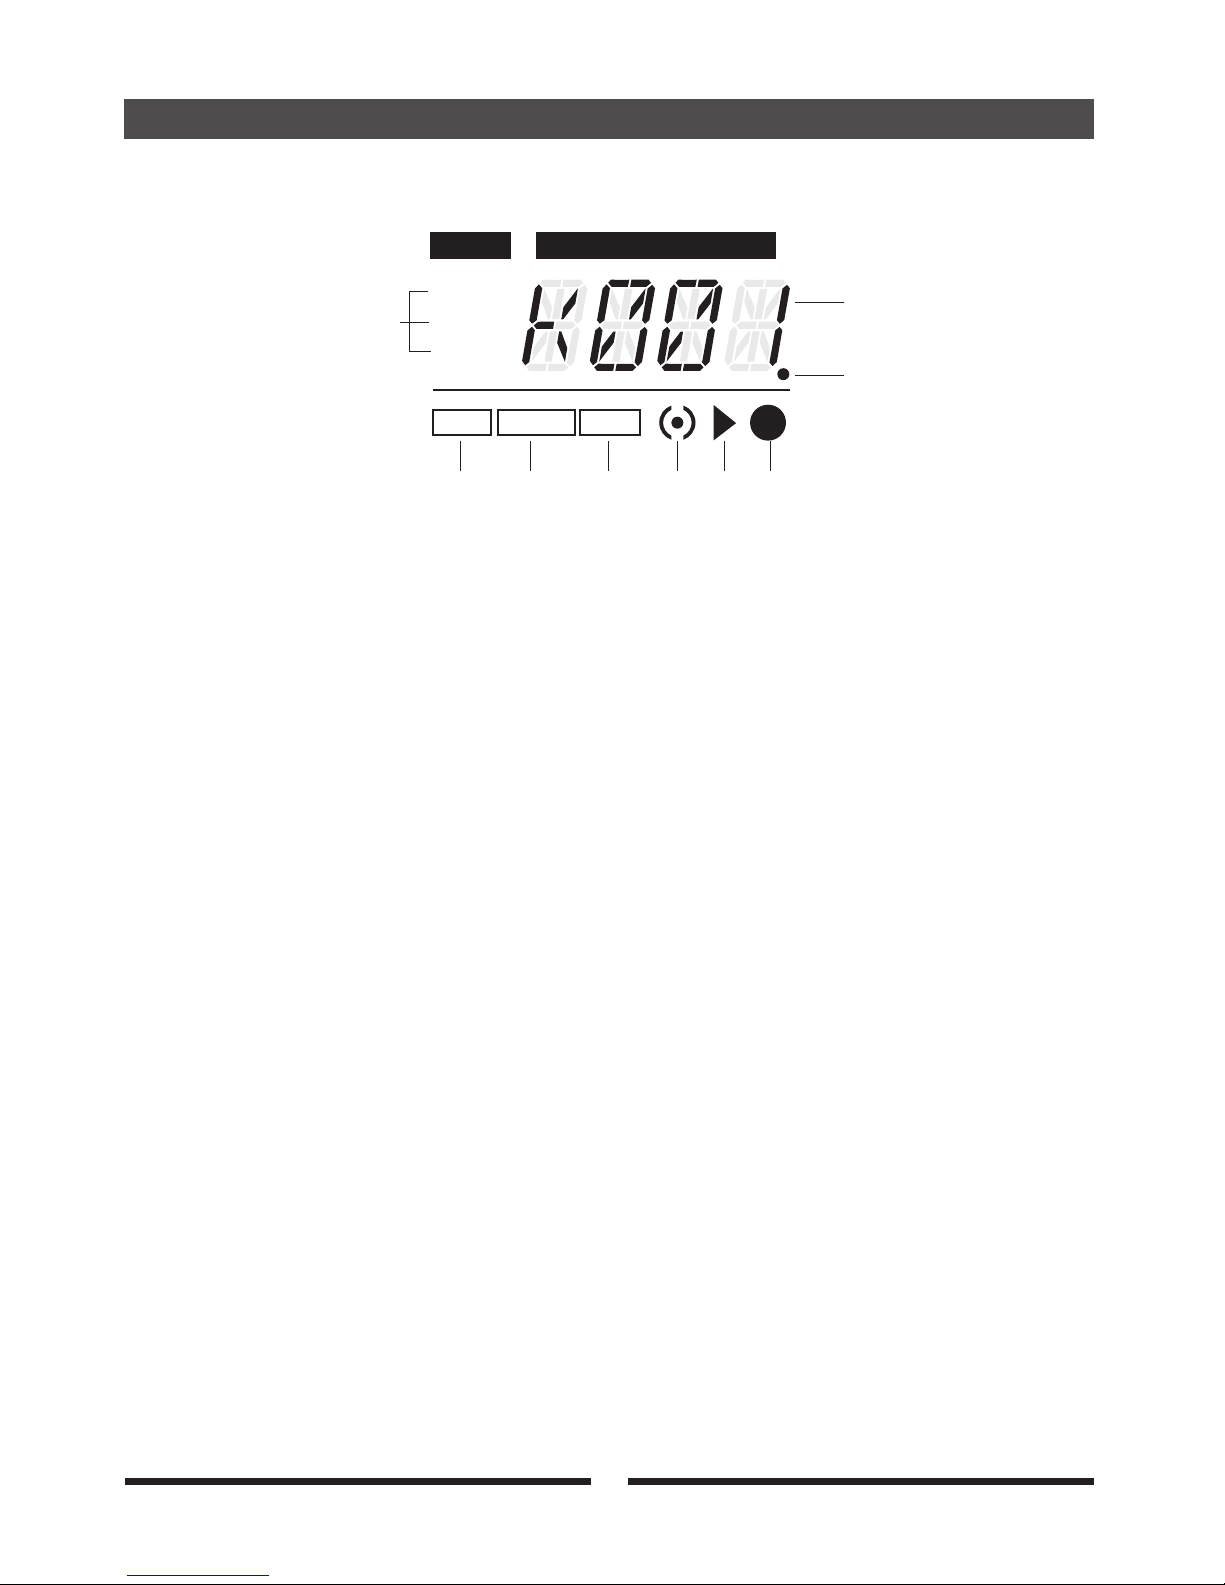
The Display
1. Mode This section indicates which mode you are in depending on
which of the three options is lit (Kit Select, Kit Edit, or Setup).
2. Parameter/Value The four large characters in the display tell you the name of the
page you have selected or the value of the current parameter.
There are several methods for changing the value or page
depending on what is being shown. See the related sections of
this manual for details.
3.“Edited” indicator The dot to the right of the kit number lets you know when the
stored drum kit has been edited in some way.setting
4. Click This icon will light when the metronome is engaged.
5. Tempo When this word is lit, the Value being shown is the tempo of
the metronome or the current song. You may adjust the tempo
using the -/+ buttons or by tapping the pads.
6. Song When this word is lit you know the drum module is in Song
mode.
'll
7. Metronome indicator This icon will flash while the click is active, or while recording or
playing a song. When the Center dot is lit, this is the downbeat bar.
When only the outer edges of the icon are lit, that this is one of the
sub-beats of the current time signature.
8. Playing Recording When the triangle is lit you will know that a song is playing back,
not .recording
9. Recording Song The large dot indicates that a song is currently being recorded.
Anything played on the will be captured for later playback.drums
Mode
Parameter/Value
K it Se lect
K it Ed it
S et up
C lick
S on gTe mpo
1
2
3
4 5 6 7 8 9
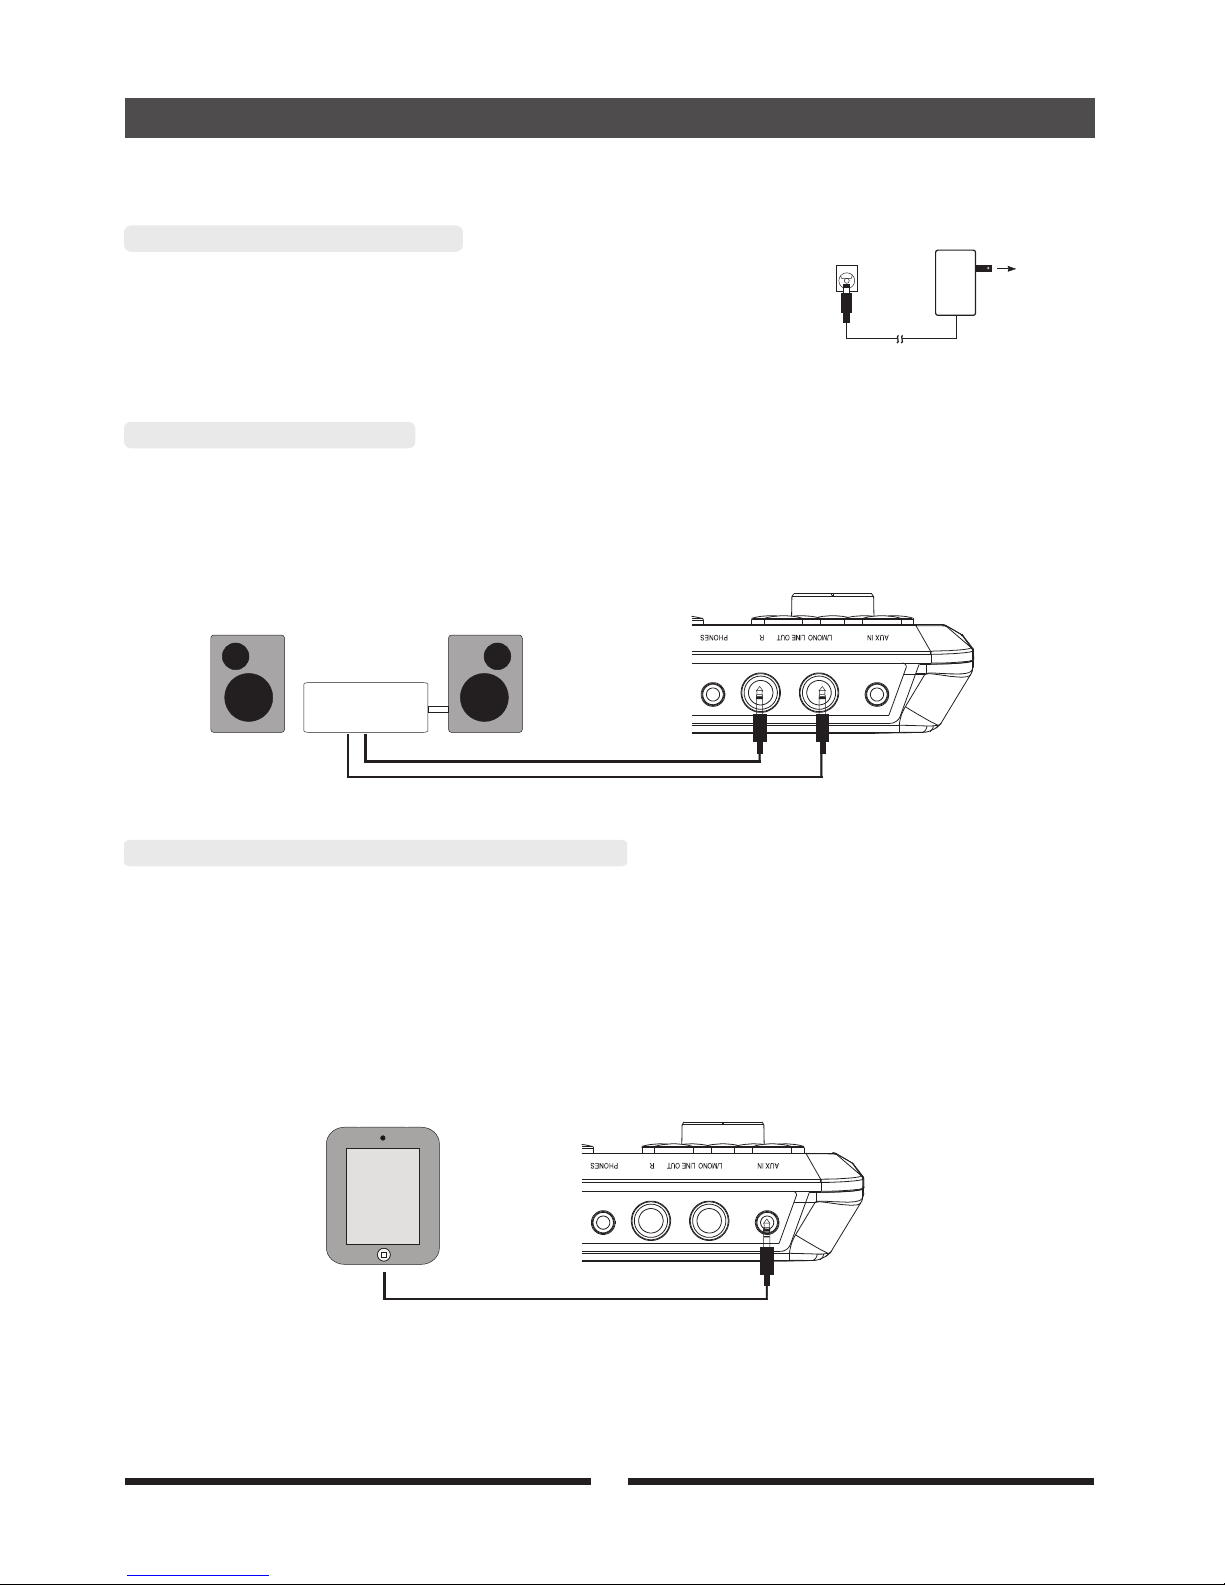
Make sure the power is switch OFF. Connect the power
adaptor to the “DC 9V”jack on the rear panel.
AC POWER
Connecting the Power Supply
When listening to the drum kit with an amplifier, connect amplifiers to the LINE OUT
jack on the rear panel. The volume is adjusted with the MASTER VOLUME knob.
Connecting an Amplifier
The audio output from a Smartphone, Tablet, Laptop etc.. can be connected to the AUX IN
jack on the rear panel so it can be mixed with the sounds from the Drum Module. This function
is convenient when you want to play along with a favorite song.
The output voluem is adjusted with the MASTER VOLUME knob.
Connecting a CD Player, etc. (AUX In jack)
Connect
9
Pad
i
AMPL IFIER

Connect
USB MIDI
Using Headphones
An optional set of stereo headphones can be connected to
the PHONES jack located to the left side of the unit. Use
the [MASTER VOLUME] to adjust the headphone volume.
PHONES
Note: Never use headphones at a high volume to avoid hearing loss.
10
Your drum module is USB class-compliant. This means you can plug it into a USB
class-compliant host (for example, a laptop, tablet or smartphone) and it should be recognized
immediately. There are no drivers to install, you simply plug n' play. For example, if you
connect the drum module to a computer, you can trigger drum libraries on the computer or
record your performance into a MIDI sequencing application. Check the operation and setup
instructions for the software you intend to use for more details.

Begin Playing the Drums
11
Switch the Power On
With everything set up and ready to go, it's time to start playing the drum kit. Locate the on/off
power switch on the drum module and switch the power on. The drum module is ready to
operate when the display shown below appears. This is the location from which you select the
drum kit you want to play or edit.
Next, connect headphones or a speaker system as described on the previous two pages.
Start with the MASTER VOLUME set to MIN and press the [Start/Stop] button on the
drum module. Gradually increase the volume until you hear a song playing through
your speaker system or headphones. If you hear no sound, please check all of the cables
connecting the drum module to your speakers and repeat the procedure. When the levels
are set to a comfortable level, press the [Start/Stop] button again to stop the song.
Once you have established that your sound system or headphones are connected
correctly to the drum module, play each of the pads, cymbals, and kick and hi-hat pedals.
You should hear a sound for every hit. If one pad or cymbal does not play a sound, check
the cable connection from that pad to the sound module.
With everything set up and the kit sounding from all pads, it time to start playing.
When you are ready to learn more about your new drum system, pick up the manual
again and continue with the next page.
's
Mode
Parameter/Value
K it Se le c t
K it Ed it
S et up
C li ck
S on gTe mp o
 Loading...