

HiTi Digital X610 User Manual
www.hiti.com
HiTi X610 User Manual
63.D26O1.001
HiTi X610 User Manual
English
Introduction
Thank you for purchasing HiTi products. This document explains how to setup and operate this printer. Please
read this manual in detail before use. In addition, please MUST read “ Safety Precautions” to correctly operate
the printer.
Copyrights
All rights reserved. The information contained in this guide is subject to change without prior notice. HiTi
Digital, Inc. makes no warranty with regard to the material, including, but not limited to, the implied warranties of merchantability and fitness for a particular purpose. HiTi Digital, Inc. will not be liable for errors
contained herein or for incidental or consequential damages in connection with the furnishing, performance,
or use of the material.
Safety Precautions
Never attempt to disassemble or modify the printer. Doing so may lead to electric shock or malfunctions.
Do not allow liquids near the printer, which may lead to electric shock or fire.
Do not use the printer if the printer body is damaged.
Do not plug the printer into an extension cord used by multiple appliances.
Do not put the printer on an unstable cart, stand, or table.
Make sure the printer is operated under the type of power indicated on the marking label. If you are not
sure of the power type, please contact or consult the dealer for detail.
Never spill liquid on this equipment.
Must use power cord provided by HiTi.
Do not block air vents designed to protect the printer from overheating.
Do not disable the safety grounding type plug. Use the power cord only in combination with an earth
ground outlet.
The socket-outlet shall be near the equipment and shall be easily accessible.
The equipment shall be used at maximum 35℃ ambient temperature.
Trademarks
Microsoft, MS-DOS, and Windows are registered trademarks of Microsoft Corporation. Adobe and Acrobat are
registered trademarks of Adobe System Incorporated. Mac, Macintosh, and Mac OS are trademarks of Apple
Computer Inc., registered in the U.S. and other countries. Pentium is a U.S. trademark of Intel Corporation. All
other trademarks or registered trademarks are properties of their respective companies.

HiTi X610 User Manual
English
Regulatory Compliance Statements
Do not make changes or modifications to the equipment unless specified in the instruction. This equipment
has been tested and found to comply with the limits for a Class A digital device, pursuant to Part 15 of the FCC
rules. These limits are designed to provide reasonable protection against harmful interference in a
commercial environment.
This equipment generates, uses, and can radiate frequency energy and , if not installed and used in
accordance with the instruction manual, may cause harmful interference to radio communications. Operation
of this equipment in a residential area is likely to cause harmful interference in which case the user will be
required to correct the interference at his or her own expenses.
Be aware that changes or modifications not expressly approved by the party responsible for compliance
could void your authority to operate this equipment.
The equipment complies with FCC radiation exposure limits set forth for an uncontrolled environment. The
antenna used for this transmitter must be installed to provide a separation distance of at least 20cm from all
persons and must not be co-located or operating in conjunction with any other antenna transmitters.
WEEE Mark
If you want to dispose this equipment, DO NOT mix with general household waste. There is a
separate collection system for used electronics products in accordance with legislation under
the WEEE Directive (Directive 2002/96/EC) and is effective only within European Union.
FCC Statement:
This device complies with part 15 of the FCC Rules. Operation is subject to the following two conditions:
(1) This device may not cause harmful interference, and
(2) this device must accept any interference received, including interference that may cause undesired
operation.
NOTE: This equipment has been tested and found to comply with the limits for a Class B digital device,
pursuant to part 15 of the FCC Rules. These limits are designed to provide reasonable protection against
harmful interference in a residential installation.
This equipment generates, uses and can radiate radio frequency energy and, if not installed and used in
accordance with the instructions, may cause harmful interference to radio communications. However, there
is no guarantee that interference will not occur in a particular installation.
If this equipment does cause harmful interference to radio or television reception, which can be determined
by turning the equipment off and on, the user is encouraged to try to correct the interference by one or more
of the following measures:
Reorient or relocate the receiving antenna.
Increase the separation between the equipment and receiver.
Connect the equipment into an outlet on a circuit different from that to which the receiver is connected.
Consult the dealer or an experienced radio/TV technician for help.
Changes or modifications not expressly approved by the party responsible for compliance could void the
user’s authority to operate the equipment.
HiTi X610 User Manual
English
Table of Contents
Checking the Package Contents ··········································
Getting the Latest Update ················································
Introduction of X610 ·····················································
Getting X610 Ready to Print
Installation of Ribbon
·· ················ ····································
Installation of Paper
························································
Installing HiTi ProLab & HiTi Print Manager (Software)
Computer System Requirement ······· ················ ······················
Installing X610 Driver········· ················ ····························
How to Add Your Own ICC Profile ·························· ··················
Installing HiTi ProLab & HiTi Print Manager ····································
What is HiTi ProLab & How to Use It ············· ·····························
What is HiTi Print Manger & How to Use It ············ ·························
How to Print Panorama Photos ··········· ··································
Troubleshooting
Error Display & Solving media errors··· ····· ···································
Marketing Specifications ················································
Page
1
1
2
3
6
9
10
13
16
17
20
24
26
27
Print Fail Error Handling
·· ················ ··································
8
X610 Master CD········· ················ ··································
9
HiTi X610 User Manual
English
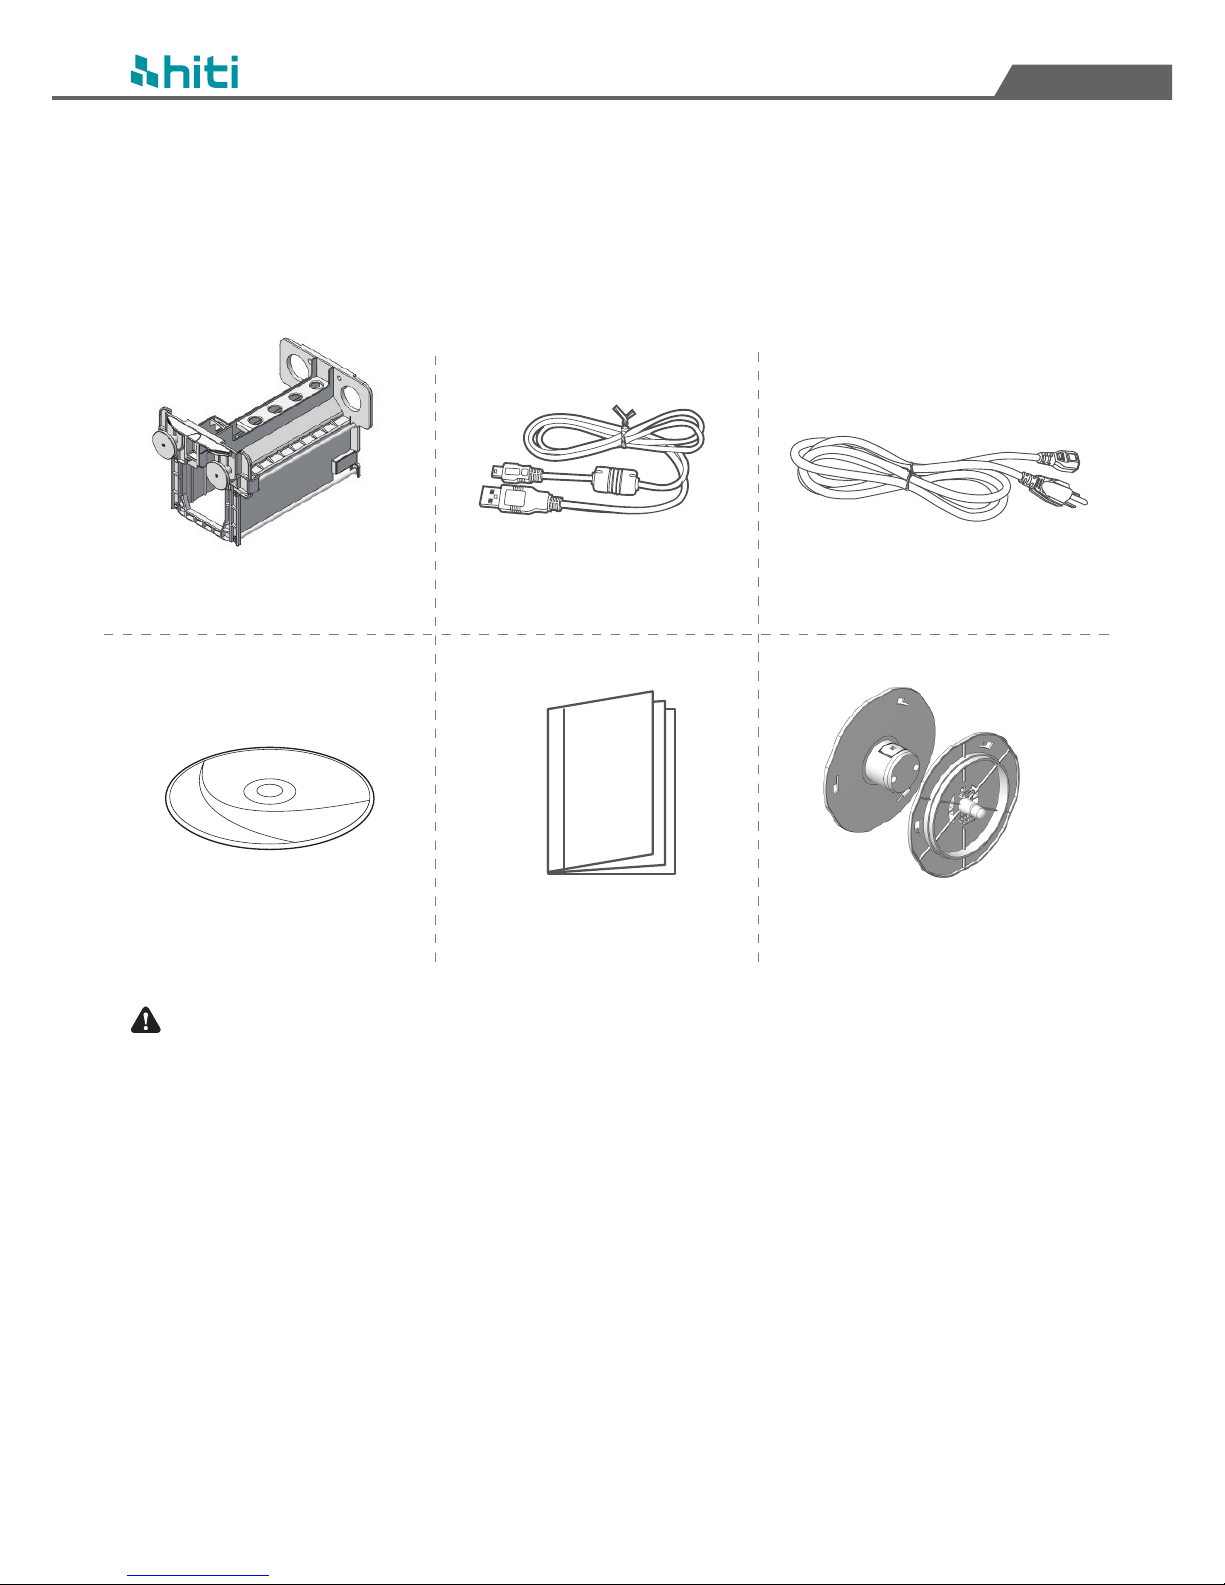
Checking the Package Contents
Please check the package contents before use to see if anything is missing. If missing parts, please
contact your local dealer or HiTi service center nearest to you.
Ribbon Cartridge x 4
USB Cable x 1
Power Cord x 1
Software CD x 1
User Manual x 1
Paper Flange (pair)
Consumables are EXCLUDED.
Getting the Latest Update
HiTi Digital, Inc. website provides the latest printer driver, firmware, PC-based software
application, user guide, and so on for users to download. To get the most updated HiTi
products, please periodically visit our website at www.hiti.com.
Any questions regarding HiTi products, your call or email is welcome.
1
HiTi X610 User Manual
English
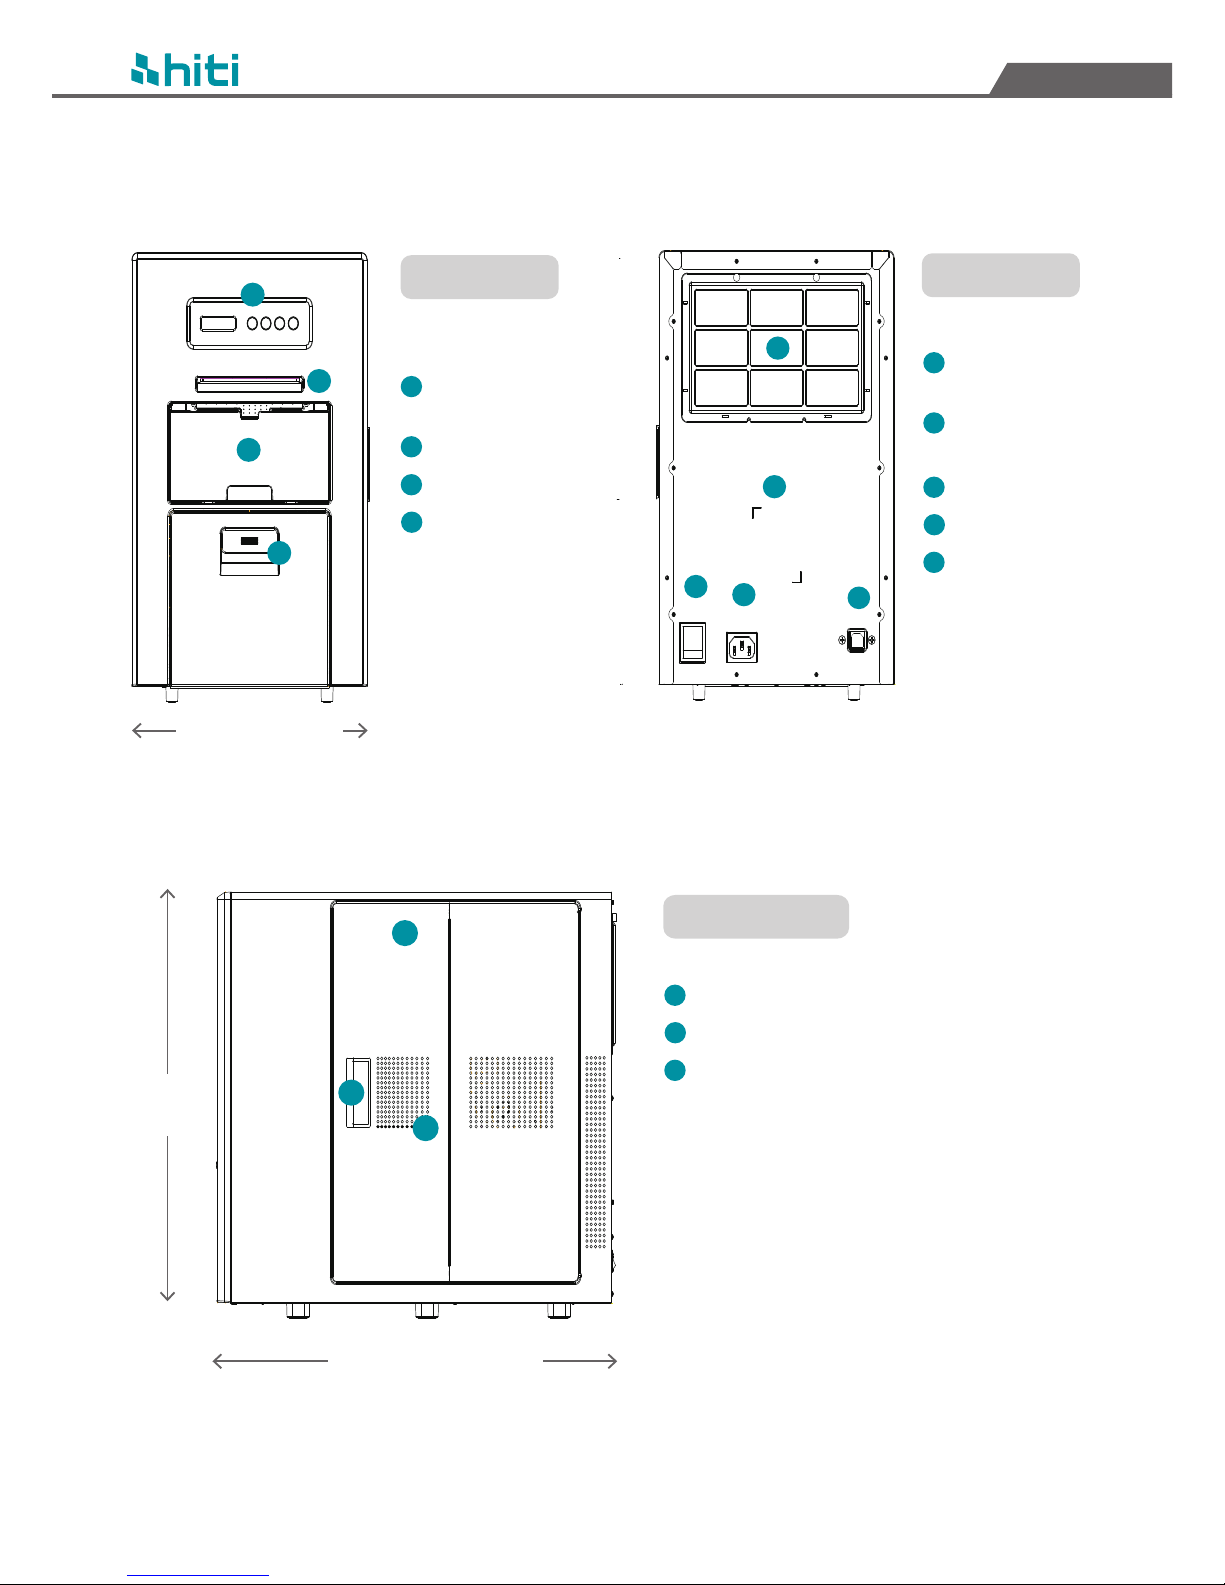
Introduction of X610
Front View
Rear View
Right Side View
Control Panel
(with 4 buttons)
Paper Exit
Scrap Box
Paper Drawer
Air Vent Filter
(Detachable)
Spec Label
(Rating Label)
Power Switch
Power Slot
USB Type B Slot
418 mm / 16.45 inch
614 mm
24.17 inch
Ribbon Door
Door Lever
Vents
1
2
3
4
10
11
12
736 mm / 28.97 inch inch
2
5
6
9
8
7
ON
OFF
AC IN
USB
1
2
3
4
5
6
7
8
9
10
11
12

HiTi X610 User Manual
English
Getting X610 Ready To Print
To get X610 ready to print, install the ribbon and photo paper in advance. Please see below
for media installation in the printer.
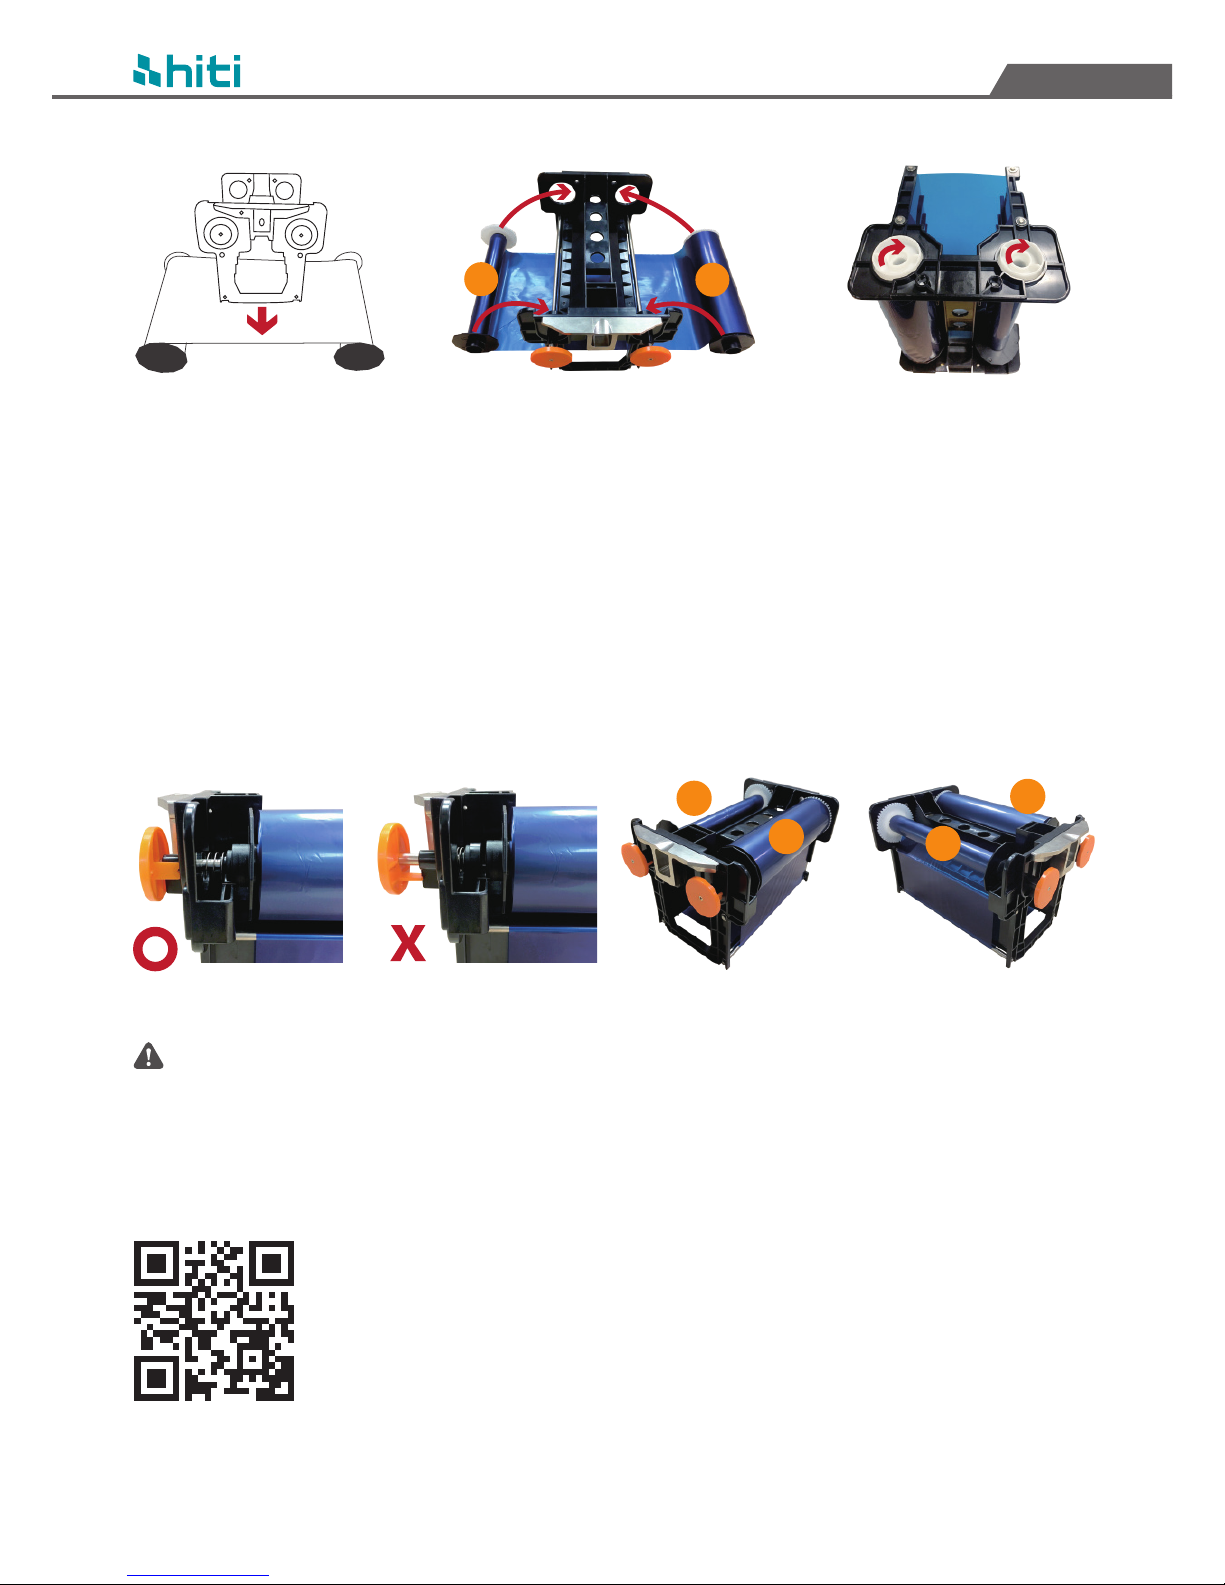
Installation of Ribbon
What you need: Ribbon cartridge & mono color ribbon
Take up side
Supply side
Pull out the handle and lock the handle
through the holder before installation
The ribbon cassettes are placed inside
the printer.
4 ribbon cartridges are interchangable.
T
S
S: Supply side
T: Take up side
S: Supply side
T: Take up side
o
X
T
S
T
S
Mono Color Ribbon
Use the holder
to lock the handle
to facilitate the
ribbon installation.
Pull out the
handle
Holder
3
HiTi X610 User Manual
English
T
S
T
S
Take out ribbon, check the
ribbon’s take up side and
supply side. Place the ribbon
cartridge onto ribbon as the
arrow indicated to install the
ribbon.
Install the ribbon onto cartridge.
Press down on arrow indicated
part, and scroll the ribbon as
the arrow indicated, till the
ribbon is as tight as possible
on the cartridge.
Assure the holder is truly fit with the ribbon flange after installing.
Scroll the ribbon as tight as possible after installing to the cartridge.
The 4 ribbon cartridges are the same, which are used for mono Y, mono M, mono C, and mono O ribbon
installation.
T
T
S
S
4
Scan QR code for X610 installation video guide.
HiTi X610 User Manual
English
5
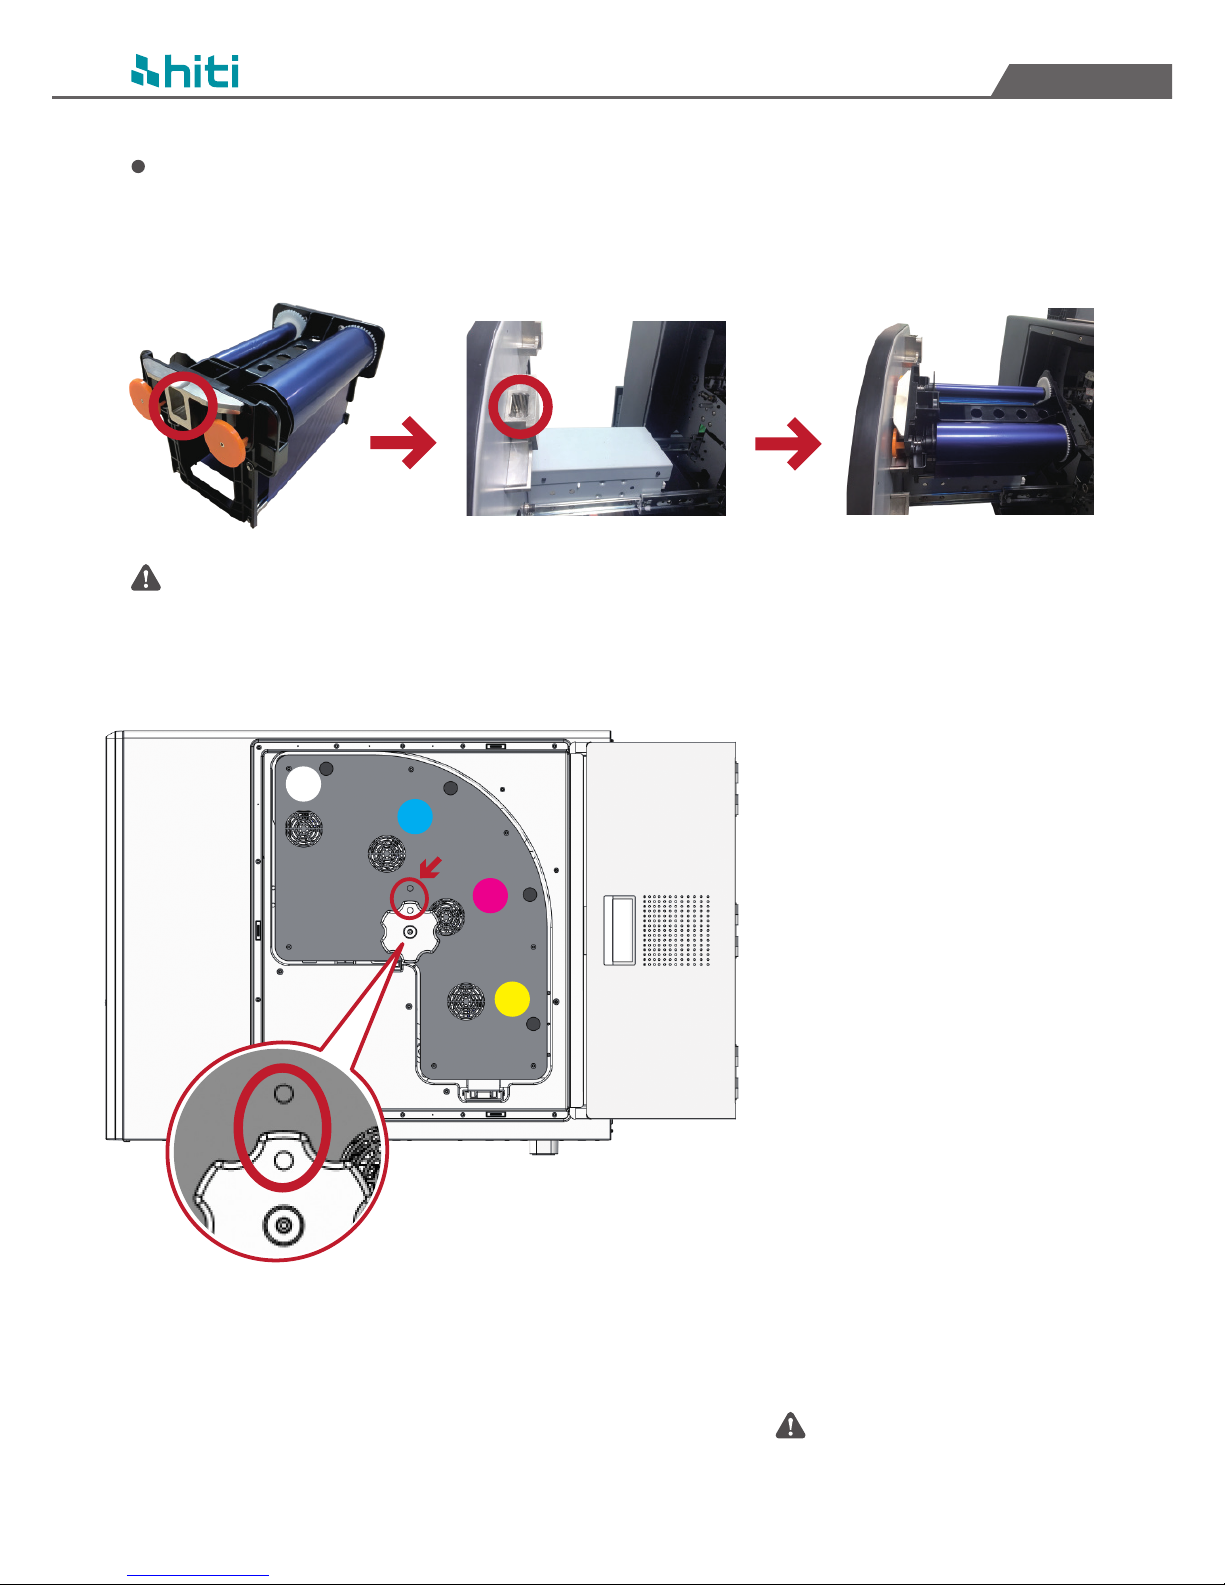
Placing the cartridge into the printer
Please slide the circled parts in place, and place each Y/M/C/O cartridge in corresponding
slots.
Misplacing of ribbon will lead to a jam.
O
C
M
Y
When placing Y/M/C/O
cartridge to the printer, make
sure each of them meets the
correct position. When you are
done, close ribbon cassette
door.
Misplacing of ribbon will lead to
a jam.
After placing the ribbons,
please push the ribbon slots
back into the printer tightly,
then scroll the knob tight until
the indicator point on the knob
match the indicator point on
the printer. This should trigger
the printer initialization and
the LCD will show printer ready.
If failed to scroll the knob
correctly, error message will
appear.
HiTi X610 User Manual
English
6
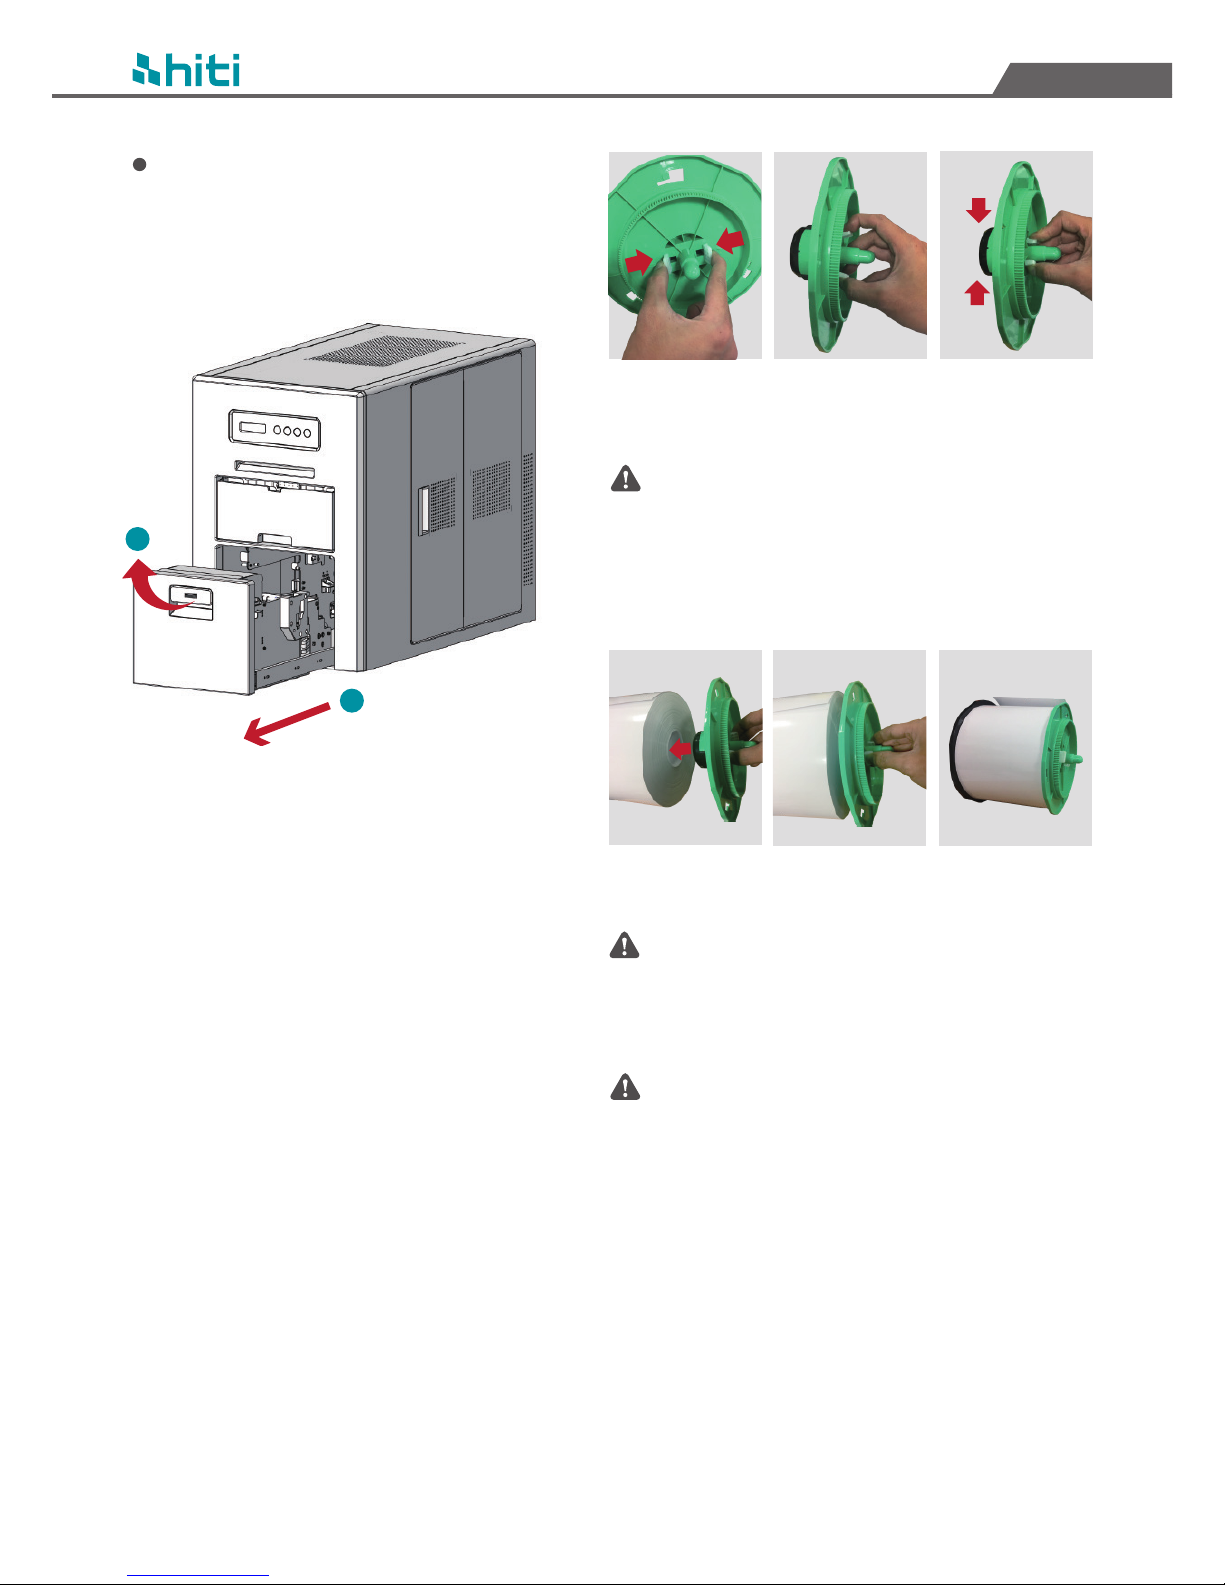
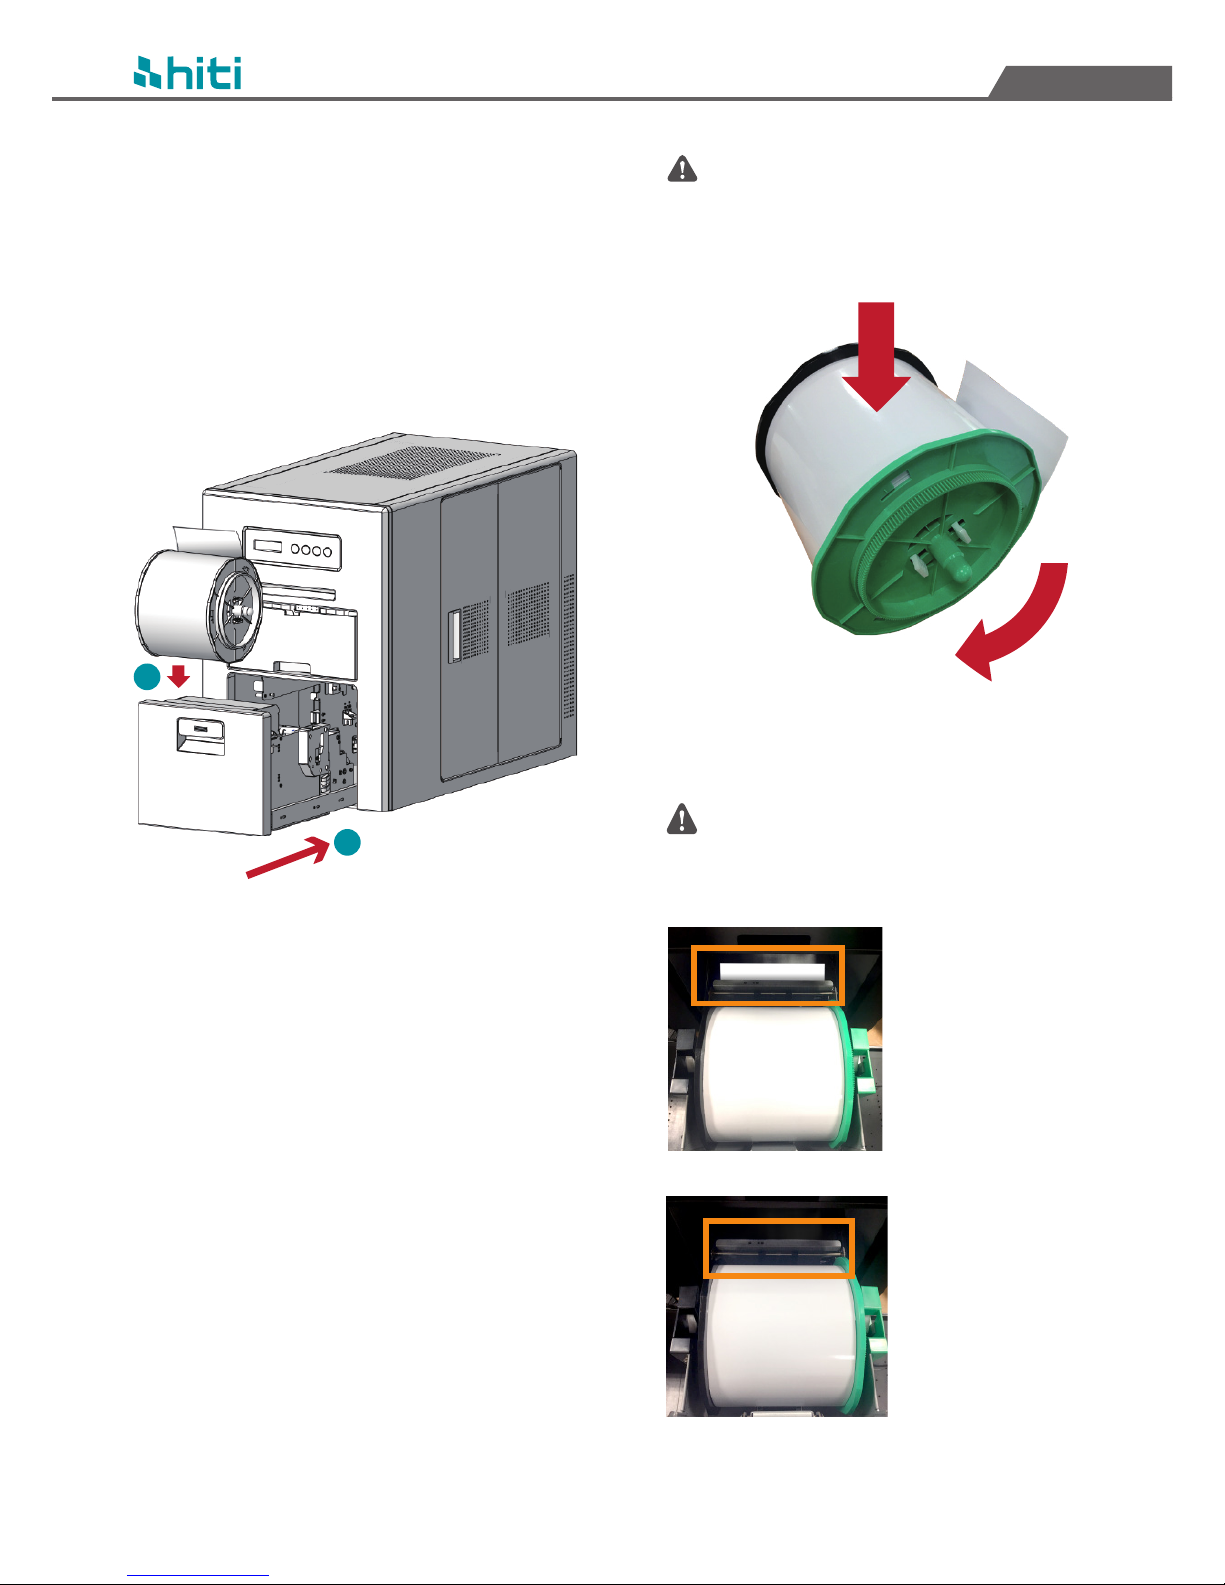
Installation of Photo Paper
What you need: Flange & Photo Paper
Press the plastic spring to get friction plate
back into the cylinder.
The photo paper is a coreless design.
Assemble the flange to photo paper
The photo paper is a coreless design, if you found
that the centre hole of the paper has been distorted,
please contact our customer service or local reseller
nearest to you for further assistance.
When facing the printer, the paper flange on the
right is green, the flange on the left is black.
Use the lever to pull out
the paper drawer.
2
1
HiTi X610 User Manual
English
7
1
2
Incorrect, paper roll
opening is visible,
might lead to a jam.
o
X
Correct, paper roll
opening is not visible.
When you place the paper roll back into the
printer, make sure the paper roll opening is
not visible, or else it might lead to a jam.
Put the photo paper set into the printer and
push the drawer back to its original position
X610 is made with automatic feeding system.
Please follow the instruction to get the paper
installed correctly.
Place the paper roll with the opening facing
up, remove sticker label, then roll the paper
in the direction indicated by the arrow, until
the opening is facing down.
1
2

Print Fail Error Handling
Turn off printer, take out
ribbon
Place ribbon on flat surface
Tape the ribbon back together ,
and place ribbon back onto
cartridge. Make sure to scroll the
ribbon back onto the cartridge as
tight as possible, till the broken
part of the ribbon cannot be seen.
In case of loose ribbon, scroll the ribbon as tight as possible. If there is a tear in the ribbon, tape it back
together, then scroll till the broken part of the ribbon cannot be seen. If issue still occurs, please contact
local technical support.
In case of other errors such as CAM error or Cutter error, do not open paper door or ribbon door. Please restart
the printer first, if printer does not show “Printer Ready” and error still occurs, please contact local technical
support.
When print fail or paper jam occurs, please turn off the printer first. Then open and pull out ribbon door,
open paper door, then roll out jammed paper. If issue still occurs, please contact local technical support.
Step2. Open paper door.*
Step1. Turn off printer,
open and pull out ribbon
door. Make sure to
separate ribbon cartridge
from the printer, if ribbon
is jammed into the printer,
please cut it loose. *
Step3. Hold onto the
flange and roll it as the
arrow indicated to roll
out jammed paper.*
Step4. Roll out paper
until paper jammed
part is visible. Use a
scissor to cut off paper
jam part.
*There might be some resistance.
8
HiTi X610 User Manual
English

HiTi X610 User Manual
English
Installing HiTi ProLab & HiTi Print Manager
Computer System Requirement
Operating System
RAM
System type
Windows 7 and above
4.00 GB and above
64 bit operating system
Software CD includes the following:
1. X610 Driver
2. HiTi ProLab
3. HiTi Print Manager
Computer system requirement is shown on the
left, if the computer system requirements are not
met, it may result in poor software function or
unsupported installation.
Due to ultra fast print speed, a high-end computer
hardware is required. If data transferring from the
computer to printer is slower than the print
speed, it would lead to abnormal prints.
X610 Master CD
X610 Master CD contains the following softwares: X610 Driver, HiTi ProLab, and HiTi Print
Manager. Please select whether X610 printer will be plugged onto this computer first, then
select which software you wish to install, and click on the Install button to start software
installation. Then simply follow the software installation process to complete each software
installation.
Due to ultra fast print speed, a high-end computer hardware is required. If data transferring from the
computer to printer is slower than the print speed, it would lead to abnormal prints.
Select whether X610 printer will
be plugged into this computer or
not.
Select which software you wish
to install, and click on the install
button to start software
installation.
Click on Read Me to learn more.
Click to exit Master CD.
9
1
2
3
4
Processor
Intel®Core™ i3 or above
1
2
3
4

HiTi X610 User Manual
English
Click Next
Click Start
Installing X610 Driver
You still need to install HiTi Print Manager if you are using X610 driver for printing.
Click OK
It is recommended to use HiTi ProLab & HiTi Print Manager to print photos on X610
printers. However, if you wish to use third-party software for the photo editing, you need
to install our X610 driver first.
Follow the steps shown on the screen to install X610 driver. Do not plug in printer first,
plug in printer to computer only when the driver installation instructs you to.
X610 Driver
After you are done with your photo editing in third-party software, click on print and select
X610 as your output printer. Your photos will be sent to HiTi Print Manager for printing.
Please read the section on how to use HiTi Print Manager.
You may open X610 driver to change the driver’s default settings.
Setting Page
If you have two or more X610 Driver on
different computers sending print jobs
to the same HiTi Print Manager, your
print job naming might be the same. To
prevent this from happening, you may
assign different print job naming rules
on each X610 Driver. You can change
the print job naming rule by clicking on
the Browse Hot Folder button. Naming
consist of 3 characters or numbers.
Import and export your color settings here
Browse and select hot folder
10
1
2
1
2
HiTi X610 User Manual
English
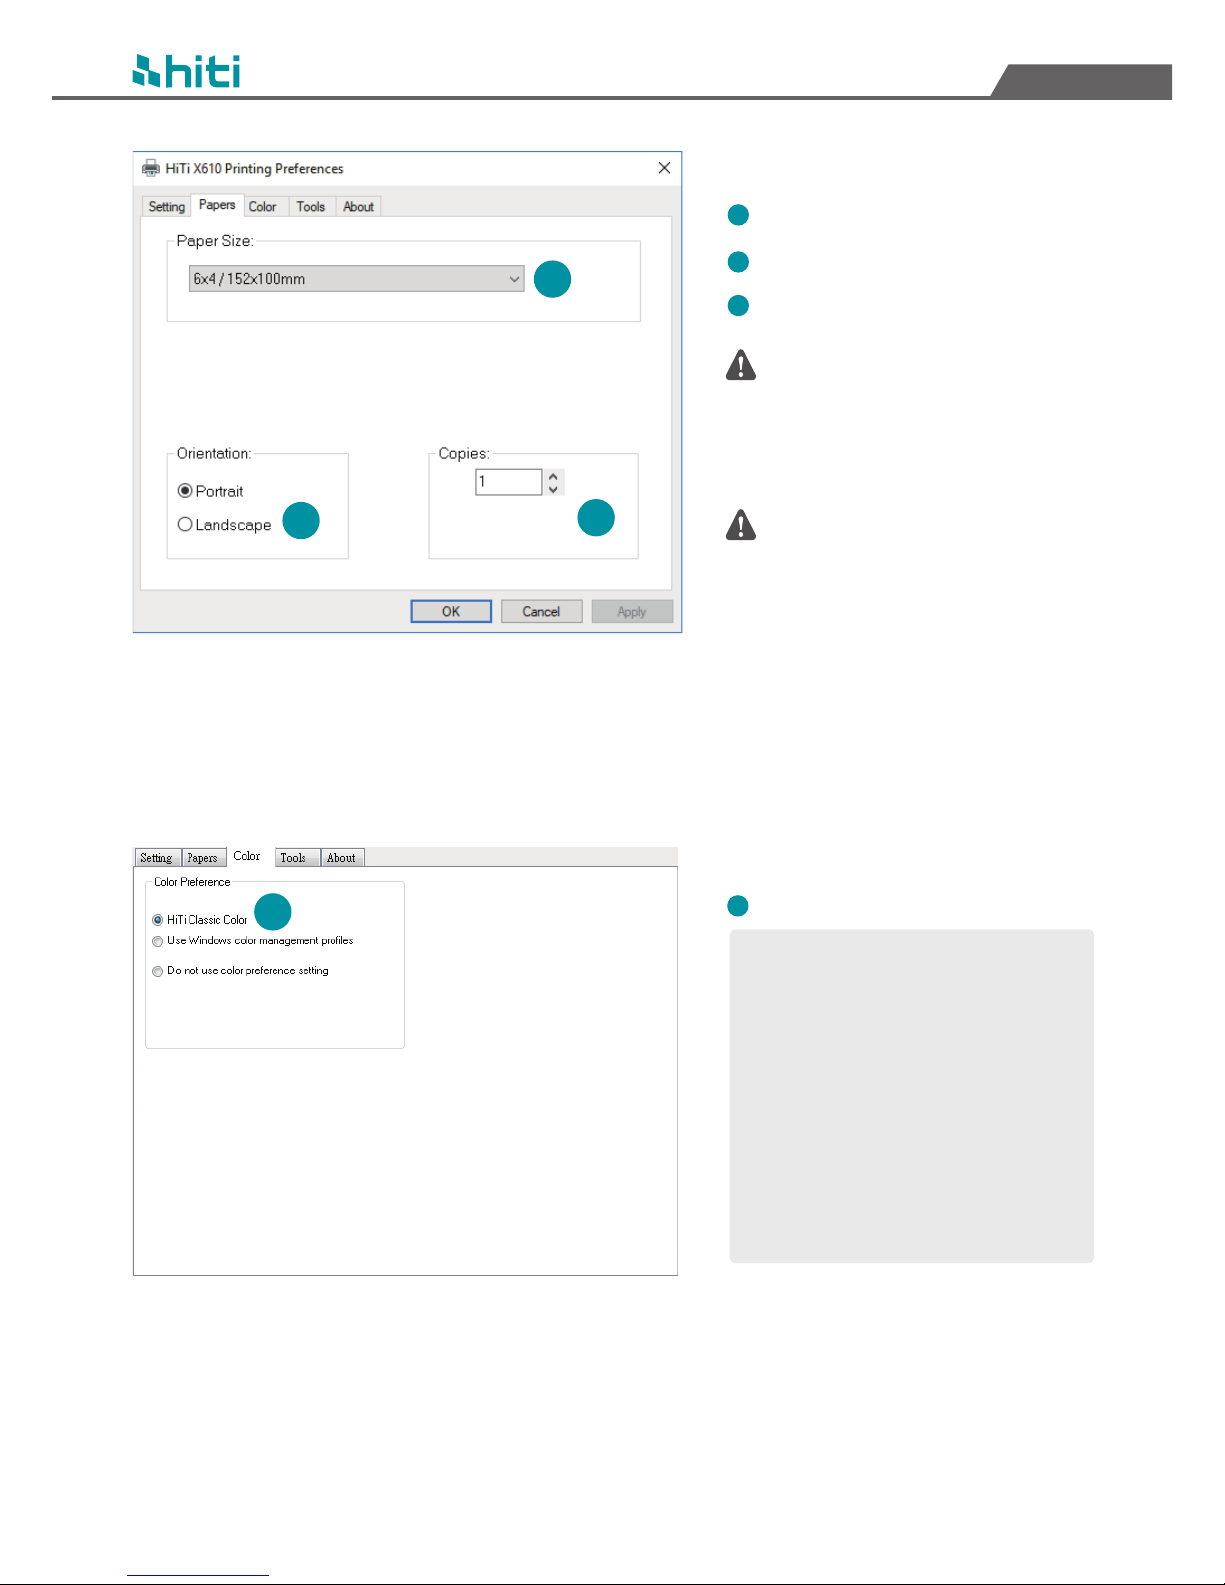
Papers Page
Please note that some third-party
photo editing software may not
support printing large panorama
photos, it is recommended to use HiTi
ProLab for panorama photo printing.
Select Paper Size
Select print photo orientation
Select default print copies per photo
11
1
2
3
If you select Panorama Print (6 in.
Height) as your output size, your
panorama photo will be automatically
scaled into 6 inch height panorama
photo(max length is 6x56”).
Color Page
Select your color preference.
1
HiTi Classic Color ‒ use default color.
Use Windows color management
profiles ‒ use your own ICC Profile.
Do not use color preference setting ‒
use this under two conditions:
1. When you need to create your own
color profile.
2. When you are using a third party
software that has color management
function enabled.
1
2
3
1
HiTi X610 User Manual
English
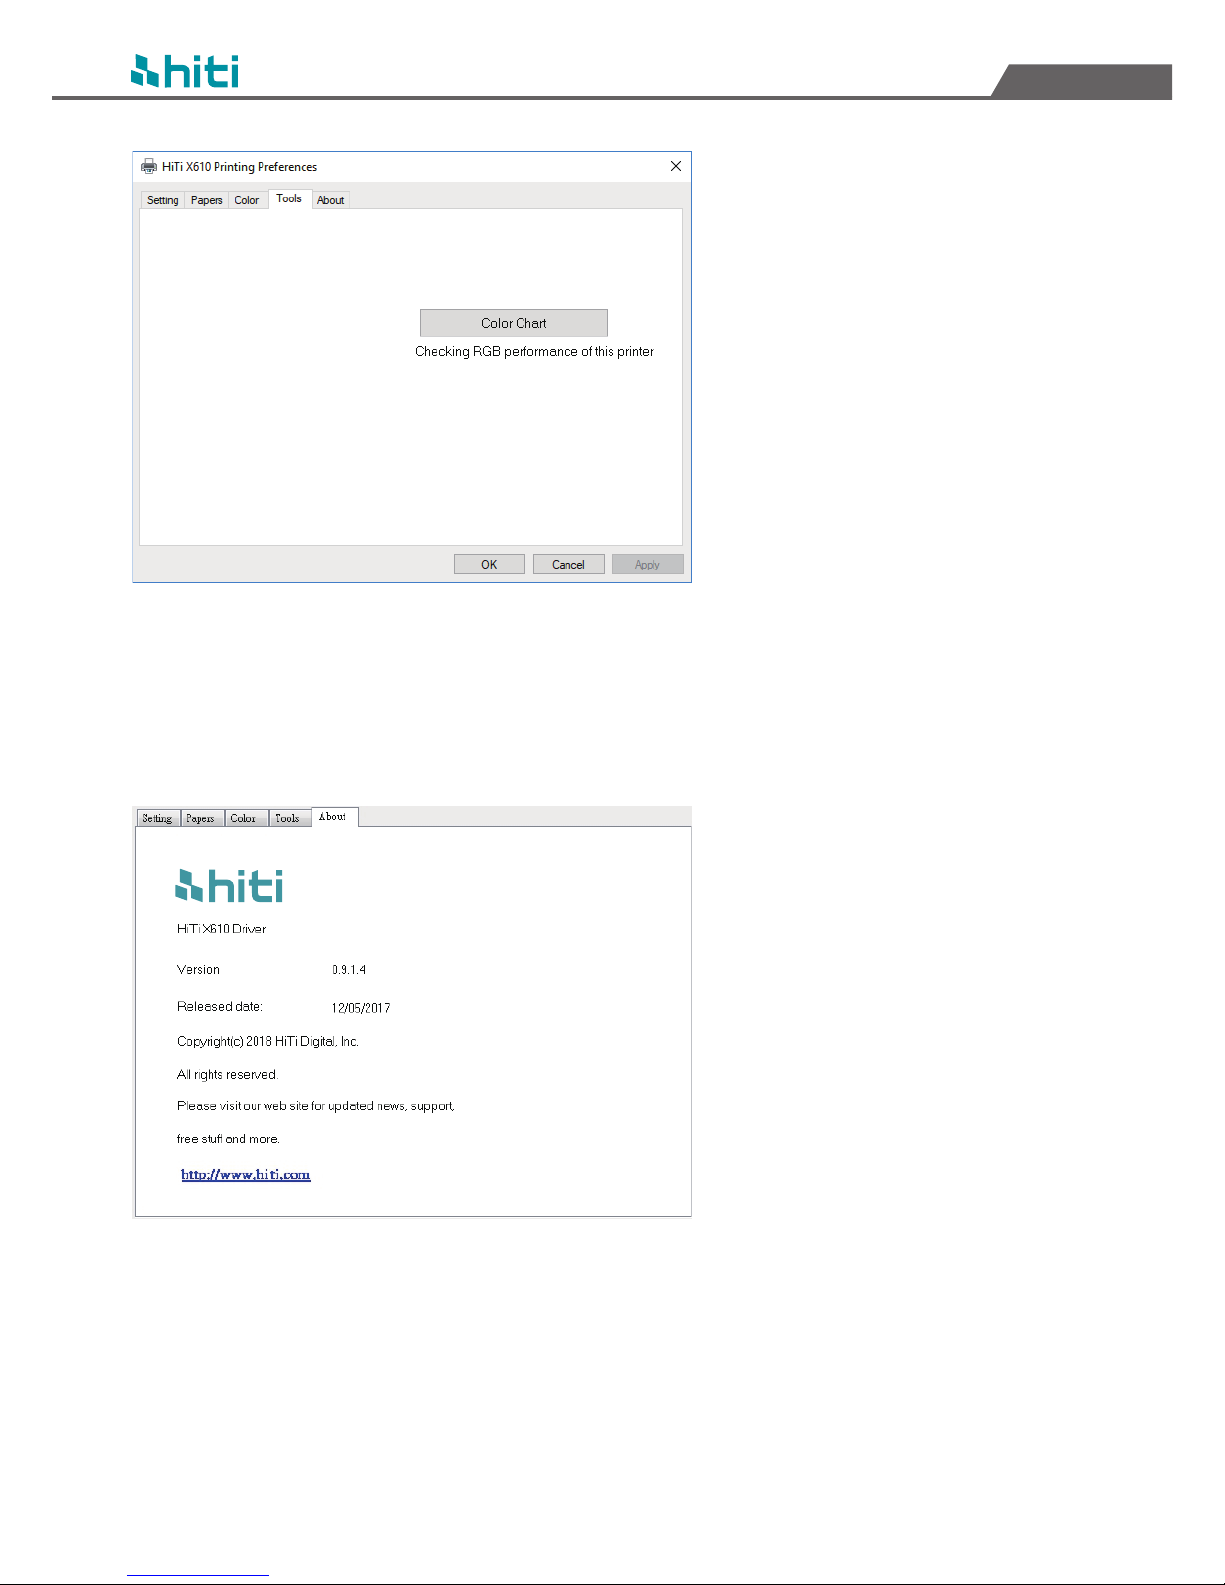
Tools Page
Select and print color chart to
check the color performance of
this printer.
About Page
Check driver version and
additional information on this
page.
12
HiTi X610 User Manual
English
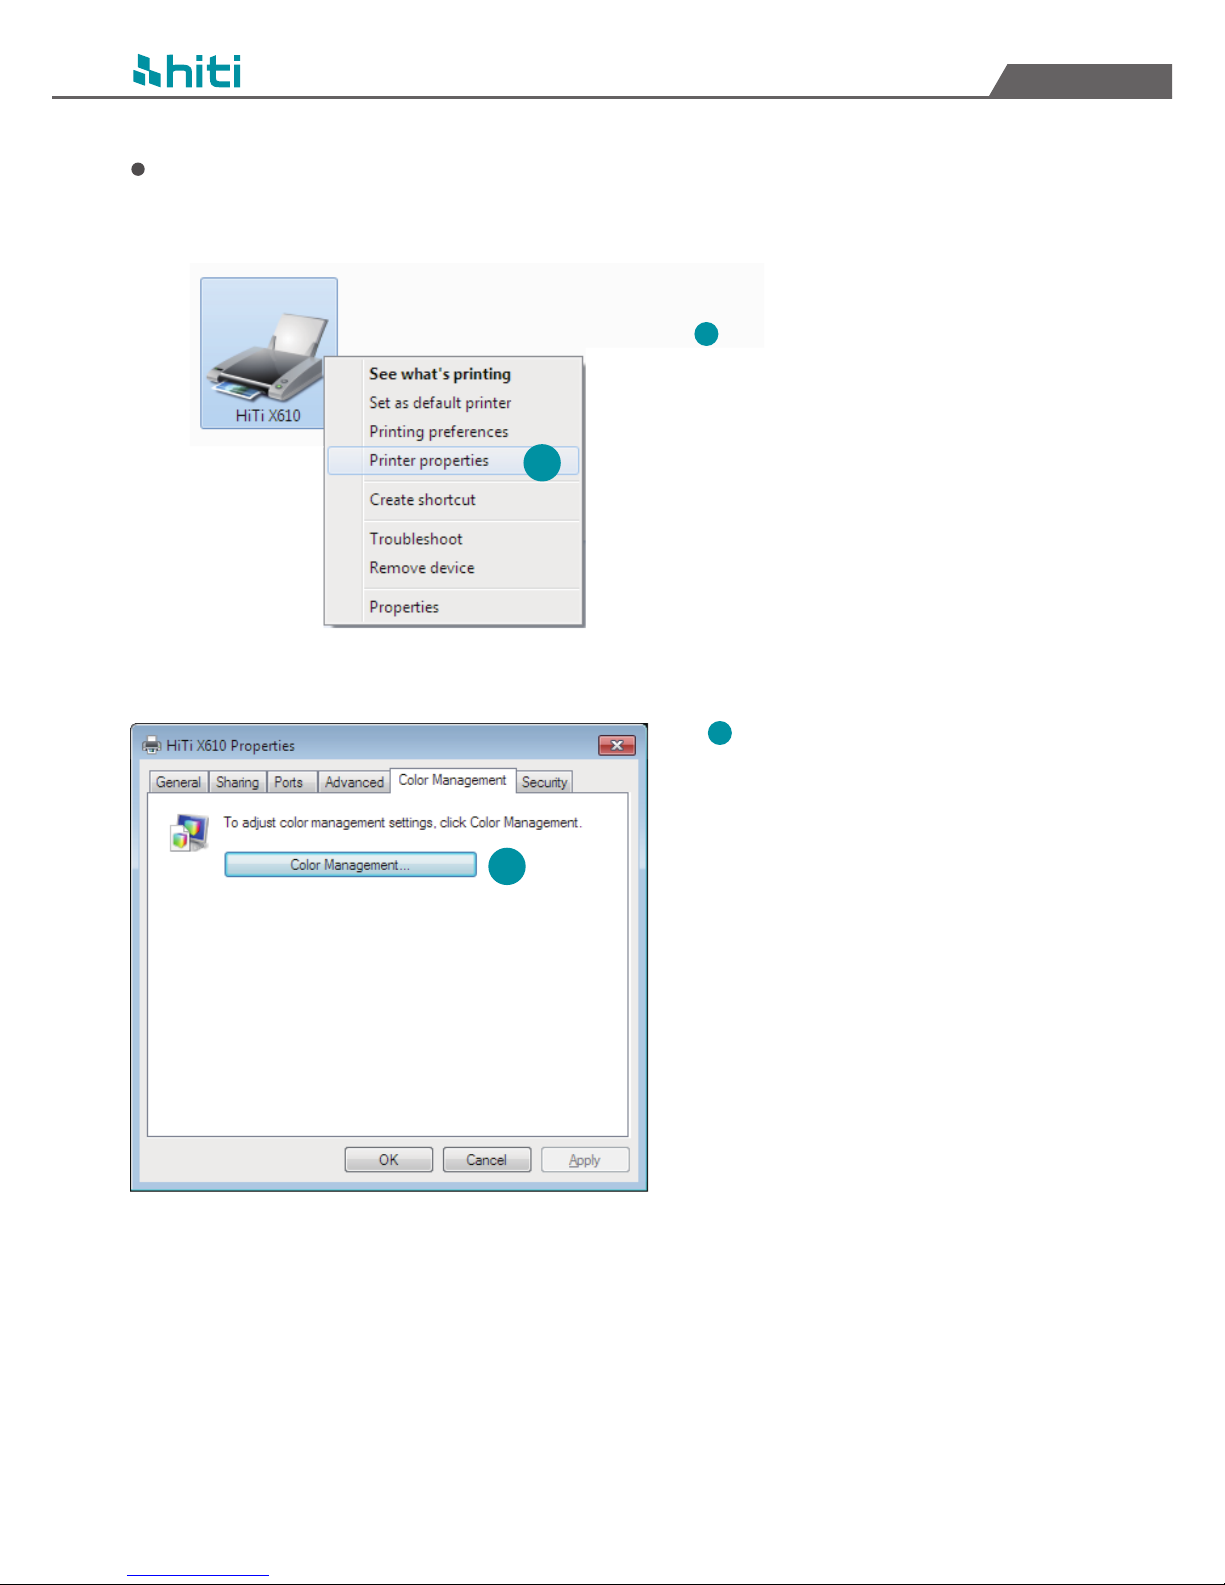
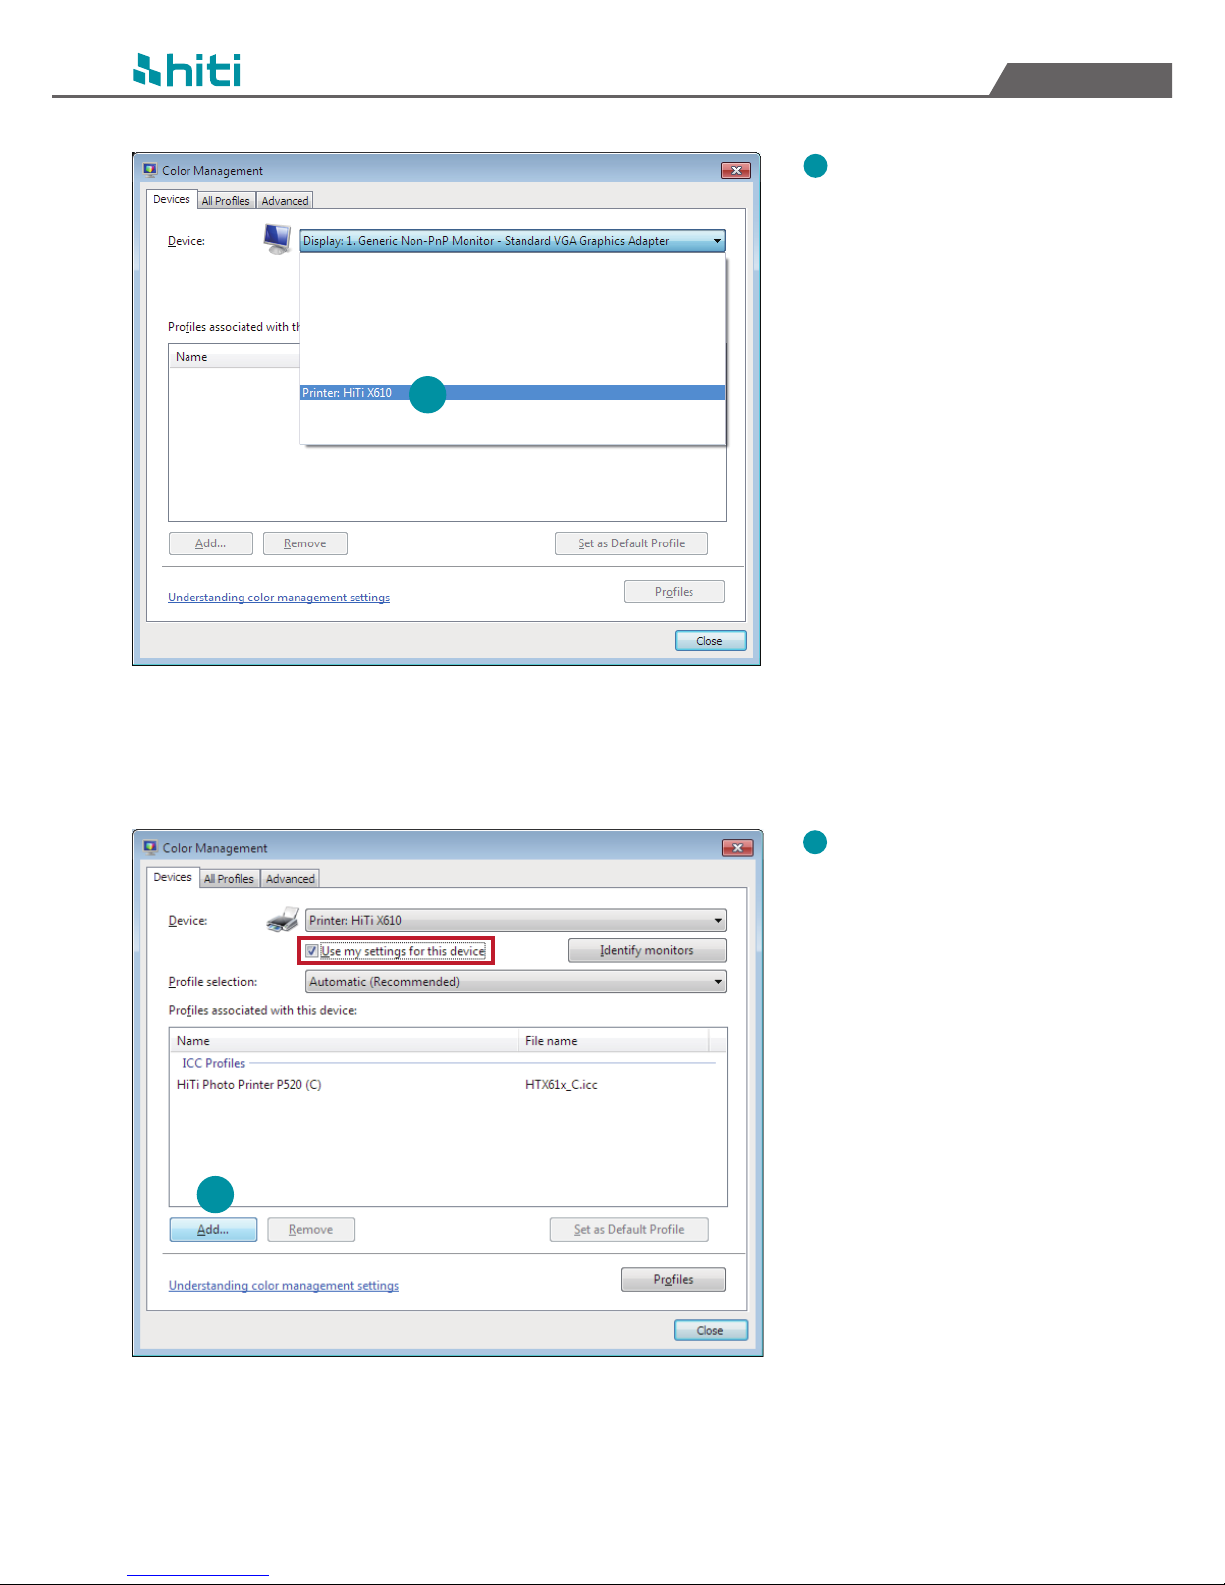
How to Add Your Own ICC Profile
Follow these steps to add your own ICC profile
Go to Control Panel --> Hardware
and Sound --> Devices and Printers,
then right click on your printer and
select "Printer properties".
1
13
Select “Color Management”
page, and click on “Color
Management” button.
2
1
2
HiTi X610 User Manual
English
3
14
Check“Use my settings
for this device”, and
click on Add.
4
Select your printer from
the drop down menu.
3
4
HiTi X610 User Manual
English
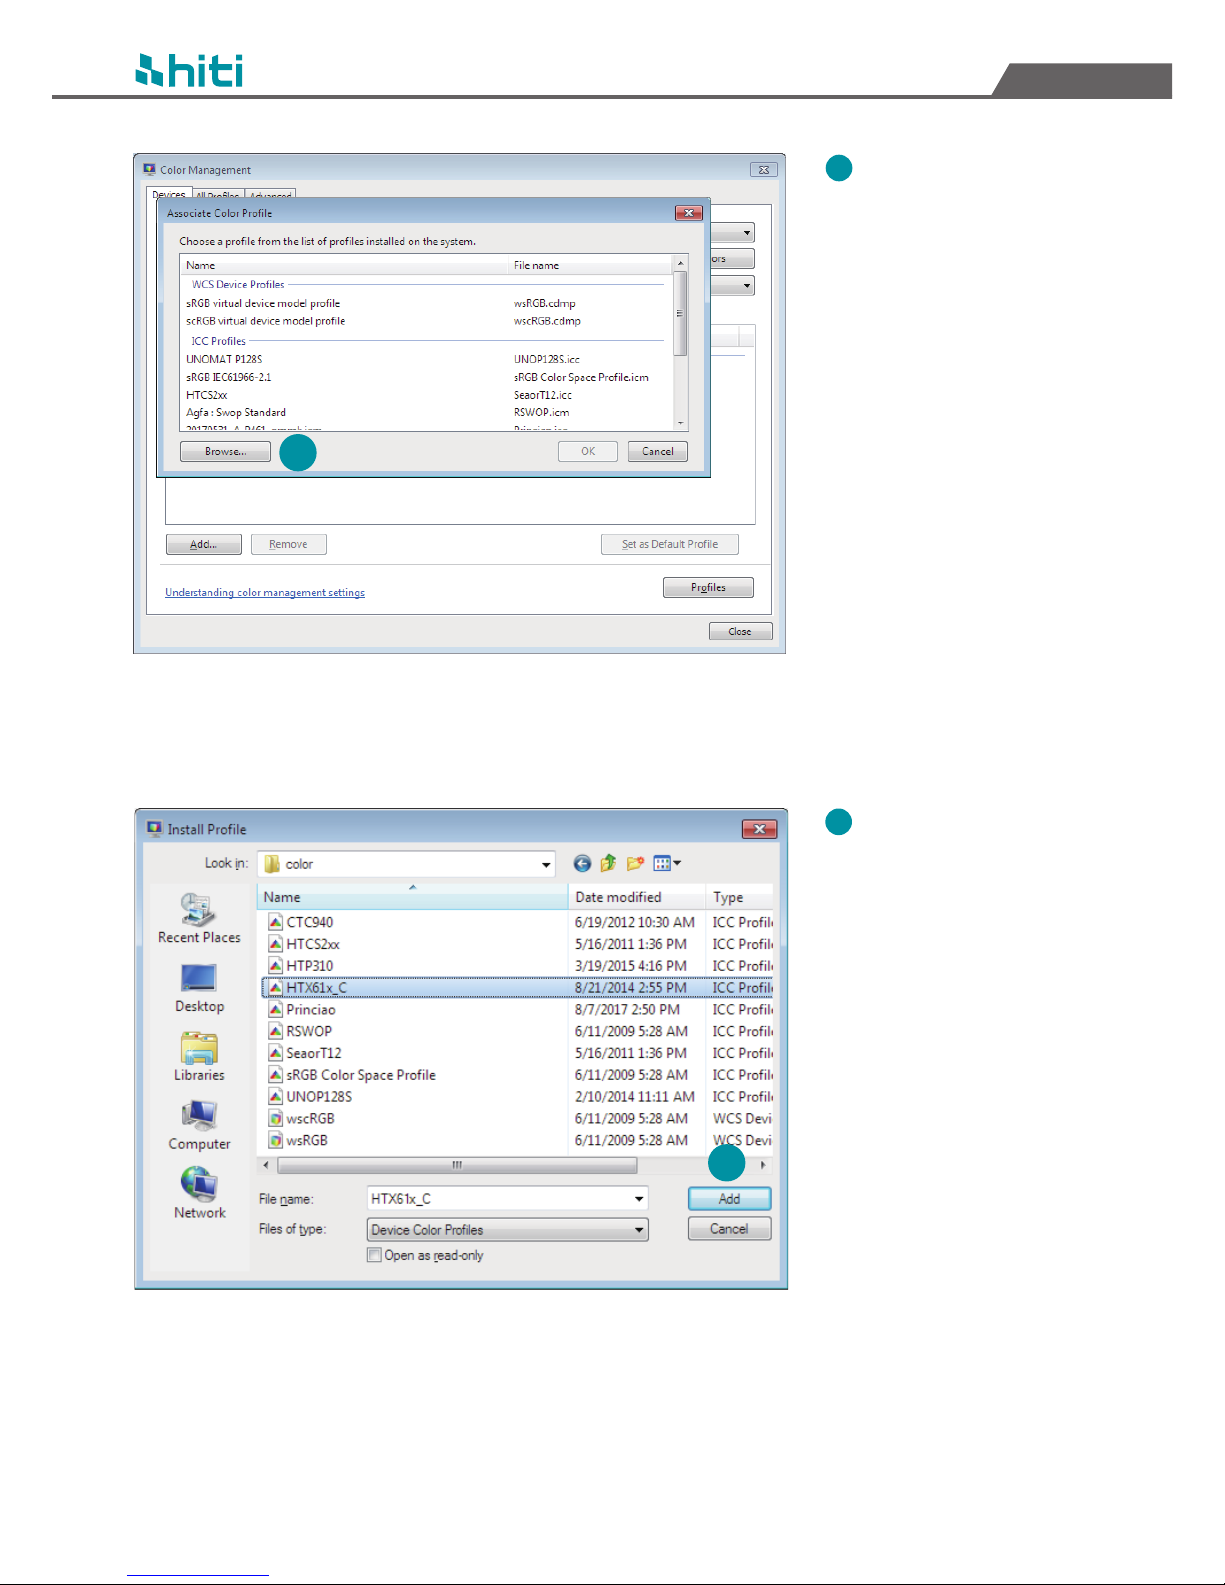
Click on browse.
5
15
6
Select desired ICC
profile and click on
Add to add your own
ICC profile.
5
6
HiTi X610 User Manual
English
16
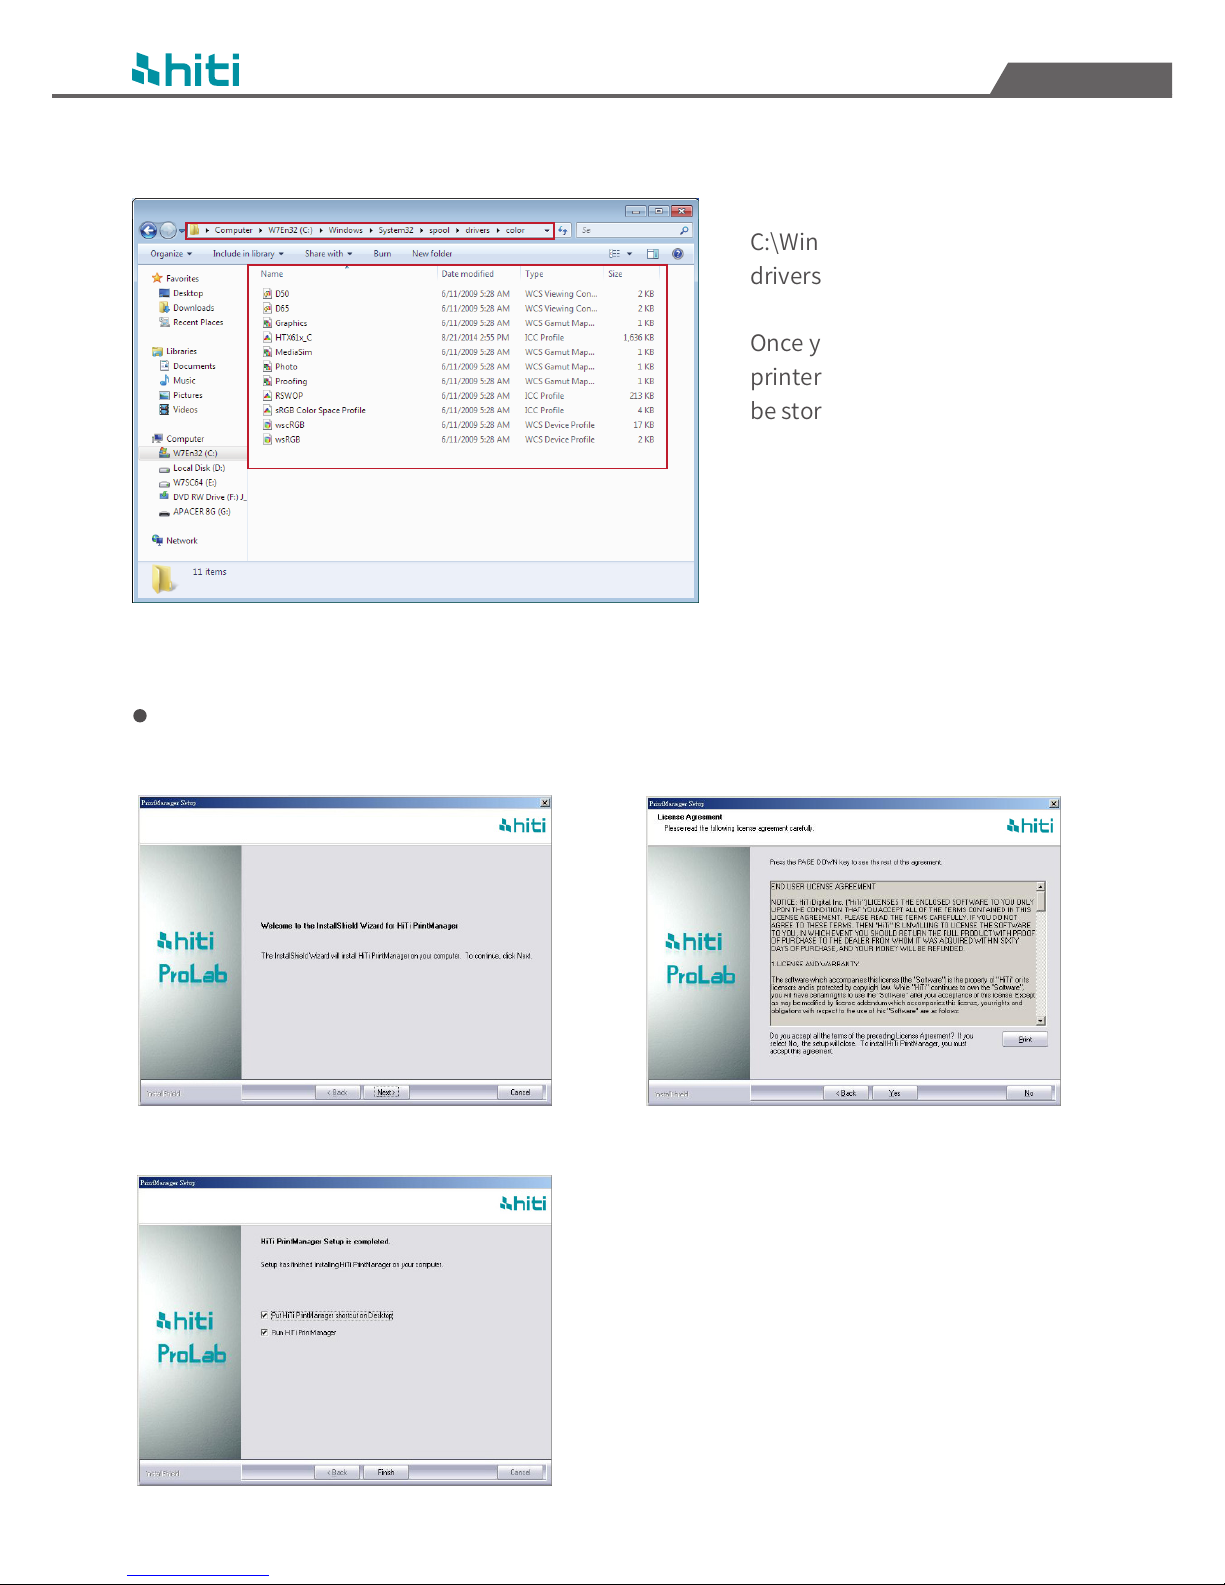
Where ICC profiles are stored
ICC profiles are stored at
C:\Windows\System32\spool\
drivers\color
Once you have installed the
printer driver, the ICC profile will
be stored here.
Installing HiTi ProLab & HiTi Print Manager
Follow the steps shown on the screen to install HiTi ProLab & HiTi Print Manager.
Click Next Click Yes
Click Finish
HiTi X610 User Manual
English
17
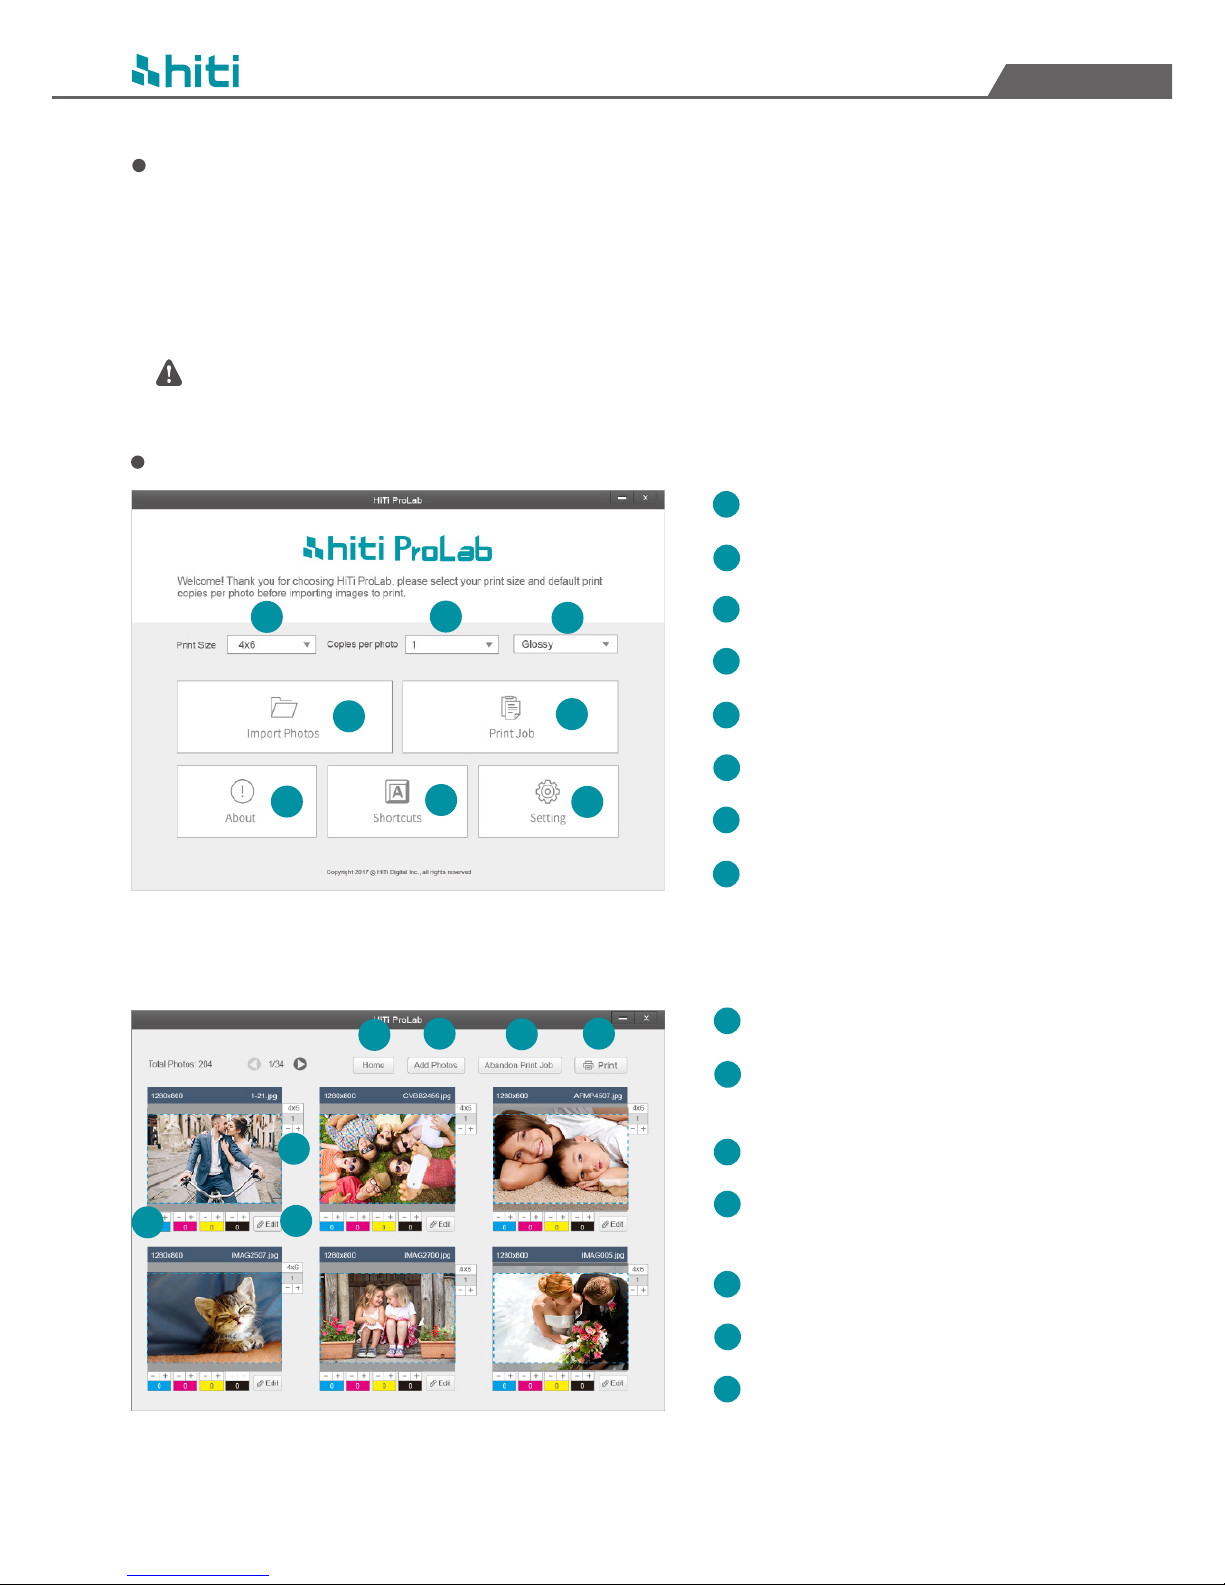
What is HiTi ProLab
HiTi ProLab is a professional photo editing software designed for photo printing and photo
editing. Simply import your photos, select desired photo print size, copies per photo, edit
and preview your photos, then send them to HiTi Print Manager for printing. HiTi ProLab
also supports editing panorama photos, please read on to learn more about HiTi ProLab.
Please note that if you wish to print your photos, you must also install HiTi Print Manager.
How to Use HiTi ProLab
Select desired photo print size
Select default print copies per photo
Select photo print option
Click to import photos to print
Click to view current print jobs
Click for software information
Click to set software shortcuts
Click to set software configurations
HiTi ProLab software main page
HiTi ProLab software photo preview page
Click to return to home page
Click to add photos to current
print job
Click to abandon Current print job
Click to add photo copies
Click to edit Y/M/C/O setting
Click to edit this photo in detail
Click to print all photos in this
print job
1
2
3
4
5
6
7
8
1
2
3
5
7
6
4
1
2
3
4
5
6
7
8
1
2
3
4
5
6
7
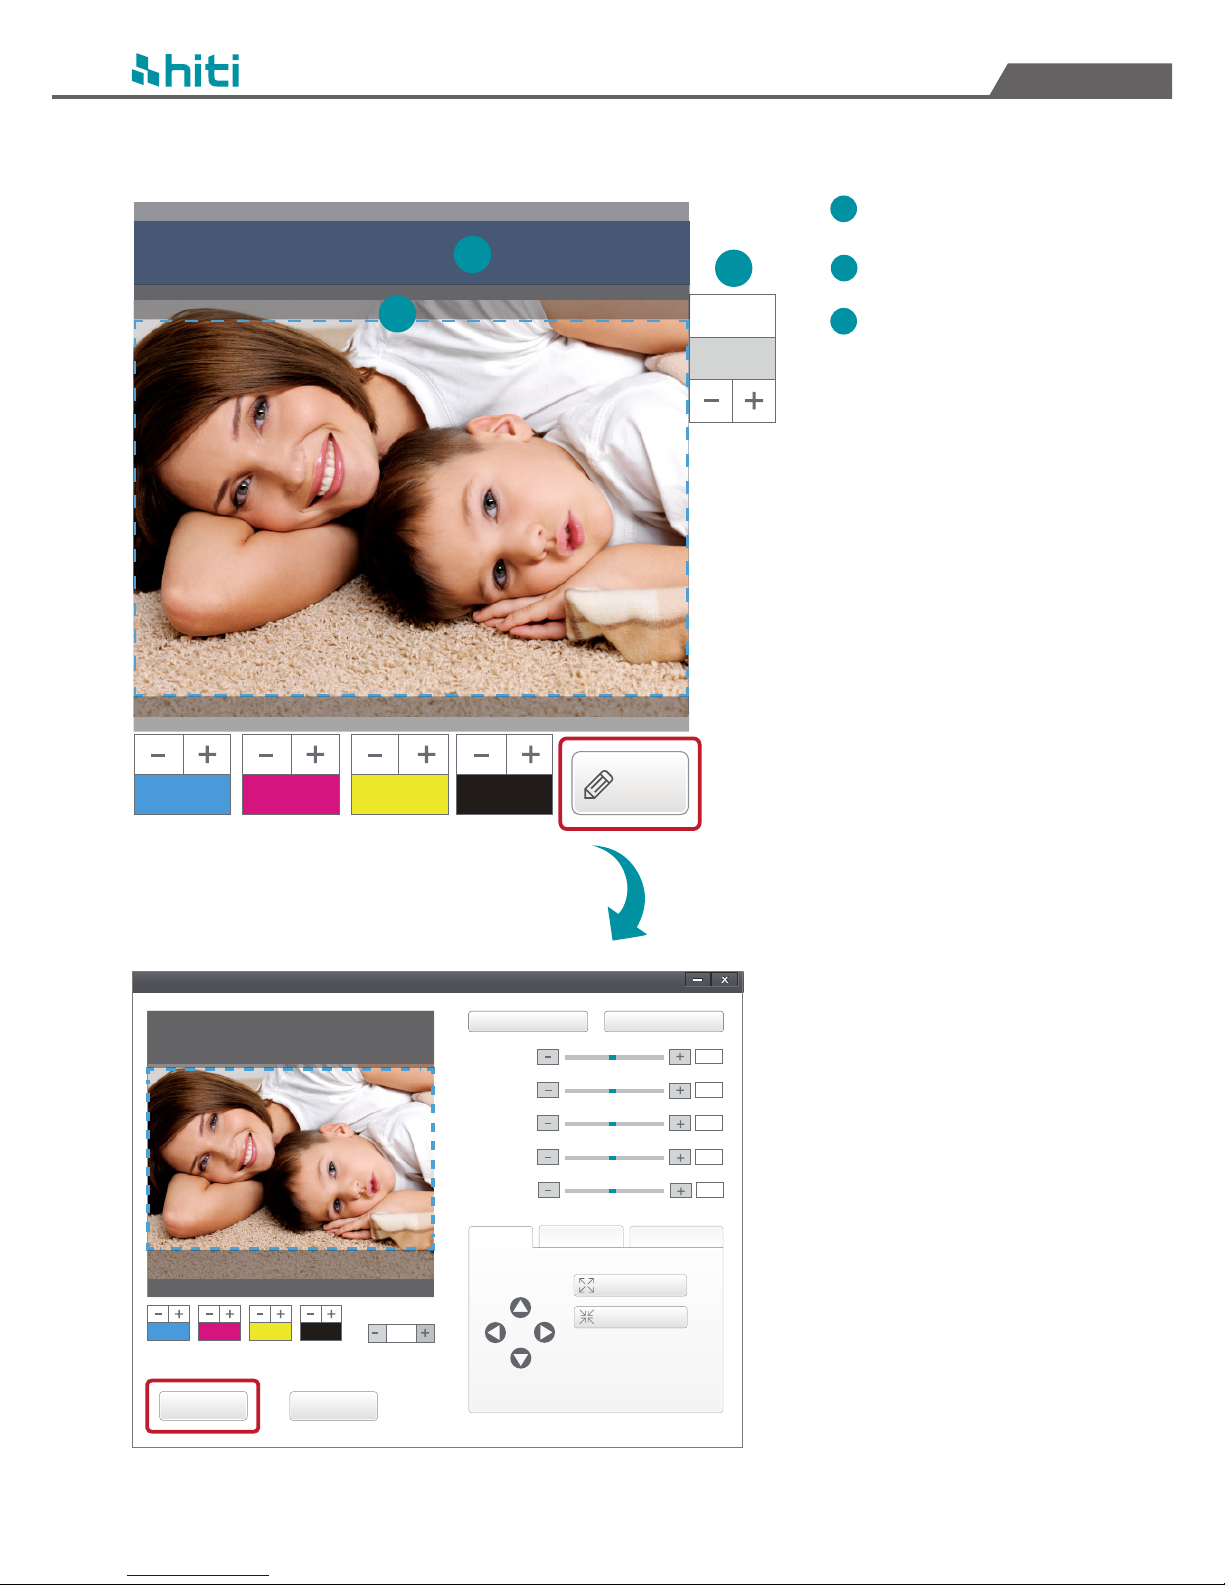
HiTi X610 User Manual
English
Additional info will be shown for each photo
HiTi ProLab
Sharpness:
Saturation:
Brightness:
Contrast:
Gamma:
0
4x6
1
0
Cancel
Finish
Print Range
0
0
0
0
Image Rescale
Red Eye Correction
Default Color Setting
Auto Color Correction
0 0 0
Tip:
Use the arrow buttons and
increase/decrease buttons to
modify photo’s print range
Increase Print Range
Decrease Print Range
0
IMAG005.jpg
1280x800
0 0 0
Edit
1
4x6
1
2
3
Photo file name
Photo output size
Photo print area
(photo outside print
area may be cropped
when printing)
Click on Edit button to
further edit each photo in
detail. Click on Finish when
you are done with your
editing.
18
1
2
3

19
HiTi X610 User Manual
English
Print
After you are done selecting
and editing your photos for
print, return to Print Job page
and click on “Print”.
Your photos will be sent to
locations based on your
settings for HiTi Print Manager
to print.
Select a folder for your print job,
and your photos for printing will
be saved here for HiTi Print
Manager to print. Once the
photos are printed, they will be
deleted by HiTi Print Manager
from the Print Job Folder, and
your recently printed print job
will be stored in“print history
backup folder”, which can be
set in HiTi Print Manager’s
system setting page.
1
Please make sure your print job
folder selection is the same as
your HiTi Print Manager setting.
Setting
It may take a few moment to
send your print job from HiTi
ProLab to HiTi Print Manager’s
Print Order page.
Please note that if you are receiving print
jobs from HiTi ProLab or X610 Driver, it
may take a moment for HiTi Print
Manager to receive these print jobs.
HiTi X610 User Manual
English
20
What is HiTi Print Manager
HiTi Print Manager is a software that helps you manage your daily photo print jobs. You can
add up to 6 printers for HiTi Print Manager to automatically assign photo print jobs for
printing, and monitor all of your print orders and printer status here. All photo printing jobs
from HiTi ProLab and X610 Driver will be sent to HiTi Print Manager for printing.
Please note that all photo printing jobs from HiTi ProLab and X610 Driver will be sent to HiTi Print Manager
for printing.
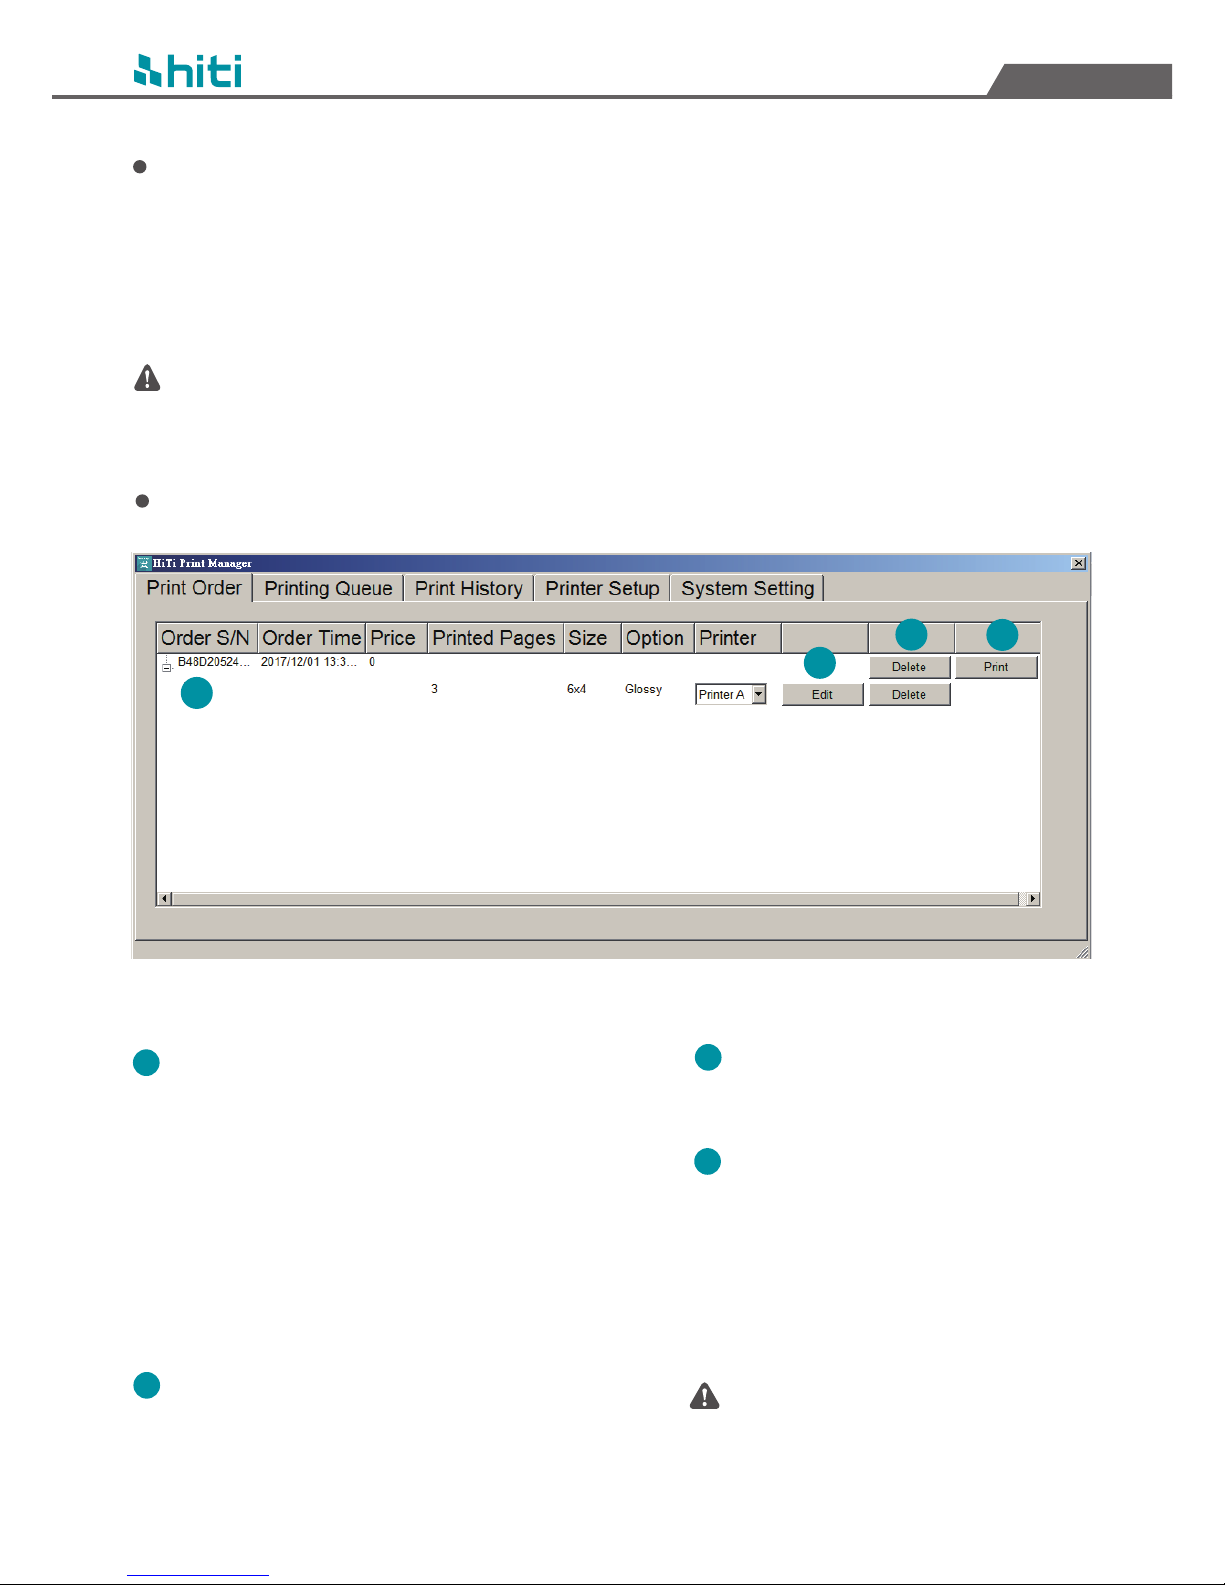
How to Use HiTi Print Manger
Each print job received will be shown on
Print Order page. Each print job will be
assigned to a default printer based on
the output size.
If two printers are both available, printer
with higher priority will be assigned.
(Printer order can be set on Printer Setup
page).
Click on Edit to edit this print job using
HiTi ProLab. You must install HiTi ProLab
first.
1
2
3
4
Print Order
Click on Delete to delete this print
order.
Click on Print to transfer this print
order to Printing Queue page. By
default, print order will be send to
printing queue automatically, you
can change this setting in System
Setting page.
1
2
3
4
1
2
HiTi X610 User Manual
English
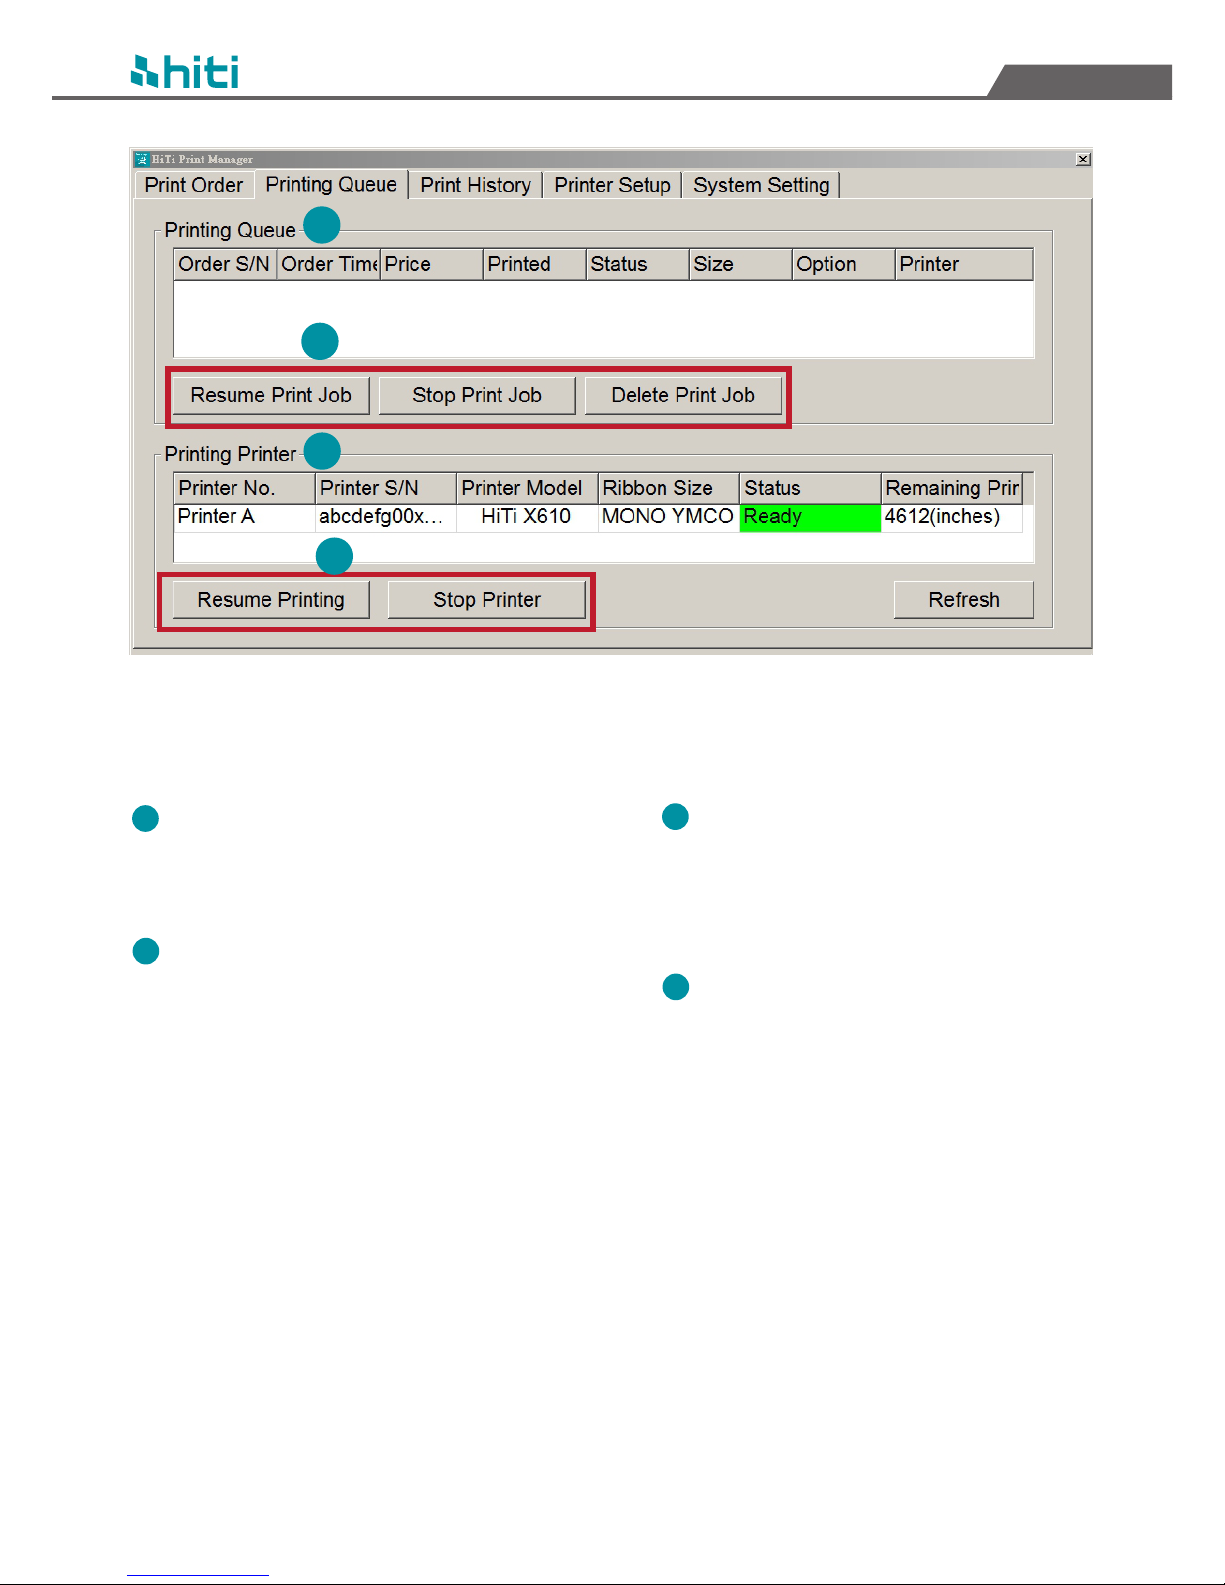
Each printing print job and print jobs
waiting to be printed will be shown on
Printing Queue page.
Use Resume/Stop/ Delete Print Job
buttons to control print job orders.
Printers in use will be shown here,
printer status will refresh
automatically, you can also click on
Refresh to refresh automatically.
Use Stop Printer and Resume Printing
buttons to stop and resume current
printing printers.
21
Printing Queue
Printing Printer
1
2
1
2
1
2
HiTi X610 User Manual
English
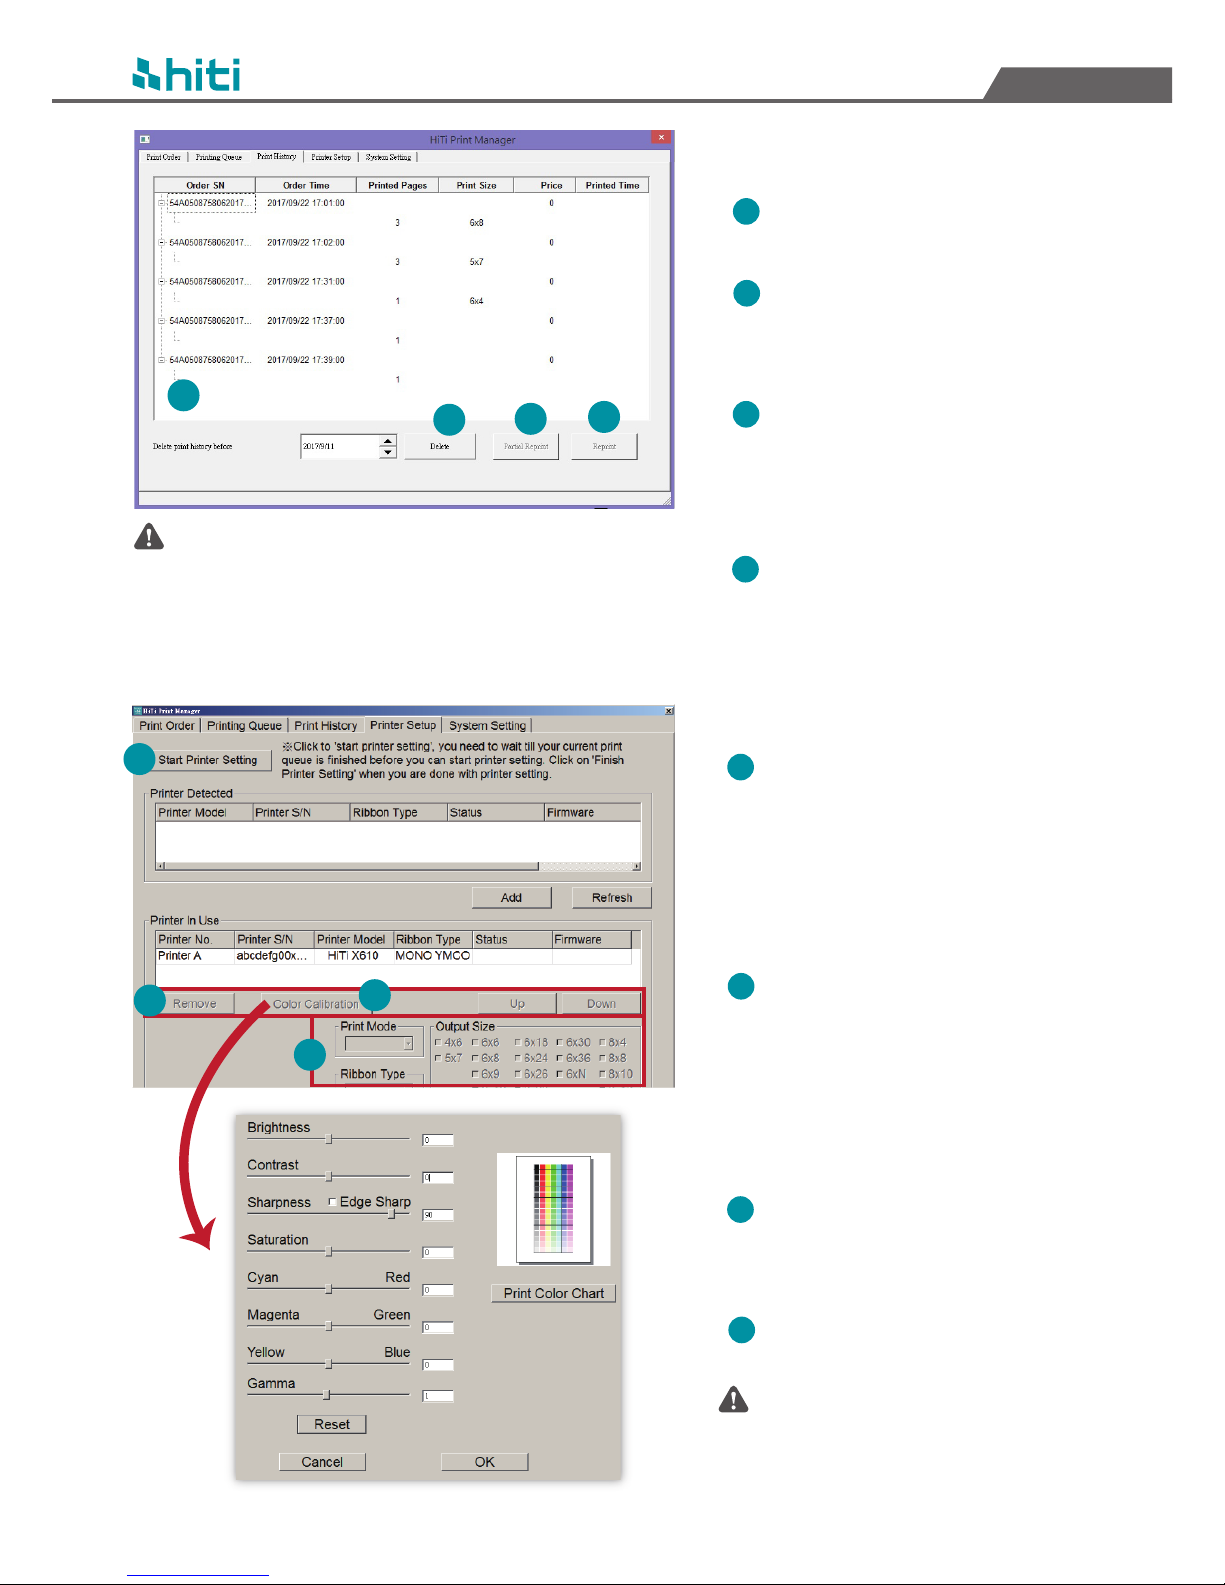
Finished printing print jobs will
be shown on Print History page.
Select a date and click on
Delete to delete print history
before selected date.
Click on Partial Reprint to open
this print using HiTi ProLab for
editing. You must install HiTi
ProLab first.
Click on Reprint to reprint this
print job without editing.
Print history files will be stored in “print history backup
folder”, which can be set in HiTi Print Manager’s system
setting page.
Click Start Printer Setting first
(wait until all current print jobs
are finished before you can add
detected printers). Click Finish
Printer Setting when you are
done.
Click Down, Up, Remove to
rearrange printer priority,
printers with higher priority will
be set as default printer when
there are two printers that
support the same print sizes.
Click Color Calibration to apply
color changes to selected
printer.
Other printer setting options.
HiTi Print Manager support a
maximum of 6 printers.
1
2
1
3
22
3
4
Print History
1
2
3
4
Printer Setup
1
2
3
2
4
4
Printer’s color calibration settings.
For X610 printers, each time
you stop and start printing
again, a fair amount of
paper will be wasted. It is
recommended to stop
printing less than 9 times
per paper roll, meaning you
should print a large amount
of photos per print job. You
can set a minimum photo
amount for X610 printers
to start printing when this
amount has been reached in
HiTi Print Manager’s system
setting page.
HiTi X610 User Manual
English
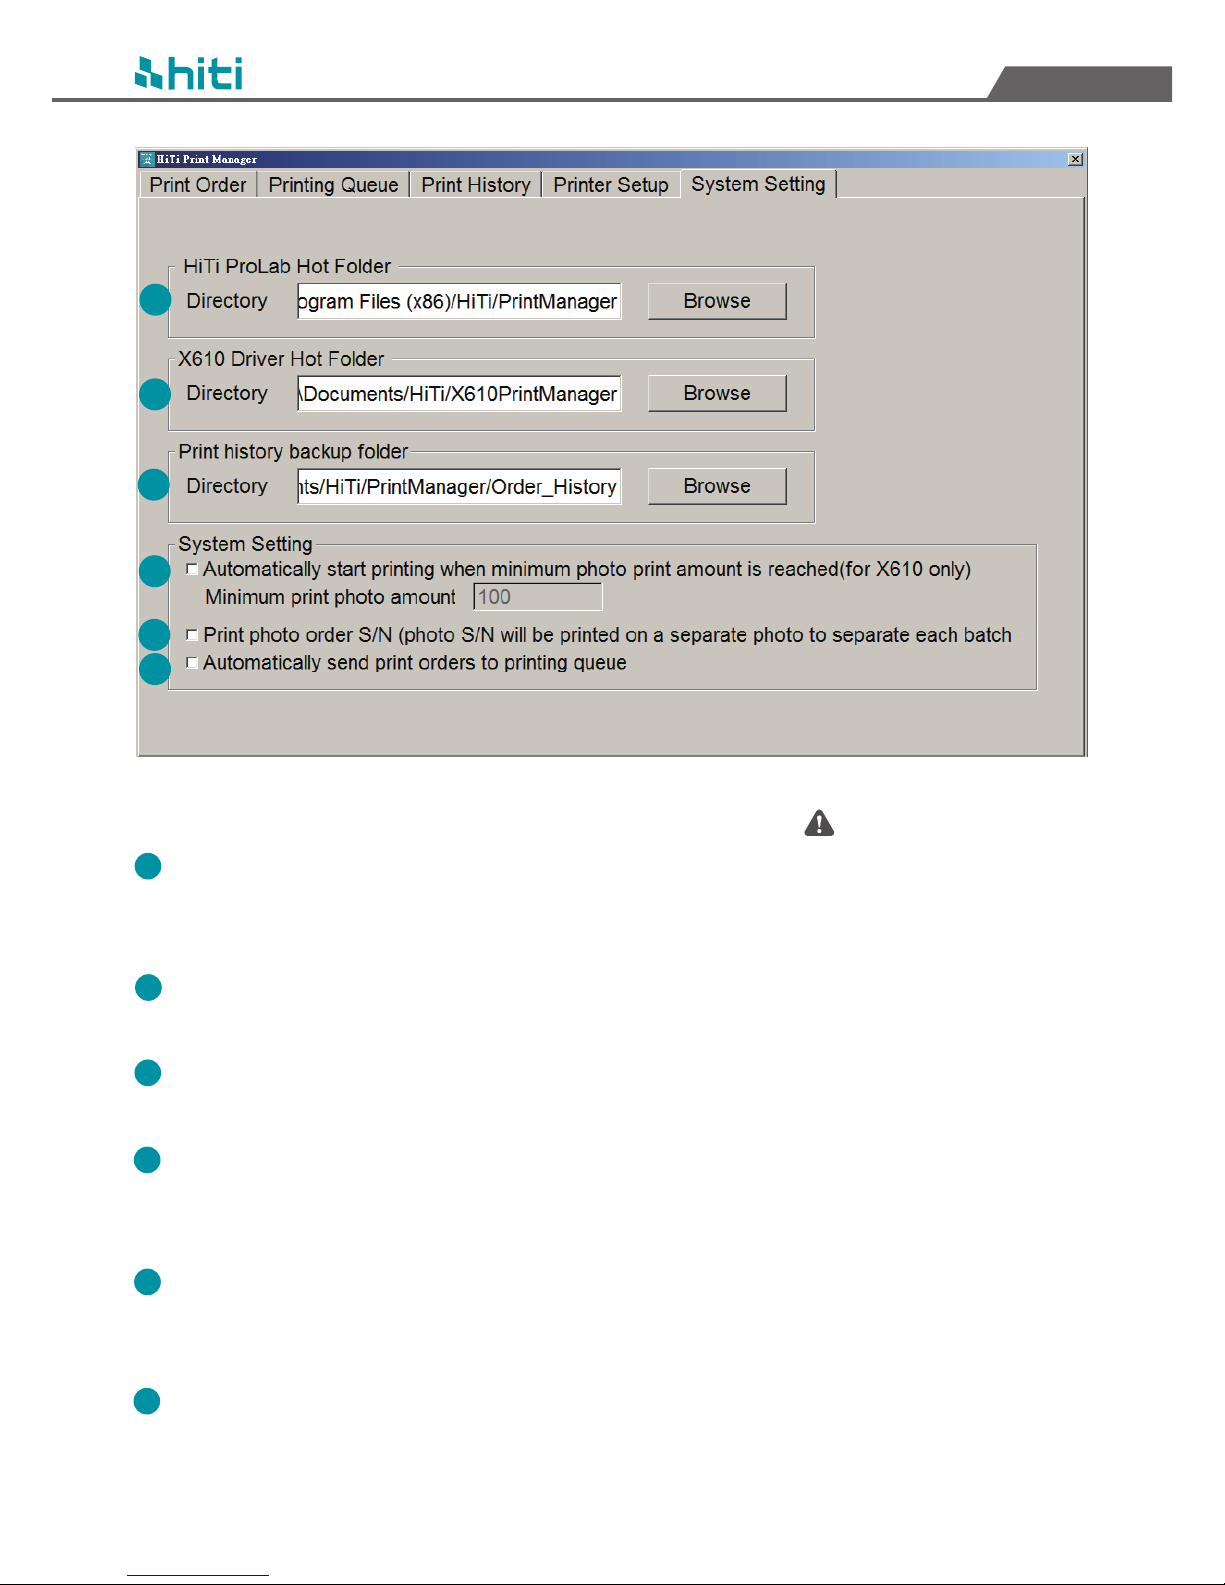
Set HiTi ProLab print job hot folder (hot folder must be
set as the same as in HiTi ProLab software’s hot folder
setting).
Set X610 Driver print job hot folder (hot folder must be
set as the same as in X610 Driver’s hot folder setting).
Set print history backup folder. Printed print jobs will
be stored here.
(For X610 only) Set a minimum photo amount for X610
printers to start printing when this amount has been
reached (photo count will be based on 4x6 paper size).
Check to print an order slip with each print job, the
order slip will contain the information for that
particular print job.
Check to automatically send print order to printing
queue.
23
1
2
3
4
5
6
System Setting
1
2
3
4
5
6
4
Please select 6xN paper size in HiTi
ProLab, then import your desired
panorama photo.
HiTi ProLab will automatically
detect your photos’ print length,
max length is 6x56” (1844 x 16892
pixels).
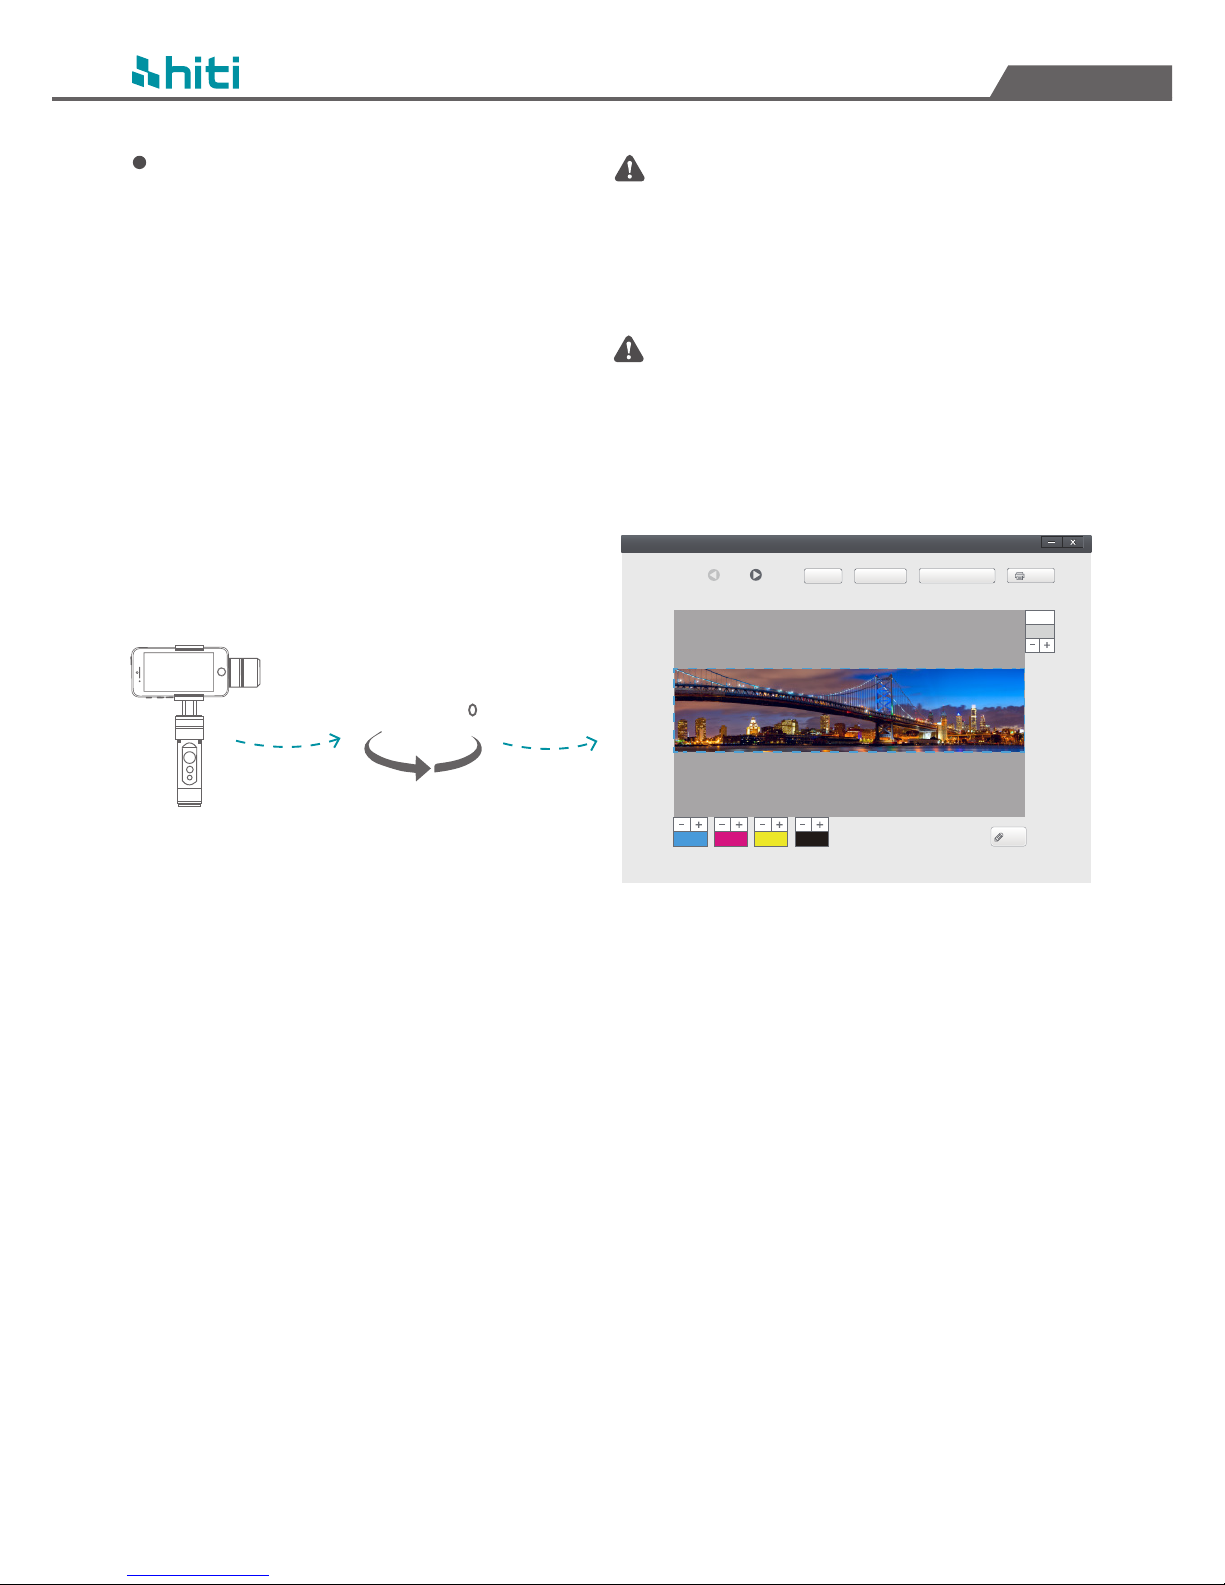
To prevent blurry panorama photos, it is advised
to take photos by placing your smartphone or
camera on a panorama tripod head to achieve
best photo results.
For X610 printers, printing mixed photo sizes larger
than 6x28 or photos larger than 6x36 will produce
photo paper cut-offs. Printing same sized photos
between 6x28 to 6x36 will not produce photo paper
cut-offs.
Panoramic tripod head
0
360
Place your smartphone on a panorama
tripod to take panorama photos.
Select 6xN output size and import your
panorama photo into Hiti ProLab, your photo
will be automatically scaled into a 6 inch
height panorama photo and ready to print
(max length is 6x56”).
Edit
IMAG005.jpg
0 0 0 0
HiTi ProLab
Total Photos: 1
1/1
Print
Abandon Print Job
Add PhotosHome
Edit
1
6xN
IMAG005.jpg
24
HiTi X610 User Manual
English
How to print panorama
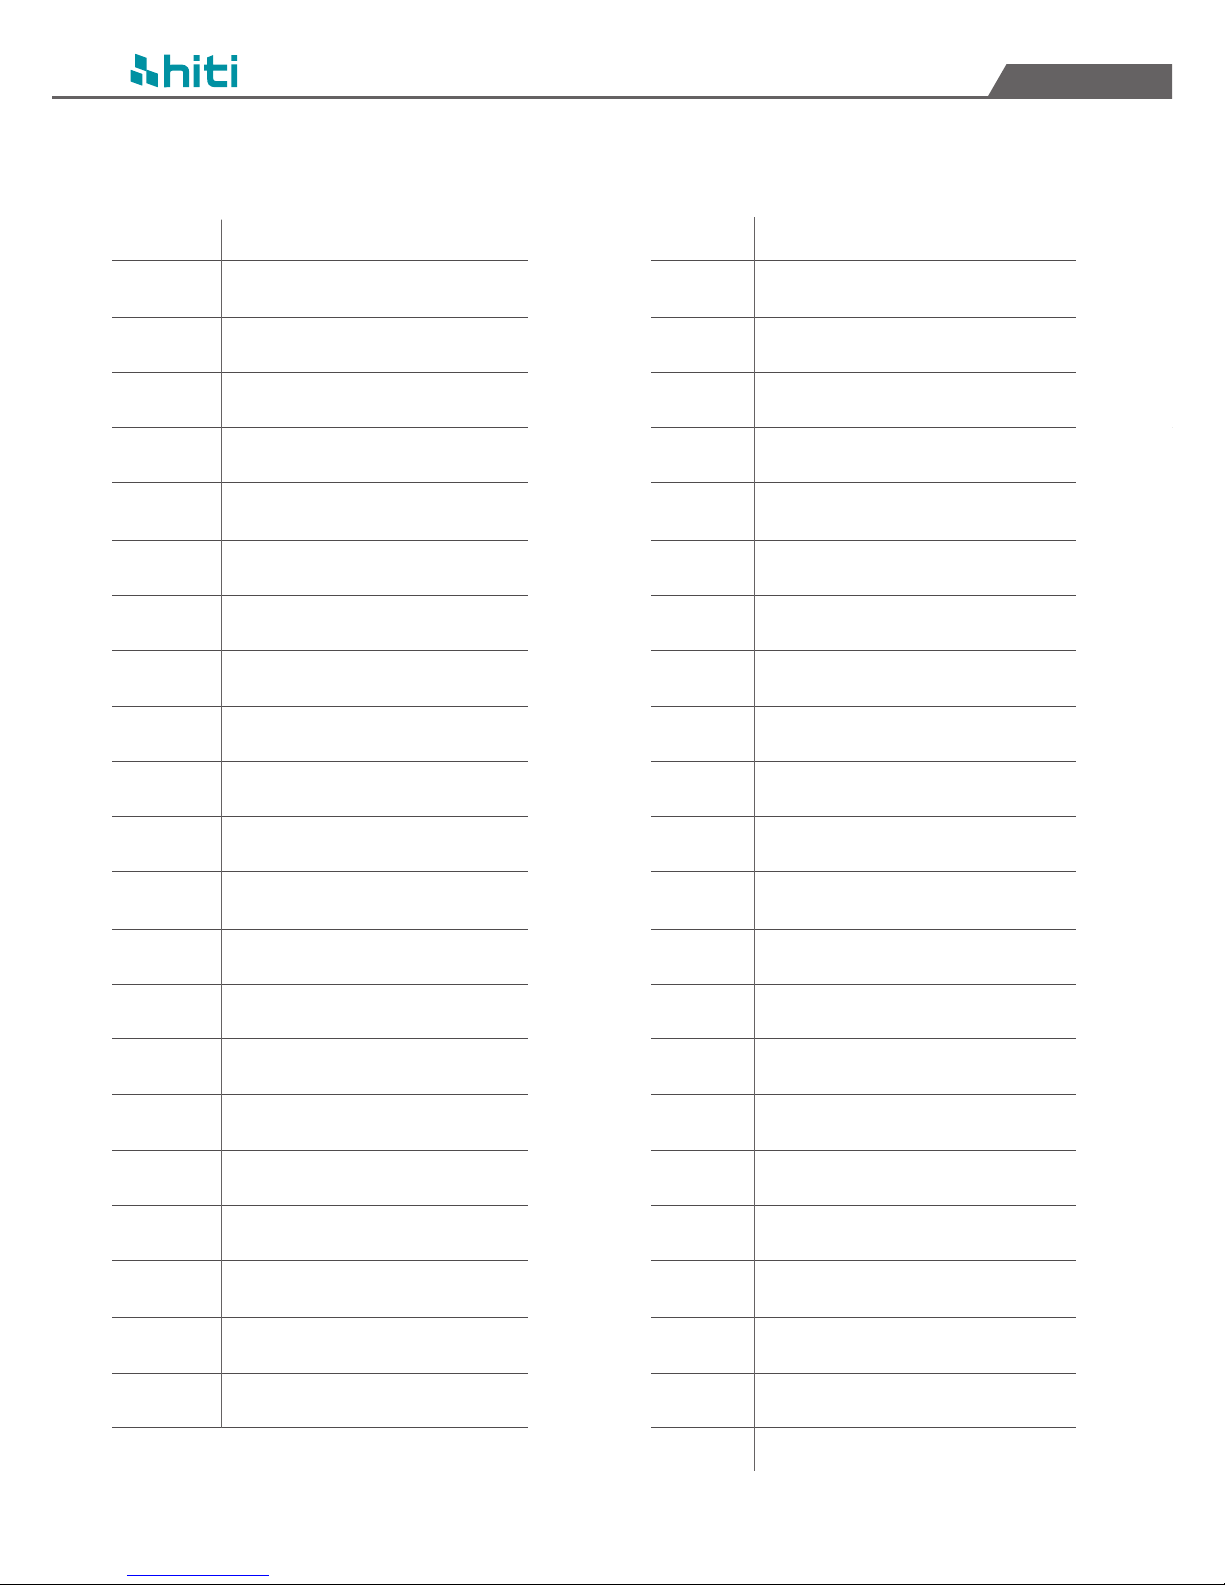
Suggested print length (pixel)
HiTi X610 User Manual
English
6x12” 1844 (H) x 3648 (W) pixel
6x13” 1844 (H) x 3952 (W) pixel
6x14” 1844 (H) x 4252 (W) pixel
6x15” 1844 (H) x 4552 (W) pixel
6x16” 1844 (H) x 4852 (W) pixel
6x17” 1844 (H) x 5156 (W) pixel
6x18 ” 1844 (H) x 5456 (W) pixel
6x19” 1844 (H) x 5756 (W) pixel
6x20 ” 1844 (H) x 6056 (W) pixel
6x21” 1844 (H) x 6360 (W) pixel
6x22” 1844 (H) x 6660 (W) pixel
6x23” 1844 (H) x 6960 (W) pixel
6x24 ” 1844 (H) x 7260 (W) pixel
6x25 ” 1844 (H) x 7564 (W) pixel
6x26 ” 1844 (H) x 7864 (W) pixel
6x27” 1844 (H) x 8164 (W) pixel
6x28” 1844 (H) x 8464 (W) pixel
6x29” 1844 (H) x 8768 (W) pixel
6x30” 1844 (H) x 9068 (W) pixel
6x31” 1844 (H) x 9368 (W) pixel
6x32” 1844 (H) x 9668 (W) pixel
6x33” 1844 (H) x 9972 (W) pixel
6x34” 1844 (H) x 10272 (W) pixel
6x35” 1844 (H) x 10572 (W) pixel
6x36” 1844 (H) x 10872 (W) pixel
6x37” 1844 (H) x 11176 (W) pixel
6x38” 1844 (H) x 11476 (W) pixel
6x39” 1844 (H) x 11776 (W) pixel
6x40” 1844 (H) x 12076 (W) pixel
6x41” 1844 (H) x 12380 (W) pixel
6x42” 1844 (H) x 12680 (W) pixel
6x43” 1844 (H) x 12980 (W) pixel
6x44” 1844 (H) x 13280 (W) pixel
6x45” 1844 (H) x 13584 (W) pixel
6x46” 1844 (H) x 13884 (W) pixel
6x47” 1844 (H) x 14184 (W) pixel
6x48” 1844 (H) x 14484 (W) pixel
6x49” 1844 (H) x 14788 (W) pixel
6x50” 1844 (H) x 15088 (W) pixel
6x51” 1844 (H) x 15388 (W) pixel
6x52” 1844 (H) x 15688 (W) pixel
6x53” 1844 (H) x 15992 (W) pixel
6x54” 1844 (H) x 16292 (W) pixel
6x55” 1844 (H) x 16592 (W) pixel
6x56” 1844 (H) x 16892 (W) pixel
25
26
HiTi X610 User Manual
English
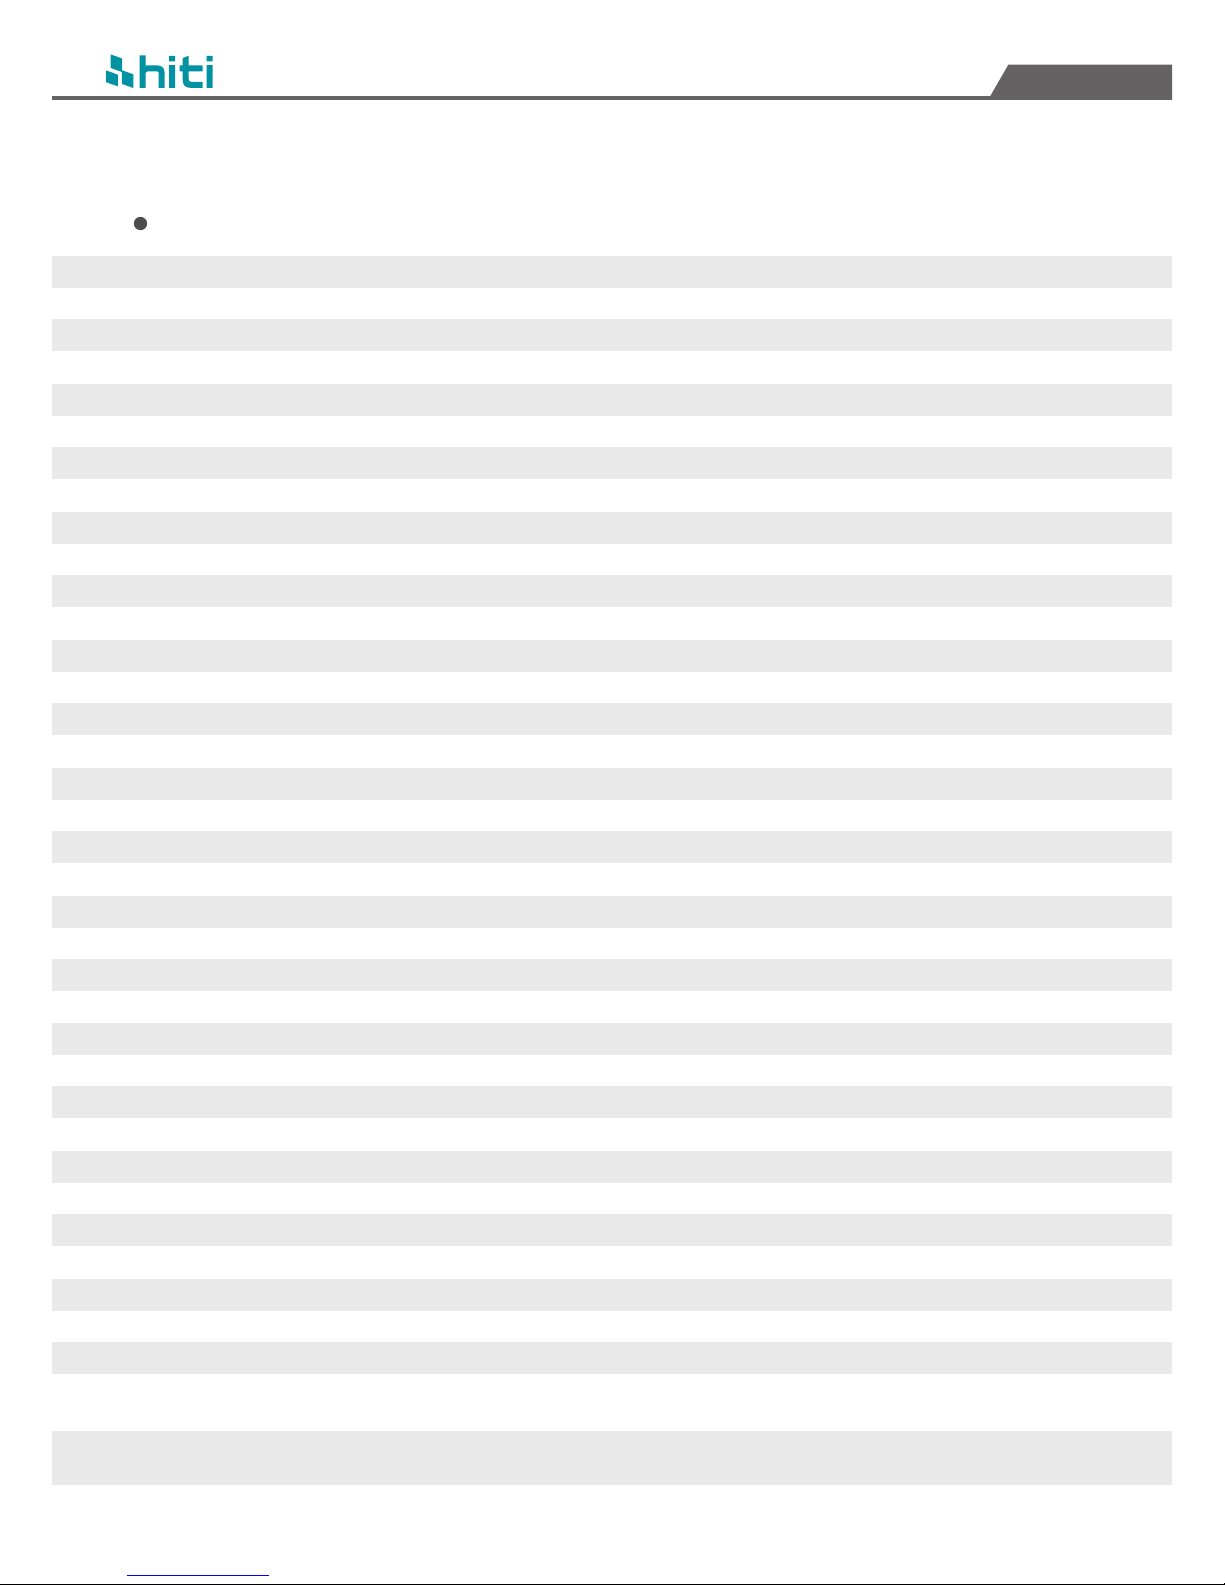
Troubleshooting
Error Display & troubleshooting
LCM Display
0100 Cover open
0101 Cover open
0102 Cover open
0200 IC Chip Missing
0201 Ribbon Missing
0202 Ribbon Missing
0203 Ribbon Missing
0204 Ribbon Missing
0205 Security Check Fail
0300 Ribbon Out
0301 Ribbon Out
0302 Ribbon Out
0303 Ribbon Out
0304 Ribbon Out
0305 Print Failed
0306 Print Failed
0307 Print Failed
0308 Print Failed
0400 Paper Out
0401 Paper Out
0500 Paper Jam
0501 Paper Jam
0502 Paper Jam
0503 Paper Jam
0700 Cam Error
0701 Cam Error
0800 Cam Error
0801 Cam Error
0900 NVRAM Error
1000 IC chip Error
1200 ADC error Y
1201 ADC error M
1202 ADC error C
1203 ADC error O
1300 FW Check Error
1500 Cutter Error
Solution
Please make sure the paper drawer is closed
Please make sure ribbon cassette door is closed
Please make sure ribbon door is closed
Please check if overcoat ribbon is properly inserted
Please check if yellow ribbon is properly inserted
Please check if magenta ribbon is properly inserted
Please check if cyan ribbon is properly inserted
Please check if overcoat ribbon is properly inserted
Please check if overcoat ribbon is properly inserted or damaged
Change a new yellow ribbon cassette if empty
Change a new magenta ribbon cassette if empty
Change a new cyan ribbon cassette if empty
Change a new overcoat ribbon cassette if empty
Change a new overcoat ribbon cassette if empty
Change or fix the yellow ribbon cassette
Change or fix the magenta ribbon cassette
Change or fix the cyan ribbon cassette
Change or fix the overcoat ribbon cassette
Change a new paper roll or check if paper roll is inserted properly
Change a new paper roll or check if paper roll is inserted properly
Remove the paper roll and reinstall it and if problem persists, then contact local service provider for support
Remove the paper roll and reinstall it and if problem persists, then contact local service provider for support
Remove the paper roll and reinstall it and if problem persists, then contact local service provider for support
Remove the paper roll and reinstall it and if problem persists, then contact local service provider for support
Please reset the printer and if problem persists, then contact local service provider for support
Please reset the printer and if problem persists, then contact local service provider for support
Please reset the printer and if problem persists, then contact local service provider for support
Please reset the printer and if problem persists, then contact local service provider for support
Please contact local service provider for support
Change a new overcoat ribbon cassette
Please contact local service provider for support
Please contact local service provider for support
Please contact local service provider for support
Please contact local service provider for support
Please update the firmware of the printer and if problem persists, then contact local service
provider for support
Please check if there is any paper scraps stuck at the exit, and if the problem persists then contact
local service provider for support
 Loading...