


1
Table of Contents
1. Checking package contents………………………………………….…2
2. Getting the latest update…………………………………………….….3
3. Introduction of WFT510
3-1.WFT510 Parts……………………………………………………….4
3-2.LED Status
…………………………………………………………..4
3-3.System Requirement
………………………………………………….4
4. Making WFT510 Ready to Work
4-1. Inserting the Batteries…………………………………………...……5
4-2. Putting WFT510 into WFT510 Carry Bag…………………………………….6
4-3. Turning on WFT510…………………………………………………………….6
5. How to Transmit Image from WFT 510 to HiTi P510Si Printer
5-1. Configuring WFT510 with HiTi P510Si Printer……................................7
5-2. Transmitting Image from Camera to p510Si and printing out image………..9
6. How to Transmit Image from WFT 510 to PC
6-1.Installing WFT PC Kit…………………………………………………………..11
6-2. Building up a network setting for WFT510 via WFT PC Kit……………….. 13
z Infrastructure……………………………………………………………14
z Ad-hoc……………………………………………………………………16
6-3.
Setting up a network on PC to connect WFT510 (For Ad-hoc Mode)……….18
6-4. Transmitting Image from Camera to PC……………………………………....22
6-5. Test network setting……………………………………………………………..24
6-6. Sub-folder function………………………………………………………………25
7. Specification…………………………………………………………….... 26

2
1. Checking package contents
HiTi Wireless Foto Transmitter WFT510 WFT510 Carry Bag WFT PC Kit CD
USB Cable User Manual Warranty Card
Hook
Note:
1. If something missed from the package, please contact your local dealer or HiTi
service center nearest to you.
2. Batteries are EXCLUDE.

3
2. Getting the latest update
HiTi Digital Inc. website provides the latest driver, application, user’s manual, printer
firmware, and so on for users to download. Please visit our website at www.hiti.com
for more information.
Any questions toward HiTi product(s), please contact your local service center for
detail.
4
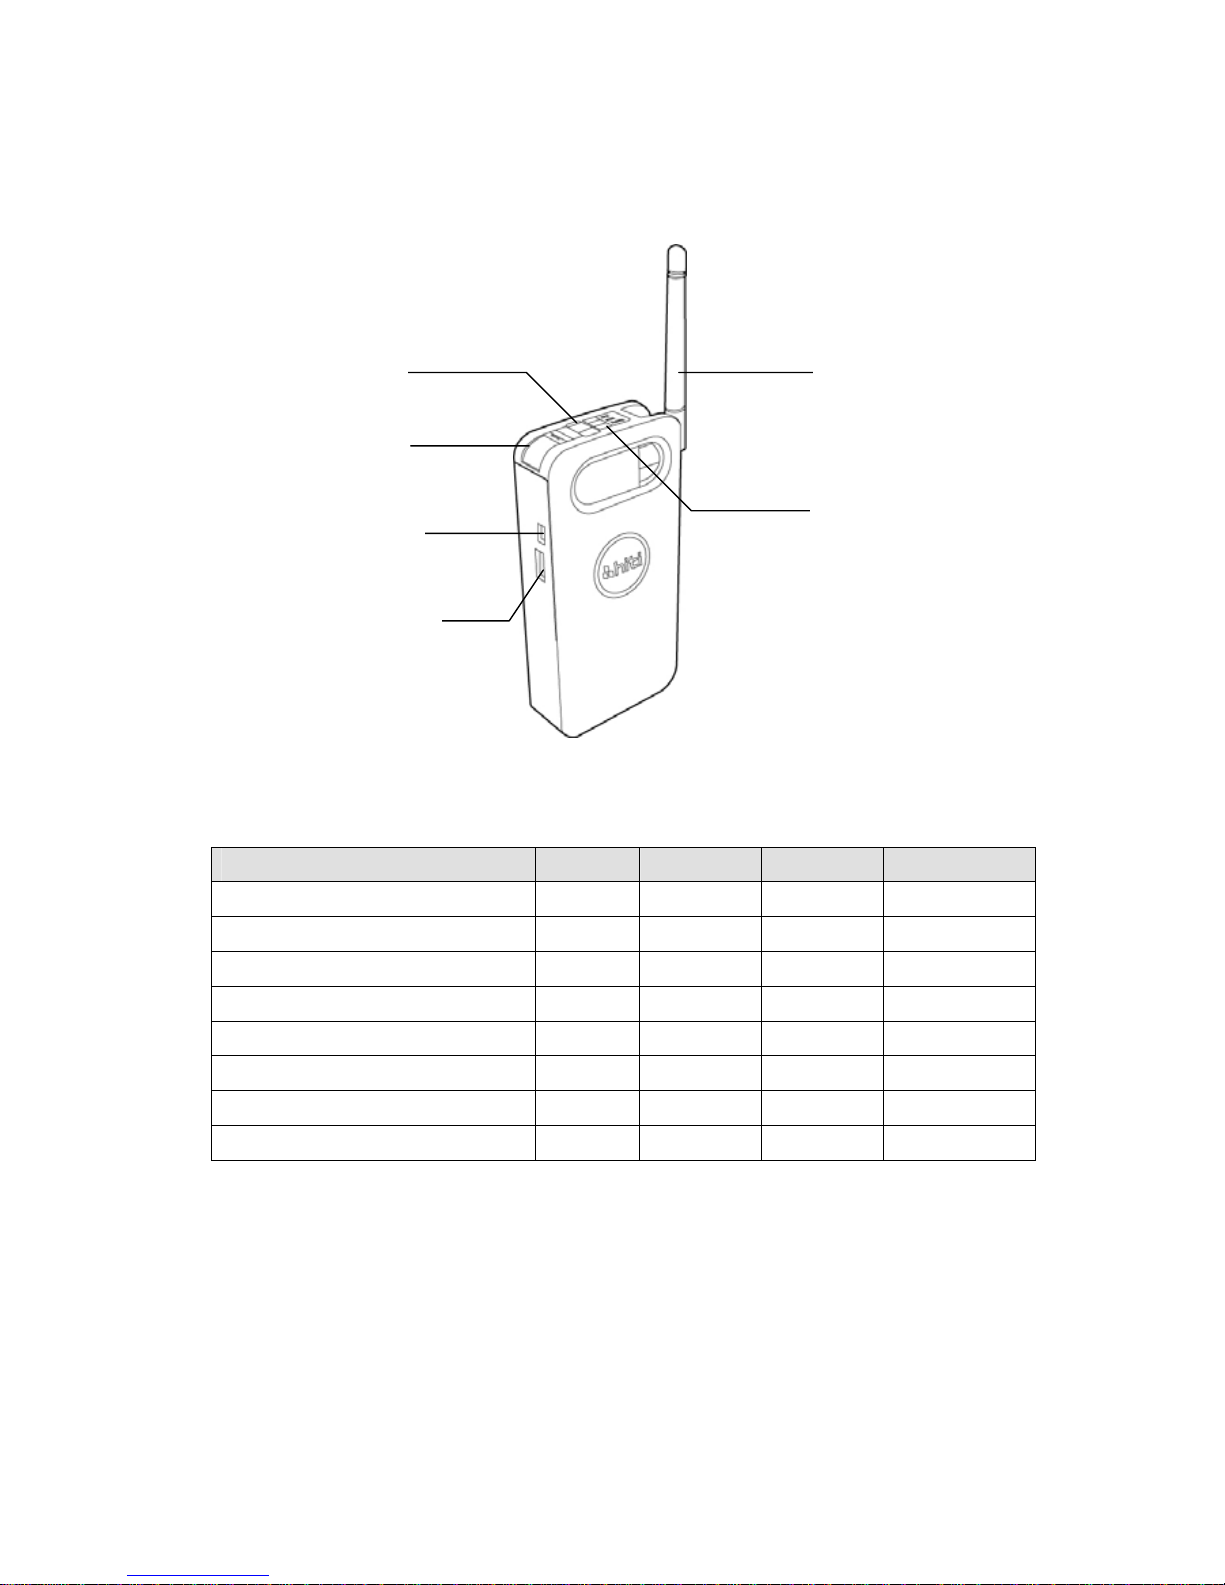
3. Introduction of WFT510
3-1. WFT510 Parts
3-2. LED status
Ready=Green Light Transmit=Orange Light
Error = Red Light Switch=Blue Light
Status Ready Error Transmit Switch
Power On
O(on) X(off) X(off) X(off)
Under PictBridge Mode
O(on) X(off) X(off) O(on)
USB connected error
O(on) O(on) X(off) X(off)
Camera transmit data to WFT510
O(on) X(off) X(off) Q(blink)
WFT510 transmit data to host
O(on) X(off) Q(blink) X(off)
Transmit error
O(on) O(on) X(off) X(off)
Battery Low
Q(blink) X(off) X(off) X(off)
Change battery
X(off) O(on) X(off) X(off)
Notice: When the batteries are lower than certain level, Error LED (Red) will
turn on. Please change batteries, otherwise Error LED will keep turning on.
3-3. System Requirements
_Intel Pentium or compatible PC _ 100MB or freer hard disk space
_ Windows 2000/XP/Vista (32 bit) _ CD-ROM or DVD-ROM drive
_ 128MB RAM or higher
Switch Button
Power Switch
Status LED
Antenna
Camera USB Slot
PC/Printer USB Slot

5
4. Making WFT510 Ready to Work
4-1 Inserting Batteries
z Pushing up the battery chamber cover of WFT510
z Inserting 4 rechargeable (Recommend) or alkaline AA batteries.
WARNING: DO NOT MIX rechargeable and alkaline batteries. This can cause
leakage or rupture, resulting in personal injury or property damage.
z Pulling down the battery chamber cover of WFT510

6
Battery Life:
In order to maximize WFT510 performance, HiTi strongly recommend using
rechargeable battery.
The following measurement s are performed at a temperature 20℃ (68℉) and
humidity 40%. HiTi WFT510 works with test device. Actual battery life could be varied by
different cameras and different batteries.
Type of rechargeable battery Consecutively work Standby
2700 Amp 3.5 hours 4.5 hours
2500 Amp 3 hours 4 hours
4-2. Putting WFT510 into WFT510 Carry Bag
WFT510 carry bag provides 3 ways to carry WFT510
Carry by strap Hang on by hook Fasten by belt
4-3. Turning on WFT510
z Push Power Switch on WFT510 from [OFF] to [ON] and then all LED will turn
on at the same time. Waiting around 25 seconds, ONLY READY LED (green) is
on. WFT510 is ready to work.
7
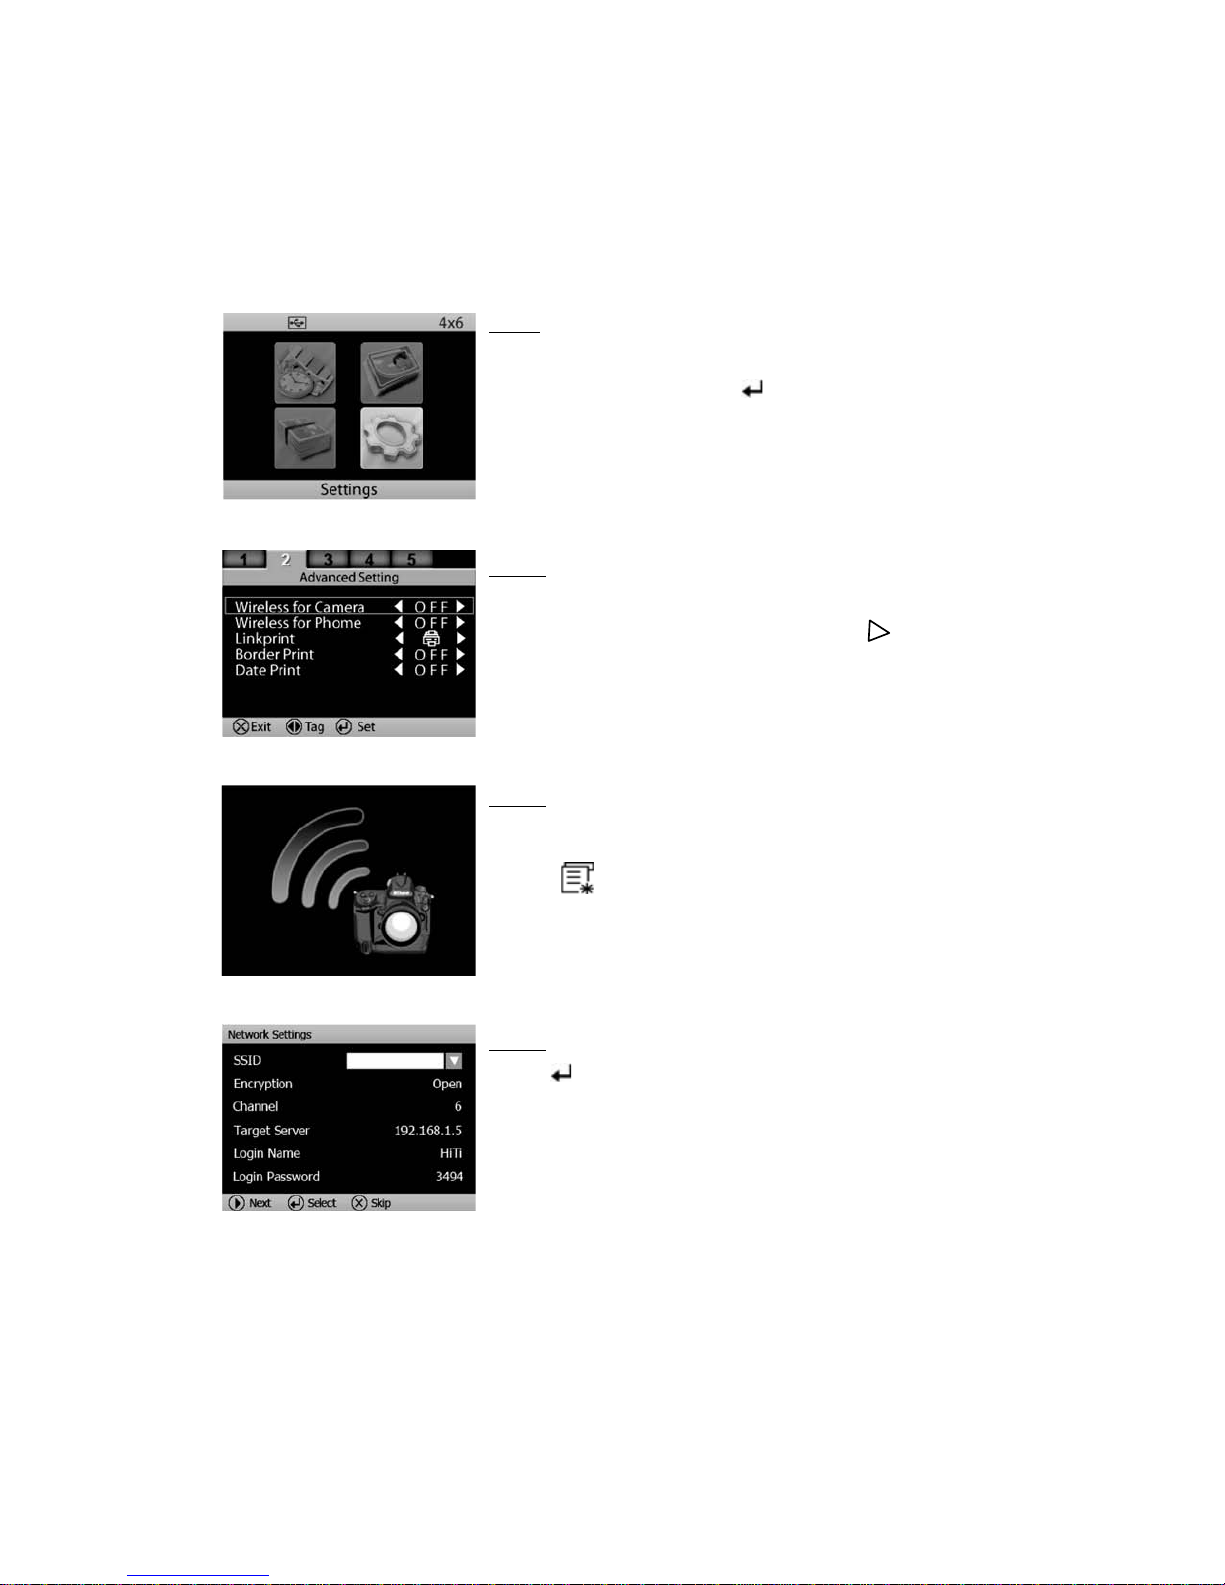
5. How to Transmit Image from WFT 510 to HiTi P510Si Printer
5-1. Configuring WFT510 with HiTi P510Si Printer
Step 2
Select [Advanced Setting]
Select [Wireless for Camera] and Press ( ) button
switch [OFF] to [ON]
Press (×) button and screen will return to main menu
Step 3
Wait until wireless camera icon show up
Press ( ) button and enter [Network Settings]
Step 4
Press ( ) button
Step1
Turn on P510Si
Select [Settings] and press ( ) button
8
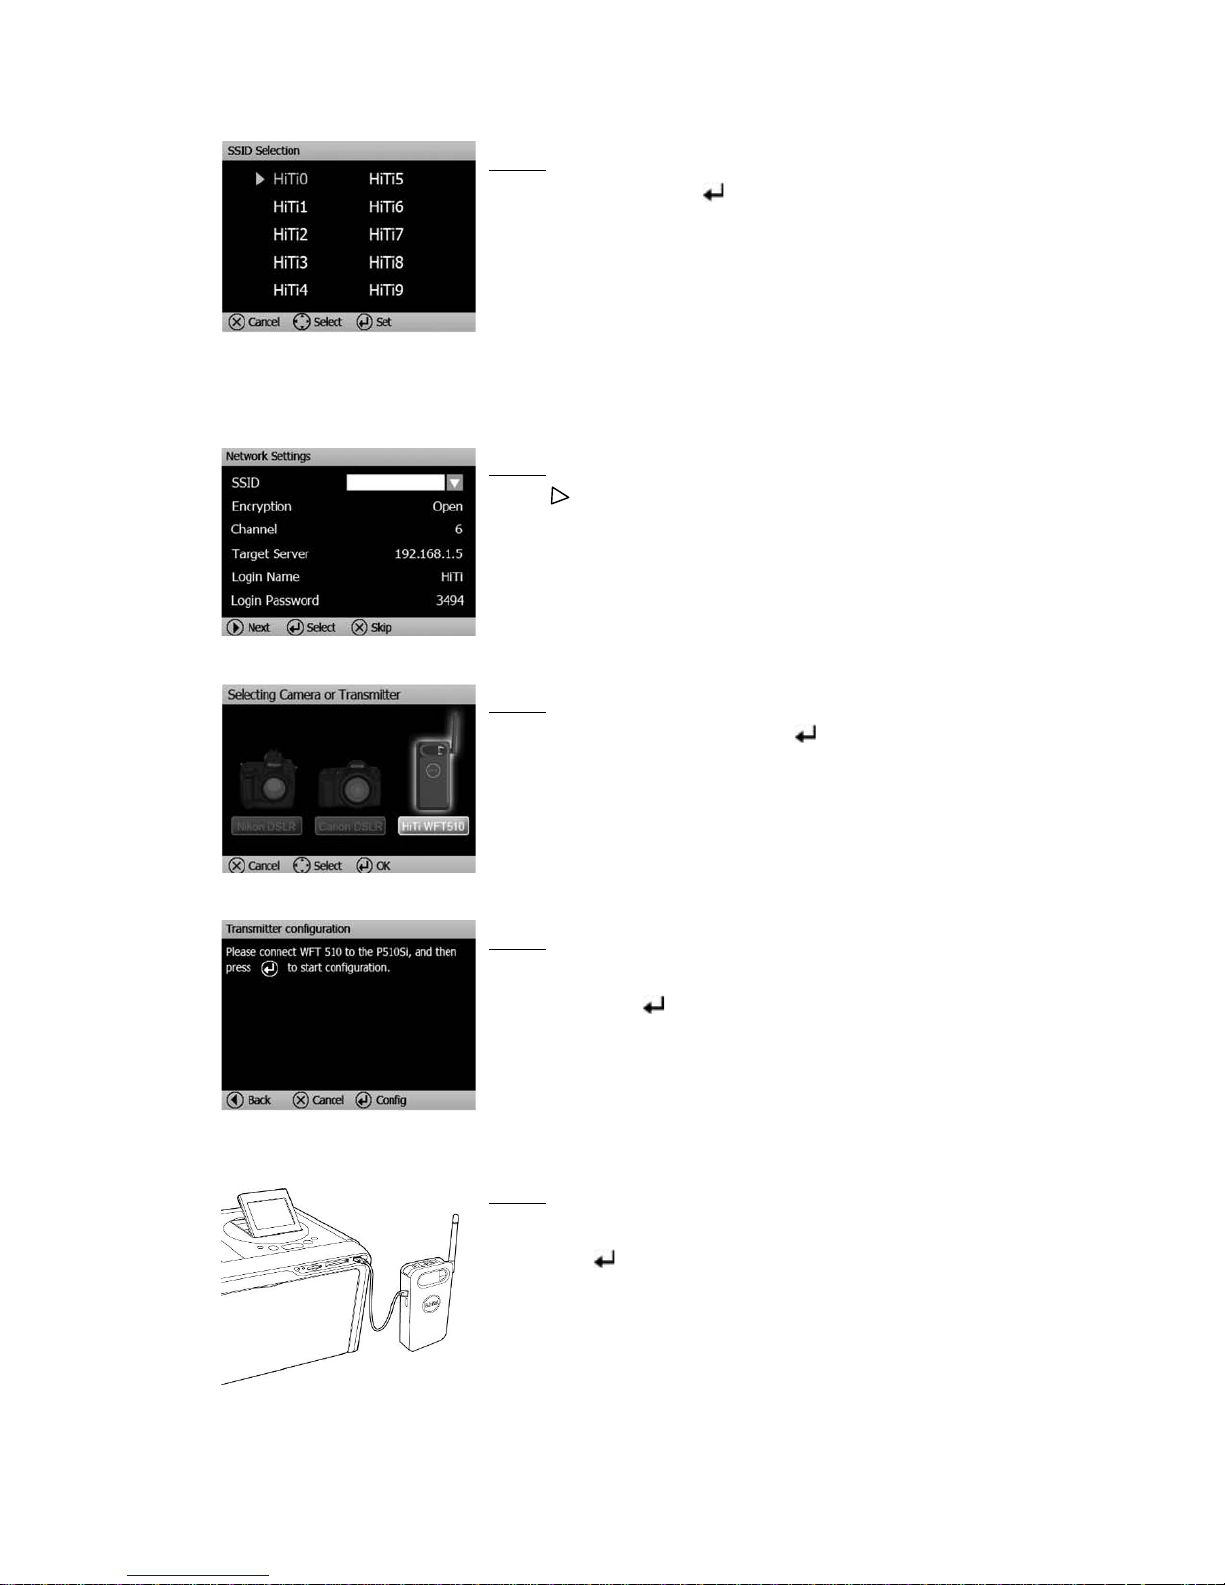
WARNING: Tow or above P510Si printers at one place MUST select different SSID.
Otherwise, WFT510 could transmit image to wrong printer due to same SSID
Step 6
Press ( ) button
Step 7
Select [WFT510 icon] and press ( ) button
Step 8
Transmitter configuration screen sho w up
DO NOT press ( ) button at this moment
Step 5
Select SSID and press ( ) button
Step 9
Using USB cable* connect WFT510 to P510Si and
then press ( ) button
*Please use USB cable attached with WFT510

9
5-2. Transmitting Image from Camera to P510Si and Printing out Image
Step 10
P510Si will automatically configure with WFT510
Step1
Use USB cable* to connect WFT510 and camera
*Please use USB cable attached with camera
Step 2
Capture images
Step 3
Click SWITCH button on WFT510
Step 11
Press (×) button to exit and WFT510 will reboot
Please wait until ONLY Green LDE is on
WFT510 is ready to work with P510Si

10
** This procedure could be varied by camera.
For example, Nikon D200/Canon S3 can switch to PictBridge Mode at Shooting
mode. Canon 40D MUST be at Playback mode and then can switch to PictBridge
Mode.
Please check camera user manual “PictBridge Mode” part.
Step 4
Camera will switch to PictBridge Mode**
Choose images and transmit them to WFT510
Step 7
After receiving the image from WFT510, P510Si will print
out the photo immediately
Step 5
Switch LED (blue) blinking means WFT510 is
receiving image from camera
Step 6
Transfer LED (orange) blinking means WFT510 is
transmitting image to P510Si

11
6. How to Transmit Image from WFT 510 to PC via WFT510
6-1. Installing WFT PC Kit
Important: if you are 1st time user of WFT PC Kit, please install Driver before
installing WFT PC Kit
Step 1
Insert the CD into CD/DVD ROM, and then the
computer will automatically star the installation. If the
installation does not star automatically, please double
click in the CD
Step 2
Click [Next]
Step 3
After reading license agreement, click [Yes] to accept
and proceed with installation
Step 4
Select installation location and click [Next]

12
Step 5
Click [Next] to start installation procedure
Step 6
Wait the installation process complete
Step 7
Select [Setup WFT Driver] (default) and click [Finish]
Complete WFT PC Kit installation

13
6-2. building up a network setting for WFT510 via WFT PC Kit
Icon Item Description
Import Import profile from other device
Export Export selected profile to device
Edit Edit profile
Delete Delete profile
Upgrade Upgrade profile sequence on the list
Downgrade Downgrade profile sequence on the list
Test Test WFT510 network setting
Step 1
Double click WFT PC Kit icon on the desktop
The first page of WFT PC Kit will show up

14
Infrastructure: An infrastructure configuration is a WLAN and
wired LAN communication to each other through an access
point.
Ad-hoc: An Ad-hoc configuration is a group of wireless
devices communication directly to each other (peer-to-peer)
without the use of an access point.
。Infrastructure
Step 2
Click [Create a new profile]
Select wireless structure: Infrastructure or Ad-hoc
Step 1.a
Select [Auto] (recommend)
Choose an access point you want to connect and Click
[Next]
Step 1.b
Select [Manual]
Enter SSID, IP Address, Subnet Mask, and Default
Gateway
Click [Next]

15
ASCII Type 5 ASCII character or, 13 ASCII character for
example”Abe2Q”
Open
System and
Shared Key
HEX Type 10 Hexadecimal digits or 26 Hexadecimal
digits, for example “abc1234567…”
None Do not need password
Step 2
Select Security method: [None], [WEP]
Enter password and confirm password
Click [Next]
Step 3.a
Select [HiTi File Server] (recommend)
Click “ ”, you can select or create a receiving folder
Click [Complete]
Step 3.b
Select [Connect to my FTP server]
Enter your FTP IP address, Port, ID, and Password
Click [Complete]

16
。Ad-hoc
IMPORTANT: Please write down Subnet Mask and Default Gateway
WARNING: If you are not familiar with WLAN network setting , HiTi do not
recommend you create your own SSID and IP address.
Step 4
Check Network setting
Click [Save] to reserve this profile
Step 5
Turn on WFT510
Use USB cable to connect PC and WFT510
Step 6
Select the profile you just created and click
Step 1
WFT PC Kit will automatically assign one set of SSID
Or you can create your own SSID set
Click [Next]

17
IMPORTANT: Please Write down Server IP
Step 2
Select Security method: [None], [WEP]
Enter password and confirm
Click [Next]
Step 3.a
Select [HiTi File Server] (recommend)
Click “ ”, you can select or create a receiving folder
Click [Complete]
Step 4
Check network setting
Click [Save] to reserve this profile
Step 3.b
Select [Connect to my FTP server]
Enter your FTP IP address, Port, ID, and Password
Click [Complete]

18
6-3. Setting up a network on PC to connect WFT510 (For Ad-hoc Mode)
Windows XP
Step 5
Turn on WFT510
Use USB cable to connect PC and WFT510
Step 6
Select the profile you just created and click
Step 1
Turn on WFT510
Click [Control Panel]
Step 2
Click [Network and Internet Communication]

19
Step3
Click [Network Communication]
Step 4
Select [Wireless Network Connection] and click right
bottom of mouse
Select [Properties]
Step 5
Select [Internet Protocol (TCP/IP)] and click
[Properties]
Step 6
Select [Use the following IP address]
Enter the Server IP, Subnet Mask, and Default Gateway that
you write down on page 16 and 17
Click [OK]

20
Important: If you reboot WFT510, Please repeat step 7 and 8
Windows Vista
Step 1
Turn on WFT510
Click [Network]
Step 2
Click [Network and Sharing Center]
Step 7
Make sure WFT510 is on ready status
Return to Step 4, select [Wireless Network
Connection] and click right bottom of
mouse.
Select [View Available Wireless Networks]
Step 8
Choose the SSID that you created and press
[Connect]
Wait until “Connected”

21
Step 3
Click [Manage network connections]
Step 4
Select [Wireless Network Connection] and click right
bottom of mouse
Click [Properties]
Step 5
Select [Internet Protocol Version 4 (TCP/IPv4)] and
click [Properties]
Step 6
Select [Use the following IP address]
Enter the Server IP, Subnet Mask, and Default Gateway that
you write down on page 14
Click [OK]

22
Important: If you reboot WFT510, Please repeat step 7 and 8
6-4. Transmitting images from Camera to PC
Step1
Use USB cable* to connect WFT510 and camera
*Please use USB cable attached with camera
Step 2
Capture images
Step 7
Make sure WFT510 is on ready status
Return to the Step 3 and click
[Connect to a network]
Step 8
Choose the SSID that you created and
press [Connect]
Wait until “Connected”

23
** This procedure could be varied by camera.
For example, Nikon D200/Canon S3 can switch to PictBridge Mode at play mode.
Canon 40D MUST be at Preview mode and then can switch to PictBridge Mode.
Please check camera user manual “PictBridge Mode” part.
Step 3
Click “Switch” button on WFT510
Step 4
Camera will switch to PictBridge Mode**
Choose images and transmit them to PC
Step 5
Switch LED (blue) blinking means WFT510 is
receiving image from camera
Step 6
Transfer LED (orange) blinking means WFT510 is
transmitting image to PC

24
6-5. Test network setting
If you cannot connect WFT510 and PC/P510Si, WFT PC Kit provides [Test function] to help you test
network setting and show the result.
Step3
Wait around 10 seconds, test result will show up.
Error message Solution
"SSID connection failed!" Please check Access Point setting
"Network is unreachable! Please check encription, server's IP or WFT510's IP!" Please check Security setting
"No route to host!" Please check WFT510 and P510Si setting
"FTP Connection refused! Please check port no." Please check FTP server port no.
"FTP authentication failed!" Please check FTP password setting
"FTP login incorrect!" Please check FTP username setting
"FTP permission Denied!" Please check FTP username authority
"No route to host! Please check server's IP!" Please check WFT510 and host IP setting
"Sending data error! Please check HiTi's server!"
"WiFi dongle totally crash! Please restart WFT510!"
"File transmitting by FTP failed!!"
"File transmitting by TCP failed!!"
"File transmitting failed!!"
Please contact your local service center for detail.
Step 1
Turn on WFT510
Use USB cable to connect PC and WFT510
Step 2
Click [ ] to test WFT510 network setting

25
6-6. sub-folder function
WFT510 provides sub-folder function to assist you managing your pictures.
Step1
Make sure that WFT510 is on ready status and
Switch LED is off.
Step2
Consecutively press Switch button at least 5
seconds
Switch LED (blue light) will blink and then you
can loose the Switch button.
Sub-folder is successfully created.
Please check the receiving folder in PC.
Step3
WFT PC Kit will automatically create a
sub-folder in receiving folder

26
7. Specification
Please notice that specification of WFT 510 is subject to change without notice.
Item Description
Hardware
Wireless Standards IEEE 802.11b/g Compatible
Transmission Method
IEEE 802.11b: DQPSK, DBPSK
IEEE 802.11g: OFDM
Transmission Frequency 2,412MHz-2,472 MHz
Antenna Gain 2 dBi
Transmission Range Approximately 100m
(With no obstructions between the transmitter and receivin
g
device and no radio interference)
Data Rates 1-11 Mbps for IEEE 802.11b
6-54Mbps for IEEE 802.11g
(Logical data rates according to IEEE standard. Actual rates
may vary by operation environment.)
Connection Method Ad-hoc/Infrastructure
Camera Connection USB2.0 Hi-Speed/Supply 100mA current
PC/Printer Connection USB 1.1 (Micro USB)
Camera Connection Protocol PictBridge
Network Protocol TCP/IP, FTP
Power Consumption 4W Maximum
Power Source 4 rechargeable or alkaline AA batteries
Operation Condition
Temperature: 0℃~40℃/35℉~103℉
Humidity: less than 85% (no condensation)
Dimension (W*H*D) 68mm*140mm*30mm
Weight Approximately 155g (body only)
Software
Software Name HiTi WFT PC Kit
Operation System Windows XP / Vista
Connection Method Ad-hoc /Infrastructure
Network Protocols TCP/IP, FTP
PC Connection USB 1.1(Micro USB)
 Loading...