

User Manual for Interactive Panel
Honghe Technology Group
www.honghe-tech.com
V901.20140703 Please properly keep the manual for further reference. This is the general user manual for all interactive panels. Therefore, it may be
different from the actual product.

2
Table of Contents
NOTICE .............................................................................................................................................................. 4
Mounting Requirements ...................................................................................................................................... 5
Bearing ........................................................................................................................................................ 6
Ventilation ................................................................................................................................................... 6
Introduction ......................................................................................................................................................... 7
Characteristics ............................................................................................................................................. 7
Outer Appearance ........................................................................................................................................ 8
Interface Panel ............................................................................................................................................. 9
Functions of Remote Controller ................................................................................................................ 10
Accessory List ........................................................................................................................................... 10
Basic Operation ..................................................................................................................................................11
Start Up .......................................................................................................................................................11
Shutdown ....................................................................................................................................................11
Installation of HitePanel ............................................................................................................................ 12
Uninstall HitePanel .................................................................................................................................... 12
Position HitePanel ..................................................................................................................................... 13
Assemble Built-in Computer ............................................................................................................................. 17
Smartbar ............................................................................................................................................................ 17
Home Page ......................................................................................................................................................... 17
Task Manager .................................................................................................................................................... 20
White Board ....................................................................................................................................................... 21
Gallery ............................................................................................................................................................... 24
File Manager ...................................................................................................................................................... 25
System Settings ................................................................................................................................................. 27
Set Time/Date ............................................................................................................................................ 28
Network ..................................................................................................................................................... 29
Input Method ............................................................................................................................................. 30
Printer ........................................................................................................................................................ 31
Language ................................................................................................................................................... 31
Clear Screenshots ...................................................................................................................................... 31
Auto Luminance ........................................................................................................................................ 32
Restore Default Setting ...................................................................................................................................... 32
Browser .............................................................................................................................................................. 33
Listen Alone ...................................................................................................................................................... 33

Programs ............................................................................................................................................................ 33
Calculator................................................................................................................................................... 34
Clock.......................................................................................................................................................... 34
Music ......................................................................................................................................................... 35
ES File ....................................................................................................................................................... 35
Temperature Measuring ............................................................................................................................. 36
Select Signal Channel ........................................................................................................................................ 36
Menu .................................................................................................................................................................. 37
Image ......................................................................................................................................................... 37
Sound Mode............................................................................................................................................... 37
Channel ...................................................................................................................................................... 39
Setting ........................................................................................................................................................ 39
Time ........................................................................................................................................................... 39
Parent Control ............................................................................................................................................ 40
ECO Mode ......................................................................................................................................................... 40
Serial Port Control ............................................................................................................................................. 41
Specifications of PC Mode (VGA Input) .......................................................................................................... 42
Formats Supported by USB Mode..................................................................................................................... 43
Instructions in Provisions for Recycling and Disposal of Waste Electrical and Electronic Products .............. 44
Maintenance Tips .............................................................................................................................................. 45
Specifications .................................................................................................................................................... 45
3

4
NOTICE
Install or place components of which power supply voltage is high enough to cause personal injury in
places out of the reach of children.
Do not use any types of power cables other than the one provided together with the product to prevent the
product from being damaged.
Do not open the enclosure unless you are a professional maintenance engineer to prevent an electric
shock.
Check if the electric supply voltage complies with the product’s receiving power supply before use.
Disconnect the product from the power supply if the product is not to be used in a long period of time.
Use a three-phase power socket and ensure that it is properly grounded.
Disconnect the product from power supply and stop using it if you sense any abnormal sound or smell
emitted by the product. Find a professional maintenance engineer to service it.
Do not let any liquid and metal object go into the product. If any liquid or metal object goes into the
product, cut off the power and find a professional maintenance engineer to handle it.
Do not place the product on an unstable stand, bracket or table. Otherwise, it may fall off and cause
personal injury.
Move the product carefully to prevent it from being hit or squeezed, especially the display part, which
may cause injury if broken.
Mount the product as instructed and using only mounting accessories recommended by the manufacturer.
The product can only be mounted on a concrete wall, solid wall and wood plank wall that can bear over
three times of the weight of the interactive panel. Ensure proper ventilation. You should assess the
bearing capability of the wall before mounting the product on a special wall such as a steel-structure,
hollow, glass or marble wall.
For pluggable equipment, the socket-outlet shall be installed near the equipment and shall be easily
accessible.

5
Model:
70GT-X、EPR8AX0070、QIT1X70、TWB-N70、TWB-NB70、TWB-N70X、TWB-NB70X、OTS-70VX、OTS-70V2、
OTS-70X、P-70、X-70、P-70X、TID-70、TID-70X、Avtek TouchScreen 70P、Avtek TouchScreen 70X、70GT、70GT-X
(standard)、 70GT-X(deluxe)、 CCS-TS-7000-CA、HD-I7005E、HD-I7006E、HD-I7007E、HD-I7008E、HD-I7009E、
HD-I7018E、HD-I7019E、HD-I7020E、HD-I7021E、HD-I7022E、HD-I7023E、 HD-I7025E、HD-I7026E、HD-I7028E、
HD-I7029E、HD-I7030E、HD-I7031E、 HD-I7032E、HD-I7033E、HD-I7035E、HD-I7036E、HD-I7039E、HD-I7048E、
HD-I7049E、HD-I7050E、HD-I7051E、HD-I7052E、HD-I7053E、HD-I7055E、 HD-I7056E、HD-I7058E、HD-I7059E、
HD-I7060E、HD-I7061E、HD-I7062E、 HD-I7063E、HD-I7070E、HD-I7066E、HD-I7068E、HD-I7069E、 WS-Z70XC、
WS-Z70XD、WS-Z70XE、WS-Z70XL、WS-Z70XN、WS-Z70XP、WS-Z70XQ、 WS-Z70XR、WS-Z70XT、WS-Z70XZ
WS-Z70AC、WS-Z70AD、WS-Z70AE、WS-Z70 AL、WS-Z70AN、WS-Z70AP、WS-Z70AQ、WS-Z70AR、WS-Z70AT、
WS-Z70AZ WB-E701、WB-E706、WB-E708、WB-E709、WB-L701、WB-L706、WB-L708、 WB-L708、WB-N701、
WB-N706、WB-N708、WB-N709、WB-K701、WB-K706、 WB-K708、WB-K709、WB-Z701、WB-Z706、WB-Z708、
WB-Z709
("X" represent 0-9 random numbers or A-Z random letters)

6
Mounting Requirements
Bearing
You can choose the potable mounting according to your needs.
If you choose portable mounting, use the mounting rack or support. If you want to use a self-made mounting
rack, the bearing capacity of the rack should be at last four times of the actual weight of the display. The
bearing capacity of the mounting support must be at least four times of the actual weight of the display to
ensure steadiness of the interactive panel.
Ventilation
Ventilation
requirements
Distance to the mounting surface (cm)
Nominal power
Left and right sides
Top
Bottom
Back
Larger than 100W
10
20
20
10
Note: in addition to the above-mentioned requirements, the area of ventilation holes at the bottom, top and
two sides must be at least 50% of the sealing surface to ensure proper ventilation.
Figure:
* See CAS 132-2006

7
Introduction
Thank you for buying HiteVision interactive panels. As our latest independently developed and produced
human-machine interactive products, HiteVision interactive panels are multi-functional teaching displays for
interactive teaching, digital demonstration, multi-media presentation, touch operations and handwriting. They
are well designed and produced to meet needs of education applications, and provide a user-friendly
experience, digital intelligent control as ideal apparatus for modern education. You can use your fingers or
opaque objects to write, edit and delete any things on them.
Characteristics
Specially designed for teaching and meeting systems
Integrating user management module to realize user adding/deleting, switching and user information
customizing functions that coincide with users’ preference
Adopting infrared array scanning and sensing technology, HID drive-free, plug-and-play
Outstanding display edit functions, supporting instant editing
Multiple optional pens, width and colors; simulative brushes that are vigorous
Multiple backgrounds, supporting customized background with any images and graphs inserted
Support dual-point touch and multi-finger roaming; simulative mouse operation
Supporting identification of handwritten Chinese, English, number and special characters
Supporting conversion of handwritten files into other formats including PDF, JPEG, GIF, PNG, TIFF and
BMP
Intelligent geometric figure identification, able to identify multiple figures with high recognition rate and
multi-pen identification
Vector-based graphic processing with high compression rate and low distortion
ECO backlight mode, lower power consumption
High luminance and contrast display to ensure clear display under straight light or in outdoor
environment
Supporting SD card

8
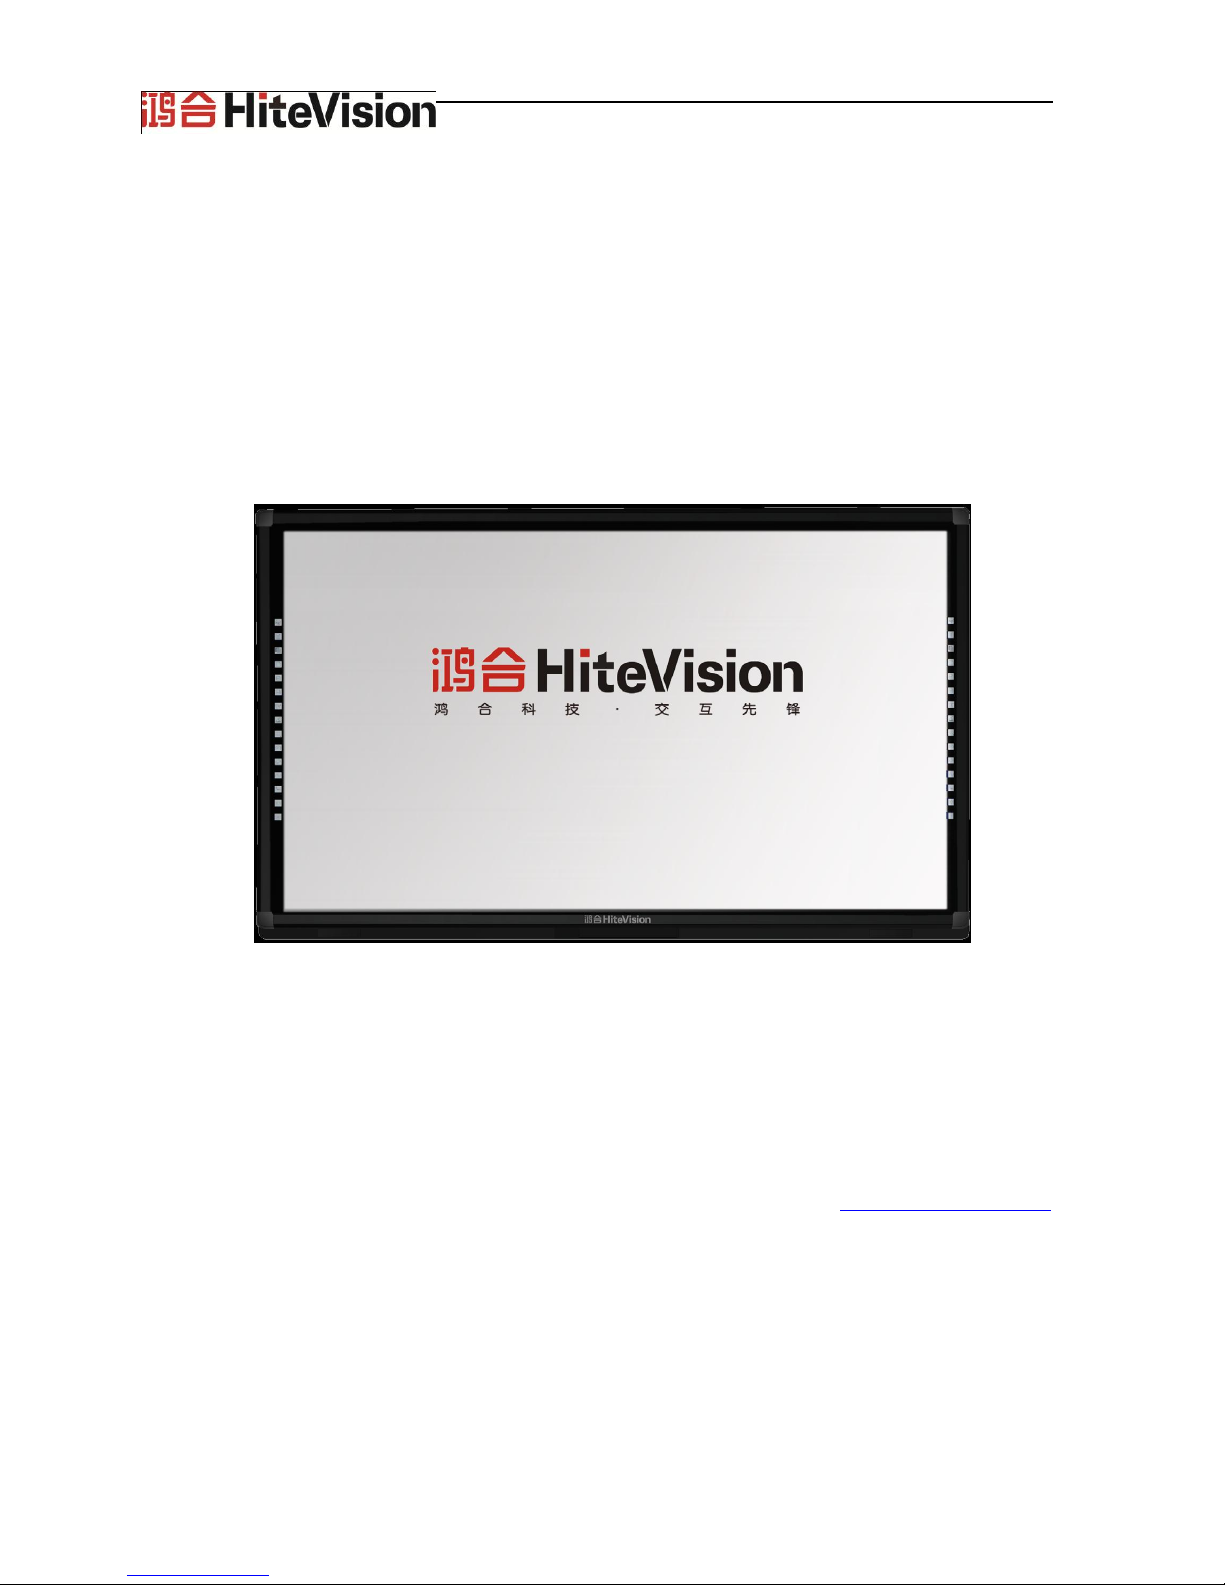
Outer Appearance
(Front view)
(Front view)
Left loudspeaker
Right loudspeaker
Control panel
OPS computer
Interface panel
Interface panel
Rocker switch
(Left view)
(Right view)
(Rear view)
9
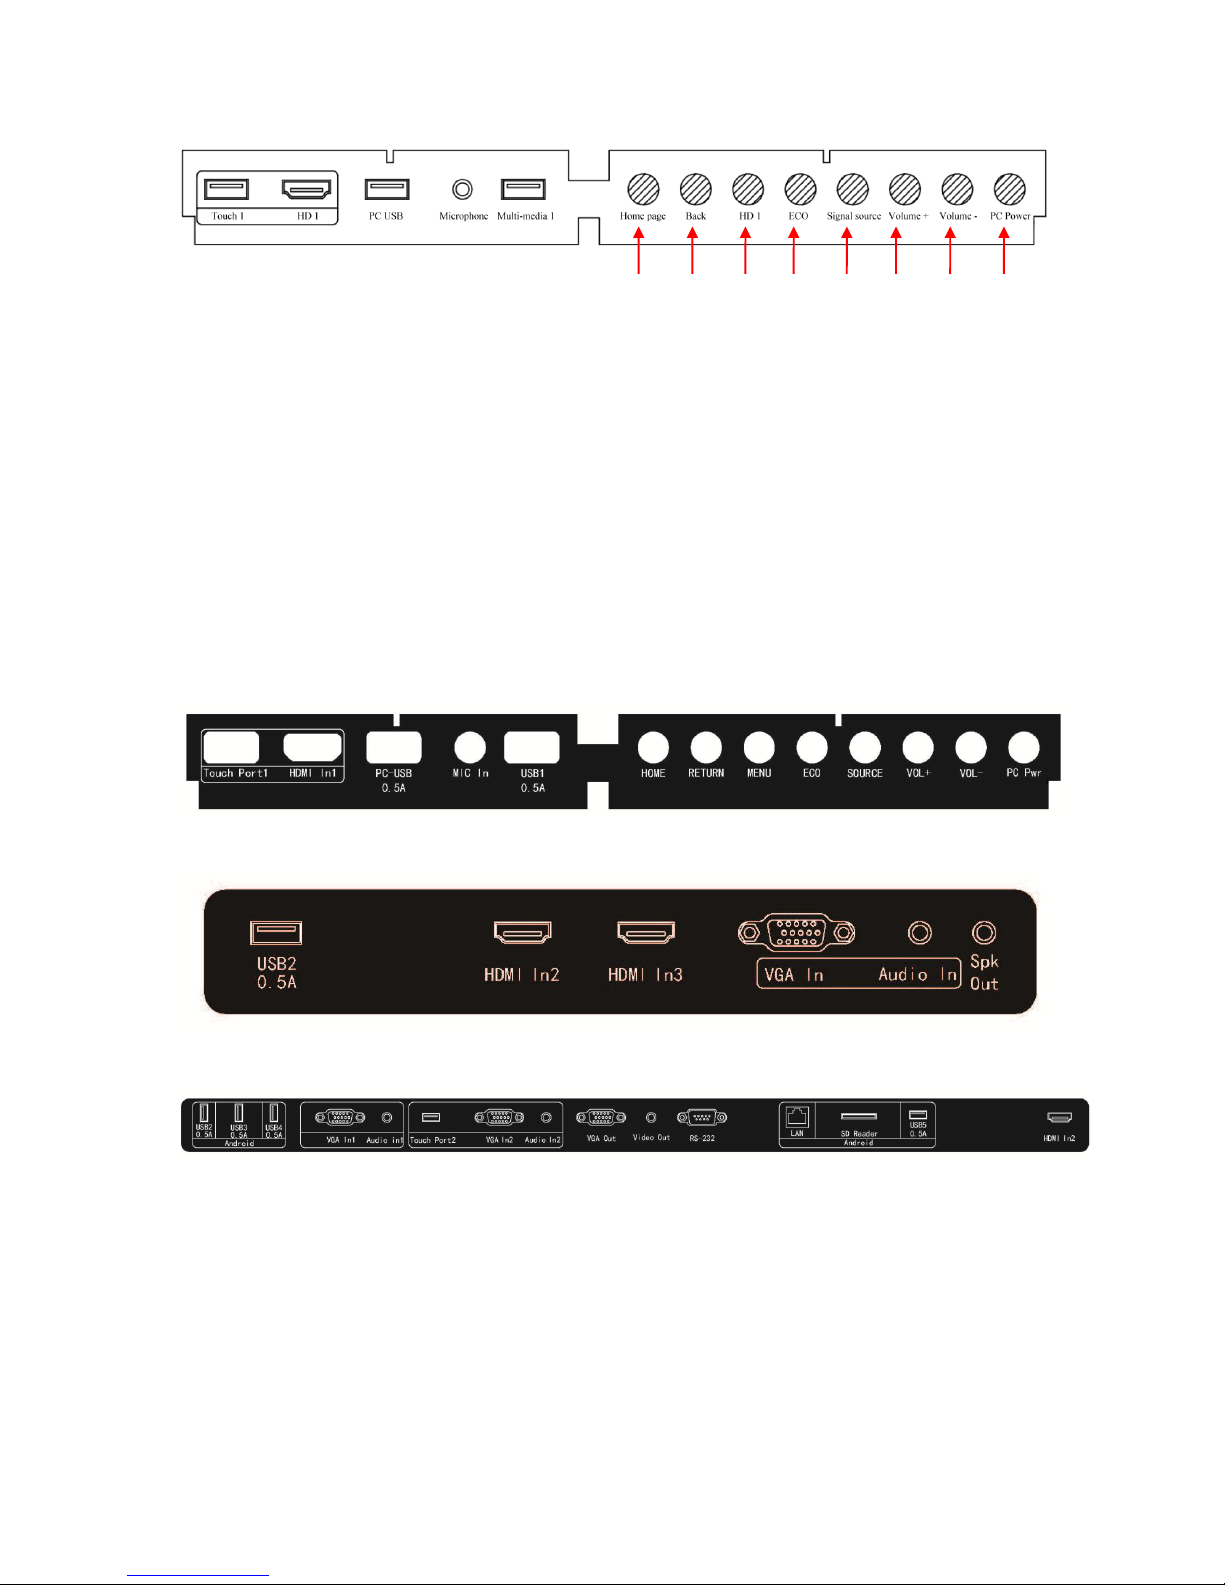
Control panel
1]. Home: Open the Android home page.
2]. Back: Go back or return to the parent menu.
3]. HD 1: Switch over to HD 1 signal source channel.
4]. ECO: Switch over to ECO, Auto or Standard mode.
5]. Signal: Show or exit from the list of signal sources.
6]. VOL+: Increase the volume.
7]. VOL-: Decrease the volume.
8]. PC Power: Turn on/off the OPS computer.
Interface Panel
2 3 4 5 6 1 8
7
10
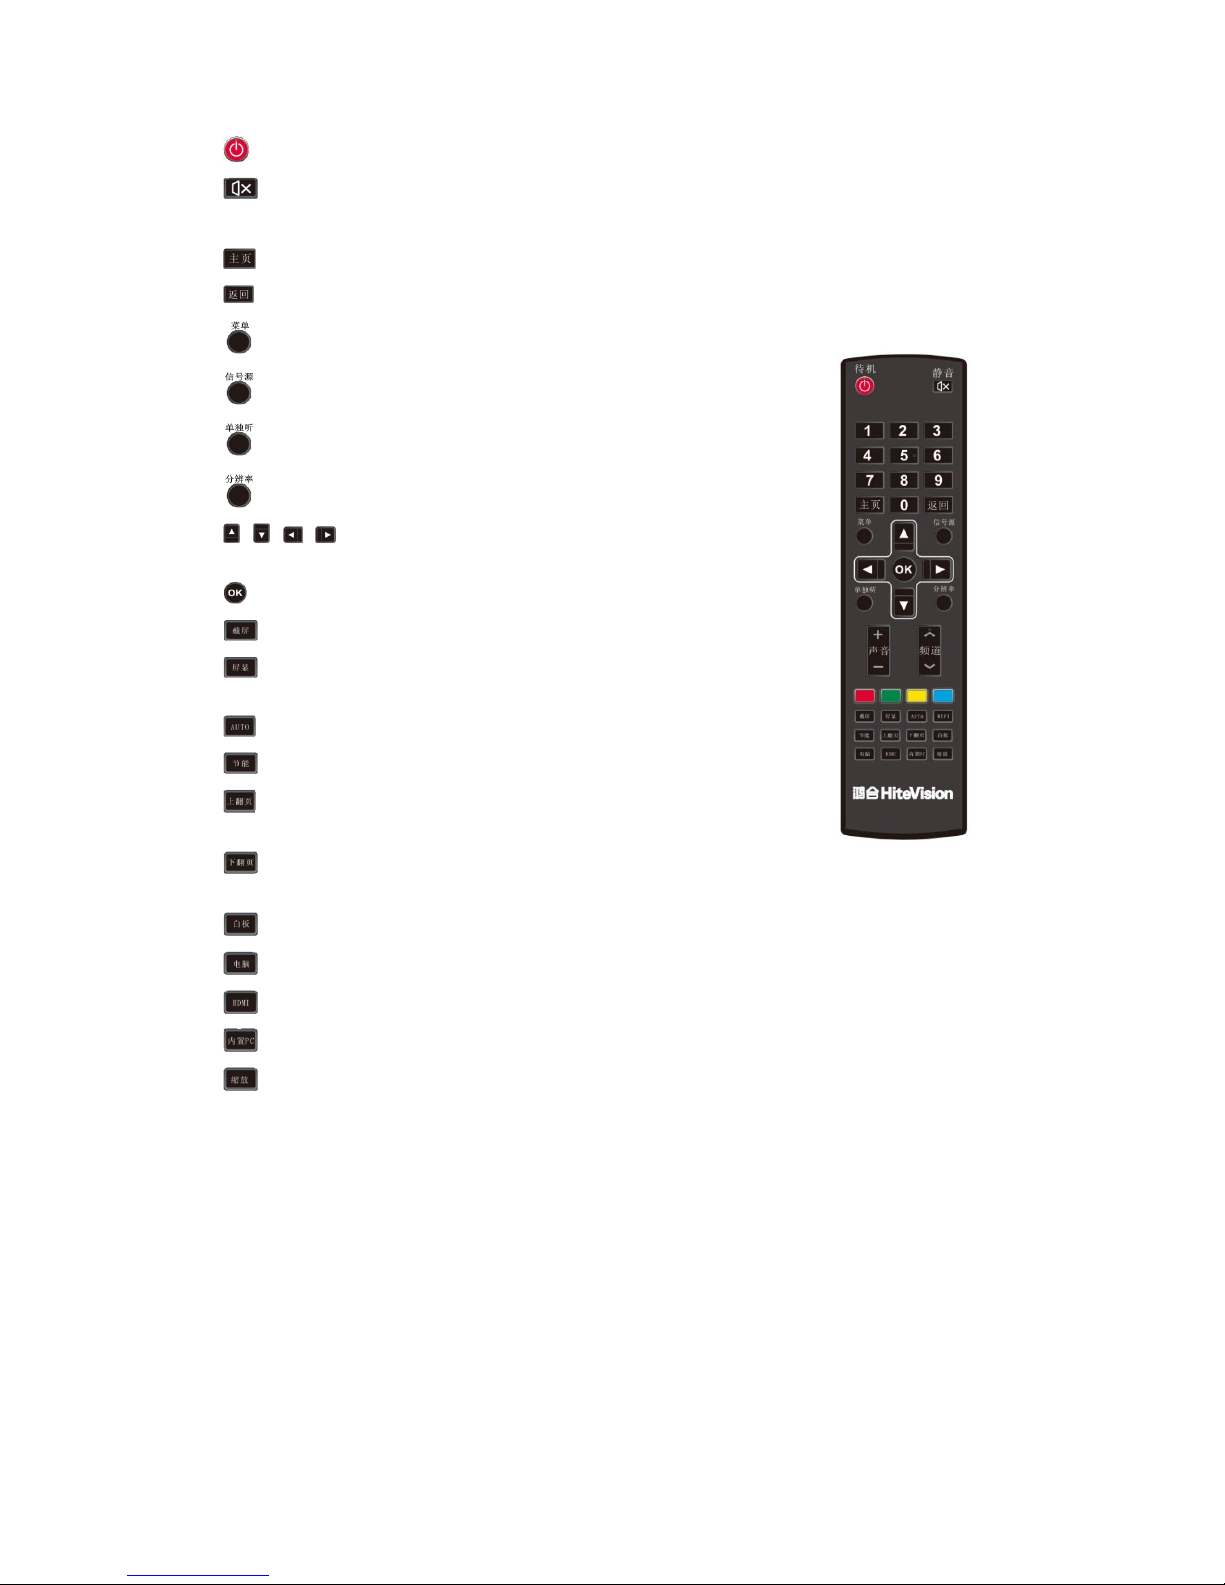
Functions of Remote Controller
1]. : On or standby
2]. : Mute
3]. 0--9: Select TV channel or enter number
4]. : Open the Android home page.
5]. : Go back or return to the parent menu.
6]. : Show or hid menu.
7]. : Show or exit from the list of signal sources.
8]. : Enable Listen Alone mode.
9]. : Switch over to the computer’s resolution.
10]. : Up/Down/Left/Right direction
buttons
11]. : Confirm.
12]. : Capture screenshots.
13]. : Show the current signal source. You cannot
show it in Android.
14]. : Adjust screen displaying.
15]. : Change the display mode.
16]. : Turn to the previous page on white board
software and PPT.
17]. : Turn to the next page on white board
software and PPT.
18]. : Open white board software.
19]. : Switch over to VGA signal source.
20]. : Switch over to HDMI signal source.
21]. : Switch over to OPS computer signal source.
22]. : Zoom up and down.
Accessory List
When you back the package, please check if the display’s outer appearance is in perfect condition and if all the
following accessories are in place:
(1) Interactive panel
(2) User manual
(3) Power cable
(4) Remote controller
(5) Pen
(6) USB lead
(7) CD
(8) HDMI cable
(9) AAA alkaline batteries
11
Basic Operation
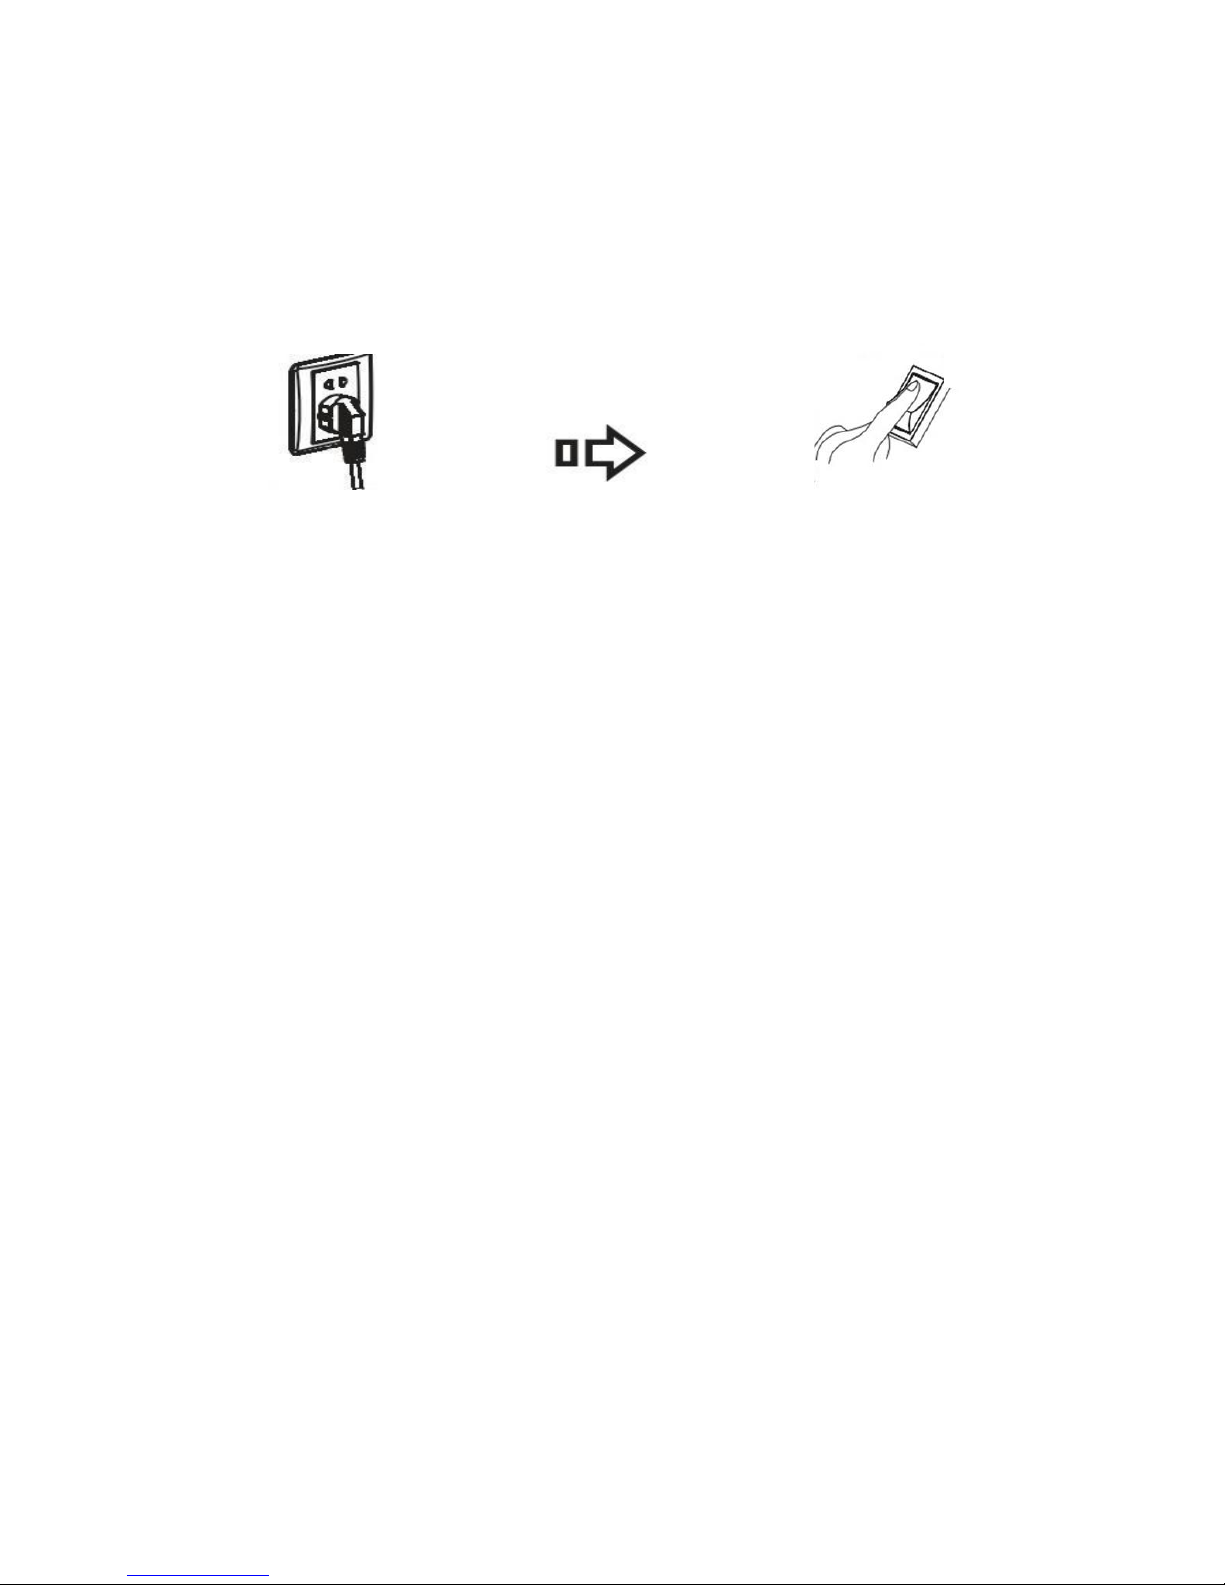
Start Up
Power the interactive panel with a 100-240V 50/60Hz AC power supply.
Connect the panel to the power supply. Switch on the rocker switch (on the left of the rear of the panel,
next to the power cable port) to enter the standby status. The power LED turns red.
Press Power on the control panel or Standby on the remote controller to turn on the interactive panel.
The OPS computer is started. The power LED turns green.
Shutdown
Press PC Power to turn off the OPS computer (for all-in-one models only).
Press Power on the control panel or Standby on the remote controller to enter the standby status. The
power LED turns red.
Under the standby status, switch off the rocker switch to turn off the interactive panel.
Note:
1] Please turn off the OPS computer before the interactive panel. Otherwise, the computer can be damaged.
2] Please disconnect the interactive panel from power after the panel enters standby status. Otherwise, the
panel can be damaged. A sudden power failure can damage the interactive panel.
12
Installation of HitePanel
Recommended configuration:
CPU: Inter (R) Core i3 2.27GHz or AMD CPU with equivalent performance
Memory: 1GB
Hard drive: 1GB
Graphics card: supports DirectX 9 or above
If the interactive panel is equipped with the latest version of handwriting software in the PC before
being delivered, please skip the step.
HID drive-free function only applies for Vista, Windows 7 and above operating systems (realizing
functions of Windows including multi-point touch). HitePanel must be installed and run for
Windows XP.
1. Use the USB lead provided together with the display to connect the interactive panel to PC via the
USB port.
2. Inset the software installation disk into the PC CD-ROM drive.
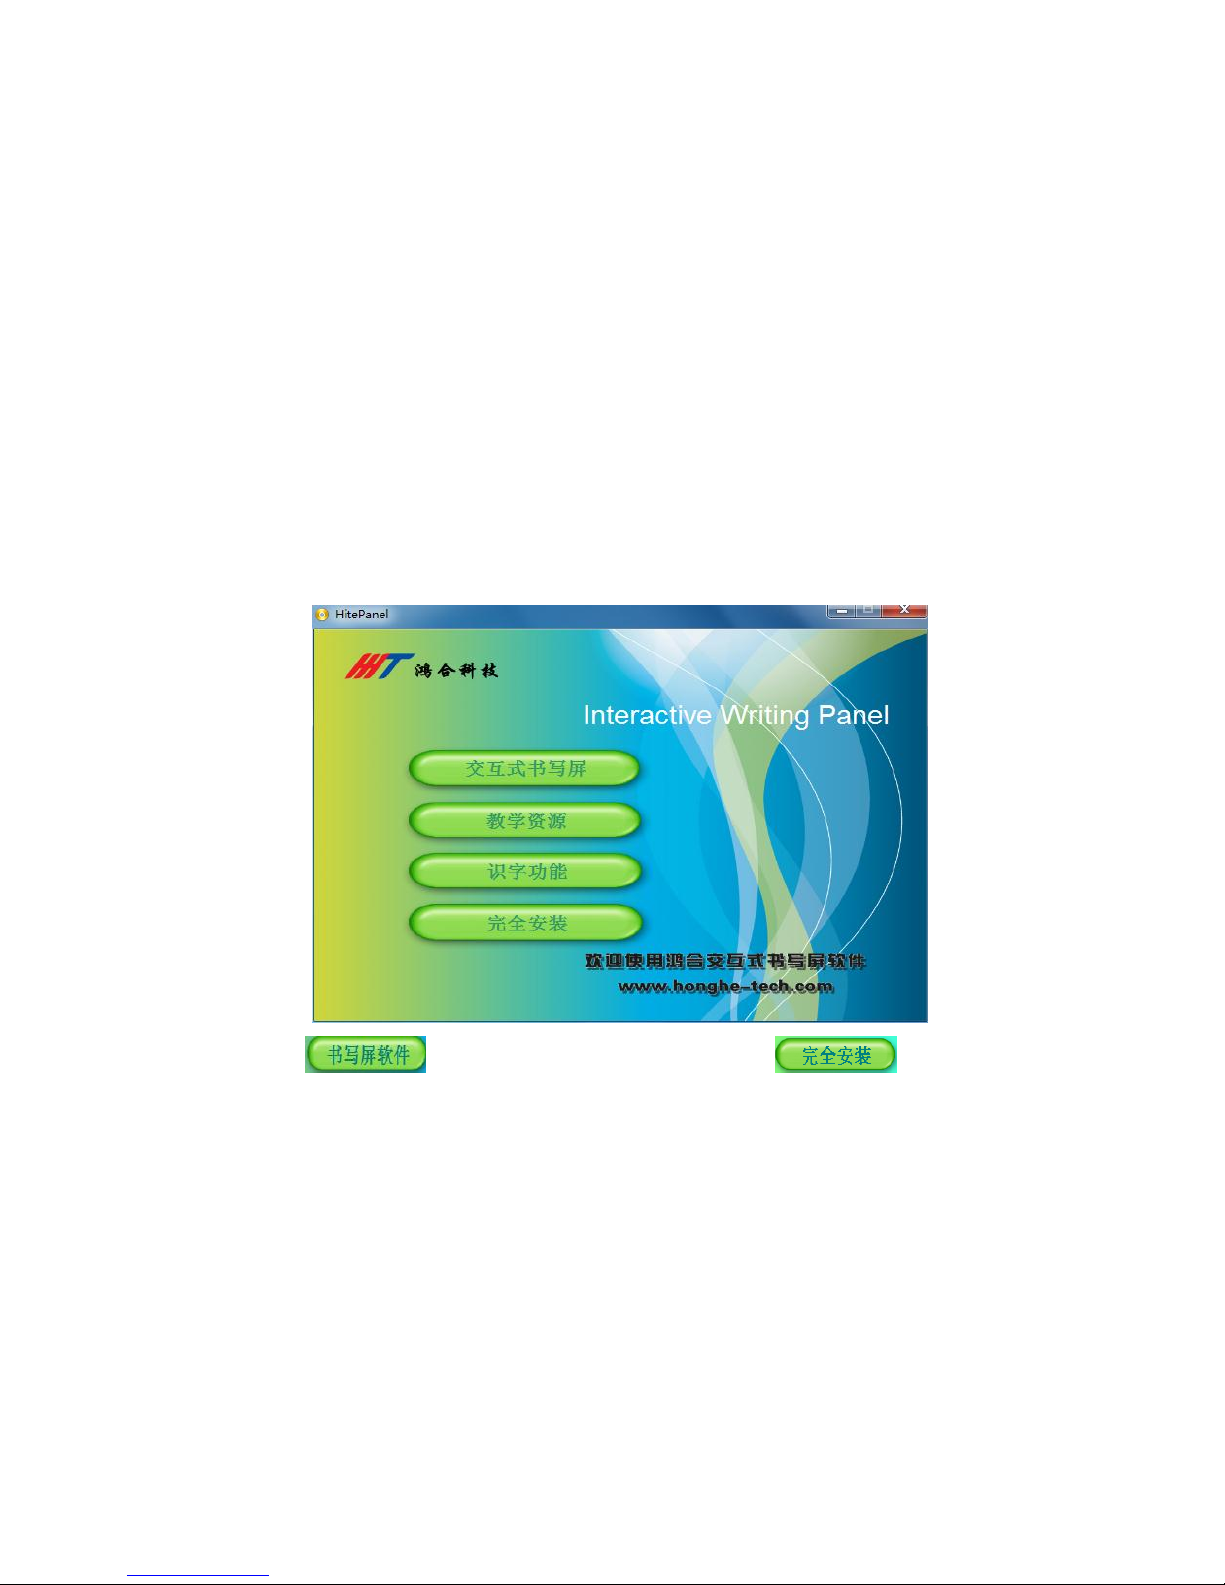
3. Double click the CD to show the following interface:
4. Click to install the software as instructed. Click and install the
software as instructed to obtain complete handwriting display functions.
5. After the software is installed, save the other documents in PC and restart the PC to make the
software effective.
Uninstall HitePanel
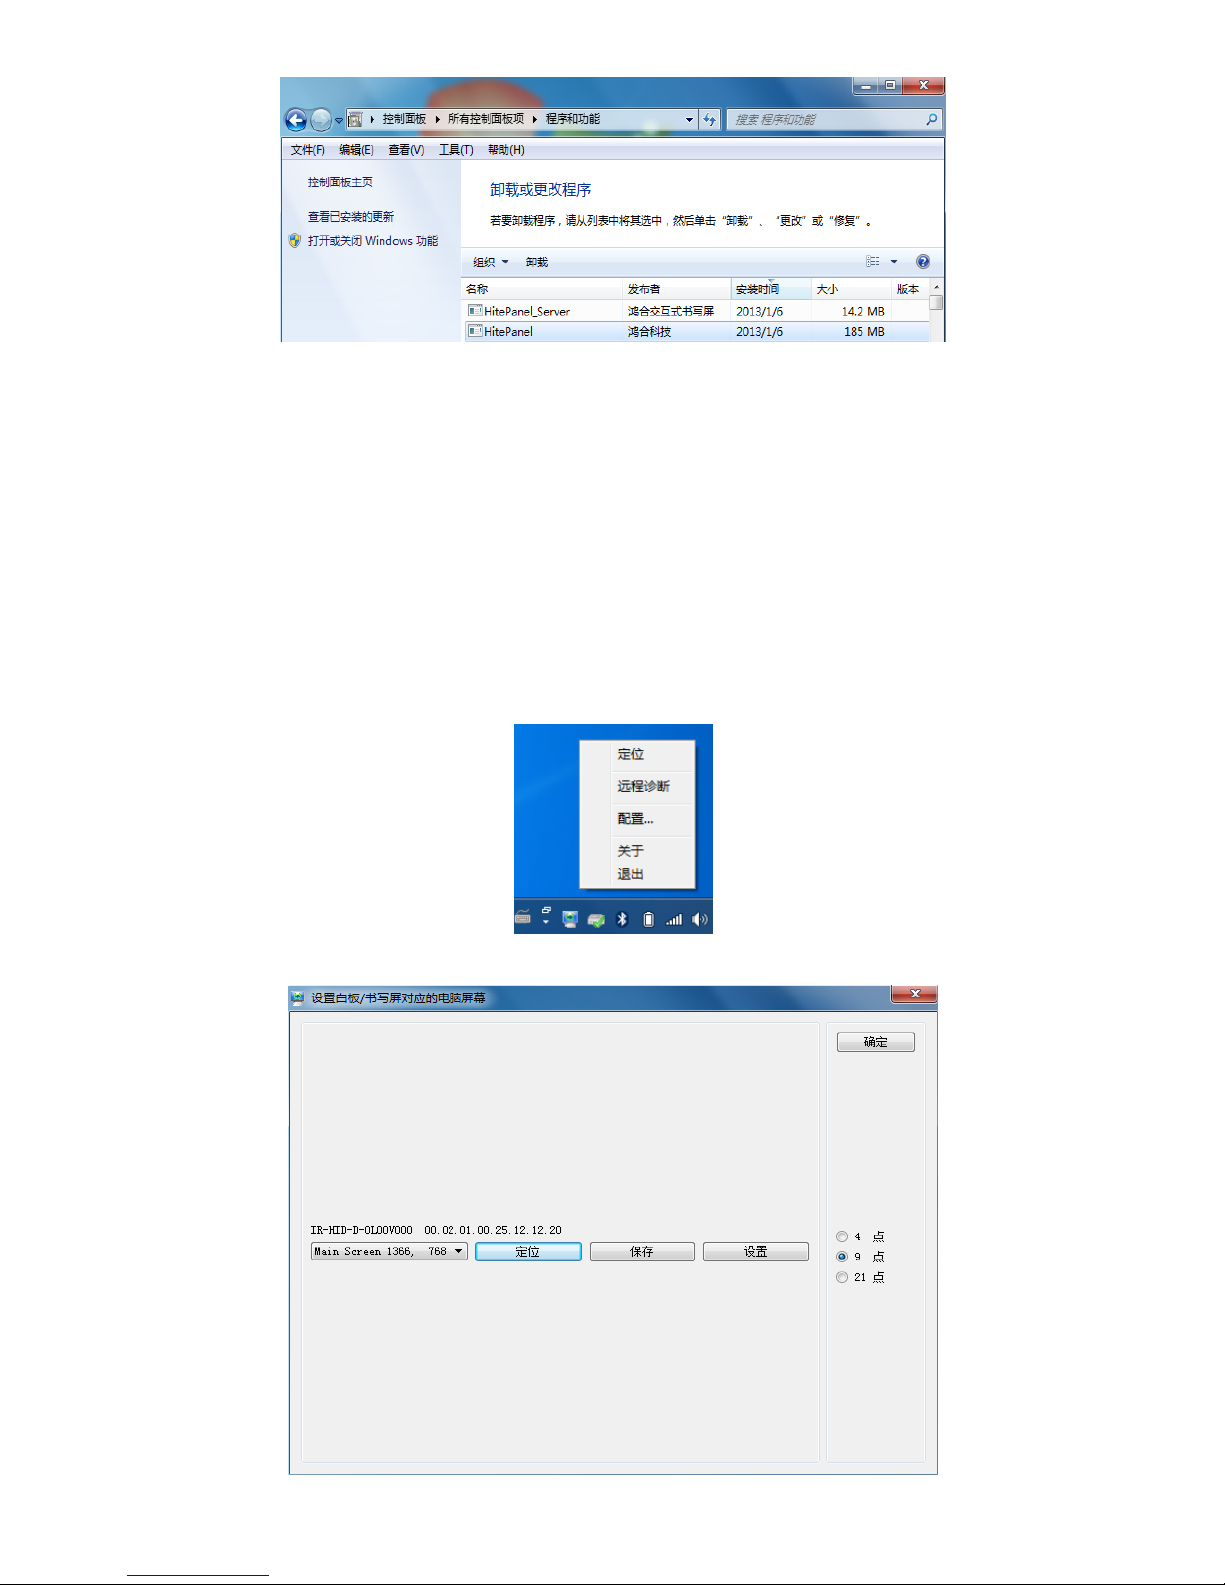
If you want to remove HitePanel from your PC, click Control Panel Add or Remove Programs
HitePanel Modify/Delete to remove HitePanel.
13
Position HitePanel
To ensure that the handwriting display works properly, you need to make the handwriting shown on the
display coincides with the actual handwriting and position HitePanel to realize accurate coincidence. You
need to position HitePanel under the following circumstances:
When you first use the interactive LED display;
Re-install the drive program;
When you connect the display to another PC;
The handwriting display adopts nine-point positioning method. The position process is described as follows:
1. Connect the display and run the drive program;
2. Click the handwriting drive icon on the right bottom of the display to show the following image:
3. Select Nine Points and click Position.
14
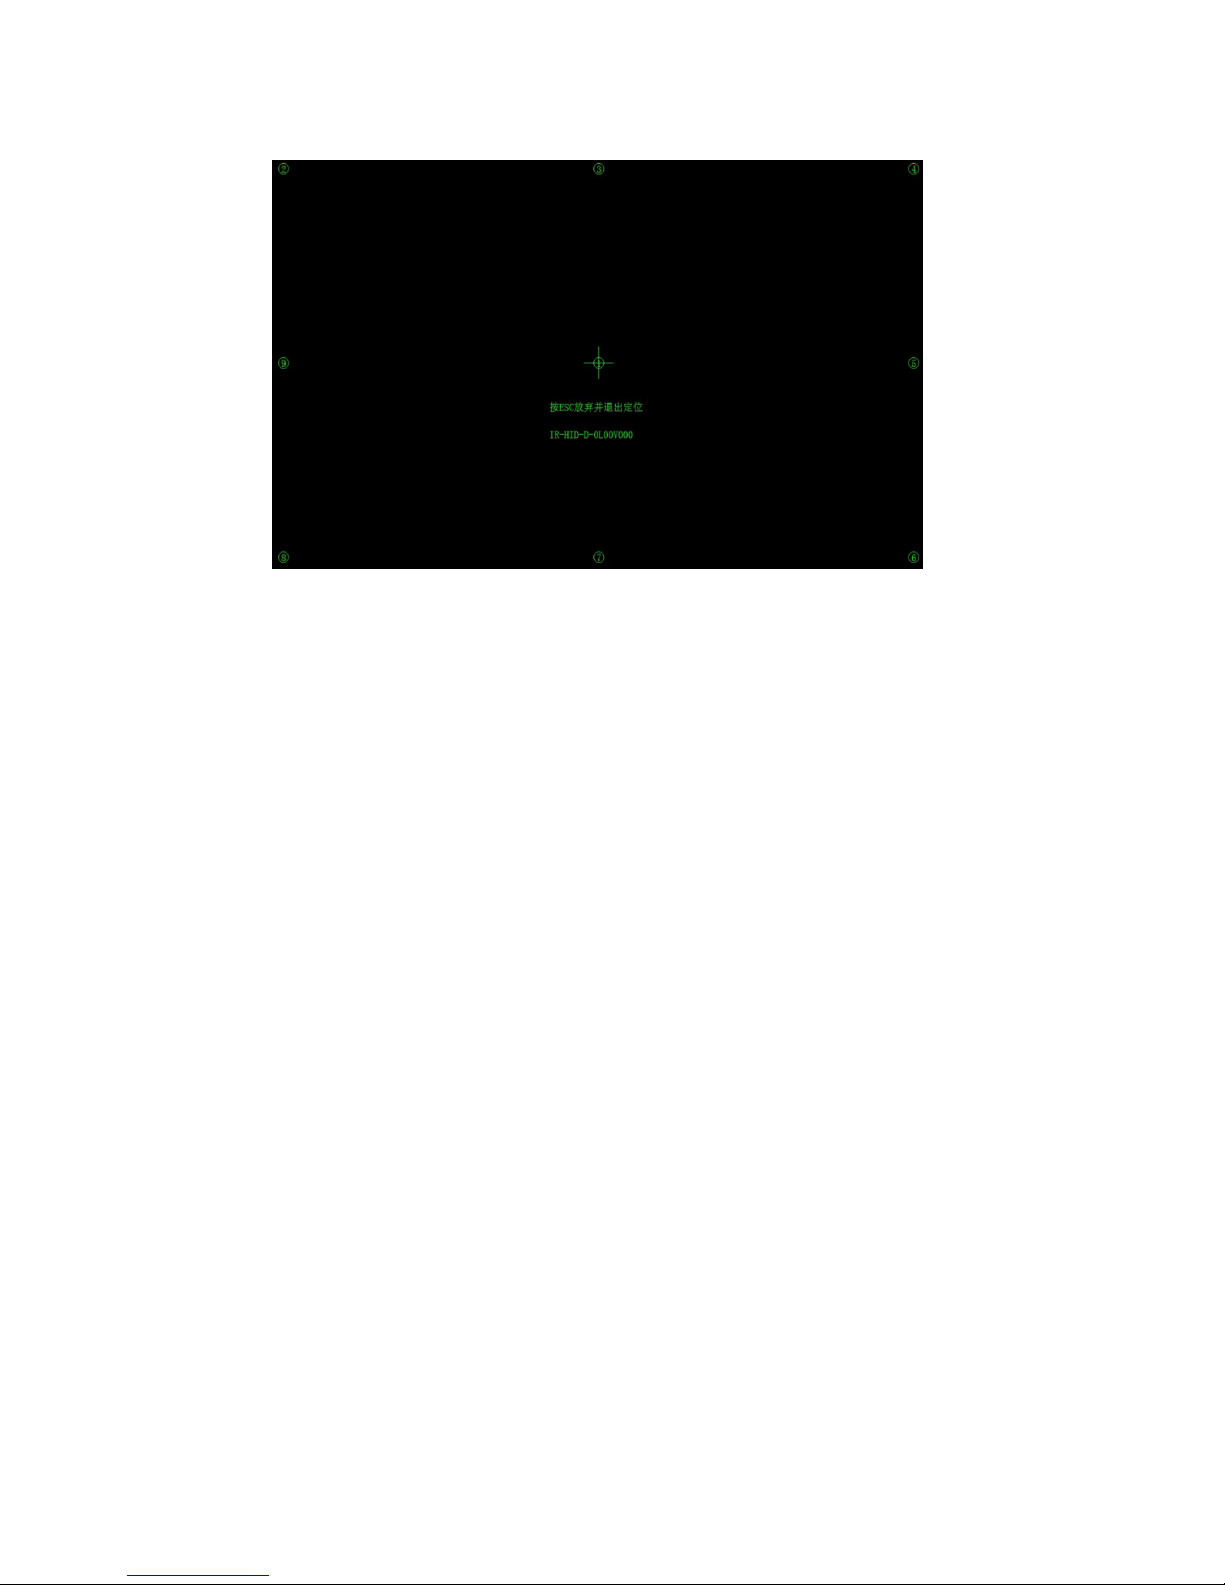
4. Use the pen to click and hold the center of the flickering cross. Do not release it until the flickering cross
moves to the next positioning point. Complete the positioning process as instructed. After it completes,
you will return to the desktop automatically.

15
Positioning Method for Windows 7
1. Connect the interactive panel to PC using the USB lead via the USB interface on the panel;
2. Select Tablet PC Setting on Control Panel.
3. Select on the setting window.

16
Use the pen to click and hold the center of the flickering cross. Do not release it until the flickering cross
moves to the next positioning point. Complete the positioning process as instructed.
Click Yes after it completes.
Hits & Tips
To ensure the handwriting accuracy, use the pen provided together with the interactive panel rather a
finger to perform positioning.
Positioning errors may cause touch functions of the interactive panel fail. In that case, please
perform positioning again.
Tap ESC on the keyboard during the positioning process to cease positioning.
The positioning interface varies between different software versions. Please follow instructions
provided on the actual interface.
17
Assemble Built-in Computer
Insert OPS computer into the slot and fasten it with two M4 screws on the left and right.
Note:
The OPS computer is not plug-and-play. Disconnect the interactive panel from the power before inserting the
OPS computer.
Smartbar
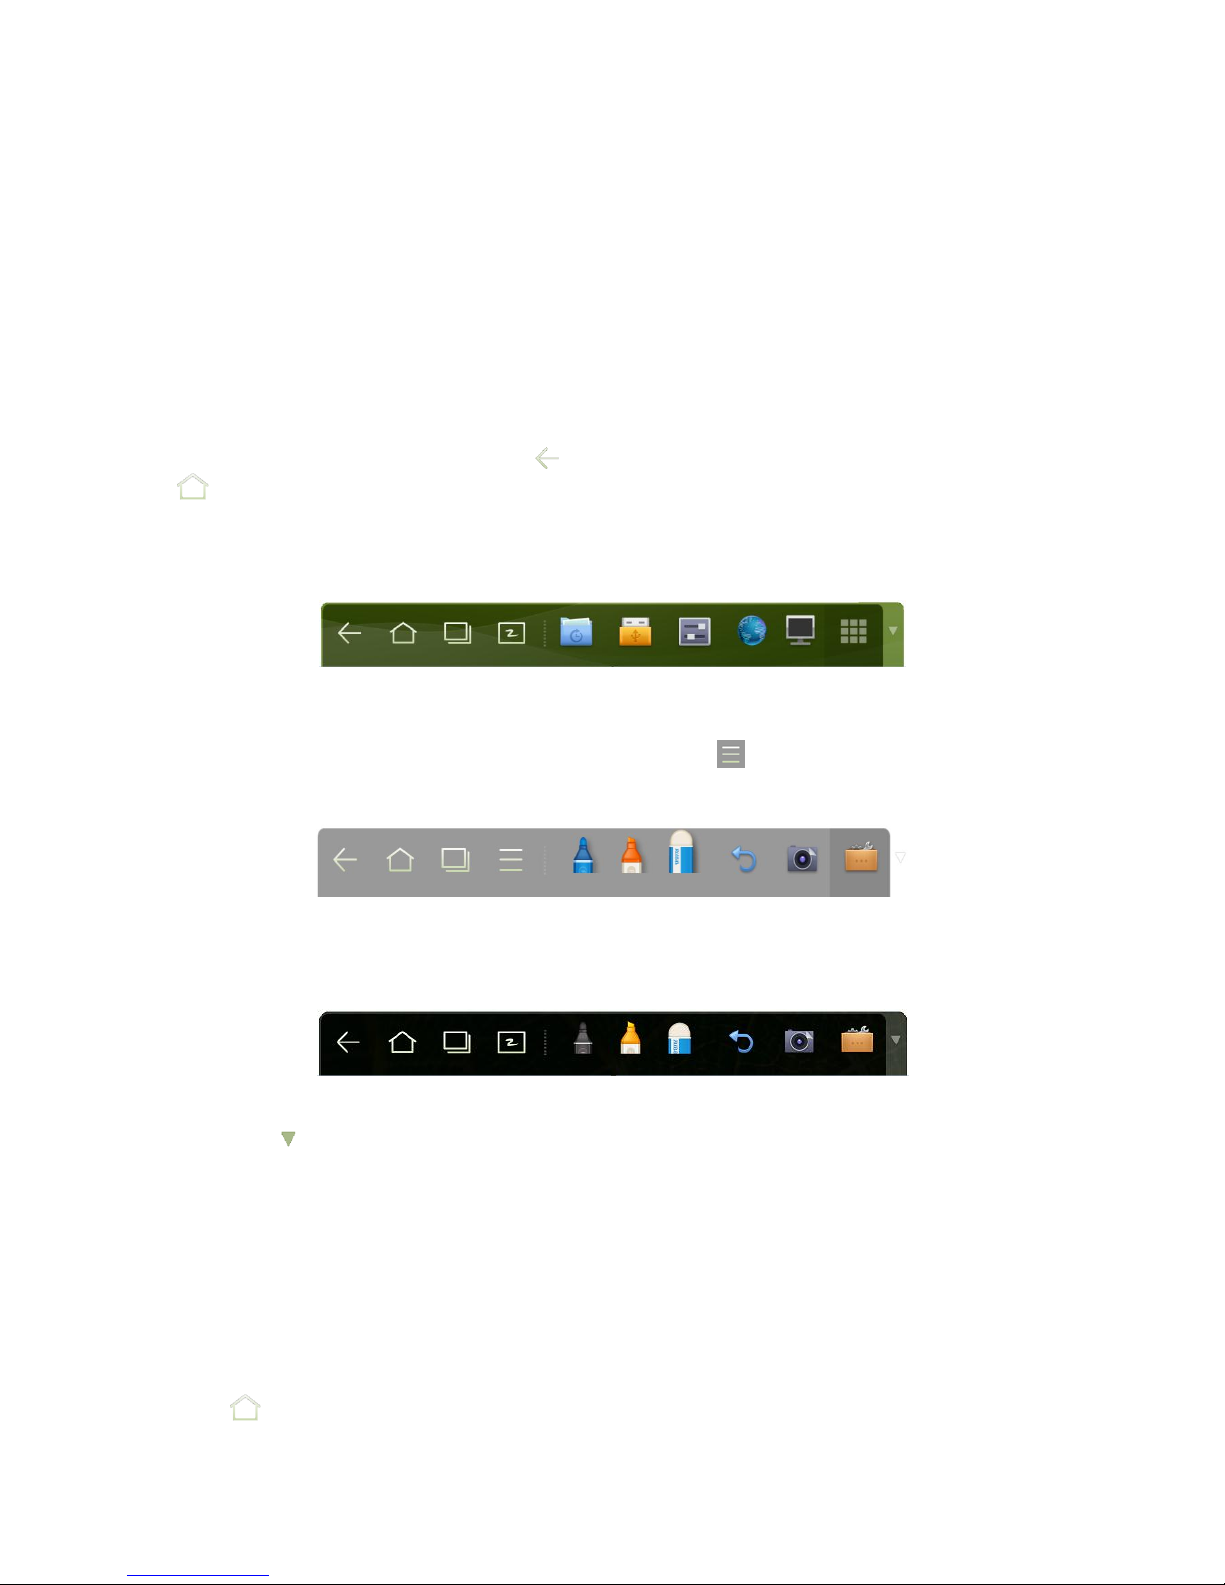
The smartbar has three modes: Home Page, White Board, and Remarks.
Under any of the three modes, you can click on the toolbar to go back to the previous page and click
to exit from other programs or go back to the home page from other signal sources.
On the home page, the smartbar is under the home page mode and shows icons of the white board,
gallery, file manager, system setting, browser and listen alone mode. You can click an icon to open the
corresponding program.
(Home page mode)
After the white board program is started, the smartbar enters the white board mode, under which you can
choose a pen, line and color to write on the white board. Click and select New, View, Delete or
Setting from the menu.
(White board mode)
In programs other than the white board, the smartbar is in the Remarks mode. You can select a pen, line
and color to add notes and remarks on the file opened (including image, PPT and PDF).
(Remarks mode)
Note: Click on the right to hide the toolbar. Scroll down with your finger to show the smartbar.
Home Page
The home page provides the preview function that displays three items:
1] OPS computer preview
2] External PC preview such as laptop
3] Portable device preview such as flash disk and SD card
Click on the smartbar or Home button to enter the home page and show the preview window. When
more than three preview windows are displayed, additional windows will be displayed on the second page.
Scroll left and right to turn page.

18
The following figure shows the interface when a SD card is inserted into an all-in-one interactive panel. The
following picture shows the desktop of the OPS computer and files in the portable device.
Click any place on the preview window of the OPS computer desktop to display the interface information.
Click the SD card preview window to open the SD card interface.
Click on the upper left corner of the home page to show tools, clock, calendar and calculator. Click
at the bottom to hide tools and go back to the home page.

19
Clock
Calendar
Calculator

20
Task Manager
In the task manager, you can view currently running programs, switch and end programs. Click to enter
the task manager as shown in the following figure:
View running programs
In the task manager, scroll left and right to view currently running programs.
Switch programs
In the task manager, click a program to switch over to the program. For example, click View ES File to
switch over to the ES file program; click Gallery to switch over to the gallery; and click File Browser to
switch to the browser program.

21
End programs
In the task manager, click a program and scroll up and down to end the program, or click a program and
hold it for several seconds to show a prompt box. Click Remove from the List to end the program.
White Board
The white board provides the writing function. In the white board program, you can select a pen, line and
color to write and use eraser to erase content on the white board. You can also print and clear the content on
the white board.
Click on the smartbar or press White Board on the remote controller to enter the white board interface:

22
New White Board and Setting
Click and select New, View, Delete or Set from the menu.
Click Set to set the color and shade of the white board as shown in the following figure:
Pen/Line/Color
If you want to use marker, click and hold for two seconds to set the line and color.
If you want to use highlighter, click and hold for two seconds to set the line and color.

23
Eraser
If you make an error or want to erase something, click to use the eraser to erase the content that you
want to erase.
Cancel
Click to cancel operations.
Capture
Click to capture the content on the white board and save it as an image under the Screenimage
directory. You can open the directory through the following ways:
(1) Go back to the home page and click on Smartbar to enter the file manager. Find folder
Screenimage in the file system.
(2) Click to enter Fast View and open folder Screenimage.
Note: Press Capture on the remote controller to save it as an image under the Screenshot directory in the
file manager.
Print/Clear
Click to show Print and Clear item. Click Print to print the content on the white board. Click
Clear to clear things written on the white board.

24
Gallery
You can enter the gallery to view images one by one or as slides.
Click on Smartbar to enter the gallery to show all folders containing images.
Click a folder to show images contained in the folder.
Single image
Click one image in a folder. Scroll left to show the previous image and right to show the next.
Under the single image mode, you can click icons on upper right corner of the image to delete, cut and
edit the image.

25
Slide
Click on the upper right corner of the folder and select Slide to view images as slides.
File Manager
In fire manager, you can copy, print and view files in the system.
Click on Smartbar to enter the fire manager interface and show the file system. It also shows files in
portable devices such as SD card and flash disk.

26
Copy
Click one file or tick off Multiple and choose several files.
Click to copy selected files to the portable device.

27
Print
Click to open the preview page. Click to set the printer. Click and to set the
number of copies to be printed. Click to start printing.
View
Click to open a file. You can view files including images, music, word, PPT and PDF.
System Settings
Click on Smartbar to enter the system settings page, which includes options including Volume, Time,
Network, Input Method, Printer, Language, Clear Screenshot, Auto Luminance, and About Android.

28
Set Time/Date
Click Time to enter the time/date setting interface.
Click 24 Hours. When it is grey, it is 12-hour system. You can click AM or PM. When it is green, it is
24-hour system.
Click Auto Update. When it is grey, you can modify the time and date. When it is green, the time and date will
be automatically updated by the system.
Click to enter the time zone setting interface as follows:
After setting, click to save it. Click < on the upper left corner or Back on the remote controller
to go back to the parent menu. Click × to close the current page.
Click here to set
Click here to set month
Click here to set year

29
Network
Click Network to show the network status, LAN, and agency settings. Choose a network connection method
and set parameters accordingly.
LAN setting
If the panel is connected with LAN cable and supports Dynamic Host Configuration Protocol (DHCP),
the system will automatically configure the network protocol (IP) value.
If you want to manually set the network protocol, enter the IP address, default gateway, and DNS server
parameters on the software keyboard or remote controller. Slide / to select the subnet mask to be
changed. After setting, click < on the upper left corner or Back on the remote controller to go back to the
parent menu. Click × to close the current page.
If you select an AP with safety authentication, you need to enter the password on the software keyboard on the
safety authentication interface.
After setting, click < on the upper left corner or Back on the remote controller to go back to the parent
menu. Click × to close the current page.
30
Agency
When the agency server is enabled, you can enter the master and agency server port numbers on the
software keyboard or remote controller.
After you enter the master and agency server port numbers, click Verify and enter the username and
password. After setting, click < on the upper left corner or Back on the remote controller to go back to
the parent menu. Click × to close the current page.
Input Method
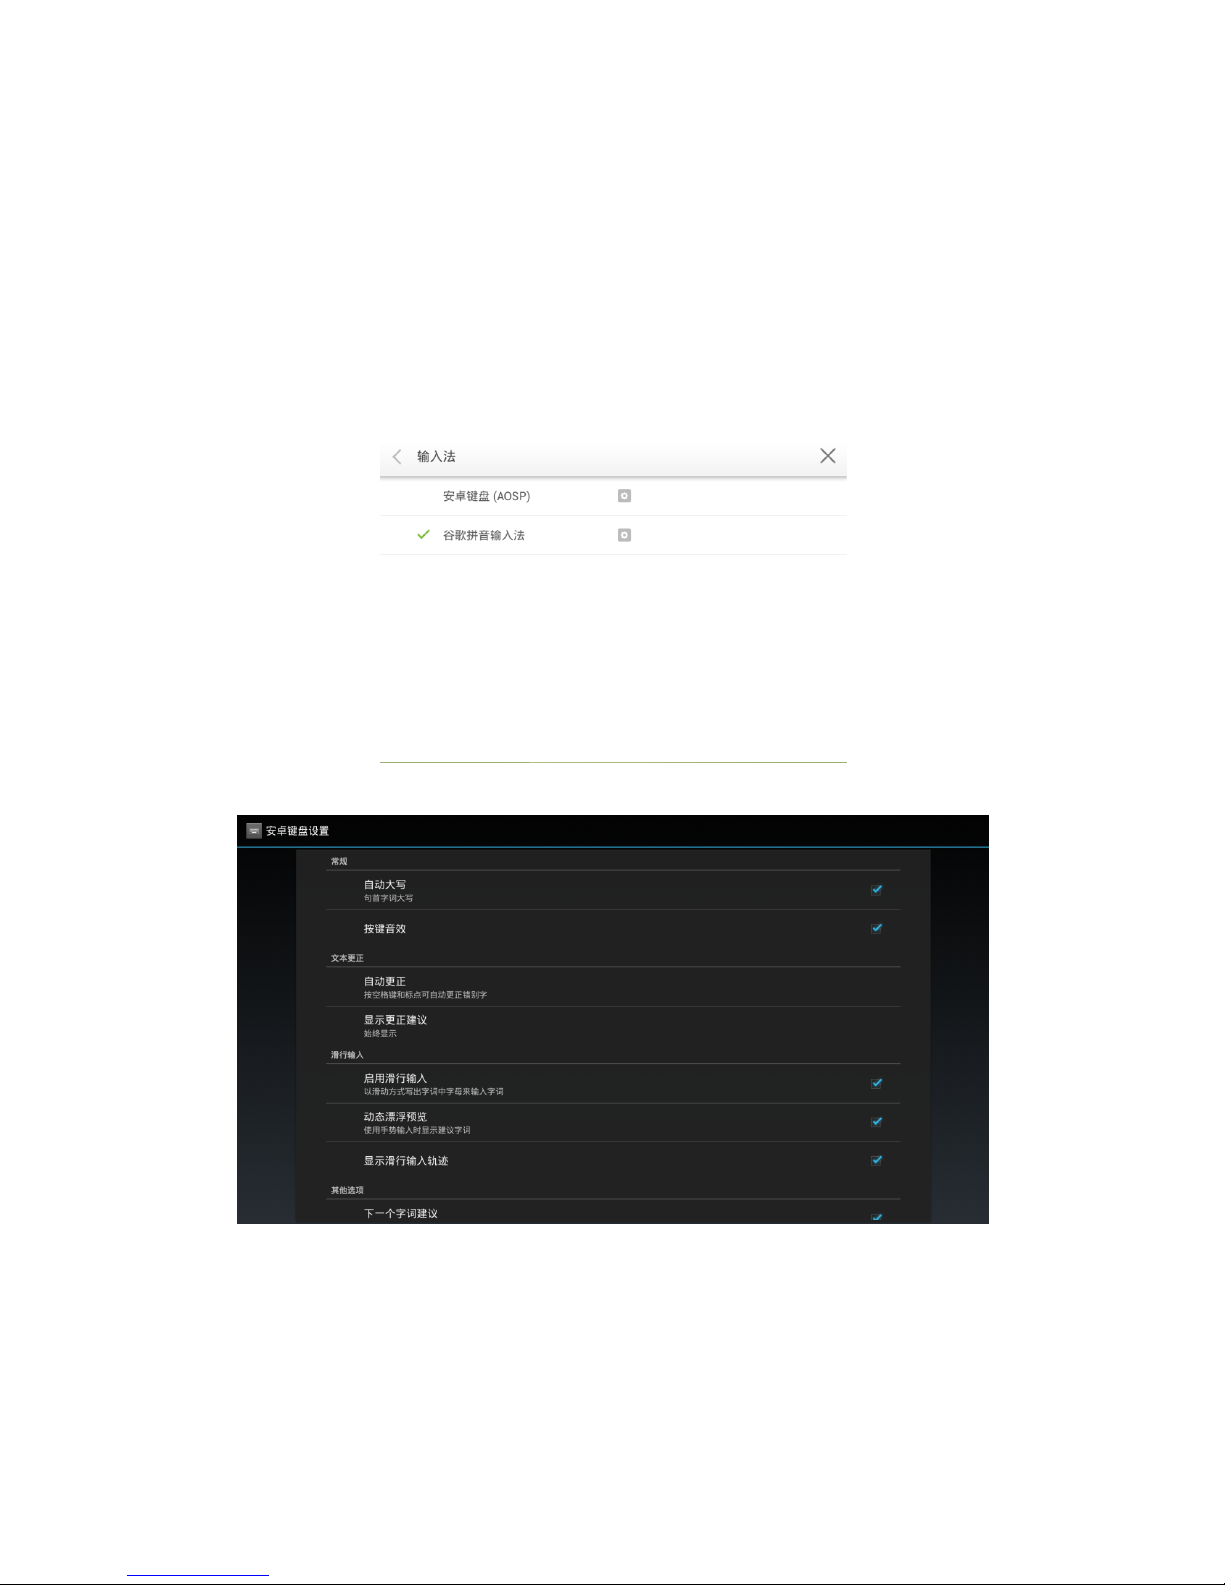
Click Input to show options including ASOP and Google Pinyin. You can choose an input method according
to your preference. After setting, click < on the upper left corner or Back on the remote controller to go back
to the parent menu. Click × to close the current page.
Click AOSP and configure functions as follows:

31
Click Google Pinyin and configure functions as follows:
Printer
Click Printer to show the printer setting interface. Enter the name, type and IP of the printer. After setting,
click < on the upper left corner or Back on the remote controller to go back to the parent menu. Click × to
close the current page.
Language
Click Language to show options including Chinese (Simplified), Chinese (Traditional), and English. Select a
language. Click < or Back to return to the parent menu. Click × to close the current interface.
Clear Screenshots
Click Clear Screenshots to show options including 1 Month, 2 Months, 3 Months, 6 Months, and 12 Months.
Select a period. Click < or Back to return to the parent menu. Click × to close the current interface.

32
Auto Luminance
Click Auto Luminance to show options including Delayed and Instant. Click Delayed and auto luminance
adjustment will be delayed for five minutes. Click Instant to enable auto luminance adjustment immediately.
Click < or Back to return to the parent menu. Click × to close the current interface.
Restore Default Setting
Click About Android to show the following interface. Click Reset.
Click OK to restore the default setting. Click < on the upper left corner or Back on the remote controller to go
back to the parent menu. Click × to close the current page.

33
Browser
Click on Smartbar to open the web browser. Enter a website and keywords to search on the software
keyboard or remote controller.
Listen Alone
Click on the Smartbar or Listen Alone on the remote controller, and the screen will turn black. You can
tap any place on the screen or press Listen Alone again under the Listen Alone mode to return to normal.
Programs
Click on the Smartbar to enter the program interface and show all programs in the system. Scroll right
and left to turn the page as follows:

34
(Page 1)
(Page 2)
Calculator
Click to enter the calculation page. Click numbers and characters on the keyboard.
Clock
Click to enter the clock page. Click Start to start timing and Stop to stop it.

35
Music
Click to start the music program. The system will display songs in the local disk by artists, albums, file
names, playlist and playing status.
ES File
Click to open ES File. You can copy, cut, delete, move and rename files.

36
Click on the upper right corner of the interface to select a file and click to select all files.
Temperature Measuring
Click to measure the temperature of the panel.
Select Signal Channel
There are three ways to select a signal channel:
1.1 Press Signal on the remote controller.
1.2 Press Signal on the control panel of the interactive panel.
1.3 Click in the Programs page.

37
Open Signal to show the following interface. Press ▲/▼ to select an option and press OK. You can also click
an icon on the interface.
Note: The interactive panel will automatically detect signals when it is started or there is no signal.
Menu
Press Menu on the remote control to show the menu (Image → Sound Mode → Channel → Setting → Time
→ Parent Control). Scroll left and right on the screen or press ◄/► to switch between options.
Image
The Image menu shows options including Image Mode, Color Temperature, Zoom, Image De-noise, and
MPEG De-noise. There are two ways to set it:
1.1 Click an icon and set it.
1.2 Press ▲/▼ to move the cursor onto an option. Press OK and press ◄/► to adjust the value. Press
Back to quit the menu.
Note: When the image mode is Custom, you can adjust the contrast, brightness, hue, sharpness and
saturation.
Sound Mode
The Sound Mode menu shows options including Sound Mode, Equalizer, Sound Balance, Surround,

38
SPDIF Output and Listen Alone. There are two ways to set it:
1.1 Click an icon and set it.
1.2 Press ▲/▼ to move the cursor onto an option. Press OK and press ◄/► to adjust the value. Press
Back to quit the menu.
Note: When the sound mode is set to Custom, you can adjust High Pitch and Low Pitch.

39
Channel
The Channel menu shows options including Antenna Type, Auto Search, DTV Manual Search, ATV
Manual Search, and Edit Channel. There are two ways to set it:
1.1 Click an icon and set it.
1.2 Press ▲/▼ to move the cursor onto an option. Press OK and press ◄/► to adjust the value. Press
Back to quit the menu.
Note: The Channel menu is only available in the TV mode.
Setting
The Setting menu shows options including Display Time, Switch Mode, Color Range, MHL Auto Switch,
Movie Mode, and Default Setting. There are two ways to set it:
1.1 Click an icon and set it.
1.2 Press ▲/▼ to move the cursor onto an option. Press OK and press ◄/► to adjust the value. Press
Back to quit the menu.
Time
The Time menu shows options including Date, Current Time, Off Time, On Time, and Sleep Time. There
are two ways to set it:
1.1 Click an icon and set it.
1.2 Press ▲/▼ to move the cursor onto an option. Press OK and press ◄/► to adjust the value. Press
Back to quit the menu.

40
Parent Control
The Parent Control menu shows options including System Lock, Change Password, Program Lock, and
Level Setting. There are two ways to set it:
1.1 Click an icon and set it.
1.2 Press ▲/▼ to move the cursor onto an option. Press OK and press ◄/► to adjust the value. Press
Back to quit the menu.
Note: This menu is only available when TV signal source is used.
ECO Mode
Press ECO on the remote controller to enter the ECO mode (ECO-Auto-Standard). Press this button to switch
among the three modes.
The power consumption will be halved under the ECO mode.
Under the Auto mode, the display will automatically adjust the brightness of the screen according to the
light from the environment. When the surrounding light is strong, the screen will bright up. When the
surround light is weak, the screen will darken.
Under the Standard mode, the screen brightness will stay the same.
Note: To save energy, please switch off the panel when it is used; and switch the panel to Listen Alone when you do
not need to watch the display, thus cutting power consumption.

41
Serial Port Control
The RS-232 port of the interactive panel is defined as follows:
Connect RS-232 port to the PC or controlling device. Enable RS-233 serial port connection and complete the
following configuration.
Port: COM1 (Set according to PC or controlling device’s port number)
Bit rate
115200
Odd/even check
None
Data bits
8
Stop bit
1
The following table lists button controlling codes. The buttons share same functions with corresponding
buttons on the remote controller:
Function Controlling codes
Function Controlling codes
Power on
7F 08 99 A2 B3 C4 02 ff 01 00 CF
1
7F 08 99 A2 B3 C4 02 ff 01 21 CF
Power off
7F 08 99 A2 B3 C4 02 ff 01 01 CF
2
7F 08 99 A2 B3 C4 02 ff 01 22 CF
Mute
7F 08 99 A2 B3 C4 02 ff 01 02 CF
3
7F 08 99 A2 B3 C4 02 ff 01 23 CF
Touch status
7F 08 99 A2 B3 C4 02 ff 01 03 CF
4
7F 08 99 A2 B3 C4 02 ff 01 24 CF
White board
7F 08 99 A2 B3 C4 02 ff 01 07 CF
7
7F 08 99 A2 B3 C4 02 ff 01 27 CF
Signal source
7F 08 99 A2 B3 C4 02 ff 01 06 CF
8
7F 08 99 A2 B3 C4 02 ff 01 28 CF
Display
status
7F 08 99 A2 B3 C4 02 ff 01 09 CF
9
7F 08 99 A2 B3 C4 02 ff 01 29 CF
HD 1
7F 08 99 A2 B3 C4 02 ff 01 0A CF
0
7F 08 99 A2 B3 C4 02 ff 01 2A CF
HD 2
7F 08 99 A2 B3 C4 02 ff 01 0B CF
OK
7F 08 99 A2 B3 C4 02 ff 01 2B CF
OPS
computer
7F 08 99 A2 B3 C4 02 ff 01 0C CF
←
7F 08 99 A2 B3 C4 02 ff 01 2C CF
PC 1
7F 08 99 A2 B3 C4 02 ff 01 0D CF
→
7F 08 99 A2 B3 C4 02 ff 01 2D CF
PC 2
7F 08 99 A2 B3 C4 02 ff 01 0E CF
↑
7F 08 99 A2 B3 C4 02 ff 01 2E CF
YPbPr
7F 08 99 A2 B3 C4 02 ff 01 10 CF
↓
7F 08 99 A2 B3 C4 02 ff 01 2F CF
Video 1
7F 08 99 A2 B3 C4 02 ff 01 11 CF
Search
7F 08 99 A2 B3 C4 02 ff 01 1E CF
Video 2
7F 08 99 A2 B3 C4 02 ff 01 12 CF
Capture
7F 08 99 A2 B3 C4 02 ff 01 1F CF
Up
7F 08 99 A2 B3 C4 02 ff 01 13 CF
Auto ADJ
7F 08 99 A2 B3 C4 02 ff 01 20 CF
Down
7F 08 99 A2 B3 C4 02 ff 01 14 CF
Listen
Alone
7F 08 99 A2 B3 C4 02 ff 01 15 CF
VOL -
7F 08 99 A2 B3 C4 02 ff 01 17 CF
ECO
7F 08 99 A2 B3 C4 02 ff 01 16 CF
VOL +
7F 08 99 A2 B3 C4 02 ff 01 18 CF
Model
7F 08 99 A2 B3 C4 02 ff 01 31 CF
Channel -
7F 08 99 A2 B3 C4 02 ff 01 19 CF
Audio
mode
7F 08 99 A2 B3 C4 02 ff 01 34 CF
Channel +
7F 08 99 A2 B3 C4 02 ff 01 1A CF
Power
status
7F 08 99 A2 B3 C4 02 ff 01 37 CF
Menu
7F 08 99 A2 B3 C4 02 ff 01 1B CF
Home page
7F 08 99 A2 B3 C4 02 ff 01 1C CF
Back
7F 08 99 A2 B3 C4 02 ff 01 1D CF

42
New search:
DEVICE TYPE
99 A2 B3 C4 02 ff 01 31
VOLUME
99 A2 B3 C4 02 ff 01 33
ECO MODE
99 A2 B3 C4 02 ff 01 35
POWER STATE
99 A2 B3 C4 02 ff 01 37
DISPLAY STATE
99 A2 B3 C4 02 ff 01 32
AUDIO MODE
99 A2 B3 C4 02 ff 01 34
TOUCH STATE
99 A2 B3 C4 02 ff 01 36
Specifications of PC Mode (VGA Input)
SN
Standard
Resolution
Refresh Rate
(Hz)
Horizontal
Frequency
(Khz)
Vertical
Frequency
(Hz)
Horizontal/Vertical
Sync Polarity (TTL)
1
VESA
640X480
60
31.5
60
N/N
2
VESA
640X480
72
37.9
72
N/N
3
VESA
640X480
75
37.5
75
N/N
4
VESA
800X600
56
35.1
56
P/P
5
VESA
800X600
60
37.9
60
P/P
6
VESA
800X600
72
48.1
72
P/P
7
VESA
800X600
75
46.9
75
P/P
8
VESA
1024X768
60
48.4
60
N/N
9
VESA
1024X768
70
56.5
70
N/N
10
VESA
1024X768
75
60
75
N/N
11
VESA
1280X960
60
60
60
N/N
12
VESA
1280X960
75
75.159
75
N/N
13
VESA
1280X1024
60
64
60
P/P
14
VESA
1280X1024
75
80
75
P/P
15
VESA
1600X1200
60
75
60
P/P
16
VESA
1920X1080
60
66.547
59.988
P/P

43
Formats Supported by USB Mode
Media category
Formats
Extension
Image
JPEG, BMP and PNG
.jpg, .bmp, and png
Movie
MPEG1, MPEG2, MPEG4, H264, RM,
RMVB, MOV, MJPEG, FLV
.avi, .mpg, .dat, .vob, .div, .mov, .mkv, .r
m, .rmvb, .mp4, .mjpeg, .ts, .trp, .asf,
and .flv
Music
WMA, MP3, M4A, (AAC)
.mp3, and .m4a
Text
TXT
.txt
FAQ & Troubleshooting
Failure
Possible cause
Solution
Fail to connect to the
service program
The drive program is not
correctly installed.
Install the drive program correctly.
The USB interface (lead) is not
connected or is faulty.
Change the USB lead or check if the USB
interface is faulty.
The infrared tube is blocked.
Ensure that the surrounding infrared tubes
are not blocked.
The panel needs
re-positioning every time it
is switched on.
The computer is equipped with a
recovery card.
Disable computer protection and perform
the positioning again.
The positioning is
inaccurate.
You do not perform the
positioning as instructed.
Press Auto on the remote controller to fully
cover the display with an image and use the
pen provided together with the panel to
perform positioning again.
The cursor of the pen is
unstable when the pen is
used.
Wrong writing method
Use the pen rather than a finger to write.
Grasp the pen as far to the nib as possible.
The angle between the pen and display
should be larger than 60 degrees. Do not let
sleeve or wrist touch the display.
Strong light or infrared
interference
Remove the interference source or change
the using environment.
The handwriting is
discontinuous.
Wrong writing method
Use the pen rather than a finger to write.
Grasp the pen as far to the nib as possible.
The angle between the pen and display
should be larger than 60 degrees. Do not let
sleeve or wrist touch the writing surface.
The required covering area is
not reached when writing or the
nib is too small.
Change the nib or use a pen with a larger
covering area.
The infrared tube is blocked.
Check if infrared tubes are blocked.
Strong light or infrared
interference
Remove the interference source or change
the using environment.
Unable to write
The color of strokes is same as
or similar to the background
color.
Change the color of strokes.
You hand or other objects are
put on the display when writing.
Use the pen rather than a finger to write.
Grasp the pen as far to the nib as possible.
The angle between the pen and display
should be larger than 60 degrees. Do not let
sleeve or wrist touch the writing surface.
Strong light or infrared
interference
Remove the interference source or change
the using environment.

44
Failure
Possible cause
Solution
Wrong writing method
Use the pen rather than a finger to write.
Grasp the pen as far to the nib as possible.
The angle between the pen and display
should be larger than 60 degrees. Do not let
sleeve or wrist touch the writing surface.
Not sound and image
1. Check if the power cable is connected to the power socket and if the panel
is connected to power.
2. Check if the rocker switch on the interactive panel is switched on.
3. Check if the Standby button on the panel is pressed.
4. Check if the video and audio input cables are connected correctly.
5. Check if the panel is switched to the right signal source.
6. Check settings including image luminance and contrast.
7. Check the volume.
Image is normal, but no
sound
1. Check the volume.
2. Check if the Mute button on the remote controller is pressed.
3. Check if the audio cable between the PC and interactive panel is connected
correctly.
No image or the image is
black and white
1. Adjust color settings.
2. Check the color system.
Image or sound is
interrupted
1. Find out the electric appliance that causes the interference and move it
away from the interactive panel.
2. Do not connect the panel to a power socket that a disrupting electric
appliance is connected to.
The remote controller fails.
1. Change the batteries.
2. Clean the launch window at the top of the remote controller. (Check if it is
blocked)
3. Check contacts of the batteries.
Computer cannot be started
(applicable for models with
computers)
1. Check if the computer adapter is correctly connected and is connected to
power.
2. Check if the computer is connected correctly to the interactive panel.
Self-inspection:
The following phenomena are not failures:
Given the high-precision production technology, the LED panel may have a very few constantly bright or
dark pixels, which turn out to be tiny red, blue, green or dark points on the panel. The phenomenon is
normal.
The panel may make slight sound when it is adjusting backlight or it is cooling.
When the image and sound are normal, and you touch the LED panel with fingers, you may feel static
electricity. The temperature of the rear of the panel and product is high. These are normal phenomena.
Instructions in Provisions for Recycling and Disposal of Waste
Electrical and Electronic Products
The Provisions for Recycling and Disposal of Waste Electrical and Electronic Products (Order
No.551) was issued by the State Council on August 20, 2008, and became effective on January 1,
2011.
When you no longer need to use the product, you must comply with laws and regulations on recycling
and disposal of waste electric and electronic products to return the waste product to a company licensed
for receiving and disposing waste electric and electronic products.
You can also send the waste interactive panel to HiteVision’s service centers across the country.

45
Maintenance Tips
Do not put or install the product near a heat source or under direct sunlight, in dusty or humid places, or where
the product can be affected or damaged by mechanical vibration. To maximize the performance, it should be
put away from equipment such as grid, large metal objects and radar stations as far as possible.
Do not wipe the panel with any chemical agent. Solvents may damage the enclosure or paint. If the panel
is stained by dust, please cut off the power, soak the clean cloth in warm water, wring it to clean the
panel. You should use a clean soft cloth to clean the LED display of the panel.
Do not frequently switch on and off the product. This can shorten the product’s service life. After the
panel is switched off, please wait for three minutes before switching on it again. If the product is not to
be used for a long period of time, please disconnect the product from power supply.
Do not maximize the brightness and contrast of the LED display for a long period of time, which can
shorten the LED display’s service life.
Do not write on the touch screen with a hard object, which can scratch the LED display.
Specifications
Screen size
70"
Backlight type
LED
Aspect ratio
16:9
Viewing angle
178°
Physical resolution
1920*1080 Pixel
Image/Sound system
PAL/DK, I
Working voltage
AC 90-265V, 50/60Hz
Power consumption
Standard: <250W, standby: ≤0.5W
Touch screen material
Tempered glass
Sensing method
Infrared
Technical feature
HID drive-free
Touch point
Multi-touch
Writing method
Fingers or pen
Resolution of touch screen
32767*32767
Communication interface
USB
Storage temperature/humidity
-20°C ~60°C , 10%~90%
Working temperature/humidity
5°C ~50°C , 10%~90%
Installation method
Wall or portable mounting
Dimensions
1673*1009*85 mm
Weight
75KG
* HiteVision may modify the user manual without prior notice.
* If you discover any unclear presentation, mistake or omission in this manual, please contact with us
immediately. HiteVision is not liable for any loss or damage if you fail to contact with us.

FCC WARNING
This device complies with Part 15 of the FCC Rules. Operation is subject to the following two
conditions:
(1) This device may not cause harmful interference, and
(2) this device must accept any interference received, including interference that may cause
undesired operation.
NOTE 1: This equipment has been tested and found to comply with the limits for a Class B digital
device, pursuant to part 15 of the FCC Rules. These limits are designed to provide reasonable
protection against harmful interference in a residential installation. This equipment generates, uses
and can radiate radio frequency energy and, if not installed and used in accordance with the
instructions, may cause harmful interference to radio communications. However, there is no
guarantee that interference will not occur in a particular installation. If this equipment does cause
harmful interference to radio or television reception, which can be determined by turning the
equipment off and on, the user is encouraged to try to correct the interference by one or more of
the following measures:
- Reorient or relocate the receiving antenna.
- Increase the separation between the equipment and receiver.
-Connect the equipment into an outlet on a circuit different from that to which the receiver is
connected.
-Consult the dealer or an experienced radio/TV technician for help.
NOTE 2: Any changes or modifications to this unit not expressly approved by the party
responsible for compliance could void the user's authority to operate the equipment.
 Loading...