


0
Electric Oven
User’s Manual & Recipe Book
Model No.: ProTG 2100
Many thanks for purchasing this electric oven.
We would particularly advise that you carefully read the operating
instructions before attempting to operate the unit.
1
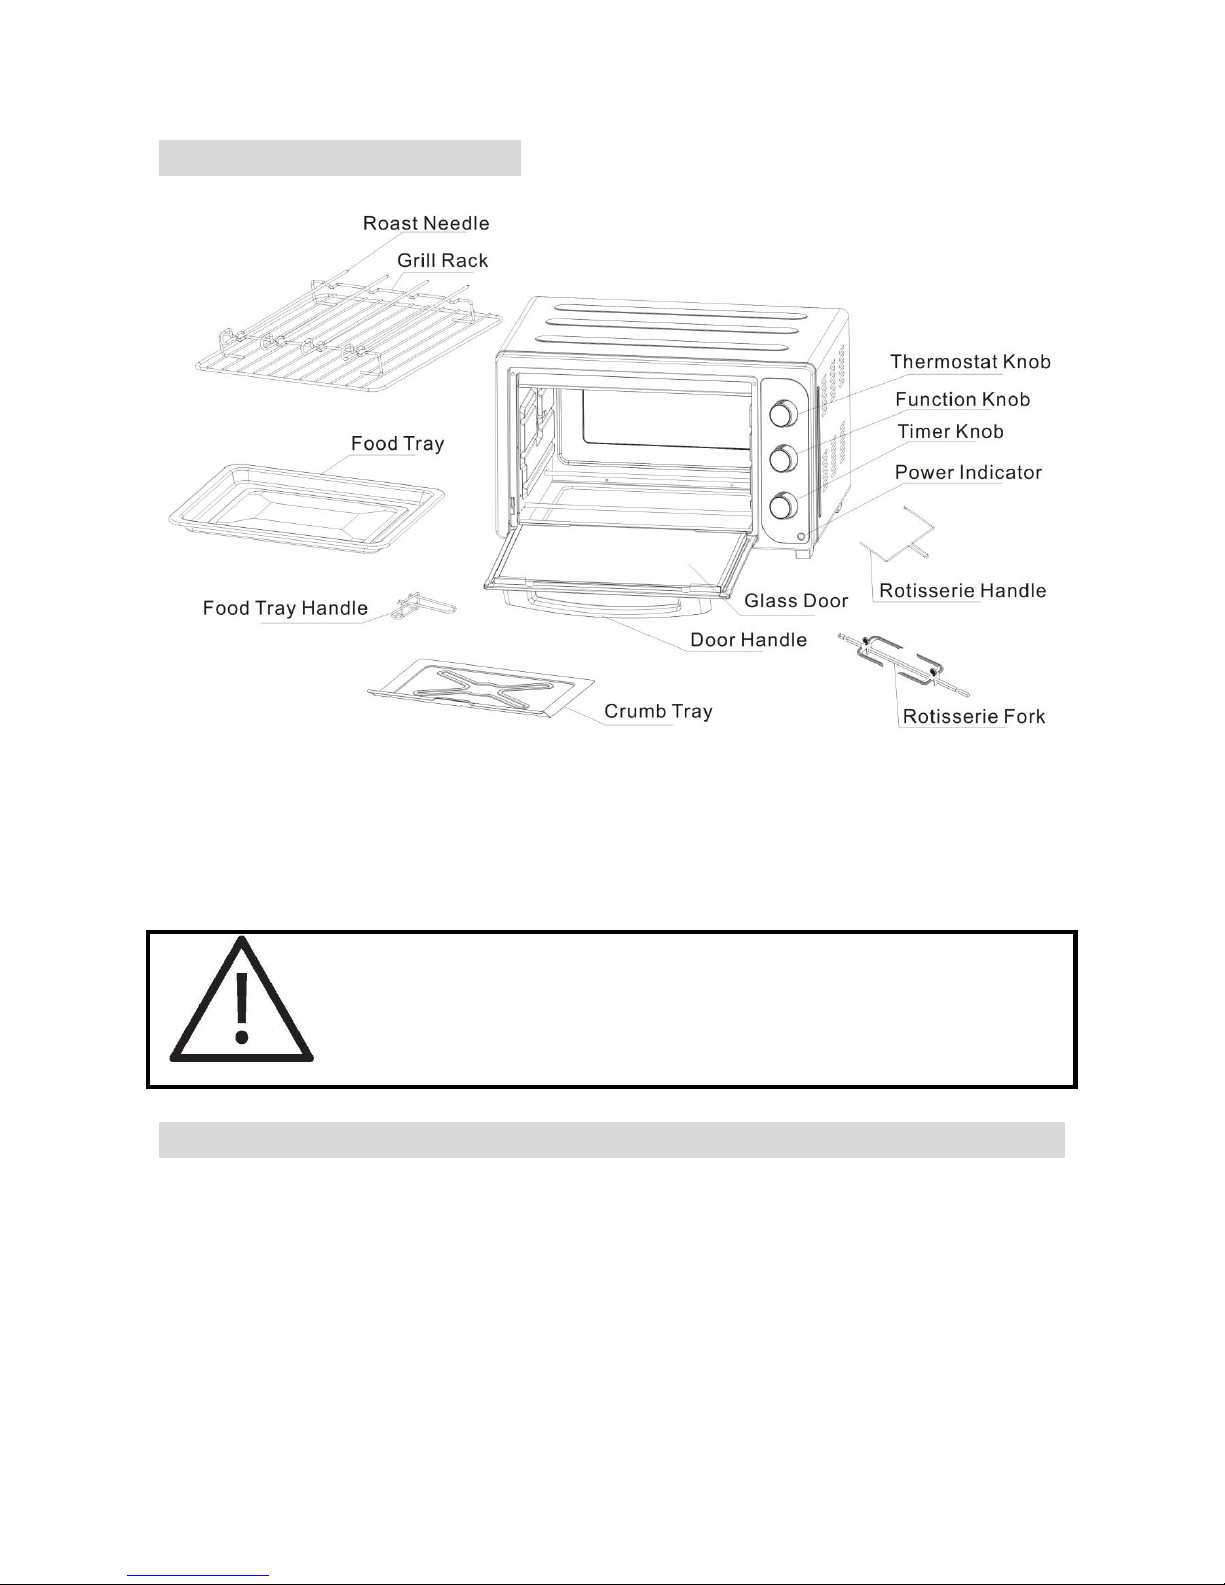
PARTS IDENTIFICATION
IMPORTANT SAFEGUARDS AND PRECAUTIONS
SAVE THESE INSTRUCTIONS
When using electrical appliances, basic safety precautions should always be
followed, including the following:
1. Read all instructions.
2. Do not touch hot surfaces. Use handle or knobs.
3. Close supervision is necessary when any appliances are used by or near
children.
4. To protect against electric shock, do not place any part of the electric oven
in water or other liquid.
5. Do not let cord hang over edge of table or counter, or touch hot surfaces.
6. Do not operate appliance with damaged cord or plug or after the appliance

2
malfunctions, or has been damaged in any manner, return appliance to the
nearest Authorized Service Center for examination, repair, or adjustment.
7. When operating the oven, keep at least four inches of space on all sides of
the oven to allow for adequate air circulation.
8. Unplug from outlet when not in use, or before cleaning.
9. To disconnect, turn the control to STOP, then unplug the plug. Always hold
the plug, but never pull the cord.
10. Do not cover BAKE TRAY or any part of oven with metal foil. This may
cause overheating of the oven.
11. Do not clean with metal scouring pads.
12. Oversized foods or metal utensils must not be inserted in an electric oven
as they may create a fire or risk of electric shock.
13. A fire may occur if the oven is covered or touching flammable material,
including curtains, draperies, walls, and the like, when in operation. Do not
store any item on the oven during operation.
14. Extreme caution should be exercised when using containers constructed if
anything other than metal or glass.
15. Do not place any of the following materials in the oven: cardboard, plastic,
paper, or anything similar.
16. Do not store any materials, other than manufacturer’s recommended
accessories, in this oven when not in use.
17. Always wear protective, insulated oven gloves when inserting or removing
items from the hot oven.
18. This appliance has a tempered,safety glass door. The glass is stronger
than ordinary glass and more resistant to breakage. Tempered glass can
break, but the pieces will not have sharp edges. Avoid scratching door
surface or nicking edges. If the door gas a scratch or nick, do not use.
19. Do not use outdoors.
20. Do not use appliance for other than intended use.
21. This appliance is for HOUSEHOLD USE ONLY.
22. The temperature of the door or the outer surface may be higher when the
appliance is working.
HOW TO USE
PREPARATION BEFORE USE
Before using your electric oven for the first time, be sure to:
1. Read all instructions included in this manual.
2. Make sure oven is unplugged and Time Knob is in the “0” position.
3. Remove all accessories. Wash in hot soapy water or in dishwasher.
4. Thoroughly dry all accessories and re-assemble in oven. Plug oven into
outlet and you are ready to use your new electric oven with Grill Rack and
Food Tray.
5. It may result in smell or smoke for the first use. This is normal. It is due to

3
the protective substance on heating elements, which avoids salt effects
during shipping from factory. So it is recommended operating oven dry for
about 15 minutes at the first, moreover, making sure to keep good
ventilation of the room.
Please familiarize yourself with the following oven functions and accessories
prior to first use:
Temperature Knob: Choose desired temperature from 100℃ to 250℃.
Function Knob: Choose desired function.
Timer Knob: Turn control to the right (clockwise) and the oven will turn off
automatically at the end of the selected time and a bell will ring. When
setting the Timer to less than 5 min, turn it to more than 6 min. and then
back to the selected time.
Power Indicator: It is illuminated whenever oven is turned on.
Grill Rack: For toasting, baking, and general cooking in casserole dishes
and standard pans.
Roast Needle: For toasting and baking meet.
Food Tray: For use in broiling and roasting meat, poultry, fish, and various
other foods.
Food Tray Handle: For use in taking food tray and wire rack out of electric
oven.
Rotisserie Fork: For use in broiling and roasting chicken and various
food.
Rotisserie Handle: For use in taking rotisserie fork out of electric oven.
CrumbTray: For use in holding crumbs during the cooking.
Operation
Place food to be cooked directly on to wire rack/in food tray.
Close the oven door
Select proper temperature by the Temperature Knob.
Preset proper cooking time and start the oven.
Make sure to turn Timer Knob to “0” for turning off the oven when cooking
is completed.
CLEANING AND CARE
MAINTENANCE:
This appliance has been designed to operate over a long period of time with a
minimum of maintenance. Continuous satisfactory operation depends upon
proper care and regular cleaning.

4
Warning! Before performing any maintenance or cleaning of this appliance,
disconnect the appliance from the electrical supply.
CLEANING:
To protect against the risk of electrical shock, do not immerse the unit, cord or
plug in water or other liquid. The exterior surface of the appliance should be
cleaned with a clean damp cloth only.
The oven features a Quick-Clean internal coating. If desired, wipe walls with
damp cloth moistened with mild detergent.
Wash all accessories in hot sudsy water or in a dishwasher. Wipe the door
with a clean damp cloth, and dry with a paper or cloth towel. Clean exterior
with damp cloth.
DO NOT USE ABRASIVE CLEANERS ON ANY PART OF THIS APPLIANCE.
ALWAYS UNPLUG THE OVEN AND ALLOW IT COOLING BEFORE
CLEANING.
DRY ALL PARTS AND SURFACES THOROUGHLY PRIOR TO PLUGGING
OVEN IN AND USING!
STORAGE:
Unplug unit, allow cooling, clean before storing. Store Electric Oven it its box
in a clean, dry place. Never store appliance white it is hot or still plugged in.
Never wrap cord tightly around the appliance, use the Cord Storage area on
the bottom of the back of the oven. Do not put any stress on the cord where it
enters the unit, as it could cause the cord to fray and break.
CAUTION
RISK OF ELECTRIC SHOCK
DO NOT OPEN
The lightening flash with arrowhead symbol, within an equilateral
triangle, is intended to alert the user of the presence of
uninsulated“dangerous voltage”within the product’s enclosure:
that may be of sufficient magnitude to constitute a risk of electric
shock to person.
The exclamation point within an equilateral triangle is intended to
alert the user of the presence of important operating and
maintenance (servicing) instructions in the literature
accompanying the product.

5
CAUTION!
Caution: The temperature of the accessible
surface may be high when the appliance is
operation.
SPECIFICATION
Model No.
ProTG 2100
Oven Capacity
2 Liter
Voltage
230V
Frequency
50Hz
Power
1380W
WEE / ENVIRONMENTAL PROTECTION
Disposal of Electrical and Electronic Equipment
Do not dispose of this product with household waste. For the
proper treatment, recovery and recycling please take this
product to the appropriate waste collection point. If you are
unsure where this may be, please contact your local authority.
Improper disposal may be harmful to the environment

6
Baked Potato with Chilli Sauce
Ingredients
6 large Potatoes
2 Green chilies
200 gms Grated cheese
100 ml Cream
1 tsp Lemon juice
1 tbsp Butter
½ tsp Red Chili powder or flakes
To taste Salt and pepper
Note: Traditionally Jalapeno Peppers are used instead of Green Chilies.
Method
1. Preheat the oven to 220° C.
2. Wash and scrub the potato. Do not peel it.
3. Dry the potatoes and prick it a couple of times with a fork.
4. Finely slice the green chilies.
5. Wrap each potato in foil and place on a baking/cooking tray.
6. Placing the tray in center rack position. Bake at 220° C in the oven for 45
minutes.
7. In a bowl mix all the remaining ingredients together.
8. Remove the potato. Open the foil and run the knife a little more than
halfway through the center taking care not to disjoint the potato.
9. Place a large dollop of the mix into the sliced opening.
10. Return to the oven and change the oven function to Broil/Grill.
11. Broil at 250° C for 5 minutes or till the cheese is a nice golden brown.
12. Remove and garnish with red chilli powder and the green chilies and
serve hot.
RECIPES

7
Potato Patties
Ingredients
• 4 large Potatoes (boiled & mashed)
• 100 gm Paneer (grated)
• 5 tbsp Peas (boiled)
• 1 Carrot (chopped finely)
• 1 tbsp Ginger-Garlic Paste
• 1 tbsp Green Chilies (finely chopped)
• 100 gm Fresh Bread Crumbs
• 1 tsp Oil
• To taste Salt
Methods
1. Apart from the oil and bread crumbs mix all the ingredients together in a
large bowl.
2. Preheat the oven to 150° C.
3. Divide the mixture into 8 large balls.
4. Flatten each ball to make a patty.
5. Roll each patty in bread crumbs.
6. Place the patties onto a lightly greased cooking tray and brush some oil
on each patty.
7. Place the baking/cooking tray in the center rack section of the preheated
oven and bake at 200° C for 3 minutes before turning it over.
8. Bake for another 2 minutes.
9. Brush oil on the tomatoes and bake it along with the patties.
10. Remove from the oven using the mittens and serve hot.
11. For garnish, cut the tomatoes in half lengthwise and lightly sprinkle it
with salt and pepper.

8
Stuffed Pepper Platter
Ingredients
• 6 Peppers (red, green and yellow)
• 50 gm Leftover rice/ spicy vegetable
• 1 tbsp. Garlic, chopped
• 30 gm Cheese grated
• To taste Salt
Method
1. Split open the peppers into halves. Blanch in hot water for 10 seconds.
2. Rub the inside of the pepper with salt and garlic.
3. Add the filling of our choice leftover rice, curry or palak paneer.
4. Top with cheese and bake till cheese melts.
5. Serve as an accompaniment or on its own.

9
Cheese Chilli Toast
Ingredients
8 Bread slices
2 Onions (finely chopped)
½ tsp Butter
150 gm Cheese (grated)
2-3 Green chilies (finely chopped)
1 Green capsicum (finely chopped)
¼ tsp Red chilli powder
Method
1. Pre-heat the oven to 180° C.
2. In a pan, lightly saute chopped onion and capsicum for 3-4 minutes.
3. Except for the bread slices, mix all the ingredients together.
4. Spread the cheese mixture evenly over the bread slices.
5. Place the prepared slices onto the wire grill cum barbecue tray.
6. Place the tray in the center rack position. Set the oven to toast mode.
7. Toast at 180° C for 5 minutes or till golden brown.
8. Remove using tongs. Serve hot with a chilli sauce.

10
Paneer Tikka
Ingredients
• 2 large Green capsicum (cut into 1” cubes)
• 200 gm Paneer (cut into 1” cubes)
• 1 large Tomato (cut into 1” cubes)
• 1 large Onion (cut into 1” cubes)
Marinade
• 2 tbsp Oil
• 1 tsp Chilli powder
• 1 tsp Tomato puree
• 1 tsp Lemon juice
• 1 tbsp Coriander leaves (chopped)
• ¼ tsp Turmeric powder
• To taste Salt
Garnish
• Radish slices/Lemon wedges
Method
1. In a large glass bowl mix all the marinade ingredients together
thoroughly.
2. Add the vegetables and paneer and mix lightly.
3. Set aside for 10 minutes.
4. Skewer the vegetables with paneer alternately onto skewers.
5. Refrigerate for 2 hours.
6. Pre-heat the oven to 200° C.
7. Place skewers on the wire grill cum barbecue tray provided and place
the drip/crumb tray below.
8. Brush excess marinade over the vegetables before placing the tray in
the top rack position in the oven.
9. Set the oven function to broil. Broil the kebab for 5 minutes before
basting it. Broil for another 3 minutes.
10. Turn the skewers occasionally using mittens.
11. Remove using mittens and serve hot garnished with radish slices and
lemon wedges.

11
Baked Pasta
Ingredients
• 200gm Macaroni
• 2 large Onions
• 2 tbps Ginger garlic paste
• ½ cup Tomato puree
• 1 cup Mushrooms
• 5 tbsps Butter
• 2 tbsps Flour
• 1½ cup Milk
• To taste Salt, red chili, pepper powder
Method
1. Boil the macaroni in salted water till tender, drain and keep aside.
2. Chop and sauce one onion in butter till transparent, then add garlic
paste and fry till oil comes to the top.
3. Add tomato puree, boiled macaroni, salt pepper and red chilly to taste.
Fry till mixture is dry.
4. Clean and chop the mushrooms. Chop and saute the remaining onion in
butter.
5. When transparent, add mushrooms, salt, red chili and pepper. Add water
and cook till done.
6. Melt 2 tbsps butter and add sifted flour. Cook till flour turns pink, then
remove from fire and slowly add milk stirring all the time.
7. Bring to a boil when all the milk is used up.
8. Line a buttered baking dish with cooked mushrooms and pour half the
white sauce.
9. Next spread the macaroni mixture and pour the remaining white sauce.
10. Bake at 200-200o C till firmly set.

12
Veg Pizza
Ingredients
For One 8” Pizza Base
• 250 gm Flour
• ½ tsp Salt
• 2 tbsp Sugar
• 2 tbsp Milk
• 50 ml Cooking oil
• 5 gm Yeast
Filling
• 100 ml Tomato puree
• 50 gm Parmesan cheese (grated)
• 1 tsp Oregano or Mixed herbs
• 100 gm Green bell pepper (diced)
• 4 large Potatoes (diced & boiled)
• 75 gm Red bell pepper (diced)
• 250 gm cheese (grated)
• 75 gm Yellow bell pepper (diced)
• 1 tsp Salt
• 2 large Onions (finely sliced)
• 2 tsp Black pepper
• 75 gm Button mushroom (sliced)
Method
1. Preheat the oven to 225° C.
2. Mix all the ingredients together in a glass bowl for smooth dough.
3. Keep aside under a damp muslin cloth to prove/rise.
4. When done knock back the dough and roll out into an 8” disc.
5. Place on a greased and flour dusted baking/ cooking tray.
6. Prick the base all over with a fork. Bake in a hot oven at 225° C for 4
minutes and remove from oven.
7. Spread the tomato puree evenly over the pizza bread.
8. Arrange the vegetables over the puree. Sprinkle herbs, salt and pepper
on top.
9. Mix the two cheeses together and sprinkle on the top.
10. Change the oven function to broil.
11. Place the pizza onto a greased and dusted baking/cooking tray in the
centre rack position. Broil at 250° C for 8 minutes.
12. Remove using tongs and serve hot.

13
Cheese and Garlic Bread
Ingredients
250 gm Flour
1 tbsp Yeast
2 tsp Sugar
1 tbsp Butter
1 tsp Salt
150 ml Water
3 tbsp Garlic (finely chopped)
5 tbsp Cheese (grated)
1 Egg (beaten for egg wash)
Method
1. Take 2 tablespoons of warm water. Add in the yeast and sugar. Mix well.
2. Cover and keep aside for 10 minutes.
3. Sieve the flour into a large bowl and pour in the yeast mixture.
4. Knead till you get a smooth pliable dough.
5. Leave to prove/rise under a damp muslin cloth till it doubles in volume.
6. Knock back the dough and add in the garlic and half the cheese into the
dough.
7. Knead well for a few minutes then shape the bread or place into a
greased bread tin or a greased baking/cooking tray.
8. Sprinkle the remaining cheese on the top, leave to prove/ rise under a
damp muslin cloth till it double in volume.
9. Brush on a lightly beaten egg and bake in a preheated oven for 30
minutes at 225° C or till golden brown.
10. Remove with mittens provided and place the bread onto a cooling rack.

14
Roast Chicken
Ingredients
• 1 large Chicken
• ½ tsp Salt
• ½ tsp Black pepper powder
• ½ tsp Parsley (finely chopped)
• 2 tbsp Soft butter
• 1 tbsp Mixed herbs
• 1 tbsp Chilli flakes
• 1 kg Baby potatoes
Stuffing
• 250 gm Cooked rice
• 1 Chicken liver (finely diced)
• 1 Onion (finely diced)
• 250 gm Button mushroom (chopped)
• 1 tbsp Parsley (finely chopped)
• ¼ tsp Black pepper powder
• ½ tsp Salt
• ¼ tsp Grated nutmeg
• 2 tsp Butter
• 1 tsp Mixed herbs
Method
1. Clean & wash the chicken well. Mix parsley, mixed herbs, chilli flakes,
salt and pepper together and liberally rub it all over the chicken.
2. In a frying pan, heat butter and saute chopped onions, chicken liver and
mushrooms for 2-3 minutes. Add the cooked rice and the remaining
stuffing ingredients.
3. Preheat the oven to 225° C.
4. Stuff the filling into the chicken cavity and truss up the chicken.
5. Skewer the chicken onto the Rotisserie rod. Place in the oven using the
Rotisserie tong and place the drip/crumb tray below.
6. Broil/Grill at 225° C for 50-55 minutes or till the chicken is a nice golden
brown, basting occasionally.
7. Serve the chicken on a platter along with roasted potatoes, boiled peas
and fresh lettuce.
Roast Potatoes
1. Wash and peel the potatoes. Parboil the potatoes for 45 minutes.
2. Mix the potatoes with butter and place onto a baking/cooking tray.
3. Place the tray in the center rack position in the oven.
4. Bake at 180° C for 7-8 minutes.

15
Spaghetti with Chicken and Eggplant
Ingredients
• 200gm Chicken (boneless)
• 2 Capsicum
• 1 tbsp Mustard paste
• 100gm Spaghetti
• 4-5 Eggplant (small)
• 6 tbsp Oil
• ¾ Cup Tomato
• 3-4 cloves Garlic
• ¼ Cup Tomato ketchup
• ½ tsp Peppercorns (crushed)
• 1 tsp Parsley (finely chopped)
• 3 tsp Red chillis (crushed)
• To taste Slat
• 1 tsp Butter
• ¾ Cup Cheese (grated)
Method
1. Wash remove stem, halve, deseed and cut capsicum into juliennes. Peel
and chop garlic.
2. Clean and wash the chicken. Pat dry and cut into thin 1½ inches long
strip Marinate the chicken with mustard paste for about 15-20 minutes.
Heat 2 tbsps oil in a frying pan and fry the chicken. Add capsicum
juliennes and mix. Keep it aside.
3. Cut the eggplant into thin roundels and soak in cold water for 10
minutes.
4. Boil spaghetti in a large vessel in plenty of salted water with 1 tbsp of oil
til it is nearly cooked. Drain, mix it with 1 tbsp of oil and spread on a plate
to cool.

16
5. At the same time, heat 1 tbsp of oil in another frying pan, add garlic and
saute, add tomato, tomato ketchup and mix. Add salt, one third of the
crushed black peppercorns and 1 tbsp of chopped fine parsley.
6. Add cooked spaghetti in the sauce and mix properly but gently. Remove
from the heat and keep aside.
7. Heat the remaining oil in another frying pan and add roundels of
eggplant. Let it cook on low heat. Add some salt, one third of the
crushed peppercorns, half of the crushed red chili, half tbsp of chopped
parsley and mix. Turn over the eggplant roundels and again season it
with salt, remaining crushed red chili and half tbsp of chopped parsley.
8. Take a baking dish; apply butter on the base and inner sides. Cover the
base with the cooked chicken and capsicum and then spread the
spaghetti over.
9. Arrange the eggplant over the spaghetti until the spaghetti is covered
entirely.
10. Sprinkle grated cheese and the remaining chopped parsley over it.
11. Cook in preheated oven at 160 degree C for 10-15 minutes. Serve hot.
Tip: To make tomato concasses, blanch the tomatoes, remove the skin
and the seeds and roughly chop.

17
Samak Kebab
Ingredients
• 650 gm Rawas fillet (1” cubes)
• 8 Cherry tomatoes
• 2 large Green capsicum (1” cubes)
• 1 large Onion (1” cubes)
Marinade
• 2 small Onions (ground to a paste)
• 3 Bay Leaves
• 1 tsp Cumin powder
• ¼ tsp Black pepper powder
• 45 ml Olive oil
• 1 tsp Parsley (chopped)
• 2 limes of juice
• To taste Salt
Garnish
• Parsley sprigs & Lemon wedges
Method
1. In a glass bowl mix all the marinade ingredients together.
2. Keep aside for 10 minutes to allow the flavors to mix.
3. Add in the prepared fish, capsicum, tomato and onion. Pre-heat the oven
to 180° C.
4. Set the oven function to broil mode.
5. Skewer the fish alternating each piece with a tomato, capsicum and
onion.
6. Place a drip/crumb tray below the skewered fish.
7. Place the skewers on the wire grill cum barbecue tray and place in the
top rack position.
8. Broil/Grill at 200° C in the preheated oven for 10 minutes.
9. Using mittens turn the fish skewers around and brush on some
marinade.
10. Return to the oven on the top rack position and broil/grill for 2 more
minutes or till golden brown.
11. Serve hot on a bed of rice, garnished with lemon wedges and parsley.

18
Baked Eggs with Chives
Ingredients
• 2 tbsp Butter (melted)
• 100 gm Ricotta cheese
• 2 tbsp Snipped fresh chives
• 4 Eggs
• 125 ml whipping cream
• Salt and freshly ground pepper
Method
1. Lightly butter individual serving dishes or molds.
2. Pre-heat the oven to 150° C.
3. Spread cheese and chopped chives onto the base of the dish.
4. Break an egg into the center and pour in a little cream.
5. Sprinkle the top with salt and pepper.
6. Place the dishes onto a baking/cooking tray.
7. Pour a cup full of hot water onto the base of the baking/cooking tray to
steam bake.
8. Place the tray in the center rack section of oven and bake at 150° C for
10-12 minutes.
9. Remove using mittens and serve hot garnished with fresh chives.

19
Bread & Butter Pudding
Ingredients
• 600 ml Milk
• 6 tbsp Sago (sabudhana)
• 3 Eggs
• 2 tbsp Honey
• ¼ tsp Nutmeg powder
• ¼ tsp Cloves (powdered)
• 2 Apples peeled & sliced
• 2 tbsp Butter
• 8 Bread slices
Method
1. Bring the milk and sago to a boil. Reduce the flame and cook for 20
minutes. Leave to cool.
2. Beat in eggs, honey and spices into the cooled mixture gently cook
apples in butter until soft.
3. Cut the bread into triangles and arrange in individual molds and fill with
sago mixture.
4. Pour a cup of hot water onto the baking/cooking tray.
5. Place the mold on the tray.
6. Preheat the oven to 180° C.
7. Place the tray in the oven in the center rack position and bake at 180° C
for 45 minutes.
8. Using the mittens provided remove and cool. Refrigerate for an hour
before serving.

20
Eggless Chocolate Cake
Ingredients
• 425 gm Refined flour
• 5 tbsp Cocoa powder
• 1 tsp Baking powder
• ½ tsp Soda
• 1 tin Condensed milk
• ½ tsp Vanilla essence
• 150 ml Milk
• 100 gm Butter
Method
1. Sift flour, cocoa, baking powder and baking soda together thrice.
2. Pre-heat the oven to 150° C.
3. Grease and lightly dust a 6” cake tin.
4. Mix the condensed milk, butter and vanilla essence well till light and
frothy.
5. Mix flour and milk in three stages alternately into the condensed milk
mixture.
6. Take care not to make the batter too runny and thin.
7. Put the batter into the prepared cake tin and place it in the oven and
bake at 180° C for 18-20 minutes.
8. Check if the cake is ready by inserting a skewer into the cake.
9. If it comes out clean the cake is done.
10. Remove from the oven using the mittens and turn the cake out of the tin
onto a cooling rack to cool.

21
Chocolate Marble Cake
Ingredients
• 1 ¼ cups All-purpose flour
• 1 tbsp. Corn flour
• 4 tsp Cocoa powder
• ¾ tsp Cooking soda
• 1 ¼ cups powdered sugar
• ¼ tsp Salt
• 1/3 cup Unsalted butter
• 2 Small eggs at room temperature
• ¾ cup Milk
• ½ tsp Vanilla essence
Method
1. Keep the butter outside the refrigerator so that it can soften a bit.
(Softened butter is easier to beat but it should not melt).
2. Sieve all-purpose flour, corn flour, cooking soda twice and divide into two
bowls. Take one bowl, add cocoa powder and sieve again.
3. Now we will have two bowls, one without and the other containing cocoa
powder.
4. Take a large bowl, add butter and sugar and mix well with a whisk till
smooth.
5. Now add eggs one at a time and beat well with an egg beater or electric
hand mixer.
6. There should be no lumps. Next add salt, vanilla essence, milk and beat
till all the ingredients are well mixed. Divide this as well into two bowls.
7. Add the all-purpose flour mix with cocoa to one bowl, and the
all-purpose flour mix without cocoa to the other bowl and fold well with a
spoon. Make sure that there are no lumps.
8. Preheat the oven at 170 degree Celsius with both upper and lower rods
on for 10 minutes.
9. Meanwhile grease an aluminum cake pan with butter and then flour with
all-purpose flour. Dust away any excess flour and keep the pan ready.
10. Now take the pan, add a few tbsps of plain cake mix, and then add a
few tbsps. Of cocoa cake mix.
11. Repeat the procedure till both the cake batters are poured into the pan.
12. Fill the cake pan till slightly more than half and finally use a knife or
spoon to form random patterns on the cake batter. • Now place the cake
pan in the central rack of the oven and bake at the same temperature
with upper and lower rods on for 20 to 25 minutes or till a toothpick
inserted comes out clean.
13. Cut it into pieces and serve with tea. Method

22
Cheese Cake
Ingredients
• Crust 150 gm Butter (softened)
• 150 gm Granulated sugar
• 2 tbsp Honey
• 1 egg Yolk (optional)
• 1 tbsp Rum (optional)
• ½ tsp Vanilla essence
• ¼ tsp Baking powder
• 250 gm Refined flour
Filling
• 100 ml Orange juice
• 2 tbsp Orange marmalade
• 100 ml Cream
• 200 gm Cream cheese (softened)
• 75 gm Granulated sugar
• 3 Eggs (at room temperature)
• 1 tbsp Vanilla essence
• ½ cup Miniature semi-sweet chocolate chips
• A pinch of Salt
Method
For Crust
1. In a blender mix butter with sugar and honey until light and fluffy. In
separate bowl, whisk egg yolk with rum and vanilla.
2. Add egg yolk mixture to butter mixture slowly, and beat until combined.
3. Sift flour and baking powder together and gently fold in the butter
mixture to make a light short crust pastry.
4. Preheat the oven to 150° C.
5. Lightly grease an 8” pie mold and spread the pastry dough evenly at the
base to about 1 cm thickness.
6. Prick the base all over with a fork and bake for 3 minutes in a pre-heated
oven at 150° C. Remove using mittens and cool slightly before pouring
in the batter.
For Filling
1. In a glass bowl combine all the filling ingredients together using a hand
blender. When the mixture is smooth keep aside for a few minutes.
2. Preheat the oven to 150° C.
3. Pour the prepared filling mixture into the baked pastry shell.
4. Place in the center rack position in the oven and bake at 200° C for 20
minutes. Remove and stand at room temperature for 15 to 20 minutes.
5. The cake will shrink a bit. Then chill for a few hours before serving.

23
Strawberry Soufflé
Ingredients
Crust
• 1500 ml hot milk
• 4 tbsp Butter
• 4 tbsp Flour
• 8 tbsp Strawberry crush
• 6 Egg whites
Garnish
• 2 tbsp Strawberry crush
Method
1. In In a heavy bottomed vessel, melt butter and add in the flour.
2. Mix together and cook for 2-3 minutes on a low flame till the raw smell
disappears.
3. Do not let it brown or color.
4. Gradually add in hot milk whisking constantly to avoid lumps.
5. Continue stirring till mixture thickens.
6. Remove from flame and whisk in the strawberry crush.
7. Preheat oven to 200° C.
8. In a clean dry bowl beat egg whites till stiff.
9. Fold the egg whites quickly yet gently into the strawberry mixture.
10. Pour into Soufflé molds and place on the baking/cooking tray.
11. Place the tray in the center rack position.
12. Bake at 220° C for 20-25 minutes.
13. Top with strawberry crush and serve immediately.

24
Blueberry Cornbread Muffins
Ingredients
• ½ cup buttermilk
• 1 large egg
• 2 tablespoons of sugar
• 2 tablespoons of unsweetened apple sauce
• ⅓ cup cornmeal
• ⅔ cup of whole wheat flour
• 2 teaspoons of baking powder
• ¼ teaspoon of salt
• ½ teaspoon cinnamon
• ½ cup of fresh blueberries
Method
1. Spray a 6-cup muffin tin with nonstick spray.
2. Preheat toaster oven to 350 degrees Fahrenheit.
3. In a medium size bowl, mix together the flour, cornmeal, baking powder,
cinnamon, and salt, and set aside. In a small bowl, whisk together the
buttermilk, egg, applesauce, and sugar.
4. Add the wet ingredients all at once to the dry ingredients.
5. Mix until just barely combined and then fold in the blueberries. Do not
over mix.
6. Divide up into the 6 muffin cups.
7. Pop into the toaster oven. Bake these for 20 to 25 minutes until a
toothpick comes out clean.

25
Viennese Walnut Cookies
Ingredients
Flour - 1 ½ cups
Butter - ½ cup
Sugar - 1/3 cup
Salt - ¼ tsp
Vanilla - 1 tsp
Finely chopped walnuts - 1 1/3 cup
Method
1. Cream together butter, sugar, salt & vanilla.
2. Blend in flour & walnuts, using hands to form the dough into a ball.
3. Chill for 30 mins.
4. Roll on lightly floured board to a little less than ¼ “thickness.
5. Cut with 2” cutter.
6. Bake on ungreased baking sheet at 350 degrees (180 degrees C) for
10-12 mts, until very lightly brown.
7. Cool on a wire rack.
8. Makes 50 biscuits.

26
Eggless Carrot Cake with Atta
Ingredients:
Sugar - 1.5 Cups
Carrot - 3 Cups Shredded
Atta - 2 Cups
Salt - 1/2 tsp
Baking powder - 2 tsp
Baking soda - 1/2 tsp
Orange Juice - 1/2 cup
Dalchini powder - 2 tsp
Oil - 3/4 Cup
Method
1. Preheat oven to 350 degrees.
2. With a large spoon, mix together- 1.5 cups sugar, 2 cups Aashirvaad
Atta, 1/2 tsp salt, 2 tsp baking powder, 1/2 tsp baking soda, and 2 tsp
dalchini powder.
3. Add 3 cups shredded carrots, 1/2 cup orange juice and 3/4 cup oil to the
above mixture.
4. Mix everything well and then add 1 cup chopped walnuts and 1 cup
raisins to the mixture.
5. Pour mix into a greased pan and bake till toothpick comes out clean.

27
Cheese Chilli Toast
Ingredients:
Amul cheese, Mozzarella : 4 tbsp grated
Green chilies: 2 finely chopped
Capsicum: 1 finely chopped
Onion: 1 finely chopped
Coriander Leaves: 2 tbsp finely chopped
Pepper powder: 1 tsp
Salt to taste
Chilli sauce: 2 tsp
Wheat Bread: 1 loaf
Method
1. Grate Cheese and keep it aside.
2. Heat little oil in kadai, fry onions, capsicum, green chilies till it turns
transparent. Add pepper powder, chilli sauce, coriander leaves and salt
to taste. Mix lightly. Finally Mix this mixture with grated cheese.
3. Take a slice of bread, spread 2 tbsp of above mixture evenly.
4. Bake in preheated oven at 180C for 5 minutes or till the cheese melts.
5. Serve hot Cheese Chilli toast with tomato sauce.

28
Baked vegetables with pasta
Ingredients
To prepare the vegetable mix
1 potato skin peeled and cut into cubes
½ cup boiled corn
1 small capsicum thinly sliced
½ cup shelled peas
1 cup sliced thinly carrots and cabbage
¼ cup thinly sliced green beans
½ cup paneer cut into cubes
4 to 5 cubes of cheese grated
½ tsp pepper powder
½ tsp salt
To cook the pasta
1 cup pasta
4 to 5 cups Water
½ tsp salt
To prepare the white sauce
1 tbsp butter
1 tbsp All-purpose flour (maida)
1 cup milk
½ tsp pepper powder
½ tsp salt
Method
1. Boil water in a pan along with salt. Add pasta and cook for about 10
minutes. Once the pasta is cooked, drain the excess water and keep
ready.

29
2. While the pasta is getting cooked, take a steamer, and steam the
potatoes, green beans and peas for about 10 minutes.
3. Take the carrots, cabbage, boiled corn, paneer cubes, half the grated
cheese, capsicum, steamed potatoes, green beans and peas in a large
bowl. Add salt and pepper (Adjust to taste) and mix well. Keep this ready
as well.
4. Preheat the oven at 150 degrees C for 10 minutes.
5. Meanwhile grease an oven proof pan with oil and add half the vegetable
mix. Layer it with the pasta and top it again with vegetable mix.
6. Prepare the white sauce by melting butter in a nonstick pan. Add maida
and stir for a couple of minutes in low flame till it turns slight golden and
the raw smell goes. Make sure that there are no lumps. Next add milk,
salt and pepper and stir for a minute till it gets a sauce like consistency.
7. Pour this over the prepared vegetables and pasta dish.
8. Finally add grated cheese and garnish with sliced carrots and capsicums.
9. Place the pan in the central rack of the oven and bake at the same
temperature with both upper and lower rods ON for 15 to 20 minutes (or
till the cheese melts).
10. Serve hot.
Notes:
1. Increase or decrease the proportions of vegetables and pasta according
to your choice.
2. To make the dish healthier, omit the white sauce. The dish will taste
equally good.
3. You can also add cauliflower, spinach and mushrooms to add more flavor
and taste to the dish.

30
Basic Pound Cake
Ingredients
4 eggs
200 grams breakfast sugar
200 grams unsalted melted butter
200 grams regular flour
8 grams baking powder
Method
1. In a bowl, mix egg and sugar with hand blender.
2. Once mixed properly add flour and baking powder and mix again.
3. Add the mixture to the melted butter.
4. Rub some butter in the mold and place the butter paper. Now pour the
cake mixture in the mold.
5. Preheat the OTG at 180°C for 2-3 minutes and place the mold on the
baking tray to bake.

31
Tandoori Gobhi
Ingredients:
1 Big Cauliflower
1 cup Curd (Hung)
½ tsp Red Chilli Powder
½ tsp Turmeric Powder
1 tsp Dhania Powder
A pinch of Hing
½ tsp Ginger & Garlic Paste
1tsp Ajwain
½ tsp Garam Masala
1 tsp Kastoori Methi
2 Onions (rings)
1 tsp Tomato Ketchup
1 tbsp Tomato Puree
Salt to taste
Method:
1. Mix the hung curd with Besan, Salt, Red chili Powder, Dhania Powder,
Turmeric Powder, Garam Masala, Ginger & Garlic Paste, Hing, ajwain,
Kastoori Methi and mix well.
2. On the other hand, dice the pieces of cauliflower.
3. Boil water in a pan, add salt and cauliflower and bring it to a boil. Rinse
and pat dry the cauliflower pieces.
4. Now Marinate these boiled cauliflower pieces in the curd mixture and
keep aside for 30 minutes.
5. Set up this marinated mixture in a deep dish and grill it at 220 degrees in
the OTG for about 25-30 minutes.
6. Separately, take oil in a pan and sauté onion rings. Add the tomato
ketchup and tomato puree to the same.
7. To arrange, take out the grilled Gobhi and top it up with onion rings and
coriander leaves.
8. Serve Hot!

32
Glossary
Bank Blind: The Procedure of banking Unfilled Pastry Case. The Pastry is
filled with dry peas or beans or pricked to prevent puffing. Example: Flans,
pies, Tarts.
Banking: It means cooking in the dry heat of the oven. Banking is done by
surrounding the food with hot air
Batter: A mixture of dry ingredients & liquid that is stirred or
beaten, of a thin creamy and pouring consistency.
Baste: A to moisten roasting meats, while cooking melted fat or sauces, to
prevent drying of meats and toad flavor.
Beat: To make a mixture smooth with a regular, unidirectional movement
using a wooden spoon, hand whisk or electric mixer.
Blend: To mix two or more ingredients thoroughly to achieve a uniform
mixture with a spoon, beater or liquidizer.
Broil: Hot steam air that goes on upper side of an OTG
Caramelize: To heat sugar till it browns.
Coat: To cover cooked food with a thin layer of sauce or dry powder.
Consistency: The thickness of the mixture, such as cake or batter mixture.
Cream: To beat butter & sugar together until smooth, creamy & light by
incorporation of air with a wooden spoon, hand mixer or a whisk.
Cut & Fold: To mix flour very gently into a mixture.
Dredge: To sprinkle food evenly with sugar or refined flour.
Dough: Mixture of flour, milk, water, &/or egg, sometimes enriched with fat,
which is firm enough to knead, roll & shape.
Dust: To sprinkle lightly with refined flour, sugar, spices or seasonings.
Flake: Break or pull apart foods with a fork or with a fork or with fingers.
Grate: To rub food on a grater to produce fine shreds.
Grease & Dust: To coat the surface of a dish/tin with fat & flour to prevent
sticking of food.

33
Grilling: Indicates cooking under a red hot grill, where the heat radiates from
the two heating element. Used for roasting small tender pieces of meat, fish,
vegetables, browning of food etc. Grilling tends to dry the food being grilled
Apply a litter oil or melted fat to moisten the food being grilled & mid-way
during the grilling time. Also turn the food being grilled upside down midway
through the grilling time.
Knead: To work a dough lightly by bringing the outside of the dough into the
center, using the knuckles of the hands.
Marinate: Blend of wine, oil, vinegar, herbs or spices. Used to tenderize,
flavor & preserve meat, poultry or fish.
Puree: A smooth mixture obtained by rubbing cooked fruit vegetables etc.
through a sieve or putting in a blender.
Saute: To fry food in small amounts of butter / fat until evenly browned.
Sift: To put dry ingredients through a fine sieve.
Whip: To beat liquid with a fork until froths.
Whisk: Looped wire utensil used to beat air into eggs, cream or batter.
 Loading...