

Instructions For Use:
1. Install a fresh 9-volt alkaline battery in the receiver. (Battery not included).
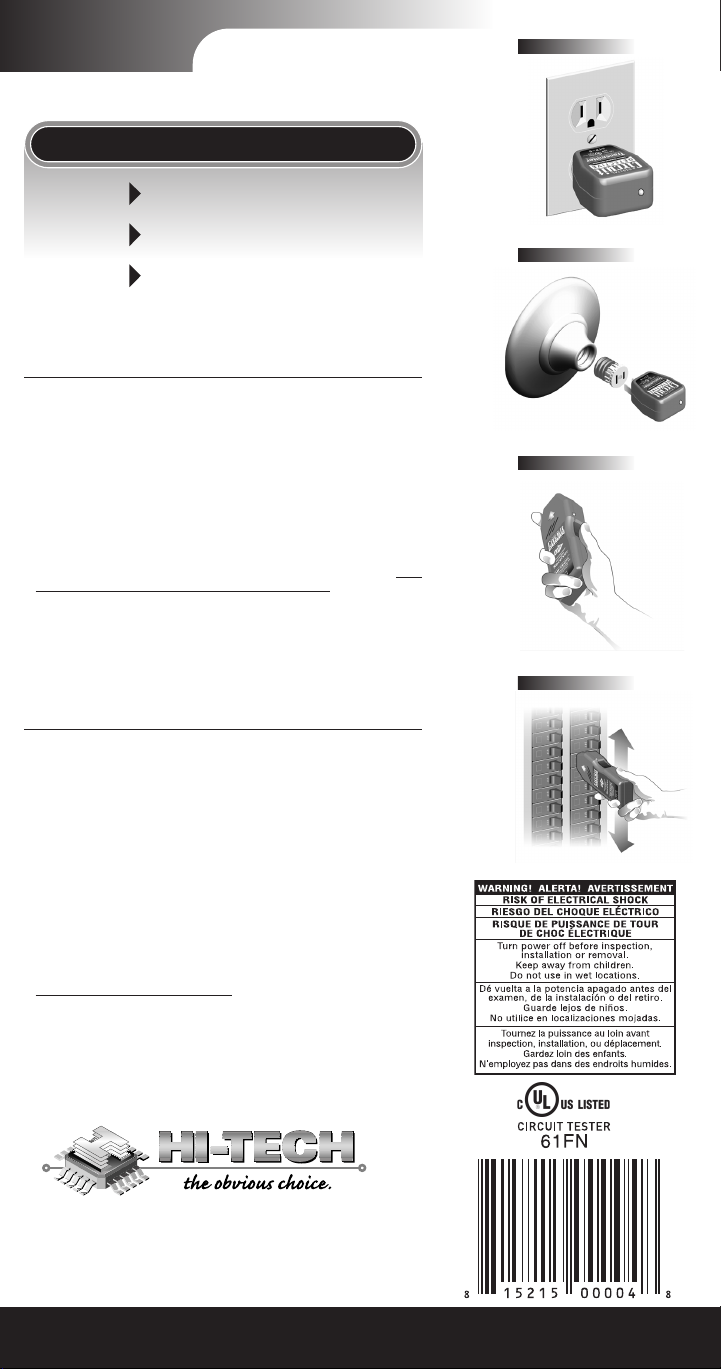
2. Plug the transmitter into the live wall outlet (See #1a) or the installed HTP-SA
light socket adapter
(sold separately) [See #1b] on the circuit you wish to iden-
tify. The LED will glow, indicating power.
3. Turn the receiver power ON by tapping the power switch once. The receiver will
beep and the arrow will flash. The LED above the switch will remain lit (See #2).
4. At the breaker box or fuse box, hold the receiver PERPENDICULAR to the breakers. With the power switch on top, scan the rows of breakers from top to bottom (See #3). During this scan the receiver may beep and flash at several
breakers. This is a normal part of the identification process. When you have
completed one scan of all the breakers, go back to the first breaker and
, with-
out touching the po
wer button, sc
an them all a second time. When the receiver
beeps and the arrow flashes during the second scan, you have correctly identified the circuit.
5. When you have finished, turn the receiver off by pressing and holding the power
switch until the LED above the switch turns off. Beeping and flashing of the
receiver during shutdown is normal. Always unplug the transmitter when you
have finished.
HTP-6 Identificador Del Circuito
Instructiones:
1. Instale una batería alcalino fresca de 9 voltios en el receptor.
(batería no incluida).
2. Enchufe el transmisor en el enchufe vivo en la pared (vea # 1) o en el adaptador ligero instalado del socket de HTP-SA (vea # 4)
(vendido por separado) en
el circuito que usted desea identificar. La luz LED se encenderá, indicando la
corriente.
3. Gire la potencia del receptor presionando el interruptor una vez. El receptor señalará
y la flecha contelleará. El LED sobre el interruptor permanecerá prendido.
4. En la caja de cortacircuítos o de fusibles sostenga el receptor PERPENDICULAR a los cortacircuítos, con el interruptor arriba, explore las filas de cortacircuítos con un movimiento hacia arriba y abajo. (vea #2) Durante esta exploración
el receptor puede señalar y contellear en varios cortacircuítos. Ésta es una parte
normal del proceso de la identificación. Cuando usted ha terminado una exploración de todos los cortacircuítos, vaya de nuevo a los primeros cortacircuítos
y e
xplórelos todos los una segunda vez. Cuando el receptor señala y la flecha
prende por intervalos durante la segunda exploración, usted ha identificado
correctamente el circuito.
5. Cuando usted ha acabado, presiona y sostiene el interruptor hasta el LED sobre
el interruptor se apage. El señalar y el contellear del receptor durante la parada
es normal. Desenchufe siempre el transmisor cuando usted ha acabado.
HTP-6
25 Hi-Tech Dr.
Oglesby, IL 61348
Phone: 1-877-HITECH5
Fax: (815) 224-1265
www.circuitdetective.com
Digital Calibration
Flashing arrow for quick ID
Auto-Off battery saver
Fully Automatic
#2
#1a
#1b (Optional)
#3

Instructions For Use:
1. Install a fresh 9-volt alkaline battery in the receiver. (Battery not included).
2. Plug the transmitter into the live wall outlet (See #1a) or the installed HTP-SA light
socket adapter
(sold separately) [See #1b] on the circuit you wish to identify. The LED
will glow, indicating power.
3. Turn the receiver power ON by tapping the power switch once. The receiver will
beep and the arrow will flash. The LED above the switch will remain lit (See #2).
4. At the breaker box or fuse box, hold the receiver PERPENDICULAR to the breakers. With the power switch on top, scan the rows of breakers from top to bottom (See #3). During this scan the receiver may beep and flash at several
breakers. This is a normal part of the identification process. When you have
completed one scan of all the breakers, go back to the first breaker and, with
out touching the power button,scan them all a second time. When the receiver
beeps and the arrow flashes during the second scan, you have correctly identified the circuit.
5. When you have finished, turn the receiver off by pressing and holding the power
switch until the LED above the switch turns off. Beeping and flashing of the
receiver during shutdown is normal. Always unplug the transmitter when you
have finished.
HTP-6P Identificador Del Circuito
Instructiones:
1. Instale una batería alcalino fresca de 9 voltios en el receptor.
(batería no incluida).
2. Enchufe el transmisor en el enchufe vivo en la pared (vea # 1) o en el adaptador
ligero instalado del socket de HTP-SA (vea # 4)
(vendido por separado) en el cir-
cuito que usted desea identificar. La luz LED se encenderá, indicando la corriente.
3. Gire la potencia del receptor presionando el interruptor una vez. El receptor señalará
y la flecha contelleará. El LED sobre el interruptor permanecerá prendido.
4. En la caja de cortacircuítos o de fusibles sostenga el receptor PERPENDICULAR
a los cortacircuítos, con el interruptor arriba, explore las filas de cortacircuítos
con un movimiento hacia arriba y abajo. (vea #2) Durante esta exploración el
receptor puede señalar y contellear en varios cortacircuítos. Ésta es una parte
normal del proceso de la identificación. Cuando usted ha terminado una exploración de todos los cortacircuítos, vaya de nuevo a los primeros cortacircuítos y
explórelos todos los una segunda vez. Cuando el receptor señala y la flecha
prende por intervalos durante la segunda exploración, usted ha identificado correctamente el circuito.
5. Cuando usted ha acabado, presiona y sostiene el interruptor hasta el LED sobre
el interruptor se apage. El señalar y el contellear del receptor durante la parada
es normal. Desenchufe siempre el transmisor cuando usted ha acabado.
HTP-6P
25 Hi-Tech Dr.
Oglesby, IL 61348
Phone: 1-877-HITECH5
Fax: (815) 224-1265
www.circuitdetective.com
Microprocessor Controlled
Flashing arrow for quick ID
Auto-off battery saver
No false readings!
Fully Automatic
#2
#1a
#1b (Optional)
#3
 Loading...