


HE-ZM883R User Manual
PAGE: 1
TABLE OF CONTENTS
1. Preface…………………………………………………………………………… 4
2. Precautions……………………………………………………………………… 4
3. Product Introduction…………………………………………………………… 6
4. Features Introduction………………………………………………………….. 7
5. Buttons and Interface………………………………………………………….. 9
6. Charging the PMP………………………………………………………………. 12
7. Basic Operation…………………………………………………………………. 14
8. Detailed Explanation of Operation…………………………………………... 17
8.1 Video Player………………………………………………………. 18
8.2 Audio Player………………………………………………………. 19
8.3 Picture View………………………………………………………. 21
8.4 Camera…………………………………………………………….. 22
8.5 DV…………………………………………………………………… 25
8.6 AudioRec…………………………………………………………... 26

HE-ZM883R User Manual
PAGE: 2
8.7 Game……………………………………………………………….. 27
8.8 Learning…………………………………………………………… 29
8.9 Tool………………………………………………………………… 31
8.10 Setup………………………………………………………………. 32
8.11 Flash Player………………………………………………………. 33
8.12 VideoRec………………………………………………………….. 33
8.13 Radio………………………………………………………………. 35
9. U-Disk and USB Driver………………………………………………………… 36
9.1 Computer Requirements……………………………………….. 36
9.2 USB Driver Installation………………………………………….. 36
9.3 Connecting PMP to your Computer…………………………… 39
9.4 Using U-Disk………………………………………………………. 40
9.5 Using SD Card…………………………………………………….. 41
9.6 Adding and Removing Files……………………………………. 42
10. Video & Image Files Conversion Software……………………………….. 44
10.1 ASF Transcoding Setup Tools…………………………………. 44

HE-ZM883R User Manual
PAGE: 3
10.2 AVI Transcoding Setup Tools 0.9.7.3………………………… 48
11. Common Errors and Solutions…………………………………………….. 53
12. Product Technical Specifications……………………………………….… 56
13. Accessories…………………………………………………………………… 59

HE-ZM883R User Manual
PAGE: 4
1. PREFACE
We express our sincere thanks for purchasing our Portable Media Player (PMP)!
Before operating this PMP, be sure to read this user manual carefully. After reading it, please keep it in a
safe place for future reference.
We reserve the right to make changes to this PMP and/or this user manual without notice. Please visit
our company’s website listed on the product packaging for additional product information and/or updates.
Note: The pictures, diagrams and certain functions described in this manual may differ from the actual
product due to different models.
2. PRECAUTIONS:
Before operating this PMP, please read the following precautions carefully:
A. Do not operate this PMP in extremely cold, hot, dusty or damp environment.
B. Avoid putting this PMP under direct sunlight
C. Do not scrub this PMP with a hard thing; it may result in scratches on the screen and/or
damage to the hardware.
D. Before inserting or pulling out the game card or SD card, please turn off the PMP power first.
Inserting or pulling out the card, while the PMP is on may cause damage to the PMP and/or the
card.
E. Keep this PMP and all accessories out of children’s reach under 3 years old.
F. Charge the PMP when:

HE-ZM883R User Manual
PAGE: 5
• The battery capacity icon is empty and flashing
• The PMP powers off automatically, immediately after turned on.
G. Avoid operating this PMP under very dry environment to prevent damage from static-shock.
H. Do not disconnect the USB cable while formatting, uploading or downloading files;
disconnecting USB cable will result in file corruption and may require reformatting.
I. When used as a removeable disk, users should backup important data. Our company is not
responsibel for loss of data.
J. This PMP does not have any user-serviceable parts or accessories, do not try to disassemble
this PMP. Use only the AC charger that came with this PMP to charge it. Try not to charge
the PMP while using it.
K. Follow instructions in section “U-Disk and USB Driver” for saving downloading video, music,
photos or other files in appropriate folders. Not following the instructions will result in the PMP
failing to play these files.
L. After deleting files directly from the PMP, please turn off the PMP once before connecting it to
the computer. Otherwise, the file folder DCIM/100MEDIA under this PMP’s removable disk
may not be found.
M. After inserting or pulling out the earphones many times, the PMP’s built-in speakers or the
earphones may not work. If this happens, press “RESET” button or long press “power” button
to restart the PMP.
N. While taking photos or making a video, avoid shaking the PMP to make sure the image quality
is not bad.
O. While operating this PMP, protect camera’s lens from accidental scratches. Scratches on the
lens will affect image quality.

HE-ZM883R User Manual
PAGE: 6
3. PRODUCT INTRODUCTION:
• 3.0 inches LTPS—TFT high resolution true color LCD
• Game function, thousands of NES simulator games downloadable from the Internet
• Digital camera function with 2-MegaPixels resolution; supporting photo & video shoot
• Catch the wonderful moment in life with DC self-shooting function
• Support AVI (DIVX, XVID) and ASF (MPEG- 4) formats with resolution up to 720*480, 30
frames/sec - DVD image quality
• Audio play function, supports MP3/WMA/WAV/PCM/ADPCM formats
• Supports FLASH2.1 animation play
• Photo browse function, supports JPEG, GIF, PNG, and BMP, and EXIF2.1 JPEG format
• Audio/video output: AV OUT (NTSC/PAL TV system)
• Record function: supports AV IN, line-in recording and microphone recording
• E-Book read function
• Chinese-English and English-Chinese Dictionary
• Calendar (solar & Chinese lunar calendars), calculator, storage checking function; auto power off,
time display
• External SD card; expand storage capacity, supports up to 2GB SD card
• USB2.0 port (full speed)
• FM Radio
• Built-in Lithium rechargeable battery
HE-ZM883R User Manual
PAGE: 7
4. FEATURES INTRODUCTION:
Features Support (Yes/No)
Digital Video Shoot Yes
Digital Photo Shoot Yes
Video Player Yes
Audio Player Yes
FM Radio Yes
Flash Media Player Yes
Photo Browsing Yes
Digital Video Recording (A/V-In) Yes
Voice Recording Yes
Game Player Yes
Calculator Yes
Calendar Yes
Memory Checking Yes

HE-ZM883R User Manual
PAGE: 8
Electronic-Book Yes
English-Chinese Electronic Dictionary Yes
Multi-language Selection Yes
Button Lock Function Yes
Screen Saver Function Yes
Audio/Video Output Yes
HE-ZM883R User Manual
PAGE: 9
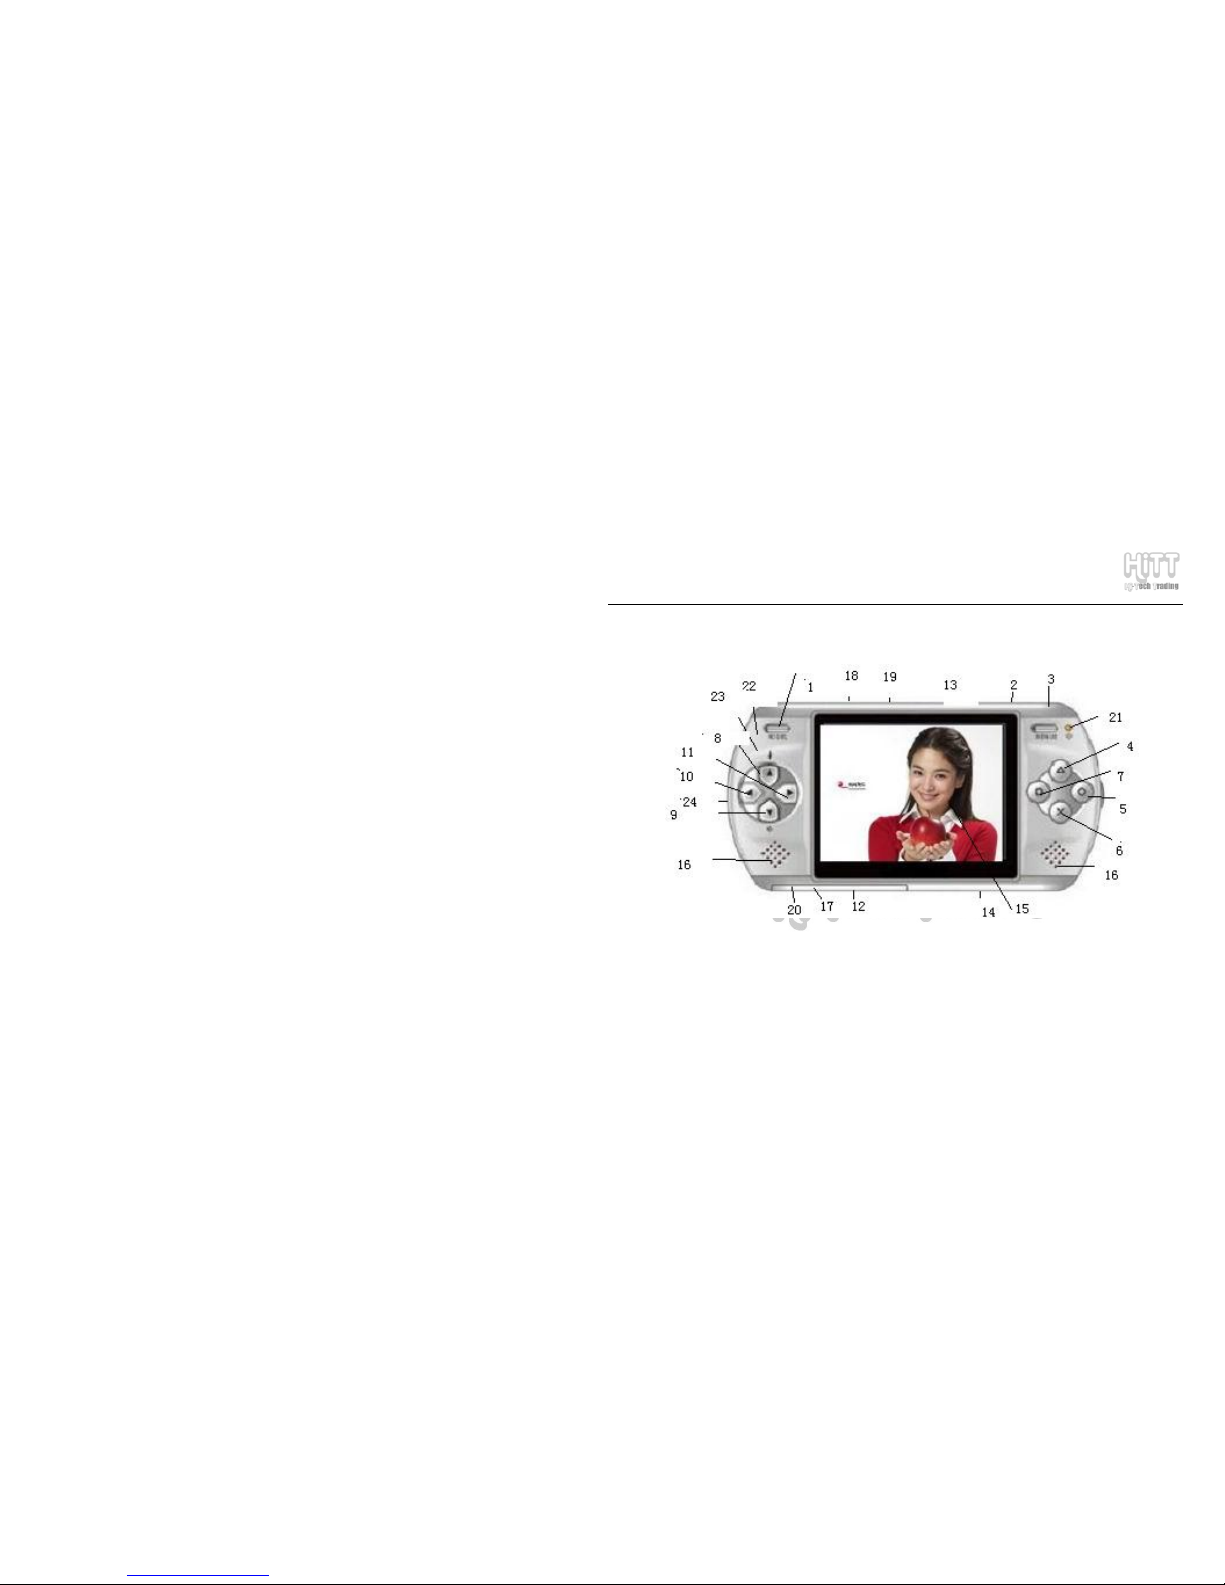
5. BUTTONS & INTERFACE

HE-ZM883R User Manual
PAGE: 10
(1) POWER Power ON/OFF key
(2) PLAY Play/Pause, Picture/Video Shoot, and Video Record Key
(3) ESC Exit Key – Previous Menu
Definition: in any working mode, press this key to exit that mode (except for video recording) and
return to the previous menu
(4) ∆ (OK) Enter/OK/Confirmation key, A-B repeat key during audio playing, & Pause function for
game
Definition: enter the current option or execute the function, its function is the same as an Enter key
on the keyboard
(5) O (MENU) Menu key during file selection mode and Select key for a submenu in Play mode
(6) X During Audio & Video Playing change function of navigation/arrow keys (see explanation of
navigation keys below for details); and Skip during playing games
(7) □ During Audio Playing, switch to Repeat Mode
(8) ▲ Press “▲” key;
1. In play mode, to play Previous Track
2. Press “X” key to switch modes and press this key to switch Equalizer mode
3. Move object up when playing game
4. Move cursor/select-bar UP
(9) ▼ Press “▼” key;
1. In play mode, play Next Track
2. Press “X” key to switch modes and press this key to change Equalizer mode
3. Move object down when playing game
4. Move cursor/select-bar DOWN
(10) ◄ Press “◄” key;
1. In play mode, to Fast Rewind

HE-ZM883R User Manual
PAG E: 11
2. Press “X” key to switch modes and press this key to Decrease the Volume
3. Move the object Left when playing game
4. Move cursor/select-bar Left
(11) ► Press “►” key
1. In play mode, to Fast Forward
2. Press “X” key to switch mode and this key to Increase the Volume
3. Move the object Right when playing game
4. Move cursor/select-bar Right
(12) RESET Reset key
(13) HOLD Lock key
(14) SD CARD SD card slot
(15) 3.0 inches true color TFT screen
(16) Built-in loudspeaker (left/right)
(17) /AV OUT Standard earphone port/AV OUT
(18) DC DC power supply/charging port
(19) USB USB port
(20) AV IN Audio and Video Recording port
(21) Power ON indicator LED (green)
(22) Charging indicator LED (red)
(23) MIC Built-in microphone
(24) Wrist strap string
HE-ZM883R User Manual
PAGE: 12
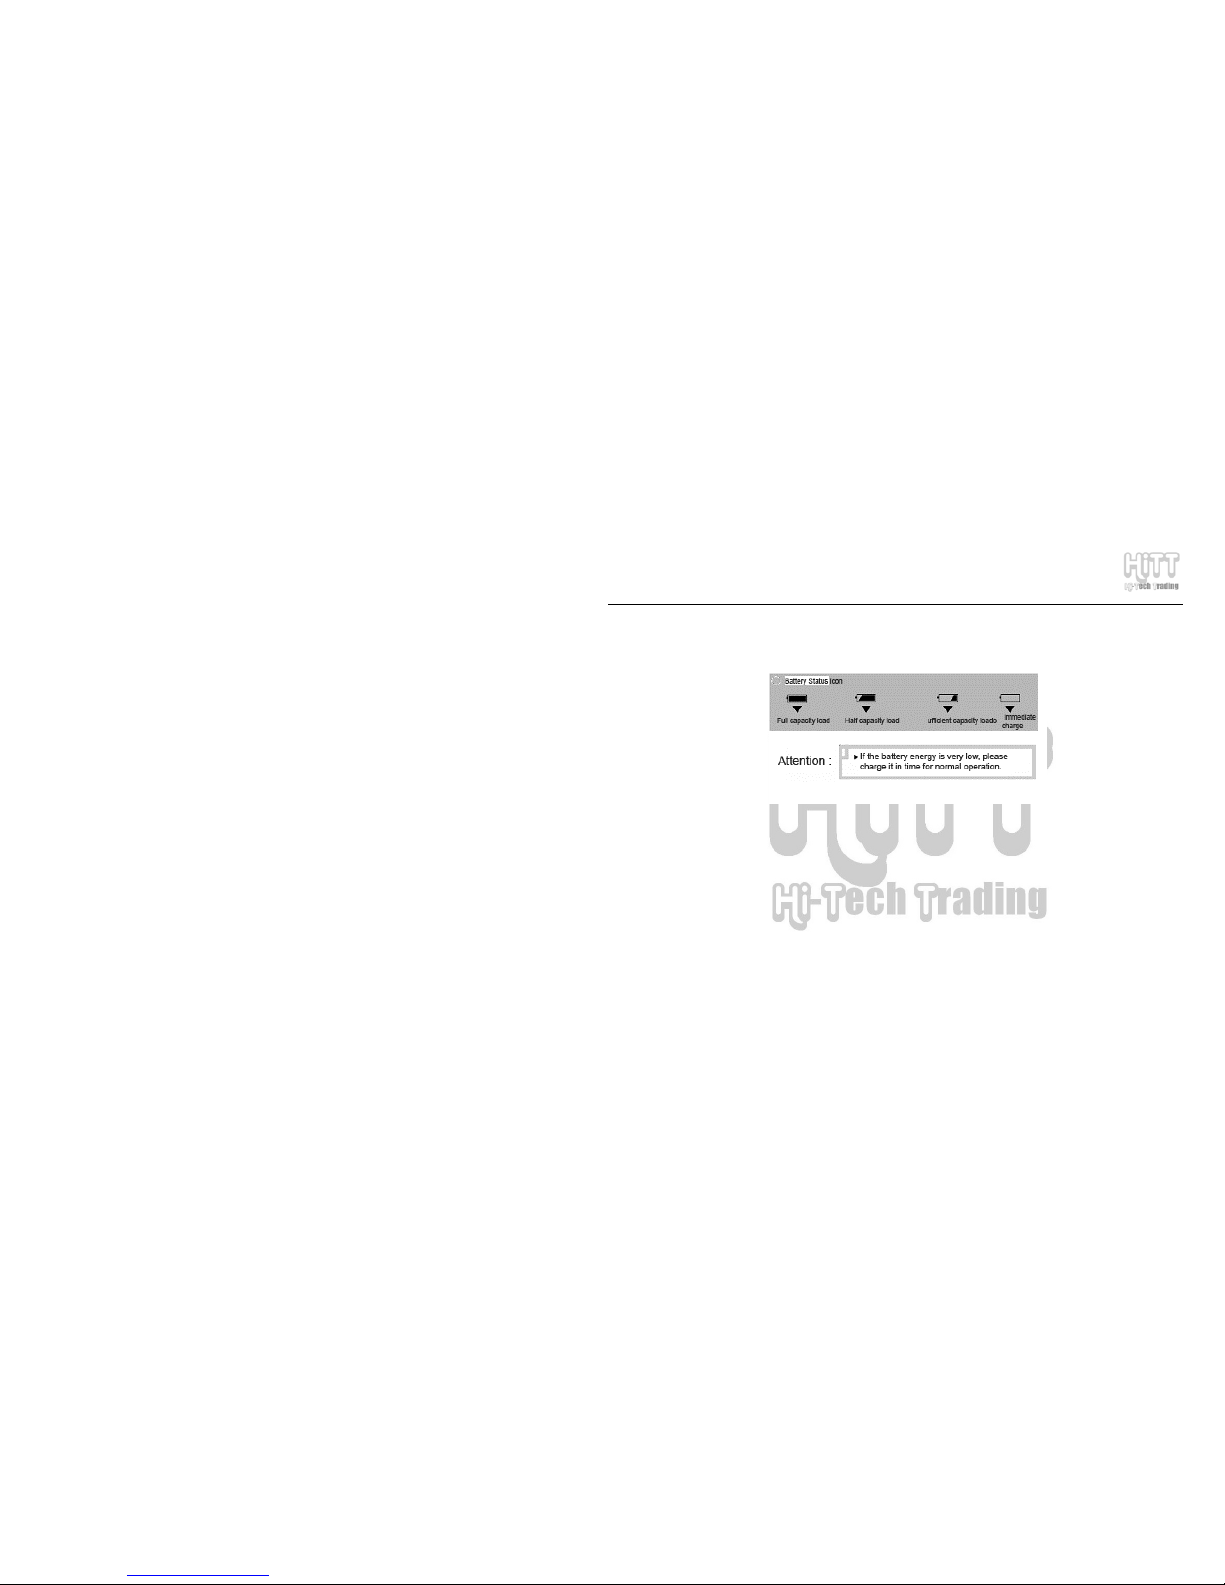
6. CHARGING PMP:
I) Battery Status:
NOTE: If the PMP can’t be turned on, it could be because the built-in battery is not charged, please
charge the battery first.
II) Charging Battery:
Insert AC charger into an electric outlet, then insert the round output terminal of the charger into the
charging port of this PMP (1). When the PMP is charging, the charging indicator LED (6) will become red;
when battery is fully charged, the LED will turn-off. When charging for the first time, it may take up to 6

HE-ZM883R User Manual
PAGE: 13
hours to fully charge the PMP.
Important:
• Only use the provided AC Charger to charge this PMP. The charger is for indoor use only.
Remove the charger from electric outlet when not in use. Don’t try to repair, disassemble or
modify the charger.
• If you don’t use the PMP for a long time, please fully charge it every 2-3 months.
• PMP can be charged with both Power ON or OFF. But it’s strongly recommended to charge
the PMP with Power OFF.

HE-ZM883R User Manual
PAGE: 14
7. BASIC OPERATION:
I) Turning PMP ON
Under power off status, long press the “Power” button to turn the PMP ON. The Green LED will be ON
and the PMP will display the Main Menu.
NOTE: No matter whether the “HOLD” button is locked or not before the PMP is turned on, long pressing
the “POWER” button can turn on the PMP.
Important:
• If this PMP has an SD or MMC card in the Card Slot, while turning it on, the screen may take
longer to come on since the system is reading the card.
• Don’t press any buttons while the card is being read, doing so may freeze the PMP and you
may have to press the “RESET” button.
II) Turning PMP OFF
From any operating mode, long pressing the “POWER” button will turn the PMP OFF (except when
the PMP is locked using the “HOLD” button. While the PMP is turning OFF, it displays the power off
message.

HE-ZM883R User Manual
PAGE: 15
Important: Sometimes you may see a vertical black line on the right side of the power off message,
which is normal.
III) PMP Turning OFF Automatically
The PMP will turn off automatically.
a. If the PMP is not used for 3 minutes
b. If the battery charge is extremely low
Important: If the set time for automatic power off function is “never”, then the PMP will not turn OFF
automatically.
IV) RESET ⇒ position recovery button
If the PMP gets locked or freezes due to wrong operation or some other reason, press the RESET button
(13), then long press the “POWER” button to turn the PMP back ON again.
V) HOLD ⇒ Lock button

HE-ZM883R User Manual
PAGE: 16
The “HOLD” key can be chosen for locking the buttons on the PMP surface to avoid wrong operations.
Under any operation mode, you can move the “HOLD” key to the left to lock the Player; a lock sign will be
displayed on the bottom of the screen. To unlock the buttons, move the “HOLD” button to the right.
HE-ZM883R User Manual
PAGE: 17
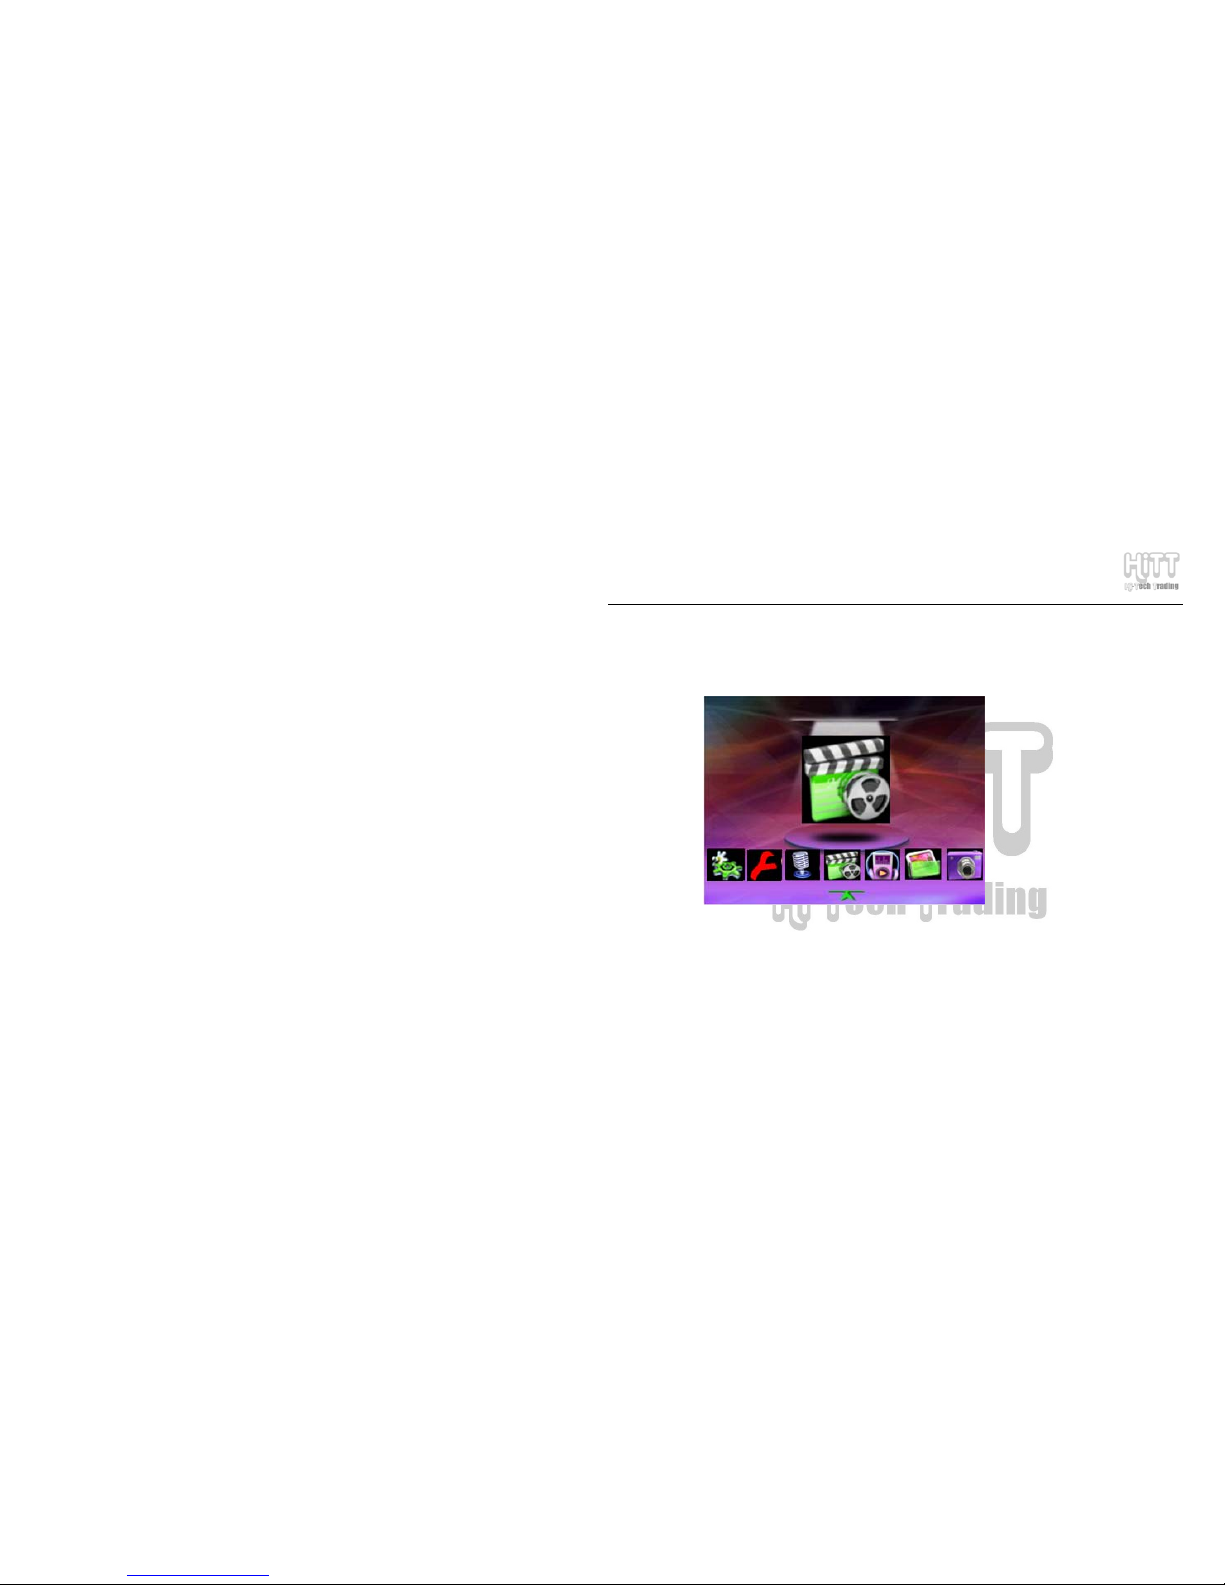
8. DETAILED EXPLAINATION OF OPERATION:
Main Menu
The following section will highlight different Menu selections
NOTE: During menu operation, navigation information is displayed at the bottom of the screen.
Please note that for “OK,” press “∆” key and for “MENU” press “O” key
.

HE-ZM883R User Manual
PAGE: 18
8.1.Video Player
From Main Menu Select Video Player and press ∆ (OK)
Use “▲”/”▼” keys to select the video file you want to play and press ∆ (OK). Press “O” key to display setup
menu. You can adjust the following options:
List
Display mode
Small picture
Repeat one
Repeat all
Repeat mode
Shuffle
Lock
File protection
Unlock
Delete one
File deletion
Delete all
4:3
Screen proportion
16:9
Exit
Press “▲”/”▼” key to select the option, a small arrow on the right side of the option means it has sub options;
press “►” key to display sub-options. Press ∆ (OK) key to confirm the selection press ESC to exit; to continue
to set up, press “◄” key to return to the previous menu.
e.g.: press navigation/arrow keys to select File Deletion option, press “►” key to select the submenu, Delete One
is to delete the selected file and Delete All is to delete all video files and press OK key to confirm.
Note: . In file browse mode the player will display the first frame of video file. But if the first frame of image is
blank screen, then it will display black screen in browsing.
. For the files that the player couldn’t play, the system will display error message “unsupported file

HE-ZM883R User Manual
PAGE: 19
format”, it means the player doesn’t support the file to play or the file is corrupted.
Lock icon is displayed on the left side of the protected file name; protected files cannot be deleted; to
delete the protected file, unlock it first.
Play video file
In the main interface of browsing video, press navigation/arrow keys to select the video file to be played, and press
PLAY key or press ∆ (OK) key to confirm to play. Keys operation is as follows:
Press Play key to pause to play, further press to continue to play; press “▲”/”▼” keys to play the previous/next
track; press “◄”/”►” key to Fast Rewind/Fast Forward; press “X” key to switch the mode of navigation/arrow
keys; after the mode is switched, press “◄”/”►” keys to adjust the volume press “▲”/”▼” keys to select the
Equalizer mode.
Press ESC key to stop playing and return to the main interface of browsing video.
Note: Big video file may stop working if Fast Rewind/Fast Forward
Exit
In the main interface of browsing video, press ESC key to exit and return to the Main Menu.
8.2. Audio Player
From Main Menu Select Video Player and press ∆ (OK)
Use “▲”/”▼” keys to select the video file you want to play and press ∆ (OK). Press “O” key to display setup
menu. You can adjust the following options:
Repeat one
Repeat all
Repeat mode
Shuffle
Lock
File protection
Unlock

HE-ZM883R User Manual
PAGE: 20
Delete one
File deletion
Delete all
Normal
Class
Pop
DBB
EQ mode
Rock
Never
0.5 minute
1 minute
Power saving
mode
3 minutes
Exit
The operating method is the same as with Video Player.
Power saving mode: the setup of screen protection time is described as follows:
Screen protection means the player will enter the black screen mode automatically after the set time; it’s a kind of
working mode of screen protection. The time parameter setup is to set the waiting time from the last key operation
to the black screen mode in the play music mode. Select never option to make the function unavailable. If it’s set to
be 0.5 minute, then the player will enter the black screen mode if no key operation is activated within 0.5 minute in
the play music mode, to enter the screen protection mode to save the power.
Note: the user may also use the default setting, press Play key to play the music after selecting the music file.
Play music file
In the main interface of music file browsing, press navigation/arrow keys to select the video file to be played, and
press PLAY key or press ∆ (OK) key to confirm to play.
Press “∆” key to select the starting point A and press “∆” key again to select the ending point B, then the player

HE-ZM883R User Manual
PAGE: 21
will play A-B section repeatedly, press “∆” key again to cancel the repeat function.
Other keys operation is as follows:
Press Play key to pause to play, further press to continue to play; press “▲”/”▼” keys to play the previous/next
track; press “◄”/”►” key to Fast Rewind/Fast Forward; press “X” key to switch the mode of navigation/arrow
keys; after the mode is switched, press “◄”/”►” keys to adjust the volume press “▲”/”▼” keys to select the
Equalizer mode.
Press ESC key to stop playing and return to the main interface of music file browsing.
Exit: press ESC key to stop playing and return to the main interface of browsing music files. Press ESC key
again to return to the Main Menu of the system.
Note: the player supports LRC lyric synchronous display and supports LRC V0.2 format, The lyrics file must in
the same folder as the music file and must have exact same file name (except for the file extension,
which is lrc).
8.3 Picture View
From Main Menu Select Picture View and press ∆ (OK)
Use “▲”/”▼” keys to select the picture file you want to play and press ∆ (OK). Press “O” key to display setup
menu. You can adjust the following options:
Small picture
List
Display mode
Slide
Lock
File protection
Unlock
Lock
File protection
Unlock

HE-ZM883R User Manual
PAGE: 22
Delete one
File deletion
Delete all
Background
Power-on picture
Power-off picture
Exit
Note: the player supports JPEG (GIF, PNG and BMP), support EXIF2.1 JPEG format.
If the player doesn’t support a picture format, you can use conversion program on the DRIVER CD to
convert the file. See Section 10 (Video, Audio & Photo Conversion Software).
Open Picture File
From the root interface of picture browse mode, press Navigation/arrow keys to select the picture file to be opened,
press PLAY or ∆ (OK) key to confirm and open the selected picture.
Other keys operation is as follows: press “▲” key to skip to the previous picture, press “▼” key to skip to the next
picture, and press ESC key to return to the root interface.
Play Slide show
From the main interface of picture browse mode, press “O” key to display sub-menu, under “Display Mode” select
“Slide” and press ∆ (OK) to start Slide Show. Press ESC key to exit and return to the picture browse mode; press
ESC again to return to the Main Menu.
Note: in setting up background, power-on picture and power-off picture, the system needs 2-3 seconds to read &
save the information. To restore default settings, from Main Menu select Setup Default.
8.4 Camera (Take Snapshots)
From Main Menu Select Camera and press ∆ (OK)

HE-ZM883R User Manual
PAGE: 23
Press “O” key to display setup menu for the camera. There are 7 options available with 6 options having
submenus:
Single
Multiple
Shoot mode
Auto Shoot
320*240
640*480
800*600
1024*768
1280*1024
Size
1600*1200
High
Medium
Quality
Low
Normal
Negative
SOLARIS mode
Rilievo
BINARIESV
SEPIA mode
Special effect
Black and white
High
Medium
Contrast
Low

HE-ZM883R User Manual
PAGE: 24
Yes
Date
N/A
Exit
The device has 4X digital zoom function. Press “▲” key to zoom-in; press “▼” key to zoom-out.
Before shooting, you can select built-in memory or SD card as the storage location. To switch between
Internal memory and SD card, from Main Menu select Tools Memory. Use “◄” or “►”key to choose
SD or Flash Tab and then press ∆ (OK) key to make that as your “Work space”.
Note: three shoot modes are available including single, multiple and auto shoot. The corresponding icon shall be
displayed at the top left corner, when it displays the clock icon, it means auto shoot mode. The waiting time in
auto shooting mode is nine seconds by default, when you press PLAY key, it will take the photograph
automatically after nine seconds. You may use the auto shoot function to take photos of yourself. In multiple
mode camera takes three photos successively after pressing PLAY key.
Shoot
After setting up the related parameters, hold the device steady using both hands, pointing at the object you want to
photograph and viewing it through LCD display, press PLAY key to shoot the picture.
Browse Photo
Thousand of digital photos could be shot and stored on this PMP. The user may view the photos by selecting
“Picture View” option from the Main Menu.

HE-ZM883R User Manual
PAGE: 25
8.5. DV (make Video)
From Main Menu Select DV and press ∆ (OK)
The working interface of recording video is same as shooting pictures.
Note:
① Before pressing PLAY key, the camera is in View mode, when PLAY key is pressed to shoot a video a time
counter is displayed in the lower right corner of LCD display.
② Approximate available video shooting time (in minutes) can be determined by dividing the available free
memory space (in MB) by 5 or 10 (depends on video quality setting) - 5MB-10MB memory is used for
one-minute of recording. When the memory is full, an error message “No Space” is displayed at the top
right corner and video shooting is stopped.
Note: Less memory is used when shooting video in dark environment, and more memory is used when shooting
video in bright and colorful environment. That’s one of the reasons why the estimated available video shooting
time may differ from actual shooting time.
Parameters
Press “O” key to display setup menu for DV:
160*128
320*240
Size
640*480
ASF
Format
AV I
H
M
Quality
L
Contrast H

HE-ZM883R User Manual
PAGE: 26
M
L
Exit
Note:
Default video resolution is 320*240.
Enter DV Shooting Mode
After setting up the parameters, while looking at the object, you want to shoot, through LCD screen press PLAY
key to start shooting the video. The timer in the lower right indicates the device is shooting the video. In the
process of shooting, the user may adjust the focus and exposure degree or set up according to the actual
requirements.
Press PLAY or ESC key to stop shooting the video and save the video file, and return to the Main Menu.
Note: Hold PMP steady using both hands while shooting video.
Note: While shooting video, the built-in microphone records the voice along with the video. It’s advised to keep
the built-in microphone as close to the sound source as possible.
Play DV Movie
To play the video you just shot, press ESC key to exit and return to the Main Menu, select Video Player from the
main menu and select the video file and press ∆ (OK) to play.
Note: You can choose SD card or built-in memory to save the video. If you had selected built-in memory before
shooting the video then video file can be found on built-in memory to play and vice versa.
8.6. AudioRec (Audio Recorder)
From Main Menu Select AudioRec and press ∆ (OK)
o Microphone Recording:

HE-ZM883R User Manual
PAGE: 27
o Use “◄” or “►” key to change Recording mode to “Mic”
o Press ∆ (OK) key to confirm and start recording; the screen displays Red recording button and
also a timer, indicating it’s recording
o Press ESC or ∆ (OK) key to stop recording and save the recorded file.
Note: To listen to the recording, from main menu select “Audio Player” and select the recorded file from the
list and press ∆ (OK).
o Line-in Recording
o Record the played audio file through connecting the player with PC or CD, DVD or TV audio
device using the line-in cable (included with the PMP).
o Connect one end of line-in cable to the AV IN port of the PMP
o Connect other end of the line-in cable to an audio out port of any audio device like MP3 or CD
player, or a Radio
o Use “◄” or “►” key to change Recording mode to “Line In”
o Press ∆ (OK) key to confirm and start recording, the screen displays Red recording button and
also a timer, indicating it’s recording
o Press ESC or ∆ (OK) key to stop recording and save the recorded file.
Note: To listen to the recording, from main menu select “Audio Player” and select the recorded file from the
list and press ∆ (OK).
8.7. Game (Video Game Player)
From Main Menu Select Game and press ∆ (OK)
Three game options are available including block, boxer and game room.
Block
Select Bock option and press ∆ (OK) key to confirm and enter the game interface. Use “▲”/”▼” keys to adjust

HE-ZM883R User Manual
PAGE: 28
the level, press ∆ (OK) key to start the game
Operating method:
o “▲” key to change the shape
o “◄”/”►” keys to move left/right
o “▲” key to move fast
o ∆ (OK) key to pause or play the game
o ESC key to exit the game
Boxer
Select Boxer option and press ∆ (OK) key to start the game interface
Press ∆ (OK) key when the red map icon is displayed at the lower right corner
Press navigation/arrow keys to select the map type
Press ∆ (OK) key to confirm
Operating method:
When yellow map is displayed at the lower right corner, press navigation/arrow keys to move the box to the
designated position
Press ESC key to exit the game
Game Room
Select Game Room option and press ∆ (OK) key to enter game interface.
Note: Games are included on the Games CD that came with this PMP. Please connect PMP to your computer
using the USB cable and copy the games from the CD (using your computer’s CD-ROM Drive, to the GAME
folder on the PMP.
Press “O” key to display setup menu:
Play game
Lock
File protection
Unlock

HE-ZM883R User Manual
PAGE: 29
Delete one
File deletion
Delete all
Exit
Press “▲”/”▼” keys to select the option and then press ∆ (OK) key to confirm.
From the games list use “▲”/”▼” keys to select the game you want to play and then press ∆ (OK) key twice to
start the game
Keys introduction:
Navigation/arrow keys move the object up, down, left or right
“O” Quick Shot
“X” Skip
∆ (OK) Pause
ESC Exit the game
8.8. Learning (English to Chinese & Chinese to English Dictionary, and eBook)
From Main Menu Select Learning and press ∆ (OK) then select Dictionary or eBook
Dictionary:
Move the cursor on the input mode switch icon “ ” (at the right of P), press ∆ (OK). Two options will pop-up
(English/Pinyin), press “▲”/”▼” keys to select and press ∆ (OK) key to confirm.
English-Chinese Dictionary: when you select English option (English-Chinese), press ∆ (OK) key to enter the
dictionary interface, press navigation/arrow keys to move the cursor, after selecting the right letter, press ∆ (OK)
key to confirm the letter, after inputting the whole word, press “X” key to display the translation, when there is
background under the input box, press “▲”/”▼” key to move and the Chinese explanation shall be displayed at
the right side; further press “X” key, when the input box has background, switching into the input mode and
continue to check other words.

HE-ZM883R User Manual
PAGE: 30
Chinese-English Dictionary:
When you select Pinyin option, press ∆ (OK) key to enter the Chinese-English dictionary interface, press
navigation/arrow keys to move the cursor, after selecting the right letters, press ∆ (OK) key to confirm, after
inputting the whole letters, press “X” key and the corresponding Chinese character(s) shall be displayed, move the
navigation/arrow keys on the right character and press ∆ (OK) key to confirm, after inputting all characters, press
“X” key to display the English words. Press “X” key, when the associated character under the input box has
background, press “▲”/”▼” key to move the cursor and the English shall be displayed at the right side; further
press “X” key, when the input has background, switching into input mode to continue to inquire about other
characters.
Note: If wrong letter or character is entered, select key to delete the letter or character.
Exit: press ESC key to return to Learn menu.
E-Book: TXT format
1. From Learning menu use navigation/arrow keys to select E-Book option and press ∆ (OK) key to confirm to
enter. Press “▲”/”▼” key to move the cursor, press ∆ (OK) key to read; when the browse mode is set to be
manual, press “▲”/”▼” key to move the lines and press “◄”/”►” to turn pages;
2. In the list menu of E-Book, press “O” key to pop up the file setup menu, such as browse mode, file protection
and file deletion: set up manual or auto (the time could be set up), press ESC to exit;
3. Bookmark setup: after exiting E-Book, the system will remember the page automatically, when you enter the
E-Book again, press Ok key in the first page interface to display the page you were on when you exit last time.
Note: E-Book reads TXT files from EBOOK folder on PMP

HE-ZM883R User Manual
PAGE: 31
8.9.Tool
From Main Menu Select Tool and press ∆ (OK)
Tools have the following options:
Calendar
The left side displays current solar calendar and the right side displays Chinese lunar calendar.
Note: you should set up current date and time using Setup Time from the Main Menu.
Calculator
Press navigation/arrow keys to move the cursor to select number and operations
Notepad
It’s same as eBook function under “Learning”
Memory
To switch between Internal memory and SD card Use “◄” or “►”key to choose SD or Flash Tab and
then press ∆ (OK) key to make that as your “Work space”
Upgrade
Press “▲”/”▼” key to move the cursor to select USB/SD, if USB option is selected, press ∆ (OK) key to
confirm. At this moment, you may see the letters “CONNECTING TO PC…” on the screen, please connect the
player and PC by the USB cable, the system could be upgraded only when the player displays “CONNECTING
TO PC…” it couldn’t upgrade the system if it displays USB.
Note: there is no upgrading procedure inside the attached CD.

HE-ZM883R User Manual
PAGE: 32
8.10.Setup
From Main Menu Select Setup and press ∆ (OK)
Language
Two languages are available including English and Simplified Chinese, press “▲”/”▼” key to move the cursor to
select and press ∆ (OK) key to confirm.
TV Output
It’s used to select the screen of this player or send output to a TV set. TV PAL is progressive scanning TV system;
and TV NTSC is the standard TV system; LCD is the screen of this player. Press “▲”/”▼” keys to select the
option and press ESC key to cancel the selection.
Note: if you want to use the TV set to play the video, please connect the player to the TV set in Power OFF mode.
Note:
① Do distinguish the audio and video cable color when using the AV cable. General, the yellow cable is
the video cable and the red and white ones are the left and right audio cables.
② It’s advised to turn power on after connecting the AV cable
③ When properly connected video will be now displayed on the TV screen instead of the PMP LCD
display. If TV screen has no color image, please change the output system of the TV set
Default (change to factory settings)
Reset all setup parameters to their factory settings.
Sound setup
You can enable or disable the sound made when keys are pressed
You can also disable or enable the sound of built-in speakers
Note: You can always use earphones to listen to the music no matter if the built-in speakers are ON or OFF.

HE-ZM883R User Manual
PAGE: 33
Note: In TV OUT mode, please turn OFF the built-in loudspeakers to save battery.
Auto Power OFF
In any working mode, adjust the waiting time from the last time any key was pressed to Auto OFF.
Select OFF option to make the function unavailable and your device shall not be powered off automatically. Press
“▲”/”▼” key to select, press ESC key to cancel the setup; press ∆ (OK) key to confirm and return to the root
interface of system setup.
Interface style
Two interfaces are available including Lovely and Pretty, press ∆ (OK) key to confirm after selecting.
Time Setup
Use “◄”/”►” keys to move the cursor and press “▲”/”▼” keys to adjust the time. When done, press ∆ (OK)
key to confirm and return to the Setup Menu. Press ESC key to cancel the operation,
Vol u me
It’s used to adjust the volume, press “◄”/”►” key to decrease/increase the volume, press ∆ (OK) key to confirm
and return to the Setup Menu.
8.11. Flash Player
From Main Menu Select Flash Player and press ∆ (OK)
Use “▲”/”▼” keys to move the cursor and select the flash file to be played and then press ∆ (OK) key to play.
Press “O” key to enter the Flash Player Setup Menu, press “▲”/”▼” key to move the cursor to select Play Flash,
File Protection or File Deletion.
8.12.VideoRec (Digital Video Recorder-DVR)
From Main Menu Select VideoRec and press ∆ (OK)

HE-ZM883R User Manual
PAGE: 34
o Before recording the video program, please connect one end of the A/V cable (3.5mm connector)
to the AV In port of PMP
o Connect other end of the A/V cable (red, white & yellow RCA connectors) to an audio out port of
any audio device like VCR, DVD, Receiver)
o When VCR/DVD is on and playing something, you will see the picture and hear audio through
PMP LCD display. If you get a blue screen then there is something wrong with the connections.
In preview mode, press “O” key to enter the setup menu to select the video format and picture
quality:
320*240
Size
640*480
ASF
Format
AV I
Exit
o After selecting the video format and size, press ESC key to go back to the Preview mode
o Press ∆ (OK) key to confirm and start recording; timer in the lower right corner indicates that
PMP is recording what’s being displayed on the PMP screen
o Press ESC or ∆ (OK) key to stop recording and save the recorded file.
Note:
To watch the video file, select “Audio Player” from the Main Menu and select the recorded file from the list and
press ∆ (OK).
If the memory gets full during the recording, the player will stop recording, and return to the main interface of

HE-ZM883R User Manual
PAGE: 35
recording mode, but the record program will be saved.
8.13.Radio (FM)
From Main Menu Select Radio and press ∆ (OK)
Use “▲”/”▼” keys to select a station.
Press “O” key to enter Radio Setup Menu. The following four options are available:
Manual
Auto
Stereo/Single channel and
Area selection
Press “▲”/”▼” keys to select menu options.
Manual:
Use “◄”/”►” keys to manually select a station.
Press “▲”/”▼” keys to save the station, press ∆ (OK) key to confirm and save.
If you want to store the next station, press ”►” key to skip over one station. If the current station is 01/20, it needs
to skip to 02/20. You can save up to 20 stations as pre-sets.
Auto:
Use this option to search the stations automatically; the station saving method is same as with the manual option.
Stereo/Single channel:
Press ∆ (OK) key to switch between the two modes.
Area Selection:
Press ∆ (OK) key to switch between Japan and Europe bands

HE-ZM883R User Manual
PAGE: 36
9. U-Disk and USB Driver:
9.1 Computer Requirements
(1) Pentium 100MHz or higher
(2) Windows 98SE/2000/ME/XP Operating System
(3) USB Port
(4) CD-ROM Driver
(5) 16MB of Free Disk Space.
(6) 32MB of Free Memory.
9.2 USB Driver Installation (Only required for Windows98 SE):
This PMP supports Windows 2000 Operating System or above without installing USB Driver software. If
your computer’s Operating System is Windows 98SE, then USB-Driver software from the CD must be
installed so that the U-Disk function can be used on this PMP
1. Insert the CD labeled DRIVER, which came with this PMP, in your computer’s CD-ROM Drive
2. Connect the PMP to PC with the included USB Cable when the PMP is turned on (see next
section for details on how to connect)
3. Your PC will detect new hardware and “Add New Hardware Wizard” Screen will be displayed
on your computer screen; Click Next

HE-ZM883R User Manual
PAGE: 37
4. Select “Search for the best driver for your device. (Recommended); Click Next
5. Check box next to “Specify a location” and press “Browse” button:
6. Select folder named USB Driver_v2.0 from your CD-ROM Drive and Click ∆ (OK):

HE-ZM883R User Manual
PAGE: 38
7. Click” Next “ button and a confirmation screen will appears as shown below:
8. Press “ Next” button to start USB driver installation program
9. After the installation is over, restart the computer

HE-ZM883R User Manual
PAGE: 39
10. Make sure the PMP is still connected to the PC
11. Run File Explorer or double-click “My Computer” icon on the desktop.
12. You will find 2 new Drives labeled as “Removable Disk Drives”; the first one is for the Built-in
flash Memory and the second for the SD Card.
9.3 Connecting PMP to your Computer
• Connect the USB cable to your PC and PMP as shown below:

HE-ZM883R User Manual
PAGE: 40
9.4 Using U-Disk
While PMP is connected to the computer, run File Explorer or double-click “My Computer” icon on the
desktop. You will find 2 new Drives labeled as “Removable Disk Drives”; the first one is for the Built-in
Flash Memory and the second for Storage Card. Double Click on any one of these drives.
You will find five folders named DCIM, MP3, EBOOK, GAME and FLASH.
It shall be
displayed after
being opened
Save the MP3
music file
Save the EBOOK
file
Save the GAME
file
Save the FLASH
file
Important:
a. For your computer to recognize the removable disk drives, the PMP must be Powered On and
connected to the PC.
b. Users must put the files into corresponding file folders, otherwise, the PMP won’t recognize and
Save video file
Save picture file

HE-ZM883R User Manual
PAGE: 41
play these files. When an External Storage Card is used, the system will automatically set up
these file folders, the saving of files must also follow the above-mentioned rules so that the PMP
can identify and play the files.
c. You need to copy Game Files from Game-CD to the “GAME” folder on the PMP in order to play
those games.
9.5 Using SD Card
This PMP supports external SD card. Insert an SD card in the slot as shown below:
Important:
Turn off the PMP first before inserting the card. Insert the card with metallic links facing up;

HE-ZM883R User Manual
PAGE: 42
you will hear a light “CLICK” sound when card is properly inserted in the slot.
Please turn off the PMP first before removing the card. Push the card in a little bit and then
release it; the card will be ejected from the slot for easy removal.
To switch between Internal memory and SD card, from Main Menu select Tools Memory.
Use “◄” or “►”key to choose SD or Flash Tab and then press ∆ (OK) key to make that as
your “Work space”.
Songs, Video/Photo, Game and Text files must be saved to the corresponding 5 folders “MP3”,
“DCIM / 100MEDIA”, “GAME”, ”EBOOK” & “FLASH”.
9.6 Adding and Removing Files
After the PMP is connected to the computer, the computer will automatically identify PMP’s storage
media as “Removable Disk Drives”. Since the PMP has External Storage Card, therefore the computer
will display two removable disks. If the storage card is not inserted in the slot, then one of the removable
disks will not be available for use. These removable drives work just like any other drives e.g. (C: or D:)
that are part of the computer.
You can use File Manager/Explorer to copy, paste or delete any files (songs or other documents) from the

HE-ZM883R User Manual
PAGE: 43
PMP. The files or songs stored on the computer or network drives can directly be copied to the PMP by
dragging and dropping or copying and pasting.
The PMP screen will display USB icon, indicating it is available for use. During data transfer (green light)
on the PMP will flash. After data transfer is over the green light will turn solid.
Important:
• While uploading or downloading files, don’t disconnect the USB cable, to prevent data loss due to
corruption of your PMP’s storage media, and requiring you to reformat it. Note: If you need to
reformat the storage media make sure to format it with FAT and not FAT32 format. After
formatting is done, the system will create the default folders after you turn the PMP OFF and
then ON again.
• Whenever you disconnect the PMP from the computer, make sure that data transfer operation is
completed (the green LED should be solid and not blinking)
• For Windows 98SE Operating System, you must use “Remove the hardware Safely” option before
disconnecting the PMP from PC to prevent data loss.

HE-ZM883R User Manual
PAGE: 44
Disclaimer
: Power Outage during data transfer between the PMP and PC may cause data loss; please
adopt data backup best practices. The company is not liable for any data loss.
10. Video, Audio & Photo Conversion Software:
DRIVER CD includes two conversion programs. Insert CD labeled DRIVER into your computer’s
CD-ROM drive and
a. To install ASF conversion program, open Folder named “ASF TRANSCODING SETUP
TOOLS” and then select appropriate sub folder “WIN98-ME” (if you have Windows
98SE or ME on your PC), or “WINNT-2000-XP” (if you have Windows NT, 2000 or XP
on your PC) and run setup program (if you want to convert to ASF Video format)
b. To install AVI conversion program, open “AVI TRANSCODING SETUP TOOLS
0.9.7.3” folder and run setup program.
10.1. ASF TRANSCODING SETUP TOOLS:
• Run setup program to install software on your computer

HE-ZM883R User Manual
PAGE: 45
• After installation is complete, you can launch “PMP Transcoding Tool” to convert video files to
ASF format that will be playable on this PMP.

HE-ZM883R User Manual
PAGE: 46
• Follow these steps to convert the files:
o Select Conversion Mode (Media, CD or Image)
• To convert Video file (Select Media Mode)
o Select Audio Sample Rate (8K, 16K or 48K)
o Select Video Quality (Best, Normal or Bad)
o Select the file you want to convert
o Select location and name of the ASF file that will be created by the conversion

HE-ZM883R User Manual
PAGE: 47
program
o Select Convert – You will see the following screen
After conversion is finished, press “STOP” button and exit from the program.
Copy the converted file (ASF format) to the DCIM/100MEDIA folder on the built-in memory or
external storage card for playing on the PMP.

HE-ZM883R User Manual
PAGE: 48
• To Convert the music file from a CD Select CD Mode
This tool can also convert the music files from a CD to MP3 format. Please follow instructions
for “Converting Video File” and save files as MP3 files.
Copy the converted file (MP3 format) to the MP3 folder on the built-in memory or external
storage card for playing on the PMP.
• To Convert Image Files Select Image Mode
The operation of converting image files is same as that of the video conversion. Just select
Image Mode in Step 1.
Copy the converted file (JPEG format) to the DCIM/100MEDIA folder on the built-in memory or
external storage card for playing on the PMP.
10.2. AVI TRANSCODING SETUP TOOLS 0.9.7.3
• Run setup program to install software on your computer
• Select language

HE-ZM883R User Manual
PAGE: 49
IMPORTANT: During installation you may be prompted to install other plug-ins like “Storm Code”
• After the installation is completed you will be prompted to restart your PC. Please select “Yes”
to restart the PC to finish the installation.

HE-ZM883R User Manual
PAGE: 50
Using conversion software
1. Launch “Transcoding” tool from “SPCA5000 Transcoding Tool” program group
2. The following screen will appear:
3. Select appropriate conversion mode

HE-ZM883R User Manual
PAGE: 51
• To convert Video file (Select Common Conversion)
o Select “Open file” to choose the file you want to convert
o Select “Output path” to choose location and name of the AVI file that will be created
by the conversion program
o Use “Settings” option to choose the audio and video quality of the converted file

HE-ZM883R User Manual
PAGE: 52
o Click on “Start” to convert the file.
• After conversion is finished, press “STOP” button and exit from the program.
• Copy the converted file (AVI format) to the DCIM/100MEDIA folder on the built-in memory or
external storage card for playing on the PMP.

HE-ZM883R User Manual
PAGE: 53
11. Common Errors & Solutions:
I) PMP can’t be turned on:
a. Battery may have no power,charge PMP’s built-in lithium rechargeable battery.
II) PMP automatically turns off after its power is turned on:
a. Battery capacity is not sufficient and causes PMP to turn off automatically. Please charge the battery
b. The setting of PMP’s automatic power off is set to a low value. Increase sleep time to a higher
number
III) Buttons don’t respond:
a. The HOLD key is in locked position, moving it to the right will unlock the keys
IV) After USB is inserted, no removable disk symbol can be found:
a. Make sure the PMP is powered on
b. Make sure the PMP is connected to the PC using proper USB cable and the cable is hooked

HE-ZM883R User Manual
PAGE: 54
up properly on both ends
c. If you are using PC with Windows 98SE, make sure that the USB driver is installed properly
d. You can try restarting both the PMP and you PC
V) There is no sound while playing:
a. Volume is too low - Adjust Volume
b. The audio output device is not set correctly. From Main Menu Setup Sound - Change
built-in speakers setting to ON or OFF
c. The music files are not the right format
d.
VI) Recorded files can’t be saved:
a. The built-in memory or external storage card is full, delete some of the files or move them to
other storage (e.g. your PC) to release space.
d. Default storage setting is not correct. From Main Menu Tools Memory select Flash or SD
(make sure the media selected has “Unused” storage available.

HE-ZM883R User Manual
PAGE: 55
VII) The normal characters can’t be displayed on the screen:
a. The language setting is wrong – From Main Menu Setup Language select the right
language
b. This language is not supported. Browse the company’s website to know whether the firmware
with new language is available
VIII) The video cable can’t be used or there is no sound after it is connected:
Make sure the Audio and Video cable connectors are connected to the right jacks on the video
device and the PMP. Yellow connector is for the video, and red and white are for Audio signals
IX) Movies can’t be played normally:
a. Check whether the movie format is supported. If not, install ASF convert tool software from
the CD and then use the installed software to convert other supported formats to ASF or AVI
format.
b. Make sure the movie files are downloaded to DCIM/100MEDIA folder.
c. If the movie is in ASF or AVI format but the PMP still can’t play, the problem could be the

HE-ZM883R User Manual
PAGE: 56
compression format and the bit-rate of the source file. Try to convert the source file again
using different parameters
X) PMP cannot identify the files:
a. Try resetting the PMP by pressing “Reset” button
b. Make sure the files are in the proper folders and are in the format supported by this PMP.
12. Product Technical Specifications:
Unit size
125mmX65mmX17mm(LENGTHXWIDTHXTHICKNESS)
Weight 100g
Screen 3.0” 260K true color TFT screen
Transmit speed Read >650Kbps, Write > 600Kbps
USB interface USB2.0 full speed
Battery After full charge for around 4 hours or under power save mode around 7
hours(times may vary based on the mode of use and the environment)
SD Card Support capacity 128M/256M/512M/1G/2G

HE-ZM883R User Manual
PAGE: 57
Audio recording Recording format WAV
Support compressed
speed
32Kbps—320Kbps
Frequency response 20HZ-20KHZ
Distortion <0.1%
S/N rate >80Db
Signal separate
degree
>80Db
MP3&WMA&WAV
Audio frequency
standard output
About 5MW+5MW(32Ω)
Resolution 2 mega pixels
Color bit 24 bits
Focus model/scope 4 times focusing/0.6m to infinite distance
CMOS camera
White balance User selectable with 5 preset selections
Shoot format AVI & ASF

HE-ZM883R User Manual
PAGE: 58
Picture format
JPEG(GIF, PNG, BMP)
Video format AVI, ASF
Video resolution 960*240
Frame rate 30fps
Video output level 1.0VPP
FLASH playing Support FLASH2.1
Music format MP3/WMA/WAV
Operation environmental
temperature
0 to 40
0
C
Menu language Chinese/English
Note: The technical specifications can be changed without any prior notice

HE-ZM883R User Manual
PAGE: 59
13. Accessories:
1. User Manual……………………………………………….1
2. Software CD……………………………………………….1
3. USB Cable………………..………………………………. 1
4. Earphones…………………..………………………...….. 1
5. A/V Cable…………………….………………………...…. 1
6. Audio Line-in Cable………………………………………. 1
7. A/C Charger….…………………………………….……… 1
8. Game CD……………………………………………………1
 Loading...