

Page 1
Page 2
disclaimer
safety precautions
It is the responsibility of the user to read the contents of this manual carefully and in full before operating
the Q-Cop 450. Once the Q-Cop 450 is put in use, the user has agreed to operate the device in accordance
with the guidelines specied here and Hitec may condently assume that the user has read and accepted the
contents of this user’s manual.
This product is suitable for ages 18 years and above.
The Q-Cop 450 is a sophisticated electronic product with integrated ight and camera control. As such, it
provides exceptional aerial photography under normal power supply and when all components are functioning
optimally. Although our quadcopter software integrates safety mechanisms to ensure the equipment is safe for
handling during power-up, Hitec strongly recommends that you remove the rotor blades through calibration.
Hitec RCD, Inc. does not assume any responsibility for any personal injury, property loss [whether direct or
indirect losses], legal disputes and compensation issues caused while using this product due to the following reasons:
1. This product is used in any illegal activity.
2. This product is used in a no-y zone for ight, video recording and/or photography.
3. This product is operated without following the instructions contained in this user’s manual.
4. In cases of any force majeure or acts of God, including earthquakes, tsunamis, lightning, hail, etc.
safety precautions
1. Check whether all product components are in good working condition prior to use. Please do not operate
the device if any part appears worn out or damage.
2. Ensure the transmitter and quadcopter batteries are sufciently charged before operating.
3. Take reasonable measures to prevent transmitter signals from interacting and interfering with other wireless
devices.
4. Ensure the quadcopter operates under the specied maximum load while it is airborne.
5. Before take-off, switch on the transmitter and then start the quadcopter. After landing, turn off the
quadcopter rst, before turning off the transmitter power.
6. While inspecting, do not get close to or touch the rotating motor or rotor blades.
7. Please ensure the quadcopter takes off or lands from/at a central point in an open area. Conrm that there
are no persons or other obstructions within a 5 to 10 meter radius prior to using the quadcopter.
8. Only y the quadcopter in a safe, clear zone away from obstructions, crowds, and high-voltage lines. Exercise
precaution for your own safety when operating the device.
9. Do not answer phone calls when using mobile WiFi to connect with the onboard camera to preview images.
10. Do not use the product in a complex electromagnetic environment as it may cause communication errors.
11. Do not use or store the product in a humid environment as it may create condensation inside the machine
that may damage the device or lead to unpredictable consequences.
12. Do not use the product during lightning, in rain, with strong winds or dust storms present, or in otherwise
harsh weather conditions to ensure your personal safety and the protection of the quadcopter.
13. . Please keep the unit away from heat as the quadcopter’s thermoplastic material may wear-off quickly,
deform, or even melt in high temperatures.
14. Novice users should operate the quadcopter under the guidance of professionals, and the throttle stick
should be operated slowly to make adjustments. Do not rapidly push or pull the throttle stick.
15. For the safety of your life and property, please follow operating instructions in the user’s manual. Do not
operate the quadcopter for any illegal activity.
16. Unauthorized disassembly or modication of the quadcopter is prohibited.
17. Batteries should be placed out of reach children. Please seek medical assistance immediately if batteries are
swallowed by a child.
18. Make sure the quadcopter battery is properly installed and locked in place.
19. Do not use any device other than the battery charger provided with the product to charge the quadcopter
battery.
20. Do not use or store batteries near heat-emitting equipment (like ovens, for example).
21. Do not dispose of batteries in a re. Do not otherwise subject the batteries to heat.
22. Do not use batteries in places with strong static charge, as it may lead to possible failure of the electronic
protection system or cause other safety accidents.
23. Do not soak batteries in water. Batteries should be stored in a cool and dry place if they are not to be used
for a long time.
24. Do not combine this product’s batteries with other manufacturer’s batteries of different capacity, type, or
variety.
25. Do not transport or store batteries together with necklaces, hairpins or other metal objects.
26. Do not strike or throw batteries.
27. Do not directly short circuit the battery contacts.
28. Do not pierce the battery case with nails or other sharp objects.
29. Do not hit the batteries with a hammer or stamp on the batteries.
30. Do not attempt to disassemble the batteries in any manner.
31. Do not use or store batteries in a hot environment, such as in direct sunlight or in a car in hot weather, as
high temperatures may affect battery performance and shorten life, or even cause batteries to catch re.
32. Do not leave batteries unattended while charging.
Conventions
All of the Q-Cop 450’s features described in this manual, unless particularly stated, are described while the
product is in the operating mode.
Download the Hitec AEE APP
Please download the Hitec AEE App to simultaneously watch live video while using the Q-Cop 450. For iOS
users, please search Hitec in the App store where you can download and install the Hitec AEE App.
p2 p3
Page 3
table of contents
table of contents
Section 1: Introduction..........................................................................................................................2
Disclaimer...................................................................................................................................................................2
Safety Precautions.....................................................................................................................................................2
Conventions...............................................................................................................................................................3
Download Hitec AEE App........................................................................................................................................3
Overview.....................................................................................................................................................................6
Kit Contents...............................................................................................................................................................6
Product Introduction................................................................................................................................................8
Section 2: quadcopter Battery...................................................................................................9
Quadcopter Battery Introduction.........................................................................................................................9
Battery Specications............................................................................................................................................10
Charging the Quadcopter Battery......................................................................................................................10
Installing the Quadcopter Battery......................................................................................................................10
Section 3: Quadcopter Preparation.......................................................................................11
Flight Control System.............................................................................................................................................11
Flight Indicator.........................................................................................................................................................12
Micro SD Card Slot................................................................................................................................................13
Onboard Camera....................................................................................................................................................13
Camera Function Keys...........................................................................................................................................13
Camera Data Copy.................................................................................................................................................13
Shooting Status Indicator.......................................................................................................................................13
Prepare Rotor Blades............................................................................................................................................14
Installation Method.................................................................................................................................................15
Removing Blades.....................................................................................................................................................16
Section 5: Preparing the Repeater........................................................................................21
Preparing the Repeater..........................................................................................................................................21
Wi-Fi Indicator.........................................................................................................................................................21
Power Indicator........................................................................................................................................................21
Pairing Button...........................................................................................................................................................21
Charging the Repeater...........................................................................................................................................22
Switching on the Repeater....................................................................................................................................22
Check Battery Status.............................................................................................................................................22
Section 6: Flying the Quadcopter..........................................................................................23
Flying Environment Requirements......................................................................................................................23
Pre-Flight Check......................................................................................................................................................23
Compass Calibration.............................................................................................................................................23
Starting / Stopping the Motors............................................................................................................................24
Basic Flight Procedures..........................................................................................................................................25
Aerial Photography Tips and Tricks.....................................................................................................................25
Failsafe Protections.................................................................................................................................................25
Battery Level Alarm Function...............................................................................................................................26
Section 7: Using the Hitec AEE App.........................................................................................27
Download and Install Hitec AEE App.................................................................................................................27
Connect to Q-Cop 450 System Network........................................................................................................27
Starting the Hitec AEE App...................................................................................................................................27
Hitec AEE App Main Interface..............................................................................................................................28
Video Interface........................................................................................................................................................29
Settings Interface....................................................................................................................................................29
Section 4: Preparing the Transmitter................................................................................17
Preparing the Transmitter......................................................................................................................................17
Switching on the Transmitter................................................................................................................................18
Antenna Signal Description..................................................................................................................................18
Transmitter Operating Instructions....................................................................................................................19
Frequency Pairing Between Transmitter and Receiver...................................................................................20
Section 8: Appendix.................................................................................................................................30
Description of Common Indicators...................................................................................................................30
Specications...........................................................................................................................................................30
Troubleshooting.......................................................................................................................................................31
p4 p5
Page 4
overview
NRM
The Q-Cop 450 is a sophisticated product with integrated ight and camera control. It is equipped with a 16
megapixel camera and advanced intelligent ight control system. You can use mobile devices to remote control
the camera through the Hitec AEE App, and achieve real-time transmission of video images. Q-Cop 450 will
help you effortlessly capture clear and stable aerial videos and photos.
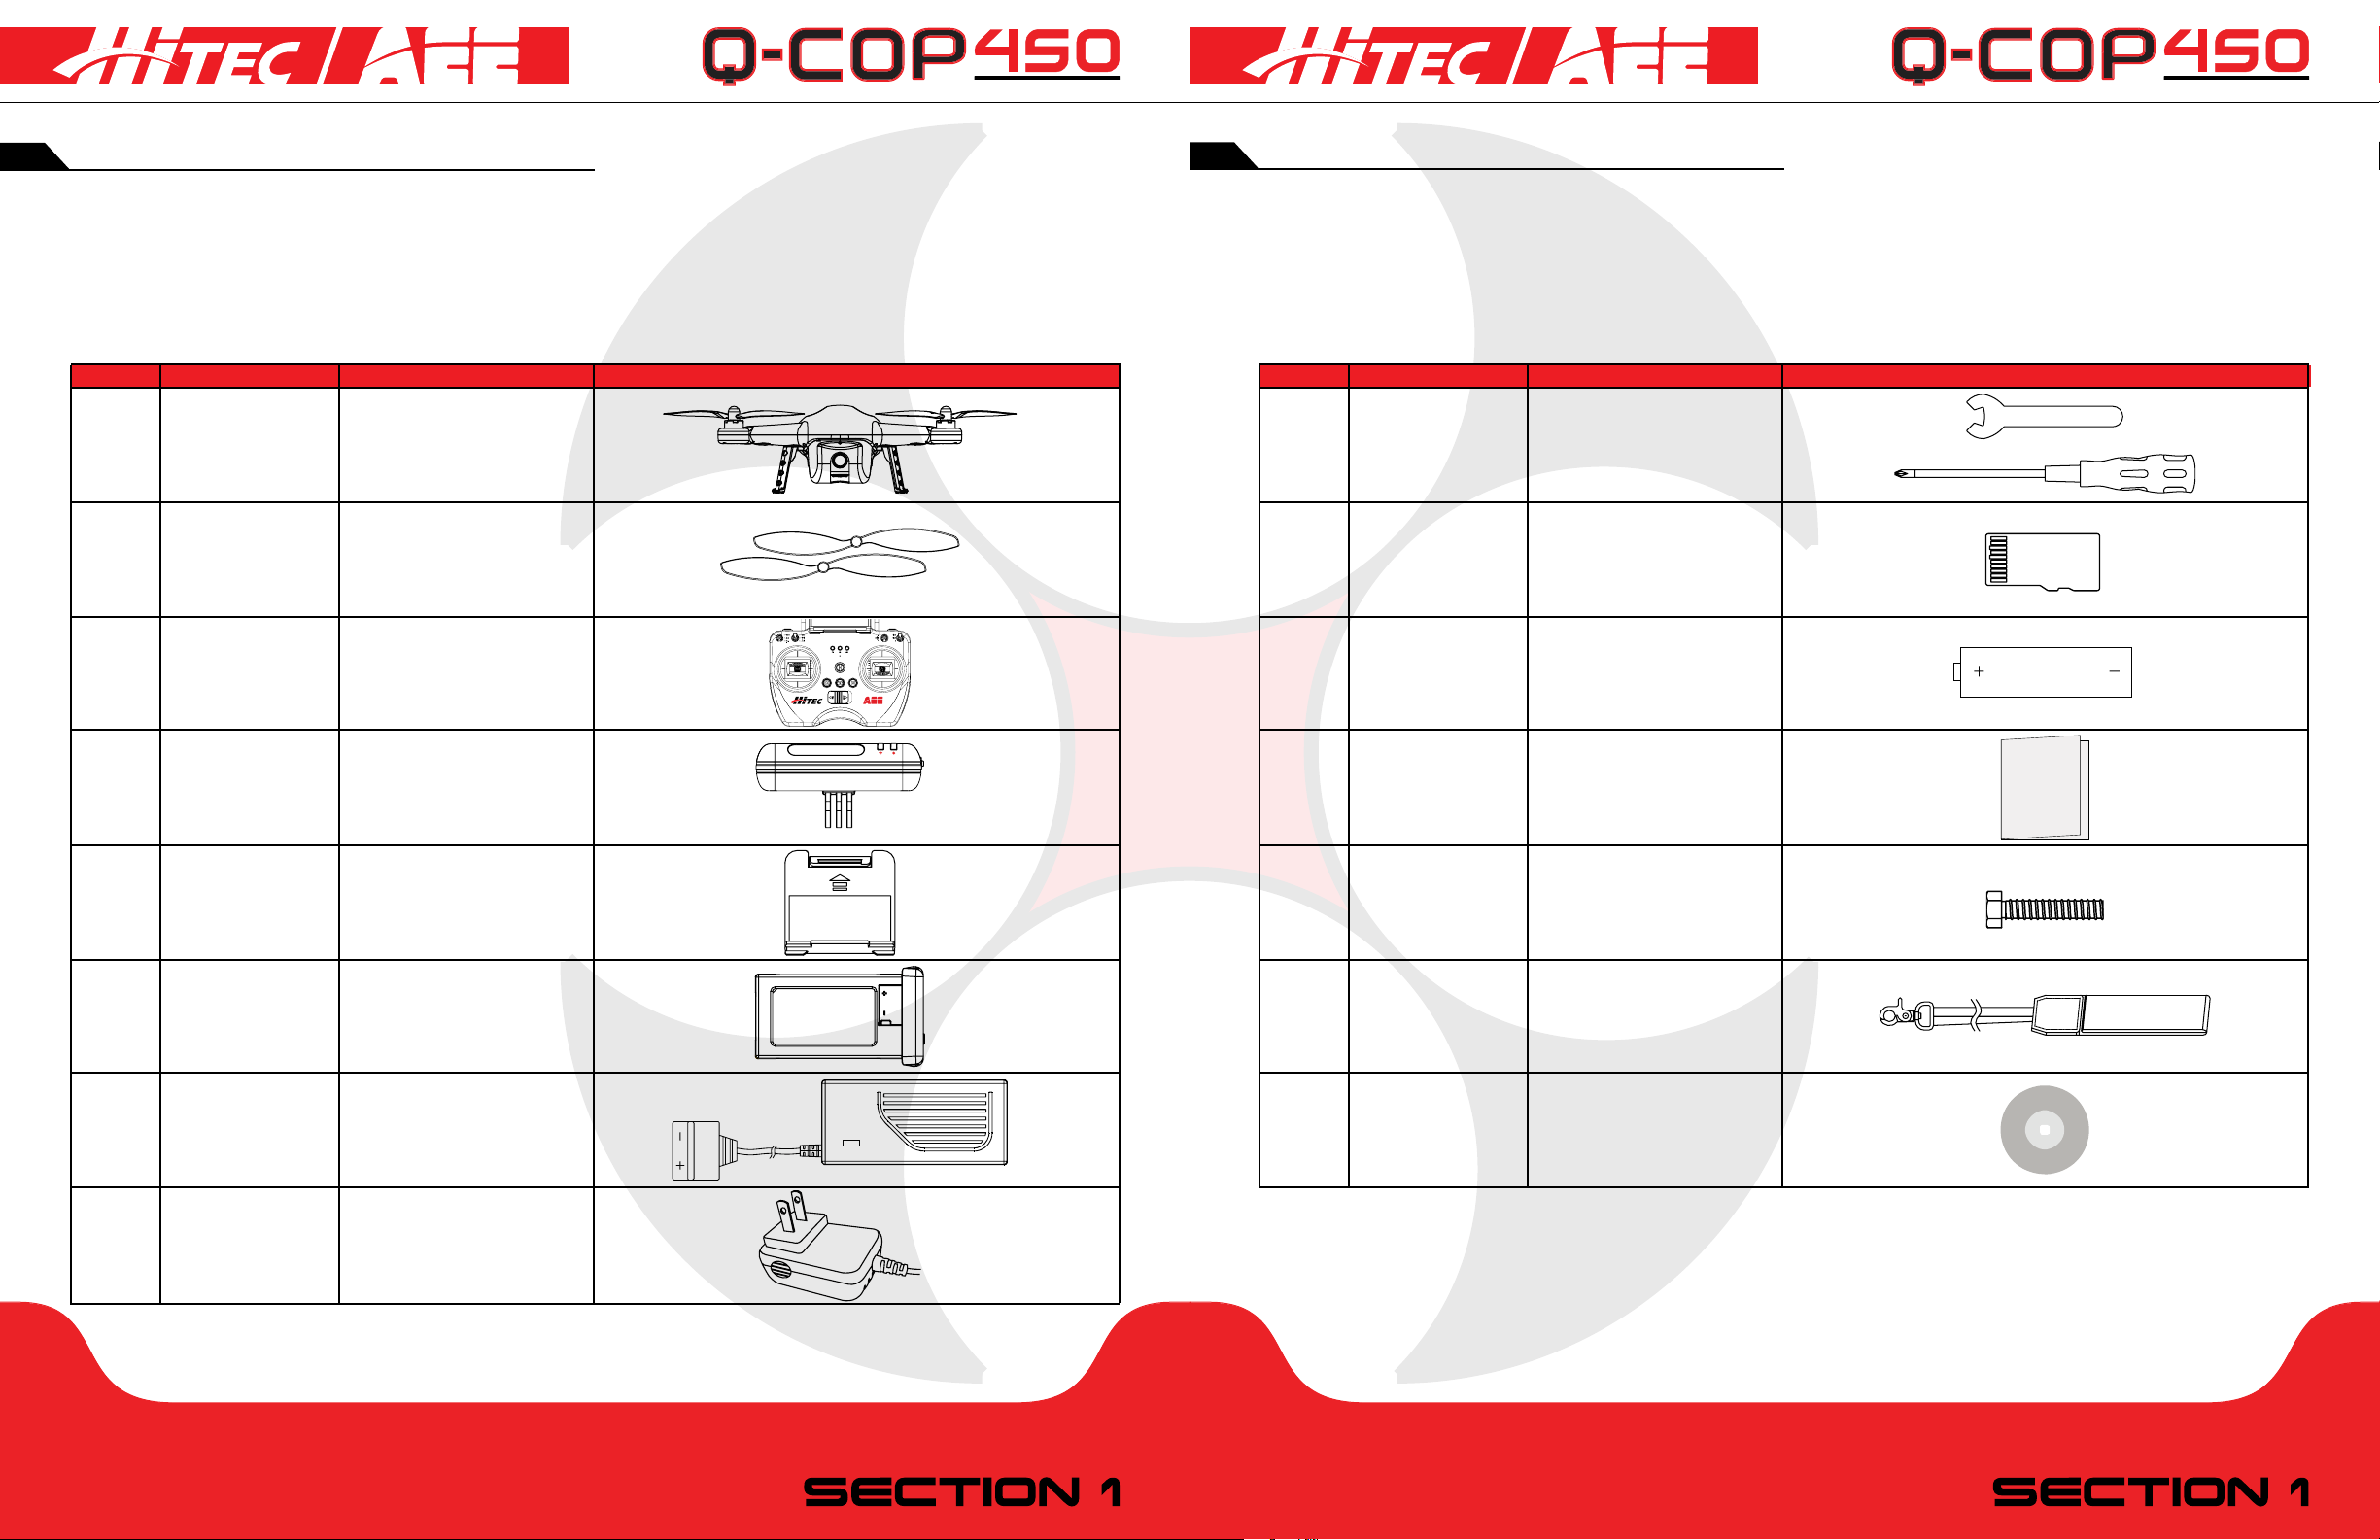
Kit Contents:
overview
Quantity Name Description Diagram
1 piece
4 pairs
1 piece
1 piece
1 piece
Quadcopter
Rotor Blades
Transmitter
Repeater
Mobile Device
Mount
With Built-in
Onboard Camera
4 Rotor Blades [gray caps]
4 Rotor Blades [black caps]
S1 S2 S3 S4
Includes Repeater Mount
Use to Connect to Mobile
Devices using Wi-Fi
Use to Mount
Mobile Devices
Quantity Name Description Diagram
1 set
1 piece
GPS
NULL
4 pieces
1 piece
9 pieces
Tools
Micro SD Card
AA Batteries
User Manual and
Warranty Card
Screws
1 Wrench & 1 Screwdriver
Required for Recording
[not included]
Provides Power for
the Transmitter
Use to Connect to Mobile
Devices with WiFi
Use to Mount
Mobile Devices
1 piece
1 piece
1 piece
Quadcopter
Battery
Quadcopter
Battery Charger
Repeater Adapter
Provides Power Supply
to the Quadcopter
100-240V 50/60Hz
100-240V 50/60Hz
1 piece
1 piece
p6 p7
Strap
Clips onto Transmitter
100-240V 50/60HzCD
Page 5

overview
quadcopter battery
Product Introduction:
Congratulations on the purchase of your new Q-Cop450!
The Q-Cop 450 adopts high-standard integrated design with professional-grade airborne photography
equipment and a repeater. Your Q-Cop450 provides excellent aerial photography in outdoor low-lying or large
indoor spaces. New owners of the Q-Cop450 will need to conduct a simple installation process to put the
quadcopter in ight and begin taking aerial photographs. The resulting images for your session will automatically
store in the memory card. Users can control the quadcopter in real-time through the transmitter and can
view light video through an appropriate mobile device. This product is suitable for residential or commercial
photography applications and features simple and exible operating procedures with an ever-stable and highly
reliable performance.
Transmitter Device Quadcopter External Components Quadcopter Operating Modes Quadcopter Internal Components
Transmitter
2pc Throttle Sticks
Multi-Channel
Airborne Camera
Power Unit [Motor & Blades]
GPS Mode
Normal Mode
Null [Reserve]
Flight Control System
Wi-Fi Module
Receiver
ESC [Electronic Speed Control]
Rotor Blade
Motor
Camera
Quadcopter
Repeater
Repeater Mount
Mobile Device Mount
Please make sure the following device batteries are fully charged before using the Q-Cop 450.
Transmitter Device Quadcopter Internal Components
Transmitter
Repeater
Quadcopter
Mobile Devices
Install 4 AA batteries for power supply.
Repeater needs to be charged through the built-in charging port [Micro USB port.]
Charge Quadcopter battery for power supply.
Please ensure that your mobile device is fully charged before using Hitec AEE App.
Quadcopter Battery Introduction:
The quadcopter battery [Figure 2] is a unique battery with charge and discharge management functions. It is
specically designed for the Q-Cop 450 and has a capacity of 5300mAh and a voltage of 11.1V. You must use
the dedicated quadcopter battery charger [Figure 3] provided for charging.
Figure 2 Figure 3
Caution:
1. Do not remove the battery when the quadcopter is switched on as it may damage the power supply
connector.
2. If the battery is not used for a long time, it is recommended that you discharge the battery to a 40-50%
charge level and store it in a dedicated battery box.
3. Replace the battery after 300 unique charges or more. Before disposing of your batteries, please discharge
the unit until the charge is fully depleted.
4. Do not continue using the battery if there is any expansion or damage to the battery surface, as it may catch
re or explode. Please replace the battery in such cases, and do not try to charge them.
5. Please pay attention while charging batteries to prevent accidents. When charging the battery, please keep
the battery and charger in a place where there are no ammable or combustible materials on the ground.
6. Do not leave the battery charging unattended.
7. Battery safety is very important. Please refer to the Safety Precautions for more notices.
Press the Battery Level Check button
GPS
NRM
S1 S2 S3 S4
NULL
[Figure 4]. The screen displays appropriate
battery level. Please fully charge the battery
when the battery charge displayed is less
than two bars.
Transmitter
p8 p9
Battery Level
Battery Level
Check Button
Figure 4
section 2section 1
Page 6

quadcopter battery
quadcopter preparation
Battery Specications:
Type Li-Po Battery
Capacity
Charging Ambient Temperatures
Discharging Ambient Temperatures
Charging/Discharging Ambient Relative Humidity
5300mAh
0°C to 50°C
-20°C to 50°C
< 80%
Before using the battery, please carefully read and strictly comply with this manual’s instructions. Any problems
caused due to failure to follow instructions will be the responsibility of the user.
Charging the Quadcopter Battery:
1. Connect the charger to an AC power source (110-240V, 50 / 60Hz). If necessary, please use a power adapter.
2. While charging, the battery charger indicator lights up, and turns red.
3. When the battery indicator turns green, it means the battery is fully charged. Please remove the battery and
disconnect the charger cable from the socket once the battery is completely charged. Do not leave the battery
plugged in to the charger for long periods of time after the light has turned green.
The quadcopter includes the ight control system and an airborne camera that are convenient to use.
Rotor Blades
Motor
Front Indicator
Camera Lens
Micro SD
Card Slot
Undercarriage
Tail Indicator
Power Switch
Figure 5
Installing the Quadcopter Battery:
Push the battery in the correct direction (Figure 6) into the quadcopter’s battery compartment and ensure
the battery is properly installed before fastening the battery lock. If the battery lock is not fastened before the
ight, it may cause poor contact with the battery which may affect ight safety or even cause the quadcopter
to fail to take off.
Figure 6
Rear Indicator
Quadcopter
Batteries
Battery Level Display
Battery Level
Check Button
Flight Control System:
The Q-Cop 450 is designed with an AEE ight control system, which is easy to operate and provides stability.
In addition to supporting basic ight maneuvers such as climb, descend, roll and pitch, it also supports failsafe
protection, battery alarm levels, smart direction control and other functions.
Flight Control System Component Modules
Master Controller
GPS & Compass
Indicators
Functions
Core of ight control system. Connects all modules and plays the role of centralized control.
Used for positioning and navigating the quadcopter.
Indicates current status of ight control system. Used to navigate during night ying.
p10 p11
section 3section 2
Page 7

quadcopter preparation
quadcopter preparation
Flight Indicator:
There are three LED Flight Indicators: the Front indicator, Rear indicator and Tail indicator. When the
quadcopter switch is turned on, the LED Flight Indicators will be lit. The Front indicator is green and the Rear
indicator is red. [Note: Hereafter use Green/Red Indicator to describe Front/Rear indicators respectively].
Front Indicator
Tail Indicator
Rear Indicator
Function Front Indicator [Green]
Flight Navigation Instructions
1st Level Low Battery Alarm
2nd Level Low Battery Alarm
Barometer Abnormal State
GPS Abnormal State
Compass Abnormal State
Compass Needs Calibration
Accelerometer Abnormal State
Accelerometer Needs Calibration
Gyro Abnormal State
Gyro Needs Calibration
Transmitter Signal Status Indication
GPS Searching Satellite Status Indication
Remains ON
Slow Blink [1sec ON , 1sec OFF]
Fast Blink twice at 1sec intervals
Remains ON
Remains ON
Fast Blink
Slow Blink
Fast Blink
Switches ON>OFF>ON
Remains ON
Remains ON
Rear Indicator [Red]
Remains ON
Slow Blink [1sec ON , 1sec OFF]
Fast Blink twice at 1sec intervals
Slow Blink once at 3sec intervals
Fast/Slow Blink twice at 3sec intervals
Remains ON
Remains ON
Fast Blink
Switches ON>OFF>ON
Fast Blink
Slow Blink
Tail Indicator [Red]
Fast Blink
Slow Blink
Micro SD Card Slot:
Before using the Q-Cop 450 to take pictures or record videos, please insert the Micro SD card into the card
slot while the power is OFF. The Q-Cop 450 Micro SD card supports a maximum of 32GB capacity cards.
Onboard Camera:
The Q-Cop 450’s camera power is supplied by the quadcopter’s battery. The camera power is on when the
power switch is turned on. Users can take photos and record videos by pressing the camera function key, or
through the Hitec AEE App. The camera supports single shot and continuous shooting mode, and video capture
resolution is up to 1080P / 30fps (N system) 1080P / 25fps (P system) Full HD video.
Camera Specications:
Resolution
Image Resolution
Video File Formats
Storage
TV System P / N System Optional
Maximum1080P / 30fps (N System) 1080P / 25fps (P System)
4608 x 3456
MOV (H .264 Compression)
External Micro SD Card, Up to 32GB
Camera Function Keys:
Photo Capture Function: Press the airborne camera button on the transmitter to take pictures. Each press
snaps one photo.
Video-Recording Function: The Q-Cop 450 quadcopter automatic recording is set to ON as a default
setting. While video recording, you can press the Stop Button on the transmitter to stop recording, or press
the Record Button to restart video recording.
Camera Data Copy:
When the Q-Cop 450 power is switched OFF, remove the Micro SD card from the Micro SD card slot, and
connect to a computer with a card reader to easily copy camera photos and videos.
[Quadcopter power must be OFF while removing the Micro SD Card.]
p12 p13
section 3section 3
Page 8

quadcopter preparation
NULL
S3 S4
GPS
NRM
quadcopter preparation
Shooting Status Indicator:
When the quadcopter is turned on and the camera is used for recording and photo capture, the Shooting
Status Indicator will light up. Users can determine the current camera status through the Shooting Status
Indicator. Camera Status Indicators on the Transmitter are as shown in the gure below.
The Three LED Indicators on the Transmitter are:
1. Transmitter Power Indicator [red.]
2. Photo Capture Indicator [green.]
3. Video Recording Indicator [green.]
Function Status Power Supply [Red]
Start Quadcopter
Accelerometer Calibration
Gyro Calibration
Compass Calibration
Start Video Recording
Stop Video Recording
Photo Capture
Photo Capture Completed
Low Power
Code-Pairing
GPS Satellite Searching
Remains ON
Remains ON
Remains ON
Remains ON
Remains ON
Remains ON
Remains ON
Remains ON
Remains ON
Remains ON
Remains ON
Photo Capture [Green]
OFF
OFF
OFF
OFF
OFF
OFF
Flash 0.3 sec
OFF
OFF
OFF
OFF
Video Recording/Code-Pairing [Green]
ON>OFF
OFF
OFF
OFF
Slow Blink [1.5 sec OFF, 0.8 sec ON]
OFF
OFF
OFF
OFF
Remains ON
OFF
Installation Method:
(As shown below) Prepare two blades with gray caps and two with black caps. Attach the blades with gray
caps to the motor shafts without “P” marks and attach the blades with black caps to the motor shafts with “P”
marks. Tighten appropriate rotor blades as per the locking direction on blade.
When the Transmitter battery charge is low, a warning alert sounds. When video recording and photo capture
commands are sent from the Transmitter, the Transmitter LED indicators show the corresponding function status.
Prepare Rotor Blades:
The Q-Cop 450 uses 10-inch rotor blades with black and gray color rotor blade caps. Rotor blades are
consumable items. If necessary, please purchase separately.
Rotor Blades Install/Uninstall
Grey Blade Lock: Turn Blade Clockwise
Grey Blade Unlock: Turn Blade Counter-Clockwise
Black Blade Lock: Turn Blade Counter-Clockwise
Black Blade Unlock: Turn Blade Clockwise
Rotor blades are designed for automatic turning, therefore do not tighten excessively during the installation.
Do not use glue. Please ensure rotor blades are installed in the correct position. The quadcopter cannot y
properly if the rotor blades are installed incorrectly. Since the blades are very thin, it is advised to wear gloves
during installation to prevent accidental injury.
p14 p15
section 3section 3
Page 9

quadcopter preparation
transmitter preparation
Removing Blades:
Auxillery
Wrench
Precautions:
1. Before each ight, please check that the rotor blades are correctly and rmly installed.
2. Ensure all rotor blades are intact before each ight. If the blades are worn or damaged, please replace with
new blades before ying.
3. Keep your distance from rotating rotor blades and the motor to avoid cuts and injury.
4. Use only rotor blades provided by Hitec and AEE to ensure optimal performance.
Preparing the Transmitter:
The Q-Cop 450 transmitter is used together with the quadcopter receiver. The transmitter and receiver
have been successfully adjusted to match frequency before delivery. The transmitter is set to U.S. mode as the
default factory setting mode. The repeater mount is already installed on the transmitter before delivery. Install
repeater as shown in the image below with included lock screw. Please install the mobile device mount to place
mobile devices. The mount is not suitable for use with oversized mobile devices like an iPad.
Antenna
Repeater
Mobile Device
Power Indicator
Photo Capture
Mount
3-Position
Switch S2
Transmitter
Indicator
GPS
NRM
S1 S2 S3 S4
NULL
Camera Angle
Control S3
3-Position
Switch S4
Video Recording
Indicator
Strap Hole
Left Stick
Airborne Video
Capture Button
Airborne Photo
Capture Button
p16 p17
Right Stick
Video Stop
Button
Transmitter
Power Switch
section 4section 3
Page 10

transmitter preparation
transmitter preparation
Switching on the Transmitter:
1. Install 4 AA batteries into the battery compartment as per positive and negative directions.
2. Ensure the two sticks are in the center position. Push switches S1and S2 to the top position.
3. Push the transmitter switch to the ON position to switch on the transmitter.
4. After switching on the transmitter, the power indicator remains on and is red.
Caution:
1. Before each use, make sure the transmitter has sufcient battery charge. If the charge is too low, the
transmitter will sound a lower power alarm. Please replace the battery immediately.
2. Please remove the batteries if you do not intend to use the transmitter for a long time.
3. After the batteries are depleted, please remove the batteries and follow the battery instructions for recycling.
Antenna Signal Description:
Point transmitter antenna vertically skywards towards the receiver antenna on the quadcopter. Try to maintain
an unobstructed view between the antennas, otherwise you may lose control of the quadcopter. Be careful not
to let the mobile device and the repeater on the transmitter block the antennas.
Transmitter Operating Instructions:
Transmitter [US Mode
Throttle/Yaw
Stick
Throttle/Yaw
Stick
Pitch/Roll
Stick
]
Quadcopter Action Explanation
Rear
The throttle stick controls quadcopter elevation. Push the
stick up and the quadcopter rises. Pull the stick down and
the quadcopter descends. Keep the stick at the center
position, and the quadcopter hovers at that particular
height [height is automatically set.] Push the throttle stick
upwards over the centered position to make quadcopter
take off from the ground. [Please push the throttle
stick slowly to prevent the quadcopter from suddenly/
unexpectedly rising.]
The yaw stick controls the quadcopter rudder. Push the
stick left and the quadcopter rotates counterclockwise.
Push the stick right, and the quadcopter rotates clockwise.
If the stick is centered, the quadcopter ies in the same
direction without rotating. The stick controls the rotating
angular velocity of the quadcopter. Move the stick to
increase quadcopter rotation velocity.
The pitch stick controls the quadcopter’s front & back
tilt. Push the stick up and the quadcopter will tilt and y
backward. The quadcopter will keep level and straight if
the stick is centered. Move the stick faster to increase
the tilt angle [maximum is 35 degrees], and faster ight
velocity.
GPS
NRM
S1 S2 S3 S4
NULL
Pitch/Roll
Stick
S2 Switch
S4 Switch
Position 1 Position 2 Position 3
Position 1 Position 2 Position 3
The roll stick controls the quadcopter’s left & right tilt.
Push the stick left and the quadcopter will tilt and y left.
Push the stick right and the quadcopter will tilt and y
right. The quadcopter will keep level and straight if the
stick is centered. Move the stick faster to increase the tilt
angle [maximum is 35 degrees], and for faster ight velocity.
S2 Switch is used to calibrate the throttle position. Toggle
the S2 to position 3 to start the transmitter. Toggle the
throttle stick from left to right and back to left in a circle,
to make the stick touch the maximum positions. After
doing this for 5-8 times, toggle S2 to position 1, the Video
Recording Indicator lights up [green], and calibration is
completed.
S4 Switch is the ight mode toggle switch:
Position 1: GPS mode
Position 2: Notmal [NRM] mode
Position 3: Null [Manual]
In GPS Mode, when all sticks are in the neutral position
[centered], the quadcopter hovers at a xed point. In
Normal Mode, when all sticks are in the neutral position
[centered], the quadcopter remains level but may drift in a
horizontal direction.
p18 p19
section 4section 4
Page 11

transmitter preparation
repeater preparation
Frequency Pairing Between Transmitter and Receiver:
Frequency pairing and the link between the transmitter and quadcopter’s inbuilt receiver are factory set before
the Q-Cop 450 product is delivered. You can skip this procedure and power on to directly use the product.
However, if the transmitter or receiver is changed, then re-establishing link and frequency-paring is required.
Frequency Pairing Procedures:
1.Keep the transmitter power OFF and turn on the quadcopter, the quadcopter Front/Rear indicators as well
as Tail indicator light up. When you hear a “beep” sound, switch on the transmitter, the Video indicator lights
up, indicating frequency-pairing has commenced. When the Tail Indicator [red] continuously blinks fast, the link
between the transmitter and receiver is successfully established.
2. After the link is established, turn on the transmitter, and then power on the quadcopter. The Tail Indicator
starts blinking fast, indicating frequency-pairing is successful.
Preparing the Repeater:
The Q-Cop 450’s repeater is a wireless communication device that works in the 2.4GHz frequency band
and is used to increase the effective communication distance between the mobile device and the Q-Cop
450. Communication distance is affected by the surrounding environment, with blockages due to trees, signal
reection by buildings, interference by other same frequency bands, etc. and more potentially affecting effective
communication distance. Before ight, make sure the repeater works properly. Otherwise the connection
cannot be established between the mobile device and the Q-Cop 450.
Power Indicator
Wi-Fi Indicator
Lock Screw
Power Switch
Charging Port
[Micro USB Port]
Pairing Button
Base
Wi-Fi Indicator:
Indicates repeater’s Wi-Fi status.
Wi-Fi Indicator
Blue light remains ON
Blue light blinks fast [1.5sec OFF, 0.3sec ON]
Blue light blinks slow [3sec ON, 0.3sec OFF]
Description
Repeater startup completed.
Repeater is paired with the onboard camera.
Successfully paired repeater with onboard camera.
Power Indicator:
Indicates repeater’s power supply status. [It is not recommended to turn on the repeater while it’s charging.]
Power Indicator
Green light remains ON
Red light blinks
Red light remains ON
Description
Repeater power supply is normal.
Repeater is charging, or repeater power is running out. Please charge as sooon as possible.
Charging is completed.
Pairing Button:
When the repeater is on, long press the Pairing button for 3 seconds and the repeater will automatically
restart for code re-pairing. Short press the Pairing button to check repeater power level.
Press Pairing Button Once
Short Press
Short Press
Short Press
Long Press [3 sec] Repeater restarts and you can re-pair codes.
Description
If Power Indicator blinks once, indicates that repeater has over 80% charge remaining.
If Power Indicator blinks twice, indicates that repeater has over 50% charge remaining.
If Power Indicator blinks three times, indicates that repeater is running out of power.
p20 p21
section 5section 4
Page 12
repeater preparation
NRM
Flying the quadcopter
Code Pairing:
1.Switch on the transmitter power switch, quadcopter power switch and repeater power switch respectively.
2. When Wi-Fi repeater’s blue light is on, the repeater is working normally. Toggle the S2 switch on the
transmitter to the center position from “OK,” and then toggle back to “OK.”
3. Press the repeater pairing button for 3sec. The Wi-Fi repeater blue light indicator blinks slowly [0.3sec ON,
3sec OFF.] This indicates the repeater has successfully paired with the onboard camera. If pairing fails, please
repeat steps above.
Charging the Repeater:
Connect the repeater to the Micro USB port through the repeater adapter to charge the repeater. It takes
about 2 hours to fully charge. Before each ight, make sure the repeater has a sufcient charge.
Switching on the Repeater:
1. Toggle repeater power switch to ON to switch on the repeater.
2. Wait until the Wi-Fi indicator blinks blue indicating that the repeater works properly.
3. While using this procecss, ensure the repeater’s LED side faces you and try to ensure that visibility between
the repeater and quadcopter is unobstructed to obtain maximum communication distance. After the ight is
completed, in addition to switching off the quadcopter and transmitter, be sure to turn off the repeater or else
the repeater’s battery will be depleted.
Check Battery Status:
In the Hitec AEE App camera interface, you can display and view the Q-Cop 450’s power information located in
the upper left corner of the screen.
Flying Environment Requirements:
1. Do not use the quadcopter in inclement weather, such as strong winds, snow, rain and fog.
2. Select an open area with no tall buildings as the ying site. Presence of a large number of steel buildings in
the area will affect the compass.
3. While ying the quadcopter, please stay away from obstacles, people, power lines, trees, shelters, water
bodies, etc.
4. Do not y in a complex electromagnetic environment, such as near mobile phone base stations or towers, to
avoid transmitter interference.
5. This product cannot be used in the Antarctic and Arctic Circle.
6.Do not y in restricted or no-y zones and abide by relevant laws and regulations.
Pre-Flight Check:
1. Ensure transmitter, quadcopter, repeater and mobile device are fully charged.
2. Ensure rotor blades are correctly installed.
3. Ensure the Micro SD card is properly inserted before using the camera to capture images and videos.
4. Ensure S1 and S2 switches are in the “OK” position on the transmitter.
5. After powering on the quadcopter, transmitter and other equipment, please ensure they are working properly.
6. Check if the motors start properly after the quadcopter is switched on.
7. Check if the Hitec AEE App is properly connected to the camera.
Compass Calibration:
Compass calibration is required before rst time use. Otherwise, the system may not work properly, affecting
ight safety. The compass is susceptible to interference from other electronic devices, resulting in data
anomalies, affecting the ight or even leading to accidents. Frequent calibration ensures the compass works
appropriately. Do not calibrate in a strong magnetic eld. Do not carry ferromagnetic items such as keys, cell
phones, etc. while calibrating.
Calibration Procedures:
Please choose vast and open venues to conduct the calibration. Start the transmitter and quadcopter and
ensure the equipment works properly. Be sure to remove rotor blades before calibration to avoid accidental
injury. The Q-Cop needs a full battery before you begin. Follow the below procedures to calibrate the compass:
Step 1
GPS
S1 S2 S3 S4
Toggle Sticks to Above Position.
Front Indicator Blinks Green
NULL
If done correctly the front indicator will turn Off then remain On solidly. If the indicator blinks rapidly instead,
please repeat steps 1-3 to obtain successful calibration.
p22 p23
Step 2 Step 3 Step 4
Rotate Q-Cop 360 Degrees
Horizontally [Y Axis]
Rotate Quadcopter 360 Degrees
Vertically Facedown [Z Axis]
section 6section 5
Rotate Q-Cop 360 Degrees [X Axis]
Front Indicator Turns OFF>ON Solid
Page 13

Flying the quadcopter
GPS
NRM
GPS
NRM
GPS
NRM
GPS
NRM
GPS
NRM
Flying the quadcopter
Situations When Recalibration is Required:
1. Compass data anomalies. Front indicator blinks fast.
2. Flight venue is far from the place where last compass calibration was conducted.
3. There are changes in quadcopter’s physical structure.
4. The quadcopter drifts a lot while ying, or cannot y straight.
If the Q-Cop 450 is still experiencing ight instability, it is possible that the gyro needs to be calibrated as well.
If so, please follow the steps below.
Gyro Calibration Procedure:
1. Place the Q-Cop 450 on a level at surface.
2. Turn on Transmitter and Q-Cop 450, wait until the Q-Cop front indicators are solid.
S1 S2 S3 S4
NULL
3. Toggle the left stick to the upper left corner, and the right stick to the upper right
corner until the rear indicators begin blinking. Then, release the joysticks.
4. Wait for the rear indicators to return solid which indicates calibration success.
5. Repeat the steps for compass calibration from the previous page.
Starting/Stopping the Motors:
Starting the Motors:
S1 S2 S3 S4
NULL
Toggle the sticks as shown in the illustration, Combination Stick Command [CSC], to
start the motor. Toggle the left stick to the bottom left corner, and toggle the right
sticks to the bottom right corner. When performing CSC, toggle the sticks quickly
and accurately. After the motors start, release the sticks immediately.
Stopping the Motors:
After the motors start, there are two ways to stop it:
1. After the quadcopter lands, toggle the throttle stick to the lowest position and then perform CSC. The
motors will immediately stop. Release the sticks after the motors stop.
S1 S2 S3 S4
NULL
S1 S2 S3 S4
NULL
Basic Flight Procedures:
1. Place the Q-Cop 450 on at and open ground, and ensure the battery indicator faces towards you.
2. Turn ON the transmitter, repeater and quadcopter.
3. Run the Hitec AEE App, connect the mobile device and Q-Cop 450, and navigate to the camera preview screen.
4. Wait until the tail indicator blinks slowly. The Q-Cop 450 enters a safe ying state. Perform CSC to start the motors.
5. Push up the throttle stick slowly for smooth take-off. Please refer to the transmitter control instructions for
detailed control procedures.
6. Use the Hitec AEE App to take photos and videos, and enjoy the ight. For details refer to “Using Hitec AEE App.”
7. When landing, slowly pull down the throttle stick to make the quadcopter descend slowly to the ground.
8. After landing, pull the throttle stick to the lowest position and hold for more than 5 seconds until the motors stop.
9. After motors stop, turn off the quadcopter, repeater, and transmitter one after the other.
During ight, if all 4 arm indicators slow blink or fast blink, it indicates the quadcopter has entered a low battery
state. Please refer to the battery warning functions for details on the next page.
Aerial Photography Tips and Tricks:
1. Perform pre-ight checks.
2. Try to capture photos and record videos during safe ight status.
3. Try to capture photos and record videos in sunny weather with little wind.
4. Set camera settings as per shooting requirements, such as video resolution, picture size, etc.
5. Carry out a trial ight before actual ight to help plan the route and frame your photos and videos.
6. During ight, push the throttle stick as slowly as possible to ensure the quadcopter ies smoothly.
Failsafe Protections:
With the Failsafe mode, if the quadcopter loses the signal from the transmitter (i.e., you lose control), the
Automatic Flight Control system will control the quadcopter, return it to the starting point and land it safely.
This reduces the chances of the quadcopter getting lost or crashing in the event of a lost signal.
Home Point:
Indicates the quadcopter’s position when the quadcopter’s GPS successfully scans and connects to the satellite.
Scenarios When Quadcopter Enters Failsafe Mode:
1. When transmitter is turned off.
2. The ight distance is beyond the effective range of the transmitter signal.
2. After the quadcopter lands, toggle the throttle stick to the lowest position and hold for 5 seconds to stop
the motors.
S1 S2 S3 S4
NULL
3. There are obstructions between the transmitter and the quadcopter.
4. There is interference in transmitter signal.
Failsafe and Return Procedure:
If you lose control of the quadcopter during ight, the quadcopter will automatically follow the below
operating procedures:
1. The quadcopter automatically slows down and hovers in one location.
2. If the quadcopter regains signal from the transmitter within 2 seconds, the ight control returns to Normal
Do not turn the motors off during ight or else the quadcopter may crash.
Mode, and the quadcopter will not enter Failsafe Mode and will not automatically y back to Home Point.
p24 p25
section 6section 6
Page 14
Flying the quadcopter
using the hitec aee app
Failsafe and Return Procedure [cont.]:
3. If the quadcopter does not regain signal from the transmitter within 2 seconds, the quadcopter enters
Failsafe Mode, and initiates automatic ight control to y back to the Home Point. The quadcopter will now
continue to hover for 15 seconds and evaluate vertical distance to the Home Point. If the distance is more
than 15 meters, the quadcopter will y back to the Home Point. If the distance is less than 15 meters, the
quadcopter will y vertically to a 15 meters height and then return. When the quadcopter reaches the Home
Point, it will hover for 5 seconds and then automatically land.
To ensure the quadcopter successfully ies back to the Home Point when it is in Failsafe Mode, please take-off
only after the quadcopter’s GPS successfully connects to the satellite.
The quadcopter cannot intuitively avoid obstacles in its path when it is ying in the Failsafe Mode.
How to Regain Control on the Transmitter:
When the quadcopter is out of control, toggle the S4 Switch on the transmitter several times to switch the
ight mode. When the signal is restored, the transmitter will regain control and you can continue to use the
transmitter to operate the quadcopter.
Battery Level Alarm Function:
When the quadcopter’s battery is low, it has insufcient power and must land as soon as possible, or else may
lose power completely and crash. In order to prevent danger caused by a low battery, the quadcopter has a
two-level battery alarm function. Level 1 is a Low Power Alarm and Level 2 is a Severe Low Power Alarm that
is indicated by the ight indicator lights. If unable to regain control on transmitter, cycle power to the Q-Cop
450. If the situation continues, turn Off the quadcopter, perform transmitter calibration, and restart the Q-Cop 450.
Low Power Alarm
Level 1 Alarm
Level 2 Alarm
Flight Indicator Light Status
4 Arm Indicators Blink Slow [Blinks
ON>OFF in 1sec Intervals]
4 Arm Indicators Blink Fast [Blinks
Twice within 1sec]
Low Power Risk Prompt
Quadcopter ies normally for 3 min and then initiates Level 2 Alarm. Be cautious while
ying, keep the quadcopter within sight and do not y too high or too far.
Quadcopter ies normally for 3 min and then initiates Failsafe Mode and commences
to automatically land. Under such a situation, please return and land the quadcopter as
safely as possible, and do not push the throttle hard or make big movements during ight.
During low-power automatic landing, you can regain control of the quadcopter by switching the ight mode.
However, doing so repeatedly may cause the following:
1. Reduce battery service life due to over discharge.
2. Quadcopter may crash due to insufcient power.
Using the Hitec AEE App:
The Hitec AEE App is primarily used to control the quadcopter camera. It can be used to congure video and
camera parameters, controlling the camera angle and for capturing images and videos. It can also display quadcopter
status parameters.
Compatible Mobile Devices:
iOS (system version iOS6.1 or above): Applicable for iPhone 4s, iPhone 5, iPhone 5s, iPhone 5c, iPod Touch 4 and
iPod Touch 5. iPad 3, iPad 4, iPad mini and iPad Air can also be used. [Hitec and AEE will continue to update on future
support for more types of mobile devices.]
Download and Install Hitec AEE App:
To use the Hitec AEE App, please download the app and install it on your mobile device.
1. Ensure your mobile device is connected to the internet
2. Enter the App Store and type “Hitec AEE App” in the search eld and search. You will nd the
application icon shown in the results.
3. Touch the icon to install the app, and follow the prompts to complete the installation.
Connect to Q-Cop 450 System Network:
Before you start using the app, you need to connect to the HRU System Network.
The specic procedures are as follws:
1. Navigate to the mobile device “Settings” then “Wi-Fi” page.
2. Locate the “HRUXXXXX” network in the list of networks. Your personal HRU Network number is located
on the bottom of the repeater on its own seperate label.
3. Select this network and enter the password. The default password is “HRU12345.”
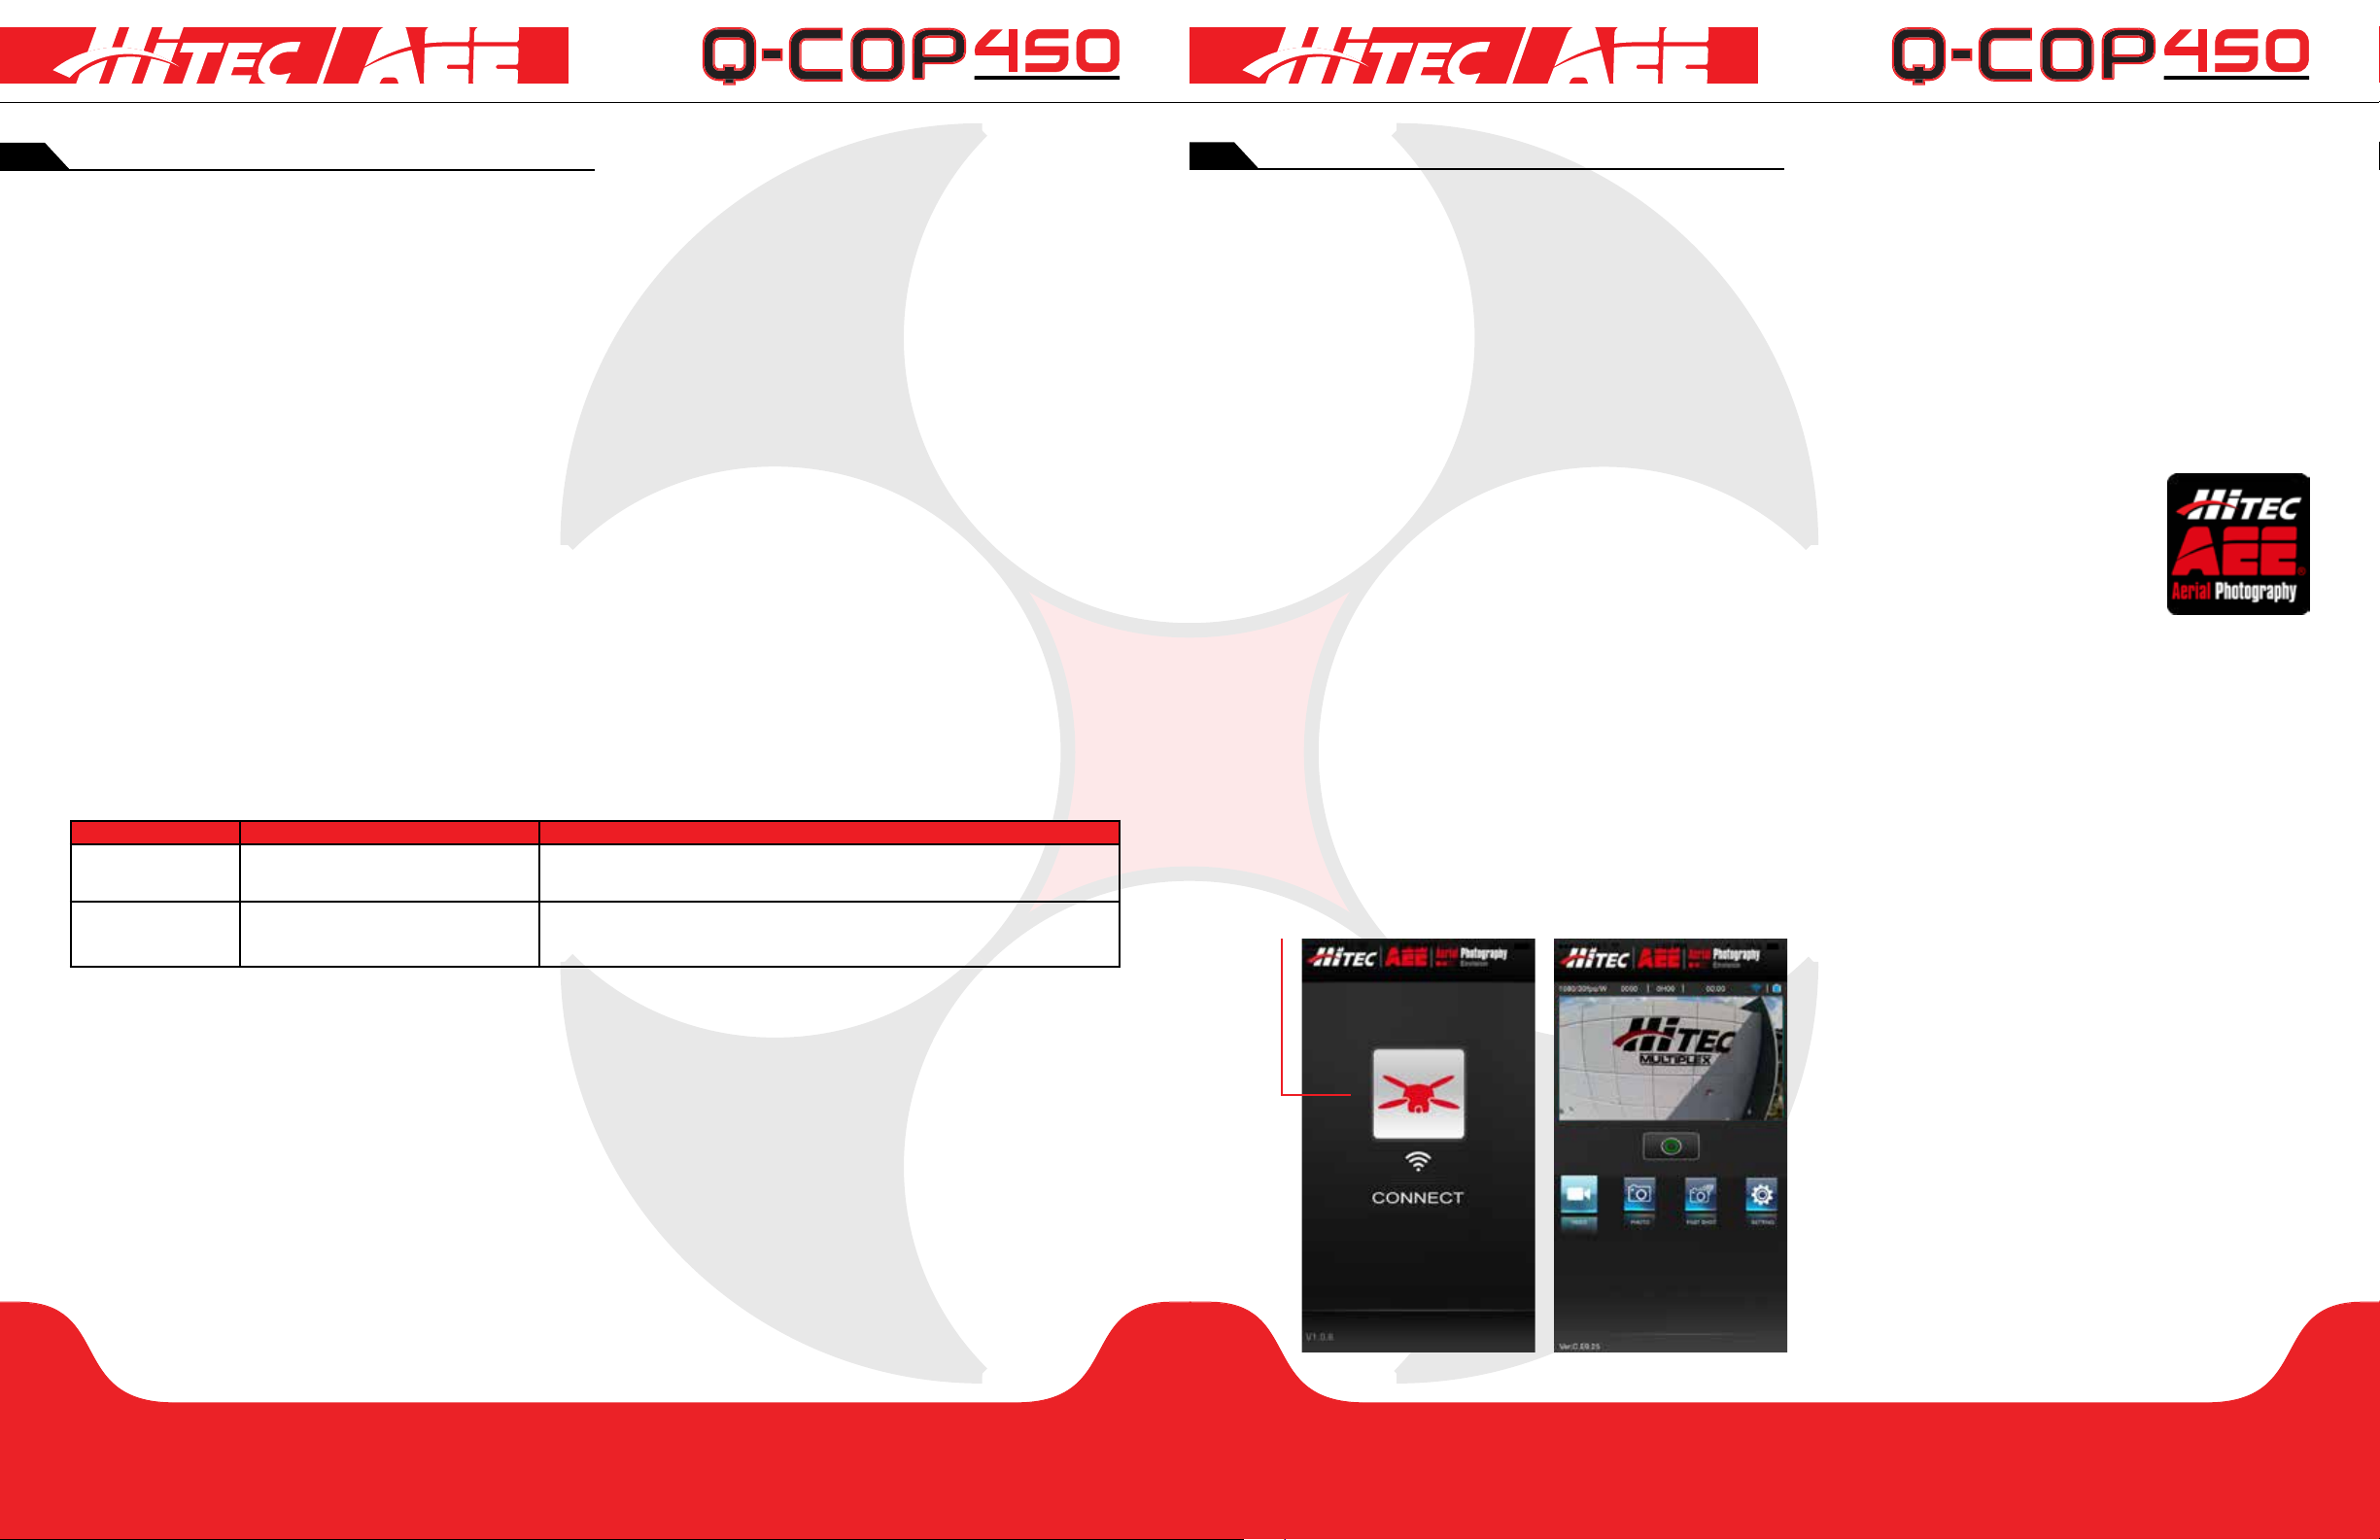
Staring the Hitec AEE App:
Touch the Hitec AEE App icon to launch it. The app will display the below interface on the mobile device. Touch
“Connect” to establish a connection between mobile device and camera. After connection is successful, the
app will display the preview interface. If connection
fails, you will see the “Connection Error” message.
Please check if your network connection is working
properly, and then try to connect again. If you
receive a phone call on the device while ying the
quadcopter, the mobile device will display the call
screen. Do not answer phone calls while the
quadcopter is ying as it may distract you and
compromise ight safety.
p26 p27
section 7section 6
Page 15

Flying the quadcopter
using the hitec aee app
Hitec AEE App Main Interface:
After successfully connecting to the Hitec AEE App, you can see the app preview screen as shown below.
Wi-Fi Signal Strength
Video Resolution
# of Files Stored on
Micro SD Card
Camera Available
Shooting Duration
Record/
Capture Photo(s)
Video Recording
Mode
Camera Mode
Q-Cop 450 Power Level
Recording Time
Video Preview Window
Settings Button
Burst Mode
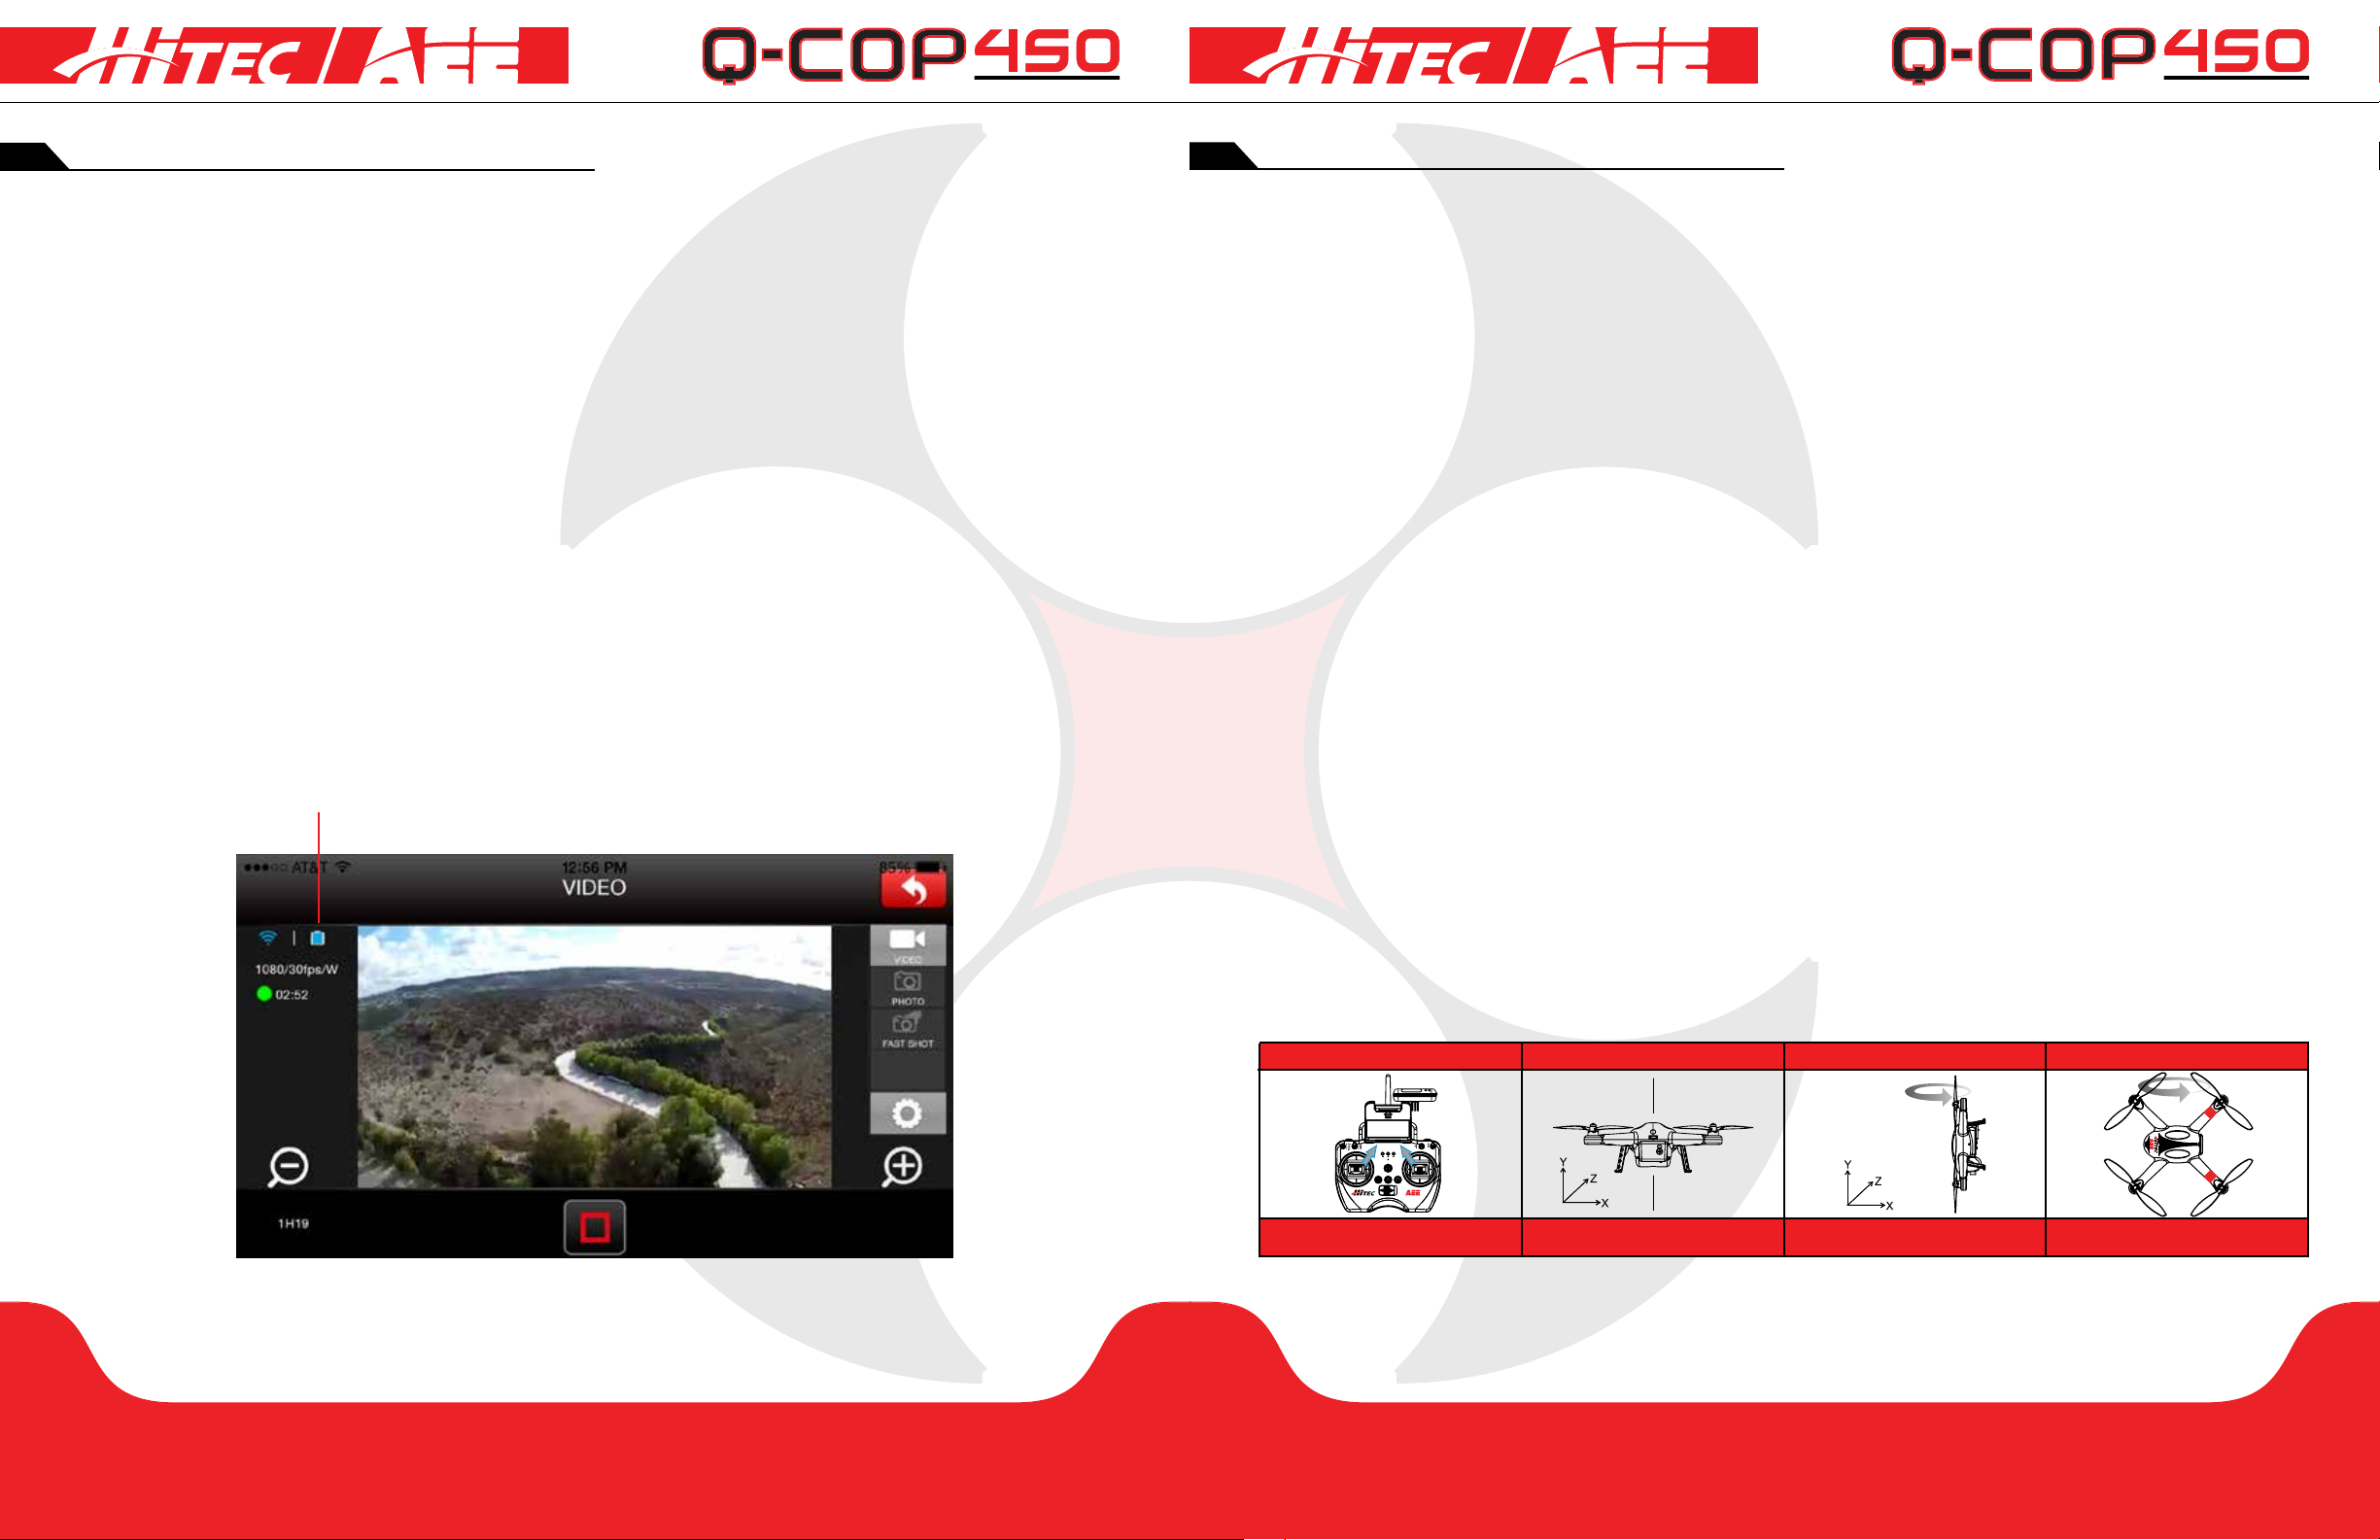
Video Interface:
Touch the “preview” area to enter the video interface as shown in the picture below. When the mobile device is
horizontal, the app interface will also change to landscape mode as shown in the picture.
The main interface and video interface buttons are essentially the same, except there are two additional buttons for
zoom in the video interface as pointed out above.
Settings Interface:
When the Hitec AEE App is successfully connected to the mobile device, we can change camera and video
parameter settings in the “Settings” menu to meet different photo and video requirements. You can also adjust the
other following options. Touch the Settings button to begin.
p28 p29
section 7section 7
Page 16

Appendix
troubleshooting
Common Indicators:
Mode
Normal
GPS
Warning Alarms
Level 1 Alarm [Low Power] Front and Rear Indicators Blink Slow
Level 2 Alarm [Severe Low Power] Front and Rear Indicators Blink Fast
Description
Front and Rear Indicators are ON; Tail Indicator Blinks Fast
Front and Rear Indicators Remain ON; Tail Indicator Blinks Slow
Specications:
Quadcopter
Battery
Weight
Hover Accuracy
Maximum Tilt Angle
Maximum Climb/Descent Speed
Maximum Flight Speed
Wheelbase
Flight Time
Camera
Ambient Operating Temperature
Sensor Size
Effective Pixels
Resolution
HD Video Recording Maximum 1080P / 30FPS [N System], 1080P / 25FPS [P System]
Transmitter
Communication Distance 500m
Working Hours
Operating Current/Voltage
Battery 4 AA Batteries
Repeater
Operating Frequency 2.4GHz
Communication Distance [Open Outdoors]
Transmitting Power
Power Consumption 1.5W
5300mAh LiPo
1.4kg
Horizontal: 2m, Vertical: 1m
35 Degrees
Climb: 8 m/s, Descend: 5 m/s
22-23mph
450mm
25 min
0-50 Degees Celsius
1/2.3
16 Mega Pixels [MP]
4608 x 3456
8hrs
150mA / 6V
300m
<=17dBm
Solutions for Transmitter Sticks Center [Neutral] Position Errors:
When there is a big difference in transmitter sticks neutral position, the motors cannot start when performing CSC.
Errors in transmitter sticks neutral position usually occurs in two cases:
Problem 1: When quadcopter is ON and the stick, not the throttle, is not in neutral position.
Solution 1: Move all transmitter sticks to neutral position and re-start the quadcopter. This will reset the neutral
position. If the problem persists, it may be caused by Problem #2.
Problem 2: Transmitter stick is over-tuned, leading to a large shift in position, [i.e., there is a large asymmetry in
transmitter stick position.]
Solution 2: Recalibrate the transmitter.
a. Toggle S2 Switch to position 3, all the way down, and start the transmitter. Then push the left and right
sticks in circles [5-8] so that the sticks touch all endpoint positions. Then toggle the S2 Switch to
position 1 [all the way up] until the video recording indicator [green] switches off and calibration is completed.
b. Restart the quadcopter and pay attention to whether the quadcopter starts properly. If the problem
cannot be solved by the above methods, please send the transmitter back to our factory for repair.
Quadcopter is Visible but Wi-Fi is Disconnected:
Turn off the transmitter and let the quadcopter automatically return. Make sure there are no obstructions on
the quadcopter’s return path, and make sure you are familiar with the procedures for regaining control of the
quadcopter.
WiFi Could Not Be Re-Connected:
This is likely due to the mobile device automatically connecting to other Wi-Fi networks after it disconnects
from the Q-Cop 450’s Wi-Fi connection. Please check that your mobile device is connected to the Q-Cop 450
Wi-Fi network.
Precautions When Multiple Mobile Devices Use the App at the Same Time:
During ight if the app is used on one mobile device and then shifted to another during ight, please make sure
you completely log out from the app on the original mobile device so that the app can be normally used on the
other mobile device.
Landing the Q-Cop 450 Smoothly:
Slowly reduce throttle stick until the Q-Cop is just above the ground. Continue to reduce throttle until the
Q-Cop lands. Hold the throttle stick completely down until blades stop.
Further Support:
For further support or if you have questions, feel free to call Hitec RCD, Inc. at (858)748-8440. You can also
send us an email at service@hitecrcd.com, or visit our website at www.HitecRCD.com for more information.
p30 p31
section 8section 8
 Loading...