

Page 1

1. Technical Values
Operating Voltage Range : 6~7 Cells
BEC Output Voltage : 5V
BEC Output Current : 1A
Maximum Current : 648A
Continuous Current : 162A
Rated Current Brake / Rev : 80A
On Resistance Forward : 0.004ohm
On Resistance Reverse : 0.008ohm
Weight : 56g(1.97oz)
Dimensions : 41x34x28mm(1.6x1.3x1.1inch)
Temperature Overload : 100~110c
PWM Frequency : 1900hz
*Motor Limit : 10 turn (Forward only)
when properly geared. 12 turn (Reverse)
2. Features
Microprocessor Controlled
Low Resistance
MOSFET Drive
Piezo Electric audio sound
Two Way or One Way
U.S. Service Procedure:
Send your defective product to:
HFX-R Installation and Set-up Instructions
Congratulations on your purchase of the HFX-R high frequency reversing electronic
speed control. The HFX-R represents the latest technology for high performance and
reliability in a reversing type ESC. Set it for two-way control for fun or forward only for
racing! The HFX-R does it all!
Step 1. Mounting instructions:
1.) Mounting the HFX-R should be done with double-sided tape in a location with
good airflow that does not interfere with the suspension of the vehicle.
Refer to your car instruction manual for their suggested location.
2.) On/Off switch should be mounted with double sided tape or screws where it is
easily accessible.
Hitec Customer Service
12115 Paine St.
Poway, CA 92064
Include with your returned product:
- Your name, address and daytime telephone number.
- A detailed note stating exactly what went wrong and how happened.
- A copy of your original purchase receipt.
4 HFX-R
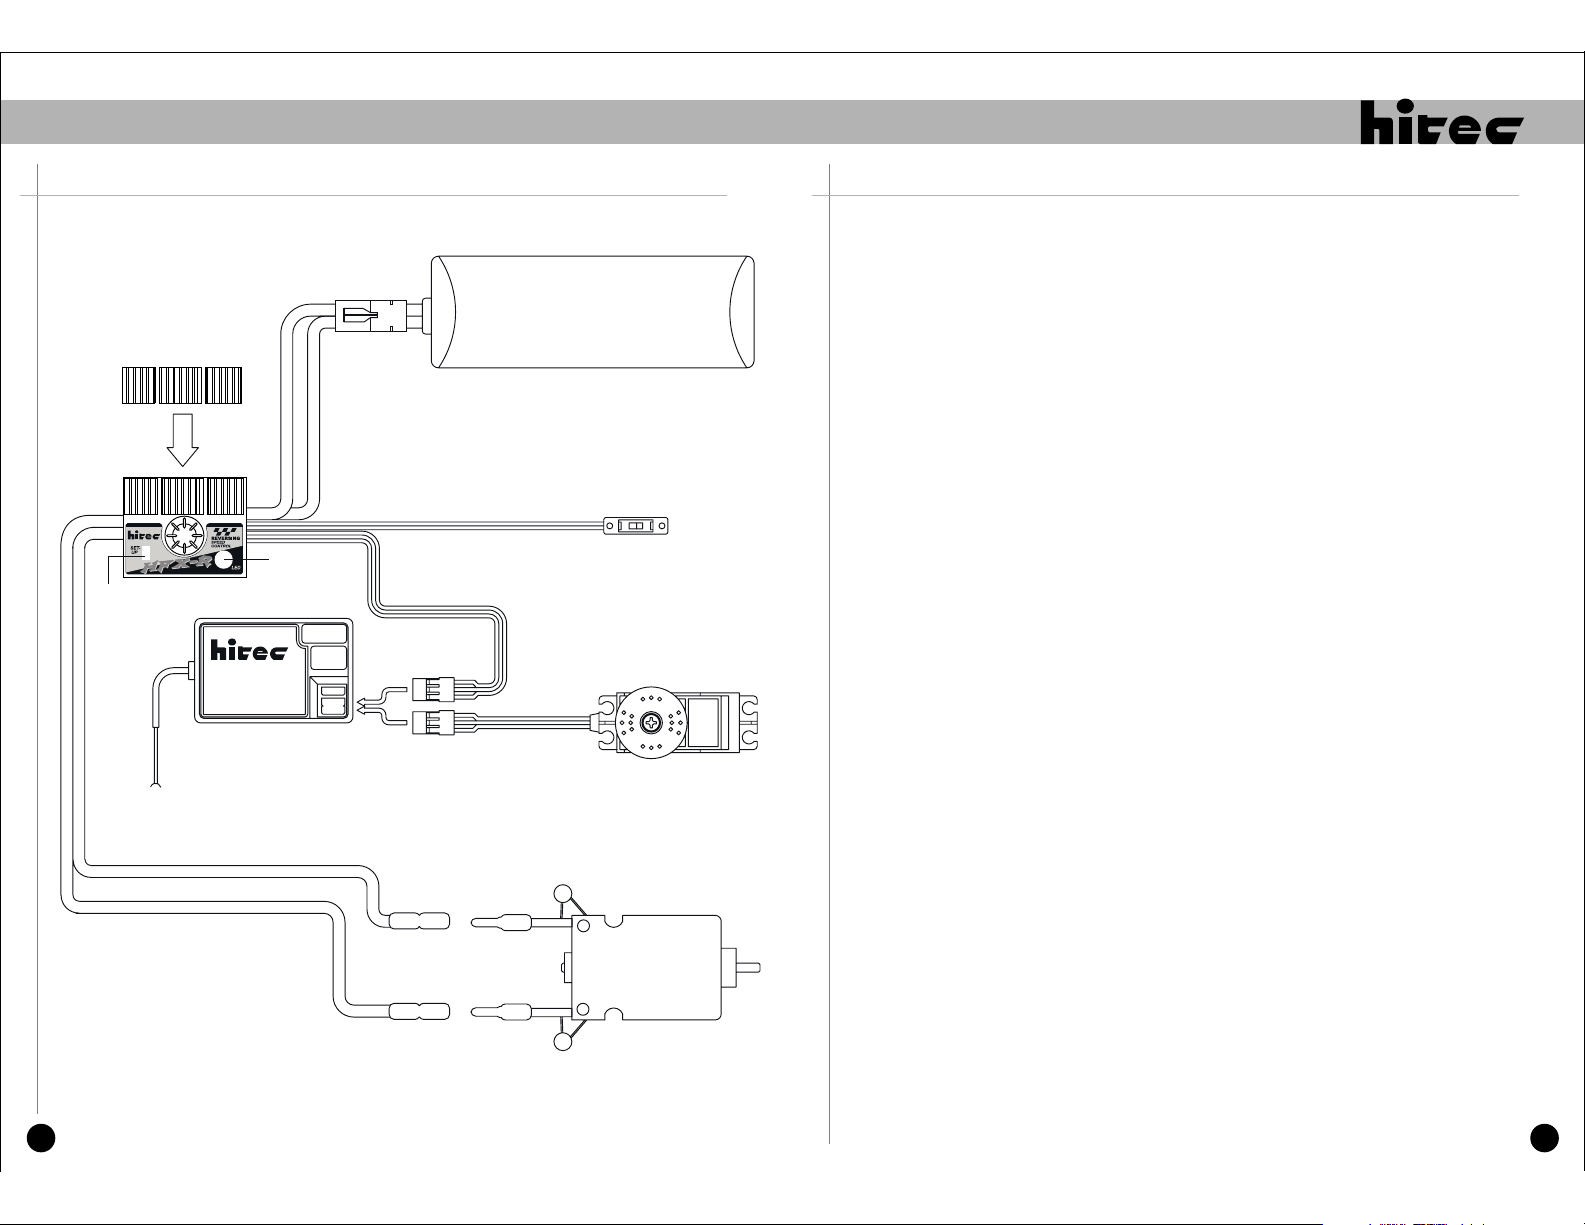
Step 2. Hook up Instructions:
1.) Connect the receiver lead to the throttle channel of the receiver.
This is typically CH#2. (Caution: The plug supplied will work with
Hitec, Futaba, JR and Airtronics "Z" only)
2.) Connect the ESC's Blue (-) and Yellow (+) wires to the motor via the
bullet connectors supplied.
3.) Connect the ESC's Tamiya type connector to the battery.
(Note: If you choose to use a different battery connector you will have to
change the stock connector to match.)
4.) Note: Always make sure you have three 0.1uf capacitors on the motor.
One from the positive motor tab to the ground (Case), the second from the
negative motor tab to the ground and the third from the positive motor tab to
the negative motor tab.
5.) Warning: Do not use a Schottky diode if using the reverse mode;
it may damage the speed control.
HFX-R 1
Page 2
HITEC HFX-R High Frequency Electronic Speed Control Instruction Manual
Step 3. Set-Up Instructions:
Two-Way Setup (Reversing)
1.) Turn on TX and make sure the EPA's or ATV's are set to 100% and
DOXPLQXP#######
KHDW#VLQN######
VHW#XS#EXWWRQ
EODFN#+0,#######
GXDO#OHG#####
LQGLFDWRU####
JUHHQ#=#IXOO#SRZHU
UHG#=#EUDNH######
5FK
UHFHLYHU
UHG#+.,#######
[0WDO
:15Y#0#;17Y#
QLFDG#EDWWHU\#
RQ
RQ2RII#VZLWFK
FK5#WKURWWOH
FK4#VWHHULQJ
VWHHULQJ#VHUYR
the trim is at neutral.
2.) Turn on the ESC switch while pushing the set-up button.
3.) The ESC will beep once. (The neutral point of throttle is set.)
4.) Select full throttle on the transmitter and the ESC will beep once again.
(Full power point of throttle is set.) Note: Motor will not run during the set up
procedure even if connected to the ESC.
5.) Now select full brakes on the transmitter and the ESC will beep once.
(Brake and Reverse is set.)
6.) Return the throttle to neutral, and it will then beep twice if
the set-up was properly done.
7.) Continuous beeping means there was an error. Repeat the set up procedure.
One way Setup (Forward Only)
1.) Turn on TX and make sure the EPA's are set to 100%.
2.) Turn on the ESC switch while pushing the set-up button.
3.) The ESC will beep once. (The neutral point of throttle is set.)
4.) Select full throttle on the transmitter and the ESC will beep once again.
(Full power point of throttle is set.) Note: Motor will not run during the set up
procedure even if connected to the ESC.
5.) Now select full brakes on the transmitter and the ESC will beep once. (Brake is set.)
6.) Push the ESC set-up switch while pushing full brake; it will then beep twice. (All set)
7.) Continuous beeping means there was an error. Repeat the set up procedure.
2 HFX-R
\HOORZ#+.,########
Eoxh#+0,#######
PRQROLWKLF###
FDSDFLWRU####
.
0
PRWRU##########
Precaution
1.) Never get your electronics wet.
2.) Always use the supplied heat sinks. Failure to do so will overheat your ESC and
void the warranty.
3.) Never use less than 7.2V (6 Cell) or more than 8.4V (7 Cell).
4.) Always use three 0.1uf capacitors on the motor.
5.) Never use a Schottky diode when using the reverse function.
6.) Motor limits are calculated and must correspond with the proper gearing.
Over gearing will cause the ESC to overheat. If this happens, use a smaller
motor pinion gear.
7.) Always make sure your batteries and connectors are wired properly.
Red is positive (+), black is negative (-). Reverse polarity will damage the ESC.
8.) Always turn your transmitter on first and off last.
9.) Always disconnect the battery from the ESC when not in use.
10.) Always insulate any exposed wires.
HFX-R 3
 Loading...