

Page 1
4 CHANNEL F.M. SYSTEM AIRCRAFT
OPERATIONAL MANUAL
Page 2

The Hitec Focus digital proportional radio control system is a highly
sophisticated system that features modern solid state circuit design and
components of unsurpassed reliability. The time you spend learning about
your Focus from this manual will ensure that you will enjoy many years of
dependable control.
1. Contents
1. Contents ....................................................................................1
2. Features & Specifications ........................................................2
A. Transmitter
B. Receiver
C. Servo
3. Transmitter Function ................................................................3
A. Front
B. Back
4. Receiver & servo connection ...................................................4
5. Operation & servo connection .................................................5
A. Control stick tension & length & trim lever adjustment
B
. Servo reverse
C.A
D
ileron and elevator & rudder & throttle A.T.V.
. Inovative MASTER-STUDENT trainer system
6. Installation ...............................................................................7
1
Page 3

2. Features & specifications
A. Transmitter
•
4 channel P.P.M/F.M. transmitter
• AMA listed 1991 F.M. system and RCMA gold stickered transmitters
• High Quality precision gimbal stick with adjustable length & tension
• All channel servo reversing
• ATV for aileron, elevator, rudder, throttle
• Trainer system
• Channel 5 for gear switch
• Innovative”MASTER-STUDENT” trainer cable system
Operating system : 2 stick system
Module change system :Internal module system
Power supply :9.6V (8 Ni-Cad batteries)
Current drain :150mA (13.5) -130mA (10.8)
B. Receiver (Ultra series)
• X-TAL interchangeable
• Ultra narrow band width for maximum adjacent channel rejection
• Minimized 2nd & 3rd order intermodulation
• Metallic noise proof
Intermediate frequency :455KHz, 10.7MHz
Power supply :4.8V (4 Ni-Cad battery) AA size
Current drain :22mA
Dimensions :37x61x22mm (1.5”x2.4”x0.9”)
Receiving range :3000 ft or greater in the air
Working voltage :3.7 - 7.0V
C. Servo
• Top oilite bearing prevents wearing out of the top plastic case
• Indirect drive for gear train protection
• Hitec custom designed I.C. with narrow dead band & high trackability
• SMT (Surface Mount Technology) circuitry adopted
• Precise & sturdy heavy duty gears improve high nuetral position and minmal
backlash.
Control system :+ pulse width control (1550 uS/N)
Operating angle :One side 45deg or more (including trim)
Power supply :4.8V (4 Ni-Cad) or 6V (4 Alkaline battery) AA size
Current drain :8mA at 6.0V (stopped)
Output torque :3.0kg/cm (41 oz/in)
Operating speed :0.21 sec/60deg
Dimensions :41x20x36mm (1.6”x0.8”x1.4”)
Weight :1.51oz (43g)
2
Page 4

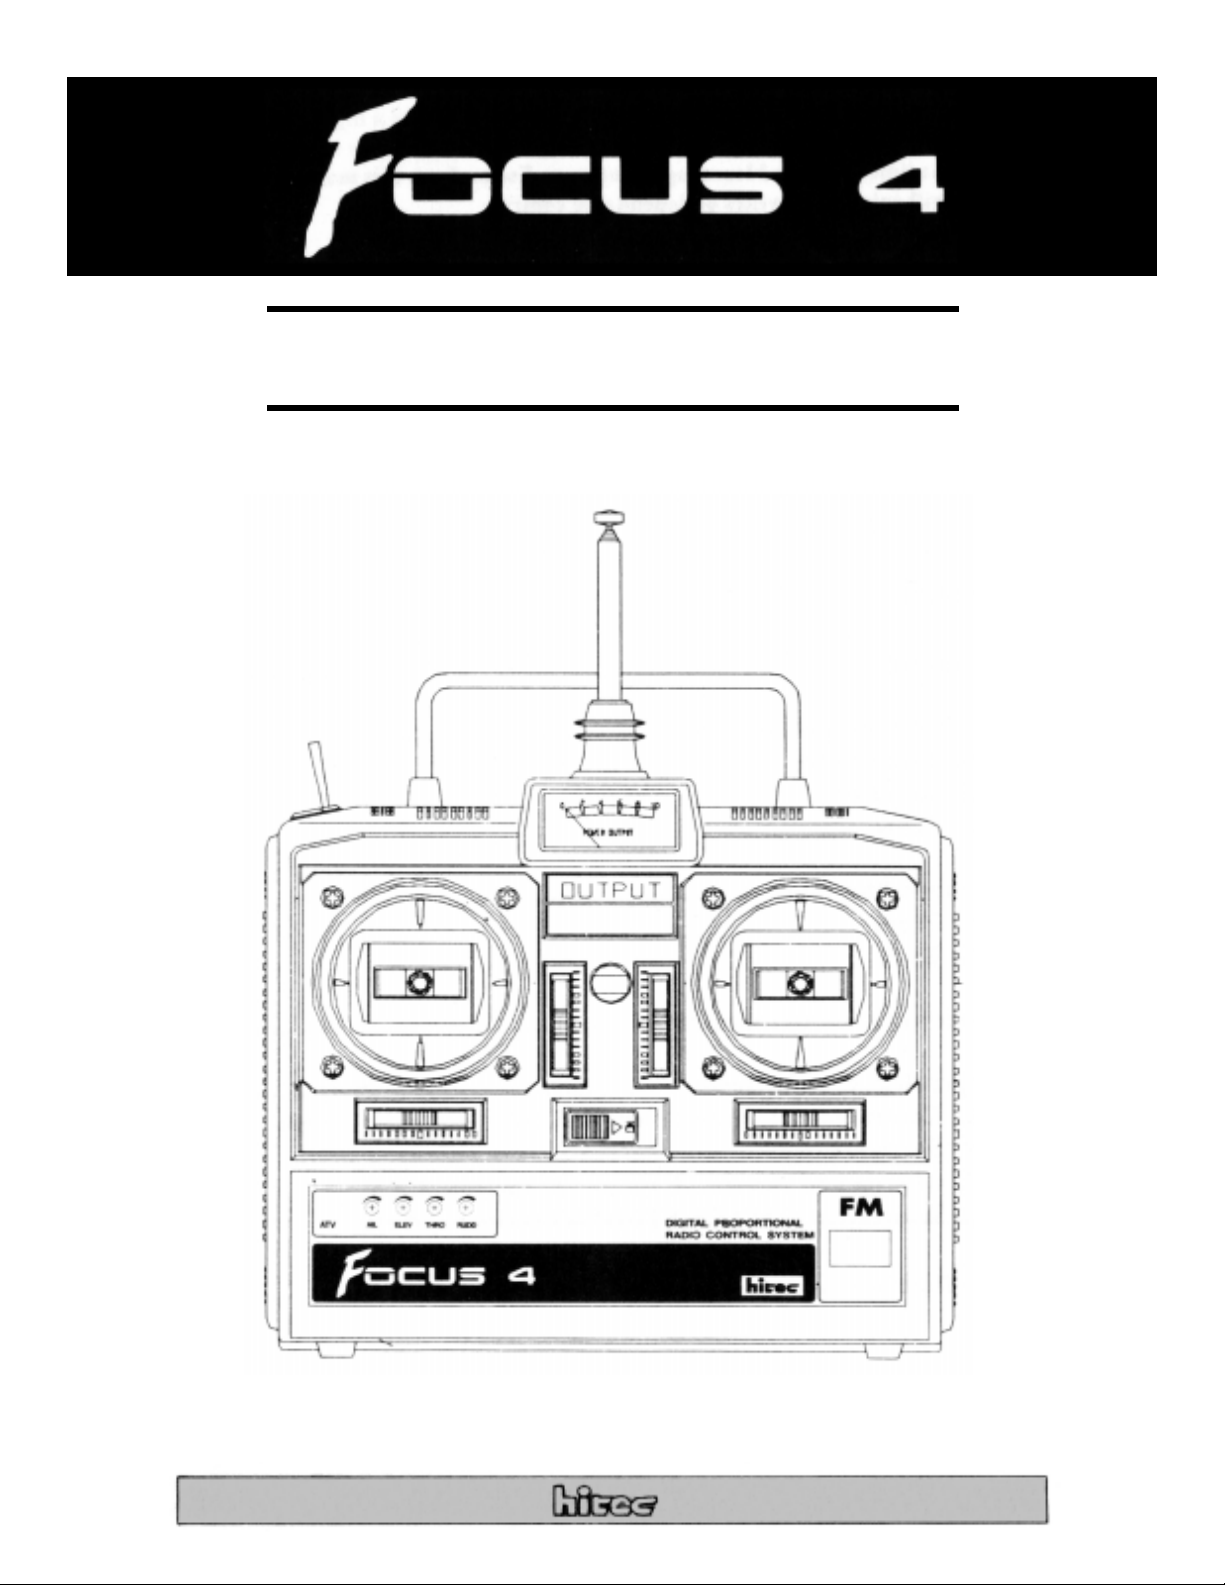
3. Transmitter function
A. Front
1
2
3
4
5
6
7
8
9
10
11
12
Aileron/Elevator stick in MODE II
Throttle/Rudder stick in MODE II
Aileron trim
Elevator trim
Throttle trim
Rudder trim
Trainer ON-OFF switch
Level meter
Power switch
Rod antenna
Neck-strap connector
Recharge jack
“Power switch should be off when
charging”
3
13
14
15
16
17
18
Crystal
Handle
Aileron & elevator and rudder and
throttle adjustable travel volume (A.T.V.)
Servo reversing switches
Ni-Cad battery (back panel)
Trainer Jack
Page 5

B. Back
fig 2
4. Receiver & servo connections
4
fig 3
Page 6

5. Operation & adjustment
A. Control stick length & tension & trim lever adjustments
Turn with a Phillips
The unique open-stick assembly
provides fully adjustable stick tension
“feel”. Turning the tension adjustment
screw counter clockwise will soften
(decrease the tension) the feel of the
Control stick (fig 4)
CP- variable resistors improve the
neutral characteristics and resolution of
the servo positioning.
All of the molded parts are
fabricated from high-grade
polycarbonate that is unaffected by
temperature and humidity.
screwdriver
The spring becomes
stronger when the
screw is turned
counterclockwise
fig 4
The length of the nonslip control sticks can be adjusted to suit the requirements of the operator. (fig 5)
Adjusting knob
• Unlock
• Set to the desired length by
turning the knob, then lock.
fig 5
The trim lever on each control stick is used to correct (trim out) flight
characteristics. After the initial test flight note the positions of the control surfaces that
required trim. Next center trim levers, turn off the receiver radio. Now adjust the control
clevises of the surfaces that required trim so that the surfaces are in the same position
before the trim levers were re-centered. Turn on the receiver radio and recheck the control
surface to ensure that all the corrections were applied in the correct direction.
5
Page 7

B. Servo reverese
The Focus 4 F.M. tranmitter is equiped with servo reversing on all 4 channels.
( Note: Leaving the reverse switch in the middle will cause the radio to work
erratically so please make sure that the switches are all pushed to the furthest end.)
C. Aileron and elevator & rudder & throttle adjustable travel volume (A.T.V.)
This function adjusts the servo left and right throws on aileron and elevator and rudder
and throttle. The rate setting range is 30% to 110%.
NEUTRAL
REDUCED
THROW
fig 7
FULL THROW
fig 8
E. Innovative MASTER-STUDENT trainer system
Pulling down the trainer switch will switch over the contol to the student transmitter.
Releasing the switch will enable master transmitter to resume control. When attaching the
trainer cable (optional item sold seperately. Spare part #58310: one way trainer cord)
the cabble must be connected to the correct side as the master side should be connected with
the master transmitter. The purpose is obvious. Connected properly, the student
transmitter cannot be activated even if it is accidentally turned on, a unique feature not
present in other systems.
6
Page 8

6. Installation
• Connect the servos, batteries and switch harness in accordance with fig 2. Carefully
check to ensure that all connectors are properly seated.
• Turn the power switches “ON” and operate the transmitter. Observe the direction of
travel of the control surfaces to see if they correspond to the control stick movement.
Improper servo direction is corrected with the servo reverse switches (fig 3).
• Operate each servo over its entire range and check for binding of the push rods. Correct
as necessary. Hold each control stick at its extreme position and listen for servo hum.
The hum indicates that the control linkage is too tight for the amount of servo travel.
This is corrected with the end point adjustment or by lengthening the push rods.
• Applying unreasonable force to a servo output arm will adversely affect the servo and
quickly drain the flight batteries. Therefore, all control linkages should operate as
smoothly and as frictionless as possible. Use Hitec “Jam Check’r” to assure smooth, safe
control setups.
• When installing the switch, cut a rectangular somewhat larger than the full stroke of the
switch, then install the switch so it moves smoothly from ON to OFF.
• The length of the receiver antenna is critical to the reception ofsignals transmitted,
therefore DO NOT cut or bundle the antenna wire, make every effort to keep the
antenna wire fully extended. Keep receiver antenna away from power & servo wires.
Keep off the metal frames.
• Protect the receiver from excessive vibration by wrapping it in sponge rubber (note: Use
Hitec “Flight Preserver: #58480”). Next place the receiver in a plastic bag. Secure the
plastic bag with rubber bands to keep out moisture and dust.
• Collapse the transmitter antenna fully and operate the system from a distance of 60 to 90
feet. The system should function flawlessly. If it does not, check to see that the receiver
and transmitter batteries are at maximum capacity.
7. Charging Instruction
• Before first use of Focus system, connect appropriate charge connectors from
charger to transmitter and receiver switch harness with battery connected.
• With transmitter and receiver switched OFF, plug charger into 110-120V AC and be
sure the RED & GREEN charge lights are ON. If either charger light is OFF,
recheck connections to charger and be sure switches on transmitter and receiver are OFF.
• Charge for 24 hours first before further use of system. This conditions the batteries for
full-charge capacity.
• Re-charge 16-20 hours immediatley before flying day.
 Loading...