

Page 1

Printer Driver for
Controller
User’s Manual
© 1999 Hitachi Koki Imaging Solutions, Inc.
1757 Tapo Canyon Road
Simi Valley, CA 93063
December 1999
336872-001, Revision A
for Windows
Page 2

© 1999 Hitachi Koki Imaging Solutions, Inc. All rights reserved.
No part of this document may be reproduced without the
expressed permission of Hitachi Koki Imaging Solutions, Inc.
The material in this document is for informational purposes and
is subject to change without notice. Hitachi Koki Imaging
Solutions, Inc. assumes no responsibility for errors or
omissions in this document. No liability is assumed for any
damages resulting from the use of the information it contains.
TRADEMARK
Digital Document Copier, DDC, DDC 35n, and their associated
logo marks, are trademarks of Hitachi Koki Imaging Solutions,
Inc.
Hitachi and the Hitachi logo are trademarks of Hitachi, Ltd. All
rights rese rved.
All other terms and product names may be trademarks or
registered trademarks of their respective owners, and are
hereby acknowledge d.
NOTICE TO USER
In an effort to meet the demands of a rapidly changing
technology, the manufacturer is continually developing new
features and functions to meet your changing printing or printer
needs. As a result, this manual may not exac tly reflect future
changes made to the product. Please be sure to consult all
manual updates or addenda when using this product’s
documentation.
Page 3

Welcome
Thank you for purchasing the printer controller.
The printer controller is an image controller designed to use the machine as a
printer. By connecting the printer controller to the machine, you can directly print
documents created on your computer to the machine. In additio n, the printer
controller is capable of using various functions offered by the machine, such as Nin-1 and Booklet, enabling you to create a wide variety of documents.
This User’s Manual explains how to run print cycles on the machine, to which the
printer controller is connected. It also gives precautions that you should review
before attempting to actually use the printer controller. So, first read this manual
carefully and thoroughly; then, keep it close at h and so yo u can ref er to it whenev er
it becomes necessary.
When operating the printer controller and machine, follow the instructions given in
this manual and in the one for the machine. Do not attempt to to uch any part that is
not covered in these manuals. Never attempt to disassemble or remodel any pieces
of equipment, either, to prevent possible hazardous conditions.
Some of the screens shown in this manual may look different from what you will
view in actual applications.
i
Trademark Acknowledgments
Microsoft, W indows 3.1 , W i ndows 95, Windows NT 3.51 and W ind ows NT 4.0 are
registered trademarks of Microsoft Corporation.
IBM and PC/AT are registered trademarks of International Business Machines
Corporation.
PCL is a registered trademark of Hewlett-Packard Company.
TrueType is a registered trademark of Apple Computer, Inc.
All other products or brand names are trademarks or registered trademarks of their
respective companies or organizations.
Adobe, Post Script and the Post Script logo are trademarks of Adobe Systems
Incorporated.
Page 4

ii
CE Marking (Declaration of Conformity)
We declare under our sole responsibility that the copier and options to which this
declaration relates is in conformity with the specifications below.
This declaration is valid for the area of the European Union (EU) only.
Product Type Printer Controller
Product Name Hi-35pc
Options 32MB Memory, 64MB Memory, Network Interface Card (4179-422, 4179-
432), Hard Disk Drive (417 9-462)
*1
Standards EMC
: EN 55 022 (Class B) / 1994 (A1: 1995, A2: 1997)
(Limits and method for measurement of radio disturbance
characteristics of information technology equipm e nt (ITE))
EN61000-3-2 / 1995
(Electromagnetic compatibility (EMC)-Part 3: Limits, Section 2:
Limits for harmonic current emissions (equipment input current
<
16A per phase))
=
EN 50 082-1/1992
(Electromagnetic compatibility-Ge neric immunity standard Pa rt1:
Residential, commercial an d light industry)
IEC 801-2 / 1991 (Electrostatic discha rge requirement)
IEC 801-3 / 1984 (Radiated elec tromagnetic field requirement)
IEC 801-4 / 1988 (Electrical fast transien t / burst requiremen t)
Notes : This device must be used with shielded interface cables.
EN 50 082-1 / 1992
(Electromagnetic compatibility-Ge neric immunity standard Pa rt1:
Residential, commercial an d light industry)
IEC 801-2 / 1991 (Electrostatic discha rge requirement)
IEC 801-3 / 1984 (Radiated elec tromagnetic field requirement)
IEC 801-4 / 1988 (Electrical fast transien t / burst requiremen t)
Notes : *1) EMC performance: This pr oduct was designed for operation
in a typical office environment
EC Directives EMC : 89 / 336 / EEC and 93 / 68 / EEC
This device must be used with shielded interface cables. The use of non-shielded
cables is likely to result in interference with radio communications and is prohibited
under EC Directive rules.
EC-01
Page 5

Contents
Chapter 1 Before Using the Printer Controller
1. Features of the Printer Controller
Features of the Printer Controller ..................................... p.1-2
Administrative Functions ................................................. p.1-5
About PCL5e and PCL6 .................................................. p.1-5
2. Configuration
Configuration ................................................................... p.1-6
3. Connecting the Printer Controller
Connecting the Printer Controller .................................... p.1-7
4. Settings Made on the Machine
Priority Device ............................... ...... ............................ p.1-8
On Line ............................................................................ p.1-8
Test Print ......................................................... ...... ...... ..... p.1-8
5. Installin g the Printer Drivers
Installing Various Printer Drivers .................................... p.1-10
Chapter 2 Installing the Printer Driver
1. Windows 95
Operating Environment .................................................... p.2-2
Installation ........................................................................ p.2-3
Test Print ......................................................... ...... ...... ..... p.2-9
Making General Settings Before Using the Printer ......... p.2-10
Displaying a Property Sheet ............................................. p.2-11
Displaying a Property Sheet from the Printer Folder ....... p.2-11
Displaying a Property Sheet from an Application Menu . p.2-11
"General" Property Sheet ................................................. p.2-13
"Details" Property Sheet .................................................. p.2-14
"Sharing" Property Sheet ................................................. p.2-15
2. Windows NT4.0
Operating Environment .................................................... p.2-16
Installation ........................................................................ p.2-17
Test Print ......................................................... ...... ...... ..... p.2-23
Making General Settings Before Using the Printer ......... p.2-24
Displaying a Property Sheet ............................................. p.2-25
Displaying a Property Sheet from the Printer Folder ....... p.2-25
Displaying a Property Sheet from an Application Menu . p.2-25
"General" Property Sheet ................................................. p.2-27
"Ports" Property Sheet ...................................................... p.2-28
"Scheduling" Property Sheet ............................................ p.2-29
"Sharing" Property Sheet ................................................. p.2-30
"Security" Property Sheet ................................................ p.2-31
1
Page 6

2
Contents
3. Windows 3.1
Operating Environment .................................................... p.2-32
Installation ........................................................................ p.2-33
Displaying a Property Sheet ............................................. p.2-37
Displaying a Property Sheet from Print Manager ............ p.2-37
Displaying a Property Sheet from an Application Menu . p.2-37
4. Windows NT 3.51
Operating Environment .................................................... p.2-39
Installation ........................................................................ p.2-40
Making General Settings Before Using the Printer ......... p.2-46
Displaying a Property Sheet ............................................. p.2-47
Displaying a Property Sheet from Print Manager: ........... p.2-47
Displaying a Property Sheet from an Application Menu . p.2-47
"Printer Properties" Dialog Box ....................................... p.2-49
"Printer Details" Dialog Box ............................................ p.2-50
Chapter 3 Property Sheet
1. Property Sheets
Property Sheets ................................................................ p.3-2
2. "Device Option" Property Sheet
Functions of the "Device Option" Property Sheet ........... p.3-3
3. "Paper" Property Sheet
Functions of the "Paper" Property Sheet .......................... p.3-5
"Security" Dialog Box ...................................................... p.3-13
4. "Advanced" Property Sheet
Functions of the "Advanced" Property Sheet ................... p.3-14
"Watermark" Dialog Box ................................................. p.3-19
5. "Graphics" Property Sheet
Functions of the "Graphics" Property Sheet .................... p.3-21
6. "PostScript" Property Sheet
Functions of the "PostScript" Property Sheet .................. p.3-28
7. "Settings" Property Sheet
Functions of the "Settings" Property Sheet ...................... p.3-33
8. "Conflict Settings Validation" Dialog Box
"Conflict Settings Validation" Dialog Box ...................... p.3-35
Chapter 4 Convenient Functions
1. Convenient Functions
Convenient Functions ...................................................... p.4-2
2. Printing More Than One Copy at a Time
Overview .......................................................................... p.4-3
Page 7

Procedure ......................................................................... p.4-3
3. Printing on Both Sides of the Paper
Overview .......................................................................... p.4-5
Procedure ......................................................................... p.4-5
4. Specifying the Exit Port
Overview .......................................................................... p.4-8
Procedure ......................................................................... p.4-8
5. Specifying N-in-1 Printing
Overview .......................................................................... p.4-10
Procedure ......................................................................... p.4-10
6. Printing in Reduced/Enlarged Size
Overview .......................................................................... p.4-13
Procedure ......................................................................... p.4-13
7. Specifying Booklet Printing
Overview .......................................................................... p.4-16
Procedure ......................................................................... p.4-16
8. Using the Copy Track Function
Overview .......................................................................... p.4-18
Procedure ......................................................................... p.4-18
9. Printing Pages with a Distribution Number
Overview .......................................................................... p.4-24
Procedure ......................................................................... p.4-24
10. Printing Pages with Watermarks
Overview .......................................................................... p.4-26
Procedure ......................................................................... p.4-26
11. Printing on OHP Transparencies
Overview .......................................................................... p.4-29
Procedure ......................................................................... p.4-29
12. Adding a Cover to Each Copy Set
Overview .......................................................................... p.4-31
Procedure ......................................................................... p.4-31
13. Using the Lock Job Function
Overview .......................................................................... p.4-33
Procedure on the Printer Drive Side ................................ p.4-33
Procedure on the Machine Side ....................................... p.4-39
Deleting a Job ................................................................... p.4-41
14. Using the Settings Function
Overview .......................................................................... p.4-43
Procedure ......................................................................... p.4-43
3
Contents
Page 8

4
Contents
Chapter 5 Troubleshooting
1. Troubleshooting
Unable to Print ................................................................. p.5-2
Unable to Make Correct Settings /
Unable to Print Exactly as Set ...................... p.5-5
Poor Print Quality ............................................................ p.5-8
Error List .......................................................................... p.5-9
Appendix A
1. Function Combination Matrix
Function Combination Matrix .......................................... p.A-2
2. Preview Listing
[Paper Preview] .............................. ...... ............................ p.A-4
[Machine Preview] ........................................................... p.A-7
[Setting Preview] .............................................................. p.A-9
3. Specifications
Specifications ................................................................... p.A-11
Font .................................................................................. p.A-13
Symbol Sets ...................................................................... p.A-15
Selectable Paper Sizes ...................................................... p.A-16
Appendix B
Appendix C
1. Glossary
Glossary ........................................................................... p.B-2
1. INDEX
INDEX ............................................................................. p.C-2
Page 9

Chapter 1
Before Using the Printer Controller
1-1
Before Using the Printer Controller Chapter 1
Page 10
1-2
1. Features of the Printer Controller
Features of the Printer Controller
The printer controller is an image controller designed to use the machine as a
printer, allowing you to print documents directly to the machine from a computer to
which the printer controller is connected. The printer driver, which is used during
printing, is equipped with various functions that make the most out of the features
of the machine. They enable you to use the same functions as those offered by the
machine. When actually running a print cycle, you can specify various functions of
the machine on your computer screen.
NOTE
• When using the printer controller, be sure to set the machine in the On Line
state.
• Some functions offered by the machine cannot be combined, such as Staple and
Hole-Punch, and others may not be used beca us e of a paper size i nvo l ved. Th e
functions that cannot be s el ected ei t her appear dimmed or appended with a
Before Using the Printer Controller Chapter 1
before the menu option.
Further, if functions that are incompatible with each other are specified, the
Conflict Settings Validation dialog box appears, prompting you to change the
settings. When this dialog box appears, check the details and reselect the
functions to ensure function compatibility.
Various Pr inting Functions
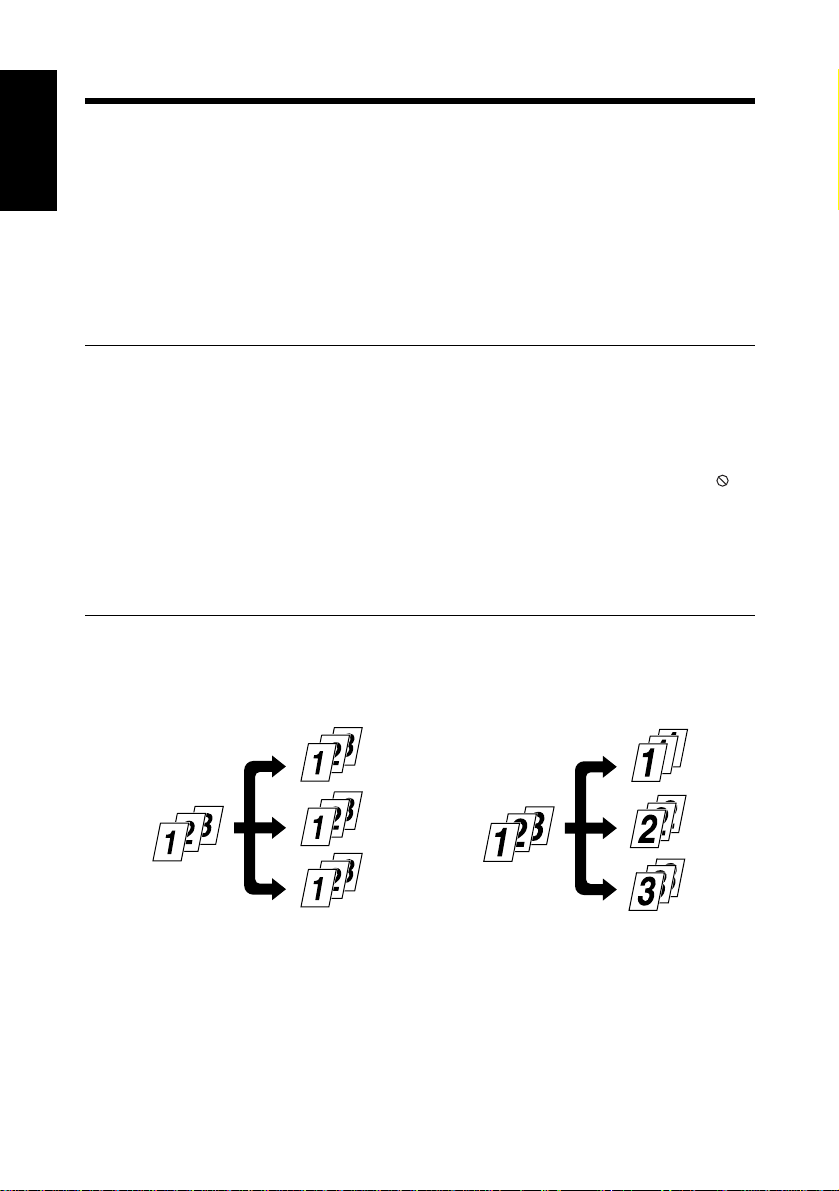
Makes prints that are sorted into complete sets of the originals (Collated) or
•
grouped into uncollated groups, each containing prints of one original (Group).
Collated
4608O006AA
Group
4608O007AA
Page 11
1. Features of the Printer Controller
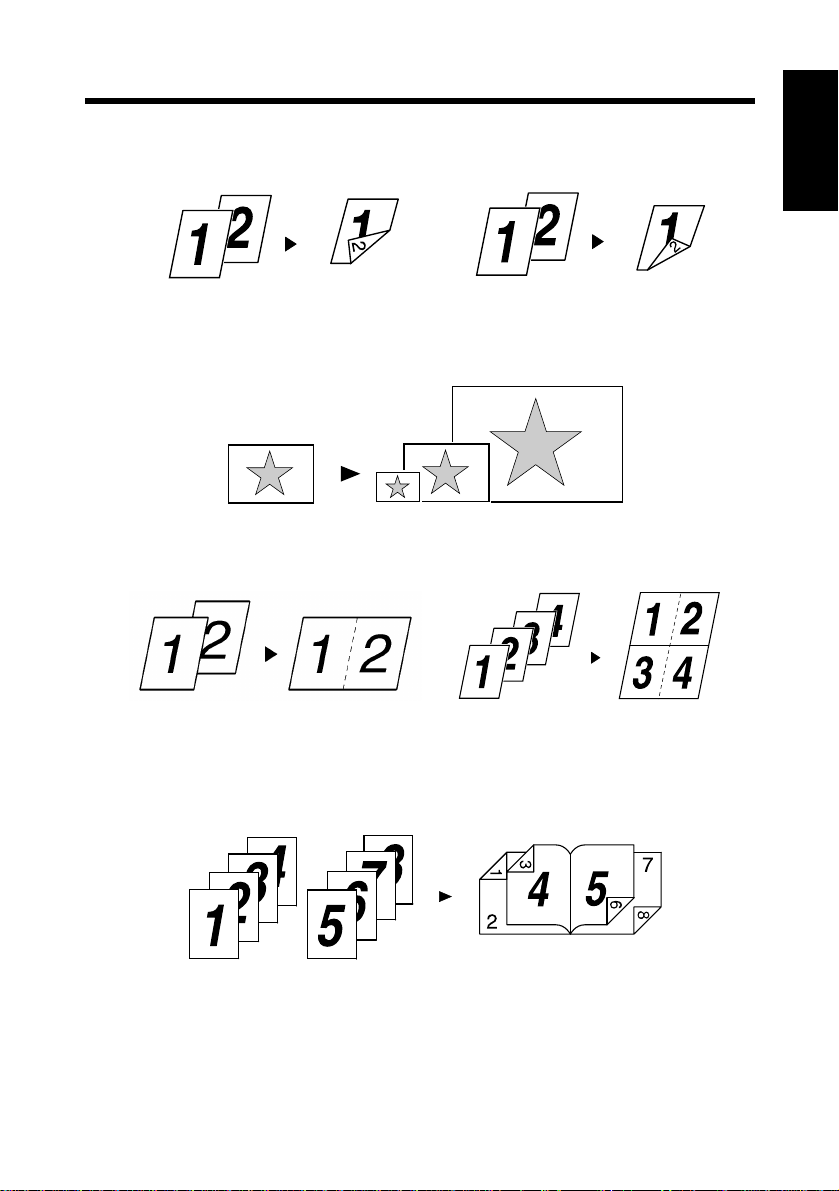
Prints two pages of originals on both front and back sides of a single sheet of
•
paper.
1-3
Bind Long Edge
Enlarges or reduces the image on the original.
•
Prints two pages or four pages of originals on a single sheet of paper.
•
2in1
Prints four pages of originals to both front and back sides of a single sheet of
•
4608O008AA
Bind Short Edge
1149O004AA
1155O007AA
4in1
4608O009AA
4608O010AA
paper.
Before Using the Printer Controller Chapter 1
4608O011AB
Page 12
1-4
1. Features of the Printer Controller
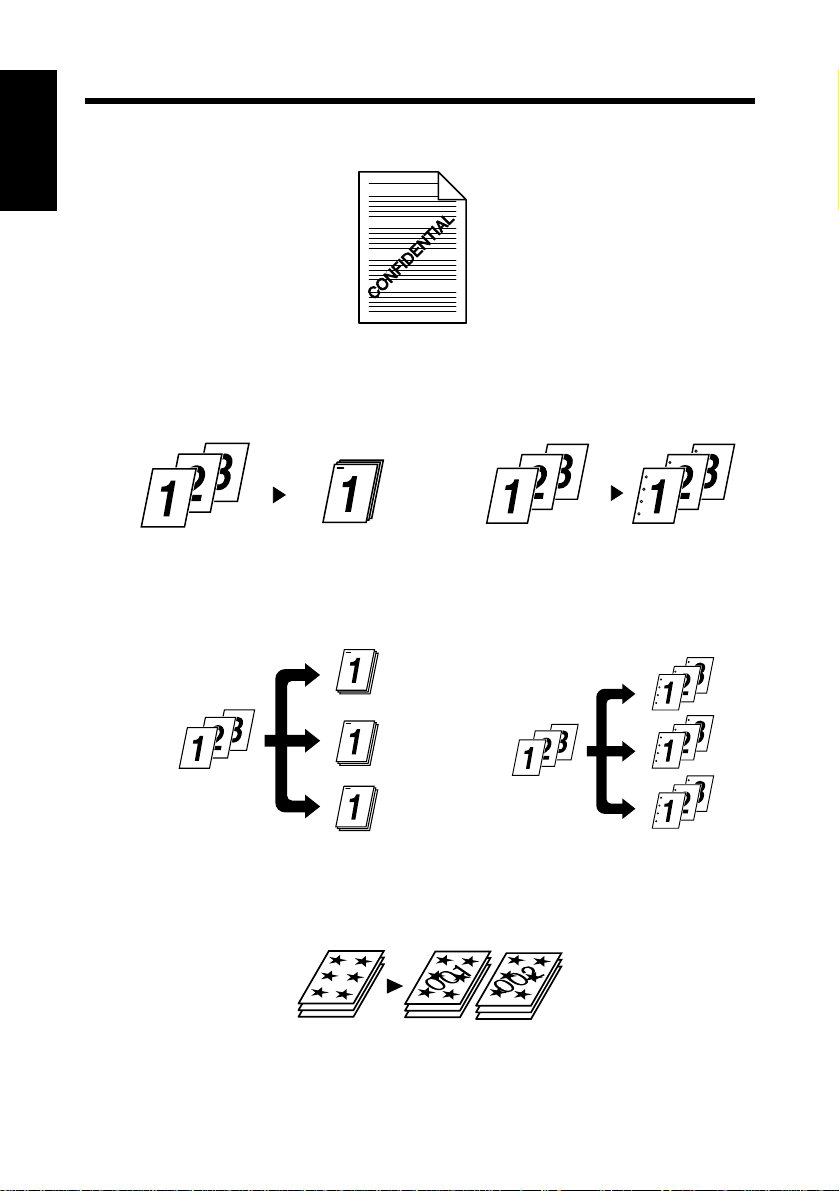
Places text in the background.
•
Makes prints of complete sets of the originals, st apled together or punched for
•
filing.
Before Using the Printer Controller Chapter 1
By combining Sort or Group with other finishing capabilities, you can make
complete sets of documents for immediate delivery without having to do any
further processing.
4608O001AA
4608O012AB 4608O026DA
4608O014AC
Adds a reference number (Distribution Number) to each document set during
•
4608O027DA
printing.
1166O114AA
Page 13
1. Features of the Printer Controller
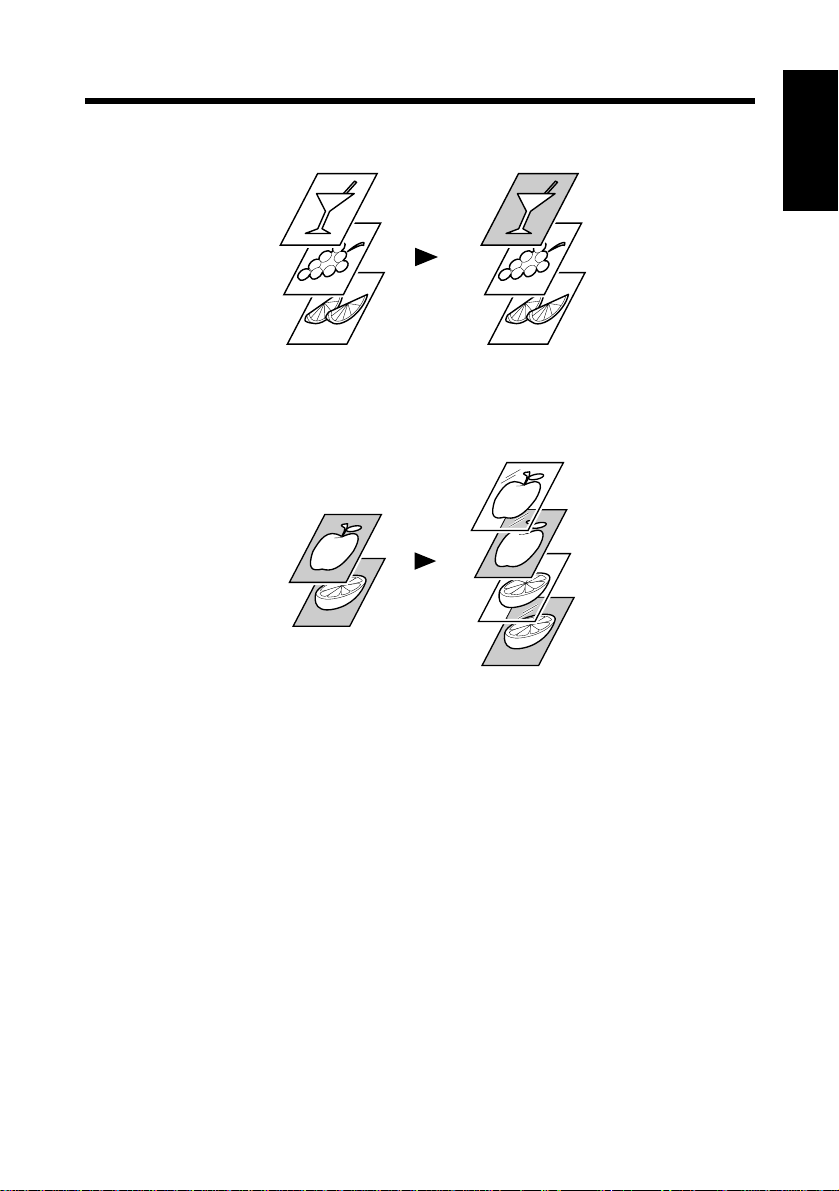
Prints only the cover on a different type of paper (such as colored paper).
•
1149O013AA
Capable of printing on OHP transparencies. You can also insert interleaves, either
•
blank or printed with the same contents as those on the OHP transparencies.
1-5
Before Using the Printer Controller Chapter 1
1149O017AA
Administrative Functions
Different accounts can be managed for printing records, just as when using the
•
machine as a copier. The setting of 100 accounts o r 1 000 acco unts dep end s on the
setting made on the machine.
Printing of confidential documents may be withheld until a legitimate password is
•
entered on the machine.
About PCL5e and PCL6
In PCL6, graphics capability is expanded from that of PC L5e.
Page 14
1-6
2. Configuration
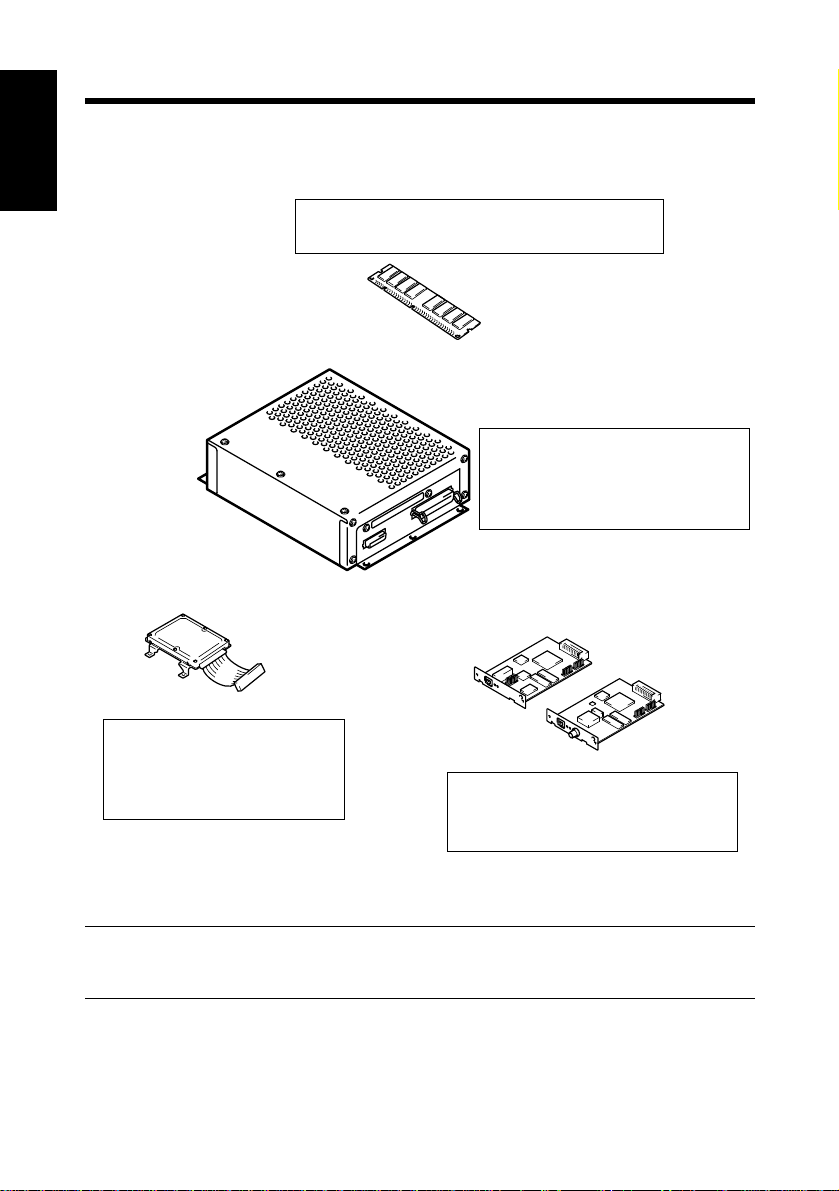
Configuration
The printer controller may be configured with the following options.
Memory (32MB/64MB, Option)
Expands the memory capacity of Hi-35pc.
4608O018AA
Printer Controller
Allows you to use the machine
Before Using the Printer Controller Chapter 1
4608D018AA
as a printer controlled by your
personal computer.
10/100BaseT
4608O017AA
Hard Disk Drive (Option)
For downloading PS fonts
for the exclusive use in
Macintosh.
NIC Board (Option)
Allows you to use the machine as a
printer in a network environment.
NOTE
The Hard Disk Drive is for the exclusive use in Macintosh.
10BaseT/2
4608O019AA
Page 15
3. Connecting the Printer Controller
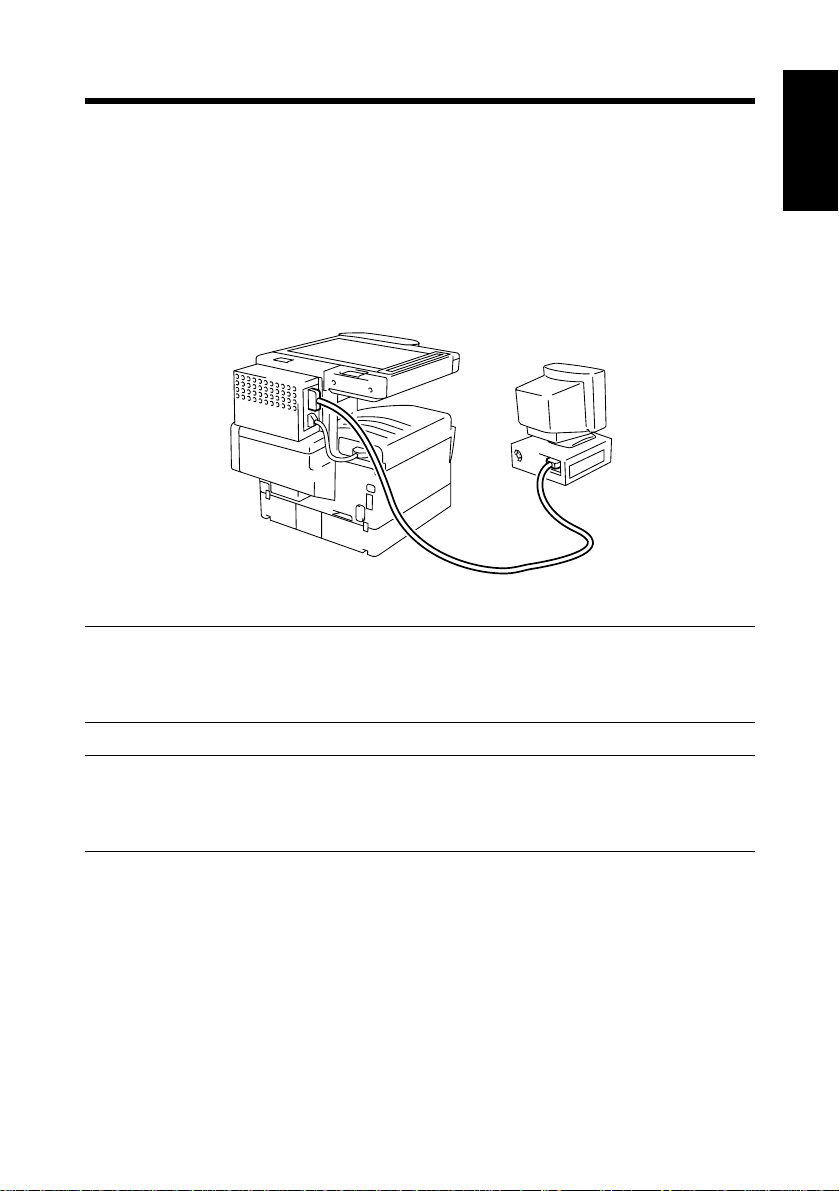
Connecting the Printer Controller
The printer controller is mounted on the rear of the machine. The installation
procedures are to be performed by the service personnel.
The printer controller is connected to the machine with the engine interface cable
and to the computer with a printer cable or network cable. Power to the printer
controller is supplied from the machine.
4608O016AA
1-7
Before Using the Printer Controller Chapter 1
NOTE
Do not connect any peripheral devices to the engine interface cable that is used
to connect the printer controller to the machine.
TIP
If you cannot print from yo ur computer, check that the engine interface cable and
printer cable are connected to the corresponding connectors.
Page 16

1-8
4. Settings Made on the Machine
The following functions must be set on the machine using its Ut ility Mode, as they
relate to the printer controller.
Priority Device
Select the priority of use of the machine, either as a copier or printer.
Copier: The machine is used as a copier.
The machine starts the print cycle only after it has received the entire data of
a particular print job.
The machine can be used for copying, since it starts printing only after it
has received the entire data of the job for printing. This means that more
time is available to you for copying, but you have to wait for a longer time
before a particular print job is done.
Printer: The machine is used as a printer.
Before Using the Printer Controller Chapter 1
The machine starts the print cycle before it completes receiving the entire
data of a particular print job.
On receiving the data for one page, the machine starts printing, accepting no
other job for copying. This means that less time is available to you for
copying, but you do not have to wait long before a particular print job is
done.
On Line
This function is the same as that available in ordinary printers as On Line/Off Line.
Select On Line normally.
Test Print
The following six types of test print will be output wh en a test print is run from the
machine:
CONFIGURAITON PRINT
•
PCL FONT LIST
•
PS FONT LIST
•
Here is the procedure to run a test print. These operations are made on the machine.
1. Press the Utility key.
2. Press the Test Print key.
NOTE
Font lists contain only those fonts that are installed as standard and any fonts
later added are not displayed.
NETWORK CONFIGURATION PRINT
•
PCL DEMO PRINT
•
PS DEMO PRINT
•
Page 17

Refer to the Test Print Outputs
•
1-9
4. Settings Made on the Machine
Before Using the Printer Controller Chapter 1
4608O028CA
Page 18

1-10
5. Installing the Printer Drivers
Installing Various Printer Drivers
T o make 100 % use of the fun ctions of fer ed by the mach ine moun ted with th e print er
controller, install the attached printer drivers in your computer. The printer
controller is furnished with the following prin ter drivers.
Windows 95 printer drivers
•
Digital Copier 35cpm (PCL5e, PCL6, PostScript)
Windows NT 4.0 printer drivers
•
Digital Copier 35cpm (PCL5e, PCL6, PostScript)
Windows 3.1 printer drivers
•
Digital Copier 35cpm (PCL5e, PCL6, PostScript)
Windows NT 3.51 printer drivers
•
Before Using the Printer Controller Chapter 1
Digital Copier 35cpm (PCL5e, PostScript)
Macintosh printer drivers
•
Install the printer driver suitable for the operating system that runs on your
computer. For the installation procedures, see the relevant page as detailed below.
Installing the Windows printer driver:
Windows 95⇒ p. 2-2
Windows NT 4.0 ⇒ p. 2-16
Windows 3.1⇒ p. 2-32
Windows NT 3.51⇒ p. 2-39
Installing the Macintosh printer driver:
See the User’s Manual for Macintosh separately provided.
Page 19

Chapter 2
2-1
Installing the Printer Driver
Installing the Printer Driver Chapter 2
Page 20

2-2
1. Windows 95
Operating Environment
This section explains the required environment for the printer driver.
Before installing the printer driver, check that your computer meets the following
requirements. If it doesn’t, the printer driver may not function properly.
Personal computer
Operating system Windows 95 (English)
Memory 8MB or more
Parallel Centronics interface
I/O interface
Free space on hard disk 3MB or more
Windows NT 4.0
•
Installing the Printer Driver Chapter 2
For the operating env ironm ent an d inst allat ion procedur e for th e Windows NT 4. 0
printer driver, see p. 2-16.
Windows 3.1
•
For the operating environment and installation procedure for the Windows 3.1
printer driver, see p. 2-32.
Windows NT 3.51
•
For the operating environment and installation procedure for the Windows NT
3.51 printer driver, see p. 2-39.
Network
IBM PC or a compatible with an i486DX
or higher CPU
10Base-T/2 (UTP/BNC), 10/100BaseT
(UTP) ; supported protocols are, IPX/SPX
(NetWare 3.1x & 4.x), and TCP/IP (lpr/
lpd)
Page 21
1. Windows 95
Installation
This section explains the installation procedure for the Windows 95 printer driver.
NOTE
Before starting to install the printer driver, be sure first to quit all applications.
TIP
The following procedure assumes that the machine is a Digital Copier 35cpm
and the printer driver is PCL5e.
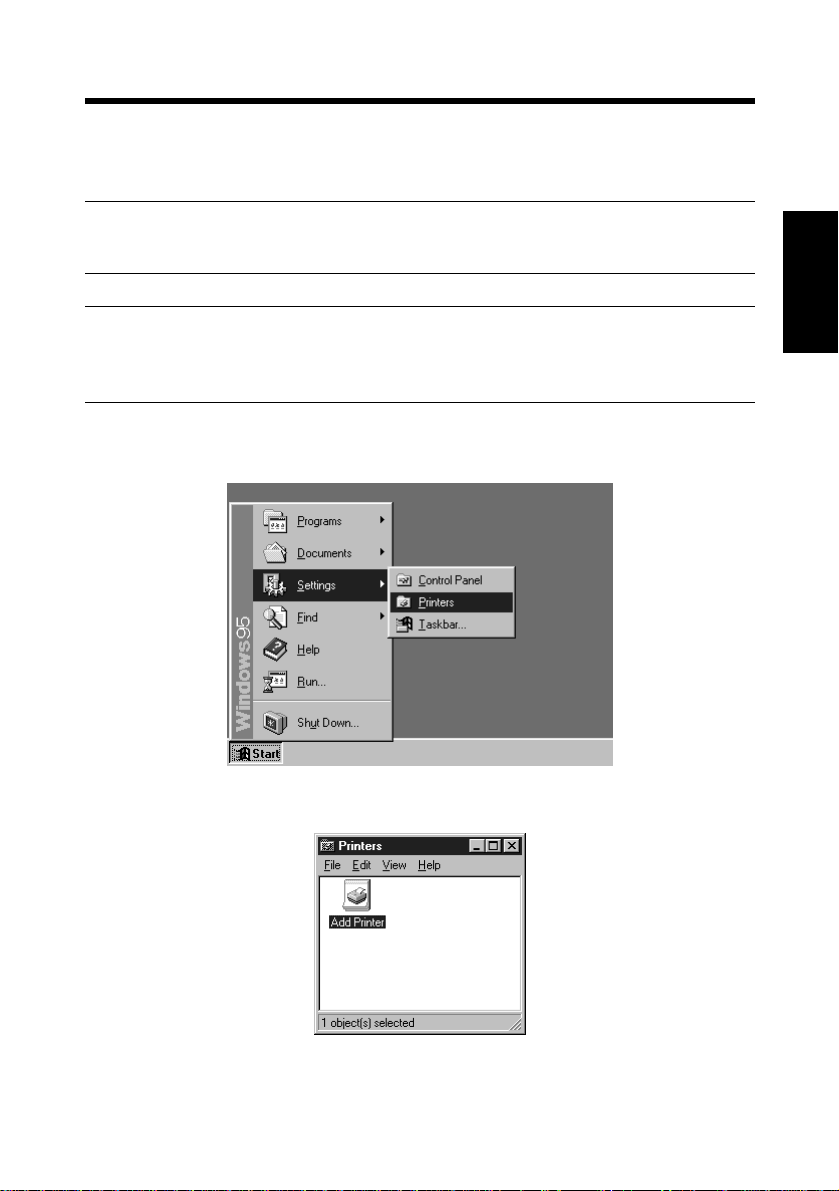
1. Click the [Start] button. From the m enu that appears, select "Settings," then
click "Printers."
2-3
Installing the Printer Driver Chapter 2
4608P001CD
2. The Printers window will appear. Double-click the "Add Printer" icon.
4608P002CB
Page 22

2-4
1. Windows 95
3. The "Add Printer Wizard" will appear. Click the [Next>] button.
4. A window will appear, asking how the printer is to be connected.
If your computer is directly connected to the machine, select "Local printer" and
Installing the Printer Driver Chapter 2
then click the [Next>] button.
4608P003CB
4608P004CB
Page 23

2-5
1. Windows 95
NOTE
• When installing the printer driver in a computer connected to the machine via a
network, be sure to consult the network administra tor.
• This is a request to be made of the network administrator. To install the printer
driver in a computer connected to a network, select "Network printer" and click
the [Next] button. Then, a window will appear prompting you to enter the
network path; so enter the path .
5. A window will appear, prompting you to select the manufacturer and model of
your printer . Click th e [Have Disk...] button on the lower righ t part of the screen.
Installing the Printer Driver Chapter 2
4608P005CA
6. The "Install From Disk" dialog box will appear. Install the printer controller
driver CD-ROM that is included with the print e r controller in the CD-ROM
drive of your computer.
4608P006CA
Page 24

2-6
1. Windows 95
7. Type the drive name in the "Copy manufacturer’s file from" box. (As an
example, the CD-ROM drive is drive I.)
Click the [OK] button.
To install PCL5e: I:\Win95\PCL5e
To install PCL6: I:\Win95\PCL6
To install PS: I:\Win95\PS
4608P190CA
8. A "Printers" list appears.
Select the driver to be installed and click the [Next>] button.
Installing the Printer Driver Chapter 2
4608P194CA
Page 25
1. Windows 95
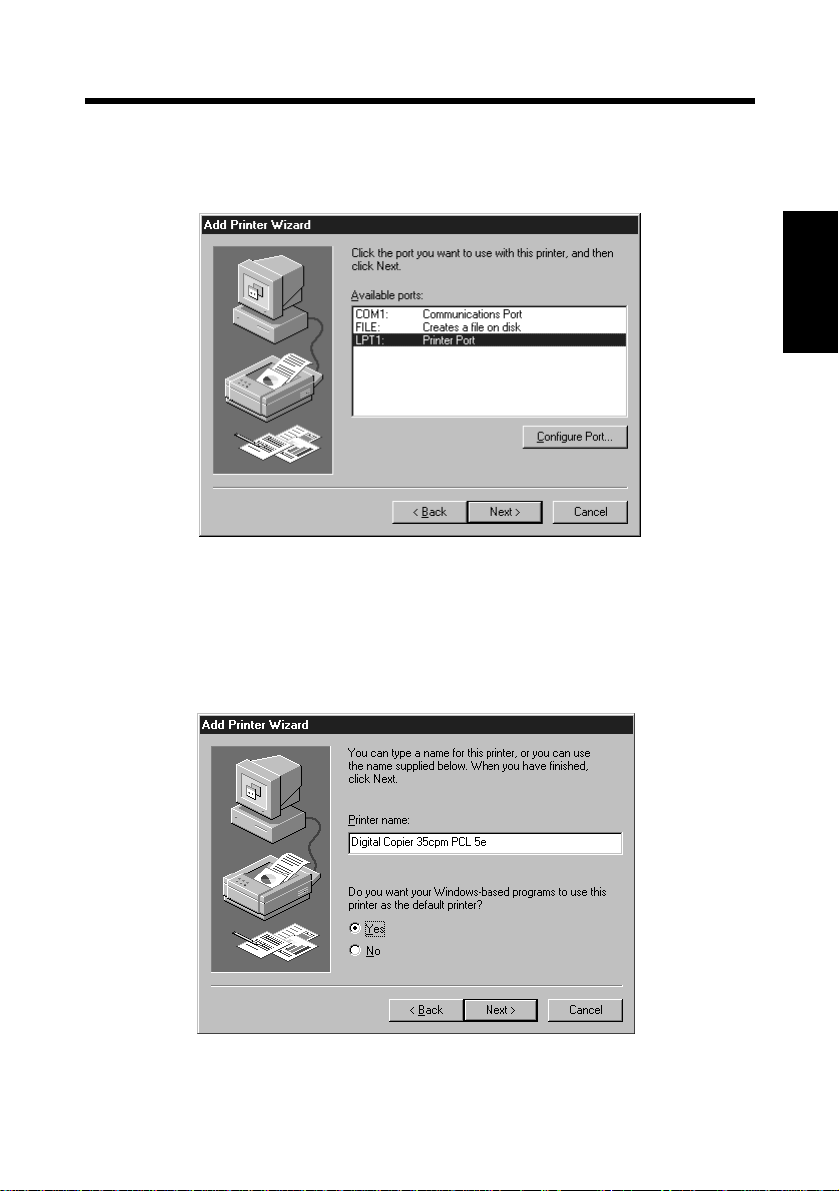
9. A window that prompts you to select th e port w ill appear. Select the port
(normally "LPT:") to which the printer cable has been connected, then click the
[Next>] button.
4608P008CB
2-7
10.A window that asks you to confirm the printer name will appear. Check the
printer name. If you want to change the printer name to one that is easy to
remember, change it in this step. If you want to designate this printer as the
default printer, select "Yes."
Click the [Next>] button.
4608P195CA
Installing the Printer Driver Chapter 2
Page 26

2-8
1. Windows 95
11.If you want to print a test page, select "Yes (recommended)." If you elect not to,
select "No." It is recommended that a test page be printed to ensure that the
printer driver has been installed properly. Now, click the [Finish] button.
4608P010CB
12.Installation will start.
Installing the Printer Driver Chapter 2
When all the files have been copied from the floppy disk, the corresponding icon
will be added to the "Printers" window.
This completes the installation.
4608P196CA
Page 27

1. Windows 95
Test Print
If "Yes [recommended]" has been selected in step 11 to specify printing of a test
page, test printing starts. Check that the printer name is co rrect.
Refer to the Test Print Output.
2-9
Installing the Printer Driver Chapter 2
4608O029CA
Page 28

2-10
1. Windows 95
Making General Settings Before Using the Printer
The printer driver requires setting of items that are common to all print jobs,
including the port to which the printer cable is connected an d optional devices
configured with the machine. These settings must be made using property sheets
available from the Properties command after the printer driver has been installed or
when the operating environment is changed.
The most common settings have already been made when the printer driver is
installed, meaning that you do not usually bother to change them. Some items must,
however, be changed in the following cases.
Cases where changes are necessary
You want to add a comment to distinguish the
•
printer from others
The computer’s connecting port has been
•
changed
You want to change the conditions for the
•
Installing the Printer Driver Chapter 2
display of a timeout error
You want to designate a port to which the
•
machine is connected via a network (this setting
must be made on a computer connected to the
machine via a network)
You want to share the machine with other
•
computers connected to the same network (this
setting must be made on the computer directly
connected to the machine)
For the details of "Device Option," see Chapter 3.
Applicable
property sheets
"General" p.2-13
"Details" p.2-14
"Sharing" p.2-15
Ref. page
Page 29

2-11
1. Windows 95
Displaying a Property Sheet
You have two different steps to take to display a property sheet. The contents of a
particular property sheet slightly differ depending on how you access it. Select the
appropriate one according to your need.
(1) To display a property sheet from the printer folder
(2) To display a property sheet from an application menu
Below are the detailed procedures for each approach.
Displaying a Property Sheet from the Printer Folder
1. Click the [Start] button and select “Settings.” Then, click “Printers.”
2. Click the icon of “ Digital Copier 35cpm PCL5e.”
3. Select “Properties” from the menu that will appear. This shows the property
sheet.
This method is mainly used when there will be no big changes in the settings once
made, such as [Device Option]. It allows you to set the environment in which you
will use the printer. The settings made through this method are valid in all
applications.
Installing the Printer Driver Chapter 2
Displaying a Property Sheet from an Application Menu
1. Select [Print...] from the [File] menu of the application.
2. Check that the “Name” of the “Printer” is “Digital Copier 35cpm PCL5e.” If
“Digital Copier 35cpm PCL5e” is not selected, click [ ▼ ] and, from the menu
that will then appear, select “Digital Copier 35cpm PCL5e”
3. Click the [Properties] button. This shows the property sheet.
This method allows you to set the number of copies and paper for each document.
The settings made on the property sheet accessed through the application are valid
only for that particular application.
TIP
To show a property sheet other than Paper, click the corresponding tab located
on the top part of the screen.
Page 30

2-12
1. Windows 95
NOTES
The steps to display a property sheet may be different depending on the
application. Follow the correct procedure according to the application. The
procedure above is based on the application WordPad.
Installing the Printer Driver Chapter 2
Page 31

2-13
1. Windows 95
"General" Property Sheet
This property sheet is co mmon l y av ai lab l e t o th e Windows 95-based printer drivers.
There is no need of making changes in settings for ord inary operating envir onments.
See Windows 95 Help for more details.
NOTE
If "Separator page" is specified, a separator pa ge can be inserted between
multiple print jobs.
Installing the Printer Driver Chapter 2
4608P197CA
Page 32

2-14
1. Windows 95
"Details" Property Sheet
This property sheet is co mmon l y av ai lab l e t o th e Windows 95-based printer drivers.
There is no need of making ch anges in settin gs fo r ordin ary operatin g enviro nments.
See Windows 95 Help for more details.
Installing the Printer Driver Chapter 2
4608P198CA
Page 33

2-15
1. Windows 95
"Sharing" Property Sheet
This property sheet is co mmon l y av ai lab l e t o th e Windows 95-based printer drivers.
It allows you to make settings for sharing a printer amon g different users. It is
displayed only when a Windows 95-based printer is being used over the network.
For more details, see Windows 95 Help for more details.
Installing the Printer Driver Chapter 2
4608P199CA
Page 34

2-16
2. Windows NT4.0
Operating Environment
This section explains the required environment for the printer driver.
Before installing the printer driver, check that your computer meets the following
requirements. If it doesn’t, the printer driver may not function properly.
Personal computer
Operating system Windows NT 4.0 (English)
Memory 8MB or more
Parallel Centronics interface
I/O interface
Free space on hard disk 3MB or more
Windows 95
•
Installing the Printer Driver Chapter 2
For the operating environment and installation procedure for the Windows 95
printer driver, see p. 2-2.
Windows 3.1
•
For the operating environment and installation procedure for the Windows 3.1
printer driver, see p. 2-32.
Windows NT 3.51
•
For the operating environment and installation procedure for the Windows NT
3.51 printer driver, see p. 2-39.
Network
IBM PC or a compatible with an i486DX
or higher CPU
10Base-T/2 (UTP/BNC), 10/100BaseT
(UTP) ; supported protocols are, IPX/SPX
(NetWare 3.1x & 4.x), and TCP/IP (lpr/
lpd)
Page 35

2. Windows NT4.0
Installation
This section explains the installation procedure for the Windows NT 4.0 printer
driver.
NOTE
Before starting to install the printer driver, be sure first to quit all applications.
TIP
The following procedure assumes that the machine is a Digital Copier 35cpm
and the printer driver is PCL5e.
1. Click the [Start] button. From the m enu that appears, select "Settings," then
click "Printers."
2-17
Installing the Printer Driver Chapter 2
4608P038CC
2. The Printers window will appear. Double-click the "Add Printer" icon.
4608P002CB
Page 36

2-18
2. Windows NT4.0
3. If the printer is directly connected to the computer , select "My Computer." If the
printer is connected via a network printer server , select "Network pr inter server."
NOTE
When installing the printer d river in a computer connected to the machine via a
network, be sure to consult the network administrator.
4. Click the [Next>] button.
Installing the Printer Driver Chapter 2
4608P039CA
5. Select the name of the port to be used and click the [Next>] button.
4608P040CA
Page 37

2-19
2. Windows NT4.0
6. A window will appear, prompting you to select the manufacturer and model of
your printer . Click th e [Have Disk...] button on the lower righ t part of the screen.
4608P041CA
7. The "Install From Disk" dialog box will appear. Install the printer controller
driver CD-ROM that is included with the print e r controller in the CD-ROM
drive of your computer.
Installing the Printer Driver Chapter 2
4608P006CA
Page 38

2-20
2. Windows NT4.0
8. Type the drive name in the "Copy manufacturer’s file from" box. (As an
example, the CD-ROM drive is drive I.)
Click the [OK] button.
To install PCL5e: I:\NT40\PCL5e
To install PCL6: I:\NT40\PCL6
To install PS: I:\NT40\PS
4608P191CB
9. A "Printers" list appears.
Installing the Printer Driver Chapter 2
Select the driver to be installed and click the [Next>] button.
4608P200CA
Page 39

2. Windows NT4.0
10.If you want to change the printer name that is displayed, change the "Printer
name" on this screen. If not, leave it as is. Click the [Next>] button.
4608P201CA
2-21
11.If you share the printer with other users, select "Shared" and type the share name
in the box to the right of "Share Name." If not, select "Not shared." Click the
[Next>] button.
4608P043CA
Installing the Printer Driver Chapter 2
Page 40

2-22
2. Windows NT4.0
12.If you want to print a test page, select "Yes (recommended)." If you elect not to,
select "No." It is recommended that a test page be printed to ensure that the
printer driver has been installed properly. As the last step, click the [Finish]
button.
4608P044CA
Installing the Printer Driver Chapter 2
13.Installation will start.
When all the files have been copied from the floppy disk, the corresponding icon
will be added to the "Printers" window. This completes the installation.
4608P196CA
Page 41

2. Windows NT4.0
Test Print
If "Yes (recommended)" has been selected in the step to specify printing of a test
page, test printing starts. Check that the printer name is co rrect.
Refer to the Test Print Output.
2-23
Installing the Printer Driver Chapter 2
4608O030CA
Page 42

2-24
2. Windows NT4.0
Making General Settings Before Using the Printer
The printer driver requires setting of items that are common to all print jobs,
including the port to which the printer cable is connected an d optional devices
configured with the machine. These settings must be made using property sheets
available from the Properties command after the printer driver has been installed or
when the operating environment is changed.
The most common settings have already been made when the printer driver is
installed, meaning that you do not usually bother to change them. Some items must,
however, be changed in the following cases.
Cases where changes are necessary
You want to add a comment to distinguish the
•
printer from others
The computer’s connecting port has b een changed
•
You want to change the conditions for the displa y
•
of a timeout error
You want to designate a port to which the
•
Installing the Printer Driver Chapter 2
machine is connected via a network (this setting
must be made on a computer connected to the
machine via a network)
You want to specify a time frame for th e machin e
•
operation
You want to share the machine with other
•
computers connected to the same network (this
setting must be made on the computer directly
connected to the machine)
You want to restrict access to the machine
•
You want to check the accounts of the machine
•
users
For the details of "Device Option," see Chapter 3.
Applicable
property sheet
"General" p.2-27
"Ports" p.2-28
"Scheduling" p.2-29
"Sharing" p.2-30
"Security" p.2-31
Ref. page
Page 43

2-25
2. Windows NT4.0
Displaying a Property Sheet
You have two different steps to take to display a property sheet. The contents of a
particular property sheet slightly differ depending on how you access it. Select the
appropriate one according to your need.
(1) To display a property sheet from the printer folder
(2) To display a property sheet from an application menu
Below are the detailed procedures for each approach.
Displaying a Property Sheet from the Printer Folder
1. Click the [Start] button and select "Settings." Then, click "Printers."
2. Click the icon of "Digital Copier 35cpm PCL5e"
<To display the Device Option sheet>
3. Click "Properties" from the [File] menu.
<To display a sheet other than Device Option>
3. Click [Document Defaults...] from the menu that will then appear. This opens
the [Digital Copier 35cpm PCL5e Default].
Installing the Printer Driver Chapter 2
This method is mainly used when there will be no big changes in the settings once
made, such as [Device Option]. It allows you to set the environment in which you
will use the printer. The settings made through this method are valid in all
applications.
Displaying a Property Sheet from an Application Menu
1. Select [Print...] from the [File] menu of the application.
2. Check that the "Name" of the "Printer" is "Digital Copier 35cpm PCL5e." If "
Digital Copier 35cpm PCL5e" is not selected, click [ ▼ ] and, from the menu
that will then appear, select "Digital Copier 35cpm PCL5e."
3. Click the [Properties] button. This shows the property sheet.
This method allows you to set the number of copies and paper for each document.
The settings made on the property sheet accessed through the application are valid
only for that particular application.
Page 44

2-26
2. Windows NT4.0
TIP
To show a property sheet other than Paper, click the corresponding tab located
on the top part of the screen.
NOTES
• The steps to display a property sheet may be different depending on the
application. Follow the correct procedure according to the application. The
procedure above is based on the application WordPad.
• With PostScript, the contents are different between when the property sheet is
accessed from Print Manager and when accessed from an application.
Installing the Printer Driver Chapter 2
Page 45

2-27
2. Windows NT4.0
"General" Property Sheet
This property sheet is commonly available to the Windows NT 4.0-based printer
drivers.
There is no need of making changes in settings for ord inary operating envir onments.
See Windows NT 4.0 Help for more details.
NOTE
If "Separator page" is specified, a separator pa ge can be inserted between
multiple print jobs.
Installing the Printer Driver Chapter 2
4608P202CA
Page 46

2-28
2. Windows NT4.0
"Ports" Property Sheet
This property sheet is commonly available to the Windows NT 4.0-based printer
drivers.
There is no need of making changes in settings for ord inary operating envir onments.
See Windows NT 4.0 Help for more details.
Installing the Printer Driver Chapter 2
4608P203CA
Page 47

2-29
2. Windows NT4.0
"Scheduling" Property Sheet
This property sheet is commonly available to the Windows NT 4.0-based printer
drivers.
There is no need of making changes in settings for ord inary operating envir onments.
See Windows NT 4.0 Help for more details.
Installing the Printer Driver Chapter 2
4608P204CA
Page 48

2-30
2. Windows NT4.0
"Sharing" Property Sheet
This property sheet is commonly available to the Windows NT 4.0-based printer
drivers.
There is no need of making changes in settings for ord inary operating envir onments.
See Windows NT 4.0 Help for more details.
Installing the Printer Driver Chapter 2
4608P205CA
Page 49

2-31
2. Windows NT4.0
"Security" Property Sheet
This property sheet is commonly available to the Windows NT 4.0-based printer
drivers.
There is no need of making changes in settings for ord inary operating envir onments.
See Windows NT 4.0 Help for more details.
Installing the Printer Driver Chapter 2
4608P206CA
Page 50

2-32
3. Windows 3.1
Operating Environment
This section explains the required environment for the printer driver.
Before installing the printer driver, check that your computer meets the following
requirements. If it doesn’t, the printer driver may not function properly.
Personal computer
Operating system Windows 3.1 (English)
Memory 8MB or more
Bidirectional
parallel
I/O interface
Network
Free space on hard disk 3MB or more
Installing the Printer Driver Chapter 2
Windows 95
•
For the operating environment and installation procedure for the Windows 95
printer driver, see p. 2-2.
Windows NT 4.0
•
For the operating env ironm ent an d inst allat ion procedur e for th e Windows NT 4. 0
printer driver, see p. 2-16.
Windows NT 3.51
•
For the operating environment and installation procedure for the Windows NT
3.51 printer driver, see p. 2-39.
IBM PC or compatible with an i486DX or
higher CPU
Centronics interface
10Base-T/2 (UTP/BNC), 10/100BaseT
(UTP) ; supported protocols are, IPX/SPX
(NetWare 3.1x & 4.x), and TCP/IP (lpr/
lpd)
Page 51

2-33
3. Windows 3.1
Installation
This section explains the installation proced ure for the Windows 3.1 printer driver.
NOTE
Before starting to install the printer driver, be sure first to quit all applications.
TIP
The following procedure assumes that the machine is a Digital Copier 35cpm
and the printer driver is PCL5e.
1. Double-click the "Print Manager" icon in the "Main" group.
Installing the Printer Driver Chapter 2
2. The "Print Manager" dialog box will appear.
Select "Printer Setup..." from the [Options] menu.
4608P127CA
4608P128CB
Page 52

2-34
3. Windows 3.1
3. The lower part of the "Printers" dialog box will appear. Select "Install Unlisted
or Updated Printer" and click the [Install...] button.
4608P129CA
Installing the Printer Driver Chapter 2
4. The "Install Driver" dialog box will ap pear. Install the printer controller driver
CD-ROM that is included with the printer controller in the CD -ROM drive of
your computer.
4608P119CA
Page 53

2-35
3. Windows 3.1
5. Type the driv e name in the The "I nstall Driver" dialog box . (As an example, the
CD-ROM drive is drive I.)
Click the [OK] button.
To install PCL5e: I:\Win31\PCL5e
To install PCL6: I:\Win31\PCL6
To install PS: I:\Win31\PS
4608P192CB
6. The "List of Printers" appears.
Select the driver to be installed and click the [OK] button.
Installing the Printer Driver Chapter 2
7. Installation will start.
4608P207CA
Page 54

2-36
3. Windows 3.1
When installation is completed, the corresponding icon will be added to the
"Installed Printers" list of the "Printers" dialog box. This completes the installation
procedure.
Installing the Printer Driver Chapter 2
4608P208CA
Page 55

2-37
3. Windows 3.1
Displaying a Property Sheet
You have two different steps to take to display a property sheet. The contents of a
particular property sheet slightly differ depending on how you access it. Select the
appropriate one according to your need.
(1) To display a property sheet from Print Manager
(2) To display a property sheet from an application menu
Below are the detailed procedures for each approach.
Displaying a Property Sheet from Print Manager
1. Open [Print Manager] from [Main].
2. Select "Printer" whose properties are to be shown.
3. Select [Printer Setup...] from [Options] on the menu.
4. Then, the [Printers] dialog box appears. Click the printer icon of the property
sheet to be displayed.
5. Click the [Setup...] button to show the property sheet.
This method is mainly used when there will be no big changes in the settings once
made, such as [Device Option]. It allows you to set the environment in which you
will use the printer. The settings made by showing the property sheet from the
control panel are valid in all applicati ons.
Displaying a Property Sheet from an Application Menu
1. Select [Print Setup...] from the [File] menu of the application.
2. Then, the Print Setup dialog box appears. Check that the "Default Printer" of
"Printer" is "Digital Copier 35cpm PCL5e."
3. Select [Options...] in the Print Setup dialog box. This shows the property sheet.
This method allows you to set the number of copies and paper for each document.
The settings made on the property sheet accessed through the application are valid
only for that particular application.
TIP
To show a property sheet other than Paper, click the corresponding tab located
on the bottom part of the screen.
Installing the Printer Driver Chapter 2
Page 56

2-38
3. Windows 3.1
NOTES
• The steps to display a property sheet may be different depending on the
application. Follow the correct procedure according to the application.
• The settings made on the property sheet accessed through the application are
valid only for that particular app lication.
Installing the Printer Driver Chapter 2
Page 57

2-39
4. Windows NT 3.51
Operating Environment
This section explains the required environment for the printer driver.
Before installing the printer driver, check that your computer meets the following
requirements. If it doesn’t, the printer driver may not function properly.
Personal computer
Operating system Windows NT 3.51 (English)
Memory 8MB or more
Parallel Centronics interface
I/O interface
Free space on hard disk 3MB or more
Windows 95
•
For the operating environment and installation procedure for the Windows 95
printer driver, see p. 2-2.
Windows NT 4.0
•
For the operating env ironm ent an d inst allat ion procedur e for th e Windows NT 4. 0
printer driver, see p. 2-16.
Windows 3.1
•
For the operating environment and installation procedure for the Windows 3.1
printer driver, see p. 2-32.
Network
IBM PC or a compatible with an i486DX
or higher CPU
10Base-T/2 (UTP/BNC), 10/100BaseT
(UTP) ; supported protocols are, IPX/SPX
(NetWare 3.1x & 4.x), and TCP/IP (lpr/
lpd)
Installing the Printer Driver Chapter 2
Page 58

2-40
4. Windows NT 3.51
Installation
This section explains the installation procedure for the Windows NT 3.51 printer
driver.
NOTE
Before starting to install the printer driver, be sure first to quit all applications.
TIP
The following procedure assumes that the machine is a Digital Copier 35cpm
and the printer driver is PCL5e.
1. Double-click the "Print Manager" icon, which is located in the "Main" group
within the Windows NT 3.51 Program Manager.
Installing the Printer Driver Chapter 2
2. The "Print Manager" dialog box will appear.
4608P099CA
4608P100CA
Page 59

4. Windows NT 3.51
3. If the printer is directly connected to the computer, select "Create Printer..."
from the "Printer" menu. If the printer is connected vi a a networ k pr inter server,
select "Connect to Printer..."
4608P101CA
2-41
NOTE
When installing the printer d river in a computer connected to the machine via a
network, be sure to consult the network administrator.
4. The "Create Printer" dialog box will appear.
4608P102CA
Installing the Printer Driver Chapter 2
Page 60

2-42
4. Windows NT 3.51
5. Select "Other..." from the drop-down list of the "Driver" box.
4608P103CA
6. The "Install Driver" dialog box will th en appear. Install the printer controller
driver CD-ROM that is included with the print e r controller in the CD-ROM
drive of your computer and change the drive name to the CD-ROM drive.
Installing the Printer Driver Chapter 2
4608P104CA
7. Type the driver on the "Install Driver" dialog box. (As an example, the CDROM drive is drive I.)
Click the [OK] button.
To install PCL5e: I:\NT351\PCL5e
To install PS: I:\NT351\PS
4608P193CB
Page 61

2-43
4. Windows NT 3.51
8. A "Printer Driver" list appears.
Select the driver to be installed and click the [OK] button.
4608P209CA
9. The printer driver name selected is displayed in the "Driver" box on the "Create
Printer" dialog box.
Installing the Printer Driver Chapter 2
4608P210CA
Page 62

2-44
4. Windows NT 3.51
10.T ype any desi red printer name i n the "Printer Name" edi t box and click t he [OK]
button.
4608P211CA
11.The [Device Option] property sheet will appear. Make the necessary settings and
click the [OK] button.
Installing the Printer Driver Chapter 2
4608P225CA
Page 63

4. Windows NT 3.51
12.The installed printer driver wind ow will be added to "Print Manager."
This completes the installation.
4608P212CA
2-45
Installing the Printer Driver Chapter 2
Page 64

2-46
4. Windows NT 3.51
Making General Settings Before Using the Printer
The printer driver requires setting of items that are common to all print jobs,
including the port to which the printer cable is connected an d optional devices
configured with the machine. To use the machine for printing, settings must be
made so that the printer driver developed for these machines can be used. These
settings may be made using the "Printer Properties" dialog box, and other dialog
boxes which can be opened from it.
The most common settings have already been made when the printer driver is
installed, meaning that you do not usually bother to change them. Some items must,
however, be changed in the following cases.
Cases where changes are necessary
The name of the printer to be used is not Digital
•
Copier 35cpm PCL5e.
The computer’s connecting port has been changed
•
You want to change the conditions for the display
•
Installing the Printer Driver Chapter 2
of a timeout error
You want to designate a port to which the mach ine
•
is connected via a network (this setting must be
made on a computer connected to the machine via
a network)
For the details of "Device Option," see Chapter 3.
Applicable
property sheet
"Printer
Properties"
"Printer Details"
Ref. page
p.2-49
p.2-50
Page 65

2-47
4. Windows NT 3.51
Displaying a Property Sheet
You have two different steps to take to display a property sheet. The contents of a
particular property sheet slightly differ depending on how you access it. Select the
appropriate one according to your need.
(1) To display a property sheet from Print Manager
(2) To display a property sheet from an application menu
Below are the detailed procedures for each approach.
Displaying a Property Sheet from Print Manager:
1. Open [Print Manager] from [Main].
2. Then, the [Printers] dialog box appears. Click the printer icon of the property
sheet to be displayed.
3. Select "Properties" from the "Printer" menu.
<To display the Device Option screen>
4. Click the [Setup...] button.
<To display a screen other than Device Option>
5. Click the [Details...] button.
6. Click the [Job Defaults ...] button.
This method is mainly used when there will be no big changes in the settings once
made, such as [Device Option]. It allows you to set the environment in which you
will use the printer. The settings made by showing the property sheet from Print
Manager are valid in all applications.
Displaying a Property Sheet from an Application Menu
1. Select [Print Setup...] from the [File] menu of the application.
2. Then, the Print Setup dialog box appears, showing the conditions of the printer
being used. Check that the "Name" of "Printer" is " Digital Copier 35cpm
PCL5e."
3. Select [Properties] in the Print Setup dialog box. This sh ows the property sheet.
This method allows you to set the number of copies and paper for each document.
The settings made on the property sheet accessed through the application are valid
only for that particular application.
Installing the Printer Driver Chapter 2
Page 66

2-48
4. Windows NT 3.51
TIP
To show a property sheet other than Paper, click the corresponding tab located
on the bottom part of the screen.
NOTES
• The steps to display a property sheet may be different depending on the
application. Follow the correct procedure according to the application.
• The PostScript property sheet of the PostScript driver may be accessed by either
one of the following three ways: (1) click the “Print Manager” icon, then
choose [Properties] and then [Setup...]; (2) clock the “Print Manger” icon,
then choose [Pr oper ties], [Detail s], and t hen [Jo b Default ]; or, (3) through the
application.
Note that the contents of the screen accessed through approaches (2) and (3)
are the same, while they ar e d ifferent from tho se of the scr een accessed through
approach (1) .
Installing the Printer Driver Chapter 2
Page 67

2-49
4. Windows NT 3.51
"Printer Properties" Dialog Box
This dialog box is commonly available to the Windows NT 3.51-based printer
drivers.
There is no need of making changes in settings for ord inary operating envir onments.
See Windows NT 3.51 Help for more details.
4608P213CA
Installing the Printer Driver Chapter 2
Page 68

2-50
4. Windows NT 3.51
"Printer Details" Dialog Box
This dialog box is commonly available to the Windows NT 3.51-based printer
drivers.
There is no need of making changes in settings for ord inary operating envir onments.
See Windows NT 3.51 Help for more details.
Installing the Printer Driver Chapter 2
4608P144CA
Page 69

Chapter 3
Property Sheet
3-1
Property Sheet Chapter 3
Page 70

3-2
1. Property Sheets
Property Sheets
Each property sheet allows you to make specific settings as detailed below. For a
detailed description of each function, see the corresponding reference page.
Property Sheet Available Settings
Allows you to make settings for options installed
"Device Option"
"Paper"
Property Sheet Chapter 3
"Advanced"
"Graphics"
"PostScript"
(PS driver only)
"Setting"
on the machine.
* This property sheet is not displayed when
Properties has been opened from the applicati on .
Allows you to make basic printer settings such as
the number of copies, paper size, print orientation,
and the paper source loaded with the paper for
printing. It allows you to set enhanced printer
functions such as duplex printing, N-in-1 printing,
print zoom ratio, and booklet creation.
It further allows you to set finishing capabilities
including sort, staple, and hole punch when you
need to make multiple, complete sets of the original
document. Still another feature that can be set is the
Administrator Mode.
Allows you to make settings for advanced
functions, such as OHP interleaving, document
distribution number, and watermark. It is also
possible to lock a print job.
Allows you to make graphic settings such as
resolution, halftone, and image process i ng met h od.
It also allows you to set TrueType fonts.
Allows you to make detailed settings concerning
PostScript.
Allows you to save the details of settings made and
later load the data for use in print jobs.
Reference
Page
p.3-3
p.3-5
p.3-14
p.3-21
p.3-28
p.3-33
NOTES
• Refer to Chapter 2 for the procedures to display "Properties."
• Different settings must be made depending on the driver involved.
• The descriptions contained herein are based on the PCL 5e version driver for
Windows 95. Peculiarities of each driver are given at the appropriate place in
text as supplementary information.
• OS-dependent functions are not detailed.
Page 71

2. "Device Option" Property Sheet
Functions of the "Device Option" Property Sheet
The "Device Option" property sheet allows you to set the options installed on the
machine. Make sure that the correct settings are made; otherwise, some printer
functions may not function properly or printing cannot be performed correctly.
The settings should match the machine configuration.
3-3
(5)
(6)
(7)
(8)
4608P214CA
(1) Installed Drawer
Set the drawer installed in the machine. If the bottommost Drawer is the LCC,
select LCC, instead of Drawer
Setting values : Drawer
Drawer
5,
3 or Drawer 4.
1, 2,
Drawer
1, 2 + LCC,
1, 2, 3,
Drawer
Drawer
1, 2, 3, 4,
1, 2, 3 + LCC
Drawer
(2) Duplex Unit
Set whether the Duplex Unit is installed or not.
Setting values : Installed, Not Installed
(1)
(2)
(3)
(4)
(9)
1, 2, 3, 4,
Property Sheet Chapter 3
Page 72

3-4
2. "Device Option" Property Sheet
(3) Finisher
Set the specifications of the finishing option installed on the machine.
Setting values : Not Installed, Job Tray, Shift Tray, Finish er, Mailbin Finisher
NOTE
If Installed Tray has not been properly selected, it may be impossible to select
Finisher properly.
(4) Punch
Set the number of holes to be made in Hole Punch.
Setting values : 4 Holes
NOTE
The setting depends on the cap ab ilities of the Finisher or Mailbin Finisher,
whichever is configured with the system.
(5) Mail Bin Name
If the machine is equipped with a Mailbin Finisher, you can name each bin.
Setting values : 1 to 8 characters
Property Sheet Chapter 3
(6) Displays the machine preview that represents the configuration of the machine
and options.
For preview listing, see p. A-7.
(7) User Name
The user name (up to eight characters) set in the printer driver is displayed as
the job user name on the machine’s Touch Panel.
Setting value : 8 characters max.
(8) About...
Click to display the manufacturer and version number of the printer driver.
(9) Restore Defaults
Click to restore all settings to the defaults.
Install Drawer : Drawer 1,2
Duplex Unit : Not Installed
Finisher : Not Installed
Punch : 4 Holes
Mail Bin Name : Bin 1~Bin 5
Page 73

3. "Paper" Property Sheet
Functions of the "Paper" Property Sheet
The "Paper" property sheet allows you to make basic printer settings.
3-5
(1)
(2)
(3)
(4)
(5)
(6)
(7)
(8)
(9)
(10)
4608P215CA
(1) Access Code
Select this check box when the Admini strator Mo de is used. An access number
is appended to the print job, allowing the machine to keep track of the print job.
To use this function, the Copy Track function must be enabled in the machine.
When the Copy Track function is enabled in the machine, printing may not be
effected unless the correct access number authorized by the machine is entered
in Access Number of Security. For more details, see p. 3-13.
(11)
(12)
(13)
(14)
(15)
(16)
Property Sheet Chapter 3
(2) Paper preview
Displays the text as it will appear when printed on a sheet of paper. It helps you
visualize how N-in-1, duplex, or any other printing functi on results in the
printout.
For a paper preview listing, see p. A-4.
Page 74

3-6
3. "Paper" Property Sheet
(3) Paper Size
Select the size of the paper to be used for printing.
NOTE
If a paper size that does not match the paper loaded in the machine is selected,
the machine will give a message that prompts you to add paper in Drawer1,
entering a standby state. If Bypass has been selected, the machine will issue a
message that prompts you to load paper in the manual feed port, entering a
standby state.
(4) Paper Source
Select the paper source to be used by the machine.
A vailable o ptions are li mited de pending on t he type o f paper sourc e mounted i n
the machine.
• Auto : Automatically selects the paper source in which p a per of the
size specified by Paper Size is loaded.
• Drawer 1 to Drawer 5, LCC
: Prints on paper loaded in the specified paper source (Drawer).
• Bypass : Prints on pap er loaded in the Multi Bypass Tray.
Property Sheet Chapter 3
NOTES
• It is possible that an o ption cann ot be s elected d ependin g on t he paper si ze. For
details, see the Operator’s Manual of th e machine.
• If "OHP Interleavin g" or "Cover Mode" is selected, "Paper Source" will
appear dimmed.
TIPS
• The p aper source type is set with Device Option.
• The machine preview shows the paper source to be used.
Page 75

3. "Paper" Pro perty Sheet
(5) Paper Output
Select the machine exit tray into which the prints are to be fed.
Available options are limited depending on the type of the finishing option
configured with the machine.
• Not Installed : Top Output Bin
• Job Tray : 1st/2nd Tray
• Shift Tray : Shift Tray
• Finisher : TopOffset Tray, Elevator Tray
• Mailbin Finisher: TopOffset Tray, Elevator Tray, bin1 to bin5
NOTE
It is possible that an option cannot be selected depending on the paper size. For
details, see the Operator’s Manual of the machine.
TIPS
• The finishing option type is set with Device Option.
• The machine preview shows the exit tray to be used.
(6) Collate
Select whether printed pages are to be sorted in to copy sets when printing mo re
than one copy of the same document.
• Collated : Sorts pages into copy sets. For instance, when printing 5 sets of
a document consisting of 10 pages, printed pages are sorted by
copy (i.e., 5 sets of a 10-page document are output).
• UnCollated : Simply prints the specified number of pages one page at a time.
For instance, when printing 5 sets of a document, pages are
printed five times, one page at a time.
• Group : Simply prints the specified number of pages which are sorted
into groups of the same pages.
3-7
Property Sheet Chapter 3
NOTE
Be sure to set Collate (Sort) on the application to "OFF" at all times.
Page 76

3-8
3. "Paper" Property Sheet
TIPS
• When the machine is equipped with a Shift Tray, or if "Elevator Tray" is
selected when the machine is equipped with a Finisher or Mailbin Finisher , sets
or stacks are stacked in a sawtooth manner so that each is easy to identify.
• If a Job Tray is mounted, or if none of the finishing options is mounted, sets or
stacks are stacked in a crisscross manner.
• The followings are the minimum requirements for enabling crisscross sorting
with the Collated setting:
The stacks of paper of the same size are loaded in the lengthwise and
crosswise direction.
Staple, Hole-Punch, or Cover is not set.
(7) Machine preview
The machine preview shows the set paper source and exit tray.
For a listing of machine preview formats, see p. A-7.
(8) Hole Punch <when Finisher or Mailbin Finisher is mounted>
Select whether to punch holes in the printed pages.
• None : Does not punch holes.
• Short Edge : Punches holes along the short edge of the document.
Property Sheet Chapter 3
• Long Edge : Punches holes along the long edge of the document.
NOTES
• It is possible that no holes are made depending on the paper size and the
specified hole position. For details, see the Operator’s Manual of the machine.
• Holes may not be punched if Long Edge is selected with manual feed copying.
TIPS
• The n umber of holes to be made is set with Device Option.
• The print preview displays the positions of the holes to be made.
(9) Staple <when Finisher or Mailbin Finisher is mounted>
Select whether to staple each copy set of the document.
• None : D oes not stap le the printed pages.
• Corner : Staples each copy set at the upper left corner.
Page 77

3. "Paper" Pro perty Sheet
NOTES
• Select "Elevator Tray" for "Paper Output" when Staple is to be used.
• The stapling position varies between the upper left corner and upper right
corner depending on the direction of the paper loaded and the printing
orientation.
• If the number of sheets of paper exceeds the limit that the Finisher or Mailbin
Finisher can handle, the stapling function may be canceled.
• If th e original document for a print jo b contains a page with a different size
from the others and this document is printed, the Staple setting may be
canceled.
• If th e original document for a print jo b contains a page with a different
direction from the others, care should be used because the stapling position is
determined according to the direction of the first page.
• It is possible that an o ption cann ot be s elected d ependin g on t he paper si ze. For
details, see the Operator’s Manual of th e machine.
TIP
The print preview allows you to check for the stapling position.
3-9
(10)Setting preview
Displays the icons corresponding to the settin gs made for the printer driver. It
allows you to identify which functions are currently enabled.
For the setting preview listing, s ee p. A-9.
(11)Copies
Set the number of copies to be made. Directly type the number, or click [▲] or
[▼] to arrive at the desired number.
Setting range : 1 to 999
NOTE
Set "1" in "Copies" when using OHP Interleaving and manual feed copying.
(12)Orientation
Select the orientation of the image. The selected orientation may be checked
with the paper preview.
• Portrait : Prints the document across the narrower dimension of the paper.
• Landscape : Prints the document across the wider dimension of the paper.
Property Sheet Chapter 3
Page 78

3-10
3. "Paper" Property Sheet
TIP
The paper preview displays the orientation, either Portrait or Landscape.
(13)Duplex Print <only when Duplex Unit is mounted>
Select the desired duplex print function. The results of the specified duplex
print function can be viewed on the paper preview.
• None : Does not perform duplex printing.
• Bind Short Edge: Prints on both sides of each page so that the printed pages
can be bound along the short edge.
• Bind Long Edge: Prints on both sides of each page so that the printed pages
can be bound along the long edge.
TIPS
• The p aper sizes that permit Duplex Print are Ledger, 11”x14”, Legal, Letter,
Executive, A3, A4, A5, B4, B5, FLS1, FLS2, FLS3, and FLS4.
• The paper preview shows the result, either Bind Short Edge or Bind Long Edge.
Property Sheet Chapter 3
Page 79

(14)Form
Set the print layout.
• 1in1 : Prints one page to one full-size sheet of paper.
• 2in1 : Prints two pages to one sheet of paper.
• 4in1 (Vert.) : Prints four pages to one sheet of paper.
4608O004AA
• 4in1 (Horiz.): Prints four pages to one sheet of paper.
3-11
3. "Paper" Pro perty Sheet
4608O002AA
• Zoom : Prints at an enlargement or reduction.
• Booklet : Prints four pages to both sides of a single sheet of paper so that
the output page can be folded at the center to form a booklet.
NOTES
• When a document that contains pages of different s ize and orientation from the
rest is printed by Booklet, void or overlapped image could result.
TIP
The paper preview displays the printout layout.
(15)Paper
Specify the output paper size used in 2in1, 4in1, Zoom, and Booklet.
Property Sheet Chapter 3
Page 80

3-12
3. "Paper" Property Sheet
(16)Restore Defaults
Resets all settings on the Paper, Advanced, Graphics, and PostScript property
sheets to the defaults.
• Paper property sheet
Access Job Number : Off
Paper Size : A4
Paper Source : Auto
Paper Output(Not installed) : Top Output Bin
(Shift Tray) : Shift Tray
(Job Tray) : 1st/2nd Tray
(Finisher) : Top Offset Tray
(Mailbin Finisher) : Top Offset Tray
Finishing (Collate) : Coll ated
(Hole Punch) : None
(Staple) : None
Copies : 1
Orientation : Portrait
Duplex Print : None
Layout (Form) : 1in1
(Paper) : A4
Property Sheet Chapter 3
TIPS
• For the defaults in the Advanced, Graphics, a nd PostScri pt pr opert y sheets, see
"Restore Defaults" of the corresponding property sheet.
• For the defaults of the PostScript property sheet of Windows NT 4.0/3.51, see
"Restore Defaults" of the property sheet accessed via the application.
Page 81

3-13
3. "Paper" Pro perty Sheet
"Security" Dialog Box
This dialog box is used to enter the access number and the password for a Loc k Job.
(1)
(2)
4608P019CC
(1) Enter the access number of the job.
Setting value : 0001 to 1000 (4 digits)
(2) Enter the password for the Lock Job.
Setting value : 0000 to 9999 (4 digits)
NOTES
• If the [Cancel] button is clicked in the Windows 95/3.1 driver, the data is
transmitted without specifying Access Code or Lock Job. It is not the
cancellation of data transmission.
• When Access Code is used, printing may not be effected unless the access
number has been correctly set. It is possible, by using the utility that comes
with the NIC Board (option), to check on the personal computer screen to see
whether the job has been canceled or not.
Property Sheet Chapter 3
Displaying the "Security" Dialog Box
<Windows 95>
The dialog box appears when the [OK] key is clicked on the "Printer" dialog
box if "Access Code" or "Lock Job" has been selected.
<Windows NT 4.0/NT 3.51>
The dialog box appears immediately after "Access Code" or "Lock Job" has
been selected.
<Windows 3.1>
The dialog box appears when "Print" of "File" is selected if Access Code or
Lock Job has been selected.
Page 82

3-14
4. "Advanced" Property Sheet
Functions of the "Advanced" Property Sheet
The "Advanced" property sheet allows you to make advanced printer settings.
(1)
(2)
(3)
Property Sheet Chapter 3
(1) Distribution Number
Select whether to print a distribution number in the background. Other
conditions for the distribution number printing may also be specified as
detailed below. The distribution number is printed for each set of prints.
•Print page designation : Select whether the distribution number is to be printed
•Image Density : Set the image density of the distribution numbers.
•Starting Number : Specify the starting distribution number.
(1)
(5)
(6)
4608P216CA
on the first page only or every page.
Setting values : 1st Page Only, All Pages
Setting values : Normal, Darker, Lighter
Setting range: 001 to 999
NOTE
When this function is used in combination with Cover Mode and, if "W ith Image"
is not selected under Cover Mode and "All Pages" is selected under this function,
the distribution number is printed on the cover.
Page 83

4. "Advanced" Property Sheet
TIPS
• The setting preview shows the corresponding icon.
• The distribution number is reset to 000 upon reaching 999.
(2) Watermark
Allows you to print specific characters as a watermark in the background. The
selected watermark can be viewed in the print preview on the left.
•Print page designation: Select whether to print the watermark on the first page
only or on every page.
Setting values :1st Page Only, All Pages
•Text : Select the desired characters from the text list.
Setting values : CONFIDENTIAL, COPY, DRAFT,
FILE COPY, FINAL, PROOF, TOP
SECRET , WaterMark1 ~ WaterMark5
•[Edit] button : Displays the "Watermark" dialog box that allows you
to set the style or position of the watermark. For more
details, see p. 3-19
3-15
NOTE
When this function is used in combination with Cover Mode and, if "W ith Image"
is not selected under Cover Mode and "1st Paper Only" is selected under this
function, the watermark is printed on the second page.
TIP
The setting preview shows the corresponding icon.
(3) Lock Job
Select this box if you want to lock a print job.
To use Lock Job, enter a password in Password of Security.
For details, see p. 2-13.
The locked print job may be printed when unlocked on the Job List display
available on the machine, at which time, an authorized password is necessary.
Property Sheet Chapter 3
Page 84

3-16
4. "Advanced" Property Sheet
(4) OHP Interleaving
When printing on several sheets of OHP transparencies at one time, it is a good
idea to insert a sheet of paper between sheets of OHP transparencies. This
paper may be left blank or have the same data printed on it as the OHP
transparencies.
•OHP Paper Source : Select the paper source from which to feed OHP
transparencies.
Setting values : Drawer 1, Bypass
•Interleaving Paper Source : Select the paper source from which to feed
interleaves.
Setting values : Drawer 1 to Drawer 5, LCC
•with Image : Select this box if you want the OHP data printed
on the interleaves.
NOTES
• Set "1" in "Copies" when using OHP Interleaving.
• The same paper source cannot be selected for "OHP Paper Source" and
"Interleaving Paper Source."
• Applicable paper sizes are "A4 & B5".
Property Sheet Chapter 3
TIPS
• The machine preview shows th e pa per so urce for OHP tran sp arencies and t hat
for interleaves.
• "Paper Source" on the "Paper" property sheet appears dimmed and becomes
unavailable when "OHP Interleaving" is selected.
• The setting preview shows the corresponding icon.
Page 85

4. "Advanced" Property Sheet
(5) Cover Mode
Lets you place a front cover and a back cover in each of your copy sets. The
front cover may be left blank or have data printed on it.
•Paper Source : Select the paper source for the text pages.
Setting values : Drawer 1 to Drawer 5, LCC
•Front Cover Paper Source : Select the paper source for the front and back
covers.
Setting values : Drawer 1 to Drawer 5, LCC
•with Image : Select this box if you want data printed on the
front cover.
•with Back Cover : Select this box if you want a back cover.
NOTE
If thick paper or other special paper is selected, the machine may not feed prints
out into the selected exit tray.
TIPS
• No data will be print ed on the back cover if selected even when yo u sel ect to
print data on the front cover.
• The machine preview shows the paper source for the text pages and that for
front and back covers.
• "Paper Source" on the "Paper" property sheet appears dimmed and becomes
unavailable when "Cover Mode" is selected.
• The setting preview shows the corresponding icon.
3-17
Property Sheet Chapter 3
Page 86

3-18
4. "Advanced" Property Sheet
(6) Restore Defaults
Resets all settings on the Paper, Advanced, Graphics, and PostScript property
sheets to the defaults.
• Advanced property sheet
Distribution Number : Off
: 1st Page Only
(Image Density) : Normal
(Starting Number) : 1
Watermark : Off
: 1st Page Only
(Text) : CONFIDENTIAL
OHP Interleaving : Off
(OHP Paper Source) : Drawer1
(Interleaving Paper Source) : Drawer2
(with Image) : Off
Cover Mode : Off
(Paper Source) : Drawer1
(Front Cover Paper Source) : Drawer1
(with Image) : Off
(with Back Cover) : Off
Property Sheet Chapter 3
TIPS
• For the defaults in the Paper, Graphics, and PostScript property sheets, see
"Restore Defaults" of the corresponding property sheet.
• For the defaults of the PostScript property sheet of Windows NT 4.0/3.51, see
"Restore Defaults" of the property sheet accessed via the application.
Page 87

4. "Advanced" Property Sheet
"Watermark" Dialog Box
The "Watermark" dialog box allows you to select the text to be inserted by the
Watermark function and its style. Select text of "Watermark" on the "Advanced"
property sheet and click the [Edit] button to show the "Watermark" dialog box.
(1)
(2)
(3)
(4)
(5)
(7)
(6)
4608P022CC
(1) Text
Edit the text to be printed as the watermark.
No. of settings available : 5 (Watermark1 to Watermark5)
No. of characters : Within 63
3-19
Property Sheet Chapter 3
TIP
Only the text for Watermark1 to Water mark5 can be edited. The set phrases of
CONFIDENTIAL, COPY, DRAFT, FILE COPY, FINAL, PROOF, and TOP
SECRET cannot be edited.
(2) Fonts
Specify the font of the text to be printed as the watermark.
When PCL5e is being used with Windows 95, 3.1, or NT 4.0, select one from
among those installed in the OS (PC fonts).
When PCL6 or PS is being used with Windows 95, 3.1, or NT 4.0, or when
Windows NT 3.51 is being used, select one from among those installed in the
controller.
Page 88

3-20
4. "Advanced" Property Sheet
(3) Style
Specify the font style of the text to be printed as the watermark.
Setting value : Regular, Bold, Italic, Bold Italic
(4) Size
Specify the font size of the text to be printed as the watermark.
Setting value : 4 to 127 pt (step: 1 pt)
(5) Darkness
Specify the image density of the text to be printed as the watermark.
Setting value : Image density corresponding to 0 to 10 (step 1)
(6) Angle
Specify the angle of the text to be printed as the watermark. The specified angle
can be viewed in the print preview on the right.
Setting value : -90 to +90 (-: clockwise; 0: horizontal; +: counterclockwise)
(7) Position
Specify the position of the text to be printed as the watermark.
• Automatically Center Watermark : Prints the watermark at the center of the
• Position Relative to Center : Prints the watermark at a position defined
Property Sheet Chapter 3
page.
by the numerical values entered in the X
and Y boxes. The specified position can
be viewed in the print preview on the
right.
Setting value X: -200 to 200 (step: 1)
Y: -200 to 200 (step: 1)
TIP
For position, specify the distance from the center . The + direction in X is toward s
the right, while the + direction in Y is upwards.
Page 89

5. "Graphics" Property Sheet
The "Graphics" property sheet allows you to make graphic settings such as
resolution, halftone, print image density, and image processing method.
Functions of the "Graphics" Property Sheet
Property Sheet for PCL5e
(1)
(2)
(3)
(4)
(5)
(6)
3-21
Property Sheet Chapter 3
4608P217CA
(1) Graphics Mode
Select the graphic image type, either vector or raster.
• Use Vector Graphics : Transmits the data as vector graphics.
• Use Raster Graphics : Expands vector graphics data to transmit bit-mapped
graphics data.
NOTE
Use Raster Graphics cannot be used in 2in1, 4in1, Zoom, and Booklet.
(2) Resolution
Select the desired print reso lu t ion.
Setting value : 600 dpi
Page 90

3-22
5. "Graphics" Property Sheet
(3) Halftone
Allows you to select the desired gray-scale dithering method.
• None : Does not perform dithering. Print results will have no gray
gradation.
• Coarse : Performs coarse dithering. It is effective when a mixture of
graphics and text is printed on paper with a rough surface.
• Fine : Performs dithering using dots. Select this option if the
document contains gray areas.
(4) TrueType fonts
Specify the print method of TrueType fonts.
• Download as Outline: Transmits the data in the outline format if the
corresponding font is not available.
• Download as Bitmap : Transmits the data in bit-map format if the
corresponding font is not available.
NOTE
This setting is valid if "Print as Gr aphics image" is OFF.
(5) Print text as graphics image
Property Sheet Chapter 3
Transmits all data in the bit-map format.
(6) Restore Defaults
Resets all settings on the Paper, Advanced, and Graphics prop erty sheets to the
defaults.
• Graphics property sheet
Graphics Mode : Use Vector Graphics
Resolution : 600 dpi
Halftone : Fine
TrueType Fonts : Download as Outline
Print as Graphics image : Off
TIP
For the defaults in the Paper, Advanced, and PostScript property sheets, see
"Restore Defaults" of the corresponding property sheet.
Page 91

Property Sheet for PCL6
3-23
5. "Graphics" Property Sheet
(2)
(7)
(4)
(8)
4608P218CA
(2) Resolution
See the description for the PCL5e version.
(4) TrueType fonts
See the description for the PCL5e version.
(7) Halftone
Allows you to select the desired gray-scale dithering method.
• Normal : Does not perform dithering. Print results will hav e no gray
gradation.
• Line Art : Perfo rms d ithering using lines. Select this option if the
document contains clear borders between white, black, and
gray shadings like line-drawings.
Property Sheet Chapter 3
Page 92

3-24
5. "Graphics" Property Sheet
(8) Restore Defaults
Resets all settings on the Paper, Advanced, and Graphics prop erty sheets to the
defaults.
• Graphics property sheet
Resolution : 600 dpi
Halftone : Normal
TrueType Fonts : Download as Outline
TIP
For the defaults in the Paper, Advanced, and PostScript property sheets, see
"Restore Defaults" of the corresponding property sheet.
Property Sheet for Windows 95/3.1 PS
Property Sheet Chapter 3
(2)
(9)
(2) Resolution
See the description for the PCL5e version.
(10)
(11)
(12)
4608P219CB
Page 93

5. "Graphics" Property Sheet
(9) Halftone
Allows you to select the desired gray-scale dithering method.
• Use Printer’s settings: Uses the settings made on the printer.
• Use settings below : Set the number of lines per inch and the angle of
pattern. Adjust these settings if Moiré occurs when
printing a fine image such as a photo.
Screen frequency
Set the number of lines for the screen.
Setting value : 1 to 600 (step: 1)
Screen angle
Set the angle for the screen.
Setting value : 1 to 360 (step: 1)
NOTE
Usually, use the default values.
(10)TrueType fonts
• Send TrueTy pe fonts to printer according to the font
: Transmits TrueType fonts according to table
correspondence.
[Edit the table...]: <Only when opened from the
control panel>
Displays a screen on which the system fonts
(Device fonts) are assigned to the PC fonts
(TrueType fonts).
• Always use built-in printer fonts instead of TrueType fonts
: Uses the printer fonts at all times.
• Always use TrueType fonts: Transmits the TrueType fonts at all times.
3-25
Property Sheet Chapter 3
(11)Special
Specify reversal of toner arrangement between black and white and mirror
image.
• Negative Image: Reverses toner arrangement between black and white.
• Mirror Image : Reverses the image as if the original were viewed in a mirror.
Page 94

3-26
5. "Graphics" Property Sheet
(12)Restore Defaults
Resets all settings on the Paper, Advanced, Graphics, and PostScript property
sheets to the defaults.
• Graphics property sheet
Resolution : 600 dpi
Halftone : Use Printer’s settings
(Screen frequency) : 60
(Screen Angle) : 45
TrueType Fonts : Send True Type fonts to printer according to
the font
Special (Negative Image) : Off
(Mirror Image) : Off
TIP
For the defaults in the Paper, Advanced, and PostScript property sheets, see
"Restore Defaults" of the corresponding property sheet.
Property Sheet for Windows NT 4.0/NT 3.51 PS
Property Sheet Chapter 3
4608P220CA
(2)
(13)
(14)
(11)
(15)
Page 95

5. "Graphics" Property Sheet
(2) Resolution
See the description for the PCL5e version.
(11)Special
See the description for the Windows 95/3.1 PS version.
(13)Halftone [Color Adjustment...]
Displays the color adjustment dialog box.
The color adjustment dialog box is a Windows NT function. For details, see
the documentation provided for Windows NT.
(14)TrueType Fonts
• Send TrueTy pe fonts to printer according to the font
: Transmits TrueType fonts according to table
correspondence.
• Always use TrueType fonts: Transmits the TrueType fonts at all times.
(15)Restore Defaults
Resets all settings on the Paper, Advanced, Graphics, and PostScript property
sheets to the defaults.
• Graphics property sheet
Resolution : 600 dpi
TrueType Fonts : Send True Type font to printer according to
the font.
Special (Negative Image) : Off
(Mirror Image) : Off
3-27
Property Sheet Chapter 3
TIPS
• For the defaults in the Paper, Advanced, and PostScript property sheets, see
"Restore Defaults" of the corresponding property sheet.
• For the PostScript property sheet, see "Restore Defaults" of the property sheet
accessed via the application.
Page 96

3-28
6. "PostScript" Property Sheet
The "PostScript" property sheet allows you to make overall settings as they relate to
PostScript.
Functions of the "PostScript" Property Sheet
Property Sheet for Windows 95/3.1 PS
(1)
(2)
(3)
(4)
(5)
(6)
Property Sheet Chapter 3
(1) PostScript out pu t format
Set the output format of PostScript.
• PostScript : Optimizes for faster printing process.
• Encapsulated, PostScript (EPS): Describes an image or page contained within
(2) PostScript header
Set the method of transmitting the header.
• Download header with each print job
• Assume header is downloaded and retained
(7)
4608P221CA
a file and places the file within another
application for printing.
: Transmits header information for each print
job. It is recommended when sharing a
network printer.
: Transmits header information only once to
the printer, thereby shortening the print time.
Page 97

6. "PostScript" Property Shee t
(3) Ctrl+D
Informs the machine of the start and completion of the current print job.
• Send CTRL+D before job: Send Ctrl+D before the job.
• Send CTRL+D after job : Send Ctrl+D after the job.
(4) Print PostScript error information
Check this box to print PostScript error information.
(5) PostS c r i pt timeout va lues
Set the timeout of the printer.
• Job timeout : Set the timeout value for a job.
Setting value : 0 to 999 (step: 1)
• Wait timeout : Set the timeout value for job wait.
Setting value : 0 to 999 (step: 1)
(6) Bitmap compression
Specify whether to perform bitmap compressi on or not.
• Compress bitmap image : Transmits graphics data after compressing it.
• No bitmap compression : Transmits graphics data without compressing it.
(7) Restore Defaults
Resets all settings made on the Paper, Advanced, Graphics, and PostScript
property sheets to the defaults.
• PostScript property sheet
PostScript output format : PostScript
PostScript header : Download header with each print job
Ctrl+D (Send CTRL+D before job) : Off
(Send CTRL+D after job) : Off
Print PostScript error information : On
PostScript Timeout values
(Job Timeout) : 0
(Wait Timeout) : 240
Bitmap Compression : Compress bitmap images
3-29
Property Sheet Chapter 3
TIP
For the defaults in the Paper, Advanced, and Graphics property sheets, see
"Restore Defaults" of the corresponding property sheet.
Page 98

3-30
6. "PostScript" Property Sheet
Property sheet accessed from a Windows NT 4.0/NT 3.51 PS application
(1)
(2)
(3)
(6)
(8)
Property Sheet Chapter 3
(1) PostScript Output Format
See the Windows 95/3.1 PS version.
(2) PostScript Header
See the Windows 95/3.1 PS version.
(3) Ctrl+D
See the Windows 95/3.1 PS version.
(6) Bitmap Compression
See the Windows 95/3.1 PS version.
4608P222CA
Page 99

6. "PostScript" Property Shee t
(8) Restore Defaults
Resets all settings made on the Paper, Advanced, Graphics, and PostScript
property sheets to the defaults.
• PostScript property sheet
PostScript Output Format : PostScript
PostScript Header : Download header with each print job
Ctrl+D (Send CTRL+D before job) : Off
(Send CTRL+D after job) : Off
Bitmap Compression : Compress bitmap images
TIP
For the defaults in the Paper, Advanced, and Graphics property sheets, see
"Restore Defaults" of the corresponding property sheet.
Property sheet accessed from a Windows NT 4.0/NT 3.51 PS control panel
3-31
4608P223CA
(9)
(10)
(5)
(11)
Property Sheet Chapter 3
Page 100

3-32
6. "PostScript" Property Sheet
(5) PostScript Timeout values
See the Windows 95/3.1 PS version.
(9) Halftone
Set the halftoning.
• Use Printer Halftoning : Uses the printer setting.
• Use System Halftoning : Uses the unique setting made by the user.
• Halftone Setup... : Displays the device color/halftone property dialog
(10)Font Substitute
Set font substitution.
• Normal : Substitu tes PostScript fonts for all TrueType
• Slowly : Downloads TrueType fonts at printing. So, there
Property Sheet Chapter 3
• Edit Substitute Table... : Opens the TrueType font to printer font
box.
A Windows NT function is used. For details, see
the documentation provided for Windows NT.
fonts. A shorter printing time results since the
TrueType fonts are not downloaded at printing.
There may, however, be some discrepancies in
fonts between what you see on the screen and
what you get on printout.
is an accurate font correspondence between what
you see on the screen and what you get on
printout. A longer printing time could result.
correspondence table.
(11)Restore Defaults
Resets all settings to the defaults.
Halftone : Use Printer Halftoning
Font Substitute : Normal
PostScript timeout values
(Job Timeout) : 0
(Wait Timeout) : 240
TIP
The settings on other property sheets are not reset to defaults.
 Loading...