

Page 1

Interface Card
User’s Manual
© 1999 Hitachi Koki Imaging Solutions, Inc.
1757 Tapo Canyon Road
Simi Valley, CA 93063
December 1999
336824-001, Revision A
Network
Page 2

© 1999 Hitachi Koki Imaging Solutions, Inc. All rights reserved.
No part of this document may be reproduced without the
expressed permission of Hitachi Koki Imaging Solutions, Inc.
The material in this document is for informational purposes and
is subject to change without notice. Hitachi Koki Imaging
Solutions, Inc. assumes no responsibility for errors or
omissions in this document. No liability is assumed for any
damages resulting from the use of the information it contains.
TRADEMARK
Digital Document Copier, DDC, DDC 35n, and their associated
logo marks, are trademarks of Hitachi Koki Imaging Solutions,
Inc.
Hitachi and the Hitachi logo are trademarks of Hitachi, Ltd. All
rights reserved.
All other terms and product names may be trademarks or
registered trademarks of their respective owners, and are
hereby acknowledge d.
NOTICE TO USER
In an effort to meet the demands of a rapidly changing
technology, the manufacturer is continually developing new
features and functions to meet your changing printing or printer
needs. As a result, this manual may not ex actly reflect future
changes made to the product. Please be sure to consult all
manual updates or addenda when using this product’s
documentation.
Page 3

Foreword
Software License Agreement and Warranty
(i)For the US and Canada
Software License Agreement
Important:
Before installing the software please carefully read this License Agreement. The installation of this software indicates your acceptance of the
terms and conditions of this License. If you do not agree with the terms and
conditions, you should return the s oftware to Hitachi Koki Imaging So lutions, Inc., for a full refund.
Ownership:
The software is owned and copyrighted by Hitachi Koki Imaging Solutions, Inc., and its third party suppliers. Your license confers no title or
ownership in the Software and should not be construed as a sales of any
right in the Software. Hitachi Koki Imaging Solutions, Inc., third party suppliers may protect their rights in the event of any violation of these terms.
The License permits you to:
1. Use this software in the conduct of business without limit when the
software is used with the intended Hitachi Koki Imaging Solutions, Inc.,
Product.
2. SOFTWARE: You may install and use the SOFTWARE on a computer to
which the Hitachi Koki Imaging Solutions, Inc., Printer is attached.
OR
NETWORK: If the software is installed on a computer acting as a network
server, any number of computers or workstations may access or utilize the
printer services of that server. The printer services are described in the
printed materials accompanying the Printer Network Card.
i
Page 4

Foreword
The following are not permitted:
1. The making of alternations to the software.
2. The right to grant sub-license, leases or other rights to others.
3. The merging of this software product or any portion of it into another
product or program.
4. The reverse engineering, decompilation or disassembly of the software.
Export Requirements:
You m ay not e xport or re-e xport th e softw are or any cop y or adap tation in
violation of any applicable laws or regulations.
Notes:
By installing this software, you acknowledge that you have read this agreement, understand it and agree to be bound by its terms and conditions. You
further agree that this is the complete and exclusive statement of the agreement between us and supersedes any proposal or prior agreement either
oral or written, and any other communication between us relating to the
subject matter of this agreement. You further agree that if Hitachi Koki
Imaging Solutions, Inc., is required to engage in any proceedi ng, legal or
otherwise to enforce its rights under this agreement, Hitachi Koki Imaging
Solutions, Inc., shall be entitled to recover from License, in addition to any
other sums due, reasonable Attorney fees, cost and disbursements.
ii
Page 5

Foreword
Limited Software Warranty
Limited Warranty
Hitachi Koki Imaging Solutions, Inc., warrants that the software will perform in accordance w ith the accompanying written materials for a period of
(90) ninety days from the date of purchase. Hitachi Koki Imaging Solutions,
Inc., does not warrant that the operation of the program will meet your
requirements. This limited warranty gives you specific legal rights. You
may have others, which vary from stat e/jurisdiction to state/jurisdicti on.
Purchase Remedies
Hitachi Koki Imaging Solutions’ entire liability and your exclusive remedy
with respect to the software sh all be at Hitachi Koki Imaging Solutions’
option either, repair or replacement of the software. The software must be
returned to Hitachi Koki Imaging Solutions, Inc., with a copy of your proof
of purchase. The Limited Warranty is void if failure of the software has
resulted from accident, abuse, or misapplication. Any replacement software will be warranted for the remainder of the original warranty period or
(30) thirty days, whichever is longer.
The remedies provided herein are customer’s sole and exclusive remedies.
In no event shall Hitachi Koki Imaging Solutions, Inc., be liable for any
lost profits, direct, indirect, special, incidental, or consequential damages,
whether based on contract, tort, or any other legal theory.
Hitachi Koki Imaging Solutions Network Card Warranty
Warranty Term
Hitachi Koki Imaging Solutions Network Cards have a (1) One Year Warranty. The Ne twork Car d must be returned to Hita chi Ko ki Imaging Solutions,
Inc., for repair or re pla cement at Hitac hi Koki Im agi ng Sol ution s’ dis cret ion .
Warranty Coverage
Hitachi Koki Imaging Solutions, Inc., warrants this product to be free from
defects in workmanship and materials for a period of one year from the
date of receipt of the unit. If the unit fails to function as written in the
User’s manual, Hitachi Koki Imaging Solutions, Inc., will repair or replace
the unit at no charge. Hitachi Koki Imaging Solutions, Inc., will ship at
their expense an exchange unit overnight to replace the defective unit.
The remedies provided herein are the customer’s sole and exclusive remedies. In no event shall Hitachi Koki Imaging Solutions, Inc., be liable for
any lost profits, direct or indirect, special, incidental, or consequential
damages, whether based on contract, tort, or other legal history.
iii
Page 6

Foreword
Software License Agreement and Warranty
(ii)For all other countries including Europe
Software License Agreement
Important:
Before installing the software please carefully read this License Agreement. The installation of this software indicates your acceptance of the
terms and conditions of this License. If you do not agree with the terms and
conditions, you should return the s oftware to Hitachi Koki Imaging So lutions, Inc., for a full refund.
1. SOFTWARE
Software means the computer program contained in this package (which
may include digitally encoded, machine readable, scalable outline font data
as encoded in a special format), together with all codes, techniques, software tools, format, design, concepts, metho ds and ideas associated with the
computer program and all documentation related thereto.
2. LICENSE AGREEMENT
This is a license agreement and not an agreement for sale. Hitachi Koki
Imaging Solutions, Inc., owns, or has been licensed from other owners,
copyrights in the Software. Except as stated in this Agreement, you are not
granted any rights to patents, copyrights, trade names, trademarks (whether
registered or unregistered), or any other rights, franchises or license in
respect of the Software. Title to the Software and any copy made from it is
retained by Hitachi Koki Imaging Solutions, Inc., or such other owners.
3. LICENSE
Hitachi Koki Imaging Solutions, Inc., hereby grants to you, and you agree
to accept a non-exclusive, non transferable and limited license and you
may:
(1) install and use the Software on a single computer and one associated
printer.
(2) use the Software only for your own customary business or personal
purpose.
(3) make a copy of the Software for backup or installation purposes only in
support of the normal and intended use of the Software.
iv
Page 7

Foreword
(4) transfer possession of copies of the Software to another party by
transferring a copy of this Agreement and all other documentation along
with at least one complete unaltered copy of the Software, provided that
(i) you either transfer Software to such other party or destroy all your
other copies of the Software (ii) such transfer of procession terminates
your license from Hitachi Koki Imaging Solutions, Inc., and (iii) such
other party shall accept and be bound by these license terms by its initial
use of the Software.
4. RESTRICTIONS
(1) You shall not without the written consent of Hitachi Koki Imaging
Solutions:
(i) use, copy, modify, merge or transfer copies of the Software except as
provided he rein.
(ii) reverse assemble or reverse compile the Software except as permitted by
law; or
(iii)Sublicense, rent, lease or distribute the Software or any copy thereof.
(2) You shall not export or r e-export the Software in any form under
violation of export restrictions by the government of your country.
5. LIMITED WARRANTY
Hitachi Koki Imaging Solutions, Inc., warrants the media on which the Software is recorded to be free from defects in materials and workmanship under
normal use. Warranty details and limitations for the Software are described
in the Statement of Limited Warranty which was supplied with the hardware.
With the exception of the foregoing express warranties applicable to hardware and media only, the Software is not warranted but provided.
SUCH WARRANTIES ARE IN LIEU OF ALL OTHER WARRANTIES,
EXPRESSED OR IMPLIED, INCLUDING, BUT NOT LIMITED TO,
THE IMPLIED WARRANTIES OF MERCHANTABILITY AND FITNESS FOR A PARTICULAR PURPOSE.
6. LIMITATION OF REMEDIES
IN NO EVENT WILL HITACHI KOKI IMAGING SOLUTIONS, INC.,
BE LIABLE FOR ANY LOST PROFITS, LOST DATA, OR ANY
OTHER INCIDENTAL OR CONSEQUENTIAL DAMAGES THAT
RESULT FROM USE OR INABILITY TO USE THE SOFTWARE,
EVEN IF HITACHI KOKI IMAGING SOLUTIONS, INC., OR ITS
AUTHORIZED REMARKETERS HAVE BEEN ADVISED TO THE
POSSIBILITY OF SUCH DAMAGES OR FOR ANY CLAIM BY YOU
BASED ON A THIRD PARTY CLAIM.
v
Page 8

Foreword
7. TERMINAT ION
You may terminate your license at any time by destroying the Software and
all your copies of it or as otherwise described in these terms. Hi tachi Koki
Imaging Solutions, Inc., may terminate your license if you fail to comply
with these terms. Upon such termination, you agree to destroy all copies of
the Software in your possession.
8. GOVERNING LAW
This Agreement shall be governed by the laws of the country where the
delivery is made to the original customer.
9. GOVERNMENT END USERS
If you are acquiring the Software on behalf of any unit or agency of the
United States Government, the following provision s apply. Use, duplication or disclosure by the Government is subject to restrictions as set forth in
the Rights in Technical Data and Computer Software clause at FAR
252.227-7013, subdivision(b)(3)(ii) or subparagraph (c)(1)(ii), as appropriate. Further use, duplication or disclosure is subject to restrictions applicable to restricted rights software as set forth in FAR 52.227-19(c)(2).
YOU ACKNOWLEDGE THAT YOU HAVE READ THIS AGREEMENT, UNDERSTAND IT, AND AGREE TO BE BOUND BY ITS
TERMS AND CONDITIONS. NEITHER PARTY SHALL BE BOUND
BY ANY STATEMENT OR REPRESENTATION NOT CONTAINED IN
THIS AGREEMENT. NO CHAN GE IN THIS AGREEMENT IS EFFECTIVE UNLESS WRITTEN AND SIGNED BY PROPERLY AUTHORIZED REPRESENTATIVES OF EACH PARTY. BY INSTALLING
THIS SOFTWARE, YOU AGREE TO ACCEPT THE TERMS OF THIS
AGREEMENT.
vi
Page 9

Foreword
1) 10/100Base-T
USER INSTRUCTIONS (For U.S.A.)
FCC PART 15- RADIO FREQUENCY DEVICES WARNING-
FCC: Declaration of Conformity
Product Type Network Interface Card
Product Name 4179-435
This device complies with Part 15 of the FCC Rules. Operation
is subject to the following two conditions:(1) This d evice may
not cause harmful interference, and (2) this device must accept
any interference received, including interference that may
cause undesired operation.
Hitachi Koki Imaging Solutions, Inc.
1757 Tapo Canyon Road, Simi Valley, California 93063
Note
• This equipment has been tested and found to comply with the limits for
a Class A digital device, pursuant to part 15 of the FCC Rules. These
limits are designed to provide reasonable protection against harmful
interference when the equipment is operated in a commercial environment. This equipment generates, users and can radiate radio frequency
energy and, if not installed and used in accordance with the instruction
manual, may cause harmful interference to radio communications.
Operation of this equipment in a residential area is likely to cause
harmful interference in which case the user will be required to correct
the interference at his own expense.
WARNING
• The design and production of this unit conform to FCC regulations,
and any changes or modifications m us t be reg ist ered with th e FCC an d
are subject to FCC control.
• Any changes made by the purchaser or user without first contacting the
manufacturer will be subject to penalty under FCC regulations.
vii
Page 10

Foreword
USER INSTRUCTIONS (For Canada)
INTERFERENCE-CAUSING EQUIPMENT STANDARD
(ICES-003 ISSUE 3) WARNING
• This Class A digital apparatus complies with Canadian ICES-003.
• Cet appareil numérique de la classe A est conforme à la norme NMB-003
du Canada.
viii
Page 11

Foreword
USER INSTRUCTIONS (For Europe)
CE Marking (Declaration of Conformi ty)
We declare under our sole responsibility that the Network Interface Card
for use with Hi-35pc Printer Controller, to which this declaration relates are
in conformity with the specifications below.
This declaration is valid for the area of the European Union (EU) only.
Product Type Network Interface Card
Product Name
Standard Safety *2: EN60 950 / 1992 (A1:1993, A2:19 93, A3:1995,
EC Directive EMC: 89/336/EEC and 93/68/EEC
4179-436
A4:1997)
(Safety of inf ormation technology equipment,
including electr ical business equipment)
EN 60825 / 1992 (A 11:1996)
(Safety of laser products-Part 1:E quipment
classification, requirement s and users guide)
EMC*1: EN 55 022 (Class B ) / 1994 (A1:1995, A2:1997)
(Limits and method for measurement of radio
disturbance characteristics of information
technology equipment (ITE))
EN61000-3-2 / 1995
(Electromagnetic compatibility (EMC) - Part 3:
Limits, Section 2: Limits for harmonic current
emissions (equipment input current ≤ 16A per
phase))
EN 50 082-1 / 1992
(Electromagnetic compatibili ty - Ge n eric i mmu nit y
standard Part 1: Residential, commercial and light
industry)
IEC 801-2 / 1991 (Electrostatic discharge
requirement)
IEC801-3 / 1984 (Radiated electromagnetic field
requirement)
IEC 801-4 / 1988 (Electrical fast transient / burst
requirement)
Notes : *1) EMC performance: This product was designed
for operation in a typical office envi ronment.
*2) First year of labe lin g acco rdin g to EC-d irec tiv e
73/23/EEC and 93 /68/EEC: 98
3) This product was designed for operation in a
typical office environment.
ix
Page 12

Foreword
This device must be used with shielded network (10/100Base-T) cable.
The use of non-shield cables is lik ely to result in interference with radio
communications and is prohibited under 89/336/EEC rules.
x
Page 13

Foreword
2) 10BaseT/2
USER INSTRUCTIONS (For U.S.A.)
FCC PART 15- RADIO FREQUENCY DEVICES WARNING-
FCC: Declaration of Conformity
Product Type Network Interface Card
Product Name 4179-425
This device complies with Part 15 of the FCC Rules. Operation
is subject to the following two conditions:(1) This d evice may
not cause harmful interference, and (2) this device must accept
any interference received, including interference that may
cause undesired operation.
Hitachi Koki Imaging Solutions, Inc.
1757 Tapo Canyon Road, Simi Valley, California 93063
Note
• This equipment has been tested and found to comply with the limits for
a Class A digital device, pursuant to part 15 of the FCC Rules. These
limits are designed to provide reasonable protection against harmful
interference when the equipment is operated in a commercial environment. This equipment generates, users and can radiate radio frequency
energy and, if not installed and used in accordance with the instruction
manual, may cause harmful interference to radio communications.
Operation of this equipment in a residential area is likely to cause
harmful interference in which case the user will be required to correct
the interference at his own expense.
WARNING
• The design and production of this unit conform to FCC regulations,
and any changes or modifications m us t be reg ist ered with th e FCC an d
are subject to FCC control.
• Any changes made by the purchaser or user without first contacting the
manufacturer will be subject to penalty under FCC regulations.
xi
Page 14

Foreword
USER INSTRUCTIONS (For Canada)
INTERFERENCE-CAUSING EQUIPMENT STANDARD
(ICES-003 ISSUE 3) WARNING
• This Class A digital apparatus complies with Canadian ICES-003.
• Cet appareil numérique de la classe A est conforme à la norme NMB-003
du Canada.
xii
Page 15

Foreword
USER INSTRUCTIONS (For Europe)
CE Marking (Declaration of Conformi ty)
We declare under our sole responsibility that the Network Interface Card
for use with Hi-35pc Printer Controller, to which this declaration relates are
in conformity with the specifications below.
This declaration is valid for the area of the European Union (EU) only.
Product Type Network Interface Card
Product Name
Standard Safety *2: EN60 950 / 1992 (A1:1993, A2:19 93, A3:1995,
EC Directive EMC: 89/336/EEC and 93/68/EEC
4179-426
A4:1997)
(Safety of inf ormation technology equipment,
including electr ical business equipment)
EN 60825 / 1992 (A 11:1996)
(Safety of laser products-Part 1:E quipment
classification, requirement s and users guide)
EMC*1: EN 55 022 (Class B ) / 1994 (A1:1995, A2:1997)
(Limits and method for measurement of radio
disturbance characteristics of information
technology equipment (ITE))
EN61000-3-2 / 1995
(Electromagnetic compatibility (EMC) - Part 3:
Limits, Section 2: Limits for harmonic current
emissions (equipment input current ≤ 16A per
phase))
EN 50 082-1 / 1992
(Electromagnetic compatibili ty - Ge n eric i mmu nit y
standard Part 1: Residential, commercial and light
industry)
IEC 801-2 / 1991 (Electrostatic discharge
requirement)
IEC801-3 / 1984 (Radiated electromagnetic field
requirement)
IEC 801-4 / 1988 (Electrical fast transient / burst
requirement)
Notes : *1) EMC performance: This product was designed
for operation in a typical office envi ronment.
*2) First year of labe lin g acco rdin g to EC-d irec tiv e
73/23/EEC and 93 /68/EEC: 98
3) This product was designed for operation in a
typical office environment.
xiii
Page 16

Foreword
This device must be used with shielded network (10Base-T and 10Base2)
cable.
The use of non-shield cables is lik ely to result in interference with radio
communications and is prohibited under 89/336/EEC rules.
xiv
Page 17

Foreword
Welcome
Congratulations on your selec tion of this quali ty Hita chi Koki Ima ging
Solutions, Inc., Network Interface Card.
This User’s Manual provides information about set-up the Network
Interface C ard and operating the prin ter in the network environment.
Trademark Acknowledgements
AppleTalk is a trademark of Apple Computer, Inc.
Ethernet is a registered trademark of Xerox Corporation.
HP LaserJet III, HPLase rJ et II ISi, HPLaserJet 4Si, are registered trade-
marks of Hewlett-Packard Company. HP UNIX is a trademark of
Hewlett-Packard Company.
Microsoft is a registered trademark of Microsoft Corporation. Windows, Windo ws NT, and Internet Explorer are tr ademarks of Mi crosof t
Corporation.
Novell, NetWare, and UNIX are registered trademarks of Novell, Inc.
Token Ring is a registered trademark of International Business
Machines Corporation. PC is a trademark of International Business
Machines Corporation.
PostScript is a registered trademark of Adobe Systems, Inc.
SCO UNIX is a trademark of The Santa Cruz Operation, Inc.
SUN and Solaris are trademarks of SUN Microsystems, Inc.
ULTRIX is a trademark of Digital Equipment Corporation.
Netscape Communications, the Netscape Communications logo,
Netscape Navigator, Netscape Communicator, and Netscape are trademarks of Netscape Communications Corporation.
All other product names are trademarks or registered trademarks of
their respective holders.
Copyright 1999 Hitachi Koki Imaging Solutions, Inc.
The information contained in this manual is subject to change without
notice to incorporate improvements made on the product or products
the manual covers.
xv
Page 18

CONTENTS
CONTENTS
Chapter 1: Introduction
1.1 What’s in the Pa ckage..................................... 1-2
1.2 Hardware/NOS Requirements......................... 1-4
Chapter 2: Installing the Network Interface Car d
2.1 Preparing the Printer....................................... 2-1
2.2 Powering Up the Printer.................................. 2-1
2.3 Connecting to a Network the NIC................... 2-2
Chapter 3: Utilizing Windows Programs
3.1 Discovery Program – Management Ac cess
Program (MAP) –.............................................. 3-2
3.1.1 Installing the MAP.................................... 3-2
3.1.2 Configuring the MAP................................ 3-3
3.1.3 Using the MAP......................................... 3-4
3.2 IP Peer-to-Peer Printing Program................... 3-5
3.2.1 Installing the IP Peer-to-Peer Printing
Program................................................... 3-5
3.2.2 Setting Up IP Peer-to-Peer Printing......... 3-6
3.2.3 Adding Printers for IP Peer-to-Peer
Printing..................................................... 3-8
3.3 IPX Peer-to-Peer Printing Program .............. 3-10
3.3.1 Installing the IPX Peer-to-Peer
Printing Program.....................................3-11
3.3.2 Installing the Printer Driver and
Setting the Printer Port.......................... 3-12
3.4 Using a Web Browser.................................... 3-13
xvi
Page 19

CONTENTS
Chapter 4: NetWare Configuration
4.1 Configuring NetWare 2.15 and 3.x.................. 4-1
4.1.1 Start PCONSOLE and Sele ct File Server.. 4-2
4.1.2 Create Print Queues................................ 4-2
4.1.3 Ente r the Print Server Name....... ..... ..... ... 4-3
4.1.4 Configure the Print Server....................... 4-4
4.1.5 Assign Print Queues to the Printer .......... 4-5
4.1.6 Set Up Notify Options for the Printer
(Optional)................................................. 4-6
4.1.7 Installing the Print Server on Multiple
File Servers.............................................. 4-8
4.1.8 Primary File Server.................................. 4-9
4.1.9 Preferred File Servers.............................. 4-9
4.2 Configuring NetWare 4.x —
Bindery Emulation................................... ..... . 4-10
4.2.1 Con firm Bind ery Context.... ..... .... ........... 4-10
4.2.2 Configure in Bindery Mode with
PCONSOLE............................................4-11
4.3 Configuring the NIC in Novell Directory
Services.......................................................... 4-13
4.3.1 Create Printer Object............................. 4-14
4.3.2 Create Print Server Object..................... 4-15
4.3.3 Create Print Queue Object.................... 4-16
4.3.4 Assign Printer Object............................. 4 -17
4.3.5 Assign Pri nt Server Object..................... 4-19
4.3.6 Check Assignments............................... 4-20
4.3.7 Set Up and Reset the Printer................. 4-21
4.4 NIC Configuration.......................................... 4-22
4.5 Using the Novell PCONSOLE Utility............. 4-24
4.5.1 Changing the File Server....................... 4-24
4.5.2 Cha ng ing Print Queu es......................... 4-25
4.5.3 How to Set Up Notify............................. 4-25
xvii
Page 20

CONTENTS
Chapter 5: AppleTalk Configuration
5.1 Choosing the Printer ....................................... 5-1
5.2 Loading the AppleTalk NIManage
Utility Program................................................. 5-2
5.3 Configuring the NIC........................................ 5-4
5.3.1 Configuration........................................... 5-4
5.3.2 Error Log.................................................. 5-4
5.3.3 Protocol Setup......................................... 5-5
5.3.4 Options .................................................... 5-5
Chapter 6: TCP/IP Configuration
6.1 Installation in a Windows Environment......... 6-1
6.1.1 Setting up the NIC................................... 6-4
6.1.2 Assigning IP Address with arp & ping...... 6-4
6.1.3 Assigning the IP Address with BOOTP.... 6-5
6.1.4 Setting Up IP and lpr Parameters............ 6-7
6.1.5 Cre ating an lpr Queue on the
Workstation.............................................. 6-7
6.2 UNIX Printing.................................................. 6-10
6.2.1 Configuring the IP Address on the NIC.. 6-12
6.2.1.1 Using BOOTP.................................. 6-12
6.2.1.2 Using rarp........................................ 6-14
6.2.1.3 Using arp & ping.............................. 6-15
6.2.2 lpd Printing............................................. 6-17
6.2.2.1 Setting Up a BSD Remote
Printer to Use lpd............................. 6-17
6.2.2.2 Setting Up an AIX 2.5 Remote
Printer to Use lpd............................. 6-18
6.2.2.3 Setting Up an AIX 4.0 System......... 6-19
6.2.2.4 Setting Up an HP/UX Remote
Printer to Use lpd............................. 6-20
xviii
Page 21

CONTENTS
6.2.2.5 Setting Up an AS/400 Systems
to Use lpd........................................ 6-21
6.2.2.6 Setting Up a DEC ULTRIX 4.3
RISC or OSF1/ALPHA Remote
Printer.............................................. 6-21
6.2.2.7 Setting Up a SCO UNIX Remote
Printers to Use lpd........................... 6-22
6.2.2.8 Setting Up System V Rel.4 and
Solaris 2.X to Use lpd...................... 6-23
6.2.3 Installing TCP/IP for NIC If Not
Running lpd............................................ 6-24
6.2.3.1 Loading the Software ...................... 6-25
6.2.3.2 Script Selection of Filters................. 6-25
6.2.3.3 Manual Selection of Filters.............. 6-26
6.2.3.4 Installing and Printing on
Solaris 1.X and OSF1/ALPHA
Systems........................................... 6-26
6.2.3.5 Installing & Printing on an
DEC ULTRIX 4.3 RISC System ...... 6-28
6.2.3.6 Installing and Printing on the
HP/UX System ................................ 6 -29
6.2.3.7 Installing and Printing on a System V
(Solaris 2.X)/System V Rel.4
386-based Machine......................... 6-31
6.2.3.8 Installing & Printing on a SCO UNIX
System ............................................ 6-33
6.2.3.9 Installing and Printing on an AIX RISC
System/6000 ................................... 6-35
6.3 Running Telnet............................................... 6-39
6.3.1 Making Connection and Main Menu...... 6-39
6.3.2 Configure IP Parameters....................... 6-40
6.3.3 S elect Printe r Lan gu ag es...................... 6-41
6.3.4 Enable/Disable Network Protocols ........ 6-43
xix
Page 22

CONTENTS
6.3.5 Reset Unit.............................................. 6-43
6.3.6 Restore Factory Defaults....................... 6-43
6.3.7 Change Password................................. 6-43
6.3.8 Exit Telnet.............................................. 6-44
6.4 FTP Printing.................................................... 6-45
6.5 Dynamic Host Configuration Protocol......... 6-46
Chapter 7: Operation and Troubleshooting
7.1 LED Status Indicator........................................ 7-1
7.2 Status/Configuration Report........................... 7-3
7.3 Resetting the NIC to Factory Default ............. 7-5
7.4 How to Diagnose Problems............................ 7-6
7.5 Troubleshooting Checklists............................ 7-7
7.5.1 Troubleshooting Network Hardware
Connections............................................. 7-7
7.5.2 Troubleshooting NetWare Protocol.......... 7-7
7.5.2.1 NetWare Checklist............................. 7-7
7.5.2.2 File Server Checklist ......................... 7-8
7.5.2.3 Workstation Checklist........................ 7-8
7.5.2.4 NIC Configuration Checklist.............. 7-9
7.5.2.5 Printer Server/File Server/Printer
Checklist............................................ 7-9
7.5.2.6 Workstation to NIC Connection
Checklist.......................................... 7-10
7.5.2.7 NIC Loses Its File Server
Connection...................................... 7-10
7.5.2.8 Unable to Print from a Different
Context............................................ 7-10
7.5.3 Troubleshooting AppleTalk Protocol.......7-11
xx
Page 23

CONTENTS
Appendix A: Jumper Settngs
A.1 Network Interface Cards and
Jumper Locations............................................A-2
A.2 Reset to Factory Default..................................A-3
A.3 Address Select.................................................A-3
A.4 BUS Handshake...............................................A-3
Appendix B: Specifications
B.1 Network Interface Card....................................B-1
B.2 10/100BaseT/UTP Cables................................B-1
Appendix C: Using a Web Browser
C.1 Accessing the HTTP Server Screens.............C-1
C.1.1 Network page...........................................C-3
C.1.1.1 Reset................................................C-4
C.1.1.2 Factory Defaults...............................C-4
C.1.1.3 Unit Status........................................C-4
C.1.1.4 Network Address.............................C-4
C.1.1.5 Change Password............................C-4
C.1.1.6 Setup NetWare.................................C-5
C.1.1.7 Setup TCP/IP ...................................C-5
C.1.1.8 Setup AppleTalk...............................C-5
C.1.1.9 Test Print..........................................C-5
C.1.1.10 Configure Status Page....................C-5
C.1.1.11 Unit info...........................................C-6
C.1.1.12 Language........................................C-6
C.2 Supported Web Browsers...............................C-6
Appendix D: Index
xxi
Page 24

MEMO
Page 25

Introduction
Chapter
1
Introduction
Chapter 1
Page 26

Introduction
Chapter 1
Page 27

Introduction
This Network Interface Card (NIC) is a multi protocol device that is
designed to support an Ethernet conne ction exclus ively with th e Printer
Controller. This Network Interface Card (NIC) has the following
features:
• Auto recognition of 10Base2 and 10BaseT Ethernet types by the
10BaseT/2 Type card, and auto recognition of 10BaseT and
100BaseT Ethernet types by the 10/100BaseT Type card.
• Fully transparent AppleTalk printing support for the Macintosh,
including support for binary PostScript printing.
• Peer-to-Peer (serverless) discovery printing from Windows 95 or
Windows NT 4.0 workstations, without a Novell file server
present and without using IP is made possible through using IPX.
• Nove ll NetWare PSERVER on both bindery based and Novell
Directory Services (NDS).
• lpr/lpd over TCP/IP for UNIX platforms and Microsoft’s Windows.
• Raw sockets support over selectable TCP/IP port with filters for
selected UNIX environments.
Chapter 1
Introduction
• IP and IPX SNMP support of MIB-2 and DPI proprietary NIC
MIB.
• SNMP support of standard MIB and proprietary printer MIB’s on
compatible printers.
• Flash memory to allow field upgrades, with capability for either
IPX/SPX or TCP/IP (FTP) download of executable code.
• Network and printer settings from a Web Browser.
• FTP printing to allow users to print directly from their Web
Browser or other FTP client.
1-1
Page 28

1.1 What’s in the Package
1.1 What’s in the Package
The Print Server contains the following:
Chapter 1
Introduction
• Network Interface Card (NIC)
• Setup Guide
• Qui ck Confi gur at io n Guide
• CD-ROM
– Network Interface Card User’s Manual
– Printer Management Utility
– Quick Configuration Guide
– NIC MIB Definition
– Utility Software
IP Peer-to-Peer Printing Program
IPX/IP Management Access Program (MAP)
IPX Peer-to-Peer Printing Program
AppleTalk NIManage Utility
UNIX TCP/IP Utility
• 2 Spacers (to adjust NIC height)
• Flat cable (for connecting the NIC and printer unit)
• 2 Screws (for spacer)
• Ferrite core
• 2 Tie band (for securing the ferrite core.)
The CD-ROM contains the ASN.1 coded SNMP MIB for the NIC.
This MIB can be loaded into a st andard SNMP console to provide
SNMP access to all NIC parameters.
BOOTP programs for Windows (to assist entering IP parameters in a
Windows environment) are also included on the CD-ROM.
1-2
Page 29

1.1 What’s in the Package
The CD-ROM may contain a ReadMe file containing the latest
information about installation and operation. Check for these files
before going any further with installation.
Instructions and soft ware to perform flash downloads are provided
with any update or upgrade package and are not incl uded in this
manual.
Chapter 1
Introduction
1-3
Page 30

Chapter 1
Introduction
1.2 Hardware/NOS Requirements
1.2 Hardware/NOS Requirements
The Network Interface Card hardware and software require the
following:
Novell NetWare Version 2.15, 3.x, or 4.x.
Macintosh System 7.x, MacOS8.x
UNIX, Windows, or LAN Server systems
Version of
Protocol or NOS
Software
Hardware
supporting lpr over TCP/IP
DEC ULTRIX 4.3 or 4.4, DEC OSF/1 2.0 or
3.0, Solaris 1.1.3 or 2.3, (SUN OS 4.1.3 or
5.3), System V Release 4, HP-UX 9.01, IBM
AIX 3.2.5, or SCO UNIX 2 for DPI TCP/IP
port 10001.
Novell NetWare printing requires NetWare
Capture, NPRINT and PCONSOLE (later
than 1.0) utilities.
IPX/IP Management Access Program ( MAP),
IP discovery Program, IPX Peer to Peer
Printing Program, and IP Peer t o Peer Pr inting
require Windows 95 or Windows NT4.0.
TCP/IP setup and maintenance may be done
with Telnet. Monitoring and maintenance with
HTTP requi res a suitable internet Web
Browser program supporting HTML.
AppleTalk printing requires printer PPD
appropriate to the printer. AppleTalk
NIManage Utility Program is provided for
setup and maintenance.
CD-ROM drive on the workstation to accept
Windows, Macintosh, or UNIX utilities.
1-4
Page 31

Network
Environment
1.2 Hardware/NOS Requirements
When using cards that are 10/100BaseT
compliant:
10 MB or 100 MB Ethernet that uses a twisted
pair cable
Chapter 1
When using cards that are 10 BaseT/2
compliant:
10 MB Ethernet that uses a twisted pair cable
or a 10Base2 Ethernet (also known as a
Thinnet)
Introduction
1-5
Page 32

Chapter 1
Introduction
1.2 Hardware/NOS Requirements
1-6
Page 33

Installing the Network
Interface Card
Chapter
2
Installing the Network
Interface Card
Chapter 2
Page 34

Installing the Network
Interface Card
Chapter 2
Page 35

2.1 Preparing the Printer
2.1 Preparing the Printer
If the printer can generate a test or status report, you should generate
one before you begin. This will give you detailed information on the
identification an d confi guratio n of your printer, as well as ensuring th at
the printer is properly set up and operating.
1. Make sure that the print er is operating p roperly. Check to see that
paper is in the paper drawer and toner cartridge is full.
2. Turn off the printer and remove the power cord.
3. Install the NIC in the option port.
Note
• Handling Precautions for Static Sensitive Devices: The NIC is
designed to protect sensitive components from damage due to electrostatic discharge (ESD) during normal operation. When pe rforming
installation procedures, however , take proper static control precau tions
to prevent damage to equipment.
Chapter 2
Interface Card
2.2 Powering Up the Printer
Use the following procedures to power up the printer. Do this before
the printer is attached to the network to verify the physical installation
of the NIC.
1. Plug in the power cord.
2. Turn on power and wait for the printer to warm up. The printer
may print out a status report (if this option is not disabled). The
NIC then provides a print job to the printer which contains the
NIC status information. Refer to 7.2 Status/Configuration Report,
for more information.
3. Check the NIC status report. Record the serial number and the
Network address or save the status report. You need this information when you configure the printer for your network.
4. Power down the printer.
5. Connect the network cable between the NIC and a network drop.
See 2.3 Connecting to a Network the NIC, f or n et wo rk c onn ection
information.
2-1
Installing the Network
Page 36

Chapter 2
1
P
1
t
t
s
c
t
2.3 Connecting to a Network the NIC
2.3 Connecting to a Network the NIC
Use an RJ45 connector (1 0/100BaseT) or BNC connector ( 10Base2) to
connect to an Ethernet.
1. Turn off the printer.
2. Connect the connector to the NIC.
Feritecore
Interface Card
0/100BaseT:
Installing the Network
lug an RJ45 connector into the
0/100BaseT port on the back of
he NIC. Attach the ferrite c ore so
Tie band
10Base2:
Use a BNC T adapter to connect
to the BNC connector o n t he back
of the NIC.
hat it is near the connector. Next,
ecure the ferrite core so that it
annot move out of posi tion using
he tie band.
3. After you make the connection, perform the procedure under 2.2
Powering Up the Printer.
Note
• Use a Category 5 cable when connecting with a 10/100BaseT.
• Be sure to use a cable with a ferrite core when making a 10/
100BaseT connection.
2-2
Page 37

Utilizing Windows
Programs
3
Chapter
Utilizing Windows Programs
Chapter 3
Page 38

Utilizing Windows Programs
Chapter 3
Page 39

The CD-ROM contains the following programs for the Windows
environment.
• Discovery Program
This program automatically searches for NICs on a network. Found
NICs are listed in the Web Browser being used. Clicking a NIC name
accesses the card’s onboard HTTP server, which you can use to make
various NIC settings. See Appendix C of this manual for details.
The Discovery Progra m generally utilizes the MAP (Management
Access Program) to find an IP or IPX based NIC. Once found, the
Discovery Program allows you to make setting changes through the
NIC’s built-in Web page.
• Peer-to-Peer Printing Program
This program provides peer-to-peer printing capabilities, without
having to go through the server. Peer-to-peer printing can be enabled
by installing IP peer-to-peer printing under a TCP/IP environment, or
by installing IPX Peer-to-Peer printing program under an IPX/SPX
environment.
Chapter 3
Utilizing Windows Programs
3-1
Page 40

3.1 Discovery Program – Management Access Program (MAP)
3.1 Discovery Program – Management Access Program (MAP)
3.1 Discovery Prog ram – Management
Access Program (MAP) –
The Management Access Progr am (MAP) use s a Windows-based Web
Browser linked with a proprietary bi-directional IPX/IP channel
program to allow access to the NIC’s HTML-based monitoring and
maintenance capabilities. It is possible to search and manage IPX and
IP based printers with this program, however it is necessary to first
install TCP/IP, and preferably IPX/SPX protocols and a Web Browser
onto your PC. This program allows you to:
• Conf igure your network protocols for the NIC.
Chapter 3
Utilizing Windows Programs
• Re set t he NIC re mote ly to eithe r cle ar an error con ditio n, or r eturn
the print se r ver to its factory default settings.
• Troubleshoot problems in the NIC.
• Enable or disable the status report printout.
Note
• To be able to change parameter values with the MAP or the Web
Browser, you must know the NIC management password. The factory
default password is “
sysadm”.
3.1.1 Installing the MAP
Use the following procedure for an automatic installation of the MAP.
If the opening sc ree n does not appear as described in step 1, follow the
instructions for the manual installation procedure.
1. Insert the CD-ROM into your workstation’s CD-ROM drive. The
opening screen appears automatically.
2. Click the
screen.
3. Click
of the
4. Select the program that you want to install and follow the instructions displayed on the screen.
CD-ROM Contents button to display the Introduction
Installation/Configuration Programs located at the bot tom
Introduction screen.
3-2
Page 41

3.1 Discovery Program – Management Access Program (MAP)
3.1 Discovery Program – Management Access Program (MAP)
You can use the following procedure to manually install the MAP.
1. Insert the CD-ROM into your workstation’s CD-ROM drive.
2. Run the program. (In this example, we assume that drive D: is
your workstation’s CD-ROM drive.)
D:\Map\Setup.exe
3. Follow the instructions that appear on the screen.
The default installation directory is C:\Program Files\Map. You can
change to a different directory if you want.
3.1.2 Config uri ng the MAP
1. Click Start, point to Programs, and then point to MAP.
2. Click
MAP Setup.
Chapter 3
Search for IPX based printers:
Check this option to search for IPX/SPX based printers.
Search for IP based printers:
Check this option to sea rch for TCP/IP based printers.
Max Hops for IP Search:
Type in a maximum hop value. The initial default value is 2.
Utilizing Windows Programs
3-3
Page 42

3.1 Discovery Program – Management Access Program (MAP)
3.1 Discovery Program – Management Access Program (MAP)
Note
• The maximum hop value def ines the maximum nu mber of subnetwork s
the program will search to find a NIC. Setting a value 0 tells discovery
program to search only within the subnet to which the workstation is
connected. A hop value of 2 tells discovery program to search all networks accessible through as many as two routers. A value of 15 or
greater specifies automatic search of all connected networks, b ut this is
not recommended because of the amount of traffic it generates.
3. After the settings are the way you want, click OK to set them and
close the dialog box.
Chapter 3
Utilizing Windows Programs
3.1.3 Using the MAP
Use the following procedure to start up MAP and search for all
compatible NICs that are available on a network.
1. Click
2. Click
A list of NICs found by the MAP search appears on the Web Browser
installed on the workstation.
T o configure or reconfigure a particular NIC, click it s ser ial number in
the Web Browser list.
Clicking a NIC serial numbe r display s the Prin ter Management page of
the card’s onboard HTTP server. See Appendix C for details of how to
use this page to configure or reconfigure the NIC.
Start, point to Programs, and then point to MAP.
MAP.
3-4
Page 43

3.1 Discovery Program – Management Access Program (MAP)
3.2 IP Peer-to-Peer Printing Program
3.2 IP Peer-to-Peer Printing Program
This section describes how to set up and use the IP Peer-to-Peer
Printing program. With the setup procedure, you set up your print
server ports for printing from a Windows environment.
3.2.1 Installing the IP Peer-to-Peer Printing
Program
Use the following procedure for automatic installation of the IP Peerto-Peer Printing Program. If the opening screen does not appear as
described in step 1, follow the instructions for the manual installation
procedure.
1. Insert the CD-ROM into your workstation’s CD-ROM drive. The
opening screen appears automatically.
2. Click the
screen.
3. Click
of the
4. Select the program that you want to install and follow the instructions displayed on the screen.
CD-ROM Contents button to display the Introduction
Installation/Configuration Programs located at the bot tom
Introduction screen.
Chapter 3
You can use the following procedure to manually install the IP Peer-toPeer Printing program.
1. Insert the CD-ROM into your workstation’s CD-ROM drive.
2. Run the program. (In this example, we assume that D: is drive
your workstation’s CD-ROM drive.)
D:\Ip-P2p\Setup.exe
3-5
Utilizing Windows Programs
Page 44

Chapter 3
3.2 IP Peer-to-Peer Printing Program
3.1 Discovery Program – Management Access Program (MAP)
3. Follow the instructions that appear on the screen.
The default installation directory is C:\Program Files\IP-P2P. You can
change to a different directory if you want.
3.2.2 Setting Up IP Peer-to-Peer Printing
1. Click Start, point to Programs, and then point to IP-P2P.
2. Click
Utilizing Windows Programs
3. This displays the setup dialog box.
3-6
IP-P2P.
Page 45

3.2 IP Peer-to-Peer Printing Program
Max Hops for Search:
Type in a maximum hop value. The initial default value is 2. See
the note under 3.1.2 Configu ring the MAP for a n expla nation ab out
maximum hops.
IP Port Base:
This is the starting port number for the printserver. The default is
10000 (corresponding to a TCP/IP port of 10001) but you can
change it if you need to.
Printer Names:
These settings let you select what format to use when displaying
the printer list.
Based on Serial Numbers
Select this option to identify printers according t o printer server
serial number. If SN991354 is the printer serial number, for example, SN991354 is the printer port.
Based on IP Address
Select this option to identify printers according t o IP address. If
199.99.92.99 is the printer IP address, for exampl e, 199.99.92.99 is
the printer port.
Based on DNS (Domain Name Server)
Select this option to identify printer s according to DNS name.
Example:
<PTR-MKTG.DOMAIN.COM>.
Based on Unit Name
Select this option to identify printers according to unit name.
Example:
<MLT_999999>.
4. After the settings are the way you want, click
OK to set them an d
close the dialog box.
Chapter 3
Utilizing Windows Programs
3-7
Page 46

Chapter 3
3.2 IP Peer-to-Peer Printing Program
3.2.3 Adding Printers for IP Peer-to-Peer
Printing
The following steps can be used to manually add a printer that cannot be
found automatically due to router setup or the maximum hop count
setting. Note, however, that manual addition of printer is normally not
required.
Step 1:Use P2P-IP to make the printer an IP peer-to-peer printer.
1. Click
2. Click
Start, point to Programs, and then point to IP-P2P.
IP-P2P to display the Peer-to-Peer IP Setup dialog box.
3. Click the
Utilizing Windows Programs
new printer.
Printers button to display a dialog box for input of a
3-8
Page 47

3.2 IP Peer-to-Peer Printing Program
4. Click the Find Printers button to automatically search the network for a printer as well as to register it.
When registering a printer manually, enter the appropriate information for the followin g field descriptions and click the
ton.
Field Descriptions
IP Address:
Type in the IP address of the printer you want to add.
Name:
Type in the name you want to assign to the printer. Assign a name
you feel best identifies the printer.
Port Number:
T ype i n th e port number of the pri nter. The default port number se tting is 10001.
Description:
Type in text that describ es the printer.
5. Click
OK after you have finished adding all the printers you want.
Setp2: Installing the P rinter Driver and Setting the Printer Port
1. Using the install pro gram, instal l the printer dr iver that comes wit h
the printer.
Refer to the manual that came with the printer for details.
2. Open the
3. Select the
4. Select the port that you want from the
Properties menu item of the printer icon.
Detail tab.
Print to the following port
item.
Add but-
Chapter 3
Utilizing Windows Programs
3-9
Page 48

Chapter 3
Utilizing Windows Programs
3.3 IPX Peer-to-Peer Printing Program
3.3 IPX Peer-to-Peer Printing Program
The IPX Peer-to Peer Printing Program enables IPX Peer-to-Peer
printing in a Windows 95 or Windows NT 4.0 environment.
The following are the characteristics of IPX Peer-to-Peer printing.
• IPX Peer-to-Peer printing implements peer-to-peer bi-directional
printing between Windows workstations and NIC printers.
• Th e Peer -to-Pe er implement ation us es the I PX/SPX stack s that a re
provided with Windows 95 or Windows NT4.0.
• The IPX Peer-to-Peer Printing program establishes a connection
with the printers supporting Peer-to-Peer, without using an intermediate file server, whether or not your network uses Novell NetWare.
• If you are not using NetWare, you do not need to activate any NetWare Client application.
Note
• The IPX Peer-to-Peer Printing program uses IPX/SPX Compatible Protocol, so you must install IPX/SPX Compatible Protocol on your workstation if it is not already installed. See the documentation that comes
with Windows for details about installation.
• Because Peer-to-Peer uses the IPX/SPX Protocol, Novell operation
must remain enabled on the NIC, even if traditional Novell printing
facilities are not being used. The name of the Peer-to-Peer printer, as it
appears in the Windows Port List, is the same as the Novell Print
Server name, and may be changed by changing the Novell Print Server
name using the Web-based management or MAP Program.
On power up, the NIC checks the network to see if there is Novell
activity. If there is, it will use the same frame type and the local
network number that it senses. If, in addition, the NIC can log on to a
file server, it wil l assume that Novell is nor mally used a nd will store
this frame type a nd n ew number in NVRAM so that , whe n i t com es up
again, it will not have to spend the time sensing (which can take some
time). However , i f the NIC canno t attach to a file server, it will use the
sensed values, but will not store them.
3-10
Page 49

3.3 IPX Peer-to-Peer Printing Program
If the NIC does not see any Novell activity, it will use 802.2 on 802.3
as a frame type and will assign itself a networ k number of 0. The frame
type and network number being used is shown on the status report.
Note
• If a NIC is being moved from a site that had active Novell to a site that
does not, the unit should be reset to the factory default to clear the
frame type and network number information.
3.3.1 Installing the IPX Peer-to-Peer Printing
Program
Use the following procedure for an automatic installation of the IPX
Peer-to Peer pri nting Pro gram. If the opening screen doe s not appea r as
described in step 1, follow the instructions for the manual installation
procedure.
1. Insert the CD-ROM into your workstation’s CD-ROM drive. The
opening screen appears automatically.
2. Click the
screen.
3. Click
of the
4. Select the program that you want to install and follow the instruc-
tions displayed on the screen.
You can use the following procedure to manually install the IPX Peerto-Peer Printing progra m.
1. Insert the CD-ROM into your workstation’s CD-ROM drive.
2. Run the program. (In this example, we assume that drive D: is
your workstation’s CD-ROM drive.)
CD-ROM Contents button to display the Introduction
Installation/Configuration Programs located at the bot tom
Introduction screen.
Chapter 3
Utilizing Windows Programs
D:\Ipx-P2p\Setup.exe
3. Follow the instructions that appear on the screen.
Once the redirector is installed, each printer on the network that supports this Peer- to-Peer capabili ty will app ear as a Port under Prin ter. To
use the Peer-to-Peer connection, create a logical printer using the
driver installation program according to the instructions for your
printer. Set up the printer as a LOCAL printer.
3-11
Page 50

Chapter 3
3.3 IPX Peer-to-Peer Printing Program
3.3.2 Installing the Printer Driver and Setting
the Printer Port
1. Using the install pro gram, instal l the printer dr iver that comes wit h
the printer.
Refer to the manual that came with the printer for details.
2. Open the
3. Select the
4. Select the port that you want from the
item.
Properties menu item of the printer icon.
Detail tab.
Print to the following port
Utilizing Windows Programs
3-12
Page 51

3.4 Using a Web Browser
3.4 Using a Web Browser
Once you have assigne d an IP addr ess to your NIC, you can use a Web
browser such as Netscape Navigator or Microsoft Internet Explorer to
access the NIC’s onboard HTTP server. The HTTP server can be used
to perform various maintenance procedures. See Appendix C of this
manual for d etails.
Chapter 3
3-13
Utilizing Windows Programs
Page 52

Utilizing Windows Programs
Chapter 3
3-14
3.4 Using a Web Browser
Page 53

NetWare Configuration
Chapter
4
NetWare Configuration
Chapter 4
Page 54

NetWare Configuration
Chapter 4
Page 55

4.1 Configuring NetWare 2.15 and 3.x
Use this chapter if you will be printing from Novell NetWare. This
chapter is divided into the following sections:
Configuring NetWare 2.15 and 3.x describes how to configure
•
the NIC for use with Versions 2.15 or 3.x. Use PCONSOLE to set
up the print server function.
Configuring NetWare 4.x in Bindery Emulation describes how
•
to configure the NIC for use with Version 4.x —Bindery Services.
Use PCONSOLE to set up the pr int server function.
Configuring Novell Directory Services describes how to config-
•
ure the NIC for use with Version 4.x Directory S ervices. Use
NWADMIN to set up the print server function.
NIC Setup Parameters describes the parameters accessible via
•
MAP or a Web Browser used to configure the Print Server for NetWare.
• Using NetWare Utilities explains how to use standard Novell Net-
Ware utilities to make chang es to the configuration of the Print
Server function.
Chapter 4
4.1 Configuring NetWare 2.15 and 3.x
Before configuring Ne tWare, you mus t determine if the NIC has its
desired name. Use MAP or a Web Browser to change the name if you
want. Refer to section 3.1 for this setting.
The following steps are the general procedures for configuring the
NIC, which require supervisor privileges. These steps are covered in
detail in th e following paragraphs:
1. Start PCONSOLE and select the file server you want to use.
2. Create the print queues.
3. Specify the NIC as a print server.
4. Configure the print server and printer.
5. Assign the print queues.
6. Set up the NOTIFY options.
7. Repeat the procedure for other file servers.
4-1
NetWare Configuration
Page 56

Chapter 4
4.1 Configuring NetWare 2.15 and 3.x
When you a r e finished, turn the printer off and on again. The printer
creates a status re por t th at indi cates the file servers to which the unit is
attached and the queues which it services.
Before you begin:
• Verify that you have supervisor privileges on the file servers on
which the NIC print server is to be entered.
• Verify that your version of PCONSOLE is later than 1.0.
4.1.1 Start PCONSOLE and Select File Server
Follow these steps to st art PCONSOLE:
1. Log in to the network, type
2. Choose
Change Current File Server from the Available Options
PCONSOLE and press .
menu. This displays a list of file server s.
3. Select the file server on which you want to install the print s erver
and press . If th e name of the file server you want is not displayed, press
Enter
Insert
to get a list of file servers.
4. Log in to the file server.
Esc
5. Press
to return to the Available Options menu.
Enter
4.1.2 Create Print Queues
The NIC must be assigned to at least one print queue on the file server.
• If the print queue that you want the NIC to service already exists,
and you know the name of this queue, go to 4.1.3 Enter the Print
NetWare Configuration
Server Name.
• I f yo u do not know the name of the queue, or it does not exist, use
the following procedur e:
1. Choose
menu, and press . This displays a list of existing queues.
2. To create a new queue, press . Type the name of the queue
and press . You do not need to enter any more information at
Print Queue Information from the Available Options
Enter
Insert
Enter
this time.
3. Press to return to the
Esc
Available Options menu.
4-2
Page 57

4.1 Configuring NetWare 2.15 and 3.x
4.1.3 Enter the Print Server Name
A print server takes the print jobs from queues and sends them to the
printer. Use this procedure to specify the name of the print server:
1. Choose
menu, and press . This displays a list of exis ti ng pr int servers.
2. press . The New Print Server Name box is displayed.
Print Server Information from the Available Options
Enter
Insert
Chapter 4
3. Type the name of the print server into the entry box. The Novell
print server name is printed under Novell NetWare information on
the status report.
Note
• If desired, this name can be changed using MAP or Web Browser. The
screen example shows how to enter the print server name for a print
server with a serial number of MLT_160151.
4. Press to add the print server name to the Print Servers list.
Enter
4-3
NetWare Configuration
Page 58

Chapter 4
Enter
4.1 Configuring NetWare 2.15 and 3.x
4.1.4 Configure the Print Server
Use the following procedure to configure the Print Server’s function:
1. Choose the print server name from the
Enter
.
Print Server Information menu appears.
The
2. Choose
3. Choose
This displays the
Print Server Configuration from th e menu and pr ess .
Printer Configuration from the menu and press .
Configured Printers menu. Since this is a new
Print Server entry, all printers are labeled “Not Installed”.
4. Choose the printer and press . The
Enter
screen appears with a title of Printer 0, as shown in the following
example.
Print Server s list and press
Enter
Printer 0 Configuration
Enter
NetWare Configuration
5. If you choose to, ch ange the d efaul t in the Nam e fi eld on this fo rm
to MFP or something else that helps you identify the printer. The
print server uses this name in its message back to the users on the
Notify list. Select
6. Select
Type and press . This displays a list of printer types.
Choose
Name, enter a name, and then press .
Remote Other/Unknown and press . This creates
Enter
Enter
default entries in the other fields. These defaults are usually optimal, so do not change them without specific knowledge of the
effects.
7. Press . At the prompt, choose to save your changes.
Esc
4-4
Page 59

4.1 Configuring NetWare 2.15 and 3.x
8. Press to return to the Print Server Configuration menu.
Esc
4.1.5 Assign Print Queues to the Printer
When you assign queues to the defined printer, you authorize the print
server to service these queues.
Note
• Do not assign the same queue to two different print servers. If a queue
is assigned to multiple print servers, print jobs may not go to the
intended printer.
1. Choose Queues Serviced By Printer from the Print Server Configuration menu.
Chapter 4
2. Select the printer name from the list of defined printers.
3. Press to display the
Insert
Available Queues list for the printer.
NetWare Configuration
4-5
Page 60

4.1 Configuring NetWare 2.15 and 3.x
4. Select the queue you want and then assign a priority level from 1
to 10. It is recommended that you accept the default priority level.
Press . The queue appears on the list for the printer.
Enter
Chapter 4
NetWare Configuration
Press again to assign additional queues.
5. When you finish assigning queues, press and then save your
changes. Continue to press
Configuration
tion. 4.1.6. If you are finished, continue to press and then
Insert
Esc
Esc
to return to the Print Server
menu. If you want to set Notify options, go to Sec-
Esc
save your changes.
4.1.6 Set Up Notify Options for the Printer
(Optional)
To enable the print server to notify users or user groups if a problem
occurs with the printer, set up the Notify options. The print server
supports the enhanced NOTIFY options for printers, including
informing users when the printer:
• Is off-line, jammed, opened, or out of paper
• Requires a manual paper feed or a form change
• Has had an engine failure
1. Choose
menu.
Notify List for Printer on the Print Server Configuration
4-6
Page 61

4.1 Configuring NetWare 2.15 and 3.x
2. Select the printer from the Defined Printers list. Press to
view a list of
Notify Candidates.
Insert
3. Select the user or group from the list.
4. Set the
recommended that you use the defaults. The
First and Next intervals in the Not ify Intervals scr een. It is
First interval is the
number of seconds the network waits before it notifies candidates
about a print job problem. The
Next interval specifies how often in
seconds candidates are notified. Enter a number for each interval
and press .
5. Press and then choose
Enter
Esc Esc
Save Changes. Press at each
screen until you reach the Print Server Configuration menu. After
you have finished the configuration, press and then save the
Esc
changes.
Chapter 4
NetWare Configuration
4-7
Page 62

Chapter 4
4.1 Configuring NetWare 2.15 and 3.x
4.1.7 Installing the Print Server on Multiple
File Servers
To install the print server on more than one file server, perform the
procedures described in Sections 4.1.1 through 4.1.6 for each file
server. You must use the same name and password for the print server
(or no password) on all file servers. You set the password for the NIC
using the MAP or a Web Browser (refer to 4.3 Configuring the NIC in
Novell Directory Services). If you use a password, specify it on each
file server using the
Informati on menu of the PCONSOLE utility.
When the NIC comes up, it automatically searches for and attaches to
the file servers that are no more than four hops and have no more than
eight ticks propagati on delay. For extremely large or complex
networks, this allows a bounded search time on start-up. If the print
server must attach to file servers beyond this range, or, if you wish to
accelerate start-up by eliminating the need to search all file servers in
the four hops/eight ticks radius, the file servers with which the print
server is to operate may be entered into the Print Server Configuration
of a “primary” file server. The primary file server can be any file server
within the four hops/eight ticks propagation time limits, but ideally is
as close as possibl e to th e prin t se rver. Once the print server locat es the
primary file server and the list of file servers to be serviced, the
automatic search is dropped and the print server will go directly to
those file servers listed (and to no others).
Change Password option on the Print Server
NetWare Configuration
4-8
Page 63

4.1 Configuring NetWare 2.15 and 3.x
4.1.8 Primary File Server
T o use the primary file s erv er option, use the following procedure on a
file server close to the printer:
1. List the file servers to be serviced by the primary file server by
selecting
Server Configuration Menu
2. Press
3. Select the name if eac h fil e serv er to be serv ic ed and pr ess to
add it to the
4. When the list is complete, press to return to the menu.
File Server To Be Serviced option from the Print
.
Insert
to display the Available File Servers list .
File Servers To Be Serviced list.
Esc
Enter
5. Install the NIC on each of the primary file servers.
4.1.9 Preferred File Servers
The Management Access Program MAP or Web Browser allow you to
identify a “preferred” file server, to be identified within the NIC i tself.
If a preferred file server is listed, the NIC will attach to this identified
file server instea d of initiat ing the automat ic search . If the prefer red file
server is also a primary file server (for example, has file servers listed
under file server s to be se rviced) , the NIC wi ll connec t direct ly to th ese
file servers.
Chapter 4
Note
• The Preferred File Server is only applicable to bindery-based queues.
Entering it has no affect on NDS queues.
NetWare Configuration
4-9
Page 64

4.2 Configuring NetWare 4.x — Bindery Emulation
4.2 Configuring NetWare 4.x — Bindery
Emulation
Novell’s NetWare 4.x can operate in two modes — Novell Directory
Services (NDS) and Bindery Services Emulation. For Directory
Services, see 4.3 Configuring the NIC in Novell Directory Services.
These services run simult ane ously a nd trans parent ly to ea ch other. The
NIC may be configured to operate with Bindery Services mode only
(this section), or to operate under NDS (4.3 Configuring the NIC in
Novell Dir ectory Servi ces). When c onfigur ed unde r NDS, the NIC will
also service older file servers operating in bindery mode.
Note
• If the NIC is not properly set up for NDS and the Bindery Services
mode is not running, the NIC can not find its file servers, and the status
report indicates the Novell NetWare protocol is not active.
Chapter 4
NetWare Configuration
4.2.1 Confirm Bindery Context
Before installing the NIC on a Novell NetWare 4.x server in Bindery
Emulation mode, check that the server has a Bindery Context (name
for the serv er under Bindery Services mode). If the server does not
have Bindery Context, it may be preferable to install in NDS mode. If
the NIC must be installed in the Bindery Emulation mode, the server
must have Bindery Contex t. Perfor m the f ollowing ste ps to conf irm the
server has Bindery Context:
1. Go to the 4.x server and at the system console type:
2. Select Maintenance/Selective Install from the menu.
3. Select
4. Select
5. Search the file to see if you have a statement similar to the follow-
6. At the console prompt, type the
NCF Files Options from the menu.
Edit AUTOEXEC.NCF from the menu.
ing included:
SET BINDERY CONTEXT=OU=ENG
Where =OU=ENG is an example of a name for the file server context. Use your own file server context in place of
SET BINDERY CONTEXT state-
ment that you entered in the autoexec.ncf file.
4-10
load install
=OU=ENG.
Page 65

4.2 Configuring NetWare 4.x — Bindery Emulation
Note
• The command at the console prompt takes effect immediately. The definition in the autoexec.ncf file takes effect when the server is shut
down and then restarted.
4.2.2 Configure in Bindery Mode with
PCONSOLE
Once you confirm the server has Bindery Context, use the following
procedure to configure the NIC.
1. Log into the network as ADMIN.
2. Type
PCONSOLE and press . The following screen appears.
Available Op tions
Print Queues
Printers
Print Drivers
Quick Setup
Change Context
Enter
Chapter 4
3. When the
Available Options menu appears, pr ess (for the
F4
Bindery Mode).
Note
• If you receive a message asking you to login to a server with Bindery
connections, the server you are attached to does not have Bindery
Mode enabled. Follow the procedures in 4.2.1 Confirm Bindery Con-
text or log onto a server with Bindery Services activated.
4. From the Available Options screen, select Qui ck Setup and press
Enter
.
4-11
NetWare Configuration
Page 66

4.2 Configuring NetWare 4.x — Bindery Emulation
Use Quick Setup to connect your print server, print queue and
printer correctly. You can modify these later if you need to.
Chapter 4
NetWare Configuration
5. Select
Print server and press to modify the entry.
6. Type the name of the print server in the
Enter
press .
F3
Print server field and
Note
• The print server name is printed under the Novell Network Information
on the status report. The factory de fault name is MLT_<serial num-
ber>.
7. Press to move to the New pri nte r fiel d. Type a name and press
Enter
.
8. Press to move to the
Enter
press .
9. Press to move to the
the list of pr inter types, select
10. When you are finished, press to save the configuration.
Repeat steps 5 through 10 for each file server that the printer
server services.
11. To view, add, delete, or modify print servers or queues after the
initial setup, select either the
option on the
Available Options screen.
New print queue field. Type a name and
Printer type field and press . From
Other/Unknown and press .
F10
Enter
Enter
Print Queues or Print Servers
4-12
Page 67

4.3 Configuring the NIC in Novell Directory Services
4.3 Configuring the NIC in NetWare
Directory Services
4.3 Configuring the NIC in Novell
Directory Services
Novell Directory Services (NDS) offers a different, more advanced
approach to network management than previous NetWare versions.
Generally, it stores and tracks all network objects. As a rule, all 4.x
servers must have NDS loaded in order to function. In this way, every
NetWare 4.x server is a Directory server, because it services named
Directory objects such as printers, print servers and print queues. With
the appropriate privileges, you can create a print server object, which,
once configured in its context (or location) on the network, eliminates
the cumbersome setup of print servers on every network server. NDS
provides true enterprise networking based on a shared network
database rather than a individually defined physical sites. The result is
greatly improved print server setup and management.
The Directory Information Base (DIB) is used to store information
about servers and services, users, printers, gateways, etc. It is a
distributed database, allowing access to data anywhere on the network
wherever it is stored. Pre-4.x NetWare versions provide the same data
found in the DIB but the data is stored in the NetWare Bindery. The
DIB was designed with more flexible access, more specif ic security,
and, since it is distributed, it was designed to be partitioned. The
Directory uses an objec t-oriented structure rat her than the flat-file
structure of the Bindery, and offers network-oriented access, rather
than server-oriented access found in the Bindery.
Chapter 4
The Directory is backward-compatible with the NetWare Bindery
through Bindery emulation mode. Section 4.2 describes Print Server
Operation with a 4.x NetWare system in bindery emulation mode.
When Bindery emulation is enabled, Directory Services will accept
Bindery requests and respond just as if a Bindery existed on the
NetWare server being accessed. Be aware that information obtained
from the Bindery query may not be stored in the server since the
Directory is a partitioned and distributed da tabase. Even though the
NetWare 4.x server is not operating from a Bindery, the applications
making Bindery requests will not know the difference.
4-13
NetWare Configuration
Page 68

Chapter 4
4.3 Configuring the NIC in NetWare
4.3 Configuring the NIC in Novell Directory Services
Directory Services
You may use NWADMIN to configure the printer in NDS. Prior to
printing, NDS must be set up as follows and the NIC must be set up
with NDS Context and T ree . See Sec tion 4.4 . The steps b elow des cribe
the use of NWADMIN configuration to create printer, print server, and
print queue objects. Then, you will assign, or associate those objects
with each other. If you wish to keep Bindery resources on any server,
you can under NetWare 4.x if you declare a SET statement in your
AUTOEXEC.NCF file.
For those who prefer, NetWare does offer PCONSOLE as an
alternative to NWADMIN. PCONSOLE can be used to set up static
information about print servers such as: which queues to service, and
whom to no tify in the event of a problem. See Novell NetWare
documentation for more information about the use of PCONSOLE for
NDS.
4.3.1 Create Printer Object
1. Click on the NWADMIN icon in the NetWare Tools group in Win-
dows. The NetWare Administrator window will appear. To bring
up your Directory Tree, open a Browser window by clicking on
Tools menu item and, the Browse item.
the
2. Highlight the Organ izational Uni t or Organizat ion where you want
to create the print service in the Directory Tree, select the
item from the main menu and choose
Create...
Object
Note
NetWare Configuration
• If you wish, you can create objects another way in NWADMIN by:
selecting an Organizational Unit, clicking on the right mouse button
(which produces a pop-up m enu) , and clicking on
mouse button to bring up the
the procedure continues as described.
New Object window). From this point,
Create... use the left
4-14
Page 69

4.3 Configuring the NIC in Novell Directory Services
4.3 Configuring the NIC in NetWare
Directory Services
3. When the New Object window appears, scroll down the Class of
New Object
icon list, select the Printer icon and click on the OK
button.
4. When the Create Printe r window appears, type a value in the
Printer Name field and click on the Create button.
Chapter 4
4.3.2 Create Print Server Object
1. Again, highlight the Organizational Unit, select the Object item
from the menu and choose
2. At the New Object window, scroll down the Class of New Object
icon list, select the Print Server icon, and click on the
3. At the Create Print Server window, type a value in the
Server N
ame field and click on the Create button.
Create...
OK button.
Print
4-15
NetWare Configuration
Page 70

Chapter 4
4.3 Configuring the NIC in NetWare
4.3 Configuring the NIC in Novell Directory Services
Directory Services
4.3.3 Create Print Queue Object
1. Once again, highlight the Organizational Unit, select the Object
item from the menu and choose
2. At the
New Object window, scroll down the Class of New Object
icon list, select the Print Queue icon, and click on the
3. At the
Create Print Queue screen, click on the Directory Service
Queue
Print Queue Volume and click on the Create button. If you don’t
know the
button, then type in values for Print Queue Name and
Print Queue Volume name (the hard drive you will be
accessing), click on the icon to the right of the volume field. The
Select Object window will appear with the volume listed in
Objects. If the volume is not listed, scroll the Directory Context
items until you find the volume where you want the queue to
reside.
Create...
OK button.
NetWare Configuration
4-16
Page 71

4.3 Configuring the NIC in Novell Directory Services
4.3 Configuring the NIC in NetWare
Directory Services
Click on the object ( h ar d dr iv e) of your choice and it will appear in t he
Selected Object: field. Click on the OK button. The full volume will
now appear in the
Create button.
Print Queue Volume field. Finally, click on the
4.3.4 Assign Printer Object
1. Go to the Directory Tree. Double click on the printer object just
created and bring up the
Assignments button on the right-side of the window and click on
Add button.
the
Printer window. See below. Find the
4-17
Chapter 4
NetWare Configuration
Page 72

Chapter 4
4.3 Configuring the NIC in NetWare
4.3 Configuring the NIC in Novell Directory Services
Directory Services
2. When the Select Object window appears, find the print queue
object just created among the choices listed in the
Objects box
and select it.
Click on the
Print Queues: box in the Printer: window. Click on the OK
the
OK button and the pr int q ueue j ust crea ted i s added to
button again.
NetWare Configuration
4-18
Page 73
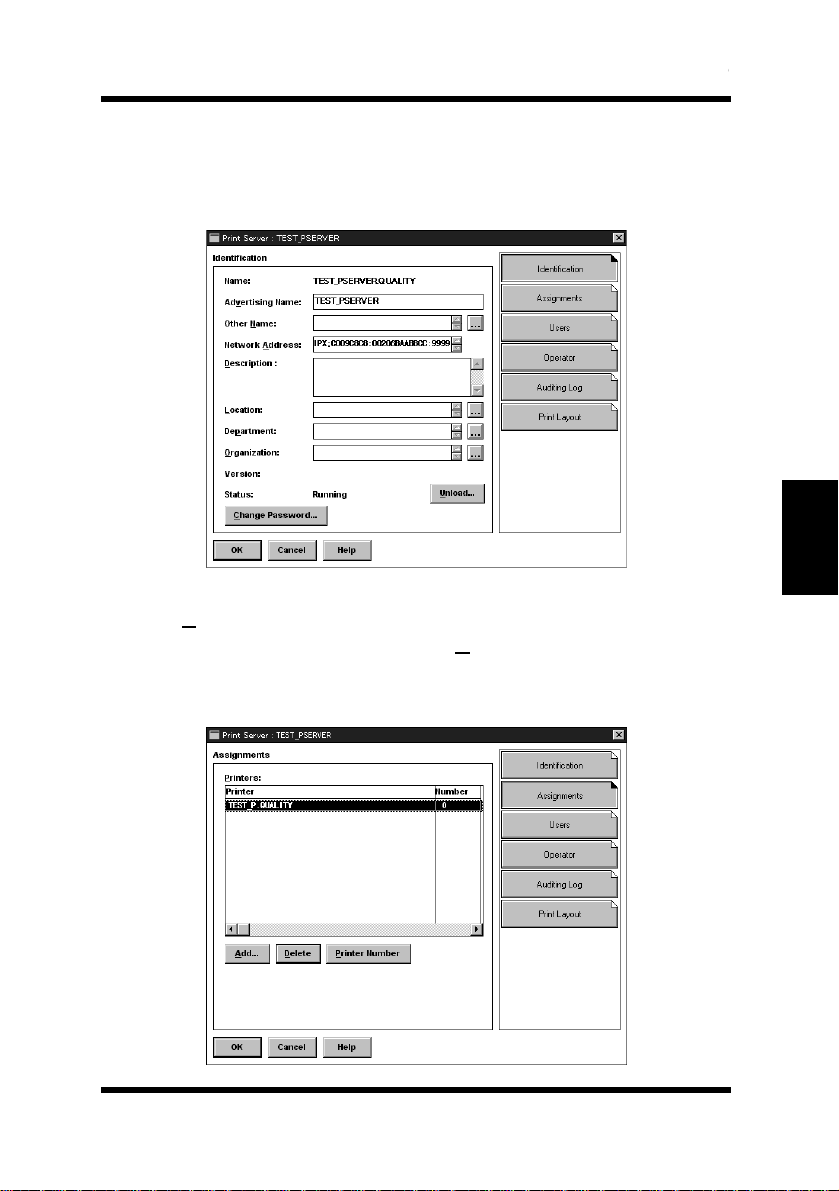
4.3 Configuring the NIC in Novell Directory Services
4.3 Configuring the NIC in NetWare
Directory Services
4.3.5 Assign Print Server Object
1. At the Directory Tree, double click on the print server object you
just created and bring up the
Print Server window.
2. At the
Print Server: window, click on the Assignments button
Add button to bring up the Select Object window. Select the
and
printer obj ect just created from the
OK button. Now the printe r (with its context) appears in the Print-
: box of the Print Server window. Click on the OK button.
ers
Objects: box and click on the
Chapter 4
NetWare Configuration
4-19
Page 74

Chapter 4
4.3 Configuring the NIC in NetWare
4.3 Configuring the NIC in Novell Directory Services
Directory Services
4.3.6 Check Assignments
At the Directory Tree, double click on the Print Queue object you j ust
created. At the
If you configured the print queu e and prin ter cor rectl y they wil l appea r
in the proper boxes on the
button.
Print Queue window, click on the Assignments button.
Print Queue window. Press the Cancel
NetWare Configuration
4-20
Page 75

4.3 Configuring the NIC in Novell Directory Services
4.3 Configuring the NIC in NetWare
Directory Services
4.3.7 Set Up and Reset the Printer
NWADMIN configuration is complete. Before you can begin printing,
though, be sure to set up and reset (power cycle) the printer.
Chapter 4
4-21
NetWare Configuration
Page 76

Chapter 4
NetWare Configuration
4.4 NIC Configuration
4.4 NIC Configuration
The MAP or a Web Browser must be used to define the context and
tree of the Prin t Se rve r. It is also used t o c hange the Print Server name,
set in a password, modify scan and frame search parameters, and sent
in bindery-mode specific values.
Use the MAP or Web Browser (refer to Chapter 3) to access the Setup
pages of the NIC. Once you have accessed the Network Setting pages
or the Main Menu, do the following:
1. Select
2. Click on
3. The default name for the NetWare Print Server is MLT_123456,
4. If you want the NIC login with a password, this password may be
5. Type the name of a preferred bindery-based file server in the
Setup NetWare under Protocols.
Enable NetWare. If it is not selected, the NetWare proto-
cols will not come up, the NIC will not appear as an advertised
device, and the NIC will not be accessible using IPX SNMP.
123456 is the serial number of the NIC. This is also the name of
the printer in peer-t o-pee r mode. If you want to change the default
Print Server name, type this name in the
Print Server Name
space. Leave the space blank if the default name is to be used.
entered in the
Password Retype field. If a p assword is used, this pa ssword must
Print Server Password field, and again in the
be the same password for all bindery-based and NDS-based Print
Server ent ries.
Pre-
ferred File Server
field. The Preferred File Server entry is significant only for bindery or bin dery emulation bas ed operations . Refer
to 4.1.9 Preferred File Servers for the significance of a Preferred
File Server. The Print Server must be configures on the Preferred
File Server. Incorrect setup of a Preferred File Ser ver can int erfer e
with NetWare printing.
4-22
Page 77

4.4 NIC Configuration
6. If the Print Server is to be operated under Novell Directory Services, type in a
the appropriate fields. Be sure to give the whole context, whether
typed or typeless, and do not begin your context path with a trailing period (.). If you don ’t know your tree, type: whoami at the
DOS command line. A typed context name example is:
ou=standard.ou=organization_1
7. In the default mode, the Print Server scans each queue which it is
to service once per second. If you prefer a longer scan rate, you
may enter the time between scans in seconds in the
Scan Rate
8. The NIC will normally monitor the network to determine which
frame type is being used for NetWare. When it recognizes a type,
it will assume the same frame type. Once it selects a frame type,
the NIC will only operate over that NetWare frame type. Monitoring normally starts looking for IEEE 802.3, then Ethernet II, then
802.3 SNAP, etc. If your network is using multi ple frame types fo r
NetWare, you should bias the frame search to the desired type by
setting the button next to the designation under
Type
.
9. You can
Disable Bindery mode on the Print Server if you are
operating in NDS mode only. To do so, click on that box. If you
disable Bindery, the NIC will not support Print Servers on a Bindery file serv er.
10. Once you have sel ected all desired s ettings a nd entered t he desire d
NetWare information, you may cause this information to be
entered in the NIC NVRAM by clic king on
with all value changes, if you have not entered the NIC Management Password before, you must enter it in the appropriate space
before clicking on
11. Entered values do not take effect until the NIC is reset or power
cycled. You may reset from MAP or the Web Browser by returning to the Network Settings page, and click on
tem
. Now click on Reset Unit. Alternatively, you may power
cycle the printer. The new NetWare values should now be in
effect.
Context entry and Preferred NDS Tree entry in
Print Queue
field.
Ethernet Frame
Accept Settings. As
Accept Settings.
Reset under Sys-
Chapter 4
NetWare Configuration
4-23
Page 78

Chapter 4
NetWare Configuration
4.5 Using the Novell PCONSOLE Utility
4.5 Using the Novell PCONSOLE Utility
This section explains how to use the PCONSOLE utilit y to perform the
following tasks:
• Attach and select a file server
• Select or delet e queues for th e print server
• Set-up the Notify function
See the NetWare Print Server Manual for detailed information on this
utility.
Note
• You must have Supervisor privileges to perform many PCONSOLE
operations.
4.5.1 Changing the File Server
You can specify a file server as the current one. To change the file
server, use the following procedure:
1. Log into the current f ile server and start the PCONSOLE utility.
2. Select
3. Press to display the available fi le servers.
4. Select the file server you want as the current one and press .
5. Type your username and press . If the username requires a
6. Select
7. Select the current file server from the
Change Current File Server from the Available Options
menu.
Insert
Enter
Enter
password, the Password screen is displayed. Type the password
and press .
Enter
Change Current File Server from the Available Options
menu. A list of the attached file servers is displayed.
File Server/Username
screen.
4-24
Page 79

4.5 Using the Novell PCONSOLE Utility
4.5.2 Changi ng Pr int Qu eu es
When you print a file, your system sends the file to a print queue. The
print server assigned to that queue extracts the print job and sends it to
the assigned printer. If a print server is servicing queues on m ultiple
file servers, you must assign queues to the printer on each file server.
To change the print queues, use the following procedure:
1. Start the PCONSOLE utility.
2. Select
3. Select the print server from the list.
4. Select
5. Select
6. Select a printer from the
7. Press at the
8. Select a queue from the list.
9. Press at the
10. Press and save all changes.
Print Server Information from the Available Options
menu.
Print Server Configuration from the menu.
Queues Serviced by Printer from the menu.
Defined Printers list.
Insert
able Queues
Enter
File Server/Queue/Priority screen. The Avail-
list appears.
Priority screen to leave the priority setting at 1.
The highest priority is 1; 10 is the last. To change the priority of a
queue, press at the
play the
Enter
Priority setting screen. Press to delete the current set-
ting. Type a new number from 1 to 10 and press .
File Server/Queue/Priority screen to dis-
Enter
Repeat steps 7, 8, and 9 to assign additional queues to the printer.
Esc
Chapter 4
4.5.3 How to Set Up Notify
You can specify users or groups of users that are notified if a problem
occurs when a print job is sent to the printer. If the print server is
servicing queues on multiple file servers, you must set up a NOTIFY
list for each file server. To set up NOTIFY, use the following
procedure:
1. Start the PCONSOLE utility.
2. Select
3. Select the print server from the menu.
4. Select
Print Server Information from the Available Options menu.
Print Server Configuration from the menu.
4-25
NetWare Configuration
Page 80

Chapter 4
Enter
4.5 Using the Novell PCONSOLE Utility
5. Select Notify List for Printer from the menu.
6. Select the printer from the
7. Press at the
Next
Esc
screen. The Notify Candidates screen appears.
File Server/Notify Name/Notify Type/First/
8. Select the user or user group from the
Notify Intervals screen displays.
The
9. Set the
First and Next intervals for notifying users about printer
problems. The First interval is the number of seconds the network
waits before it notifies users about a print job problem. The Next
interval specifies how often in seconds users are notified. Enter a
number for each interval and press .
10. Press and save all changes.
11. Press until you see the prompt to exit PCONSOLE. Select
Yes and then press .
Esc
Esc
Defined Printers menu.
Notify Candidates screen.
Enter
NetWare Configuration
4-26
Page 81

AppleTalk Configuration
Chapter
5
AppleTalk Configuration
Chapter 5
Page 82

AppleTalk Configuration
Chapter 5
Page 83

5.1 Choosing the Printer
Use this chapter if you will be printing from a Macintosh. This chapt er
explains how to conf igure the NI C usin g App leTalk and how to use t he
AppleTalk NIManage utility program.
Note
• The printer must be equipped with the PS option when operating in an
AppleTalk environment.
5.1 Choosing the Printer
To choose the printer, use the following procedure:
1. Make sure you have loaded the printer driver appropriate to your
printer.
2. Select the AppleTalk link for AppleTalk by clicking on the Apple
icon in the Macintosh menu bar.
3. Select
4. Click on
5. Choose
6. Click on the Apple menu.
7. Select
Control Panel.
Apple Ta lk.
AppleTalk as the AppleTalk connection.
Chooser to display the Chooser screen.
Note
• The Chooser screen will not show AppleTalk zones if your network
does not have more than one zone.
8. Select the AppleTalk Zone containing the printer from the list at
the lower left of the screen. Select the device driver type corresponding to your printer from those indicated at the upper left of
the screen. A list of printers will appear in the display panel at the
right of the screen.
9. From the display pane l at the right of the screen, choose the name
of the printer from the list of printers. The AppleTalk printer name
for your printer is pr inte d out on the st atus r eport under Appl eTalk
Connection Information.
5-1
Chapter 5
AppleTalk Configuration
Page 84

Chapter 5
5.2 Loading the AppleTalk NIManage Utility Program
10. The options available at this point depend on your printer driver.
With a typical driver, you may select
SETUP
nicates with the printer and locates the proper PPD. The setup
screen will return, listing the PPD file selected. Select
exit from Chooser.
. There will be a series o f messag es a s the Choo ser co mmu-
SETUP. Then select AUTO
OK. Then
5.2 Loading the Apple Talk NIManage
Utility Program
The AppleTalk NIManage utility program has the following functions:
• View the names of the printer or printe r zone.
• Enable or disable the status report.
• View the erro r log.
• Enable or disable other protocols and view or modify the TCP/IP
address, subnet mask, and default gateway address.
Use the following procedure to get access to AppleTalk NIManage
utility program:
1. Insert the CD-ROM into the CD-ROM drive.
2. Double-click the
3. Click the
screen.
4. Click
of the Introduction screen.
5. Select the
to start the NIManage program. The Zone and Device screen is
displayed.
CD-ROM Contents button to display the Introduction
Installation/Configuration Program located at the bottom
NIManage AppleTalk Administration Program item
NIC mac icon from the CD-ROM.
AppleTalk Configuration
5-2
Page 85
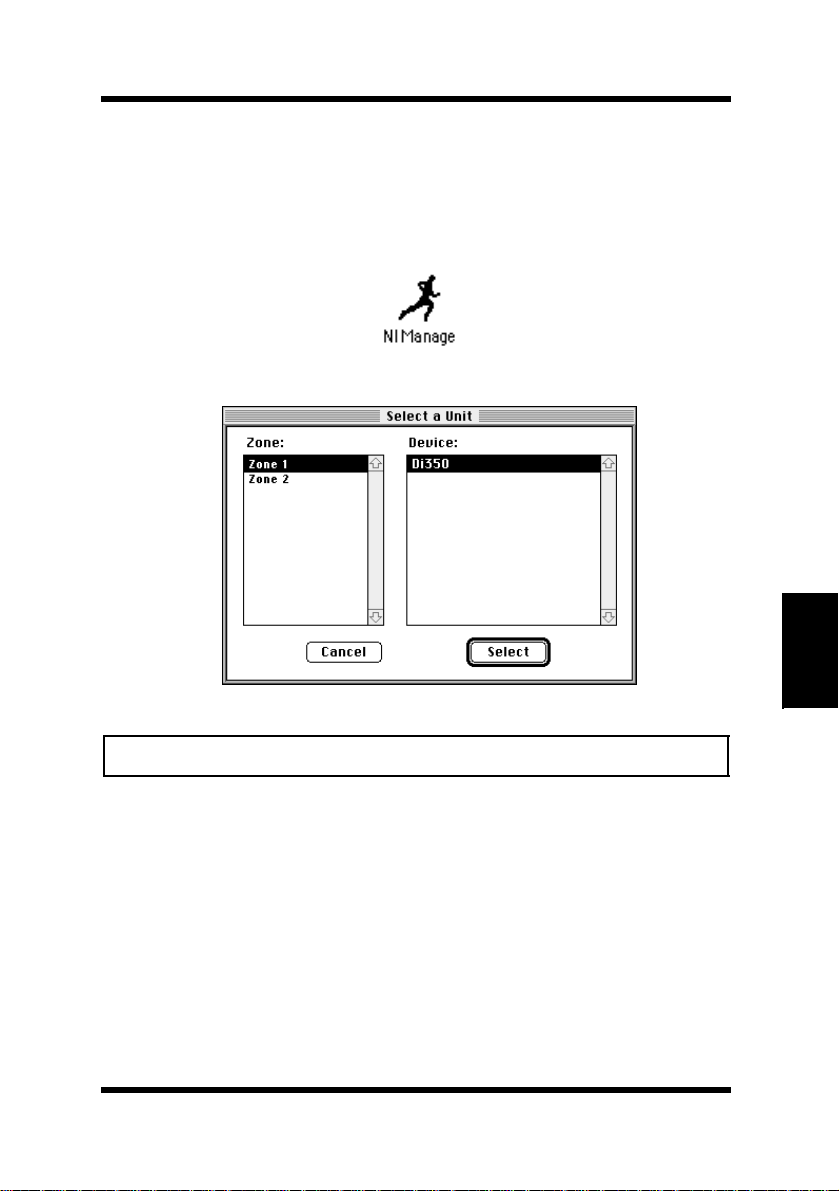
5.2 Loading the AppleTalk NIManage Utility Program
You can use the following procedure to start the NIManage program
instead of step 1 to 5 above.
• Insert the CD-ROM into the CD-ROM drive, and double-click the
APPLTLK folder from the CD-ROM. Double-click th e
icon
• The Zone and Device screen appears on the display.
NIManage
Note
• If you have one zone, the above screen will not appear.
6. From the Device display panel, select the NIC. Afte r you select
the device, a menu of option s is adde d to the menu bar at the top of
your screen.
Chapter 5
AppleTalk Configuration
5-3
Page 86

Chapter 5
5.3 Configuring the NIC
5.3 Configuring the NIC
You use the options added to t he menu bar t o configu re the pr int serv er.
Depending on your printer, certain operations may not be available.
These functions will be “grayed” out and cannot be selected.
5.3.1 Configuration
Use the Configuration function to change the names of the device and
AppleTalk Zone.
5.3.2 Error Log
The Error Log function is used to view a log of events that the NIC has
registered. The log contains information as well as errors. Customer
Support may need the information on this screen if your NIC
encounters problems.
Choosing this function displays a screen containing the text of the log.
You can print the error log contents by using the Print option unde r t h e
File menu. To save the contents of the error log, do one of the following:
• Use the
file.
Save As option from the File menu to save the entire log
• Use the
file.
Edit option to cut, copy, and paste some or all of the log
Note
• This does not enter data into the error log itself. The data is cleared
each time the printer is power cycled.
AppleTalk Configuration
5-4
Page 87

5.3 Configuring the NIC
5.3.3 Protocol Setup
Use the Protocol Setup option to configure network protocols other
than AppleTalk. Selecting the Protocol Setup function displays the
following screen:
Note
• The default values for the IP address and Subnet Mask are shown as
zeros. However, this represents a “no IP address” condition, not an IP
address.
1. Click the protocols to On if you want them to be active. Click
those protocols that you do not want to use to
not let you make active any protocol that the NIC does not support
or cannot handle because of active protocol limitations.
2. Type the IP address and subnet mask if you have enabled TCP/IP.
Type the default gateway address, if you have one.
3. Click on
4. You must power the printer off and on to make the changes take
effect.
OK when you have finished using this screen.
Off. The utility will
5.3.4 Options
Click on Status Sheets: En ab le to send a status report to the printer
each time you power it on, or click on
Click on
printer.
OK. The change takes effect the next time you power on the
Disable to disable this option.
5-5
Chapter 5
AppleTalk Configuration
Page 88

AppleTalk Configuration
Chapter 5
MEMO
Page 89

TCP/IP Configuration
Chapter
6
TCP/IP Configuration
Chapter 6
Page 90

TCP/IP Configuration
Chapter 6
Page 91

6.1 Installation in a Windows Environment
This chapter explains how to configure the NIC and your network for
use with TCP/IP communication in vario us environments. Indepe ndent
setup and installation procedures are provided for Windows systems
and for most popular UNIX systems. The NIC TCP/IP capability will
also operate with lpr spoolers on other systems, and with spooler/
supervisor capabilitie s that communicate raw print jobs to the Print
Server TCP/IP Port. This port number defaults to 10001, but may be
changed to any desired number using the Telnet utility, SNMP, or the
HTML pages accessible via MAP or a Web Browser. Section 6.3
Running Telnet, describes the interactive setup capability accessible
through the Telnet utility on any TCP/IP platform, and is equally
applicable to Windows, UNIX, and other TCP/IP environments. The
use of MAP or a Web Browser to access Web pages in the NIC is
described in Chapter 3.
6.1 Installation in a W in dows Environ ment
The several versions and variations of Microsoft Windows may be
used on a NetWare and/or TCP/IP networks, as well as in a native
Microsoft Windows network. This flexibility allows various options
for setting up the network printing system even though this NIC does
not support NetBEUI. If the Windows workstations are connected to a
NetWare network, configu re the printer interfaces for NetWare, and
use standard Windows/NetWare utilities to provide access to the
printer. If NetWare is not to be used, the users may access the printer
using TCP/IP. Windows 95 and Windows NT4.0 users can al so use the
NIC Peer-to-Peer capability as described in Chapter 3. The following
sections describe installation using TCP/IP under Windows for
Workgroups, Windows 95, and Windows NT.
Chapter 6
6-1
TCP/IP Configuration
Page 92

6.1 Installation in a Windows Environment
Note
• See the documentation that comes with Windows for details about
installing TCP/IP on each workstation.
• Printing with TCP/IP requires that the workstation have TCP/IP capability and the corresponding spooler, lpr; or that the workstation can
share an lpr queue on a Windows NT server (for example) that has one.
In general, if printers are not shared, an lpr queue must be created on
each workstation from which printing is initiated. See the Windows
documentation about sharing printers.
Windows for Workgroups
Windows for Workgroups does not normally come with TCP/IP.
However, various TCP/IP facilities are avai lable for Windows for
Workgroups workstations, including a free TCP/ IP provided by
Microsoft. There are thi rd party lp r spo olers avail able. The following instructions are based on the Microsoft TCP/IP and a shareware lpr application that is available from various so urces. You
will need the files
TCP/IP, and
wlprspl.txt) for the lpr.
WFWTCP32.zip and WFWTCP32.txt for the
Windows lpr Spooler Version 4.1 (wlprs41.zip and
Chapter 6
TCP/IP Configuration
See the file named
dows lpr Spooler Version 4.1
If you wish to use the BOOTP, you also need the
wlprspl.txt for details about installing Win-
.
BOOTPL16.exe
file provid ed with this NI C.
Windows 95
Windows 95 comes with a TCP/IP stack. To print with this protocol, a client also re quires an lpr utility. This program is available
from various sources. The lpr queue can be created on each workstation or the lpr queue can be created on one workstation and
shared on the netwo rk. W indows 95 wor kstations c an also shar e an
lpr printer i nstalled on a Windows NT server on the network.
The following instructions are based on the a shareware lpr application that is available from various sources. You will need the
6-2
Page 93

6.1 Installation in a Windows Environment
Windows lpr Spooler Version 4.1 (wlprs41.zip and wlprspl.txt)
for the lpr.
See the file named
dows lpr Spooler Version 4.1
If you wish to use the BOOTP, you also need the
wlprspl.txt for details about installing Win-
.
BOOTPL32.exe
file provid ed with this NI C.
Windows NT
Windows NT (version 3.5 or higher) does come with TCP/IP and
lpr capabilities, although these must be installed when the unit is
configured. You must install the TCP/IP Protocol, Simple TCP/IP
Services, and Microsoft TCP/IP Printing prior to entering the network printer on the workstation.
If you wish to use the BOOTP, you also need the
BOOTPL32.exe
file provid ed with this NI C.
Note
• Once you have lpr installed on an W in dows NT Server workstation and
have allowed printer sharing, other workstations may use the printer
through the Microsoft Windows Network without having to have separate lpr queues installed on each workstation.
6-3
Chapter 6
TCP/IP Configuration
Page 94

6.1 Installation in a Windows Environment
6.1.1 Setting up the NIC
The NIC must be given IP address and routing information to be
used with TCP/IP. This can be done with MAP if you have a NetW are con nection on you r network, or wi th AppleTalk NIManage for
Macintosh utility prog ra m i f there is an Apple Macintosh on the network. Follow the instructions for these programs which are documented elsewhere in this manual. If you cannot use these programs,
you can use either the ARP procedure or the BOOTP.
Prior to running these programs, install the NIC in your printer.
Power-up the printer. Keep the status report handy for the Ethernet
MAC Address. It should show that TCP/IP is enabled, but that the
IP address is not configured. If the unit already has an IP address,
these procedures will not work. However, you can Telnet to the unit
or use the Web pages accessed by MAP or a Web Browser to change
the IP parameters.
6.1.2 Assigning IP Address with arp & ping
The NIC must be on the same network segment as the workstation
that you are using to configure it. The TCP/IP stack must be
installed and operating.
Chapter 6
TCP/IP Configuration
See 6.1.3 Assign ing the IP Addr e ss with BOOTP f or de tail s on usi ng
BOOTP instead of ARP to assign IP addresses.
1. From Windows, enter the MS-DOS box.
2. At the command prompt type :
>ping <any valid IP address on your network
- not the NIC>
The identified unit should reply.
>arp -s <NIC IP address> <NIC MAC Address>
The entry should be accepted.
6-4
Page 95

6.1 Installation in a Windows Environment
For example:
>arp -s 192.9.200.200 00-20-6b-aa-bb-cc
>ping <NIC IP address>
Request should time out.
For example:
>ping 192.9.200.200
3. Recycle the power on t he pri nter, or let the NIC reset itself . The
NIC will produce a st at us report that should include the ent er ed
IP address.
4. When the NIC is up again, type the following at the command
prompt:
>ping <NIC IP address>
(continue until you get a reply)
Note
• This only enters the IP address; you must use the Telnet facility or
the Web pages accessed by
the IP setup for networks where subnets are used. See 6.3 Running
Telnet, for instructions on how to enter the other IP parameters.
MAP or a Web Browser to complete
6.1.3 Assigning the IP Address with BOOTP
BOOTP programs use the BOOTP protocol. The NIC must be on
the same network segment as the workstation that you are using to
configure it. The TCP/IP stack must be installed and operating. The
BOOTP program will not work in a Windows PC Operating as a
DHCP Server.
The BOOTP program you should use depends on the version of
Windows on the workstation.
BOOTPL16.exe Work with a 16 Bit TCP/IP Sta ck (Windows For
Workgroup).
BOOTPL32.exe W ork wi th a 32 Bit TCP/IP Stack (Windows NT &
Windows 95).
Chapter 6
TCP/IP Configuration
6-5
Page 96

6.1 Installation in a Windows Environment
BOOTP programs are loc ated on the CD-ROM in the dir ectory named
bootp.
5. Copy
BOOTPL16.exe or BOOTPL32.exe into a directory on
your workstation’s hard disk.
6. Reset the printer.
Note
• The NIC issues the BOOTP request for a finite period of time. The
NIC must be freshly reset for this program to work.
7. Run the program.
8. Pull down the Admin menu to Configure option.
9. Enter the IP address that you want to as si gn to the NIC, its Subnet Mask (make sure it matches what you are using on your
subnet), the Default gatewa y (your rou ter’s IP address), and the
MAC Address of the NIC (listed on the status report as MAC
Address). Use colons as delimiters as sh own on the status report
rather than the dashes that Windows uses.
10. Click on
ing, and then it will tell you whether the unit is active or not.
11. Wait for about five minutes for the NIC to reset. The newly
entered IP information should be shown on the status report.
12. Enter the MS-DOS box. At the command prompt type:
Go. You will get a message that the program is Verify-
Chapter 6
TCP/IP Configuration
>ping <NIC IP address>
(continue until you get a reply)
If it does not respond, verify that TCP/IP is enabled on the
status report. If the status report does not show the IP
information, then repeat the above procedures.
6-6
Page 97

6.1 Installation in a Windows Environment
6.1.4 Setting Up IP and lpr Parameters
The NIC provides for a setup connection via the standard Telnet
port. To be able to make changes to a unit with factory default settings, you must logon as
“sysadm” (This password can be changed from the Telnet utility).
“sysadm”. The default password is also
Section 6.3 Running Telnet, describes the use of the Telnet utility.
1. Telnet to the NIC (the login and password are both sysadm).
2. Turn off the protocols that you are not utilizing (option 3).
3. Setup the subnet mask an d def aul t gateway for the NIC if applicable (option 1). (If you used BOOTP, this will already have
been done).
4. Exit, Save and Reset the NIC
You can also use the HTML pages accessible via MAP or a Web
Browser to setup lpr. The password to change parameters with the
Web pages is the same as the Telnet password.
6.1.5 Creating an lpr Queue on the Work stat ion
The method for setting up lpr queue depends on the Windows version running on the workstation. Confirm the Windows version on
the workstation and use one of the setup procedures below.
Windows for Workgroup
Once you install the sp ooler onto the wor kstation , the setu p program
will create a group and icon.
1. Double click on the
2. Click on
setup, and define a new queue.
spooler icon.
3. At the Remote Host Name prompt type the NIC IP Address.
PORT1 for the Remote Printer Name
Enter
4. Go to Control Panel, Printers, a nd choose
5. Select your driver and click on
Next.
Connect.
At this point, you should see an entry for your Windows lpr
Spooler’s printer in the “Available ports” listing. For example,
C:\SPOOL\PRINTER_NAME.
6-7
Chapter 6
TCP/IP Configuration
Page 98

Chapter 6
6.1 Installation in a Windows Environment
Windows 95
Once you install th e spool er onto t he worksta tion; t he setup program
will create a group and icon.
1. Double click on the
2. Click on
setup, define new queue.
spooler icon.
3. At the Remote Host Name prompt type the NIC’s IP Address,
and for the Remote Printe r Name enter
PORT1.
4. Using the install program, install the printer driver that comes
with the printer.
Refer to the manual that came with the printer for details.
5. Open the
6. Select the
7. Select the port that you want from the
port
Properties menu item of the printer icon.
Detail tab.
Print to the following
item.
Windows NT3.51
The following proced ure is us ed to s et up t he lp r spo oler o n th e Windows NT server.
1. Open
2. Go to
3. Choose
4. Choose
5. Enter a printer name (for example , lprprinter).
6. Select the proper
7. Type a description. This is optional.
8. In the
9. In Print Destinations window, select
10. Line 1: Address of host providing lpd (Print server); type
11. Line 2: Nam e of printer on that machine - type
12. Choose
Control Panel.
Printers.
Printer Menu.
Create Printer.
printer driver.
Print To dialog, choose Other.
add lpr compatible printer window.
with
address
word PORT
.
MUST be in uppercase).
OK to exit.
lpr port. This leaves you
PORT1 (the
IP
TCP/IP Configuration
from any application by the following the normal print instructions fo r
that application.
6-8
Your NIC is now configured to operate Windows NT. You may print
Page 99

6.1 Installation in a Windows Environment
Windows NT4.0
The following proced ure is us ed to s et up t he lp r spo oler o n th e Windows NT server.
1. Using the install program, install the printer driver that comes
with the printer.
Refer to the manual that came with the printer for details.
2. Open the Printer Properties dialog box for the printer. Click
Ports to display the Ports property tab.
3. Click
4. Select
5. In the
6. Press
7. Click
8. Close the Printer Ports property tab.
9. Click
10. Open the Printer Properties dialog box for the printer. Click
11. Click
Add Port.
The available port types are displayed.
LPR Port and click New Port.
If the LPR po rt is not listed, install the T CP/IP protocols. For
details, see your Windows NT documentation.
Add LPR compatible printer dialog box, enter the NIC
IP address.
If your network uses Dom ain Name Serv ices (DNS), e nter the
DNS name assigned to the NIC instead of the IP address.
Tab and type the internal name of the pr inter in l owercase
letters.
OK.
The workstation checks the address or DNS name that you
entered and notifies you if it cannot resolve the address.
The Ports property tab shows the new port configuration.
OK to close the Ports property tab.
The new port has been configured. You should now print a test
page to verify the connection.
General to display the General property tab and click Print
T est Page
.
When you print, your files are transmitted over the LPR Port
connection to the printer.
OK to exit the Printer Properties dialog box.
Chapter 6
6-9
TCP/IP Configuration
Page 100

6.2 UNIX Printing
6.2 UNIX Printin g
Note
• This manual cover general settings only. See your UNIX system manual for full details about setting procedures.
The NIC can support UNIX TCP/IP printing in two modes:
• Host-based lpd where a supplied line print er daemon is r unning o n
one or more workstations and print data is communicated to the
NIC via a TCP/IP port or,
• Printer-based lpd where the printer appears a s a host r unning a l ine
printer daemon.
In general, printer-based lpd is easiest to use on BSD UNIX systems,
requiring an entry in the printcap file once the NIC has its IP
information. Some UNIX System V systems have restrictions on
support of remote LPD printers, requiring that the host-based LPD
approach be used. For many opera ti ng systems, you have the option of
using host-resident printing or print server-resident printing. Each
mode has certain advantages.
Chapter 6
TCP/IP Configuration
• The host-resident method can print the username and filename on
its banner page; the print server-resident method prints a banner
page with the host’s name.
• The print server-resident method requires you to configure the
printer only one time, when you install the print server. The hostresident method requires that a printing daemon be installed on
every host that you want to be able to print jobs.
Note
• The NIC will also operate with other host-resident print supervisor/
spooler programs that present a print image to the printer over a TCP/
IP port. The base TCP/IP port number can be changed via Telnet, or the
NIC HTML setup pages accessed by MAP or a Web Browser. Remember, the actual port is always one higher than the base port number . The
status report indicates the actual port number.
6-10
 Loading...