

Page 1

Designed for operating in USA & Canada only.
When this product is used in areas other than the USA & Canada,
we cannot guarantee the product quality and performance.
G
B
Blower
Soufeur
Soplador
THB-260PF
F
R
E
S
THB-260PF
Read the manual carefully before operating this machine.
Lire attentivement le manuel avant d’utiliser la machine.
Antes de utilizar esta máquina, lea cuidadosamente el manual.
Handling instructions
Mode d’emploi
Instrucciones de manejo
Page 2

T
1 2 3
4 5 6
7 8 9
10 11 12
13 14 15
Page 3
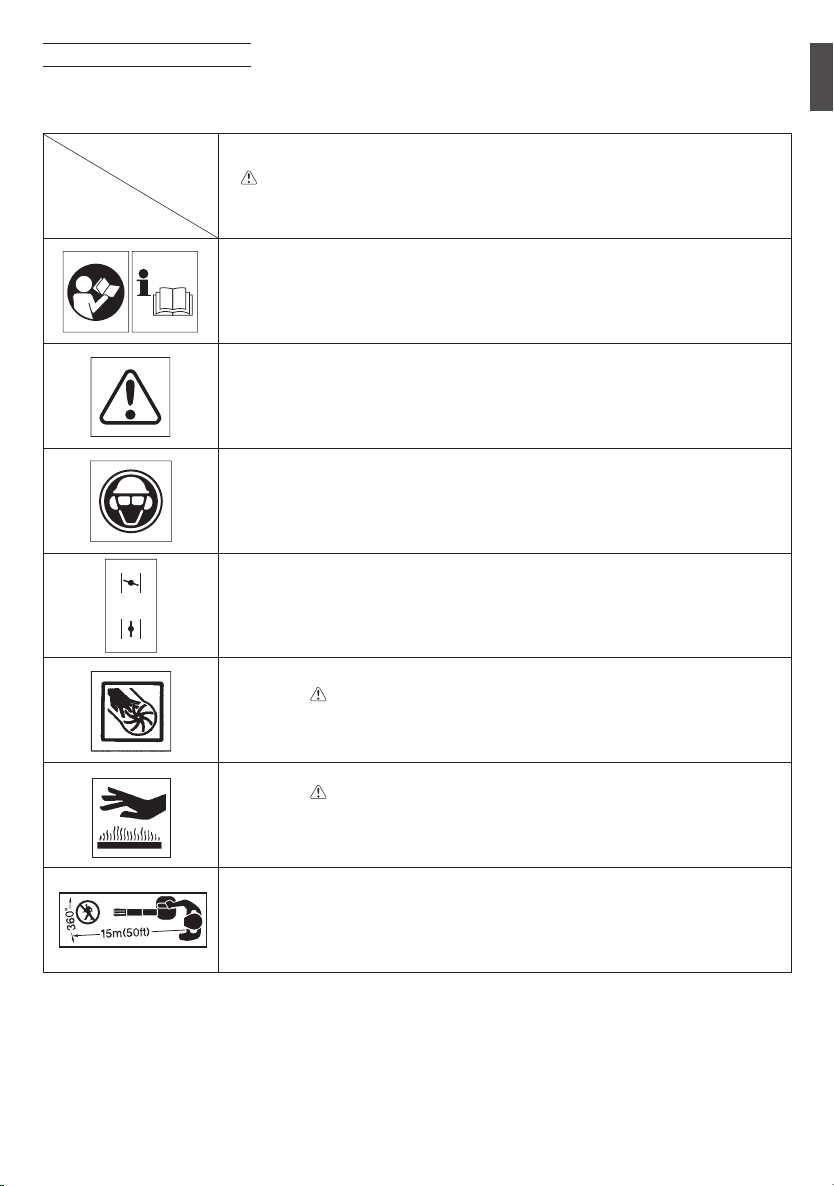
Meanings of symbols
NOTE : Some units do not carry them.
symbols
WARNING
The engine exhaust from this product contains chemicals known to the State of
California to cause cancer, birth defects and other reproductive harm.
It is important that you read, fully understand and observe the following safety
precautions and warnings. Careless or improper use of the unit may cause serious or
fatal injury.
Read, understand and follow all warnings and instructions in this manual and on the
unit.
Always wear eye, head and ear protectors when using this unit.
Explains choke position. Upper sign indicates choke closed and the lower fully open.
G
B
WARNING
Keep hands off from rotating fan. For vacuum, vacuum pipe and bag must be in
place. For blower, dust cover must be securely installed.
WARNING
Hot surfaces ; The mufer or catalytic mufer and surrounding cover may become
extremely hot. Always keep clear of exhaust and mufer area, otherwise serious
personal injury may occur.
Keep all children, bystanders and helpers 50 ft (15 m) away from the unit. If anyone
approaches you, stop the engine immediately.
DANGER
DANGER
Index
What is what? ................................................................
Warnings and safety instructions ..................................
Specications ................................................................
Assembly procedures ....................................................
Operating procedures ...................................................
Maintenance ..................................................................
2
3
4
5
5
6
GB-1
Page 4
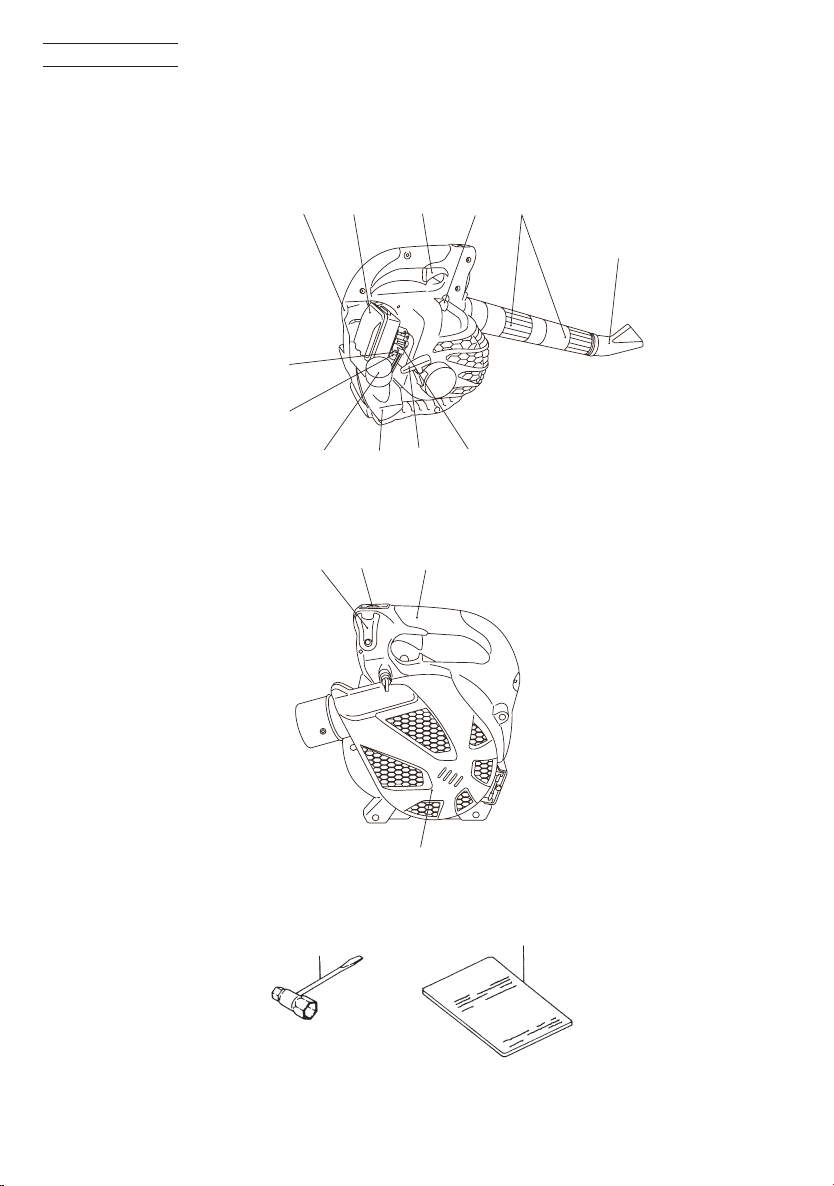
What is what?
17
18
6
2
13 10
8
14
15
1
4
3
5
11
12
7
9
16
Since this manual covers several models, there may be some
difference between pictures and your unit. Use the instructions
that apply to your unit.
1. Fuel cap
2. Throttle trigger
3. Starter handle
4. Fuel tank
5. Carburetor
6. Air cleaner
7. Handle
8. Suspension eyelet
9. Ignition switch
10. Straight pipe
11. Fan-headed pipe
12. Dust cover
13. Spark plug
14. Choke knob
15. Priming bulb
16. Cruise lever
17. Combi box spanner
18. Handling instructions
GB-2
Page 5

Warnings and safety instructions
Pay special attention to statements preceded by the following words:
WARNING
Indicates a strong possibility of severe personal injury or loss
of life, if instructions are not followed.
CAUTION
Indicates a possibility of personal injury or equipment damage, if
instructions are not followed.
NOTE
Helpful information for correct function and use.
Operator safety
• IMPORTANT: A dust lter mask should be worn during operation.
• Always wear a safety face shield or goggles.
• Always wear heavy, long pants, boots and gloves. Do not wear
loose clothing, jewelry, short pants, sandals or go barefoot.
Secure hair so it is above shoulder length.
• Do not operate this tool when you are tired, ill or under the
inuence of alcohol, drugs or medication.
• Never let a child or inexperienced person operate the machine.
• Wear hearing protection. Pay attention to your surroundings.
Be aware of any bystanders who may be signaling a problem.
Remove safety equipment immediately upon shutting off engine.
• Wear head protection.
• Never start or run the engine inside a closed room or building.
Breathing exhaust fumes can kill.
• Keep handles free of oil and fuel.
• Keep hands away from moving part or heated area.
• Do not grab or hold the unit by the blow pipe.
• When the unit is turned off make sure the engine has stopped
before the unit is set down.
• When operation is prolonged, take a break from time to time
so that you may avoid possible Hand-Arm Vibration Syndrome
(HAVS) which is caused by vibration.
WARNING
Antivibration systems do not guarantee that you will not
sustain Hand-Arm Vibration Syndrome (HAVS) or carpal tunnel
syndrome. Therefore, continual and regular users should
monitor closely the condition of their hands and ngers.
If any of the above symptoms appear, seek medical advice
immediately.
WARNING
If you are using any medical electric/electronic devices such
as a pacemaker, consult your physician as well as the device
manufacturer prior to operating any power equipment.
Unit / machine safety
• Inspect the entire unit/machine before each use. Replace
damaged parts. Check for fuel leaks and make sure all fasteners
are in place and securely tightened.
• Replace parts that are cracked, chipped or damaged in any way
before using the unit/machine.
• Make sure the safety guard is properly attached.
• Keep others away when making carburetor adjustments.
• Use only accessories as recommended for this unit/machine by
the manufacturer.
WARNING
Never modify the unit/machine in any way. Do not use your
unit/machine for any job except that for which it is intended.
Fuel safety
NOTE
• Empty the fuel tank before storing the tool. It is a must otherwise
fuel may corrode causing carburetor damage. It is recommended
that the fuel be emptied after each use. If fuel Is left In the tank,
store so fuel will not leak.
• Fuel contains highly ammable and it is possible to get the serious
personal injury when inhaling or spilling on your body. Always pay
attention when handling fuel. Always have good ventilation when
handling fuel inside building.
• Mix and pour fuel outdoors and where there are no sparks or
ames.
• Use a container approved for fuel.
• Do not smoke or allow smoking near fuel or the unit/machine or
while using the unit/machine.
• Wipe up all fuel spills before starting engine.
• Move at least 3 m away from fueling site before starting engine.
• Stop engine before removing fuel cap.
• Store unit/machine and fuel in area where fuel vapors cannot
reach sparks or open ames from water heaters, electric motors
or switches, furnaces. etc.
WARNING
Fuel is easy to ignite or get explosion or inhale fumes, so that
pay special attention when handling or lling fuel.
Blowing safety
• Operate power equipment only at reasonable hours-not
early in the morning or late at night when people might be
disturbed. Comply with times listed in local ordinances. Usual
recommendations are 9:00 a.m. to 5:00 p.m., Monday through
Saturday,
• Never direct discharge of air toward bystanders nor allow anyone
near the area of operation. Use care in directing discharge to
avoid glass enclosures, automobiles, etc.
• Stay alert for uneven sidewalks, holes in terrain or other unstable
condition when using the tool.
• Take all possible precautions when leaving the tool unattended
such as stopping the engine.
• Never operate the tool without guards, blow pipes or other
protective device in place. (If so equipped.)
• Use rakes and brooms to loosen debris before blowing.
• Keep others including children, animals, bystanders and helpers
outside the 15 m hazard zone. Stop the engine immediately if you
are approached.
•
Always keep the engine on the right side of your body. (Blower only)
• Keep rm footing and balance. Do not over-reach.
• Keep all parts of your body away from the mufer.
• Always carry a rst-aid kit when operating any power equipment.
• Never start or run the engine inside a closed room or building
and/or near inammable liquids. Breathing exhaust fumes can kill.
Maintenance safety
• Maintain the unit/machine according to recommended
procedures.
• Disconnect the spark plug before performing maintenance except
for carburetor adjustments.
• Keep others away when making carburetor adjustments.
• Use only genuine Tanaka replacement parts as recommended by
the manufacturer.
CAUTION
Do not disassemble the recoil starter. You may get a possibility
of personal injury with recoil spring.
Transpor t and storage
• Carry the unit/machine by hand with the engine stopped and the
mufer away from your body.
• Allow the engine to cool, empty the fuel tank, and secure the unit/
machine before storing or transporting in a vehicle.
• Empty the fuel tank before storing the unit/machine, It is
recommended that the fuel be emptied after each use. If fuel is
left in the tank, store so fuel will not leak.
• Store unit/machine out of the reach of children.
• Clean and maintenance the unit carefully and store it in a dry
place.
• Make sure engine switch is off when transporting or storing.
If situations occur which are not covered in this manual, take
care and use common sense. Contact Tanaka dealer if you need
assistance.
G
B
GB-3
Page 6

Specications
MODEL
MODEL
THB-260PF
Engine Size (cu. in)
Spark Plug
Air Cleaner
Dry Weight (lbs)
Fuel Tank Capacity (
Sound pressure level LpA (dB(A))
by ISO 22868
Uncertainty (dB(A))
. oz
)
1.46 (23.9 ml)
Champion CJ6
Oiled foam filter system
11.0 (5.0 kg)
20.1 (0.6 l)
By ANSI 68.0
By CEN 81.0
0.6
Sound power level
Lw measured (dB(A))
by ISO 22868
Sound power level LwA (dB(A))
by 2000/14/EC
2
Vibration level (m/s
by ISO 22867
Uncertainty (m/s2)
NOTE : Equivalent noise level/vibration level are calculated as the time-weighted energy total for noise/vibration levels
under various working conditions with the following time distribution : 1/7 idle, 6/7 racing.
*All data subject to change without notice.
GB-4
)
101
104
11.2
1.5
Page 7

Assembly procedures
WARNING
Make sure the engine is turned off/stopped and not hot before
assembly.
Blow pipes to main body (Fig. 1)
Inspect the main body and accessories.
Connect straight pipe (1) and other pipe(s) securely. (See page 1 )
Align groove (2) in straight pipe with projection (3) on blower
housing (or another pipe) and slide the pipe onto the blower
housing (or another pipe).
Rotate the pipe clockwise to lock it into place.
Fan headed pipe to straight pipe (Fig. 2)
• Align groove (2) on the fan headed pipe (4) and projection (3) on
nd
straight pipe (1) and rotate the fan head in place.
2
NOTE (Optional)
Vacuum attachment is offered as an optional kit which converts the
hand-held blower into a vacuum cleaner.
For installation see optional kit (THV-260) manual.
NOTE ; Safety future
If you try to open the dust cover (5) when engine is running, it will
automatically stop the engine. (Fig.3)
But never try to open the dust cover (5) when engine is running
even with this future, otherwise serious personal injury may occur.
Operating procedures
Fuel (Fig. 4)
WARNING
• This unit is equipped with a two-stroke engine. Always run
the engine on fuel, which is mixed with oil. Provide good
ventilation, when fueling or handling fuel.
• Fuel contains highly ammable and it is possible to get the
serious personal injury when inhaling or spilling on your body.
Always pay attention when handling fuel. Always have good
ventilation when handling fuel inside building.
Fuel
• Always use branded 89 octane unleaded gasoline.
• Use genuine two-cycle oil or use a mix between 25:1 to 50:1,
please consult the oil bottle for the ratio or Tanaka dealer.
• Only for the state of California at 50:1.
• If genuine oil is not available, use an anti-oxidant added quality
oil expressly labeled for air-cooled 2-cycle engine use(JASO FC
GRADE OIL or ISO EGC GRADE). Do not use BIA or TCW (2-stroke
water-cooling type) mixed oil.
• Never use multi-grade oil (10 W/30) or waste oil.
• Always mix fuel and oil in a separate clean container.
Always start by lling half the amount of fuel, which is to be used.
Then add the whole amount of oil. Mix (shake) the fuel mixture.
Add the remaining amount of fuel.
Mix (shake) the fuel-mix thoroughly before lling the fuel tank.
Fueling
WARNING
• Always shut off the engine and let it cool for a few minutes
before refueling.
• Slowly open the fuel tank, when lling up with fuel, so that
possible over-pressure disappears.
• Tighten the fuel cap carefully, after fueling.
• Always move the unit at least 3 m (10 ft.) from the fueling area
before starting.
• Do not smoke and/or allow ames or sparks near fuel when
handling or lling fuel.
• Always wash any spilled fuel from clothing immediately with
soap.
• Be sure to check for any fuel leaking after refueling.
Before fueling, clean the tank cap area carefully, to ensure that
no dirt falls into the tank. Make sure that the fuel is well mixed by
shaking the container, before fueling.
Starting
CAUTION
Do not start if the pipe and dust cover are obstructed by the ground
or any other object.
1. Set ignition switch (6) to ON position. (Fig. 5)
*Push priming bulb (7) several times so that fuel ows through the
bulb or return pipe. (8) (Fig. 6)
2. Set choke lever to CLOSED position. (Fig. 7)
3. Pull recoil starter briskly, taking care to keep the handle in your
grasp and not allowing it to snap back. (Fig. 8)
4. When you hear the engine want to start, return choke lever to
RUN position (open). Then pull recoil starter briskly again.
WARNING
• Never start or run the engine inside a closed room or building
and/or near the inammable liquid. Breathing exhaust fumes
can kill.
• Do not allow the rope to snap back in and always hold the
unit rmly.
NOTE
If engine does not start, repeat procedures from 2 to 4.
5. After starting engine, allow the engine about 2-3 minutes to
warm up before subjecting it to any load.
Operating blower (Fig. 9)
• A low speed should be used to blow leaves and dry grass.
• A medium speed should be used to clean wet leaves and grass.
• A high speed should be used when moving gravel, dirt or other
heavy materials.
WARNING
• Do not direct discharge of air toward people or pet.
• The unit should be operated in a well ventilated area.
• Never perform assembly or disassembly procedures with
engine running or serious personal injury may result.
• Never touch mufer, spark plug, or other metallic parts while
engine is in running or immediately after shutting off engine.
CAUTION
This blower has been designed and adjusted to be used with all
blowing pipes attached (See page 1). It must never be operated
without the straight pipe, and fan headed pipe.
NOTE
When you hear or feel strange sound or vibration, stop engine
immediately and check if anything blocks fans or pipes, If so,
remove it and check for damage.
Stopping (Fig. 10)
Decrease engine speed and run at an idle for a few minutes, then
turn off ignition switch.
GB-5
G
B
Page 8

Maintenance
MAINTENANCE, REPLACEMENT OR REPAIR OF THE
EMISSION CONTROL DEVICES AND SYSTEMS MAY
BE PERFORMED BY ANY NON-ROAD ENGINE REPAIR
ESTABLISHMENT OR INDIVIDUAL.
Carburetor adjustment (Fig. 11)
In the carburetor, fuel is mixed with air. When the engine is test run
at the factory, the carburetor is adjusted. A further adjustment may
be required, according to climate and altitude. The carburetor has
one adjustment possibility:
T = Idle speed adjustment screw.
Idle speed adjustment (T)
Check that the air lter is clean. If adjustment is required, turn
IDLE speed Adjustment Screw (T) close (clockwise) to increase
engine speed, open (counterclockwise) to decrease engine speed.
Standard Idle rpm is 2800-3200rpm.
CAUTION
The above adjusting procedure must be followed when adjustment
is MADE or DAMAGE to engine will occur because of the incorrect
condition.
NOTE
Some models sold areas with strict exhaust emission regulation
do not have high and low speed carburetor adjustments. Such
adjustments may allow the engine to be operated outside of their
emission compliance limits. For these models, the only carburetor
adjustment is idle speed.
RECOMMENDATION:
CARBURETOR ADJUSTMENT NEEDS THE SKILL OF EXPERIENCED
OR WELL TRAINED PEOPLE, OR IS RECOMMENDED TO TAKE
THE UNIT TO Tanaka DEALER.
Air lter (Fig. 12)
The air lter must be cleaned from dust and dirt in order to avoid:
• Carburetor malfunctions.
• Starting problems.
• Engine power reduction.
• Unnecessary wear on the engine parts.
• Abnormal fuel consumption.
Remove the air cleaner cover by pushing and pulling back the tab
on the top. (Fig. 12)
Cleaning the air lter
Clean the cleaner element every day or every 8 hours of operation.
More frequent cleaning is recommended under very dusty
conditions. Wash the element in liquid detergent and water.
Squeeze the element to remove the dirt. Press the element in a dry
rag until it is completely dry. Saturate the element in 2 cycle oil.
Squeeze the element to distribute the oil completely and to remove
any excess oil. Replace the element and install the cover. (Fig. 13)
An air lter that has been used for some time cannot be cleaned
completely. Therefore, it must regularly be replaced with a new
one. A damaged lter must always be replaced.
Fuel lter (Fig. 14)
Drain all fuel from fuel tank and pull fuel lter line from tank. Pull
lter element out of holder assembly and rinse element in warm
water with detergent. Rinse thoroughly until all traces of detergent
are eliminated. Squeeze, do not wring, away excess water and
allow element to air dry.
NOTE
If element is hard due to excessive dirt buildup, replace it.
Spark plug (Fig. 15)
The spark plug condition is inuenced by:
• An incorrect carburetor setting.
• Wrong fuel mixture (too much oil in the gasoline)
• A dirty air lter.
• Hard running conditions (such as cold weather).
These factors cause deposits on the spark plug electrodes, which
may result in malfunction and starting difculties. If the engine
is low on power, difcult to start or runs poorly at idling speed,
always check the spark plug rst. If the spark plug is dirty, clean it
and check the electrode gap. Re-adjust if necessary. The correct
gap is 0.6 mm. The spark plug should be replaced after about 100
operation hours or earlier if the electrodes are badly eroded.
NOTE
In some areas, local law requires using a resistor spark plug to
suppress ignition signals. If this machine was originally equipped
with resistor spark plug, use same type of spark plug for
replacement.
Maintenance schedule
Below you will nd some general maintenance instructions. For
further information please contact Tanaka dealer.
Daily maintenance
• Clean the exterior of the unit.
• Check that the air intake at the dust cover is not clogged.
• Check the dust cover for damage or cracks. Change the cover in
case of impacts or cracks.
• Check that nuts and screws are sufciently tightened.
Weekly maintenance
• Check the starter, especially cord.
• Clean the exterior of the spark plug.
• Remove it and check the electrode gap. Adjust it to 0.6 mm, or
change the spark plug.
• Clean the air lter.
Monthly maintenance
• Rinse the fuel tank with gasoline, and clean fuel lter.
• Clean the exterior of the carburetor and the space around it.
Quarterly maintenance
• Clean the cooling ns on the cylinder.
• Clean the fan and the space around it.
• Clean the mufer of carbon.
CAUTION
Cleaning of cylinder ns, fan and mufer shall be done by a
Tanaka dealer.
NOTE
When ordering the parts to your nearest dealer, please use
the item No. showing on the parts breakdown section in this
instruction.
GB-6
Page 9

Signication des symboles
REMARQUE : Certains ensembles n'en sont pas pourvus.
Symboles
ATTENTION
Les gaz d'échappement du moteur de cette machine contiennent des produits
chimiques considérés comme pouvant entraîner des cancers, des malformations
congénitales et autres troubles de la reproduction.
II est essentiel que vous lisiez et compreniez parfaitement les consignes de sécurités
et autres avertissements suivants et que vous les observiez strictement. L'utilisation
inattentive ou inadéquate de cette machine risque de provoquer des blessures
graves ou fatales.
Lisez, comprenez et suivez toutes les instructions et tous les avertissements donnés
dans ce manuel et sur le produit.
Utilisez toujours des lunettes de protection ainsi qu'une protection pour la tête et les
oreilles lorsque vous utilisez ce produit.
Explique la position de l’étrangleur. La marque supérieure indique que l’étrangleur
est fermé et la marque inférieure qu’il est complètement ouvert.
AVERTISSEMENT
Ne pas toucher le ventilateur tournant avec la main. Le tuyau à vide et le sac doivent
se trouver à leur place pour le vide. Le capot contre la poussière doit être monté
fermement pour le soufet.
AVERTISSEMENT
Surfaces chaudes. Le pot d’échappement (ou pot catalytique) et le capot qui l’
entoure peuvent devenir extrêmement chauds.
Ne vous approchez jamais de la zone d’échappement des gaz et du pot, vous
risqueriez des blessures sévères.
DANGER
DANGER
F
R
Maintenez les enfants, spectateurs et aides à plus de 15 m de l’appareil.
Si quelqu’un s’approche de vous, coupez immédiatemment le moteur.
Index
Description ....................................................................
Précautions et consignes de sécurité ...........................
Caractéristiques ............................................................
Montage ........................................................................
Utilisation .......................................................................
Entretien ........................................................................
2
3
4
5
5
6
FR-1
Page 10

Description
17
18
6
2
13 10
8
14
15
1
4
3
5
11
12
7
9
16
Comme ce manuel se réfère à plusieurs modèles, il se peut qu’
il y ait de différences entre les images et votre appareil. Suivez
les instructions concernant votre modèle.
1. Bouchon de remplissage du carburant
2. Levier de commande des gaz
3. Poignée de lanceur
4. Réservoir de carburant
5. Carburateur
6. Filtre à air
7. Poignée
8. Oeillet d'accrochage
9. Interrupteur marche-arrêt
10. Tuyau droit
11. Tuyau de tête du ventilateur
12. Couvercle antipoussière
13. Bougie d'allumage
14. Bouton étangleur
15. Poire d’amorçage
16. Levier du réglage de vitesse
17. Clé à douille multiple
18. Mode d’emploi
FR-2
Page 11

Précautions et consignes de sécurité
Faites particulièrement attention aux stipulations introduites par les
mots ci-dessous.
ATTENTION
Information de première importance pour éviter des dommages
corporels graves ou mortels.
IMPORTANT
Information importante an d'éviter les dommages corporels ou matériels.
REMARQUE
Information importante pour la compréhension d'une intervention,
évitant ainsi des erreurs.
Sécurité de l'utilisateur
• IMPORTANT: Un masque servant de ltre antipoussière doit être
porté duant l’opération de la soufeuse.
• Portez toujours une visière et des lunettes de protection.
• Portez toujours un pantalon, des chaussures et des gants de
sécurité. Evitez les vêtements amples, les shorts, les sandales et
les pieds nus. Veillez à ce que vos cheveux ne descendent pas
au-dessous des épaules.
• N’utilisez cette machine que si vous êtes en pleine possession
de vos moyens physiques. Evitez strictement la consommation
d’alcool, de drogue ou de médicaments.
• Ne jamais laisser un enfant ou une personne inexpérimentée se
servir de ces machines.
• Portez un dispositif de proteclion contre le bruit pour vos oreilles.
Restez vigilant à tout ce qui vous entoure. Soyez attentif dans
l’éventualité où une personne située à proximité vous signalerait
un problème. Retirez les équipements de sécurité immédiatement
après avoir coupé le moteur de l’appareil.
• Protégez-vous la tête.
• Ne mettez jamais le moteur en marche dans un local clos, les gaz
d'échappement étant toxiques.
• Nettoyez les poignées de toute trace d'huile ou de carburant.
• Ne pas approcher les mains des pièces en mouvement ou des
parties chaudes.
• Ne pas attraper ni tenir l’ensemble par le tuyau de souferie.
• Lorsque l’on arrête la soufeuse, s’assurer que le moteur est
complètement arrêté avant de poser l’unité.
• Lors d’une utilisation prolongée, veillez à pratiquer des pauses
régulières an d’éviter des troubles éventuels provoqués par les
vibrations.
ATTENTION
Les systèmes anti-vibrations ne préviennent pas de la maladie
des doigts blancs, ni du syndrome du canal carpien. Par
conséquent, en cas d’utilisation régulière et continue de votre
machine, surveillez soigneusement l’état de vos mains et
de vos doigts. Si l’un des symptômes ci-dessus venait à
apparaître, il serait indispensable de vous faire examiner
immédiatement par votre médecin.
ATTENTION
Si vous êtes équipé d’un appareillage médical électrique/
électronique (par ex. un pacemaker), consultez votre médecin
et le fabricant de cet appareillage avant d’utiliser tout appareil
électrique/ thermique.
Règles de sécurité concernant l'utilisation de la machine.
• Contrôlez entièrement votre machine avant chaque utilisation.
Remplacez les pièces endommagées. Vériez l'absence de fuites
de carburant et assurez-vous que tous les dispositifs de xation
sont en place et solidement xés.
• Remplacez les éléments Tanaka de la machine qui présentent
des ssures, des ébréchures ou toute autre avarie.
• Vériez que les systèmes de sécurité sont bien opérant.
•
Ne laissez personne s'approcher lorsque vous réglez le carburateur.
• Utilisez uniquement les accessoires recommandés par le
constructeur pour cette machine.
ATTENTION
Ne modiez en aucun cas la machine. N'utilisez jamais la
tronçonneuse pour tout autre tâche que celles auxquelles elle
est destinée.
Sécurité au niveau du carburant
REMARQUE
• Vidangez le réservoir d'essence avant de remiser l’appareil. Cette
opération est fortement recommandée pour éviter tout dommage
au carburateur car l'essence peut être corrosive.
• Le carburant contient des substances hautement inammables.
Vous risquez des blessures sévères en cas d’inhalation de
vapeurs ou de renversement accidentel du produit sur votre
corps. Usez toujours de précaution lorsque vous manipulez
le carburant. Si vous prévoyez de manipuler le carburant en
intérieur, faites-le dans un local bien ventilé.
• Faites le mélange et le plein à l'air libre, à distance de toute
étincelle ou amme.
• Utilisez pour l'essence un récipient agréé.
• Ne fumez pas et ne laissez personne fumer à proximité du
carburant ou de la machine. ni lorsque vous utilisez la machine.
• Essuyez soigneusement toutes les traces de carburant avant de
mettre le moteur en marche.
• Pour démarrer la tronçonneuse, écartez vous d'au moins 3
mètres de l'endroit où vous avez fait le plein.
• Arrêtez le moteur avant de dévisser les bouchons des réservoirs
de carburant ou d'huile.
• Rangez la machine et le carburant dans un endroit où les vapeurs
d'essence ne risquent pas d'entrer en contact avec des étincelles
ou une amme en provenance d'un chauffe-eau, d'un moteur
électrique, d'un commutateur, d'une chaudière, etc.
ATTENTION
Le carburant peut s’enammer facilement ou exploser
et l’inhalation de ses vapeurs est dangereuse. Faites
particulièrement attention lorsque vous manipulez le carburant
ou faites l’appoint du réservoir.
Sécurité de souferie
• Faire fonctionner l’appareillage mécanique à des heures
convenables seulement-non pas le faire de bon matin ou à une
heure avancée de la nuit quand il se peut que les autres gens
se sentent dérangés. Conformez-vous à l’horaire prescrit par
des ordonnances locales. Les avis coutumiers rendus indiquent
l’horaire de 9 heures du matin jusqu’à 5 heures de l’après-midi de
lundi à samedi.
• Ne jamais diriger le débit d’air envers des spectateurs et ne
laisser personne s’approcher de l’endroit d’opération. Faire
attention à la direction de refoulement pour éviter des enclos en
vitre, des voitures, etc.
•
Redoubler de vigilance lorsque vous travaillez sur des bords de
chaussée irréguliers ou non pavés, sur des terrains où il y a des trous
ou dans d’autres conditions peu sûres lorsque vous utilisez l’outil.
•
Prendre toutes mesures de précaution nécessaires lorsque l’on laisse
l’outil sans la présence de l’opérateur comme l’arrêt du moteur.
• Ne faire jamais fonctionner l’outil sans protection, tuyaux de
souferie ou autres dispositifs de protection coprrectement
installés à leur place. (Si l’outil en est équipé.)
• Avant de soufer, décollez les débris du sol à l’aide d’un râteau et
d’un balai.
• Veillez à ce que personne, enfants, animaux, spectateurs ou aides
ne se tienne à l'intérieur d'une zone de sécurité de 15 mètres.
Arrêtez immédiatement le moteur si quelqu'un s'approche de vous.
• Tenez toujours le moteur à votre droite. (UNIQUEMENT pour
soufeur)
• Tenez vous bien en équilibre sur vos deux jambes. Ne travaillez
jamais en porte-à-faux.
• Ne vous approchez pas dusilencieux d’échappement !
• Lors de l’utilisation de tout appareil électrique/ thermique,
emportez toujours avec vous une trousse de premiers soins.
• Ne démarrez jamais le moteur de l’appareil, et ne l’utilisez jamais
dans un local clos et/ou à proximité de produits inammables, les
gaz d’échappement étant toxiques.
Sécurité au niveau de l'entretien
•
Entretenez votre machine selon les recommandations du constructeur.
•
Débranchez la bougie avant toute intervention intervention
d'entretien, à l'exception des opérations de réglages du carburateur.
• Ne laissez personne s'approcher de la machine lorsque vous
procédez au réglage du carburateur.
• N’utilisez que les pièces de remplacement Tanaka d’origine
comme recommandé par le fabricant.
IMPORTANT
Ne démontez pas le lanceur à retour automatique. Vous pourriez
vous blesser à cause du ressort de recul.
Transport et rangement
•
Portez la machine avec moteur arrêté et silencieux orienté vers l'extérieur.
• Laissez le moteur refroidir, videz le réservoir de carburant et
veillez à ce que la machine ne risque pas de tomber lorsque vous
la rangez ou la chargez à bord d'un véhicule.
• Vidangez le réservoir de carburant avant de remiser la machine,
II est en fait recommandé de le faire après chaque utilisation. Si
le réservoir n'est pas vide, rangez alors votre tronçonneuse dans
une position telle que le carburant ne risque pas de couler.
• Remisez la machine hors de portée des enfants.
• Nettoyer et entretenir l’outil soigneusement et le remiser dans un
endroit sec.
• Assurez vous que le commutateur d'arrêt du moteur est bien sur
la position "stop" lors du transport ou du remisage de la machine.
Dans l’éventualité de situations qui ne seraient pas prises en
compte par le présent manuel, redoublez d’attention et usez de
bon sens. Communiquez avec un concessionnaire Tanaka pour
toute assistance.
FR-3
F
R
Page 12

Caractéristiques
MODELE
MODEL
THB-260PF
Taille du moteur (cu. in)
Bougie d’allumage
Filtre à airr
Poids à sec (livre)
Contenance du réservoir
de carburant (. oz)
Niveau de pression sonore
LpA (dB(A))
par ISO22868
Incertitude (dB(A))
1.46 (23.9 ml)
Champion CJ6
A huilé le système de ltre de mousse
Oiled foam filter system
11.0 (5.0 kg)
20.1 (0.6 l)
By ANSI 68.0
By CEN 81.0
0.6
Niveau de puissance sonore
Lw mesuré (dB(A))
par ISO22868
Niveau de puissance sonore
LwA (dB(A))
par 2000/14/EC
Niveau de vibrations
par ISO22867
Incertitude (m/s
REMARQUE : Les niveaux de bruit/vibrations équivalents sont calculés comme total d’énergie pondérée en fonction
*Toutes les données sont sujettes à modier sans préavis.
FR-4
du temps pour les niveaux de bruit/vibrations dans diverses conditions de travail avec la répartition
temporelle suivante : 1/7 ralenti, 6/7 vitesse de course.
2
)
(m/s2)
101
104
11.2
1.5
Page 13

Montage
AVERTISSEMENT
Assurez-vous de ce que le moteur a été arrêté/éteint
et qu'il n'est pas chaud avant l'assemblage.
Installation de la tuyauterie de souferie sur le corps principal
de la soufeuse. (Fig. 1)
Inspecter le corps principal et les accessoires.
Raccorder solidement le tuyau droit (1) et les autres tuyaux. (Voir page 1)
Aligner la rainure (2) dans le tuyau droit avec la projection (3) sur le
logement de la soufeuse (ou sur un autre tuyau) et faire glisser le
tuyau sur le logement de la soufeuse (ou un autre tuyau).
Faire tourner le tuyau dans le sens des aiguilles d’une montre an
de le mettre en place en le bloquant, et, ensuite, Tournez le tube de
soufage dans le sens des aiguilles d’une montre pour le verrouiller
en position.
Raccordement du tube de la turbine au tube de soufage (Fig. 2)
• Alignez la rainure (2) du tube de la turbine (4) avec la saillie (3)
située sur le second segment du tube de soufage (4) et tournez
la tête de la turbine pour l’amener en position.
REMARQUE (Facultatif)
L’accessoire à vide est offert en tant qu’un trousseau facultatif qui
transforme le soufet tenu dans la main en aspirateur.
Quant au montage, Pour savoir comment procéder à l’installation,
consultez le manuel « Kit optionnel (THV-260) ».
REMARQUE. Fonction de sécurité
Si vous essayez d’ouvrir le capot anti-poussières (5) quand le moteur
tourne, une sécurité coupe automatiquement le moteur (Fig. 3).
Même si cette fonctionnalité d’arrêt existe, vous ne devez surtout
pas ouvrir le capot protecteur (5) quand le moteur tourne. Vous
vous exposeriez à des blessures corporelles graves.
Utilisation
Carburant (Fig. 4)
ATTENTION
• Cette unité est équipée d'un moteur à deux temps et doit
toujours être alimenté en mélange essence/huile. Veiller à
une bonne aération pendant l'opération de remplissage du
réservoir.
• Le carburant contient des substances hautement
inammables. Vous risquez des blessures sévères en cas
d’inhalation de vapeurs ou d’éclaboussure accidentelle du
produit sur votre corps. Faites toujours très attention lorsque
vous manipulez le carburant. Si vous prévoyez de manipuler
le carburant en intérieur, faites-le dans un local bien ventilé.
Essence
• Toujours utiliser de l'essence sans plomb avec un taux d'octane
de 89.
• Utilisez une huile pour moteur à deux temps ou un mélange
variant de 25:1 à 50:1; veuillez consulter le contenant d’huile
pour la proportion du mélange ou communiquez avec un
concessionnaire Tanaka.
• Et une proportion 50:1 pour l'Etat de la Californie uniquement.
• Si vous n’utilisez pas une huile d’origine, utilisez une huile
de qualité contenant un antioxydant recommandée pour être
utilisée avec un moteur à deux temps refroidi à l’air (HUILE JASO
QUALITÉ FC OU ISO QUALITÉ EGC). Ne jamais utiliser des huiles
mélangées BIA ou TCW (pour les moteurs à essence 2 temps à
refroidissement par eau).
• Ne jamais utiliser d'huile Multigrade (10W/30), ni d'huile usagée.
• Effectuez toujours le mélange dans un récipient propre.
Toujours commencer par verser la moitié de l'essence á mélanger.
Verser ensuite la totalité de l'huile. Mélanger en agitant le récipient.
Enn, verser le reste de l'essence, puis agiter le récipient an de
mélanger soigneusement le carburant avant de faire le plein.
Faire le plein
ATTENTION
• Coupez toujours le moteur et laissez-le refroidir quelques
minutes avant de refaire le plein.
• Desserrer lentement le bouchon du réservoir de carburant
pour effectuer le remplissage an de laisser échapper une
surpression éventuelle.
• Serrer le bouchon soigneusement aprés avoir rempli le
réservoir de carburant.
• Avant de redémarrer le moteur, toujours s'éloigner d'au
moins trois métres de l'endroit ou vous avez fait le plein de
carburant.
• Ne fumez pas et/ ou évitez tout risque de amme ou
d’étincelle lorsque vous manipulez le carburant ou faites
l’appoint du réservoir.
• En cas de projection accidentelle de carburant sur vos
vêtements, lavez immédiatement ces derniers avec du savon.
• Après chaque appoint de carburant, vériez toujours
l’absence de fuite.
Pendant le remplissage respectez les règles de propreté.
Essuyez autour du bouchon du réservoir an d'éviter que des
corps étrangers ne pénètrent dans le réservoir. Les saletés qui se
trouveraient dans le réservoir risquant d'occasionner des troubles
de fonctionnement. Veillez à ce que le mélange soit bien homogène
en agitant à intervalle régulier le récipient avant et pendant le
remplissage.
Démarrage
IMPORTANT
Ne démarrez pas la machine en cas d’obstruction du tuyau et du
Couvercle antipoussière.
1. Placer l'interrupteur marche-arrêt (6) en position marche (ON).
(Fig. 5)
*Presser la poire de la pompe d'amorçage (7) à plusieurs reprises
pour que le carburant puisse s'écouler par la poire ou
par le tuyau de retour. (8) (Fig. 6)
Régler la manette d’étranglement sur la position CLOSED). (Fig. 7)
2.
3.
Tirer vivement sur la corde du lanceur, en faisant attention de bien
tenir la poignée sans la laisser se détacher brusquement. (Fig. 2-8)
4. Lorsqu'on sent que le moteur va démarrer, repousser la manette
de starter dans la position de fonctionnement (ouverte). Puis tirer
à nouveau vivement sur le lanceur.
ATTENTION
• Ne démarrez jamais le moteur de l’appareil/ N’utilisez jamais
l’appareil dans un local clos ou à l’intérieur d’un bâtiment et/
ou à proximité d’un produit inammable. L’inhalation des
fumées d’échappement peut être mortelle.
• Retenez le cordon pour éviter qu’il ne revienne en place trop
brusquement et maintenez toujours l’appareil fermement.
REMARQUE
Si le moteur ne se met pas en marche, répéter la procédure à partir
des points 2 à 4.
5. Après avoir mis en marche le moteur, le laisser s'échauffer
pendant 2 à 3 minutes avant de le soumettre à une charge
quelconque.
Soufeuse d’exploitation (Fig. 9)
• Il faut employer une petite vitesse pour chasser des feuilles et
l’herbeséchée.
• Il faut employer une vitesse moyenne pour nettoyer des feuilles
mouillées et l’herbe.
• Il faut employer une grande vitesse lorsqu’on déplace du
gravillon, de la saleté ou d’autres matiéres lourdes.
ATTENTION
• Ne pas décharger directement l’air vers des personnes ou
des animaux.
• Il faut faire fonctionner l’appareil dans un endroit bien ventilé.
• N’effectuez jamais d’opération d’assemblage ou de
désassemblage lorsque le moteur tourne, vous risqueriez des
blessures sévères.
• Ne portez jamais la main sur l’échappement, la bougie
d’allumage ou toute autre partie métallique lorsque le moteur
tourne ou immédiatement après l’arrêt du moteur.
IMPORTANT
Cette soufeuse a été conçue et mise au point pour être utilisée
avec tous les tuyaux de souferie installés (Voir page 1). Il doit
obligatoirement être utilisé avec tube de soufage et tube de
raccordement à la turbine installés.
REMARQUE
Lors d'entendre ou de sentir quelque bruit ou vibration étrange,
arrêter tout de suite le moteur et vérier si quelque chose est en
train de bloquer des ventilateurs ou des tuyaux. Si tel est le cas, Ia
quitter et vérier s'il y a de l'avarie.
Arret de l'unite (Fig. 10)
Ralentir le moteur et le faire fonctionner au ralenti pendant
quelques minutes, ensuite, mettre l'interrupteur marchearrêt sur la
position "STOP".
FR-5
F
R
Page 14

Entretien
L’ENTRETIEN, LE REMPLACEMENT OU LA RÉPARATION
DES DISPOSITIFS ET SYSTÈMES DE CONTRÔLE DE
L’ÉCHAPPEMENT PEUVENT ÊTRE EFFECTUÉS PAR
N’IMPORTE QUEL ATELIER DE RÉPARATION OU MÉCANICIEN
DE MOTEUR NON AUTOMOBILE.
Réglage du carburateur (Fig. 11)
Dans le carburateur, l'air est mélangé à l'essence. Le carburateur
est réglé pendant les essais en usine. Ce réglage peut nécessiter
des modications selon les conditions climatiques et l'altitude. Le
carburateur présente une possibilité de réglage.
T = Vis de réglage du ralenti
Réglage du ralenti (T)
Véri ez la propreté du ltre à air. Si un réglage s’avère nécessaire,
serrez la vis de réglage de la vitesse du RALENTI (T) pour
augmenter le régime du moteur et desserrez-la (dans le sens
inverse des aiguilles d’une montre) pour le diminuer. Au ralenti, le
moteur effectue normalement 2800-3200 tr/min.
IMPORTANT
Il faut suivre le procédé d’ajustage précité lorsqu’on effectue
l’ajustage ou le moteur pourrait être endommagé à cause de la
condition incorrecte.
IREMARQUE
Quelques-uns modèlent vendu dans les secteurs avec les
règlements d'émission d'échappement stricts n'a pas haut
ajustements et les ajustements bas de carburateur de vitesse.
Tels ajustements peuvent permettre au moteur être fonctionné
l'extérieur de leurs limites de conformité d'émission. Pour ces
modèles, le seul ajustement de carburateur est la vitesse inoccupé.
RECOMMANDATION:
LE RÉGLAGE DU CARBURATEUR DOIT ÊTRE EFFECTUÉ PAR
UN PERSONNEL QUALIFIÉ; IL EST RECOMMANDÉ DE CONFIER
L’UNITÉ À UN CONCESSIONNAIRE Tanaka.
Filtre á air (Fig. 12)
Nettoyer le ltre à air régulièrement pour éviter :
• Les troubles de fonctionnement du carburateur.
• Les problèmes de démarrage.
• Les pertes de puissance.
• L'usure prématurée des organes du moteur.
• Une consommation anormalement élevée.
Retirer le couvercle du ltre à air en poussant et en tirant sur la
languette sur la partie supérieure. (Fig. 12)
Nettoyage du ltre
Nettoyer l’élément équrateur chaque jour ou aprés chaque 8 heures
de fonctionnement. Laver l’élément dans un détersif liquide ou
dans l’eau. Presser l’élément dans un chiffon sec jusqu’à ce qu’il
devienne complètement séché. Saturez le ltre en le plongeant
dans de l'huile pour moteur deux-temps. Presser l’élément pour
pouvoir distribuer complètement l’huile et éliminer toute l’huile
excédante. Remettre l’élément et installer le couvercle. (Fig. 13)
Un ltre à air ayant servi longtemps ne peut être complètement
nettoyé. Par conséquent, il doit être remplacé régulièrement par un
ltre neuf. Remplacez toujours le ltre s’il est endommagé.
Filtre à carburant (Fig. 14)
Purger tout le carburant qui se trouve dans le réservoir de
carburant et retirer la durite du ltre à carburant du réservoir.
Détacher la cartouche du ltre de l'ensemble et rincer la cartouche
dans de l'eau chaude contenant un produit détersif.
Rincer soigneusement jusqu'à ce que toutes traces de détergent
aient été éliminées. Presser la cartouche sans la tordre an
d'éliminer l'excès d'eau et laisser celle-ci sécher à l'air libre.
REMARQUE
Si le ltre a durci à cause des impuretés contenues dans le
carburant, il convient de le remplacer.
Bougie (Fig. 15)
L'état de la bougie est inuencé par:
• Le mauvais réglage du carburateur.
• Un mélange incorrect (trop riche en huile).
• Un ltre à air sale.
• De dures conditions d'utilisation. (comme par temps froid, par
exemple)
Ces facteurs contribuent à la formation de dépôts sur les électrodes
de la bougie et peuvent entraîner troubles de fonctionnement
et difcultés au démarrage. Si la débroussailleuse manque de
puissance, si ellel démarre mal ou si le ralenti est irrégulier,
toujours commencer par vérier l'état de la bougie. Si la bougie est
encrassée, la nettoyer et vérier l'écartement des électrodes qui
doit être de 0,6 mm. La bougie devra être remplacée toutes les 100
heures d'utilisation ou avant si les électrodes sont endommagées.
REMARQUE!
Dans certaines régions, la réglementation locale exige l'utilisation
d'une bougie équipée d'une résistance d'antiparasitage an
d'éliminer les signaux d'allumage. Si cette machine était équipée
à l'origine d'une bougie avec résistance d'antiparasitage, utiliser le
même type de bougie lorsque vous la remplacez.
Entretien
Vous trouverez ci-dessous quelques conseils d'entretien d'ordre
général. Pour plus d’informations, veuillez communiquer avec un
concessionnaire Tanaka.
Entretien quotidien
• Nettoyer extérieurement le taille-haies.
• Vériez que l’admission d’air au niveau du capot protecteur n’est
pas bouchée.
• Vérier que le couvercle antipoussière n'est pas endommagé ou
ssuré. Rempiacer le couvercle dans le cas où l'on a observé des
impacts de choc ou des craquelures.
• Vérier le serrage de tous les écrous et vis, surtout les écrous
xant le ltre à air.
Entretien hebdomadaire
• Contrôlez le lanceur, notamment le cordon.
• Nettoyer la bougie extérieurement, la démonter et contrôler
l'écartement de ses électrodes, qui doit être de 0.6 mm.
• La remplacer le cas échéant.
• Nettoyer le ltre à air.
Entretien mensuel
• Rincez le réservoir de carburant avec de l’essence et nettoyez le
ltre du carburant.
• Nettoyer extérieurement le carburateur et son logement.
Entretien trimestriel
• Nettoyez les ailettes de refroidissement du cylindre.
• Nettoyez le volant magnétique (turbine) et son logement.
• Nettoyez le silencieux d’échappement a n d’éliminer toute trace
de calamine.
IMPORTANT
Le nettoyage des nervures du cylindre, du ventilateur et du
silencieux devra être effectué par un revendeur agréé Tanaka.
REMARQUE
Lors de la commande de pièces détachées auprès de votre
revendeur local, utilisez le numéro de référence indiqué dans
la section « Liste des pièces détachées » des présentes
instructions.
FR-6
Page 15

Los signicados de los símbolos
NOTA : Algunos aparatos no están provistos de ellos.
Símbolos
ADVERTENCIA
El gas de escape de este producto contiene productos químicos conocidos por el
Estado de California que causan cáncer, nacimiento con defectos y otros daños de
reproducción.
Es importante que usted lea, entienda totalmente y observe las siguientes
precauciones y advertencias de seguridad. El uso descuidado o incorrecto de la
unidad podrá causarle lesiones serias o fatales.
Lea, comprenda y siga todas las advertencias y demás instrucciones de este manual
y las que hay en la máquina.
Utilizar siempre las protecciones para los ojos, cabeza y oldos cuando trabaje con la
máquina.
Explica la posición del cebador. La señal superior indica el cebador cerrado y la
inferior indica totalmente abierto.
E
S
ADVERTENCIA
No se arríme al ventilador giratorio con la mano. El tubo de vacío y la bolsa tienen
que hallarse en su lugar para el vacío. Hay que instalar seguramente la tapa contra el
polvo para el ventilador.
ADVERTENCIA
Supercies calientes; El silenciador o el catalizador y la cubierta alrededor pueden
calentarse extremadamente.
Manténgase siempre alejado de la zona de escape y del catalizador, de lo contrario
podrán ser causadas graves lesiones.
Haga que los niños, sus ayudantes o cualquier otra persona se mantengan a una
distancia de 15 m del aparato. Si alguien se acerca a usted, detenga el motor de
inmediato.
PELIGRO
PELIGRO
Contenido
¿Qué es qué? ................................................................
Advertencias e instrucciones de seguridad ..................
Especicaciones............................................................
Procedimiento de montaje ............................................
Modo de uso .................................................................
Mantenimiento ...............................................................
2
3
4
5
5
6
ES-1
Page 16

17
18
6
2
13 10
8
14
15
1
4
3
5
11
12
7
9
16
¿Qué es qué?
Ya que este manual se reere a varios modelos es posible que
haya diferencias entre las imagenes y su aparato. Emplee las
instrucciones que se apliquen a su unidad.
1. Tapón del de combustible
2. Acelerador
3. Manilla de arranque
4. Tanque de combustible
5. Carburador
6. Filtro de aire
7. Mango
8. Ojal de suspensión
9. Llave de ignición
10. Tubo recto
11. Tubo colector de ventilador
12. Cubierta contra polvo
13. Bujía de encendido
14. Botón estrangulador
15. Perilla cebadora
16. Palanca de velocidad
17. Llave combinada de cubo
18. Instrucciones de manejo
ES-2
Page 17

Advertencias e instruccione de seguridad
Dedique especial atención a los apartados precediodos por las
palabras siguientes:
ADVERTENCIA
Indica gran peligro de daños personales graves e incluso la
muerte, si no se siguen las instrucciones.
PRECAUCIÓN
Indica posibilidad de daños personales o materiales, si no se
siguen las instrucciones.
NOTA
Indica información útil para un correcto uso y funcionamiento de la
máquina.
Seguridad del usuario
• IMPORTANTE: Debe ponerse la mscara de ltro de polvo durante
la operación
• Lleven siempre las protecciones tales como, la pantalla o gafas
de seguridad.
• Use siempre pantalones largos gruesos, botas y guantes. No
utilice prendas sueltas, adornos, pantalón corto. sandalias ni
ande descalzo. Sujete el cabello para que quede por encima de
los hombros.
• No operen esta máquina cuando estén cansados, enfermos o
bajo la inuencia del alcohol, drogas o medicamentos.
• No dejen a los niños o personas inexpertas para que operen esta
máquina.
• Lleven las protecciones de oídos. Preste atención a su entorno.
Observe a los asistentes que pudiesen estar señalizando un
problema. Quite el equipo de seguridad inmediatamente después
de parar el motor.
• Utilice casco protector.
• Nunca pongan en marcha esta máquina dentro de un local
cerrado o edicio. La respiración de los gases de escape puede
causar la muerte.
• Mantengan la manilla libre de aceite y combustible.
• Mantenga las manos alejadas de la parte en movimiento o del
área caliente.
• No agarre esta unidad por el tupo de escape.
• Cuando para la unidad, asegúrese que el motor se haya detenido
antes de apoyarla sobre el suelo.
• Durante periodos de operación prolongados, se recomienda
descansar de vez en cuando para evitar el posible síndrome de
vibración de manos y brazos (HAVS) causado por las vibraciones.
ADVERTENCIA
Los sistemas antivibratorios no garantizan que pudiera verse
afectado por síndrome de vibración de manos y brazos o el
síndrome del túnel carpiano. Por lo tanto, los usuarios que
utilicen el aparato asiduamente o con regularidad deberán
vigilar con atención el estado de sus manos y dedos. Si
aparece cualquiera de los síntomas citados, deberá acudirse a
un médico de inmediato.
ADVERTENCIA
Si Ud. usa algún dispositivo médico eléctrico o electrónico
tales como marcapasos, consulte a su médico así como al
fabricante del dispositivo antes de operar cualquier equipo de
potencia.
Seguridad de la unidad de máquina
• Inspeccione siempre la unidad de máquina antes de usarla.
Sustituya las piezas dañadas. Compruebe que no haya fugas
de combustible y asegúrese de que todas las piezas estén bien
apretadas en su sitio.
• Sustituya las piezas agrietadas, rotas o deterioradas antes de
poner en marcha la unidad de máquina.
•
Asegurar que el protector de seguridad esté perfectamente colocado.
•
Al ajustar el carburador no permita que se acerquen otras personas.
• Utilice únicamente los accesorios para esta unidad de máquina
que hayan sido recomendados por el fabricante.
ADVERTENCIA
No deberá modicarse de ninguna manera la unidad de
maquina. No usar su unidad de máquina de corte para
cualquier tarea excepto para la cual se haya destinado.
Seguridad para con el combustible
NOTA
• Antes de guardar la máquina, vacíe el depósito de combustible.
Vacíe el depósito de combustible antes de guardar la herramienta.
Esto es obligatorio; de lo contrario, se pueden
y daños en el carburador. Es conveniente vaciar el depósito cada
vez que se ha usado la máquina. Si se deja combustible en el
depósito, asegurarse de que no puedan producirse fugas.
producir corrosión
• El combustible contiene sustancias altamente inamables,
existiendo la posibilidad de graves lesiones por inhalación o
por derrame sobre su cuerpo. Preste siempre atención cuando
maneje combustible. Asegure siempre una buena ventilación
cuando maneje combustible dentro de un edicio.
• Mezcle y cargue el combustible al aire libre, en lugares donde no
se produzcan chispas ni fuegos.
• Utilice para el combustible un recipiente adecuado.
• No fume ni deje fumar a otras personas en las cercanías del
combustible o de la unidad de maquina mientras esta está en marcha.
•
Limpie los residuos de combustible antes de poner en marcha el motor.
• Antes de poner en marcha el motor, apártese como mínimo 3
metros del lugar en el que se ha repostado.
•
Pare el motor antes de quitar el tapón del depósito de combustible.
• Almacene la unidad de máquina y el combustible en un lugar
donde los vapores del combustiblé no puedan llegar a chispas o
llamas de calentadores de agua, motores eléctricos, interruptores,
hornos, etc.
ADVERTENCIA
El combustible puede inamarse, explotar o emitir gases con
facilidad. Por lo tanto, debe prestar especial atención cuando
manipule o recargue el combustible.
Seguridad de soplado
• Hágase funcionar el equipo de potencia solamente a horas
convenables-no de madrugada o a hora avanzada de noche
cuando pueda incomodar a la gente. Obsérvese el horario
prescrito por las ordenanzas locales. Se recomenda por regla
general el horario de las 9 de la mañana a las 5 de la tarde de
lunes a sábado.
• No se dirija nunca la descarga de aire hacia espectadores o no se
permita a nadie que se acerque a la zona de maniobra. Téngase
cuidado al dirigir la descarga para evitar recintos de vidrio,
coches, etc.
• Póngase vigilante para evitar aceras irregularee, baches en el
terreno u otras condiciones inestables al emplear la herramienta.
• Tomese todas las medidas posibles de seguridad al dejar la
herramienta inatendida, tal como la parada del motor.
• No se haga funcionar nunca la herramienta sin guardias, tubos
de escape u otro dispositivo protector en su sitio. (Si están
equipados de tal forma).
•
Utilice un rastrillo y una escoba para aojar la hojarasca antes de soplar.
• Mantenga a otras personas, niòos, ani-males, ayudantes y
mirones fuera de la zona de peligro de 15 metros, Pare el motor
inmediatamente si se acerca alguien.
• Mantenga siempre el motor al lado derecho del cuerpo.
(El aparato se debe utilizar ÚNICAMENTE)
• Mantenga estable el cuerpo, con los pies bien apoyados sobre el
suelo. No estire demasiado el cuerpo.
• Manténga su cuerpo apartado del silenciador de escape.
• Lleve siempre un botiquín de primeros auxilios consigo cuando
opere cualquier equipo de potencia.
• Nunca encienda el motor o haga funcionar el aparato dentro de
una sala cerrada o un edicio o en las proximidades de líquidos
inamables. La inhalación de los gases de escape puede ser
mortal.
Seguridad en el mantenimiento
• Mantenga la unidad de máquina según las recomendaciones.
• Antes de iniciar el mantenimiento desco-necte la bujía, excepto si
hay que ajustar el carbu rator.
• No permita que se acerquen otras personas mientras está
ajustando el carburador.
• Use solamente piezas de repuesto genuinas Tanaka de acuerdo
con lo recomendado por el fabricante.
PRECAUCIÓN
No desmonte el arrancador de retroceso. Podría provocarse
lesiones con el resorte del arrancador.
Transporte y almacenamiento
• Transporte la unidad de máquina con el motor y el silenciador
apartado de¡ cuerpo.
• Antes de almacenar o transportar la unidad de máquina en un
vehículo espere a que se haya enfriado el motor, vacíe el depósito
de combustible y asegúrela bien.
• Vacíe el depósito antes de almacenar la unidad de la máquina.
Es recomendable vaciar el depósito cada vez que se ha usado
la máquina. Si se deja combustible en el depósito, asegúrese de
que no puedan producirse fugas.
• Almacene la unidad de máquina fuera de¡ alcance de niños.
• Limpie y mantenga cuidadosamente la unidad, y guárdela en un
lugar seco.
• Asegúrese de que está desconectado el conmutador de¡ motor al
transportarlo o al almacenarlo,
Si ocurren situaciones que no se han previsto en este manual,
utilice el sentido común. teniendo buen juicio. Comuníquese con
un distribuidor Tanaka si usted necesita ayuda.
ES-3
E
S
Page 18

Especicaciones
MODELO
MODEL
THB-260PF
Tamaño del motor (cu. in)
Bujía
Filtro de aire
Peso en vacío (libras)
Capacidad del tanque de
combustible (
. oz
)
Nivel de presión sonora
LpA (dB(A))
por ISO22868
Incertidumbre (dB(A))
1.46 (23.9 ml)
Champion CJ6
Oiled foam filter system
Sistema engrasado de ltro de espuma
11.0 (5.0 kg)
20.1 (0.6 l)
By ANSI 68.0
By CEN 81.0
0.6
Nivel de potencia de
Lw medido (dB(A))
por ISO22868
Nivel de potencia acústica
LwA (dB(A))
por 2000/14/EC
Nivel vibratorio (m/s
por ISO22867
Incertidumbre (m/s
2
sonido
2
)
)
101
104
11.2
1.5
NOTA : Los niveles de ruido/vibración equivalentes se calculan como la energía ponderada en tempo en varias
condiciones de trabajo con la distribución de tiempo siguiente: 1/7 de ralentí, 6/7 de velocidad de aceleración al
máximo.
*Todos los datos están sujetos a cambio sin previo aviso.
ES-4
Page 19

Procedimiento de montaje
ADVERTENCIA
Asegúrese de que está parado/apagado el motor y
que no está caliente antes del montaje.
Tubos de escape al cuerpo principal (Fig. 1)
Inspeccione el cuerpo principal y los accesorios. Conecte el tubo
recto (1) y otros tubos(s) seguramente. (Véase la página 1)
Alinee la ranura (2) en el tubo recto con projección (3) sobre la
caja de soplador (o sobre otro tubo) y deslice el tubo en la caja de
soplador (o en otro tubo).
Gire el tubo de soplado en el sentido de las agujas del reloj para
encajarlo.
Tubo del soplador sobre tubo recto (Fig. 2)
• Haga coincidir la ranura (2) en el tubo del cabezal del ventilador
(4) y la nariz (3) sobre el 2° tubo recto (4) y gire el cabezal del
ventilador a su posición.
NOTA (Facultativo)
Se ofrece accesorio de vacío como equipo facultativo que
transforma el ventilador de mano en aspirador al vacío.
Para la instalación, vea el manual "Equipamiento opcional" (THV-260)".
NOTA Dispositivo de seguridad
Si con el motor en marcha se intenta abrir la cubierta contra polvo
(5), el motor se detendrá inmediatamente (Fig. 3).
No trate nunca de abrir la cubierta guardapolvo (5) cuando el motor
esté en marcha, incluso con este dispositivo. Se podrían causar
graves lesiones.
Modo de uso
Combustible (Fig. 4)
ADVERTENCIA
• Esta unidad es de dos tiempos y ha de funcionar siempre
con una mezcla de gasolina y aceite. Asegurarse siempre de
que hay buena ventilación en los lugares donde se maneja el
combustible.
• El combustible contiene sustancias altamente inamables,
existiendo la posibilidad de graves lesiones por inhalación
o por derrame sobre su cuerpo. Preste siempre atención
cuando maneje el combustible. Asegure siempre una buena
ventilación cuando maneje el combustible dentro de un edicio.
Gasolina
• Utilice siempre gasolina sin plomo de marca 89 de octano.
• Use aceite de dos tiempos genuino o use una mezcla de 25:1
a 50:1, sírvase ver la relación en la botella o consulte con un
distribuidor Tanaka.
• Unica-mente para el Estado de Califomia a 50:1.
• Si no dispone de aceite genuino, use un aceite con antioxidante
de calidad que esté etiquetado expresamente para motores de
dos tiempos enfriados por aire (ACEITE GRADO JASO FC o
GRADO ISO EGC). No utilice aceite mezclado BIA o TCW (tipo de
2 tiempos refrigerado por agua).
• No utilice nunca aceites multigrado (10W130) ni residuales.
• Mezcle siempre la gasolina y el aceite en un recipiente especial
para ello que esté limpio.
Empiece llenando el recipiente hasta la mitad con gasolina y
aòada luego todo el aceite. Sacuda la mezcla y aòada el resto
de la gasolina. Antes de llenar el depósito agite la mezcla
cuidadosamamente.
Repostar
ADVERTENCIA
• Apague siempre el motor y deje que se enfríe varios minutos
antes de proceder a llenar combustible.
• Para llenar el combustible del tanque, deberá abrirse
lentamente la tapa del tanque de combustible para que
escape la sobrepresión que pueda con-tener.
• Después de haber repostado, apretar bien la tapa.
• Antes de arrancar la unidad, deberá alejarse por lo menos 3m
(10 pies) del áre ade carga de combustible.
• No fume ni tampoco permita llamas ni chispas cerca cuando
esté manejando o cargando combustible.
• Lave siempre inmediatamente con jabón cualquier
combustible vertido sobre la ropa.
• Asegúrese de veri car si existe alguna fuga de combustible
después del llenado.
Antes de repostar, limpiar cuidadosamente el área del tapón del
tanque, para asequrar que no entre suciedad en el depósito.
Asegurarse de que el combustible está bien mezclado agitando
bien el recipiente antes de verter su contenido en el depósito.
Arranque
PRECAUCIÓN
No lo ponga en marcha si el tubo y la Cubierta contra polvo están
obstruidos.
1. Fijar la llave de ignición (6) en la posición ON (encendida). (Fig. 5)
*Presione varias veces el bulbo de ceba-dor (7), de manera que el
combustible uya a través del bulbo o de la tubería de retorno (8).
(Fig. 6)
2. Poner la palanca del estrangulador en la posición cerrada
CLOSED. (Fig. 7)
3. Tirar enérgicamente del arrancador de retroceso y teniendo
cuidado en no soltar el mango. (Fig. 8)
4. Cuando se note que el motor tiende a arrancar, poner el
estrangulador en la posición de funcionamiento (abierto). Tirar
entonces enérgicamente del arrancador una vez más.
ADVERTENCIA
• Jamás arranque o haga funcionar el motor dentro de un
recinto o edicio cerrado y/o cerca del líquido inamable.
La inhalación de los humos de escape puede ser letal.
• No permita que el cable salte hacia atrás y sujete siempre
rmemente la unidad.
NOTA
Si el motor no se pone en marcha, repítanse los puntos 2 al 4.
5. Después de arrancar el motor, permitir que el motor se caliente
unos 2-3 minutos antes de someter a cualquier carga.
Soplador de mando (Fig. 9)
• Hay que emplear la baja velocidad para quitar soplando hojas e
hierba seca.
• Hay que emplear la velocidad intermedia para barrer hojas
mojadas e hierba.
• Hay que emplear la altavelocidad al desplazar grava, suciedad u
otros materiales pesados.
ADVERTENCIA
• No descargue el aire directamente hacia persona o animal
doméstico.
• Hay que hacer funcionar el aparato en una zona bien
ventilada.
• Jamás efectúe ensamblajes o desensamblajes con el motor
en marcha porque podrían ser causadas graves lesiones
personales.
• Jamás toque el escape, la bujía u otras piezas metálicas
mientras el motor esté en marcha o inmediatamente después
de haber sido parado.
PRECAUCIÓN
Este soplador fue concebido y ajustado para que se emplee con
todos los tubos de ventilación impelente jados. (Véase la página 1).
El aparato no se debe utilizar nunca sin el tubo recto y el cabezal del
soplador.
NOTA
Al ofr o al sentir aigun ruído o vibración extraño, párese en seguida el
motor y veriffquese si algo está bloqueando los ventiladores o los tubos.
En tal caso, quítese y veriffquese si hay avería.
Parada (Fig. 10)
Redúzcase la velocidad del motor y hágase marchar en vacío
durante algunos minutos y, entonces, desconéctese la llave de
encend ido.
E
S
ES-5
Page 20

Mantenimiento
EL MANTENIMIENTO, SUSTITUCIÓN O REPARACIÓN DE LOS
DISPOSITIVOS Y SISTEMAS DE CONTROL DE EMISIONES
PUEDEN REALIZARSE EN CUALQUIER TALLER O A CARGO
DE CUALQUIER TÉCNICO DE REPARACIONES MECÁNICAS
NO DESTINADAS AL TRANSPORTE .
Ajuste del carburador (Fig. 11)
En el carburador se mezcla el combustible con el aire. Durante
la prueba del motor en la fábrica, el carburador está ajustado.
Sin embargo, puede ser necesario reajustarlo según el clima y la
altitud, El carburador tiene una posibilidad de ajuste:
T = Tornillo para el ajuste de las revoluciones de ralentí.
Ajuste de la velocidad de ralentí (T)
Compruebe que el ltro del aire está limpio. Si es preciso proceder
a un ajuste, gire el tornillo de ajuste (T) de velocidad IDLE a la
posición de cerrado (en dirección de las agujas del reloj) para
aumentar la velocidad del motor, y a la posición de abierto
(en dirección contraria a las agujas del reloj) para disminuir la
velocidad del motor. La velocidad estándar es de 2800~3200 rpm.
PRECAUCIÓN
Debe seguirse el procedimiento de ajuste sobredicho al efectuar el
ajuste o se averiará el motor por causa de la condición incorrecta.
NOTA
Algunos modelan vendido en áreas con regulaciones estrictas de
emisión de escape no tiene los ajustes altos y bajos de carburador
de velocidad. Tales ajustes pueden permitir el motor para ser
operado fuera de sus límites de la conformidad de la emisión. Para
estos modelos, el ajuste del único carburador es la velocidad vago.
RECOMENDACIÓN:
EL AJUSTE DEL CARBURADOR NECESITA LA TÉCNICA DE
PERSONAS CON EXPERIENCIA O BIEN CAPACITADAS, SE
RECOMIENDA LLEVAR LA UNIDAD A UN DISTRIBUIDOR Tanaka.
Filtro de aire (Fig. 12)
Este ltro debe limpiarse con regularidad quitando polvo y
suciedad a n de evitar:
• Perturbaciones en el funcionamiento del carburador.
• Problemas de arranque.
• Pérdidas de potencia.
• Desgaste innecesario de las piezas del motor.
• Consumo de combustible excesive.
Quite la cubierta del ltro de aire oprimiéndola y retirando el
tabulador en la cima. (Fig. 12)
Limpieza del ltro de aire
Límpiese el elemento depurador de aire cada día o después de
cada 8 horas de funcionamiento. Se recomienda limpieza más
frecuente en condiciones muy polvorientas. Lávese el elemento
con detergente líquido y agua. Apriétese el elemento para quitar la
sucidad. Comprímase el elemento en un trapo seco hasta que se
vuelva completamente seco. Trate el elemento con una cantidad
abundante de aceite para motores de dos tiempos. Apriétese el
elemento para distribuir completamente el aceite y para quitar
cualquier aceite sobrante. Repóngase el elemento e instálese la
tapa. (Fig. 13)
Un ltro de aire que ha sido utilizado durante mucho tiempo, nunca
podrá quedar completamente limpio. Por tanto, los ltros deben
reemplazarse por otros nuevos en intervalos regulares. Reemplace
los ltros que estén dañados.
Filtro de gasolina (Fig. 14)
Vaciar todo el combustible del tanque de gasolina y sacar la línea
de ltro de gasolina del tanque. Sacar el elemento de ltro de
la unidad de soporte y lavar el elemento en el agua caliente con
detergente. Lavar bien hasta que el detergente se haya eliminado
completamente. Exprimirlo sin torcer para quitar el exceso de agua
y dejar el elemento secar por aire.
NOTA
Si el ltro estuviera obstruido debidoal polvo y la suciedad, deberá
reemplazarse.
Bujía (Fig. 15)
El estado de la bujía es inuenciado por:
• Carburador mal ajustado.
• Mezcla incorrecta de combustible y aceite (exceso de aceite).
• Filtro de aire sucio.
• Condiciones de funcionamiento difíciles. (como clima frío)
Todos estos factores dan lugar a la formación de sedimentos en los
electrodos pudiendo causar perturbaciones en el funcionamiento
y dicultades de arranque. Si en la cortadora se nota falta de
potencia, si los arranques son difíciles y si el ralentí es inestable,
controlar siempre primero la bujía antes de adoptar otras medidas.
Si la bujía está muy sucia, limpiarla y controlar la separación entre
elec-trodos, que ha de ser de 0,6 mm (0.024 pulg.). La bujía debe
cambiarse después de unas 100 horas de funcionamiento o autes
si los elec-trodos están muy gastados.
NOTA
En algunas áreas, los reglamentos locales requieren el uso de una
bujía de encendido de rcsistencia para eliminar seòales de ignición.
En el caso de que esta máquina estaba equipada originalmente de
la bujía de encen-dido de resistencia, debe usar algún tipo de bujía
de encendido de resistencia como re-puesto.
Esquema de mantenimiento
Siguen a continuación algunas instrucciones generales de
mantenimiento. Para obtener información adicional, sírvase
contactar a un distribuidor Tanaka.
Cuidados diarios
• Limpie la máquina por fuera.
• Compruebe que el oricio de admisión de aire en la cubierta
guardapolvo no está obstruido.
• Compruebe que la cubierta contra polvo no está deteriorada y
no tenga grietas. Combie la cubierta si está dañada por golpes o
tiene grietas.
• Controlar que las tuercas y tornillos est apretados.
Cuidados semanales
• Veri que el sistema de arranque, en especial la cuerda.
• Limpie la bujia por fuera.
• Desmóntela y controle la distancia entre electrodos que ha de
ser de 0.6 mm, o cambie la bujía.
• Limpie el ltro de aire.
Cuidados mensuales
• Lave el depósito de combustible congasolina y, a continuación,
limpie el ltro de combustible.
• Limpie el carburador por fuera y los alrede- dores del mismo.
Mantenimiento trimestral
• Limpie las aletas de refrigeración del cilindro.
• Limpie el ventilador y sus alrededores.
• Limpie el carbón del silenciador.
PRECAUCIÓN
La limpieza de las aletas del cilindro, del ventilador y del silenciador
será realizada por un Centro de Servicios Autorizado.
NOTA
Cuando pida las piezas a su distribuidor más cercano, use por
favor el número de artículo de la sección de desglose de piezas
de estas instrucciones.
ES-6
Page 21

B
B
ENGINE
13
12
14
15
16
17
18
19
20
21
22
23
24
25
26
27
28
33
34
35
29
36
30
31
32
37
38
41
42
39
40
52
53
54
56
57
64
65
66
67
68
69
70
71
72
50
51
55
12
1
2
3
4
5
6
7
8
9
10
11
58
59
60
61
62
63
73
74
75
76
77
78
79
80
81
82
81
80
83
Page 22

HTU0014
形 名
図 番
尺 度
RB24E (2/2)
Rev.1
BLOWER
RECOIL STARTER
122
123
124
125
127
128
130
131
121
122
133
134
160
136
138
137
139
140
141
142
143
145
146
147
155
150
153
154
152
156
159
162
161
183
184
186
187
189
185
182
191
188
190
501
157
126
149
151
181
132
135
129
158
164
163
144
148
192
Page 23

MEMO
Page 24

WARNING:
Hitachi Koki Co., Ltd.
Some dust created by power sanding, sawing, grinding, drilling, and other construction activities contains
chemicals known to the State of California to cause cancer, birth defects or other reproductive harm.
Some examples of these chemicals are:
• Lead from lead-based paints,
• Crystalline silica from bricks and cement and other masonry products, and
• Arsenic and chromium from chemically-treated lumber.
Your risk from these exposures varies, depending on how often you do this type of work. To reduce your
exposure to these chemicals: work in a well ventilated area, and work with approved safety equipment,
such as those dust masks that are specially designed to fi lter out microscopic particles.
AVERTISSEMENT:
La poussière résultant d’un ponçage, d’un sciage, d’un meulage, d’un perçage ou de toute autre activité
de construction renferme des produits chimiques qui sont connus par l’Etat de Californie pour causer
des cancers, des défauts de naissance et autres anomalies de reproduction. Nous énumérons ci-dessus
certains de ces produits chimiques:
• Plomb des peintres à base de plomb,
• Silice cristalline des briques et du ciment et autres matériaux de maçonnerie, et
• Arsenic et chrome du bois d’oeuvre traité chimiquement.
Le risque d’exposition à ces substances varie en fonction de la fréquence d’exécution de ce genre de
travail. Pour réduire l’exposition à ces produits chimiques, travailler dans un lieu bien ventilé, et porter un
équipement de protection agréé, par exemple un masque anti-poussière spécialement conçu pour fi lter
les particules microscopiques.
ADVERTENCIA:
Algunos polvos creados por el lijado mecánico, el aserrado, el esmerilado, el taladrado y otras actividades
de construcción contienen sustancias químicas conocidas por le Estado de California como agentes
cancerígenos, defectos congénitos y otros daños reproductores. Algunos ejemplos de estas sustancias
químicas son:
• El plomo de las pinturas a base de plomo,
• El sílice cristalino de los ladrillos y cemento y otros productos de mampostería, y
• El arsénico y el cromo de la madera tratada químicamente.
El riesgo resultante de la exposición varía según la frecuencia con que se realiza este tipo de trabajo. Para
reducir la exposicíon a esta sustancias químicas: trabaje en un lugar bien ventilado y realice el trabajo
utilizando el equipamiento apropiado, tal como las máscaras para el polvo especialmente diseñados
para eliminar las partículas minúsculas.
Shinagawa Intercity Tower A, 15-1, Konan 2-chome,
Minato-ku, Tokyo 108-6020, Japan
Hitachi Koki U.S.A., Ltd.
450 Export Blvd. Unit B,
Mississauga ON L5S 2A4
Issued by
Distributed by
PO Box 970
Braselton, GA 30517
400
Code No. E99000762 NA
Printed in China
 Loading...