

Page 1
Drill
Taladro
Berbequim
FD 10VB • FD 10SB
Read through carefully and understand these instructions before use.
Leer cuidadosamente y comprender estas instrucciones antes del uso.
Antes de usar, leia com cuidado para assimilar estas instruções.
Handling instructions
Instrucciones de manejo
Instruções de uso
Page 2
1
2
2
3
8
7
4
5
6
1
3
4
!
0
@
9
#
5
$
%
1
Page 3

English Español Português
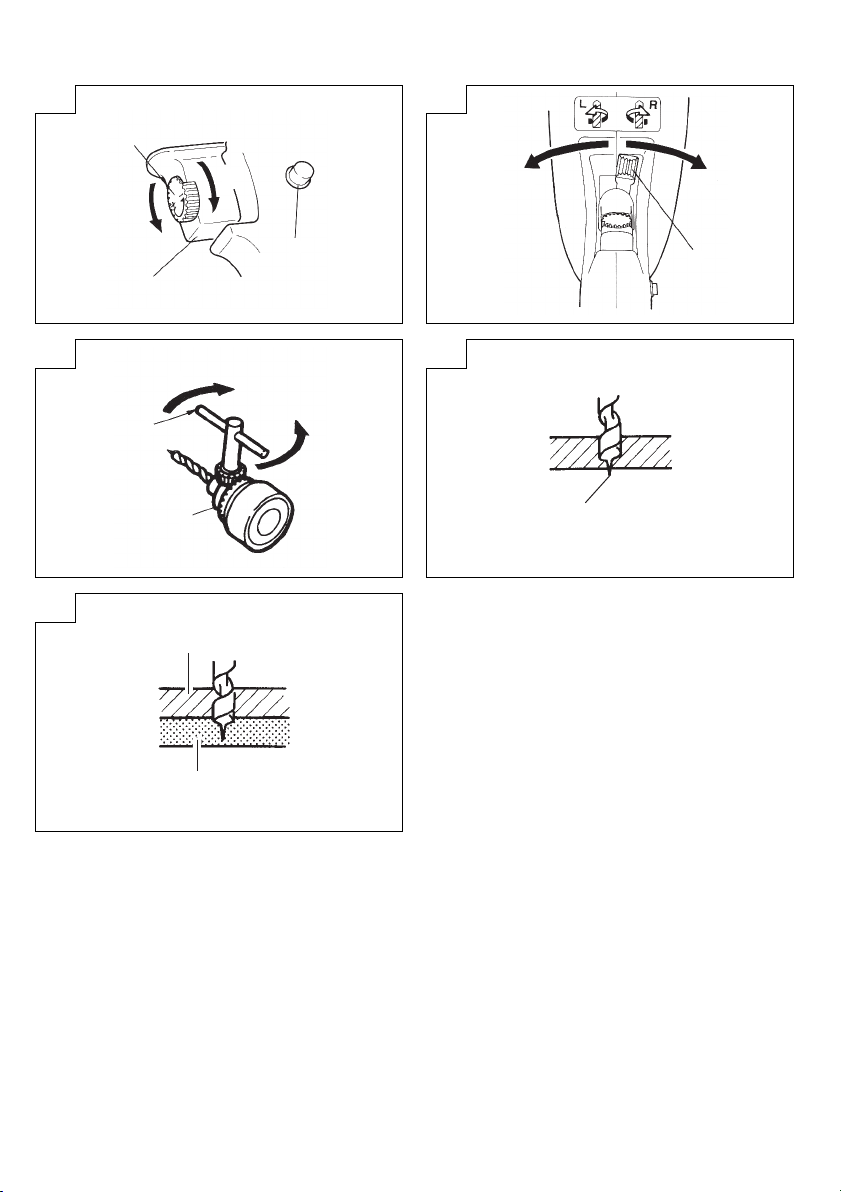
1
Trigger switch Interruptor de gatillo Interruptor de gatilho
2
Adjusting knob
3
High speed Alta velocidad
4
Low speed Baja velocidad Baixa rotação
5
Stopper Tope Obturador
6
Lever Palanca Alavanca
7
Right (clockwise)
8
Left (counterclockwise)
9
Drill chuck Portabrocas
0
Chuck wrench Llave Chave do mandril
!
Tighten (clockwise)
@
Loosen (counterclockwise)
When the point appears, turn lumber
#
over.
$
Lumber to be drilled Madera que va a taladrar Madeira a ser perfurada
%
Extra lumber Madera adicional Madeira extra
Mando de ajuste Botão de ajuste
Alta rotação
Derecha (en el sentido de las
agujas del reloj)
Izquierda (en el sentido contrario a
las agujas del reloj)
Apretar (en el sentido de las agujas
del reloj)
Afl ojar (en el sentido contrario a las
agujas del reloj)
Cuando aparezca la punta, dele la
vuelta a la madera.
Direita (sentido horário)
Esquerda (sentido anti-horário)
Mandril
Apertar (sentido horário)
Afrouxar (sentido anti-horário)
Quando a ponta aparecer, vire a
madeira ao contrário.
2
Page 4

English
GENERAL POWER TOOL SAFETY WARNINGS
WARNING
Read all safety warnings and all instructions.
Failure to follow the warnings and instructions may result in
electric shock, fi re and/or serious injury.
Save all warnings and instructions for future reference.
The term “power tool” in the warnings refers to your mainsoperated (corded) power tool or battery-operated (cordless)
power tool.
1) Work area safety
a) Keep work area clean and well lit.
Cluttered or dark areas invite accidents.
b) Do not operate power tools in explosive
atmospheres, such as in the presence of
fl ammable liquids, gases or dust.
Power tools create sparks which may ignite the dust
or fumes.
c) Keep
children and bystanders away while
operating a power tool.
Distractions can cause you to lose control.
2) Electrical safety
a) Power tool plugs must match the outlet.
Never modify the plug in any way.
Do not use any adapter plugs with earthed
(grounded) power tools.
Unmodifi ed plugs and matching outlets will reduce
risk of electric shock.
b) Avoid body contact with earthed or grounded
surfaces, such as
refrigerators.
There is an increased risk of electric shock if your
body is earthed or grounded.
c) Do not expose power tools to rain or wet
conditions.
Water entering a power tool will increase the risk of
electric shock.
d) Do not abuse the cord. Never use the cord for
carrying, pulling or unplugging the power tool.
Keep cord away from heat, oil, sharp edges or
moving parts.
Damaged or entangled cords increase the risk of
electric shock.
e) When operating a
extension cord suitable for outdoor use.
Use of a cord suitable for outdoor use reduces the
risk of electric shock.
f) If operating a power tool in a damp location
is unavoidable, use a residual current device
(RCD) protected supply.
Use of an RCD reduces the risk of electric shock.
3) Personal safety
a) Stay alert, watch what you are doing and use
common sense when operating a power tool.
Do not use a power tool while you are tired
or under the infl uence of drugs, alcohol or
medication.
A moment of inattention while operating power tools
may result in serious personal injury.
b) Use personal protective equipment. Always wear
eye protection.
Protective equipment such as dust mask, non-skid
safety shoes, hard hat, or hearing protection used for
appropriate conditions will reduce personal injuries.
c) Prevent unintentional starting. Ensure the
switch is in the off -position before connecting to
power source and/or
carrying the tool.
3
pipes, radiators, ranges and
power tool outdoors, use an
battery pack, picking up or
Carrying power tools with your fi nger on the switch or
energising power tools that have the switch on invites
accidents.
d) Remove any adjusting key or wrench before
turning the power tool on.
A wrench or a key left attached to a rotating part of the
power tool may result in personal injury.
e) Do not overreach. Keep proper footing and
balance at all times.
This enables better control of the power tool in
unexpected situations.
f) Dress properly. Do not wear loose clothing or
jewellery. Keep your hair, clothing and
away from moving parts.
Loose clothes, jewellery or long hair can be caught in
moving parts.
g) If devices are provided for the connection of
dust extraction and collection facilities, ensure
these are connected and properly used.
Use of dust collection can reduce dust related
hazards.
4) Power tool use and care
a) Do not force the power tool. Use the correct
power tool for your application.
The correct power tool will do the job better and safer
at the rate for which it was designed.
b) Do
not use the power tool if the switch does not
turn it on and off .
Any power tool that cannot be controlled with the
switch is dangerous and must be repaired.
c) Disconnect the plug from the power source and/
or the battery pack from the power tool before
making any adjustments, changing accessories,
or storing power tools.
Such preventive safety measures reduce the risk of
starting the power tool accidentally.
d) Store idle power tools out
and do not allow persons unfamiliar with the
power tool or these instructions to operate the
power tool.
Power tools are dangerous in the hands of untrained
users.
e) Maintain power tools. Check for misalignment or
binding of moving parts, breakage of parts and
any other condition that may aff ect the power
tools’
If damaged, have the power tool repaired before
Many accidents are caused by poorly maintained
f) Keep cutting tools sharp and clean.
Properly maintained cutting tools with sharp cutting
g) Use the power tool, accessories and tool bits
Use of the power tool for operations diff erent from those
5) Service
a) Have your
This will ensure that the safety of the power tool is
PRECAUTION
Keep children and infi rm persons away.
When not in use, tools should be stored out of reach of
children and infi rm persons.
operation.
use.
power tools.
edges are less likely to bind and are easier to
control.
etc. in accordance with these instructions,
taking into account the working conditions and
the work to be performed.
intended could result in a hazardous situation.
person using only identical replacement parts.
maintained.
power tool serviced by a qualifi ed repair
of the reach of children
gloves
Page 5

English
DRILL SAFETY WARNINGS
1. When mounting the drill bit or driver bit, insert it fully into
the drill chuck and completely tighten the drill chuck with
the chuck wrench.
If mounting is not done properly, it is very dangerous as
the drill bit may slip or loosen during operation.
2. Do not wear gloves made of stuff liable to roll up such as
cotton, wool, cloth or string, etc.
3. Do not touch the bit during or immediately after operation.
The bit becomes very hot during operation and could
cause serious burns.
4. When placing the drill on the fl oor, make sure that the drill
has stopped completely.
5. Before drilling into a wall, fl oor or ceiling, thoroughly
confi rm that no items such as electric cables or conduits
are buried inside.
6. When working in high position, take care of downward
direction.
SPECIFICATIONS
Model FD10VB FD10SB
Voltage (by areas)* (110 V, 115 V, 120 V, 127 V, 220 V, 230 V, 240 V)
Power input 420 W*
No-load speed 0 – 2800/min 2800/min
Capacity
Weight (without cord) 1.4 kg
* Be sure to check the nameplate on product as it is subject to change by areas.
APPLICATIONS
1. Drilling various materials
○ Drilling metal
Use a metal-working drill bit
○ Drilling wood
Use a wood-working drill bit (However, a metal-
2. Tightening wood screws (Only model FD10VB)
Use the driver bit. Use a Phillips screw for easy
tightening.
PRIOR TO OPERATION
1. Power source
Ensure that the power source to be utilized conforms
to the power requirements specifi ed on the product
nameplate.
2. Power switch
Ensure that the power switch is in the OFF position. If the
plug is connected to a receptacle while the power switch
is in the ON position, the power tool will start operating
immediately, inviting serious accident.
3. Extension cord
When the work area is removed from the power source.
Use an extension cord of suffi cient thickness and rated
capacity. The extension cord should be kept as short as
practicable.
4. Check the tightening of the drill chuck
The drill chuck has been tightened at the factory, but
check again that it is in order before use.
Turn the drill chuck clockwise to tighten.
HOW TO USE
1. Operation of switch
Pulling the trigger of switch and push the stopper, it
keeps, the switched-on condition and it is convenient for
the continuous running. When switched off , the stopper
can be disconnected by means of pulling the trigger
again.
Steel
Wood 25 mm
2. Adjustment of speed
[FD10SB]
The maximum speed can be obtained by pulling the
trigger switch.
[FD10VB]
(1) The speed is adjustable from zero to maximum speed
according to the extent the trigger switch is pulled.
working drill bit to make pilot holes for wood screws
or holes smaller than 6.5 mm.)
(2) The maximum speed is adjustable from zero to 2800/
min. with the rotation of adjusting knob.
(3) Turn the adjusting knob clockwise for higher speed and
counterclockwise for lower speed. (Rotate the adjusting
knob approximately 1-2/3 turns.) (Fig. 1)
(4) The switch can be locked with the stopper at any required
position irrespective as to how far the adjusting knob has
been rotated. Select a proper position according to the
required speed for each work.
3. Confi rm the direction of bit rotation (Fig. 2)
The bit rotates clockwise (viewed from the rear
side) by pushing the R-side of the reversing switch
lever. The L-side of the lever is pushed to turn the bit
counterclockwise.
CAUTION
Never change the direction of bit rotation during
operating.
Turn the power switch OFF before changing the direction
of bit rotation.
4. For use as a drill
(1) Mounting drill bit
Tighten drill bit with the chuck wrench. There are three
holes in which the chuck wrench should be inserted.
Tighten them equally in turn at three holes, without
tightening them only at one hole. The drill bit can be
removed in the opposite method as mentioned above.
(Fig. 3)
(2) How to drill
1 To use for drilling lumber
○ Apply the point of the drill bit to the desired drilling
position, hold the drill perpendicular to the workpiece
surface and turn on the switch.
○ When drilling a through hole in lumber, remove the drill
from the material as soon as the tip of the drill bit protrudes
from the opposite surface. Then, turn the workpiece over
and complete the drilling from the opposite side to obtain
a clean hole. (Fig. 4)
10 mm
4
Page 6

English
If extra lumber is applied under the lumber you want to
drill and it is drilled together, a fi ne hole will also be made.
(Fig. 5)
○ A wood-working drill need not be pressed strongly since it
penetrates using the screw at the point. Even if excessive
force is used, a hole will not be made quickly.
2 To use for drilling metal
○ In case you drill metal with a metal-working drill, apply in
advance a center punch in the drilling position. You can
drill metal stably since the point of the drill does not slip.
○ If you apply sewing machine oil or soapy water to the drill
with a brush or an old tooth brush, the drill will last long.
○ Even if more-than-necessary force is used, a hole will not
be made quickly.
On the contrary, the edge of the drill will be damaged.
This will decrease operational effi ciency and shorten the
life of this tool.
CAUTION
Do not expose the motor to water as it may cause motor
malfunction and electric shock.
5. To use the driving wood screws (FD10VB)
(1) Driver bit
○ For driving a slotted head wood screw, the driver bit
detaches easily. So use cross-recessed head wood
screws as often as possible.
○ Select a driver bit matching the cross-recessed and the
slotted groove of the wood screw.
(2) Pilot hole
If a pilot hole is made with a drill a little smaller than the
diameter of the wood screw, the lumber will not be split
and the wood screw will be driven with ease.
(3) Driving operation
Put the wood screw lightly in the pilot hole, apply the bit to
the screw head groove, turn on the switch and drive the
screw.
6. Caution to be taken immediately after operation
When placing the drill in dusty places before the rotating
parts has stopped completely, make sure the machine
does not suck in dust and swarf.
This Parts List will be helpful if presented with the tool to
the Hitachi Authorized Service Center when requesting
repair or other maintenance.
In the operation and maintenance of power tools, the
safety regulations and standards prescribed in each
country must be observed.
MODIFICATION
Hitachi Power Tools are constantly being improved
and modifi ed to incorporate the latest technological
advancements.
Accordingly, some parts (i.e. code numbers and/or
design) may be changed without prior notice.
NOTE
Due to HITACHI’s continuing program of research and
development, the specifi cations herein are subject to change
without prior notice.
MAINTENANCE AND INSPECTION
CAUTION
Be sure to switch power OFF and disconnect the plug during
maintenance and inspection.
1. Inspecting the drill bits and driver bit
Since use of an abraded drill bit will cause motor
malfunctioning and degraded effi ciency, replace the drill
bit with a new one or resharpening without delay when
abrasion is noted. If you use a driver bit of which point
is worn or broken, it will be dangerous since it slips. So
replace it with a new one.
2. Inspecting the mounting screws
Regularly inspect all mounting screws and ensure that
they are properly tightened. Should any of the screws be
loose, retighten them immediately. Failure to do so could
result in serious hazard.
3. Servicing
Consult a Hitachi Authorized Service Center in the event
of power tool failure.
4. Service parts list
A: Item No.
B: Code No.
C: No. Used
D: Remarks
CAUTION
Repair, modifi cation and inspection of Hitachi Power
Tools must be carried out by a Hitachi Authorized Service
Center.
5
Page 7

Español
ADVERTENCIAS DE SEGURIDAD GENERAL DE
LA HERRAMIENTA ELÉCTRICA
ADVERTENCIA
Lea todas las instrucciones y advertencias de
seguridad.
Si no se siguen las advertencias e instrucciones, podría
producirse una descarga eléctrica, un incendio y/o daños
graves.
Guarde todas las advertencias e instrucciones para
futura referencia.
El término “herramienta eléctrica” en las advertencias hace
referencia a la herramienta eléctrica que funciona con la red
de suministro (con cable) o a la herramienta eléctrica que
funciona con pilas (sin cable).
1) Seguridad del área de trabajo
a) Mantenga la zona de trabajo limpia y bien
iluminada.
Las zonas desordenadas u oscuras pueden provocar
accidentes.
b) No utilice las herramientas eléctricas en entornos
explosivos como, por ejemplo, en presencia de
líquidos infl
Las herramientas eléctricas crean chispas que
pueden infl amar el polvo o los humos.
c) Mantenga a los niños y transeúntes alejados
cuando utilice una herramienta eléctrica.
Las distracciones pueden hacer que pierda el
control.
2) Seguridad eléctrica
a) Los enchufes de las herramientas eléctricas
tienen que ser adecuados a la toma de
corriente.
No modifi que el enchufe.
No utilice enchufes adaptadores con
herramientas eléctricas conectadas
Si no se modifi can los enchufes y se utilizan tomas
de corriente adecuadas se reducirá el riesgo de
descarga eléctrica.
b) Evite el contacto corporal con superfi cies
conectadas a tierra como tuberías, radiadores y
frigorífi cos.
Hay mayor riesgo de descarga eléctrica si su cuerpo
está en contacto con el suelo.
c) No exponga las herramientas eléctricas a la
lluvia o a la humedad.
La entrada de agua en una herramienta eléctrica
aumentará el riesgo de descarga eléctrica.
d) No utilice el cable incorrectamente. No utilice el
cable para transportar, tirar de la
eléctrica o desenchufarla.
Mantenga el cable alejado del calor, del aceite,
de bordes afi lados o piezas móviles.
Los cables dañados o enredados aumentan el riesgo
de descarga eléctrica.
e) Cuando utilice una herramienta eléctrica al aire
libre, utilice un cable prolongador adecuado
para utilizarse al aire libre.
La utilización de un cable adecuado para usarse al
aire libre reduce el riesgo de descarga eléctrica.
f) Si no se puede evitar el uso de una herramienta
eléctrica en un lugar húmedo, utilice un
suministro protegido mediante un dispositivo
de corriente residual (RCD).
El uso de un RCD reduce el riesgo de descarga
eléctrica.
amables, gases o polvo.
a tierra.
herramienta
3) Seguridad personal
a) Esté atento, preste atención a lo que hace y
utilice el sentido común cuando utilice una
herramienta eléctrica.
No utilice una herramienta eléctrica cuando esté
cansado o esté bajo la
alcohol o medicación.
La distracción momentánea cuando utiliza
herramientas eléctricas puede dar lugar a importantes
daños personales.
b) Utilice un equipo de protección. Utilice siempre
una protección ocular.
El equipo de protección como máscara para el
polvo, zapatos de seguridad antideslizantes, casco
o protección para oídos utilizado para condiciones
adecuadas reducirá los daños personales.
c) Evite un inicio involuntario. Asegúrese de que
el interruptor está en “off ” antes de conectar la
herramienta a una fuente de alimentación y/o
batería, cogerla o transportarla.
El transporte de herramientas eléctricas con el dedo
en el interruptor o el encendido de herramientas
eléctricas con el interruptor encendido puede
provocar accidentes.
d)
Retire las llaves de ajuste antes de encender la
herramienta eléctrica.
Si se deja una llave en una pieza giratoria de la
herramienta eléctrica podrían producirse daños
personales.
e) No se extralimite. Mantenga un equilibrio
adecuado en todo momento.
Esto permite un mayor control de la herramienta
eléctrica en situaciones inesperadas.
f) Vístase adecuadamente. No lleve prendas
sueltas o joyas. Mantenga el pelo, la ropa y los
guantes alejados de las piezas móviles.
La ropa suelta, las joyas y el pelo largo pueden
pillarse en las piezas móviles.
g) Si se proporcionan dispositivos
de extracción de polvo e instalaciones de
recogida, asegúrese de que están conectados y
se utilizan adecuadamente.
La utilización de un sistema de recogida de polvo
puede reducir los riesgos relacionados con el polvo.
4) Utilización y mantenimiento de las herramientas
eléctricas
a) No fuerce la herramienta eléctrica. Utilice
la herramienta eléctrica correcta para su
aplicación.
La herramienta eléctrica correcta trabajará mejor y
de forma más segura si se utiliza a la velocidad para
la que fue diseñada.
b) No utilice la herramienta eléctrica si el interruptor
no la enciende y apaga.
Las herramientas eléctricas que no pueden
controlarse con el interruptor son peligrosas y deben
repararse.
c) Desconecte el enchufe de la fuente eléctrica y/o
la batería de la herramienta eléctrica antes de
hacer ajustes, cambiar accesorios o almacenar
herramientas eléctricas.
Estas medidas de seguridad preventivas reducen el
riesgo de que la herramienta eléctrica se ponga en
marcha accidentalmente.
d) Guarde las herramientas eléctricas que no se
utilicen para que no las cojan los niños y no
permita
que utilicen las herramientas eléctricas
personas no familiarizadas con las mismas o
con estas instrucciones.
infl uencia de drogas,
para la conexión
6
Page 8

Español
Las herramientas eléctricas son peligrosas si son
utilizadas por usuarios sin formación.
e) Mantenimiento de las herramientas eléctricas.
Compruebe si las piezas móviles están mal
alineadas o unidas, si hay alguna pieza rota u otra
condición que pudiera afectar al funcionamiento
de las herramientas eléctricas.
Si la herramienta eléctrica está dañada, llévela a
reparar antes de utilizarla.
Se producen muchos accidentes por no realizar
un mantenimiento correcto de las herramientas
eléctricas.
f) Mantenga las herramientas
limpias.
Las herramientas de corte correctamente mantenidas
con los bordes de corte afi lados son más fáciles de
controlar.
g) Utilice la herramienta eléctrica, los accesorios
y las brocas de la herramienta, etc. de acuerdo
con estas instrucciones, teniendo en cuenta las
condiciones laborales y el trabajo que se va a
realizar.
La utilización de la herramienta eléctrica para
operaciones diferentes a aquellas pretendidas podría
dar lugar a una situación peligrosa.
5) Revisión
a) Lleve su herramienta a que la
cualifi cado que utilice sólo piezas de repuesto
idénticas.
de corte afi ladas y
revise un experto
Esto garantizará el mantenimiento de la seguridad de
la herramienta eléctrica.
PRECAUCIÓN
Mantenga a los niños y a las personas enfermas
alejadas.
Cuando no se utilicen, las herramientas deben
almacenarse fuera del alcance de los niños y de las
personas enfermas.
ADVERTENCIAS DE SEGURIDAD DEL
TALADRO
1. Cuando monte la broca en el taladro, insértela
completamente en el portabrocas y ajuste el portabrocas
con la llave.
Un montaje incorrecto puede ser muy peligroso, puesto
que la broca puede resbalar o afl ojarse durante la
operación.
2. No utilice guantes hechos de un material que se pueda
enrollar, como algodón, lana, paño, cordón, etc.
3. No toque la broca durante o inmediatamente después
de su operación puesto que se calienta mucho y puede
ocasionar quemaduras graves.
4. Cuando deje el taladro en el suelo, asegúrese de que la
broca ha parado completamente.
5. Antes de taladrar en la pared, suelo o techo, compruebe
que tras ellos no hay cables eléctricos ni conductos.
6. Cuando trabaje en lugares altos, tenga en cuenta la
caída.
ESPECIFICACIONES
Modelo FD10VB FD10SB
Voltaje (por áreas)* (110 V, 115 V, 120 V, 127 V, 220 V, 230 V, 240 V)
Acometida 420 W*
Velocidad de marcha en vacío 0 – 2800/min 2800/min
Capacidad
Peso (sin cable) 1,4 kg
* Verifi car indefectiblemente los datos de la placa de características de la máquina, pues varían de acuerdo al país de
destino.
APLICACIONES
1. Taladrar distintos materiales
○ Taladrar metal
Use una broca para metal
○ Taladrar madera
Use una broca para madera. No obstante, use una
2. Apretar tornillos de madera (sólo el modelo
FD10VB)
Use la broca atornilladora. Use un tornillo de estrella para
un ajuste más fácil.
ANTES DE LA PUESTA EN MARCHA
1. Alimentación
Asegurarse de que la acometida de red que ha de ser
utilizada es conforme a las exigencias de corriente
espacifi cadas en la placa de características del
producto.
Acero
Madera 25 mm
2. Conmutador de alimentación
Asegurarse de que el conmutador de acometida
está en posición OFF (desconectado). Si el enchufe
está conectado a la caja del enchufe mientras el
conmutador de acometida está en posición ON
(conectado) la herramienta eléctrica empezará a trabajar
inmediatamente, provocando un serio accidente.
broca para metal para hacer los orifi cios guía para
tornillos de madera o para los orifi cios inferiores a 6,5
mm.)
3. Cable de prolongación
Cuando está alejada el área de trabajo de la red de
acometida, usar un cable de prolongación de un grosor
sufi ciente y potencia nominal. El cable de prolongación
debe ser mantenido o más corto posible.
4. Compruebe que el portabrocas se ajusta bien
El portabrocas viene ajustado de fábrica, pero vuelva a
comprobar que está en su sitio antes de usarlo.
Para ajustarlo, gire el portabrocas a la derecha.
10 mm
7
Page 9

Español
COMO SE USA
1. Operación del interruptor
Accione el gatillo del interruptor y pulse el bloqueador.
Ello mantendrá el taladro encendido y es recomendable
si lo va a usar varias veces. Cuando está apagado, el
bloqueador se puede desconectar accionando el gatillo
de nuevo.
2. Ajustar la velocidad
[FD10SB]
La velocidad máxima se obtiene accionando el interruptor
del gatillo.
[FD10VB]
(1) La velocidad se puede ajustar de cero a velocidad
máxima dependiendo del grado en el que se accione el
gatillo.
(2) La velocidad máxima se puede ajustar de cero a 2800 en
menos de un minuto girando el mando de ajuste.
(3) Gire el mando de ajuste a la derecha para aumentar
la velocidad y a la izquierda para disminuirla. (Gire el
mando de ajuste aproximadamente 1-2/3 vueltas.)
(Fig. 1)
(4) El interruptor se puede bloquear con el bloqueador en
cualquier posición independientemente de la posición a
la que se haya girado el mando de ajuste. Seleccione
la posición adecuada dependiendo de la velocidad
necesaria para cada trabajo.
3. Confi rme la dirección de la broca (Fig. 2)
La broca gira hacia la derecha (vista desde atrás) al
pulsar el lado derecho (R) de la palanca reversa. Pulse el
lado izquierdo (L) de la palanca para hacer girar la broca
a la izquierda.
PRECAUCIÓN
Nunca cambie la dirección de rotación de la broca
durante su operación.
Apague el interruptor de corriente antes de cambiar la
dirección de rotación de la broca.
4. Para uso como taladro
(1) Montaje de la broca
Ajuste la broca con la llave. Hay tres orifi cios en los que
deberá insertar la llave. Ajuste los tres orifi cios de igual
forma. No ajuste únicamente un orifi cio. La broca se retira
siguiendo el proceso inverso al descrito anteriormente.
(Fig. 3)
(2) Cómo taladrar
1 Taladrar madera
○ Aplique la punta de la broca en la posición de taladro
deseada. Sujete el taladro perpendicularmente a la
superfi cie de trabajo y encienda el interruptor.
○ Cuando taladre orifi cios en madera, retire el taladro del
material tan pronto como la punta de la broca salga por
el otro lado. A continuación, dele la vuelta a la pieza de
trabajo y complete el orifi cio desde la otra parte para
obtener un orifi cio limpio. (Fig. 4)
Si se aplica madera adicional bajo la madera que desea
taladrar y se taladra a la vez, el orifi cio será igualmente
válido. (Fig. 5)
○ No se necesita ejercer presión sobre el taladro cuando
se taladre madera, ya que se taladra usando el tornillo
de la punta. El exceso de presión no acelerará el taladro
del orifi cio.
2 Taladrar metal
○ Si está taladrando metal con la broca para metal,
practique una hendidura en el punto donde desea hacer
el orifi cio. Esto le permitirá taladrar más fácilmente, ya
que el taladro no resbalará.
○ Si aplica aceite para máquinas de coser o agua jabonosa
al taladro con un cepillo o un cepillo de dientes el taladro
se conservará mejor.
○ El exceso de presión no acelerará el taladro del orifi cio.
Por el contrario, la punta del taladro se dañará. Esto
disminuirá la efi cacia y acortará la vida útil de la
herramienta.
PRECAUCIÓN
No exponga el motor al agua, puesto que podría
ocasionar un funcionamiento defectuoso o una descarga
eléctrica.
5. Para atornillar en madera (FD10VB)
(1) Broca atornilladora
○ La broca atornilladora baila cuando se usan tornillos
planos. Se recomienda usar tornillos de estrella siempre
que sea posible.
○ Seleccione una broca atornilladora que se ajuste bien a
la cabeza del tornillo.
(2) Orifi cio guía
Si se emplea una broca un poco inferior al diámetro del
tornillo para hacer el orifi cio guía, la madera no se partirá
y el tornillo entrará fácilmente.
(3) Atornillado
Coloque el tornillo sobre el orifi cio guía, sitúe la broca
sobre la cabeza del tornillo, encienda el interruptor y
atornille.
6. Precauciones tras la operación
Cuando coloque el taladro en lugares con polvo antes
de que las partes rotadoras hayan parado, asegúrese de
que la máquina no succiona polvo ni rebabas.
MANTENIMIENTO E INSPECCIÓN
PRECAUCIÓN
Asegúrese de que el interruptor de corriente está
desconectado y desconecte el enchufe durante las tareas
de mantenimiento e inspección.
1. Inspeccionar las brocas taladradoras y
atornilladoras
Para evitar un mal funcionamiento o una degradación de la
efi cacia del motor como resultado de una broca gastada,
sustitúyala inmediatamente por una nueva o afílela si
advierte indicios de abrasión. Puede ser peligroso usar
una broca atornilladora con la punta gastada o rota ya
que puede resbalar. Le recomendamos que la sustituya
por una nueva.
2. Inspeccionar la broca de taladro y el macho de
roscar
Como el uso continuado de una broca o macho de roscar
desgastados disminuye la efi ciencia operativa y causa
un posible recalentamiento del motor, reemplazar o afi lar
la broca o el macho sin demora si se nota un excesivo
desgaste.
3. Averías
Consulte con un servicio técnico autorizado por Hitachi
si experimenta un funcionamiento defectuoso de la
herramienta.
4. Lista de repuestos
A: N° ítem
B: N° código
C: N° usado
D: Observaciones
PRECAUCIÓN
La reparación, modifi cación e inspección de las
herramientas eléctricas Hitachi deben ser realizadas por
un Centro de Servicio Autorizado de Hitachi.
Esta lista de repuestos será de utilidad si es presentada
junto con la herramienta al Centro de Servicio Autorizado
de Hitachi, para solicitar la reparación o cualquier otro
tipo de mantenimiento.
En el manejo y el mantenimiento de las herramientas
eléctricas, se deberán observar las normas y reglamentos
vigentes en cada país.
8
Page 10

Español
MODIFICACIONES
Hitachi Power Tools introduce constantemente mejoras
y modifi caciones para incorporar los últimos avances
tecnológicos.
Por consiguiente, algunas partes (por ejemplo, números
de códigos y/o diseño) pueden ser modifi cadas sin
previo aviso.
NOTA
Debido al programa continuo de investigación y desarollo de
HITACHI estas especifi caciones están sujetas a cambio sin
preaviso.
9
Page 11

Português
ADVERTÊNCIAS GERAIS DE SEGURANÇA
PARA A FERRAMENTA ELÉTRICA
ADVERTÊNCIA
Leia todas as instruções e advertências de segurança.
Deixar de seguir as instruções e as advertências pode
provocar um choque elétrico, incêndio e/ou ferimentos
graves.
Guarde todas as advertências e instruções para futuras
consultas.
O termo “ferramenta elétrica” em todas as advertências
refere-se à sua ferramenta conectada à corrente (com um
cabo de alimentação) ou à ferramenta elétrica alimentada
por bateria (sem um cabo de alimentação).
1) Segurança da área de trabalho
a) Mantenha a área de trabalho limpa e bem
iluminada.
As áreas escuras ou cheias de material são propícias
a acidentes.
b) Não trabalhe com ferramentas elétricas em
ambientes explosivos, tais como na presença
de líquidos infl amáveis,
As ferramentas elétricas criam faíscas que podem
infl amar os gases ou pó.
c) Mantenha as crianças e outras pessoas afastadas
quando trabalhar com uma ferramenta elétrica.
As distrações podem fazer com que perca controle.
2) Segurança elétrica
a) Os plugues da ferramenta elétrica devem
corresponder às tomadas.
Nunca modifi que o plugue.
Não use plugues de adaptação com ferramentas
elétricas conectadas à terra.
Os plugues inalterados e tomadas correspondentes
reduzirão o risco de choques elétricos.
b) Evite o
Existe um risco maior de choque elétrico se o seu
c) Não exponha ferramentas elétricas à chuva ou
A entrada de água numa ferramenta elétrica
d) Não abuse do cabo de alimentação. Nunca use
Mantenha o cabo afastado do
Fios danifi cados ou entrelaçados podem aumentar o
e) Quando trabalhar com uma ferramenta elétrica
O uso de um cabo adequado para uso ao ar livre
f) Se não for possível evitar o uso de uma máquina
O uso de um RCD reduz o risco de choques
3) Segurança pessoal
a) Mantenha-se alerta, esteja atento ao que estiver
contato corporal com superfícies
conectadas à terra, tais como canos, radiadores,
fogões e geladeiras.
corpo estiver conectado à terra.
condições de umidade.
aumentará o risco de choques elétricos.
o cabo para transportar, puxar ou desligar a
ferramenta elétrica.
agudas ou peças móveis.
risco de choques elétricos.
ao ar livre, use uma extensão adequada para
uso em exteriores.
reduz o risco de choques elétricos.
elétrica num local úmido, use uma fonte de
alimentação protegida por um
corrente residual (RCD).
elétricos.
fazendo e use o bom senso ao trabalhar com
uma ferramenta elétrica.
gases ou pó.
calor, óleo, bordas
dispositivo de
Não use uma ferramenta elétrica quando estiver
cansado ou sob a infl uência de drogas, álcool
ou medicamentos.
Um momento de desatenção enquanto trabalha com
ferramentas elétricas pode resultar em ferimentos
pessoais graves.
b) Use o equipamento
sempre protetores para os olhos.
O equipamento de proteção, tal como uma máscara
de pó, sapatos de segurança antiderrapantes,
capacete ou protetores auditivos usados para
condições adequadas reduzirá os ferimentos
pessoais.
c) Evite ligar a ferramenta acidentalmente.
Certifi que-se de que o interruptor esteja na
posição de desligado antes de conectar a
fonte de alimentação e/ou bateria, levantar ou
transportar a ferramenta.
Transportar ferramentas elétricas com o dedo
no interruptor ou ativar ferramentas que estão
com o interruptor ligado é perigoso e aumenta a
probabilidade de acidentes.
d) Remova qualquer chave de parafusos ou chave
de
aperto antes de ligar a ferramenta.
Uma chave de aperto ou de parafusos instalada
na parte rotativa da ferramenta pode provocar
ferimentos pessoais.
e) Não se estique. Mantenha sempre o controle e
equilíbrio adequados.
Isso lhe permite obter um melhor controle da
ferramenta em situações inesperadas.
f) Vista-se adequadamente. Não use roupas largas
ou jóias. Mantenha o cabelo, roupas e luvas
afastados das peças móveis.
As roupas largas, jóias ou cabelo comprido podem
ser apanhados em peças móveis.
g) Se forem fornecidos componentes para a
conexão de dispositivos de extração
de pó, certifi que-se de que os mesmos sejam
conectados e usados adequadamente.
O uso de um coletor de pó pode reduzir os perigos
relacionados com o pó.
4) Uso da ferramenta e manutenção
a) Não force a ferramenta elétrica. Use a ferramenta
correta para a sua aplicação.
A ferramenta correta fará o trabalho melhor e
com mais segurança à velocidade para a qual foi
concebida.
b) Não use a ferramenta elétrica se o interruptor
não a ligar ou desligar.
Qualquer ferramenta que não possa ser controlada
pelo interruptor é perigosa e deve ser reparada.
c) Desligue o plugue da rede elétrica e/ou a
bateria da ferramenta elétrica antes de efetuar
quaisquer ajustes, mudar os acessórios ou
guardar a ferramenta elétrica.
Tais medidas preventivas de segurança reduzem o
risco de ligar a ferramenta elétrica acidentalmente.
d) Guarde as ferramentas elétricas fora do alcance
de crianças e não permita que pessoas não
habituadas à ferramenta elétrica ou estas
instruções trabalhem
As ferramentas elétricas são perigosas nas mãos de
usuários inexperientes.
e) Efetue a manutenção de ferramentas elétricas.
Verifi que a existência de desalinhamentos ou
curvaturas das peças móveis, rupturas de peças
e quaisquer outras condições que possam afetar
o funcionamento das ferramentas elétricas.
de proteção pessoal. Use
e coleta
com a ferramenta.
10
Page 12

Português
Se encontrar qualquer dano, solicite o conserto
da ferramenta antes de usá-la.
Muitos acidentes são causados por ferramentas com
manutenção inadequada.
f) Mantenha as ferramentas de corte afi adas e
limpas.
As ferramentas de corte com uma manutenção
adequada e extremidades afi adas são menos
propensas a curvar-se e mais fáceis de controlar.
g) Use a ferramenta elétrica, acessórios e
brocas de ferramentas, etc., de acordo com
estas instruções, levando em consideração
as condições de trabalho e o
efetuado.
O uso de uma ferramenta elétrica para operações
diferentes das concebidas pode resultar num mau
funcionamento.
5) Manutenção
a) A manutenção da sua ferramenta elétrica deve
ser realizada por pessoal técnico qualifi cado e
somente peças idênticas devem ser usadas para
substituição de peças defeituosas.
Isso garantirá que a segurança da ferramenta elétrica
seja mantida.
trabalho a ser
PRECAUÇÃO
Mantenha afastadas das crianças e pessoas
debilitadas.
Quando não estiverem sendo usadas, as ferramentas
devem ser guardadas fora do alcance de crianças e
pessoas debilitadas.
ADVERTÊNCIAS DE SEGURANÇA PARA O
BERBEQUIM
1. Ao montar a broca de perfuração ou a broca de
aparafusamento, insira-a completamente no mandril
e aperte o mandril completamente com a chave de
mandril.
Se a montagem não for feita adequadamente, será
perigoso usar a ferramenta, pois a broca poderia sair de
posição ou soltar-se durante a operação.
2. Não use luvas feitas com material que possa se enrolar
como, por exemplo, algodão, tecido ou malha, etc.
3. Não toque na broca durante ou logo após a operação.
A broca fi ca muito quente durante a operação e poderia
causar sérias queimaduras.
4. Ao colocar a ferramenta no chão, certifi que-se de que a
ferramenta tenha parado completamente.
5. Antes de perfurar uma parede, assoalho ou teto,
certifi que-se de que não haja coisas como cabos
elétricos ou encanamentos embutidos no material a ser
perfurado.
6. Ao trabalhar num lugar alto, tome cuidado com o que
está debaixo da área de trabalho.
ESPECIFICAÇÕES
Modelo FD10VB FD10SB
Voltagem (por áreas)* (110 V, 115 V, 120 V, 127 V, 220 V, 230 V, 240 V)
Potência de entrada 420 W*
Rotação sem carga 0 – 2800/min 2800/min
Capacidade
Peso (sem cabo) 1,4 kg
* Certifi que-se de verifi car a placa de identifi cação no produto, já que existe a possibilidade de alterações de acordo com a
área.
APLICAÇÕES
1. Perfuração de diversos tipos de materiais
○ Perfuração de metais
Use uma broca de trabalho em metal
○ Perfuração de madeira
Use uma broca de trabalho em madeira (No entanto,
2. Aperto de parafusos para madeira (Somente modelo
FD10VB)
Use a broca de aparafusamento. Use um parafuso
Phillips para um aperto fácil.
ANTES DA OPERAÇÃO
1. Fonte de energia
Certifi que-se de que a fonte de energia que será usada
satisfaça as exigências especifi cadas na placa de
identifi cação do produto.
Aço
Madeira 25 mm
2. Interruptor de alimentação
Certifi que-se de que o interruptor de alimentação
use uma broca de trabalho em metal para fazer furospiloto para parafusos para madeira ou furos menores
que 6,5 mm.)
3. Cabo de extensão
Quando o local de trabalho não possuir uma fonte de
4. Verifi que o aperto do mandril
O mandril é apertado antes que a ferramenta saia
Gire o mandril no sentido horário para apertá-lo.
esteja na posição de desligado (OFF). Se o plugue for
conectado a uma tomada elétrica com o interruptor na
posição de ligado (ON), a ferramenta elétrica começará
a funcionar imediatamente, podendo provocar um grave
acidente.
energia, utilize um cabo de extensão de espessura e
de potência nominal sufi cientes. A extensão deve ser
mantida o mais curta quanto possível.
da fábrica, mas certifi que-se de que o aperto esteja
adequado antes de usar a ferramenta.
10 mm
11
Page 13

Português
MODO DE USAR
1. Operação do interruptor de gatilho
Puxar o interruptor de gatilho e pressionar o detentor
mantém a ferramenta na condição ligada, sendo
conveniente para um trabalho contínuo. Para desligar,
desconecte o detentor puxando o interruptor de gatilho
de novo.
2. Ajuste da velocidade
[FD10SB]
A velocidade máxima pode ser obtida puxando-se o
interruptor de gatilho até o fundo.
[FD10VB]
(1) A velocidade é ajustável de zero até a velocidade
máxima de acordo com a extensão em que o interruptor
de gatilho é puxado.
(2) A velocidade máxima é ajustável de zero a 2800/min
com a rotação do botão de ajuste.
(3) Gire o botão de ajuste no sentido horário para uma
velocidade mais alta, e no sentido anti-horário para
uma velocidade mais baixa. (Gire o botão de ajuste
aproximadamente 1-2/3 volta.) (Fig. 1)
(4) O interruptor pode ser bloqueado com o detentor em
qualquer posição requerida, independentemente de
quanto o botão de ajuste tiver sido girado. Selecione
uma posição apropriada de acordo com a velocidade
requerida para cada trabalho.
3. Confi ra a direção de rotação da broca (Fig. 2)
A broca gira no sentido horário (visto de trás) quando
se pressiona o lado R da alavanca do interruptor de
inversão. O lado L da alavanca é pressionado para girar
a broca no sentido anti-horário.
PRECAUÇÃO
Nunca altere a direção de rotação da broca durante a
operação.
Coloque o interruptor de alimentação na posição de
desligado (OFF) antes de alterar a direção de rotação da
broca.
4. Para usar como um berbequim
(1) Montagem da broca
Aperte a broca com a chave de mandril. Há três orifícios
nos quais a chave de mandril deve ser inserida. Aperte
igualmente em ordem nos três orifícios, sem apertar
somente em um orifício. Realize o procedimento acima
na ordem inversa para retirar a broca. (Fig. 3)
(2) Como perfurar
1 Para perfurar madeira
○ Aplique a ponta da broca na posição desejada para a
perfuração, segure a ferramenta perpendicularmente à
superfície da peça de trabalho e ligue a ferramenta com
o interruptor de alimentação.
○ Ao perfurar um orifício atravessante na madeira, retire
a broca do material assim que a ponta da broca sair
pela superfície oposta. Logo, vire a peça de trabalho ao
contrário e complete a perfuração desde o lado oposto
para obter um orifício de corte limpo. (Fig. 4)
Se for aplicada uma madeira extra sob a madeira que
será perfurada e a mesma for perfurada junto, também é
possível obter um orifício fi no. (Fig. 5)
○
Um berbequim de trabalho em madeira não precisa
ser pressionado fortemente, pois o mesmo penetra na
madeira usando o parafuso na ponta. A aplicação de
uma força excessiva não acelerará a perfuração.
2 Para perfurar metal
○ Para perfurar metal com um berbequim de trabalho
em metal, aplique previamente um punção centrador
na posição de perfuração. Assim, o metal poderá ser
perfurado com estabilidade, já que a ponta da broca não
escorregará.
○ Se você aplicar óleo de máquina de costura ou água
ensaboada no berbequim com uma escova ou escova
de dentes usada, a ferramenta durará mais tempo.
○ A aplicação de uma força maior do que a força necessária
não realizará uma perfuração mais rápida.
Pelo contrário, a borda da ferramenta poderá sofrer
danos. Isso reduzirá a efi cácia operacional e encurtará
a vida útil da ferramenta.
PRECAUÇÃO
Não exponha o motor à água, pois isso pode causar um
mau funcionamento do motor e choques elétricos.
5. Para aparafusar parafusos para madeira (FD10VB)
(1) Broca de aparafusamento
○ Para aparafusar um parafuso para madeira de cabeça
fendida, a broca de aparafusamento sai de posição
facilmente. Portanto, sempre que possível, use parafusos
para madeira de fenda cruzada.
○ Selecione uma broca de aparafusamento compatível
com a fenda cruzada e a ranhura fendida do parafuso
para madeira.
(2) Furo-piloto
Se for feito um furo-piloto com um berbequim um pouco
menor que o diâmetro do parafuso para madeira, a
madeira não rachará e o parafuso para madeira poderá
ser aparafusado com facilidade.
(3) Operação de aparafusamento
Coloque o parafuso para madeira ligeiramente no furo-
piloto, aplique o berbequim na ranhura da cabeça do
parafuso, ligue a ferramenta e aparafuse o parafuso.
6. Precaução logo após a operação
Ao colocar o berbequim em lugares poeirentos antes
que as peças rotativas tenham parado completamente,
certifi que-se de que a ferramenta não aspire a poeira e
serragem.
MANUTENÇÃO E INSPEÇÃO
PRECAUÇÃO
Certifi que-se de desligar (OFF) a ferramenta e de
desconectar o plugue da rede elétrica para a manutenção
e inspeção.
1. Inspeção das brocas de perfuração e brocas de
aparafusamento
Como o uso de uma broca desgastada causará o
mau funcionamento do motor e deteriorará a efi cácia
operacional, troque a broca por uma nova ou afi e a
broca sem demora quando perceber qualquer desgaste.
Se você usar uma broca de aparafusamento com uma
ponta desgastada ou quebrada, isso será perigoso pois
a broca poderá escorregar. Portanto, troque a broca por
uma nova.
2. Inspeção dos parafusos de montagem
Inspecione regularmente todos os parafusos de
montagem e certifi que-se de que estejam corretamente
apertados. Se algum deles estiver frouxo, reaperte-o
imediatamente. Caso isso não seja feito, pode resultar
em perigo grave.
3. Serviço
Consulte um Centro de Serviço Autorizado da Hitachi no
caso de qualquer defeito da ferramenta elétrica.
4. Lista de peças para conserto
A: N° do item
B: N° do código
C: N° da peça usada
D: Observações
PRECAUÇÃO
Os consertos, modifi cações e inspeção de Ferramentas
Elétricas da Hitachi devem ser realizados por uma
Ofi cina Autorizada da Hitachi.
12
Page 14

Português
Esta lista de peças pode ser útil se for apresentada com
a ferramenta na Ofi cina Autorizada da Hitachi ao solicitar
conserto ou manutenção.
Na operação e na manutenção das ferramentas
elétricas, devem-se observar as normas de segurança e
os padrões estabelecidos por cada país.
MODIFICAÇÕES
As Ferramentas Elétricas da Hitachi estão sempre sendo
aperfeiçoadas e modifi cadas para incorporar os mais
recentes avanços tecnológicos.
Dessa forma, algumas peças (isto é, números de código
e/ou design) podem sofrer modifi cações sem aviso
prévio.
NOTA
Devido ao contínuo programa de pesquisa e desenvolvimento
da HITACHI, as especifi cações contidas aqui estão sujeitas
a modifi cações sem aviso prévio.
13
Page 15

1 980057 1
ABCD
FD10VB
2 950292 1 “1”
3 312368 1
4 6202VV 1 6202VVCMPS2L
5 939544 1
6 994721 1
7 954789 1
8 608VVM 1 608VVC2PS2L
10 340228E 1 220V-230V
9A 360456E 1 220V-230V
11 626VVM 1 626VVC2PS2L
13 ———— 1
14 302086 7 D4×20
12-1 312386 1 (MOSS GREEN)
12-2 312387 1 (OFF BLACK GREEN)
15 930483 2
16 999041 2
17 981373 2
18 303665 1
19 303656 1
20 312388 1
21 303657 1
22 303666 1
23 ———— 1
24 ———— 1
26 960266 1
27 305812 2 D4×16
28 ———— 1
29 303654 1
30 303655 1
31 994273 1
25-1 307217 1 D7.2
25-2 303662 1 D8.8
32 302488 1
14
Page 16

1 980057 1
ABCD
FD10SB
2 950292 1 “1”
3 312368 1
4 6202VV 1 6202VVCMPS2L
5 939544 1
6 994721 1
7 954789 1
8 608VVM 1 608VVC2PS2L
10 340228E 1 220V-230V
9A 360455E 1 220V-230V
11 305808 1
12 312371 1
13 626VVM 1 626VVC2PS2L
15 ———— 1
16 302086 7 D4×20
17 305807 1
14-1 312372 1 (MOSS GREEN)
14-2 312373 1 (OFF BLACK GREEN)
18 312370 1
19 930483 2
20 999041 2
22 994734 1
23 994273 1
24 960356 2 M3.5
25 302488 1
26 ———— 1
28 960266 1
29 305812 2 D4×16
21-1 960356 2 M3.5
21-2 980063 2
27-1 307217 1 D7.2
27-2 303662 1 D8.8
30 ———— 1
15
Page 17

161718
Page 18

Page 19

Page 20

Issued by
Shinagawa Intercity Tower A, 15-1, Konan 2-chome,
Minato-ku, Tokyo 108-6020, Japan
Distributed by
Francisco Petrarca No. 239 Local A
Col. Chapultepec Morales C. P. 11570
Mexico, D. F.
Avenida Balboa, Edif. BBVA,
Piso 21 B-1, Panamá, Rep. de Panamá
904
Code No. C99182241 G
Printed in China
 Loading...