

Page 1

High Pressure Washer
Hochdruckreiniger
Nettoyeur haute pression
Idropulitrice ad alta pressione
Arandela de alta presión
Anilha de alta pressão
Myjka wysokoci nieniowa
Magasnyomású mosó
Basinçli yikama makinesi
M a
M a
AW 150
Read through carefully and understand these instructions before use.
Diese Anleitung vor Benutzung des Werkzeugs sorgfältig durchlesen und verstehen.
Lire soigneusement et bien assimiler ces instructions avant usage.
Prima dell’uso leggere attentamente e comprendere queste instruzioni.
Leer cuidadosamente y comprender estas instrucciones antes del uso.
Antes de usar, leia com cuidado para assimilar estas instruções.
Przed u ytkowaniem nale y dok adnie przeczyta niniejsz instrukcj i zrozumie jej tre .
Használat el tt olvassa el fi gyelmesen a használati utasítást.
Aleti kullanmadan önce bu kılavuzu iyice okuyun ve talimatları anlayın.
, , , .
.
Handling instructions
Bedienungsanleitung
Mode d’emploi
Istruzioni per l’uso
Instrucciones de manejo
Instrukcja obs ugi
Kezelési utasítás
Kullanım talimatları
Instruções de uso
Page 2
1 2 3
ï
í ì
î
4 5
ð
ç
(1)
(2) (3)
6 7
ê
é
ë
è
ÿ
ª
ç
ý
à
û
ü
8 9
Â
ï
ú
î
ö
ø
2
÷
¯
ö
î
Â
ï
í
Page 3
10 11 12
Â
®©
ï
÷
î
í
13 14 15
§
»
«
¬
ë
ï
ì
î
16 17 18
¶
¸
µ
·
ï
î
±
°
¿
¼
º
¹
ü
å
´
º
-
¨
¦
19 20 21
¾
º
¨
Â
ª
û
²
-
¸
½
³
ª
3
Page 4
22 23 24
ò
ô
•
¾
ñ
¾
ô
25 26 27
~
}
´
28
Â
û
j
y
Ž
à
º
ü
ÿ
4
±
Page 5
English Deutsch Français Italiano
Gun holder Pistolenhalter Porte-pistolet Supporto della pistola
ï
î Washer protrusion Reinigervorsprung Saillie du nettoyeur Sporgenza dell'idropulitrice
í 14 to 15 mm 14 bis 15 mm 14 à 15 mm 14 - 15 mm
ì 20 mm or less 20 mm oder weniger 20 mm au maximum 20 mm o meno
ë Gun support protrusion
Vorsprung der
Pistolenhalterung
Support du pistolet en
saillie
Sporgenza del supporto
della pistola
ê Washer long hole Langes Loch des Reinigers Trou profond du nettoyeur Foro lungo dell'idropulitrice
Press fi rmly Fest drücken Appuyez fermement Premere saldamente
é
Screw supplied Mitgelieferte Schraube Vis fournie Vite in dotazione
è
ç Hose handle Schlauchgri Poignée du tuyau Manovella avvolgitubo
ð Attachment hole Befestigungsloch Trou de fi xation Foro di attacco
ÿ Power plug Netzstecker Fiche d'alimentation Spina di alimentazione
Water feed inlet Wasserzulaufö nung
à
ý Water feed inlet cap
Kappe für
Wasserzulaufö nung
ü Water feed connector Wasserzulaufanschluss
Entrée d'alimentation en
eau
Bouchon de l'alimentation
en eau
Connecteur d'alimentation
en eau
û High-pressure hose Hochdruckschlauch Tuyau à haute pression
Trigger gun Auslöserpistole Pistolet à gâchette Pistola a grilletto
Â
Connector Anschluss Connecteur Connettore
ú
Ingresso di alimentazione
dell'acqua
Tappo dell'ingresso di
alimentazione dell'acqua
Connettore di
alimentazione dell'acqua
Tubo fl essibile ad alta
pressione
ö O-ring O-Ring Joint torique O-ring
ø Ring Ring Joint Anello
÷ Nozzle Düse Buse Ugello
¯ Protrusion Vorsprung Saillie Sporgenza
© Jet Strahl Jet Getto
Spray Sprühen Vaporisateur Spruzzo
»
Low-pressure Niederdruck Basse pression Bassa pressione
®
¬ High-pressure Hochdruck Haute pression Alta pressione
§ Nozzle tip Düsenspitze Pointe de la buse Punta dell'ugello
« Pressure adjuster Druckregler Régulateur de pression Regolatore di pressione
Water supply pipe Wasserversorgungsrohr
·
Conduite d'alimentation
en eau
Tubo di alimentazione
acqua
± Detergent bottle Reinigungsmittelfl asche Flacon de détergent Flacone del detergente
Filter on the tip of the water
°
feed pipe
Hose band Schlauchklemme Collier de serrage du tuyau Fascetta fermatubo
¿
- Suction hose Ansaugschlauch Tuyau d'aspiration
Moisten the inside with
¼
water
Filter an der Spitze des
Wasserversorgungsrohrs
Die Innenseite mit Wasser
befeuchten
Filtre à l'extrémité du tuyau
d'alimentation en eau
Humidifi ez l'intérieur à l'eau
Filtro all'estremità del tubo
di alimentazione dell'acqua
Tubo fl essibile di
aspirazione
Inumidire l'interno con
acqua
º Strainer Siebfi lter Crépine Filtro
¹ Slotted screwdriver Flachkopfschraubenzieher Tournevis à tête plate Cacciavite a testa piatta
¸ One-touch joint Gelenk auf Knopfdruck Raccord rapide Raccordo rapido
Insert the suction hose
¶
µ Pass it through the ring fi rst
Den Ansaugschlauch
einschieben
Zuerst durch den Ring
führen
Insérez le tuyau
d'aspiration
Commencez par le passer
dans le joint
Inserire il tubo fl essibile di
aspirazione
Inserirlo prima nell'anello
´ Tighten Festziehen Serrez Serrare
Hose end Schlauchende Extrémité du tuyau Estremità tubo fl essibile
å
5
Page 6
English Deutsch Français Italiano
¦ Insert it past this point
¨ Accumulated water Angesammeltes Wasser Réservoir d'eau Acqua accumulata
½ Insert directly Direkt einschieben Insérez directement Inserire direttamente
ª Switch Schalter Interrupteur Interruttore
¾ Trigger Auslöser Gâchette Grilletto
Center of the trigger Mitte des Auslösers Centre de la gâchette Centro del grilletto
²
Switch ON Einschalten Interrupteur ON Interruttore su ON (acceso)
³
ô Trigger stopper Auslöserstopper Sécurité de la gâchette Fermo del grilletto
ò Lock Verriegeln Verrou Blocco
ñ Release Entriegeln Relâchez Rilascio
• Hose reel Schlauchaufroller Dévidoir Tamburo avvolgitubo
Ž Hose handle Schlauchgri Poignée du tuyau Manovella avvolgitubo
} Nozzle cleaner pin Düsenreinigungsstift
Nozzle hole Düsenloch Orifi ce de la buse Foro dell'ugello
~
Loosen Lockern Desserrez Allentare
y Turbo nozzle Turbodüse Buse turbo Ugello turbo
j Cleaning brush Reinigungsbürste Brosse de nettoyage Spazzola per pulizia
Über diesen Punkt hinaus
einschieben
Insérez au-delà de ce point Inserirlo oltre questo punto
Broche de nettoyage de
la buse
Pulitore dell'ugello
6
Page 7

English Deutsch Français
Symbols
WARNING
The following show
symbols used fo r the
machine. Be sure that you
understand their meaning
before use.
Read all safety
warnings and all
instructions.
Failure to follow
the warnings and
instructions may result
in electric shock, fi re
and/or serious injury.
Only for EU countries
Do n ot dispose of electric
tools together with
household waste material!
In observance of European
Directive 2002/96/EC
on waste electrica l and
electr onic equipment
and its implementation in
accordance with nation al
law, electric tools that
have reached the end of
their life must be colle cted
separately and returned
to an environmentally
compatible recycling facility.
High-pressure water
can be dangerous if
used incorrectly. Highpressure water jets
must not be directed
at people, electrical
equipment or the
washer itself.
Water that has passed
through the backfl ow
valve cannot be used
for drinking.
Alternating current Wechselstrom Courant alternatif Corrente alternata
Symbole
WARNUNG
Die folgenden Sym bole
werden für diese Maschine
verwendet. Achten Sie
darauf, diese vor der
Verwendung zu verstehen.
Lesen Sie säm tliche
Sicherhe itshinwe ise und
Anweis ungen durch .
Wenn die Warnungen
und Anweisungen nicht
befolgt we rden, kann es
zu Stro mschlag , Brand
und/oder ern sthaften
Verletzungen kommen.
Nur für EU-Länder
Werfen Sie
Elektrowerkzeuge nicht
in den Hausmüll!
Gemäss Europäischer
Richtlinie 2002/96/EG
über Elektro- und
Elektronik- Altgeräte
und Umsetzung in
nationales Recht
müssen verbrauchte
Elektrowerkzeuge
getrennt gesammelt und
einer umweltgerechaten
Wieder ververtung
zugeführt werden.
Wasser unter hohem
Druck kann bei falscher
Benutzung gefährlich
sein. Der Ho chdruckstrahl
darf nicht auf Menschen,
elektrische Anlagen,
oder den Reiniger selbst
gerichtet werden.
Wasser, das durch
das Rückfl ussventil
gefl ossen ist, ist nicht
trinkbar.
Symboles
AVERTISSEMENT
Les symboles suivants
sont utilisés pour l’outil.
Bien se familiariser
avec leur signifi cation
avant d’utiliser l’outil.
Lir e tous les
aver tisseme nts de
séc urité e t toute s les
instru ctions.
Tout manquement
à observer ces
avertissements et
instruction s peut en gendrer
des chocs électriques,
des incen dies et/ou des
blessures graves.
Pour les pays européen s
uniquement
Ne pas jeter le s appareils
électriques dans les ordures
ménagères!
Con formément à la directive
européenne 20 02 /9 6/EG
relative aux déchets
d’équipements électriques
ou électroniques (DEEE),
et à sa transposition dans
la législation nationale,
les appareils électriques
doivent être collectés à
part et être soumis à un
recyclage respectueux de
l’enviro nnem ent.
L'eau sous haute pression
peut être dangereuse
si elle n'est pas utilisée
correctement. Un jet
d'eau sous haute pression
ne doit pas être dirigé
vers des personnes, des
équipements électriques ou
le nettoyeur.
L'eau qui est passée à
travers le clapet antiretour n'est pas potable.
Italiano
Simboli
AVVERTENZA
Di seguito mostriamo
i simboli usati per la
macchina. Assicurarsi
di comprenderne il
signifi cato prima dell’uso.
Leggere tutti gli
avvertimenti di
sicurezza e tutte le
istruzioni.
La mancata osservanza
degli avvertimenti e
delle istruzioni potrebbe
essere causa di scosse
elettriche, incendi e/o
gravi lesioni.
Solo per Paesi UE
Non gettare le
apparecchiature elettriche
tra i rifi uti dom estici.
Secondo la Direttiva
Europea 2002/96/CE sui
rifi uti di apparecchiature
elettr iche ed elettroniche
e la sua attuazione
in conformità alle
norme nazionali, le
apparecchiature elettriche
esauste devono essere
raccolte separatamente, al
fi ne di essere reimpieg ate in
modo eco-compatibile.
L'acqua ad alta pressione
può essere pericolosa,
se utilizzata in modo
scorretto. Non puntare il
getto ad alta pressione
dell'idropulitrice verso
persone, apparecchiature
elettriche o l'idropulitrice
stessa.
L'acqua che ha
attraversato la valvola
antirifl usso non è
potabile.
V
A
Hz
W
kg
MPa
Class II tool Werkzeug der Klasse II Outil classe II Attrezzo di Classe II
Warning Warnung Avertissement Avvertenza
Volts Volt Volts Volt
Amperes Ampere Ampères Ampere
Hertz Hertz Hertz Hertz
Watts Watt Watts Watt
Kilograms Kilogramm Kilogrammes Kilogrammi
Megapascals Megapascal Mégapascals Megapascal
11
Page 8

English
(Original instructions)
GENERAL POWER TOOL SAFETY WARNINGS
WARNING
Read all safety warnings and all instructions.
Failure to follow the warnings and instructions may result in electric
shock, fi re and/or serious injury.
Save all warnings and instructions for future referen ce.
1. Make sure the work area is always kept neat and
tidy.
Failure to observe this may result in accidents.
2. Take the surrounding environment into
consideration when using the washer.
Make sure the work area is brightly lit.
Do not use the washer near fl ammable liquid or gas.
3. Beware of electric shocks.
Do not touch anything that is earthed (grounded) when
using the High Pressure Washer. (For example, pipes,
heaters, microwave ovens, refrigerators, etc.)
4. Do not use the washer near children.
People other than the person using the washer must not
be allowed to touch the washer or the cord.
People other than the person using the washer must not
come near the work area.
5. Store the washer in a safe place when not in use.
Store the washer in a dry, high location or protected with
a lock out of the reach of children.
6. Do not use the washer in inappropriate ways.
Use the High Pressure Washer within the limits of its
capabilities to ensure safe and e cient results.
Do not use the washer for any purpose other than that for
which it was designed.
7. Wear safe clothing when using the washer.
Use safety boots, gloves, helmets with visors and
earplugs in accordance with necessity.
8. Use protective goggles and dust-protection masks
when using the washer.
There is a chance that splashes and dust may enter the
eyes and mouth when using the washer.
9. Do not handle the power cord roughly.
Do not carry the High Pressure Washer with only the
power cord or pull the plug from the socket while holding
the power cord.
Keep the power cord away from heat, oil and sharp
corners.
10. Make sure the item being cleaned is fi rmly fi xed in
place.
There are cases in which the power of the water pressure
will cause light objects to fl y o . Do not use the washer on
light objects that cannot be fi xed in place.
11. Maintain a proper stance when using the washer.
Make sure your feet are always placed fi rmly on the
ground to maintain balance.
12. Pay close attention to maintaining the High Pressure
Washer.
Clean the washer regularly to ensure safe and e cient
use.
Refer to the instruction manual when replacing supplied
parts.
Regularly check the power cord and ask your dealer for
repairs in the event of it being damaged.
If using an extension cord, check it regularly and replace
it in the event of it being damaged.
Make sure the grip is always kept dry and clean, and do
not allow oil of grease to come into contact with it.
13. Switch o and unplug the High Pressure Washer in
the following situations:
When it is not in use and when it is being repaired.
When attaching or detaching supplied or purchased
parts.
In other situations in which risks seem apparent.
14. Always remove equipment used for adjustment
purposes.
Check to make sure that all equipment used for
adjustment purposes has been removed before switching
on the power.
15. Avoid accidentally switching on the power.
Make sure you do not accidentally switch on the power to
the washer when it is plugged in.
Check to make sure that the washer is switched o
before plugging it into the power supply.
16. Use extension cords designed for outdoor use.
When using extension cords outdoors, make sure they
are cab-tire cords or cables.
17. Pay attention at all times when using the washer.
Pay attention to the methods of use stipulated in the
instruction manual and the surrounding environment
when using the High Pressure Washer.
Do not use the washer when tired.
18. Only use specifi ed accessories and attachments.
Using accessories and attachments other than those
specifi ed in the instruction manual or in Hitachi catalogs
may result in accidents or injuries and must be avoided at
all costs.
19. High Pressure Washer repairs to be performed only
by experts.
The High Pressure Washer conforms to all relevant
safety regulations and must not be modifi ed.
All repairs must be requested to Hitachi authorized
service centers. Attempting to carry out repairs without
the correct skills may result in accidents or injuries.
20. Check to make sure there are no damaged parts.
Carry out thorough inspections before using the washer
to make sure that no parts are damaged, and check to
ascertain that the washer is functioning properly.
Check that all moving parts or correctly positioned, have
been tightened in place and are correctly attached,
and then check all areas to confi rm that there are no
abnormalities that could a ect operations.
Refer to the instruction manual when replacing or
repairing damaged parts.
Request repairs to Hitachi authorized service centers
if details on repairs are not specifi ed in the instruction
manual.
Request repairs to Hitachi authorized service centers if
the switch is damaged.
Do not use the High Pressure Washer if the switch
becomes inoperable or cannot be turned o .
21. Use a power supply that conforms to the voltage
listed on the name plate.
Failure to observe this may result in the washer operating
at higher speeds than normal, leading to overheating
and the outbreak of smoke and fi re, which may cause
damage or injuries.
14
Page 9

English
22. Use an independent power socket with a rated value
of 15 A or more.
Sharing a power socket with other equipment may result
in the breaker shutting down.
23. Hold the trigger gun fi rmly in both hands when
using the washer.
Failure to observe this may result in injury.
24. High-pressure water can be dangerous if used
incorrectly.
High-pressure water jets must not be directed at people,
animals, easily-broken items, electrical equipment or the
washer itself.
25. Do not use gasoline, oil, organic solvents or
other infl ammable or toxic liquids, or any other
inappropriate liquid.
Failure to observe this may result in explosions, the
outbreak of fi re or smoke, or other accidents, which may
cause damage or injury.
26. When washing automobile tires, make sure that the
tip of the nozzle is kept at least 50cm distant from
the surface being washed.
Failure to observe this may result in damage to the tire or
brakes, which may cause serious accidents.
27. Do not touch the power plug or power socket with
wet hands.
Failure to observe this may result in electric shocks.
28. When the washer is being used by people (including
children) with reduced physical, sensory or mental
capabilities, or lack of experience and knowledge,
they must be supervised and guided by people
capable of operating it safely.
29. Make sure that a backfl ow valve is used without fail
when connecting the washer to a drinking water
faucet.
Water that has passed through the backfl ow valve cannot
be used for drinking.
30. Make sure that water is not splashed onto the High
Pressure Washer, power cord, extension cable,
power plug, power socket or other areas. Also,
neither exposes it to rain nor use it in the rain.
Failure to observe this may result in electric shocks.
31. Do not hold the trigger gun when fi xing it in place.
32. If the washer is not functioning normally or is
emitting strange noises or vibrations switch it o
immediately and contact Hitachi authorized service
centers to request inspections or repairs.
Continued use may result in injury.
33. If the washer is accidently dropped or banged into
something solid, inspect it for damage, cracks and
malformation.
Failure to observe this may result in injury.
CAUTION
1. Purge all of the pressure within the washer before
disconnecting the high-pressure hose.
2. Attach all supplied accessories correctly in
accordance with the instruction manual.
Failure to observe this may result in the accessories
becoming detached or in injury.
3. Check to make sure that no foreign matter is
adhering to the object being washed.
Failure to observe this may result in the matter fl ying o
and causing unexpected injury.
4. Do not spray a jet of water at the areas surrounding
labels on the object being washed.
Failure to observe this may result in the labels peeling o .
5. Grip the handle fi rmly when carrying the washer.
6. Do not use any accumulated water other than clean
water from the faucet (water containing dirt, mud,
sand, etc.) when using the auto-suction function.
SPECIFICATIONS
Model AW150
Voltage (by areas)*
Power input*
1
1
Max. discharge pressure (1MPa: 10.2 kgf/cm2) 11.0 MPa
Max permissible pressure 15.0 MPa
Max feed pressure 0.7 MPa
Max water discharge 6.67 L/min
Permissible temperature 40°C or less
Dimensions (Length x Width x Depth)
2
Weight*
(Including the hose handle, power cord holder, gun holder,
*1 Be sure to check the nameplate on product as it is subject to change by areas.
*2 Weight: Excluding the power cord, weight consists of trigger gun, high-pressure hose, variable nozzle, water feed connector
and accessory holder.
Single-phase AC 50/60 Hz
Voltage 220 V to 240 V
2000 W
425 mm x 345 mm x 905 mm
gun support and water feed connector)
12.4 kg
15
Page 10

English
STANDARD ACCESSORIES
(1) Trigger gun ..................................................................1
(2) High-pressure hose (10 m) ..........................................1
(3) Variable nozzle (with pressure adjuster) ......................1
(4) Turbo nozzle ...............................................................1
(5) Detergent bottle (stored inside the unit) ......................1
(6) One-touch joint (black)
(For use with the strainer hose) ...................................1
(7) Water feed connector ..................................................1
(8) Nozzle cleaner pin .......................................................1
(9) Gun holder ..................................................................1
(10)
Hose handle ................................................................1
(11)
Gun support (with 1 attachment screw) .......................1
(1) (2)
(3) (4)
(5) (6)
(7) (8)
(9) (10)
(11)
16
Page 11

English
OPTIONAL ACCESSORIES (sold separately)
Items shown in are sold separately. Contact Hitachi authorized service centers for replacements if the standard
accessories become damaged or broken.
Variable nozzle
(With pressure adjuster)
[Standard accessory]
Trigger gun
[Standard accessory]
Turbo nozzle
[Standard accessory]
Cleaning brush
Washes away dirt that has
been dislodged with the
brush.
Rotary brush
The central brush is rotated
by water pressure for cleaning
the windows and other items
with large surfaces.
Angle nozzle (variable)
Used for cleaning di cultto-reach places, such as
the underneath of cars and
ceilings, etc.
High-pressure extension hose
(10 m)
Extends the length of the highpressure hose supplied.
High-pressure hose
[Standard accessory]
Water feed connector
[Standard accessory]
One-touch joint (black)
[Standard accessories]
Pipe cleaning kit
(7.5 mm hose)
High-pressure water jets
from the front of the hose are
reversed to clean the inside
of the pipe.
Strainer hose set
Accumulated
water
17
Page 12

English
APPLICATIONS
Cleans screen doors, window glass, fl oors, walls, etc.
Cleans automobiles, motorbikes, etc.
Cleans mud o gardening equipment and agricultural
equipment.
PRIOR TO OPERATION
1. Installation of an earth leakage circuit breaker
It is recommended that an earth leakage circuit breaker
is connected to the washer to shut o the power if leaking
current exceeds 30 mA for 30 milliseconds in order to
prevent electric shocks.
2. Keep the work area neat and tidy
Dirty water will be sprayed about when using the washer.
It is therefore necessary to check the area to make sure
there are no hindrances, and keep the work area neat
and tidy.
3. Situating the washer
Select fl at locations where the washer will not be
splashed with water when cleaning.
4. Using extension cords
Make sure the cord is thick enough to provide a constant
supply of electricity, and use cords that are as short as
possible.
Acceptable cord thicknesses (Nominal cross sectional
area cable) and cord length are indicated in the table
below.
ݱ®¼ ̸·½µ²»-- ø³³î÷ ݱ®¼ Ô»²¹¬¸ ø³÷
ï ïîòë
ïòë îð
îòë íð
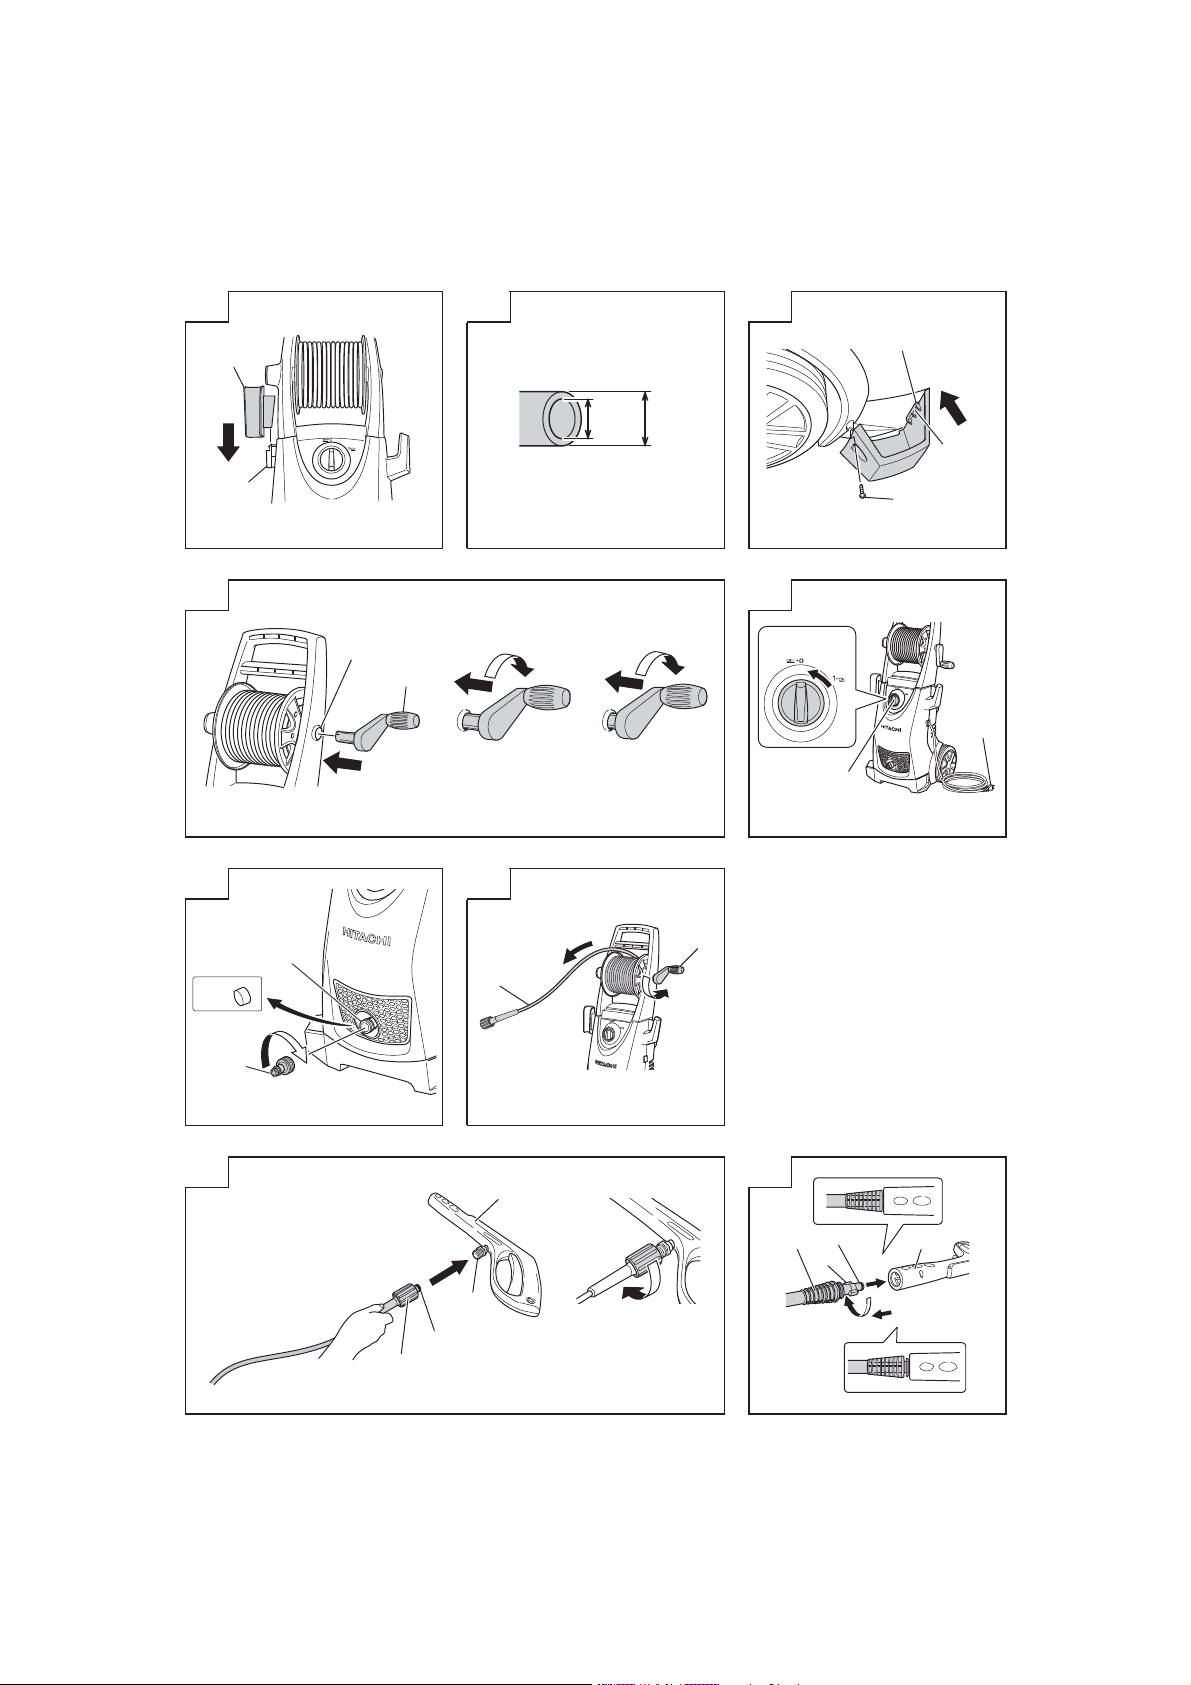
5. Attaching the gun holder (Fig. 1)
Align the groove on the gun holder with the protrusion on
the washer and push until it clicks into place.
6. Prepare a water feed hose (Fig. 2)
Prepare the following when using water feed hoses:
Hoses that can withstand pressure (equipped with
meshes)
Hoses with an inner diameter of 14 to 15 mm.
Hoses with an outer diameter of 20 mm or less.
7. Attaching the gun support (Fig. 3)
(1) Press the protrusion on the gun support into the long hole
on the washer at an angle shown in the illustration.
(2) Firmly screw the screw supplied into the screw hole with
a Phillips screwdriver.
8. Attaching the hose handle (Fig. 4)
(1) Insert the hose handle into the attachment hole on the
washer.
(2) Press down while rotating it until it reaches a position
approximately 15 mm deep.
(3) Continue to press down and rotate it until it clicks into
place at approximately 15 mm deep.
INSPECTIONS PRIOR TO USE
WARNING
Check the following before using the washer. Check the
items listed in 1 and 2 before plugging into the power
socket.
1. Check to make sure the switch is at the “OFF”
position (Fig. 5)
Plugging the washer into the power socket with the
switch set at “ON” will cause the washer to immediately
begin operating, which may result in unexpected injuries.
2. Check the power supply
Only use a rated voltage.
Do not use motor engines are direct current. Failure to
observe this will not only result in damage to the washer,
it is also very dangerous.
3. Check the power socket
If the power socket is loose or the plug is easily dislodged,
it needs to be repaired.
It is dangerous to use it in this condition. Consult with
your local electrical engineering outlet.
ATTACHING PARTS
Make sure all parts are correctly attached in the following
sequence in order to guarantee safe usage.
WARNING
Switch o the washer and disconnect it from the power
socket without fail to prevent unexpected accidents.
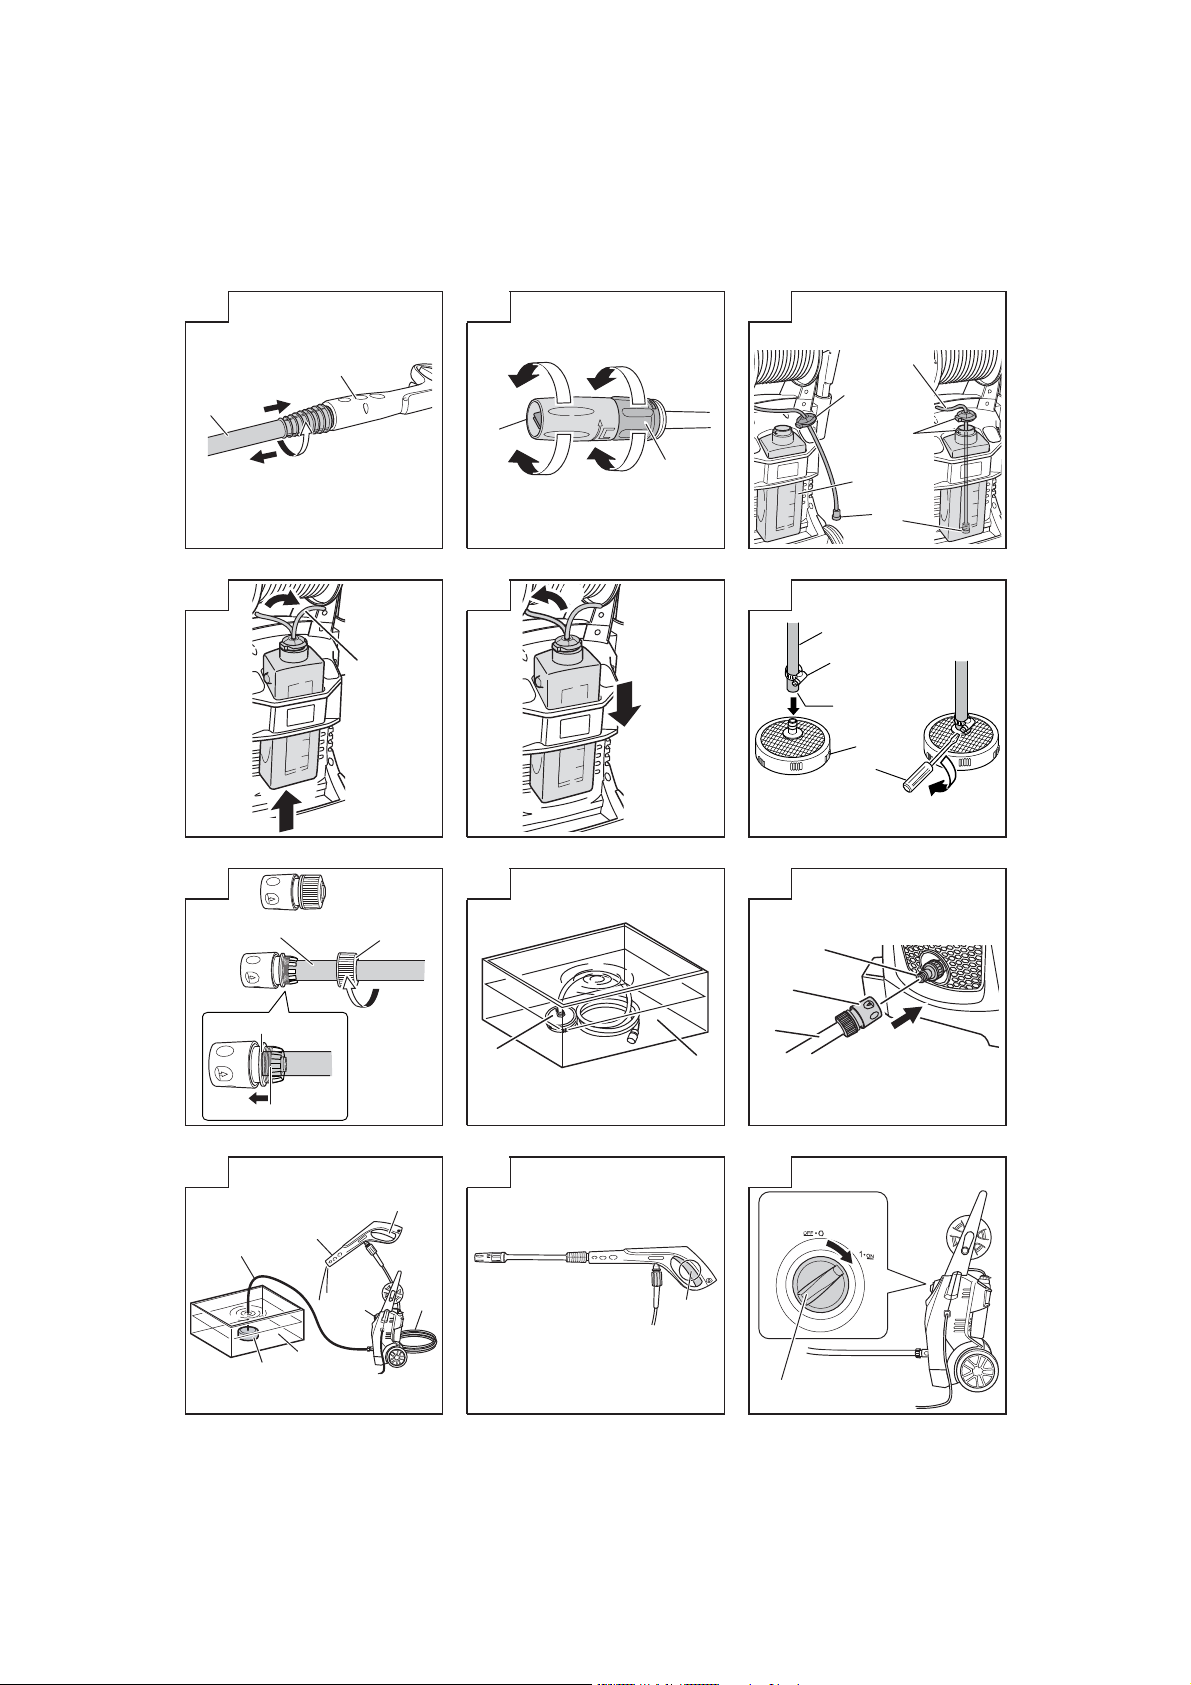
1. Attach the water feed connector to the water feed
inlet on the washer (Fig. 6)
Remove the cap on the washer’s water feed inlet and
fi rmly attach the water feed connector.
Loose connections may result in water leaks.
2. Pull the high-pressure hose from the hose reel
(Fig. 7)
Pull the entire length of the high-pressure hose from the
reel while steadying the reel to prevent it from toppling
over.
NOTE
Using the washer with part of the hose wrapped around
the reel may result in insu cient pressure or abnormal
vibrations.
3. Attach the high-pressure hose to the trigger gun.
(Fig. 8)
Grip the thick end of the high-pressure hose, insert it into
the connector on the trigger gun, and then rotate the ring
on the hose to fi x it in place.
NOTE
Moisten the O-ring with water to facilitate the connection
if it is di cult to insert the hose.
If the ring cannot be tightened, it means that the end of
the high-pressure hose has not been su cient inserted.
4. Attach the nozzle to the trigger gun.
<Attachment (Fig. 9)>
(1) Align the protrusion on the nozzle with the entry hole on
the trigger gun and press it into place.
NOTE
Remove all dirt, mud and other matter from the trigger
gun’s entry hole and the protrusion on the nozzle.
Moisten the O-ring with water to facilitate the connection
if it is di cult to insert the nozzle.
(2) Press down fi rmly on the nozzle and then rotate it in the
direction of the arrow until it stops (half rotation.)
(3) Check to make sure that the nozzle cannot be pulled out
once it has been attached.
<Detachment (Fig. 10)>
Press down fi rmly on the nozzle and then rotate it counter-
clockwise until it stops. The nozzle can be withdrawn at
that position.
18
Page 13

English
USING DIFFERENT NOZZLES
Variable nozzle (with pressure adjustor) (Fig. 11)
The variable nozzle (with pressure adjustor) can be used
to alternation between “Jet” and “Spray” and between
“High Pressure” and “Low Pressure”.
Rotate the end on the nozzle clockwise for “Jet”, and
counter-clockwise for “Spray”.
Also, rotate the pressure adjuster clockwise for “Low
Pressure”, and counter-clockwise for “High Pressure”.
• Jet washer
A water jet is discharged in a direct line to remove
stubborn mud and other dirt from agricultural machinery,
etc.
• Spray washer
The water is discharged in a wide fan for cleaning walls,
motorbikes and automobiles, etc.
The entire nozzle can be rotated by approximately 90
degrees to change the shape of the spray between
horizontal and vertical.
NOTE
The pressure adjuster will also be rotated when
alternating between “Jet” and “Spray”, so readjust this to
the required setting after making the adjustment.
Set the spray adjustment to “Jet” fi rst of all, and then
gradually move it to the “Spray” position while pulling the
trigger.
Note that there is a chance of the water being sprayed
horizontally over a wide area if this is rotated fully to the
“Spray” position.
Note that the nozzle may be damaged if it is forced to
move past the stop position when alternating between
“Jet” and “Spray”.
Turbo nozzle
The turbo nozzle rotates as it sprays high-pressure jets of
water for e cient washing.
NOTE
The turbo nozzle only discharges powerful jets of water
when set at the “Jet” mode.
Avoid using this on items that are easily broken or for
which coatings are easily peeled.
USING THE DETERGENT BOTTLE (Fig. 12)
Sprays water mixed with detergent.
Uses neutral detergents available on the open market.
WARNING
Do not use acidic or alkali detergents. Use only neutral
detergents available on the open market.
Using detergents other than neutral detergents or
chemical agents may result in accidents or malfunctions.
NOTE
Check to make sure that the water feed pipe is fi rmly
connected to the washer.
The detergent will not be mixed with the spray otherwise.
ï Remove the cap from the detergent bottle and pour the
detergent into it.
î Make sure the fi lter on the tip of the detergent bottle’s
water feed pipe is inserted into the liquid and then tighten
the cap fi rmly.
NOTE
Only the “Low Pressure” setting can be used for variable
nozzles (with pressure adjustors) when using the
detergent bottle.
The detergent will not be sprayed if the “High Pressure”
setting on variable nozzles (with pressure adjustors) or
turbo nozzles are used.
í Set the adjustor to “Low Pressure” when using variable
nozzles (with pressure adjustors.)
ì Water containing the detergent will be sprayed at low
pressure when the trigger on the trigger gun is pulled.
Cleaning the detergent bottle (Figs. 13 and 14)
ï Remove the detergent bottle’s water feed pipe from the
washer.
î Push the detergent bottle from the bottom and withdraw it
from the top.
í Wash the detergent bottle, water feed pipe and fi lter with
water from the faucet.
ì When reattaching the bottle, hold it as shown in Fig. 14,
and then push the protrusion on the bottom in as far as it
will go.
ë Insert the water feed pipe into the washer and tighten the
cap while making sure dust or dirt does not enter.
USING THE STRAINER HOSE SET (sold
separately)
The separately-sold strainer hose set is equipped with a
function that will automatically suck water from a water tank,
etc., when attached to the AW150.
The maximum height of suction (lifting range) is
approximately 0.5 m.
Attach this correctly in accordance with conditions.
Í«½¬·±² ¸»·¹¸¬ ©¸»² ¬¸» ¸»·¹¸¬ ±º ¬¸» ©¿¬»® º»»¼ ±«¬´»¬
·- ´±©»® ¬¸¿² ¬¸» ³¿¨·³«³ ¸»·¹¸¬ ±º ¬¸» -«½¬·±² ¸±-»æ
Ú®±³ ¬¸» ³¿¨·³«³ ¸»·¹¸¬ ±º ¬¸» -«½¬·±² ¸±-» ¬± ¬¸»
-«®º¿½» ±º ¬¸» ©¿¬»®ò
Ó¿¨·³«³ ¸»·¹¸¬ ±º
¬¸» -«½¬·±² ¸±-»
Water surface
Water
feed inlet
Í«½¬·±² ¸»·¹¸¬ ©¸»² ¬¸» ¸»·¹¸¬ ±º ¬¸» ©¿¬»® º»»¼
±«¬´»¬ ·- ¬¸» -¿³» ¿- ¬¸» ³¿¨·³«³ ¸»·¹¸¬ ±º ¬¸»
-«½¬·±² ¸±-»æ Ú®±³ ¬¸» ©¿¬»® º»»¼ ±«¬´»¬ ¬± ¬¸» -«®º¿½»
±º ¬¸» ©¿¬»®ò
É¿¬»® º»»¼ ·²´»¬
ø³¿¨·³«³ ¸»·¹¸¬ ±º
¬¸» -«½¬·±² ¸±-»÷
Water surface
19
Page 14

English
1. Attaching the strainer to the suction hose (Fig. 15)
(1) Pass the suction hose through the hose band supplied
and then gently moisten the inside of the suction hose
with water.
(2) Insert the strainer as far as it will go, and then fi rmly
tighten the hose band with a fl at-headed screwdriver.
2. Attaching the one-touch joint (black) to the suction
hose (Fig. 16)
Attach the one-touch joint (black) supplied as a standard
accessory to the suction hose.
3. Starting the suction hose water suction process
(Fig. 17)
Sink the strainer hose set into a container fi lled with
water.
Start o the suction process (introduce water to the
suction hose.)
NOTE
Do not use anything other than clean water (river or pond
water, muddy water containing sand granules.)
Failure to observe this may result in malfunctions.
Set the switch at “ON” without the nozzle attached.
Failure to observe this may result in dry operations,
leading to malfunctions.
4. Insert the one-touch joint into the water feed
connector (Fig. 18)
Withdraw the one-touch joint from the accumulated water
and insert it into the water feed connector on the washer
while making sure that the water inside the hose does not
escape.
5. Check to make sure the water is fl owing out
(Fig. 19)
(1) Connect the trigger gun from which the nozzle has been
removed to the high-pressure hose.
(2) Plug in the power socket and set the switch to “ON”.
(3) Pull the trigger gun’s trigger, and then set the switch to
“OFF” after checking that su cient water is fl owing out.
6. Attach the nozzle.
NOTE
Set the switch at “OFF” if water does not fl ow out within
two minutes.
Failure to observe this may result in malfunctions (dry
operations.)
7. Washing
Set the switch at “ON” and pull the trigger gun’s trigger to
commence washing.
8. Cleaning
Remove all dirt from the strainer’s grill, wash it with water
and store it after it has dried.
WASHING
WARNING
Do not switch the washer on while the trigger is being
pulled.
Failure to observe this may result in high-pressure water
being sprayed immediately, leading to unexpected
accidents.
Do not point the nozzle at people or animals.
Failure to observe this may result in injury.
CAUTION
Set the switch to “OFF” immediately if the hose becomes
detached from the faucet or washer, and if water is no
longer being fed to the washer.
Failure to observe this may result in immediate
malfunctions (dry operations.)
Set the switch to “OFF” without fail when temporarily
suspending operations.
Failure to observe this may result in the motor
automatically starting up.
Place your fi nger in the center of the trigger during
operations (Fig. 20)
Failure to observe this may result in injury from pinched
fi ngers.
Grip the gun and nozzle fi rmly with both hands.
The trigger gun may kick back when water is discharged.
NOTE
Do not use the water hose when it is wound onto the reel.
Failure to observe this may result in insu cient water
feed.
Commence initial washing approximately 2 to 3 meters
away from the targeted item, and then move gradually
closer while checking the level of cleaning until you reach
a distance in which soiling is e ectively washed away.
The pressure of the spray from the washer is
approximately 20-times greater than tap water. Highpressure water jets may therefore damage or peel the
coating from the items being washed.
There are cases when the water spray will appear
unstable owing to the fact that air that has built up in
the pump and hose is purged together with the water
immediately after use. In this event, allow the water to
fl ow out until it stabilizes.
Leave two or more seconds gap between pulling and
releasing the trigger.
Failure to observe this may result in the pressure switch
malfunctions.
Do not use the washer for more than thirty consecutive
minutes without giving it a break.
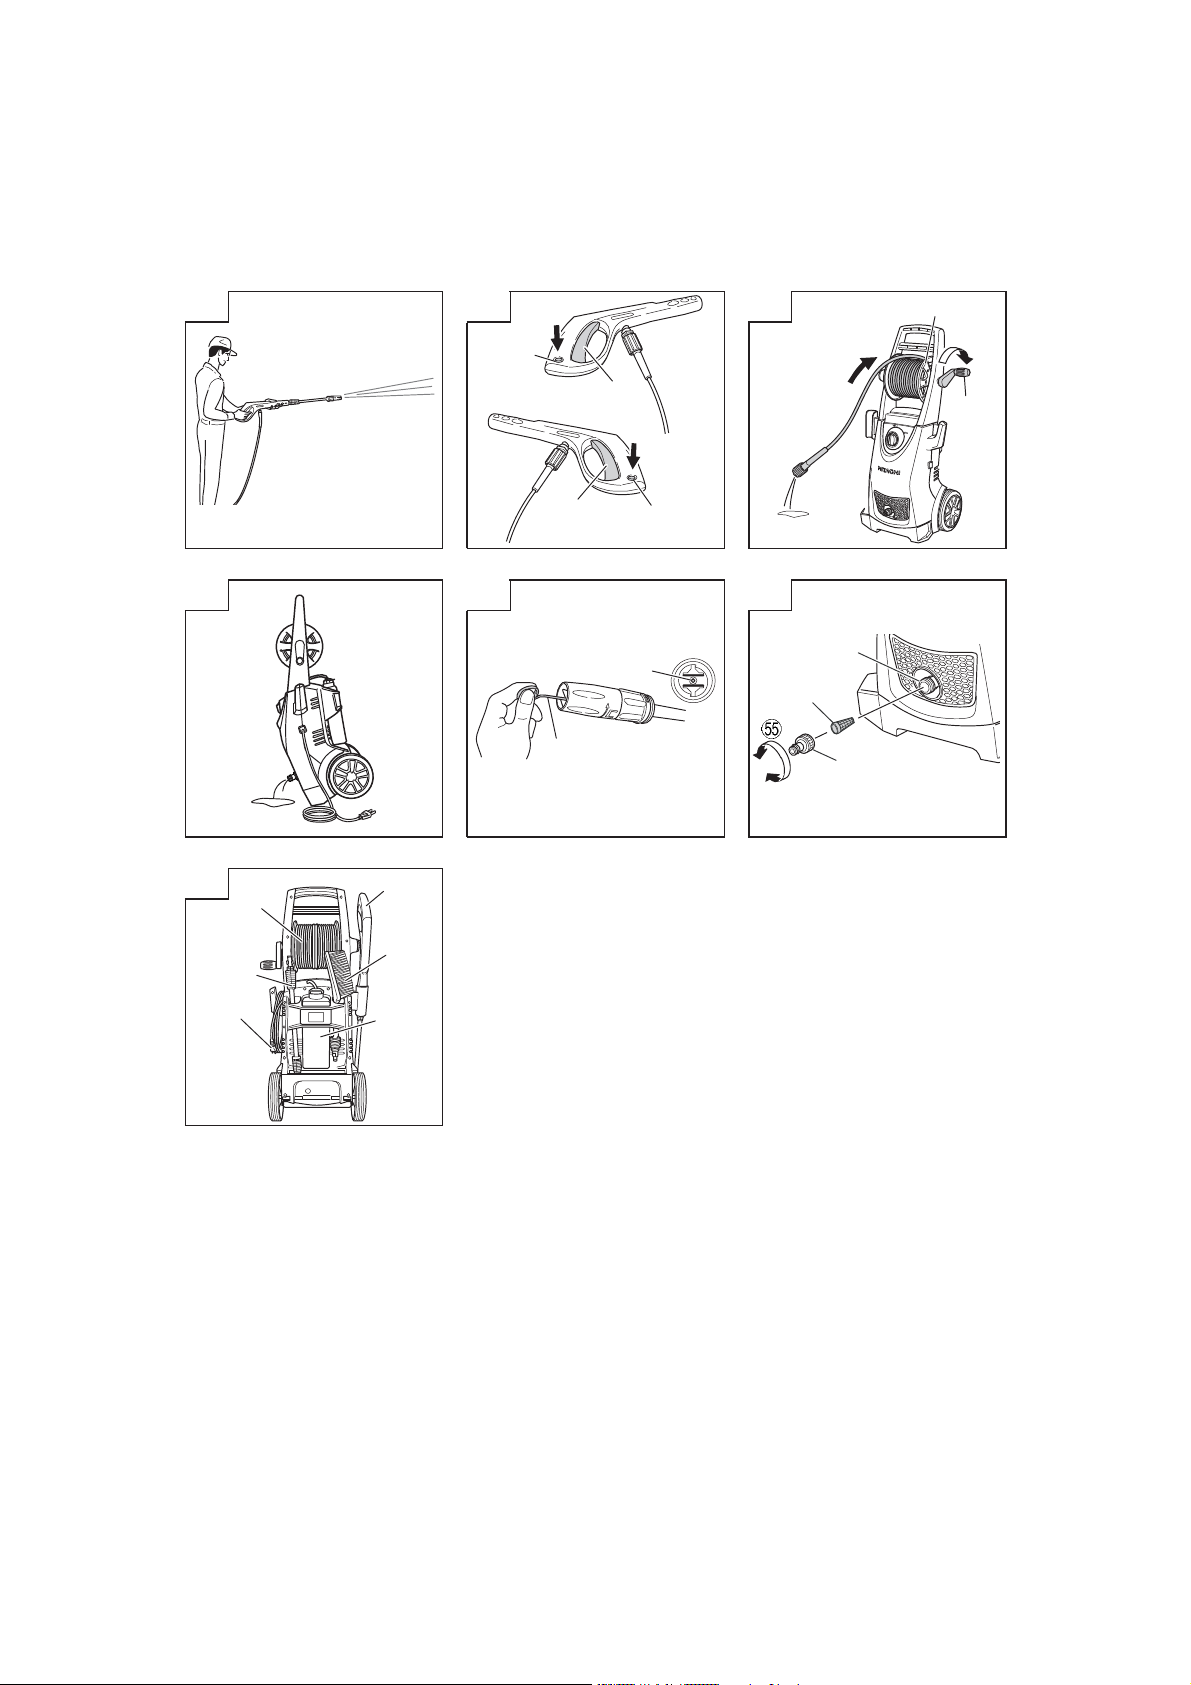
1. Open the faucet to its fullest.
Point the nozzle in a safe direction and then fully open the
faucet. Check to make sure no water is leaking from the
joints.
Release the trigger stopper with the washer switched o ,
pull the trigger on the trigger gun to discharge a small
amount of water from the nozzle with just the pressure
from the tap water. Check to make sure that no water is
leaking.
NOTE
Do not switch the washer on with the faucet turned o .
Failure to observe this may result in malfunctions.
2. Set the switch to the “ON” position (Fig. 21)
The motor will start operating when the washer is
switched on. The motor will automatically switch o once
su cient water pressure has built up inside the washer.
3. Pull the trigger (Fig. 22)
Hold the trigger gun fi rmly in both hands, point the nozzle
at the item to be washed, and then pull the trigger.
The high-pressure water jet will spray out.
Adjust the nozzle between “Jet” and “Spray” in
accordance with need.
Trigger stopper (Fig. 23)
The trigger gun is fi tted with a trigger stopper to prevent
the trigger from being pulled.
The trigger is locked and released by pressing the
stopper in the direction shown by the arrows.
NOTE
Lock the trigger with the trigger stopper during pauses
and after washing has been completed.
20
Page 15

English
ON COMPLETION OF USE
Once the targeted item has been washed, drain the residual
water from the washer and store it in a well-ventilated
location to dry.
There are cases in which water left in the hose may freeze
during the winter, so drain as much water as possible and
store it indoors.
WARNING
Make sure all residual water is drained from the washer,
the trigger gun and the hose, etc., after use.
Failure to observe this may result in freezing, leading to
malfunctions.
1. Draining water from the washer
(1) Stop the water supply.
(2) Set the switch to “ON” and pull the trigger on the trigger
gun to drain the water from the inside of the washer.
Continue this until water is no longer discharged
(approximately 30 to 60 seconds.)
(3) Press the trigger stopper on the trigger gun to lock it in
place.
2. Set the switch to “OFF”.
(1) Switch o the washer.
(2) Unplug the power cord from the mains socket.
NOTE
Leaving the washer switched on may result in dry
operations, leading to malfunctions.
3. Detach the trigger gun.
Follow the reverse procedure explained in “Attach the
high-pressure hose to the trigger gun” to detach the
trigger gun.
4. Rewind the high-pressure hose (Fig. 24)
Place the end of the high-pressure hose at a position
lower than the reel and then rewind it while draining out
all residual water.
5. Drain the water from the washer (Fig. 25)
(1) Tilt the washer to drain out the residual water.
(2) Wipe away all moisture with a dry cloth.
CAUTION
Water left in the washer may freeze in the winter, which
could result in damage to the pump.
SAFETY MECHANISMS
The washer is equipped with the following safety mechanisms
to ensure safe usage.
Power switch
This prevents the washer from being unintentionally
operated.
Trigger gun equipped with a lock
This prevents the trigger from being pulled, unintentionally
operating the washer.
Pressure switch
This prevents the pressure inside the washer from
exceeding permissible levels. Releasing the lever on the
trigger gun causes the valve operated by water pressure
to halt pump operations, which allows the pressure to be
released through the water feed. The pump is started
again when the lever is pulled.
Thermal protector
This protects the motor by halting operations when
abnormal heat is detected in the motor. It will start
operating again when the motor cools down.
MAINTENANCE AND INSPECTION
WARNING
Switch o the washer and disconnect the plug from the
power socket without fail when inspecting and cleaning it.
1. Inspecting the washer and hoses (Fig. 26)
Check to make sure that there is no damage, cracks or
malformations.
Make sure you clean the hole on the nozzle with the
nozzle cleaner pin supplied on a regular basis.
NOTE
Detach the trigger gun and clean the nozzle hole.
2. Inspecting the strainer (Fig. 27)
Wash all blockages out of the grid with water on a regular
basis.
NOTE
Withdraw the strainer from the water feed inlet with the
use of fl at radio pliers.
3. Clean the washer
Squeeze the excess moisture from a cloth soaked in
soap and water and wipe the washer.
Do not use gasoline, thinner, benzene, kerosene, etc.
Failure to observer this may result in malformations.
4. Check for loose screws.
Check for loose screws on a regular basis and tighten
any screws that are loose. Failure to observe this could
be dangerous.
5. Tidying up and storing the washer after use
(Fig. 28)
The accessories can be stored inside the washer as
shown in Fig. 28 when not in use and when being carried
around.
Avoid the following environments and store the washer
and accessories in a safe, dry location when not in use.
Do not store within the reach of children, or in locations
where children can use it.
Do not store in location where rain can reach it, such as in
front of the house, or in locations with high humidity.
Do not store in locations that are subject to drastic
changes in temperature or direct sunlight.
Do not store in locations containing volatile substances
that may ignite or explode.
6. Replacing supply cord
If the replacement of the supply cord is necessary, it has
to be done by a Hitachi Authorized Service Center to
avoid a safety hazard.
7. Service parts list
CAUTION
Repair, modifi cation and inspection of Hitachi Power
Tools must be carried out by a Hitachi Authorized Service
Center.
This Parts List will be helpful if presented with the tool to
the Hitachi Authorized Service Center when requesting
repair or other maintenance.
In the operation and maintenance of power tools, the
safety regulations and standards prescribed in each
country must be observed.
MODIFICATIONS
Hitachi Power Tools are constantly being improved
and modifi ed to incorporate the latest technological
advancements.
Accordingly, some parts may be changed without prior
notice.
21
Page 16

English
TROUBLESHOOTING
Use the inspections in the table below if the tool does not operate normally. If this does not remedy the problem, consult your
dealer or the Hitachi Authorized Service Center.
Symptom Possible cause Remedy
The motor won’t operate
when the trigger is pulled.
The motor continues
operating when the
trigger is released.
Water is not being
discharged.
The water pressure won’t
rise.
The power plug is not plugged into the power
socket.
The switch is set at “OFF” Switch the washer on.
The extension cord is unplugged or severed
midway.
The thermal protector has been activated. Remedy the problem in accordance with the
The water volume or pressure from the faucet
is too low.
Water is leaking. Check the hose connections.
The water hose is not connected. Connect the water hose.
The water hose or high-pressure hose is
twisted.
The backfl ow valve on the one-touch joint is
not operating.
The trigger stopper is locked. Remedy the problem in accordance with the
The faucet it turned o . Open the faucet fully.
The nozzle is blocked. Clean the end of the nozzle with the nozzle
The strainer is blocked. Wash the strainer, which is incorporated into
The power plug is not plugged into the power
socket.
The switch is set at “OFF”. Switch the washer on.
The water volume or pressure from the faucet
is too low.
The nozzle is blocked. Clean the end of the nozzle with the nozzle
The electrical voltage is too low. Check to make sure that the thickness and
Water is leaking. Check the hose connections.
Plug the power cord into the power socket.
Replace the extension cord or check it with a
di erent electrical appliance.
details listed in “Safety Mechanisms” on
page 21.
Open the faucet fully.
Unravel any twists in the water hose and
high-pressure hose.
Check to make sure that the inner diameter
of the water hose is correct.
Check to make sure that the water hose is
not wound onto the reel.
Unravel the twists.
Check to make sure that the inner diameter of
the water hose is correct.
details listed in “Trigger Stopper” on page 20.
cleaner pin supplied.
the water feed inlet, in accordance with the
details listed in “Inspecting the Strainer” on
page 21.
Plug the power cord into the power socket.
Open the faucet fully.
Unravel any twists in the water hose and
high-pressure hose.
Check to make sure that the inner diameter
of the water hose is correct.
Check to make sure that the water hose is
not wound onto the reel.
cleaner pin supplied.
length of the extension cord is appropriate.
22
Page 17

GUARANTEE
We guarantee Hitachi Power Tools in accordance with
statutory/country specifi c regulation. This guarantee does
not cover defects or damage due to misuse, abuse, or normal
wear and tear. In case of complaint, please send the Power
Tool, undismantled, with the GUARANTEE CERTIFICATE
found at the end of this Handling instruction, to a Hitachi
Authorized Service Center.
NOTE
Due to HITACHI’s continuing program of research and
development, the specifi cations herein are subject to
change without prior notice.
Information concerning airborne noise and vibration
The measured values were determined according to
EN60335 and declared in accordance with ISO 4871.
Measured A-weighted sound power level: 92 dB (A)
Measured A-weighted sound pressure level: 81 dB (A)
Uncertainty KpA: 3 dB (A).
Wear hearing protection.
Vibration total values (triax vector sum) determined
according to EN60335.
Vibration emission value a
Uncertainty K = 1.5 m/s
2
= 3.3 m/s
h
2
English
The declared vibration total value has been measured in
accordance with a standard test method and may be used
for comparing one tool with another.
It may also be used in a preliminary assessment of exposure.
WARNING
The vibration emission during actual use of the power
tool can di er from the declared total value depending on
the ways in which the tool is used.
Identify safety measures to protect the operator that
are based on an estimation of exposure in the actual
conditions of use (taking account of all parts of the
operating cycle such as the times when the tool is
switched o and when it is running idle in addition to the
trigger time).
23
Page 18

Part NameQ’TY
55BACK SW COVER1
56WIND BOARD1
57FERRITE CORE2
58PLATE1
59GUN SUPPORT1
61FERRITE CORE2
53MAIN SWITCH1
54CAPACITOR1
No.
Item
Part NameQ’TY
1PUMP ASS'Y (P8) (INCLUDE 6-8)1
2MOTOR 1
3MOTOR COVER 1
4BACK MOTOR FILTER 1
Item
No.
5CARBON BRUSH 2
62SCREW M5 × 18 2
60 1
6FRONT MOTOR FILTER 1
7SCREW 5.5 × 25 4
8PEACH SHAPED RING 1
9INLET FILTER (MESH) 1
10VALVE CAP 1
65CORD SET 1
66BACK HOUSING 1
67WHEEL SHAFT 1
68NAME PLATE 1
69WHEEL 2
70WHEEL COVER 2
63WHEEL GUARD (L) 1
64WHEEL GUARD (R) 1
11VALVE CORE 1
12SPRING 1
13MICRO SWITCH 1
14MOTOR WIND COVER (A)2
71WASHER 2
15SCREW 2.9 × 13 4
16FAN COVER 1
17SEAL PLATE 1
18HANDLE 1
19HOSE REEL COVER 1
1
VARIABLE NOZZLE (B)
(INCLUDE 505)
72EXTERNAL CIRCLIP 2
501NOZZLE CLEANER PIN 1
502INLET NUT 1
503TURBO NOZZLE (INCLUDE 505)1
504
21O-RING ( 4.8 × 1.8) 1
20CONNECTOR 1
22CONNECTION TUBE 1
23HOSE REEL 2
24HANDLE (HOSE REEL) 1
25HANDLE COVER (L) 1
1
HIGH-PRESSURE HOSE
(INCLUDE 507)
505O-RING 2
506GUN (A) 1
507O-RING 2
508
509ONE-TOUCH JOINT 1
26SCREW 4.8 × 20 20
31SCREW 4.8 × 16 6
27HANDLE COVER (R) 1
28GUN HOLDER 1
29U-PIN 2
30INNER HOSE 1
32HANDLE GRIP 1
33SCREW 4.8 × 25 4
34TUBE CONNECTOR 1
35CAUTION LABEL 1
36INNER TUBE 1
41TANK 1
37SPRAY TUBE 1
38TANK COVER 1
39SPRAY SPIGOT 1
40SPRAY PLUG 1
42FRONT CLAMP 1
47 1
43KNOB 1
44 1
45 1
46 1
51FRONT SW COVER 1
48BACK CLAMP1
49SCREW (C) 4 × 1413
50SEAL RING 1
52SW SHAFT 1
133
Page 19

English Polski
GUARANTEE CERTIFICATE
ï Model No.
î Serial No.
í Date of Purchase
ì Customer Name and Address
ë Dealer Name and Address
(Please stamp dealer name and address)
Deutsch
ï Model
î Numer seryjny
í Data zakupu
ì Nazwa klienta i adres
ë Nazwa dealera i adres
(Piecz punktu sprzeda y)
Magyar
GARANTIESCHEIN
ï Modell-Nr.
î Serien-Nr.
í Kaufdaturn
ì Name und Anschrift des Kunden
ë Name und Anschrift des Händlers
(Bitte mit Namen und Anschrift des Handlers
abstempeln)
Français Türkçe
ï Típusszám
î Sorozatszám
í A vásárlás dátuma
ì A Vásárló neve és címe
ë A Keresked neve és címe
(Kérjük ide elhelyezni a Keresked nevének és
címének pecsétjét)
CERTIFICAT DE GARANTIE
ï No. de modèle
î No de série
í Date d achat
ì Nom et adresse du client
ë Nom et adresse du revendeur
(Cachet portant le nom et l adresse du
ï Model No.
î Seri No.
í Satın Alma Tarihi
ì Mü teri Adı ve Adresi
ë Bayi Adı ve Adresi
(Lütfen bayi adını ve adresini ka e olarak basın)
revendeur)
Italiano
CERTIFICATO DI GARANZIA
ï Modello
î N° di serie
í Data di acquisto
ì Nome e indirizzo dell acquirente
ë Nome e indirizzo del rivenditore
(Si prega di apporre il timbro con questi dati)
Español
ï
î
í
ì '
ë '
( ,
CERTIFICADO DE GARANTÍA
ï Número de modelo
î Número de serie
í Fecha de adquisición
ì Nombre y dirección del cliente
ë Nombre y dirección del distribudor
(Se ruega poner el sello del distribudor con su
ï
î
í
ì
ë
( ,
nombre y dirección)
Português
CERTIFICADO DE GARANTIA
ï Número do modelo
î Número do série
í Data de compra
ì Nome e morada do cliente
ë Nome e morada do distribuidor
(Por favor, carímbe o nome e morada do
distribuidor)
GWARANCJA
GARANCIA BIZONYLAT
GARANT SERT F KASI
)
)
135
Page 20

English Polski
Object of declaration: Hitachi High Pressure Washer AW150
We declare under our sole responsibility that this product is in conformity with standards or
standardization documents EN60335-1, EN60335-2-79, EN55014-1, EN55014 -2, EN61000-3-2
and EN61000-3-3 in accordance with Directives 2004/108/EC a nd 2006/42/EC. This product
also conforms to RoHS Directive 2011/65/EU.
The European Standards Manager at Hitachi Koki Europe Ltd. is authorized to compile
the technical fi le.
This declaration is applicable to the product a xed CE marking.
EC DECLARATION OF CONFORMITY
Przedmiot deklaracji: Hitachi Myjka wysokoci nieniowa AW150
Oznaj
miamy z cakowit odpowiedzialno ci , e produkt ten jest zgodny ze standardami
lub standardowymi dokumentami EN60335-1, EN60335-2-79, EN55014-1, EN55014-2,
EN61000-3-2 i EN61000-3-3 w zgodzie z Zasadami 2004/108/EC i 2006/42/EC. Ten produkt
spe nia tak e wymagania Dyrektywy RoHS 2011/65/EU.
Mened er Standardów Europejskich w fi rmie Hitachi Koki Europ Ltd. Jest upowa niony
d
o kompilowania pliku technicznego.
To o wiadczenie odnosi si do za czonego produktu z oznaczeniami CE.
Deutsch Magyar
Gegenstand der Erklärung: Hitachi Hochdruckreiniger AW150
Wir erklären mit alleini ger Verantwor tung, dass diese s Produkt den Standards oder
EN60335-1, EN60335-2-79, EN55014-1, EN55014-2, EN61000-3-2 und EN61000-3-3 in
Übereinstimmung mit den Direktiven 2004/108/EG und 2006/42/ EG entspricht. Dieses
Produkt stimmt auch mit der RoHS-Richtlinie 2011/65/EU überein.
Der Manager für
Datei befugt.
Diese Erklärung gilt für Produkte, die die CE-Markierung tragen.
EG-KONFORMITÄTSERKLÄRUNG
europäische Standards bei der Hitachi Koki Europe Ltd. ist zum Verfassen der technischen
Standardisierungsdokumenten
Megfelel ségi nyilatkozat: Hitachi Magasnyomású mosó AW150
Teljes felel sségünk tudatában kijelentjük, hogy ez a termék megfelel az EN60335-1,
EN60335-2-79, EN55014-1, EN55014-2, EN61000-3-2, és EN61000-3-3 szabványoknak
illetve szabványosítási dokumentumoknak, az Európa Tanács 2004/108/EK és 2006/42/
EK Direktíváival összhangban. Ez a termék is megfelel a 2011/65/EU RoHS irányelvnek.
Az Hitachi Koki Europe Ltd. Európai Szabványkezel je fel van hatalmazva a
Jelen nyilatkozat a terméken feltüntetett CE jelzésre vonatkozik.
Français Türkçe
Objet de la déclaration: Hitachi Nettoyeur haute pression AW150
Nous déclarons sous notre seule et entière responsabilité que ce produit est conforme aux
normes ou doc uments de normalisation EN60335-1, EN60335-2-79, EN55014-1, EN55014-2,
EN61000-3-2 et EN61000-3-3 en accord avec les Directives 2004/108/CE et 2006/42/
CE. Ceproduit est aussi conforme à la Directive RoHS 2011/65/EU.
Le responsable des normes européennes d’Hitac hi Koki Europe Ltd. est autorisé à compiler
les données techniques.
Cette déclaration s’applique aux produits désignés CE.
DECLARATION DE CONFORMITE CE
Beyan konusu: Hitachi Basinçli yikama makinesi AW150
Bu ürünün, 2004/108/EC ve 2006/42/EC sayılı Direktifl erine uygun olarak, EN60335-1,
EN60335 -2-79, EN55014-1, EN55014-2, EN61000-3-2 ve EN61000-3-3 sayılı stand artlar a
ve standardizasyon belgelerine uygun olduåunu, tamamen kendi sorumluluåumuz altında
beyan ederiz. Bu ürün, ayrıca RoHS Yönergesi 2011/65/EU’ya uygundur.
Hitachi Koki Europe Ltd. Avrupa Standartlar Müdürü, teknik dosyayı hazırlama yetkisine sahiptir.
Bu beyan, üzerinde CE i areti bulunan ürünler için geçerlidir.
Italiano
Oggetto della dichiarazione: Hitachi Idropulitrice ad alta pressione AW150
Dichiariamo sotto nostra responsabilità che questo prodotto è conforme agli standard o ai
documenti sulla standardizzazione EN60335-1, EN60335-2-79, EN55014-1, EN55014-2,
EN61000-3-2 e EN61000-3-3 in conformità alle Direttive 2004/108/CE e 2006/42/CE. Il
prodotto è inoltre conforme alla direttiva RoHS 2011/65/EU.
Il Responsabile delle Norme Europee di Hitachi Koki Ltd. è autorizzato a compilare la
scheda tecnica.
Questa dichiarazione è applicabile ai prodotti cui sono applicati i marchi CE.
DICHIARAZIONE DI CONFORMITÀ CE
,
EN60335-1, EN60335-2-79, EN55014-1, EN55014-2, EN61000-3-2 EN61000-3-3
, .
Español Pycc
Objeto de declaración: Hitachi Arandela de alta presión AW150
DECLARACIÓN DE CONFORMIDAD DE LA CE
Declaramo s bajo nuestra única responsabilidad que este producto está de acuerdo con las
normas o con los documentos de normalización EN60335-1, EN60335-2-79, EN55014-1,
EN55014-2, EN61000-3-2 y EN61000-3-3, según indican las Directrices 2004/108/CE y
2006/42/CE. Este producto satisface también los requisitos establecidos por la Directiva
2011/65/EU (RoHS).
El Jefe de Normas Europeas de Hitachi Koki Europe Ltd. está autorizado para recopilar
archivos técnicos.
Esta declaración se aplica a los productos con marcas de la CE.
,
EN55014-2, EN61000-3-2 EN61000-3-3 2004/108/ 2006/42/ .
.
Ltd. .
Português
Objeto de declaração: Hitachi Anilha de alta pressão AW150
Declaramos,
as normas ou documentos normativos EN60335-1, EN60335-2-79, EN55014-1, EN55014-2,
EN61000-3-2 e EN61000-3-3, em conformidade com as Directrizes 2004/108/CE e 2006/42/
CE. Este produto está também em conformidade com a Directiva RoHS 2011/65/EU.
O Gestor de Normas Europeias da Hitachi Koki Europe Ltd. está autorizado a compilar
o fi chei
Esta declaração se aplica aos produtos designados CE.
DECLARAÇÃO DE CONFORMIDADE CE
sob nossa única e inteira responsabilidade,que este produto está de a cordo com
ro técnico.
Hitachi Koki Europe Ltd.
Clonshaugh Business & Technology Park, Dublin 17, lreland
Representative o ce in Europe
Hitachi Power Tools Europe GmbH
Siemensring 34, 47877 Willich 1, F. R. Germany
Head o ce in Japan
Hitachi Koki Co., Ltd.
Shinagawa Intercity Tower A, 15-1, Konan 2-chome,
Minato-ku, Tokyo, Japan
DEKLARACJA ZGODNO CI Z EC
EK MEGFELEL SÉGI NYILATKOZAT
m szak i fájl elkészítésé re.
AB UYGUNLUK BEYANI
: Hitachi M a AW150
2004/108/EC 2006/42/EC.
2011/65/EU.
Hitachi Koki Europe Ltd.
.
: Hitachi M a AW150
EN6033 5-1, EN60335-2-79, EN55014-1,
2011/65/EU
Hitachi Koki Europe
, .
30. 12. 2012
Mr. John de Loughry
European Standards and
Compliance Manager
30. 12. 2012
F. Tashimo
Vice-President & Director
212
Code No. C99205291
Printed in China
 Loading...