

Page 1

- 1 -
Product is certified to comply with technical standards.
Administrator Manual
Thank you for purchasing the WirelessIP 3000.
● Before use, kindly read this “Administrator Manual”
thoroughly to have an understanding of the contents.
● After reading, place it within reach at all times such as at
the side of this product.
WirelessIP 3000
TD61-2898A
Page 2

- 2 -
CONTENTS
CONTENTS..............................................................................................................................................................................2
Chapter 1 Administrator Settings......................................................................................................................................1-1
Administrator Menu...............................................................................................................................................................1-2
Network.................................................................................................................................................................................1-3
Network.............................................................................................................................................................................1-3
■ Addition...................................................................................................................................................................1-4
■ Deletion...................................................................................................................................................................1-7
■ Priority-Level Settings.............................................................................................................................................1-8
■ Basic Information.....................................................................................................................................................1-8
■ Wireless LAN...........................................................................................................................................................1-9
■ Encryption...............................................................................................................................................................1-9
■ When WEP is selected for Mode...........................................................................................................................1-10
■ When WPA-PSK is selected for Mode..................................................................................................................1-11
■ Authentication Method...........................................................................................................................................1-12
■ TCP/IP...................................................................................................................................................................1-13
■ SIP Outb Proxy......................................................................................................................................................1-14
■ NAT Traversal.......................................................................................................................................................1-15
■ QoS.......................................................................................................................................................................1-16
■ Coding...................................................................................................................................................................1-17
■ Jitter Buffer............................................................................................................................................................1-17
SIP..................................................................................................................................................................................1-18
■ User account.........................................................................................................................................................1-18
■ Server....................................................................................................................................................................1-19
■ IMS Server............................................................................................................................................................1-19
■ Outbound Proxy....................................................................................................................................................1-20
■ Expire....................................................................................................................................................................1-20
Network Connection........................................................................................................................................................1-21
■ Network Connection..............................................................................................................................................1-21
Certificate Management..................................................................................................................................................1-22
■ Certificate Management........................................................................................................................................1-22
Network Search...............................................................................................................................................................1-25
Ping.................................................................................................................................................................................1-27
■ Manual Operations................................................................................................................................................1-27
■ Proxy Server 1.......................................................................................................................................................1-28
■ Proxy Server 2.......................................................................................................................................................1-28
■ Default Gateway....................................................................................................................................................1-29
■ TFTP Server..........................................................................................................................................................1-29
Password.............................................................................................................................................................................1-30
Administrator Password..................................................................................................................................................1-30
User Password Reset.....................................................................................................................................................1-31
Version Upgrade..................................................................................................................................................................1-32
Error Log..............................................................................................................................................................................1-34
Web Server..........................................................................................................................................................................1-35
Initializing.............................................................................................................................................................................1-36
Memory Info (Memory Usage).............................................................................................................................................1-37
Chapter 2 Web Settings......................................................................................................................................................2-1
WirelessIP 3000 Web Settings..............................................................................................................................................2-2
Overview...........................................................................................................................................................................2-2
When setting via TELNET:................................................................................................................................................2-2
Access restrictions............................................................................................................................................................2-2
Management User Menu.......................................................................................................................................................2-3
Main..................................................................................................................................................................................2-3
Page 3

- 3 -
Configuration.....................................................................................................................................................................2-4
System Setup....................................................................................................................................................................2-5
■ Load & Upgrade......................................................................................................................................................2-6
■ Change Password...................................................................................................................................................2-6
■ Web Server Stop.....................................................................................................................................................2-7
Network Setup...................................................................................................................................................................2-7
Chapter 3 Appendix.............................................................................................................................................................3-1
Glossary................................................................................................................................................................................3-2
INDEX....................................................................................................................................................................................3-5
Page 4

- 1-1 -
Chapter 1 Administrator Settings
Page 5
- 1-2 -
Chapter 1
Administrator
Settings
Administrator Menu
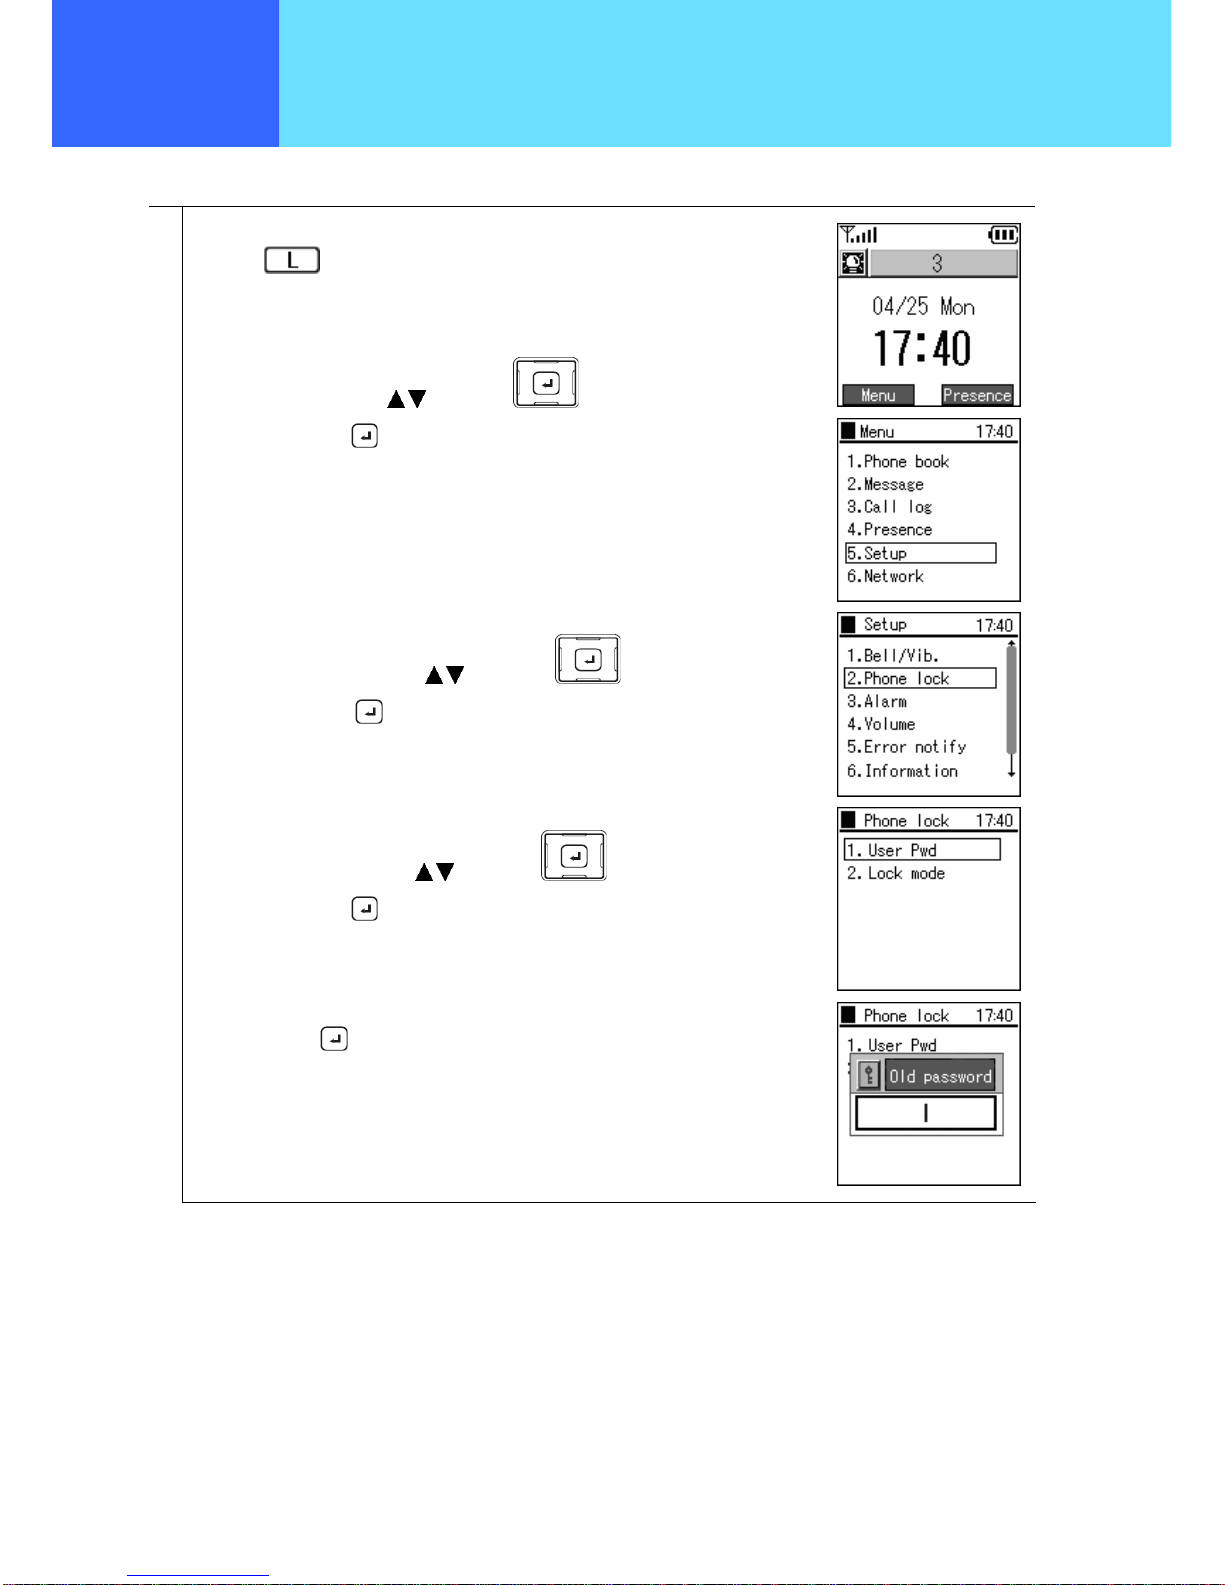
Makes required settings for using the phone. Only administrators are able to set items on the Administrator Menu.
1
Press the
key to select Menu.
Select “5. Setup” using the
keys of the key,
and confirm using the key.
From the Setup menu,
Select “2. Phone lock” using the
keys of the key,
and confirm using the key.
From the Phone lock menu,
Select “1. User Pwd” using the
keys of the key,
and confirm using the key.
When you select "1. User Pwd", the system asks you for the current password. Enter
the Admin password. The default value is 000000 (6 zeroes).
Set this using the
key.
Page 6

- 1-3 -
Chapter 1
Administrator
Settings
Network
This configures network-related settings.
1
From the Admin menu,
Select “1. Network config” using the
keys of the key,
and confirm using the
key.
Network
You can check the settings for the type of connected network as well as information about settings.
1
From the Network config menu,
Select “1. Network config” using the keys of the key,
and confirm using the key.
The list of profiles (network settings) is displayed.
Page 7

- 1-4 -
Chapter 1
Administrator
Settings
Network
■ Addition
New network profiles can be created
1
When making additions to the profile,
press the
key on Network confi screen to select the submenu.
Select “1. Add”, and press the
key.
A confirmation message is displayed.
Select "Yes" using the
keys of the key, and set this using the
key.
2
The network profile registration wizard is started.
Input the profile name.
For the “Join Method”, select “Auto” or “Manual” using the
keys.
After completion of editing, press the
key.
3
Input the SSID value of the wireless LAN to connect to.
If left blank, connection is made to the access point having the strongest wave signal
from among the access points that can be connected to.
After completion of editing, press the
key.
If returning to the previous screen, press the
key.
Page 8
- 1-5 -
Chapter 1
Administrator
Settings
Network
4
Select encryption type.
Select “None”, “WEP” or “WPA-PSK” using the keys of the key, and
confirm using the
key.
If returning to the previous screen, press the
key.
If “WEP” is selected, a screen for performing settings related to WEP is displayed.
Input the values as prompted on screen.
If “WPA-PSK” is selected, a screen for inputting a pre-shared key is displayed. Input
the values as prompted on screen.
Finally, press the
key.
5
Configure the settings for TCP/IP.
For “Use DHCP”, select “Disabled” or “Enabled” using the
keys.
If returning to the previous screen, press the
key.
If “Disabled” is selected, the screen for setting the IP address is selected. Input the
value as prompted on screen.
Finally, press the
key.
Page 9
- 1-6 -
Chapter 1
Administrator
Settings
Network
6
Configure the settings for the network authentication method.
For “Mode”, select “Disable”, “WEB”, “8021X-MD5”, “8021X-TLS”, “8021X-PEAP” , or
“8021X-TTLS” using the keys.
If returning to the previous screen, press the
key.
If anything other than “Disabled” is selected, the screen for setting the user ID and
password is displayed. Input the values as prompted on screen.
Finally, press the
key.
7
Configure the settings for NAT Traversal.
For “Mode”, select “Disable”, “SNAT”, “UPnP”, or “STUN” using the
keys.
If returning to the previous screen, press the
key.
If “SNAT” or “STUN” is selected, the respective setting screens are displayed. Input
the values as prompted on screen.
Finally, press the
key.
Page 10

- 1-7 -
Chapter 1
Administrator
Settings
Network
8
The Advanced settings screen is displayed.
Other advanced settings can be made using the
keys of the key.
When the settings are completed, select “1. Save & Exit”, and press the key.
Select "Yes" using the
keys of the key, and set this using the
key.
The profile is saved and network reconnection is performed.
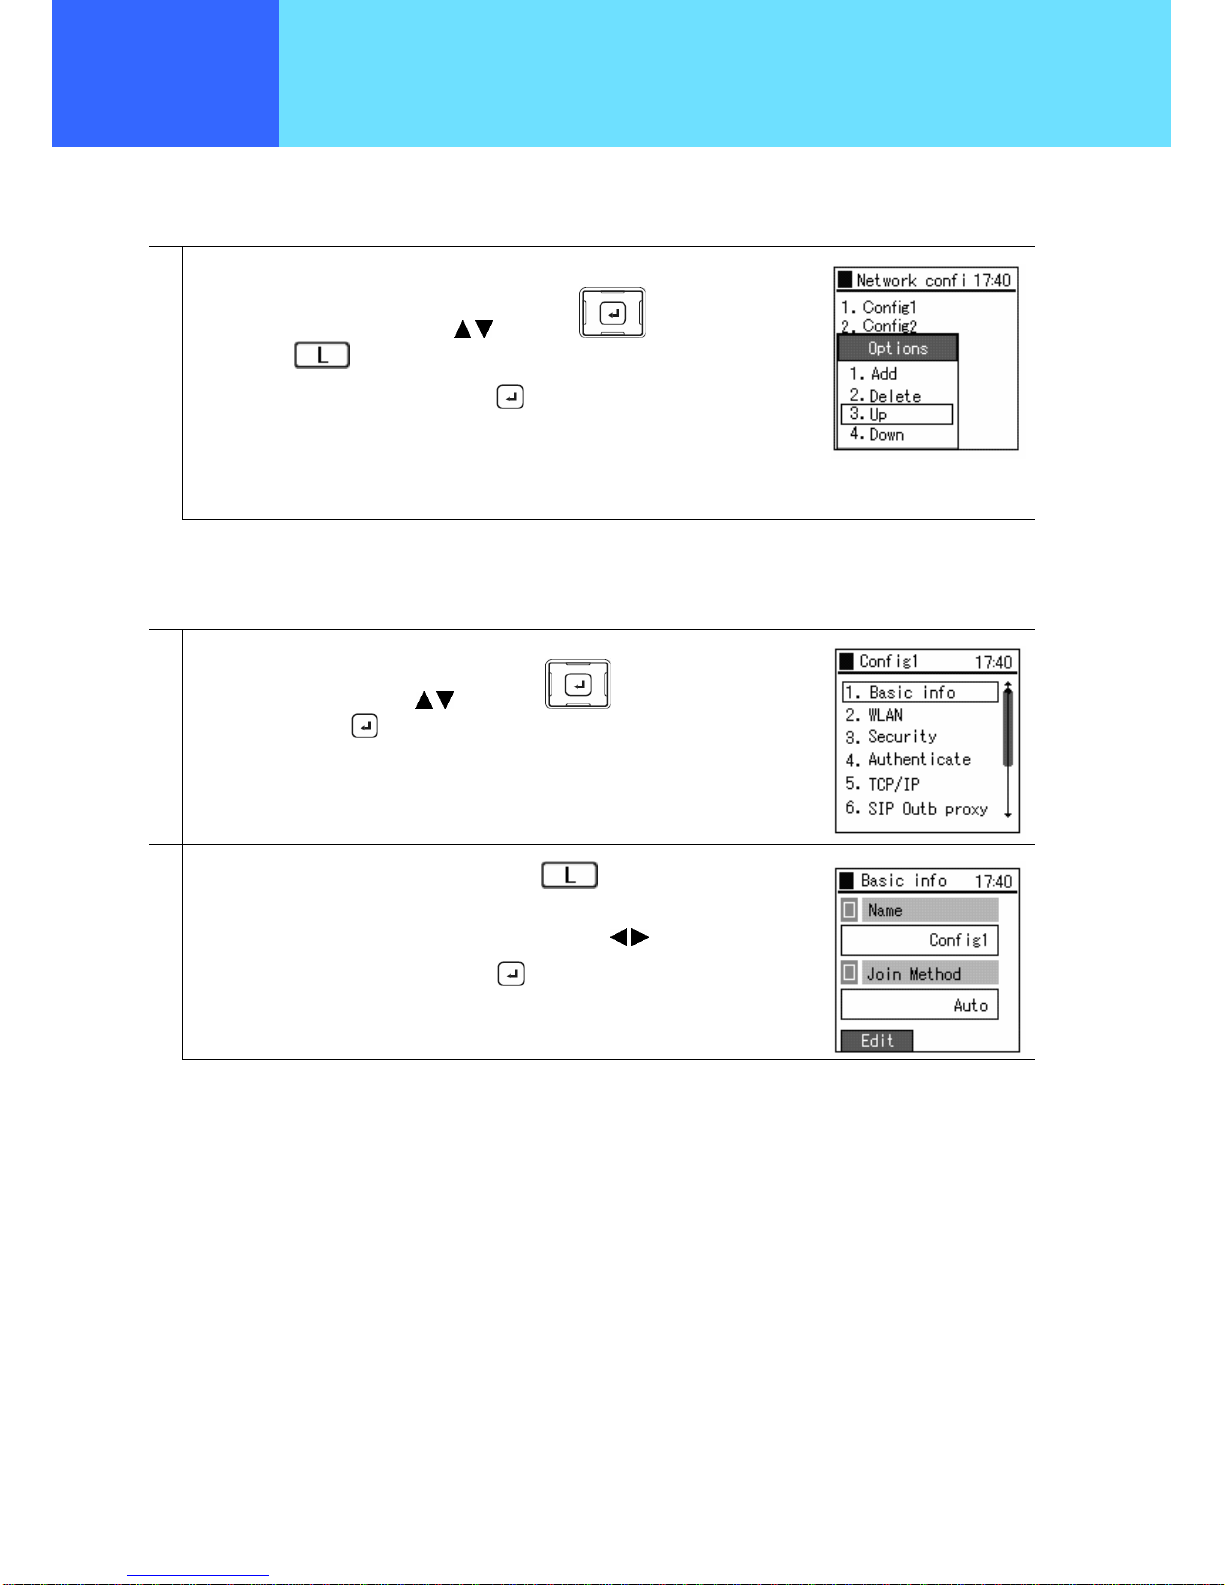
Up to a maximum of 5 profiles can be created.
■ Deletion
Network profiles can be deleted.
1
When deleting a profile, from the Network confi screen
select the profile to be deleted using the
keys of the key,
and press the
key to select the submenu.
Select “2. Delete”, and press the key.
A confirmation message is displayed.
Select "Yes" using the keys of the key, and confirm using the
key.
Deletion of all profiles is not possible.
Page 11
- 1-8 -
Chapter 1
Administrator
Settings
Network
■ Priority-Level Settings
The priority level of a profile can be set.
1
When setting the priority level of a profile, from the profile-list screen
Select the profile to be set using the
keys of the key,
and press the
key to select the submenu.
Select “3. Up” or “4. Down”, and press the key.
■ Basic Information
A profile’s name and its connection method can be set.
1
From the Config1(profile name) menu,
Select “1. Basic info” using the
keys of the key,
and confirm using the
key.
2
When editing the “Name”, select “Edit” using the key.
For the “Join Method”, select “Auto” or “Manual” using the keys.
After completion of editing, save using the key.
Page 12

- 1-9 -
Chapter 3
Administrator
Settings
Chapter 1
Administrator
Settings
Network
■ Wireless LAN
The SSID that identifies the access point can be set.
1
From the Config1(profile name) menu,
Select “2. WLAN” using the keys of the key,
and set using the key.
2
Select “Edit” using the key.
Input the SSID value of the wireless LAN to be connected to.
If left blank, connection is made to the access point having the strongest wave signal
from among the access points that can be connected to.
Finally, save using the
key.
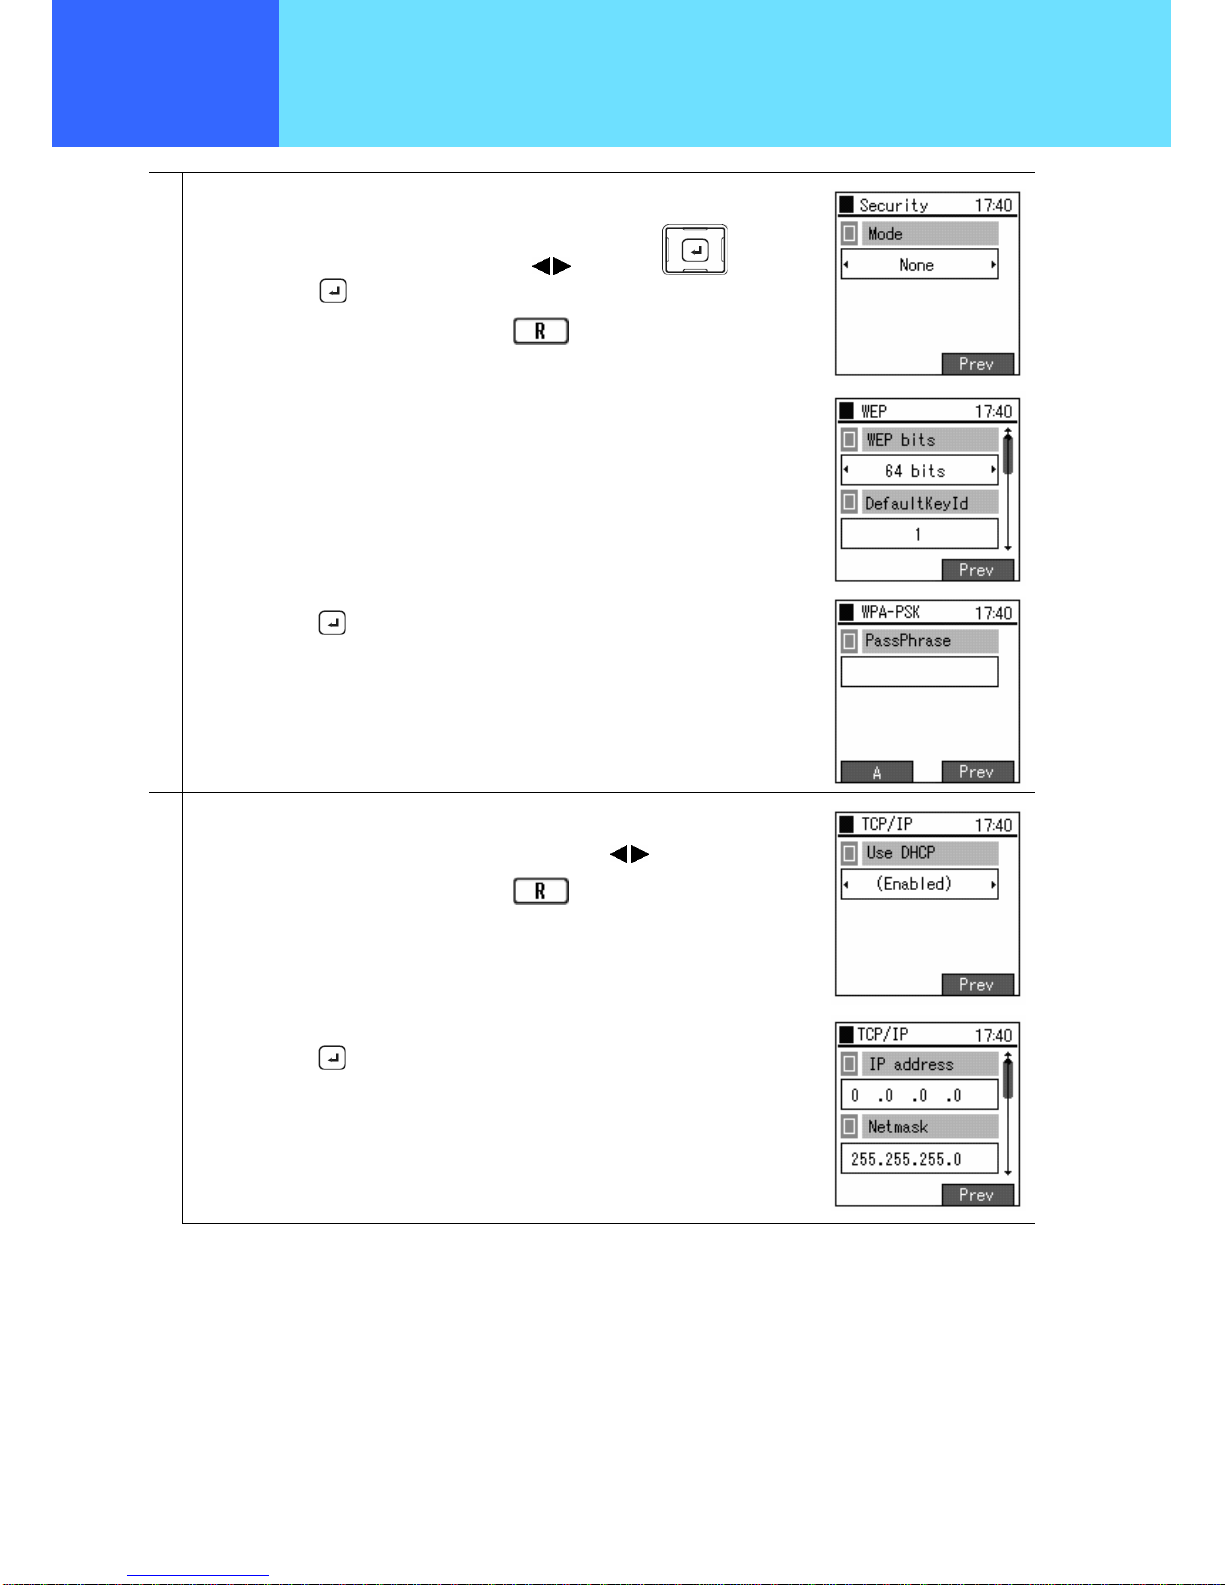
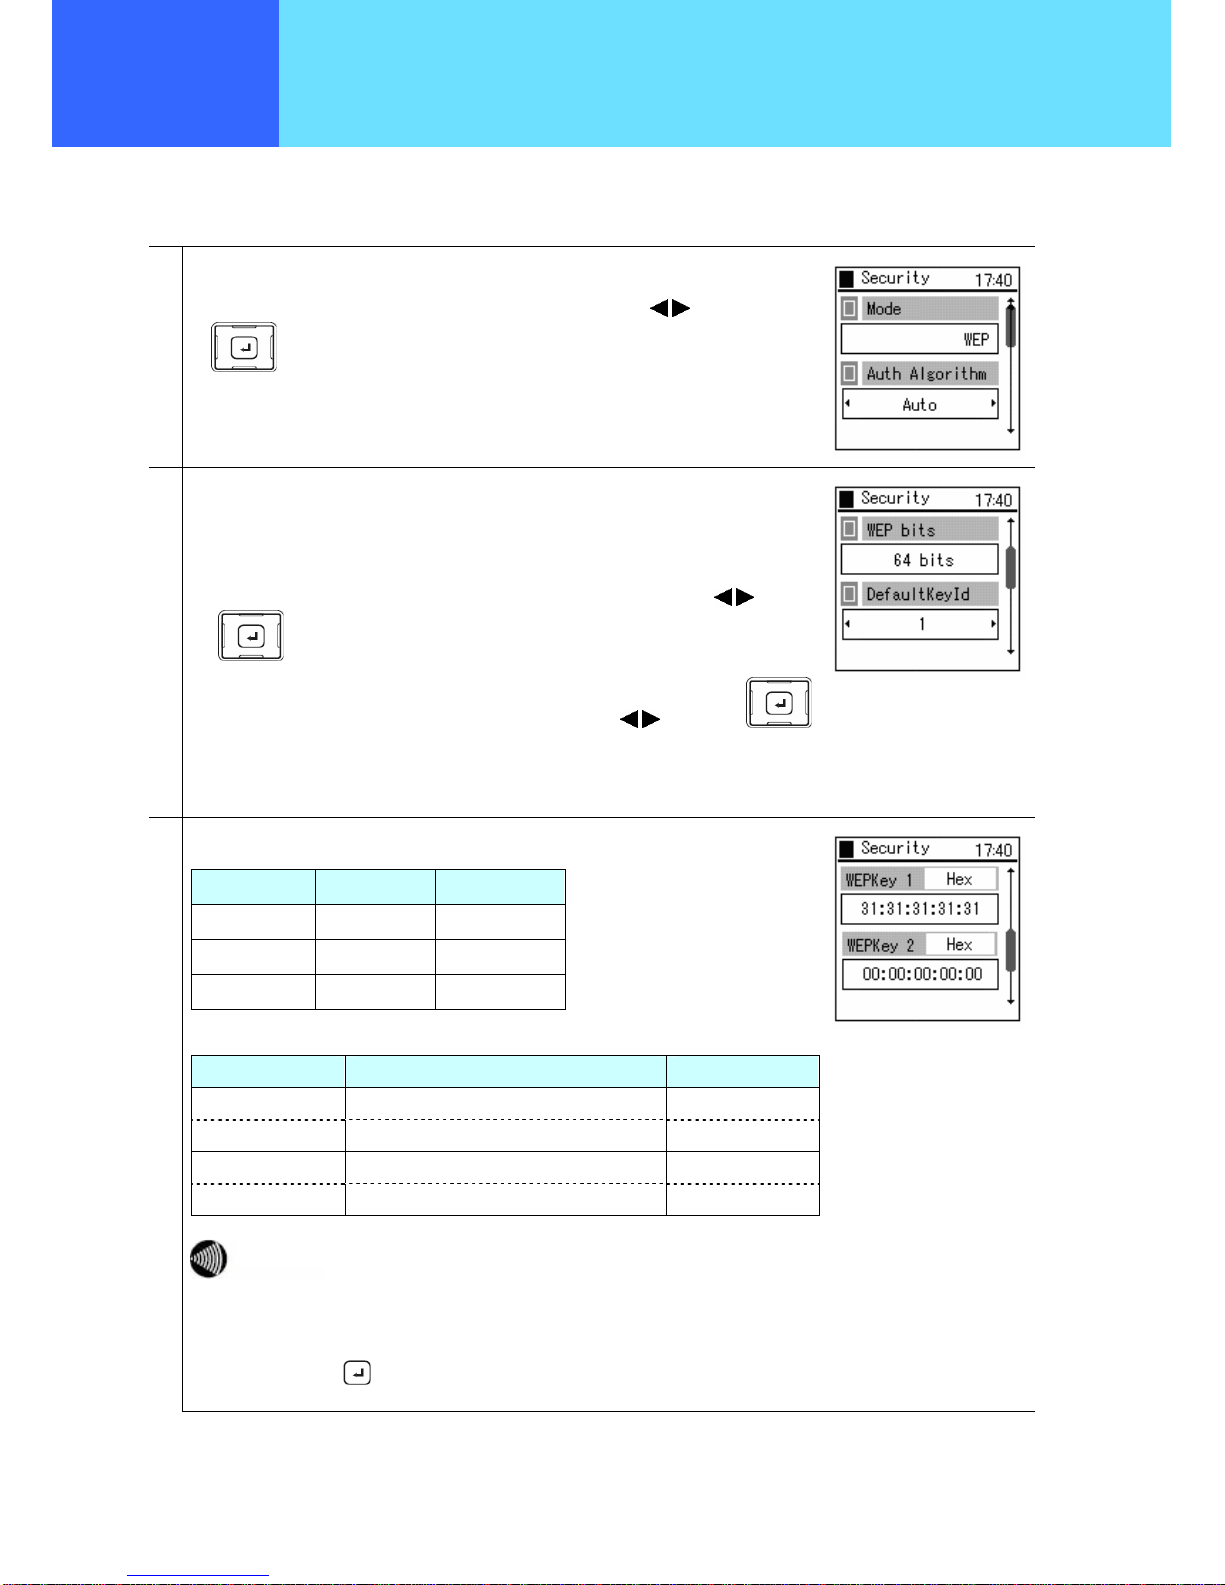
■ Encryption
These settings are related to encryption. This product supports encryption based on WEP (64/128/256 bits).
1
From the Config1(profile name) menu,
Select “3. Security” using the keys of the key,
and confirm using the
key.
2
Select “Edit” using the key.
For “Mode”, select "Disabled", "WEP", or "WPA-PSK" using the
keys of the
key.
Mode Explanation
WEP Based on the WEP key that was set, an effectively secure method for
encrypting wireless communications data is made.
WPA-PSK This is the method to encrypt wireless communications data based on a
pre-shared key set in both this product and the connected device. As the
encryption key is replaced automatically, strong security can be
achieved.
Page 13
- 1-10 -
Chapter 3
Administrator
Settings
Chapter 1
Administrator
Settings
Network
■ When WEP is selected for Mode
1
If “WEP” is selected as the Mode, for the “Auth Algorithm”,
Select “Auto”, “Open System”, or “Pre-shared Key” using the
keys of the
key .
2
Select “WEP bits” and “Default Key Id”.
For the “WEP bits”, select “64 bits”, “128 bits”, or “256 bits” using the
keys of
the
key.
For the “Default Key Id”, Select “1”, “2”, “3”, or “4” using the keys of the
key.
3
Input the WEP key as hexadecimal or alphanumeric. (Refer to the equivalence chart
below)
Bit Hexadecimal Alphanumeric
256 bits 58 characters 29 characters
128 bits 26 characters 13 characters
64 bits 10 characters 5 characters
Encryption Bit Length
Hexadecimal (0– 9, a– f)
Alphanumeric
128 bits 26 characters 13 characters
Input example 31:31:31:31:31:31:31:31:31:31:31:31:31 1111111111111
64 bits 10 characters 5 characters
Input example 31:31:31:31:31 11111
If the WEP key (hexadecimal, alphanumeric) that is input does not fill up
the character count specified in the encryption bit length, the WEP key is
generated by padding the hexadecimal number with additional zeros.
The longer the encryption bit length, the stronger the security.
Finally, set using the
key.
Page 14
- 1-11 -
Chapter 1
Administrator
Settings
Network
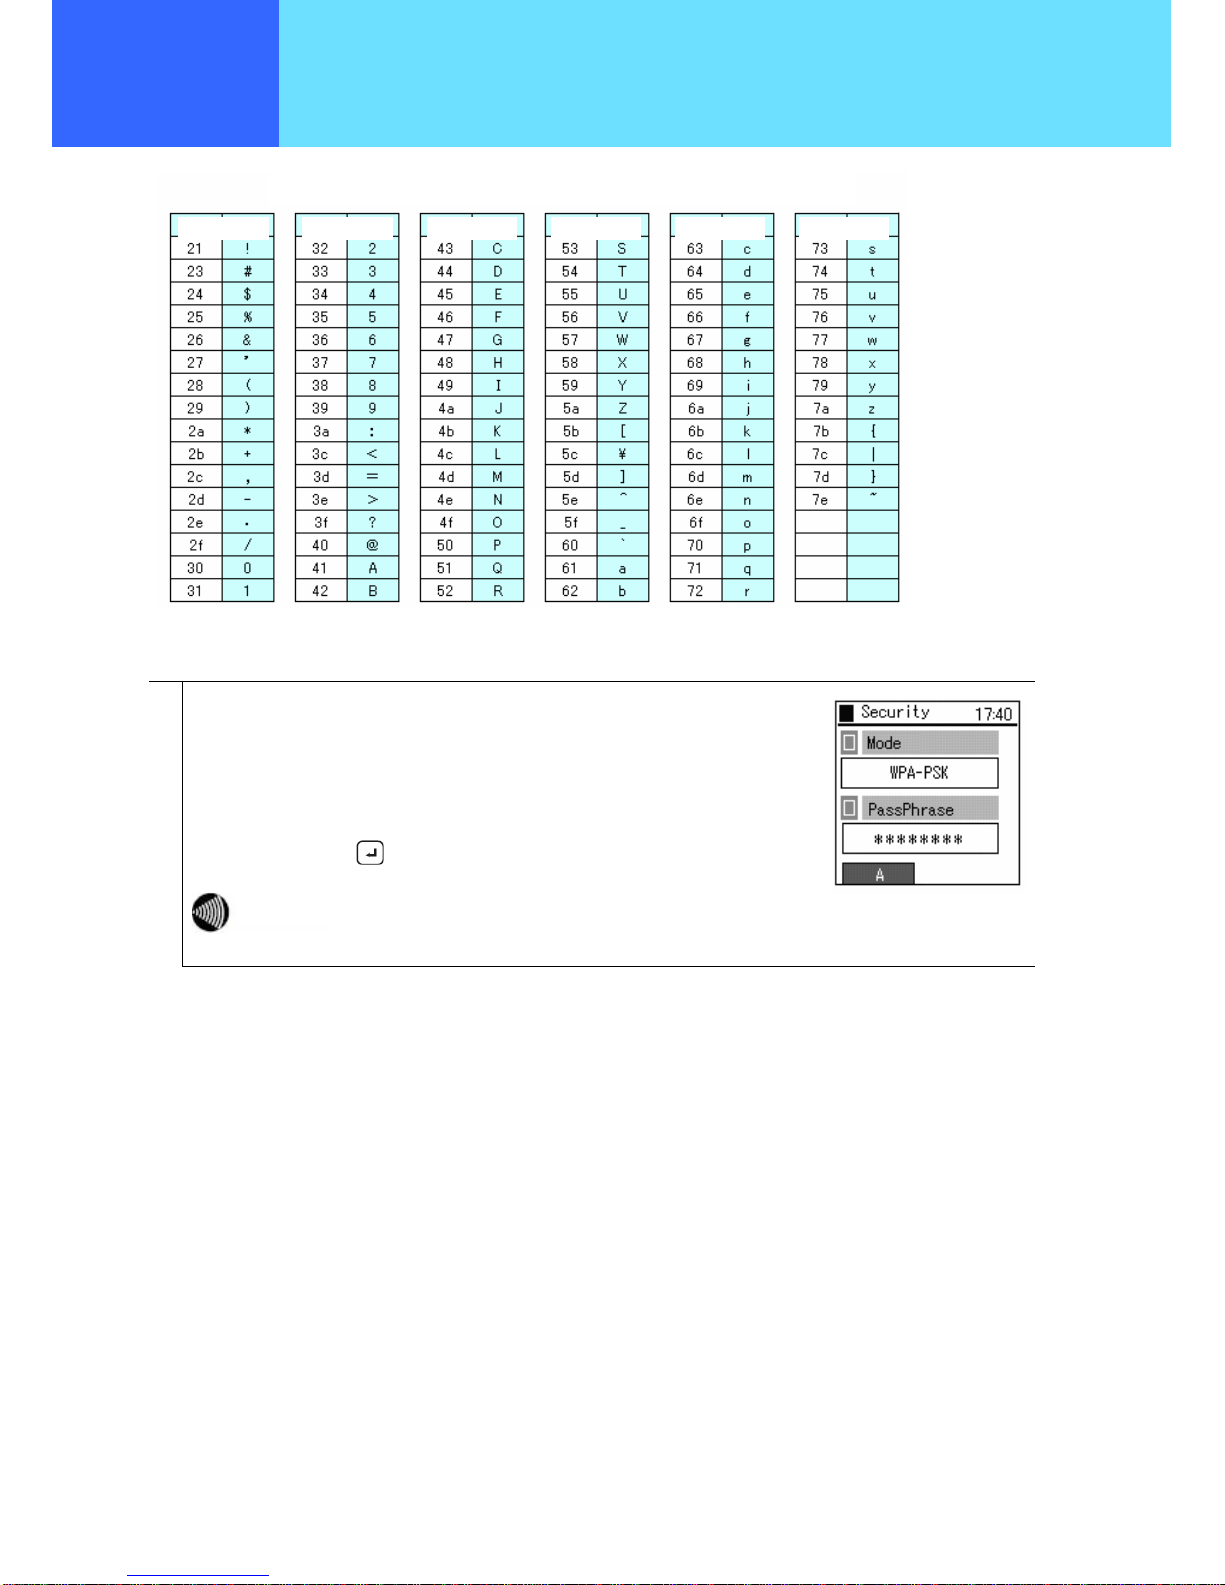
■ When WPA-PSK is selected for Mode
1
Select “Pre-shared key” (PassPhrase). Input the same value as the value set in the
connection device.
Input the “PassPhrase” as single-byte alphanumeric characters with at least 8
characters but not more than 63 characters.
Finally, save using the key.
Starting from the input pre-shared key, the key is automatically changed to
a new value every fixed period. This makes it more secure than WEP.
Hex (Hexadecimal Code) and Alpha (ASCII Code) equivalence chart
Hex|Alpha Hex|Alpha Hex|Alpha Hex|Alpha Hex|Alpha Hex|Alpha
Page 15

- 1-12 -
Chapter 1
Administrator
Settings
Network
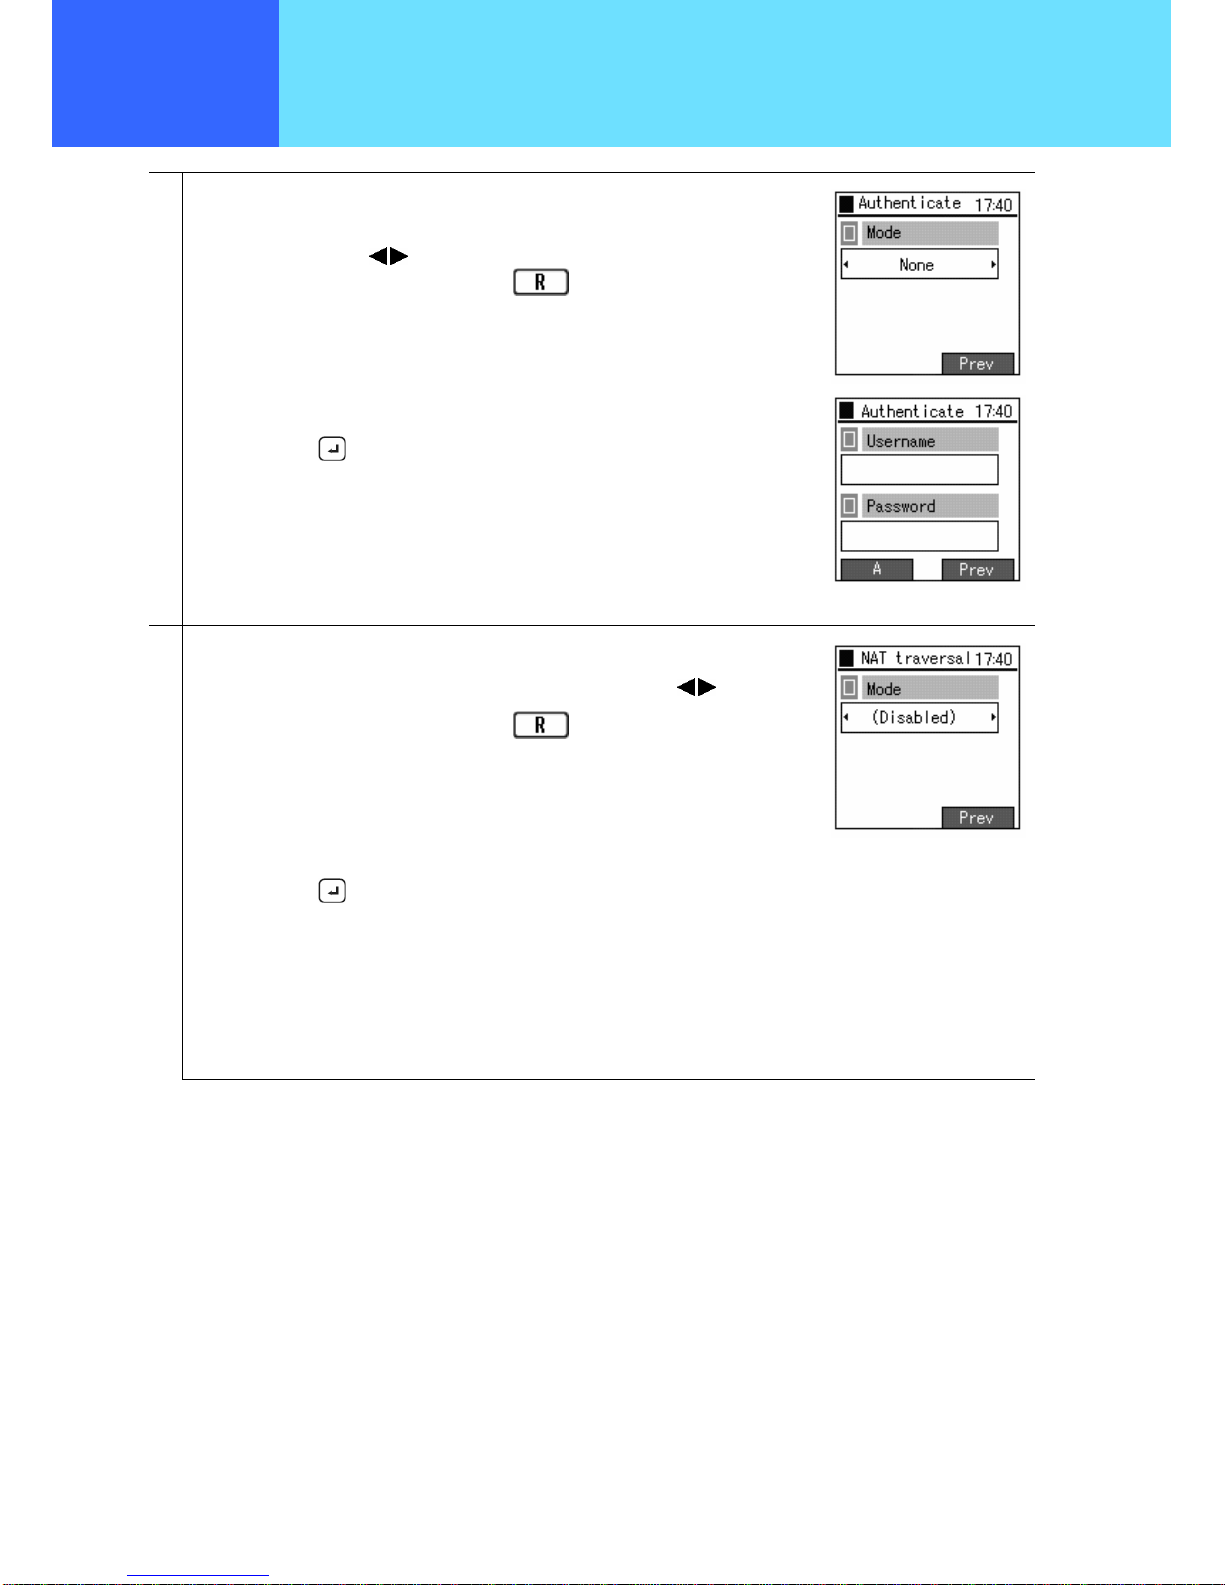
■ Authentication Method
Authentication method is the settings related to network authentication.
1
From the Config1(profile name) menu,
Select “4. Authenticate” using the
keys of the key,
and confirm using the
key.
2
Select “Edit” using the key,
For “Mode”, Select “Disable”, “WEB”, “8021X-MD5”, “8021X-TLS”, “8021X-PEAP” , or
“8021X-TTLS” using the keys.
Finally, set using the
key.
Page 16
- 1-13 -
Chapter 1
Administrator
Settings
Network
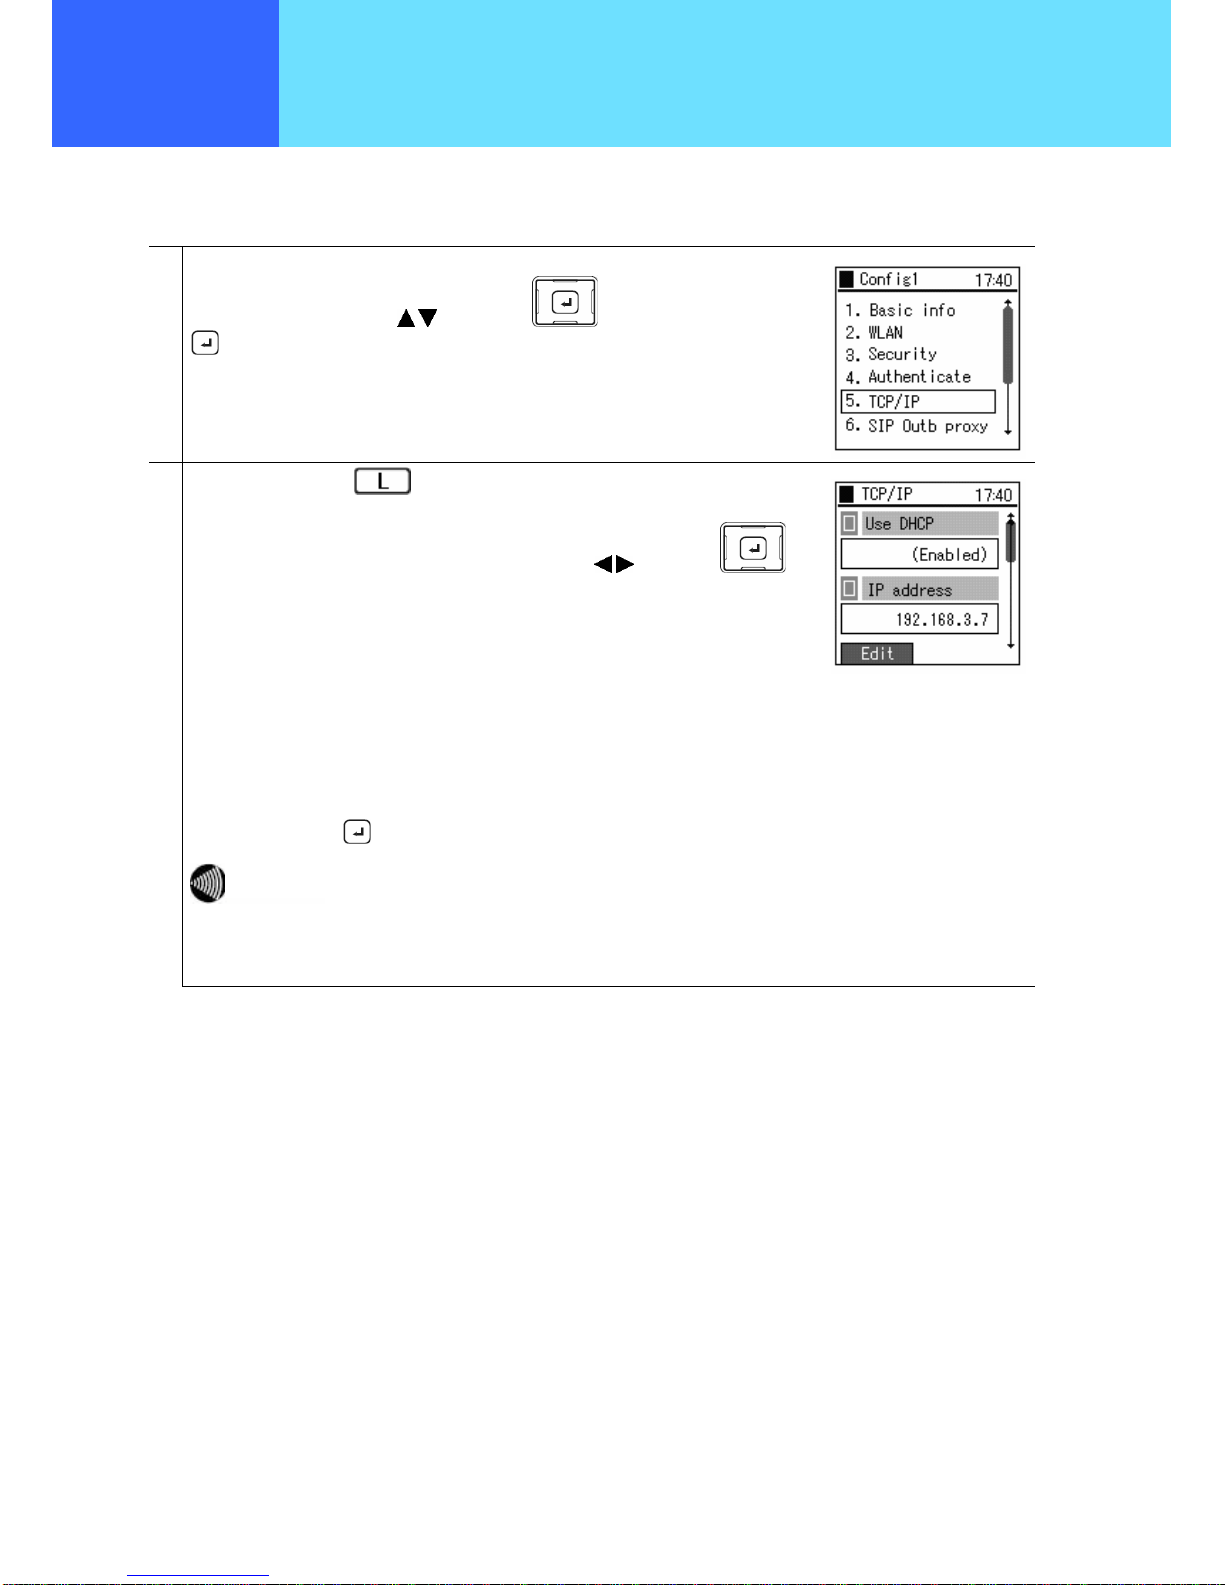
■ TCP/IP
The settings for DHCP, IP address, subnet mask, default gateway, and DNS can be configured.
1
From the Config1(profile name) menu,
Select “5. TCP/IP” using the
keys of the key, and confirm using the
key.
2
Select “Edit” using the key.
For “Use DHCP”, Select “Enable” or “Disable” using the
keys of the
key.
When setting the IP address manually, set DHCP to “Disable” and input values for the
items below:
• IP address: IP address of the WIP3000
• Subnet mask: Value of subnet mask
• Default gateway: IP address of default gateway
• DNS server 1: IP address of primary DNS
• DNS server 2: IP address of secondary DNS
Finally, set using the
key.
When “DHCP” is set to “Enable”, the values of other setting parameters
relating to TCP/IP do not apply.
Notice
Page 17
- 1-14 -
Chapter 1
Administrator
Settings
Network
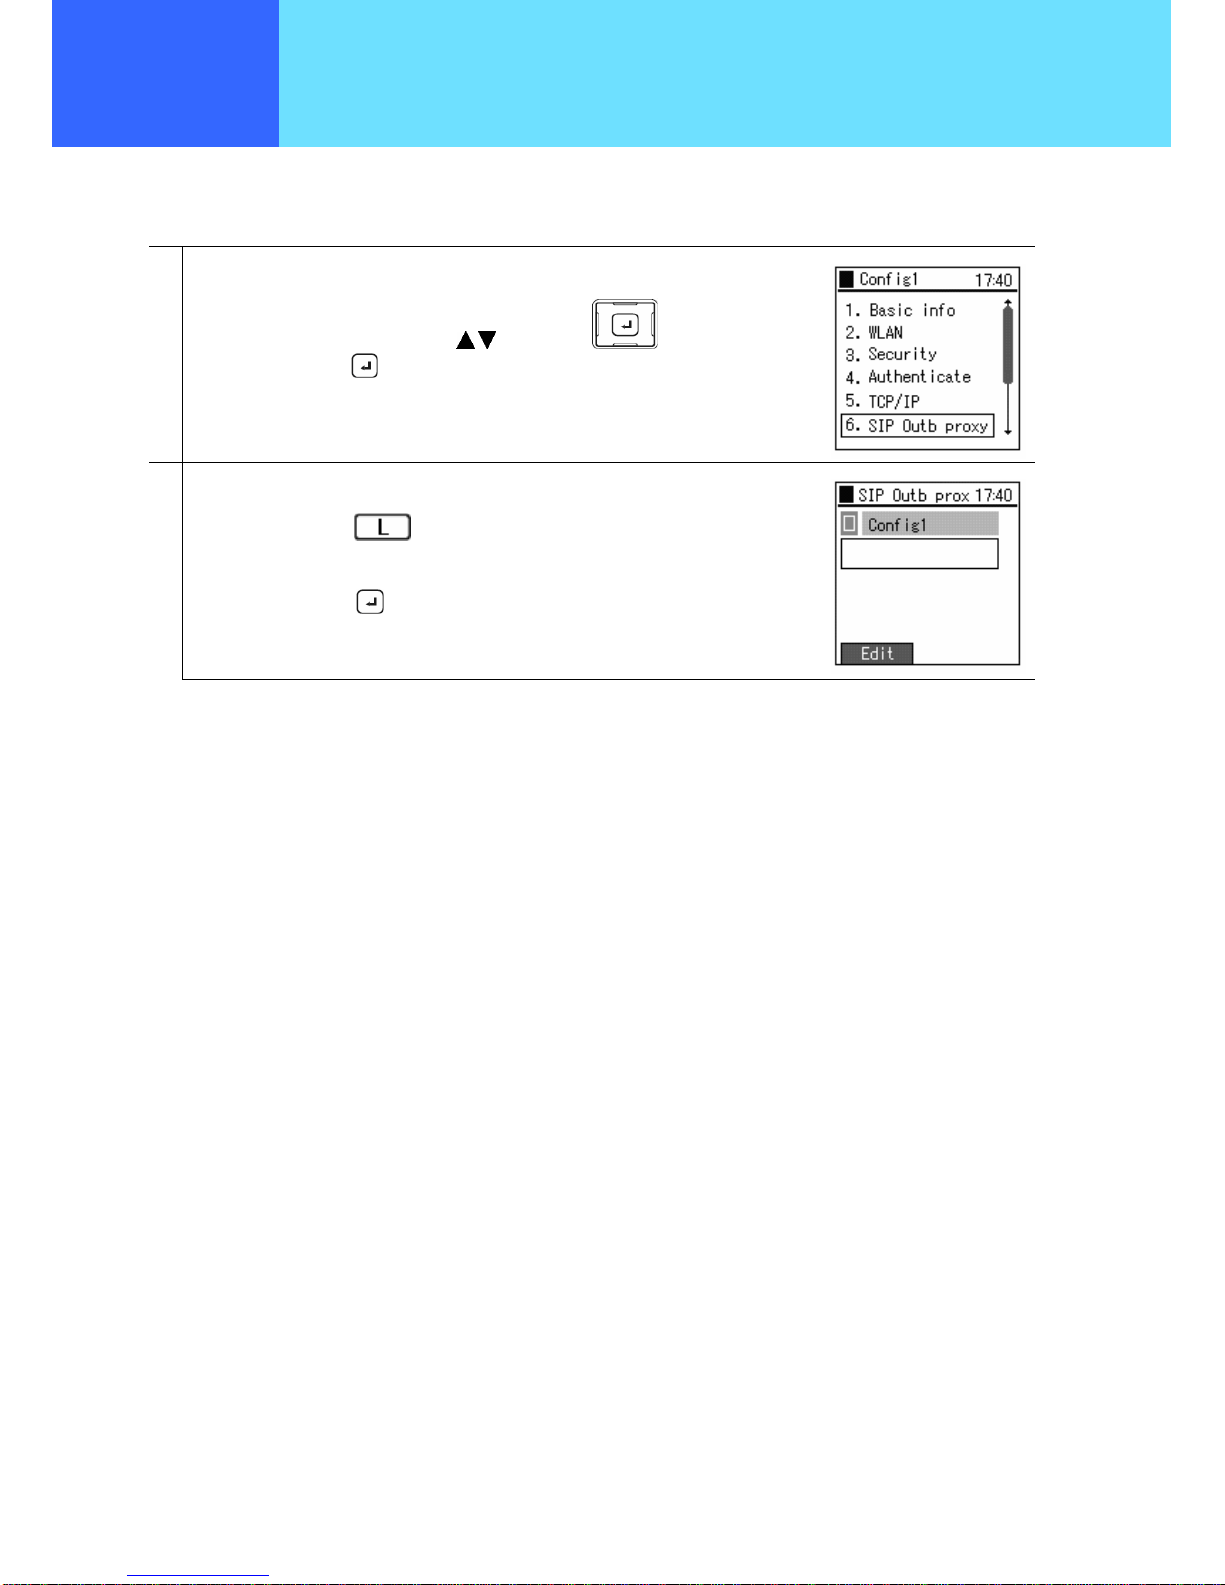
■ SIP Outb Proxy
You can set the Outbound Proxy server settings. Depending on the system configuration it may not be necessary to set them.
1
From the Config1(profile name) menu,
Select “6. SIP Outb Proxy” using the keys of the key,
and confirm using the
key.
2
The screen for inputting the IP address of the SIP Outb Proxy is displayed.
Select “Edit” using the
key.
Enter the IP address.
Finally, save using the
key.
Page 18

- 1-15 -
Chapter 1
Administrator
Settings
Network
■ NAT Traversal
This product supports UPnP and Static NAT, and it is possible to make calls from within the LAN to outside the LAN via a NAT
Box. At these times, the settings for UPnP and Static NAT can be made to match the settings of the NAT Box to be
connected to.
1
From the Config1(profile name) menu,
Select “7. NAT Traversal” using the keys of the key,
and confirm using the
key.
2
From the NAT Traversal menu,
Select “1. Mode” using the keys of the key,
and confirm using the
key.
Select “Edit” using the
key.
For “Mode”, select “SNAT”, “UPnP”, “STUN”, or “Disabled”.
Finally, save using the
key.
3
From the NAT Traversal menu,
Select “2. STUN” using the keys of the key ,
and confirm using the
key.
Select “Edit” using the
key.
Input the values for server IP and port number.
Finally, save using the
key.
Page 19

- 1-16 -
Chapter 1
Administrator
Settings
Network
4
From the NAT Traversal menu,
Select “3. Static NAT” using the keys of the key,
and confirm using the
key.
Select “Edit” using the
key.
Input the values for external IP and port number.
Finally, save using the
key.
■ QoS
Settings related to QoS can be configured.
1
From the Config1(profile name) menu,
Select “8. QoS” using the keys of the key, and confirm using the
key.
2
Select “Edit” using the key.
For WMM, Select “On” or “Off” using the
keys of the key.
Finally, save using the
key.
Page 20

- 1-17 -
Chapter 1
Administrator
Settings
Network
■ Coding
You can set the CODEC (priority and transmission interval) to match the system configuration.
1
From the Config1(profile name) menu,
Select “9. Coder” using the keys of the key,
and confirm using the
key.
2
From the Coder menu,
Select one codec using the
keys of the key,
and confirm using the
key.
Detailed information is displayed.
Select “Edit” using the key.
Set the priority (1– 3) and the RTP “Multiframe” interval (20– 40 ms).
Finally, save using the
key.
■ Jitter Buffer
Settings related to jitter buffer can be configured.
1
From the Config1(profile name) menu,
Select “0. JitterBufSize” using the keys of the key,
and confirm using the
key.
2
Select “Edit” using the key.
For jitter buffer value, use the keys of the key to select a value from
20– 200 ms.
Finally, save using the
key.
Page 21

- 1-18 -
Chapter 1
Administrator
Settings
Network
SIP
SIP settings can be configured.
1
From the Network menu,
Select “2. SIP” using the
keys of the key,
and confirm using the
key.
■ User account
Configures the settings for the display name, phone number, user ID, and URL Scheme.
1
From the SIP menu,
Select “1. User account” using the keys of the key,
and confirm using the
key.
2
Select “Edit” using the key.
The following information is displayed:
• Display name
• Phone number
• User ID
• User password
• URL Scheme
The phone number is mandatory, while display name, user ID, and URL Scheme
should be input as needed.
Finally, save using the
key.
Page 22

- 1-19 -
Chapter 1
Administrator
Settings
Network
■ Server
Configures the settings related to the server.
1
From the SIP menu,
Select “2. Server setup” using the
keys of the key,
and confirm using the
key.
2
Select “Edit” using the key.
Input values for the following items:
• SIP domain
• Proxy server 1
• Register server 1
• Proxy server 2
• Register server 2
Finally, save using the
key.
■ IMS Server
This configures the settings related to IMS server.
1
From the SIP menu,
Select “3. IMS server” using the
keys of the key,
and confirm using the
key.
2
Select “Edit” using the key.
Input values for IM and Presence.
Finally, save using the
key.
Page 23

- 1-20 -
Chapter 1
Administrator
Settings
Network
■ Outbound Proxy
The settings for the outbound proxy server can be configured. Depending on the system configuration it may not be necessary
to set them.
1
From the SIP menu,
Select “4. Outbound proxy” using the keys of the key,
and confirm using the key.
2
Select “Edit” using the key.
Input the IP address for outbound proxy server.
Finally, save using the
key.
■ Expire
The settings for Regist Expire Timer, Session Timer, and Presence Expire Timer can be configured.
1
From the SIP menu,
Select “5. Expire” using the keys of the key,
and confirm using the key.
2
Select “Edit” using the key.
Input values for the following items:
・Regist Expire
・Session Expire
・Presence Expire
Finally, save using the
key.
Page 24

- 1-21 -
Chapter 1
Administrator
Settings
Network
Network Connection
■ Network Connection
When adding, deleting, and changing settings of profiles, reconnection can be done manually.
1
From the Network menu,
Select “3. Network reload” using the
keys of the key,
and confirm using the
key.
2
Select “Auto”, “Suspend”, “Disconnect”, or “Profile name” using the keys of the
key, and confirm using the key.
Reload commences.
Page 25

- 1-22 -
Chapter 1
Administrator
Settings
Network
Certificate Management
Certificate settings can be configured.
1
From the Network menu,
Select “4. Certs manager” using the keys of the key,
and confirm using the key.
■ Certificate Management
When running 802.1x (EAP-TLS, PEAP, TTLS), information on root certificates and private certificates can be imported and
checked.
1
From the Certs manager menu,
Select “1. View RootCA” using the keys of the key,
and confirm using the key.
2
From the Certs manager menu,
Select “2. View PrivateCA” using the
keys of the key,
and confirm using the key.
Page 26

- 1-23 -
Chapter 1
Administrator
Settings
Network
3
From the Certs manager menu,
Select “3. Download RootCA” using the
keys of the key,
and confirm using the
key.
A warning message is displayed.
Select “Yes” or “No” using the
keys of the key.
If “Yes” is selected, there is a prompt for input of the IP address of the download
destination TFTP server. After inputting the IP address, press the
key and
download is started.
Page 27

- 1-24 -
Chapter 1
Administrator
Settings
Network
4
From the Certs manager menu,
Select “4. Download PrivateCA” using the
keys of the key,
and confirm using the
key.
If the PrivateCA is not downloaded, a warning message as listed on the right will
display.
Select “Yes” or “No” using the
keys of the key.
If “Yes” is selected, there is a prompt for input of the IP address of the download
destination TFTP server. After input of the IP address, press the
key and the
download is started.
5
From the Certs manager menu,
Select “5. Delete CA” using the
keys of the key,
and confirm using the
key.
Select “RootCA”, “PrivateCA”, or “Delete all” using the keys of the
key.
Page 28

- 1-25 -
Chapter 1
Administrator
Settings
Network
Network Search
Information on detected signals can be displayed.
1
From the Network menu,
Select “5. Site scan” using the keys of the key,
and confirm using the key.
2
A message indicating a search is in progress appears.
Several seconds later, the SSIDs of the detected access points are displayed.
When detailed information needs to be viewed,
select the SSID using the keys of the key,
and confirm using the key.
Access points that are set to ‘reject ANY’ connection are not displayed
in the detection result listing. If the detected access point is encrypted,
the SSID is displayed with a net overlay. In addition, access points can
be displayed for up to a maximum of 10 locations.
3
To refresh the network search information, press the key to select the
submenu and then select “1. Refresh”.
The network search is started again.
Notice
Page 29

- 1-26 -
Chapter 1
Administrator
Settings
Network
4
Refer to the list of SSIDs for detected access points,
select the SSID to be connected to,
select submenu by pressing the
key,
and select “2. Add”.
Follow the wizard as in the screen displayed to the right, and each of the network
settings can be performed in order.
5
When checking specific SSID and channel, select the submenu by pressing the
key, and select “3. Advanced”.
For example, inputting the detected SSID into the “SSID” column in the right-hand
diagram and pressing the
key starts the search for that SSID, and the result is
displayed.
In addition, inputting the channel number to be checked into the “Search channel”
column and pressing the
key starts the search for that channel, and the result is
displayed.
Page 30

- 1-27 -
Chapter 1
Administrator
Settings
Network
Ping
A Ping can be executed for any IP address.
1
From the Network menu,
Select “6. Ping test” using the keys of the key,
and confirm using the
key.
■ Manual Operations
1
From the Ping test menu,
Select “1. Manual” using the keys of the key,
and confirm using the
key.
2
Input the IP address to ping, and the ping is started when the key is pressed.
recv: Shows the response to the ping.
The following digits show the response time (seconds).
time out: Shows that there was no response to the ping.
To end the ping, press either the
or the key.
Page 31

- 1-28 -
Chapter 1
Administrator
Settings
Network
■ Proxy Server 1
1
From the Ping test menu,
Select “2. 1st Proxy” using the keys of the key,
and confirm using the key.
2
Proxy server 1 is pinged.
recv: Shows the response to the ping.
The following digits show the response time (seconds).
time out: Shows that there was no response to the ping.
To end the ping, press either the
or the key.
3
If proxy server 1 is not set, a message as in the diagram on the right is displayed.
■ Proxy Server 2
1
From the Ping test menu,
Select “3. 2nd Proxy” using the keys of the key,
and confirm using the key.
2
Proxy server 2 is pinged.
recv: Shows the response to the ping.
The following digits show the response time (seconds).
time out: Shows that there was no response to the ping.
To end the ping, press either the
or the key.
Page 32

- 1-29 -
Chapter 1
Administrator
Settings
Network
3
If proxy server 2 is not set, a message as in the diagram on the right is displayed.
■ Default Gateway
1
From the Ping test menu,
Select “4. Gateway” using the keys of the key,
and confirm using the key.
2
The default gateway is pinged.
recv: Shows the response to the ping.
The following digits show the response time (seconds).
time out: Shows that there was no response to the ping.
To end the ping, press either the
or the key.
■ TFTP Server
1
From the Ping test menu,
Select “5. TFTP server” using the
keys of the key,
and confirm using the
key.
2
The TFTP server is pinged.
recv: Shows the response to the ping.
The following digits show the response time (seconds).
time out: Shows that there was no response to the ping.
To end the ping, press either the
or the key.
Page 33

- 1-30 -
Chapter 1
Administrator
Settings
Password
The settings for changing administrator password and resetting user password are configured.
1
From the Admin menu,
Select “2. Password” using the keys of the key,
and confirm using the
key.
Administrator Password
If the administrator password is forgotten, contact the sales agent where the purchase was made.
This sets the administrator password.
1
From the Password menu,
Select “1. Admin Pwd” using the keys of the key,
and confirm using the
key.
2
When “Admin Pwd” is selected, there is a prompt for the current password.
Input the correct value, and confirm using the
key.
The initial value of password is 000000 (6 zeroes).
3
When you input the correct password, the system asks you to input the new
password.
The only characters that can be entered are numerals (0– 9)
only. Input a 5 to 7 digit long password
.
4
For verification, the system asks you to input the new password a second time.
Notice
Notice
Page 34

- 1-31 -
Chapter 1
Administrator
Settings
Password
5
When you input the password, a screen like that on the right is displayed for a few
seconds.
User Password Reset
This resets the user password.
1
From the Password menu,
Select “2. UserPwd Reset” using the
keys of the key,
and confirm using the
key.
2
Select “Yes” or “No” using the keys of the key,
and confirm using the
key.
When the user password is reset, it reverts to the initial value of
0000 (4 zeroes).
3
When “Yes” is selected, the message as shown in the diagram on the right is
displayed, and returns to the Password menu.
Notice
Page 35

- 1-32 -
Chapter 1
Administrator
Settings
Version Upgrade
The firmware version can be upgraded online.
1
From the Admin menu,
Select “3. Upgrade” using the keys of the key,
and confirm using the key.
2
Select “1. Program” by pressing the
key .
3
A message is displayed. Press the key.
Select “Yes” or “No” using the
keys of the key,
and confirm using the key.
Page 36

- 1-33 -
Chapter 1
Administrator
Settings
Version Upgrade
4
When “Yes” is selected, the screen for specifying the TFTP server is displayed.
Input the IP address of the TFTP server, and confirm using the key.
The downloading of firmware commences.
When the downloading of firmware completes, a confirmation message is displayed.
When the
key is pressed and “Yes” is selected, the version upgrade for firmware
is started. When it completes, the WIP3000 is automatically restarted.
When in the midst of firmware upgrade, do not cut off power to this product
as this may cause failure.
If the version upgrade fails, the message in the right-hand diagram is
displayed.
Notice
Page 37

- 1-34 -
Chapter 1
Administrator
Settings
Error Log
The contents of the error log can be checked.
1
From the Admin menu,
Select “4. Error log” using the keys of the key,
and confirm using the key.
2
The history for error messages is displayed.
3
When an error message is selected from the list, the details for the error are
displayed.
The first and last error details can be displayed using the
keys of the
key.
4
When deleting error messages,
Select “Edit” by pressing the
key.
select “1. Delete all”, and press the
key.
Select “Yes” using the
keys of the key, and press the key.
All the error messages are deleted.
Page 38

- 1-35 -
Chapter 1
Administrator
Settings
Web Server
Here, the functions of the Web server can be switched ON/OFF.
1
From the Admin menu,
Select “4. Web server” using the
keys of the key,
and confirm using the
key.
2
Select “Enabled” or “Disabled” using the keys of the key,
and confirm using the
key.
Page 39

- 1-36 -
Chapter 1
Administrator
Settings
Initializing
Reverts settings to the configuration last uploaded.
1
From the Admin menu,
Select “6. Phone reset” using the
keys of the key,
and confirm using the
key.
2
Select “Yes” or “No” using the keys of the key,
and confirm using the
key.
When “Yes” is selected, initialization is started and reverts to the configuration
conditions uploaded previously.
When initialization completes, it automatically reboots.
Page 40

- 1-37 -
Chapter 1
Administrator
Settings
Memory Info (Memory Usage)
This displays the memory usage.
1
From the Admin menu,
Select “7. Memory Info” using the
keys of the key,
and confirm using the
key.
2
Memory usage is displayed.
Page 41

- 2-1 -
Chapter 2 Web Settings
Page 42

- 2-2 -
Chapter 2
Web Settings
WirelessIP 3000 Web Settings
Overview
This product can be configured via the World Wide Web. WirelessIP3000 Web Settings enables advanced configurations
which cannot be configured with this product.
When using web settings, the web server of this product must be set to “Enable”.
The recommended browser is IE5.0 and above.
When setting via TELNET:
First, prepare the PC to be used for setting the WirelessIP 3000.
Next, perform the network settings that will enable the PC to be connected to the WirelessIP 3000 phone.
When starting up the WirelessIP 3000 web settings, start up the browser from the PC and access http://<host>:<port>/
. Here,
input the IP address or host name of this product into <host>, and the port number into <port> (port number is 8080, this cannot
be omitted).
Access restrictions
The authentication screen for logging in to the WirelessIP 3000 web settings is displayed.
Input the username and password that are set in the WirelessIP 3000 phone and log in.
Management User
Username admin (default)
Password 000000 (default)
Authority • setting changes
• firmware upgrade and configuration upgrade
• admin password changes
• stopping the web server
(Note) The same user cannot simultaneously log in from multiple browsers (clients).
General user and admin user are allowed to log in simultaneously.
Notice
Page 43

- 2-3 -
Chapter 2
Web Settings
Management User Menu
You can change settings for the phone, upgrade firmware/configuration, change admin passwords, and stop the web server.
Main
The basic information regarding the phone such as its software version and TCP/IP settings is displayed.
[Display Items]
• Model: displays model name
• Software version: displays software version of the WirelessIP 3000
• IP address: displays IP address of the phone
• Net mask: displays net mask of the phone
• Default gateway: displays default gateway of the phone
• MAC address: displays MAC address of the phone
Page 44

- 2-4 -
Chapter 2
Web Settings
Management User Menu
Configuration
This is the menu for configuring the product.
1. Select the item to be changed.
2. Edit the value. (Example on screen is “SYSTEM”)
3. Click the “CHANGE VALUE” button and change the settings.
Page 45

- 2-5 -
Chapter 2
Web Settings
Management User Menu
4. Click the “YOU MUST REBOOT” button and reboot this product.
* If this product is not rebooted, the settings are not applied.
* Depending on the item, "YOU MUST REBOOT" button may not be displayed.
For those cases, the settings are applied after the “CHANGE VALUE” button is clicked.
System Setup
The phone’s firmware/configuration can be upgraded, admin user password changed, and the web server can be stopped.
Page 46

- 2-6 -
Chapter 2
Web Settings
Management User Menu
■ Load & Upgrade
This upgrades the firmware and configuration of the phone.
1. Enter the IP address of the TFTP server where the firmware is located.
2. Indicate the type of upgrade (software/config).
3. Click the “DO UPGRADE” button.
■ Change Password
This changes the user password of the phone.
• Input the username (admin) into the ID column.
• Input old password.
• Input new password.
• Input new password (to confirm).
Click the “CHANGE VALUE” button.
* If the inputted information is to be reset, click the “RESET” button.
* Set passwords as 5 -7 digit numerals.
Page 47

- 2-7 -
Chapter 2
Web Settings
Management User Menu
■ Web Server Stop
This stops the web server used for accessing the WirelessIP 3000 web settings.
Note that access via WWW is not possible during the time the “Web Server Stop” button is clicked.
Network Setup
Configures SIP/Network.
1. Select the item to be changed.
Page 48

- 2-8 -
Chapter 2
Web Settings
Management User Menu
2. Edit the value. (Example on screen is “USER ACCOUNT”)
3. Click the “CHANGE VALUE” button and change the settings.
Page 49

- 3-1 -
Chapter 3 Appendix
Page 50

- 3-2 -
Chapter 3
Appendix
Glossary
ANY Connection
If the SSID of the wireless LAN client is set to ‘ANY connection’, any wireless LAN access point can
be connected to.
However, access points that reject LAN clients set to ‘ANY connection’ cannot be connected to.
CODEC
(COder DECoder)
Algorithm for compressing and decompressing digital video and audio data.
This product supports G.711μ-Law, G711A-Law, and G729.
DHCP
(Dynamic Host
Configuration Protocol)
This is the protocol (communication procedure) for automatically configuring the network settings. The
DHCP server automatically configures the network settings for the network’s DHCP clients.
DHCP Server
This is the server that automatically assigns DHCP.
Information that can be assigned to client such as IP address, subnet mask, IP address of gateway
and DNS server, and the like are set; this information is provided to accessing clients; and when the
communications are ended, the address is automatically recovered and assigned to other computers.
DNS
(Domain Name System)
Used in TCP/IP networks, this is a system related to the actual IP address and the name affixed to
computer.
DNS Server
This is the computer that possesses information related to IP address and name affixed to computer,
and that responds to inquiries from outside.
DSCP
(DiffServ Code Point)
This is the code (program) for deciding on the actions for routers, etc., in identifying and carrying out
transaction processing to suits the types of services (traffic) on the internet with various features such
as motion picture and voice. For this purpose, a TOS (type of service) field inside the IP packet is
redefined as a DS (DiffServ) field, and in order to decide on actions that the DiffServ target node
(such as router) performs on this DS field, a value is set which becomes the basis for quality of
service.
IP address
This is the address (location number) affixed for the purpose of distinguishing all connected devices in
networks built on TCP/IP protocol.
IP Diffserv
Technology that identifies the types of traffic (this traffic is called services) transmitted and received
by internet users, and offers communications quality (QoS: Quality of Service) that satisfies that type.
LAN
(Local Area Network)
This is the abbreviation for local area network. It refers to small-scale computer networks.
MAC address value
This is the ID number that is assigned to be unique for each Ethernet card. There is no duplication of
this number in Ethernet cards worldwide.
This phone also has a unique MAC address.
NAT-Traversal (NAT Translation
Function)
This is the mechanism for carrying out address translation for communications between hosts within
the organization which have private IP addresses and hosts on the internet having a global IP
address.
A global IP address is an IP address used on the global internet that is unique, while a private IP
address refers to the IP address used only within architectures that are not connected to the internet.
Ping
(Packet Internet Groper)
This is the program for diagnosing TCP/IP network such as internet and intranet. When an IP address
to be investigated whether or not it is connected is specified, data is sent using ICMP, and the
network is diagnosed based on whether the other party replies.
Private-CA
Private (user) certificate used for 802.1x authentication.
Root-CA
Root (certification authority) certificate used for 802.1x authentication.
RTP (Real-time Transport
Protocol)
Real-time data transport protocol. RTP is designed on the assumption of being used in applications
such as for remote conferencing making use of image and voice, and has the objective of transporting
the image and voice data in a form appropriate for real time. In RTP, data is divided into packets
based on unit time and transported with the time information of data added to the packets.
SIP (Session Initiation
Protocol)
This is one of the call control protocols and used in internet calls employing VoIP, and the like. The
transport function, caller number notification function and others, when compared to similar protocols,
provide functions close to that of the public telephone network, and the time required for connection is
also short.
Page 51

- 3-3 -
Chapter 3
Appendix
Glossary
SIP Domain
This is the domain for offering services to the SIP user.
SSID
This is the ID used in wireless LAN communications for identifying the network.
Static NAT(SNAT)
This is the static NAT table settings. Refer to the NAT-Traversal column with regard to NAT.
STUN (Simple Traversal of UDP
Through NATs)
Protocol used for traversing NAT using UDP. The traversing of NAT by UDP packets is realized
through examining the router’s mapping algorithm and the port number mapped to the external
address of the NAT router.
Syslog server
Server that collects system logs.
TCP
(Transmission Control
Protocol)
This is the standard protocol used in internet. It bridges the IP of network layer and the protocols
(HTTP, FTP, SMTP, POP, etc) above the session layer.
TCP/IP
This is the standard protocol used in the internet and intranets.
TFTP Server (Trivial File Transfer
Protocol)
This is the simple protocol for transporting files between computers connected to the network.
It is characterized by having no authentication function and allowing easy usage.
It can be used for updating the settings file and firmware of WirelessIP 3000.
UPnP (Universal Plug and Play)
Technical specifications for enabling mutual recognition of devices connected to a network such as
PC or peripheral devices. It was advocated by Microsoft® in 1999, and is being standardized by the
Universal Plug and Play Forum. UPnP gathers together technologies such as XML, DHCP, SOAP,
and GENA that are standard to the internet; and has the functionality for auto recognition of devices
connected to a network, mutually exchanging information between devices, and exerting control.
Web Server
This refers to a computer that offers contents to be browsed through web browser.
Web Browser
This is an application for browsing web pages.
ciphering
This is the encryption of wireless LAN communications. This WirelessIP 3000 product supports 2
types of encryption methods, which are “WEP” and “WPA-PSK (TKIP)”, for wireless LAN
communications.
Subnet Mask
Within the IP address, this is the numeral that defines which bits are used in network address for
distinguishing networks.
The portion that is outside the network address becomes the host address for identifying the
individual computers within the network.
Server
This is a computer or software that offers data or functionality in own possession to client computers
in a computer network.
Signal (dBm)
Shows the wave strength of wireless LAN.
Jitter Buffer
The jitter size that can be tolerated in fulfilling the required quality of conversation differs according to
the jitter buffer of the receiving device.
The role of the jitter buffer is to store the arriving VoIP packets in the buffer and adjust the latency in
the arrival times of packets prior to sending to end user.
If the jitter buffer is made bigger the jitter certainly becomes less, but if the size is made too big
intolerable delays in conversation are forced onto the end users.
Certificate
This is the data for authenticating the authenticity of the public key used for analyzing digital
signatures. Although it is not possible, by the digital signature itself, to confirm whether the public key
belongs to the person; based on the digital certificate belonging to the digital signature, it is possible
via the certification authority to certify the creator of data as well as there being no tampering of data
(this function can be realized by the digital signature itself).
Channel
Wireless LAN uses electromagnetic waves with frequencies in the 2.4 GHz band. The bandwidth is
2.400 to 2.497 GHz, and that range is used divided into 14 channels.
Default Gateway
This refers to device such as computer or router that represents the “entrance and exit” used when
accessing computers outside the LAN.
With regard to the IP address of an access location, if a specific gateway is not specified, data is sent
to the host specified in the default gateway.
Beacon Interval
A Beacon is the packet sent at fixed intervals for the synchronization of wireless LAN
communications. The beacon interval is the period of that fixed interval.
Firmware
This is the software incorporated into the device for the basic management of the hardware.
Page 52

- 3-4 -
Chapter 3
Appendix
Glossary
Proxy Server
This is the computer that connects to the internet as an “agent” in place of internal computers that
cannot directly connect to the internet, and is the boundary between the internet and the internal
network of an enterprise.
Protocol
This is the communications procedure that must mutually be in accord when multiple computers are
communicating. If the protocol differs, communications are not possible.
Router
This is the device for relaying data that flows in the network to other networks.
It has the function of analyzing the protocol, looking at the address and selecting the route. In
addition, all data of unsupported protocols is discarded.
Registration Server
This is the server for registering and managing the SIP user information.
Page 53

- 3-5 -
Chapter 3
Appendix
INDEX
A
administrator password...............................................................1-30
B
Basic info.......................................................................................1-8
beacon interval..............................................................................3-3
C
Channel.........................................................................................3-3
D
Default Gateway...................................................................1-13, 3-3
Default Send Key.........................................................................1-10
DHCP ...................................................................................1-13, 3-2
DNS...............................................................................................3-2
E
Encryption...............................................................................1-9, 3-3
Encryption Bit Length .................................................................. 1-10
F
Firmware........................................................................................3-3
G
gateway..................................................................................3-2, 3-3
I
Initialization.........................................................................1-36, 1-37
IP address ............................................................1-13, 1-27, 3-2, 3-3
L
LAN.........................................................................................3-2, 3-3
M
Mode..............................................................................................1-9
N
Network..........................................................................................1-3
P
PassPhrase.................................................................................1-11
Ping.......................................................................................1-27, 3-2
Profile Name...........................................................................1-4, 1-8
Protocol............................................................................3-2, 3-3, 3-4
Proxy server .........................................................................1-19, 3-4
R
Register server............................................................................1-19
Router.....................................................................................3-3, 3-4
S
Server............................................................................1-19, 3-2, 3-3
Signal.............................................................................................3-3
SIP.................................1-18, 1-19, 1-20, 1-21, 1-22, 1-25, 1-27, 3-2
SIP domain..................................................................................1-19
SSID...............................................................1-4, 1-5, 1-9, 1-25, 3-3
Subnet Mask..................................................................1-13, 3-2, 3-3
T
TCP.......................... 1-5, 1-12, 1-13, 1-14, 1-15, 1-16, 1-17, 3-2, 3-3
TCP/IP.............................1-12, 1-13, 1-14, 1-15, 1-16, 1-17, 3-2, 3-3
U
User account ...............................................................................1-18
V
Version upgrade.................................................................1-32, 1-34
W
Web Server..................................................................................1-35
Page 54

Our corporate homepage provides updated information and version upgrade services for each product. To use this product in
the most appropriate manner it is recommended that this homepage is periodically visited.
Home page: http://www.wirelessip5000.com/
NOTICE
This product is in accordance with the Japanese Foreign Exchange and
Foreign Trade Law.
When you plan to export or take this product out to overseas,
similar law(s) and/or regulation(s) applicable in your country may
require approval or permission from a relative authority.
Copyright© 2006
Hitachi Cable, LTD.
First Edition, February 2005
Second Edition, June 2005
Third Edition January 2006
 Loading...