

Cordless Impact Driver
Atornillador de impacto a batería
Aparafusadora com percussão a bateria
WH 7DL
Read through carefully and understand these instructions before use.
Leer cuidadosamente y comprender estas instrucciones antes del uso.
Antes de usar, leia com cuidado para assimilar estas instruções.
Handling instructions
Instrucciones de manejo
Instruções de uso
12
1
5
4
2
34
1
1
6
3
2
A
7
9
0
C
B
8
56
F
F
R
L
G
D
D
E
87
H
1

1
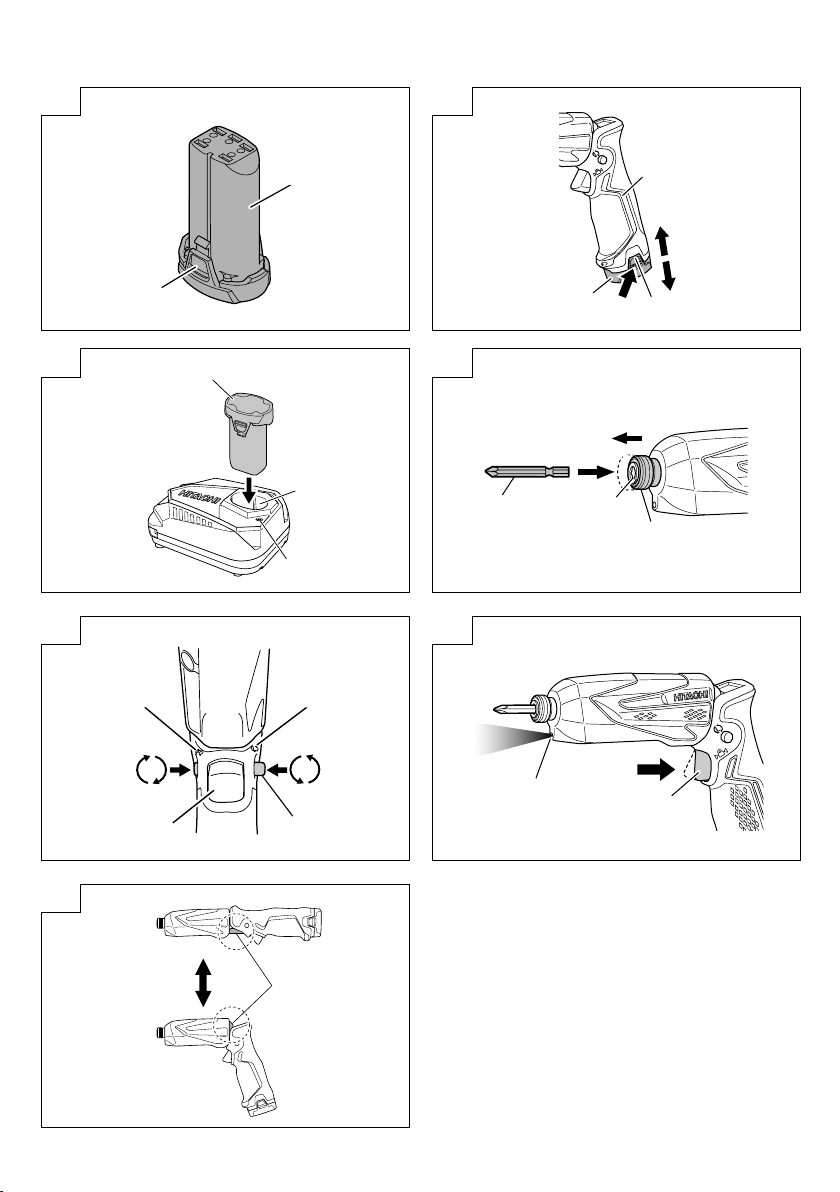
Rechargeable battery
2
Latch
3
Pull out
4
Insert
5
Handle
6
Push
7
Insert
8
Pilot lamp
Hole for connecting the
9
rechargeable battery
0
Driver bit
A
Movement
B
Guide sleeve
C
Hexagonal hole in the socket
D
Trigger switch
E
Selector button
F
and L marks
R
G
Light
H
Bending portion
English Español Português
Batería recargable
Cierre
Sacar
Insertar
Asidero
Presionar
Insertar
Lámpara piloto
Agujero para conectar la batería
recargable
Punta de destornillador
Movimiento
Manguito guía
Orificio hexagonal en el
receptáculo
Conmutador de gatillo
Botón selector
Marcas
Luz
Parte de flexión
y
R
L
Bateria recarregável
Fecho
Puxar
Inserir
Cabo
Empurrar
Inserir
Lâmpada piloto
Orifício para conectar a bateria
recarregável
Broca de chave de fenda
Movimento
Manga de guia
Orifício hexagonal no soquete
Interruptor de disparo
Botão seletor
Marcas
Luz
Parte de flexão
e
L
R
2

English
GENERAL POWER TOOL SAFETY WARNINGS
WARNING
Read all safety warnings and all instructions.
Failure to follow the warnings and instructions may result
in electric shock, fire and/or serious injury.
Save all warnings and instructions for future reference.
The term “power tool” in the warnings refers to your
mains-operated (corded) power tool or battery-operated
(cordless) power tool.
1) Work area safety
a) Keep work area clean and well lit.
Cluttered or dark areas invite accidents.
b) Do not operate power tools in explosive
atmospheres, such as in the presence of
flammable liquids, gases or dust.
Power tools create sparks which may ignite the
dust or fumes.
c) Keep children and bystanders away while
operating a power tool.
Distractions can cause you to lose control.
2) Electrical safety
a) Power tool plugs must match the outlet.
Never modify the plug in any way.
Do not use any adapter plugs with earthed
(grounded) power tools.
Unmodified plugs and matching outlets will
reduce risk of electric shock.
b) Avoid body contact with earthed or grounded
surfaces, such as pipes, radiators, ranges and
refrigerators.
There is an increased risk of electric shock if
your body is earthed or grounded.
c) Do not expose power tools to rain or wet
conditions.
Water entering a power tool will increase the
risk of electric shock.
d) Do not abuse the cord. Never use the cord for
carrying, pulling or unplugging the power tool.
Keep cord away from heat, oil, sharp edges or
moving parts.
Damaged or entangled cords increase the risk
of electric shock.
e) When operating a power tool outdoors, use an
extension cord suitable for outdoor use.
Use of a cord suitable for outdoor use reduces
the risk of electric shock.
f) If operating a power tool in a damp location
is unavoidable, use a residual current device
(RCD) protected supply.
Use of an RCD reduces the risk of electric shock.
3) Personal safety
a) Stay alert, watch what you are doing and use
common sense when operating a power tool.
Do not use a power tool while you are tired or
under the influence of drugs, alcohol or medication.
A moment of inattention while operating power
tools may result in serious personal injury.
b) Use personal protective equipment. Always wear
eye protection.
Protective equipment such as dust mask, nonskid safety shoes, hard hat, or hearing protection
used for appropriate conditions will reduce
personal injuries.
3
c) Prevent unintentional starting. Ensure the switch
is in the off position before connecting to power
source and/or battery pack, picking up or
carrying the tool.
Carrying power tools with your finger on the
switch or energising power tools that have the
switch on invites accidents.
d) Remove any adjusting key or wrench before
turning the power tool on.
A wrench or a key left attached to a rotating part
of the power tool may result in personal injury.
e) Do not overreach. Keep proper footing and
balance at all times.
This enables better control of the power tool in
unexpected situations.
f) Dress properly. Do not wear loose clothing or
jewellery. Keep your hair, clothing and gloves
away from moving parts.
Loose clothes, jewellery or long hair can be
caught in moving parts.
g) If devices are provided for the connection of
dust extraction and collection facilities, ensure
these are connected and properly used.
Use of dust collection can reduce dust-related hazards.
4) Power tool use and care
a) Do not force the power tool. Use the correct
power tool for your application.
The correct power tool will do the job better and
safer at the rate for which it was designed.
b) Do not use the power tool if the switch does
not turn it on and off.
Any power tool that cannot be controlled with
the switch is dangerous and must be repaired.
c) Disconnect the plug from the power source
and/or the battery pack from the power tool
before making any adjustments, changing
accessories, or storing power tools.
Such preventive safety measures reduce the risk
of starting the power tool accidentally.
d) Store idle power tools out of the reach of children
and do not allow persons unfamiliar with the
power tool or these instructions to operate the
power tool.
Power tools are dangerous in the hands of
untrained users.
e) Maintain power tools. Check for misalignment
or binding of moving parts, breakage of parts
and any other condition that may affect the
power tool's operation.
If damaged, have the power tool repaired before
use.
Many accidents are caused by poorly maintained
power tools.
f) Keep cutting tools sharp and clean.
Properly maintained cutting tools with sharp
cutting edges are less likely to bind and are
easier to control.
g) Use the power tool, accessories and tool bits
etc. in accordance with these instructions, taking
into account the working conditions and the
work to be performed.
Use of the power tool for operations different from
those intended could result in a hazardous situation.

English
5) Battery tool use and care
a) Recharge only with the charger specified by the
manufacturer.
A charger that is suitable for one type of battery
pack may create a risk of fire when used with
another battery pack.
b) Use power tools only with specifically designated
battery packs.
Use of any other battery packs may create a risk
of injury and fire.
c) When battery pack is not in use, keep it away
from other metal objects, like paper clips, coins,
keys, nails, screws or other small metal objects,
that can make a connection from one terminal
to another.
Shorting the battery terminals together may
cause burns or a fire.
d) Under abusive conditions, liquid may be ejected
from the battery; avoid contact. If contact
accidentally occurs, flush with water. If liquid
contacts eyes, additionally seek medical help.
Liquid ejected from the battery may cause
irritation or burns.
6) Service
a) Have your power tool serviced by a qualified repair
person using only identical replacement parts.
This will ensure that the safety of the power tool
is maintained.
PRECAUTION
Keep children and infirm persons away.
When not in use, tools should be stored out of reach of
children and infirm persons.
PRECAUTIONS FOR CORDLESS IMPACT
DRIVER
1. Hold power tool by insulated gripping surfaces,
when performing an operation where the fastener
may contact hidden wiring. Fasteners contacting a
"live" wire may make exposed metal parts of the
power tool "live" and could give the operator an
electric shock.
2. This is portable tool for tightening and loosenig
screws. Use it only for these operation.
3. Use the earplugs if using for a long time.
4. One-hand operation is extremely dangerous; hold
the unit firmly with both hands when operating.
5. After installing the driver bit, pull lightly out the bit
to make sure that it does not come loose. If the bit is
not installed properly, it can come loose during
use, which can be dangerous.
6. Use the bit that matches the screw.
7. Tightening a screw with the impact driver at an
angle to that screw can damage the head of the
screw and the proper force will not be transmitted
to the screw. Tighten with this impact driver lined
up straight with the screw.
8. Always charge the battery at a temperature of 0 –
40°C. Charging the battery at temperatures outside
the range of 0 – 40°C may prevent proper charging
and reduce battery life.
The most suitable temperature for charging is that
of 20 – 25°C.
9. When one charging is completed, leave the charger
for about 15 minutes before the next charging of
battery.
10. Do not allow foreign matter to enter the hole for
connecting the rechargeable battery.
11. Never disassemble the rechargeable battery and
charger.
12. Never short-circuit the rechargeable battery. Shortcircuiting the battery will cause a great electric
current and overheat. It results in burn or damage
to the battery.
13. Do not dispose of the battery in fire.
If the battery is burnt, it may explode.
14. Bring the battery to the shop from which it was
purchased as soon as the post-charging battery life
becomes too short for practical use. Do not dispose
of the exhausted battery.
15. Using an exhausted battery will damage the charger.
16. Do not insert object into the air ventilation slots of
the charger.
Inserting metal objects or inflammables into the
charger air ventilation slots will result in electrical
shock hazard or damaged charger.
CAUTION ON LITHIUM-ION BATTERY
To extend the lifetime, the lithium-ion battery equips
with the protection function to stop the output.
In the cases of 1 to 3 described below, when using this
product, even if you are pulling the switch, the motor
may stop. This is not the trouble but the result of
protection function.
1. When the battery power remaining runs out, the
motor stops.
In such case, charge it up immediately.
2. If the tool is overloaded, the motor may stop. In this
case, release the switch of tool and eliminate causes
of overloading. After that, you can use it again.
3. If the battery is overheated under overload work,
the battery power may stop.
In this case, stop using the battery and let the
battery cool. After that, you can use it again.
Furthermore, please heed the following warning and
caution.
WARNING
In order to prevent any battery leakage, heat generation,
smoke emission, explosion and ignition beforehand,
please be sure to heed the following precautions.
1. Make sure that swarf and dust do not collect on the
battery.
䡬 During work make sure that swarf and dust do not
fall on the battery.
䡬 Make sure that any swarf and dust falling on the
power tool during work do not collect on the battery.
䡬 Do not store an unused battery in a location exposed
to swarf and dust.
䡬 Before storing a battery, remove any swarf and
dust that may adhere to it and do not store it together
with metal parts (screws, nails, etc.).
2. Do not pierce battery with a sharp object such as a
nail, strike with a hammer, step on, throw or subject
the battery to severe physical shock.
3. Do not use an apparently damaged or deformed
battery.
4. Do not use the battery in reverse polarity.
4
English
5. Do not connect directly to an electrical outlets or
car cigarette lighter sockets.
6. Do not use the battery for a purpose other than
those specified.
7. If the battery charging fails to complete even when
a specified recharging time has elapsed,
immediately stop further recharging.
8. Do not put or subject the battery to high
temperatures or high pressure such as into a
microwave oven, dryer, or high pressure container.
9. Keep away from fire immediately when leakage or
foul odor are detected.
10. Do not use in a location where strong static
electricity generates.
11. If there is battery leakage, foul odor, heat generated,
discolored or deformed, or in any way appears
abnormal during use, recharging or storage,
immediately remove it from the equipment or
battery charger, and stop use.
CAUTION
1. If liquid leaking from the battery gets into your
eyes, do not rub your eyes and wash them well
with fresh clean water such as tap water and contact
a doctor immediately.
If left untreated, the liquid may cause eye-problems.
2. If liquid leaks onto your skin or clothes, wash well
with clean water such as tap water immediately.
There is a possibility that this can cause skin irritation.
3. If you find rust, foul odor, overheating, discolor,
deformation, and/or other irregularities when using
the battery for the first time, do not use and return it
to your supplier or vendor.
SPECIFICATIONS
POWER TOOL
No-load speed 0 – 2400 min–1 (/min)
Capacity (Ordinary bolt) M3 – M8
Tightening torque (Maximum) 25 N·m
Rechargeable battery BCL715: Li-ion DC 7.2 V (1.5 Ah 2 cells)
Weight 0.58 kg
CHARGER
Model UC7SL
Charging voltage 7.2 V
Weight 0.35 kg
APPLICATIONS
䡬 Driving and removing of machine screws, wood
screws, tapping screws, etc.
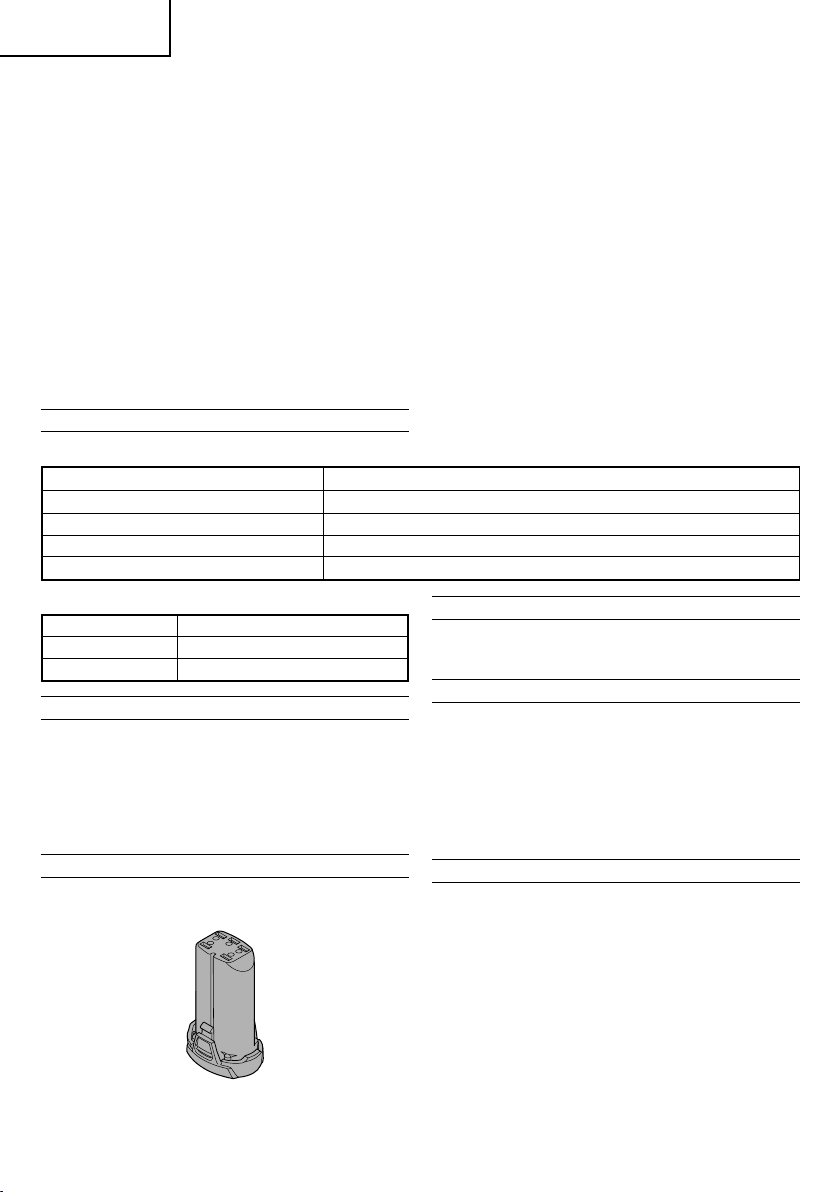
BATTERY REMOVAL/INSTALLATION
STANDARD ACCESSORIES
1 Battery (BCL715) ......................................................... 2
2 Charger
3 Plastic case ................................................................. 1
4 Battery cover ............................................................... 1
Standard accessories are subject to change without
notice.
(UC7SL) .................................................................
1. Battery removal
Hold the handle tightly and push the battery latch to
remove the battery (see Figs. 1 and 2).
1
CAUTION
Never short-circuit the battery.
2. Battery installation
Insert the battery while observing its polarities (see
Fig. 2).
OPTIONAL ACCESSORIES (sold separately)
1. Battery (BCL715)
Optional accessories are subject to change without notice.
5
CHARGING
Before using the power tool, charge the battery as follows.
1. Connect the charger’s power cord to the receptacle.
When connecting the plug of the charger to a
receptacle, the pilot lamp will blink in red
(At 1-second intervals).
2. Insert the battery into the charger.
Firmly insert the battery into the charger till it contacts
the bottom of the charger as shown in
Fig. 3.
3. Charging
When inserting a battery in the charger, the pilot
lamp will light up continuously in red.
When the battery becomes fully recharged, the pilot
lamp will blink in red (At 1-second intervals).
(See Table 1)
(1) Pilot lamp indication
The indications of the pilot lamp will be as shown in
Table 1, according to the condition of the charger or
the rechargeable battery.
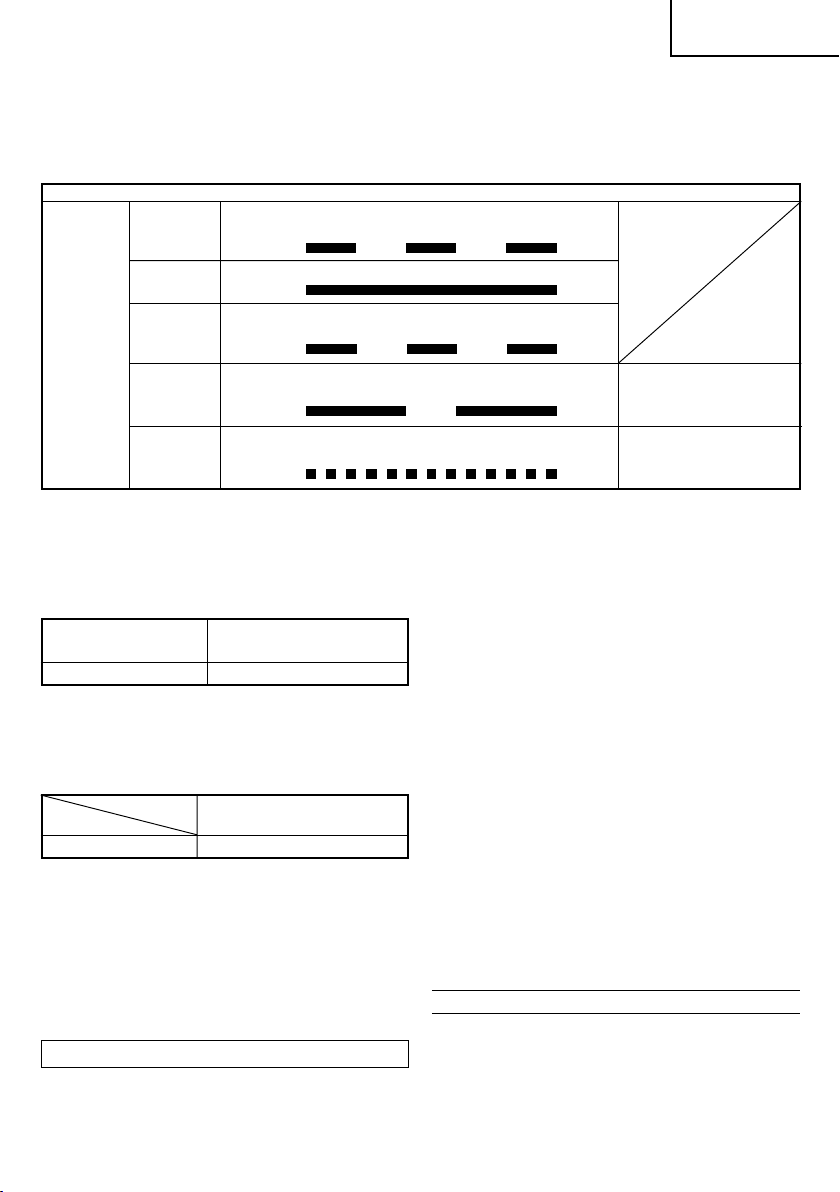
Table 1
Indications of the pilot lamp
Before
charging
Blinks
Lights for 0.5 seconds. Does not light for
0.5 seconds. (off for 0.5 seconds)
English
While
charging
Pilot lamp
(red)
(2) Regarding the temperature of the rechargeable battery
The temperatures for rechargeable batteries are as
shown in the Table 2, and batteries that have become
hot should be cooled for a while before being
recharged.
Table 2 Recharging ranges of batteries
Rechargeable batteries
BCL715 0°C – 50°C
(3) Regarding recharging time
Depending on the combination of the charger and
batteries, the charging time will become as shown in
Table 3.
Table 3 Charging time (At 20°C)
Battery
BCL715 Approx. 30 min.
NOTE
The charging time may vary according to temperature
and power source voltage.
4. Disconnect the charger’s power cord from the
receptacle.
5. Hold the charger firmly and pull out the battery.
NOTE
Be sure to pull out the battery from the charger after
use, and then keep it.
How to make the batteries perform longer
(1) Recharge the batteries before they become completely
exhausted.
When you feel that the power of the tool becomes
weaker, stop using the tool and recharge its battery.
Charging
complete
Overheat
standby
Charging
impossible
Charger
Lights
Blinks
Blinks
Flickers
Temperatures at which the
battery can be recharged
Lights continuously
Lights for 0.5 seconds. Does not light for
0.5 seconds. (off for 0.5 seconds)
Lights for 1 second. Does not light for
0.5 seconds. (off for 0.5 seconds)
Lights for 0.1 seconds. Does not light for 0.1
seconds. (off for 0.1 seconds)
UC7SL
Battery overheated.
Unable to charge.
(Charging will commence
when battery cools)
Malfunction in the
battery or the charger
If you continue to use the tool and exhaust the electric
current, the battery may be damaged and its life will
become shorter.
(2) Avoid recharging at high temperatures.
A rechargeable battery will be hot immediately after
use. If such a battery is recharged immediately after
use, its internal chemical substance will deteriorate,
and the battery life will be shortened. Leave the battery
and recharge it after it has cooled for a while.
CAUTION
䡬 If the battery is charged while it is heated because it
has been left for a long time in a location subject to
direct sunlight or because the battery has just been
used, the pilot lamp of the charger lights for 1 second,
does not light for 0.5 seconds (off for 0.5 seconds). In
such a case, first let the battery cool, then start
charging.
䡬 When the pilot lamp flickers (at 0.2-second intervals),
check for and take out any foreign objects in the
charger’s battery connector. If there are no foreign
objects, it is probable that the battery or charger is
malfunctioning. Take it to your authorized Service
Center.
䡬 Since the built-in micro computer takes about 3
seconds to confirm that the battery being charged
with UC7SL is taken out, wait for a minimum of 3
seconds before reinserting it to continue charging. If
the battery is reinserted within 3 seconds, the battery
may not be properly charged.
PRIOR TO OPERATION
䡬 Setting up and checking the work environment
Check if the work environment is suitable by the
above precautions.
6

English
HOW TO USE
1. Installing the bit
Always follow the following procedure to install driver
bit. (Fig. 4)
(1) Pull the guide sleeve forward.
(2) Insert the bit into the hexagonal hole in the socket.
(3) Release the guide sleeve and it returns to its original
position.
CAUTION
If the guide sleeve does not return to its original
position, then the bit is not installed properly.
2. Removing the bit
Please do the opposite point on the method of
installing bit.
3. Confirm that the battery is mounted correctly
4. Check the rotational direction
The bit rotates clockwise (viewed from the rear side)
by pushing the R-side of the selector button.
The L-side of the selector button is pushed to turn the
bit counterclockwise (See Fig. 5) (The
marks are provided on the body).
5. Switch operation
䡬 When the trigger switch is depressed, the tool rotates.
When the trigger is released, the tool stops.
䡬 The rotational speed of the drill can be controlled by
varying the amount that the trigger switch is pulled.
Speed is low when the trigger switch is pulled slightly
and increases as the trigger switch is pulled more.
NOTE
A buzzing noise is produced when the motor is about
to rotate. This is only a noise, not a machine failure.
6. Using the light
Pull the trigger switch to light up the light. The light
keeps on lighting while the trigger switch is being
pulled. The light goes out after releasing the trigger
switch. (Fig. 6)
CAUTION
Do not look directly into the light. Such actions could
result in eye injury.
7. Tightening and loosening screws
Install the bit that matches the screw, line up the bit in
the grooves of the head of the screw, then tighten it.
Push the impact driver just enough to keep the bit
fitting the head of the screw.
CAUTION
Applying the impact driver for too long tightens the
screw too much and can break it.
Tightening a screw with the impact driver at an angle
to that screw can damage the head of the screw and
the proper force will not be transmitted to the screw.
Tighten with this impact driver lined up straight with
the screw.
8. Using in the straight or pistol configuration
Use the tool in the straight configuration when using
in confined spaces. Use it in the pistol configuration
when using in other locations. Select the configuration
that best matches the tool application. When changing
the configuration, the tool will make a clicking sound
when it snaps into position. Bend (or extend) the tool
until the clicking sound is heard.
CAUTION
When using the tool in the pistol configuration, do
not hold onto the bending portion of the tool when
returning to the straight configuration. Your finger or
other part of the hand may be pinched by the bending
portion resulting in possible injury (Fig. 7).
7
L
and
9. Automatic spindle-lock mechanism
When the main switch is off, the bit is locked in place,
and the tool can be used as a manual screwdriver.
OPERATIONAL CAUTIONS
1. Resting the unit after continuous work
After use for continuous bolt-tightening work, rest
the unit for 15 minutes or so when replacing the
battery. The temperature of the motor, switch, etc.,
will rise if the work is started again immediately after
battery replacement, eventually resulting in burnout.
NOTE
Do not touch the metal parts, as it gets very hot
during continuous work.
2. Cautions on use of the speed control switch
This switch has a built-in, electronic circuit which
steplessly varies the rotation speed. Consequently,
when the switch trigger is pulled only slightly (low
speed rotation) and the motor is stopped while
R
continuously driving in screws, the components of the
electronic circuit parts may overheat and be damaged.
3. Use a tightening time suitable for the screw
The appropriate torque for a screw differs according to
the material and size of the screw, and the material
being screwed etc., so please use a tightening time
suitable for the screw. In particular, if a long tightening
time is used in the case of screws smaller than M8, there
is a danger of the screw breaking, so please confirm the
tightening time and the tightening torque beforehand.
4. Work at a tightening torque suitable for the bolt
under impact
The optimum tightening torque for nuts or bolts differs
with material and size of the nuts or bolts. An
excessively large tightening torque for a small bolt
may stretch or break the bolt. The tightening torque
increases in proportion to the operation time. Use
the correct operating time for the bolt.
5. Confirm the tightening torque
The following factors contribute to a reduction of the
tightening torque. So confirm the actual tightening
torque needed by screwing up some bolts before the
job with a hand torque wrench. Factors affecting the
tightening torque are as follows.
(1) Voltage
When the discharge margin is reached, voltage
decreases and tightening torque is lowered.
(2) Operating time
The tightening torque increases when the operating
time increases. But the tightening torque does not
increase above a certain value even if the tool is
driven for a long time.
(3) Diameter of bolt
The tightening torque differs with the diameter of the
bolt. Generally a larger diameter bolt requires larger
tightening torque.
(4) Tightening conditions
The tightening torque differs according to the torque
ratio; class, and length of bolts even when bolts with
the same size threads are used. The tightening torque
also differs according to the condition of the surface
of workpiece through which the bolts are to be
tightened. When the bolt and nut turn together, torque
is greatly reduced.

MAINTENANCE AND INSPECTION
1. Inspecting the driver bit
Using a broken bit or one with a worn out tip is
dangerous because the bit can slip. Replace it.
2. Inspecting the mounting screws
Regularly inspect all mounting screws and ensure
that they are properly tightened. Should any of the
screws be loose, retighten them immediately. Failure
to do so could result in serious hazard.
3. Maintenance of the motor
The motor unit winding is the very “heart” of the
power tool.
Exercise due care to ensure the winding does not
become damaged and/or wet with oil or water.
4. Cleaning of the outside
When the impact driver is stained, wipe with a soft
dry cloth or a cloth moistened with soapy water. Do
not use chloric solvents, gasoline or paint thinner, as
they melt plastics.
5. Storage
Store the impact driver in a place in which the
temperature is less than 40°C, and out of reach of
children.
NOTE
Make sure that the battery is fully charged when
stored for a long period (3 months or more). The
battery with smaller capacity may not be able to be
charged when used, if stored for a long period.
6. Service parts list
CAUTION
Repair, modification and inspection of Hitachi Power
Tools must be carried out by a Hitachi Authorized
Service Center.
This Parts List will be helpful if presented with the
tool to the Hitachi Authorized Service Center when
requesting repair or other maintenance.
In the operation and maintenance of power tools,
the safety regulations and standards prescribed in
each country must be observed.
MODIFICATIONS
Hitachi Power Tools are constantly being improved
and modified to incorporate the latest technological
advancements.
Accordingly, some parts may be changed without
prior notice.
English
Important notice on the batteries for the Hitachi
cordless power tools
Please always use one of our designated genuine
batteries. We cannot guarantee the safety and
performance of our cordless power tool when
used with batteries other than these designated
by us, or when the battery is disassembled and
modified (such as disassembly and replacement
of cells or other internal parts).
NOTE
Due to HITACHI’s continuing program of research and
development, the specifications herein are subject to
change without prior notice.
8

Español
ADVERTENCIAS DE SEGURIDAD GENERAL
DE LA HERRAMIENTA ELÉCTRICA
ADVERTENCIA
Lea todas las instrucciones y advertencias de seguridad.
Si no se siguen las advertencias e instrucciones, podría
producirse una descarga eléctrica, un incendio y/o daños
graves.
Guarde todas las advertencias e instrucciones para futura
referencia.
El término “herramienta eléctrica” en las advertencias
hace referencia a la herramienta eléctrica que funciona
con la red de suministro (con cable) o a la herramienta
eléctrica que funciona con pilas (sin cable).
1) Seguridad del área de trabajo
a) Mantenga la zona de trabajo limpia y bien iluminada.
Las zonas desordenadas u oscuras pueden
provocar accidentes.
b) No utilice las herramientas eléctricas en entornos
explosivos como, por ejemplo, en presencia de
líquidos inflamables, gases o polvo.
Las herramientas eléctricas crean chispas que
pueden inflamar el polvo o los humos.
c) Mantenga a los niños y transeúntes alejados
cuando utilice una herramienta eléctrica.
Las distracciones pueden hacer que pierda el control.
2) Seguridad eléctrica
a) Los enchufes de las herramientas eléctricas tienen
que ser adecuados a la toma de corriente.
No modifique el enchufe.
No utilice enchufes adaptadores con herramientas
eléctricas conectadas a tierra.
Si no se modifican los enchufes y se utilizan tomas
de corriente adecuadas se reducirá el riesgo de
descarga eléctrica.
b) Evite el contacto corporal con superficies conectadas
a tierra como tuberías, radiadores y frigoríficos.
Hay mayor riesgo de descarga eléctrica si su
cuerpo está en contacto con el suelo.
c) No exponga las herramientas eléctricas a la lluvia
o a la humedad.
La entrada de agua en una herramienta eléctrica
aumentará el riesgo de descarga eléctrica.
d) No utilice el cable incorrectamente. No utilice el
cable para transportar, tirar de la herramienta
eléctrica o desenchufarla.
Mantenga el cable alejado del calor, del aceite, de
bordes afilados o piezas móviles.
Los cables dañados o enredados aumentan el
riesgo de descarga eléctrica.
e) Cuando utilice una herramienta eléctrica al aire
libre, utilice un cable prolongador adecuado para
utilizarse al aire libre.
La utilización de un cable adecuado para usarse
al aire libre reduce el riesgo de descarga eléctrica.
f) Si no se puede evitar el uso de una herramienta
eléctrica en un lugar húmedo, utilice un suministro
protegido mediante un dispositivo de corriente
residual (RCD).
El uso de un RCD reduce el riesgo de descarga
eléctrica.
3) Seguridad personal
a) Esté atento, preste atención a lo que hace y utilice
el sentido común cuando utilice una herramienta
eléctrica.
9
No utilice una herramienta eléctrica cuando esté
cansado o esté bajo la influencia de drogas,
alcohol o medicación.
La distracción momentánea cuando utiliza
herramientas eléctricas puede dar lugar a
importantes daños personales.
b) Utilice un equipo de protección. Utilice siempre
una protección ocular.
El equipo de protección como máscara para el
polvo, zapatos de seguridad antideslizantes, casco
o protección para oídos utilizado para condiciones
adecuadas reducirá los daños personales.
c) Evite un inicio involuntario. Asegúrese de que el
interruptor está en “off” antes de conectar la
herramienta a una fuente de alimentación y/o
batería, cogerla o transportarla.
El transporte de herramientas eléctricas con el
dedo en el interruptor o el encendido de
herramientas eléctricas con el interruptor
encendido puede provocar accidentes.
d) Retire las llaves de ajuste antes de encender la
herramienta eléctrica.
Si se deja una llave en una pieza giratoria de la
herramienta eléctrica podrían producirse daños
personales.
e) No se extralimite. Mantenga un equilibrio
adecuado en todo momento.
Esto permite un mayor control de la herramienta
eléctrica en situaciones inesperadas.
f) Vístase adecuadamente. No lleve prendas sueltas
o joyas. Mantenga el pelo, la ropa y los guantes
alejados de las piezas móviles.
La ropa suelta, las joyas y el pelo largo pueden
pillarse en las piezas móviles.
g) Si se proporcionan dispositivos para la conexión
de extracción de polvo e instalaciones de recogida,
asegúrese de que están conectados y se utilizan
adecuadamente.
La utilización de un sistema de recogida de polvo
puede reducir los riesgos relacionados con el polvo.
4) Utilización y mantenimiento de las herramientas
eléctricas
a) No fuerce la herramienta eléctrica. Utilice la
herramienta eléctrica correcta para su aplicación.
La herramienta eléctrica correcta trabajará mejor
y de forma más segura si se utiliza a la velocidad
para la que fue diseñada.
b) No utilice la herramienta eléctrica si el interruptor
no la enciende y apaga.
Las herramientas eléctricas que no pueden
controlarse con el interruptor son peligrosas y
deben repararse.
c) Desconecte el enchufe de la fuente eléctrica y/o
la batería de la herramienta eléctrica antes de
hacer ajustes, cambiar accesorios o almacenar
herramientas eléctricas.
Estas medidas de seguridad preventivas reducen
el riesgo de que la herramienta eléctrica se ponga
en marcha accidentalmente.
d) Guarde las herramientas eléctricas que no se
utilicen para que no las cojan los niños y no
permita que utilicen las herramientas eléctricas
personas no familiarizadas con las mismas o con
estas instrucciones.
Las herramientas eléctricas son peligrosas si son
utilizadas por usuarios sin formación.

Español
e) Mantenimiento de las herramientas eléctricas.
Compruebe si las piezas móviles están mal
alineadas o unidas, si hay alguna pieza rota u
otra condición que pudiera afectar al
funcionamiento de las herramientas eléctricas.
Si la herramienta eléctrica está dañada, llévela a
reparar antes de utilizarla.
Se producen muchos accidentes por no realizar
un mantenimiento correcto de las herramientas
eléctricas.
f) Mantenga las herramientas de corte afiladas y
limpias.
Las herramientas de corte correctamente
mantenidas con los bordes de corte afilados son
más fáciles de controlar.
g) Utilice la herramienta eléctrica, los accesorios y las
brocas de la herramienta, etc. de acuerdo con estas
instrucciones, teniendo en cuenta las condiciones
laborales y el trabajo que se va a realizar.
La utilización de la herramienta eléctrica para
operaciones diferentes a aquellas pretendidas
podría dar lugar a una situación peligrosa.
5) Utilización y mantenimiento de las herramientas a
batería
a) Recargue sólo con el cargador especificado por
el fabricante.
Un cargador adecuado para un tipo de batería
podría crear peligro de incendio si se utiliza con
otra batería.
b) Utilice herramientas eléctricas sólo con baterías
designadas específicamente.
La utilización de otras baterías podría crear peligro
de daños e incendio.
c) Cuando no se utilice la batería, manténgala alejada
de otros objetos metálicos como clips de papel,
monedas, llaves, clavos, tornillos u otros objetos
metálicos pequeños que puedan hacer una
conexión de un terminal a otro.
Si se acortan y acercan los terminales de las baterías,
podrían producirse quemaduras o un incendio.
d) Bajo condiciones abusivas, podría salir líquido de
la batería; evite todo contacto. Si se produce un
contacto accidentalmente, aclare con agua. Si entra
líquido en los ojos, busque ayuda médica.
El líquido de la batería podría causar irritación o
quemaduras.
6) Revisión
a) Lleve su herramienta a que la revise un experto
cualificado que utilice sólo piezas de repuesto
idénticas.
Esto garantizará el mantenimiento de la seguridad
de la herramienta eléctrica.
PRECAUCIÓN
Mantenga a los niños y a las personas enfermas alejadas.
Cuando no se utilicen, las herramientas deben almacenarse
fuera del alcance de los niños y de las personas enfermas.
PRECAUCIONES PARA EL ATORNILLADOR
DE IMPACTO A BATERÍA
1. Sujete la herramienta motorizada por las
superficies de agarre aisladas cuando realice una
operación donde el pasador pueda entrar en
contacto con cables. Los pasadores que entren en
contacto con un cable "activo" pueden dejar al
descubierto partes metálicas "activas" de la
herramienta motorizada, lo que podría provocar
descargas eléctricas al operario.
2. Esta es una herramienta portátil para apretar y
aflojar tornillos. Empléela solamente para este fin.
3. Utilizar tapones en los oidos cuando se utilice la
herramienta durante un largo período de tiempo.
4. El empleo con una sola mano es extremadamente
peligroso; cuando utilice La unidad, sosténgala
firmemente con ambas manos.
5. Después de instalar la punta de destornillador, tire
ligeramente de la misma para asegurarse de que
no esté floja. Si no instala adecuadamente la
punta, es posible que ésta se afloje durante la
operación, lo que podría resultar peligroso.
6. Emplee la punta de destornillador adecuada al
tornillo.
7. El apretado angular de un tornillo con el
atornillador de impacto puede dañar la cabeza del
mismo, y es posible que a éste no se le transmita
la fuerza apropiada. Apriete con este atornillador
de impacto alineado con el tornillo.
8. Siempre cargar la batería a una temperatura
comprendida 0 – 40°C. Si se carga la batería a
temperaturas fuera del rango de 0 – 40°C tal vez
la carga no se realice correctamente y se reduzca
al vida de la batería.
La temperatura más apropiada para cargar es la
de 20 – 25°C.
9. Cuando se completa la carga, dejar descansar el
cargador por 15 minutos antes de proseguir con
la carga siguiente.
10. No dejar que entre suciedad por el orificio de
conexión de la batería recargable.
11. Nunca desarmar la batería recargable ni el cargador.
12. Nunca poner en cortocircuito la batería recargable.
Poner en cortocircuito la batería produce una
corriente eléctrica enorme y el consecuente
recalentamiento, pudiendo quemar o deteriorar la
batería.
13. No tirar la batería al fuego.
Si se quema la batería puede explotar.
14. Llevar la batería al sitio de compra original en el
caso de que la duración de la batería recargable
sea reducida al usarse. No tirar la batería
descargada.
15. El uso de una batería descargada dañará el
cargador.
16. No insertar objetos en las ranuras de ventilación
del cargador.
La inserción de objetos metálicos o inflamables
en dichas ranuras puede provocar descargas
eléctricas o dañar el cargador.
10

Español
ADVERTENCIA DE LA BATERÍA DE LITIO
Para ampliar su duración, la batería de litio está
equipada con la función de protección para detener la
salida.
En los casos 1 a 3 descritos más abajo, cuando utilice
este producto, incluso si tira del interruptor, el motor
puede detenerse. No es un problema, sino el resultado
de la función de protección.
1. Cuando la batería restante se agota, el motor se
detiene.
En este caso, cárguela inmediatamente.
2. Si la herramienta se sobrecarga, el motor puede
detenerse. En este caso, suelte el interruptor de
la herramienta y elimine las causas de la
sobrecarga. A continuación, puede volverla a
utilizar.
3. Si la batería se calienta excesivamente al realizar
un trabajo de sobrecarga, la potencia de la batería
podría pararse.
En este caso, deje de utilizar la batería y deje que
se enfríe. Posteriormente puede utilizarla de nuevo.
Asimismo, preste atención a las siguientes advertencias
y precauciones.
ADVERTENCIA
Para evitar fugas de la batería, generación de calor,
emisión de humo, explosiones e igniciones, preste
atención a las siguientes precauciones.
1. Asegúrese de que no entran virutas o polvo en
la batería.
䡬 Durante el trabajo, asegúrese de que no caen
virutas o polvo en la batería.
䡬 Asegúrese de que las virutas o el polvo que caen
sobre la herramienta eléctrica durante el trabajo
no entran en la batería.
䡬 No almacene una batería sin utilizar en un lugar
expuesto a virutas y polvo.
䡬 Antes de almacenar una batería, retire las virutas
y el polvo que se haya adherido y no la almacene
junto a piezas metálicas (tornillos, clavos, etc.).
2. No agujeree la batería con un objeto afilado como
un clavo, no la golpee con un martillo, la pise,
la tire o la exponga a fuertes impactos físicos.
3. No utilice una batería que pudiera estar dañada
o deformada.
4. No utilice la batería con las polaridades cambiadas.
5. No conecte la batería directamente a salidas eléctricas
o a los encendedores de cigarros de los coches.
6. No utilice la batería para un fin diferente a los
especificados.
7. Si la carga de la batería no finaliza incluso cuando
ha transcurrido un determinado tiempo de recarga,
detenga inmediatamente la recarga.
8. No coloque o exponga la batería a temperaturas
elevadas o alta presión como en un microondas,
una secadora o un contenedor de gran presión.
9. Aléjela del fuego inmediatamente cuando se
detecte una fuga o un olor raro.
10. No la utilice en un lugar donde se genere gran
electricidad estática.
11. Si hay una fuga de la batería, mal olor, se genera
color, está descolorida o deformada, o de algún
modo funciona de forma anormal durante su
utilización, recarga o almacenamiento, retírela
inmediatamente del equipo o del cargador de la
batería y detenga su utilización.
PRECAUCIÓN
1. Si el líquido de fuga de la batería entra en contacto
con los ojos, no se los frote y lávelos bien con
agua limpia como, por ejemplo, agua del grifo y
póngase en contacto con un médico
inmediatamente.
Si no se trata, el líquido podría causar problemas
de visión.
2. Si el líquido de fuga entra en contacto con la piel
o la ropa, lávela bien con agua limpia como, por
ejemplo, agua del grifo inmediatamente.
Podría producir irritación de la piel.
3. Si observa óxido, mal olor, recalentamiento,
decoloración, deformación y/u otras irregularidades
al utilizar la batería por primera vez, no la utilice
y devuélvasela a su proveedor o distribuidor.
ESPECIFICACIONES
HERRAMIENTA MOTORIZADA
Velocidad sin carga 0 – 2400 min–1 (/min)
Capacidad (tornillo ordinario) M3 – M8
Par de torsión (Máximo) 25 N·m
Batería recargable BCL715: Li-ion 7,2 V (1,5 Ah 2 celdas)
Peso 0,58 kg
CARGADOR
Model UC7SL
Tensión de carga
Peso 0,35 kg
11
7,2 V
ACCESORIOS ESTANDAR
1 Batería (BCL715) ....................................................... 2
2 Cargador (UC7SL) ..................................................... 1
3 Caja de plástico ......................................................... 1
4 Tapa de batería ......................................................... 1
Los accesorios estándar están sujetos a cambio sin
previo aviso.

Español
ACCESORIOS OPCIONALES
(de venta por separado)
1. Batería (BCL715)
Lo accesorios facultativos están sujetos a cambio sin
previo aviso.
APLICACIÓN
䡬 Atornillamiento y desatornillamiento de tornillos para
metales, tornillos para madera, tornillos que no
necesitan abrir antes su agujero, etc.
DESMONTAJE E INSTALACIÓN DE LA
BATERIA
1. Desmontaje de la batería
Sujetar firmemente el asidero y presionar el cierre
de la bataría para desmontarla (Ver las Figs. 1 y
2).
PRECAUCIÓN
No cortocircuitar nunca la batería.
Tabla 1
Indicaciones de la lámpara indicadora
Se encenderá durante 0,5 segundos. No se
Antes de la
carga
Parpadeo
encenderá durante 0,5 segundos.
(Apagada durante 0,5 segundos)
2. Instalación de la batería
Insertar la batería observando sus polaridades (ver
la Fig. 2).
CARGA
Antes de usar la herramienta eléctrica, cargar la batería
del modo siguiente.
1. Enchufe el cable de alimentación del cargador a un
tomacorriente de CA.
Cuando haya conectado el enchufe del cargador a
una toma de la red, el piloto parpadeará en rojo
(A intervalos de 1 segundo).
2. Inserte la batería en el cargador
Inserte firmemente la batería en el cargador hasta
que entre en contacto con la parte inferior del
mismo tal y como se muestra en la Fig. 3.
3. Carga
Cuando inserte una batería en el cargador, el piloto
permanecerá continuamente encendido en rojo.
Cuando la batería se haya cargado completamente,
el piloto parpadeará en rojo (A intervalos de 1
segundo). (Vea las Tabla 1)
(1) Indicaciones de la lámpara indicadora
Las indicaciones de la lámpara indicadora serán tal
y como se muestran en la Tabla 1, de acuerdo con
la condición del cargador o de la batería.
Durante la
carga
Lámpara
piloto
(rojo)
(2) Temperatura de las baterías
Carga
completa
Espera por
recalentamiento
Carga
imposible
Las temperaturas para las baterías recargables se
muestran en la Tabla 2; las baterías calientes deben
dejarse enfriar antes de volver a cargarlas.
Iluminación
Parpadeo
Parpadeo
Destello
Iluminación permanente
Se encenderá durante 0,5 segundos. No se
encenderá durante 0,5 segundos.
(Apagada durante 0,5 segundos)
Se encenderá durante 1 segundo. No se
encenderá durante 0,5 segundos.
(Apagada durante 0,5 segundos)
Se encenderá durante 0,1 segundos. No se
encenderá durante 0,1 segundos.
(Apagada durante 0,1 segundos)
Batería recalentada.
No puede cargarse
(la carga comenzará
cuando la batería se
enfríe).
Mal funcionamento
de la battería o del
cargador
Tabla 2 Márgenes de carga de las baterías
Baterías
BCL715 0°C – 50°C
Temperatura con la que
podrá cargarse la batería
12

Español
(3) Tiempo de recarga
Dependiendo de la combinación del cargador y las
baterías, el tiempo de carga será como se muestra
en la Tabla 3.
Tabla 3 Tiempo de carga (a 20°C)
Batería
BCL715 Aprox. 30 min.
NOTA
El tiempo de carga puede variar de acuerdo con
la tem peratura y la tensión de la fuente de
alimentación.
4. Desenchufe el cable de alimentación del cargador
del tomacorriente de CA.
5. Sostenga el cargador firmemente y saque la batería.
NOTA
Asegúrese de extraer la batería del cargador después
del uso, y guárdela después.
Forma de hacer que las baterías duren más
(1) Recarque las baterías antes de que se hayan agotado
completamente.
Si siente que la potencia de la herramienta eléctrica
se debilita, deje de utilizarla y recargue su batería.
Si continuase utilizando la herramienta hasta agotar
la capacidad de la batería, ésta podría dañarse y
su duración útil podría acortarse.
(2) Evite realizar la recarga a altas temperaturas.
Una batería se calentará inmediatamente después
de haberla utilizado. Si recargase tal batería
inmediatamente después de haberla utilizado, su
substancia química interna se deterioraría, y la
duración útil de la batería se acortaría. Deje la
batería y recárguela después de que se haya enfriado
durante cierto tiempo.
PRECAUCIÓN
䡬 Si carga la batería mientras esté caliente por haber
estado mucho tiempo en un lugar sometido a la
luz solar directa, o por haber acabado de utilizarla,
la lámpara de piloto del cargador parpadea durante
1 segundo y no se enciende durante 0,5 segundos
(apagada durante 0,5 segundos). En tales casos,
deje primero que se enfríe la batería e inicie luego
la carga.
䡬 Cuando la lámpara piloto destelle (a intervalos de
0,2 segundos), realice una comprobación y extraiga
los objetos extraños de la batería del cargador. Si
no hay ningún objeto extraño, es posible que la
batería o el cargador funcione mal. Llévelos a un
agente de servicio técnico autorizado.
䡬 Como el microprocesador incorporado tarda 3
segundos en confirmar que la batería que estaba
cargándose con el UC7SL se ha estraído, espere 3
segundos como mínimo antes de reinsertarla para
continuar cargando.
Si reinserta la batería antes de 3 segundos, es
posible que no se carge adecuadamente.
Cargador
UC7SL
ANTES DE USAR LA HERRAMIENTA
䡬 Instalación y comprobación del ambiente de trabajo
Compruebe si el ambiente de trabajo es adecuado
de acuerdo con las precauciones anteriores.
COMO SE USA
1. Instalación de la punta de destornillador
Para instalar la punta de destornillador, realice
siempre el procedimiento siguiente. (Fig. 4)
(1) Tire del manguito guía hacia delante.
(2) Inserte la punta del destornillador en el orificio
hexagonal en el receptáculo.
(3) Suelte el manguito guía y devuélvalo a su posición
original.
PRECAUCIÓN
Si el manguito guía no vuelve a su posición original,
significará que la punta de destornillador no está
correctamente instalada.
2. Extracción de la broca
Realice la operación contraria a la de instalación
de la broca.
3. Confirmar que la batería está puesta correctamente
4. Examinar la dirección de rotación
La broca rota hacia la derecha (mirándola desde
atrás) al oprimir el lado R (der.) de inversión.
El lado L (izq.) se usa para hacer girar la broca
a la izquierda (Vea las Fig. 5). (Las marcas
están en el cuerpo del taladro.)
R
5. Operación del interruptor
䡬 Cuando se tira del gatillo del interruptor, la
herramienta gira.
Cuando se suelta el gatillo, la herramienta se detiene.
䡬 La velocidad rotacional de la taladradora podrá
controlarse variando la presión con la que se tire
del interruptor de gatillo. La velocidad será baja
cuando se tire ligeramente del gatillo, y aumentará
a medida que se tire más de él.
NOTA
Se produce un ruido de zumbido antes de que el
motor empíece a girar, lo cual no indica problema
alguno de la máguina.
6. Utilización de la luz
Tire del interruptor de activación para encender la
luz. La luz sigue iluminando mientras se tire del
interruptor de activación. La luz se apaga tras soltar
el interruptor de activación. (Fig. 6)
PRECAUCIÓN
No mire directamente a la luz, ya que podrían
producirse daños en los ojos.
7. Apretado y aflojado de pernos
Instale la punta de destornillador adecuada al tornillo,
alinéela con las ranuras de la cabeza del mismo,
y después apriételo.
Empuje el atornillador de percusión lo
suficientemente como para que la punta de
destornillador encaje en la cabeza del tornillo.
PRECAUCIÓN
Si aplica demasiado tiempo el atornillador de
impacto sobre el tornillo, éste se apretará demasiado
y se romperá.
Apriete los tornillos con el ángulo que no dañe sus
cabezas y de forma que se pueda aplicar la fuerza
apropiada.
y
L
13

Español
Apriete con el atornillador de impacto alineado con
el tornillo.
8. Utilización de la configuración recta o de pistola
Utilice la herramienta en la configuración recta
cuando utilice en espacios limitados. Utilícela en la
configuración de pistola en otros lugares. Seleccione
la configuración que se ajusta mejor a la aplicación
de la herramienta. Cuando cambie la configuración,
la herramienta emite un “clic” cuando se encaja en
posición. Doble (o extienda) la herramienta hasta
que oiga el sonido de “clic”.
PRECAUCIÓN
Cuando utilice la herramienta en la configuración
de pistola, no sostenga la parte doblada de la
herramienta cuando regrese a la configuración recta.
Puede prender el dedo u otra parte de la mano en
la parte de flexión, pudiendo sufrir serias lesiones
(Fig. 7).
9. Mecanismo de bloqueo del husillo
Cuando el interruptor principal está apagado, la
broca está fijada en su lugar y la herramienta puede
utilizarse como destornillador manual.
PRECAUCIONES OPERACIONALES
1. Reposo de la herramienta después de un
funcionamiento prolongado
Tras una tarea de apriete de pernos de larga
duración, deje la unidad en reposo durante unos
15 minutos al reemplazar la batería. Si reinicia la
tarea inmediatamente después de reemplazar la
batería, aumentaría la temperatura del motor, del
interruptor, etc., con los consiguientes riesgos de
quemadura.
NOTA
No toque las partes metálicas, debido a que puede
alcanzar altas temperaturas durante el trabajo
continuo.
2. Precauciones sobre el empleo del interruptor de
control de velocidad
Este interruptor posee un circuito electrónico
incorporado que varía la velocidad de rotación. Por
consiguiente, cuando apriete el gatillo sólo
ligeramente (baja velocidad de rotación) y el motor
se pare mientras esté insertando continuamente
tornillos, los componentes de dicho circuito
electrónico pueden recalentar y dañarse.
3. Emplee el tiempo de apriete adecuado al tornillo
El par adecuado a un tornillo difiere de acuerdo con
el material y el tamaño del mismo, el material en
el que se esté atornillando, etc. Por lo tanto, emplee
el tiempo de apriete adecuado al tornillo. En especial,
en caso de tornillos menores a M8 si utiliza un
tiempo de apriete largo, existe el peligro de rotura
de los tornillos, motivo por el que se le a ènseja
confirmar con antelación el tiempo y el par de
apriete.
4. Tensiónde apriete apropiada para los pernos y
tuercas
La tensión de apriete óptima para pernos y tuercas
difiere según su material y tamaño. Una tensión de
apriete excesiva para un perno pequeño podría
deformarlo o romperlo. La tensión de apriete
aumenta proporcionalmente al teimpo de operación.
Utilice la indicación de la escala y el tiempo de
operación adecuados a cada perno.
5. Confirmación de la tensión de apriete
Los factores que se mencionen a continuación
contribuyen a reducir la tensión de apriete.
Comprobar por ello la tensión de apriete necesaria
atornillando previamente algunos tornillos con una
llave de tuercas manual. Factores que afectan a la
tensión de apriete.
(1) Tensión
Cuando se alcance el margen de descarga, la tensión
se reducirá y la torsión de apriete disminuirá.
(2) Tiempo de operación
La tensión de apriete aumenta al aumentar el tiempo
de operación. La tensión de apriete sin embargo
no supera cierto valor a pesar de que la herramienta
funcione durante un largo periodo de tiempo.
(3) Diámetro del perno
El par de torsión es diferente al diámetro de la
tuerca. En general, un diámetro más grande requiere
un par de torsión más grande.
(4) Condiciones de apriete
La tensión de apriete difiere según la clase y longitud
de los tornillos; a pesar de que éstos tengan la
rosca del mismo tamaño. La tensión de apriete
difiere también según las condiciones de las
superficies del metal en el cual van a apretarse los
pernos. Cuando el perno y la tuerca giran
conjuntamente, el par se reduce considerablemente.
MANTENIMIENTO E INSPECCIÓN
1. Inspección de las puntas de atornillador
El empleo de una punta rota o desgastada es
peligroso porque ésta podría deslizarse.
Reemplácela.
2. Inspección de los tornillos de montaje
Inspeccionar regularmente los tornillos de montaje
y asegurarse que están bien apretados. Si se afloja
algún tornillo, hay que apretarlos inmediatamente.
De lo contrario, en ésto, puede ser muy peligroso.
3. Mantenimiento de motor
La unidad de bobinado del motor es el verdadero
“corazón” de las herramientas eléctrias.
Prestar el mayor cuidado a asegurarse de que el
bobinado no se dañe y/o se humedezca con aceite
o agua.
4. Limpieza en el exterior
Cuando el atornillador de impacto esté sucio,
límpielo con un paño suave y seco o con un paño
mojado en agua jabonosa. No utilizar disolventes
clóricos, gasolina o disolventes parapinturas ya que
éstos funden los materiales plásticos.
5. Almacenamiento
Guarde el atornillador de impacto en un lugar en
el cual la temperatura sea inferior a 40ºC y esté
alejado del alcance de los niños.
NOTA
Asegúrese de que la batería está completamente
cargada si la va a almacenar durante un prolongado
período de tiempo (3 meses o más). Es posible que
la batería con una capacidad más pequeña no se
pueda cargar cuando se utilice si se ha almacenado
durante un prolongado período de tiempo.
14

Español
6. Lista de repuestos
PRECAUCIÓN
La reparación, modificación e inspección de las
herramientas eléctricas Hitachi deben ser realizadas
por un Centro de Servicio Autorizado de Hitachi.
Esta lista de repuestos será de utilidad si es
presentada junto con la herramienta al Centro de
Servicio Autorizado de Hitachi, para solicitar la
reparación o cualquier otro tipo de mantenimiento.
En el manejo y el mantenimiento de las herramientas
eléctricas, se deberán observar las normas y
reglamentos vigentes en cada país.
MODIFICACIONES
Hitachi Power Tools introduce constantemente
mejoras y modificaciones para incorporar los últimos
avances tecnológicos.
Por consiguiente, algunas partes pueden ser
modificadas sin previo aviso.
Aviso importante sobre las pilas de las
herramientas inalámbricas de Hitachi
Utilice siempre una de nuestras pilas genuinas.
No podemos garantizar la seguridad y el
funcionamiento de nuestra herramienta eléctrica
inalámbrica cuando se utiliza con pilas diferentes
a las indicadas por nosotros o cuando la pila se
desmonta y modifica (como cuando se desmontan
y sustituyen celdas u otras piezas internas).
NOTA
Debido al programa continuo de investigación y
desarrollo de HITACHI estas especificaciones están
sujetas a cambio sin previo aviso.
15

Português
ADVERTÊNCIAS GERAIS DE SEGURANÇA
PARA A FERRAMENTA ELÉTRICA
ADVERTÊNCIA
Leia todas as instruções e advertências de segurança.
Deixar de seguir as instruções e as advertências pode
provocar um choque elétrico, incêndio e/ou ferimentos
graves.
Guarde todas as advertências e instruções para futuras
consultas.
O termo “ferramenta elétrica” em todas as advertências
refere-se à sua ferramenta conectada à corrente (com um
cabo de alimentação) ou à ferramenta elétrica alimentada
por bateria (sem um cabo de alimentação).
1) Segurança da área de trabalho
a) Mantenha a área de trabalho limpa e bem
iluminada.
As áreas escuras ou cheias de material são propícias
a acidentes.
b) Não trabalhe com ferramentas elétricas em
ambientes explosivos, tais como na presença de
líquidos infl amáveis, gases ou pó.
As ferramentas elétricas criam faíscas que podem
infl amar os gases ou pó.
c) Mantenha as crianças e outras pessoas afastadas
quando trabalhar com uma ferramenta elétrica.
As distrações podem fazer com que perca controle.
2) Segurança elétrica
a) Os plugues da ferramenta elétrica devem
corresponder às tomadas.
Nunca modifi que o plugue.
Não use plugues de adaptação com ferramentas
elétricas conectadas à terra.
Os plugues inalterados e tomadas correspondentes
reduzirão o risco de choques elétricos.
b) Evite o contato corporal com superfícies
conectadas à terra, tais como canos, radiadores,
fogões e geladeiras.
Existe um risco maior de choque elétrico se o seu
corpo estiver conectado à terra.
c) Não exponha ferramentas elétricas à chuva ou
condições de umidade.
A entrada de água numa ferramenta elétrica
aumentará o risco de choques elétricos.
d) Não abuse do cabo de alimentação. Nunca use
o cabo para transportar, puxar ou desligar a
ferramenta elétrica.
Mantenha o cabo afastado do calor, óleo, bordas
agudas ou peças móveis.
Fios danifi cados ou entrelaçados podem aumentar o
risco de choques elétricos.
e) Quando trabalhar com uma ferramenta elétrica
ao ar livre, use uma extensão adequada para uso
em exteriores.
O uso de um cabo adequado para uso ao ar livre
reduz o risco de choques elétricos.
f) Se não for possível evitar o uso de uma máquina
elétrica num local úmido, use uma fonte de
alimentação protegida por um dispositivo de
corrente residual (RCD).
O uso de um RCD reduz o risco de choques
elétricos.
3) Segurança pessoal
a) Mantenha-se alerta, esteja atento ao que estiver
fazendo e use o bom senso ao trabalhar com
uma ferramenta elétrica.
Não use uma ferramenta elétrica quando estiver
cansado ou sob a infl uência de drogas, álcool ou
medicamentos.
Um momento de desatenção enquanto trabalha com
ferramentas elétricas pode resultar em ferimentos
pessoais graves.
b) Use o equipamento de proteção pessoal. Use
sempre protetores para os olhos.
O equipamento de proteção, tal como uma máscara
de pó, sapatos de segurança antiderrapantes,
capacete ou protetores auditivos usados para
condições adequadas reduzirá os ferimentos
pessoais.
c) Evite ligar a ferramenta acidentalmente.
Certifi que-se de que o interruptor esteja na
posição de desligado antes de conectar a
fonte de alimentação e/ou bateria, levantar ou
transportar a ferramenta.
Transportar ferramentas elétricas com o dedo
no interruptor ou ativar ferramentas que estão
com o interruptor ligado é perigoso e aumenta a
probabilidade de acidentes.
d) Remova qualquer chave de parafusos ou chave
de aperto antes de ligar a ferramenta.
Uma chave de aperto ou de parafusos instalada na
parte rotativa da ferramenta pode provocar ferimentos
pessoais.
e) Não se estique. Mantenha sempre o controle e
equilíbrio adequados.
Isso lhe permite obter um melhor controle da
ferramenta em situações inesperadas.
f) Vista-se adequadamente. Não use roupas largas
ou jóias. Mantenha o cabelo, roupas e luvas
afastados das peças móveis.
As roupas largas, jóias ou cabelo comprido podem
ser apanhados em peças móveis.
g) Se forem fornecidos componentes para a
conexão de dispositivos de extração e coleta
de pó, certifi que-se de que os mesmos sejam
conectados e usados adequadamente.
O uso de um coletor de pó pode reduzir os perigos
relacionados com o pó.
4) Uso da ferramenta e manutenção
a) Não force a ferramenta elétrica. Use a ferramenta
correta para a sua aplicação.
A ferramenta correta fará o trabalho melhor e
com mais segurança à velocidade para a qual foi
concebida.
b) Não use a ferramenta elétrica se o interruptor
não a ligar ou desligar.
Qualquer ferramenta que não possa ser controlada
pelo interruptor é perigosa e deve ser reparada.
c) Desligue o plugue da rede elétrica e/ou a bateria
da ferramenta elétrica antes de efetuar quaisquer
ajustes, mudar os acessórios ou guardar a
ferramenta elétrica.
Tais medidas preventivas de segurança reduzem o
risco de ligar a ferramenta elétrica acidentalmente.
d) Guarde as ferramentas elétricas fora do alcance
de crianças e não permita que pessoas não
habituadas à ferramenta elétrica ou estas
instruções trabalhem com a ferramenta.
As ferramentas elétricas são perigosas nas mãos de
usuários inexperientes.
e) Efetue a manutenção de ferramentas elétricas.
Verifi que a existência de desalinhamentos ou
curvaturas das peças móveis, rupturas de peças
e quaisquer outras condições que possam afetar
o funcionamento das ferramentas elétricas.
16

Português
Se enc ontrar qual quer dano, sol icite o conse rto
da ferramenta antes de usá-la.
Muitos acidentes são causados por ferramentas
com manutenção inadequada.
f) Mantenha as ferramentas de corte afi adas e
limpas.
As ferramentas de corte com uma manutenção
adequada e extremidades afi adas são menos
propensas a curvar-se e mais fáceis de controlar.
g) Use a ferramenta elétrica, acessórios e
brocas de ferramentas, etc., de acordo com
estas instruções, levando em consideração
as condições de trabalho e o trabalho a ser
efetuado.
O uso de uma ferramenta elétrica para operações
diferentes das concebidas pode resultar num mau
funcionamento.
5) Uso e cuidados da ferramenta a bateria
a) Recarregue somente com o carregador
especifi cado pelo fabricante.
Um carregado adequado para um determinado
tipo de bateria pode criar o risco de incêndio se for
usado com outras baterias.
b) Use ferramentas elétricas somente com as
baterias designadas especifi camente.
O uso de qualquer outro tipo de bateria pode criar o
risco de ferimentos e incêndio.
c) Quando não estiver usando a bateria,
mantenha-a longe de objetos metálicos
tais como clipes de papel, moedas, chaves,
pregos, parafusos ou outros objetos metálicos
pequenos que possam fazer uma conexão
entre os terminais.
Colocar os terminais da bateria em cur to- circuito
pode causar queimaduras ou incêndio.
d) Em condições abusivas, o líquido da bateria
pode ser ejetado. Neste caso, evite o contato.
Em caso de contato acidental, lave bem com
água. Se o líquido entrar em contato com os
olhos, procure assistência médica.
O líquido ejetado da bateria pode causar irritações
ou queimaduras.
6) Manutenção
a) A manutenção da sua ferramenta elétrica deve
ser realizada por pessoal técnico qualifi cado e
somente peças idênticas devem ser usadas para
substituição de peças defeituosas.
Isso garantirá que a segurança da ferramenta
elétrica seja mantida.
PRECAUÇÃO
Mantenha afastadas das crianças e pessoas
debilitadas.
Quando não estiverem sendo usadas, as ferramentas
devem ser guardadas fora do alcance de crianças e
pessoas debilitadas.
PRECAUÇÕES RELATIVAS À PARAFUSADEIRA
DE IMPACTO SEM FIO
1. Segure a ferramenta elétrica pelas superfícies de
empunhadura isoladas, ao realizar uma operação
na qual o prendedor possa entrar em contato com
uma fi ação elétrica oculta. O contato do s prendedore s
com um fi o “ viv o” po de pas sar a cor ren te pa ra a s par tes
metálicas expostas da ferramenta elétrica e causar um
choque elétrico no operador.
2. Esta é uma ferramenta portátil para apertar e afrouxar
parafusos. Use -a somente para estas operações.
17
3. Use tampões de ouvido se usar durante um longo
período de tempo.
4. A operação com apenas uma mão é extremamente
perigosa; segure a ferramenta fi rmemente com ambas
as mãos quando operar.
5. Após instalar a broca de chave de fenda, puxe a broca
ligeiramente para assegurar que não esteja frouxa.
Se a broca não for instalada corretamente, ela pode
afrouxar-se durante o uso, o que pode ser perigoso.
6. Use uma broca correspondente ao parafuso aplicável.
7. Apertar um parafuso com a parafusadeira num ângulo
com o par afuso pode dan ifi c ar a cabeça do p arafuso e a
força apropriada não será transmitida para o parafuso.
Aperte com a parafusadeira de impacto alinhada em
linha reta com o parafuso.
8. Sempre carregue a bateria a uma temperatura de 0
a 40°C. Carregar a bateria a temperaturas fora do
intervalo de 0 a 40°C pode impedir o carregamento
adequado e reduzir a vida útil da bateria.
A temperatura mais adequada para carregar é de 20 a
25°C.
9. Uma vez concluído um carregamento, deixe o
carregador inativo durante cerca de 15 minutos antes
de usá-lo novamente.
10. Não permita que matérias estranhas entrem no orifício
para conectar a bateria recarregável.
11. Nunca tente desmontar a bateria recarregável e o
carregador.
12. Nunca coloque a bateria recarregável em curtocircuito. Colocar a bateria em curto-circuito produzirá
uma grande corrente elétrica e um sobreaquecimento.
Isso resultará em queimaduras e danos da bateria.
13. Não jogue a bateria no fogo.
Se a bateria for queimada, ela pode explodir.
14. Traga a bateria para a loja onde a comprou caso o
tempo de uso da bateria tornar-se muito cur to após
um carregamento. Não elimine uma bateria esgotada
como lixo comum.
15. Usar uma bateria esgotada danifi cará o carregador.
16. Não insira objetos nas aberturas de ventilação de ar do
carregador.
Inserir objetos metálicos ou substâncias infl amáveis
nas aberturas de ventilação de ar do carregador
causará o risco de choque elétrico ou danifi cará o
carregador.
PRECAUÇÃO RELATIVA À BATERIA IÔNICA DE
LÍTIO
Para estender sua vida útil, a bateria iônica de lítio vem
com uma função de proteção para interromper a saída.
Quando usar o produto nos casos de 1 a 3 descritos a
seguir, o motor pode parar mesmo que esteja puxando
o interruptor. Isso não indica um problema, mas sim o
resultado da função de proteção.
1. Quando a energia restante da bateria se esgota, o
motor para.
Neste caso, carregue-a imediatamente.
2. Se a ferramenta for sobrecarregada, o motor pode
parar. Neste caso, solte o interruptor da ferramenta e
elimine as causas da sobrecarga. Depois disso, você
pode usá-la novamente.
3. Se a bateria for sobreaquecida devido a uma
sobrecarga, a energia da bateria pode parar.
Neste caso, pare de usar a bateria e deixe-a esfriar.
Depois disso, você pode usá-la novamente.
Além disso, observe a seguinte advertência e precaução.
ADVERTÊNCIA
Para prevenir um vazamento da bateria, geração de calor,
emissão de fumaça, explosão e ignição, certifi que-se de
observar as seguintes precauções.

Português
1. Cer t ifi que-se de que aparas e poeira não se acumulem
na bateria.
○ Durante o trabalho, certifi que-se de que aparas e
poeira não caiam na bateria.
○ Certifi que-se de que as aparas e poeira que caírem
na ferramenta elétrica durante o trabalho não se
acumulem na bateria.
○ Não guarde uma bateria não usada em um local
exposto a aparas e poeira.
○ Ante s de guardar uma b ateria, reti re quaisquer a paras e
poeira que possam estar aderidas nela e não a guarde
junto com objetos metálicos (parafusos, pregos, etc.).
2. Não fure a bateria com um objeto afi ado tal como um
prego, não bata com um martelo, não pise, atire nem
sujeite a bateria a impactos físicos for tes.
3. Não use uma bateria aparentemente danifi cada ou
deformada.
4. Não use a bateria com as polaridades inver tidas.
5. Não conecte diretamente a tomadas elétricas ou à
tomada do isqueiro de um automóvel.
6. Não use a bateria para uma fi nalidade que não seja a
especifi cada.
7. Se o carregamento da bateria não puder ser concluído
mesmo após ter passado o tempo de recarregamento
especifi cado, pare o recarregamento imediatamente.
8. Não coloque nem sujeite a bateria a altas temperaturas
ou a altas pressões tais como num forno de micro ondas, secador ou recipiente de alta pressão.
9. Afaste-se imediatamente do fogo se detectar qualquer
vazamento ou mau cheiro.
10. Não use em um lugar onde se gere uma for te
eletricidade estática.
11. No caso de vazamento, mau cheiro, geração de calor,
descoloração ou deformação da bateria, ou qualquer
outra anormalidade durante o uso, recarregamento
ou armazenamento, retire a bateria imediatamente do
equipamento ou carregador de bateria e pare de usála.
PRECAUÇÃO
1. Caso o vazamento do líquido da bateria entrar em
contato com os olhos, não esfregue os olhos. Lave-os
bem com água limpa fresca como água de torneira e,
em seguida, procure um médico imediatamente.
Se não tratar corretamente, o líquido pode causar
problemas nos olhos.
2. Se o líquido vazado entrar em contato com sua pele ou
roupa, lave bem imediatamente com água limpa como
água de torneira.
Existe a possibilidade que isso possa causar irritações
na pele.
3. Se você encontrar ferrugem, mau cheiro,
sobreaquecimento, descoloração, deformação e/
ou outras anormalidades quando usar a bateria pela
primeira vez, não use e devolva-a ao seu fornecedor ou
vendedor.
ESPECIFICAÇÕES
FERRAMENTA ELÉTRICA
Rotação sem carga 0 – 2 400 min-1 (/min)
Capacidade (parafuso ordinário) M3 – M8
•
Torque de aper to (máximo) 25 N
Bateria recarregável BCL715: Iônica de lítio, CC 7,2 V (1,5 Ah 2 células)
Peso 0,58 kg
m
CARREGADOR
Modelo UC7SL
Voltagem de carregamento 7,2 V
Peso 0,35 kg
ACESSÓRIOS PADRÕES
(1) Bateria (BCL715) ..........................................................2
(2) Carregador (UC7SL) ....................................................1
(3) Estojo de plástico .........................................................1
(4) Tampa da bateria .........................................................1
Os acessórios padrões estão sujeitos a modifi cações sem
aviso prévio.
ACESSÓRIOS OPCIONAIS
(vendidos separadamente)
1. Bater ia (BC L715)
Os acessórios opcionais estão sujeitos a modifi cações
sem aviso prévio.
APLICAÇÕES
○ Aparafusamento e desaparafusamento de parafusos
de máquina, parafusos para madeira, parafusos
autorroscantes, etc.
18

Português
REMOÇÃO/COLOCAÇÃO DA BATERIA
1. Remoção da bateria
Segure o cabo fi rmemente e emp urre o fecho da bate ria
para retirar a bateria (vide Figs. 1 e 2).
PRECAUÇÃO
Nunca coloque a bateria em curto-circuito.
2. Colocação da bateria
Coloque a bateria com as polaridades nas direções
corretas (vide Fig. 2).
CARREGAMENTO
Antes de usar a ferramenta elétrica, carregue a bateria
como segue.
1. Conecte o cabo de alimentação do carregador a
uma tomada elétrica.
Ao conectar o plugue do carregador a uma tomada
elétrica, a lâmpada piloto começará a piscar em
vermelho (em intervalos de 1 segundo).
Tabela 1
Indicação da lâmpada piloto
Acende-se durante 0,5 segundo. Não se
acende durante 0,5 segundo.
(apagada durante 0,5 segundo)
Fica acesa
Acende-se durante 0,5 segundo. Não se
acende durante 0,5 segundo.
(apagada durante 0,5 segundo)
Acende -se durante 1 segundo. Não se
acende durante 0,5 segundo.
(apagada durante 0,5 segundo)
Acende-se durante 0,1 segundo. Não se
acende durante 0,1 segundo.
(apagada durante 0,1 segundo)
Lâmpada
piloto
(vermelho)
Antes do
carregamento
Durante o
carregamento
Conclusão do
carregamento
Espera de
sobreaquecimento
Carregamento
impossível
Pisca
Acende-se
Pisca
Pisca
Tre me lu z
2. Coloque a bateria no carregador.
Insira a bateria fi rmemente no carregador até que entre
em contato com a parte inferior do carregador como
mostrado na Fig. 3.
3. Carregamento
Ao colocar a bateria no carregador, a lâmpada piloto se
acenderá em vermelho.
Quando a bateria fi car totalmente carregada, a
lâmpada piloto começará a piscar em vermelho (em
intervalos de 1 segundo). (Vide Tabela 1)
(1) Indicação da lâmpada piloto
As indicaç ões da lâmpada piloto serão como mostrado
na Tabela 1, de acordo com a condição do carregador
ou da bateria recarregável.
Bateria sobreaquecida. Não
é possível carregar.
(O carregamento começará
quando a bateria esfriar.)
Mau funcionamento da
bateria ou do carregador
(2) Temperatura da bateria recarregável
As temperaturas para as baterias recarregáveis são
indic adas na Tabela 2. As bateri as que fi caram quentes
devem esfriar antes que possam ser recarregadas.
Tabela 2 Intervalos de carregamento de baterias
Baterias recarregáveis
BCL715 0°C – 50°C
(3) Tempo de carregamento
Dependendo da combinação do carregador e baterias,
o tempo de carregamento será conforme indicado na
Tabela 3.
Tabela 3 Tempo de carregamento (A 20°C)
Carregador
Bateria
BCL715 Aprox. 30 min.
NOTA
O tempo de carregamento pode variar dependendo da
temperatura e da voltagem da fonte de energia.
19
Temperaturas nas
quais a bateria pode ser
recarregada
UC7SL
4. Desconecte o cabo de alimentação do carregador
da tomada elétrica.
5. Segure o carregador fi rmemente e puxe a bateria
para fora.
NOTA
Após o uso, certifi que-se de retirar a bateria do
carregador e de guardá-la adequadamente.
Como estender a vida útil das baterias
(1) Recarregue as baterias antes que fi quem
completamente descarregadas.
Quando achar que a potência da ferramenta está se
enfraquecendo, pare de usar a ferramenta e recarregue
sua bateria. Se você continuar a usar a ferramenta e
esgotar a corrente elétrica, a bateria poderá sofrer
danos e a sua vida útil se encurtará.
(2) Evite recarregar em altas temperaturas.
Uma bateria recarregável fi ca quente logo após o uso.
Se a bateria for recarregada logo após o uso, sua
substância química interna se deteriorará e a vida útil
da bateria se encurtará. Deixe a bateria inativa por
algum tempo e recarregue-a somente depois que
tenha esfriado.

Português
PRECAUÇÃO
○ Se a bateria for carregada enquanto estiver quente,
porque foi deixada durante um longo período de tempo
em um local sujeito à luz direta do sol ou porque a
bateria acabou de ser usada, a lâmpada piloto do
carregador se acenderá durante 1 segundos e se
apagará durante 0,5 segundo (apagada durante 0,5
segundo). Neste caso, primeiro deixe a bateria esfriar
e, somente depois, inicie o carregamento.
○ Quando a lâmpada piloto tremeluzir (em intervalos de
0,2 segundo), verifi que e remova quaisquer matérias
estranhas que estejam no conector da bateria no
carregador. Se não houver matérias estranhas,
é provável que a bateria ou carregador esteja
funcionando incorretamente. Leve-a para o seu Centro
de Assistência Técnica Autorizada.
○ Visto que o microcomputador incorporado demora
cerca de 3 segundos para confi rmar que a bateria está
sendo carregada com o carregador UC7SL, espere
pelo menos 3 segundos antes de recolocá-la para
continuar o carregamento. Se a bateria for recolocada
dentro d e 3 segundos, a b ateria pode nã o ser carreg ada
adequadamente.
ANTES DA OPERAÇÃO
○ Preparação e verifi cação do ambiente de trabalho
Verifi que se o am biente de traba lho é adequado at ravés
das precauções acima.
COMO USAR
1. Colocação da broca
Sempre siga o seguinte procedimento para colocar a
broca de chave de fenda. (Fig. 4)
(1) Puxe a manga de guia para a frente.
(2) Insira a broca no orifício hexagonal no soquete.
(3) Solte a manga de guia para retorná-la à sua posição
original.
PRECAUÇÃO
Se a manga de guia não retornar à sua posição
original, isso signifi ca que a broca não está colocada
corretamente.
2. Remoção da broca
Siga o procedimento na ordem inversa à da colocação
da broca.
3. Confi rme que a bateri a está montada corretame nte
4. Verifi que a direção de rotação
A broca gira no sentido horário (visto do lado traseiro)
ao empurrar o lado R do botão seletor.
Empurre o lado L do botão seletor para girar a broca no
sentido anti-horário (Vide Fig. 5) (As marcas
estão gravadas no corpo.)
5. Operação do interruptor
○ Ao pressionar o interruptor de disparo, a ferramenta
gira. Ao soltar o interruptor de disparo, a ferramenta
para.
○ A velocidade de rotação da broca pode ser controlada
através da variação da quantidade em que o interruptor
de disparo é puxado. A velocidade é lenta quando o
interr uptor de disparo é puxado ligeir amente e aumenta
quando o interruptor de disparo é puxado mais.
NOTA
Um ruído de zumbido é produzido quando o motor está
prestes a girar. Isso é apenas um ruído e não signifi ca
uma falha da máquina.
6. Uso da luz
Puxe o interruptor de disparo para acender a luz. A luz
continua acesa enquanto o interruptor de disparo está
sendo puxado. A luz se apaga ao soltar o interruptor de
disparo. (Fig. 6)
L
e R
PRECAUÇÃO
Não olhe diretamente para a luz. Isso pode resultar em
uma lesão ocular.
7. Aperto e afrouxamento de parafusos
Col oque uma bro ca corresp ondente ao pa rafuso, alin he
a broca nas ranhuras da cabeça do parafuso e, em
seguida, aperte o parafuso. Empurre a parafusadeira
de impacto apenas o sufi ciente para manter a broca
colocada na cabeça do parafuso.
PRECAUÇÃO
Aplicar a parafusadeira de impacto durante um período
prolongado apertará o parafuso demasiadamente e
poderá quebrá-lo.
Aper tar um parafuso com a parafusadeira num ângulo
com o parafuso pode danifi car a cabeça do parafuso
e a força apropriada não será transmitida para o
parafuso.
Aperte com a parafusadeira de impacto alinhada em
linha reta com o parafuso.
8. Uso da confi guração reta ou de pistola
Use a ferramenta na confi guração reta quando usá-
la em espaços confi nados. Use-a na confi guração
de pistola quando usar em outros locais. Selecione
a confi guração que seja a melhor para a aplicação
da ferramenta. Quando mudar a confi guração, a
ferramenta produzirá um som de estalido quando
se encaixar em posição. Flexione (ou estenda) a
ferramenta até ouvir o som de estalido.
PRECAUÇÃO
Quando usar a ferramenta na confi guração de pistola,
não segu re na parte de fl exão da ferramenta ao retornar
para a confi guração reta. Você pode prender os dedos
ou outra parte da mão na parte de fl exão, o que pode
resultar em ferimentos (Fig. 7).
9. Mecanismo do bloqueio automático do eixo
Quando o interruptor principal é desligado, a broca
é travada em posição e a ferramenta pode ser usada
como uma chave de fenda manual.
PRECAUÇÕES OPERACIONAIS
1. Descanso da ferramenta após o trabalho contínuo
Depois de usar a ferramenta continuamente para um
trabalho de aperto de parafuso, deixe a ferramenta
inativa durante cerca de 15 minutos antes de substituir
a bateria. A temperatura do motor, interruptor, etc.,
subirá se o trabalho for iniciado imediatamente após a
substituição da bateria, resultando eventualmente em
queima.
NOTA
Não toque nas partes metálicas, pois elas fi cam muito
quentes durante o trabalho contínuo.
2. Precauções relativas ao uso do interruptor de
controle da velocidade
Este interruptor tem um circuito eletrônico incorporado
que vari a a velocida de de rotação s em escalo namentos .
Em consequência, quando o interruptor de disparo é
puxado ligeiramente (rotação em baixa velocidade) e
o motor é parado durante um aparafusamento contínuo
de um parafuso, os componentes do circuito eletrôni co
podem se sobreaquecer e ser danifi cados.
3. Use um tempo de aperto adequado para o
parafuso.
O torque apropriado para um parafuso difere de
acordo com o material e o tamanho do parafuso, com
o material que está sendo aparafusado, etc. Portanto,
use um tempo de aperto adequado para o parafuso.
Em particular, se um tempo de aperto longo for usado
no caso de parafusos menores que M8, existe o perigo
de quebra do parafuso. Portanto, confi rme o tempo de
aperto e o torque de aperto previamente.
20

Português
4. Trabalhe com um torque de aperto adequado para
o parafuso sob impacto.
O torque de aperto ótimo para porcas ou parafusos
difere com o material e tamanho das porcas ou
parafusos. Um torque de aperto excessivamente
grande para um parafuso pequeno pode estirar ou
quebrar o parafuso. O torque de aperto aumenta com o
tempo de operação. Use o tempo de operação correto
para o parafuso.
5. Confi rme o torque de aperto.
Os seguintes fatores contribuem para a redução do
torque de aperto. Portanto, confi rme o torque de aperto
real necessário aparafusando alguns parafusos antes
do trabalho com uma chave dinamométrica manual.
Indicam-se a seguir os fatores que afetam o torque de
aperto.
(1) Volt ag em
Quando a margem de descarga é atingida, a voltagem
diminui e o torque de aper to baixa.
(2) Tempo de operação
O torque de aperto aumenta com o aumento do tempo
de operação. Con tudo, o torque de ap erto não aumenta
acima de um certo valor, mesmo que a ferramenta seja
acionada durante um longo período de tempo.
(3) Diâmetro do parafuso
O torque de aperto difere com o diâmetro do parafuso.
Em geral, um parafuso com um diâmetro maior exige
um torque de aperto maior.
(4) Condições de aperto
O torque de aperto difere de acordo com a razão de
torque, classe e comprimento dos parafusos, mesmo
que se use parafusos com roscas do mesmo tamanho.
O torque de aperto também difere de acordo com a
condição da superfície da peça de trabalho através da
qual o parafuso será apertado. Quando o parafuso e
porca giram juntos, o torque é reduzido grandemente.
MANUTENÇÃO E INSPEÇÃO
1. Inspeção da broca de chave de fenda
Usar uma broca quebrada ou uma broca com a
ponta desgastada é perigoso, porque a broca pode
escorregar. Substitua-a.
2. Inspeção dos parafusos de montagem
Inspecione regularmente todos os parafusos de
montag em e certifi que -se de que este jam corretam ente
apertados. Se algum deles estiver frouxo, reaperte -o
imediatamente. Deixar de fazer isso pode resultar em
graves perigos.
3. Manutenção do motor
O enrolamento da unidade do motor é o verdadeiro
“coração” da ferramenta elétrica. Tome cuidado para
assegurar que o enrolamento não se danifi que e/ou se
molhe com óleo ou água.
4. Limpeza do exterior
Quando a parafusadeira de impacto estiver suja,
limpe-a com um pano seco e macio ou com um pano
umedecido com água ensaboada. Não use solventes
clóricos, gasolina ou diluente de tinta, já que esses
componentes derretem plásticos.
5. Armazenamento
Guarde a parafusadeira de impacto em um lugar
em que a temperatura seja inferior a 40°C, e fora do
alcance de crianças.
NOTA
Certifi que-se de carregar a bateria completamente
quando guardá-la durante um longo período de tempo
(3 meses ou mais) Uma bateria com uma capacidade
menor pode não ser capaz de ser carregada quando
for usada, se for guardada durante um longo período
de tempo.
21
6. Lista de peças para conserto
PRECAUÇÃO
Os consertos, modifi cações e inspeções de
Ferramentas Elétricas da Hitachi devem ser realizados
por uma Ofi cina Autorizada da Hitachi.
Esta lista de peças pode ser útil se for apresentada
com a ferramenta na Ofi cina Autorizada da Hitachi ao
solicitar conserto ou manutenção.
Na operação e na manutenção das ferramentas
elétricas, devem-se observar as normas de segurança
e os padrões estabelecidos por cada país.
MODIFICAÇÃO
As Ferramentas Elétricas da Hitachi estão sempre
sendo aperfeiçoadas e modifi cadas para incorporar os
mais recentes avanços tecnológicos.
Dessa forma, algumas peças podem sofrer
modifi cações sem aviso prévio.
Aviso importante sobre as baterias para as
ferramentas sem fi os Hitachi.
Utilize sempre uma das nossas baterias originais
designadas. Não podemos garantir a segurança
e desempenho da nossa ferramenta sem fi os
quando é utilizada com baterias diferentes das
baterias designadas por nós ou quando a bateria é
desmontada e modifi cada (assim como desmontagem
e substituição das células ou outras peças internas).
NOTA
Devido ao contínuo programa de pesquisa e
desenvolvimento da HITACHI, as especifi cações aqui
contidas estão sujeitas a modifi cações sem aviso prévio.

503
1
2
3
4
5
6
8
9
10
11
12
13
14
15
16
17
17
8
19
20
21
22
23
24
25
26
27
28
18
29
30
31
32
32
29
34
35
38
39
37
33
36
42
33
40
41
501
502
504
7
23
22
Part Name Q’TY
Item
Part Name Q’TY
No.
39 TERMINAL CAPACITOR 1
40 BATTERY BCL 715 2
41 HANDLE (A).(B) SET (INCLUD.33) 1
42 CLIP 2
501 + DRIVER BIT 1
502 CHARGER (MODEL UC7SL) 1
503 CASE 1
504 BATTERY COVER 1
1
1
2
6
GUIDE SLEEVE SET (INCLUD.2-5, 12)
1
2 RETAINING RING 1
3 WASHER (F) 1
4 GUIDE SPRING (C) 1
5 GUIDE SLEEVE (C) 1
6 OIL SEAL 1
7 INVERTED RING 1
8 BALL BEARING 6801VVCMSRL 2
9 METAL 1
10 NEEDLE PIN 2
11 CARRIER 2
12 STEEL BALL D3.175 1
No.
Item
13 ANVIL 1
14 STEEL BALL D4.76 2
15 HAMMER 1
TAPPING SCREW
(W/FLANGE) D4×20
16 STEEL BALL D3 23
17 WASHER (J) 2
18
MACHINE SCREW
(W/SP.WASHER) M2.6×6
19 HAMMER SPRING 1
20 STOPPER 1
21 SPINDLE 1
22 IDLE GEAR SET 2
23 NEEDLE ROLLER (A) 2
24 WASHER (C) 1
25
26 RING GEAR 1
27 MOTOR DC 7.2V 1
28 HOUSING (A).(B) SET 1
TAPPING SCREW
(W/FLANGE) D3×16
29
30 NAME PLATE 1
31 CAUTION LABEL 1
32 CLICK PLATE 2
33 STEEL BALL D3 4
34 INTERNAL WIRE FERRITE SET 1
35 HANDLE COVER 1
36 DC-SPEED CONTROL SWITCH 1
37 SWITCH TRIGGER 1
38 PUSHING BUTTON 1
22

Issued by
Hitachi Koki Co., Ltd.
Shinagawa Intercity Tower A, 15-1, Konan 2-chome,
Avenida Isaac Newton No.286, Piso 2, Colonia Polanco Sección V,
Minato-ku, Tokyo 108-6020, Japan
Distributed by
Delegación Miguel Hidalgo, C. P. 11560
México, D. F.
Code No. C99207241 G
Printed in China
410
 Loading...