

Cordless Impact Driver
Visseuse percussion à batterie
WH 14DAF2
Read through carefully and understand these instructions before use.
Lire soigneusement et bien assimiler ces instructions avant usage.
Handling instructions
Mode d’emploi
1
2
3
4
1
6
8
1
5
2
43
9
B
A
2
1
0
7
65
4
5
3
2
(B)
1
C
(A)
7
8
C
E
D
1
109
5
4
3
C
13
2
H
F
1
C
G
1211
C
L
L
J
J
I
K
M
K
N
R
L
OO
2
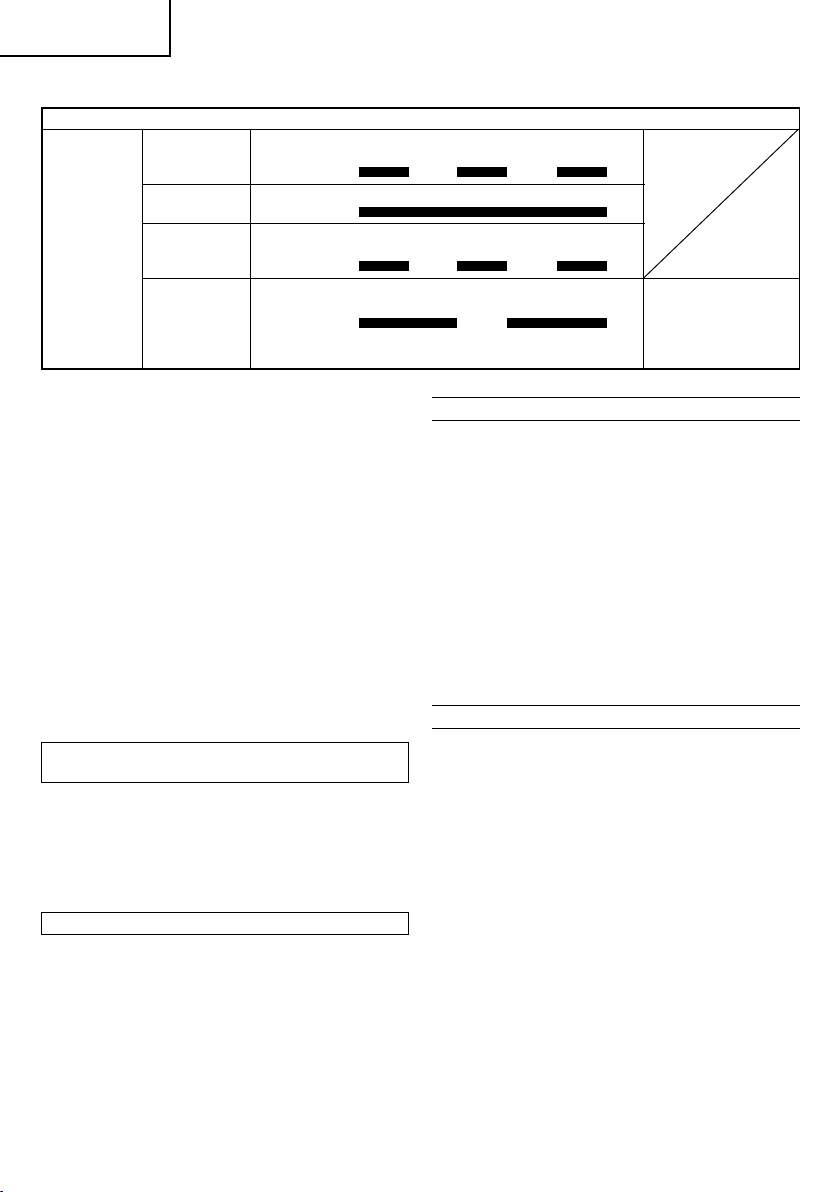
English Français
1
Rechargeable battery
2
Latch
3
Handle
4
Insert
5
Pull out
6
Insert
7
Pilot lamp
Hole for connecting the
8
rechargeable battery
9
Movement
0
Guide sleeve
Hexagonal hole in the
A
anvil
B
Driver bit
C
Hook
D
Spring
E
Larger diameter
F
Switch
G
Phillips-head screwdriver
H
Screw
I
Arrow
J
Hook cover
K
Indentation
L
Protuberance
M
AAAA batteries
N
Push button
O
Push
Batterie rechargeable,
Loquet
Poignée
Insérer
Tirer
Insérer
Lampe pilote
Orifice de raccordement
de la batterie rechargeable
Mouvement
Manchon-guide
Orifice hexagonal de la
chabotte
Mèche
Crochet
Ressort
Gros diamètre
Interrupteur
Tournevis à tête Phillips
Vis
Flèche
Cache de crochet
Entaille
Saillie
Piles AAAA
Poussoir
Pousser
Symbols
WARNING
The following show symbols used for the
machine. Be sure that you understand their
meaning before use.
Read all safety warnings and all instructions.
Failure to follow the warnings and instructions
may result in electric shock, fire and/or serious
injury.
Only for EU countries
Do not dispose of electric tools together with
household waste material!
In observance of European Directive 2002/96/EC on
waste electrical and electronic equipment and its
implementation in accordance with national law,
electric tools that have reached the end of their life
must be collected separately and returned to an
environmentally compatible recycling facility.
3
Symboles
AVERTISSEMENT
Les symboles suivants sont utilisés pour l’outil.
Bien se familiariser avec leur signification avant
d’utiliser l’outil.
Lire tous les avertissements de sécurité et toutes
les instructions.
Tout manquement à observer ces avertissements
et instructions peut engendrer des chocs
électriques, des incendies et/ou des blessures
graves.
Pour les pays européens uniquement
Ne pas jeter les appareils électriques dans les
ordures ménagères!
Conformément à la directive européenne 2002/96/EG
relative aux déchets d’équipements électriques ou
électroniques (DEEE), et à sa transposition dans la
législation nationale, les appareils électriques doivent
être collectés à part et être soumis à un recyclage
respectueux de l’environnement.

(Original instructions)
English
GENERAL POWER TOOL SAFETY WARNINGS
WARNING
Read all safety warnings and all instructions.
Failure to follow the warnings and instructions may result
in electric shock, fire and/or serious injury.
Save all warnings and instructions for future reference.
The term “power tool” in the warnings refers to your
mains-operated (corded) power tool or battery-operated
(cordless) power tool.
1) Work area safety
a) Keep work area clean and well lit.
Cluttered or dark areas invite accidents.
b) Do not operate power tools in explosive
atmospheres, such as in the presence of
flammable liquids, gases or dust.
Power tools create sparks which may ignite the
dust or fumes.
c) Keep children and bystanders away while
operating a power tool.
Distractions can cause you to lose control.
2) Electrical safety
a) Power tool plugs must match the outlet.
Never modify the plug in any way.
Do not use any adapter plugs with earthed
(grounded) power tools.
Unmodified plugs and matching outlets will
reduce risk of electric shock.
b) Avoid body contact with earthed or grounded
surfaces, such as pipes, radiators, ranges and
refrigerators.
There is an increased risk of electric shock if
your body is earthed or grounded.
c) Do not expose power tools to rain or wet
conditions.
Water entering a power tool will increase the
risk of electric shock.
d) Do not abuse the cord. Never use the cord for
carrying, pulling or unplugging the power tool.
Keep cord away from heat, oil, sharp edges or
moving parts.
Damaged or entangled cords increase the risk
of electric shock.
e) When operating a power tool outdoors, use an
extension cord suitable for outdoor use.
Use of a cord suitable for outdoor use reduces
the risk of electric shock.
f) If operating a power tool in a damp location
is unavoidable, use a residual current device
(RCD) protected supply.
Use of an RCD reduces the risk of electric shock.
3) Personal safety
a) Stay alert, watch what you are doing and use
common sense when operating a power tool.
Do not use a power tool while you are tired or
under the influence of drugs, alcohol or medication.
A moment of inattention while operating power
tools may result in serious personal injury.
b) Use personal protective equipment. Always wear
eye protection.
Protective equipment such as dust mask, nonskid safety shoes, hard hat, or hearing protection
used for appropriate conditions will reduce
personal injuries.
c) Prevent unintentional starting. Ensure the switch
is in the off-position before connecting to power
source and/or battery pack, picking up or
carrying the tool.
Carrying power tools with your finger on the
switch or energising power tools that have the
switch on invites accidents.
d) Remove any adjusting key or wrench before
turning the power tool on.
A wrench or a key left attached to a rotating part
of the power tool may result in personal injury.
e) Do not overreach. Keep proper footing and
balance at all times.
This enables better control of the power tool in
unexpected situations.
f) Dress properly. Do not wear loose clothing or
jewellery. Keep your hair, clothing and gloves
away from moving parts.
Loose clothes, jewellery or long hair can be
caught in moving parts.
g) If devices are provided for the connection of
dust extraction and collection facilities, ensure
these are connected and properly used.
Use of dust collection can reduce dust related hazards.
4) Power tool use and care
a) Do not force the power tool. Use the correct
power tool for your application.
The correct power tool will do the job better and
safer at the rate for which it was designed.
b) Do not use the power tool if the switch does
not turn it on and off.
Any power tool that cannot be controlled with
the switch is dangerous and must be repaired.
c) Disconnect the plug from the power source
and/or the battery pack from the power tool
before making any adjustments, changing
accessories, or storing power tools.
Such preventive safety measures reduce the risk
of starting the power tool accidentally.
d) Store idle power tools out of the reach of children
and do not allow persons unfamiliar with the
power tool or these instructions to operate the
power tool.
Power tools are dangerous in the hands of
untrained users.
e) Maintain power tools. Check for misalignment
or binding of moving parts, breakage of parts
and any other condition that may affect the
power tools operation.
If damaged, have the power tool repaired before
use.
Many accidents are caused by poorly maintained
power tools.
f) Keep cutting tools sharp and clean.
Properly maintained cutting tools with sharp
cutting edges are less likely to bind and are
easier to control.
g) Use the power tool, accessories and tool bits
etc. in accordance with these instructions, taking
into account the working conditions and the
work to be performed.
Use of the power tool for operations different from
those intended could result in a hazardous situation.
4

English
5) Battery tool use and care
a) Recharge only with the charger specified by the
manufacturer.
A charger that is suitable for one type of battery
pack may create a risk of fire when used with
another battery pack.
b) Use power tools only with specifically designated
battery packs.
Use of any other battery packs may create a risk
of injury and fire.
c) When battery pack is not in use, keep it away
from other metal objects like paper clips, coins,
keys, nails, screws, or other small metal objects
that can make a connection from one terminal
to another.
Shorting the battery terminals together may
cause burns or a fire.
d) Under abusive conditions, liquid may be ejected
from the battery; avoid contact. If contact
accidentally occurs, flush with water. If liquid
contacts eyes, additionally seek medical help.
Liquid ejected from the battery may cause
irritation or burns.
6) Service
a) Have your power tool serviced by a qualified repair
person using only identical replacement parts.
This will ensure that the safety of the power tool
is maintained.
PRECAUTION
Keep children and infirm persons away.
When not in use, tools should be stored out of reach of
children and infirm persons.
PRECAUTIONS FOR CORDLESS IMPACT
DRIVER
1. This is portable tool for tightening and loosenig
screws. Use it only for these operation.
2. Use the earplugs if using for a long time.
3. One-hand operation is extremely dangerous; hold
the unit firmly with both hands when operating.
4. After installing the driver bit, pull lightly out the
bit to make sure that it does not come loose. If
the bit is not installed properly, it can come loose
during use, which can be dangerous.
5. Use the bit that matches the screw.
6. Tightening a screw with the impact driver at an
angle to that screw can damage the head of the
screw and the proper force will not be transmitted
to the screw. Tighten with this impact driver lined
up straight with the screw.
7. Always charge the battery at a temperature of 0
– 40°C.
A temperature of less than 0°C will result in over
charging which is dangerous. The battery cannot
be charged at a temperature greater than 40°C.
The most suitable temperature for charging is that
of 20 – 25°C.
8. Do not use the charger continuously.
When one charging is completed, leave the charger
for about 15 minutes before the next charging of
battery.
9. Do not allow foreign matter to enter the hole for
connecting the rechargeable battery.
10. Never disassemble the rechargeable battery and
charger.
11. Never short-circuit the rechargeable battery.
Short-circuiting the battery will cause a great
electric current and overheat. It results in burn or
damage to the battery.
12. Do not dispose of the battery in fire.
If the battery burnt, it may explode.
13. Do not insert object into the air ventilation slots
of the charger.
Inserting metal objects or inflammables into the
charger air ventilation slots will result in electrical
shock hazard or damaged charger.
14. Bring the battery to the shop from which it was
purchased as soon as the post-charging battery
life becomes too short for practical use. Do not
dispose of the exhausted battery.
15. Using an exhausted battery will damage the
charger.
SPECIFICATIONS
POWER TOOL
Model WH14DAF2
No-load speed 0 – 2500 min
Capacity M4 – M8 (Small screw)
Tightening torque
Rechargeable battery EB14B: Ni-Cd battery, 14.4 V (2.0 Ah 12 cells)
Weight 1.8 kg (EB14B Installation)
5
Tightening is M14 high tension bolt (strength grade 12.9), when fully charged at
20°C temp.
Tightening time: 3 sec.
BCH1415: Ni-MH battery, 14.4 V (1.5 Ah 12 cells)
M5 – M12 (Ordinary bolt)
M5 – M10 (High tension bolt)
Maximum 120 N·m {1220 kgf·cm}
1.7 kg (BCH1415 Installation)
–1

CHARGER
Model UC18YG UC18YGH
Charging time
(at 20°C)
Charging voltage 7.2 – 18 V 7.2 – 18 V
Weight 0.3 kg 0.35 kg
NOTE: The charging time may vary according to the ambient temperature and power source voltage.
STANDARD ACCESSORIES
1. Charger (UC18YG or UC18YGH) .............................. 1
2. Battery (EB14B or BCH1415) .................................... 2
3. Plastic case ................................................................ 1
Standard accessories are subject to change without
notice.
OPTIONAL ACCESSORIES
(Sold separately)
1. Battery (EB14B, BCH1415)
Optional accessories are subject to change without notice.
APPLICATION
䡬 Driving and removing of small screws, small bolts,
etc.
BATTERY REMOVAL/INSTALLATION
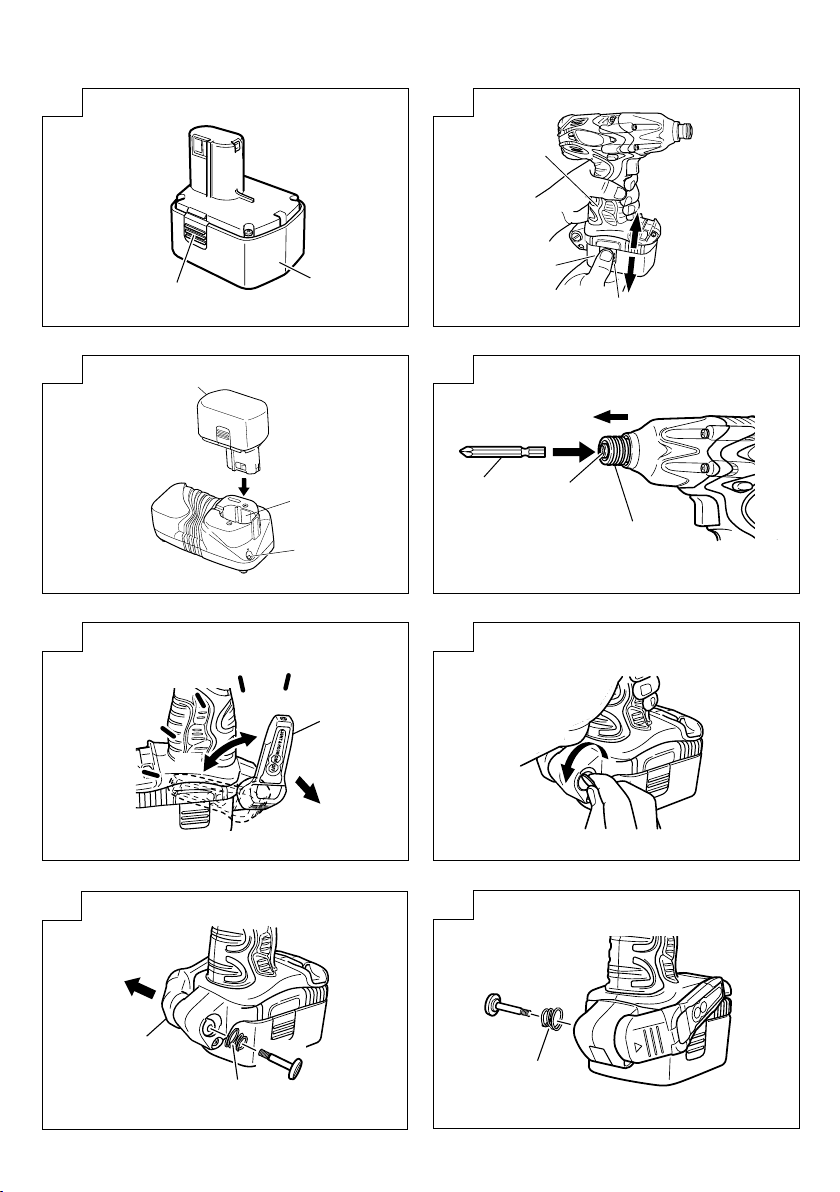
1. Battery removal
Hold the handle tightly and push the battery latch to
remove the battery. (See Fig. 1 and 2)
CAUTION:
Never short-circuit the battery.
2. Battery installation
Insert the battery while observing its polarities. (See
Fig. 2)
CHARGING
〈UC18YG〉
Before using the power tool, charge the battery as follows.
1. Connect the charger power cord to the receptacle
Connecting the power cord will turn on the charger.
2. Insert the battery into the charger
Insert the battery firmly while observing its direction,
until it contacts the bottom of the charger (the pilot
lamp lights up) (See Fig. 3).
CAUTION
If the pilot lamp does not light up, pull out the
power cord from the receptacle and check the
battery mounting condition.
䡬 Regarding the temperatures of the rechargeable
battery
The temperatures for rechargeable batteries are as
shown in Table 1.
EB14B Approx. 50 min. Approx. 50 min.
BCH1415 ––––– Approx. 35 min.
Table 1 Recharging ranges of batteries
Rechargeable
batteries
EB14B 0°C – 45°C -5°C – 55°C
BCH1415 ––––– -5°C – 50°C
䡬 The pilot lamp goes off to indicate that the battery is
fully charged.
The battery charging time becomes longer when a
temperature is low or the voltage of the power source
is too low.
When the pilot lamp does not go off even if more
than 120 minutes have elapsed after starting of the
charging, stop the charging and contact your HITACHI
AUTHORIZED SERVICE CENTER.
CAUTION
If the battery is heated due to direct sunlight, etc.,
just after operation, the charger pilot lamp may
not light up. At that time, cool the battery first,
then start charging.
3. Disconnect the charger’s power cord from the
receptacle
4. Hold the charger firmly and pull out the battery
NOTE
After charging, pull out batteries from the charger
first, and then keep the batteries properly.
〈UC18YGH〉
Before using the power tool, charge the battery as follows.
1. Connect the charger’s power cord to the receptacle.
When connecting the plug of the charger to a
receptacle, the pilot lamp will blink in red
(At 1-second intervals).
2. Insert the battery into the charger.
Firmly insert the battery into the charger till it contacts
the bottom of the charger and checking the polarities
as shown in Fig. 3.
CAUTION
If the batteries are inserted in the reverse direction,
not only recharging will become impossible, but
it may also cause problems in the charger such as
a deformed recharging terminal.
3. Charging
When inserting a battery in the charger, the pilot
lamp will light up continuously in red.
When the battery becomes fully recharged, the pilot
lamp will blink in red (At 1-second intervals).
(See Table 2)
(1) Pilot lamp indication
The indications of the pilot lamp will be as shown in
Table 2, according to the condition of the charger or
the rechargeable battery.
Temperatures at which the
battery can be recharged
UC18YG UC18YGH
English
6
English
Table 2
Indications of the pilot lamp
Before Blinks Lights for 0.5 seconds. Does not light
charging for 0.5 seconds. (off for 0.5 seconds)
While
charging
Pilot lamp
(red)
(2) Regarding the temperature of the rechargeable
battery.
The temperatures for rechargeable batteries are as
shown in Table 1.
4. Disconnect the charger’s power cord from the
receptacle.
5. Hold the charger firmly and pull out the battery.
CAUTION (UC18YGH)
䡬 If the battery is charged while it is heated because it
has been left for a long time in a location subject to
direct sunlight or because the battery has just been
used, the pilot lamp of the charger lights for 1 second,
does not light for 0.5 seconds (off for 0.5 seconds). In
such a case, first let the battery cool, then start
charging.
䡬 Since the built-in micro computer takes about 3
seconds to confirm that the battery being charged
with UC18YGH is taken out, wait for a minimum of 3
seconds before reinserting it to continue charging. If
the battery is reinserted within 3 seconds, the battery
may not be properly charged.
Regarding electric discharge in case of new batteries,
etc.
As the internal chemical substance of new batteries
and batteries that have not been used for an extended
period is not activated, the electric discharge might
be low when using them the first and second time.
This is a temporary phenomenon, and normal time
required for recharging will be restored by recharging
the batteries 2 – 3 times.
How to make the batteries perform longer.
(1) Recharge the batteries before they become completely
exhausted.
When you feel that the power of the tool becomes
weaker, stop using the tool and recharge its battery.
If you continue to use the tool and exhaust the electric
current, the battery may be damaged and its life will
become shorter.
(2) Avoid recharging at high temperatures.
A rechargeable battery will be hot immediately after
use. If such a battery is recharged immediately after
use, its internal chemical substance will deteriorate,
and the battery life will be shortened. Leave the battery
and recharge it after it has cooled for a while.
7
Charging
complete
Overheat
standby
Lights Lights continuously
Blinks Lights for 0.5 seconds. Does not light
for 0.5 seconds. (off for 0.5 seconds)
Blinks Lights for 1 second. Does not light
for 0.5 seconds. (off for 0.5 seconds)
Battery overheated.
Unable to charge.
(Charging will
commence when
battery cools)
PRIOR TO OPERATION
1. Preparing and checking the work environment
Make sure that the work site meets all the conditions
laid forth in the precautions.
2. Checking the battery
Make sure that the battery is installed firmly. If it is at
all loose it could come off and cause an accident.
3. Installing the bit
Always follow the following procedure to install driver
bit. (Fig. 4)
(1) Pull the guide sleeve away from front of the tool.
(2) Insert the bit into the hexagonal hole in the anvil.
(3) Release the guide sleeve and it returns to its original
position.
CAUTION:
If the guide sleeve does not return to its original
position, then the bit is not installed properly.
HOW TO USE
CAUTION:
䡬 When using the light equipped hook, pay sufficient
attention so that the main equipment does not fall. If
the tool falls, there is a risk of accident.
䡬 Do not attach the tip tool except phillips bit to the tool
main unit when carrying the tool main unit with the
light equipped hook suspended from a waist belt.
Injury may result if you carry the equipment
suspended from the waist belt with sharp tipped
components such as drill bit attached.
1. Using the light equipped hook
The light equipped hook can be installed on the right
or left side and the angle can be adjusted in 5 steps
between 0° and 80°.
(1) Operating the hook
(a) Pull out the hook toward you in the direction of
arrow (A) and turn in the direction of arrow (B).
(Fig. 5)
(b) The angle can be adjusted in 5 steps (0°, 20°, 40°,
60°, 80°).
Adjust the angle of the hook to the desired position
for use.
(2) Switching the hook position
English
CAUTION:
Incomplete installation of the hook may result in
bodily injury when used.
(a) Securely hold the main unit and remove the screw
using a slotted head screwdriver or a coin. (Fig. 6)
(b) Remove the hook and spring. (Fig. 7)
(c) Install the hook and spring on the other side and
securely fasten with screw. (Fig. 8)
NOTE:
Pay attention to the spring orientation. Install the
spring with larger diameter toward the main unit.
(Fig. 8)
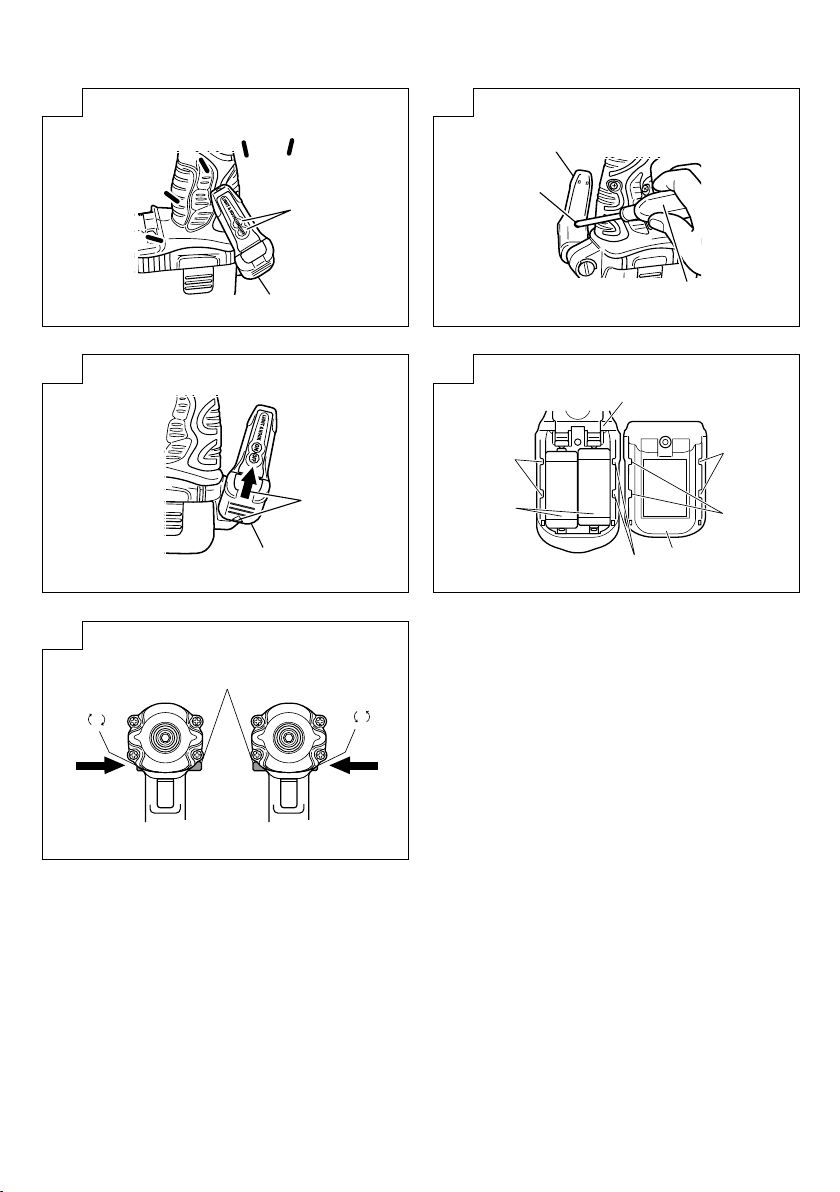
(3) Using as an auxiliary light
(a) Press the switch to turn off the light.
If forgotten, the light will turn off automatically
after 15 minutes.
(b) The direction of the light can be adjusted within
the range of hook positions 1 - 5. (Fig. 9)
䡬 Lighting time
AAAA manganese batteries: approx. 15 hrs.
CAUTION:
(4) Replacing the batteries
NOTE:
CAUTION:
䡬 Failure to observe the following can result in battery
䡬 Do not discard batteries together with normal trash
䡬 Store batteries out of the reach of children.
䡬 Use batteries correctly in accordance with the battery
2. Check the rotational direction
CAUTION:
AAAA alkali batteries: approx. 30 hrs.
Do not look directly into the light.
Such actions could result in eye injury.
(a) Loosen the hook screw with a phillips-head
screwdriver (No. 1). (Fig. 10)
Remove the hook cover by pushing in the direction
of the arrow. (Fig. 11)
(b) Remove the old batteries and insert the new
batteries. Align with the hook indications and
position the plus (+) and minus (–) terminals
correctly. (Fig. 12)
(c) Align the indentation in the hook main body with
the protuberance of the hook cover, press the
hook cover in the direction opposite to that of the
arrow shown in Fig. 11 and then tighten the screw.
Use commercially available AAAA batteries
(1.5 V).
Do not tighten the screw excessively. Such action
could strip the screw threads.
leakage, rust or malfunction.
Position the plus (+) and minus (–) terminals correctly.
Replace both batteries at the same time. Do not mix
old and new batteries.
Remove exhausted batteries from the hook
immediately.
and do not throw batteries into fire.
specifications and indications.
The bit rotates clockwise (viewed from the rear side)
by pushing the R-side of the push button.
The L-side of the push button is pushed to turn the
bit counterclockwise. (See Fig. 13) (The
marks are provided on the body.)
The push button cannot be switched while the impact
driver is turning. To switch the push button, stop the
impact driver, then set the push button.
L
and
R
3. Switch operation
䡬 When the trigger switch is depressed, the tool rotates.
When the trigger is released, the tool stops.
䡬 The rotational speed can be controlled by varying the
amount that the trigger switch is pulled. Speed is low
when the trigger switch is pulled slightly and increases
as the trigger switch is pulled more.
4. Tightening and loosening screws
Install the bit that matches the screw, line up the bit
in the grooves of the head of the screw, then tighten
it.
Push the impact driver just enough to keep the bit
fitting the head of the screw.
CAUTION:
Applying the impact driver for too long tightens the
screw too much and can break it.
Tightening a screw with the impact driver at an angle
to that screw can damage the head of the screw and
the proper force will not be transmitted to the screw.
Tighten with this impact driver lined up straight with
the screw.
5. Number of screws tightenings possible
Please refer to the table below for the number of
screw tightened possible with one charge.
Screw used
Wood screw ø4 × 50
(Soft wood)
Machine screw M8 × 16 Approx. 850 Approx. 640
These values may vary slightly, according to
surrounding temperature and battery characteristics.
No. of tightenings
EB14B BCH1415
Approx. 320 Approx. 240
OPERATIONAL CAUTIONS
1. Resting the unit after continuous work
After use for continuous bolt-tightening work, rest
the unit for 15 minutes or so when replacing the
battery. The temperature of the motor, switch, etc.,
will rise if the work is started again immediately after
battery replacement, eventually resulting in burnout.
NOTE:
Do not touch the hammer case, as it gets very hot
during continuous work.
2. Cautions on use of the speed control switch
This switch has a built-in, electronic circuit which
steplessly varies the rotation speed. Consequently,
when the switch trigger is pulled only slightly (low
speed rotation) and the motor is stopped while
continuously driving in screws, the components of
the electronic circuit parts may overheat and be
damaged.
3. Tightening torque
Refer to Fig. 14 for the tightening torque of bolts
(according to size), under the conditions shown in
Fig. 15. Please use this example as a general reference,
as tightening torque will vary according to tightening
conditions.
NOTE:
䡬 If a long striking time is used, screws will be strongly
tightened. This may cause the screw to break, or may
damage the tip of the bit.
8

English
䡬 If the unit is held at an angle to the screw being
tightened, the head of the screw may be damaged, or
the specified torque may not be transmitted to the
screw. Always keep the unit and the screw being
tightened in a straight line.
4. Use a tightening time suitable for the screw
The appropriate torque for a screw differs according
to the material and size of the screw, and the material
being screwed etc., so please use a tightening time
suitable for the screw. In particular, if a long tightening
time is used in the case of screws smaller than M8,
there is a danger of the screw breaking, so please
confirm the tightening time and the tightening torque
beforehand.
5. Work at a tightening torque suitable for the bolt
under impact
The optimum tightening torque for nuts or bolts
differs with material and size of the nuts or bolts. An
excessively large tightening torque for a small bolt
may stretch or break the bolt. The tightening torque
increases in proportion to the operaton time. Use the
correct operating time for the bolt.
6. Holding the tool
Hold the impact wrench firmly with both hands. In
this case hold the wrench in line with the bolt.
It is not necessary to push the wrench very hard.
Hold the wrench with a force just sufficient to
counteract the impact force.
kgf·cm N·m Ordinary bolt
100
1000
800
600
80
60
M14 × 50 t=25mm
M12
×
45 t=25mm
M10
×
30 t=10mm
7. Confirm the tightening torque
The following factors contribute to a reduction of the
tightening torque. So confirm the actual tightening
torque needed by screwing up some bolts before the
job with a hand torque wrench. Factors affecting the
tightening torque are as follows.
(1) Voltage
When the discharge margin is reached, voltage
decreases and tightening torque is lowered.
(2) Operating time
The tightening torque increases when the operating
time increases. But the tightening torque does not
increase above a certain value even if the tool is
driven for a long time. (See Fig. 14)
(3) Diameter of bolt
The tightening torque differs with the diameter of the
bolt as shown in Fig. 14. Generally a larger diameter
bolt requires larger tightening torque.
(4) Tightening conditions
The tightening torque differs according to the torque
ratio; class, and length of bolts even when bolts with
the same size threads are used. The tightening torque
also differs according to the condition of the surface
of workpiece through which the bolts are to be
tightened. When the bolt and nut turn together, torque
is greatly reduced.
kgf·cm N·m
1000
800
600
High tension bolt
1201200
100
80
60
M14 × 50 t=25mm
M12
×
45 t=25mm
M10
×
30 t=10mm
M8
×
30 t=10mm
40
400
Tightening torque
20
200
0
0
0 123
Tightening time: sec
Bolt
Nut
9
M8
×
30 t=10mm
(t: Steel plate thickness)
Steel plate thickness t
400
Tightening torque
200
0
Fig. 14
*The following bolt is used.
Ordinary bolt: Strength grade 4.8
High tension bolt: Strength grade 12.9
Fig. 15
40
20
0
0 123
Tightening time: sec
Explanation of strength grade:
4 — Yield point of bolt: 32 kgf/mm
8 — Pulling strength of bolt: 40 kgf/mm
(t: Steel plate thickness)
2
)(
2

English
MAINTENANCE AND INSPECTION
1. Inspecting the driver bit
Using a broken bit or one with a worn out tip is
dangerous because the bit can slip. Replace it.
2. Inspecting the mounting screws
Regularly inspect all mounting screws and ensure
that they are properly tightened. Should any of the
screws be loose, retighten them immediately. Failure
to do so may result in serious hazard.
3. Cleaning of the outside
When the impact driver is stained, wipe with a soft
dry cloth or a cloth moistened with soapy water. Do
not use chloric solvents, gasoline or paint thinner, as
they melt plastics.
4. Storage
Store the impact driver in a place in which the
temperature is less than 40°C, and out of reach of
children.
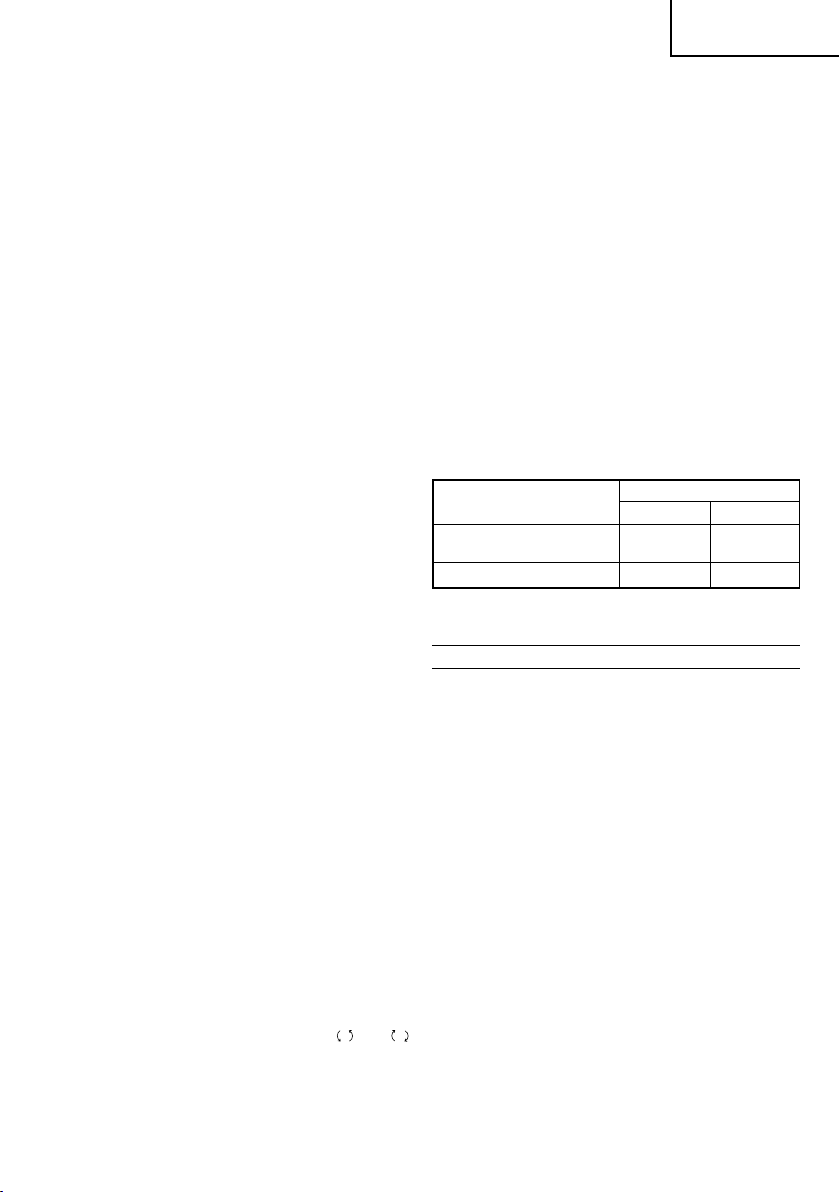
5. Service parts list
A:Item No.
B:Code No.
C:No. Used
D:Remarks
CAUTION:
Repair, modification and inspection of Hitachi Power
Tools must be carried out by an Hitachi Authorized
Service Center.
This Parts List will be helpful if presented with the
tool to the Hitachi Authorized Service Center when
requesting repair or other maintenance.
In the operation and maintenance of power tools, the
safety regulations and standards prescribed in each
country must be observed.
MODIFICATIONS:
Hitachi Power Tools are constantly being improved
and modified to incorporate the latest technological
advancements.
Accordingly, some parts (i.e. code numbers and/or
design) may be changed without prior notice.
NOTE:
Due to HITACHI’s continuing program of reserch and
development, the specifications herein are subject to
change without prior notice.
Information concerning airborne noise and vibration
The measured values were determined according to
EN60745 and declared in accordance with ISO 4871.
Measured A-weighted sound power level: 99 dB (A)
Measured A-weighted sound pressure level: 86 dB (A)
Uncertainty KpA: 3 dB (A).
Wear ear protection.
Vibration total values (triax vector sum) determined
according to EN60745.
Impact tightening of fasteners of the maximum capacity
of the tool:
Vibration emission value
Uncertainty K = 1.5 m/s
The declared vibration total value has been measured in
accordance with a standard test method and may be
used for comparing one tool with another.
It may also be used in a preliminary assessment of
exposure.
WARNING
䡬 The vibration emission during actual use of the power
tool can differ from the declared total value depending
on the ways in which the tool is used.
䡬 Identify safety measures to protect the operator that
are based on an estimation of exposure in the actual
conditions of use (taking account of all parts of the
operating cycle such as the times when the tool is
switched off and when it is running idle in addition to
the trigger time).
ah = 16.0 m/s
2
2
Important notice on the batteries for the Hitachi
cordless power tools
Please always use one of our designated genuine
batteries. We cannot guarantee the safety and
performance of our cordless power tool when
used with batteries other than these designated
by us, or when the battery is disassembled and
modified (such as disassembly and replacement
of cells or other internal parts).
GUARANTEE
We guarantee Hitachi Power Tools in accordance with
statutory/country specific regulation. This guarantee does
not cover defects or damage due to misuse, abuse, or
normal wear and tear. In case of complaint, please send
the Power Tool, undismantled, with the GUARANTEE
CERTIFICATE found at the end of this Handling
instruction, to a Hitachi Authorized Service Center.
10

Français
(Traduction des instructions d'origine)
AVERTISSEMENTS DE SÉCURITÉ GÉNÉRAUX
CONCERNANT LES OUTILS ÉLECTRIQUES
AVERTISSEMENT
Lire tous les avertissements de sécurité et toutes les
instructions
Tout manquement à observer ces avertissements et
instructions peut engendrer des chocs électriques, des
incendies et/ou des blessures graves.
Conservez tous les avertissements et toutes les
instructions pour vous y référer ultérieurement.
Le terme "outil électrique", utilisé dans les avertissements,
se réfère aux outils électriques (câblé) ou aux outils à piles
(sans fil).
1) Sécurité sur l'aire de travail
a) Maintenir l'aire de travail propre et bien éclairée.
Les endroits encombrés ou sombres sont propices
aux accidents.
b) Ne pas utiliser d'outils électriques en présence
de liquides, gaz ou poussière inflammables, au
risque de provoquer une explosion.
Les outils électriques créent des étincelles
susceptibles d'enflammer la poussière ou les
vapeurs.
c) Ne pas laisser les enfants et les visiteurs s'approcher
de vous lorsque vous utiliser un outil électrique.
Les distractions peuvent faire perdre le contrôle.
2) Sécurité électrique
a) Les prises de l'outil électrique doivent
correspondre à la prise secteur.
Ne jamais modifier la prise.
Ne pas utiliser d'adaptateurs avec les outils
électriques mis à la masse.
Les prises non modifiées et les prises secteurs
correspondantes réduisent les risques de choc
électrique.
b) Eviter tout contact avec les surfaces mises à la
masse telles que les tuyaux, radiateurs, bandes
et réfrigérateurs.
Le risque de choc électrique est accru en cas de
mise à la masse du corps.
c) Ne pas exposer les outils électriques à la pluie ou
à des conditions humides.
Si l'eau pénètre dans l'outil, cela augmente les
risques de choc électrique.
d) Ne pas utiliser le cordon à tort. Ne jamais utiliser
le cordon pour transporter ou débrancher l'outil
électrique.
Maintenir le cordon loin de la chaleur, de l'huile,
des bords pointus ou des pièces mobiles.
Les cordons endommagés ou usés augmentent
les risques de choc électrique.
e) En cas d'utilisation d'un outil électrique à
l'extérieur, utiliser un cordon de rallonge adapté
à un usage extérieur.
L'utilisation d'un cordon adapté à l'usage extérieur
réduit les risques de choc électrique.
f) Si vous devez utiliser un outil électrique dans un
endroit humide, utilisez une alimentation
protégée contre les courants résiduels.
L'utilisation d'un dispositif de protection contre les
courants résiduels réduit le risque de choc électrique.
3) Sécurité personnelle
a) Restez alerte, regarder ce que vous faites et usez
de votre bon sens en utilisant un outil électrique.
Ne pas utiliser d'outil électrique si vous êtes sous
l'influence de drogues, d'alcool ou de médicaments.
Pendant l'utilisation d'outils électrique, un instant
d'inattention peut entraîner des blessures graves.
b) Utiliser un équipement de protection individuelle.
Toujours porter des verres de protection.
L'utilisation d'équipements de protection tels que
les masques anti-poussière, les chaussures de
sécurité anti-dérapantes, les casques ou les
protections auditives dans des conditions
appropriées réduisent les risques de blessures.
c) Empêcher les démarrages intempestifs. Veiller à
ce que l'interrupteur soit en position d'arrêt avant
de brancher à une source d'alimentation et/ou
une batterie, de ramasser l'outil au sol ou de le
transporter.
Transporter les outils électriques avec le doigt sur
l'interrupteur ou brancher les outils électriques
avec l'interrupteur en position de marche peut
entraîner des accidents.
d) Retirer toute clé de sécurité ou clé avant de mettre
l'outil électrique en marche.
Laisser une clé ou une clé de sécurité sur une
partie mobile de l'outil électrique peut engendrer
des blessures.
e) Ne pas trop se pencher. Toujours garder une
bonne assise et un bon équilibre pendant le travail.
Cela permet un meilleur contrôle de l'outil
électrique dans des situations imprévisibles.
f) Porter des vêtements adéquats. Ne pas porter de
vêtements amples ni de bijoux. Maintenir les
cheveux, les vêtements et les gants loin des pièces
mobiles.
Les vêtements amples ou les cheveux longs
peuvent se prendre dans les pièces mobiles.
g) En cas de dispositifs destinés au raccordement
d'installations d'extraction et de recueil de la
poussière, veiller à ce qu'ils soient correctement
raccordés et utilisés.
L'utilisation d'un dispositif de collecte de la poussière
peut réduire les dangers associés à la poussière.
4) Utilisation et entretien d'un outil électrique
a) Ne pas forcer sur l'outil électrique. Utiliser l'outil
électrique adapté à vos travaux.
Le bon outil électrique fera le travail mieux et en
toute sécurité au régime pour lequel il a été conçu.
b) Ne pas utiliser l'outil électrique si l'interrupteur
ne le met pas en position de marche et d'arrêt.
Tout outil ne pouvant être contrôlé par
l'interrupteur est dangereux et doit être réparé.
c) Débrancher la prise et/ou la batterie avant de
procéder à des réglages, au remplacement des
accessoires ou au stockage des outils électriques.
Ces mesures préventives de sécurité réduisent les
risques de démarrage accidentel de l'outil électrique.
d) Stockez les outils électriques inutilisés hors de la
portée des enfants et ne pas laisser des personnes
non familiarisées avec l'outil ou ces instructions
utiliser l'outil électrique.
Les outils électriques sont dangereux entre les
mains d'utilisateurs non habilités.
11

Français
e) Entretenir les outils électriques. Vérifier l'absence
de mauvais alignement ou d'arrêt,
d'endommagement de pièces ou toute autre
condition susceptible d'affecter l'opération de l'outil.
Si l'outil est endommagé, le faire réparer avant
utilisation.
De nombreux accidents sont dus à des outils mal
entretenus.
f) Maintenir les outils coupants aiguisés et propres.
Des outils coupants bien entretenus avec des
bords aiguisés sont moins susceptibles de se
coincer et plus simples à contrôler.
g) Utiliser l'outil électrique, les accessoires et les
mèches de l'outil, etc. conformément à ces
instructions en tenant compte des conditions
d'utilisation et du travail à réaliser.
L'utilisation de l'outil électrique pour des
opérations différentes de celles pour lesquelles il
a été conçu est dangereuse.
5) Utilisation et entretien de l’outil à batterie
a) Recharger uniquement avec le chargeur spécifié
par le fabricant.
Un chargeur adapté pour un type de batterie peut
constituer un risque d’incendie en cas d’utilisation
avec une autre batterie.
b) Utiliser les outils électriques exclusivement avec
les batteries désignées.
L’utilisation d’autres batteries peut entraîner un
risque de blessures et d’incendie.
c) Lorsque la batterie n’est pas utilisée la garder à
l’écart d’objets métalliques tels que trombones,
pièces, clés, clous, vis ou autres petits objets
métalliques pouvant interférer avec les bornes de
la batterie.
L’interférence avec les bornes de la batterie peut
entraîner des brûlures ou un incendie.
d) Dans des conditions extrêmes, du liquide peut
couler de la batterie ; éviter tout contact. En cas
de contact accidentel, rincer à l’eau. En cas de
contact avec les yeux, consulter un médecin.
Le liquide de la batterie peut entraîner des irritations
ou des brûlures.
6) Service
a) Faire entretenir l'outil électrique par un technicien
habilité à l'aide de pièces de rechange identiques
exclusivement.
Cela garantira le maintien de la sécurité de l'outil
électrique.
PRECAUTIONS
Maintenir les enfants et les personnes infirmes éloignés.
Lorsque les outils ne sont pas utilisés, ils doivent être
rangés hors de portée des enfants et des personnes infirmes.
4. Après avoir installé la mèche, tirer légèrement sur
celle-ci pour s’assurer qu’elle est fermement fixée.
En effet, si la mèche n’est pas bien mise en place,
ele pourrait se détacher de l’outil et provoquer un
accident.
5. Utiliser la mèche qui correspond à la vis.
6. Le fait de serrer une vis à un angle inadéquat peut
endommager la tête de la vis et de plus, il est alors
impossible de transmettre la force requise à cette
vis. Dès lors, toujours serrer les vis en alignant la
perceuse perpendiculairement à celles-ci.
7. Chargez toujours la batterie à une température de
0–40°C.
Une température inférieure à 0°C entrainera une
surcharge dangereuse. La batterie ne peut pas être
chargée à une température supérieure à 40°C.
La température la plus appropriée serait de 20 –
25°C.
8. N’utilisez pas le chargeur continuellement.
Quand une charge a été effectuée, laissez le
chargeur au repos pendant environ 15 minutes
avant de commencer la prochaine charge de
batterie.
9. Ne laissez pas de corps étrangers pénétrer par le
trou de raccord de la batterie rechargeable.
10. Ne désassemblez jamais la batterie rechargeable et
le chargeur.
11. Ne court-circuitez jamais la batterie rechargeable.
Le fait de cour-circuiter la batterie génèrera un
courant électrique élevé et une surchauffe, ce qui
entraînera la brûlure ou l’endommagement de la
batterie.
12. Ne jetez pas la batterie au feu.
Elle pourrait exploser.
13. Ne pas insérer d’objets dans les fentes d’aération
du chargeur.
Ne pas introduire d’objets métalliques ou des
produits inflammables dans les fentes d’aération
du chargeur, cela provoquera un choc électrique
ou endommagera le chargeur.
14. Apportez la batterie aù magasin ou vous l’avez
achetée dès que la durée de vie de postcharge de la
batterie devient trop courte pour une utilisation
pratique. Ne jetez pas de batterie usagée.
15. L’utilisation d’une batterie usagée endommagera
le chargeur.
PRECAUTIONS POUR LA PERCEUSE À
PERCUSSION SUR BATTERIE
1. Outil portatif destiné au serrage et au desserrage
des vis. Utiliser l’outil uniquement à ces fins.
2. Mettre des tampons dans les oreilles pour une
utilisation prolongée.
3. Manipuler le chargeur d’une seule main est
extrêment dangereux. Dès lors, toujours le tenir
fermement des deux mains.
12

Français
SPECIFICATIONS
OUTIL ELECTRIQUE
Modèle WH14DAF2
Vitessa à vide 0 – 2500 min
Capacité M4 – M8 (Petite vis)
Couple de serrage
Batterie rechargeable EB14B: Ni-Cd batterie, 14,4 V (2,0 Ah 12 accus)
Poids 1,8 kg (Installation EB14B)
CHARGEUR
Modèle UC18YG UC18YGH
Temps de charge
(à 20°C)
Tension de charge 7,2 – 18 V 7,2 – 18 V
Poids 0,3 kg 0,35 kg
REMARQUE : Le temps de recharge peut varier selon la température ambiante et la tension de la source.
Le serrage est un boulon hautement extensible M14, (dureté de 12,9)
complètement chargé à une température de 20°C.
Temps de serrage : 3 sec.
BCH1415: Ni-MH batterie, 14,4 V (1,5 Ah 12 accus)
EB14B Env. 50 min. Env. 50 min.
BCH1415 ––––– Env. 35 min.
ACCESSOIRES STANDARDS
1. Chargeur (UC18YG ou UC18YGH) ........................... 1
2. Batterie (EB14B ou BCH1415) ................................... 2
3. Boîtier en plastique ................................................... 1
Les accessoires standard sont sujets à changement sans
préavis.
ACCESSOIRES SUR OPTION
(vendus séparément)
1. Batterie (EB14B, BCH1415)
Les accessoires à option sont sujets à changements sans
préavis.
APPLICATION
䡬 Serrage et enlévement de petites vis, de petits
boulons, etc.
EXTRACTION ET INSTALLATION DE LA
BATTERIE
1. Retrait de la batterie
Maintenir fermement la poignée et pousser le taquet
de la batterie pour l’enlever. (Voir Fig. 1 et 2)
ATTENTION :
Ne jamais court-circuiter la batterie.
2. Mise en place de la batterie
Insérer la batterie tout en respectant la polarité. (Voir
la Fig. 2)
13
M5 – M12 (Boulon ordinaire)
M5 – M10 (Boulon hautement extensible)
Maximum 120 N·m {1220 kgf·cm}
1,7 kg (Installation BCH1415)
CHARGE
〈
UC18YG
Avant d’utiliser l’outil, charger la batterie comme suit.
1. Brancher le cordon d’alimentation du chargeur à la
prise secteur
Le fait de connecter le cordon mettra le chargeur
sous tension.
2. Insérer la batterie dans le chargeur
Insérer la batterie à fond tout en observant son sens,
jusqu’à ce qu’elle touche le fond du chargeur (la
lampe témoin s’allumera) (Voir Fig. 3).
ATTENTION
Si laa lampe témoin ne s’éclaire pas, retirer le
cordon d’alimentation de la prise secteur et
vérifier le sens de montage de la batterie.
䡬 Au sujet de la température de la batterie rechargeable
Les temperatures des batteries rechargeables sont
présentées dans le Tableau 1.
Tableau 1 Plage de recharge des batteries
Batteries
rechargeables
EB14B 0°C – 45°C -5°C – 55°C
BCH1415 ––––– -5°C – 50°C
䡬 La lampe témoin s’éteint pour indiquer que la batterie
est complètement chargée.
Il faut plus de temps pour recharger la batterie lorsque
la température ambiante est basse ou la tension de la
source d'alimentation trop faible.
Si la lampe témoin ne s'éteint pas quand 120 minutes
se sont écoulées depuis le début de la charge, arrêter
la recharge et contacter le SERVICEAPRES-VENTE
HITACHI.
–1
〉〉
〉
〉〉
Températures de recharge
de la batterie
UC18YG UC18YGH

Français
ATTENTION
Si la batterie est échauffée à cause de
l’exposition directe au soleil, etc. juste
apres le fonctionnement, il se peut que la
lampe témoin du chargeur ne s’allume pas.
Dans ce cas, laissez d’abord refroidir la batterie
avant de commencer la charge.
3. Débrancher le cordon d’alimentation secteur de la
prise secteur
4. Tenir fermement le chargeur et dégager la batterie
REMARQUE
Après le chargement, retirer tout d’abord les batteries
du chargeur et les entreposer de la manière adéquate.
〈
UC18YGH
Avant d’utiliser la perceuse épectrique, chargez la batterie
comme suit:
1. Brancher le cordon d’alimentation du chargeur sur
Tableau 2
Lampe
témoin
(rouge)
〉〉
〉
〉〉
une prise secteur.
Quand vous raccordez la fiche du chargeur à une
prise murale, le voyant témoin clignote en rouge (à
intervalles d’une seconde).
Explications de la lampe témoin
Avant la Clignote S’allume pendant 0,5 seconde.
recharge Ne s’allume pas pendant 0,5 seconde.
Pendant la
recharge
Recharge
terminée
Veille
en surchauffe
S’allume S’allume sans interruption
Clignote S’allume pendant 0,5 seconde.
Clignote S’allume pendant 1 seconde.
(Eteint pendant 0,5 seconde)
Ne s’allume pas pendant 0,5 seconde.
(Eteint pendant 0,5 seconde)
Ne s’allume pas pendant 0,5 seconde.
(Eteint pendant 0,5 seconde)
2. Insérer la batterie dans le chargeur.
Insérer fermement la pile dans le chargeur, jusqu’à
ce qu’elle entre en contact avec le fond du chargeur
et vérifier les polarités comme illustré aux Fig. 3.
ATTENTION:
Si les piles sont insérées dans le mauvais sens, la
recharge sera impossible. En outre, le chargeur
peut être endommagé, par exemple la borne de
recharge peut être déformée.
3. Recharge
Quand vous insérez une batterie dans le chargeur, le
voyant témoin s’allume en rouge.
Quand la batterie est complètement chargée, le voyant
témoin clignote en rouge (à intervalles d’une
seconde). (voir Tableau 2)
(1) Explication de la lampe témoin
Les explications de la lampe témoin se trouvent sur
le tableau 2, en fonction de l’état du chargeur ou de
la pile rechargeable.
Batterie en surchauffe.
Chargement impossible
(le chargement
commencera une fois que
la batterie sera froide).
(2) Au sujet de la température de la batterie rechargeable
Les températures des batteries rechargeables sont
présentées dans le Tableau 1.
4. Débrancher le cordon d’alimentation secteur de la
prise secteur.
5. Tenir fermement le chargeur et dégager la batterie.
ATTENTION (UC18YGH)
䡬 Si la batterie est chaude quand elle est rechargée,
parce qu’elle est restée longtemps en plein soleil ou
parce qu’elle vient juste d’être utilisée, la lampe pilote
du chargeur clignote en s’allumant pendant 1
seconde, puis en s’éteignant pendant 0,5 seconde.
Dans une telle éventualité, laisser la batterie refroidir,
puis procéder à la recharge.
䡬 Etant donné qu’il faut environ 3 secondes au micro-
ordinateur intégré pour confirmer l’extraction de la
batterie en cours de chargement avec UC18YGH,
attendre 3 secondes au minimum avant de la réinsérer
pour continuer le chargement. Si la batterie est
réinsérée dans les 3 secondes, elle risque de ne pas
être correctement rechargée.
En ce qui concerne le courant de décharge d’une
batterie neuve.
Etant donnée que les substances chimiques internes
sont restées inactives dans le cas des batteries neuves
ou des batteries qui sont restées longtemps
inutilisées, le courant de décharge risque d’être très
faible lors des première et deuxième utilisations. Ce
phénomène est temporaire et le temps de recharge
normal sera rétabli quand les batteries auront été
rechargées 2 ou 3 fois.
Comment prolonger la durée de vie des batteries.
(1) Recharger les batteries avant qu’elles ne soient
complètement épuisées.
Quand la puissance de l’outil utilisé faiblit, l’éteindre
et recharger la batterie. Si l’outil continue d’être utilisé
jusqu’à épuisement du courant électrique, la batterie
risque d’être endommagée et sa durée de vie se
raccourcira.
14

Français
(2) Eviter d’effectuer la recharge sous des températures
élevées.
Une batterie est toujours chaude immédiatement
après son utilisation. Si la batterie est rechargée
immédiatement après utilisation, les substances
chimiques internes risquent de se détériorer et la
durée de vie de la batterie se raccourcira. Laisser la
batterie refroidir un moment avant de l’utiliser.
AVANT LA MISE EN MARCHE
1. Préparatifs et inspection de la zone de travail
S’assurer que la zone de travail remplit les conditions
citées dans le chapitre des précautions générales.
2. Vérification de la batterie
S’assurer que la batterie est fermement maintenue
en place. En effet, si cette batterie n’est pas bien
placée dans le chargeur, elle peut tomber et provoquer
un accident.
3. Mise en place de la mèche
Pour installer la mèche, toujours se reporter aux
démarches suivantes. (Fig. 4)
(1) Tirer le manchon-guide loin de l’avant de l’outil.
(2) Insérer la mèche dans l’orifice hexagonel de la
chabotte.
(3) Relâcher le manchon-guide et le replacer à sa position
originale.
ATTENTION :
Si le manchon-guide n’est pas replacé à sa position
originale, la mèche n’est pas installée correctement.
UTILISATION
ATTENTION :
䡬 Lorsqu’on utilise le crochet muni d’un éclairage, faire
bien attention à ce que l’outil principal ne tombe pas.
Si l’outil tombe, cela risque de provoquer un accident.
䡬 Ne pas fixer d’outil avec une pointe autre qu’une
mèche Phillips sur l’élément principal de l’outil
lorsqu’on transporte l’outil principal avec le crochet
muni d’un éclairage attaché à la ceinture.
On risque de provoquer des blessures si l’on
transporte l’outil accroché à la ceinture avec des
accessoires à bout pointu, par exemple un foret,
fixés sur l’outil.
1. Utilisation d’un crochet muni d’un éclairage
Le crochet muni d’un éclairage se fixe soit à droite
soit à gauche, et son angle se règle sur 5 paliers de 0°
à 80°.
(1) Ouverture du crochet
(a) Tirer le crochet vers soi dans le sens de la flèche
(A), et le tourner dans le sens de la flèche (B). (Fig. 5)
(b) L’angle se règle sur 5 paliers (0°, 20°, 40°, 60°,
80°).
Régler l’angle du crochet sur la position
d’utilisation voulue.
(2) Modification de la position du crochet
ATTENTION :
Une installation incomplète du crochet peut entraîner
des blessures physiques lors de l’utilisation.
(a) Tenir fermement le boîtier de l’outil et retirer la
vis à l’aide d’un tournevis pour écrou à fente ou
d’une pièce de monnaie. (Fig. 6)
(b) Retirer le crochet et le ressort. (Fig. 7)
(c) Fixer le crochet et le ressort de l’autre côté et
serrer à fond avec la vis. (Fig. 8)
15
REMARQUE :
Faire attention à l’orientation du ressort. Installer le
ressort, le diamètre le plus gros dirigé vers l’unité
principale. (Fig. 8)
(3) Utilisation de la lampe auxiliaire
(a) Appuyer sur l’interrupteur pour allumer la lampe.
Si on l’oublie, la lampe s’éteint automatiquement
15 minutes plus tard.
(b) Il est possible de régler la direction de la lampe
dans la plage des positions 1 à 5 du crochet.
(Fig. 9)
䡬 Durée d’éclairage
Piles au manganèse AAAA : environ 15 heures
ATTENTION :
(4) Remplacement des piles
REMARQUE :
ATTENTION :
䡬 Le non respect des précautions suivantes risque
䡬 Ne pas jeter les piles aux ordures ménagères ni les
䡬 Ranger les piles hors de portée des enfants.
䡬 Utiliser les piles conformément à leurs spécifications
2. Vérifiez le sens de rotation.
ATTENTION :
3. Fonctionnement de l’interrupteur
䡬 Quand on tire sur la gâchette de l’interrupteur, l’outil
䡬 La vitesse de rotation peut être contrôlée en faisant
Piles alcalines AAAA : environ 30 heures
Ne pas regarder la lampe directement.
Cela pourrait abîmer les yeux.
(a) Desserrer la vis du crochet avec un tournevis à
tête phillips (no. 1). (Fig. 10)
Retirer le cache du crochet en appuyant dessus
dans le sens de la flèche. (Fig. 11)
(b) Retirer les piles usées et insérer des piles neuves.
Les aligner sur le crochet et disposer les bornes
positive (+) et négative (–) correctement. (Fig. 12)
(c) Aligner la découpe du corps principal du crochet
sur la saillie du cache du crochet, appuyer sur le
cache du crochet dans le sens contraire à celui de
la flèche de la Fig. 11, puis resserrer la vis.
Utiliser des piles AAAA (1,5 V) en vente dans le
commerce.
Ne pas trop serrer la vis. Cela pourrait abîmer le
filetage.
d’entraîner une fuite d’électrolyte, l’apparition de
rouille ou une anomalie.
Disposer les bornes positive (+) et négative (–)
correctement.
Remplacer les deux piles en même temps. Ne pas
mélanger des piles neuves et des piles ayant déjà
servi.
Retirer les piles du crochet dès qu’elles sont usées.
jeter au feu.
et à leurs indications.
La mèche tourne dans le sens horaire (vu de l’arrière)
quand on appuie sur le côté R du bouton-poussoir.
En appuyant sur le côté L du bouton-poussoir, la
mèche tourne dans le sens anti-horaire. (Voir Fig. 13)
(Les repères
Il n’est pas possible de commuter le bouton-poussoir
pendant que la perceuse à percussion fonctionne.
Pour commuter le bouton-poussoir, arrêter la
perceuse à percussion, puis régler le bouton-poussoir.
tourne. Quand on relâche la gâchette, l’outil s’arrête.
varier la force avec laquelle on appuie sur la gâchette.
Quand on appuie légèrement sur la gâchette, la vitesse
est lente, et elle augmente quand on appuie plus fort.
et R sont marqués sur le corps.)
L

Français
4. Serrage et desserrage des vis
Installer une mèche correspondant à la vis, faire
coincider la mèche avec les rainures sur la tête de la
vis, puis commencer à serrer.
Appuyer sur la perceuse juste assez pour que la
mèche tienne dans les rainures.
ATTENTION :
Si l’on serre trop longtemps une vis, celle-ci peut se
briser.
Si l’on serre une vis à un angle inadéquat, la tête de
vis peut être endommagée et de plus, il est impossible
de transmettre à la vis la force requise. Dès lors,
toujours aligner la visseuse perpendiculairement aux
vis.
5. Nombre de serrages d’écrous ou de vis possible
Prière de se référer au tableau ci-dessous pour
connaître le nombre de serrages d’écrous ou de vis
possible avec une seule charge.
Vis utilisé
Vis de bois ø4 × 50
(Bois tendre)
Vis mécanique M8 × 16 Environ 850 Environ 640
Ces valeurs peuvent varier quelque peu selon la
température ambiante et le type des piles employées.
Nombre de serrages
EB14B BCH1415
Environ 320 Environ 240
PRECAUTIONS DE FONCTIONNEMENT
1. Repos de l’appareil après un travail continu
Après un travail de serrage de boulons effectué de
façon continue, laisser l’outil reposer pendant environ
15 minutes lors du remplacement de la batterie. La
température du moteur, de la gâchette, etc.
augmentera si le travail est repris tout de suite après
le remplacement de la batterie, ce qui risque de
provoquer un grillage.
REMARQUE :
Ne pas toucher le carter du marteau car il devient très
chaud lors d’un travail continu.
2. Précautions d’utilisation du sélecteur de réglage de
vitesse
Ce sélecteur comprend un circuit électronique intégré
qui fait varier à l’infini la vitesse de rotation. Par
conséquent, si la gâchette de sélection n’est tirée que
légèrement (faible vitesse de rotation) et le moteur
est arrêté tout en vissant des vis en continu, les
composants du circuit électronique risquent de
chauffer et d’être endommagés.
3. Couple de serrage
Les couples de serrage des boulons (en fonction de
la taille) sont indiqués dans les figure 14 sous les
conditions illustrées dans la figure 15. Prière d’utiliser
cet exemple à titre de référence générale, étant donné
que le couple de serrage varie en fonction des
conditions du serrage.
REMARQUE :
䡬 Si l’on applique un long moment de frappe, les vis
seront fortement serrées. Ceci peut les briser ou
endommager l’extrémité de la mèche.
䡬 Si l’outil n’est pas maintenu perpendiculairement à
la vis en cours de serrage, la tête de la vis sera
endommagée, ou le couple de serrage spécifié ne
sera pas transmis à cete vis. S’assurer de serrer les
vis perpendiculairement à celles-ci.
4. Utiliser le couple de serrage adapté à chaque type de
vis
Le couple de serage approprié varie en fonction du
matériau et de la taille de la vis, ainsi que le matériau
dans lequel elle est vissée. Par conséquent, utiliser
un temps de serrage approprié. Plus particulièrement,
si l’on utilise un long temps de serrage dans le cas de
vis de taiffe inférîeure à M8, celles-ci peuvent se
briser parce que trop longtemps serrées. Dès lors,
vérifier, avant toute chose, le couple et le temps de
serrage.
5. Travailler à un couple de serrage convenable pour le
boulon percuté
Le couple de serrage optimal pour écrous et boulons
diffère en fonction de la matière et de la taille des
écrous et des boulons. Un couple de serrage frop
important pour un petit boulon risque de déformer
ou de fendre lee boulon. Le couple augment
proportionnellement au temps de fonctionnement.
Utiliser le réglage d’échelle et le temps de
fonctionnement appropriés pour le boulon.
6. Manipulation de l’appareil
Tenir la visseuse à percussion fermement avec les
deux mains à l’aide des deux poignées. Dans ce cas,
tenir la visseuse perpendiculairement au boulon.
Il n’est pas nécessaire de pousser trop fort sur
l’appareil. Maintenir l’appareil avec une force suffisant
à contrer la force de percussion.
7. Vérifier le couple de serrage
Les facteurs suivants contributent à une réduction du
couple de serrage. Ainsi, vérifier le couple de serrage
réel désiré en serrage quelques boulons avec une clé
dynamométrique à main avant d’effecteur le travail.
Facteurs influençant le couple de serrage.
(1) Tension
Si la marge de décharge est atteine, la tension décroît
et le couple e serrage diminue.
(2) Temps de fonctionnement
Le couple de serrage augmente quand le temps de
fonctionnement augmente. Toutefois, le couple de
serrage n’augmente pas au-dessus d’une certaine
valeur, ceci même si l’appareil fonctionne pendant
longtemps. (Voir Fig. 14).
(3) Diamètre de boulon
Comme indiqué dans les figure 14, le couple de
serrage varie en fonction de la taille du boulon. En
règle générale, un boulon de diamètre plus large
nécessite un couple de serrage plus important.
(4) Conditions de serrage
Le couple de serrage diffère selon le rapport de couple,
la classification et la longueur des boulons et ceci
même si des boulons ayant des filetages de
dimensions identiques sont utilisés. Le couple diffère
aussi en fonction de l’état du métal à la surface à
travers lequel les boulons doivent être serrés.
16

Français
kgf·cm N·m
1000
800
600
400
200
Couple de serrage
Boulon ordinaire
100
80
60
40
20
0
0
0 123
Temps de serrage : sec
Boulon
Ecrou
M14 × 50 t=25mm
×
45 t=25mm
M12
M10
×
30 t=10mm
×
30 t=10mm
M8
(t: Epaisseur de la
plaque d’acier)
Epaisseur de la plaque
d’acier t
ENTRETIEN ET CONTROLE
1. Inspection de la mèche
Utiliser une mèche brisée ou usée présente un danger
réel, car ce genre de mèche peut jaillir de l’outil.
Remplacer la mèche.
2. Contrôle des vis de montage
Vérifier régulièrement les vis de montage et s’assurer
qu’elles sont correctement serrées. Resserrer
immédiatement toute vis desserrée. Sinon, il y a
danger sérieux.
3. Nettoyage de l’extérieur
Quand la visseuse à percussion est sale, essuyezla
avec un chiffon sec et doux ou un chiffon imbibé
d’eau savoneuse. N’utilisez pas de solvant au chlore,
d’essence ou de diluant, car ils font fondre les matières
plastiques.
4. Rangement
Rangez la visseuse à percussion dans un endroit ou
la température est inférieure à 40°C et hors de portée
des enfants.
5. Liste des pièces de rechange
A:No. élément
B:No. code
C:No. utilisé
D:Remarques
ATTENTION:
Les réparations, modifications et inspections des
outils électriques Hitachi doivent être confiées à un
service après-vente Hitachi agréé.
17
kgf·cm N·m
1000
800
600
400
Couple de serrage
200
Fig. 14
*Le boulon suivant est utilisé.
Boulon ordinaire: degré de dureté 4,8
Boulon hautement extensible: degré de dureté 12,9
Degré de dureté:
4 — Couple de serrage du boulon : 32 kgf/mm
()
8 — Résistance du boulon : 40 kgf/mm
Fig. 15
MODIFICATIONS:
Avis important sur les batteries pour outils
électriques sans fil Hitachi
Toujours utiliser une de nos batteries originales
spécifiées. Nous ne saurions garantir la sécurité
et la performance de notre outil électrique sans
fil s’il est utilisé avec une batterie autre que celle
que nous avons spécifié, ou encore si la batterie
est démontée et modifiée (par exemple, le
démontage et remplacement des cellules ou autres
composants internes).
Boulon hautement
extensible
1201200
100
80
60
40
20
0
0
0 123
Temps de serrage : sec
Il sera utile de présenter cette liste de pièces au
service après-vente Hitachi agréé lorsqu’on apporte
un outil nécessitant des réparations ou tout autre
entretien.
Lors de l’utilisation et de l’entretien d’un outil
électrique, respecter les règlements et les normes de
sécurité en vigueur dans le pays en question.
Les outils électriques Hitachi sont constamment
améliorés et modifiés afin d’incorporer les tous
derniers progrès technologiques.
En conséquence, il est possible que certaines pièces
(c.-à-d. no. de code et/ou dessin) soient modifiées
sans avis préalable.
M14 × 50 t=25mm
M12
×
45 t=25mm
M10 × 30 t=10mm
M8
×
30 t=10mm
(t: Epaisseur de la
plaque d’acier)
2
2

GARANTIE
Nous garantissons que l’ensemble des Outils électriques
Hitachi sont conformes aux réglementations spécifiques
statutaires/nationales. Cette garantie ne couvre pas les
défauts ni les dommages inhérents à une mauvaise
utilisation, une utilisation abusive ou l'usure et les
dommages normaux. En cas de réclamation, veuillez
envoyer l'Outil électrique, en l’état, accompagné du
CERTIFICAT DE GARANTIE qui se trouve à la fin du
Mode d’emploi, dans un service d’entretien autorisé.
REMARQUE :
Par suite du programme permanent de recherche et de
développement HITACHI, ces spécifications peuvent faire
l’objet de modifications sans avis préalable.
Au sujet du bruit et des vibrations
Les valeurs mesurées ont été déterminées en fonction
de la norme EN60745 et déclarées conforme à ISO 4871.
Niveau de puissance sonore pondérée A: 99 dB (A)
Niveau de pression acoustique pondérée A: 86 dB (A)
Incertitude KpA: 3 dB (A)
Porter un casque de protection.
Valeurs totales des vibration (somme vectorielle triaxiale)
déterminée conformément à EN60745.
Serrage par percussion de fixations à la capacité
maximale de l’outil:
Valeur d’émission de vibration
Incertitude K = 1,5 m/s
2
ah = 16,0 m/s
2
Français
La valeur totale des vibrations a été mesurée par une
méthode d’essai standard et peut être utilisée pour
comparer un outil à un autre.
Elle peut également être utilisée pour une évaluation
préliminaire du niveau d’exposition.
AVERTISSEMENT
䡬 La valeur d’émission de vibration en fonctionnement
de l’outil électrique peut être différente de la valeur
totale déclarée, en fonction des utilisations de l’outil.
䡬 Pour identifier les mesures de protection de
l’utilisateur fondées sur une estimation de l’exposition
en conditions d’uitilisation (tenant compte de tous
les aspects du cycle d’utilisation, tels que les moments
où l’outil est mis hors tension ou lorsqu’il tourne à
vide en plus des temps de déclenchements).
18

31-2
44-1
31-1
44-2
501-1 501-2
AB C D
40 320-777 1
1 UC18YG
1 UC18YGH
–––––––––––
–––––––––––
41 320-776 1
42 319-926 1
43 320-881 1 M5
44-1 315-130 2 EB14B
44-2 331-750 2 BCH1415
501-1
501-2
502 324-359 1
1 324-854 1 “2-5, 7-25”
AB C D
1
–––––––––––
2 315-984 1
3 315-983 1
4 320-409 1
5 323-954 1
6 992-630 4 D4×40
7 323-940 1
8 319-535 1 D3.5
9 321-915 1
10 959-154 2 D5.556
11 323-949 1
12 321-934 28 D3
13 315-978 1
14 323-944 1
15 316-172 1
17 323-945 1
18 323-941 2
19 323-942 2
20 323-946 1
21 319-911 1
22 690-1VV 1 6901VVCMPS2L
23 323-947 1
24 321-894 1
25 321-893 1
26 326-102 1
27 321-876 1 115L
28 326-184 1 65L
29 302-086 7 D4×20
30
31-1 326-103 1
1
–––––––––––
32 326-104 1
33 321-871 1
34
31-2 326-183 1
35 321-918 1 “36, 37”
36 321-672 2 D2×6
37 320-288 1 M5
1
–––––––––––
38
39 323-710 1
19

English
GUARANTEE CERTIFICATE
1 Model No.
2 Serial No.
3 Date of Purchase
4 Customer Name and Address
5 Dealer Name and Address
(Please stamp dealer name and address)
Français
CERTIFICAT DE GARANTIE
1 No. de modèle
2 No. de série
3 Date d'achat
4 Nom et adresse du client
5 Nom et adresse du revendeur
(Cachet portant le nom et l'adresse du
revendeur)
✄
20

1
2
3
4
5
✄
21

Hitachi Power Tools Europe GmbH
Siemensring 34, 47877 willich 1, F. R. Germany
Tel: +49 2154 49930
Fax: +49 2154 499350
URL: http://www.hitachi-powertools.de
Hitachi Power Tools France S. A. S.
Prac del’ Eglantier 22, rue des Crerisiers Lisses, C. E. 1541,
91015 EVRY CEDEX, France
Tel: +33 1 69474949
Fax: +33 1 60861416
URL: http://www.hitachi-powertools.fr
22

English
EC DECLARATION OF CONFORMITY
We declare under our sole responsibility that this product
is in conformity with standards or standardization
documents EN60745, EN60335, EN55014 and EN61000
in accordance with Directives 2004/108/EC, 2006/95/EC
and 2006/42/EC.
The European Standards Manager at Hitachi Koki Europe
Ltd. is authorized to compile the technical file.
This declaration is applicable to the product affixed CE
marking.
Français
Nous déclarons sous notre seule et entière responsabilité
que ce produit est conforme aux normes ou documents
de normalisation EN60745, EN60335, EN55014 et
EN61000 en accord avec les Directives 2004/108/CE, 2006/
95CE et 2006/42/CE.
Le responsable des normes européennes d’Hitachi Koki
Europe Ltd. est autorisé à compiler les données techniques.
Cette déclaration s’applique aux produits désignés CE.
Representative office in Europe
Hitachi Power Tools Europe GmbH
Siemensring 34, 47877 Willich 1, F. R. Germany
Technical file at:
Hitachi Koki Europe Ltd.
Clonshaugh Business & Technology Park, Dublin 17, lreland
Head office in Japan
Hitachi Koki Co., Ltd.
Shinagawa Intercity Tower A, 15-1, Konan 2-chome,
Minato-ku, Tokyo, Japan
DECLARATION DE CONFORMITE CE
30. 12. 2010
F. Tashimo
Vice-President & Director
Hitachi Koki Co., Ltd.
Code No. C99151551 G
012
Printed in China
 Loading...