

Hitachi W62H User Manual

Contents/Ready
Contents/Ready
Phone Call
Inputting
Characters
Address Book/
Pair Function
Mail
BasicManual
Camera
EZweb
EZ Navi
au Media Tuner
Other Functions
Troubleshooting/
Remote Ctrl Lock
Index
Introduction
Thank you for purchasing the W62H.
Before using it for the first time, be sure to read the Basic Manual (this PDF manual) so as
to know how to use it correctly. After you finish reading this manual, store it and the printed
materials that come with the phone in a safe place for future reference.
Printed Manuals for the W62H (Japanese)
The W62H comes with a Basic Manual and an Instruction Manual.
For information about basic
operation
Basic Manual
Refer to this English
PDF manual.
The following information is also available on the au website.
• To download the Basic Manual or Instruction Manual
(http://www.au.kddi.com/torisetsu/index.html)
• To access a keyword searchable au On-Line Manual
(http://www.au.kddi.com/manual/index.html)
You can also access the au On-Line Manual using EZweb.
EZweb Access
au one Top
→auお客さまサポート (au Customer Support)
→調べる (Information)
→オンラインマニュアル (On-Line Manual)
For detailed information
about each function
Instruction Manual
English version not
available.
All mentions of “the W62H” in this manual refer to “the Wooo
◎
W62H
.”
ケータイ
◎Thetypeface,fonts,andcolorsofthetextsonthescreens
showninthismanualmaydifferfromtheactualcontents.Also,
certainiconsandthescrollbarsmaybeomitted.
◎Thetypeface,screens,iconsshowninthismanualand
explanationsaremadeontheinitialsettingsofmainunitcolor
LaserBlueandFlashSilver.
Cellphone Etiquette
Mind your manners!
A cellphone always emits weak radio waves while it is turned on.
Enjoy operation of your cellphone without forgetting to be considerate
of those around you.
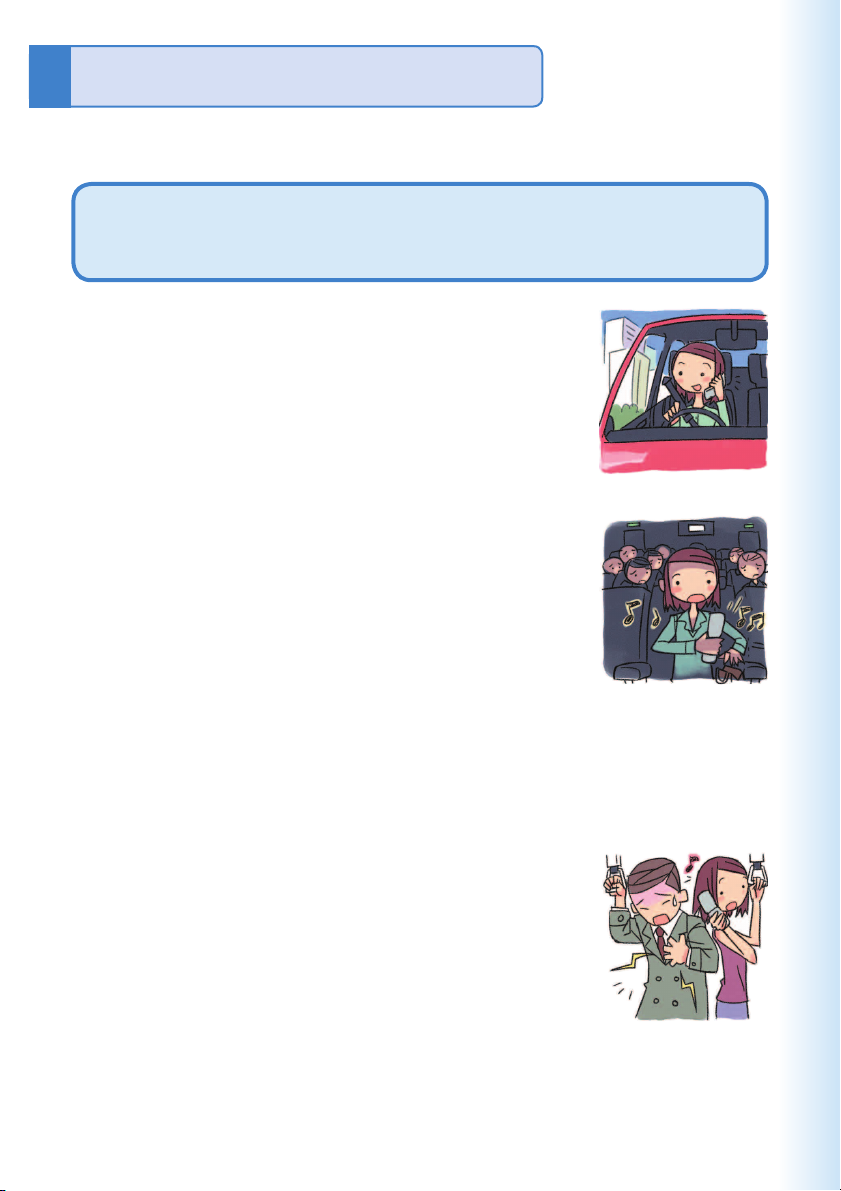
Some locations do not allow the use of
cellphones.
Using a cellphone while driving is dangerous and
■
prohibited by the Traffi c Control Law.
Using a cellphone inside of an aircraft is prohibited
■
by the law. Be sure to turn off your cellphone before
takeoff.
Watch out where you use your cellphone,
and keep your voice down.
Do not make calls at cinemas, theaters, museums,
■
libraries, or other similar locations. Turn off the
cellphone or use Manner Mode to ensure that the
ringtone does not disturb others.
When in public, move to a location where you will
■
not be blocking traffi c.
On the Shinkansen, in a hotel lobby, or in other similar locations, move
■
to a location where you will not disturb others.
Take care to avoid talking on the phone in a loud voice.
■
Before taking the picture of others, be sure to obtain permissions fi rst.
■
Cellphone radio waves may interfere with
electrical medical equipment.
On a train or in other crowded locations, there is
■
always the possibility that someone nearby may be
wearing a pacemaker. Turn off your cellphone when
you are in a crowded area.
Follow the rules of hospitals and other medical
■
facilities prohibiting the use or possession of cellphones.
1
Cellphone Basics
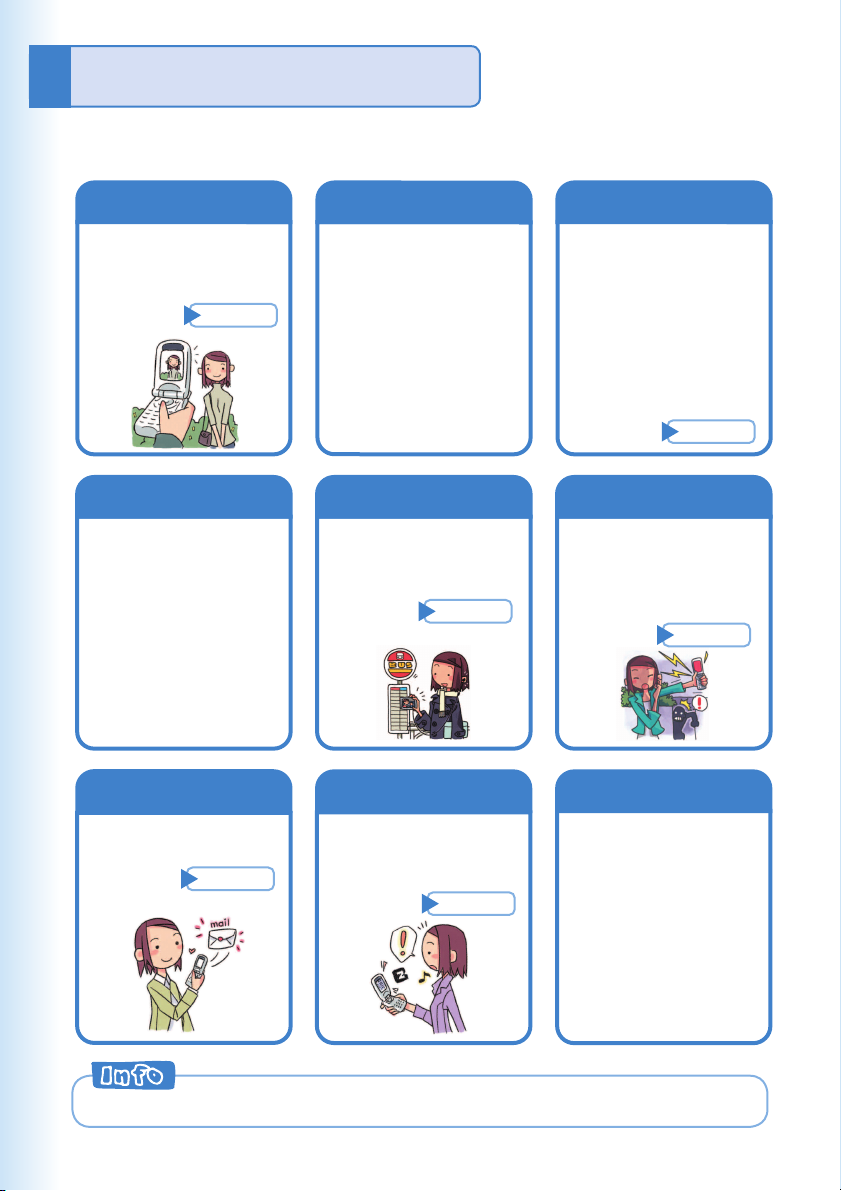
Features
Camera
Shoot photos and
record movies, and
send them by e-mail.
Page
61
EZ FeliCa
Use the cellphone for
shopping by using
electronic money, or
use it as member’s
cards, point cards,
and so on.
LISMO
Play music or
download “ChakuUta-Full®” from “au
one Music.”
au Media Tuner
Enjoy using
Television (1Seg)
and EZ Channel-Plus.
Page
77
EZ Navi
EZ Navi Walk,
Passenger Seat Navi,
Evacuate Navi and
Security Navi allow you
to get various kinds of
location information.
They are all built-in
functions.
Page
74
Security Setup
Select either “Safety
Buzzer” or “HOT
DIAL” as reliable
setting function.
Page
85
Mail
Send mail messages
to other cellphones or
to PCs.
For other useful functions, see page 86.
2
Page
50
EZweb
Download “ChakuUta®”/other data or
access sites.
Page
66
PC Document Viewer
Display Excel, Word,
PDF files and so on.

Manner Mode and Answer Memo
Manner Mode
Use Manner Mode to turn off the
ringtone so as not to bother
others around you.
While the standby
screen is displayed,
(
Page
for
37
hold down
at least one second.
Answer Memo
If you cannot answer a call,
Answer Memo plays an
answering message and records
the caller’s message.
While the standby
screen is displayed,
hold down
at least one second.
Checking Power, Signal Strength, and Battery Level
Normally leave the phone turned on.
The phone needs to be turned on to make and receive
calls.
Hold down F for at least 2.5 seconds to turn on W62H.
After a while, W62H turns on with tone and the standby
screen appears.
C
Page
Page
for
38
14
You cannot talk on the phone
if it is unable to receive a signal.
Signal strength is low in some areas, even if
they are within the service area.
indicates the current signal strength.
Keep an eye on the battery level.
The phone may not function properly if battery
power is low.
indicates the current battery level.
Page
Page
14
14
3
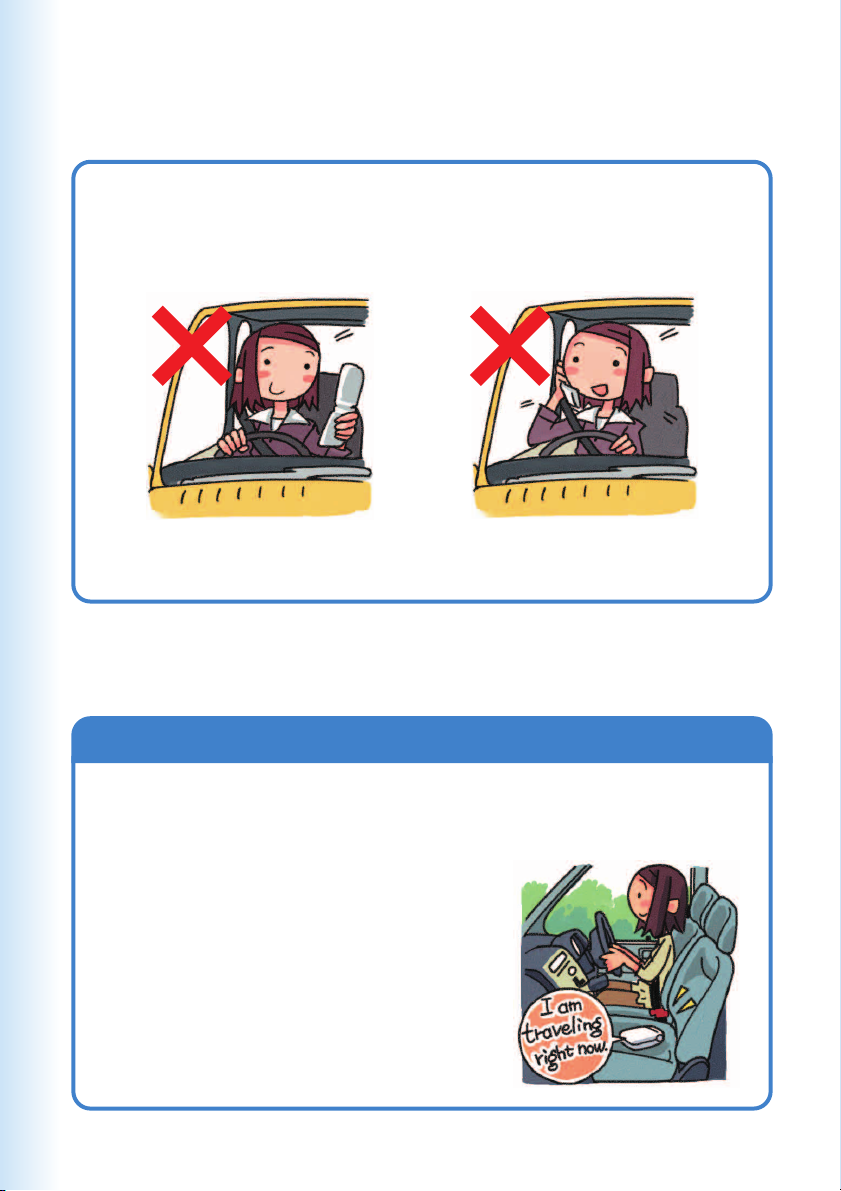
Never use your cellphone while driving!
Do not use the cellphone while driving a car/motorcycle/bicycle.
It may cause a traffic accident. Use of the cellphone while driving
a car/motorcycle is forbidden by the law. Use of the cellphone
while driving a bicycle may be punished by the law too.
× Reading mail or looking
at the display.
× Holding a cellphone in
your hand to talk.
Turn off your cellphone or use Drive Mode while
driving.
Drive Mode
In Drive Mode, the phone will play the message “ただいま移動中で
すので電話に出ることができません。・・・” (I am traveling and unable to
answer the phone right now…), and then ask the caller to leave a
message using Answer Memo.
While the standby screen is displayed, press
(
, and press
Drive Mode.
2
(Drive) to turn on
4
Beware of spam and One-ring Calls!
You can set up mail filters to block
specific mail or spoof mail.
The following are the main features your
cellphone uses to block spam.
・Blocking of “未承諾広告※”
(unsolicited advertisement) mail
・Blocking of specific mail
・Blocking of spoof mail
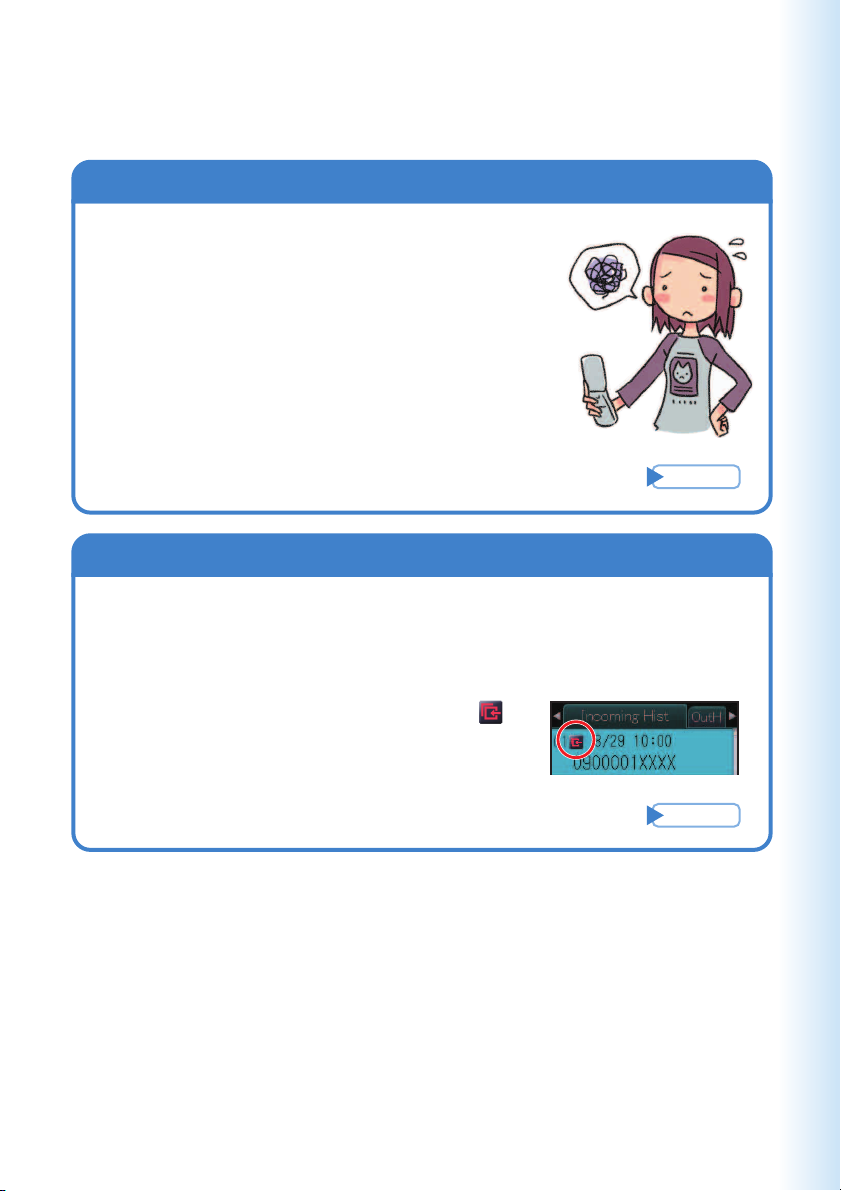
Beware of One-ring Calls!
A “One-ring Call” (wan-giri in Japanese) rings your phone only
once, in an attempt to make you call back to a service that
automatically bills you very high charges.
If W62H received a “One-ring Call,” the
icon appears at the head of an incoming
history.
If you get spam
Page
57
Page
33
5
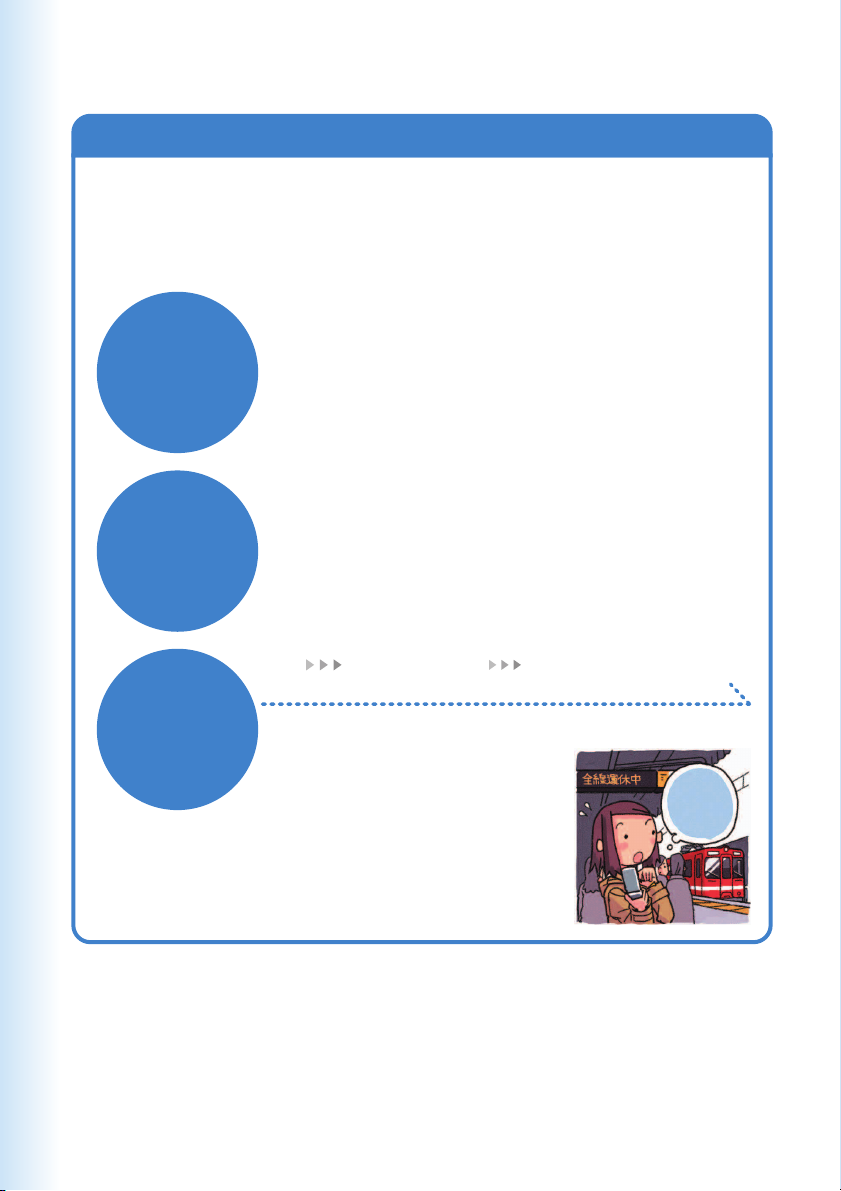
Disaster Message Board Service
Disaster Message Board
The Disaster Message Board lets you use EZweb to register
information about your well-being in case of a major disaster. The
information you register can be accessed from anywhere in Japan
over EZweb or the Internet.
◆When a major disaster strikes, you can use your au
Registering
the safety
information
Checking
the safety
information
Access
method
cellphone to access the “
Board) on EZweb and register your current condition,
comments, and other information about your well-being.
◆After you register information, it can be sent by mail to
family, friends, and other individuals you have registered as
a recipient of your Disaster Message Board information.
◆Disaster Message Board information can be accessed by
inputting the phone number of an individual over EZweb or
the Internet.
※ Disaster Message Board information can be accessed
from cellphone of other manufacturer’s, PHS, or PC at
http://dengon.ezweb.ne.jp/.
R
※
auoneTop
http://dengon.ezweb.ne.jp/
災害用伝言板” (Disaster Message
災害用伝言板
(Disaster Message Board)
m
’
I
.
K
O
6
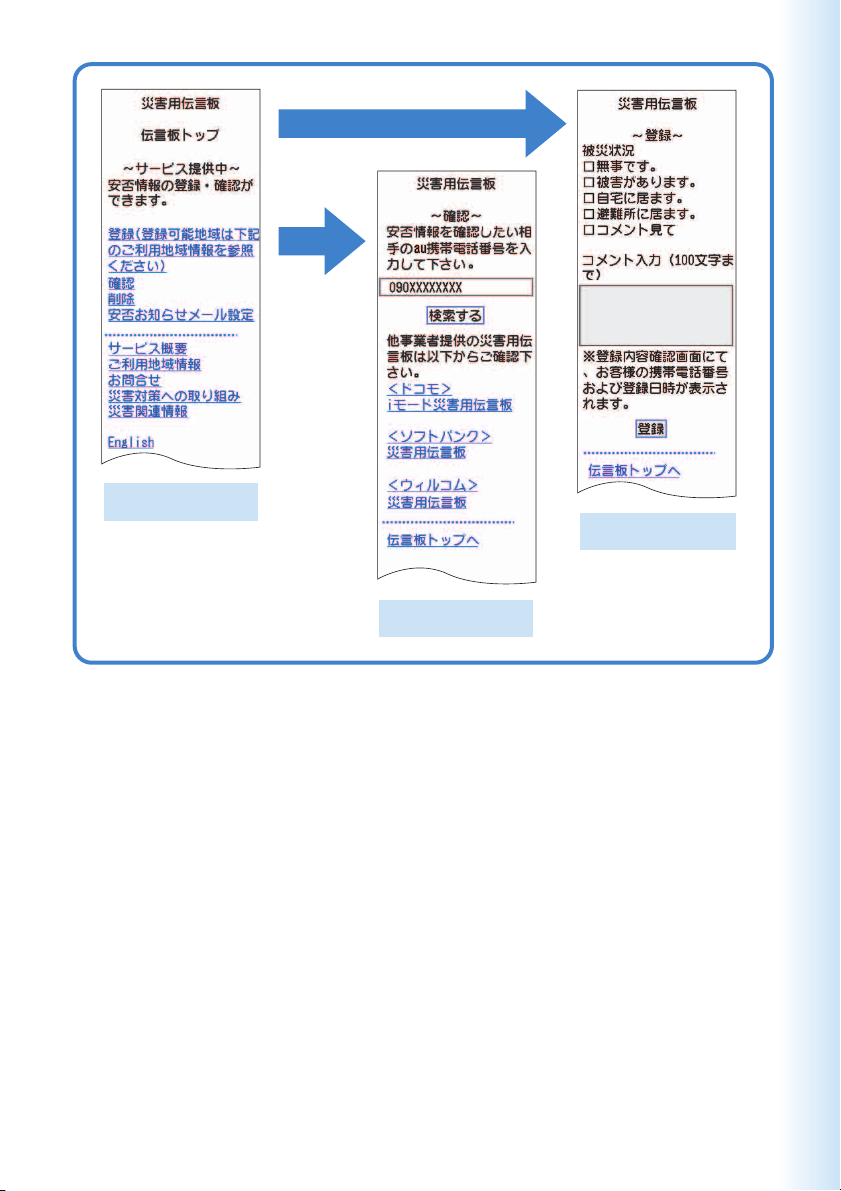
Registration
Access
Disaster Message
Board top screen
Information screen
※ Registration contents are retained for up to 72 hours.
※ You can register up to 10 entries per phone number. Registering a new entry while there are already 10
registered entries, automatically overwrites the oldest entry.
※You can view a Disaster Message Board demonstration at:
R→ auoneTop→auお客さまサポート →災害用伝言板(デモ版)
(au Customer Support) (Disaster Message Board (Demo))
※ To view the Disaster Message Board in English, select the “English” option on the Disaster Message Board top
screen.
Information registration
screen
7

Contents
Cellphone Etiquette 1
Mind your manners! ......................................1
Cellphone Basics 2
Features ........................................................2
Manner Mode and Answer Memo .................3
Checking Power, Signal Strength, and
Battery Level ...............................................3
Never use your cellphone while driving! ........4
Beware of spam and One-ring Calls! ............5
Disaster Message Board Service..................6
Contents 8
Phone Call 30
Making a Call ..............................................30
Making an International Call .......................31
Answering a Call .........................................32
Redialing (Outgoing Histories/Incoming
Histories) ..................................................33
One-ring Calls .............................................33
Changing the Ringtone ................................34
Adjusting the Ringtone Volume ...................36
Adjusting the Earpiece Volume during a
Call ...........................................................37
Turning On Manner Mode ............................37
Turning On Answer Memo...........................38
Playing an Answer Memo ...........................39
Inputting Characters 40
Inputting an E-mail Address ........................41
Inputting Pictograms ...................................42
Ready 10
Checking the Contents of the Package .......10
Names of Parts ...........................................11
Charging the Battery Pack ..........................12
Turning On Power .......................................14
Initial Values ................................................14
Security Code and Passwords ....................15
Selecting English as the Display Language
.................................................................16
Operation Basics .........................................18
Display Indicators ........................................19
Main Menu ..................................................20
Positions of W62H .......................................24
Wide open position features........................25
Initializing E-mail and EZweb ......................26
Looking Up Your Current Phone Number
and E-mail Address ..................................27
Changing Your E-mail Address ...................28
Address Book 43
Registering an Address Book .....................43
Editing an Address Book Record ................45
Adding Outgoing or Incoming History
Data to the Address Book .........................46
Dialing from the Address Book ...................47
Pair Function 48
Registering a Pair Partner ...........................48
Making a Phone Call or Sending Mail to a
Pair Partner ...............................................49
Mail 50
Using E-mail ................................................50
Using C-mail ...............................................51
Creating and Sending E-mail Messages .....52
Reading Received E-mail Messages ..........54
Reading an E-mail Message with an
Attached Photo .........................................55
Replying to a Received E-mail Message ....56
Avoiding Spam ............................................57
Creating and Sending C-mail Messages ....58
Reading Received C-mail Messages ..........60
8

Camera 61
Using the Camera .......................................61
Shooting a Photo ........................................63
Viewing Photos ...........................................64
Attaching a Photo to an E-mail Message ....65
EZweb 66
Using EZweb ...............................................66
Displaying the au one Top ...........................67
Bookmarking Sites You Frequently Access
.................................................................68
Viewing a Bookmarked Site ........................69
Checking Charges ......................................69
Downloading Chaku-Uta®/Chaku-Uta-Full
.................................................................70
®
Index 91
Contents
EZ News Flash/au one Gadget
EZ News Flash/au one Gadget Features ....72
Setting EZ News Flash service ...................73
72
EZ Navi 74
EZ Navi Features ........................................74
au Media Tuner 77
au Media Tuner Features ............................77
Confi guring au Media Tuner Initial Settings
.................................................................79
Using Television (1Seg)...............................81
Viewing in the Wide open Position ..............83
Exiting au Media Tuner ................................84
Other Functions 85
Security Setup Features .............................85
Troubleshooting 87
If you lose your W62H .................................88
9
Ready
All
Before using the W62H, check the contents
of the package coming with your W62H.
You should also familiarize yourself with
basic operations, like how to charge the
battery, how to turn the power on, etc.
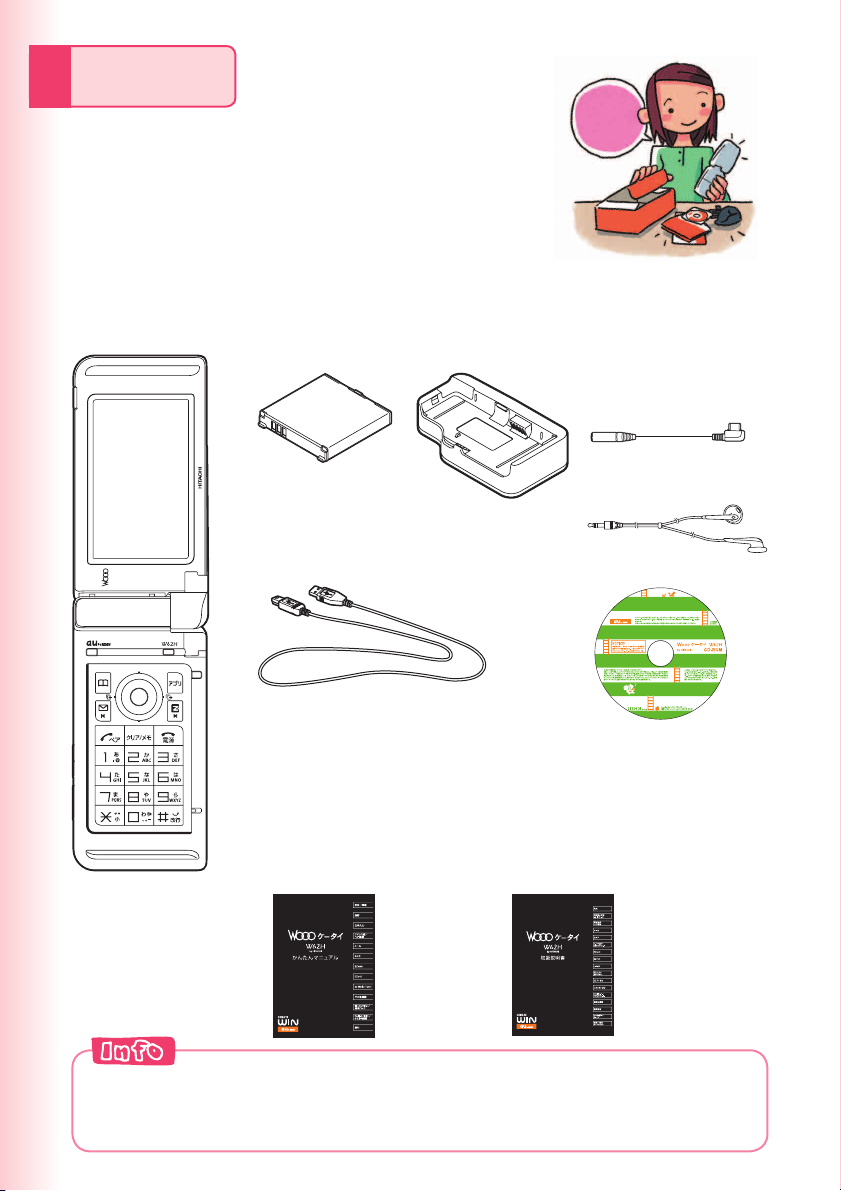
Checking the Contents of the Package
set?
●
W62H
Battery pack
●
(53HIUAA)
Casio USB cable 03 (MiniB)
●
(03CAHUA)
Warranty (Japanese)
●
Osaifu-Keitai® Basic
●
Manual (Japanese)
LISMO Installation
●
Guide (Japanese)
Basic Manual (Japanese)
●
Desktop holder
●
(62HIPUA)
Casio round-type
●
earphone jack
conversion adaptor
03 (03CAQNA)
SONY MDR-E0921
●
(sample)
CD-ROM
●
Operating Precautions
●
(Japanese)
Global Passport mobile
●
rental service Owner’s Guide
(Japanese)
Promotional Fliers (Japanese)
●
Instruction Manual (Japanese)
●
10
◎ The microSD
◎ An AC adaptor is not included. It is up to you to purchase a common AC
adaptor 01/02 (option).
TM
memory card is not included.
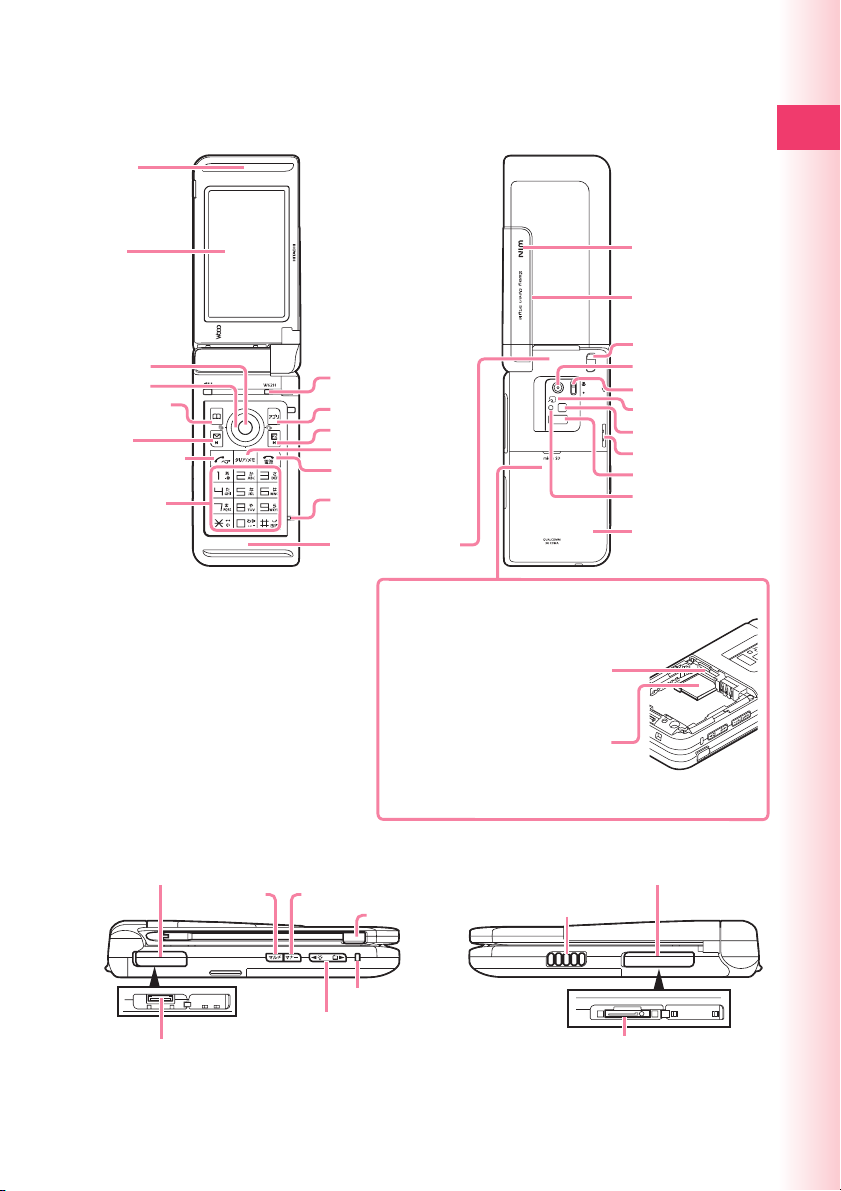
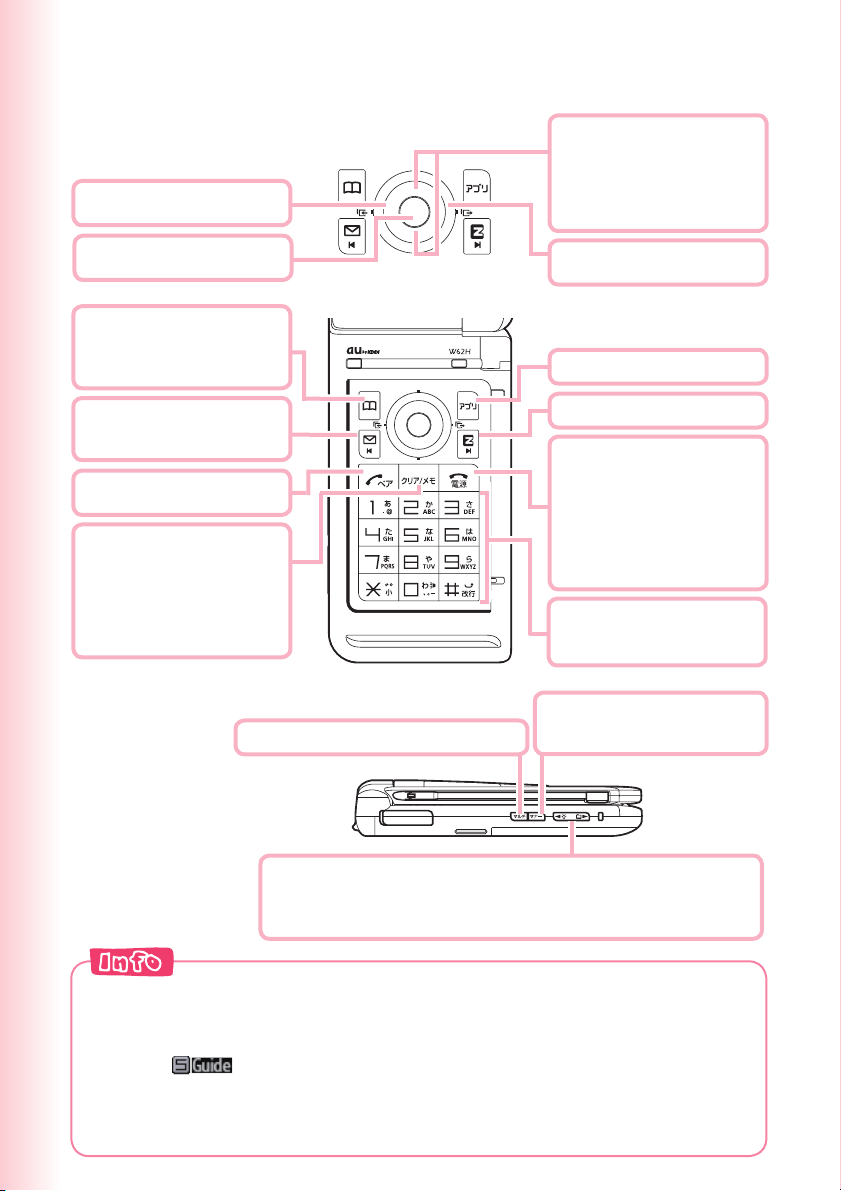
Names of Parts
Front
■
Earpiece
Display
Center key
Cursor key
Address book
key
Mail key
Answer/Pair key
Number keys
※1
During a call, do not cover the
microphone with your hands or your
chin.
※2Take care to avoid covering the
built-in antenna with your hand when
making a call, using EZweb, using PC
Site Viewer and when accessing GPS
information.
Back
■
Optical sensor
Application key
EZ key
Clear/Memo key
End/Power key
※
Microphone
Built-in antenna
1
※
2
Attach/remove au IC-Card or microSD™ memory card
after turning the phone off and uninstalling the battery
pack.
microSDTM memory
card slot
au IC-Card
※
Incoming indicator
(LED)
Luminous slit (LED)
Strap eyelet
Camera lens
Closeup switch
FeliCa mark
Photo light/Pocket light
Speaker
Infrared port
Camera start
indicator
Battery pack/cover
Ready
Side
■
Flat-type earphone-microphone jack
Manner keyMulti key
TV antenna
Charge indicator (LED)
Up/Down key (side)
※
Do not take out this card if not necessary as your
number is recorded on it.
External connection jack coverFlat-type earphone-microphone jack cover
Charging terminals
External connection jack
11
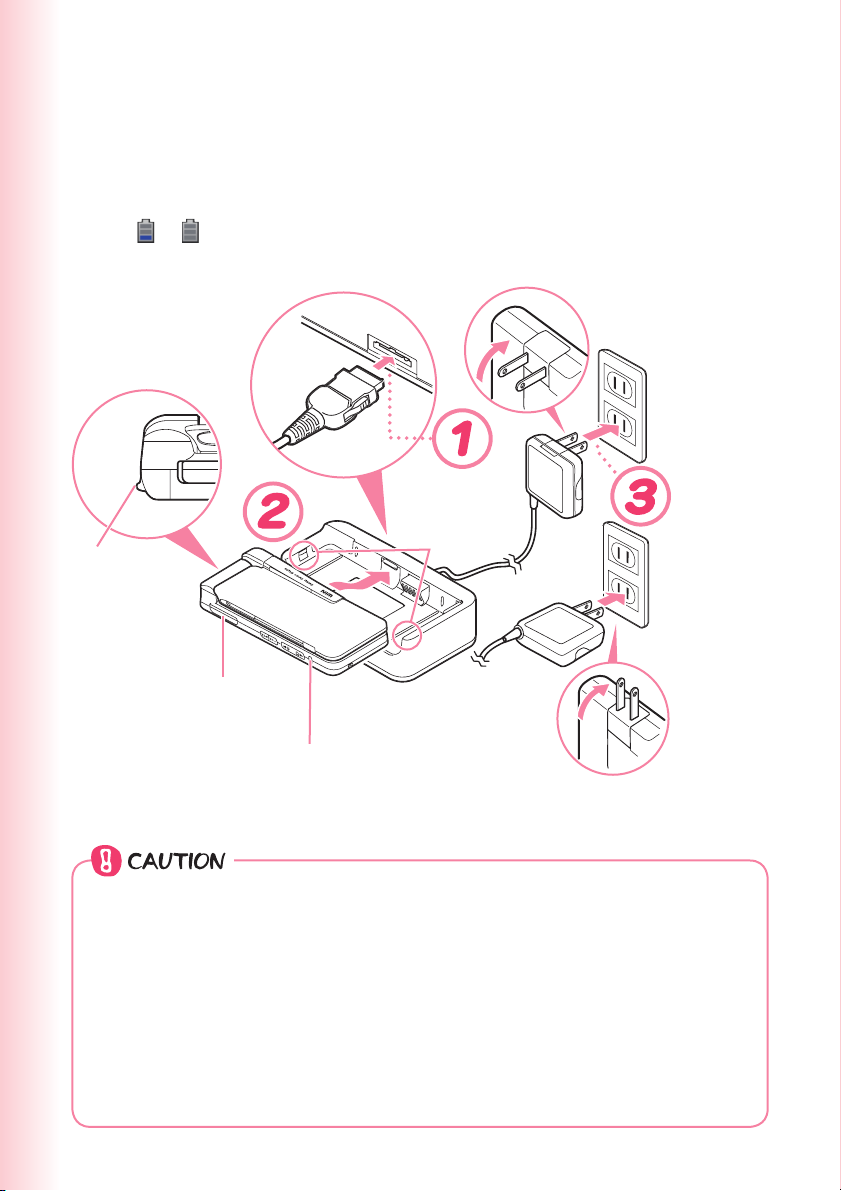
Charging the Battery Pack
The battery pack that comes with the phone is not fully charged when
you purchase it. Be sure to charge the battery pack before using the
W62H for the fi rst time. Charging takes about 140 minutes.
You should recharge the battery pack whenever the battery level icon
shows
Check the shape of
connectors before connecting,
and ensure that you plug
them in as far as they
will go.
or .
Protruding
part
Flat-type earphone-microphone
jack cover
Charge indicator (LED)
Make sure that the locking tabs of the desktop holder align with the slots on the sides of the
phone.
You must purchase a common AC adaptor 01/02 (option) for charging.
◎
Note that the confi guration of the AC adaptor may be different from that
shown in the illustration above.
Whenever connecting or disconnecting the common AC adaptor 01/02
◎
(option) to the desktop holder, make sure the connector on the back of
the desktop holder is positioned horizontally.
When attaching or removing W62H to the desktop holder, follow the
◎
instructions as specifi ed. Do not attach or remove into the wrong
direction by force. Also, do not pull W62H forward when it is locked to the
desktop holder.
Locking tab
You can also
use the plug
by extending
the prongs
like this.
12

Connect the common AC adaptor 01/02 (option) to
the desktop holder.
Check the shape of the connectors to ensure they are aligned correctly before
you connect.
Trying to force a connection may damage the connectors.
Firmly insert the closed W62H into the desktop holder.
Hold the desktop holder, align the locking tabs of the desktop holder with the
slots on the sides of the phone, and push the phone against the holder until it
clicks. Do not attach by pressing the phone into the wrong direction by force.
Fold out the power plug of the common AC adaptor 01/02
(option), and then plug it into a 100V AC power outlet.
This will cause the W62H Charge indicator (LED) to light red, and (charging
battery icon) to display. When charging is completed, the Charge indicator (LED)
will go out.
When removing the phone, hold the desktop holder, place a fi nger under
the fl at-type earphone-microphone jack cover, lift the phone straight upward,
unlock and pull forward.
You can connect the common AC adaptor 01/02 (option) to the W62H directly to
※
charge the battery pack.
Ready
Fully open the external connection jack cover, check
the shape of connectors and insert it horizontally.
13
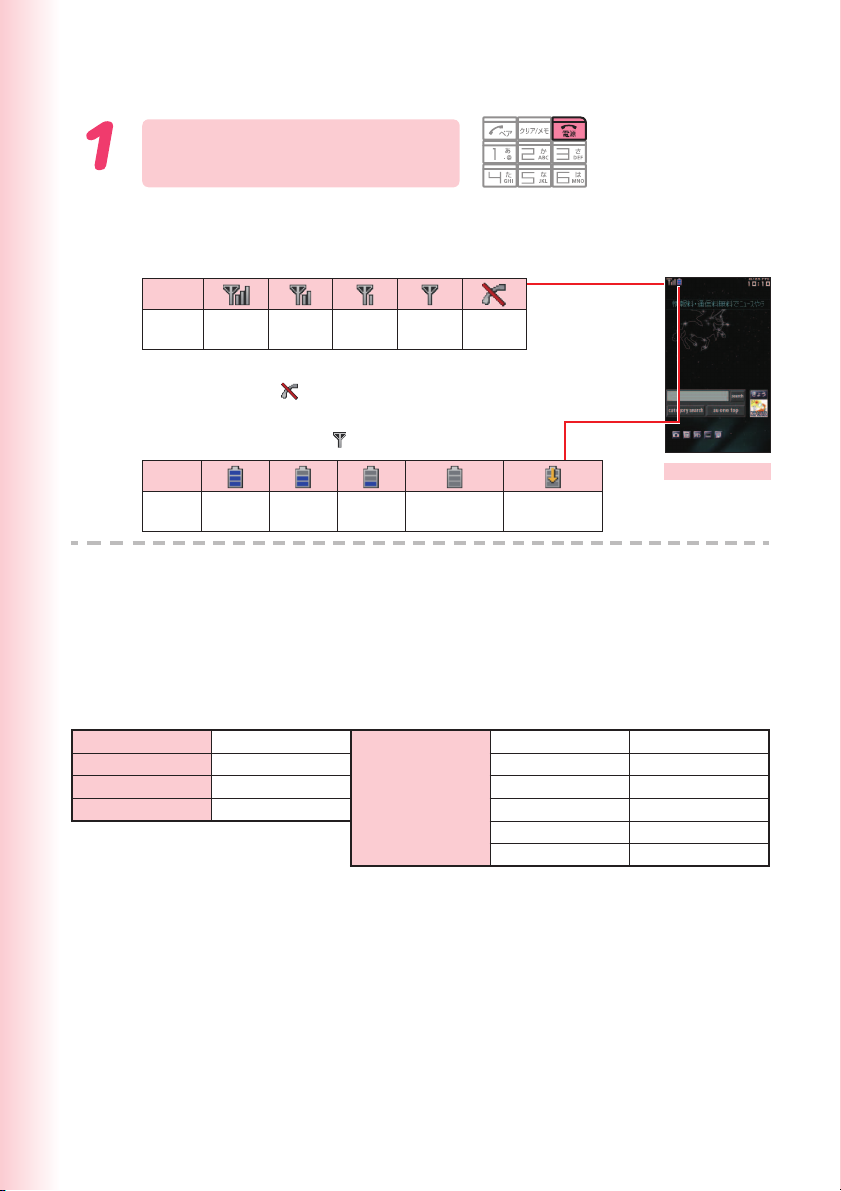
Turning On Power
Hold down
F
for at
least 2.5 seconds.
The message “Now loading” will appear
on the display for a short while, followed
by the standby screen.
Icon
Signal
Strong
Strength
• Communication is not possible while the signal
strength icon is
• Communication may not be possible while the
signal strength icon is
Icon
Battery
Level
Turning off power
■
Hold down
High
F
Medium
Medium
Weak
(Out of Range).
for at least 1.5 seconds.
Ver y
Weak
(Very Weak).
Fully
Low
Discharged
Out of
Range
Standby screen
Charging
Initial Values
The following are the initial settings of the phone.
Lock No. 1234 Font Size Input Size Slightly Large
Caller ID ON Mail Display Medium
Incm Caller Disp Display EZweb Display Medium
Profi le Blank Address Book Slightly Large
History Slightly Large
Phone No. Slightly Large
14
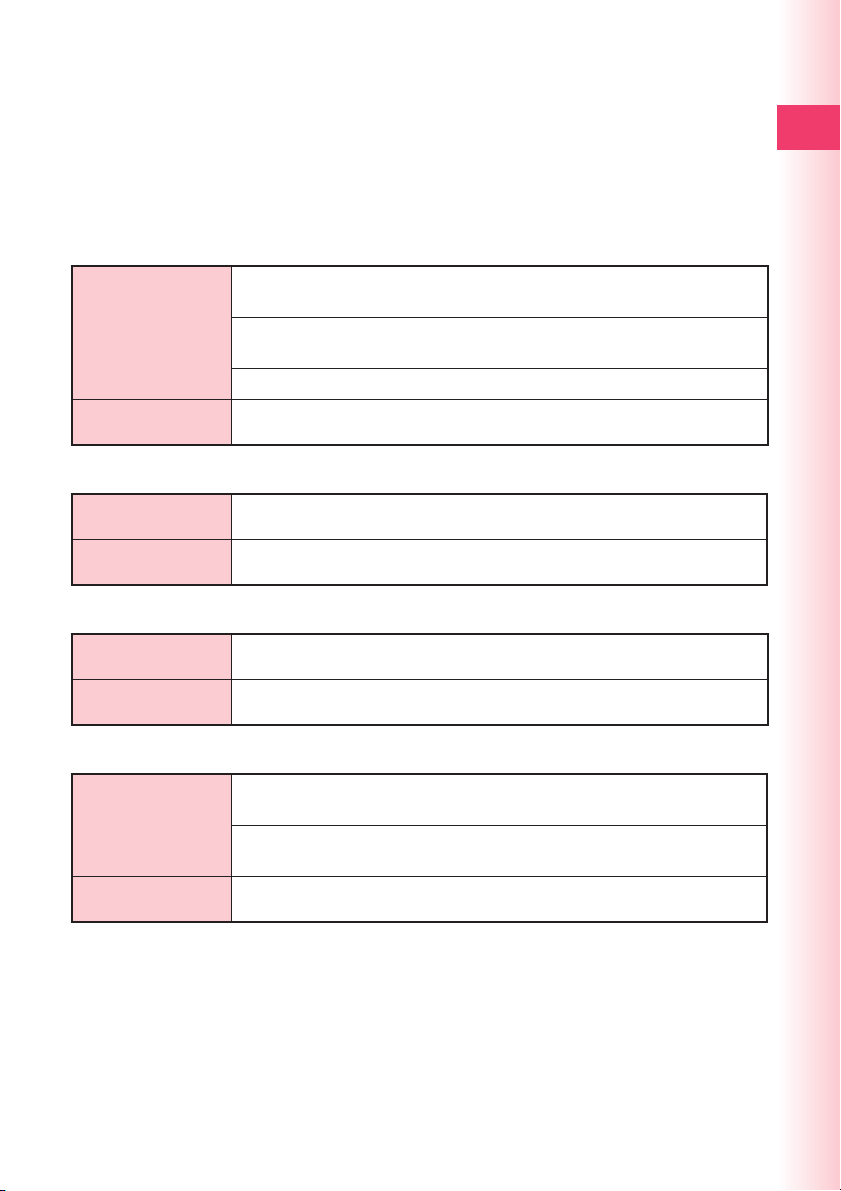
Security Code and Passwords
The W62H lets you use the numbers and passwords described below.
Be sure to take steps so you do not to forget your numbers and
passwords. You will need them to perform various operations and to
access subscription services.
Security Code
For remote operation of the Answering Service (Voice Mail) and Call
a
Transfer from a standard phone
For inquiries, applications, and service modifi cations using au
Usage Examples
b
Customer Service Center voice guidance, au website, and EZweb
For changing e-mail settings
c
Ready
Initial Value
4-digit number you entered on your subscription contract
Lock No.
Usage Examples
Initial Value
For modifying various phone settings
1234
EZ Password
Usage Examples
Initial Value
For entering and canceling subscriptions for EZweb fee-based content
4-digit number you entered on your subscription contract
Premium EZ Password
For entering and canceling subscriptions for EZweb fee-based content
a
Usage Examples
Initial Value
paid for using “
For purchasing products from EZweb sites that use “
b
(
au Collective Payment Service
4-digit number you entered on your subscription contract
まとめてau支払い
” (au Collective Payment Service)
まとめてau支払い
)
”
15
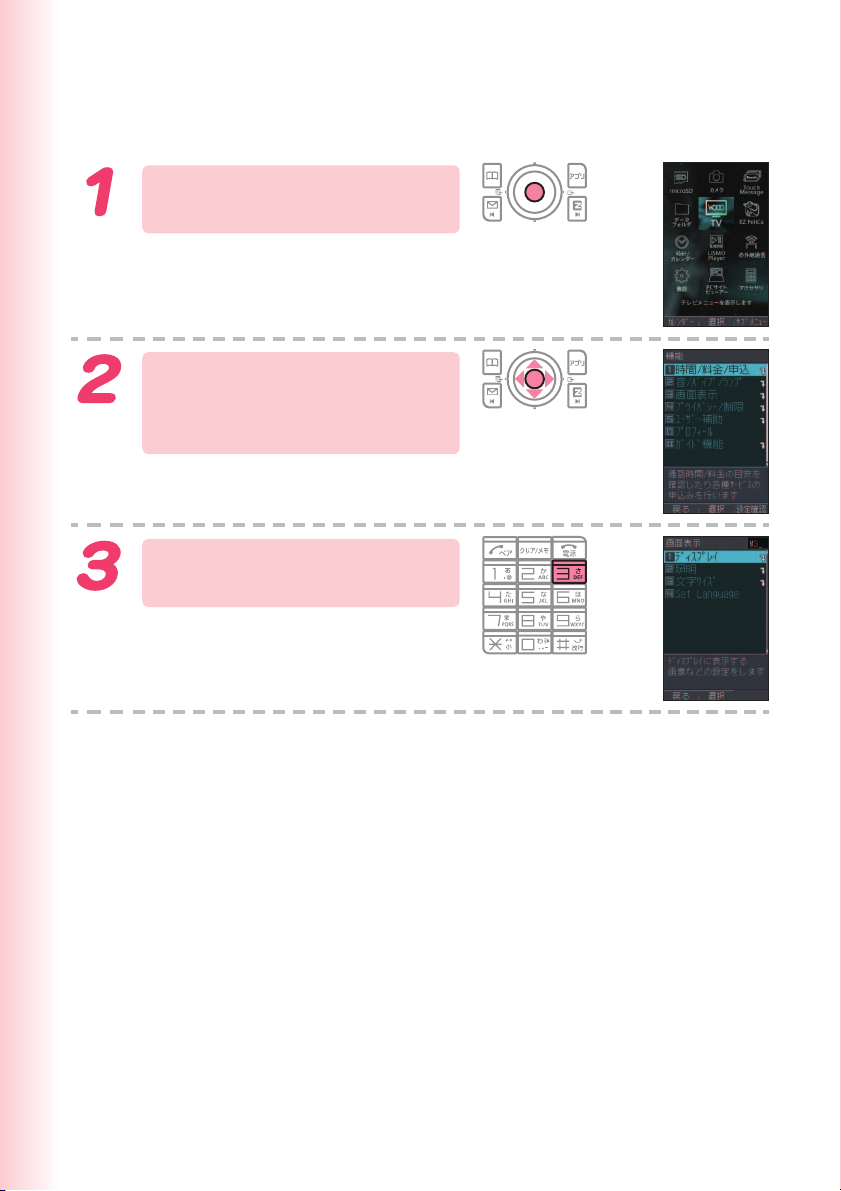
Selecting English as the Display Language
While the standby screen
is displayed, press c.
Use a to select “
(FUNCTION), and then
press c (
Press
(Screen Display).
選択
3 (画面表示
機能
) (Select).
)
”
16
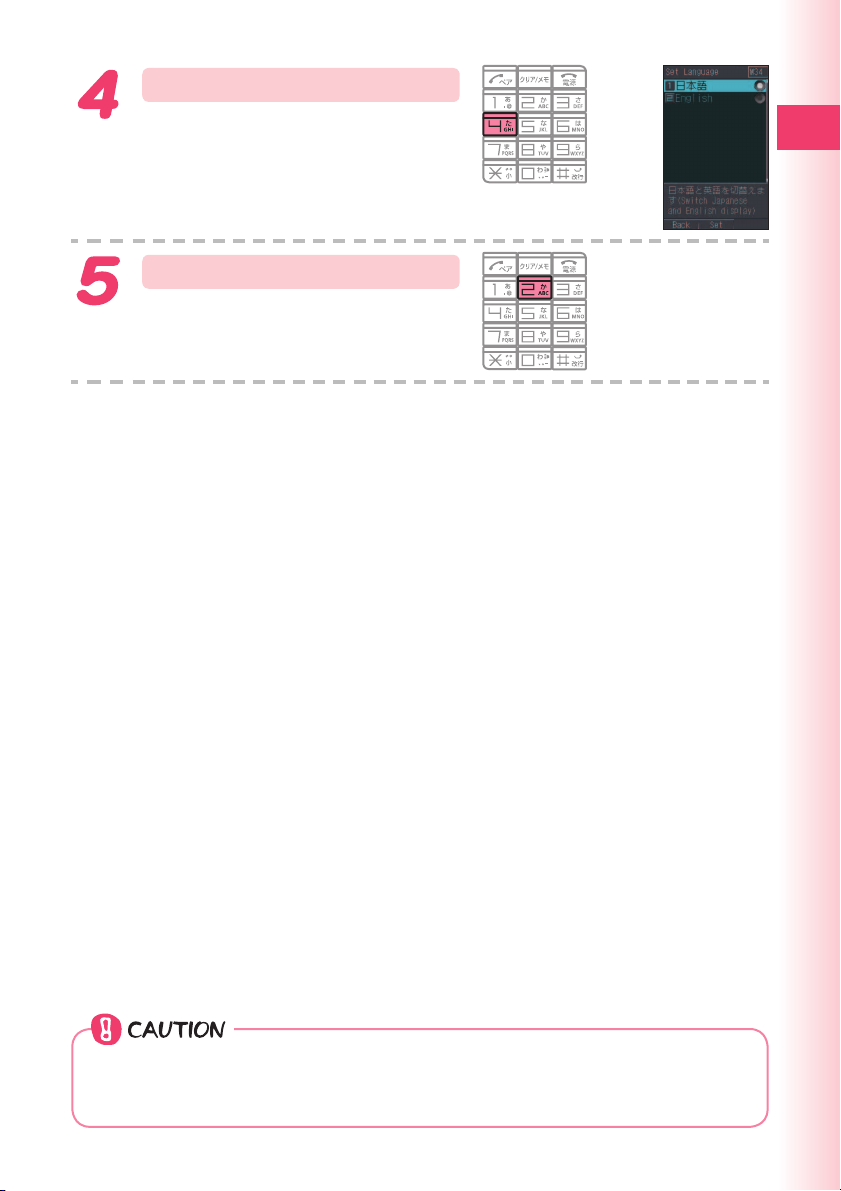
Press
(Set Language).
4
Ready
Press
This selects English as the display
language.
2
(English).
Even if English is selected as the display language, schedule and other
dates are displayed in the format year/month/day. Folder names inside of
the Data Folder are also displayed in year/month/day format.
17
Operation Basics
■ Key functions
•
Displays incoming histories.
l
•
Selects an item.
•
Displays the main menu.
c
•
Applies an item.
•
Displays the address book.
&
•
Creates a new address
book (hold down for at
least one second).
•
Selects EZ News Flash
j
telop/window or au one
Gadget.
•
Displays the standby
shortcut icon.
•
Selects an item.
•
Displays outgoing histories.
r
•
Selects an item.
•
Displays the EZ apps menu.
%
•
E-mail
L
•
C-mail (hold down for at
least one second)
•
Dials/answers a phone call.
N
•
Displays the Pair Function.
•
Memo
C
•
Toggles Answer Memo
on and off (hold down
for at least one second).
•
Deletes a character.
•
Returns to the previous
menu screen.
Side key functions
■
v
•
Displays Multi Play Window.
•
While the standby screen is displayed, hold down g for at least
h
one second to light the pocket light and hold down f for at least
one second to start au Media Tuner.
•
Page scroll at browser display.
•
Displays the EZ web menu.
R
•
Power on (hold down for
F
at least 2.5 seconds).
•
Power off (hold down for
at least 1.5 seconds).
•
Hangs up.
•
Terminates a function.
•
Returns to the standby
screen (hold down).
0〜9*#
•
Inputs phone number.
•
Inputs text character.
•
Toggles Manner Mode on
(
and off (hold down for at
least one second).
18
If you lose track of where you are or if you make a mistake:
◎
Press
Hold down
When
◎
etc., pressing
Holding down c for at least one second toggles side key’s disabling
◎
to scroll back to the previous screen.
C
to return to the standby screen.
F
is displayed in the lower right corner of the photo screen
will display key help.
5
feature on and off while W62H is folded.
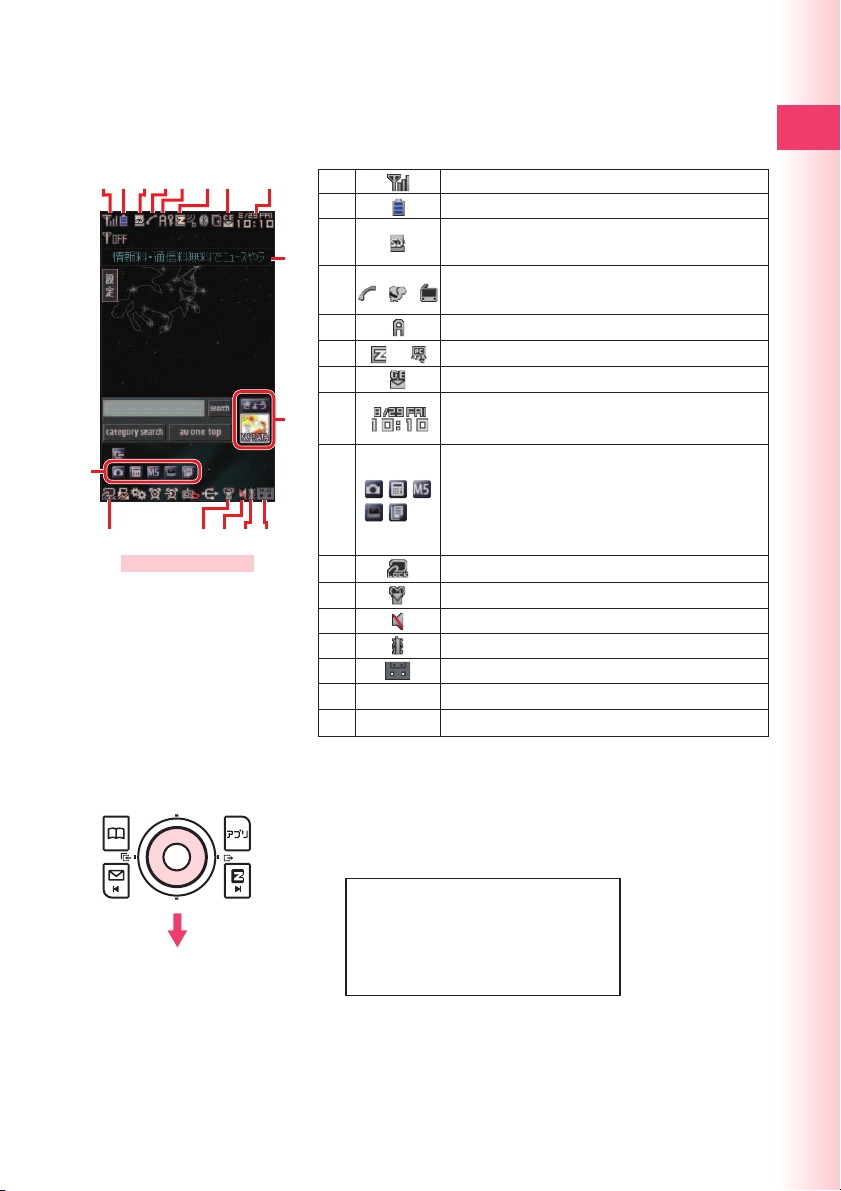
Display Indicators
The following explains the main icons that appear on the standby
screen.
abcd h
i
j
efg
Display
a
b
c
o
d
//
e
f
g
h
p
i
nmlk
j
k
l
m
n
o
p
※ A hyphen (-) may appear in place of the current date.
Signal strength
Battery level
The microSD
is inserted into the cellphone.
During phone call or LISMO Player/au Media
Tuner on
EZ apps (BREW
/
EZweb browsing in progress/PC Site Viewer on
Unread mail
Current time
The date and time are set automatically.
Selects the user defined icons such as Photo
(DSC Mode), calculator, Emission Off Mode,
Wide Open Start, and “01
(information from Hitachi)(Notepad 01), etc. by
pressing d and a.
FeliCa Lock on
Manner Mode on
Ringtone off
Vibrator on
Answer Memo on
-
EZ News Flash Telop
-
EZ News Flash Window
TM
memory card (commercial item)
®
) on
※
日立製作所からのご案内”
Ready
Key symbols used in this manual
■
The cursor key is described in this manual using
the key symbols shown below.
or d key:
u
or r key:
l
u, d, l
a
j
s
or r key:
a
19
Main Menu
There are four initial main menus (“Aurora,” “Typography,” “Instrument,”
and “Simple”) for W62H.
Pressing c while the standby screen is displayed displays the main
menu.
The menu structure depends on the type of the main menu.
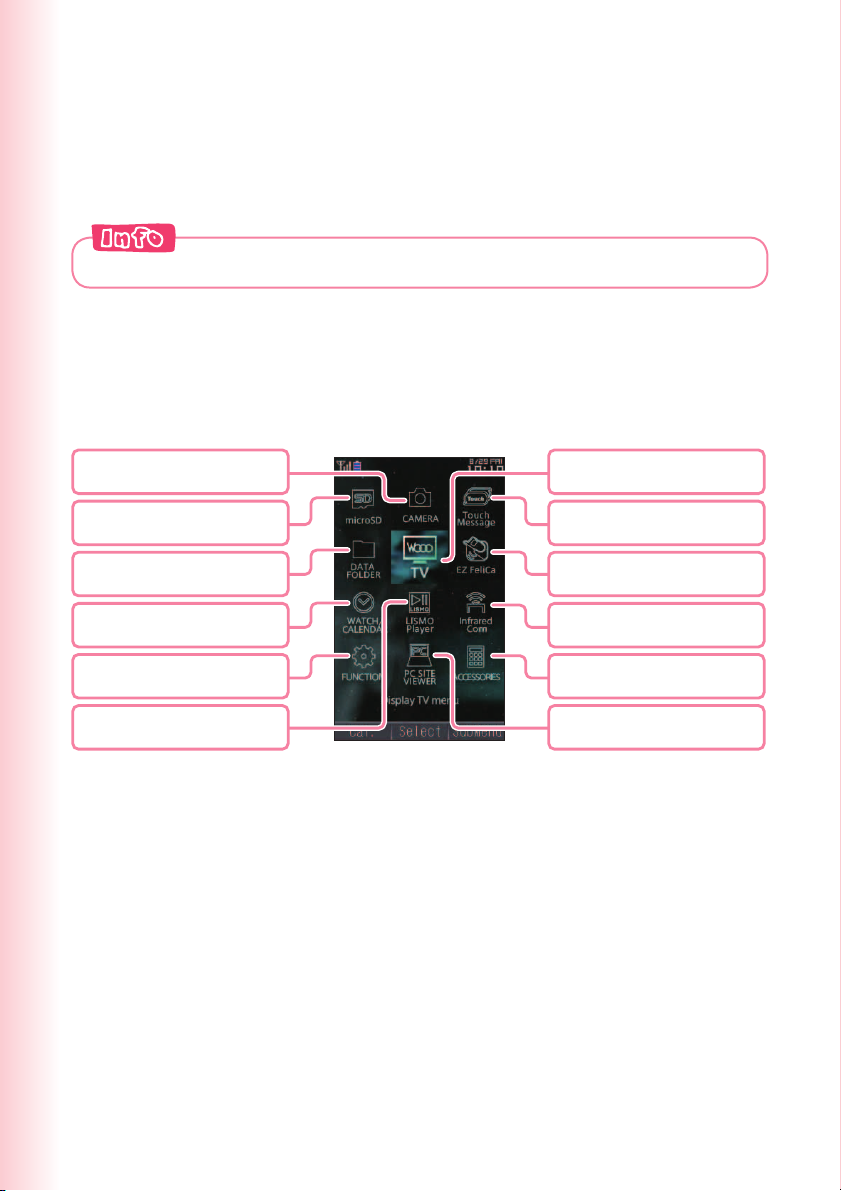
Using the “Aurora” menu
■
If your cellphone color is “Laser Blue” or “Flash Silver,” the initial
main menu is “Aurora.”
Use a to select the icon, and then press c (Select) to access the
function associated with the icon.
CAMERA
microSD
DATA FOLDER
WATCH/CALENDAR
FUNCTION
LISMO Player
TV
Touch Message
EZ FeliCa
Infrared Comm
ACCESSORIES
PC SITE VIEWER
20
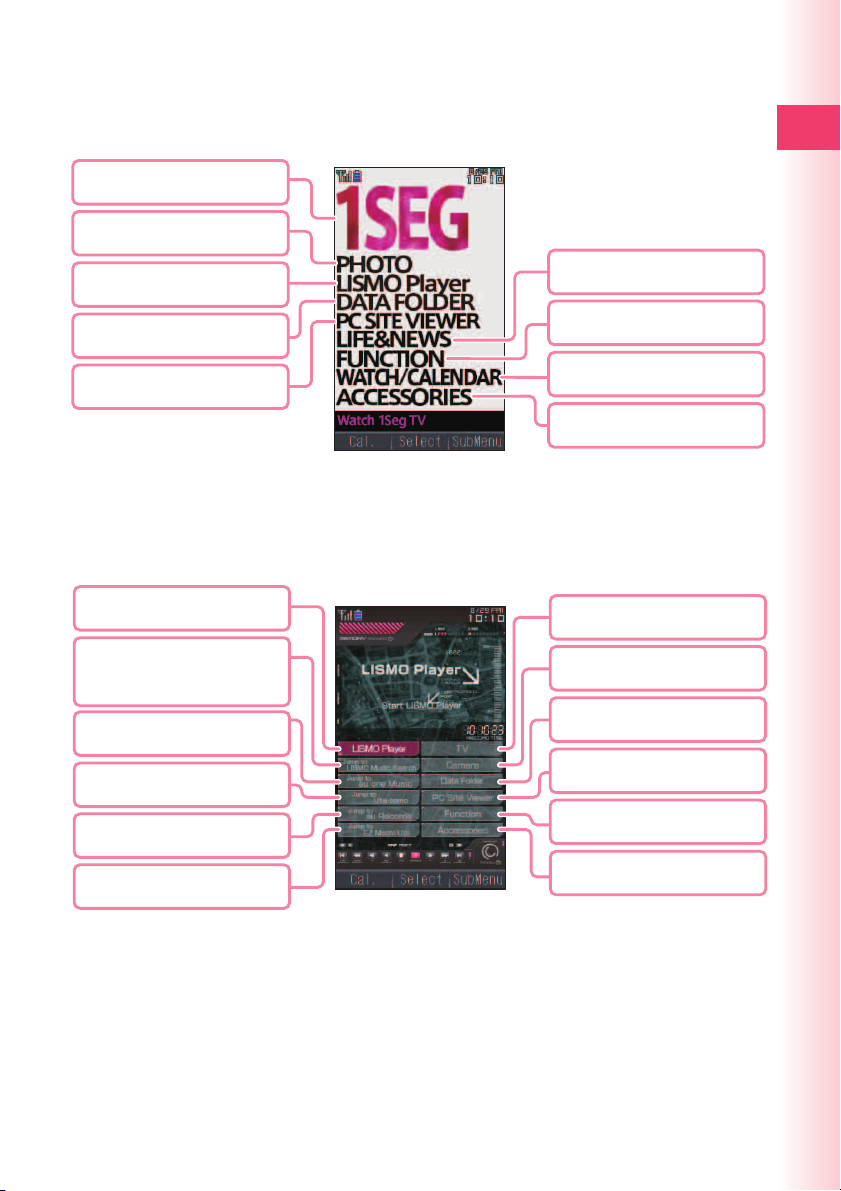
Using the “Typography” menu
■
Use j to select the icon, and then press c (Select) to access the
function associated with the icon.
1SEG
PHOTO
Ready
LISMO Player
DATA FOLDER
PC SITE VIEWER
Using the “Instrument” menu
■
LIFE&NEWS
FUNCTION
WATCH/CALENDAR
ACCESSORIES
If your cellphone color is “Shade Black,” the initial main menu is
“Instrument.” Use a to select the icon, and then press c (Select)
to access the function associated with the icon.
LISMO Player
Jump to LISMO Music
Search
Jump to au one Music
Jump to Uta-tomo
Jump to au Records
TV
Camera
Data Folder
PC Site Viewer
Function
Jump to EZ Machi-Uta
Accessories
21
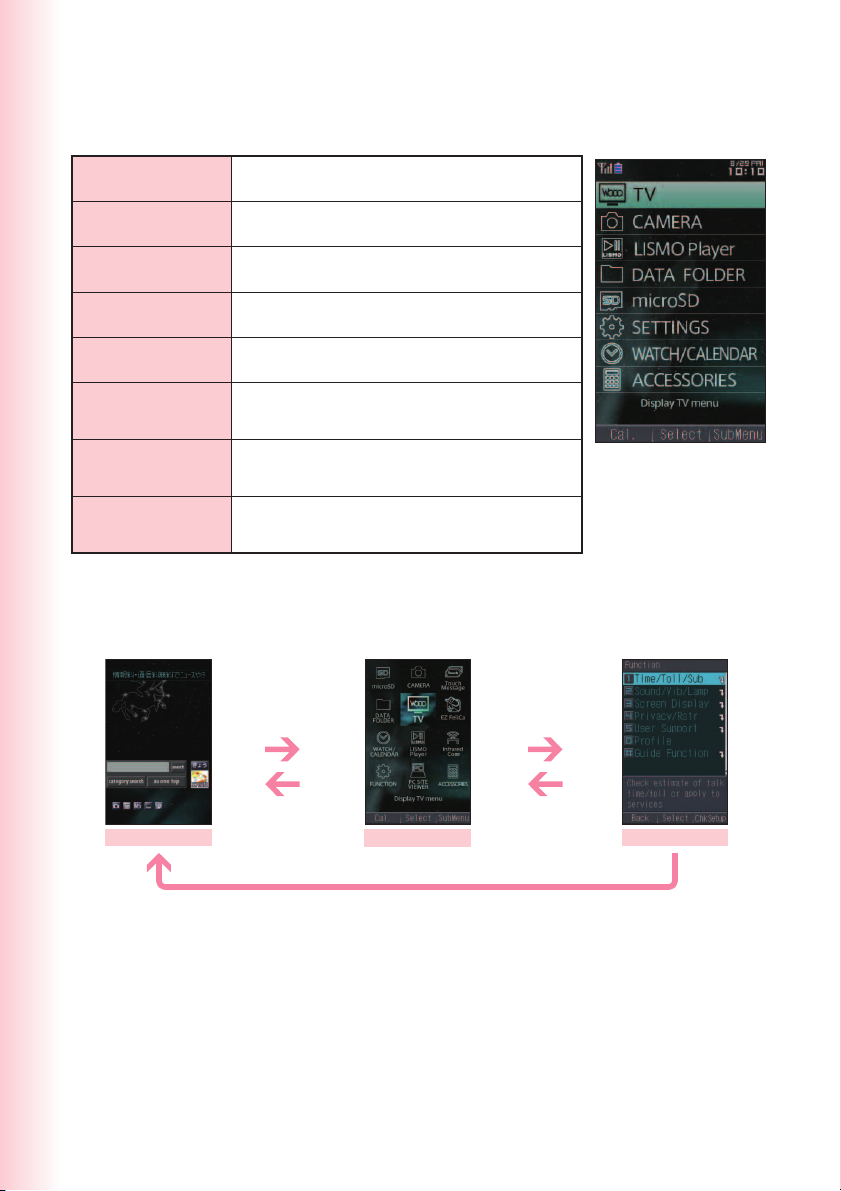
Using the “Simple” menu
■
Use j to select the icon, and then press c (Select) to access the
function associated with the icon.
TV
CAMERA
LISMO Player
DATA FOLDER
microSD
SETTINGS
WATCH/
CALENDAR
ACCESSORIES
Using the Main Menu
■
Television (1Seg)/EZ Channel-Plus
Photo/Movie/Bar code Reader
Play music/video clips
Check and play stored data
Check and play stored data
Incoming settings, display settings and other
frequently used setting functions
Alarm/Calendar/Schedule/Task List and other
functions
Mobile Dictionary/PC Site Viewer/Infrared
Communication and other functions
Example: To display the function screen from the main menu.
Press a to select
“FUNCTION,” and
c
then press
c
(Select).
22
Standby screen
returns to the
C
previous screen.
Holding down F returns to the standby screen.
Main menu
C returns to the
previous screen.
Function screen
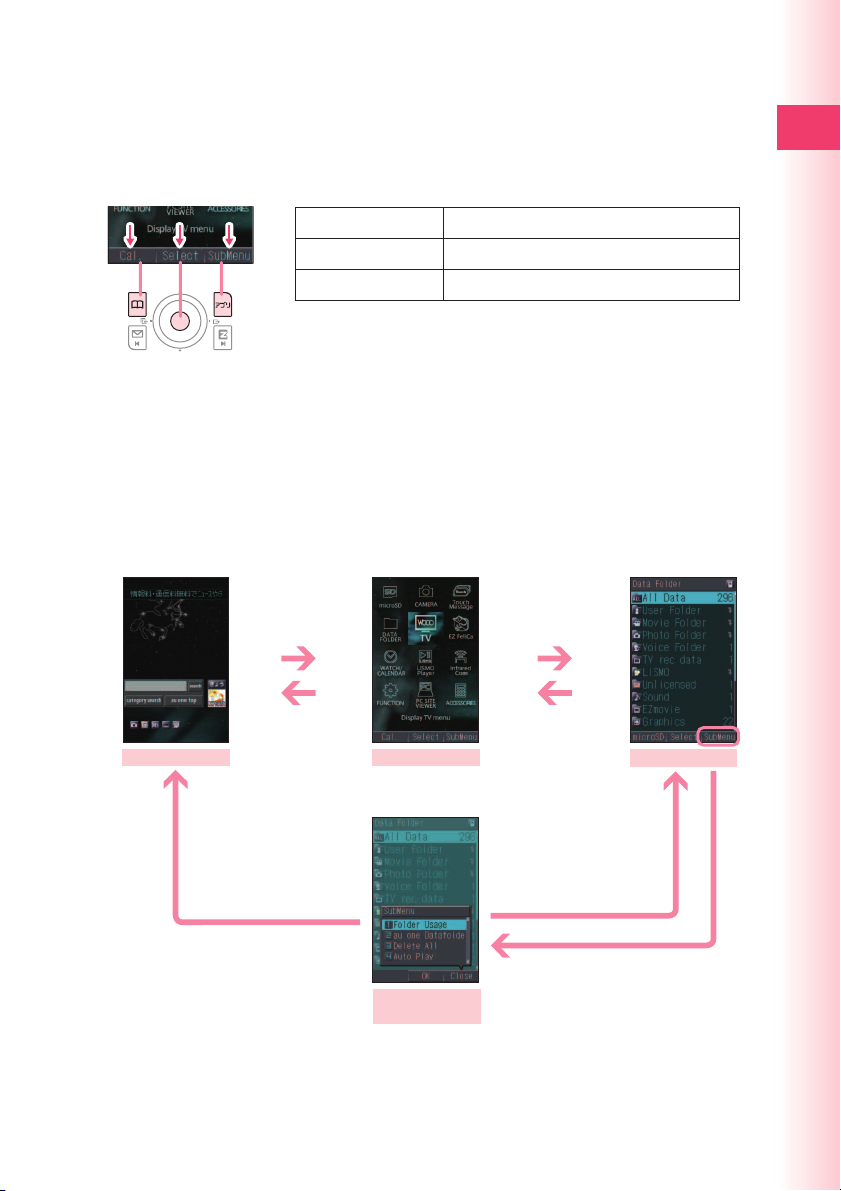
■ Using Soft Keys
Left
Center
Right
Soft keys are the keys you use to execute the functions along with
the bottom of the screen. The table below explains how to assign the
soft keys to the on-screen functions. Note that the function of each
soft key depends on the currently displayed screen.
Left
Center
Left Center Right
Right
Left soft key
Center soft keycExecutes the function on the center.
Right soft key
&
Executes the function on the left.
Executes the function on the right.
%
■ Using submenus
Pressing the soft key that corresponds to the “SubMenu” at the
bottom of the display will display a submenu of various operations
related to the function you are currently using.
Example: To open the folder list submenu screen from the folder list
screen.
Press
a to select
“DATA FOLDER,”
c
and then press
c (Select).
Ready
Standby screen
Holding down F returns
to the standby screen.
returns to the
C
previous screen.
Main menu
Folder list
submenu screen
returns to the
C
previous screen.
Folder list screen
C returns to the previous
screen. Or,
closes the submenu.
%
% (Close)
(SubMenu)
23
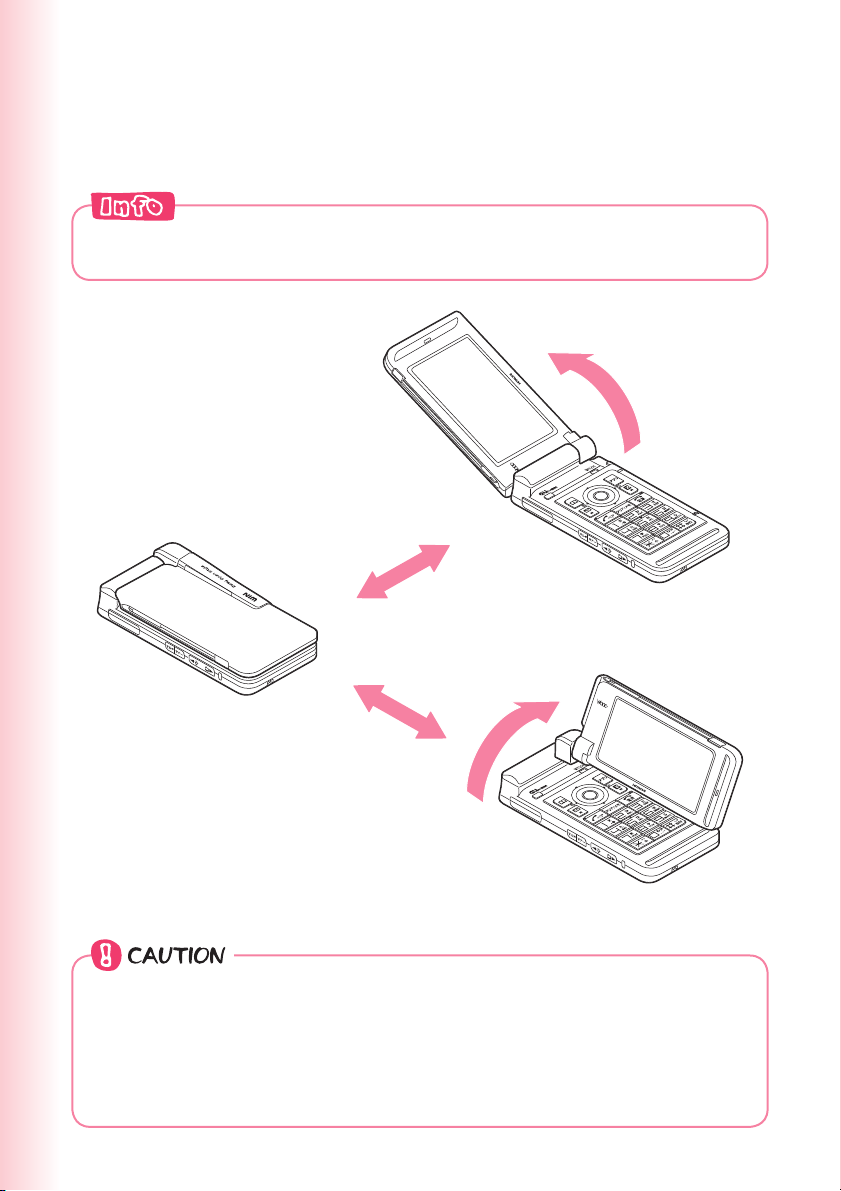
Positions of W62H
W62H has two positions: Regular open position which the display part
open lengthwise, and Wide open position which the display part open
crosswise.
In this manual, if the position is not specifi ed, the operation step
explanations are described in Regular open position.
Regular open position
Wide open position
24
When re-opening from Regular open position to Wide open position, or
◎
from Wide open position to Regular open position, always close your
cellphone before re-opening. If you force power when your cellphone is
not closed, it may cause damage.
In Regular open position and Wide open position, do not force to close
◎
your cellphone except to the direction it closes. It may cause damage.
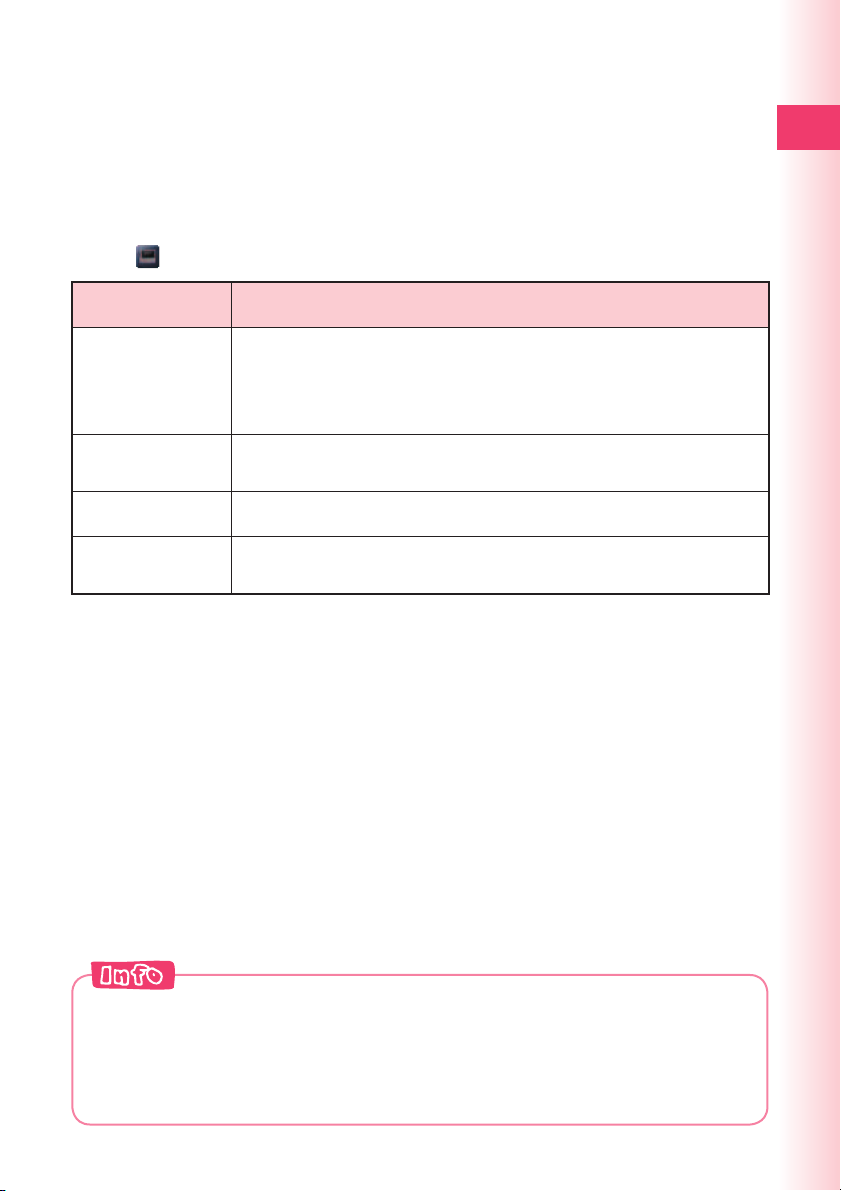
Wide open position features
In Wide open position, you can enjoy Television (1Seg), PC Site Viewer,
PC Document Viewer, EZ apps in the wide screen. Also, you can set the
following functions to start just by opening your cellphone in Wide open
position while the standby screen is displayed (“Wide Open Start”). To
set “Wide Open Start,” press d while the standby screen is displayed,
select
MEDIA STAND
(Initial setting)
and press c (Select).
Function Description
Select from “FixedAnime+News” (Initial setting)/“FixedAnime”/
“Slideshow” and display animations or graphics on the standby screen.
• While the Media Stand is displayed, press g to start PC Site
Viewer, press f to start Television (1Seg).
Ready
TV (1Seg)
PC Site Viewer
None
You can not make call in Wide open position. If you receive a call in Wide
open position, re-open W62H in Wide open position before answering.
In Wide open position, you can make or answer a call only when fl attype switched earphone microphone (option) or fl at-type stereo earphone
microphone (option) is attached.
You can view Television (1Seg) on the wide screen.
“Wide Open Start” (Page 84)
→
You can enjoy net surfi ng on the wide screen.
Displays normal standby screen.
Making/answering calls are unavailable.
25

Initializing E-mail and EZweb
An EZweb subscription is required to use e-mail, EZweb or other EZ
services. If you did not subscribe when you purchased your phone,
contact your nearest au shop or the au Customer Service Center.
You will be assigned an e-mail address automatically when you perform the
※
EZweb initialization procedure.
While the standby screen
is displayed, press L.
Press c (OK).
Wait until the phone connects to the
server for initialization.
After your automatically
assigned e-mail address
appears, press c (OK).
26
Pressing R/% also allows you to make initial settings.
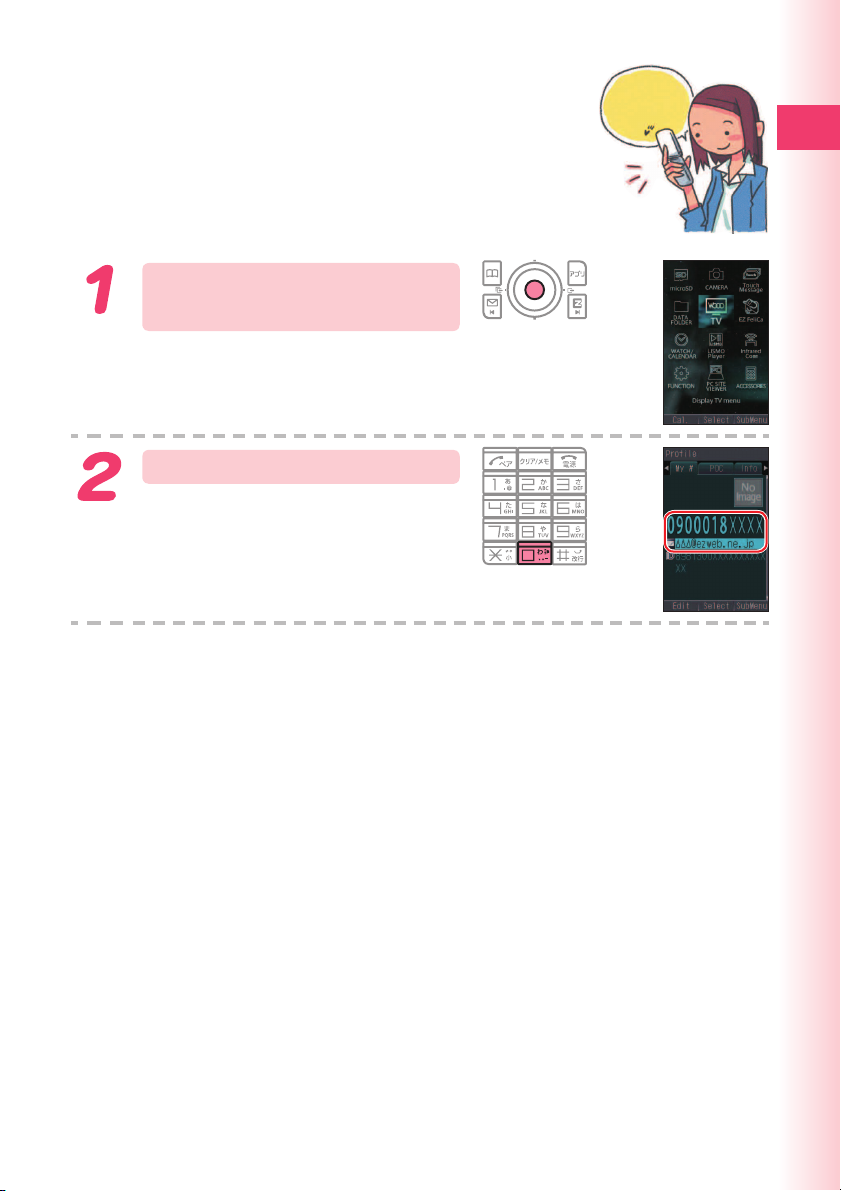
Looking Up Your Current Phone Number and E-mail Address
While the standby screen
is displayed, press c.
My phone
number and
mail address
Ready
Press
Your current phone number and e-mail
address appear.
0
.
27
 Loading...