

Page 1

VIDEO CASSETTE RECORDER
VT-FX621A
Owner's manual
Using these quality features:
• Super rewind and fast forward
• Multi-channel TV sound (MTS).
• 8-program/1-year preset recording.
• Auto tracking system automatically adjusts the tracking so the picture is
optimized.
• Frequency synthesized tuner provides easy, preset tuning of up to 68 broadcast
TV channels and 125 cable channels.
• VHS Hi-Fidelity sound in playback.
• On-screen programming guide.
Hitachi Home Electronics (America), Inc. HITACHI (HSC) CANADA INC
3890 Steve Reynolds Blvd., Norcross, GA 30093 3300 Trans Canada Highway, Pointe Claire,
Tel. 770-279-5600 Quebec, H9R 1B1, CANADA
HITACHI SALES CORPORATION OF HAWAII, INC
3219 Koapaka Street, Honolulu, Hawaii 96819
Tel. 808-836-3621
Tel. 514-697-9150
1
Page 2

TABLE OF CONTENTS
FOR YOUR SAFETY..................................................................................................................2
IMPORTANT SAFEGUARDS.....................................................................................................3
CUSTOMER CONTROLS..........................................................................................................7
REMOTE OPERATION............................................................................................................10
CASSETTE TAPES..................................................................................................................11
BASIC ANTENNA HOOKUP [A]...............................................................................................12
ADVANCED ANTENNA HOOKUP -AV HOOKUP [B]..............................................................13
BASIC CABLE HOOKUP [C]....................................................................................................14
ADVANCED CABLE HOOKUP -AV HOOKUP [D]...................................................................15
BASIC CABLE HOOKUP -WITH CABLE BOX [E]....................................................................15
ADVANCED CABLE HOOKUP -WITH CABLE BOX [F]...........................................................16
ADVANCED CABLE HOOKUP -WITH CABLE BOX AND SPLITTER [G] ...............................17
SETTING THE CLOCK ............................................................................................................17
PRE-TUNING THE VCR TUNER.............................................................................................19
PLAYBACK...............................................................................................................................23
SPECIAL PLAYBACK EFFECTS.............................................................................................25
USING THE "INDEX" FEATURE ..............................................................................................29
VIEWING THE ON-SCREEN DISPLAY...................................................................................30
INDEX WITH THE TIME COUNTER........................................................................................31
RECORDING A PROGRAM.....................................................................................................32
RECORDING A PROGRAM -RECORDING TIPS....................................................................35
INSTANT RECORDING TIMER...............................................................................................37
DELAYED RECORDING..........................................................................................................38
PROGRAM REVIEW................................................................................................................42
PROGRAMMING THE VCR REMOTE TO CONTROL YOUR TV...........................................43
PROGRAMMING THE VCR REMOTE TO CONTROL YOUR CABLE BOX............................45
INTEGRATING YOUR STEREO SYSTEM WITH YOUR VCR ................................................46
COPYING TAPES FROM A CAMCORDER.............................................................................47
COPYING FROM ONE VCR TO ANOTHER VCR (DUBBING)................................................48
PROBLEM GUIDE / MAINTENANCE.......................................................................................50
TECHNICAL SPECIFICATIONS ..............................................................................................51
FOR YOUR SAFETY
POWER SUPPLY: AC 120V, 60 Hz ONLY.
The POWER button turns the VCR on and off, leaving the clock/timer unaffected. If the
unit is to be left unattended for a long period, it is recommended that the unit be
completely switched off and unplugged.
Illustrated below is the label on the back of your unit.
2
Page 3
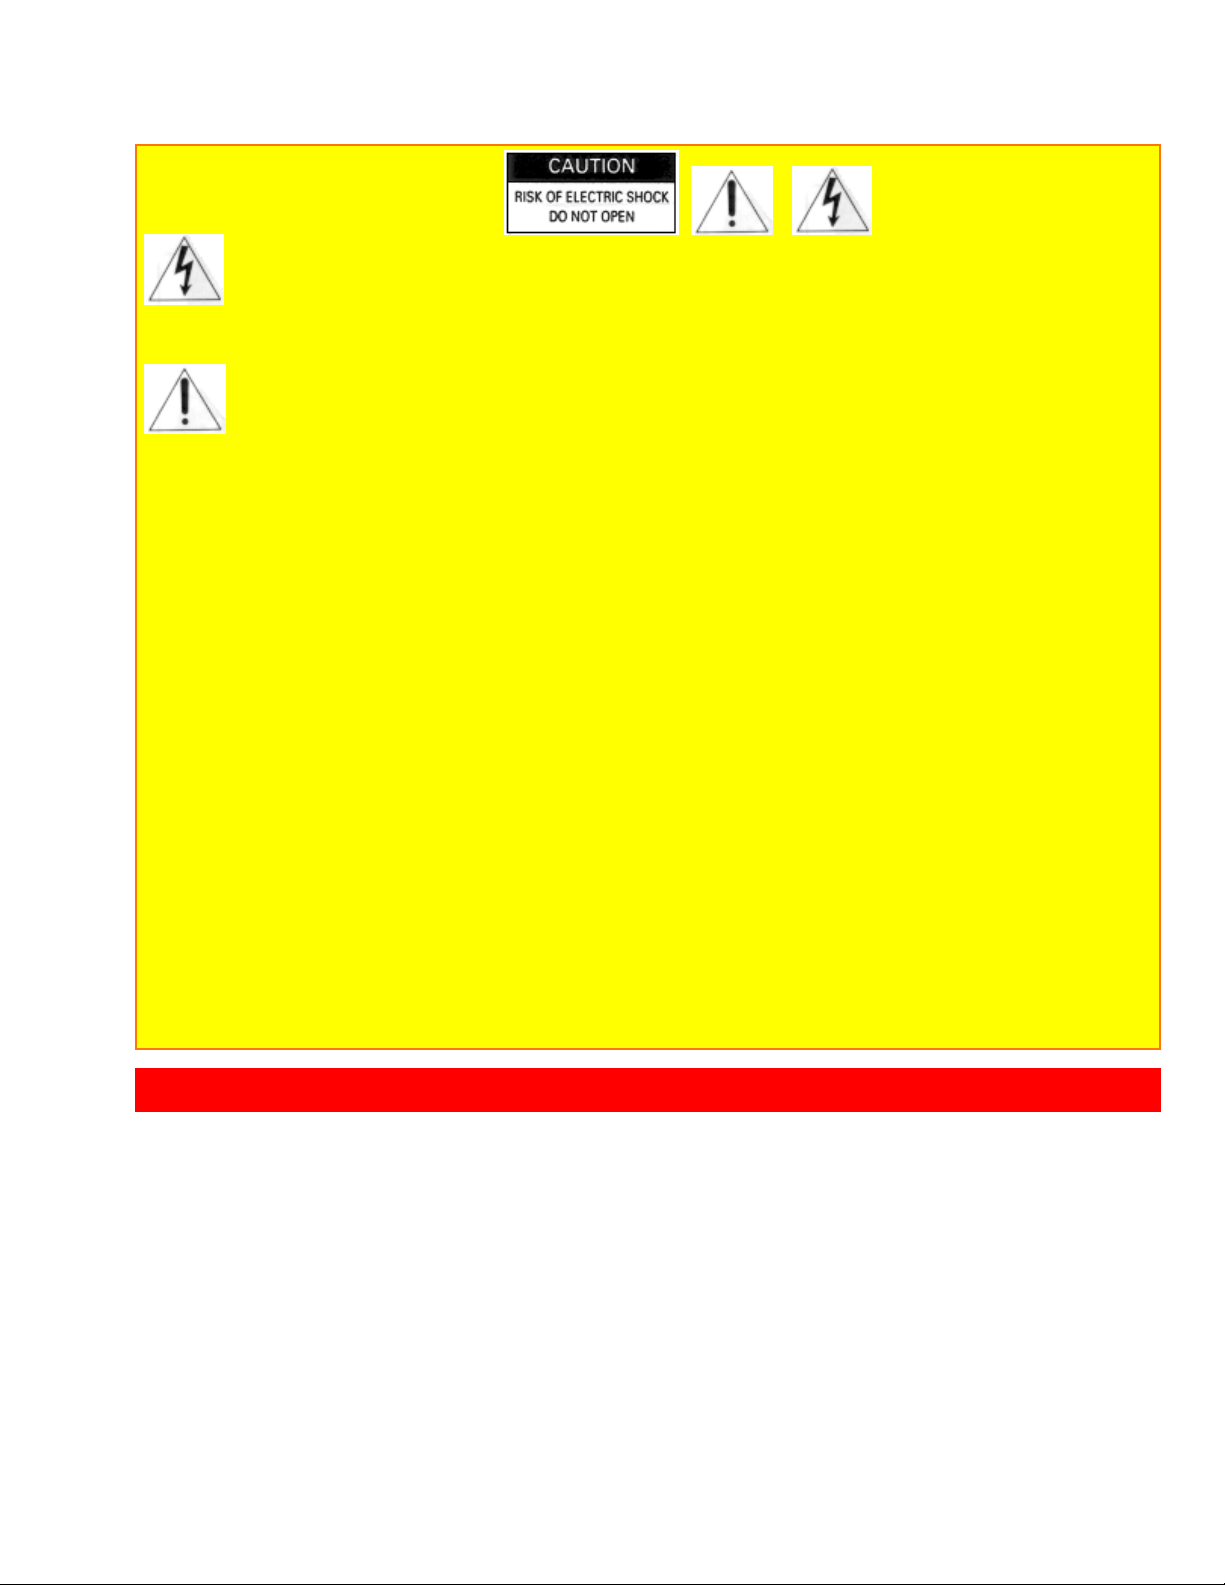
This symbol warns the user that uninsulated voltage within the unit may have sufficient
magnitude to cause electric shock. Therefore, it is dangerous to make any kind of contact with
any inside part of this unit.
This symbol alerts the user that important literature concerning the operation and
maintenance of this unit has been included. Therefore, it should be read carefully in order to
avoid any problems.
CAUTION: TO REDUCE THE RISK OF ELECTRIC
SHOCK, DO NOT REMOVE COVER (OR BACK).
NO USER-SERVICEABLE PARTS INSIDE.
REFER SERVICING TO QUALIFIED SERVICE PERSONNEL.
WARNING: Many television programs and films are copyrighted. In certain circumstances,
copyright law may apply to private in-home videotaping of copyrighted materials.
WARNING: TO PREVENT FIRE OR ELECTRIC SHOCK, DO NOT EXPOSE
THIS APPLIANCE TO RAIN OR MOISTURE.
CAUTION: TO PREVENT ELECTRIC SHOCK, MATCH WIDE BLADE OF PLUG TO WIDE
SLOT, FULLY INSERT.
Caution to the user: Changes or modifications not expressly approved by the party
responsible for compliance could void the user's authority to operate the equipment.
"Note to CATV system installer: This reminder is provided to call the CATV system installer's
attention to Article 820-40 of the NEC that provides guidelines for proper grounding and, in
particular, specifies that the cable ground shall be connected to the grounding system of the
building, as close to the point of cable entry as practical".
IMPORTANT SAFEGUARDS
In addition to the careful attention devoted to quality standards in the manufacture of
your video product, safety is a major factor in the design of every instrument. But,
safety is your responsibility too.
This page lists important information that will help to assure your enjoyment and proper
use of a Video Cassette Recorder and accessory equipment. Please read it carefully
before operating your video product and keep it in a handy place for future reference.
INSTALLATION
1 Read and Follow Instructions -- All the safety and operating instructions should be
read before the video product is operated. Follow all operating and use instructions.
3
Page 4

2 Retain Instruction -- The safety and operating instructions should be retained for
future reference.
3 Heed Warnings -- Comply with all warnings on the video product and in the
operating instructions.
4 Polarized Plug -- This video product is equipped with a polarized alternating current
line plug (a plug having one blade wider than the other). This plug will fit into the power
outlet only one way. This is a safety feature. If you are unable to insert the plug fully
into the outlet, try reversing the plug. If the plug should still fail to fit, contact your
electrician to replace your obsolete outlet. To prevent electric shock do not use this
polarized plug with an extension cord, receptacle or other outlet unless the blades can
be fully inserted without blade exposure. If you need an extension, use a polarized
cord.
5 Power Sources -- This video product should be operated only from the type of power
source indicated on the marking label. If you are not sure of the type of power supply to
your home, consult your video dealer or local power company. For video products
intended to operate from battery power, or other sources, refer to the operating
instructions.
6 Overloading -- Do not overload wall outlets and extension cords as this can result in
a risk of fire or electric shock. Overloaded AC outlets and extension cords are
dangerous, and so are frayed power cords, damaged or cracked wire insulation and
broken plugs. They may result in a shock or fire hazard. Periodically examine the cord
and have it replaced by your service technician if appearance indicates damage or
deteriorated insulation.
7 Power Cord Protection -- Power supply cords should be routed so that they are not
likely to be walked on or pinched by items placed upon or against them, paying
particular attention to cords at plugs, convenience receptacles, and the point where they
exit from the appliance.
8 Ventilation -- Slots and openings in the cabinet are provided for ventilation to ensure
reliable operation of the video product and to protect it from overheating. These
openings must not be blocked or covered. The openings should never be blocked by
placing the video product on a bed, sofa, rug or other similar surface. This video
4
Page 5
product should never be placed near or over a radiator or heat register. This video
product should not be placed in a built-in installation such as a bookcase or rack unless
proper ventilation is provided or the video product manufacturer's instructions have
been followed.
9 Attachments -- Do not use attachments unless recommended by the video product
manufacturer as they may cause hazards.
Caution: Maintain electrical safety. Powerline operated equipment or accessories connected
to this unit should bear the UL listing mark or CSA certification mark on the accessory itself
and should not have been modified so as to defeat the safety features. This will help avoid
any potential hazard from electric shock or fire. If in doubt, contact qualified service personnel.
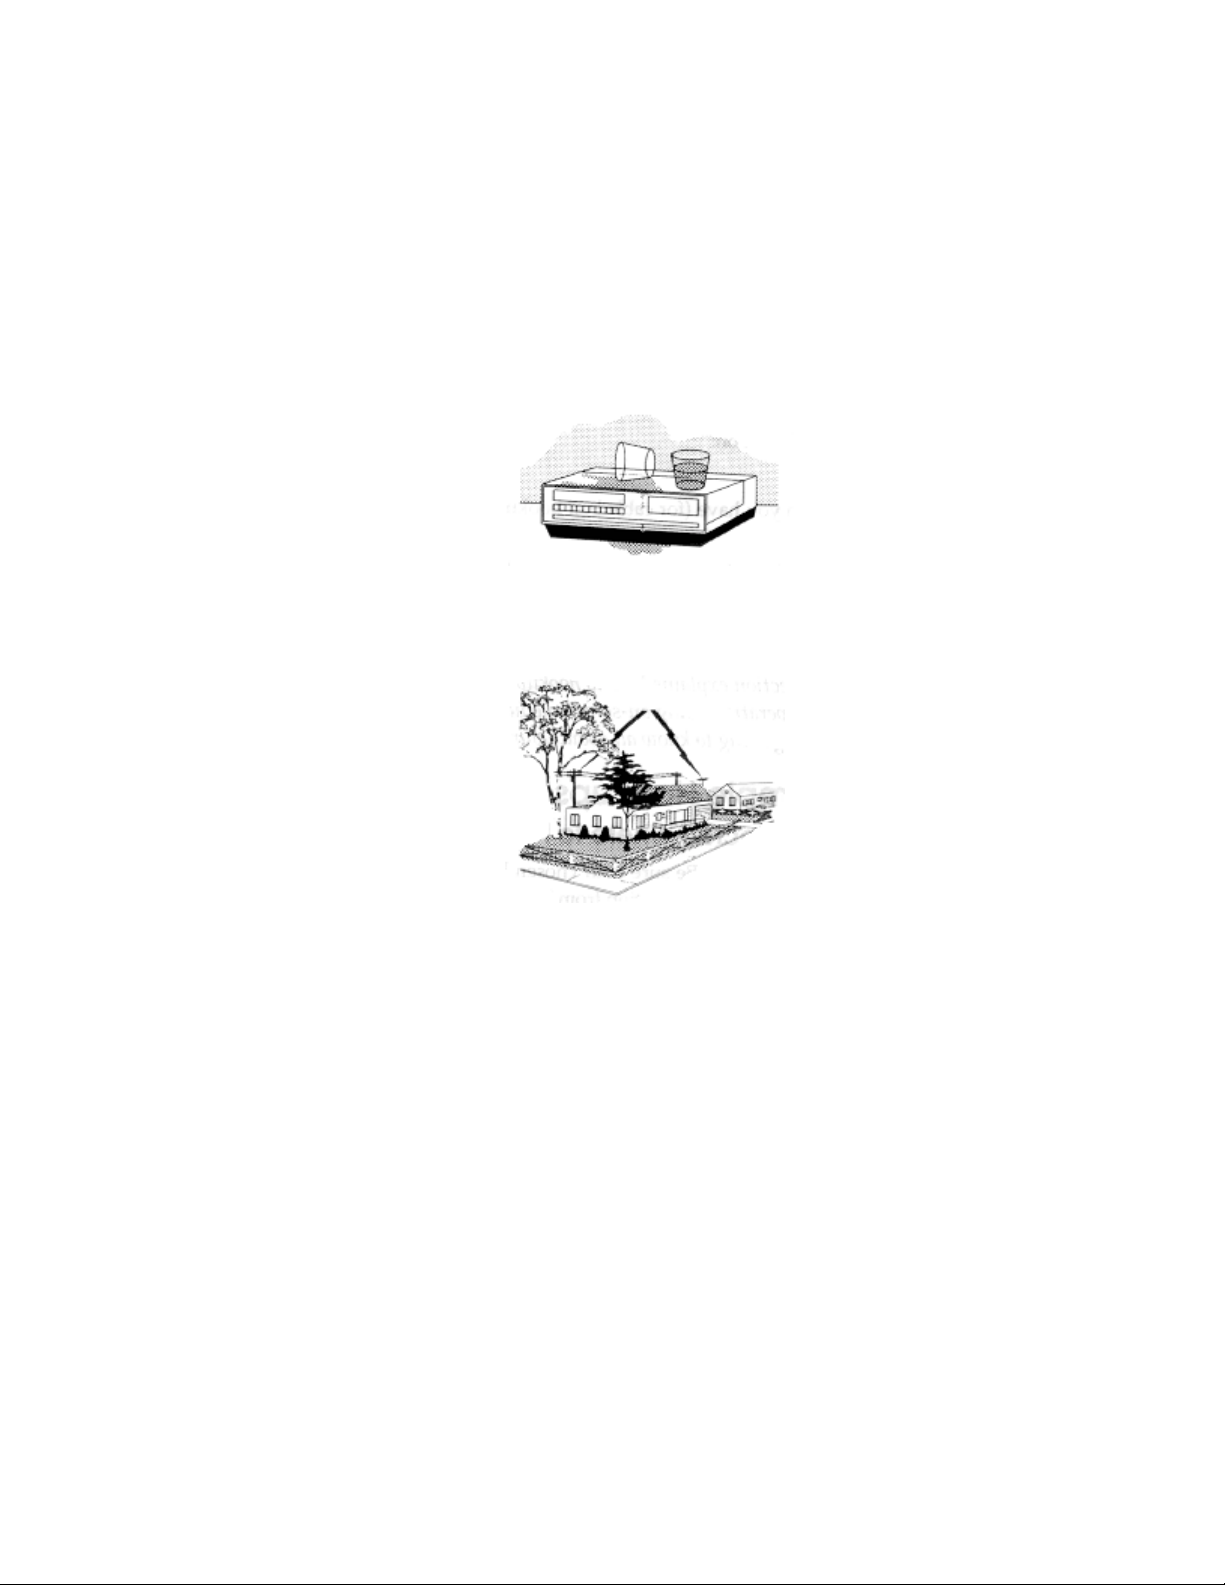
10 Water and Moisture -- Do not use this video product near water - for example, near
a bath tub, wash bowl, kitchen sink, or laundry tub, in a wet basement, or near a
swimming pool, and the like.
11 Accessories -- Do not place this video product on an unstable card, stand, tripod,
bracket or table. The video product may fall, causing serious injury to a child or adult,
and serious damage to the appliance. Use only with a cart, stand, tripod, bracket or
table recommended by the manufacturer, or sold with the video product. Any mounting
of the product should follow the manufacturer's instructions, and should use a mounting
accessory recommended by the manufacturer.
11A An appliance and cart combination should be moved with care. Quick stops,
excessive force, and uneven surfaces may cause the appliance and cart combination to
overturn.
12 Outdoor Antenna Grounding -- If an outside antenna or cable system is
connected to the video product, be sure the antenna or cable system is grounded so as
to provide some protection against voltage surges and built-up static charges. Section
810 of the National Electrical Code, ANSI/NFPA No. 70, provides information with
respect to proper grounding of the mast and supporting structure, grounding of the leadin wire to an antenna discharge unit, size of grounding conductors, location of antennadischarge unit, connection to grounding electrodes, and requirements for the grounding
electrode. See example below.
EXAMPLE OF ANTENNA GROUNDING
13 Power Lines -- An outside antenna system should not be located in the vicinity of
overhead power lines or other electric light or power circuits, or where it can fall into
such power lines or circuits. When installing an outside antenna system, extreme care
should be taken to keep from touching or approaching such power lines or circuits as
contact with them might be fatal. Installing an outdoor antenna can be hazardous and
5
Page 6
should be left to a professional antenna installer.
USE
14 Cleaning -- Unplug this video product from the wall outlet before cleaning. Do not
use liquid cleaners or aerosol cleaners. Use a damp cloth for cleaning.
15 Object and Liquid Entry -- Never push objects of any kind into this video product
through openings as they may touch dangerous voltage points or short-out parts that
could result in a fire or electric shock. Never spill liquid of any kind on the video
product.
16 Lightning -- For added protection for this video product during a lightning storm, or
when it is left unattended and unused for long periods of time, unplug it from the wall
outlet and disconnect the antenna or cable-system. This will prevent damage to the
video product due to lightning and power-line surges.
SERVICE
17 Servicing -- Do not attempt to service this video product yourself as opening or
removing covers may expose you to dangerous voltage or other hazards. Refer all
servicing to qualified service personnel.
18 Conditions Requiring Service -- Unplug this video product from the wall outlet and
refer servicing to qualified service personnel under the following conditions.
a. When the power-supply cord or plug is damaged.
b. If liquid has been spilled, or objects have fallen into the video product.
c. If the video product has been exposed to rain or water.
d. If the video product does not operate normally by following the operating instructions.
Adjust only those controls that are covered by the operating instructions. Improper
adjustment of o t her controls may result in damage a nd will often require extensive work
by a qualified technician to restore the video product to its normal operation.
e. If the video product has been dropped or the cabinet has been damaged.
f. When the video product exhibits a distinct change in performance - this indicates a
need for service.
19 Replacement Parts -- When replacement parts are required, have the service
technician verify that the replacements he uses have the same safety characteristics as
the original parts. Use of replacements specified by the video product manufacturer can
6
Page 7

prevent fire, electric shock or other hazards.
20 Safety Check -- Upon completion of any service or repairs to this video product, ask
the service technician to perform safety checks recommended by the manufacturer to
determine that the video product is in safe operating condition.
CUSTOMER CONTROLS
VCR Customer Controls
Item No. Function Page
1 POWER button 2
2 Infrared receiver 8
3 Cassette compartment 9
4 REC/IRT button 31
5 REW button 23
6 F.FWD button 23
7 PLAY button 24
8 STOP/EJECT button 9
9 CHANNEL ( up/down) 31
TRACKING buttons 23
VCR Display
10 AM/PM indicators 18
11 Time, 18
Tape counter, 28
Tape remaining or 28
VCR mode indicator 22
PLAY - playback 22
SRCH - double-speed play, 25
visual search and skip playback
["-" appears during reverse
direction viewing]
SLOW - slow play 25
REW - rewind 22
S:REW - high speed rewind 23
FF - fast forward S:FF - high speed fast forward 23
7
Page 8
STILL - play pause and frame
advance 24
12 REM (tape remaining time)
indicator 28
13 VCR, operate mode 14 Audio indicators -
15 - re cord (flashes durin g
record pause) 31
16 Tape-in indicator 9
17 TV channel or Auxiliary 31
(L) 43
18 Delayed recording indicator 37
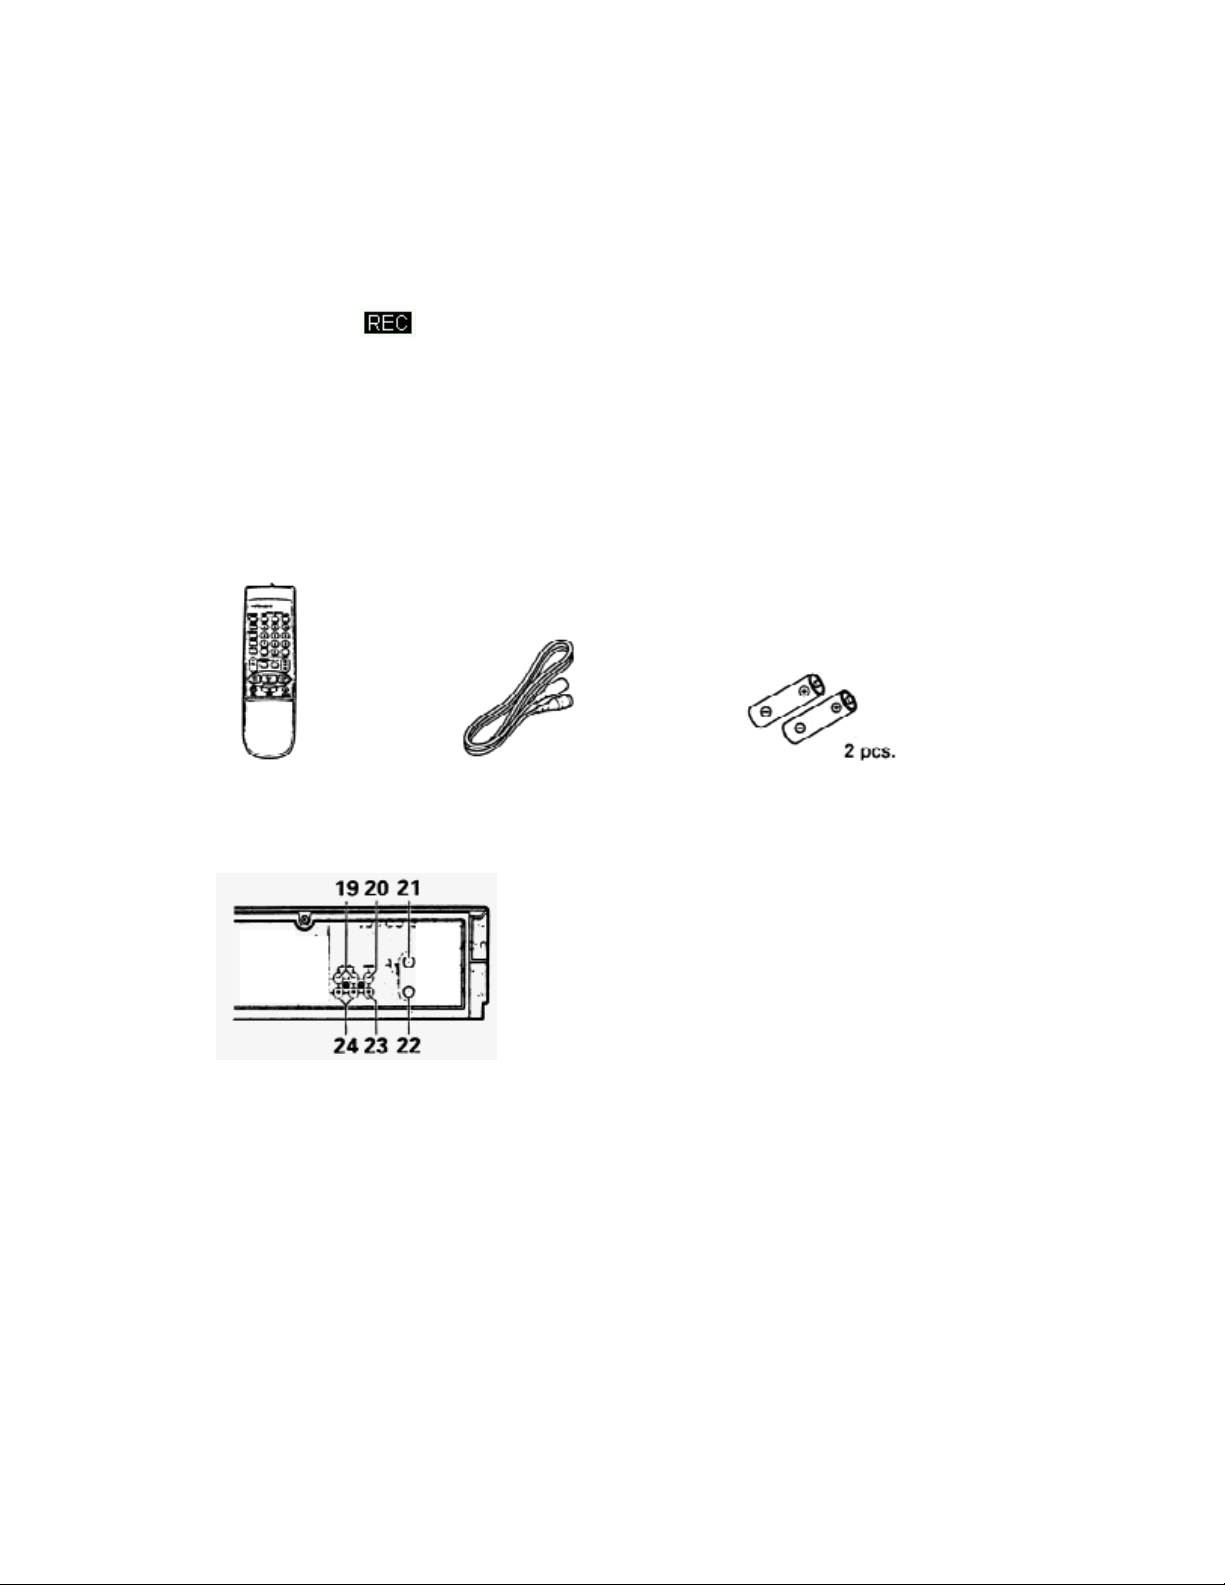
Accessories supplied
Check and identify the accessories supplied. If any are missing or appear damaged,
consult your dealer.
Remote Cable for connecting Batteries for remote
control this VCR to a TV control handset (R6)
VCR Customer Controls
Item No. Function Page
19 AUDIO IN L, R jacks 41
20 VIDEO IN jack 43
21 IN FROM ANT. - signal
input 10
22 OUT TO TV - signal to
TV 10
23 VIDEO OUT jack 11
24 AUDIO OUT L, R jacks 11
Remote Control Customer Controls
8
Page 9
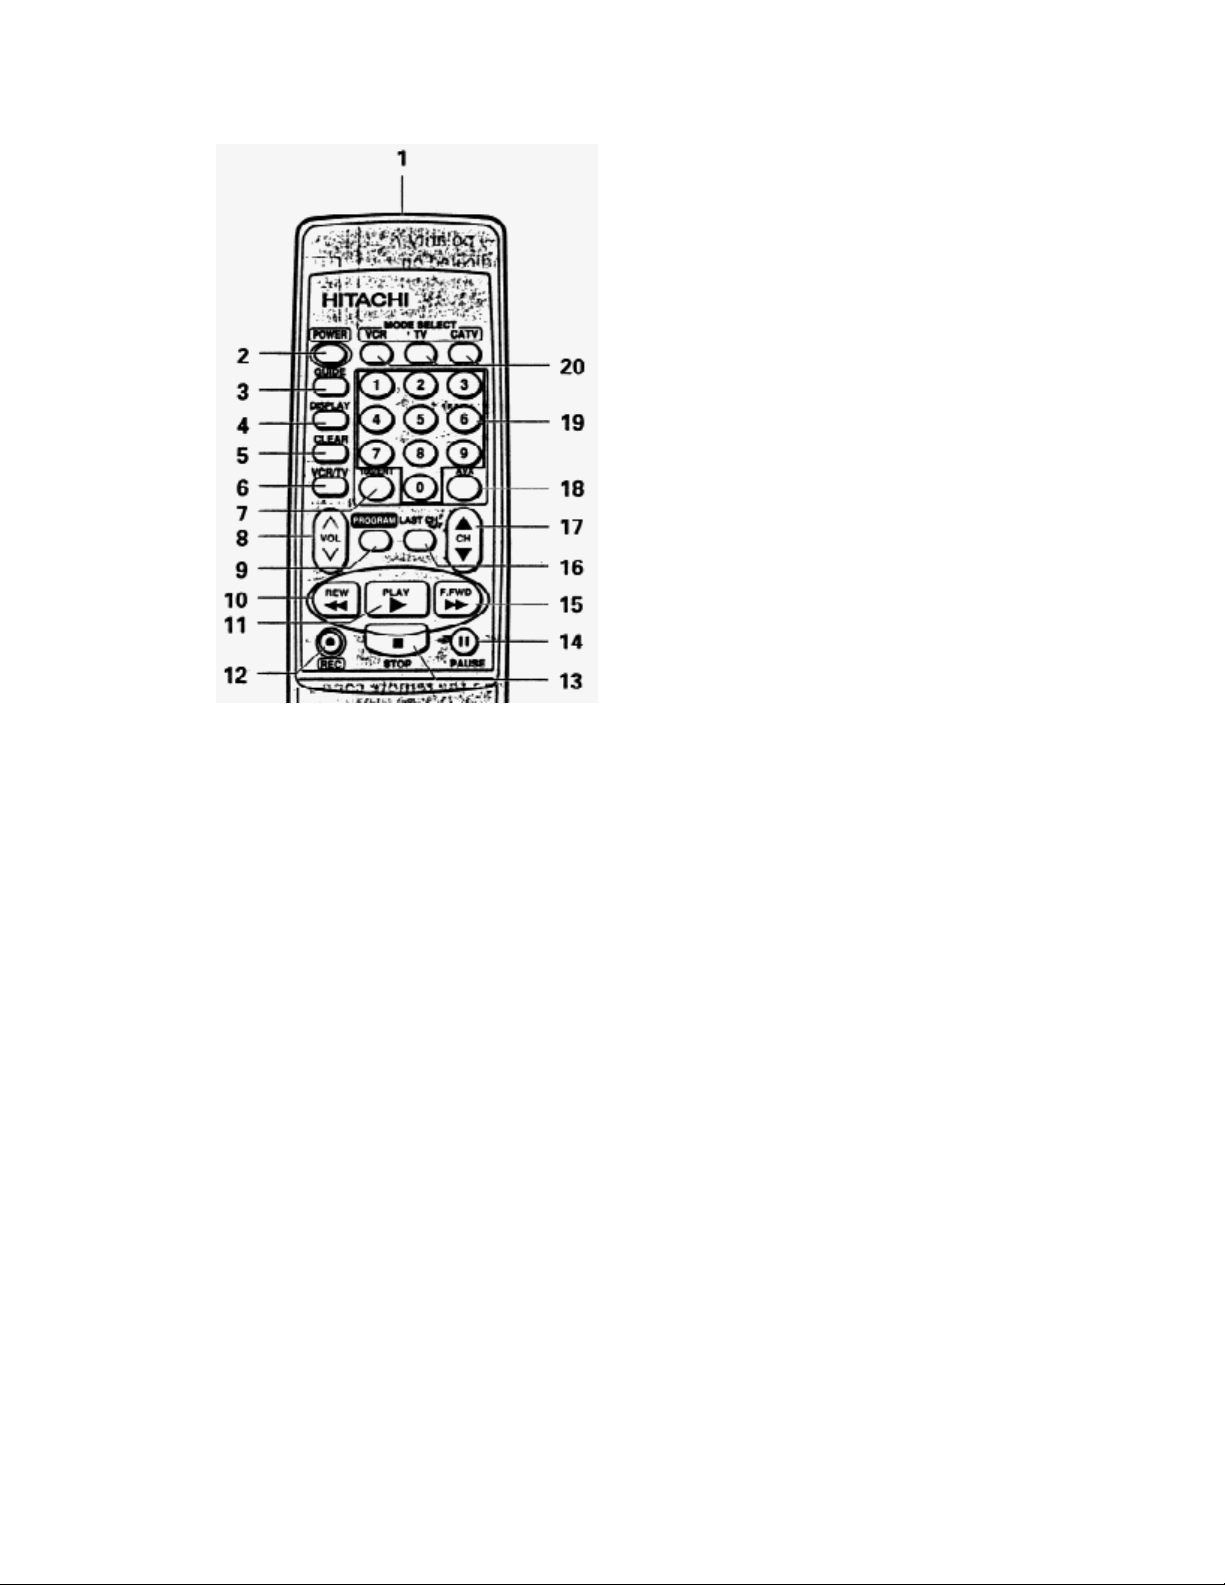
Item No. Function Page
1 Transmission window 8
2 POWER button 19
3 GUIDE - to recall OSD menu 19
4 DISPLAY - to recall on-screen
display 27
5 CLEAR - clears time counter 29
6 VCR/TV mode select button 10
7 100/ENT button 31
8 VOL button - increase or
decrease the audio volume 39
9 PROGRAM (programming)
button 35
10 REW button - fast rewind
or search 23
11 PLAY button - playback 20
12 REC - record button 31
13 STOP button - stops play/
record function 20
14 PAUSE button 24
15 F.FWD button - fast forward
or search 25
16 LAST CH button - switches
to the TV channel you watched
previously during the current
viewing session 39
17 CH (channel up/down) button 31
9
Page 10
18 AVX button - select L 4
19 Number buttons 17
20 VCR, TV, CATV - device buttons let
you set the remote to control
one of the three devices 8
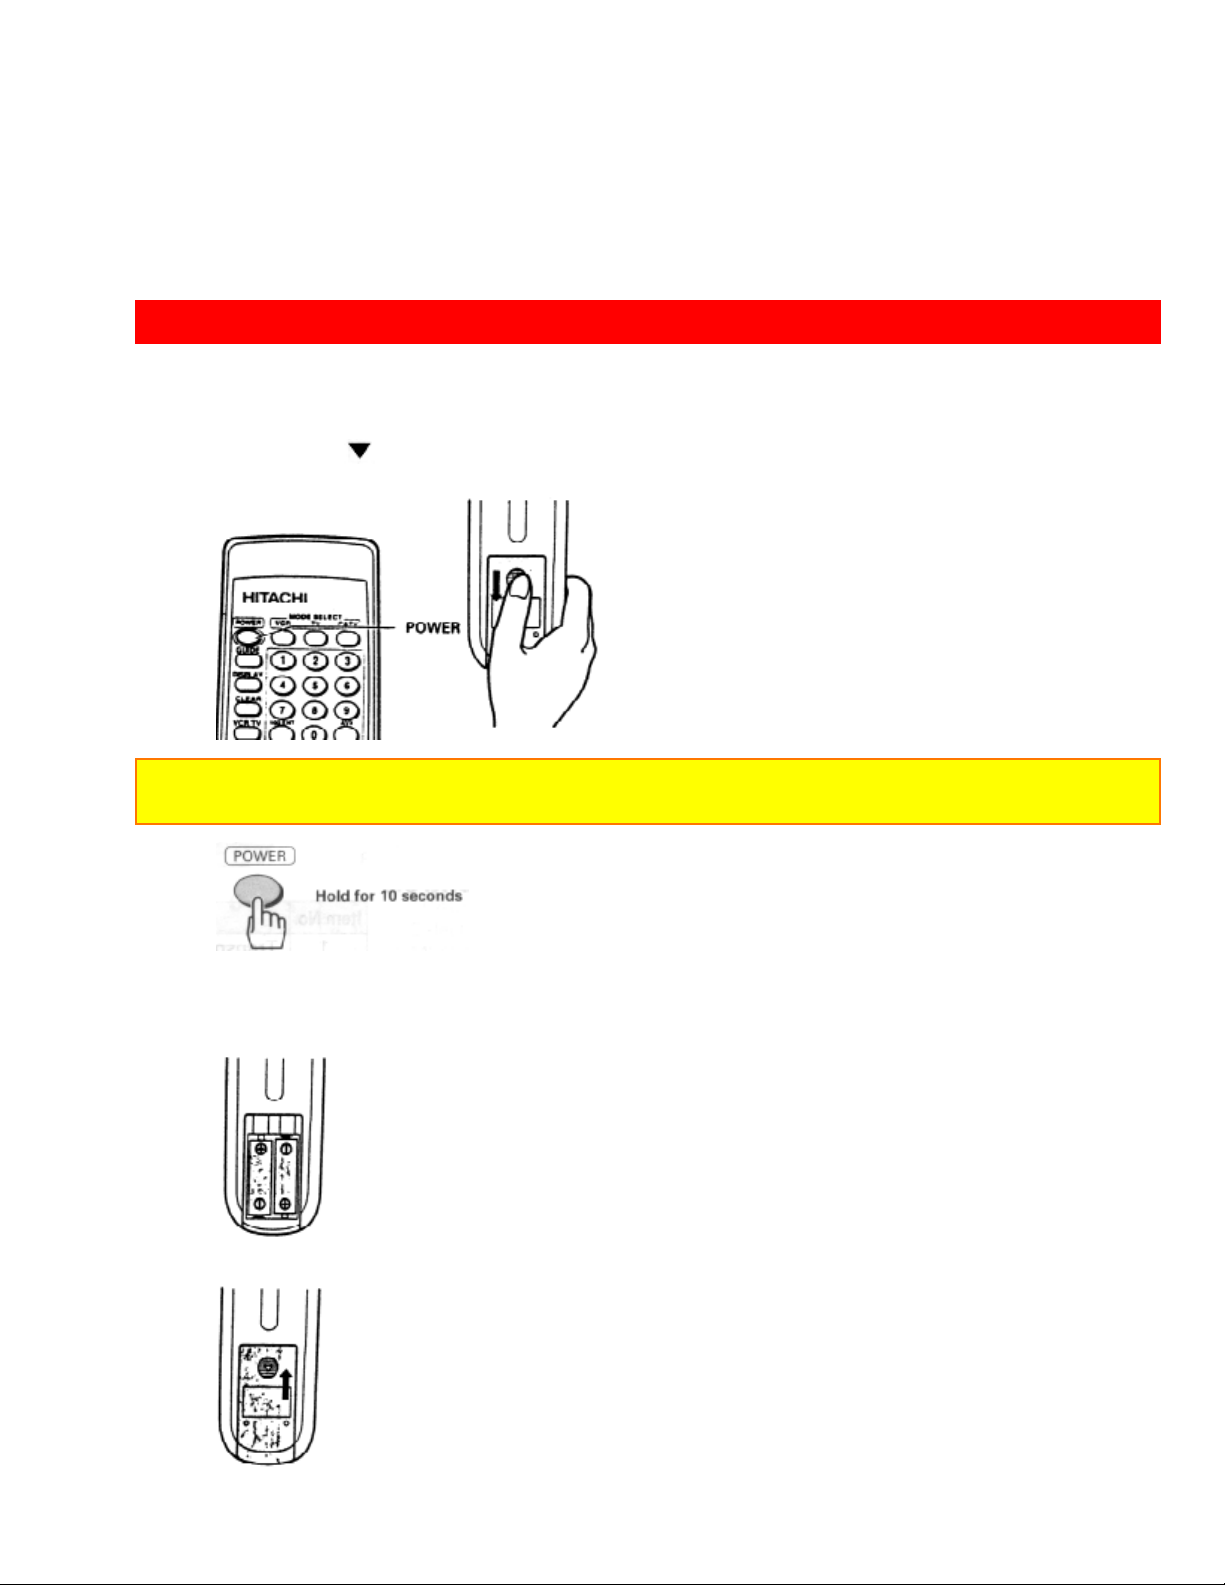
REMOTE OPERATION
Install batteries in the remote control
The remote control requires two "AA" batteries.
1 Push the mark and hold it, then slide the cover in the direction of the arrow
to remove it.
Note: When replacing the batteries, remove the old batteries and keep the POWER button
depressed for 10 seconds before inserting fresh batteries.
2 Install batteries.
• Align the positive (+) and negative (-) polarity marks on the batteries with those
indicated on the remote control.
3 Slide the cover in the direction of the arrow to close it.
10
Page 11
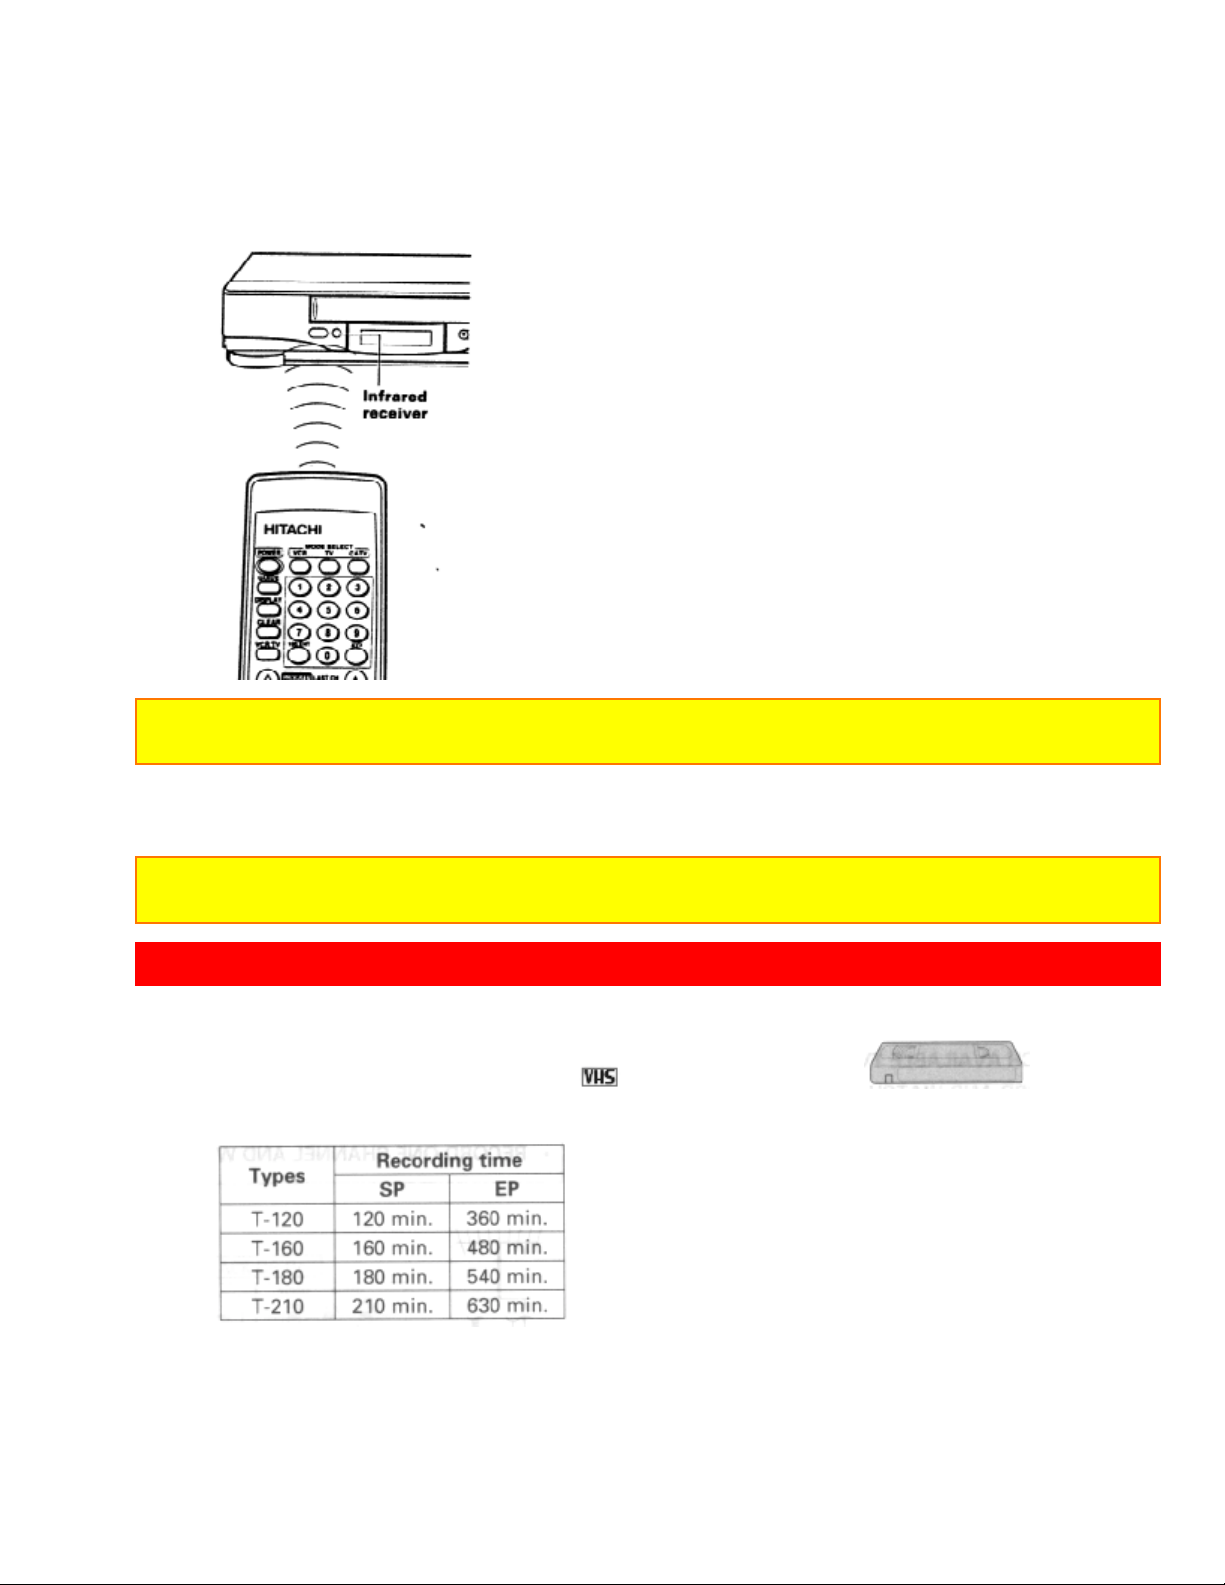
Operating in the remote control
1 Make sure there is no obstacle between the remote control and VCR's infrared
receiver.
Note: You cannot operate the VCR if there is an obstacle (for example, coffee table, sofa, etc)
between the VCR and remote control.
2 Point the remote control at the VCR's infrared receiver and press the required
button on the remote control.
Note: If the remote does not work even at close range, try replacing the batteries with two
fresh "AA" batteries.
CASSETTE TAPES
Types
Only use video cassettes with the mark in this V CR.
The table shows the recording time of different cassettes.
• To get the best quality picture, record at standard recording speed (SP).
• This VCR does not record at the LP speed, but it can play cassettes that were
recorded at the LP speed.
Safety tabs prevent erasure
11
Page 12
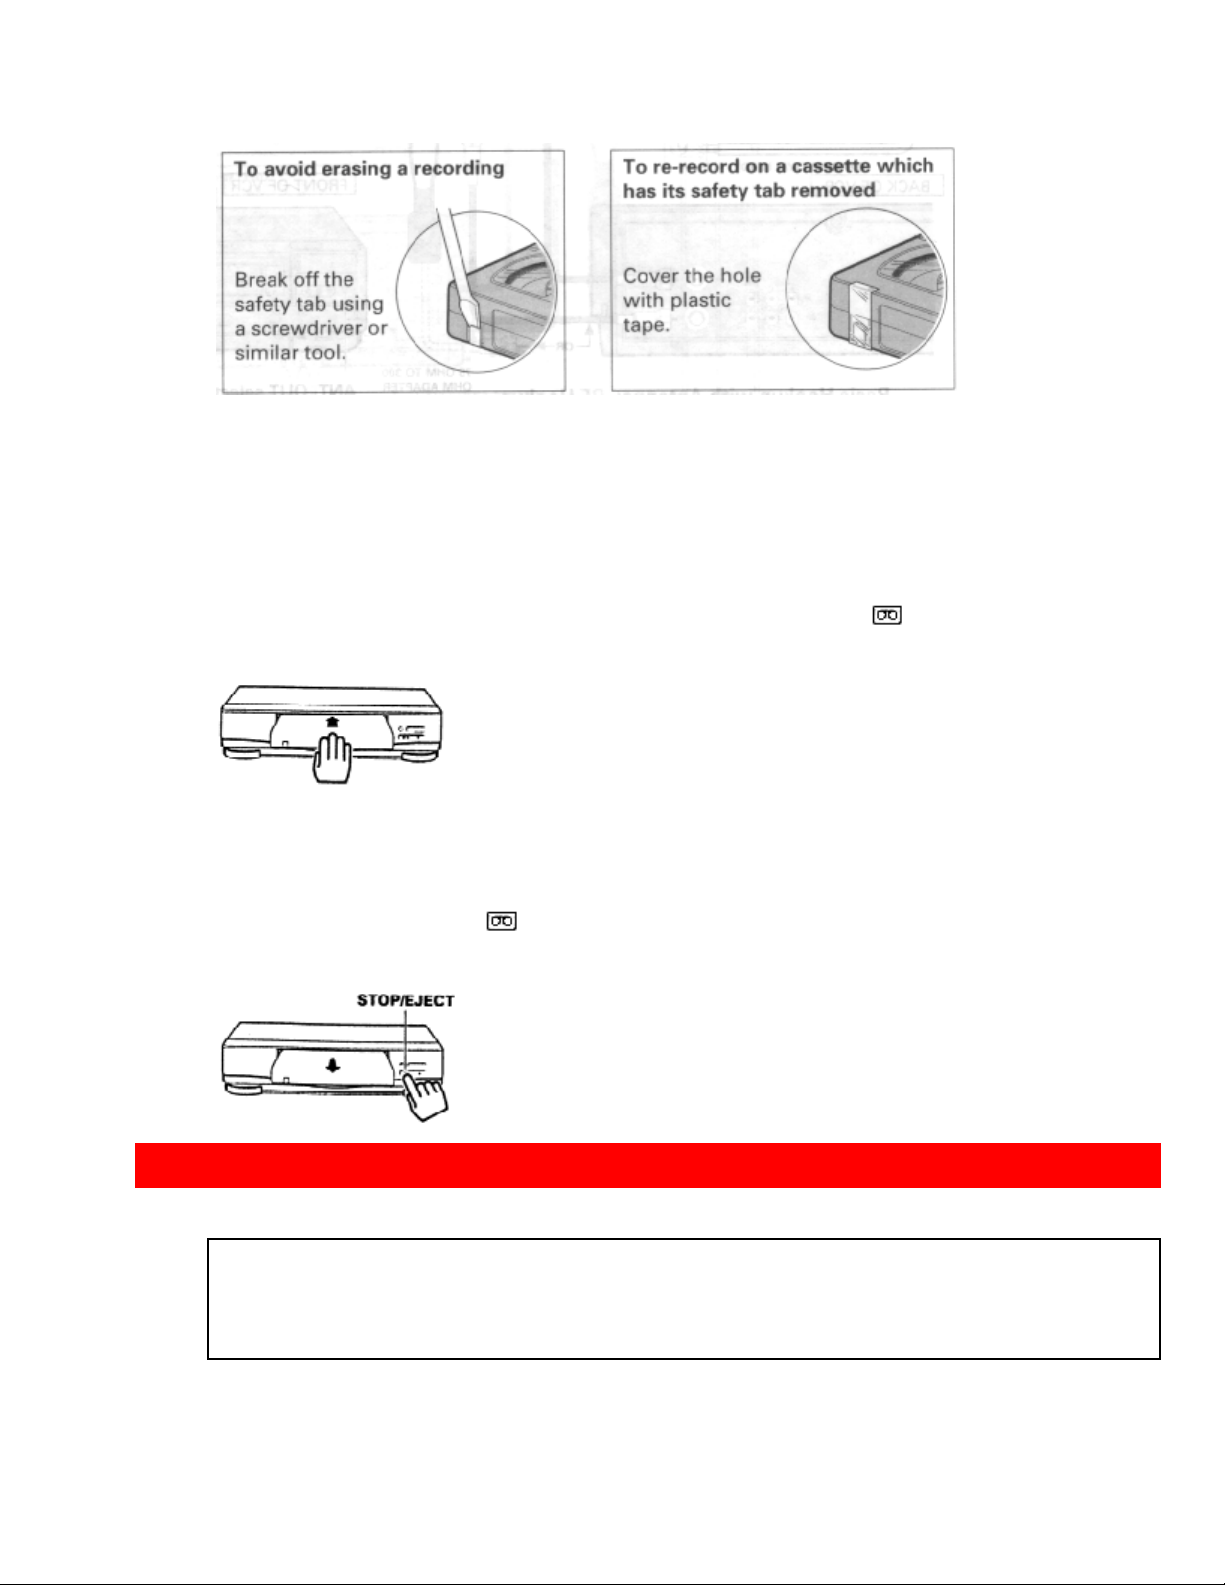
The VCR automatically enters the playback mode when a cassette without its safety tab
is inserted. The VCR won't record on a tape without a safety tab and the cassette
will be ejected if the REC or REC/IRT button is pressed. Be sure to check the safety
tab before inserting a cassette.
Insertion
Push the video cassette gently into the slot on the front of the VCR.
• The VCR automatically turns on and the "Tape-In" indicator turns on when the
cassette is in place.
Removal
Press the STOP/EJECT button on the VCR.
The cassette will come partially out of the co mpartment so you can pull it out.
• The "Tape-In" indicator turns off.
• The cassette can be ejected with the power on or off.
BASIC ANTENNA HOOKUP [A]
WITH THIS HOOKUP
YOU CAN...
• WATCH AVAILABLE TV CHANNELS
• RECORD AND W ATCH THE SAME CHANNEL
• RECORD ONE CHANNEL AND WATCH ANOTHER
Hookup A Illustration
12
Page 13
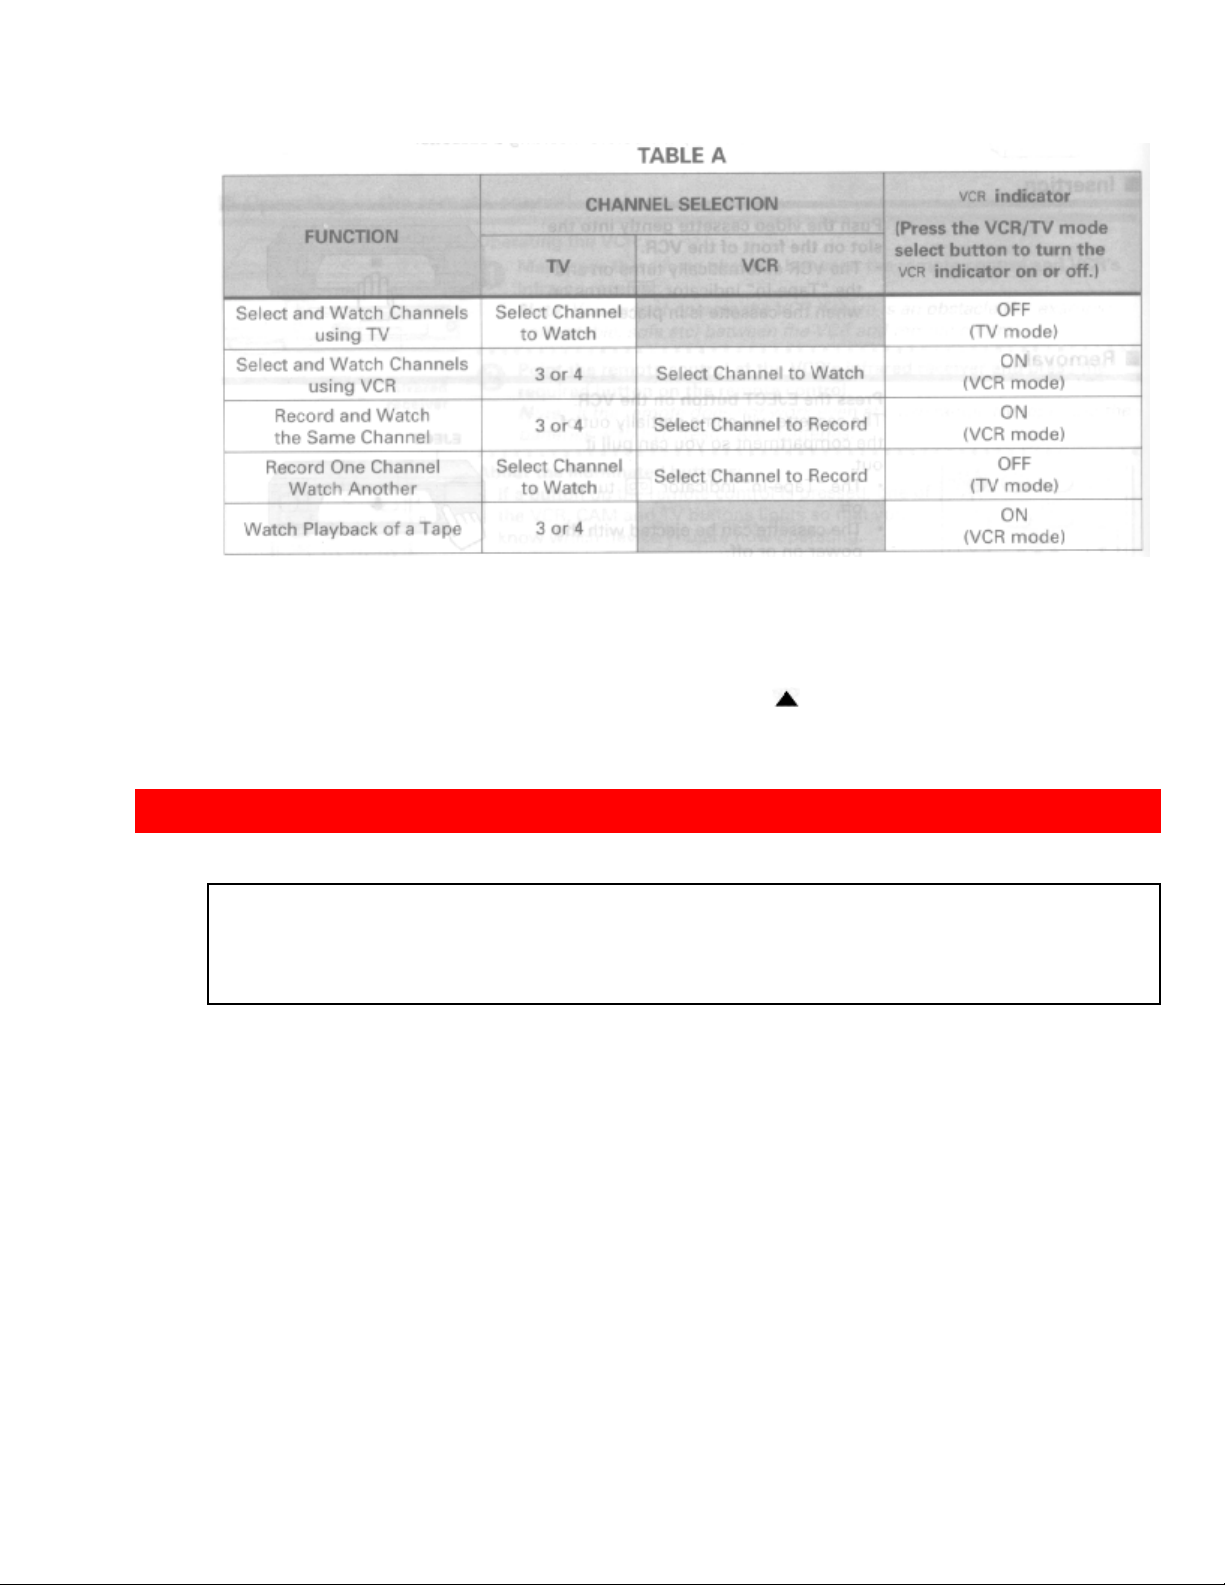
Switch the RF Channel
When the VCR is on, its video signal can come into your TV on either channel 3 or
channel 4. You need to select the appropriate channel.
• When the power is turned on, press the POWER button to turn it off. Press the PLAY
button on front of the VCR. Pressing the CHANNEL button alterantes between
RFCH-03 (channel 3) and RFCH-04 (channel 4) in the VCR's display.
Display the channel which is not used by a commercial channel in your area.
ADVANCED ANTENNA HOOKUP -AV HOOKUP [B]
WITH THIS HOOKUP
YOU CAN...
• WATCH AVAILABLE TV CHANNELS
• RECORD AND W ATCH THE SAME CHANNEL
• RECORD ONE CHANNEL AND WATCH ANOTHER
Hookup B Illustration
13
Page 14
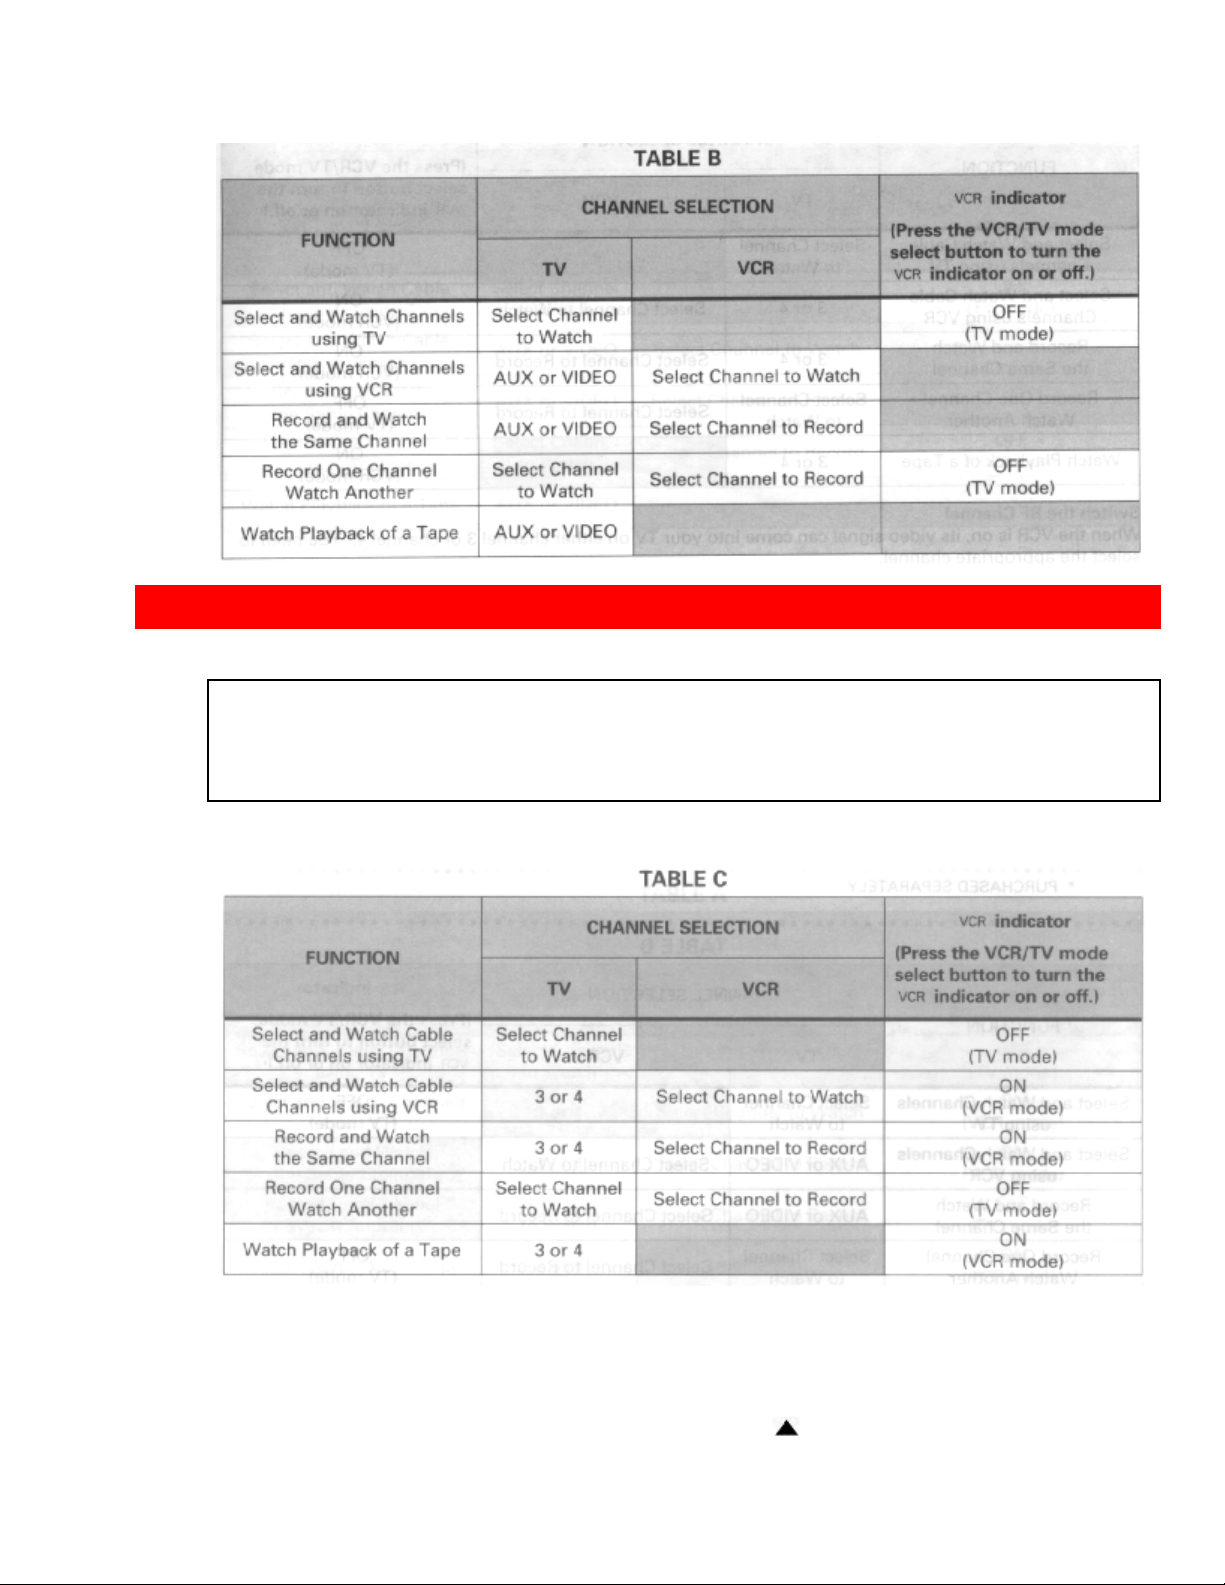
BASIC CABLE HOOKUP [C]
WITH THIS HOOKUP
YOU CAN...
• WATCH AVAILABLE CABLE CHANNELS
• RECORD AND W ATCH THE SAME CHANNEL
• RECORD ONE CHANNEL AND WATCH ANOTHER
Hookup C Illustration
Switch the RF Channel
When the VCR is on, its video signal can come into your TV on either channel 3 or
channel 4. You need to select the appropriate channel.
• When the power is turned on, press the POWER button to turn it off. Press the PLAY
button on front of the VCR. Pressing the CHANNEL button alterantes between
RFCH-03 (channel 3) and RFCH-04 (channel 4) in the VCR's display.
14
Page 15
Display the channel which is not used by a commercial channel in your area.
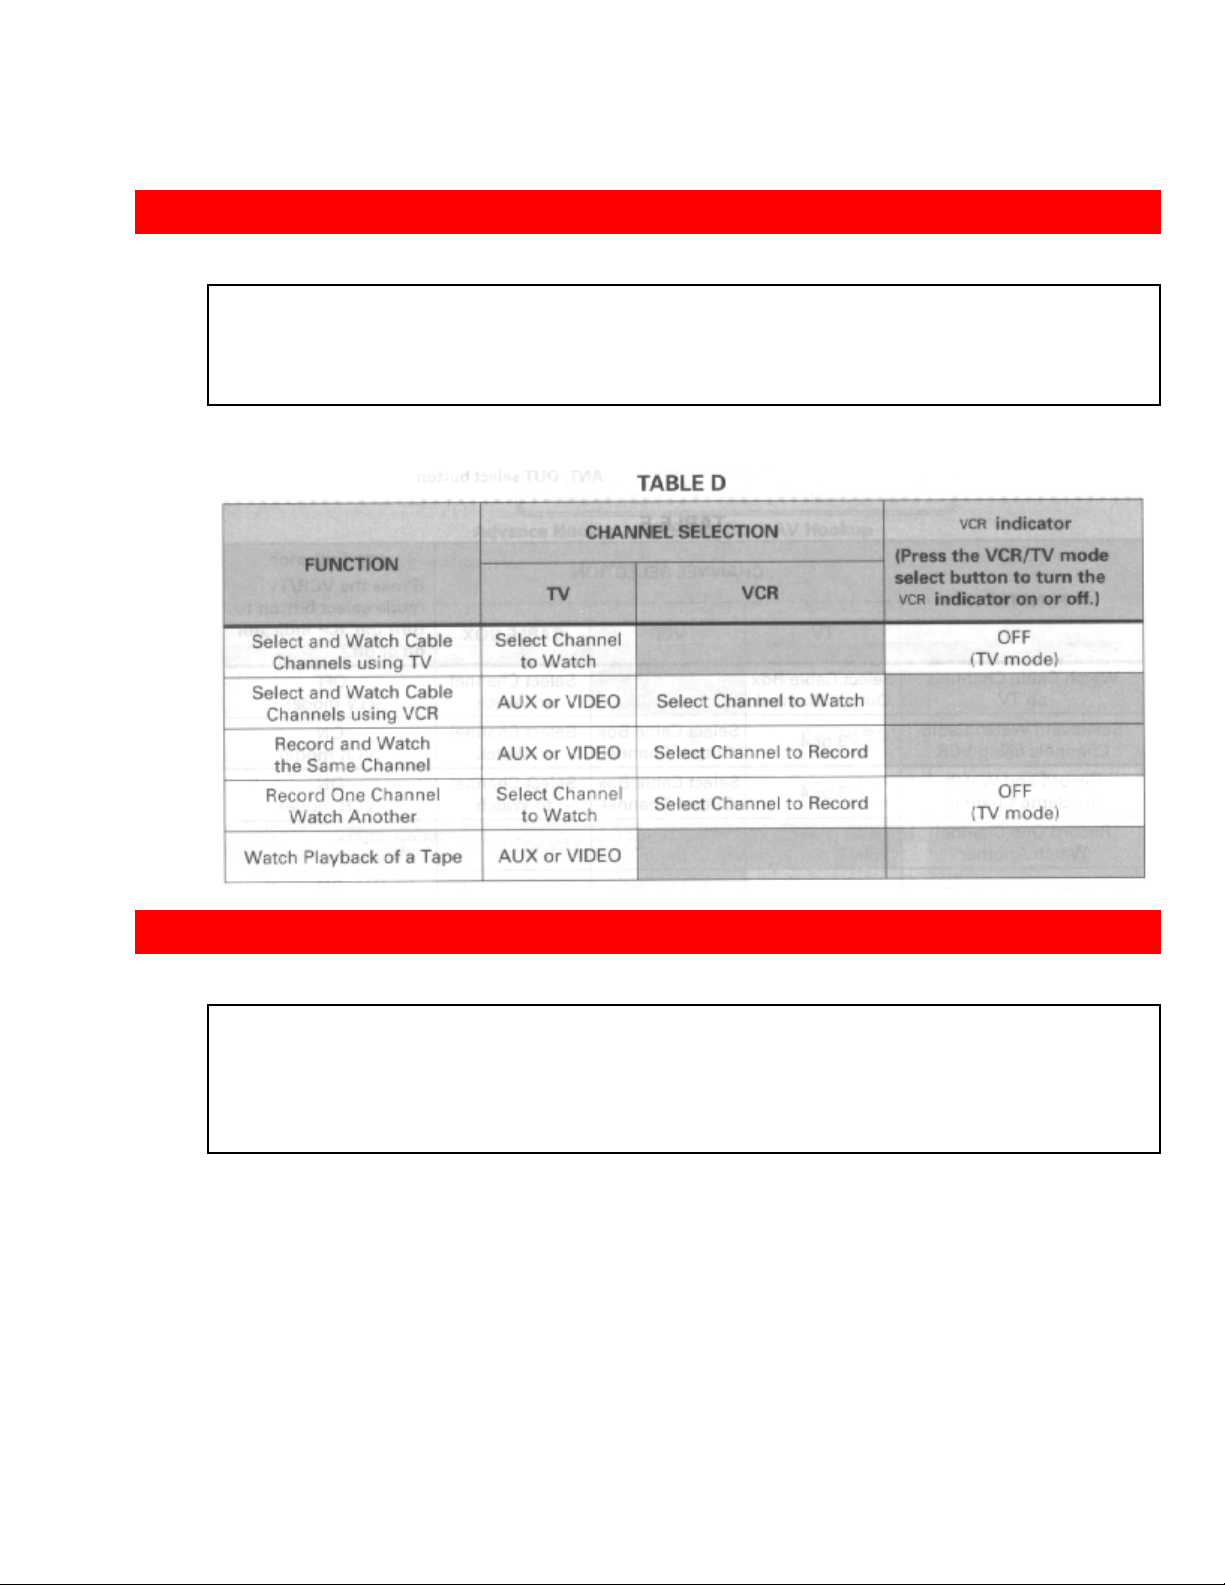
ADVANCED CABLE HOOKUP -AV HOOKUP [D]
WITH THIS HOOKUP
YOU CAN...
• WATCH AVAILABLE CABLE CHANNELS
• RECORD AND W ATCH THE SAME CHANNEL
• RECORD ONE CHANNEL AND WATCH ANOTHER
Hookup D Illustration
BASIC CABLE HOOKUP -WITH CABLE BOX [E]
WITH THIS HOOKUP
YOU CAN...
• WATCH AVAILABLE CABLE CHANNELS
• RECORD AND W ATCH THE SAME CHANNEL
YOU CAN'T...
• RECORD ONE CHANNEL AND WATCH ANOTHER
ALL CHANNEL SELECTIONS MUST BE MADE AT THE CABLE BOX.
BE SURE TO CONSULT YOUR CABLE BOX MANUAL FOR THE CABLE BOX
OUTPUT CHANNEL.
Hookup E Illustration
15
Page 16
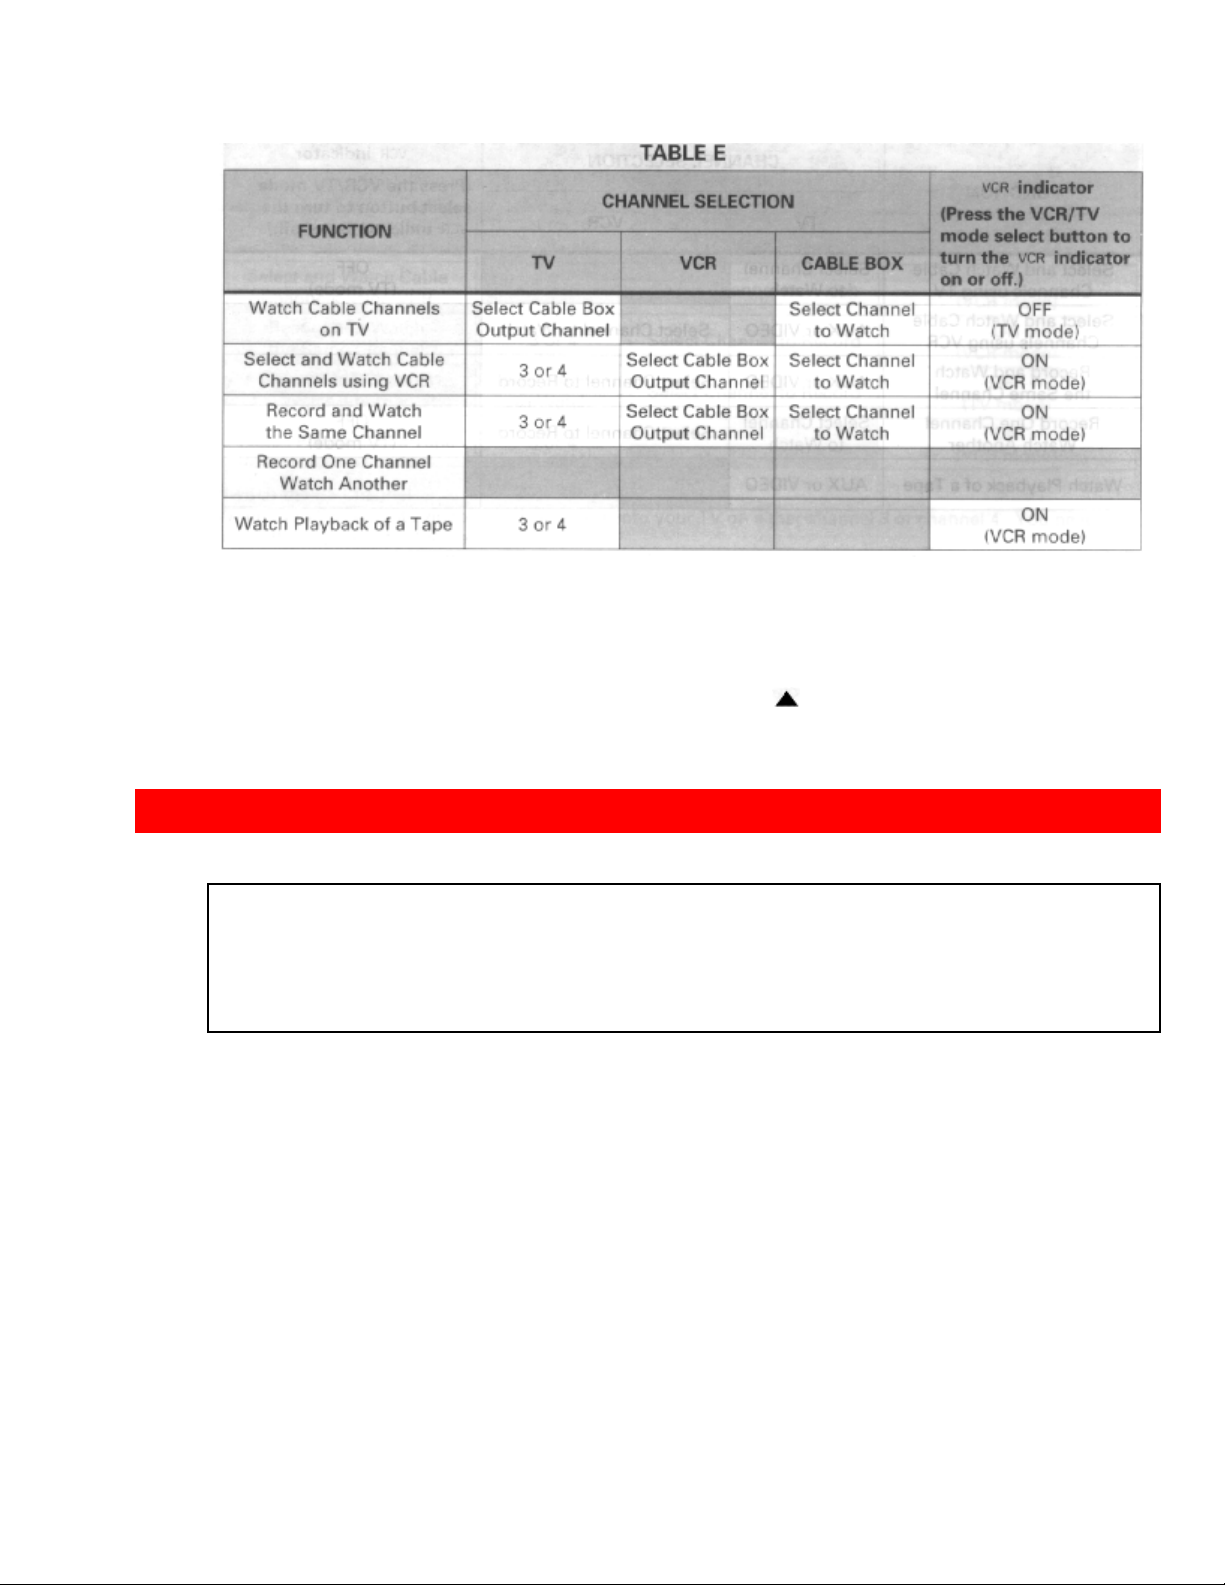
Switch the RF Channel
When the VCR is on, its video signal can come into your TV on either channel 3 or
channel 4. You need to select the appropriate channel.
• When the power is turned on, press the POWER button to turn it off. Press the PLAY
button on front of the VCR. Pressing the CHANNEL button alterantes between
RFCH-03 (channel 3) and RFCH-04 (channel 4) in the VCR's display.
Display the channel which is not used by a commercial channel in your area.
ADVANCED CABLE HOOKUP -WITH CABLE BOX [F]
WITH THIS HOOKUP
YOU CAN...
• WATCH AVAILABLE CABLE CHANNELS
• RECORD AND W ATCH THE SAME CHANNEL
YOU CAN'T...
• RECORD ONE CHANNEL AND WATCH ANOTHER
ALL CHANNEL SELECTIONS MUST BE MADE AT THE CABLE BOX.
BE SURE TO CONSULT YOUR CABLE BOX MANUAL FOR THE CABLE BOX
OUTPUT CHANNEL.
Hookup F Illustration
16
Page 17

ADVANCED CABLE HOOKUP -WITH CABLE BOX AND SPLITTER [G]
WITH THIS HOOKUP
YOU CAN...
• WATCH AVAILABLE CABLE CHANNELS
• RECORD AND W ATCH THE SAME CHANNEL
• RECORD ONE CHANNEL AND WATCH ANOTHER
TO RECORD, ALL CHANNEL SELECTIONS MUST BE MADE AT THE CABLE BOX.
BE SURE TO CONSULT YOUR CABLE BOX MANUAL FOR THE CABLE BOX
OUTPUT CHANNEL.
Hookup G Illustration
SETTING THE CLOCK
Note: An antenna or cable must be connected to the VCR before you begin this operation.
17
Page 18

Tips
You'll need to set the clock when first hooking up your VCR, and any time the power
goes out for more than 1 hour. When you first plug in the VCR or after a power outage,
the clock display will read "--:--".
To set the clock manually
Remote illustration
1 Press the GUIDE button.
The main on-screen menu will appear on the TV screen. Click to see remote control
illustration.
You may view all the on-screen instructions in English, French, or Spanish. When you
first set up your VCR, it will be set to English. Press the (8) button for French or the (9)
button for Spanish.
2 Press the (3) button to bring up the "CLOCK SET" menu.
• The white dash "-" appears for the item to be changed on the screen as you proceed.
3 Press the number buttons to fill the hour and minutes. Click to see remote control
illustration.
• For times with only one number (1-9) press the ( 0) button fir st, then the hour or minute.
For example, if it is now 10:20AM, press (1)(0)(2)(0). "AM" and "PM" will now appear on
18
Page 19

the screen.
4 Press the (1) button for AM or (2) for PM.
For example, press the (1) button for AM.
Click to see remote control illu stration
5 Press the number buttons to fill in the number of the month, then the day then
the year.
• For dates with only one number (1-9) press the (0) button first, then the date.
For example, if today is July 8 1997, press (0)(7)(0)(8)(9)(7). The correct day of the
week will appear by itself.
8 Press the GUIDE button.
The VCR clock is now set, and should show the correct time of day on the VCR's
display.
Notes:
• The clock uses the 12-hour system. You set it for AM or PM.
• An illogical time (like 13 for the hour or 20 for the month) will not be accepted.
• If you press the wrong digit, exit the screen by pressing GUIDE and recall the screen to enter
the correct setup.
PRE-TUNING THE VCR TUNER
Note: An antenna or cable must be connected to the VCR before you begin this operation.
Presetting the received channels without using a cable box (Hookups
19
Page 20

[A], [B], [C] or [D])
1 Press the POWER button to turn on the VCR.
2 Turn on the TV and select the video channel (3 or 4).
Or, if you are hooked up with an audio/video cable, set the TV to AUX or VIDEO.
3 Press the GUIDE button. Click to see remote control illustration.
The main on-screen menu will appear on the TV screen.
4 Press the (4) button to select the CHANNEL PRESET operation.
5 Press the (1) button to select the type of receiving setup you have:
<CATV1> Ordinary cable
<ANT> Internal or external antenna
<CATV2> Alternate cable (If CATV1 doesn't give you the channels you expect).
6 Press the (2) button.
The VCR will automatically store channels received in your area. It takes about 2 - 3
minutes. After the channels are stored in memory, the channel with the lowest number
appears in the VCR's display.
20
Page 21

7 Press GUIDE to return to regular viewing.
Note: Your VCR is capable of receiving 68 broadcast TV channels (VHF 2-13, UHF 14-69)
and cable channels (1-125). In some areas channels cannot be received when CATV1 is
selected. In this case, select CATV2 in the receiving setup.
When automatic presetting of channels are finished
Press the CH (channel) button (or numbered buttons) to check the channels you can
receive.
To add or erase channels
The auto channel set procedure may memorize channels that are blank, have snowy
pictures, or interference. You may skip these channels by erasing them. Very weak
stations might not be memorized at all. You may receive these stations by adding them.
1 Press the GUIDE button. Click to see remote control illustration.
The main on-screen menu will appear on the TV screen.
2 Press the (4) button to select the CHANNEL PRESET operation.
21
Page 22

3 Press the (3) button to select "ADD/ERASE CHANNEL".
4 Use the number buttons to select the number of the channel you want to add or
erase.
5 Press the STOP button to delete the channel, or press the PLAY button to add
it.
6 Press the GUIDE button to return to regular viewing.
Auto blue setting
1 Turn on the TV and select the video channel (3 or 4).
Or, if you are hooked up with an audio/video cable, set the TV to AUX or VIDEO.
2 Press the GUIDE button. Click to see remote control illustration.
22
Page 23

The main on-screen menu will appear on the TV screen.
3 Press the (2) button to select "VCR SETUP".
4 Press the (1) button to select AUTO BLUE "ON" or "OFF".
ON: The screen becomes blue and mutes sound when a channel without a broadcast
signal on the VCR or a channel on which broadcasting has finished.
• If the signal is too strong, this function may not operate even if you specify <ON>.
During playback this function does not operate.
OFF: The AUTO BLUE feature is switched off.
5 Press the GUIDE button to end the setting.
PLAYBA CK
To playback a recorded tape
1 Turn on the TV and select the video channel (3 or 4).
Or, if you are hooked up with an audio/video cable, set the TV to AUX or VIDEO.
2 Insert a recorded tape.
The power comes on automatically and the tape indicator lights on the display.
• When a cassette without its safety tab is inserted, playback starts automatically.
23
Page 24

3 Press the PLAY button to start playing the tape. Click to see remote control
illustration.
4 Press the STOP button to end playback.
Rewinding the tape
When the video cassette reaches the end of the tape, the VCR will stop
automatically and automatically rewind the tape.
• If you press the POWER button while the tape is rewinding, the power will not shut off
until the tape has been completely rewound.
You may also rewind the tape manually at any time.
Manual Rewind
1 Press the STOP button to end playback. Click to see remote control illustration.
2 Press the REW button.
The VCR rewinds the tape all the way to the beginning, then stops.
• Press the EJECT button on the VCR to eject the tape.
Rewinding the tape
Movie Return
If your videocassette has the safety tab removed, the VCR will stop and automatically
rewind the videocassette, eject it, and turn off the power when it reaches the end of the
tape or a blank section of tape which lasts for more than 30 seconds.
Note: This function works only in PLAYBACK mode, not in RECORDING mode.
Rewinding or fast for warding the tape at high speed
24
Page 25

This function rewinds or fast-forwards T-120 tape for about 83 seconds. This time
period will vary for different types of tape.
Press the REW or F.FWD button, then press it again.
To stop the tape, press the STOP button.
Note: During super rewind/fast/forward, there will be an interval of 5 seconds between the time
the stop button is pressed and the time the tape actually stops. This is designed to protect the
tape. To stop the tape earlier, press the REW or F.FWD button to restore the normal
rewind/fast-forward speed, then press the stop button.
To remove noise from the picture
Auto Tracking
Pressing the PLAY button starts the auto tracking feature, which automatically adjusts
playback to eliminate static lines or picture noise that may appear on the screen.
Manual Tracking
Scratched tapes or poorly recorded tapes may require additional picture adjustment.
You can do this with the remote control.
Note: To reactivate auto tracking, simply eject the tape and reinsert it into the VCR.
Press the CH ( or ) button on the remote control or TRACKING button on the
VCR when viewing a cassette.
Press either the
or buttons until picture is clear.
SPECIAL PLAYBACK EFFECTS
Variable speed playback
25
Page 26

Still Playback (Pause)
Press the PAUSE button on the remote control or PLAY/STILL on the VCR to still
the tape during play.
The picture will "freeze". You may see some minor noise or interference on the screen.
This is normal.
• To resume play, press the PLAY button or PAUSE button again.
Note: The sound is muted and cannot be heard during "Special Playback Effects".
Notes:
• After 1 minute in the PAUSE mode, the VCR automatically switches to STOP mode to protect
the tape.
• If noise bars appear on the TV screen during the PAUSE mode, first set the VCR to the
SLOW mode by pressing the (4) button during playback and then press the CH ( or )
button on the remote control to minimize the noise bars (see page 25).
• If the screen jitters during PAUSE, press the CH ( or ) button to minimize the jitter.
If you press the DISPLAY button when viewing a video cassette, the display, as shown,
appears for several seconds so you can see the functions of the number buttons on the remote
control.
Number (4) button: Slow motion
Number (6) button: Frame advance
• The above function always work when you are viewing a video cassette even if the display,
as shown, is not displayed.
Frame Advance
1 Press the PAUSE button to stop the tape during playback.
26
Page 27

2 Press the (6) button to view the picture one frame at a time.
• Press the PAUSE button to resume play.
Skip playback
While playing back your tape you can skip forward by pressing the (6) button.
The tape will search ahead about a minute then resume playing.
Slow motion
1 Press the PLAY button.
2 Press the (4) button to slow the playback speed.
3 Press the PLAY button to return to play back at normal speed.
27
Page 28

Press the STOP button to stop the tape.
Notes:
• Use the CH ( or ) button to minimize any visual noise bands on the screen.
• After 1 minute in slow motion playback, the VCR will stop the tape automatically to prevent
damage to the tape and VCR.
Visual Search
This function let you search backward and forward through the videotape while viewing
it.
During play:
Press the REW button to search in reverse.
Press the F.FWD button to search ahead.
• Press the PLAY button to return to normal playback.
Press REW or F.FWD and hold it; you can search backward or forward through
the tape at a higher speed while viewing it.
• Press PLAY and REW, then hold REW for backward search at a higher speed.
• Press PLAY and F.FWD, then hold F.FWD for forward search at a higher speed.
• Release REW or F.FWD to return to normal playback.
Choosing a mode for audio playback
The VCR records the same audio on both the Hi-Fi and linear tracks on the tape. The
Hi-Fi sound is recorded on separate left and right stereo channels. Monaural sound is
recorded on the linear track.
To enjoy Hi-Fi sound, connect your VCR to a stereo television or amplifier/receiver
using the audio/video jacks (see page 41).
How to select playback audio
1 Press the GUIDE button.
28
Page 29

2 Press the (2) button to select the VCR SETUP operation.
3 Press the (4) button to select "HIFI" or "LINEAR".
• Select Hi-Fi to playback sound recorded on the Hi-Fi track and for normal use.
The L and R indicators will light in the VCR's display panel.
• Select LINEAR to play back the sound recorded on the linear monaural track. Also, if
the audio sounds distorted or unusual or there is no audio, select LINEAR.
4 Press the GUIDE button to end the setting.
USING THE "INDEX" FEATURE
To find specific sections on a tape using the "INDEX" feature
Jump to an Index Mark with INDEX
A quick way to access specific program segments is with the index search feature. This
lets you move through a tape that has several recordings on it by searching for the
INDEX "mark". This function only works with recordings that have been set up with
indexing. You create an INDEX mark (VISS signal) every time you pres the REC or
REC/IRT button while recording.
29
Page 30

1 Press the DISPLAY button in the stop mode.
The index screen appears on TV.
2 Press the (7) button for rewind or the (9) button for forward to begin the index
search.
• The tape rewinds or fast forwards until an index mark is detected. During this search,
the word INDEX is displayed at the top left corner of the screen.
• When the VCR finds an index mark, it plays 15 seconds of the program that begins at
that spot.
3 If this is the program you were looking for, press the PLAY button for normal
playback.
• To stop the index search before an index mark is reached, press the STOP button.
Note: If there are no index marks on the tape, the VCR will just rewind to the beginning or fast
forward to the end.
VIEWING THE ON-SCREEN DISPLAY
Switching between the clock, time counter and time of remaining tape
30
Page 31

Press DISPLAY while the on-screen display is displayed. The on-screen display
switches in the order below together with the VCR's display.
Remote Control Illustration
Click to see on-screen and VCR displays
Press the DISPLAY button to see the clock.
Press the DISPLAY button a second time to see just the time counter.
Notes:
• The linear time counter operates only if there is something recorded on the tape.
• The counter changes to 0:00:00 when the tape is ejected.
Press the DISPLAY button a third time to see the tape remaining time.
Note: Immediately after the tape is inserted, "-:--" will appear.
2 minutes after playback or recording is started, the tape remaining time is displayed.
Press the CLEAR button repeatedly to switch the type of the tape used. The correct
remaining time will appear.
AUTO: T-120 or shorter tape
T-160: T-140 or T-160 tape
T-180: T-180 tape
T-210: T-210 tape
Notes:
• The tape remaining time is not displayed correctly for a tape without any recordings or tapes
other than T-30/60/90/120/140/160/180/210.
• The remaining time may not be displayed correctly during fast forwarding or rewinding.
INDEX WITH THE TIME COUNTER
To find specific sections on a tape
Indexing with the Time Counter
You can set the time counter to memorize a certain point in the video programming, and
you can return to that point automatically.
31
Page 32

1 Press the DISPLAY button two or three times.
The counter will appear in the VCR's display.
2 Begin recording or playing back a tape.
3 At the point that you want to go back to, press the CLEAR button.
This resets the counter to 0:00:00.
4 Press the STOP button when you are done recording or playing back the tape.
5 Press the REW button to rewind the tape.
It will automatically stop at the stop where you cleared the counter in step 3.
• Press the PLAY button to watch the tape from the selected spot.
Notes:
• Press the DISPLAY button to turn the counter display off. The selected spot will stay in
memory until you set a new one or until the tape is ejected.
•During super rewind/fast forward, the tape does not stop automatically even if the counter
reads "0:00:00".
RECORDING A PROGRAM
Before you record
Note: The cassette safety tab must be in place in order to record.
32
Page 33

The VCR must be hooked up properly for recording. See the Simple Hookups at the
beginning of this manual.
Copyright infringement warning
Most television programs and films are copyrighted. This means that someone has legal
rights governing the reproduction and distribution of this material. In certain
circumstances, copyright law may apply to private in-home taping of copyrighted
materials. In most cases, it is okay to record for personal use, as long as you do not sell
the material. You must act responsibly in this area - check into the matter if you are
unsure.
Basic recording steps
Note: You may use a blank tape or you may record over a previously recorded (erasable)
tape.
1 Turn on TV and select the video channel (3 or 4).
Or, if you are hooked up with an audio/video cable, set the TV to AUX or VIDEO.
2 Insert a blank or erasable tape.
The power comes on automatically and the tape indicator lights on the display.
• If a cassette without its safety tab is inserted, playback starts automatically, and you
cannot complete the record operation.
3 Press the DISPLAY button.
This screen appears on the TV.
33
Page 34

4 Press (5) button to select SP (standard play, for the best picture quality) or EP
(extended play, for the longest recording time on a single tape).
5 Press the CH ( / ) button or the number buttons to select the channel you
want to record.
Example: Select channel 8.
• 100/ENT and (2) and (4) for channel 124.
6 Press the REC button on the remote control or the REC/IRT button on the VCR.
Recording will start and the REC indicator on the VCR will appear.
34
Page 35

Notes:
• Recording will not start unless the cassette has the safety tab in place. If this tab has been
removed, the VCR will eject the tape.
• Press the PAUSE button to set the VCR to the recording pause mode. Press the button again
to re-start recording.
• If you stay in PAUSE mode for more than 5 minutes, the VCR automatically switches to
STOP mode to protect the tape.
7 Press the STOP button to finish recording.
RECORDING A PROGRAM -RECORDING TIPS
To watch one program while recordi ng another
1 Once you have set the VCR for recording, press the VCR/TV button.
The VCR indicator disappears. Now, you will be viewing through your TV only.
2 Switch channels using your TV controls or the VCR remote, if it's programmed
to control your TV (see page 39).
Notes:
• You can check on the recording by pressing VCR/TV again. This will switch you back to
viewing through the VCR, and you'll see the program you are recording.
• If you're hooked up with an audio/video cable: Switch the TV from AUX or VIDEO mode
back to the TV mode, then select the channels you want to watch, as described in Step 2.
Switch TV back to AUX or VIDEO to monitor your recording.
To change the channel being recorded
Remote Control Illustration
1 Press the PAUSE button to stop the recording temporarily.
2 Press the CH ( / ) button or number buttons to change the channel to the
one you prefer.
35
Page 36

3 Press the PAUSE button to continue recording.
Automatic Indexing
Your VCR will automatically create an invisible "INDEX" mark every time you press the
REC button while recording. During playback, the Index Search feature will let you
move through a tape that has several recordings on it by searching for the "INDEX"
mark. See Page 27, "Jump to an Index Mark with INDEX".
To record a Second Audio Program (SAP)
Some stations transmit a Second Audio Program - such as in a second language. If a
station broadcasts in SAP, the SA indicator will display on your TV screen.
You can set the VCR to record a second audio program by activating the SAP option.
Remote Control Illustration
How to set the SAP option.
1 Press the GUIDE button.
2 Press the (2) button to select the VCR SETUP operation.
3 Press the (6) button to set the SAP option to "ON".
4 Press the (5) button to set the STEREO/MONO option to "STEREO".
36
Page 37

5 Press the GUIDE button to end the setting.
6 Follow the Step 1 through 5 on "Basic Recording Steps" on pages 30 and 31.
Stereo vs. mono sound
When you select the STEREO option in the initial setup operation, your VCR records in
stereo any station that broadcasts stereo sounds. When a TV channel broadcasts in
stereo, you'll see a stereo indicator on the TV screen.
Set to MONO if the stereo signal is weak and the sound is too "noisy".
Note: When you select MONO, sound is recorded as mono even when a channel broadcasts
in stereo.
INSTANT RECORDING TIMER
Using the Instant Recording Timer (IRT)
The Instant Recording Timer (REC/IRT button on the V CR) will let you make a
simplified timer recording without having to use the programming timer. In order to set
the IRT properly the clock must be set before starting.
1 Follow the steps 1 through 5 on "Basic recording steps" on pages 30 and 31.
2 Press the REC/IRT button twice to indicate the recording time on the display.
• You may increase the recording time by 30 minutes each time you press the REC/IRT
button.
• While you are recording, the remaining recording time is shown on the VCR display.
• At the end of your recording, the display will read "0:00", recording will stop
automatically, and the VCR will turn itself off.
37
Page 38

To stop recording while in the IRT mode:
1 Press the POWER button.
2 Press the STOP button within 10 seconds.
• This can be done either on the VCR or with the remote control.
DELAYED RECORDING
Setting the VCR to record later
38
Page 39

Note: The cassette safety tab must be in place in order to record.
With the delayed recording feature, you can set this VCR so that it automatically turns
on and records programs whenever you like - without your being around! You can
record a program one time only, or you can automatically record a show every weekday
or every week at the same time. You can preset as many as 8 timed recordings at once.
Before you begin
Assemble the information you need for timed recording:
• Be sure that the clock is set to the correct time
• Date and day of the program
• Starting time
• Ending time
• Channel to be recorded
• Blank or erasable videocassette (safety tab intact)
Delayed Recording Steps
You set up the delayed recording using the on-screen Easy Guide System.
1 Insert blank or erasable tape.
The power comes on automatically and the tape indicator lights on the display.
• If a cassette without its safety tab is inserted, playback starts automatically and timed
record won't operate.
2 Turn on the TV and select the video channel (3 or 4).
Or, if you are hooked up with an audio/video cable, set the TV to AUX or VIDEO.
3 Press the PROGRAM button for delayed recording.
39
Page 40

Types of Delayed Recordings
ONE TIME Records one show at a particular date and time.
DAILY Records a show at the same time every day of the week, Monday through
Friday.
WEEKLY Records a show at the same day and time every week.
EXAMPLE: Set the VCR to record "one time", a program on Channel 8 that starts at
6:00 PM and ends at 6:30 PM on 7/10/97, at the EP recording speed.
Remote Illustration
4 Press the (1) button to bring up the screen for One Time Recording
5 Press the (0) and (8) buttons to select channel 8.
Note: Remember to press 0 before single-digit channel numbers, times, and dates.
• If you want to record from an external equipment, press the AVX button to select LINE
1 or LINE 2 instead of the channel number.
• If you make a mistake when entering digits, press the CLEAR button repeatedly to
40
Page 41

display "-" for the incorrect digit, then reenter the correct digit.
6 Enter the start time by pressing (0), (6), (0) and (0) for 6:00.
Remote Illustration
7 Press the (2) button for PM.
8 Enter the end time by pressing (0), (6), (3) and (0) for 6:30.
The VCR automatically selects PM for you.
9 Enter the recording date by pressing (0), (7), (1) and (0) for 7/10/97.
Click to see remote control illu stration.
10 Press the (5) button to select the recording speed EP.
11 Press the PROGRAM button to set the program in memory.
41
Page 42

12 Press the POWER button to turn off the VCR.
The delayed recording indicator will display on the VCR.
This tells you that the VCR will automat ically record at the times and dates you have
programmed.
• If you are using a cable box, you must select the channel you want to record on the
cable box (in this case 08); and turn on the cable box.
Note: You can correct any item entered as you go by pressing the CLEAR button repeatedly
until the digit to be corrected changes to white dash "-" on the screen. Then enter the correct
number. Illogical times and dates won't be accepted.
Remote Control Illustration
To stop recording while in the timed recording mode:
1 Press POWER button.
2 Press the STOP button within 10 seconds.
• This can be done either on the VCR or with the remote control.
When you have set up all the timed recordings you want:
• Don't forget to load a videocassette (with the safety tab still attached) to record on.
• If using a cable box, turn on the cable box and tune it to the channel you want to
record before the time the recording is to begin.
Important: Your timed recording settings take effect when you turn off the power on the
VCR.
PROGRAM REVIEW
Reviewing what you have programmed
You can look back over any of the recordings you have preset and if you need to, clear
out any of the programs. Normal programs will clear automatically once recording is
complete, but daily and weekly setting must be cleared out manually.
Remote illustration
1 Press the GUIDE button.
The main on-screen menu will appear on the TV screen.
42
Page 43

2 Press the (1) button for the PROGRAM REVIEW option.
This brings up the screen setting for the first program.
If you want to clear this program, press the CLEAR button to remove this
program.
3 Keep pressing the (1) button to cycle through all the programs you have preset.
• The screen will display the next program, if there are more, or it will switch back to the
main menu.
4 Press the GUIDE button to end.
PROGRAMMING THE VCR REMOTE TO CONTROL YOUR TV
The VCR remote control can be programmed to control many TV brands that are
remote controlled.
1 Turn on the TV.
2 Point VCR remote control toward TV.
43
Page 44

3 Press and hold the "TV" button.
4 Press the remote button corresponding to your TV brand as shown in the set-up
chart. The TV channel will change to confirm that the remote control has been
set.
TV Brand Press "TV" and TV Brand Press "TV" and
this remote button this remote button
Hitachi 1 Pansonic 2 9
Zenith 2 RCA 0
Sony 3 Panasonic 1 CH
Magnavox 4 Mitsubishi CH
Sanyo 5 JVC 100/ENT
Gold star 1 6 Sharp 1 LAST CH
Toshiba 7 Sharp 2 DISPLAY
Gold star 2 8
Note: If your TV brand is not listed on the Set-Up Chart, try all the buttons listed in the chart
until the TV changes channels. If the TV channel does not change, you won't be able to
program the remote for your TV.
Using the VCR remote to control your TV
picture of remote
1 Press the "TV" button on remote control.
2 Point VCR remote control toward TV.
3 Press buttons corresponding to the functions available on your TV remote
44
Page 45

control.
PROGRAMMING THE VCR REMOTE TO CONTROL YOUR CABLE BOX
The VCR remote control can be programmed to control many cable boxes that are
remote controlled. YOu can easily change channels.
1 Turn on the cable box.
2 Point VCR remote control toward cable box.
3 Press and hold the "CATV" button.
4 Press the remote button corresponding to your cable box as shown in the setup chart. The cable box channel will change to confirm that the remote control
has been set.
Cable Box Press "CATV" and
this number button
Jerrold 1 1
Jerrold 2 2
Jerrold 3 3
Hamlin 4
Zenith 5
Scientific Atlanta 6
Pioneer 7
Philips 8
Note: If your cable box is not listed on the Set-Up Chart, try all the buttons listed in the chart
45
Page 46

until the cable box changes channels. If the cable box channel does not change, you won't be
able to program the remote for your cable box.
Using the VCR remote to control your cable box
Remote Control Illustration
1 Press the "CATV" button on remote control.
2 Point VCR remote control toward cable box.
3 Press the CH (channel / ) button.
INTEGRATING YOUR STEREO SYSTEM WITH YOUR VCR
Hookup
When your VCR is connected to a stereo system, you can:
• Make high quality "audio only" recordings for up to 6 hours (on a T-120 video cassette
tape).
• Receive quality stereo sound from your VCR through your stereo system.
• Use the VCR as an extra audio tape deck for dubbing.
Stereo System Hookup Illustration
To record from stereo
BEFORE YOU BEGIN...
• Make sure the VCR is connected to your stereo system, as shown above.
• Make sure that "STEREO" audio is selected from the VCR Set-Up Menu, as shown on
Page 33, of "RECORDING OPERATION" Section, "Stereo vs. mono sound".
• Select VCR recording speed (SP or EP) as shown on page 30, of "RECORDING
OPERATIONS" Section, "Basic Recording Steps".
1 Press the AVX button on remote control, so that L (line) appears on the display.
46
Page 47

2 Turn on stereo, and start the selection you wish to record.
3 Press the REC/IRT button on VCR or REC button on the remote control to start
recording.
4 Press the STOP button or remote control to stop recording.
COPYING TAPES FROM A CAMCORDER
Hookup
You may use your VCR to copy tapes from any camcorder onto standard VHS cassette
tapes.
NOTE: If your camcorder is not stereo (has only one audio plug), connect it to the AUDIO IN-L
input on the front of the VCR.
* It is not necessary to connect the S-VIDEO jack.
To copy from a camcorder
47
Page 48

BEFORE YOU BEGIN...
Connect the camcorder's AV output cable to the audio/video jacks on the front of your
VCR.
Remote Control Illustration
1 Press the AVX button on remote control, to display L (line) on the TV display.
2 Press the REC, then PAUSE buttons on the VCR remote control. The VCR will
go into Record/Pause.
3 Press the PLAY button on the camcorder. You will see the camcorder tape
being played on the TV.
4 When you see the part of the Camcorder tape you wish to copy, press the
PAUSE button again to release pause and start copying the camcorder tape.
• Press the stop button to finish recording.
COPYING FROM ONE VCR TO ANOTHER VCR (DUBBING)
Hookup
If you have two VCRs, you may use one VCR to record a tape that is being played back
in the other VCR.
48
Page 49

To copy from one VCR to another VCR
1 Press the AVX button on the remote control of VCR-1 so that L (line) appears in
the display.
2 Press the REC, then PAUSE buttons on VCR-1. The VCR will go into
Record/Pause.
3 Press the PLAY button on VCR-2. You will see the taped program being played
on the TV.
4 When you see the part of the program you wish to record, press the PAUSE
button on VCR-1 again to release pause and start recording.
49
Page 50

• Press the STOP button to finish recording.
PROBLEM GUIDE / MAINTENANCE
Problem guide
No power • Make sure the VCR is plugged into an AC outlet.
Remote control doesn't work • Make sure the batteries are fresh, and properly
installed.
Won't record • Safety tab has been removed from cassette (VCR will
automatically
eject the tape).
Won't play back • Make sure the TV/VCR switch is set to the VCR mode.
• Make sure the TV is set to the VCR channel (3 or 4) or
AUX (if using
direct audio/video hookup).
Won't make timer recordings • The VCR power must be turned off to activate timer
recording.
• Clock is not set correctly.
• Programs entered incorrectly.
• Programs exceed the length of the cassette. Use the EP
recording
speed for maximum programming.
• Safety tab has been removed from cassette.
Snowy picture in playback • Snow or picture noise is normal durin g search, still, and
slow
Playback.
• Head cleaning may be required.
• Tape is worn or of inferior quality - adjust tracking controls.
Snowy picture in normal TV • Check antenna or cable connections.
viewing
Clock shows --:-- • Power has been interrupted - reset the clock.
• Reset the clock.
Erratic VCR display • Push the reset switch with a sharp pointed instrument (pen,
toothipick, etc.)
Maintenance
50
Page 51

Regular periodic maintenance is required to maintain optimum VCR performance. Such
maintenance and adjustments should not be attempted by the user. Please consult your
service dealer for further information.
NOTE: Dirt accumulation on the video heads will cause the playback picture to become noisy.
Heavy accumulations due to abnormal usage, or the use of poor quality tapes may be
beyond the capabilities of the Auto Head Cleaning System, and may require the video
heads to be professionally cleaned by a qualified service dealer.
TECHNICAL SPECIFICATIONS
Technical specifcations
Format: VHS
Video Signal System: NTSC color EIA standard
Record/Playback System: Video: 4 head
Audio: VHS Hi-Fi stereo record/playback system
Tape Speed: 33.35 mm/sec (SP), 16.67 mm/sec (LP) (playback only),
11.12 mm/sec (EP)
RF Input: UHF/VHS 75 ohm
Tuner: USA: 181 channel tuning ability* (125 cable channels)
Canada: 178 channel tuning ability* (122 cable channels)
Type: Auto programming frequency synthesis
Power Input: AC 120V 60 Hz
Power Consumption: 20W nominal
Cabinet Size: 14-15/16" (W) x 3-11/16" (H) x 10-11/16" (D)
38.0 cm (W) x 9.3 cm (H) x 27.1 cm (D)
Weight: 7.7 lbs. (3.5 kg)
Storage Temperature: -4°F to 131°F
Operating Temperature: 41°F to 104°F
Accessories: 1 coaxial cable (Part No. EW10251)
1 remote control unit (Part No. HL10624),
2 AA batteries
*Check your cable company's compatibility requirements.
For information about how to obtain these and other HITACHI accessories, please call
HiTRON, Inc. TOLL FREE at 1-800-995-4500 (in the continental United States). For
ALASKA and HAWAII, please contact the nearest Hitachi Regional Office.
Design and specifications subject to change without notice.
Hitachi Service Hotline
Authorized Hitachi service facilities are available throughout the US and Canada. For
the location nearest to you, call the Hitachi Service Hotline at one of these numbers:
In the continental U.S.A
DIAL TOLL FREE
7 days a week, 24 hours a day
1-800-HITACHI
(1-800-448-2244)
51
Page 52

You must state your zip code when calling
In Canada
MONTREAL 514-956-9882
TORONTO 905-821-4545
VANCOUVER 604-526-7881
52
 Loading...