

Hitachi UT37V702, UT42V702 Owner Manual
™
UltraVision HDTV Monitors
1.5" UltraThin Liquid Crystal Display
Anthracite Pearl Crystal Frame
1920 x 1080p 120Hz PictureMaster™ VI with Reel 120™
(1) HDMI™ (V.1.3 with CEC) Input; (1) RGB D-sub15 Input with Audio
Operating Guide
READ THE ENCLOSED INSTRUCTIONS CAREFULLY.
KEEP THIS OPERATING GUIDE FOR FUTURE REFERENCE.
Record the serial number of your monitor for future reference.
SERIAL NO.
This serial number is located on the back and right side of the monitor.
ANY QUESTION ABOUT THIS PRODUCT PLEASE CONTACT 800-Hitachi
Model Name
UT37V702
UT42V702

1
CONTENTS
IMPORTANT SAFETY INSTRUCTIONS ...........02
INTRODUCTION..............................................04
About This Manual .................................................... 04
Trademark Credits .................................................... 04
Software.................................................................... 04
Features.................................................................... 04
SAFETY PRECAUTIONS .................................05
Explanation of the Symbols ...................................... 05
Cleaning and Maintenance ....................................... 08
Main Unit Installation ................................................09
Anti-tumble Measures ............................................... 09
Child Safety Notice .................................................. 10
Wall Mount Setup ..................................................... 11
Floor Stand Setup ..................................................... 12
QUICK START GUIDE .....................................13
1. Supplied Accessories (including option) ............... 13
2. Connection............................................................ 13
3. Insert the Batteries into the Remote Control......... 14
4. Power On .............................................................. 14
5. Language Selection .............................................. 14
COMPONENT NAMES .....................................15
Main Unit................................................................... 15
Remote Control......................................................... 16
PREPARATION ................................................17
Remote Control Battery Installation .......................... 17
Handling the Remote Control ...................................17
Caution When Moving the Main Unit ........................ 17
CONNECTION .................................................18
1. Connect Power Cord to the Rear Panel ...............18
2. Connect your Equipment to the Monitor ............... 18
Connecting to Equipment Having
HDMI or DVI Output Terminals ....................... 18
Connecting to Equipment Having
Video Output Terminals ................................... 19
Connecting to a PC ............................................ 20
3. Attach Cushion, Secure with Clamps and Fit
Terminal Cover ...................................................... 20
4. Connect the Power Plug into the Wall Socket ...... 21
BASIC OPERATION .........................................22
Power On/Off ............................................................ 22
Volume Up/Down ...................................................... 23
Mute .......................................................................... 23
Input Switching to HDMI and RGB ...........................24
Input Signal Screen Display...................................... 24
SETUP OPERATION ........................................25
How to Use the Remote to Control your
External Devices
Remote Control Codes ............................................. 29
How to Use the On-Screen Display (OSD) System
Select Language ....................................................... 31
Main Menu List .........................................................32
Watching Images from HDMI/Composite Input ........33
Setting Picture Adjustment .................................... 33
Reducing Noise ..................................................... 35
Making the Moving Image Smooth ........................ 36
Advanced Setting .................................................. 37
Viewing Images from a PC ....................................... 38
Setting Picture Adjustment .................................... 38
Advanced Setting .................................................. 39
FUNCTION ......................................................40
Aspect Switching ......................................................40
HDMI/Composite Signal Input ............................... 40
Display Aspect ................................................... 40
Position Adjustment ........................................... 41
RGB Signal Input................................................... 41
Display Aspect ................................................... 41
Power Save Mode ....................................................42
When HDMI/Composite Input is Selected ............. 42
When RGB Input is Selected................................. 42
TROUBLESHOOTING ......................................43
About LCD Display Technology ................................ 43
When the Following Messages Appear
on the Screen ...........................................................43
Symptom and Checklist ............................................ 43
PRODUCT SPECIFICATIONS ..........................46
Signal Input ............................................................... 47
Recommended Signal List ........................................ 48
Dimensions ............................................................... 49
SERVICE INFORMATION ................................51
LIMITED WARRANTY .....................................52
END USER LICENSE AGREEMENT .................53
....................................................... 25
... 31
2
ENGLISH
IMPORTANT SAFETY INSTRUCTIONS
NOTE
SAFETY POINTS YOU SHOULD KNOW ABOUT YOUR HITACHI LCD MONITOR
Our reputation has been built on the quality, performance, and ease of service of Hitachi LCD Monitors.
Safety is also foremost in our minds in the design of these units. To help you operate these products properly, this
section illustrates safety tips which will be of benet to you. Please read it carefully and apply the knowledge you obtain
from it to the proper operation of your Hitachi LCD Monitor.
Please ll out your warranty card and mail it to Hitachi. This will enable Hitachi to notify you promptly in the improbable
event that a safety problem should be discovered in your product model. Model and serial numbers are indicated on
back side and right side of the LCD Monitor.
READ BEFORE OPERATING EQUIPMENT
Follow all warnings and instructions marked on this LCD
Monitor.
Read these instructions.1.
Keep these instructions.2.
Heed all warnings.3.
Follow all instructions.4.
Do not use this apparatus near water.5.
Clean only with a dry cloth.6.
Do not block any ventilation openings. Install in 7.
accordance with the manufacturer’s instructions.
Do not install near any heat sources such as radiators, 8.
heat registers, stoves, or other apparatus (including
ampliers) that produce heat.
Do not defeat the safety purpose of the polarized or 9.
grounding-type plug. A polarized plug has two blades
with one wider than the other. A grounding type plug
has two blades and a third grounding prong. The
wide blade or the third prong are provided for your
safety. If the provided plug does not t into your
outlet, consult an electrician for replacement of the
obsolete outlet.
Protect the power cord from being walked on 10.
or pinched particularly at plugs, convenience
receptacles, and the point where they exit from the
apparatus.
Only use the attachments/accessories specied by 11.
the manufacturer.
Use only with the cart, stand, tripod, 12.
bracket, or table specied by the
manufacturer, or sold with the apparatus.
When a cart is used, use caution when
moving the cart/apparatus combination
to avoid injury from tip-over.
Unplug this apparatus during lightning storms or 13.
when unused for long periods of time.
Refer all servicing to qualied service personnel. 14.
Servicing is required when the apparatus has been
damaged in any way, such as power-supply cord or
plug is damaged, liquid has been spilled or objects
have fallen into the apparatus, the apparatus has
been exposed to rain or moisture, does not operate
normally, or has been dropped.
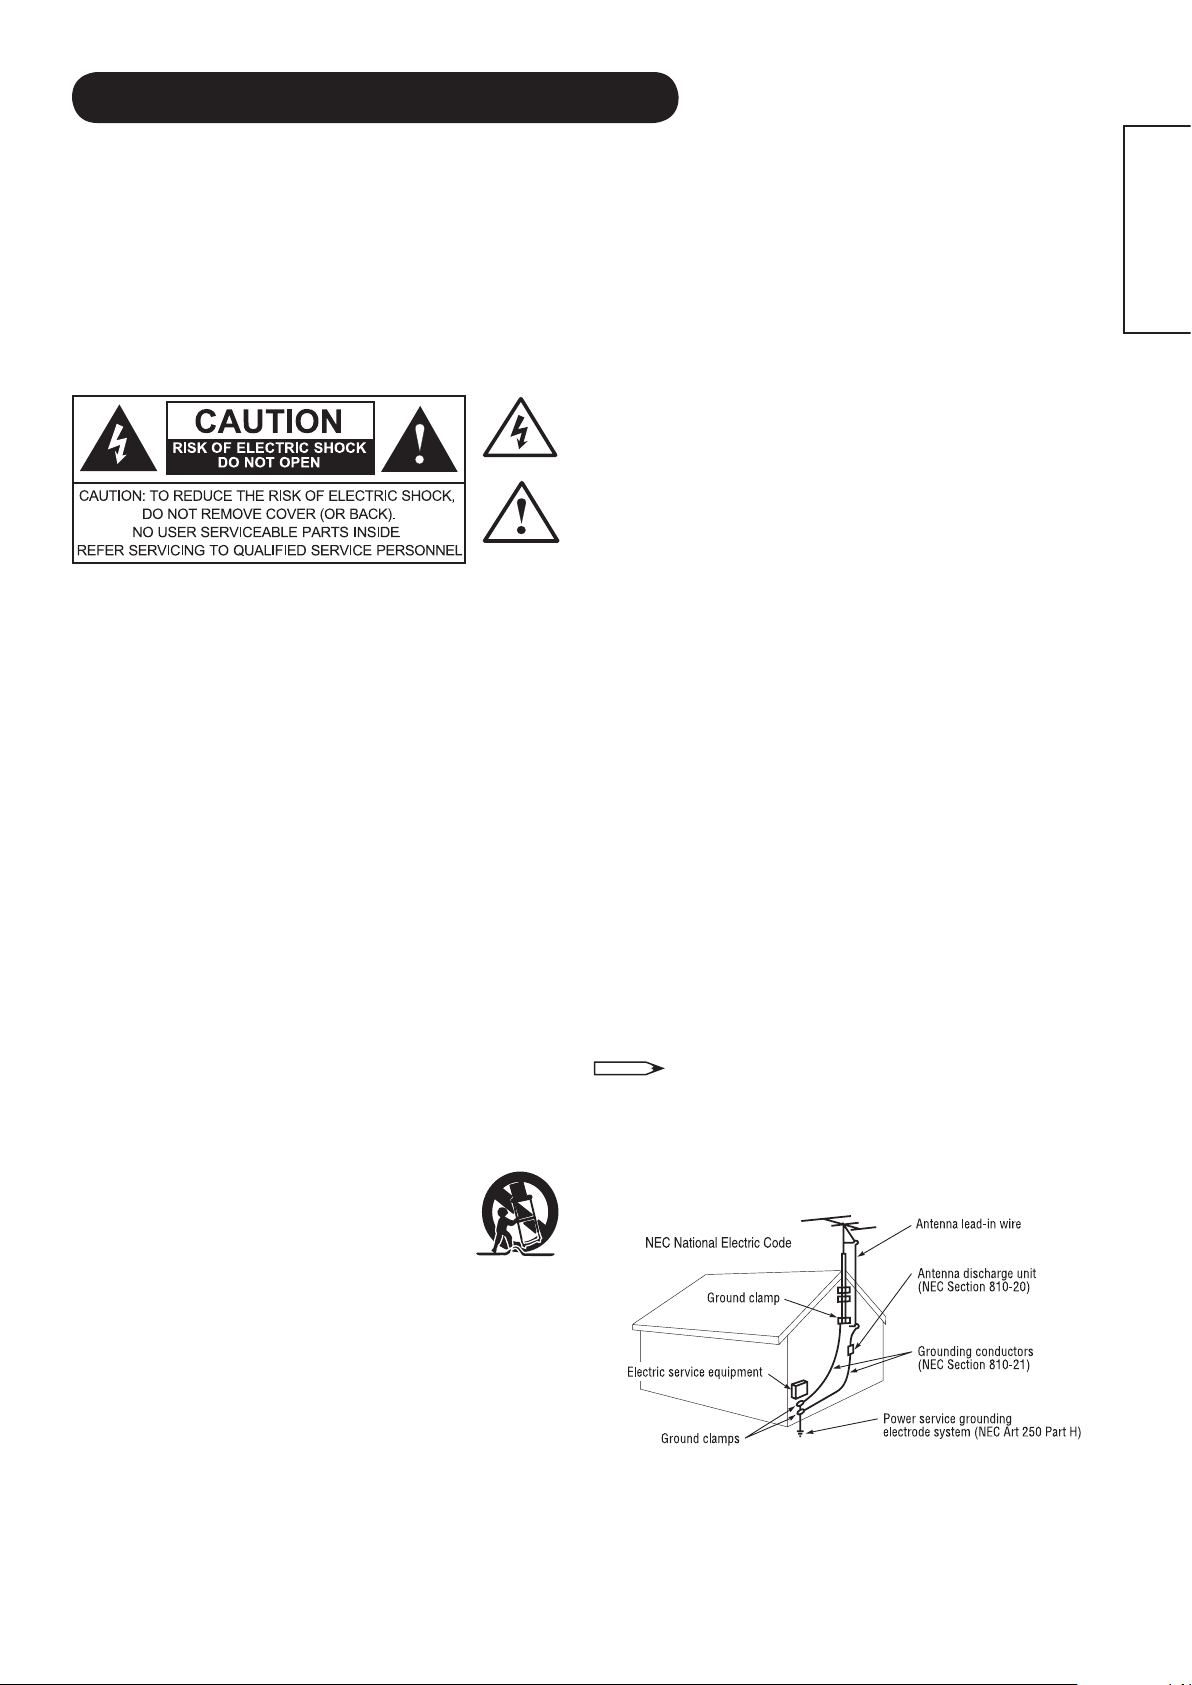
The lightning ash with arrowhead symbol, within an equilateral triangle,
is intended to alert the user to the presence of uninsulated “dangerous
voltage” within the product’s enclosure that may be of a sufcient
magnitude to constitute a risk of electric shock to a person.
The exclamation point within an equilateral triangle, is intended to
alert the user to the presence of important operating and maintenance
(servicing) instructions in the literature accompanying the appliance.
Monitors and Televisions are designed to comply with 15.
the recommended safety standards for tilt and stability.
Do not apply excessive pulling force to the front, or
top, of the cabinet which could cause the product to
overturn resulting in product damage and/or personal
injury.
Follow instructions for wall, shelf or ceiling mounting 16.
as recommended by the manufacturer.
An outdoor antenna should not be located in the vicinity 17.
of overhead power lines or other electrical circuits.
If an outside antenna is connected to the receiver and 18.
the monitor be sure the antenna system is grounded so
as to provide some protection against voltage surges
and built up static charges. Section 810 of the National
Electric Code, ANSI/NFPA No. 70-1984, provides
information with respect to proper grounding for the
mast and supporting structure, grounding of the leadin wire to an antenna discharge unit, size of grounding
connectors, location of antenna discharge unit,
connection to grounding electrodes and requirements
for the grounding electrode.
To the CATV system installer: This reminder is provided to
call the CATV system installer’s attention to Article 820-44
of the NEC that provides guidelines for proper grounding
and, in particular, species that the cable ground shall
be connected to the grounding system of the building, as
close to the point of cable entry as practical.
3
Hg
IMPORTANT SAFETY INSTRUCTIONS (continued)
Warning
To reduce the risk of re or electric shock, do not expose this apparatus to rain or moisture.•
The LCD Monitor should not be exposed to dripping or splashing and objects lled with liquids, such •
as vases, should not be placed on the Monitor.
This apparatus shall be connected to a mains socket outlet with a protective earthing connection.•
The mains plug is used as the disconnect device and shall remain readily operable.•
If problems occur during installation or operation of the product, before calling for technical support or service
technicians, please read “TROUBLESHOOTING” (43 ~ 45) to determine the symptoms.
If serious problems occur (such as smoke or an abnormal odor from the unit), turn off the main power, unplug the
power cord, and then, contact 800-HITACHI immediately.
Lead/Mercury Notice
This product contains lead and one or more non-replaceable mercury backlights. Do not put in trash.
Recycle or dispose of according to applicable laws. For product recycling and disposal information, contact
your local government agency or visit www.eiae.org (in USA) or www.epsc.ca (in Canada). FOR MORE
INFORMATION, CALL 800-HITACHI.
FEDERAL COMMUNICATIONS COMMISSION NOTICE
This equipment has been tested and found to comply with the limits for a Class B digital device, pursuant to Part 15 of
the FCC Rules. These limits are designed to provide reasonable protection against harmful interference in a residential
installation. This equipment generates, uses and can radiate radio frequency energy and if not installed and used
in accordance with the instructions, may cause harmful interference to radio communications. However, there is no
guarantee that interference will not occur in a particular installation. If this equipment does cause harmful interference
to radio or television reception, which can be determined by turning the equipment off and on, the user is encouraged
to try to correct the interference by one or more of the following measures:
If the Monitor is connected with a Set Top Box or TV Receiver, • reorient or relocate the receiving antenna.
Increase the separation between the equipment and the receiver.•
Connect the equipment into an outlet on a circuit different from that to which the receiver is connected.•
Consult the dealer or an experienced radio/television technician for help.•
Declaration of Conformity
This device complies with part15 of the FCC Rules. Operation is subject to the following two conditions :
(1) This device may not cause harmful interference and (2) This device must accept any interference received,
including interference that may cause undesired operation.
For questions regarding this declaration, contact:
Hitachi Home Electronics (America), Inc.
900 Hitachi Way
Chula Vista, CA 91914-3556
Tel. 800-448-2244 (800-HITACHI)
ATTN: Customer Relations
Modications
The FCC requires the user to be notied that any changes or modications made to this device that are not expressly
approved by Hitachi Home Electronics (America), Inc. may void the user’s authority to operate the equipment.
Cables
Connections to this device must be made with shielded cables with metallic RFI/EMI connector hoods to maintain
compliance with FCC Rules and Regulations.
Any cables that are supplied with the system must be replaced with identical cables in order to assure compliance with
FCC rules. Order Hitachi spares as replacement cables.
INDUSTRY CANADA AGENCY REGULATORY INFORMATION
This class B digital apparatus meets all requirements of the Canadian Interference-Causing Equipment Regulations.
This Class B digital apparatus complies with Canadian ICES-003.
Cet appareil numérique de la classe B est conforme à la norme NMB-003 du Canada.
4
ENGLISH
INTRODUCTION
Thank you for purchasing the Hitachi 1.5 LCD Monitor. We hope that you will enjoy the outstanding performance of
this product.
This LCD Monitor has been designed to comply with international standards. However, it could cause personal
injury and property damage if improperly handled. In order to prevent potential danger and obtain maximum benet
from your set, please read this operating guide carefully before operating this product and observe the following
instructions when installing, operating, and cleaning the product. To ensure proper operation, please read and follow
ALL the instructions, especially the "IMPORTANT SAFETY INSTRUCTIONS" and "SAFETY PRECAUTIONS".
Keep this manual for future reference and record the serial number of your set in the space provided on the front
cover page of this manual.
About This Manual
The information in this manual is subject to change without notice.
This manual has been produced with the utmost care. If you have any comments or questions regarding this
manual, please contact your local dealer or our Customer Service Center.
Before operating the set, please fully understand the prerequisites such as specifications or constraints for the
hardware and software. Hitachi is not responsible and accept no liability for any loss, damage or injury as a result of
misuse.
Reproduction, copying, utilization, modication and/or transmission in whole or in part of this manual are prohibited
except by prior written consent.
All other products and company names used in this manual are trademarks or registered trademarks of their
respective owners.
Trademark Credits
VGA and XGA are trademarks of International Business Machines Corporation.
VESA is a registered trademark of the Video Electronics Standard Association.
HDMI, the HDMI logo and High-Denition Multimedia Interface are trademarks or registered trademarks of HDMI
Licensing LLC.
Even if no special note has been made of company or product trademarks, these trademarks have been fully
respected.
Software
It is illegal for you to alter, decompile, disassemble, decrypt, or otherwise reverse-engineer the software installed in
this product.
Features
UltraVision 37" and 42" HDTV Monitors
1.5" UltraThin Liquid Crystal Display
Wide Viewing Angle IPS (In-Plane Switching) Technology
Picture Enhancement: Smooth Motion Film process
High Resolution Progressive Display 1920(H) x 1080(V)
High Efciency EEFL (External Electrode Fluorescent Lamp) BackLight
(1) HDMI™ (V.1.3 with CEC) Input
(1) RGB D-sub15 Input with Audio
Preprogrammed Remote Control
Easy-to-use Multi-Language On-Screen Display
High Quality Audio System with 4 Drivers
High Efciency Display with Power Saving Features
5
SAFETY PRECAUTIONS
For your safety, please read the following precautions carefully before using this product. Improper use would cause
serious personal injury and/or damage to your property or the product.
Explanation of the Symbols
The following are the symbols used in this manual and afxed to the unit itself. Please fully understand the meanings
of the symbols before reading the instructions in this section.
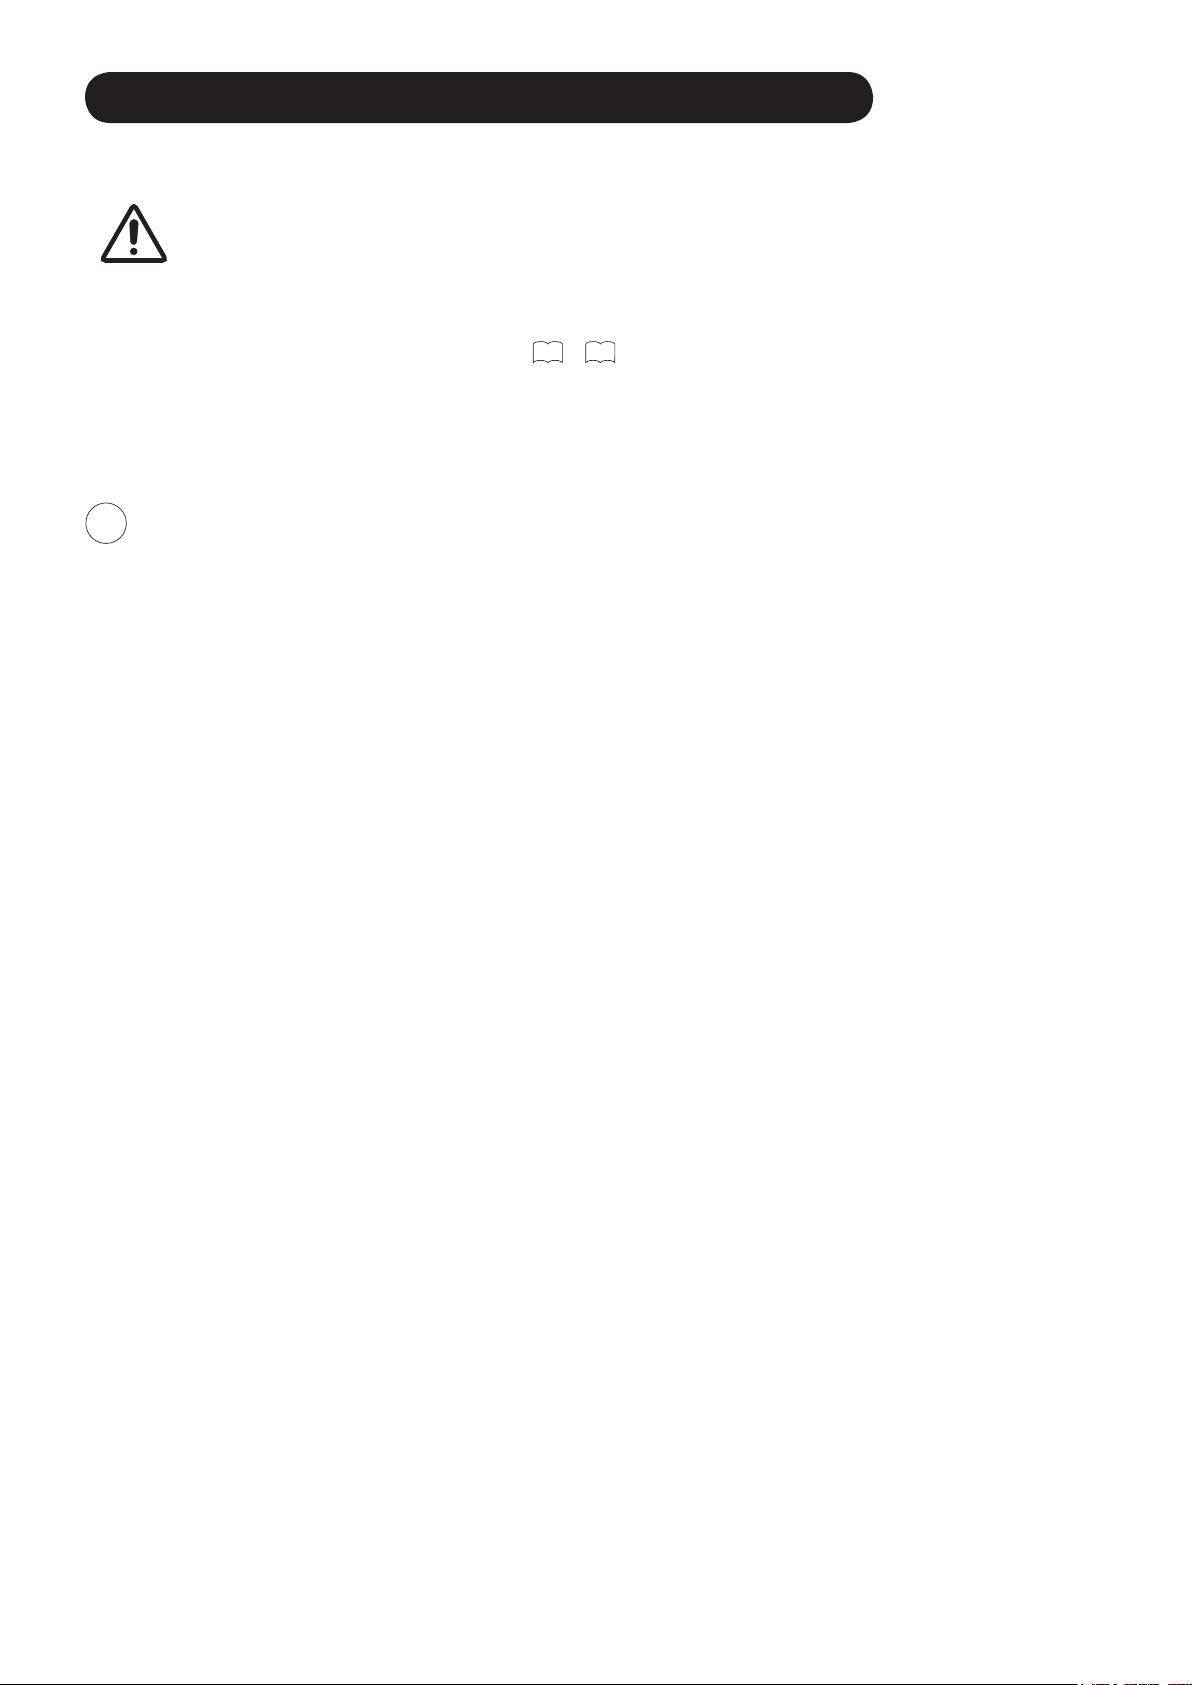
WARNING
CAUTION
The triangle with illustration is intended to alert the users that there are risks of re, explosion, or high temperature if
the product is handled improperly.
Each illustration within the triangle species the contents in detail. (The gure on the left is an example.)
The circle with diagonal line and illustration indicates a prohibited action (the symbol to the left indicates that
dismantling is prohibited).
This symbol indicates a compulsory action.
The contents are clearly indicated in or adjacent to an illustration (the symbol to the left indicates that the power plug
should be disconnected from the power outlet).
Never ignore the instruction. There are risks of serious or fatal injury to the user.
Do not ignore the instruction. There are risks of personal injury and/or property damage.
Other Symbols
WARNING
There is a risk of re, electric shock, or serious injury.
■
If serious problems occur, unplug the power cord immediately.
Serious problems such as:
Smoke, abnormal odor or noise emitted from the product.
No picture, no sound or distorted picture on the display.
Foreign matter (such as water, metals etc.) entered the unit.
Do not continue using the product under these abnormal conditions.
Turn off the main power, unplug the power cord, and contact 800-HITACHI immediately.
For your safety, never try to repair the product yourself.
■
Do not allow liquids or any foreign matter (such as metals or ammable items) to enter the unit.
If this does occur, turn off the main power, unplug the power cord, and contact 800-HITACHI immediately.
Exercise special caution when young children are around the unit.
■
Do not remove covers, or modify the product.
High-voltage components are installed inside of the unit. Removing covers can expose you to high
-voltage electric shock, and other hazardous conditions.
Contact 800-HITACHI to perform servicing such as inspection, adjustment or repair work.
Disconnect the
plug from the
power outlet.
Do not
dismantle.
6
ENGLISH
SAFETY PRECAUTIONS (continued)
WARNING
There is a risk of re, electric shock or serious injury.
■
Install the unit in a proper location where it does not expose anyone to danger.
If you bump against the edges of the unit, you could be injured.
■
Do not rest weight on top of the unit.
Objects such as
Liquid containers (vase, sh tank, owerpot, cosmetics or liquid medicine).
If water or any liquid spills onto the unit, it may cause short-circuiting and result in re or electric shock.
If this occurs, turn off the main power, unplug the power cord, and contact 800-HITACHI immediately.
Do not rest anything heavy on top of the unit.
Do not climb on or hang from the unit.
Do not allow your pets to get on top of the unit
■
Do not install the unit in an unsuitable location.
This could cause a malfunction or in extreme cases danger of electric shock. Locations where high
moisture is likely, such as bathrooms or shower rooms, close to windows, or outside where rain, snow
or other inclement conditions could occur, should be avoided. Please also avoid installing the unit in a
location where fumes from hot springs could come into contact with it.
■
Unplug the unit in the event of a lightning storm.
To reduce the risk of electric shock, do not touch the product when lightning occurs.
Disconnect the
plug from the
power outlet.
■
Do not do anything that may damage the power cord.
Do not damage, modify, twist, forcibly bend, heat, or pull excessively on the power cord.
Do not place heavy objects (including the unit itself) on top of the power cord.
If the power cord is damaged, contact 800-HITACHI for repairs or exchange.
■
Use only with designated power supply voltage.
To prevent the risk of re and electric shock, operate the product only with the power supply voltage indicated on the
unit.
■
Be careful not to drop or allow any impact to affect the unit.
Take extra care while moving the unit.
There is no protection glass on the surface of the LCD panel. Therefore do not press the panel surface with your ngers
or hands. Also do not hit any objects against the monitor. These actions would damage the LCD cells or the panel
surface and could cause failure or personal injury.
In the event that you drop the unit or the cabinet is damaged, turn off the main power, unplug the power cord and
contact 800-HITACHI immediately.
Continuing use of the product under the above conditions may cause re or electric shock.
■
Clean dust or metals from on or around the pins of the power plug regularly.
Continuing use of the product under the above conditions may cause re or electric shock.
Always unplug the power cord rst, then clean the pins using a dry cloth.
■
Do not place the unit on an unstable surface.
Unstable surfaces such as:
Tilted surface or shaky shelving, table, stand or trolley.
If the unit falls down, this could cause personal injury.
7
SAFETY PRECAUTIONS (continued)
CAUTION
■
Do not place or use the unit in a dusty location.
This could cause a malfunction.
■
Do not cover or block any ventilation holes on the product.
The unit would overheat and this could cause re or damage to the product which may shorten its service lifetime.
Install the product in accordance with the instructions in this manual.
Do not place the unit with the ventilation side downward.
Do not install the unit on carpeting or bedding.
Do not cover the unit with table cloths etc.
■
Be sure to ground the earth cable correctly.
Especially when you use a power cord adapter, be sure to connect the earth cable to the ground terminal. Incorrect
connection could cause re or electric shock.
For your safety, always make sure to unplug the power cord before connecting or disconnecting the earth cable.
■
Observe the anti-tumble measures described in this manual.
If the unit tumbles over, there is a risk of personal, possibly fatal injury. Also, this would damage the product seriously.
Connect the
earth cable.
■
Do not install the unit near medical devices.
To prevent malfunction of medical devices, do not use the product and medical devices in the same room.
■
Do not place a CRT-based television near the speakers of the LCD Monitor.
This could cause partial discoloration or blurring of the image on the CRT-based television.
Please install it away from the speakers of the unit.
■
Disconnect all of the external connection cables and detach the anti-tumble measures before
moving the unit.
Otherwise re, electric shock or personal injury may result.
■
Connect the power plug securely.
Improper connection will cause overheating and may result in re.
Do not touch the pins of the plug while connecting it to the wall socket. This could cause electric shock.
If the plug is not suitable for the wall socket, contact your dealer for replacement.
■
Do not handle the power cord with wet hands.
This could result in electric shock.
■
Do not pull the cord when you unplug the power cord.
This may damage the cord and could result in re or electric shock.
Grip the plug when disconnecting it.
■
Unplug the power cord when you do not intend to use the product for long periods of time.
■
Handle the batteries properly.
Improper or incorrect use of the batteries may cause corrosion or battery leakage, which could cause re, personal
injury or damage to property.
Use only the types of batteries which are indicated in this manual.
Do not replace batteries with used ones.
Install the batteries correctly by observing the polarity (+ and -) indications on the battery compartment.
Do not dispose of used batteries as domestic waste. Dispose of them in accordance with the local regulations.

8
ENGLISH
SAFETY PRECAUTIONS (continued)
CAUTION
■
Do not install the unit in locations where it will be subjected to high temperature.
This could damage the cabinet or components of the product.
Do not install near any heat sources such as radiators, heating grilles, stoves, or other apparatus that produce heat.
Keep the unit out of direct sunlight. Otherwise the resulting increase in temperature of the unit may cause a malfunction.
■
Viewing Advice
The lighting of the environment in which the product is used should be appropriate. Too bright/dark environments are not good for
your eyes.
Take time to relax your eyes occasionally.
When you use the product, view from a distance equal to 3 to 7 times the height of the screen. This is the best viewing distance in
order to protect your eyes against eyestrain. Example: (3X)= approx: 1.5m (4'), (7X)= approx: 3.5m (9').
Adjust the volume to an appropriate level, especially during night time.
■
Transporting the product
When the product needs to be transported due to moving or repair, use the carton box and buffer material that came with
the product.
Always transport the product upright; otherwise this could damage the LCD panel.
Avoid laying the product down on its face or back.
Avoid vibrations. If the product "must" be transported laying on its face, be sure to provide soft cushioning material.
■
Keep radios away from the unit while in use.
The unit is designed to meet the international EMI standards to prevent radio interference. However, the unit may generate
noise in the radio.
If noise is heard on the radio, please try the following actions.
Adjust the direction of the radio antenna in order not to receive interference from the unit.
Keep the radio away from the unit.
■
Infrared communication devices
Infrared communication devices such as cordless microphones or cordless headphones may not operate properly around the unit.
This is because of communication failure. Please note that this is not a malfunction.
■
When you dispose of the product at the end of its service lifetime, follow the regulations in your residential area.
For more information, contact the local authority or the dealer where you purchased the product.
Cleaning and Maintenance
Please make sure to unplug the power cord before cleaning the unit.
■
How to clean the LCD panel of the unit.
Wipe the panel with a lint-free and dry cloth in order to prevent damage to the panel surface.
Do not use a chemical cloth or cleaners. Depending on the ingredients, these may cause discoloration and damage to the panel
surface.
Do not wipe with a rough cloth or rub hard. This may damage the panel surface.
In case of greasy dirt such as ngerprints, wipe the panel surface with a lint-free cloth moistened with a diluted neutral detergent
solution (dilute 1 part of detergent to 100 parts of water), and then wipe with a soft and dry cloth.
Do not use a spray cleaner. This could cause a malfunction.
■
How to clean the cabinet of the unit.
The following may cause cracking, deformation and peeling of paint.
Do not wipe the cabinet with benzene, thinners and other chemical products.
Do not spray volatile solutions such as insecticide over the cabinet.
Do not leave the cabinet in prolonged contact with plastic or rubber materials.
Do not use a chemical cloth, cleaner or wax. Depending on the ingredients, these may cause cracking and deformation.
Use a lint-free cloth (e.g. cloth for cleaning glasses) to clean the cabinet and control panel of the unit. In case of the excessive dirt,
wipe with a soft cloth moistened with a diluted neutral detergent solution and then wipe with a soft and dry cloth.
Never use the following detergents. They could cause cracking, discoloration and scratching.
Acidic/alkaline detergents, alcoholic detergents, abrasive cleaners, soap powder, OA cleaner, car wax, glass cleaner, etc.
9
SAFETY PRECAUTIONS (continued)
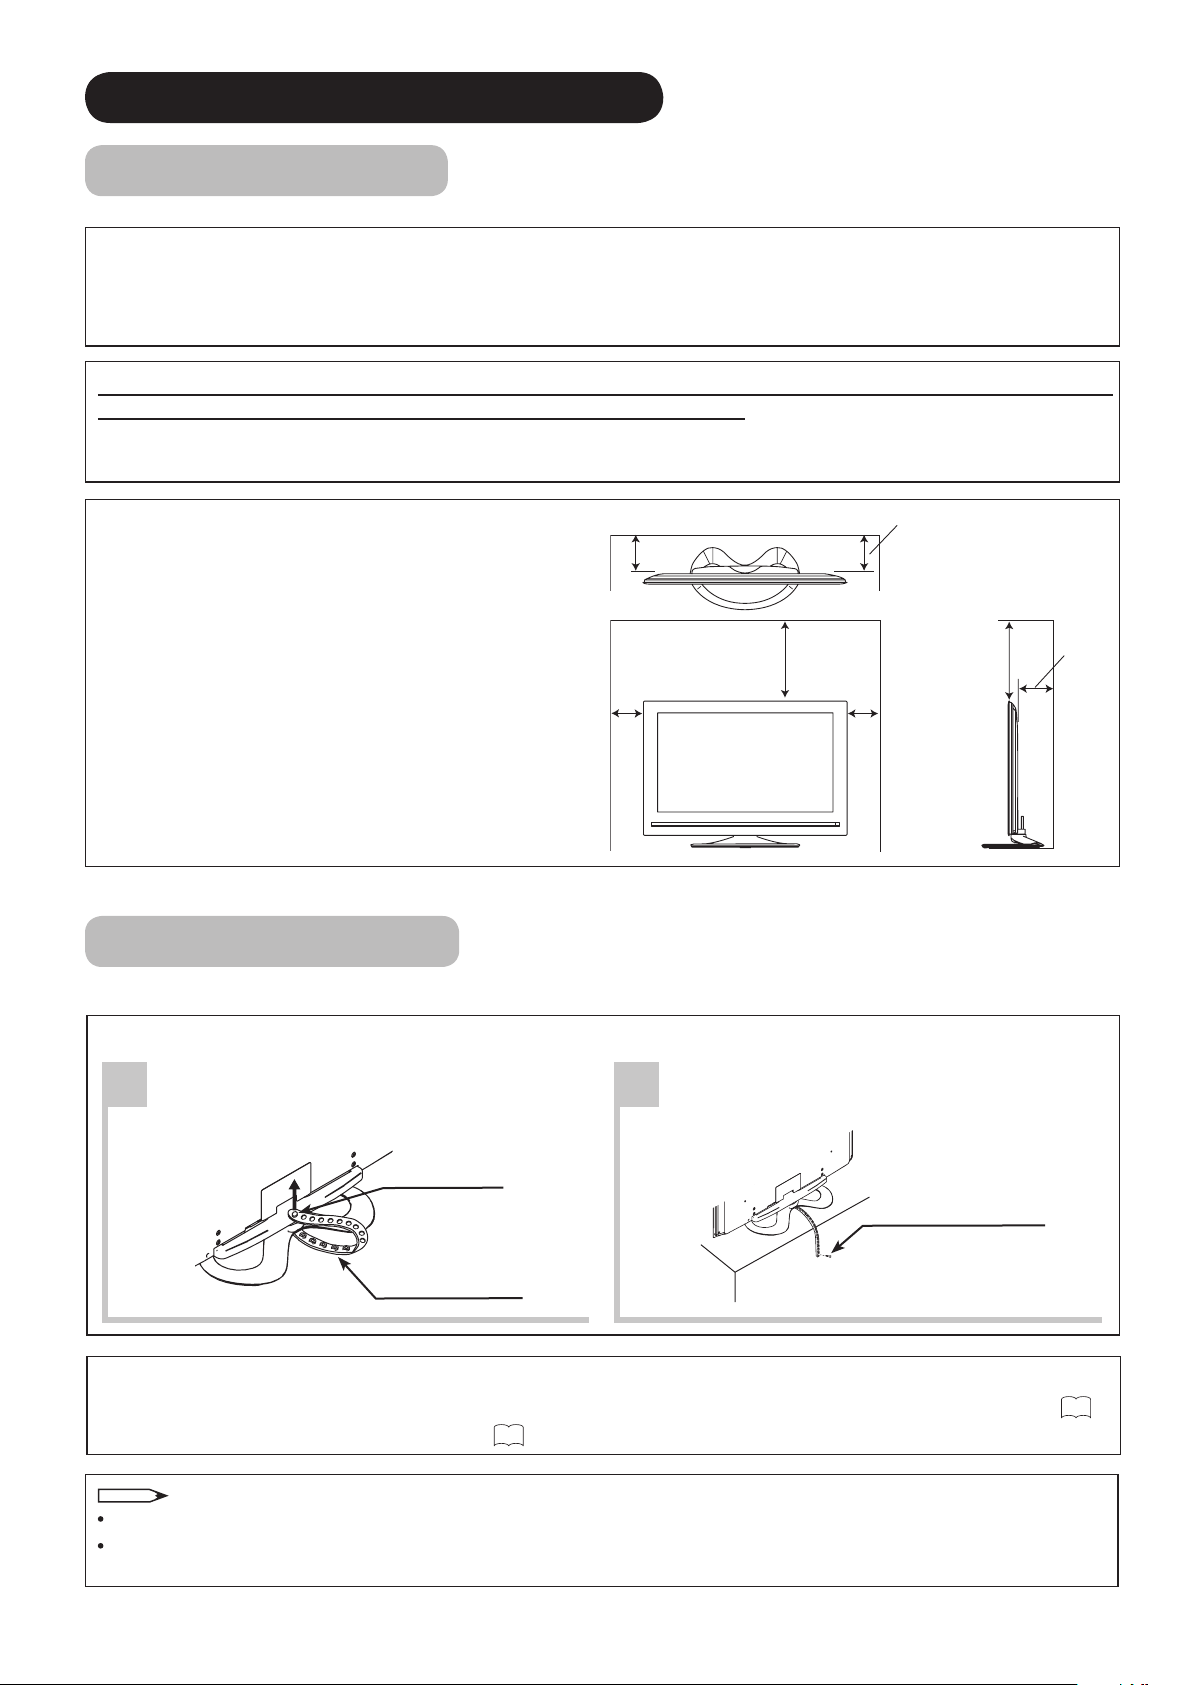
NOTE
10cm (4”)
or more
10cm (4”)
or more
30cm (1’)
or more
10cm (4”)
or more
10cm (4”)
or more
Main Unit Installation
When installing the main unit, be sure to use the specied mounting units in order to obtain maximum performance
and maintain safety.
Hitachi assumes no responsibility nor liability for personal injuries or property damage caused by use of other
mounting units or improper installation.
With respect to installation instructions, please read each user manual for the respective mounting units: for
Tabletop Setup, Floor Stand Setup, Wall Mounting, and Ceiling Mounting.
If using Wall or Ceiling Mounting units, contact your local dealer and ask for an approved installation specialist to
set up the unit. Never attempt to install it yourself. That could cause injury or damage.
Please leave adequate space around the unit in order
to avoid increasing the internal temperature.
Make sure not to block any ventilation holes.
Do not install the unit in a small space such as inside
a cabinet, closet or box without adequate ventilation.
Leave at least 10cm (4") of clearance from each side
of the unit and 30cm (1') from the top of the unit to
ceiling.
Anti-tumble Measures
Install in a stable location and take safety precautions against overturning.
Securing to a table
Remove the plastic rivet.
1
Plastic rivet
Fastening strap
Securing to ceiling or wall
Use the specied mounting unit to secure the set to a ceiling. For Wall Mounting setup please refer to page ( 11 ).
For Floor Stand setup please refer to page ( 12 ).
For more information regarding mounting of the unit, please contact 800-HITACHI.
Please install the unit in a proper location where it does not expose anyone to the danger of bumping themselves
(for example their hands, head or face, etc) against the edges of the unit and causing personal injury.
Fasten the fastening strap to a table using
2
the wood screw provided.
Wood screw
(4 x 20 screw) : 1 pc.
10
ENGLISH
SAFETY PRECAUTIONS (continued)
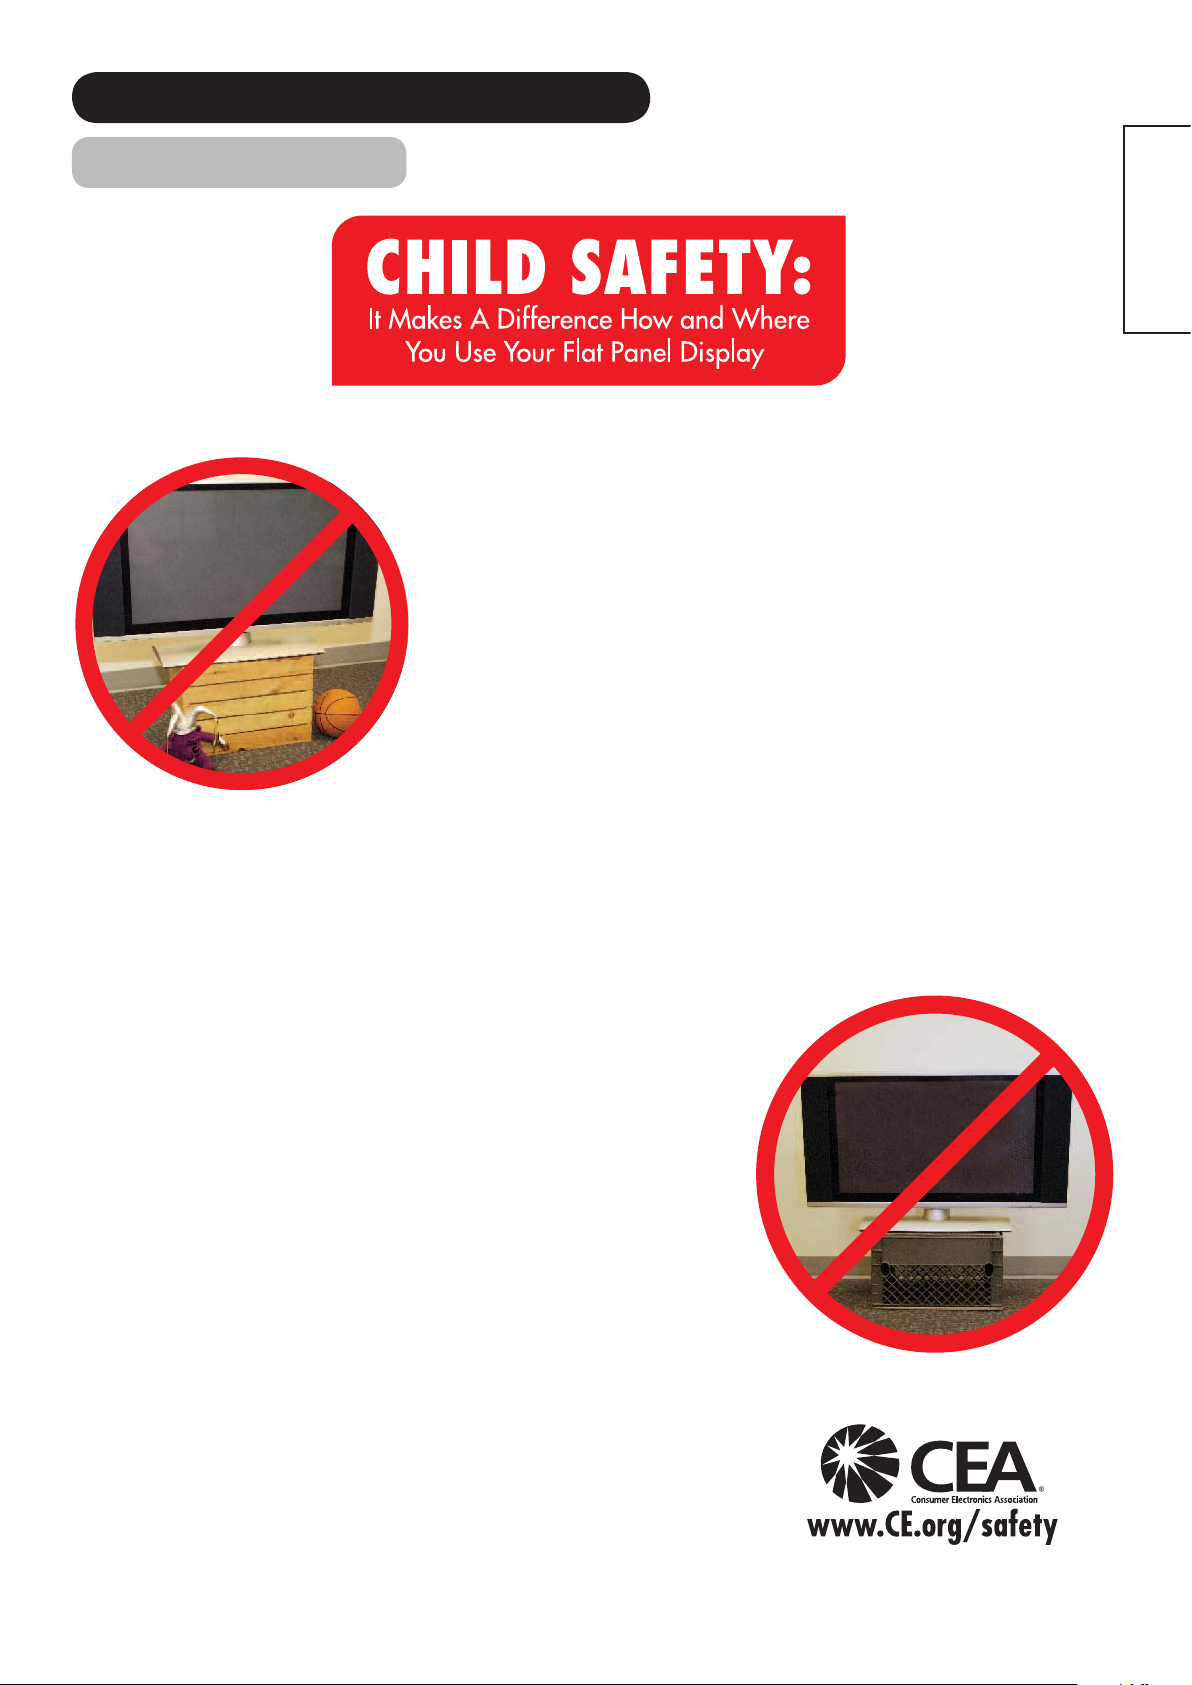
Child Safety Notice
Congratulations on your purchase! As you enjoy your new product, please keep these safety tips
in mind:
THE ISSUE
The home theater entertainment experience is a growing trend and larger •
at displays are popular purchases. However, at panel displays are
not always supported on the proper stands or installed according to the
manufacturer’s recommendations.
Flat Panel displays that are inappropriately situated on dresser, bookcases, •
shelves, desks, speakers, chest or carts may fall over and cause injury.
HITACHI CARES!
The consumer electronics industry is commited to making home •
entertainment enjoyable and safe.
TUNE INTO SAFETY
One size does NOT t all. Follow the manufacturer’s recommendations •
for the safe installation and use of your at panel display.
Carefully read and understand all enclosed instructions for proper use •
of this product.
Don’t allow children to climb on or play with furniture and television •
sets.
Don’t place at panel displays on furniture that can easily be used as •
steps, such as a chest of drawers.
Remember that children can become excited while watching a program, •
especially on a “larger than life” at panel display. Care should be taken
to place or install the display where it cannot be pushed, pulled over,
or knocked down.
Care should be taken to route all cords and cables connected to the •
at panel display so that they cannot be pulled or grabed by curious
children.
WALL MOUNTING: IF YOU DECIDE TO WALL
MOUNT YOUR FLAT PANEL DISPLAY, ALWAYS:
Use a mount that has been recommended by the display manufacturer •
and/or listed by an independent laboratory (such as UL, CSA, ETL).
Follow all instructions supplied by the display and wall mount •
manufacturers.
If you have any doubts about your ability to safely install your at panel •
display, contact your retailer about professional installation.
Make sure that the wall where you are mounting the display is •
appropiate. Some wall mounts are not designed to be mounted to walls
with steel studs or old cinder block construction. If you are unsure,
contact a professional installer.
A minimum of two people are required for installation. Flat panel •
displays can be heavy.
11
SAFETY PRECAUTIONS (continued)
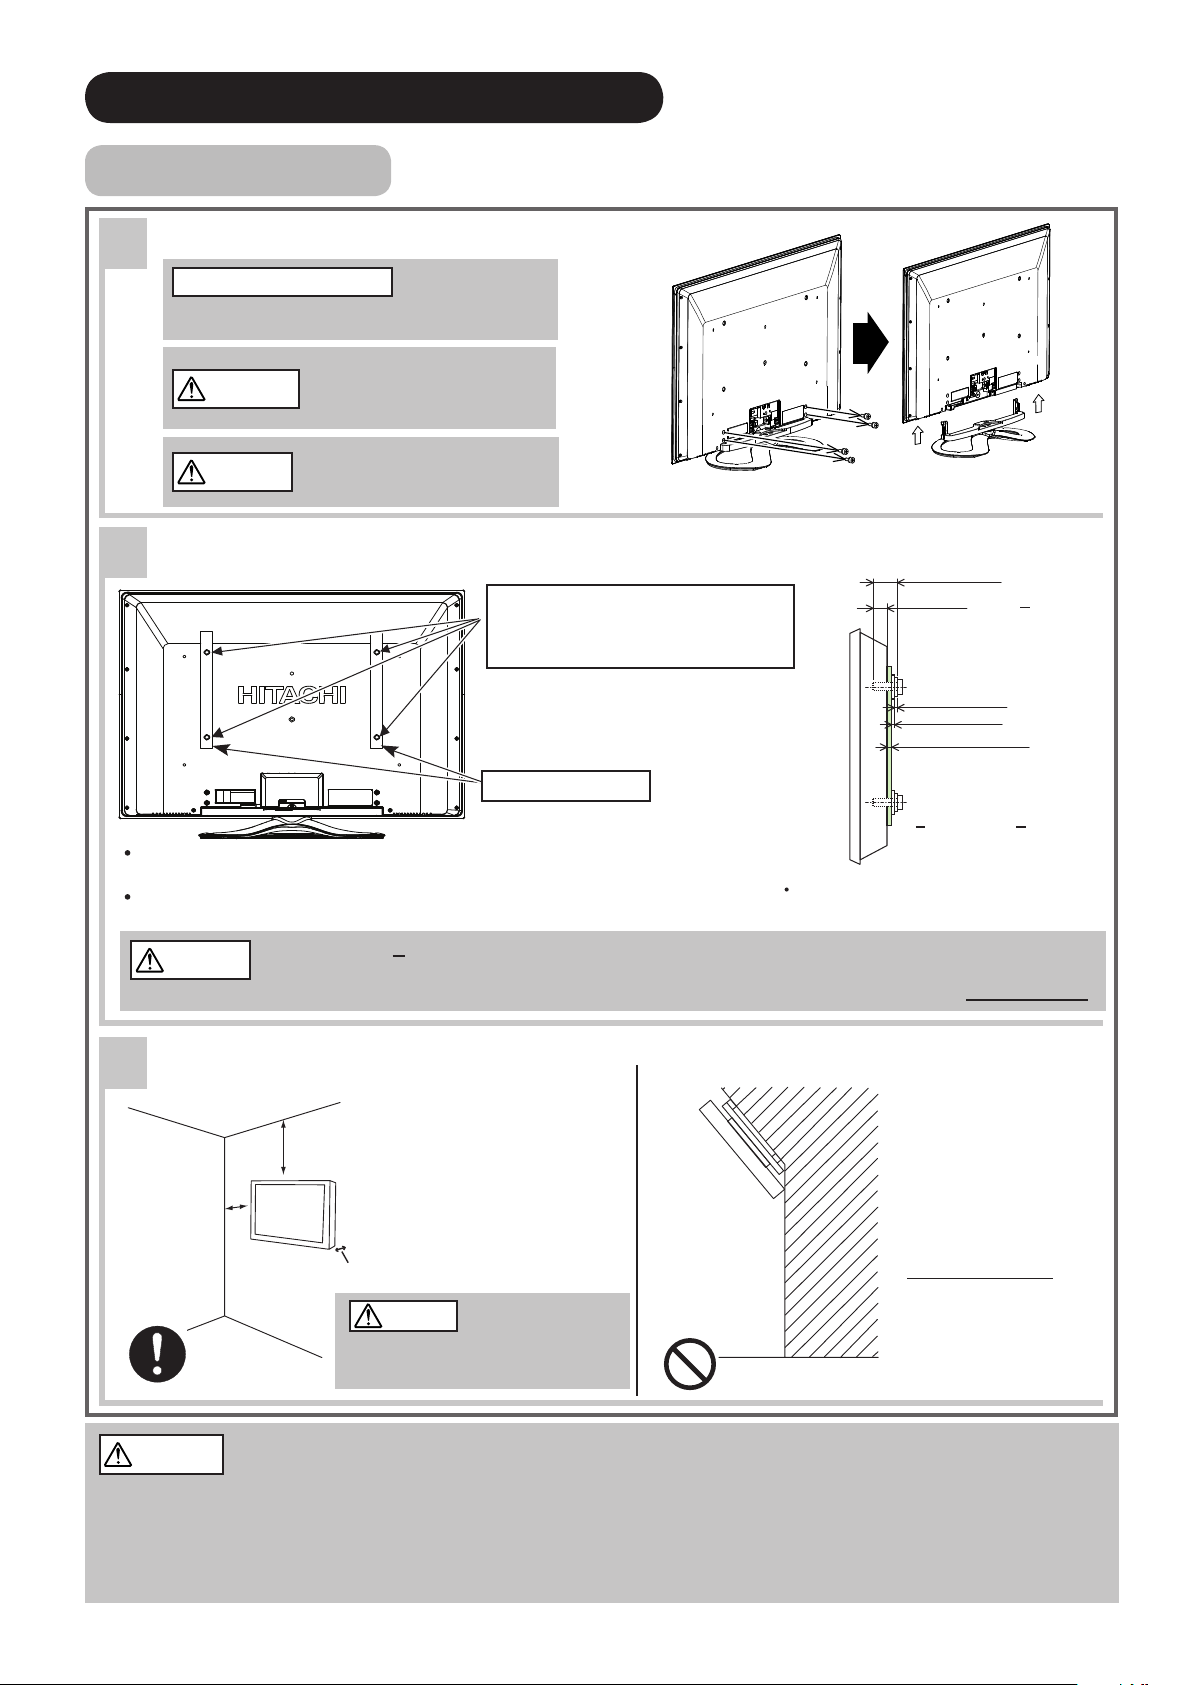
Wall Mount Setup
Remove the Stand Base from the Monitor
1
About the Installation
Th i s product is heavy and should be
carried by at least 2 people.
Please make sure screws are
WARNING
CAUTION
Install the Wall Mount Brackets on the Monitor using 4 screws (Screws
2
Specication is shown below ).
tightened properly.
The torque should be 1.8~3.0
N.m (18~30 kgf.cm).
Keep the screws. They may
be used for the Wall Mount
installation.
Screw Mounting Holes (4 places).Don't
use the original at head screws (A) that
comes in the monitor, for the Wall Mount
Braket. The length is not long enough.
Remove the 4 screws and raise straight up from tabletop stand.
Screw Length (A)
Insertion length (B)
Wall Mount Brackets
For Wall Mount assembly; please refer to the Installation Manual of the
Wall Mount Unit.
If the Wall Mount Bracket thickness is 1~3 mm. the original screws
removed from the stand base can be used for the Wall Mount installation.
CAUTION
Insertion length (B) of the screws must be within 7~9 mm(37") or 8~12 mm(42"). If the length is less than
7 mm(37") or 8 mm(42"), the weight can not be maintained. If the length is more than 9 mm(37") or 12
mm(42"), a space is created between the Wall Mount Bracket and the Monitor. This length is very important.
Tips to consider for the location of the Monitor.
3
D o n o t b l o c k t h e
ve n t il a ti o n h o l e s . In
addition plea se keep a
cetain distance around
an d ma k e su r e no t to
ob s t r u c t ve n t il a t i o n .
Blocking the ventilation
holes might cause re or
defect.
If you purchased
the Wall Mount unit,
More than
10 cm (4").
More than
30 cm (1').
Keep
more than
2 cm (0.8")
away from
the wall.
CAUTION
ple a s e a s k f o r a pr o f ess i o n al
installer. Do not install by yourself.
Spring Washer (C)
Plane Washer (D)
Wall Mount Bracket (E)
Example(37") :
A = B+C+D+E
A: 11~13 mm.
B: 7~9 mm.
C: 1 mm.
D: 1 mm.
E: 2 mm.
The screw type :Theread ISO M5 (Metric
type, do not use Standard type).
This ultrathin unit features
an a dva nce d ventil ati on
sy s t em co nf i g ur e d fo r
vertical installation. A
k n o w l e d g e a b l e a n d
experienced professional
te c h n ician can per f o r m
o t h e r m o u n t i n g o r
in s tal l atio n ori enta t ions
(e . g., ho r izont a l , til t e d)
provided that y o u
spe c i f i cal l y in f orm th e
te c h n ician of the unit's
spec i a l i z e d ve n t i l a t ion
needs. Call 800-HITACHI
for add i t i o n a l in f o an d
guidance.
Example(42') :
A = B+C+D+E
A: 12~16 mm.
B: 8~12 mm.
C: 1 mm.
D: 1 mm.
E: 2 mm.
CAUTION
Although this LCD Monitor can be installed using a variety of third party wall mounting brackets/devices, such
third party brackets/devices have not been tested or approved by Hitachi for use or compatibility with this
LCD Monitor. Accordingly, Hitachi accepts no responsability or liability for any injuries or property damage
resulting from the use of such third party brackets/devices. Hitachi strongly advises that any installation of this LCD Monitor
using wall mounting brackets/devices be performed only by a qualied and experienced television installation technician who
has completed a thorough evaluation of:
a) the weight-bearing strength and stability of the intended wall mount surface; and
b) the weight-bearing strength and compatibility of the intended wall mount brackets/device.
12
ENGLISH
SAFETY PRECAUTIONS (continued)
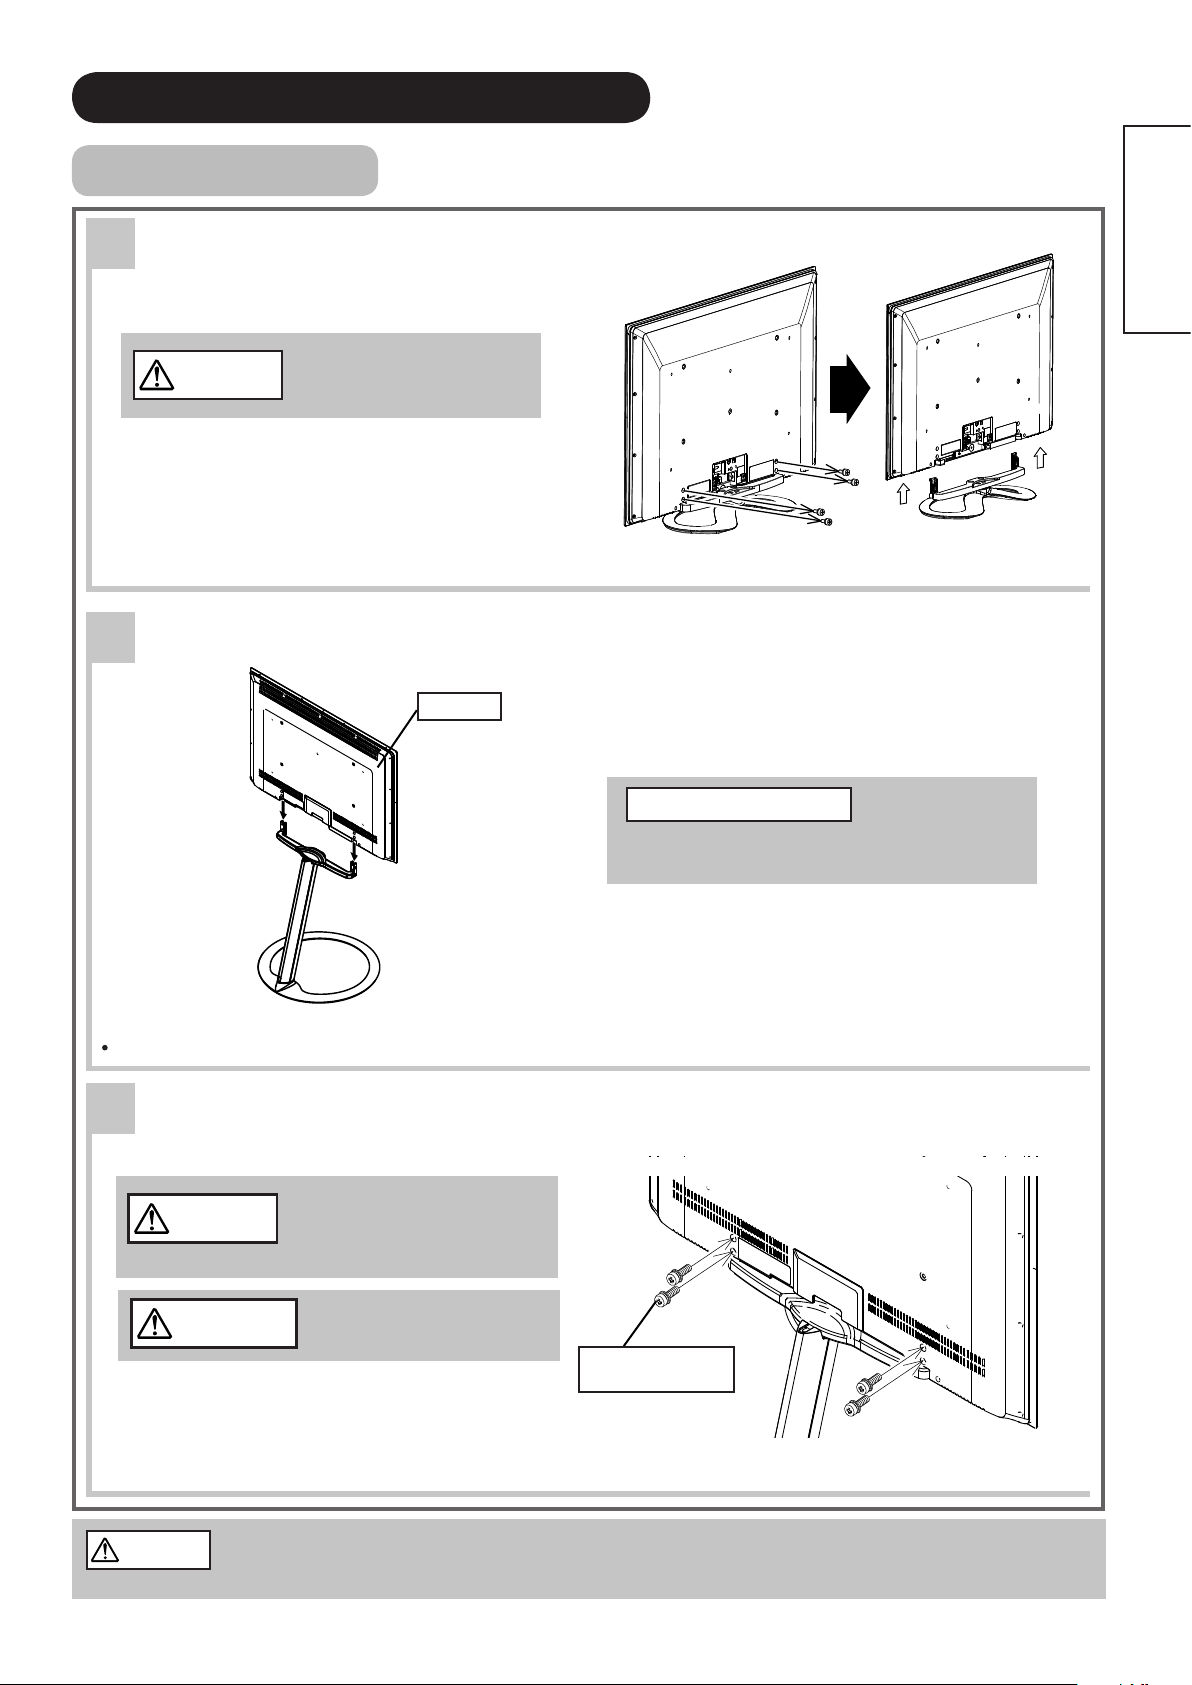
Floor Stand Setup
Remove the Stand Base from the Monitor
1
Keep the screws. They will
CAUTION
be used for the Floor stand
installation.
Remove the 4 screws and raise straight up from tabletop stand.
Install the Monitor on the Floor Stand
2
Monitor
About the Installation
This product is heavy and should be carried
by at least 2 people.
For Stand Assembly; please refer to the Installation Manual of the Floor Stand.
Attach the Monitor to the Floor Stand with the 4 screws used with the
3
tabletop stand.
Adjust Monitor position left or
CAUTION
right to match with screw holes.
If the screw holes do not align,
the Monitor may be damaged.
WARNING
CAUTION
Please mak e sur e scr ews
are tightened properly.
Screws from the
tabletop stand.
LCD Monitors are for use with Hitachi AS-LSZ0081 or AS-LSZ0082 Floor stand for UT37" Use
with other oor stands could cause instability and possible injury.
13
QUICK START GUIDE
*
*
NOTE
For more information on connecting and using your monitor, please be sure to read all instructions in this user
manual.
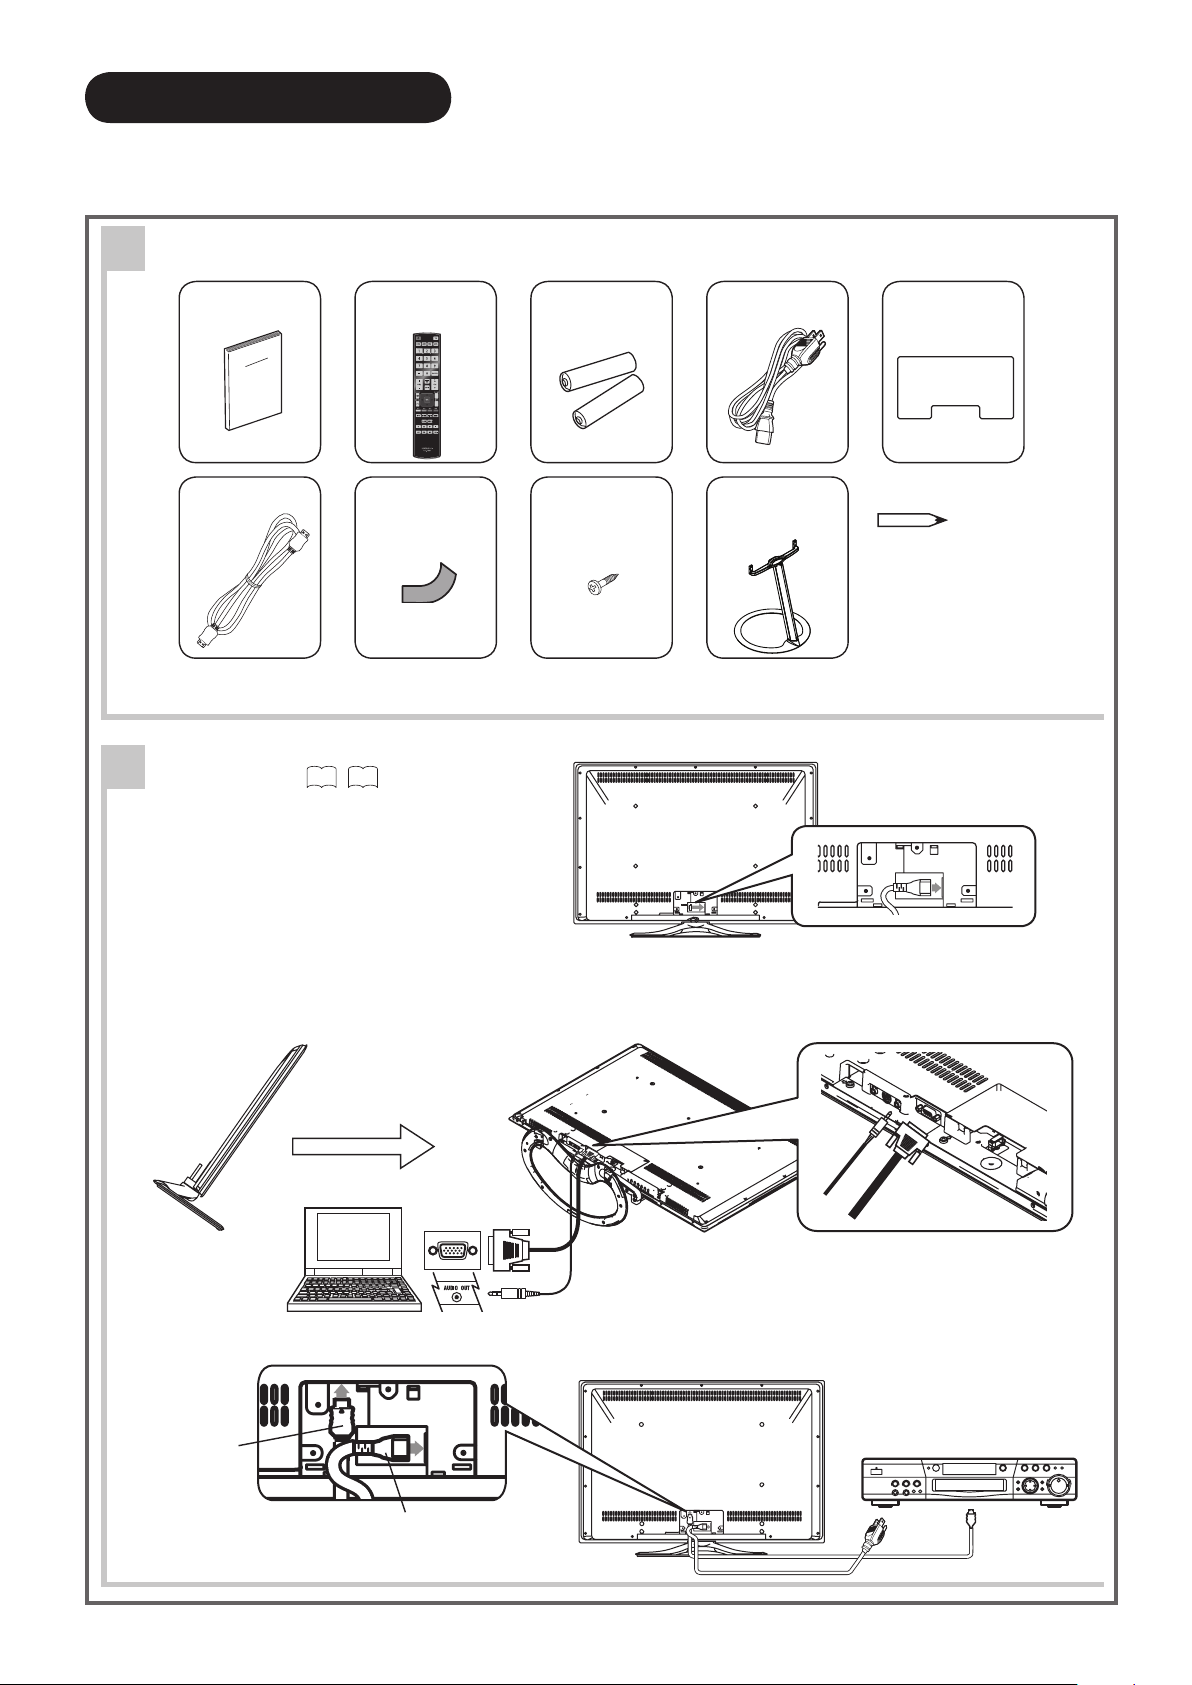
Supplied Accessories (including option)
1
User Manual AAA Size
HDMI Cable HDMI Cushion Wood Screw
*For some countries, the type of power plug provided may be different from that depicted.
2
Connection
q Connect the power cord to the rear panel.
Remote Control
P# HL02562
18~21
Battery X 2
(4 x 20) X 1
Power Cord*
Floor Stand
(See Beside Note)
(Optional)
Terminal
Cover
Optional Floor Stand
AS-LSZ0081(37" black)
AS-LSZ0082(37" silver)
w Connect to external equipment.
Example 1: Connecting to PC
To insert D-sub 15 pin, tilt the monitor forward and bring the terminals into view. Two people are required
to hold the monitor and insert D-sub 15 pin safely. Be careful not to damage the panel.
Tilt Forward
D-Sub 15
Audio Cable
Example 2: Connecting to DVD player
HDMI Cable
Power Cord
*D-sub 15 and Audio cables are not included.
HDMI Cable
14
ENGLISH
QUICK START GUIDE (continued)
◄►
◄►
OK
Language
ޓޓޓޓޓ
English
ޓޓޓޓޓ
English (US)
ޓޓޓޓޓ
Français
ޓޓޓޓޓ
Español
ޓޓޓޓޓ
Deutsch
ޓޓޓޓޓᣣᧄ⺆
ޓޓޓޓޓޓᢥ
ޓޓޓޓޓ❥㜚ᢥ ޓޓޓޓޓ
Select OK Set Return
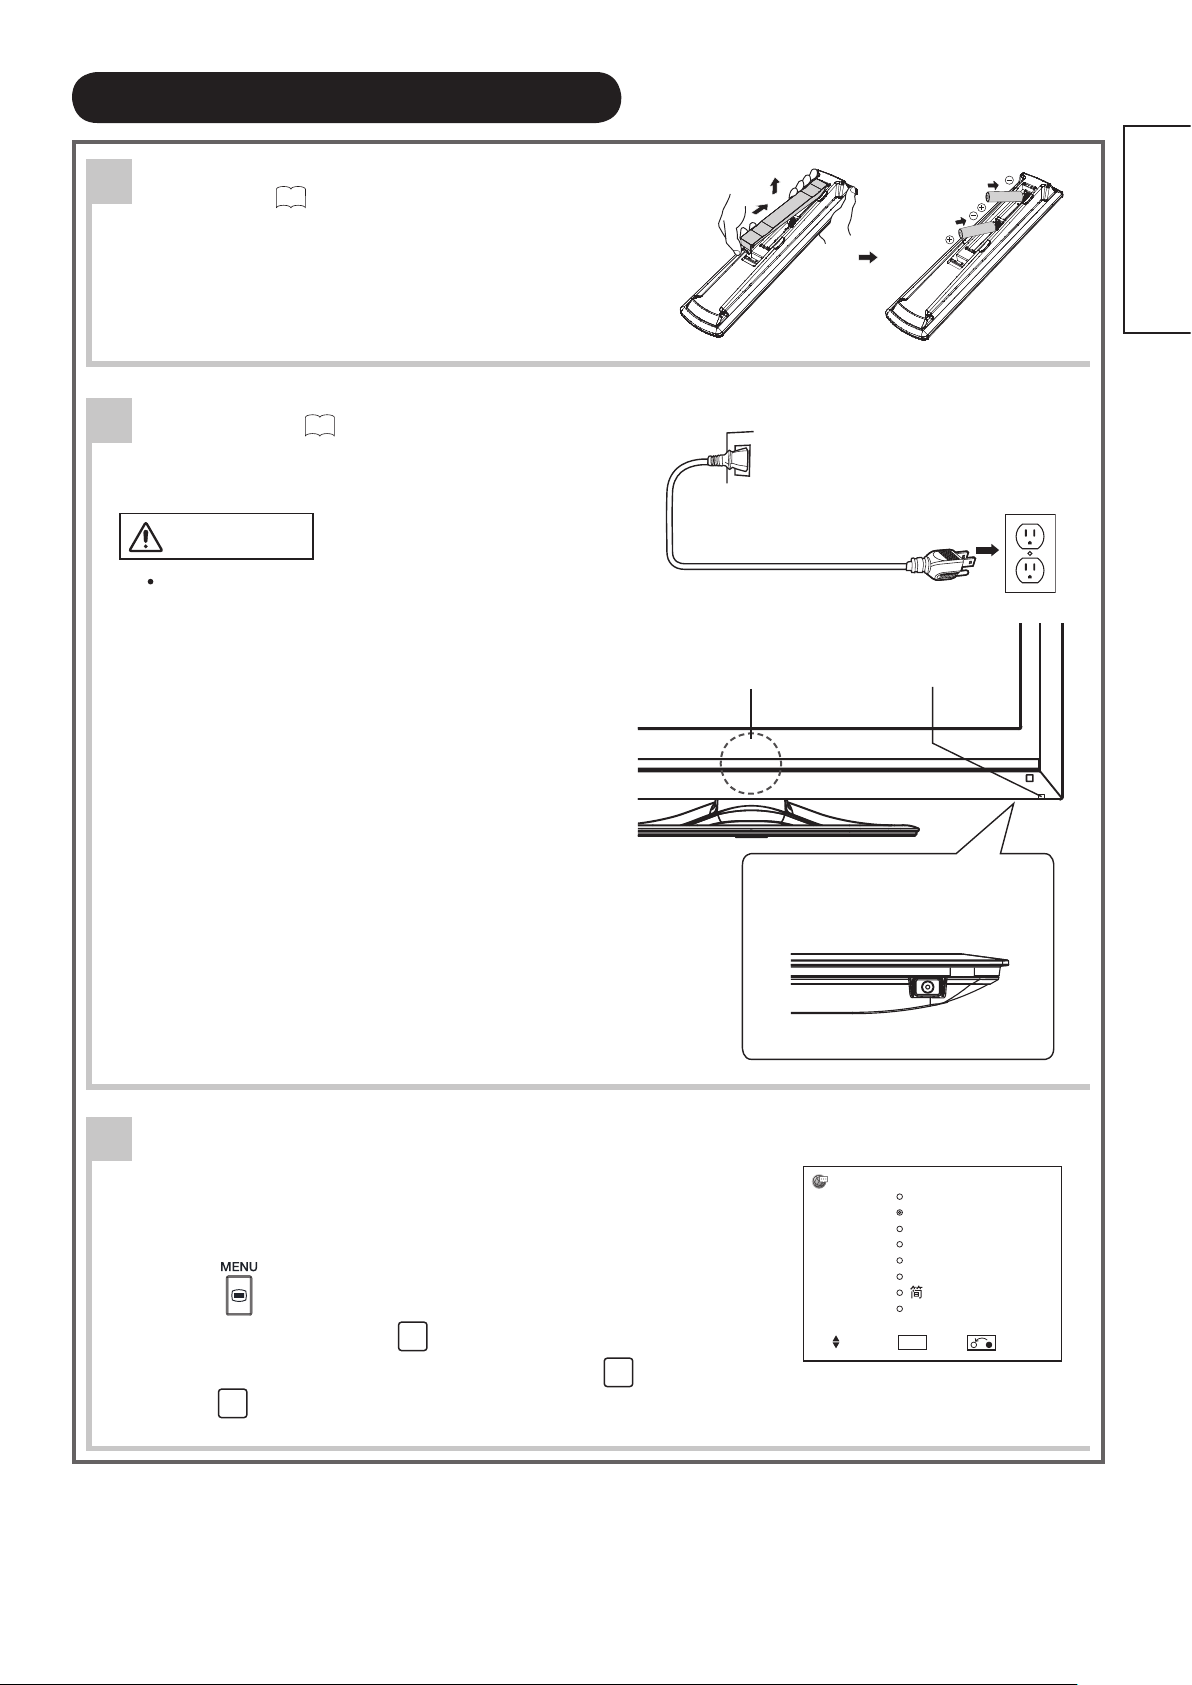
Insert the Batteries into the Remote
3
Control...
17
Power On...
4
22
q Connect the plug into the wall socket after all other
connections are completed.
CAUTION
Ensure that both ends of the power cord are easily
accessible.
Th e M ai n P ow er Sw it c h is fa ct o ry s et to O n
(activated), therefore after you connect the plug into
the wall socket, the color of the indicating lamp must
turn Green and the Illumination Lamp turns Blue.The
image will display on screen.
Once the Main Power switch is on, you can turn On/
Off by pressing the Power (On/Off) button on the
remote control.
Monitor
Rear
Panel
Illumination Lamp
AC
Wall
Socket
Indicating Lamp
Main Power Switch
(on the underside)
Front
Language Selection
5
The initial language setting for on-screen displays is English (US).
You can change to your preferred language.
Press the button to display Main Menu.
q
Select “Language” using the
w
Select the language you prefer from the list using the
e
press the
Rear
button.
button and then
button.

15
COMPONENT NAMES
MENU/EXIT VOLINPUT/OK
Main Unit
Front Panel
y
u
Control panel (located on the bottom)
q
w
e
r
t
Cabinet
q
Panel
w
Remote Control Receiver
e
Indicating Lamp
r
Speaker
t
Illumination Lamp
y
Tabletop Stand
u
Main Power switch
i
Service use only
o
RS232C
a
PC (RGB)/DVI Analog Audio Input Terminal
s
PC Connection Terminal (D-sub 15 Pin)
d
Reset button (See
f
Rear Panel
44
hjk gl;
)
.
f
▲ button
g
▼ button
h
Volume Up/► button
j
Volume Down/◄ button
k
Input Select/OK button
l
Menu/Exit button
;
Power Cord Socket
q
HDMI Input Terminal
w
ioasd
w q
*This drawing shows UT37V702
Please refer to 18~21 for detailed information regarding the connections.
16
ENGLISH
COMPONENT NAMES (continued)
HDMI RGB (/Composite)
Dynamic Natural
Cinema
NOTE
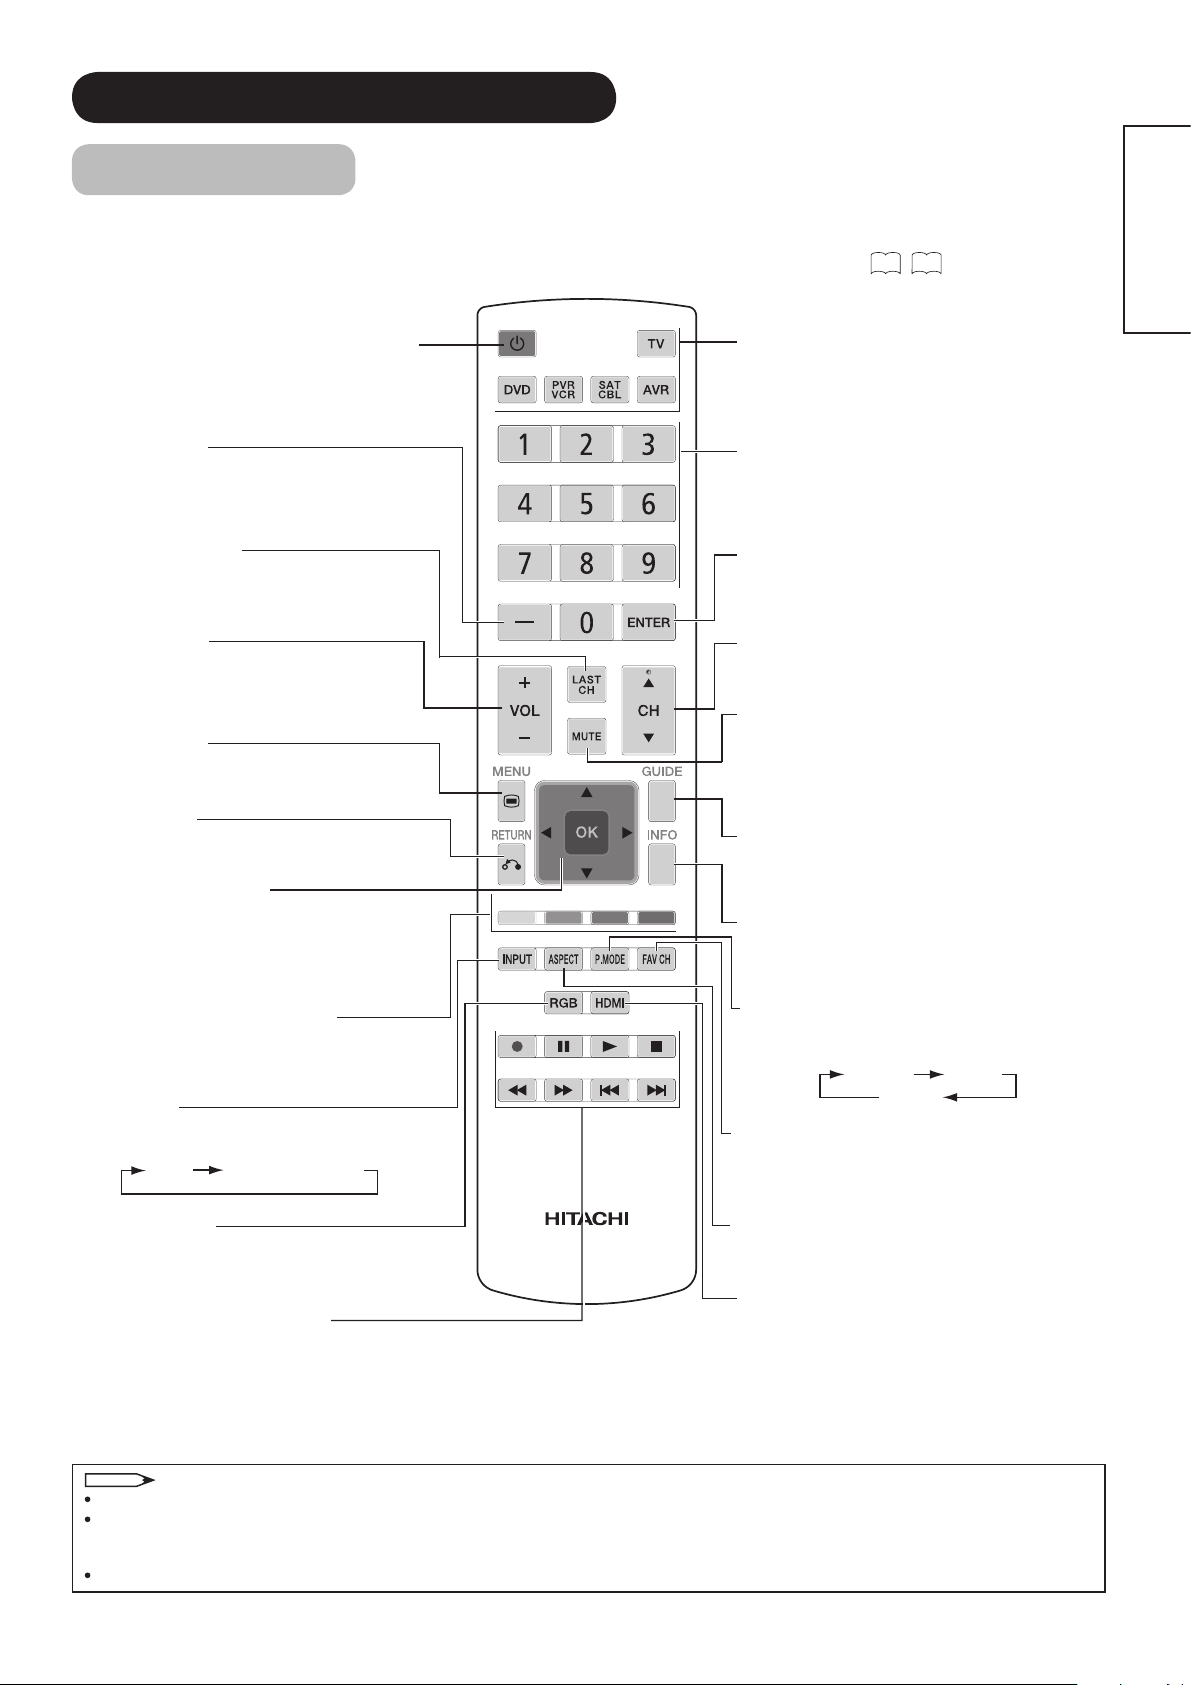
Remote Control
In addition to controlling all of the functions on your Hitachi UT LCD Monitor, the new remote control is designed to operate
different types of devices, such as, DVD players, Cable Boxes, Set-Top-Boxes, Satellite Receivers, VCR's, PVR's and AVR's.
The remote control must be programmed to control the chosen device. Please refer to pages 25~28 for external device
programming setup.
Power On/Off
(Monitor, TV, DVD, PVR/VCR, SAT/CBL, AVR)
Press this button to switch the selected device
On or Off standby.
(-) Dash Button
(TV, SAT,PVR,DVD)
Press this button when the remote is in Set-
Top-Box mode (SAT) or when the TV uses a
digital input.
Last Channel Button
(TV, SAT/CBL, PVR)
Press this button to switch between the
current and the last channel viewed.
Volume Buttons
(Monitor, TV, AVR)
Press up (+) to increase or down (-) to
decrease the audio level of your TV.
Menu Button
(Monitor, TV, DVD, PVR/VCR, SAT/CBL, AVR)
Accesses the OSD menu system.
Return Button
(Monitor, TV,DVD, PVR/VCR, SAT/CBL, AVR)
Press this button to return to the previous menu.
Cursor PAD/OK Buttons
(Monitor, TV, DVD, PVR/VCR, SAT/CBL, AVR)
The Cursor PAD is used to navigate through
the OSD and INPUT menu system, The OK
button is used to Set/Activate highlighted
menu items.
Color Buttons
( SAT/CBL)
Use them for certain CBL/SAT device in OSD
navigation or features..
Device Buttons
(TV, DVD, PVR/VCR,
SAT/CBL, AVR)
Press these buttons to switch between your
devices.
Numeric Buttons
(TV, DVD, PVR/VCR, SAT/CBL, AVR)
Pr e s s th e s e bu t t o n s to ma n u a l l y en t e r
th e ch ann e l an d fo r nu meri c en try whe n
navigating through the OSD menu system.
Enter Button
(TV, DVD, VCR, SAT/CBL)
Press this button to use as a SELECT feature.
Channel Up/Down Buttons
(TV, PVR/VCR, SAT/CBL)
Changes up or down the channel.
Mute
(Monitor, TV, AVR)
Press this button once to turn off temporally
the audio level, press it again to restore audio
level.
Guide Button
(SAT/CBL, PVR,DVD)
Press this button to access the program guide
of TV and other devices.
Info Button
(Monitor, TV, DVD,SAT/CBL, PVR)
Sho ws t h e i n put sig nal sta tus and oth er
information.
Picture Mode
(Monitor, TV)
Picture mode can be changed each time
pressed in the following sequence.
Input Select
(Monitor, TV, AVR)
Press this button to change input mode.
RGB Input Select
(Monitor)
Press this button to select RGB (/Composite)
input.
DVD/VCR CONTROL BUTTONS
(DVD, PVR/VCR, AVR)
Control the functions of your DVD and VCR.
LEGENDS
TV - Television VCR - Video Cassete Recorder PVR - Personal Video Recorder
DVD- Digital Video Disc Player SAT - Satellite Receiver CBL - Cable Box
AVR - Audio/Video Receiver
Pressing any button will illuminate the backlight for 4 seconds.
TV Mode is used for LCD Monitor. Please notice that NOT all keys are available for this LCD Monitor, the only working keys
are the ones marked as Monitor in parenthesis, since other ones are available when equipped with Hitachi Set-Top-Box and
Monitor is used as a TV.
For the Record button there is a feature for safety; so this key have to be press twice in order to start recording.
Favorite Channel Button
(TV,SAT/CBL, PVR)
Press to enter/access Favorite Channel mode.
Aspect
(Monitor, TV)
Press this button to change picture size.
HDMI Input Select
(Monitor)
Press this button to select HDMI input.
 Loading...