

Hitachi SMU400, SMU300 Hardware Reference Manual
System Manager Unit (SMU)
Hardware Reference
MK-92HNAS065-03

Notices and Disclaimer
Copyright © 2016 Hitachi Data Systems Corporation. All rights reserved.
The performance data contained herein was obtained in a controlled isolated environment. Actual results that may
be obtained in other operating environments may vary significantly. While Hitachi Data Systems Corporation has
reviewed each item for accuracy in a specific situation, there is no guarantee that the same results can be
obtained elsewhere.
All designs, specifications, statements, information and recommendations (collectively, "designs") in this manual
are presented "AS IS," with all faults. Hitachi Data Systems Corporation and its suppliers disclaim all warranties,
including without limitation, the warranty of merchantability, fitness for a particular purpose and non-infringement
or arising from a course of dealing, usage or trade practice. In no event shall Hitachi Data Systems Corporation or
its suppliers be liable for any indirect, special, consequential or incidental damages, including without limitation,
lost profit or loss or damage to data arising out of the use or inability to use the designs, even if Hitachi Data
Systems Corporation or its suppliers have been adv ised of the possibility of such damages.
This document has been reviewed for accuracy as of the date of initial publication. Hitachi Data Systems
Corporation may make improvements and/or changes in product and/or programs at any time without notice. No
part of this document may be reproduced or transmitted without written approval from Hitachi Data Systems
Corporation.
ii

Document Revision Level
Revision
Date Description
0
April
First
1
June 2015
Updated SMU Removal and Replacement se ct i on
2.0 December 2015
Added Use an ssh session to the SMU Removal and
Replacement section
3.0 January 2
Revised
.0
.0
2015
publication
016
iii

Table of Contents
Introduction to the SMU400 ....................................................................................................................... 2
SMU400 hardware ................................................................................................................................ 4
Introduction to the SMU300 ....................................................................................................................... 5
SMU300 hardware ................................................................................................................................ 7
Supported server releases ......................................................................................................................... 7
Port usage and connectivity ...................................................................................................................... 8
Serial port (COM1 and COM2) connection setti ngs ............................................................................. 8
Laptop Serial/KVM Configuration .......................................................................................................... 9
SMU Removal and Replacement ............................................................................................................. 10
Retrieve an SMU backup .................................................................................................................... 10
Configuring the Replacment SMU ...................................................................................................... 12
Replacement of the original SMU ....................................................................................................... 13
Perform a sanity check on the new replacement S M U ....................................................................... 13
Hitachi Data Systems
Introduction to the SMU400
The SMU400 is a 1U rack mounted device, used to manage the servers and clu sters of the
Hitachi NAS Platform and the Hitachi HUS File Module storage systems.
HDS does not support component replacement, and the entire SMU should be replaced in case
of hardware failures.
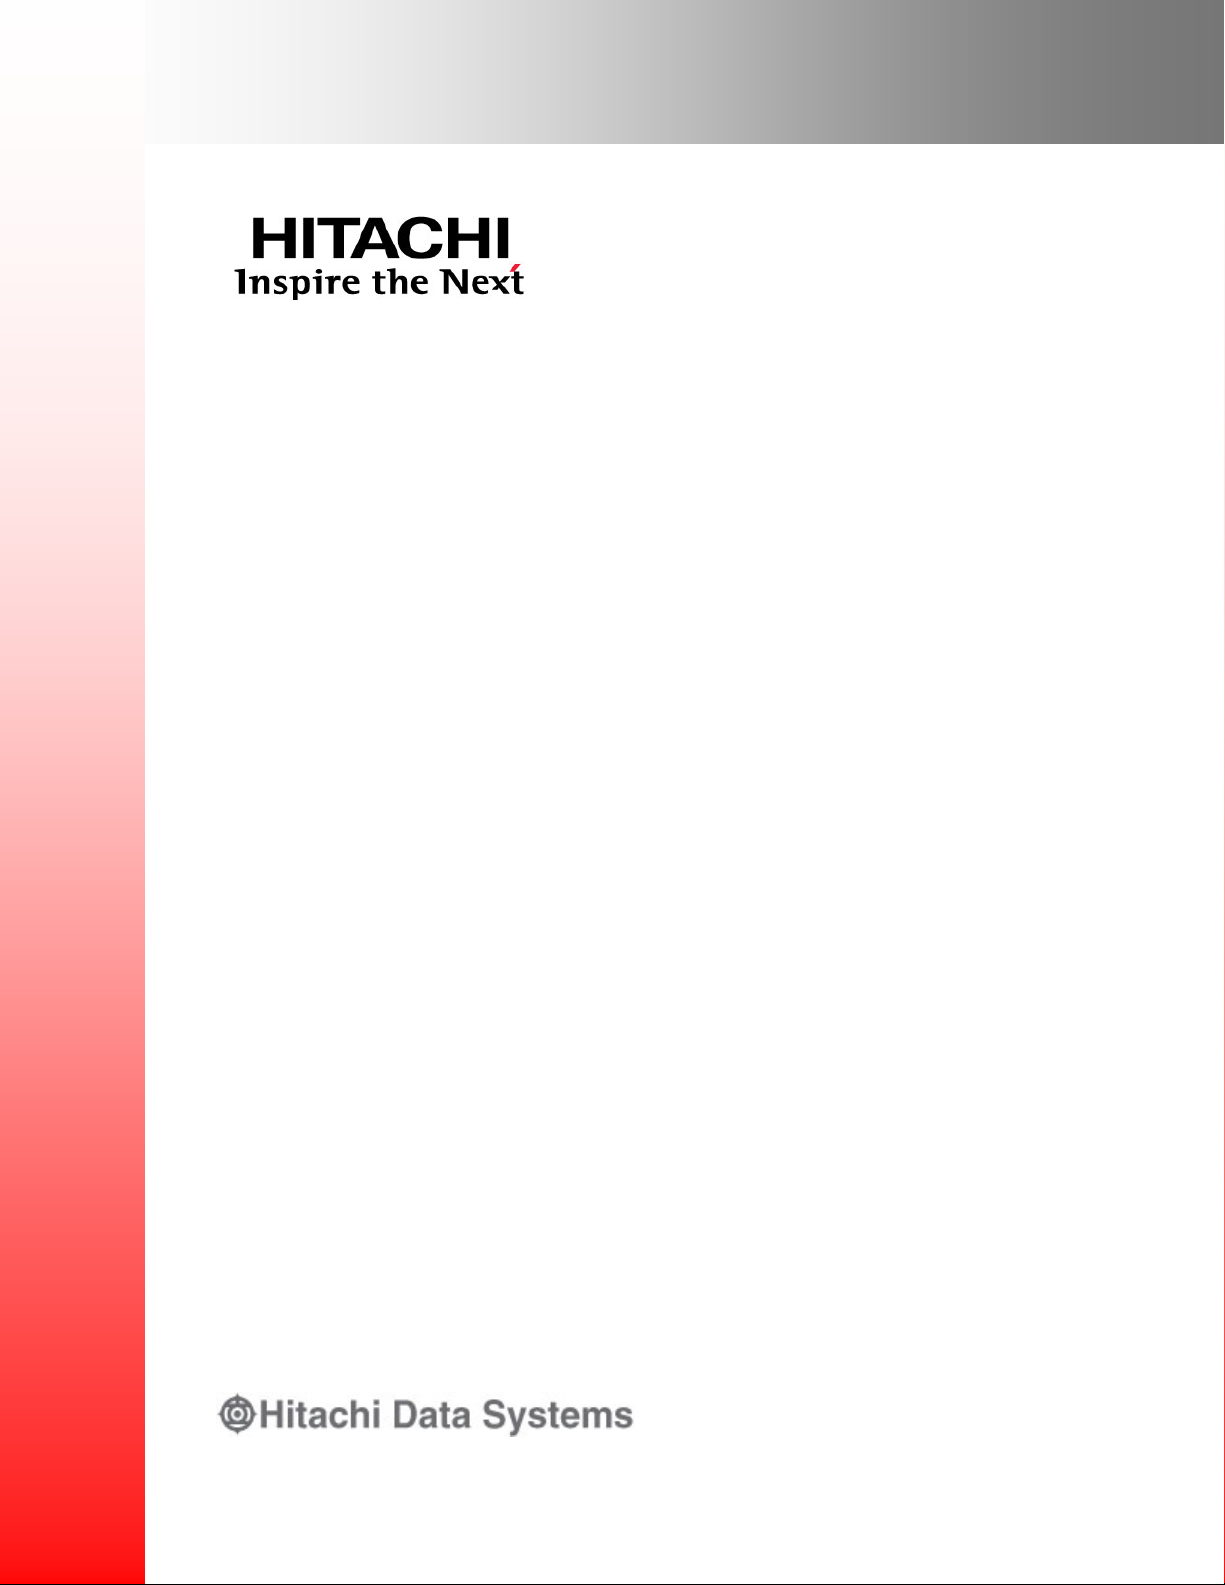
Figure 1: SMU400 Front View
Item Description
1 Hard disk carrier.
2 Hard disk release button.
Note: Just above the hard disk release button on the disk carrier, there are two LEDs that
indicate hard disk status.
1. Hard disk activity
2. Hard disk failure
3 DVD ROM.
4 USB Ports.
5 COM2, (serial connector B). COM2 can only be used at boot time, and is not available
after the system has started. Note that COM1 (serial connector A) is on the rear panel.
2
Item Description
at boot time and after boot time. Note that COM2 ( serial connector B) is on the front panel
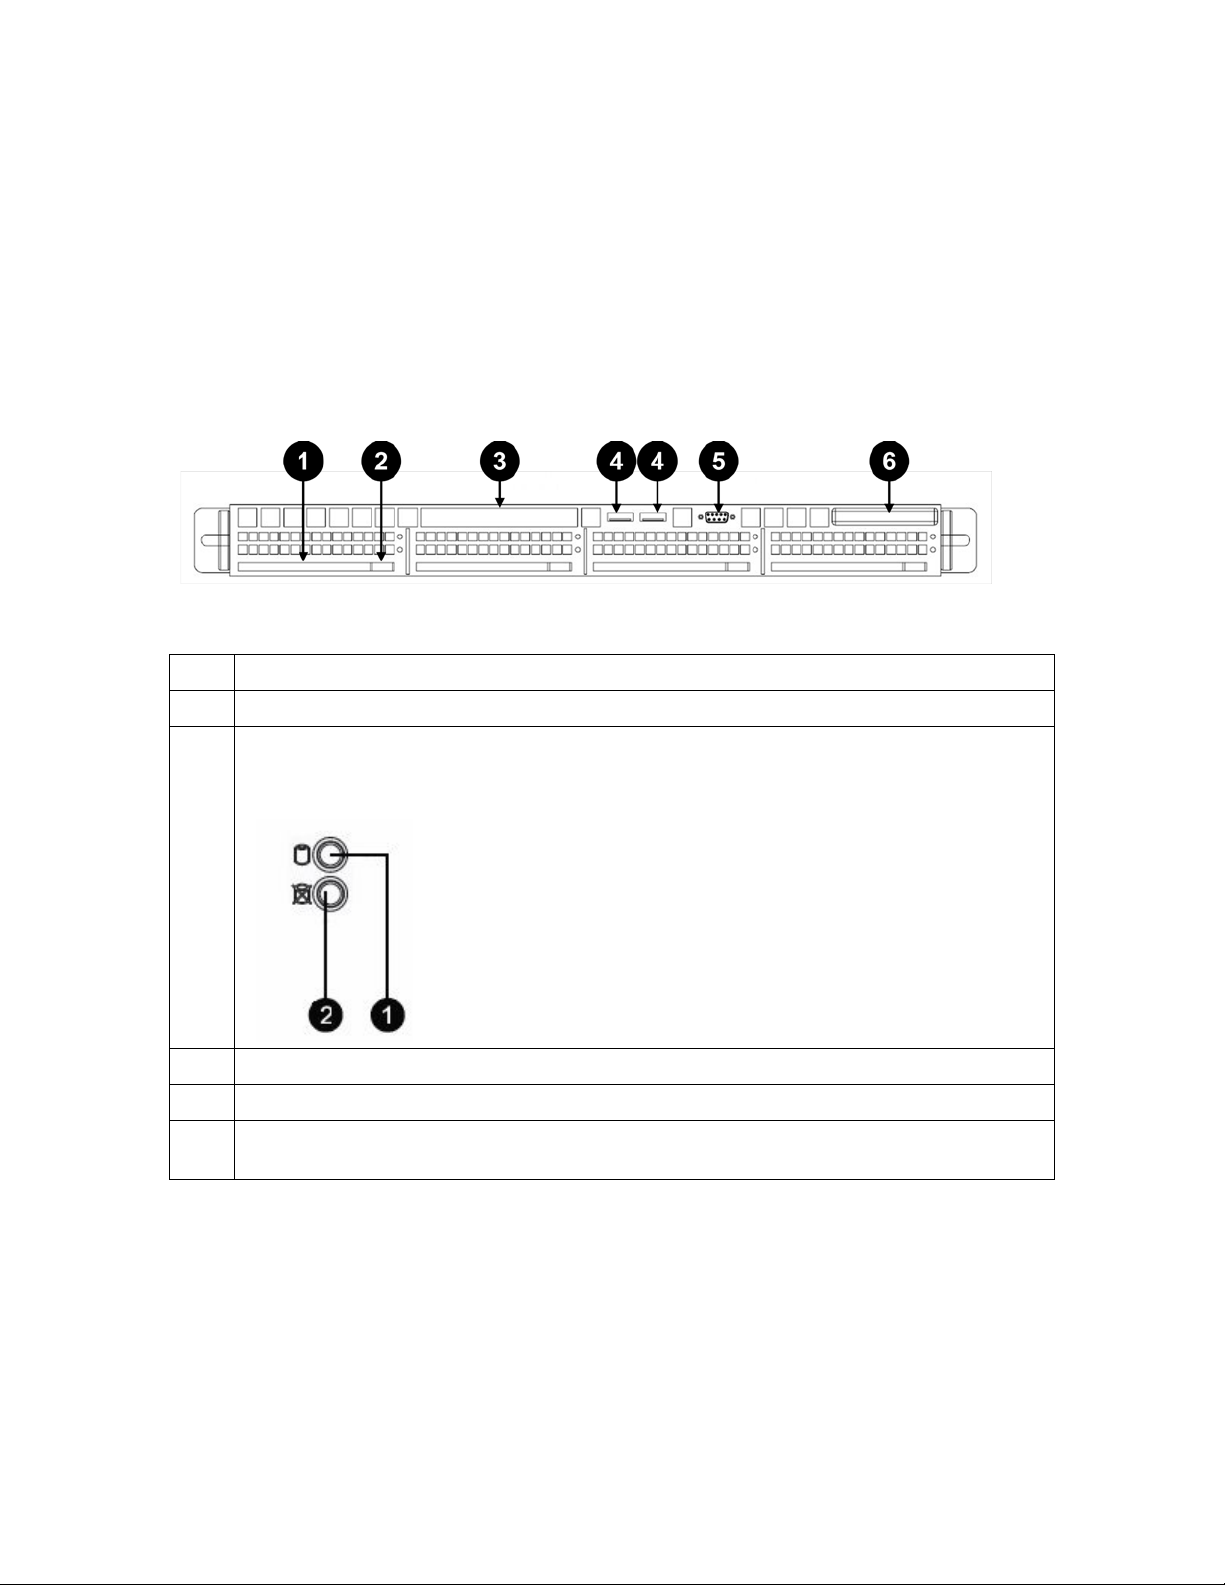
6 System buttons and LEDs.
1. Power
2. Reset
3. Power
4. Hard disk activity
5. LAN1 (ETH1) on the right and LAN2 (ETH0) on the left
6. Overheat or fan failure
Flashes for fan or temp problems, and also flashe s for power supply problems
such as AC cable unplugged.
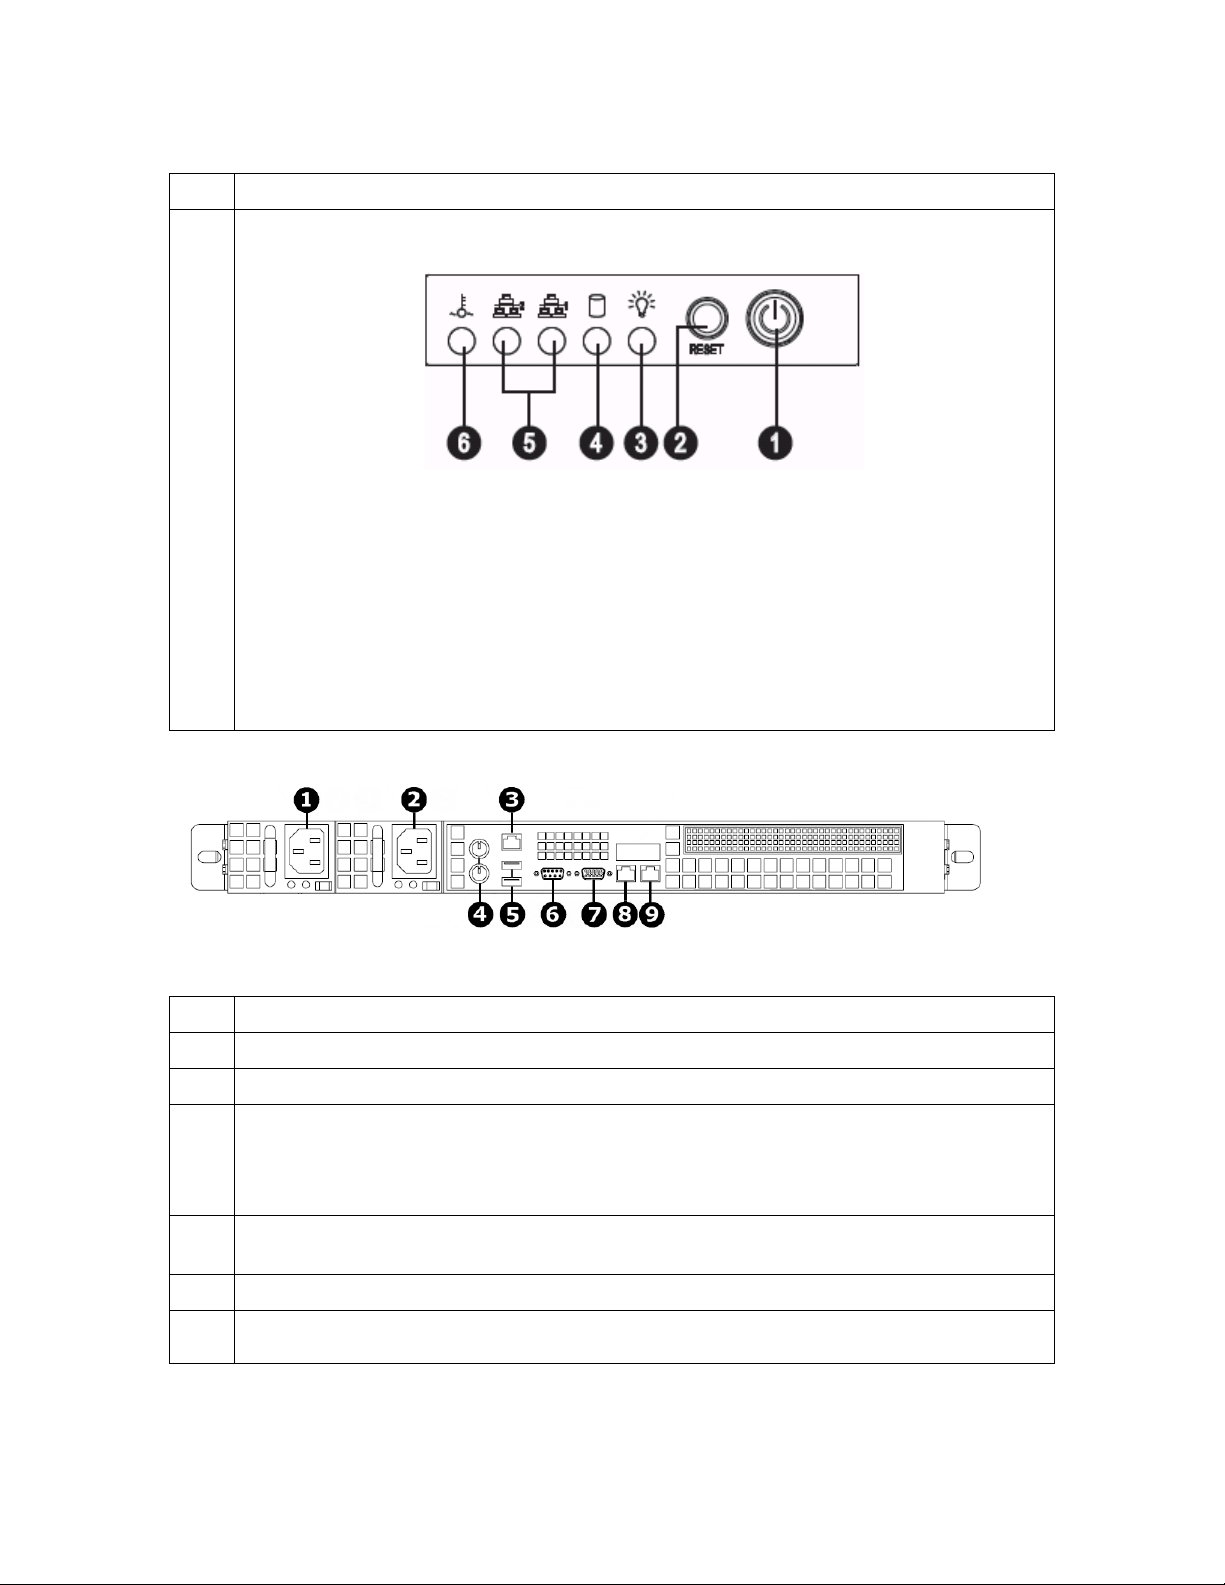
Figure 2: SMU400 Rear View
Item Description
1 PSU 1.
2 PSU 2.
3 IPMI Ethernet port (optional).
Warning: IPMI functionality is provided as-is. The IPMI functionality for the SMU400 is
not provided by HDS, and the use of IPMI with t he S M U400 is not supported by the HDS
Technical Resource Centre. Use at your own risk.
4 Keyboard and mouse PS/2 ports (keyboard and m ouse may be connected through USB
ports).
5 USB ports.
6 COM1 (serial connector A). This port is preferred for serial communications, since it works
3
 Loading...