

Page 1

FOR HITACHI INVERTER
SJ-FB (Feed-Back Board)
INSTRUCTION
HITACHI
NB616XB
Thank you for purchasing the SJ-FB (HITACHI FEED-BACK BOARD).
This manual explains the operation of the feed-back board for use with
Page 2

SAFETY
To get best performance with SJ-FB (Feedback Board), read this manual, the SJ300
Instruction Manual, and all of the warning labels attached to the inverter carefully before
installation and operation, and follow the instructions exactly. Keep this manual handy
for your quick reference.
Definitions and Symbols
A safety instruction (message) is given with a hazard alert symbol and a signal
word -
WARNING or CAUTION. Each signal word has the following meaning
throughout this manual.
This symbol means hazardous high voltage. It used to call your
attention to items or operations that could be dangerous to
your and/or other persons operating this equipment.
Read these messages and follow these instructions carefully.
WARNIN
G
CAUTION
NOTE
HAZARDOUS HIGH VOLTAGE
Motor control equipment and electronic controllers are connected to hazardous
line voltages. When servicing drives and electronic controllers, there might be
exposed components with cases or protrusions at or above line potential. Extreme
This is the "Safety Alert Symbol. " This symbol is used to call
your attention to items or operations that could be dangerous
to your and/or other persons operating this equipment. Read
the messages and follow these instructions carefully.
WARNING
Indicates a potentially hazardous situation which, if not
avoided, can result in serious injury or death.
CAUTION
Indicates a potentially hazardous situation which, if not
avoided, can result in minor to moderate injury, or serious
damage of product.
The mat t ers des c ribed u nd er may, i f not av o ided,
lead to serious results depending on the situation. Important
matters are described
in CAUTION ( as well as WARNING ), so be sure to observe
them.
CAUTION
NOTE
Notes indicate an area or subject of special merit, emphasizing
either the product's capabilities or common errors in operation
or maintenance.
Page 3

care should be taken to protect against shock. Stand on an insulating pad and
make it a habit to use only one hand when checking components. Always work with
another person in case an emergency occurs. Disconnect power before checking
controllers or performing maintenance. Be sure the equipment is properly
grounded. Wear safety glasses whenever working on electronic controllers or
rotating electrical equipment.
Page 4

Revision History Table
No
.
Initial Release of Manual NB616X
1
Revision A, by P. Curtis/Hitachi America, Ltd.
A
Revision B, by P. Curtis/Hitachi America, Ltd.
B
Revision Contents
The Date
of Issue
Feb. 2000
August 2000
August 2001
Operation
Manual No.
NB616X
NB616XA
NB616XB
Page 5

WARNING
Only qualified personnel should carry out wiring work.
Otherwise, there is a danger of electric shock and/or fire.
Implement wiring after checking that the power supply is off.
Otherwise, there is a danger of electric shock and/or injury.
Be sure not to touch inside the inverter case and terminals of the option board while
the inverter is energized.
Otherwise, there is a danger of electric shock and/or injury.
Be sure not to remove the encoder line and feedback board during operation.
Otherwise, there is a danger of electric shock and/or fire.
Do not perform maintenance or inspection until 10 minutes or more after turning off the
input power supply.
Otherwise, there is a danger of electric shock
Make sure that only qualified persons will perform maintenance, inspection and part
replacement. Before starting work, remove metallic objects from your person. Be sure
to use tools protected with insulation
Otherwise, there is a danger of electric shock and/or injury.
Never modify the unit.
Otherwise, there is a danger of electric shock and/or injury.
Be sure to implement wiring after installing the inverter body.
Otherwise, there is a danger of electric shock and/or injury.
Page 6

CAUTION
Do not allow materials such as cutting waste, welding sputter, wire fragments, solder
balls, dust etc. to come into contact with the unit.
There is a fire risk.
Inverter main body and option board must be mounted securely.
There is a risk of intermittent connection due to vibration.
Tighten the screws of the encoder line on the option board so that there is no loose
connection.
There is a risk of intermittent connection due to vibration.
Confirm that the power supply rating of the encoder is the same as the option card (DC
5V).
Otherwise, there is the danger of damage, injury and/or fire.
Make sure that the direction of the motor is correct.
There is a danger of injury or machine damage.
Make sure there is no abnormal noise or vibration during operation.
There is a danger of injury or machine damage.
Page 7

CONTENTS
Contents PAGE
Chapter 1 GENERAL DESCRIPTIONS 7
1.1 Inspection upon unpacking 7
1.2 Inquiries and Warranty 7
1.2.1 Inquiries 7
1.2.2 Warranty 7
Chapter 2 OUTLINE OF SJ-FB 8
Chapter 3 INSTALLATION 9
Chapter 4 WIRING AND CONNECTION 10
4.1 Terminal Assignments of the SJ-FB Board 10
4.2 Function Explanation of the Terminals 11
4.3 Terminal Connections 12
Chapter 5 SETTINGS 14
5.1 Setting the DIP switches 14
5.2 Initial Settings 14
5.3 Inverter Configuration Parameters for the SJ-FB board 15
5.4 Setting Flowchart for the DIP Switches 18
Chapter 6 OPERATION 19
Chapter 7 FUNCTIONS 21
7.1 Orientation function 21
7.1.1 Function outline 21
7.1.2 Data setting 23
7.2 Speed control (ASR) 24
7.3 Position control (APR) (Electronic gear function) 24
7.3.1 Function outline 24
7.3.2 Control mode setting 24
7.3.3 Data setting 25
7.3.4 Pulse train mode selection 28
7.4 Speed control (P/PI) switching function 29
7.5 Compensation of secondary resistor function …. 30
Chapter 8 PROTECTION FUNCTION 31
8.1 Action selection in case of option error 31
8.2 Causes and countermeasures of Option Board Errors 31
8.3 Warning display 31
Chapter 9 SPECIFICATIONS 32
Page 8

Chapter 1 GENERAL DESCRIPTIONS
1.1 Inspection upon unpacking
Handle with care. Please verify the contents of the package check for any damage
that may have occurred during transportation.
(Package contents)
1. SJ-FB (Feed back board) 1
2. Instruction manual 1
3. Board mounting screws (M3×8mm) 2
Please contact your supplier or Hitachi Distributor immediately if anything is
missing or broken.
1.2 Inquiries and Warranty
1.2.1 Inquiries
If you have any questions regarding damage of the unit, unknown parts, or
general inquiries please contact your supplier or the local Hitachi Distributor
with the following information.
(1) Inverter Model
(2) Production Number (MFG. NO)
(3) Date of Purchase
(4) Reason for Calling
Damaged part and its condition etc.
Unknown parts and their contents etc.
1.2.2 Warranty
The warranty period of the board is shown below.
1 year after normal installation, or 2 years from date of manufacture.
However within the warranty period, the warranty will be void if the fault is due
to:
(1) Incorrect use as outlined in this manual, or attempted repair by
unauthorized personnel.
(2) Any damage to the board, other than from transportation (which should
be reported immediately).
(3) Operating the unit beyond the limits of the specifications.
(4) Act of God (Natural Disasters: Earthquakes, Lightning, etc)
The warranty covers the board only, any damage caused to third party equipment
by malfunction of the board is not covered by the warranty. Any examination or
repair after the warranty period (one year) is not covered. Within the warranty
period, any inspection and repair which shows the fault was caused by any of the
items mentioned above, the inspection and repair costs are not covered. If you
have any questions regarding the warranty please contact either your supplier or
8
Page 9

the local Hitachi Distributor.
Chapter 1 GENERAL DESCRIPTIONS
9
Page 10
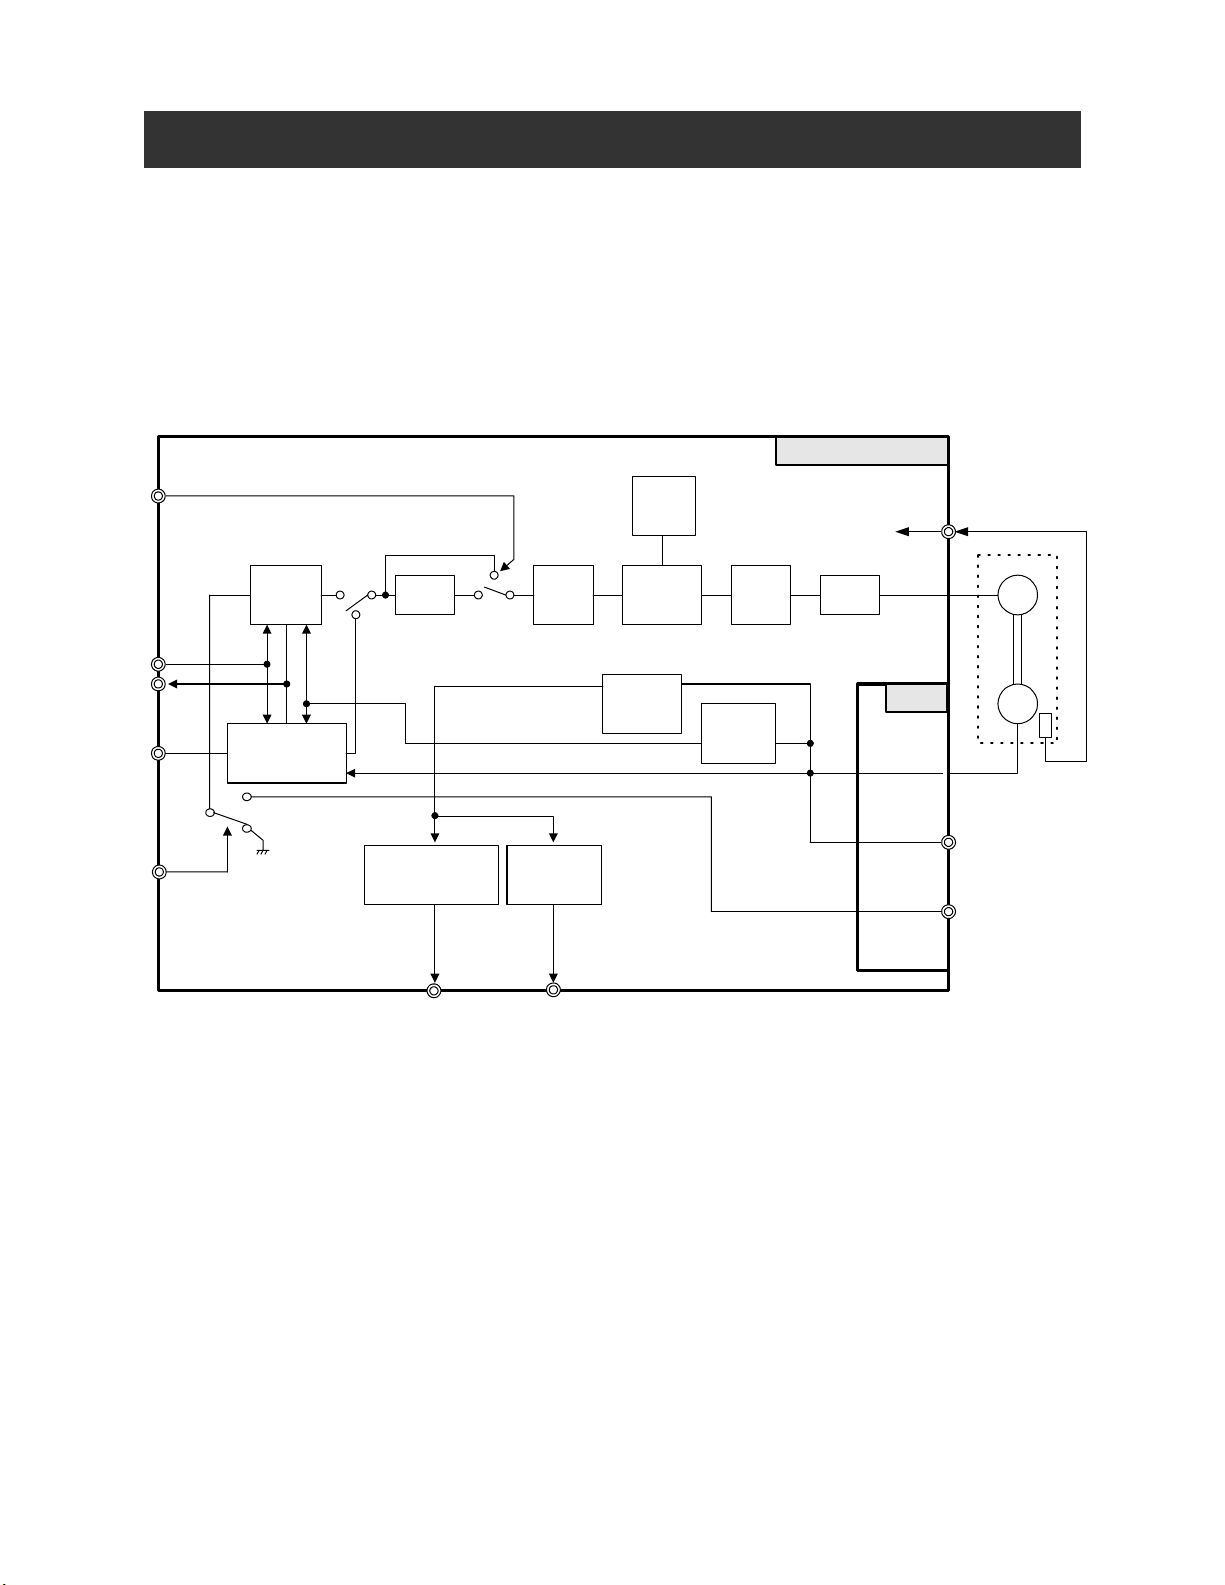
Chapter 2 OUTLINE OF SJ-FB
This manual describes the option board SJ-FB for the SJ300 series inverter.
This SJ-FB board, installed in an SJ300 inverter, detects the rotation speed of a motor by
accepting pulses from a shaft-mounted motor encoder, achieving highly accurate speed
regulation.
This SJ-FB board can also be used to control motor stop position by inputting 90 degree
out-of-phase (quadrature) pulses, as well as for synchronized operation between multiple
inverters (master/slave or electronic gear), orientation function, and external torque limit input
Inverter main body
LAC
Inside
setting
TH
PCLR
POK
ORT
STAT
function.
Position
control
Orientation
control
LAD
Speed deviation
excessive signal
DSE ZS
Speed
control
Zero speed
detection
Torque
limiter
Turn
several
detection
Current
control
Position
detection
Figure 2-1
Function Block Diagram
PWM M
SJ-FB
EAP,EAN
EBP,EBN
EZP,EZN
EP5,EG5
AP,AN
BP,BN
SAP,SAN
SBP,SBN
EC
10
Page 11
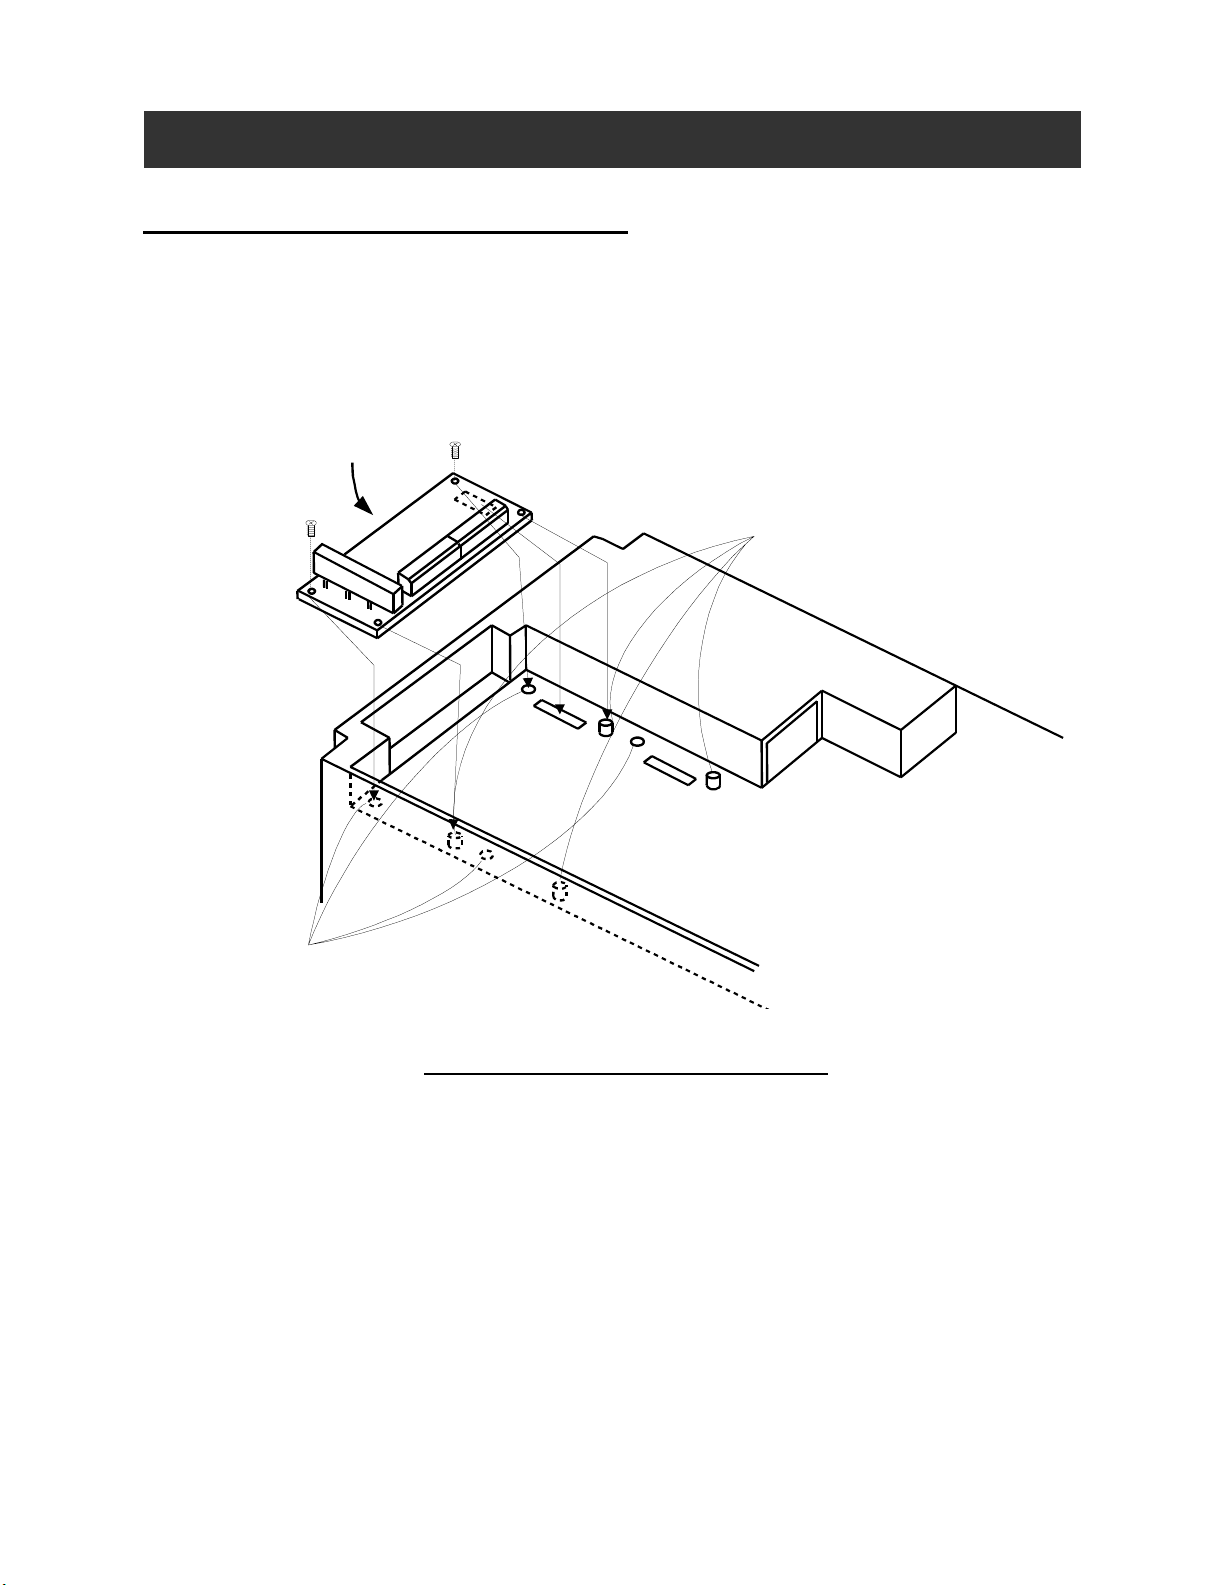
Chapter 3 INSTALLATION
How to Mount the SJ-FB Board
Align the holes at the four corners of the SJ-FB board to the guide posts for positioning, in option
port 1 or 2 of the inverter. Then gently push the option board into position, making sure the board
is fully seated in its connector. Install two screws to secure the board to the inverter body as
shown below.
Option board
Guide posts for
option board positioning
Option port 1
Screw hole for securing the option board
(M3 screw)
Figure 3-1 Option Board Installation
Option port 2
11
Page 12

Chapter 4 WIRING AND CONNECTION
4.1 Terminal Assignments of the SJ-FB Board
Outlook of SJ-FB
Dip switch SWENC
TM1 TM2
TM1 terminal assignment
EP5 EG5 EAP EAN EBP EBN EZP EZN
Figure 4-1 Terminal assignments
Dip switch SWR
Connector for Main body
connection
TM2 terminal assignment
SAP SAN SBP SBN AP AN BP BN
12
Page 13

p
Chapter 4 WIRING AND CONNECTION
4.2 Function Explanation of the Terminals
Terminal Code Function
Pulse train position
command inputs
Encoder signal
inputs
Input terminals
Pulse train position
command input
permissive signal
(Note 1)
Orientation signal:
(Note 1)
LAD cancel signal:
(Note 1)
Position deviation
clear signal:
(Note 1)
Encoder signal
output
Power supply for
encoder
Positioning
completion signal
(Note 2)
Output terminals
Speed deviation
excessive signal
(Note 2)
Zero speed signal
(note 2)
Pulse train position command input (see page 16)
• Mode 0 : 90 degree phase difference pulse
SAP
SAN
SBP
SBN
EAP
EAN
EBP
EBN
EZP
EZN
STAT
ORT
LAC
PCLR
AP
AN
BP
BN
EP5 DC +5V power supply EG5 150mA max
POK
DSE
ZS
(quadrature)
• Mode 1 : Forward/Reverse signal; pulse train
• Mode 2 : Forward pulse/Reverse pulse
Built-in 150 ohm termination resistance can be
turned ON or OFF with DIP switch SWR.
Mode is selected via the pulse mode selection
parameter (P013)
A, B, Z: rotary encoder signal input
Position control with pulse train input
is valid when STAT is Turned ON.
(Note 3)
Turn ON for orientation operation.
(Note 3)
Turn ON to cancel LAD.
(Note 3)
Turn ON to clear position deviation
counter. (Note 3)
Retransmits the input encoder signal (ratio 1:1).
Used for position control or
orientation.
Output ON when the position comes
within the specified range (P017).
(Note 3)
Output ON when the real rotation
speed deviation from command speed
exceeds (P027). (Note 3)
Output when the real rotation speed
becomes zero speed detection level
(C063). (Note 3)
Common
terminal
CM1
CM2
(Note 1): Valid when LAC is assigned to an intelligent input terminal of the inverter (SJ300).
(Note 2): Valid when POK is assigned to an intelligent output terminal of the main body (SJ300).
(Note 3): Refer to the configuration setting procedure for the inverter in the SJ300 Instruction Manual
electrical
specifications
DC 5V receiver in
(based on RS-422
standard)
Photo coupler input
(Compatible with the
DC5V line driver
type rotary encoder)
Photo coupler input
(Configure to an
inverter intelligent
input terminal.)
DC5V line driver
output (based on
RS-422 standard)
Open collector
outputs
(Configure to an
inverter intelligent
output terminal)
ut
13
Page 14

APA
Chapter 4 WIRING AND CONNECTION
Figure 4-2 Terminal wiring
Configure to an
intelligent input term. 1-8
Input
terminal
Output
terminal
Inverter main body control
FW
RV
LAC LAD cancellation signal
PCLR Position deviation Clear signal
ORT Orientation signal
STATPulse train input permisive signal
CM1
POK Positioning completion signal
ZS Zero speed signal
DSE Speed deviation excessive signal
H
O
L
Configure to an
intelligent output term. 1-5
SJ-FB
(Feed-back board)
EP5
EG5
EAP
EAN
EBP
TM1
EBN
EZP
EZN
SAP
SAN
SBP
TM2
SBN
BP
BN
Encoder signal
M
EC
Motor with
encoder
Pulse train pos.
command
N
Encoder
signal output
4.3 Terminal Connections
(Note 1) : Please refer to the SJ300 Instruction Manual for information about wiring the logic
terminals.
(Note 2) : Use a shielded, twisted pair cable for the signal cables, and cut the shielded covering as
shown in the diagram below. Make sure that the length of the signal cable is no more
than 20 meters. If the length exceeds 20 meters, use a VX application control device
RCD-E (remote control device) or CVD-E (signal isolation) to avoid malfunction
caused by EMC noise or voltage drop. Also, the signal wire for the encoder should be
shielded twisted pair line of 28 AWG (0.75mm2) or more, and the distance should also
be less than 20m. If more than 20m, use a 5V line driver relay amplifier.
Insulation
DO NOT GROUND
THIS END
Connect to common terminal
14
Page 15

Chapter 4 WIRING AND CONNECTION
(Note 3) : Be sure to separate the power wiring from the control circuit wiring. If they have to be
crossed, be sure that they cross at a right angle.
Power cables
Right angle
Control signals (STAT, ORT, LAC, PCLR, SAP, SAN, SBP, SBN,
EAP, EAN, EBP, EBN, POK, DSE, ZS, AP, AN, BP, BN, L, EP5,
EG5, CM1, CM2, P24, PLC etc.)
Separate 10cm or more.
R, S, T, U, V, W, P, PD,
RB, N, R0, T0 etc.
Input/Output signal lines
(Note 4) : Take care not to short circuit between the EP5 and EG5 terminals. There is a danger of
malfunction.
(Note 5) : Isolate common signal for inverter analog signals (L terminal of the logic card of
SJ300) from common terminal of the SJ-FB.
(Note 6) : Be sure to connect the encoder signal lines properly so that the relationship among their
phases is as shown below during rotation of the motor (Standard EG5).
EAP
EAN
EBP
EBN
EZP
EZN
15
Page 16

5.1 Setting the DIP Switches
Chapter 5 SETTING
Layout of SJ-FB
SWENC
SWR
TM1 TM2
Figure 5-1 Switch arrangement figure
5.2 Switch Initial Settings
Setting
item
SWENC
SWR
(Note) : Default setting for all the switches is OFF.
Switch
No.
1
2
1
2
ON
OFF
Detection of disconnected A or B signal (EAP-EAN or
EBP-EBN) is valid.
Detection of disconnected A or B signal (EAP-EAN or
EBP-EBN) is invalid.
ON Detection of disconnected Z signal (EZP-EZN) is valid.
OFF Detection of disconnected Z signal (EZP-EZN) is invalid.
ON
Termination resistance is provided between SAP and SAN
(150 ohms).
OFF No terminal resistance is provided between SAP and SAN.
ON
Termination resistance is provided between SBP and SBN
(150 ohms).
OFF No terminal resistance is provided between SBP and SBN.
How to Set Switches
SWENC and SWR
[ON/OFF]
O
F
F
Slide to the (OFF) marked side
of the switch to turn it off and the
opposite side to turn it on.
Contents
1
2
16
Page 17

Chapter 5 SETTING
5.3 Inverter Configuration Parameters for the SJ-FB Board
Code Function name Setting range Initial data
A044 1st control method
H001
H002
H003
H004
H005
H006 1st stabilized factor 0. - 255. 100.
H020 1st motor R1 setting
H021 1st motor R2 setting
H022 1st motor L setting 0.00 - 99.99 / 100.0 - 655.35(mH)
H023 1st motor I0 setting 0.00 - 99.99 / 100.0 - 655.35(A)
H024 1st motor J setting
H030
H031
H032
H033
Auto-tuning mode
selection
1st motor constant
selection
1st motor capacity
selection
1st motor pole
selection
1st motor speed
response setting
1st motor R1 setting
(Auto-tuning data)
1st motor R2 setting
(Auto-tuning data)
1st motor L setting
(Auto-tuning data)
1st motor I0setting
(Auto-tuning data)
00(VC) / 01(VP1.7power) / 02(Free V/f Setting)
/ 03(SLV) / 04(0Hz area SLV) / 05(V2)
00(NOR : Invalid) / 01(NRT : not rotate)/ 02(AUT :
rotate)
00(Hitachi standard motor constant)/
01(Auto-tuning data)/
02(Auto tuning data with online auto-tuning)
0.20 - 75.0(kW)
2/4/6/8 (Poles) 4 - -
0.001 - 9.999 / 10.00 - 65.53 1.590
0.000 - 9.999 / 10.00 - 65.53(Ω)
0.000 - 9.999 / 10.00 - 65.53(Ω)
0.000 - 9.999 / 10.00 - 99.99 /
100.0 - 9999.(kgm2)
0.000 - 9.999 / 10.00 - 65.53(Ω)
0.000 - 9.999 / 10.00 - 65.53(Ω)
0.00 - 99.99 / 100.0 - 655.35(mH)
0.00 - 99.99 / 100.0 - 655.35(A)
00 - -
00 - -
00 - -
Setting on
forwarding
depends on
the motor
capacity
depends on
the motor
capacity
depends on
the motor
capacity
depends on
the motor
capacity
depends on
the motor
capacity
depends on
the motor
capacity
depends on
the motor
capacity
depends on
the motor
capacity
depends on
the motor
capacity
Setting
on run
- -
- -
- -
- -
- -
- -
- -
- -
- -
- -
Change
mode on
run
17
Page 18

Chapter 5 SETTING
Code Function name Setting range Initial data
H034
H050
H051
H052
H070
st
The 1
motor J setting
(Auto-tuning data)
st
1
PI control proportional gain
setting
st
1
PI control integral gain
setting
st
1
P control proportional gain
setting
PI control proportional gain
switching
0.000 - 9.999 / 10.00 - 99.99 / 100.0 - 9999.( kgm
0.00 - 99.99 / 100.0 - 999.9 / 1000.(%) 100.0
0.00 - 99.99 / 100.0 - 999.9 / 1000. (%) 100.0
0.00 - 10.00 1.00
0.00 - 99.99 / 100.0 - 999.9 / 1000.(%) 100.0
2
)
depends on
the motor
capacity
H071 PI control integral gain setting 0.00 - 99.99 / 100.0 - 999.9 / 1000.(%) 100.0
H072
P001
P002
P control proportional gain
setting
Option 1 operation selection
on error
Option 2 operation selection
on error
0.00 - 10.00 1.00
00(TRP) / 01(RUN) 00 -
00(TRP) / 01(RUN) 00 -
Setting
on run
- -
P011 Encoder pulse setting 128. - 9999. / 1000 - 6500 (10000 - 65000)(Pulse) 1024. - P012 Control mode selection 00(ASR Mode) / 01(APR Mode) 00 - -
P013
P014
P015
P016
P017
P018
P019
P020
P021
P022
P023
P025
P026
P027
Pulse train input mode
selection
Stop position setting for
orientation
Frequency setting for
orientation
Direction setting for
orientation
Completion range setting for
orientation
Completion delay time setting
for orientation
Position selection for
electronic gear
Numerator of ratio setting for
electronic gear
Denominator of ratio setting
for electronic gear
Feed forward gain setting for
position control
Loop gain setting for position
control
The 2 next resistance revision
presence selection
Over speed abnormal
detection level
Speed error over detection
level
00(Mode 0) / 01(Mode 1) / 02(Mode 2) 00 - -
0. - 4095. 0. -
0.00 - 99.99 / 100.0 - 120.0(Hz) 5.00 -
00(Forward) / 01(Reverse) 00 - -
0. – 9999. / 1000(Pulse) 5 -
0.00 - 9.99(s) (Note3) 0.00 -
00(Position feed back side)/ 01(Position command
side)
00 -
0. - 9999. 1. -
0. - 9999. 1. -
0.00 - 99.99 / 100.0 - 655.3 0.00 -
0.00 - 99.99 / 100.0 0.50 -
00(Disable) / 01(Enable) 00 -
0.00 - 99.99 / 100.0 - 150.0(%) (Note 2)
(Note 3)
135.0 -
0.00 - 99.99 / 100.0 - 120.0(Hz) (Note 2) 7.50 -
Change
mode on
run
18
Page 19

r
r
Chapter 5 SETTING
(Note 1) : Please refer to the instruction manual of the inverter main body as to the setting procedure.
(Note 2): When the over speed abnormal detection level (P026), the speed error over detection level
(P027) are set 0, the Abnormal detection data processing will be invalid.
(Note 3): Regarding the SJ-FB setting, there are some warning about what type of main body
combines with the SJ-FB which is written following list.
Main body of SJ300 Production No (MFG No) (Note 4)
No. Item
1 Completion
delay time
setting for
orientation
(P018)
2 Over speed
abnormal
detection
level
Range of setting: 0.00 - 9.99 (X10(sec))
(Example) In order to operate the completion
delay time setting for orientation for 1(sec). Set
P018 setting which is written below.
P018=1(sec)/10(sec) =0.10
Range of setting: 0.0 - 150.0 (X100)
(Example) In order to operate the over speed
detection level at 66Hz while maximum
frequency is 60Hz. Set P026 setting which is
written below.
P026=66Hz / 60Hz=1.1
9 8 XXXXXXXXXXXX
9 9 XXXXXXXXXXXX
9 O XXXXXXXXXXXX
9 J XXXXXXXXXXXX
9 K XXXXXXXXXXXX
0 1 XXXXXXXXXXXX
others
Range of setting: 0.00 - 9.99 (X1(sec))
( Example) In order to operate the completion
delay time setting for orientation for 1(sec). Set
P018 setting which is written below.
P018=1(sec) / 1(sec)=1.00
Range of setting: 0.0 - 150.0 (X1%)
(Example) In order to operate the over speed
detection level at 66Hz, while maximum
frequency is 60Hz. Set P026 setting which is
written below.
P026=66Hz / 60HzX100=110.0
(Note 4) The SJ300 Production number (MFG No) is printed on the main body of the SJ300
specifications label. Refer to figure 5-2(1), figure 5-2(2).
Specifications label
Figure 5-2(1) location of specification labels
Inverter model
Maximum applicable moto
Input ratings
Output ratings
Production numbe
Figure 5-2 (2) Contents of specification label
19
Page 20

5.4 Setting Flowchart for the DIP Switches
Detect a wire break of the
Use the pulse train position
Connect parallel motors to the pulse
train position command input?
Turn SWR1, 2 on only 1 unit that is
the most distant from a master
inverter in a plural motor.
START
Detect a wire break of
A, B phase signal?
YES
Set SWENC1
switch ON.
Z phase signal?
YES
Set SWENC2
switch ON.
command input?
YES
YES
END
NO
NO
NO
NO
Set SWR1,2
Figure 5-3 Switch setting flowchart
Chapter 5 SETTING
Set SWENC1
switch OFF.
Set SWENC2
switch OFF.
switch ON.
20
Page 21

Chapter 6 OPERATION
Refer to [Chapter 3 OPERATION] in the instruction manual for the SJ300 inverter before
operating with this board. When the operation command is given from the terminal side of the
inverter main body, operate with the following procedure.
<Procedure>
1. Turn ON the POWER switch of the inverter.
2. Set the control method (A044) in [05].
3. Set the necessary items according to the instruction manual "Chapter 4 FUNCTION
EXPLANATION" of the inverter main body.
4. For speed control, operation is started when operation command of the inverter main
body is turned on.
5. For position control, turn on the STAT terminal of SJ-FB and operation command of the
inverter main body first of all. Next input the pulse train position command to
SAP-SAN and SBP-SBN. Then the motor turns only the pulse that you input.
Confirm the following while trial operation.
The motor accelerates normally.
The motor rotates in the correct direction.
Neither abnormal vibration nor noise is recognized in the motor.
If the motor doesn’t accelerate normally or the inverter trips with overload, check the encoder for
phase order. The normal phase order is that the waveform of phase A advances by 90° than that of
phase B when the motor rotates forward.
(Note 1) : The monitor signal may not be output from FM terminal of inverter main body under
vector control with sensor (A044=05). Please confirm the monitor output in this case.
(Note 2) : Please do not do the free run action by "RS terminal" of inverter main body. When you
do this action, over current trip, or power element destruction may occur. Please use
"FRS" the terminal when performing free run action.
(Note 3) : If the torque limit setting (b041-b044) is enlarged, over current trip would occur at the
time of the motor added burden. In this case, please adjust the torque limit setting
value.
(Note 4) : The motor constant data of the SJ300 series is the data at the time of base frequency
50Hz in the J1 motor made in Hitachi. . Please put in the value that did it to motor
constant I0 (H023) 0.7 times, in the case that you use it with base frequency 60Hz in
the J1 motor.
(Note 5) : Please do the auto tuning, in the case that you do not understand the motor constant.
21
Page 22

Chapter 6 OPERATION
(Note 6) : If satisfactory performance can not be obtained, adjust the motor constants for the
particular symptoms observed according to following table:
Inverter
Status
At starting
deceleratio
n
During
torque limit
At low
frequency
operation
Symptom Observed Adjustment Guidelines
Shock occurs at
starting
Instability of motor
rotation
Insufficient torque
during torque limit
at low speed
Irregular rotation
Set “Motor constant J” higher gradually, up to
1.2 times the initially preset (default) value.
Set the speed response lower. H005 At
Set “Motor constant J” smaller than the
initially preset value.
Set overload restriction level lower than the
torque limit level(s).
Set “Motor constant J” higher than the initial
preset (default) value.
Parameter(s)
to Adjust
H024/H034
H024/H034
b022
b041-b044
H024/H034
22
Page 23

Chapter 7 FUNCTIONS
7.1 Orientation function
This board is provided with the orientation function used to
position the motor at a certain point during operation. This
function can be used for replacing a component of the main axis
of the subject machine tool for example.
7.1.1 Function outline
The orientation function maintains position which has decided
with the position control after speed control operation. The action
is shown in Figure 7-1.
A044: 1st Control Method
P014: Orientation Stop Position
P015: Orientation Speed setting
P016: Orientation Direction setting
P017: Completion range setting
P018: Completion delay time
P023: Position loop gain
C001-C008: Intelligent input terminal
C021-C025: Intelligent output terminal
Relation
1. In the speed control operation period, inverter drives at constant speed with the orientation
speed setting (P015). (Orientation mode becomes valid when turning RUN command ON
under ORT is being ON.)
2. After arriving to the orientation speed setting(P015), the first coming the Z pulse is detected
after that the control mode moves to the position control.
3. Inverter controls the motor to stop at a certain stop position which is set to (P014) during
position control operation period.
Operation command
(FW/RV)
ORT terminal
Acceleration rate
follow acceleration
time setting F002
Rotation Speed
of Motor
Z pulse
POK signal output
(Positioning completion)
Output motor
Speed control Position control
(Note 1) Rotation speed of the motor is zero but inverter is outputting to the motor.
Don't touch the motor power line. Otherwise, there is a danger of electric shock and/or injury.
(Note 2) In case of reoperating when the operation command is set terminal.
Set the command operation(FW,REV)again.
(1)
Completion delay time setting (P018)
(2)
Deceleration time doesn't follow
deceleration time setting F003.
(3)
If the loop back gain (P023) is
big, deceleration time is short
In the case of exceeding
the required stop position
(4)
(5)
Output zero
servo
(Note 1)
Figure 7 - 1(1) Orientation and timing
23
Page 24

g
p
Chapter 7 FUNCTIONS
4. Inverter maintains the position after the completion, and outputs the ‘position control
completion (POK) signal’ after the set value of ‘delay time setting (P018). (Inverter drives
the motor reverse and return to the required stop position in the case it exceeds the required
stop position.)
5. When the ORT terminal is turned off, the inverter stops operation and the orientation mode is
cleared.
(Note3) In case of using Z pulse, use 5V line driver type output for EZP-EZN input.
(Note 4): Action timing of when only the operation command is OFF during the orientation.
If only the operation command is OFF, the motor will stop (1). After that if the ORT
terminal is OFF(2), POK signal output will be OFF (3).
(While ORT terminal is ON. Due to the orientation mode is running , even though
only the operation command is OFF , the POK signal output (4) keep ON within
the completion range.
Operationcomman
(1)
d
ORT terminal
Rotation Speed
of Motor
ulse
Z
POK signal output
(Positioning
completion)
Output motor
(Action timing of when only the operation command is OFF during the orientation.)
(4)
Position control
Figure 7 - 1(2) Orientation and timing
(2)
(3)
Completion delay time
settin
Output Zero
servo
(Note 5)
Don't touch the motor power line. Otherwise there is a danger of electric shock
Rotation speed of motor is zero but inverter is outputting to the motor.
/Injury
.
24
Page 25

m
Chapter 7 FUNCTIONS
7.1.2 Data setting
Data setting related to speed control
Setting item Function code Setting Range, Setting Contents
Orientation speed setting (Note 1) P015
Orientation direction setting (Note 2) P016 0:Forward / 1:Reverse
(Note 1) : In order to stop the motor for setting position. (Motor takes 2 rotation to stop setting
position)Don’t set high frequency to the orientation speed setting. Otherwise it will be
over-voltage protection trip.
(Note 2) : Turn direction of the motor while orientation is done based on the setting of P016.
Data setting related to position control
Setting item
0.00∼99.99 / 100.0∼120.0 (Hz)
Function
code
Setting range, setting contents
Orientation stop position(Note 3) P014
Completion range setting P017
Completion delay time (Note 4) P018
Position loop gain(Note 5) P023
0∼9999. / 1000 (10,000) (pulses)
(Setting four times fairly of the encoder pulses)
0.00∼99.99 / 100.0 (rad/s)
0. ∼4095.
0.00∼9.99
(Note 3) : The orientation stop position is to be set as 4096 of division (0∼4095) per 1 turn toward
forward from the original point. (It is 4096 division irrespective of the pulse number
of the encoder.) The original point is where the pulse has input to EZP-EZN.
Stoppage goal position is like shown in Figure 7-2 irrespective of the turn direction.
(Note 4) : It depends on what type of main body combines with the SJ-FB, the setting value
conversion is different. Please refer to the (Note 3) of the “5.3 Items regarding the
feed back board of the inverter main body“.
(Note 5) : To improve the positioning accuracy. Increase position loop gain (G).
When the motor is unstable. Decrease position loop gain.
Z pulse Position
(Reference point)
0
Motor Shaft viewed fro
the load side
1024
3072
Figure 7-2 Concept of Orientation setting Position
25
Page 26

Chapter 7 FUNCTIONS
Data setting of the input-output terminal
Input-output terminal Terminal assignment Contents
Input
ORT terminal (ORT)
Output
Positioning
completion signal
(POK)
Set up 45 to one of
them of C001∼C008
Set up 23 to one of
them of C021∼C025
ON : Orientation mode
Output when it comes to the positioning
completion range.
7.2 Speed control (ASR)
When the control mode selection (P012) is set to 00, operation mode
becomes a speed control operation mode (ASR mode).
Please drive after setting up the frequency, operation command and
each motor constant .
7.3 Position control (APR)
(Electronic gear function)
When the control mode selection (P012) is set to 01, operation
mode becomes a speed control operation mode (APR mode).
7.3.1 Function outline
This function generates the frequency based on the position
command pulse which comes from the pulse train input from the
terminal and position feed back pulse which is detected by the motor
encoder, and performs the position control operation. It can be used
as synchronous operation of main and sub motor. Also the turn
ratio of main and sub motor can be changed by setting up the
electronic gear ratio (N/D). (Electronic gear function)
7.3.2 Control mode setting
Inverter at the main motor (master inverter) can be set both as a
speed control and position control. Please set up the inverter at the
sub motor side (slave inverter) to a position control mode.
A044: 1
P012: Control mode selection
A001: Frequency command selection
A002: Operation command selection
F001: Frequency setting
F002: Acceleration time
F003: Deceleration time
F004: Operation direction selection
H002/H202-H052/H252:
A044: 1
P012: Control mode selection
A002: Operation command selection
P017: Completion range setting
P018: Completion delay time
P019: Electronic gear position selection
P020: Electronic gear ratio numerator
P021: Electronic gear ratio denominator
P022: Feed forward gain
P023: Position loop gain
C001-C008: Intelligent input terminal
C021-C025: Intelligent output terminal
H002/H202-H052/H252:
Motor constant relation data
Relation
st
Control method
Motor constant relation data
Relation
st
Control method
26
Page 27

Chapter 7 FUNCTIONS
Master Inverter Slave Inverter
AP,BP
AN,BN
EG5
EAP,EBP
EAN,EBN
Main Motor
M
EC
SAP,SBP
SAN,SBN
EG5
EAP,EBP
EAN,EBN
Sub Motor
M
EC
Figure 7-3 Wiring for Synchronized Operation
(Note) : Please connect EG5 of the main and sub inverter together to avoid
malfunction caused by EMC noise.
7.3.3 Data setting
Data setting related to position control
Setting item Function code Setting range, setting contents
Feed-forward gain
(Note 1)
Position loop gain (Note 2) P023
Electronic gear position
selection (Note 3)
Numerator of the electronic
gear ratio (Note 3)
Denominator of the electronic
gear ratio (Note 3)
Completion range setting P017
Completion delay time P018
(Note 1) : We promote the adjustment from P022=2.00 at the time of the feed forward gain
adjustment .To make the position deviation of the main and sub motor small, then
increase feed forward gain. When the motor is unstable, then decrease feed forward
gain
(Note 2) :We promote the adjustment from P023=2.00 at the time of the position loop gain
adjustment. To get good accuracy of the position control then increase posotion loop
gain, then to get much power to maintain the positioning then increase posotion loop
gain. Motor is unstable due to too big position loop gain, then decrease position loop
gain.
P022
P019
P020
P021
0.00∼99.99 / 100.0∼655.3
0.00∼9.99 / 100.0 (rad/s)
00: to the feed back side (FB)
01: to the position command side (REF)
1∼9999
1∼9999
0∼9999. / 1000 (10,000) (pulse)
0.00∼9.99 (s)
27
Page 28

Chapter 7 FUNCTIONS
(Note 3) : N/D must be given as the ranges of 1/50 ≤ (N/D) ≤ 20.
(N: Electronic gear ratio numerator, D: Electronic gear ratio denominator)
(Note 4) : It depends on what type of main body combines with the SJ-FB, the setting
value conversion is different. Please refer to the (Note 3) of the “5.3 Items
regarding the feed back board of the inverter main body“.
Data setting of input-output terminals
Input-output terminal With terminal assignment Contents
The pulse train position
command input
permission signal.
Input
(STAT)
Set ‘48’ to one of
C001∼C008
Pulse train position command
input is valid while ON.
Positioning completion
Output
signal.(POK)
Set ‘23’ to one of
C021∼C025
Output when it entered into the
positioning completion range
Set ‘48’ (the pulse train position command input permission signal (STAT)) to one of
C001∼C008. Pulse train position command input is valid only in the case that the STAT terminal
is turned ON. In the case that the STAT terminal is OFF or unestablished, pulse train position
command input is invalid.
Below the example of the proportion of the slave side turn number to the master side turn number
by the setting of P019~P021 is shown. (Yet, the encoder pulse number of the master side and
slave side are same and be in the case of 1024 pulses. )
Position selection for electronic gear (P019)
Numerator of ration setting for electronic gear
(P020)
Denominator of ratio setting for electronic gear
(P021)
Slave side turn number to the master side turn
number
01
(REF)
1024 2048 1024 2048
2048 1024 2048 1024
1/2 2 2 1/2
01
(REF)
00 (FB) 00 (FB)
28
Page 29

[Setting example]
Main Motor : Encoder pulse 1024 pulses
Sub Motor : Encoder pulse 3000 pulses
(Main motor rotation speed) : (sub motor rotation speed) = 2 : 1
Set the following for slave inverter in this case.
Electronic gear setting position (P019) : RET (command pulse side)
Electronic gear numerator (P020) : 3000
Electronic gear ratio denominator (P021) : 1024*2=2048
Figure 7-4 Control block diagram of the electron gear function (1)
Figure 7-5 Control block diagram of the electron gear function (2)
FFWG
Feed forward gain
Chapter 7 FUNCTIONS
REF
REF
+
-
N
D
FB
Electron gear establishment position selection = FB
N
D
Electron gear establishment position selection = REF
+
-
FB
G
Position loop gain
FFWG
Feed forward gain
G
Position loop gain
+
+
+
ASR
+
ASR
29
Page 30

Chapter 7 FUNCTIONS
7.3.4 Pulse train mode selection
The following 3 ways of pulse line input can be selected by the setting of P013.
1) 90° phase difference pulse train (Mode 0)
SAP
SAN
(Pulse train input)
SBP
SBN
(Pulse train input)
Detected
pulse number
Forward
Reverse
2) Forward/Reverse command + pulse train (mode 1)
SAP
SAN
(Pulse train input)
Time
SBP
SBN
(Forward/reverse command)
Detected
pulse number
Forward
3) Forward pulse train + Reversion pulse train (mode 2)
SAP
SAN
(Forward pulse train input)
SBP
SBN
(Reverse pulse train input)
Detected
pulse number
Reverse
Time
Forward Reverse
30
Time
Page 31

Chapter 7 FUNCTIONS
7.4 Speed control (P/PI) switching function
Speed control mode is normally controlled by
proportional-integration compensation (Pi), which keeps the
A044: 1st Control Method
P052: 1
st
Proportional gain
deviation between the actual speed and speed command
becomes 0. Further, you can also achieve a propotional control
function, which can be used as drooping operation (i.e. one load
with several inverters) with this option card.
Set P/PI switching function to one of the intelligent input terminal 1∼8 by the operator to achieve
this function. (Input ‘43’ in one of C001∼C008.) When this is turned on, control mode becomes
proportion control (P).
Please set proportional gain(Kpp ; a value used to decide the speed change rate) to H052 by a
digital operator. The relationship between the Kpp value and the speed change rate is shown
below.
10
=)RateChangeSpeed(
(%)
)ValueSetKpp(
Relationship between Kpp Value and Speed Change Rate
Torque
PI controlP control
100 %
(A)
0 Rotation Speed
Figure 7-6 Torque characteristic (P/PI)
()
=)RateChangeSpeed(
ATorqueRatedatErrorSpeed
frequencybasespeedsSynchronou
Relationship between Speed Change Rate and Rated Rotation Speed
31
Page 32

Chapter 7 FUNCTIONS
7.5 Compensation of secondary resistor function
(Temperature revision)
Please use this function, if you want to do the temperature revision
to restrain the speed fluctuation by the temperature change of the
motor. (Please use the thermistor of the characteristic like type B
that shows it below. (This thermistor is the characteristic of
PE-41E made of a Shibaura electronics co.,Ltd.))
Relation
P025: Compensation of secondary
resistor selection
b098: Thermistor selection
b099: Thermistor error level
C085: Thermistor adjustment
1. Please wire the thermistor that is built to the motor to the inverter.
(Wiring between TH and CM1 of the terminal unit board of the main body)
2. Please set up it as follows.
P025………01(valid) b098……… 02(NTC)
b099……….(This code is thermistor error level setting. Set the resistance value
of temperature for trip according to thermistor methods.)
C085……….(Use this as gain adjustment.)
Figure 7-7 Resistor vs. Temperature Curves
(Note):Please wire it once again after the thermistor error occurrence level is changed, after you
remove the wiring of the thermistor once, if the thermistor error occurred.
32
Page 33

Chapter 8 PROTECTION FUNCTION
8.1 Action selection in case of option error
To ignore or make inverter trip can be selected in case of option error.
Item Function code Data Contents
Action selection in
case of option error
P001 / P002
00 TRP: Inverter trips and outputs alarm signal.
01
RUN: Inverter ignores the option error and
continues the operation.
(Note) : Inverter trips anyway in case of encoder line break error (E60, E70), SJ-FB abnormal
connection (E69,E79) occurs, although action selection is set to 01 (RUN). Please refer to
"Chapter 5.2 FEED-BACK BOARD INITIAL SETTINGS".
8.2 Causes and Countermeasures for Option Board Errors
When any of the following alarms occurs, the inverter displays the alarm cause and stops.
Display Item Contents Processing
Detect the line break or disconnection of the
encoder line.
E60
(E70)
(Note 1)
E61
(E71)
(Note 1)
E62
(E72)
(Note 1)
E69
(E79)
(Note 1)
Encoder line
break
Over speed
Positioning
error
connection
error
Detect when there is an encoder failure.
Detect when the specification of the encoder is
not line driver output type.
Detect when there is no Z pulse.
Detect when the motor rotation speed exceeds
(maximum frequency (note 2))× (over speed
error detection level (P026).
(Note 3),(Note 4)
Detect when the deviation of the current
position and command value becomes more
than 1,000,000 pulses during position
controlling.
Detect abnormal connection between the
inverter main body and SJ-FB.
(Note 1): Data in parentheses ( ) applies when the option card is connected to option slot 2.
(Note 2): Frequency upper limit value (A061/A261) is reflected when it is set.
(Note 3): It depends on what type of main body combines with the SJ-FB, the setting value
conversion is different.
Please refer to the (Note 3) of the “5.3 Items regarding the feed back board of the
inverter main body“.
(Note 4): When the over speed error occurred . There is a possibility the over speed error occur
again. Even though the trip is cleared during the motor free run. In this case stop the
motor, then clear the trip please.
Check the encoder signal line and
connection.
Replace it to a suitable one.
Turn SWENC-2 OFF on the option
board.
Adjust the Kp and J constants
related to the speed control system
to reduce overshoot.
Increase the position loop gain.
Decrease the numbers of the pulse
train input per second.
Check the connection between the
inverter main body and SJ-FB.
8.3 Warning display (Feed back option relation)
(Refer to the operation manual of the main body about the warning other than the following,)
The 009 is displayed in the case that it became orientation speed setting (P015) > the highest
33
Page 34

Chapter 8 PROTECTION FUNCTION
frequency setting (A004). Please confirm the case, orientation speed setting (P015) and highest
frequency setting (A004).
34
Page 35

Chapter 8 PROTECTION FUNCTION
Product specification
Item Specification
Encoder
Speed
control
Position
control
Orientat
ion
Protection function
feed-back:
Speed control
system:
Position
command:
Electronic gear:
Stop position:
Speed:
(Note 1): The main body setting or external input is selectable.
SJ-DG (digital input option board) is required in case of external input.
(Note 2): It depends on what type of main body combines with the SJ-FB, the
setting value conversion is different.
Please refer to the (Note 3) of the “5.3 Items regarding the feed back
board of the inverter main body“.
• Standard encoder pulse number 1024 pulse/r
• Max. input pulse 100k pulse/s
• Proportional-Integral (PI) / Proportional (P) control
• Three kinds of pulse train input selectable by main
body setting.
Mode 0 : 90° phase difference pulse
Mode 1 : Forward/Reverse signal pulse
Mode 2 : Forward pulse/Reverse pulse
• Max. input pulse 100k pulse/s
• Pulse ratio A/B (A, B: 1~ 9999 selectable)
• Setting range 1/50 ≤ A/B ≤ 20
• 4096 division against 1 rotation of the motor shaft
(Note 1)
• Orientation speed and turn direction selectable
• Encoder cable line break protection
• Over speed protection (over speed error detection
level (P026)) (Note 2)
• Positioning error
• Connection abnormal of SJ-FB
HITACHI
35
HAL-PC0411
 Loading...