

Page 1

User’s Guide
PCS Vision Picture Phone
with Built-in Camera
(Hitachi SH-G1000)
Page 2

Table of Contents
Welcome to Sprint . . . . . . . . . . . . . . . . . . . . . . . . . . . . . . . . . . . . . 1
Introduction to This Online User’s Guide . . . . . . . . . . . . . . . . . 3
SECTION 1: Getting Started . . . . . . . . . . . . . . . . . . . . . . . . . . . . . 5
1A. Setting Up Service . . . . . . . . . . . . . . . . . . . . . . . . . . . . . . . . . . . . . . . . . . . . 7
Getting Started With PCS Service . . . . . . . . . . . . . . . . . . . . . . . . . . . . . . . . . . . . . . . . . . . . 8
Setting Up Your Voicemail . . . . . . . . . . . . . . . . . . . . . . . . . . . . . . . . . . . . . . . . . . . . . . . . . 8
Getting Help . . . . . . . . . . . . . . . . . . . . . . . . . . . . . . . . . . . . . . . . . . . . . . . . . . . . . . . . . . . . 9
SECTION 2: Understanding Your Device . . . . . . . . . . . . . . . . . 11
2A. Your PCS Phone – The Basics . . . . . . . . . . . . . . . . . . . . . . . . . . . . . . . . . 13
Your PCS Phone’s Features . . . . . . . . . . . . . . . . . . . . . . . . . . . . . . . . . . . . . . . . . . . . . . . . 14
Using the Batteries . . . . . . . . . . . . . . . . . . . . . . . . . . . . . . . . . . . . . . . . . . . . . . . . . . . . . . 16
Installing the Main Battery . . . . . . . . . . . . . . . . . . . . . . . . . . . . . . . . . . . . . . . . . . . . . 16
Removing the Main Battery . . . . . . . . . . . . . . . . . . . . . . . . . . . . . . . . . . . . . . . . . . . . . 18
Charging the Battery . . . . . . . . . . . . . . . . . . . . . . . . . . . . . . . . . . . . . . . . . . . . . . . . . . 20
Battery Life . . . . . . . . . . . . . . . . . . . . . . . . . . . . . . . . . . . . . . . . . . . . . . . . . . . . . . . . . . 22
Battery Operating Time . . . . . . . . . . . . . . . . . . . . . . . . . . . . . . . . . . . . . . . . . . . . . . . . 22
Extending the Maximum Battery Operating Time . . . . . . . . . . . . . . . . . . . . . . . . . . . 23
Data Backup Time . . . . . . . . . . . . . . . . . . . . . . . . . . . . . . . . . . . . . . . . . . . . . . . . . . . . 24
Resetting . . . . . . . . . . . . . . . . . . . . . . . . . . . . . . . . . . . . . . . . . . . . . . . . . . . . . . . . . . . . . . 25
Initialization . . . . . . . . . . . . . . . . . . . . . . . . . . . . . . . . . . . . . . . . . . . . . . . . . . . . . . . . . . . 26
Turning Your Device ON and OFF . . . . . . . . . . . . . . . . . . . . . . . . . . . . . . . . . . . . . . . . . . 28
Turning the Device On and Off . . . . . . . . . . . . . . . . . . . . . . . . . . . . . . . . . . . . . . . . . . 28
Turning the Phone On and Off . . . . . . . . . . . . . . . . . . . . . . . . . . . . . . . . . . . . . . . . . . 28
LEDs . . . . . . . . . . . . . . . . . . . . . . . . . . . . . . . . . . . . . . . . . . . . . . . . . . . . . . . . . . . . . . . . . 29
USB Cradle . . . . . . . . . . . . . . . . . . . . . . . . . . . . . . . . . . . . . . . . . . . . . . . . . . . . . . . . . . . . 30
Using the USB Port . . . . . . . . . . . . . . . . . . . . . . . . . . . . . . . . . . . . . . . . . . . . . . . . . . . . . . 32
Using the Infrared Communications Port . . . . . . . . . . . . . . . . . . . . . . . . . . . . . . . . . . . . 33
Using SD Card / MultiMediaCard . . . . . . . . . . . . . . . . . . . . . . . . . . . . . . . . . . . . . . . . . . 34
Using the Optional Headset . . . . . . . . . . . . . . . . . . . . . . . . . . . . . . . . . . . . . . . . . . . . . . . 36
Camera . . . . . . . . . . . . . . . . . . . . . . . . . . . . . . . . . . . . . . . . . . . . . . . . . . . . . . . . . . . . . . . 37
Jog Wheel . . . . . . . . . . . . . . . . . . . . . . . . . . . . . . . . . . . . . . . . . . . . . . . . . . . . . . . . . . . . . 38
Talk Button . . . . . . . . . . . . . . . . . . . . . . . . . . . . . . . . . . . . . . . . . . . . . . . . . . . . . . . . . . . . 38
End Button . . . . . . . . . . . . . . . . . . . . . . . . . . . . . . . . . . . . . . . . . . . . . . . . . . . . . . . . . . . . 39
Speaker Phone Button . . . . . . . . . . . . . . . . . . . . . . . . . . . . . . . . . . . . . . . . . . . . . . . . . . . 39
Voice Button . . . . . . . . . . . . . . . . . . . . . . . . . . . . . . . . . . . . . . . . . . . . . . . . . . . . . . . . . . . 40
Volume Button . . . . . . . . . . . . . . . . . . . . . . . . . . . . . . . . . . . . . . . . . . . . . . . . . . . . . . . . . 40
Key Guard Switch . . . . . . . . . . . . . . . . . . . . . . . . . . . . . . . . . . . . . . . . . . . . . . . . . . . . . . . 41
Page 3

Environment Switch . . . . . . . . . . . . . . . . . . . . . . . . . . . . . . . . . . . . . . . . . . . . . . . . . . . . . 42
Using the Keyboard . . . . . . . . . . . . . . . . . . . . . . . . . . . . . . . . . . . . . . . . . . . . . . . . . . . . . 43
Adjusting the Screen Brightness . . . . . . . . . . . . . . . . . . . . . . . . . . . . . . . . . . . . . . . . . . . . 44
Using the Stylus . . . . . . . . . . . . . . . . . . . . . . . . . . . . . . . . . . . . . . . . . . . . . . . . . . . . . . . . 44
Initial Setup . . . . . . . . . . . . . . . . . . . . . . . . . . . . . . . . . . . . . . . . . . . . . . . . . . . . . . . . . . . 45
Provisioning . . . . . . . . . . . . . . . . . . . . . . . . . . . . . . . . . . . . . . . . . . . . . . . . . . . . . . . . . . . 46
Today Screen . . . . . . . . . . . . . . . . . . . . . . . . . . . . . . . . . . . . . . . . . . . . . . . . . . . . . . . . . . . 47
Navigation Bar and Command Bar . . . . . . . . . . . . . . . . . . . . . . . . . . . . . . . . . . . . . . . . . 49
Programs . . . . . . . . . . . . . . . . . . . . . . . . . . . . . . . . . . . . . . . . . . . . . . . . . . . . . . . . . . . . . 51
Pop-up Menus . . . . . . . . . . . . . . . . . . . . . . . . . . . . . . . . . . . . . . . . . . . . . . . . . . . . . . . . . 53
Notifications . . . . . . . . . . . . . . . . . . . . . . . . . . . . . . . . . . . . . . . . . . . . . . . . . . . . . . . . . . . 53
Entering Information on Your Device . . . . . . . . . . . . . . . . . . . . . . . . . . . . . . . . . . . . . . . 54
Entering Text Using the Input Panel . . . . . . . . . . . . . . . . . . . . . . . . . . . . . . . . . . . . . . . . 54
Writing on the Screen . . . . . . . . . . . . . . . . . . . . . . . . . . . . . . . . . . . . . . . . . . . . . . . . . . 57
Drawing on the Screen . . . . . . . . . . . . . . . . . . . . . . . . . . . . . . . . . . . . . . . . . . . . . . . . . 60
Recording a Message . . . . . . . . . . . . . . . . . . . . . . . . . . . . . . . . . . . . . . . . . . . . . . . . . . 62
Using My Text . . . . . . . . . . . . . . . . . . . . . . . . . . . . . . . . . . . . . . . . . . . . . . . . . . . . . . . . 64
Finding and Organizing Information . . . . . . . . . . . . . . . . . . . . . . . . . . . . . . . . . . . . . . . 65
2B. Using Your Phone . . . . . . . . . . . . . . . . . . . . . . . . . . . . . . . . . . . . . . . . . . . . 67
Viewing the Display Screen . . . . . . . . . . . . . . . . . . . . . . . . . . . . . . . . . . . . . . . . . . . . . . . 68
Dialer Screen . . . . . . . . . . . . . . . . . . . . . . . . . . . . . . . . . . . . . . . . . . . . . . . . . . . . . . . . 68
Keypad Operation List . . . . . . . . . . . . . . . . . . . . . . . . . . . . . . . . . . . . . . . . . . . . . . . . . 68
Signal Indicator and Icon . . . . . . . . . . . . . . . . . . . . . . . . . . . . . . . . . . . . . . . . . . . . . . 70
Status Icon . . . . . . . . . . . . . . . . . . . . . . . . . . . . . . . . . . . . . . . . . . . . . . . . . . . . . . . . . . 71
Turning the Phone ON and OFF . . . . . . . . . . . . . . . . . . . . . . . . . . . . . . . . . . . . . . . . . . . 72
Displaying Your Phone Number . . . . . . . . . . . . . . . . . . . . . . . . . . . . . . . . . . . . . . . . . . . 72
Making and Answering Calls . . . . . . . . . . . . . . . . . . . . . . . . . . . . . . . . . . . . . . . . . . . . . . 73
Making Calls . . . . . . . . . . . . . . . . . . . . . . . . . . . . . . . . . . . . . . . . . . . . . . . . . . . . . . . . . 73
Answering Calls . . . . . . . . . . . . . . . . . . . . . . . . . . . . . . . . . . . . . . . . . . . . . . . . . . . . . . 73
Calling Emergency Numbers . . . . . . . . . . . . . . . . . . . . . . . . . . . . . . . . . . . . . . . . . . . . 74
Making a Call From the Internal Phone Book . . . . . . . . . . . . . . . . . . . . . . . . . . . . . . 74
Making a Call From Speed Dial . . . . . . . . . . . . . . . . . . . . . . . . . . . . . . . . . . . . . . . . . . 75
Making a Call From Call History . . . . . . . . . . . . . . . . . . . . . . . . . . . . . . . . . . . . . . . . . 75
Making a Call From 4/5 Digit Dial . . . . . . . . . . . . . . . . . . . . . . . . . . . . . . . . . . . . . . . 76
Making a Call From Voice Dial . . . . . . . . . . . . . . . . . . . . . . . . . . . . . . . . . . . . . . . . . . 76
Using Memo . . . . . . . . . . . . . . . . . . . . . . . . . . . . . . . . . . . . . . . . . . . . . . . . . . . . . . . . . 76
Using Speaker Phone . . . . . . . . . . . . . . . . . . . . . . . . . . . . . . . . . . . . . . . . . . . . . . . . . . 77
2C. Controlling the Phone Function’s Settings . . . . . . . . . . . . . . . . . . . . . . 79
Changing the Voicemail Number . . . . . . . . . . . . . . . . . . . . . . . . . . . . . . . . . . . . . . . . . . 80
Changing the Ringer and Key Beep Settings . . . . . . . . . . . . . . . . . . . . . . . . . . . . . . . . . . 80
Page 4

Changing the Location Setting . . . . . . . . . . . . . . . . . . . . . . . . . . . . . . . . . . . . . . . . . . . . 81
Changing the Settings for Individual Modes . . . . . . . . . . . . . . . . . . . . . . . . . . . . . . . . . . 82
Data . . . . . . . . . . . . . . . . . . . . . . . . . . . . . . . . . . . . . . . . . . . . . . . . . . . . . . . . . . . . . . . . . . 83
Changing the Others Settings . . . . . . . . . . . . . . . . . . . . . . . . . . . . . . . . . . . . . . . . . . . . . 84
Phone Info . . . . . . . . . . . . . . . . . . . . . . . . . . . . . . . . . . . . . . . . . . . . . . . . . . . . . . . . . . . . 86
TTY . . . . . . . . . . . . . . . . . . . . . . . . . . . . . . . . . . . . . . . . . . . . . . . . . . . . . . . . . . . . . . . . . . 87
2D. Controlling Your Device’s Settings . . . . . . . . . . . . . . . . . . . . . . . . . . . . . 89
Adjusting Settings . . . . . . . . . . . . . . . . . . . . . . . . . . . . . . . . . . . . . . . . . . . . . . . . . . . . . . . 90
Adding or Removing Programs . . . . . . . . . . . . . . . . . . . . . . . . . . . . . . . . . . . . . . . . . . . . 91
Setting Buttons . . . . . . . . . . . . . . . . . . . . . . . . . . . . . . . . . . . . . . . . . . . . . . . . . . . . . . . . . 94
Setting a Password . . . . . . . . . . . . . . . . . . . . . . . . . . . . . . . . . . . . . . . . . . . . . . . . . . . . . . 95
Selecting Sounds & Notifications Settings . . . . . . . . . . . . . . . . . . . . . . . . . . . . . . . . . . . . 96
Selecting Backlight Settings . . . . . . . . . . . . . . . . . . . . . . . . . . . . . . . . . . . . . . . . . . . . . . . 97
Adjusting Memory Settings . . . . . . . . . . . . . . . . . . . . . . . . . . . . . . . . . . . . . . . . . . . . . . . 98
Setting the Microphone . . . . . . . . . . . . . . . . . . . . . . . . . . . . . . . . . . . . . . . . . . . . . . . . . . 99
Adjusting Power Settings . . . . . . . . . . . . . . . . . . . . . . . . . . . . . . . . . . . . . . . . . . . . . . . . 100
Customizing Regional Settings . . . . . . . . . . . . . . . . . . . . . . . . . . . . . . . . . . . . . . . . . . . 101
2E. Controlling Your Roaming Experience . . . . . . . . . . . . . . . . . . . . . . . . . 103
Understanding Roaming . . . . . . . . . . . . . . . . . . . . . . . . . . . . . . . . . . . . . . . . . . . . . . . . 104
Setting Your Device’s Roam Mode . . . . . . . . . . . . . . . . . . . . . . . . . . . . . . . . . . . . . . . . . 104
Controlling Roaming Charges Using Call Guard . . . . . . . . . . . . . . . . . . . . . . . . . . . . . 105
2F. Managing Call History . . . . . . . . . . . . . . . . . . . . . . . . . . . . . . . . . . . . . . . 107
Viewing History . . . . . . . . . . . . . . . . . . . . . . . . . . . . . . . . . . . . . . . . . . . . . . . . . . . . . . . . 108
Call History Options . . . . . . . . . . . . . . . . . . . . . . . . . . . . . . . . . . . . . . . . . . . . . . . . . . . . 109
Making a Call From Call History . . . . . . . . . . . . . . . . . . . . . . . . . . . . . . . . . . . . . . . . . . 109
Saving a Phone Number From Call History . . . . . . . . . . . . . . . . . . . . . . . . . . . . . . . . . 109
Erasing Call History . . . . . . . . . . . . . . . . . . . . . . . . . . . . . . . . . . . . . . . . . . . . . . . . . . . . 110
2G. Using Microsoft Pocket Outlook . . . . . . . . . . . . . . . . . . . . . . . . . . . . . . 111
Contacts: Tracking Friends and Colleagues . . . . . . . . . . . . . . . . . . . . . . . . . . . . . . . . . . 112
Creating a Contact . . . . . . . . . . . . . . . . . . . . . . . . . . . . . . . . . . . . . . . . . . . . . . . . . . . 113
Finding a Contact . . . . . . . . . . . . . . . . . . . . . . . . . . . . . . . . . . . . . . . . . . . . . . . . . . . . 113
Using the Summary Screen . . . . . . . . . . . . . . . . . . . . . . . . . . . . . . . . . . . . . . . . . . . . 114
Making a Call From Contacts . . . . . . . . . . . . . . . . . . . . . . . . . . . . . . . . . . . . . . . . . . 114
Assigning a Picture to a Contact (Picture Display Mode) . . . . . . . . . . . . . . . . . . . . . 115
Calendar: Scheduling Appointments and Meetings . . . . . . . . . . . . . . . . . . . . . . . . . . . 116
Creating an Appointment . . . . . . . . . . . . . . . . . . . . . . . . . . . . . . . . . . . . . . . . . . . . . . 117
Using the Summary Screen . . . . . . . . . . . . . . . . . . . . . . . . . . . . . . . . . . . . . . . . . . . . 118
Creating Meeting Requests . . . . . . . . . . . . . . . . . . . . . . . . . . . . . . . . . . . . . . . . . . . . . 118
Tasks: Keeping a To Do List . . . . . . . . . . . . . . . . . . . . . . . . . . . . . . . . . . . . . . . . . . . . . . 119
Page 5

Creating a Task . . . . . . . . . . . . . . . . . . . . . . . . . . . . . . . . . . . . . . . . . . . . . . . . . . . . . . 120
Using the Summary Screen . . . . . . . . . . . . . . . . . . . . . . . . . . . . . . . . . . . . . . . . . . . . 121
Notes: Capturing Thoughts and Ideas . . . . . . . . . . . . . . . . . . . . . . . . . . . . . . . . . . . . . . 122
Creating a Note . . . . . . . . . . . . . . . . . . . . . . . . . . . . . . . . . . . . . . . . . . . . . . . . . . . . . . 123
2H. Using Your Phone’s Voice Services . . . . . . . . . . . . . . . . . . . . . . . . . . . 125
Using Voice-Activated Dialing . . . . . . . . . . . . . . . . . . . . . . . . . . . . . . . . . . . . . . . . . . . . 126
Calling by Name . . . . . . . . . . . . . . . . . . . . . . . . . . . . . . . . . . . . . . . . . . . . . . . . . . . . . 126
Calling by Phone Number . . . . . . . . . . . . . . . . . . . . . . . . . . . . . . . . . . . . . . . . . . . . . 126
Selecting Voice Dial Settings . . . . . . . . . . . . . . . . . . . . . . . . . . . . . . . . . . . . . . . . . . . 127
Recording Voice . . . . . . . . . . . . . . . . . . . . . . . . . . . . . . . . . . . . . . . . . . . . . . . . . . . . . . . 127
2I. Using Application Programs . . . . . . . . . . . . . . . . . . . . . . . . . . . . . . . . . 129
Pocket Internet Explorer . . . . . . . . . . . . . . . . . . . . . . . . . . . . . . . . . . . . . . . . . . . . . . . . 130
The Mobile Favorites Folder . . . . . . . . . . . . . . . . . . . . . . . . . . . . . . . . . . . . . . . . . . . . 130
Favorite Links . . . . . . . . . . . . . . . . . . . . . . . . . . . . . . . . . . . . . . . . . . . . . . . . . . . . . . . 130
Mobile Favorites . . . . . . . . . . . . . . . . . . . . . . . . . . . . . . . . . . . . . . . . . . . . . . . . . . . . . 130
Using AvantGo Channels . . . . . . . . . . . . . . . . . . . . . . . . . . . . . . . . . . . . . . . . . . . . . . 132
Using Pocket Internet Explorer . . . . . . . . . . . . . . . . . . . . . . . . . . . . . . . . . . . . . . . . . 132
Inbox: Sending and Receiving Email Messages . . . . . . . . . . . . . . . . . . . . . . . . . . . . . . 134
Synchronizing Email Messages . . . . . . . . . . . . . . . . . . . . . . . . . . . . . . . . . . . . . . . . . 134
Connecting Directly to an Email Server . . . . . . . . . . . . . . . . . . . . . . . . . . . . . . . . . . 134
Using the Message List . . . . . . . . . . . . . . . . . . . . . . . . . . . . . . . . . . . . . . . . . . . . . . . . 135
Composing Messages . . . . . . . . . . . . . . . . . . . . . . . . . . . . . . . . . . . . . . . . . . . . . . . . . 137
Managing Email Messages and Folders . . . . . . . . . . . . . . . . . . . . . . . . . . . . . . . . . . 137
MSN Messenger . . . . . . . . . . . . . . . . . . . . . . . . . . . . . . . . . . . . . . . . . . . . . . . . . . . . . . . . 139
Setting Up . . . . . . . . . . . . . . . . . . . . . . . . . . . . . . . . . . . . . . . . . . . . . . . . . . . . . . . . . . 139
Working With Contacts . . . . . . . . . . . . . . . . . . . . . . . . . . . . . . . . . . . . . . . . . . . . . . . . 140
Chatting With Contacts . . . . . . . . . . . . . . . . . . . . . . . . . . . . . . . . . . . . . . . . . . . . . . . 141
Pocket Word . . . . . . . . . . . . . . . . . . . . . . . . . . . . . . . . . . . . . . . . . . . . . . . . . . . . . . . . . . 142
Typing Mode . . . . . . . . . . . . . . . . . . . . . . . . . . . . . . . . . . . . . . . . . . . . . . . . . . . . . . . . 143
Writing Mode . . . . . . . . . . . . . . . . . . . . . . . . . . . . . . . . . . . . . . . . . . . . . . . . . . . . . . . 144
Drawing Mode . . . . . . . . . . . . . . . . . . . . . . . . . . . . . . . . . . . . . . . . . . . . . . . . . . . . . . 145
Recording Mode . . . . . . . . . . . . . . . . . . . . . . . . . . . . . . . . . . . . . . . . . . . . . . . . . . . . . 145
Pocket Excel . . . . . . . . . . . . . . . . . . . . . . . . . . . . . . . . . . . . . . . . . . . . . . . . . . . . . . . . . . 146
Tips for Working in Pocket Excel . . . . . . . . . . . . . . . . . . . . . . . . . . . . . . . . . . . . . . . . 147
Windows Media Player for Pocket PC . . . . . . . . . . . . . . . . . . . . . . . . . . . . . . . . . . . . . . 148
Microsoft Reader . . . . . . . . . . . . . . . . . . . . . . . . . . . . . . . . . . . . . . . . . . . . . . . . . . . . . . . 149
Getting Books on Your Device . . . . . . . . . . . . . . . . . . . . . . . . . . . . . . . . . . . . . . . . . . 149
Using the Library . . . . . . . . . . . . . . . . . . . . . . . . . . . . . . . . . . . . . . . . . . . . . . . . . . . . 149
Reading a Book . . . . . . . . . . . . . . . . . . . . . . . . . . . . . . . . . . . . . . . . . . . . . . . . . . . . . 150
Using Reader Features . . . . . . . . . . . . . . . . . . . . . . . . . . . . . . . . . . . . . . . . . . . . . . . . 151
Page 6

Removing a Book . . . . . . . . . . . . . . . . . . . . . . . . . . . . . . . . . . . . . . . . . . . . . . . . . . . . 152
Camera . . . . . . . . . . . . . . . . . . . . . . . . . . . . . . . . . . . . . . . . . . . . . . . . . . . . . . . . . . . . . . 153
Review/Share . . . . . . . . . . . . . . . . . . . . . . . . . . . . . . . . . . . . . . . . . . . . . . . . . . . . . . . . . 155
Thumbnail View . . . . . . . . . . . . . . . . . . . . . . . . . . . . . . . . . . . . . . . . . . . . . . . . . . . . . 155
Expand View . . . . . . . . . . . . . . . . . . . . . . . . . . . . . . . . . . . . . . . . . . . . . . . . . . . . . . . . 156
Share Menu . . . . . . . . . . . . . . . . . . . . . . . . . . . . . . . . . . . . . . . . . . . . . . . . . . . . . . . . 156
Options Menu . . . . . . . . . . . . . . . . . . . . . . . . . . . . . . . . . . . . . . . . . . . . . . . . . . . . . . . 156
View Menu . . . . . . . . . . . . . . . . . . . . . . . . . . . . . . . . . . . . . . . . . . . . . . . . . . . . . . . . . 157
Online Pictures . . . . . . . . . . . . . . . . . . . . . . . . . . . . . . . . . . . . . . . . . . . . . . . . . . . . . . . . 157
Thumbnail View . . . . . . . . . . . . . . . . . . . . . . . . . . . . . . . . . . . . . . . . . . . . . . . . . . . . . 157
Expand View . . . . . . . . . . . . . . . . . . . . . . . . . . . . . . . . . . . . . . . . . . . . . . . . . . . . . . . . 158
Share Menu . . . . . . . . . . . . . . . . . . . . . . . . . . . . . . . . . . . . . . . . . . . . . . . . . . . . . . . . 159
Options Menu . . . . . . . . . . . . . . . . . . . . . . . . . . . . . . . . . . . . . . . . . . . . . . . . . . . . . . . 159
ClearVue . . . . . . . . . . . . . . . . . . . . . . . . . . . . . . . . . . . . . . . . . . . . . . . . . . . . . . . . . . . . . 160
Viewing a File . . . . . . . . . . . . . . . . . . . . . . . . . . . . . . . . . . . . . . . . . . . . . . . . . . . . . . . 160
World Clock . . . . . . . . . . . . . . . . . . . . . . . . . . . . . . . . . . . . . . . . . . . . . . . . . . . . . . . . . . 162
SaiSuke . . . . . . . . . . . . . . . . . . . . . . . . . . . . . . . . . . . . . . . . . . . . . . . . . . . . . . . . . . . . . . 163
Installing Application Programs from the Companion CD . . . . . . . . . . . . . . . . . . . . . 164
2J. Getting Connected . . . . . . . . . . . . . . . . . . . . . . . . . . . . . . . . . . . . . . . . . . 165
Sending Files Using Infrared Rays . . . . . . . . . . . . . . . . . . . . . . . . . . . . . . . . . . . . . . . . . 166
Sending and Receiving Data . . . . . . . . . . . . . . . . . . . . . . . . . . . . . . . . . . . . . . . . . . . 166
Connecting to the Internet Using PCS Connection . . . . . . . . . . . . . . . . . . . . . . . . . . . . 167
Restoring the PCS Vision Connection . . . . . . . . . . . . . . . . . . . . . . . . . . . . . . . . . . . . . . 168
Disconnecting from the Internet Using PCS Connection . . . . . . . . . . . . . . . . . . . . . . . 169
Connecting to the PCS e-Mail Server . . . . . . . . . . . . . . . . . . . . . . . . . . . . . . . . . . . . . . . 169
Making PCS e-Mail Setting . . . . . . . . . . . . . . . . . . . . . . . . . . . . . . . . . . . . . . . . . . . . 169
Connecting to the PCS e-Mail Server . . . . . . . . . . . . . . . . . . . . . . . . . . . . . . . . . . . . . 169
Connecting Directly to an Email Server . . . . . . . . . . . . . . . . . . . . . . . . . . . . . . . . . . . . 171
Get Help on Connecting . . . . . . . . . . . . . . . . . . . . . . . . . . . . . . . . . . . . . . . . . . . . . . . . . 172
2K. Connecting with a Personal Computer . . . . . . . . . . . . . . . . . . . . . . . . 173
Using Microsoft ActiveSync . . . . . . . . . . . . . . . . . . . . . . . . . . . . . . . . . . . . . . . . . . . . . . . 174
Installing ActiveSync on a Personal Computer . . . . . . . . . . . . . . . . . . . . . . . . . . . . . 175
Connecting With a Personal Computer . . . . . . . . . . . . . . . . . . . . . . . . . . . . . . . . . . . 176
2L. Backing Up Data . . . . . . . . . . . . . . . . . . . . . . . . . . . . . . . . . . . . . . . . . . . . 179
Backing Up Data Using a Personal Computer . . . . . . . . . . . . . . . . . . . . . . . . . . . . . . . 180
Backing Up Data Using a Memory Card . . . . . . . . . . . . . . . . . . . . . . . . . . . . . . . . . . . . 182
SECTION 3: Using PCS Service Features . . . . . . . . . . . . . . . 185
3A. PCS Service Features: The Basics . . . . . . . . . . . . . . . . . . . . . . . . . . . . 187
Using Voicemail . . . . . . . . . . . . . . . . . . . . . . . . . . . . . . . . . . . . . . . . . . . . . . . . . . . . . . . 188
Page 7

Setting Up Your Voicemail . . . . . . . . . . . . . . . . . . . . . . . . . . . . . . . . . . . . . . . . . . . . . 188
Voicemail Notification . . . . . . . . . . . . . . . . . . . . . . . . . . . . . . . . . . . . . . . . . . . . . . . . 188
New Voicemail Message Alerts . . . . . . . . . . . . . . . . . . . . . . . . . . . . . . . . . . . . . . . . . . 189
Retrieving Your Voicemail Messages . . . . . . . . . . . . . . . . . . . . . . . . . . . . . . . . . . . . . 189
Voicemail Options . . . . . . . . . . . . . . . . . . . . . . . . . . . . . . . . . . . . . . . . . . . . . . . . . . . 190
Using Caller ID . . . . . . . . . . . . . . . . . . . . . . . . . . . . . . . . . . . . . . . . . . . . . . . . . . . . . . . . 192
Responding to Call Waiting . . . . . . . . . . . . . . . . . . . . . . . . . . . . . . . . . . . . . . . . . . . . . . 192
Three-Way Calling . . . . . . . . . . . . . . . . . . . . . . . . . . . . . . . . . . . . . . . . . . . . . . . . . . . . . 193
Using Call Forwarding . . . . . . . . . . . . . . . . . . . . . . . . . . . . . . . . . . . . . . . . . . . . . . . . . . 194
3B. PCS Vision . . . . . . . . . . . . . . . . . . . . . . . . . . . . . . . . . . . . . . . . . . . . . . . . . 195
PCS Business Connection Personal Edition . . . . . . . . . . . . . . . . . . . . . . . . . . . . . . . . . 196
Web . . . . . . . . . . . . . . . . . . . . . . . . . . . . . . . . . . . . . . . . . . . . . . . . . . . . . . . . . . . . . . . . . 197
Browsing the Web . . . . . . . . . . . . . . . . . . . . . . . . . . . . . . . . . . . . . . . . . . . . . . . . . . . . 197
Picture Mail . . . . . . . . . . . . . . . . . . . . . . . . . . . . . . . . . . . . . . . . . . . . . . . . . . . . . . . . . . 197
Taking Pictures . . . . . . . . . . . . . . . . . . . . . . . . . . . . . . . . . . . . . . . . . . . . . . . . . . . . . . 197
Viewing Pictures . . . . . . . . . . . . . . . . . . . . . . . . . . . . . . . . . . . . . . . . . . . . . . . . . . . . . 197
Uploading Pictures to the Picture Mail Website . . . . . . . . . . . . . . . . . . . . . . . . . . . . 198
Sharing Pictures . . . . . . . . . . . . . . . . . . . . . . . . . . . . . . . . . . . . . . . . . . . . . . . . . . . . . 199
Messaging . . . . . . . . . . . . . . . . . . . . . . . . . . . . . . . . . . . . . . . . . . . . . . . . . . . . . . . . . . . . 201
PCS Vision FAQs . . . . . . . . . . . . . . . . . . . . . . . . . . . . . . . . . . . . . . . . . . . . . . . . . . . . . . . 201
3C. PCS Voice Command . . . . . . . . . . . . . . . . . . . . . . . . . . . . . . . . . . . . . . . . 203
Getting Started With PCS Voice Command . . . . . . . . . . . . . . . . . . . . . . . . . . . . . . . . . . 204
Creating Your Own Address Book . . . . . . . . . . . . . . . . . . . . . . . . . . . . . . . . . . . . . . . . . . 204
Making a Call With PCS Voice Command . . . . . . . . . . . . . . . . . . . . . . . . . . . . . . . . . . . 205
Accessing Information Using PCS Voice Command . . . . . . . . . . . . . . . . . . . . . . . . . . . 205
SECTION 4: Safety and Warranty Information . . . . . . . . . . . 207
4A. Safety . . . . . . . . . . . . . . . . . . . . . . . . . . . . . . . . . . . . . . . . . . . . . . . . . . . . . 209
Getting the Most Out of Your Reception . . . . . . . . . . . . . . . . . . . . . . . . . . . . . . . . . . . . 210
Maintaining Safe Use of and Access to Your Device . . . . . . . . . . . . . . . . . . . . . . . . . . . 211
Caring for the Battery . . . . . . . . . . . . . . . . . . . . . . . . . . . . . . . . . . . . . . . . . . . . . . . . . . . 214
Warning . . . . . . . . . . . . . . . . . . . . . . . . . . . . . . . . . . . . . . . . . . . . . . . . . . . . . . . . . . . . . 215
Caution . . . . . . . . . . . . . . . . . . . . . . . . . . . . . . . . . . . . . . . . . . . . . . . . . . . . . . . . . . . . . . 217
Precautions for Use . . . . . . . . . . . . . . . . . . . . . . . . . . . . . . . . . . . . . . . . . . . . . . . . . . . . 219
Instructions for Daily Use . . . . . . . . . . . . . . . . . . . . . . . . . . . . . . . . . . . . . . . . . . . . . . . . 219
Acknowledging Special Precautions and the FCC Notice . . . . . . . . . . . . . . . . . . . . . . . 220
Consumer Information on Wireless Phones . . . . . . . . . . . . . . . . . . . . . . . . . . . . . . . . . 225
Hardware Specifications . . . . . . . . . . . . . . . . . . . . . . . . . . . . . . . . . . . . . . . . . . . . . . . . . 244
Owner’s Record . . . . . . . . . . . . . . . . . . . . . . . . . . . . . . . . . . . . . . . . . . . . . . . . . . . . . . . . 246
User Guide Proprietary Notice . . . . . . . . . . . . . . . . . . . . . . . . . . . . . . . . . . . . . . . . . . . . 246
Page 8

4B. Customer Limited Warranty . . . . . . . . . . . . . . . . . . . . . . . . . . . . . . . . . . 247
Customer Limited Warranty . . . . . . . . . . . . . . . . . . . . . . . . . . . . . . . . . . . . . . . . . . . . . . 248
Index . . . . . . . . . . . . . . . . . . . . . . . . . . . . . . . . . . . . . . . . . . . . . . 253
Page 9

Welcome to Sprint
print built the largest all-PCS nationwide network with advanced
S
multimedia services and clear calls, reaching more than 230 million
people for clarity you can see and hear. We built our network to give you
what we believe you really want from a wireless phone: clear sound, private
conversations and time-saving features.
But with Sprint, you can do something even more far-reaching – simplify
your life. Our advanced technology is designed to grow with your
communications needs so that one day you’ll be able to rely entirely on
your PCS Phone to stay connected.
This guide will familiarize you with our technology and with your new
PCS Phone through simple, easy-to-follow instructions. If you have already
reviewed the Start Here Guide, which was packaged with your new device,
then you’re ready to explore the advanced features outlined in this guide.
If you have not read your Start Here Guide, go to Section One – Getting
Started. This section provides all the information you need to quickly
activate your phone, set up your voicemail, and much more. It also
contains information on how to contact Sprint should you have questions
about service, want to purchase additional products or services, or just to
check your account balance.
Thank you for choosing Sprint.
1
Page 10

2
Page 11

Introduction to This Online User’s Guide
his online User’s Guide introduces you to PCS Service and all the
T
features of your new device. It’s divided into four sections:
䊳
Section 1: Getting Started
䊳
Section 2: Understanding Your Device
䊳
Section 3: Using PCS Service Features
䊳
Section 4: Safety Guidelines and Warranty Information
Throughout the guide, you’ll find tips that highlight special shortcuts and
timely reminders to help you make the most of your new device and service.
The Table of Contents and Index will help you locate specific information
quickly.
You’ll get the most out of your device if you read each section. However, if
you’d like to get right to a specific feature, simply turn to that page. Follow
the instructions in that section and you’ll be ready to use your device in
no time.
Tip: You can print out this guide to keep on hand or view it online.
3
Page 12

4
Page 13

Section 1
Getting Started
Section 1
5Getting Started
Page 14

6
Page 15

Section 1A
Setting Up Service
In This Section
䊳
Getting Started With PCS Service
䊳
Setting Up Your Voicemail
䊳
Getting Help
his section walks you through the basics of setting up service for the
T
phone on your device, including unlocking and activating your phone,
setting up your voicemail, and how to contact Sprint for assistance with
your PCS Service.
Section 1: Getting Started
71A: Setting Up Service
Page 16

Getting Started With PCS Service
Determine if Your Phone is Already Activated
If you received your device in the mail or purchased it at a Sprint Store,
the phone probably has been activated. If your phone is not activated,
please refer to the Start Here Guide included with your device.
Activating Your Phone
To activate your phone, follow the directions in the Start Here Guide that
was included with your device. Or visit
http://activate.sprintpcs.com and
activate your phone online.
Setting Up Your Voicemail
All unanswered calls to your PCS Phone are automatically transferred to
voicemail, even if your phone is in use or turned off. Therefore, you will
want to set up your voicemail and personal greeting as soon as your
PCS Phone is activated.
To set up voicemail:
1. Make sure the phone is on. See “Turning the Phone ON and OFF” on
page 72 for details.
2. If the dialer screen is not displayed, activate the dialer screen by
pressing T on the device.
3. From the dialer screen, tap and hold 1 for two seconds.
4. Follow the system prompts to create your pass code, record your
greeting, record your name announcement, and choose whether to
activate One-Touch Message Access (a feature that lets you press one key to
access messages and bypasses the need for you to enter your pass code).
Note: The voicemail setup process may vary in certain Affiliate areas.
Section 1: Getting Started
8 1A: Setting Up Service
Page 17

Getting Help
Visit Our Website
Stop by www.sprintpcs.com and log on to get up-to-date information on
PCS Service, options, and more.
You can also:
䊳
Review coverage maps
䊳
Learn how to use voicemail
䊳
Access your account information
䊳
Purchase accessories
䊳
Add additional options to your service plan
䊳
Check out frequently asked questions
䊳
And more
Section 1: Getting Started
91A: Setting Up Service
Page 18

PCS Customer Solutions
PCS Customer Solutions is available to assist you 24 hours a day, seven
days a week. Visit us at
www.sprintpcs.com by signing on and clicking
on Help Center.
Receiving Automated Invoicing Information
For your convenience, your phone gives you access to invoicing
information on your PCS Account. This information includes balance
due, payment received, invoicing cycle, and the amount of minutes and/
or data used since your last invoicing cycle. (A nominal fee and/or
airtime charges may apply.)
To access this information:
䡵
Tap S 4 T.
Note: This service may not be available in all Affiliate markets.
PCS Directory Assistance
PCS Directory Assistance provides a variety of services, including
residential, business and government listings; assistance with local or
long-distance calls; movie listings; and hotel, restaurant, shopping, and
major local event information. There is a per-call charge and you will be
billed for airtime.
䡵
Tap 4 1 1 T.
PCS Operator Services
PCS Operator Services can provide assistance in placing collect calls or
calls billed to a local telephone calling card or a third party.
䡵
Tap 0 T.
For more information or to see the latest in products and services, visit us
online at
Note: PCS Operator Services may not be available in all Affiliate
markets.
Section 1: Getting Started
10 1A: Setting Up Service
www.sprintpcs.com.
Page 19

Section 2
Understanding Your
Device
Section 2
11Understanding Your Device
Page 20

12
Page 21

Section 2A
T
Your PCS Phone – The Basics
In This Section
䊳
Your PCS Phone’s Features
䊳
Using the Batteries
䊳
Resetting
䊳
Initialization
䊳
Turning Your Device ON and
OFF
䊳
LEDs
䊳
USB Cradle
䊳
Using the USB Port
䊳
Using the Infrared
Communications Port
䊳
Using SD Card /
MultiMediaCard
䊳
Using the Optional Headset
䊳
Camera
䊳
Jog Wheel
䊳
Talk Button
䊳
End Button
䊳
Speaker Phone Button
䊳
Voice Button
䊳
Volume Button
䊳
Key Guard Switch
䊳
Environment Switch
䊳
Using the Keyboard
䊳
Adjusting the Screen
Brightness
䊳
Using the Stylus
䊳
Initial Setup
䊳
Provisioning
䊳
Today Screen
䊳
Navigation Bar and Command
Bar
䊳
Programs
䊳
Pop-up Menus
䊳
Notifications
䊳
Entering Information on Your
Device
䊳
Entering Text Using the Input
Panel
䊳
Finding and Organizing
Information
his section will guide you through the basics of your device, and you’ll
be on your way to using it in no time.
Section 2: Understanding Your Device
132A: Your PCS Phone – The Basics
Page 22
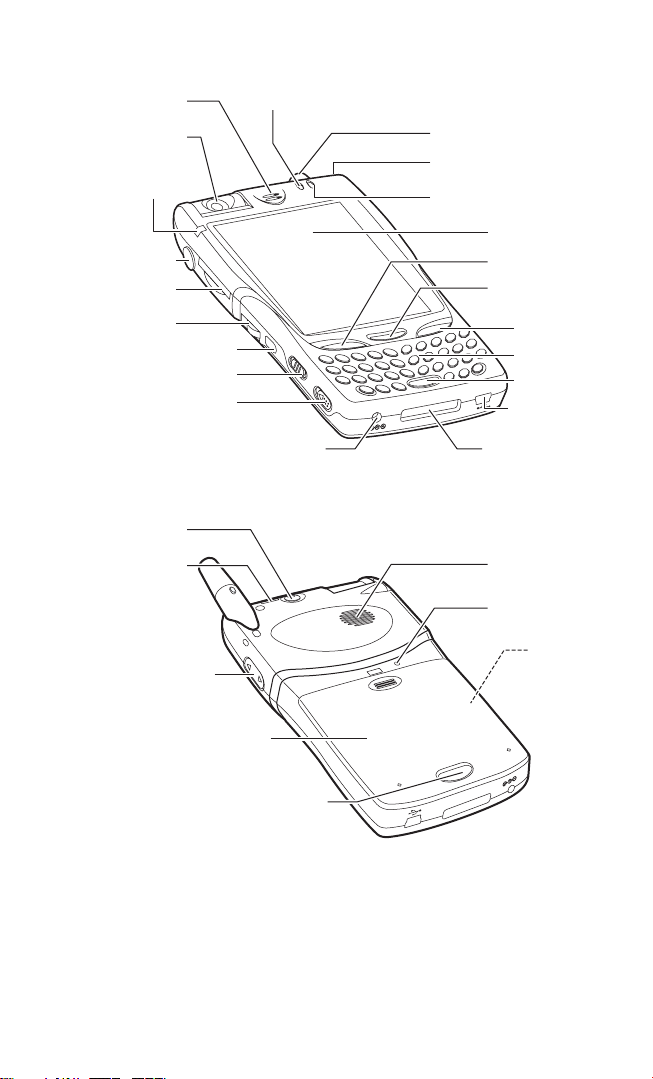
Your PCS Phone’s Features
Receiver
Camera
LED for Phone
Power
LED for Reminder
Antenna
Stylus Pen
LED for Charging
Headset
Jack
SD Card Slot
Jog Wheel
Voice Button
Environment Switch
Key Guard Switch
Power Button
IrDA Port
Volume Button
AC Adapter Jack
Battery Cover
Battery Cover Knob
Touch Screen
Talk Button
Speaker Phone
Button
End Button
Keyboard
Microphone
USB
Function Port
Cradle Connector
Speaker
Reset Button
Full Reset
Switch
Section 2: Understanding Your Device
14 2A: Your PCS Phone – The Basics
Page 23
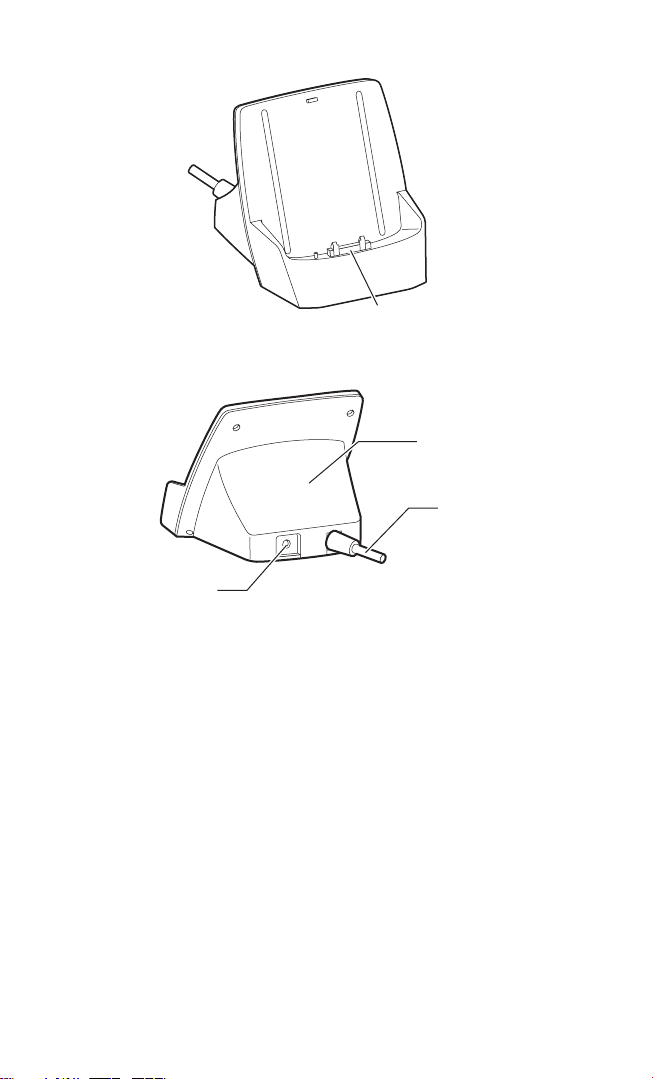
AC Adapter Jack
Connector
USB Cradle
USB Cable
Section 2: Understanding Your Device
152A: Your PCS Phone – The Basics
Page 24
Using the Batteries
This device uses two types of batteries; one is the main Lithium Ion
(LiIon) battery and the other is the backup battery that holds data when
the main battery is replaced. Because the device is shipped with neither of
the batteries charged, make sure to charge the batteries before starting to
use the device. The backup battery, which has been built into the device,
is automatically charged through the main battery or the AC adapter.
The main battery will be referred to in this guide as just the battery.
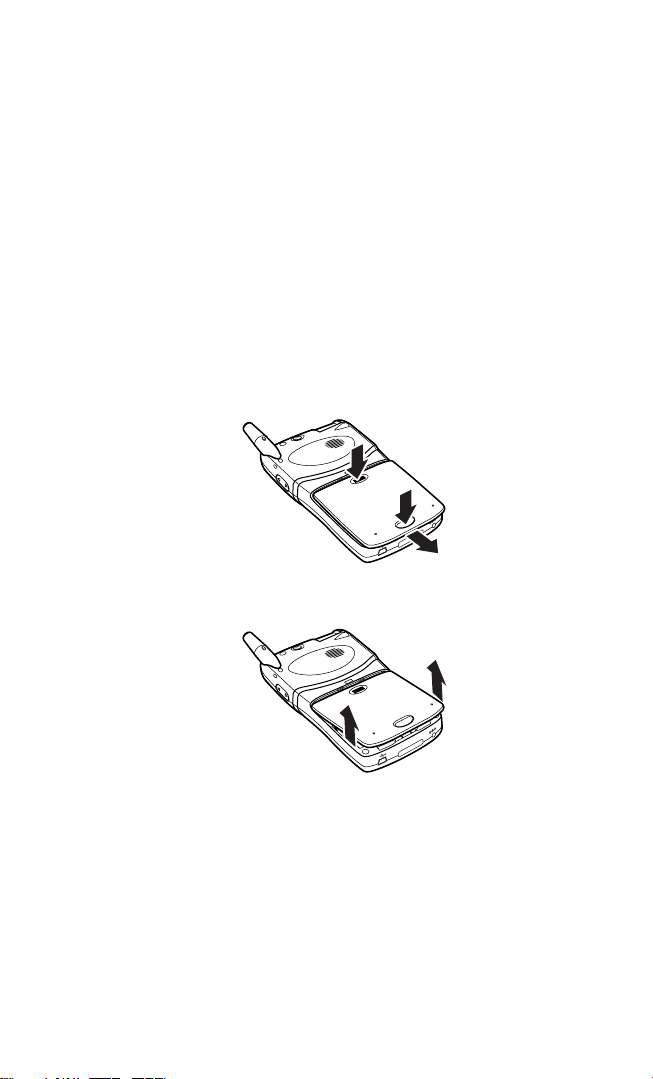
Installing the Main Battery
Use the following procedure to install the supplied main battery:
1. While holding down the battery cover (A), slide it forward while
pressing the release button (B).
AA
B
2. Slide the battery cover until the cover comes out of the guides, and
then lift and remove the cover.
Section 2: Understanding Your Device
16 2A: Your PCS Phone – The Basics
Page 25
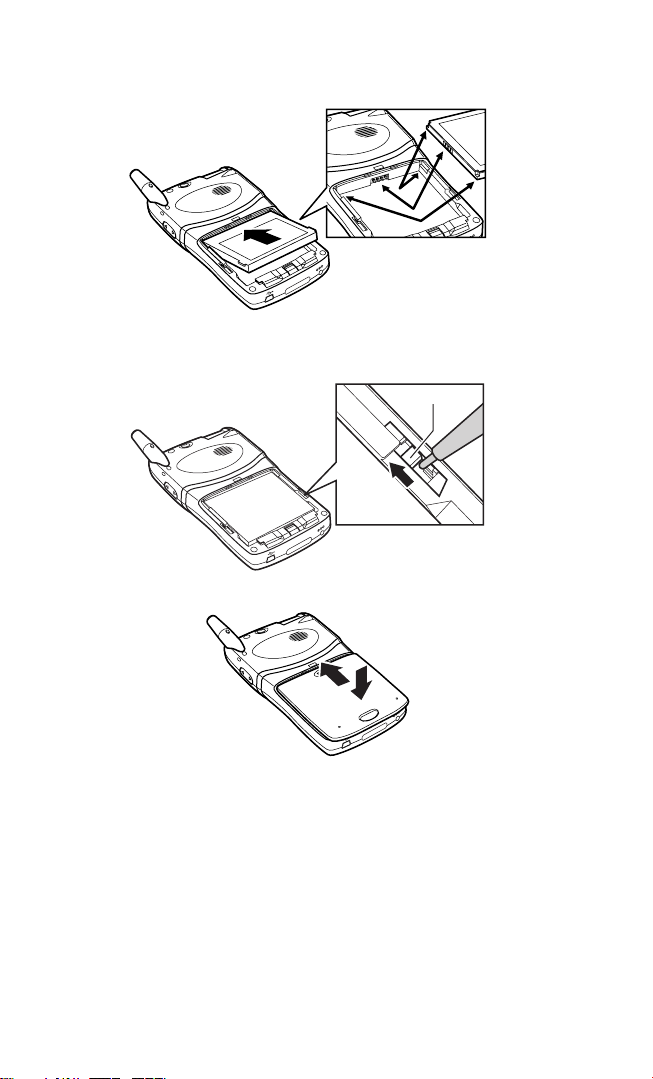
3. Hold the main battery with the label surface facing upward, and then
Full Reset switch
install the battery so that the grooves at both sides mate.
4. Using the stylus, shift the Full Reset switch upward to unlock it. (The
switch is locked before the device is shipped.)
Full Reset switch
Full Reset Switch
Release
5. Replace the battery cover on the device.
Section 2: Understanding Your Device
172A: Your PCS Phone – The Basics
Page 26
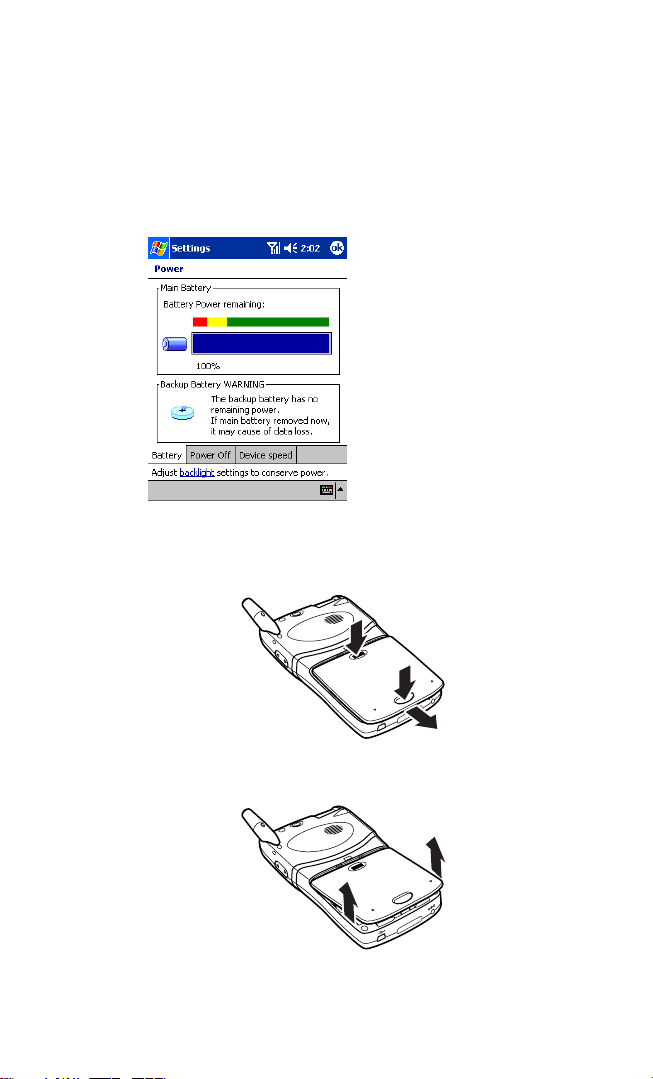
Removing the Main Battery
Use the following procedure to remove the main battery:
1. Confirm that the following backup battery power warning has not
been displayed on the Power screen under Settings. If the warning has
been displayed, charge the backup battery until the warning
disappears.
2. Press the Power button to turn the device off.
3. While holding down the battery cover (A), slide it forward while
pressing the release button (B).
AA
B
4. Slide the battery cover until the cover comes out of the guides, and
then lift and remove the cover.
Section 2: Understanding Your Device
18 2A: Your PCS Phone – The Basics
Page 27

5. Hold both sides of the battery, and then lift and remove the battery.
Note: If the battery is removed with the device on, data will be lost.
Note: If the main battery is removed when the backup battery is empty,
data on the device will be lost.
Note: If the device is left with the main battery removed for more than
five minutes, data on the device can be lost.
Tip: When the battery cover is removed from the device, the phone
function is turned off.
To turn the phone function back on, ensure the battery cover is firmly slid
into place and please do the following:
1. Press and hold the Power button for at least 2 seconds.
2. Tap phone antenna icon located at the top of the screen. A window
will popup.
3. Ta p Turn phone on.
Phone function is now turned on.
Section 2: Understanding Your Device
192A: Your PCS Phone – The Basics
Page 28
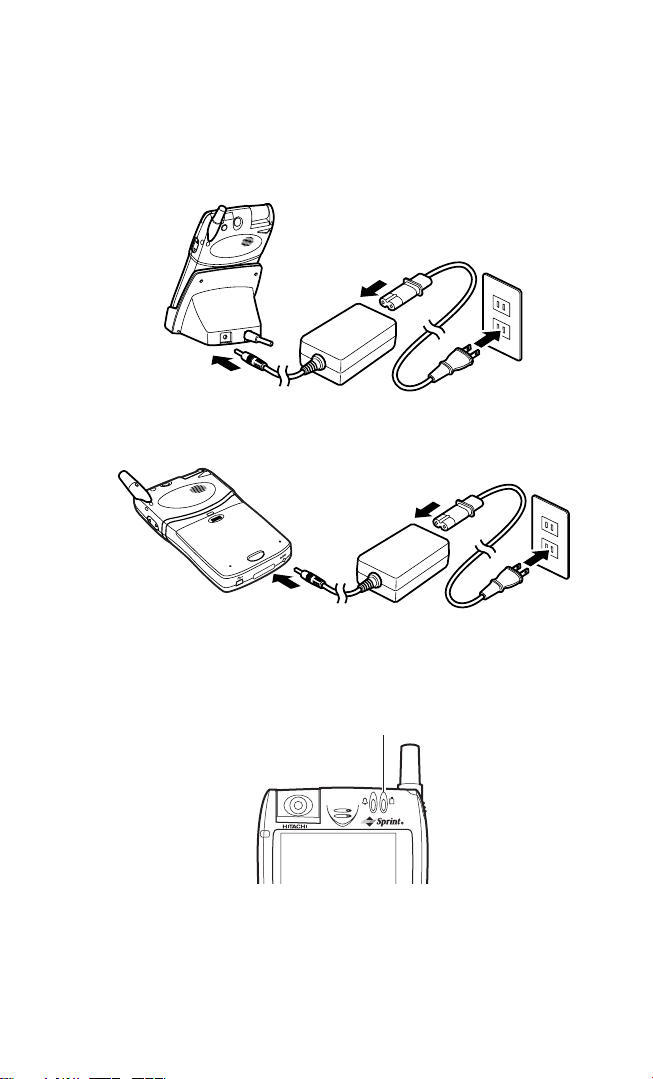
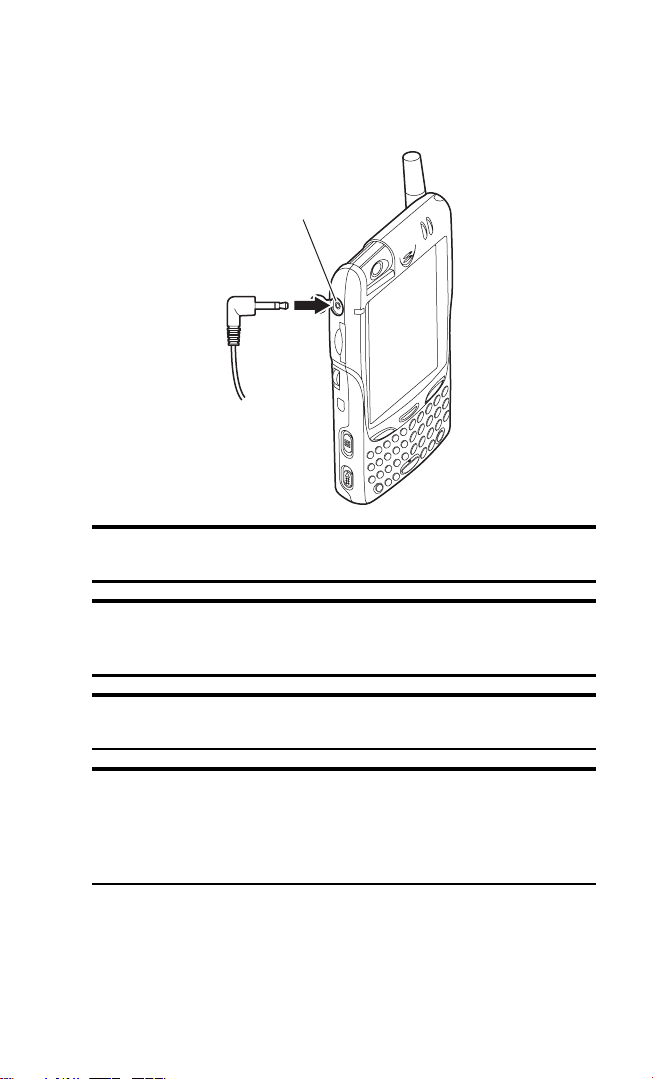
Charging the Battery
Use one of the following two methods for charging the battery:
䡵
Connect the supplied AC adapter and cradle as shown below, and then
attach the device onto the cradle. For information on using the cradle,
see “USB Cradle” on page 30.
- or -
䡵
Connect the supplied AC adapter to the device as shown below.
The LED for Charging lights amber while charging is being performed.
The LED turns green when charging is completed. For more information
about the LED for Charging, see “LEDs” on page 29.
LED for charging
It takes approximately three hours to finish charging a battery that has
only enough power for data backup, but not enough for operation.
Section 2: Understanding Your Device
20 2A: Your PCS Phone – The Basics
Page 29

Note: Charge the battery at an ambient temperature in the range from
0°C to 35°C (32°F to 95°F). Depending on the operating conditions of the
device, charging may be interrupted even when the ambient temperature
is lower than 35°C (95°F).
Note: If the ambient temperature becomes too high during charging, the
Charging LED lights red and charging is interrupted. Charging is
automatically restarted when the ambient temperature becomes
appropriate.
Note: The battery may not be properly charged at low temperatures
(less than 0°C/32°F) in winter. If this is the case, charge the battery in a
warm room.
Note: If the device is used as it is just after purchase or after the device
is left without being charged for an extended period of time, the
remaining battery power may not be correctly indicated. Before using
the device, be sure to charge the battery until the LED for Charging turns
green.
Note: When the device has been connected with the AC adapter or
placed on the cradle, incoming calls do not cause vibration, even with
vibration on.
Note: As the battery nears a full charge, the LED for charging may turn
green and orange alternately.
Section 2: Understanding Your Device
212A: Your PCS Phone – The Basics
Page 30

Battery Life
The main battery has a limited service life. Repeated charging and
discharging of the battery will result in a gradual decrease in the
charging capacity of the battery. If a fully recharged battery operates the
device for a much shorter period than before, this indicates the end of
battery life. When battery life is over, replace the battery with a new one.
The life of the main battery can vary, depending on how the device is used
and ambient temperatures.
Tip: Unlike NiCad and Nickel Metal Hydride batteries, charging the main
LiIon battery with some amount of power remaining hardly reduces the
maximum allowable operating time.
Note: Do not use the device at too high a temperature. The battery life
will become shorter than when used at normal temperatures.
Note: For safe disposal options of your Lithium Ion batteries, contact
your nearest Sprint-authorized service center.
Note: Be sure to dispose of your battery properly. In some areas, the
disposal of batteries in household or business trash may be prohibited.
Battery Operating Time
The main battery allows approximately 2.5 hours of continuous talk
time, approximately seven days of continuous standby time, or
approximately 12 hours of continuous PDA operation time.
Note: The maximum continuous talk time, standby time, and PDA
operation time are affected by backlight settings, service searching,
vibrate mode, game use, and browser use.
Note: The maximum battery operating time varies, depending on how the
device is stored and on ambient temperatures. Charging or using the
battery at low temperatures (less than 0°C/32°F) can cause a significant
reduction in the maximum operating time because of the characteristics
of a Lithium Ion battery. The standard maximum operating time is
restored when placed under room temperature conditions (25°C/77°F).
Section 2: Understanding Your Device
22 2A: Your PCS Phone – The Basics
Page 31

Extending the Maximum Battery Operating Time
You can use the following methods to extend the maximum operating
time of the main battery:
䊳
Decrease the screen brightness. For the setting method, see “Adjusting
the Screen Brightness” on page 44.
䊳
Set the device so that screen brightness is automatically lowered when
the main battery is consumed. For the setting method, see “Selecting
Backlight Settings” on page 97.
䊳
Place the device into the power saving (low speed) mode. For the
setting method, see “Adjusting Power Settings” on page 100.
䊳
Set the device so that the LED does not blink when the alarm is set. For
the setting method, see “Selecting Sounds & Notifications Settings” on
page 96.
䊳
Switch off the sound function that produces various sounds, including
beeps generated at the time of key entry and tapping. For the setting
method, see “Selecting Sounds & Notifications Settings” on page 96.
Tip: When connecting to a personal computer, use the AC adapter to
conserve LiIon battery strength.
Section 2: Understanding Your Device
232A: Your PCS Phone – The Basics
Page 32

Data Backup Time
When both the main battery and the backup battery are completely
discharged, data stored in the device will be lost. Immediately after the
battery icon indicates the low level or a warning message appears,
connect the AC adapter to charge the battery.
䊳
Data will be kept for approximately five days after the main battery is
discharged to such an extent that the device cannot be switched on.
䊳
The main battery and the backup battery discharge slowly even when
they are not used. The batteries will be completely discharged when
they are not used for an extended period of time.
䊳
It is strongly recommended that you save the device’s data on a
personal computer or a memory card. For the method of backing up
data, see “Backing Up Data” on page 179.
Note: When the device is left with a USB cable or a card connected, the
backup time may be reduced. When not using the device, remove
peripheral equipment from the device.
Note: If the device is left with the battery discharged for an extended
period of time, the battery life may be shortened. Recharge the battery
every three months, even not when using the device for a long period
of time.
Section 2: Understanding Your Device
24 2A: Your PCS Phone – The Basics
Page 33

Resetting
Use the stylus to push the Reset button when the device freezes during
operations or when the device prompts you to do so at the time of
software installation.
Reset Button
Note: Resetting the device causes data not yet saved to be lost. Data
that has been saved will not be lost through this operation.
Tip: If resetting the device does not allow it to restore the normal status,
perform initialization. Note, however, that initialization will cause all data
saved in the device’s memory to be erased. For details, see
“Initialization” on page 26.
Note: When the screen freezes do not remove the battery. Press the
Reset button. Removing the battery may cause data to be lost.
Section 2: Understanding Your Device
252A: Your PCS Phone – The Basics
Page 34

Initialization
Lock
Full Reset switch
Perform initialization only when pushing the Reset button does not allow
the device to be restarted.
Note: Initialization will cause all data saved in the device’s memory to be
erased. The programs preinstalled before shipment will not be erased.
Before performing initialization, back up important data using a
personal computer or a memory card. For details about data backup, see
“Backing Up Data” on page 179.
Note: Remove a memory card before starting initialization.
1. Remove the AC adapter and peripheral equipment from the device.
Executing initialization with equipment connected may result in
initialization failure.
2. Remove the main battery. To remove, see “Removing the Main
Battery” on page 18.
3. Using a non-conductive fine tool, shift the Full Reset switch downward
(lock position). The power is switched off.
Full Reset switch
Full Reset
Switch
Lock
Lock
4. Wait for approximately two minutes.
5. Install the main battery. To install, see “Installing the Main Battery”
on page 16.
Section 2: Understanding Your Device
26 2A: Your PCS Phone – The Basics
Page 35

6. Using the stylus, shift the Full Reset switch upward (unlock position).
Full Reset switch
The memory will be initialized, and the device is restarted.
Full Reset switch
Full Reset Switch
Release
7. Replace the battery cover on the device.
8. Connect the AC adapter to the device.
9. Set up the device. See “Initial Setup” on page 45.
Section 2: Understanding Your Device
272A: Your PCS Phone – The Basics
Page 36

Turning Your Device ON and OFF
Turning the Device On and Off
Each time you press the Power button, the device is switched on and off.
Tip: You cannot operate the Power button when:
䊳
The main battery has no power left.
䊳
The Key Guard switch is on.
䊳
The Full Reset switch has been locked.
Turning the Phone On and Off
Each time you press and hold the Power button or the End button for
two seconds, the phone is switched on and off.
When the phone is on, the LED for Phone Power blinks. For more
information about LED for Phone Power, see“LEDs” on page 29.
Power Button
Section 2: Understanding Your Device
28 2A: Your PCS Phone – The Basics
End Button
Page 37

LEDs
This device is equipped with three status LEDs.
1. For Charging
2. For Reminder
3. For Phone Power
1. LED For Charging
䊳
Steady amber: Charging in progress
䊳
Steady green: Charging completed
䊳
Steady red: Charging stopped (because of high ambient temperature)
2. LED For Reminder
䊳
Flashes orange: Alarm for the programmed plan and job
3. LED For Phone power
Flashes green at various intervals as below when the phone is on.
䊳
In Service: Blinks at intervals of five seconds (with a shorter On time
period)
Flashes at this interval when service is available; this is not true of
active MIP data connections mentioned below. The statuses where this
happens include idle, voice call, and inactive data connections.
䊳
Active Data Service: Blinks at intervals of 0.5 second
Flashes at this interval when an active MIP data connection is
established. The flashing status for in-service is restored when data
connection becomes inactive.
Section 2: Understanding Your Device
292A: Your PCS Phone – The Basics
Page 38

䊳
No Service: Blinks at intervals of five seconds (with a longer On time
period).
Flashes at this interval when the phone is out of any service range.
䊳
Deep Sleep: Blinks at intervals of three minutes.
Flashes at this interval when the phone is out of any service range for
15 minutes.
USB Cradle
Your PCS Phone comes with a USB cradle.
Use the supplied USB cradle to charge the battery or to exchange data
with a connected personal computer.
Knob
Connector AC Adapter Jack USB CablePin
Mounting the Device onto the USB Cradle
1. Insert the bottom of the device onto the mating connector and pin on
the USB cradle.
Section 2: Understanding Your Device
30 2A: Your PCS Phone – The Basics
Page 39

2. Tilt the device in the direction of the arrow so that its tab hole is
aligned with the tab on the cradle.
Removing the Device from the USB Cradle
䡵
Pull the device forward, and then remove it from the USB cradle.
Note: After the device has been mounted onto the USB cradle, the
vibrating device (if switched on) does not function when a call is
received.
Section 2: Understanding Your Device
312A: Your PCS Phone – The Basics
Page 40

Using the USB Port
Using the USB allows you to easily connect the device to a personal
computer in order to exchange data. Use one of the following two
connecting methods:
䡵
Connect one appropriate end of a USB cable to the device, and the
other appropriate end to the USB port on the personal computer.
USB Function Port
USB (A)
Personal Computer
USB (Mini-B) To the USB Connector
- or -
䡵
Connect the cable of the supplied USB cradle to the USB port on the
personal computer, and then mount the device onto the USB cradle. To
use the USB cradle, see “USB Cradle” on page 30.
To the USB Connector
Section 2: Understanding Your Device
32 2A: Your PCS Phone – The Basics
Personal Computer
Page 41

Using the Infrared Communications Port
This device also has an IrDA port for communicating with another
compatible device. When using the IrDA port, position the two devices so
that the respective IrDA ports face each other. In addition, there should be
no obstacles between the two devices.
IrDA Port
Be careful that the IrDA ports line up within 15 degrees in the horizontal
and vertical directions and that the distance between the two devices is
less than 70 cm (27.5 inches).
15 degrees left
15 degrees down
15 degrees up
15 degrees right
Section 2: Understanding Your Device
332A: Your PCS Phone – The Basics
Page 42

Using SD Card / MultiMediaCard
This device can be used with a commercially available SD card or
MultiMediaCard.
1. Remove the card slot protector from the SD card slot.
SD Card Slot
䊳
Push the card slot protector until it clicks, and then release your finger
to cause the protector to be ejected. Slowly pull the ejected protector
out of the slot.
Section 2: Understanding Your Device
34 2A: Your PCS Phone – The Basics
Page 43

2. Hold the card so that its top surface and the touch screen face the same
direction, and then insert the card into the SD card slot. Push the card
until it clicks.
Top Surface
To remove the card, follow the instructions in step 1.
Note: This device does not support the SD card security function.
Note: If you insert a card incorrectly and push it with a strong force, both
the card and the card slot can be damaged.
Note: When releasing your finger after pushing the card, the card may
jump out of the slot. Do not place your face close to the slot.
Note: Do not try to force the card out of the card slot with your fingernails.
Note: When not using a card, make sure to replace the card slot protector.
Tip: This device supports a Secure MultiMediaCard.
Section 2: Understanding Your Device
352A: Your PCS Phone – The Basics
Page 44
Using the Optional Headset
䡵
To connect an optional headset to this device, insert the plug on the
headset into the headset jack on the device.
Headset Jack
Note: Insert the headset plug into the jack as far as it goes. Incomplete
connection of the headset plug can result in abnormal sounds.
Note: When using headphones with a 3.5 mm (1/8 inches) stereo phone
plug, use the supplied stereo mini plug adapter. You must not use an
adapter other than the supplied one.
Note: When using the headset or headphones, be careful not to increase
the volume too much.
Note: Audio volume differs depending on data to be played back. If the
volume control has been set to the maximum level, unexpected
excessive volume may damage your ears. Before playing back data, set
the volume control to the minimum level, and then gradually increase the
volume to the appropriate level.
Section 2: Understanding Your Device
36 2A: Your PCS Phone – The Basics
Page 45

Camera
This device incorporates a VGA camera to capture still images.
You can rotate the camera forward and backward 180 degrees. When the
camera is fully rotated forward, captured images are displayed upside
down. For details about operations, see “Camera” on page 153.
180 degrees rotation
Camera
Note: If the lens is dirtied with fingerprints, oil, or grease, clean it with a
soft cloth before taking pictures.
Note: Even though the camera is produced with very high precision
technologies, some pixels may always appear bright and some pixels
may always appear dark. This is not a malfunction.
Note: If pictures are taken after the device has been in a warm location
for an extended period of time, image quality may be lowered.
Note: Do not expose the lens to direct sunlight for a long period of time.
This may cause the internal color filter to be discolored.
Note: Do not attempt to rotate the lens beyond the allowable range.
Section 2: Understanding Your Device
372A: Your PCS Phone – The Basics
Page 46

Note: Make sure to hold the device firmly so that captured images will
not be blurred.
Jog Wheel
Use the jog wheel to select and execute an application or a pull-down
menu item.
Turn upward
Push
Turn downward
Jog Wheel
䊳
Upward turn: Moves the cursor upward
䊳
Downward turn: Moves the cursor downward
䊳
Push: Executes the item selected using the cursor
Talk Button
Use the Talk button to make a phone call or answer an incoming call.
You can also use it to activate the phone application.
For details about operations, see “Keypad Operation List” on page 68.
Section 2: Understanding Your Device
38 2A: Your PCS Phone – The Basics
End Button
Speaker Phone Button
Talk Button
Page 47

End Button
Use the End button to switch off the ringer volume or to finish a
conversation.
For details about operations, see “Keypad Operation List” on page 68.
Speaker Phone Button
Use the Speaker Phone button to enable the speaker phone or to activate
the voice dial function (for details, see “Using Voice-Activated Dialing”
on page 126).
The Speaker Phone button provides different functions, depending on the
current status.
The following functions are available when the phone function is on:
Status Press to
The dialer is being executed
without a phone number entered
The dialer is being executed with
a phone number entered
A function other than the dialer
is being executed
A call is being received Answer the incoming call and switch
During conversation Switch to speaker phone
Activate the voice dial function and
switch the speaker phone on
Call the entered telephone number
and switch the speaker phone on
Activate the voice dial function and
switch the speaker phone on
the speaker phone on
Note: When the conversation is ended, the speaker phone will
automatically be switched off.
Section 2: Understanding Your Device
392A: Your PCS Phone – The Basics
Page 48

Voice Button
V
Use the Voice button to activate the voice dial and voice memo functions.
For details about the voice dial function, see “Making a Call From Voice
Dial” on page 76. For details about the voice memo function, see
“Recording a Message” on page 62.
oice Button
The Voice button provides the different functions, depending on the
current status.
Status Press to Press and hold to
Waiting for a call
Activate Voice Dial Activate Voice Memo
(with the device
switched on)
During conversation – Activate Voice Memo
Volume Button
Use the Volume button to adjust the device’s sound volume.
䊳
Upward press: Increases the volume
䊳
Downward press: Decreases the volume
Section 2: Understanding Your Device
40 2A: Your PCS Phone – The Basics
Press upward
Volume Button
Press downward
Page 49

Note: When the Environment switch is set for “Silent,” the volume will be
switched off regardless of the operation of the Volume button. For details
about the Environment switch, see “Environment Switch” on page 42.
Key Guard Switch
Use the Key Guard switch to prevent unintentional operations. This
button is also convenient when using functions (such as music
playback) that do not need the screen.
ON
Key Guard Switch
OFF
Turning on the Key Guard switch (up position) places the device into the
following status:
䊳
Screen: Off
䊳
The Power button, touch panel, keyboard, jog wheel, and Voice button
will be disabled.
Note: Even when the Key Guard switch is on, the LEDs, Talk button, End
button, Speaker Phone button, Environment switch, Volume button, Reset
button, and Full Reset switch are still available.
Section 2: Understanding Your Device
412A: Your PCS Phone – The Basics
Page 50

Environment Switch
Use the Environment switch to change the volume and type of
ringer tones.
You can set the mode simply by putting the switch in the top, middle, or
bottom positions, providing a quick and easy way to select modes suited
to various places and situations.
Silent All (top)
Environment (middle)
Normal (bottom)
䊳
The mode names for the three switch positions are Silent All (top),
Environment (middle), and Normal (bottom).
䊳
Slide the switch up or down to switch modes. Silent All or names of the
Environment modes appear on the Today Screen (See “Today Screen”
on page 47).
䊳
You can select Meeting, Outdoor, Office, and Private within the
Environment mode. See “Changing the Environment Mode and
Volume and Ring Type/Tone Settings for Individual Modes” on
page 82.
䊳
When in the Environment mode, the ringer tone volume and type
selected under “Environment” (page 82) will be used.
䊳
If the volume or ring type setting is changed when in the Environment
mode, the new setting is valid until another mode is selected.
䊳
When in the Silent All mode, “Off” is always selected for the volume.
This is true no matter if the volume is changed through “Sound &
Notification” under “Settings” (page 96), or if the ringer type/tone is
changed though “Phone” under “Settings” (page 80).
Environment Switch
Section 2: Understanding Your Device
42 2A: Your PCS Phone – The Basics
Page 51

Using the Keyboard
The keyboard allows you to enter text. This section describes the basic
operations for entering text using the keyboard.
Keyboard
䊳
To enter characters (small letters) or codes printed on the keys in
black, simply press the corresponding keys.
䊳
To enter characters (capital letters) or codes printed on the keys in
black, press and hold the Shift key, and then press the corresponding
keys.
䊳
To switch Caps Lock on and off, press and hold the Shift key, and then
press the Fn (Caps) key.
䊳
To switch Num Lock on and off, press and hold the Shift key, and then
press the Num key.
Note: With Caps Lock on, pressing a key with an alphabetic character
causes the corresponding capital letter to be entered. With Caps Lock
on, pressing a key with an alphabetic character while pressing the Shift
key causes the corresponding small letter to be entered.
䊳
To enter numeric characters and codes printed on the keys in purple,
press and hold the Num key, and then press the corresponding keys.
䊳
To enter A1 to A8 or printed in bluish green, press and
hold the Fn key, and then press the corresponding keys. When A1 to A8
are entered, the applications registered under these keys are started.
For the registration method, see “Setting Buttons” on page 94. For
, see “Adjusting the Screen Brightness” on page 44.
Section 2: Understanding Your Device
432A: Your PCS Phone – The Basics
Page 52

䊳
The Shift, Fn, and Num keys also function as sticky keys. When one of
these keys is pressed, this function causes the key to remain active until
another key is pressed. This function is useful when pressing two keys
at the same time is difficult.
Note: You can also enter text using the Input panel. For the method of
using the Input panel, see “Entering Text Using the Input Panel” on
page 54.
Adjusting the Screen Brightness
You can adjust the screen brightness, depending on the ambient
brightness and other ambient conditions.
䡵
To adjust the screen brightness, press and hold the Fn key, and then
press (brighter) or (dimmer).
Note: You can select the screen brightness from five levels. You can also
set the screen brightness to automatically decrease when no entry is
made through the screen or keyboard for a certain period of time. For
more information, see “Selecting Backlight Settings” on page 97.
Using the Stylus
Use the stylus to select menu items or enter data on the touch screen.
The methods for using the stylus are as follows:
䊳
Tap : Touch the screen once with the stylus to select items such as
menus, icons, and buttons on the screen.
䊳
Tap and hold: Keep touching the screen with the stylus. When an icon
or item is tapped and held, a red circular mark appears, followed by a
pop-up menu.
䊳
Drag: Hold the stylus on the screen and move it to shift icons or other
items on the screen, to enter text by handwriting, or to draw pictures.
Note: Use only the supplied stylus to operate the touch screen. When
using the stylus, gently touch the screen with it.
Section 2: Understanding Your Device
44 2A: Your PCS Phone – The Basics
Page 53

Initial Setup
When the device is switched on for the first time after purchase or after
the device is initialized, the following screen appears. Perform initial
setup procedures according to the on-screen instructions.
1. Tap anywhere on the screen.
2. The Align screen appears for touch screen alignment.
䊳
Tap the center of the cross marker. Each time you tap the center of the
marker, the marker moves. When the center of the marker is tapped
five times, the alignment is completed and the Stylus screen appears.
3. Read the descriptions of the methods for using the stylus, then tap
Next. The screen for practicing pop-up menu operations appears.
4. Following the instructions, open a pop-up menu and perform
cut-and-paste operations. After finishing the paste operation, tap
The Location screen appears.
5. Specify a location on the Location screen.
䊳
Tapping (shown to the right of the Time zone box) causes a list to be
displayed. As necessary, change the time zone where the device is to be
used and then tap
Next. The Complete screen appears.
Next.
6. Tap the Complete screen. The Today screen appears and the device is
ready for use.
Section 2: Understanding Your Device
452A: Your PCS Phone – The Basics
Page 54

7. If the phone of the device has not been activated, switch the phone on
to start the Activation Wizard.
8. Following the Activation Wizard, enter your activation code (also
known as OTKSL), phone number (also known as MDN), and the
MSID assigned to you by your PCS Customer Solutions Specialist.
Provisioning
In order to perform data communications, you need to perform the
following operations first:
1. Tap , then Settings. On the Personal tab, tap Phone, then the
Data tab on the bottom.
2. Ta p Update Data Profile, then Yes.
Section 2: Understanding Your Device
46 2A: Your PCS Phone – The Basics
Page 55

Today Screen
You can display the Today screen by tapping and then Today. On the
Today screen, you can see at a glance important information for the day.
Tap to select a program.
䊳
Environment switch status
Status icon: Battery, Location, Roaming
Tap to change volume or mute all sounds.
Tap to change date and time.
Environment switch status
Your day at a glance
Short-cut Buttons (Phone related).
Short-cut Buttons (Program related).
Tap to view connection status.Tap to create a new item.
The current Environment switch mode is indicated with text. Mode types:
“Silent All,” “Meeting,” “Outdoor,” “Office,” “Private.”
Note: No Environment indication is given with Normal mode selected.
For the Environment switch, see page 42.
䊳
Short-cut buttons
Call Log button: Launches the Dialer Log screen
Speed Dial button: Launches the Dialer Speed Dial screen
Voice Mail button: Launches Voice Mail
Pictures button: Launches the picture-related program start screen
Tools button: Launches the tool-related program start screen
Section 2: Understanding Your Device
472A: Your PCS Phone – The Basics
Page 56

Tip: To customize the programs registered on the tool-related program
start screen, select the Items tab on Settings under Tod ay , and then
select Options under Prglaunch to start a screen for customization.
Running button: Launches the running program start screen
䊳
Status icon
Following are some of the status icons you may see:
Status Icon Meaning
Main batteries are full
Main batteries are low (26–50%)
Main batteries are low
Main batteries are very low
Location ON
Location OFF
Roaming ON
Section 2: Understanding Your Device
48 2A: Your PCS Phone – The Basics
Page 57

Navigation Bar and Command Bar
The navigation bar is located at the top of the screen. It displays the active
program and current time, and allows you to switch to programs and
close screens.
Use the command bar at the bottom of the screen to perform tasks in
programs. The command bar includes menu names, buttons, and the
Input Panel button. To create a new item in the current program, tap
New. To see the name of a button, tap and hold the stylus on the button.
Drag the stylus off the button if you do not wish to carry out the
command.
Tap to change volume or mute the device.
Navigation Bar
Tap to quickly select a program
you have recently used.
Tap to select a program.
Tap to see additional programs.
Tap to customize the device.
New Button
Menu
Names
Buttons
Input Panel Button
The following icons will appear on the navigation bar:
Phone is on, but is out of range of any signal.
Phone is on, and is receiving a signal.
Phone call is in progress. To quickly switch back to
Phone from any other program, tap this icon.
Section 2: Understanding Your Device
Command Bar
492A: Your PCS Phone – The Basics
Page 58

Phone is off. (Airplane mode)
Sound ON
Sound OFF
Vibrate ON
Battery power remaining Low status
Battery power remaining Very Low status
More than one status icon is in display
Data connection is in progress
Signing in with MSN Messenger is being executed
Start and end processings of synchronization with a
personal computer through ActiveSync
Voice Message
email/SMS
Speaker Phone ON
Emergency callback mode
Missed call
Note: If more notification icons need to be displayed than there is room
to display them, the Notification icon ( ) will display. Tap the icon to
view all active notification icons.
Section 2: Understanding Your Device
50 2A: Your PCS Phone – The Basics
Page 59

Programs
You can switch from one program to another by selecting it from
the menu. You can customize which programs you see on this menu
(see “To add a program to the Start menu:” on page 93). To access some
programs, you’ll need to tap ,
name.
You can also start programs using the launcher function on the Today
screen. See “Today Screen” on page 47.
The following table contains a partial list of programs that are installed
on your device:
Icon Program Description
ActiveSync Synchronize information between your
Calendar Keep track of your appointments and
Contacts Keep track of your friends and
Inbox Send and receive email/SMS messages
Programs, and then the program
device and computer
create meeting requests
colleagues
Pocket Internet
Explorer
Browse Web and WAP sites and
download new programs and files from
the Internet
Notes Create handwritten or typed notes,
drawings, and recordings
Tasks Keep track of your tasks
Pocket Excel Create new workbooks or view and edit
Excel workbooks created on your
computer
MSN Messenger Send and receive instant messages with
your MSN Messenger contacts
Pocket Word Create new documents or view and edit
Word documents created on your
desktop computer
Section 2: Understanding Your Device
512A: Your PCS Phone – The Basics
Page 60

Icon Program Description
Phone Make and receive calls
Microsoft Reader Read e-books
Windows Media
Player
Play back Windows Media Audio
(.wma) files, MP3 (.mp3) files, and
Windows Media Video (.wmv) files
Solitaire Play a card game
File Explorer Manage files
Camera Take pictures using the built-in camera
Review/Share Display and edit JPEG images
Data Backup Back up your device files to an SD card
Calculator Perform calculations
ClearVue
Document
ClearVue
Worksheet
ClearVue
Presentation
Display Microsoft Word files created on
your computer
Display Microsoft Excel files created on
your computer
Display Microsoft PowerPoint files
created on your computer
ClearVue PDF Display Adobe Portable Document
Format (PDF) files created on your
computer
Section 2: Understanding Your Device
52 2A: Your PCS Phone – The Basics
Page 61

Pop-up Menus
With pop-up menus, you can quickly choose an action for an item. For
example, you can use the pop-up menu in the contact list to quickly
delete a contact, make a copy of a contact, or send an email message to a
contact. The actions in the pop-up menus vary from program to
program. To access a pop-up menu, tap and hold the stylus on the item
name that you want to perform the action on. When the menu appears,
lift the stylus and tap the action you want to perform. Tap anywhere
outside the menu to close the menu without performing an action.
Tap and hold to display
the pop-up menu.
Lift the stylus and tap
the action you want.
Tap outside the menu
to close it without performing
an action.
Notifications
Your device reminds you in a variety of ways when you have something to
do. For example, if you’ve set up an appointment in Calendar, a task with
a due date in Tasks, or an alarm in Clock, you’ll be notified in any of the
following ways:
䊳
A message box appears on the screen.
䊳
A sound (which you can specify) is played.
䊳
A light flashes on your device.
䊳
The device vibrates.
Section 2: Understanding Your Device
532A: Your PCS Phone – The Basics
Page 62

䡵
To choose reminder types and sounds for your device, tap and then
Settings. In the Personal tab, tap Sounds & Notifications. The
options you choose here apply throughout the device.
Entering Information on Your Device
You have several options for entering new information:
䊳
Use the input panel to enter typed text, either by using the soft
keyboard or other input method.
䊳
Write directly on the screen.
䊳
Draw pictures on the screen.
䊳
Speak into your device microphone to record a message.
䊳
Use Microsoft® ActiveSync® to synchronize or copy information from
your computer to your device. For more information on ActiveSync, see
ActiveSync Help on your computer.
Entering Text Using the Input Panel
Use the input panel to enter information in any program on your device.
You can either type using the soft keyboard or write using Letter
Recognizer, Block Recognizer, or Transcriber. In each case, the characters
appear as typed text on the screen.
䡵
To show or hide the input panel, tap the Input Panel button. Tap the
arrow next to the
Input Panel button to see your choices.
Select an input method.
Tap to see your choices.
Input Panel Button
Note: You can also enter text using the keyboard. To use the keyboard,
see “Using the Keyboard” on page 43.
Section 2: Understanding Your Device
54 2A: Your PCS Phone – The Basics
Page 63

When you use the input panel, your device anticipates the word you are
typing or writing and displays it above the input panel. When you tap the
displayed word, it is inserted into your text at the insertion point. The
more you use your device, the more words it learns to anticipate.
Tap here if this
is the right word.
Soft Keyboard
Note: To change word suggestion options, such as the number of words
suggested at one time, tap ,
the Word Completion tab.
To Type with the Keyboard:
䡵
Tap the arrow next to the Input Panel button and then tap
Hardware Keyboard. For more information, see “Using the
Settings, Personal tab, Input, and then
Keyboard” on page 43.
To Type with the Soft Keyboard:
1. Tap the arrow next to the Input Panel button and then tap Keyboard.
2. On the soft keyboard that is displayed, tap the keys with your stylus to
enter text.
Section 2: Understanding Your Device
552A: Your PCS Phone – The Basics
Page 64

To use Letter Recognizer:
With Letter Recognizer you can use the stylus to write letters just as you
would write on paper.
1. Tap the arrow next to the Input Panel button and then tap
Letter Recognizer.
2. Use the stylus to write a letter in the box.
When you write a letter, it is converted to typed text that appears on the
screen. For specific instructions on using Letter Recognizer, open Letter
Recognizer and tap the question mark next to the writing area.
To use Block Recognizer:
With Block Recognizer you can use the stylus to input character strokes
that are similar to those used on other devices.
1. Tap the arrow next to the Input Panel button and then
Block Recognizer.
2. Use the stylus to write a letter in the box.
When you write a letter, it is converted to typed text that appears on the
screen. For specific instructions on using Block Recognizer, open Block
Recognizer and tap the question mark next to the writing area.
To use Transcriber:
With Transcriber you can use the stylus to write anywhere on the screen
just as you would on paper. Unlike Letter Recognizer and Block
Recognizer, you can write a sentence or more with Transcriber. Then,
pause and let Transcriber change the written characters to typed
characters.
1. Tap the arrow next to the Input Panel button and then Transcriber.
2. Use the stylus to write anywhere on the screen.
For specific instructions on using Transcriber, open Transcriber and tap
the question mark in the lower right hand corner of the screen.
Section 2: Understanding Your Device
56 2A: Your PCS Phone – The Basics
Page 65

To select typed text:
1. Drag the stylus across the text you want to select.
2. Format or edit text by tapping the command on the Edit menu or by
tapping and holding the selected words until the pop-up menu
appears.
Writing on the Screen
In any program that accepts writing, such as the Notes program, and in
Notes tab in Calendar, Contacts, and Tasks, you can use your stylus to
the
write directly on the screen. Write the way you do on paper. You can edit
and format what you’ve written and convert the information to text at a
later time.
To write on the screen:
䡵
Tap the Pen button to switch to writing mode. This action displays
lines on the screen to help you write.
Tap the Pen button and use
your stylus like a pen.
Note: Some programs that accept writing may not have the Pen button.
See the documentation for that program to find out how to switch to
writing mode.
Section 2: Understanding Your Device
572A: Your PCS Phone – The Basics
Page 66

To select writing:
If you want to edit or format writing, you must first select it.
1. Tap and hold the stylus next to the text you want to select until the
insertion point appears.
2. Without lifting, drag the stylus across the text you want to select.
䊳
If you accidentally write on the screen, tap Edit, then Undo and try
again. You can also select text by tapping the
Pen button to deselect it
and then dragging the stylus across the screen.
You can cut, copy, and paste written text in the same way you work with
typed text: tap and hold the selected words and then tap an editing
command on the pop-up menu, or tap the command on the
To convert writing to text:
䡵
Tap Tools and then Recognize.
Edit menu.
If you want to convert only certain words, select them before tapping
Recognize on the Tools menu (or tap and hold the selected words and
Recognize on the pop-up menu). If a word is not recognized, it
then tap
is left as writing.
Select the text you want
to convert and tap Recognize on the
Tools pop-up menu.
Section 2: Understanding Your Device
58 2A: Your PCS Phone – The Basics
The writing is
converted into text.
Page 67

If the conversion is incorrect, you can select different words from a list of
alternates or return to the original writing. To do so, tap and hold the
incorrect word (tap one word at a time). On the pop-up menu, tap
Alternates. A menu with a list of alternate words appears. Tap the word
you want to use or tap the writing at the top of the menu to return to the
original writing.
Tap to return to your
original writing.
Or, tap the word you want
to use.
Tips for getting good recognition:
䊳
Write neatly.
䊳
Write on the lines and draw descenders (e.g., the lower part of “g”)
below the line. Write the cross of the “t,” the dots of the “i” and “j,”
and apostrophes below the top line so that they are not confused with
the word above. Write periods and commas above the line.
䊳
For better recognition, try increasing the zoom level to 300% using the
Tools menu.
䊳
Write the letters of a word closely and leave large gaps between words
so that the device can easily tell where words begin and end.
Note: Hyphenated words, foreign words that use special characters
such as accents, and some punctuation cannot be converted.
Section 2: Understanding Your Device
592A: Your PCS Phone – The Basics
Page 68

Note: If you add writing to a word to change it (such as changing a “3” to
an “8”) after you attempt to recognize the word, the writing you add will
not be included if you attempt to recognize the writing again.
Drawing on the Screen
You can use the stylus to draw on the screen in the same way that you
write on the screen. The difference between writing and drawing on the
screen is how you select items and how they can be edited. For example,
selected drawings can be resized, while writing cannot.
Section 2: Understanding Your Device
60 2A: Your PCS Phone – The Basics
Page 69

To create a drawing:
䡵
Cross three ruled lines on your first stroke. A drawing box appears.
Subsequent strokes in or touching the drawing box become part of the
drawing. Drawings that do not cross three ruled lines will be treated as
writing.
The drawing box indicates
the boundaries of the drawing.
Pen Button
Note: You may want to change the zoom level so that you can more
easily work on or view your drawing. Tap Too ls and then tap a zoom level.
Section 2: Understanding Your Device
612A: Your PCS Phone – The Basics
Page 70

To select a drawing:
If you want to edit or format a drawing, you must first select it.
䡵
Tap and hold the stylus on the drawing until the selection handle
appears. To select multiple drawings, deselect the
Pen button and then
drag to select the drawings you want.
You can cut, copy, and paste selected drawings by tapping and holding
the selected drawing and tapping an editing command on the pop-up
menu, or by tapping a command on the
Edit menu. To resize a drawing,
make sure the Pen button is not selected, and drag a selection handle.
Recording a Message
In any program where you can write or draw on the screen, you can also
quickly capture thoughts, reminders, and phone numbers by recording a
message. In Calendar, Tasks, and Contacts, you can include a recording
Notes tab. In the Notes program, you can either create a stand-
in the
alone recording or include a recording in a written note. If you want to
include the recording in a note, open the note first. In the Inbox
program, you can add a recording to an email message.
To create a recording:
1. Hold your device’s microphone near your mouth (or other audio
source).
2. Press and hold the Voice button on the right side of the device. The
recording toolbar appears.
3. Tap the Record button ( ) on the toolbar to start recording.
4. To stop recording, tap the Stop button ( ) on the toolbar.
Section 2: Understanding Your Device
62 2A: Your PCS Phone – The Basics
Page 71

䡵
To play a recording, tap it in the list or tap its icon in the note.
Indicates an embedded
recording.
Tap to begin recording.
Tap to show or hide
the Recording toolbar.
Section 2: Understanding Your Device
632A: Your PCS Phone – The Basics
Page 72

Using My Text
When using Inbox or MSN Messenger, use My Text to quickly insert preset
or frequently used messages into the text entry area. To insert a message,
My Text and tap a message.
tap
Tap to select a prewritten message.
Note: After inserting a My Text message, you can add text before
sending the message.
䡵
To edit a My Text message, open the Tools menu, tap
Edit My Text Messages. Select the message you wish to edit and
make desired changes.
Section 2: Understanding Your Device
64 2A: Your PCS Phone – The Basics
Page 73

Finding and Organizing Information
The Find feature on your device helps you quickly locate information.
䡵
On the menu, tap Find. Enter the text you want to find, select a
data type, and then tap
Note: To quickly find information that is taking up storage space on your
device, select Larger than 64 KB in Typ e .
You can also use the File Explorer to find files on your device and to
organize these files into folders. On the menu, tap
File Explorer.
then tap
Tap to change folders.
Go to start the search.
Programs, and
Select the sort order
for the list.
Tap the folder name
to open it.
Tap and hold to create
a new folder.
Note: You can move files in File Explorer by tapping and holding the item
you want to move, and then tapping
up menu.
Cut or Copy and Paste on the pop-
Section 2: Understanding Your Device
652A: Your PCS Phone – The Basics
Page 74

Section 2: Understanding Your Device
66 2A: Your PCS Phone – The Basics
Page 75

Section 2B
Using Your Phone
In This Section
䊳
Viewing the Display Screen
䊳
Turning the Phone ON and OFF
䊳
Displaying Your Phone Number
䊳
Making and Answering Calls
our device is packed with features that simplify your life and expand
Y
your ability to stay connected to the people and information that are
important to you. This section will guide you through the basics of your
device’s phone function. Follow these instructions and you’ll be on your way
to using your phone in no time.
Section 2: Understanding Your Device
672B: Using Your Phone
Page 76

Viewing the Display Screen
Dialer Screen
Backspace in Digit Entry
Talk Button
Keypad
“Memo” Shortcut “Contacts” Shortcut
Speed Dial Button
Call Log Button
End Button
Status Icon
Keypad Operation List
Regardless of the program in use, pressing the T button while the
phone is turned on displays the dialer screen.
When the phone function’s screen is displayed, the T/E buttons
on the device perform the same functions as the T/E buttons on
the screen. Button functions include:
Button Idle Incoming Call During a Voice Call
T Call phone number
displayed on the
screen. If a phone
Answer a call. Answer Incoming
call; Switch to
Three-Way calling.
number is not
displayed, the last
number dialed is
called.
Section 2: Understanding Your Device
68 2B: Using Your Phone
Page 77

Button Idle Incoming Call During a Voice Call
E Delete all entered
numbers at once.
Silence the
ringer or stop
End all calls.
vibration. If
E is pressed
again, it will
reject a call.
B Delete entered
digits one by one.
Tap and hold
B to delete the
— Delete entered digits
one by one. Tap and
hold B to delete
the entire number.
entire number.
0
9
S
s
Enter the number
.
.
you wish to call.
.
Tap and hold the
Speed Dial location
number for one-
— The number entered
is displayed on
screen.
touch dialing of
that number.
Speed Dial button: Tap to view the Speed Dial.
Call Log button: Tap to view the Call Log.
“Memo” Shortcut: Tap to create a note.
“Contacts” Shortcut: Tap to create a contact.
Edit Menu:
Clear: Delete all entered numbers at once.
Paste: Paste.
Hard Pause: “w” is entered into the number entry field. The next
set of numbers are not dialed until you press T .
Section 2: Understanding Your Device
692B: Using Your Phone
Page 78

Time Pause: “p” is entered into the number entry field. Your
phone automatically sends the next set of numbers after three
seconds.
Tools Menu:
Mute: Tap to mute your phone’s microphone during
conversations.
Options: Tap to change phone settings.
Voice Mail: Tap to call your voicemail.
Tip: You can also call voicemail by pressing and holding 1.
Signal Indicator and Icon
Signal Indicator Description
Phone is on, but is out of range of any signal.
Phone is on and is receiving a signal.
Phone call is in progress. To quickly switch back to
Phone from any other program, tap this icon.
Phone is off. (Airplane mode)
You may also see the following icons while the dialer screen is in display:
Icon Description
Phone is in roaming mode.
Location ON
Location OFF
Mute
Section 2: Understanding Your Device
70 2B: Using Your Phone
Page 79

Status Icon
The following icons appear at the bottom right of the screen:
Icon Description
Battery status
Full: (51–100%), (26–50%), (11–25%),
Empty: (0–10%), Charging: Flash
The following text messages may also appear to the left of the Battery
status:
Text message Description
No Service Outside of phone service area
Phone OFF Phone OFF (Airplane mode)
Key Guard Key guard switch is ON
Silent All, Meeting, Outdoor,
Environment status
Office, Private
Note: If more than one of the above conditions is present, text messages
in upper rows of the table are given higher priority for display.
Tip: For the icons on the navigation bar, see “Navigation Bar and
Command Bar” on page 49.
Section 2: Understanding Your Device
712B: Using Your Phone
Page 80

Turning the Phone ON and OFF
1. Press the Power button to turn the device on, and then press and hold
the Power button to turn the phone on. To turn the phone off, press
and hold the Power button again. To turn the device off, press the
Power button again.
Tip: You may also press and hold the End key to turn the phone on and off.
Tip: You can also turn the phone on by tapping the Signal indicator,
instead of pressing and holding the Power button. If you want to make
absolutely sure you do not receive calls, such as when you are on an
airplane, tap the Signal Indicator again and then tap
(The Signal Indicator, located in the navigation bar, indicates whether
your phone is on, receiving a signal while on, turned off, and so on.)
2. Press the Talk button. The dialer screen appears and the device is ready
Turn phone off.
to make a phone call.
䊳
When the phone is on, the LED for Phone Power blinks at intervals of
approximately five seconds.
Displaying Your Phone Number
In case you forget your phone number, your PCS Phone can remind you.
To display your phone number:
䡵
Tap Tools, Options, then the Phone tab on the bottom.
Tip: You may use the following procedure instead: Tap , then Settings.
On the Personal tab, tap Phone, then the Phone tab on the bottom.
Section 2: Understanding Your Device
72 2B: Using Your Phone
Page 81

Making and Answering Calls
Making Calls
Your PCS Phone offers many different ways to make calls, including
SM
PCS Voice Command
(page 203), using Contacts (page 74), Speed
Dialing (page 75), and using Call History (page 109).
To make a call using your keypad:
1. Make sure the phone is on. See page 72 for details.
2. Press T to access the dialer screen.
3. Enter a phone number. If you make a mistake while dialing, tap
B to erase one digit at a time. To erase the entire number, tap
E, tap and hold B, or tap
4. Ta p T to dial the number.
5. When you’re finished, tap E to disconnect the call.
Tip: To redial your last outgoing call, tap T.
Tip: When making calls off the Sprint Nationwide PCS Network, always
dial using 11 digits (1 + area code + phone number).
Edit and Clear.
Answering Calls
1. Make sure the phone is on.
2. When a call comes in, tap Answer.
Depending on your settings, your PCS Phone notifies you of incoming
calls in the following ways:
䊳
The device rings or vibrates.
䊳
The screen displays an incoming bubble message.
䊳
If available, the phone number of the caller is displayed.
䊳
If the phone number is in the Pocket Outlook® Contacts list, the list
entry’s name is displayed.
Section 2: Understanding Your Device
732B: Using Your Phone
Page 82

䡵
To reject an incoming call, tap Ignore. (If you reject the call, the busy
tone will be sent out or the call will go to voicemail.)
䡵
To silence the ringer and stop vibration, press E. Press E
again to reject the call.
Note: If the phone is off, incoming calls go to voicemail.
About Caller ID:
If a call is received from a number stored in the Pocket Outlook® Contacts
list, the name and number will be displayed. For callers not found in the
Contact list, only numbers will be shown.
Calling Emergency Numbers
䡵
You can place calls to 911 (dial 9 1 1 and tap T ).
Note: If an emergency number is stored in Speed Dial, you will be able to
dial it by tapping a single key. However, speed dial will not work if Key
Guard is enabled.
Making a Call From the Internal Phone Book
Phone numbers entered in Contacts can be used to quickly locate phone
numbers and make calls.
1. In the contact list, tap and hold the contact.
2. On the pop-up menu, tap Call and the type of phone number
displayed, such as
Work tel.
Another way to make calls:
1. In the contact list, tap the contact.
2. Ta p Tools and Call and the type of phone number displayed, such as
Work tel.
Tip: For details about Contacts, see page 112.
Section 2: Understanding Your Device
74 2B: Using Your Phone
Page 83

Making a Call From Speed Dial
Speed dialing enables you to quickly place a call simply by tapping a
contact or by tapping and holding a Speed Dial location number.
To add a contact to Speed Dial:
1. From the Dialer screen, tap Speed Dial and then tap New.
2. Tap the contact name and number you want to add.
3. Select an available Speed Dial location number using the arrow keys.
䊳
Phone numbers are stored in Speed Dial based on the location number
you choose when adding the phone number, rather than by the contact
name, and cannot be reorganized. You can store up to 99 numbers in
Speed Dial.
To dial a phone number using Speed Dial:
䡵
Tap the Speed Dial button and then tap the contact you want to call.
Another way to make calls:
䡵
From the keypad, you can tap and hold the speed dial location number
you want to call.
䊳
The first location in the speed dial list will automatically be set to your
voicemail. To call your voicemail, tap the first location in the speed
dial list, and then follow the directions for your voicemail system.
(To set up voicemail, see page 188. To use voicemail, see “Using
Voicemail” on page 188.)
Making a Call From Call History
The Call Log details all incoming, outgoing, and missed calls, and also
provides a summary of total calls. The Call Log can also tell you when a
call was initiated, and how long it lasted, and it provides easy access to
any notes taken during the call.
To view the call log:
䡵
Tap the Call Log button.
Section 2: Understanding Your Device
752B: Using Your Phone
Page 84

To reorganize your call log to view only the information you need:
䡵
Tap the view list (labeled All Calls by default) and select a different
view. For example, you can view only missed calls, incoming calls, or
list calls by caller name.
To respond to the call:
䡵
Tap the Dial button located to the left of the number you want to call.
To place a call from Call History:
䡵
See “Making a Call From Call History” on page 109.
Making a Call From 4/5 Digit Dial
4/5 Digit Dial enables you to make a call without entering a complete
number. See “Changing the Others Settings” on page 84.
1. Make sure Prglaunch mode is set (4/5 Digit Dial is available).
2. Enter 4 or 5 digits and tap Tal k .
A programmed number will be automatically added to the beginning of
the entered number, or the Contact directory will be searched for phone
numbers whose lower digits match the entered number.
Making a Call From Voice Dial
1. Press the Voice button on the side bar of your device.
2. Say the number or a name in Contacts you want to call.
3. Say “Yes” to confirm.
See page 127 to set Voice Dial.
Using Memo
While you are on a call, you can use the Notes application to type, write,
draw, or record a Memo (see “Notes: Capturing Thoughts and Ideas” on
page 122).
1. To access the Memo function, tap .
2. Take a note.
3. Ta p ok to close Memo.
Section 2: Understanding Your Device
76 2B: Using Your Phone
Page 85

After you have finished the note, it will be saved as an attachment to the
call in one of the Call Log lists.
䡵
To access a note, tap in the Call Log list.
Using Speaker Phone
Speaker Phone can be used in any situation where you would like to use
your phone without using your hands.
䡵
To turn Speaker Phone on, press the Speaker Phone button.
䡵
To turn Speaker Phone off, press the Speaker Phone button again.
Note: For more information about the phone on your device, tap , and
then tap Help.
Section 2: Understanding Your Device
772B: Using Your Phone
Page 86

Section 2: Understanding Your Device
78 2B: Using Your Phone
Page 87

Section 2C
T
Controlling the Phone Function’s Settings
In This Section
䊳
Changing the Voicemail Number
䊳
Changing the Ringer and Key Beep Settings
䊳
Changing the Location Setting
䊳
Changing the Environment Mode and Volume and Ring Type/Tone
Settings for Individual Modes
䊳
Data
䊳
Changing the Others Settings
䊳
Phone Info
䊳
TTY
his section describes how you can change the phone function settings
for your device.
Section 2: Understanding Your Device
792C: Controlling the Phone Function’s Settings
Page 88

Changing the Voicemail Number
1. Tap , then Settings. On the Personal tab, tap Phone, then the
Phone tab on the bottom.
2. Enter the number you wish to call to retrieve your voicemail.
3. Ta p ok. The Personal tab screen is restored.
Changing the Ringer and Key Beep Settings
1. Tap , then Settings. On the Personal tab, tap Phone, then the
Phone tab on the bottom.
2. Use the drop-down menus to select settings for Ring type, Ring tone,
Keypad, and Other Settings.
3. Ta p ok. The Personal tab screen is restored.
Note: With the Environment switch set to “Silent”, the above selections
will result in no changes.
Section 2: Understanding Your Device
80 2C: Controlling the Phone Function’s Settings
Page 89

Changing the Location Setting
Your phone’s Location feature allows the network to detect your position
and is designed for use in connection with location-based services which
may be available in the future.
To turn Location on or off:
1. Tap , then Settings. On the Personal tab, tap Phone, then the
Location tab on the bottom.
2. Select ON or OFF for the location setting.
䊳
ON: The user allows search user’s position from Network.
䊳
OFF: The user does not allow search user’s position from Network.
3. Ta p ok.
䊳
After a message appears, tap ok. The Personal tab screen is restored.
Tip: The current location setting is shown on the dialer screen (and
Today screen). For more information, see page 47.
Note: Turning Location off will hide your location from everyone except 911.
Note: Even if the Location feature is enabled, no service may use your
location without your expressed permission.
Section 2: Understanding Your Device
812C: Controlling the Phone Function’s Settings
Page 90

Changing the Environment Mode and Volume and Ring Type/Tone Settings for Individual Modes
When the Environment switch is set to “Environment,” the device is
placed into the mode that you select, from “meeting,” “outdoor,”
“office,” and “private.” For the individual modes, you can also make
selections for volume and ring type/tone.
Tip: The Environment switch is used for changing the volume and ring
type/tone settings for incoming calls. For more information, see
“Environment Switch” on page 42.
1. Tap , then Settings. On the Personal tab, tap Phone, then the
Environment tab on the bottom.
2. Under Select Mode, select a desired mode.
3. Under Environment, select a mode to be changed. Then select settings
for
Volume and Ringer.
䊳
You can customize volume and ring type/tone for each mode.
4. Ta p ok. The Personal tab screen is restored.
Section 2: Understanding Your Device
82 2C: Controlling the Phone Function’s Settings
Page 91

The defaults for the individual modes are as below:
Mode Volume Ring type Ring tone Vibrate
Environment Meeting OFF
Vibrate None Pattern1
(Silent)
Outdoor Max
(level 6)
Office Medium
Vibrate
BellDitty Pattern1
and ring
Ring BellDitty None
(level 3)
Private Max
(level 6)
Note: The settings made for Sounds & Notification (page 96) and Phone
(page 80) will be effective unless the Environment switch is set to a
different position.
Vibrate
and ring
BellDitty Pattern1
Data
1. Tap , then Settings. On the Personal tab, tap Phone, then the
Data tab on the bottom.
䊳
Tap Camera Reset to clean up registration information of Online
pictures.
䊳
Tap Update Data Profile to pull PCS Vision information such as user
ID and password from the network.
Section 2: Understanding Your Device
832C: Controlling the Phone Function’s Settings
Page 92

Changing the Others Settings
You can select various settings for other phone functions using the
Others tab.
1. Tap , then Settings. On the Personal tab, tap Phone, then the
Others tab on the bottom.
2. Make selections for each item.
䊳
4 or 5 digits dial
This function allows you to dial a number using only four or five digits,
either by programming a number to automatically be added to the
entered digits or by searching the Contacts directory for a phone number
containing the entered digits.
Abbreviate: Check the box to add a programmed number to the
beginning of an entered number. For Prefix, enter a number to be
added.
Contact match: Check the box to search the Contact directory for
phone numbers whose lower digits match the entered number.
䊳
On battery power: Check the box to darken the screen during
conversations.
Tip: The screen will be automatically darkened when conversations are
continued for 60 seconds. When the screen is off, pressing the POWER,
TALK buttons, or operating the jog-wheel turns the screen on.
䊳
Answer
This function allows you to select settings for answering incoming calls.
Any key answer: When Any-key answer is checked, incoming calls
can be answered by pressing any key other than the END, Power, Key
Guard buttons, Environment switch and Shift, Num, Fn keys on the
QWERTY keyboard. However, this function isn’t enabled in the Key
Guard state.
Auto Answer: When Auto Answer is checked, incoming calls can be
answered after nine seconds. The entered end key becomes invalid.
Section 2: Understanding Your Device
84 2C: Controlling the Phone Function’s Settings
Page 93

Use Headset: Incoming calls can be answered only when Headset is
being inserted into the device.
All: Incoming calls can be answered on external power state.
Speaker Phone ON: Speaker phone is turned on during call.
Tip: Selections for Use Headset, All, and Speaker Phone On are valid
only when the box for Auto answer has been checked.
䊳
Automatic: Seeks service on the Sprint Nationwide PCS Network. If
PCS Service is unavailable, the phone searches for an alternate system.
When
Display message at Roaming Area in begin call state is
checked, the text message “Caution! This operation will be charged”
appears in the incoming or outgoing bubble message or message
window on the dialer.
䊳
Sprint: Allows you to access the Sprint Nationwide PCS Network only
and prevents roaming on other networks.
3. Ta p ok. The Personal tab screen is restored.
Section 2: Understanding Your Device
852C: Controlling the Phone Function’s Settings
Page 94

Phone Info
1. Tap , then Settings. On the Personal tab, tap Phone, then the
Phone Info tab on the bottom.
2. Your Phone information is displayed.
3. Ta p ok.
Tip: For the User ID, “PCS Vision disabled” appears with data connection
disabled, and a user ID appears with data connection enabled.
Section 2: Understanding Your Device
86 2C: Controlling the Phone Function’s Settings
Page 95

TTY
A TTY (also known as a TDD or Text Telephone), is a
telecommunications device that allows people who are deaf or hard of
hearing, or who have speech or language disabilities, to communicate by
telephone.
Your phone is compatible with select TTY devices. Please check with the
manufacturer of your TTY device to ensure that it supports digital
wireless transmission. Your phone and TTY device will connect via a
special cable that plugs into your phone’s headset jack. If this cable was
not provided with your TTY device, contact your TTY device
manufacturer to purchase the connector cable.
Use the following procedure to make a setting for TTY:
1. Tap , then Settings. On the Personal tab, tap Phone, then the TTY
tab on the bottom.
Tip: When you enter “##889” (TTY) on the dialer, the TTY setting screen is
opened.
2. When you select Enable, “TTY is enabled” appears.
3. Ta p ok at the top right of the screen to close the setting screen.
4. Insert the TTY into the headset jack.
Note: Malfunction may occur if you insert the TTY into the headset jack
without doing steps 1 to 3.
Section 2: Understanding Your Device
872C: Controlling the Phone Function’s Settings
Page 96

5. “TTY is available” appears.
Note: You cannot change the TTY setting during a call.
IMPORTANT NOTICE: 911 Emergency Calling
Sprint recommends that TTY users make emergency calls by other
means including Telecommunications Relay Services (TRS), analog
cellular, and landline communications. Wireless TTY calls to 911 may be
corrupted when received by public safety answering points (PSAPs)
rendering some communications unintelligible. The problem
encountered appears related to TTY equipment or software used by
PSAPs. This matter has been brought to the attention of the FCC, and the
wireless industry and PSAP community are currently working to resolve
this.
Section 2: Understanding Your Device
88 2C: Controlling the Phone Function’s Settings
Page 97

Section 2D
T
Controlling Your Device’s Settings
In This Section
䊳
Adjusting Settings
䊳
Adding or Removing Programs
䊳
Setting Buttons
䊳
Setting a Password
䊳
Selecting Sounds & Notifications Settings
䊳
Selecting Backlight Settings
䊳
Adjusting Memory Settings
䊳
Setting the Microphone
䊳
Adjusting Power Settings
䊳
Customizing Regional Settings
his section describes the procedures for making various settings to
customize your device.
Section 2: Understanding Your Device
892D: Controlling Your Device’s Settings
Page 98

Adjusting Settings
You can adjust device settings to suit the way you work. To see available
options, tap ,
the bottom of the screen.
You might want to adjust the following:
䊳
Backlight: See “Selecting Backlight Settings” on page 97.
䊳
Buttons: See “Setting Buttons” on page 94.
䊳
Clock: To change the time or to set alarms.
䊳
Input: To set up the input methods of your device.
䊳
Memory: See “Adjusting Memory Settings” on page 98.
䊳
Menus: To customize what appears on the menu, and to enable a
pop-up menu from the
䊳
Microphone: See “Setting the Microphone” on page 99.
䊳
Owner Information: To enter your contact information.
䊳
Password: To limit access to your device. See “Setting a Password” on
page 95.
䊳
Power: To maximize battery life. See “Adjusting Power Settings” on
page 100.
䊳
Regional Settings: See “Customizing Regional Settings” on page 101.
䊳
Remove Programs: See “Adding or Removing Programs” on page 91.
䊳
Screen: To recalibrate the screen and enable/disable the Clear Type
feature.
䊳
Sound & Notification: See “Selecting Sounds & Notifications
Settings” on page 96.
䊳
Today: To customize the look and the information that is displayed on
the Today screen.
Settings, then the Personal or System tab located at
New button.
Section 2: Understanding Your Device
90 2D: Controlling Your Device’s Settings
Page 99

Adding or Removing Programs
Programs installed to your device at the factory are stored in ROM (readonly memory). You cannot remove this software, and you’ll never
accidentally lose ROM contents. ROM programs can be updated using
special installation programs with a *.xip extension. All other programs
and data files added to your device after factory installation are stored in
RAM (random access memory).
You can install any program created for your device, as long as your
device has enough memory. The most popular place to find software for
your device is on the Pocket PC Website (
mobile/pocketpc).
To add programs using ActiveSync:
You’ll need to install the appropriate software for your device on your
desktop computer before installing it on your device.
Note: Determine your device and processor type so that you know which
version of the software to install. Tap , and then
System tab, tap About. In the Vers ion tab, make a note of the
information in Processor.
1. Download the program to your computer (or insert the CD or disk that
contains the program into your computer). You may see a single *.xip,
*.exe, *.zip file, a Setup.exe file, or several versions of files for different
device types and processors. Be sure to select the program designed for
the Pocket PC and your device processor type.
2. Read any installation instructions, Read Me files, or documentation
that comes with the program. Many programs provide special
installation instructions.
http://www.microsoft.com/
Settings. On the
3. Connect your device and computer via the USB port. (See “Using the
USB Port” on page 32.)
4. Double-click the *.exe file.
䊳
If the file is an installer, the installation wizard will begin. Follow the
directions on the screen. Once the software has been installed on your
Section 2: Understanding Your Device
912D: Controlling Your Device’s Settings
Page 100

computer, the installer will automatically transfer the software to your
device.
䊳
If the file is not an installer, you will see an error message stating that
the program is valid but it is designed for a different type of computer.
You will need to move this file to your device. If you cannot find any
installation instructions for the program in the Read Me file or
documentation, use ActiveSync Explore to copy the program file to the
Program Files folder on your device. For more information on copying
files using ActiveSync, see ActiveSync Help.
Once installation is complete, tap ,
Programs, and then the program
icon to switch to it.
To add a program directly from the Internet:
Note: Determine your device and processor type so that you know which
version of the software to install. Tap and then
System tab, tap About. In the Vers ion tab, make a note of the
information in Processor.
1. Download the program to your device straight from the Internet using
Settings. On the
Pocket Internet Explorer. You may see a single *.xip, *.exe, *.zip file, a
Setup.exe file, or several versions of files for different device types and
processors. Be sure to select the program designed for the Pocket PC
and your device processor type.
2. Read any installation instructions, Read Me files, or documentation
that comes with the program. Many programs provide special
installation instructions.
3. Tap the file, such as a *.xip or *.exe file. The installation wizard will
begin. Follow the directions on the screen.
Section 2: Understanding Your Device
92 2D: Controlling Your Device’s Settings
 Loading...