

Page 1
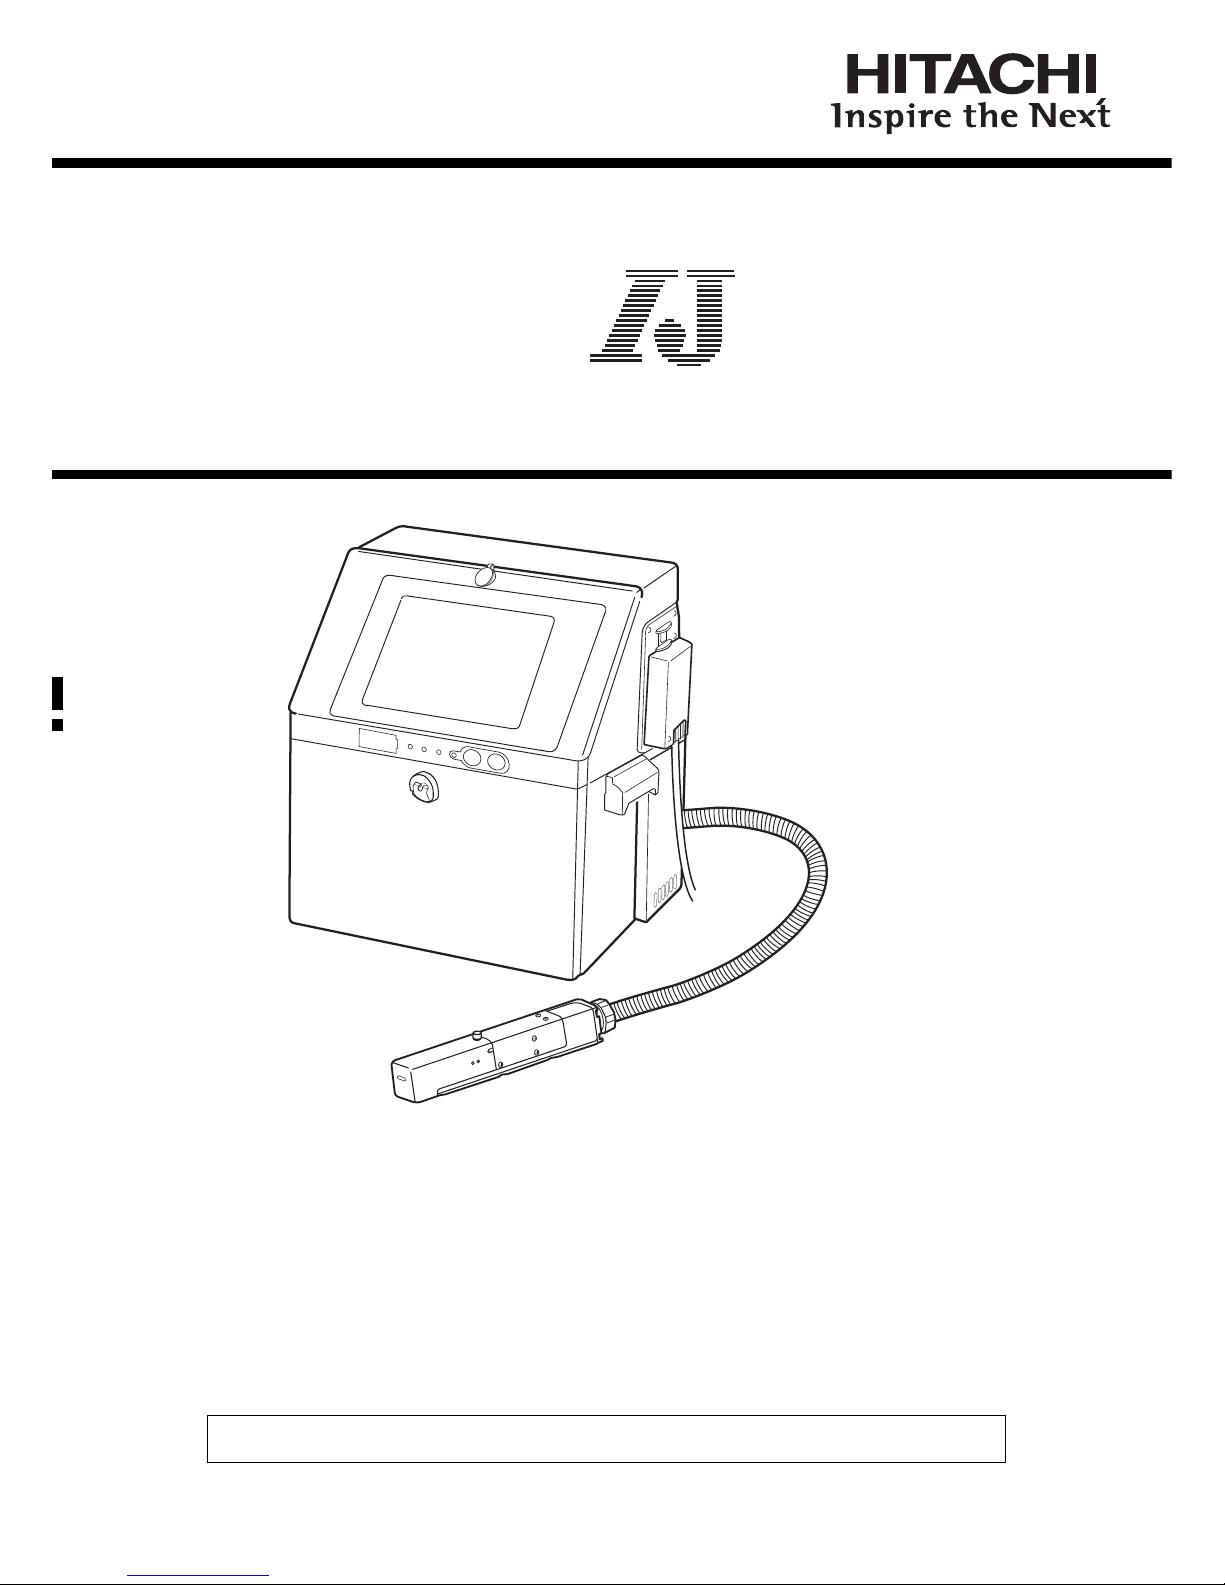
HITACHI Printer
Instruction Manual
INK JET PRINTER FOR INDUSTRIAL MARKING
Model RX2
Thank you for purchasing the Hitachi IJ Printer Model RX2.
This printer employs a noncontact, ink-jet method to print onto a print target.
This instruction manual describes the basic operating procedures, maintenance procedures, and other detailed
handling procedures of the Hitachi IJ Printer Model RX2.
If the printer is improperly handled or maintained, it may not operate smoothly and may become defective or
cause an accident. It is therefore essential that you read this manual to gain a complete understanding of the
printer and use it correctly.
After thoroughly reading the manual, properly store it for future reference.
IF you changed the language of the screen by mistake, see Chapter 7.8 "Selecting Languages".
Page 2

Page 3
●Safety Precautions (1)
SAFETY PRECAUTIONS
● Before using the printer, thoroughly read the following safety precautions for optimum printer
use.
● You should observe the precautions set forth below in order to use the product properly and
avoid endangering you or other persons or damaging property. For the purpose of clarifying
the severity of injury or damage and likelihood of occurrence, the precautions are classified
into two categories, WARNING and CAUTION, which both describe hazardous situations
that may arise if you ignore the precautions and perform an incorrect handling or operating
procedure. The precautions in these two categories are both important and must therefore
be observed without fail.
WARNING
WARNING is used to indicate the presence of a hazard which
may cause severe personal injury or death if the warning against
performing an incorrect handling procedure is ignored.
CAUTION
CAUTION is used to indicate the presence of a hazard which
may cause personal injury or property damage if the warning
against performing an incorrect handling procedure is ignored.
● If the warning in the CAUTION category is ignored, serious results may occur depending on
the situation.
● After the manual has been read, it must be stored in such a location that all printer operation
personnel can refer to it at all times.
● All the instructions set forth in this manual are important and must therefore be observed
without fail.
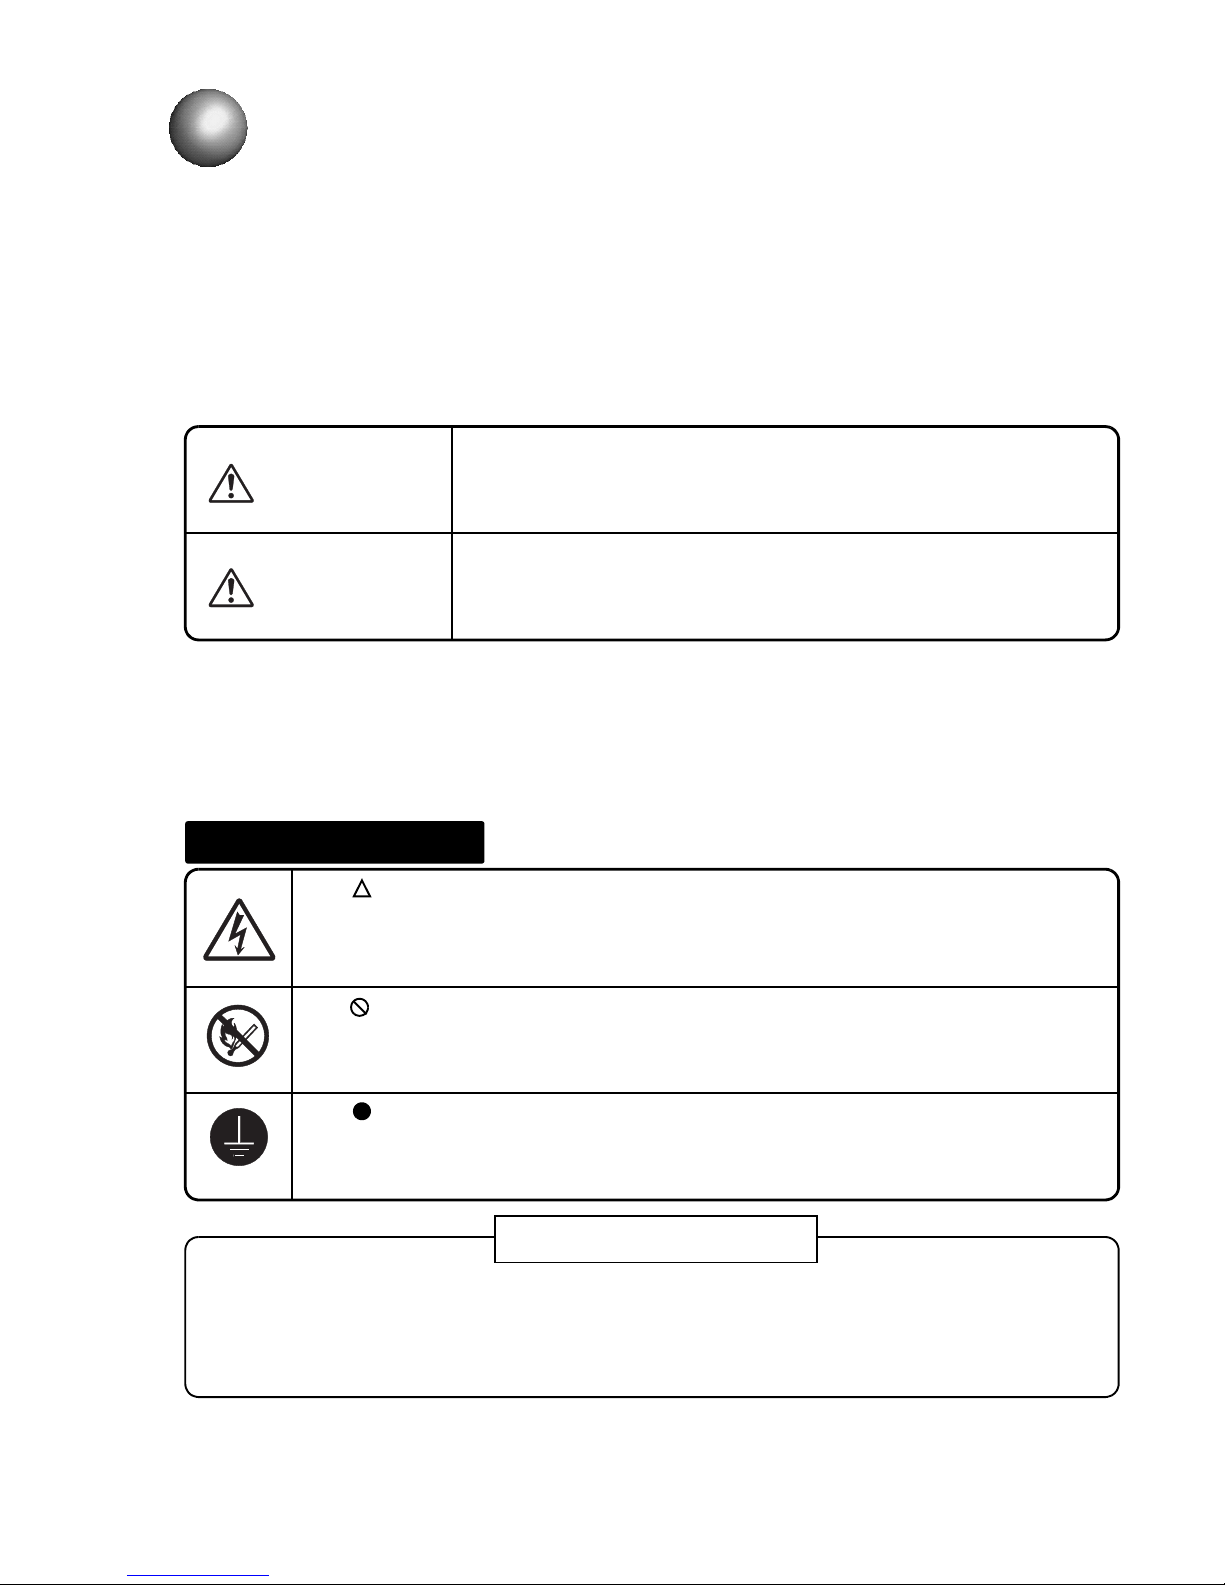
Pictograph Examples
The symbols are used to indicate precautions (including those related to
potential warnings) to be observed. Detailed information is furnished by a picture
within the symbol outline (a shock hazard is indicated by the example shown at
left).
The symbols are used to describe prohibited actions. The details of a
prohibited action are given by a picture within or near the symbol outline (the
example shown at left dictates that you must keep flames away).
The symbols are used to describe required actions. Detailed instructions are
given by a picture within the symbol outline (the example shown at left dictates
that a ground connection must be made).
User hereby agrees not to export or re-export this product to any end-user who the user
has reason to suspect may utilize the product for the design, development or reproduction
of nuclear, chemical or biochemical weapons.
Restrictions on Export
File management and USB management are carried out using eParts made from eSOL.
Ethernet is the product name of Xerox Corporation in America.
Page 4
(2) ●Safety Precautions
SAFETY PRECAUTIONS (Continued)
WARNING
● Ensure that there is no flame- or arc-generating device around the
printer.
The ink and makeup are both flammable and may cause fire.
Fire can be generated by matches, lighters, cigarettes, heaters, stoves, gas
burners, welders, grinders and static electricity. Arcs may be generated from
open-type relays, switches, and brush motors. Before handling the ink and
makeup, remove static electricity from your body, peripheral equipment, and so
on. In the interest of safety, position a dry-chemical fire extinguisher near the
printer.
● Since the ink and makeup contain organic solvents, install the printer at
an adequately ventilated location.
Never install the printer in an enclosed space.
Connect exhaust equipment to the printer in order to prevent it from filling
with organic solvent vapor.
● Do not insert tweezers, a screwdriver, or any other metal article into the
ink ejection hole in the end of the print head.
When the printer is ready to print, a high voltage (approximately 6 kV) is applied
to the deflection electrode section in the print head.
Exercise caution to avoid electric shock, injury, and fire.
● Do not remove the outer covering.
A high voltage is applied to some sections of the printer.
Exercise caution to avoid electric shock and injury.
● Use an AC voltage of 100 to120 V or 200 to 240 V ±10% only and a
power frequency of 50 or 60 Hz only.
If the above requirements are not met, the electric parts may overheat and burn,
creating a risk of fire or electric shock.
● Never drain the ink or makeup waste solution into a public sewer system.
Waste disposal must comply with all appropriate regulations. Consult the
appropriate regulatory agency for further information.
● Exercise caution to avoid inadvertently disconnecting, forcibly pulling, or
bending piping tubes.
Since the ink and makeup in some portions of piping tubes are pressurized,
they may splash into your eyes or mouth or onto your hands or clothing.
If any ink or makeup enters your eyes or mouth, immediately flush with warm or
cold water and consult a physician.
1
2
Page 5
●Safety Precautions (3)
SAFETY PRECAUTIONS (Continued)
WARNING
● While the printer is operating, do not look into the ink ejection hole in the
end of the print head.
Ink or makeup may enter your eyes or mouth or soil your hands or clothing.
If any ink or makeup enters your eyes or mouth, immediately flush with warm or
cold water and consult a physician.
● Before servicing the printer, be sure to stop the ink ejection.
Because ink or makeup may splash into your eyes or mouth or onto your hands
or clothing. If any ink or makeup enters your eyes or mouth, immediately flush
with warm or cold water and consult a physician.
● If an earthquake, fire, or other emergency occurs while the printer is
engaged in printing or just turned on, press the Main power switch to turn
off the power.
● The printer must be managed in compliance with all appropriate
regulations.
Read and understand the appropriate Material Safety Data Sheet (SDS) before
using any ink or makeup.
● Use Hitachi approved consumables and periodic replacement parts.
Using products that are not designated by Hitachi could cause s failure in
certain functions.
● Warning for Mercury
-- THE LAMP IN THIS PRODUCT CONTAINS MERCURY.
RECYCLE OR DISPOSE OF IT ACCORDING TO APPLICABLE
ENVIRONMENTAL LAWS.
For Recycling and Disposal information, contact your government agency, the
Electronic Industries Alliance at www.eiae.org, and/or www.lamprecycle.org (in
the US), or the Electronic Product Stewardship Canada at www.epsc.ca (in
Canada). For more information, call 1-800-HITACHI (1-800-448-2244) (in the
US).
Hg
Page 6
(4) ●Safety Precautions
SAFETY PRECAUTIONS (Continued)
WARNING
● When charging a refill of ink or makeup, exchanging ink, or otherwise
handling ink or makeup, take enough care not to spill ink or makeup.
If you spill any ink or makeup by mistake, wipe it off neatly and promptly
with wiping paper or something similar. Do not close the maintenance
cover until you make sure that the portion you have just wiped is
completely dry.
You must pay particular attention when you have spilled ink or makeup
inside the printer and it is not completely dry. Why? Because vapors of
ink or makeup will stay inside the printer and may catch on or cause a
fire.
If you find it hard to wipe the printer when it is turned on, stop it with the
maintenance cover open. Power it down, and then wipe it off again.
● If you wish to clean the casing of the printer with wiping paper
impregnated with makeup, be sure to do so with the power off.
Attempting to clean it when the power is on will cause makeup or vapors of
makeup to enter the printer, possibly catching on or causing a fire.
When the cleaning is over, open the maintenance cover and make sure that no
makeup has entered and no vapors remain inside.
● Should you find a leak of ink or makeup inside the printer while the
printer is running or being maintained, wipe it off promptly with wiping
paper or something similar. Then, with the maintenance cover open,
stop the printer, power it down, and repair the leak.
Continuing operation with a leak of ink or makeup will cause an anomaly,
resulting in abnormal printing.
Ink and makeup are flammable. They may therefore catch on or cause a fire.
● If you wish to receive ink particles in a beaker, for a printing test for
example, use an electrically conductive beaker and connect the beaker
securely to the ground.
Do not let the tip of the printing head enter the beaker.
Ink particles used for printing are electrically charged. An ungrounded beaker
has a gradually rising charge, possibly catching on or causing a fire.
● Ensure that all electrical wiring, connections and grounding comply with
applicable cords. Properly connect the printer to its dedicated ground.
Complete the above procedure to avoid electrical shock hazards.
● When welding, keep enough space between the IJ printer and the
welding work area to prevent the arc from starting a fire. Also, be sure to
insulate the printhead and IJ printer frame to keep the welding current
from flowing to the control section of the printer, and to make a separate
ground connection for the printer.
Page 7
●Safety Precautions (5)
SAFETY PRECAUTIONS (Continued)
CAUTION
● Only persons who have completed an operator training course for
Hitachi IJP can operate and service the printer.
If the printer is operated or serviced incorrectly, it may malfunction or break
down.
● Do not attempt to make repairs for any purpose other than operation or
maintenance.
● Since the ink and makeup contain organic solvents, observe the
following handling precautions.
Secure adequate space for the ink/makeup handling area and printer
installation site. At least 200 m must be provided per print head.
Ensure that adequate ventilation is provided.
When handling the ink or makeup, wear protective gloves and safety goggles
to avoid direct skin contact. If the ink or makeup comes into contact with
skin, wash thoroughly with soap and warm or cold water.
When transferring the ink or makeup to or from a bottle, exercise caution to
prevent it coming into contact with the printer or surrounding articles.
If there is any spillage, immediately wipe it clean using a cloth moistened
with makeup.
● Ink and makeup must be stored as flammable liquids. Storage must
comply with local regulatory requirements. Consult the appropriate
regulatory agency for further information.
● If extraneous noise enters the printer, it may malfunction or break down.
For maximum noise immunity, observe the following installation and wiring
precautions.
Ensure that 100 to 120 VAC or 200 to 240 VAC power cables are not
bundled with other power supply cables.
Insulate the printer main body and print head so that they do not come into
direct contact with the conveyor or other devices.
If the employed print target detector is housed in a metal case, use a plastic
mounting brace for the purpose of insulating the detector from the conveyor
and other devices.
Be sure that the print target detector wiring is not bundled together with other
power supply cables.
● Please make sure the print status and print content are correct each time when
you start operation of IJP.
● Please implement periodical checkup of print status in the process, even
including during production.
● A touch panel is employed for data entry to operation screen.
When manipulating the Touch panel, use only fingers. If the touch panel is
operated with metal and/or sharp objects such as ball point pen, it may
malfunction or break down.
1
2
3
3
2
1
3
4
Page 8
(6) ●Safety Precautions
SAFETY PRECAUTIONS (Continued)
FCC Notice
This device complies with part 15 of the FCC Rules. Operation is subject to the following two
conditions: (1) This device may not cause harmful interference, and (2) this device must accept
any interference received, including interference that may cause undesired operation.
This equipment has been tested and found to comply with the limits for a Class A digital device,
pursuant to part 15 of the FCC Rules. These limits are designed to provide reasonable protection
against harmful interference when the equipment is operated in a commercial environment.
This equipment generates, uses, and can radiate radio frequency energy and, if not installed and
used in accordance with the instruction manual, may cause harmful interference to radio
communications. Operation of this equipment in a residential area is likely to cause harmful
interference in which case the user will be required to correct the interference at his own expense.
Page 9

●Contents 1
1. USAGE PRECAUTIONS . . . . . . . . . . . . . . . . . . . . . . . . . . 1-1
1.1 Ink and makeup . . . . . . . . . . . . . . . . . . . . . . . . . . . . . . . . . . . . . . . . . . . . . 1-1
1.2 IJ printer long-term shutdown . . . . . . . . . . . . . . . . . . . . . . . . . . . . . . . . . . . 1-1
1.3 Print head cleaning. . . . . . . . . . . . . . . . . . . . . . . . . . . . . . . . . . . . . . . . . . . 1-2
1.4 Shutdown (no-cleaning stop) . . . . . . . . . . . . . . . . . . . . . . . . . . . . . . . . . . . 1-3
1.5 Cautions on operating time when printer is in service . . . . . . . . . . . . . . . . 1-4
1.6 Heating of ink . . . . . . . . . . . . . . . . . . . . . . . . . . . . . . . . . . . . . . . . . . . . . . . 1-4
1.7 Ink concentration control. . . . . . . . . . . . . . . . . . . . . . . . . . . . . . . . . . . . . . . 1-5
1.8 Gutter cleaning . . . . . . . . . . . . . . . . . . . . . . . . . . . . . . . . . . . . . . . . . . . . . . 1-5
1.9 Protection sheet . . . . . . . . . . . . . . . . . . . . . . . . . . . . . . . . . . . . . . . . . . . . . 1-6
2. COMPONENT NAMES AND FUNCTIONS . . . . . . . . . . . . 2-1
2.1 External views. . . . . . . . . . . . . . . . . . . . . . . . . . . . . . . . . . . . . . . . . . . . . . . 2-1
2.2 Main body internal parts arrangement . . . . . . . . . . . . . . . . . . . . . . . . . . . . 2-2
2.3 Print head . . . . . . . . . . . . . . . . . . . . . . . . . . . . . . . . . . . . . . . . . . . . . . . . . . 2-3
3. BASIC OPERATION . . . . . . . . . . . . . . . . . . . . . . . . . . . . . 3-1
3.1 Start operation . . . . . . . . . . . . . . . . . . . . . . . . . . . . . . . . . . . . . . . . . . . . . . 3-1
3.1.1 Start operation . . . . . . . . . . . . . . . . . . . . . . . . . . . . . . . . . . . . . . . . . . . . . . . . . . . . . . 3-1
3.1.2 When an error occurred at the start of operation . . . . . . . . . . . . . . . . . . . . . . . . . . . . 3-5
3.1.3 Ready and Standby state switching operation . . . . . . . . . . . . . . . . . . . . . . . . . . . . . 3-10
3.1.4 Specifying the user. . . . . . . . . . . . . . . . . . . . . . . . . . . . . . . . . . . . . . . . . . . . . . . . . . 3-12
3.2 Shut down operation. . . . . . . . . . . . . . . . . . . . . . . . . . . . . . . . . . . . . . . . . 3-13
3.2.1 Automatically stopping by pressing one button (RX2-S only) . . . . . . . . . . . . . . . . . 3-13
3.2.2 Stopping ink ejection by pressing the screen button . . . . . . . . . . . . . . . . . . . . . . . . 3-14
3.2.3 Turning off the main power switch . . . . . . . . . . . . . . . . . . . . . . . . . . . . . . . . . . . . . . 3-15
3.3 Basic operation . . . . . . . . . . . . . . . . . . . . . . . . . . . . . . . . . . . . . . . . . . . . . 3-17
3.3.1 Operating Scheme . . . . . . . . . . . . . . . . . . . . . . . . . . . . . . . . . . . . . . . . . . . . . . . . . . 3-17
3.3.2 Status . . . . . . . . . . . . . . . . . . . . . . . . . . . . . . . . . . . . . . . . . . . . . . . . . . . . . . . . . . . . 3-20
3.3.3 Basic operation to change the settings . . . . . . . . . . . . . . . . . . . . . . . . . . . . . . . . . . 3-22
3.3.4 Operations (OK, Back, Apply) which exit from a screen . . . . . . . . . . . . . . . . . . . . . 3-24
CONTENTS
Page 10

2 ●Contents
4. CREATION AND PRINTING OF MESSAGES . . . . . . . . . .4-1
4.1 Print description screen (initial screen) . . . . . . . . . . . . . . . . . . . . . . . . . . . 4-1
4.2 Edit messages to be printed (Change message screen) . . . . . . . . . . . . . . 4-3
4.3 Call and print saved messages . . . . . . . . . . . . . . . . . . . . . . . . . . . . . . . . . 4-6
4.4 Overwrite messages to be printed . . . . . . . . . . . . . . . . . . . . . . . . . . . . . . . 4-8
4.5 Edit messages different from the current message . . . . . . . . . . . . . . . . . . 4-9
4.6 Save created messages. . . . . . . . . . . . . . . . . . . . . . . . . . . . . . . . . . . . . . 4-11
4.7 Set the print format (Fixed layout) . . . . . . . . . . . . . . . . . . . . . . . . . . . . . . 4-14
4.7.1 Select the print items to be edited . . . . . . . . . . . . . . . . . . . . . . . . . . . . . . . . . . . . . . 4-14
4.7.2 Set the number of print lines. . . . . . . . . . . . . . . . . . . . . . . . . . . . . . . . . . . . . . . . . . . 4-16
4.7.3 Add and delete print items . . . . . . . . . . . . . . . . . . . . . . . . . . . . . . . . . . . . . . . . . . . . 4-17
4.7.4 Set dot matrix, inter-character space, and other parameters . . . . . . . . . . . . . . . . . . 4-18
4.7.5 Print a bar code (RX2-S only). . . . . . . . . . . . . . . . . . . . . . . . . . . . . . . . . . . . . . . . . . 4-22
4.8 Set the print format (Free layout; RX2-S only) . . . . . . . . . . . . . . . . . . . . . 4-24
4.8.1 Select the print items to be edited . . . . . . . . . . . . . . . . . . . . . . . . . . . . . . . . . . . . . . 4-24
4.8.2 Set the print items to be edited. . . . . . . . . . . . . . . . . . . . . . . . . . . . . . . . . . . . . . . . . 4-25
4.8.3 Add and delete print items . . . . . . . . . . . . . . . . . . . . . . . . . . . . . . . . . . . . . . . . . . . . 4-28
4.8.4 Set dot matrix, inter-character space, and other parameters . . . . . . . . . . . . . . . . . . 4-30
4.8.5 Print a bar code . . . . . . . . . . . . . . . . . . . . . . . . . . . . . . . . . . . . . . . . . . . . . . . . . . . . 4-31
4.8.6 Cautions for printing overlapped some print items . . . . . . . . . . . . . . . . . . . . . . . . . . 4-31
4.9 Print characters . . . . . . . . . . . . . . . . . . . . . . . . . . . . . . . . . . . . . . . . . . . . 4-32
4.9.1 Print fixed characters . . . . . . . . . . . . . . . . . . . . . . . . . . . . . . . . . . . . . . . . . . . . . . . . 4-32
4.10 Use the calendar function. . . . . . . . . . . . . . . . . . . . . . . . . . . . . . . . . . . . 4-34
4.10.1 Print calendar characters . . . . . . . . . . . . . . . . . . . . . . . . . . . . . . . . . . . . . . . . . . . . 4-34
4.10.2 Print future date (offset) . . . . . . . . . . . . . . . . . . . . . . . . . . . . . . . . . . . . . . . . . . . . . 4-41
4.10.3 Print by substituting a different character for the date (substitution rule) . . . . . . . . 4-44
4.11 Print shift code (Optional on RX2-S). . . . . . . . . . . . . . . . . . . . . . . . . . . . 4-46
4.12 Update the print contents at a fixed interval(Time count)
(Optional on RX2-S) . . . . . . . . . . . . . . . . . . . . . . 4-50
4.13 Use the count function . . . . . . . . . . . . . . . . . . . . . . . . . . . . . . . . . . . . . . 4-54
4.13.1 Print count characters. . . . . . . . . . . . . . . . . . . . . . . . . . . . . . . . . . . . . . . . . . . . . . . 4-54
4.13.2 Use count multiplication printing. . . . . . . . . . . . . . . . . . . . . . . . . . . . . . . . . . . . . . . 4-65
4.13.3 Skip specified character and print (Count skip) . . . . . . . . . . . . . . . . . . . . . . . . . . . 4-68
4.14 Set the print specifications . . . . . . . . . . . . . . . . . . . . . . . . . . . . . . . . . . . 4-71
4.14.1 Set the character height, character width, and orientation . . . . . . . . . . . . . . . . . . . 4-71
4.14.2 Set repeat printing . . . . . . . . . . . . . . . . . . . . . . . . . . . . . . . . . . . . . . . . . . . . . . . . . 4-78
4.14.3 Set various printing. . . . . . . . . . . . . . . . . . . . . . . . . . . . . . . . . . . . . . . . . . . . . . . . . 4-79
4.14.4 Fine adjust the print specifications (Adjust print parameters). . . . . . . . . . . . . . . . . 4-81
Page 11

●Contents 3
3
5. MAINTENANCE. . . . . . . . . . . . . . . . . . . . . . . . . . . . . . . . . 5-1
5.1 Confirm the Unit information . . . . . . . . . . . . . . . . . . . . . . . . . . . . . . . . . . . . 5-2
5.2 Monitor operational status . . . . . . . . . . . . . . . . . . . . . . . . . . . . . . . . . . . . . 5-3
5.3 Print without any sensor signal (Test print, Start printing). . . . . . . . . . . . . . 5-4
5.4 Confirm the registered software . . . . . . . . . . . . . . . . . . . . . . . . . . . . . . . . . 5-5
5.5 Checking the functions that can be performed . . . . . . . . . . . . . . . . . . . . . . 5-6
6. ENVIRONMENT SETUP . . . . . . . . . . . . . . . . . . . . . . . . . . . . . . . . . . 6-1
6.1 Set the user environment . . . . . . . . . . . . . . . . . . . . . . . . . . . . . . . . . . . . . . 6-2
6.2 Set the date and time . . . . . . . . . . . . . . . . . . . . . . . . . . . . . . . . . . . . . . . . . 6-8
6.3 Set up the touch screen . . . . . . . . . . . . . . . . . . . . . . . . . . . . . . . . . . . . . . 6-10
6.4 Changing the user . . . . . . . . . . . . . . . . . . . . . . . . . . . . . . . . . . . . . . . . . . 6-12
6.5 Setting password for each user . . . . . . . . . . . . . . . . . . . . . . . . . . . . . . . . 6-14
7. AUXILIARY FUNCTIONS . . . . . . . . . . . . . . . . . . . . . . . . . . . . . . . . . 7-1
7.1 Manage messages . . . . . . . . . . . . . . . . . . . . . . . . . . . . . . . . . . . . . . . . . . . 7-2
7.1.1 Managing stored messages . . . . . . . . . . . . . . . . . . . . . . . . . . . . . . . . . . . . . . . . . . . . 7-2
7.1.2 Changing the message name . . . . . . . . . . . . . . . . . . . . . . . . . . . . . . . . . . . . . . . . . . 7-4
7.1.3 Deleting stored messages . . . . . . . . . . . . . . . . . . . . . . . . . . . . . . . . . . . . . . . . . . . . . 7-5
7.1.4 Changing message number . . . . . . . . . . . . . . . . . . . . . . . . . . . . . . . . . . . . . . . . . . . . 7-6
7.1.5 Changing the group to which a message belongs . . . . . . . . . . . . . . . . . . . . . . . . . . . 7-9
7.2 Manage group. . . . . . . . . . . . . . . . . . . . . . . . . . . . . . . . . . . . . . . . . . . . . . 7-10
7.2.1 Manage group . . . . . . . . . . . . . . . . . . . . . . . . . . . . . . . . . . . . . . . . . . . . . . . . . . . . . 7-10
7.2.2 Change group name. . . . . . . . . . . . . . . . . . . . . . . . . . . . . . . . . . . . . . . . . . . . . . . . . 7-11
7.2.3 Delete a stored group. . . . . . . . . . . . . . . . . . . . . . . . . . . . . . . . . . . . . . . . . . . . . . . . 7-12
7.2.4 Change group number . . . . . . . . . . . . . . . . . . . . . . . . . . . . . . . . . . . . . . . . . . . . . . . 7-13
7.3 Creating a user pattern . . . . . . . . . . . . . . . . . . . . . . . . . . . . . . . . . . . . . . . 7-15
7.3.1 Creating and saving user pattern . . . . . . . . . . . . . . . . . . . . . . . . . . . . . . . . . . . . . . . 7-15
7.3.2 Selecting a user pattern . . . . . . . . . . . . . . . . . . . . . . . . . . . . . . . . . . . . . . . . . . . . . . 7-19
7.3.3 Editing a pattern . . . . . . . . . . . . . . . . . . . . . . . . . . . . . . . . . . . . . . . . . . . . . . . . . . . . 7-20
7.3.4 Creating a user pattern of a free size . . . . . . . . . . . . . . . . . . . . . . . . . . . . . . . . . . . . 7-23
7.3.5 Selecting a bitmap file(BMP) . . . . . . . . . . . . . . . . . . . . . . . . . . . . . . . . . . . . . . . . . . 7-25
7.4 Touch screen coordinate correction . . . . . . . . . . . . . . . . . . . . . . . . . . . . . 7-27
7.5 Backing up data to USB memory . . . . . . . . . . . . . . . . . . . . . . . . . . . . . . . 7-28
7.6 Editing standard pattern . . . . . . . . . . . . . . . . . . . . . . . . . . . . . . . . . . . . . . 7-33
7.7 Editing Substitution Rules. . . . . . . . . . . . . . . . . . . . . . . . . . . . . . . . . . . . . 7-35
7.8 Selecting Languages . . . . . . . . . . . . . . . . . . . . . . . . . . . . . . . . . . . . . . . . 7-36
Page 12

4 ●Contents
8. INK AND MAKEUP REPLENISHMENT. . . . . . . . . . . . . . .8-1
8.1 Replenishing the ink . . . . . . . . . . . . . . . . . . . . . . . . . . . . . . . . . . . . . . . . . . 8-2
8.2 Replenishing the makeup . . . . . . . . . . . . . . . . . . . . . . . . . . . . . . . . . . . . . 8-3
9. WHEN WARNING OR FAULT WAS GENERATED. . . . . . . . 9-1
9.1 Display when warning or fault was generated . . . . . . . . . . . . . . . . . . . . . . 9-1
9.2 On-screen message descriptions. . . . . . . . . . . . . . . . . . . . . . . . . . . . . . . . 9-3
9.2.1 Fault messages . . . . . . . . . . . . . . . . . . . . . . . . . . . . . . . . . . . . . . . . . . . . . . . . . . . . . 9-3
9.2.2 Warning messages. . . . . . . . . . . . . . . . . . . . . . . . . . . . . . . . . . . . . . . . . . . . . . . . . . . 9-7
9.2.3 Other messages . . . . . . . . . . . . . . . . . . . . . . . . . . . . . . . . . . . . . . . . . . . . . . . . . . . . . 9-9
9.3 When checking the warning and fault generation status . . . . . . . . . . . . . 9-10
9.4 Remedial action to be taken in the event of a printing failure. . . . . . . . . . 9-11
10. TROUBLESHOOTING GUIDE. . . . . . . . . . . . . . . . . . . . . . . . . . 10-1
11. EMERGENCY PROCEDURES . . . . . . . . . . . . . . . . . . . . . . . . . 11-1
12. SPECIFICATIONS . . . . . . . . . . . . . . . . . . . . . . . . . . . . . . . . . . . . . . 12-1
13. APPENDIX . . . . . . . . . . . . . . . . . . . . . . . . . . . . . . . . . . . . . . . . . . . . . 13-1
● Index . . . . . . . . . . . . . . . . . . . . . . . . . . . . . . . . . . . . . . . . . . . . . . . . . . . . . . 13-1
Page 13
●Ink and makeup 1-1
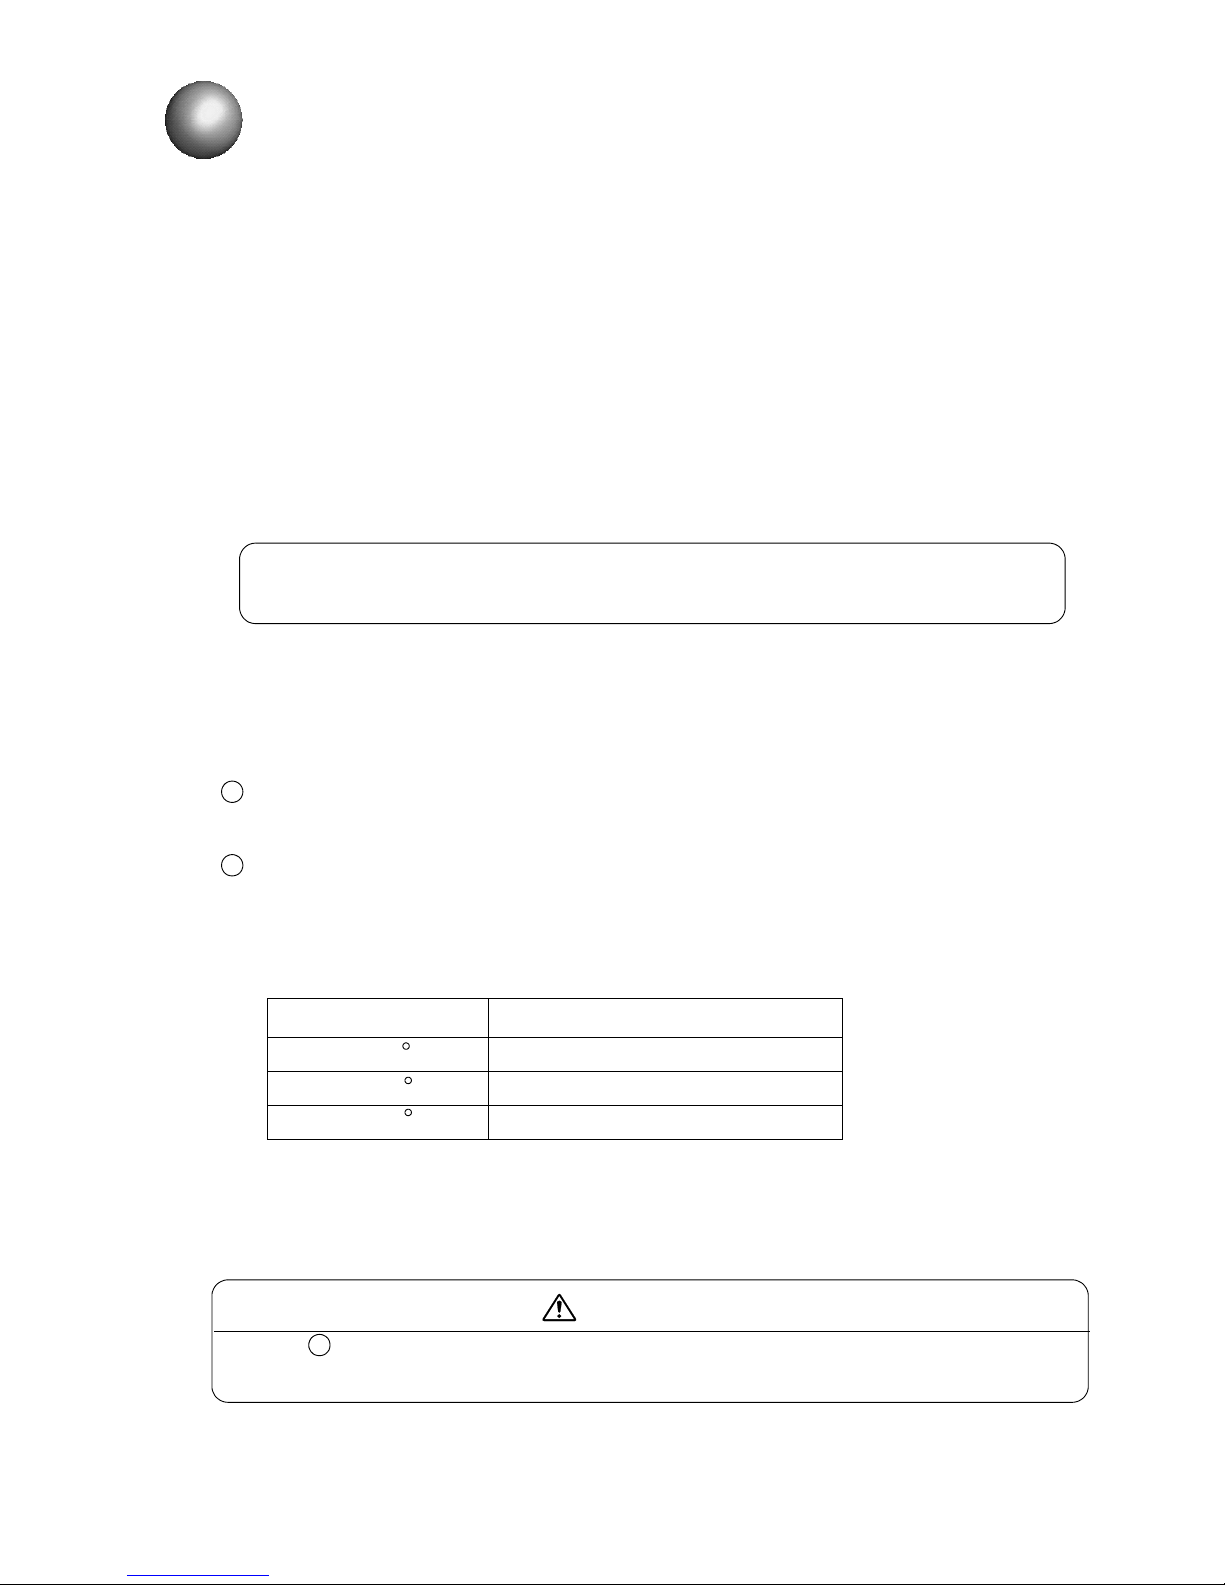
Storage temperature Shutdown Period Guideline *1
0 to35 C 3 weeks
35 to 40 C 2 weeks
40 to 45 C 1 week
1.1 Ink and makeup
(1) Ink and makeup replenishment
The printer employs an automatic ink/makeup replenishment system. While the printer is operated, the
ink reservoir automatically supplies the ink and the makeup reservoir automatically supplies the makeup
to the ink main tank at regular intervals. If the ink or makeup replenisher level is too low, an alarm is
issued. In this case, replenish the ink or makeup without delay.
(For the replenishment procedures, see Section 8.)
(2) Ink periodic replacement
For the replacement procedures, see “Technical Manual Chapter 6”.
●While the IJ printer ink circulates for operations, it reacts with the atmospheric air elements and
deteriorates with time. Therefore, it needs periodic replacement. The guide for determining the
replacement interval conforms to the handling guidance of each ink.
*What is makeup? :
The makeup serves as the replenisher that makes up for the constituent loss due to ink
evaporation during ink ejection. It is also used as a cleaning solution.
1.2 IJ printer long-term shutdown
When the IJ printer is shut down for a long time due to production or other circumstances, the ink may
accrete inside of the printer and cause such problems as inability to be ejected or to be recovered. When
this occurs, the following actions must be taken.
Prevent accretion by operating the printer periodically.
Operate (eject ink) the printer for 1 hour or longer at least once during the “Shutdown Period
Guideline” shown in the table below.
Perform long-term shutdown storage work.
Before storage, drain the ink from inside the printer and fill the printer with makeup.
When restarting operation after storage, drain the makeup from inside the printer and fill the printer
with ink.
Refer to Technical manual “6.15 Long-term Shutdown” for detail.
*1: Maximum period the printer can be continuously shut down without being operated.
●The values in the table are for MEK based ink.
●Handling of ink other than the above requires special handling in accordance with the handling
guidance of each ink.
1. USAGE PRECAUTIONS
Since “ Perform long-term shutdown storage work” requires special work,
it is recommended to contact your local distributor and ask for the work.
CAUTION
1
2
2
Page 14
1-2 ●Print head cleaning
1.3 Print head cleaning
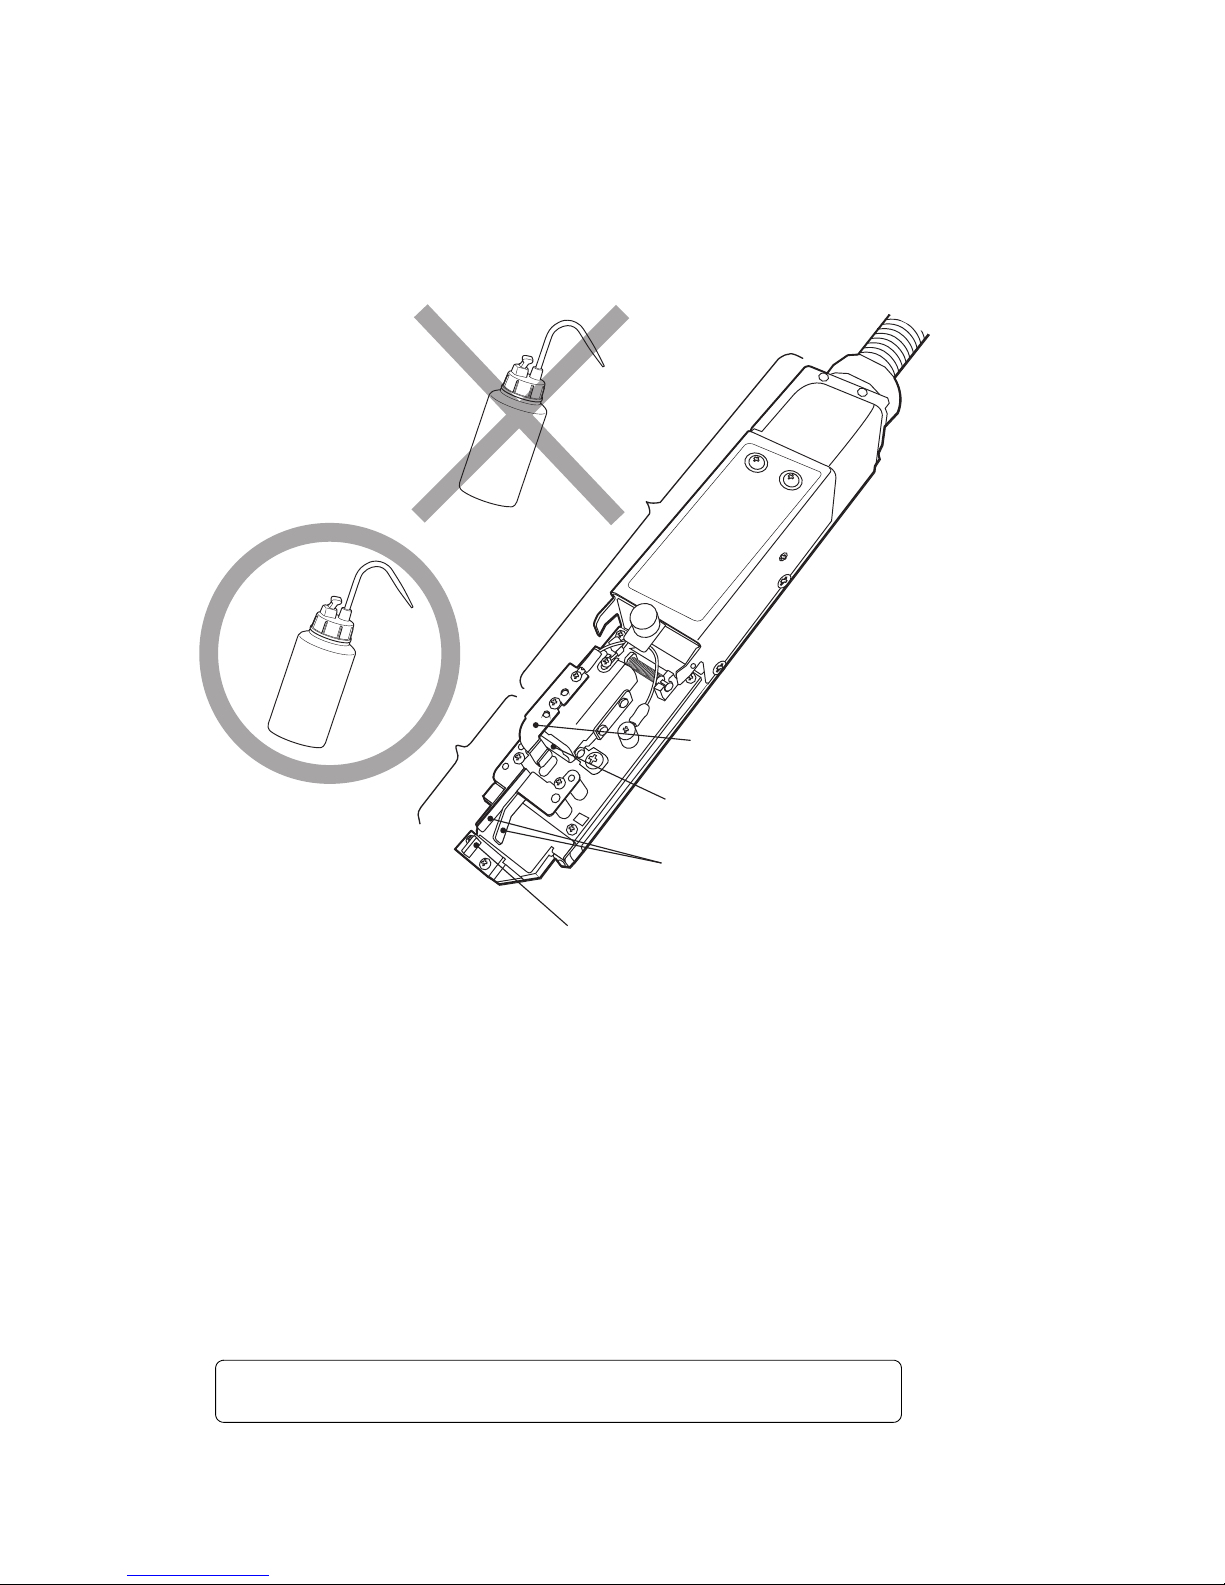
Take the following precautions when cleaning ink from around the nozzle.
(1) Orient the end of the print head downward and pour makeup onto the dirty part and clean while
catching the makeup in a beaker.
(2) After cleaning, thoroughly wipe the print head with wiping paper and allow it to dry.
●Thoroughly dry the nozzle, charge electrode, deflection electrode, mounting base and fringe of the gutter.
Confirm that the parts are sufficiently dry before starting the next operation.
If operated while wet, the printer will not start normally.
●While the print head is wet, do not orient its end upward.
(3) Never immerse the print head in the makeup.
(4)When printing is frequently performed or the distance between the print material and the print head is short,
ink splashes may stain the end of the print head and the print head cover. If this condition is left unresolved, the
stained status will be made worse, resulting in a print error or emergency stop. If a print error or emergency
stop frequently occurs because of stain due to ink splashes, stop the operation in progress and clean the end of
the print head (around the nozzle, charge electrode, deflection electrode, mounting base and gutter) and the
print head cover. Do this in addition to the cleaning to be performed at the end of each day’s work.
Air purging of the print head is effective against staining due to ink splashing.
See the Technical Manual “3.1 Print head air purge”.
Cleaning range
Do not pour the makeup over this section.
Wipe the print head clean with wiping paper
dampened with the makeup.
Nozzle
Deflection electrode
Charge electrode
Gutter
Page 15
●Shutdown 1-3
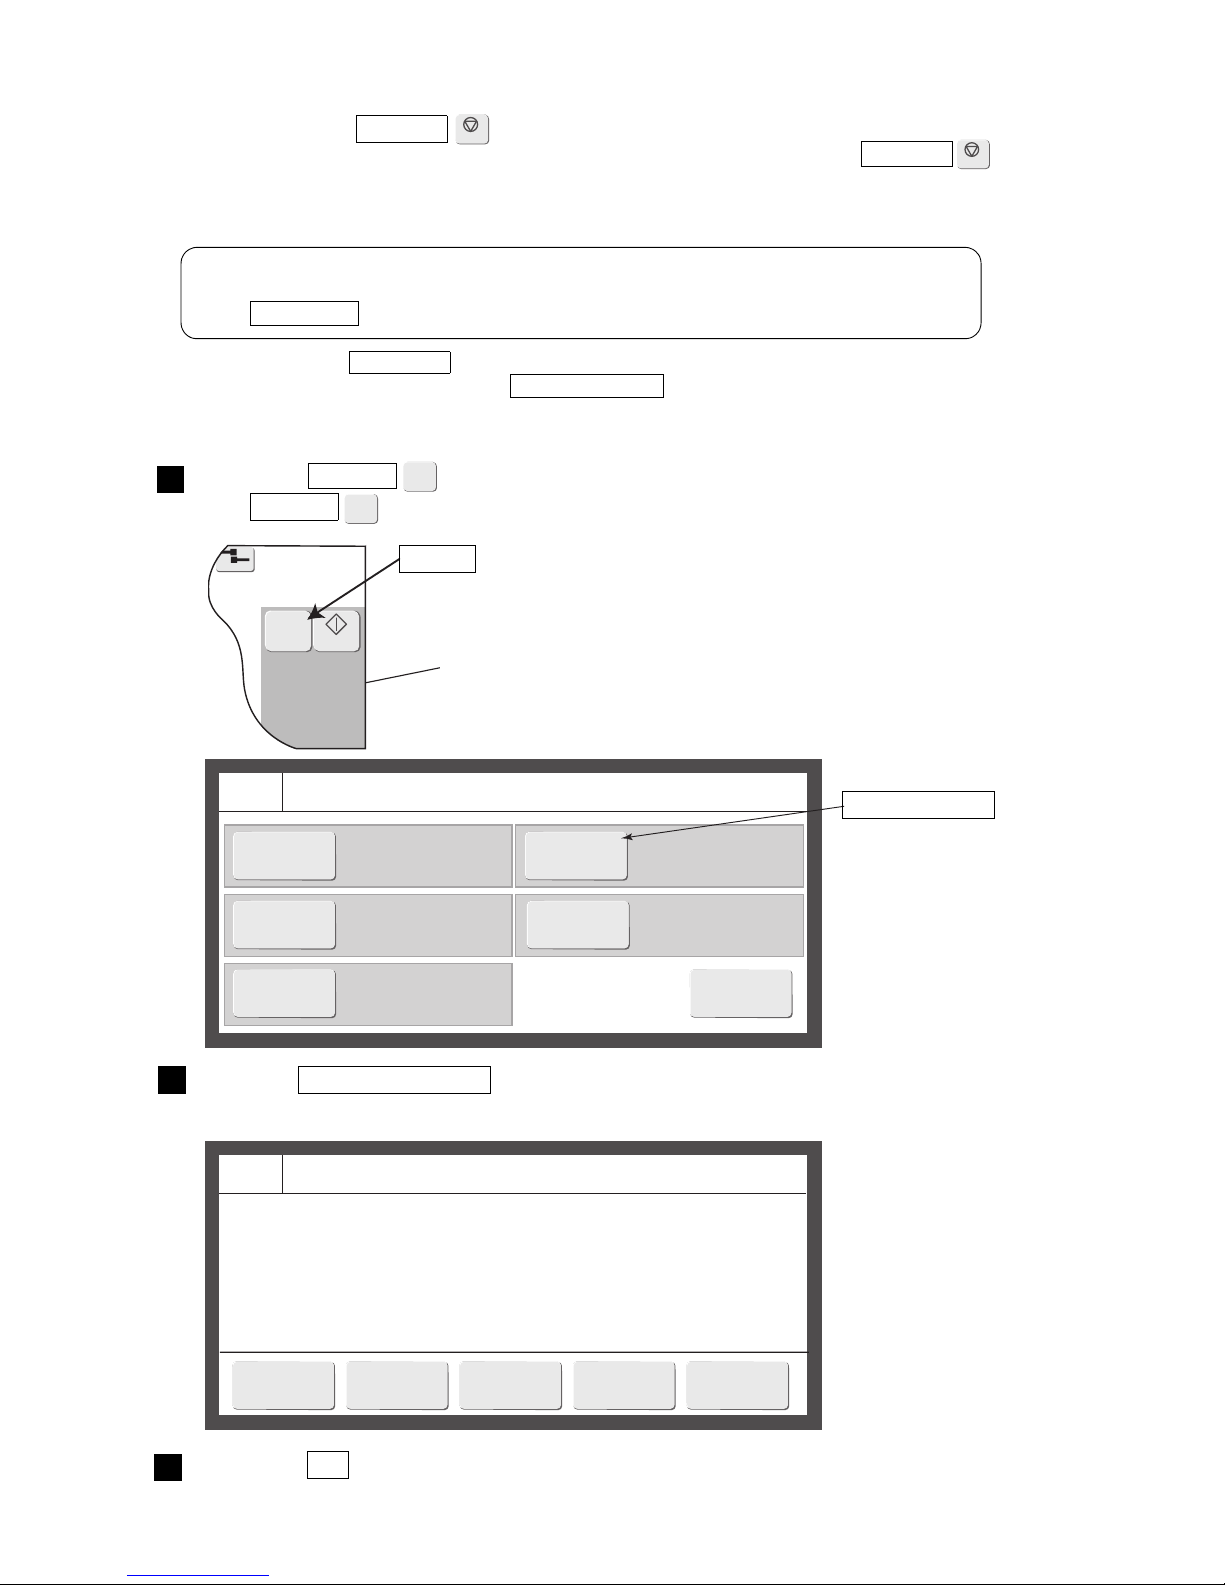
1.4 Shutdown (no-cleaning stop)
When you press the Shutdown on the upper right-hand corner of the screen, the printer stops after
completing its automatic nozzle cleaning sequence. If you repeatedly activate the Shutdown to stop an
operation, excessive makeup will enter the printer, thereby thinning the ink or producing an unduly high ink main
tank solution level. If it is absolutely necessary to repeatedly stop the printer operation, use the following
procedure.
2015.07.0712:45
M
Manual
Startup
Com=0
===== Manual Control Menu =====
Start
printing
The current message is
printed.
No-cleaning
stop
Stops ink ejection
without cleaning.
Cancel
Standby
No deflection voltage is
applied. The printer
status becomes Standby.
===== Shutdown Process Confirmation =====
Shutdown will stop the ink jet.
Solution To stop the ink jet, press <OK>.
OK
Close
Press the Manual .
(The Manual is displayed commonly on all the screens.)
Press the No-cleaning stop within the control menu.
Press the OK .
An ink stop confirmation message appears.
*1: Do not use the Shutdown to stop operation more than two successive times.
*2: When operation was stopped using No-cleaning stop , if left in that state, the ink will become stuck in the
nozzle and cause ink stream bending, nozzle clogging, and printing disturbance. Apply makeup to the
orifice plate to wash it within 30 minutes after a stop to cause the ink to eject once again.
1
2
The no-cleaning stop procedure works even while the startup sequence is
being executed.
(The Shutdown button is inoperative during the startup sequence.)
Shutdown
M
Manual
2
3
Manual
Common to all screens
No-cleaning stop
M
Manual
Shutdown
Page 16
1-4 ●Cautions on operating time when printer is in service
1.6 Heating of ink
(1) If the ambient temperature is under approximately 20 C, the ink is heated by a heating unit in the print head.
The startup processing time relative to when not operating becomes long.
When not operating: Approximately 1.5 minutes
When operating: Maximum approximately 10 minutes (Changes depending on the ambient temperature)
*Depending on the type of ink, the heating unit may not be used.
Refer to the handling guidance of each ink.
(2) When a heating unit fault occurs, take care of the following items.
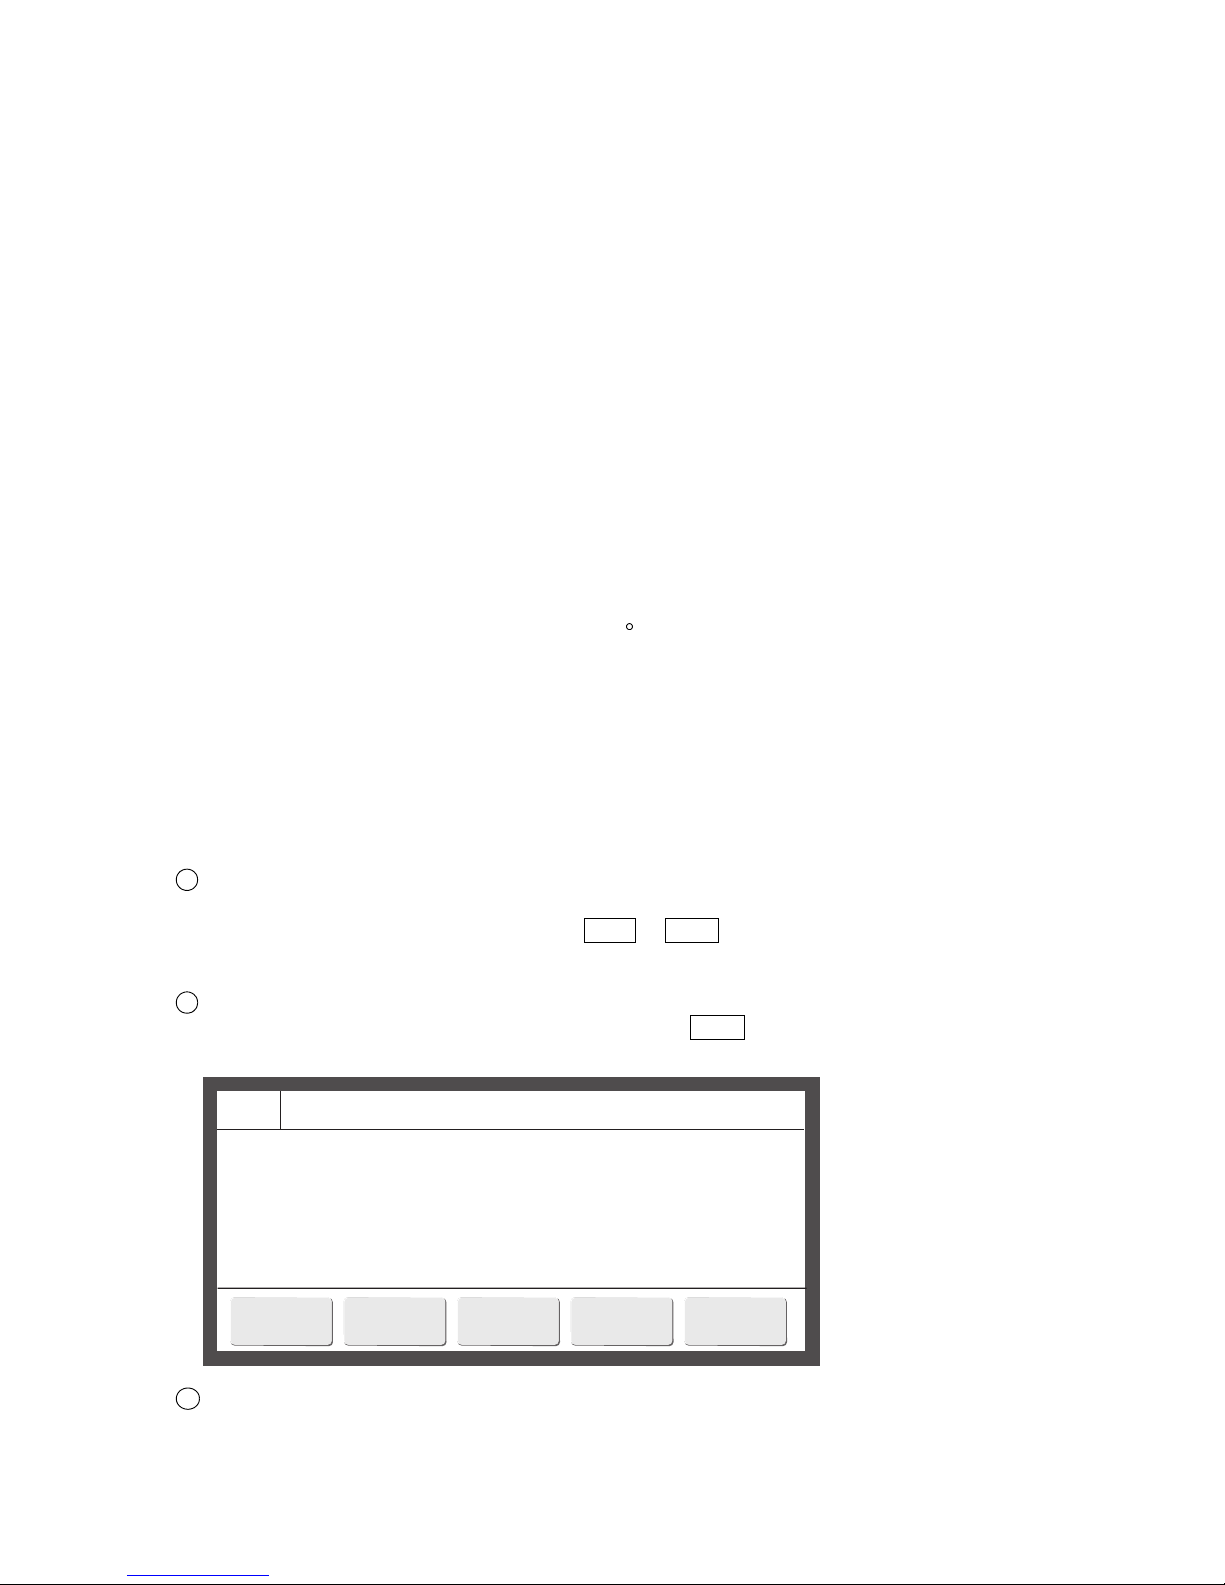
If a heating unit fault occurs, the messages “Ink Heating Unit too High”, “Ink Heating Unit Temperature
Sensor Fault”, or “Ink Heating Unit Over Current” are displayed and the IJ printer fault stops.
The IJ printer can be restarted by pressing the Reset or Close . However, the ink will not be heated even
if the temperature drops thereafter.
Once “do not perform ink heating” is set, the following message is always displayed whenever the power
is turned on thereafter. Cancel the message by pressing the Close and be sure to inform your nearest
local distributor.
If the printer is temporally operated in "do not perform ink heating" status, the operation of the printer
may become possible by resetting the excitation voltage.
Reset the excitation voltage according to Technical Manual “6.11 Excitation V Adjustment”.
===== Ink Temperature Correction Notice =====
The selected setup does not allow ink temperature corrections
to be made.
Solution Contact your local distributor.
Close
1.5 Cautions on operating time when printer is in service
(1) Cautions when printer is repeatedly stopped immediately after the start
of operation
If you repeatedly stop the printer immediately after the start of operation, automatic nozzle cleaning at shutdown
will cause the ink in the IJ printer to gradually become thinner. For stable operation of the IJ printer, operate the
printer for a given amount of time or more once started.( =in Ink eject status)
During the operation, the ink viscosity is adjusted automatically and returns to the initial value.
The required amount of operation time varies depending on the ambient temperature or ink types used.
Refer to the handling guidance of each ink for details.
(2) Caution when daily operating time is relatively long
The IJ printer emits an ink jet when printing, so the outside and inside of the print head cover will become dirty
with accumulated ink spillage during operation. To prevent printing defects due to this ink accumulation,
periodically check the head cover and clean it as required.
1
2
3
Page 17
●Ink concentration control 1-5
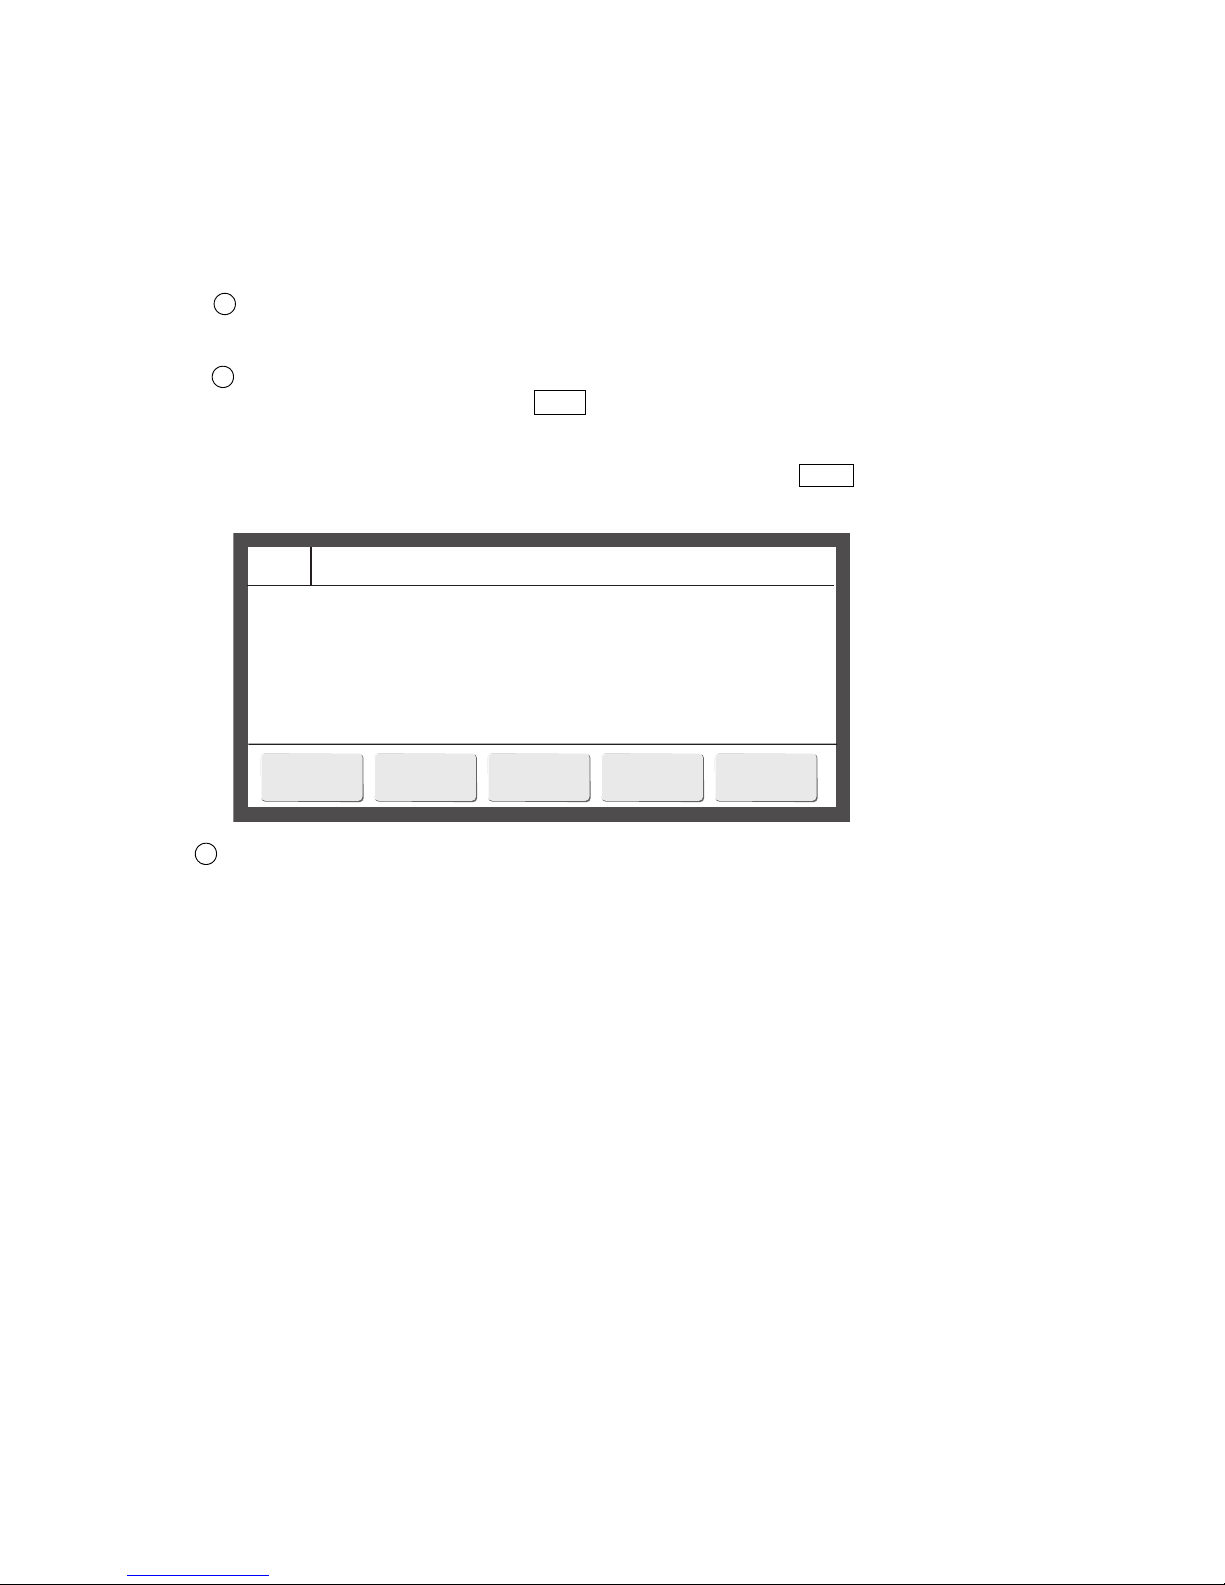
===== No Ink Concentration Control =====
The current settings have made ink concentration control
unavailable.
Solution Contact your local distributor.
Close
1.7 Ink concentration control
(1) The ink is automatically controlled to maintain optimum concentration for printing.
*Depending on the type of ink, ink concentration control may not be performed by viscometer.
Refer to the handling guidance of each ink.
(2)If an error occurs in the viscometer which is used to control ink concentration, take care of the following points:
There are three types of viscometer errors:
“Viscometer Ink Temperature Sensor Fault”, “Viscometer Reading Instability”, and “Viscometer Reading
Out of Range”.
When a “Viscometer Ink Temperature Sensor Fault” occurs, the unit will enter the fault stop state.
Re-start is possible by pressing the Close , but the setting will be changed to the state in which ink
concentration control based on the measured result using the viscometer is not performed thereafter.
Once the setting of automatic concentration control is released, every time the power is turned on, the
following message will appear. Cancel the message by pressing the Close and be sure to inform your
nearest local distributor.
When “Viscosity Reading Instability” or “Viscosity Readings Out of Range” occurs, the unit will not
enter the fault stop state and printing can be continued. However, you should contact your nearest
local distributor for inspection.
1
2
3
1.8 Gutter cleaning
The IJ printer collects ink not used for printing from the gutter. At the same time, it sucks in atmospheric gas, dust,
and other matter from the air. If these substances are mixed with the ink in the gutter, undissolved
components in the ink or makeup may stick to the gutter. If the system is run for 24 consecutive hours without
automatic cleaning, these components will gradually accumulate in the gutter. This, together with the ink stream
coming into contact with it, may cause such errors as “an error stemming from a dirty head”.
If any such component sticks to the gutter, immerse it in a solution of about 0.5% household dishwashing
detergent and clean it for about 10 minutes with an ultrasonic cleaner. The dirt can then be removed.
Page 18
1-6 ●Protection sheet
1.9 Protection sheet
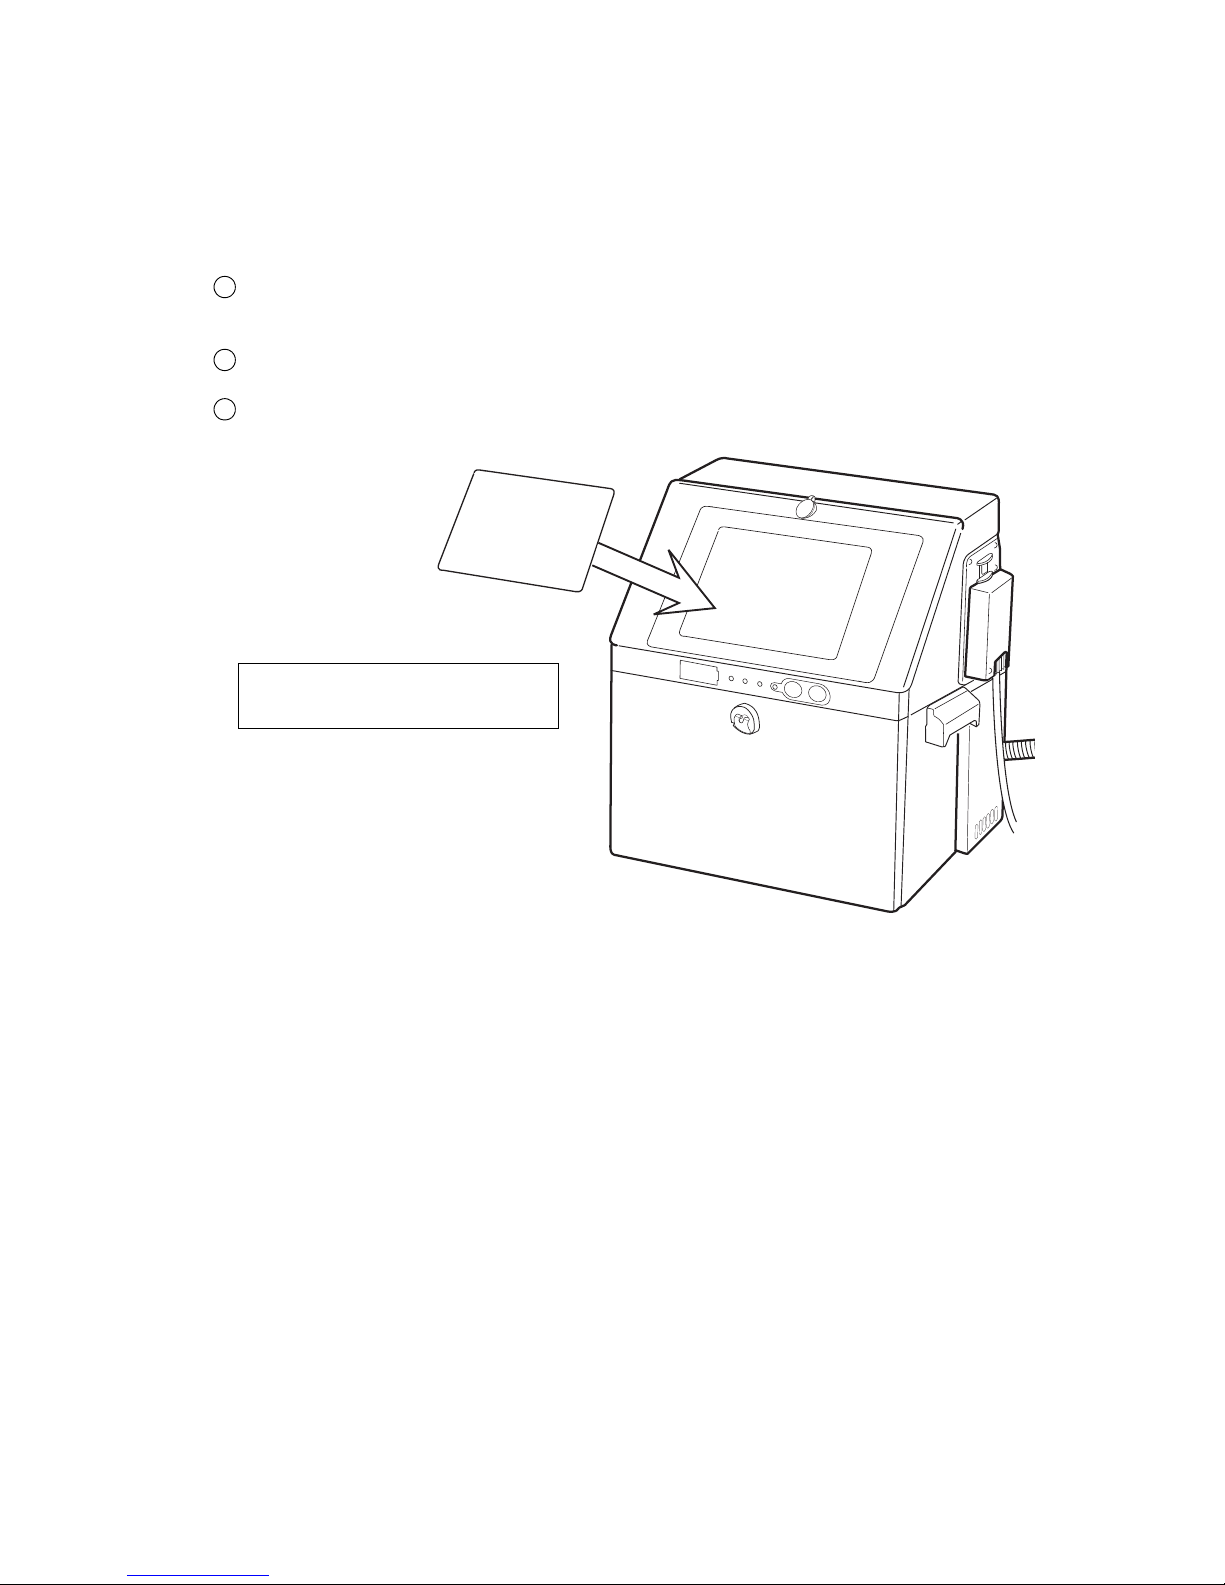
A protection sheet is provided to protect the screen display of the IJ printer.
This is used to prevent the screen display from becoming dirty, scratched, etc.
(1) Installing the protection sheet
Clean all dirt, debris, ink, etc., from the panel surface.
Use a paper wipe, etc., soaked in water or makeup to wipe the display clean.
*Install the protection sheet after the panel surface has dried.
Peel off the removable paper from the back of the protection sheet.
*Do not touch the double-sided tape on the back of the protection sheet.
Affix the protection sheet to the IJ printer screen display as shown in the figure.
1
2
3
Protection sheet parts No.:451902
(3pcs/pack)
(The protection sheet can be used
for both the RX2-S and RX2-B.)
(2) Usage Precautions
Be careful not to get ink or makeup on the protection sheet.
If ink or makeup does get on the protection sheet, wipe it off immediately.
When ordering the protection sheet,
please specify the following parts No.
Page 19
●External views 2-1
2.
COMPONENT NAMES AND FUNCTIONS
2.1 External views
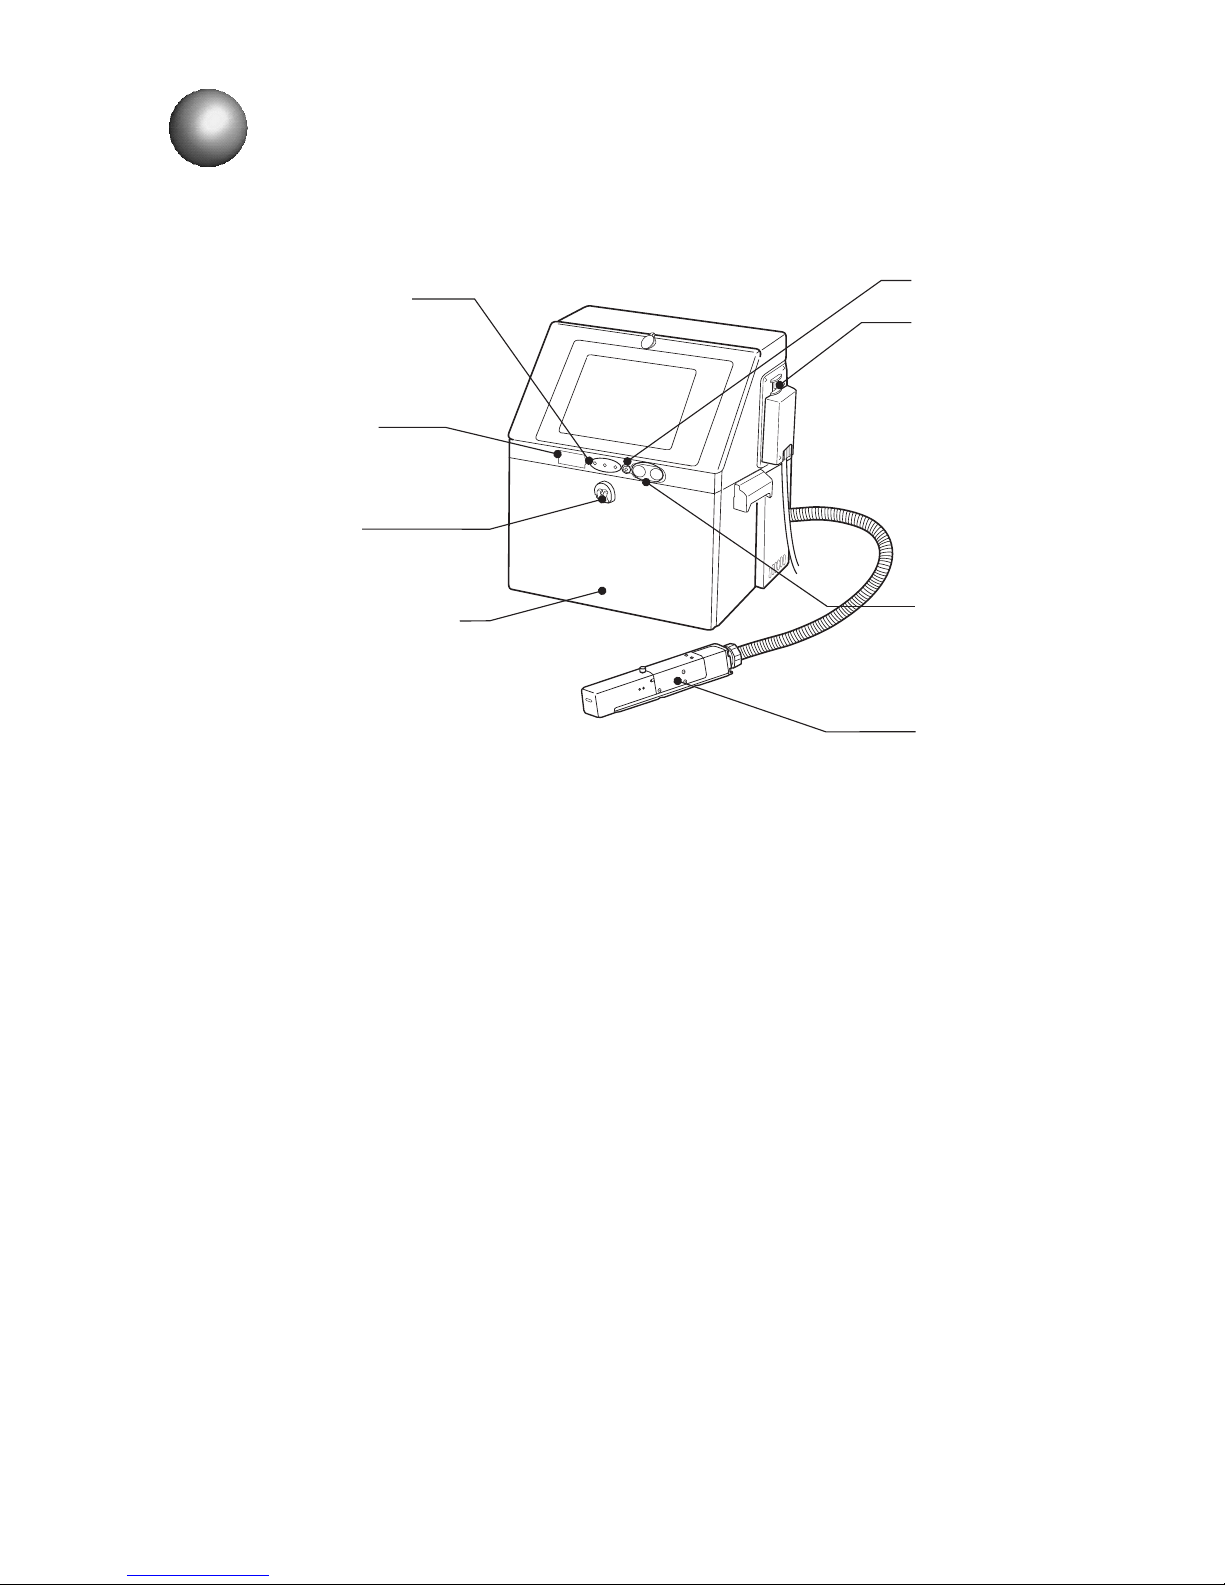
(1) External views
Operating status
indicator lamps
Displays "Ready",
"Fault" and
"Warning"
Handle
USB cover
Start / Stop switch
(*Standard Model only)
Main power switch
Power lamp
Maintenance cover
Opened/closed for ink
and makeup replacement
and other maintenance
purposes.
Print head
This section
performs printing.
Page 20
2-2 ●Main body internal parts arrangement
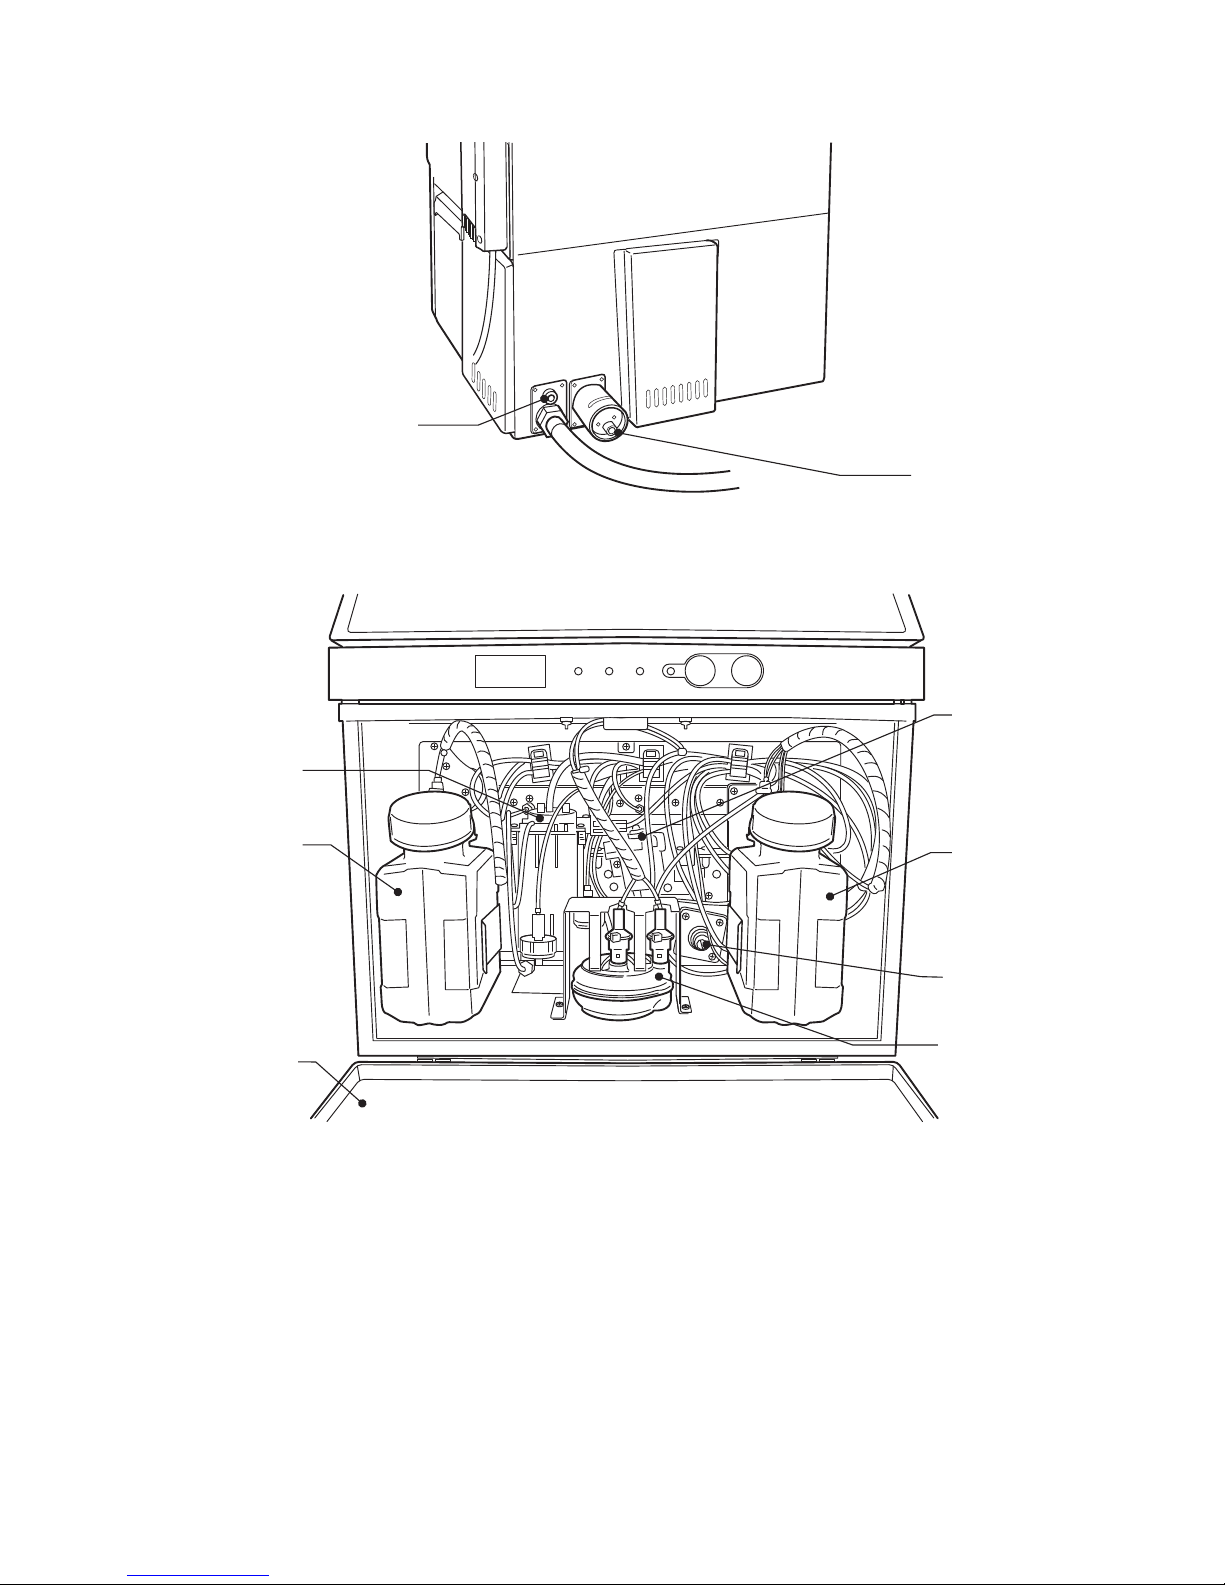
(2) External views (rear side)
2.2 Main body internal parts arrangement
Air-purge
connection port
Makeup
reservoir
Ink reservoir
Maintenance
cover
Recovery filter
Pressure-reducing
valve
Ink filter
Main ink tank
Exhaust duct
connection port
Page 21
●Print head 2-3
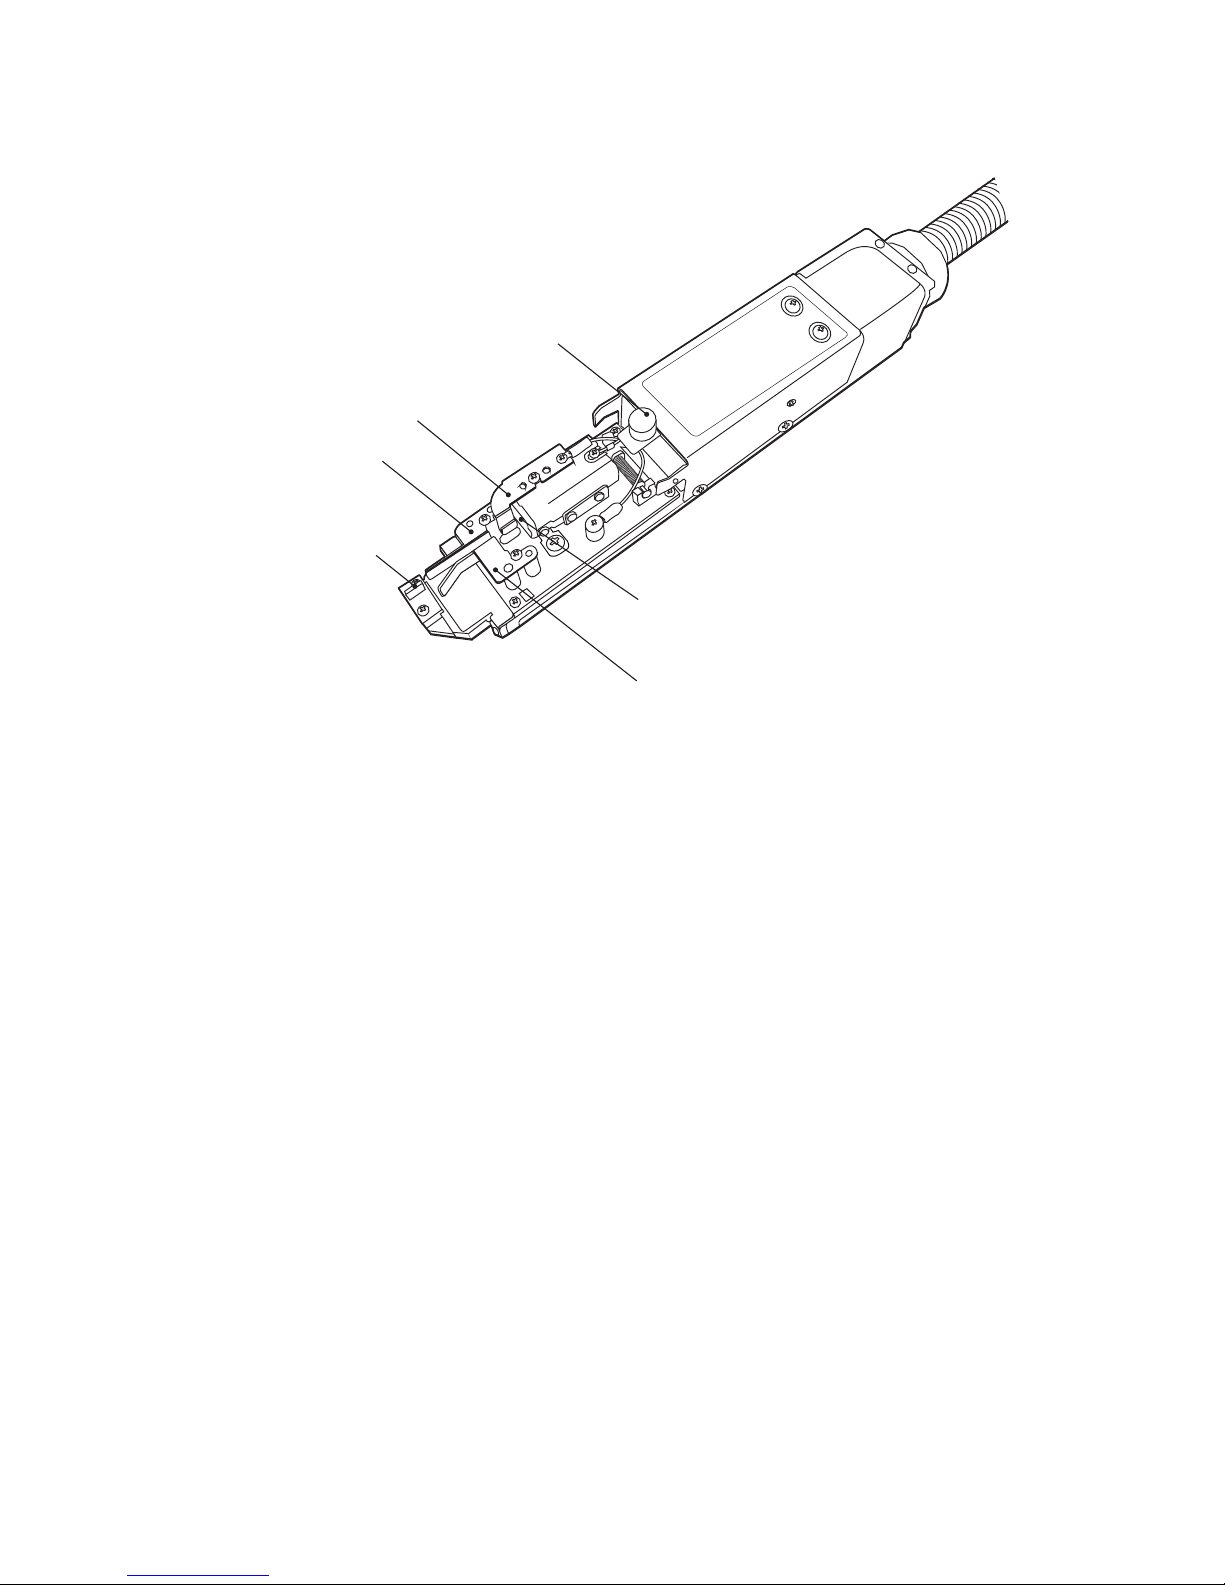
2.3 Print head
Print head cover lock thumbscrew
Nozzle orifice
Minus deflection electrode
Gutter
Plus deflection electrode
Charge electrode
Page 22
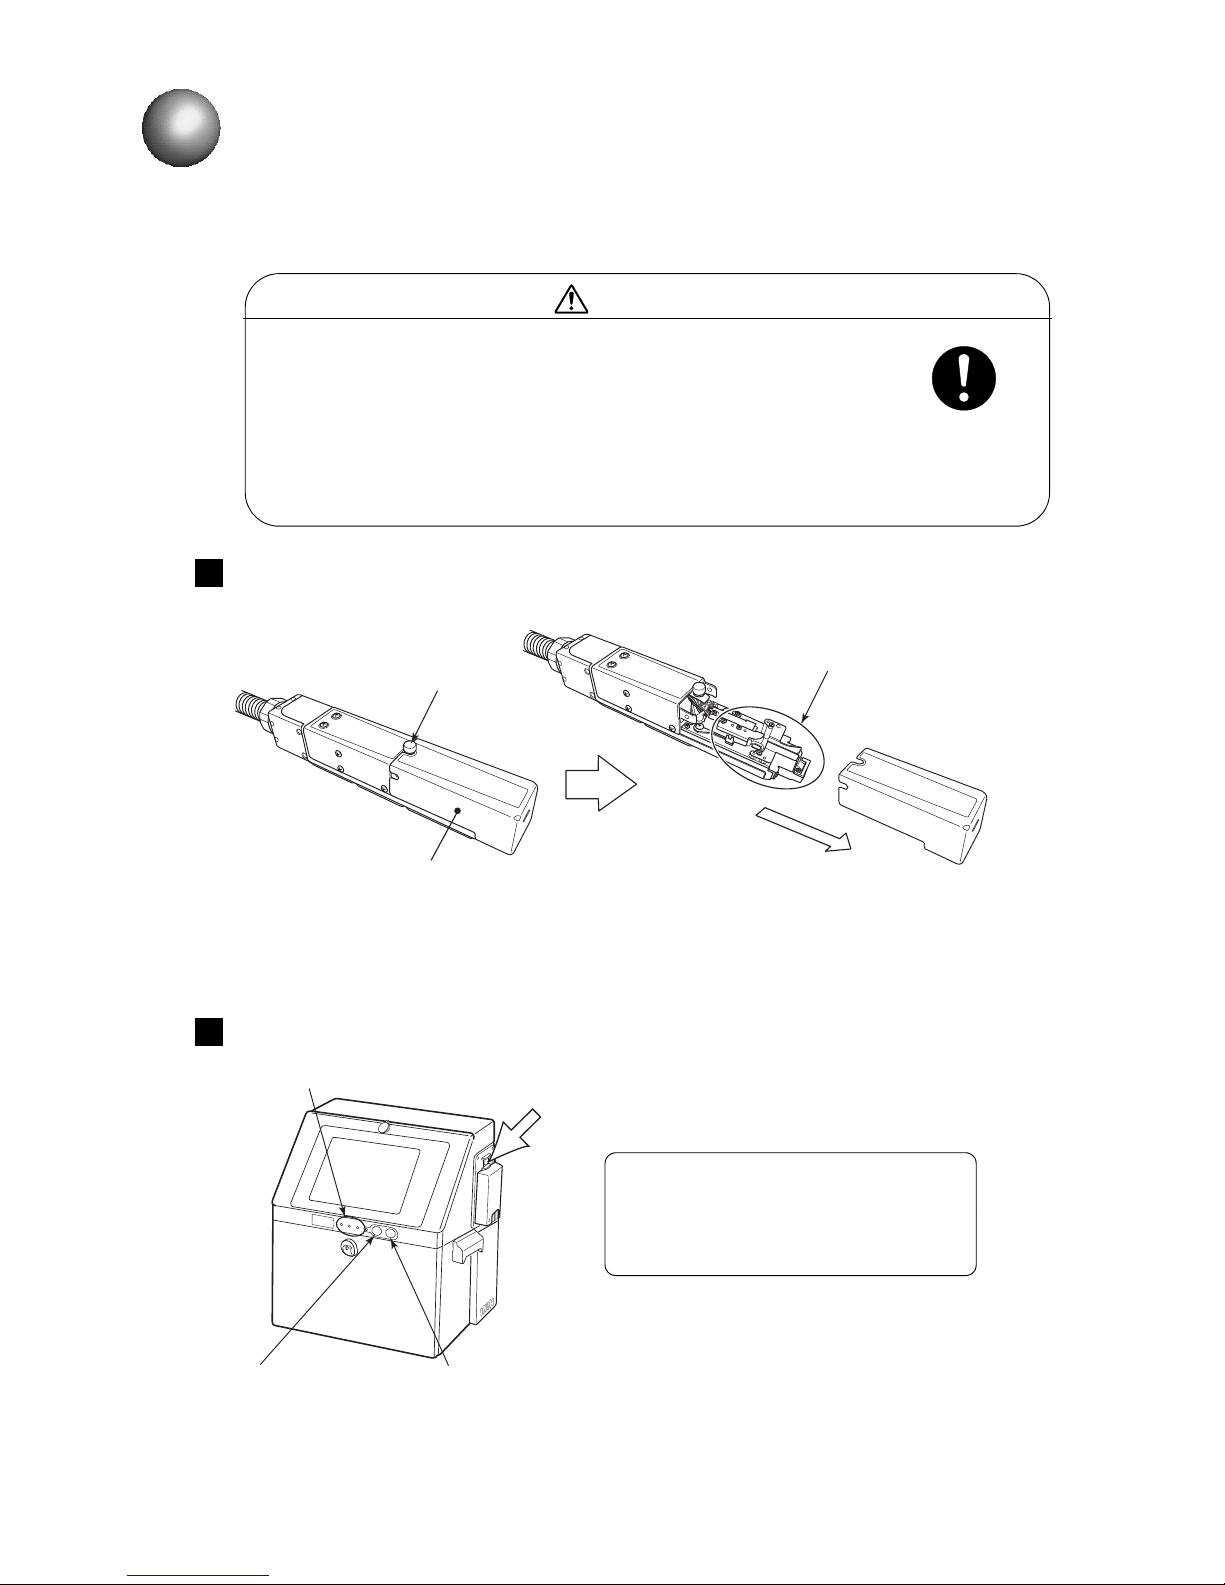
3-1 ●Start operation
3.1 Start operation
3.1.1 Start operation
●The ink and makeup contains organic solvents.
When handling the ink and makeup, wear protective gloves and goggles so
that the ink will not directly contact your skin.
●An LCD touch panel is used for the screen.
Do not press the buttons with unreasonable force.
●If the system shuts down, turn off the power by pressing the Stop switch. To
turn on the power and reuse the system, see “11. EMERGENCY
PROCEDURES”.
3. BASIC OPERATION
CAUTION
Turn on the power by pressing the main power switch.
1
Remove the print head cover, and check whether or not the print head cover and
the area around the nozzle are soiled by ink.
2
Since the IJ printer prints by ejecting ink against the print material, the outside and inside of the print
head cover are soiled by splashing of the ink from the print material. To prevent printing problems due
to soiling, check the soiling state and clean as required.
See “1.3 Print head cleaning” for a description of the cleaning method.
When stopped only by Stop switch and
the main power switch was not turned off
at the previous operation, the main power
switch does not have to be pressed
.
Loosen the screw.
Print head cover
Pull out.
Around nozzle
Operating status Indicator lamps
Stop switch
Start switch
Main power switch
Page 23
●Start operation 3-2
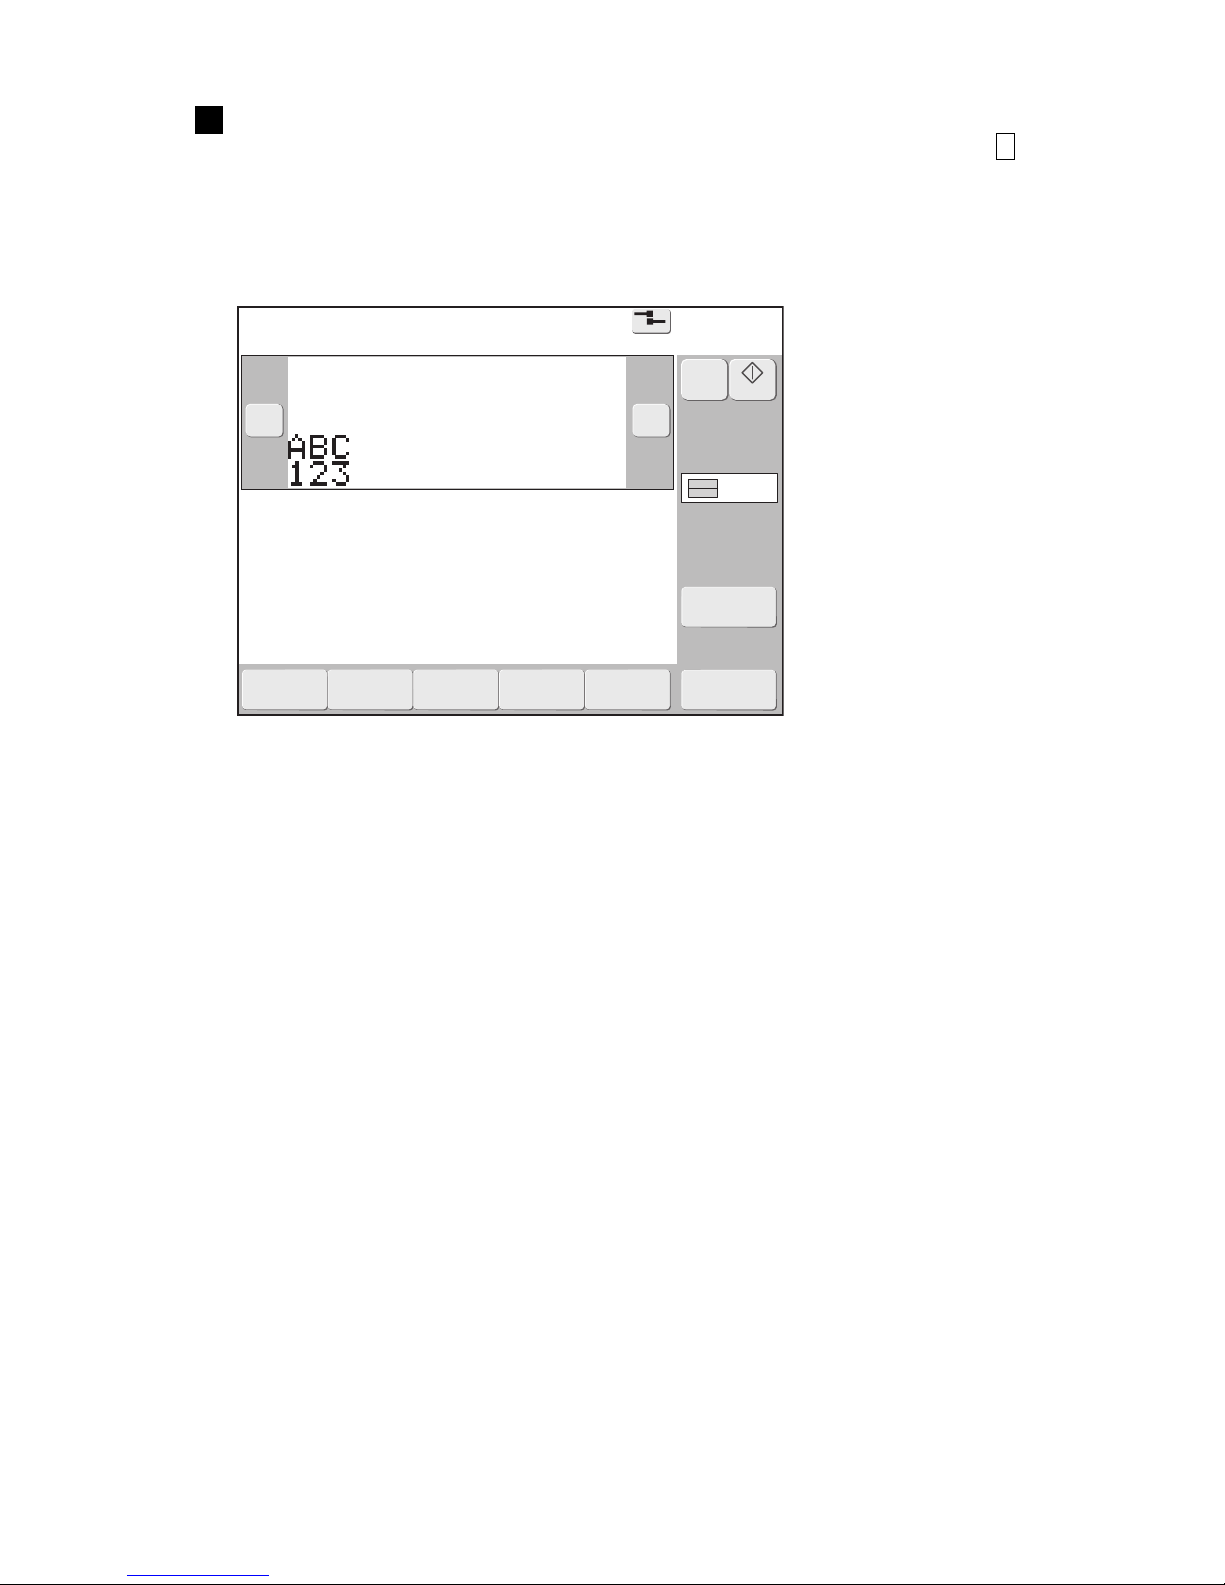
3
Print description
2015.07.0712:45
M
Manual
Startup
Menu
Com=0
[Stop ]
Ink operating time 100(hours)
Cumulative op. time 100(hours)
Print count 1000(prints)
Ink pressure 0.000(MPa;standard value:0.250)
Change
message
Select
message
Overwrite
message
Adjustprint
parameters
Operation
management
Message name[ ]
− +
Current user ID : user2
Interlaced
Printcount
reset
●Confirm the print description, count value, and calendar character contents.
Press the Start switch. (Press for about 2 seconds.)
(Depending on the model, there may not be a Start switch. When the main power switch of 2 is
pressed, the following “Print description” screen appears.)
In the case of turning on the power again, ensure that status indicator lamp is off when Start switch is
pressed.
The “Print description” screen shown below appears.
If the “Select login user” screen opened, see “3.1.4 Specifying the user”.
Page 24
3-3 ●Start operation
2015.07.0712:45
M
Manual
Startup
Com=0
===== Ink Jet Startup Confirmation =====
The ink jet will be turned ON.
Solution To turn the ink jet ON, press <Ready>.
Ready
Cancel
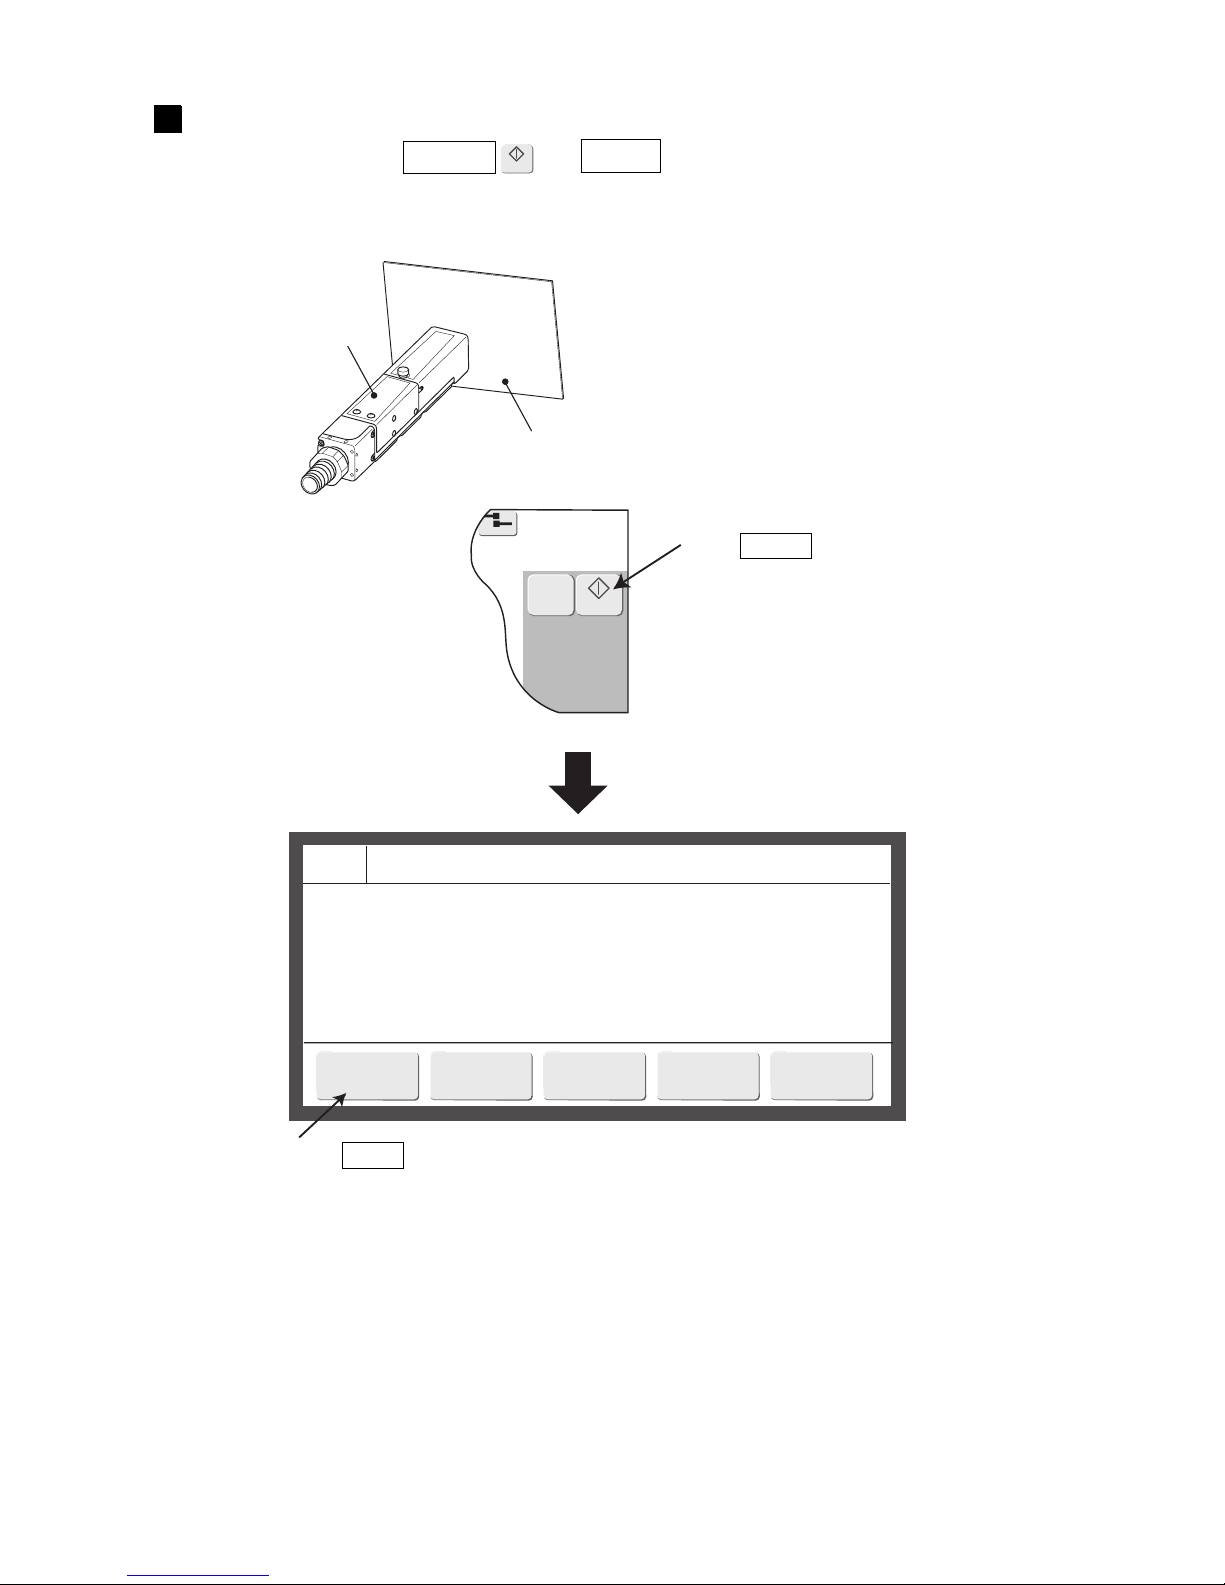
Place a piece of wiping paper, etc., against the ink injection port at the end of the print
head and press the Startup → Ready .
●Ink is ejected from the nozzle inside the print head.
●Place a piece of wiping paper, etc., against the ink ejection port in preparation for splashing of the ejected ink.
Startup
4
Print head
Wiping paper, etc.
Press Start up .
Press Ready .
Page 25
●Start operation 3-4
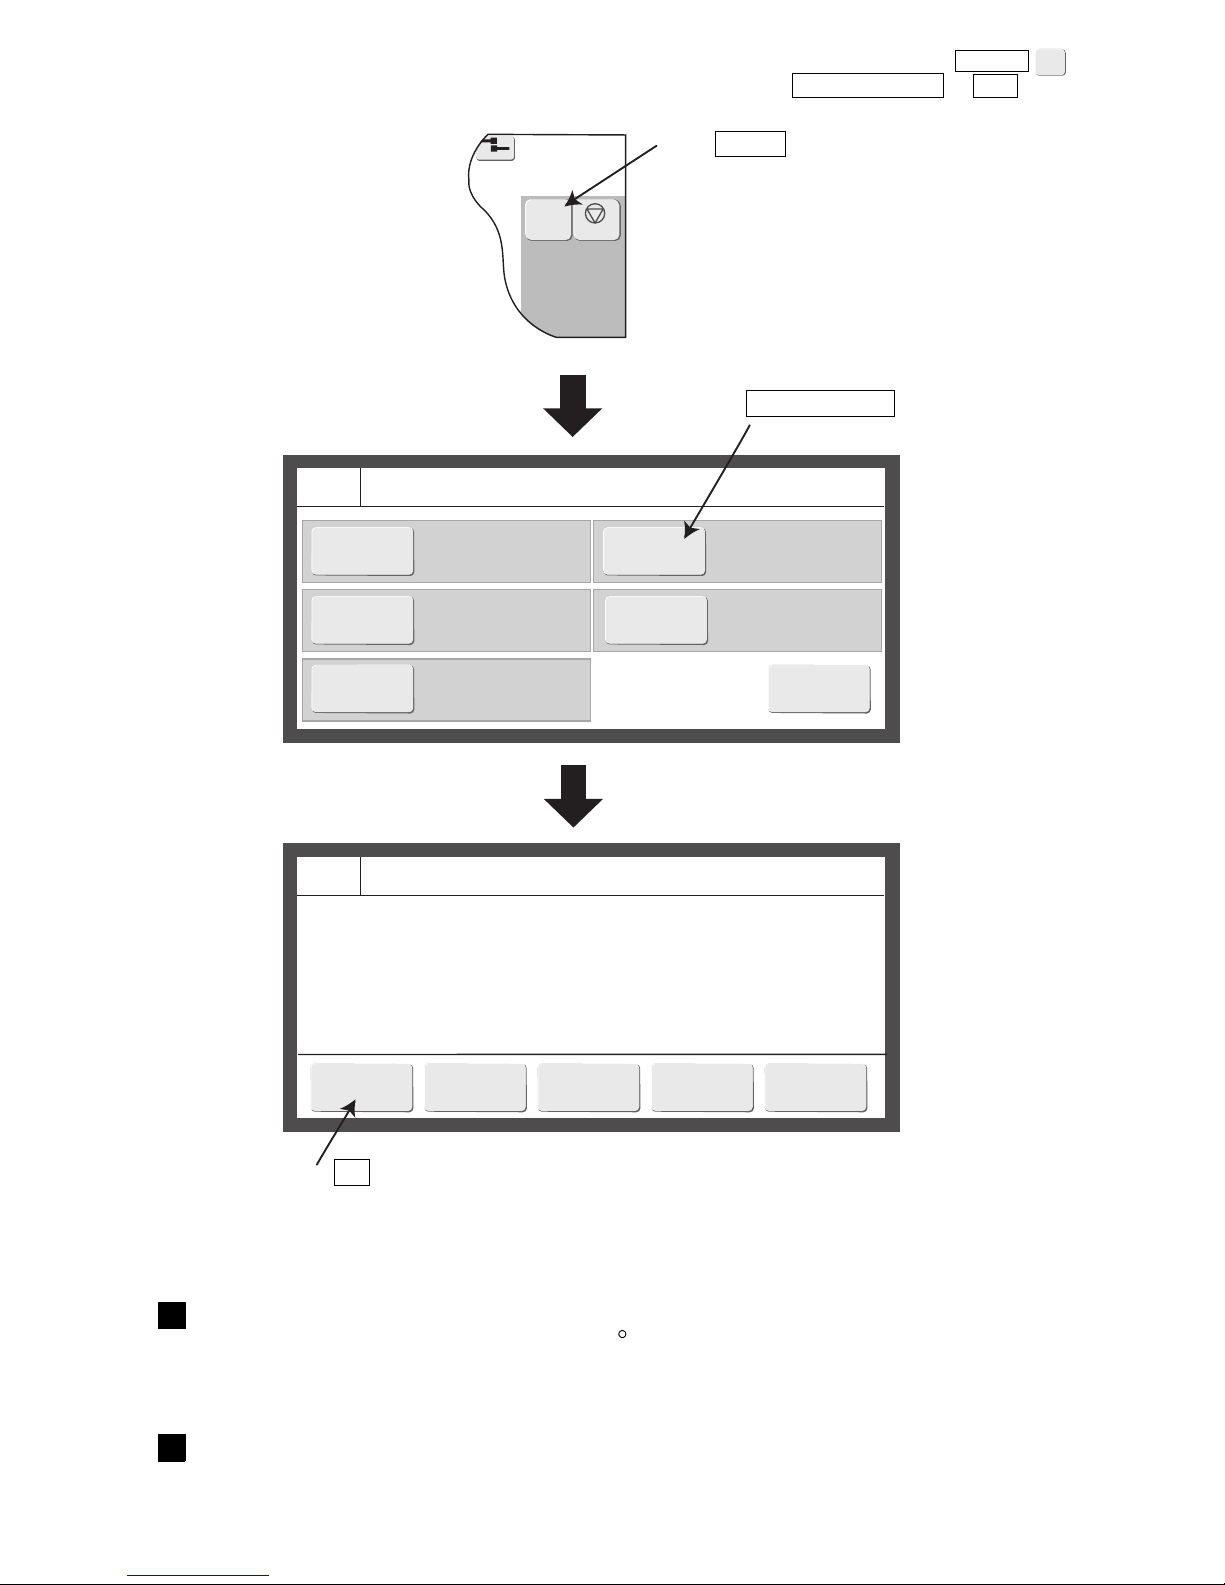
● Continuous ejection of ink even though not printing is abnormal. If this occurs, press the Manual .
The Manual Control Menu appears. Stop ink ejection by pressing the No-cleaning stop → OK .
M
Manual
2015.07.0712:45
M
Manual
Shutdown
Com=0
=====
Manual Control Menu
=====
Start
printing
The current message is
printed.
No-cleaning
stop
Stops ink ejection
without cleaning.
Cancel
===== Shutdown Process Confirmation =====
Shutdown will stop the ink jet.
Solution To stop the ink jet, press <OK>.
OK
Close
Standby
No deflection voltage is
applied. The printer
status becomes Standby.
● For a description of subsequent operation, see “3.1.2 When an error occurred at the start of operation”.
● At ink ejection, ink may momentarily spurt out and soil the paper. However, this is normal.
Wait until the status changes from “Starting” to “Ready”.
● When the temperature is low (approximately 20 C or lower), it may take longer than usual for the printer
to enter the “Ready” state.
5
Input the print target detection signal and check whether or not the print state and
print description are correct.
●If the print target detection signal is input when the status is “Ready”, the set print description is printed.
6
Press Manual .
Press No-cleaning stop .
Press OK .
Page 26
3-5 ●Start operation
3.1.2 When an error occurred at the start of operation
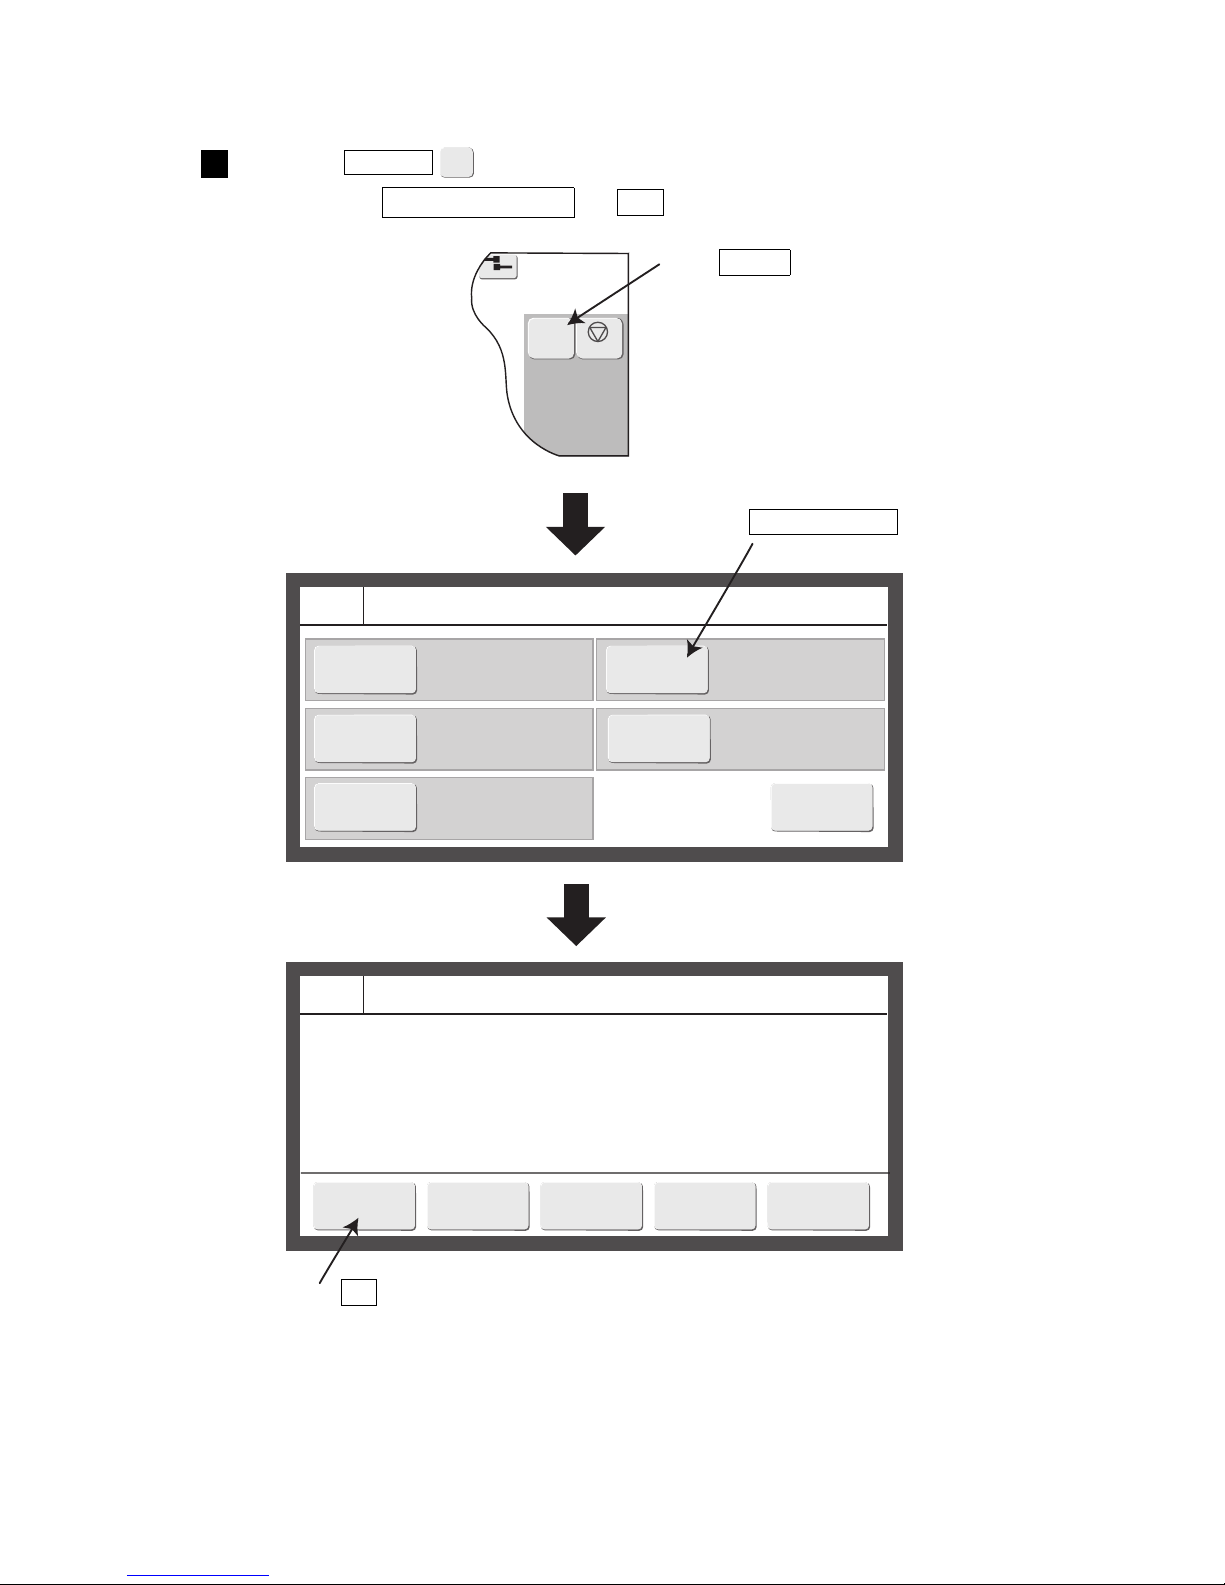
Press the Manual . The Manual Control Menu appears. Stop ink ejection by
pressing the No-cleaning stop → OK .
1
M
Manual
2015.07.0712:45
M
Manual
Shutdown
Com=0
=====
Manual Control Menu
=====
Start
printing
The current message is
printed.
No-cleaning
stop
Stops ink ejection
without cleaning.
Cancel
===== Shutdown Process Confirmation =====
Shutdown will stop the ink jet.
Solution To stop the ink jet, press <OK>.
OK
Close
Standby
No deflection voltage is
applied. The printer
status becomes Standby.
Press Manual .
Press No-cleaning stop .
Press OK .
Page 27
●Start operation 3-6
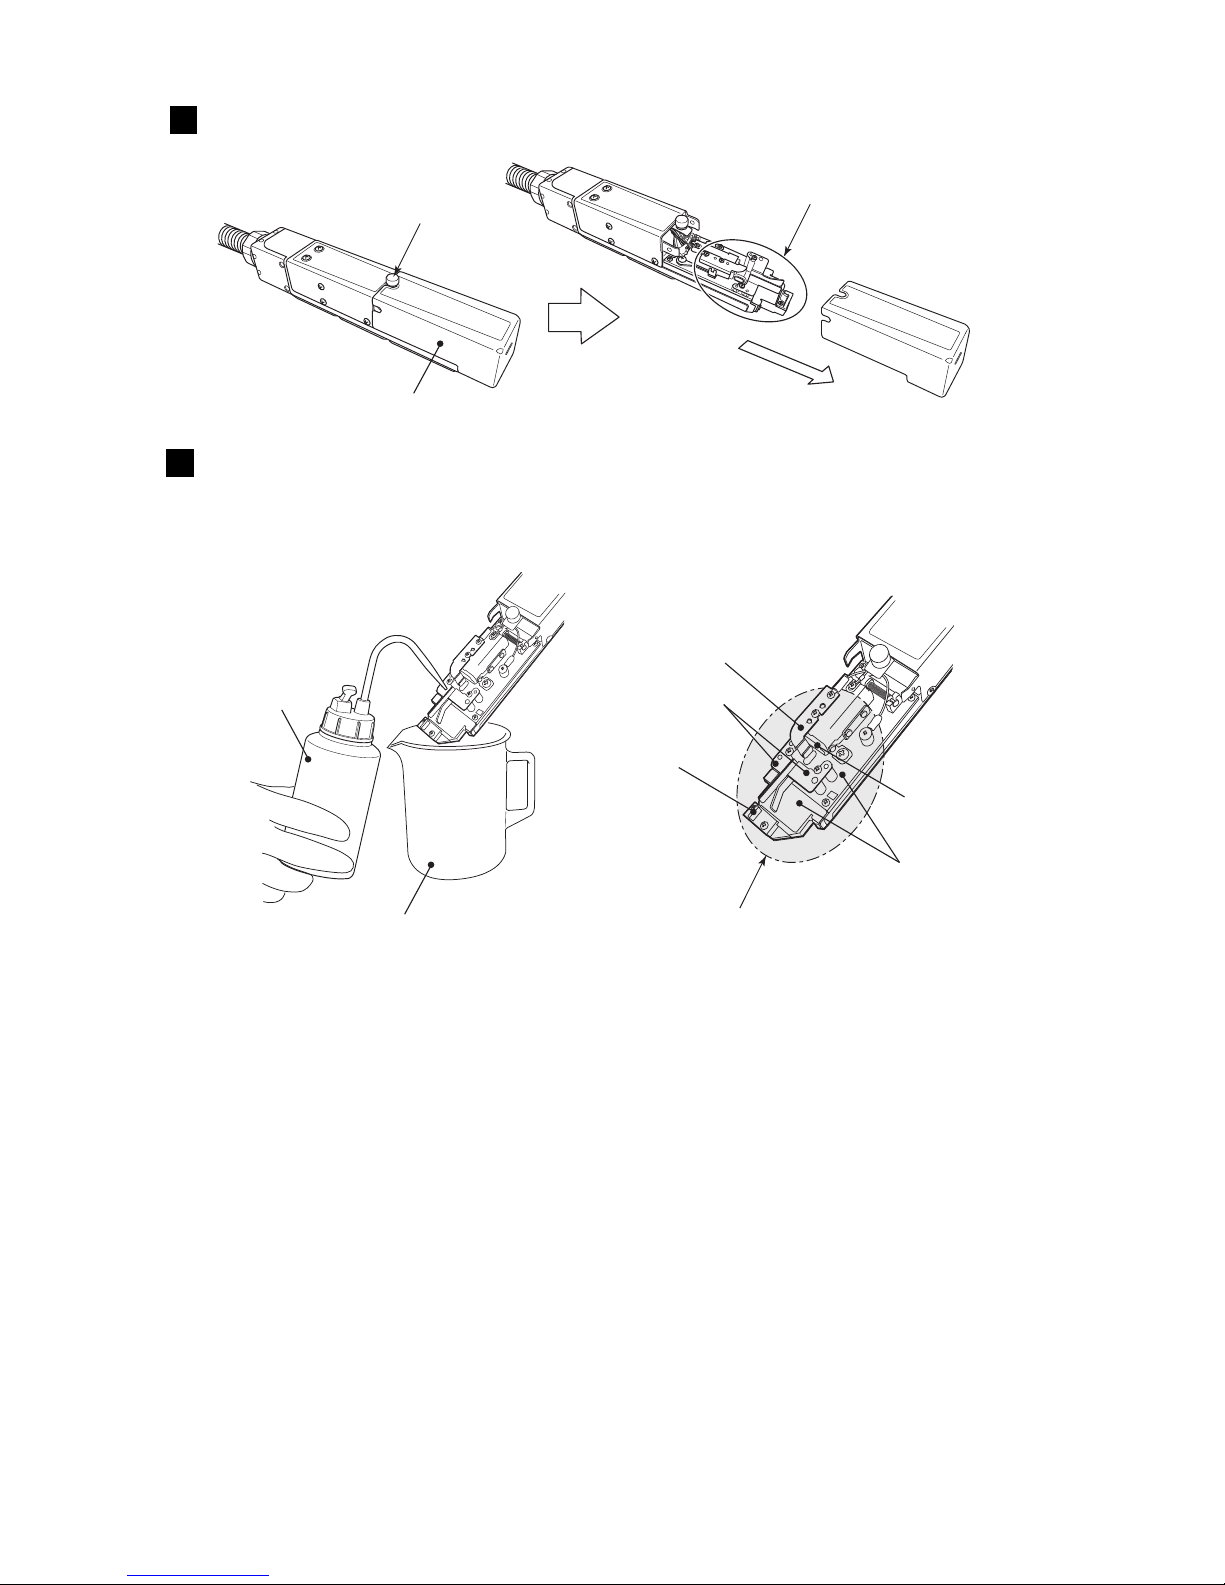
* Thoroughly wipe off the makeup on the surface of each part (including the mounting base) and dry each part
thoroughly with wiping paper.
Clean the inside of the cleaning section with makeup.
Clean the orifice plate, charge electrode, deflection electrode, gutter, and mounting base with makeup.
(Also see “1.3 Print head cleaning”.)
3
Loosen the screw and remove the print head cover.
2
Orifice plate
Charge electrode
Deflection electrode
Mounting base
Beaker
Cleaning bottle
Gutter
Area to be cleaned
Loosen the screw.
Print head cover
Pull out.
Around nozzle
Page 28
3-7 ●Start operation
2015.07.0712:45
M
Manual
Startup
Com=0
===== Ink Jet Startup Confirmation =====
The ink jet will be turned ON.
Solution To turn the ink jet ON, press <Ready>.
Ready
Cancel
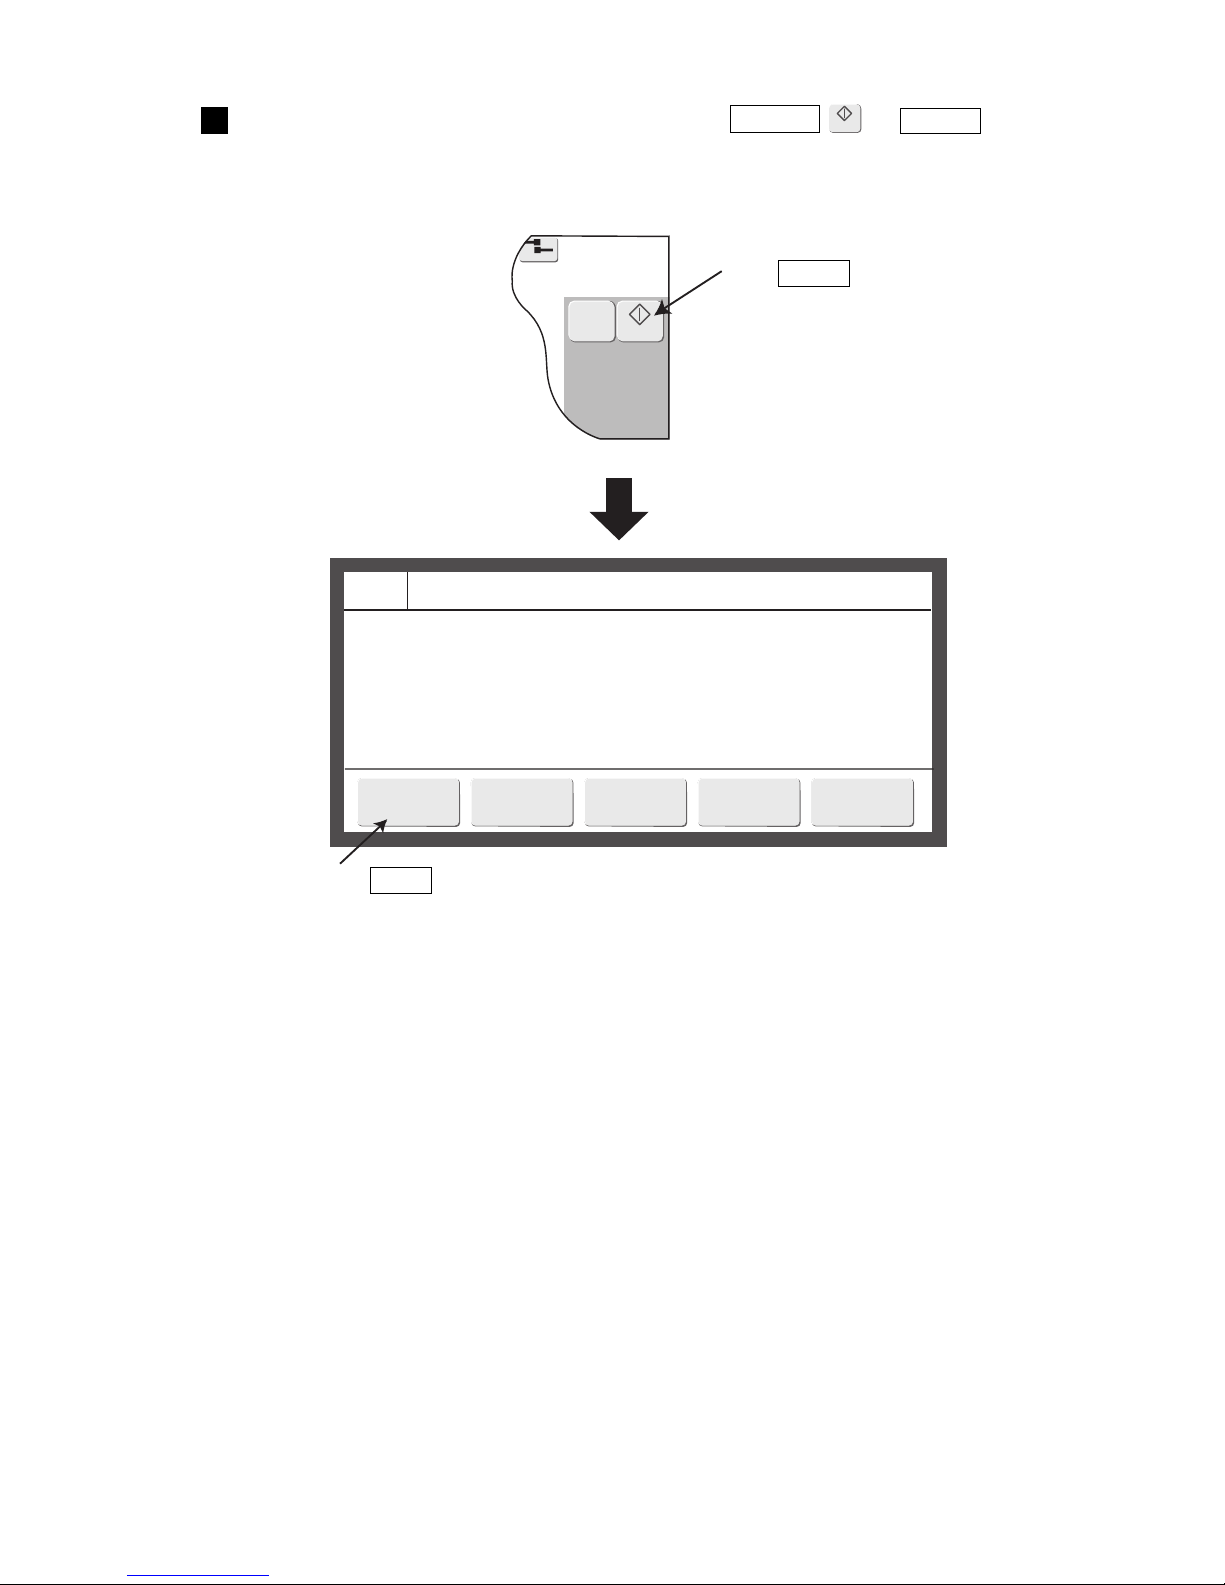
With the print head cover removed, press the Startup → Ready .
● Ink is ejected from the nozzle. (The status changes from “Stop” to “Starting”.
● Operate the unit with the end of the print head remaining inside the beaker.
4
Startup
Press Start up .
Press Ready .
Page 29
●Start operation 3-8
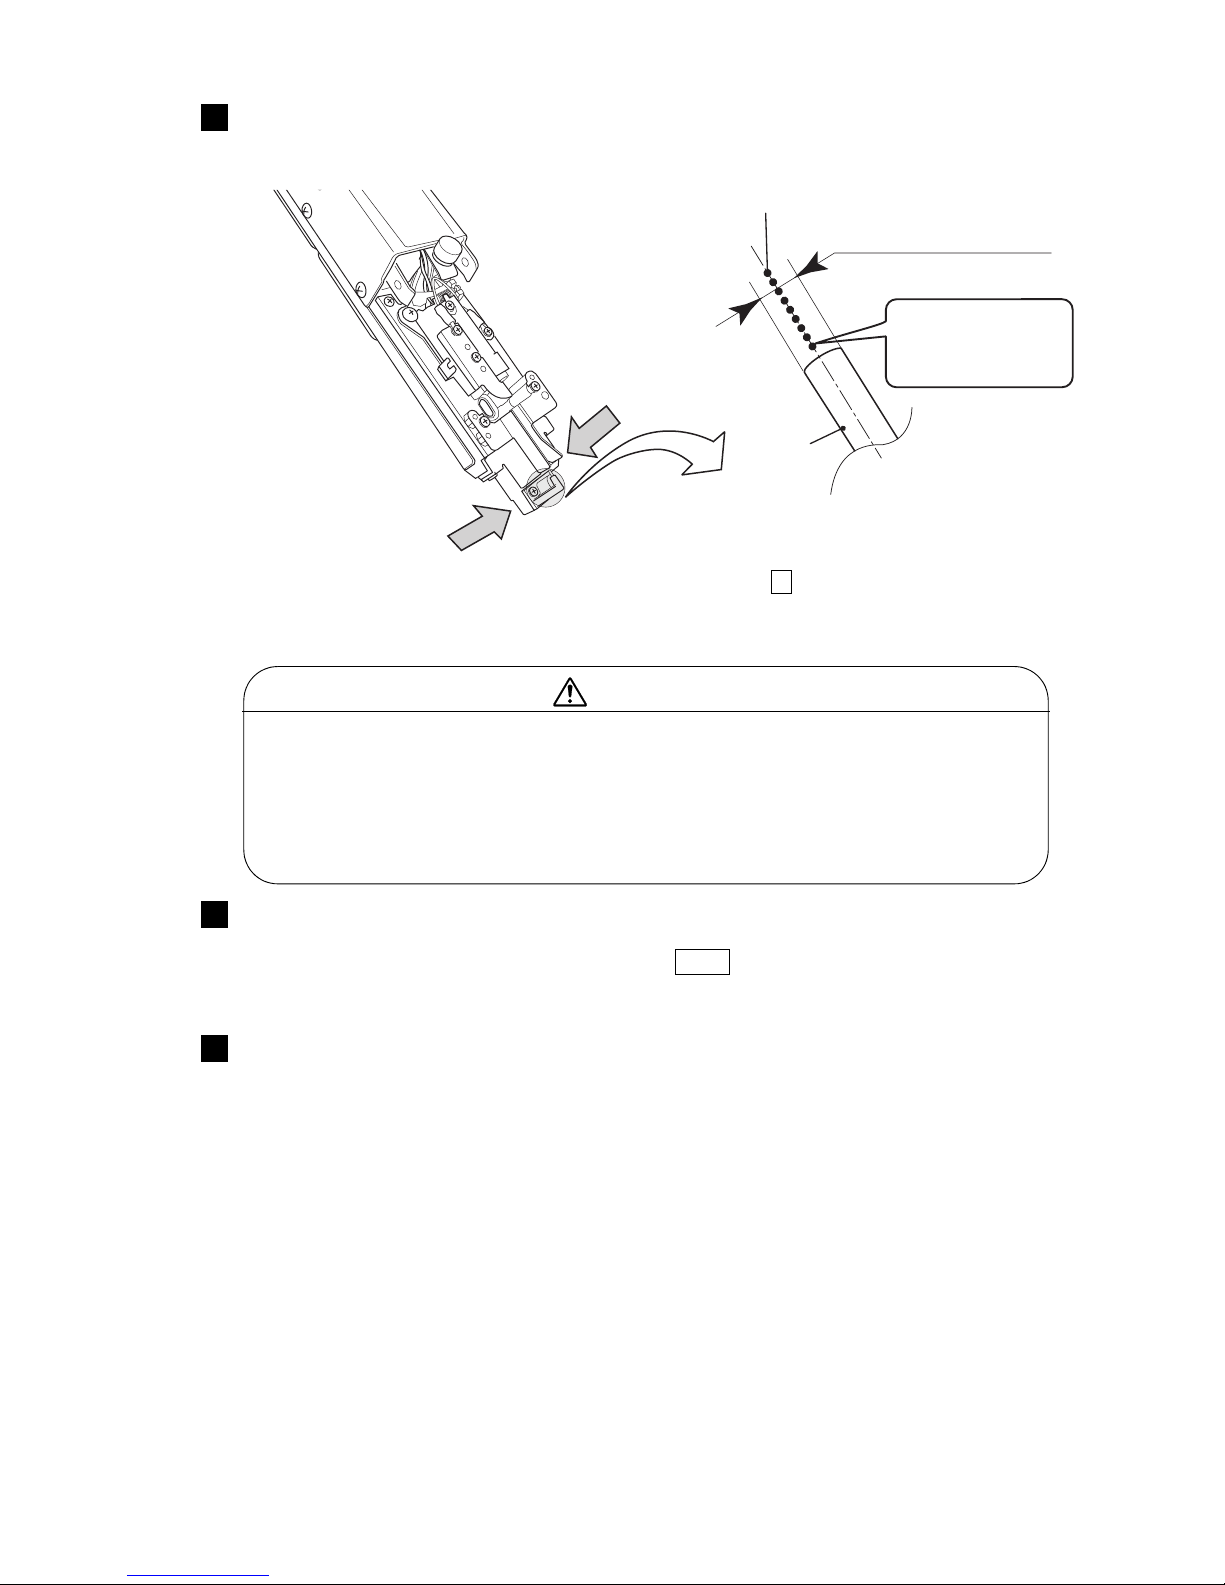
Confirm that the ink stream is at the center of the gutter.
● Check the position of the ink stream from the sides and top of the print head as shown in the figure
and confirm that it is in the center of the gutter.
5
● If the ink stream is not at the center of the gutter, perform step 1 and stop the ink injection. After
that, take action in accordance with Technical Manual “6.4 How to correct ink stream bending and
nozzle clogging”.
● Wear protective gear (goggles and mask) when checking the position of the ink stream.
● If you should get ink or makeup in your eyes or mouth, immediately wash with warm
water or water and see a doctor.
● When ejecting the ink, do it after confirming that there is no one in the ejection
direction.
(Operate with the end of the print head inserted in a beaker, etc.)
WARNING
Install the print head cover.
●Wait until the status changes to “Ready”.
●If the “Cover open” error was displayed, press the Close .
6
Input the print target detection signal and check the printing state.
(See “3.1.1 Start operation”.)
7
Gutter
Ink stream
Side direction
Upper direction
Gutter entrance diameter
The ink stream
should be positioned
at the center of the
gutter inlet.
Page 30
3-9 ●Start operation
2015.07.0712:45
M
Manual
Startup
Com=0
===== Manual Control Menu =====
Eject ink
Ejects ink while applying no deflection voltage.
Cancel
===== Ink Jet Startup Confirmation =====
The ink jet will be turned ON.
Solution To turn the ink jet ON, press <Ready>.
Ready
Cancel
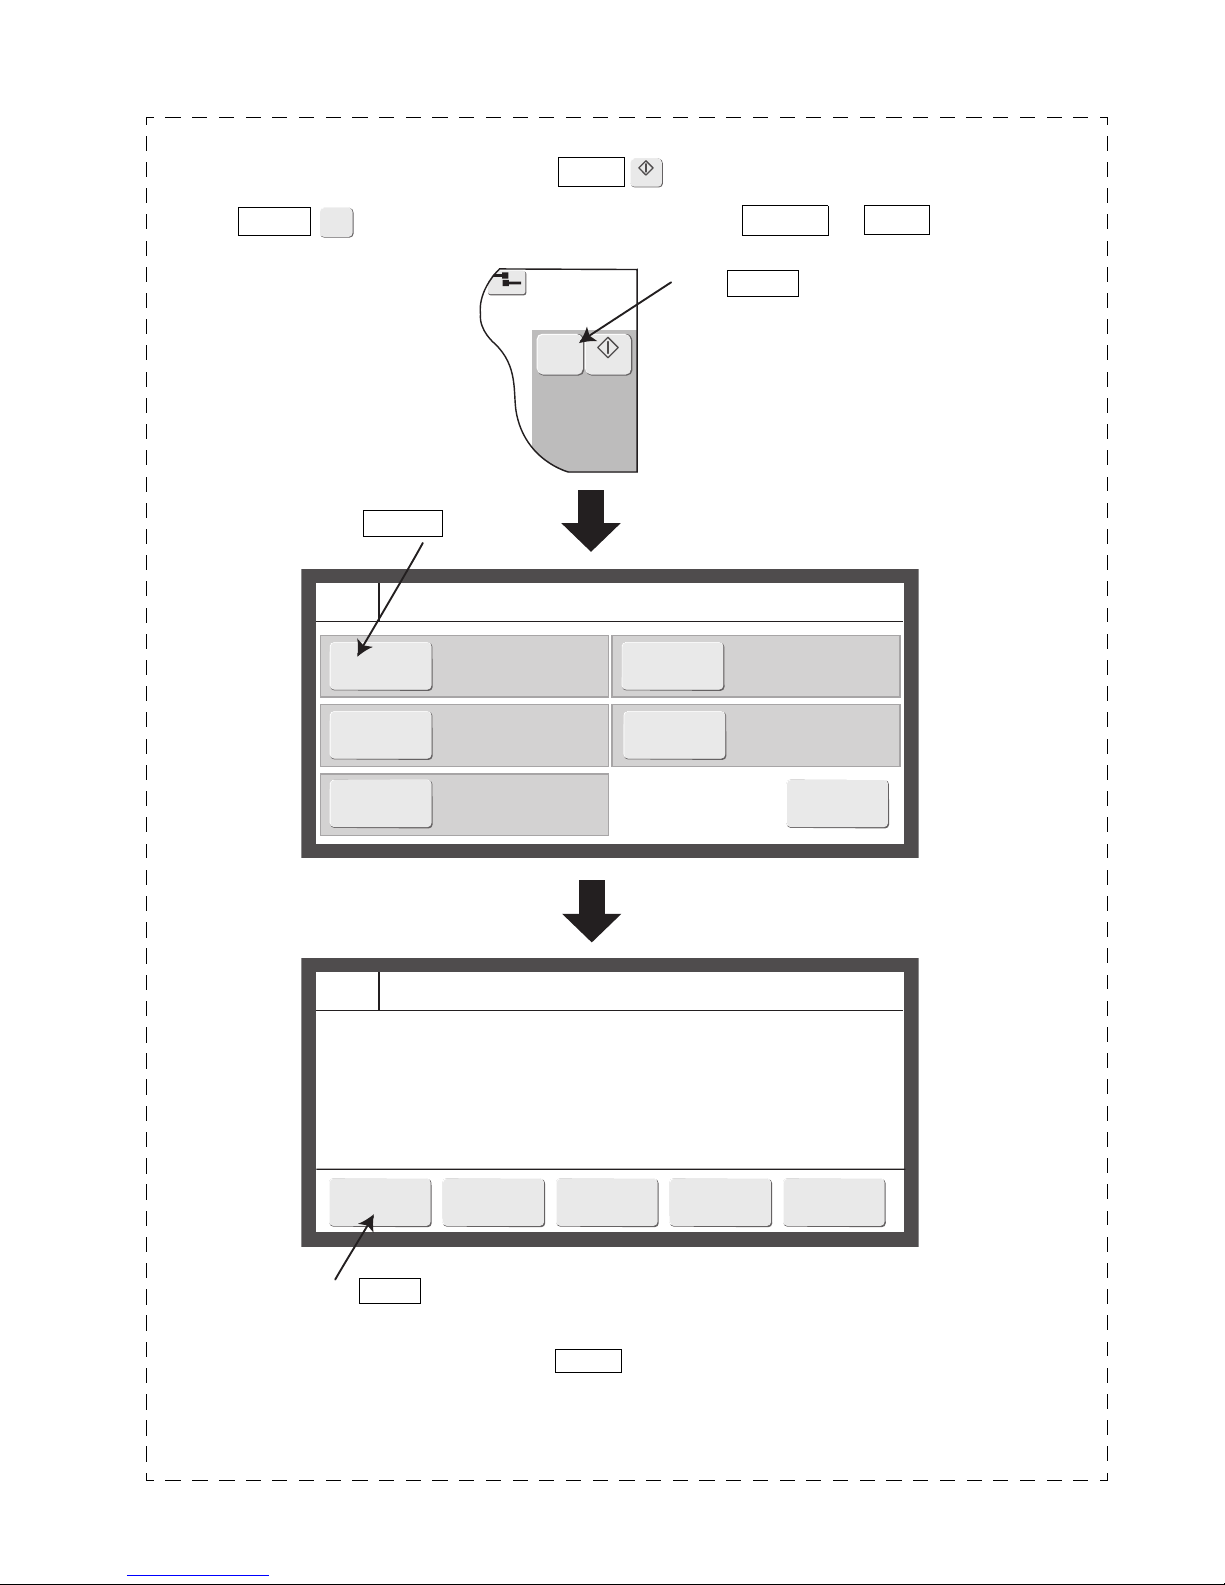
Use this procedure when you want to eject ink from the nozzle for a purpose other than printing.
(Use only during maintenance. To print, use the Startup )
Press the Manual . The Manual Control menu appears. Press the Eject ink → Ready .
M
Manual
Ink ejection using the Manual Control Menu
● Operation can be aborted by pressing the Cancel at the “Manual Control Menu” and “Ink Jet
Startup Confirmation message”.
● If the print head cover installed, the printer will not enter the Ready state even if this operation is
performed. (Enters the Standby state)
Startup
Press Manual .
Press Eject ink .
Press Ready .
Page 31
●Start operation 3-10
2015.07.0712:45
M
Manual
Startup
Com=0
===== Manual Control Menu =====
Stops ink ejection
without cleaning.
Cancel
===== Print Abort Confirmation =====
Printing will be aborted.
Solution Press <OK> to abort.
OK
Cancel
No-cleaning
stop
No deflection voltage is
applied. The printer
status becomes Standby.
Standby
Start
printing
The current message is
printed.
3.1.3 Ready and Standby state switching operation
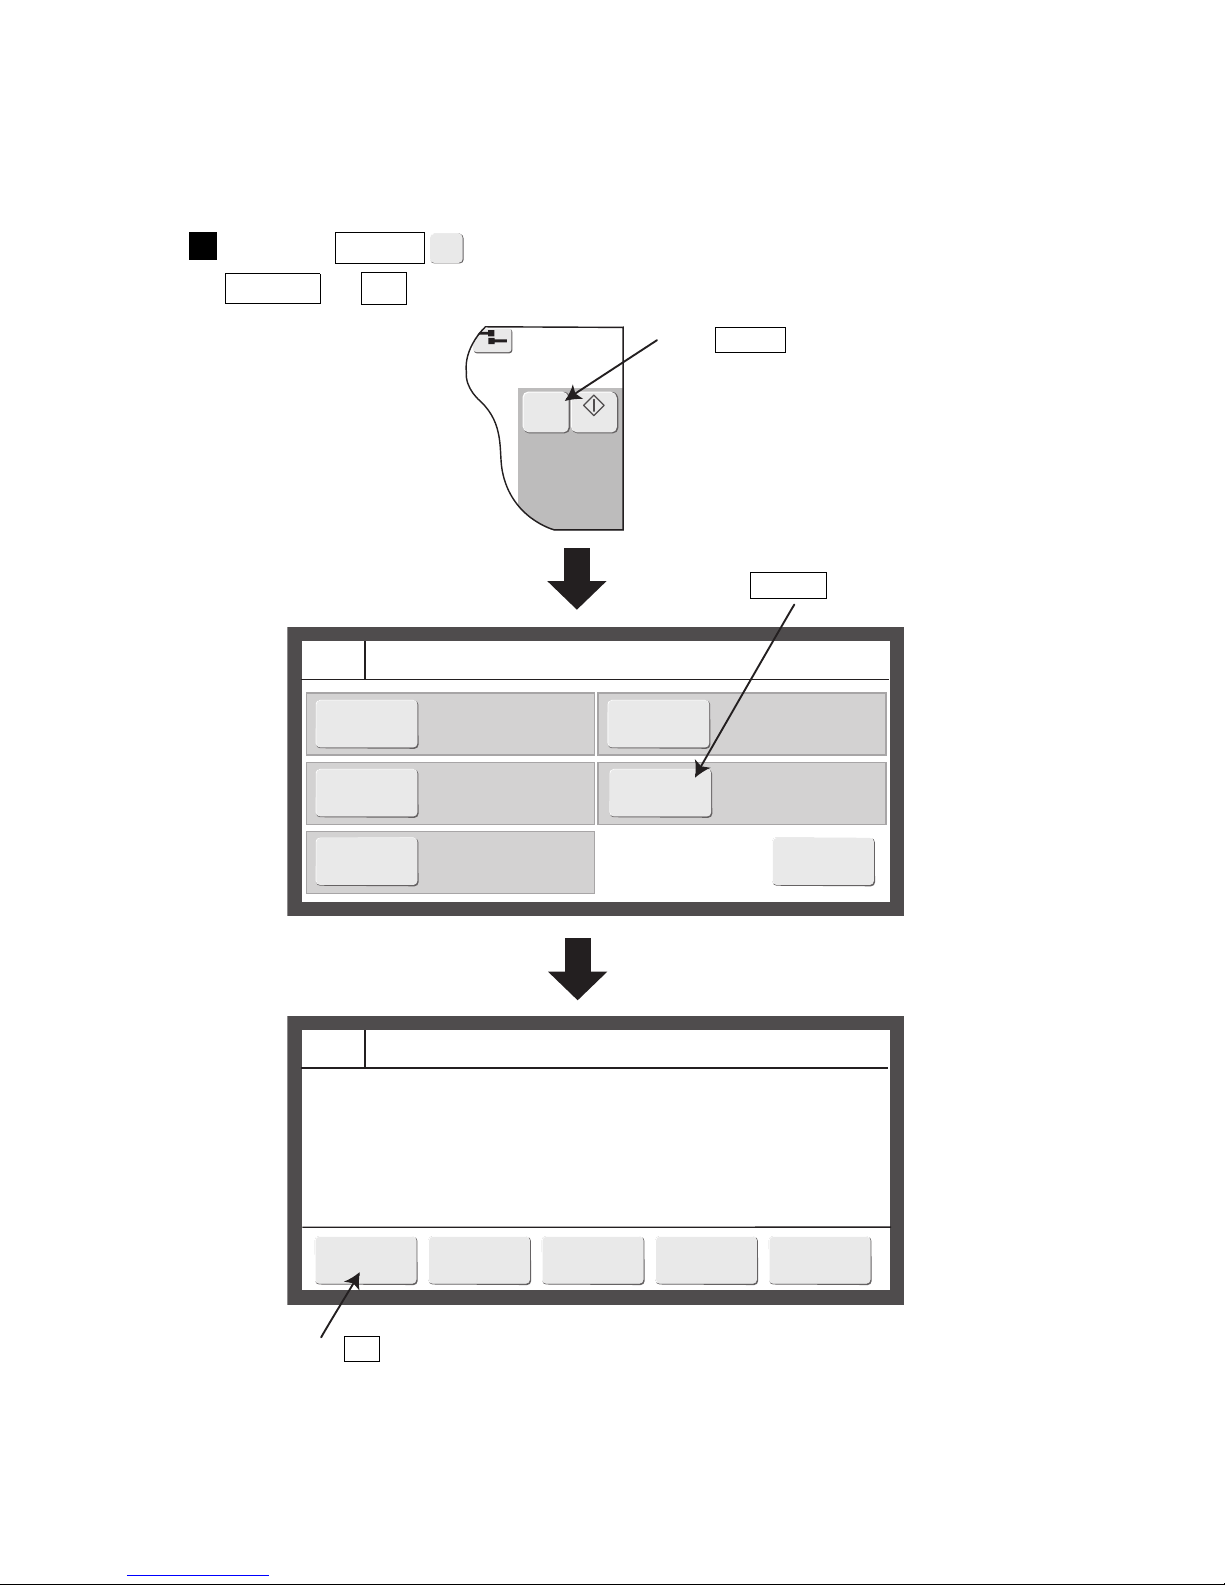
(1) “Ready” state → “Standby” state switching
● With the conveyor interlock being activated by “Ready” signal, should this “Ready” signal be
turned to “Standby”, the conveyor will stop.
Press the Manual . The Manual Control menu appears. Press the
Standby → OK .
1
M
Manual
Press Manual .
Press Standby .
Press OK .
Page 32
3-11 ●Start operation
2015.07.0712:45
M
Manual
Shutdown
Com=0
===== Manual Control Menu =====
Ready
The deflection voltage
is applied. The printer
status becomes Ready.
No-cleaning
stop
Stops ink ejection
without cleaning.
Cancel
===== Print confirmation =====
The current message data will be printed.
Solution Press <OK> to print.
OK
Cancel
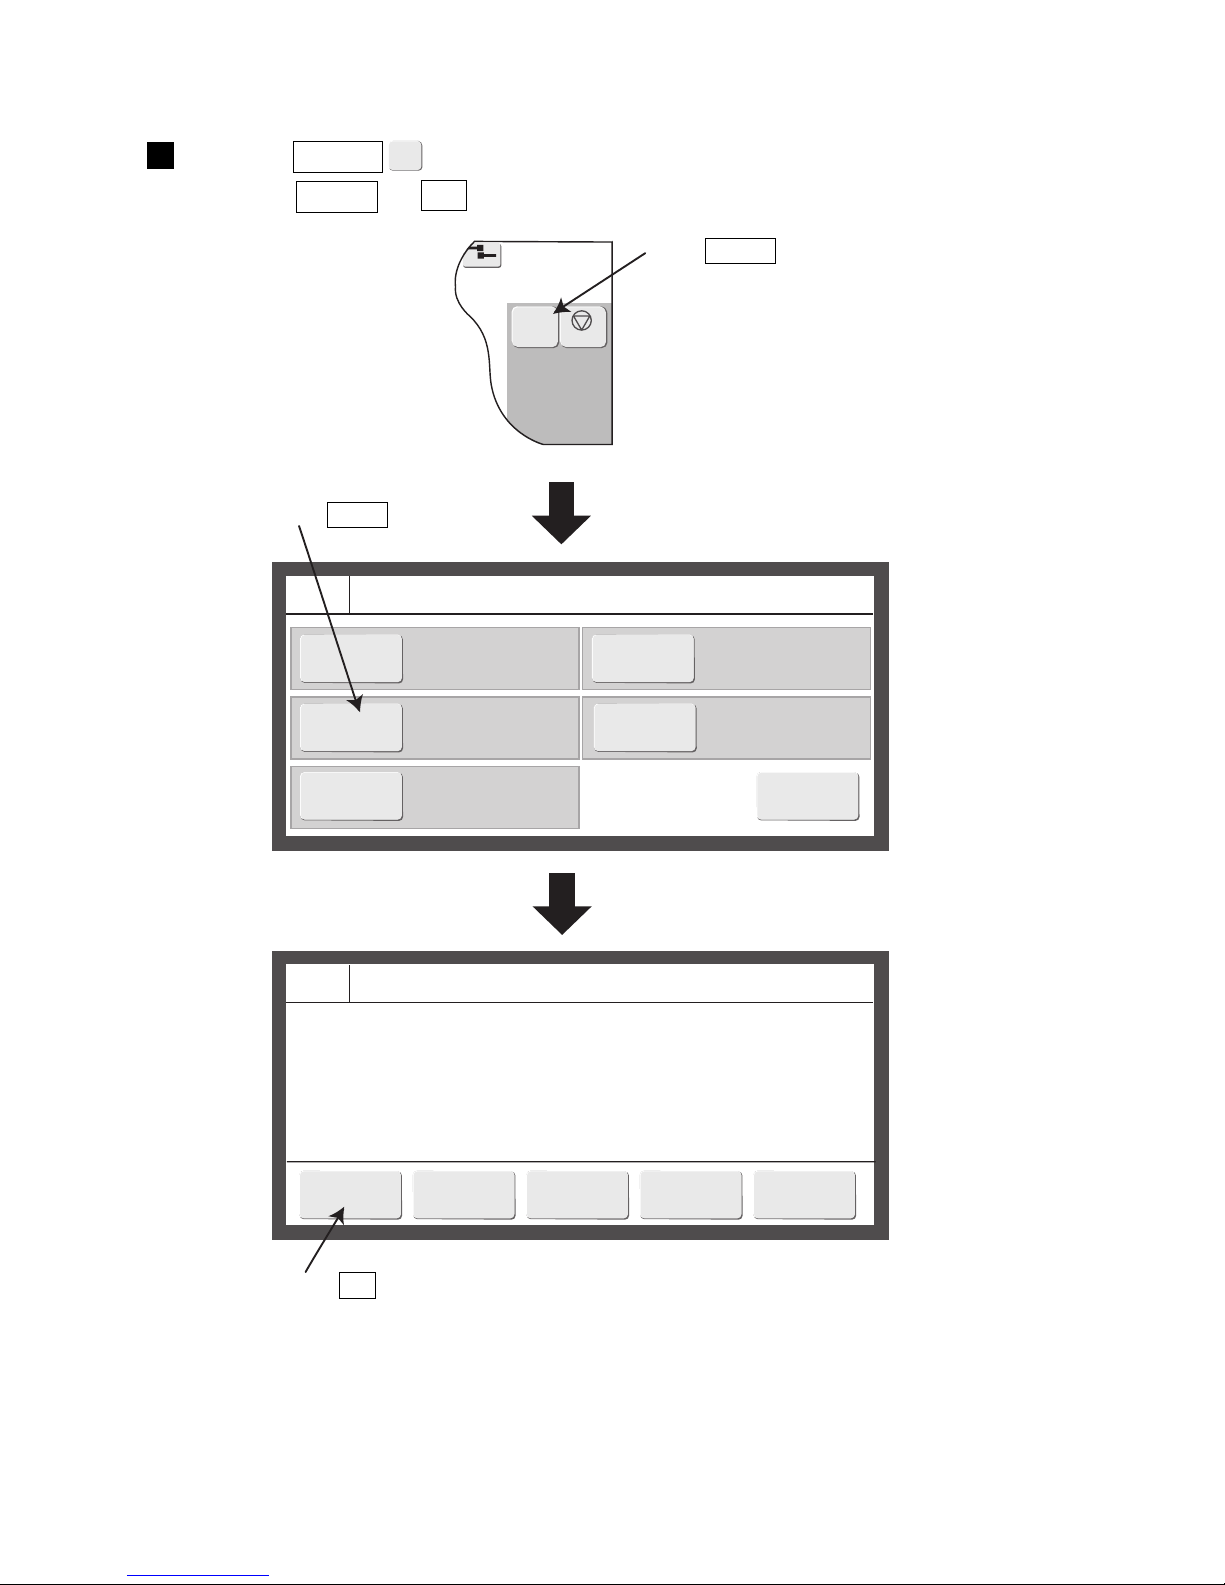
(2) “Standby” state → “Ready” state switching
Press the Manual . The Manual Control Menu appears.
Press the Ready → OK .
1
M
Manual
Press OK .
Press Manual .
Press Ready .
Page 33
●Start operation 3-12
3.1.4 Specifying the user
(1) Functions
●Specifies the user to be logged in at power-on.
●Selects the user and inputs the password when logging in.
●The administrator defines the user name and password and password protection setting in advance.
The password protection setting can be changed beforehand for each user. The user name must be within
12 digits.
●Sets whether or not to select a user which logs in when the power is turned on.
See the Technical Manual “3.3 Selecting user when power is turned on”.
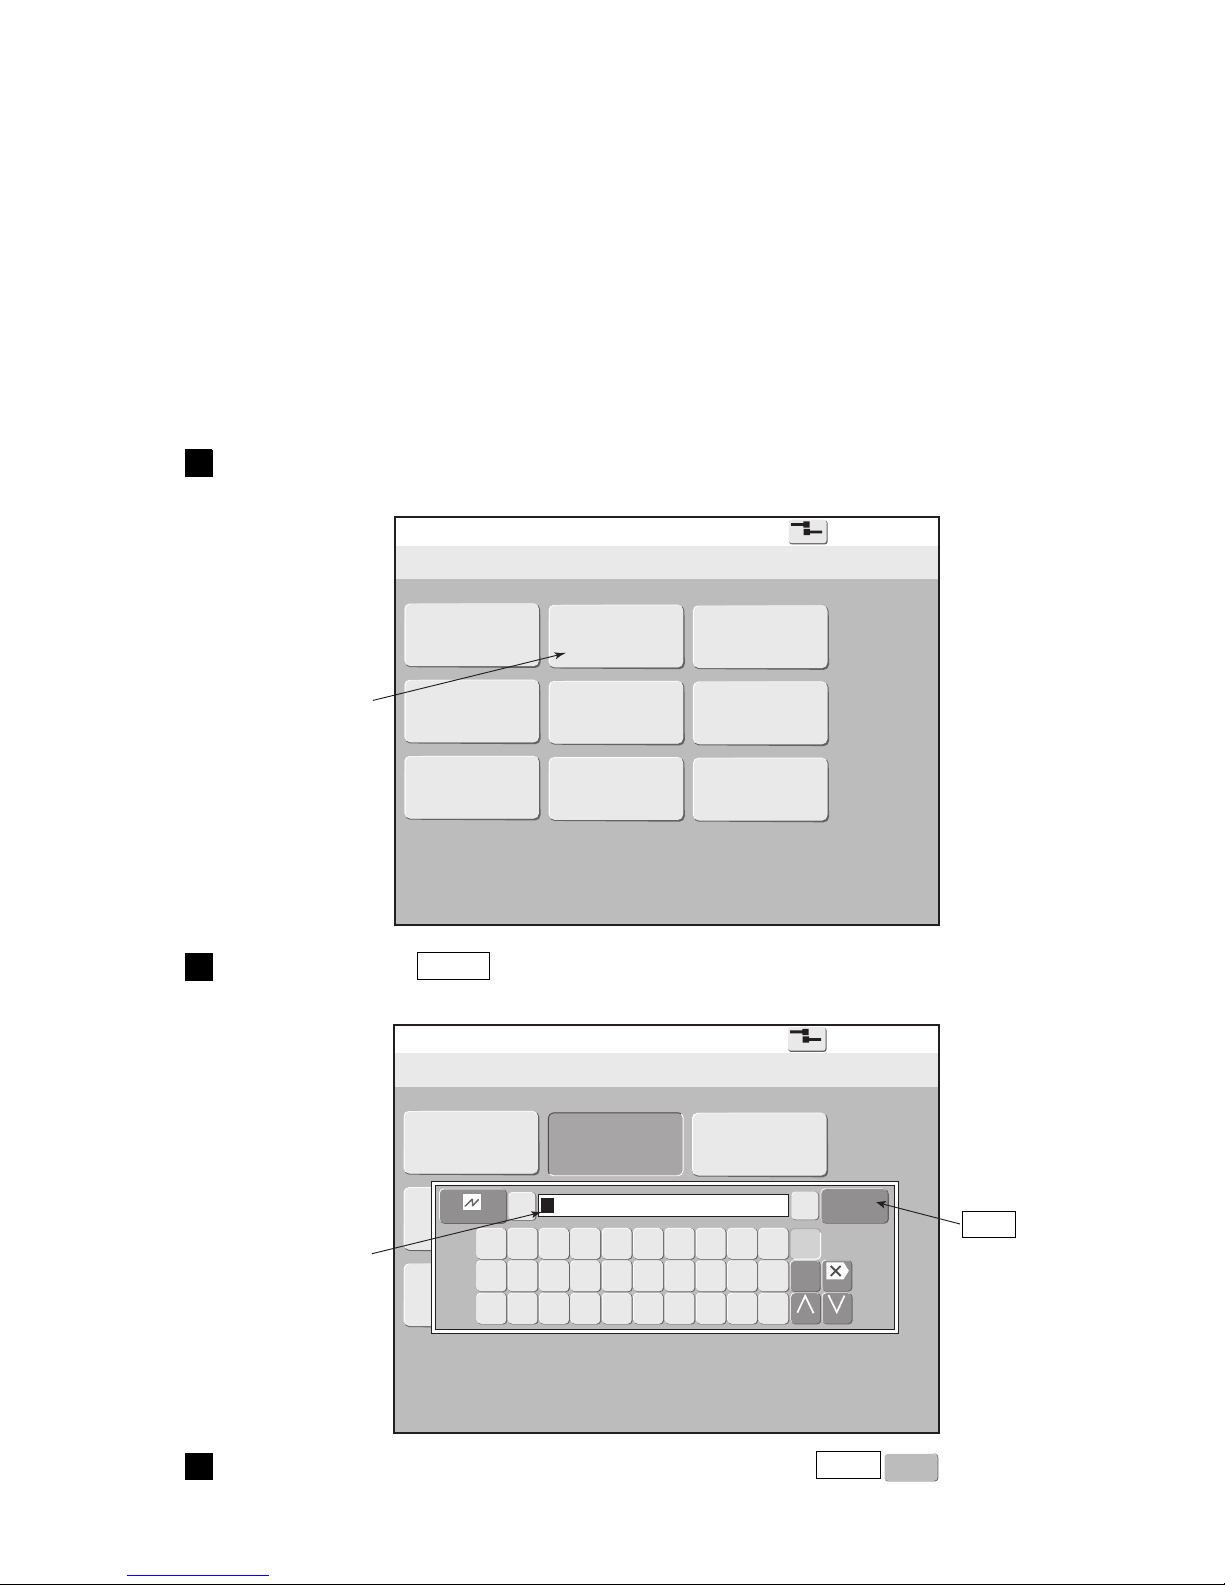
(2) Operation
The administrator sets the login procedure necessary at power-on beforehand.
Select login user
2015.07.0712:45
Com=0
[Stop ]
Admin User2 User3
User4
User5 User6
User7 User8 User9
Select login user
2015.07.0712:45
Com=0
[Stop ]
Admin User3
User4
User5 User6
User7 User8 User9
←
Cancel
Ent
Enter
→
A B C D E F G H I J
K L M N O P Q R S T
123
U V W X Y Z
Delete
Change Change
ABC
User2
Ent
Enter
Turn on the power.
The Select login user screen is displayed.
1
Press user name User2 .
A password input window opens.
2
Input the password for user name “User2” and press Enter .
The initial screen is displayed.
3
The saved user
names are
displayed.
A password input
window opens.
Enter
Page 34
3-13 ●Shut down operation
3.2 Shut down operation
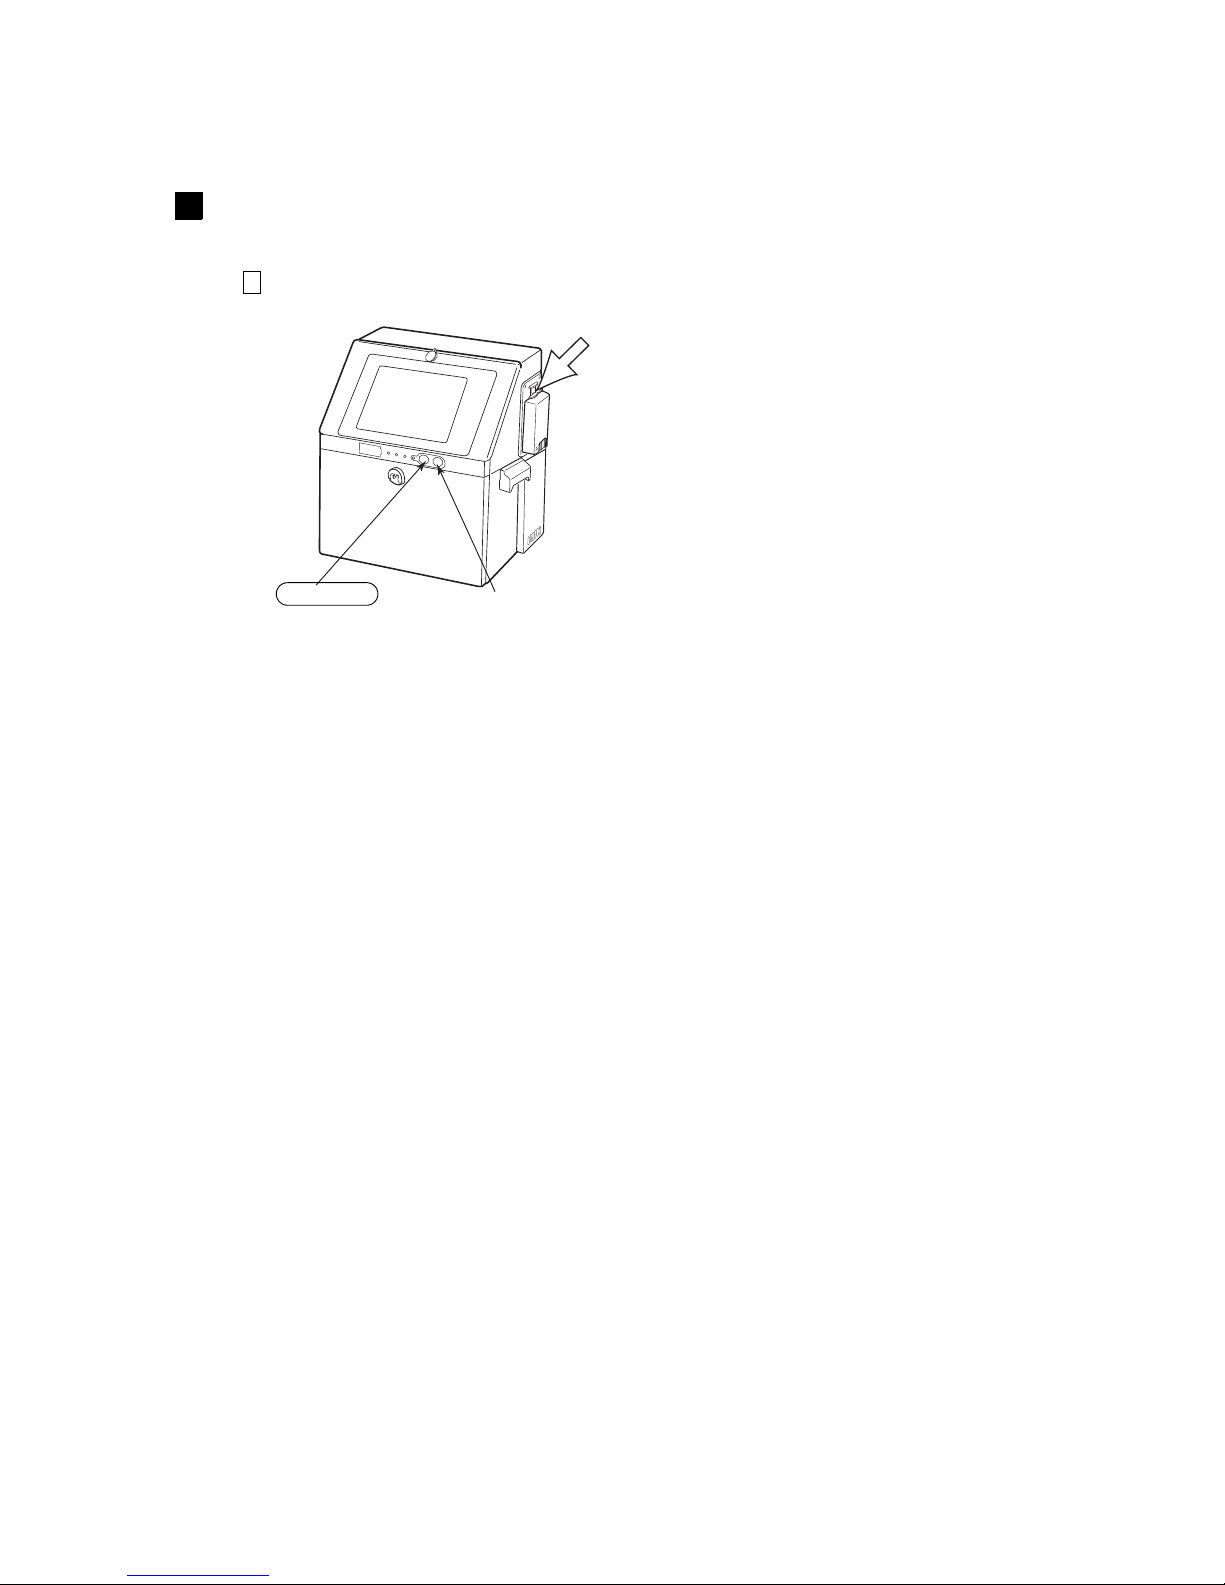
3.2.1 Automatically stopping by pressing one button
(RX2-S only)
Press the Stop switch. (Press for about 2 seconds.)
All operations up to IJ printer power OFF are performed automatically.
Depending on the model, there may not be a Stop switch. Stop the ink with the button on the screen
at 1 of par. 3.2.2, and turn off the power in accordance with par. 3.2.3.
1
The power is turned OFF by Stop switch from the state in which ink is being ejected or being stopped.
(The main power switch does not have to be turned off. The power consumption does not change even
if the main power switch remains ON.)
Main power switch
Start switch
Stop switch
Page 35
●Shut down operation 3-14
3.2.2 Stopping ink ejection by pressing the screen button
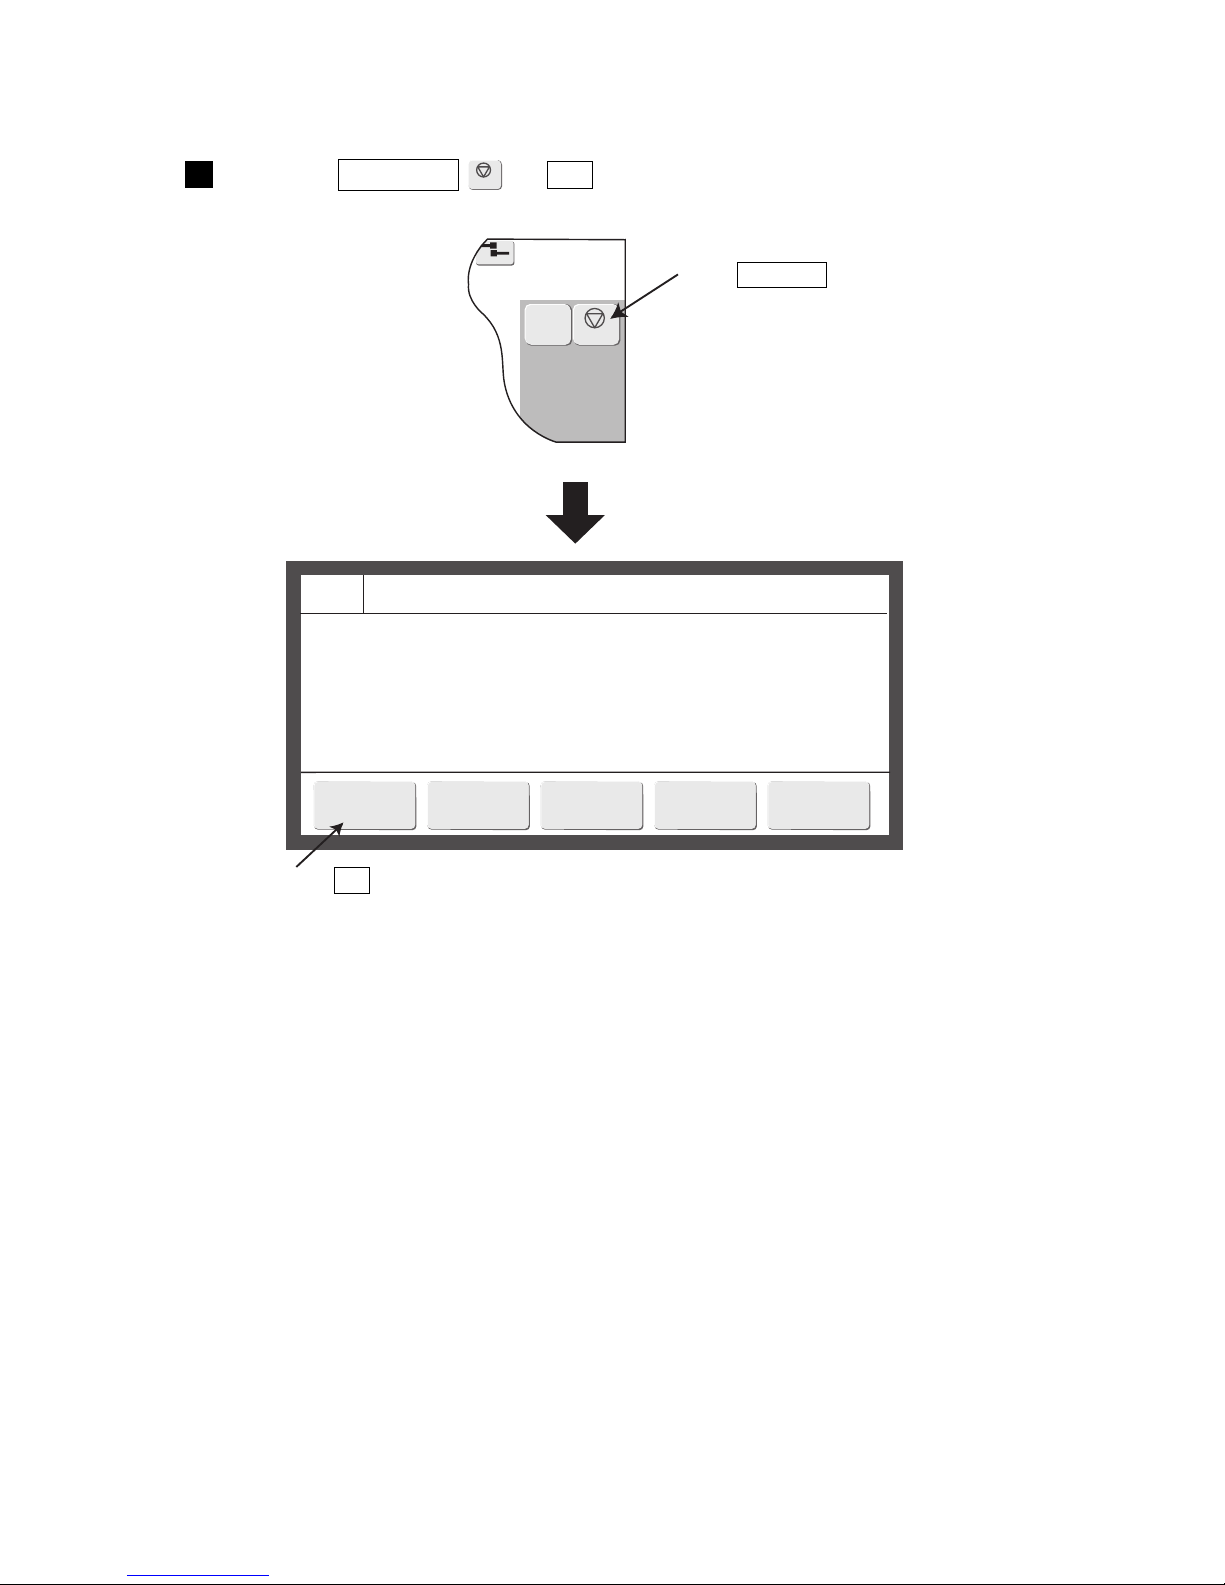
● Perform ink stop processing using the following procedure.
2015.07.0712:45
M
Manual
Shutdown
Com=0
===== Shutdown Process Confirmation =====
Shutdown will stop the ink jet.
Solution To stop the ink jet, press <OK>.
OK
Close
Press the Shutdown → OK .
A confirmation screen is displayed.
Shutdown
1
●Wait for the status to change from “Stopping” to “Stop”.
Press Shutdown .
Press OK .
Page 36
3-15 ●Shut down operation
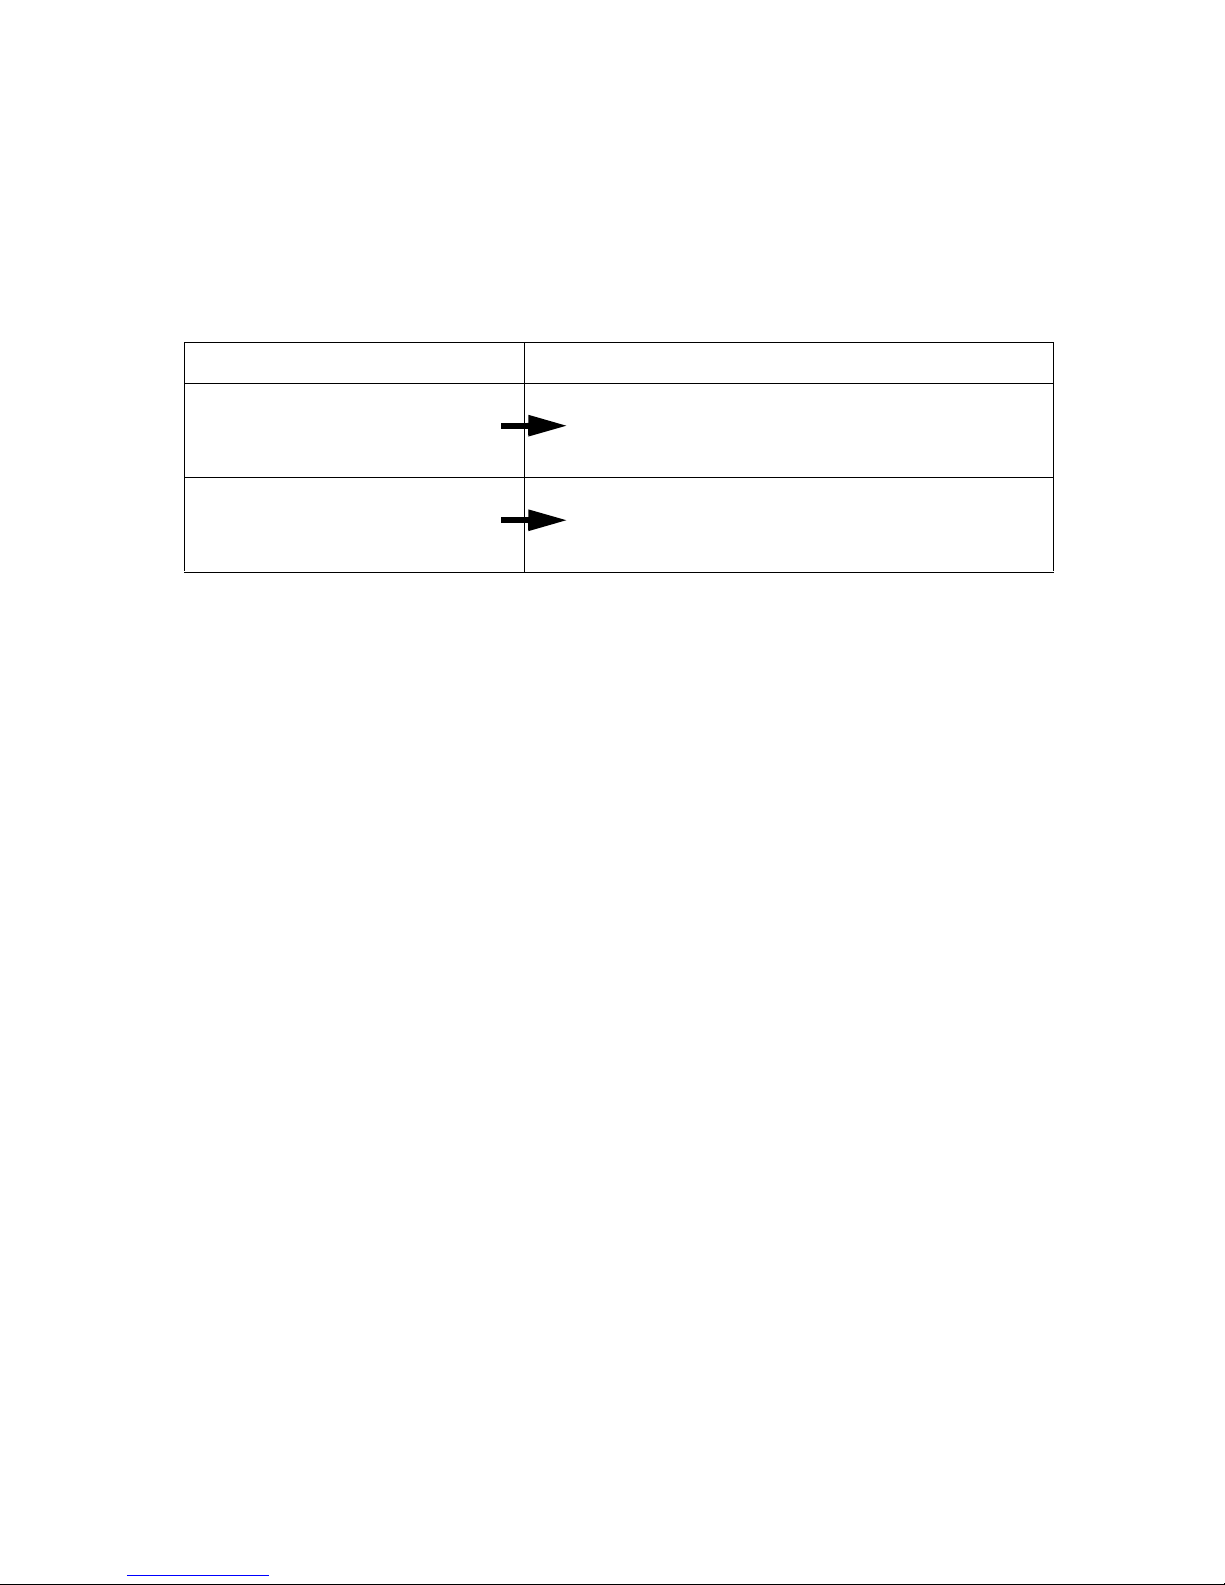
Turn off method Method which displays a screen at the next operation
When the main power switch was
turned off after being stopped by
Stop switch.
Screen is displayed when the startup switch is
turned ON after the main power switch was turned
ON.
When the main power switch was
turned off without using the stop
switch
Screen is displayed when the main power switch
is turned ON.
3.2.3 Turning off the main power switch
(1) RX2-S
●Press Stop switch normally instead of main power switch to turn off the power at the end of operation.
●If the IJ printer will not be used for a long time, turn off the main power switch.
●Do not turn off the main power switch while ink is being ejected.
See “11. EMERGENCY PROCEDURES”.
●The state when the power is turned on at the next operation differs depending on the state when the main
power switch was turned off.
(2) RX2-B
●Turn off main power switch at the end of operation.
●Do not turn off the main power switch while ink is being ejected.
Page 37
●Shut down operation 3-16
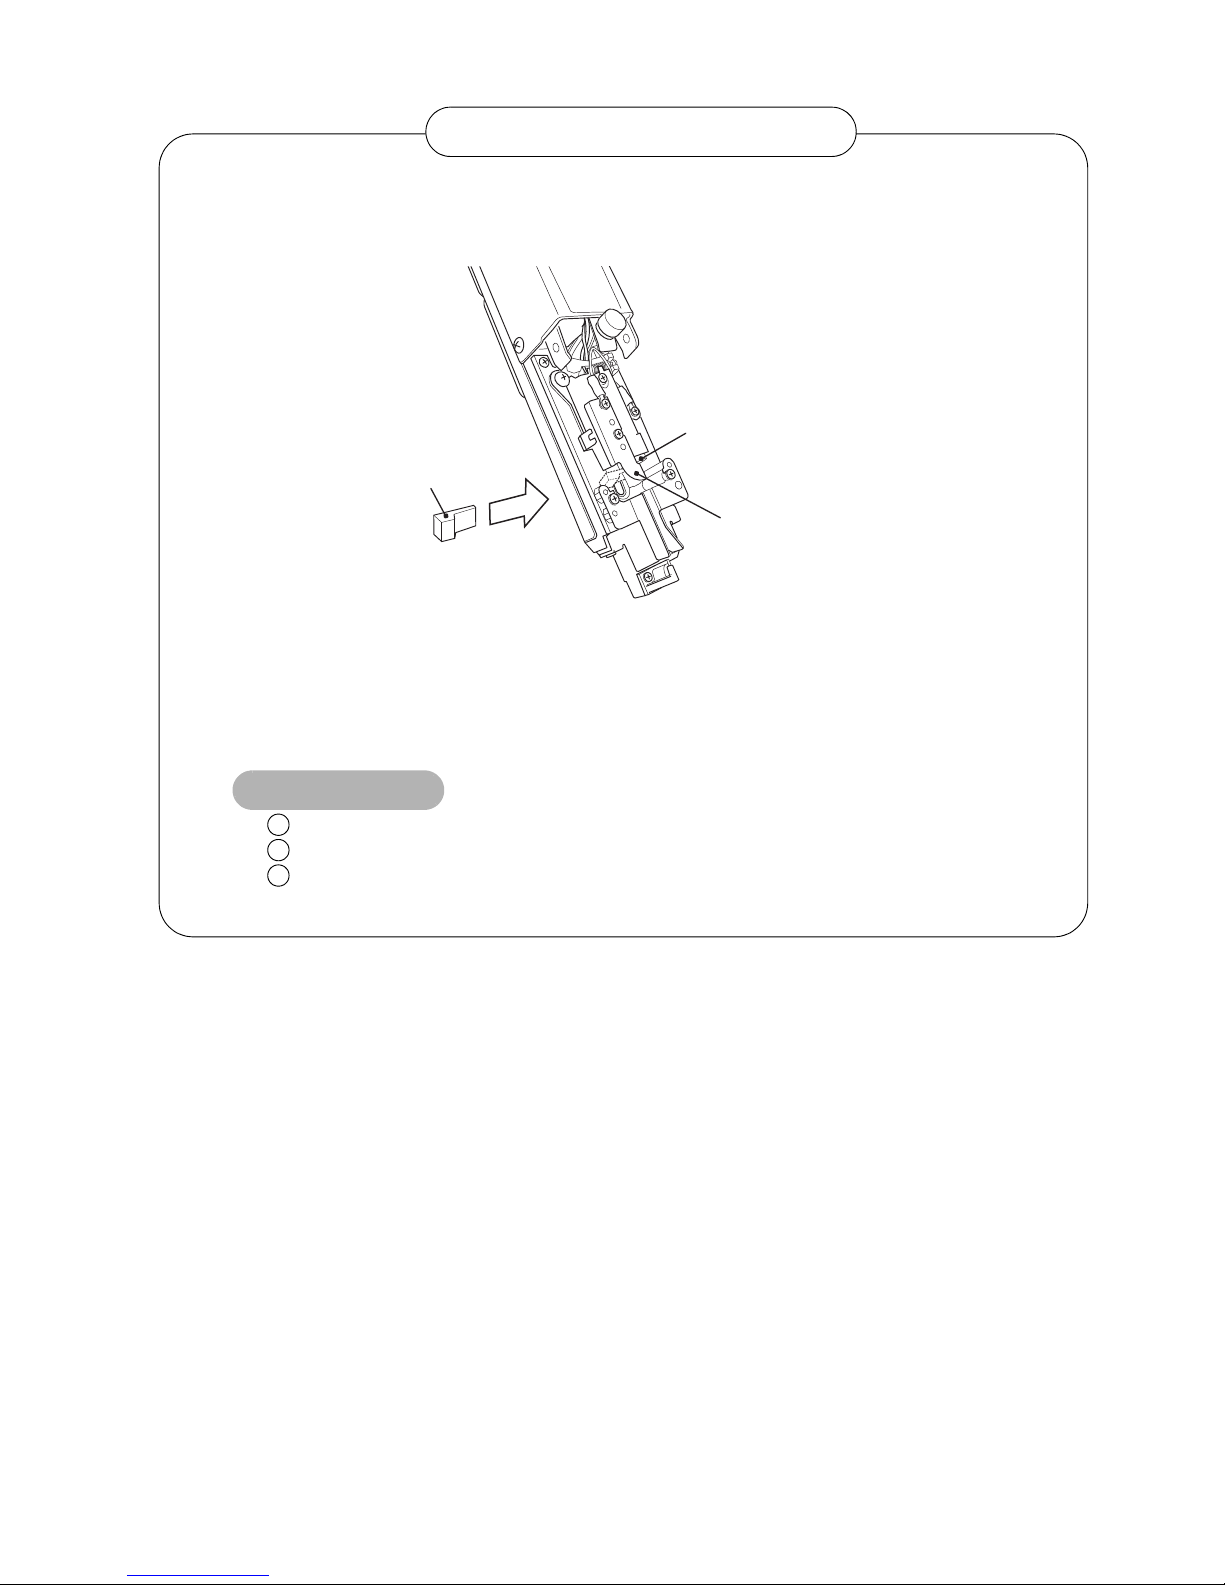
1. To prevent drying of the nozzle orifice and dust from sticking to the plate during unit storage,
the unit is shipped with a “nozzle rubber seal” installed. Remove this “nozzle rubber seal” at
installation and test running and adjustment.
2. The “nozzle rubber seal” prevents drying of the orifice plate and dust from sticking to the
plate. When the IJ printer will not be used for several days over a holiday, etc., we
recommend that the “nozzle rubber seal” be installed between the orifice plate and charge
electrode at shutdown.
Store the “nozzle rubber seal” in a plastic bag, etc., to protect it from dirt and dust.
Always install the “nozzle rubber seal” after cleaning it with makeup.
When installing the “nozzle rubber seal”, be careful not to deform the charge
electrode.
1
2
3
Usage precautions
Handling the nozzle rubber seal
Charge electrode
Orifice plate
Nozzle rubber seal
Page 38
3-17 ●Basic operation
3.3 Basic operation
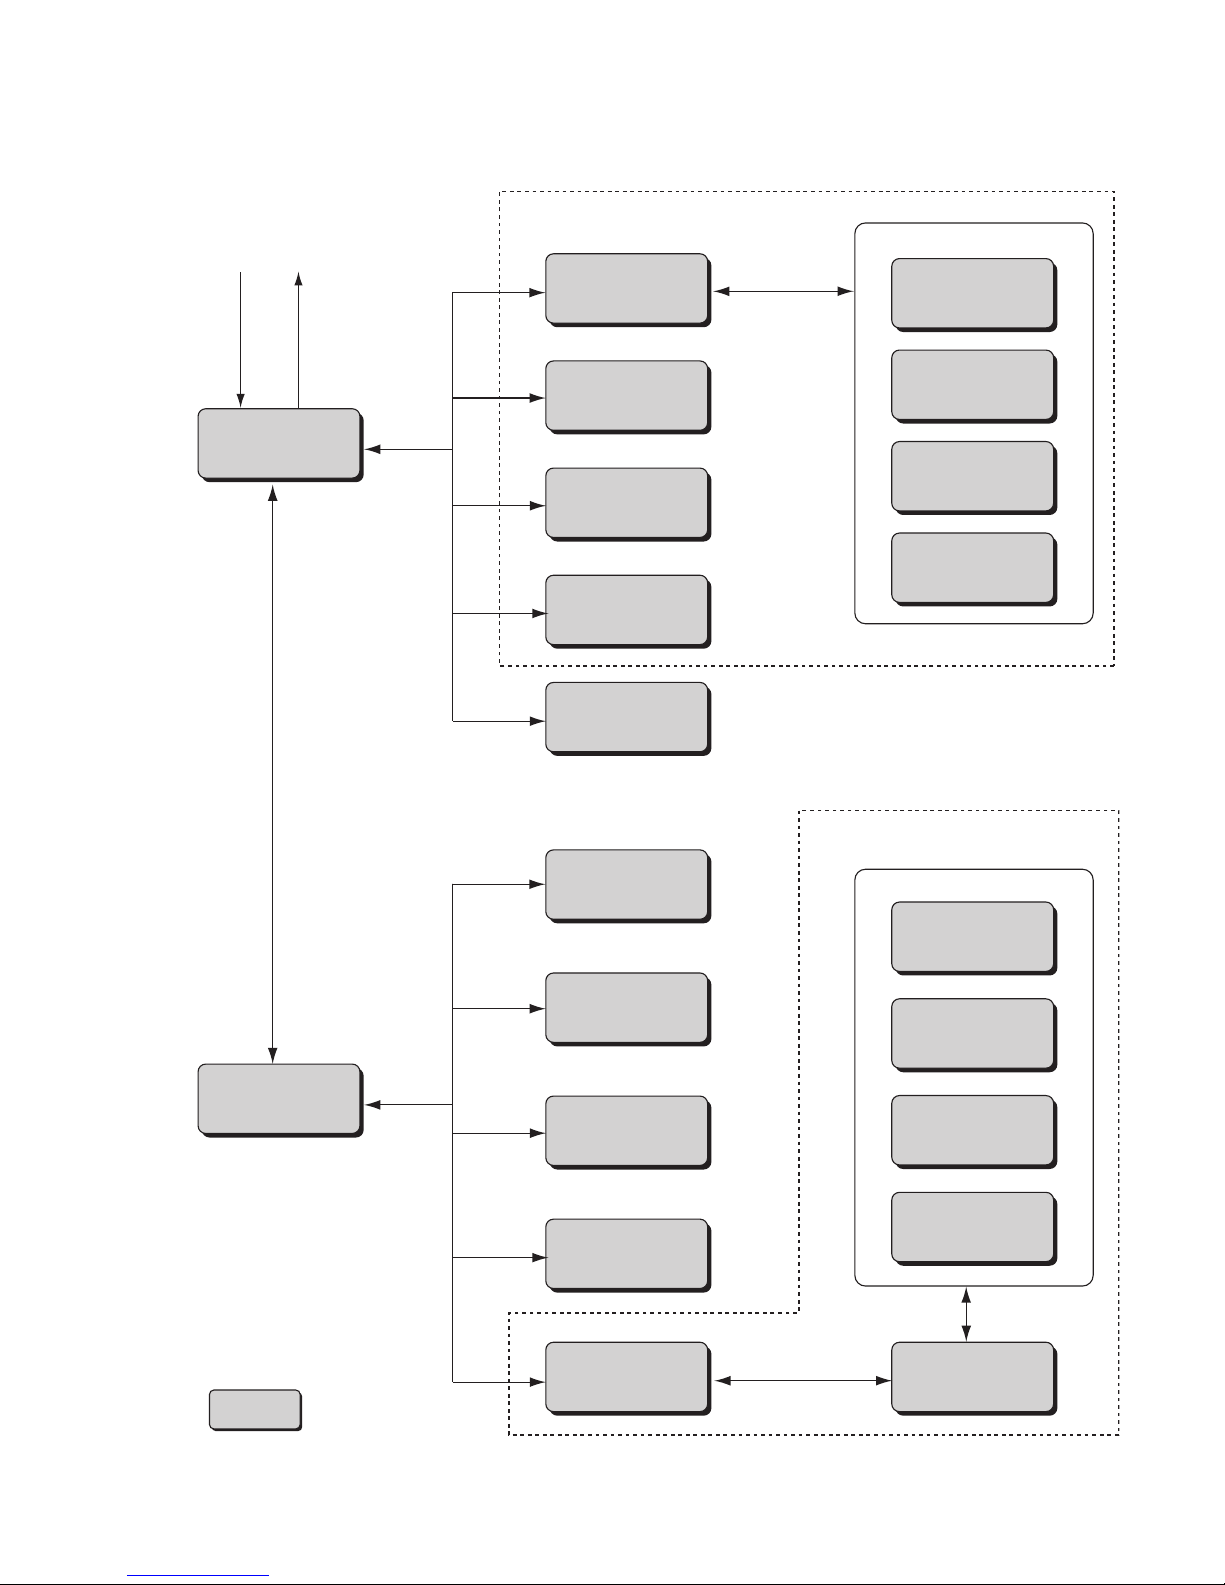
3.3.1 Operating Scheme
(1) Overall view
Print description
(Menu 1)
Print description
(Menu 2)
Power ON Power OFF
Operation
management
Select message
Over Write
message
Adjust print
parameters
Environment setup
menu
Auxiliary function
menu
Maintenance
menu
: Screen name
* See next page, Change message
Change message
Edit message
Print format
Print specifications
Change message
Adjust print
parameters
Edit message
Print format
Print specifications
Adjust print
parameters
Change message
Select
login user
Create/Edit
message
For print target data
For save data
Change message
Page 39
●Basic operation 3-18
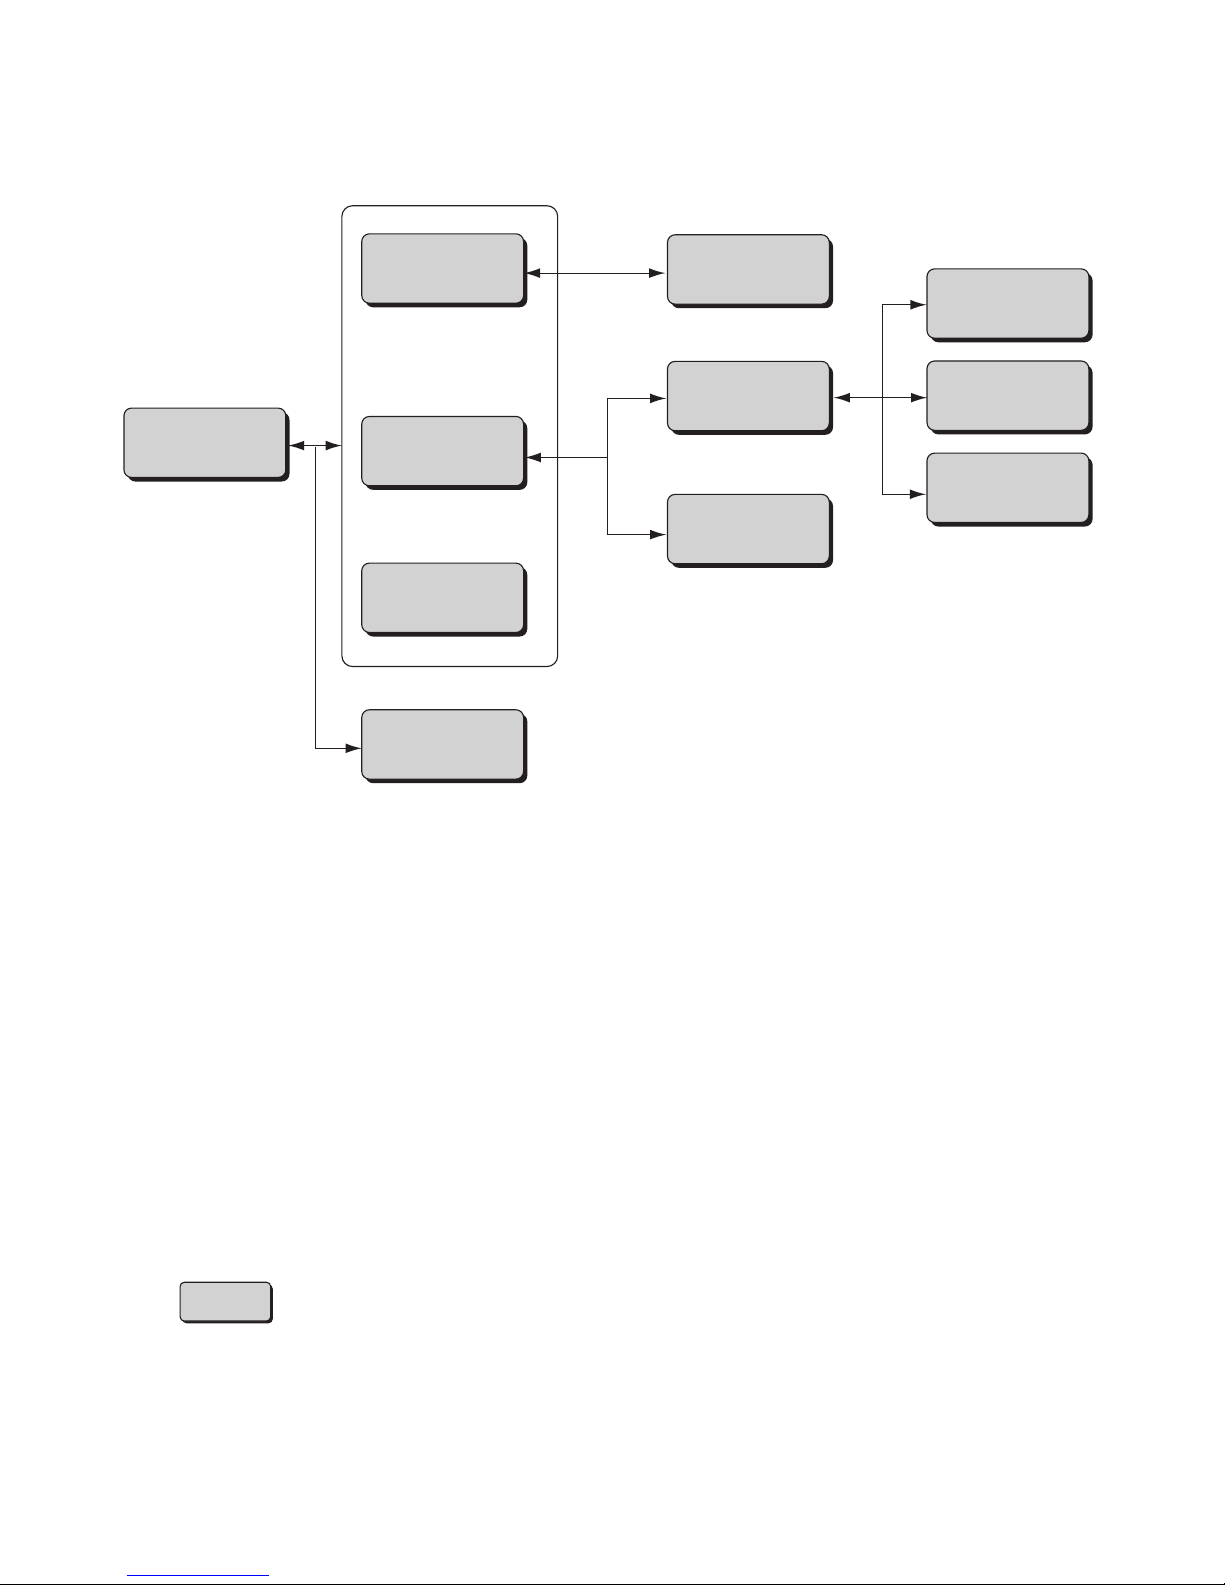
(2) Change message
Change message
Edit message
Print format
Print specifications
Var i ous prin t
setup
Count conditions
Calendar
conditions
Adjust
Inter-character
space Substitution
rules
Shift code setup
(Op on RX2-S)
(Op on RX2-S)
Time count
conditions
* The display can be
switched between screens
Edit message,
Print format, and
Print specifications.
: Screen name
Page 40
3-19 ●Basic operation
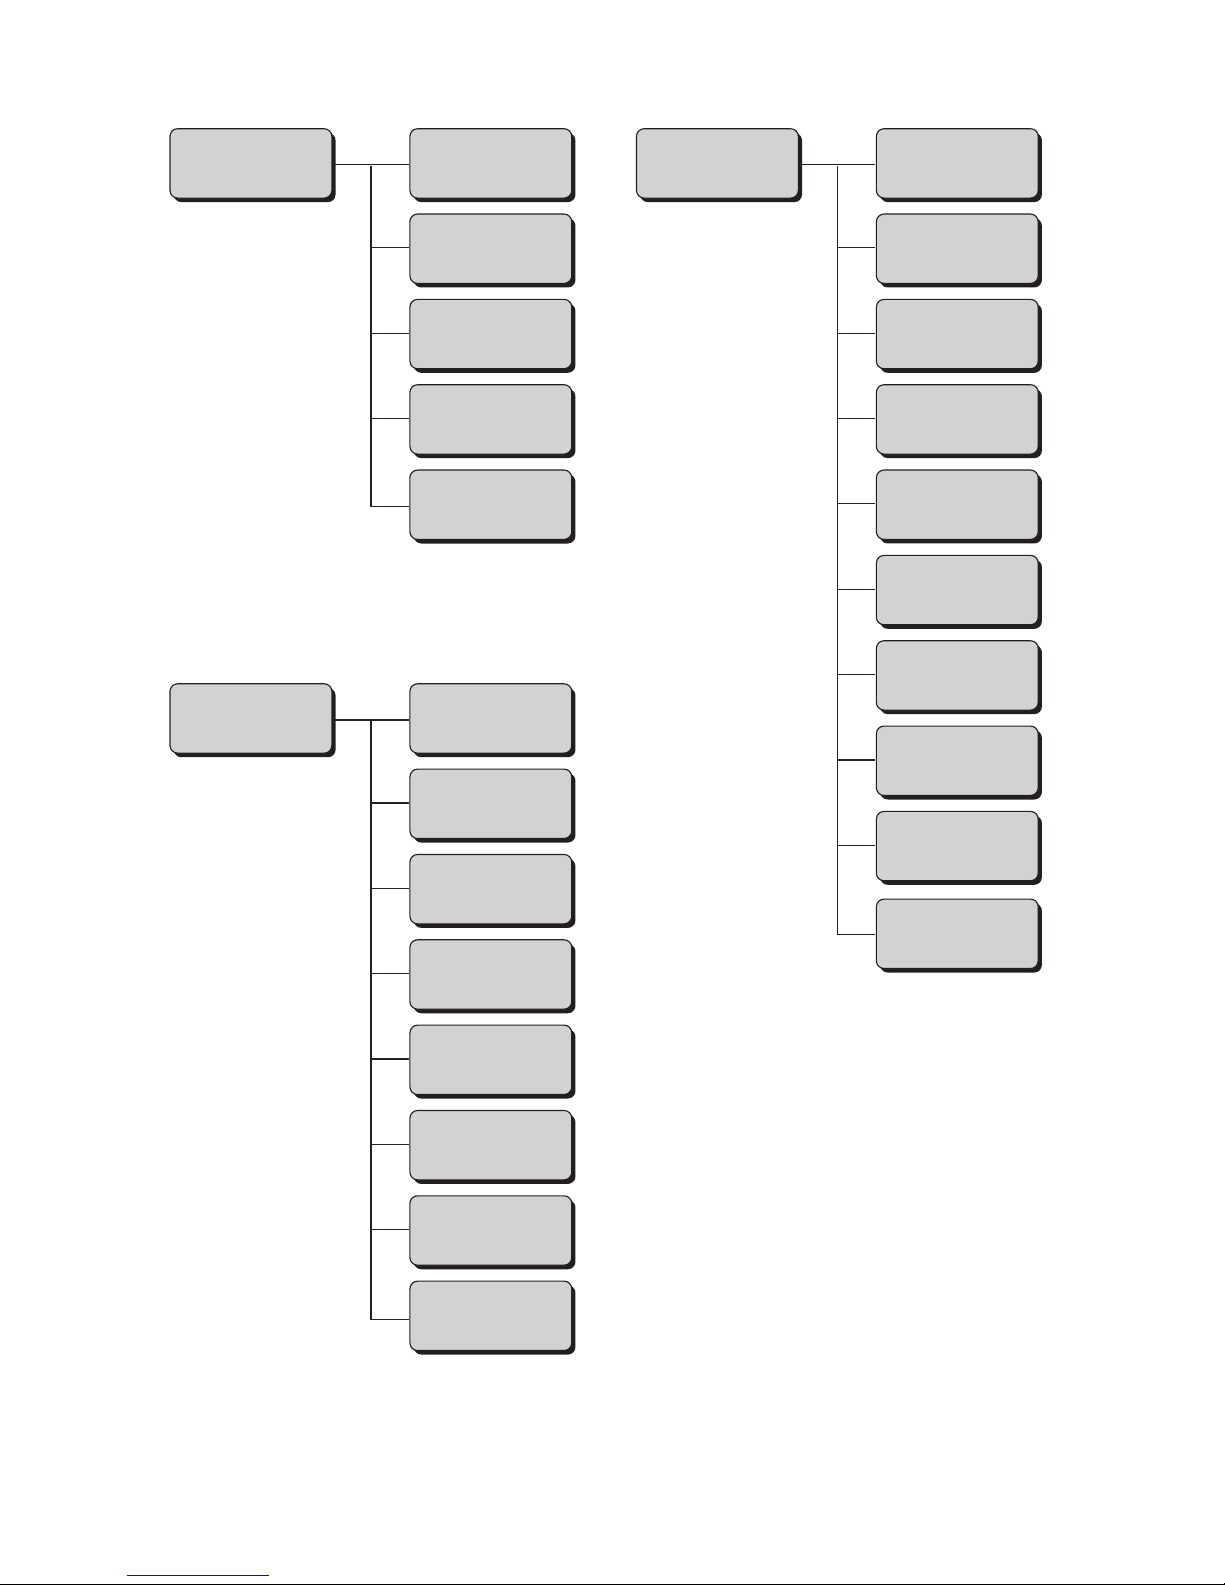
(3) Environment setup menu, Auxiliary menu, Maintenance menu
Environment setup
menu
Auxiliary function
menu
Maintenance
menu
User environment
setup
Date / time
setup
Communication
environment
setup
Touch screen
setup
Login
management
Manage
messages / Group
Create
user pattern
Calibration touch
screen coordinates
Copy data
(IJP → USB)
Copy data
(USB → IJP)
Edit standard
pattern
Edit substitution
rules
Select languages
Unit information
Operation
management
Tes t p rin t
Excitation
V update
(Nozzle test)
View alarm
history
Circulation control
View software
version
Comm. monitor
(Optional on RX2-B)
Password
protection
Solenoid valve/
pump test
(Optional on RX2-B)
Page 41
●Basic operation 3-20
Print description
2015.07.0712:45
M
Manual
Message name[ ]
《 》
[Ready ]
Shutdown
Com=1
Current user ID : user2
Print description
2015.07.0712:45
M
Manual
Message name[ ]
《 》
[Stop ]
Com=0
Current user ID : user2
Startup
Off line
Stop status
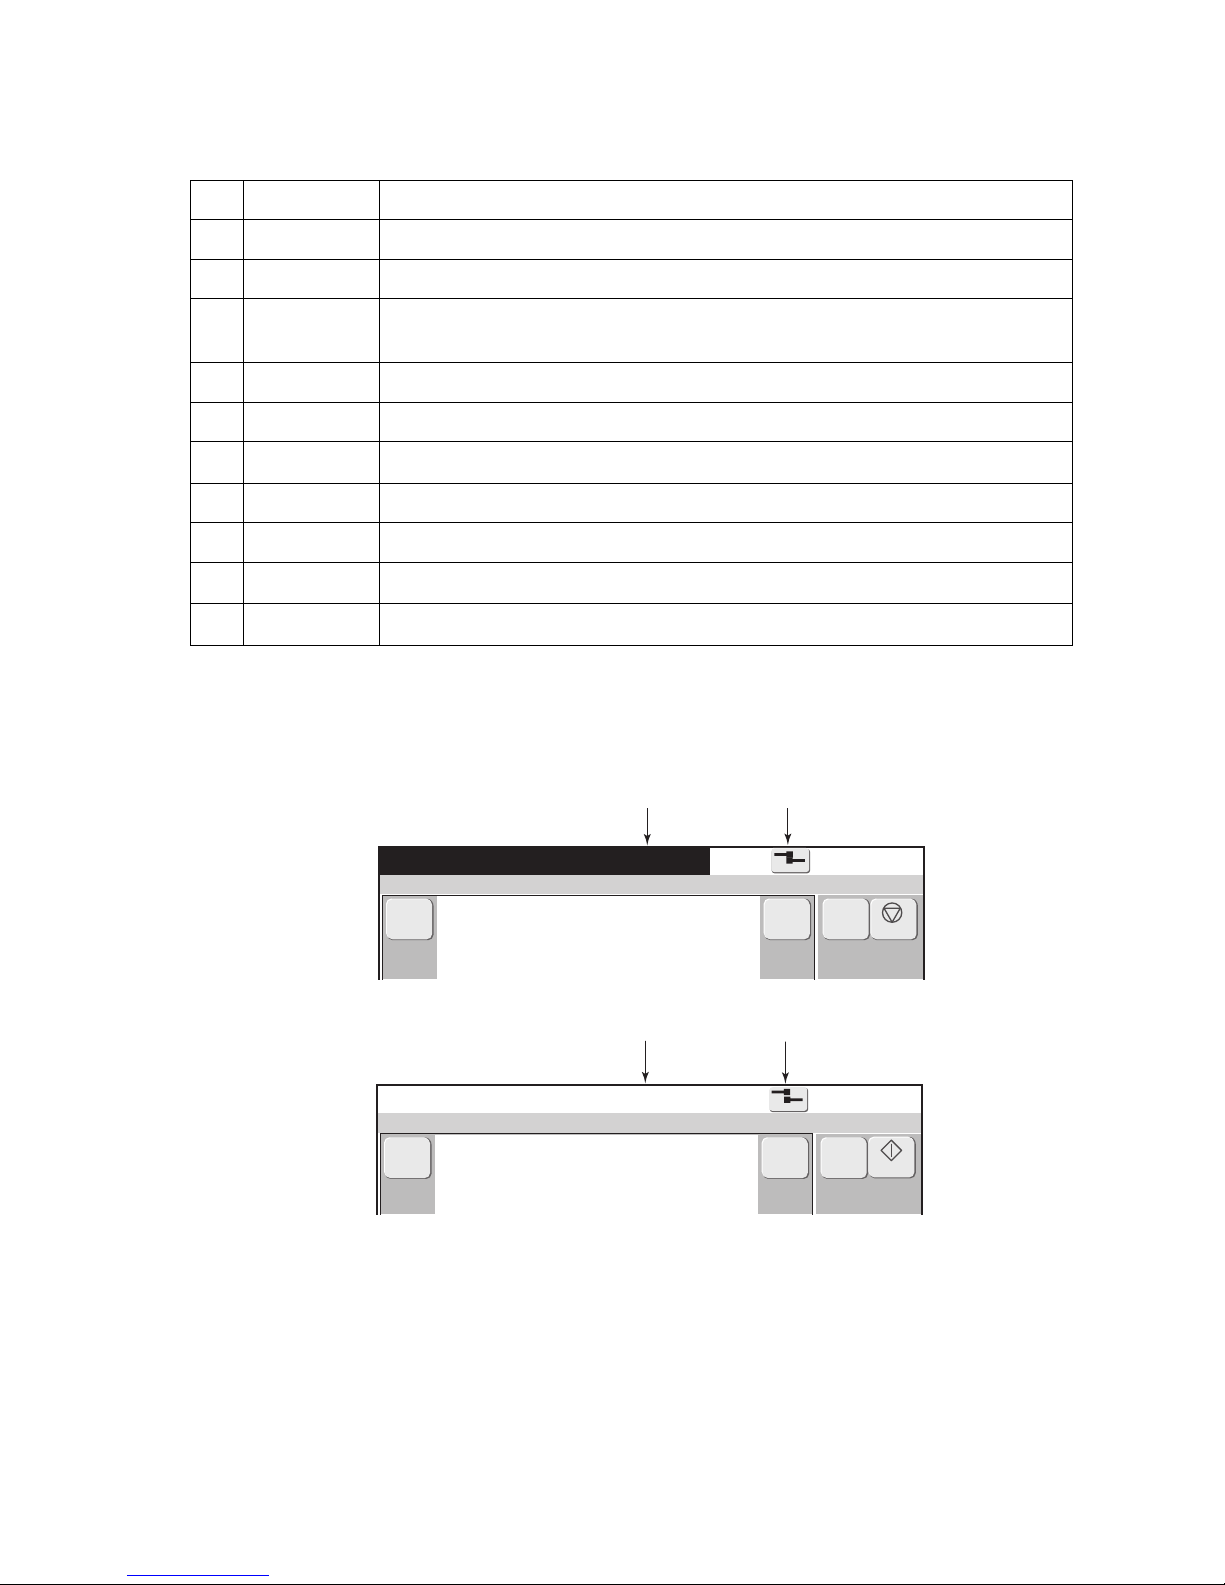
3.3.2 Status
(1) The printer is in one of the following states.
No. State Description
1 Stop The ink is stopped. No deflection voltage is applied.
2 Standby The ink is ejected. No deflection voltage is applied.
3Ready
The ink is ejected. The deflection voltage is applied (printing is permitted by the
sensor signal).
4 Starting State in which the printer changes from the inactive state to the standby state.
5 Ink heating Start up in process, with the ink being heated.
6 Stopping
State in which the printer changes from the standby state to the stop state.
7 Drop adjust Period during which ink particles are not properly charged in the standby state.
8 Cover open Period during which the nozzle head cover is open in the standby state
9 Service Circulation control process for maintenance task execution.
10 Fault State in which a fault exists.
(2) The current states including the on-line/off-line (communication) state is constantly displayed at the
top of the screen
.
Ready status
On line
Page 42
3-21 ●Basic operation
2015.07.0712:45
M
Manual
Message name[ ]
《 》
[Ready
]
Shutdown
Warning
Print description
◇◇◇◇◇ Ink Low Warning ◇◇◇◇◇
The ink level in the ink reservoir is low.
Cause 1. The ink reservoir is almost empty.
2. The Low Level sensor in the ink reservoir is faulty.
Solution 1. Add more ink to the ink reservoir within 60 minutes.
2. Check the Low Level sensor.
Close
Ink Low Warning
Makeup Low Warning
Cancel
Com=0
Current user ID : user2
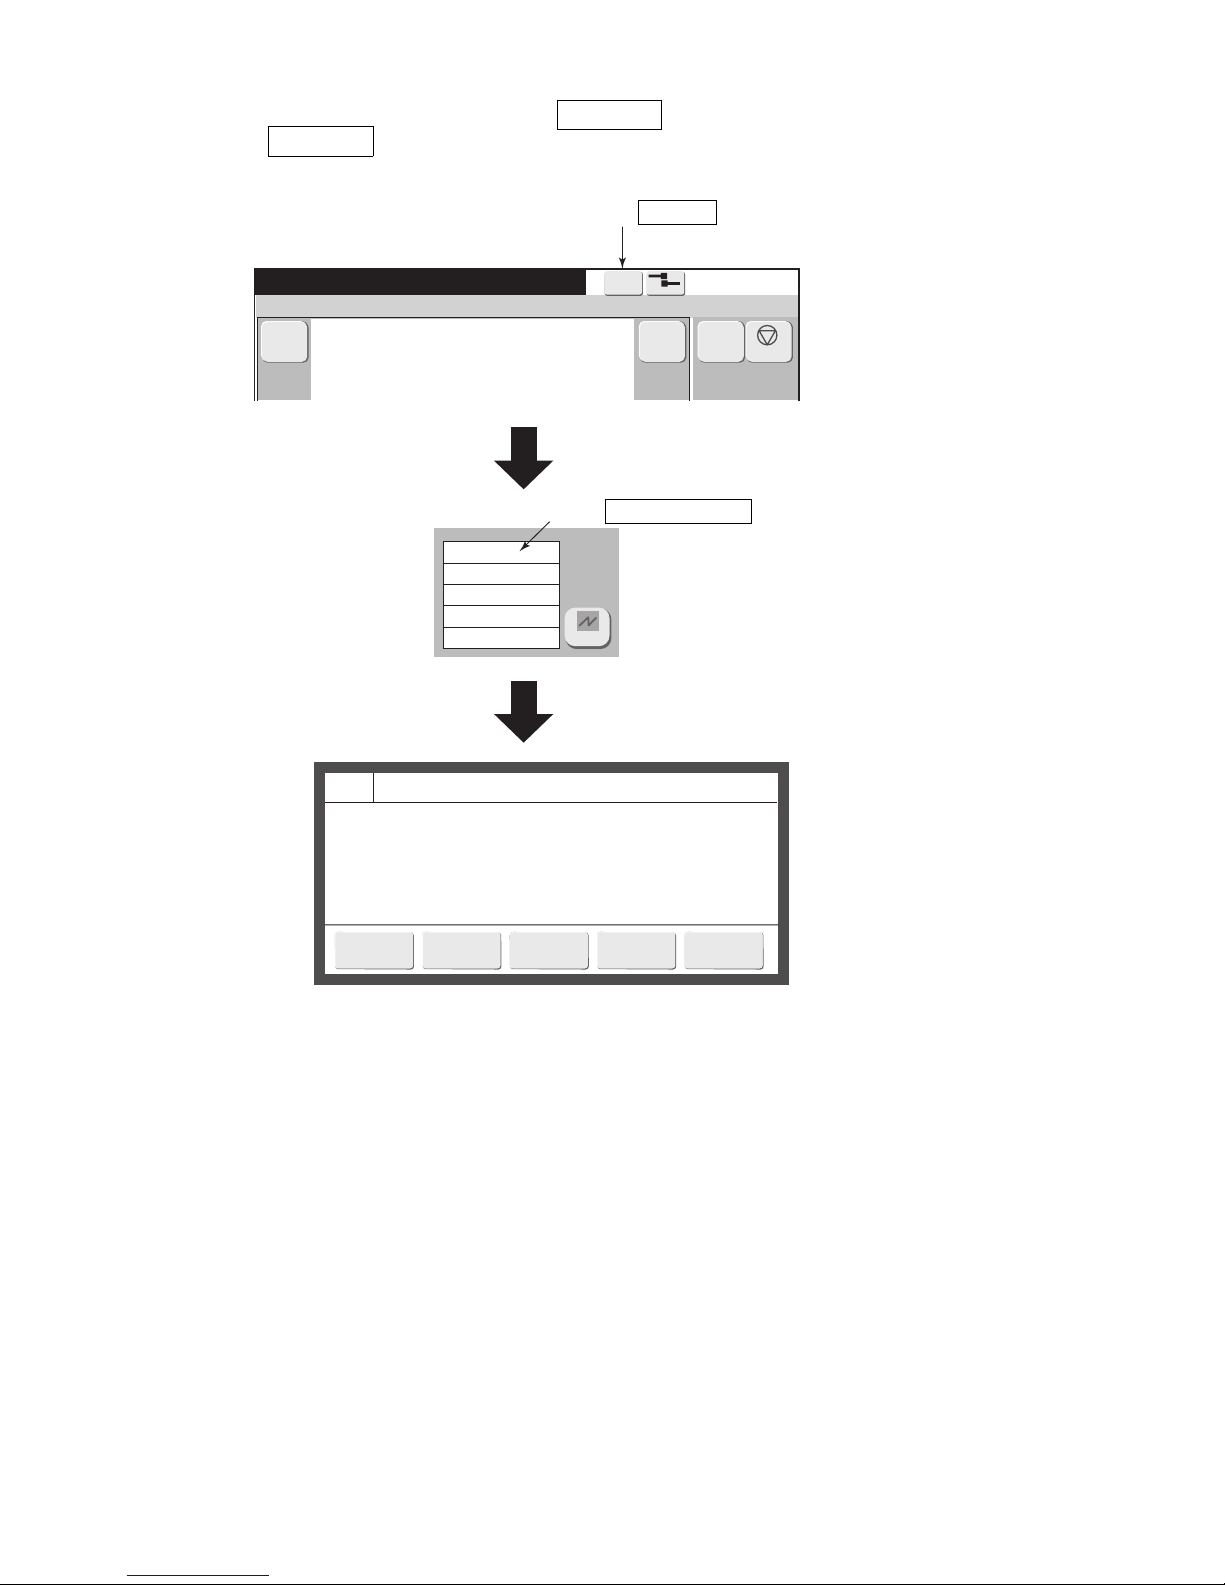
(3) When there is a “Not reset alarm”, a Warning is displayed.
When the Warning is pressed, a warning list is displayed.
Press Warning .
Warning list
Press Ink Low Warning .
Page 43
●Basic operation 3-22
2015.07.0712:45
Com=0
Excitation V-ref.
Ref. ambient temperature
Automatic update
Incremental change
Print trigger source
Print data
Inc.
1
(0〜19)
(℃)
20
(1〜9)
11
Excitation V update [Standby ]
SensorButton input
Data to be displayed
For test
Increment
7 8 9
Enter
4 5 6
Clear
1 2 3
0 ← →
Decrement
Cancel
11
−
M
Manual
HOME
Shutdown
3.3.3 Basic operation to change the settings
(1) Overview
●There are 3 types of settings.
No. Classification
Set value confirmation
method
Set value change method
1 Setting of value
The value is displayed on
the numeric buttons.
Display the value window by
pressing the numeric button
and input the value.
2
Setting with few selections.
(All selection buttons are
displayed: mainly a choice
between the two)
The pressed button
becomes yellow.
Press the applicable button.
3
Settings with many selections.
(When a button is pressed, a
selection menu is displayed in a
window.)
The set value is displayed
on the input button.
Display the selection menu
window by pressing the button and select the
relevant item.
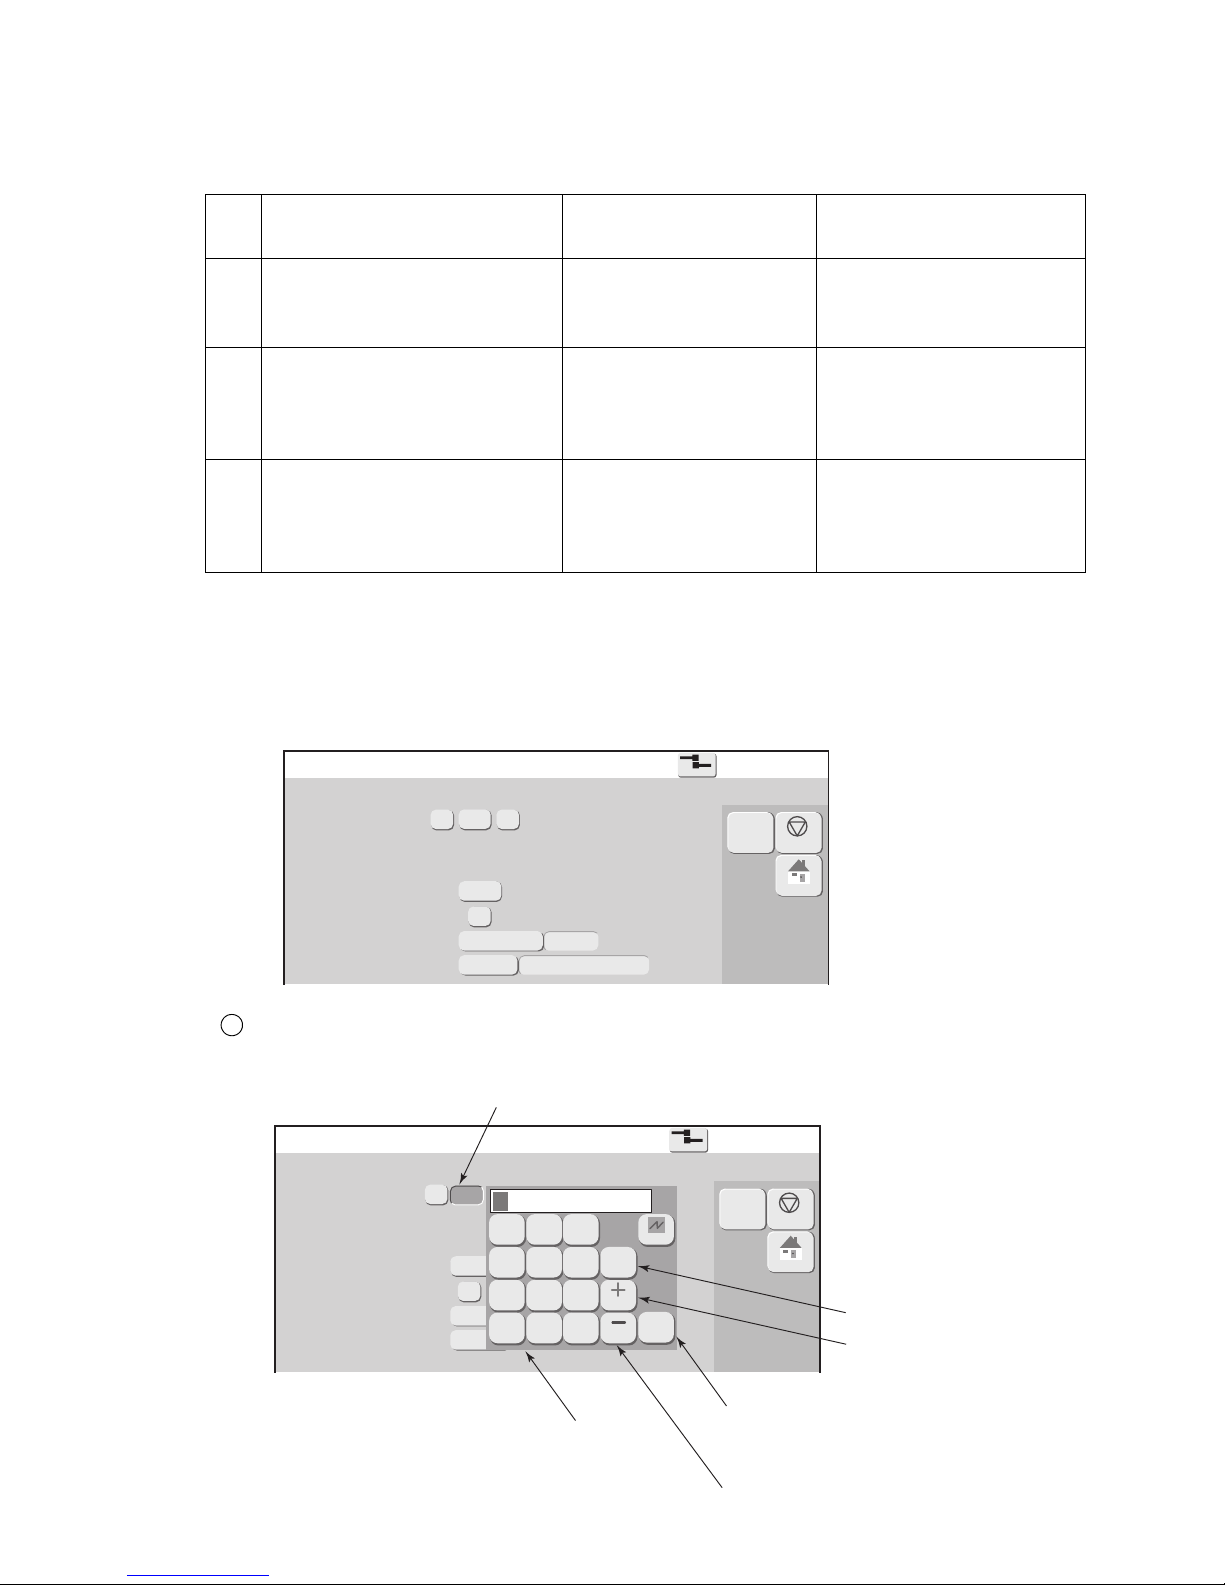
(2) Operation (Maintenance “Excitation V update” screen is used as an
example.)
●There are 3 types of settings.
1
“Excitation V-ref.” setting (Value input)
Display the numeric window by pressing the numbers button and input the value.
Minimum value is input.
Each time this button is
pressed, the set value is
increased by 1.
The value window is closed
and the input value is reflected
on the screen.
Each time this button is pressed,
the set value is decreased by 1.
Press the numeric button.
Numeric windows displayed.
Excitation V update
2015.07.0712:45
Com=0
[Standby
]
Excitation V-ref.
Ref. ambient temperature
Automatic update
Incremental change
Print trigger source
Print data
Inc.
SensorButton input
11
Data to be displayed
For test
1
(0〜19)
20
(1〜9)
− +
(℃)
M
Manual
HOME
Shutdown
Page 44
3-23 ●Basic operation
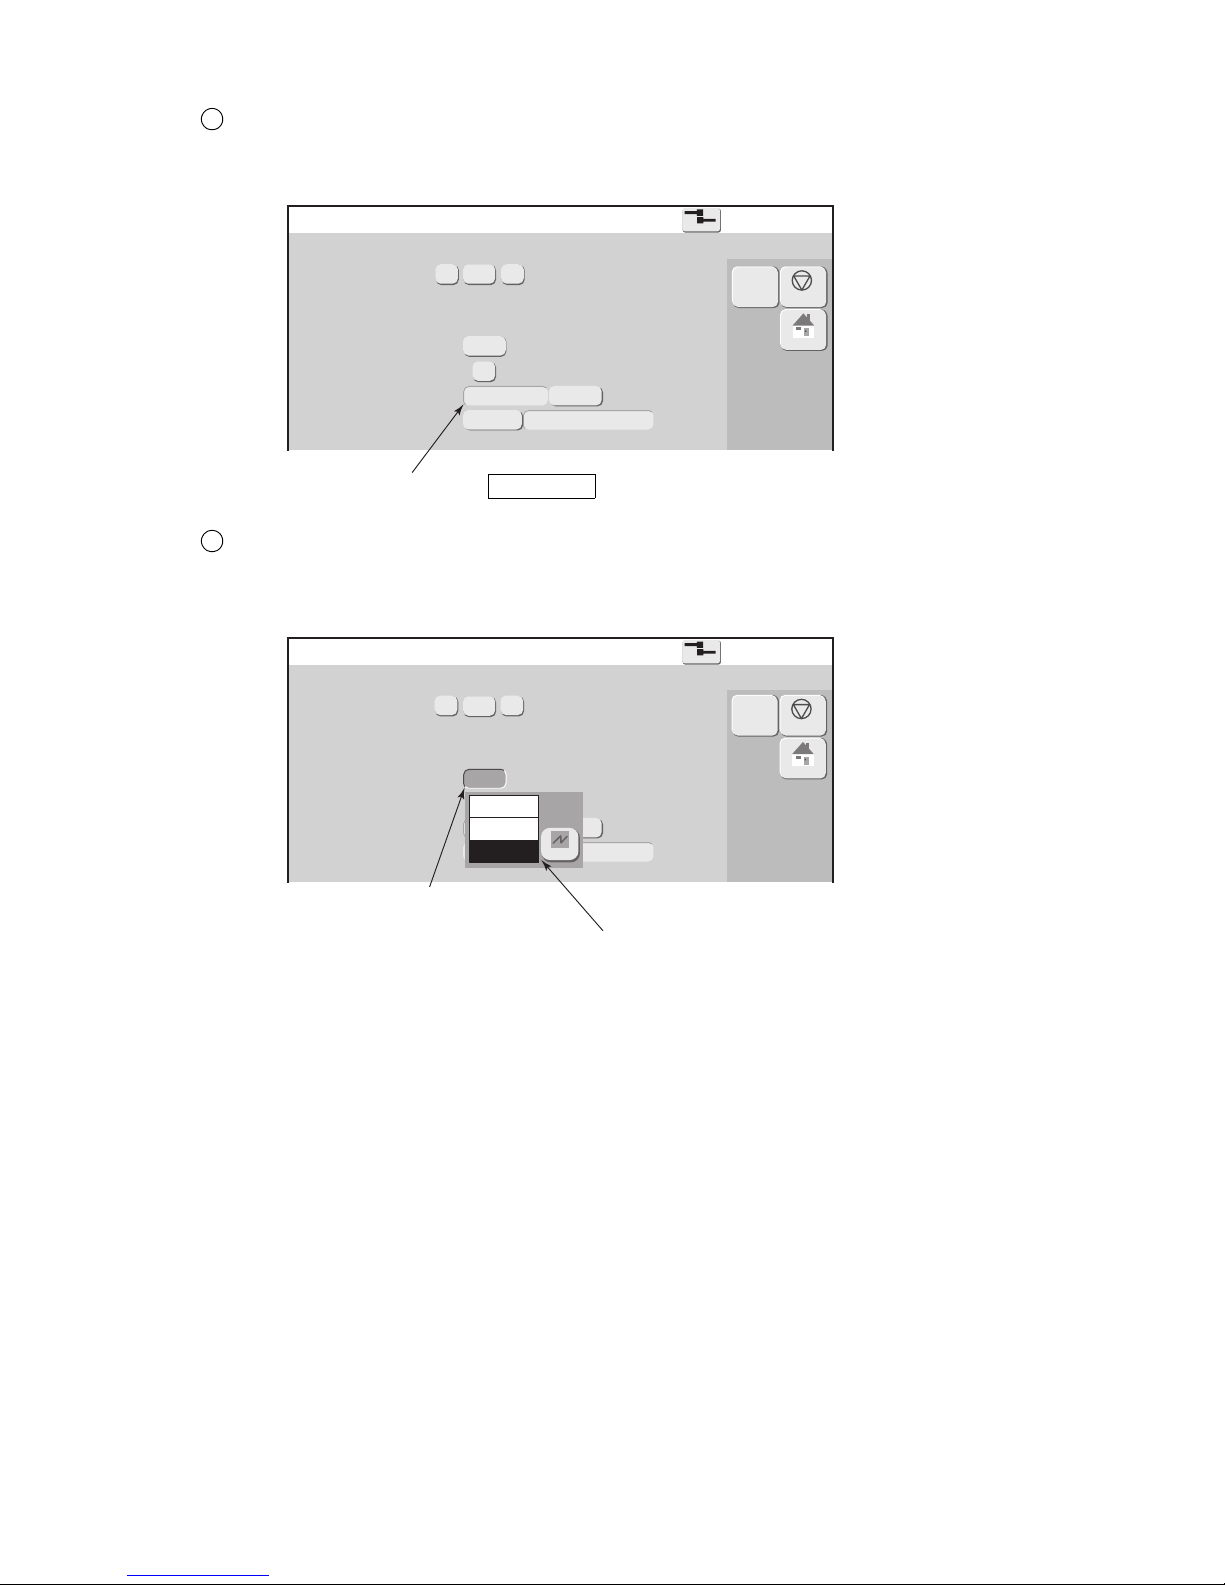
2
2015.07.0712:45
Com=0
Excitation V-ref.
Ref. ambient temperature
Automatic update
Incremental change
Print trigger source
Print data
Inc.
11
1
20
(1〜9)
Data to be displayed
For test
Sensor
Button input
Excitation V update [Standby ]
(0〜19)
− +
(℃)
M
Manual
HOME
Shutdown
2015.07.0712:45
Com=0
Excitation V-ref.
Ref. ambient temperature
Automatic update
Incremental change
Print trigger source
Print data
11
1
20
(1〜9)
Inc.
Data to be displayed
For test
Sensor
Button input
(0〜19)
(℃)
Cancel
Disable
Dec.
Inc.
Excitation V update [Standby ]
(0〜19)
− +
(℃)
M
Manual
HOME
Shutdown
“Print trigger source” setting
Press the applicable button.
3
“Automatic update” setting
Display the selection menu window by pressing the button and close from within that window.
Press the Button input .
Press the button.
Selection menu window is displayed.
Page 45
●Basic operation 3-24
Date/time setup
2015.07.0712:45
Com=0
Current time
Calendar time control
Calendar time
Clock system
24-hour clock
clock stop
OK
07
2015
(year)
07
(month) (day)
12 45 45
(hour) (minute) (second)
07
2015
(year)
07
(month) (day)
12 45 45
(hour) (minute) (second)
12-hour clock
●
Press OK to apply the date/time setup.
●
The current time affects the clock display only
when changes are made.
●
Calendar character will be printed based on "calendar time"
Cancel
same as current time
OK
Cancel
[Ready
]
M
Manual
HOME
Shutdown
No. Classification Contents
1
Screens with OK
and Cancel
● When OK is pressed, the set contents are accepted
and the display returns to the previous screen.
● When Cancel is pressed, the set contents are canceled
and the display returns to the previous screen.
● Apply is not displayed.
2 Screens with Back
● When Back is pressed, the display returns to the
previous screen.
● When Apply is pressed, the set contents are accepted.
● When Back was pressed in the state in which
Apply is not pressed, a confirmation window is displayed
and action is requested.
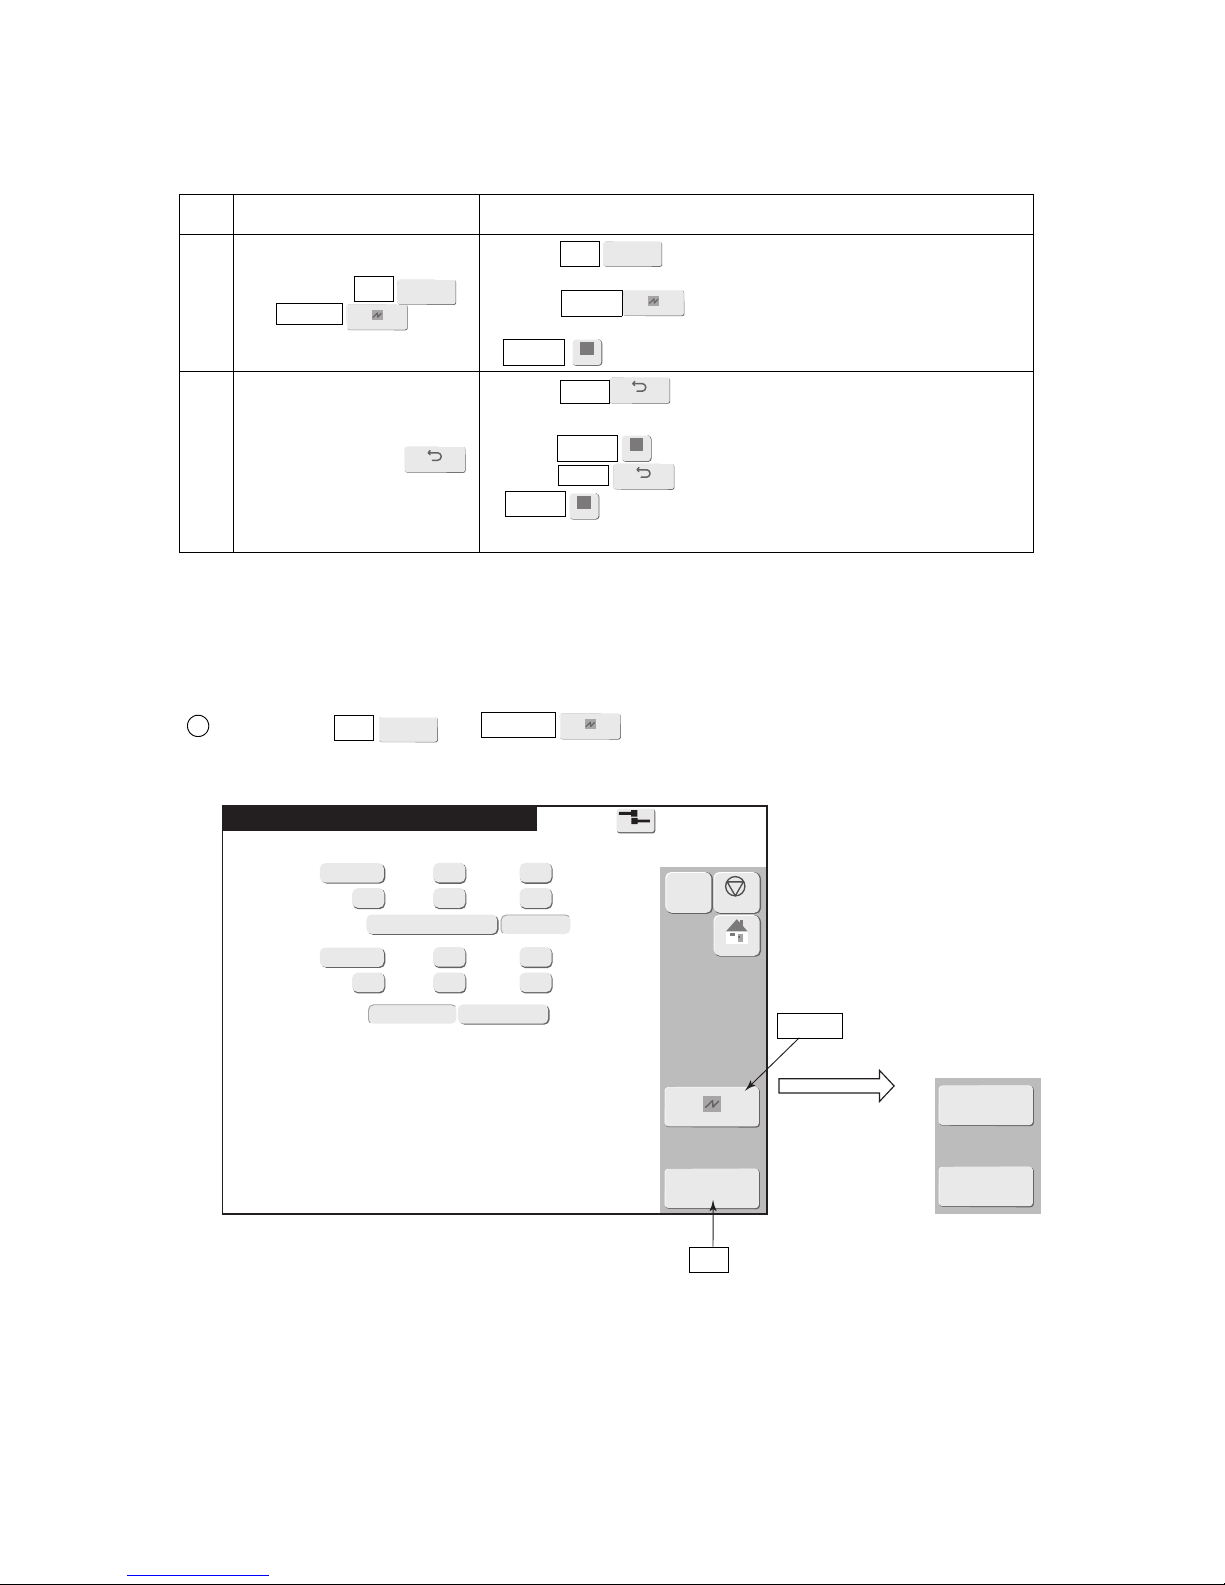
(2) Screen examples
Screen with OK and Cancel
[Example of Date/time setup screen]
Cancel
Apply
OK
Back
3.3.4 Operations (OK, Back, Apply) which exit from a screen
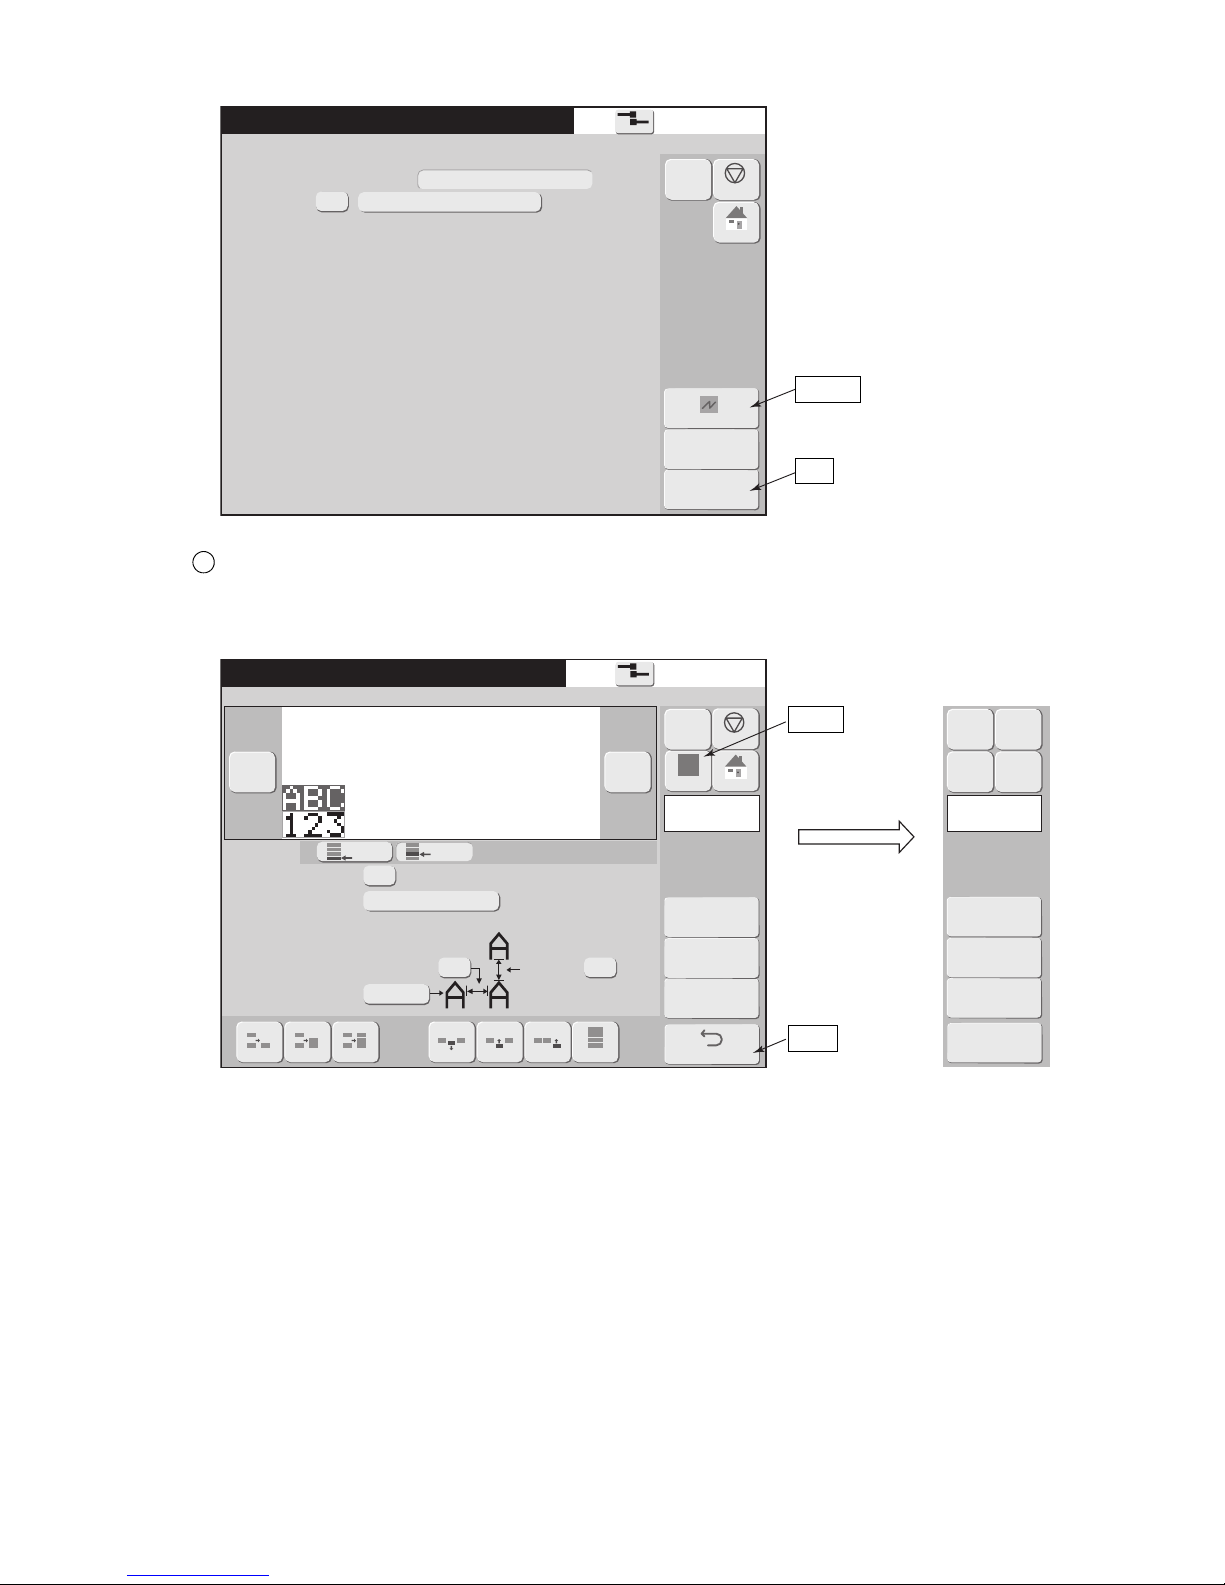
(1) Overview
●There are 2 types of setup screens.
● When “Apply” was performed during editing of the current message and at the User environment
setup screen, the set contents are reflected in printing.
● For the setup of whether or not to show some buttons as icon, refer to "6.3 setup the touch screen."
1
OK
Back
Back
Apply
Apply
OK
Cancel
Cancel
Cancel
OK
When set without
icons at the Touch
screen setup screen.
Page 46
3-25 ●Basic operation
Save message
2015.07.0712:45
OK
Com=0
[Ready ]
Message name [ ]
01
GROUP001
Simplelist
Save message as (name)
Group No.
Free space 20%
ABC001
Cancel
M
Manual
HOME
Shutdown
Print format
2015.07.0712:45
Adjustment
char.cond.
Com=0
[Ready ]
Select line
Bold (times 1- 9)
Bar code
Message name [ ]
1
none
Inter-char. space
(MAX 27 )
02
5x7
Line
spacing
(MAX 2 )
Dot matrix
Print
spec.
Edit
message
Column1 Column1
ToOverallAddCol.InsertC.DeleteC.2lines⁝3lines
⁝
1line
⁝
2
2ndline
1stline
Manual
Shut
down
Apply HOME
Adjustment
char.cond.
Print
spec.
Edit
message
− +
Apply
M
Manual
HOME
Shutdown
Back
Back
[Example of Save message screen]
Screen with Back button
[Example of Print format screen]
2
Cancel
OK
Apply
Back
When set without
icons at the Touch
screen setup screen.
Page 47
●Basic operation 3-26
Print format
2015.07.0712:45
文字間調整
Com=0
[
Ready
]
変更段数指定
横倍角 (横倍 1〜9)
バーコード
Message name
[ ]
1
なし
文字間
スペース
02
12x16
段間
スペース
文字サイズ
印字仕様
文字入力
一括設定
Column1
登録
Back
ToOverallAddCol.InsertC.DeleteC.2lines
⁝
1line
⁝
2
2ndline
1stline
===== Data Entry Confirmation =====
The data entered will be used in the print message.
Solution 1. To save the input data and use it for print message, press <OK>.
2. To delete the input data, press <Cancel changes>.
3. To return to the previous screen, press <Cancel>.
OK
Cancel
Cancel
changes
Apply
M
Manual
HOME
Shutdown
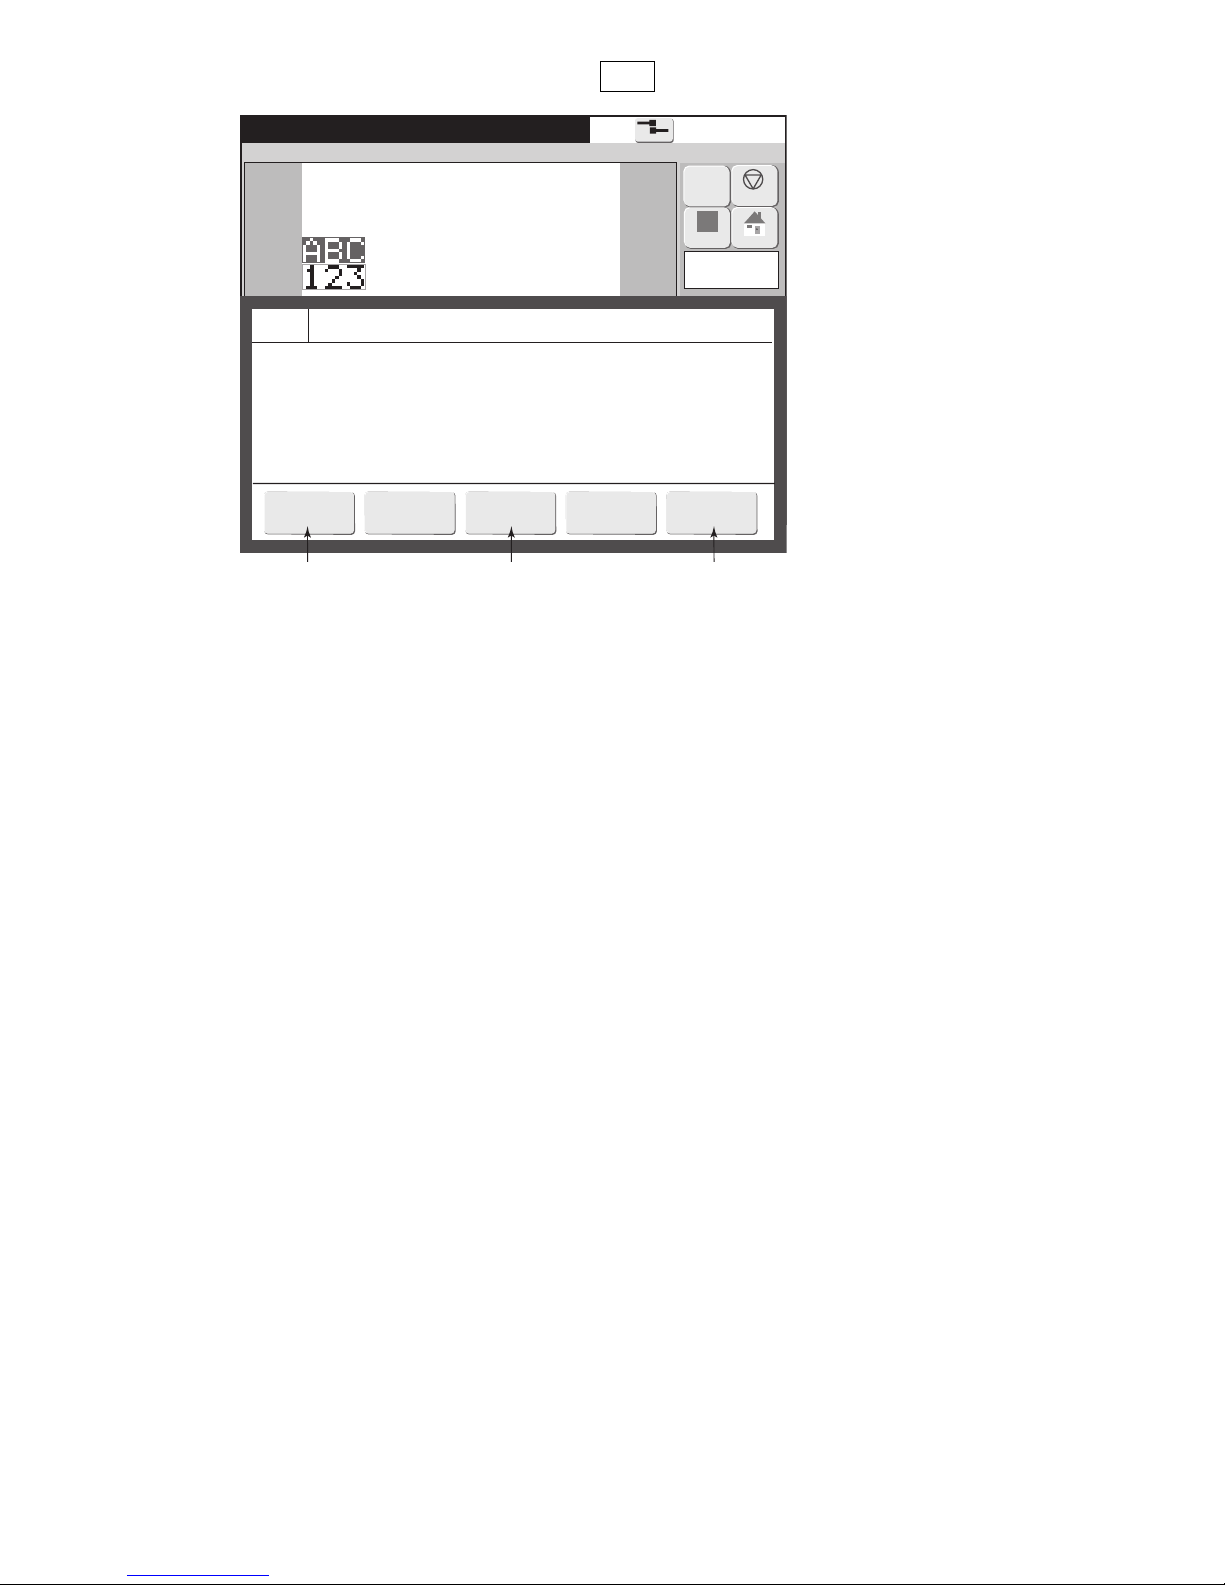
[Example of confirmation message when Back was pressed]
Accepts the
set contents.
Return from set
contents to original
contents.
Closes the message window with the
set contents remaining displayed.
Page 48
4-1 ●Print description screen
4.
CREATION AND PRINTING OF MESSAGES
Print description
2015.07.0712:45
M
Manual
Startup
Menu
Com=0
[Stop ]
Ink operating time 100(hours)
Cumulative op. time 100(hours)
Print count 1000(prints)
Ink pressure 0.000(MPa;standard value:0.250)
Change
message
Select
message
Overwrite
message
Adjustprint
parameters
Operation
management
Message name[ ]
《
−
》
+
Maintenance
Auxiliary
function
Environment
setupmenu
2015.07.0712:45
M
Manual
Shutdown
Com=0
Current user ID : user2
Select
loginuser
Create/Edit
message
Interlaced
Printcount
reset
4.1 Print description screen (initial screen)
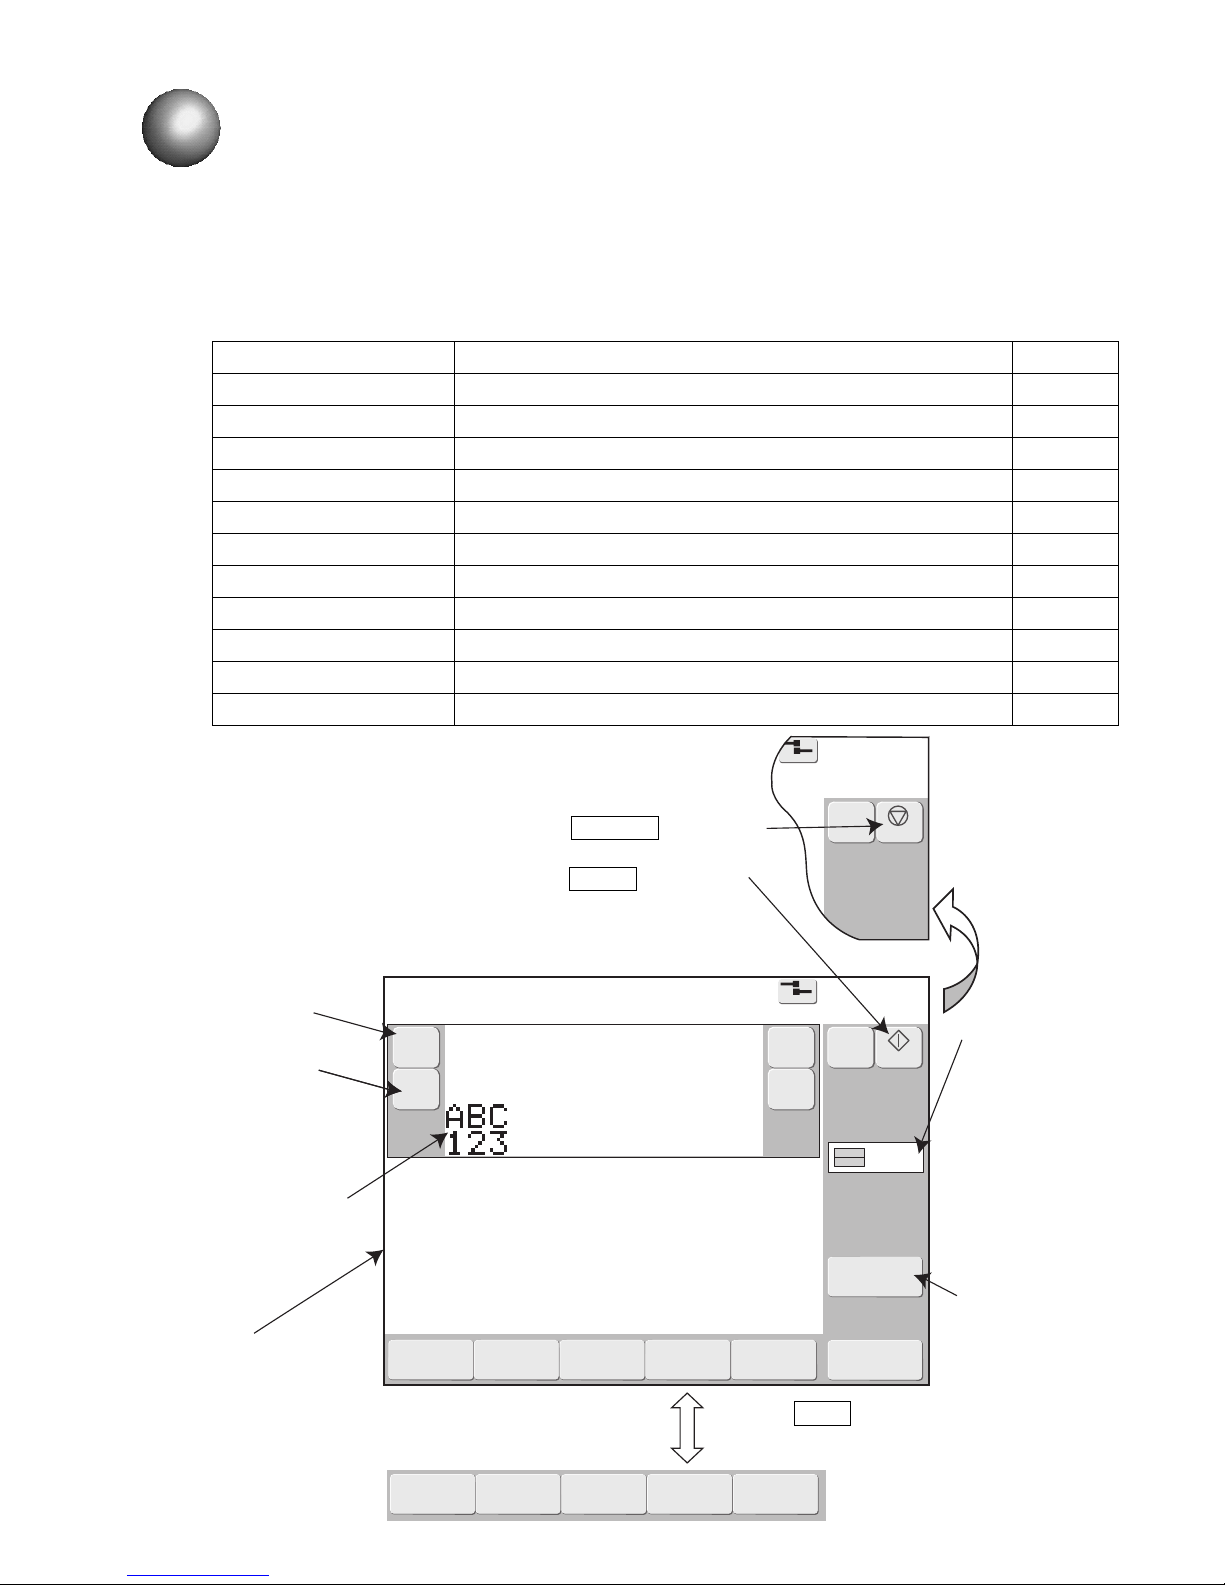
(1) Overview
●The display is shifted to the screens for message edit and Maintenance, Auxiliary function, and
Environment setup menu screens by pressing each button.
●The print image can be confirmed at the “Print layout” area.
Item Description Reference
Change message ●Edits and corrects current message. 4.2
Select message ●Calls and prints saved messages. 4.3
Overwrite message ●Overwrites the current message. 4.4
Adjust print parameters ●Creates and edits messages different from the current message. 4.14.4
Operation management ●Displays operation status. 5.2
Maintenance ●Displays the maintenance menu. 5
Auxiliary function ●Displays the auxiliary functions menu. 7
Environment setup menu ●Displays the environment setup menu 6
Select login user ●Logs in again as a different user from currently logged in user. 6.4
Create/Edit message ●Creates and edits messages different from the current message. 4.5
Print count reset ●Reset the print count to zero (0). 4.1
The Shutdown is displayed
during ink ejection.
The Startup is displayed
during stop.
Displays the
print layout.
Displays the operation
management
information.
When the Menu is pressed,
the display is switched.
Displays the zoom in
or zoom out.
Displays the scroll.
For details
regarding the
printing method
display, refer to
"4.14.1 Set the
character
height,
character width,
and
orientation."
Print count is
reset to 0.
If is indicated in
off-line state.
Page 49
●Print description screen 4-2
Print description
2015.07.0712:45
M
Manual
Startup
Menu
Com=0
[Stop ]
Ink operating time 100(hours)
Cumulative op. time 100(hours)
Print count 1000(prints)
Ink pressure 0.000(MPa;standard value:0.250)
Change
message
Select
message
Overwrite
message
Adjustprint
parameters
Operation
management
Message name[ ]
− +
Current user ID : user2
Interlaced
Printcount
reset
(3) Current message and saved message
●There are 2 types of messages; current messages and saved messages.
Types of messages
Type Features
Current message
●The message currently being printed is called “current message”.
●When the power is turned on, the last current message is memorized.
●The print layout of the current message is displayed on the Print description
screen.
●The contents of the current message can be changed by calling the message
from the saved messages.
Saved message
●Messages can be given a message name. Multiple messages can be saved
beforehand.
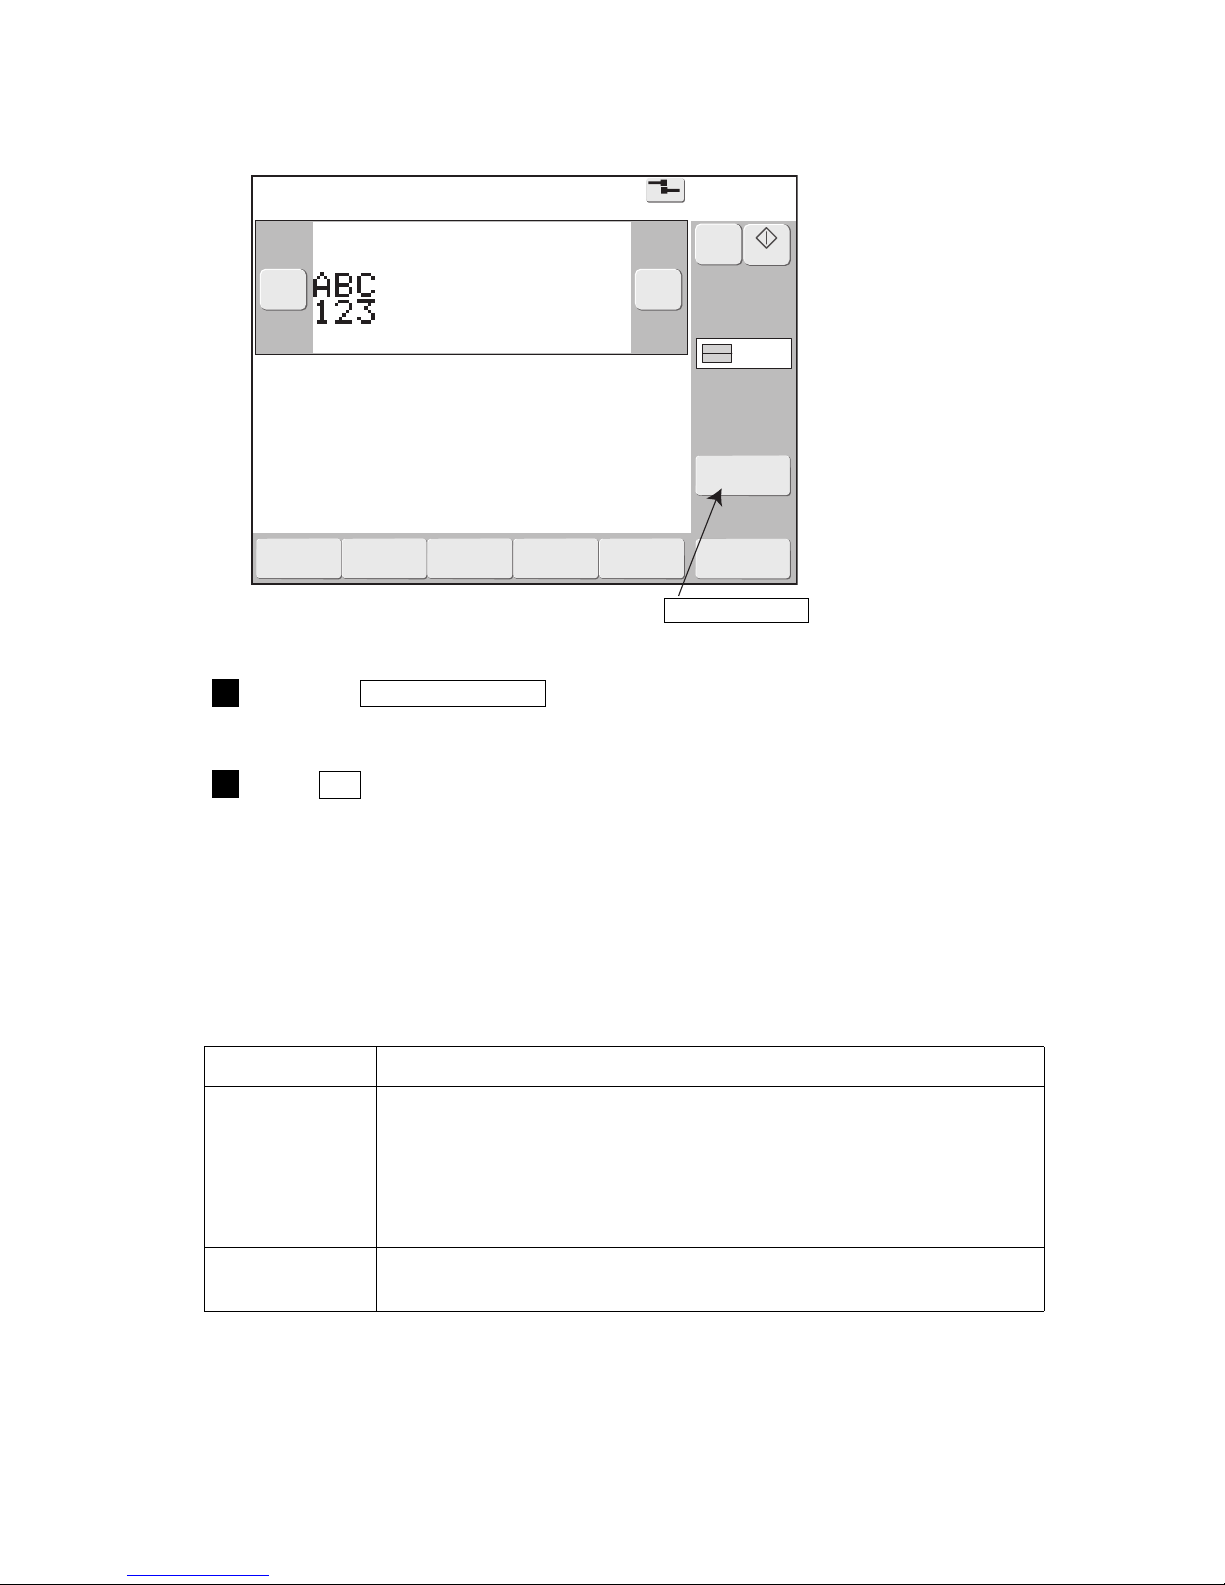
(2) Operation
The Print description screen is displayed.
Press the Print count reset on the Print description screen.
Confirmation message of "Print count reset." will be displayed.
1
Press OK on the confirmation message window.
Print count will be reset to zero (0).
2
Print count reset
Page 50
4-3 ●Edit messages to be printed
XY
ABCDEFG
2015.12.31
ABCDEFG
2015.12.31
ABCD
2015.12.31
XY
EFG
4.2 Edit messages to be printed (Change message screen)
(1) Overview
●Edits the current message (message currently being printed).
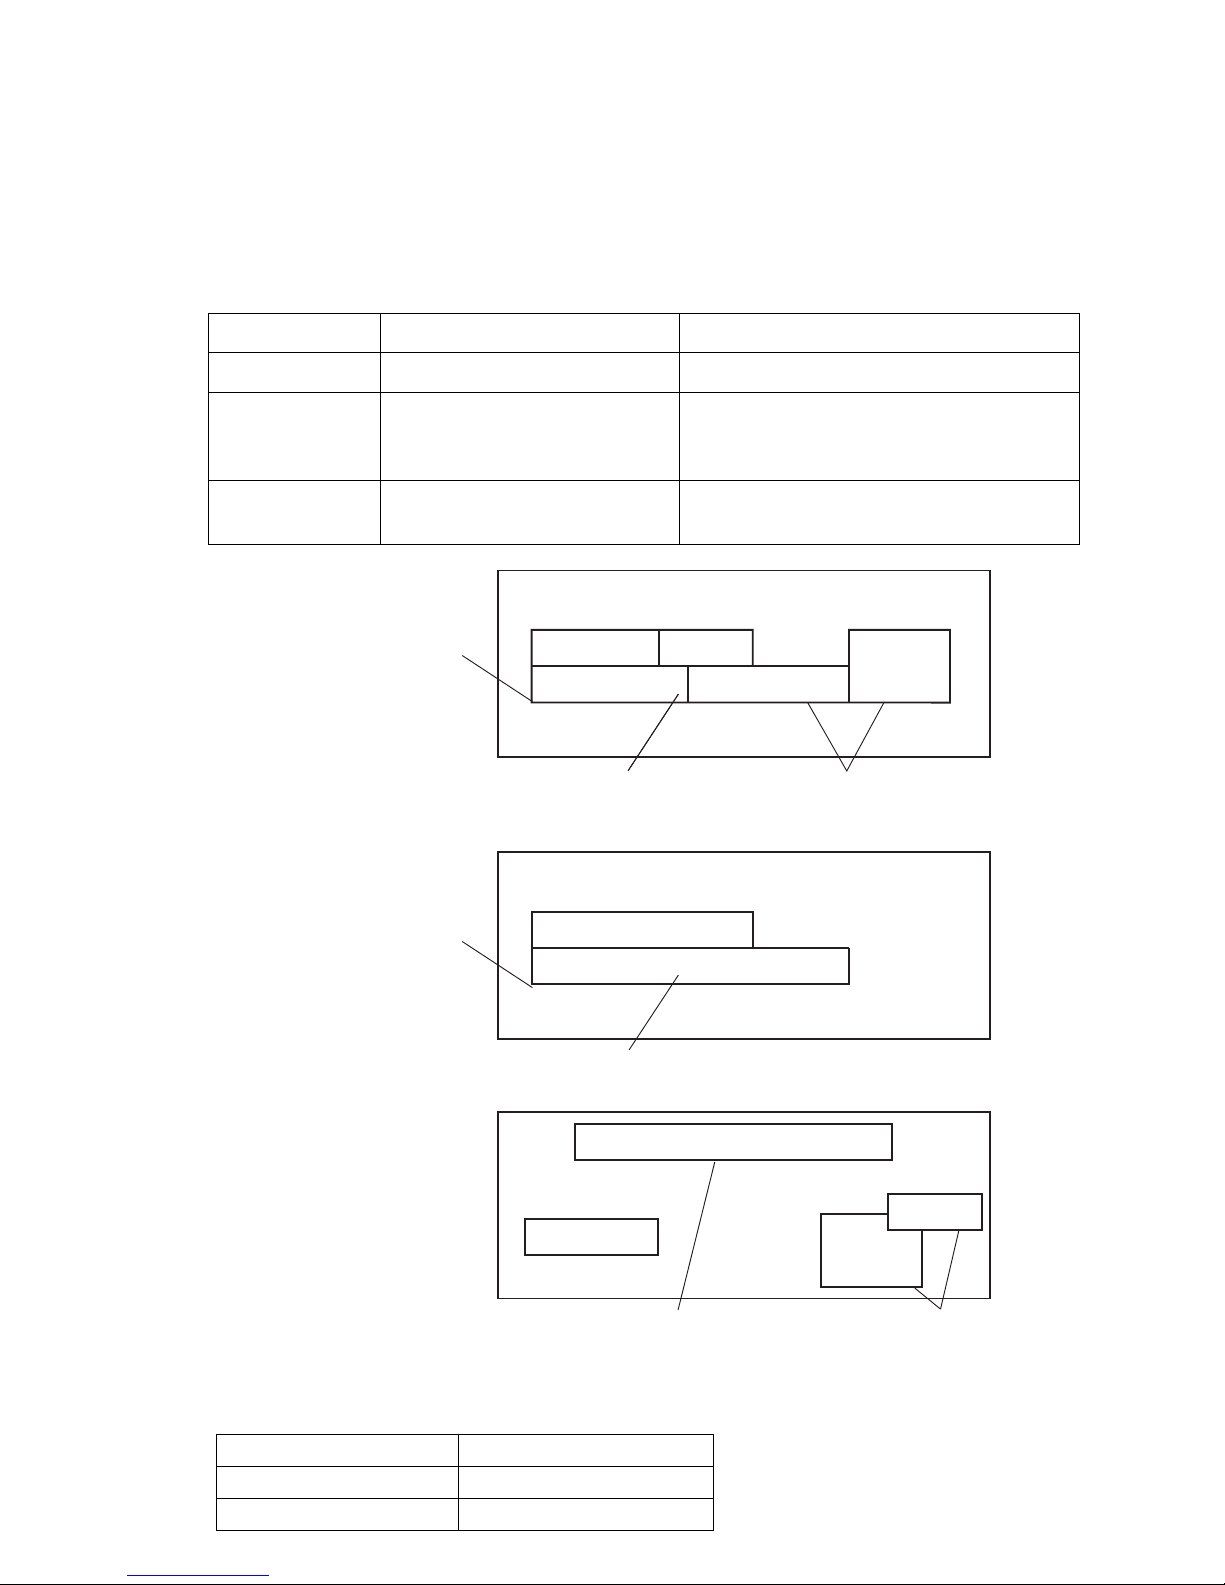
●There are 2 types of print format.
●Style displayed in the Details mode of the message name list display of the Select message screen shows the
type of print format.
Types of Style
Type of Style Meaning Features
(a) Individual Individual setup of fixed layout Multiple character sizes can be mixed.
(b) Overall Overall setup of fixed layout
Character size and inter-character space set
value are matched at all lines.
Only 1 column can be input.
(c) Free layout Setup of free layout
An arbitrary position can be set for each print
item.
●The background of the current message edit screen is colored.
Edit screen background color
Editing objective Background color
Current message Light green
Saved message Gray
Print items are stacked
from the bottom.
Columns (vertical list) with the same
line count, line spacing, and character
size list are linked and handled.
Columns of several different
formats can be input.
(a) Individual setup
(b) Overall setup
Print items are stacked
from the bottom.
Only one column (vertical list) with the same line count,
line spacing, and character size list is handled.
(c)
Free layout
An arbitrary position can be
set for each print item.
A print item can be lapped over
other print items.
Page 51
●Edit messages to be printed 4-4
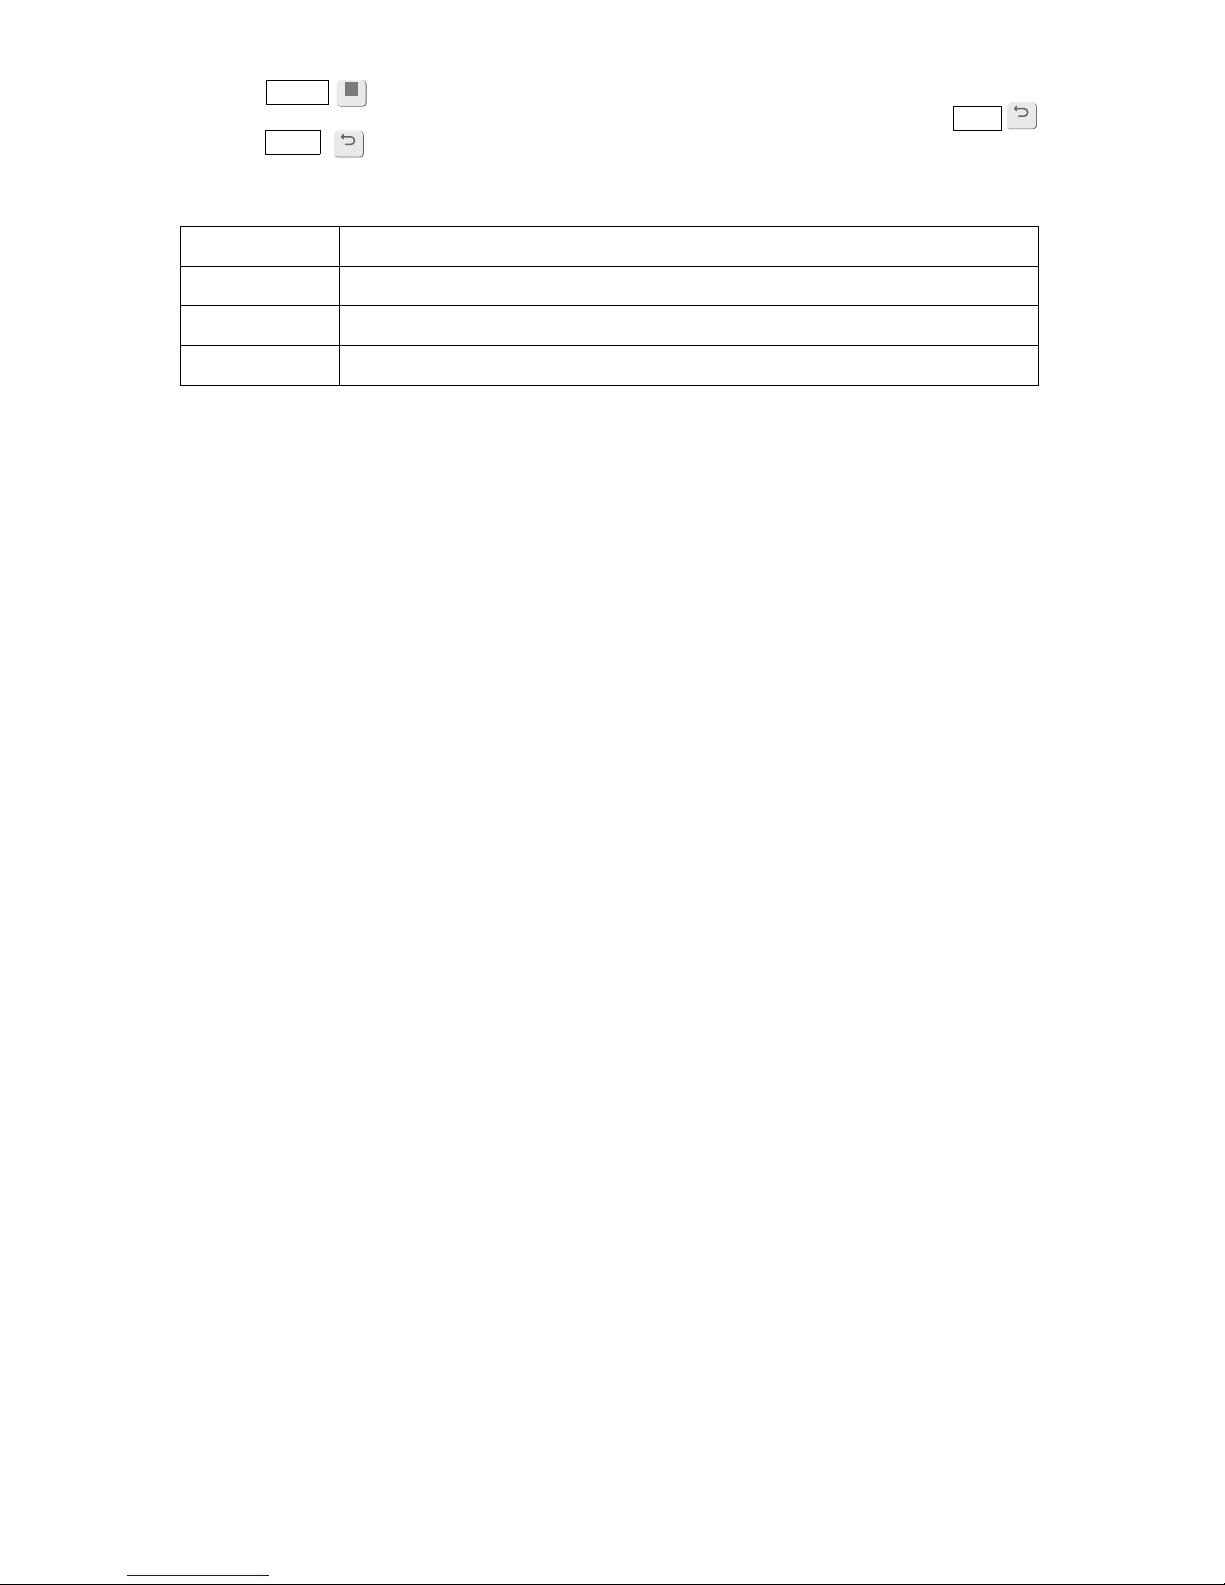
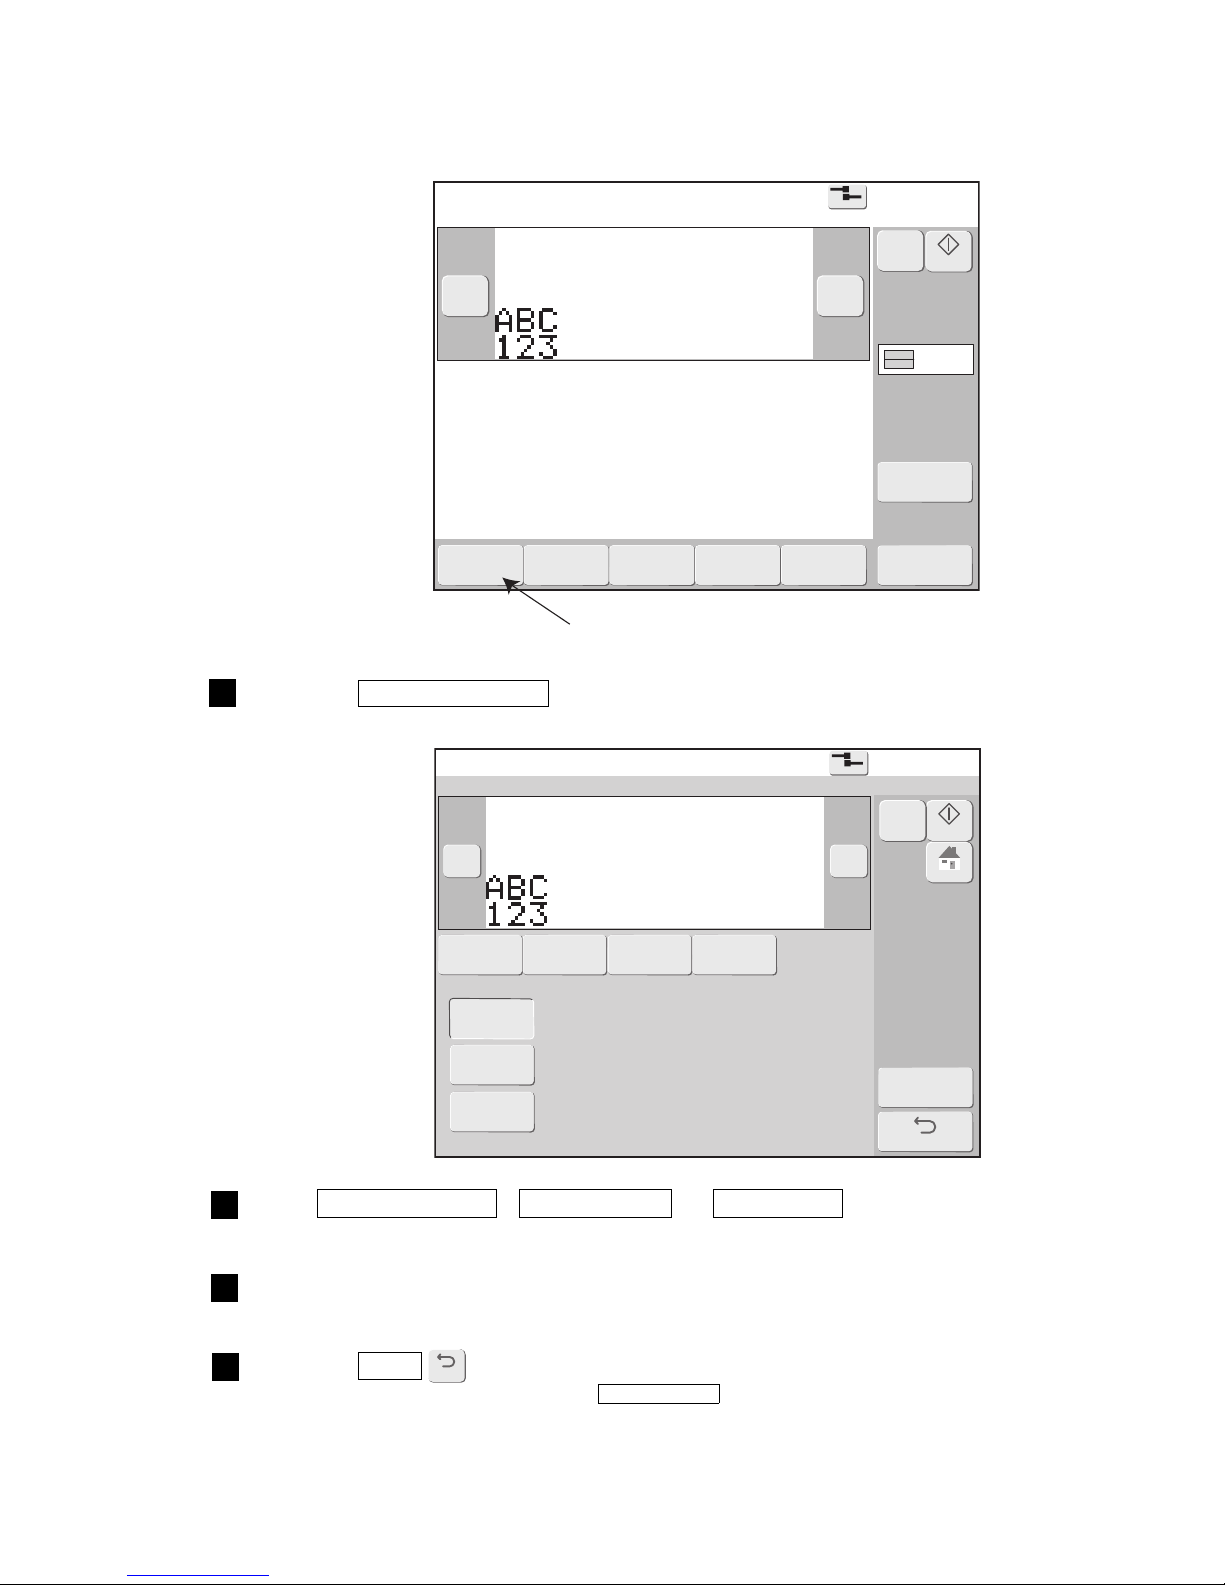
●When the Apply is pressed during editing, the input value is applied and reflected in printing.
The input value is also applied when returning to the Print description screen by pressing the Back .
●When the Back is pressed at the Print format, Print specifications, and Edit message, various print setup
screens, the confirmation message “Data Entry Confirmation” is displayed.
Apply
Back
Functions of confirmation message “Data Entry Confirmation”
Button Contents
OK Applies the message by input value and switches to the Print description screen.
Cancel changes Cancels the input value and returns to the state before the change.
Cancel Returns to the original screen with the input data as it was.
Back
Page 52
4-5 ●Edit messages to be printed
Print description
2015.07.0712:45
M
Manual
Startup
Menu
Com=0
[Stop ]
Ink operating time 100(hours)
Cumulative op. time 100(hours)
Print count 1000(prints)
Ink pressure 0.000(MPa;standard value:0.250)
Change
message
Select
message
Overwrite
message
Adjustprint
parameters
Operation
management
Message name[ ]
− +
Current user ID : user2
Interlaced
Printcount
reset
Change message
2015.07.0712:45
SaveandBack
Com=0
[Stop ]
Message name[ ]
:Multiple print formats can be mixed.
<Format Setup>
− +
Print
format
Edit
message
Print
spec.
Various
printsetup
Individual
setup
Overall
setup
Freelayout
:Character size and inter-character space set
value are matched at all lines.
Only 1 column can be input.
:An arbitrary position can be set for each print
item.
Back
Startup
M
Manual
HOME
Change the display contents using the group, search, sort, and select page
functions so that the desired message name is displayed.
3
(2) Operation
The Print description screen is shown below.
Press the Change message on the Print description screen.
The Print format screen is displayed.
1
Press the Back .
To save as a registered print data ,press save and back .
4
Back
Press Individual setup , Overall setup or Free layout to modify <Format
setup>.
2
Change message
Page 53
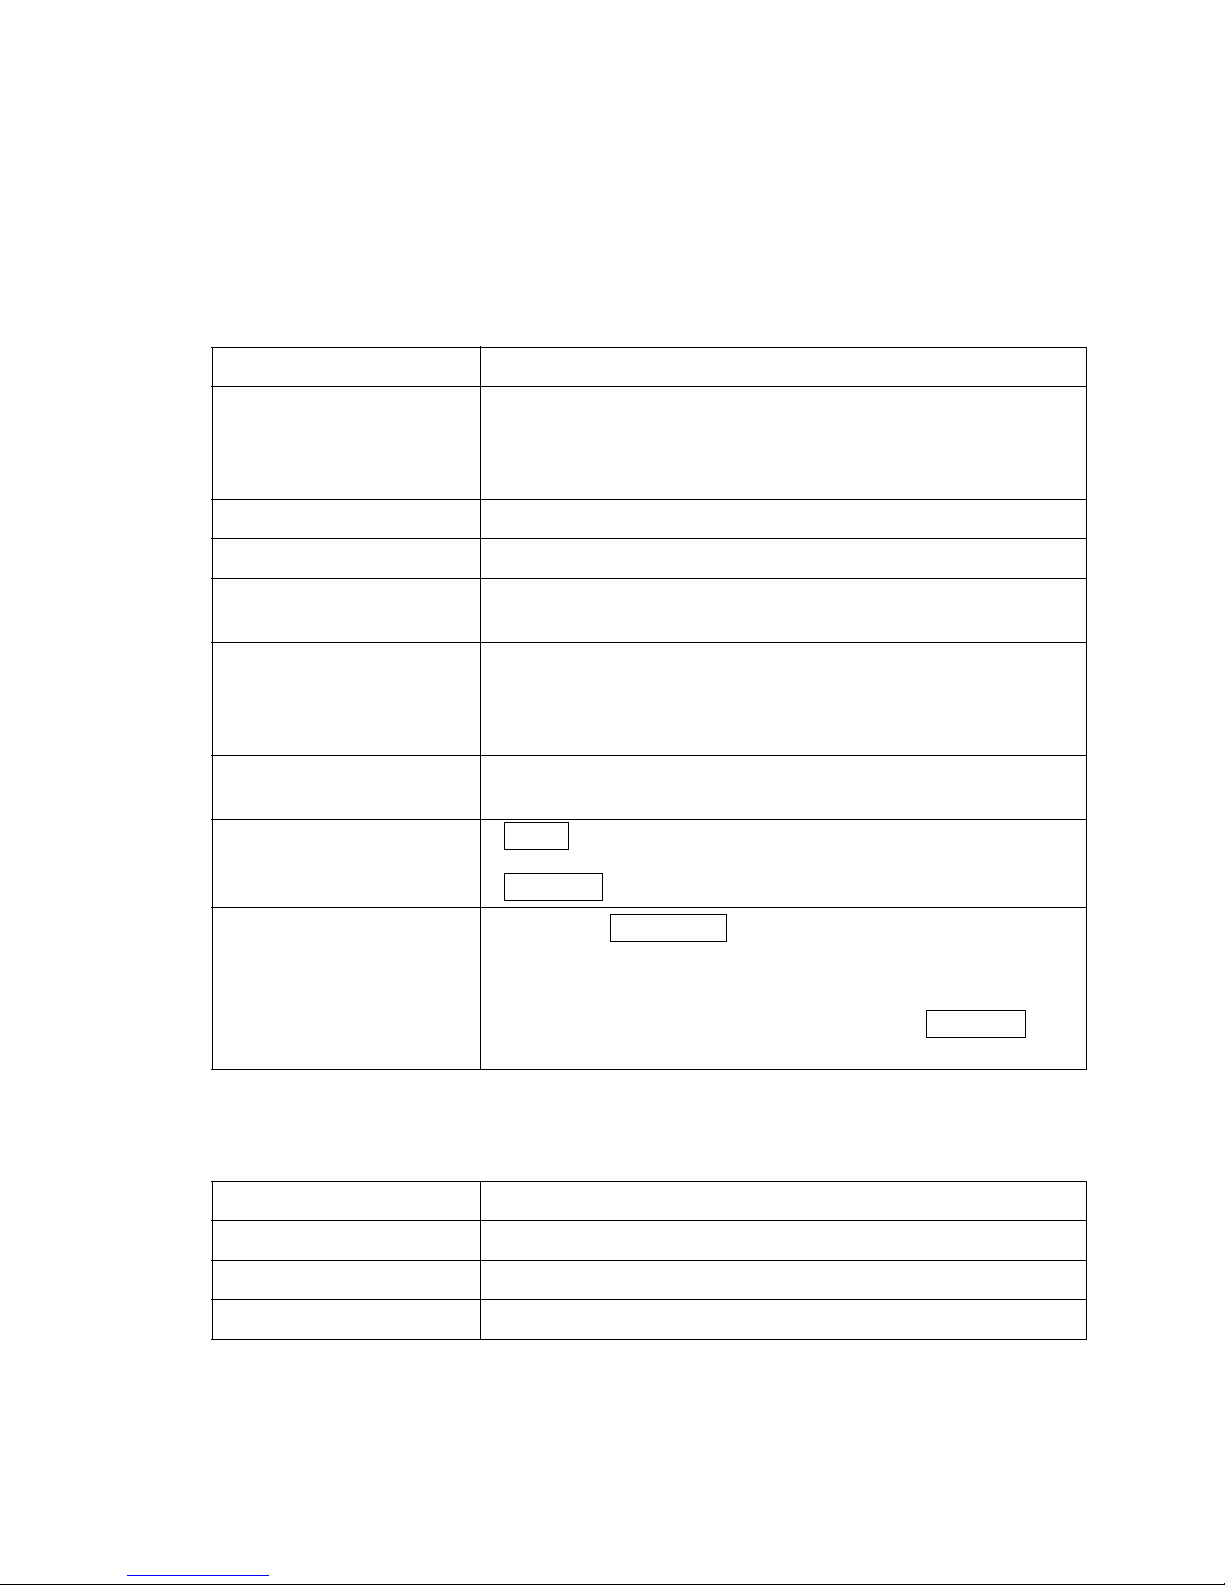
●Call and print saved messages 4-6
4.3 Call and print saved messages
(1) Overview
●Calls and prints saved messages.
●The message currently being printed is called “Current message”.
●When a message is called during printing, the Print description display changes to the called message and
printing continues to print the previous contents. The printed result changes from the next printing.
●The desired message can be efficiently found by changing the display contents of the message name list.
Method of changing the message name list display
Item Contents
Group
●Press the group No. button.
●Only the messages belonging to the selected group are displayed.
●When “0:All message names” is selected, the message names of all
the groups are displayed.
Previous display, next display ●Switches the message name list display screen.
Select page ●Selects the message name list page.
Sort
●The sort order can be switched by pressing the heading part of the
message name list display.
Search
●The first several characters of a message name are input and only the
message names beginning with those characters are displayed.
●If the Search conditions are not input, all the message names in that
group are displayed.
Display All
●Defines Group No. as "00" and the search condition as space, then
displays message name list.
Details
● Details displays the update date/time, Style, and group No., as well
as the No. and message name.
● Simple list displays the No. and message name.
Free number
● By pressing Free number , all the registered numbers will be
displayed.
● Nicknames will be sorted and displayed in ascending sequence of
Registration numbers.
● Search by Group No. or Search condition input or Display all is
NOT available.
●Style displayed in the Details mode shows the type of print format.
Types of Style
Type of style Meaning
Individual Individual setup of fixed layout.
Overall Overall setup of fixed layout
Free Set up of free layout.
Page 54
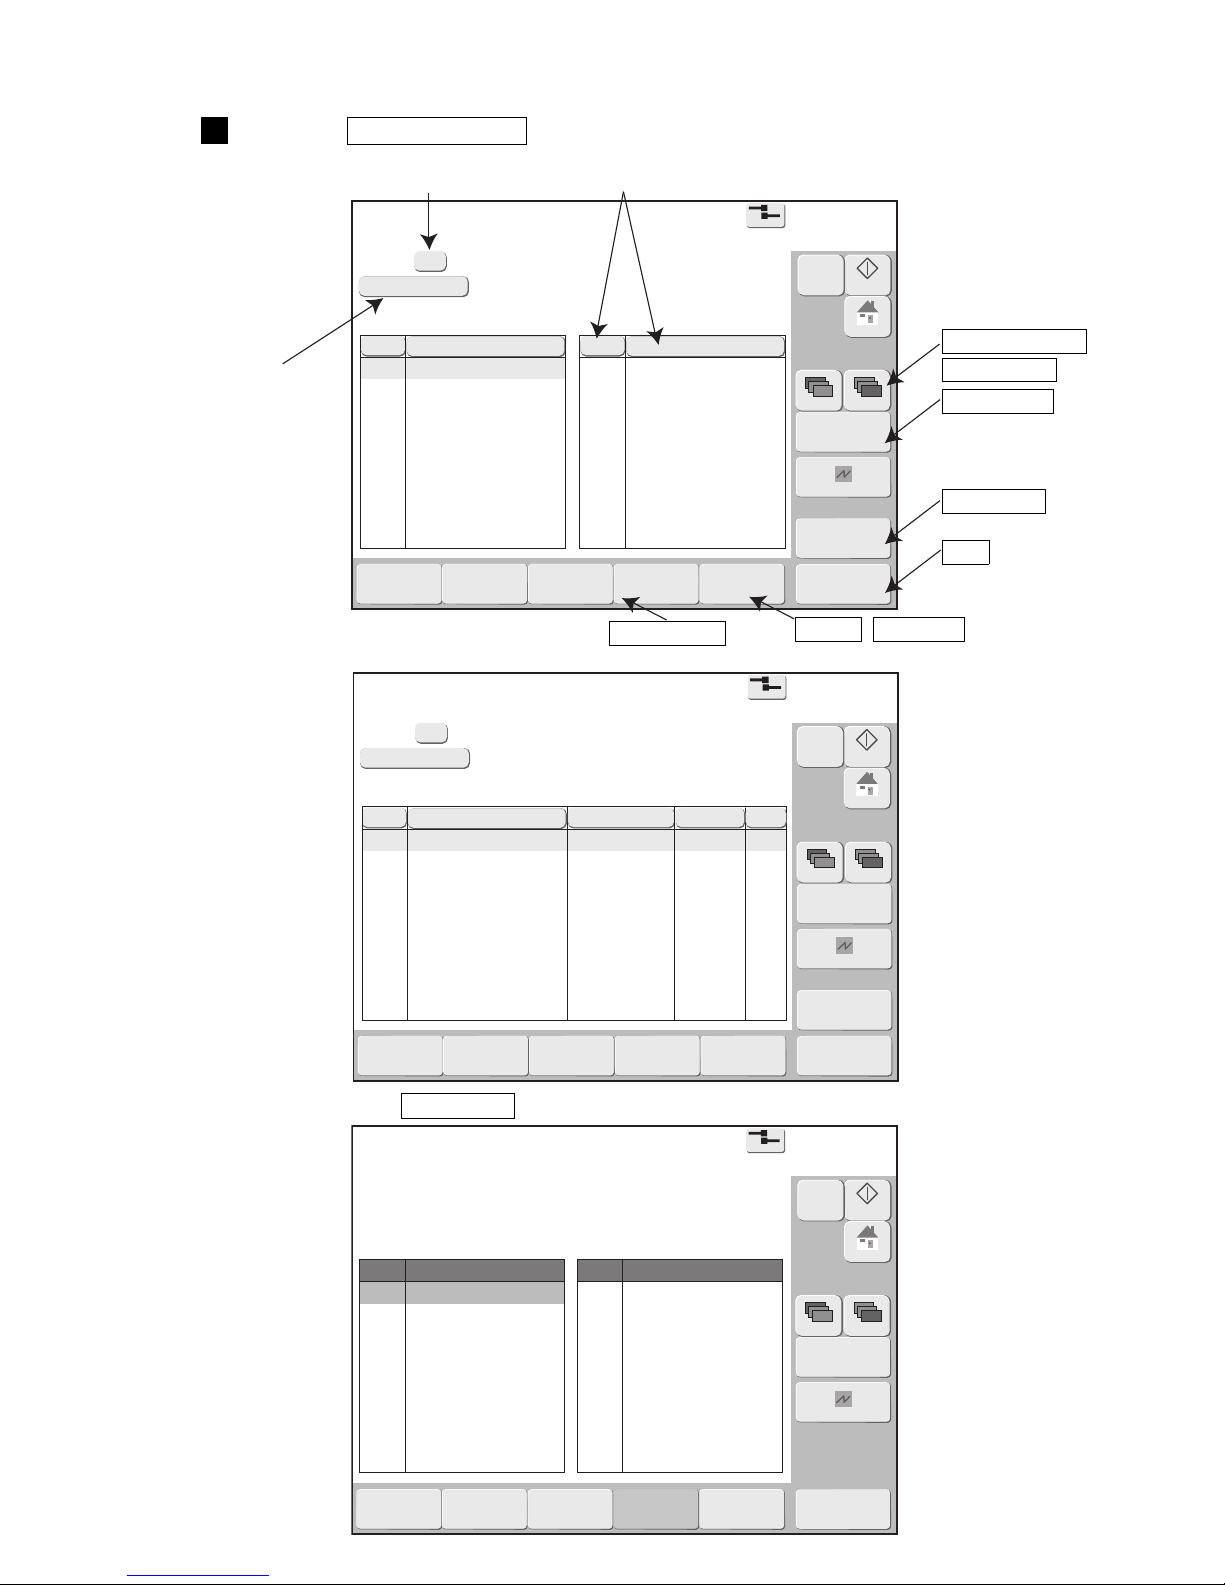
4-7 ●Call and print saved messages
Select message
2015.07.0712:45
OK
Com=0
[Stop ]
Details
Message name[ ]
Group No.
Group name
[ ]
[ ]
00
Search condition
ABC001
ABC002
ABC003
LMN10
LMN20
ABC004
ABC005
A01
B
C
1
2
3
4
5
10
11
12
13
14
No△
Message name
D
LMN30
LMN40
LMN50
LMN60
E01
E02
E03
E04
E05
15
21
22
23
24
30
31
32
33
34
No△
Message name
Display
All
Cancel
Prev.Dsp.
NextDsp.
Selectpage
1/3
Startup
M
Manual
HOME
Freenumber
Select message
2015.07.0712:45
OK
Com=0
[Stop ]
Simplelist
Message name[ ]
Group No.
Group name
[ ]
[ ]
00
Search condition
ABC001
ABC002
ABC003
LMN10
LMN20
ABC004
ABC005
A01
B
C
1
2
3
4
5
10
11
12
13
14
No△
Message name
Display
All
Cancel
Prev.Dsp.
NextDsp.
Selectpage
1/3
2015.06.01 12:00
2015.06.02 12:00
2015.06.03 12:00
2015.06.04 12:00
2015.06.05 12:00
2015.06.06 12:00
2015.06.07 12:00
2015.06.08 12:00
2015.06.09 12:00
2015.06.10 12:00
OVERALL
OVERALL
OVERALL
INDIV.
INDIV.
INDIV.
INDIV.
INDIV.
FREE
FREE
1
1
1
3
3
5
5
5
5
5
Update Date/Time Style GrNo
Startup
M
Manual
HOME
Freenumber
Select message
2015.07.0712:45
OK
Com=0
[Stop ]
Details
Message name[ ]
Group No.
Group name
[ ]
[ ]
00
Search condition
Cancel
Prev.Dsp.
NextDsp.
Selectpage
1/100
Startup
M
Manual
HOME
Freenumber
ABC001
ABC002
ABC003
LMN10
LMN20
ABC004
1
2
3
4
5
6
7
8
9
10
No Message name
ABC005
A01
B
C
D
11
12
13
14
15
16
17
18
19
20
No Message name
(2) Operation
Press the Select message on the Print description screen.
The Select message screen is displayed.
1
Example of Details screen
Search conditions
input
Group
Sort
Previous display ,
Next display
Select page
Display All
OK
Details , Simple list
Free number
By pressing Free number , the screen shown below will be displayed.
Page 55
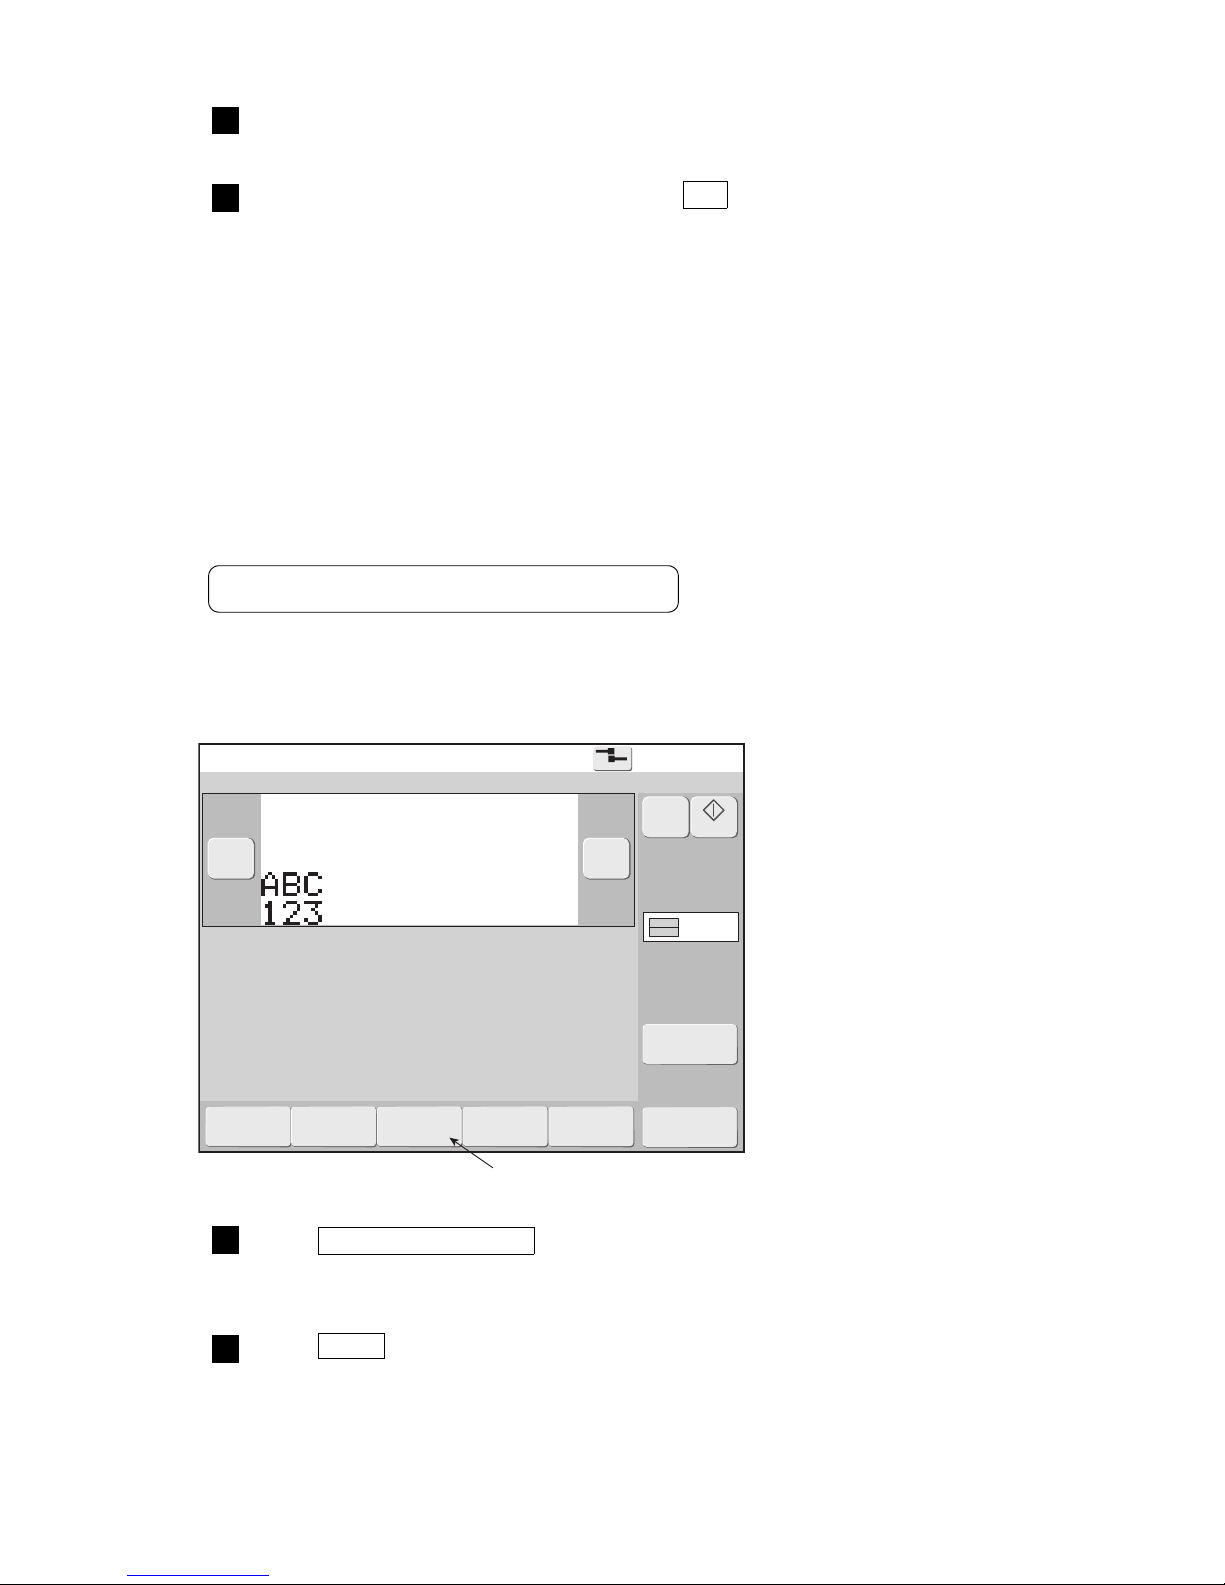
●Overwrite messages to be printed 4-8
Print description
2015.07.0712:45
M
Manual
Startup
Menu
Com=0
[Stop ]
Ink operating time 100(hours)
Cumulative op. time 100(hours)
Print count 1000(prints)
Ink pressure 0.000(MPa;standard value:0.250)
Message name [ ]
−
+
Change
message
Select
message
Overwrite
message
Adjustprint
parameters
Operation
management
Current user ID : user2
Interlaced
Printcount
reset
4.4 Overwrite messages to be printed
(1) Overview
●Overwrites the current message by the same name.
●If the message is saved using the overwrite message function when updating the count value, the same
print description can be selected later.
●Message name cannot be changed.
See “4.6 Save created messages” for message save.
(2) Operation
The Print description screen is displayed.
Press Overwrite message .
“Same Print Data Found” message is displayed.
1
Press Enter .
Save is performed.
2
Overwrite message
Change the display contents using Group, Search, Sort, Select page function,
Display All, so that the desired message name is displayed.
2
Select the message name and press the OK .
The selected message is called and the display returns to the Print description screen.
3
Page 56
4-9 ●Edit messages different from the current message
1
4.5 Edit messages different from the current message
(1) Overview
●Edits and saves a specific saved message or a new message.
●Since a message different from the current message (message currently being printed) is edited, the
contents currently being printed are not affected.
●When the Back button is pressed at the Edit message screen or other edit screen, the display returns to the
Select message screen. Before pressing the Back button, always save the created and edited message.
If returned to the Select message screen without saving the message, the edited message is lost.
●The desired message can be efficiently found by changing the display contents of the message name list.
Method of changing the message name list display
Item Contents
Group
●Press the group No. button.
●Only the messages belonging to the selected group are displayed.
●When “0:All message names” is selected, the message names of all
the groups are displayed.
Previous display, next display ●Switches the message name list display screen.
Select page ●Selects the message name list page.
Sort
●The sort order can be switched by pressing the heading part of the
message name list display.
Search
●The first several characters of a message name are input and only the
message names beginning with those characters are displayed.
●If the Search conditions are not input, all the message names in that
group are displayed.
Display All
● Defines Group No. as "00" and the search condition as space, then
displays message name list.
Details
● Details displays the update date/time, Style, and group No., as well
as the No. and message name.
● Simple list displays the No. and message name.
Free number
● By pressing Free number , all the registered numbers will be
displayed.
● Nicknames will be sorted and displayed in ascending sequence of
Registration numbers.
● Search by Group No. or Search condition input or Display all is
NOT available.
●Style displayed in the Details mode shows the type of print format.
Types of Style
Type of style Meaning
Individual Individual setup of fixed layout.
Overall Overall setup of fixed layout
Free Set up of free layout.
Page 57
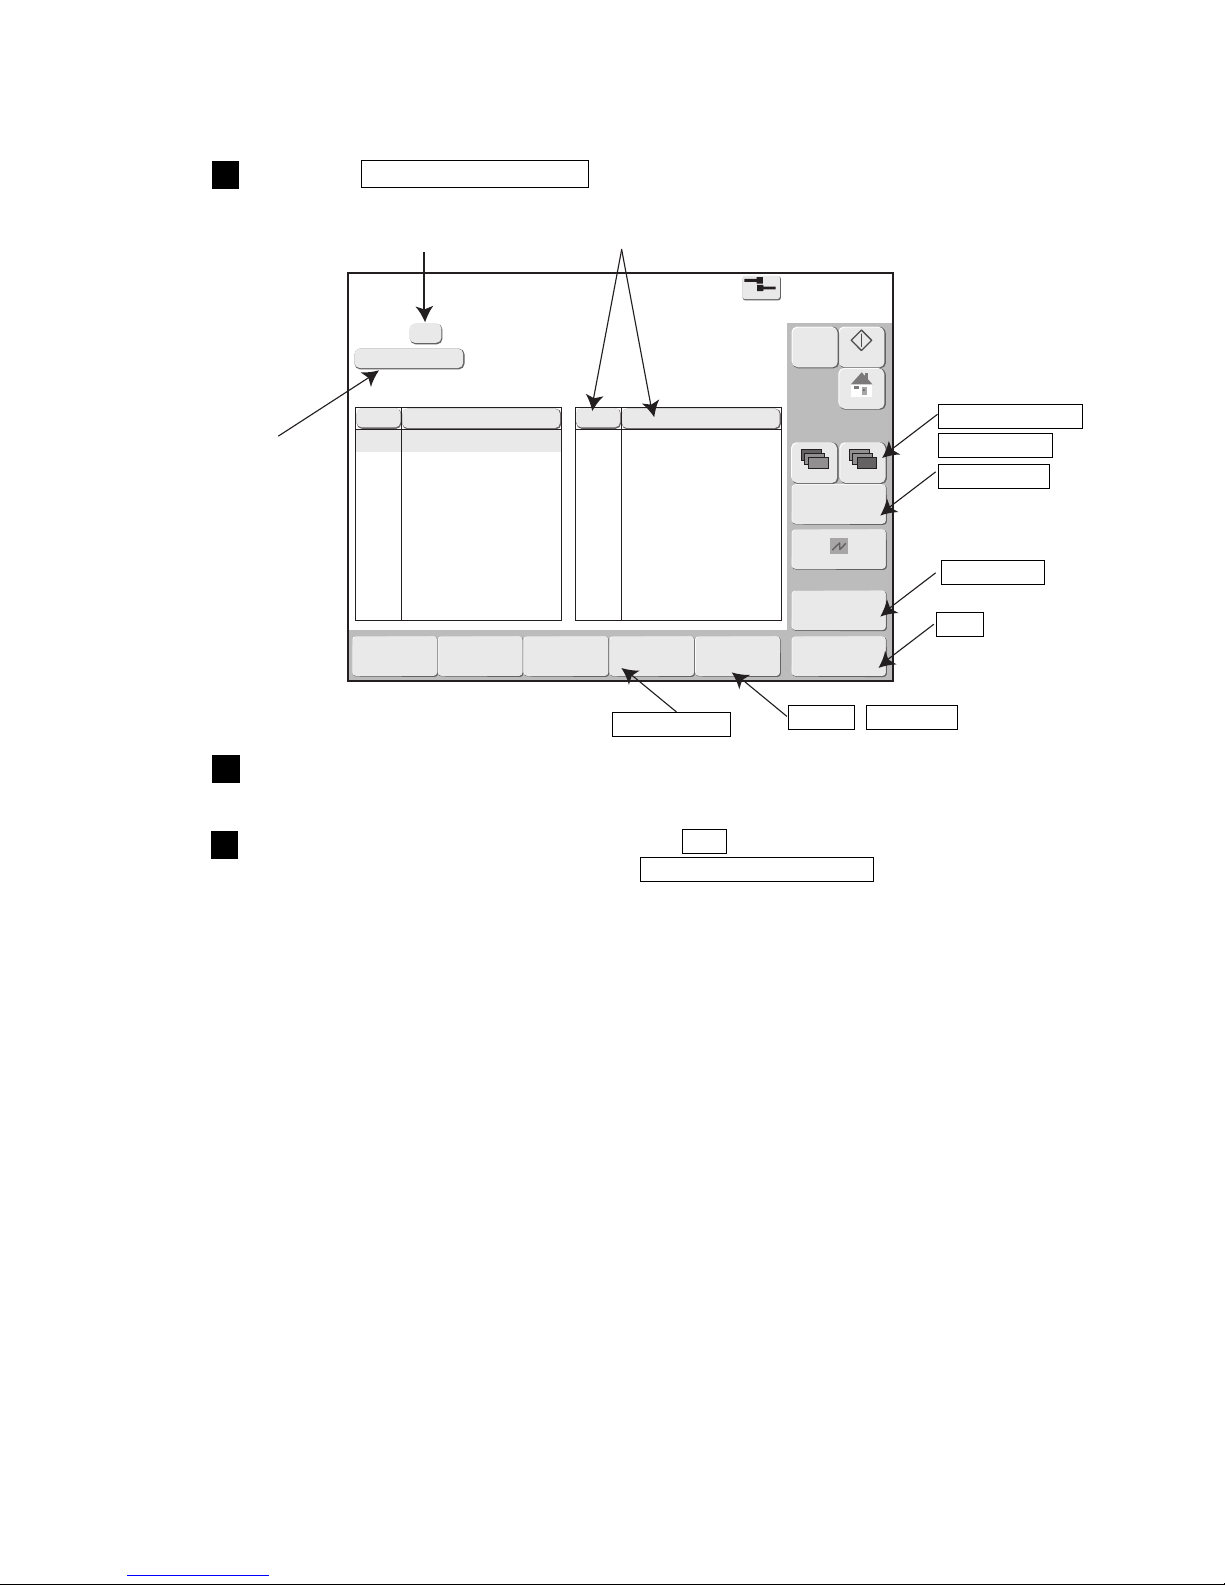
●Edit messages different from the current message 4-10
1
Create/Edit message
2015.07.0712:45
OK
Com=0
[Stop ]
Create
newmessage
Details
Message name[ ]
Group No.
Group name
[ ]
[ ]
00
Search condition
ABC001
ABC002
ABC003
LMN10
LMN20
ABC004
ABC005
A01
B
C
1
2
3
4
5
10
11
12
13
14
No△
Message name
D
LMN30
LMN40
LMN50
LMN60
E01
E02
E03
E04
E05
15
21
22
23
24
30
31
32
33
34
No△
Message name
Display
All
Cancel
Prev.Dsp.
NextDsp.
Selectpage
1/3
Startup
M
Manual
HOME
Freenumber
Change the display contents using Group, Search, Sort, Select page function,
Display All, so that the desired message name is displayed.
2
Select the message name and press the OK .
To create a new message, press the Create new message .
The change message screen is displayed.
3
(2) Operation
Press the Create/Edit message on the Print description screen.
The Create/Edit message screen is displayed.
1
Search conditions
input
Group No.
Sort
Previous display ,
Next display
Select page
Display All
OK
Details , Simple list
Free number
Page 58
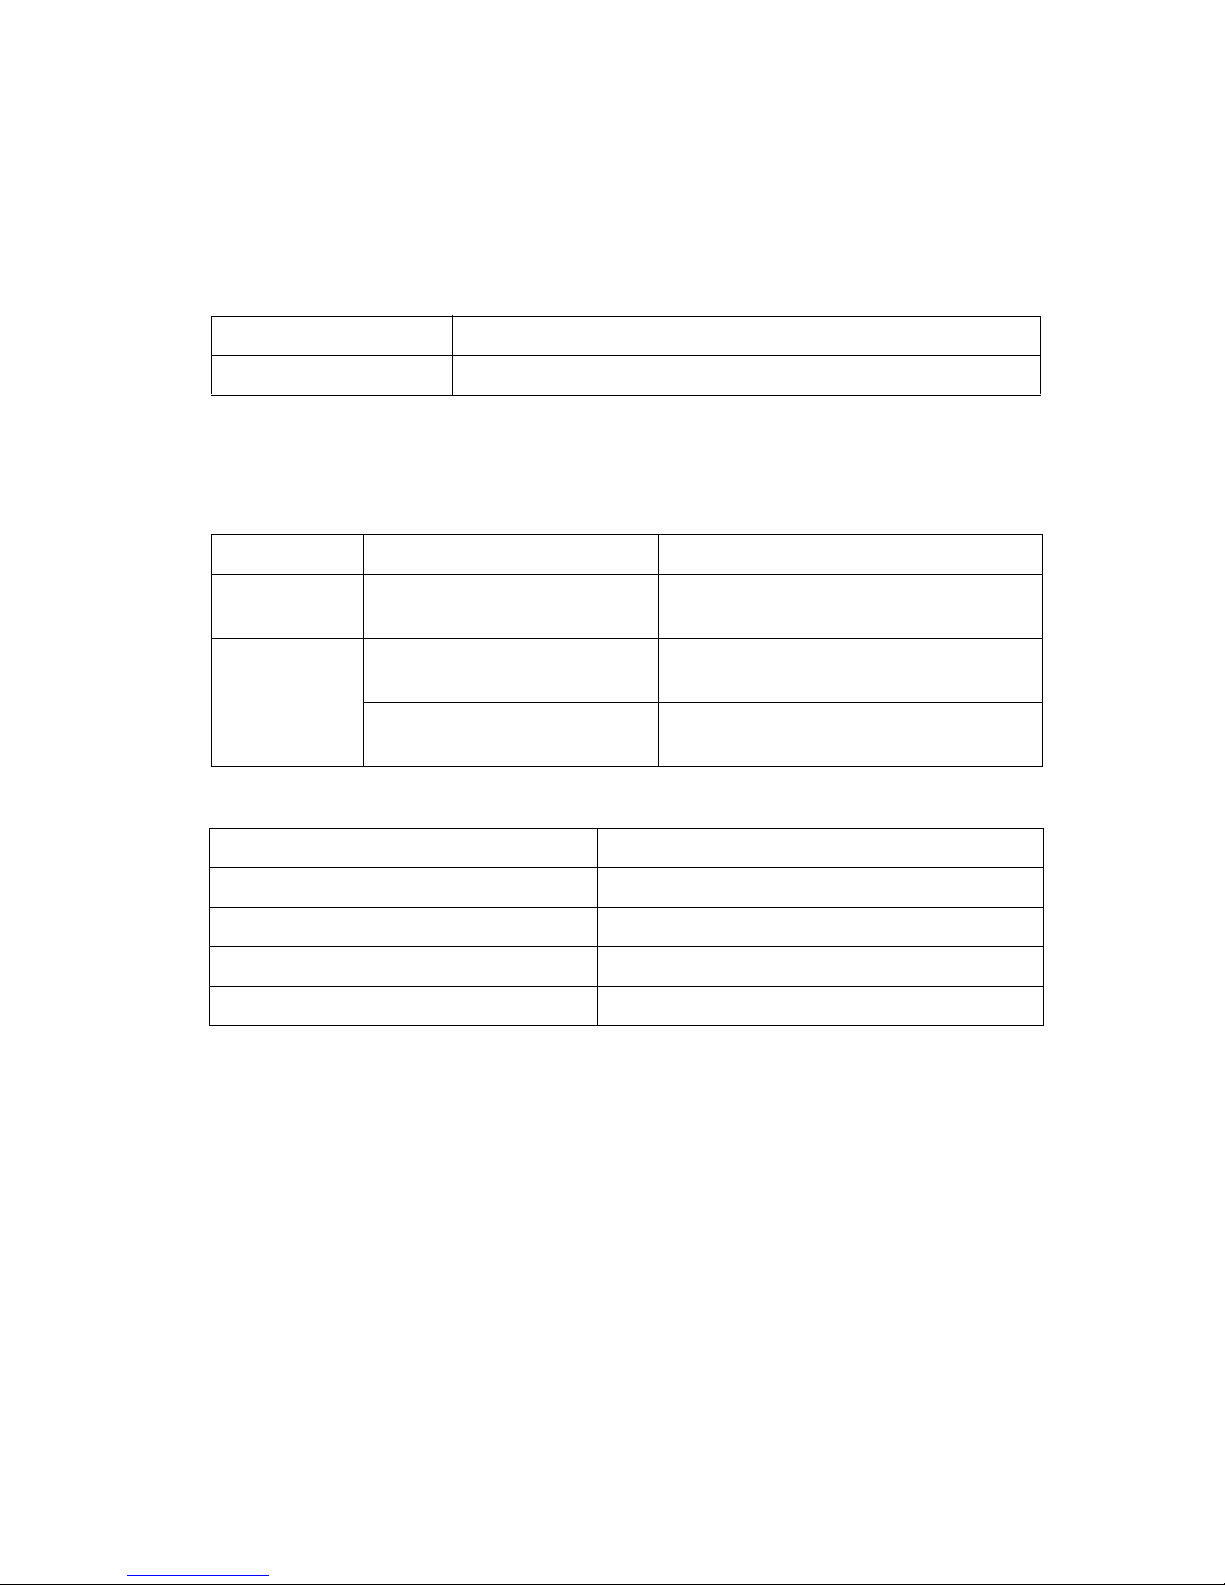
4-11 ●Save created messages
4.6 Save created messages
(1) Overview
●Saves created messages.
●A save No. is automatically assigned.
●The same message name cannot be assigned.
●Saving to a selected group is possible.
●Free spaces are displayed.
Item Contents
Free space Proportional of save area which is vacant.
● If the number of input characters is small, the capacity necessary to save the message decreases. A lot of
small capacity messages can be saved. When there are many large capacity messages, the number of
messages which can be saved decreases.
Maximum message save count
Model type Maximum save count Remarks
RX2-B 24 messages
24 messages can be saved without regard to
their capacity.
RX2-S
48 messages
48 messages can be saved without regard to
their capacity.
Option :
Up to 2,000 messages
The save count depends on the capacity.
*1) Maximum message save count
Conditions example Message save count
Characters 70 chars 2,000 messages
Characters 20 chars, calendar 1, count 1 Approx. 1,900 messages
Characters 240 chars Approx. 800 messages
Characters 240 chars, calendar 8, count 8 Approx. 300 messages
*1)
Page 59
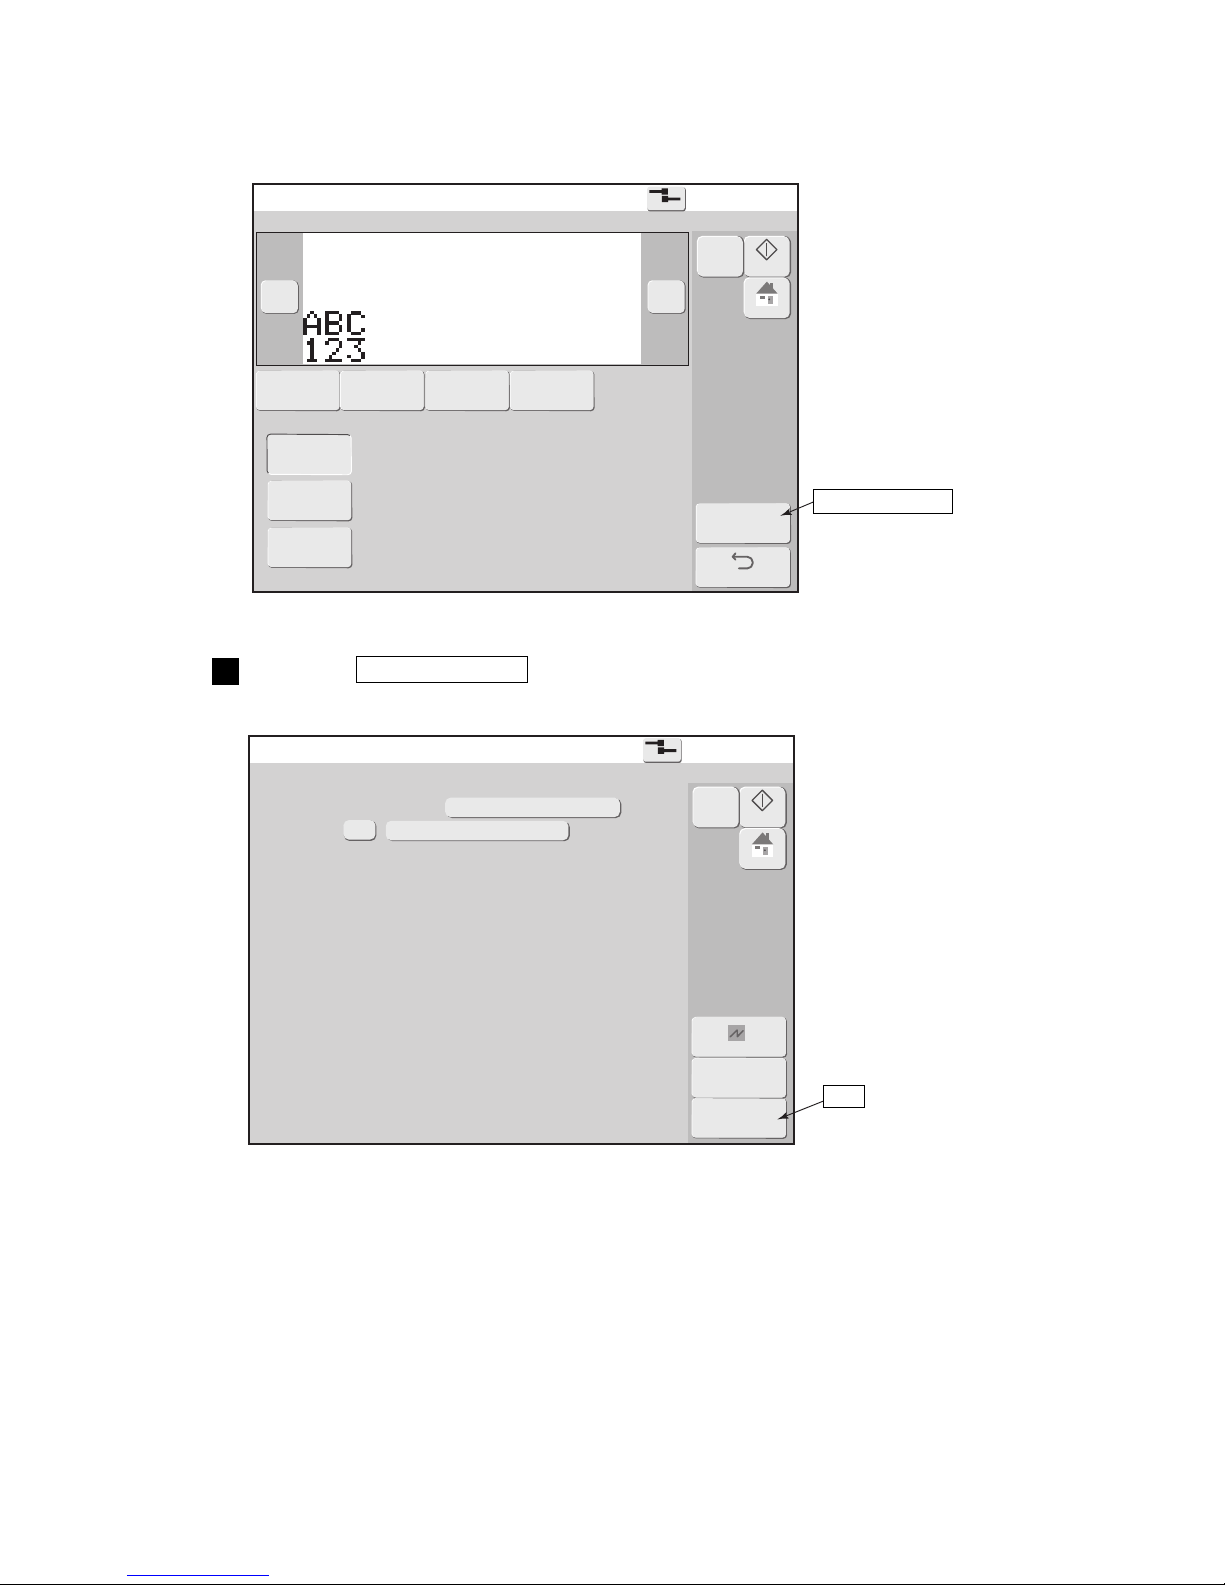
●Save created messages 4-12
Change message
2015.07.0712:45
SaveandBack
Com=0
[Stop ]
Message name[ ]
:Multiple print formats can be mixed.
<Format Setup>
− +
Print
format
Edit
message
Print
spec.
Various
printsetup
Individual
setup
Overall
setup
:Character size and inter-character space set
value are matched at all lines.
Only 1 column can be input.
Back
Startup
M
Manual
HOME
Freelayout
:An arbitrary position can be set for each print
item.
Save message
2015.07.0712:45
OK
Com=0
[Stop ]
Message name [ ]
01
GROUP001
Simplelist
Save message as (name)
Group No.
Free space 20%
Cancel
ABC001
Startup
M
Manual
HOME
(2) Operation
The Change message screen is displayed.
Press the Save and Back .
The Save message screen is displayed.
1
Save and Back
OK
Page 60
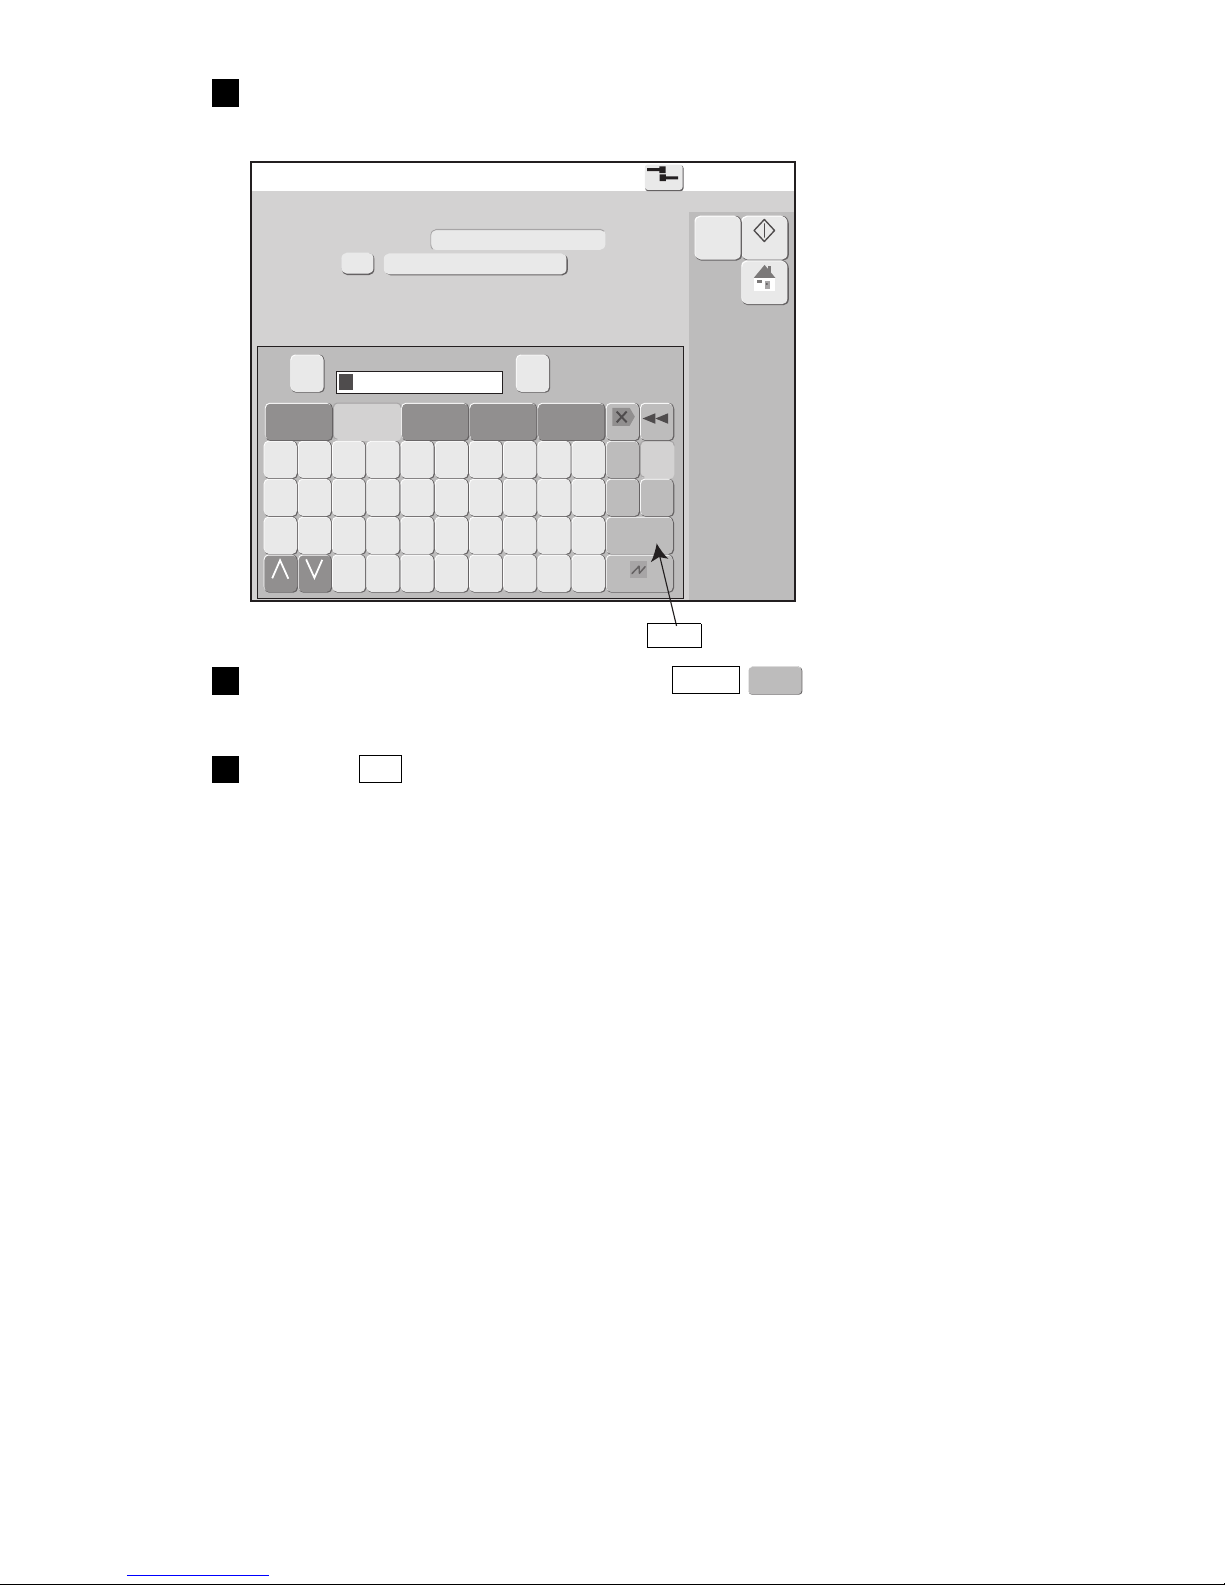
4-13 ●Save created messages
Ent
Enter
Input the message name and press the Enter .
A keyboard is displayed.
Press Message name.
A keyboard is displayed.
Save message
2015.07.0712:45
Com=0
[Stop ]
Message name[ ]
01
GROUP001
Save message as (name)
Group No.
Free space 20 %
ABC001
A B C D E F G H I J
Insert
Over-
write
Delete
Backspace
K L M N O P Q R S T
Dupli-
cate
Paste
U V W X Y Z
Ent
Enter
Space
Cancel
← →
ABC001
123…
Sign
ABC…
Change Change
Startup
M
Manual
HOME
etc.
▽
2
3
Press the OK .
The message is saved.
4
Enter
Page 61
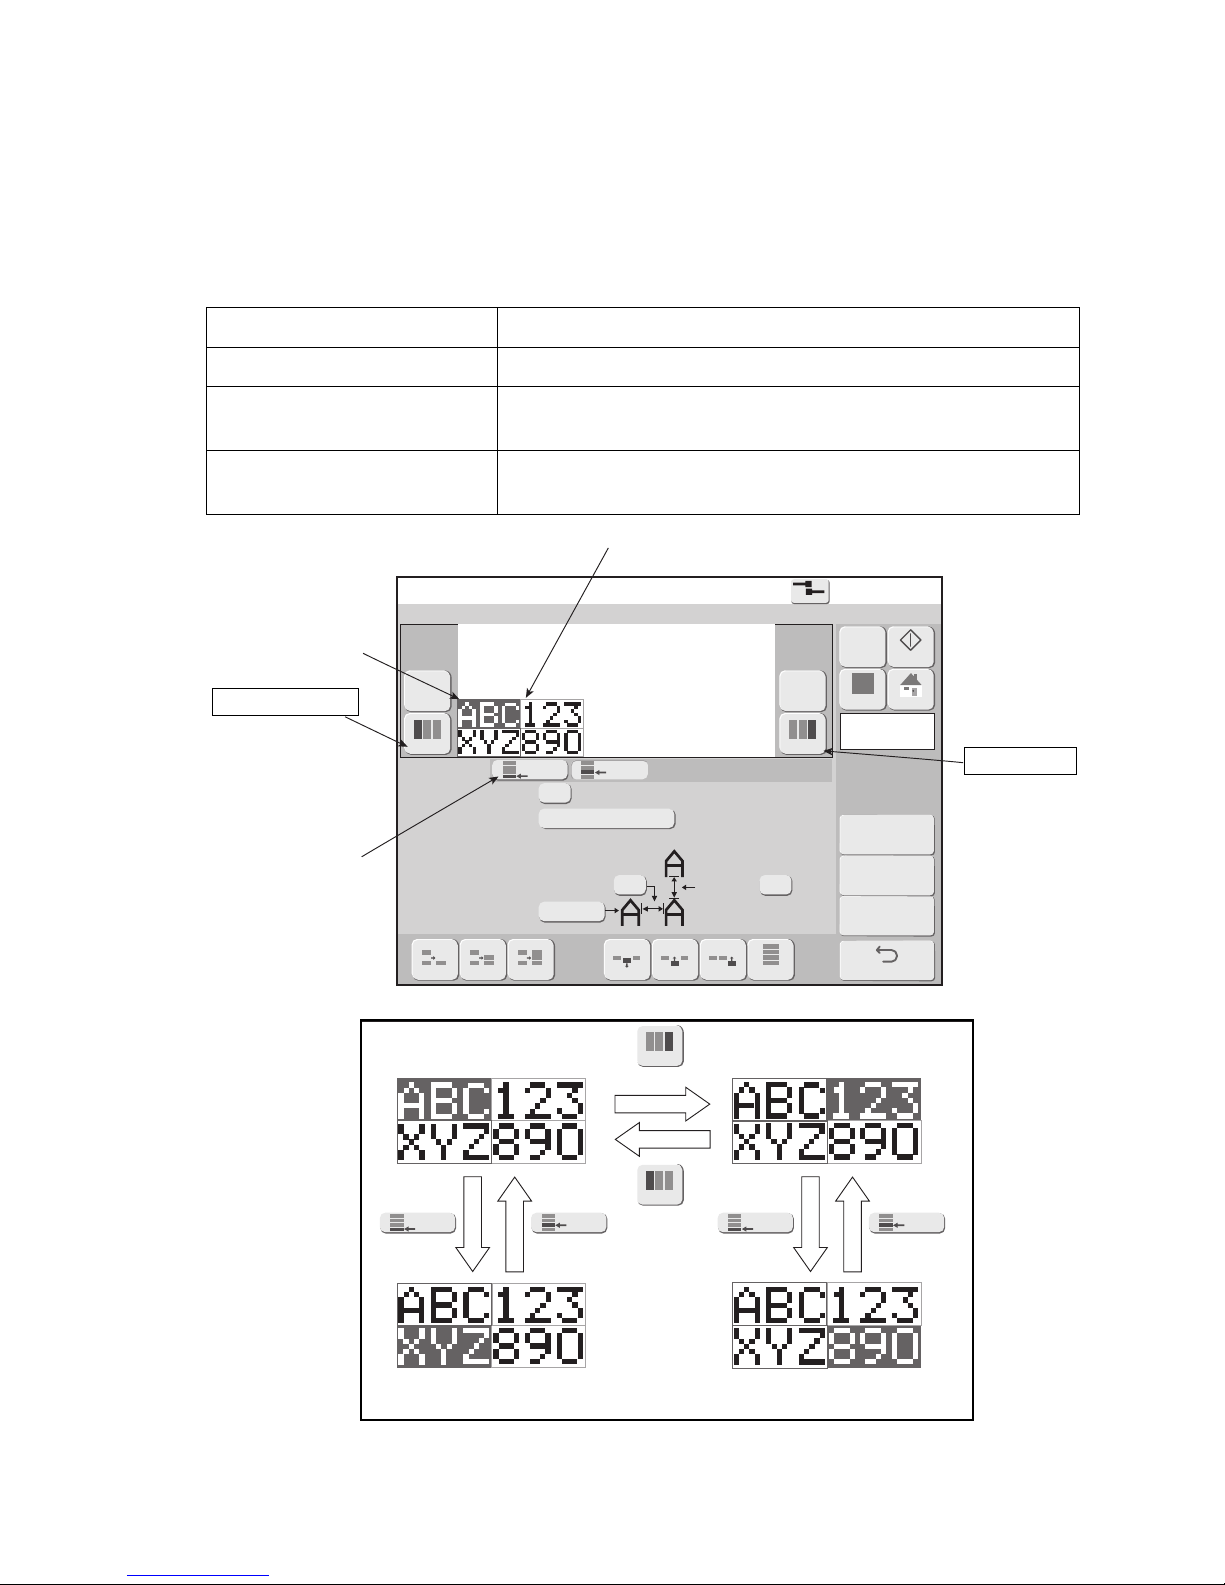
●Set the print format (Fixed layout) 4-14
Prev.col.
Nextcol.
1stline 2ndline 1stline 2ndline
4.7 Set the print format(Fixed layout)
4.7.1 Select the print items to be edited
(1) Selecting one print item
●Sets and changes the print format including the character size for the print item to be edited.
●There are 3 methods of selecting the print item to be edited.
Print format
2015.07.0712:45
Adjustment
char.cond.
Com=0
[Stop ]
Select Line
Bold (times 1〜9)
Bar code
Message name[ ]
1
none
02
5x7
Dot matrix
Print
spec.
Edit
message
Column1
ToOverallAddCol.InsertC.DeleteC.2lines
⁝
1line
⁝
Prev.col. Nextcol.
0
2ndline
1stline
− +
M
Manual
Startup
Apply
HOME
Inter-char. space
(MAX 27 )
Line
spacing
(MAX 2 )
Back
3lines
⁝
Methods of selecting the print item to be edited
Type Features
Directly touching the print item The touched item becomes the editing objective.
Previous column, next column
The topmost line of the previous column or the next column
becomes the editing objective
Select line
The print item of the specified line in the editing objective column
becomes the editing objective.
The editing objective can be changed by
directly touching a print item.
The colored print
item is the editing
objective.
Previous column
The selected line
in the editing
objective column
becomes the
editing objective
by Select line
button.
Next column
Next column
First line Second line First line Second line
Previous
column
How to change the print item to be edited
Page 62
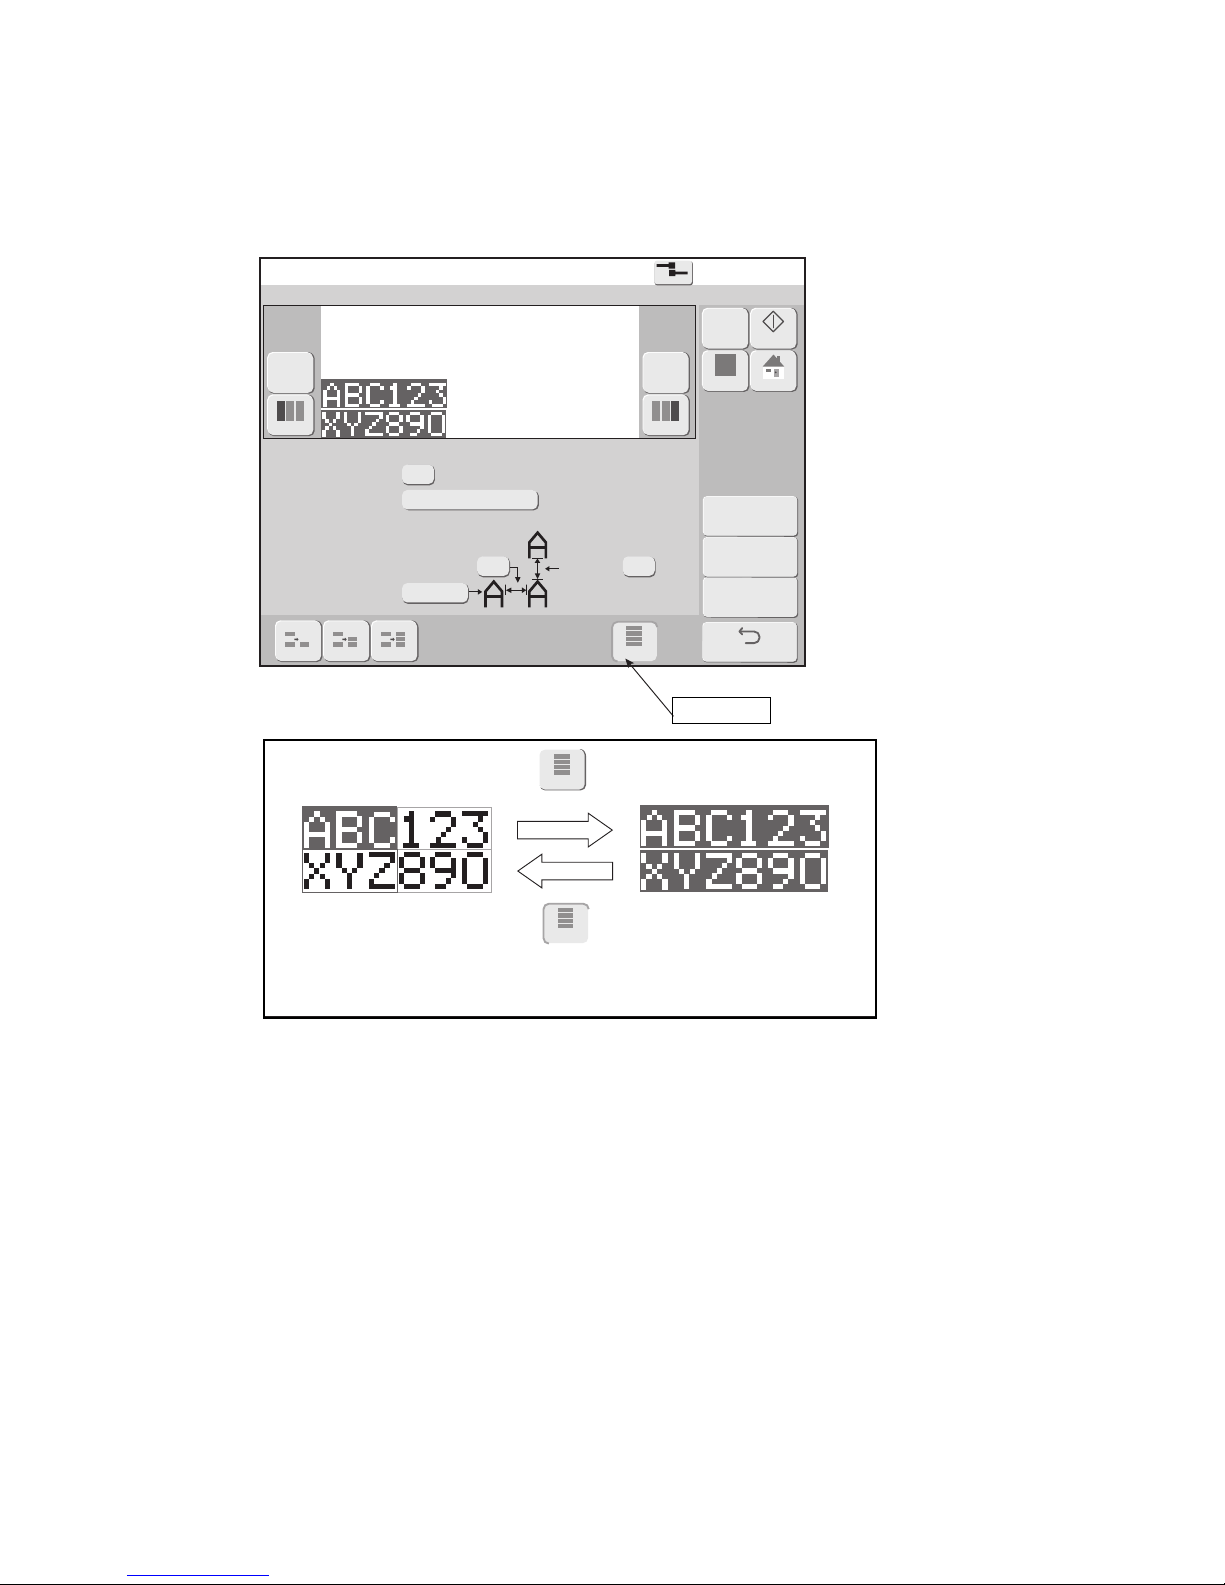
4-15 ●Set the print format (Fixed layout)
Print format
2015.07.0712:45
Adjustment
char.cond.
Com=0
[Stop ]
Bold (times 1〜9)
Bar code
Message name[ ]
1
none
02
5x7
Dot matrix
Print
spec.
Edit
message
2lines
⁝
1line
⁝
Prev.col. Nextcol.
0
ToOverall
− +
Inter-char. space
(MAX 27 )
Line
spacing
(MAX 2 )
M
Manual
Startup
Apply
HOME
Back
3lines
⁝
ToOverall
ToOverall
(2) Selecting all print items
●All the print items become the editing objective.
●When placed into the Overall mode, first matching to the format information of the 1st line is
performed.
●Overall mode is cancelled after closing the Change message screen.
To Overall
One print item becomes
the editing objective.
All the print items become
the editing objective.
Overall
Overall (To cancel)
How to change the print item to be edited
Page 63
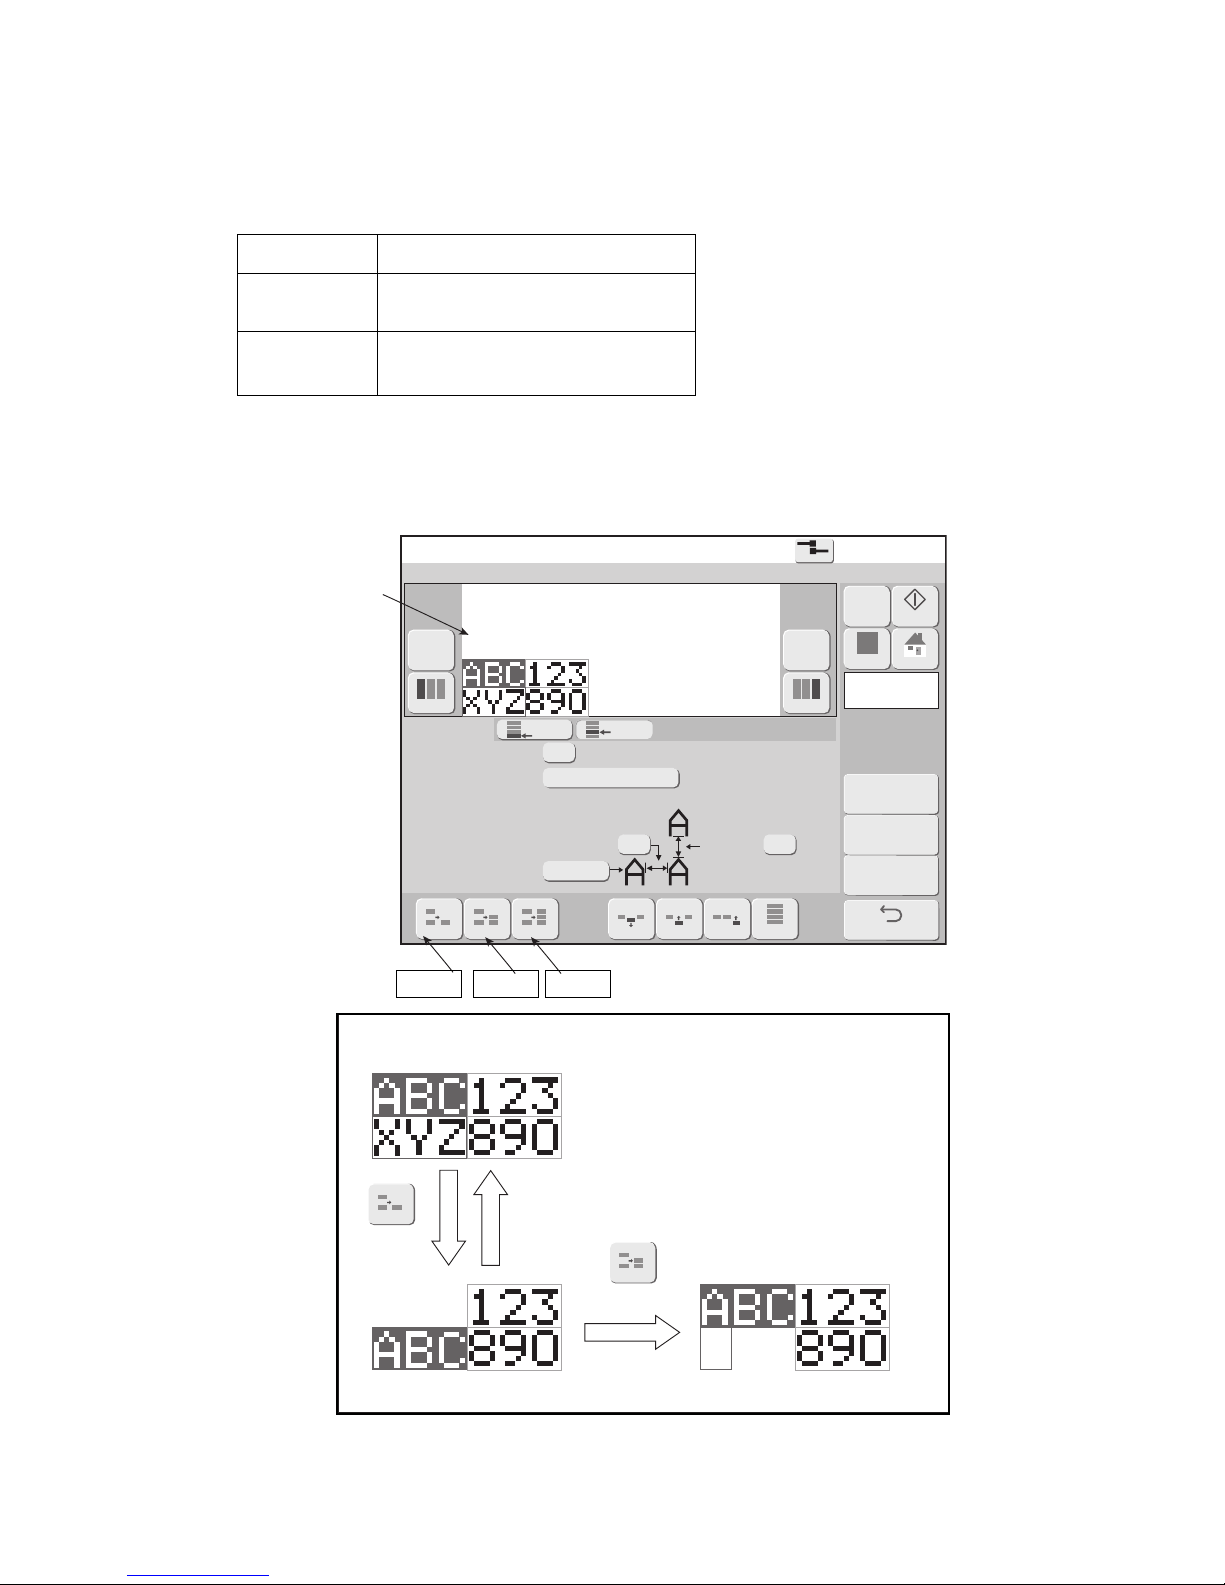
●Set the print format (Fixed layout) 4-16
Print format
2015.07.0712:45
Adjustment
char.cond.
Com=0
[Stop ]
Select Line
Bold (times 1〜9)
Bar code
Message name[ ]
2ndline
1
none
02
5x7
Dot matrix
Print
spec.
Edit
message
Column1
ToOverallAddCol.InsertC.DeleteC.2lines
⁝
1line
⁝
Prev.col. Nextcol.
0
1stline
− +
M
Manual
Startup
Apply
HOME
Back
Inter-char. space
(MAX 27 )
Line
spacing
(MAX 2 )
3lines
⁝
2lines
⁝
1line
⁝
4.7.2 Set the number of print lines
(1) Function
●Sets the number of lines of the selected column.
●The number of lines which can be set is “1 to 5”.
Maximum line count
Model type Maximum line count
RX2-B 3 lines
RX2-S
3 lines
(Option : Up to 5 lines)
●When the number of vertical dots exceeds the maximum number of dots, the characters size
becomes 5×8(5×7).
The colored print
item is the editing
objective.
1 line
2 lines
1 line
2 lines
Example for changing the number of lines of the editing objective column
3 lines
Page 64
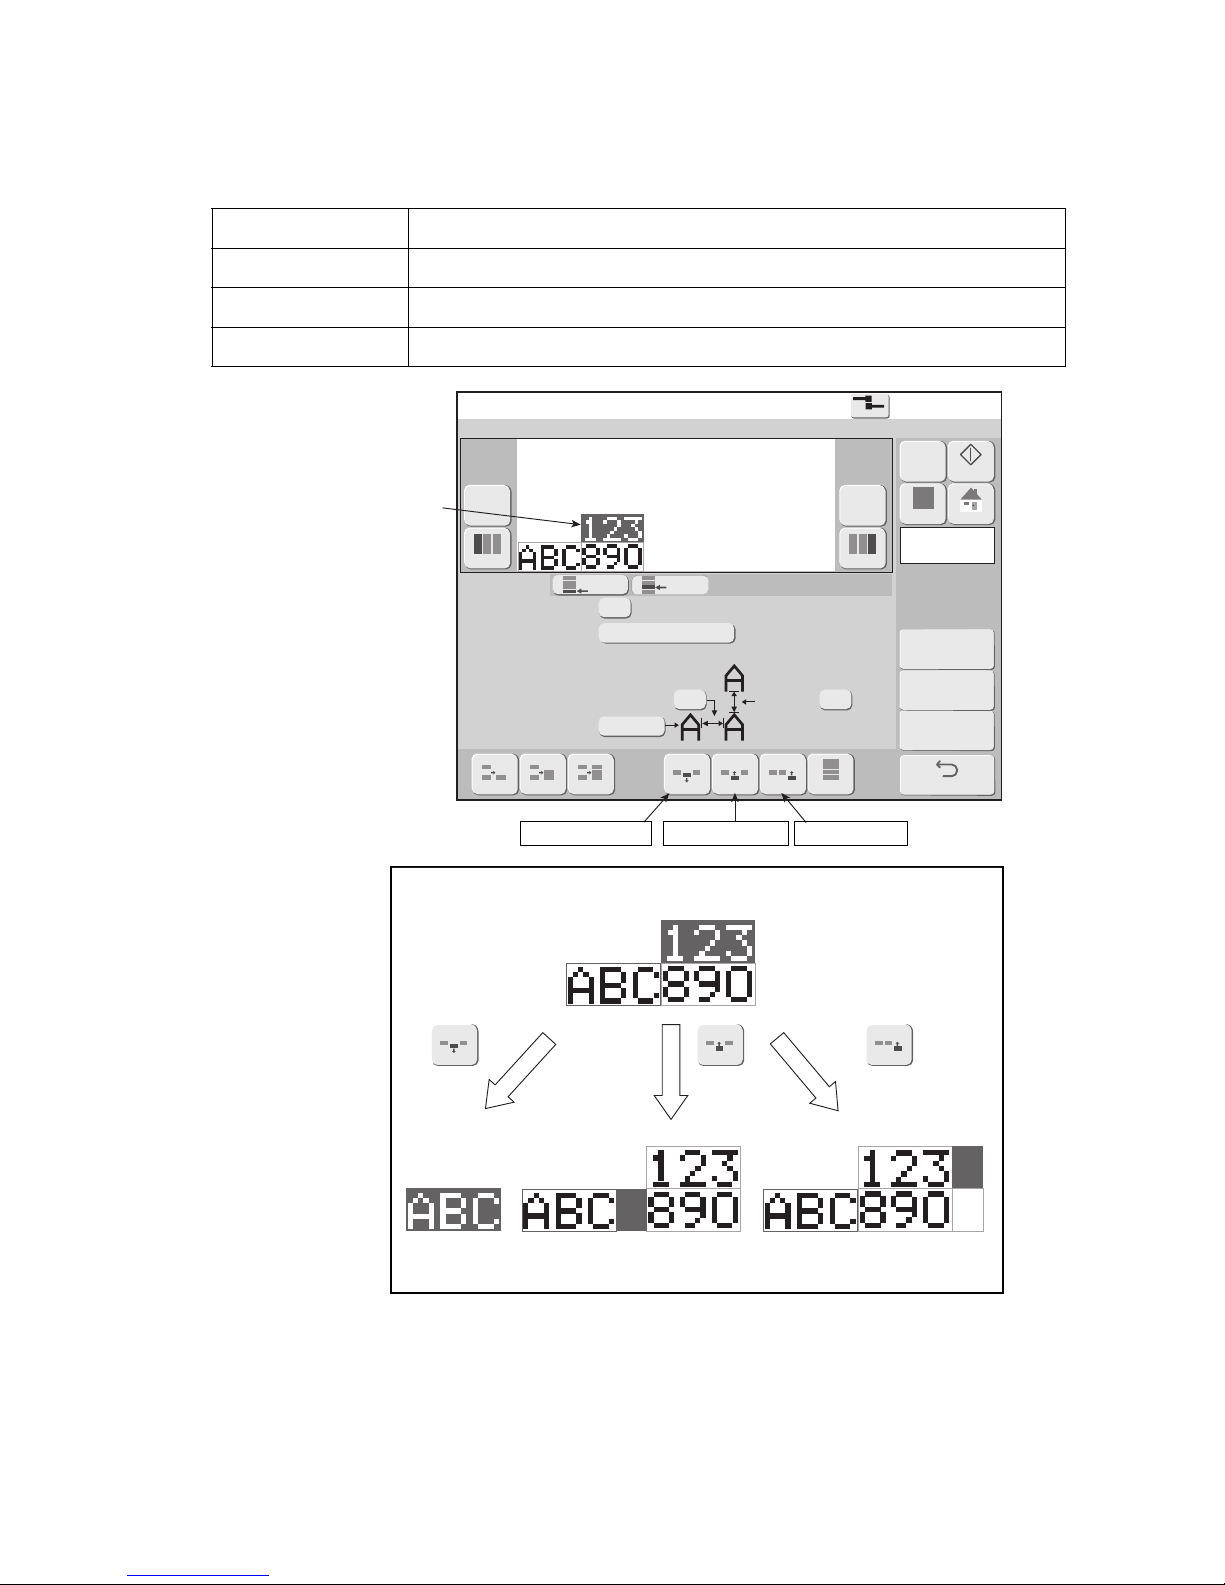
4-17 ●Set the print format (Fixed layout)
Print format
2015.07.0712:45
Adjustment
char.cond.
Com=0
[Stop ]
Select Line
Bold (times 1〜9)
Bar code
Message name[ ]
2ndline
1
none
02
5x7
Dot matrix
Print
spec.
Edit
message
Column2
ToOverallAddCol.InsertC.DeleteC.2lines
⁝
1line
⁝
Prev.col. Nextcol.
0
1stline
− +
Inter-char. space
(MAX 27 )
Line
spacing
(MAX 2 )
M
Manual
Startup
Apply
HOME
Back
3lines
⁝
AddCol.InsertC.DeleteC.
4.7.3 Add and delete print items
(1) Function
●Deletes, inserts, and adds print items in column units.
Methods of adding and deleting print items
Type Fea tures
Delete column Deletes all the print items of the editing objective column.
Insert column Adds a column directly before the editing objective column.
Add column Adds a column at the end.
The colored column is
the editing objective.
Delete Column
Insert Column
Add Column
Delete
column
Insert
column
Add column
Example of deleting, inserting, and adding print items in column units
Page 65
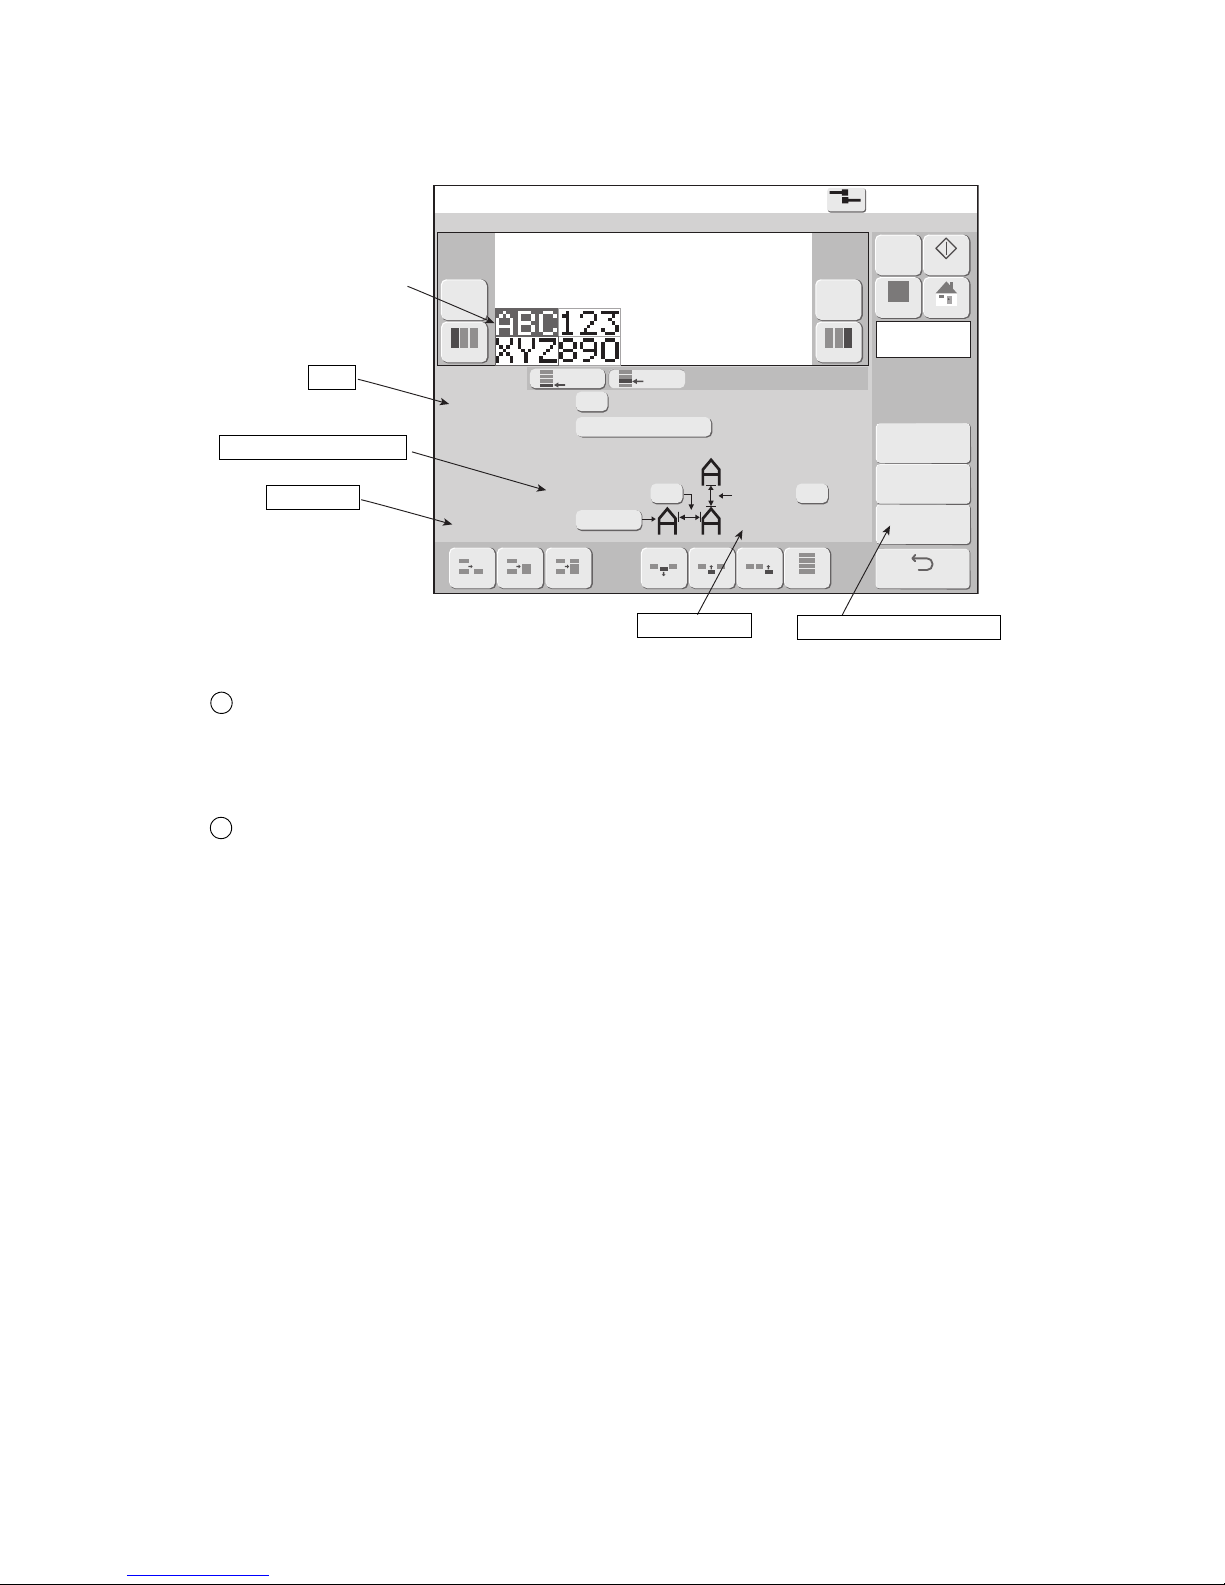
●Set the print format (Fixed layout) 4-18
Print format
2015.07.0712:45
Adjustment
char.cond.
Com=0
[Stop ]
Select Line
Bold (times 1〜9)
Bar code
Message name[ ]
2ndline
1
none
02
5x7
Dot matrix
Print
spec.
Edit
message
Column1
ToOverallAddCol.InsertC.DeleteC.2lines
⁝
1line
⁝
Prev.col. Nextcol.
0
1stline
− +
M
Manual
Startup
Apply
HOME
Back
Inter-char. space
(MAX 27 )
Line
spacing
(MAX 2 )
3lines
⁝
4.7.4 Set dot matrix, inter-character space, and other parameters
(1) Function
●Sets the line spacing, dot matrix, inter-character space, bold font, and bar code.
Bold
●Sets the character to bold.
●The magnification which can be set is “1 to 9”.
Line spacing
●Adjust the spacing with the line above.
●Set for each column.
●Can be set up to a maximum of 2 dots.
1
2
The colored print item
is the editing objective.
Bold
Inter-character space
Dot matrix
Line spacing
Adjustment char. cond.
Page 66
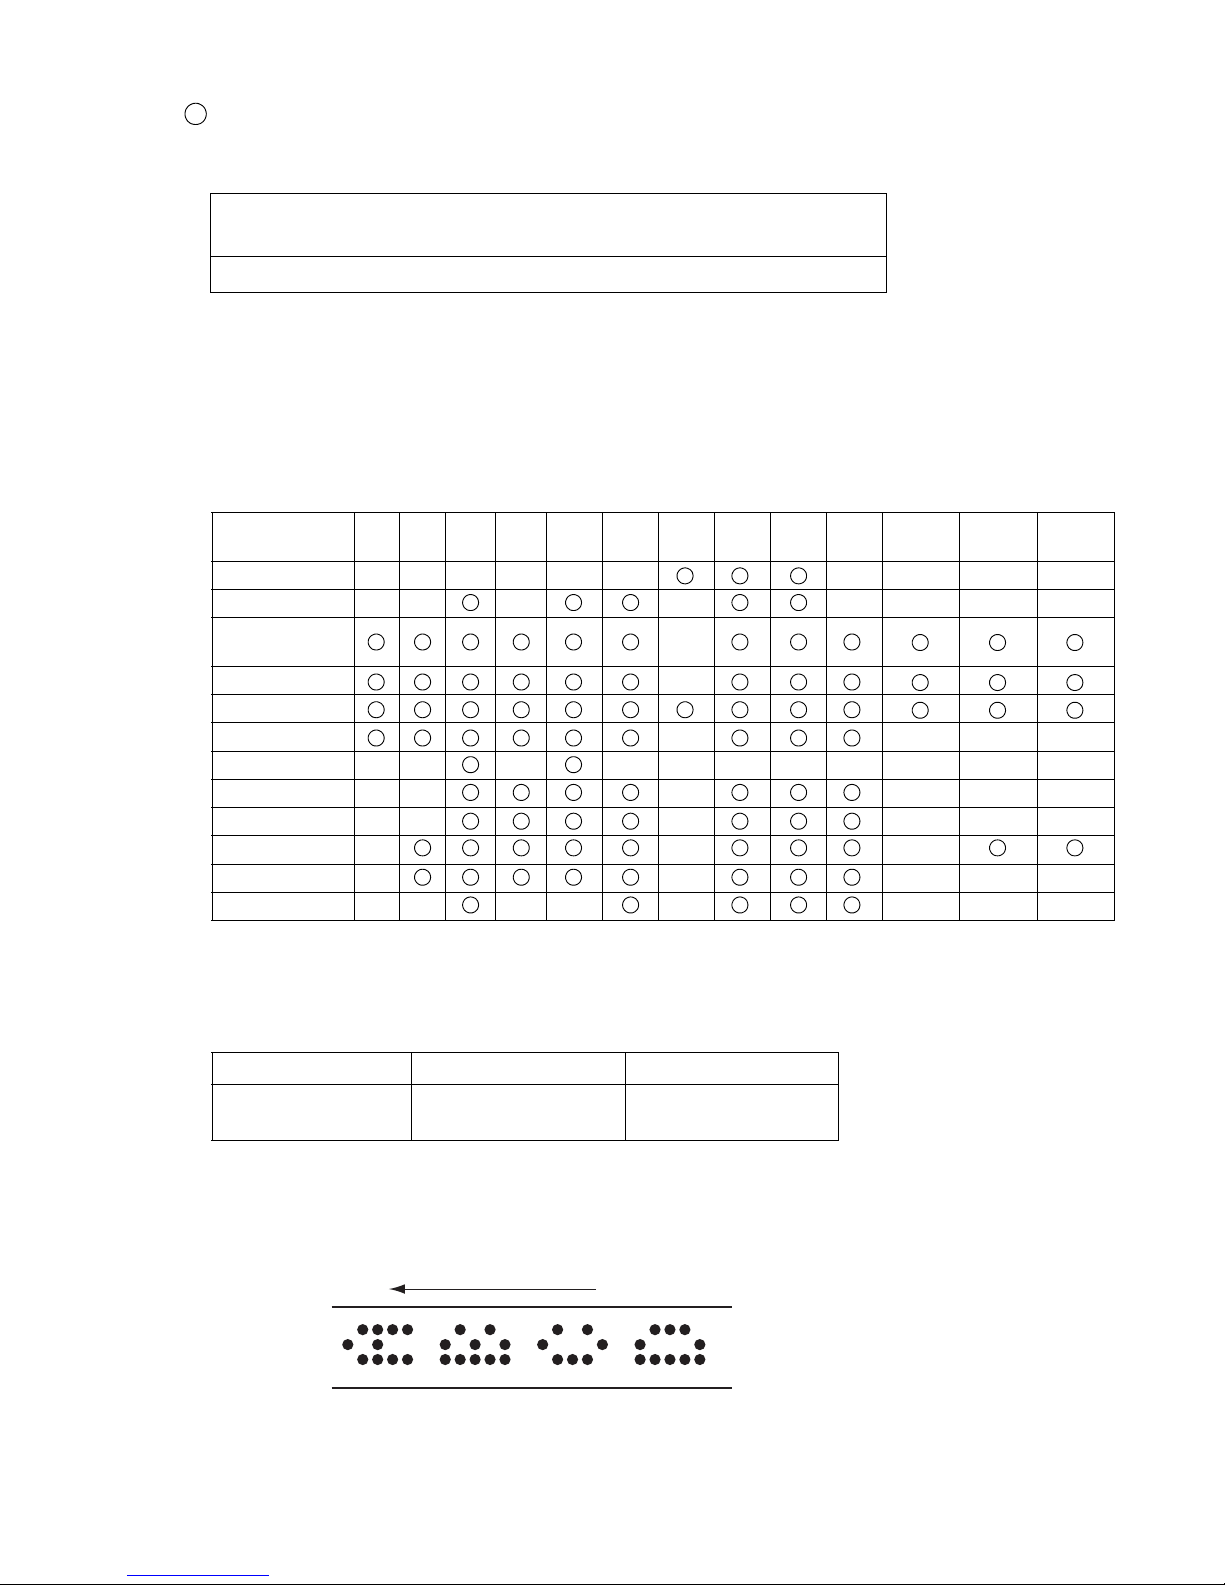
4-19 ●Set the print format (Fixed layout)
Dot matrix
●Sets the character size.
3
Settable sizes (horizontal dots × vertical dots)
4×5, 5×5, 5×8(5×7), 9×8(9×7), 7×10,
10×12, 11×11, 12×16, 18×24, 24×32,
5×3 (chimney), 5×5 (chimney), 7×5(chimney) (Optional on RX2-S)
●See “6.1 Set the user environment” for 5×8, 5×7 and 9×8, 9×7 switching. However, for special characters,
accent characters, Russian characters, Arabic numbers, and Arabic letters, select character size with
vertical 8 dots since the pattern is designed with vertical 8 dots.
●The kinds of characters which can be input are defined for each character size. A space is entered when
there is no corresponding character for the changed character size.
Kinds of characters which can be input by character size
Character kind 4×5 5×5
5×8
(5×7)
9×8
(9×7)
7×10 10×12 11×11 12×16 18×24 24×32
Chimney
5×3
Chimney
5×5
Chimney
7×5
Chinese character XXXXXX XXXX
Kana XX X X XXXX
Alphabet letters,
numeric, symbols
X
Space X
User pattern
Punct. character X XXX
Dedicated character
XX X XXXXX X X X
Accent character XX X XXX
Greek character XX X XXX
Russian character XXX
Arabic numeric X X XXX
Arabic letter XX XX X XXX
●Communication is unsupported for Russian characters of 5x5, 5x5(chimney) and 7x5(chimney).
●Multiple character sizes can be freely combined. However, there is a limit on the total number of vertical
dots.
Total vertical dots limit
RX2-B RX2-S
Total vertical dots 30 dots
30 dots
(Option : Up to 32 dots)
Character sizes having 8 or less vertical dots are calculated as 8 dots.
●Chimney characters consist of characters which can be written vertically.
Line direction
Chimney printing example
Page 67
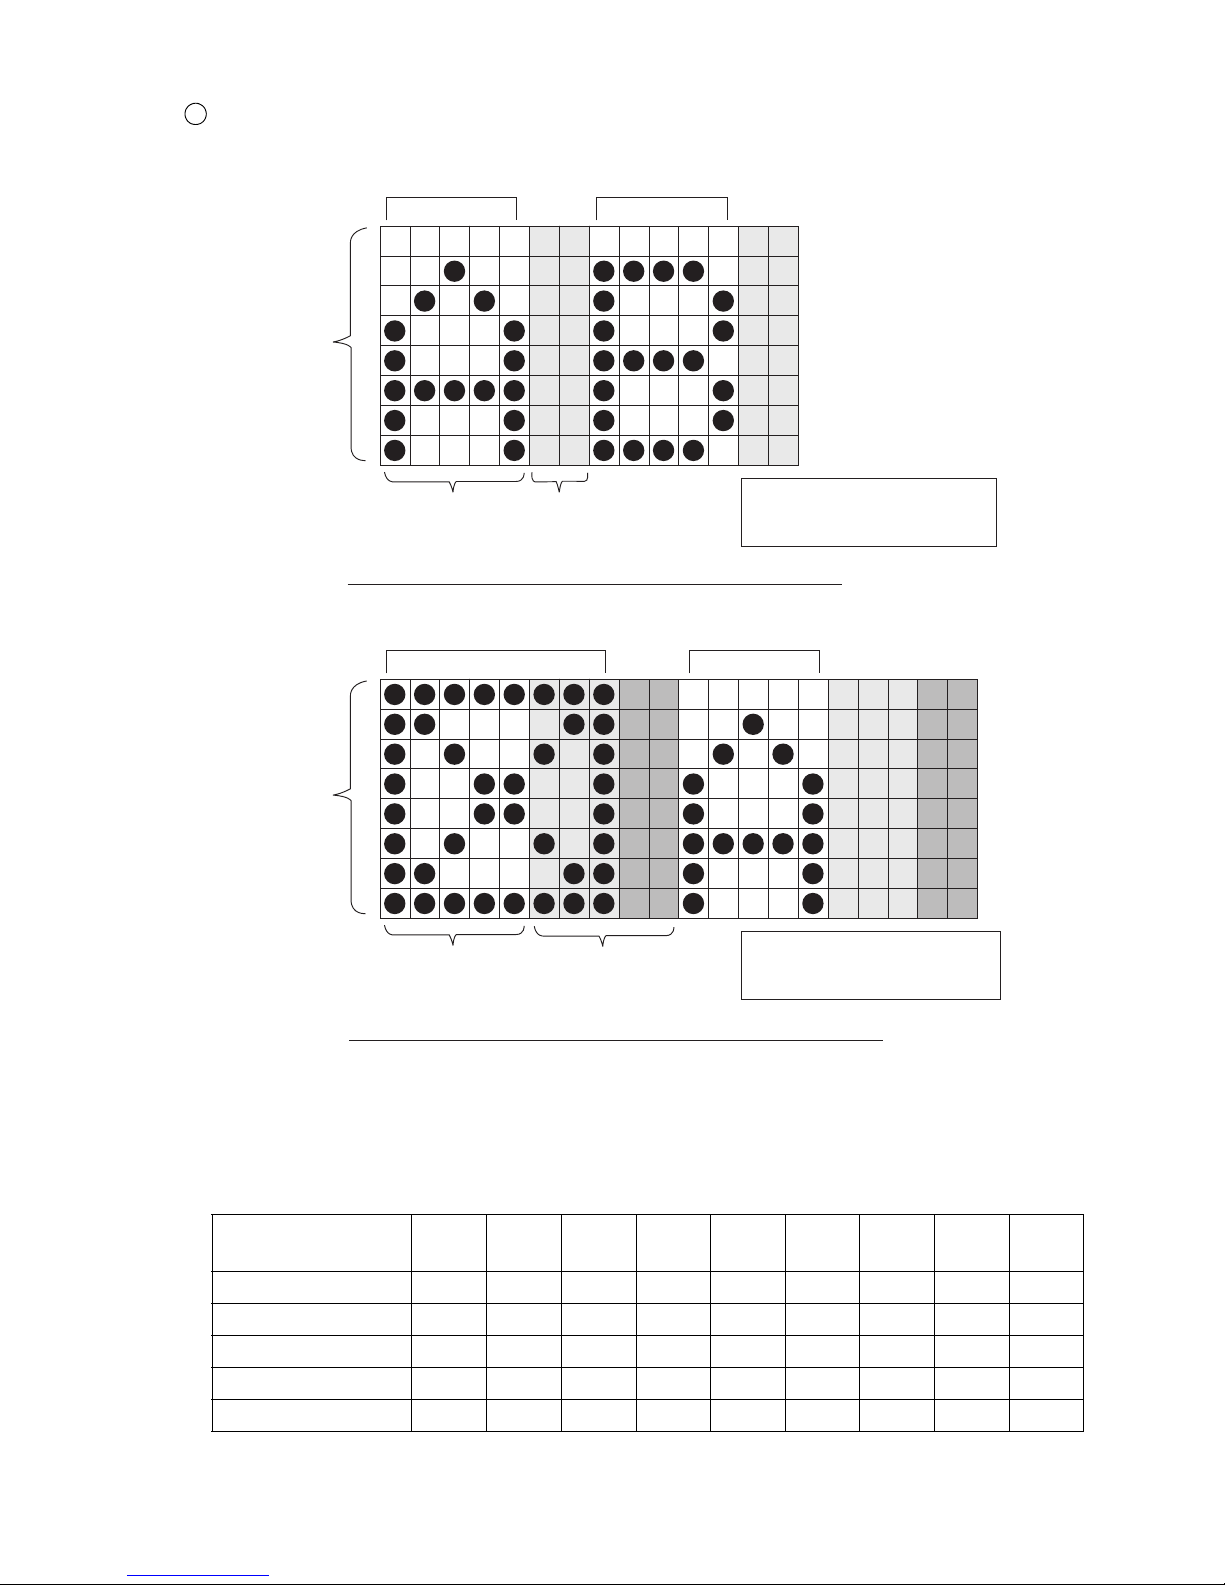
●Set the print format (Fixed layout) 4-20
Inter-character space
●Sets the spacing between character and character.
4
●For user pattern (user pattern), patterns can be designed at the inter-character space part.
●For special characters also, a pattern can be designed at the inter-character space. Set an inter-character
space the same as the values shown in the table below.
Inter-character space minimum set value
Character kind 5×5
5×8
(5×7)
9×8
(9×7)
7×10 10×12 11×11 12×16 18×24 24×32
Chinese character - - - - - 0 4 6 -
Kana -0-02-46-
Dedicated character - 1 - 1 - - - - -
Arabic numeric 02000-222
Arabic letter - 2 - - 0 - 2 2 2
English A English B
Vertical 8 dots
Horizontal 5 dots Inter-character space
Character size: 5x8
Inter-character space: 2 dots
Relationship between character and inter-character space
User pattern (save character)
English A
Vertical 8 dots
Horizontal 5 dots Inter-character space
Character size: 5x8
Inter-character space: 5 dots
Relationship between user pattern and inter-character space
Page 68
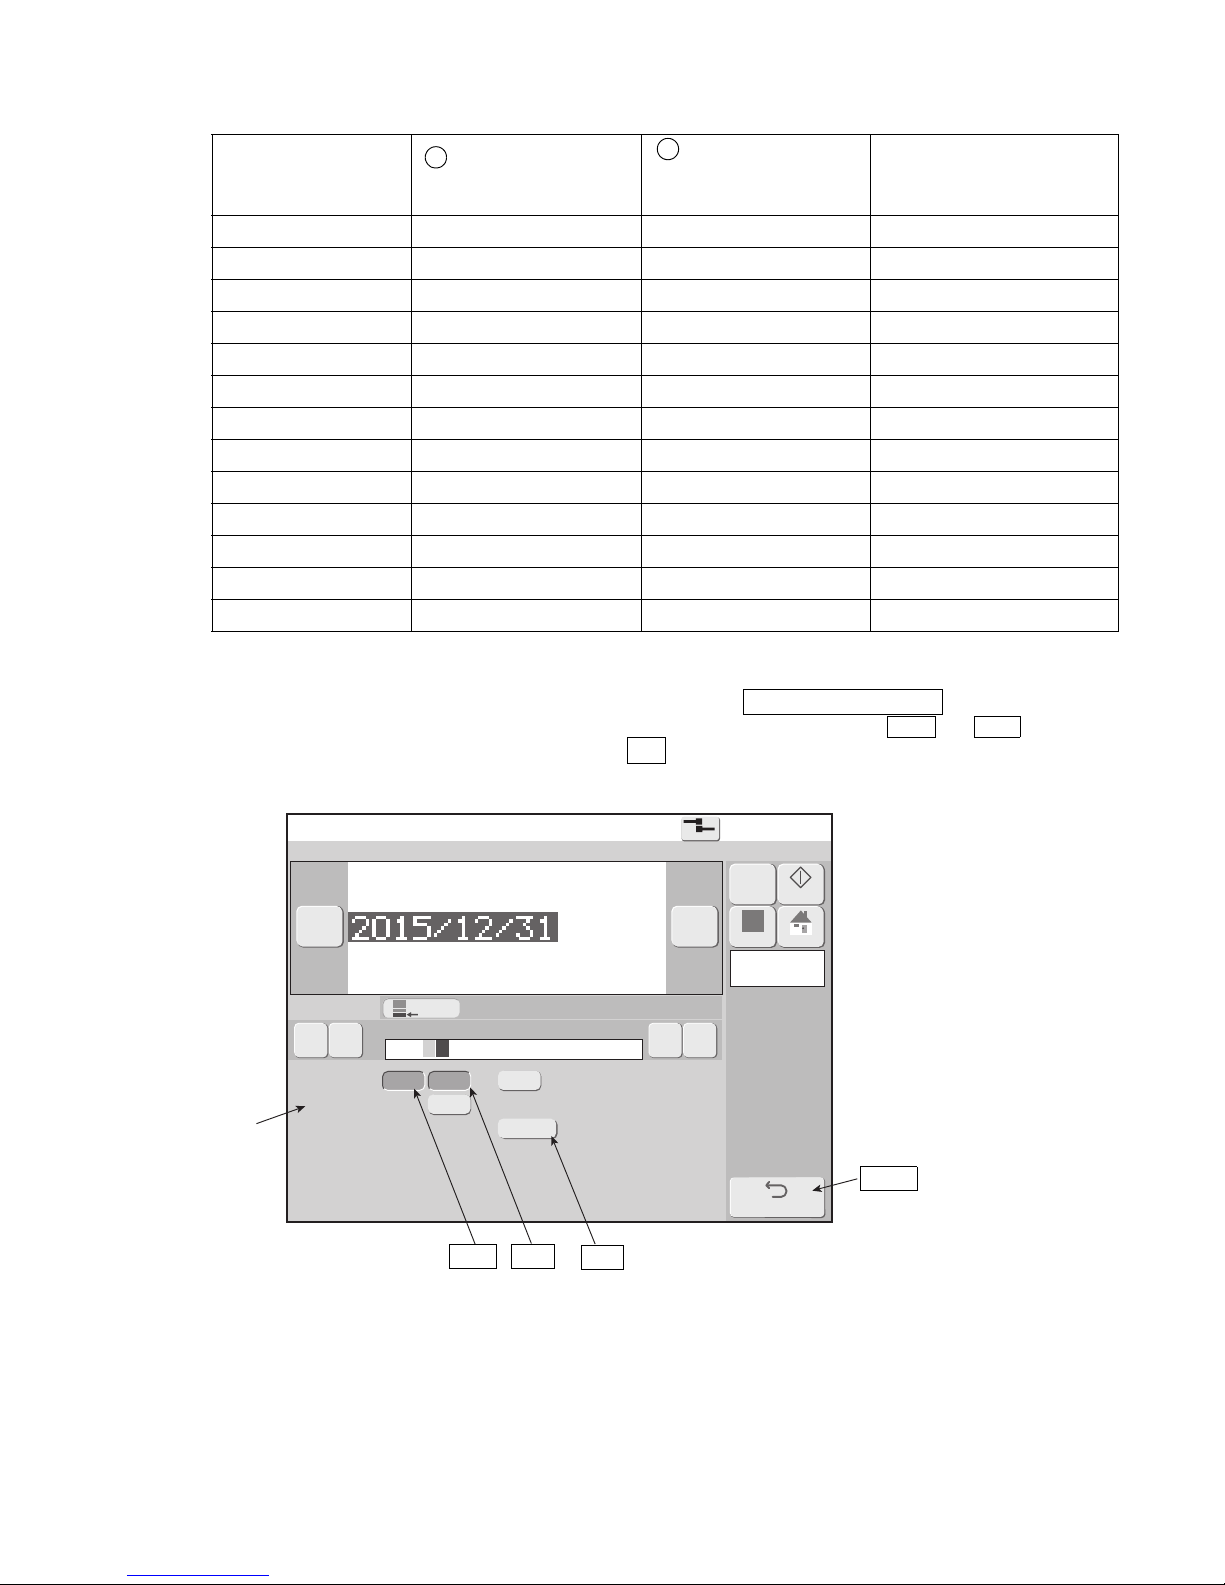
4-21 ●Set the print format (Fixed layout)
Adjust Inter-character space
2015.07.0712:45
Com=0
[Stop ]
Select line
Message name[ ]
1stline
Select area
Inter-char. space
Adjust Inter-character space
Column1
Back
← →《 》
110 20
OK
06
Start End
Cancel
Set value [ 00 ]
2015/12/31・
− +
M
Manual
Startup
Apply
HOME
Character size inter-character space
Character size
(horizontal × vertical)
Number of horizontal
dots of character
Inter-character space
which can be input by
user pattern creation
Maximum inter-character
size which can be set
4×5 4 4 28
5×5 5 3 27
5×8(5×7) 5 3 27
9×8(9×7) 9 7 23
7×10 7 1 25
10×12 10 6 22
11×11 11 5 21
12×16 12 4 20
18×24 18 6 14
24×32 24 8 8
5×3 chimney 5 0 27
5×5 chimney 5 0 27
7×5 chimney 7 0 25
1
2
●Inter-character space can be set in character units using the Adjustment char. cond. .
●Select the character column where the inter-character space will be set using Start and End , input the
inter-character space set value, and press the OK .
Chimney is available on RX2-S as option.
Inter-char. space
Start
End
OK
Back
●When the inter-character space of the print format screen changed, the value set in character units
changes to the same value.
●The display value of the inter-character space of the print format screen displays the inter-character space
of the first character.
Page 69
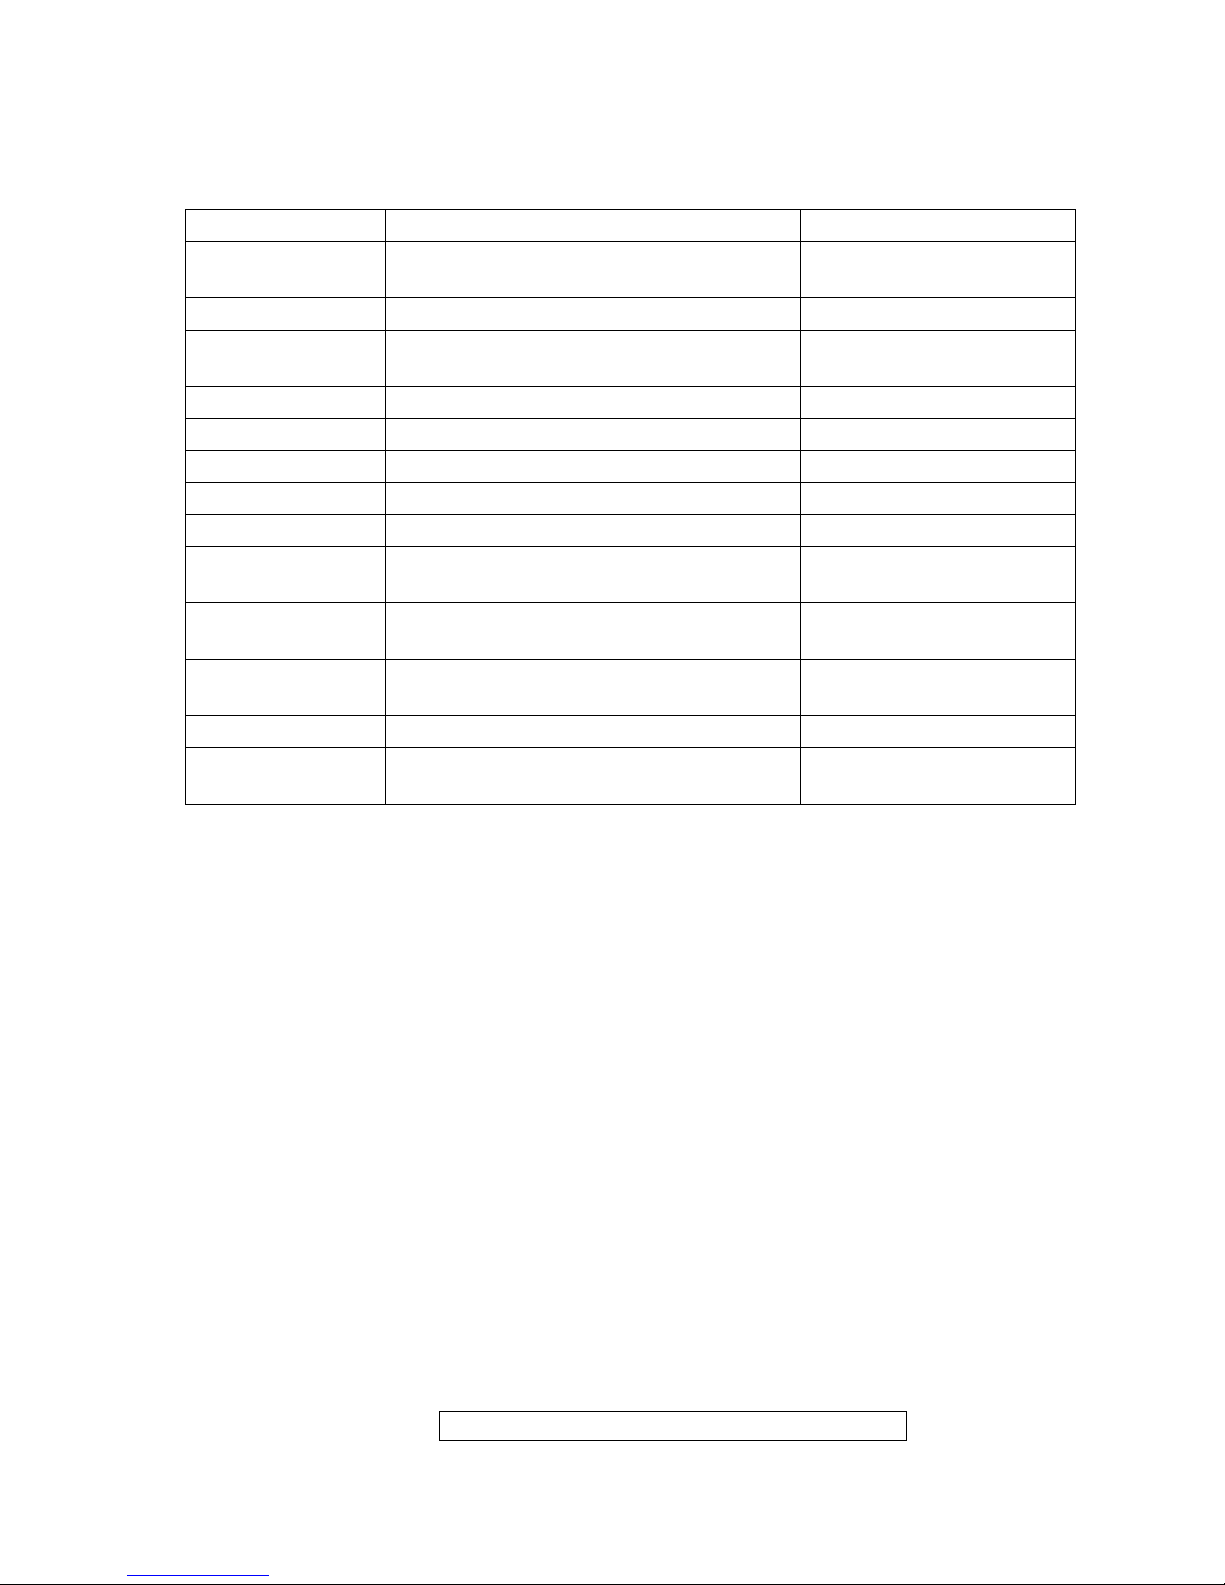
●Set the print format (Fixed layout) 4-22
4.7.5 Print a bar code (RX2-S only)
(1) Kinds of bar codes
●Different kinds of bar codes can be set for each print item.
Kinds of bar codes
Bar code Kinds of characters which can be input Remarks
Code 39
0 to 9 A to Z Space
+ - (minus) / . (period) $ %
ITF 0 to 99 Input of two-digit numbers
NW-7
0 to 9
+ - (minus) / . (period) : (colon) $
EAN-13 0 to 9
EAN-13 Add-On 5 0 to 9
EAN-8 0 to 9
UPC-A 0 to 9
UPC-E 0 to 9
Code 128
(code set B)
0 to 9 A to Z a to z Space
FNC1 Code B Code C Symbols
Input numeric of two-digit
numbers
Code 128
(code set C)
0 to 9 FNC1 Code B Code C
Data matrix
(DM)
0 to 9 A to Z a to z Space
FNC1 Symbols
QR code, Micro QR Same as above.
GS1 DataBar 0 to 9
Limited, Omnidirectional and
Stacked
●When a bar code of the same kind was set at adjacent print items, only the continuous series bar code is
assumed. However, fixed length bar codes such as EAN-13, EAN-8, UPC-A, UPC-E,
EAN-13 Add-On 5 and GS1 DataBar become independent bar codes.
●For multiple settings, provide a print item for which a bar code is not set between the print items with a
bar code set.
●Up to a maximum of 4 DM (Data Matrix), code 128, QR code, Micro QR and GS1 DataBar can be set
respectively.
QR code and Micro QR can be collectively set up to 4.
●Since the number of horizontal dots is uniquely determined for bar codes, an inter-character space cannot
be set.
●A bar code can be set even for print items with a calendar and count set. However, when calendar
substitution, zero suppression, or an invalid character is set, for the bar code setting, the relevant character
is deleted.
●Neither the calendar nor the count set can be set to the country code.
●When code set C of code 128 was set when the English alphabet is set for the count upper limit, the
relevant character is deleted.
●Since start and stop codes are automatically generated, input as print description is unnecessary.
●A barcode with the identification numbers can be set in 1 line or 2 lines setting.
When in 2 lines setting, the barcode with the identification numbers can only be set to either upper or
lower line.
If the barcode is set to the upper line, it cannot be set to the lower line or vice versa.
●For GS1 DataBar, neither the calendar nor the count can be set to 1st, 2nd and 3rd digit.
See the Technical Manual “9. APPENDIX” for details.
Page 70
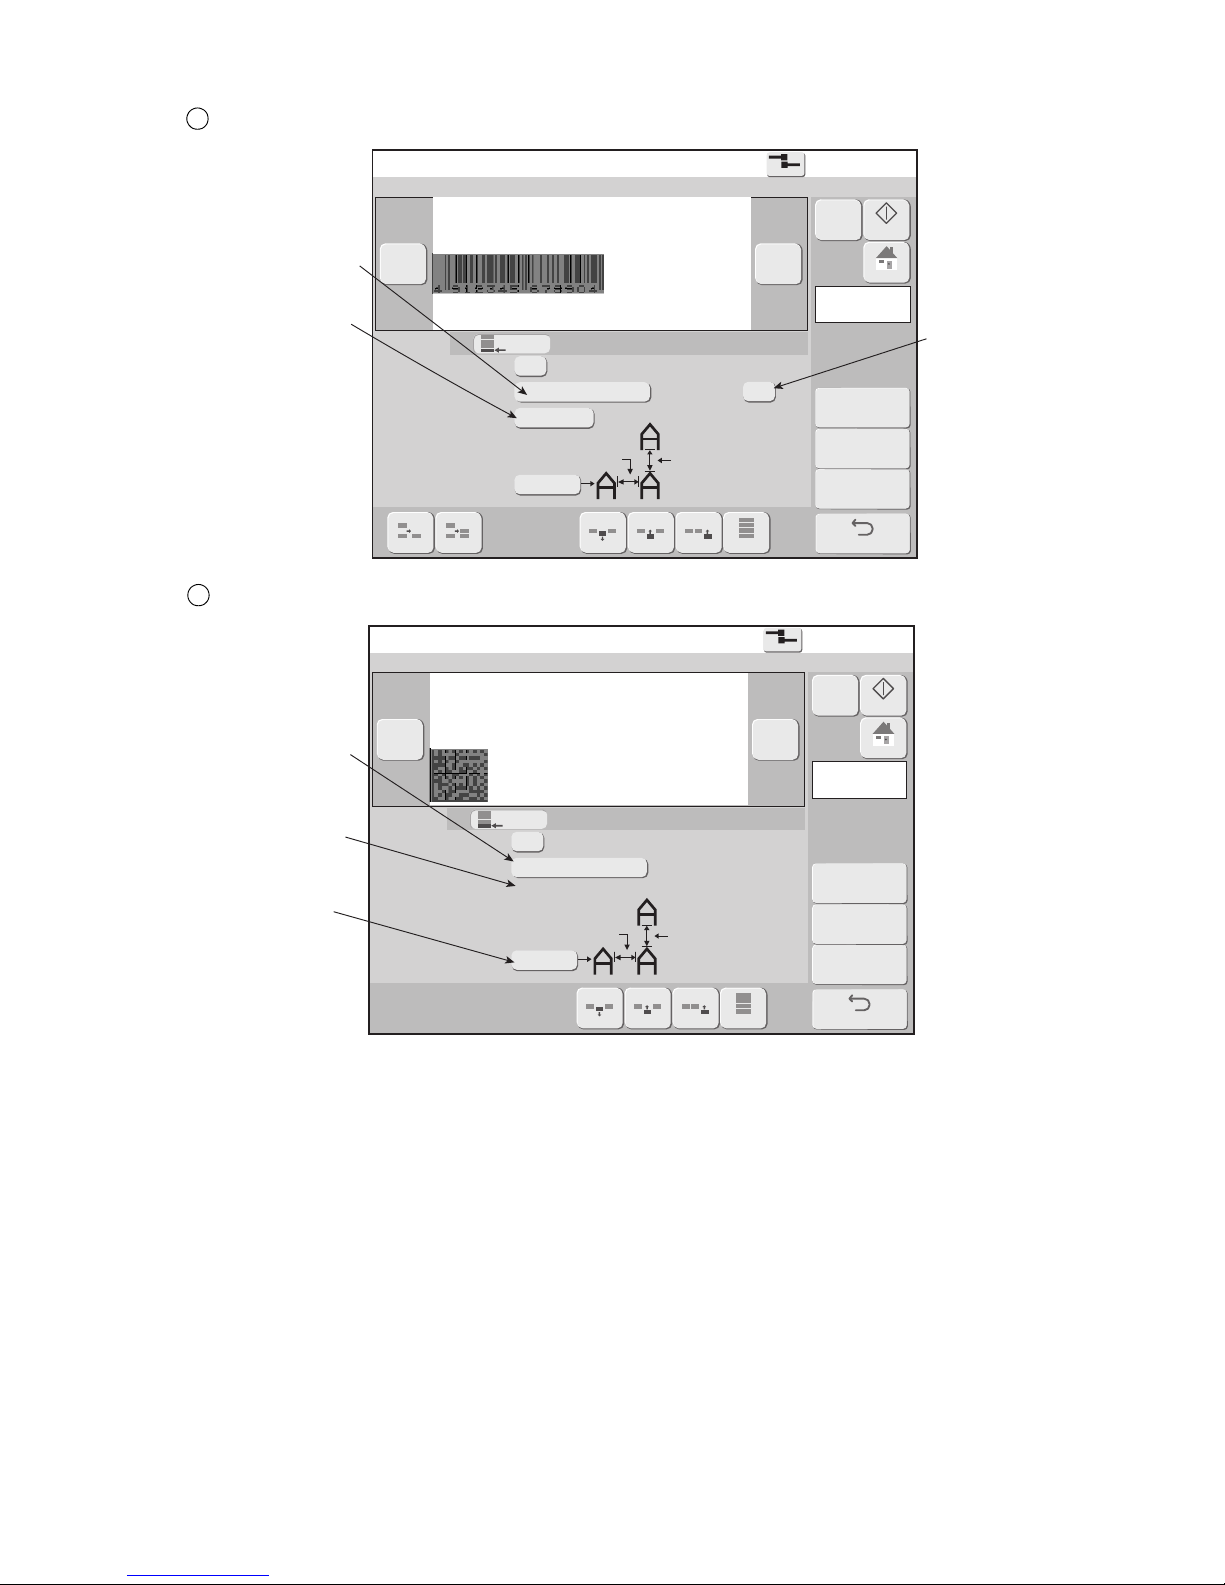
4-23 ●Set the print format (Fixed layout)
Print format
2015.07.0712:45
Adjustment
char.cond.
Com=0
[Stop ]
Select Line
Bold (times 1-9)
Bar code
EAN readable code
Message name[ ]
1
EAN-13
00
18x24
Dot matrix
Print
spec.
Edit
message
Column1
ToOverallAddCol.InsertC.DeleteC.2lines
⁝
1line
⁝
0
1stline
− +
M
Manual
Startup
HOME
Inter-char. space
(MAX 0 )
Line
spacing
(MAX 0 )
Back
5x5
EAN Prefix
49
Print format
2015.07.0712:45
Adjustment
char.cond.
Com=0
[Stop ]
Select Line
Bold (times 1-9)
Bar code
Max digits numeric: 24 ,alphameric: 12- 23
Message name[ ]
1
DM(16x16)
00
12x16
Dot matrix
Print
spec.
Edit
message
Column1
ToOverallAddCol.InsertC.DeleteC.
0
1stline
− +
M
Manual
Startup
HOME
Inter-char. space
(MAX 4 )
Line
spacing
(MAX 0 )
Back
(2) Examples
Example of EAN-13
Example of Data Matrix
1
2
Sets barcode type.
Sets "Disable" or
character size of
identification code
when EAN-13,
EAN-8, UPC-A,
UPC-E, EAN-13
Add-On 5 or GS1
DataBar is
selected.
(When character
size is 12 x 16 or
larger.)
Sets an EAN Prefix
code when EAN-13,
EAN-8 or EAN-13
Add-On 5 is selected
(the EAN Prefix code
can also be set at the
Edit message screen
(See "4.14.3 Set
various printing".)).
Sets barcode type.
Displays maximum
input digits for DM
(Data Matrix)
Selectable matrix
size depends
on the character
size.
Page 71
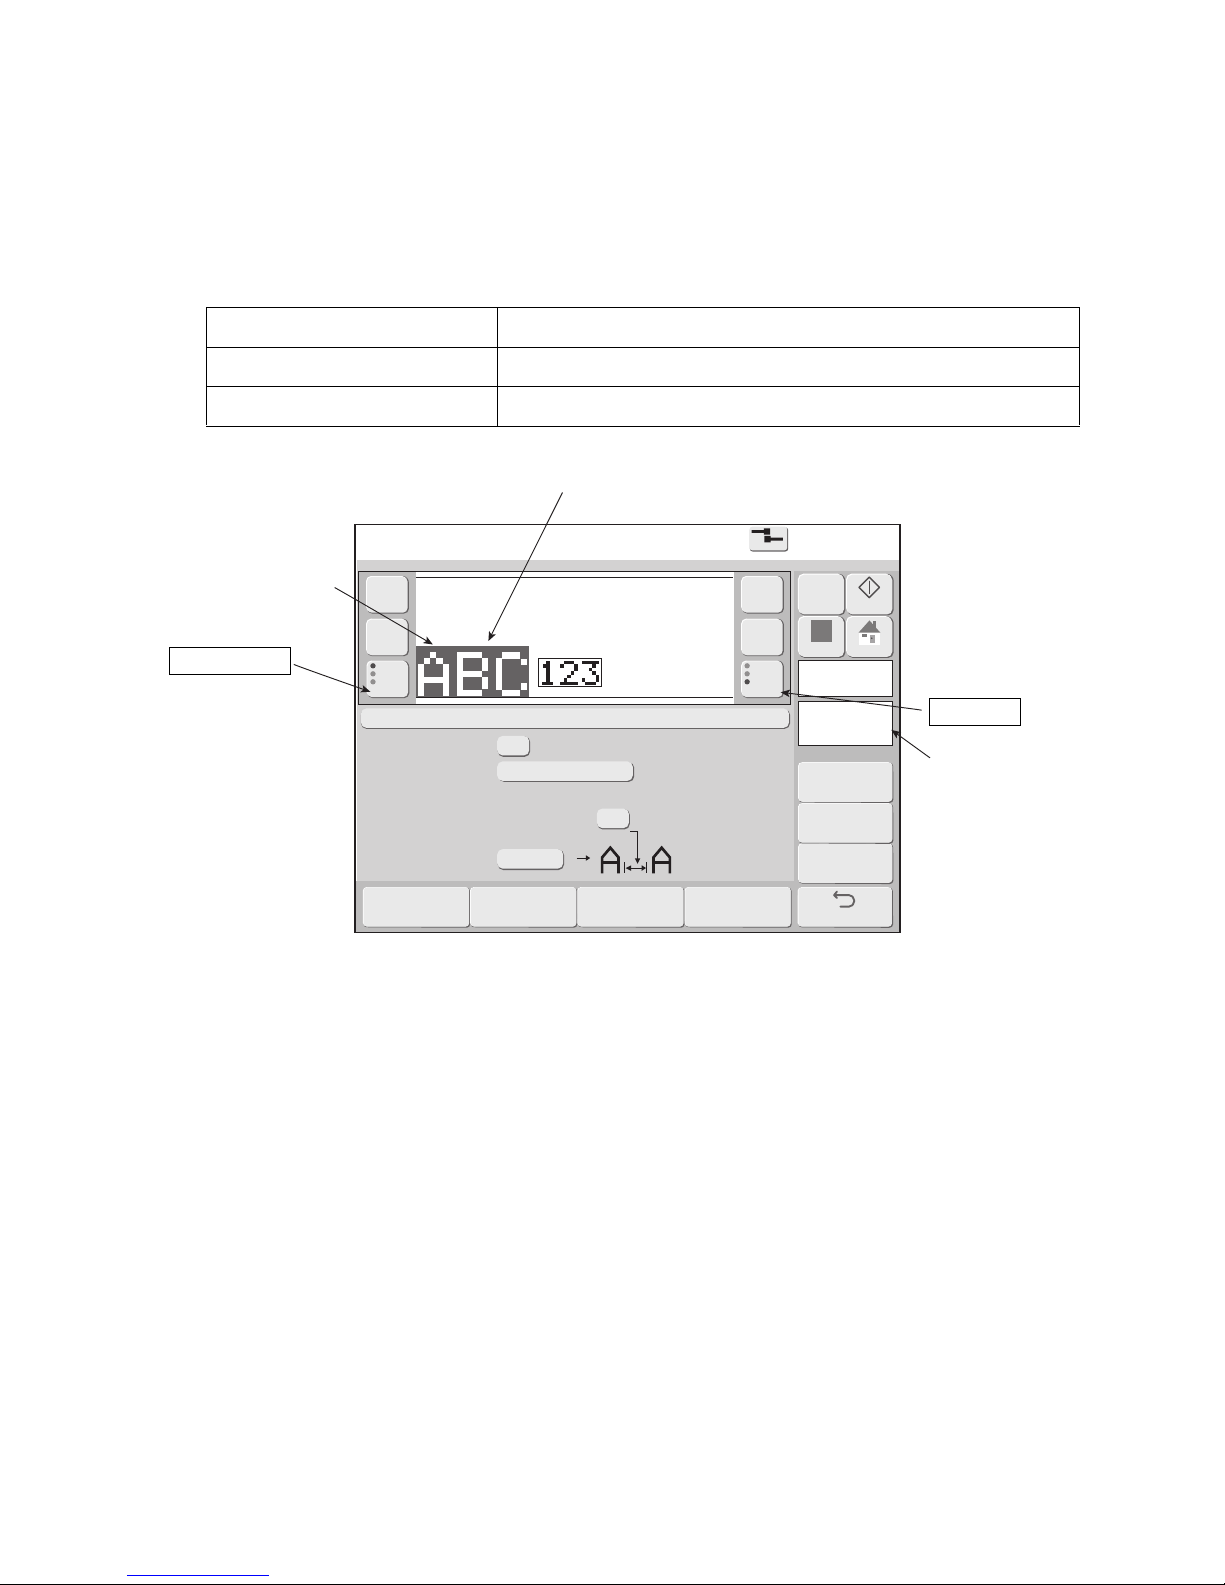
●Set the print format (Free layout; RX2-S only) 4-24
Com=0
Bold(times 1〜9)
Bar code
1
none
Inter-char. space
(MAX 0)
1
12x16
Dot matrix
Item1
Usagerange
Hor. 60
Vert. 16
−
《
+
》
Back
M
Manual
Startup
Apply
HOME
00000 00100
Overall
itemmove
Individual
itemmove
Deleteitem Insertitem
Prev.item
abcde
fghij
klmno
Nextitem
abcde
fghij
klmno
Print format
2015.07.0712:45
[Stop ]
Message name[ ]
Adjustment
char.cond.
Printspec.
Editmessage
4.8 Set the print format (Free layout; RX2-S only)
4.8.1 Select the print items to be edited
●Set and change the print format including the character size for the print item to be edited.
●There are 2 methods of selecting the print item to be edited.
Methods of selecting the print item to be edited
Type Features
Directly touching the print item The touched item becomes the editing objective.
Previous item, next item The previous item or the next item becomes the editing objective.
The editing objective can be changed by
directly touching a print item.
The colored print
Item is the editing
objective.
Previous item
Next item
Display the vertical
printing range and
horizontal printing
range.
Page 72
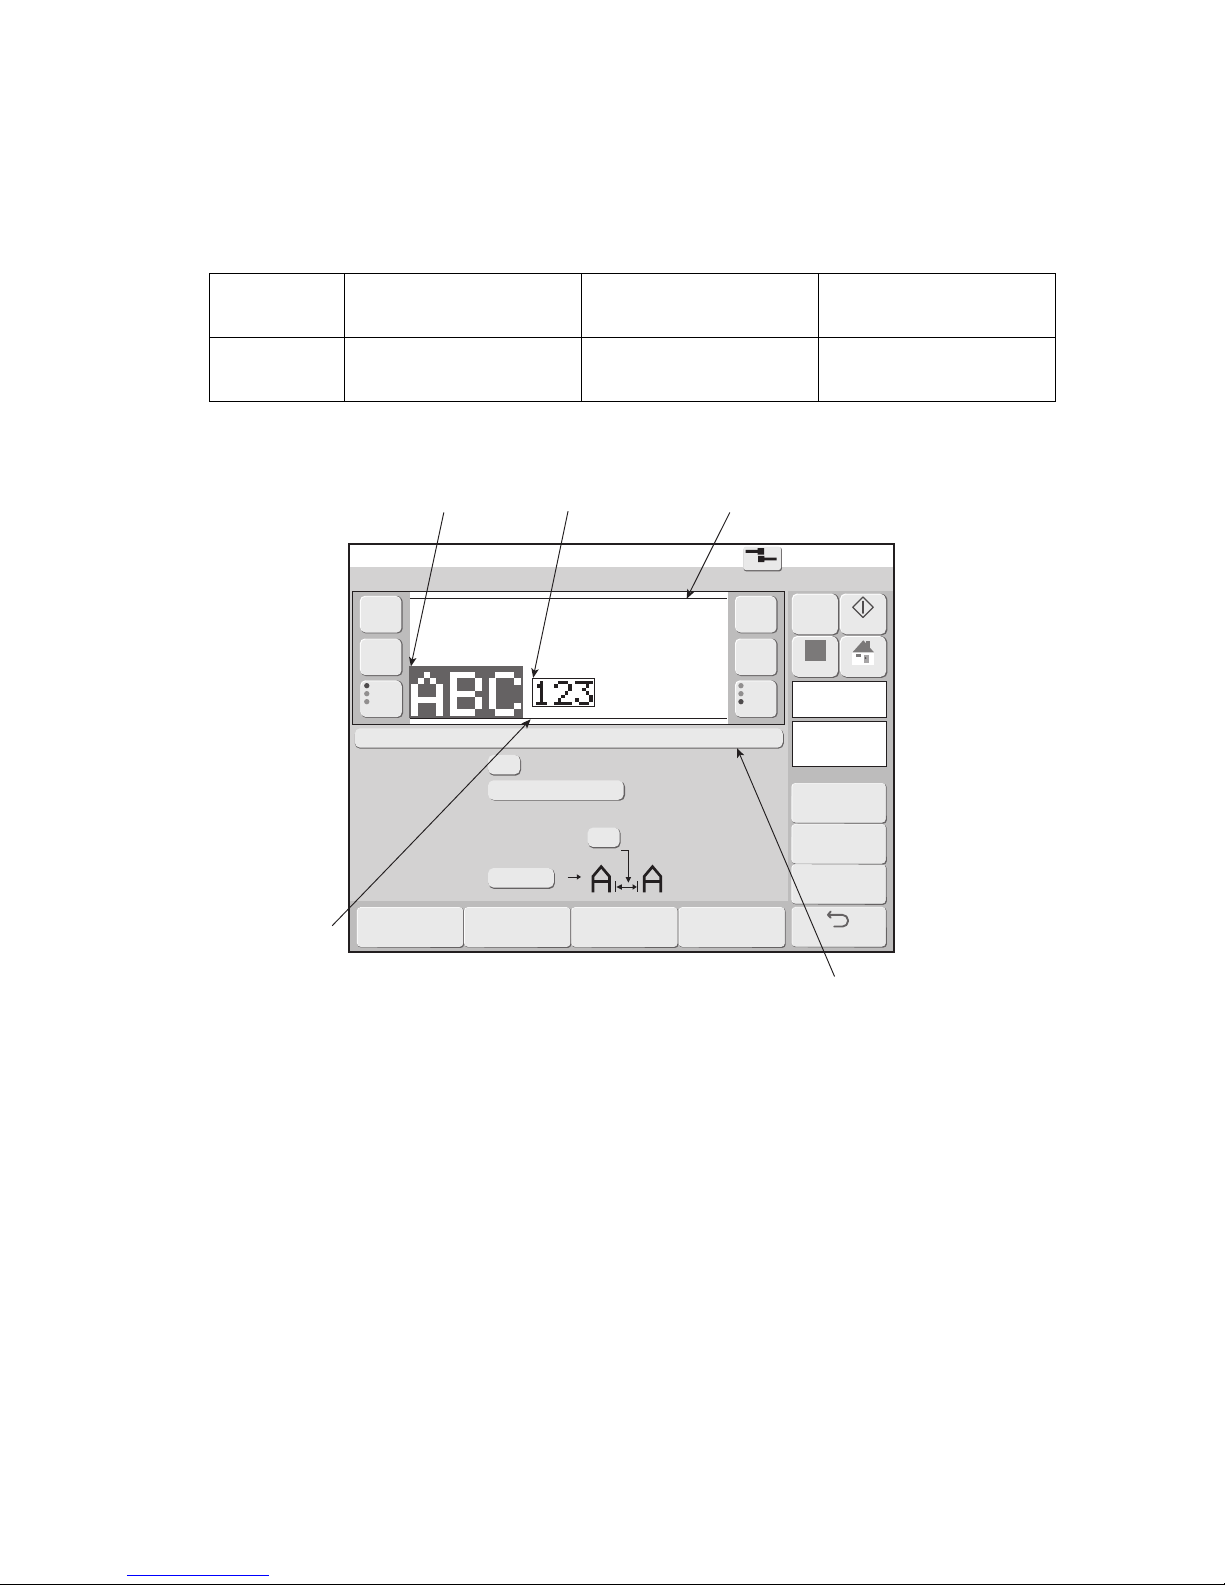
4-25 ●Set the print format (Free layout; RX2-S only)
2015.07.0712:45
Com=0
−
《
+
》
Back
M
Manual
Startup
Apply
HOME
00000 00100
Prev.item
abcde
fghij
klmno
Nextitem
abcde
fghij
klmno
Print format [Stop ]
Message name[ ]
Item1
Usagerange
Hor. 60
Vert. 16
Adjustment
char.cond.
Printspec.
Editmessage
Overall
itemmove
Individual
itemmove
Deleteitem Insertitem
Bold(times 1〜9)
Bar code
1
none
Inter-char. space
(MAX 0)
1
12x16
Dot matrix
4.8.2 Set the print items to be edited
(1) Function
●Set the "horizontal (X) coordinate" and "vertical (Y) coordinate" of the selected item at the
bottom-left.
●The total number of vertical dots and limit of the coordinate are as follows;
Total vertical dots and limit of coordinate
Model type
Total vertical dots Horizontal (X)
coordinate
Vertical (Y) coordinate
RX2-S
30 dots
(Option : Up to 32 dots)
0 to 31999
0 to 29
(Option : Up to 31)
Horizontal (X) coord. = 0
Vertical (Y) coord. = 0
Horizontal (X) coord. = 42
Vertical (Y) coord. = 4
Display the upper limit line of the
vertical dots.
(The line position is changed by the
display magnification)
Display the Horizontal (X)
coordinate
Display the lower limit
line of the vertical dots.
(The line position is
changed by the
display magnification)
Page 73
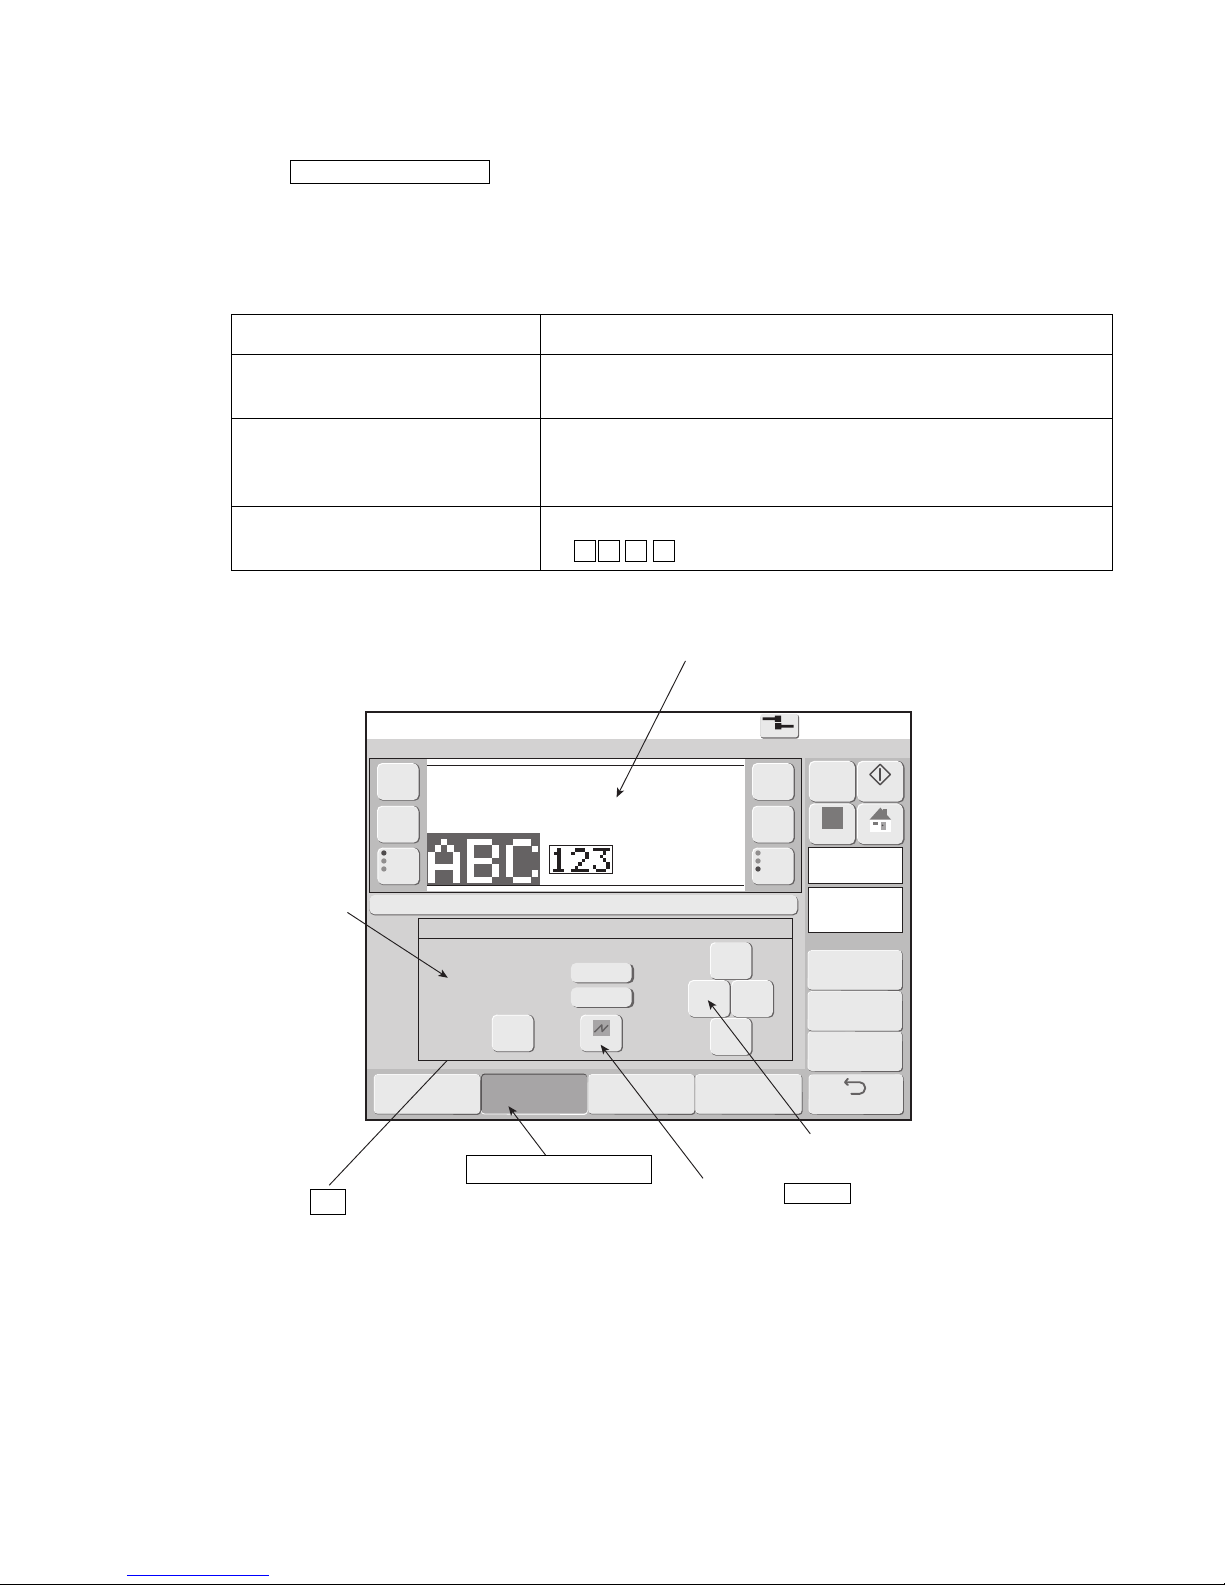
●Set the print format (Free layout; RX2-S only) 4-26
2015.07.0712:45
Com=0
−
《
+
》
Back
M
Manual
Startup
Apply
HOME
Prev.item
abcde
fghij
klmno
Nextitem
abcde
fghij
klmno
00000 00100
Print format [Stop ]
Message name[ ]
Item1
Usagerange
Hor. 60
Vert. 16
Adjustment
char.cond.
Printspec.
Editmessage
Bold(times 1〜9)
Bar code
1
none
Inter-char. space
(MAX 0)
1
12x16
Dot matrix
Item position select
Item move with button or touch on screen.
Horizontal (X)
Vertical (Y)
00
00001
OK
← →
↓
↑
Cancel
Overall
itemmove
Individual
itemmove
Deleteitem
Insertitem
(2) Set the coordinate of one print item
● Set and change the "horizontal (X) coordinate" and "vertical (Y) coordinate" of the print item to be
edited, at the bottom-left.
● Press Individual item move, and set the coordinate of the print item to be edited.
● There are 3 methods of setting the horizontal (X) coordinate and vertical (Y) coordinate.
● The horizontal (X) coordinate and vertical (Y) coordinate cannot be set over the range of [ Table of
(1) ].
Methods of setting the horizontal (X) coordinate and vertical (Y) coordinate
Type Features
Directly touching the screen
The print item to be edited can be moved by directly touching the
screen within the limit of vertical dots.
Set the value of the coordinate
The print item to be edited can be moved by setting the value of
the "horizontal (X) coordinate" and "vertical (Y) coordinate" on
the screen.
Set the position by cursor button
The print item to be edited can be moved dot by dot one by means
of ↑ ↓ ← → buttons.
The editing objective can be moved by
directly touching the screen.
Cursor button
Press the Cancel if canceling the
moving the coord..
Individual item move
Press the OK if the print item
has been moved.
The horizontal (X)
coordinate and
vertical (Y) coordinate
of editing objective can
be moved by directly
touching the screen.
Page 74
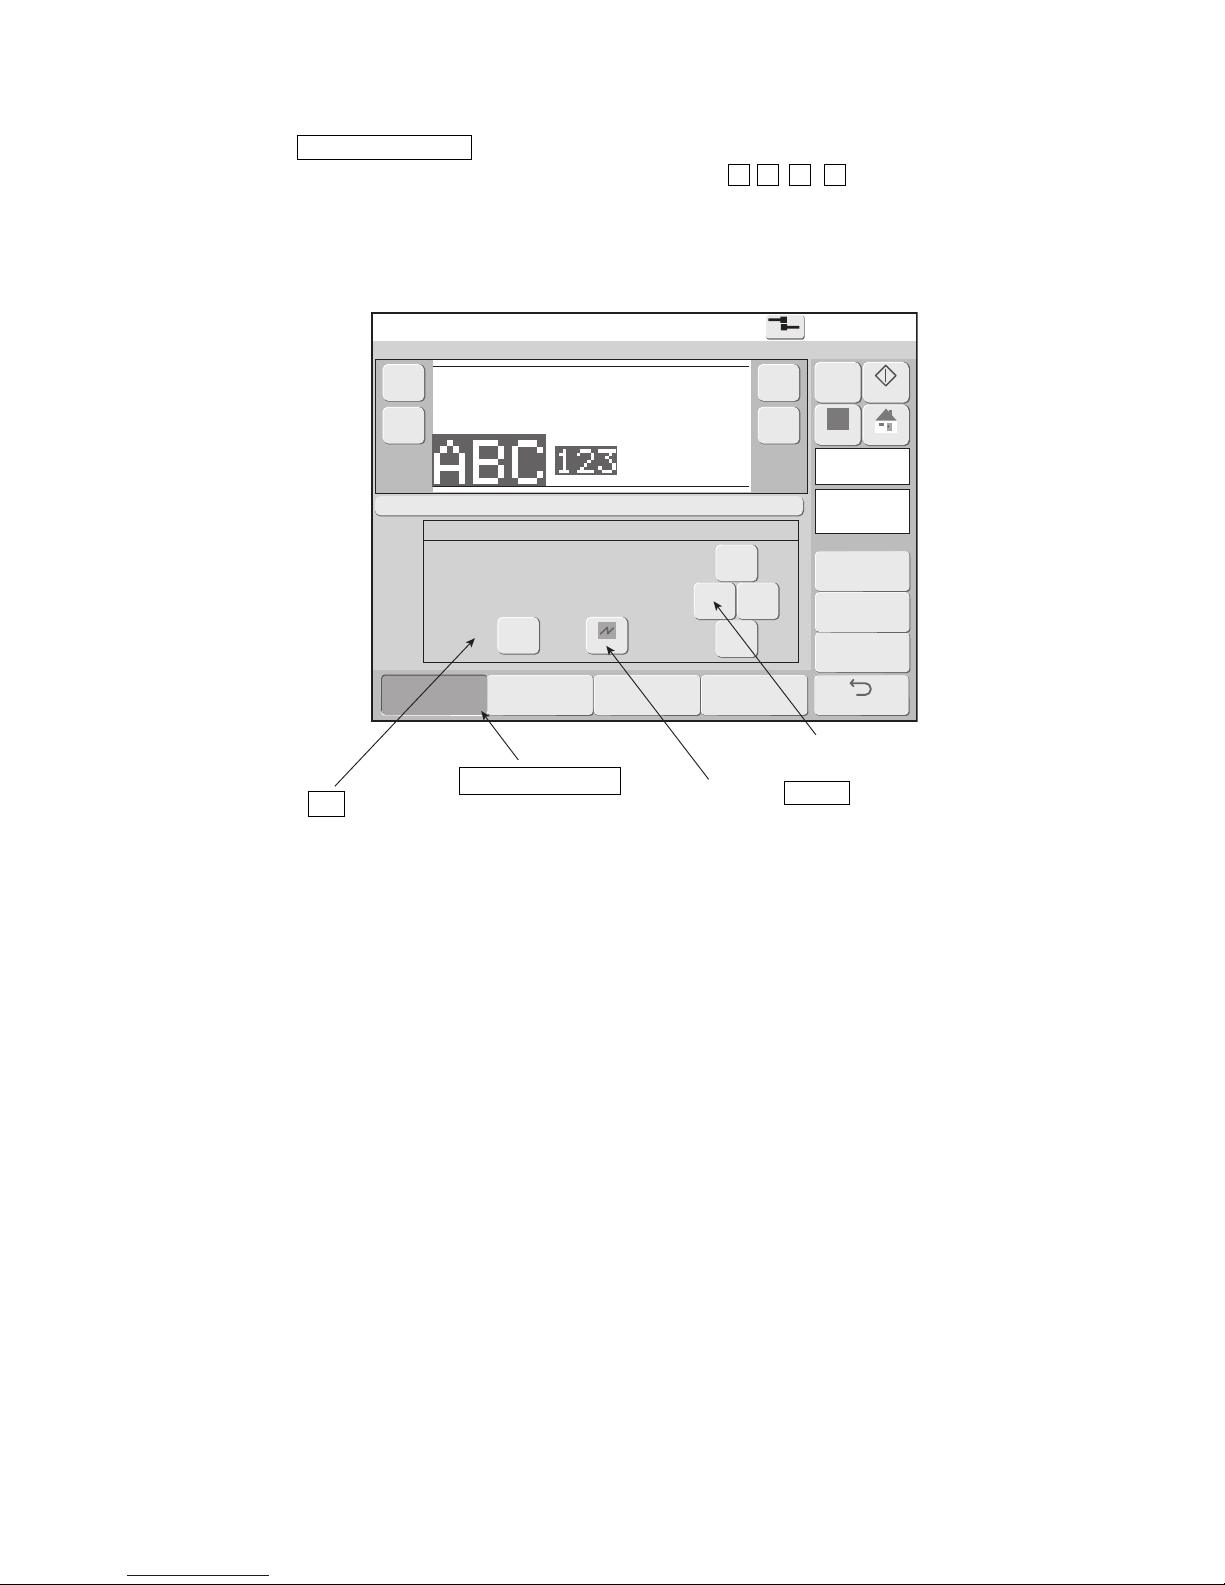
4-27 ●Set the print format (Free layout; RX2-S only)
2015.07.0712:45
Com=0
−
《
+
》
Back
M
Manual
Startup
Apply
HOME
00000 00100
Print format [Stop ]
Message name[ ]
Bold(times 1〜9)
Bar code
1
none
Inter-char. space
(MAX 0)
1
12x16
Dot matrix
tem position select
Item move with button.
OK
← →
↓
↑
Cancel
Overall
itemmove
Individual
itemmove
Deleteitem Insertitem
Item1
Usagerange
Hor. 60
Vert. 16
Adjustment
char.cond.
Printspec.
Editmessage
(3) Set the coordinate of all print items
● All print items can be moved collectively.
● Press Overall item move , and move all items.
● All print items can be moved dot by dot by means of ↑ ↓ ← → buttons.
● The horizontal (X) coordinate and vertical (Y) coordinate cannot be set over the range of Table of
item (1).
Cursor button
Press the Cancel if canceling the
moving the coord..
Overall item move
Press the OK if the print
item has been moved..
Page 75
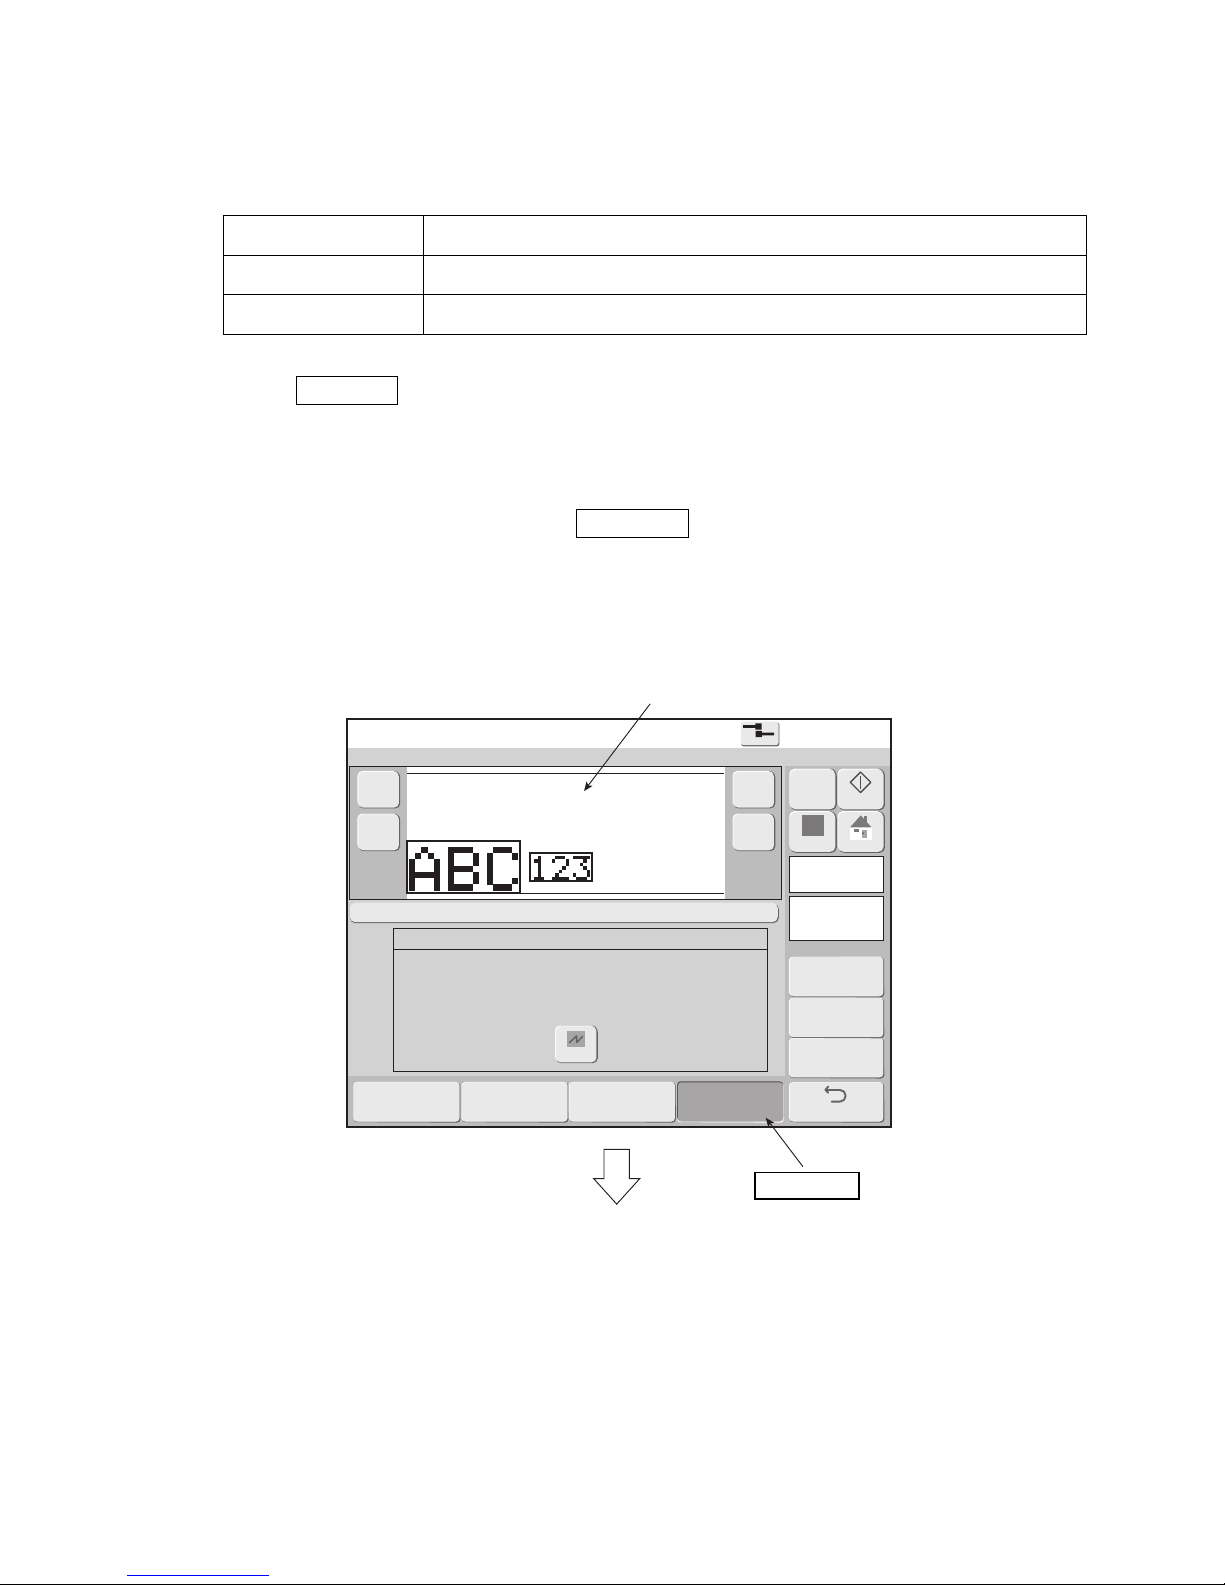
●Set the print format (Free layout; RX2-S only) 4-28
2015.07.0712:45
Com=0
−
《
+
》
Back
M
Manual
Startup
Apply
HOME
00000 00100
Print format [Stop ]
Message name[ ]
Overall
itemmove
Individual
itemmove
Deleteitem Insertitem
Item1
Usagerange
Hor. 60
Vert. 16
Adjustment
char.cond.
Printspec.
Editmessage
Bold(times 1〜9)
Bar code
1
none
Inter-char. space
(MAX 0)
1
12x16
Dot matrix
Item position select
Touch on screen at insert position.
The touch position is left-bottom coordinate of item.
Cancel
4.8.3 Add and delete print items
(1) Function
● Add or delete print items one by one.
Methods of adding and deleting print items
Type Fea tures
Insert item Add the print item at the selected position.
Delete item Delete the print item to be edited
A print item can be created by directly
touching the print layout screen.
● Press Insert item and touch the print layout screen, then the print item (character size is 5x7 or
5x8) will be created.
When the print item is created, if the horizontal (X) coordinate or vertical (Y) coordinate is over
the limit of range of the coordinate, the horizontal (X) coordinate or vertical (Y) coordinate will
be adjusted automatically.
● When there is only one print item, if Delete item is pressed and the print item is deleted, a
print item (character size is 5x7 or 5x8) will be created at the horizontal (X) coordinate = 0,
vertical (Y) coordinate =0.
Insert item
Page 76
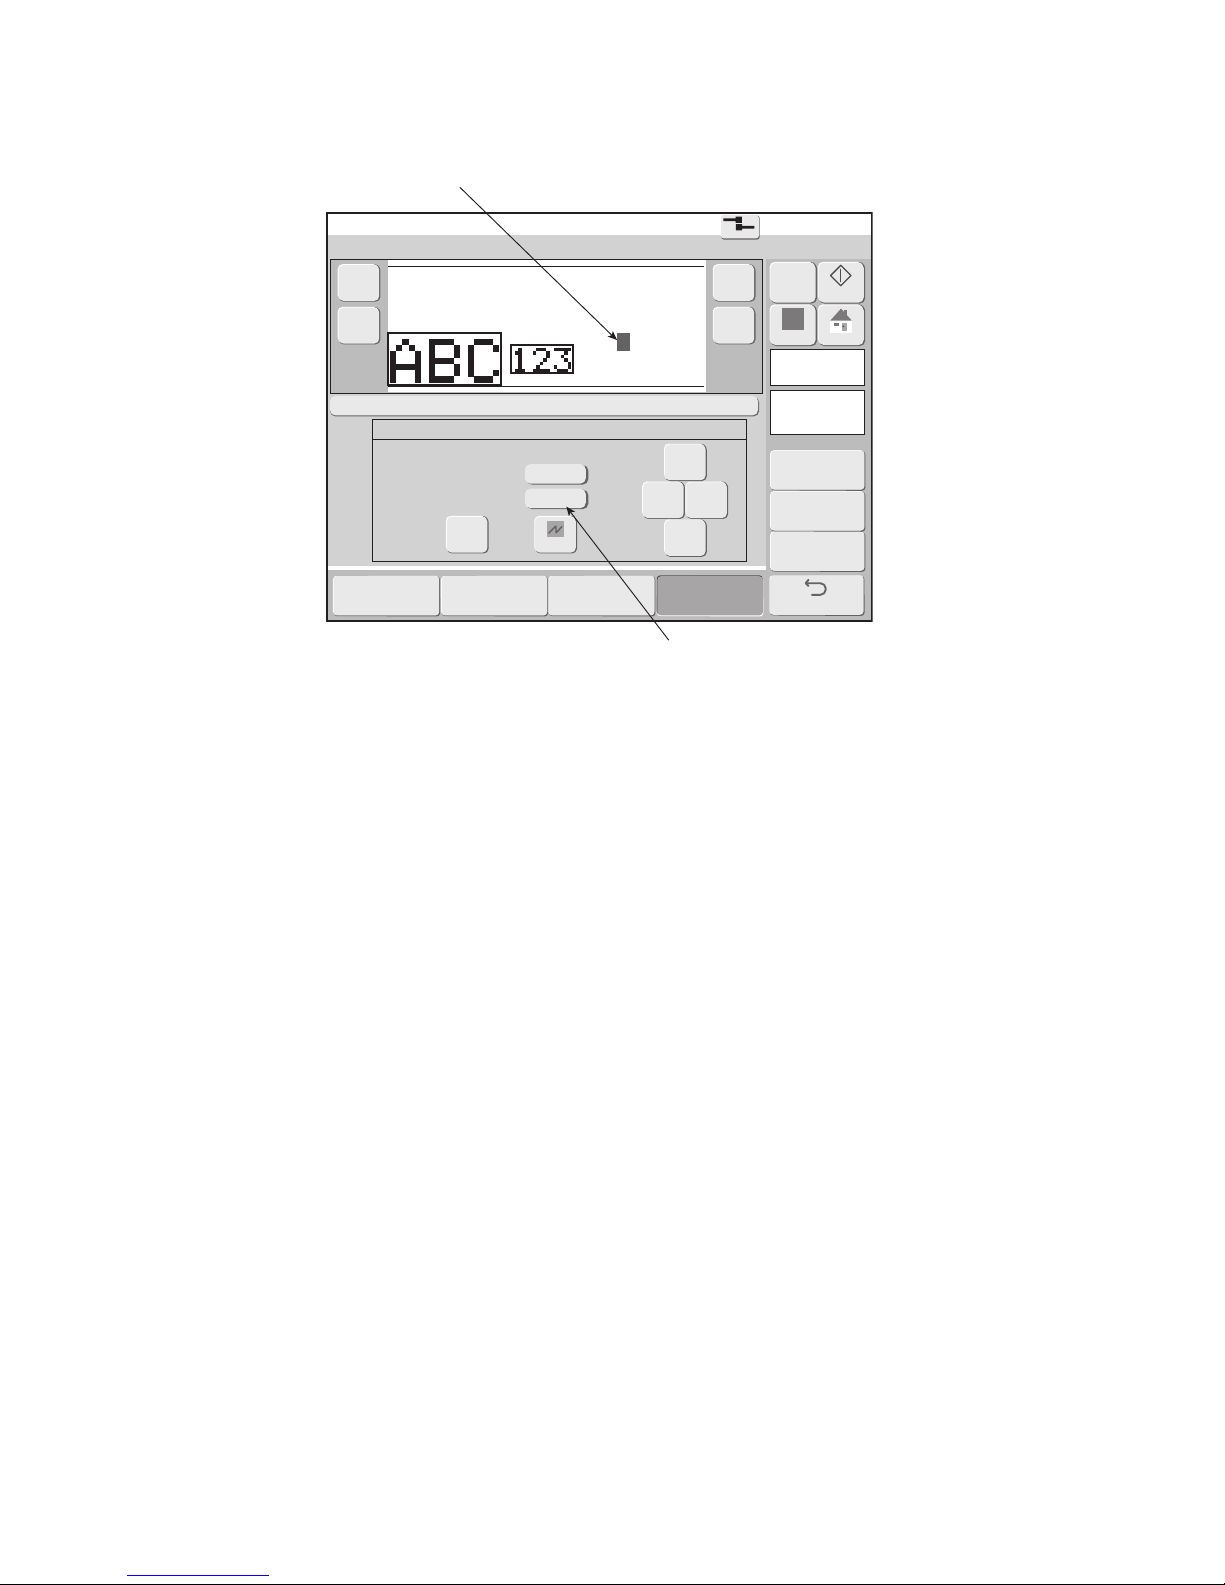
4-29 ●Set the print format (Free layout; RX2-S only)
2015.07.0712:45
Com=0
−
《
+
》
Back
M
Manual
Startup
Apply
HOME
00000 00100
Print format [Stop ]
Message name[ ]
Bold(times 1〜9)
Bar code
1
none
Inter-char. space
(MAX 0)
1
12x16
Dot matrix
Item position select
Item move with button or touch on screen.
Horizontal (X)
Vertical (Y)
01
00144
OK
← →
↓
↑
Cancel
Overall
itemmove
Individual
itemmove
Deleteitem Insertitem
Item1
Usagerange
Hor. 60
Vert. 16
Adjustment
char.cond.
Printspec.
Editmessage
A print item (character size is 5x7 or 5x8) will be created.
The method of setting the horizontal (X) coordinate and
vertical (Y) coordinate is as same as "Individual item move".
Page 77
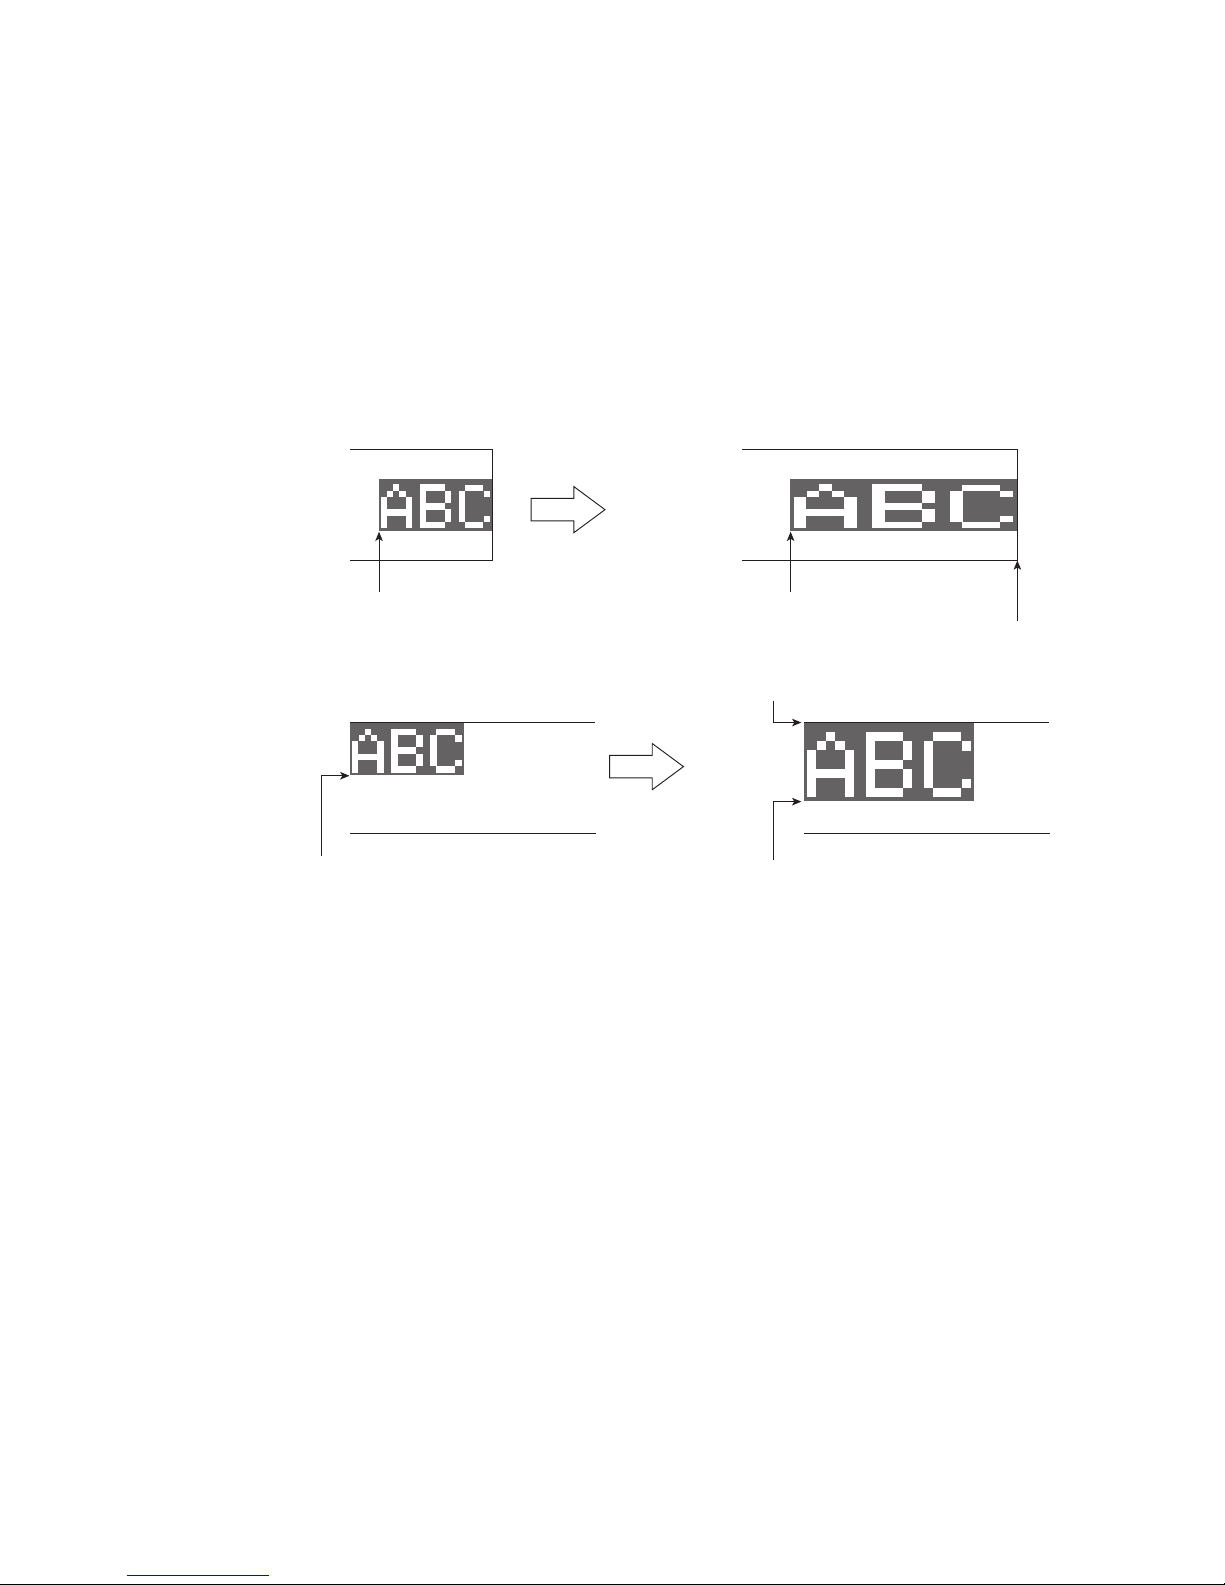
●Set the print format (Free layout; RX2-S only) 4-30
4.8.4 Set dot matrix, inter-character space, and other parameters
● Set the dot matrix, inter-character space, bold font, and bar code.
● The methods of setting is the same as fixed layout. See “4.7.4 Set dot matrix, inter-character space,
and other parameters” for details.
● The bottom-left coordinate of the selected print item is first fixed and adjust as follows:.
When changing the dot matrix, inter-character space, etc…, the top-right coordinate of the print
item can be over the limit of coordinate.
Should the top-right of the print item go beyond the limit of horizontal (X) coordinate, it will be
automatically adjusted to horizontal (X) coordinate =31999.
Should the top-right of the print item go beyond limit of vertical (Y) coordinate, it will be
automatically adjusted to vertical (Y) coordinate = 29 (3 lines upgrade) or 31 (4 lines or 5 lines
upgrade).
Char. size : 12x16
Bold font : x 1
Char. size : 12x16
Bold font : x 2
Horizontal (X) coordinate = 31961 Horizontal (X) coordinate = 31922
Horizontal (X) coordinate = 31999
Char. size :
12x16
Char. size :
18x24
Vertical (Y) coordinate=31
Vertical (Y) coordinate=8
Vertical (Y) coordinate=16
Page 78
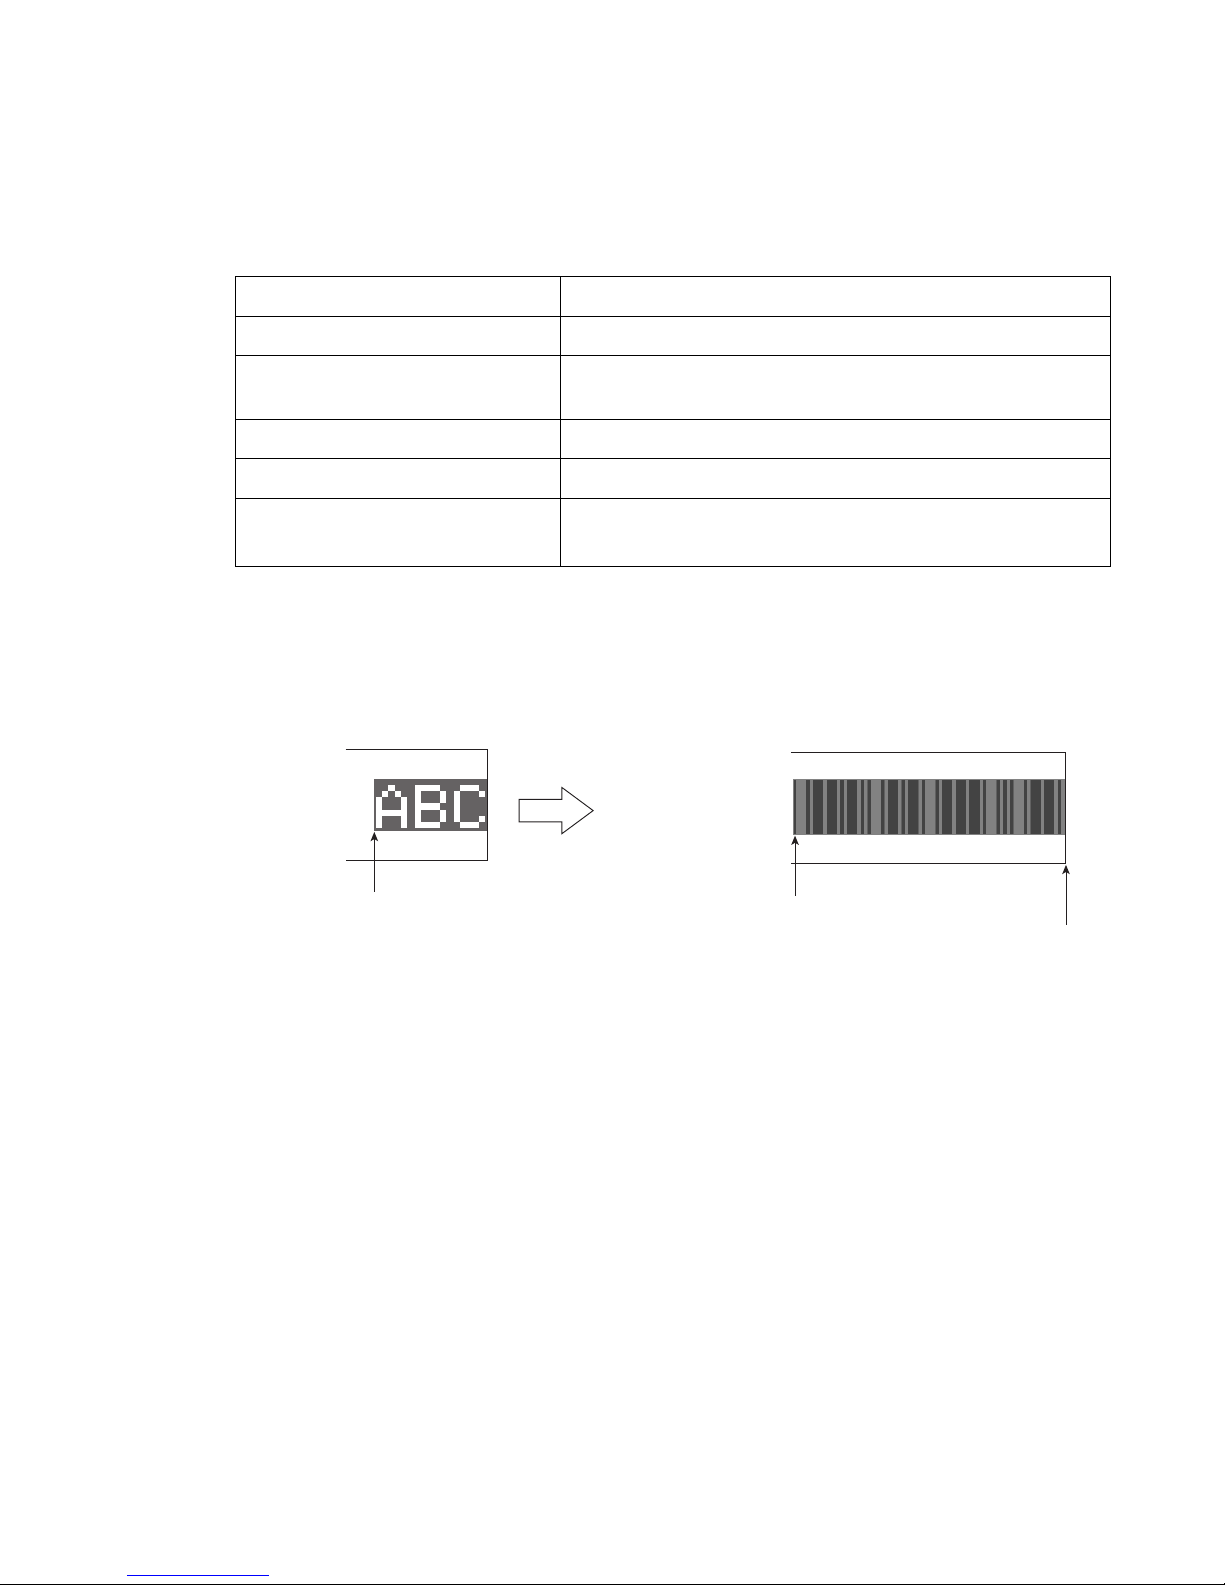
4-31 ●Set the print format (Free layout; RX2-S only)
4.8.5 Print a bar code
● Set bar code for free layout.
● Basic method of the setting bar code is the same as the method for the fixed layout. See the “4.7.5
Print a bar code” for details.
● There are some restrictions for setting the bar code for free layout. The restrictions are described as
follows;
The restrictions of the setting bar code for free layout
Bar code Restriction
Data Matrix (DM) Up to maximum of 1 DM, per one message.
QR code and Micro QR
QR code and Micro QR can be collectively set up to 1,
per one message.
GS1 DataBar Up to maximum of 1 GS1 DataBar, per one message.
Code 128 Up to maximum of 1 Code 128, per one message.
In case that a bar code of the same
kind was Set at adjacent print items
Two of the bar code are not handled a series of barcode.
Each bar code is handled as an independent bar codes.
Char. size : 12x16
Bar code : none
● When changing the bar code, the top-right coordinate of the print item can go over the limit of
coordinate.
Should the top-right of the print item go beyond the limit of horizontal (X) coordinate, it will be
automatically adjusted to horizontal (X) coordinate=31999.
Char. size : 12x16
Bar code : Code39
Horizontal (X) coordinate = 31961
Horizontal (X) coordinate = 31920
horizontal (X) coordinate = 31999
4.8.6 Cautions for printing overlapped some print items
● If multiple numbers of print items are overlapped, the printing may be aborted depending on the
number of print items or characters because it requires time to create the print data while printing is
in process.
In this case, the alarm “Free Layout Printing Disabled” occurs.
● Please first conduct print test at the free layout setting, and if the alarm “Free Layout Printing
Disabled” occurs, delete some print items which are overlapped, or decrease the value of ink drop
use setting.
Page 79
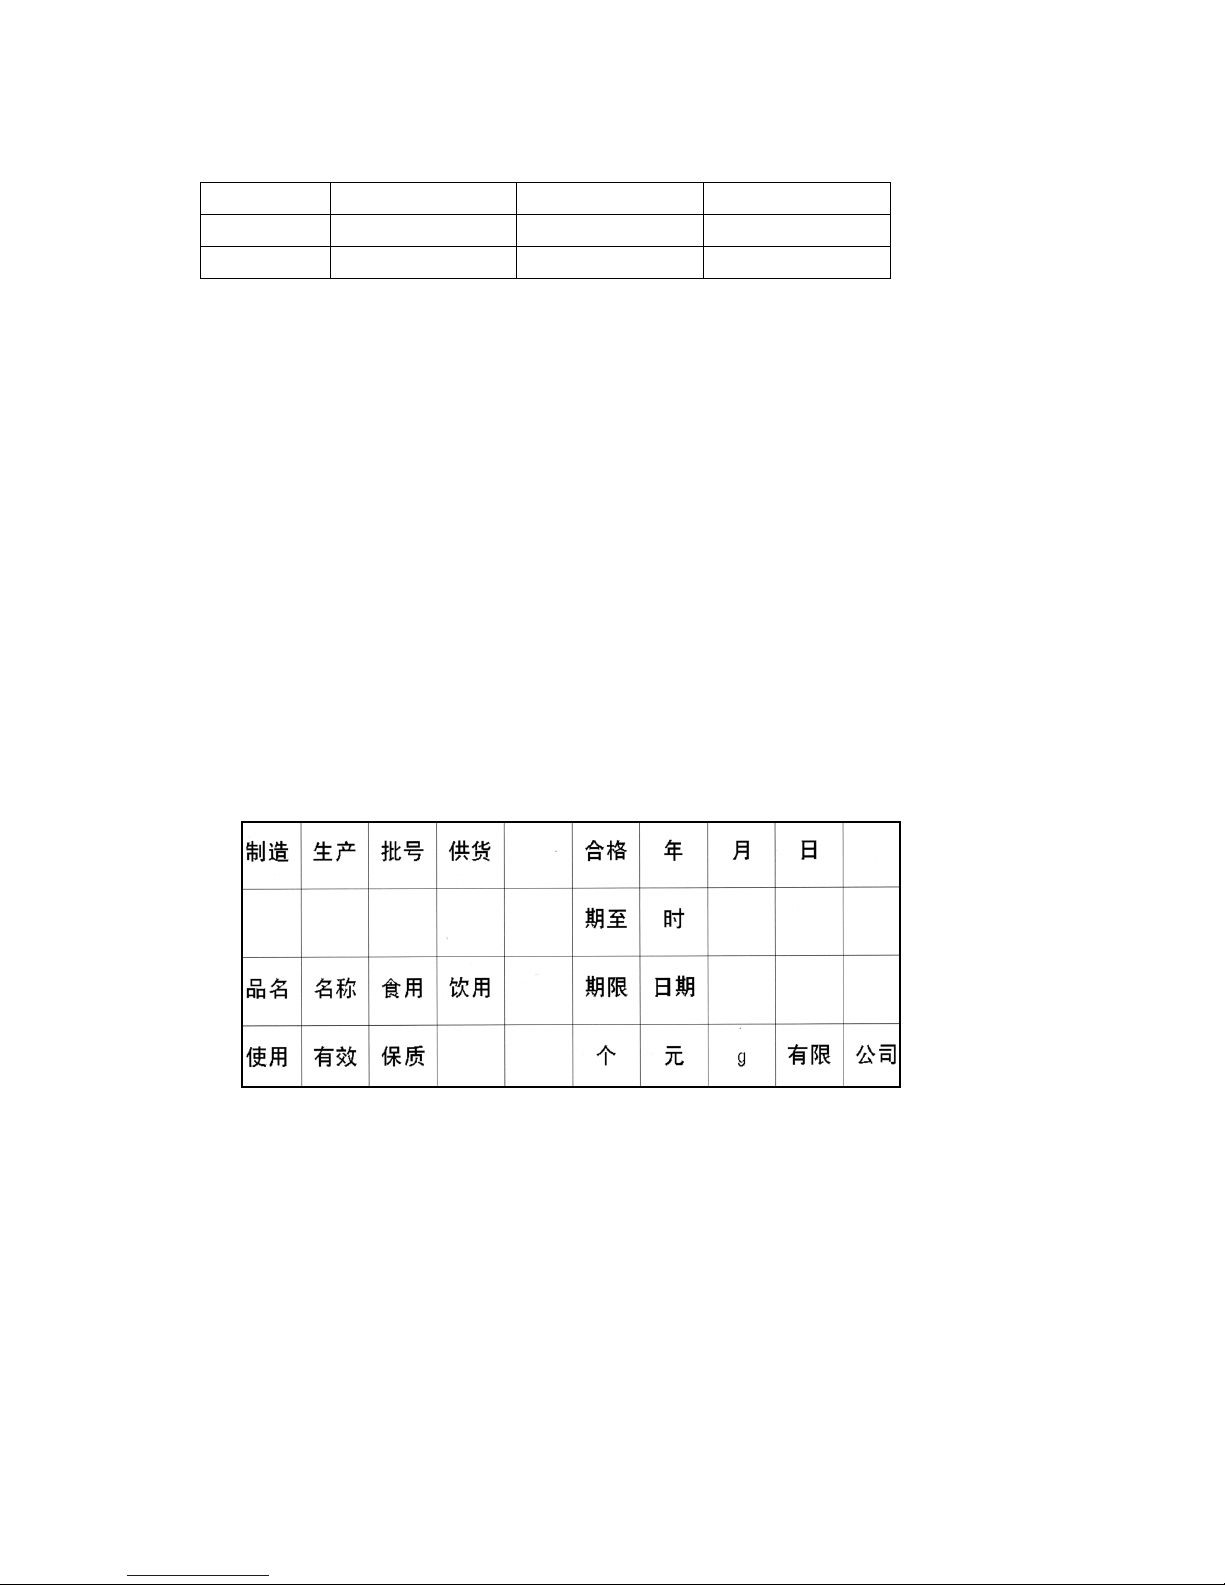
●Print characters 4-32
4.9 Print characters
Ex. Dedicated character (Simple Chinese)
Lines and Message length (Characters)
Model type 1 line 2 lines 3 lines
RX2-B 60 char. × 1 line 30 char. × 2 lines 20 char. × 3 lines
RX2-S 120 char. × 1 line 60 char. × 2 lines 40 char. × 3 lines
*) RX2-S OP : Up to 5 lines
OP : Up to 1,000 characters
4.9.1 Print fixed characters
(1) Function
●Inputs the characters to be printed.
●The kinds of characters which can be input are defined for each character size. Moreover, there is an
appropriate inter-character space depending on the kind of character. (See “4.7.4 Set dot matrix,
inter-character space, and other parameters”.)
●There is an “Insert” mode and an “Overwrite” mode when inputting.
●“Duplicate” by selecting the start and end of the character string and “Paste” at an arbitrary position are
possible.
●The characters which can be set as dedicated characters are shown below.
For dedicated characters, single words are handled collectively at input and deletion.
● Inputting an Arabic character will move the cursor to the left.
● Use the Insert mode to input Arabic characters.
●There are no limits on the number of digits which can be input at one print item.
Page 80
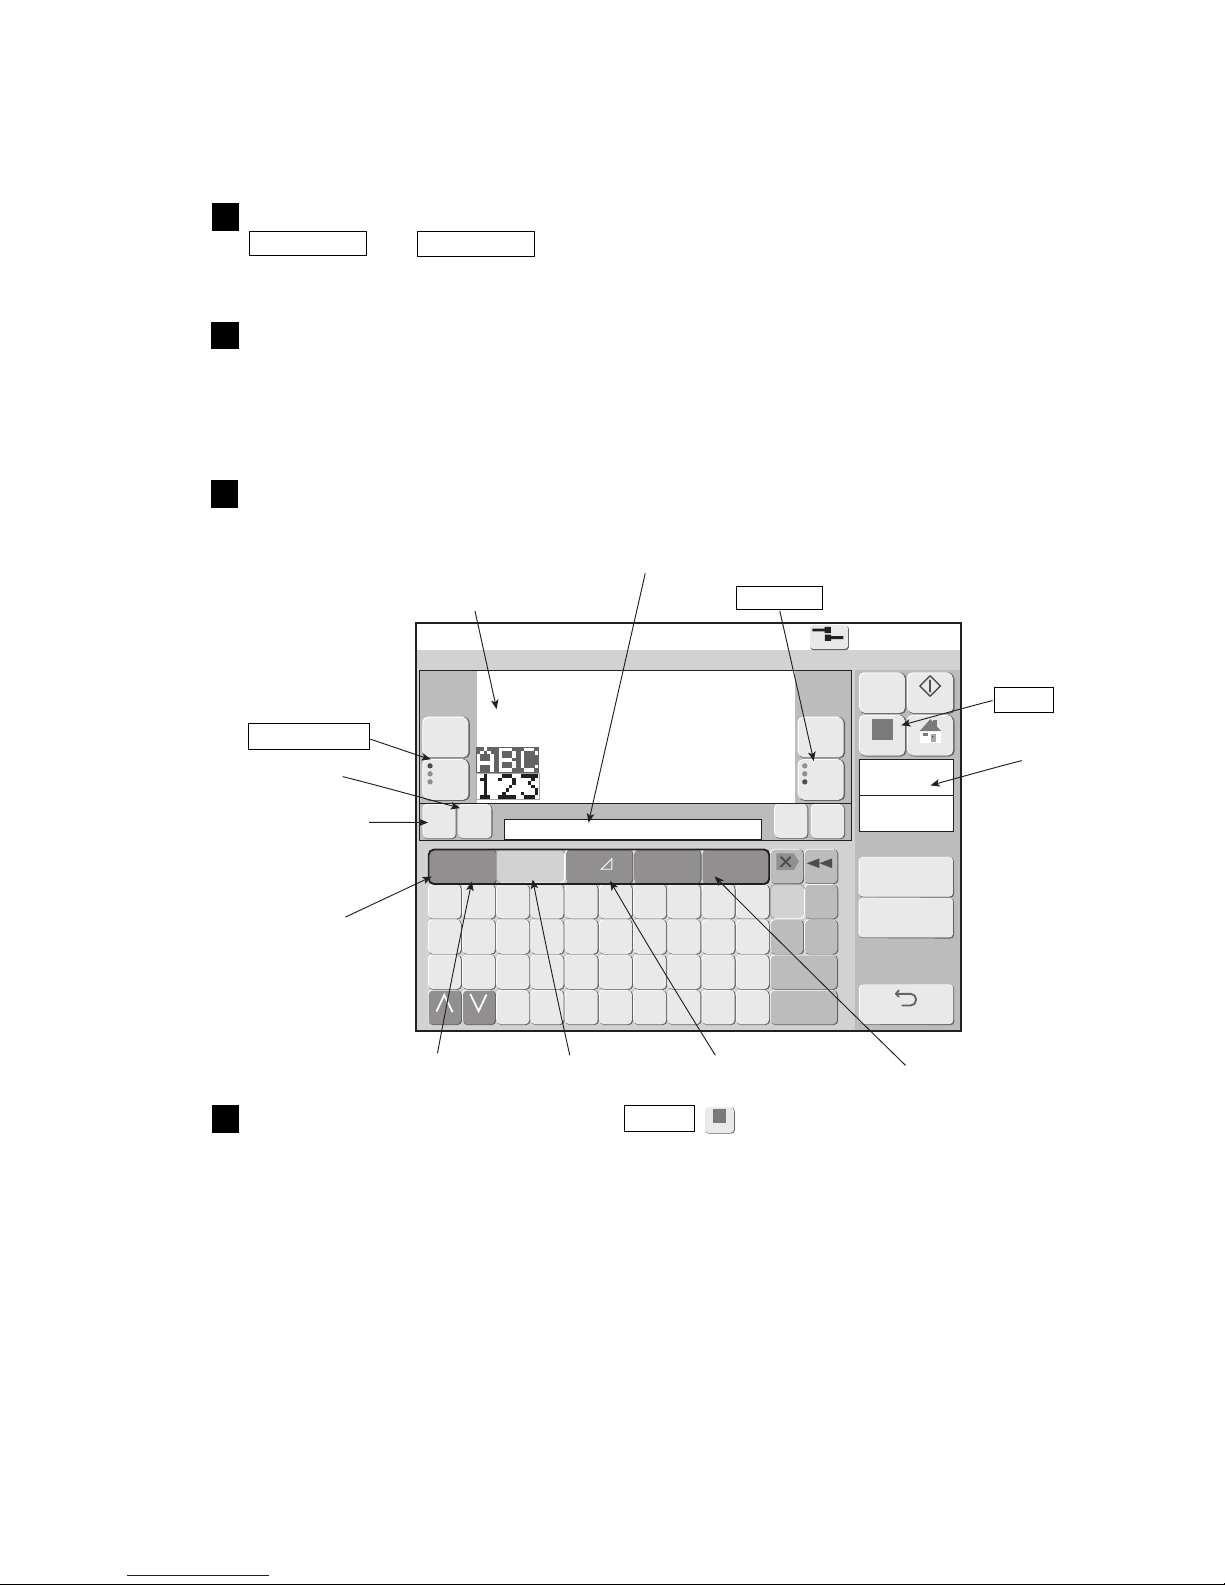
4-33 ●Print characters
Edit message
2015.07.0712:45
Com=0
[Stop ]
Message name[ ]
Print
spec.
Pint
format
Column1
Item1
Char.count
6/1000
A B C D E F G H I J
Backspace
K L M N O P Q R S T
Dupli-
cate
Paste
U V W X Y Z
Space
etc.
▽
Calendar
/count
←
123‥
Sign
★◎ ‥
Logo
《 》
Delete
Over-
write
110 20
ABC・
→
Prev.item
abcde
fghij
klmno
Nextitem
abcde
fghij
klmno
Change Change
Insert
ABC…
− +
M
Manual
Startup
Apply
HOME
Cal.
cond.
Count
cond.
Back
Apply
(2) Operation
The Edit message screen is displayed. (See “3.3.1 Operating Scheme”.)
Touch the print item which is to be the objective of message editing.
Prev. Item and Next Item may also be pressed.
The print description of the selected print item is displayed at the print description edit area.
1
Touch the position at which input in the print description edit area is to begin
and move the cursor.
The cursor button may also be pressed.
The cursor is displayed at the selected position.
2
Press the input mode button.
The kind of keyboard is changed.
3
Input the characters and press the Apply .
The character string of the print contents edit area is displayed at the print layout.
4
Print contents edit area
Print layout
Previous item
Cursor
Scroll in the print
description edit area
Input mode button
group
Numeric, Symbols
Alphabet letters Logo (Fixed, Free size)
Punct. character,
Accent character, etc.
Print item No.
Apply
Next item
Page 81
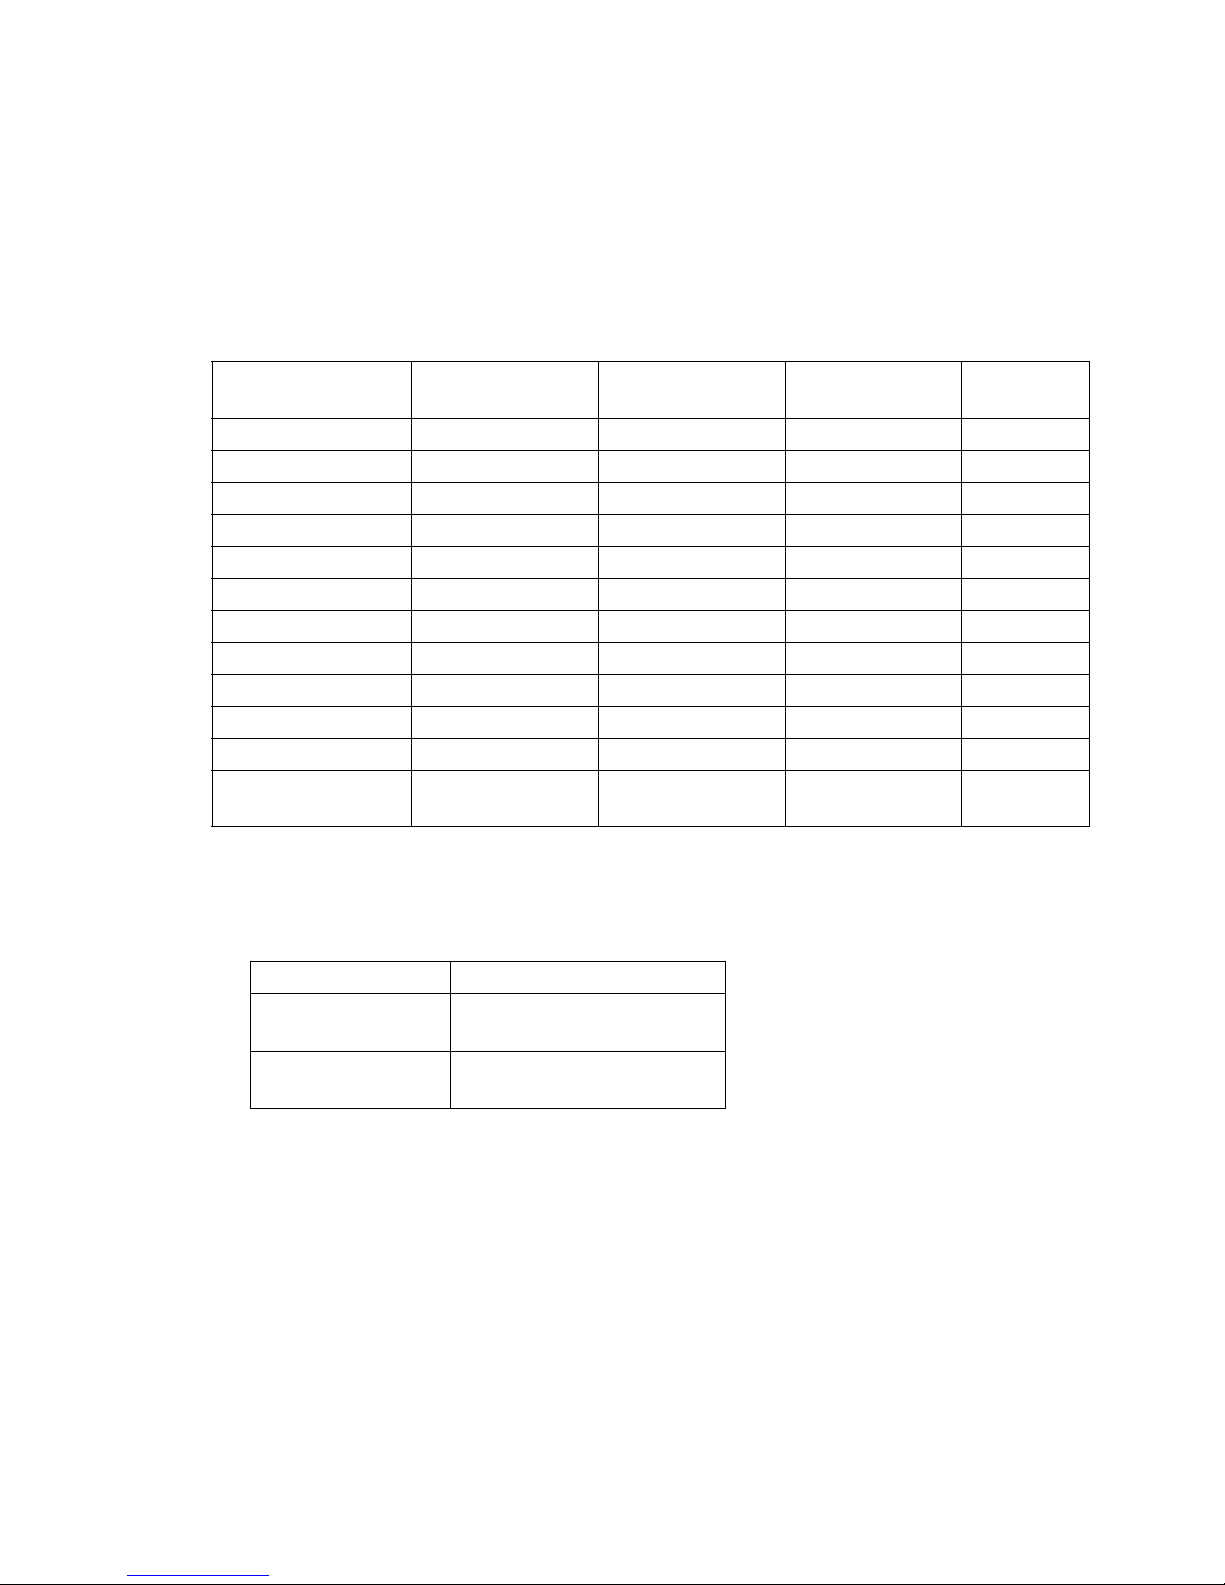
●Use the calendar function 4-34
4.10 Use the calendar function
4.10.1 Print calendar characters
(1) Calendar characters
●When set as calendar characters, the year, month, day, hour, minute, and second are matched to the current
date/time and printed each time the calendar time is changed.
●When “clock stop” is selected for calendar time control at the Date/time setup screen, the inputted
calendar time is referenced and printed.
Kinds of calendar characters
Item
Displays in
"Print layout area"
Number of digits
which can be input
Substitution rules Reference
Ye ar Y 4 Ye s
Month M 3 Yes
Day D 3 Yes
Hour h 2 Yes
Minute m 2 Yes
Second s 2 -
Total number of days T 3 - 4.10.1(2)
Week No. W 3 Yes 4.10.1(4)
Day of week 7 3 Yes 4.10.1(5)
Shift code (*1) E 10 - 4.11
Time count (*1) F 3 - 4.12
JAN, FEB, ----
(Month 3 digits)
- 3 - 4.10.1(3)
●A group of calendar characters is called “Calendar block”.
(*1) Optional on RX2-S
Maximum Calendar block count
Model type Maximum Calendar count
RX2-B 2
RX2-S
2
(Option : Up to 8)
●Calendar conditions are set for each calendar block.
●Calendar characters cannot be input at the same calendar block as shift code characters and time count
characters.
(Maximum digit : 20 digits/Calendar block)
Page 82
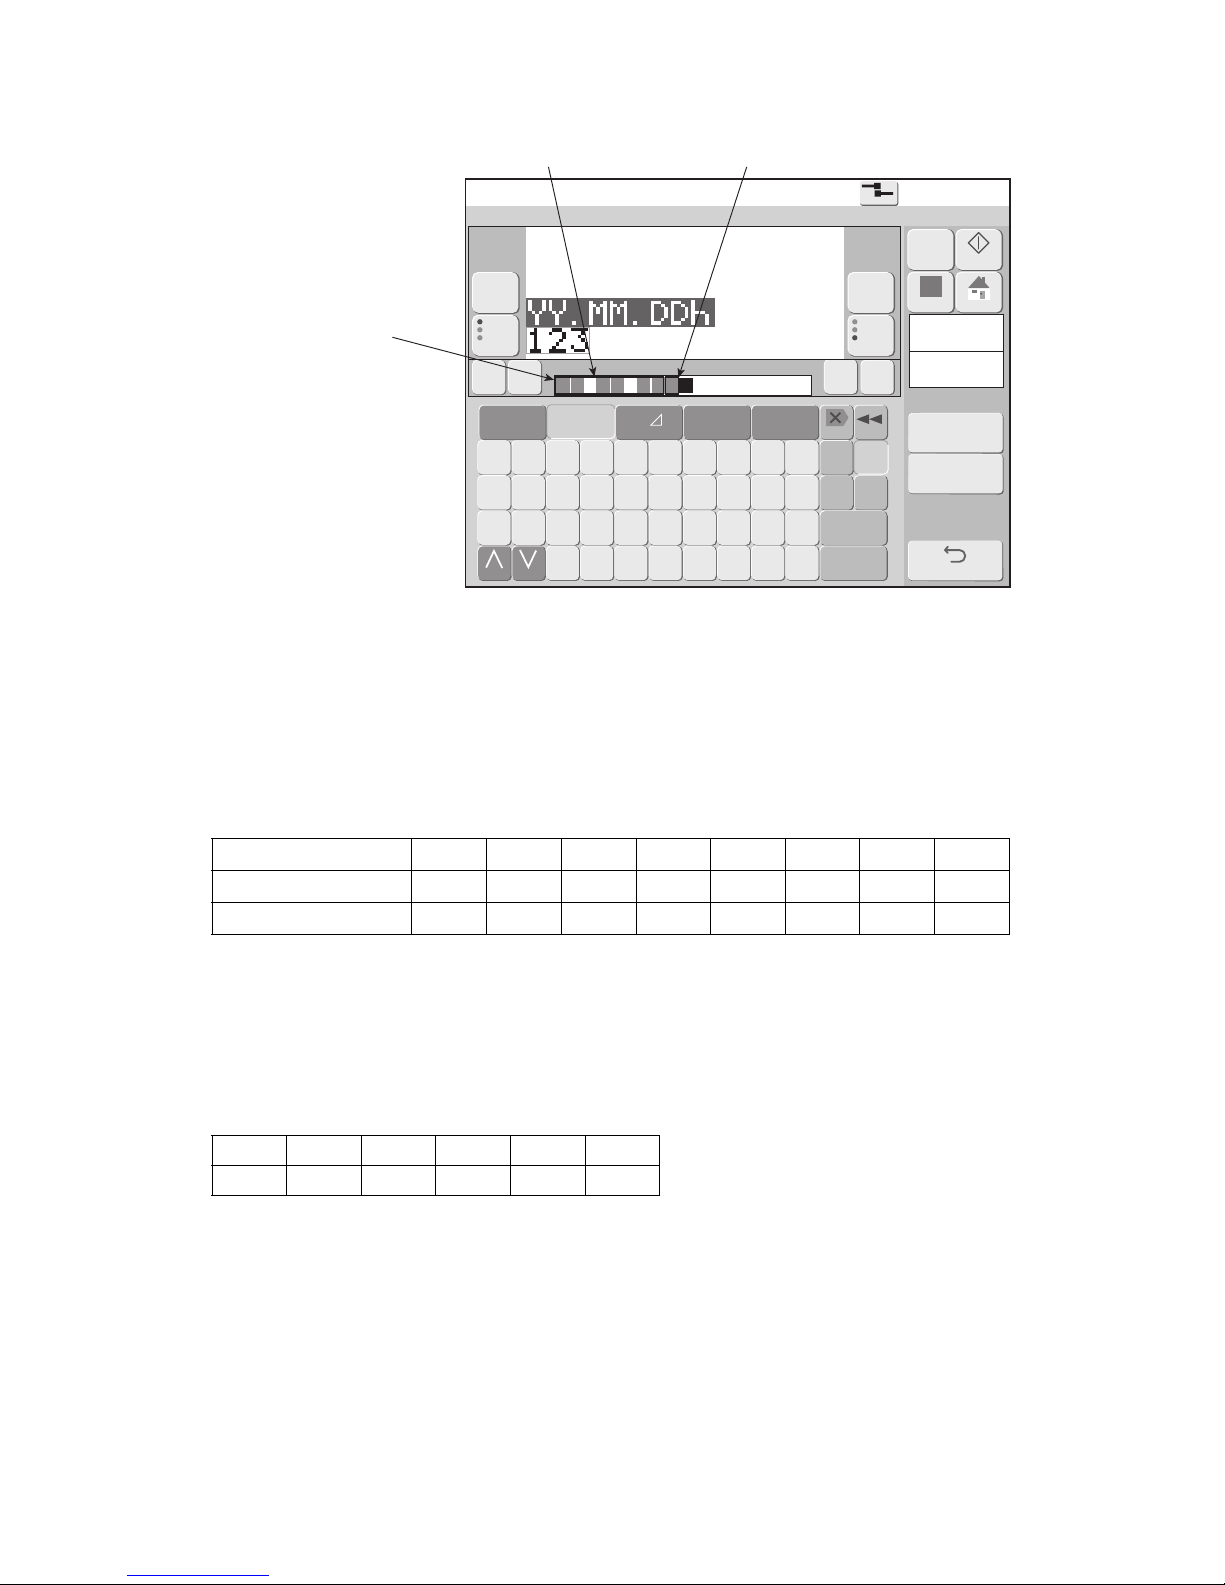
4-35 ●Use the calendar function
(2) Total number of days
●Use when setting up to print the total number of days from the first of January.
●When set as total date character, it is linked to the calendar time and the print description is changed to
match the current total number of days.
●Leap year and ordinary year are shown in the table below.
●There is no zero-suppression function.
Total number of days
1/1 1/2 ---- 2/28 2/29 3/1 ---- 12/31
Ordinary year 1 2 ---- 59 - 60 ---- 365
Leap year 1 2 ---- 59 60 61 ---- 366
(3) Alphabet month 3 digits (JAN, FEB, ----)
●Use when printing the month in alphabet 3 digits representation.
●For printing in other than English, it is defined by the month 3 digits “Substitution rules” screen.
●When month 3 digits are corresponded to new substitution rules, the English representations shown below
are set beforehand.
English representation
JAN FEB MAR APR MAY JUN
JUL AUG SEP OCT NOV DEC
Edit message
2015.07.0712:45
Com=0
[Stop ]
Message name[ ]
Print
spec.
Print
format
Column1
Item1
Char.count
12/1000
A B C D E F G H I J
Backspace
K L M N O P Q R S T
Dupli-
cate
Paste
U V W X Y Z
Space
etc.
▽
Calendar
/count
←
123‥
Sign
★◎ ‥
Logo
《 》
Delete
110 20
→
Prev.item
abcde
fghij
klmno
Nextitem
abcde
fghij
klmno
Change Change
Insert
YY.MM.DD h・
Overwrite
ABC…
− +
Cal.
cond.
Count
cond.
Back
M
Manual
Startup
Apply
HOME
Calendar block
Calendar block
Calendar block is
displayed in a red
frame.
Page 83
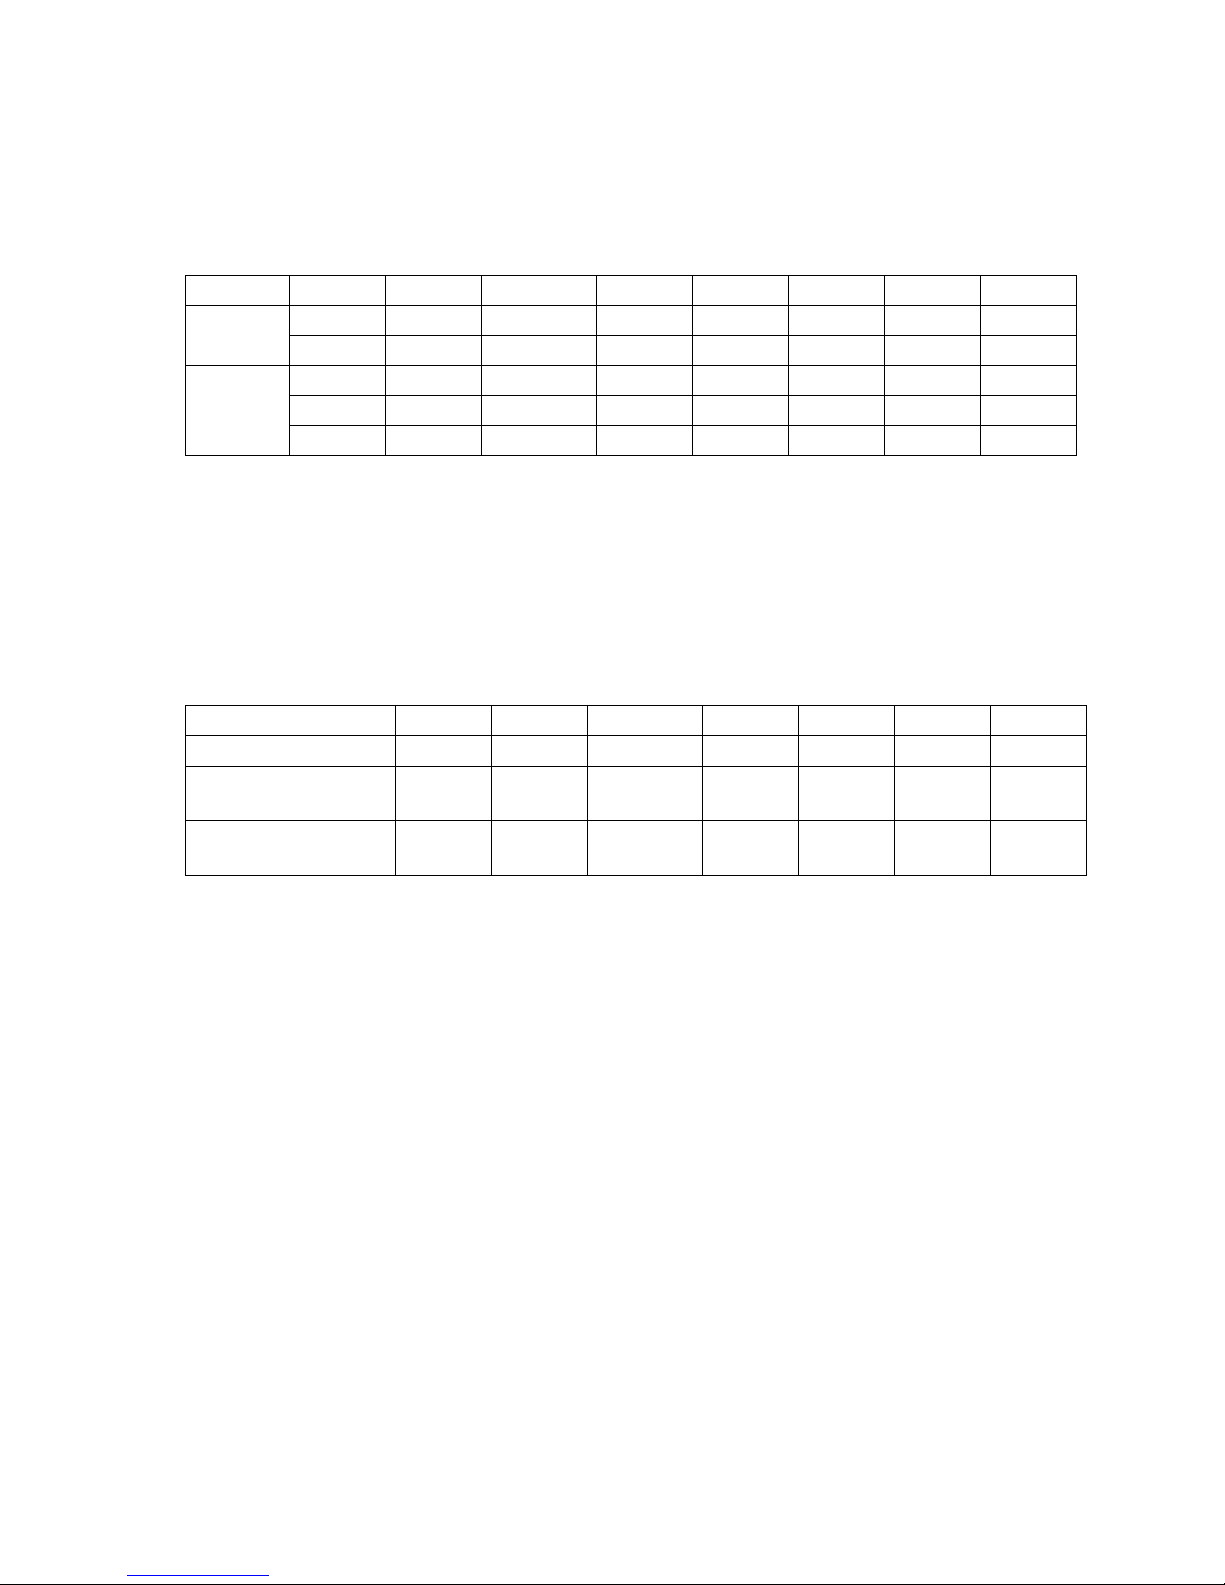
●Use the calendar function 4-36
(4) Week number
●Use week number when printing the week of the year.
●One week begins on Monday and ends on Sunday.
●The week including January 4 of that year shall be week one. Making the week including the first Thursday
of the year week one is also another way of saying it.
●The beginning of a year not included in week one becomes the last week of the previous year.
Example of counting week number of end and beginning of year
Monday Tuesday Wednesday Thursday Friday Saturday Sunday Week No.
December
21 22 23 24 25 26 27 52
28 29 30 31 53
January
12353
45 6 789101
11 12 13 14 15 16 17 2
(5) Day of the week
●Use when representing and printing the day of the week using a 1 digit character.
●One week begins on Monday and ends on Sunday.
●When the calendar characters “Day of week” are input, the numbers 1 to 7 are printed. When printing other
representations, set the appropriate substitution rules.
Calendar “Day of the week” printing example
Monday Tuesday Wednesday Thursday Friday Saturday Sunday
Standard 1234567
Substitution rule set
by inputting 1 digit.
AB C DE FG
Substitution rule set
by inputting 3 digits
MON TUE WED THU FRI SAT SUN
Page 84
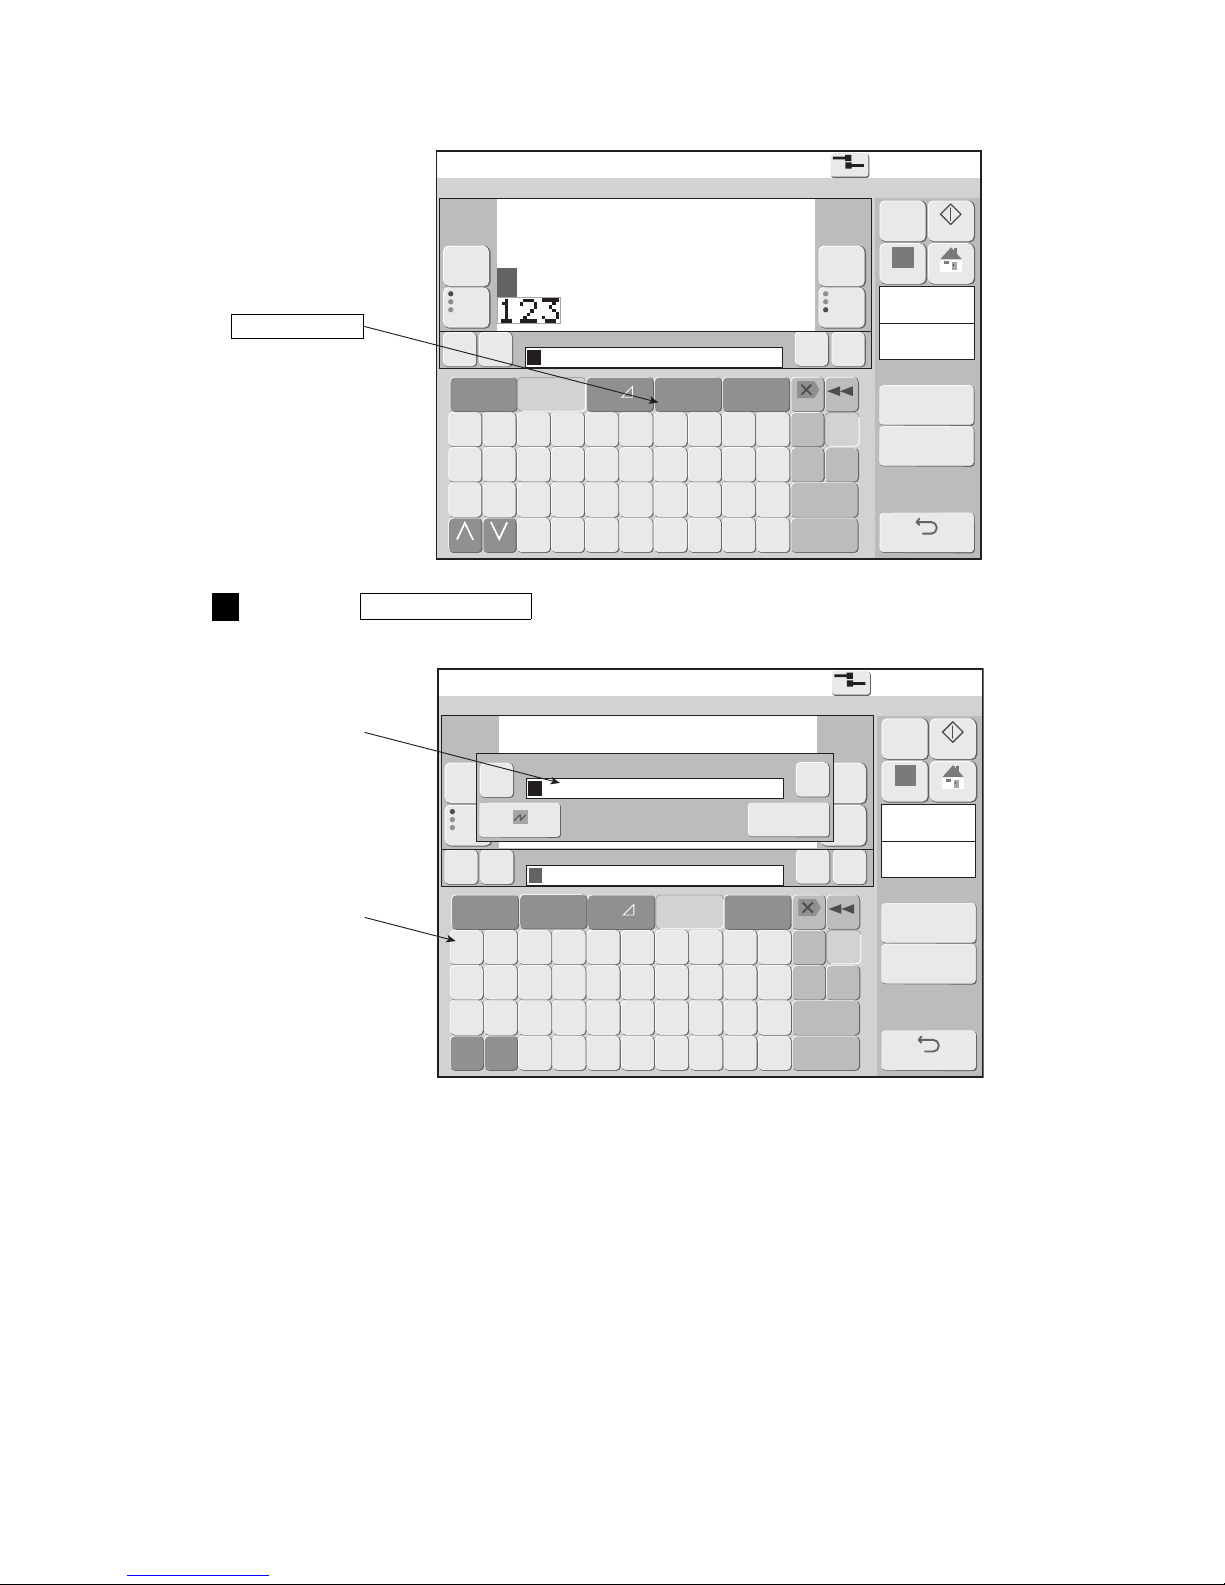
4-37 ●Use the calendar function
Edit message
2015.07.0712:45
Com=0
[Stop ]
Message name[ ]
Column1
Item1
Char.count
3/1000
A B C D E F G H I J
Backspace
K L M N O P Q R S T
Dupli-
cate
Paste
U V W X Y Z
Space
etc.
▽
Calendar
/count
←
123‥
Sign
★◎ ‥
Logo
《 》
Delete
110 20
→
Prev.item
abcde
fghij
klmno
Nextitem
abcde
fghij
klmno
Change Change
Insert
・
Overwrite
ABC…
− +
Print
spec.
Print
format
M
Manual
Startup
Apply
HOME
Back
Cal.
cond.
Count
cond.
Edit message
2015.07.0712:45
Com=0
[Stop ]
Message name[ ]
Column1
Item1
Char.count
3/1000
←
《 》
110 20
→
Prev.item
abcde
fghij
klmno
Nextitem
abcde
fghij
klmno
・
Year
Month
Day Hour
Minu-
te
Seco-
nd
Total
days
Week
num-
ber
Day
of
week
Shift
code
Time
count
Count
Backspace
etc.
▽
123‥
Sign
★◎ ‥
Logo
ABC…
Delete
Insert
+ − × /
( ) . : ,
Over-
write
Calendar
/ count
− +
←
→
・
Cancel
OK
Print
spec.
Print
format
M
Manual
Startup
Apply
HOME
Back
Space
(6) Operation
The Edit message screen is displayed.
Press the Calendar/count .
The display changes to the calendar/count keyboard and the calendar/count edit window is displayed.
1
Calendar/count
Calendar/count
edit window
Calendar/count
keyboard
Page 85
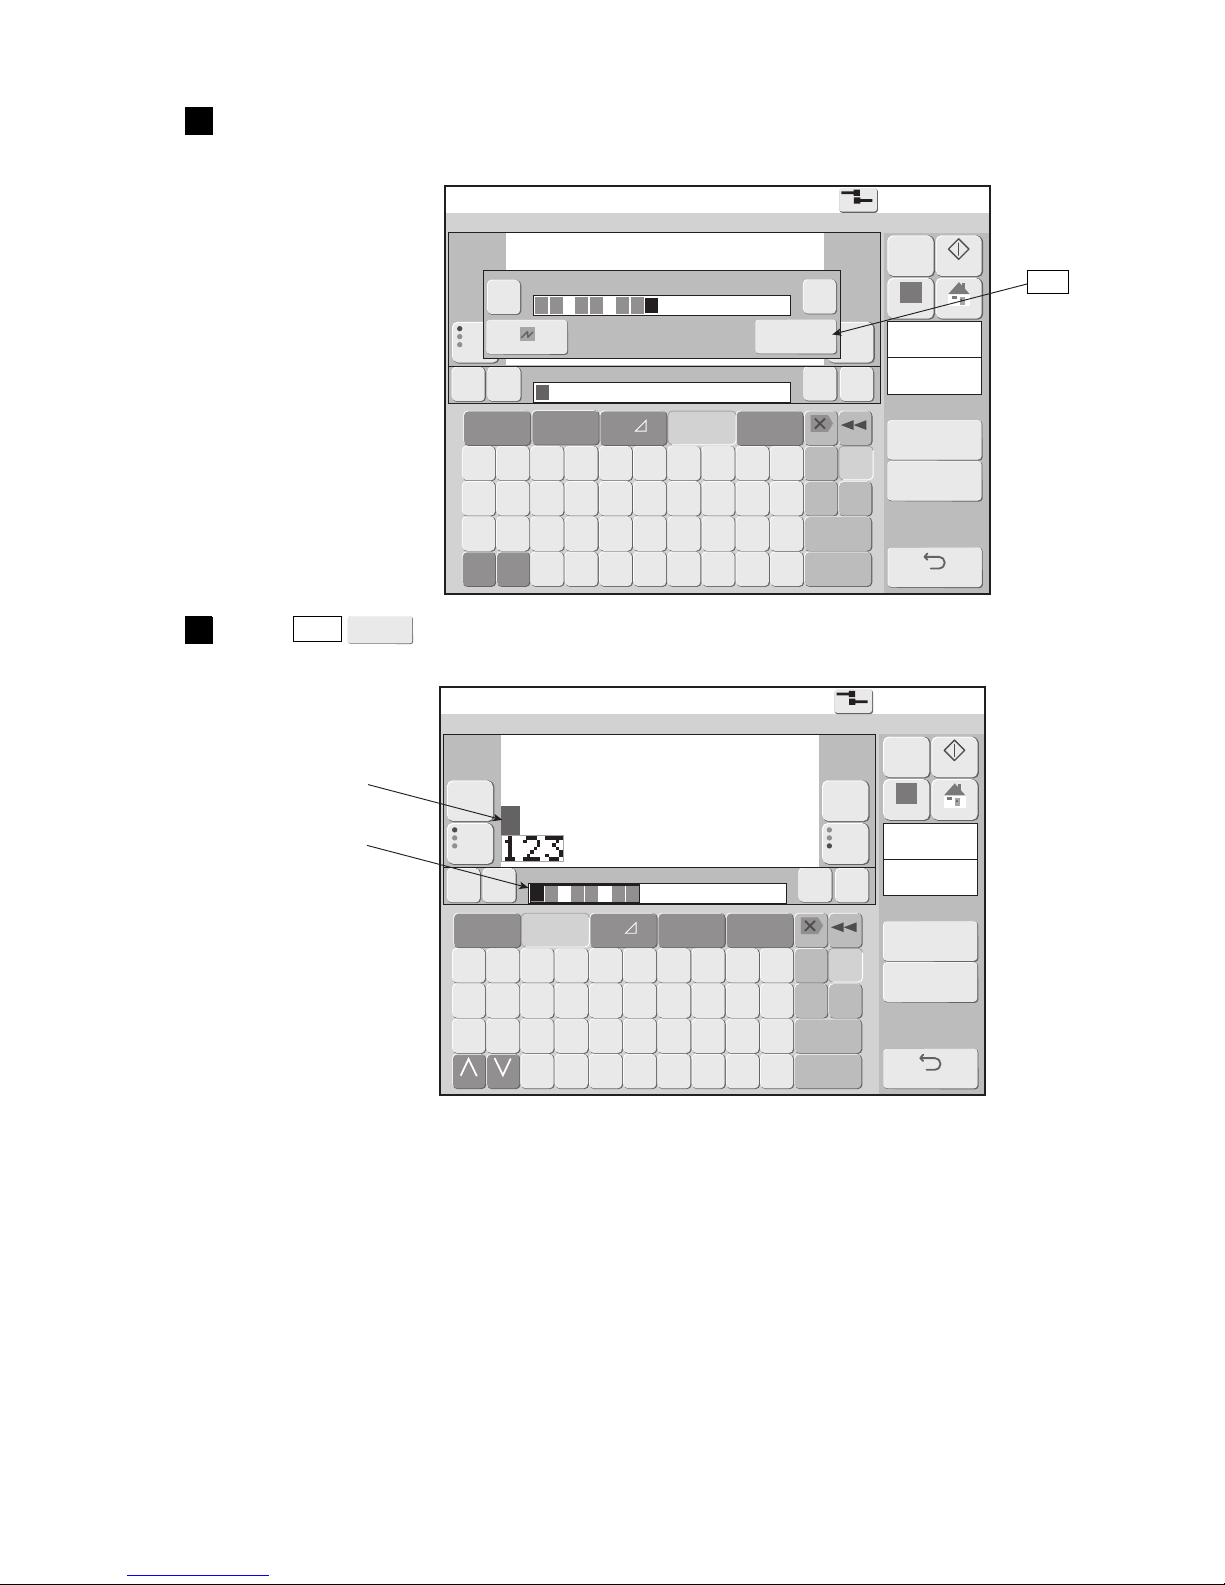
●Use the calendar function 4-38
Edit message
2015.07.0712:45
Com=0
[Stop ]
Message name[ ]
←
《 》
110 20
→
Prev.item
abcde
fghij
klmno
Nextitem
abcde
fghij
klmno
・
←
→
Cancel
OK
YY.MM.DD・
Column1
Item1
Char.count
3/1000
Year
Month
Day Hour
Minu-
te
Seco-
nd
Total
days
Week
num-
ber
Day
of
week
Shift
code
Time
count
Count
Backspace
etc.
▽
123‥
Sign
★◎ ‥
Logo
ABC…
Delete
Insert
+ − × /
( ) . : ,
Over-
write
Calendar
/ count
Print
spec.
Print
format
M
Manual
Startup
Apply
HOME
Back
Space
Edit message
2015.07.0712:45
Com=0
[Stop ]
Message name[ ]
Column1
Item1
Char.count
3/1000
A B C D E F G H I J
Backspace
K L M N O P Q R S T
Dupli-
cate
Paste
U V W X Y Z
Space
etc.
▽
Calendar
/count
←
123‥
Sign
★◎ ‥
Logo
《 》
Delete
110 20
→
Prev.item
abcde
fghij
klmno
Nextitem
abcde
fghij
klmno
Change Change
Insert
YY.MM.DD ・
Overwrite
ABC…
− +
Print
spec.
Print
format
M
Manual
Startup
Apply
HOME
Back
Cal.
cond.
Count
cond.
Input the calendar characters.
The calendar characters are displayed on the calendar/count edit window.
2
Press OK .
The calendar characters are displayed at the print description edit area.
3
OK
OK
Print item to input
Calendar block is
displayed in a red
frame.
Page 86
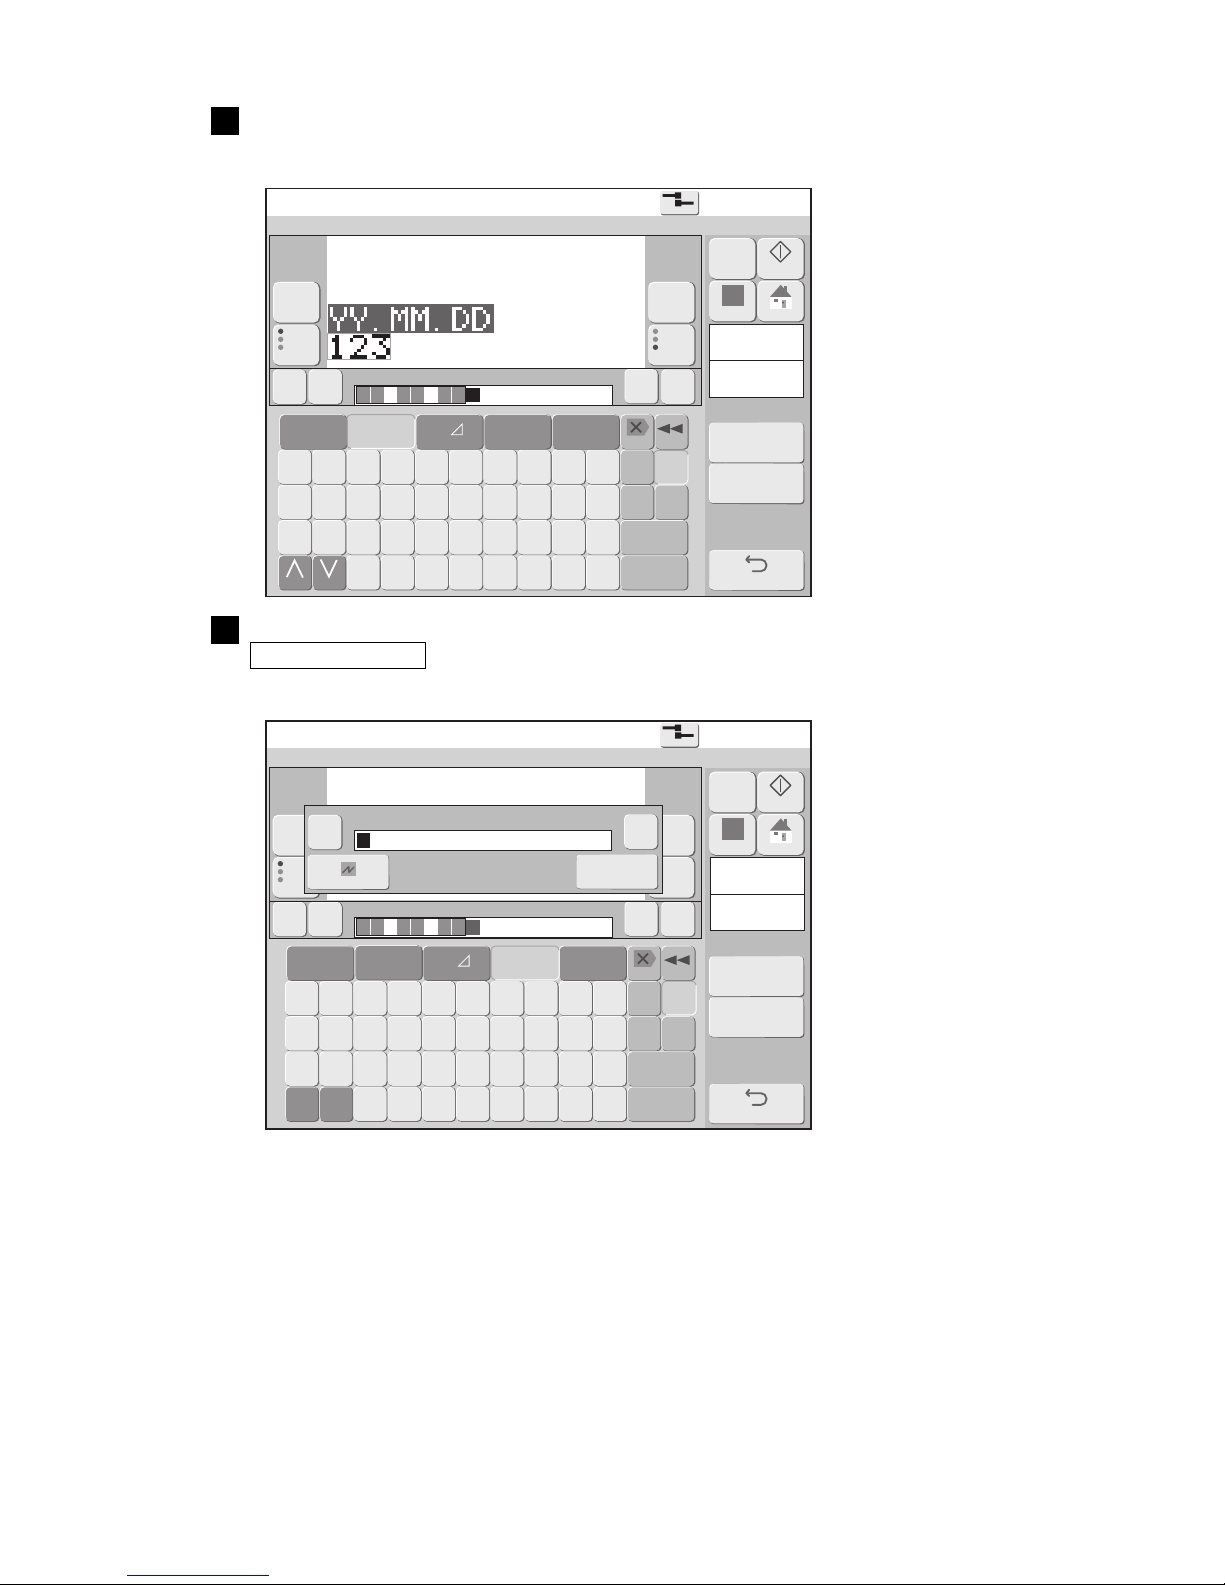
4-39 ●Use the calendar function
Edit message
2015.07.0712:45
Com=0
[Stop ]
Message name[ ]
Column1
Item1
Char.count
11/1000
A B C D E F G H I J
Backspace
K L M N O P Q R S T
Dupli-
cate
Paste
U V W X Y Z
Space
etc.
▽
Calendar
/count
←
123‥
Sign
★◎ ‥
Logo
《 》
Delete
110 20
→
Prev.item
abcde
fghij
klmno
Nextitem
abcde
fghij
klmno
Change Change
Insert
YY.MM.DD ・
Over-
write
ABC…
− +
Print
spec.
Print
format
M
Manual
Startup
Apply
HOME
Back
Cal.
cond.
Count
cond.
Edit message
2015.07.0712:45
Com=0
[Stop ]
Message name[ ]
←
《 》
110 20
→
Prev.item
abcde
fghij
klmno
Nextitem
abcde
fghij
klmno
YY.MM.DD・
Column1
Item1
Char.count
11/1000
Year
Month
Day Hour
Minu-
te
Seco-
nd
Total
days
Week
num-
ber
Day
of
week
Shift
code
Time
count
Count
Backspace
etc.
▽
123‥
Sign
★◎ ‥
Logo
ABC…
Delete
Insert
+ − × /
( ) . : ,
Over-
write
Calendar
/ count
− +
←
→
・
Cancel
OK
Print
spec.
Print
format
M
Manual
Startup
Apply
HOME
Back
Space
Touch the print item to input.
The character string of the print contents edit area is displayed at the print layout.
4
To input another calendar, move the cursor to the input position and press
Calendar/count .
The display changes to the calendar/count keyboard and the calendar/count edit window is displayed.
5
Page 87
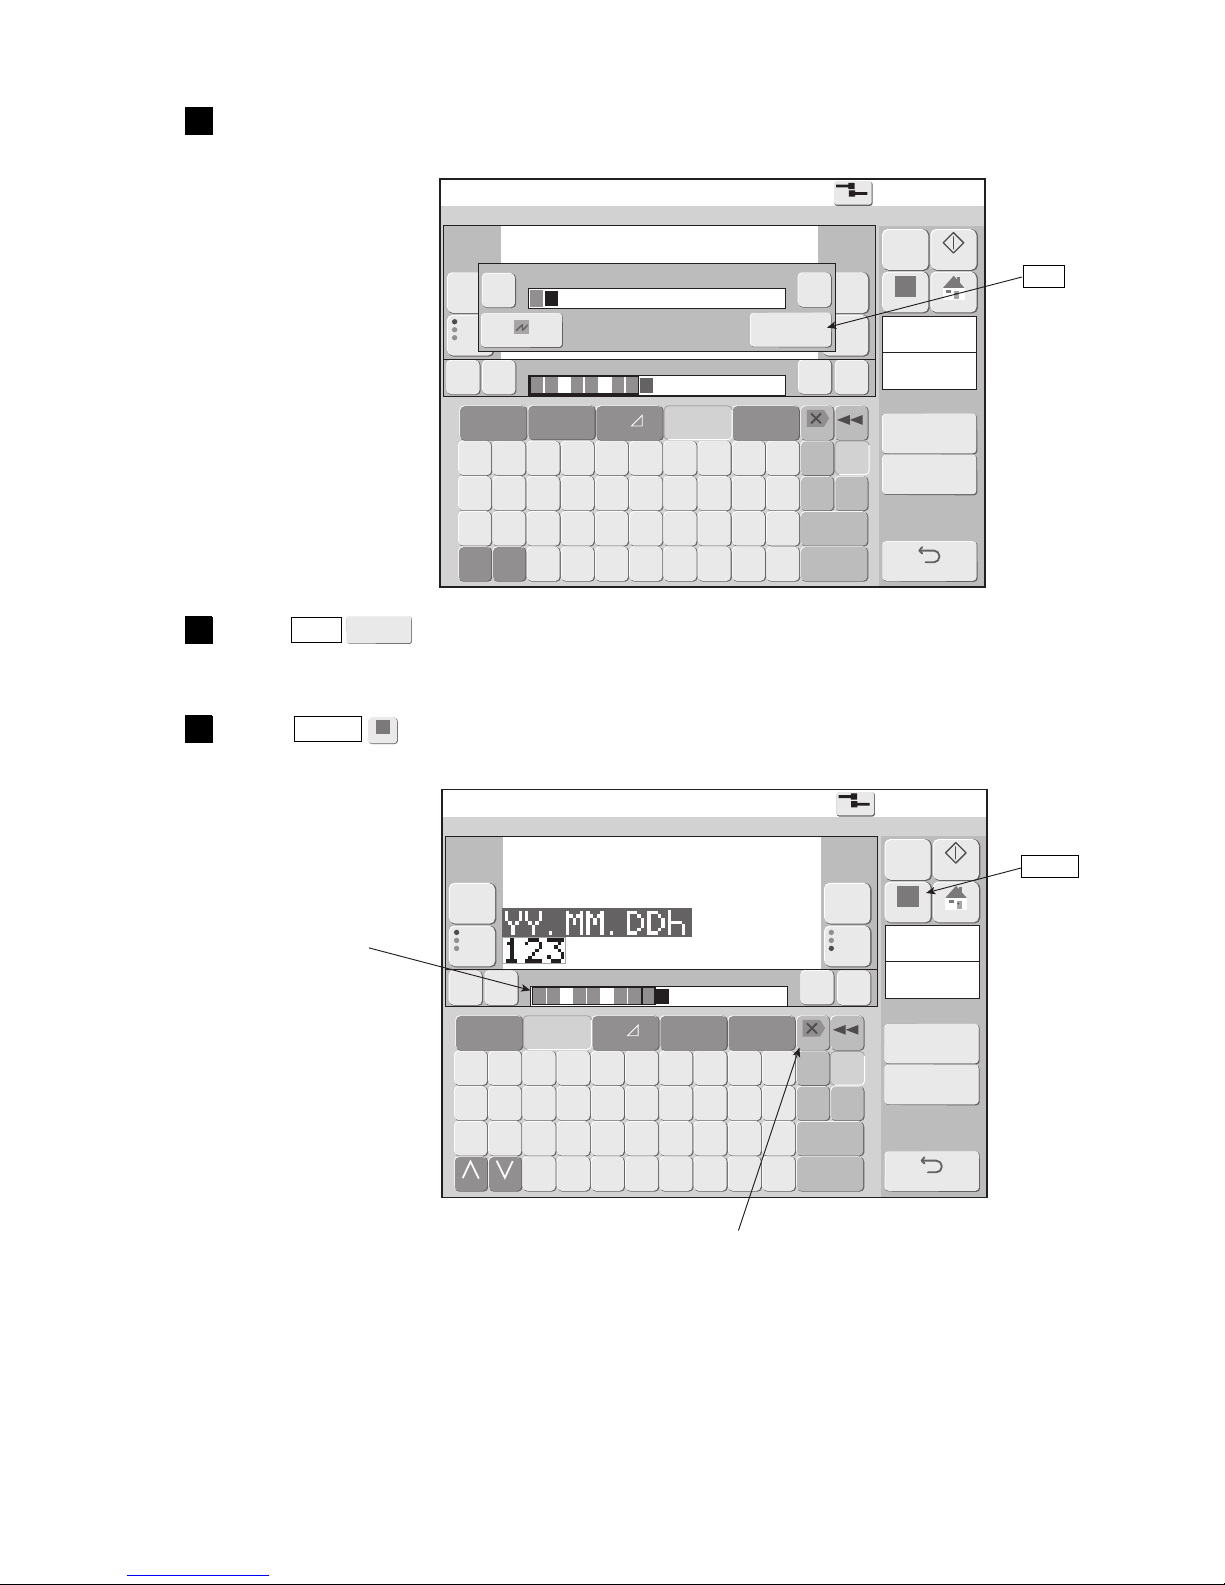
●Use the calendar function 4-40
Edit message
2015.07.0712:45
Com=0
[Stop ]
Message name[ ]
←
《 》
110 20
→
Prev.item
abcde
fghij
klmno
Nextitem
abcde
fghij
klmno
YY.MM.DD・
Column1
Item1
Char.count
3/1000
Year
Month
Day Hour
Minu-
te
Seco-
nd
Total
days
Week
num-
ber
Day
of
week
Shift
code
Time
count
Count
Backspace
etc.
▽
123‥
Sign
★◎ ‥
Logo
ABC…
Delete
Insert
+ − × /
( ) . : ,
Over-
write
Calendar
/ count
− +
←
→
Cancel
OK
h・
Space
Print
spec.
Print
format
M
Manual
Startup
Apply
HOME
Back
Edit message
2015.07.0712:45
Com=0
[Stop ]
Message name[ ]
Column1
Item1
Char.count
12/1000
A B C D E F G H I J
Backspace
K L M N O P Q R S T
Dupli-
cate
Paste
U V W X Y Z
Space
etc.
▽
Calendar
/count
←
123‥
Sign
★◎ ‥
Logo
《 》
Delete
110 20
→
Prev.item
abcde
fghij
klmno
Nextitem
abcde
fghij
klmno
Change Change
Insert
YY.MM.DD h・
Overwrite
ABC…
− +
Print
spec.
Print
format
M
Manual
Startup
Apply
HOME
Back
Cal.
cond.
Count
cond.
Apply
Input the calendar characters.
The calendar characters are displayed in the calendar/count edit window.
6
Press OK .
The calendar characters are displayed at the print description edit area.
7
Press Apply .
The character string of the print contents edit area is displayed at the print layout.
8
OK
OK
Apply
Calendar block is
displayed in a red
frame.
Calendar character is deleted
per calendar block unit.
Page 88
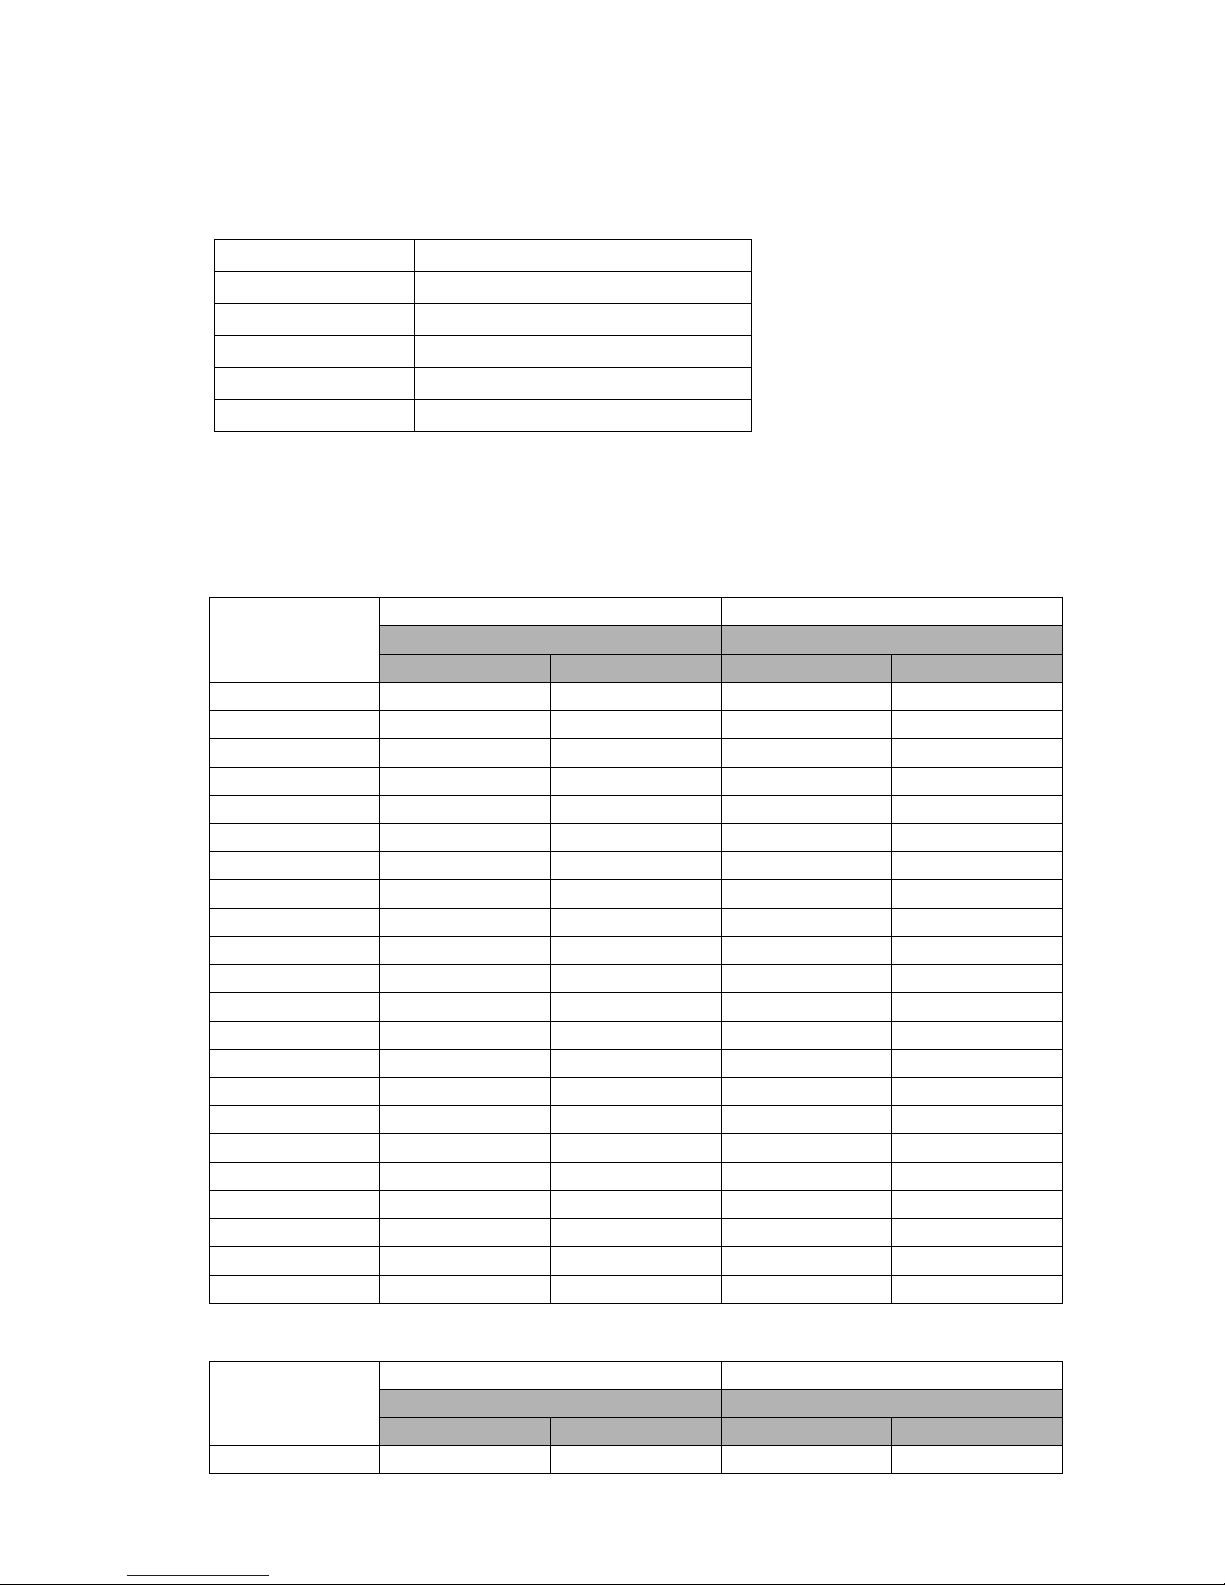
4-41 ●Use the calendar function
4.10.2 Print future date (offset)
(1) Offset function
●Sets the date/time by adding the offset value and the date/time of the internal clock.
●The offset values which can be set are shown in the table below.
Offset value setting range
Yea r 0 t o 99
Month 0 to 99
Day 0 to 1999
Hour -23 to 99
Minute -59 to 99
<Example of offset in month units (2012 is a leap year)>
Calendar time
Offset from yesterday From today
Offset value Offset value
1 month 1 month + 1 day 1 month 1 month + 1 day
2015.01.28 2015.02.27 2015.02.28 2015.02.28 2015.03.01
2015.01.29 2015.02.28 2015.02.28 2015.02.28 2015.03.01
2015.01.30 2015.02.28 2015.02.28 2015.02.28 2015.03.01
2015.01.31 2015.02.28 2015.02.28 2015.02.28 2015.03.01
2015.02.01 2015.02.28 2015.03.01 2015.03.01 2015.03.02
2015.02.02 2015.03.01 2015.03.02 2015.03.02 2015.03.03
2015.02.27 2015.03.26 2015.03.27 2015.03.27 2015.03.28
2015.02.28 2015.03.27 2015.03.28 2015.03.28 2015.03.29
2015.03.01 2015.03.31 2015.04.01 2015.04.01 2015.04.02
2016.01.28 2016.02.27 2016.02.28 2016.02.28 2016.02.29
2016.01.29 2016.02.28 2016.02.29 2016.02.29 2016.03.01
2016.01.30 2016.02.29 2016.02.29 2016.02.29 2016.03.01
2016.01.31 2016.02.29 2016.02.29 2016.02.29 2016.03.01
2016.02.01 2016.02.29 2016.03.01 2016.03.01 2016.03.02
2016.02.02 2016.03.01 2016.03.02 2016.03.02 2016.03.03
2016.02.27 2016.03.26 2016.03.27 2016.03.27 2016.03.28
2016.02.28 2016.03.27 2016.03.28 2016.03.28 2016.03.29
2016.02.29 2016.03.28 2016.03.29 2016.03.29 2016.03.30
2016.03.01 2016.03.31 2016.04.01 2016.04.01 2016.04.02
<Example of year offset (2012 is a leap year)>
Calendar time
Offset from yesterday From today
Offset value Offset value
1 year 4 years 1 year 4 years
2016.02.29 2017.02.28 2020.02.28 2017.02.28 2020.02.29
●There are two offset methods for future date calculations that use Month and/or Year variables, “Offset
from yesterday” and “From today”.
(See “4.14.3 Set various printing” for “Offset from yesterday” and “From today” setting switching.)
Page 89
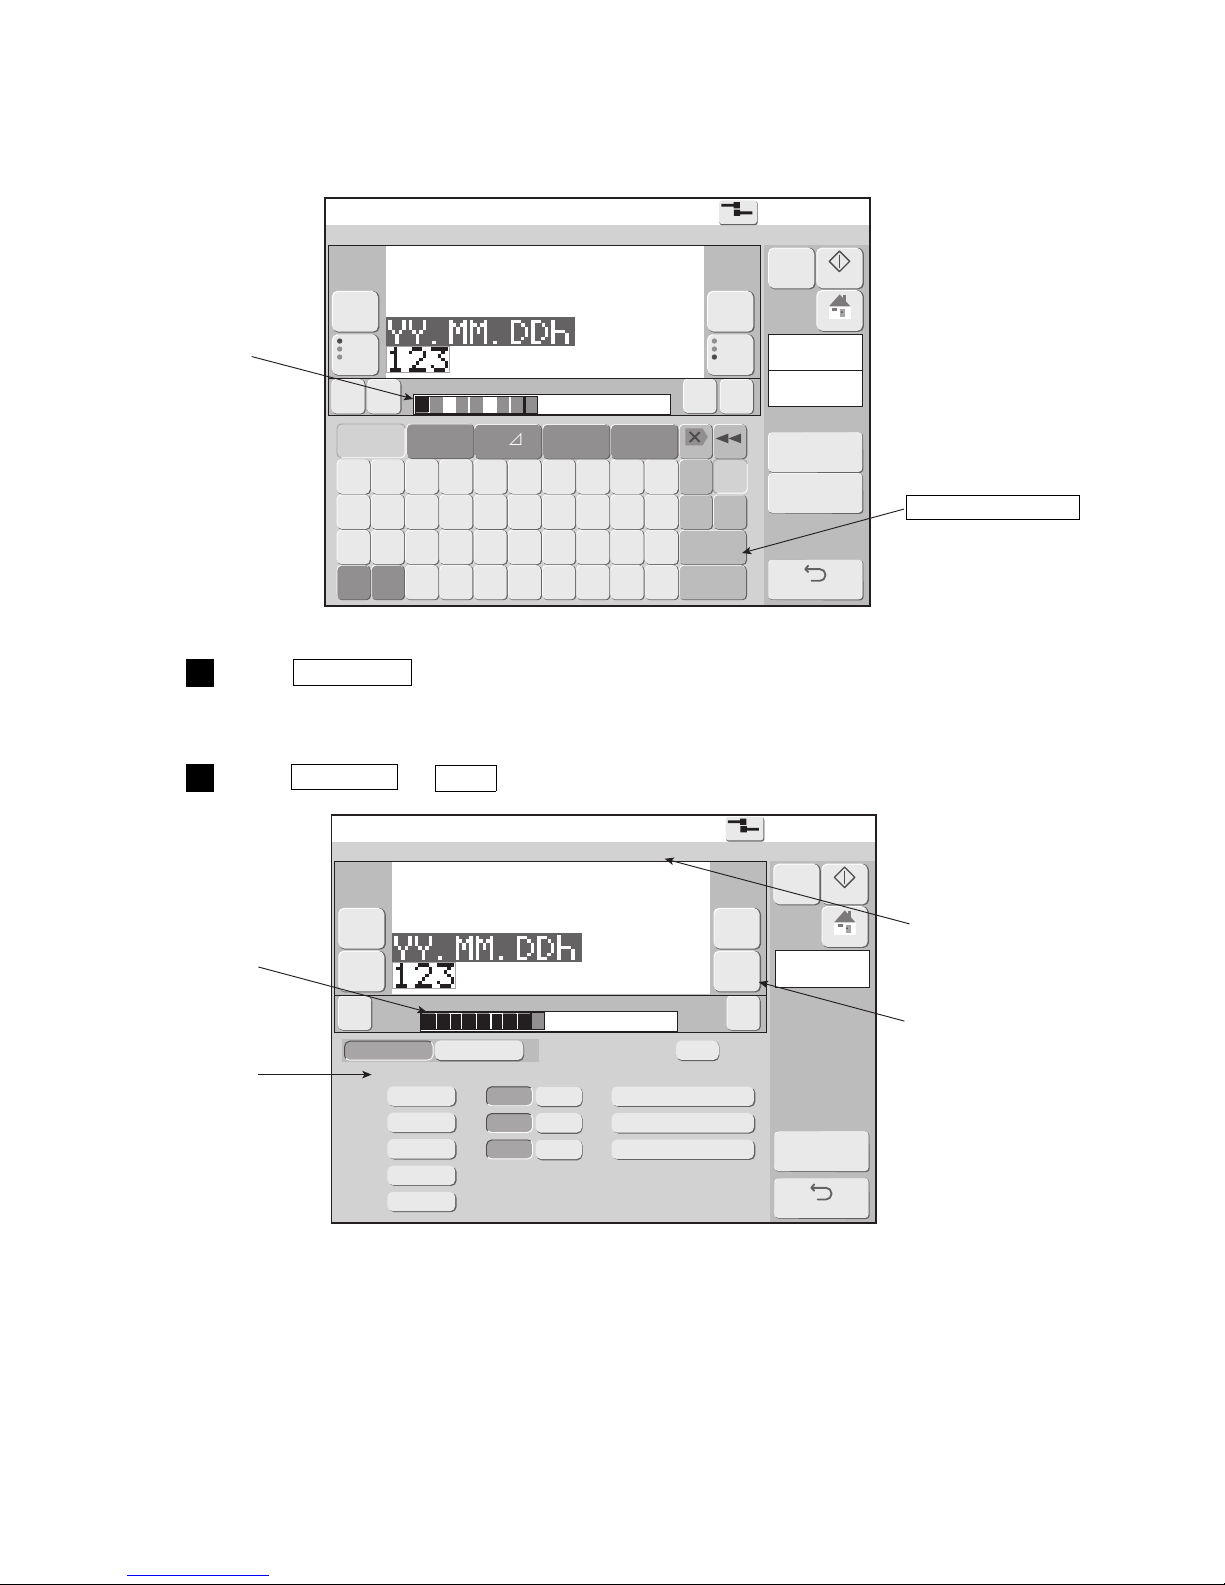
●Use the calendar function 4-42
Edit message
2015.07.0712:45
Com=0
[Stop ]
Message name[ ]
Column1
Item1
Char.count
12/1000
1 2 3 4 5 6 7 8 9 0
Backspace
+ − × / !
Dupli-
cate
Paste
# $ % & ¥
Space
etc.
▽
Calendar
/count
←
★◎ ‥
Logo
《 》
Delete
110 20
→
Prev.item
abcde
fghij
klmno
Nextitem
abcde
fghij
klmno
Insert
YY.MM.DD h・
ABC…
( ) . : ,
■ [ ]
= ? < > ; * _
Overwrite
123‥
Sign
− +
Print
spec.
Print
format
M
Manual
Startup
HOME
Back
Cal.
cond.
Count
cond.
Calendar conditions
2015.07.0712:45
Com=0
[Stop ]
Message name[ ]
Substitution
rules
Column1
Item1
Back
《 》
110 20
Prev.
Next
Y Y.MM.DD h・
< Offset > < Substitution rules > < Zero-suppression >
Year
Month
Day
Hour
Minute
Disable
1st screen
2nd screen
Substitution rules No.
01
Disable
Enable
Disable
Enable
Disable
Enable
0000
0000
0000
0000
0000
Calendar blocks:1/2
− +
M
Manual
Startup
HOME
Disable
Disable
(2) Operation
Set offset of 1 month at the “YY.MM.DD” calendar block.
The Edit message screen is displayed.
Press Cal. Cond. .
The Calendar conditions screen is displayed.
1
Press Previous or Next and change the objective calendar block.
2
Cursor
Calendar conditions
Calendar block No.
Changes the objective
calendar block.
Objective calendar
block is colored.
Offset setting
Page 90
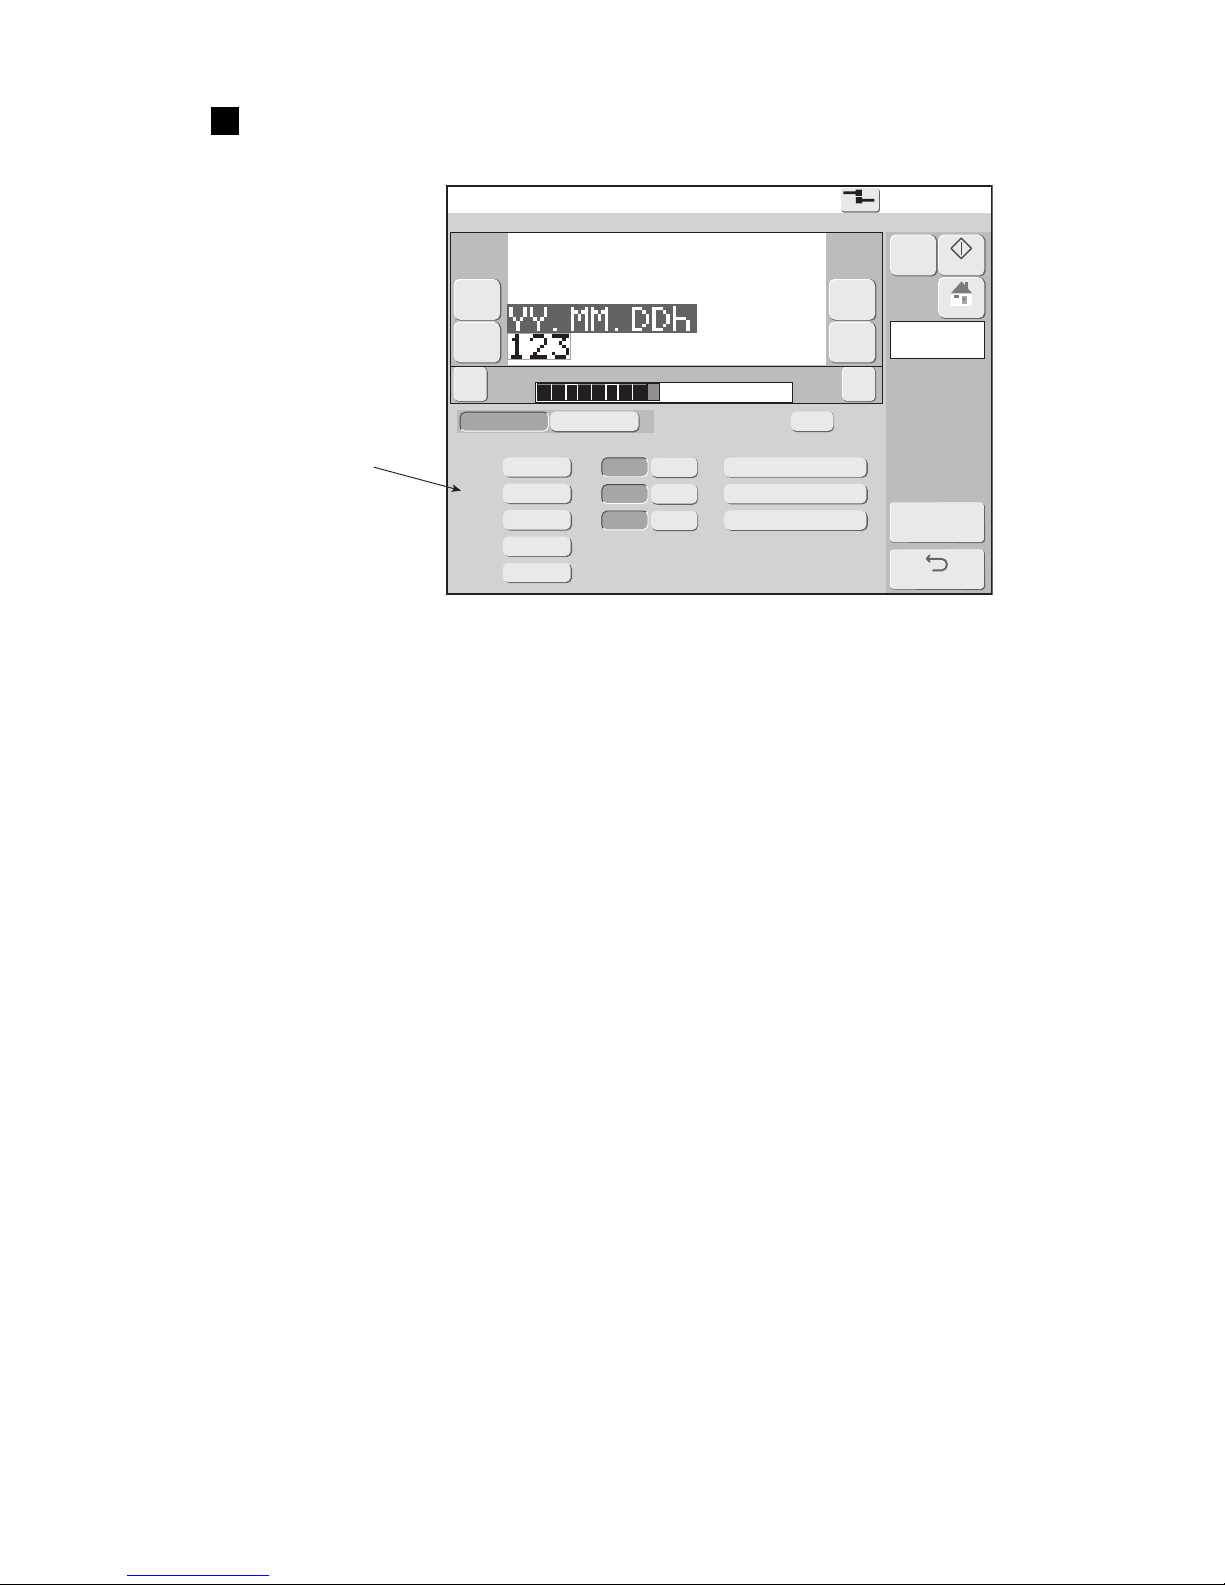
4-43 ●Use the calendar function
Calendar conditions
2015.07.0712:45
Com=0
[Stop ]
Message name[ ]
Substitution
rules
Column1
Item1
Back
《 》
110 20
Prev.
Next
Y Y.MM.DD h・
1st screen
2nd screen
Substitution rules No.
01
Calendar blocks:1/2
< Offset > < Substitution rules > < Zero-suppression >
Year
Month
Day
Hour
Minute
Disable
Enable
Disable
Enable
Disable
Enable
0000
0001
0000
0000
0000
− +
Disable
Disable
Disable
M
Manual
Startup
HOME
Input “1” at offset “Month”.
The character string of the print description edit area is displayed at the print layout.
3
Offset 1 month
Page 91
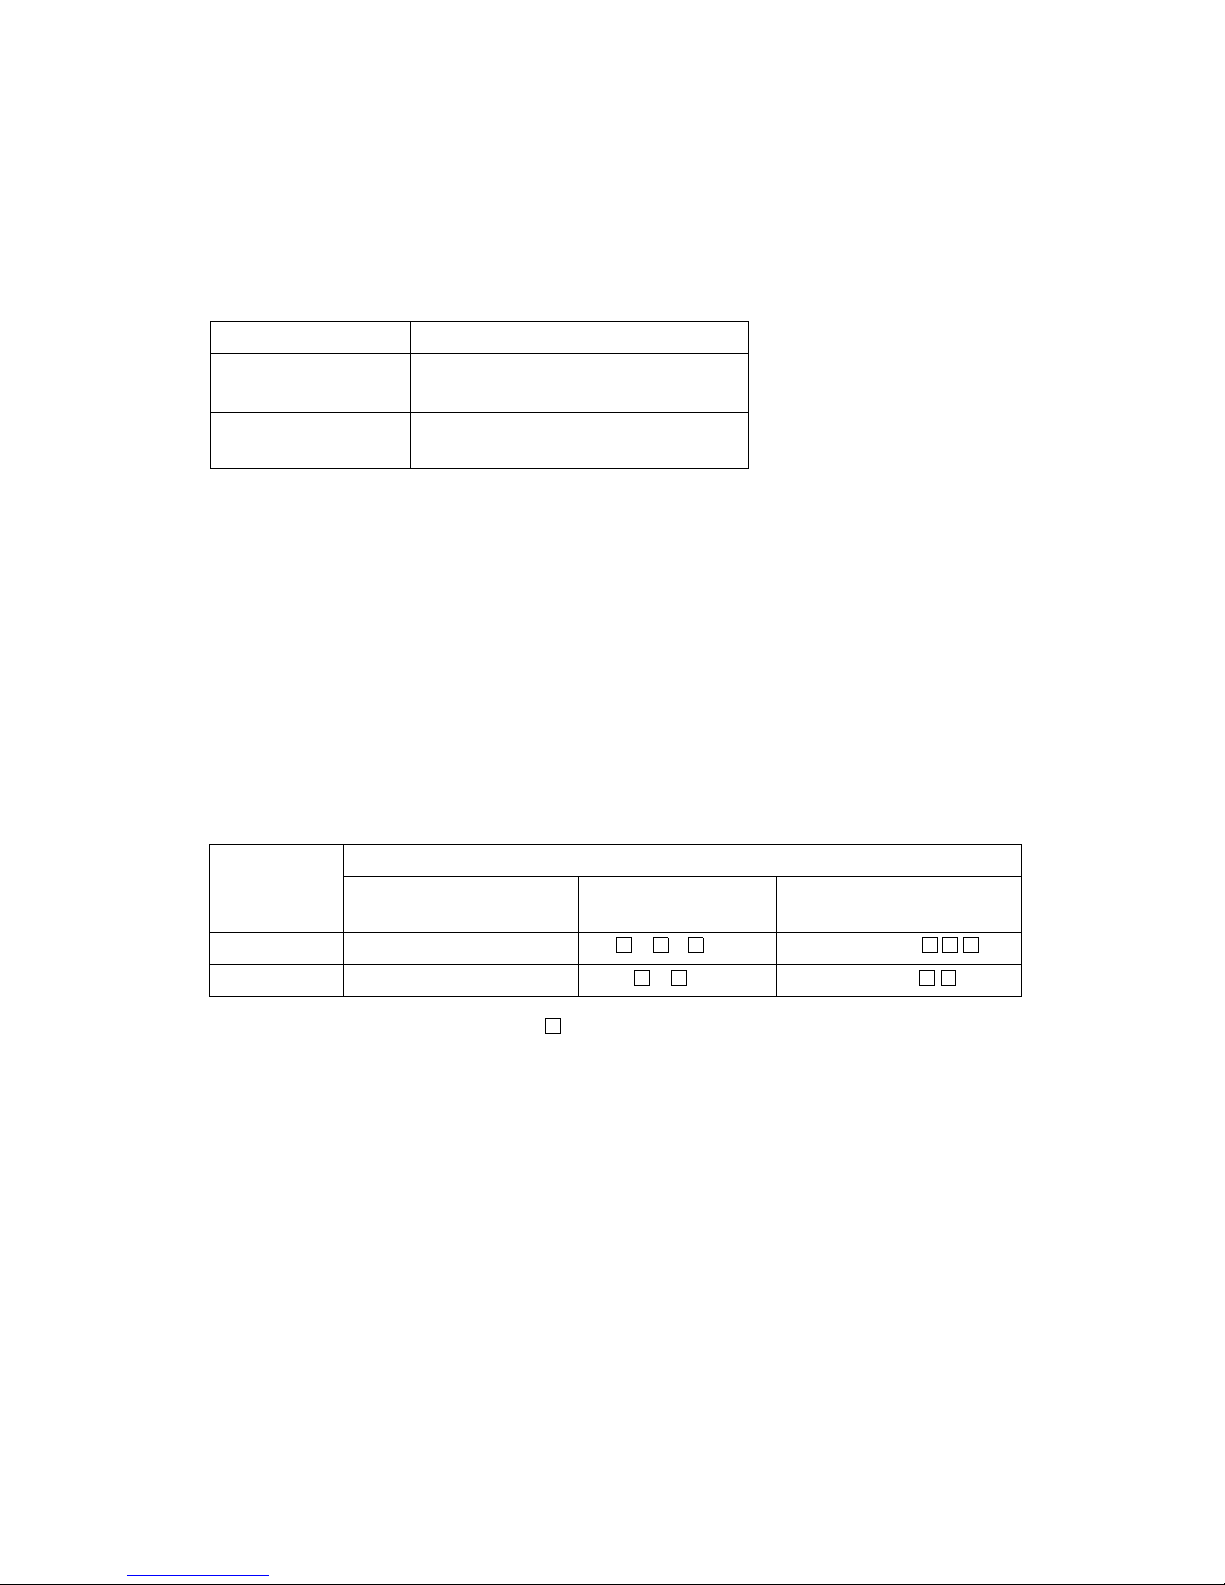
●Use the calendar function 4-44
4.10.3 Print by substituting a different character for the date
(substitution rule)
(1) Substitution rule function
●Prints the date and time by replacing it with the selected characters.
●One substitution rule No. is selected for one calendar block.
●The substitution rule No. can be used in common for multiple calendar blocks.
Example of zero-suppression (time 2009.01.02 03:04)
Set contents
Print result
Zero-suppression disabled
Enabled
(space)
Enabled
(character justification)
YY.MM.DD 09.01.02 9. 1. 2 9.1.2
HH.MM 03:04 3: 4 3:4
( =space)
Maximum Substitution rule count
Model type Maximum Substitution rule count
RX2-B 48
RX2-S
48
(Option : Up to 99)
●Kana, alphanumeric, and user pattern can be set as substitution characters.
●The substitution character for year is 25 years from the year of the calendar time.
[Note] The substitution character for year omits the substitution character of the previous year each time one
year elapses.
At this time, the substitution character after 25 years becomes a space.
Moreover, when the current time “Year” is returned to the past, the substitution character for that
year becomes a space.
(2) Zero-suppression function
●Prints by substituting a space for “0” in the high-order digit of the calendar characters.
Also deletes the “0” and prints left-justified.
Page 92
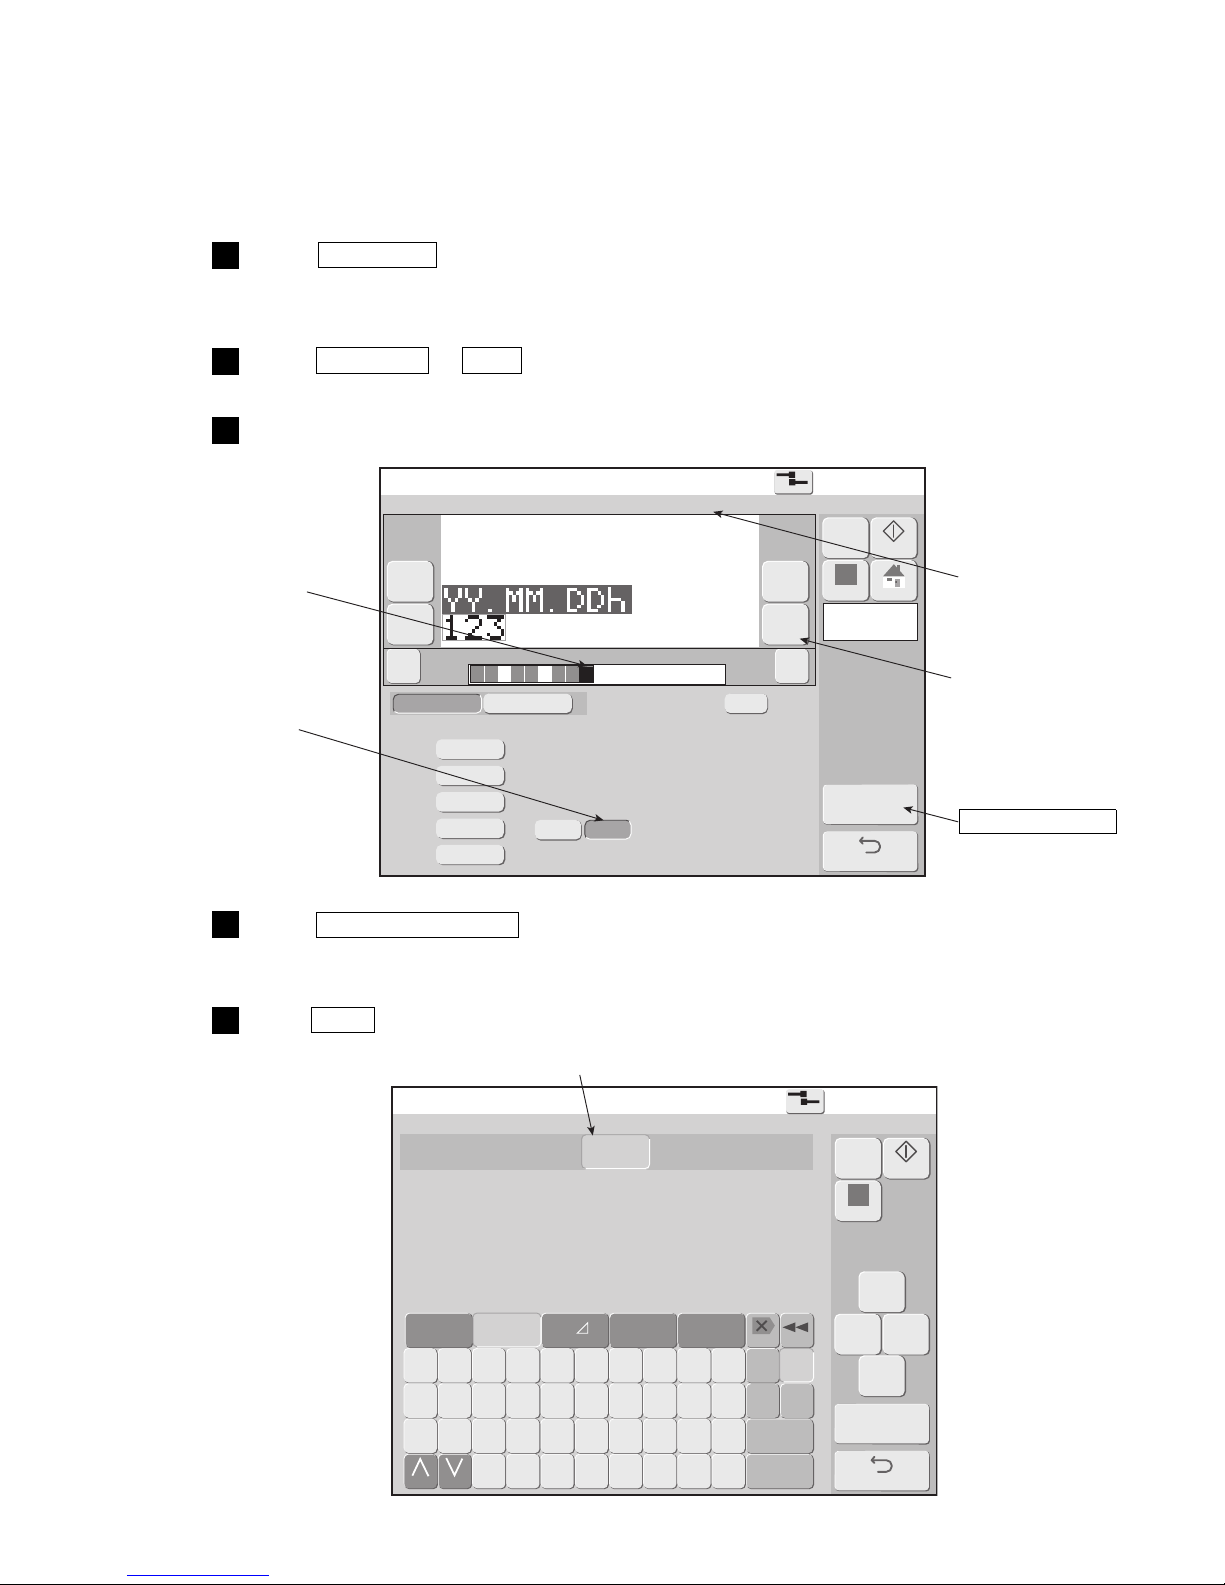
4-45 ●Use the calendar function
Calendar conditions
2015.07.0712:45
Com=0
[Stop ]
Message name[ ]
Substitution
rules
Column1
Item1
Back
《 》
110 20
Prev. Next
YY.MM.DD h・
1st screen
2nd screen
Substitution rules No.
01
Calendar blocks:1/2
< Offset > < Substitution rules > < Zero-suppression >
Year
Month
Day
Hour
Minute
Disable
0000
0000
0000
0000
0000
Disable
Enable
− +
M
Manual
Startup
Apply
HOME
Substitution rules
2015.07.0712:45
Com=0
[Stop ]
N0.[01]Subst.rulename[ ]
00[A] 01[B] 02[C] 03[D] 04[E] 05[F]
06[G] 07[H] 08[I] 09[J] 10[K] 11[L]
12[M] 13[N] 14[O] 15[P] 16[Q] 17[R]
18[S] 19[T] 20[U] 21[V] 22[W] 23[X]
← →
↑
↓
Backspace
Delete
Insert
Duplicate
Back
A B C D E F G H I J
K L M N O P Q R S T
U V W X Y Z
Space
123‥
Sign
★◎ ‥
Logo
Change Change
Overwrite
ABC…
Hour
etc.
▽
M
Manual
Startup
Apply
(3) Operation
Set the substitution rule for the “Hour” calendar character.
The Edit message screen is displayed.
Press Cal. Cond. .
The Calendar conditions screen is displayed.
1
Press Previous or Next and change the objective calendar block.
2
Set “Hour” substitution rule to “Enable”.
3
Press Substitution rules .
The Substitution rules screen is displayed.
4
Input Hour the substitution rule for “Hour”.
5
Calendar block No.
Changes the
objective
calendar block.
Substitution rules
Objective calendar
block is colored.
Substitution rules
enabled
"Hour" substitution rules
Page 93

●Print shift code 4-46
4.11 Print shift code (Optional on RX2-S)
(1) Overview
●Divides one day into multiple work shifts and prints a different code for each work shift.
(Example) Example of one day divided into 3 work shifts
No. Range Print result
1 0:30 to 8:14 A1
2 8:15 to 16:44 A2
3 16:45 to 0:29 A3
(See “(2) Operation” for the shift code setup procedure of this example.)
●Shift code character can be set at only one place in one message. Up to a maximum of 10 digits can be
input.
●Shift code rules are set at the Shift code setup screen.
●For work shift, the start time is specified in hour/minute units. Up to a maximum of 48 shifts can be
specified.
●One shift code rule is held for each message. To input the same shift code at another message, use the
“Duplicate” and “Paste” function. Input the shift code rules, memorize them by pressing Duplicate , and
press Paste at the Shift code setup screen of the other message.
●Shift code characters cannot be input at the same calendar block as another calendar.
Page 94
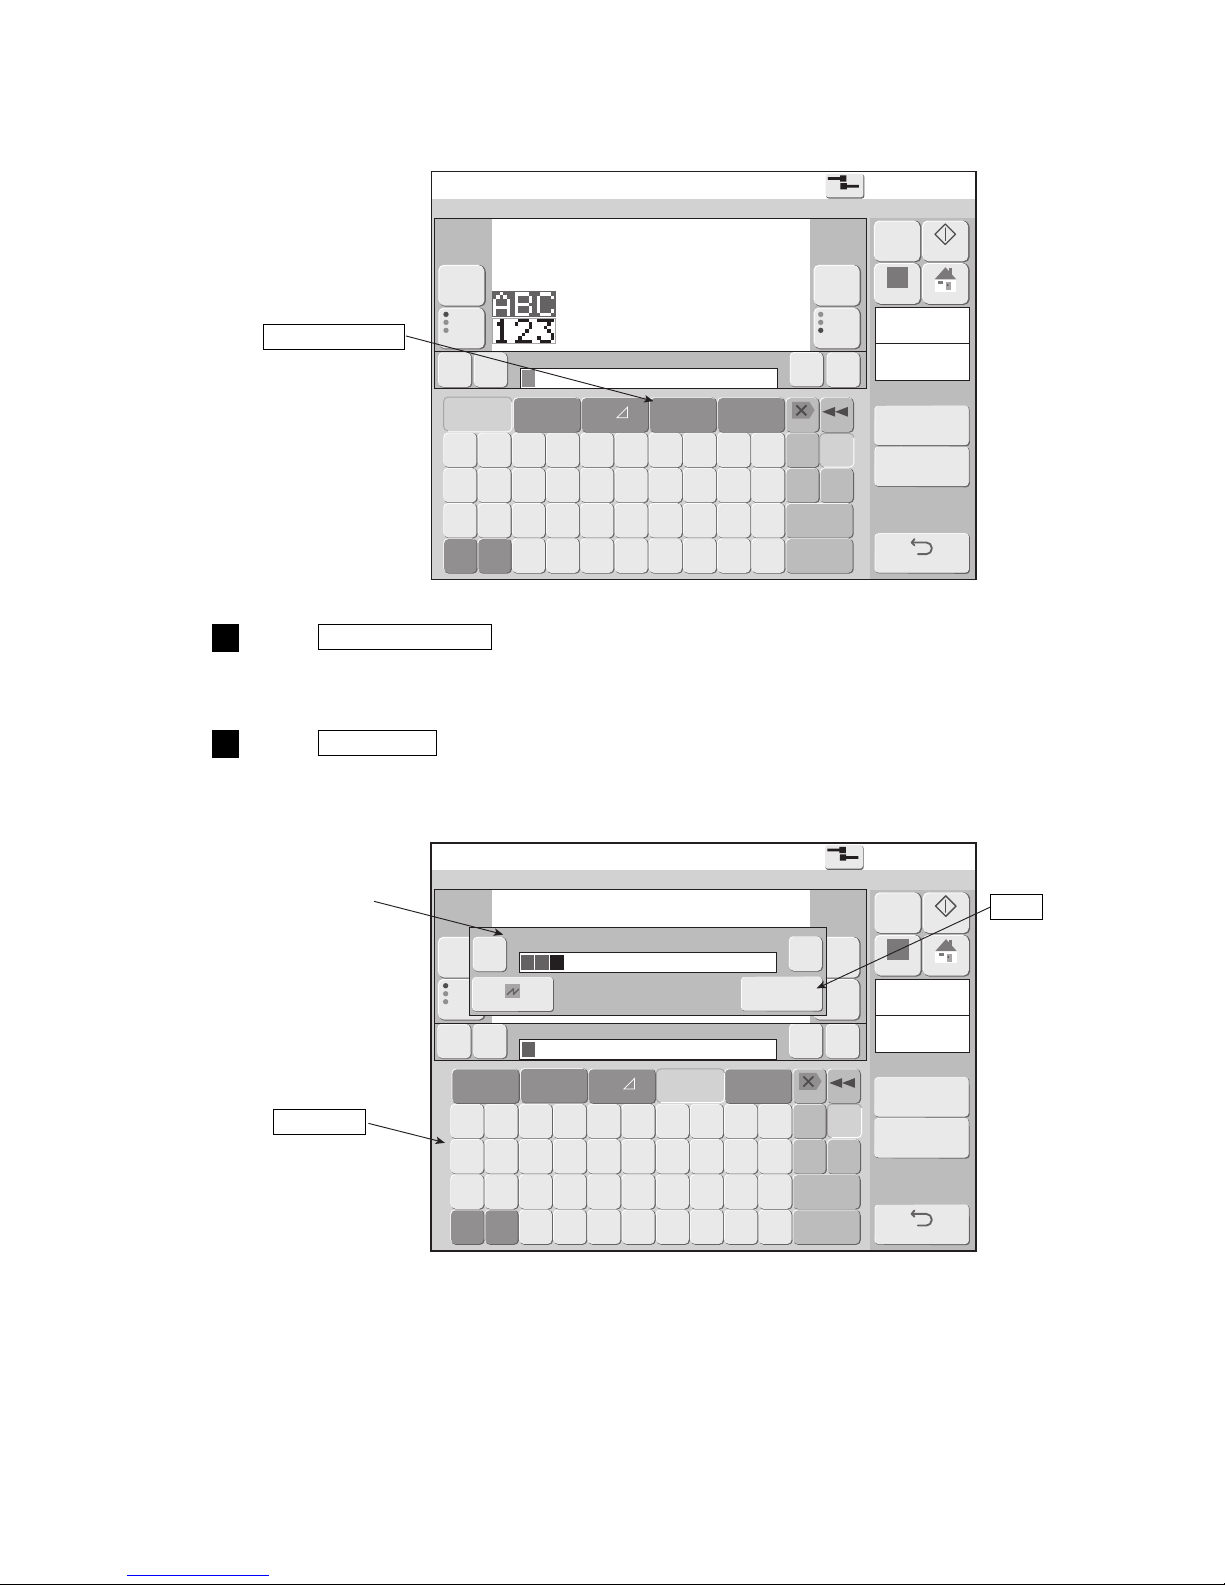
4-47 ●Print shift code
Edit message
2015.07.0712:45
Com=0
[Stop ]
Message name[ ]
Column1
Item1
Char.count
6/1000
1 2 3 4 5 6 7 8 9 0
Backspace
+ − × / ( ) . : , !
Dupli-
cate
Paste
# $ % & ¥
Space
etc.
▽
Calendar
/count
←
★◎ ‥
Logo
《 》
Delete
110 20
→
Prev.item
abcde
fghij
klmno
Nextitem
abcde
fghij
klmno
Insert
ABC・
Over-
write
ABC…
123‥
Sign
■ [ ]
=?<>;* _
− +
M
Manual
Startup
Apply
HOME
Print
spec.
Print
format
Back
Cal.
cond.
Count
cond.
Edit message
2015.07.0712:45
Com=0
[Stop ]
Message name[ ]
←
《 》
110 20
→
Prev.item
abcde
fghij
klmno
Nextitem
abcde
fghij
klmno
ABC・
Column1
Item1
Char.count
6/1000
Year
Month
Day Hour
Minu-
te
Seco-
nd
Total
days
Week
num-
ber
Day
of
week
Shift
code
Time
count
Count
Backspace
etc.
▽
123‥
Sign
★◎ ‥
Logo
ABC…
Delete
Insert
+ − × /
( ) . : ,
Over-
write
Calendar
/ count
− +
←
→
Cancel
OK
EE・
Print
spec.
Print
format
M
Manual
Startup
Apply
HOME
Back
Space
(2) Operation
The Edit message screen is displayed.
Press Calendar/count .
The display changes to the calendar/count keyboard and the calendar/count edit window is displayed.
1
Press Shift code .
“EE” meaning shift code is displayed at the calendar/count edit window.
2
Calendar/count
Calendar/count
edit window
Shift code
OK
Page 95
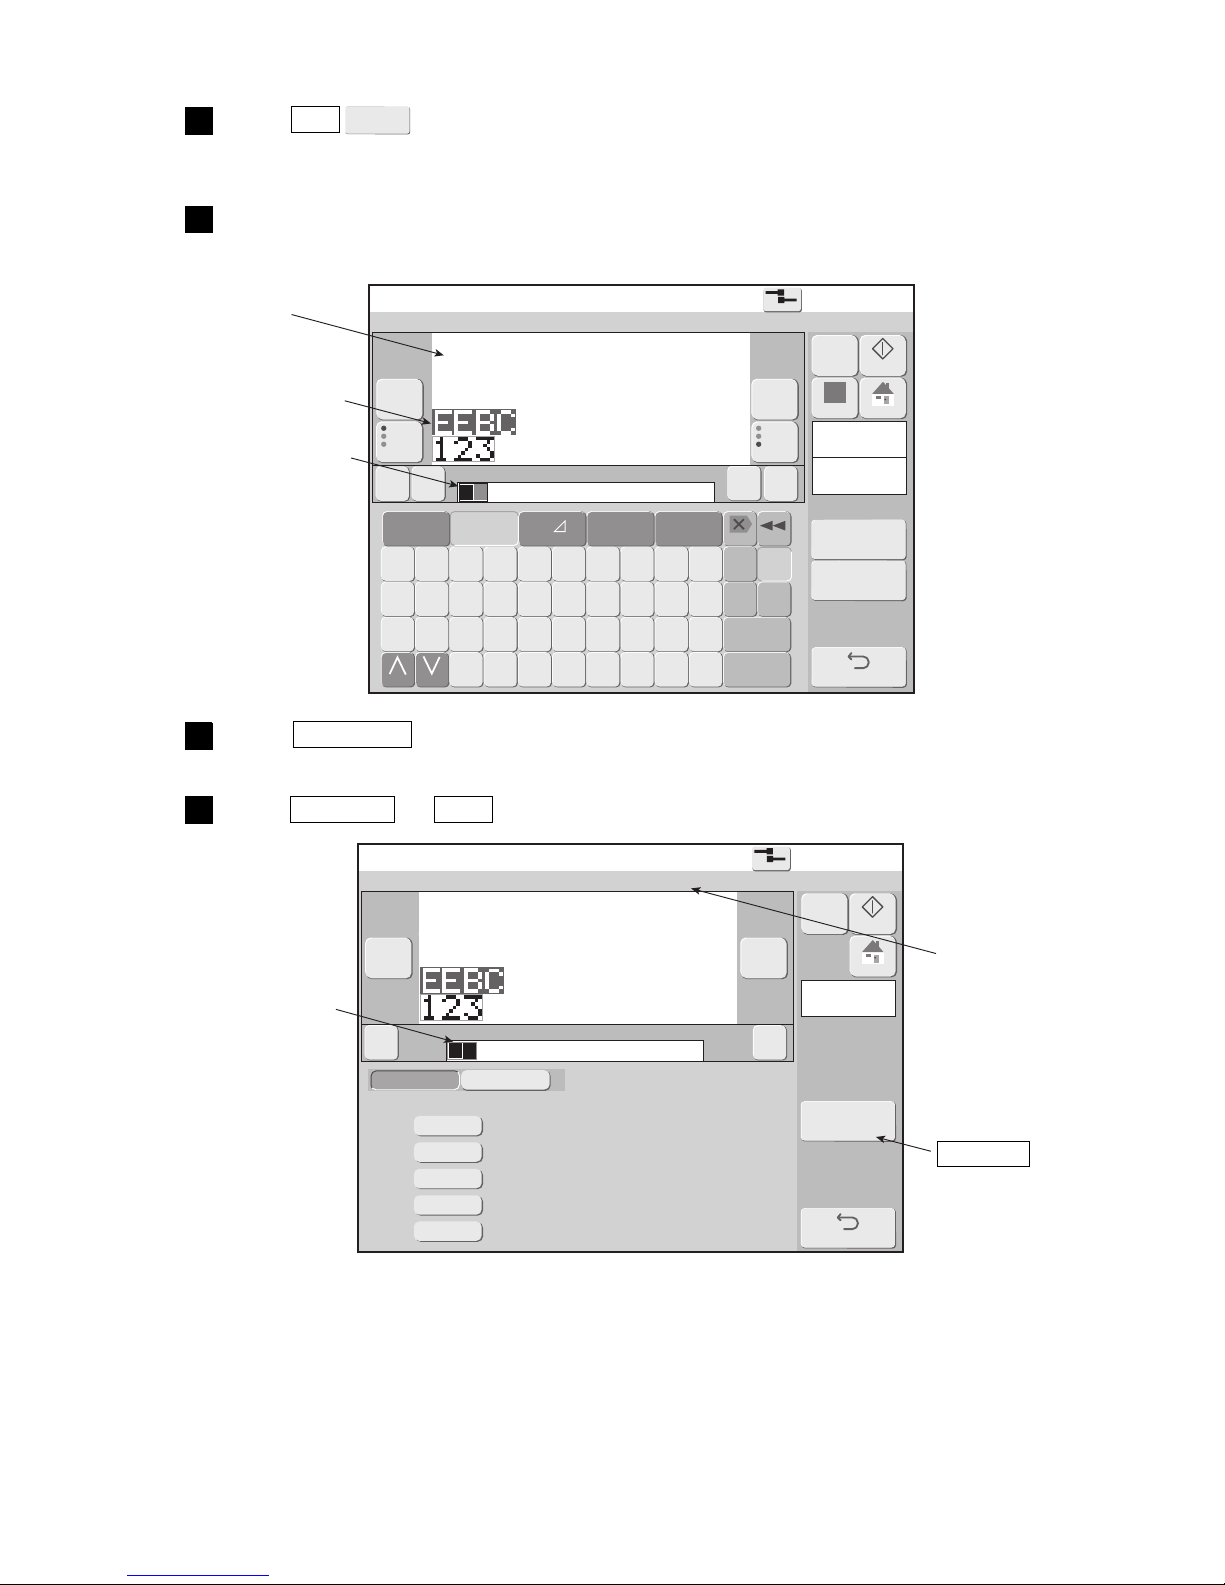
●Print shift code 4-48
Edit message
2015.07.0712:45
Com=0
[Stop ]
Message name[ ]
Column1
Item1
Char.count
7/1000
A B C D E F G H I J
Backspace
K L M N O P Q R S T
Dupli-
cate
Paste
U V W X Y Z
Space
etc.
▽
Calendar
/count
←
123‥
Sign
★◎ ‥
Logo
《 》
Delete
110 20
→
Prev.item
abcde
fghij
klmno
Nextitem
abcde
fghij
klmno
Change Change
Insert
EEBC・
Overwrite
ABC…
− +
Print
spec.
Print
format
M
Manual
Startup
Apply
HOME
Back
Cal.
cond.
Count
cond.
Calendar conditions
2015.07.0712:45
Com=0
[Stop ]
Message name[ ]
Shiftcode
Column1
Item1
Back
《 》
110 20
EEBC・
1st screen
2nd screen
Calendar blocks:1/1
< Offset > < Substitution rules > < Zero-suppression >
Year
Month
Day
Hour
Minute
0000
0000
0000
0000
0000
− +
M
Manual
Startup
HOME
Press OK .
The calendar characters are displayed in the print contents edit area.
3
Touch the print item to input.
The character string of the print contents edit area is displayed in the print layout.
4
Press Cal. Cond. .
The Calendar conditions screen is displayed.
5
Press Previous or Next and change the objective calendar block.
6
OK
Print layout
Print item to input
Calendar block is
displayed in a red
frame.
Calendar block is
displayed in a red
frame.
Shift code
Calendar block No.
Page 96
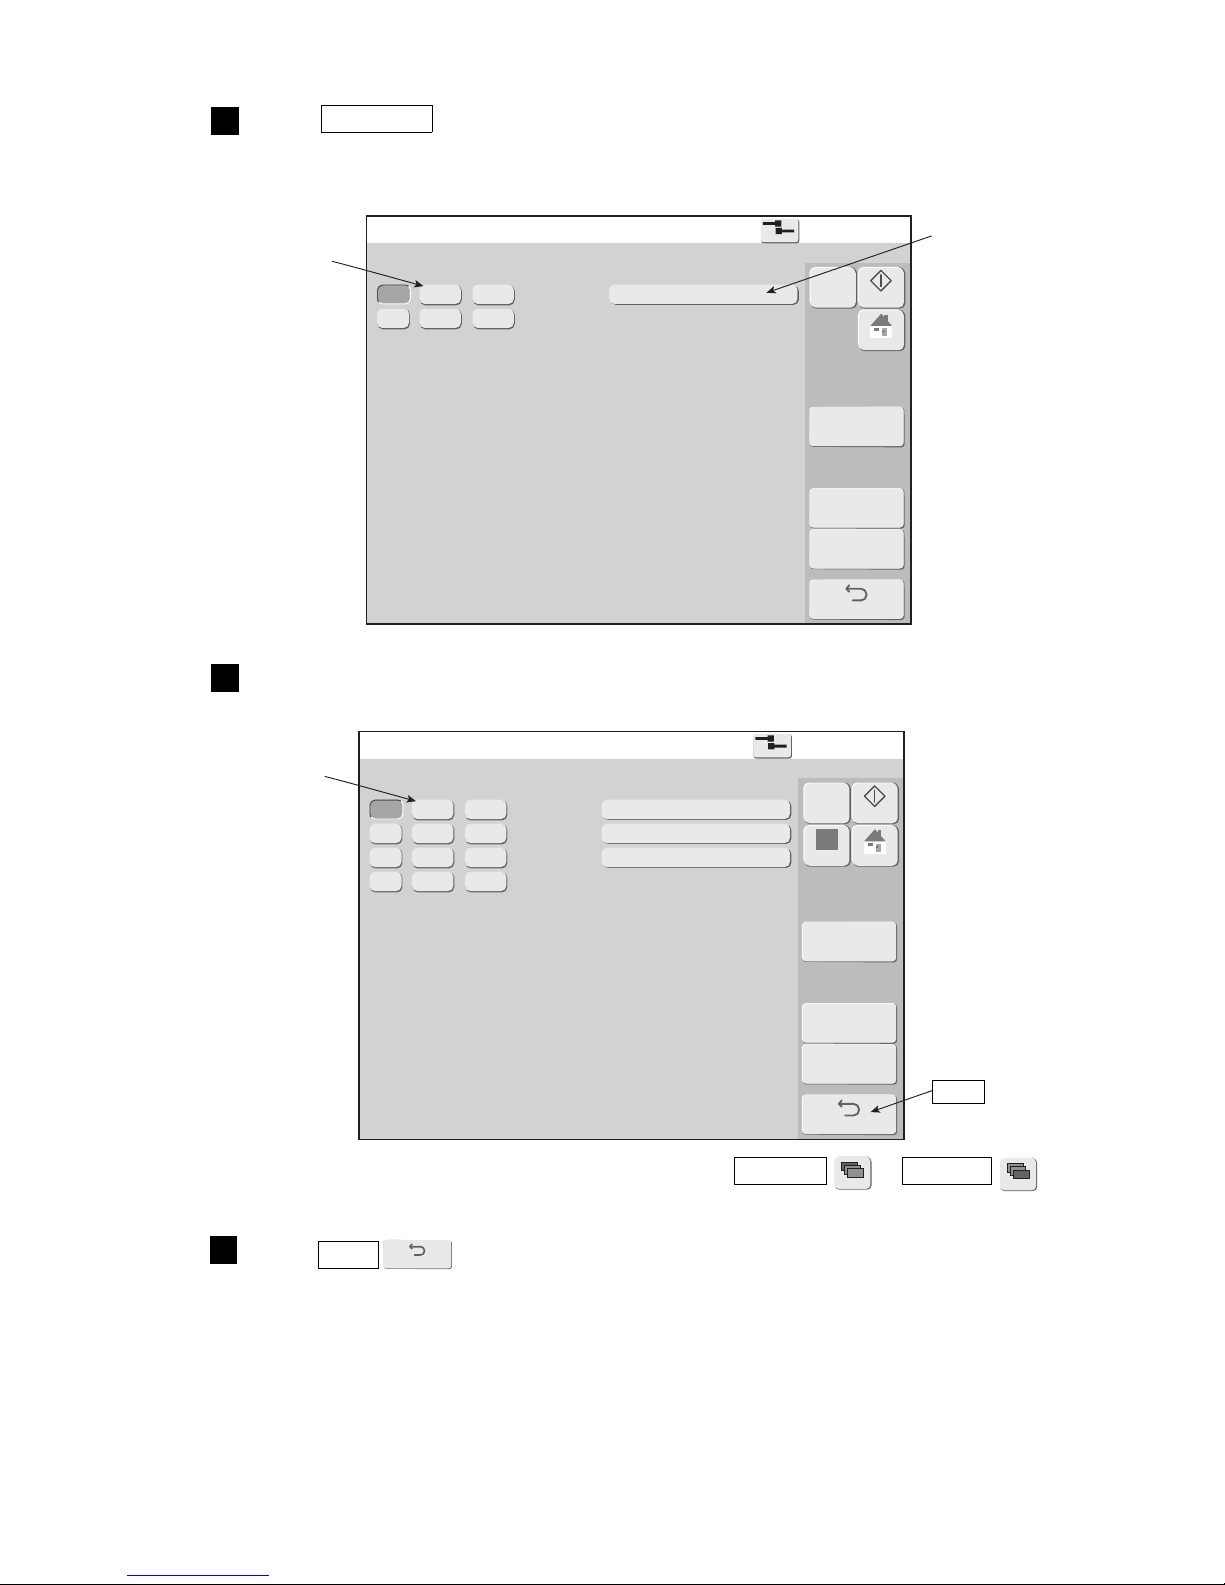
4-49 ●Print shift code
When the work shifts exceeded 12 classes, switch using Prev. Dsp. or Next Dsp. .
Insertion or deletion can be performed in line units.
Shift code setup
2015.07.0712:45
Com=0
[Stop ]
Input time in ascending order.
2
00
Insertline
Deleteline
Duplicate
00 00
00 00
1
: 〜23:59
〜23:59:
Back
M
Manual
Startup
HOME
Shift code setup
2015.07.0712:45
Com=0
[Stop ]
Input time in ascending order.
2
A1
A2
A3
Insertline
Deleteline
Duplicate
00 30
08 15
1
: 〜08:14
〜16:44:
3 16 45
〜00:29:
4 00 00
〜00:00:
Back
M
Manual
Startup
Apply
HOME
Prev.Dsp.
NextDsp.
Back
Press Shift code .
The Shift code setup screen is displayed.
The last line is for addition.
7
Input the start time and print contents for each shift.
When start time is input, the finish time which is 1 line above changes.
8
Press Back .
Returns to the Calendar conditions screen.
9
Start time
Print contents
Start time
Back
Page 97
●Update the print contents at a fixed interval (Time count) 4-50
4.12 Update the print contents at a fixed interval (Time count)
(Optional RX2-S)
(1) Overview
●The print contents are updated at a preset update internal (minutes) timing.
●When the time that becomes the standard is set one time a day, the print contents are updated to a preset
value when that time arrives.
●The time count characters can be set at only one place in one message. Up to a maximum of 3 digits can be
set.
●The time count conditions are set at the Time count conditions screen.
●Range, reset value, reset time, and renewal period can be set as conditions.
●Updating of the print contents is always increment + 1.
●One time count condition is held for each message. To input the same time count condition at another
message, use the “Duplicate” and “Paste” functions. Input the time count conditions, memorize them by
pressing Duplicate , and press Paste at the Time count conditions screen of the other message.
●The time count characters cannot be input at the same count block as another count.
Time Value
00:00 FD
00:30 FE
01:00 FF
01:30 FG
02:00 GA
02:30 GB
03:00 GC
03:30 GD
(Example) Range AA to GG, renewal period 30 minutes, reset time 05:00, reset value “AA”
Time and count value
Time Value
04:00 GE
04:30 GF
05:00 AA
05:30 AB
06:00 AC
06:30 AD
07:00 AE
07:30 AF
Time Value
08:00 AG
08:30 BA
09:00 BB
09:30 BC
10:00 BD
10:30 BE
11:00 BF
11:30 BG
Time Value
12:00 CA
12:30 CB
13:00 CC
13:30 CD
14:00 CE
14:30 CF
15:00 CG
15:30 DA
Time Value
16:00 DB
16:30 DC
17:00 DD
17:30 DE
18:00 DF
18:30 DG
19:00 EA
19:30 EB
Time Value
20:00 EC
20:30 ED
21:00 EE
21:30 EF
22:00 EG
22:30 FA
23:00 FB
23:30 FC
(See “(2) Operation” for the time count conditions setup procedure of this example.)
Page 98
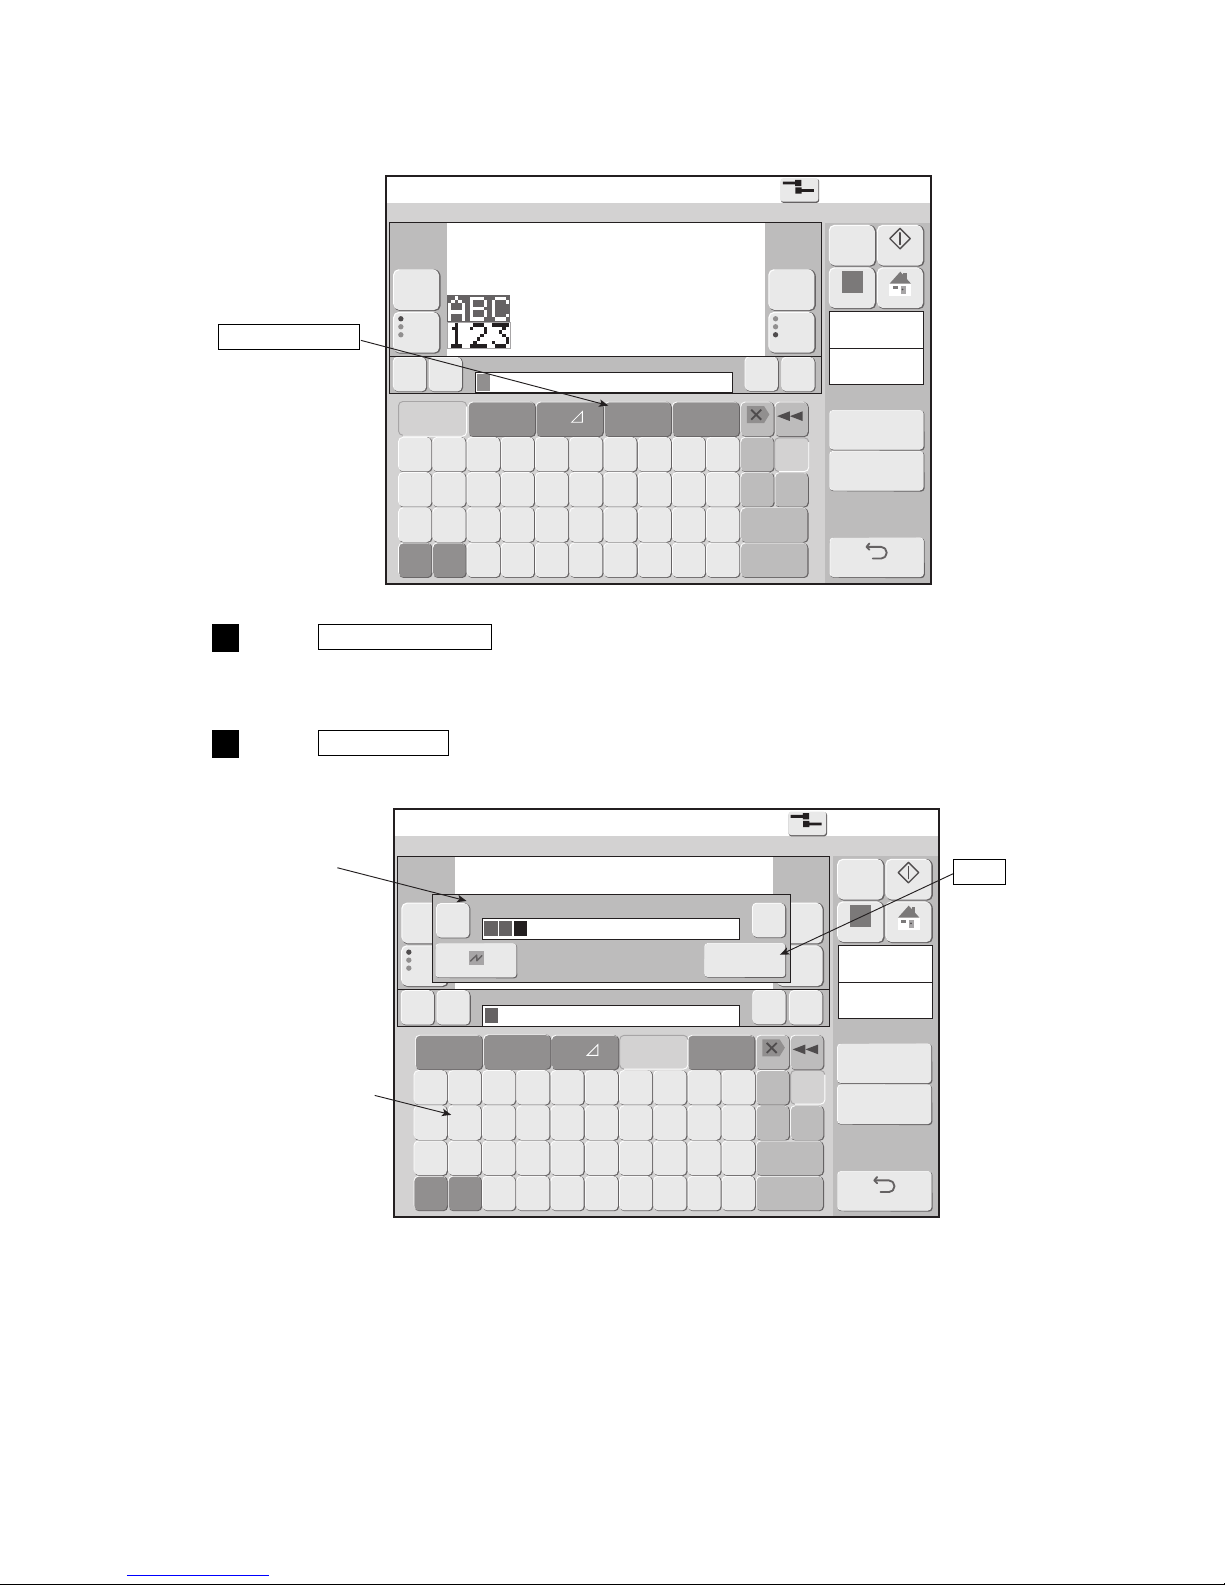
4-51 ●Update the print contents at a fixed interval (Time count)
Edit message
2015.07.0712:45
Com=0
[Stop ]
Message name[ ]
Column1
Item1
Char.count
6/1000
1 2 3 4 5 6 7 8 9 0
Backspace
+ − × / ( ) . : , !
Dupli-
cate
Paste
# $ % & ¥
Space
etc.
▽
Calendar
/count
←
★◎ ‥
Logo
《 》
Delete
110 20
→
Prev.item
abcde
fghij
klmno
Nextitem
abcde
fghij
klmno
Insert
ABC・
Over-
write
ABC…
123‥
Sign
■ [ ]
=?<>;* _
− +
M
Manual
Startup
Apply
HOME
Print
spec.
Print
format
Back
Cal.
cond.
Count
cond.
Edit message
2015.07.0712:45
Com=0
[Stop ]
Message name[ ]
←
《 》
110 20
→
Prev.item
abcde
fghij
klmno
Nextitem
abcde
fghij
klmno
ABC・
Column1
Item1
Char.count
6/1000
Year
Month
Day Hour
Minu-
te
Seco-
nd
Total
days
Week
num-
ber
Day
of
week
Shift
code
Time
count
Count
Backspace
etc.
▽
123‥
Sign
★◎ ‥
Logo
ABC…
Delete
Insert
+ − × /
( ) . : ,
Over-
write
Calendar
/ count
− +
←
→
Cancel
OK
FF・
Print
spec.
Print
format
M
Manual
Startup
Apply
HOME
Back
Space
(2) Operation
The Edit message screen is displayed.
Press Calendar/count .
The display changes to the calendar/count keyboard and the calendar/count edit window are displayed.
1
Press Time count .
“FF” meaning time count is displayed at the calendar/count edit window.
2
Calendar/count
Calendar/count
edit window
Time count
OK
Page 99
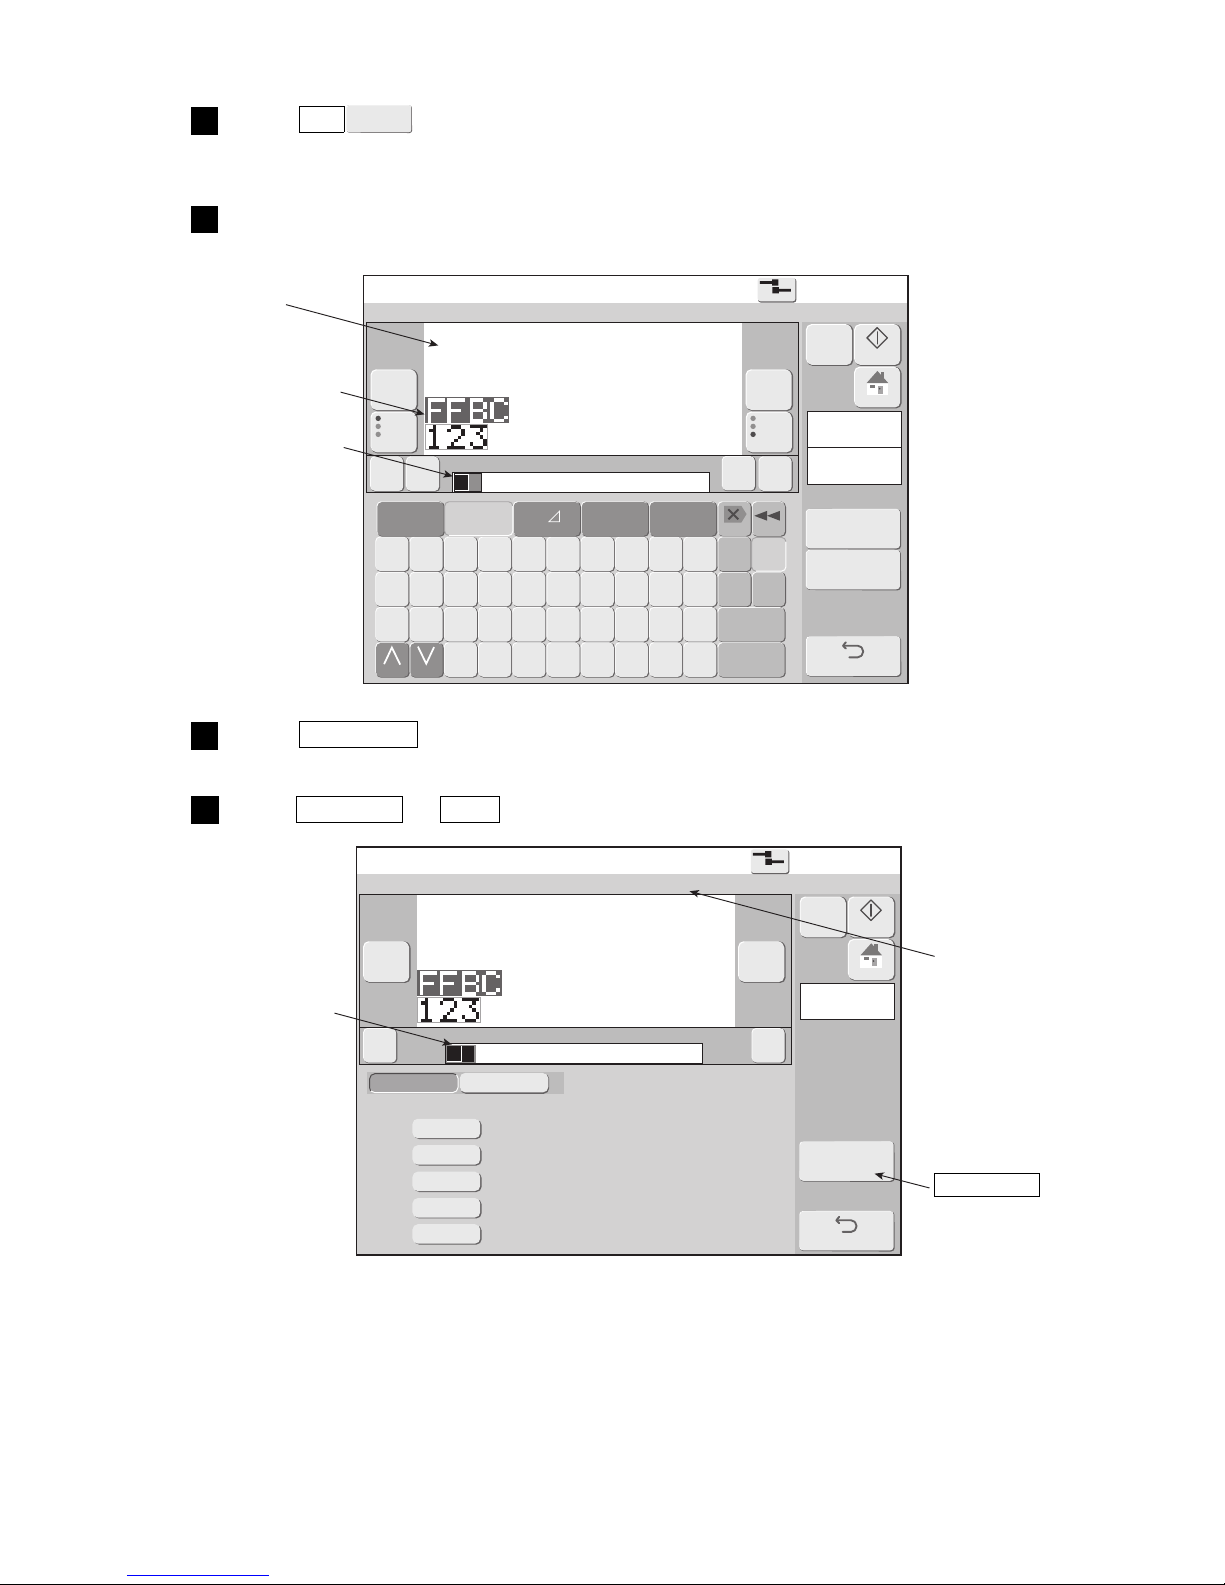
●Update the print contents at a fixed interval (Time count) 4-52
Edit message
2015.07.0712:45
Com=0
[Stop ]
Message name[ ]
Column1
Item1
Char.count
7/1000
A B C D E F G H I J
Backspace
K L M N O P Q R S T
Dupli-
cate
Paste
U V W X Y Z
Space
etc.
▽
Calendar
/count
←
123‥
Sign
★◎ ‥
Logo
《 》
Delete
110 20
→
Prev.item
abcde
fghij
klmno
Nextitem
abcde
fghij
klmno
Change Change
Insert
FFBC・
Overwrite
ABC…
− +
Print
spec.
Print
format
M
Manual
Startup
HOME
Back
Cal.
cond.
Count
cond.
Calendar conditions
2015.07.0712:45
Com=0
[Stop ]
Message name[ ]
Timecount
Column1
Item1
Back
《 》
110 20
FFBC・
1st screen
2nd screen
Calendar blocks:1/1
< Offset > < Substitution rules > < Zero-suppression >
Year
Month
Day
Hour
Minute
0000
0000
0000
0000
0000
− +
M
Manual
Startup
HOME
Press OK .
The calendar characters are displayed at the print contents edit area.
3
Touch the print item to input.
The character string of the print contents edit area is displayed at the print layout.
4
Press Cal. Cond. .
The Calendar conditions screen is displayed.
5
Press Previous or Next and change the objective calendar block.
6
OK
Print layout
Print item to input
Calendar block is
displayed in a red
frame.
Calendar block is
displayed in a red
frame.
Time count
Calendar block No.
Page 100
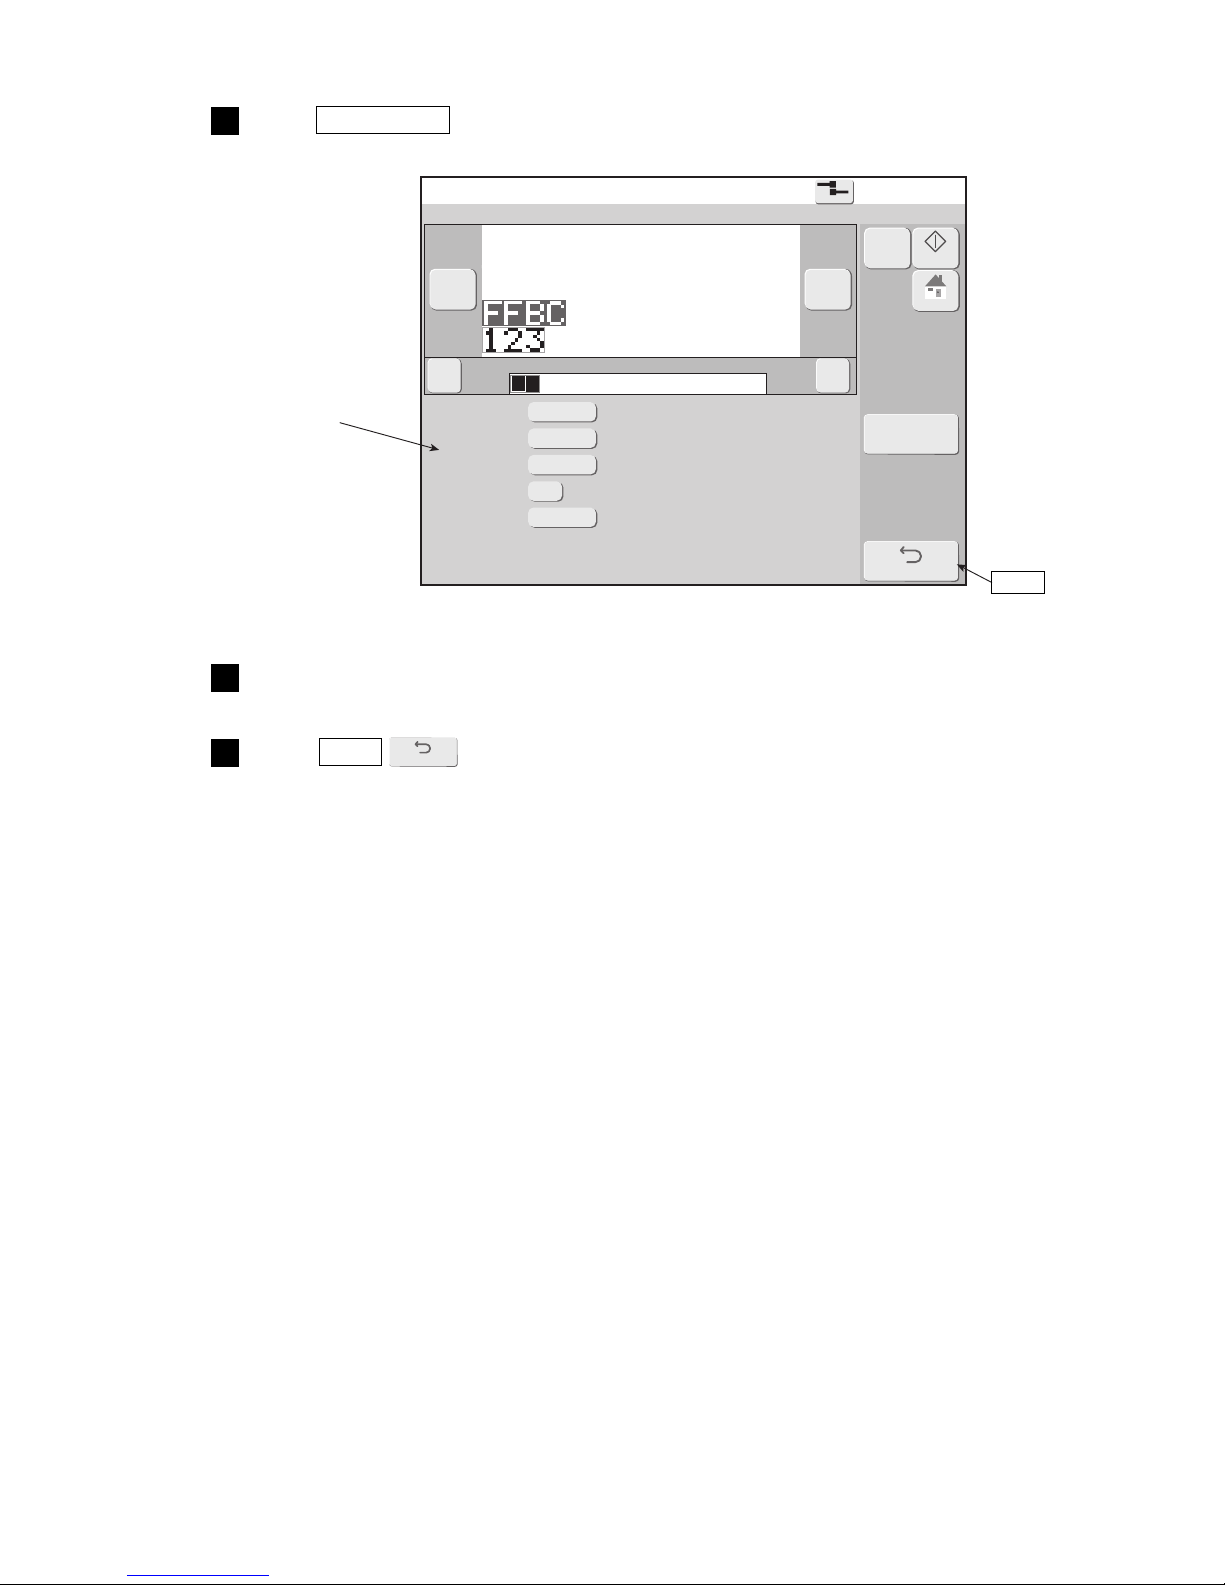
4-53 ●Update the print contents at a fixed interval (Time count)
Time count conditions
2015.07.0712:45
Com=0
[Stop ]
Message name[ ]
Duplicate
Back
《 》
110 20
FFBC・
Range
Reset
Reset time hour 00minute
Renewal period
00
99
00
00
15 minutes
− +
M
Manual
Startup
HOME
Press Time count .
The Time count conditions screen is displayed.
7
Input the range, reset value, reset time, and renewal period.
8
Press Back .
Returns to the Calendar conditions screen.
9
Back
Back
Time count
conditions
 Loading...